
Homemade Christmas Peppermint Sticks
Bring the Magic of the Holidays Home with Homemade Peppermint Sticks
Hey friends, Beau here! Is there anything that screams “holidays” quite like the sweet, cool zing of a peppermint stick? I’m not just talking about the ones you unwrap from a plastic sleeve—I’m talking about the real deal. The kind you make with your own two hands, filling your kitchen with the unmistakable scent of sugar and mint that feels like a warm, festive hug. Welcome to my favorite holiday kitchen project: Homemade Christmas Peppermint Sticks!
If the idea of making candy from scratch sounds a little intimidating, I’m here to tell you to take a deep breath. You’ve got this. We’re going to walk through this together, step-by-step, and I promise it’s more fun than trying to untangle a string of Christmas lights. This isn’t just about the candy; it’s about the experience. It’s about gathering your favorite people, turning up the holiday tunes, and creating something magical that’s infused with laughter and love.
These peppermint sticks are the ultimate multi-taskers. They’re gorgeous homemade gifts that show you put in a little extra thought. They’re the perfect stocking stuffers that will make your kids’ eyes light up. And my personal favorite? They make the most incredible stirrers for a steaming mug of rich hot chocolate. As they melt slowly into the cocoa, they create a swirl of minty sweetness that’s pure bliss on a cold winter’s night. So, are you ready to roll up your sleeves and create some holiday magic? Let’s get cooking!
A Sticky-Fingered Memory: My First Peppermint Stick
I’ll never forget the first time I helped my Grandma Eleanor make these. I must have been about seven years old, standing on a wobbly stool so I could see clear into the big steel pot. The air was thick with the smell of melting sugar, and Grandma warned me, “Now, Beau, this is hotter than a summer sidewalk, so no tasting!”
But the best part came after the syrup cooked. She’d butter my little hands generously, and we’d wait for the candy to cool just enough to handle. Then, the pulling began! We’d stretch and fold, stretch and fold, and like magic, the clear, glass-like syrup would turn opaque and pearly white. My arms would get tired, but I refused to let go. We’d laugh as I tried to twist my red rope with her white one, inevitably creating a sticky, beautiful mess. Those peppermint sticks tasted better than any store-bought candy, not because of a secret ingredient, but because we made them together. That’s the spirit I want to bring into your kitchen today.
Gathering Your Peppermint Potion: The Ingredients
One of the beautiful things about this recipe is its simplicity. You only need a handful of ingredients to create pure magic. Here’s what you’ll need, along with a few of my chef-y insights to set you up for success.
- 2 cups granulated sugar: This is the foundation of our candy. Regular white sugar gives us a clean, sweet base and that beautiful clear syrup that we’ll later turn opaque. Don’t try to substitute brown sugar here—its molasses content will change the texture and flavor completely.
- ⅔ cup light corn syrup: Now, I know some folks like to avoid corn syrup, but in candy-making, it’s a superstar. It prevents the sugar from crystallizing, ensuring our peppermint sticks are smooth and glassy, not grainy and cloudy. If you need a swap, you can use golden syrup or even agave nectar, but the texture might be slightly different.
- ½ cup water: Simple H2O! It helps the sugar dissolve evenly before we bring it up to a boil. Just use regular tap water.
- ½ teaspoon peppermint extract: This is where the magic happens! Use a good quality extract for the best flavor. A little goes a long way. If you’re feeling adventurous, you could try a mix of peppermint and a tiny drop of vanilla extract for a more complex flavor profile.
- Red food coloring (gel is best!): For those classic candy-cane stripes. I highly recommend gel food coloring over the liquid kind. The gel is more concentrated, so you get vibrant color without adding extra liquid that could throw off your sugar syrup.
- Powdered sugar (for dusting): We’ll use this to lightly dust our work surface to prevent sticking. It’s much better than flour, which can cook into the hot candy.
- Butter (for greasing): Your best friend during this process! You’ll use it to grease your hands, your scissors, and your work surface. It creates a barrier against the super-sticky candy.
The Fun Part: Let’s Make Some Candy!
Okay, team. This is where we turn simple ingredients into holiday gold. Read through all the steps first, and let’s do this together. Active voice, engaged minds, and buttered hands at the ready!
- Combine and Dissolve: In a medium, heavy-bottomed saucepan (this is key for even heating!), combine the granulated sugar, light corn syrup, and water. Stir it over medium heat just until the sugar dissolves. You’ll feel the grittiness disappear. Chef’s Hack: Use a pastry brush dipped in water to wash down any sugar crystals on the sides of the pan. This little trick is a game-changer for preventing crystallization!
- Boil Without Peeking (Well, Stirring): Once the sugar is dissolved, stop stirring! I know it’s tempting, but stirring can cause sugar crystals to form. Bring the mixture to a rolling boil. Clip your candy thermometer to the side of the pan, making sure the tip isn’t touching the bottom. Now, we play the waiting game. Cook until the mixture reaches 280°F, also known as the “soft-crack stage.” This usually takes about 15-20 minutes. Why 280°F? This temperature gives the candy its signature hard-but-snapable texture. If you go too low, it will be chewy; too high, and it might be brittle.
- Extract and Color: As soon as you hit 280°F, immediately remove the pan from the heat. Carefully stir in the peppermint extract—it might bubble up a bit, so stand back! Now, quickly pour about half of the hot syrup onto a buttered marble slab, silicone baking mat, or a large, rimmed baking sheet that you’ve generously buttered. To the remaining half in the pot, add several drops of red gel food coloring and stir quickly to combine, then pour that out onto another buttered spot.
- The Cool Down (Briefly!): Let the candy cool for just a minute or two. You want it to be cool enough to handle but still very pliable. Test it by poking the edge with a buttered finger. If it’s firm but you can make an indentation, you’re good to go.
- Butter Up and Pull! This is the most fun part. Butter your hands REALLY well. I’m not kidding—get between those fingers! Pick up one of the candy masses (start with the white one) and begin to pull. Stretch it out, fold it back on itself, give it a twist, and pull again. You’ll see a magical transformation: the clear candy will become opaque, white, and pearly. This process incorporates air, creating the classic texture. Do the same with the red portion. Pro-Tip: If the candy gets too hard to pull, you can pop it on a buttered baking sheet in a 200°F oven for a minute to soften it up.
- Twist and Shape: Once both colors are pulled and opaque, roll each one into a long, smooth rope about ½ to ¾ inch thick. Lay the red and white ropes side-by-side. Now, gently twist them together, creating the iconic spiral pattern. Don’t worry if it’s not perfect—the charm is in the handmade look!
- Cut into Sticks: Using a pair of well-oiled kitchen scissors, quickly cut the long twisted rope into your desired peppermint stick lengths, about 4-6 inches long. If the candy starts to harden and crack while cutting, you can gently warm the rope again with a hairdryer or in the low oven to make it pliable. Place the finished sticks on a parchment-lined tray to cool completely and harden.
How to Serve Your Sweet Creations
You’ve made it! You’re officially a candy artisan. Now, how do you show off these beautiful creations?
The Classic Stocking Stuffer: Let’s start with the obvious. Once completely cool and hard, wrap each stick individually in cellophane or clear treat bags, tying the ends with a festive ribbon. Tuck them into stockings for a sweet surprise on Christmas morning.
The Ultimate Hot Cocoa Stirrer: This is my absolute favorite way to enjoy them. Serve a homemade peppermint stick alongside a big mug of rich hot chocolate. Let your guests use it as a stirrer, watching as it slowly melts and sweetens their drink. It’s an experience, not just a beverage!
A Stunning Homemade Gift: Gather a bunch of sticks and arrange them upright in a tall, clear mason jar. Tie a ribbon around the jar with a cute tag that says “Handmade with Love.” It’s a heartfelt, impressive gift that costs very little but means so much.
Simple Sweet Jar: Keep a jar of these on your kitchen counter or holiday dessert table for guests to grab and enjoy. They’re a beautiful and delicious decoration all on their own!
Mix It Up! Fun Flavor Twists
Once you’ve mastered the classic, why not get creative? Here are a few of my favorite twists on the traditional peppermint stick.
- Chocolate-Dipped Dreams: Melt some high-quality dark or semi-sweet chocolate and dip one end of each cooled peppermint stick. Place them on parchment paper to set. The combination of mint and chocolate is timeless.
- Fruity Fun: Swap the peppermint extract for other flavors. Cherry extract with red coloring makes a delicious “candy cane,” or try orange extract with orange food coloring for a citrusy twist.
- Swirled Colors: Go beyond red and white! Divide the syrup into three parts and color them green, white, and red for a truly festive tri-color stick. You can also try blue and white for a “winter wonderland” theme.
- A Little Spice: Add a pinch of cinnamon or a tiny drop of cinnamon oil to the peppermint extract for a warm, spiced peppermint flavor that’s extra cozy.
- Crunchy Candy Cane Bits: Instead of forming perfect sticks, break the cooled candy into small, irregular pieces with a knife. These are perfect for sprinkling on top of ice cream, cupcakes, or your morning oatmeal.
Beau’s Chef’s Notes & Kitchen Confessions
This recipe has been a labor of love in my kitchen for years. The first time I tried it alone, I’ll admit, I panicked when I saw sugar crystals forming. I learned the hard way about the “no-stir” rule! But that’s the beauty of cooking—every “mistake” is a lesson. Over time, I’ve learned that a good candy thermometer is worth its weight in gold, and that butter is your absolute best friend during the pulling process.
One year, my dog, Biscuit, managed to snag a freshly pulled rope of red candy off the counter. Let’s just say he had a very festive, very sticky red beard for a few days, and I learned to always work on a high surface! The point is, don’t strive for perfection. Strive for fun. The slightly lopsided sticks made by tiny hands are the ones you’ll remember most. This recipe is about the joy of creating, the mess, and the memories. The delicious candy is just a wonderful bonus.
Your Candy Questions, Answered!
I’ve gotten a lot of questions about this recipe over the years. Here are the most common ones to help you troubleshoot like a pro.
Q: My candy turned out grainy and sugary. What did I do wrong?
A: This is almost always caused by sugar crystals forming, either from stirring after the sugar dissolved or from crystals on the side of the pan. Next time, be diligent about not stirring during the boil and use a wet pastry brush to wash down the sides of the pan at the beginning.
Q: The candy hardened too fast and I couldn’t pull or shape it! Help!
A: This is a common speed bump! Candy-making is a race against the clock. If it hardens, don’t despair. Place the hard piece on a buttered baking sheet and warm it in a 200°F oven for just a minute or two until it becomes pliable again. You can also use a hairdryer to gently warm a specific spot.
Q: Can I make this without a candy thermometer?
A: You can, but it’s a bit of a gamble. The “cold water test” is the old-school method: drop a small bit of the syrup into a cup of cold water. At the soft-crack stage (280°F), the syrup will form hard, flexible threads that you can bend slightly. A thermometer takes the guesswork out and is highly recommended for beginners.
Q: How long do these peppermint sticks last, and how should I store them?
A: Stored correctly in an airtight container at room temperature, they will stay fresh and crunchy for up to a month. The key is keeping moisture out, so a glass jar with a tight seal is perfect. If your kitchen is humid, you can add a silica gel packet to the container to absorb any moisture.

Homemade Christmas Peppermint Sticks
Description
There’s nothing quite like the sweet, cool zing of a peppermint stick to make your kitchen feel festive. Making peppermint sticks from scratch is easier than you think—and the aroma of sugar and mint filling your home is pure holiday magic. These treats make perfect gifts, stocking stuffers, or even stirring sticks for a rich cup of hot chocolate.
Ingredients
-
2 cups granulated sugar
-
⅔ cup light corn syrup
-
½ cup water
-
½ teaspoon peppermint extract
-
Red gel food coloring
-
Powdered sugar (for dusting)
-
Butter (for greasing hands and work surface)
Instructions
-
Combine and Dissolve
In a medium, heavy-bottomed saucepan, combine sugar, corn syrup, and water. Stir over medium heat until the sugar dissolves. Use a wet pastry brush to wash down sugar crystals on the sides of the pan to prevent crystallization. -
Boil to Soft-Crack Stage
Stop stirring once dissolved. Clip a candy thermometer to the side and bring to a rolling boil until it reaches 280°F (soft-crack stage), about 15–20 minutes. -
Add Flavor and Color
Remove from heat. Stir in peppermint extract carefully. Pour half of the syrup onto a buttered marble slab, silicone mat, or rimmed baking sheet. Add red gel food coloring to the remaining syrup, stir quickly, and pour onto another buttered surface. -
Cool Slightly
Let candy cool 1–2 minutes until firm but pliable. Test with a buttered finger. -
Butter and Pull
Generously butter your hands. Pull the white candy repeatedly, folding and stretching until it turns opaque and pearly. Repeat with the red candy. -
Twist and Shape
Roll each color into a long rope (½–¾ inch thick). Lay red and white ropes side by side and twist gently for the classic candy-cane spiral. -
Cut into Sticks
Using oiled scissors, cut into 4–6 inch sticks. If candy hardens, gently warm in a 200°F oven or with a hairdryer. Let cool completely.
Notes
-
Avoid Grainy Candy: Do not stir the syrup once boiling; wash down side crystals with water.
-
Candy Hardens Too Fast? Warm briefly in a low oven or use a hairdryer.
-
No Thermometer? Use the cold water test: syrup dropped in water forms flexible threads at soft-crack stage.
-
Storage: Keep in an airtight container at room temperature up to 1 month. Avoid moisture.
Nutrition
- Calories: 120 Cal Per Stick
- Sugar: 28g
- Sodium: 5g
- Fat: 0g
- Carbohydrates: 30g
Nutritional Information (Approximate)
Let’s be real, friends—this is a holiday treat, a special indulgence! Here’s a rough nutritional breakdown per peppermint stick (based on a yield of 12 sticks). Remember, these are estimates, and the exact values can vary based on the specific ingredients you use.
- Prep Time: 10 minutes
- Cook Time: 20 minutes
- Cool Time: 30 minutes
- Total Time: ~1 hour
- Servings: About 10–12 sticks
Per Stick (approximate):
- Calories: 120
- Total Carbohydrates: 30g
- Sugars: 28g
- Total Fat: 0g
- Sodium: 5mg
This is a fun, sugar-based candy, so the best approach is to enjoy it mindfully as part of your holiday celebrations!
Final Thoughts from My Kitchen to Yours
Well, there you have it! My complete guide to creating unforgettable Homemade Christmas Peppermint Sticks. This recipe is more than just a list of ingredients and steps; it’s an invitation to slow down and savor the season. It’s about the laughter that happens when your hands are covered in butter, the focus required to hit that perfect temperature, and the pride of presenting something you made from scratch.
So this year, I encourage you to give it a try.

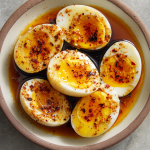
Butter-Soaked Boiled Eggs (Spicy Southern Style)
Butter-Soaked Boiled Eggs: Your New Favorite Spicy Southern Snack
Hey friends, Beau here! Let’s be real for a second. How many times have you stared at a bowl of plain, hard-boiled eggs and thought, “Well, you’re healthy… and that’s about it.” We’ve all been there. They’re the reliable, no-fuss friend in the fridge, but they’re not exactly the life of the party. They’re the wallflowers of the picnic table.
But what if I told you we could throw a flavor fiesta for those humble eggs? What if we could transform them from a simple protein punch into a rich, spicy, buttery, and downright addictive treat in under 15 minutes? That’s the magic of my Spicy Southern Butter-Soaked Boiled Eggs.
This isn’t just a recipe; it’s a revelation. We’re taking the simplicity of a boiled egg and elevating it with a pour of melted, spice-infused butter. The result is something warm, soulful, and incredibly satisfying. It’s the kind of dish that feels both indulgent and wholesome, the perfect bridge between a quick snack and a crave-worthy side. So, if you’re ready to give those eggs the glow-up they deserve, grab your favorite skillet (or just a simple bowl) and let’s get cooking. Your taste buds are about to send you a thank-you note.
A Little Back-Porch Inspiration
This recipe was born from a happy accident on a sweltering Georgia afternoon. I was visiting my Grandad Collier, a man who believed any problem could be solved on the back porch with a cold sweet tea and a plate of something good. We’d been prepping a big family barbecue, and as usual, we’d overestimated the deviled egg situation. We had a whole bowl of plain, leftover boiled eggs staring us down.
Grandad, never one to let good food go to waste, looked at that bowl, looked at the stick of butter softening on the counter next to his cornbread, and got that familiar twinkle in his eye. “Beau,” he said, “fetch me the Old Bay and the red pepper flakes.” What happened next was pure, simple, Southern genius. He melted that butter, stirred in a handful of spices, and poured the whole glorious, sizzling mixture over the halved eggs. We ate them right there, warm and dripping with flavor, and I knew I’d just been let in on a secret. It was a lesson in improvisation, in flavor, and in the fact that the best recipes often come from a place of “why not?”
Gathering Your Flavor Arsenal
This recipe is all about simplicity, so you probably have most of this in your pantry right now. Here’s what you’ll need and why each ingredient is a star player:
- 6–8 Hard-Boiled Eggs, peeled and halved: The blank canvas! I find that peeling them under a tiny trickle of running water helps the shell slide right off. Pro-tip: Slightly older eggs peel easier than super fresh ones!
- 1/4 cup (half stick) Butter, melted: The rich, velvety vehicle for all our spices. This is what makes the dish feel like a warm hug. Chef’s Insight: I use salted butter for an extra flavor boost, but unsalted works perfectly if you’re watching your sodium.
- 1/2 teaspoon Old Bay Seasoning: This is the secret weapon! It brings a complex, celery-salt-forward flavor that just screams coastal comfort. Substitution Tip: No Old Bay? A mix of celery salt, paprika, and a pinch of allspice can get you close.
- 1/4 teaspoon Garlic Powder: It gives us that savory, aromatic base note without the fuss of mincing fresh garlic.
- 1/4 teaspoon Onion Powder: The sweet, savory cousin to garlic powder that deepens the overall flavor profile.
- 1/4 teaspoon Crushed Red Pepper Flakes: This is where the “spicy” comes in! It provides a gentle, building heat that tickles the back of your throat. Adjust to your preference! For mild, use a pinch; for fiery, go for a full 1/2 teaspoon.
- 1/4 teaspoon Black Pepper: For a little earthy, pungent kick. Freshly cracked is always best!
- Optional: A Pinch of Lemon Pepper or Cajun Seasoning: This is your chance to play! Lemon pepper adds a zesty brightness, while a good Cajun blend (like Slap Ya Mama or Tony Chachere’s) will kick the Southern heat up another notch.
Let’s Make Some Magic: Step-by-Step
Ready? This comes together so fast, you’ll want to have your serving dish ready before you even start. Let’s do this.
- Prep Your Eggs: Get your hard-boiled eggs peeled and carefully slice them in half lengthwise. I like to use a sharp, non-serrated knife and give it a quick rinse between cuts for clean slices.Chef’s Hack: Arrange them cut-side up in a shallow baking dish or a pie plate. You want them cozy in there so none of that glorious butter escapes!
- Create the Spiced Butter Elixir: In a small saucepan over low heat (or in a microwave-safe bowl in 20-second bursts), melt your butter until it’s just liquid. Don’t let it brown! We just want it melted.Chef’s Commentary: This is the fun part. As soon as the butter is melted, take it off the heat and immediately stir in all your seasonings—the Old Bay, garlic powder, onion powder, red pepper flakes, and black pepper. Whisk it with a fork or a small whisk until it’s totally combined and smells absolutely incredible. You’ll see the spices blooming in the warm butter, releasing all their hidden flavors.
- The Grand Pour: Now, take your saucepan and slowly, deliberately, pour that spiced butter over the waiting eggs. Try to get a little bit in every nook and cranny. Don’t be shy! The goal is for each egg half to get a generous bath.Little Tip: I like to use a spoon to help distribute the butter and make sure every single yolk gets some of that spicy, buttery love.
- The Soak: This is the hardest part—the waiting! Let the eggs sit for a solid 2-3 minutes. This allows the warm butter to seep into the yolks and the whites, carrying all that flavor deep into the egg.Why This Matters: This short soak is what transforms them from “eggs with butter on top” to “butter-soaked” wonders. The texture becomes unbelievably rich.
- Serve & Savor: That’s it! You’re done. Serve them immediately while they’re still warm and the butter is glistening.Bonus Idea: Got a kitchen torch? A quick pass over the tops can give them a subtly smoky, blistered finish that’s just next-level.
How to Serve These Buttery Gems
Presentation is part of the fun! You can keep it rustic and serve them right from the dish you soaked them in, or get a little fancy. I love piling them onto a rustic wooden board for a casual appetizer spread. Scatter some fresh parsley or chives over the top for a pop of color and freshness that cuts through the richness beautifully.
These eggs are incredibly versatile. They’re the star of any brunch table, sitting proudly next to fluffy biscuits and grits. They’re a knockout side dish for a grilled steak or a pile of smoky barbecue ribs. Or, my personal favorite, serve them as a unique appetizer with some crusty bread on the side for dipping into any leftover spiced butter pooling at the bottom of the dish—trust me, you won’t want to waste a single drop.
Make It Your Own: Delicious Variations
The basic formula is your playground. Once you’ve mastered the original, try one of these tasty twists!
- The “Everything Bagel” Twist: Swap the spice blend for 2 teaspoons of Everything Bagel Seasoning. It’s savory, sesame-seed deliciousness that works perfectly with the creamy egg.
- Smoky Paprika & Herb: Use 1/2 teaspoon of smoked paprika instead of Old Bay, and stir in a tablespoon of freshly chopped dill or chives into the melted butter. It’s a warmer, earthier flavor profile.
- Keto-Friendly & Extra Rich: This recipe is already naturally low-carb, but for an extra richness, use ghee (clarified butter) instead of regular butter. It has a beautiful, nutty flavor that is just incredible.
- Zesty Lemon-Herb: Omit the Old Bay and red pepper. Use the garlic and onion powder, but add 1/2 teaspoon of lemon zest and 1 tablespoon of chopped fresh tarragon or parsley to the butter. Bright, fresh, and elegant.
- The “Buffalo” Style: For all my buffalo wing lovers! Replace half the butter with 2 tablespoons of Frank’s RedHot sauce. Pour it over, and you’ve got spicy, tangy, buttery eggs that taste like game day.
Beau’s Kitchen Notes
This recipe has evolved a bit since that first day on Grandad’s porch. I’ve found that letting the butter-soaked eggs chill in the fridge creates a totally different, but equally delicious, experience. The butter firms up around the eggs, creating a flavorful, savory shell that’s perfect for picnics or lunchboxes. It’s like two recipes in one!
A funny story: I once made a triple batch for a potluck and forgot to tell people they were spicy. Watching my friend’s toddler grab one and then proudly proclaim, “My tongue is dancing!” was both terrifying and hilarious. (Don’t worry, he was fine and now asks for the “dancing eggs” every time he visits!). It just goes to show, even a little heat can be a fun adventure.
Your Questions, Answered!
I’ve gotten a lot of questions about this recipe over the years. Here are the most common ones:
- Q: My eggs are always hard to peel! Any foolproof method?
A: I feel your pain! My best method is to steam them. Place a steamer basket in a pot with an inch of water, bring to a boil, add the eggs, cover, and steam for 12-13 minutes. Then, plunge them into an ice bath. The shells practically jump off! Also, using eggs that are a week or two old really does help.
- Q: Can I make these ahead of time?
A: Absolutely! You have two great options. 1) Prep and peel the eggs up to 3 days in advance, then make the butter sauce fresh when ready to serve. Or 2) Make the whole dish and refrigerate it. They’re fantastic cold, with the butter solidified. The flavors meld and intensify overnight.
- Q: The butter solidified really quickly after I poured it. What did I do wrong?
A: You didn’t do anything wrong! This just means your eggs or your dish were very cold. It’s totally fine. The flavor will still be there. To keep it saucy, make sure your serving dish is at room temp, and serve immediately after pouring. The goal is to eat them warm for that “soaked” texture.
- Q: Can I use olive oil instead of butter?
A: You can, but you’ll lose that classic, rich, Southern comfort-food soul. Butter is key here. For a dairy-free version, a high-quality vegan butter works surprisingly well!
Butter-Soaked Boiled Eggs (Spicy Southern Style)
Description
Spicy Southern Butter-Soaked Boiled Eggs
Transform ordinary hard-boiled eggs into rich, buttery, and spicy Southern delights in under 15 minutes! Perfect as a snack, side, or brunch star.
Ingredients
-
6–8 hard-boiled eggs, peeled and halved
-
¼ cup (½ stick) butter, melted (salted or unsalted)
-
½ tsp Old Bay Seasoning (or substitute: celery salt + paprika + pinch of allspice)
-
¼ tsp garlic powder
-
¼ tsp onion powder
-
¼ tsp crushed red pepper flakes (adjust to taste)
-
¼ tsp black pepper, freshly cracked if possible
Optional twists:
-
Lemon pepper or Cajun seasoning for extra zing
-
Everything Bagel seasoning for a savory, nutty variation
-
Smoked paprika + fresh dill/chives for earthy warmth
-
Buffalo-style: replace 2 tbsp butter with hot sauce
Instructions
-
Prep the Eggs:
-
Peel hard-boiled eggs and slice in half lengthwise.
-
Arrange cut-side up in a shallow dish or pie plate.
-
-
Make Spiced Butter:
-
Melt butter in a small saucepan over low heat (or microwave in 20-second bursts).
-
Remove from heat and whisk in Old Bay, garlic powder, onion powder, red pepper flakes, and black pepper until combined.
-
-
Butter Bath:
-
Slowly pour the spiced butter over the eggs, making sure each yolk gets a generous coating.
-
Optional: use a spoon to distribute evenly.
-
-
Soak for Maximum Flavor:
-
Let eggs sit for 2–3 minutes to allow the butter to seep into the yolks and whites.
-
-
Serve & Enjoy:
-
Serve immediately while warm.
-
Optional garnish: fresh parsley, chives, or a light dusting of paprika.
-
Pair with crusty bread, biscuits, or serve as a unique side for grilled meats or barbecue.
-
Notes
-
Easy peeling: Steam eggs 12–13 min, then ice bath. Slightly older eggs peel best.
-
Make ahead: Eggs can be prepped 3 days in advance. Butter sauce is best fresh, but refrigerated assembled eggs are great cold.
-
Butter solidifies fast? Room-temp dish and serve immediately to keep the “soaked” texture.
Nutrition
- Calories: 120 Cal per serving
- Fat: 10g
- Carbohydrates: 1g
- Protein: 6g
Nutritional Lowdown (Because We’re Curious!)
Alright, let’s talk about what’s fueling this deliciousness. Per serving (2 halves, which is one whole egg), you’re looking at:
- Calories: ~120
- Protein: 6g
- Fat: 10g
- Carbohydrates: <1g
As you can see, these Butter-Soaked Boiled Eggs are a fantastic source of high-quality protein and healthy fats, keeping you full and satisfied for hours. They’re naturally low-carb and keto-friendly, making them a great option for a variety of eating styles. The fats from the butter and egg yolk also help your body absorb the fat-soluble vitamins from the egg yolk itself. So, you’re not just eating something delicious; you’re giving your body a solid, nutrient-dense snack. It’s a win-win!
Final Thoughts from My Kitchen to Yours
Friends, this recipe is a perfect example of what Feastical is all about. It’s not about fancy techniques or hard-to-find ingredients. It’s about looking at a simple, everyday food with fresh eyes and a little bit of courage. It’s about adding a splash of butter and a dash of spice to turn the ordinary into the extraordinary.
This dish has brought so much joy to my table, from a quiet solo lunch to a rowdy family gathering, and I truly hope it does the same for yours. It’s a little reminder that the best food doesn’t have to be complicated—it just has to be made with a sense of adventure and a whole lot of flavor.
So, give it a try. And when you do, I’d love to hear about it! Tag me on social @Feastical or @BeauCollier and show me your beautiful, buttery creations. Now, go forth and soak some eggs!
With a full heart and a happy plate,
Beau
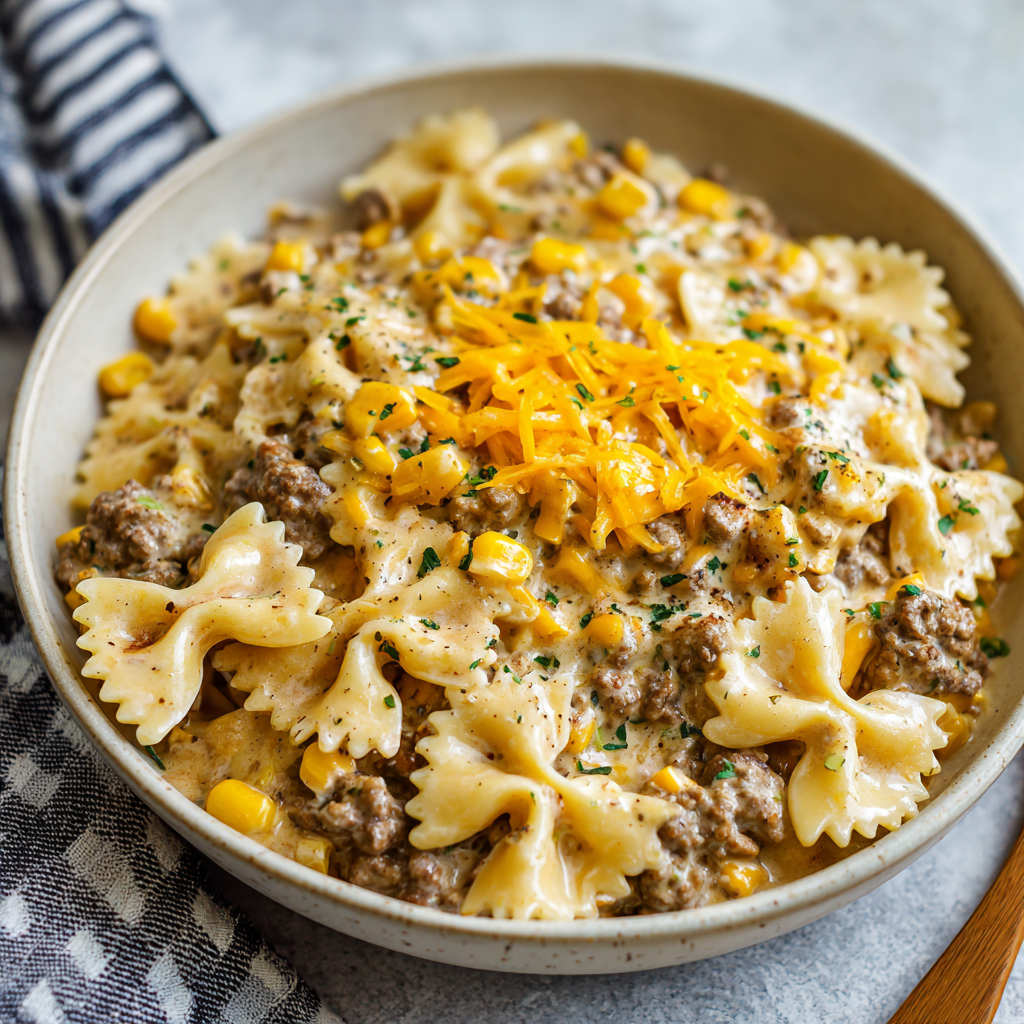
Slow Cooker Creamy Ranch Beef & Corn Bowties
The Slow Cooker Dinner That Feels Like a Warm Hug
Hey friends, Beau here from Feastical! Let’s be real for a second. Some days, you’re firing on all cylinders—julienning vegetables, flambéing things, feeling like a total kitchen rockstar. And then there are other days. The days where the thought of figuring out dinner makes you want to hide the spatula (we’ve all been there) and order takeout for the third time this week.
I’m here to tell you there’s a better way. A simpler, cozier, and downright delicious way that involves your slow cooker and a serious lack of stress. I’m talking about my Slow Cooker Creamy Ranch Beef & Corn Bowties. Just saying the name makes me smile.
This dish is the culinary equivalent of your favorite cozy sweater. It’s hearty, satisfying, and packed with familiar, feel-good flavors that everyone at your table will adore. Savory ground beef, sweet pops of corn, and fun bowtie pasta all swimming in a luxuriously creamy, cheesy sauce with that unmistakable zesty kick from ranch seasoning. The best part? Your slow cooker does about 95% of the work. You get to just toss everything in, let it work its magic, and stroll back in a few hours to a kitchen that smells like a dream and a dinner that’s ready to bring everyone together.
So, if you’re ready for a guaranteed hit that requires minimal effort for maximum reward, grab your slow cooker. We’re about to make magic happen.
A Recipe Born from Busy Days & Happy Accidents
This recipe honestly came from one of those “what-on-earth-do-I-have-in-the-pantry” moments. It was a few years back, right in the middle of launching Feastical. My days were a whirlwind of recipe testing, photo editing, and trying to remember to water my poor, neglected basil plant. Dinner was often an afterthought, but I still craved something homemade and comforting.
One Wednesday, staring into the abyss of my fridge, I saw the usual suspects: ground beef, a block of cream cheese, some corn, and a packet of ranch seasoning leftover from a party. Pasta? Always. I thought, “What if I just… threw it all in?” I browned the beef, dumped everything (pasta included—rookie mistake!) into the slow cooker, crossed my fingers, and went back to work.
Four hours later, I lifted the lid to a creamy, bubbling pot of… well, let’s call it “rustic.” The pasta had absorbed every drop of liquid and was a tad softer than I’d like, but the flavor? Oh, the flavor was incredible. It was a hit! My wife, Sarah, took one bite and said, “This is a keeper, Beau. Just maybe cook the pasta separately next time.” And just like that, through a happy little kitchen accident, a new Feastical family favorite was born.
Gathering Your Flavor Dream Team
One of the best things about this recipe is its beautiful simplicity. You probably have most of this hanging out in your kitchen right now. Here’s the lineup:
- 1 lb ground beef – I like an 80/20 blend here for the best flavor, but leaner works great, too. Chef’s Insight: For a fantastic twist, try using ground turkey or even a plant-based ground “meat” alternative!
- 3 cups bowtie (farfalle) pasta – Farfalle, or “bowties,” are my go-to because their fun shape and ridges hold the creamy sauce perfectly. Substitution Tip: Any short pasta works—penne, shells, or rotini are all excellent stand-ins.
- 1 can (15 oz) sweet corn, drained – This adds a lovely pop of sweetness and color. Chef’s Insight: In the summer, I love using fresh corn kernels cut right off the cob. Frozen corn (thawed) is a fantastic year-round option, too.
- 1 packet ranch seasoning mix – This is the secret weapon! It brings a herby, tangy, savory flavor that ties the whole dish together.
- 1 cup cream cheese, softened – This is the base of our creamy sauce. Pro-Tip: Make sure it’s softened to room temperature! This is non-negotiable for a smooth, lump-free sauce. Just leave it on the counter for an hour before you start.
- 1/2 cup milk – Whole milk will give you the richest sauce, but 2% or even your favorite unsweetened milk alternative will work just fine to loosen everything up.
- 1 cup shredded cheddar cheese – Because more cheese is always the answer. I like to shred my own from a block for the best melt, but pre-shredded works in a pinch.
- 1/2 tsp garlic powder & 1/2 tsp black pepper – A little extra garlic never hurt anybody, and the fresh cracked pepper at the end just makes everything sing.
Let’s Get Cooking: Your Effortless Path to Dinner Bliss
Okay, team. Aprons on? Great. Let’s walk through this together. I’ll be right here with my little chef hacks to make sure your dish turns out perfectly.
Step 1: Brown That Beef!
Grab a trusty skillet and cook your ground beef over medium heat. Break it up with a wooden spoon as it cooks until it’s nicely browned and no pink remains. Now, here’s a key step for a non-greasy sauce: drain off the excess grease. I just tilt the skillet and use a paper towel to soak it up, or pour it into an old can. This little move makes a world of difference.
Step 2: The Slow Cooker Shuffle
Transfer your beautifully browned beef right into the bowl of your slow cooker. Now, add in the drained corn, the entire packet of ranch seasoning, your softened cream cheese, milk, garlic powder, and black pepper. Chef’s Hack: Dollop the cream cheese in a few spots around the pot so it’s easier to stir in. Now, give it all a really good stir until everything is combined. It might look a little separated at first, but trust the process! It will all melt together into creamy perfection.
Step 3: Practice Patience (The Hardest Part)
Pop the lid on that slow cooker and set it to cook on LOW for 4 hours. I know, I know, the high setting is tempting, but low and slow is what develops the deepest flavors and gives the cream cheese time to meld seamlessly. This is your free time! Go for a walk, tackle that pile of laundry, or just put your feet up. You’ve earned it.
Step 4: Pasta Party (Separately!)
About 20 minutes before your slow cooker timer goes off, it’s pasta time! Bring a large pot of salted water to a boil and cook your bowtie pasta according to the package directions, but aim for al dente—meaning it still has a slight bite to it. This is the most important tip! Cooking the pasta separately prevents it from soaking up all the sauce and becoming mushy. Drain the pasta well, but no need to rinse it.
Step 5: The Grand Finale
Open up your slow cooker—smells amazing, right? Stir in the drained, cooked bowtie pasta and the shredded cheddar cheese. Mix it all together, and in just a minute or two, the residual heat will melt that cheddar into the most glorious, velvety sauce. Give it one final taste and adjust seasoning if needed.
How to Serve Up the Coziness
This dish is a star all on its own, but a little presentation goes a long way! I love serving this family-style, right out of the slow cooker (keep it on the “warm” setting if you have it). Ladle generous portions into shallow bowls.
For a little extra “wow” factor, top each bowl with a sprinkle of fresh chopped parsley or chives for a pop of color and freshness. A little extra crack of black pepper on top is always a good idea. If you’re feeling fancy, a light dusting of paprika adds a nice color contrast.
This is a rich and hearty meal, so simple sides are your best friend. A crisp green salad with a tangy vinaigrette helps cut through the creaminess beautifully. A side of steamed green beans or some garlic bread for dipping and mopping up every last bit of sauce are also legendary choices.
Make It Your Own: Delicious Twists & Swaps
One of my favorite things about cooking is making a recipe your own. Here are a few ways to mix it up!
- Spicy Southwest Kick: Add a can of diced green chiles and a teaspoon of cumin along with the other ingredients. Swap the cheddar for pepper jack cheese and top with a dollop of sour cream and sliced jalapeños.
- Chicken & Bacon Bliss: Use 2 cups of cooked, shredded chicken instead of ground beef. Stir in 1/2 cup of cooked, crumbled bacon at the end with the pasta for a smoky, savory punch.
- Loaded Veggie Delight: Want to sneak in more veggies? Sauté a diced onion and a cup of chopped mushrooms with the ground beef. A handful of fresh spinach stirred in at the very end until just wilted is also fantastic.
- Gluten-Free & Hearty: This is an easy one! Simply use your favorite gluten-free pasta (the brown rice or chickpea blends work great) and double-check that your ranch seasoning is gluten-free. You’re all set!
Beau’s Kitchen Corner: A Few Parting Thoughts
Over the years, this recipe has become a true workhorse in my kitchen. It’s the one I text to friends when they have a new baby, the one I make for potlucks (it travels like a dream in the slow cooker), and the one my family requests on a chilly Sunday.
The biggest evolution was, of course, learning to cook the pasta separately after that first, slightly mushy attempt. I’ve also played with adding a dash of hot sauce for a subtle heat and found that letting it sit for 10 minutes after adding the cheese helps the sauce thicken up to the perfect consistency. It’s a living, breathing recipe, just like all the best ones are. Don’t be afraid to play with it and make it yours!
Your Questions, Answered!
I’ve gotten a lot of questions about this recipe over the years. Here are the most common ones to help you out!
Q: Can I cook the pasta directly in the slow cooker to save a pot?
A: I don’t recommend it. The pasta absorbs too much liquid, leaving you with a thick, pasty dish and often overcooked, mushy noodles. That one extra pot is 100% worth it for the perfect texture.
Q: My sauce seems a little thin. How can I thicken it up?
A: No worries! First, let it sit for 10-15 minutes with the lid off; it will naturally thicken as it cools slightly. If it’s still too thin, make a quick slurry by mixing a tablespoon of cornstarch with two tablespoons of cold milk. Stir this into the slow cooker, and let it cook on high for another 10-15 minutes until thickened.
Q: Can I make this ahead of time?
A: Absolutely! You can brown the beef and mix everything (except the pasta and cheddar) in the slow cooker insert the night before. Cover and refrigerate. In the morning, just place the insert back in the base and start cooking, adding an extra 15-30 minutes to the cook time since it’s starting cold.
Q: What’s the best way to store and reheat leftovers?
A: Store leftovers in an airtight container in the fridge for up to 4 days. The pasta will continue to absorb sauce, so when reheating, add a splash of milk or water and warm it gently on the stovetop or in the microwave, stirring frequently, until creamy again.

Slow Cooker Creamy Ranch Beef & Corn Bowties
Description
Slow Cooker Creamy Ranch Beef & Corn Bowties
A comforting, creamy, cheesy slow-cooker pasta dish with ranch-seasoned beef, sweet corn, and bowtie pasta. Minimal effort, maximum cozy vibes!
Ingredients
-
1 lb ground beef (80/20 blend; or leaner, turkey, chicken, or plant-based)
-
3 cups bowtie (farfalle) pasta (short pasta like penne, shells, or rotini works too)
-
1 (15 oz) can sweet corn, drained (fresh or thawed frozen corn works)
-
1 packet ranch seasoning mix (dry)
-
1 cup cream cheese, softened
-
½ cup milk (whole, 2%, or unsweetened alternative)
-
1 cup shredded cheddar cheese
-
½ tsp garlic powder
-
½ tsp black pepper
-
Optional garnish: fresh parsley, chives, extra black pepper, or paprika
Optional variations:
-
Spicy Southwest: add green chiles, cumin, and use pepper jack cheese; top with sour cream and jalapeños.
-
Chicken & Bacon: swap beef for 2 cups cooked shredded chicken; stir in ½ cup cooked, crumbled bacon.
-
Veggie Load: sauté onions, mushrooms, spinach, or bell peppers with beef.
-
Gluten-Free: use GF pasta and ensure ranch seasoning is GF.
Instructions
-
Brown the Beef:
-
Cook ground beef in a skillet over medium heat until no pink remains.
-
Drain most grease and transfer beef to the slow cooker.
-
-
Add Creamy Base:
-
Add drained corn, ranch seasoning, cream cheese (dollop it in several spots), milk, garlic powder, and black pepper.
-
Stir until combined; it may look separated at first but will melt into creamy perfection during cooking.
-
-
Slow Cook:
-
Cover and cook on LOW for 4 hours.
-
-
Cook Pasta Separately:
-
About 20 minutes before slow cooker is done, cook bowtie pasta to al dente according to package instructions. Drain well.
-
-
Finish the Dish:
-
Stir cooked pasta and shredded cheddar into the slow cooker.
-
Mix until cheese melts into a creamy sauce. Adjust seasoning as needed.
-
-
Serve:
-
Ladle into bowls and garnish with fresh parsley, chives, or a sprinkle of paprika.
-
Pair with a crisp salad, steamed veggies, or garlic bread.
-
Notes
-
Sauce too thin? Let it sit 10–15 min or stir in a cornstarch slurry (1 tbsp cornstarch + 2 tbsp cold milk) and cook on high 10–15 min.
-
Make ahead: Assemble (without pasta and cheddar) and refrigerate overnight; add 15–30 min to cooking time.
-
Leftovers: Store in airtight container, up to 4 days. Reheat with a splash of milk.
Nutrition
- Calories: 450 Cal per serving
- Fat: 22g
- Carbohydrates: 38g
- Protein: 26g
A Quick Look at the Good Stuff
Now, I’m all about balance. This is a hearty, comforting dish, and it’s not pretending to be a salad! But it’s always good to know what you’re enjoying. The nutritional info below is an estimate per serving (based on 6 servings) and can vary based on the specific ingredients you use, like the leanness of your beef or the type of milk.
- Calories: ~450
- Protein: 26g (Great for keeping you full and satisfied!)
- Fat: 22g
- Carbohydrates: 38g
To lighten it up a bit, you can use lean ground beef (90/10 or 93/7), reduced-fat cream cheese, and low-fat milk. It will still be incredibly tasty! Remember, food is about nourishment for both the body and the soul, and this dish delivers big on the soul part.
Dig In & Enjoy!
And there you have it, friends! My go-to, no-fuss, always-delicious Slow Cooker Creamy Ranch Beef & Corn Bowties. It’s more than just a recipe; it’s a promise of a stress-free dinner and a happy, full belly. It’s the kind of meal that fills your home with an incredible aroma and brings everyone to the table with a smile.
I hope this recipe finds its way into your regular rotation and becomes a source of comfort and ease in your kitchen, just like it has in mine. If you make it (and I really hope you do!), I’d love to see your creation! Tag me @Feastical on social media or shoot me an email. Hearing your stories and seeing your spins on my recipes is my absolute favorite part of this job.
Now go forth, enjoy that hands-off cooking time, and get ready for the compliments to roll in. Happy cooking!

Velvety Ranch Beef & Sweet Corn Penne Bake
The Ultimate Comfort Food Hug: Velvety Ranch Beef & Sweet Corn Penne Bake
Hey friends, Beau here! Let’s get real for a second. Some days, you want to craft a culinary masterpiece that’ll have everyone snapping pictures for their foodie feeds. And other days? Other days, you just want a big, warm, cheesy hug from your dinner plate. You want something that comes together without a fuss, fills your kitchen with that unbelievable “something good is happening” aroma, and makes everyone at the table go completely silent except for the sounds of happy chewing.
If you’re having one of *those* days, my friend, you have landed in the right spot. Today, we’re diving headfirst into one of my all-time, go-to, never-fail comfort food creations: my Velvety Ranch Beef & Sweet Corn Penne Bake.
Now, I see you. “Ranch? In a pasta bake?” Trust me on this. This isn’t just a bottle of dressing; we’re using the dry seasoning mix, and it works a kind of magic you have to taste to believe. It brings this herby, tangy, savory punch that cuts through the richness of the beef and cheese in the most perfect way. Paired with the sweet, juicy pops of corn and a sauce so creamy it feels like a dream, this dish is a total flavor explosion. It’s hearty, it’s satisfying, and it’s so incredibly easy. So, grab your favorite baking dish and let’s make some magic happen.
The Accidental Masterpiece That Started It All
This recipe has a fun little backstory, born from one of those “what do I have in the pantry?” kind of nights. It was a rainy Tuesday, the kind that makes you want to curl up on the couch with a blanket. My fridge was looking a little sparse, but I had some ground beef, a lone box of penne, and a few pantry staples. My goal was simple: create maximum coziness with minimal effort.
I started browning the beef, and my eyes landed on a packet of ranch seasoning peeking out from the spice rack. A lightbulb went off. I’d used it for dips and chicken, but why not in the pasta? I stirred it in with some cream cheese and sour cream I had left over from taco night, and the second that sauce came together, I knew I was onto something. The smell was insane—savory, herby, and so inviting. When my partner walked into the kitchen and said, “Okay, whatever that is, I need it immediately,” I knew this impromptu experiment was a keeper. It’s been a Feastical favorite ever since, a reminder that the best recipes often come from a little kitchen courage and a happy accident.
Gathering Your Flavor Dream Team
Here’s everything you’ll need to bring this cozy masterpiece to life. Don’t stress about having the *exact* brands—cooking is about making it work for you!
- 1 lb Ground Beef (80/20 blend is perfect): This is our hearty, savory base. The little bit of fat in an 80/20 blend adds so much flavor! If you prefer, you can use ground turkey or chicken for a leaner option, or even a plant-based ground meat alternative.
- 1 (15 oz) can Sweet Corn, drained: These little golden gems bring a pop of sweetness that balances the savory ranch and beef beautifully. In a pinch, frozen corn (thawed) works just as well!
- 1 packet Ranch Seasoning Mix: This is our secret weapon! It’s a powerhouse of dill, garlic, onion, and buttermilk flavor that creates the sauce’s incredible backbone. Chef’s Insight: Look for the powder, not the bottled dressing.
- 1 cup Cream Cheese, softened: The key to our “velvety” sauce. Let it sit on the counter for 30 minutes before you start. This makes it blend into a smooth, luscious sauce instead of clumping. Neufchâtel cheese is a great lower-fat substitute that works the same way.
- 1/2 cup Sour Cream: This adds a delightful tang and creaminess that makes the sauce sing. Greek yogurt is a fantastic, protein-packed substitute if that’s what you have on hand.
- 2 cups cooked Penne Pasta: I love penne because its tubes and ridges grab onto the sauce so well. Feel free to use any short pasta you love—rigatoni, ziti, or shells are all awesome here. Pro tip: cook it just to al dente, as it will soften a bit more in the oven.
- 1 cup shredded Mozzarella Cheese: For that iconic, stretchy, melty cheese pull we all love. A pre-shredded Italian blend would also be delicious.
- 1/2 cup grated Parmesan Cheese: This adds a salty, nutty depth of flavor that takes the cheesiness to the next level. Freshly grated is always best, but the stuff in the green can will work in a pinch!
- Salt and Pepper, to taste: Season as you go! The ranch seasoning has salt, so I usually just add a good crack of black pepper after browning the beef.
Let’s Build That Bake: Your Step-by-Step Guide
Okay, team, let’s fire up the oven and get cooking. I’ll walk you through every step with my favorite little hacks to ensure your bake is absolutely perfect.
- Preheat and Prep: First things first, get that oven preheating to a cozy 375°F (190°C). This is the perfect temperature for getting our cheese beautifully golden and bubbly without burning the bottom. While it’s warming, grab a 9×13 inch baking dish and give it a light coating of cooking spray or a quick brush of oil. Chef’s Hack: No need to wait for the oven to fully preheat before you start cooking on the stovetot—multitasking is a cook’s best friend!
- Brown the Beef: Grab a large skillet and place it over medium-high heat. Crumble in your ground beef and cook it up until it’s beautifully browned and no pink remains. This is where we build our foundation of flavor! Once it’s cooked, carefully drain off the excess fat. Chef’s Tip: I like to leave about a tablespoon of drippings in the skillet for extra flavor, but draining most of it keeps the final dish from being greasy.
- Create the Velvety Sauce: Now for the magic! Reduce the heat to low. To the same skillet with your beef, add the entire packet of ranch seasoning, your softened cream cheese, and the sour cream. Stir, stir, stir! It might look a little separated at first, but keep going. In about 2-3 minutes, it will melt into the most luscious, creamy, and fragrant sauce you’ve ever seen. Chef’s Commentary: This is the “wow” moment. The smell is going to make your stomach growl—I promise.
- Bring the Family Together: Time to introduce everyone! Dump in your drained sweet corn and your cooked penne pasta. Gently stir everything until every single piece of pasta and every kernel of corn is lovingly coated in that velvety ranch sauce. Take a second to appreciate the beauty of it all.
- The Cheesy Transfer: Carefully pour the entire saucy, beefy, corny pasta mixture into your prepared baking dish. Spread it out into a nice, even layer. Now, for the grand finale: shower the top with that glorious mozzarella and parmesan cheese. Be generous! This is what creates that gorgeous, golden-brown crust.
- Bake to Perfection: Slide your masterpiece into the preheated oven and let it bake for 20-25 minutes. You’re looking for the cheese to be completely melted, bubbly around the edges, and maybe even have a few gorgeous golden spots. Chef’s Hack: If you want an extra-golden top, switch your oven to broil for the last minute or two, but WATCH IT CLOSELY—it can go from golden to burnt in seconds!
- The Hardest Part: Let it Rest! I know, I know. It’s tempting to dive right in. But trust me, let it sit for about 5-10 minutes after pulling it out of the oven. This allows the sauce to thicken up just a bit and makes serving so much easier. Use this time to chop some fresh herbs for garnish!
How to Serve Up This Slice of Comfort
Presentation is part of the fun! While this bake is a star all on its own, a few simple touches can turn dinner into an event.
I love serving generous scoops right into shallow bowls. The golden cheese top looks amazing against the creamy white interior. For a pop of color and freshness, I always garnish with a sprinkle of thinly sliced green onions or some fresh chopped parsley or chives. The fresh, green flavor is the perfect contrast to the rich, cheesy pasta.
What to serve on the side? You can’t go wrong with a simple, crisp green salad with a light vinaigrette to cut through the richness. If you’re going for the full comfort food experience, though, a side of buttery garlic bread or soft, warm dinner rolls is non-negotiable for scooping up every last bit of sauce. It’s a complete, crowd-pleasing meal that feels like a celebration, even on a regular old Wednesday.
Make It Your Own: Delicious Twists & Swaps
One of the best things about this recipe is how adaptable it is. Play with it! Here are a few of my favorite variations:
- “Everything but the Kitchen Sink” Veggie Load-Up: Sauté a diced onion and a few minced garlic cloves with the ground beef. Stir in a handful of fresh spinach or some chopped roasted red peppers when you add the corn.
- Spicy Southwest Fiesta: Kick up the heat! Use a Mexican-blend cheese, add a can of drained diced green chiles or a tablespoon of your favorite taco seasoning along with the ranch, and top with fresh cilantro and a dollop of cool avocado crema after baking.
- Chicken & Bacon Bliss: Not in the mood for beef? Swap it for 2 cups of shredded cooked chicken (a rotisserie chicken is perfect here!) and stir in some cooked, crumbled bacon. The smoky bacon with the ranch is a match made in heaven.
- Lightened-Up Lover’s Dream: You can easily make this lighter without sacrificing flavor. Use 93% lean ground turkey, low-fat cream cheese and sour cream, and part-skim mozzarella. It’s still incredibly delicious!
- Gluten-Free & Great: Simply use your favorite gluten-free penne pasta and double-check that your ranch seasoning mix is certified gluten-free. It works like a charm!
Beau’s Kitchen Notes & Stories
This recipe has evolved so much since that first rainy night. I’ve made it for potlucks, new parents, and casual Friday night get-togethers more times than I can count. It’s my ultimate “no-fail” dish. One time, I was in a huge rush and accidentally used a block of cream cheese straight from the fridge. My sauce was a bit lumpy at first, but a quick minute with a whisk smoothed it right out. So don’t panic over small hiccups—cooking is resilient!
The biggest lesson this bake has taught me? Comfort food doesn’t have to be complicated. It’s about the feeling it gives you and the people you share it with. This dish always, without fail, brings a smile to people’s faces. And that, my friends, is the real secret ingredient.
Your Questions, Answered!
Over the years, I’ve gotten a few repeat questions about this bake. Here are the answers to help you out!
Q: Can I make this Velvety Ranch Penne Bake ahead of time?
A: Absolutely! Assemble the entire dish right up to the point of baking (including the cheese on top), cover it tightly, and refrigerate for up to 24 hours. When you’re ready, just pop it in the oven. You might need to add 5-10 minutes to the bake time since it’s going in cold.
Q: My sauce seems a bit thick. Is that normal?
A: The sauce is meant to be thick and creamy, not a runny liquid. However, if it feels *too* thick to coat the pasta easily, don’t worry! Just stir in a splash of milk, beef broth, or even the pasta cooking water until it reaches your desired consistency.
Q: Can I freeze this pasta bake?
A: You can, but with a heads-up! Cream-based sauces can sometimes separate or become a bit grainy upon thawing and reheating. For the best texture, I recommend freezing it *before* baking. Assemble it, wrap it tightly in a few layers of plastic wrap and foil, and freeze for up to 2 months. Thaw in the fridge overnight before baking as directed.
Q: I don’t have penne. What other pasta can I use?
A: Any short pasta with good “sauce-grabbing” capabilities is perfect! Rigatoni, ziti, cavatappi, fusilli, or even medium shells would all be fantastic substitutes.

Velvety Ranch Beef & Sweet Corn Penne Bake
Description
Velvety Ranch Beef & Sweet Corn Penne Bake
A creamy, cheesy, crowd-pleasing comfort food bake with ranch-seasoned beef, sweet corn, and tender penne pasta.
Ingredients
-
1 lb ground beef (80/20 blend; substitute turkey, chicken, or plant-based if desired)
-
1 (15 oz) can sweet corn, drained (or 1 ½ cups thawed frozen corn)
-
1 packet ranch seasoning mix (dry)
-
1 cup cream cheese, softened
-
½ cup sour cream (or Greek yogurt)
-
2 cups cooked penne pasta (al dente)
-
1 cup shredded mozzarella cheese
-
½ cup grated Parmesan cheese
-
Salt and pepper, to taste
-
Optional garnish: chopped green onions, parsley, or chives
Optional twists:
-
Veggie load-up: add spinach, roasted red peppers, onions, garlic
-
Southwest spicy: Mexican-blend cheese, green chiles, taco seasoning, cilantro, avocado crema
-
Chicken & bacon: substitute chicken for beef, add crumbled bacon
-
Lighter version: use lean turkey, low-fat cream cheese, low-fat sour cream, part-skim mozzarella
-
Gluten-free: use gluten-free penne and ranch seasoning
Instructions
-
Preheat Oven: 375°F (190°C). Lightly grease a 9×13-inch baking dish.
-
Brown Beef: In a skillet over medium-high, cook ground beef until no pink remains. Drain most fat, leaving ~1 tbsp for flavor.
-
Make Sauce: Reduce heat to low. Add ranch seasoning, softened cream cheese, and sour cream to the beef. Stir until smooth and creamy (2–3 min).
-
Combine Pasta & Corn: Stir in drained corn and cooked penne until evenly coated with sauce.
-
Transfer & Top: Pour mixture into prepared baking dish. Sprinkle mozzarella and Parmesan over the top.
-
Bake: 20–25 minutes until cheese is melted, bubbly, and golden. Optional: broil 1–2 minutes for extra browning—watch closely!
-
Rest & Serve: Let cool 5–10 minutes. Garnish with green onions or herbs. Serve with a salad or garlic bread.
Notes
Tips & Tricks
-
Sauce too thick? Add a splash of milk, beef broth, or pasta water.
-
Make ahead: Assemble (with cheese) and refrigerate up to 24 hours; add 5–10 min to baking time.
-
Freezing: Assemble unbaked, wrap tightly, freeze up to 2 months; thaw overnight before baking.
-
Pasta swap: Use rigatoni, ziti, shells, or other short pasta with ridges or tubes.
Nutritional Information (For Your Info!)
Hey, I’m all about balance! While this is a celebration of comfort food, I know many of you like to have the facts. Here’s a general breakdown per serving (based on this recipe serving 6). Remember, these are estimates and can vary based on the specific brands and ingredients you use.
- Calories: ~480
- Protein: 26g
- Fat: 28g
- Carbohydrates: 30g
This dish is a great source of protein, which helps keep you full and satisfied. To adjust the nutrition, feel free to refer to the “Lightened-Up” variation I mentioned earlier! Using leaner meats and low-fat dairy can significantly reduce the fat and calorie count while keeping all the flavor.
Final Thoughts from My Kitchen to Yours
Well, there you have it, my foodie friends—my heart and soul in a baking dish. This Velvety Ranch Beef & Sweet Corn Penne Bake is more than just a recipe; it’s a reminder of how simple, honest ingredients can come together to create something truly special and comforting.
I hope this recipe finds its way into your regular rotation and becomes a requested favorite in your home, just like it is in mine. Don’t be afraid to put your own spin on it. That’s what cooking is all about. Now, I’d love to hear from you! Did you add any extra veggies? Did your family go crazy for it? Snap a picture and tag me @Feastical on social media so I can see your beautiful creations!
Until next time, keep your spatula close and your appetite adventurous.

Loaded Sliced Baked Potatoes
The Ultimate Party Starter: Loaded Sliced Baked Potatoes
Hey friends, Beau here! Let’s get real for a second. We all have that one dish we’re secretly hoping shows up at every party, game day spread, or family potluck. You know the one—the dish that makes your eyes light up, the one you strategically position yourself near so you can grab “just one more” without looking too obvious. For me, that dish has always been the humble, yet heroic, loaded baked potato.
But let’s be honest, while a classic baked potato is a thing of beauty, it’s not exactly the most practical party food. You need a plate, a fork, a knife, and maybe even a napkin tucked into your shirt. It’s a whole production! I found myself dreaming of a way to capture all that glorious flavor—the crispy skin, the fluffy interior, the river of melted cheese, the salty bacon—in a format that was easy to share, perfect for dipping, and an absolute joy to eat with your hands.
And that, my friends, is how my recipe for Loaded Sliced Baked Potato Rounds was born. Think of these as the ultimate potato upgrade. We’re taking a trusty russet, slicing it into golden rounds, and loading each one up with all your favorite toppings. The result? A crispy, cheesy, bacon-y bite of heaven that’s guaranteed to disappear from the tray faster than you can say “sour cream.” They’re simple to make, incredibly fun to eat, and they have this magical way of bringing everyone together around the food. So, preheat that oven and let’s make some magic happen!
A Potato Epiphany: Where It All Began
This recipe didn’t come to me in a fancy test kitchen; it was born out of a little bit of desperation and a whole lot of nostalgia. Picture this: It’s my first big game day party in my first real apartment. The place is packed, the game is on, and I’ve foolishly decided to make fully-loaded baked potatoes for a crowd. Chaos ensued. My tiny oven could only fit four potatoes at a time, people were juggling hot spuds on flimsy paper plates, and I was playing the role of a short-order cook, frantically reloading toppings.
In a moment of panic, I looked at the last few raw potatoes I had left and had a flashback to my mom making simple fried potato rounds as a quick side for breakfast. A lightbulb went off. What if I baked slices instead of whole potatoes? I sliced them up, tossed them with the butter and salt I had on hand, and crossed my fingers. Thirty minutes later, I pulled out a tray of golden, crispy-edged rounds. We just started piling the leftover cheese, bacon, and green onions on top and stuck them back in the oven. The reaction was instantaneous. They were a smash hit! That messy, chaotic night taught me a valuable lesson: the best recipes aren’t about being perfect; they’re about being clever, resourceful, and focused on flavor and fun. This dish has been a staple in my home ever since.
Gathering Your Potato Posse: The Ingredients
One of the best things about this recipe is its beautiful simplicity. You only need a handful of humble ingredients to create something truly spectacular. Here’s your shopping list, complete with a few of my chef-y insights to help you nail it every single time.
- 3–4 large Russet Potatoes: These are our MVPs! Russets have a high starch content and thick skin, which gives us that gloriously fluffy interior and crispy edge we’re after. No need to peel them—the skin adds great texture and flavor. Chef’s Tip: Give them a good scrub under cold water to remove any dirt. If your potatoes have any green spots, be sure to cut those away.
- 2–3 tablespoons Melted Butter: This is our key to golden-brown goodness. The butter helps the salt and pepper stick and gives each slice a rich, savory flavor. Substitution Tip: For a dairy-free version, a good olive oil or avocado oil works wonderfully.
- Salt and Pepper, to taste: Don’t be shy here! Potatoes need a good amount of seasoning. I use kosher salt and freshly cracked black pepper for the best flavor.
- 1 cup shredded Sharp Cheddar Cheese: The sharper the cheddar, the more flavor punch you get! I always recommend shredding your own cheese from a block. Pre-shredded bags contain anti-caking agents that can prevent it from melting as smoothly and beautifully.
- 4–5 slices cooked Bacon, chopped: BACON. It adds that irreplaceable smoky, salty, crunchy element. Chef’s Hack: Baking your bacon is a game-changer for recipes like this! Lay the strips on a foil-lined sheet and bake at 400°F for 15-20 minutes. It gets perfectly crispy with minimal mess.
- 2–3 tablespoons chopped Green Onion: These little green gems provide a fresh, sharp contrast to all the rich, cheesy goodness. They’re the pop of color and flavor that ties everything together.
- Sour Cream, for dipping: The cool, tangy dip is the perfect partner for our warm, loaded potato rounds. It’s non-negotiable in my book!
Let’s Get Cooking: The Step-by-Step Guide
Alright, team, it’s go-time! This process is straightforward, but I’ve packed in a few of my favorite kitchen hacks to ensure your potato rounds are nothing short of phenomenal.
- Preheat your oven to 400°F (200°C). A properly preheated oven is crucial for getting that instant sizzle and crispiness we want. While it’s heating up, grab a large baking sheet and line it with parchment paper. Chef’s Hack: The parchment paper isn’t just for easy cleanup; it also prevents the potatoes from sticking without making them greasy. A little spritz of cooking spray on the parchment never hurts, though!
- Slice your scrubbed potatoes into 1/4-inch thick rounds. Consistency is key here! If your slices are all different thicknesses, they’ll cook unevenly—some will be burnt while others are still raw in the middle. Using a sharp knife and taking your time will pay off big time. Chef’s Insight: Don’t worry about making them absolutely perfect. A little rustic charm is a good thing! Just aim for that 1/4-inch sweet spot.
- Arrange the potato rounds in a single layer on your prepared baking sheet. Give them a little personal space! If they’re too crowded, they’ll steam instead of roast and we’ll end up with soggy potatoes. We want crispy. If you need to, use two baking sheets. It’s worth it.
- Brush both sides of each potato round with the melted butter and season generously with salt and pepper. Get in there and make sure every nook and cranny is coated. This butter-and-seasoning layer is what builds our foundational flavor. Don’t just drizzle—brush it on for maximum coverage.
- Bake for 30 minutes, or until the potatoes are tender and starting to turn golden and crisp around the edges. I like to give the pan a quick flip halfway through (around the 15-minute mark) to ensure even browning. You’ll know they’re ready when you can easily pierce one with a fork.
- Pull the tray out of the oven (carefully, it’s hot!) and immediately sprinkle the shredded cheese, chopped bacon, and most of your green onions over the top. Work relatively quickly so the residual heat can start melting the cheese right away. I like to save a pinch of green onion for a fresh garnish at the end.
- Return the tray to the oven for another 5 minutes, or just until the cheese is fully melted, bubbly, and glorious. Keep a close eye on it! It doesn’t take long. We’re just melting the cheese, not cooking the toppings.
- Remove from the oven and let them cool for just a minute or two on the tray. This allows the cheese to set slightly so it doesn’t all slide off when you pick one up. Now, transfer them to a serving platter, sprinkle with the remaining green onions, and get ready for the compliments to roll in!
The Grand Finale: Serving Your Masterpiece
Presentation is part of the fun! I love serving these piled high on a big wooden cutting board or a rustic ceramic platter. Place a generous bowl of cool, creamy sour cream right in the center for dipping. For an extra touch, you can offer a few other dipping options like zesty ranch dressing, a spicy chipotle aioli, or even a drizzle of hot sauce for those who like a kick.
These loaded potato rounds are the ultimate social food. They’re perfect for a finger-food appetizer spread, an irresistible game-day snack, or a fun and interactive side dish alongside grilled steak, roasted chicken, or a big, crisp salad. Watch how they bring people together—it’s a beautiful thing!
Mix It Up! Creative Twists on the Classic
Once you’ve mastered the basic recipe, the potato world is your oyster! Here are a few of my favorite ways to switch things up and keep it exciting.
- The Pizza Party: Swap the cheddar for low-moisture mozzarella, skip the bacon, and top with mini pepperoni slices and a sprinkle of dried oregano before the final bake. Serve with warm marinara sauce for dipping instead of sour cream.
- The Buffalo Chicken Dip: After the initial bake, top each round with a small spoonful of shredded rotisserie chicken tossed in buffalo sauce, then a sprinkle of blue cheese crumbles and cheddar. Bake until melty and serve with a side of ranch dressing.
- The Fully Loaded BBQ: Use a Monterey Jack and cheddar blend, top with pulled pork or chopped brisket, and a drizzle of your favorite BBQ sauce. A little pickled red onion on top after baking adds a fantastic tang.
- Garden Veggie Delight (Vegetarian): Omit the bacon. Top with a mix of cheeses, then add finely chopped broccoli florets, diced red bell pepper, and thinly sliced mushrooms before the final bake. The veggies will soften perfectly.
- The Sweet Potato Swap: For a slightly sweeter, nutrient-packed version, use sweet potatoes! Their natural sweetness pairs amazingly with the salty bacon and sharp cheddar. Just follow the same method.
Beau’s Kitchen Chronicles: A Few Parting Thoughts
This recipe has evolved so much since that chaotic game day years ago. I’ve learned that the type of potato really does matter (I tried it with waxy red potatoes once—trust me, stick with russets!). I’ve also found that a light sprinkle of garlic powder or smoked paprika with the initial salt and pepper can add a wonderful depth of flavor. The best part? This recipe is incredibly forgiving. Even if your slices aren’t perfect, or you burn a few edges (we’ve all been there!), they will still taste absolutely delicious. Food, at its heart, is about joy and connection, not perfection. These little potato rounds deliver on that promise every single time.
Your Questions, Answered!
Q: My potato rounds are sticking to the pan! What did I do wrong?
A: The two biggest culprits are not using enough fat (butter/oil) or not using parchment paper. Parchment paper is a true lifesaver for this recipe. Also, make sure you let the potatoes cook for the full 30 minutes before trying to move them—they’ll naturally release from the pan once they’ve crisped up.
Q: Can I make these ahead of time?
A: You can absolutely do some prep work ahead! You can slice the potatoes and keep them submerged in a bowl of cold water in the fridge for up to 24 hours (this also helps remove excess starch). Just be sure to pat them completely dry before tossing with butter and baking. You can also cook the bacon and chop the green onions ahead of time.
Q: Why are my potatoes soggy instead of crispy?
A: Sogginess usually means they were overcrowded on the baking sheet. They need space for the moisture to evaporate! Always bake in a single layer with a little room between each round. Using two sheets is better than one overcrowded one.
Q: What’s the best way to reheat leftovers?
A> While they’re best fresh, you can reheat them in a 375°F oven or a toaster oven for about 5-10 minutes until warm and crispy again. I don’t recommend the microwave, as it will make them soft and rubbery.

Loaded Sliced Baked Potatoes
Description
Loaded Sliced Baked Potatoes
Crispy, cheesy, bacon-topped potato rounds—perfect for parties, game days, or finger-food dinners.
Ingredients
-
3–4 large russet potatoes, scrubbed
-
2–3 tbsp melted butter (or olive/avocado oil for dairy-free)
-
Salt and pepper, to taste
-
1 cup shredded sharp cheddar cheese
-
4–5 slices cooked bacon, chopped
-
2–3 tbsp chopped green onions
-
Sour cream, for dipping
Optional creative twists:
-
Pizza style: mozzarella, mini pepperoni, oregano, serve with marinara
-
Buffalo chicken: shredded rotisserie chicken in buffalo sauce + blue cheese
-
BBQ loaded: Monterey Jack & cheddar, pulled pork or brisket, BBQ sauce
-
Veggie delight: omit bacon, add broccoli, bell peppers, mushrooms
-
Sweet potato swap: use sweet potatoes instead of russets
Instructions
-
Preheat Oven: 400°F (200°C). Line a large baking sheet with parchment paper.
-
Slice Potatoes: Cut into ¼-inch thick rounds. Arrange in a single layer on the sheet.
-
Season: Brush both sides with melted butter, then sprinkle generously with salt and pepper.
-
Bake: 30 minutes, flipping halfway through, until tender with golden, crispy edges.
-
Add Toppings: Sprinkle cheese, bacon, and most green onions on top. Return to oven for 5 minutes until cheese is melted and bubbly.
-
Serve: Let cool 1–2 minutes, garnish with remaining green onions, and serve with sour cream or other dips.
Notes
-
Avoid sticking: use parchment paper and brush well with butter/oil.
-
Crispy, not soggy: give each slice space on the pan; don’t overcrowd.
-
Make ahead: slice potatoes and soak in cold water (up to 24 hours); cook bacon ahead.
-
Reheat: 375°F oven for 5–10 minutes; avoid the microwave to keep crispiness.
Nutrition
- Calories: 250 Calo per serving
- Fat: 15g
- Carbohydrates: 22g
- Fiber: 2g
- Protein: 7g
Let’s Talk Nutrition & Prep
Now, I’m not a nutritionist, I’m a comfort food chef! But I believe it’s always helpful to have a general idea of what you’re enjoying. This nutritional information is an estimate based on the core recipe and can vary based on your specific ingredients and portion sizes.
Prep time: 10 minutes
Cook time: 35 minutes
Total time: 45 minutes
Serves: 4–6
Nutrition (per serving, approx. 6-8 slices):
Calories: ~250 | Protein: 7g | Fat: 15g | Carbohydrates: 22g | Fiber: 2g
Remember, these are a treat, a celebration food! They provide energy from carbohydrates, protein from the cheese and bacon, and yes, a bit of fat for flavor and satiety. The key, as with all good things, is to enjoy them as part of a balanced diet. You can lighten them up by using a reduced-fat cheese or turkey bacon, but sometimes, the classic, full-flavored version is just what the soul needs.
Final Thoughts from My Kitchen to Yours
Well, there you have it, my friends—my all-time favorite way to turn a simple potato into a show-stopping, crowd-pleasing masterpiece. This recipe is a testament to the idea that the best food doesn’t have to be complicated. It’s about taking humble ingredients, treating them with a little love and creativity, and creating something that truly makes people happy.
I hope you and your loved ones adore these Loaded Sliced Baked Potato Rounds as much as I do. They’re more than just a recipe; they’re a reminder to have fun in the kitchen, to not take food too seriously, and to always, always make room for a little extra cheese.
If you make them, I’d be absolutely thrilled to see your creations! Tag me on social @FeasticalBeau or @Feastical with your photos. Now, go forth and get your potato on! Happy cooking!

Sweet & Savory Grilled Chicken Thighs
Sweet & Savory Grilled Chicken Thighs: Your New Go-To Grill Master Recipe
Hey friends, Beau here! Welcome back to the Feastical kitchen. Can we talk about that universal dinner dilemma for a second? You know the one: you’re staring into the fridge, the family is getting hungry, and you need something that’s going to be a total crowd-pleaser without you having to perform culinary gymnastics. You want flavor that sings, tenderness that melts in your mouth, and a meal that makes everyone at the table feel like they’re getting a big, delicious hug.
Well, my friends, I’m about to hand you the golden ticket. These Sweet & Savory Grilled Chicken Thighs are, without a doubt, one of the most requested recipes in my household and at every single backyard BBQ I’ve ever brought them to. They are the definition of “simple, soulful, and satisfying.” We’re taking a humble, budget-friendly family pack of chicken thighs and transforming them into something truly magical with an overnight soak in a marinade that’s the perfect balance of sweet, salty, and tangy.
This isn’t just a recipe; it’s a trusty sidekick. It’s your meal prep hero for the week, your surefire win for a Saturday grill-out with friends, and your answer to a Tuesday night that needs a little extra sparkle. So, grab your favorite mixing bowl and let’s make some memories, one perfectly grilled, caramelized chicken thigh at a time.
The BBQ That Started It All
This recipe has roots, and they’re tangled up in one of my most cherished (and slightly chaotic) memories. Picture this: It was my first summer in my first house with a real, honest-to-goodness backyard. I was so proud of that patch of grass, I decided to throw an “unveiling” BBQ for about twenty friends. Ambition was high, but my grill-master credentials were, let’s say, still under construction.
I had planned an elaborate menu, but by the afternoon before, I was in a panic. Everything felt too complicated. Then I remembered my grandma. She never fussed with fussy food. She made food that felt like home. I raided my pantry, threw together soy sauce, brown sugar, and a few other staples, dumped it over a giant pack of chicken thighs, and crossed my fingers. The next day, that chicken came off the grill glistening, with those perfect, sexy grill marks and a sticky, caramelized crust. The smell alone drew people off the patio and right to the grill. They devoured it. There wasn’t a single piece left. That day, I learned a lesson that became the heart of Feastical: the best food isn’t about being fancy; it’s about being full of flavor and shared with people you love.
Gather Your Flavor Makers
Here’s the beautiful part: the ingredient list is short, sweet, and probably already in your kitchen. This is where flavor alchemy happens with just a handful of simple players.
- 1 Family Pack Boneless, Skinless Chicken Thighs (about 2.5–3 lbs): Thighs are my absolute go-to for grilling. They’re more forgiving than breast meat, staying incredibly juicy and tender even if you accidentally leave them on a minute too long. All that lovely fat renders out on the grill, creating an unbelievable texture. Chef’s Insight: If you have bone-in, skin-on thighs, go for it! Just add a few extra minutes to your cook time and get that skin nice and crispy.
- 1 Cup Soy Sauce: This is our salty, umami powerhouse. It’s the base of our marinade and what gives the chicken its deep, savory flavor and that beautiful brown color. Substitution Tip: For a gluten-free version, tamari or coconut aminos are fantastic one-to-one swaps. If you’re watching sodium, use a low-sodium soy sauce.
- 1 Cup Brown Sugar: This is our sweet counterpoint. It doesn’t just sweeten; it caramelizes beautifully on the hot grill, creating that sticky, finger-licking-good glaze we’re after. Chef’s Insight: The molasses in the brown sugar is the secret to that deep, rich color and flavor. In a pinch, honey or maple syrup will work, but you’ll get a slightly different, though still delicious, flavor profile.
- 1 Tablespoon Minced Garlic: Because what’s a feel-good recipe without garlic? It adds that essential aromatic punch. Substitution Tip: No fresh garlic? 1 teaspoon of garlic powder will do the trick. No judgment here!
- 2 Tablespoons White Vinegar: This is our secret weapon for balance! The acidity from the vinegar cuts through the richness of the sugar and soy, brightening everything up and helping to tenderize the chicken. Chef’s Insight: Apple cider vinegar is a great alternative if that’s what you have on hand.
Let’s Fire Up the Grill: Your Step-by-Step Guide
Ready to work some magic? This process is so simple, but a few little chef hacks along the way will take your chicken from “good” to “can-I-please-have-the-recipe” great.
Step 1: The Marinade Mix
Grab a medium-sized mixing bowl. Add your soy sauce, brown sugar, minced garlic, and white vinegar. Now, take a whisk to it and whisk until you can’t see any more sugar crystals. You want it fully dissolved and harmonious. Little Chef Hack: If your brown sugar is a little hard, pop it in the microwave for 15 seconds to soften it up. It’ll blend into the marinade like a dream.
Step 2: The Chicken Bath
Place all your chicken thighs into a gallon-sized zip-top bag. I’m a huge fan of the bag method because it’s less messy and you can really squish everything around to ensure every nook and cranny gets coated. Carefully pour your marinade into the bag over the chicken. Little Chef Hack: Place the bag inside a bowl or large measuring cup before you pour. This prevents any potential “oops, marinade all over the counter” situations. We’ve all been there!
Step 3: The Patience Part
Seal the bag tightly, getting as much air out as possible. Now, give it a good massage through the bag. Make sure every thigh is happily swimming in that flavorful liquid. Pop it in the fridge. Here’s the non-negotiable part: let it marinate overnight, or for at least 6 hours. Little Chef Hack: Flip the bag over once or twice during the marinating time if you remember. This just helps distribute the flavor evenly.
Step 4: Grill Time!
When you’re ready to cook, pull the chicken out of the fridge about 20-30 minutes before grilling. This lets it come closer to room temperature, which helps it cook more evenly. Preheat your grill to a solid medium-high heat (around 400-450°F). You want a good, hot surface to get those picture-perfect grill marks and that caramelization. Little Chef Hack: To prevent sticking, give those grates a quick brush and a light swipe with an oiled paper towel (hold it with tongs!) right before you put the chicken on.
Step 5: The Main Event
Take the chicken thighs out of the bag, letting the excess marinade drip off. Discard the used marinade—do not reuse it! Place the thighs on the hot grill. Cook for 5-6 minutes on the first side, without moving them. You’re looking for those beautiful, dark grill marks. Flip and cook for another 5-6 minutes on the second side. The chicken is done when it reaches an internal temperature of 165°F. Little Chef Hack: Don’t be a constant flipper! Let the grill do its work. That single flip is key to getting a great sear.
Step 6: The Final, Crucial Step
Once the chicken is off the grill, transfer it to a clean plate or cutting board and let it rest for 5 minutes. I know it’s tempting to dive right in, but this is essential! Resting allows the juices to redistribute throughout the meat. If you cut into it immediately, all those gorgeous juices will run out, leaving you with drier chicken. Trust me on this one.
How to Serve Up This Sunshine
Now for the fun part: plating! This chicken is incredibly versatile. For a classic, feel-good summer plate, I love to serve it alongside a big, vibrant Summer Corn and Avocado Salad or some Grilled Asparagus that you can cook right alongside the chicken during the last few minutes. The char on the veggies complements the chicken perfectly.
If you’re going for ultimate comfort food vibes, you can’t beat a scoop of creamy mashed potatoes or buttery rice to soak up every last drop of that delicious glaze. For a low-carb option, a simple bed of crisp romaine lettuce turns these grilled thighs into the star of an incredible salad. Chop the chicken, toss it in, and maybe add a little extra drizzle of your favorite vinaigrette.
Make It Your Own: Flavor Twists & Swaps
Once you’ve mastered the base recipe, the world is your oyster! Here are a few of my favorite ways to mix it up:
- Spicy Pineapple Twist: Add 1/2 cup of crushed pineapple (with its juice) and 1-2 teaspoons of sriracha or red pepper flakes to the marinade. The pineapple adds a tropical sweetness and its natural enzymes make the chicken even more tender.
- Ginger-Sesame Vibe: Whisk in 1 tablespoon of freshly grated ginger and 1 teaspoon of toasted sesame oil to the marinade. Garnish the finished chicken with toasted sesame seeds and sliced green onions for a fantastic Asian-inspired flair.
- Honey Mustard Version: Swap the brown sugar for 3/4 cup of honey and add 2 tablespoons of whole-grain Dijon mustard to the mix. It’s a classic combo that never fails.
- Herbaceous Lemon Lift: Add the zest of one lemon and 2 tablespoons of chopped fresh herbs (rosemary and thyme are a dream team) to the marinade for a brighter, more Mediterranean feel.
Beau’s Kitchen Notes & Stories
This recipe has been on quite a journey with me. I’ve made it in tiny apartment kitchens with a George Foreman grill and in pouring rain under a patio umbrella, determined to get my grill fix. The beauty of it is its resilience. Over the years, I’ve learned that the “overnight” marinade is truly the key. I once got impatient and only let it sit for two hours, and while it was still tasty, it didn’t have that deep, penetrated flavor that makes people’s eyes roll back in their heads. So do yourself a favor and plan ahead—your future self will thank you at dinnertime!
Your Questions, Answered!
Q: Can I bake this instead of grilling?
A: Absolutely! Preheat your oven to 400°F. Place the marinated chicken thighs on a parchment-lined baking sheet and bake for 20-25 minutes, or until they reach 165°F internally. For extra caramelization, you can pop them under the broiler for the last 1-2 minutes.
Q: How long can I store the marinated chicken?
A: The raw chicken can hang out in the marinade in the fridge for up to 24 hours. After that, the texture can start to get a little mushy from the acid. Once cooked, the chicken will keep in an airtight container in the fridge for 3-4 days, making it phenomenal for meal prep.
Q: My chicken is burning on the outside but not cooked inside! Help!
A: This usually means your grill is too hot! You’ve got a fiery inferno when you need consistent, medium-high heat. If this happens, move the chicken to a cooler part of the grill (or reduce the heat on a gas grill), close the lid, and let it finish cooking through more gently.
Q: Can I freeze the chicken in the marinade?
A: You bet! This is a fantastic freezer meal. Put the chicken and marinade in the bag, squeeze out the air, seal it, and freeze it for up to 3 months. Thaw it completely in the refrigerator before grilling.

Sweet & Savory Grilled Chicken Thighs
Description
Sweet & Savory Grilled Chicken Thighs
Juicy, caramelized, and full of flavor—perfect for weeknight dinners, meal prep, or a backyard BBQ.
Ingredients
-
2.5–3 lbs boneless, skinless chicken thighs (family pack)
-
1 cup soy sauce (or tamari/coconut aminos for gluten-free)
-
1 cup brown sugar (or honey/maple syrup)
-
1 tbsp minced garlic (or 1 tsp garlic powder)
-
2 tbsp white vinegar (or apple cider vinegar)
Optional flavor twists:
-
½ cup crushed pineapple + 1–2 tsp sriracha (tropical/spicy)
-
1 tbsp grated ginger + 1 tsp toasted sesame oil + sesame seeds (Asian-inspired)
-
¾ cup honey + 2 tbsp whole-grain Dijon mustard (honey mustard)
-
Zest of 1 lemon + 2 tbsp chopped fresh herbs (rosemary & thyme)
Instructions
-
Make the Marinade:
-
Whisk together soy sauce, brown sugar, garlic, and vinegar until sugar dissolves.
-
-
Marinate Chicken:
-
Place chicken thighs in a gallon zip-top bag. Pour marinade over chicken.
-
Seal, massage to coat, and refrigerate overnight (or at least 6 hours). Flip once or twice if you remember.
-
-
Prep Grill:
-
Remove chicken from fridge 20–30 min before cooking.
-
Preheat grill to medium-high (400–450°F). Oil grates lightly.
-
-
Grill Chicken:
-
Remove chicken from marinade (discard used marinade).
-
Grill 5–6 min per side, until internal temperature reaches 165°F.
-
Let rest 5 min before serving.
-
-
Serve Ideas:
-
Classic: mashed potatoes or rice + grilled or fresh veggies.
-
Low-carb: serve over a bed of romaine lettuce with vinaigrette.
-
Summer vibes: pair with corn & avocado salad or grilled asparagus.
-
Notes
-
Bone-in, skin-on thighs: add a few extra minutes for crispy skin.
-
Oven baking: 400°F for 20–25 min; broil last 1–2 min for caramelization.
-
Grill too hot: move to cooler part of grill or reduce heat to avoid burning.
-
Freezing: Freeze raw chicken with marinade up to 3 months; thaw completely before cooking.
Nutrition
- Calories: 220Cal Per Chicken
- Fat: 9g
- Carbohydrates: 12g
- Protein: 22g
Nutritional Info (For My Health-Conscious Foodies!)
I believe food is about joy and nourishment, and it’s always helpful to know what you’re putting into your body! Here’s a rough estimate per serving (based on one thigh from a batch of 10):
Calories: ~220 | Protein: 22g | Fat: 9g | Carbohydrates: 12g
A few notes: The majority of the carbs and sodium come from the marinade, and a good amount of it is left behind in the bag and on the grill. Boneless, skinless chicken thighs are a great source of protein and essential nutrients like iron and zinc. To lighten it up, you can easily use a low-sodium soy sauce and a brown sugar substitute that works for you. Remember, it’s all about balance and finding what makes you feel your best!
Final Thoughts from My Kitchen to Yours
And there you have it! My all-time favorite, no-fail, always-impressive grilled chicken thighs. This recipe is more than just a list of ingredients and steps; it’s a reminder that the most satisfying meals are often the simplest ones, made with a little bit of love and a lot of flavor.
I hope this recipe finds its way into your regular rotation and becomes a staple for your own family gatherings, lazy weeknights, and celebratory BBQs. If you make it (and I really hope you do!), tag me on social @Feastical or @BeauCollier—I love seeing your creations! Now get out there and fire up that grill. Happy cooking, friends!
Prep time: 10 minutes | Marinate time: Overnight (6–12 hrs) |

Crockpot Turkey Breast Roast with Potatoes & Gravy
Your New Favorite Weeknight Hero: The Easiest Crockpot Turkey Breast Roast
Hey friends, Beau here! Let’s talk about one of my all-time kitchen crushes: the humble slow cooker. It’s the ultimate teammate for those days when life is moving a mile a minute, but you still crave a meal that tastes like you fussed over it for hours. And if you think a juicy, herb-infused turkey roast is something you can only pull off on a major holiday, I am so excited to prove you wrong.
Today, we’re diving into a recipe that is pure magic in its simplicity: a Crockpot Turkey Breast Roast with Potatoes and Gravy. This isn’t just a meal; it’s a masterclass in easy, hands-off cooking. We’re talking about succulent, boneless turkey, buttery-soft potatoes, and a rich, savory gravy, all coming together in one single pot. The best part? You don’t even need to add any extra liquid. The turkey and its little gravy packet do all the heavy lifting, creating their own delicious broth as they slow-cook to perfection.
This recipe is for the parent juggling after-school activities, the busy professional who’s beat by 6 PM, or anyone who just wants to walk in the door to the incredible smell of a home-cooked meal that’s ready to go. It’s comfort food that’s smart, soulful, and seriously satisfying. So, let’s plug in that crockpot and get ready for a dinner that’s about to become a regular in your rotation. Trust me, your future self will thank you!
The Accidental Masterpiece: How This Recipe Came to Be
I have to share a little story about how this recipe became a Feastical favorite. It was a few years ago, right in the middle of a chaotic week. I had friends coming over for a casual dinner, but my day was packed with work, and I had zero time to stand over a stove. I did a frantic fridge and pantry scan and found a frozen turkey breast roast, a bag of potatoes, and a lone onion staring back at me. Desperation, as they say, is the mother of invention.
I literally threw everything into the slow cooker, crossed my fingers, and hoped for the best. I remember thinking, “Well, if this is a disaster, we’re ordering pizza.” But when I lifted the lid hours later, the most incredible aroma filled my kitchen. The turkey was fall-apart tender, the potatoes had soaked up all those savory juices, and the gravy… oh, the gravy was a game-changer. My friends raved about it, convinced I’d been slaving away all afternoon. I just smiled and kept my little secret. That night taught me a powerful lesson: the most beloved dishes aren’t always the most complicated. Sometimes, they’re just the ones made with a bit of hope and a whole lot of convenience.
Gathering Your A-Team: The Ingredients
Here’s the beautiful part: you only need a handful of simple ingredients to create this flavor explosion. Quality matters, but simplicity is key.
- 1 Butterball Boneless Turkey Breast Roast (with gravy packet): This is the star of our show! I love this particular roast because it’s consistently well-seasoned, stays incredibly juicy, and comes with its own little packet of gravy magic. It’s a huge time-saver. Chef’s Insight: Be sure to leave the netting on the roast! It’s there to help the turkey keep its shape while cooking, ensuring even doneness.
- 4-6 Medium Potatoes, peeled and halved: I’m a fan of Yukon Gold potatoes here. They have a naturally buttery flavor and creamy texture that mashes beautifully or holds its shape if you prefer them sliced. Russets also work great if you want a fluffier mash. Substitution Tip: No time to peel? Baby potatoes, halved with the skins on, are a fantastic, rustic alternative.
- ½ Onion, sliced: The onion isn’t just for flavor; it creates a little aromatic “rack” for the turkey to sit on, allowing the heat and juices to circulate. It adds a subtle sweetness that balances the savory gravy. Chef’s Insight: A sweet yellow onion is perfect, but a white or red onion will work just fine in a pinch.
- Gravy Packet (comes with the roast): Don’t you dare forget this little guy! This is our secret weapon for building a deeply flavorful base without any extra work.
See? I told you it was simple. Now, let’s get cooking!
Let’s Get Cooking: Your Step-by-Step Guide
Follow these steps, and you’re guaranteed a perfect result. I’ve sprinkled in my favorite chef hacks to make you feel like a pro.
- Prep is a Breeze: First things first, take your turkey roast out of the fridge about 20-30 minutes before cooking if you have time. Letting it come closer to room temperature helps it cook more evenly. Remember our rule: leave the netting on! This is non-negotiable for a pretty, intact roast. While that’s sitting, go ahead and peel your potatoes. Halving them ensures they cook through at the same rate as the turkey. Slice your onion into half-moons. Chef’s Hack: Rinsing your peeled potatoes in cold water removes excess starch, which helps prevent them from getting gluey.
- Layer with Love: Now, let’s build our flavor foundation. Take your sliced onions and scatter them evenly across the bottom of your slow cooker. This creates a natural bed that will infuse the turkey with flavor from below and keep it from sitting directly on the hot surface. Next, arrange your halved potatoes over the onions in a relatively even layer.
- The Main Event: Gently place your turkey breast roast right on top of the bed of potatoes and onions. The goal is to let the turkey be the king of the pot, with its juices raining down on the veggies below. Position it so it’s sitting evenly.
- The Flavor Bomb: Grab that precious gravy packet from the turkey package. Open it up and sprinkle the powder evenly over the top of the turkey roast. Don’t worry if it looks a little dusty; the magic happens as it cooks and mingles with the turkey juices. Here’s the key part: do not add any water or broth! The turkey and vegetables will release plenty of moisture as they cook, creating the most incredible natural broth. Chef’s Hack: For an extra flavor boost, you can rub a little olive oil and a sprinkle of black pepper on the turkey before adding the gravy powder, but it’s truly not necessary. It’s that good on its own.
- Patience is a Virtue: Pop the lid on your slow cooker. Now, for the cooking times. You have two options:
- High Setting: Cook for 5-6 hours. This is my go-to when I remember to start lunchtime.
- Low Setting: Cook for 7-8 hours. This is the “set it and forget it” method for all-day cooking. The low and slow method yields an unbelievably tender texture.
- The Final Check: However you cook it, the most important step is to check for doneness with a meat thermometer. Insert the thermometer into the thickest part of the turkey breast. You’re looking for an internal temperature of 165°F (74°C). Once it hits that magic number, it’s done! The turkey will be juicy and safe to eat.
- The Rest is Crucial: Carefully remove the turkey roast from the slow cooker (tongs are helpful here!) and place it on a cutting board. Tent it loosely with aluminum foil and let it rest for at least 15-20 minutes. This allows the juices to redistribute throughout the meat, ensuring every single slice is moist and delicious. Skipping this rest is the number one mistake that leads to dry turkey!
Plating Up Perfection: How to Serve Your Masterpiece
While the turkey is resting, you have the perfect window to put the finishing touches on your sides. You’ve got a few delicious options right in the pot!
Option 1: The Classic Mash: Using a slotted spoon, transfer the now incredibly tender potatoes and onions to a bowl. Add a generous knob of butter, a splash of milk or cream, and mash them until they’re smooth and creamy. They’ll be infused with so much flavor from the cooking liquid.
Option 2: Rustic and Whole: If you prefer your potatoes with more structure, simply serve them as they are, halved and buttery-soft, alongside the sliced turkey.
For the Gravy: Now, for the liquid gold left in the crockpot. Carefully pour the drippings through a fine-mesh strainer into a saucepan to remove any bits. Bring it to a simmer. If you like a thicker gravy, mix a tablespoon of cornstarch with two tablespoons of cold water to create a slurry. Whisk this into the simmering drippings until the gravy thickens to your liking.
To serve, slice the turkey against the grain, plate it alongside your mashed or whole potatoes, and drown everything in that glorious homemade gravy. A simple side of steamed green beans or a crisp salad is all you need to complete this comforting feast.
Make It Your Own: Delicious Recipe Variations
Once you’ve mastered the basic recipe, feel free to get creative! Here are a few of my favorite twists:
- Herb Garden Delight: Before adding the gravy packet, create a simple herb rub. Mix together 1 tablespoon of olive oil, 1 teaspoon each of dried rosemary, thyme, and sage, and a pinch of garlic powder. Rub this all over the turkey breast for a classic, aromatic flavor.
- The “Everything but the Kitchen Sink” Version: Add more veggies to the pot! Toss in some chopped carrots, celery stalks, or even parsnips along with the potatoes and onions. They’ll cook down and add even more depth to the gravy.
- Citrus Brightness: For a lighter, zesty note, place a few slices of lemon and a couple of sprigs of fresh thyme under the netting on the turkey breast before cooking. The citrus steam will keep the turkey incredibly moist and add a bright flavor.
- Creamy Gravy Finish: After straining the drippings for gravy, finish it off with a splash of heavy cream or a tablespoon of cream cheese for an ultra-rich, velvety sauce.
- Spice It Up: Love a little heat? Add a pinch of red pepper flakes to the gravy powder before sprinkling it over the turkey.
Beau’s Chef’s Notes & Kitchen Stories
This recipe has become such a staple in my home that it’s evolved in little ways over time. I remember one time I was filming a video for the site and I completely forgot to add the gravy packet. I realized it halfway through cooking and had a mini heart attack! I ended up sprinkling it over the top, giving everything a quick stir, and letting it cook for another hour. It turned out fine, but it was a good reminder that even “mistakes” in the kitchen can lead to edible, and sometimes delicious, results. The turkey is so forgiving. The biggest lesson I’ve learned? That 20-minute rest is non-negotiable. I’ve sliced into it too early exactly once, and I regretted it. The patience is always, always worth it.
Your Questions, Answered: FAQs & Troubleshooting
Q: My gravy is too thin. How can I thicken it?
A: No worries! This is a common one. The easiest way is to make a cornstarch slurry. Mix 1 tablespoon of cornstarch with 2 tablespoons of cold water until smooth. Whisk this into the simmering drippings. It should thicken up within a minute or two. You can repeat with another slurry if you want it even thicker.
Q: Can I use a frozen turkey breast roast?
A: I don’t recommend it for food safety reasons. A frozen roast will take too long to come up to a safe temperature, potentially staying in the “danger zone” (40°F – 140°F) for too long. Always thaw your roast completely in the refrigerator before cooking for the best and safest results.
Q: My turkey reached 165°F, but it’s a bit dry. What happened?
A: The most likely culprit is overcooking. Even though 165°F is the safe temperature, turkey breast can start to dry out if it goes much higher. Another factor could be not letting it rest, which causes the juices to run out immediately upon slicing. Next time, try taking it out at 160°F or 162°F. The residual heat will carry it to 165°F as it rests, resulting in a juicier bird.
Q: Can I add other vegetables like broccoli?
A: I’d advise against adding soft vegetables like broccoli or zucchini at the beginning. They’ll turn to mush. If you want to add them, stir them in during the last 30-60 minutes of cooking so they just become tender.
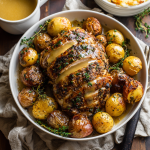
Crockpot Turkey Breast Roast with Potatoes & Gravy
Description
Crockpot Turkey Breast Roast with Potatoes & Gravy
Juicy turkey, tender potatoes, and savory gravy—all cooked in one slow cooker. Perfect for weeknights or a stress-free dinner that tastes like a holiday feast.
Ingredients
-
1 Butterball Boneless Turkey Breast Roast (with gravy packet)
-
4–6 medium potatoes, peeled and halved (Yukon Gold or Russets)
-
½ onion, sliced
-
Gravy packet (included with turkey)
Optional flavor boosts:
-
1 tbsp olive oil, black pepper, dried herbs (rosemary, thyme, sage)
-
Lemon slices or fresh thyme sprigs
Instructions
-
Prep:
-
Remove turkey from fridge 20–30 min before cooking. Keep netting on.
-
Peel and halve potatoes; slice onion into half-moons. Rinse potatoes if desired to remove starch.
-
-
Layer:
-
Scatter onions in bottom of slow cooker.
-
Layer potatoes over onions.
-
Place turkey roast on top.
-
-
Add Gravy & Season:
-
Sprinkle gravy packet evenly over turkey.
-
Optional: rub turkey with olive oil, black pepper, and herbs.
-
-
Cook:
-
High: 5–6 hours
-
Low: 7–8 hours
-
Check internal temperature: 165°F (74°C)
-
-
Rest:
-
Remove turkey and tent with foil for 15–20 min before slicing.
-
-
Serve:
-
Mash or serve potatoes whole.
-
Make gravy: strain drippings, simmer, thicken with cornstarch slurry if desired.
-
Slice turkey against the grain, serve with potatoes and gravy.
-
Notes
-
Extra Veggies: Add carrots, celery, or parsnips with potatoes.
-
Herb & Citrus: Rub turkey with herbs or place lemon slices under netting for flavor.
-
Creamy Gravy: Stir in a splash of cream or cream cheese to finished gravy.
-
Spicy Twist: Add red pepper flakes to the gravy mix.
Nutrition
- Calories: 380 Cal per serving
- Fat: 15g
- Carbohydrates: 22g
- Protein: 35g
Nutritional Information (Approximate)
Let’s be real, we eat this for the soul-warming comfort, but it’s always good to know what’s going into our bodies! Here’s a rough breakdown per serving (based on 4-6 servings). Please note, this is an estimate and can vary based on the specific size of your roast and potatoes.
- Calories: ~380
- Protein: 35g (Turkey is an excellent source of lean protein!)
- Fat: 15g
- Carbohydrates: 22g (Primarily from the potatoes, a great energy source.)
- Sodium: 850mg (A good portion comes from the gravy packet. If you’re watching sodium, you can use a low-sodium gravy mix or make your own from scratch.)
This meal is a wonderfully balanced plate, providing high-quality protein for muscle repair, complex carbs for energy, and it’s all cooked in one pot, which, in my book, counts as a major win for your sanity!
Final Thoughts from My Kitchen to Yours
Friends, this Crockpot Turkey Breast Roast is more than just a recipe; it’s a ticket to an easier, more delicious weeknight. It proves that you don’t need a special occasion to enjoy a celebratory-feeling meal. It’s the kind of dish that fills your home with warmth and your belly with contentment.
And let’s not forget the leftovers! They are legendary. Shred the leftover turkey for incredible sandwiches, toss it into a hearty soup, or my personal favorite: use it as the base for an epic turkey pot pie. The possibilities are endless.
I hope this recipe brings as much joy and ease to your table as it has to mine. If you make it, I’d love to hear about it! Tag me on social @Feastical or leave a comment on the blog
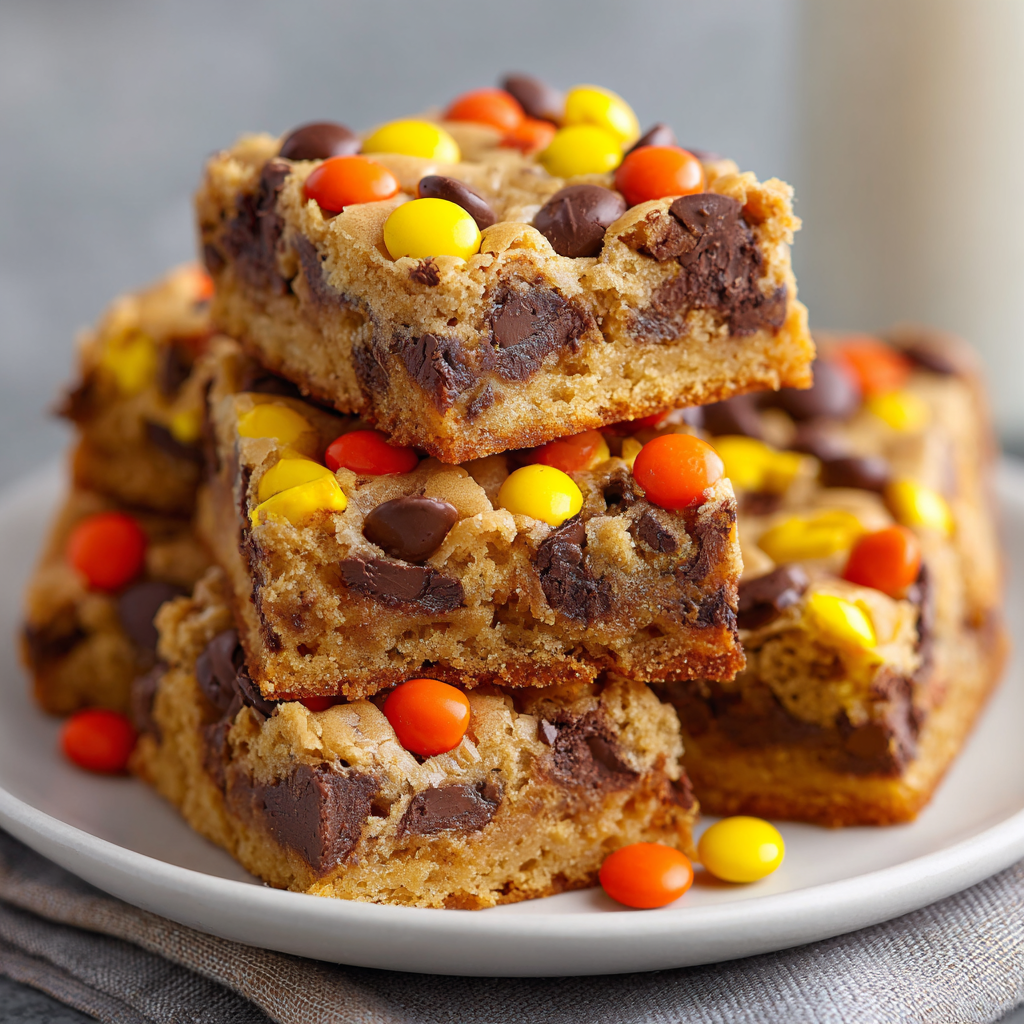
Reese’s Pieces Chocolate Chip Cookie Bars
The Ultimate Crowd-Pleaser: Reese’s Pieces Chocolate Chip Cookie Bars
Hey there, friend! Beau here, welcoming you back to Feastical. You know that feeling when you’re hit with a sudden, undeniable craving for something sweet, but the thought of creaming butter and sugar, sifting flour, and dirtying every bowl in the kitchen just feels… exhausting? Yeah, I’ve been there more times than I can count. Some days, even us seasoned cooks need a shortcut that doesn’t taste like one. We need a recipe that feels like a secret weapon—a guaranteed path to deliciousness with minimal fuss.
Well, pull up a stool and get ready to meet your new best friend: these outrageously good Reese’s Pieces Chocolate Chip Cookie Bars. Imagine the chewy, buttery goodness of a perfect chocolate chip cookie, but in super-simple bar form. Now, picture it studded with melty chocolate chips and crowned with a confetti of colorful, peanut-buttery Reese’s Pieces. The result? A dessert that’s a total flavor explosion and a complete textural dream.
These bars are the undisputed champions of my recipe box when it comes to easy, crowd-pleasing treats. They’re the perfect project for a lazy Sunday afternoon, a last-minute bake sale lifesaver, or a fun activity to do with the kids (who, let’s be honest, are mainly in it for the candy). So, let’s ditch the complicated steps and dive headfirst into a pan of pure, unadulterated joy. Trust me, your spatula—and your taste buds—will thank you.
A Sweet Slice of Nostalgia
This recipe takes me right back to my grandma’s kitchen, with its checkered linoleum floor and the ever-present scent of something baking. She wasn’t a fancy chef, but she was a wizard of “semi-homemade” before it was even a term. Her secret weapon? A simple box of cake mix. She could transform it into a dozen different magical creations, and her “kitchen sink cookie bars” were legendary.
I remember one sweltering summer afternoon when my cousins and I were bouncing off the walls. Instead of shooing us outside, Grandma pulled out a yellow cake mix, a stick of butter, and a treasure trove of leftover baking bits from her pantry—including a nearly forgotten bag of Reese’s Pieces. With us as her eager (and slightly messy) assistants, she whipped up a pan of these bars in minutes. The wait for them to cool felt like an eternity, but that first warm, gooey square, bursting with peanut butter and chocolate, was a pure taste of happiness. It taught me that the best recipes aren’t always the most complex; they’re the ones that bring people together and create lasting memories. This is my homage to her—and to that perfect, simple joy.
Gathering Your Sweet Supplies
The beauty of this recipe is its short and sweet ingredient list. You might already have most of this in your pantry! Here’s what you’ll need, plus a few of my chef-y insights to make it even better.
- 1 box (15.25 oz) Yellow Cake Mix: This is the magical base that gives us our structure and that classic, vanilla-kissed flavor. Chef’s Tip: I prefer a “butter recipe” or “extra moist” style cake mix for a richer taste and chewier texture, but any standard yellow mix works perfectly.
- 1 stick (½ cup) Unsalted Butter, melted: Melted butter is key here! It binds everything together and creates a wonderfully dense, chewy bar. Using unsalted lets you control the salt level, but if salted is all you have, it’ll still be delicious—just maybe skip adding any extra salt.
- 2 Large Eggs: Our binding agents! They provide structure and richness. Make sure they’re at room temperature for the easiest mixing. A quick tip: to bring eggs to room temp fast, place them in a bowl of warm water for 5-10 minutes.
- 1 tsp Pure Vanilla Extract: Don’t skip this! It enhances all the other flavors. The pure stuff makes a noticeable difference compared to imitation, adding a warm, floral depth.
- 2 cups Chocolate Chips: This is your chance to get creative! I love using semi-sweet chips for a perfect balance, but milk chocolate will make it extra sweet and decadent, or dark chocolate will add a sophisticated bitterness. A mix is always fun, too!
- 1 small bag (8-10 oz) Reese’s Pieces Candy: The star of the show! These little gems add pops of color and that unmistakable peanut butter flavor. You can find them in the candy aisle. Substitution Idea: If you’re not a peanut butter fan, M&M’s are a fantastic swap for a classic chocolate chip cookie bar vibe.
Let’s Get Baking: The Foolproof Steps
Ready? This is where the magic happens. It’s so simple, you might just have the recipe memorized after one try. I’ll walk you through each step with my favorite little hacks to ensure bar perfection.
- Preheat and Prep: First things first, preheat your oven to 350°F (175°C). This is non-negotiable for even baking! While it’s heating up, grab your 9×13-inch baking pan. Grease it generously with butter, cooking spray, or line it with parchment paper. My Pro Hack: If you use parchment paper with a little overhang on two sides, you can become a bar-removing superhero later, lifting the entire slab out for flawlessly clean cuts.
- The One-Bowl Wonder: In a large mixing bowl, combine the dry cake mix, melted butter, vanilla extract, and eggs. Now, here’s the trick: don’t overmix! Just stir with a sturdy spatula or a wooden spoon until a soft, thick dough forms and no dry streaks of cake mix remain. Overmixing can make the bars a bit tough, so a few lumps are totally fine. This dough will be thick and glorious.
- Fold in the Chocolatey Goodness: Time for the chocolate chips! Dump them into the bowl and gently fold them in until they’re evenly distributed. “Folding” just means turning the dough over onto itself repeatedly—it’s a gentler motion than stirring that prevents overworking the dough.
- Press It Perfectly: Transfer the dough to your prepared pan. This is the only slightly tricky part because the dough is thick. I like to spray my clean hands with a little cooking spray or dab them with water to prevent sticking. Then, just press the dough evenly into the bottom of the pan, making sure you get it into all the corners. We want an even layer so every bar bakes at the same rate.
- The Candy Confetti: Now for the fun part! Take your Reese’s Pieces and scatter them evenly over the top of the dough. Don’t press them down too hard—just a gentle tap so they stick. They’ll sink in a bit as they bake, creating little pockets of peanut butter bliss.
- Bake to Golden Perfection: Slide the pan into your preheated oven and bake for 20-25 minutes. Ovens can be sneaky, so start checking at the 20-minute mark. You’re looking for golden brown edges and a top that looks set. The center might still look a tiny bit soft, but that’s what you want! It will continue to set as it cools, giving you that dreamy, chewy texture. A toothpick inserted near the edge should come out mostly clean, maybe with a few moist crumbs.
- The Hardest Part: Wait! I know, I know. The smell is intoxicating. But you *must* let the pan cool completely on a wire rack before you even think about slicing. If you cut into warm bars, they’ll be gooey and fall apart. Letting them cool is the secret to getting those clean, beautiful squares. Patience, my friend, is a virtue that pays off in perfect cookie bars.
How to Serve Up the Smiles
Once your bars are completely cool, it’s showtime! Use a sharp knife to slice them into squares. I usually get about 20 generous bars or 24 smaller, two-bite pieces—perfect for a party platter.
These bars are fantastic all on their own, but let’s talk about leveling them up. For the ultimate indulgence, serve a warm bar (yes, you can gently microwave a cooled one for 10 seconds!) à la mode with a big scoop of vanilla bean ice cream. The contrast of warm, chewy bar and cold, creamy ice cream is a religious experience. For a drizzle of decadence, melt a little peanut butter and chocolate sauce and zig-zag it over the top. For a simple, kid-friendly treat, just grab and go! They’re perfect packed in lunchboxes or as an after-school snack with a tall glass of cold milk.
Get Creative: Fun Flavor Twists!
The basic recipe is a blank canvas for your culinary creativity. Here are a few of my favorite ways to mix it up:
- Peanut Butter Paradise: Swirl ½ cup of creamy peanut butter into the batter along with the chocolate chips for an even more intense peanut butter flavor. You can also use Reese’s Peanut Butter Cups, chopped, instead of or in addition to the Pieces.
- Triple Chocolate Threat: Use a devil’s food chocolate cake mix instead of yellow, and swap the chocolate chips for a mix of white chocolate and dark chocolate chips. Top with chocolate sprinkles for a chocoholic’s dream.
- Birthday Cake Blast: Use a funfetti cake mix, keep the chocolate chips, and use colorful M&M’s on top for the most festive, celebratory bars imaginable.
- Salted Caramel Delight: After pressing the dough into the pan, drizzle ½ cup of thick caramel sauce over the top, then sprinkle with the Reese’s Pieces and a light sprinkle of flaky sea salt before baking. Sweet, salty, and sublime.
- Gluten-Free Friendly: Many brands now make gluten-free yellow cake mixes! Just be sure to check that all your other ingredients (like vanilla extract) are certified gluten-free if needed.
Beau’s Kitchen Notes
This recipe has been a staple in my life for years, and it’s evolved in funny ways. I once, in a pre-coffee haze, accidentally used a box of cornbread mix. Let’s just say that sweet and savory chocolate chip cornbread bars are… an acquired taste I do not recommend! Stick to the yellow cake mix, folks.
I’ve also learned that these bars freeze like a dream. Once they’re cooled and sliced, layer them between sheets of parchment paper in an airtight container and freeze for up to 3 months. They’re my secret for always having a homemade dessert on hand for unexpected guests—or unexpected cravings.
Your Questions, Answered!
Q: My bars came out really cakey and puffy, not dense and chewy. What happened?
A: The most likely culprit is overmixing! When you mix the dough too vigorously, you incorporate more air, which leads to a cakier texture. Remember, just mix until combined. Also, double-check that you used melted butter, not softened, as that contributes to the chewiness.
Q: Can I make these without a stand mixer?
A: Absolutely! In fact, I often make them by hand. A sturdy spatula and a little elbow grease are all you need. The dough is thick, but it comes together quickly.
Q: Why did my Reese’s Pieces crack or lose their color on top?
A: This is totally normal! The candy shells can sometimes crack from the heat, and the colors can bleed a tiny bit. It doesn’t affect the taste one bit, and I think it gives them a charming, homemade look.
Q: The center of my bars is still very gooey after 25 minutes. What should I do?
A: All ovens vary. If the edges are getting too brown but the center is still raw, loosely tent the pan with aluminum foil and continue baking in 2-3 minute increments until the center is set. Next time, try an oven thermometer to ensure your oven temperature is accurate.

Reese’s Pieces Chocolate Chip Cookie Bars
Description
Craving chocolate chip cookies but short on time? These chewy, buttery bars studded with chocolate chips and Reese’s Pieces candy are the ultimate crowd-pleaser. Easy, fast, and irresistibly colorful—perfect for parties, bake sales, or anytime you need a sweet fix.
Ingredients
-
1 box (15.25 oz) yellow cake mix
-
½ cup (1 stick) unsalted butter, melted
-
2 large eggs, room temperature
-
1 tsp pure vanilla extract
-
2 cups chocolate chips (semi-sweet, milk, or dark)
-
8–10 oz Reese’s Pieces candy
Instructions
-
Preheat & Prep: Preheat oven to 350°F (175°C). Grease a 9×13-inch pan or line with parchment paper with overhang for easy removal.
-
Mix Dough: In a large bowl, combine cake mix, melted butter, eggs, and vanilla. Stir until just combined—some lumps are fine.
-
Add Chocolate Chips: Fold in the chocolate chips gently.
-
Press Dough: Press the thick dough evenly into the prepared pan. Spray hands lightly with cooking spray to prevent sticking.
-
Top with Candy: Scatter Reese’s Pieces evenly over the dough; lightly press so they stick.
-
Bake: Bake 20–25 minutes. Edges should be golden, center slightly soft. Insert toothpick near edges; it should come out mostly clean.
-
Cool & Slice: Let bars cool completely on a wire rack before slicing into 20 squares.
Notes
-
Chewy Texture: Avoid overmixing and use melted butter.
-
Peanut Butter Boost: Swirl ½ cup peanut butter into batter for extra richness.
-
Chocolate Lovers: Use a mix of white, milk, and dark chocolate chips.
-
Birthday Cake Version: Swap cake mix for funfetti and top with M&M’s.
-
Salted Caramel Twist: Drizzle ½ cup caramel sauce and sprinkle flaky sea salt before baking.
-
Gluten-Free: Use a certified gluten-free yellow cake mix.
Nutrition
- Calories: 240 Cal per bar
- Sodium: 220mg
- Fat: 12g
- Carbohydrates: 30g
- Fiber: 1g
- Cholesterol: 30mg
Nutritional Information*
Okay, let’s be real: these are a treat, through and through. But I believe in transparency! Here’s a general breakdown per bar (assuming 20 bars per pan). Remember, these are estimates and can vary based on the specific brands of ingredients you use.
Per Bar (approximate):
Calories: 240 | Total Fat: 12g | Saturated Fat: 7g | Cholesterol: 30mg | Sodium: 220mg | Total Carbohydrates: 30g | Dietary Fiber: 1g | Sugars: 20g | Protein: 3g
*This information is provided as a courtesy and is an estimate only. For precise nutritional data, I recommend using a calculator with the exact brands and quantities you use.
Final Thoughts from My Kitchen to Yours
Well, there you have it—my go-to recipe for pure, uncomplicated baking happiness. These Reese’s Pieces Chocolate Chip Cookie Bars are more than just a dessert; they’re a reminder that the best things in life (and the kitchen) don’t have to be complicated. They’re about the joy of creating, the warmth of sharing, and the simple pleasure of a perfectly chewy, chocolatey, peanut-buttery bite.
I hope this recipe finds its way into your regular rotation and becomes a beloved tradition in your home, just like it is in mine. If you make them, I’d love to hear about it! Tag me on social or leave a comment over on Feastical.com. Now, go preheat that oven and get ready for some serious compliments. Happy baking!
With a full heart and an even fuller pan,
Beau

Orange Dreamsicle Fudge
Orange Dreamsicle Fudge: Your New Favorite Bite of Sunshine
Hey there, friend! Beau here, welcoming you back to the Feastical kitchen. Is there a flavor that instantly teleports you back to being a kid? For me, it’s that unmistakable, sunny combination of creamy vanilla and bright, zesty orange—the one and only Orange Dreamsicle. It’s the taste of summer vacations, sticky fingers, and the simple joy of a melting popsicle on a hot afternoon.
But what if I told you we could capture that magical flavor in a rich, decadent, melt-in-your-mouth fudge? And what if I told you it’s one of the easiest, most foolproof recipes you’ll ever make? No candy thermometers, no frantic stirring, just a few simple ingredients coming together to create pure, unadulterated happiness.
This Orange Dreamsicle Fudge is my go-to treat for potlucks, holiday gift boxes, or just those days when you need a little edible sunshine. It’s ultra-creamy, bursting with nostalgic flavor, and guaranteed to put a smile on your face. So, let’s ditch the complicated stuff and dive into this simple, soul-satisfying recipe. I promise, by the end of this, you’ll be a fudge-making pro!
A Sticky-Fingered Trip Down Memory Lane
This recipe always takes me back to my grandma’s backyard. She had this giant oak tree that was perfect for climbing, and her rule was simple: if you made it to the top branch you could see from, you earned a Dreamsicle from the big chest freezer in the garage. My cousins and I would spend hours daring each other to go higher, fueled entirely by the promise of that frozen treat.
I can still feel the anticipation as she’d hand me the double-stick popsicle, the immediate chill against my palm. The first bite was always a race against the melting orange ice, followed by the slow, creamy reward of the vanilla center. It wasn’t just a popsicle; it was a trophy. This fudge is my way of bottling that feeling—the triumph, the sweetness, the pure joy of a summer afternoon—and sharing it with you, no tree-climbing required.
Gather Your Sunshine: The Ingredients
Here’s the beautiful part: you only need a handful of simple ingredients to create this magic. I’ll walk you through each one and share a few chef-y insights and substitutions to make it your own.
- 1 (12 oz) bag of High-Quality White Chocolate Chips: This is the foundation of our fudge, so quality matters! I look for brands with real cocoa butter. They melt smoother and give us a much richer flavor than cheaper, waxy chips. Chef’s Tip: If you’re feeling fancy, you can chop up a good-quality white chocolate bar instead.
- 1 can (16 oz) of Vanilla Frosting (not whipped!): This is our secret weapon for foolproof, creamy fudge. The whipped variety has too much air and won’t set properly, so make sure you grab the classic, dense vanilla frosting. It provides the perfect sweetness and structure.
- 3-4 tablespoons of Orange Crush Ice Cream Topping (or any orange syrup): This is where the magic happens! The syrup gives us that authentic, vibrant orange flavor and a beautiful marbled effect. Substitution Tip: No orange syrup? No problem! You can use 2-3 tablespoons of thawed orange juice concentrate mixed with a drop of orange food coloring for a similar effect.
- Optional: 1 teaspoon of Orange Zest: This is my little pro-move for an extra burst of fresh, citrusy aroma. It really makes the orange flavor pop and feel more natural.
- Optional: 1-2 drops of Orange Extract: If you want an even more intense orange flavor, a tiny drop of extract added with the chips will do the trick. A little goes a long way!
Let’s Make Some Magic: The Foolproof Steps
Ready? This comes together so fast, you’ll want to have your pan prepared before you even turn on the stove. Let’s do this!
Step 1: Prep Your Pan. First things first, grab an 8×8-inch baking pan. Line it with parchment paper, leaving a little overhang on two opposite sides. This creates “handles” that will make it a breeze to lift the entire slab of fudge out later for clean cutting. If you don’t have parchment, you can lightly grease the pan with butter or cooking spray. Trust me, this prep step saves a world of frustration later!
Step 2: Melt the Frosting. Now, place your saucepan over LOW heat. I mean it—low and slow is the key here! We’re not trying to boil anything, just gently warm it. Dump the entire can of frosting into the pan and stir it constantly with a spatula or wooden spoon. You’ll see it loosen up and become smooth and glossy in just a few minutes. This is your foundation, so keep it moving to avoid any hot spots or burning.
Step 3: Welcome the Chocolate. Once the frosting is melted and smooth, pour in the entire bag of white chocolate chips. Continue stirring over low heat. You’ll watch as the chips slowly melt into the frosting, creating a thick, luxurious, velvety mixture. Keep stirring until every last chip has melted and the two are completely combined into one homogenous, heavenly substance. This should take about 5-7 minutes. Chef’s Hack: If a few stubborn chips won’t melt, just take the pan off the heat and keep stirring. The residual heat will finish the job without risking scorching.
Step 4: The Big Pour. Immediately pour your beautiful, creamy fudge mixture into your prepared pan. Use your spatula to spread it into an even layer, getting it into all the corners. Work relatively quickly here, as the fudge will start to set as it cools.
Step 5: Swirl in the Sunshine. Here’s the fun part! Take your Orange Crush syrup and drizzle it generously all over the top of the fudge. Don’t be shy! Now, take a toothpick, a knife tip, or the tines of a fork and gently drag it through the orange drizzle and into the white fudge beneath. Make swirls, figure-eights, zig-zags—get creative! You’re not mixing it in completely; you’re creating a beautiful marbled effect. This is where your fudge gets its personality.
Step 6: The Patience Part. Carefully transfer the pan to the refrigerator. Now, we wait. Let it chill for at least 2-3 hours, or until it’s completely firm to the touch. I know it’s tempting, but don’t rush this! A properly set fudge is key for getting those clean, beautiful squares.
Step 7: Slice and Savor. Once it’s rock-solid, use your parchment paper handles to lift the entire fudge slab out of the pan and onto a cutting board. Using a large, sharp knife, wipe the blade with a hot, damp cloth between cuts for the cleanest slices. Cut into 36 small squares (6 rows by 6 rows) for the perfect bite-sized treat.
How to Serve Up This Slice of Sunshine
This fudge is a star all on its own, but a little presentation goes a long way! For a simple, elegant look, arrange the squares on a white or light-colored platter. The bright orange swirls will really pop against a neutral background.
If you’re feeling extra, you can garnish the platter with a few thin slices of candied orange or a light dusting of additional orange zest. It adds a touch of sophistication and a hint of what’s inside. These little squares are also perfect for gift-giving. Tuck them into a cute cellophane bag tied with a ribbon, or layer them in a festive tin between sheets of parchment paper. A homemade gift that tastes this good? That’s a Feastical favorite for sure.
Get Creative! Flavor Variations to Try
The best part about this base recipe is its versatility. Once you master the classic, the flavor world is your oyster! Here are a few of my favorite twists:
- Lemon Bar Fudge: Swap the vanilla frosting for lemon frosting and use lemon syrup or a few tablespoons of lemon curd for the swirl. It’s tart, sweet, and incredibly refreshing!
- Root Beer Float Fudge: Use vanilla frosting, white chocolate chips, and swirl in root beer syrup instead of orange. It tastes just like the classic ice cream float!
- Peppermint Bark Fudge: Perfect for the holidays! Use the classic vanilla/white chip base, but swirl in 2-3 tablespoons of crushed candy canes or peppermint sprinkles instead of syrup. Add a drop of peppermint extract to the melted mixture for an extra kick.
- Chocolate Raspberry Fudge: A match made in heaven! Use chocolate frosting and semi-sweet chocolate chips for the base. Then, swirl in seedless raspberry jam that you’ve warmed slightly to make it pourable.
- Dairy-Free/Vegan Option: You can easily adapt this! Use a certified vegan vanilla frosting and dairy-free white chocolate chips. Most orange syrups are naturally vegan, but just double-check the label.
Beau’s Chef Notes & Kitchen Stories
This recipe has become a Feastical staple, but it had a hilarious (and slightly messy) beginning. The first time I tested it, I got a phone call right after I poured the fudge into the pan. Distracted, I left the orange syrup bottle uncapped on the counter above the pan. You can probably guess what happened next. I bumped the counter, the bottle fell, and I ended up with not marbled fudge, but a pan of violently orange, soupy fudge! It was a great lesson in both patience and proper bottle-closing etiquette. The batch was still delicious, but now I always place my syrup bottle safely away from the edge!
Over time, I’ve learned that the quality of your white chocolate is the single biggest factor in the final taste. It’s worth the extra dollar or two for the good stuff. Also, don’t skip the zest if you have an orange on hand—it really is the secret ingredient that elevates it from great to “oh wow, what is in this?!”
Your Fudge Questions, Answered!
Q: My fudge is too soft and won’t set. What happened?
A: The most common culprit is not using enough chilling time. Make sure it chills for a full 2-3 hours, undisturbed. If it’s still soft, it’s possible the heat was too high when melting, which can cause the fats to separate. Also, double-check that you used regular frosting, not the whipped variety!
Q: Can I freeze this fudge?
A: Absolutely! This fudge freezes beautifully. Once it’s set and cut, layer the squares between parchment paper in an airtight container. It will keep in the freezer for up to 3 months. Thaw in the fridge for a few hours before serving.
Q: Why did my fudge get a grainy texture?
A: Graininess usually means the white chocolate was exposed to too much heat or a drop of moisture got into the mix. Always melt over low heat and make sure your utensils and pan are completely dry.
Q: My orange syrup sank to the bottom. How do I get a good swirl?
A: This can happen if the fudge base is too warm and liquidy when you add the syrup. Let the base cool in the pan for just 2-3 minutes before adding the drizzle. This gives it a chance to thicken slightly, so the syrup will stay suspended on top for a perfect swirl.
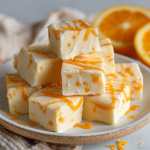
Orange Dreamsicle Fudge
Description
Capture the nostalgic taste of an orange creamsicle in a rich, creamy fudge! This simple recipe blends white chocolate and vanilla frosting with bright orange syrup for a melt-in-your-mouth treat that’s perfect for holidays, gifts, or a sunny snack.
Ingredients
-
12 oz white chocolate chips (high-quality)
-
16 oz can vanilla frosting (not whipped)
-
3–4 tbsp orange syrup or Orange Crush ice cream topping
-
Optional: 1 tsp orange zest
-
Optional: 1–2 drops orange extract
Instructions
-
Prep Pan: Line an 8×8-inch pan with parchment paper, leaving overhang for easy removal.
-
Melt Frosting: In a saucepan over low heat, stir the vanilla frosting until smooth and glossy.
-
Add Chocolate: Pour in white chocolate chips, stirring until fully melted and combined. Remove from heat if needed to avoid scorching.
-
Pour & Spread: Transfer fudge mixture to the prepared pan and spread evenly.
-
Swirl in Orange: Drizzle orange syrup over the top and swirl gently with a toothpick or knife for a marbled effect.
-
Chill: Refrigerate for 2–3 hours until completely firm.
-
Cut & Serve: Lift fudge from the pan using parchment overhang, and cut into 36 squares.
Notes
-
Extra Zest: Add fresh orange zest for a brighter, natural flavor.
-
Flavor Twists: Try lemon syrup for Lemon Bar Fudge or root beer syrup for a Root Beer Float version.
-
Vegan Option: Use vegan white chocolate chips and dairy-free frosting.
-
Clean Cuts: Wipe knife with a warm, damp cloth between slices.
Nutrition
- Calories: 110 Ca per square
- Sugar: 14g
- Fat: 6g
- Saturated Fat: 3g
- Protein: 0.5g
Nutritional Information*
Let’s be real, this is a treat, and treats are meant to be enjoyed! But I believe in transparency, so here’s a general breakdown per small square (based on 36 servings). Remember, these are estimates and can vary based on the specific brands you use.
Per Serving (approx.): Calories: 110 | Fat: 6g | Saturated Fat: 3g | Carbohydrates: 16g | Sugar: 14g | Protein: 0.5g
*This information is an estimate provided by an online calculator. For the most accurate nutritional information, please calculate using the specific brands and ingredients you use.
Final Sweet Thoughts
Well, there you have it! My secret for bringing a little bit of summer sunshine into your kitchen, no matter what the season. This Orange Dreamsicle Fudge is more than just a recipe; it’s a conversation starter, a memory-maker, and a guaranteed mood-lifter.
I hope you have as much fun making it as I do. Remember, cooking is about joy, not perfection. If your swirls are a little wobbly or your squares aren’t perfectly even, it doesn’t matter one bit. What matters is the love you put into it and the smiles it creates.

Homemade 2-Ingredient Butterfingers
Who Knew Candy Corn Had a Secret Superpower?
Hey there, friend! Beau here, welcoming you back to Feastical. You know what I love almost as much as a perfectly golden-brown casserole? A kitchen hack that feels like a little bit of magic. The kind that makes you look at a humble ingredient in a whole new light and impresses everyone without requiring a culinary degree. Today, we’re pulling off one of my all-time favorite bits of kitchen wizardry: we’re making Homemade Butterfingers.
Yes, you read that right. The crispy, flaky, impossibly addictive candy bar you know and love. But here’s the twist that’ll make your jaw drop: we’re making them with just two main ingredients. And one of them is the most divisive, love-it-or-hate-it candy of all time: candy corn.
Before you click away, hear me out! I was a skeptic, too. But when you melt down candy corn, something incredible happens. It transforms from those little tri-colored cones into a sweet, molten base that, when mixed with peanut butter, creates a texture that’s a dead ringer for the classic Butterfinger filling. It’s got that same satisfying snap, that same melt-in-your-mouth crispiness. All we have to do is dip it in chocolate, and voilà—you’ve just created a candy bar masterpiece in your own kitchen.
This recipe is perfect for when a sweet tooth strikes, for holiday treat plates, or for just wowing your friends with your confectionery skills. It’s simple, it’s fun, and it’s downright delicious. So, let’s grab our bowls and uncover the secret life of candy corn together!
The Accidental Discovery That Started It All
This recipe takes me back to my first Halloween in my own apartment. I’d bought a giant bag of candy corn, convinced I’d have dozens of trick-or-treaters. Turns out, living on a third-floor walk-up isn’t exactly a hot spot for costumed kids. So there I was, staring at a mountain of leftover candy corn, determined not to let it go to waste.
I started experimenting. I melted some down for a caramel-like dip, stirred it into frosting, and then, on a whim, I globbed a spoonful of melted candy corn into a bowl of peanut butter I was eating. I gave it a stir, let it cool for a second, and took a tentative bite. My eyes went wide. The texture wasn’t gooey or soft; it was crispy. It shattered into a million little pieces just like a Butterfinger! I remember calling my mom right away, my voice probably an octave too high, saying, “You are NOT going to believe what I just made!” I spent the rest of the night dipping my creation in chocolate, feeling like a certified kitchen genius. It’s a memory that always reminds me that some of the best recipes aren’t found in fancy cookbooks—they’re born from a little curiosity and a lot of leftover candy.
Gathering Your Magical Ingredients
See? I told you it was simple. Here’s your short-and-sweet grocery list. But don’t let the simplicity fool you—each ingredient plays a starring role.
- 16 oz Candy Corn: This is the foundation of our “crispy” filling. The magic is in the melting! Chef’s Insight: Don’t worry about the colors blending; when melted, it all turns a lovely golden-amber color. If you’re making this outside of the Halloween season, you can often find “Indian Corn” or just plain yellow-and-orange corn year-round in the baking aisle.
- 1 cup Creamy Peanut Butter: This is our flavor and texture partner. Substitution Tip: For the most authentic Butterfinger taste, stick with a standard, no-stir creamy peanut butter like Jif or Skippy. The stabilizers in them help create the perfect texture. If you use natural peanut butter (the kind that separates), the final result might be a bit oilier and less crisp. For a nut-free version, sunflower seed butter works amazingly well and gives a similar color and flavor profile!
- Chocolate for Dipping (about 12-16 oz): The glorious finishing touch. Chef’s Insight: I’m a fan of using good-quality chocolate chips or melting wafers. Milk chocolate is the classic choice, but semi-sweet is fantastic if you prefer a little less sweetness. For an extra-professional finish, add a teaspoon of coconut oil to the melted chocolate to make it smoother and shinier.
Let’s Make Some Magic: The Step-by-Step Guide
Okay, friends, put on your favorite apron and let’s get to it. This process is straightforward, but a few key tips will ensure candy-making success. Read through all the steps before you begin—it’ll make everything flow like a dream.
Step 1: The Meltdown (The Most Important Step!)
Dump your entire bag of candy corn into a large, microwave-safe bowl. Glass is best here. Now, here’s the secret: PATIENCE. We’re going to melt the candy corn at 50% power in 30-second intervals. After each interval, take the bowl out and give it a really good stir. It will look soupy and weird at first, then it will start to smooth out. This should take about 4-5 minutes total. Chef’s Hack: Why 50% power? High heat is the enemy of candy. It can cause the sugars to seize up and become a grainy, unworkable mess. Low and slow is the name of the game for a silky-smooth melt.
Step 2: The Peanut Butter Party
Once your candy corn is completely melted and smooth (no lumps!), work quickly. Immediately add the full cup of peanut butter to the hot candy. Stir, stir, stir! The mixture will become very thick and might even seem a bit stiff—that’s totally normal. It’s the peanut butter working its magic and starting to set up the crispy structure. Chef’s Hack: If you find it really difficult to stir, you can pop the bowl back in the microwave for just 15 seconds to loosen it up a bit.
Step 3: Press and Impress
Line a 9×13 inch baking pan with wax paper or parchment paper (a little non-stick spray underneath helps it stay put). Scrape the thick peanut butter-candy mixture into the pan. Now, for a neat trick: take another sheet of wax paper and place it directly on top of the mixture. Use your hands (or the bottom of a flat glass or measuring cup) to press the mixture into an even, flat layer. This top layer of paper prevents it from sticking to your hands! Press it to about a ¼ to ½-inch thickness.
Step 4: The Patience Game
Now, we wait. Let the pan sit at room temperature until the slab is completely firm to the touch. This usually takes about 30 minutes. You can speed this up by popping it into the refrigerator for 15-20 minutes, but I find room-temperature cooling gives the best texture.
Step 5: The Big Cut
Once firm, lift the entire slab out of the pan using the parchment paper. Place it on a cutting board. Using a sharp knife, cut it into small rectangles or squares. Think classic “fun size” candy bar proportions! Chef’s Hack: Wiping your knife with a little warm water between cuts can help you get cleaner edges.
Step 6: The Chocolate Bath
Melt your chocolate in another microwave-safe bowl, again using 30-second intervals at 50% power, stirring until smooth. Using a fork or a dipping tool, dip each peanut butter square into the chocolate, tap off the excess, and place it on a parchment-lined baking sheet. Chef’s Hack: For that signature Butterfinger look, use the tines of your fork to make wavy lines in the chocolate on top before it sets!
Step 7: Set and Serve
Let the chocolate set completely. You can leave them at room temperature if your kitchen is cool, or pop the whole tray into the fridge for about 10 minutes to speed things up. Once the chocolate is hard, they’re ready to devour!
How to Serve Your Homemade Butterfingers
Presentation is part of the fun! You can keep it casual and pile them high in a big bowl for a party—I promise they’ll be the first thing to disappear. For a more elegant touch, arrange them on a festive platter, maybe with some other homemade treats like rice crispy squares or chocolate-dipped pretzels.
These are the perfect addition to a holiday cookie box or a Halloween treat bag. Package them in little cellophane bags tied with a ribbon, and you’ve got a incredibly thoughtful, homemade gift that people will absolutely rave about. They also make a fantastic after-school snack (in moderation, of course!) or a sweet little pick-me-up with your afternoon coffee.
Get Creative! 5 Fun Flavor Twists
Once you’ve mastered the classic, the playground is open! Here are a few of my favorite ways to mix things up.
- The Nutty Professor: Swap the creamy peanut butter for crunchy peanut butter for an extra textural element. You can also use almond butter or cashew butter for a different, equally delicious flavor profile.
- The Salty-Sweet Sensation: After dipping in chocolate, but before it sets, sprinkle the tops with a tiny pinch of flaky sea salt. It cuts the sweetness and elevates the flavor to gourmet levels.
- The Triple-Chocolate Threat: Use dark chocolate for dipping and stir a handful of mini chocolate chips into the peanut butter mixture before pressing it into the pan for an ultra-chocolatey experience.
- The “Not-Nutter” Butterfinger: As mentioned, sunflower seed butter is a fantastic nut-free alternative. It gives a remarkably similar taste and color!
- The Spooky Sprinkle Version: Perfect for Halloween! Use orange and black sprinkles, or even Halloween-colored nonpareils, to decorate the tops right after dipping.
Beau’s Chef’s Notes & Kitchen Confessions
This recipe has been a staple in my kitchen for years, and it’s evolved a bit. I used to try and melt the candy corn on high power to save time, which led to more than one batch of grainy, ruined candy. I learned the hard way so you don’t have to! The low-and-slow method is non-negotiable.
Another funny story: I once tried to double the batch in the same-sized bowl. Let’s just say I spent more time cleaning melted candy corn off my microwave turntable than I did actually making the candy. Lesson learned—use a big bowl and give the ingredients plenty of room to be stirred without drama. The beauty of this recipe is in its simplicity, so don’t overcomplicate it. Enjoy the process!
Your Questions, Answered!
Q: My candy corn mixture seized up and got grainy. What did I do wrong?
A: This is almost always caused by too much heat. You likely used full power in the microwave or heated it for too long without stirring. Unfortunately, there’s no fixing seized sugar. The best bet is to start over—but this time, stick to 50% power and stir diligently!
Q: Can I use the stovetop instead of a microwave?
A: Absolutely! Use a double boiler (a heatproof bowl set over a pot of simmering water, making sure the bottom of the bowl doesn’t touch the water) to melt the candy corn. This method gives you even more control over the heat and is very gentle.
Q: How should I store these, and how long do they last?
A: Store them in an airtight container at room temperature for up to two weeks. You can layer them between sheets of parchment paper so they don’t stick together. If your kitchen is very warm, the fridge is fine, but let them come to room temperature for the best texture and flavor.
Q: My mixture is too sticky to handle when cutting. Help!
A: This means it needed more time to cool and set. Pop the whole pan into the refrigerator for another 15-20 minutes until it’s firm. Also, if you used natural peanut butter, it can lead to a softer texture.

Homemade 2-Ingredient Butterfingers
Description
Who knew candy corn had a secret superpower? When melted and mixed with peanut butter, it magically transforms into a crispy, flaky filling that tastes just like a Butterfinger bar. Coat it in chocolate, and you’ve got a homemade candy bar that will wow friends and family with minimal effort.
Ingredients
-
16 oz candy corn
-
1 cup creamy peanut butter (regular, no-stir brands work best)
-
12–16 oz milk or semi-sweet chocolate (for coating)
Instructions
-
Melt Candy Corn
Place candy corn in a microwave-safe bowl. Heat at 50% power in 30-second bursts, stirring each time, until completely melted and smooth (about 4–5 minutes). -
Mix with Peanut Butter
Quickly stir in the peanut butter until fully combined. The mixture will be thick and start to set as it cools. -
Press Into Pan
Line a 9×13-inch pan with parchment. Spread the mixture evenly, pressing to about ½-inch thick. Let it cool at room temperature or in the fridge until firm. -
Cut Into Pieces
Lift the slab out of the pan and cut into rectangles or squares with a sharp knife. -
Dip in Chocolate
Melt the chocolate (again at 50% power, stirring often). Dip each piece, shaking off excess, and place on parchment to set. -
Serve and Enjoy
Let the chocolate harden, then store in an airtight container at room temperature for up to 2 weeks.
Notes
-
Crunchy twist: Use crunchy peanut butter for added texture.
-
Nut-free option: Swap in sunflower seed butter.
-
Gourmet upgrade: Sprinkle flaky sea salt on top before the chocolate sets.
-
Holiday fun: Decorate with sprinkles to match the season.
Nutrition
- Calories: 140Cal per piece
- Sugar: 15g
- Fat: 7g
- Carbohydrates: 17g
- Protein: 2g
A Quick Note on Nutrition
Let’s be real, friends—these are a treat! I’m all about balance. Enjoy them mindfully as part of a happy, varied diet. The nutritional info is an estimate and can vary based on the specific brands of ingredients you use. Each piece is a little bundle of energy, perfect for when you need a sweet boost. If you’re looking for ways to lighten them up slightly, using dark chocolate (which often has less sugar) is a great option, and opting for a peanut butter with no added sugar can also help. But sometimes, you just need a classic, satisfying homemade candy bar, and that’s more than okay!
Final Thoughts from My Kitchen to Yours
Well, there you have it! The candy bar hack that never fails to bring a smile to my face. It’s a testament to the fact that the most incredible creations often come from the simplest places. You don’t need fancy equipment or hard-to-find ingredients—just a bag of candy corn, a jar of peanut butter, and a sense of adventure.
I hope you give this recipe a try. It’s a fantastic one to make with kids (they’ll be mesmerized by the melting candy corn!) or to whip up when you need a last-minute dessert that looks like you spent all day in the kitchen. Most of all, I hope it brings a little bit of Feastical’s feel-good magic into your home.
If you make them, I’d love to see your creations! Tag me on social @Feastical or leave a comment on the blog. Now, go forth and make some magic!
Happy cooking,