Mediterranean Pasta Salad
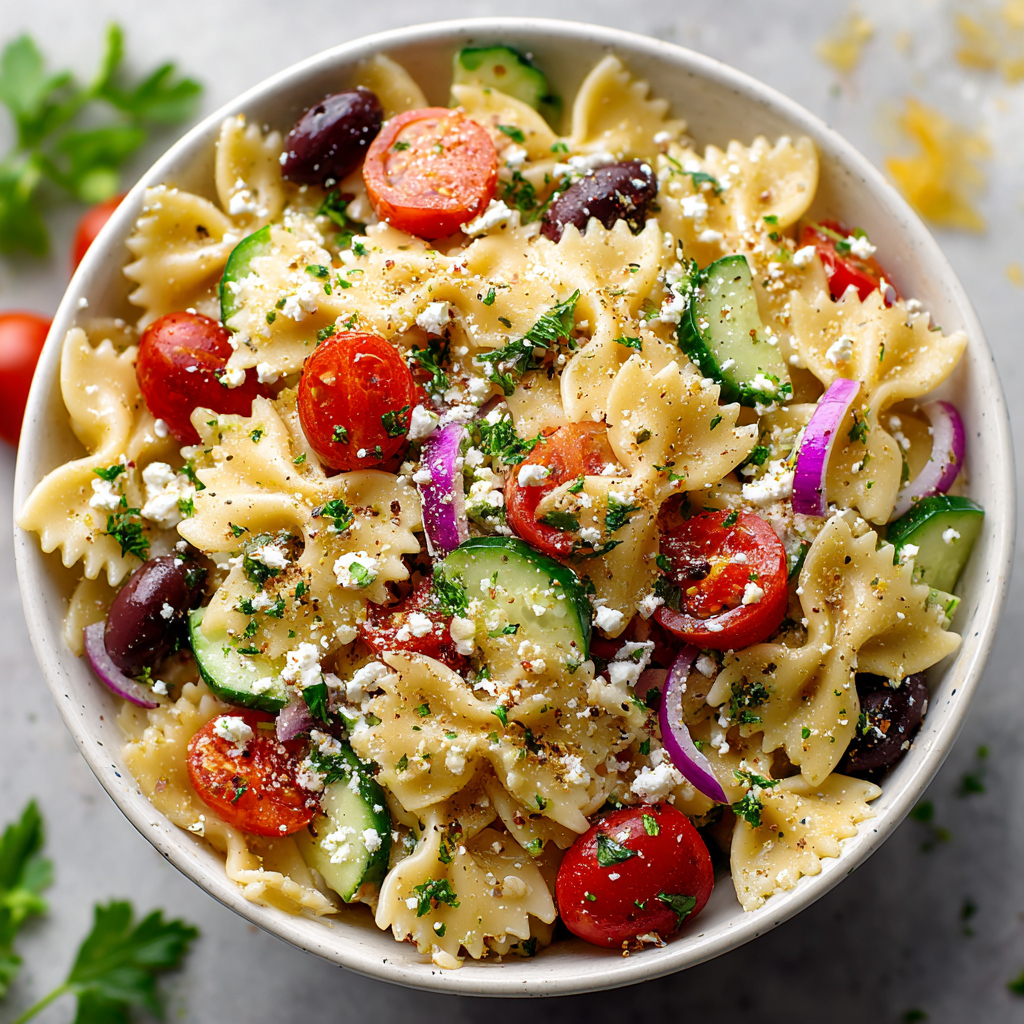
Mediterranean Pasta Salad – Fresh Greek-Inspired Bowtie Pasta
Hey there, friend! Beau here, welcoming you back to the Feastical kitchen. Is there anything better than a dish that’s as beautiful to look at as it is delicious to eat? One that doesn’t just fill your belly but somehow feeds your soul with sunshine and good vibes? That’s the magic I’m chasing today, and I’ve got just the ticket: my ultimate Mediterranean Pasta Salad.
Picture this: tender, whimsical bowtie pasta (because food should be fun, right?) cradling bursts of juicy cherry tomatoes, crisp cucumbers, and savory bites of briny olives. It’s all brought together with creamy crumbles of feta cheese and a homemade lemon-oregano vinaigrette that sings with freshness. This isn’t just a side dish; it’s a vibrant, satisfying meal that celebrates simple, clean flavors. Whether you’re gearing up for a backyard BBQ, need a stellar potluck contribution, or just want to make your weekday lunches something to actually look forward to, this salad is your new best friend. It’s forgiving, customizable, and gets even better as it chills, making it the perfect make-ahead hero. So, grab your favorite big mixing bowl and let’s create some edible sunshine together.
Why This Salad Tastes Like Summer to Me
This recipe always takes me straight back to my Aunt Clara’s sprawling, slightly chaotic, and utterly wonderful Fourth of July parties. The air would be thick with the scent of charcoal and citronella, and her picnic table groaned under the weight of every potluck dish imaginable. My contribution, even as a teenager who’d rather be playing corn hole, became this pasta salad. I started making it because it was easy, but I kept making it because of the way people’s faces would light up. I’d see my gruff uncle go back for thirds, and my cousin’s new boyfriend (who claimed to “not really do vegetables”) quietly clean out the bowl. It was the dish that always disappeared first, and there’s no bigger compliment for a cook. It taught me that the best food isn’t about fancy techniques; it’s about bringing people together with bright, honest flavors that make everyone feel welcome and happy. That’s the spirit I mix into every single batch.
Gathering Your Sunshine Ingredients
Here’s everything you’ll need to build this flavor masterpiece. I’ve added my little chef notes to help you shop and substitute like a pro!
- 12 oz farfalle (bowtie) pasta: The playful shape holds the dressing and veggies perfectly. Chef’s Insight: You can absolutely use penne, rotini, or even orzo for a different twist!
- 1 cup cherry tomatoes, halved: Look for the sweetest, ripest ones you can find. Their pop of juice is key. Sub Tip: In winter, grape tomatoes are often more flavorful than larger ones.
- 1 cup cucumber, chopped: I prefer English or Persian cucumbers for their thin skin and fewer seeds. That crisp crunch is non-negotiable!
- ½ cup red onion, thinly sliced: They add a sharp, colorful bite. Pro Hack: Soak the slices in ice water for 10 minutes before adding to mellow their intensity.
- ½ cup Kalamata olives, halved: These are the VIPs of briny, salty flavor. Don’t skip them! Sub Tip: Castelvetrano olives offer a milder, buttery alternative.
- ¾ cup crumbled feta cheese: Buy the block and crumble it yourself for better texture and flavor than pre-crumbled. Chef’s Insight: For a dairy-free version, a good vegan feta or even chickpeas can work wonders.
- 2 tbsp fresh parsley, chopped: A final hit of fresh green herbiness. Don’t use dried here—fresh is everything.
For The Zesty Dressing:
- ¼ cup extra virgin olive oil: Use the good stuff! It’s the base of the dressing, so a fruity, high-quality oil makes a difference.
- 2 tbsp red wine vinegar: This gives the dressing its classic tangy backbone. Sub Tip: White wine vinegar or even a squeeze of extra lemon juice works in a pinch.
- 1 tbsp fresh lemon juice: Brightness alert! Always use fresh juice, never the bottled stuff.
- 1 tsp Dijon mustard: Our secret weapon! It adds depth and helps emulsify the dressing so it coats every ingredient beautifully.
- 1 tsp dried oregano: The quintessential Mediterranean herb. Rubbing it between your palms before adding wakes up its oils.
- Salt and freshly ground black pepper: Season with love and taste as you go!
Let’s Build That Bowl! Your Step-by-Step Guide
Okay, team. Let’s get cooking! Follow these steps, and you’ll have a perfect pasta salad every single time. I’m tossing in my favorite kitchen hacks as we go.
- Cook the Pasta to Perfection: Bring a large pot of well-salted water to a rolling boil—it should taste like the sea. Add your bowties and cook according to package directions, but aim for al dente (that means it still has a slight bite to it). Why? Mushy pasta will fall apart when we toss everything together. Drain it in a colander and give it a quick, brief rinse under cool water to stop the cooking and wash off excess starch. This keeps the salad from getting gummy.
- Chop and Prep Your Veggies: While the pasta cooks, use that time wisely! Halve those juicy tomatoes, chop the cucumber into bite-sized pieces, thinly slice your red onion (remember the ice water bath if you want it milder!), and halve the olives. Chop your parsley. Having everything prepped and ready to go is the key to relaxed, joyful cooking.
- Whisk Up That Magic Dressing: In a small bowl or a jam jar with a lid, combine the olive oil, red wine vinegar, fresh lemon juice, Dijon mustard, dried oregano, a big pinch of salt, and a few cracks of pepper. Whisk it vigorously or shake the jar like you mean it until the mixture looks smooth and slightly thickened. Chef’s Hack: Taste it! Dip a piece of cucumber or pasta in and adjust. Need more tang? Add a splash more vinegar or lemon. Trust your palate.
- The Big, Beautiful Toss: In your largest mixing bowl (I’m talking huge—give everything room to dance), combine the cooled pasta, tomatoes, cucumber, onion, olives, and parsley. Pour about three-quarters of the dressing over the top. Now, use a big spoon and a gentle folding motion to combine everything evenly. We’re being gentle to keep those veggies pretty!
- The Feta Finale: Here’s the important part: add the feta cheese last, after the initial toss. Why? If you mix it in too aggressively from the start, it’ll break down and turn the whole salad a milky pink (still tasty, but not as pretty). Gently fold in the crumbled feta so it stays in distinct, creamy chunks.
- The Patient Chill: Cover the bowl and pop it in the fridge for at least 30 minutes, but ideally an hour or two. This is non-negotiable for the best flavor! The chilling time lets the pasta drink up the dressing and allows all the flavors to get to know each other and become best friends.
Serving Up the Sunshine
When it’s time to serve, give the salad one more gentle stir and check the seasoning—sometimes a final pinch of salt or squeeze of lemon is needed after chilling. I love to transfer it to a wide, shallow serving platter for maximum visual impact. For a gorgeous finish, scatter a little extra crumbled feta and a sprinkle of fresh parsley or even some fresh oregano leaves on top. This salad is a meal all on its own, but it also plays incredibly well with others! Serve it alongside grilled chicken skewers, juicy lamb burgers, or simple lemon-herb salmon. For a plant-powered feast, pair it with creamy hummus and warm pita bread. Don’t forget to drizzle that last bit of reserved dressing over the top right before serving for an extra glossy, flavorful finish!
Make It Your Own: Delicious Twists & Swaps
The beauty of this Mediterranean pasta salad is its flexibility. Play with it! Here are a few of my favorite riffs:
- Protein Power-Up: Add 1-2 cups of shredded rotisserie chicken, canned chickpeas (rinsed and drained), or a can of high-quality tuna in olive oil for a hearty, main-dish salad.
- Herb Garden Explosion: Swap the parsley for fresh dill or mint, or use a combination! A tablespoon of chopped fresh oregano is also divine.
- Pepper Perfection: Add a diced roasted red pepper (from a jar is fine!) or a handful of peppadew peppers for a sweet and smoky element.
- Artichoke & Spinach: Fold in a cup of marinated artichoke hearts (chopped) and a couple of big handfuls of fresh baby spinach right before serving for a new flavor dimension.
- Gluten-Free/Vegan Friendly: Use your favorite gluten-free pasta (corn/quinoa blends work great). Swap the feta for a vegan alternative or use capers and extra olives for that salty punch, and ensure your Dijon is vegan.
A Few Chef’s Notes From My Kitchen to Yours
This recipe has been a living, evolving thing in my kitchen for over a decade. I’ve learned a few things! First, if you’re making this for a potluck, I strongly recommend doubling the recipe. It goes fast, and you’ll be a hero. Second, don’t fear the red onion—that soak in ice water truly tames it without robbing its character. And finally, the best kitchen tool for this job is your hands. Seriously! When it’s time for the final gentle fold before serving, I sometimes ditch the spoon and use my hands to lift and turn the salad. It’s the best way to ensure everything is coated without crushing the delicate ingredients. It also just feels good to connect with your food. My Aunt Clara would approve.
Your Questions, Answered!
- Q: Can I make this Mediterranean pasta salad ahead of time?
A: Absolutely! It’s a meal-prep dream. Make it up to 24 hours in advance. Keep it covered in the fridge, and hold off on adding fresh herbs (like parsley) until just before serving so they stay bright. The flavors only get better. - Q: My salad seems dry after chilling. What happened?
A: Pasta is thirsty! It absorbs dressing as it sits. That’s why I suggest holding back a little dressing to refresh it before serving. You can also add a tiny splash of olive oil, lemon juice, or even a tablespoon of water to loosen it up. - Q: Can I use a different type of pasta?
A: 100%! Farfalle is my favorite for this, but any short pasta with good “sauce-grabbing” ability works: penne, fusilli, cavatappi, or even medium-sized shells. Just stick to the same weight (12 oz). - Q: How long will leftovers keep in the fridge?
A: Stored in an airtight container, it stays fresh for 3-4 days. The veggies will soften a bit but it’s still delicious. I don’t recommend freezing it, as the texture of the veggies and pasta will suffer.

Mediterranean Pasta Salad
Description
This Mediterranean pasta salad is bright, colorful, and packed with fresh flavor. It combines tender bowtie pasta with crisp vegetables, salty olives, creamy feta, and a zesty lemon-oregano dressing. It’s easy to make, perfect for potlucks or lunches, and tastes even better after chilling. If you want a reliable, crowd-pleasing dish that feels light but satisfying, this is a great one to keep on repeat.
Ingredients
Salad
-
12 oz (340 g) farfalle (bowtie) pasta
-
1 cup cherry tomatoes, halved
-
1 cup cucumber, diced (English or Persian preferred)
-
½ cup red onion, thinly sliced
-
½ cup Kalamata olives, halved
-
¾ cup feta cheese, crumbled
-
2 tbsp fresh parsley, finely chopped
Lemon-Oregano Dressing
-
¼ cup extra virgin olive oil
-
2 tbsp red wine vinegar
-
1 tbsp fresh lemon juice
-
1 tsp Dijon mustard
-
1 tsp dried oregano
-
½ tsp salt (adjust to taste)
-
¼ tsp black pepper
Instructions
-
Cook the pasta
Bring a large pot of salted water to a boil. Cook the bowtie pasta until al dente according to package directions. Drain and rinse briefly under cool water to stop cooking. Let it cool. -
Prep the vegetables
While the pasta cooks, chop tomatoes, cucumber, onion, olives, and parsley. For milder onion flavor, soak slices in cold water for 10 minutes, then drain. -
Make the dressing
In a small bowl or jar, whisk together olive oil, red wine vinegar, lemon juice, Dijon mustard, oregano, salt, and pepper until smooth. -
Combine
In a large mixing bowl, add cooled pasta, tomatoes, cucumber, onion, olives, and parsley. Pour most of the dressing over and toss gently to coat. -
Add feta last
Fold in the crumbled feta gently so it stays chunky and doesn’t break down too much. -
Chill
Cover and refrigerate at least 30–60 minutes before serving for best flavor. -
Finish & serve
Stir, taste, and adjust seasoning. Add the remaining dressing if needed and garnish with extra parsley or feta.
Notes
-
Salt your pasta water well — it should taste lightly salty; this builds flavor from the start.
-
Cool pasta before mixing to keep veggies crisp and cheese intact.
-
Hold back some dressing to refresh the salad just before serving.
-
Use block feta and crumble it yourself for better texture and taste.
-
Make it a meal by adding chickpeas, grilled chicken, or tuna.
Nutritional Information (A General Guide)
Please note: The following is an approximate estimate per serving (based on 8 servings) generated from the listed ingredients. For precise dietary needs, use a dedicated nutritional calculator with your specific brands and measurements.
- Calories: ~360
- Protein: 11g (Thanks, pasta and feta!)
- Carbohydrates: 44g
- Dietary Fiber: 3g (The veggies contribute!)
- Total Fat: 16g (Mostly from heart-healthy olive oil and feta)
- Saturated Fat: 5g
This salad is a fantastic source of complex carbs for energy, and the olive oil provides healthy monounsaturated fats. To lower the sodium, you can reduce the amount of olives and feta, or look for lower-sodium varieties.
Final Thoughts: Share the Sunshine
And there you have it, friends—my heart-on-a-platter, my taste of summer, my go-to crowd-pleaser. This Mediterranean Pasta Salad is more than just a recipe; it’s a reminder that the most memorable meals are often the simplest, built on fresh ingredients and shared with good people. I hope this dish finds its way to your picnic blankets, your dinner tables, and your lunchboxes, bringing a little burst of Mediterranean sunshine wherever it goes. If you make it (and I truly hope you do), tag me over on the Feastical social channels—I love seeing your creations! Now, go forth, cook with joy, and always save a bite for the cook. Until next time, keep it flavorful!
– Beau
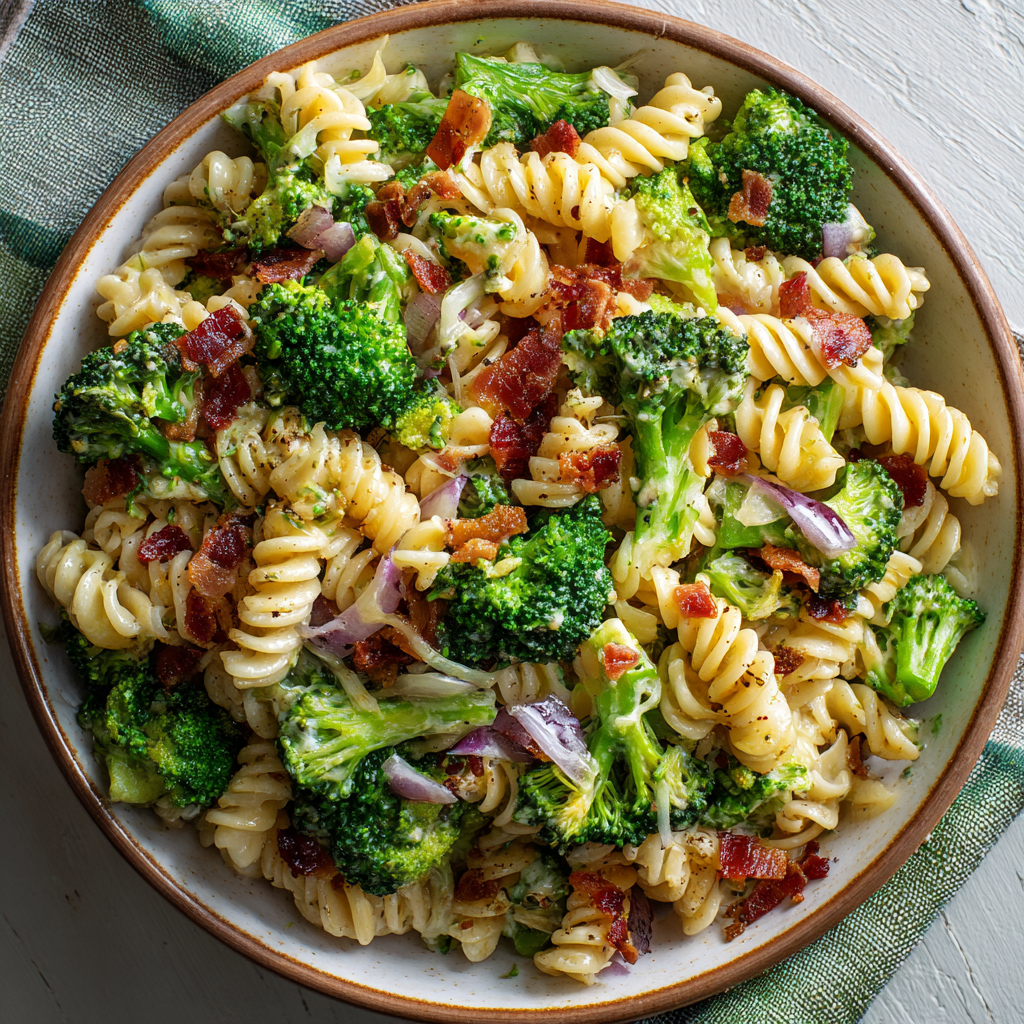
Fresh Broccoli Pasta Salad : Creamy, Crunchy & Never-Fail Favorite
The Potluck Hero That’ll Steal the Spotlight: Fresh Broccoli Pasta Salad
Hey there, friends! Beau here, welcoming you back to the Feastical kitchen. You know that moment at a summer BBQ or a family potluck when you’re scanning the table, fork at the ready, and your eyes lock onto that one dish you know is going to be good? The one that’s always creamy, always crunchy, and somehow disappears before the burgers are even off the grill? That’s the magic we’re whipping up today.
I’m talking about my never-fail, always-requested Fresh Broccoli Pasta Salad. This isn’t just a side dish; it’s a mood. It’s the taste of sunshine, lazy afternoons, and the satisfying crunch that cuts through the richest of spreads. We’re combining tender rotini pasta with crisp, fresh broccoli, savory bacon, a punch of red onion, and a tangy, creamy dressing that ties it all together in perfect harmony. It’s the culinary equivalent of your favorite, most comfortable pair of jeans—reliable, feels great, and goes with absolutely everything.
Whether you’re a kitchen newbie or a seasoned pro, this recipe is your new secret weapon. It’s simple enough for a quick weeknight side but impressive enough to be the star of the show. So, tie on your apron, grab your biggest mixing bowl, and let’s create something downright delicious together.
A Crunchy Flashback: Picnics, Plastic Bowls & Perfect Bites
This recipe takes me straight back to my Grandma Lou’s backyard. Picture it: checkered blankets, the smell of charcoal, and a folding table groaning under the weight of every family’s best dish. My contribution, even as a gangly teenager who’d rather be anywhere else, was always this broccoli pasta salad.
I remember the first time I made it. I was so nervous, convinced I’d mess up the dressing or overcook the broccoli. But when I saw my gruff Uncle Frank go back for third helpings, muttering about how it was “better than his wife’s,” I knew I’d struck gold. There’s something incredibly powerful about a dish that can silence critics and bring smiles with just one bite. That plastic bowl, licked clean by the end of the day, was my first trophy. It taught me that good food isn’t about fancy techniques; it’s about flavor, texture, and the joy of sharing. Every time I make this salad, I get a little of that backyard sunshine back.
Gathering Your Flavor Arsenal
Here’s everything you’ll need to build this crunchy masterpiece. Don’t just think of these as ingredients; think of them as your flavor teammates!
- 12 oz rotini pasta: Those little spirals are genius—they trap the dressing in every nook and cranny. Chef’s Insight: You can swap in fusilli, farfalle (bowties), or even small shells. The key is a shape with texture to hold onto the good stuff.
- 3 cups fresh broccoli florets (small bite-sized pieces): The star of the show! We want fresh, crisp broccoli for that signature crunch. Pro Tip: Save those stems! Peel off the tough outer layer and chop the tender inside for an extra, less-wasteful crunch.
- 6 slices bacon, cooked and crumbled: Smoky, savory, salty goodness. It’s the umami bomb. Substitution: For a vegetarian twist, use ½ cup of toasted, chopped pecans or sunflower seeds for a similar salty crunch.
- ½ cup red onion, finely diced: This adds a necessary sharp bite that cuts through the creaminess. Chef’s Hack: Soak the diced onion in cold water for 10 minutes before using. It tames the raw onion harshness beautifully.
- 1 cup mayonnaise: The creamy base of our dressing. Use a good-quality mayo you love. Substitution: For a lighter version, swap half with full-fat Greek yogurt. The tang is fantastic!
- 2 tbsp apple cider vinegar: Our bright, tangy secret weapon. It lifts the whole dish. Chef’s Insight: White wine vinegar or even fresh lemon juice works in a pinch.
- 1 tbsp Dijon mustard: Adds depth and a subtle zip. Yellow mustard works, but Dijon brings a more sophisticated flavor profile.
- 1 tsp sugar: Just a touch to balance the acidity. Honey or maple syrup are great natural swaps.
- ½ tsp salt & ½ tsp black pepper: The essential flavor enhancers. Always season to taste at the end!
- Optional: ½ cup shredded cheddar cheese: Because cheese makes everything better. A sharp white cheddar or even pepper jack would be delightful here.
Let’s Build Some Crunch: Your Step-by-Step Roadmap
Follow these steps, and you’re guaranteed success. I’m walking you through each one with all my favorite kitchen hacks!
- Cook the Pasta Like a Pro: Bring a large pot of well-salted water to a rolling boil. That salt seasons the pasta from the inside out! Add your rotini and cook according to package directions for al dente—you want it to have a slight bite. Critical Tip: Once drained, rinse it under cold water until it’s completely chilled. This stops the cooking process and washes away excess starch so your salad isn’t gloopy. Give it a good shake in the colander to get rid of all that water.
- Prep Your Broccoli for Maximum Joy: While the pasta cooks, chop your broccoli into small, bite-sized florets. Here’s your choice: For super-crisp raw broccoli, just chop and go. For a slightly softer, brighter green texture that’s a bit more tender, blanch it. Drop the florets into the boiling pasta water for exactly 60 seconds during the last minute of the pasta’s cook time, then fish them out with a slotted spoon and plunge into an ice bath. It’s a game-changer.
- Whisk Up the Magic Dressing: In a bowl large enough to hold the entire salad, whisk together the mayo, apple cider vinegar, Dijon, sugar, salt, and pepper. Whisk until it’s completely smooth and creamy. Little Chef Secret: Taste it! Dip a tiny piece of broccoli in. Want more tang? Add a splash more vinegar. Need more zip? Another half teaspoon of Dijon. Make it yours.
- The Grand Toss: To that same bowl with the dressing, add your chilled pasta, prepared broccoli, crumbled bacon, drained red onion, and cheese (if using). Now, get in there with a large spoon or spatula and gently fold and toss until every single piece is lovingly coated in that creamy dressing. Be thorough but gentle—you don’t want to smash the broccoli.
- The Patience Pays Off (Chill Time!): This is the hardest but most important step. Cover the bowl and pop it in the fridge for at least 1 hour, though 2-3 is even better. This isn’t just about getting it cold. This is where the magic happens—the flavors marry, the pasta soaks up the dressing, and everything becomes harmonious. Trust the process.
How to Serve It Up with Style
Okay, it’s chilled, it’s perfect, it’s time to serve! You can absolutely plop this beauty in the same big bowl, but let’s talk presentation for a minute. For a potluck, I love using a wide, shallow serving dish. It shows off all the gorgeous colors and textures. Garnish is your friend: a final sprinkle of extra bacon crumbles, a little more cracked black pepper, or a few microgreens on top adds a “chef’s kiss” finish.
This salad is the ultimate team player. It’s the perfect sidekick to grilled chicken, smoky ribs, juicy burgers, or even simple deli sandwiches. I’ve also been known to grab a fork and eat a giant bowl of it for lunch all by itself—no judgment here! Serve it straight from the fridge for that refreshing, cool crunch.
Make It Your Own: 5 Flavorful Twists
Once you’ve mastered the classic, the playground is open! Here are some of my favorite ways to mix it up:
- The “Everything But The Kitchen Sink” Veggie Load: Add ½ cup each of halved cherry tomatoes, diced bell pepper (any color!), and grated carrot. It’s a rainbow in a bowl.
- Protein Powerhouse (Make it a Meal): Toss in 1-2 cups of shredded rotisserie chicken or a can of rinsed chickpeas for a hearty, main-dish salad.
- Sweet & Salty Dream: Swap the bacon for ½ cup of chopped crispy prosciutto and add ⅓ cup of dried cranberries or raisins. The sweet and savory combo is unreal.
- Lighter & Brighter: Replace the mayo entirely with 1 cup of full-fat plain Greek yogurt. You’ll get an incredible tang and a protein boost. You might need a pinch more salt.
- Smoky Southwest Fiesta: Omit the Dijon. Add 1 tsp smoked paprika, ½ tsp cumin, and a pinch of chili powder to the dressing. Swap cheddar for pepper jack and add a handful of toasted corn kernels.
Beau’s Kitchen Confidential
This recipe has been on quite a journey with me. The original version, scribbled on a notecard from my grandma, called for Miracle Whip and pre-cut broccoli from a bag. Over the years, I’ve tweaked it—upping the acid, discovering the blanching trick, and learning that thick-cut bacon is always worth the extra penny.
One funny fail I remember: I once tried to “save time” by adding the hot pasta directly to the dressing. Big mistake. The dressing melted, separated, and turned into a greasy, sad pool. I had to start completely over. Lesson learned: always chill your pasta! This salad is forgiving, but it does have a few non-negotiables. Now, it’s my most requested dish, and I wouldn’t have it any other way.
Your Questions, Answered!
Q: Can I make this ahead of time?
A: Absolutely! That’s one of its best qualities. Make it up to 24 hours in advance. Just hold off on adding any extra-garnishy bits like bacon (it can get soggy) until right before serving.
Q: My salad seems dry after chilling. What happened?
A: The pasta and broccoli absorb the dressing. No worries! Simply stir in an extra tablespoon or two of mayo thinned with a teaspoon of vinegar or water before serving.
Q: How long will leftovers keep in the fridge?
A: Stored in an airtight container, it stays delicious for 3-4 days. The texture of the broccoli will soften a bit, but the flavor will still be fantastic.
Q: Is blanching the broccoli really necessary?
A: Not necessary, but highly recommended! Blanching (that quick boil & ice bath) softens the raw edge ever so slightly, turns it a vibrant green, and makes it more digestible, all while keeping that essential crunch. It’s a 60-second step with a big payoff.

Fresh Broccoli Pasta Salad : Creamy, Crunchy & Never-Fail Favorite
Description
This broccoli pasta salad is creamy, crunchy, and packed with fresh flavor. It’s an easy make-ahead side dish that works perfectly for BBQs, potlucks, and family dinners. With crisp broccoli, savory bacon, tender pasta, and a tangy dressing, it’s balanced, satisfying, and always a hit.
Ingredients
-
12 oz (340 g) rotini pasta
-
3 cups fresh broccoli florets, cut small
-
6 slices bacon, cooked and crumbled
-
½ cup red onion, finely diced
-
1 cup mayonnaise
-
2 tbsp apple cider vinegar
-
1 tbsp Dijon mustard
-
1 tsp sugar (or honey)
-
½ tsp salt (plus more to taste)
-
½ tsp black pepper
-
Optional: ½ cup shredded cheddar cheese
Instructions
-
Cook the pasta
Boil pasta in well-salted water until al dente. Drain and rinse under cold water to stop cooking. Let drain well and cool. -
Prepare the broccoli
Cut into small bite-size florets. Use raw for maximum crunch, or blanch in boiling water for 60 seconds, then cool in ice water and drain. -
Make the dressing
In a large bowl, whisk mayonnaise, vinegar, Dijon mustard, sugar, salt, and pepper until smooth. -
Combine
Add cooled pasta, broccoli, bacon, red onion, and cheese (if using). Toss gently until fully coated. -
Chill
Cover and refrigerate at least 1–2 hours before serving for best flavor. -
Serve
Stir, taste, adjust seasoning, and serve cold.
Notes
-
Cut broccoli small so every bite gets a little of everything.
-
Cool pasta fully before mixing to keep dressing creamy.
-
Soak diced onion in cold water 10 minutes for a milder taste.
-
Add bacon just before serving if you want it extra crisp.
-
If salad thickens in the fridge, stir in a spoon of mayo or a splash of water or vinegar.
Nutritional Breakdown (Because We’re Curious!)
Okay, let’s talk numbers for a moment. This is a hearty, satisfying salad. The following is an approximate nutritional estimate per serving (based on 8 servings, using the classic recipe with mayo, and including the optional cheddar cheese). Remember, these values can vary based on the specific brands of ingredients you use.
Per Serving: Calories: ~360 | Fat: 22g | Saturated Fat: 5g | Carbohydrates: 32g | Fiber: 3g | Sugar: 3g | Protein: 10g
The protein comes from the bacon and cheese, the healthy fats from the mayo and bacon, and the carbs are primarily from the wholesome pasta and broccoli. For dietary adjustments, refer to the variations section—using Greek yogurt or adding chickpeas can significantly alter this profile to meet your needs!
Final Thoughts
And there you have it, friends—my heart and soul in a bowl, or rather, my Fresh Broccoli Pasta Salad. This recipe is more than just a list of instructions; it’s an invitation to create, to share, and to enjoy the simple, profound pleasure of a dish made with care.
I can’t wait for you to try it, to make it your own, and to see it become a requested favorite at your own tables and gatherings. That’s what Feastical is all about. When you make it, tag me or shoot me a message. I want to hear your stories, your twists, and see those beautiful, empty bowls.
Now, go forth and create some crunch! Until next time, keep your knives sharp and your hearts full.
— Beau
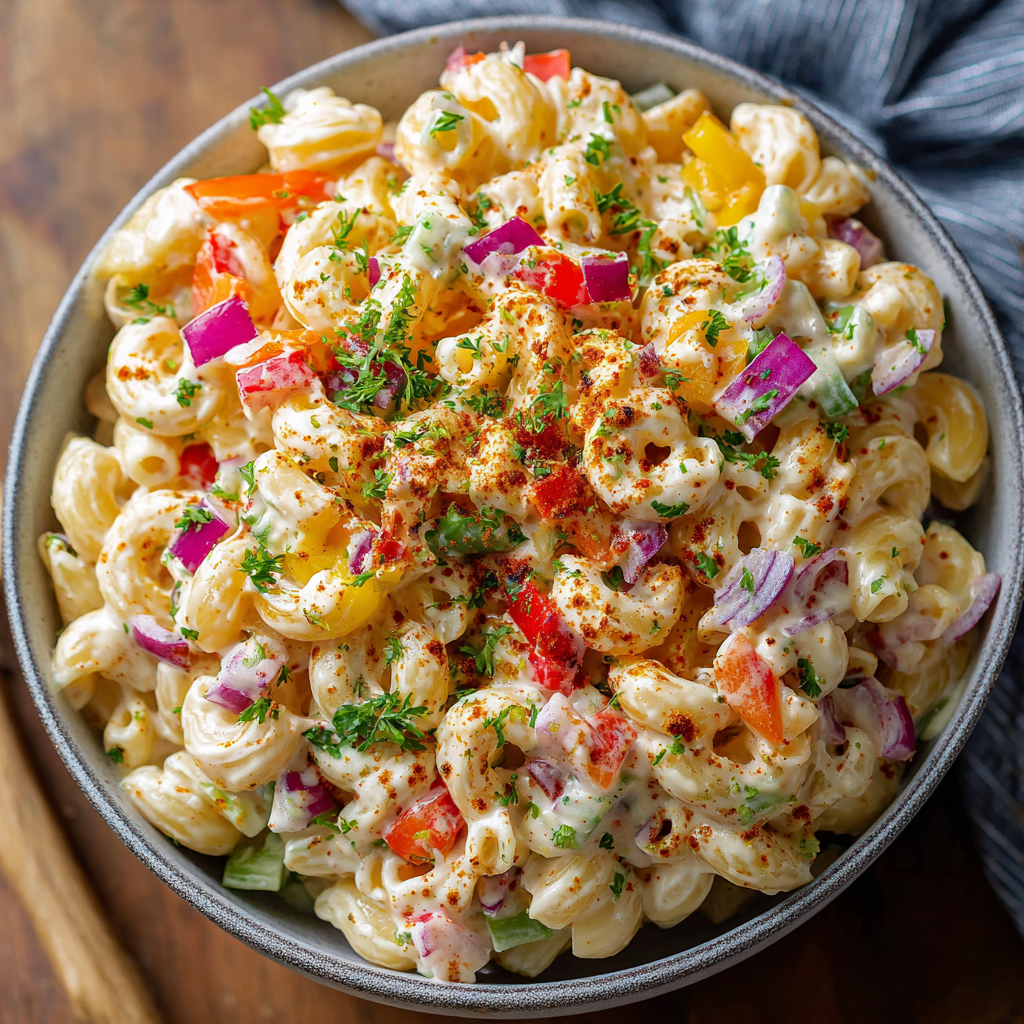
Ultra Flavorful Homemade Macaroni Salad
Ultra Flavorful Homemade Macaroni Salad – Creamy Classic BBQ Side
This Ultra Flavorful Homemade Macaroni Salad is the kind of side dish that steals the show at every cookout. Creamy, tangy, and loaded with crunchy vegetables, it’s perfectly balanced with just the right touch of sweetness and spice. Whether you’re hosting a backyard BBQ, heading to a potluck, or planning a holiday spread, this classic macaroni salad is guaranteed to be a crowd favorite.
Welcome to the Side Dish That Might Just Become the Main Event
Hey there, friend! Beau here, and I have to tell you, I’m a firm believer that some of the best memories are made not at the fancy dining table, but around a picnic table loaded with classic, comforting dishes. And right there, nestled between the smoky ribs and the charred burgers, sits the humble hero: macaroni salad. But not just any macaroni salad. We’re talking about a version so flavorful, so creamy and crave-able, that people will be asking for the recipe before they’ve even finished their first helping.
Now, I know what you’re thinking. “Beau, it’s just pasta and mayo.” Ah, but that’s where the magic happens! The difference between a “meh” mac salad and a “WOW, can I get this recipe?” mac salad lies in the details. It’s in the balance of tangy and sweet, the symphony of textures from crisp veggies, and that essential chill time where all the flavors decide to become best friends. This isn’t a side dish you just throw together; it’s a feel-good creation you build with love. So, grab your favorite mixing bowl—you know, the big one with the little chips on the rim that’s seen a thousand family gatherings—and let’s make a macaroni salad that’ll have everyone coming back for seconds (and thirds!).
The Macaroni Salad That Built a Reputation
This recipe takes me straight back to my Uncle Leo’s annual Fourth of July bash. It was a legendary event—the grill was the size of a small car, the laughter was loud, and the food table groaned under the weight of every classic American dish imaginable. My contribution, even as a gangly teenager just starting to find my way around the kitchen, was always the macaroni salad. One year, I got brave. I tweaked my mom’s good-but-safe recipe, adding an extra hit of Dijon, a dash of smoked paprika, and doubling the crunch factor. I held my breath as the first spoonful was taken… and then I saw it. The “nod.” You know the one. Eyes close, a slow smile, followed by, “Kid, what did you DO to this?” That bowl was scraped clean by halftime of the horseshoe tournament. It was the moment I realized food isn’t just about feeding people; it’s about creating a little moment of joy, a bite of pure, unadulterated happiness. That’s the spirit I’m packing into this recipe for you.
Gathering Your Flavor Makers
Here’s the beautiful cast of characters that’s going to make this salad unforgettable. Using the best you can find makes all the difference!
- 16 oz elbow macaroni: The classic canvas. I love elbows because their curves hold onto that creamy dressing so well. Pro-tip: Salty pasta water is key—it should taste like the sea! It’s our only chance to season the pasta itself.
- 1 cup mayonnaise: The creamy base. Use a good-quality, full-fat mayo for the richest texture and flavor. This is not the time for the diet stuff; we’re building flavor here!
- 2 tablespoons Dijon mustard: Our secret weapon for depth. Dijon brings a complex, tangy sharpness that cuts through the richness. Yellow mustard works in a pinch, but Dijon is a game-changer.
- 1 tablespoon apple cider vinegar: The bright, tangy wake-up call. It balances the mayo’s richness and keeps the whole dish from feeling heavy. A little splash of sunshine!
- 1 teaspoon sugar: Just a touch! It doesn’t make it sweet; it just perfectly rounds out the tang from the vinegar and mustard, creating a harmonious background note.
- ½ teaspoon paprika: For color and a gentle, smoky warmth. Smoked paprika is an incredible upgrade here if you have it—it adds a whisper of the grill.
- ½ teaspoon garlic powder: Trust me on this. Garlic powder distributes flavor evenly without the harsh bite of raw garlic. It gives that “what is that amazing flavor?” undertone.
- Salt and black pepper to taste: Season in layers! We’ll salt the pasta water, season the dressing, and do a final check before serving.
- ½ cup finely diced celery: The essential crunch. It adds a fresh, almost peppery bite that’s absolutely non-negotiable for texture.
- ½ cup finely diced red bell pepper: Sweetness, color, and more delightful crunch. It makes the salad visually pop.
- ¼ cup finely diced red onion: For a little sharp, pungent kick. If raw onion is too strong for you, soak the diced pieces in ice water for 10 minutes and drain. It mellows them right out!
- ¼ cup sweet pickle relish: The sweet-and-briny surprise. It adds little bursts of flavor and keeps the salad moist. Don’t skip it!
- Optional garnish: chopped parsley or extra paprika: A little sprinkle of green or red makes it look professionally “finished” and appetizing.
Let’s Build Some Magic, Step-by-Step
Ready? Tie on your apron, put on some good tunes, and let’s get cooking. This is where the fun happens!
- Cook the Pasta to Perfection: Bring a large pot of well-salted water to a rolling boil. Add your elbow macaroni and stir immediately to prevent sticking. Cook according to package directions, but aim for al dente—it should have a slight bite to it. Mushy pasta = sad salad. Once it’s done, drain it in a colander and give it a quick, light rinse under cool water. This stops the cooking instantly and washes off excess starch, preventing a gummy texture. Let it drain thoroughly—we don’t want watery dressing!
- Create the Flavor-Packed Dressing: While the pasta cools a bit, grab that big mixing bowl. In it, combine the mayonnaise, Dijon mustard, apple cider vinegar, sugar, paprika, garlic powder, a good pinch of salt, and a few cracks of black pepper. Now, whisk it like you mean it! Get it completely smooth and emulsified. Taste it right now on a spoon. This is your moment to adjust—want more tang? A tiny bit more vinegar. More depth? Another half-teaspoon of Dijon. You’re the boss.
- The Veggie Parade: To your beautiful, creamy dressing, add all your chopped veggies and the sweet pickle relish. Fold them in gently with a spatula until they’re all happily coated. You’ll see the dressing take on the colors from the pepper and relish—it’s already starting to look incredible.
- The Grand Union: Now, add the cooled, well-drained macaroni to the bowl. Using your spatula, gently fold the pasta into the dressing and veggie mixture. Be thorough but gentle, making sure every nook and cranny of those elbow noodles gets a luxurious coat of the dressing. Chef’s hack: I sometimes reserve a tablespoon of the dressing to stir in right before serving, just to freshen it up.
- The Patience Pays Off Step: This is the hardest part for me—I always want to dig in! Cover the bowl tightly with plastic wrap and tuck it into the refrigerator. Let it chill for at least 1-2 hours, but honestly, overnight is even better. This isn’t just about getting it cold; it’s a flavor-marriage ceremony. The pasta absorbs the dressing, the veggies soften just a touch, and all those individual flavors melt into one superstar dish.
- Serve with Love: When you’re ready, take the salad out, give it one final, gentle stir, and do a quick taste for seasoning. Sometimes it needs another tiny pinch of salt after its long rest. Transfer it to a serving bowl, sprinkle with a little chopped fresh parsley or a dusting of paprika for that picture-perfect finish, and watch it disappear.
How to Serve This Crowd-Pleaser
Presentation is part of the fun! For a casual backyard BBQ, I love serving this right out of my big, vintage ceramic bowl. For a potluck, a clear glass bowl lets those vibrant colors shine through. Spoon it onto a bed of crisp butter lettuce leaves for a fancier picnic look, or keep it simple in a trusty ol’ Tupperware for easy transport. This salad is the ultimate team player. It pairs flawlessly with grilled chicken, smoky pulled pork, juicy burgers, and hot dogs. It’s also fantastic alongside other picnic classics like baked beans, corn on the cob, and a big slice of watermelon. Don’t forget the serving spoon—things might get competitive!
Make It Your Own: Creative Twists
Once you’ve mastered this classic, the playground is open! Here are a few of my favorite spins:
- The Protein Powerhouse: Turn it into a main course by folding in two cups of diced, cooked ham, shredded rotisserie chicken, or flaked tuna (drained well) after chilling.
- Greek-Inspired Twist: Swap the mayo for a Greek yogurt/mayo blend, use lemon juice instead of vinegar, and add diced cucumber, kalamata olives, cherry tomatoes, and crumbled feta cheese. Omit the relish and use dried oregano.
- Southwestern Fiesta: Add a teaspoon of cumin and chili powder to the dressing. Mix in a cup of black beans (rinsed), a cup of sweet corn (thawed if frozen), and substitute the red bell pepper with diced roasted poblano. Garnish with cilantro.
- Lighter & Brighter: Replace half the mayo with plain, full-fat Greek yogurt. It adds a wonderful tang and protein boost while lightening it up.
- Sweet & Crunchy: Add ½ cup of well-drained crushed pineapple and ½ cup of toasted, chopped pecans or walnuts just before serving for a tropical, textured twist.
Beau’s Kitchen Notes
This recipe has been my trusty plus-one for over a decade, and it’s evolved with me. I started with yellow mustard and white onion, but over the years, the Dijon and red onion upgrade happened, and it was a revelation. The biggest lesson? Don’t skimp on the chill time. I once had to bring a “just-made” salad to a party, and while it was still good, it wasn’t the transcendent, flavor-melded experience it is after a few hours in the fridge. It’s like a good stew—it gets better as it sits. Also, a funny story: I once accidentally used hot chili powder instead of paprika. Let’s just say it was a VERY popular salad with my brother-in-law, but the kids were not impressed. Always double-check your spice jars!
Your Questions, Answered
Q: My salad seems dry the next day. What happened?
A: Pasta continues to absorb liquid as it sits. This is totally normal! Simply stir in a tablespoon or two of milk, buttermilk, or even a little more mayo to bring back the creamy consistency before serving.
Q: Can I make this ahead of time?
A> Absolutely! In fact, I encourage it. You can make this up to 2 days in advance. Store it covered tightly in the fridge. The flavors just get happier and more cohesive.
Q: I’m not a fan of raw onion. Any tips?
A> You’re not alone! Soaking the finely diced red onion in a small bowl of ice water for 10-15 minutes works wonders. It pulls out that sharp, sulfuric bite and leaves you with a pleasant, mild onion flavor and great crunch. Drain well before adding.
Q: What’s the best way to store leftovers?
A> Keep it in an airtight container in the refrigerator for up to 3-4 days. Give it a good stir each time before you serve it. I don’t recommend freezing it, as the mayo-based dressing and veggies will become watery and separate when thawed.
Ultra Flavorful Homemade Macaroni Salad
Description
This ultra flavorful macaroni salad is creamy, tangy, and packed with crunchy vegetables. It’s the kind of classic BBQ side that works for cookouts, potlucks, and family dinners. Easy to make ahead and even better after chilling, it’s a reliable crowd favorite.
Ingredients
-
16 oz (450 g) elbow macaroni
-
1 cup mayonnaise
-
2 tbsp Dijon mustard
-
1 tbsp apple cider vinegar
-
1 tsp sugar
-
½ tsp paprika (smoked paprika if you like)
-
½ tsp garlic powder
-
Salt and black pepper, to taste
-
½ cup finely diced celery
-
½ cup finely diced red bell pepper
-
¼ cup finely diced red onion
-
¼ cup sweet pickle relish
-
Optional garnish: chopped parsley or extra paprika
Instructions
-
Cook the pasta
Boil macaroni in well-salted water until al dente. Drain and rinse briefly under cool water. Let it drain well and cool. -
Make the dressing
In a large bowl, whisk mayonnaise, Dijon mustard, apple cider vinegar, sugar, paprika, garlic powder, salt, and pepper until smooth. -
Add vegetables
Stir in celery, bell pepper, red onion, and relish until coated. -
Combine with pasta
Add cooled macaroni and gently mix until every piece is coated with dressing. -
Chill
Cover and refrigerate at least 1–2 hours (overnight is best for flavor). -
Serve
Stir, adjust seasoning if needed, garnish, and serve cold.
Notes
-
Salt the pasta water well — this builds flavor from the start.
-
Cook just to al dente so pasta stays firm after chilling.
-
Drain thoroughly to avoid watery dressing.
-
Let it chill — flavor improves a lot after resting.
-
If it thickens too much later, mix in a spoon of mayo or a splash of milk.
Nutritional Information*
*Please note: Nutritional information is an estimate provided by an online calculator. For precise dietary needs, consult a nutritionist.
- Prep Time: 15 minutes
- Cook Time: 10 minutes
- Chill Time: 1–2 hours
- Total Time: 1 hour 25 minutes
- Servings: 10
Approximate Nutrition (per serving):
Calories: 390 | Protein: 9g | Carbohydrates: 45g | Fat: 19g | Fiber: 2g
Final Thoughts
And there you have it—my heart and soul in a bowl of pasta. This Ultra Flavorful Homemade Macaroni Salad is more than a recipe; it’s a ticket to creating those easy, joyful, sun-drenched moments with people you love. It’s forgiving, customizable, and always, always satisfying. I hope it becomes a staple in your recipe box, the one you reach for when you need a guaranteed win. Thanks so much for letting me share my kitchen with you today. Now, go make a memory (and save me a spoonful!). Until next time, keep it flavorful.
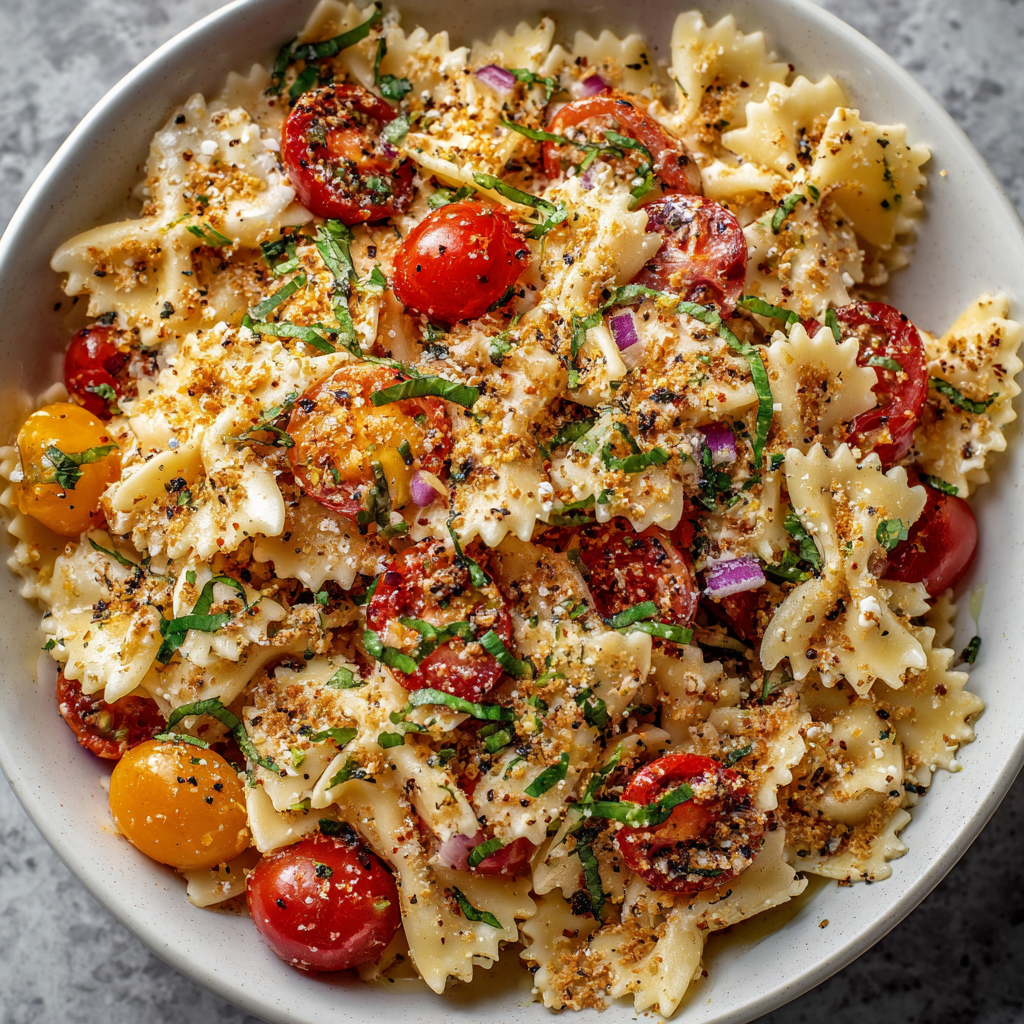
Bruschetta Pasta Salad : Fresh Tomato Basil Pasta with Crunchy Breadcrumbs
Let’s Make a Salad That Tastes Like Summer on a Plate
Hey friends, Beau here from Feastical! Tell me if this sounds familiar: It’s a gorgeous, sunny day, you’ve got friends coming over, and you want to make something that screams “summer” without you screaming in the kitchen. You crave those bright, fresh flavors of a perfect bruschetta—the juicy tomatoes, the fragrant basil, the garlicky olive oil—but you need something more substantial, something you can scoop into a bowl and share.
Enter my Bruschetta Pasta Salad. This isn’t your average, mayo-heavy pasta salad. Nope. This is the love child of a classic Italian antipasti plate and your favorite potluck side dish. We’re taking everything magical about bruschetta and tossing it with tender bowtie pasta, creamy mozzarella pearls, and a secret weapon: crispy, golden sourdough breadcrumbs that mimic the crunch of toasted baguette. It’s vibrant, satisfying, and so incredibly flavorful. It’s the dish that disappears first from the picnic blanket, the one that gets recipe requests before you’ve even packed up the leftovers. So, tie on your favorite apron, and let’s turn those beautiful summer ingredients into a meal that’s basically a celebration in a bowl.
The Little Plate That Started It All
This recipe is a total memory-maker for me. It all goes back to my first trip to a proper Italian-American deli as a kid. I was wide-eyed, surrounded by hanging meats and wheels of cheese, but what stopped me in my tracks was the counter of “salads.” Not leafy greens, but glorious, jewel-toned bowls of orzo, tortellini, and farfalle. The one I begged for was a simple tomato and basil pasta. I ate it out of the container with a plastic fork, sitting on a curb in the sunshine. The flavors were a revelation—so pure and bright compared to the heavier food I was used to.
Years later, trying to recreate that feeling for a big backyard BBQ, I missed the essential textural contrast of bruschetta. The creamy pasta and juicy tomatoes needed a crunch. Staring at a leftover piece of sourdough, it hit me: toasted breadcrumbs! That moment of kitchen inspiration—using what I had to solve a flavor-texture puzzle—is what Feastical is all about. It transformed a good pasta salad into a “can’t-stop-eating-it” experience. Every time I make it now, I’m back on that sunny curb, discovering how good simple food can be.
Gathering Your Flavor Crew
Here’s the beautiful part: this dish is all about quality, not quantity. Using the best, freshest ingredients you can find will make it sing. Let’s break it down.
- 12 oz bowtie (farfalle) pasta: Those little bows are perfect for catching bits of tomato and pools of dressing. Chef’s Insight: You can use any short pasta you love—orecchiette, fusilli, or even mini shells all work great.
- 2 cups cherry tomatoes (mixed colors), halved: The star of the show! Mixed colors aren’t just pretty; they offer slightly different sweetness levels. Pro Tip: In the off-season, slow-roast halved tomatoes with a drizzle of oil at 300°F for 45 minutes to concentrate their flavor.
- 1 cup mozzarella pearls: Little bursts of creamy, mild freshness. Easy Sub: A block of fresh mozzarella, torn into bite-sized pieces, is even more decadent.
- ¼ cup red onion, thinly sliced: They add a necessary sharp bite. Kitchen Hack: Soak the sliced onion in ice water for 10 minutes before using. It tames the harshness and makes them delightfully crisp.
- ¼ cup fresh basil, chopped: Non-negotiable! The herbal soul of the dish. Always add it fresh at the end. Dried basil just won’t do the trick here.
- 2 cloves garlic, minced: For that essential zing. Fun Twist: For a mellower, almost sweet garlic flavor, grate it on a microplane instead of mincing.
- 3 tbsp extra virgin olive oil: Use the good stuff here. It’s a main flavor component, not just a lubricant.
- 1 tbsp balsamic vinegar: A touch of sweetness and acidity to balance the oil. A aged, syrupy balsamic glaze makes a gorgeous drizzle on top when serving.
- ½ tsp salt & ½ tsp cracked black pepper: Season as you go! Taste, taste, taste.
- ½ cup toasted sourdough breadcrumbs: The “bruschetta” crunch! Chef’s Secret: Pulse stale sourdough in a food processor, then toast in a skillet with a tiny bit of olive oil until golden. It beats store-bought every time.
Let’s Get Cooking: Building Layers of Flavor
This recipe is less about fancy techniques and more about timing and treating each component with love. Follow these steps, and you’re guaranteed a winner.
Step 1: Cook & Cool the Pasta. Bring a large pot of well-salted water to a rolling boil (it should taste like the sea!). Add your bowties and cook according to package directions for al dente—you want a little bite. Once done, drain immediately and give it a quick rinse under cold water to stop the cooking. This also washes away excess starch, preventing clumping. Let it cool completely in the colander or spread on a baking sheet. A hot pasta will wilt your beautiful basil and melt the mozzarella, so patience is key!
Step 2: Wake Up the Bruschetta Mix. While the pasta cools, make the heart of the dish. In your large serving bowl, combine the halved cherry tomatoes, minced garlic, chopped basil, olive oil, balsamic vinegar, salt, and pepper. Give it a gentle, loving stir. Now, let it sit. This 10-15 minute marinade is magic—the salt draws out the tomato juices, the garlic infuses the oil, and everything mingles to create the most incredible, simple dressing. Your kitchen will smell amazing.
Step 3: The Grand Toss. To your bowl of now-perfumed tomatoes, add the completely cooled pasta, the mozzarella pearls, and your rinsed (or soaked) red onion slices. Using a large spoon or flexible spatula, toss everything together gently but thoroughly. You want every nook and cranny of pasta coated in that glossy, flavorful dressing. Take a taste! Does it need another pinch of salt or a crack of pepper? Now’s the time to adjust.
Step 4: The Crunch Factor (Timing is Everything!). Here’s the pro move: DO NOT add the breadcrumbs yet. If you toss them in and refrigerate the whole salad, they’ll lose their crunch and become sad and soggy. Cover the tossed salad and pop it in the fridge for at least 30 minutes to let the flavors get to know each other.
Step 5: Serve with Style. Right before you’re ready to serve, pull the salad from the fridge. Give it one final gentle stir, then generously sprinkle the toasted sourdough breadcrumbs over the top. This preserves their perfect, crispy texture, giving everyone that delightful bruschetta crunch in every bite. Garnish with a few whole basil leaves and an extra grind of black pepper for a chef-y finish.
How to Serve This Summer Showstopper
Presentation is part of the joy! I love serving this salad in a big, wide, shallow bowl so all the colorful ingredients are visible. For a family-style dinner, plop it right in the center of the table with a large serving spoon. For a more elegant potluck presentation, consider individual servings in mason jars (layer the salad, then add breadcrumbs to the very top just before handing them out).
This salad is a fantastic team player. It’s the perfect side to grilled lemon-herb chicken, garlic butter shrimp skewers, or a juicy burgers straight off the BBQ. For a vegetarian feast, pair it with grilled halloumi cheese and some marinated white beans. Don’t forget a crusty baguette on the side for mopping up any extra tomatoey dressing left in the bowl—trust me, there will be some!
Make It Your Own: Delicious Twists & Swaps
The beauty of this formula is its flexibility. Play with it based on what’s in your fridge or your dietary needs!
- Mediterranean Twist: Add ½ cup of chopped kalamata olives, ¼ cup of crumbled feta cheese (instead of mozzarella), and a handful of chopped pepperoncini. Swap the basil for fresh oregano.
- Protein Power-Up: Turn it into a main course by folding in a can of drained, seasoned chickpeas, 2 cups of shredded rotisserie chicken, or a few handfuls of baby arugula (added with the pasta).
- Caprese-Style: Swap the balsamic vinegar for a splash of red wine vinegar or lemon juice. Add ¼ cup of finely chopped sun-dried tomatoes (packed in oil) for an intense flavor punch.
- Dairy-Free/Vegan: Omit the mozzarella or replace it with a vegan mozzarella alternative or creamy, marinated tofu cubes. Ensure your breadcrumbs are vegan.
- Gluten-Free: Super easy! Use your favorite gluten-free pasta (corn and rice blends work well) and ensure your breadcrumbs are made from certified GF bread.
A Few Chef-y Secrets from My Kitchen to Yours
This recipe has evolved like a good friendship. I started out making it exactly as I remembered from the deli, but over dozens of barbecues and picnics, I’ve learned a few things. The breadcrumb idea was born from a minor kitchen disaster where I burned the crostini I was going to serve on the side—crumbling them over the top was a happy accident! I also used to add the onion raw, but after one too many “spicy” bites, the ice-water soak became a permanent step. It’s these little tweaks, born from experience and taste, that make a recipe truly yours. Don’t be afraid to experiment. Want to add a pinch of red pepper flakes for heat? Do it. Love the tang of fresh lemon zest? Zest it right in! The kitchen is your playground.
Your Questions, Answered
Q: Can I make this salad ahead of time?
A: Absolutely, and it often tastes better! Assemble the salad (through Step 3) up to 24 hours in advance. Store it covered in the fridge. Keep the toasted breadcrumbs in a separate bag or container at room temperature. Add the breadcrumbs and give it a final stir just before serving.
Q: My pasta salad seems dry after chilling. What happened?
A: Pasta absorbs liquid as it sits. No worries! Simply drizzle a little extra virgin olive oil and a tiny splash of balsamic vinegar over the salad and toss again. The flavors will reawaken.
Q: What’s the best way to store leftovers?
A: Store in an airtight container in the fridge for up to 3 days. The breadcrumbs will soften, but the flavors will still be delicious. For best texture, you can re-toast a few fresh breadcrumbs to sprinkle on individual servings.
Q: Can I use a different vinegar?
A: Of course! Red wine vinegar or a fresh squeeze of lemon juice are excellent substitutes for balsamic. They’ll give a brighter, more acidic profile that’s equally delicious.

Bruschetta Pasta Salad : Fresh Tomato Basil Pasta with Crunchy Breadcrumbs
Description
This bruschetta pasta salad tastes like summer in every bite. It’s light, colorful, and full of juicy tomatoes, fresh basil, olive oil, and creamy mozzarella. Unlike heavy creamy salads, this one is bright and refreshing — perfect for picnics, barbecues, or quick lunches.
Ingredients
-
12 oz (340 g) bowtie (farfalle) pasta
-
2 cups cherry tomatoes, halved
-
1 cup mozzarella pearls (or diced fresh mozzarella)
-
¼ cup thinly sliced red onion
-
¼ cup fresh basil, chopped
-
2 cloves garlic, minced
-
3 tbsp extra virgin olive oil
-
1 tbsp balsamic vinegar
-
½ tsp salt (or to taste)
-
½ tsp black pepper
-
½ cup toasted sourdough breadcrumbs
Instructions
-
Cook the pasta
Boil pasta in well-salted water until al dente. Drain and rinse briefly under cool water. Let cool completely. -
Make the tomato mixture
In a large bowl, combine tomatoes, garlic, basil, olive oil, balsamic vinegar, salt, and pepper. Stir and let sit 10–15 minutes so flavors blend. -
Combine
Add cooled pasta, mozzarella, and red onion to the bowl. Toss gently until evenly coated. -
Chill
Cover and refrigerate at least 30 minutes to develop flavor. -
Add crunch & serve
Sprinkle toasted breadcrumbs over the top just before serving and toss lightly.
Notes
-
Cool pasta fully before mixing so cheese stays firm and basil stays fresh.
-
Add breadcrumbs last so they stay crispy.
-
Too dry after chilling? Add a drizzle of olive oil and a splash of vinegar.
-
Milder onion flavor: soak slices in cold water for 10 minutes, then drain.
-
Best texture: eat within 24 hours for peak freshness.
Nutritional Information*
This salad is a celebration of fresh, whole ingredients. Here’s a general breakdown per serving (about 1.5 cups), keeping in mind that exact values can vary based on specific brands and ingredient quantities used.
- Calories: ~320
- Total Fat: 14g (The healthy fats come primarily from heart-healthy olive oil.)
- Saturated Fat: 4g
- Carbohydrates: 38g (A good balance of complex carbs from the pasta and simple sugars from the fresh tomatoes.)
- Fiber: 3g
- Sugars: 4g
- Protein: 10g (Thanks to the pasta and mozzarella!)
- Sodium: ~380mg
*This information is an estimate provided by an online nutrition calculator. For precise dietary needs, please calculate with your exact ingredients.
Go Forth and Feast!
And there you have it, friends—my ultimate Bruschetta Pasta Salad. It’s more than just a recipe; it’s a vibe. It’s the taste of sunshine, shared laughs, and easy, delicious living. I hope it becomes a staple in your summer rotation, the dish you’re known for bringing, the one that has everyone asking, “Can I get the recipe?”
Remember, cooking is about joy, not perfection. If your tomatoes aren’t perfectly uniform or you accidentally add the breadcrumbs early, it’s still going to be delicious. The real magic is in the sharing. So make this salad, call some friends, fire up the grill, and create your own sunny-day memories. Thanks for letting me share one of my favorites with you. Now, go grab a fork and dig in!
With love and a full plate,
Beau

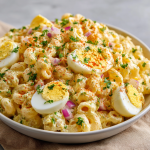
Creamy Deviled Egg Macaroni Salad
Creamy Deviled Egg Macaroni Salad – Classic Picnic Side Dish
The Side Dish That Steals the Show Every Time
Hey friends, Beau here! Let me paint you a picture. It’s a perfect summer afternoon. The grill is humming, laughter is bouncing around the backyard, and the picnic table is buckling under the weight of all your favorite dishes. You’ve got your burgers, your dogs, your watermelon wedges… but what’s the one bowl that always, always gets scraped clean first? In my family, it’s the macaroni salad. But not just any macaroni salad. We’re talking about the ultimate mash-up, the culinary love child of two picnic-table legends: the Creamy Deviled Egg Macaroni Salad.
If you’ve ever stood over a platter of deviled eggs, wondering how to make that magical, tangy, creamy filling stretch to feed a crowd, this recipe is your answer. We’re taking all the iconic flavors of a perfect deviled egg—the rich mayo, the punchy mustard, the sweet hint of relish—and we’re folding it into tender elbow macaroni and chunks of hard-boiled egg. The result is a side dish that’s nostalgic, comforting, and ridiculously satisfying. It’s cool, creamy, and has just the right amount of zip to cut through the richness of any BBQ main. This isn’t just a salad; it’s a memory-maker, a potluck powerhouse, and your new secret weapon for everything from Fourth of July to Sunday supper. So, tie on your apron, and let’s make a bowl of pure, unadulterated joy.
Grandma’s Picnic Table & The “More Is More” Philosophy
This recipe’s soul comes straight from my Grandma Eleanor’s crowded, checkered-tablecloth picnics. She was a firm believer in the “more is more” school of thought when it came to feeding people. One year, she famously declared she’d made “enough deviled eggs to feed a small army,” which, for her, meant six dozen. The sight of those platters, each egg meticulously sprinkled with paprika, was glorious. But the real magic happened with the “oops” eggs—the ones that peeled ugly or got a little mangled in transit. Those weren’t wasted. Oh no.
With a wink, she’d chop them up, fold them into her already fantastic macaroni salad, and add an extra heavy glug of yellow mustard. “We’re just gilding the lily, Beau,” she’d say. That “gilded” version always disappeared first. It was creamier, eggier, and had this bold flavor that the regular salad just didn’t. Without realizing it, Grandma was innovating. She taught me that recipes aren’t museums—they’re living, breathing things that get better when you listen to the ingredients (and aren’t afraid of a little mustard). This dish is my homage to her, a perfected version of that happy kitchen accident, created intentionally from the start.
Gathering Your Flavor Allies
Here’s everything you’ll need to build this flavor powerhouse. I’ve included my little chef insights for each, because knowing the “why” makes you a more confident cook!
- 12 oz elbow macaroni: The classic choice! Its little curves are perfect for cradling the creamy dressing. Chef’s Insight: You can use any small pasta like shells or cavatappi, but elbows are the nostalgic champion.
- 6 hard-boiled eggs, chopped: The star of the show! They provide rich, savory pockets of flavor and that signature deviled egg texture. Tip: For easy-peel eggs, use slightly older eggs and plunge them into an ice bath immediately after boiling.
- ¾ cup mayonnaise: This is the base of our creamy dressing. It brings everything together in a lush, smooth embrace. Substitution: For a tangier twist, swap half with full-fat Greek yogurt or sour cream.
- 2 tablespoons yellow mustard: This gives us that bright, classic picnic flavor. It’s non-negotiable for authenticity!
- 1 tablespoon Dijon mustard (optional for extra depth): My personal “gilding the lily” move. Dijon adds a sophisticated, sharp complexity that takes the dressing to the next level.
- 2 tablespoons sweet pickle relish: The secret sweet-and-briny note! It provides tiny bursts of flavor and moisture. Substitution: Dill pickle relish works for a less sweet, more tangy profile.
- ¼ cup finely diced celery: Don’t skip this! It’s not just filler. Celery adds a crucial, fresh crunch and a subtle, almost herbal note that balances the richness.
- ¼ cup finely diced red onion: Soaks up the dressing beautifully and offers a mild, peppery bite. Chef’s Hack: Soak the diced onion in cold water for 10 minutes to mellow its raw bite if you’re sensitive.
- 1 teaspoon apple cider vinegar: The brightening agent! A small splash cuts through the fat and makes all the other flavors pop.
- Salt and black pepper to taste: Season in layers. Taste as you go!
- Paprika, for garnish: The iconic deviled egg finish. A sprinkle on top adds color and a whisper of sweet, smoky flavor.
- Fresh parsley, chopped (optional): A green flourish that adds a pop of color and a hint of freshness.
Let’s Build Some Magic: Step-by-Step
Follow these steps, and you’ll have a foolproof, fantastic salad. I’m talking you through it like you’re here in my kitchen with me!
- Cook the Pasta Like a Pro: Bring a large pot of well-salted water to a rolling boil. Add your elbow macaroni and cook according to package directions until al dente – that means it’s tender but still has a slight bite. Why? Mushy pasta turns into a sad, bloated mess in a salad. Once cooked, drain it in a colander. Here’s my key hack: give it a quick, light rinse under cool water. This stops the cooking instantly, washes off excess starch that can make the salad gummy, and cools the pasta down so it doesn’t “cook” the eggs when you mix everything.
- Craft the Dreamy Dressing: While the pasta cools, grab your largest mixing bowl. This is where the flavor foundation is laid. Whisk together the mayonnaise, yellow mustard, Dijon (if using), sweet pickle relish, and apple cider vinegar. Give it a taste! Season with a good pinch of salt and a few cranks of black pepper. Chef’s Commentary: The dressing should taste bold and a little too tangy on its own. Once it coats the neutral pasta and eggs, it will mellow into perfection.
- Incorporate the Good Stuff: To the same bowl with your dressing, add the chopped hard-boiled eggs, the diced celery, and the diced red onion. Gently stir them in until they’re evenly coated and happy. Little Hack: If you hate chopping eggs, pop your peeled eggs in a large bowl and use a potato masher for 3-4 mashes. You’ll get a perfect mix of chunks and fine pieces that cling to every nook of the pasta.
- The Grand Unification: Now, add the cooled, rinsed macaroni to the bowl. Using a large rubber spatula or a big spoon, fold and stir until every single piece of pasta is gleaming with that creamy, dreamy dressing. No naked macaroni allowed! Take a final taste here and adjust seasoning if needed—maybe another pinch of salt or a grind of pepper.
- The Patience Payoff: This step is crucial. Cover the bowl tightly with plastic wrap and tuck it into the refrigerator for at least 1 hour. Overnight is even better! Why the wait? This chill time allows the flavors to get to know each other, mingle, and deepen. The pasta soaks up the dressing, transforming from coated to infused. Trust me, it’s worth the wait.
- The Final Flourish: When you’re ready to serve, give the salad one last gentle stir. Transfer it to your prettiest serving bowl. Just before it hits the table, dust the top generously with that beautiful, rusty-red paprika and sprinkle with fresh parsley if you like. This is the presentation moment—it says, “I care, and this is going to be delicious.”
How to Serve It Up (and Watch it Vanish)
This salad is the ultimate team player. I love serving it in a wide, shallow bowl so you can see all the colorful bits of egg, celery, and onion peeking through. For a real picnic vibe, use a classic vintage Pyrex dish—it just tastes better that way, I swear.
It’s the perfect sidekick to pretty much anything coming off the grill: juicy burgers, smoky hot dogs, tangy pulled pork, or simple grilled chicken. It also shines on a holiday buffet table next to a glazed ham or roasted turkey. For a lighter summer lunch, I’ll sometimes make a huge bed of crisp romaine lettuce and pile a generous scoop of this salad right on top. The creamy, cool pasta against the crunchy lettuce is a textural dream. Don’t forget the iced tea or lemonade!
Make It Your Own: Delicious Twists
Once you’ve mastered the classic, have fun playing with these variations! This recipe is a wonderful canvas.
- The “Everything Bagel” Twist: Add 2 tablespoons of everything bagel seasoning to the dressing, and use green onion instead of red. Garnish with extra seasoning and everything bagel-spiced toasted breadcrumbs for insane crunch.
- The Smoky & Savory Upgrade: Fold in ½ cup of crumbled, crispy cooked bacon and use smoked paprika for the garnish. A teaspoon of liquid from a chipotle pepper in adobo sauce in the dressing adds a wicked smoky heat.
- The Garden Fresh Herb Bomb: Boost the freshness by adding ¼ cup each of finely chopped fresh dill and chives to the mix. Swap the yellow mustard for a whole grain mustard for little pops of texture and flavor.
- The Lighter, Tangier Swap: Substitute the mayonnaise entirely with 1 cup of full-fat, plain Greek yogurt. You’ll get a tangier, protein-packed salad that’s still incredibly creamy.
- The Vegan Delight: Use your favorite egg-free pasta. For the “eggs,” crumble ½ block of extra-firm pressed tofu and toss it with a pinch of turmeric (for color) and black salt (kala namak), which has an incredible sulfurous, eggy flavor. Use vegan mayo and mustard. It’s shockingly good!
Beau’s Kitchen Notes & Stories
This recipe has been on quite a journey with me. The first time I made it for a big friend potluck, I was so nervous. I kept tweaking the dressing right up until we walked out the door. My partner finally took the bowl from my hands and said, “Beau, it’s perfect. Stop fussing!” Of course, it was the first thing gone, and I got three recipe requests. Lesson learned: trust the process, and trust your taste buds.
One of my favorite evolutions was adding the Dijon mustard. It started as an accident—I was out of yellow mustard and had to improvise—and it was such a happy discovery that I wrote it into the recipe permanently. Also, I never, ever skip the chill time now. I once got impatient and served it warm, and it was just… fine. Letting it rest makes it legendary. That’s the difference between good and “can I have your recipe?” good.
Your Questions, Answered!
Q: My salad seems a bit dry after chilling. What happened?
A: Pasta is a thirsty creature! It continues to absorb dressing as it sits. No worries—this is an easy fix. Simply stir in an extra tablespoon or two of mayonnaise or a splash of milk/cream right before serving to bring back that creamy consistency.
Q: Can I make this ahead of time?
A> Absolutely, and I encourage it! This salad is actually at its best made 1 day ahead. Just hold off on the final paprika and parsley garnish until you’re ready to serve. Keep it covered tightly in the fridge for up to 3 days.
Q: Help! My salad turned out watery.
A> This usually stems from two things: 1) Not rinsing the pasta, leaving sticky starch that breaks the emulsion of the dressing, or 2) Adding veggies (like the relish or celery) that haven’t been patted dry. Make sure your rinsed pasta is well-drained and give your diced veggies a quick blot with a paper towel before adding.
Q: What’s the best way to chop hard-boiled eggs for this?
A> My two favorite methods: 1) Use an egg slicer. Slice the egg one way, then rotate it 90 degrees and slice again for a perfect, even chop. 2) The potato masher method I mentioned earlier—it’s fast and gives a great, rustic texture that holds onto the dressing.
Creamy Deviled Egg Macaroni Salad
Description
This creamy deviled egg macaroni salad combines two picnic favorites into one crowd-pleasing dish. It’s cool, rich, tangy, and full of comforting flavor. Perfect for barbecues, potlucks, or make-ahead family meals, it’s easy to prepare and even better after chilling.
Ingredients
-
12 oz (340 g) elbow macaroni
-
6 hard-boiled eggs, chopped
-
¾ cup mayonnaise
-
2 tbsp yellow mustard
-
1 tbsp Dijon mustard (optional)
-
2 tbsp sweet pickle relish
-
¼ cup finely diced celery
-
¼ cup finely diced red onion
-
1 tsp apple cider vinegar
-
Salt and black pepper to taste
-
Paprika, for garnish
-
Chopped parsley (optional)
Instructions
-
Cook the pasta
Boil macaroni in salted water until al dente. Drain and rinse briefly under cool water. Let it drain well. -
Make the dressing
In a large bowl, whisk mayonnaise, mustards, relish, and apple cider vinegar. Season with salt and pepper. -
Add mix-ins
Stir chopped eggs, celery, and red onion into the dressing. -
Combine
Add cooled pasta and mix gently until evenly coated. -
Chill
Cover and refrigerate at least 1 hour (overnight is even better). -
Serve
Stir, then garnish with paprika and parsley before serving.
Notes
-
Salt your pasta water well — it’s your only chance to season the pasta itself.
-
Rinse and cool pasta so it doesn’t absorb too much dressing too fast.
-
Pat veggies dry after chopping to prevent watery salad.
-
Make it ahead — flavor improves after several hours in the fridge.
-
If it thickens too much, stir in a spoon of mayo or a splash of milk before serving.
Nutritional Info (For Your Peace of Mind)
Here’s a general breakdown per serving, based on the classic recipe. Remember, variations will change these numbers!
Prep Time: 15 minutes | Cook Time: 10 minutes | Chill Time: 1 hour | Total Time: 1 hour 25 minutes | Servings: 8
Approximate Nutrition (per serving):
Calories: 420 | Protein: 12g | Carbohydrates: 38g | Fat: 25g | Fiber: 2g
This salad is a satisfying side dish that provides a good source of energy (carbs from the pasta) and protein (from the eggs). The fats are primarily from the mayonnaise and egg yolks, which help your body absorb the fat-soluble vitamins present. To lighten it up, refer to the “Lighter, Tangier Swap” variation using Greek yogurt!
Final Thoughts from My Kitchen to Yours
At the end of the day, this Creamy Deviled Egg Macaroni Salad is about more than just ingredients. It’s about the laughter around the table, the satisfaction of a dish loved by all, and the simple joy of sharing something you made with your own two hands. It’s proof that the best
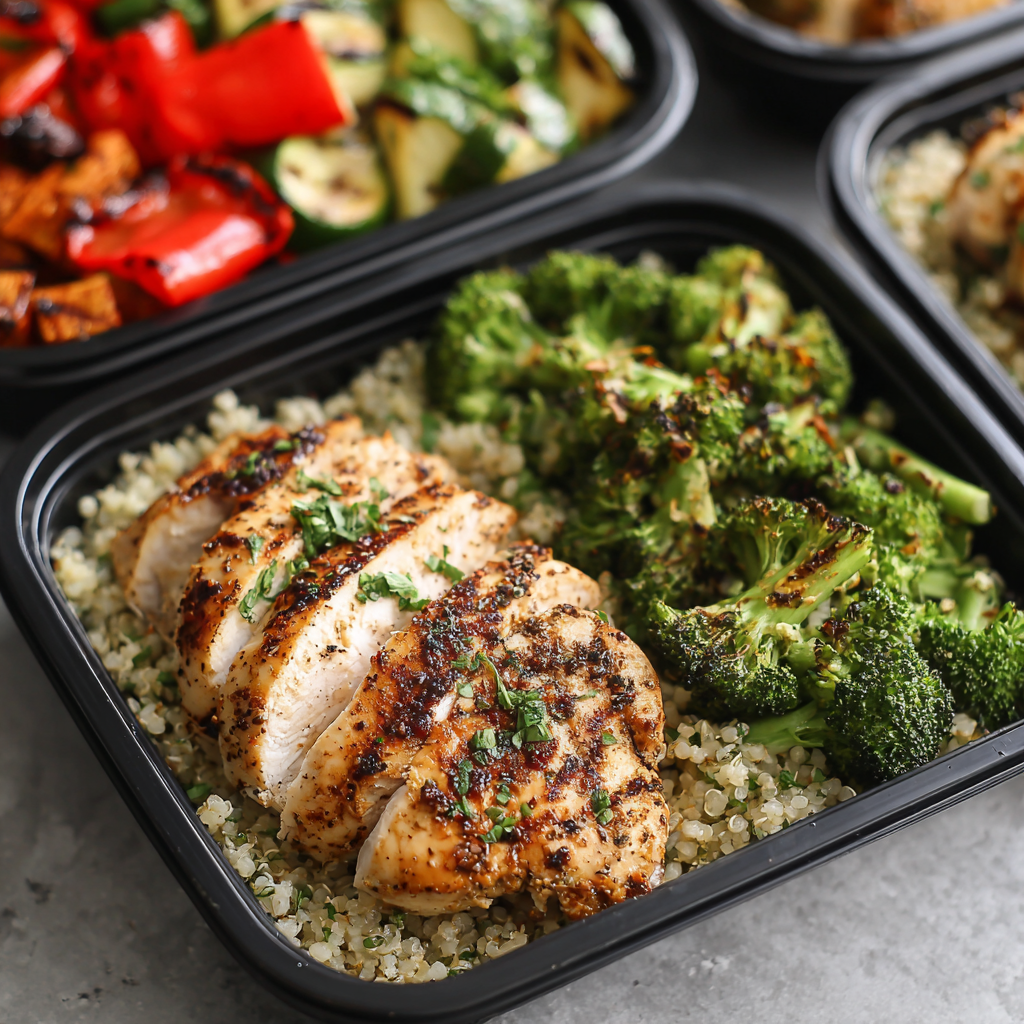
High-Protein Italian Pasta Salad : Easy Meal Prep Favorite
Your New Go-To Lunch That Actually Excites You
Hey friend, Beau here! Let me ask you a question. Do you ever find yourself staring into the fridge at lunchtime, feeling that familiar slump? You’re hungry, you want something satisfying, but the thought of another sad sandwich or basic leftovers just… doesn’t spark joy. You want something that tastes like it took effort, but you don’t actually have the time or energy for effort. That, right there, is the exact culinary conundrum that led me to create this masterpiece.
This isn’t just any pasta salad. This is your secret weapon, your lunchbox hero, your guaranteed answer to “what’s for dinner?” on a hectic Wednesday. My High-Protein Italian Pasta Salad is the full package: it’s bold, fresh, incredibly satisfying, and it gets even better as it chills in your fridge. We’re talking savory salami, crisp cucumbers, sweet bell peppers, juicy tomatoes, and tender rotini all getting cozy in a creamy, tangy, herb-kissed dressing. It’s the kind of food that brings people together at a barbecue but is also savvy enough to be your structured, protein-packed meal prep champion.
I built this recipe for us—the busy people who still believe food should be a highlight of the day, not a chore. It’s a hug in a bowl that also happens to keep you full and energized for hours. So, grab your favorite big mixing bowl (you know the one), and let’s make something delicious that you’ll be thanking yourself for all week long.
More Than Just a Salad: A Picnic Revelation
This recipe has roots in a very specific, slightly chaotic memory. Picture this: It’s a sweltering July afternoon, and my extended family has decided to host a massive potluck picnic in the park. My contribution, tasked to me by my Nonna, was the “pasta salad.” Being a young, eager-to-impress cook, I went ultra-traditional—pasta, olives, pepperoni, a bottle of store-bought Italian dressing. It was… fine. But as it sat in the sun, something sad happened. The oil separated, the flavors never really married, and it felt heavy, not refreshing.
Fast-forward to my early meal-prep days, trying to pack lunches that wouldn’t leave me starving by 3 PM. I craved that Italian flavor profile but needed more staying power and a dressing that wouldn’t bail on me. I started playing around, adding more veggies for crunch, swapping in Greek yogurt for some of the oil to create a creamy, clingy, protein-boosting dressing base. The first time I took a forkful of the new-and-improved version, it was a revelation. It had the soul of that family picnic dish but evolved—brighter, heartier, and infinitely more reliable. It’s the perfect example of how our food grows up with us, taking the best memories and making them even better.
Gathering Your Flavor Crew
Here’s everything you’ll need to build this flavorful, protein-packed masterpiece. I’ve included some chef-y insights and easy swaps because your kitchen, your rules!
- 12 oz Rotini Pasta: Those little corkscrews are genius for trapping dressing and bits of salami in every bite. Chef’s Tip: For a gluten-free twist, use chickpea or brown rice rotini—they hold up beautifully.
- 1 cup Sliced Salami: This is our savory, salty, protein-packed anchor. I prefer a good hard salami for its firm texture. Easy Swap: Use turkey pepperoni for a lighter option, or grilled chicken breast for a cleaner protein hit.
- 1 cup Cherry Tomatoes, halved: They bring a juicy, sweet acidity. Halve them just before mixing to keep their gorgeous juices inside the salad.
- 1 cup Diced Cucumber: For that essential, refreshing crunch. I like to use English cucumber (seedless) so you don’t have to worry about watery seeds.
- 1 cup Diced Red or Yellow Bell Pepper: Color and sweet crunch! Using a yellow or orange pepper adds a lovely sunny hue and a slightly sweeter flavor than green.
- ¼ cup Thinly Sliced Red Onion: A little zip goes a long way. Soak the slices in ice water for 10 minutes if you want to mellow their sharpness.
- ½ cup Mozzarella Pearls or Diced Mozzzarella: Creamy, mild pockets of cheesy goodness. The pearls are so convenient, but cubing a fresh ball of mozzarella works just as well.
- ½ cup Plain Greek Yogurt: Our secret weapon! It creates a luxuriously creamy, protein-rich dressing base without heaviness. Full-fat will give you the creamiest result, but any fat percentage works.
- ¼ cup Italian Dressing: The flavor shortcut we all deserve. Use a good-quality bottled one, or your own homemade vinaigrette.
- 1 tbsp Red Wine Vinegar: This little splash brightens up the whole dressing, cutting through the richness perfectly.
- 1 tsp Italian Seasoning: The dried herb dream team. Rub it between your palms as you add it to wake up the oils and maximize flavor.
- Salt & Black Pepper to taste: Always, always taste as you go. The salami and dressing bring salt, so season judiciously.
Let’s Build Some Deliciousness: Step-by-Step
Don’t worry, this is the fun, easy part. I’ll walk you through each step with the kind of tips I’d tell you if we were cooking side-by-side.
Step 1: Cook & Cool Your Pasta (The Foundation)
Bring a large pot of generously salted water to a rolling boil—it should taste like the sea! Add your rotini and cook according to the package directions for al dente (usually about 8-10 minutes). You want it to still have a gentle bite. Why? Mushy pasta turns into a sad, bloated mess in the fridge. Once it’s perfectly cooked, drain it immediately in a colander. Here’s my non-negotiable hack: rinse it under cold water until it’s completely cool. This stops the cooking process dead in its tracks, washes away excess starch that can cause clumping, and gets your pasta to the perfect chilled base temperature. Give the colander a good shake to get rid of all that water.
Step 2: Whisk Up That Magical Dressing (The Glue)
Grab your large mixing bowl—yes, the one you’ll eventually toss everything in. To this empty bowl, add the Greek yogurt, Italian dressing, red wine vinegar, Italian seasoning, a pinch of salt, and a few cranks of black pepper. Now, whisk it like you mean it! You’re looking for a smooth, homogenous, creamy, pale pinkish-orange dressing. Taste it right now on a spoon. This is your moment to adjust. Want more zip? Add a touch more vinegar. More herbiness? A pinch more seasoning. You are the boss of this flavor.
Step 3: The Big, Beautiful Toss (The Party)
To the bowl of waiting dressing, add your cooled, rinsed pasta. Follow it with all your chopped and sliced stars: the salami, cherry tomatoes, cucumber, bell pepper, red onion, and mozzarella. Now, take a large spoon or spatula and gently fold and toss everything together. Be thorough but kind—you want every single rotini corkscrew to get coated in that creamy dressing and to have a few friends (a piece of salami, a mozzarella pearl) nestled inside it. The colors at this stage are just gorgeous.
Step 4: The Patient Chill (The Transformation)
This might be the hardest step because it requires patience, but trust me, it’s essential. Cover the bowl tightly with plastic wrap or a lid and slide it into the fridge for at least 30 minutes, but ideally 1-2 hours. What’s happening in there? The flavors are getting to know each other. The pasta is absorbing the dressing, the vegetables are chilling and staying crisp, and everything is melding into one harmonious, delicious entity. This wait is what turns a bunch of ingredients into a dish.
How to Serve Your Culinary Masterpiece
Alright, the wait is over! Pull that beautiful bowl from the fridge and give it one final, gentle stir. You’ll see the dressing has set perfectly. Now, let’s serve it with style.
For a hearty lunch, I love packing it into a wide-mouth mason jar (layered pretty) or a sturdy container and eating it straight from there with a fork. At home, scoop generous portions into wide, shallow bowls. For a real treat, I like to serve it over a big handful of fresh arugula or baby spinach—the slight peppery bite of the greens with the creamy salad is next-level.
Garnish is your friend here! A final sprinkle of fresh chopped parsley or basil, a few extra grinds of black pepper, or a light dusting of grated Parmesan cheese right before eating adds a wonderful finishing touch. This salad is a complete meal on its own, but it also makes a phenomenal sidekick to grilled lemon-herb chicken, simple burgers, or fish for a easy, crowd-pleasing dinner.
Make It Your Own: 5 Flavorful Twists
One of the best things about this recipe is its versatility. Once you’ve mastered the base, play around! Here are a few of my favorite riffs:
- The “Everything But The Kitchen Sink” Veggie Boost: Add ½ cup each of chopped marinated artichoke hearts and sliced Kalamata olives. Swap the mozzarella for crumbled feta. Instant Greek-Italian fusion!
- The Lean & Clean Version: Swap the salami for 1.5 cups of shredded rotisserie chicken or two cans of drained, flaked tuna. Use a light Italian dressing. It’s just as satisfying but feels a bit lighter.
- The Vegan Power Bowl: Omit the salami and cheese. Add one can of rinsed chickpeas or white beans for plant-based protein. Use a vegan Italian dressing and swap the Greek yogurt for a dairy-free plain yogurt or vegan mayo. You won’t miss a thing.
- The “No Pasta” Low-Carb Take: Replace the rotini entirely with 4 cups of cooked, chilled quinoa or farro. You get a wonderful nutty texture and a whole-grain powerhouse that soaks up the dressing just as well.
- The Creamy Pesto Dream: Replace the Italian dressing and red wine vinegar with ⅓ cup of prepared basil pesto. Thin it out with a tablespoon of lemon juice. This version is herby, garlicky, and incredibly fragrant.
Beau’s Kitchen Confidential
This recipe has been a work-in-progress for years, and it’s taught me a few things. First, the rinse-the-pasta-in-cold-water trick was a total game-changer I learned after a batch turned into a gelatinous block. Lesson: hot pasta keeps cooking and absorbs dressing too aggressively. Cold pasta is your chilled-salad bestie.
Secondly, I used to be afraid of overdressing, which led to dry salads. With this yogurt-based dressing, you can be a bit more generous—it clings beautifully without becoming a soup. And a funny story? I once accidentally used vanilla Greek yogurt (same colored lid, my fault!). It was… surprisingly not terrible, but let’s just stick to plain, folks. The evolution here is all about balance: maximum flavor, maximum satisfaction, minimum fuss. That’s the Feastical philosophy in a bowl.
Your Questions, Answered
Q: My pasta salad seems a bit dry after a day in the fridge. What happened?
A: The pasta continues to absorb liquid! This is totally normal. The fix is simple: stir in a tablespoon or two of Italian dressing, a splash of water, or even a dollop of extra Greek yogurt to bring it back to life before serving.
Q: Can I make this ahead of time? How long does it keep?
A: You absolutely can, and it gets better! For the best texture, combine everything up to 24 hours in advance. It will keep beautifully in an airtight container in the fridge for 3-4 days. The vegetables will soften slightly but remain delicious.
Q: It got a little watery at the bottom of the container. Did I do something wrong?
A: Not at all! This is usually from the tomatoes and cucumbers releasing their natural juices as they sit, which is a good sign of freshness. Just give it a good stir before serving to reincorporate those flavorful juices back into the salad.
Q: I need to bump up the protein even more. Any ideas?
A: I love this mindset! Try adding a can of rinsed cannellini beans, some cooked shredded chicken breast, or even a handful of shelled edamame. You could also stir in some grated Parmesan cheese—it adds protein and a salty, umami punch.

High-Protein Italian Pasta Salad : Easy Meal Prep Favorite
Description
If you’re tired of boring lunches, this high-protein Italian pasta salad is a total upgrade. It’s colorful, filling, and packed with bold flavors and crunch. You can make it ahead, keep it in the fridge, and enjoy a satisfying meal in minutes. Perfect for school, work, or quick dinners.
Ingredients
-
12 oz (340 g) rotini pasta
-
1 cup sliced salami (or cooked chicken breast)
-
1 cup cherry tomatoes, halved
-
1 cup diced cucumber
-
1 cup diced red or yellow bell pepper
-
¼ cup thinly sliced red onion
-
½ cup mozzarella pearls or diced mozzarella
-
½ cup plain Greek yogurt
-
¼ cup Italian dressing
-
1 tbsp red wine vinegar
-
1 tsp Italian seasoning
-
Salt and black pepper to taste
Instructions
-
Cook the pasta
Boil pasta in salted water until al dente. Drain and rinse under cold water to cool completely. -
Make the dressing
In a large bowl, whisk Greek yogurt, Italian dressing, red wine vinegar, Italian seasoning, salt, and pepper until smooth. -
Combine
Add cooled pasta, salami, tomatoes, cucumber, bell pepper, onion, and mozzarella to the bowl. -
Toss
Mix gently until everything is well coated. -
Chill
Cover and refrigerate at least 30–60 minutes before serving for best flavor.
Notes
-
Cool pasta fully before mixing so the dressing stays creamy, not absorbed too fast.
-
Add extra protein like chickpeas, grilled chicken, or tuna if you want it more filling.
-
If it dries out after chilling, stir in a spoon of yogurt or a splash of dressing.
-
For meal prep: keep 3–4 days refrigerated in a sealed container.
-
Milder onion flavor: soak sliced onion in cold water for 10 minutes, then drain.
Nutritional Breakdown (Approximate)
Let’s talk fuel! This salad is designed to be a balanced, sustaining meal. The numbers below are per serving (based on 6 servings) and are estimates, as ingredients can vary. The combination of complex carbs from the pasta, protein from the salami, Greek yogurt, and cheese, and healthy fats from the dressing and salami creates a meal that provides steady energy and keeps you full. Remember, you’re also getting a great serving of vegetables for vitamins, minerals, and fiber. It’s a satisfying choice that proves healthy eating doesn’t have to be bland or boring.
- Calories: ~390
- Protein: ~22g
- Fat: ~18g
- Carbohydrates: ~36g
- Fiber: ~3g
The Last Bite
And there you have it! My ultimate, feel-good, high-protein Italian pasta salad. This recipe is more than just a list of instructions—it’s a template for easy, delicious success all week long. It’s proof that with a few simple tricks (hello, cold pasta rinse and Greek yogurt!), you can transform humble ingredients into something truly special.
I hope this becomes a trusted favorite in your rotation, the thing you make on Sunday and look forward to all Monday afternoon. Food is about connection—to our past, to each other, and to our own well-being. This salad, for me, hits all those notes. If you make it (and I really hope you do), tag me over on @Feastical so I can see your creation! Now, go forth and enjoy every last forkful.
With a full heart and a full bowl,
Beau
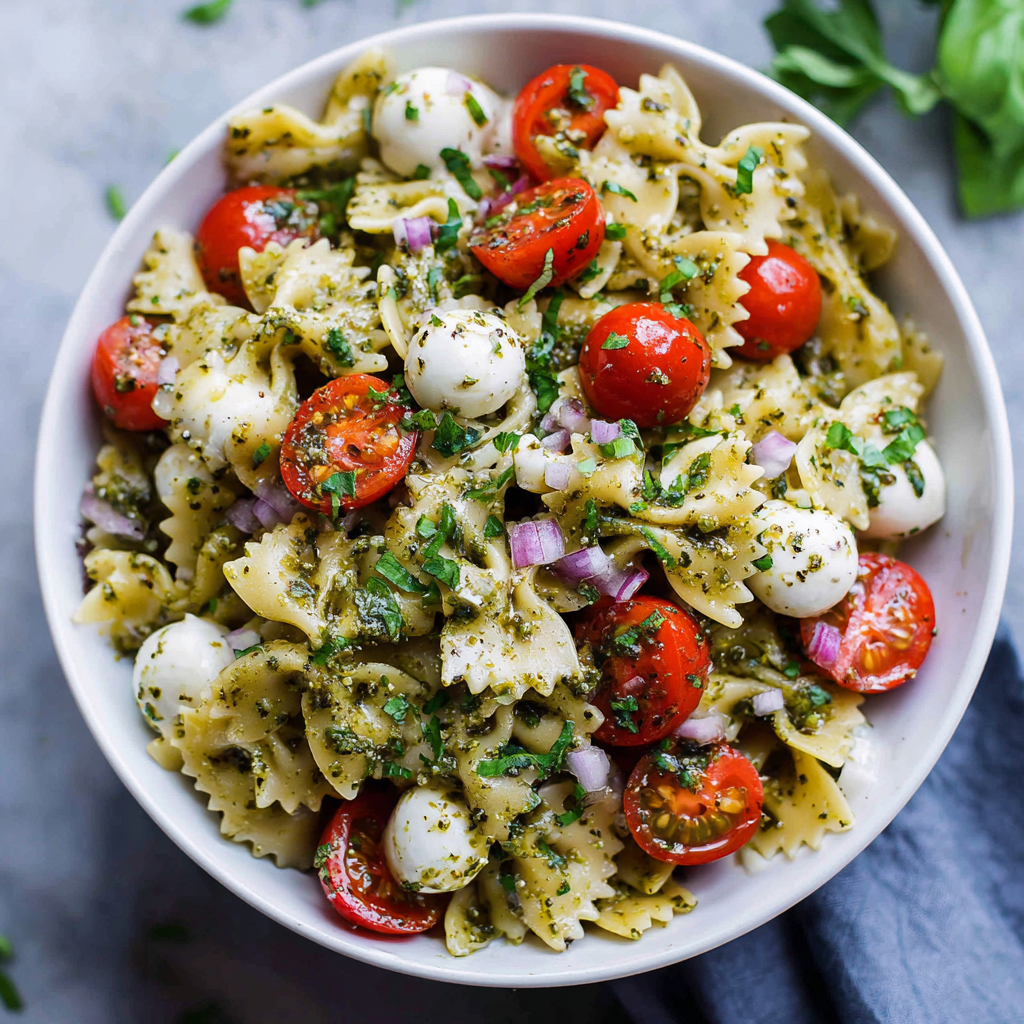
Fresh Caprese Pesto Pasta Salad
Caprese Pesto Pasta Salad – Easy Fresh Mozzarella & Tomato Pasta
This Caprese Pesto Pasta Salad is fresh, vibrant, and bursting with summer flavor. Tender bowtie pasta is tossed in fragrant basil pesto and combined with juicy cherry tomatoes, creamy mozzarella pearls, and fresh herbs. It’s light yet satisfying, making it perfect for lunch, potlucks, or backyard gatherings. Simple ingredients, bold flavor, and ready in under 30 minutes.
The Joy of a No-Fuss, Flavor-Packed Dish
Hey friends, Beau here from Feastical! Let’s talk about that magical moment when you need a dish that’s going to wow a crowd, feed your family, or just make your own lunch break something to look forward to, but you absolutely do not have the time or energy for a kitchen marathon. We’ve all been there. You stare into the pantry, willing inspiration to strike. Well, I’m grabbing my favorite wooden spoon to tell you that your answer is right here: the Fresh Caprese Pesto Pasta Salad.
This isn’t just another pasta salad. This is a celebration of the best, brightest flavors of summer, all hanging out together in one bowl. We’re talking sweet, sun-ripened tomatoes, milky-soft fresh mozzarella, and the herby, garlicky punch of a great pesto, all clinging to perfectly cooked pasta. It’s a dish that feels fancy but is built on the beautiful simplicity of a few incredible ingredients. It’s the culinary equivalent of your favorite, most comfortable jeans—reliable, always looks good, and makes you feel fantastic.
Whether you’re prepping for a backyard BBQ, a potluck with pals, or just want a make-ahead lunch that won’t have you bored by Wednesday, this recipe is your new best friend. So, tie on that apron (or don’t—we’re chill here), and let’s make something that tastes like a sunny afternoon, no matter what the calendar says.
A Taste of Summer, Any Day of the Year
This recipe always takes me straight back to my Grandma Lou’s screened-in porch. She wasn’t a “gourmet” cook, but she was a genius at making simple things taste like love. In the peak of summer, her garden would practically groan under the weight of basil plants and cherry tomato vines. I’d be tasked with picking, my hands smelling of green and earth for hours afterward.
One sweltering August afternoon, she made a version of this salad with what we had: some leftover pasta, a jar of pesto she’d put up, those warm tomatoes right off the vine, and little chunks of mozzarella from the deli. We ate it straight from the big mixing bowl, sitting on the porch steps, listening to the cicadas. It was cool, creamy, tangy, and fresh—the perfect antidote to the heat. That’s the spirit I want to capture every time I make it. It’s more than a recipe; it’s a vibe. It’s about taking the good stuff and letting it shine without overcomplicating things. Every bite is a little nostalgia trip, and I can’t wait for you to create your own memories with it.
Gathering Your Flavor All-Stars
Here’s the beautiful part: the ingredient list is short and sweet. When you have fewer elements, each one needs to be a superstar. Let’s break it down.
- 12 oz farfalle (bowtie) pasta: Those little bows aren’t just cute; their ruffled edges and center pinch are perfect for trapping pesto and tiny bits of tomato and cheese in every single bite. Chef’s Insight: If you’re out of farfalle, fusilli, rotini, or orecchiette make fantastic substitutes. They all have great texture for holding onto the sauce.
- ¾ cup basil pesto: The heart and soul of the dish! A vibrant, homemade pesto is divine, but a high-quality store-bought jar is a total lifesaver and tastes fantastic. Pro Tip: Give the ingredients list a quick glance. Look for one where basil and olive oil are the first ingredients, not fillers.
- 1 cup cherry tomatoes, halved: Little bursts of juicy sweetness. I love using a mix of red and yellow for extra color. Substitution Tip: If cherry tomatoes aren’t in season, sun-dried tomatoes (packed in oil, chopped) add an incredible depth of flavor and chewy texture.
- 1 cup mozzarella pearls (ciliegine): These tiny, fresh mozzarella balls are creamy, mild, and delightfully bite-sized. Chef’s Insight: No pearls? No problem! Simply cut an 8-ounce ball of fresh mozzarella into ½-inch cubes. The key is that fresh, soft texture.
- 2 tablespoons finely diced red onion: Don’t skip this! It adds a necessary sharp, crisp bite that cuts through the richness. Pro Hack: If raw onion is too strong for you, soak the diced pieces in ice water for 10 minutes. It mellows the flavor significantly while keeping the crunch.
- ¼ cup fresh basil, chopped (plus more for garnish): We’re doubling down on that basil goodness. The fresh leaves added at the end give a pop of color and a bright, aromatic finish you just can’t get from the pesto alone.
- 1–2 tablespoons olive oil (if needed): This is your “make it silky” reserve. A good drizzle of extra virgin olive oil can loosen the salad and add a fruity note if the pesto seems a little thick.
- Salt and black pepper to taste: Your best friends for making flavors pop. Always taste before you season!
- Optional: Balsamic glaze drizzle or grated Parmesan: The glam squad. A swirl of syrupy balsamic glaze adds a sweet-tart finish, and a snowstorm of Parmesan brings a salty, umami kick. Highly recommended for serving!
Let’s Get Mixing! Your Foolproof Guide
Ready? This is where the magic happens, and it’s so easy. Follow these steps, and you’re guaranteed a winner.
- Cook the Pasta Like a Pro: Bring a large pot of water to a rolling boil. Here’s my non-negotiable rule: salt that water until it tastes like the sea! This is your one chance to season the pasta from the inside out. Add your bowties and cook according to package directions until al dente—that means tender but with a pleasant bite. Chef’s Hack: Reserve about ½ cup of the starchy pasta water before you drain. It’s liquid gold for adjusting sauces later.
- Drain & Cool (But Not Too Much!): Drain the pasta in a colander. Give it a very quick, light rinse under cool water just to stop the cooking and wash off excess starch so it doesn’t get gummy. You don’t want it ice-cold, just no longer steaming hot. Why? We’re about to add the pesto, and slightly warm pasta absorbs flavors like a dream.
- The Flavor Foundation: Transfer your pasta to a large, wide mixing bowl—this gives you room to toss without making a mess. Immediately add about ½ cup of the pesto. Using a big folding motion, toss until every single bowtie is happily coated. Let it sit for a minute. The warm pasta will drink in that pesto. Pro Tip: This is where you can use a splash of that reserved pasta water if things look dry. The starch helps the pesto cling beautifully.
- Bring in the Fresh Crew: Now, for the colorful confetti! Add your halved cherry tomatoes, mozzarella pearls (or cubes), the finely diced red onion, and the chopped fresh basil. Pour the remaining ¼ cup of pesto over the top.
- The Gentle Fold: This is key—use a gentle folding motion to combine everything. We want to keep those tomato halves and soft cheese pearls intact, not smash them into a paste. Take your time and work from the bottom of the bowl up. Chef’s Note: If the salad seems a bit tight or dry, now is the time to drizzle in that optional olive oil for extra silkiness.
- Taste and Season: Grab a fork and take a taste. Does it need a pinch more salt? A crack of black pepper? This is your moment to make it perfect for you. Adjust accordingly.
- The Rest (If You Can Wait!): For the best flavor marriage, cover the bowl and let it chill in the fridge for 20-30 minutes before serving. This lets the flavors get to know each other. You can absolutely serve it right away at room temperature, too—it’s delicious any way you choose!
How to Serve It Up with Style
Presentation is part of the fun! Here’s how to take this salad from “bowl on the counter” to “centerpiece of the table.”
For a family-style feast, I love piling it high in a big, colorful ceramic bowl. Scatter a few whole basil leaves on top and maybe a few extra mozzarella pearls for a chef-y touch. Right before serving, I finish it with a generous drizzle of balsamic glaze (it makes those pretty swirls) and a hefty sprinkle of grated Parmesan cheese.
For individual servings, get creative! Use a large, hollowed-out beefsteak tomato as a natural bowl. For a picnic or potluck, mason jars are your best friend—layer the salad in them for a portable, no-mess, absolutely adorable presentation. This salad is the ultimate team player. It’s fantastic alongside grilled lemon-herb chicken, garlic shrimp skewers, or a simple juicy burger. For a light vegetarian meal, just add a hunk of crusty bread for mopping up every last bit of pesto. It’s a crowd-pleaser, through and through.
Make It Your Own: Delicious Twists & Swaps
The beauty of this framework is its flexibility. Play with it! Here are a few of my favorite riffs:
- The Protein Power-Up: Add 1-2 cups of shredded rotisserie chicken, a can of drained and flaked tuna, or some chickpeas for a heartier, main-dish salad.
- Vegan Delight: Easy! Use a stellar vegan pesto (or make your own with nutritional yeast). Swap the mozzarella for creamy, marinated tofu cubes or a vegan mozzarella alternative. The flavors are still incredible.
- Greens & Grains: Feeling low-carb? Swap half the pasta for 4 cups of fresh arugula or baby spinach. Toss the greens in right before serving so they stay perky. You can also use cooked quinoa or farro instead of pasta for a whole-grain twist.
- Flavor Bomb Add-Ins: Toss in a handful of toasted pine nuts or walnuts for crunch. Kalamata olives or chopped pepperoncini add a briny, salty kick. For a sweet note, a handful of fresh peaches or nectarines in summer is unreal.
- Pesto Swap: Try a sun-dried tomato pesto or a kale-walnut pesto for a completely different, but equally delicious, flavor profile.
A Few More Tidbits from My Kitchen
This recipe has evolved from that simple porch-side version into my go-to for practically every casual gathering. I’ve learned a few things along the way. First, if I’m making it more than a few hours ahead, I’ll often hold back the fresh basil and add it just before serving so it stays bright green and doesn’t wilt. Second, the pasta salad tastes even better on day two as the flavors continue to meld, but the tomatoes will soften a bit—still delicious, just different.
Funny story: I once brought this to a potluck and forgot to chill it. It sat on a sunny table for an hour. While I was panicking, it was the first dish to disappear! The warmth actually made the cheese a little melty and the pesto more aromatic. Everyone raved about the “warm Caprese pasta” variation. So, don’t stress. This dish is resilient and delicious, warm, room temp, or cold.
Your Questions, Answered
Q: Can I make this pasta salad ahead of time?
A: Absolutely! It’s a fantastic make-ahead dish. Prepare it up to 24 hours in advance, cover tightly, and store in the fridge. For the best texture, let it sit at room temperature for 15-20 minutes before serving and give it a good stir. You may want to add a tiny splash of water or olive oil to refresh it.
Q: My pesto seems dry/oily and isn’t coating the pasta well. Help!
A: No worries! This is where that reserved pasta water works miracles. Add a tablespoon at a time and toss. The starch will emulsify with the pesto and oil, creating a creamy, clingy sauce. If you didn’t save any, warm water or a little extra olive oil will also do the trick.
Q: How long will leftovers keep in the fridge?
A: Stored in an airtight container, it will be tasty for 3-4 days. The pasta may continue to absorb moisture, so a quick refresh with a little pesto, oil, or lemon juice can bring it back to life.
Q: I’m not a fan of raw onion. Any other options?
A: Totally. Try 2-3 tablespoons of thinly sliced scallions (green parts only) for a milder flavor. A tablespoon of capers, rinsed, would add a fantastic briny pop without the oniony bite.

Fresh Caprese Pesto Pasta Salad
Description
Hey friends—Beau here from Feastical. If you need a fast, colorful, flavor-packed dish that works for lunch, potlucks, or warm-weather gatherings, this Caprese Pesto Pasta Salad is it. It’s bright, herby, creamy, and comes together in under 30 minutes with simple ingredients. No complicated steps—just fresh flavors that always deliver.
Ingredients
-
12 oz (340 g) bowtie (farfalle) pasta
-
¾ cup basil pesto (store-bought or homemade)
-
1 cup cherry tomatoes, halved
-
1 cup fresh mozzarella pearls (or cubed fresh mozzarella)
-
2 tbsp red onion, very finely diced
-
¼ cup fresh basil, chopped
-
1–2 tbsp extra virgin olive oil (as needed)
-
Salt and black pepper to taste
Optional for serving:
-
Balsamic glaze drizzle
-
Grated Parmesan cheese
Instructions
Bring a large pot of well-salted water to a boil. Cook pasta until al dente according to package directions.
Reserve ½ cup pasta water, then drain. Rinse briefly under cool water to stop cooking.
Transfer warm (not hot) pasta to a large bowl. Add about ½ cup pesto and toss until evenly coated.
If it seems thick, add a splash of reserved pasta water to loosen.
Add tomatoes, mozzarella, red onion, and chopped basil. Spoon in remaining pesto.
Fold everything together gently so the cheese and tomatoes stay intact.
Add olive oil if needed for a silkier texture.
Taste and season with salt and pepper.
Chill 20–30 minutes before serving for best flavor, or serve right away at room temperature.
Notes
-
Salt your pasta water well — it’s your main chance to season the pasta itself.
-
Add pesto while pasta is slightly warm so it absorbs flavor better.
-
Soak diced onion in cold water for 10 minutes if you want a milder bite.
-
Add fresh basil just before serving if making far ahead to keep it bright green.
-
If the salad dries out in the fridge, refresh with a drizzle of olive oil or a spoon of pesto.
Nutritional Information*
Prep Time: 10 minutes | Cook Time: 10–12 minutes | Total Time: 25 minutes | Servings: 6
*Please note: Nutritional information is an estimate based on the ingredients listed and standard calculations. Values may vary depending on specific brands and quantities used.
Approximate Nutrition (per serving):
Calories: 390 | Protein: 14g | Carbohydrates: 44g | Fat: 18g | Saturated Fat: 4g | Cholesterol: 15mg | Sodium: 350mg | Fiber: 2g | Sugar: 3g
This salad provides a good balance of carbs for energy, protein from the cheese and pasta, and healthy fats from the olive oil in the pesto. It’s a satisfying and flavorful choice that fits beautifully into a varied diet.
Final Thoughts
And that’s it, friends! Your passport to a seriously delicious, impossibly easy dish that’s guaranteed to bring smiles. The Fresh Caprese Pesto Pasta Salad proves that amazing food doesn’t have to be complicated. It’s about combining great ingredients with a little bit of love and a lot of enjoyment.
I’d love to hear how it turns out for you! Did you add a personal twist? Did it become the star of your picnic? Tag me on social or drop a comment over on Feastical.com—sharing our kitchen adventures is my favorite part of this whole journey.
French Toast Fried Chicken Sandwich : Sweet & Spicy Brunch Showstopper
French Toast Fried Chicken Sandwich: The Sweet & Spicy Brunch Showstopper
Hey friends, Beau here! Grab a stool and pull up to the counter. I want to talk about that magical moment when a crazy-good idea hits you in the kitchen. You know the one—where two classic comfort foods collide so perfectly, you wonder why you didn’t think of it sooner. That’s exactly the story behind this French Toast Fried Chicken Sandwich. We’re talking crispy, juicy fried chicken, cradled by soft, cinnamon-speckled brioche French toast, and absolutely drenched in a sticky, sweet, and subtly spicy bourbon chili sauce. It’s not just a sandwich; it’s an experience.
Now, I know what you might be thinking. “Beau, French toast… for a sandwich? With fried chicken?” Trust me, I had the same moment of delicious disbelief. But then I remembered: some of the best food memories start with a little “what if?” What if we took the cozy, familiar embrace of weekend French toast and gave it a savory, seriously satisfying upgrade? This sandwich is the glorious answer. It’s the star of your brunch table, the hero of your game-day spread, and the undeniable proof that sometimes, the most indulgent ideas are the best ones. So, let’s ditch the boring and build something legendary together.
The Brunch Epiphany That Started It All
This whole beautiful, messy creation was born on a lazy Sunday. My friends were over, we were doing our classic “brunch potluck,” and the table was a glorious chaos of half-empty coffee mugs, syrup bottles, and a big platter of my buttermilk fried chicken. As I went to clear a space, I accidentally (okay, maybe a little intentionally) dragged a piece of French toast through a puddle of syrup and a stray bit of fried chicken crumbs. I took a bite of that Frankenstein forkful, and everyone at the table went silent. Then, the chorus: “What IS that? You have to make it a thing!”
That happy accident took me right back to my grandma’s kitchen, where she’d always serve her famous fried chicken with a side of sweet honey biscuits. She understood the divine pairing of sweet and savory, of crispy and soft. This sandwich is my loud, fun, over-the-top tribute to that principle. It’s for those days when you want to cook something that makes people’s eyes light up, something that sparks a “you made this?!” It’s food that’s meant to be shared, laughed over, and absolutely devoured.
Gathering Your Flavor Arsenal
Here’s everything you’ll need to build this masterpiece. Don’t stress about perfection—cooking is about flavor, not fuss. I’ve added my little chef notes to guide you!
For the Chicken & Marinade:
- 4 boneless, skinless chicken thighs: Thighs are my go-to for fried chicken. They stay incredibly juicy and forgiving, even if you cook them a minute too long. Chef’s Swap: Chicken breasts work if you prefer white meat, but pound them to an even thickness so they cook at the same rate as the coating browns.
- 1 cup buttermilk: This is your secret weapon for tender, flavorful chicken. The acidity gently breaks down proteins, leading to that melt-in-your-mouth texture. Chef’s Hack: No buttermilk? Stir 1 tablespoon of lemon juice or white vinegar into 1 cup of regular milk and let it sit for 5 minutes.
- ½ tsp each white pepper & salt: White pepper gives a sharper, more distinct heat than black pepper. It’s classic in Southern fried chicken for a reason!
For the Crispy Coating:
- 2 cups self-rising flour: The built-in leavening agents give the coating an extra-light, craggy texture. Chef’s Insight: If you only have all-purpose, add 1 tbsp baking powder and ½ tsp salt to the mix.
- 1 tbsp each onion powder & garlic powder: These are non-negotiables for deep, savory flavor in every crunch.
- 1 tbsp paprika: For color and a sweet, smoky backbone.
- ½ tbsp Tony Chachere’s Creole Seasoning: My favorite flavor booster! It adds salt, garlic, and a kick of heat. Chef’s Note: If you’re sensitive to salt or spice, start with 1 tsp.
For the Bourbon Sweet Chili Sauce:
- 1 cup apricot preserves: The fruity base of our sauce. It brings a bright, tangy sweetness that balances the heat perfectly. Peach or mango jam are fantastic substitutes.
- 1 tbsp chili sauce (like Heinz): This isn’t pure hot sauce—it’s a tangy, mild condiment that adds body and a gentle kick.
- ¼ cup honey: For a rich, floral sweetness that helps the sauce glaze beautifully.
- ½ cup bourbon: The grown-up kick! The alcohol cooks off, leaving behind a wonderful, warm oakiness. Chef’s Tip: Don’t have bourbon? Use apple cider or orange juice for a non-alcoholic version.
- Dash of sriracha: Our adjustable heat dial. Start with a dash and add more until it sings to your taste buds.
For the French Toast:
- 4 thick slices brioche bread: Brioche is soft, rich, and slightly sweet—the perfect plush throne for our chicken. Challah or Texas Toast are great backups.
- 3 tbsp unsalted butter: For that golden, buttery crisp on the outside of your French toast.
- 4 large eggs, ½ cup milk: The classic custard base. Whole milk is ideal for richness.
- 1 tsp almond extract (or vanilla): Almond extract is my sleeper hit here—it adds a gorgeous, bakery-like aroma. Vanilla is a classic, always-delicious choice.
- 1 tsp cinnamon, pinch of nutmeg & salt: The warm spice brigade. Salt in your sweet French toast custard makes all the other flavors pop!
Let’s Get Cooking: Build Your Masterpiece, Step-by-Step
Okay, team! Let’s break this down. We’ll tackle one component at a time. Put on some tunes, pour yourself a drink (maybe a little of that bourbon), and let’s have fun with it.
Step 1: Marinate the Chicken (The Flavor Foundation)
First, give your chicken thighs a quick pat-down with paper towels. This helps the marinade stick. In a bowl, whisk together the buttermilk, white pepper, and salt. Plop the chicken in, make sure it’s fully submerged, cover it, and let it hang out in the fridge. Chef’s Hack: Even 30 minutes does wonders, but if you’ve got the time, let it go for 2 hours. I sometimes do this in the morning for an epic dinner. The longer it soaks, the more tender and flavorful it gets.
Step 2: Heat the Oil & Mix the Coating (Get Ready to Fry)
Pour about 1.5 inches of vegetable or peanut oil into a heavy-bottomed pot or Dutch oven. Attach a deep-fry or candy thermometer to the side and slowly bring the heat to a steady 350°F (175°C). This is the sweet spot—hot enough to seal and crisp, not so hot it burns. While it heats, mix all your coating ingredients (flour and seasonings) in a wide, shallow bowl. Give it a good whisk to distribute all those spices evenly.
Step 3: Coat & Fry to Golden Perfection
Time for the fun, messy part! Pull a chicken thigh from the buttermilk, let the excess drip off, and then dredge it thoroughly in the flour mixture. Press it in, flip it, really get it coated. Then, for the SECRET to extra crunch: Dip it back into the buttermilk for just a second, and give it a second dredge in the flour. This double-dip creates those incredible, craggy nooks and crannies. Carefully lower two pieces into the hot oil—don’t crowd the pot! Fry for about 6-7 minutes per side until they’re a deep, glorious golden brown and the internal temperature hits 165°F. Let them rest on a wire rack, not paper towels. The rack keeps the bottom crispy!
Step 4: Whip Up That Killer Bourbon Sauce
While the chicken rests, make your magic elixir. Combine the apricot preserves, chili sauce, honey, bourbon, and sriracha in a small saucepan. Bring it to a simmer over medium heat, stirring frequently. Let it bubble gently for 5-7 minutes. You’ll see it thicken slightly and become beautifully glossy. Chef’s Tip: It will thicken more as it cools. Give it a taste and adjust the heat (more sriracha) or sweetness (a pinch more honey) to your liking.
Step 5: Create the French Toast “Buns”
In a pie dish or another wide bowl, whisk the eggs, milk, extract, cinnamon, nutmeg, and salt until completely smooth. Melt your butter in a large skillet or griddle over medium heat. Working one or two slices at a time, soak each slice of brioche in the custard for about 20-30 seconds per side—you want it fully saturated but not falling apart. Cook until each side is a perfect, toasty golden brown, about 3-4 minutes per side.
Step 6: The Grand Assembly
Place one beautiful slice of French toast on a plate. Top with a piece of that majestic, crispy chicken. Drizzle (or frankly, drown) it with the warm bourbon chili sauce. Crown it with the second slice of French toast. You did it! Now, serve it immediately while everything is hot, crispy, and glorious.
How to Serve This Brunch Rockstar
Presentation is part of the fun! I like to slice the sandwich in half on a sharp diagonal—that reveal of the juicy chicken inside is everything. Serve it on a big, colorful plate with a side of cool, creamy coleslaw or a simple arugula salad with a lemon vinaigrette to cut through the richness. For a true brunch feast, add some crispy hash browns or fresh fruit on the side. And don’t forget the napkins—the big, durable kind. This is a hands-on, sauce-dripping-down-your-wrist kind of joy, and you should embrace every delicious, messy bite.
Make It Your Own: Delicious Twists & Swaps
This recipe is a fantastic blueprint. Play with it!
- Spicy Maple Bacon Upgrade: Add two slices of crispy bacon to the sandwich and swap the bourbon sauce for a blend of maple syrup and a hefty pinch of cayenne pepper.
- Nashville Hot Style: After frying, brush the chicken with a mixture of ¼ cup hot oil (from the fryer), 1 tbsp brown sugar, and 1-2 tbsp cayenne pepper. Skip the fruit sauce for a fiery kick.
- Savory Herb French Toast: For a less sweet vibe, omit the cinnamon and nutmeg from the French toast custard. Add a teaspoon of chopped fresh thyme or rosemary instead.
- Gluten-Free Friendly: Use your favorite GF flour blend for the coating and GF bread for the French toast. The buttermilk marinade and sauce remain the same stars.
- “Breakfast for Dinner” Version: Top the chicken with a fried egg and a slice of sharp cheddar cheese before adding the top bun. The runny yolk becomes part of the sauce!
Beau’s Kitchen Notes & Stories
This recipe has seen some fun iterations in my kitchen. One time, I was out of brioche and used leftover glazed donuts instead. It was… a wildly delicious, once-a-year kind of decadence! I’ve also learned that letting the coated chicken sit on the rack for 5 minutes before frying helps the coating “set,” leading to less flour falling off in the oil. The biggest evolution, though, was the sauce. It started as just apricot jam and hot sauce. Adding the bourbon and simmering it was a game-changer—it transformed it from a glaze to a complex, chef-worthy sauce. Don’t be afraid to make it your own. That’s where the real magic happens.
Your Questions, Answered!
Q: Can I make any parts ahead of time?
A: Absolutely! You can marinate the chicken overnight. The sauce can be made up to 3 days ahead and gently reheated. I don’t recommend pre-frying the chicken or making the French toast ahead, as they’re best fresh and crispy.
Q: My coating is falling off the chicken! What did I do wrong?
A> Two likely culprits: 1) The oil wasn’t hot enough. Make sure it’s a steady 350°F before adding the chicken. 2) You didn’t shake off enough buttermilk before dredging. Let the excess drip off thoroughly for the flour to adhere properly.
Q: Is there a non-alcoholic substitute for the bourbon that still tastes good?
A> Yes! Apple cider, pineapple juice, or even a strong-brewed black tea work wonderfully. You’ll lose the oakiness, but you’ll keep a great flavor depth.
Q: Can I bake the chicken instead of frying?
A> For a lighter version, you can! Dredge as instructed, place on a wire rack over a baking sheet, spray generously with oil, and bake at 400°F for 25-30 minutes. It won’t be *quite* the same as deep-fried, but it will still be delicious.

French Toast Fried Chicken Sandwich : Sweet & Spicy Brunch Showstopper
Description
Hey friends—this one is what happens when brunch and comfort food team up. Crispy fried chicken tucked between golden, cinnamon-spiced French toast with a sticky sweet-heat sauce on top. It looks over the top, but it’s very doable at home and perfect for weekends, special brunches, or when you want to impress hungry guests.
Ingredients
Chicken
-
4 boneless skinless chicken thighs (or breasts, pounded even)
-
1 cup buttermilk
-
½ tsp salt
-
½ tsp white or black pepper
Coating
-
2 cups flour
-
1 tbsp garlic powder
-
1 tbsp onion powder
-
1 tbsp paprika
-
1 tsp salt
-
½ tsp pepper
-
Oil for frying
Sweet & Spicy Sauce
-
1 cup apricot preserves (or peach jam)
-
¼ cup honey
-
1 tbsp chili sauce or ketchup + hot sauce
-
½ cup bourbon (or apple cider/orange juice)
-
Dash of sriracha or hot sauce (optional)
French Toast “Buns”
-
8 thick slices brioche or challah
-
4 eggs
-
½ cup milk
-
1 tsp vanilla
-
1 tsp cinnamon
-
Pinch salt
-
2–3 tbsp butter for the pan
Instructions
Mix buttermilk, salt, and pepper in a bowl. Add chicken and coat well. Cover and chill at least 30 minutes (up to overnight).
Add preserves, honey, chili sauce, bourbon (or juice), and sriracha to a small saucepan. Simmer on medium 5–7 minutes until glossy and slightly thick. Set aside.
Heat 1–1½ inches of oil in a deep pan to 350°F / 175°C.
Mix all coating ingredients in a shallow bowl.
Remove chicken from marinade, let excess drip off.
Coat in flour → quick dip back in buttermilk → coat again in flour (extra crispy).
Fry 6–8 minutes per side until deep golden and cooked through (165°F/74°C inside).
Rest on a rack.
Whisk eggs, milk, vanilla, cinnamon, and salt.
Dip bread slices 20–30 seconds per side.
Cook in buttered skillet over medium heat 3–4 minutes per side until golden.
French toast slice → fried chicken → warm sauce drizzle → second French toast slice. Serve hot.
Notes
-
Use thighs for juiciness — they stay tender even if slightly overcooked.
-
Keep oil temperature steady so the coating doesn’t fall off.
-
Don’t overcrowd the pan when frying.
-
Make sauce ahead — it reheats perfectly.
-
For less sweetness, reduce cinnamon and use savory herbs in the French toast batter.
Nutritional Info (Because We’re All About Balance!)
Alright, let’s keep it real. This is a celebratory, indulgent sandwich, and it’s meant to be enjoyed as such. Per serving (one full sandwich), you’re looking at approximately: 670 calories, 55g carbs, 30g protein, and 35g fat. The bulk of the calories come from the frying oil, the brioche, and the sauce. To lighten it up slightly, you can use the baking option for the chicken, opt for a leaner milk in the French toast, or simply serve with a bigger side salad. But remember, friends—food is about joy and connection, too. So savor every bite without guilt when you decide to go all-in!
Final Thoughts from My Kitchen to Yours
There you have it, my friends—the French Toast Fried Chicken Sandwich in all its messy, magnificent glory. This recipe is more than just a list of steps; it’s an invitation to play, to experiment, and to create a meal that’s guaranteed to spark conversation and empty plates. It captures everything I love about cooking: big flavors, comforting textures, and the sheer fun of making something uniquely delicious. I hope you give it a try on your next lazy weekend or special gathering. And when you do, I’d love to hear about it! Tag me on social or drop a comment over on Feastical.com. Now, go forth and make some kitchen magic!
Happy cooking,
Beau

Coconut Cream Bunny Parfaits : Adorable Easter Dessert in a Jar
Coconut Cream Bunny Parfaits: Your New Favorite Easter Tradition
Hey friends, Beau here from Feastical! Can you smell it? That soft, sweet hint of coconut and vanilla floating from the kitchen, mixed with the excited chatter of your favorite people gathered around the table. That’s the sound and scent of a holiday memory in the making, and I’m absolutely here for it. Easter, for me, has always been less about formality and more about pure, unadulterated joy—the pastel colors, the hopeful spring sunshine, and, let’s be real, the absolutely epic desserts.
But I know what you’re thinking: “Beau, I want to make something show-stopping, but I don’t have all day to fuss with complicated pastry.” My friend, that is exactly why I created these Coconut Cream Bunny Parfaits. We’re talking individual jars of happiness: layers of fluffy coconut cream, soft vanilla cake, and billowy whipped cream, all topped with a playful bunny hiding in toasted coconut “grass.” It’s a dessert that looks like you fussed for hours, but secretly comes together with a wink and a smile. It’s the perfect project to do with helpers of all ages, and the final “ta-da!” moment when you set them on the table is pure magic. So, grab your favorite mixing bowl and let’s make an Easter treat that’s as fun to create as it is to devour.
The Bunny That Started It All
This recipe takes me right back to my grandma’s linoleum-tiled kitchen. Every Easter, alongside the glorious glazed ham, she’d make her famous “Bunny Trifle” in this giant, clear glass bowl she called her “showpiece.” Us kids would press our noses against the fridge door, watching the layers magically appear throughout the day. She’d let me sprinkle the bright yellow “peeps” on top, a responsibility I took very seriously. It wasn’t just a dessert; it was the centerpiece of our celebration, the sweet promise that the meal was almost ready.
These parfaits are my personal spin on her masterpiece. I’ve swapped the big bowl for personal jars (no fighting over who got the corner piece with the most topping!), traded the sometimes-too-sweet peeps for simple homemade marshmallow ears, and infused that creamy layer with my love for tropical coconut. It’s a nod to her tradition, but with a Feastical twist. Every time I layer one up, I can almost hear her saying, “Don’t skimp on the whipped cream, Beau!” Wise words to live by.
Gathering Your Bunny Brigade: Ingredients & Insights
Here’s the crew you’ll need to summon these adorable desserts to life. I’ve added my little chef’s notes because knowing *why* we use something is just as important as the *what*.
- Coconut Pudding (2 cups, prepared): The star of the show! Using a good-quality instant pudding mix is a total weeknight win, but if you’re feeling fancy, a homemade pudding with real coconut milk will send the flavor into the stratosphere. Chef’s Tip: For extra coconut punch, use coconut milk instead of regular milk to prepare your instant pudding.
- Vanilla Cake Cubes (3 cups): The soft, comforting base. A store-bought angel food or pound cake works beautifully here—no shame in that game! Want to go homemade? My one-bowl vanilla cupcake recipe (baked in a 9×13 pan) is perfect. Day-old cake actually works best, as it soaks up the creamy layers without getting mushy.
- Sweetened Whipped Cream (2 cups): Our cloud layer. I highly recommend whipping your own heavy cream with a bit of sugar and vanilla. The texture and flavor are incomparable. Chef’s Hack: Chill your bowl and whisk attachment for 10 minutes before whipping. You’ll get stiffer peaks in half the time!
- Shredded Coconut, Toasted (1 cup): This is our “grass” and it brings essential texture and a nutty depth. Toasting is non-negotiable—it transforms chewy coconut into a fragrant, golden crunch.
- Large Marshmallows & Pink Decorating Sugar/Candy Melts: The bunny ears! Large marshmallows are the perfect canvas. The pink sugar adds that iconic touch. In a pinch, a tiny drop of pink food gel works too.
- Mini Chocolate Eggs: The final festive sprinkle. They add little pops of color and a delightful chocolatey surprise. Use your favorite brand—cadbury mini eggs, robin’s eggs, or even pastel M&Ms all work wonderfully.
Let’s Build Some Bunny Magic: Step-by-Step
Alright, team! Let’s roll up our sleeves and create some edible art. This is where the fun really begins.
- Toast Your “Grass”: Preheat your oven to 325°F (160°C). Spread your shredded coconut in a thin layer on a baking sheet. Pop it in for 5-7 minutes, but stay close! Stir it once halfway through. You’re looking for a light, even golden brown, not deep amber. It can burn in a heartbeat. Once perfect, pull it out and let it cool completely on the sheet. This is your first layer of flavor—toasted, nutty, and ready to crunch.
- Create the Bunny Ears: Grab your large marshmallows and a clean pair of kitchen scissors. Snip each one diagonally from one top corner to the opposite bottom corner. You’ll get two perfect, plump ear shapes. Now, for the cute pink detail: pour a little pink decorating sugar onto a small plate. Simply press the sticky, cut side of each marshmallow ear into the sugar. If using candy melts, melt a small amount and brush a pink line onto each ear. Let them set on a piece of parchment paper. Look at you, already a candy sculptor!
- Master the Layering: This is the zen part. Grab your clear jars, glasses, or even sturdy plastic cups. Start with a base layer of vanilla cake cubes—gently press them down just a bit. Next, spoon a generous layer of your coconut pudding. Follow that with a fluffy dollop of whipped cream. Repeat if your jar is tall enough! The key is to create distinct, visible stripes. I like to finish with the whipped cream layer to create a perfect “canvas” for our toppings.
- The Grand Decoration: Here comes the “awww” moment. Take a big pinch of your cooled toasted coconut and sprinkle it liberally over the whipped cream top to create a nest of grassy goodness. Gently press your two marshmallow ears into the “grass” near the edge of the jar. Finally, scatter a handful of mini chocolate eggs around, as if your bunny is guarding its treasure.
- The Patient Chill: I know it’s tempting to dig right in, but trust me on this one. Cover the parfaits loosely and let them chill in the fridge for at least an hour. This allows the layers to settle, the cake to get beautifully soft, and the flavors to become best friends. It’s the secret to that perfect, cohesive bite.
Presenting Your Easter Masterpiece
Presentation is half the fun! Line these parfaits up down the center of your Easter table for a stunning centerpiece. Tie a pastel ribbon or twine around each jar neck and tuck a sprig of fresh mint or a tiny faux flower into the bow. For a casual brunch, set each one on a small napkin-lined plate with a pastel spoon tucked alongside. The beauty is in the individual serving—no slicing, no serving fuss, just pure, portable delight. Watch as your guests peek into the jars, smiling before they even take a bite. That’s the Feastical feeling right there.
Make It Your Own: Delicious Twists & Swaps
Love the idea but want to mix it up? Go for it! Cooking is about creativity.
- Lemon Berry Bliss: Swap the coconut pudding for lemon curd or lemon pudding. Use lemon pound cake cubes and layer in fresh raspberries or blueberries. Top with lemon zest in the whipped cream.
- Chocolate Carrot Patch: Use chocolate pudding and chocolate cake cubes. Mix a tablespoon of orange zest into the whipped cream. For the “grass,” use crushed chocolate wafer cookies or Oreo crumbs, and top with candy carrots instead of eggs!
- Tropical Escape: Add a layer of diced mango or pineapple between the cake and pudding. Use toasted *sweetened* coconut for an extra caramelized grass.
- Adult Elegance: Fold a tablespoon of Malibu rum or coconut liqueur into the pudding. A drizzle of dark chocolate sauce over the top layer adds sophistication.
- Dietary-Friendly: Use your favorite gluten-free cake and ensure your pudding mix is gluten-free. For a dairy-free version, use coconut whipped cream and ensure your pudding is made with coconut or almond milk.
Beau’s Kitchen Confidential
This recipe is a living, breathing thing in my house. One year, I was out of marshmallows and in a panic, I used halved strawberries as ears—it was a huge hit and looked so fresh! Another time, my nephew decided the bunnies needed “faces,” so we dotted on little eyes and mouths with melted chocolate. It was messy and perfect. The point is, don’t stress over perfection. The first time I made these, I was so focused on neat layers that I forgot to toast the coconut. We ate it anyway, and you know what? It was still delicious. Let the recipe be a guide, not a rulebook. The real magic is in the laughter and stories you share while you’re making them.
Your Questions, Answered
- Q: Can I make these parfaits a day ahead?
A: You can absolutely prep the components! Toast the coconut, make the pudding, cube the cake, and whip the cream. Store each separately in the fridge. Assemble the layers (minus the final decorative toppings) up to 4 hours before serving. Add the coconut “grass,” ears, and eggs right before you serve to keep everything looking sharp and prevent soggy ears. - Q: My whipped cream is getting runny. Help!
A: This usually means your cream, bowl, or kitchen was too warm. For a more stable whipped cream that holds for days, try this trick: add a tablespoon of instant vanilla pudding powder to the cream as you start to whip. It stabilizes it beautifully without affecting the flavor. - Q: I don’t have clear jars. What can I use?
A: No problem at all! Clear glass is just for the “wow” factor of seeing the layers. You can use any cute cup, mug, small bowl, or even a wine glass. A mason jar is a classic, inexpensive option you can find anywhere. - Q: Can I use fresh coconut?
A: You absolutely can! Freshly grated coconut will have a more delicate texture and flavor. Toast it very carefully, as it can brown even faster than the shredded kind. It’s a lovely, gourmet touch.

Coconut Cream Bunny Parfaits : Adorable Easter Dessert in a Jar
Description
These Coconut Cream Bunny Parfaits are the kind of Easter dessert that makes people smile before they even take a bite. Fluffy coconut pudding, soft vanilla cake, and whipped cream are layered into individual jars, then topped with toasted coconut “grass,” candy eggs, and adorable marshmallow bunny ears. They look bakery-fancy but are surprisingly simple to make — perfect for holiday tables and family kitchen fun.
Ingredients
-
2 cups coconut pudding (instant or homemade)
-
3 cups vanilla cake, cut into small cubes (store-bought or homemade)
-
2 cups sweetened whipped cream
-
1 cup shredded coconut
-
6–8 large marshmallows
-
Pink decorating sugar or pink candy melts
-
Mini chocolate eggs or pastel candy-coated chocolates
Instructions
-
Toast the coconut
-
Heat oven to 325°F (160°C).
-
Spread shredded coconut on a baking sheet.
-
Bake 5–7 minutes, stirring once, until lightly golden.
-
Cool completely.
-
-
Prepare bunny ears
-
Cut each marshmallow diagonally to form two ear shapes.
-
Press the sticky cut side into pink decorating sugar.
-
If using candy melts, brush a thin pink stripe inside each ear and let set.
-
-
Layer the parfaits
-
Use clear jars or glasses.
-
Add a layer of cake cubes.
-
Spoon over coconut pudding.
-
Add a layer of whipped cream.
-
Repeat layers if your container is tall enough.
-
Finish with whipped cream on top.
-
-
Decorate
-
Sprinkle toasted coconut over the top to make “grass.”
-
Insert two marshmallow ears near the edge.
-
Add mini chocolate eggs around the ears.
-
-
Chill
-
Refrigerate at least 1 hour before serving so layers soften and flavors blend.
-
Notes
-
Use day-old cake — it holds texture better in layers.
-
Chill before serving for the best spoonable texture.
-
Toast coconut carefully — it browns quickly near the end.
-
Stabilize whipped cream by adding 1 tablespoon instant pudding powder while whipping if you need it to hold longer.
-
Add toppings last if making ahead, so decorations stay neat.
A Quick Nutritional Glance
Let’s keep it real—this is a celebratory dessert, meant to be enjoyed fully! Each parfait (assuming 6 servings) comes in around 420 calories. The main contributors are the wholesome fats from the coconut and cream, and the carbohydrates from the cake and sugar. It’s a treat packed with joy. To lighten it up slightly, you can use a sugar-free pudding mix, light whipped topping, and a lower-sugar cake. But for Easter, I’m a firm believer in embracing the celebration. Enjoy every creamy, coconutty, chocolate-eggy bite!
Final Thoughts from My Kitchen to Yours
And there you have it, my friends—your ticket to becoming the Easter dessert hero. These Coconut Cream Bunny Parfaits are more than just a recipe; they’re a little jar of happiness, a conversation starter, and a delicious way to create a moment of pure, simple joy around the table. Remember, the best meals and the best memories aren’t about perfection. They’re about the love you stir in, the people you share it with, and the fun you have along the way. I hope these bunnies hop right into your heart and your holiday tradition. If you make them, I’d love to see your creations! Tag me over at @Feastical or drop a comment on the blog. Now, go forth and make something Feastical!
With a full heart and a sweet tooth,
Beau

Easy Easter Cake Pops : Festive Easter Egg Cake Balls
The Cutest Easter Dessert for Your Celebration: Let’s Make Some Magic!
Hey there, friend! Beau here, welcoming you back to the Feastical kitchen. Can you feel it? That little buzz in the air? The sun’s sticking around a bit longer, flowers are popping up, and there’s a certain… pastel-colored energy everywhere. That’s right, Easter is hopping our way! And while I’m all for a beautiful ham and those deviled eggs that vanish in 2.5 seconds, my heart really sings when it’s time for dessert. But let’s be real—sometimes, after a big feast, we need something sweet that’s also a whole lot of fun.
That’s where these Easy Easter Cake Pops come in. Imagine this: moist, tender cake mixed with just the right amount of creamy frosting, all hand-shaped into adorable little Easter eggs. We’re talking bigger-than-usual cake balls, friends—no fussy sticks needed!—dipped in a blanket of smooth white chocolate and dressed up in their festive Sunday best with colorful drizzles and dots. They’re the ultimate crowd-pleaser, the perfect project to get the kids involved (seriously, little hands are the best egg shapers), and they bring a splash of pure, edible joy to your table. They taste like a celebration and look like a springtime dream. So, tie on your favorite apron, clear off a bit of counter space, and let’s create a dessert that’s as fun to make as it is to eat. Trust me, these aren’t just cake pops; they’re edible Easter memories in the making.
Why These Cake Eggs Have a Special Place in My Heart
This recipe always takes me right back to my niece Lily’s first Easter where she was actually “helping” in the kitchen. She was about four, covered in what I swear was more frosting than the cake, and her mission was clear: to make the “most bootiful eggs for the bunny.” We used our hands to squish the cake and frosting together, and her serious little face as she tried to roll perfect oval shapes was everything. They were more like lumpy potatoes than eggs, but her pride was absolute. When we dipped them in chocolate and she got to drizzle the colors, it was pure magic. Her colorful zigzags looked more like abstract art, but to everyone at our table, they were masterpieces. That’s the spirit I want to bring to your kitchen. It’s not about perfection; it’s about the laughter, the slightly sticky fingers, and the proud moment when you set a platter of these homemade goodies on the table. Every time I make them now, I think of Lily’s concentrated frown and subsequent beaming smile. Food memory? More like a food hug.
Gathering Your Easter Egg Squad: Ingredients & Insights
Here’s the beautiful part: this recipe is brilliantly simple and designed for success. Let’s break down what you’ll need and why, along with my favorite chef-y swaps and tips.
- 1 box cake mix (any flavor), baked and cooled – This is our superstar shortcut! I’m a huge fan of using a simple vanilla or yellow cake mix as a blank canvas—it lets the decorations really shine. Chef’s Insight: Bake the cake the day before and let it cool completely. A dry-ish, cool cake crumbles perfectly. Feeling homemade? Go for it! Your favorite from-scratch chocolate or lemon cake would be divine here.
- 1 (16 oz) tub frosting – The glue that holds our edible eggs together! Vanilla or cream cheese frosting are my top picks. Pro Tip: Start with about 2/3 of the tub and add more only if needed. You want the mixture to hold together when squeezed, not feel greasy.
- 1 lb white almond bark (or vanilla candy melts) – This is for our main, sleek white coating. I prefer almond bark for its stable texture and easy melting. Why This Works: It sets firm and has a lovely sheen, giving us that perfect “Easter egg” base.
- Colorful candy melts – This is where the party starts! Grab a few small bags in pastel pinks, blues, yellows, and greens. These are for our decorative drizzles and dots.
- Resealable sandwich bags (or small piping bags) – Our makeshift piping tools! These make decorating foolproof and keep cleanup a breeze.
- Optional but Helpful: A 2-tablespoon cookie scoop for perfectly portioned eggs, wax or parchment paper, and a baking sheet for freezing.
Step-by-Step: Let’s Build Some Easter Eggs!
Ready to play with your food? Follow these steps for guaranteed cute and delicious results.
Step 1: Prepare the Cake Base – Get Your Hands Dirty!
Crumble your completely cooled cake into a large mixing bowl. I mean it—get in there with your fingers! You want fine, even crumbs, no big chunks. This tactile part is oddly satisfying. Now, spoon in about half to two-thirds of your frosting. Use a spatula or, again, your hands, to mix until it’s fully combined. Do the squeeze test: grab a handful and squeeze. It should hold together firmly without oozing frosting. If it’s too dry, add a bit more frosting. My Hack: If you accidentally go overboard with frosting and the mix gets too sticky, you can add a tablespoon or two of dry cake mix or even some crushed graham cracker crumbs to balance it out.
Step 2: Shape the Eggs – Channel Your Inner Bunny!
Use your 2-tablespoon scoop to portion the mixture. This keeps your eggs uniform. Roll each portion into a ball between your palms, then gently shape it into an oval/egg shape. Don’t stress about them being identical—real eggs aren’t! Place each formed egg on a wax paper-lined baking sheet. Once the tray is full, pop it into the freezer for a solid hour. Critical Tip: This freezing step is non-negotiable! It firms up the eggs so they don’t fall apart when we dip them. It also helps the chocolate coating set quickly and smoothly.
Step 3: Coat with Chocolate – The Magic Blanket!
Melt your white almond bark according to package directions, usually in a deep, microwave-safe bowl in 30-second intervals, stirring well between each. Chef’s Secret: For ultra-smooth dipping, add a teaspoon of coconut oil or shortening to the melted bark. Remove a few eggs from the freezer at a time (keep the rest cold!). Using a fork or a dipping tool, lower an egg into the chocolate, swirl to coat completely, let the excess drip off, and gently slide it back onto the wax paper. If a “foot” of chocolate pools, you can use a toothpick to trim it before it sets. Let the chocolate harden completely at room temperature.
Step 4: Decorate – Unleash Your Picasso!
Now for the best part! Place your colored candy melts into separate resealable bags (one color per bag). Microwave at 50% power in 30-second bursts, kneading the bag between bursts, until completely smooth. Key Move: Always use 50% power to avoid scorching the candy! Snip a TINY corner off each bag—you can always make the hole bigger, but you can’t make it smaller. Pipe stripes, zigzags, polka dots, or swirly patterns over your hardened white eggs. Let your creativity (or your kids’ creativity) run wild! Let the decorations set fully.
How to Serve Your Masterpiece Eggs
Presentation is half the fun! Don’t just toss these beauties in a bowl. For a stunning Easter table centerpiece, nestle them in a bed of green-colored coconut “grass” on a large platter. You can also place each one in a mini pastel cupcake liner for individual servings—great for a buffet. Arrange them on a cake stand layered with pretty spring napkins or even in a rustic basket lined with a checked towel. They’re perfect alongside a pot of coffee after brunch or boxed up as the sweetest “to-go” favor for your guests. However you present them, be prepared for the “oohs” and “aahs” and the immediate question: “You MADE these?!”
Mix It Up! Fun Variations to Try
This recipe is your playground. Here are a few twists to make it your own:
- The Chocolate Lover’s Dream: Use a chocolate cake mix with chocolate frosting. Dip in dark chocolate candy melts and decorate with gold or white drizzle for a sophisticated look.
- Spring Citrus Burst: Bake a lemon cake mix and pair it with lemon frosting. Dip in white chocolate and decorate with yellow and green candy melts. It’s like a bite of sunshine!
- Funfetti Fiesta: Use a funfetti cake mix and vanilla frosting. The colorful sprinkles inside the cake make for a fun surprise when you bite into the egg!
- Allergy-Friendly/Dietary Swap: Use your favorite gluten-free cake mix and frosting. Ensure your chocolate and candy melts are also gluten-free/dairy-free as needed (many are!).
- “Nesting” Eggs: After dipping in white chocolate, immediately roll the bottom half in crushed graham crackers or toasted coconut to create a “nest” effect before adding your colorful drizzle on top.
Beau’s Chef Notes & Kitchen Confessions
This recipe has evolved from a slightly frustrating cake-pop-on-a-stick endeavor to this chill, no-stick-required winner. The “big egg” format is a game-changer—way less fussy. My main kitchen confession? I’ve absolutely, on more than one rushed holiday, used a store-bought pound cake, crumbled it up, and mixed it with frosting. It worked like a charm! The goal is joy, not stress. Also, these eggs have a funny way of disappearing before the event. I now enforce a strict “one for the chef, one for the tray” policy to ensure there are enough left for guests. Learn from my mistakes!
FAQs & Troubleshooting: Your Questions, Answered
Q: My cake pop mixture is too wet and sticky! Help!
A: No worries—this happens! Pop the whole mixture into the fridge for 20-30 minutes to firm up. You can also add a sprinkle of dry cake mix, bread crumbs, or even crushed vanilla wafers to absorb the excess moisture.
Q: Why did my chocolate crack after dipping?
A: This is almost always a temperature issue. If the cake balls are too cold (straight from the deep freezer) and the chocolate is very warm, the contraction causes cracks. Let the cake balls sit out of the freezer for 3-4 minutes before dipping. Also, make sure your chocolate isn’t too hot.
Q: Can I make these ahead of time?
A: Absolutely! You can shape the eggs and freeze them for up to a month in an airtight container. Thaw in the fridge before dipping and decorating. Fully finished cake eggs keep beautifully in the fridge for up to 5 days.
Q: My candy melt drizzle is too thick/too runny. What did I do wrong?
A: Consistency is key. If it’s too thick, the bag is hard to squeeze. Microwave for a few more seconds or add a tiny dot of coconut oil. If it’s too runny and spreads everywhere, let it sit for a minute to cool slightly and thicken up.

Easy Easter Cake Pops : Festive Easter Egg Cake Balls
Description
Looking for a fun, festive dessert that’s easy to make and perfect for Easter celebrations? These Easter Cake Pops (shaped like little eggs) are a guaranteed hit. They’re made with crumbled cake and frosting, dipped in white chocolate, and decorated with colorful drizzles. No special tools, no sticks, and no baking skills required beyond a simple cake — just mix, shape, dip, and decorate.
Ingredients
-
1 box cake mix, baked and fully cooled (any flavor)
-
1 (16 oz) tub frosting (vanilla or cream cheese works best)
-
1 lb white almond bark or white candy melts
-
1–2 cups colored candy melts (pastel colors for decorating)
-
Optional: 1 teaspoon coconut oil or shortening (for smoother melting)
Instructions
-
Crumble the cake
Place the cooled cake in a large bowl and crumble it into fine crumbs using your hands. -
Mix with frosting
Add about 2/3 of the frosting and mix well. Squeeze some mixture in your hand — it should hold together. Add more frosting only if needed. -
Shape the eggs
Scoop about 2 tablespoons of mixture and roll into a ball, then gently shape into an egg oval. Place on a parchment-lined tray. -
Freeze to firm
Freeze shaped eggs for 45–60 minutes until firm. -
Melt the coating
Melt white almond bark or candy melts in the microwave in 30-second intervals, stirring each time. Add a little coconut oil if needed for smoother texture. -
Dip
Using a fork, dip each egg into the melted coating. Let excess drip off and place back on parchment paper. Let set completely. -
Decorate
Melt colored candy melts in small bags or bowls. Snip a tiny corner of the bag and drizzle lines, dots, or zigzags over the eggs. Let decorations harden.
Notes
-
Cool cake completely before mixing or the texture becomes greasy.
-
Don’t over-add frosting — too much makes soft, hard-to-dip eggs.
-
Freeze before dipping so eggs hold their shape.
-
Dip a few at a time and keep the rest cold.
-
If coating cracks: let frozen eggs sit out 3–4 minutes before dipping.
A Quick Note on Nutrition & Details
Let’s keep it real—these are a celebratory treat, meant to be enjoyed for the happiness they bring! Here are the details for planning your feast:
- Prep Time: 15 minutes (plus cake baking/cooling time)
- Chill Time: 1 hour
- Total Time: 1 hour 15 minutes (active time)
- Servings: Makes about 25-30 adorable cake eggs
- Calories: Approximately 210 per cake egg
- Storage: Store in a single layer in an airtight container in the refrigerator for up to 5 days. They can also be frozen for up to a month; thaw in the fridge.
Final Thoughts from My Kitchen to Yours
And there you have it! Your guide to creating the most delightful, festive, and downright fun Easter dessert on the block. Remember, the magic isn’t in achieving bakery-perfect lines (though if you do, high five!). The magic is in the shared experience, the laughter around the kitchen counter, and the proud moment you present something made with love. These Easy Easter Cake Pops are more than a recipe; they’re a invitation to play, to create, and to make the holiday a little bit sweeter. So from my Feastical family to yours, I wish you a delicious, joyful, and absolutely wonderful Easter celebration. Now, go make some magic—and save one of those eggs for the chef!
Happy Baking,
Beau Collier