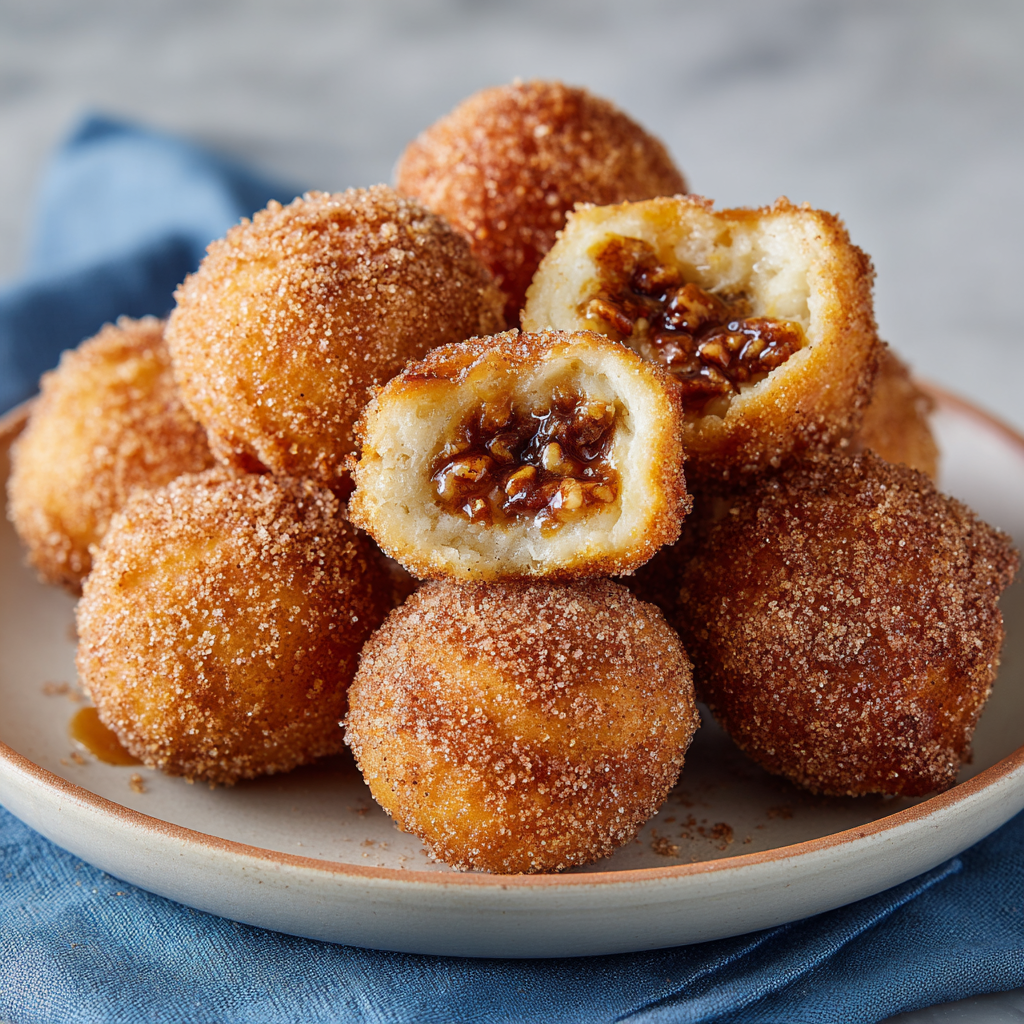
Pecan Pie Churro Bites
Pecan Pie Churro Bites: Your New Favorite Party Trick
Hey friends, Beau here! Let’s get real for a second. Have you ever stood in front of a dessert table, your plate already full, and faced the ultimate dilemma: a slice of rich, gooey pecan pie or a pile of warm, cinnamon-dusted churros? It’s a tough call, right? You want that comforting, nutty sweetness, but you also crave that crispy, fried-dough magic. Well, I’m here to tell you that the era of choosing is officially over.
Welcome to the glorious world of Pecan Pie Churro Bites. Imagine this: a golden-brown, bite-sized churro ball, still warm from the fryer, crackling with a cinnamon-sugar crust. You take a bite, and instead of just a soft, pillowy center, you hit a hidden pocket of sticky, caramelized pecan pie filling. It’s a surprise in every single one—a little explosion of flavor that tastes like a state fair and a holiday dinner decided to throw a party in your mouth.
I know frying can sound a little intimidating, but trust me, this recipe is designed for fun, not fuss. We’re using a simple choux pastry (the same dough used for cream puffs and éclairs) that comes together in minutes. The filling is a quick stovetop version of pecan pie goodness. And the best part? These little guys are totally poppable. They’re perfect for passing around at a party, stacking on a dessert board, or just “quality testing” straight from the cooling rack. So, grab your favorite mixing bowl and let’s make some kitchen magic happen!
The Day I Discovered Dessert Mashups
This recipe didn’t come from a fancy culinary school lesson. Oh no, it was born out of a happy accident during one of our epic Collier family Thanksgiving potlucks. My cousin, always the overachiever, showed up with both a classic pecan pie and a massive tray of churros. As the night went on, the desserts got pushed closer and closer together on the table.
At one point, I went for a churro and accidentally dragged it right through a rivulet of pecan pie filling that had escaped a slice. I took a bite, and my eyes practically popped out of my head. The combination was insane! The warm, soft churro and the cool, sticky pecans were a match made in heaven. I remember looking around the chaotic, laughter-filled kitchen and thinking, “This. This needs to be one single, perfect bite.” I spent the next few weeks in my kitchen, tweaking and testing, until I landed on this method of stuffing the filling inside the churro. It’s become a Feastical staple ever since, and it always brings me right back to that delicious, messy, and wonderfully chaotic family moment.
Gathering Your Kitchen Crew: The Ingredients
Here’s everything you’ll need to create these little bites of joy. I’ve included some notes and swaps because I believe in cooking with what you’ve got!
For the Pecan Pie Filling:
- ½ cup chopped pecans: Toasting these first is a game-changer! It unlocks their deep, nutty flavor. Just pop them in a dry skillet for a few minutes until fragrant.
- ¼ cup brown sugar: Pack it in! The molasses in the brown sugar gives that classic, rich pecan pie taste.
- 1 tbsp corn syrup: This is our secret weapon for that gooey, sticky texture. If you prefer, you can swap in pure maple syrup or even honey.
- 1 tbsp butter: Because butter makes everything better. It adds a lovely richness and helps bind the filling.
- Pinch of salt: Crucial for balancing the sweetness and making all the flavors pop.
For the Churro Dough:
- 1 cup water: The base of our dough. Make sure it’s at a rolling boil when you add the flour!
- ½ cup (1 stick) butter: Unsalted is best so we can control the saltiness. Cut it into chunks so it melts quickly.
- 1 tbsp granulated sugar: A little sweetness in the dough itself.
- ¼ tsp salt: Don’t skip this! It enhances the flavor of the entire churro.
- 1 cup all-purpose flour: The backbone of our dough. Spoon and level it into your measuring cup for accuracy—don’t scoop directly from the bag!
- 2 large eggs: They need to be at room temperature to incorporate smoothly into the warm dough. This gives the churros their lift and structure.
For the Cinnamon-Sugar Coating & Frying:
- ½ cup granulated sugar: The perfect amount for rolling our warm churros.
- 1 tbsp ground cinnamon: Adjust this to your taste! I like a strong cinnamon flavor, so I’m generous.
- Vegetable or Canola Oil for frying: You’ll need enough to have about 2 inches of oil in your pot. These oils have a high smoke point and neutral flavor.
Let’s Get Cooking: Step-by-Step Instructions
Ready to roll up your sleeves? Follow these steps, and you’ll be a churro-stuffing pro in no time.
- Make the Pecan Pie Filling First. In a small saucepan over medium heat, combine the chopped pecans, brown sugar, corn syrup, butter, and salt. Stir constantly for about 3-5 minutes until the butter is melted, the sugar has dissolved, and the mixture is bubbling and thickened slightly. It will look glossy and smell amazing. Pour it into a small bowl and let it cool completely. Chef’s Hack: Pop it in the fridge for 10-15 minutes to speed this up. A cool filling is much easier to handle!
- Create the Churro Dough. In a medium-sized saucepan, bring the water, butter, sugar, and salt to a rolling boil. The butter should be fully melted. Reduce the heat to low and immediately dump in the entire cup of flour. Stir vigorously with a wooden spoon! The mixture will form a ball and pull away from the sides of the pan. Keep stirring for about a minute more to cook out the raw flour taste. Take the pan off the heat and let the dough cool for 5-7 minutes. You don’t want to cook the eggs when you add them!
- Incorporate the Eggs. Add the eggs one at a time, beating well after each addition. This is an arm workout! I like to use a wooden spoon, but you can use a hand mixer on low speed if you prefer. The dough will look slippery and separated at first, but keep beating! It will eventually come together into a smooth, sticky, and gorgeous dough.
- Stuff ‘Em! This is the fun part. Scoop up about a tablespoon of dough. I like using a small cookie scoop for uniformity. Flatten it slightly in your hand. Place about ½ teaspoon of the cooled pecan filling in the center. Gently fold the dough around the filling, pinching it shut to fully enclose it. Roll it gently between your palms to form a smooth ball. Place the finished balls on a parchment-lined baking sheet. Chef’s Hack: If the dough is too sticky, lightly wet your hands with water. It prevents sticking like a charm!
- Heat the Oil and Fry. Pour oil into a heavy-bottomed pot (like a Dutch oven) until it’s about 2-3 inches deep. Heat it over medium-high heat until it reaches 350°F (175°C). Use a candy thermometer for accuracy—it’s the key to perfectly cooked, non-greasy churros! Carefully lower a few dough balls into the hot oil using a slotted spoon. Don’t overcrowd the pot. Fry for 2-4 minutes, turning occasionally, until they are puffed and deep golden brown.
- Coat While Warm. While the churro bites are frying, mix the sugar and cinnamon in a medium bowl. As soon as the bites come out of the oil, drain them on a paper towel for just 30 seconds (they need to be hot for the sugar to stick), then toss them gently in the cinnamon-sugar mixture until fully coated. Serve immediately for maximum bliss!
How to Serve These Little Gems
Presentation is part of the fun! Here are a few of my favorite ways to serve these Pecan Pie Churro Bites:
- The Classic Pile: Stack them high on a rustic wooden board or in a wide, shallow bowl. Dust with a little extra cinnamon sugar for a snowy effect. Simple and stunning.
- Dipping Station: Take it to the next level by serving them with small bowls of dipping sauces. A rich chocolate ganache, a dollop of freshly whipped cream, or even a salted caramel sauce are all phenomenal choices.
- Holiday Dessert Board: Arrange them alongside other bite-sized treats like mini cookies, chocolate truffles, and fruit on a large platter. They’re the star of the show!
- With Ice Cream: For the ultimate indulgence, place a few warm churro bites on top of a scoop of vanilla bean ice cream. The contrast of hot and cold is pure magic.
Get Creative: Recipe Variations
Once you’ve mastered the classic, feel free to play with the formula! Here are some delicious twists:
- Chocolate Hazelnut: Swap the pecan filling for a spoonful of high-quality chocolate-hazelnut spread. It’s like a fried Ferrero Rocher!
- Apple Pie Twist: Replace the pecan filling with a thick, cooked apple pie filling (finely chopped apples cooked with butter, sugar, and cinnamon).
- Baked, Not Fried: Want a slightly lighter version? Preheat your oven to 375°F (190°C). Arrange the stuffed dough balls on a parchment-lined baking sheet, brush them lightly with melted butter, and bake for 20-25 minutes until puffed and golden. Roll in cinnamon sugar right after they come out of the oven.
- Gluten-Free Friendly: Use a 1:1 gluten-free all-purpose flour blend in the dough. The results are just as fantastic!
- Spicy Kick: Add a tiny pinch of cayenne pepper or chipotle powder to the cinnamon sugar for a sweet and spicy surprise.
Beau’s Chef’s Notes
This recipe has seen a lot of love (and a few hilarious failures) in my kitchen. The first time I tried it, I didn’t cool the filling enough, and it oozed out into the oil, creating a caramelized mess. Tasted great, but looked wild! The key is patience with that filling. Over the years, I’ve found that using a small cookie scoop is the ultimate hack for getting evenly sized bites that cook at the same rate. And don’t be afraid of the dough—it’s supposed to be sticky! A little water on your hands makes the shaping process a breeze. This recipe is all about joy, so put on some music, don’t stress about a little mess, and enjoy the process.
FAQs & Troubleshooting
Q: My dough is too runny and won’t hold its shape. What happened?
A: This usually means the dough wasn’t cooked long enough in the pan after adding the flour. Make sure you stir for a full minute after the dough forms a ball. Also, ensure you’re measuring your flour correctly (spoon and level!). If it’s still too soft, you can add an extra tablespoon of flour to the pan while cooking.
Q: The filling is leaking out during frying. How can I prevent this?
A: Two main culprits: 1) The filling wasn’t cool enough. It must be completely cool or even slightly chilled. 2) The dough wasn’t sealed properly. Make sure you pinch the seam really well and roll it into a smooth, seamless ball.
Q: I don’t have a thermometer. How do I know when the oil is ready?
A: A handy trick is the “wooden spoon test.” Dip the handle of a wooden spoon into the oil. If bubbles form around it steadily and vigorously, the oil is likely around 350°F. You can also test with a small piece of dough—it should sizzle and rise to the surface immediately, turning golden in about 60-90 seconds.
Q: Can I make these ahead of time?
A> You can prepare the stuffed, uncooked dough balls and keep them covered in the fridge for up to 4 hours before frying. For the best texture, I highly recommend frying them fresh. You can re-crisp leftovers in an air fryer or a 350°F oven for a few minutes.

Pecan Pie Churro Bites
Description
Hey friends! Beau here. Imagine a golden, cinnamon-sugar churro bite with a hidden pocket of gooey pecan pie filling. It’s the ultimate mashup of comfort desserts, perfect for parties, dessert boards, or just a sweet, indulgent snack. These bites are fun to make and even more fun to eat.
Ingredients
Pecan Pie Filling:
-
½ cup chopped pecans (toasted for extra flavor)
-
¼ cup brown sugar
-
1 tbsp corn syrup (or maple syrup/honey)
-
1 tbsp butter
-
Pinch of salt
Churro Dough:
-
1 cup water
-
½ cup (1 stick) unsalted butter
-
1 tbsp granulated sugar
-
¼ tsp salt
-
1 cup all-purpose flour
-
2 large eggs, room temperature
Cinnamon-Sugar Coating & Frying:
-
½ cup granulated sugar
-
1 tbsp ground cinnamon
-
Vegetable or canola oil (for frying, ~2–3 inches deep)
Instructions
1. Make the Pecan Pie Filling
-
In a small saucepan over medium heat, combine pecans, brown sugar, corn syrup, butter, and salt.
-
Stir for 3–5 minutes until thickened and glossy.
-
Pour into a small bowl and cool completely (refrigerate 10–15 minutes to speed up cooling).
2. Make the Churro Dough
-
In a medium saucepan, bring water, butter, sugar, and salt to a rolling boil.
-
Reduce heat to low and add flour all at once. Stir vigorously until dough forms a ball and pulls away from sides (about 1 minute).
-
Remove from heat and cool 5–7 minutes.
3. Incorporate the Eggs
-
Beat in eggs one at a time until smooth. Dough may look separated at first—keep mixing!
4. Stuff the Churros
-
Scoop ~1 tbsp of dough, flatten slightly.
-
Add ½ tsp cooled pecan filling in the center.
-
Fold dough around filling, pinch to seal, and roll into a smooth ball.
-
Place on parchment-lined baking sheet. (Tip: wet hands lightly if dough is sticky.)
5. Fry the Churros
-
Heat oil in a heavy-bottomed pot to 350°F (175°C). Use a thermometer or wooden spoon test.
-
Fry a few dough balls at a time, 2–4 minutes, turning until golden and puffed.
-
Drain briefly on paper towels.
6. Coat in Cinnamon Sugar
-
Mix sugar and cinnamon in a bowl.
-
Toss warm churro bites in mixture until fully coated. Serve immediately.
Notes
-
Cool filling completely before stuffing.
-
Use a small cookie scoop for evenly sized bites.
-
Sticky dough is normal; water on hands helps shape balls.
-
Fry in small batches to avoid overcrowding.
Nutrition
- Calories: 120 kcal per bite
- Sugar: 14g
- Fat: 7g
- Carbohydrates: 14g
Nutritional Information
Okay, let’s be real—these are a treat! But it’s always good to know what you’re enjoying. The following is an approximate estimate per churro bite (assuming the recipe makes about 24 bites). Remember, values can vary based on specific ingredients and how much oil is absorbed.
- Calories: ~120 kcal
- Fat: 7g
- Carbohydrates: 14g
- Sugar: 8g
- Protein: 2g
These bites are a source of energy (carbs!) and contain a small amount of protein. The pecans add healthy fats and a touch of fiber. Enjoy them mindfully as part of a balanced diet, and savor every single delicious bite!
Final Thoughts
Well, there you have it, my friends—my secret weapon for making any gathering a little more special. These Pecan Pie Churro Bites are more than just a dessert; they’re a conversation starter, a memory maker, and a testament to the fact that the best recipes often come from a place of joy and a little bit of kitchen experimentation.
I hope you feel inspired to give them a try. Don’t be nervous—you’ve got this! And when you pull that first batch of golden, sugar-dusted bites out of the oil and bite into that gooey, pecan-filled center, I guarantee you’ll feel like a kitchen rockstar.
If you make them, I’d be absolutely thrilled to see your creation! Tag me @Feastical on social media or use the hashtag #FeasticalEats. Happy cooking!
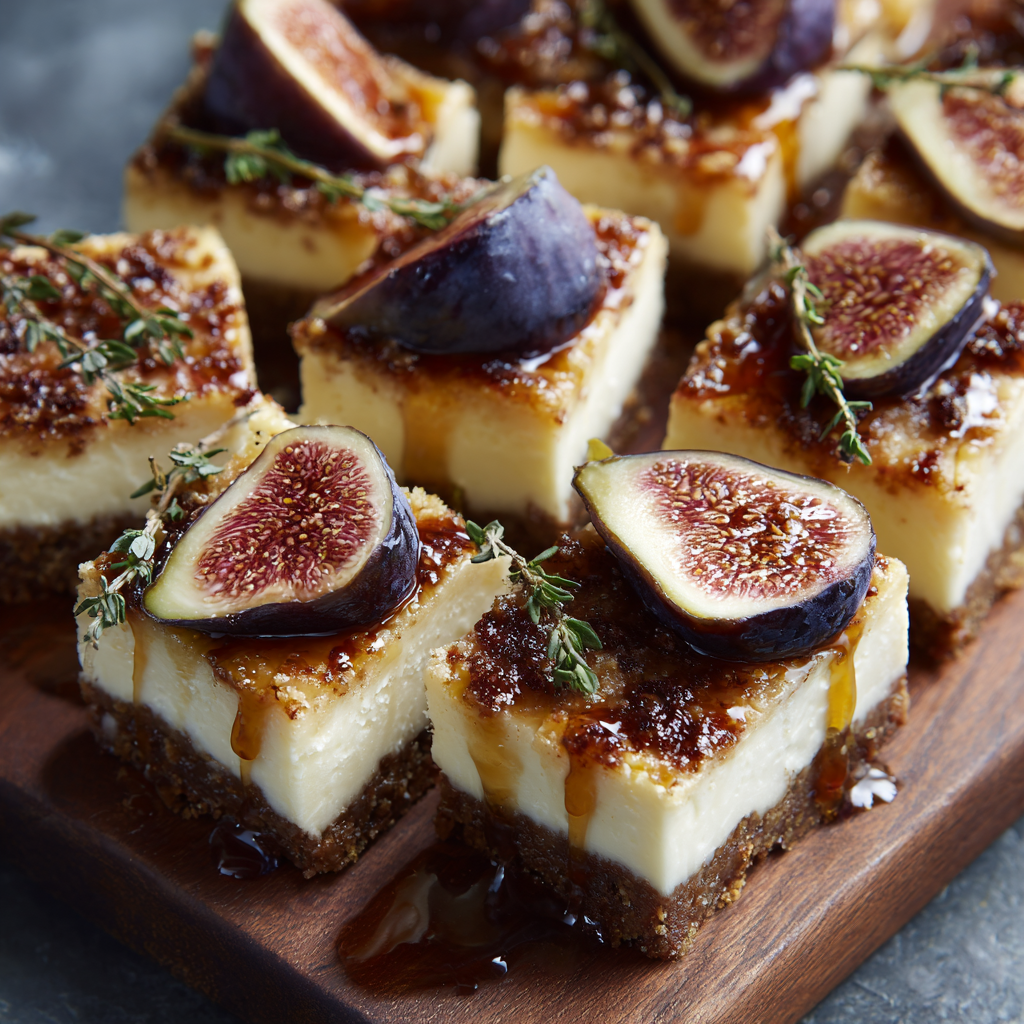
Baked Fig & Honey Cheesecake Bars
Baked Fig & Honey Cheesecake Bars: Your New Favorite Slice of Elegance
Hey friends, Beau here from Feastical! Let’s get real for a second. Sometimes, you want a dessert that’s a total showstopper—the kind of thing that makes your guests’ eyes go wide and earns you a chorus of “You made this?!” But let’s be honest, most of us don’t have the time or energy for a multi-day, fussy pastry project that dirties every bowl in the kitchen. Am I right?
That’s exactly why I’m so head-over-heels for these Baked Fig & Honey Cheesecake Bars. They look like they came straight from the patisserie case of a fancy bakery, but I promise you, they are 100% achievable in your very own kitchen. We’re talking about a buttery, crumbly graham cracker crust, a luxuriously creamy and tangy cheesecake layer that’s sweetened purely with golden honey, and a stunning topping of roasted fresh figs that get all jammy and intense in the oven.
The final flourish? A warm, glossy thyme-honey glaze that we drizzle over the top. It adds a whisper of herbal sophistication that cuts through the richness in the most magical way. This isn’t just a dessert; it’s an experience. It’s earthy, it’s elegant, and it tastes like the very best part of a cozy autumn afternoon. So, are you ready to create something truly special? Grab your favorite mixing bowl, and let’s make some magic together.
A Sweet Slice of Memory
This recipe takes me right back to my grandparents’ backyard. They had this massive, somewhat unruly fig tree that my grandpa was inexplicably proud of. Every late summer, it would become a race against the birds to harvest the ripe, purple jewels before they got to them. My grandma, a no-nonsense woman who believed dessert was a necessary food group, would turn those figs into the most incredible jam and simple tarts.
But my favorite memory is of her “cheesecake squares.” They were much simpler than this version—a basic cheesecake base with fig jam swirled in. But the way the sweet, creamy filling paired with the tangy fruit felt like a revelation to my eight-year-old self. It was my first taste of “grown-up” dessert. This recipe is my homage to her and that prolific tree. It’s my way of capturing that feeling of rustic elegance and sharing it with you. Every time I smell figs roasting with honey, I’m right back in her sunny kitchen, sneaking a taste before dinner.
Gathering Your Ingredients: A Chef’s Guide
Great food starts with great ingredients. Here’s everything you’ll need, along with a few of my insider tips to make these bars absolutely perfect.
For the Crust:
- 1½ cups graham cracker crumbs: You can buy these pre-crumbled, but I find crushing whole sheets in a zip-top bag with a rolling pin is strangely therapeutic. It also gives you more control over the texture—you want fine crumbs, not dust, for the perfect base.
- ¼ cup granulated sugar: This helps the crust caramelize slightly and hold together. For a deeper flavor, you can swap this for brown sugar.
- 6 tbsp unsalted butter, melted: Chef’s Insight: Using unsalted butter lets you control the salt level. The melted butter is the glue that holds our crust together. Make sure it’s fully melted but not scalding hot.
For the Cheesecake Layer:
- 16 oz (two 8-oz blocks) full-fat cream cheese, softened: This is non-negotiable, friends! Full-fat cream cheese gives you that rich, creamy texture we’re after. Pro Tip: Take it out of the fridge at least an hour before you start. Soft cream cheese blends smoothly and prevents a lumpy batter.
- ½ cup sour cream: This is my secret weapon for a tangy, velvety cheesecake that’s not overly heavy. If you’re in a pinch, plain Greek yogurt works as a great substitute.
- ½ cup honey: Use the best honey you can comfortably afford! A wildflower or orange blossom honey adds beautiful floral notes. This is our primary sweetener, so its quality really shines through.
- 2 large eggs, at room temperature: Room temp eggs incorporate into the batter more evenly, giving you a smoother final product. Just place them in a bowl of warm water for 5-10 minutes if you forgot to take them out.
- 1 tsp pure vanilla extract: It enhances all the other flavors. Trust me, the real stuff makes a difference.
- A generous pinch of salt: This might seem odd, but salt is a flavor enhancer. It makes the sweet and tangy notes pop!
For the Topping:
- 1 cup fresh figs, halved: Look for figs that are soft but not mushy. Black Mission figs are classic and give that gorgeous purple color, but any variety will work.
- 2 tbsp honey: For that gorgeous, glossy glaze.
- ½ tsp fresh thyme leaves: Don’t be scared! The thyme adds an incredible, subtle savory note that complements the honey and figs beautifully. If you’re not a thyme person, a tiny pinch of flaky sea salt on top after baking is also divine.
Let’s Get Baking: Your Step-by-Step Guide
Okay, team. Oven mitts on? Let’s do this. I’ll walk you through each step with all my favorite hacks to ensure success.
- Prep Like a Pro. First things first, preheat your oven to 325°F (165°C). This lower temperature is key for a cheesecake that cooks evenly without cracking. Now, line an 8×8-inch baking pan with parchment paper, leaving some overhang on two opposite sides. Chef’s Hack: A quick spritz of cooking spray on the pan before laying down the parchment helps it stick in place, making it a breeze to lift the entire slab of bars out later for clean slicing.
- Create the Crust. In a medium bowl, stir together the graham cracker crumbs and sugar. Pour in the melted butter and mix with a fork until the mixture resembles wet sand and holds together when you pinch it. Dump it into your prepared pan and press it down firmly and evenly into the bottom. I like to use the flat bottom of a measuring cup to really pack it in. Bake this for 10 minutes. This “pre-baking” or blind baking sets the crust so it doesn’t get soggy from the filling. Let it cool slightly while you make the filling.
- Whip Up the Dreamy Filling. In a large bowl, using an electric mixer (or a stand mixer with the paddle attachment), beat the softened cream cheese on medium speed until it’s completely smooth and free of lumps. This is the most important step for a silky texture! Scrape down the sides of the bowl. Add the sour cream and honey and beat again until combined. Now, add the eggs one at a time, beating on low speed just until each egg is incorporated. Pro Tip: Over-mixing after adding the eggs can incorporate too much air and lead to cracking. Finally, mix in the vanilla and salt. Your batter should be gloriously smooth and pourable.
- Assemble with Care. Pour the cheesecake filling over the warm crust and gently smooth the top with a spatula. Now, take your halved figs and arrange them cut-side up on the batter. You can do a neat pattern or just scatter them artfully—they’ll look beautiful either way! They will sink in slightly, which is exactly what we want.
- The Main Bake. Place the pan in the preheated oven and bake for 30-35 minutes. The edges should look set, but the center will still have a slight jiggle to it—like Jell-O. This is crucial! It will continue to set as it cools. If the center is completely firm, it’s overbaked and might be dry.
- The Final Glaze. While the bars are still warm from the oven, warm the 2 tablespoons of honey with the thyme leaves in the microwave for about 15 seconds, just until it’s runny. This helps the thyme infuse its flavor. Use a spoon or a brush to drizzle this fragrant glaze all over the top, making sure some gets into the figs.
- The Patience Game. Let the bars cool completely in the pan on a wire rack. Then, and this is the hard part, cover the pan and transfer it to the refrigerator to chill for at least 2 hours, but preferably overnight. This cooling and chilling time is non-negotiable for the perfect, sliceable texture.
How to Serve These Stunners
Once your bars are thoroughly chilled, use the parchment paper overhang to lift the whole block out of the pan onto a cutting board. Use a long, sharp knife to slice them into squares. For super clean cuts, wipe the knife clean between each slice.
I love serving these bars slightly chilled. They are elegant enough to stand alone on a beautiful platter. For an extra touch of decadence, you could add a dollop of lightly sweetened whipped cream or a drizzle of extra honey. A few extra fresh thyme sprigs or a scattering of crushed pistachios on the plate adds a lovely pop of color and texture. These are perfect for a holiday party, a fancy picnic, or just a Tuesday night when you deserve something extraordinary.
Make It Your Own: Delicious Variations
One of the best things about a great recipe is making it your own! Here are a few twists on this classic:
- Nutty Crust: Swap out half of the graham cracker crumbs for finely ground toasted almonds or pecans. The nuttiness pairs wonderfully with the figs.
- Citrus Zing: Add the zest of one orange or lemon to the cheesecake batter for a bright, sunny flavor that cuts through the richness.
- Ginger Spice: Add 1 teaspoon of ground ginger or 2 tablespoons of finely chopped crystallized ginger to the crust mixture for a warm, spicy kick.
- No Fresh Figs? No Problem! You can use about ¾ cup of high-quality fig jam instead. After pouring the batter into the crust, dollop the jam on top and use a knife to swirl it in beautifully before baking. Skip the fresh fig topping and thyme honey glaze.
- Bourbon Caramel Drizzle: For a truly decadent adult twist, skip the thyme honey and drizzle the cooled bars with a bourbon-spiked caramel sauce before serving.
Beau’s Chef Notes & Kitchen Stories
This recipe has become a staple in my fall baking rotation, but it’s evolved over time. The first time I made it, I was so impatient that I sliced into it after only an hour of chilling. Let’s just say I had more of a “fig cheesecake spoonable delight” than a bar! It was still delicious, but it taught me the importance of that chilling time. Another time, I tried to rush the cream cheese softening by microwaving it. Big mistake. It created weird hot spots and my batter was lumpy. Lesson learned: patience is the most important ingredient in baking.
This recipe is forgiving, though. Even if it cracks a little (which mine sometimes still does!), the beautiful fig topping hides all sins. It’s a reminder that cooking is about the joy of the process and the people you share it with, not perfection.
Your Questions, Answered!
Q: Can I use frozen figs?
A: You can, but thaw and drain them thoroughly first to avoid adding extra moisture to the cheesecake. They might be a bit softer than fresh, but the flavor will still be great.
Q: My cheesecake layer puffed up and cracked in the oven. What happened?
A: Don’t worry! This is usually caused by over-mixing the batter (incorporating too much air) or a sudden temperature change. To prevent it, mix on low speed once the eggs are added, and avoid opening the oven door during the first 25 minutes of baking. Remember, a crack is just a chance for extra glaze to pool—it will still taste amazing!
Q: How long will these bars keep?
A: Stored in an airtight container in the refrigerator, they are at their best for 3-4 days. The crust may soften slightly over time, but they’ll still be delicious.
Q: Can I make these gluten-free?
A: Absolutely! Just use your favorite gluten-free graham crackers or gluten-free digestive biscuits for the crust. Ensure all your other ingredients are certified gluten-free.

Baked Fig & Honey Cheesecake Bars
Description
Hey friends! Beau here from Feastical. Sometimes dessert should be a showstopper, but also achievable in your own kitchen. These Baked Fig & Honey Cheesecake Bars have it all: a buttery graham cracker crust, a creamy honey-sweetened cheesecake, and roasted figs with a glossy thyme-honey glaze. Earthy, elegant, and cozy—all in one sliceable bar.
Ingredients
Crust:
-
1½ cups graham cracker crumbs
-
¼ cup granulated sugar (or brown sugar for deeper flavor)
-
6 tbsp unsalted butter, melted
Cheesecake Layer:
-
16 oz (two 8-oz blocks) full-fat cream cheese, softened
-
½ cup sour cream (or Greek yogurt)
-
½ cup honey (high-quality preferred)
-
2 large eggs, room temperature
-
1 tsp pure vanilla extract
-
Pinch of salt
Topping:
-
1 cup fresh figs, halved
-
2 tbsp honey
-
½ tsp fresh thyme leaves (optional, can use a pinch of flaky sea salt)
Instructions
1. Prep the Pan
Preheat oven to 325°F (165°C). Line an 8×8-inch pan with parchment paper, leaving overhang for easy lifting. Spray parchment lightly with cooking spray.
2. Make the Crust
-
Mix graham cracker crumbs and sugar.
-
Add melted butter and mix until it holds together.
-
Press firmly into the pan. Use a measuring cup bottom to compact it.
-
Bake 10 minutes, then cool slightly.
3. Make the Cheesecake Filling
-
Beat cream cheese until smooth. Scrape down sides.
-
Add sour cream and honey, mix until combined.
-
Beat in eggs one at a time on low speed.
-
Mix in vanilla and salt. Batter should be smooth and pourable.
4. Assemble
-
Pour cheesecake filling over crust, smooth top.
-
Arrange halved figs cut-side up on top. They will sink slightly.
5. Bake
Bake 30–35 minutes. Edges should be set; center should jiggle slightly.
6. Glaze
Warm honey with thyme leaves for ~15 seconds. Drizzle over warm bars.
7. Chill
Cool completely, then refrigerate 2+ hours or overnight before slicing.
Notes
-
Nutty Crust: Replace half of the crumbs with ground toasted almonds or pecans.
-
Citrus Zing: Add zest of 1 orange or lemon to cheesecake batter.
-
Ginger Spice: Add 1 tsp ground ginger or 2 tbsp chopped crystallized ginger to crust.
-
No Fresh Figs: Use ¾ cup high-quality fig jam swirled on top instead.
-
Bourbon Caramel: Skip thyme honey glaze; drizzle cooled bars with bourbon caramel.
-
Gluten-Free: Use gluten-free graham crackers.
Nutrition
- Calories: 270 Cal per bar
- Sugar: 17g
- Fat: per bar
- Carbohydrates: 23g
A Quick Note on Nutrition
I’m all about balance. These bars are a rich, indulgent treat, and that’s something to be celebrated! While they’re not a health food, it’s helpful to know what you’re enjoying. The estimated nutritional info per bar (assuming 12 bars) is roughly: 270 calories, 18g fat, 23g carbohydrates, 17g sugar, and 4g protein. The figs add fiber and nutrients like potassium, and using honey offers trace minerals you won’t find in refined sugar. My philosophy? Savor every single, mindful bite without an ounce of guilt. Life’s too short for anything less!
Final Thoughts from My Kitchen to Yours
Well, there you have it, my friends. My ultimate recipe for Baked Fig & Honey Cheesecake Bars. This dessert is more than just a list of ingredients and steps; it’s a chance to create a little moment of beauty and connection. Whether you’re making these for a special occasion or just to brighten an ordinary day, I hope you feel the same joy and satisfaction I do every time I pull them out of the oven.
Remember, the best kitchen tool you have is your own creativity. Don’t be afraid to put your own spin on it. I’d love to hear how it goes! Tag me @Feastical on social media when you make them so I can see your beautiful creations. Now, go preheat that oven and get ready for some serious compliments. Happy baking!

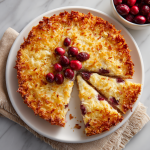
Cranberry Coconut Macaroon Pie
When a Pie Crust and a Cookie Fall in Love: Meet Your New Favorite Dessert
Hey friends, Beau here! Let’s talk about pie for a second. I love a classic, flaky, buttery pie crust as much as the next person. But sometimes? Sometimes you want a dessert that’s a little more… adventurous. A dessert that breaks the rules in the best possible way. A dessert that looks like a stunning holiday centerpiece but is secretly a breeze to make.
That’s exactly what this Cranberry Coconut Macaroon Pie is all about. We’re taking two incredible dessert worlds—the zesty, vibrant world of cranberry curd and the chewy, sweet world of coconut macaroons—and smashing them together into one glorious creation. The result is a pie that’s a total showstopper. Imagine a golden, crispy-edged coconut macaroon that forms a sturdy, delicious crust, holding a pool of the most brilliantly pink, tart, and silky cranberry curd you’ve ever tasted.
And here’s the best part for my friends who are gluten-free or just like to mix things up: this entire pie is naturally gluten-free. No fancy flour blends needed! It’s the perfect answer for those holiday potlucks where you want to bring something that everyone can enjoy, something that’s bursting with flavor and feels special from the first slice to the last. So, if you’re ready to create a dessert that’s as fun to make as it is to eat, grab your mixing bowls. We’re about to make some magic.
A Happy Kitchen Accident: The Story Behind the Pie
This pie, like so many of my favorite recipes, was born from a happy little kitchen accident. A few years back, I was in full-on holiday baking mode. My kitchen counter looked like a flour bomb had gone off, and I was determined to make a classic cranberry pie. The only problem? I was completely out of all-purpose flour. I stared into my pantry, willing a bag to appear, and my eyes landed on a giant bag of shredded coconut.
Now, I’d been making coconut macaroons earlier in the week, and a lightbulb went off. What if the macaroon was the crust? I quickly whipped up a simple macaroon base, pressed it into a pie pan, and crossed my fingers while it baked. It came out smelling incredible—toasty, sweet, and golden. I filled it with my tangy cranberry curd, let it chill, and held my breath as I cut the first slice. Friends, it was a revelation. The chewy coconut was the perfect textural contrast to the smooth, sharp curd. It was better than my original plan could ever have been! It just goes to show that sometimes the best recipes come from a little improvisation and a whole lot of coconut.
Gathering Your A-Team: The Ingredients
This recipe keeps it simple with two main components. Here’s everything you’ll need, plus a few of my chef-y insights to help you understand the “why” behind each ingredient.
For the Macaroon Crust:
- 3 cups sweetened shredded coconut: This is the star of the crust! The sweetened variety gives us that classic macaroon flavor and helps the crust hold together and get beautifully golden. Chef’s Tip: If you only have unsweetened, just add an extra tablespoon or two of sugar to the mix.
- 2 egg whites: Our binder! Egg whites are the magic that transforms loose coconut into a cohesive, chewy crust. Make sure they’re at room temperature for the best volume.
- ¼ cup sugar: A little extra sweetness to balance the tart cranberry filling. Granulated white sugar works perfectly here.
- ½ tsp vanilla extract: The flavor enhancer. Vanilla and coconut are a match made in heaven. For a next-level flavor, try using almond extract instead!
- Pinch of salt: Never, ever skip the salt! It makes all the other flavors pop and prevents the crust from tasting one-note.
For the Cranberry Curd:
- 2 cups fresh or frozen cranberries: The heart of the pie! Fresh cranberries give you the brightest flavor, but frozen work just as well—no need to thaw. Substitution Tip: In a pinch, you could use other tart berries like raspberries, but the color and unique tang will be different.
- ½ cup orange juice: Our liquid gold. The orange juice adds a beautiful citrus note that complements the cranberries perfectly. Use freshly squeezed for the best flavor, but a good-quality store-bought juice is fine too.
- ½ cup sugar: We’re taming the tartness here. You can adjust this to your taste—if you love a super-sharp curd, feel free to reduce it by a tablespoon or two.
- 2 whole eggs + 2 egg yolks: This combo is the key to a luxuriously thick and creamy curd. The yolks add incredible richness and help the curd set beautifully.
- 4 tbsp butter, cut into pieces: Stirred in at the end, the butter gives the curd its signature silky, glossy finish and rounds out the sharp edges of the fruit.
- Zest of 1 orange: This is where the big, bright orange flavor lives! Don’t skip the zest—it makes all the difference.
Let’s Get Baking: The Step-by-Step Guide
Ready to create this masterpiece? Follow these steps, and you’ll have a perfect pie in no time. I’ve sprinkled in my favorite tips and hacks to make the process smooth sailing.
- Preheat and Prep: First things first, get that oven preheating to 350°F (175°C). This is crucial for our macaroon crust to start cooking immediately and get those crispy edges. While it’s heating, grab a 9-inch pie pan and give it a light coating of butter or non-stick spray. Chef’s Hack: I like to use the butter wrapper itself to grease the pan—no waste!
- Make the Macaroon Crust: In a medium bowl, combine the 3 cups of shredded coconut, ¼ cup sugar, and that all-important pinch of salt. In a separate, clean bowl, whisk the 2 egg whites and ½ tsp of vanilla extract just until they become frothy. You don’t need stiff peaks here, just a bit of air incorporated. Now, pour the frothy egg whites over the coconut mixture and use a fork or your hands to mix everything together until the coconut is evenly coated. It will seem a bit dry at first, but keep mixing—it’ll come together!
- Press and Bake: Dump the coconut mixture into your prepared pie pan. Now, here’s the fun part: use your fingers or the flat bottom of a measuring cup to press the mixture firmly and evenly across the bottom and up the sides of the pan. You want a nice, compact layer. Pro Tip: To prevent sticky fingers, lightly wet your hands with water before pressing. Pop the crust into the preheated oven and bake for 15-18 minutes, or until the edges are a deep, toasty golden brown and the top is lightly colored. Set it on a wire rack to cool completely. Do not add the filling to a warm crust! This is a key step for the perfect texture.
- Create the Cranberry Curd: While the crust is cooling, let’s make that gorgeous filling. In a medium saucepan, combine the 2 cups of cranberries, ½ cup of orange juice, and ½ cup of sugar. Cook this over medium heat, stirring occasionally, for about 8-10 minutes. You’ll know it’s ready when the cranberries have all burst and the mixture looks like a loose, chunky jam. Remove it from the heat and let it cool for a minute or two.
- Blend and Strain (The Secret to Silkiness): Carefully transfer the cranberry mixture to a blender. Important Safety Tip: Always vent the blender lid slightly and cover it with a kitchen towel to allow steam to escape. Blend until completely smooth. For the absolute silkiest curd, press this puree through a fine-mesh strainer into a clean bowl to remove any remaining skins. This step is optional but highly recommended for a professional texture.
- Temper the Eggs: In a separate bowl, whisk together the 2 whole eggs and 2 egg yolks. Now, we need to slowly raise the temperature of the eggs to prevent them from scrambling. While whisking the eggs constantly, slowly drizzle in about ½ cup of the warm (not boiling hot) cranberry puree. This is called tempering. Once incorporated, you can whisk this egg-cranberry mixture back into the saucepan with the remaining puree.
- Cook to Perfection: Return the saucepan to medium-low heat. Cook, stirring constantly with a spatula or wooden spoon, for about 5-7 minutes, until the curd has thickened enough to coat the back of the spoon. When you run your finger through it, it should leave a clear path. Don’t walk away during this step! Constant stirring is the key to a lump-free curd.
- Finish with Butter and Zest: Once thickened, remove the curd from the heat. Stir in the 4 tablespoons of butter, one piece at a time, until each is fully melted and incorporated. Finally, stir in the bright, fragrant orange zest.
- Assemble and Chill: Pour the warm cranberry curd into your completely cooled macaroon crust. Smooth the top with a spatula. Now, the hardest part: patience! Carefully transfer the pie to the refrigerator and let it chill for at least 2-4 hours, or until the curd is completely set. Overnight is even better!
The Grand Finale: How to Serve This Beauty
Okay, the pie is set, and it’s time for the grand reveal! This pie is stunning all on its own, but a few simple touches can make it extra special.
I love to let the colors shine, so I serve it simply. Use a sharp knife to slice clean portions. For an elegant touch, add a dollop of freshly whipped cream or a scoop of vanilla bean ice cream on the side. The creamy, cool element is a dream paired with the tart curd and chewy coconut.
For a festive garnish, a few fresh cranberries, a sprinkle of extra coconut, or a few curls of orange zest on top look absolutely beautiful. Serve it chilled straight from the fridge—it’s the perfect refreshing yet rich end to any meal.
Make It Your Own: Delicious Recipe Variations
One of the best things about this recipe is how adaptable it is. Feel free to get creative and put your own spin on it!
- Lemon-Lime Twist: Swap the orange juice and zest for the juice of one lemon and the zest of one lime. The result is an even tarter, super-bright pie that’s incredibly refreshing.
- Ginger Spice: Add a teaspoon of freshly grated ginger to the cranberry mixture as it simmers. You could also add a quarter teaspoon of ground ginger to the macaroon crust for a warm, spicy kick throughout.
- White Chocolate Drizzle: For a sweeter, more decadent version, melt some white chocolate and drizzle it over the top of the chilled pie. The combination of white chocolate and cranberry is a classic for a reason!
- Individual Mini Pies: Press the coconut crust mixture into a muffin tin (lined with liners for easy removal) to create individual-sized pies. Just reduce the baking time for the crust to about 10-12 minutes.
- Dairy-Free Delight: This pie is easily made dairy-free! Simply use a plant-based butter (my favorite is Miyoko’s or Earth Balance) in the cranberry curd. The crust is already dairy-free!
Beau’s Kitchen Notes
This pie has become a staple in my holiday rotation, and it’s evolved a bit over the years. I’ve found that toasting the shredded coconut for the crust in a dry skillet for a few minutes before mixing it with the other ingredients adds an incredible depth of nutty flavor. It’s an extra step, but so worth it if you have the time!
I also have a funny story about the first time I brought this to a friendsgiving. Someone took a bite, closed their eyes, and said, “This tastes like Christmas, but on a beach.” I think that’s the perfect description—it’s festive and cozy, but the tropical coconut gives it a sunny, happy vibe. Don’t be afraid to make this pie year-round; it’s far too good to be reserved just for the holidays!
Your Questions, Answered: FAQs & Troubleshooting
Let’s tackle a few common questions to ensure your pie turns out perfectly.
Q: My crust is sticking to the pan! How can I prevent this?
A: Greasing the pan well is key. I’m a fan of butter, but a non-stick baking spray with flour works wonders too. Let the pie cool completely before trying to remove slices—this helps the crust firm up.
Q: My cranberry curd is too runny. What did I do wrong?
A: This usually means it needed a bit more time on the heat. Remember, it should thicken enough to coat the back of a spoon. If you’ve already chilled it and it’s still runny, you can pour it back into the saucepan, re-whisk in an extra egg yolk, and cook it for a few more minutes until thickened, then pour it back into the crust to chill again.
Q: Can I use canned cranberry sauce instead?
A. I wouldn’t recommend it for this specific recipe. The texture and sweetness of canned sauce are very different from our homemade curd, and it likely won’t set properly. The fresh curd is what makes this pie so special!
Q: How long will this pie keep in the fridge?
A: It stores beautifully! Cover it tightly with plastic wrap or store it in an airtight container. It will keep for up to 4 days. The crust may soften a bit over time, but it will still be delicious.
Cranberry Coconut Macaroon Pie
Description
Hey friends! Beau here. Imagine a dessert where a flaky pie crust and a chewy cookie have a magical love child—that’s this Cranberry Coconut Macaroon Pie. Sweet, chewy coconut forms the crust, while a tangy, silky cranberry curd fills the center. Naturally gluten-free, festive, and surprisingly easy, this pie is perfect for holidays—or anytime you want a stunning dessert with minimal fuss.
Ingredients
Macaroon Crust:
-
3 cups sweetened shredded coconut
-
2 egg whites (room temperature)
-
¼ cup sugar
-
½ tsp vanilla extract
-
Pinch of salt
Cranberry Curd:
-
2 cups fresh or frozen cranberries
-
½ cup orange juice
-
½ cup sugar
-
2 whole eggs + 2 egg yolks
-
4 tbsp butter, cut into pieces
-
Zest of 1 orange
Instructions
1. Prepare the Oven and Pan
Preheat oven to 350°F (175°C). Lightly grease a 9-inch pie pan with butter or non-stick spray.
2. Make the Macaroon Crust
-
In a bowl, mix shredded coconut, sugar, and salt.
-
In a separate bowl, whisk egg whites and vanilla until frothy.
-
Pour egg whites over coconut, mixing until evenly coated.
-
Press mixture into the pie pan, covering bottom and sides. Wet your hands slightly to prevent sticking.
Tip: Toast the coconut in a dry skillet for a few minutes before mixing for a deeper flavor.
3. Bake the Crust
Bake for 15–18 minutes until edges are golden brown. Cool completely before adding filling.
4. Make the Cranberry Curd
-
In a saucepan, combine cranberries, orange juice, and sugar. Cook over medium heat 8–10 minutes until cranberries burst and mixture is jam-like.
-
Blend until smooth, then strain through a fine mesh for extra silkiness.
5. Temper the Eggs
-
In a separate bowl, whisk eggs and yolks.
-
Slowly whisk in ½ cup of the warm cranberry mixture to raise the eggs’ temperature without scrambling.
-
Pour egg mixture back into the saucepan with remaining cranberry puree.
6. Cook the Curd
Cook over medium-low, stirring constantly for 5–7 minutes until thickened. Remove from heat. Stir in butter and orange zest until smooth.
7. Assemble and Chill
Pour curd into cooled crust and smooth top. Chill at least 2–4 hours (or overnight) until set.
Notes
-
Lemon-Lime Twist: Swap orange juice/zest with lemon juice and lime zest.
-
Ginger Spice: Add 1 tsp fresh grated ginger to cranberry mixture or ¼ tsp ground ginger to crust.
-
White Chocolate Drizzle: Melt white chocolate over the chilled pie for extra decadence.
-
Mini Pies: Use muffin tins for individual servings, bake crust 10–12 minutes.
-
Dairy-Free: Use plant-based butter in the curd; crust is already dairy-free.
Nutrition
- Calories: 260 Cal
- Sugar: 22g
- Fat: 14g
- Carbohydrates: 28g
- Protein: 3g
A Quick Nutritional Glance
Please remember, I’m a chef, not a dietitian! This is a rough estimate based on the ingredients used, and values can vary depending on specific brands and portion sizes. This information is provided as a helpful guide.
Per Slice (assuming 8 slices):
Calories: ~260 | Fat: 14g | Carbohydrates: 28g | Sugar: 22g | Protein: 3g
This pie is naturally gluten-free, which is a great bonus for many. It’s also a source of healthy fats from the coconut. As with any dessert, it’s all about balance and enjoying it as part of a happy, varied diet!
Final Thoughts from My Kitchen to Yours
Well, there you have it! My beloved Cranberry Coconut Macaroon Pie in all its glory. This recipe is a true testament to the joy of cooking—it’s about experimenting, embracing imperfections, and creating something that’s uniquely delicious and full of heart.
I hope this pie brings as much joy to your table as it has to mine. It’s more than just a dessert; it’s a conversation starter, a celebration of flavor, and a reminder that the best things in life are often a little unexpected. So, give it a try, make it

Boursin-Stuffed Mushrooms
Boursin-Stuffed Mushrooms: Your New Go-To Party Appetizer
Forget Boring Party Apps: Let’s Make Magic
Hey friends, Beau here from Feastical! Let me paint you a picture. You’re hosting a get-together. The doorbell is ringing, coats are piling up, and laughter is already starting to bubble from the living room. You want to glide out of the kitchen with a platter of something that looks like you fussed for hours, tastes like a dream, and makes everyone feel instantly welcomed and loved.
But… you also don’t actually want to fuss for hours. I get it. We’re all about that real-life, feel-good cooking here, and that means recipes that deliver maximum flavor with minimum stress.
Enter the hero of today’s story: the one, the only, the utterly irresistible Boursin-Stuffed Mushroom. These little guys are the undisputed champions of my party appetizer lineup. They’re creamy, savory, bursting with herby-garlicky flavor, and they have this magical ability to disappear from the plate in about 60 seconds flat. The best part? They are deceptively simple. We’re talking 15 minutes of prep for a payoff that will have your guests begging for the recipe. So, tie on your apron, grab that trusty baking sheet, and let’s create some kitchen magic that tastes like a warm, cheesy hug.
A Holiday Kitchen Catastrophe (& A Happy Ending)
I’ll never forget the first time I truly understood the power of these mushrooms. It was a chaotic Christmas Eve at my Aunt Carol’s house. I was tasked with bringing an appetizer, and in the holiday madness, I completely forgot to make the elaborate pastry-wrapped thing I’d planned. Panic set in. I raced to the store with about 45 minutes to spare before we had to leave.
Staring into the abyss of the refrigerated cheese section, a little round package of Boursin Garlic & Fine Herbs cheese practically winked at me. Next to it, a beautiful box of cremini mushrooms. A lightbulb went off. I grabbed them, along with some breadcrumbs and parsley, and sprinted home. In a whirlwind of activity, I whipped these together, popped them in the oven, and arrived at the party with a baking sheet that was still warm. They were gone before the main course even made it to the table. My fancy-pants cousin, who usually critiques everything, came back for thirds. That’s when I knew: sometimes, the simplest, most heartfelt dishes are the ones that truly steal the show.
Gathering Your Flavor All-Stars
One of the best things about this recipe is the short, sweet ingredient list. Each one plays a crucial role in creating that perfect bite. Here’s what you’ll need and why:
- 16–20 Cremini or White Mushrooms: I’m a big fan of cremini (aka baby bellas) for their deeper, earthier flavor and sturdier texture, but classic white button mushrooms work beautifully, too! Look for mushrooms that are firm, with closed caps, so they form perfect little cups for our filling.
- 1 package Boursin Cheese (Garlic & Fine Herbs recommended): This is the superstar, the secret weapon, the reason these mushrooms are so insanely good. It’s a creamy, spreadable cheese already packed with garlic, herbs, and black pepper. It does all the heavy flavor-lifting for us. Chef’s Insight: If you can’t find Boursin, mix 8 oz of softened cream cheese with 1 minced garlic clove, 1 tbsp each of chopped fresh chives, dill, and parsley, and a big pinch of salt and pepper.
- 1/4 cup Breadcrumbs: These are our textural hero, giving the filling a little structure so it’s creamy but not runny. I use plain, unseasoned Panko breadcrumbs for their light, crispy texture. Substitution Tip: Gluten-free? No problem! Your favorite GF breadcrumbs or even crushed-up pork rinds for a keto version will work perfectly.
- 2 tbsp Chopped Fresh Parsley: A pop of fresh, green flavor that cuts through the richness. I highly recommend fresh here for that bright note, but in a pinch, 2 teaspoons of dried parsley will do.
- 1 tbsp Olive Oil: This helps bind the filling and adds a lovely richness. It also helps the tops get beautifully golden in the oven.
- Salt and Pepper to Taste: Don’t go too crazy with the salt right away—the Boursin and any Parmesan we add are already plenty salty. A few cracks of fresh black pepper, however, are always a good idea.
- Optional: Grated Parmesan for Topping: This is my “pro-move” for an extra layer of savory, umami flavor and a gorgeous, golden-brown crust. Seriously, don’t skip it!
Let’s Get Stuffing: Your Foolproof Guide
Ready to see how these little miracles come together? Follow these steps, and you’ll be a stuffed mushroom pro in no time. I’ve packed this section with all my favorite chef hacks to ensure your success.
- Preheat and Prep: First things first, get that oven preheating to a nice, hot 375°F (190°C). This gives the mushrooms a blast of heat right away, helping them cook through and get tender without getting watery. Chef’s Tip: While the oven is heating, line your baking sheet with parchment paper or a silicone baking mat. This is a game-changer for cleanup—trust me, you’ll thank yourself later.
- Clean and Prep Your Mushrooms: Now, for the mushrooms! Please, for the love of all that is holy, do not run them under water. Mushrooms are like little sponges and they’ll soak it all up. Instead, just give them a good wipe with a damp paper towel to remove any dirt. Next, gently pop out the stems. You can use your fingers or the tip of a small spoon. Chef’s Hack: Don’t throw those stems away! Finely chop them and toss them right into the filling for an extra boost of mushroom flavor and zero waste.
- Create the Dreamy Filling: In a medium bowl, it’s time to bring the band together. Take your package of Boursin cheese and add it to the bowl with the breadcrumbs, chopped parsley, and olive oil. Use a fork to mash it all together until it’s well-combined. It should be a thick, spoonable mixture. Give it a taste—this is your moment! See if it needs that extra crack of pepper. Chef’s Insight: If you saved your mushroom stems, mix those in now! The filling might seem thick, but that’s exactly what we want. It will soften and become incredibly creamy as it bakes.
- The Main Event: Stuffing! Using a small spoon (a teaspoon or a melon baller works great), generously fill each mushroom cap. Don’t be shy! Mound the filling up a bit. I like to give each one a little press with the back of my spoon to make sure it’s packed in there. As you fill them, place them on your prepared baking sheet. They don’t need a ton of space, but they shouldn’t be touching.
- The Golden Touch (Optional, but Recommended): Remember that optional Parmesan? Now’s the time! Take a small pinch and sprinkle it over the top of each stuffed mushroom. This is what’s going to give you that beautiful, restaurant-worthy, golden-brown finish.
- Bake to Perfection: Slide that baking sheet into your preheated oven and let the magic happen. Bake for 20-22 minutes. You’re looking for the mushrooms to be tender (a knife should slide in easily) and the tops to be a lovely golden brown. Your kitchen is about to smell absolutely incredible.
Plating Up & Making it Pretty
You’ve pulled a tray of gorgeous, bubbling, golden-brown stuffed mushrooms out of the oven. Now what? Let’s make them look as good as they taste.
First, let them cool for just a minute or two on the baking sheet. This allows the cheesy filling to set slightly so it doesn’t ooze out the second you pick one up. Then, transfer them to your serving platter. I love using a simple white or rustic wooden board to let their beautiful color pop.
For a final chef-y touch, garnish with a little extra freshly chopped parsley. It adds a fresh flavor and a vibrant spot of green that makes the whole platter look professional. Serve them warm! These are best enjoyed fresh from the oven when the filling is luxuriously creamy and the mushroom is perfectly tender. Place a small stack of cocktail napkins nearby—these are a one-bite wonder, but that cheesy goodness can be delightfully messy!
Mix It Up! 5 Fun Flavor Twists
The classic recipe is a 10/10, but part of the fun of cooking is making a recipe your own. Here are a few of my favorite ways to shake things up:
- The “Everything Bagel” Bomb: Before baking, sprinkle the tops with everything bagel seasoning. The sesame seeds, garlic, and onion add an incredible crunch and flavor.
- Bacon & Cheddar Upgrade: Because bacon makes everything better. Mix 1/4 cup of finely chopped cooked bacon and 2 tablespoons of shredded sharp cheddar cheese into the filling. Prepare for applause.
- Spinach & Artichoke Vibes: Thaw and thoroughly squeeze dry 1/4 cup of frozen chopped spinach. Mix it into the filling along with 2 tablespoons of finely chopped marinated artichoke hearts. It’s like your favorite dip, in mushroom form!
- Spicy Sriracha Kick: For those who like a little heat, drizzle a tiny zigzag of sriracha over the stuffed mushrooms right before serving. The creamy, cool cheese and the spicy kick are a match made in heaven.
- Seafood Sensation: Feeling fancy? Fold in 1/4 cup of finely chopped cooked shrimp or lump crab meat into the filling. It’s an elegant twist perfect for a New Year’s Eve or anniversary dinner.
Beau’s Kitchen Notebook
Over the years, I’ve made these mushrooms more times than I can count, and they’ve evolved in little ways. I used to meticulously chop herbs to mix into plain cream cheese before I discovered the sheer convenience of Boursin. It was a true “why make it harder?” moment. I also learned the hard way that over-stuffing can lead to a bit of a mess in the oven—a happy, tasty mess, but a mess nonetheless. Now, I make sure my baking sheet is lined, and I embrace any cheesy overflow as “cook’s treat.” The best part of this recipe, beyond its deliciousness, is its flexibility. It’s a blank canvas for your cravings, and I love hearing how you all make it your own!
Your Questions, Answered!
I’ve gotten a lot of questions about these mushrooms over on Feastical’s social media. Here are the most common ones to help you out:
- Can I make these ahead of time? Absolutely! You can clean the mushrooms and make the filling up to a day in advance. Keep them separate in the fridge. About 30 minutes before you want to bake, assemble them on the baking sheet and pop them in the oven. You may need to add 1-2 minutes to the baking time since they’ll be going in cold.
- Why are my mushrooms so watery? This usually happens if the mushrooms are washed instead of wiped, or if they’re packed too tightly on the baking sheet. Ensure they have a little breathing room for the steam to escape. Using cremini mushrooms also helps, as they tend to be less watery than white buttons.
- Can I use a different cheese? Of course! While Boursin is the flavor king, a mix of softened cream cheese, grated Parmesan, garlic powder, and Italian seasoning is a great substitute. The texture will be slightly different, but still delicious.
- How do I reheat leftovers? While they are best fresh, you can reheat them! The air fryer or a toaster oven at 350°F for 3-5 minutes is your best bet to keep them from getting soggy. I don’t recommend the microwave.
A Quick Bite on Nutrition
Hey, I’m all about balance. Sometimes that means a big, vibrant salad, and sometimes it means indulging in a few incredibly delicious, cheesy stuffed mushrooms. Here’s the lowdown so you can enjoy them guilt-free. Remember, these are estimates and can vary based on the specific ingredients you use.
Based on a serving of 3 mushrooms (approx.): You’re looking at around 110 calories, 3g of protein, 4g of carbs, and 9g of fat. The mushrooms themselves are a great low-calorie vehicle, packed with nutrients like B vitamins and selenium. The bulk of the calories and fat come from the delicious, flavorful Boursin cheese, which is what makes this appetizer such a satisfying treat. It’s all about mindful enjoyment!
Print
Boursin-Stuffed Mushrooms
Description
-
The ultimate holiday appetizer! This easy Maple-Cranberry Baked Brie is a gooey, show-stopping centerpiece wrapped in flaky puff pastry. Simple & impressive!
Ingredients
-
16–20 Cremini or White Mushrooms – Firm, closed caps form perfect cups
-
1 package Boursin Cheese (Garlic & Fine Herbs) – The flavor superstar
-
1/4 cup Breadcrumbs – Adds structure and light crunch
-
2 tbsp Chopped Fresh Parsley – Bright, fresh flavor
-
1 tbsp Olive Oil – Helps bind and enriches the filling
-
Salt & Pepper to Taste – Keep it balanced; Boursin is already salty
-
Optional: Grated Parmesan – For a golden-brown, savory top
Chef’s Insight: Can’t find Boursin? Mix 8 oz cream cheese with 1 minced garlic clove, 1 tbsp each chives, dill, parsley, and a pinch of salt & pepper.
Instructions
1. Preheat & Prep
-
Oven: 375°F (190°C)
-
Line a baking sheet with parchment or a silicone mat for easy cleanup.
2. Clean & Prep Mushrooms
-
Wipe mushrooms gently (don’t rinse!).
-
Pop out stems; chop reserved stems and add to filling.
3. Make the Filling
-
In a medium bowl, combine Boursin, breadcrumbs, parsley, olive oil (and chopped stems if using).
-
Mash with a fork until thick and spoonable. Season with black pepper.
4. Stuff the Mushrooms
-
Spoon filling into mushroom caps, mounding slightly.
-
Place on the baking sheet; keep some space between each.
5. Add the Golden Touch (Optional)
-
Sprinkle a little Parmesan on top for a gorgeous, golden finish.
6. Bake
-
Bake 20–22 minutes until mushrooms are tender and tops golden.
Notes
-
Over-stuffing = a tasty, happy mess; line your sheet!
-
These mushrooms are versatile—a blank canvas for your cravings.
-
Boursin makes flavor effortless; no extra herb chopping required.
Nutrition
- Calories: 110 Cal Approx. per 3 mushrooms
- Fat: 9g
- Carbohydrates: 4g
- Protein: 3g
Your New Party Secret
And there you have it, my friends—the complete guide to making the most unforgettable Boursin-Stuffed Mushrooms. This recipe is a testament to what we believe in here at Feastical: that incredible food doesn’t have to be complicated. It’s about using great ingredients, adding a dash of love, and creating something that brings people together around the table.
I can’t wait for you to try these. When you do, make sure to tag me @Feastical on social media or leave a comment on the blog! I love seeing your creations and hearing your stories. Now, go forth and stuff some mushrooms. Your next party guest is going to be seriously impressed.
Final Thoughts: Your New Party Secret Awaits
And there you have it—the complete story behind the humble mushroom’s transformation into a party legend. This recipe is more than just a list of ingredients and steps; it’s your ticket to stress-free hosting and guaranteed compliments. It proves that the most memorable dishes aren’t always the most complex, but the ones made with a little intention and a lot of flavor.
So, the next time that doorbell rings, you can greet your guests with a warm smile, a cool head, and a platter of these golden, cheesy, irresistible bites. They’re more than an appetizer; they’re a warm, delicious welcome.
I can’t wait for you to make them and create your own stories. When you do, be sure to tag me @Feastical—I love seeing your kitchen magic!
Happy cooking,
Beau
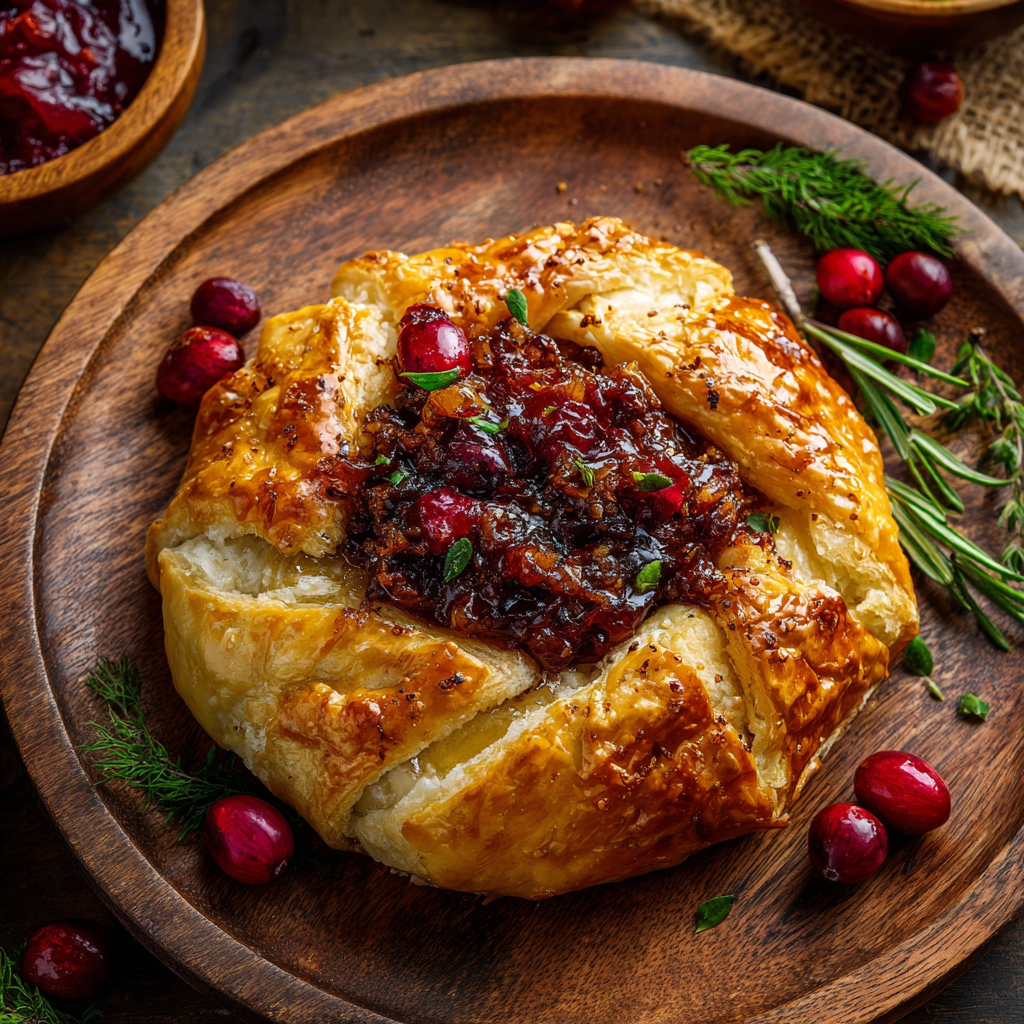
Maple-Cranberry Baked Brie
The Cozy, Gooey, Show-Stopping Appetizer Your Holiday Table Needs
Hey friends, Beau here from Feastical! Can we just take a moment to appreciate the magic that happens when cheese meets heat? It’s a universal truth that melted cheese is a love language all its own. And when you take a beautiful, creamy wheel of brie, wrap it in a buttery, flaky blanket of puff pastry, and crown it with a sweet-tart homemade maple-cranberry jam… well, you’ve just created a culinary standing ovation.
This Maple-Cranberry Baked Brie is more than just a recipe; it’s a centerpiece. It’s the star of the party that everyone gathers around, the conversation starter that turns into a happy, silent, mouth-full-of-cheesy-goodness moment. It looks incredibly fancy, like you spent hours in a fancy French patisserie, but the secret I’m letting you in on today is that it’s deceptively simple. We’re talking 15 minutes of active prep for a dish that will have your friends and family declaring you the host of the year.
Whether you’re gearing up for a festive holiday potluck, hosting a cozy game night, or just treating yourself to a well-deserved indulgent snack, this recipe is your new best friend. It’s warm, it’s welcoming, and it tastes like a hug feels. So, preheat your oven, grab your favorite baking sheet, and let’s make some magic together.
A Brie-lliant Kitchen Disaster (And The Lesson It Taught Me)
I’ll never forget the first time I attempted a baked brie. It was my turn to host Friendsgiving, and I was determined to impress. I’d seen a picture in a magazine—this perfect, golden, puffy pastry dome. I was so focused on making the outside look flawless that I committed the cardinal sin of baked brie: I didn’t take the rind off. I just plopped the whole wheel, white rind and all, into the pastry. The result? A beautiful, golden-brown… rock. We had to literally chisel the pastry off to get to the cheese, which had barely melted. It was a hilarious, cheesy catastrophe that had us all laughing until we cried.
But that little kitchen flop taught me one of the most valuable lessons I now share with all of you: the rind is totally edible, but for the ultimate, oozy, lava-flow-of-cheese experience, you have to slice that top rind off. It’s the difference between a good appetizer and a legendary one. That night, amidst the laughter and the slightly-crunchy brie, I perfected the method. And this Maple-Cranberry version? It’s the glorious, delicious result of that very first, wonderfully messy, kitchen fail.
Gathering Your Cozy Ingredients
One of the best things about this recipe is the short, sweet ingredient list. You probably have a few of these things in your pantry already! Here’s what you’ll need and a little “chef’s insight” on each one.
- 1 wheel of brie (8 oz): This is our star player! Don’t be intimidated by the white rind—it’s a natural part of the cheese. A quick pro-tip: for the gooiest results, let your brie sit at room temperature for about 20-30 minutes before baking. Chef’s Insight: You can use a larger wheel, just adjust the baking time by a few extra minutes.
- 1 sheet puff pastry, thawed: The flaky, buttery hug for our cheese. You’ll find this in the freezer aisle. Substitution Tip: If you’re in a pinch, crescent roll dough can work, but puff pastry gives that classic, elegant flakiness we all love.
- 1/2 cup fresh or frozen cranberries: These little ruby gems bring the perfect pop of tartness. Chef’s Insight: Using fresh cranberries during the holiday season is fantastic, but frozen work just as beautifully and are available year-round!
- 2 tbsp pure maple syrup: This is our natural sweetener that adds a deep, cozy flavor. Pro-Tip: Please, for the love of all things cozy, use the real stuff! The flavor is incomparable to pancake syrup.
- 1 tbsp orange juice: A splash of bright, citrusy freshness that cuts through the richness. Substitution Tip: A teaspoon of orange zest works wonders here too, or even a dash of lemon juice in a pinch.
- 1/4 tsp cinnamon: Just a whisper of warm spice to make your kitchen smell like a holiday dream. Chef’s Insight: A tiny pinch of nutmeg or allspice would also be a lovely addition here.
- 1 egg, beaten (for egg wash): This is our secret weapon for that gorgeous, golden-brown, professional-looking finish. Pro-Tip: A splash of water or milk in the beaten egg will help it brush on more smoothly.
Let’s Build Our Masterpiece: Step-by-Step
Alright, team, it’s go-time! This is where the fun happens. Follow these steps, and you’ll have a show-stopping appetizer in no time flat.
- Preheat and Prep: First things first, get that oven preheating to a toasty 400°F (200°C). This gives the pastry an immediate blast of heat, helping it puff up beautifully. While it’s warming up, take your puff pastry out of the fridge if it’s thawed—you want it pliable but still cool. Chef’s Hack: Line your baking sheet with a little parchment paper. It’s not just for easy cleanup; it also prevents the bottom of your pastry from getting too dark.
- Create the Magic Jam: In a small saucepan, combine your cranberries, maple syrup, orange juice, and cinnamon. Bring it to a lively simmer over medium heat. You’ll hear the cranberries start to pop and sizzle—that’s the music! Let it bubble away for 10-12 minutes, stirring occasionally, until it thickens into a lovely, jammy consistency. Pro-Tip: You can mash a few of the cranberries with the back of your spoon to help it thicken faster. Once it’s done, take it off the heat and let it cool for a few minutes. This is crucial because if it’s too hot, it will start to melt the brie before it even hits the oven.
- The Brie Transformation: Place your wheel of brie on a cutting board. Now, for the game-changing step I learned from my Friendsgiving fiasco: using a sharp knife, carefully slice the top rind off the brie wheel. Just the top! You’re creating a well for that gorgeous jam to nestle into. Don’t worry about being perfect—rustic is charming!
- The Great Wrap: Unfold your sheet of puff pastry onto the prepared baking sheet. Place your rind-less brie wheel right in the center. Now, spoon that beautiful, glossy maple-cranberry jam right onto the exposed cheese, spreading it almost to the edges. Here’s the fun part: gently lift the edges of the pastry up and over the brie, pleating and folding as you go to encase it completely. Pinch the seams together to seal your cheesy parcel. It should look like a little present! Flip the whole thing over so the seam side is on the bottom. Chef’s Hack: If you have extra pastry, you can cut out little leaf or holly shapes to decorate the top—it’s a cute festive touch!
- The Golden Glow-Up: Use a pastry brush to generously brush the beaten egg all over the surface of the pastry. This is what gives it that deep, golden, magazine-cover shine. Make sure you get into all the nooks and crannies. Pro-Tip: Be careful not to let egg pool at the bottom, as it can glue the pastry to the pan.
- Bake to Perfection: Slide your beautiful creation into the preheated oven and bake for 20-25 minutes. You’re looking for a deep, golden brown pastry that’s puffed up proudly. Your kitchen will smell absolutely incredible. Chef’s Hack: If you notice one side browning faster than the other, just rotate the pan halfway through baking.
- The Most Important Step: Rest! I know, I know, the temptation to dive right in is overwhelming. But trust me on this: let the baked brie rest on the pan for at least 5-10 minutes before you serve it. This allows the molten cheese to settle slightly, so when you cut into it, it’s a glorious, controlled ooze rather than a volcanic eruption.
How to Serve This Star of the Show
Presentation is part of the fun! I love placing the warm, golden baked brie right in the center of a wooden board or a pretty platter. Surround it with an array of dippers for a beautiful, inviting spread.
My go-to dipper dream team includes:
- Classic Crackers: Water crackers, wheat crackers, or even buttery Ritz—they’re all perfect vehicles for cheesy goodness.
- Fresh & Crisp: Sliced green apples or firm pears (like Bosc or Bartlett) are fantastic. The cool, crisp sweetness is a perfect contrast to the warm, rich cheese.
- For the Bread Lovers: Thinly sliced and lightly toasted baguette is a must. It’s sturdy enough to scoop up every last bit.
- A Savory Touch: Crispy, salty pretzel rods or chips add a wonderful texture and flavor contrast.
Don’t forget to provide a small cheese knife or spreader so your guests can dive in with ease. Watch their eyes light up as they break through that flaky crust and see the river of cheesy, cranberry goodness flow out. It’s pure joy on a plate.
Make It Your Own: Delicious Recipe Variations
The beauty of this recipe is its versatility. Once you’ve mastered the classic, feel free to get creative and play with flavors! Here are a few of my favorite twists.
- The Nutty Professor: Before adding the cranberry jam, sprinkle the top of the brie with a couple of tablespoons of chopped pecans or walnuts. The toasty, nutty flavor is a dream with the maple and cranberry.
- Spicy & Sweet: Add a pinch of red pepper flakes or a dash of hot honey to the cranberry jam as it simmers. The little kick of heat playing with the sweet and creamy is an unforgettable combination.
- Rosemary & Fig Elegance: Swap the cranberry jam for a few tablespoons of fig jam. Tuck a few fresh rosemary sprigs under the pastry before you wrap it, or sprinkle some chopped rosemary on top with the egg wash. It’s incredibly sophisticated.
- Savory Herb Delight: For a less sweet option, skip the jam altogether. Instead, top the brie with a tablespoon of pesto and a sprinkle of sun-dried tomatoes before wrapping. It’s a whole new world of flavor!
- Dairy-Free & Vegan-Friendly: Yes, it’s possible! Use a high-quality vegan brie and vegan puff pastry. For the egg wash, simply brush the pastry with a little olive oil or plant-based milk to help it brown.
Beau’s Chef’s Notes & Kitchen Stories
This recipe has been a staple in my kitchen for years, and it’s evolved in the best ways. I used to be so precious about making the pastry wrap look perfect, but I’ve learned that the slightly messy, rustic-looking ones often have the most character (and the most delicious, flaky layers). My dog, Biscuit, has become the official floor-cleaner for any dropped cranberry or pastry flake, so he’s a big fan of recipe-testing days. The biggest lesson? Food is meant to be shared and enjoyed, not stressed over. If your pastry tears a little, just patch it up with a scrap—no one will notice once it’s baked to golden perfection. It’s all part of the homemade charm.
Your Brie Questions, Answered!
Over the years, I’ve gotten a lot of great questions about this recipe. Here are the answers to the most common ones to ensure your baked brie is flawless.
Q: Can I make this ahead of time?
A: Absolutely! You can assemble the whole thing—wrap the brie, add the jam, and seal it in the pastry—up to a day in advance. Keep it covered in the fridge. When you’re ready to bake, just brush with the egg wash and pop it in the oven. You might need to add 2-3 extra minutes to the baking time since it’s going in cold.
Q: My pastry is getting soggy on the bottom. What happened?
A: The usual culprit is the jam being too hot or watery when it was added. Make sure your cranberry mixture has cooled and thickened properly. Also, ensuring your oven is fully preheated and using a parchment-lined baking sheet will help create a crisp bottom.
Q: Can I use a different cheese?
A: Brie is ideal because of its creamy, meltable texture. Camembert is a direct and delicious substitute. I wouldn’t recommend a harder cheese like cheddar or gouda, as they won’t give you that signature oozy center.
Q: How do I know when it’s done baking?
A: Go by the color of the pastry! It should be a uniform, deep golden brown. If you’re unsure, you can gently press the side—the pastry should feel firm and crisp, not soft or doughy. The cheese inside will be molten and hot.

Maple-Cranberry Baked Brie
Description
A Brie-lliant Kitchen Disaster
My first baked brie attempt? Friendsgiving. I left the rind on and ended up with a golden-brown… rock. We had to chisel the pastry off to get to the barely-melted cheese. Lesson learned: the top rind is edible, but removing it ensures a gooey, lava-flow-of-cheese experience.
This Maple-Cranberry version is the perfected, delicious result of that first kitchen flop.
Ingredients
For the Baked Brie
-
1 wheel brie (8 oz), top rind removed, room temperature
-
1 sheet puff pastry, thawed
-
1/2 cup fresh or frozen cranberries
-
2 tbsp pure maple syrup
-
1 tbsp orange juice
-
1/4 tsp cinnamon
-
1 egg, beaten (for egg wash)
Chef’s Insight: Let brie sit at room temperature for 20–30 mins for maximum ooze.
Instructions
1. Preheat & Prep
-
Oven: 400°F (200°C)
-
Line baking sheet with parchment.
2. Make Maple-Cranberry Jam
-
In a small saucepan, combine cranberries, maple syrup, orange juice, cinnamon.
-
Simmer 10–12 mins until thickened, mashing a few berries.
-
Let cool slightly before adding to brie.
3. Prep the Brie
-
Slice off the top rind.
-
Place brie on puff pastry center.
4. Assemble
-
Spoon jam onto brie.
-
Wrap pastry over brie, pleating and pinching seams.
-
Optional: decorate with extra pastry cutouts.
-
Flip so seam is underneath.
5. Egg Wash
-
Brush pastry with beaten egg for a golden finish.
6. Bake
-
Bake 20–25 mins until deep golden brown and puffed.
-
Let rest 5–10 mins before serving.
Notes
-
Rustic pastry looks charming; minor tears are fine.
-
Biscuit (my dog) approves of any stray pastry or cranberry bits.
-
Food is meant to be shared and enjoyed, not stressed over.
Nutrition
- Calories: 220 kcal Per Serving
- Sugar: 7 g
- Fat: 14 g
- Carbohydrates: 18 g
- Protein: 6 g
Nutritional Information (Because Balance is Cool!)
Let’s keep it real—this is a celebratory treat, and it’s meant to be indulged in joyfully! That said, here’s a general breakdown per serving (assuming 8 servings) so you can enjoy it mindfully. Remember, these are estimates and can vary based on the specific brands of ingredients you use.
- Calories: ~220
- Protein: 6g
- Carbohydrates: 18g
- Fat: 14g
- Sugar: 7g
This appetizer packs a satisfying combination of protein from the cheese and carbs from the pastry. Pairing it with those fresh apple slices not only tastes amazing but also adds a bit of fiber and vitamins to your snack. So, dig in, savor every gooey bite, and enjoy the moment of pure, cheesy bliss!
Final Thoughts from My Kitchen to Yours
Well, there you have it, my friends—my ultimate guide to creating a Maple-Cranberry Baked Brie that’s sure to steal the show. This recipe is a testament to the fact that the most memorable dishes aren’t always the most complicated ones. They’re the ones made with a little bit of love and a whole lot of delicious, comforting flavor.
I hope this recipe brings as much warmth and joy to your table as it has to mine. It’s more than just food; it’s a catalyst for connection

Classic Italian Lemon Cookies with Glaze
Sunshine in a Bite: My Ultimate Italian Lemon Cookies
Hey friends, Beau here! Welcome back to the Feastical kitchen. Is there anything quite like the smell of something baking? That warm, buttery, sugary aroma that just wraps around you like your favorite blanket? Now, imagine that, but with a bright, sunny burst of lemon cutting through the sweetness. That, my friends, is the magic we’re making today.
We’re diving into a recipe that holds a special place in my heart and, I’m willing to bet, in the hearts of many of you: Classic Italian Lemon Cookies. These aren’t your average, crunchy cookies. Oh no. These are soft, pillowy, cake-like little clouds that practically melt in your mouth. They’re kissed with a zesty lemon flavor and draped in a simple, sweet glaze that hardens just enough to give you that satisfying little *tap* when you bite into it.
Whether you grew up with a nonna who made these by the dozen for every holiday, church function, and Tuesday, or you’re discovering their fluffy wonder for the very first time, you are in for a treat. They’re deceptively simple, incredibly forgiving, and are guaranteed to make your kitchen the happiest place in the house. So, tie on your apron, find that spatula (check the sink, that’s where mine always ends up), and let’s bake up some sunshine together.
A Kitchen Full of Laughter and Lemon Zest
I’ll never forget the first time I truly experienced these cookies. It wasn’t in a fancy bakery, but in my college roommate Marco’s cramped, chaotic, and incredibly loud family kitchen. It was a week before Christmas, and his entire family—aunts, uncles, cousins, you name it—was packed in there, all talking over each other in a beautiful mix of English and Italian. In the center of it all was his Nonna Lucia, a tiny woman with the strength of an ox and a laugh that could power a small city.
She handed me a lump of sticky, pale yellow dough and a cookie scoop. “You,” she said, pointing a flour-dusted finger at me, “make yourself useful.” For the next hour, I scooped, she baked, and we all glazed, our fingers getting stickier by the minute. The counters were covered in a fine dusting of powdered sugar, and the air was thick with the scent of lemon and love. That day, I learned that these cookies aren’t just a dessert; they’re a vehicle for connection, for laughter, and for creating memories that stick with you even longer than the glaze on your fingers.
Gathering Your Sunshine Squad: The Ingredients
One of the best things about this recipe is its beautiful simplicity. You probably have most of this in your pantry right now! Here’s the lineup for our star players and a few chef-y insights to make you feel like a pro.
For the Cookies:
- ½ lb (2 sticks) unsalted butter, softened: This is the foundation of our cookie’s rich, tender crumb. Using unsalted lets us control the salt level. Chef’s Tip: “Softened” is key! It should be cool to the touch but leave a slight indent when you press it. Don’t melt it! If you forgot to take it out, you can quickly soften it by cutting it into chunks and letting it sit for 15-20 minutes.
- 1 cup granulated sugar: Sweetness and structure. It helps cremate with the butter to create that lovely, light texture.
- 1½ teaspoons lemon extract: This is our flavor powerhouse! It gives that intense, classic lemon cookie flavor. Substitution: You can use the zest and juice of 2-3 large lemons for a more natural, nuanced lemon flavor. The cookies will be slightly less bright yellow, but just as delicious.
- 6 large eggs: These are the workhorses that provide structure, richness, and that beautiful cake-like rise. Make sure they’re at room temperature for the best incorporation into the butter and sugar.
- 5 cups all-purpose flour: The backbone of our dough. I like to fluff the flour in the bag, then spoon it into my measuring cup and level it off. This prevents you from accidentally using too much and making the cookies dry.
- 2 teaspoons baking powder: Our leavening agent! This is what gives these cookies their signature puff and soft, airy texture. Make sure yours is fresh for the best rise.
For the Glaze:
- 3½ cups powdered sugar: Also known as confectioner’s sugar, this creates a smooth, shiny, and sweet glaze that sets perfectly.
- ¼ cup milk: This thins the glaze to a perfect dippable consistency. Substitution: Whole milk is great, but 2% works fine. For a richer glaze, use heavy cream. For a dairy-free option, unsweetened almond or oat milk works beautifully.
- 1½ teaspoons lemon extract: Doubling down on that sunny flavor! This ensures every single bite is bursting with lemony goodness.
The Fun Part: Let’s Bake! (Step-by-Step)
Alright, team, let’s get our hands dirty! Or, more accurately, a little sticky. This is where the magic happens. Follow along, and don’t stress—this dough is very forgiving.
- Preheat and Prep: First things first, get that oven preheating to a toasty 375°F (190°C). This gives it plenty of time to reach the perfect, consistent temperature. Now, line your baking sheets with parchment paper. This is my number one kitchen hack for perfect cookies—no sticking, easy cleanup, and evenly baked bottoms. You’re welcome.
- Cream the Butter and Sugar: In a large bowl, beat the softened butter and granulated sugar together. We’re not just mixing; we’re “creaming.” This means beating it on medium-high speed for a good 2-3 minutes until it becomes pale, fluffy, and light. You’re incorporating air, which is essential for that soft texture. Don’t rush this step!
- Incorporate the Eggs: Now, add your room-temperature eggs one at a time, beating well after each addition. Why one at a time? It allows each egg to fully emulsify into the butter-sugar mixture, creating a smooth, cohesive batter rather than a curdled one. Scrape down the sides of the bowl as needed.
- Zest and Extract: Stir in that glorious 1½ teaspoons of lemon extract. If you’re using fresh lemon zest and juice, add it all in here. Take a moment to inhale. Smells like heaven, right?
- Bring in the Dry Goods: In a separate bowl, I like to give my flour and baking powder a quick whisk together. This ensures the baking powder is evenly distributed. Now, gradually mix the dry ingredients into the wet. I usually do this in three additions, mixing on low speed until *just* combined. The dough will be soft and a bit sticky—this is 100% normal and exactly what we want!
- Scoop and Shape: Using a cookie scoop (a tablespoon-sized one is perfect) or two spoons, drop rounded portions of dough onto your prepared baking sheets, spacing them about 1-2 inches apart. They don’t spread a ton, but they do puff up! No need to roll them perfectly; their rustic, craggy look is part of their charm.
- Bake to Golden-Perfection: Pop those trays into your preheated oven and bake for 13-15 minutes. You’re looking for the bottoms to be a very light golden brown, while the tops should still be pale. Do not overbake! They will continue to set as they cool. That softness is their signature.
- The All-Important Cool Down: Let the cookies cool on the baking sheet for about 5 minutes before transferring them to a wire rack to cool completely. I cannot stress this enough: THE COOKIES MUST BE COMPLETELY COOL BEFORE YOU GLAZE THEM. Otherwise, that beautiful glaze will just melt right off. Patience, young grasshopper.
- Create the Glaze: While the cookies are cooling, make your glaze. It couldn’t be easier. In a medium bowl, whisk together the powdered sugar, milk, and lemon extract until it’s completely smooth. You’re aiming for a consistency that’s thin enough to dip but thick enough to coat the back of a spoon.
- The Grand Finale: Glazing! Now for the fun, messy part! Take a cooled cookie, turn it upside down, and dip the top directly into the glaze. Give it a little swirl to coat it nicely, then lift it out, letting any excess drip back into the bowl. Place it back on the wire rack, glaze-side up. Repeat with all your little lemon clouds. The glaze will set and harden in about 30 minutes to an hour.
Sharing the Sunshine: How to Serve These Beauties
Now that you’ve created these masterpieces, how do you serve them? Well, a big pile on a plate is always a winner, but let’s get a little fancy.
I love serving these on a beautiful cake stand or a rustic wooden board. For a real showstopper, stack them in a pyramid. They look absolutely stunning with a few thin slices of lemon and maybe a sprig of fresh mint or rosemary tucked in between for a pop of color.
And what to serve with them? A freshly brewed pot of coffee is their classic partner. The bitterness of the coffee is the perfect counterpoint to the sweet, tangy cookie. A cup of hot tea, especially Earl Grey or a herbal lemon tea, is also a match made in heaven. For a truly special treat, pair them with a glass of chilled Moscato d’Asti or Prosecco—the bubbles and fruitiness are a phenomenal combination.
Mix It Up! Fun Flavor Twists
Once you’ve mastered the classic, the world is your oyster! Or, well, your cookie. Here are a few of my favorite ways to play with this recipe.
- The Citrus Trio: Swap the lemon extract for an equal amount of orange extract. Use fresh orange zest in the dough and a splash of orange juice in the glaze for a sunny, vibrant Orange Cookie.
- Anise Classic: For a truly traditional Italian twist, replace the lemon extract with 1½ teaspoons of anise extract. It’s that classic “pizzelle” or “biscotti” flavor that so many love.
- Lemon Poppy Seed Bliss: Add 2 tablespoons of poppy seeds to the dry ingredients. The little crunch and visual appeal are fantastic.
- Vanilla Bean Dream: Want something a little less zesty? Use 2 teaspoons of pure vanilla extract (or the seeds from one vanilla bean) in the dough and for the glaze. You get a simple, elegant vanilla cookie that’s a perfect blank canvas for sprinkles.
- Gluten-Free & Dairy-Free Friendly: This recipe is wonderfully adaptable! Use a 1:1 gluten-free all-purpose flour blend (like Bob’s Red Mill) and your favorite plant-based butter and milk. The texture might be slightly different, but they’ll still be utterly delicious.
Beau’s Kitchen Confidential
Over the years, I’ve made these cookies more times than I can count, and they’ve evolved a bit in my kitchen. I remember one time, early on, I was in a rush and used melted butter. Let’s just say I ended up with lemon puddles instead of cookies! It was a delicious, buttery, lemony mess. A great reminder that baking is a science, and softened butter is non-negotiable.
I’ve also learned that the dough’s stickiness is its superpower. Don’t be tempted to add a ton of extra flour when you’re scooping. Just lightly flour your hands or your scoop, and power through. That sticky dough is what gives you that incredibly moist, tender interior. Trust the process!
Your Questions, Answered!
I’ve gotten a lot of questions about this recipe over on Feastical’s social media. Here are the most common ones to help you out.
Q: My cookies came out flat! What happened?
A: The usual suspects are over-creamed butter (it can get too warm) or old baking powder. Make sure your baking powder is fresh, and your butter is softened but not greasy. Also, double-check your oven temperature with an oven thermometer—an oven that runs cool can cause spreading.
Q: My glaze is too thin/too thick. How can I fix it?
A: No worries, this is an easy fix! If it’s too thin, whisk in more powdered sugar, a tablespoon at a time. If it’s too thick and gloopy, add more milk, a teaspoon at a time, until it reaches that perfect, dippable consistency.
Q: Can I make the dough ahead of time?
A: Absolutely! You can cover the bowl of dough and refrigerate it for up to 2 days. Let it sit at room temperature for about 30 minutes before scooping and baking. The flavor actually deepens a bit!
Q: How do I store these cookies?
A: Once the glaze is fully set, store them in a single layer in an airtight container at room temperature. They’ll stay soft and delicious for up to 5 days. You can also freeze the unglazed cookies for up to 3 months. Thaw and glaze when you’re ready to serve.

Classic Italian Lemon Cookies with Glaze
Description
A Kitchen Full of Laughter and Lemon Zest
My first experience with these cookies? In my college roommate Marco’s chaotic family kitchen a week before Christmas. Nonna Lucia, a tiny woman with a giant laugh, handed me sticky yellow dough and a cookie scoop: “You, make yourself useful.”
For the next hour, we scooped, baked, and glazed as powdered sugar coated the counters. I learned that these cookies are more than dessert — they’re a vehicle for connection, laughter, and memories that stick as long as the glaze on your fingers.
Instructions
1. Preheat & Prep
-
Oven: 375°F (190°C)
-
Line baking sheets with parchment paper.
2. Cream Butter & Sugar
-
Beat butter + sugar for 2–3 mins until pale & fluffy.
3. Add Eggs & Lemon
-
Add eggs one at a time, fully incorporating each.
-
Stir in lemon extract or zest + juice.
4. Mix Dry Ingredients
-
Whisk flour + baking powder.
-
Gradually fold into wet mixture in three additions. Dough will be soft and sticky — perfect!
5. Scoop & Shape
-
Drop dough with a tablespoon scoop, 1–2 inches apart.
-
Rustic, craggy tops are part of their charm.
6. Bake
-
13–15 minutes, until bottoms are light golden.
-
Allow cookies to cool on baking sheet 5 mins, then transfer to wire rack.
7. Glaze
-
Mix powdered sugar, milk, lemon extract until smooth.
-
Dip tops of cooled cookies and let set 30–60 mins.
Notes
-
Citrus Trio: Orange extract + zest + juice.
-
Anise Classic: Substitute anise extract for a traditional Italian flavor.
-
Lemon Poppy Seed Bliss: Add 2 tbsp poppy seeds.
-
Vanilla Bean Dream: Swap lemon for 2 tsp vanilla or seeds of 1 vanilla bean.
-
Gluten/Dairy-Free: Use GF flour blend, plant-based butter & milk.
Nutrition
- Calories: 100 kcal per Cookie
- Sugar: 10 g
- Fat: 4 g
- Carbohydrates: 15 g
- Protein: 2 g
Nutritional Info (For Your Peace of Mind)
Okay, let’s be real—we don’t eat cookies for their health benefits. We eat them for joy! But I know it’s helpful to have a general idea, so here’s the approximate nutritional breakdown per cookie. Remember, this is an estimate and can vary based on specific ingredients and portion sizes.
- Calories: ~100 kcal
- Fat: 4 g
- Sugar: 10 g
- Carbohydrates: 15 g
- Protein: 2 g
Contains: Dairy, gluten, eggs. (But remember the easy swaps we talked about in the variations!)
Final Thoughts from My Kitchen to Yours
And there you have it! My go-to, never-fail, always-impresses recipe for Classic Italian Lemon Cookies. More than just a list of ingredients and steps, I hope this feels like an invitation to create your own kitchen memories. These cookies are a reminder that the best food is often the simplest, made with love and shared with people who make you smile.
I hope your kitchen fills with the incredible scent of lemon and butter, and that you feel that same sense of accomplishment and joy I feel every time I pull a batch out of the oven. Baking is my love language, and sharing it with you is what Feastical is all about.
If you make these (and you totally should), I’d be absolutely thrilled to see your creations! Tag me on Instagram @FeasticalBeau or use the hashtag #FeasticalSunshine. Now, go grab a cookie—you’ve earned it!
With love and a full cookie jar,
Beau

Homemade Crème Brûlée Coffee Creamer
Your Morning Coffee, But Make It a Dessert Dream
Hey friends, Beau here from Feastical! Let’s have a little heart-to-heart about our morning routines. For so many of us, that first cup of coffee is a sacred ritual. It’s the warm, comforting handoff from sleepyhead to fully-functioning human. But let’s be real, sometimes that plain brew can feel a little… well, plain. And while those store-bought creamers are convenient, have you ever turned the bottle around to read the ingredients? It can look more like a science experiment than something meant to bring you joy.
That’s exactly why I’m so fired up to share this recipe with you today. We’re taking that daily ritual and turning it into a moment of pure, unapologetic indulgence. We’re talking about a Homemade Crème Brûlée Coffee Creamer that’s so silky, so rich, and so perfectly sweet, it’ll make your kitchen smell like a Parisian patisserie. Imagine the deep, caramel notes of brown sugar, the warm, aromatic hug of real vanilla, and a luxuriously smooth texture that transforms your coffee into a liquid dessert.
The best part? This isn’t just a “make-it-and-use-it” recipe. This little jar of happiness is made for canning. That means you can whip up a big batch, process it in jars, and have this decadent creamer on your shelf for weeks, ready to elevate your morning or become the most thoughtful, homemade gift for the foodies in your life. So, grab your favorite saucepan and let’s create some magic together. Your coffee (and your future self) will thank you.
The Day I Spilled (and Spilled) the Sugar
This recipe takes me right back to my first “real” kitchen job. I was a teenager, wide-eyed and desperately trying to look like I knew what I was doing. The pastry chef, a formidable woman named Margot, decided my initiation would be mastering the crème brûlée station. For a whole week, my life was custard cups and a terrifying propane torch.
One particularly hectic Saturday, I was carrying a tray of freshly torched brûlées, their sugar tops glistening like amber glass. I took a corner too fast, and the whole tray did a slow-motion slide right out of my hands. Sugar and custard went everywhere—on the floor, the walls, even the ceiling. The kitchen fell silent. I was mortified. But Margot just looked at me, covered in dessert, and started laughing. “Well, Collier,” she said, wiping a tear from her eye, “at least we know it smells good. Now, grab a mop. The only way out is through.”
That messy disaster taught me a valuable lesson: the pursuit of incredible flavor is always worth a little chaos. This creamer captures the soul of that classic dessert—the crackle of the torched sugar, the velvety custard beneath—but without any of the stress (or cleanup!). It’s all the joy, poured straight into your cup.
Gathering Your Creamer Dream Team
One of the things I love most about this recipe is its beautiful simplicity. You only need a handful of pantry staples to create something truly spectacular. Here’s the lineup:
- 1 can (12 oz) Evaporated Milk: This is our secret weapon for richness without overwhelming heaviness. It’s milk that’s had about 60% of its water removed, giving it a subtly sweet, concentrated flavor and a gorgeous creamy body that holds up perfectly in hot coffee. Chef’s Insight: Don’t confuse this with sweetened condensed milk! That would make this creamer cloyingly sweet. We want to control our sugar here.
- ½ cup Brown Sugar: This is the heart of the “crème brûlée” flavor. The molasses in the brown sugar gives us those warm, caramel, toffee-like notes that mimic the torched sugar top of the classic dessert. Substitution Tip: You can use light or dark brown sugar. Dark brown will give you a deeper, more molasses-forward flavor, which I personally love.
- 1½ cups Milk: This is where you can customize based on what you have and how rich you want your creamer. Whole milk will give you the creamiest result, but 2% or even fat-free works perfectly well. Feeling decadent? Swap this entire amount for half-and-half or even heavy cream for an ultra-luxurious treat. Chef’s Insight: Using a higher-fat milk will also make the creamer a little thicker, which is a delightful bonus.
- 2 teaspoons Vanilla Extract: Please, for the love of all that is good and holy, use the real stuff! That imitation vanilla just can’t compete. The pure extract adds a beautiful, floral complexity that ties the whole creamer together. Pro Hack: If you’re feeling fancy, scrape the seeds from a real vanilla bean pod into the mix for those gorgeous little black specks and an even more intense vanilla aroma.
Let’s Get Cooking: Your Foolproof Creamer Method
Ready to see how easy this is? We’re going to walk through this step-by-step. No fancy techniques, no scary equipment—just you, a saucepan, and a little bit of stirring. Let’s do this!
- Combine the Base. Grab a medium-sized saucepan—non-stick is great for easy cleanup. Pour in the entire can of evaporated milk, your 1½ cups of milk, and the ½ cup of brown sugar. Now, place this over medium heat. Chef’s Hack: Before you turn on the heat, give everything a good whisk. This helps break up the brown sugar clumps right from the start, leading to a smoother creamer.
- Warm and Dissolve. This is the most important step. Stir the mixture constantly with a wooden spoon or a whisk. You’re not trying to boil it; you just want to warm it up enough to completely dissolve the brown sugar. You’ll know it’s ready when you rub a little between your fingers and don’t feel any grittiness. This should take about 5-7 minutes. Critical Tip: Do NOT let it boil! Boiling can cause the milk to scorch or develop a “skin,” and it can sometimes alter the texture. We’re going for warm and smooth, not hot and angry.
- Incorporate the Vanilla. Once the sugar is fully dissolved and the mixture is steaming happily, take the saucepan off the heat. Now, stir in those 2 glorious teaspoons of vanilla extract. The reason we add it off the heat is to preserve its delicate flavor. High heat can cause some of those beautiful aromatic compounds to evaporate. Chef’s Note: Ahhh, smell that? That’s the sound of success right there.
- Jar It Up (For Canning). If you’re planning to can your creamer (which I highly recommend!), you need to work while the mixture is still hot. Carefully pour the hot creamer into sterilized jars, leaving about ½ inch of space at the top (this is called “headspace”). Wipe the rims of the jars with a clean, damp cloth to ensure a perfect seal. Pro Tip: Use a canning funnel! It makes this process clean and easy, with no dribbles down the side of your jars.
- Process the Jars. Apply your lids and rings, fingertip-tight (don’t crank them on with all your might!). Process the jars in a boiling water bath for 15 minutes. Carefully remove them and let them cool completely, undisturbed, on a towel on your countertop. You’ll be rewarded with the satisfying *pop* of the seals as they set. Chef’s Reminder: Always check the seals after 24 hours. The lid should be concave and not flex when you press the center. If a jar didn’t seal, no worries! Just pop it in the fridge and use it first.
How to Serve This Liquid Gold
Okay, the hard part is over (and it wasn’t even hard!). Now for the fun part: enjoying the fruits of your labor. Brew your favorite coffee—whether it’s a dark roast, a light blend, or even a strong cold brew. Pour a generous splash (or two, I don’t judge) of your homemade Crème Brûlée Creamer into your mug and watch it swirl into your coffee like a creamy dream.
Want to take it to the next level? Here are a few of my favorite ways to serve it:
- The Classic: Just coffee and creamer. It’s perfect as is.
- The Dessert Coffee: Top your mug with a dollop of whipped cream and a tiny sprinkle of brown sugar or a drizzle of caramel sauce.
- The Iced Indulgence: This creamer is fantastic in iced coffee! Because it’s already sweetened and flavored, it mixes in beautifully without crystallizing at the bottom of your glass. Pour over ice for the ultimate afternoon pick-me-up.
However you take it, take a moment. Sip it slowly. This isn’t just fuel; it’s a experience.
Get Creative: Shake Up Your Creamer Game!
Once you’ve mastered the classic, the kitchen playground opens up! This recipe is an incredible base for so many other flavors. Here are a few of my favorite twists to get your creative juices flowing:
- Maple Cinnamon Brûlée: Replace the brown sugar with ⅓ cup of pure maple syrup and add one cinnamon stick to the saucepan while warming. Remove the stick before jarring.
- Toasted Coconut Dream: Use canned coconut milk instead of the regular milk for a dairy-free version. The tropical flavor pairs amazingly with the brown sugar and vanilla.
- Bourbon Vanilla Splash: For a grown-up twist, reduce the vanilla extract to 1 teaspoon and add 1 teaspoon of good-quality bourbon along with it. The oaky notes are incredible.
- Chocolate Hazelnut Bliss: Whisk in 2 tablespoons of chocolate hazelnut spread (like Nutella) along with the milks and sugar. Make sure it’s fully melted and incorporated for a creamer that tastes like a liquid Ferrero Rocher.
- Pumpkin Spice Latte (The Real Deal): Add 2 tablespoons of pumpkin puree and ½ teaspoon of pumpkin pie spice to the mix. You’ve just created a homemade PSL that puts any chain version to shame.
A Few Parting Thoughts from My Kitchen
This recipe has become a staple in my home, especially around the holidays. I make a giant batch, can it all, and suddenly I have the most heartfelt, homemade gifts for my neighbors, my mail carrier, and my kid’s teachers. It always gets a huge reaction because it’s made with love, not just bought from a store.
It’s also evolved over time. My first attempt was far too sweet because I got overzealous with the sugar. Another time, I got distracted and let it simmer, which gave it a slightly “cooked” milk flavor. But that’s the beauty of cooking! You learn, you tweak, and you make it your own. This version you have here is the culmination of all those little experiments—perfected for you.
Your Creamer Questions, Answered!
I know you might have a question or two, so I’ve gathered the most common ones here. Think of this as our little kitchen huddle.
Q: Do I HAVE to can it? How long does it last if I don’t?
A: Not at all! Canning is just an option for long-term shelf storage. If you skip the canning process, just let the creamer cool and pour it into a clean bottle or jar. It will keep perfectly in the refrigerator for 7-10 days. Shake it well before each use, as natural separation can occur.
Q: My creamer seems a little thin. How can I thicken it?
A> Great question! The thickness will depend on the milk you use. For a thicker creamer, simply replace the 1½ cups of milk with an equal amount of half-and-half or heavy cream. The higher fat content will give you a much richer, thicker result that feels truly decadent.
Q: Can I use a sugar substitute?
A> You can experiment, but it will change the final product. The deep, caramel flavor of brown sugar is integral to the “crème brûlée” taste. A brown sugar substitute like Swerve or a liquid sweetener like monk fruit might work, but the flavor profile will be different. I’d recommend making a very small, single-serving batch to test it first!
Q: Why did my jars not seal in the water bath?
A> This usually comes down to a few common issues: 1) The rims weren’t wiped clean, 2) The lids were old or damaged (always use new lids for canning!), or 3) The rings were screwed on too tightly, which prevented the air from venting during processing. Don’t be discouraged! Just pop that unsealed jar in the fridge and enjoy it first.
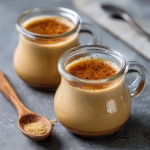
Homemade Crème Brûlée Coffee Creamer
Description
So today, we’re elevating your daily brew with a touch of dessert decadence. My Homemade Crème Brûlée Coffee Creamer is silky, rich, and perfectly sweet, with brown sugar caramel notes and a whisper of vanilla that’ll make your kitchen smell like a Parisian café.
Ingredients
-
1 can (12 oz) evaporated milk
-
½ cup brown sugar (light or dark)
-
1½ cups milk (whole for richness, or 2%/fat-free to lighten it up)
-
2 teaspoons pure vanilla extract
Chef’s Tip:
Swap the milk for half-and-half or heavy cream if you want it extra luxurious. For visible vanilla specks, scrape in half a vanilla bean.
Instructions
1. Combine the Base
Whisk together evaporated milk, milk, and brown sugar in a medium saucepan (nonstick works great).
2. Warm and Dissolve
Place over medium heat, stirring often until the sugar completely dissolves (about 5–7 minutes). Don’t boil—just gently steam.
3. Add the Vanilla
Remove from heat and stir in vanilla extract. This keeps the aroma intact and prevents bitterness.
4. Jar It Up (Optional Canning Step)
Pour the hot creamer into sterilized jars, leaving ½ inch of headspace. Wipe rims clean, seal, and process in a boiling water bath for 15 minutes. Cool completely before storing.
5. Chill and Serve
If not canning, let cool, pour into a bottle or jar, and refrigerate for up to 10 days. Shake before each use.
Notes
-
Don’t let it boil—gentle heat keeps it silky.
-
Use a canning funnel for mess-free pouring.
-
Higher-fat milk = thicker, creamier texture.
-
For the deepest flavor, opt for dark brown sugar.
Nutrition
- Calories: 60Cal Per 2 Tbsp Serving
- Sugar: 9g
- Fat: 2g
- Carbohydrates: 10g
- Protein: 2g
Nutritional Information (Because We’re All Curious!)
Okay, let’s talk numbers. I’m a big believer in balance. This creamer is a treat, and knowing what’s in it helps you enjoy it mindfully. The following info is an estimate per 2-tablespoon serving, which is a really generous amount for one cup of coffee!
- Calories: ~60 kcal
- Fat: 2 g
- Carbohydrates: 10 g
- Sugar: 9 g
- Protein: 2 g
- Sodium: 30 mg
Compare that to many store-bought creamers, which can be loaded with high-fructose corn syrup, hydrogenated oils, and a longer list of preservatives. Here, you’re in control. You know every single ingredient that went into it. By making it yourself, you’re choosing real food, and that’s something you can feel genuinely good about.
Your Cup Runneth Over
And there you have it, my friend! You are now the proud creator of a truly spectacular homemade coffee creamer. This isn’t just about saving a trip to the store; it’s about reclaiming a little piece of your day. It’s about starting your morning with a ritual that feels special, indulgent, and deeply satisfying.
I hope this recipe brings as much warmth and joy to your kitchen as it has to mine. Remember, the best food—and the best coffee!—is the kind that’s made with a little bit of love and a whole lot of flavor.
Now, I’d love to hear from you! Did you try one of the fun variations? Have a kitchen story of your own? Share it with me in the comments below or tag me on social with #Feastical. Until next time, keep your whisks busy and your coffee mugs full.
Happy Sipping,

Cheesy Crockpot Beef & Bowtie Pasta
Your New Favorite Dinner is Just a Crockpot Click Away
Hey friends, Beau here! Let’s be real for a second. Some days, you want to channel your inner gourmet chef, spending hours lovingly crafting a from-scratch masterpiece. And other days? Other days, you just want to throw a bunch of delicious things into a pot, walk away, and have magic happen. You want a meal that feels like a warm, cheesy hug at the end of a long day. You want a dinner that makes the whole family actually cheer when you announce it’s ready.
If you’re nodding your head, then you, my friend, have come to the absolute right place. Today, we’re making my legendary Cheesy Crockpot Beef & Bowtie Pasta. This isn’t just a recipe; it’s your ticket to dinnertime peace. Imagine tender ground beef, soft bowtie noodles (I love how they hold the sauce like little edible pockets!), and a creamy, zesty, outrageously cheesy sauce that all comes together with minimal effort. We’re talking 15 minutes of prep for a meal that tastes like you slaved over the stove for hours.
This dish is the ultimate crowd-pleaser. It’s perfect for hectic weeknights, potlucks where you want to be the hero, or those cozy weekends when you just don’t feel like doing a mountain of dishes. So, grab your trusty crockpot, and let’s create some serious comfort food magic together. I promise, this one’s going straight into your regular rotation.
The Story Behind the Comfort: A Recipe Born from Chaos
This recipe holds a special place in my heart because it literally saved a family gathering a few years back. I was hosting my nephew’s birthday party at my place. The plan was ambitious: grilled burgers, homemade potato salad, the works. But of course, the universe had other plans. A surprise thunderstorm rolled in right as I was about to fire up the grill.
Panic mode? You bet. I had a house full of hungry kids and adults, and my main cooking method was now a soggy mess in the backyard. I did what any sensible person would do: I took a deep breath, scanned the pantry and fridge, and started improvising. I had ground beef, pasta, and a whole lot of cheese. Into the crockpot it all went, with a hopeful prayer.
An hour and a half later, the most incredible aroma filled the house. That cheesy, beefy, slightly spicy scent worked better than any dinner bell. The dish was an instant hit. The kids devoured it, the parents asked for the recipe, and my nephew declared it his new favorite birthday meal. It was a beautiful reminder that sometimes the best memories—and the best recipes—come from happy accidents. This cheesy beef and pasta became a symbol of flexibility and comfort, and it’s been a Feastical favorite ever since.
Gathering Your Flavor Arsenal
Here’s everything you’ll need to create this creamy, dreamy masterpiece. Don’t just think of these as ingredients; think of them as the building blocks of flavor and texture that are about to become best friends in your crockpot.
- 2.25 lbs Ground Beef (80/20 blend is ideal): This gives us rich, beefy flavor. The little bit of extra fat adds so much taste, but you can absolutely use a leaner blend if you prefer—just know you might lose a smidge of flavor. For a twist, try ground turkey or Italian sausage!
- 1 (16 oz) block of Velveeta, cubed: I know, I know. But hear me out! Velveeta is the secret weapon for a perfectly smooth, melt-every-time cheese sauce. It refuses to get grainy, which is why it’s the champion of this dish. Cubing it helps it melt evenly and quickly.
- 1 (8 oz) block of Cream Cheese, softened: This is our richness booster. It adds a subtle tang and incredible creaminess that takes the sauce to a whole new level of decadence. Let it sit on the counter for 30 minutes before you start—it’ll blend into the sauce like a dream.
- 1 can Cream of Chicken Soup: This is our flavor and thickening base. It adds a savory depth that’s just perfect. Not a fan of chicken soup? Cream of Mushroom or Celery work beautifully too!
- 1 can Rotel Tomatoes with Chilies (Original): This is the flavor MVP! Rotel brings a zesty, slightly spicy kick that cuts through all the richness and keeps the dish from feeling too heavy. If you’re sensitive to heat, use the “Mild” version. For more fire, grab the “Hot” one!
- 1 box (12-16 oz) Bowtie Pasta (Farfalle): I love bowties because their fun shape and ruffled edges are perfect for grabbing all that cheesy sauce. But any short pasta like elbow macaroni, shells, or penne will work great.
- Optional: 1 cup reserved pasta water: This is a pro chef hack! The starchy water is liquid gold for adjusting your sauce to the perfect consistency at the end.
Let’s Get Cooking: The Foolproof Steps to Perfection
Okay, team, it’s go time. This process is so simple, but I’m going to walk you through each step with a few of my favorite kitchen hacks to ensure your result is nothing short of spectacular.
- Brown that Beef! First things first, grab a large skillet and cook your ground beef over medium-high heat. Break it up as it cooks until it’s nicely browned and no pink remains. This step is non-negotiable for building flavor—don’t be tempted to add it raw to the crockpot! Once it’s done, drain off the excess grease. My tip? Tilt the skillet and use a spoon to remove the fat, or carefully drain it into a old can or jar. Then, transfer your beautiful, browned beef into the crockpot.
- The Cheesy Pile of Glory. Now for the fun part! To the beef in the crockpot, add your cubed Velveeta, the softened cream cheese (it should give easily when you press it), the entire can of cream of chicken soup (no need to dilute it), and the can of Rotel (do NOT drain it—that liquid is flavor!). Give everything a gentle stir just to combine. It’s going to look a bit chunky and weird now, but trust the process. All that cheesy goodness is about to melt into a creamy dream.
- Set It and (Almost) Forget It. Pop the lid on your crockpot and set it to HIGH. Let it cook for about 1.5 hours. Here’s my pro tip: about every 30 minutes, give it a good stir. This helps the cheeses melt evenly and prevents any scorching on the edges. You’ll watch it transform from a bunch of separate ingredients into a smooth, bubbling, cheesy sauce. The smell will be absolutely incredible.
- Pasta Time! While the sauce is working its magic, cook your bowtie pasta according to the package directions for al dente. This is crucial! We want the pasta to have a little bite left because it’s going to hang out in the hot sauce for a bit later. Before you drain the pasta, RESERVE ABOUT A CUP OF THE STARCHY PASTA WATER. This is your sauce-saving secret weapon. Drain the pasta and set it aside.
- The Grand Finale. After 1.5 hours, your sauce should be perfectly smooth and creamy. Now, stir in the cooked bowtie pasta. If the sauce seems a little too thick for your liking, this is where you use that reserved pasta water. Add a splash at a time (maybe 1/4 cup to start) and stir until it reaches your desired consistency. The starch in the water will thin the sauce without making it watery.
- Serve it Up! Give everything one final, glorious stir to make sure every single bowtie is coated in that luscious sauce. Then, dish it out into bowls and get ready for the compliments to roll in!
How to Serve Your Masterpiece
This dish is a hearty meal all on its own, but a few simple sides can turn it into a true feast. Here’s how I love to plate it up:
For a Simple, Cozy Meal: Ladle a generous portion into a deep bowl. The beauty is in the simplicity. Maybe sprinkle a little fresh chopped parsley or chives on top for a pop of color and freshness. A side of buttery garlic bread or a simple green salad with a tangy vinaigrette is all you need to balance the richness.
For a Potluck or Party: Keep it warm right in the crockpot on the “Warm” setting. It’s a self-serve dream! Provide a ladle and set out some fun toppings so folks can customize their bowls. Think crispy fried onions, extra shredded cheddar cheese, a dollop of sour cream, or even some sliced jalapeños for the brave.
For the Ultimate Comfort Food Plate: Serve it alongside some steamed green beans, roasted broccoli, or sweet corn. The vibrant veggies make the plate look beautiful and add a nutritious element that everyone will appreciate.
Make It Your Own: Delicious Twists & Swaps
One of the best things about this recipe is how adaptable it is. Feel free to get creative and make it suit your taste buds or dietary needs!
- The “Southwest Fiesta” Twist: Swap the ground beef for ground turkey or chicken. Add a tablespoon of taco seasoning to the meat as it browns. Use a can of Corn (drained) and a can of Black Beans (rinsed and drained) along with the Rotel. Top with crushed tortilla chips and a squeeze of lime juice!
- The “Extra Veggie Boost” Version: Sneak in some nutrients by sautéing a finely chopped onion and a couple of minced garlic cloves with the ground beef. You can also stir in a cup of frozen peas or chopped spinach during the last 10 minutes of cooking.
- The “Spicy Kick” Variation: Like it hot? Use Hot Rotel tomatoes. Add a teaspoon of cayenne pepper or a few dashes of your favorite hot sauce to the crockpot. Garnish with sliced fresh jalapeños.
- The “Creamy Mushroom” Swap: Not a fan of cream of chicken? Use Cream of Mushroom soup instead for an earthier, deeper flavor. It pairs wonderfully with the beef and cheese.
- The “Lower-Carb” Option: Believe it or not, this is amazing without the pasta! Just make the sauce and beef as directed and serve it over steamed cauliflower rice or zucchini noodles. It becomes a fantastic, hearty low-carb bowl.
Beau’s Chef’s Notes & Kitchen Confessions
This recipe has evolved a bit since that fateful rainy birthday party. The biggest lesson learned? Always cook the pasta separately. I tried a version once where I threw the uncooked pasta right into the crockpot with the sauce to truly make it a one-pot meal. Big mistake! The pasta absorbed all the liquid and turned into a starchy, mushy brick. We still ate it (because, cheese), but it was not my finest hour. Cooking the pasta separately gives you total control over the final texture.
Another confession: I am a chronic “sauce thinner.” I almost always use that reserved pasta water. I just love a saucy, loose consistency that coats every noodle perfectly. Don’t be afraid to adjust it to how you like it! This is your kitchen, your rules. The recipe is a guide, but you’re the artist.
Your Questions, Answered!
Q: Can I cook this on LOW instead of HIGH?
A: You absolutely can! If you have more time, cook the sauce (without the pasta) on LOW for 3-4 hours, stirring occasionally. Then, stir in the cooked pasta and warm through. The longer, slower cook can make the beef even more tender.
Q: My sauce seems a bit greasy. What happened?
A: This usually means there was a bit too much fat left in the ground beef after browning. No worries! For next time, be sure to drain the beef really well. For now, you can gently spoon a little of the excess oil off the top of the sauce before adding the pasta.
Q: Can I make this ahead of time?
A: Yes, with one caveat. You can brown the beef and mix the sauce ingredients in the crockpot insert a day ahead. Cover and refrigerate. When you’re ready, let it sit on the counter for 20-30 minutes to take the chill off, then cook as directed. I do NOT recommend cooking the pasta ahead of time, as it can get mushy. Always cook the pasta fresh right before serving.
Q: The cheese sauce is a little grainy. How can I fix this?
A> Graininess can happen if the heat is too high or if the cream cheese was too cold when added. To fix it, try whisking in a splash of milk or that reserved pasta water vigorously. This can often help bring the emulsion back together and smooth it out.

Cheesy Crockpot Beef & Bowtie Pasta
Description
Hey friends, Beau here! Some days you want to cook a gourmet masterpiece; other days, you just want to throw delicious things into a pot, walk away, and have magic happen. Enter Cheesy Crockpot Beef & Bowtie Pasta: tender ground beef, bowtie pasta that soaks up every bit of cheesy sauce, and a rich, creamy, slightly zesty sauce—all with minimal effort.
Ingredients
-
2.25 lbs Ground Beef (80/20) – Rich, flavorful, slightly fatty
-
1 (16 oz) block Velveeta, cubed – Smooth, melty cheese magic
-
1 (8 oz) block Cream Cheese, softened – Adds richness and tang
-
1 can Cream of Chicken Soup – Thickens and flavors
-
1 can Rotel Tomatoes with Chilies (Original) – Zesty kick; keep liquid!
-
1 box (12–16 oz) Bowtie Pasta (Farfalle) – Or other short pasta like elbows or shells
-
Optional: 1 cup reserved pasta water – Adjust sauce consistency
Pro Tip: Try ground turkey, Italian sausage, or cream of mushroom soup for a twist.
Instructions
Cook ground beef over medium-high heat until fully browned. Drain excess grease. Transfer beef to the crockpot.
To the beef, add Velveeta cubes, cream cheese, cream of chicken soup, and Rotel (with liquid). Stir gently—the mix looks chunky now but will melt beautifully.
Cover crockpot. Cook on HIGH for 1.5 hours, stirring every 30 minutes to ensure even melting and prevent scorching.
Cook bowtie pasta al dente. Reserve 1 cup pasta water, then drain.
Stir pasta into the crockpot sauce. Use reserved pasta water if sauce is too thick. Adjust consistency to preference.
Dish into bowls. Sprinkle with fresh parsley or chives for color. Optional sides: garlic bread, salad, or roasted veggies.
Notes
-
Always cook pasta separately; uncooked pasta in the crockpot can turn mushy.
-
I often add reserved pasta water for an extra saucy, perfectly coated dish.
-
Adjust cheese sauce texture to your preference—it’s your kitchen, your rules!
A Quick Note on Nutrition
Let’s be honest, this is a comfort food dish, through and through. It’s rich, satisfying, and meant to be enjoyed as part of a balanced diet. The nutritional information provided is an estimate based on the specific ingredients used. Here’s a little breakdown of what’s inside:
This dish is an excellent source of protein from the ground beef, which is essential for muscle repair and keeping you full and satisfied. The cheese and soup contribute to the calcium and fat content, providing energy and flavor. The pasta is your main source of carbohydrates, giving you the energy to power through your day.
If you’re watching your sodium intake, you can make a few simple swaps: use low-sodium cream of chicken soup and consider reducing the amount of Velveeta slightly, supplementing with a lower-sodium shredded cheese. Remember, you are in control! The variations section above is a great place to start if you’re looking to lighten things up or add more veggies.
Approximate Nutrition per Serving (1 of 8): Calories: 550, Fat: 30g, Saturated Fat: 15g, Carbohydrates: 35g, Protein: 35g, Sodium: 980mg.
Final Thoughts from My Kitchen to Yours
Well, there you have it! My go-to recipe for when life gets busy, but my craving for something deeply comforting does not. This Cheesy Crockpot Beef & Bowtie Pasta is more than just food; it’s a reliable friend in the kitchen. It’s the meal that brings everyone to the table with a smile.
I hope this recipe brings as much joy to your home as it has to mine. Don’t forget to tag me @Feastical on social media if you make it—I love seeing your creations! Got a variation you tried and loved? Drop a comment below on Feastical.com and share your genius with the rest of our foodie family. Now, go forth and enjoy your well-deserved, deliciously easy dinner. You’ve earned it!
Happy cooking,
Beau

Cranberry Almond Biscotti Tiramisu
Ditch the Heavy Dessert: My Cranberry Almond Biscotti Tiramisu is a Holiday Game-Changer
Hey friends, Beau here from Feastical! Let’s talk about the holiday dinner finale. You know the scene: the turkey’s a memory, the mashed potatoes are long gone, and everyone’s leaning back in their chairs with that familiar, slightly dazed look of contentment. Then, out comes the dessert spread—a rich, decadent, often heavy parade of pies, cakes, and custards. Don’t get me wrong, I love a slice of pecan pie as much as the next guy, but sometimes, after a feast of that magnitude, your taste buds (and your stomach) are begging for a little mercy.
What if I told you there’s a dessert that feels like a breath of fresh, wintry air? One that’s elegant, light, and bursting with bright, festive flavor, yet still feels indulgent and special? Enter my Cranberry Almond Biscotti Tiramisu. This isn’t your nonna’s classic tiramisu (though I love that one, too!). This is a modern, vibrant twist that swaps out the traditional coffee-soaked ladyfingers for chunks of crisp, tart-sweet cranberry almond biscotti, dunked in a warm spiced cranberry syrup.
We’re talking layers of that fruity, crunchy goodness with a cloud-like mascarpone cream that’s just sweet enough. It’s a dessert that’s both sophisticated and incredibly easy to pull together. No baking required, friends! You can assemble it in about 20 minutes, let it chill, and become the cool, calm, and collected host who whips out a show-stopping dessert without breaking a sweat. So, if you’re ready to bring a little modern flair to your holiday table, grab your favorite mixing bowl and let’s create some magic.
A Happy Accident: How This Recipe Came to Be
This recipe has a fun little origin story that involves a last-minute potluck and a serious lack of planning. A few years back, I was signed up to bring a dessert to a friend’s holiday party. I had grand plans to make a complicated Yule log, but the day got away from me, and suddenly I had about an hour before I needed to walk out the door. Panic mode! I started frantically scanning the pantry.
My eyes landed on a big tin of homemade cranberry almond biscotti my aunt had gifted me. Next to it was a half-empty bottle of cranberry juice from Thanksgiving brunch. And in the fridge, the usual suspects: mascarpone and heavy cream. A lightbulb went off. What if I treated the biscotti like ladyfingers? I quickly simmered the juice with some sugar and spices to make a quick syrup, whipped up the mascarpone cream, and started layering everything in a big trifle dish I barely ever use.
I arrived at the party, slightly flustered, and placed my “experiment” on the table next to all the perfect, traditional pies. To my absolute shock, it was the first dessert to disappear. People were raving about the “lightness” and the “amazing cranberry flavor.” That happy accident taught me a valuable lesson: the best recipes often come from a place of creativity and using what you have. This Cranberry Almond Biscotti Tiramisu is now a requested staple in my home, and I’m so thrilled to share the *proper*, tested version with you.
Gathering Your A-Team: The Ingredients Breakdown
This recipe is all about the harmony of flavors and textures. Here’s what you’ll need, plus a few of my chef-y insights to help you understand the “why” behind each one.
- 12 Cranberry Almond Biscotti: The star of the show! Their crunch and slight sweetness are the foundation. Chef’s Tip: Look for bakery-style biscotti that aren’t rock-hard. If you can’t find cranberry almond, plain almond biscotti work great—we’ll add plenty of cranberry flavor elsewhere.
- 1 cup Cranberry Juice: We’re reducing this to create a intensely flavored syrup. Substitution Tip: Pomegranate juice is a fantastic swap here for an equally deep, ruby-red color and tart flavor.
- ¼ cup Sugar: This balances the tartness of the cranberry juice. You can adjust to your taste.
- ½ tsp Cinnamon: Adds a warm, cozy spice that screams holidays. A tiny pinch of nutmeg or clove would be lovely here, too.
- 1 tsp Orange Zest: The bright, citrusy note is non-negotiable! It cuts through the richness and makes the cranberry flavor pop. Pro Hack: Zest your orange before you juice it—it’s infinitely easier!
- 8 oz Mascarpone Cheese: The creamy, luxurious heart of the tiramisu. Make sure it’s at room temperature for a smooth, lump-free whip.
- 1 cup Heavy Cream: This gives our cream layer its light, airy texture. Ensure it’s very cold for the best whip.
- ¼ cup Powdered Sugar: Dissolves instantly into the cream, preventing graininess. Granulated sugar just won’t do the trick here.
- 1 tsp Vanilla Extract: The flavor backbone that makes everything taste more… well, everything! Use the good stuff if you have it.
Let’s Build This Beauty: Your Step-by-Step Guide
Okay, team! Let’s get assembling. This process is simple, but a few key tips will ensure your tiramisu is absolutely perfect.
- Create the Spiced Cranberry Syrup. In a small saucepan, combine the cranberry juice, granulated sugar, cinnamon, and orange zest. Bring it to a gentle simmer over medium heat, stirring occasionally until the sugar dissolves. Let it bubble away for about 5-7 minutes, until it’s reduced by about a third and has thickened slightly enough to coat the back of a spoon. Chef’s Hack: Don’t walk away during this step! Cranberry juice can boil over in a flash. Transfer this syrup to a shallow bowl or pie plate and let it cool completely. A warm syrup will turn our biscotti into mush—patience is key!
- Whip the Mascarpone Dream Cream. While the syrup cools, let’s make the filling. In a large mixing bowl, add the room-temperature mascarpone, heavy cream, powdered sugar, and vanilla. Using a hand mixer or a stand mixer with the whisk attachment, beat on medium-high speed until soft peaks form. Watch it like a hawk! You want a spreadable, cloud-like consistency, not stiff, over-whipped butter. This should take about 2-3 minutes.
- The All-Important Dip and Layer. Now for the fun part! Take your biscotti chunks and give each one a very quick, I-repeat, QUICK dip into the cooled cranberry syrup. We’re talking a one-second dunk—just enough to infuse them with flavor and a little moisture, but not so long that they become soggy and fall apart. Arrange a single layer of these dipped biscotti in the bottom of your serving glasses or trifle dish.
- Build Those Beautiful Layers. Spoon or pipe a layer of the mascarpone cream over the biscotti. Then, drizzle a little of the leftover cranberry syrup right over the cream—this creates gorgeous red swirls and adds another punch of flavor. Repeat the layers: dipped biscotti, mascarpone cream, syrup drizzle. You should get two good layers in most vessels.
- The Waiting Game (The Hardest Part). Cover your tiramisu with plastic wrap and refrigerate it for at least 2-4 hours. This is not a suggestion, it’s a requirement! This chilling time allows the flavors to meld beautifully and the biscotti to soften to a perfect, cake-like texture. Overnight is even better if you’re planning ahead.
How to Serve This Stunner
When it’s time to serve, you’ve got options! I love using clear glasses—mason jars, parfait glasses, or even wine glasses—because they show off the gorgeous layers you worked so hard to create. If you’re feeding a crowd, a large glass trifle dish makes a spectacular centerpiece.
Right before serving, add the finishing touches. I like to crumble an extra biscotti or two over the top for a final bit of crunch. A little extra orange zest sprinkled over the white cream adds a pop of color and fresh aroma. For a truly festive touch, a few fresh cranberries or a sprig of mint look incredible. Serve it straight from the fridge with a smile, and get ready for the compliments to roll in.
Make It Your Own: Delicious Recipe Variations
The beauty of this recipe is its flexibility. Here are a few ways to mix it up:
- Chocolate Lover’s Twist: Add ¼ cup of mini chocolate chips to the mascarpone cream, or sprinkle them between the layers. A drizzle of dark chocolate sauce on top would be divine.
- Boozy & Bold: For an adult-only version, add a tablespoon of Grand Marnier, Chambord, or even bourbon to the cooled cranberry syrup. It deepens the flavor beautifully.
- Nut-Free Version: Simply use cranberry-orange biscotti or any fruit-based biscotti without nuts. The recipe works just as well!
- Ginger-Spiced: Add ¼ teaspoon of ground ginger or a tablespoon of finely chopped crystallized ginger to the cranberry syrup for a warm, zesty kick.
- Individual Mini Trifles: Make individual servings in small 4-ounce mason jars. They’re perfect for grab-and-go treats or for gifting to neighbors and friends!
Beau’s Chef Notes & Kitchen Confessions
This recipe has evolved since that first frantic potluck. I’ve learned that taking the extra minute to zest the orange perfectly (no white pith!) makes a world of difference. I also used to be lazy and try to whip the mascarpone straight from the fridge, which always led to a slightly lumpy cream. Lesson learned: patience with ingredients leads to a perfect texture.
One of my favorite kitchen stories with this dish involves my nephew, who is a notoriously picky eater. He saw the red layers and thought it was some kind of weird jelly dessert and refused to try it. I convinced him to just taste the white part. He did, and his eyes got wide. He then proceeded to eat the entire top layer of cream from his serving, exposing the biscotti underneath, which he then also devoured. A win in my book!
Your Questions, Answered: FAQs & Troubleshooting
Q: My mascarpone cream is lumpy. What happened?
A: This almost always means your mascarpone was too cold. Next time, make sure it sits on the counter for 30-45 minutes to come to room temperature before whipping. If it’s lumpy now, you can try to whisk it vigorously by hand or push the mixture through a fine-mesh sieve to smooth it out.
Q: Can I make this dessert ahead of time?
A: Absolutely! In fact, I highly recommend it. You can assemble it up to 24 hours in advance. The flavors have more time to develop, making it even more delicious. Just add the final garnish right before serving.
Q: My biscotti got too soft and mushy. How can I prevent this?
A: You probably dunked them for too long! The dip should be an in-and-out motion. Remember, the biscotti will continue to soften as they chill in the fridge. A quick dip is all you need for the perfect texture.
Q: I can’t find cranberry almond biscotti. What’s the best substitute?
A: No problem! Anise biscotti or orange biscotti would be wonderful. You could even use a sturdy ginger snap cookie for a different, but equally tasty, flavor profile.

Cranberry Almond Biscotti Tiramisu
Description
Boursin-Stuffed Mushrooms: Your New Go-To Party Appetizer
Forget Boring Party Apps: Let’s Make Magic
Hey friends, Beau here from Feastical! Let me paint you a picture. You’re hosting a get-together. The doorbell is ringing, coats are piling up, and laughter is already starting to bubble from the living room. You want to glide out of the kitchen with a platter of something that looks like you fussed for hours, tastes like a dream, and makes everyone feel instantly welcomed and loved.
But… you also don’t actually want to fuss for hours. I get it. We’re all about that real-life, feel-good cooking here, and that means recipes that deliver maximum flavor with minimum stress.
Enter the hero of today’s story: the one, the only, the utterly irresistible Boursin-Stuffed Mushroom. These little guys are the undisputed champions of my party appetizer lineup. They’re creamy, savory, bursting with herby-garlicky flavor, and they have this magical ability to disappear from the plate in about 60 seconds flat. The best part? They are deceptively simple. We’re talking 15 minutes of prep for a payoff that will have your guests begging for the recipe. So, tie on your apron, grab that trusty baking sheet, and let’s create some kitchen magic that tastes like a warm, cheesy hug.
A Holiday Kitchen Catastrophe (& A Happy Ending)
I’ll never forget the first time I truly understood the power of these mushrooms. It was a chaotic Christmas Eve at my Aunt Carol’s house. I was tasked with bringing an appetizer, and in the holiday madness, I completely forgot to make the elaborate pastry-wrapped thing I’d planned. Panic set in. I raced to the store with about 45 minutes to spare before we had to leave.
Staring into the abyss of the refrigerated cheese section, a little round package of Boursin Garlic & Fine Herbs cheese practically winked at me. Next to it, a beautiful box of cremini mushrooms. A lightbulb went off. I grabbed them, along with some breadcrumbs and parsley, and sprinted home. In a whirlwind of activity, I whipped these together, popped them in the oven, and arrived at the party with a baking sheet that was still warm. They were gone before the main course even made it to the table. My fancy-pants cousin, who usually critiques everything, came back for thirds. That’s when I knew: sometimes, the simplest, most heartfelt dishes are the ones that truly steal the show.
Gathering Your Flavor All-Stars
One of the best things about this recipe is the short, sweet ingredient list. Each one plays a crucial role in creating that perfect bite. Here’s what you’ll need and why:
- 16–20 Cremini or White Mushrooms: I’m a big fan of cremini (aka baby bellas) for their deeper, earthier flavor and sturdier texture, but classic white button mushrooms work beautifully, too! Look for mushrooms that are firm, with closed caps, so they form perfect little cups for our filling.
- 1 package Boursin Cheese (Garlic & Fine Herbs recommended): This is the superstar, the secret weapon, the reason these mushrooms are so insanely good. It’s a creamy, spreadable cheese already packed with garlic, herbs, and black pepper. It does all the heavy flavor-lifting for us. Chef’s Insight: If you can’t find Boursin, mix 8 oz of softened cream cheese with 1 minced garlic clove, 1 tbsp each of chopped fresh chives, dill, and parsley, and a big pinch of salt and pepper.
- 1/4 cup Breadcrumbs: These are our textural hero, giving the filling a little structure so it’s creamy but not runny. I use plain, unseasoned Panko breadcrumbs for their light, crispy texture. Substitution Tip: Gluten-free? No problem! Your favorite GF breadcrumbs or even crushed-up pork rinds for a keto version will work perfectly.
- 2 tbsp Chopped Fresh Parsley: A pop of fresh, green flavor that cuts through the richness. I highly recommend fresh here for that bright note, but in a pinch, 2 teaspoons of dried parsley will do.
- 1 tbsp Olive Oil: This helps bind the filling and adds a lovely richness. It also helps the tops get beautifully golden in the oven.
- Salt and Pepper to Taste: Don’t go too crazy with the salt right away—the Boursin and any Parmesan we add are already plenty salty. A few cracks of fresh black pepper, however, are always a good idea.
- Optional: Grated Parmesan for Topping: This is my “pro-move” for an extra layer of savory, umami flavor and a gorgeous, golden-brown crust. Seriously, don’t skip it!
Let’s Get Stuffing: Your Foolproof Guide
Ready to see how these little miracles come together? Follow these steps, and you’ll be a stuffed mushroom pro in no time. I’ve packed this section with all my favorite chef hacks to ensure your success.
- Preheat and Prep: First things first, get that oven preheating to a nice, hot 375°F (190°C). This gives the mushrooms a blast of heat right away, helping them cook through and get tender without getting watery. Chef’s Tip: While the oven is heating, line your baking sheet with parchment paper or a silicone baking mat. This is a game-changer for cleanup—trust me, you’ll thank yourself later.
- Clean and Prep Your Mushrooms: Now, for the mushrooms! Please, for the love of all that is holy, do not run them under water. Mushrooms are like little sponges and they’ll soak it all up. Instead, just give them a good wipe with a damp paper towel to remove any dirt. Next, gently pop out the stems. You can use your fingers or the tip of a small spoon. Chef’s Hack: Don’t throw those stems away! Finely chop them and toss them right into the filling for an extra boost of mushroom flavor and zero waste.
- Create the Dreamy Filling: In a medium bowl, it’s time to bring the band together. Take your package of Boursin cheese and add it to the bowl with the breadcrumbs, chopped parsley, and olive oil. Use a fork to mash it all together until it’s well-combined. It should be a thick, spoonable mixture. Give it a taste—this is your moment! See if it needs that extra crack of pepper. Chef’s Insight: If you saved your mushroom stems, mix those in now! The filling might seem thick, but that’s exactly what we want. It will soften and become incredibly creamy as it bakes.
- The Main Event: Stuffing! Using a small spoon (a teaspoon or a melon baller works great), generously fill each mushroom cap. Don’t be shy! Mound the filling up a bit. I like to give each one a little press with the back of my spoon to make sure it’s packed in there. As you fill them, place them on your prepared baking sheet. They don’t need a ton of space, but they shouldn’t be touching.
- The Golden Touch (Optional, but Recommended): Remember that optional Parmesan? Now’s the time! Take a small pinch and sprinkle it over the top of each stuffed mushroom. This is what’s going to give you that beautiful, restaurant-worthy, golden-brown finish.
- Bake to Perfection: Slide that baking sheet into your preheated oven and let the magic happen. Bake for 20-22 minutes. You’re looking for the mushrooms to be tender (a knife should slide in easily) and the tops to be a lovely golden brown. Your kitchen is about to smell absolutely incredible.
Plating Up & Making it Pretty
You’ve pulled a tray of gorgeous, bubbling, golden-brown stuffed mushrooms out of the oven. Now what? Let’s make them look as good as they taste.
First, let them cool for just a minute or two on the baking sheet. This allows the cheesy filling to set slightly so it doesn’t ooze out the second you pick one up. Then, transfer them to your serving platter. I love using a simple white or rustic wooden board to let their beautiful color pop.
For a final chef-y touch, garnish with a little extra freshly chopped parsley. It adds a fresh flavor and a vibrant spot of green that makes the whole platter look professional. Serve them warm! These are best enjoyed fresh from the oven when the filling is luxuriously creamy and the mushroom is perfectly tender. Place a small stack of cocktail napkins nearby—these are a one-bite wonder, but that cheesy goodness can be delightfully messy!
Mix It Up! 5 Fun Flavor Twists
The classic recipe is a 10/10, but part of the fun of cooking is making a recipe your own. Here are a few of my favorite ways to shake things up:
- The “Everything Bagel” Bomb: Before baking, sprinkle the tops with everything bagel seasoning. The sesame seeds, garlic, and onion add an incredible crunch and flavor.
- Bacon & Cheddar Upgrade: Because bacon makes everything better. Mix 1/4 cup of finely chopped cooked bacon and 2 tablespoons of shredded sharp cheddar cheese into the filling. Prepare for applause.
- Spinach & Artichoke Vibes: Thaw and thoroughly squeeze dry 1/4 cup of frozen chopped spinach. Mix it into the filling along with 2 tablespoons of finely chopped marinated artichoke hearts. It’s like your favorite dip, in mushroom form!
- Spicy Sriracha Kick: For those who like a little heat, drizzle a tiny zigzag of sriracha over the stuffed mushrooms right before serving. The creamy, cool cheese and the spicy kick are a match made in heaven.
- Seafood Sensation: Feeling fancy? Fold in 1/4 cup of finely chopped cooked shrimp or lump crab meat into the filling. It’s an elegant twist perfect for a New Year’s Eve or anniversary dinner.
Beau’s Kitchen Notebook
Over the years, I’ve made these mushrooms more times than I can count, and they’ve evolved in little ways. I used to meticulously chop herbs to mix into plain cream cheese before I discovered the sheer convenience of Boursin. It was a true “why make it harder?” moment. I also learned the hard way that over-stuffing can lead to a bit of a mess in the oven—a happy, tasty mess, but a mess nonetheless. Now, I make sure my baking sheet is lined, and I embrace any cheesy overflow as “cook’s treat.” The best part of this recipe, beyond its deliciousness, is its flexibility. It’s a blank canvas for your cravings, and I love hearing how you all make it your own!
Your Questions, Answered!
I’ve gotten a lot of questions about these mushrooms over on Feastical’s social media. Here are the most common ones to help you out:
- Can I make these ahead of time? Absolutely! You can clean the mushrooms and make the filling up to a day in advance. Keep them separate in the fridge. About 30 minutes before you want to bake, assemble them on the baking sheet and pop them in the oven. You may need to add 1-2 minutes to the baking time since they’ll be going in cold.
- Why are my mushrooms so watery? This usually happens if the mushrooms are washed instead of wiped, or if they’re packed too tightly on the baking sheet. Ensure they have a little breathing room for the steam to escape. Using cremini mushrooms also helps, as they tend to be less watery than white buttons.
- Can I use a different cheese? Of course! While Boursin is the flavor king, a mix of softened cream cheese, grated Parmesan, garlic powder, and Italian seasoning is a great substitute. The texture will be slightly different, but still delicious.
- How do I reheat leftovers? While they are best fresh, you can reheat them! The air fryer or a toaster oven at 350°F for 3-5 minutes is your best bet to keep them from getting soggy. I don’t recommend the microwave.
A Quick Bite on Nutrition
Hey, I’m all about balance. Sometimes that means a big, vibrant salad, and sometimes it means indulging in a few incredibly delicious, cheesy stuffed mushrooms. Here’s the lowdown so you can enjoy them guilt-free. Remember, these are estimates and can vary based on the specific ingredients you use.
Based on a serving of 3 mushrooms (approx.): You’re looking at around 110 calories, 3g of protein, 4g of carbs, and 9g of fat. The mushrooms themselves are a great low-calorie vehicle, packed with nutrients like B vitamins and selenium. The bulk of the calories and fat come from the delicious, flavorful Boursin cheese, which is what makes this appetizer such a satisfying treat. It’s all about mindful enjoyment!
Your New Party Secret
And there you have it, my friends—the complete guide to making the most unforgettable Boursin-Stuffed Mushrooms. This recipe is a testament to what we believe in here at Feastical: that incredible food doesn’t have to be complicated. It’s about using great ingredients, adding a dash of love, and creating something that brings people together around the table.
I can’t wait for you to try these. When you do, make sure to tag me @Feastical on social media or leave a comment on the blog! I love seeing your creations and hearing your stories. Now, go forth and stuff some mushrooms. Your next party guest is going to be seriously impressed.
Happy cooking,
Ingredients
For the Spiced Cranberry Syrup:
-
1 cup cranberry juice (or pomegranate juice)
-
¼ cup granulated sugar
-
½ teaspoon cinnamon
-
1 teaspoon orange zest
For the Mascarpone Cream:
-
8 oz mascarpone cheese, room temperature
-
1 cup heavy cream, cold
-
¼ cup powdered sugar
-
1 teaspoon pure vanilla extract
For the Layers:
-
12 cranberry almond biscotti, broken into large chunks
-
Optional garnish: extra biscotti crumbs, orange zest, fresh cranberries, or mint sprigs
Instructions
In a small saucepan, combine cranberry juice, sugar, cinnamon, and orange zest. Simmer over medium heat for 5–7 minutes, until slightly thickened and syrupy. Transfer to a shallow bowl and let cool completely.
Pro Tip: Keep an eye on it — cranberry juice can boil over fast!
In a large bowl, beat mascarpone, cold heavy cream, powdered sugar, and vanilla using a hand or stand mixer until soft peaks form (about 2–3 minutes). Don’t overbeat — you’re going for light and fluffy, not stiff.
Quickly dip biscotti chunks (just 1 second each!) into the cooled cranberry syrup and arrange a layer in the bottom of your serving dish or glasses.
Spread a layer of mascarpone cream on top and drizzle with a little extra syrup. Repeat for two layers.
Cover and refrigerate for at least 2–4 hours (overnight is even better). This allows the biscotti to soften just enough and the flavors to meld beautifully.
Top with crumbled biscotti, orange zest, or a few fresh cranberries. Serve chilled and watch it disappear!
Notes
-
Always bring mascarpone to room temp before whipping — cold cheese = lumps.
-
Zest your orange before juicing — it’s much easier!
-
Chill time is non-negotiable — that’s what transforms biscotti into soft, cake-like layers.
Nutrition
- Calories: 290Ca Per Serving
- Sugar: 16g
- Fat: 18g
- Carbohydrates: 26g
A Quick Note on Nutrition
I’m all about balance here at Feastical. This dessert is a treat, and it’s meant to be enjoyed as part of a celebratory meal! Per serving (assuming this makes about 6 generous portions), you’re looking at approximately: 290 Calories, 18g Fat, 26g Carbs, 16g Sugar, and 4g Protein.
While it’s not a health food, it is noticeably lighter than many traditional holiday desserts. The bright, tart cranberries offer antioxidants, and the portion control of individual glasses can help keep indulgence in check. My philosophy? Savor every delicious bite without guilt!
Final Thoughts from My Kitchen to Yours
Well, friends, there you have it—my secret weapon for a holiday dessert that wows without the weigh-down. This Cranberry Almond Biscotti Tiramisu is more than just a recipe; it’s a reminder that the best food comes from the heart, and sometimes, the happiest accidents lead to the most beloved traditions.
I hope you feel inspired to give this a try. It’s a testament to the fact that you don’t need to be a professional pastry chef to create something truly special. You just need a few good ingredients, a little bit of time, and a whole lot of love. If you make it, I’d be absolutely thrilled to see your creation! Tag me on social @Feastical or leave a comment on the blog. Now, go forth and create something delicious!
With a full heart and an empty mixing bowl,

Homemade Peanut Butter Meltaways
The Ultimate Little Treat: Homemade Peanut Butter Meltaways
Hey friends, Beau here! Let’s talk about one of life’s simple, perfect pleasures. You know the one—that little piece of candy that makes you close your eyes for a second just to fully appreciate the moment. It’s not fussy. It doesn’t need a fancy wrapper. It just needs to be creamy, dreamy, and melt-in-your-mouth delicious. That, my friends, is the magic of a Peanut Butter Meltaway.
If you’ve never made candy at home before, you might be thinking, “Beau, that sounds complicated.” I’m here to tell you, with a warm hug of reassurance, that it is anything but. We’re talking three ingredients, zero baking, and about 15 minutes of active kitchen time. The result? A treat so good, people will swear you have a secret candy-making diploma hidden in your apron pocket.
These little gems are my go-to for so many occasions. Last-minute holiday gifting? Check. A sweet surprise for the kids’ teachers? Absolutely. A “just because” moment of kindness for a neighbor who’s had a tough week? You bet. Or, and this is my favorite reason, a little something stashed in the fridge for when that 3 pm sweet tooth comes knocking. They’re the edible equivalent of a comfort blanket—familiar, satisfying, and always there when you need them.
So, are you ready to create some sweet magic? Grab your favorite mixing bowl, and let’s whip up a batch of happiness together. I promise, it’s going to be easy, fun, and incredibly rewarding.
A Sweet Memory: Where My Love for Meltaways Began
My obsession with these candies goes way back. Picture a much younger Beau, spending a rainy Saturday at my grandma’s house. The air was always thick with the smell of something wonderful—sometimes it was a simmering pot roast, other times it was a fresh-baked pie. But on the best days, it was the rich, sweet scent of melting chocolate wafting from her tiny, wonderfully cluttered kitchen.
She’d have her big yellow melamine bowl set up over a pot of simmering water, a ritual that felt almost mystical to me. She wasn’t making anything elaborate; it was usually just chocolate and peanut butter. But the way she’d carefully stir, then pour the glossy mixture into her old metal ice cube trays, felt like alchemy. The hardest part was the wait while they set up in the fridge. I’d press my nose against the cool glass, willing them to harden faster.
That first bite was pure bliss. The chocolate shell would give way to a filling so smooth it practically dissolved on my tongue. It wasn’t just about the sugar; it was about the love and the simple joy of creating something from scratch. That’s the feeling I want to bring to you with this recipe. It’s more than a candy; it’s a little edible memory, and now you get to make your own.
Gathering Your Sweet Squad: The Ingredients
See? I told you it was simple. Just three powerhouse ingredients are all you need to create candy counter magic. But as with any simple recipe, the quality of your ingredients really shines through. Here’s the lowdown on what you’ll need and why each one matters.
- 1.5 pounds Milk Chocolate: This is your flavor base. I recommend using good-quality chocolate bars or melting wafers from the baking aisle. They’re specifically formulated to melt smoothly and set up with a nice snap. Chef’s Insight: If you’re a dark chocolate fan, feel free to swap this out! A semi-sweet or dark chocolate will create a richer, less sweet meltaway that’s absolutely divine.
- 1.5 pounds White Chocolate: The secret weapon! The white chocolate doesn’t just add sweetness; it creates that signature creamy, meltaway texture that gives these candies their name. Substitution Tip: Make sure you’re using real white chocolate (check for cocoa butter in the ingredients), not white baking chips, which have a different texture and won’t melt as smoothly.
- 1 (16 oz) jar Creamy Peanut Butter: The star of the show! Use a standard, no-stir creamy peanut butter like Jif or Skippy. The oil and consistency in these brands are perfect for this recipe. Heads-up: Avoid natural peanut butters where the oil separates, as they can make the mixture too greasy and prevent it from setting properly.
Let’s Get Making: The Step-by-Step Guide
Okay, team! It’s go-time. This process is so straightforward, but I’ve packed in a few of my favorite chef hacks to make it even smoother. Read through the steps once before you start, and you’ll be a candy-making pro in no time.
Step 1: The Melting Pot (or Bowl!)
In a large, heatproof bowl, combine your milk chocolate and white chocolate. Now, for melting, you have two great options. The double boiler method is my grandma’s way: place the bowl over a pot of gently simmering water, making sure the bottom of the bowl doesn’t touch the water. Stir continuously until smooth. This gives you the most control. The microwave method is faster: heat the chocolate in 30-second intervals on medium power, stirring vigorously between each blast. Little Chef Hack: Whether you use the microwave or stovetop, the golden rule is low and slow. Burnt chocolate is bitter and grainy, and we don’t want that! Patience is your best friend here.
Step 2: The Peanut Butter Swirl
Once your chocolate mixture is completely smooth and glossy, take it off the heat. Now, dump in that entire jar of creamy peanut butter. Stir, stir, stir! You want to mix until everything is fully combined into one gloriously homogenous, peanut-buttery-chocolatey dream. Pro Tip: If your peanut butter was stored in a cool pantry, warming it in the microwave for 15-20 seconds before adding can help it incorporate more easily.
Step 3: The Pour (This is Where the Magic Happens)
Here’s my favorite trick for neat, professional-looking candies: transfer your mixture to a squeeze bottle. It makes filling the molds absolutely mess-free and gives you so much control. No squeeze bottle? No problem! You can carefully spoon the mixture into the molds, or even use a zip-top bag with a corner snipped off. Heads-up: Work relatively quickly here, as the mixture will start to thicken as it cools. Silicone candy molds are a must—they’re flexible, making it a breeze to pop the finished candies out.
Step 4: The Big Chill
Once your molds are filled, gently tap them on the countertop to release any air bubbles. Then, pop the whole tray into the freezer. We’re using the freezer instead of the fridge because it sets them up super fast—in just 5 to 10 minutes! This quick chill gives them that perfect, melt-in-your-mouth texture.
Step 5: The Grand Finale
After their quick freeze, the candies should be firm to the touch. Now for the satisfying part! Flex the silicone mold backwards, and the meltaways should just pop right out. It’s so gratifying! Transfer them to an airtight container or a cute holiday tin if you’re gifting them. Store them in the refrigerator until you’re ready to serve.
Sharing the Sweetness: How to Serve Your Masterpiece
You’ve done it! You’ve created a batch of pure joy. Now, how do you present these little beauties? For everyday enjoyment, a simple plate piled high is all you need. For something extra special, here are a few ideas:
Gifting with Heart: Layer them in a clear cellophane bag tied with a rustic ribbon for a homemade touch. Or, pack them into a decorative tin—it’s reusable, which makes the gift that much sweeter. Add a little handwritten tag that says “Homemade Peanut Butter Meltaways” and you’ve got a gift anyone would adore.
The Perfect Platter: Create a candy board! Arrange your meltaways alongside other simple treats like pretzels, dried fruit, and a few different types of store-bought chocolates. It’s an instant party starter that looks incredibly impressive but took you almost no time at all.
After-Dinner Delight: Serve a couple of meltaways with coffee after a dinner party. It’s the perfect little sweet bite to end the meal on a high note without being too heavy.
Mix It Up! Fun Flavor Twists
Once you’ve mastered the classic, the kitchen playground opens up! Here are a few of my favorite ways to put a spin on these meltaways. Don’t be afraid to get creative!
- The Nutty Professor: Swap the creamy peanut butter for crunchy peanut butter for a delightful texture. Or, go wild and use almond butter or cashew butter for a totally different flavor profile!
- Salted Caramel Swirl: Before pouring the mixture into the molds, swirl in a tablespoon or two of thick salted caramel sauce. You’ll get gorgeous ribbons of caramel running through each piece.
- Cookie Crunch: Stir in ½ cup of crushed graham crackers or sandwich cookies (like Oreos) into the chocolate-peanut butter mixture for a fun, crunchy surprise.
- Dark Chocolate Decadence: As I mentioned earlier, use all dark chocolate instead of the milk/white combo for a richer, more sophisticated treat that’s a little less sweet.
- Festive Sprinkle: Immediately after filling the molds, sprinkle the tops with a pinch of flaky sea salt, colorful sprinkles, or even crushed peanuts for a pretty finish.
Beau’s Kitchen Notes & Stories
This recipe has been a constant in my life, but it’s definitely evolved. I remember one holiday season, in a fit of “creative” ambition, I decided to add a splash of peppermint extract. Let’s just say my family was… divided. It tasted like a peanut butter toothpaste candy! We still laugh about it. The lesson? Stick with classic pairings, or test your wild ideas on a very small batch first!
Over the years, I’ve found that the squeeze bottle was a total game-changer. The first time I made these, I used a spoon and let me tell you, my countertops looked like a chocolate crime scene. The other key evolution was realizing the freezer is your best friend for a quick set. This recipe is foolproof, but little hacks like these make it even more enjoyable. The goal is to have fun in the kitchen, not to create a huge cleanup project!
Your Questions, Answered!
I’ve made these more times than I can count, and I’ve heard all the questions. Here are the answers to the most common ones.
Q: My chocolate seized up and became grainy! What happened?
A: Ah, the dreaded seize! This usually happens if a tiny bit of steam or water gets into the chocolate while melting. Chocolate is finicky that way. To fix it, you can try stirring in a teaspoon of neutral oil (like vegetable or coconut oil) at a time until it smooths out again. Prevention is key: make sure all your equipment is completely dry.
Q: Can I use natural peanut butter?
A: I don’t recommend it for this specific recipe. Natural peanut butters have a different oil content and consistency, which can prevent the candies from setting firmly. They might end up too soft or oily. For guaranteed success, stick with a conventional, stabilized creamy peanut butter.
Q: How long do these stay fresh?
A: Stored in an airtight container in the refrigerator, they’ll stay perfect for up to 2 weeks. You can also freeze them for up to 3 months! Just layer them between parchment paper in a freezer-safe container. Thaw in the fridge before serving.
Q: I don’t have candy molds. What can I use instead?
A> No worries! You can pour the mixture into a parchment-lined 8×8 inch baking pan. Once it’s set, simply lift it out using the parchment paper and cut it into small squares with a sharp knife.

Homemade Peanut Butter Meltaways
Description
Sometimes, the simplest pleasures are the sweetest. These creamy, dreamy Peanut Butter Meltaways are melt-in-your-mouth candies that require just three ingredients, zero baking, and about 15 minutes of active prep. Perfect for gifting, sharing, or keeping a secret stash for yourself!
Ingredients
-
1.5 pounds milk chocolate (bars or melting wafers)
-
1.5 pounds white chocolate (real white chocolate with cocoa butter)
-
1 (16 oz) jar creamy peanut butter (no-stir preferred)
Optional toppings: flaky sea salt, sprinkles, or crushed nuts
Instructions
1. Melt the Chocolate
-
Combine milk and white chocolate in a heatproof bowl.
-
Double boiler method: Place the bowl over simmering water (bottom of bowl not touching water). Stir until smooth.
-
Microwave method: Heat in 30-second intervals on medium power, stirring between each interval.
Tip: Keep heat low to prevent burning; patience is key.
2. Add Peanut Butter
-
Remove from heat. Add the entire jar of peanut butter and stir until fully combined into a smooth, glossy mixture.
-
Pro Tip: Warm peanut butter for 15–20 seconds in the microwave if it’s very firm.
3. Fill Molds
-
Transfer mixture to a squeeze bottle for easy, mess-free filling.
-
Fill silicone candy molds, or use a zip-top bag with a corner snipped off.
-
Tap molds gently to release air bubbles.
4. Chill Quickly
-
Place molds in the freezer for 5–10 minutes to set the candies.
5. Remove and Store
-
Flex silicone molds to pop out candies.
-
Store in an airtight container in the refrigerator until ready to serve.
Alternative: Pour mixture into a parchment-lined 8×8 pan, chill, and cut into squares.
Notes
-
Chocolate Seizing: If chocolate becomes grainy, stir in a teaspoon of neutral oil at a time until smooth. Ensure all equipment is dry.
-
Natural Peanut Butter: Avoid for this recipe; it may prevent proper setting.
-
Storage: Keeps in the fridge for up to 2 weeks or freezer for 3 months (layer between parchment).
-
Mix-Ins: Try crunchy peanut butter, caramel swirls, crushed cookies, or festive sprinkles for variety.
Nutrition
- Calories: 80 Cal per Piece
- Sugar: 6g
- Fat: 6g
- Carbohydrates: 8g
- Fiber: 1g
A Quick Note on Nutrition
Let’s be real—these are a treat, and that’s exactly what they’re meant to be! While they’re not a health food, it’s always helpful to know what you’re enjoying. The nutritional info below is an estimate per piece, assuming you get about 100 candies from the batch. Remember, these are small, rich, and satisfying, so a little goes a long way!
Prep Time: 15 minutes | Chill Time: 10 minutes | Total Time: ~25 minutes
Yield: ~100 mini meltaways (depending on mold size)
Per Piece (approximate):
Calories: 80 | Fat: 6g | Sugar: 6g | Carbs: 8g | Protein: 1g
Final Thoughts from My Kitchen to Yours
Well, there you have it. The secret to creating the easiest, most impressive little candy you’ll ever make. I hope this recipe brings as much joy to your kitchen as it has to mine over the years. It’s a reminder that the best food doesn’t have to be complicated. It’s about the love you put in and the smiles you create.
So, what are you waiting for? Go grab those three ingredients and make someone’s day. Maybe that someone is you—you deserve a sweet moment, too. If you make them, I’d love to see your creations! Tag me on social @Feastical so I can share in the fun.
Until next time, happy cooking, and remember—food should always taste like a warm hug.