
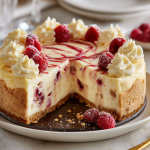
White Chocolate Raspberry Cheesecake
Your New Favorite Dessert is Here: White Chocolate Raspberry Cheesecake
Hey friends, Beau from Feastical here! Let’s talk about a dessert that feels like a celebration in every single bite. We’re diving fork-first into the world of my legendary White Chocolate Raspberry Cheesecake. Now, I know what you might be thinking: “Beau, cheesecake can be intimidating!” But trust me, we’re going to walk through this together, step-by-step, and I promise you’ll end up with a show-stopping masterpiece that’s as fun to make as it is to devour.
This isn’t just any cheesecake. This is a symphony of textures and flavors. Imagine a buttery, crumbly crust that gives way to an impossibly silky, rich filling infused with sweet, creamy white chocolate. Woven through it all are vibrant, tangy ribbons of raspberry swirl that cut through the richness perfectly. It’s elegant enough for a holiday table, special enough for a birthday, and honestly, just perfect for a Tuesday when you need a little extra joy.
So, tie on your favorite apron, clear some counter space, and let’s create some magic. This recipe is my love letter to desserts that look fancy but are built on simple, feel-good techniques. Get ready to fall in love with baking all over again!
The Cheesecake That Started It All
This recipe takes me right back to my grandma’s kitchen, a place that always smelled like sugar and sunshine. She was the queen of “a little of this, a little of that” cooking, but her cheesecake was a sacred, written-in-pen recipe. One summer, I was determined to learn it. I was about fourteen, feeling mighty confident with a whisk, and I decided to “improve” her classic New York-style by adding the white chocolate and raspberry she loved in her thumbprint cookies.
The first attempt was… a learning experience. Let’s just say I learned the hard way that “softened” cream cheese doesn’t mean “melted in the microwave.” We ended up with a lumpy, grainy filling that made us both laugh until we cried. But Grandma, in her infinite wisdom, just patted my shoulder and said, “Beau, the best recipes are born from happy mistakes. Let’s try again, together.” That second try, watching the beautiful pink swirls marble into the creamy white batter, was pure magic. It’s that spirit of joy, experimentation, and togetherness that I’ve baked into this very recipe for you.
Gathering Your Cheesecake Dream Team
Here’s everything you’ll need to create this masterpiece. I’ve included some of my favorite chef insights and substitution tips to make this recipe your own. Remember, quality ingredients make a happy cheesecake!
For the Buttery Crust:
- 1½ cups graham cracker or vanilla wafer crumbs: Graham crackers give you that classic, slightly honeyed flavor, while vanilla wafers create a sweeter, more cookie-like base. You can’t go wrong! I often use a food processor to crush them, but a zip-top bag and a rolling pin work great for a little stress relief.
- ¼ cup granulated sugar: This sweetens the crust and helps it crisp up beautifully.
- 6 tbsp melted butter: The glue that holds our crust together! Use unsalted butter so you control the salt level. For a deeper flavor, try browning the butter first—it adds a incredible nutty note.
For the Silky White Chocolate Filling:
- 3 (8 oz) blocks full-fat cream cheese, softened: This is non-negotiable, friends. Full-fat gives you that luxuriously creamy texture. And softened is the secret word! Leave it on the counter for a few hours until it’s room temperature and pliable. This prevents a lumpy batter.
- ¾ cup granulated sugar: The perfect amount to sweeten without overpowering the white chocolate.
- 3 large eggs, at room temperature: Room temp eggs incorporate more smoothly, giving you a seamless, velvety filling. Add them one at a time, just like we’ll talk about in the steps.
- 8 oz quality white chocolate, melted and slightly cooled: Don’t use white chocolate chips here—they often contain stabilizers that don’t melt as smoothly. Look for a baking bar. We’ll melt it gently to avoid seizing.
- ½ cup full-fat sour cream: This is my secret weapon! It adds a subtle tang and incredible moisture, making the cheesecake even creamier.
- 1 tsp pure vanilla extract: The flavor backbone. It enhances both the chocolate and the berry notes beautifully.
For the Vibrant Raspberry Swirl:
- ½ cup raspberry preserves or seedless raspberry sauce: Using seedless preserves gives you a super smooth, beautiful swirl. If you love the texture of seeds, go for it! You can also blend fresh raspberries with a little sugar and strain them for a from-scratch sauce.
Let’s Build This Beautiful Beast: Step-by-Step
Okay, team. This is where the fun begins. Read through all the steps once before you start, and remember: patience is your best friend in the cheesecake game. We’re not rushing; we’re creating.
- Preheat and Prep: Fire up your oven to 325°F (165°C). Grab your trusty 9-inch springform pan. Pro Chef Hack: For extra insurance against sticking, take a small piece of butter and lightly grease the bottom and sides of the pan before you add the crust. It’s a little trick that makes release day a breeze.
- Create the Crust: In a medium bowl, stir together your graham cracker crumbs and sugar. Pour in the melted butter and mix until the mixture resembles wet sand and holds together when you pinch it. Dump it into your prepared pan and press it firmly and evenly into the bottom and about halfway up the sides. I like to use the bottom of a measuring cup to really tamp it down flat. Bake this for 10 minutes, then let it cool on a rack while you make the filling. This quick pre-bake sets the crust and prevents sogginess!
- Conquer the Filling: In the bowl of a stand mixer fitted with the paddle attachment (or a large bowl with a hand mixer), beat the softened cream cheese and sugar on medium-low speed until it is completely smooth, creamy, and free of lumps. This is crucial: Scrape down the bowl and beater several times to ensure no hidden lumps are lurking. Now, with the mixer on low, add the eggs one at a time, mixing until just incorporated after each addition. Overmixing at this stage incorporates too much air and can cause cracking! Finally, mix in the slightly cooled melted white chocolate, followed by the sour cream and vanilla extract. Mix until the batter is a beautiful, uniform, creamy dream. Remember, low and slow wins the race.
- The Grand Swirl: Pour your gorgeous filling into the cooled crust and smooth the top with a spatula. Now, for the art project! Drop small spoonfuls of the raspberry preserves randomly over the top of the filling. Take a thin knife or a wooden skewer and gently drag it through the raspberry dollops and the cheesecake batter beneath, creating beautiful marbled patterns. Don’t over-swirl, or the colors will muddle! A few elegant passes are all you need.
- The Perfect Bake: Place the cheesecake in the preheated oven and bake for 55-65 minutes. You’re looking for the edges to be puffed and set, while the center—about a 3-inch circle—still has a distinct jiggle when you gently shake the pan. It will look underdone, but I promise, it’s perfect. This residual heat will continue to cook the center as it cools. Another Pro Hack: For the ultimate creamy texture and to prevent cracks, place a pan of hot water on the rack below the cheesecake. The steam creates a gentle, even heat.
- The All-Important Cool Down: Once baked, turn off the oven, crack the door open slightly, and let the cheesecake cool inside for about an hour. This gradual temperature change is the #1 defense against the dreaded cheesecake crack! After that, transfer it to a wire rack to cool completely to room temperature. Then, and only then, cover it and move it to the refrigerator to chill for at least 4 hours, but preferably overnight. This patience-testing step is what gives you that perfect, sliceable, firm-yet-creamy texture.
How to Serve This Stunning Dessert
The moment of truth! When you’re ready to serve, run a thin, sharp knife under hot water, wipe it dry, and gently slide it around the edge of the springform pan before releasing the clamp. This ensures a clean, beautiful release.
For the final flourish, I love to top the whole cheesecake with a pile of fresh, vibrant raspberries right in the center. You can also dust the edges with a little powdered sugar for a snowy effect or drizzle with a bit of extra melted white chocolate.
When slicing, remember the hot knife trick! Dip your sharp knife in hot water and wipe it clean between each cut. This gives you those pristine, restaurant-quality slices that show off your beautiful swirls. Serve it on its own for pure decadence, or with a little dollop of freshly whipped cream on the side. It’s a showstopper no matter what!
Make It Your Own: Delicious Twists & Swaps
One of the best things about this recipe is its versatility. Feel like playing? Here are some of my favorite ways to mix it up:
- Chocolate Lover’s Dream: Swap the graham cracker crust for a chocolate wafer crust. You can even fold in a handful of mini dark chocolate chips into the batter for a double-chocolate experience.
- Triple Berry Blast: Use a mix of raspberry, blackberry, and strawberry preserves for your swirl. The mix of berry flavors is absolutely incredible.
- Lemon Raspberry Brightness: Add the zest of one lemon to the cheesecake filling. The bright, citrusy notes make the raspberry and white chocolate absolutely sing.
- Boozy & Bold: For a grown-up version, stir one tablespoon of Chambord (raspberry liqueur) or a good quality vanilla vodka into the raspberry preserves before swirling.
- Gluten-Free Friendly: Use certified gluten-free graham crackers for the crust, and you’re all set! The filling is naturally gluten-free.
Beau’s Chef’s Notes & Kitchen Confessions
This recipe has been my go-to for years, and it’s evolved with every bake. I used to be so terrified of cracks that I’d barely breathe near the oven! But I’ve learned that even if a small crack appears (and they sometimes do!), it’s nothing a pile of fresh berries or a whipped cream topping can’t hide. The flavor is always 100% phenomenal.
My biggest lesson? The overnight chill is not a suggestion—it’s a commandment. The flavors meld and deepen, and the texture becomes absolute perfection. It’s a dessert that rewards planning. And hey, if you’re like me and sometimes forget to soften the cream cheese, you can *gently* warm it in the microwave in 15-second bursts on low power. Just watch it like a hawk!
Your Cheesecake Questions, Answered!
Over the years, I’ve gotten a lot of questions about this recipe. Here are the ones I see most often!
Q: My cheesecake cracked! What did I do wrong?
A: First, don’t panic! It still tastes amazing. Cracks usually happen from a sudden temperature change or overbaking. Next time, make sure you’re using the water bath method (even just a pan of water on a lower rack helps) and that you’re cooling it gradually in the turned-off oven with the door cracked. Remember, the center should still be jiggly!
Q: Can I use frozen raspberries instead of preserves?
A: You can! Thaw about 1 cup of frozen raspberries, then blend and strain them to remove the seeds. Simmer the puree in a small saucepan with a tablespoon of sugar until it thickens slightly (like a thin sauce). Let it cool completely before using it for the swirl.
Q: Why is my filling lumpy?
A: This almost always traces back to the cream cheese not being soft enough. Room temperature is key! Also, make sure you’re beating the cream cheese and sugar until it’s perfectly smooth before adding the other ingredients.
Q: How long will this keep in the fridge?
A: Tightly covered, this cheesecake is happy in the fridge for up to 5 days. It also freezes beautifully for up to 3 months. Thaw it overnight in the refrigerator before serving.
White Chocolate Raspberry Cheesecake
Description
Hey friends, Beau from Feastical here! This cheesecake is a showstopper: buttery crust, silky white chocolate filling, and vibrant raspberry swirls that cut through the richness perfectly. Elegant enough for holidays, birthdays, or just a Tuesday treat, it’s built on simple, feel-good techniques that anyone can master.
Ingredients
For the Crust:
-
1½ cups graham cracker or vanilla wafer crumbs
-
¼ cup granulated sugar
-
6 tbsp unsalted butter, melted
For the White Chocolate Filling:
-
3 (8 oz) blocks full-fat cream cheese, softened
-
¾ cup granulated sugar
-
3 large eggs, room temperature
-
8 oz white chocolate, melted and slightly cooled
-
½ cup full-fat sour cream
-
1 tsp vanilla extract
For the Raspberry Swirl:
-
½ cup raspberry preserves or seedless raspberry sauce
Optional Garnish:
-
Fresh raspberries
-
Powdered sugar
-
Drizzle of melted white chocolate
Instructions
1. Prep & Crust
-
Preheat oven to 325°F (165°C).
-
Grease a 9-inch springform pan lightly with butter.
-
Mix crumbs and sugar; stir in melted butter until wet sand-like. Press into the bottom and halfway up the sides.
-
Bake 10 minutes; let cool while preparing filling.
2. Make Filling
-
Beat cream cheese and sugar until smooth.
-
Add eggs one at a time, mixing slowly.
-
Mix in melted white chocolate, sour cream, and vanilla until smooth.
3. Add Raspberry Swirl
-
Pour filling over cooled crust.
-
Drop spoonfuls of raspberry preserves on top and gently swirl with a knife or skewer.
4. Bake Cheesecake
-
Bake 55–65 minutes: edges set, center slightly jiggly.
-
Optional: place a pan of hot water on a lower rack for gentle baking.
5. Cool & Chill
-
Let cool in oven with door cracked for 1 hour.
-
Transfer to wire rack to reach room temperature.
-
Refrigerate at least 4 hours or overnight.
6. Serve
-
Run a hot, clean knife around the edges before removing the springform.
-
Garnish with fresh raspberries, powdered sugar, or extra melted white chocolate.
-
Slice with a hot knife for perfect, clean pieces.
Notes
-
Chocolate Lovers: Use chocolate wafer crust or fold in mini dark chocolate chips.
-
Triple Berry: Swap or mix preserves: raspberry, strawberry, and blackberry.
-
Lemon Twist: Add zest of 1 lemon to filling for bright citrus notes.
-
Boozy: Stir 1 tbsp Chambord or vanilla vodka into raspberry preserves.
-
Gluten-Free: Use certified gluten-free graham crackers.
-
Prevent Cracks: Use a water bath and allow gradual cooling.
Nutrition
- Calories: 420Cal Per slice
- Fat: 28g
- Carbohydrates: 35g
- Protein: 6g
Nutritional Info (Because Balance is Key!)
Now, let’s be real—this is a decadent, special-occasion dessert. But I believe in knowing what you’re eating, so you can enjoy every single bite mindfully. The following is an estimate per slice (based on 12 servings):
- Calories: ~420
- Fat: 28g
- Protein: 6g
- Carbohydrates: 35g
This cheesecake is rich in calcium from the dairy and provides a good amount of energy, making it a truly satisfying treat. It’s all about savoring a slice, not devouring the whole thing (as tempting as that may be!). Pair it with a cup of black coffee or a glass of cold milk for the ultimate experience.
Final Thoughts from My Kitchen to Yours
Well, there you have it, my friends—my heart and soul in cheesecake form. This White Chocolate Raspberry Cheesecake is more than just a recipe; it’s a project filled with love, a little bit of science, and a whole lot of delicious reward. It’s the dessert you make when you want to say “I love you,” “Congratulations,” or simply “You are worth the effort.”
I hope you feel inspired, empowered, and excited to give it a try. Remember, cooking is an adventure, and the kitchen is your playground. If you make it, I’d be absolutely thrilled to see your creation! Tag me @Feastical on social media so I can cheer you on.
Until next time, keep your kitchen messy and your heart full.
Cranberry Orange Trifle
Cranberry Orange Trifle: The No-Fuss Dessert That Steals the Holiday Show
Hey friends, Beau here from Feastical! Can you smell it? That’s the smell of the holidays rolling in—pine needles, cinnamon sticks, and the sweet, sweet promise of dessert. And let’s be real, the dessert table is the main event, isn’t it? You want something that looks like a million bucks but doesn’t require a culinary degree and a week of your life to make. You want a dessert that makes people’s eyes light up when you carry it to the table.
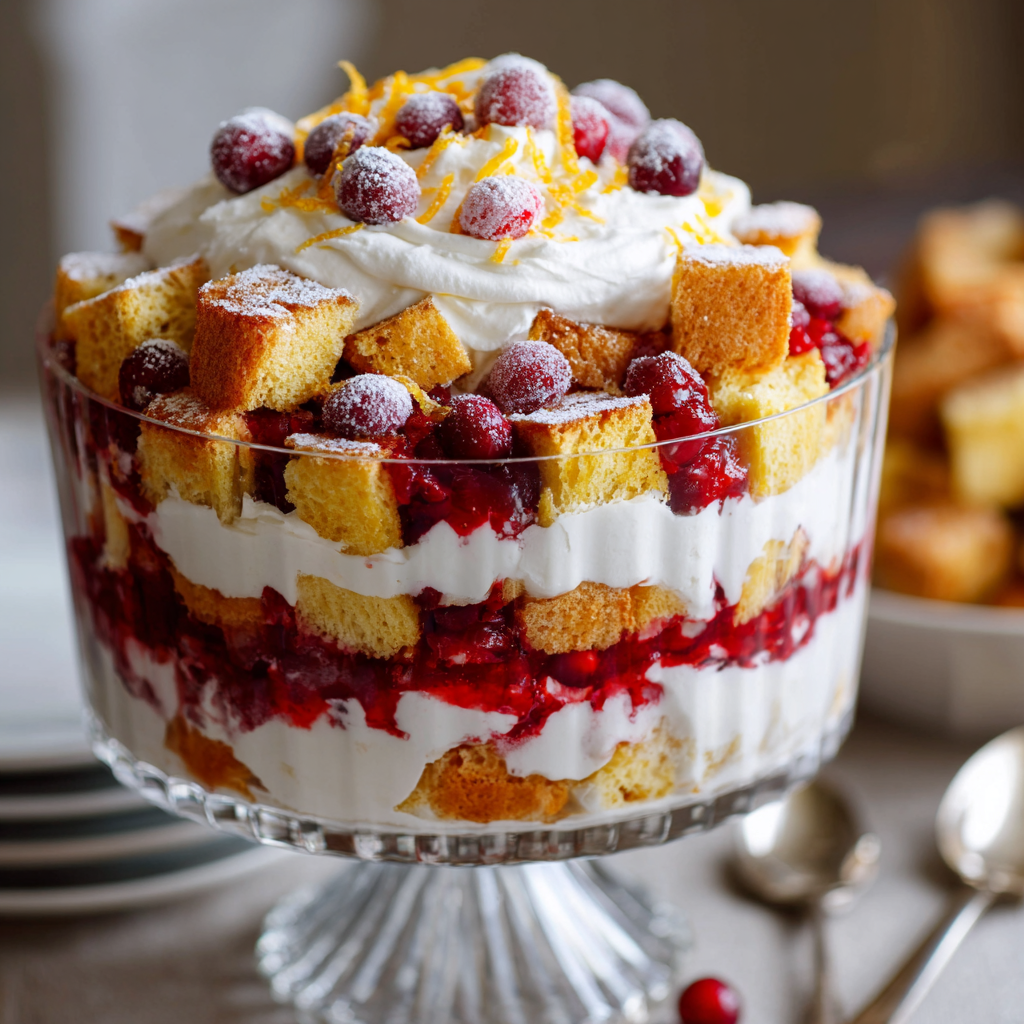
Well, my foodie friend, I’ve got your secret weapon right here: the Cranberry Orange Trifle. This beauty is a symphony of flavors and textures. We’re talking tender, zesty orange cake, a tart and vibrant cranberry sauce, and clouds of the fluffiest, slightly sweetened whipped cream. Each spoonful is a perfect bite—a little sweet, a little tangy, and 100% comforting.
The best part? It’s literally layers of simple components stacked together in a gorgeous dish. No fancy pastry skills required. If you can whip cream and spread layers, you are a trifle-making superstar. So, let’s ditch the stress and create a dessert that’s not just a treat for the taste buds, but a total showstopper for the eyes, too. Grab your favorite trifle bowl (or a big glass one—we’re not picky!), and let’s get layering!
The Trifle That Started It All
This recipe takes me right back to my Nana’s kitchen, a place that always smelled of citrus and nutmeg. One particularly chaotic Christmas Eve, she was so busy with the main feast she completely forgot about dessert. Panic set in for a hot minute until she looked at the leftover orange loaf cake from breakfast and a jar of cranberry sauce in the pantry. With a wink, she said, “Watch this, Beau.”
She cubed that cake, whipped some cream, and started layering everything in her big, clouded glass bowl. In less than 15 minutes, she created what looked like the most elegant, intentional dessert I’d ever seen. When she served it, my aunts and uncles raved, convinced she’d slaved over it for hours. She just smiled, and I learned a powerful lesson that day: the best recipes often come from a little bit of love and a whole lot of smart, simple thinking. This trifle is my homage to her—a little bit of magic made from simple, beautiful things.
Gathering Your Trifle Trio
This recipe is all about the harmony of three main components. Don’t be intimidated by the list; most of it is probably already in your kitchen! Here’s what you’ll need and my little chef insights for each.
- 1 Orange Pound Cake or Loaf Cake (cubed): You can absolutely use a high-quality store-bought cake here—no judgment! It’s a huge time-saver. If you’re feeling ambitious, my homemade orange pound cake adds an extra-special touch. The key is a cake that’s sturdy enough to hold up to the juicy layers without turning to mush.
- 2 cups Cranberry Sauce (whole berry works best): The tart superstar! I love using a whole-berry sauce for those little bursts of flavor. Homemade is fantastic, but a good-quality jarred sauce works beautifully in a pinch. The tanginess is crucial for cutting through the richness of the cream.
- 2 cups Heavy Whipping Cream: Make sure it’s heavy whipping cream and it’s very cold. This is non-negotiable for getting those perfect, fluffy peaks. I sometimes pop my bowl and beaters in the freezer for 10 minutes before I start.
- ¼ cup Powdered Sugar: We’re using powdered instead of granulated sugar because it dissolves instantly, giving us a silky-smooth whipped cream without any graininess.
- 1 tsp Vanilla Extract: A splash of pure vanilla adds a warm, cozy depth to the cream. It’s the secret handshake that makes it taste truly homemade.
- Optional Garnishes: Orange Zest & Sugared Cranberries: These are your “wow” factors. A little bright orange zest on top adds a pop of color and fragrance, and sugared cranberries look like edible jewels. They’re easier to make than they look, I promise!
Let’s Build Some Delicious Layers!
Okay, the fun part! We’re going to build this masterpiece step-by-step. Put on some holiday tunes, and let’s get to it.
Step 1: The Cake Prep
First, take your orange cake and cut it into roughly 1-inch cubes. Don’t worry about them being perfect—rustic is charming! Chef’s Hack: If you have a little extra time, spread the cubes on a baking sheet and toast them in a 350°F (175°C) oven for 5-7 minutes. This gives them a slightly crisp exterior that holds up even better against the moist layers, adding a wonderful textural contrast.
Step 2: Whip It Good!
In a large, chilled bowl, pour in your cold heavy whipping cream. Using a hand mixer or a stand mixer with the whisk attachment, start whipping on medium-high speed. Once it starts to thicken slightly (after about a minute), add in the powdered sugar and vanilla extract. Pro Tip: Start slow when you add the sugar or you’ll have a sweet, powdery cloud in your face! Continue whipping until soft peaks form. What’s a soft peak? When you lift the beaters, the cream should form a peak that gently curls over at the top. Be careful not to over-whip, or you’ll start making butter! (Though if you do, just call it a science experiment and start over with new cream.)
Step 3: The Grand Layering Ceremony
Now, grab your trifle dish or individual glass cups. We’re creating layers of joy. Start with a solid base of cake cubes, using about a third of them. Gently press them down just a bit. Next, spoon a third of your cranberry sauce over the cake. Use the back of the spoon to spread it into an even layer, making sure to get some of those beautiful berries right up against the glass for a stunning visual. Now, dollop a third of your whipped cream over the cranberry layer and spread it gently. And that’s your first layer! Repeat the process—cake, cranberry, cream—two more times.
Step 4: The Finishing Flourish
For the top layer, I like to make it all about the cream. Give it a final, beautiful swoop with your spatula. Now, sprinkle that vibrant orange zest over the top and artfully arrange a few sugared cranberries. It instantly looks like it came from a professional bakery.
Step 5: The Patience Game
This might be the hardest step: cover the trifle with plastic wrap and pop it in the fridge for at least one hour, but ideally 2-4. I know, the wait is torture! But this chill time is magical. It allows the cake to soak up all the lovely juices from the cranberry sauce, the flavors to mingle and get to know each other, and the whole structure to set up perfectly for slicing.
How to Serve Your Masterpiece
When it’s finally time to serve, use a large, deep spoon to dig all the way down to the bottom, ensuring you get every single glorious layer in one scoop. I love serving this right from the trifle dish placed in the center of the table—it’s a real conversation starter!
For an extra festive touch, pair each serving with a cup of strong coffee, a hot chocolate with a cinnamon stick, or even a glass of dessert wine like a Moscato d’Asti. The bubbles and lightness are a fantastic contrast to the creamy, rich trifle. If you’re doing individual cups, you can let your guests grab their own, which is perfect for a casual holiday party.
Make It Your Own: Creative Twists
The beauty of a trifle is its versatility. Feel free to play around and make it suit your taste or dietary needs!
- Lemon Blueberry Bliss: Swap the orange cake for lemon pound cake and the cranberry sauce for a thick blueberry compote. It’s like summer in a bowl, even in the dead of winter.
- Chocolate Cherry Cheer: Use chocolate cake cubes and a layer of cherry pie filling. Top with chocolate shavings for an incredibly decadent twist.
- Boozy & Bold: For the adults, you can brush the cake cubes with a little Grand Marnier, Cointreau, or even a sweet sherry before layering. It adds a wonderful warm depth.
- Dairy-Free Dream: Easily make this dairy-free by using chilled coconut cream (the solid part from a can of full-fat coconut milk) whipped with powdered sugar. It’s just as luscious!
- Nutty Crunch: Add a textural surprise by sprinkling a layer of toasted, chopped pecans or walnuts between the cranberry and cream layers.
Beau’s Kitchen Confidential
Over the years, this trifle has been my trusty plus-one to more potlucks than I can count. One time, I was rushing out the door and forgot to add the sugar to the whipped cream. I realized it at the party and, in a moment of panic, I gently folded in a jar of lemon curd I found in the host’s fridge. Guess what? It was a happy accident everyone demanded the recipe for! So don’t be afraid to improvise. The recipe you see here is the classic, but your kitchen, your rules. The trifle is a forgiving friend, not a fussy critic.
Your Trifle Questions, Answered!
Can I make this trifle ahead of time?
Absolutely! In fact, I highly recommend it. You can assemble the entire trifle, cover it tightly, and let it hang out in the fridge for up to 24 hours before serving. The flavors will be even more amazing. Just add any fresh garnishes like orange zest right before you serve.
My whipped cream is runny! What happened?
This usually means one of two things: your cream wasn’t cold enough, or your bowl/beaters were warm. Always start with everything chilled. If it’s a lost cause, you can stabilize it next time by adding a tablespoon of cornstarch or instant pudding mix to the cream while whipping.
What can I use if I don’t have a trifle dish?
No problem! A large glass salad bowl, a pretty soup tureen, or even a clear 9×13 baking dish will work perfectly. For a party, individual parfait glasses or even sturdy mason jars are adorable and portion-controlled.
The bottom layer seems dry. How can I prevent this?
This is a common trifle quirk. To ensure every bite is moist, you can very lightly sprinkle the first layer of cake cubes with a little orange juice or simple syrup before adding the cranberry sauce. It’s a little extra step that guarantees perfection.

Cranberry Orange Trifle
Description
Hey friends, Beau here! The holidays are all about cozy flavors, bright colors, and desserts that wow without the stress. Enter the Cranberry Orange Trifle—layers of tender orange cake, tart cranberry sauce, and fluffy whipped cream that make every bite a holiday hug. It’s easy to assemble, beautiful to serve, and absolutely delicious. Let’s make some magic!
Ingredients
For the Trifle:
-
1 Orange Pound Cake or Loaf Cake, cubed (store-bought works!)
-
2 cups Cranberry Sauce (whole berry recommended)
-
2 cups Heavy Whipping Cream, very cold
-
¼ cup Powdered Sugar
-
1 tsp Vanilla Extract
Optional Garnishes:
-
Orange zest
-
Sugared cranberries
Instructions
1. Prepare the Cake
-
Cube your orange cake into 1-inch pieces. Rustic is perfect!
-
Tip: Toast the cubes at 350°F (175°C) for 5-7 minutes for a slight crisp that holds up against the juicy layers.
2. Whip the Cream
-
In a chilled bowl, whip the cold heavy cream.
-
When slightly thickened, add powdered sugar and vanilla extract.
-
Continue until soft peaks form (gently curling over).
-
Tip: Don’t over-whip, or it’ll turn to butter.
3. Layer the Trifle
-
In a trifle dish or glass cups, start with 1/3 of the cake cubes. Press gently.
-
Add 1/3 of cranberry sauce, spreading evenly.
-
Top with 1/3 of whipped cream.
-
Repeat two more times until all layers are used.
4. Garnish & Chill
-
Finish with a smooth layer of whipped cream.
-
Sprinkle orange zest and arrange sugared cranberries on top.
-
Cover and refrigerate 1–4 hours for flavors to meld.
5. Serve
-
Use a deep spoon to scoop all layers.
-
Pair with coffee, hot chocolate, or dessert wine for a festive touch.
Notes
-
Make ahead: Assemble up to 24 hours in advance. Add fresh garnish just before serving.
-
Keep cream stable: Ensure cream and tools are very cold; add cornstarch or instant pudding if needed.
-
No trifle dish? Large glass bowl, clear 9×13 dish, or individual mason jars work.
-
Extra moist layers: Lightly drizzle cake with orange juice or simple syrup before layering.
-
Flavor twists: Lemon cake & blueberry sauce, chocolate cake & cherry filling, or boozy versions with Grand Marnier.
Nutrition
- Calories: 280 Cal Per Serving
- Fat: 15g
- Saturated Fat: 9g
- Carbohydrates: 32g
- Fiber: 1g
Nutritional Info (Because We’re All Friends Here)
Let’s keep it real—this is a celebratory dessert, and it’s meant to be enjoyed! But I know many of you like to plan, so here’s a general breakdown per serving (assuming 8 servings). Remember, these are estimates and can vary based on your specific ingredients.
Per Serving: Approximately 280 calories, 15g fat (9g saturated), 32g carbohydrates, 1g fiber, 22g sugar, 3g protein.
To lighten it up a bit, you can use a reduced-fat pound cake and swap the heavy cream for a lighter whipping cream (just check that it has enough fat to whip properly). You can also reduce the powdered sugar in the whipped cream by a tablespoon or two. But my philosophy? Enjoy the real deal during the holidays, savor every bite, and get back to your routine tomorrow.
Your New Holiday Tradition
And there you have it! The Cranberry Orange Trifle in all its layered glory. This recipe is more than just a dessert; it’s a reminder that the best holiday memories are often made from simple, joyful moments in the kitchen. It’s about creating something beautiful and delicious that brings everyone together around the table.
I hope this recipe becomes a star on your holiday table and a tradition in your home, just like it is in mine. If you make it (and I really hope you do!), tag me on social @feastical with #FeasticalHolidays so I can see your beautiful creations! Now, go forth and trifle. You’ve got this.
Final Thoughts: You’ve Got This!
So there you have it, my friend—the not-so-secret secret to a stress-free, showstopping holiday dessert. This Cranberry Orange Trifle is more than just a recipe; it’s a reminder that the most memorable moments often come from simplicity, a little bit of love, and a willingness to embrace a happy accident or two.
You don’t need to be a pastry chef to create something truly beautiful and delicious. All you need is a few simple components, a gorgeous bowl, and the confidence to stack them high. This trifle is your canvas. It’s forgiving, flexible, and guaranteed to bring a little bit of “wow” to your table.
So, as the holiday chaos swirls around you, let this be your moment of calm, creative joy. Channel your inner Nana, put on those holiday tunes, and build something delicious. I have no doubt it will be the star of the show.
Roasted Carrots with Honey & Pistachios
Your New Go-To Side Dish is Sweet, Savory, and Seriously Simple
Hey friends, Beau here! Welcome back to the Feastical kitchen. You know that feeling when you need a side dish that’s going to do a little more than just sit there on the plate? Something that’s going to turn heads, start conversations, and maybe even steal a little thunder from the main course? I’m talking about a sidekick with star power.
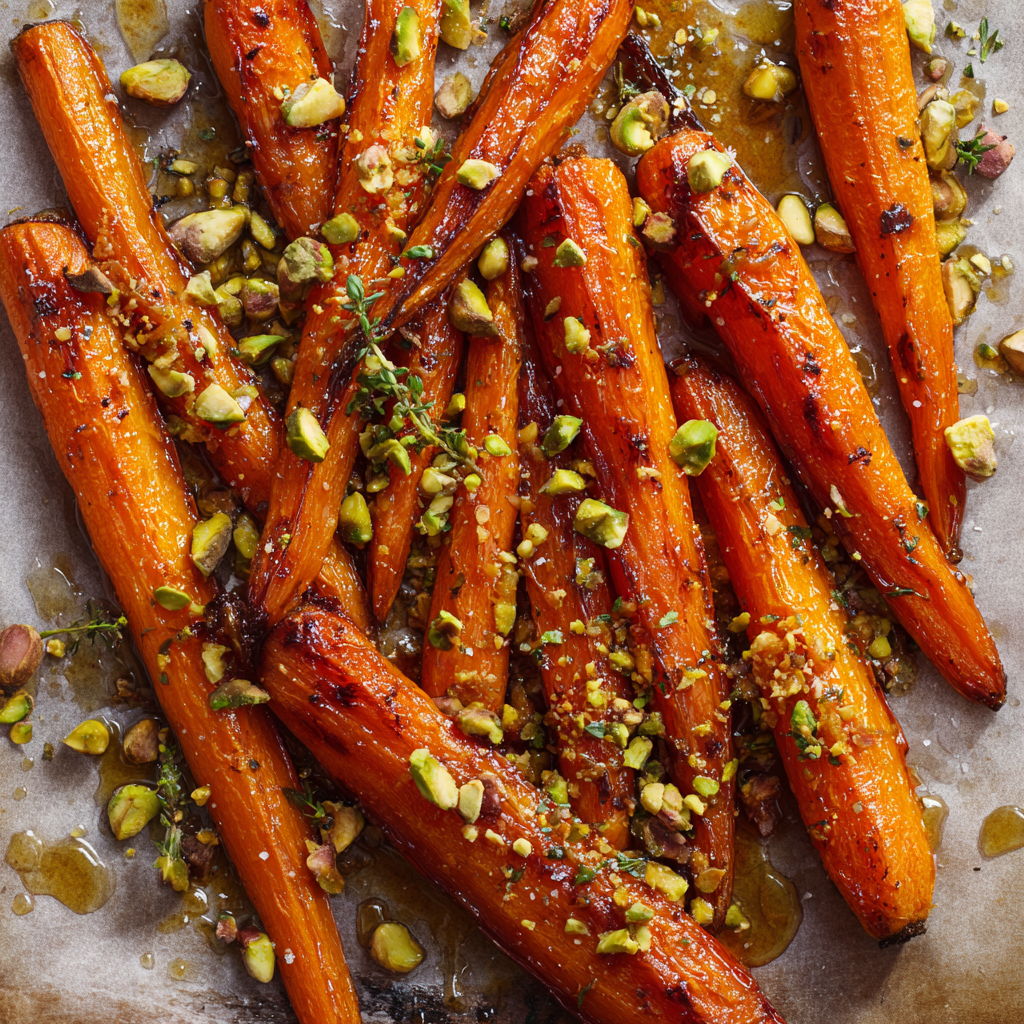
Well, pull up a chair, because I’m about to let you in on one of my all-time favorite secrets: Roasted Carrots with Honey & Pistachios. This isn’t just a recipe; it’s a total game-changer for weeknight dinners and holiday feasts alike. We’re taking the humble carrot, a true kitchen workhorse, and elevating it into something truly spectacular. Imagine this: carrots, roasted until they’re tender and caramelized at the edges, then draped in a warm, golden honey glaze and finished with a confetti of salty, crunchy pistachios.
It’s a symphony of textures and flavors—sweet, savory, earthy, and nutty all at once. And the best part? It’s deceptively easy. This dish is proof that you don’t need a culinary degree or a pantry full of obscure ingredients to create something memorable. You just need a little know-how, a hot oven, and about 40 minutes. So, let’s get these carrots roasting and fill your kitchen with the kind of aroma that makes everyone ask, “What’s cooking? It smells amazing in here!”
A Carrot Epiphany at a Farmhouse Table
I’ll never forget the first time I truly got the carrot. It wasn’t in a fancy restaurant or from a complicated cookbook. It was at a friend’s rustic farmhouse dinner years ago. The table was crammed with people, laughter echoed off the walls, and in the middle of it all was a platter of these gorgeous, glistening roasted carrots. They weren’t just an afterthought; they were the centerpiece of the veggie spread.
I took one bite, and it was a revelation. The carrot was sweet, almost like candy, but with a deep, savory, roasted flavor that was utterly irresistible. They were finished with a drizzle of wild honey from the host’s own hives and a sprinkle of nuts from a jar in the pantry. It was simple, honest food, but it was made with such intention. That dish taught me a powerful lesson: cooking isn’t about showing off. It’s about taking beautiful, simple ingredients and treating them with respect to create something that makes people feel good. It’s about connection. Every time I make this recipe, I’m transported back to that warm, noisy farmhouse kitchen, and I hope it brings a little of that same joy to your table.
Gathering Your A-Team: Simple Ingredients, Big Flavor
One of the things I love most about this recipe is the short, sweet ingredient list. Each component plays a specific role in building that incredible final flavor. Here’s what you’ll need and why it matters.
- 2 lbs Carrots, peeled and cut on the bias: This is our star! I recommend using whole carrots, not baby carrots, for the best texture and sweetness. Cutting them on the bias (aka diagonally) isn’t just for looks—it creates more surface area, which means more delicious, caramelized edges. Chef’s insight: Try to pick carrots that are roughly the same thickness so they cook evenly.
- 2 tbsp Olive Oil: Our trusty workhorse. A good, extra-virgin olive oil helps the carrots roast up beautifully and adds a subtle fruity note. Substitution tip: Avocado oil is a fantastic high-heat alternative if that’s what you have on hand.
- Salt & Pepper, to taste: Don’t be shy here! Salt is essential for pulling out the natural sweetness of the carrots and balancing the honey. Freshly cracked black pepper adds a gentle warmth that ties everything together.
- 2 tbsp Honey: This is our magic glaze. When warmed, it becomes a beautiful, drizzle-able liquid gold that clings to every nook and cranny of the carrots. Substitution tip: For a vegan version, pure maple syrup works wonderfully and gives a slightly deeper, caramel-like flavor.
- ⅓ cup Chopped Pistachios: Our flavor and texture finisher! The pistachios bring a lovely, buttery crunch and a subtle saltiness that cuts through the sweetness perfectly. Chef’s insight: Give them a quick toast in a dry pan for a minute or two before chopping to really wake up their nutty aroma.
- Optional: Fresh Thyme or Parsley for garnish: A final flourish! A sprinkle of fresh, green herbs not only makes the dish look restaurant-worthy but adds a pop of fresh, aromatic flavor. Thyme has an earthy affinity with roasted veggies, while parsley gives a bright, clean finish.
Let’s Get Roasting: Your Foolproof Guide to Carrot Perfection
Alright, team, it’s go-time. This is where the magic happens. Follow these steps, and you’ll have a tray of golden, glorious carrots in no time. I’ve packed this section with my favorite chef hacks to make sure you get perfect results every single time.
- Preheat and Prep: First things first, get that oven screaming hot. Crank it to 400°F (200°C). While it’s heating up, line a large baking sheet with parchment paper. This isn’t just for easy cleanup (though that’s a huge bonus!); it also prevents the honey from sticking and burning onto the pan at the end. Little Chef Hack: Give your carrots a good wash and peel. When cutting them on the bias, aim for pieces about ½-inch thick. This ensures they’ll be tender in the center and caramelized on the outside without burning.
- The Perfect Toss: Pile your beautiful orange spears onto the prepared baking sheet. Drizzle them with the olive oil, then season generously with salt and pepper. Now, get your hands in there! Use your hands to toss everything together, making sure every single piece of carrot is lovingly coated in that oil and seasoning. Trust me, hands are the best tools in the kitchen for this—you’ll get a much more even coat than with a spoon. Once they’re slick and shiny, spread them out in a single, uncrowded layer. This is crucial for proper roasting, not steaming!
- Roast to Caramelized Glory: Slide that tray into your preheated oven and let the heat work its magic. We’re going to roast them for 25-30 minutes. About halfway through, at the 15-minute mark, I want you to open the oven and give them a good flip. You’ll already start to see some beautiful browning on the bottoms. This flip ensures they get evenly caramelized and gorgeous on all sides. They’re done when you can easily pierce them with a fork and the edges are kissed with dark, crispy bits.
- The Grand Finale (Drizzle & Sprinkle): As soon as you pull the carrots out of the oven, it’s time for the grand finale! They need to be warm for this next step. Take your honey and warm it for about 10 seconds in the microwave—this makes it super runny and easy to drizzle. Drizzle that liquid gold all over the hot carrots. Immediately follow up with a generous sprinkle of your chopped pistachios. The residual heat will help the honey cling and slightly toast the nuts. If you’re using fresh herbs, now’s the time to scatter them over the top for that fresh, colorful finish.
Plating Up: How to Make Your Carrots Shine
You’ve done the hard work, now let’s make these beauties look as good as they taste. Presentation is part of the fun! I like to transfer the carrots to a warm serving platter—a long, rectangular one works great for showing off their shape. Pour any of the delicious honey and oil goodness left on the baking sheet right over the top; that’s pure flavor!
So, what do you serve these with? Honestly, they’re incredibly versatile. They are a dream alongside a simple roasted chicken or a juicy pork loin. For a vegetarian feast, they pair beautifully with a creamy lentil salad or a big portion of creamy polenta. During the holidays, they are the perfect vibrant, sweet counterpoint to a savory holiday turkey or a rich beef roast. They’re also fantastic at room temperature, making them a brilliant make-ahead option for potlucks and picnics.
Make It Your Own: Delicious Twists on a Classic
Once you’ve mastered the base recipe, the world is your oyster! (Or, well, your carrot). Don’t be afraid to play around and adapt this to your taste or what you have in the fridge. Here are a few of my favorite riffs:
- Spicy & Smoky: Add ½ teaspoon of smoked paprika and a pinch of cayenne pepper to the olive oil before tossing with the carrots. The smoky heat with the sweet honey is a match made in heaven.
- Maple-Glazed with Pecans: Swap the honey for pure maple syrup and the pistachios for toasted pecans. This gives a wonderfully autumnal, deep caramel flavor that just screams comfort food.
- Herbaceous & Cheesy: After drizzling with honey, finish the carrots with a shower of freshly crumbled goat cheese or feta and a big handful of fresh chopped dill. The tangy cheese and bright dill are an incredible combination.
- Moroccan-Inspired: Toss the carrots with a spice blend of ¼ teaspoon each of cumin, coriander, and cinnamon along with the oil. Use chopped toasted almonds instead of pistachios and finish with a sprinkle of fresh mint.
- Vegan Powerhouse: As mentioned, use maple syrup instead of honey. For a extra protein boost, after roasting, toss the carrots with a can of drained and rinsed chickpeas that you’ve roasted alongside them for the last 15 minutes.
Beau’s Kitchen Confidential
This recipe has been a staple in my kitchen for years, and it’s evolved in the best way. I used to be so precise with my cuts, but I’ve learned that a little rustic irregularity is a good thing—it gives you a variety of textures in one bite! One time, I was filming a video for the site and I got so caught up in chatting that I completely forgot to flip the carrots. You know what? They were still delicious, just a bit more caramelized on one side. It was a great reminder that cooking is forgiving, and the goal is flavor, not perfection. Don’t stress, just enjoy the process. The smell of carrots roasting with a little black pepper is one of my favorite kitchen smells—it just feels like home.
Your Questions, Answered!
I’ve gotten a lot of questions about this recipe over the years, so I’ve gathered the most common ones here to help you out.
Q: Can I use baby carrots instead of whole carrots?
A: You can, but I find whole carrots have a superior flavor and texture. If you use baby carrots, just be aware they often contain more water, so they might steam rather than roast and won’t caramelize as well. If it’s all you have, pat them very dry before tossing with oil and maybe add a few extra minutes to the roasting time.
Q: My carrots are burning before they get tender! What did I do wrong?
A> This usually means your oven is too hot, or your carrot pieces are too small. Oven temperatures can vary, so an inexpensive oven thermometer is a great investment. If you see them browning too quickly, simply lower the temperature to 375°F and let them cook a bit longer. Also, make sure you’re cutting them into substantial pieces, no smaller than ½-inch thick.
Q: Can I make these ahead of time?
A> Absolutely! You can peel and cut the carrots a day in advance; just keep them submerged in water in the fridge so they don’t dry out. You can also roast the carrots completely, let them cool, and store them in the fridge. To serve, warm them gently in a 350°F oven for about 10 minutes before adding the honey and pistachios so they get glossy again.
Q: What other nuts can I use?
A> Pistachios are my favorite, but this is a very flexible recipe! Toasted almonds, walnuts, pecans, or even pumpkin seeds (pepitas) would be delicious. Just make sure whatever nut or seed you use is toasted for maximum crunch and flavor.
Roasted Carrots with Honey & Pistachios
Description
Hey friends, Beau here! Carrots don’t have to be boring. In this recipe, they’re tender, caramelized, and finished with a honey glaze and crunchy pistachios. Perfect for weeknights, holidays, or potlucks—it’s a side dish that steals the spotlight.
Ingredients
-
2 lbs carrots, peeled and cut on the bias (~½-inch thick)
-
2 tbsp olive oil (or avocado oil)
-
Salt & freshly cracked black pepper, to taste
-
2 tbsp honey (or maple syrup for vegan version)
-
⅓ cup chopped pistachios (toasted for extra aroma)
-
Optional garnish: fresh thyme or parsley
Instructions
1. Preheat & Prep
-
Preheat oven to 400°F (200°C).
-
Line a baking sheet with parchment paper for easy cleanup and to prevent sticking.
2. Prep the Carrots
-
Wash, peel, and cut carrots diagonally into ½-inch thick pieces.
-
Toss carrots with olive oil, salt, and pepper until evenly coated. Spread in a single layer.
Tip: Uniform size ensures even roasting and caramelization.
3. Roast the Carrots
-
Roast for 25–30 minutes, flipping halfway through at 15 minutes.
-
Carrots are done when tender and slightly caramelized at the edges.
Chef Hack: Avoid overcrowding the pan—otherwise, the carrots steam instead of roast.
4. Finish with Honey & Pistachios
-
Warm honey for 10 seconds in the microwave to make it drizzle-ready.
-
Drizzle honey over the hot carrots and sprinkle with toasted pistachios.
-
Optional: Add fresh herbs for a bright, aromatic finish.
5. Serve & Enjoy
-
Transfer carrots to a warm serving platter, drizzle with any pan juices, and serve immediately.
-
Perfect alongside roasted meats, vegetarian mains, or at potlucks.
Notes
-
Baby carrots vs whole carrots? Whole carrots roast better and have superior texture.
-
Carrots burning before tender? Oven too hot or pieces too small; lower to 375°F and cook longer.
-
Make ahead? Peel and cut in advance (store in water) or roast, cool, and reheat gently.
-
Other nuts? Almonds, walnuts, pecans, or pumpkin seeds all work—toast for max flavor.
Nutrition
- Calories: 160 Cal Per Serving
- Fat: 8g
- Saturated Fat: 1g
- Carbohydrates: 19g
- Fiber: 4g
- Protein: 3g
A Nourishing Bite
While we’re all about the flavor here at Feastical, it’s always nice to know that what you’re eating is also doing your body good. And this dish is a total powerhouse! Carrots are famously packed with beta-carotene, which your body converts to Vitamin A—essential for healthy vision, skin, and immunity. They’re also a great source of fiber.
We’re using healthy fats from the olive oil and pistachios, which help your body absorb all those fat-soluble vitamins from the carrots. The honey adds natural sweetness, and the pistachios bring a little plant-based protein to the party. So, you can feel fantastic about serving this side dish—it’s as nourishing as it is delicious.
Approximate Nutritional Info per Serving (Serves 6):
Calories: ~160 | Fat: 8g | Saturated Fat: 1g | Carbohydrates: 19g | Fiber: 4g | Sugar: 12g | Protein: 3g
Wrapping It All Up
Well, there you have it, my friends—my not-so-secret weapon for a side dish that never fails to impress. It’s proof that a little bit of technique and a few quality ingredients can transform the ordinary into the extraordinary. I hope this recipe finds its way into your regular rotation and becomes a beloved favorite in your home, just like it is in mine.
Final Thoughts: Your New Go-To Side is Served
So there you have it—the simple, stunning side dish that’s ready to steal the show. It’s more than just a recipe; it’s a reminder that the most memorable meals often come from the humblest ingredients, treated with a little care and creativity. With its perfect balance of sweet, savory, and crunchy, this dish is guaranteed to become a star on your table, from a quiet Tuesday night to a bustling holiday feast.
I hope these honey-glazed carrots bring as much warmth, connection, and downright deliciousness to your kitchen as they have to mine. Now, I’d love to hear from you! Did you make them? What twist did you try? Share your creations with me @Feastical. Happy cooking!

Creamy Parmesan Broccoli Bake
Your New Favorite Side Dish is Here to Steal the Show
Hey friends, Beau here! Let’s be real for a second. We all have that one dish. The one that shows up at the family potluck, sits there quietly next to the glazed ham or the golden turkey, and then—BAM—it’s gone before you can even blink. The dish that makes your aunt ask for the recipe and your veggie-skeptical nephew sneak a second helping. That, my friends, is the magic of a truly epic casserole.
And today, we’re making one for the ages. We’re talking about my Creamy Parmesan Broccoli Bake. Now, I know what you might be thinking: “Beau, it’s just broccoli.” But oh, it is so much more than that. This is broccoli living its absolute best life, swimming in a velvety, garlicky Parmesan sauce, and baked under a perfectly golden, bubbly top. It’s the culinary equivalent of your favorite cozy sweater. It’s veggies, but we’re making them cozy, comforting, and downright irresistible.
This recipe is the hero we need for busy weeknights, holiday feasts, or anytime you need a guaranteed win on the dinner table. It’s simple, soulful, and so satisfying. So, preheat that oven, grab your favorite baking dish, and let’s transform that humble head of broccoli into a side dish that’s fully prepared to steal the spotlight.
The Broccoli That Won Over a Skeptic
This recipe has a special place in my heart because it’s the dish that officially made me a broccoli believer. Growing up, my experience with broccoli was, well, tragic. It was usually relegated to the “eat-it-because-it’s-good-for-you” corner of my plate—a sad, steamed, and often soggy affair. I’d hide it under my mashed potatoes or, on particularly brave days, feed it to the dog under the table (sorry, Mom!).
That all changed one Thanksgiving at my Grandma Lorraine’s house. She was a wizard with cream, cheese, and a well-seasoned casserole dish. She brought a bubbling, golden-topped dish to the table that smelled like heaven. I took one skeptical bite and my world turned upside down. The broccoli was tender but still had a bite, and it was enveloped in this rich, cheesy, garlicky sauce that made my eyes go wide. I asked for seconds before I’d even finished my first helping. Grandma just winked and said, “See, Beau? Everything’s better with a little sauce and a lot of love.” She was right. This bake is my homage to her—a recipe that turns skeptics into superfans, one cheesy bite at a time.
Gathering Your Cast of Characters
One of the best things about this recipe is its beautiful simplicity. You likely have most of these ingredients hanging out in your fridge and pantry right now. Here’s everything you’ll need to create this masterpiece.
- 5 cups fresh broccoli florets: Look for bright green, firm heads of broccoli. The florets are our stars here—they hold the sauce perfectly. Chef’s Insight: No fresh broccoli? A 16-ounce bag of frozen florets, thawed and patted dry, works in a pinch! Just be sure to squeeze out any excess water so your bake doesn’t get soupy.
- 2 tbsp butter: This is the rich, flavorful base for our roux. Unsalted is best so we can control the salt level, but salted works too—just adjust your added salt later.
- 2 tbsp all-purpose flour: Our trusty thickening agent. It teams up with the butter to create the roux that gives our sauce its luxurious body.
- 1 ½ cups milk: Whole milk will give you the creamiest, richest sauce, but 2% works wonderfully too. I don’t recommend skim, as the sauce can end up a bit thin.
- ½ cup sour cream: This is my secret weapon! It adds a wonderful tang and incredible creaminess that takes the sauce to a whole new level. Substitution Tip: Plain, full-fat Greek yogurt is a fantastic swap if that’s what you have on hand.
- ¾ cup grated Parmesan cheese: Please, for the love of all that is cheesy and good, grate it yourself if you can! The pre-grated stuff in a tub often has anti-caking agents that can make your sauce a little grainy. Freshly grated Parmesan melts like a dream and has a much more robust flavor.
- ½ cup shredded mozzarella cheese: This is our stretchy, gooey dream machine. It adds that classic, pull-apart cheese quality we all love.
- ½ tsp garlic powder: I know, I know—fresh garlic is king. But in this creamy sauce, garlic powder distributes its flavor evenly without the risk of burning, giving you that consistent, cozy garlic note in every bite.
- Salt & freshly cracked black pepper, to taste: Don’t be shy! Season in layers. Taste your sauce before you add the broccoli and adjust accordingly.
- Optional: ½ cup crushed crackers or breadcrumbs for topping: For that irresistible golden, crunchy top! Buttery Ritz crackers are my personal favorite, but panko breadcrumbs toasted with a little butter also work beautifully.
Let’s Get Cooking: Building Your Broccoli Masterpiece
Okay, team! Aprons on? Let’s do this. I’ll walk you through each step, sharing all my little kitchen hacks to ensure your bake is absolutely perfect.
- Preheat and Prep: First things first, get that oven preheating to 375°F (190°C). This is the perfect temperature for getting a bubbly, golden bake without burning the top. While it’s warming up, lightly grease your 9×9-inch baking dish (or a similar-sized casserole dish) with a little butter or non-stick spray. Chef’s Hack: A well-preheated oven is key for even cooking. Don’t put your casserole in a cold oven!
- Wake Up the Broccoli: We’re not cooking the broccoli all the way through just yet. We’re just giving it a quick head start. Steam or blanch your broccoli florets for about 2-3 minutes, until they turn a vibrant, brilliant green and are just tender-crisp. Why do this? This step locks in that beautiful color and ensures our broccoli bakes up perfectly tender, not raw and crunchy. Immediately drain it well and maybe even give it a gentle pat with a paper towel. A dry broccoli is a happy broccoli when it comes to avoiding a watery sauce!
- Craft the Velvety Sauce (This is the Fun Part!): In a medium saucepan over medium heat, melt your 2 tablespoons of butter. Once it’s foaming, add the 2 tablespoons of flour and immediately start whisking. Cook this roux for about a full minute. You’ll smell a lovely, nutty aroma—that’s how you know it’s ready! Now, slowly—and I mean slowly—pour in the milk while whisking constantly. Pro Tip: Adding the milk gradually while whisking is the secret to a lump-free sauce. Don’t rush it! You’re creating a beautiful, smooth base. Keep whisking until the sauce thickens enough to coat the back of a spoon, about 3-5 minutes.
- Cheese, Please!: Take the saucepan off the heat. Now, stir in your sour cream, garlic powder, the glorious ¾ cup of grated Parmesan, and the ½ cup of mozzarella. The residual heat will melt the cheese beautifully. Give it a good stir until everything is smooth, creamy, and united in cheesy harmony. Now, taste it! This is your moment. Season with salt and a good crack of black pepper until it sings.
- The Grand Union: In a large mixing bowl, gently toss your pre-cooked broccoli florets with the magnificent cheese sauce you just created. Make sure every single floret gets a cozy, cheesy blanket. Then, pour the whole mixture into your prepared baking dish and spread it into an even layer.
- The Golden Crown: If you’re using the optional topping, now’s the time! Sprinkle your crushed crackers or breadcrumbs evenly over the top. This adds a wonderful textural contrast to the creamy interior.
- Bake to Perfection: Pop that dish into your preheated oven and bake for 20-25 minutes. You’re looking for the sauce to be bubbly around the edges and the top to be a beautiful, inviting golden brown. If you used a topping, it should be perfectly crisp.
- The Hardest Step of All: Let it Rest! I know, the aroma is intoxicating and you want to dive right in. But trust me on this—let it sit for about 5-10 minutes after pulling it out of the oven. This allows the sauce to set just a little, making it easier to serve beautiful, clean scoops instead of a cheesy lava flow. It’s worth the wait, I promise!
How to Serve This Cozy Masterpiece
This Creamy Parmesan Broccoli Bake is the ultimate team player. It’s incredibly versatile and makes everything it touches feel like a special occasion.
For a classic family dinner, I love serving it right out of the baking dish in the middle of the table, family-style. It’s the perfect sidekick to a simple roasted chicken, some pan-seared pork chops, or a juicy pot roast. The creamy, cheesy flavors complement savory meats perfectly.
Heading to a potluck or holiday gathering? This is your golden ticket. It travels like a dream and always earns rave reviews. Pair it with other comfort food classics like garlic mashed potatoes and herb stuffing for the ultimate feast.
And for my vegetarian friends? This bake is a star all on its own! Serve a bigger portion alongside a hearty quinoa salad or a lentil soup for a completely satisfying and comforting meal. No matter how you plate it, get ready for the compliments to roll in!
Make It Your Own: Delicious Twists & Swaps
One of my favorite things about cooking is making a recipe your own. This broccoli bake is a fantastic canvas for your creativity! Here are a few of my favorite ways to mix it up.
- The “Everything but the Kitchen Sink” Version: Add a cup of cooked, diced chicken, ham, or even leftover holiday turkey to the mix before baking for a full, one-dish meal. A half-cup of cooked, crumbled bacon is also a game-changer!
- Cauli-Power Blend: Not a broccoli-only household? Use half broccoli and half cauliflower florets. The flavors work in perfect harmony, and it’s a great way to get more veggies in.
- Spice It Up: Add a little kick with a pinch of cayenne pepper or a few shakes of your favorite hot sauce into the cheese sauce. A tablespoon of diced jalapeños would also be fantastic for a spicy twist.
- Gluten-Free & Lighter Options: To make this gluten-free, simply swap the all-purpose flour for a 1:1 gluten-free flour blend and use gluten-free crackers for the topping. For a lighter version, you can use low-fat milk and reduced-fat cheeses, though the sauce will be slightly less rich.
- Italian-Inspired Twist: Swap the mozzarella for Italian blend cheese and stir in a teaspoon of Italian seasoning into the sauce. Top with a mix of breadcrumbs and a little extra Parmesan for a real “fancy pasta night” vibe.
Beau’s Kitchen Notes & Stories
This recipe has been a living, evolving thing in my kitchen for years. The sour cream was a happy accident one day when I was out of heavy cream, and it turned out to be the best “mistake” I ever made! It’s become the non-negotiable secret to the sauce’s tangy creaminess.
I’ve also learned that this dish is a fantastic “clean out the fridge” hero. That little nub of cheddar? Grate it in. A handful of Gruyère left over from another recipe? Yes, please! A bit of fontina? Divine. Don’t be afraid to play with your cheese blends. Cooking should be fun, not stressful. The most important ingredient is always the joy you stir into it.
Your Questions, Answered!
Over the years, I’ve gotten a few repeat questions about this bake. Here are the answers to help you nail it every single time.
Q: My casserole turned out a bit watery. What happened?
A: The most common culprit is excess water on the broccoli. If you’re using frozen, make sure it’s fully thawed and you’ve squeezed it in a clean kitchen towel. For fresh, pat it dry after blanching. Also, be sure your sauce has thickened nicely on the stovetop before you combine everything.
Q: Can I make this ahead of time?
A: Absolutely! You can assemble the entire casserole (without baking) up to a day in advance. Cover it tightly and store it in the fridge. When you’re ready, you may need to add a few extra minutes to the baking time since it will be going in cold.
Q: What’s the best substitute for sour cream?
A: As mentioned, full-fat plain Greek yogurt is my go-to. You could also use an equal amount of heavy cream or crème fraîche for a similar rich and tangy effect.
Q: Can I freeze the leftovers?
A: You can, but with a caveat. Cream-based sauces can sometimes separate or become a bit grainy upon thawing. It will still taste good, but the texture might not be as perfect. If you do freeze it, thaw it overnight in the fridge and reheat it gently in the oven.

Creamy Parmesan Broccoli Bake
Description
Hey friends, Beau here! Broccoli doesn’t have to be boring. In this dish, it’s tender, cheesy, and baked under a golden, bubbly topping that will have everyone asking for seconds. Perfect for weeknights, holidays, or potlucks—it’s cozy, comforting, and utterly irresistible.
Ingredients
-
5 cups fresh broccoli florets (or 16 oz frozen, thawed & patted dry)
-
2 tbsp butter
-
2 tbsp all-purpose flour
-
1½ cups milk (whole milk recommended)
-
½ cup sour cream (or plain Greek yogurt)
-
¾ cup freshly grated Parmesan cheese
-
½ cup shredded mozzarella cheese
-
½ tsp garlic powder
-
Salt & freshly cracked black pepper, to taste
-
Optional topping: ½ cup crushed crackers or breadcrumbs
Instructions
1. Preheat & Prep
-
Preheat oven to 375°F (190°C).
-
Grease a 9×9-inch baking dish with butter or non-stick spray.
2. Blanch the Broccoli
-
Steam or blanch broccoli for 2–3 minutes until vibrant green and slightly tender.
-
Drain thoroughly and pat dry.
Tip: Dry broccoli prevents a watery bake.
3. Make the Velvety Sauce
-
Melt butter in a medium saucepan over medium heat.
-
Add flour, whisking constantly for 1 minute to make a roux.
-
Slowly pour in milk, whisking continuously to avoid lumps. Cook 3–5 minutes until thickened.
-
Remove from heat; stir in sour cream, garlic powder, Parmesan, and mozzarella. Season with salt and pepper to taste.
4. Combine & Assemble
-
Gently toss broccoli with cheese sauce in a large bowl.
-
Pour mixture into prepared baking dish and spread evenly.
-
Optional: Sprinkle crushed crackers or breadcrumbs on top.
5. Bake to Perfection
-
Bake for 20–25 minutes until bubbly and the top is golden brown.
-
Let rest 5–10 minutes before serving to set the sauce.
Serving Suggestions
-
Serve family-style alongside roasted meats or as a vegetarian main with grains or soup.
-
Perfect for potlucks—travels well and is always a hit.
Notes
-
Watery casserole? Pat broccoli dry and ensure sauce is thick before combining.
-
Make ahead? Assemble up to 1 day in advance; add a few extra minutes to bake.
-
Sour cream substitute? Greek yogurt, heavy cream, or crème fraîche.
-
Freezing? Can freeze, but sauce texture may change; thaw overnight and reheat gently.
A Note on Nutrition
I’m all about balance. While this is definitely a comfort food dish, it’s packed with good-for-you broccoli, which is a fantastic source of Vitamins C and K, fiber, and powerful antioxidants. The cheese and milk provide a good dose of protein and calcium.
This is a rough estimate per serving (assuming 6 servings and without the optional topping): approximately 210 calories, 13g fat, 8g protein, and 14g carbs. Remember, these are estimates and can vary based on the specific brands and ingredients you use. My philosophy? Enjoy your food, savor the comfort, and know that feeding your soul is just as important as feeding your body. This dish does both beautifully.
Final Thoughts from My Kitchen to Yours
Well, there you have it! My go-to recipe for a side dish that never, ever fails. This Creamy Parmesan Broccoli Bake is more than just a recipe; it’s a reminder that with a little love and a lot of cheese, we can make even the simplest ingredients feel like a celebration.
I hope this dish finds its way to your table and becomes a part of your own family’s story. It’s a testament to the fact that food doesn’t have to be complicated to be incredible. It just has to be

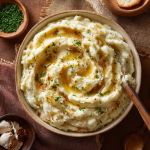
Brown Butter Mashed Potatoes
Brown Butter Mashed Potatoes: Your New Secret Weapon for Comfort Food
Forget Everything You Thought You Knew About Mashed Potatoes
Hey friends, Beau here. Let’s talk about a classic for a second. Mashed potatoes. They’re the reliable friend at the dinner table, the one who always shows up and never causes drama. They’re cozy, they’re comforting, and let’s be real, they’re basically a vehicle for gravy. But what if I told you we could take that beloved, humble side dish and turn it into the undisputed star of the show? The one that makes people’s eyes go wide, that has them asking, “What did you do to these?” in the best way possible.
Well, pull up a chair and get ready, because we’re about to unlock that level. The secret? Brown butter. Now, I know, I know. It sounds fancy. It sounds like something you’d hear on a cooking competition show. But trust me, it’s one of the simplest, most magical tricks in my entire kitchen playbook. We’re taking regular butter and gently toasting it until it transforms into a liquid gold that’s nutty, rich, and deeply aromatic. When you swirl that into your fluffy, creamy potatoes, it’s a game-changer. It adds a dimension of flavor that feels both gourmet and deeply, soulfully comforting. This isn’t just a recipe; it’s an upgrade. And once you try it, you might just forget regular mashed potatoes ever existed.
The Day the Mashed Potatoes Stole the Show
This recipe always takes me back to one particularly chaotic Thanksgiving at my Nana’s house. I was maybe fourteen, deemed “old enough” to help with the potatoes. I was mashing away, lost in thought, when I realized I’d melted the butter for them a little too early. It sat on the warm stovetop, and by the time I went to pour it in, it had turned this gorgeous golden-brown color with little dark specks at the bottom. My heart sank. I was sure I’d ruined it.
But Nana, a woman who believed in wasting nothing, just peered into the saucepan, sniffed the air, and said, “Smells nutty. Pour it in.” With more than a little trepidation, I did. We mashed, we seasoned, we plated. That year, amidst the glorious turkey and the perfect pies, the quietest dish on the table got the loudest reaction. My uncle, a man of few words, took one bite and just said, “Wow.” That was it. That was the moment I truly understood the power of a simple, intentional twist. It wasn’t a mistake; it was a happy little accident that taught me to listen to my ingredients. They’ll often tell you where they want to go.
Gathering Your A-Team: The Ingredients
Great food starts with great ingredients, and this recipe is a perfect example of how a few simple, quality components can create something spectacular. Here’s your shopping list, with a little chef-ly insight for each one.
- 2½ lbs Yukon Gold or Russet Potatoes: This is your foundation! Yukon Golds are my personal favorite for this recipe—they have a naturally buttery flavor and a creamy, waxy texture that mashes up beautifully without becoming gluey. Russets are the classic choice; they’re starchier, which gives you that super fluffy, light texture. You really can’t go wrong with either. Chef’s Tip: If you’re using Russets, make sure to rinse them well after peeling and cubing to remove excess surface starch.
- ½ cup (1 stick) Unsalted Butter: This is the star of our show! We use unsalted butter so we have complete control over the seasoning. The browning process is where the magic happens, transforming it from a simple fat into a complex, nutty flavor bomb.
- ½ cup Warm Milk: The warmth is key! Adding cold milk to hot potatoes can make them gummy. Gently warming your milk (I just pop it in the microwave for 30 seconds) helps everything incorporate smoothly and stay gloriously hot. Substitution: Heavy cream or half-and-half will make them even more decadent, while whole milk is perfect for everyday luxury.
- ¼ cup Sour Cream: This is my secret weapon for the perfect texture and tang. It adds a subtle sharpness that cuts through the richness of the brown butter and gives the potatoes a fantastic creaminess that’s hard to beat. Substitution: Plain Greek yogurt works in a pinch for a similar tangy effect.
- Salt & Freshly Cracked Black Pepper, to taste: Do not be shy! Potatoes need seasoning. I use a generous amount of kosher salt in the boiling water and then season again at the end. Freshly cracked pepper adds a little warmth and bite that pre-ground just can’t match.
- Optional: Chopped Fresh Chives for Garnish: This isn’t just for looks! The fresh, mild oniony flavor of chives is the perfect bright counterpoint to the deep, rich, nutty potatoes. A sprinkle right before serving makes all the difference.
Let’s Get Mashing: Your Step-by-Step Guide
Ready to make some magic? Follow these steps, and you’ll be a brown butter believer in no time. I’ve packed this section with all my favorite little hacks to ensure your spuds are perfect.
- Prep and Boil the Potatoes: Start by peeling your potatoes and cutting them into uniform, 1-inch cubes. The consistent size is crucial—it means they’ll all cook at the same rate. Plunge them into a large pot of heavily salted cold water—it should taste like the sea. Starting them in cold water helps them cook evenly from the inside out. Bring it to a boil over high heat, then reduce to a lively simmer. Cook for 15-20 minutes, or until they are completely fork-tender. Chef’s Hack: Don’t rush the boil! A violent, rolling boil can cause the outside of the potatoes to become waterlogged and mushy before the inside is cooked.
- Drain and Dry: This step is non-negotiable for fluffy potatoes! Drain the cooked potatoes thoroughly in a colander. Then, for an extra pro move, return them to the hot, empty pot and place it back on the warm (but turned off) burner for about a minute. Let the residual heat steam off any excess moisture. Watery potatoes = sad, gluey mashed potatoes.
- The Main Event: Brown the Butter: While the potatoes are boiling, let’s make the gold. Cut your butter into tablespoons and melt it in a light-colored skillet or saucepan over medium heat. A light-colored pan helps you see the color change clearly. The butter will melt, then foam, and you’ll hear a sizzling sound. Keep stirring, scraping the bottom of the pan with a spatula. After 3-5 minutes, the foam will subside a bit, and you’ll see golden-brown milk solids forming at the bottom. It will smell incredibly nutty and toasted. The second you see those brown bits and get that aroma, take it off the heat immediately and pour it into a heatproof bowl to stop the cooking. Chef’s Hack: Brown butter goes from perfect to burnt in seconds. Stay with it, and don’t walk away! It’s a conversation, not a monologue.
- Mash and Combine: Now for the fun part! Using your preferred mashing tool (I’m a ricer fan for ultimate silkiness, but a good old-fashioned potato masher works beautifully too), mash the potatoes right in the warm pot. Once they’re broken down, add the warm milk and sour cream. Mash or stir until smooth and creamy. Now, season generously with salt and pepper. Taste as you go!
- Swirl in the Magic: Finally, pour in that gorgeous, nutty brown butter, making sure to get every last one of those flavorful browned bits. Gently fold and stir it into the potatoes until it’s fully incorporated and you see beautiful golden streaks throughout. You are now a kitchen wizard.
Plating Up Your Masterpiece
You’ve done the hard work, now let’s make these potatoes look as incredible as they taste. I’m a big believer that presentation is part of the joy of cooking. For a family-style meal, I love piling them into a warm, wide bowl. Using the back of a spoon, I create gentle swoops and peaks on the surface—these are perfect little valleys for catching gravy or holding a pat of extra butter. Then, the grand finale: a generous sprinkle of those vibrant green chopped chives. It adds a pop of color and a fresh flavor that just sings.
If you’re feeling a little extra (and why wouldn’t you be?), you can transfer the mashed potatoes to a baking dish, dot the top with a little more butter, and pop them under the broiler for a few minutes to get a beautifully browned, crispy top. It’s a textural dream. No matter how you serve them, get them to the table while they’re still steaming hot. That’s when the aroma of that brown butter is at its most intoxicating.
Make It Your Own: Delicious Variations
The beauty of this recipe is its incredible versatility. Once you’ve mastered the base, feel free to play! Here are a few of my favorite ways to mix it up.
- Garlic & Herb Infusion: Add 3-4 cloves of minced garlic to the cold butter as you start to brown it. The garlic will toast and mellow, infusing the butter with a gorgeous, savory flavor. Stir in a tablespoon of fresh chopped rosemary or thyme along with the chives at the end.
- Parmesan & Black Pepper: After you’ve stirred in the brown butter, fold in a full cup of freshly grated Parmesan cheese and a hefty dose of coarse black pepper. It’s cheesy, peppery, and utterly irresistible.
- Loaded “Baked Potato” Style: Turn these into a meal! Fold in crispy chopped bacon, shredded sharp cheddar cheese, and sliced green onions along with the brown butter. A dollop of sour cream on top is mandatory.
- Vegan/Dairy-Free Twist: You can still get in on this! Use a high-quality vegan butter (Miyoko’s Kitchen or Melt are great for browning) and follow the same browning process. Substitute the milk and sour cream with unsweetened, unflavored oat milk or almond milk and a splash of vegan sour cream or a spoonful of olive oil.
Beau’s Brain Dump: Chef’s Notes
This recipe has been a living, evolving thing in my kitchen for years. I started with just brown butter and potatoes, and the sour cream was a later addition after a “what if?” moment that turned out brilliantly. I’ve learned that the type of potato masher you use changes the texture—a ricer is for when I want to impress, a hand masher is for when I want that lovely, rustic, homemade feel with a few tiny lumps. And I’ll let you in on a secret: I’ve been known to make a double batch of the brown butter and keep half in the fridge. It solidifies into a spreadable, nutty compound butter that’s insane on toast, steak, or roasted vegetables. One recipe, endless possibilities—that’s the Feastical spirit!
Your Questions, Answered!
Over the years, I’ve gotten a lot of questions about this recipe. Here are the ones that pop up most often.
- Q: My mashed potatoes turned out gummy. What happened?
A: This is usually one of two things: either you overworked the potatoes (a food processor is your worst enemy here—it releases too much starch), or you used the wrong type of potato. Russets are starchier and can become gluey if over-mashed. Stick to Yukon Golds for a foolproof creamy texture, and don’t over-mix!
- Q: Can I make these ahead of time?
A: Absolutely! Make them up to a day in advance. Let them cool completely, then store them in an airtight container in the fridge. When you’re ready to serve, reheat them gently in a saucepan over low heat, stirring in a splash of extra milk or cream to bring back the creamy consistency. You can also reheat them in a baking dish, covered with foil, in a 350°F oven for 20-30 minutes.
- Q: I think I burnt my butter. Can I save it?
A: Oh, friend, I’ve been there. Unfortunately, once it’s burnt, that bitter flavor is there to stay. It’s best to toss it and start over. Remember, medium heat, a light-colored pan, and your undivided attention are the keys to success!
- Q: Do I really need to peel the potatoes?
A: “Need” is a strong word! You can absolutely leave the skins on for a more rustic, textured mash. Just give them a really good scrub first. I find this works best with thin-skinned potatoes like Yukon Golds or red potatoes.
Brown Butter Mashed Potatoes
Description
Hey friends, Beau here! Mashed potatoes are a classic side, but with brown butter, they become unforgettable. Nutty, rich, and aromatic, this twist takes humble potatoes to gourmet-level comfort food.
Ingredients
-
2½ lbs Yukon Gold or Russet potatoes, peeled and cut into 1-inch cubes
-
½ cup (1 stick) unsalted butter
-
½ cup warm milk (or cream/half-and-half for extra richness)
-
¼ cup sour cream (or plain Greek yogurt)
-
Salt & freshly ground black pepper, to taste
-
Optional: Chopped fresh chives for garnish
Instructions
1. Boil the Potatoes
-
Place potato cubes in a large pot of salted cold water.
-
Bring to a boil over high heat, then reduce to a simmer.
-
Cook 15–20 minutes, until fork-tender.
Tip: Start in cold water to cook evenly.
2. Drain & Dry
-
Drain potatoes thoroughly.
-
Return to the hot, empty pot for 1 minute to let excess moisture steam off.
Tip: This ensures fluffy, not gluey, mashed potatoes.
3. Brown the Butter
-
Melt butter in a light-colored skillet over medium heat.
-
Stir constantly; butter will foam, then brown milk solids will form at the bottom in 3–5 minutes.
-
Smell that nutty aroma? That’s when you remove it from heat immediately.
Tip: Brown butter can burn in seconds—stay attentive!
4. Mash & Combine
-
Mash potatoes using a ricer or masher.
-
Add warm milk and sour cream; mix until smooth.
-
Season generously with salt and pepper.
5. Swirl in the Magic
-
Pour in browned butter, including the golden bits, and fold gently until fully incorporated.
Serving & Presentation
-
Pile mashed potatoes in a wide serving bowl.
-
Create gentle swoops for gravy pockets.
-
Sprinkle chopped chives on top for color and freshness.
-
Optional: Dot with extra butter and broil briefly for a golden, crispy top.
Notes
-
Gummy potatoes? Don’t overmix; avoid food processors. Yukon Golds are foolproof.
-
Make ahead? Refrigerate cooled potatoes in an airtight container; reheat gently with a splash of milk.
-
Burnt butter? Start over; it can’t be salvaged.
-
Peel potatoes? Optional. Skins add rustic texture; scrub well if leaving them on.
Let’s Talk Nutrition (The Real Talk)
Look, we’re here for comfort food, and I believe in enjoying it fully. These are mashed potatoes, a dish meant to be rich, satisfying, and soul-warming. They are a source of carbohydrates for energy, and the butter and dairy provide fats that carry flavor and help you feel full and satisfied. To make it a balanced meal, I love serving them alongside a lean protein like roasted chicken or pork loin and a big, vibrant green salad. It’s all about balance and joy. You can lighten them up slightly by using low-fat milk, but for a special occasion, I say go for the real deal and savor every single, nutty, creamy bite.
The Last Bite
And there you have it, my friends. The humble mashed potato, transformed. This recipe is more than just a list of ingredients and steps; it’s a reminder that the smallest changes can have the biggest impact. It’s about paying attention, trusting your senses, and having the courage to pour that “mistake” brown butter into the bowl. This dish has been the quiet hero on my holiday table more times than I can count, and it’s a regular in my weeknight rotation because comfort shouldn’t be saved for special occasions. So, I hope you give it a try. I hope it becomes a new favorite in your home, a recipe that makes your people say “Wow.” Now, grab your potatoes, and let’s get cooking!
With a full belly and a happy heart,
Final Thoughts: A Simple Step to a Culinary Revelation
So, there you have it. The humble mashed potato, reinvented. This isn’t just a new recipe; it’s a new standard. Brown butter is the key that unlocks a deeper level of comfort and flavor, transforming a weeknight side into a conversation piece and a holiday staple into a legend. It’s a technique that asks for so little—just a watchful eye and a willingness to listen to the sizzle—but gives back in spades. Don’t just make mashed potatoes. Make a memory. Make these. Your dinner table will thank you.
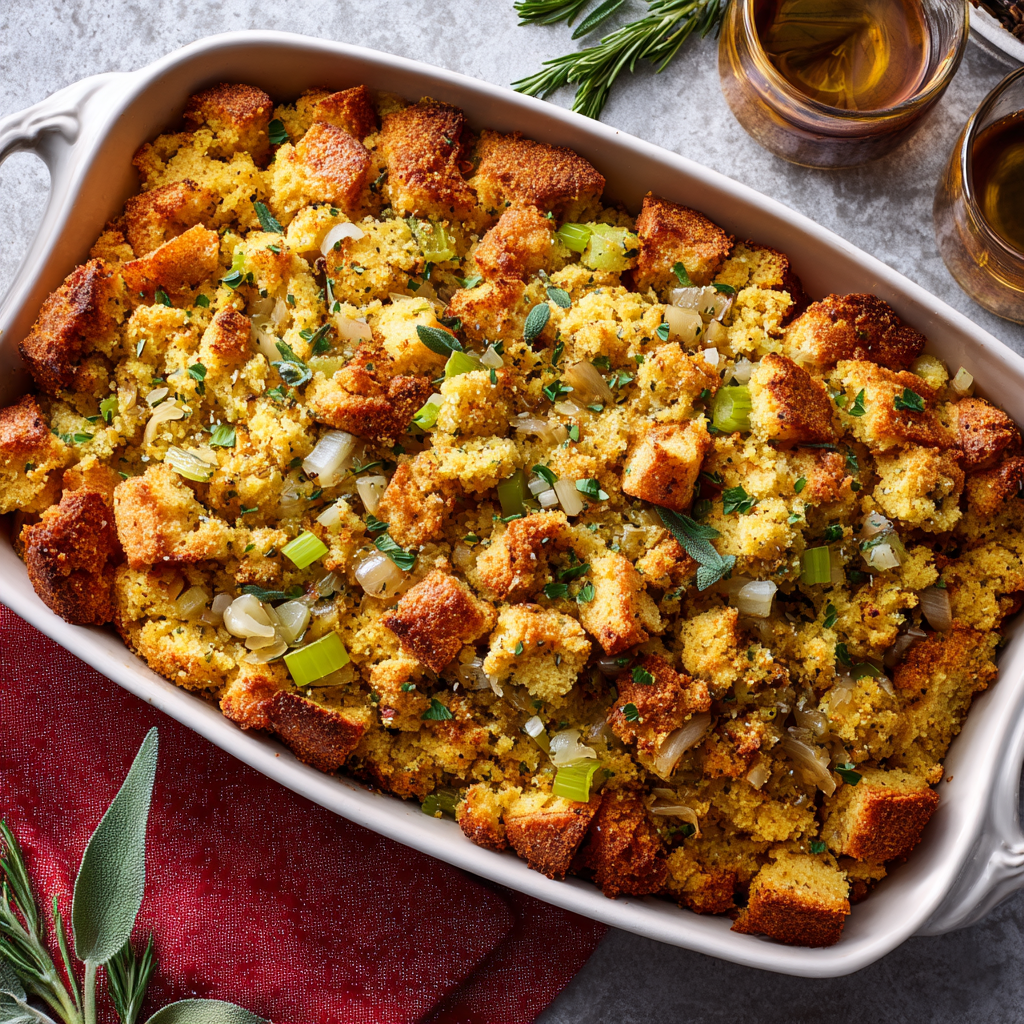
Southern Cornbread Dressing
Your New Favorite Holiday Tradition: Southern Cornbread Dressing
Hey friends, Beau here! Can you smell it? That’s the question I ask myself every single time I slide my favorite baking dish into the oven on a crisp holiday morning. It’s not just the turkey roasting or the pies cooling that gets me. No, the real star of the show, the scent that truly whispers “welcome home,” is the unmistakable, herby, buttery aroma of a golden pan of Southern Cornbread Dressing baking to perfection.
Now, I know some of you might call it “stuffing,” but in my neck of the woods, and in my kitchen, we proudly call it dressing. And this isn’t just a side dish. Let’s be real. This is the heart and soul of the holiday table. It’s the dish everyone sneaks a second (or third) spoonful of when they think no one is looking. It’s the one that sparks debates—“Should it be more moist?” “Does yours have sage?”—and the one that connects us to generations of family cooks who stood in their own kitchens, crumbling cornbread with love.
Today, I’m pulling back the curtain and sharing my absolute go-to recipe for Southern Cornbread Dressing. This is the one that has never, ever failed me. It’s the perfect balance of fluffy and crisp, savory and herby, simple and spectacular. Whether you’re a holiday hosting pro or tackling this classic for the very first time, I’m right here with you, every step of the way. So, tie on your favorite apron, and let’s make some magic together.
The Great Dressing Debate of ’98
I’ll never forget the Thanksgiving of 1998. I was about ten years old, tasked with my most important job yet: stirring the giant yellow bowl of dressing before my Grandmama Collier poured it into the pan. I was stirring with all my might when I looked up and asked, “Grandmama, why don’t we put oysters in ours like they do on TV?”
Well, you would have thought I’d suggested putting candy canes in the gravy. She stopped dead in her tracks, placed one flour-dusted hand on her hip, and looked me square in the eye. “Beau Collier,” she said, in that tone only Southern grandmas can master, “In this house, we respect the classics. Our dressing is built on three things: good cornbread, the ‘holy trinity’ of onion and celery, and a whole lot of heart. We don’t need fancy fixins’ to make something memorable.”
She was right, of course. That simple, soulful dressing was the highlight of my plate. It taught me a lesson I carry into my cooking today: the best recipes aren’t about being the most complicated; they’re about being made with intention and love. This recipe is a tribute to that wisdom.
Gathering Your Cast of Characters
Great dressing starts with great ingredients. Here’s everything you’ll need. Don’t just think of this as a shopping list—think of it as your flavor roadmap!
- 6 cups crumbled cornbread (preferably day-old): This is your foundation! Using slightly dry, day-old cornbread is a secret weapon—it soaks up that glorious broth like a dream. I use my simple buttermilk cornbread recipe, but a store-bought unsweetened cornbread works in a pinch.
- 3 cups bread cubes (white or French, slightly dried): This is the supporting actor that gives the dressing a wonderful, varied texture. Stale bread is perfect here. Just cube it and let it sit out for a few hours, or toast it lightly in the oven.
- 1 large onion, finely chopped: The sweet, aromatic base of our flavor. Yellow onion is my go-to for its balanced flavor.
- 3 celery stalks, diced: Don’t skip the celery! It provides a crucial, subtle crunch and a grassy freshness that cuts through the richness.
- 4 tbsp butter: We’re sautéing our veggies in this. Butter adds a depth and richness that oil just can’t match. It’s non-negotiable for that “warm hug” flavor.
- 2½ – 3 cups chicken or turkey broth: The lifeblood of the dressing! I highly recommend a good-quality, low-sodium broth so you can control the salt level. The amount can vary, so we’ll add it gradually.
- 2 large eggs, beaten: Our binding agent. The eggs hold everything together, giving the dressing its perfect sliceable-yet-tender structure.
- 1 tsp poultry seasoning: A classic blend that screams “holidays.” It’s usually a mix of thyme, sage, marjoram, and rosemary.
- 1 tsp dried sage (or to taste): The quintessential dressing herb. It’s earthy, slightly peppery, and so nostalgic. If you’re using fresh sage, chop it finely and use about 1 tablespoon.
- Salt & freshly ground black pepper, to taste: Season confidently! Taste as you go, especially after adding the broth.
Let’s Get Cooking: Building the Perfect Dressing
Okay, team! This is where the fun begins. We’re not just mixing ingredients; we’re building layers of flavor. Read through all the steps once before you start, and remember, cooking is a feeling, not just a formula.
- Preheat and Prep: Fire up your oven to a steady 375°F (190°C). This is our sweet spot—hot enough to get a beautiful golden-brown top and cook the eggs through, but not so hot that the edges burn before the center is set. While it’s heating, generously grease a 9×13-inch baking dish with butter or non-stick spray. Chef’s Hack: Greasing the dish well is your ticket to those irresistible, crispy edges everyone fights over.
- Sauté the Aromatics: In a large skillet over medium heat, melt your 4 tablespoons of butter. Once it’s foaming slightly, add the chopped onion and celery. We’re not looking for color here, just tenderness. Sauté them for 8-10 minutes, stirring occasionally, until the onions are translucent and the celery has lost its raw bite. You should be able to smell that beautiful, savory fragrance filling your kitchen. This step is crucial—it softens their texture and mellows their flavors, making them sweet and harmonious in the final dish.
- The Big Mix: In the largest bowl you own—seriously, don’t be shy, grab that giant one—combine the crumbled cornbread and the dried bread cubes. Pour the sautéed onion and celery mixture right over the top, making sure to get every last bit of that melted butter from the pan. Sprinkle in the poultry seasoning, dried sage, and a good pinch of salt and pepper. Give this a gentle stir to distribute the veggies and herbs. Now, pour in the beaten eggs and mix again. You’re building a base that’s ready to absorb all the goodness.
- The Broth Pour (The Most Important Step!): Here’s where your intuition comes in. Start with 2 ½ cups of your warm broth. Pour it over the cornbread mixture and gently fold it in. Now, grab a handful and squeeze it lightly. It should hold together loosely without being soupy or dripping liquid. If it feels a bit dry and crumbly, add the remaining ½ cup of broth, a little at a time, until it reaches that perfect “moist but not wet” consistency. Remember, the cornbread will continue to absorb liquid as it bakes!
- Pan and Bake: Transfer your perfectly mixed dressing into the prepared baking dish. Use a spatula to press it down gently and smooth the top—this helps it bake evenly. Slide it into the middle of your preheated oven, uncovered. We bake it uncovered to get that glorious, textured, golden-brown crust on top.
- The Grand Finale: Bake for 35-45 minutes. You’re looking for a firm center, a top that’s golden brown and slightly crisp, and edges that are pulling away from the dish. If you insert a knife in the center, it should come out clean. The smell at this point will be absolutely intoxicating. Let it rest for about 10 minutes before serving. This rest time allows everything to set up perfectly, making it easier to slice and serve.
Setting the Stage: How to Serve Your Masterpiece
You’ve done it! You’ve created a holiday icon. Now, let’s give it the presentation it deserves. I like to serve my dressing right from the baking dish—it’s rustic, homey, and says “dig in!”
Use a large spoon or a square-edged serving spatula to cut neat (or not-so-neat—I won’t judge!) squares. Place a generous portion right next to that slice of turkey, because let’s be honest, they’re best friends. The number one rule? Always, and I mean always, serve it with a boat of rich, homemade turkey gravy. A ladleful poured over the top is pure bliss.
For a beautiful plate, frame it with some vibrant garlicky green beans and a spoonful of tart cranberry sauce. The red, green, and golden brown colors just scream celebration. And if there’s any left the next day? It makes a phenomenal breakfast, reheated in a skillet with a fried egg on top. You’re welcome.
Make It Your Own: Fun & Flavorful Twists
While the classic will always have my heart, I love getting creative in the kitchen. Here are a few ways to put your own spin on this Southern staple:
- Sausage & Apple: Brown and crumble ½ pound of mild or spicy breakfast sausage. Drain the fat and add it to the mix. Toss in 1 cup of finely diced sweet apple (like Honeycrisp or Gala) with the onions and celery for a sweet and savory twist.
- Mushroom & Thyme: A fantastic vegetarian option! Sauté 8 ounces of sliced cremini mushrooms with the onions and celery until they’ve released their liquid and turned golden. Swap the poultry seasoning for 2 teaspoons of fresh thyme leaves.
- Spicy Southwest: Add a kick! Mix in a 4-ounce can of diced green chiles and 1 cup of shredded pepper jack cheese. Substitute 1 teaspoon of cumin for the sage. It’s a fun, fusion twist that’s incredible with roasted chicken.
- Gluten-Free & Cornbread-Only: Easy! Just ensure your cornbread is made with a gluten-free flour blend, and skip the white bread cubes entirely. Use 9 cups of crumbled gluten-free cornbread instead. The texture will be slightly more crumbly, but just as delicious.
Beau’s Back-Porch Kitchen Notes
This recipe has been a living, breathing thing in my family. My mom always added a pinch of sugar to her sautéing onions, claiming it “helped them caramelize better.” I’ve adopted that trick, and I swear by it. Over the years, I’ve learned that the best dressing is made a day ahead. Mix it all up, cover it, and let it hang out in the fridge overnight. The flavors marry and deepen in a magical way, and all you have to do on the big day is pop it in the oven. It’s a hosting game-changer! Just add 5-10 minutes to the bake time since it’s going in cold.
Your Dressing Questions, Answered!
I’ve gotten a lot of questions about this recipe over the years. Here are the most common ones to ensure your success:
- Q: My dressing turned out too dry! What happened?
A: The most common culprit is not enough broth or overbaking. Remember, the dressing continues to firm up as it cools. Next time, be more generous with the broth during the “squeeze test,” and check for doneness at the 35-minute mark. If it’s already baked and dry, no worries! Serve it with extra gravy—it’s a delicious fix. - Q: Can I make this completely vegetarian?
A: Absolutely! It’s an easy and delicious swap. Just use a rich vegetable broth instead of chicken or turkey broth. The sautéed veggies and herbs provide tons of flavor on their own. - Q: Why is my dressing mushy in the middle?
A: This usually means it needed more baking time, or there was a bit too much liquid. The center should be firm to the touch. If you find it’s consistently mushy, try baking it in a slightly larger, shallower dish next time for more even cooking. - Q: How far in advance can I prepare this?
A: You can crumble the cornbread and dry the bread cubes up to 3 days ahead. You can also sauté the veggies a day in advance. For the best results, I recommend mixing the entire dish and refrigerating it for up to 24 hours before baking, as mentioned in my Chef’s Notes.
Let’s Talk Nourishment
While this is definitely a celebratory dish, it’s wonderful to know what’s on your plate. Here’s a general breakdown per serving (assuming 8 servings). Remember, these are estimates and can vary based on your specific ingredients (like the type of broth or cornbread used).
Each satisfying serving comes in at around 250-300 calories. It provides a good source of energy with about 28g of carbohydrates, and the eggs contribute roughly 6g of protein to help keep you full. The fat content (around 12g) primarily comes from the butter and eggs, which adds to that rich, comforting mouthfeel we all love. To lighten it up slightly, you can use a low-fat broth and reduce the butter by 1 tablespoon, but for the holidays, I say embrace the joy!

Southern Cornbread Dressing
Description
Hey friends, Beau here! If there’s one dish that smells like home during the holidays, it’s this Southern Cornbread Dressing. Crispy on top, tender inside, and bursting with buttery, herby goodness, it’s the soul of the holiday table. Whether it’s your first time making it or you’re a seasoned pro, this recipe will guide you every step of the way.
Ingredients
-
6 cups crumbled day-old cornbread (homemade or unsweetened store-bought)
-
3 cups bread cubes (white or French, slightly dried)
-
1 large onion, finely chopped
-
3 celery stalks, diced
-
4 tbsp butter
-
2½–3 cups chicken or turkey broth (low-sodium recommended)
-
2 large eggs, beaten
-
1 tsp poultry seasoning
-
1 tsp dried sage (or 1 tbsp finely chopped fresh sage)
-
*Salt & freshly ground black pepper, to taste
-
Optional: ½ cup cooked sausage, diced apple, mushrooms, or green chiles for variations
Instructions
1. Preheat & Prep
-
Preheat oven to 375°F (190°C).
-
Grease a 9×13-inch baking dish generously with butter or non-stick spray.
2. Sauté Vegetables
-
In a skillet over medium heat, melt butter.
-
Add onion and celery; sauté 8–10 minutes until soft and fragrant.
3. Mix the Dressing
-
In a large bowl, combine cornbread and bread cubes.
-
Add sautéed veggies, poultry seasoning, sage, salt, and pepper.
-
Stir in beaten eggs.
4. Add Broth
-
Gradually add 2½ cups warm broth, folding gently.
-
Test by squeezing a handful; it should hold together loosely.
-
Add more broth (up to ½ cup) if too dry.
5. Bake
-
Transfer mixture to the prepared dish. Smooth the top.
-
Bake 35–45 minutes, uncovered, until top is golden and center is firm.
-
Let rest 10 minutes before serving.
Notes
-
Sausage & Apple: Add ½ lb cooked breakfast sausage and 1 cup diced apple.
-
Mushroom & Thyme: Sauté 8 oz mushrooms; use fresh thyme instead of poultry seasoning.
-
Spicy Southwest: Mix in 4 oz diced green chiles and 1 cup shredded pepper jack cheese.
-
Gluten-Free: Use 9 cups gluten-free cornbread, skip white bread cubes.
Nutrition
- Calories: 250–300 Cal Per Serving
- Fat: 12 g
- Carbohydrates: 28 g
- Protein: 6g
More Than a Recipe
As I pull this pan of golden-brown, fragrant dressing out of the oven, I can’t help but smile. It’s more than just a recipe; it’s a connection. It’s a link to my Grandmama Collier’s kitchen, to the laughter around my parents’ table, and now, I hope, to the new memories you’re creating in your own home.
This Southern Cornbread Dressing is a testament to the fact that the most beloved dishes are often the simplest ones, made with care and shared with people you love. So don’t stress about perfection. Embrace the little imperfections, taste as you go, and pour all that good intention into the bowl. I promise, it’s the secret ingredient that makes all the difference.
Now, I’d love to hear from you! Did you add a special twist? Did your family go crazy for it? Share your stories and photos with me over on Instagram @feastical. Happy cooking, friends!
Final Thoughts: More Than a Recipe
As I pull that pan of golden-brown, fragrant dressing out of the oven, I can’t help but smile. It’s more than just a recipe; it’s a connection. It’s a link to my Grandmama Collier’s kitchen, to the laughter around my parents’ table, and now, I hope, to the new memories you’re creating in your own home.
This Southern Cornbread Dressing is a testament to the fact that the most beloved dishes are often the simplest ones, made with care and shared with people you love. So don’t stress about perfection. Embrace the little imperfections, taste as you go, and pour all that good intention into the mix. That’s the real secret ingredient that never appears on any list.
Whether this becomes a new tradition or finds its place among your old favorites, I am so grateful you let me share it with you. From my kitchen to yours, I wish you a holiday filled with warmth, joy, and a second helping of the good stuff.
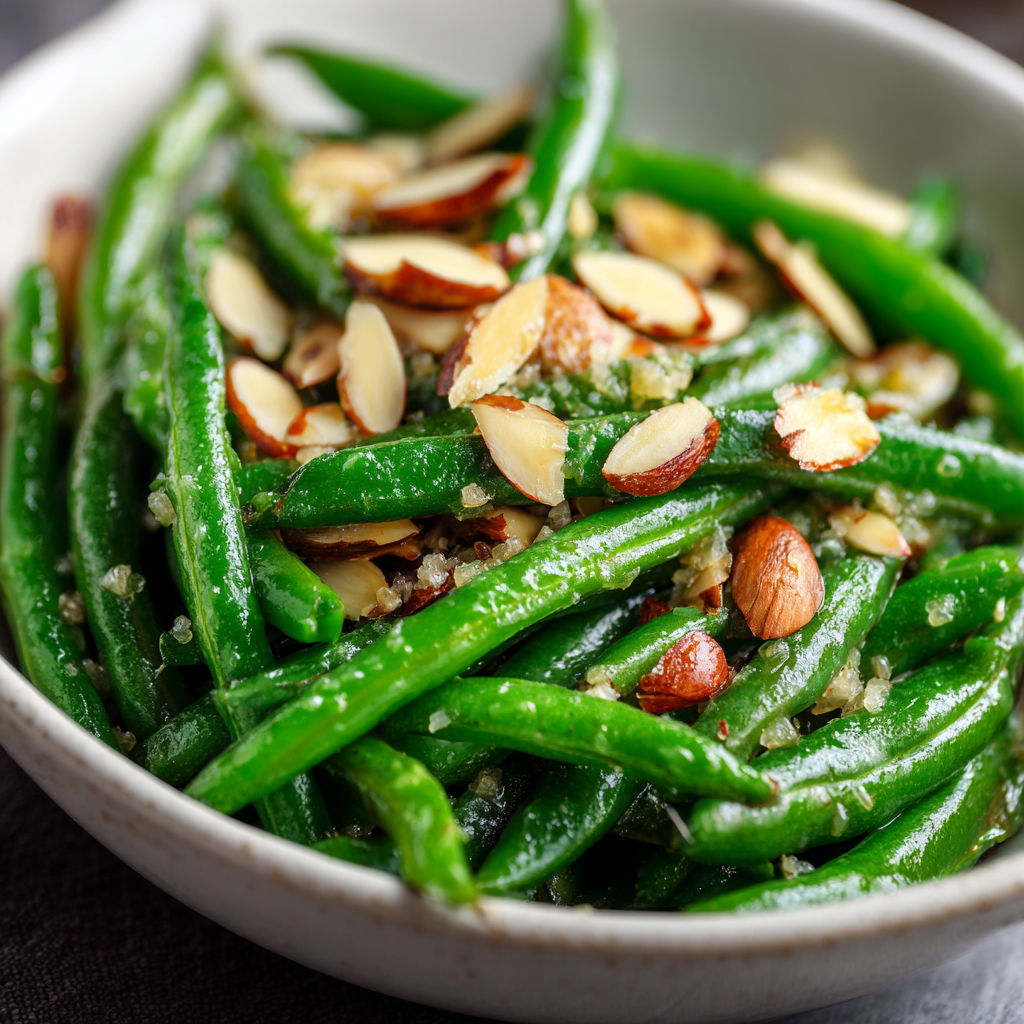
Garlic Butter Green Beans with Almonds
Garlic Butter Green Beans with Almonds: Your New Favorite Side Dish
Hey friends, Beau here from Feastical! Let’s be real for a second. How many times have you stared into your fridge or wandered the grocery store aisles, completely stumped on what to make for a side dish? You want something that feels a little special, tastes fantastic, but doesn’t require a chemistry degree or an entire afternoon to pull together. I see you, and I’ve been there more times than I can count.
That’s exactly why I’m so excited to share this recipe with you today. We’re talking about Garlic Butter Green Beans with Almonds. Now, I know what you might be thinking: “Green beans? Really, Beau?” But trust me on this one. We’re not talking about a sad, mushy, forgotten-about pile of veggies. Oh no. We’re transforming the humble green bean into a star player.
Imagine this: crisp-tender green beans, sautéed in a pool of golden, sizzling butter that’s been infused with the sweet, aromatic punch of fresh garlic. Then, we finish it all off with a generous sprinkle of almonds we’ve toasted to a perfect, nutty golden brown. The result? A side dish that’s so good, it might just steal the spotlight from your main course. It’s fresh, it’s elegant, and it comes together in about 20 minutes flat. This isn’t just a recipe; it’s your new secret weapon for making any meal feel like a celebration. So, let’s get our skillet sizzling!
A Pinch of Nostalgia: Why These Beans Feel Like Home
This recipe always takes me right back to my Grandma Ida’s kitchen. She had this tiny, sun-drenched room where magic constantly happened, and her Thanksgiving feasts were the stuff of legend. The turkey was always juicy, the mashed potatoes were clouds of delight, but for me, the green beans were the unsung hero.
Grandma Ida didn’t believe in the canned, cream-of-mushroom soup method (no shade to green bean casserole lovers!). She’d stand at the counter, snapping the ends off fresh beans one by one, a little bowl for the “tails” as she called them. The sound of the beans snapping was the official soundtrack to Thanksgiving morning. She’d toast almonds in her cast-iron skillet, and the smell would mix with the roasting turkey—a fragrance I now know as pure, unadulterated joy. She taught me that even the simplest vegetable, treated with a little respect and a whole lot of butter and garlic, could be extraordinary. This is my homage to her, a recipe built not just on ingredients, but on a foundation of love and really good, simple food.
Gathering Your A-Team: The Ingredients
One of the best things about this dish is its simplicity. We’re using a handful of high-quality ingredients that work together in perfect harmony. Here’s what you’ll need:
- 1 lb (450 g) Fresh Green Beans, trimmed – Look for beans that are bright green, firm, and snap easily. Avoid any that are limp or have brown spots. This is our main event! Chef’s Insight: If you can find haricot verts, those thinner French green beans, grab them! They cook even faster and have a wonderfully delicate texture.
- 2 tbsp Butter – Butter is the base of our luxurious sauce, giving the beans a rich, velvety coating and that irreplaceable flavor. Substitution Tip: For a dairy-free version, a high-quality olive oil or vegan butter works beautifully.
- 2 cloves Garlic, minced – Fresh is best here, folks! The sharp, pungent flavor mellows out as it cooks in the butter, becoming sweet and aromatic. Chef’s Hack: Use a microplane to grate the garlic directly into the pan for a finer, more distributed flavor that won’t give you big chunks.
- ¼ cup Sliced Almonds – These are our crunch factor! Toasting them unlocks a deep, nutty flavor that takes this dish from great to unforgettable.
- Salt & Pepper, to taste – The essential seasonings. I use a flaky sea salt for finishing and freshly cracked black pepper for a little bite.
- Optional: A squeeze of Fresh Lemon Juice – Don’t sleep on this! A quick spritz of lemon right at the end cuts through the richness of the butter and brightens up the entire dish. It’s a total game-changer.
Let’s Get Cooking: Your Step-by-Step Guide
Alright, team! It’s time to turn these beautiful ingredients into a side dish you’ll be proud of. Follow these steps, and you’ll have a restaurant-quality dish on your table in no time. I’ve packed this section with all my favorite chef hacks to ensure your success!
Step 1: The Blanching Brilliance
Bring a large pot of generously salted water to a rolling boil. While it’s heating up, get your green beans trimmed. Just snap off or slice away the woody stem ends. Once your water is boiling, carefully add the green beans. We’re only going to blanch them for 2-3 minutes. You’ll know they’re ready when their color turns from a dull green to a vibrant, almost electric emerald. Chef’s Tip: This quick boil not only sets that gorgeous color but also starts the cooking process, meaning we spend less time in the skillet later. Immediately drain the beans and then plunge them into a bowl of ice water. This “shocks” them and stops the cooking process, locking in that crisp-tender texture we’re after. Let them hang out in the ice bath for a minute, then drain and pat them completely dry with a kitchen towel. A dry bean is a bean that will get beautifully sautéed, not steamed!
Step 2: Toast Those Nuts!
Grab a large skillet (I love using a wide stainless steel or cast-iron one for this) and place it over medium heat. No oil or butter yet! Add your sliced almonds to the dry skillet. Now, stand right there and watch them. Stir them or shake the pan frequently. In about 2-3 minutes, you’ll see them turn a lovely light golden brown and you’ll be hit with that incredible, warm, nutty aroma. Chef’s Warning: Nuts can go from perfectly toasted to tragically burnt in seconds, so don’t wander off to check your phone! Once they’re golden, immediately pour them onto a plate or bowl to cool. We’ll use this same skillet for the next step—no need to wash it!
Step 3: Create the Garlic Butter Elixir
In that same, now-empty skillet, melt your 2 tablespoons of butter over medium heat. Once it’s melted and just starting to foam, add your minced garlic. This is where the magic starts. Sauté the garlic for about 30 seconds, just until it becomes fragrant. Chef’s Secret: We do NOT want to brown the garlic. Browned garlic turns bitter, and we’re going for sweet and aromatic. If it starts to color quickly, your heat is too high—don’t be afraid to lower it!
Step 4: The Grand Sauté
Now, add your perfectly blanched and dried green beans to the skillet. They should sizzle happily as they hit the garlic butter. Season generously with salt and pepper. Using tongs, toss the beans around to coat every single one in that glorious buttery sauce. Let them cook for 4-5 minutes, tossing occasionally, until they are heated through and have reached your desired level of tenderness. I like mine with a definite snap – “tender-crisp” is the goal!
Step 5: The Grand Finale
Take the skillet off the heat. Now, shower your green beans with the toasted almonds we prepared earlier. If you’re using the lemon juice, now is the time for that quick squeeze over the top. Give everything one final, joyful toss to combine.
Plating with Pizzazz: How to Serve Your Masterpiece
You’ve done it! You’ve created a side dish that’s bursting with color, texture, and flavor. Now, let’s serve it with style. I love transferring these beans to a warm, shallow serving platter. Piling them high lets everyone see how beautiful they are. Make sure to scrape every last bit of that garlicky butter and those toasted almonds from the skillet onto the beans—that’s the good stuff!
These Garlic Butter Green Beans are the ultimate team player. They pair wonderfully with a simple roasted chicken, a perfectly seared steak, or a flaky piece of baked salmon. For a holiday spread, they are a bright and fresh counterpoint to rich dishes like mashed potatoes and gravy. I sometimes like to finish them with an extra tiny sprinkle of flaky sea salt right before serving for a little extra texture and a professional touch. It’s all about making the everyday feel extraordinary.
Mix It Up! Fun Flavor Twists
Once you’ve mastered the classic, feel free to get creative and make this recipe your own! Here are a few of my favorite variations:
- Parmesan & Herb: Right before serving, toss in a handful of freshly grated Parmesan cheese and a tablespoon of chopped fresh parsley or chives. The salty, umami cheese melts into the butter and creates a next-level sauce.
- Spicy Sriracha Kick: Love a little heat? Add a teaspoon (or more!) of Sriracha or a pinch of red pepper flakes to the garlic butter in step 3. It gives the beans a fantastic sweet-and-spicy vibe.
- Bacon Lover’s Dream: Before you start with the butter, cook 4 slices of chopped bacon in the skillet until crispy. Remove the bacon, then use the rendered bacon fat instead of (or in addition to) the butter for sautéing. Top the finished beans with the crispy bacon bits. You’re welcome.
- Vegan Delight: An easy swap! Use a high-quality vegan butter or extra virgin olive oil, and skip the Parmesan option. The dish is still packed with flavor from the garlic and toasted almonds.
- Lemon Zest Frenzy: For an even bigger citrus punch, add the zest of half a lemon along with the juice at the end. The zest is packed with aromatic oils that will make the whole dish sing.
From My Kitchen to Yours: A Few Parting Thoughts
This recipe has been a staple in my repertoire for years, and it’s evolved in fun ways. I once made a triple batch for a big family potluck and accidentally used a whole head of garlic instead of a few cloves. Let me tell you, no one complained—in fact, they demanded the recipe! It just goes to show that you should cook to your own taste. Love garlic? Add more! Prefer a deeper flavor? Try swapping the almonds for toasted pine nuts or pecans. The best part of cooking is making a dish your own. This green bean recipe is a fantastic canvas, so don’t be afraid to paint outside the lines a little.
Your Questions, Answered!
Q: Can I use frozen green beans?
A: You can, but the texture will be different. Frozen green beans are already blanched and tend to be softer. I’d recommend thawing them completely and patting them VERY dry. Skip the blanching step and go straight to sautéing. They’ll cook faster, so keep an eye on them to avoid mushiness.
Q: My garlic burned! What do I do?
A: It happens to the best of us! If your garlic bits are black and bitter, it’s best to wipe out the skillet, let it cool for a minute, and start the garlic butter step over. This time, keep the heat to medium-low. Remember, we’re just looking to fragrance the butter, not fry the garlic.
Q: Can I make this ahead of time?
A: For the best texture, I recommend serving these right away. However, you can do some prep to make things faster! You can blanch the green beans and toast the almonds a few hours ahead. Keep them separate in the fridge. When you’re ready to serve, the final sauté will only take 5 minutes.
Q: My green beans turned out soggy. Where did I go wrong?
A: The most common culprit is not drying them thoroughly after the ice bath. Any extra water will steam the beans in the pan instead of letting them sauté. Also, make sure your skillet is nice and hot before adding the butter and garlic, and don’t overcrowd the pan—if the beans are piled on top of each other, they’ll steam.

Garlic Butter Green Beans with Almonds
Description
Hey friends, Beau here! Let’s be honest—sometimes choosing a side dish can feel like a chore. You want something simple, tasty, and a little special, right? Enter Garlic Butter Green Beans with Almonds. Crisp-tender green beans sautéed in buttery garlic, topped with toasted almonds—this dish transforms a humble veggie into a star. It’s fresh, elegant, and comes together in about 20 minutes.
Ingredients
-
1 lb (450 g) fresh green beans, trimmed
Look for firm, bright green beans that snap easily. Haricot verts work wonderfully! -
2 tbsp butter (or olive oil/vegan butter for a dairy-free option)
-
2 cloves garlic, minced (fresh is best; use a microplane for fine grating if desired)
-
¼ cup sliced almonds (toasted for deep, nutty flavor)
-
Salt & pepper, to taste
-
Optional: Squeeze of fresh lemon juice
Instructions
1. Blanch the Green Beans
-
Bring a large pot of salted water to a boil.
-
Trim the ends off your green beans.
-
Boil for 2–3 minutes, until bright green and tender-crisp.
-
Immediately transfer to an ice bath to stop cooking. Drain and pat dry.
Chef’s Tip: Dry beans sauté better and won’t steam in the pan.
2. Toast the Almonds
-
Heat a dry skillet over medium heat.
-
Add almonds and toast 2–3 minutes, stirring frequently, until golden and fragrant.
-
Remove from the skillet and set aside.
Warning: Nuts burn quickly—stay close!
3. Make the Garlic Butter
-
Melt butter in the same skillet over medium heat.
-
Add garlic and sauté 30 seconds, until fragrant (don’t brown it!).
4. Sauté the Green Beans
-
Add the blanched green beans to the skillet.
-
Season with salt and pepper.
-
Toss and cook 4–5 minutes, until heated through and tender-crisp.
5. Finish with Almonds and Lemon
-
Remove skillet from heat.
-
Toss in toasted almonds and a squeeze of lemon juice, if using.
-
Serve immediately on a warm platter.
Pro Tip: Scrape all that buttery, garlicky goodness from the pan onto the beans—it’s the best part!
Notes
Can I use frozen green beans?
Yes! Thaw and pat dry. Skip blanching; sauté directly but watch for mushiness.
What if my garlic burns?
Start over at medium-low heat. We want sweet, aromatic garlic, not bitter.
Can I prep ahead?
Yes! Blanch the beans and toast almonds in advance. Store separately. Sauté just before serving.
Soggy beans?
Ensure beans are fully dry and the pan is hot. Don’t overcrowd, or they’ll steam instead of sauté.
Nutrition
- Calories: 180 Cal Per Serving
- Fat: 14 g
- Protein: 5g
Nourishing & Delicious: A Quick Nutritional Glance
I’m all about food that tastes good AND makes you feel good. This dish is a perfect example! Green beans are a fantastic source of vitamins like Vitamin C, Vitamin K, and fiber. The almonds add healthy fats, a bit of protein, and vitamin E. Using butter gives us some richness, but you can control the amount based on your preference. All in all, it’s a side dish that adds a vibrant, nutrient-packed element to your plate without any guilt. It’s a win-win in my book!
Prep time: 10 minutes | Cook time: 10 minutes | Total time: 20 minutes | Serves: 4
Dig In & Enjoy!
And there you have it, friends! My go-to recipe for Garlic Butter Green Beans with Almonds. It’s simple, elegant, and proof that a little bit of technique and a whole lot of love can transform the most basic ingredient into something truly memorable. I hope this recipe finds its way onto your table again and again, creating new stories and happy memories in your own kitchen.
Did you make it? Did you add your own twist? I’d love to hear all about it! Tag me on social or drop a comment over on Feastical.com and let me know how it turned out. Now, go forth and cook something Feastical!
– Beau
Final Thoughts: Your New Go-To Side Dish Awaits
And there you have it, friends! What started as a simple solution to a side-dish slump has transformed into a recipe I know you’ll come back to again and again. These Garlic Butter Green Beans with Almonds are more than just a recipe; they’re a reminder that incredible food doesn’t have to be complicated. It’s about taking a few quality ingredients and treating them with care to create something truly special.
This dish has it all: the satisfying crunch of toasted almonds, the rich, aromatic silkiness of garlic butter, and the bright, fresh vibrancy of perfectly cooked green beans. It’s a symphony of textures and flavors that comes together in a mere 20 minutes. Whether you’re jazzing up a weeknight dinner, impressing guests, or adding a touch of nostalgic elegance to your holiday table, this recipe is your reliable, crowd-pleasing secret weapon.
So, the next time you find yourself staring into the abyss of your fridge, remember this little culinary gem. Don’t just make a side dish—create a moment. A moment that tastes like a warm hug from Grandma Ida’s kitchen, feels like a restaurant-quality treat, and proves that you can make any meal a celebration.

Festive Homemade Salsa
Festive Homemade Salsa: Your New Holiday Tradition in a Jar
More Than Just a Dip: It’s a Jar of Sunshine
Hey there, friend! Beau here, welcoming you back to Feastical. The holidays are upon us, and while I absolutely adore the classic scents of cinnamon and pine, sometimes my taste buds crave a little sunshine. A little zing. A little… fiesta amidst the fir trees. That’s where this recipe for Festive Homemade Salsa comes in, and let me tell you, it’s about to become your new favorite holiday kitchen project.
This isn’t just any salsa. This is a celebration in a bowl—a vibrant, confetti-like blend of homegrown goodness that tastes like a warm hug from your garden, even if there’s snow on the ground. We’re talking juicy tomatoes, crisp peppers, fragrant herbs, and a sprinkle of love that transforms simple ingredients into something truly magical. It’s the perfect way to add a pop of color and freshness to your holiday cheese board, a brilliant companion to your Christmas morning eggs, and honestly, the most thoughtful, heartfelt gift you can give.
Forget the crowded malls and generic presents. Giving someone a jar of something you made with your own two hands? That’s pure, delicious love. It says, “I thought of you, I worked for you, and I want you to have a taste of my kitchen.” So, tie on your favorite apron, put on some cheerful music, and let’s create some flavorful magic together. This process is simple, soulful, and incredibly satisfying. Ready? Let’s get chopping!
The Salsa That Started It All: A Grandma’s Garden Memory
This recipe always takes me right back to my Grandma Rose’s sun-drenched backyard. She didn’t have a garden; she had a jungle of edible wonders. One sweltering August afternoon, she handed me a wicker basket and said, “Come on, Beau. We’re putting up sunshine.” We spent hours picking ruby-red tomatoes, snappy green peppers, and fistfuls of cilantro and basil that smelled like pure happiness.
In her steamy kitchen, with the radio playing old tunes, she taught me how to chop, simmer, and listen for the “pop” of the jars sealing. It wasn’t just about preserving food; it was about preserving a moment. We’d line up the finished jars on her countertop, and they looked like a row of stained-glass windows, each one holding a little bit of summer’s soul. That feeling—the pride, the connection, the love—is what I pack into every single batch of this salsa. When you make it, you’re not just following a recipe; you’re starting your own tradition.
Gathering Your Garden Goodies
Here’s your shopping (or harvesting!) list. The beauty of this salsa is its flexibility, so don’t stress if your garden yeilds something a little different. I’ve got plenty of swaps and chef secrets for you right here.
- 2 cups chopped homegrown tomatoes: The heart and soul of the operation! You want them ripe, juicy, and heavy for their size. The deeper the color, the richer the flavor. Chef’s Insight: If you don’t have homegrown, Roma or plum tomatoes are your best bet from the store—they’re less watery, which means a thicker, more robust salsa.
- ½ cup chopped homegrown peppers: This is your dial for heat. A mild poblano or a couple of jalapeños (seeds removed for less heat) are perfect. Feeling brave? Throw in a serrano or a sliver of habanero! Substitution Tip: A half-cup of chopped bell pepper works beautifully for a completely mild, kid-friendly version.
- ½ cup chopped homegrown onions: I love a sharp white or a sweet yellow onion here. They add a crucial bite and sweetness that balances the tomatoes. Chef’s Insight: If raw onion is a bit too pungent for you, give the chopped onions a quick rinse under cold water after dicing. It tames the bite perfectly!
- ¼ cup chopped homegrown cilantro leaves: The herb that makes everything taste fresh and vibrant. If you’re one of those folks who thinks cilantro tastes like soap (no judgment!), simply skip it.
- ¼ cup chopped homegrown basil leaves: My “festive” secret weapon! Basil adds an unexpected, aromatic sweetness that makes this salsa truly special and holiday-worthy. It pairs wonderfully with the tomatoes.
- 1–2 teaspoons salt: Start with one and add to taste. Salt isn’t just for saltiness; it’s a flavor enhancer that makes all the other ingredients sing.
- 1–2 tablespoons lime juice (optional): I almost never skip this. The bright, tangy acidity from the lime juice cuts through the richness and brings all the flavors into sharp, delicious focus.
Let’s Make Some Magic: The Step-by-Step Simmer
Okay, team! Everything is prepped and ready to go. This is where the alchemy happens. Follow these steps, and you’ll be a salsa-canning pro in no time.
- Wash and Chop: Give all your gorgeous garden veggies a good rinse under cool water. Now, for the texture! You have two paths here. For a rustic, chunky salsa, I love hand-chopping everything into a fine, uniform dice. It’s therapeutic! For a more restaurant-style, saucy consistency, pulse everything a few times in your food processor. Chef’s Hack: Don’t over-process! You want texture, not baby food. A few quick pulses is all you need.
- The Big Combine: Dump your beautiful chopped tomatoes, peppers, onions, cilantro, and basil into a large, non-reactive pot (like stainless steel or enameled cast iron). Stir in the salt and that all-important lime juice. Take a moment to appreciate the rainbow of colors in that pot. That’s real food, right there.
- The Flavor-Melding Simmer: Place your pot over medium heat and bring it to a lively simmer. Let it bubble away for 15-20 minutes, stirring occasionally with a wooden spoon. You’ll notice the salsa darken slightly and the liquid will reduce a bit. Chef’s Insight: This step isn’t just about cooking; it’s about letting the flavors get to know each other, mingle, and become best friends. The aroma at this stage is absolutely incredible.
- Jar Prep is Key: While the salsa is simmering, get your jars ready. You MUST use sterilized jars for safe canning. I run mine through the dishwasher on a hot cycle or boil them in a large pot of water for 10 minutes. Keep the jars hot until you’re ready to fill them. Your lids and bands should be clean and heated as well (a small saucepan of simmering water is perfect for this).
- Fill ‘Em Up: Carefully ladle the hot salsa into your hot, sterilized jars, leaving a ½ inch of headspace at the top. This space is crucial for creating a vacuum seal as the jars cool.
- The De-bubble Step: This might sound like a small thing, but don’t skip it! Take a clean, thin utensil (like a chopstick or a plastic knife) and run it along the inside of the jar, gently releasing any trapped air bubbles. This ensures a solid seal and a consistent product.
- Seal and Process: Wipe the rims of the jars with a clean, damp cloth to ensure a perfect seal. Place the heated lids on top and screw on the bands until they are fingertip-tight—that means snug, but don’t Hercules them on. Using a jar lifter, carefully lower the jars into your boiling water bath canner. Make sure the water covers the jars by at least an inch. Process them for 15 minutes (start the timer once the water returns to a full boil).
- The Victory “Pop”: After 15 minutes, carefully remove the jars and place them on a towel-lined countertop. Listen closely over the next few hours. That beautiful, satisfying “pop” sound is the music of a successful seal! Let the jars cool completely, untouched, for 12-24 hours. Then, press the center of each lid to check that it’s sealed (it should not move or bounce back).
How to Serve Up This Sunshine
You did it! You’ve created jars of holiday gold. Now, how do you show it off?
For your holiday table, I love serving this salsa in a beautiful ceramic bowl alongside a giant platter of crispy tortilla chips. But let’s think beyond the chip! It’s a phenomenal topping for grilled chicken or fish, a vibrant spoonful over cream cheese for an instant festive appetizer, or the perfect zesty companion to your Christmas morning breakfast burritos. When gifting, tie a ribbon around the lid, attach a handwritten tag with serving suggestions, and maybe even include a bag of homemade tortilla chips. You’re not just giving a jar of salsa; you’re giving an experience.
Make It Your Own: Creative Twists & Swaps
Once you’ve mastered the classic, have fun playing with the formula! Here are a few of my favorite variations:
- Tropical Twist: Add ½ cup of finely chopped pineapple or mango with the tomatoes. It adds a sweet and tangy flavor that’s absolutely irresistible with the basil.
- Smoky & Spicy: Replace the fresh peppers with 1-2 chopped chipotle peppers in adobo sauce. It gives a deep, smoky heat that’s perfect for winter.
- Roasted Garlic Delight: Before chopping, roast a whole head of garlic until soft and caramelized. Squeeze the cloves into the salsa pot for a mellow, sweet, and incredibly rich garlic flavor.
- No-Sugar-Added Sweetness: Add ½ cup of roasted corn kernels or finely diced roasted sweet potato for a natural sweetness and a wonderful textural contrast.
- Herb Garden Medley: Swap the basil and cilantro for other garden herbs! A combination of oregano, thyme, and a little parsley creates a more Italian-inspired “salsa” that’s amazing on bruschetta.
Beau’s Kitchen Chronicles
This recipe has evolved more than my taste in music since that first batch with Grandma Rose. I once, in a very ambitious and slightly messy experiment, tried to triple the recipe in a pot that was clearly not large enough. Let’s just say my kitchen walls wore a festive, tomato-y speckle for a week. The lesson? Use a big pot, folks! Bigger than you think you need. The other evolution is the basil—that was my own addition a few years back when my basil plant was threatening a garden takeover. It was a happy accident that’s now a non-negotiable part of the “festive” spirit. Cooking isn’t about perfection; it’s about the stories you create along the way.
Your Salsa Questions, Answered!
I’ve gotten a lot of questions about this recipe over the years. Here are the big ones:
Q: My salsa turned out a bit watery. What happened?
A: No worries! This usually comes from the tomatoes. Next time, you can core and de-seed your tomatoes before chopping to remove excess liquid. You can also let the simmer go for an extra 5-10 minutes to reduce the liquid further. For this batch, just give it a good stir before serving—it’ll still taste amazing!
Q: Can I skip the water bath canning process?
A: You can absolutely make this as a “fridge salsa”! Just follow the recipe through the simmering step, let the salsa cool, and store it in a sealed container in the fridge. It will keep beautifully for about 1-2 weeks. The water bath is only necessary for shelf-stable storage and gifting.
Q: How long do the sealed jars last?
A: Properly sealed and processed jars are shelf-stable for at least 12 months. Once opened, store them in the refrigerator and consume within two weeks.
Q: I’m nervous about canning safety. Any tips?
A> Your caution is smart! Always use recipes from trusted sources (like Feastical!) that are designed for canning. Never alter the ratios of low-acid ingredients. The two golden rules: 1) Always sterilize your jars, and 2) Always process for the full, recommended time in the water bath. This ensures any potential nasties are eliminated and you get a safe, solid seal.
Straight From the Garden, Straight to You
One of the things I love most about this recipe is that it’s not just delicious; it’s genuinely good for you. You’re in control of every single ingredient that goes into the jar. There are no preservatives, no artificial flavors, and you can adjust the salt to your liking. It’s a celebration of whole, real food. Per ¼ cup serving, you’re looking at a low-calorie, fat-free, vegan, and gluten-free condiment that’s packed with vitamins from the fresh vegetables and herbs. It’s a flavor-packed way to add a healthy, vibrant option to your holiday spread.
Festive Homemade Salsa
Description
Festive Homemade Salsa
Prep Time: 15 min | Cook Time: 20 min | Yield: ~4 cups
A vibrant, sunshiny salsa that’s perfect for holiday gifting, topping your breakfast, or spicing up your cheese board.
Ingredients
-
2 cups chopped ripe tomatoes (Roma or plum tomatoes work well)
-
½ cup chopped peppers (poblano, jalapeño, or bell peppers for mild heat)
-
½ cup chopped onions (white or yellow)
-
¼ cup chopped cilantro leaves
-
¼ cup chopped basil leaves
-
1–2 tsp salt, to taste
-
1–2 tbsp lime juice (optional, for brightness)
Optional Variations:
-
Tropical Twist: Add ½ cup finely chopped pineapple or mango
-
Smoky & Spicy: Replace fresh peppers with 1–2 chopped chipotle peppers in adobo
-
Roasted Garlic: Add a head of roasted garlic, squeezed into the pot
-
Natural Sweetness: Add ½ cup roasted corn or finely diced roasted sweet potato
-
Herb Garden Medley: Swap basil and cilantro for oregano, thyme, and parsley
Instructions
1. Prep Your Veggies
-
Wash all produce thoroughly.
-
Chop for a chunky salsa or pulse briefly in a food processor for a smoother texture (don’t over-process).
2. Combine & Simmer
-
Place tomatoes, peppers, onions, cilantro, and basil in a large, non-reactive pot.
-
Stir in salt and lime juice.
-
Simmer over medium heat for 15–20 minutes, stirring occasionally, until the salsa thickens slightly and flavors meld.
3. Prepare Jars (Optional for Canning)
-
Sterilize jars and lids by boiling or running through a hot dishwasher cycle.
-
Keep jars hot until ready to fill.
4. Fill & Seal
-
Carefully ladle hot salsa into jars, leaving ½ inch of headspace.
-
Remove air bubbles with a chopstick or plastic utensil.
-
Wipe rims, place lids, and finger-tighten bands.
-
Process jars in a boiling water bath for 15 minutes (water should cover jars by at least 1 inch).
-
Remove and let cool 12–24 hours. Check that lids are sealed.
5. Storage & Serving
-
Canned jars: Shelf-stable for 12 months; refrigerate after opening (consume within 2 weeks).
-
Fridge salsa: Store in a sealed container, 1–2 weeks.
-
Serve with chips, as a topping for grilled meats, breakfast burritos, or cream cheese appetizers.
Notes
-
Watery salsa? Core and de-seed tomatoes or simmer a few extra minutes.
-
Adjust heat by removing seeds from peppers or swapping in milder varieties.
-
Use large pots to avoid messy spills when simmering.
Your New Holiday Tradition Awaits
And there you have it, my friend. A recipe that’s more than the sum of its parts. It’s a connection to the past, a gift for the present, and a delicious tradition for the future. This Festive Homemade Salsa is proof that the most memorable holiday flavors don’t always come from a cookie tin. Sometimes, they come from a sun-warmed garden and a steamy kitchen filled with love and laughter.
I am so grateful you spent this time in the Feastical kitchen with me. I can’t wait to hear your stories and see your beautiful jars! Tag me on social with #FeasticalSalsa so I can share in your success. Now, go forth and spread the joy, one jar at a time.
With a full heart and a happy spoon,
Beau
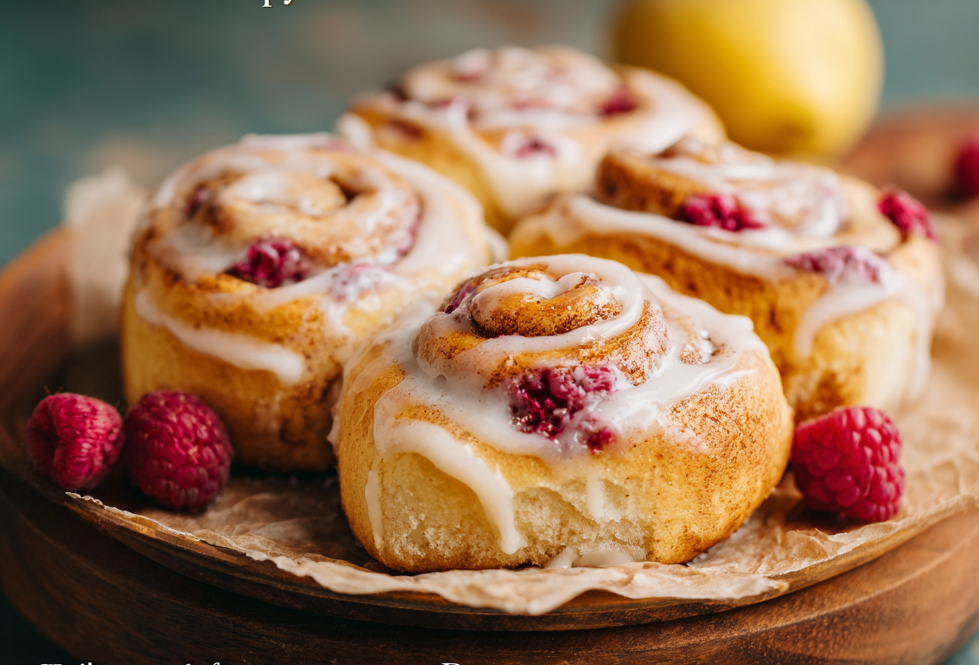
Heavenly Delight: Raspberry Cinnamon Rolls with Lemon Cream Cheese Frosting
Heavenly Delight: Raspberry Cinnamon Rolls with Lemon Cream Cheese Frosting
Hey there, friend! Beau here, welcoming you back to my kitchen. Is there anything in the world that smells more like pure, unadulterated happiness than cinnamon rolls baking in the oven? That warm, spicy, sugary scent just seems to hug every corner of the house, promising something truly special is on the way.
But today, we’re not just making any cinnamon roll. We’re taking that classic comfort and giving it a vibrant, sunny-day twist. We’re talking about Raspberry Cinnamon Rolls with Lemon Cream Cheese Frosting. Imagine this: impossibly soft, fluffy dough, swirled with a ribbon of cinnamon sugar and pockets of tart, jammy raspberries, all topped with a frosting that’s so bright and zesty it practically sings.
This recipe is for those slow weekend mornings that deserve a celebration, for holiday brunches that you want to be unforgettable, or for those “just because” days when you want to treat yourself and your people. It’s a project of love, sure, but I promise I’ll walk you through every single step. We’re keeping it simple, soulful, and so, so satisfying. So, tie on your apron, find that trusty spatula, and let’s bake up some sunshine together.
The Story Behind the Swirl
This recipe didn’t just pop into my head one day. It has roots, my friend. It goes back to my Grandma Eleanor’s kitchen, a place that always smelled of yeast and wisdom. She was the queen of classic cinnamon rolls—the kind so big and gooey they could solve any problem. I spent countless Saturday mornings at her counter, covered in flour, learning the magic of watching dough rise.
But as I grew up and found my own style in the kitchen, I started playing with her sacred recipe. One summer, I had a bumper crop of raspberries in my little backyard patch, and a bowl of bright lemons sitting on the counter. On a whim, I mashed the berries into the filling and zested a lemon into the frosting. The result was a revelation. The tart raspberries cut through the sweetness, and the lemon made the whole thing taste… brighter. It was like my grandma’s warm hug, but with a sunny, modern twist. It’s my little way of honoring tradition while dancing to my own beat.
Gathering Your Sunshine Ingredients
Alright, let’s get our mise en place! That’s just a fancy chef term for “getting everything in its place” before we start. It makes the whole process a smooth, joyful dance. Here’s what you’ll need to create this heavenly delight.
For the Dough:
- 1 cup warm milk – The foundation of our soft dough. Make sure it’s warm to the touch (about 110°F), not hot. Too hot, and it’ll shock the yeast; too cold, and it won’t wake up. If you don’t have a thermometer, it should feel like a pleasant warm bath.
- 2¼ tsp active dry yeast – Our little miracle worker! This is what makes the dough puff up into those beautiful, airy clouds.
- ½ cup granulated sugar – This feeds the yeast and adds a touch of sweetness to the dough itself.
- ⅓ cup unsalted butter, softened – For that irresistible richness and tender crumb. I always use unsalted so I can control the salt level. Chef’s Tip: Let this sit out on the counter for 30-60 minutes before you start. It should be soft enough that your finger leaves an indent.
- 1 tsp salt – The flavor booster! It balances all the sweetness and makes the other flavors pop.
- 2 large eggs – These add structure and a beautiful golden color to the baked rolls.
- 4½ cups all-purpose flour – The backbone of our dough. I like to fluff the flour in the bag before I scoop and level it off with a knife. This prevents you from accidentally using too much and making the dough dense.
For the Filling:
- 1 cup fresh or frozen raspberries – Don’t stress if they’re not in season! Frozen raspberries work beautifully here—just don’t thaw them completely, or they’ll get too watery. Substitution Tip: Feel free to use blackberries or a mix of berries for a different twist!
- ½ cup granulated sugar – This mixes with the cinnamon to create that classic, caramelized swirl.
- 1 tsp ground cinnamon – The warm, spicy heart of the roll. Use the freshest cinnamon you have for the best aroma.
For the Lemon Cream Cheese Frosting:
- ½ cup cream cheese, softened – The tangy superstar of our frosting. Again, softening is key for a lump-free, silky texture.
- ¼ cup unsalted butter, softened – Paired with the cream cheese for the perfect spreadable consistency.
- 2 cups powdered sugar – This gives our frosting its sweetness and structure. Sift it if you have time to avoid any little lumps.
- Zest of 1 lemon – This is where the magic is! The zest holds all the potent, sunny lemon oil. Don’t skip it!
- 2 tbsp fresh lemon juice – For that bright, acidic punch that balances the sweetness.
- 1 tsp vanilla extract – The flavor bridge that ties the lemon and cream cheese together beautifully.
Let’s Get Rolling: Your Step-by-Step Guide
Ready to make some magic? Follow these steps, and you’ll be a cinnamon roll pro in no time. I’ve packed this section with all my favorite chef hacks to ensure your success.
Step 1: Wake Up the Yeast. In the bowl of your stand mixer (or a large mixing bowl if you’re going old-school), pour in your warm milk. Sprinkle the yeast over the top and give it a gentle stir. Let it sit for 5-10 minutes. You’re waiting for it to get foamy and smell a bit like bread—that’s how you know your yeast is alive and ready to party! Chef’s Hack: If it doesn’t foam, your yeast might be old or your milk was too hot/cold. Start over—it’s worth it!
Step 2: Make the Dough. To the foamy yeast mixture, add the sugar, softened butter, salt, and eggs. Give it a quick mix with the paddle attachment until it’s just combined. Now, switch to the dough hook. With the mixer on low, gradually add the flour, one cup at a time. Once it’s all in, kick the speed up to medium and let the mixer knead the dough for 8-10 minutes. You’re looking for a smooth, slightly tacky dough that pulls away from the sides of the bowl. If you’re kneading by hand, turn it out onto a floured surface and knead for a good 10-12 minutes. It’s a great arm workout!
Step 3: The First Rise. Shape the dough into a ball. Place it in a lightly greased bowl, turn it over to coat, and cover the bowl with a clean kitchen towel or plastic wrap. Find a warm, draft-free spot in your kitchen and let it rise for about 1 hour, or until it has doubled in size. Chef’s Hack: I sometimes turn my oven on to the “warm” setting for one minute, then turn it off and let the dough rise in there. It creates the perfect cozy environment.
Step 4: Roll & Fill. Punch down the dough to release the air (this is the fun part!). Turn it out onto a lightly floured surface. Using a rolling pin, roll it out into a rectangle, roughly 16×12 inches. Now, for the filling! Sprinkle the cinnamon-sugar mixture evenly over the entire surface, leaving about a half-inch border along one of the long edges. Then, evenly scatter your raspberries over the sugar. Gently press them into the dough so they stick.
Step 5: Shape the Rolls. Starting with the long edge closest to you (the one with the filling all the way to the edge), tightly roll the dough into a log. Try to keep it as even as possible. When you get to the bare edge, pinch the seam to seal it. Now, grab your sharpest serrated knife. Chef’s Hack: Use unflavored dental floss to slice the rolls for perfect, uncompressed spirals! Just slide a long piece under the roll, cross the ends over the top, and pull. Perfect slices every time. Slice the log into 12 even rolls.
Step 6: The Second Rise. Place your beautiful spirals into a greased 9×13-inch baking dish. Cover them again and let them rise for a second time, about 30-45 minutes. They should look nice and puffy. Meanwhile, preheat your oven to 350°F (175°C).
Step 7: Bake to Golden Perfection. Once risen, pop those gorgeous rolls into the preheated oven. Bake for 25-30 minutes, or until they are golden brown on top and sound hollow when you gently tap them. Your kitchen will smell absolutely divine.
Step 8: Whip Up the Frosting. While the rolls are baking, make the frosting. In a medium bowl, beat the softened cream cheese and butter together until completely smooth and creamy. Gradually beat in the powdered sugar. Finally, add the lemon zest, lemon juice, and vanilla, and mix until it’s all one glorious, sunny, spreadable cloud.
Step 9: The Grand Finale. As soon as the rolls come out of the oven, spread that luscious lemon cream cheese frosting over the top. Watch as it melts into all the nooks and crannies. This is the moment of truth, and it is a beautiful one.
How to Serve Up This Slice of Heaven
Okay, the hardest part is over. Now, how do we serve these masterpieces? I’m a firm believer that presentation is part of the joy.
For a classic, homey feel, serve them right from the baking dish. Let everyone grab their own roll with a spatula—it’s communal and cozy. If you’re plating for a special brunch, use a wide, shallow bowl. Place one warm roll in the center and drizzle a little extra frosting over the top. You can even garnish with a few fresh raspberries and a tiny twist of lemon zest for a restaurant-worthy look.
What to serve with them? A hot cup of strong coffee or a tall glass of cold milk is the ultimate partner in crime. If you’re going all out for a brunch spread, these rolls pair wonderfully with savory dishes like scrambled eggs or crispy bacon to balance the sweetness.
Make It Your Own: Fun Recipe Twists
One of the best things about cooking is making a recipe your own. Here are a few of my favorite variations on this raspberry cinnamon roll theme.
- White Chocolate & Raspberry: Sprinkle ½ cup of white chocolate chips over the raspberries before you roll up the dough. The melty chocolate is an incredible addition.
- Orange & Cranberry: Swap the raspberries for dried cranberries and use orange zest and juice in the frosting instead of lemon for a wintery, festive twist.
- Lemon Blueberry Bliss: Use blueberries instead of raspberries and add a teaspoon of lemon zest to the cinnamon-sugar filling. The lemon-blueberry combo is a classic for a reason!
- Vegan-Friendly Version: Use plant-based milk and butter, a flax egg (1 tbsp ground flax + 3 tbsp water per egg), and vegan cream cheese. It works like a charm!
- Gluten-Free Swap: Use a 1:1 gluten-free all-purpose flour blend in place of the regular flour. The texture will be slightly different but still utterly delicious.
Beau’s Kitchen Notes & Stories
This recipe has seen a few… learning experiences. The first time I made them, I was so excited I dumped the raspberries in without patting them dry. Let’s just say I created a beautiful, but very soggy, pink spiral. Lesson learned! Now I use frozen berries straight from the freezer, or if using fresh, I make sure they are completely dry.
Over time, I’ve also started adding a tiny pinch of cardamom to the cinnamon-sugar filling. It adds this mysterious, warm depth that people can’t quite place but always love. Don’t be afraid to play and evolve your recipes. The best dishes are the ones that have a little story—and maybe a few happy accidents—baked right in.
Your Questions, Answered!
Q: My dough didn’t rise! What went wrong?
A: The most common culprits are old yeast or liquid that was too hot (which kills the yeast) or too cold (which puts it to sleep). Always check the expiration date on your yeast and make sure your milk is just warm to the touch.
Q: Can I make these the night before?
A> Absolutely! This is my favorite brunch hack. After you place the sliced rolls in the baking dish for their second rise, instead of letting them rise on the counter, cover them tightly and pop them in the fridge overnight. In the morning, take them out, let them sit on the counter for 30-60 minutes to take the chill off, then bake as directed. You can also make the frosting the night before and store it in the fridge.
Q: My filling leaked out and burned on the pan. How do I prevent this?
A> This usually happens if the rolls are too tightly packed in the pan or if there’s too much liquid from the berries. Make sure there’s a little space between each roll in the dish, and using frozen berries helps a ton. A little leakage is normal and actually tastes delicious, but this should minimize it.
Q: Can I use a different fruit?
A> You bet! This recipe is a fantastic canvas. Diced apples, pears, peaches, or cherries all work wonderfully. Just adjust the spice if you like—a little nutmeg with apple is divine.

Heavenly Delight: Raspberry Cinnamon Rolls with Lemon Cream Cheese Frosting
Description
Raspberry Cinnamon Rolls with Lemon Cream Cheese Frosting
Prep Time: 30 min | Rise Time: 1 hr 30 min | Bake Time: 25–30 min | Yield: 12 rolls
Soft, fluffy cinnamon rolls swirled with tart raspberries and topped with a bright lemon cream cheese frosting—a perfect weekend treat or holiday brunch centerpiece.
Ingredients
Dough:
-
1 cup warm milk (110°F)
-
2¼ tsp active dry yeast
-
½ cup granulated sugar
-
⅓ cup unsalted butter, softened
-
1 tsp salt
-
2 large eggs
-
4½ cups all-purpose flour
Filling:
-
1 cup fresh or frozen raspberries
-
½ cup granulated sugar
-
1 tsp ground cinnamon
Lemon Cream Cheese Frosting:
-
½ cup cream cheese, softened
-
¼ cup unsalted butter, softened
-
2 cups powdered sugar
-
Zest of 1 lemon
-
2 tbsp fresh lemon juice
-
1 tsp vanilla extract
Optional Variations:
-
White Chocolate & Raspberry: Add ½ cup white chocolate chips
-
Orange & Cranberry: Swap raspberries for dried cranberries; use orange zest/juice in frosting
-
Lemon Blueberry: Use blueberries in place of raspberries
-
Vegan: Plant-based milk & butter, flax egg, vegan cream cheese
-
Gluten-Free: 1:1 gluten-free flour blend
Instructions
1. Activate the Yeast
-
In a large bowl or stand mixer, combine warm milk and yeast. Let sit 5–10 min until foamy.
2. Make the Dough
-
Add sugar, softened butter, salt, and eggs. Mix until combined.
-
Gradually add flour, kneading with a stand mixer dough hook (8–10 min) or by hand (10–12 min) until smooth and slightly tacky.
3. First Rise
-
Shape dough into a ball, place in a greased bowl, cover, and let rise 1 hour in a warm, draft-free spot until doubled.
4. Roll & Fill
-
Punch down dough and roll into a 16×12-inch rectangle.
-
Mix sugar and cinnamon; sprinkle evenly over dough.
-
Scatter raspberries over cinnamon sugar, gently pressing them in.
5. Shape Rolls
-
Roll dough tightly from the long edge, pinch seam to seal.
-
Slice into 12 even rolls (dental floss works perfectly!).
6. Second Rise
-
Place rolls in a greased 9×13-inch pan. Cover and rise 30–45 min until puffy. Preheat oven to 350°F (175°C).
7. Bake
-
Bake 25–30 min until golden brown and cooked through.
8. Frosting
-
Beat cream cheese and butter until smooth.
-
Add powdered sugar gradually, then lemon zest, lemon juice, and vanilla. Mix until creamy.
9. Serve
-
Spread frosting generously over warm rolls. Optionally, garnish with fresh raspberries and lemon zest.
Notes
-
Use frozen berries to reduce leakage.
-
Leave space between rolls to prevent burning.
-
Dough can be refrigerated overnight after slicing for a make-ahead option.
-
Experiment with fruits and spices—cardamom, nutmeg, or different berries are all delightful.
Nutrition
- Calories: 370 kcal Approx. per roll
- Sugar: 28 g
- Sodium: 200 mg
- Carbohydrates: 55 g
- Protein: 6 g
Nutritional Info (For the Curious!)
Hey, I’m all about balance, but I also believe in enjoying life’s sweet moments! This is a treat, through and through, and it’s meant to be savored. Here’s a rough breakdown per roll (this is an estimate and can vary based on specific ingredients):
- Calories: ~370 kcal
- Fat: 15 g
- Carbohydrates: 55 g
- Sugar: 28 g
- Protein: 6 g
- Sodium: 200 mg
Remember, these are made with real ingredients like butter, eggs, and fruit. Enjoy one with a loved one, maybe split one for a smaller treat, and pair it with a protein-rich breakfast to keep you full and happy. No guilt allowed at this table—just good food and good vibes.
Final Thoughts from My Kitchen to Yours
Well, we made it! From that first foamy yeast to that final drizzle of sunny frosting, you’ve just created something truly special. These Raspberry Cinnamon Rolls are more than just a recipe; they’re a experience. They’re the smell of a happy home, the taste of a slow morning, and the joy of sharing something made with your own two hands.
I hope you feel a huge sense of accomplishment and that your first bite is everything you dreamed of—fl

Christmas Coffee Bliss
Your New Favorite Holiday Tradition is in a Mug
Hey friends, Beau here! Can you smell it? That magical, once-a-year aroma that seems to float through the air from late November straight through to the New Year? It’s a mix of pine needles, sugar cookies, and… hope. Pure, unadulterated holiday hope. For me, that feeling isn’t complete without a warm, perfectly spiced mug in my hands.
I’m a firm believer that the best moments happen around food and drink. It’s the quiet pause before the kids wake up, the cheerful chaos of a holiday brunch, or the cozy quiet after a long day of wrapping presents. And right at the center of those moments? A great cup of coffee. But not just any coffee. I’m talking about a cup that tastes like Christmas morning feels.
That’s why I’m so ridiculously excited to share my recipe for Christmas Coffee Bliss with you today. This isn’t just a recipe; it’s a jar of instant holiday spirit. We’re blending bold coffee, creamy cocoa, and a symphony of cozy spices to create a mix that’s going to become your go-to all season long. It’s simple enough for a sleepy Tuesday morning and special enough for your Christmas Day spread. So, let’s put the kettle on, grab our biggest mixing bowl, and create a little magic together. Your taste buds are about to send you a thank-you note.
The Christmas Eve Kitchen Calamity
This recipe always takes me back to a particularly chaotic Christmas Eve at my Grandma Lou’s house. I was about ten, and my job was to keep the adults caffeinated. Simple, right? I had the big percolator going, but I wanted to make it *special*. I started raiding her spice cabinet, adding a pinch of this and a dash of that directly into the coffee grounds. Cinnamon, a little nutmeg… it was going great until I grabbed what I thought was the clove jar. It was allspice. And I used a *very* generous hand.
The resulting brew was… potent. My Uncle Frank took one sip, his eyes went wide, and he declared it tasted like “a Christmas tree fell into a cup of coffee.” We laughed until we cried. But you know what? we all drank it. And every year since, someone brings up “Beau’s Spice Bomb Coffee.” It became a weird, wonderful part of our family lore. This recipe is the refined, perfectly balanced, and absolutely delicious version of that childhood experiment. It captures all the warmth and nostalgia without any of the, ahem, forest-floor undertones.
Gathering Your Coffee Bliss Ingredients
This is the fun part! We’re essentially building our own little holiday flavor bomb. Here’s everything you’ll need. The beauty of this is that most of it is probably sitting in your pantry right now.
- 2 cups Powdered Creamer: This is our base for that rich, creamy texture. Chef’s Insight: I use a plain, non-dairy creamer because it dissolves beautifully, but feel free to use a dairy-based one or even a coconut milk powder for a tropical twist!
- 1½ cups Hot Cocoa Mix: Hello, chocolatey warmth! This adds a depth of flavor that makes the coffee feel like a decadent treat. Substitution Tip: If you only have unsweetened cocoa powder, you can use it, but you may want to increase the sugar slightly to balance the bitterness.
- 1½ cups Instant Coffee: The star of the show, providing that essential caffeine kick and robust coffee flavor. Don’t skimp here—get a good quality instant coffee you enjoy on its own.
- 1½ cups Sugar: Sweetens the deal. Substitution Tip: This is a fantastic place to customize! You can easily swap this for coconut sugar, a granulated sugar substitute like monk fruit, or even brown sugar for a deeper, molasses-like note.
- 1½ tablespoons Ground Cinnamon: The king of cozy spices. It’s warm, sweet, and fundamentally “Christmas.”
- 1 tablespoon Ground Ginger: This adds a little spicy zing and warmth that plays so nicely with the chocolate and coffee.
- ½ teaspoon Ground Clove: A little goes a long way! Clove brings an intense, aromatic warmth that is quintessentially holiday. It’s the secret weapon.
- ½ teaspoon Ground Nutmeg: Nutty, warm, and slightly sweet. It rounds out the spice profile perfectly.
- 1 teaspoon Ground Cardamom: My personal “chef’s kiss.” Cardamom has a complex, citrusy, floral aroma that elevates the entire mix from “spiced coffee” to “gourmet holiday experience.” Don’t skip it!
Brewing the Magic: Your Step-by-Step Guide
Alright, team, time to assemble our masterpiece. This is literally one of the easiest things you’ll ever make, but I’ve got a few little hacks to make it even better.
Step 1: The Big Mix
Grab the largest mixing bowl you have. I’m not kidding. You want plenty of room for everything to get to know each other without puffing out in a cloud of powdered sugar. Add all of your dry ingredients—the creamer, cocoa mix, instant coffee, sugar, and all those glorious spices. Now, here’s my pro-tip: if you have a whisk, use it! A whisk is your best friend for breaking up any little clumps and ensuring every single tablespoon of mix is perfectly uniform. If you don’t have a whisk, a fork works just fine. Mix, mix, mix until you see a consistent color and no streaks of individual ingredients remain. Your kitchen should already be smelling incredible.
Step 2: The Jarring Ceremony
This is where it gets real. You’ll need a clean, completely dry airtight container. Mason jars are my go-to because they just look so darn charming lined up on the counter. Carefully funnel or spoon your Christmas Coffee Bliss mix into the jar(s). As you’re doing this, give it a little shake to settle the mix and get rid of any air pockets. Tap the jar gently on the counter to help it settle. You want to pack in as much joy as possible! Seal it up tight.
Step 3: Storage for Maximum Freshness
Find a cool, dark, and dry spot for your jar. A pantry shelf is perfect. The spices and coffee are sensitive to light and heat, so keeping them stable will ensure your mix stays vibrant and flavorful for weeks. Properly stored, this bliss in a jar will keep its magic for up to 2 months.
Step 4: The Moment of Truth: Serving It Up
This is the reward! Boil some fresh water. Place 2 to 3 heaping tablespoons of your Christmas Coffee Bliss mix into your favorite mug. I’m a 3-tablespoon guy—I like my coffee strong and sweet. Pour about 8 ounces of hot water over the mix and stir vigorously until everything is dissolved and you have a beautiful, frothy, aromatic brew. Now, for the pièce de résistance…
How to Serve Your Cup of Christmas Bliss
How you serve this is part of the fun! This isn’t just fuel; it’s an experience.
First, the topping. A giant dollop of freshly whipped cream is non-negotiable for me. Let it float on top like a snowy cloud. Then, for a little festive flair, give it a tiny dusting of the coffee mix itself, or just some cinnamon or cocoa powder. If you’re feeling extra, a cinnamon stick makes the perfect edible stirrer.
Think beyond the morning cup, too. This is your secret weapon for holiday entertaining. Set up a “Christmas Coffee Bar” at your next brunch or party. Put the jar of mix out with a cute scoop, a kettle of hot water, an array of mugs, and all the toppings: whipped cream, peppermint sticks, chocolate shavings, and caramel sauce. Let your guests build their own perfect cup. It’s interactive, delicious, and takes the pressure off you as the host!
Make It Your Own: Festive Flavor Twists
The basic recipe is a dream, but the real joy is in making it your own. Here are a few of my favorite riffs on this Christmas classic.
- Peppermint Patty Twist: Add ½ cup of crushed candy canes or peppermint baking bits to the mix. It creates a delightful chocolate-mint coffee that feels like a liquid dessert.
- Spiked & Spiced (For the Grown-Ups): When preparing a single mug, add a splash of Irish Cream, Peppermint Schnapps, or Kahúa to the finished drink. It’s the ultimate cozy evening treat by the fire.
- Gingerbread Lane: Boost the ginger to 2 tablespoons and add ¼ cup of powdered butterscotch pudding mix. This creates an incredible, deep, molasses-like gingerbread flavor that is out of this world.
- Dairy-Free Delight: Super simple! Just use a coconut or almond milk-based powdered creamer and ensure your hot cocoa mix is also dairy-free. Everyone gets to join the party.
- Lower-Sugar Sip: Replace the sugar with a zero-calorie granulated sweetener like erythritol or allulose. The spices and cocoa are so flavorful, you won’t miss a thing.
A Few More Thoughts from My Kitchen to Yours
This recipe is a living, breathing thing in my house. I’ve been tweaking it for years. The cardamom was a recent addition after a friend brought me some from her travels, and it was a total game-changer. I also love making a huge batch of this in early December and dividing it into smaller jars. They make the most thoughtful, heartfelt gifts for neighbors, teachers, and friends. I just tie a ribbon around the lid, attach a tag with the serving instructions, and boom—instant holiday hero. It’s a gift that says, “I hope your mornings are cozy and bright.” And honestly, what’s better than that?
Your Christmas Coffee Questions, Answered!
I’ve made this enough times (and received enough emails from you all!) to know what questions might pop up. Let’s tackle them head-on.
Q: My mix seems a little clumpy. What did I do wrong?
A: You likely did nothing wrong! Humidity is the culprit here. If your mix gets clumpy, don’t panic. Just give it a good stir or a vigorous shake in the jar before you scoop. For a super-smooth texture, you can pulse the clumpy mix in a food processor for a few seconds to break it all up.
Q: Can I use decaf instant coffee?
A: Absolutely! This is a fantastic option for a cozy evening drink. Just swap the regular instant coffee for decaf one-to-one. The flavor will be just as wonderful.
Q: The cloves are a bit strong for my taste. Any advice?
A: Clove is a powerful spice, and I get it! Next time, you can reduce the clove to ¼ teaspoon or even leave it out. You could also add a pinch of black pepper for a different kind of warm spice that’s a little less intense.
Q: How long will this mix really stay fresh?
A: In an airtight container in a cool, dark pantry, it will be at its best for about 2 months. The coffee and spices will slowly lose their potency after that. I don’t recommend refrigerating it, as that can actually introduce moisture.
Christmas Coffee Bliss
Description
Christmas Coffee Bliss
Prep Time: 5 min | Yield: ~40 servings
A cozy, chocolatey, spiced coffee mix that turns every cup into a festive experience. Perfect for gifting or enjoying at home.
Ingredients
Dry Mix:
-
2 cups powdered creamer (dairy or non-dairy)
-
1½ cups hot cocoa mix
-
1½ cups instant coffee
-
1½ cups sugar (or substitute with coconut sugar, monk fruit, or brown sugar)
-
1½ tbsp ground cinnamon
-
1 tbsp ground ginger
-
½ tsp ground clove
-
½ tsp ground nutmeg
-
1 tsp ground cardamom
Optional Toppings/Decorations:
-
Whipped cream
-
Cinnamon sticks
-
Cocoa powder, cinnamon, or crushed candy canes
Optional Twists:
-
Peppermint: Add ½ cup crushed candy canes or peppermint baking bits
-
Spiked (Adults Only): Add Irish Cream, Peppermint Schnapps, or Kahlúa to prepared mug
-
Gingerbread Lane: Increase ginger to 2 tbsp + ¼ cup powdered butterscotch pudding mix
-
Dairy-Free: Use coconut/almond milk creamer and dairy-free cocoa mix
-
Lower-Sugar: Replace sugar with zero-calorie sweeteners like erythritol or allulose
Instructions
1. Mix It Up
-
In a large bowl, combine all dry ingredients.
-
Whisk or stir thoroughly to remove clumps and ensure even distribution.
2. Jar It
-
Transfer the mix to a clean, airtight container (Mason jars work perfectly).
-
Tap gently to settle, and seal tightly.
3. Store
-
Keep in a cool, dark, dry place for up to 2 months.
4. Serve
-
Scoop 2–3 heaping tablespoons of mix into your favorite mug.
-
Pour ~8 oz hot water over the mix and stir until fully dissolved.
-
Top with whipped cream, a cinnamon stick, or a dusting of cocoa/cinnamon for festive flair.
5. Hosting Tip
-
Create a “Christmas Coffee Bar”: provide jars of mix, scoops, hot water, mugs, and toppings for an interactive, crowd-pleasing station.
Notes
-
Clumpy mix? Stir or pulse in a food processor briefly.
-
Decaf option: Swap instant coffee one-to-one.
-
Too much clove? Reduce to ¼ tsp or skip; consider a pinch of black pepper for warmth.
-
Keep it fresh: Pantry storage is best; avoid refrigeration to prevent moisture.
Nutrition
- Calories: 90 kcal per 2 tbsp mix prepared with hot water
- Sugar: 15 g
- Sodium: 15 mg
- Fat: 2 g
- Carbohydrates: 18 g
Nutritional Information (Per Serving)
Let’s keep it real—this is a treat! It’s a festive, indulgent coffee designed for joy. Here’s a rough breakdown per 2-tablespoon serving of the dry mix, prepared with hot water (without whipped cream). Remember, these values can vary based on the specific brands of ingredients you use.
- Prep Time: 5 minutes
- Makes: ~40 servings
- Calories: ~90 kcal
- Fat: 2 g
- Carbohydrates: 18 g
- Sugar: 15 g
- Protein: 1 g
- Sodium: 15 mg
- Caffeine: ~60 mg (will vary with coffee brand)
- Contains: Dairy (if using dairy-based creamer or cocoa mix)
One Last Sip of Wisdom
Well, my friends, there you have it. Your new secret weapon for the most wonderful time of the year. This Christmas Coffee Bliss is more than just a recipe; it’s a feeling. It’s the promise of a quiet moment of peace, the warmth of a shared laugh with family, and the simple, profound joy of a really, really good cup of coffee.
I hope this recipe brings as much warmth and happiness to your kitchen as it has to mine. Don’t be afraid to play with it, to make it yours, and to share it generously. That’s what Feastical is all about.
Now, I’ve got to go—my mug is empty and in desperate need of a refill. Wishing you and yours a season filled with delicious flavors and joyful moments. Happy brewing!