
Valentine Peanut Butter Blossom Cookies : Sweet, Simple, and Full of Heart
Valentine Peanut Butter Blossom Cookies: Your New Sweetheart Tradition
Hey, friends! Beau here, welcoming you back to my kitchen. Is there anything better than the smell of warm peanut butter cookies wafting through the house? I think not. But today, we’re not just making any peanut butter cookie. We’re turning a classic into a heartfelt masterpiece. We’re whipping up a batch of Valentine Peanut Butter Blossom Cookies that are guaranteed to make your favorite people feel seen, loved, and seriously well-fed.
You know me—I live for recipes that are equal parts delicious and doable. These cookies are exactly that. They’re soft, they’re chewy, and they’re hugging a melty chocolate heart right in the center, all decked out in festive red, pink, and white sprinkles. Whether you’re prepping treats for a classroom party, surprising your significant other, or just practicing a little self-love with a fresh-baked batch and your favorite movie, these blossoms are the answer. They’re a warm hug in cookie form, and I can’t wait for you to experience the magic. So, tie on that apron, find your favorite mixing bowl, and let’s bake up some love!
A Cookie Jar Full of Memories
This recipe takes me right back to my grandma’s linoleum-floored kitchen. She was the queen of “a little bit of this, a little bit of that” cooking, but her Peanut Butter Blossoms were a precise, December-only event. The whole house would smell like roasting nuts and sugar, a scent I now know is pure happiness. One year, a few days before Valentine’s, I remember feeling a little glum because the Christmas cookie tin was empty. My grandma, without missing a beat, looked at me, winked, and said, “Who says hearts are only for February?” She pulled out the last bag of Hershey’s Kisses from the pantry and a jar of red sugar crystals. We made a “Valentine’s” batch in the middle of January, and it was the best surprise. She taught me that day that a little sweet gesture, anytime, can turn a whole day around. That’s the spirit I bake these with every time.
Gathering Your Cookie Crew: The Ingredients
Simple, quality ingredients are the secret to any great comfort food. Here’s your lineup for these sweet, simple, and full-of-heart cookies. Don’t worry, I’ve included my chef-y insights and easy swaps to make this recipe your own!
- 1½ cups all-purpose flour: This is the backbone of our cookie, giving it that perfect, tender structure. For a slightly softer cookie, you can swap in ½ cup of cake flour for ½ cup of the all-purpose.
- ¾ tsp baking soda & ½ tsp baking powder: Our dynamic leavening duo! The baking soda helps the cookies spread and brown, while the baking powder gives them a little lift. Using both creates that ideal chewy-yet-soft texture.
- ¼ tsp salt: Never, ever skip the salt! It’s the flavor enhancer that makes the peanut butter and chocolate sing. It balances the sweetness perfectly.
- ½ cup unsalted butter, softened: The key word here is softened, not melted! Leave it on the counter for about an hour. Soft butter creams with the sugar to create tiny air pockets, which is the secret to a light, not dense, cookie.
- ½ cup creamy peanut butter: I’m a classic creamy Jif or Skippy guy for this—their consistency is reliable. Natural peanut butter can be a bit oily and might change the texture, so I don’t recommend it for this specific recipe.
- ½ cup granulated sugar + ½ cup packed brown sugar: The white sugar gives us crispness and spread, while the brown sugar (pack it firmly into the cup!) brings moisture, chew, and that wonderful molasses depth.
- 1 large egg: Our binder! It brings everything together and adds richness. Make sure it’s at room temperature to blend seamlessly into the creamed butter and sugar.
- 1 tsp vanilla extract: The aromatic soul of so many baked goods. It adds a warm, complex flavor that makes the peanut butter taste even more peanut-buttery.
- Red, pink, and white nonpareil sprinkles: The festive confetti! Nonpareils (those tiny round balls) work better than long sprinkles here because they coat the dough balls evenly.
- 24 chocolate heart candies: The star of the show! I love using Dove Promises or Reese’s Hearts for this. Unwrap them all before you start baking. Trust me on this one.
Let’s Get Baking: The Step-by-Step Magic
Ready to create some kitchen magic? Follow these steps, and you’ll have a picture-perfect batch of cookies in no time. I’ve tucked a few of my favorite chef hacks in here to guarantee your success.
- Preheat and Prep. Fire up your oven to 350°F (175°C). This is step one for a reason—a properly preheated oven is non-negotiable for even baking. While it’s warming up, line your baking sheets with parchment paper. This little trick prevents sticking and makes cleanup an absolute dream. Chef’s Hack: If you have two baking sheets, line them both. You can get the second batch ready to go while the first one bakes!
- Whisk the Dry Team. In a medium bowl, grab a whisk and give your flour, baking soda, baking powder, and salt a good whisking. We’re not just mixing here; we’re aerating the flour and making sure those leaveners are evenly distributed. This means every single cookie will rise and bake the same way. No surprises!
- Cream the Good Stuff. In a large bowl, using a hand mixer or a stand mixer with the paddle attachment, beat the softened butter, peanut butter, granulated sugar, and brown sugar together. We’re not just mixing; we’re “creaming.” Beat it on medium-high speed for a good 2-3 minutes until the mixture turns pale, fluffy, and wonderfully smooth. This step incorporates air, which is the secret to a light, tender cookie. Chef’s Hack: If your butter wasn’t quite soft enough, don’t panic. Cut it into small chunks and beat it for a minute before adding the sugars.
- Bring in the Wet Crew. Crack in the egg and add that glorious teaspoon of vanilla. Mix on medium speed until everything is perfectly combined, scraping down the sides of the bowl as needed. You should see a smooth, cohesive mixture.
- Marry the Wet and Dry. Now, with your mixer on low speed, gradually add the dry ingredients to the wet. Mix just until the flour disappears and a soft dough forms. Do not overmix! Overmixing develops gluten and can lead to tough cookies. A few streaks of flour are okay; you can finish mixing with a spatula.
- Scoop, Roll, and Sparkle. Using a small cookie scoop (about 1 tablespoon) or a spoon, portion the dough into 1-inch balls. Roll them between your palms to make them nice and round. Now, pour your sprinkles into a shallow bowl and roll each dough ball until it’s fully coated in Valentine’s cheer. Place the sparkling dough balls about 2 inches apart on your prepared baking sheet. They need a little room to spread and become the beautiful cookies they’re destined to be.
- Bake to Golden Perfection. Slide the baking sheet into your preheated oven and bake for 8-10 minutes. You’re looking for the edges to be just set and very lightly golden. The centers will still look a tiny bit soft and puffy—that’s perfect! They will continue to cook on the hot baking sheet. Chef’s Hack: For super-soft cookies, err on the side of 8 minutes. For a bit more chew, go for the full 10.
- The Grand Finale: The Heart! As soon as you pull the baking sheet from the oven, it’s go-time. Working quickly but carefully, gently press a chocolate heart into the center of each warm cookie. You want to press down just enough so the cookie cracks slightly around the edges and cradles the chocolate. The warmth of the cookie will start to soften the chocolate perfectly.
- Cool and Set. Let the cookies cool on the baking sheet for a full 5 minutes. This allows them to set up so they don’t fall apart when you move them. Then, use a spatula to transfer them to a wire rack to cool completely. This stops the cooking process and prevents the bottoms from getting soggy.
Sharing the Love: How to Serve These Beauties
Now for the best part—enjoying them! These cookies are stars all on their own, but a little presentation goes a long way. Pile them high on a cute vintage plate or a rustic wooden board for a homey feel. For a real “wow” factor at a party, arrange them in the shape of one giant heart on your serving platter.
And what to enjoy with them? A tall, ice-cold glass of milk is the undisputed champion pairing, of course. But for the adults, I highly recommend a rich cup of coffee or even a glass of red wine—the peanut butter and chocolate play so nicely with the deep notes of a good Cabernet. These also make incredible gifts! Tuck a few into a cellophane bag, tie it with a pretty ribbon, and you’ve got a handmade Valentine’s gift that beats any store-bought card.
Make It Your Own: Delicious Recipe Variations
Feel like mixing it up? This recipe is a fantastic canvas for your creativity. Here are a few of my favorite twists:
- The Chocolate Lover’s Dream: Swap the peanut butter cookie base for a chocolate cookie dough! Just replace ¼ cup of the flour with ¼ cup of unsweetened cocoa powder.
- Nut-Free Neighbor: Have an allergy to work around? Sunflower seed butter is a fantastic, nut-free substitute for the peanut butter. The flavor and color are remarkably similar!
- Dark & Dreamy: Prefer a less sweet chocolate? Use dark chocolate hearts or even a high-quality dark chocolate square pressed into the center.
- Funfetti Fun: For an extra pop of color, add 2 tablespoons of your Valentine’s sprinkles directly into the dough when you mix in the flour.
- Peanut Butter Overload: Use Reese’s Peanut Butter Hearts instead of regular chocolate hearts for an insane double peanut butter experience.
Beau’s Kitchen Chronicles: A Few Parting Thoughts
This recipe has become a year-round favorite in my house, not just for Valentine’s Day. We make them with star-shaped chocolates for the Fourth of July and orange sprinkles for Halloween. The base recipe is just that good and adaptable. One funny story: I once was filming a video for Feastical and was so busy chatting to the camera that I completely forgot to set a timer. Let’s just say we ended up with a batch of “extra-crispy” blossoms that day. The lesson? Even a seasoned cook makes mistakes! The beauty of baking is in the journey, not just the perfect cookie. So have fun with it, and don’t stress.
Your Questions, Answered: FAQs & Troubleshooting
Let’s tackle a few common questions to ensure your cookie-baking is smooth sailing.
Q: My cookies spread too much and went flat. What happened?
A: The most common culprit is butter that was too warm or even melted. Make sure it’s just softened. Another reason could be an old or under-measured leavener (baking soda/powder). Finally, make sure your oven is fully preheated before the cookies go in.
Q: Can I make the dough ahead of time?
A: Absolutely! You can scoop and roll the dough balls, then freeze them on a baking sheet before transferring to a freezer bag. When you’re ready to bake, just roll the frozen dough balls in sprinkles and add 1-2 minutes to the baking time. No need to thaw!
Q: My chocolate hearts melted into a mess when I pressed them in.
A: This usually means the cookies baked for a tad too long and were too hot. Remember, the residual heat is enough to soften the chocolate. Try baking for the lower end of the time range (8 minutes) and let the cookies cool on the pan for 2 minutes before adding the chocolate.
Q: I can’t find heart-shaped chocolates! What can I use instead?
A: No problem! Hershey’s Kisses work beautifully year-round. You can also use Rolos for a caramel twist, or even chocolate-covered almonds for a little elegance.

Valentine Peanut Butter Blossom Cookies : Sweet, Simple, and Full of Heart
Description
Hey friends! Ready to make a cookie that’s equal parts heartwarming and show-stopping? These Valentine Peanut Butter Blossom Cookies are soft, chewy, and hugging a melty chocolate heart in the center, all decked out in festive red, pink, and white sprinkles. Perfect for classroom parties, Valentine’s Day surprises, or just a cozy night in.
Ingredients
-
1½ cups all-purpose flour (swap ½ cup for cake flour for a softer cookie)
-
¾ tsp baking soda
-
½ tsp baking powder
-
¼ tsp salt
-
½ cup unsalted butter, softened
-
½ cup creamy peanut butter (classic Jif or Skippy recommended)
-
½ cup granulated sugar
-
½ cup packed brown sugar
-
1 large egg (room temperature)
-
1 tsp vanilla extract
-
Red, pink, and white nonpareil sprinkles
-
24 chocolate heart candies (Dove Promises or Reese’s Hearts)
Instructions
1. Preheat & Prep
-
Preheat oven to 350°F (175°C).
-
Line baking sheets with parchment paper.
2. Whisk Dry Ingredients
-
In a medium bowl, whisk together flour, baking soda, baking powder, and salt.
3. Cream Butter, Peanut Butter & Sugars
-
In a large bowl, beat butter, peanut butter, granulated sugar, and brown sugar for 2–3 minutes until pale and fluffy.
4. Add Egg & Vanilla
-
Mix in the egg and vanilla until smooth. Scrape down the sides as needed.
5. Combine Wet & Dry Ingredients
-
Gradually add the flour mixture on low speed. Mix just until combined; a few streaks of flour are okay.
6. Scoop, Roll & Coat
-
Scoop dough into 1-inch balls and roll between palms.
-
Roll each ball in sprinkles until fully coated. Place 2 inches apart on the prepared baking sheet.
7. Bake
-
Bake 8–10 minutes until edges are lightly golden and centers look soft.
8. Add Chocolate Hearts
-
Immediately press a chocolate heart into the center of each cookie. Press gently so the cookie cracks slightly around the chocolate.
9. Cool
-
Let cookies cool on the baking sheet for 5 minutes, then transfer to a wire rack to cool completely.
Notes
-
Cookies spread too much? Butter too warm or oven not preheated.
-
Can dough be made ahead? Yes! Freeze dough balls and bake directly from frozen, adding 1–2 minutes.
-
Chocolate melts too fast? Bake for shorter time (8 minutes) and let cookies rest 2 minutes before adding chocolate.
-
No heart-shaped chocolates? Hershey’s Kisses, Rolos, or chocolate-covered almonds work great.
Nutrition
- Calories: 160 Cal Per Serving
- Sugar: 12g
- Fat: 9g
- Carbohydrates: 18g
The Sweet Details: Nutrition & Prep Info
While we’re all about feel-good food, I know many of you like to have the facts! Here’s the nutritional breakdown for your planning. Remember, this is an estimate and can vary based on specific ingredients used.
- Yield: 24 cookies
- Prep Time: 15 minutes
- Cook Time: 10 minutes
- Total Time: 25 minutes
Estimated Nutrition Per Cookie: Calories: ~160 | Carbohydrates: 18g | Fat: 9g | Sugar: 12g
Final Thoughts from My Kitchen to Yours
And there you have it, my friends—the recipe for what I believe are the most joyful cookies of the Valentine’s season. They’re simple enough for a weeknight baking session but special enough to become a yearly tradition. The real magic isn’t just in the peanut butter or the chocolate; it’s in the act of making something with your own two hands to share with someone you love.
So, I hope you’ll give these Valentine Peanut Butter Blossoms a try. I have a feeling they’ll find a permanent spot in your recipe box. When you make them, be sure to tag me @Feastical on social media—I love seeing your creations! Now, go preheat that oven and bake someone’s day better.
With a full heart and an even fuller cookie jar,
Beau
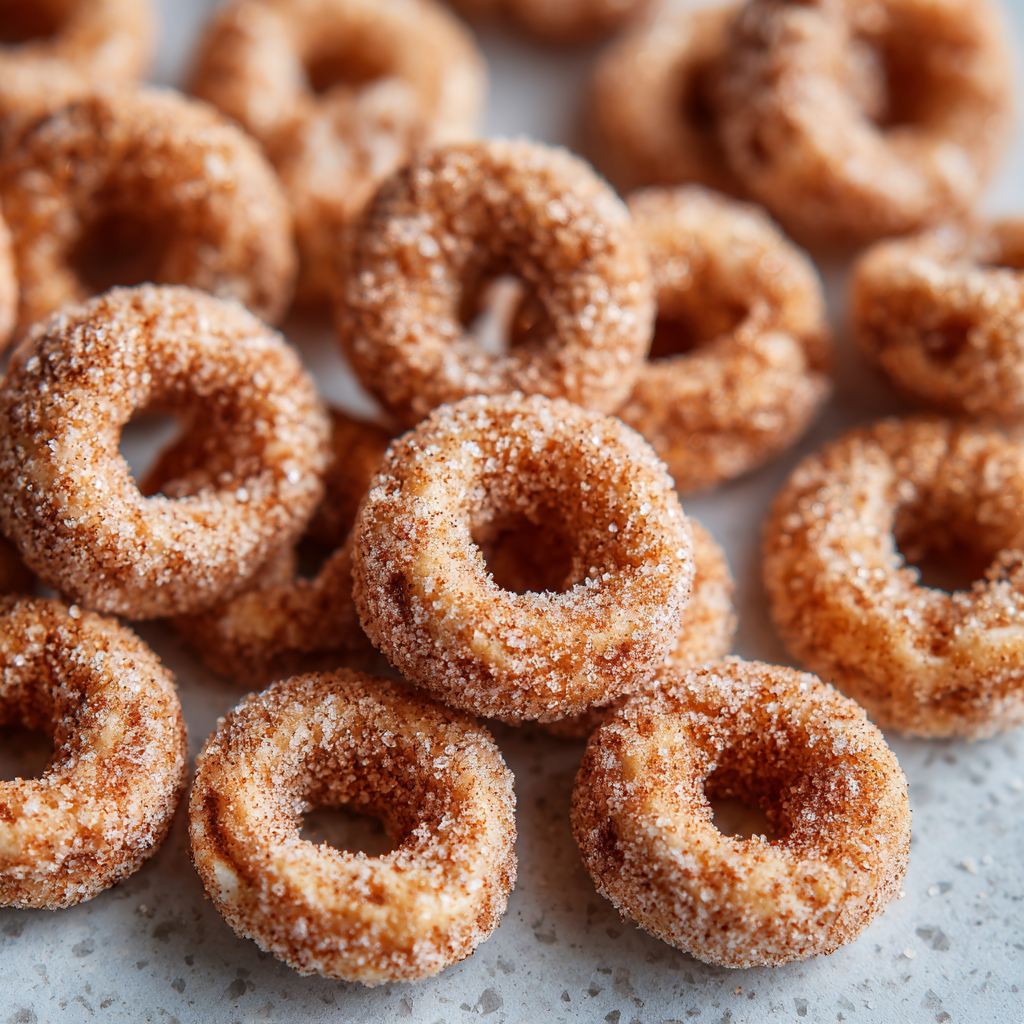
Mini Cinnamon Sugar Cheerios “Donuts” : A Quick, Sweet Snack Hack
Mini Cinnamon Sugar Cheerios “Donuts” – Your New Favorite Sweet Snack Hack
Hey friends, Beau here! Let’s be real for a second. Some days, you get hit with a sweet tooth that demands immediate attention. You want something warm, cinnamony, and delightfully crunchy that tastes like a mini donut you’d get at a county fair. But you also don’t want to haul out the mixer, wait for dough to rise, or deal with a vat of bubbling oil. I get it. Life is busy, but your cravings are valid.
That’s exactly why I’m so excited to share one of my all-time favorite kitchen magic tricks with you today: Mini Cinnamon Sugar Cheerios “Donuts.” This recipe is the definition of a happy accident, a snack hack that feels so indulgent but is secretly a breeze to whip up. We’re taking that trusty box of Cheerios from your pantry and transforming it into a warm, buttery, cinnamon-sugar-coated treat that will have everyone in the house gathered around the kitchen island, begging for a handful.
In less than 10 minutes, you can have a bowl of these little delights ready to go. They’re perfect for a quick after-school snack, a cozy movie night munch, or even a fun, unexpected dessert. So, if you’re ready to make your kitchen smell like a bakery and your taste buds do a happy dance, grab your favorite skillet and let’s get toasting!
The Day My Grandma Made “Magic” Cereal
This recipe always takes me right back to my Grandma Lou’s kitchen. It was a rainy Saturday, the kind that makes you want to stay in your pajamas all day. My brother and I were antsy, and we’d already gone through our usual rounds of cartoons and board games. Grandma, in her infinite wisdom, saw two bored kids and a looming sugar craving.
She peered into the pantry, pulled out the big yellow box of Cheerios, and winked. “Watch this,” she said. With a little butter, a little sugar, and a generous shake of cinnamon, she performed what I could only describe as pure magic. That humble cereal was transformed right before our eyes in her trusty cast-iron skillet. The smell was intoxicating—like donuts and love all mixed together. We devoured that first batch, our fingers sticky and happy, and I remember thinking, “This is the best thing I’ve ever eaten.” It was more than a snack; it was a moment of pure, simple joy. That’s the spirit I want to bring to your kitchen with this recipe.
Gather Your Ingredients: The Dream Team
Here’s the beautiful part: you only need a handful of simple ingredients to create this magic. Chances are, you have most of them in your kitchen right now!
- 4 Cups Cheerios: The star of the show! I use the original kind for that classic, wholesome oat flavor. They have the perfect shape and texture to hold onto all that delicious, buttery coating. Chef’s Insight: Don’t be tempted to use a different cereal here; the simple, neutral canvas of Cheerios is what makes this work so well.
- ¼ Cup Salted Butter: This is our magic wand. It’s what toasts the cereal and gives it that rich, irresistible base. I prefer salted butter because it creates a lovely sweet-and-salty balance that’s just *chef’s kiss*. Substitution Tip: Unsalted butter works perfectly fine too—just add a tiny pinch of salt to the cinnamon-sugar mixture to achieve that same balance.
- ¼ tsp Pure Vanilla Extract: Don’t you dare skip this! A splash of vanilla adds a warm, aromatic depth that makes these taste truly bakery-quality. It’s the secret weapon that elevates them from “good” to “can’t-stop-eating-these” good.
- ¼ Cup Granulated Sugar: This is what creates that classic, crackly sweet shell. It’s the perfect amount to coat the Cheerios without making them overly sweet.
- 1 tsp Ground Cinnamon: The other half of our dynamic duo! This brings the warm, cozy flavor we all know and love. Chef’s Insight: For an extra flavor kick, try using Saigon cinnamon or a mix of cinnamon and a tiny pinch of nutmeg or cardamom.
- Pinch of Salt (Optional): As I mentioned, if you’re using unsalted butter, this is non-negotiable. But even with salted butter, a tiny extra pinch can really make the sweet flavors pop.
Let’s Make Some Magic: Your Step-by-Step Guide
Ready? This is where the fun begins. I’ll walk you through every step, with a few of my favorite chef hacks sprinkled in to ensure your snack hack is a 100% success.
- Mix Your Coating: Before you even turn on the stove, grab a small bowl and whisk together your granulated sugar and cinnamon. Chef’s Hack: Give it a good whisk for about 15 seconds. This ensures the cinnamon is perfectly distributed so you don’t get any clumps of plain sugar or overpowering pockets of cinnamon. Set this bowl aside within arm’s reach—you’ll need it in a hot minute!
- Melt and Infuse the Butter: Place a large skillet over medium heat. Add your butter and let it melt, swirling the pan occasionally. Once it’s fully melted and just starting to bubble, take it off the heat for a second and stir in that ¼ teaspoon of pure vanilla extract. Why do this off the heat? Vanilla is delicate! Adding it directly to high heat can cause its beautiful flavor to evaporate too quickly. This little pause lets the flavor infuse into the butter without burning.
- Toast the Cheerios: Return the skillet to medium heat and pour in all 4 cups of Cheerios. Using a silicone spatula, gently toss and stir the cereal, making sure every last O is glistening with that vanilla-butter goodness. Keep them moving in the pan for about 3 minutes. You’ll hear a faint sizzle and smell a gorgeous, toasty, nutty aroma. Chef’s Tip: Don’t walk away! We’re toasting, not burning. The goal is to warm them through and let them soak up the butter, which makes them extra crisp.
- The Big Coating Moment: This is the most important step! Remove the skillet from the heat. Immediately, while the Cheerios are still hot and buttery, sprinkle your pre-mixed cinnamon sugar over them. Do not add the sugar while the skillet is on the burner! The sugar will melt into a sticky syrup instead of creating that perfect, dusty donut coating. Toss, toss, toss! Keep stirring and tossing for a solid minute to ensure every single piece is lovingly coated.
- The Patience Payoff: Spread the coated Cheerios out on a baking sheet or a large plate in a single layer. I know it’s tempting to dig right in (trust me, I know), but let them sit for about 5 minutes. As they cool, the coating will set and they’ll become wonderfully crisp. This is the final transformation from cereal to “donut.”
How to Serve These Little Bites of Joy
Okay, they’re cool, they’re crisp, and they’re ready to devour. How should you enjoy them? Let me count the ways!
The simplest way is to just pour them into a big bowl and let everyone grab handfuls. It’s a fantastic shareable snack. For movie night, I love divvying them up into individual paper cones or small bowls—it feels so festive, like you’re at the movies!
Want to make them a bit more special? Serve them alongside a big mug of hot chocolate or a cold glass of milk for dipping. The contrast of the warm, crunchy “donut” with a cool sip of milk is pure bliss.
They also make an incredible topping! Sprinkle them over vanilla ice cream, Greek yogurt, or even a bowl of apple sauce. They add the most delicious crunch and cinnamon flavor. Get creative with it!
Mix It Up! Fun Flavor Twists
Once you’ve mastered the classic, the playground is open! This recipe is a fantastic base for all sorts of delicious variations. Here are a few of my favorites:
- Chocolate Lover’s Dream: After tossing the warm Cheerios with the cinnamon sugar, immediately add ¼ cup of mini chocolate chips and toss quickly. The residual heat will slightly melt the chips, creating a chocolatey-cinnamon coating that is out of this world.
- “Apple Pie” Spice: Swap the cinnamon for apple pie spice blend. It’s like having the coziest part of fall in a snack bowl.
- Maple Glaze Drizzle: Skip the cinnamon-sugar coating. Instead, after toasting the Cheerios in butter, drizzle them with a mixture of 2 tablespoons of powdered sugar and 1 tablespoon of real maple syrup. Toss to coat and let them cool. You’ll get a beautiful, glossy glaze.
- Pumpkin Spice Bliss: It’s not just for lattes! Use a pumpkin pie spice blend in place of the cinnamon for that iconic autumn flavor.
- Dairy-Free Delight: This is an easy one! Simply use your favorite plant-based butter (I find vegan butters made from olive or avocado oil work great) and ensure your vanilla extract is pure.
Beau’s Kitchen Notes & Stories
This recipe has been a part of my life for so long, and it’s evolved in funny ways. I once tried to double the batch in a small skillet—big mistake! I ended up with Cheerios all over the stovetop because I didn’t have enough room to toss them properly. Lesson learned: use the biggest skillet you have, even for a single batch. Give those little O’s room to dance!
Another time, my nephew declared they were “cinnamon fairies” and that we had to eat them to gain their magic powers. I’m not one to argue with that kind of logic. That’s the beauty of this recipe—it’s not just about the food, it’s about the little moments of imagination and connection it creates. Don’t be afraid to make it your own!
Your Questions, Answered!
Over the years, I’ve gotten a few common questions about this recipe. Here’s the scoop to make sure yours turns out perfectly every single time.
Q: My cinnamon sugar melted and got sticky instead of powdery. What happened?
A: Ah, the number one issue! This means the skillet was still too hot when you added the sugar. Remember to always take the pan completely off the heat before you start sprinkling. The residual heat is all you need to make the sugar adhere without melting it.
Q: Can I make a big batch ahead of time for a party?
A: You can! They are best eaten the day they are made, but they will keep in an airtight container at room temperature for 2-3 days. They may lose a *little* of their initial crispness, but they’ll still be delicious.
Q: Can I use a different type of cereal?
A: I’ve experimented! Chex cereal works quite well, as it has a similar ability to hold coating. I wouldn’t recommend using a cereal that’s already heavily sweetened or flavored, as it can become cloying. The simplicity of Cheerios is key.
Q: Is there a way to make this less sugary?
A> Absolutely. You can reduce the sugar by a tablespoon or two, or use a granulated sugar substitute that measures 1:1 like erythritol. The texture of the coating will be slightly different, but it will still satisfy that sweet, cinnamony craving.
Mini Cinnamon Sugar Cheerios “Donuts” : A Quick, Sweet Snack Hack
Description
Hey friends! Let’s be real: sometimes your sweet tooth hits hard, and all you want is something warm, cinnamony, and crunchy that tastes like a mini donut—but without the fuss of frying or waiting for dough to rise. That’s why I’m so excited to share this kitchen magic trick: Mini Cinnamon Sugar Cheerios “Donuts.”
Ingredients
-
4 cups Cheerios (original works best)
-
¼ cup salted butter (or unsalted + pinch of salt)
-
¼ tsp pure vanilla extract
-
¼ cup granulated sugar
-
1 tsp ground cinnamon
-
Pinch of salt (optional)
Instructions
In a small bowl, whisk together the sugar and cinnamon. Set aside.
Heat a large skillet over medium heat. Melt the butter, swirling occasionally. Remove from heat and stir in the vanilla extract (prevents burning and preserves flavor).
Return the skillet to medium heat and add Cheerios. Gently toss for ~3 minutes until the cereal is warm and coated with butter. Watch carefully to avoid burning.
Remove from heat. Sprinkle the cinnamon-sugar mixture over the hot Cheerios and toss well for 1 minute until evenly coated.
Spread Cheerios on a plate or baking sheet to cool for 5 minutes. This sets the coating and makes them crisp. Enjoy as a snack, on ice cream, or with yogurt.
Notes
-
Use a large skillet—even for a single batch, so the Cheerios have room to toss.
-
Add sugar off the heat to prevent a sticky syrup.
-
Make ahead? Store in an airtight container for 2–3 days; crispness may reduce slightly.
Nutrition
- Calories: 140 Cal Per Serving
- Sugar: 8g
- Fat: 6g
- Carbohydrates: 20g
Quick Nutritional Glance
Now, I’m not a nutritionist, I’m a guy who loves feel-good food. But I know many of you like to keep an eye on these things, so here’s a general breakdown. Remember, this is a treat, and it’s all about balance!
Per ½ Cup Serving (Approximate):
Calories: 140 | Total Fat: 6g | Carbohydrates: 20g | Sugar: 8g
Compared to a traditional fried donut, these are a lighter option because they’re toasted in a minimal amount of butter instead of being deep-fried. You’re also getting the whole-grain goodness from the Cheerios. It’s a snack you can feel good about sharing and enjoying!
Your New Go-To Snack Awaits
And there you have it, my friends! Your secret weapon against boring snacks and powerful sugar cravings. This Mini Cinnamon Sugar Cheerios “Donuts” recipe is proof that you don’t need fancy equipment or complicated techniques to make something truly special and delicious.
It’s a recipe built on nostalgia, simplicity, and the pure joy of a warm, sweet bite. I hope it becomes a staple in your home, creating as many happy memories for you and your loved ones as it has for me. Now, I’d love to hear from you! Did you try the classic version or one of the fun twists? Tag me on social @Feastical so I can see your creations!
Final Thoughts: Your New Go-To Smile Maker
So there you have it, friends—the snack hack that’s part kitchen magic, part cherished memory, and 100% delicious. These Mini Cinnamon Sugar Cheerios “Donuts” are proof that you don’t need a complicated recipe or a lot of time to create something truly special. In the span of just a few minutes, you can turn a simple pantry staple into a warm, joyful treat that has the power to turn a boring afternoon into a tiny celebration.
This recipe is more than just a list of ingredients and steps; it’s an invitation to find a little bit of magic in the everyday. It’s about the messy, happy, sticky-fingered moments that become the stories we tell later. Whether you’re making them for your kids, your friends, or just for yourself with a hot cup of coffee, I hope this recipe brings a wave of cozy, cinnamony comfort to your day.
Life is busy, but it’s these small, sweet rituals that make it so rich. So go ahead, give it a try. I have a feeling this will become one of those beloved, back-of-the-box recipes you’ll return to again and again.
Happy cooking, and enjoy every last crunchy bite!
With love and a full heart,
Beau

Red Velvet Kiss Cookies : Soft & Chewy with a Chocolate Center
Your New Favorite Cookie is Here: Red Velvet Kiss Cookies!
Hey, friends! Beau here, welcoming you back to my kitchen. Is there anything better than the smell of cookies wafting from the oven? It’s like a universal signal that says, “Hey, everything’s going to be just fine.” And today, we’re baking up a batch of pure, unadulterated joy: my Soft & Chewy Red Velvet Kiss Cookies.
Picture this: a tender, cake-like red velvet cookie, rolled in sparkling red sugar for a little crunch, still warm from the oven. And right in the center, we’re tucking a creamy, melty Hershey’s Kiss that just takes the whole experience to another level. This isn’t just a cookie; it’s an event. It’s the cookie you bring to the party and watch disappear in minutes. It’s the treat you make for your kids and instantly become the coolest parent on the block. It’s a little bite of magic that’s perfect for Valentine’s Day, Christmas, or just a Tuesday that needs a splash of red.
Now, I know some of you might be thinking, “Beau, red velvet can be tricky!” But trust me on this one. We’re keeping it wonderfully simple. No fussy techniques, no hard-to-find ingredients. We’re using my favorite little chef hacks to ensure you get a soft, chewy, and absolutely stunning cookie every single time. So, tie on that apron, find your favorite mixing bowl, and let’s create some delicious memories together.
A Sweet Slice of Nostalgia
These cookies always take me right back to my grandma’s linoleum-floored kitchen. She wasn’t a fancy baker, but she was a powerhouse of love, and her signature move was hiding a little surprise inside her desserts. One blustery December, she decided her classic thumbprint cookies needed a “heart.” She didn’t have jam, but she did have a bag of chocolate kisses. She pressed one into a warm, red-tinted cookie, and a family legend was born.
We’d crowd around her table, still in our snow-damp coats, waiting for these ruby-red treasures to cool just enough to handle. That first bite—the slight resistance of the sugary shell giving way to the soft cookie and the warm, melting chocolate center—was pure childhood bliss. It taught me that the best recipes aren’t just about taste; they’re about the stories and the smiles they create. Every time I make these, I feel like I’m sharing a piece of her kitchen, and that’s a feeling I want to pass on to you.
Gathering Your Cookie Crew: The Ingredients
Let’s get our mise en place ready! (That’s just a fancy chef term for having all your ingredients prepped and measured. It makes everything flow so smoothly.) Here’s what you’ll need to gather. I’ve also included some of my favorite insights and swaps, because I believe in making recipes work for YOU.
- 7 tbsp Butter (softened): This is the heart of our cookie, providing that rich flavor and tender crumb. I use salted butter for a little flavor boost, but unsalted works perfectly too. Just make sure it’s softened to room temperature so it creams up beautifully with the sugar. If you’re in a pinch, you can gently soften it in the microwave for a few seconds, but be careful not to melt it!
- ½ cup Brown Sugar & 2 tbsp Granulated Sugar: This dynamic duo is key! The brown sugar gives us that moist, chewy texture and a hint of molasses warmth, while the little bit of granulated sugar helps with that slight crispness on the outside.
- 1 large Egg Yolk: We’re using just the yolk here for extra richness and a fudgier, more tender texture without making the cake too “eggy.” Save the white for a healthy omelet tomorrow morning!
- 1 tsp Vanilla Extract: The flavor enhancer! It rounds out the chocolate and buttery notes. Always use the real stuff if you can—it makes a world of difference.
- ¼ tsp Red Food Coloring Gel: I highly recommend gel over liquid food coloring. It’s more concentrated, so you get a vibrant red color without throwing off the liquid balance of your dough. Your hands will also thank you for being less stained!
- 1 cup All-Purpose Flour: The trusty foundation of our cookie. For a slightly softer cookie, you can fluff your flour with a spoon before measuring, then level it off with a knife to avoid packing too much in.
- 1 tbsp Cocoa Powder: This gives us that classic, subtle red velvet flavor. We’re not going for a deep chocolate hit here, just a lovely cocoa background. Natural, unsweetened cocoa powder is perfect.
- ½ tsp Baking Powder: Our leavening agent! This is what gives the cookies their gentle rise and soft, cake-like texture.
- ¼ tsp Salt: Never skip the salt! It’s the secret weapon that makes all the other flavors pop and balances the sweetness.
- ¼ cup Red Sanding Sugar: This is for that gorgeous, sparkling coating. It gives a wonderful little crunch with every bite. If you don’t have it, regular white sugar or even some festive sprinkles will work in a pinch.
- 18 Hershey’s Kisses, unwrapped: The star of the show! Unwrap them before you start so you’re ready to go when the cookies come out of the oven. It’s a great job for any little helpers in the kitchen.
Let’s Get Baking: The Step-by-Step Guide
Okay, team, this is where the magic happens. Follow these steps, and you’ll be a red velvet cookie hero in no time. I’m sprinkling in all my best tips along the way!
Step 1: Preheat and Prep. Fire up your oven to 350°F (175°C). Line a baking sheet with parchment paper. This is my non-negotiable hack for perfectly baked cookies—no sticking, easy cleanup, and even browning. Chef’s Tip: If you have a dark-colored baking sheet, consider reducing the oven temp by 25 degrees, as they tend to bake faster and can lead to darker bottoms.
Step 2: The Creaming Method. In a large bowl, cream together your softened butter, brown sugar, and granulated sugar. Now, “cream” doesn’t just mean “mix.” We want to beat it on medium-high speed for a good 2-3 minutes until it becomes pale, fluffy, and wonderfully smooth. This step is crucial because it incorporates air into the dough, which helps our cookies rise. Don’t rush it!
Step 3: The Wet Team Assembles. Beat in the vanilla extract, the single egg yolk, and that vibrant red food coloring gel. Mix it until the color is completely uniform. It should look like a bowl of delicious red velvet cake batter already. If the color isn’t as deep as you’d like, now is the time to add another tiny dab of gel.
Step 4: Whisk the Dry Goods. In a separate, medium-sized bowl, whisk together the flour, cocoa powder, baking powder, and salt. Whisking is important here—it ensures our leavening agents and cocoa are evenly distributed throughout the flour, so every cookie bakes up consistently.
Step 5: Bring It All Together. Gradually add the dry ingredients to the wet ingredients, mixing on low speed until *just* combined. I mean it—the moment you no longer see streaks of flour, STOP MIXING. Overmixing is the enemy of a tender cookie, as it develops the gluten in the flour and can make them tough.
Step 6: The Sugar Coating. Place your red sanding sugar in a small bowl. Using a cookie scoop or a tablespoon, portion the dough into 1-inch balls. Roll them between your palms to make them nice and round, then roll each one generously in the red sugar. This is where they get their gorgeous, jewel-like appearance!
Step 7: Bake to Perfection. Place the dough balls on your prepared baking sheet, spacing them about 2 inches apart. They don’t spread a ton, but they need their personal space! Bake for 8-10 minutes. They’re done when the edges are set and the tops are no longer glossy. They might look a little soft in the center—that’s exactly what we want! Chef’s Hack: For an extra-chewy cookie, slightly underbake them by a minute. They’ll finish setting up on the hot tray.
Step 8: The Grand Finale – The Kiss! As soon as you pull the baking sheet from the oven, it’s go-time. Working quickly but carefully, gently press a Hershey’s Kiss into the center of each warm cookie. You’ll see the cookie puff up around it beautifully. Don’t press too hard or you might crack the bottom.
Step 9: The Patience Test. Let the cookies cool on the baking sheet for a full 5 minutes. This allows them to set up so they don’t fall apart when you move them. Then, transfer them to a wire rack to cool completely. I know it’s hard, but try to let the chocolate set a bit before diving in!
How to Serve These Stunning Cookies
Presentation is part of the fun! I love piling these cookies high on a vintage cake stand or a simple wooden board. They look incredible all on their own. For a special touch, you can drizzle a little melted white chocolate over the top or add a few heart-shaped sprinkles around the base, especially for Valentine’s Day.
And what to serve with them? A tall glass of cold milk is the classic, unbeatable partner. For the adults, a rich cup of coffee or a latte complements the chocolate perfectly. These cookies also make the most adorable homemade gift. Tuck a few into a cellophane bag, tie it with a pretty ribbon, and you’ve got a present that’s straight from the heart.
Mix It Up! Fun Recipe Variations
Once you’ve mastered the classic, feel free to get creative! This dough is a fantastic canvas. Here are a few of my favorite twists:
- Peppermint Twist: Use a York Peppermint Pattie or an Andes Mint in the center instead of a Kiss. You can also add ¼ tsp of peppermint extract to the dough along with the vanilla for a real holiday vibe.
- White Chocolate Wonder: Swap the Hershey’s Kiss for a white chocolate kiss or a Hug. The contrast between the red cookie and the white chocolate is just gorgeous.
- Nutty Buddy: Press a roasted pecan or almond into the top alongside the Kiss for a little nutty crunch and flavor.
- Gluten-Free & Happy: You can easily use a 1:1 gluten-free all-purpose flour blend in place of the regular flour. I’ve had great results with brands like Bob’s Red Mill and King Arthur.
- Cream Cheese Surprise: Want to go next-level? Make a simple cream cheese filling by beating together 2 oz softened cream cheese, 2 tbsp powdered sugar, and a splash of vanilla. Flatten the dough ball, add a tiny dollop of this mixture, then seal the dough around it before rolling in sugar and baking. It’s a red velvet cheesecake in cookie form!
Beau’s Chef’s Notes
This recipe has been a fun one to evolve. I remember one time, in a pre-coffee haze, I accidentally used baking soda instead of baking powder. Let’s just say we ended up with very flat, very wide, and ironically, very tasty “red velvet cookie crisps.” We still ate them, of course! It was a great lesson in reading labels carefully.
Over the years, I’ve found that chilling the dough for 30 minutes before baking can help prevent a little bit of spreading if your kitchen is particularly warm, but it’s not strictly necessary for this recipe. The real key is nailing that creaming step and not overbaking. These cookies are wonderfully forgiving and always a crowd-pleaser.
Your Questions, Answered!
I’ve gotten a lot of questions about these cookies over the years, so here are the answers to the most common ones.
Q: My cookies spread too much. What happened?
A: This usually means your butter was too warm. It’s essential that it’s softened but not melted or greasy. If your kitchen is hot, pop the shaped dough balls in the fridge for 15-20 minutes before baking to firm up the butter.
Q: Can I make the dough ahead of time?
A: Absolutely! You can scoop and roll the dough balls, then freeze them on a tray before transferring to a freezer bag. When you’re ready to bake, just roll them in the red sugar (it sticks to the frozen dough perfectly) and add 1-2 minutes to the baking time. Fresh cookies on demand!
Q: My food coloring stained my hands. Help!
A> I feel your pain! Gel is better, but it can still stain. Wearing disposable food-safe gloves while rolling the dough is a game-changer. If you do get stained, a paste of baking soda and dish soap usually does the trick.
Q: The Kiss completely melted into the cookie. Why?
A> This means the cookies were likely a bit too hot when you pressed the Kiss in. Make sure you’re pressing them in *immediately* after removing from the oven, but if your cookies are very puffy and hot, it can happen. Letting them cool on the sheet for just 60 seconds first can help, but don’t wait too long or the cookie will set.

Red Velvet Kiss Cookies : Soft & Chewy with a Chocolate Center
Description
Hey friends! These Soft & Chewy Red Velvet Kiss Cookies are tender, cake-like red velvet cookies rolled in sparkling red sugar with a melty Hershey’s Kiss at the center. Perfect for Valentine’s Day, Christmas, or any day that needs a splash of red.
Ingredients
-
7 tbsp butter, softened (salted or unsalted)
-
½ cup brown sugar
-
2 tbsp granulated sugar
-
1 large egg yolk (save the white for another use)
-
1 tsp vanilla extract
-
¼ tsp red food coloring gel (use gel for vibrant color)
-
1 cup all-purpose flour
-
1 tbsp cocoa powder (unsweetened)
-
½ tsp baking powder
-
¼ tsp salt
-
¼ cup red sanding sugar (or regular sugar/festive sprinkles)
-
18 Hershey’s Kisses, unwrapped
Instructions
1. Preheat & Prep
-
Preheat oven to 350°F (175°C).
-
Line a baking sheet with parchment paper.
2. Cream Butter & Sugars
-
Beat the softened butter, brown sugar, and granulated sugar on medium-high speed for 2–3 minutes until pale and fluffy.
3. Add Wet Ingredients
-
Mix in vanilla extract, egg yolk, and red food coloring until fully combined and vibrant.
4. Whisk Dry Ingredients
-
In a separate bowl, whisk together flour, cocoa powder, baking powder, and salt.
5. Combine Wet & Dry
-
Gradually add dry ingredients to the wet on low speed, mixing just until combined. Stop once no streaks of flour remain.
6. Roll in Sugar
-
Scoop dough into 1-inch balls, roll between palms, then coat generously in red sanding sugar.
7. Bake
-
Place dough balls 2 inches apart on the baking sheet.
-
Bake 8–10 minutes, until edges are set and tops are no longer glossy. Slightly underbake for extra chewiness.
8. Add the Kiss
-
Immediately press a Hershey’s Kiss into the center of each warm cookie. Do not press too hard.
9. Cool
-
Cool on the baking sheet 5 minutes, then transfer to a wire rack to finish cooling.
Notes
-
Cookies spread too much? Butter too warm—chill dough 15–20 minutes.
-
Make ahead: Scoop and freeze dough balls; bake with an extra 1–2 minutes.
-
Food coloring stains: Wear gloves while rolling dough.
-
Kiss melts too fast: Press in after 60 seconds of cooling, not immediately if very hot.
Nutritional Information (Because Knowledge is Power!)
Alright, let’s talk facts. I’m a big believer in enjoying treats mindfully. Here’s a general breakdown per cookie (assuming you make 18). Remember, these are estimates and can vary based on the specific brands of ingredients you use.
Per Cookie: Calories: ~130 | Fat: 6g | Saturated Fat: 3.5g | Carbs: 18g | Fiber: 0g | Sugar: 11g | Protein: 1g
These are definitely a dessert cookie, and that’s okay! The joy they bring is part of the recipe. The fat comes primarily from the butter, which gives us that rich flavor and texture. The carbs and sugar are what make them a treat. To make them a bit lighter, you could use a light butter alternative, but the texture will change slightly. My philosophy? Enjoy one or two of the real-deal, homemade cookies slowly and with delight, rather than a whole sleeve of something less satisfying.
Final Sweet Thoughts
Well, there you have it! My go-to recipe for cookies that are guaranteed to bring a smile. They’re simple enough for a beginner but special enough for any celebration. The process of making them—the vibrant red dough, the sparkly sugar, the final press of that chocolate kiss—is just as joyful as eating them.
I hope you’ll give these Red Velvet Kiss Cookies a try. And when you do, I’d love to see your masterpiece! Tag me @Feastical on social media or share your photos in the comments on the blog. You’re not just baking cookies; you’re creating little moments of happiness. And that, my friends, is what Feastical is all about.

Strawberry Cheesecake Cookies : Soft, Creamy & Bursting with Berry Flavor
Your New Favorite Cookie Just Walked In
Hey friends, Beau here! Let’s get right to it. Have you ever been stuck in that delicious dilemma of wanting a slice of creamy, dreamy cheesecake but also craving a soft, warm, straight-from-the-oven cookie? You stand there, fridge door open, oven mitt in hand, torn between two of life’s greatest pleasures.
Well, my foodie friends, I’m here to tell you the struggle is over. For good.
I’m so excited to share what might just be my all-time favorite recipe I’ve ever created for Feastical: Strawberry Cheesecake Cookies. Imagine this: a buttery, supremely soft cookie base that literally melts in your mouth. Now, swirl that with the tangy, rich flavor of real cream cheese. And just when you think it can’t get any better, you get a burst of sweet, fruity flavor from real strawberries in every single bite. It’s like a little pocket-sized piece of cheesecake heaven, but even more fun to eat.
These cookies are a total game-changer for bake sales, spring picnics, Valentine’s Day, or just because it’s Tuesday. They look gorgeous, taste incredible, and I’ve packed this guide with all my best chef hacks to make sure you nail them on the very first try. So, preheat those ovens, and let’s make some magic happen!
A Berry Sweet Memory
This recipe takes me right back to my grandma’s kitchen. Every summer, we’d drive out to a local farm and spend the morning picking strawberries until our fingers were stained pink and our baskets were overflowing. The rule was you had to eat as many as you picked, and I took that job very, very seriously.
We’d always come home and make a classic strawberry cheesecake—it was our tradition. But one sweltering afternoon, the power went out right after we’d baked the graham cracker crust. With a fridge full of cream cheese filling and a mountain of fresh berries, my grandma, never one to waste a thing, looked at me and said, “Beau, let’s get creative.” We mixed the filling into a simple sugar cookie dough, folded in those gorgeous berries, and baked them on the gas grill. What emerged were the lumpy, imperfect, but utterly delicious ancestors of this very recipe. They were a happy accident born from a hot day and a love for good food. Every time I bake these now, I smell those summer strawberries and remember that nothing brings people together quite like a kitchen adventure.
Gathering Your Cookie Dream Team
Here’s everything you’ll need to bring these strawberry cheesecake cookies to life. I’ve included some of my favorite insights and swaps so you can bake with confidence!
- 2 ¼ cups All-Purpose Flour: The trusty foundation of our cookie. It gives them that perfect, soft structure. For a slightly lighter cookie, you can swap in ½ cup of cake flour, but all-purpose works beautifully.
- 1 tsp Baking Powder: This is our leavening agent, the little miracle worker that gives the cookies their lift and that lovely, pillowy texture.
- ½ tsp Salt: Don’t you dare skip this! Salt is the flavor enhancer that makes the sweet strawberries and rich cream cheese truly pop. It balances everything out.
- ½ cup Unsalted Butter, softened: The key to flavor and that melt-in-your-mouth quality. I always use unsalted so I can control the salt level. Pro Chef Tip: Your butter is perfectly softened when you can press your thumb into it easily and leave an indentation, but it’s not greasy or melted.
- 4 oz Cream Cheese, softened: The star of the show! This is what gives us that unmistakable cheesecake flavor and an incredibly tender crumb. Make sure it’s full-fat for the best results, and softened to the same level as your butter.
- 1 cup Granulated Sugar: Sweetens the deal and helps create a slightly crisp edge while the center stays soft and fudgy.
- 1 large Egg: Our binding agent, bringing all the ingredients together. Make sure it’s at room temperature to create a smooth, emulsified dough.
- 1 tsp Vanilla Extract: The supporting actor that makes all the other flavors sing. Use the real stuff if you have it—it makes a difference!
- ½ cup Freeze-Dried Strawberries, crushed: This is my secret weapon! Using freeze-dried berries instead of fresh gives us an intense, concentrated strawberry flavor without adding any extra moisture that would make the cookies cakey or soggy.
- ½ cup White Chocolate Chips (optional): I highly recommend them! They add little pockets of creamy sweetness that pair perfectly with the tangy strawberries and cream cheese. It’s a next-level combo.
Let’s Bake! Your Step-by-Step Guide to Cookie Perfection
Ready to get your hands dirty? Follow these steps, and you’ll be a cookie hero in no time. I’ve sprinkled in my best tips to ensure your cookies are absolute perfection.
- Preheat and Prep. Fire up your oven to 350°F (175°C). Line your baking sheets with parchment paper. This isn’t just for easy cleanup; it prevents the bottoms from browning too quickly and helps the cookies bake evenly. Chef’s Hack: If you don’t have parchment, a light coating of baking spray works, but parchment is king.
- Combine the Dry Goods. In a medium bowl, take a whisk and vigorously whisk together your flour, baking powder, and salt. Why whisk? It aerates the flour and ensures the baking powder and salt are evenly distributed throughout, so every cookie is consistent. Set this bowl aside.
- Cream the Good Stuff. In a separate, larger bowl, use an electric mixer (or some serious elbow grease with a wooden spoon) to beat the softened butter, softened cream cheese, and granulated sugar together. We’re looking for a mixture that is light, pale, and fluffy. This should take about 2-3 minutes on medium speed. This step is crucial—it incorporates air into the dough, which helps with the cookie’s texture.
- Bring in the Wet Team. Crack in the room-temperature egg and add the vanilla extract. Mix on medium speed until everything is just combined and smooth. Don’t overmix at this stage. Scrape down the sides of the bowl with a spatula to make sure nothing is hiding down there.
- Marry the Dry and Wet. Gradually add your flour mixture to the wet ingredients, mixing on low speed. I usually add it in three parts. Mix until *just* combined and you no longer see streaks of flour. This is the most important tip: Overmixing the dough after adding the flour is the #1 cause of tough cookies. A few flour streaks are better than overmixed dough!
- The Fun Part: Folding! Now, take your crushed freeze-dried strawberries and your white chocolate chips (if using) and gently fold them into the dough with a spatula. Fold until they are evenly distributed. You’ll see the dough turn a beautiful, speckled pink—it’s a gorgeous sight!
- Scoop and Shape. Using a cookie scoop or a tablespoon, portion out the dough into balls, about 1.5 tablespoons each. Roll them gently between your palms to smooth them out. You don’t need to press them down; they will spread beautifully on their own. Place them about 2 inches apart on your prepared baking sheet.
- Bake to Perfect. Pop the baking sheet into your preheated oven and bake for 10-12 minutes. The cookies are done when the edges are lightly golden and set, but the centers still look a little soft and underdone. Chef’s Secret: They will continue to cook on the hot baking sheet out of the oven. Pulling them out at this stage is the secret to an ultra-soft, almost gooey center.
- The Cool Down. Let the cookies cool on the baking sheet for a full 5 minutes. This allows them to set up enough to handle. Then, carefully transfer them to a wire rack to cool completely. I know it’s hard, but try to let them cool for at least 10-15 minutes before diving in—the flavors really settle and intensify.
How to Serve These Strawberry Stunners
Okay, the cookies are baked, your kitchen smells incredible, and now it’s time for the grand finale. How you serve them can turn a great cookie into an unforgettable experience.
For a simple, elegant touch, I love dusting them with a little powdered sugar right before serving. It looks like a light snowfall and adds a tiny extra bit of sweetness.
Want to go full dessert mode? Warm a cookie for about 10 seconds in the microwave and place it next to a scoop of high-quality vanilla bean ice cream. The contrast of the warm, soft cookie and the cold, creamy ice cream is a match made in heaven. Drizzle with a little strawberry sauce for the ultimate decadence.
For a brunch or afternoon tea, these cookies are perfect just as they are, arranged on a pretty cake stand. They pair wonderfully with a cup of coffee, a glass of cold milk, or even a bubbly glass of Prosecco. However you choose to enjoy them, do it with someone you love. Food always tastes better when it’s shared.
Make It Your Own: Delicious Recipe Variations
One of the best things about this recipe is how adaptable it is! Feel like mixing it up? Here are a few of my favorite twists:
- Mixed Berry Bliss: Swap out the freeze-dried strawberries for a mix of freeze-dried raspberries and blueberries. You get a beautiful, confetti-like look and a fantastic medley of flavors.
- Lemon Zest Twist: Add the zest of one lemon to the wet ingredients when you add the vanilla. The bright, zesty lemon cuts through the richness and makes the strawberry flavor even more vibrant.
- Chocolate Lovers’ Swap: Not a white chocolate fan? No problem! Fold in semi-sweet or dark chocolate chips instead. The deep, rich chocolate with the strawberry is a classic, unbeatable combination.
- Gluten-Free Goodness: You can easily make these gluten-free by using a 1:1 gluten-free all-purpose flour blend. I’ve had great success with brands like Bob’s Red Mill or King Arthur.
- “Cheesecake Crust” Finish: Before baking, gently roll the top of each dough ball in some finely crushed graham cracker crumbs. It gives you that authentic cheesecake crust flavor and a delightful little crunch.
Beau’s Chef’s Notes & Kitchen Stories
This recipe has evolved so much since that first grill-baked batch with my grandma. The biggest game-changer was discovering freeze-dried strawberries. I tried for years to get the perfect strawberry flavor using jams or fresh pieces, but they always made the cookies too wet or too cakey. The day I ground up a bag of freeze-dried berries and folded them in, it was a total “EUREKA!” moment. The flavor was pure, intense strawberry, and the texture was perfect.
A funny story: I once accidentally doubled the cream cheese in a test batch. The cookies spread into one giant, delicious, pan cookie. It was a happy, cheesy, mess! We just broke it into pieces and ate it with forks. It taught me that even the “mistakes” can be delicious, so don’t stress too much. Baking is supposed to be fun!
Your Questions, Answered!
I’ve gotten a lot of questions about this recipe over the years. Here are the answers to the most common ones to help you troubleshoot.
Q: My cookies spread too much and got flat. What happened?
A: This is almost always a temperature issue! If your butter and cream cheese were too warm or melted, the cookies will spread. Make sure they are softened but still cool to the touch. Also, double-check that your baking powder is fresh—it loses its potency over time.
Q: Can I use fresh or frozen strawberries instead?
A: I don’t recommend it. Fresh and frozen berries contain a lot of water, which will steam in the oven and make your cookies gummy, wet, and cakey. They also won’t provide that intense strawberry punch. Freeze-dried is the way to go for the best flavor and texture.
Q: Why do the centers look underbaked when I take them out?
A> That’s exactly what you want! Trust the process. The residual heat from the baking sheet and the cookies themselves will continue to cook the centers as they cool. This is the ultimate secret to a soft, creamy, perfect cookie texture. If you bake them until the centers look fully done, they’ll be overbaked and dry once cooled.
Q: How should I store these cookies, and can I freeze the dough?
A> Once completely cool, store them in an airtight container at room temperature for up to 3 days. For longer storage, you can freeze the baked cookies for up to 2 months. You can also freeze the scooped dough balls on a parchment-lined sheet, then transfer them to a freezer bag. Bake straight from frozen, adding 1-2 minutes to the baking time.

Strawberry Cheesecake Cookies : Soft, Creamy & Bursting with Berry Flavor
Description
Hey friends! Ready for a cookie that delivers cheesecake and strawberries in every bite? These Strawberry Cheesecake Cookies are soft, buttery, and packed with tangy cream cheese and sweet bursts of real strawberries—perfect for bake sales, brunch, or just a midweek treat.
Ingredients
-
2 ¼ cups all-purpose flour (swap ½ cup for cake flour for a slightly lighter cookie)
-
1 tsp baking powder
-
½ tsp salt
-
½ cup unsalted butter, softened
-
4 oz cream cheese, softened (full-fat for best results)
-
1 cup granulated sugar
-
1 large egg (room temperature)
-
1 tsp vanilla extract
-
½ cup freeze-dried strawberries, crushed
-
½ cup white chocolate chips (optional but highly recommended!)
Instructions
1. Preheat & Prep
-
Preheat oven to 350°F (175°C).
-
Line baking sheets with parchment paper (or lightly grease if needed).
2. Combine Dry Ingredients
-
Whisk together flour, baking powder, and salt in a medium bowl. Set aside.
3. Cream Butter, Cream Cheese & Sugar
-
Beat butter, cream cheese, and sugar with an electric mixer until pale and fluffy (2–3 minutes).
4. Add Wet Ingredients
-
Mix in egg and vanilla until smooth. Scrape down bowl sides to incorporate everything.
5. Combine Dry & Wet
-
Gradually add the flour mixture in 3 parts, mixing on low just until combined. Do not overmix—few streaks of flour are fine.
6. Fold in Flavor
-
Gently fold in crushed freeze-dried strawberries and white chocolate chips. Dough will be speckled pink.
7. Scoop & Shape
-
Using a cookie scoop or tablespoon, portion dough into 1.5 tbsp balls. Roll lightly between palms.
-
Place 2 inches apart on baking sheet; do not press down.
8. Bake
-
Bake 10–12 minutes until edges are lightly golden but centers still look soft.
9. Cool
-
Let cookies rest 5 minutes on baking sheet, then transfer to wire rack to cool completely (~10–15 minutes).
Notes
-
Cookies spread too much? Butter/cream cheese may be too warm. Ensure softened but cool to touch.
-
Fresh/frozen strawberries? Avoid—they add too much moisture. Freeze-dried is key.
-
Centers look underbaked? Perfect! Residual heat continues to cook them for a soft, creamy texture.
-
Storage: Store cooled cookies in an airtight container up to 3 days; freeze baked cookies for up to 2 months. Freeze dough balls for later baking, adding 1–2 minutes to bake time.
Nutrition
- Calories: 160 Cal Per Serving
- Sugar: 12g
- Fat: 7g
- Carbohydrates: 20g
Nutritional Information (Because We’re All Friends Here!)
I’m all about balance. Enjoy your treats mindfully! Here’s a general breakdown of what you’re getting in one of these delightful cookies. Please note that this is an estimate and can vary based on specific ingredients and portion sizes.
- Yield: ~24 cookies
- Prep Time: 15 mins
- Bake Time: 12 mins
- Total Time: 27 mins
- Calories per cookie: ~160
- Carbohydrates: 20g
- Fat: 7g
- Sugar: 12g
Remember, these are a treat! Savor them slowly, share them with neighbors, and enjoy every single bite without any guilt. Life’s too short not to eat the cookie.
Final Thoughts from My Kitchen to Yours
Well, there you have it, my friends—my heart and soul in cookie form. These Strawberry Cheesecake Cookies are more than just a recipe to me; they’re a reminder that the best food comes from a place of joy and a little bit of experimentation.
I truly hope you love baking them as much as I do. I hope your kitchen fills with that incredible sweet aroma, and I hope you get to see the smiles on the faces of the people you share them with. That’s what Feastical is all about.
If you make them (and you totally should!), I’d be absolutely thrilled if you tagged me on social @Feastical or left a comment on the blog. Seeing your creations is my favorite part of the day.
Now, go forth and bake something wonderful!
With a full heart and an empty mixing bowl,
Beau
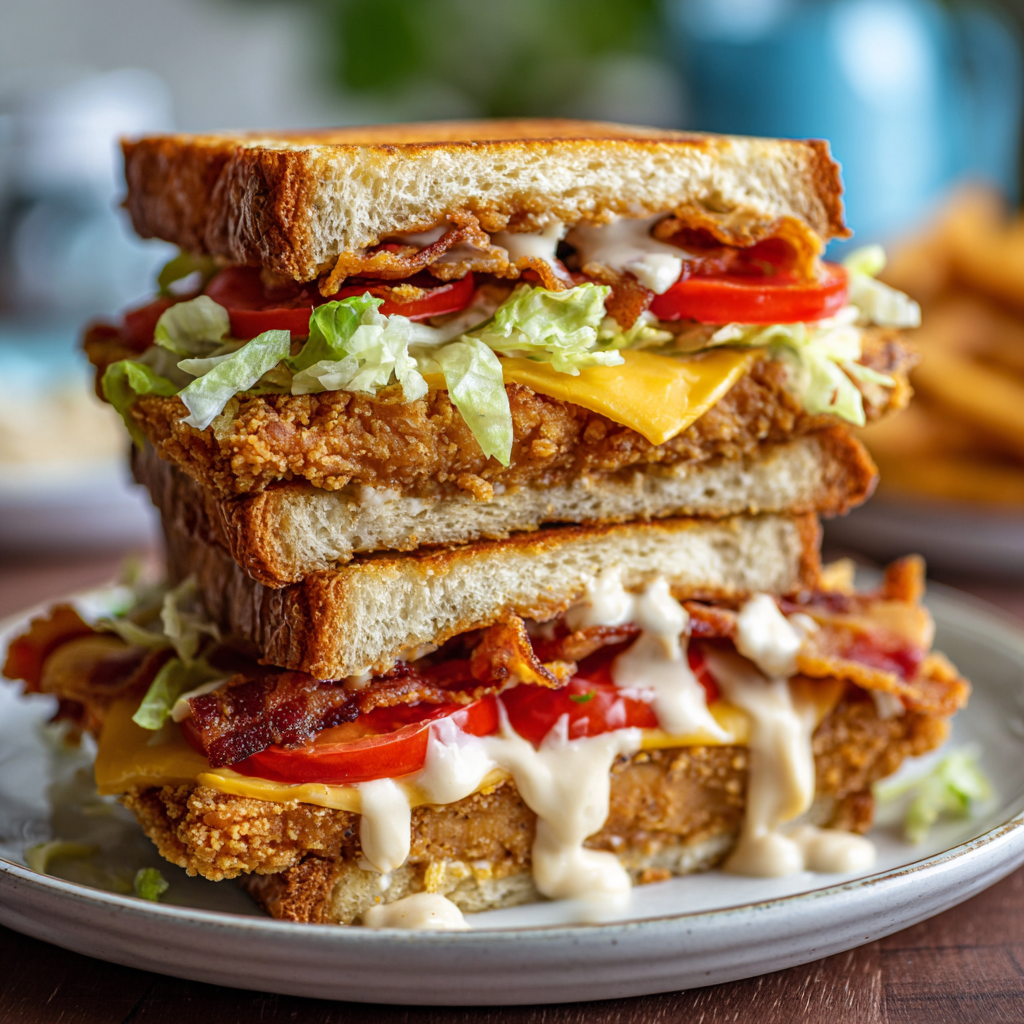
Vegan KFC-Style Double Down : A Plant-Based Fast Food Fantasy
Vegan KFC-Style Double Down: A Plant-Based Fast Food Fantasy
Hey there, Feastical family! Beau Collier here, coming at you from a kitchen that currently smells like a glorious cross between a southern fry shack and a modern plant-based bistro. And let me tell you, that is a *beautiful* combination.
We all have those cravings, right? The ones that hit you out of nowhere on a lazy Friday night. For me, it was always for something gloriously over-the-top, something that felt like a celebration in your hands. I remember the buzz around that infamous fast-food sandwich—the one that boldly replaced buns with fried chicken. It was audacious, it was indulgent, and for a long time, it was firmly off the table for anyone exploring a plant-based lifestyle.
But here at Feastical, we don’t believe in missing out. We believe in reinvention. So, I put on my chef’s hat (a slightly flour-dusted baseball cap, if we’re being real) and got to work. My mission? To create a Vegan KFC-Style Double Down that doesn’t just mimic the original, but absolutely *eclipses* it in flavor, texture, and pure, unadulterated joy.
This isn’t just a sandwich; it’s a statement. It’s proof that you can have that big, bold, comfort-food experience without any compromise. We’re talking about two incredibly juicy, crispy, perfectly seasoned fried seitan cutlets acting as the buns, hugging layers of smoky vegan bacon, melty, stretchy vegan cheese, and a creamy, zesty sauce that ties it all together. It’s a project, it’s a party, and it’s about to become your new favorite kitchen adventure. So, tie on your apron, and let’s make some magic!
This recipe takes me right back to my college days. My roommate, Leo, and I had a tradition: after every grueling finals week, we’d celebrate by diving headfirst into the most decadent, nutritionally questionable fast food we could find. It was our reward, our ritual. One year, the Double Down had just hit the scene, and we were equal parts horrified and fascinated. We got one, split it in the car, and just laughed at the glorious absurdity of it. It became our post-finals tradition for years.
When I started my plant-based journey, a lot of those nostalgic food memories felt… distant. I wasn’t missing the meat itself so much as the experience, the tradition, the shared joy of eating something ridiculously fun. I wanted to recreate that feeling for Leo and me, and for all of you. The first time I perfected this vegan version, I invited him over. The look on his face after the first bite—a mix of shock, nostalgia, and pure delight—was everything. “Dude,” he said, mouth still full, “this is better. Way better.” That’s the power of food, friends. It’s not just fuel; it’s a time machine to your best memories, now with a delicious, compassionate upgrade.
Alright, let’s get down to the good stuff. Gathering your ingredients is the first step to this plant-based paradise. I’ve included some of my favorite chef insights and swaps to make this work with what you’ve got!
- For the Seitan Cutlets:
- 1 cup Vital Wheat Gluten: This is the magic protein that gives seitan its chewy, meaty texture. There’s no direct sub for this, it’s the star of the show!
- 2 tbsp Nutritional Yeast: Adds a savory, “chickeny” depth of flavor. Don’t skip it!
- 1 tsp Onion Powder & 1 tsp Garlic Powder: The foundation of our seasoning. Fresh is great for sautés, but powder gives an even, distributed flavor here.
- 1 tsp Smoked Paprika: This little gem adds a subtle smokiness and gorgeous color.
- 3/4 cup Cold Vegetable Broth: Using cold broth helps keep the seitan from getting tough. You can sub with water and a veggie bouillon cube.
- 1 tbsp Soy Sauce or Tamari: For that essential umami punch. Coconut aminos work great for a soy-free option.
- For the Breading & Frying:
- 1 cup All-Purpose Flour: The first layer of our crispy armor. For a gluten-free version, use a 1:1 GF flour blend.
- 1 cup Unsweetened Non-Dairy Milk: My go-to is unsweetened soy or oat milk for its neutral flavor and creamy texture.
- 1 cup Panko Breadcrumbs: Panko gives you that ultra-crispy, shatteringly light crust. Regular breadcrumbs work, but they’ll be denser.
- High-Heat Oil for Frying: Avocado, canola, or peanut oil are my top picks. You’ll need enough for about 1-2 inches in your pan.
- For the Assembly:
- 2-3 slices Vegan Bacon: My current fave is coconut-based bacon for its crispiness, but tempeh or store-bought options are fantastic too.
- 2-3 tbsp Vegan Cheese: Look for a melty brand like Violife or Miyoko’s. Shredded or sliced, it’s all good!
- 2 tbsp Creamy Vegan Sauce: Chipotle mayo, garlic aioli, or even a simple cashew cheese sauce. This is your flavor playground!
- Optional: Lettuce or a Slice of Tomato: A little freshness to cut through all that glorious richness.
Ready to get your hands dirty? This is where the fun begins. Follow these steps, and you’ll be a vegan fry master in no time.
- Make the Seitan Dough. In a large bowl, whisk together the vital wheat gluten, nutritional yeast, onion powder, garlic powder, and smoked paprika. In a separate jug, combine the cold veggie broth and soy sauce. Pour the wet ingredients into the dry and mix with a fork until it just starts to come together. Then, use your hands to knead the dough for 2-3 minutes right in the bowl. You’ll feel it become firm and elastic. Let it rest for 5 minutes. Chef’s Hack: Don’t over-knead! This is the key to tender, not tough, seitan.
- Shape and Simmer the Cutlets. Divide the dough into two equal pieces. Stretch and flatten each piece into a cutlet shape, about 1/2-inch thick. They will puff up a bit! Now, bring a pot of water or light vegetable broth to a gentle simmer—not a rolling boil. Carefully add your cutlets, cover, and let them simmer for 30 minutes, flipping halfway through. Chef’s Hack: Simmering gives the seitan its final structure and cooked flavor. Think of it as pre-cooking your “chicken.”
- Set Up Your Breading Station. While the cutlets simmer, set up three shallow dishes. One with the all-purpose flour, seasoned with a pinch of salt and pepper. The second with the non-dairy milk. The third with the panko breadcrumbs. This is your assembly line to crispy perfection.
- Bread the Cutlets. Once the cutlets are done simmering, remove them and pat them very dry with a paper towel. This is crucial for the breading to stick! Dredge each cutlet in the flour, shaking off the excess. Then, dip it fully into the non-dairy milk. Finally, press it firmly into the panko breadcrumbs, ensuring every inch is coated. Chef’s Hack: Use one hand for the dry steps (flour, panko) and the other for the wet step (milk) to avoid “club hand.”
- Fry to Golden Perfection. In a large, heavy-bottomed skillet (I love my cast iron for this), heat about 1-2 inches of oil over medium-high heat. To test if it’s ready, drop a small breadcrumb in—if it sizzles immediately, you’re good to go. Carefully place your breaded cutlets in the hot oil. Fry for 3-4 minutes per side, until deeply golden brown and crispy. Transfer to a wire rack set over a baking sheet to drain. Chef’s Hack: A wire rack keeps the bottom from getting soggy! Paper towels can trap steam.
- Cook Your Bacon & Melt Your Cheese. While the cutlets are frying, cook your vegan bacon according to package directions until crispy. Right when the cutlets come out of the oil, place a slice of vegan cheese on each one. The residual heat will start to melt it beautifully.
Okay, the moment of truth! Assembly is an art form here. You’ve built this masterpiece, now let’s present it with the flair it deserves.
Grab your crispiest, most golden seitan cutlet and place it on your plate. This is your bottom “bun.” Slather on a generous tablespoon of your chosen creamy sauce—I’m a sucker for chipotle mayo for that smoky kick. Next, lay down your crispy vegan bacon strips. If you’re using lettuce or tomato, add that now for a pop of freshness and color. Carefully place your second, cheese-topped cutlet on top, cheese-side down, so the melty goodness is facing the bacon.
Now, for the real talk: this is a two-hands, lean-over-the-plate, napkin-on-the-lap situation. Embrace it! I love serving this with a side of crispy potato wedges and a simple, tangy pickle spear to cut through the richness. For a lighter companion, a simple arugula salad with a lemon vinaigrette works wonders. The goal is to create a meal that feels like a total treat, a restaurant-worthy experience right from your own kitchen.
One of the best things about this recipe is its versatility. Once you’ve mastered the base, the world is your vegan oyster! Here are a few of my favorite twists:
- The Buffalo Burner: After frying, toss the hot seitan cutlets in a bowl with your favorite vegan buffalo sauce. Assemble with a cool, creamy ranch-style sauce (vegan mayo, dill, garlic powder, and a splash of non-dairy milk) and some crunchy celery or carrot slaw.
- The BBQ Bacon Cheeseburger: Swap the creamy sauce for a smoky BBQ sauce. Add a crispy onion ring inside the sandwich for an incredible textural surprise.
- The “Garden Club”: Keep it lighter by skipping the bacon and loading up with avocado slices, spinach, a thick tomato slice, and a smear of vegan pesto.
- Gluten-Free Glory: Use a certified gluten-free flour blend and gluten-free breadcrumbs. For the seitan, you’ll need to swap it entirely—thick slices of pressed and marinated extra-firm tofu or a store-bought gluten-free vegan chicken patty work beautifully.
- Spicy Sriracha Mayo: Mix vegan mayo with sriracha and a squeeze of lime. Add pickled jalapeños for an extra kick that will wake up your taste buds!
This recipe has evolved so much from my first attempt, which was… let’s call it a “learning experience.” The first seitan I made was so dense you could have used it as a doorstop. The key was the cold broth and the gentle simmer. I also used to bake the cutlets to be healthier, but for this specific sandwich, frying truly delivers that authentic, fast-food crunch we’re chasing. Don’t be afraid of the hot oil—just be respectful and careful.
Another fun evolution? The sauce. It started with just ketchup and mayo, but now I love whipping up a quick aioli with minced garlic, lemon juice, and vegan mayo. It’s these little touches that make it feel special. This recipe is a testament to the fact that the best dishes aren’t born perfect; they’re crafted through trial, error, and a whole lot of tasty experimentation.
I’ve gotten a lot of questions about this showstopper over on Feastical.com! Here are the answers to the most common ones.
- Q: My breading fell off during frying! What happened?
A: The most common culprit is moisture. Make sure you pat your simmered seitan cutlets completely dry before breading. Also, ensure your oil is hot enough. If it’s too cool, the cutlet will sit in the oil and steam, causing the breading to slip right off.
- Q: Can I bake or air fry this instead?
A: You can! For baking, place the breaded cutlets on a parchment-lined baking sheet, spray generously with oil, and bake at 425°F (220°C) for 20-25 minutes, flipping halfway. For the air fryer, spray well and cook at 400°F (200°C) for 12-15 minutes. The crust won’t be *quite* as shaggy and crispy as deep-frying, but it’s a fantastic healthier alternative.
- Q: My seitan turned out tough and rubbery. Help!
A: This almost always means the seitan was over-kneaded or simmered at too aggressive of a boil. Knead just until the dough becomes elastic and then stop. And keep that pot at a gentle, lazy simmer—no big bubbles!
- Q: Can I make the seitan ahead of time?
A: Absolutely! You can simmer the seitan cutlets up to 3 days in advance. Keep them stored in an airtight container in the fridge. When you’re ready, just bread and fry them as directed. This makes weeknight Double Downs a real possibility!
Now, let’s be real—this is a treat, not a everyday green smoothie. But it’s a treat you can feel good about! Here’s a general breakdown (values can vary based on the specific brands of vegan cheese, bacon, and sauce you use).
Print
Vegan KFC-Style Double Down : A Plant-Based Fast Food Fantasy
Description
Hey Feastical friends! Ready to take your taste buds on an over-the-top adventure? This Vegan Double Down swaps fried chicken buns for crispy, juicy seitan cutlets, hugging smoky vegan bacon, melty vegan cheese, and a creamy, zesty sauce. It’s indulgent, nostalgic, and completely plant-based—a true kitchen showstopper.
Ingredients
For the Seitan Cutlets
-
1 cup vital wheat gluten
-
2 tbsp nutritional yeast
-
1 tsp onion powder
-
1 tsp garlic powder
-
1 tsp smoked paprika
-
¾ cup cold vegetable broth (or water + veggie bouillon)
-
1 tbsp soy sauce or tamari (coconut aminos for soy-free)
For the Breading & Frying
-
1 cup all-purpose flour (or gluten-free flour blend)
-
1 cup unsweetened non-dairy milk
-
1 cup panko breadcrumbs (or regular breadcrumbs)
-
High-heat oil for frying (avocado, canola, or peanut)
For Assembly
-
2–3 slices vegan bacon (coconut, tempeh, or store-bought)
-
2–3 tbsp vegan cheese (melty brand like Violife or Miyoko’s)
-
2 tbsp creamy vegan sauce (chipotle mayo, garlic aioli, or cashew cheese)
-
Optional: lettuce, tomato, or pickles for freshness
Instructions
1. Make the Seitan Dough
-
In a large bowl, whisk together vital wheat gluten, nutritional yeast, onion powder, garlic powder, and smoked paprika.
-
In a separate jug, combine cold vegetable broth and soy sauce.
-
Pour wet ingredients into dry and mix with a fork until it starts to come together.
-
Knead the dough 2–3 minutes until firm and elastic. Rest for 5 minutes.
Tip: Don’t over-knead to avoid tough seitan.
2. Shape and Simmer
-
Divide dough into two equal pieces. Flatten into ½-inch thick cutlets.
-
Simmer in a pot of gently simmering water or light vegetable broth for 30 minutes, flipping halfway.
3. Set Up Breading Station
-
Three shallow dishes: flour (seasoned with salt/pepper), non-dairy milk, panko breadcrumbs.
4. Bread the Cutlets
-
Pat simmered cutlets dry.
-
Dredge in flour, dip in milk, then coat with panko.
Tip: One hand for wet, one for dry keeps the breading neat.
5. Fry to Golden Perfection
-
Heat 1–2 inches of oil in a heavy skillet over medium-high heat.
-
Fry cutlets 3–4 minutes per side until golden and crispy.
-
Drain on a wire rack over a baking sheet to keep the crust crisp.
6. Cook Bacon & Melt Cheese
-
Cook vegan bacon until crispy.
-
Place vegan cheese on hot cutlets; residual heat will melt it.
7. Assemble Your Double Down
-
Place one cutlet on plate, cheese side up.
-
Spread 1 tbsp creamy sauce, add vegan bacon, optional lettuce/tomato.
-
Top with second cutlet, cheese side down.
-
Grab both hands, lean over the plate, and enjoy!
Notes
-
Breading falling off? Pat cutlets dry, ensure oil is hot enough.
-
Can I bake or air fry? Bake: 425°F (220°C) 20–25 mins, flipping halfway. Air fryer: 400°F (200°C) 12–15 mins. Crust will be slightly less crisp.
-
Seitan tough? Don’t over-knead and simmer gently—no rolling boil.
-
Make ahead? Simmer cutlets up to 3 days in advance; bread & fry when ready.
Nutrition
- Calories: 550 Cal Per Serving
- Sugar: 2g
- Fat: 35g
- Carbohydrates: 28g
- Fiber: 3g
- Protein: 25g
Per Serving (approximate):
Calories: ~550 | Protein: 25g | Carbohydrates: 28g | Fat: 35g | Saturated Fat: 5g | Fiber: 3g | Sugar: 2g
Compared to its traditional counterpart, this vegan version is a game-changer. We’ve completely eliminated cholesterol and significantly reduced saturated fat, all while packing in a powerful plant-based protein punch from the seitan. The fats here are primarily from the frying oil and your chosen vegan products, which are often based on healthier sources like coconut, nuts, and seeds. It’s indulgent, sure, but it’s an indulgence made with whole-food, conscious ingredients. As always, listen to your body and enjoy it as part of a balanced diet filled with all the fruits, veggies, and whole grains you love.
Well, friends, we did it. We took a fast-food legend and gave it a heart, a soul, and a completely plant-based passport. This recipe is more than just a sandwich to me; it’s a symbol of what Feastical is all about. It’s about not giving up the foods you love, but falling in love with them all over again in a new, more conscious way.
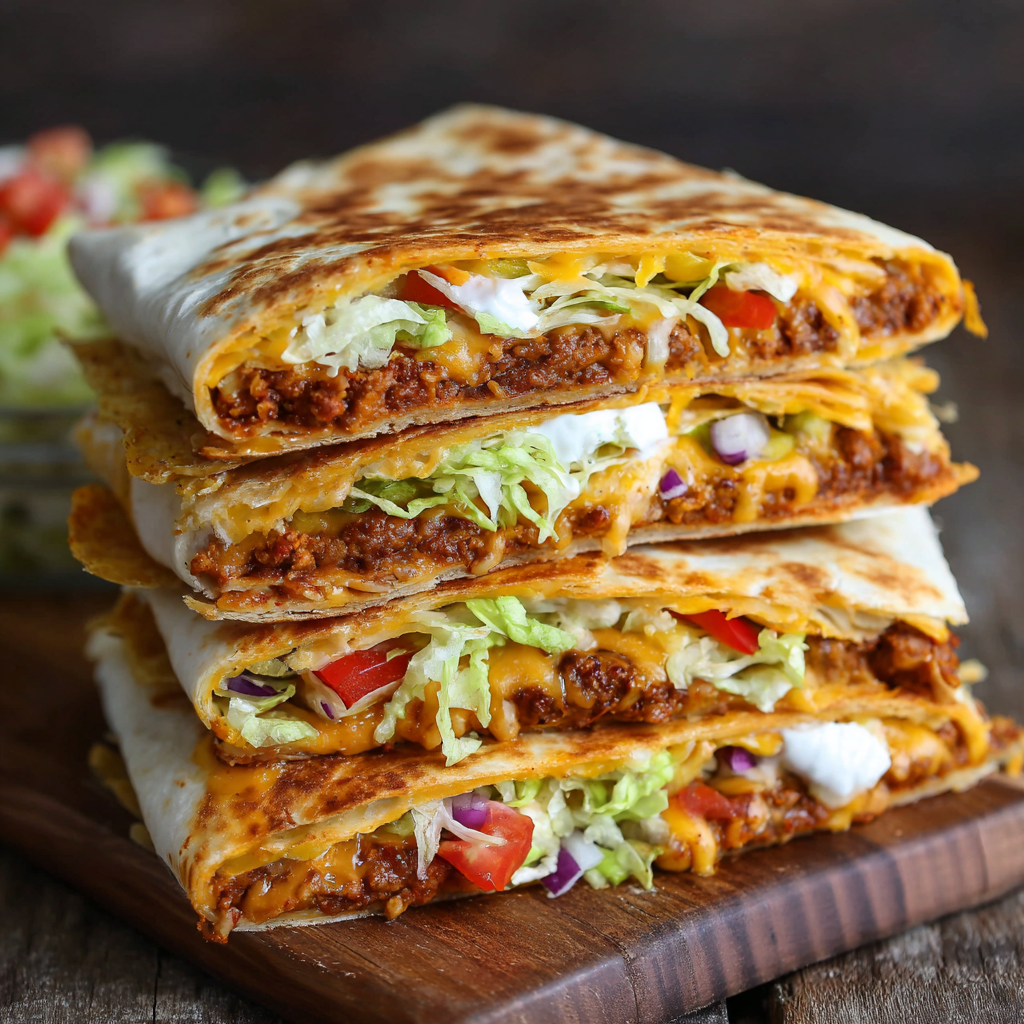
Vegetarian Crunchwrap Supreme : Taco Bell Copycat with a Meatless Twist
Your New Favorite Meatless Marvel is Here!
Hey there, friends! Beau here, welcoming you back to my kitchen. You know me—I’m all about those recipes that hit the spot, the kind of food that makes you close your eyes and just say, “Mmm.” Today, we’re tackling a legend. We’re talking about that glorious, geometric, handheld feast from the drive-thru, but we’re giving it a delicious, homemade, meat-free makeover. Get ready to fall in love with my Vegetarian Crunchwrap Supreme!
If you’ve ever craved the iconic Taco Bell Crunchwrap but wanted to know exactly what’s going into it, or if you’re simply looking for a fantastically fun and satisfying meatless meal, you have absolutely come to the right place. This isn’t just a copycat; it’s an upgrade. We’re using wholesome, simple ingredients to build layers of flavor and texture that will have you wondering why you ever waited in a drive-thru line. Imagine: a warm, soft flour tortilla, grilled to a perfect golden brown, giving way to a layer of savory, seasoned beans, a molten river of gooey cheese, a shocking CRUNCH from a hidden tostada shell, and a cool, fresh finish of lettuce, tomato, and a creamy sauce. It’s a symphony in every single bite, and I’m so excited to be your conductor today.
This recipe is a total game-changer for busy weeknights, epic game-day spreads, or those late-night cravings that demand something spectacular. It’s forgiving, it’s fun to assemble, and it’s guaranteed to bring everyone to the table with a smile. So, grab your favorite skillet and let’s get folding!
The Midnight Snack That Started It All
I have to confess, the inspiration for this recipe struck in a moment of pure, unadulterated hunger. Picture this: It’s 1 AM after a long day of recipe testing. My fridge is full of components, but my soul is empty. All I can think about is the perfect, portable, crunchy-chewy delight of a Crunchwrap. But the nearest one is miles away, and let’s be real, my pajamas are way too comfortable to change out of.
So, I did what any self-respecting food-obsessed person would do: I raided the pantry. I had tortillas, a can of refried beans, some leftover cheese, and a bag of tostada shells that were begging for a purpose. What followed was a little kitchen magic. I started layering, I folded (a little messily at first, I won’t lie!), and I grilled. That first sizzle in the pan, that first whiff of toasty tortilla and warm, seasoned beans… it was a revelation. When I took that first bite, the CRUNCH was everything I dreamed of. It was better than the original because it was made with my own two hands, with ingredients I loved. It was a “feastical” moment, born from a midnight craving, and it’s been a staple in my home ever since.
Gathering Your Crunchwrap Crew
Here’s the beautiful cast of characters that will come together to create your homemade masterpiece. Don’t be afraid to mix and match based on what you have on hand—that’s the joy of cooking!
- 4 Large Flour Tortillas (Burrito Size): These are your canvas! The large size is non-negotiable for that perfect fold. If they’re a little cold, give them a quick 10-second zap in the microwave to make them more pliable and prevent tearing.
- 1 Cup Refried Beans or Seasoned Black Beans: This is our hearty, savory base. I love the creaminess of refried beans, but whole black beans (mashed slightly with a fork) work wonderfully too. Chef’s Insight: For an extra flavor kick, look for refried beans with jalapeños or add a pinch of cumin to plain ones.
- 1 Cup Shredded Cheddar or Mexican Blend Cheese: The glue that holds our dreams together! I’m a big fan of a pre-shredded Mexican blend for its perfect melt, but a sharp cheddar will give you a bolder flavor. Substitution Tip: A pepper jack cheese would be fantastic for a little spice!
- 4 Tostada Shells (or a handful of sturdy tortilla chips): This is the CRUNCH in your Crunchwrap! Tostada shells are ideal because they create a perfect, flat layer of crispiness. In a pinch, a solid layer of thick, restaurant-style tortilla chips will do the trick.
- 1 Cup Shredded Lettuce & 1 Medium Tomato, Diced: Our fresh, cool counterpoint. I prefer romaine or iceberg for their crunch. Dice the tomato small so it doesn’t make the tortilla soggy.
- ½ Cup Sour Cream or Greek Yogurt: The creamy element! Sour cream is classic, but plain Greek yogurt adds a lovely tang and a protein boost. Chef’s Insight: Mix a little lime juice and taco seasoning into your sour cream for a next-level “creamy jalapeño” sauce vibe.
- ¼ Cup Nacho Cheese Sauce or More Shredded Cheese: This is the secret weapon for ultimate gooeyness. A little smear of warm nacho cheese sauce right under the tostada shell takes this to fast-food glory. No sauce? Just add an extra sprinkle of shredded cheese.
- 1 Avocado or ½ Cup Guacamole (Optional but Highly Recommended): Because everything is better with avocado. It adds a rich, creamy fat that balances all the other textures beautifully.
- Taco Seasoning & Olive Oil/Cooking Spray: The flavor booster and the grilling essential. Use your favorite store-bought blend or make your own with chili powder, cumin, paprika, and a touch of garlic powder.
Let’s Build Some Delicious Geometry!
Okay, team, this is where the fun begins. Don’t be intimidated by the folding—it’s easier than it looks, and I’ll guide you through every step. Think of it as edible origami!
- Wake Up Your Beans: In a small saucepan over medium heat, warm your refried or black beans. Stir in a tablespoon or two of taco seasoning—go by taste! You want them to be flavorful and spreadable. If they seem too thick, a splash of water or vegetable broth will loosen them up perfectly. Chef’s Hack: While your beans are warming, this is the perfect time to get all your other ingredients prepped and in little bowls (your mise en place). This makes assembly a smooth, stress-free process.
- Lay the Foundation: Place one large flour tortilla on a clean, flat surface. Visualize a 6-inch circle in the very center of the tortilla. This is your “build zone.” Spread a generous, even layer of your warm, seasoned beans right in that center circle.
- The Gooey & The Crispy: Next, sprinkle a layer of shredded cheese over the beans. This first cheese layer will melt and act as a delicious glue. Now, carefully place your tostada shell (or a solid layer of chips) right on top. If you’re using nacho cheese sauce, now is the time to spread a layer of it directly onto the tostada shell. Pro Tip: The tostada shell acts as a moisture barrier, helping to keep the crunchy layer crisp and protecting it from the wetter ingredients above.
- Top It Off & Create the “Lid”: Now, layer on your sour cream, diced tomatoes, shredded lettuce, and guacamole (if using). Here’s the key structural move: place a smaller tortilla (or use a second large one and trim it down to a 5-6 inch circle with a knife or a bowl as a guide) on top of all your fillings. This creates a flat “lid” that we will fold the outer tortilla over.
- The Grand Fold: This is the magic! Starting at the bottom, fold the edge of the large tortilla up and over the center “lid.” Move to the next section and fold it over, slightly overlapping the first fold. Continue working your way around, creating a hexagon shape. The weight of the folds will hold everything together. If you have a small gap in the very center, don’t worry! You can patch it with a tiny piece of tortilla scrap. Chef’s Confidence Boost: The first one might feel a little awkward, but by your second Crunchwrap, you’ll be a folding pro. I promise!
- Grill to Golden Perfection: Heat a large skillet or griddle over medium heat. A non-stick or well-seasoned cast-iron skillet is perfect here. Lightly brush or spray the pan with oil. Carefully place your Crunchwrap folded-side down in the hot skillet. This seals the deal! Cook for 2-4 minutes, until beautifully golden brown and crisp. Then, using a wide spatula, gently flip it over and cook for another 2-3 minutes on the second side until equally gorgeous. Watchful Eye: Don’t rush this by cranking the heat—we want the cheese inside to melt completely and the exterior to get crisp, not burn.
- The Finale: Transfer your masterpiece to a cutting board. Let it rest for just a minute (this helps the interior set slightly), then slice it in half to reveal all those glorious, colorful, crunchy layers. Serve immediately!
How to Serve Up This Masterpiece
Presentation is part of the fun! I love serving these right on a wooden cutting board, cut in half to show off that stunning cross-section. It’s an instant conversation starter.
While this Crunchwrap is a full meal in itself, you can absolutely build a feast around it. For a true “Feastical” spread, pair it with a side of zesty cilantro-lime rice, a big bowl of charred corn and black bean salad, or a simple side of tortilla chips and your favorite salsa. For dipping, a side of extra sour cream, salsa, or a quick chipotle aioli is never a bad idea.
And let’s talk drinks! A classic margarita (on the rocks, please!), an ice-cold Mexican lager, or a refreshing agua fresca would be the perfect companion to this savory, crunchy delight.
Make It Your Own! Creative Twists & Swaps
The beauty of this recipe is its versatility. Once you’ve mastered the basic build, the flavor world is your oyster! Here are a few of my favorite ways to mix it up:
- The “Fiesta Veggie”: Sauté a mix of bell peppers, onions, and zucchini with taco seasoning and use that as your base layer instead of beans. It’s a fantastic way to pack in more veggies!
- Spicy Sriracha & Lime: For the heat-seekers! Mix a tablespoon of sriracha into your sour cream and add a squeeze of fresh lime juice over the lettuce and tomatoes before you fold it up. It adds a wonderful tangy heat.
- Breakfast Crunchwrap: Yes, you read that right! Scramble some eggs, and use them as your base layer along with crispy hash browns or tater tots for the crunch. Add cheese and maybe even a little sausage gravy if you’re feeling wild. It’s a game-day brunch hero.
- Fully Loaded Vegan Version: Easily make this plant-powered! Use vegan refried beans, a dairy-free cheese shred, vegan sour cream, and skip the nacho cheese sauce (or find a vegan brand). The guacamole becomes the star of the show!
- Buffalo “Chickpea” Crunch: Toss rinsed, mashed chickpeas with buffalo sauce and a little garlic powder. Use this as your protein layer, and pair it with a cool, blue cheese-style dressing (or vegan ranch) instead of sour cream. Unbelievably good.
Beau’s Kitchen Chronicles
This recipe has truly evolved in my kitchen. My first attempt, as I mentioned, was a bit of a messy, lopsided affair. But that’s how you learn! I’ve found that warming the tortillas is the single biggest tip for a perfect, non-cracking fold. I’ve also learned that you can actually assemble these a few hours ahead of time, keep them in the fridge, and then grill them when you’re ready—perfect for parties!
The funniest moment was when I was teaching my nephew how to make them, and he got so excited with the folding that he created a “Crunchwrap Burrito Log.” It was… structurally unsound, but we grilled it anyway, and it was still delicious. Proof that even the “failures” in the kitchen can be tasty triumphs.
Your Crunchwrap Questions, Answered!
Q: My Crunchwrap is falling apart when I flip it! What did I do wrong?
A: The most common culprit is overfilling. Make sure you’re keeping your fillings within that 6-inch center circle. Also, ensure your skillet is properly preheated so it starts searing the tortilla the moment it hits the pan, creating a crisp “shell” that holds everything together. Using a wide, sturdy spatula for flipping is a huge help, too!
Q: Can I make these ahead of time and reheat them?
A: You can! They are absolutely best fresh off the griddle, but you can assemble them ahead (without grilling), wrap tightly in plastic wrap, and refrigerate for a few hours. Grill from cold, adding an extra minute or two per side. To reheat a fully cooked one, an air fryer or toaster oven will get it the crispiest. The microwave will make it soft.
Q: Why do I need a small tortilla on top? Can I skip it?
A: That little “lid” is a structural game-changer. It gives the large tortilla a flat, firm surface to fold over, creating a tight seal and preventing fillings from squishing out the top. You can skip it, but your folding experience will be much trickier and messier. I highly recommend using it!
Q: My tostada shell got soggy. How can I prevent that?
A> Great question! The key is the layering. The cheese and beans below and the nacho cheese sauce (if using) on top of the tostada create a protective, melty barrier. Also, make sure your lettuce and tomatoes are thoroughly dried after washing, and don’t assemble them too far in advance of grilling.

Vegetarian Crunchwrap Supreme : Taco Bell Copycat with a Meatless Twist
Description
Hey friends! If you’ve ever craved the iconic Crunchwrap but wanted a wholesome, meat-free version, this is your golden ticket. Imagine: a warm, soft tortilla, a layer of seasoned beans, gooey cheese, a crisp tostada shell, fresh lettuce, diced tomato, and creamy sauce—all folded into one handheld delight. It’s fun to assemble, customizable, and perfect for weeknights, game day, or late-night cravings.
Ingredients
Crunchwrap Base
-
4 large flour tortillas (burrito size)
-
1 cup refried beans or seasoned black beans
-
1 cup shredded cheddar or Mexican blend cheese
-
4 tostada shells (or thick tortilla chips)
Fresh Toppings
-
1 cup shredded lettuce
-
1 medium tomato, diced
-
½ cup sour cream or Greek yogurt
-
¼ cup nacho cheese sauce or additional shredded cheese
-
1 avocado or ½ cup guacamole (optional)
Seasoning & Cooking
-
Taco seasoning (store-bought or homemade)
-
Olive oil or cooking spray
Chef Tips:
-
Warm tortillas for pliability and easier folding.
-
Dice tomatoes small to avoid soggy layers.
-
Mix lime juice or taco seasoning into sour cream for extra flavor.
Instructions
1. Prep Your Beans
-
Heat refried or black beans in a small saucepan.
-
Stir in 1–2 tbsp taco seasoning; thin with water or broth if too thick.
2. Lay the Foundation
-
Place a large tortilla on a flat surface.
-
Spread a 6-inch circle of warm beans in the center.
3. Add Cheese & Crunch
-
Sprinkle a layer of shredded cheese over the beans.
-
Place a tostada shell or thick chips on top.
-
Spread nacho cheese sauce on the tostada (optional).
4. Layer Fresh Ingredients
-
Top with sour cream or Greek yogurt, diced tomatoes, lettuce, and guacamole (if using).
-
Place a smaller tortilla or trimmed large tortilla on top as a “lid.”
5. Fold the Crunchwrap
-
Fold the edges of the large tortilla over the center, working around to create a hexagon shape.
-
Patch small gaps with tortilla scraps if needed.
6. Grill to Golden Perfection
-
Heat a skillet over medium heat; lightly oil.
-
Place Crunchwrap folded-side down; cook 2–4 minutes until golden.
-
Flip and cook 2–3 minutes more.
7. Serve
-
Let rest 1 minute, slice in half, and reveal the layers.
-
Serve with salsa, extra sour cream, or a side like cilantro-lime rice or corn salad.
Notes
-
Falling apart? Don’t overfill; use a wide spatula to flip.
-
Make ahead? Assemble (ungrilled) and refrigerate; grill later.
-
Soggy tostada? Cheese below and sauce on top protect crunch; use dry lettuce/tomatoes.
-
Why a top tortilla? It creates a flat surface for easier folding and prevents spillage.
A Quick Bite on Nutrition
Now, I’m a chef, not a dietitian, but I believe in being mindful about what we eat. This Vegetarian Crunchwrap is a hearty, satisfying meal. The beans provide a great source of plant-based protein and fiber, which helps keep you full. Using Greek yogurt instead of sour cream boosts the protein and lowers the fat, and loading it up with fresh veggies like lettuce, tomato, and avocado adds vitamins and nutrients.
As with any indulgent comfort food, it’s all about balance. This is a fantastic meatless option that doesn’t skimp on flavor or satisfaction. You can easily lighten it up by using low-fat cheese, loading on more veggies, or using a whole-wheat tortilla. It’s a customizable feast that fits right into a balanced, “feastical” lifestyle!
You’ve Mastered the Magic!
And there you have it, my friend! You are now officially a Crunchwrap connoisseur. You’ve taken simple, wholesome ingredients and transformed them into a fast-food legend, right in your own kitchen. I hope this recipe brings as much joy, crunch, and deliciousness to your table as it has to mine.
Remember, cooking is an adventure. Don’t be afraid to get a little messy, to try a new filling, or to fold that tortilla with confidence. This is more than just a recipe
Final Thoughts: You’ve Mastered the Magic!
And there you have it, my friend! You are now officially a Crunchwrap connoisseur. You’ve taken simple, wholesome ingredients and transformed them into a fast-food legend, right in your own kitchen. No more late-night drives or mystery ingredients—just the pure, satisfying joy of creating something incredibly delicious with your own two hands.
This recipe is more than just a meal; it’s a experience. It’s about the fun of assembly, the thrill of that perfect golden-brown grill, and the shared “wow” when you cut into it to reveal all those glorious, colorful layers. It’s proof that with a little bit of kitchen courage, you can recreate—and even improve upon—your favorite comfort foods.
I hope this Vegetarian Crunchwrap Supreme brings as much joy, crunch, and deliciousness to your table as it has to mine. It’s a recipe that’s meant to be played with, adapted, and made your own. So go ahead, fold with confidence, and make every bite a “feastical” one.
Now, I’d love to hear from you! Did you stick with the classic bean and cheese, or did you try a wild new twist? Share your creations and stories with me online using the hashtag #BeausCrunchwrap. Happy cooking!
With a crispy, crunchy high-five,
Beau

Crispy Vegetable Chickpea Fritters : Vegan, Gluten-Free, and Protein-Packed
Crispy Vegetable Chickpea Fritters: Your New Go-To Feel-Good Food
Hey friends, Beau here! Let’s be real for a second. Some days, you want a meal that feels like a genuine accomplishment—the kind of thing you’d proudly serve to your foodie friends. And other days? You just want something downright delicious, nourishing, and on the table in under 30 minutes without dirtying every dish in the kitchen. Sound familiar?
Well, my friends, I’m about to introduce you to your new kitchen best friend: the Crispy Vegetable Chickpea Fritter. These little golden-brown patties of joy are a total game-changer. They’re crispy on the outside, soft and fluffy on the inside, and packed with so much vibrant flavor and plant-powered protein, you’ll forget they’re also vegan and gluten-free. We’re talking about a versatile little number that works as a stellar appetizer, a killer sandwich filler, or a quick-and-easy main course that even the pickiest eaters will devour.
I built Feastical on the idea that food should be a warm hug, not a chore, and this recipe is the perfect example. It’s forgiving, fun to make, and lets you play with whatever veggies you have hanging out in your crisper drawer. So, tie on your apron, grab your favorite mixing bowl, and let’s make some magic happen together.
The Fritter That Started It All
This recipe takes me right back to my first tiny apartment kitchen. It was about the size of a postage stamp, with questionable linoleum and a stove that had exactly one reliable burner. I was flat broke, trying to eat healthier, and living off cans of beans and frozen veggies. One rainy Tuesday, staring into a nearly empty pantry, I had what I call a “kitchen sink” moment. I dumped a can of chickpeas, a lonely onion, and some spices into my secondhand food processor. I formed a few patties and pan-fried them with a hopeful heart.
The sizzle was promising. The smell was incredible. And that first bite? Pure, unadulterated triumph. They were crispy, savory, and deeply satisfying. My roommate wandered in, drawn by the aroma, and after trying one, declared them “ridiculously good.” In that moment, surrounded by the cozy chaos of my first real home, I realized that the best food isn’t about fancy ingredients—it’s about heart, a little creativity, and the joy of sharing something you made with your own two hands. These fritters have been in my weekly rotation ever since.
Gathering Your Fritter Fuel
Here’s the beautiful part: this recipe is more of a guideline than a rigid rulebook. The star, of course, is the humble chickpea. From there, it’s a colorful party of textures and flavors. Here’s what you’ll need:
- 2 (15 oz) cans chickpeas, drained and rinsed – This is our protein-packed base! I don’t recommend using dried chickpeas you’ve cooked yourself for this, as they can be a bit too moist. The canned ones give us the perfect texture. Chef’s Insight: Give them a really good rinse to get rid of that extra sodium and any “canned” taste.
- 1 medium onion & 4 cloves garlic – The ultimate flavor foundation. They get blitzed right in with the chickpeas, so no need for fancy chopping!
- Juice of 1 lime – A bright hit of acidity that wakes up all the other flavors. Substitution Tip: No lime? Lemon juice works just as beautifully.
- 2 tsp onion powder, 2 tsp ground cumin, 1 tsp ground oregano, 1 tsp smoked paprika, ½ tsp red pepper flakes – This is our flavor dream team. The smoked paprika adds a subtle, smoky depth, while the red pepper flakes bring a gentle heat. Chef’s Insight: Toasting whole cumin seeds and grinding them yourself will take the flavor to a whole new level!
- 1 tsp salt & Black pepper, to taste – Don’t be shy with the seasoning! Chickpeas need a good amount of salt to truly sing.
- 1¼ cups chickpea or rice flour – This acts as our binder and keeps everything gloriously gluten-free. Chickpea flour adds an extra nutty, protein boost. Substitution Tip: All-purpose flour works if you’re not avoiding gluten.
- 2 medium bell peppers, chopped & 2 cups corn (fresh or canned) – Hello, color and crunch! The sweet pop of corn against the savory base is a match made in heaven. Chef’s Insight: Use any color bell pepper you like—a mix of red, yellow, and orange makes these fritters look especially festive.
- 4–5 tbsp fresh parsley, chopped – A fresh, herbal finish that cuts through the richness.
- Oil for pan-frying (or use air fryer/oven) – A neutral oil like avocado or grapeseed oil is perfect for getting that golden, crispy crust.
- Vegan cheese shreds (optional) – For those glorious, melty pockets of joy. Totally optional, but highly recommended for an extra treat!
Let’s Get Our Hands Dirty: Making the Magic
Okay, team. It’s go-time. This is where the simple ingredients transform into something spectacular. Follow these steps, and you’ll be a fritter master in no time.
- The Pulse: In your trusty food processor, add the drained chickpeas, onion (just roughly chop it), garlic, lime juice, and all those wonderful spices (onion powder, cumin, oregano, smoked paprika, red pepper flakes, salt, and pepper). Now, here’s the first pro tip: PULSE, don’t puree! You want the mixture to be well-combined but still have some texture. A few chunky bits of chickpea are what give the fritters their fantastic fluffy-inside texture. Over-processing will give you hummus, and we’re not making hummus today! Chef’s Hack: No food processor? No problem! You can mash the chickpeas really well with a potato masher or even a fork, then finely mince the onion and garlic and mix everything by hand.
- The Mix-In: Scrape the chickpea mixture into a large mixing bowl. Now, add the chickpea flour, chopped bell peppers, corn, fresh parsley, and vegan cheese (if using). Grab a spatula and mix it all together until everything is evenly distributed. The dough should be firm enough to hold its shape when you press it together, but still moist. If it feels too wet and sticky, add another tablespoon of flour. If it’s too dry and crumbly, a tiny splash of water or more lime juice will bring it together.
- The Forming: Using your hands or a ¼-cup measuring scoop, form the mixture into 12-14 patties. I like to make them about ½-inch thick. Press them firmly so they hold together, but don’t compact them into hockey pucks! Chef’s Hack: Lightly wet your hands with a bit of water or oil to prevent the mixture from sticking to you.
- The Cooking (Choose Your Adventure!):
- To Pan-Fry (for maximum crispiness): Heat a generous glug of oil in a large skillet over medium heat. You’ll know it’s ready when a tiny bit of the mixture sizzles upon contact. Carefully place the patties in the skillet, without crowding them. Cook for 3-4 minutes per side, until they’re a deep, golden brown and beautifully crispy. Work in batches if you need to.
- To Bake (for a hands-off approach): Preheat your oven to 400°F (200°C). Line a baking sheet with parchment paper and place the fritters on it. Brush or spray the tops lightly with oil. Bake for 20-25 minutes, flipping them halfway through, until firm and golden.
- To Air-Fry (for the best of both worlds): My personal favorite for a lighter, yet still crispy, result! Arrange the fritters in a single layer in your air fryer basket (you may need to cook in batches). Spray them with oil and cook at 375°F (190°C) for 10-12 minutes, flipping once halfway through.
Plating Up Your Perfect Fritter Feast
You’ve cooked up a storm, and now it’s time for the grand finale: serving these beauties. How you present them can turn a simple fritter into a full-blown meal.
My absolute favorite way is to create a vibrant “Fritter Platter.” I lay down a bed of fresh greens (arugula is fantastic for its peppery bite), place 2-3 warm fritters on top, and then go to town with toppings. A big dollop of cool, creamy vegan tzatziki or tahini sauce, a sprinkle of extra fresh herbs, and a side of juicy cherry tomatoes. It’s a restaurant-worthy meal in minutes.
Want something more handheld? These fritters make an epic sandwich. Lightly toast a soft pita or a brioche bun, slather it with avocado or hummus, add a fritter or two, and top with lettuce, sliced cucumber, and a drizzle of hot sauce. It’s messy, satisfying, and everything a good sandwich should be.
And of course, they’re a phenomenal appetizer. Stick a toothpick in each one and serve them with a trio of dipping sauces—a spicy mayo, a sweet chili sauce, and that trusty tzatziki. Watch them disappear faster than you can say “Feastical!”
Make It Your Own: Endless Fritter Twists
The fun doesn’t stop here! This recipe is a blank canvas for your culinary creativity. Here are a few of my favorite ways to mix it up:
- Mediterranean Twist: Swap the corn and bell peppers for ½ cup of chopped sun-dried tomatoes and ¼ cup of chopped Kalamata olives. Add a tablespoon of fresh chopped dill along with the parsley. Incredible!
- Spicy Southwest Kick: Add a finely chopped jalapeño (seeds and all for maximum heat!) to the food processor. Swap the parsley for fresh cilantro, and mix in a teaspoon of chili powder with the other spices. Serve with a creamy cilantro-lime dipping sauce.
- Curry Coconut Dream: Replace the cumin and paprika with 2 teaspoons of your favorite curry powder. Use shredded carrot instead of corn, and stir in ¼ cup of unsweetened shredded coconut. The flavor is warm, aromatic, and totally unique.
- Zucchini & Carrot Garden Patch: Got extra zucchini? Grate one and squeeze out all the excess liquid. Add a grated carrot, too! This is a fantastic way to sneak more veggies in and keep the fritters super moist.
- Nut-Free & Binding Boost: If you have issues with the fritters holding together, try adding 1-2 tablespoons of ground flaxseed or chia seeds to the mixture. They act as a powerful natural binder.
Beau’s Kitchen Confidential
Over the years, this recipe has seen it all. I’ve made them for fancy dinner parties and for lazy Sunday meal prep. I once accidentally used a whole habanero instead of a jalapeño (we needed a gallon of milk to recover), and I’ve definitely had a batch or two fall apart in the pan because I was impatient and didn’t let them cook long enough on the first side.
The biggest lesson? Let them be. When you place that fritter in the pan, resist the urge to move it or press down on it. Let a solid, crispy crust form, and it will flip like a dream. This recipe is a testament to the fact that the best dishes evolve with you in the kitchen. Don’t be afraid to make mistakes and make it your own. That’s where the real magic happens.
Fritter FAQs: Your Questions, Answered!
I’ve gotten a lot of questions about these fritters over on Feastical, so I’ve gathered the most common ones right here to help you out.
Q: My fritters are falling apart in the pan! What did I do wrong?
A: This is the number one question! Usually, it’s one of two things: 1) The mixture is too wet. Solution: Add another tablespoon or two of flour until the mixture holds together firmly. 2) You flipped them too soon. Be patient! Wait until you see the edges browning and you can easily slide your spatula underneath. A good, solid sear is your best friend here.
Q: Can I make the mixture ahead of time?
A: Absolutely! You can prepare the mixture, cover the bowl tightly, and store it in the fridge for up to 24 hours before cooking. This can actually help the flavors meld together even more! Just give it a quick stir before forming your patties.
Q: How do I store and reheat leftovers?
A> Let cooked fritters cool completely, then store them in an airtight container in the fridge for 3-4 days. To reheat, don’t microwave them (they’ll get soft)! For best results, pop them in a toaster oven, air fryer, or a conventional oven at 375°F for 5-10 minutes until hot and crispy again.
Q: Are these fritters freezer-friendly?
A: Yes, they are! After forming the patties, place them on a parchment-lined baking sheet and “flash freeze” for about an hour until solid. Then, transfer them to a freezer bag. They’ll keep for up to 3 months. You can cook them straight from frozen—just add a few extra minutes to the cooking time.

Crispy Vegetable Chickpea Fritters : Vegan, Gluten-Free, and Protein-Packed
Description
Hey friends! Some days, you want a meal that feels like an accomplishment. Other days, you just want something delicious, nourishing, and on the table in under 30 minutes without dirtying half the kitchen. That’s exactly why I’m excited to share Crispy Vegetable Chickpea Fritters—golden-brown patties that are crispy on the outside, soft on the inside, and packed with plant-based protein. They’re vegan, gluten-free, and incredibly versatile: serve as an appetizer, sandwich filling, or a quick main course.
Ingredients
-
2 (15 oz) cans chickpeas, drained and rinsed
-
1 medium onion, roughly chopped
-
4 cloves garlic
-
Juice of 1 lime (or lemon)
-
2 tsp onion powder
-
2 tsp ground cumin
-
1 tsp dried oregano
-
1 tsp smoked paprika
-
½ tsp red pepper flakes
-
1 tsp salt & black pepper to taste
-
1¼ cups chickpea or rice flour (or all-purpose flour)
-
2 medium bell peppers, chopped
-
2 cups corn (fresh or canned)
-
4–5 tbsp fresh parsley, chopped
-
Oil for pan-frying (or air fryer/oven)
-
Optional: vegan cheese shreds
Chef Tips:
-
Toast whole cumin seeds and grind for extra flavor.
-
Use any bell pepper color mix for a vibrant fritter.
-
Optional cheese adds melty pockets of joy.
Instructions
In a food processor, add chickpeas, onion, garlic, lime juice, and spices. Pulse, don’t puree—you want some texture. No processor? Mash chickpeas and finely chop the onion and garlic, then mix by hand.
Transfer mixture to a large bowl. Add flour, bell peppers, corn, parsley, and vegan cheese (if using). Mix until evenly combined. Adjust texture: too wet → add flour, too dry → add a splash of water or lime juice.
Shape mixture into 12–14 patties, about ½-inch thick. Lightly wet hands to prevent sticking.
Pan-Fry: Heat oil in a skillet over medium heat. Cook patties 3–4 min per side until golden and crispy.
Bake: Preheat oven to 400°F (200°C). Place on parchment-lined sheet, lightly oil, bake 20–25 min, flipping halfway.
Air-Fry: Spray fritters with oil, cook at 375°F (190°C) for 10–12 min, flipping once.
Notes
-
Fritters falling apart? Mixture too wet or flipped too soon. Add flour or wait for edges to brown.
-
Make ahead: Store mixture in fridge up to 24 hours; stir before forming patties.
-
Storage: Keep cooked fritters in an airtight container in the fridge 3–4 days. Reheat in oven or air fryer for crispiness.
-
Freezer-friendly: Flash freeze patties, store up to 3 months. Cook from frozen, adding a few minutes.
Nutrition
- Calories: 130 Cal Per Serving
- Fat: 3g
- Carbohydrates: 18g
- Protein: 6g
The Good Stuff: A Nourishing Bite
I’m all about food that tastes good and makes you feel good, and these fritters deliver on both fronts. Let’s break it down. The star, the chickpea, is a nutritional powerhouse. It’s loaded with plant-based protein to keep you full and satisfied, and dietary fiber that’s great for your gut health. The blend of veggies like bell peppers and corn adds a dose of vitamins (hello, Vitamin C!) and antioxidants.
Using chickpea flour instead of traditional all-purpose adds even more protein and fiber, making these fritters a solid, energy-sustaining choice. They’re naturally vegan and gluten-free, catering to a variety of dietary needs without compromising on flavor or texture. Remember, the nutritional info is an estimate, and it can vary based on the size of your fritters, the specific brands you use, and your cooking method (baking or air-frying will use less oil than pan-frying).
Per Fritter (Approximate): Calories: ~130 | Protein: 6g | Carbs: 18g | Fat: 3g
Your Kitchen, Your Rules
And there you have it! From my humble little apartment kitchen to yours, a recipe that’s stood the test of time, countless experiments, and many, many happy bellies. These Crispy Vegetable Chickpea Fritters are more than just a meal; they’re a reminder that incredible food can be simple, accessible, and packed with both flavor and love.
Final Thoughts: Your New Kitchen Staple Awaits
And there you have it! From a hopeful experiment in my humble little apartment kitchen to a Feastical favorite, this recipe is more than just a list of ingredients—it’s a reminder that the most satisfying meals are often the simplest ones. These Crispy Vegetable Chickpea Fritters are a celebration of what happens when a few good ingredients, a little creativity, and a whole lot of heart come together.
They’re proof that you don’t need a gourmet kitchen or a pantry full of exotic items to put something truly delicious and nourishing on the table. They’re forgiving, flexible, and designed to bring you joy, both in the making and the eating.
So, I’m passing this kitchen-tested, soul-warming recipe over to you. Make it your own. Play with the flavors, celebrate your successes, and laugh off any mishaps (we’ve all been there!). This is your kitchen, and these are your rules.
I hope these fritters find a spot in your weekly rotation and bring as much happiness to your table as they have to mine. When you make them, I’d be absolutely thrilled to see your creation! Tag me [@Feastical] so I can share in the joy.
Now, go forth and make some magic. You’ve got this.
With love and a full plate,
Beau
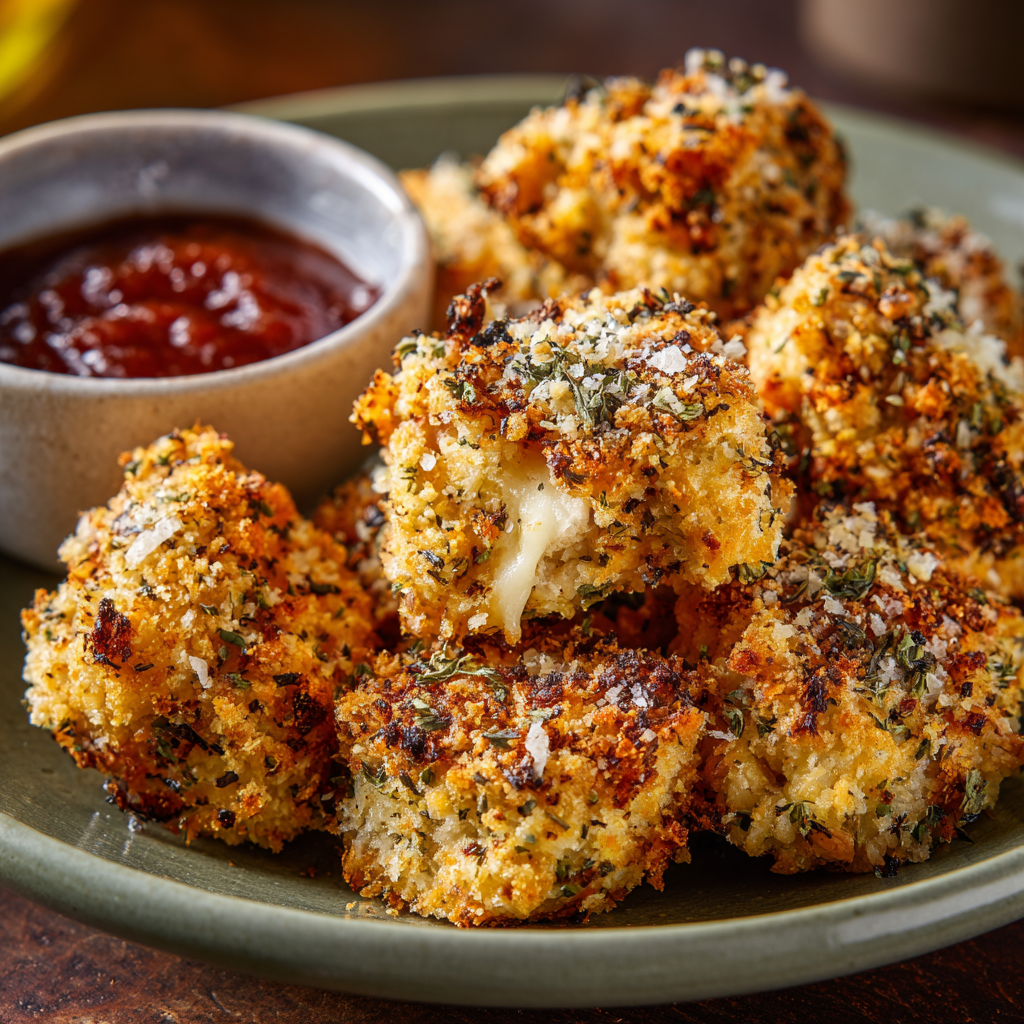
Crispy Herb-Crusted Cheesy Chicken Bites : Baked & Full of Flavor
Crispy Herb-Crusted Cheesy Chicken Bites – Your New Favorite Weeknight Hero
Forget Frying, Let’s Get Baking!
Hey friends, Beau here from Feastical! Tell me if this sounds familiar: you’re craving something crispy, cheesy, and undeniably delicious, but the thought of dealing with a vat of splattering oil just makes you want to order takeout instead. I get it. We’ve all been there. But what if I told you that you can get all the satisfying crunch and flavor of your favorite fried chicken appetizer, right in your own oven, with minimal mess and maximum joy?
That’s the magic behind these Crispy Herb-Crusted Cheesy Chicken Bites. We’re talking about tender chunks of chicken breast, hugged by a blanket of melty mozzarella and savory Parmesan, all rolled up in a golden, herb-infused crust. They bake up into little puffs of perfection that are impossible to resist. They’re the perfect party appetizer, a killer salad topper, or a downright fun weeknight dinner that the whole family will go nuts for. So, let’s preheat that oven and turn a simple ingredient list into something truly Feastical.
The Little Bite That Started It All
This recipe always takes me back to my grandma’s kitchen. She wasn’t a fancy chef, but she was a wizard with simple ingredients. Her version involved shaking chicken pieces in a paper bag with seasoned flour and pan-frying them in a cast-iron skillet. The kitchen would fill with this incredible aroma of herbs and browning chicken that felt like a warm hug. My brother and I would hover by the stove, hoping to sneak a piece straight from the pan the second she turned her back.
My recipe is a loving nod to hers—a little updated for our modern, busy lives. I swapped the frying for baking to keep things light and easy, and I added that double-cheesy punch because, well, cheese makes everything better. It’s that same soul-satisfying flavor, but designed for you to make any night of the week without a mountain of dishes. It’s food that brings people together, and that’s what Feastical is all about.
Gathering Your Flavor All-Stars
One of the things I love most about this recipe is its beautiful simplicity. You probably have most of this stuff in your kitchen right now. Here’s what you’ll need to feed a happy crew of four.
- 2 cups chicken breast, cut into bite-sized pieces: I like to use breast for its lean, quick-cooking nature, but chicken thighs work wonderfully too for an even juicier result! The key is to cut them into uniform, 1-inch pieces so they all cook at the same time. No one gets a raw bite while another is overcooked!
- 1 cup shredded mozzarella cheese: This is our melty, gooey superstar. I recommend shredding a block of low-moisture mozzarella yourself for the best melt. The pre-shredded stuff often has anti-caking agents that can make it a little grainy.
- ½ cup grated Parmesan cheese: Parmesan brings that salty, nutty, umami punch that takes the flavor to the next level. Freshly grated is always a game-changer, but the stuff in the green can will work in a pinch!
- ½ cup breadcrumbs (preferably Italian-style): This is our crunch-creator. The Italian-style ones come pre-mixed with classic herbs like oregano and basil. If you only have plain breadcrumbs, just add an extra ½ teaspoon of Italian seasoning to the mix.
- 1 tbsp Italian seasoning: The aromatic heart of the dish! Give the jar a little shake and smell before you use it—if the aroma isn’t popping, it might be time for a new one. Fresh herbs equal vibrant flavor.
- 1 tbsp olive oil: A good glug of olive oil not only helps the coating stick but also encourages that beautiful, golden-brown crispiness in the oven. It’s our “fry without frying” secret weapon.
- Salt and pepper, to taste: Don’t be shy here! Seasoning the chicken directly is crucial for building flavor from the inside out. I start with ½ tsp of salt and a few good cracks of black pepper.
Let’s Build Some Bites: Your Step-by-Step Guide
Ready to see how these little miracles come together? It’s a one-bowl, one-pan situation that’s as easy as it is delicious. Follow these steps, and you’ll be a pro in no time.
- Preheat and Prep. First things first, get that oven roaring hot to 400°F (200°C). This high heat is the key to getting a crispy crust without drying out the chicken. While it’s warming up, line a baking sheet with parchment paper. This isn’t just for easy cleanup (though that’s a huge win); it also prevents the cheesy bits from sticking and tearing our beautiful crust. Chef’s Hack: For extra crispiness, place a wire rack on top of the baking sheet. This allows hot air to circulate all around the bites, making them evenly golden and crunchy.
- The Magic Mix. In a medium-sized bowl, we’re going to combine almost everything. Add your chicken pieces, olive oil, mozzarella, Parmesan, breadcrumbs, Italian seasoning, salt, and pepper. Now, roll up your sleeves and use your hands to toss it all together. Yes, your hands! They’re your best kitchen tool. You want to make sure every single nook and cranny of every chicken piece is coated in that cheesy, herby, breadcrumb-y goodness. The mixture might seem a little loose, but trust the process—it will melt and fuse into a perfect crust in the oven.
- Arrange with Care. Now, take your beautifully coated chicken bites and spread them out on your prepared baking sheet. This next part is important: give them a little space! Make sure they aren’t touching each other. If they’re too crowded, they’ll steam instead of bake, and we’ll lose that crucial crispiness we’re working so hard for. A single, uncrowded layer is the goal.
- Bake to Perfection. Slide that baking sheet into your preheated oven and let the magic happen. We’re going to bake them for 15-20 minutes. Now, here’s a pro move: set a timer for 10 minutes. When it goes off, pull the tray out and flip each bite over. This ensures we get an even, all-around golden-brown crust. They’re done when the chicken is cooked through (no pink inside, and the juices should run clear) and the exterior is a gorgeous, crispy gold.
- The Hardest Part: Let Them Rest! I know, the aroma is intoxicating and you just want to dive in. But patience, young grasshopper! Let the bites rest on the pan for about 5 minutes after they come out of the oven. This allows the cheese to set slightly so they don’t fall apart when you pick them up, and it lets the juices redistribute throughout the chicken, guaranteeing a moist and tender bite every single time.
How to Serve These Golden Gems
Okay, the bites are resting (good job being patient!), so let’s talk about how to serve them up. The possibilities are almost endless!
For the ultimate game day spread or party platter, pile them high on a plate with a couple of dipping sauces. My go-tos are a creamy marinara for that pizza-parlor vibe, a cool and tangy ranch, or a spicy sriracha mayo for a kick.
Turning this into a full meal? Toss a handful of these warm, crispy bites over a fresh green salad for the best protein-packed croutons you’ve ever had. Or, nestle them next to some creamy mashed potatoes and roasted green beans. They also make an incredible filling for wraps or pita pockets with a drizzle of tzatziki sauce. Get creative!
Make It Your Own: Fun Flavor Twists
This recipe is like a blank canvas, just begging for your personal touch. Once you’ve mastered the classic version, try one of these fun twists!
- Buffalo Bleu: Toss the baked bites in a few tablespoons of buffalo wing sauce right when they come out of the oven. Serve with a side of chunky blue cheese dressing for dipping. Instant sports bar favorite!
- Garlic Parmesan Lover’s Dream: Add 2-3 minced garlic cloves (or 1 tsp garlic powder) to the original mix. After baking, while they’re still hot, toss them in a bowl with an extra tablespoon of grated Parmesan and some chopped fresh parsley.
- Gluten-Free & Low-Carb Friendly: This is an easy swap! Simply replace the breadcrumbs with an equal amount of almond flour, crushed pork rinds, or your favorite gluten-free panko-style breadcrumbs. The method stays exactly the same.
- Spicy Southwest Fiesta: Swap the Italian seasoning for a taco seasoning blend. Use a pepper jack cheese instead of mozzarella, and add a pinch of chili powder or cayenne to the breadcrumb mix. Serve with salsa and avocado crema.
Beau’s Kitchen Notes & Stories
This recipe has become a real workhorse in my kitchen. I’ve lost count of how many times it’s saved me when friends dropped by unexpectedly. I once made a triple batch for a last-minute potluck, and they were gone so fast I’m not sure everyone even got to taste them! The recipe has evolved, too. My first attempt was a bit of a mess—I overcrowded the pan and ended up with steamed chicken nuggets. Lesson learned! Giving them space is non-negotiable. The other key is not to skimp on the cheese. It acts as both flavor and glue, creating that incredible, crispy-chewy crust we all love. This is a no-stress, high-reward kind of dish, so have fun with it!
Your Questions, Answered!
I’ve made these bites a million times, and I’ve heard all your awesome questions. Here are the answers to the most common ones.
- Q: Can I make these ahead of time?
A: Absolutely! You can assemble the raw, coated chicken bites on the baking sheet, cover them tightly with plastic wrap, and refrigerate for up to 8 hours before baking. You might need to add 1-2 minutes to the baking time since they’ll be going in cold.
- Q: My coating isn’t sticking to the chicken. What did I do wrong?
A: This usually happens if there’s not enough “glue.” Make sure you’re adequately coating the chicken in the olive oil first before adding the dry ingredients. Using your hands to really massage and press the coating onto each piece is the best technique.
- Q: Can I use an air fryer instead of an oven?
A: You bet! Air fryers are fantastic for this recipe. Arrange the bites in a single layer in your air fryer basket (you may need to cook in batches) and air fry at 375°F (190°C) for 10-12 minutes, shaking the basket halfway through. They get incredibly crispy!
- Q: How do I store and reheat leftovers?
A: Store any leftovers in an airtight container in the fridge for up to 3 days. To reheat, pop them back in a 375°F oven or air fryer for 5-7 minutes until hot and crispy. Avoid the microwave, as it will make them soft.

Crispy Herb-Crusted Cheesy Chicken Bites : Baked & Full of Flavor
Description
Tender chicken bites coated in a melty, cheesy, herb-infused crust. Crispy on the outside, juicy on the inside, and perfect for dinner, snacks, or party platters.
Ingredients
-
2 cups chicken breast, cut into 1-inch pieces (or thighs for extra juiciness)
-
1 cup shredded mozzarella cheese (low-moisture preferred)
-
½ cup grated Parmesan cheese
-
½ cup Italian-style breadcrumbs (or plain + ½ tsp Italian seasoning)
-
1 tbsp Italian seasoning
-
1 tbsp olive oil
-
Salt & pepper, to taste
Instructions
1. Preheat & Prep
-
Preheat oven to 400°F (200°C).
-
Line a baking sheet with parchment paper. Optional: use a wire rack for extra crispiness.
2. Coat the Chicken
-
In a medium bowl, combine chicken, olive oil, mozzarella, Parmesan, breadcrumbs, Italian seasoning, salt, and pepper.
-
Use your hands to mix thoroughly, ensuring each piece is well coated.
3. Arrange & Bake
-
Spread chicken bites on the baking sheet in a single layer.
-
Bake 15–20 minutes, flipping halfway through for even browning.
-
Chicken is done when cooked through and the exterior is golden and crispy.
4. Rest & Serve
-
Let rest 5 minutes before serving.
-
Serve with your favorite dipping sauces: marinara, ranch, sriracha mayo, or tzatziki.
Notes
-
Assemble coated chicken bites ahead and refrigerate up to 8 hours before baking.
-
Store leftovers in an airtight container, fridge up to 3 days.
-
Reheat in oven or air fryer at 375°F for 5–7 minutes to keep them crispy.
-
Air fryer option: 375°F for 10–12 minutes, shaking halfway.
Nutrition
- Calories: 280Cal Per Serving
- Fat: 14g
- Carbohydrates: 8g
- Protein: 30g
Nutritional Info (Because Knowledge is Power!)
I’m all about feel-good food, and that includes knowing what you’re putting into your body. Here’s a general breakdown per serving (assuming the recipe serves 4). Remember, these are estimates and can vary based on the specific brands and amounts you use.
Calories: ~280 | Protein: ~30g | Carbohydrates: ~8g | Fat: ~14g
The beauty of this recipe is that it’s packed with high-quality protein from the chicken, keeping you full and satisfied. By baking instead of frying, we significantly cut down on unnecessary fats. Using part-skim cheeses can lighten it up a bit more, and as mentioned in the variations, using almond flour can make it a fantastic low-carb option. It’s a balanced, wholesome dish you can feel great about serving.
Your New Go-To Recipe Awaits
And there you have it! From my grandma’s kitchen to yours, a recipe that’s built for real life. It’s simple, satisfying, and sure to become a regular in your meal rotation. The best part about cooking is the joy it brings—the joy of creating something delicious, the joy of sharing it with people you love, and the joy of finding a recipe that just works.
I really hope you love these Crispy Herb-Crusted Cheesy Chicken Bites as much as I do. Give them a try this week and let me know how it goes! Tag me on social @Feastical or shoot me an email. I love seeing your kitchen creations.
Final Thoughts: Your New Weeknight Secret is Out of the Bag
Well, friends, we’ve reached the end of our crispy, cheesy journey. From a nostalgic memory in my grandma’s kitchen to a foolproof recipe for your busy modern life, these chicken bites are more than just a meal—they’re your ticket to a stress-free, delicious dinner that feels like a celebration.
Remember, the real magic of this recipe isn’t just in the blend of herbs and cheese (though that’s pretty magical). It’s in its power to bring people together. It’s the kind of food that has everyone gathering in the kitchen, sneaking a bite before they hit the table, and asking, “When are you making these again?”
You now have everything you need: a simple method, fun twists to keep it exciting, and the confidence to make a dish that’s guaranteed to impress. So, don’t save it for a special occasion. Turn an ordinary Tuesday into something Feastical. You’ve got this.
I can’t wait to hear about your own kitchen adventures with this recipe. Now go forth and bake up some joy
Until next time, keep your spatula close and your appetite closer!
– Beau
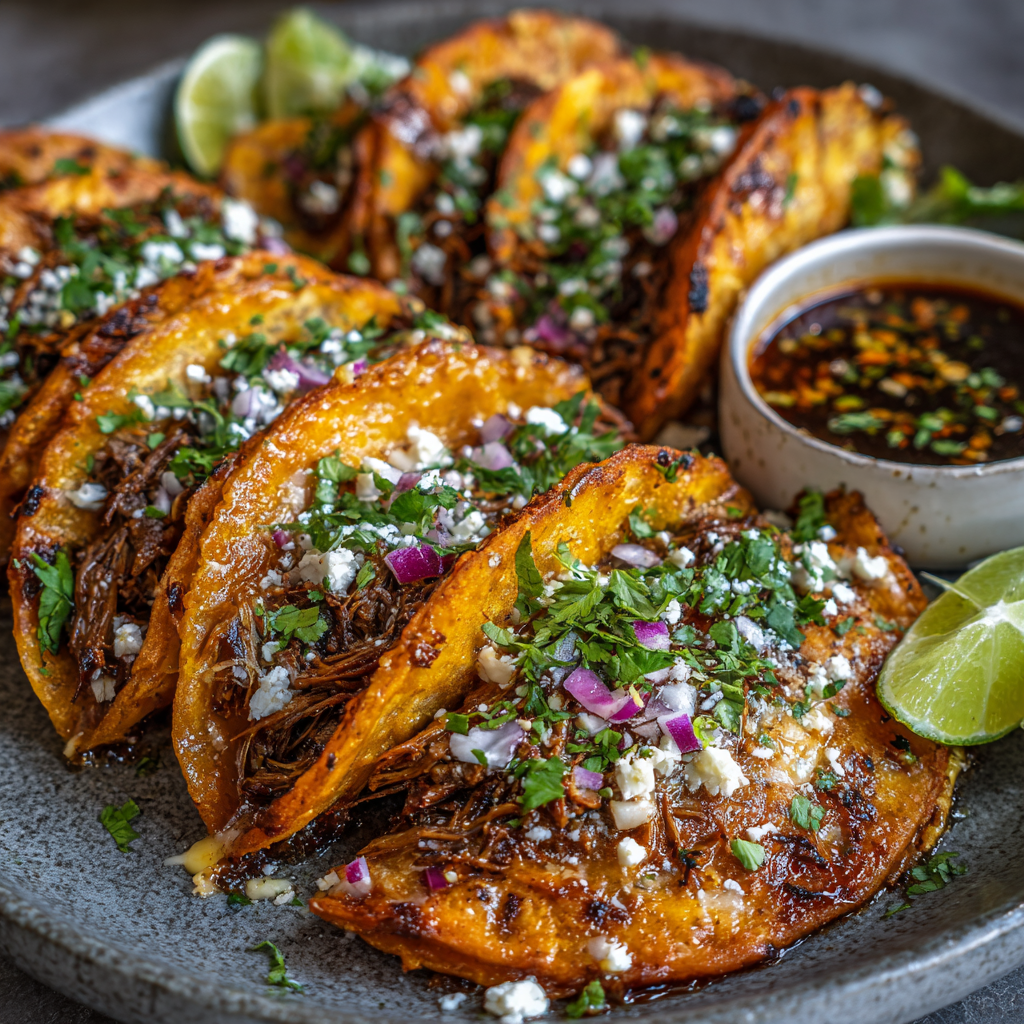
Ultimate Birria Tacos with Cheese : Juicy, Crispy & Full of Flavor
Your New Favorite Taco Night Just Got a Major Upgrade
Hey friends, Beau here from Feastical! Let’s be real, we all have that one dish that feels like a warm, delicious victory. You know the one—it’s the showstopper you make when you want to see eyes light up, the meal that turns a regular Tuesday into a mini-fiesta. For me, that dish is, without a doubt, these Ultimate Birria Tacos.
If you’ve been scrolling through social media and seen those jaw-dropping videos of crispy, cheesy tacos being dipped into a rich, shimmering red broth, you already know the magic we’re about to create. This isn’t just a taco; it’s an experience. We’re talking fall-apart tender beef that’s been slow-braised for hours in a soul-warming blend of dried chiles and spices, then tucked into a tortilla that’s been pan-fried to golden perfection with a glorious layer of melted Oaxaca cheese. Each bite is a perfect harmony of juicy, crispy, cheesy, and boldly flavorful.
I know it might look a little intimidating, but I’m here to guide you through every single step. We’re keeping it simple, soulful, and satisfying, just like we do around here. So, tie on your favorite apron, put on some good music, and let’s make some taco magic together. Your kitchen is about to smell absolutely incredible.
The First Bite That Started It All
I’ll never forget my first real Birria taco. I was on a trip to Tijuana, wandering through a vibrant street market just as the sun was setting. The air was thick with the most incredible aroma—smoky, meaty, and deeply spicy—and it led me like a culinary homing beacon to a small, bustling stall with a line of happy, chatty locals.
A woman with a kind smile and a well-loved ladle was dipping tortillas into a massive pot of rich, red consommé before slapping them on a giant griddle. She’d pile on the shredded meat, a generous handful of stringy cheese, and fold them over until they were crispy and glorious. She handed me one, along with a small cup of that beautiful broth for dipping. That first bite… oh man. It was a flavor explosion I hadn’t known was possible. The crunch, the juicy beef, the stretchy cheese, the deep, complex spice from the chiles… it was pure, unadulterated joy in a tortilla. I’ve been chasing that feeling ever since, and this recipe is my love letter to that perfect taco.
Gathering Your Flavor Arsenal
Don’t let the list of ingredients scare you! Many are pantry staples, and the rest are easy to find. This is where we build the foundation of flavor, so let’s break it down.
For the Magic Chili Paste:
- 4 dried guajillo peppers: These are the sweet, mild backbone of our paste, providing a beautiful red color and a fruity, tangy flavor. Chef’s Tip: If you can’t find guajillos, use 2 more ancho chiles.
- 4 dried ancho chiles: These are dried poblanos, and they bring a sweet, raisin-like flavor with a mild heat. They add incredible depth.
- 4 chipotle peppers in adobo: This is our secret weapon for a smoky, spicy kick! Substitution: Use 1-2 tsp of smoked paprika for the smoke, but you’ll miss a little heat.
- 1 onion, chopped & 4 garlic cloves: The aromatic dream team. They build a savory-sweet base that makes everything taste like home.
- ½ cup crushed tomatoes: Adds a touch of acidity and body to help bring the paste together.
- ½ cup beef stock (or water): This is just to help get the blender going and create a smooth, pourable paste.
- 1 tbsp apple cider vinegar: A little bright acidity to balance the richness of the meat and chiles.
- The Spice Squad: 2 bay leaves, 2 tbsp Mexican oregano, 1 tsp dried thyme, ½ tsp cumin, ½ tsp ground cinnamon, ½ tsp smoked paprika, ½ tsp allspice. This blend is what makes the flavor so complex and unforgettable. It’s earthy, warm, and just a little bit sweet.
For the Meat & That Liquid Gold (Consomé):
- 3 lbs chuck roast: This cut is perfect for slow cooking—it’s marbled with fat that renders down and makes the meat incredibly tender. Chef’s Insight: You can also use a mix of chuck roast and beef shank for even more gelatinous, rich flavor in the broth.
- 1 tbsp olive oil, 1 tsp sea salt, 1 tsp black pepper, 1 tsp garlic powder: For giving our beautiful beef a perfect sear and initial seasoning.
- ½ onion, diced & 4 cups beef stock & 2 cups water: This creates the braising liquid that will transform into our coveted consommé. Don’t be shy with the liquid!
For Assembling Your Masterpiece:
- 12 corn tortillas: The vessel for our joy. Corn tortillas fry up to the perfect crispy texture. Pro Tip: Look for the slightly thicker “street taco” size for easier handling.
- Shredded Oaxaca cheese: The king of meltiness! It’s like a super-stretchy, mild mozzarella. Substitution: If you can’t find it, low-moisture mozzarella or Monterey Jack are fantastic stand-ins.
- 1 cup chopped cilantro & Fresh pico de gallo: The fresh, zesty finish that cuts through the richness and makes everything pop.
Let’s Build Some Taco Magic: Step-by-Step
Okay, team. This is where the fun begins. We’re going low and slow to build layers of flavor you just can’t rush. Read through all the steps first, then let’s get cooking!
Step 1: Wake Up Those Chiles & Make the Paste
First, we need to activate the flavors in our dried chiles. Heat a dry skillet over medium heat. Place your guajillo and ancho chiles in the pan and toast them for about 1-2 minutes per side, just until they become fragrant and slightly puffed. Chef’s Hack: Be careful not to burn them, or they’ll turn bitter! Transfer the toasted chiles to a bowl and cover them with hot water. Let them soak and rehydrate for 15-20 minutes until they’re soft and pliable.
Once they’re softened, drain the water and remove the stems and seeds. Add them to a blender along with the chipotle peppers, chopped onion, garlic, crushed tomatoes, vinegar, all those wonderful spices, and the ½ cup of beef stock. Blitz it on high until you have a completely smooth, vibrant red paste. This paste is the very heart and soul of your birria. Give it a taste—it should be complex, a little spicy, and deeply aromatic.
Step 2: Sear and Simmer to Tenderness
Pat your chuck roast dry with paper towels (this is the secret to a good sear!) and season it generously on all sides with the salt, pepper, and garlic powder. In a large Dutch oven or heavy-bottomed pot, heat the olive oil over medium-high heat. Carefully place the roast in the pot and sear it for 4-5 minutes per side, until you have a beautiful, dark brown crust. This isn’t just for looks; it builds a ton of flavor in the bottom of the pot.
Now, pour that incredible chili paste all over the seared meat. Add in the diced onion, bay leaves, 4 cups of beef stock, and 2 cups of water. Give everything a gentle stir. Bring the pot to a boil, then immediately reduce the heat to low, cover it with a tight-fitting lid, and let it simmer gently for about 2.5 to 3 hours. Chef’s Patience Reminder: You’ll know it’s ready when you can easily shred the meat with two forks. If you’re using an Instant Pot, you can pressure cook it on high for about 60-70 minutes with a natural pressure release.
Step 3: The Big Shred and The Fat Skim
Once the meat is fall-apart tender, carefully remove it from the pot and place it in a large bowl. Use two forks to shred it into beautiful, juicy strands. Now, here’s a crucial step: take a spoon and skim off the beautiful red fat that has risen to the top of the broth. DO NOT THROW THIS AWAY! This is liquid gold. We’re going to use it to fry our tacos. Set this fat aside in a small bowl. You can return the shredded beef to the pot with the consommé to keep it warm and juicy.
Step 4: The Grand Finale: Assembling & Frying the Tacos
This is the most satisfying part. Heat a large non-stick or cast-iron skillet over medium heat. Take one corn tortilla and dip it into the top of the warm consommé, coating both sides. Place it directly onto the hot skillet. Immediately sprinkle a generous amount of Oaxaca cheese on one half of the tortilla, then top with a good portion of the shredded beef. Use your spatula to fold the other half of the tortilla over, creating a taco. Cook for 2-3 minutes per side, pressing down gently, until the tortilla is crispy and golden brown and the cheese is audibly sizzling and melted. Repeat with the remaining tortillas, adding a little more of the reserved fat to the pan if things start to look dry.
How to Serve These Beauties
Presentation is part of the fun! Don’t just pile these on a plate and call it a day. Let’s do it right. I like to serve two or three tacos per person on a warm plate. Immediately after they come out of the skillet, give them a sprinkle of fresh, chopped cilantro and a spoonful of bright pico de gallo.
Now, the pièce de résistance: serve each person a small cup or bowl of that warm, rich consommé on the side. This is for dipping. Every. Single. Bite. The combination of the crispy taco and the warm, flavorful broth is what makes this dish legendary. It’s a messy, joyful, and utterly delicious experience. Have plenty of napkins on hand!
Make It Your Own: Delicious Twists & Swaps
The beauty of this recipe is its adaptability. Don’t be afraid to play with it!
- Lamb Birria (Birria de Chivo): The traditional way! Substitute a 3-lb lamb shoulder or leg for the beef. The gamey flavor of the lamb pairs phenomenally well with the rich chile sauce.
- Chicken Birria: For a lighter option, use 3 lbs of bone-in, skin-on chicken thighs. The cooking time will be less—simmer for about 1 to 1.5 hours, or until the chicken is cooked through and shreddable.
- Go Full Vegan/Vegetarian: This works surprisingly well! Swap the beef for 4-5 cups of young green jackfruit (canned, in brine, drained and rinsed). Use vegetable broth instead of beef broth. The jackfruit will shred and absorb all the amazing flavors. Use your favorite vegan melty cheese for the tacos.
- Spice Level Adjustment: Control the heat by adjusting the chipotle peppers. For mild, use only 1-2 peppers. For extra spicy, add a couple of dried arbol chiles to the paste blend.
- Birria Ramen: Got leftover consommé? It makes the most incredible ramen broth! Just heat it up, cook your favorite ramen noodles in it, top with the shredded birria meat, a soft-boiled egg, and some green onions.
Beau’s Kitchen Notes & Stories
This recipe has evolved so much in my kitchen. The first time I made it, I was so nervous about the chiles that I barely used any, and the result was… beige and sad. Don’t be like past Beau! Embrace the chiles. They’re not just about heat; they’re about depth and color and soul.
Another funny fail: I once tried to use flour tortillas because it’s all I had. Friends, learn from my mistake. They get soggy and just don’t achieve that perfect crispy-to-juicy ratio. Corn tortillas are non-negotiable for the authentic texture. This dish is a labor of love, but I promise you, the look on your friends’ and family’s faces when you bring a platter of these to the table makes every single minute worth it.
Your Birria Taco Questions, Answered!
Q: My consomé seems a bit thin. How can I thicken it up?
A: Great question! If you want a thicker consommé, you have a couple of options. 1) After you remove the meat, you can simmer the pot uncovered for another 20-30 minutes to reduce and concentrate the liquid. 2) You can take a tablespoon of the reserved fat, mix it with a tablespoon of all-purpose flour (or cornstarch for gluten-free) to make a paste, and whisk that back into the simmering broth to thicken it slightly.
Q: Can I make this ahead of time?
A: Absolutely! In fact, I think it tastes even better the next day. You can cook the meat and broth completely, let it cool, and store it in the fridge for up to 3 days. The fat will solidify on top, making it easy to skim off for frying when you’re ready. Reheat the meat and broth gently on the stove before assembling.
Q: My tortillas are tearing when I try to dip and fold them. Help!
A: This usually means your tortillas are too cold. Corn tortillas are more pliable when warm. I like to wrap a stack of 5-6 in a damp paper towel and microwave them for 30-45 seconds before I start the dipping and frying process. This makes them flexible and less likely to crack.
Q: Is this recipe gluten-free?
A> Yes! As written, this recipe is naturally gluten-free. Just be sure to double-check the labels on your beef stock and chipotles in adobo to ensure no gluten-containing ingredients are added.

Ultimate Birria Tacos with Cheese : Juicy, Crispy & Full of Flavor
Description
Fall-apart tender beef slow-braised in a rich, smoky chile sauce, stuffed into corn tortillas with melty cheese, and served with a side of consommé for dipping.
Ingredients
Chili Paste:
-
4 dried guajillo chiles
-
4 dried ancho chiles
-
3 chipotle peppers in adobo
-
1 onion, chopped
-
4 garlic cloves
-
½ cup crushed tomatoes
-
½ cup beef stock (or water)
-
1 tbsp apple cider vinegar
-
Spices: 2 bay leaves, 2 tbsp Mexican oregano, 1 tsp dried thyme, ½ tsp cumin, ½ tsp cinnamon, ½ tsp smoked paprika, ½ tsp allspice
Beef & Consommé:
-
3 lbs chuck roast
-
1 tbsp olive oil
-
1 tsp sea salt
-
1 tsp black pepper
-
1 tsp garlic powder
-
½ onion, diced
-
4 cups beef stock
-
2 cups water
Assembling Tacos:
-
12 corn tortillas (street taco size preferred)
-
Shredded Oaxaca cheese (or mozzarella/Monterey Jack)
-
1 cup chopped cilantro
-
Fresh pico de gallo
Instructions
1. Make the Chili Paste
-
Toast guajillo and ancho chiles in a dry skillet 1–2 minutes per side until fragrant.
-
Soak in hot water 15–20 minutes. Remove stems and seeds.
-
Blend chiles, chipotle, onion, garlic, crushed tomatoes, vinegar, spices, and ½ cup beef stock until smooth.
2. Sear & Braise the Beef
-
Pat roast dry and season with salt, pepper, and garlic powder.
-
Sear in olive oil 4–5 minutes per side until dark brown.
-
Pour chili paste over meat; add diced onion, bay leaves, 4 cups beef stock, 2 cups water.
-
Simmer low, covered, 2.5–3 hours (or Instant Pot: 60–70 min high pressure). Meat should shred easily.
3. Shred & Reserve Fat
-
Remove beef and shred with forks.
-
Skim fat from top of consommé; reserve for frying.
-
Keep shredded beef warm in consommé.
4. Assemble & Fry Tacos
-
Dip a tortilla in consommé to coat. Place on skillet.
-
Sprinkle cheese on one half, top with shredded beef. Fold over.
-
Cook 2–3 minutes per side until crispy and cheese is melted. Repeat.
5. Serve
-
Sprinkle with chopped cilantro and pico de gallo.
-
Serve with warm consommé for dipping.
Notes
-
Lamb Birria: Use 3 lbs lamb shoulder or leg.
-
Chicken Birria: Use 3 lbs bone-in, skin-on chicken thighs. Simmer 1–1.5 hours.
-
Vegan: Swap beef for 4–5 cups young green jackfruit; use vegetable broth.
-
Adjust Spice: Mild = 1–2 chipotles; Extra spicy = add arbol chiles.
-
Leftover Consommé: Perfect as ramen broth.
Nutrition
- Calories: 330Cal Per Serving
- Fat: 15g
- Carbohydrates: 20g
- Protein: 25g
Nourishment Info (Because We Care!)
Let’s keep it real—this is a celebratory, indulgent dish, and it’s packed with flavor and protein. Here’s a rough breakdown per taco (assuming 12 tacos total and using the skimmed fat for frying):
- Calories: ~330
- Protein: ~25g (Fantastic for keeping you full and satisfied!)
- Fat: ~15g
- Carbohydrates: ~20g
Remember, these are estimates and can vary based on your specific ingredients and how much cheese and fat you use. The great news is that this meal is balanced with protein, healthy fats from the beef, and carbs from the tortillas. To lighten it up
Final Thoughts: Your Taco Triumph Awaits
There you have it, friends—your guide to creating a truly legendary meal. I know this might seem like more steps than your average weeknight dinner, but that’s the point. This isn’t just about feeding people; it’s about creating a moment. It’s about the anticipation that builds as your home fills with the incredible aroma of toasting chiles and slow-braised beef. It’s about the shared joy of that first, messy, perfect dip of a crispy taco into the rich consommé.
Remember, cooking is a journey, not a destination. Don’t stress about perfection. Maybe your first tortilla folds a little awkwardly, or you decide you want a little more spice next time. That’s all part of the process. This recipe is a foundation, a love letter to flavor that you can now make completely your own.
So, gather your people, pour a refreshing drink, and get ready for the compliments to roll in. You’re not just serving tacos; you’re serving an experience, a story, and a whole lot of soul. You’ve got this.
Now go forth and create some taco magic. I can’t wait to hear how it turns out!
With love and a full plate,
Beau

Valentine’s Heart Cake : Soft, Sweet & Perfectly Frosted
Bake Your Heart Out: The Ultimate Valentine’s Day Cake
Hey there, friend! Beau here, welcoming you back to Feastical. Valentine’s Day is just around the corner, and I can already smell the sugar and feel the love in the air. Now, I’m a firm believer that the best gifts don’t come from a store—they come from the heart, and preferably, from the oven. That’s why I’m so excited to share this recipe with you today.
This isn’t just any cake; this is a soft, buttery, melt-in-your-mouth Heart Cake that’s guaranteed to be the star of your celebration. Whether you’re surprising your soulmate, hosting a Galentine’s brunch, or simply treating yourself (because you absolutely deserve it!), this cake is your perfect partner in crime. It’s tender, it’s sweet, and that cloud-like buttercream frosting? Let’s just say it’s a hug in edible form.
The best part? You don’t need to be a pastry chef to pull this off. I’ve packed this guide with all my favorite kitchen hacks and simple steps to make you look like a total baking pro. We’re keeping it simple, soulful, and oh-so-satisfying. So, tie on your favorite apron, preheat that oven, and let’s create some delicious magic together.
A Cake That Started with a Kitchen Disaster
This recipe always takes me back to my very first Valentine’s Day trying to impress my now-wife. I was young, ambitious, and wildly overconfident. I decided to bake a complicated, six-layer torte I’d seen in a fancy magazine. Long story short, it involved a broken whisk, a smoke alarm serenade, and a cake that looked more like a topographic map of the Andes than a dessert.
In a last-minute panic, I whipped up this simple, humble heart-shaped cake from a recipe my grandma had scribbled on an index card. It was lopsided, and my frosting job was… enthusiastic, at best. But when I presented it, her face lit up brighter than my oven’s “broil” setting ever had. It wasn’t about perfection; it was about the gesture, the effort, and the shared laughter over my earlier kitchen fail. That’s the spirit of this cake. It’s not about creating a flawless, magazine-cover masterpiece (though it certainly can be!). It’s about the joy of making something with your own two hands for someone you adore.
Gathering Your Ingredients: A Little Love in Every Layer
Before we start, let’s get our mise en place ready—that’s just a fancy chef term for having all your ingredients measured and prepped. It makes the baking process a smooth, joyful dance rather than a frantic scramble. Here’s what you’ll need for this feel-good masterpiece.
For the Cake:
- 1 ½ cups all-purpose flour: The trusty foundation of our cake. For a slightly lighter crumb, you can swap it 1:1 with cake flour.
- 1 ½ tsp baking powder: Our primary leavening agent, giving the cake its beautiful rise and soft texture.
- ½ tsp baking soda: This works with the sour cream to ensure our cake is incredibly tender and moist.
- ¼ tsp salt: Don’t skip this! Salt is the flavor superhero that makes all the sweetness pop and balances the entire cake.
- ½ cup unsalted butter, softened: This is where the rich, buttery flavor comes from. I always use unsalted so I can control the salt level. Pro Tip: “Softened” means it should give slightly when you press it, not be melted or greasy. Leave it on the counter for about 45-60 minutes before you start.
- ¾ cup granulated sugar: Sweetness and tenderness, all in one.
- 2 large eggs: They bind everything together and add structure. Make sure they’re at room temperature to create a smoother, more voluminous batter.
- 1 tsp vanilla extract: The classic flavor we all know and love. Use the real stuff if you can—it makes a world of difference.
- ½ cup sour cream or Greek yogurt: This is my secret weapon! The acidity tenderizes the gluten, and the fat content guarantees a super-moist, velvety crumb that stays fresh for days.
- ½ cup milk: Whole milk is my go-to for the richest flavor, but any milk you have on hand will work beautifully.
For the Dreamy Buttercream Frosting:
- 1 cup (2 sticks) unsalted butter, softened: Yes, it’s a whole cup. This is a celebration, and buttercream is non-negotiable. Trust me.
- 3 ½ cups powdered sugar: It dissolves easily, giving us that silky-smooth texture we’re after.
- 2–3 tbsp heavy cream or milk: Heavy cream will give you a richer, more luxurious frosting, but milk works perfectly in a pinch.
- 1 tsp vanilla extract: A must for that classic, comforting flavor.
- Pinch of salt: This cuts the overwhelming sweetness and elevates the entire frosting.
- Gel food coloring (pink, red, optional): Gel coloring is my top choice because it adds vibrant color without thinning out the frosting.
- Sprinkles or heart decorations (optional): Go wild! This is where your personality shines.
Let’s Get Baking: Your Step-by-Step Guide to Cake Glory
Alright, team! Oven is preheated to 350°F (175°C)? Heart-shaped pan is greased and lined with a little parchment paper? Fantastic. Let’s dive in.
- Combine the Dry Team. In a medium bowl, grab your whisk and give the flour, baking powder, baking soda, and salt a good, thorough mix. We’re not just combining here; we’re aerating the flour to make our cake extra light. Set this bowl aside—this is our “dry team.”
- Cream the Butter & Sugar. In a large mixing bowl, beat the softened butter and granulated sugar together on medium-high speed. Now, don’t rush this! We’re looking for a mixture that is pale, fluffy, and almost white. This should take a good 3-4 minutes. This step is crucial because it incorporates air into the batter, which is a big part of our cake’s rise and texture. Chef’s Hack: Scrape down the sides of the bowl with a spatula halfway through to make sure everything is getting evenly mixed.
- Incorporate the Eggs & Vanilla. With the mixer on medium, add your eggs one at a time, letting each one fully blend in before adding the next. This prevents the batter from breaking or curdling. Then, pour in that glorious vanilla extract and mix until it’s all one happy, fragrant family.
- The Grand Batter Finale. Now for the gentle dance. Mix in the sour cream on low speed until it’s just combined. Then, we’re going to alternate adding our “dry team” and the milk. Start and end with the dry ingredients. So, add about one-third of the flour mixture, mix on low until almost combined, then half the milk, then another third of flour, the rest of the milk, and finally the last of the flour. Mix until JUST combined. A few streaks of flour are okay! Overmixing is the enemy of a tender cake—it develops the gluten and can make it tough.
- Bake to Perfection. Gently pour your beautiful batter into your prepared heart-shaped pan and smooth the top with your spatula. Slide it into the center of your preheated oven and bake for 30-35 minutes. You’ll know it’s done when the top is springy to the touch and a toothpick inserted into the center comes out with a few moist crumbs, not wet batter. Chef’s Hack: Avoid the temptation to open the oven door during the first 25 minutes of baking. That rush of cold air can cause your cake to fall!
- The All-Important Cool Down. Once baked, pull the cake from the oven and let it cool in the pan on a wire rack for 15 minutes. Then, carefully run a knife around the edges and invert it onto the rack to cool completely. I mean it—completely cool. If you try to frost a warm cake, you’ll have a melty, sliding mess. Patience is a virtue, especially in baking!
- Whip Up the Buttercream. While the cake is cooling, let’s make the frosting that dreams are made of. In a clean bowl, beat the softened butter on medium speed until it’s perfectly smooth and creamy. Gradually add the powdered sugar, about a cup at a time, with the mixer on low (unless you want a powdered sugar snowstorm in your kitchen!). Once it’s all incorporated, add the vanilla, salt, and 2 tablespoons of cream. Whip it on high speed for a full 2-3 minutes until it’s incredibly light, fluffy, and pale. If it’s too thick, add the remaining cream a teaspoon at a time. If you’re using food coloring, now’s the time to tint your frosting to your desired shade of pink, red, or whatever color your heart desires!
- Decorate with Joy! This is the fun part! Once the cake is totally cool, spread a generous layer of buttercream over the top. You can go for a rustic, swoopy look with an offset spatula or get fancy with a piping bag and a star tip. Pile on the sprinkles, add some edible glitter, or press little candy hearts into the frosting. There are no rules here—just pure, unadulterated fun.
Sharing the Love: How to Serve Your Masterpiece
Presentation is the final flourish of love! I love serving this cake right on a beautiful cake stand as the centerpiece of the table. For an extra touch of romance, scatter a few fresh rose petals or raspberries around the base.
When it’s time to slice, use a sharp, thin-bladed knife. For the cleanest cuts, dip the knife in hot water and wipe it dry between each slice. This will give you those picture-perfect pieces with gorgeous, sharp layers. Pair each slice with a hot cup of coffee to balance the sweetness, or a glass of cold milk for the ultimate nostalgic treat. And remember, the first slice is always for the one you love (or for you, you magnificent baker, you).
Make It Your Own: Delicious Recipe Twists
Feel like mixing it up? This recipe is a fantastic canvas for your creativity. Here are a few of my favorite ways to play with the flavors:
- The Chocolate Lover’s Dream: Replace ¼ cup of the all-purpose flour with ¼ cup of high-quality unsweetened cocoa powder for a deeply chocolatey version. You can even add a handful of chocolate chips to the batter!
- Lemon Raspberry Bliss: Add the zest of one lemon to the cake batter and swap the vanilla extract in the frosting for lemon extract. Swirl a few tablespoons of seedless raspberry jam into the frosting or use it as a filling between layers if you’re stacking two cakes.
- Funfetti Celebration: Fold ½ cup of rainbow sprinkles into the cake batter right before pouring it into the pan. It instantly turns into a party!
- Dairy-Free Delight: Use vegan butter sticks, your favorite plant-based milk (oat milk works great), and dairy-free yogurt. The structure will be perfect.
- Berry Cream Cheese Frosting: For a tangy twist, replace the buttercream with a cream cheese frosting. Beat 8 oz of softened cream cheese with ½ cup of softened butter, then gradually add 3 cups of powdered sugar and 1 tsp of vanilla. Fold in some freeze-dried berry powder for a natural pink color and flavor.
Beau’s Kitchen Chronicles: A Few Parting Thoughts
This recipe has been my Valentine’s Day go-to for years, and it’s evolved in tiny ways with every bake. I once accidentally used salted butter and forgot to add the extra salt, and you know what? It was still delicious. Another time, my kid “helped” by adding a whole bottle of red food coloring, resulting in a cake that could be seen from space. We laughed, we ate it, and we loved it.
The point is, your cake doesn’t have to be perfect. The little imperfections are what make it uniquely yours. This recipe is forgiving and friendly, just like we are here at Feastical. So embrace the flour on your nose and the frosting on your fingers—it’s all part of the beautiful, messy, delicious joy of cooking from the heart.
Your Questions, Answered!
I’ve gotten a lot of questions about this cake over the years. Here are the answers to the most common ones to ensure your baking success!
Q: My cake is dense and didn’t rise much. What happened?
A: The most common culprit is overmixing the batter after adding the flour. Remember, mix until *just* combined! Other possibilities are old baking powder/soda (they lose their potency over time) or your oven temperature running a bit low. An oven thermometer is a baker’s best friend.
Q: Can I make this into cupcakes instead?
A: Absolutely! This batter is perfect for about 12-14 cupcakes. Line your muffin tin, fill the cups 2/3 full, and bake at the same temperature for 18-22 minutes, or until a toothpick comes out clean.
Q: My frosting is too runny/thin. How can I fix it?
A: No worries! If it’s too thin, just gradually add a bit more powdered sugar until it thickens up. If it’s too thick and stiff, add more cream, one teaspoon at a time, until it reaches your desired spreading consistency.
Q: Can I make the cake ahead of time?
A: You sure can! Bake the cake layers, let them cool completely, then wrap them tightly in plastic wrap and store them at room temperature for a day or in the freezer for up to a month. Thaw before frosting. The frosting can also be made ahead and stored in the fridge for a week; just let it come to room temperature and re-whip it before using.

Valentine’s Heart Cake : Soft, Sweet & Perfectly Frosted
Description
Soft, buttery, and melt-in-your-mouth, this heart-shaped cake with dreamy buttercream frosting is perfect for Valentine’s Day or any celebration of love.
Ingredients
For the Cake:
-
1 ½ cups all-purpose flour (or cake flour)
-
1 ½ tsp baking powder
-
½ tsp baking soda
-
¼ tsp salt
-
½ cup unsalted butter, softened
-
¾ cup granulated sugar
-
2 large eggs, room temperature
-
1 tsp vanilla extract
-
½ cup sour cream or Greek yogurt
-
½ cup milk (whole milk preferred)
For the Buttercream Frosting:
-
1 cup (2 sticks) unsalted butter, softened
-
3 ½ cups powdered sugar
-
2–3 tbsp heavy cream or milk
-
1 tsp vanilla extract
-
Pinch of salt
-
Gel food coloring (pink, red, optional)
-
Sprinkles or heart decorations (optional)
Instructions
1. Prep & Preheat
-
Preheat oven to 350°F (175°C).
-
Grease and line a heart-shaped cake pan with parchment paper.
2. Mix Dry Ingredients
-
In a medium bowl, whisk together flour, baking powder, baking soda, and salt. Set aside.
3. Cream Butter & Sugar
-
Beat butter and sugar on medium-high until pale and fluffy, about 3–4 minutes. Scrape down sides halfway.
4. Add Eggs & Vanilla
-
Add eggs one at a time, mixing until combined. Stir in vanilla extract.
5. Combine Batter
-
Mix in sour cream.
-
Alternate adding dry ingredients and milk, starting and ending with dry. Mix until just combined (slight streaks of flour are okay).
6. Bake
-
Pour batter into prepared pan, smooth top.
-
Bake 30–35 minutes, or until a toothpick comes out with a few moist crumbs.
-
Cool 15 minutes in pan, then remove and cool completely on a wire rack.
7. Make Buttercream
-
Beat butter until creamy. Gradually add powdered sugar on low speed.
-
Add vanilla, salt, and cream; whip on high 2–3 minutes until fluffy.
-
Tint with gel coloring if desired.
8. Frost & Decorate
-
Frost cooled cake with buttercream.
-
Decorate with sprinkles, candy hearts, or edible glitter.
Notes
-
Chocolate Lover: Replace ¼ cup flour with ¼ cup cocoa powder. Add chocolate chips if desired.
-
Lemon Raspberry: Add lemon zest to batter, swirl raspberry jam into frosting.
-
Funfetti: Fold in ½ cup rainbow sprinkles to batter.
-
Dairy-Free: Use vegan butter and plant-based milk.
-
Berry Cream Cheese Frosting: Mix 8 oz cream cheese + ½ cup butter + 3 cups powdered sugar + berry powder.
Nutrition
- Calories: 410 Cal Per Serving
- Sugar: 36g
- Fat: 22g
- Saturated Fat: 14g
- Carbohydrates: 50g
Nutritional Info (Because We’re All About Balance!)
Alright, let’s keep it real—this is a celebration cake, and it’s meant to be enjoyed fully and joyfully! That said, I know many of you like to have an idea of what you’re eating. Here’s a rough nutritional breakdown per slice (assuming 8 generous slices). Remember, these are estimates and can vary based on the specific brands of ingredients you use and your decorating choices.
- Calories: ~410
- Total Fat: 22g
- Saturated Fat: 14g
- Carbohydrates: 50g
- Sugar: 36g
- Protein: 4g
My philosophy? Savor every single bite without an ounce of guilt. Food is love and joy, and this cake is packed with both. Enjoy it as part of a balanced life filled with delicious things!
Final Thoughts from My Kitchen to Yours
Well, friend, we’ve done it. From gathering our ingredients to putting the final sprinkle on top, we’ve created something truly special. This Valentine’s Heart Cake is more than just a dessert; it’s a tangible expression of care, a reason to gather, and a reminder that the simplest things—