
Thick and Chewy Peanut Butter Cookies : Soft, Buttery, and Totally Addictive
The Cookie That Started It All: My Thick & Chewy Peanut Butter Cookies
Hey friends, Beau here! Let’s talk about one of life’s simplest, most profound joys: a perfect peanut butter cookie. I’m not talking about those crumbly, dry numbers that leave you reaching for a glass of milk just to get through one. No, no. I’m talking about a cookie that’s a true event. A cookie with a soft, almost brownie-like center, slightly crisp golden edges, and a rich, roasty peanut butter flavor that just *sings*. The kind of cookie that makes you close your eyes for a second after the first bite.
This recipe is my gold standard, my go-to, my “wow, I really nailed it” peanut butter cookie. It’s the one I’ve made for countless potlucks, school bake sales (the ultimate taste-testers!), and those late-night “I deserve a treat” moments. It’s deceptively simple, but a few chef-approved secrets take it from good to legendary. We’re using a beautiful blend of brown sugar for that molasses-y moisture and a specific mixing method to guarantee that perfect, thick, and chewy texture. So, preheat your oven, friends. We’re about to make your kitchen smell like a warm, peanut-buttery hug.
A Spoonful of Nostalgia: Why This Recipe Sticks
Every time I cream together that peanut butter and butter, the smell instantly transports me back to my grandma’s kitchen. Her house always had this magical, slightly chaotic energy, especially on rainy afternoons. The counter would be dusted with flour, and she’d let me “help” by pressing the criss-cross pattern into the dough with a fork. I was convinced I was doing the most important job in the world. Her version was fantastic, but over the years, I’ve tinkered—swapping in more brown sugar, adjusting the flour ratio, and insisting on letting the cookies rest on the baking sheet. It’s her soul with my little chef twists. That’s the beautiful thing about recipes; they’re living stories. This cookie isn’t just a snack; it’s a direct line to a happy memory, and now, I’m so excited to help you start your own.
Gathering Your Cookie Crew: The Ingredients
Simple ingredients, superstar results. That’s the Feastical way! Here’s the dream team that’s going to create cookie magic. Let’s break it down.
- 1 cup creamy peanut butter – This is the star, so make it a good one! I prefer standard commercial brands like Jif or Skippy for this recipe because their stabilizers help with the perfect chewy texture. Natural peanut butter (the kind you have to stir) can make the cookies a bit greasy and spread more.
- 1/2 cup unsalted butter, softened – “Softened” is key here! Leave it on the counter for about an hour. It should be cool to the touch but yield easily when you press it. This creams together with the sugars to create a light, airy base for our cookies.
- 1 cup brown sugar, packed – This is our secret weapon for chewiness. The molasses in brown sugar adds moisture and a deep, caramel-like flavor. Pack it firmly into your measuring cup!
- 1/2 cup granulated sugar – The white sugar helps create those delightfully crisp edges and aids in spreading. The combination of the two sugars is non-negotiable for the perfect texture.
- 2 large eggs – They act as a binder, bringing our dough together. Always use large eggs at room temperature for the best incorporation into the creamed butter and sugar.
- 1 teaspoon vanilla extract – The flavor enhancer! It rounds out the peanut butter and adds a warm, aromatic depth. Don’t you dare skip it.
- 1 1/2 cups all-purpose flour – The structure-builder. I like to fluff my flour with a spoon before scooping and leveling it off with a knife to avoid packing too much in.
- 1 teaspoon baking soda – Our leavening agent! This is what gives the cookies their lift and prevents them from being dense hockey pucks. Make sure yours is fresh for the best rise.
Let’s Get Baking: The Step-by-Step Magic
Okay, team, it’s go time. Follow these steps, and you’ll be a peanut butter cookie hero in no time. I’ve sprinkled in my favorite chef hacks to ensure your success.
- Preheat and Prep. First things first, get that oven heating to a toasty 350°F (175°C). This ensures a consistent temperature from the moment your cookies go in. Line your baking sheets with parchment paper. Trust me, this is a game-changer for easy cleanup and preventing any sticking. Chef’s Hack: If you have a dark-colored baking sheet, reduce the oven temp by 25°F as they tend to bake faster and can lead to darker bottoms.
- The Creaming Method. In a large bowl, cream together the peanut butter, softened butter, brown sugar, and granulated sugar. Now, “cream” doesn’t just mean “mix.” You want to beat it on medium-high speed for a good 2-3 minutes until it becomes noticeably lighter in color and fluffy. This step incorporates air, which is crucial for texture! Chef’s Hack: If your butter wasn’t quite soft enough, don’t microwave it! Cut it into chunks and it will come to temp faster.
- Incorporate the Wet Team. Add the eggs one at a time, beating well after each addition. This allows the emulsion to form properly, so your dough doesn’t break. Then, mix in that glorious vanilla extract. Scrape down the sides of the bowl to make sure everything is homogenous.
- Bring in the Dry Crew. In a separate bowl, whisk together your flour and baking soda. Why whisk? It aerates the flour and evenly distributes the baking soda, so you get a uniform rise. Gradually add this to your wet ingredients, mixing on low speed until *just* combined. The second the flour disappears, stop mixing! Overmixing is the enemy of a tender cookie. Chef’s Hack: For an extra-chewy cookie, let the mixed dough rest in the fridge for 15-20 minutes. This hydrates the flour and reduces spreading.
- Scoop and Shape. Use a cookie scoop or a tablespoon to portion the dough into 1.5-inch balls. Roll them gently between your palms. Place them about 2 inches apart on your prepared baking sheets—they need their personal space to spread!
- The Signature Press. Gently flatten each ball of dough slightly with your palm. Then, for that classic look, use a fork to press a criss-cross pattern into the top. I like to dip my fork in a little granulated sugar between presses to prevent sticking and add a tiny sparkle.
- Bake to Perfection. Bake for 10-12 minutes. Now, listen closely: the cookies are done when the edges are set and lightly golden, but the centers still look soft, puffy, and slightly underdone. They will look perfect to you about 2 minutes *after* you think they need to come out. Chef’s Hack: For super-thick cookies, bang the baking sheet on the oven rack or counter as soon as you take them out. This deflates them just enough and creates wonderful wrinkles.
- The Crucial Cool-Down. This might be the hardest step! Let the cookies cool on the hot baking sheet for a full 5 minutes. They are still setting up from the residual heat. After that, transfer them to a wire rack to cool completely. This patience rewards you with the ultimate chewy texture.
Sharing the Love: How to Serve These Beauties
Okay, the cookies are cool enough to handle. Now what? The simplest way is piled high on a vintage plate with a cold glass of milk. That’s a classic for a reason. But let’s get creative!
For a next-level dessert, I love serving two warm cookies with a scoop of vanilla bean ice cream sandwiched between them for an epic ice cream sandwich. Drizzle a little chocolate sauce over the top, and you’ve got a restaurant-worthy treat. They’re also fantastic crumbled over a bowl of chocolate or coffee ice cream. For a fun party platter, set out small bowls of different dippings—like melted chocolate, caramel sauce, and even a sprinkle of sea salt for the gourmands in your life. However you serve them, do it with a smile. Good food is meant to be shared.
Make It Your Own: Delicious Recipe Variations
Once you’ve mastered the base recipe, the playground is open! Here are a few of my favorite ways to mix things up.
- The Chocolate Lover: Fold in 1 cup of semi-sweet or milk chocolate chips into the dough right at the end. Peanut butter and chocolate is a match made in heaven.
- The Salty-Sweet Fanatic: Press a few flakes of Maldon sea salt onto the top of each cookie right when they come out of the oven. It elevates the peanut butter flavor incredibly.
- The Peanut Butter Cup Devotee: Chop up 6-8 full-sized peanut butter cups and fold them in with the flour. You get little pockets of melty, peanut-buttery chocolate in every bite.
- The “Healthier” Swap: You can replace the all-purpose flour with white whole wheat flour for a nuttier flavor and a fiber boost. The texture will be slightly denser but still delicious.
- The Gluten-Free Friend: Use a 1:1 gluten-free all-purpose flour blend. I’ve had great success with Bob’s Red Mill or King Arthur brands. The cookies might spread a tiny bit less, but they’ll be just as tasty.
From My Kitchen to Yours: A Few Parting Thoughts
This recipe has been a living, evolving thing in my kitchen. I once, in a frantic, out-of-butter situation, used all peanut butter. The result? A delicious, but intensely dense and crumbly cookie that my dog absolutely adored (don’t worry, he only got a tiny, dog-safe piece!). It taught me the importance of butter for that perfect texture. I’ve also learned that while the criss-cross is iconic, it’s not just for looks—it ensures the thick dough bakes evenly in the center. The biggest lesson, though? Always make a double batch. The first one disappears faster than you can say “Feastical.”
Your Questions, Answered!
I’ve made these cookies more times than I can count, and I’ve heard all your brilliant questions. Here are the most common ones.
Q: My cookies spread too much and got flat! What happened?
A: This is usually one of three things: 1) Your butter was too warm or melted. 2) Your baking sheet was still warm from a previous batch. 3) You didn’t use enough flour (be sure to fluff, scoop, and level!). Chilling the dough for 15-30 minutes next time will solve this.
Q: Can I use natural peanut butter?
A: You can, but the texture will be different. Natural peanut butter has more oil and can make the cookies greasier and spread more. If you do, try reducing the butter by a tablespoon or two and definitely chill the dough.
Q: Why are my cookies cakey and puffy?
A: This usually means you over-measured the flour (scooping directly from the bag packs it in) or over-mixed the dough after adding the flour. Mix until *just* combined!
Q: How do I make these cookies extra soft for days?
A: The brown sugar is your best friend for moisture. Also, storing them in an airtight container with a single piece of white bread works miracles! The cookies absorb the moisture from the bread, staying soft for days (the bread will get hard, but your cookies will be perfect).

Thick and Chewy Peanut Butter Cookies : Soft, Buttery, and Totally Addictive
- Total Time: 30 mins
Description
These Thick & Chewy Peanut Butter Cookies are the kind that stop conversations mid-sentence. With a golden, crisp edge and a soft, fudgy center that melts in your mouth, they redefine comfort baking. Inspired by childhood memories and perfected through years of tweaking, this recipe captures everything you love about peanut butter—rich, nutty, and deeply satisfying. No dry, crumbly cookies here—just pure, chewy bliss that’ll make your kitchen smell like heaven.
Ingredients
-
1 cup creamy peanut butter (Jif or Skippy for best results)
-
½ cup unsalted butter, softened
-
1 cup packed brown sugar
-
½ cup granulated sugar
-
2 large eggs, room temperature
-
1 tsp vanilla extract
-
1½ cups all-purpose flour
-
1 tsp baking soda
Instructions
-
Preheat & Prep
Heat oven to 350°F (175°C) and line baking sheets with parchment paper. -
Cream the Base
Beat peanut butter, butter, brown sugar, and granulated sugar for 2–3 minutes until light and fluffy. -
Add Wet Ingredients
Mix in eggs one at a time, then add vanilla. Scrape the bowl to ensure everything’s combined. -
Add Dry Ingredients
Whisk together flour and baking soda. Add to the wet mixture, stirring just until no streaks of flour remain. (Don’t overmix!) -
Scoop & Shape
Roll dough into 1½-inch balls. Place 2 inches apart on baking sheets. Flatten slightly with your palm, then press a criss-cross pattern using a fork dipped in sugar. -
Bake & Cool
Bake 10–12 minutes, until edges are golden but centers still look soft. Cool on the sheet for 5 minutes before transferring to a rack.
Notes
-
Chill dough for 15–20 minutes for thicker cookies.
-
Add chocolate chips or flaky sea salt for a flavor upgrade.
-
Store with a slice of bread to keep cookies soft for days.
- Prep Time: 15 mins
- Cook Time: 12 mins
Nutrition
- Calories: 210 Cal Per Serving
Let’s Talk Nutrition (The Fun Kind!)
Look, we’re here for a delicious cookie, and I believe in enjoying every single bite without guilt. But it’s always good to know what you’re enjoying! This is an approximate breakdown per cookie (based on a batch of 24).
- Calories: 210 – A perfect little energy boost.
- Fat: 12g – Coming from the peanut butter and butter, giving us that satisfying richness.
- Sugar: 14g – The sweet stuff that makes life worth living. The blend of brown and white sugar is key.
- Carbs: 22g – Fuel for your next kitchen dance party while you wait for the next batch to bake.
- Protein: 4g – A nice little bit from the peanut butter and eggs, making these surprisingly satisfying.
- Sodium: 110mg – Just a hint to balance all the flavors.
Remember, friends, food is about more than just numbers. It’s about the joy of baking, the smell filling your home, and the smile on someone’s face when you hand them a warm cookie. That’s the real nutrition.
The Last Crumb: Final Thoughts
And there you have it! My heart and soul in cookie form. This recipe is a testament to the fact that the best foods are often the simplest, made with love and a little bit of know-how. I hope these thick and chewy peanut butter cookies become a staple in your home, just like they are in mine. They’re more than just a recipe; they’re a reminder to slow down, preheat the oven, and create a little moment of deliciousness.
I’d love to hear how your batch turns out! Tag me on social @Feastical or @BeauCollier so I can see your beautiful creations. Now, go forth and bake! Your cookie jar is waiting.
With a full heart and an empty plate,
Beau

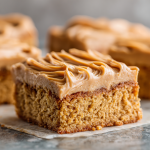
Peanut Butter Lunch Lady Cookie Bars : Soft, Sweet, and Totally Nostalgic
Peanut Butter Lunch Lady Cookie Bars – Soft Frosted Peanut Butter Bars
Welcome Back to the Best Part of the School Day
Hey friends, Beau here from Feastical! Let me ask you a question. Close your eyes for a second. Can you smell it? That unmistakable aroma of roasting peanuts and sweet vanilla wafting through the fluorescent-lit hallways? Can you hear the clatter of plastic trays and the buzz of a hundred kids counting down the minutes until lunch? And then, you see it. Sitting there, glorious and unassuming under the sneeze guard, was the holy grail of cafeteria desserts: the Peanut Butter Lunch Lady Bar.
It wasn’t fancy. It wasn’t artisanal. But my goodness, was it perfect. A thick, impossibly soft and chewy peanut butter cookie base, topped with a cloud of rich, melt-in-your-mouth peanut butter frosting. It was the kind of treat that made you forget about that pop quiz you just bombed. For years, I chased that flavor, that specific texture, trying to recreate the magic in my own kitchen. And after more batches than I care to admit (all in the name of research, of course!), I’ve finally nailed it.
Today, I’m sharing my ultimate recipe for these Peanut Butter Lunch Lady Cookie Bars. This is more than just a recipe; it’s a time machine. It’s a warm hug from the past, designed to bring a little simple, soulful joy to your kitchen right now. They’re incredibly easy to make, require no fancy equipment, and are guaranteed to disappear faster than you can say “second helping.” So, preheat that oven, grab your favorite mixing bowl, and let’s bake up a big pan of pure, unadulterated nostalgia.
The Cafeteria Line & A Sweet Core Memory
I’ll never forget my third-grade lunch lady, Dorothy. She had a towering beehive hairdo that defied gravity and a smile that could calm even the most frantic kindergartener. She called everyone “sweet pea” and always had a kind word. But her real superpower was her peanut butter bars. They were legendary. Rumor had it she’d been making them from the same stained, handwritten recipe card since the school opened in the 60s.
One fateful Tuesday, I was the designated “line leader” for my class. My heart was pounding as I approached the dessert section, my tray shaking slightly. Dorothy saw my wide eyes locked on the last remaining bar. She leaned in, her voice a warm whisper. “For you, sweet pea,” she said, sliding that precious bar onto my tray with a wink. “I saved the biggest one.” In that moment, I wasn’t just a kid getting a dessert; I felt seen. It was a small act of kindness, baked into a 3×3 inch square, that taught me how food can truly connect us. That’s the feeling I try to bake into every single batch.
Gathering Your Sweet, Simple Ingredients
The beauty of this recipe is in its simplicity. These are pantry staples that come together to create something truly magical. Here’s your shopping list, complete with a few of my chef-y insights to help you nail it.
For the Cookie Bars:
- 2 cups all-purpose flour: This is the structural backbone of our bars. I don’t recommend substituting with whole wheat here, as we want that classic, tender crumb. For a gluten-free swap, a 1:1 gluten-free flour blend works wonderfully!
- 2 cups granulated sugar: Yes, two full cups! This is a nostalgic treat, after all. The sugar not only adds sweetness but also contributes to that beautifully crisp, golden top and chewy center.
- 1½ cups peanut butter: This is the star of the show! I find creamy, conventional peanut butter (like Jif or Skippy) works best for that authentic “lunch lady” texture and flavor. The added oils and sugars help keep the bars super soft. Natural peanut butter can sometimes make the bars a bit drier and oilier.
- 3 sticks (1½ cups) butter, softened: Use unsalted butter and let it come to true room temperature. This is the secret to a light, creamy batter that isn’t greasy. If you only have salted, just reduce the added salt in the recipe by half.
- 2 large eggs: They bind everything together and add richness. Make sure they’re at room temperature to blend seamlessly into the batter.
- 1 tsp vanilla extract: The supporting actor that makes the peanut butter flavor sing. Don’t skip it!
- 1 tsp baking soda: Our leavening agent, giving the bars a little lift and a perfect, cake-like texture.
- 1 tsp salt: Crucial for balancing all that sweetness and enhancing the peanut butter flavor. Trust me on this one.
For That Dreamy Peanut Butter Frosting:
- 4 cups powdered sugar: Also known as confectioner’s sugar. It creates that smooth, melt-in-your-mouth frosting we all love. No substitutes here!
- ½ cup milk: Whole milk will give you the creamiest, richest frosting, but 2% or even a plain, unsweetened non-dairy milk like almond or oat milk will work just fine.
- ½ cup peanut butter: This is taken from the 1½ cups listed for the bars. We’ll use 1 cup in the batter and reserve this ½ cup specifically for the frosting.
Let’s Bake: Step-by-Step to Nostalgia
Ready to create some magic? This process is as easy as, well, pie. Or in this case, bars! Follow these steps, and you’ll be a lunch lady legend in no time.
- Preheat and Prep: Fire up your oven to 350°F (175°C). Now, grab your trusty 9×13-inch baking pan. Grease it thoroughly with butter or non-stick spray. I’m a big fan of the butter-and-flour method for absolute non-stick security, but a good spray will do the trick. Chef’s Hack: For super easy removal and clean slicing, line your pan with parchment paper, leaving a little overhang on two sides. You’ll be able to lift the entire slab of bars out in one go!
- Cream the Good Stuff: In a large mixing bowl, combine the softened butter, granulated sugar, and 1 cup of the peanut butter. Using an electric mixer (or some serious elbow grease with a wooden spoon), beat this together on medium speed for a good 2-3 minutes. You want it to be light, fluffy, and pale in color. This step is key for incorporating air, which gives our bars that perfect texture. Don’t rush it!
- Incorporate the Wet Ingredients: Crack in the two eggs and add the teaspoon of vanilla extract. Mix on medium speed until everything is fully combined and the mixture looks smooth and satiny. Scrape down the sides of the bowl with a spatula to make sure no rogue butter is hiding out.
- Bring in the Dry Team: In a separate bowl, whisk together your flour, baking soda, and salt. This ensures the leavening and salt are evenly distributed throughout the flour. Now, with your mixer on low speed, gradually add the dry ingredients to the wet mixture. Mix just until the flour disappears. Chef’s Hack: Overmixing at this stage is the enemy of a tender bar! A few streaks of flour are fine; they’ll incorporate as you spread the batter.
- Pan and Bake: Transfer the thick, glorious batter to your prepared pan. Use a spatula or your fingers (lightly dampened with water to prevent sticking) to spread it into a smooth, even layer. Pop it into the preheated oven and bake for 22-25 minutes. You’ll know it’s done when the top is a beautiful golden brown and the edges are just starting to pull away from the sides of the pan. The center might still look a tiny bit soft—that’s perfect! It will set up as it cools. Chef’s Hack: For the ultimate fudgy texture, err on the side of under-baking. A toothpick inserted in the center should come out with a few moist crumbs attached, not completely clean.
- The All-Important Cool Down: This is the hardest part: patience. Remove the pan from the oven and place it on a wire rack. You must let the bars cool completely before you even think about frosting them. I’m talking totally, 100% cool to the touch. If you frost them warm, the frosting will melt into a goopy, sugary puddle. Let’s avoid that tragedy!
- Whip Up the Frosting: While the bars are cooling, let’s make that iconic frosting. In a medium saucepan over low heat, combine the milk and the remaining ½ cup of peanut butter. Warm it gently, whisking constantly, until the peanut butter has melted and the mixture is smooth and unified. Remove the pan from the heat. Now, gradually whisk in the powdered sugar, one cup at a time, until you have a thick, glossy, pourable frosting. If it seems too thick, add a teaspoon of milk at a time. Too thin? Add a bit more powdered sugar.
- Frost and Finale: Once the bars are completely cool, pour the frosting over the top. Tilt the pan to help it spread into a beautiful, even layer. Now, you have two choices: you can dig in immediately for a softer, more gooey experience, or you can let the frosting set for about an hour for cleaner slices. I won’t judge either way.
How to Serve Up These Sweet Squares
Presentation is part of the fun! For the true cafeteria experience, slice them into generous rectangles and serve them right from the pan. But if you’re feeling a little fancy, here are a few ideas:
The Classic: A simple square on a napkin or a small plate is all you need. This is pure, unpretentious comfort food.
The Dinner Party Darling: Place a small square on a dessert plate alongside a shot glass of cold milk or a dollop of freshly whipped cream. It elevates the nostalgia just enough.
The Ultimate Indulgence: Warm a square gently in the microwave for 10-15 seconds and top it with a scoop of high-quality vanilla bean ice cream. The contrast of warm bar, cool ice cream, and that soft frosting is a life-changing experience.
And the perfect pairing? A tall, ice-cold glass of milk is non-negotiable. It’s the official beverage of these bars.
Get Creative! Fun Flavor Twists
Once you’ve mastered the classic, feel free to play with your food! Here are a few of my favorite ways to mix it up:
- Chocolate Peanut Butter Paradise: Stir 1 cup of semi-sweet chocolate chips into the batter before baking. Or, for a decadent top, make a simple chocolate glaze instead of the peanut butter frosting by melting together 1 cup chocolate chips with ½ cup of heavy cream.
- The “Elvis” Special: For the King himself! After spreading the batter, sprinkle 1 cup of chopped, cooked bacon and 1 sliced banana over the top before baking. The sweet and salty combo is insane.
- Peanut Butter & Jelly Bars: Before baking, drop teaspoonfuls of your favorite jam or jelly (grape is classic!) randomly over the batter. Use a knife to gently swirl it in for a marbled effect.
- Crunchy Time: Add a delightful texture by folding in ½ cup of chopped, salted peanuts into the batter along with the dry ingredients.
- Oatmeal Peanut Butter Bars: Replace ½ cup of the all-purpose flour with ½ cup of old-fashioned oats for a heartier, chewier bar with a lovely nubbly texture.
Beau’s Kitchen Confidential
This recipe has been a living, evolving thing in my kitchen. The first time I made it, I was so eager I dumped all the peanut butter into the batter and had to make a sad, peanut-butter-less powdered sugar glaze. It was… fine. But it wasn’t Dorothy’s bar. That’s when I learned the importance of reserving that ½ cup for the frosting! I’ve also learned that the brand of peanut butter really does matter for that specific nostalgic taste. My family now has a “bar alert” system—if they see me pulling out the 9×13 pan and the giant jar of Jif, they know it’s going to be a good day.
Your Questions, Answered!
Over the years, I’ve gotten a lot of great questions about this recipe. Here are the most common ones to ensure your baking success.
Q: My bars came out really dry and crumbly. What happened?
A: The most common culprit is over-baking. Ovens can vary wildly, so start checking at the 20-minute mark. Also, be sure you’re measuring your flour correctly. Spoon it into your measuring cup and level it off with a knife instead of scooping directly from the bag, which can pack in too much flour.
Q: Can I make these ahead of time?
A: Absolutely! These bars are actually even better the next day. Once cooled and frosted, just cover the pan tightly with plastic wrap or foil. They’ll stay soft and delicious at room temperature for up to 3 days. You can also freeze them for up to 3 months!
Q: Why did my frosting turn out grainy?
A: This usually happens if the powdered sugar isn’t fully dissolved. Make sure your milk and peanut butter mixture is warm enough (but not boiling) before you whisk in the sugar. Whisking vigorously for a full minute or two can also help achieve that super-smooth, glossy texture.
Q: Can I use natural peanut butter?
A> You can, but be prepared for a different texture. Natural peanut butter tends to be oilier and can separate, which might make the bars a bit greasier and less cohesive. If it’s all you have, give it a good stir and maybe reduce the butter by a tablespoon or two.
Peanut Butter Lunch Lady Cookie Bars : Soft, Sweet, and Totally Nostalgic
- Total Time: 40 mins
Description
Thick, soft, and slathered in creamy peanut butter frosting—these Peanut Butter Lunch Lady Cookie Bars are pure nostalgia in a pan. Inspired by the old-school cafeteria favorite, this recipe brings back that warm, sweet scent of peanut butter and vanilla that used to drift through the lunch line. Made with simple ingredients, these bars are perfectly chewy, rich, and melt-in-your-mouth delicious. One bite, and you’ll be transported straight back to the good old days—minus the plastic tray!
Ingredients
For the Bars
-
2 cups all-purpose flour
-
2 cups granulated sugar
-
1½ cups creamy peanut butter (divided)
-
1½ cups unsalted butter, softened (3 sticks)
-
2 large eggs, room temperature
-
1 tsp vanilla extract
-
1 tsp baking soda
-
1 tsp salt
For the Frosting
-
½ cup peanut butter (reserved from above)
-
4 cups powdered sugar
-
½ cup milk (whole or evaporated for extra creaminess)
-
Pinch of salt
Instructions
-
Preheat & Prep
Heat oven to 350°F (175°C). Grease a 9×13-inch baking pan and line with parchment for easy lifting. -
Make the Batter
Beat together butter, sugar, and 1 cup of peanut butter until light and fluffy (2–3 minutes). Mix in eggs and vanilla until smooth. -
Add Dry Ingredients
In a separate bowl, whisk flour, baking soda, and salt. Gradually mix into the wet ingredients until just combined—don’t overmix! -
Bake
Spread batter evenly in the pan and bake for 22–25 minutes, until golden and set at the edges but soft in the center. Cool completely before frosting. -
Frosting Time
Warm milk and remaining ½ cup peanut butter over low heat until smooth. Remove from heat and whisk in powdered sugar and a pinch of salt until glossy and spreadable. Pour over cooled bars and spread evenly. -
Set & Slice
Let frosting set for about an hour for clean squares—or dig in while it’s still gooey and irresistible!
Notes
-
Use creamy Jif or Skippy for the most authentic “school cafeteria” flavor.
-
Slightly underbake for soft, chewy bars.
-
Top with flaky sea salt or mini chocolate chips for a modern twist.
- Prep Time: 15 mins
- Cook Time: 25 mins
Nutrition
- Calories: 290 Cal per bar
Let’s Talk Nutrition (The Fun Kind!)
Look, we’re all friends here. This is a dessert bar, through and through. It’s meant to be enjoyed as a special treat that brings joy and a flood of happy memories. Each generous bar comes in at around 290 calories. It’s a rich, satisfying indulgence, so a little goes a long way! They pack about 17g of fat (from all that delicious butter and peanut butter), 30g of carbs for that energy boost, and 4g of protein thanks to our star ingredient. My philosophy has always been that food should nourish the soul first, and these bars are packed with soul. So savor every bite without an ounce of guilt!
One Last Bite of Wisdom
And there you have it, my friends—the secret to bringing that lunchroom magic right into your own kitchen. This recipe is a testament to the fact that the most beloved foods are often the simplest ones, made with love and shared with joy. I hope baking these Peanut Butter Lunch Lady Cookie Bars fills your home with the same warmth and wonderful smells that it fills mine.
I’d love to hear about your baking adventures! Did you add a twist? Did it bring back a core memory for you? Tag me on social @Feastical or shoot me an email. Sharing our kitchen stories is my favorite part of this whole journey.
Now, go forth and bake something Feastical!
Final Thoughts: More Than Just a Bar
Baking, at its very best, is a time machine. It’s a way to preserve and relive the moments that shaped us—the simple, powerful joys of childhood. This recipe for Peanut Butter Lunch Lady Cookie Bars is more than just a list of ingredients and steps; it’s a direct line back to the squeak of sneakers on linoleum, the sound of a best friend’s laugh, and the profound kindness of a lunch lady named Dorothy.
These bars are a celebration of the unpretentious, soul-satisfying treats that form the fabric of our sweetest memories. They prove that you don’t need exotic ingredients or complicated techniques to create something truly magical. All you need is a well-loved recipe, a handful of pantry staples, and the intention to bake with heart.
So, as you slice into that pan and see the soft, chewy base beneath its cloud of frosting, I hope you feel a wave of that same simple happiness. I hope it reminds you that joy can be found in a 9×13-inch pan, that connection can be baked into a dessert, and that sometimes, the most powerful flavor of all is nostalgia.
Now, grab that glass of milk, take a bite, and welcome back to the best part of the day.
With a full heart and an even fuller pan,
Beau
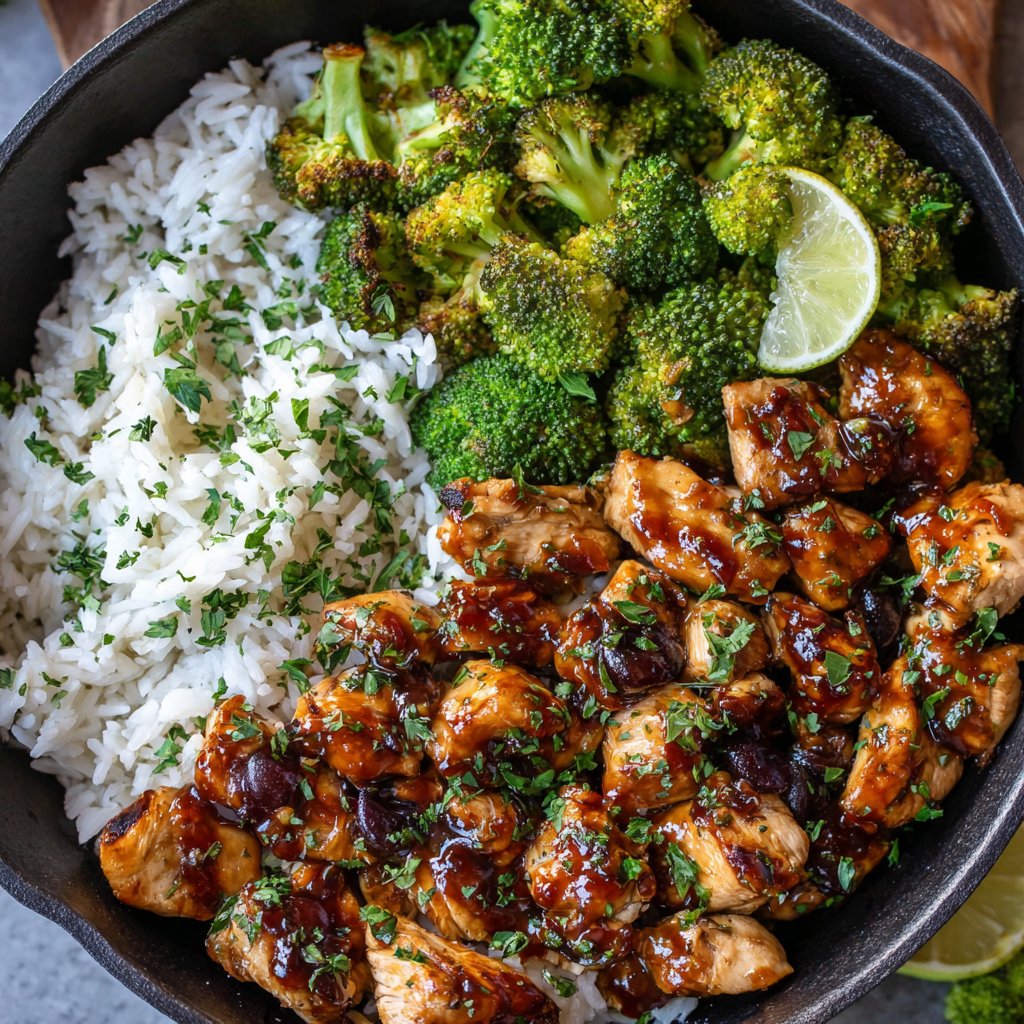
Sticky Grape Chipotle Chicken Bowls : Easy, Sweet, and Smoky Meal Prep
Sticky Grape Chipotle Chicken Meal Prep Bowls – Easy Low-Calorie Lunch Idea
Ditch the Boring Lunch, Embrace the Flavor Revolution
Hey friends, Beau here! Let’s have a real talk for a second. How many times have you stared into your fridge on a Sunday night, dreading the thought of another week of sad, repetitive lunches? You know the ones I’m talking about—the dry chicken breast, the plain steamed broccoli, the whole “I’m-being-good-but-I’m-miserable” vibe. I’ve been there, and I’m officially calling it: that era is over.
I’m a firm believer that eating well should be a joy, not a chore. It should be a burst of flavor that makes you actually look forward to your midday meal. That’s exactly why I created these Sticky Grape Chipotle Chicken Bowls. This isn’t just another meal prep recipe; it’s your ticket to a lunch that’s anything but boring.
Imagine this: tender, juicy chicken cubes, seared to perfection and then tossed in a glaze that’s the stuff of dreams. We’re talking a magical, sticky sauce that’s sweet from 100% grape juice, with a deep, smoky kick from chipotle peppers, all balanced with a touch of savory soy. We pile it high on a cloud of fluffy jasmine rice and some bright, crisp broccoli. Every single bite is a perfect harmony—sweet, smoky, tangy, and fresh. It’s a feel-good, low-calorie powerhouse that proves healthy eating can be downright exciting. So, grab your favorite skillet and let’s make your taste buds do a happy dance!
The Happy Accident That Started It All
This recipe, like so many of the best things in my kitchen, was born from a happy accident. It was a classic “what-do-I-have-in-the-pantry” kind of evening. My friends were coming over for a casual game night, and I’d promised something tasty. I had chicken, I had rice, but my usual sauce ingredients were MIA. Staring back at me from the fridge door was a bottle of grape juice my niece had left behind, right next to a nearly-empty jar of chipotles in adobo.
I was skeptical, I won’t lie. Grape and chipotle? But desperation is the mother of invention, right? I reduced the juice with those smoky peppers and a splash of soy, and the second that syrupy glaze coated the chicken, I knew I had stumbled onto something special. The room filled with this incredible, sweet-smoky aroma. My friends descended on the kitchen, forks in hand, and the bowl was scraped clean in minutes. The unanimous verdict? “Beau, you HAVE to put this on the blog.” So here it is, the recipe that almost wasn’t, now one of my most-requested dishes. It just goes to show that sometimes, the best flavors come from taking a delicious leap of faith.
Gathering Your Flavor Power Team
This recipe is all about simple ingredients doing extraordinary things. Here’s your shopping list—it’s short, sweet, and packs a mighty punch.
For the Chicken:
- 1.5 lbs Boneless, Skinless Chicken Breast, Cubed: I like breast for a lean, protein-packed base, but chicken thighs would be incredible here for even more juiciness. Just adjust the cooking time slightly as they take a bit longer.
- Salt and Pepper to Taste: The fundamental building blocks of flavor. Don’t be shy here—a good seasoning on the chicken itself makes all the difference.
- 1 tbsp Olive Oil: For getting that beautiful, golden-brown sear on our chicken. Any neutral oil like avocado or canola works great too.
For the Sticky Grape Chipotle Sauce:
- ½ cup 100% Grape Juice (no sugar added): This is our secret weapon! It provides a natural, fruity sweetness without any refined sugar. Pomegranate or cranberry juice would be a fantastic swap if that’s what you have.
- 1 tbsp Chipotle in Adobo (minced): This is where the magic happens! It brings the smoke and the heat. Start with 1 tbsp if you’re sensitive to spice, you can always add more. No chipotle? A teaspoon of smoked paprika mixed with a pinch of cayenne can work in a pinch.
- 1 tbsp Honey or Sugar-Free Maple Syrup: A touch more sweetness to balance the heat. For a completely refined sugar-free version, sugar-free maple syrup is my go-to.
- 1 tbsp Soy Sauce: This adds that essential salty, umami depth that makes the sauce taste rich and complex. For a gluten-free option, tamari or coconut aminos are perfect substitutes.
- 2 tsp Cornstarch + 2 tbsp Water (slurry): Our thickening agent! Mixing the cornstarch with cold water first prevents lumps and gives us that glossy, restaurant-quality glaze.
For the Bowls:
- 2 cups Cooked Jasmine or Basmati Rice: I love the fragrant, fluffy texture of these rices. Quinoa, cauliflower rice, or brown rice are all excellent, healthy alternatives.
- 2 cups Steamed Broccoli: For that fresh, green crunch. It’s the perfect vehicle for soaking up any extra sauce!
- Lime Wedges, for Serving: Non-negotiable! A squeeze of fresh lime juice right before eating brightens up the whole dish and cuts through the richness.
- Fresh Chopped Parsley or Cilantro, for Garnish: A pop of color and freshness. If you’re a cilantro-hater (I won’t judge!), parsley or even some sliced green onions are perfect.
Let’s Build Some Magic, Step-by-Step
Ready to see how this all comes together? It’s easier than you think, and I’ve got some little chef hacks along the way to make it foolproof.
- Cook the Chicken: Start by patting your cubed chicken completely dry with a paper towel. (This is Chef Hack #1: dry chicken sears better than wet chicken!) Season it generously with salt and pepper. Heat the olive oil in a large skillet over medium-high heat. Once the oil is shimmering, add the chicken in a single layer—don’t crowd the pan! We want a good sear, not a steam. Let it cook for 3-4 minutes without touching it, then flip and cook for another 3-4 minutes until it’s golden brown and cooked through. Remove the chicken from the pan and set it aside on a plate.
- Make the Sauce: Now, into that same, now-flavor-packed pan, we’re going to build our sauce. No need to wipe it out—those little browned bits at the bottom are pure flavor gold! Reduce the heat to medium. Carefully add the grape juice, minced chipotle, soy sauce, and honey. Use a whisk or a wooden spoon to scrape up all those delicious browned bits from the bottom of the pan. This is called deglazing, and it’s the secret to a deeply flavorful sauce. Bring the mixture to a lively simmer.
- Thicken the Glaze: While the sauce is heating up, quickly whisk your cornstarch and cold water together in a small bowl until it’s smooth. (Chef Hack #2: Always make a slurry with cold liquid to prevent instant clumping!) Once your sauce is simmering, slowly drizzle in the cornstarch slurry while constantly stirring. You’ll see it start to thicken almost immediately. Keep stirring for about 1-2 minutes until the sauce is glossy, thick, and coats the back of a spoon.
- Glaze the Chicken: Here comes the grand finale! Reduce the heat to low. Return the cooked chicken and any accumulated juices on the plate back to the skillet. Gently toss the chicken in the sticky sauce until every single piece is beautifully coated and glistening. Let it heat through for another minute. Take a second to admire your work—that gorgeous, sticky glaze is what meal prep dreams are made of.
How to Serve These Flavor-Packed Bowls
Now for the fun part—building your bowls! If you’re meal prepping, grab four equal-sized containers. Start with a fluffy base of your cooked jasmine rice. Next to it, arrange a generous pile of that vibrant green steamed broccoli. Then, proudly pile on a heaping portion of your sticky grape chipotle chicken right in the center. The goal is to let some of that incredible sauce drizzle down over the broccoli and rice.
Don’t pack your garnish away just yet! For meal prep, I like to store my lime wedges and fresh herbs in a tiny separate bag or container. That way, when lunchtime rolls around, you can garnish your bowl with a sprinkle of fresh parsley or cilantro and a big, bold squeeze of fresh lime juice. That final squeeze is the key that unlocks all the flavors and makes it taste like you just cooked it. It’s a little touch that makes a huge difference, turning a simple lunch into a restaurant-worthy experience.
Make It Your Own: Delicious Twists & Swaps
One of the best things about this recipe is its versatility. Feel free to get creative and make it work for you!
- Spice Lover’s Dream: Double the chipotle in adobo! Or, add a pinch of red pepper flakes to the sauce as it simmers for an extra kick.
- Veggie Power-Up: Swap or add to the broccoli! Sautéed bell peppers, red onions, zucchini, or roasted sweet potatoes would be phenomenal in these bowls.
- Sweet & Sour Twist: Add a tablespoon of apple cider vinegar or rice vinegar to the sauce ingredients for a tangy punch that plays beautifully with the sweet grape.
- Keep it Keto/Low-Carb: No problem! Simply swap the jasmine rice for cauliflower rice and use a sugar-free sweetener like monk fruit or the sugar-free maple syrup we mentioned. You’re good to go!
- Tropical Vibe: Replace the grape juice with pineapple juice and garnish with chopped fresh cilantro. It’s a whole new flavor profile that’s equally delicious.
Beau’s Kitchen Notes & Stories
This recipe has become a staple in my own weekly rotation, and it’s evolved in little ways. I’ve learned that if I’m really short on time, I’ll sometimes use pre-cut broccoli florets from the salad bar at the grocery store. No shame in the game! I also love making a double batch of the sauce and keeping it in a jar in the fridge for up to a week—it’s incredible on salmon, shrimp, or even as a glaze for roasted carrots.
A funny story: the first time I filmed this for the blog, I was so busy talking to the camera that I completely forgot I had the sauce on simmer. Let’s just say I ended up with a *very* thick, *very* sticky glaze that was more like grape chipotle candy! It was still delicious, but it taught me a valuable lesson about paying attention during the thickening stage. So, don’t be like me—keep an eye on that sauce and stir it constantly!
Your Questions, Answered!
I’ve gotten a lot of questions about this recipe over time, so here are the answers to the most common ones.
Q: My sauce didn’t get thick and sticky. What did I do wrong?
A: No worries, this is a common hiccup! The most likely culprit is that the cornstarch slurry wasn’t fully activated. Make sure you’re adding it to a simmering (not just warm) liquid and stirring constantly for a full 1-2 minutes as it cooks. If it’s still too thin, you can mix another teaspoon of cornstarch with a tablespoon of cold water and add it in, letting it simmer again.
Q: How long do these meal prep bowls last in the fridge?
A: Stored in airtight containers, they’ll stay fresh and delicious for up to 4 days. The chicken reheats beautifully in the microwave. I don’t recommend freezing them, as the texture of the broccoli and rice can become a bit mushy upon thawing.
Q: The chipotle is too spicy for me! How can I tone it down?
A> Great question! Chipotles can vary in heat. To control the spice level, start by using just one teaspoon of the minced chipotle. You can also use the adobo sauce from the can *without* the actual pepper for a milder, smoky flavor. Always taste as you go!
Q: Can I make this recipe with frozen chicken?
A> I highly recommend thawing your chicken first. Cooking frozen chicken directly in the pan will release a lot of water and prevent you from getting that nice sear. It can also make your sauce watery. For the best results, thaw it in the fridge overnight.

Sticky Grape Chipotle Chicken Bowls : Easy, Sweet, and Smoky Meal Prep
Description
Get ready to fall in love with meal prep again! These Sticky Grape Chipotle Chicken Bowls are the perfect blend of sweet, smoky, and savory—proof that healthy doesn’t have to mean bland. Juicy chicken coated in a glossy chipotle-grape glaze sits atop fluffy jasmine rice with bright, crisp broccoli. It’s low-calorie, high-protein, and loaded with vibrant flavor that keeps lunchtime exciting.
Ingredients
For the Chicken:
-
1.5 lbs boneless, skinless chicken breast, cubed
-
Salt & pepper to taste
-
1 tbsp olive oil
For the Sauce:
-
½ cup 100% grape juice (no sugar added)
-
1 tbsp chipotle in adobo, minced
-
1 tbsp honey or sugar-free maple syrup
-
1 tbsp soy sauce (or tamari/coconut aminos)
-
2 tsp cornstarch + 2 tbsp water (slurry)
For the Bowls:
-
2 cups cooked jasmine or basmati rice
-
2 cups steamed broccoli
-
Lime wedges & fresh cilantro or parsley for garnish
Instructions
-
Sear the Chicken
Pat chicken dry and season with salt and pepper. Heat olive oil in a skillet over medium-high. Cook chicken for 6–8 minutes, turning until golden and cooked through. Set aside. -
Make the Sauce
In the same pan, add grape juice, chipotle, soy sauce, and honey. Simmer while scraping up browned bits for flavor. -
Thicken the Glaze
Stir in cornstarch slurry while whisking. Cook 1–2 minutes until glossy and thick. -
Coat the Chicken
Return chicken to the pan, tossing until every piece is beautifully coated in sticky sauce. -
Assemble the Bowls
Layer rice and broccoli, then top with glazed chicken. Garnish with fresh herbs and a squeeze of lime.
Notes
-
Keep sauce at a gentle simmer—too hot and it may over-thicken.
-
Use thighs for extra juiciness or swap rice for cauliflower for a low-carb twist.
-
Store up to 4 days in airtight containers; reheat gently to preserve texture.
The Goodness in Every Bite
I know many of you are mindful of what you’re eating, and I love that this bowl is as nourishing as it is delicious. Here’s a quick breakdown of what you’re getting in one satisfying serving (based on the ingredients listed):
Per Bowl: Approximately 440 calories | 36g protein | 10g fat | 45g carbs
This is a fantastic macro balance for a satisfying lunch! You’re getting a hefty dose of lean protein from the chicken to keep you full and fueled, complex carbs from the rice for energy, and healthy fats from the olive oil. The broccoli adds fiber, vitamins C and K, and a host of other nutrients. By using 100% fruit juice and just a touch of natural sweetener, we keep the refined sugars to a minimum. It’s a meal that truly fuels your body and delights your senses.
Your New Lunchtime Go-To Awaits
And there you have it, my friends! Your complete guide to ditching the lunchtime blues with these unbelievably tasty Sticky Grape Chipotle Chicken Bowls. This recipe is proof that with a few simple, smart ingredients and a little bit of kitchen confidence, you can transform your weekly meal prep from a task into a treat.
I can’t wait for you to try this. When you do, please come back and let me know what you think! Tag me on social @Feastical with a photo of your creation—it absolutely makes my day to see you cooking and enjoying these recipes in your own kitchen.
Remember, good food is about connection, joy, and treating yourself well. Now go forth and conquer your week, one incredibly flavorful bite at a time. Happy cooking!
Final Thoughts: Your Lunch Game, Forever Changed
So, there you have it. The secret to a lunch that’s anything but ordinary, all thanks to a little “happy accident” and a whole lot of flavor.
These Sticky Grape Chipotle Chicken Bowls are more than just a recipe—they’re a reminder that eating well should be a vibrant, joyful part of your day. No more settling for bland or boring. You now have the power to create a low-calorie lunch that’s bursting with sweet, smoky, and savory goodness, a meal that you’ll genuinely be excited to eat.
This is your flavor revolution. It’s proof that with a few simple ingredients and one incredible sauce, you can transform your routine and fuel your week with something truly special.
I can’t wait for you to experience the magic. When you make it, please come back and let me know what you think! Share your creations and tag me @Feastical—seeing your kitchen wins absolutely makes my day.
Now, go forth and conquer your week, one incredibly flavorful bite at a time. Happy cooking!
– Beau
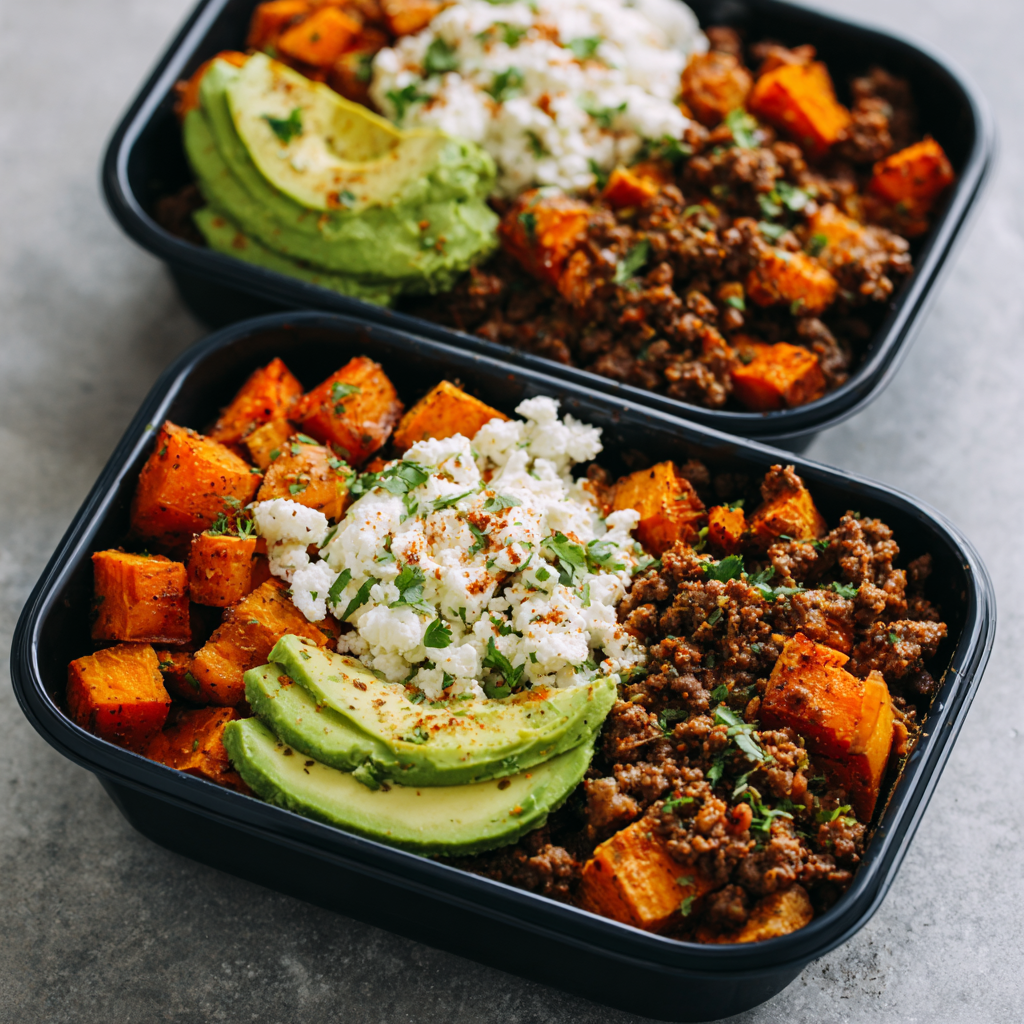
Sweet Potato Taco Beef & Cottage Cheese Meal Prep Bowls : High Protein, Whole Food Fuel
Ditch the Sad Desk Lunch: Your New Favorite Meal Prep is Here!
Hey there, friend! Beau from Feastical back with another one of my kitchen obsessions. Let’s be real for a second. How many times have you stood in front of the fridge on a Sunday night, dreading the chore of prepping lunches for the week? You end up throwing together the same old, boring chicken and broccoli, already counting down the minutes until Wednesday’s inevitable food boredom sets in. I’ve been there, and let me tell you, it’s a flavorless, soul-crushing place to be.
But what if your lunch was something you actually looked forward to? Something that felt like a treat but fueled your body like a champion? Enter the hero of our story: the Sweet Potato Taco Beef & Cottage Cheese Meal Prep Bowl. I know, I know. Cottage cheese might have you flashing back to 1970s diet fads, but trust me on this. We’re giving it a serious glow-up.
This isn’t just another “healthy” recipe. This is a symphony of textures and tastes—savory, spiced beef, sweet and caramelized roasted sweet potatoes, cool and creamy cottage cheese, and rich, mashed avocado. Every single bite is a perfect, balanced mouthful. It’s high-protein, packed with whole-food fuel, and so dang satisfying, you’ll forget you’re even “meal prepping.” So, grab your favorite meal prep containers and let’s create something delicious that your future self will thank you for. No more sad lunches on our watch!
A Taco Tuesday Revolution
This recipe was born out of a happy accident, like most of the best things in my kitchen. It was a classic “clean-out-the-fridge” scenario. I had some leftover taco-seasoned beef from a seriously epic Taco Tuesday, a lone sweet potato staring me down, and a tub of cottage cheese I’d bought for a pancake recipe. Instead of just reheating the same old tacos, I thought, “Why not put it all in a bowl?”
I roasted the sweet potato with a heavy hand of smoky paprika, and the second that hot, spiced beef hit the cool, creamy cottage cheese… magic happened. It was a revelation! It had all the cozy, familiar flavors of taco night but in a fresh, exciting, and honestly, more convenient format. No more soggy shells or messy fillings falling out. Just a perfect, pre-portioned bowl of joy. It immediately became a staple in my house, and after sharing it with a few friends who are now equally obsessed, I knew I had to share it with all of you.
Gathering Your Flavor All-Stars
Here’s everything you’ll need to build four of these incredible bowls. Don’t be shy about making substitutions—cooking is all about making a recipe work for you!
- 1 lb lean ground beef (90/10 or 93/7 is perfect): This is our protein powerhouse. The leaner beef means less grease to drain, keeping things tidy and a bit lighter. Chef’s Insight: Feel free to swap in ground turkey, chicken, or even lentils for a plant-based version!
- 2 medium sweet potatoes, cubed: Nature’s candy! They roast up into sweet, caramelized little cubes that are the perfect counterpoint to the savory beef. Sub Tip: Butternut squash or even carrots would be a fantastic stand-in here.
- 1 tbsp olive oil: This is what we’ll toss our sweet potatoes in to get them perfectly crispy and golden. Avocado oil works great too.
- 1 tsp smoked paprika: This is the secret weapon! It gives the sweet potatoes a deep, smoky, almost bacony flavor. If you only have regular paprika, use it, but smoked is a game-changer.
- 1/2 tsp garlic powder & 1/2 tsp cumin: The dynamic duo of taco seasoning. Toasty, earthy, and absolutely essential.
- Salt & pepper to taste: Don’t forget to season every layer of your cooking. It makes all the difference!
- 2 cups cottage cheese: Wait, don’t scroll past! This is your creamy, high-protein base. It’s mild, milky, and acts as the perfect cool canvas for the spiced elements. Chef’s Insight: If you’re texture-averse, give it a quick blend in the food processor for an ultra-smooth, ricotta-like consistency.
- 1 avocado, mashed or sliced: Hello, healthy fats and creaminess! It adds a richness that ties the whole bowl together. A squeeze of lime juice over it will keep it from browning.
- Optional: hot sauce or a drizzle of honey: This is your chance to personalize! A few dashes of hot sauce bring the heat, while a tiny drizzle of honey can enhance the natural sweetness of the potatoes beautifully.
Let’s Build Those Beautiful Bowls!
Alright, team, let’s fire up the oven and get cooking. This whole process is a breeze, especially if you multitask a little. I’ll walk you through every step.
- Roast the Sweet Potatoes to Perfection. First, preheat your oven to 400°F (200°C). While it’s heating up, peel your sweet potatoes and chop them into ½-inch cubes. The goal is uniform size so they all cook at the same rate. Toss them in a bowl with the olive oil, smoked paprika, garlic powder, cumin, and a good pinch of salt and pepper. Don’t be timid—get your hands in there and massage those spices in until every cube is happily coated. Spread them out in a single layer on a baking sheet. Chef’s Hack: Give them some space! If they’re crowded, they’ll steam instead of roast. We want caramelized edges, people! Pop them in the oven for 25-30 minutes, flipping them halfway through. You’ll know they’re done when you can easily pierce them with a fork and the edges are looking deliciously browned.
- Cook the Taco Beef. While the potatoes are working their magic in the oven, let’s tackle the beef. Heat a large skillet over medium-high heat. Add your ground beef, breaking it up with a wooden spoon or spatula. Season it with another good pinch of salt and pepper as it cooks. I like to add an extra pinch of cumin here too, just to reinforce that taco vibe. Cook until it’s nicely browned and no pink remains, about 8-10 minutes. Once it’s done, drain off any excess fat (though with lean beef, there shouldn’t be much). Chef’s Tip: Let the beef get a little crispy in spots for extra texture!
- The Grand Assembly. This is the fun part! Grab your four meal prep containers. In each one, we’re going to create four distinct sections. Start by spooning about ½ cup of cottage cheese into one quadrant. Next, add a quarter of your cooked taco beef. Then, a quarter of those gorgeous, roasted sweet potatoes. Finally, add your avocado. You can mash it right in the container or add neat slices. Pro Assembly Tip: Let the beef and potatoes cool for about 10 minutes before assembling. This prevents them from “cooking” the avocado and cottage cheese and making everything watery.
- The Finishing Touches. This is where you make it yours. A few dashes of your favorite hot sauce? A tiny, artistic drizzle of honey? A sprinkle of fresh cilantro? Go for it! Seal those lids tight, and you’ve just conquered lunch for the next four days.
How to Serve & Savor
You’ve done the hard work, now for the best part: eating! If you’re enjoying this right away, you can dig in straight from the bowl. The contrast between the warm beef and potatoes and the cool, creamy cottage cheese and avocado is absolutely divine.
For your prepped lunches during the week, you have a couple of options. I personally love it cold, straight from the fridge—the flavors have had time to mingle and get to know each other, and it’s incredibly refreshing. If you prefer a warm lunch, simply remove the avocado and cottage cheese (if possible), and pop the bowl with the beef and sweet potatoes into the microwave for 60-90 seconds. Then, stir everything back together. It’s delicious either way!
Want to make it feel extra special? Serve it in a deep, wide pasta bowl and garnish with a lime wedge for squeezing and a few fresh chopped chives or a sprinkle of red pepper flakes for color.
Make It Your Own: Fun Flavor Twists!
This recipe is a fantastic blueprint, but feel free to get creative and play with your food! Here are a few of my favorite variations:
- The “Fiesta” Bowl: Stir a tablespoon of your favorite salsa or a squeeze of fresh lime juice right into the cottage cheese before assembling. Top with pickled red onions or jalapeños for a tangy kick.
- Mediterranean Twist: Swap the taco spices for a blend of oregano, garlic powder, and lemon zest. Use ground lamb or chicken, and replace the cottage cheese with a dollop of tzatziki. So good!
- Fully Loaded Tex-Mex: Go all out! Add a layer of cooked corn, black beans, and a sprinkle of shredded sharp cheddar cheese. You might need a bigger container, but it’s worth it.
- Lean & Green: For an extra veggie punch, replace half the beef with finely chopped mushrooms sautéed with the meat. It stretches the recipe, adds umami, and sneaks in more nutrients.
- Dairy-Free Delight: Not a cottage cheese fan? No problem! A generous scoop of seasoned, mashed black beans or a creamy, unsweetened coconut or Greek-style yogurt alternative works beautifully.
A Few Chef’s Secrets & Stories
This recipe has evolved so much since that first “fridge clean-out” bowl. The biggest game-changer was definitely committing to the smoked paprika on the sweet potatoes. The first time I used it, my roommate wandered into the kitchen asking what smelled so incredible, thinking I was cooking bacon. That’s when I knew I was onto something special.
Another little secret? I almost always double the sweet potatoes. I roast two sheets pan’s worth, and we snack on the extra cubes straight from the pan while assembling the bowls. They’re like little roasted candy bites, and they rarely make it to the containers! Don’t be afraid to make this recipe your own. That’s the true spirit of Feastical—cooking should be fun, flexible, and deeply satisfying.
Your Questions, Answered!
I’ve gotten a few questions about this recipe over time, so I figured I’d tackle the big ones right here.
- “Will the avocado turn brown?” It can, but you can fight back! A good squeeze of lime juice over the avocado before sealing the container is your best defense. The acid helps slow down the oxidation process. For the absolute best results, you can wait to add the avocado the morning you plan to eat the bowl.
- “I’m not a fan of cottage cheese texture. Any ideas?” Absolutely! This is the most common question. Give it a whirl in a blender or food processor until it’s completely smooth. It becomes this luxuriously creamy, protein-packed base that’s more like a savory mousse. It’s a total texture game-changer.
- “Can I freeze these bowls?” I wouldn’t recommend it, unfortunately. The cottage cheese can become watery and grainy upon thawing, and the avocado will turn into an unappetizing mush. This recipe is best kept in the fridge and enjoyed within 4 days.
- “My sweet potatoes got soggy. What happened?” The number one culprit for soggy potatoes is overcrowding the pan. If they’re all piled on top of each other, they steam instead of roast. Make sure they’re in a single layer with a little space between them for the hot air to circulate. Using too much oil can also make them steam rather than crisp up.
The Good Stuff: What’s Fueling Your Body?
Let’s talk about why these bowls make you feel so amazing. This isn’t just empty calories; it’s balanced, whole-food fuel designed to keep you energized and satisfied for hours.
Each bowl packs a powerful punch of around 32 grams of protein, primarily from the lean ground beef and cottage cheese. Protein is essential for building and repairing muscle, and it’s the most satiating macronutrient, meaning it keeps hunger pangs at bay. The complex carbohydrates from the sweet potatoes provide a steady release of energy, preventing those mid-afternoon slumps. The healthy fats from the avocado and olive oil are crucial for brain health and help your body absorb all the fat-soluble vitamins from the other ingredients. Plus, with around 5 grams of fiber, it’s great for digestive health. It’s a truly balanced meal that tastes anything but “diet food.”
Print
Sweet Potato Taco Beef & Cottage Cheese Meal Prep Bowls : High Protein, Whole Food Fuel
Description
This Sweet Potato Taco Beef & Cottage Cheese Bowl is your new go-to for vibrant, feel-good lunches. With savory taco-spiced beef, caramelized sweet potatoes, creamy cottage cheese, and buttery avocado, it’s the perfect combo of flavor and fuel. Ideal for meal prep or quick dinners, this bowl will keep you satisfied, energized, and excited to eat every bite. Say goodbye to boring lunches and hello to flavor that powers you through the day.
Ingredients
-
1 lb lean ground beef (90/10 or 93/7)
-
2 medium sweet potatoes, peeled & cubed
-
1 tbsp olive oil
-
1 tsp smoked paprika
-
½ tsp garlic powder
-
½ tsp cumin
-
Salt & pepper to taste
-
2 cups cottage cheese
-
1 avocado, mashed or sliced
-
Optional: hot sauce, honey drizzle, lime juice, or cilantro
Instructions
-
Roast the Sweet Potatoes
Preheat oven to 400°F (200°C). Toss cubed sweet potatoes with olive oil, smoked paprika, garlic powder, cumin, salt & pepper. Spread evenly on a baking sheet and roast 25–30 mins, flipping halfway until golden and tender. -
Cook the Beef
In a skillet over medium-high heat, brown the ground beef for 8–10 mins. Season with salt, pepper, and extra cumin if desired. Drain excess fat. -
Assemble the Bowls
Divide cottage cheese, roasted sweet potatoes, beef, and avocado evenly among 4 containers. Add toppings of choice—hot sauce for spice or honey for balance. -
Serve or Store
Enjoy warm or cold! For reheating, warm the beef and potatoes separately before adding cottage cheese and avocado. Keeps fresh in the fridge for up to 4 days.
Notes
-
Blend cottage cheese for a smooth, ricotta-like texture.
-
Squeeze lime over avocado to prevent browning.
-
Don’t overcrowd sweet potatoes—spread them out for that perfect crisp.
Nutrition
- Calories: 450 Cal Per bowl
- Fat: 22g
- Carbohydrates: 28g
- Fiber: 5g
- Protein: 32g
Your New Lunchtime Victory Lap
And there you have it! Your ticket out of the boring lunch loop and into a world of flavor and feel-good fuel. This recipe proves that eating well doesn’t have to be complicated, time-consuming, or bland. It’s about combining simple, wholesome ingredients in a way that makes you excited to open your lunchbox.
I hope these Sweet Potato Taco Beef & Cottage Cheese Bowls become a trusted friend in your weekly rotation, just like they are in mine. Give one of the fun variations a try, or stick with the classic—it’s a winner every time. If you make them, I’d love to see your creations! Tag me @Feastical on social media so I can cheer you on.
Now go forth and prep with confidence! Until next time, keep your spatula close and your appetite closer.
A Final Word from My Kitchen to Yours
This recipe, born from a happy fridge-cleaning accident, has become one of my absolute favorites, and I’m so glad to share it with you. My biggest hope is that it gives you one less thing to worry about during your busy week and one more thing to look forward to. Cooking should be a joy, and eating should be a pleasure. Here’s to many more delicious, stress-free lunches ahead.
If you make it, I’d love to see your creation! Tag me @Feastical so I can share in your mealtime victory.
— Beau
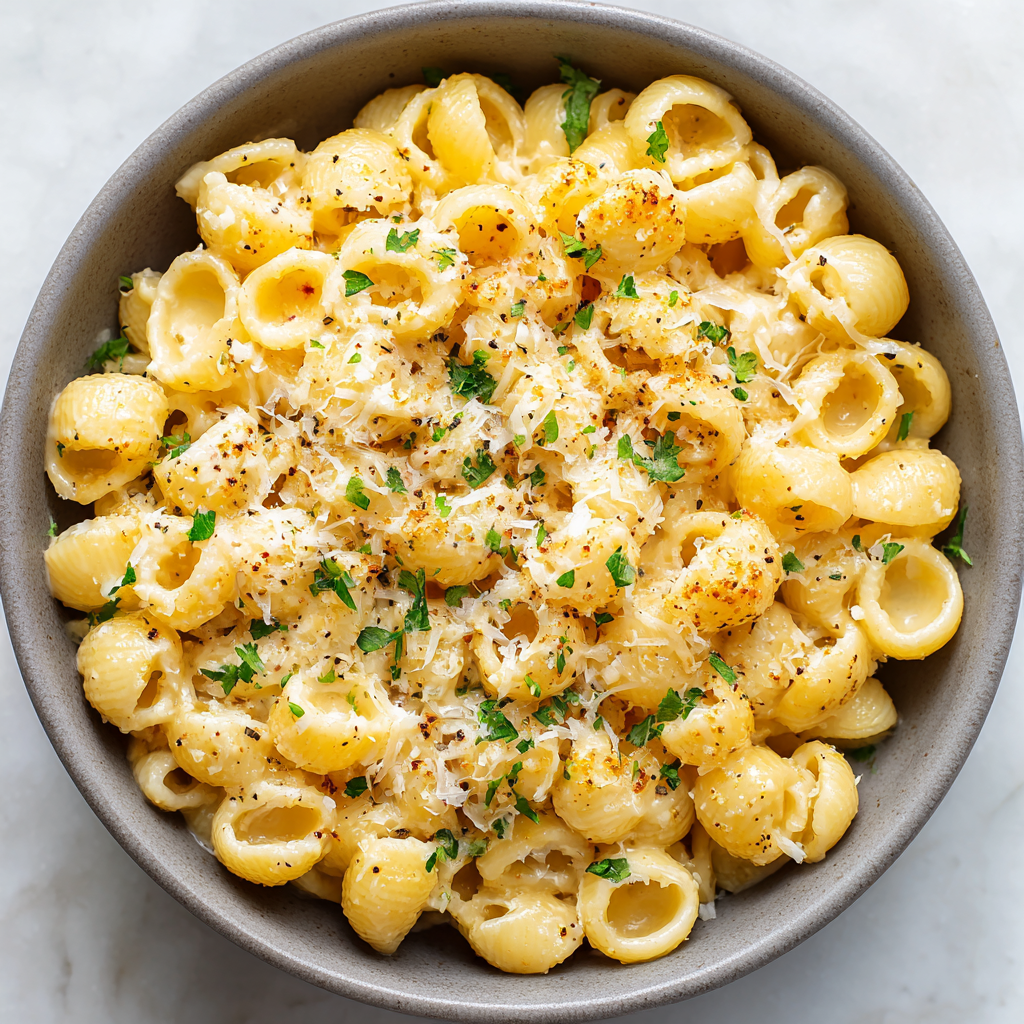
Creamy Garlic Butter Ditalini Pasta
Your New Favorite Comfort Food is Just 20 Minutes Away
Hey friends, Beau here! Let’s be real for a second. Some days, you just need a big, steaming bowl of pure, unapologetic comfort. You know the feeling. It’s been a long day, your energy is zapped, and the thought of tackling a complicated recipe with a mountain of dishes? Yeah, hard pass. You want something that feels like a warm, cheesy, buttery hug from the inside out.
Well, my friend, you have just found your culinary safe space. Today, we’re whipping up a pot of pure magic: my Creamy Garlic Butter Ditalini Pasta. This isn’t just any pasta dish. This is the kind of simple, soulful food that brings you back to the best parts of childhood, but with a gourmet twist that’ll make you feel like a kitchen rockstar. We’re talking tender little ditalini pasta tubes, each one swimming in a luxuriously creamy, garlic-infused, Parmesan-laced sauce. It’s elegant enough to feel special but so darn easy, you can make it with your eyes closed (though maybe keep them open for the garlic part). So, tie on that apron, and let’s turn a few simple ingredients into a memory-making meal.
A Pot of Pasta and a Whole Lot of Heart
This recipe takes me right back to my first tiny apartment kitchen. It was about the size of a postage stamp, with a stove that had exactly one reliable burner. My go-to meal back then was, you guessed it, buttered noodles. It was cheap, it was easy, and it filled me up. But one rainy Tuesday, feeling a little homesick, I decided to get fancy. I sautéed some garlic I had left over, tossed in the last of my chicken broth, and swirled in a glorious splash of heavy cream I’d splurged on. When I stirred in that Parmesan and saw it melt into a silky sauce, I knew I’d stumbled onto something special. It was no longer just a meal; it was my first real “creation.” That pot of pasta taught me that the best dishes aren’t about being fancy—they’re about making the most of what you have and adding a whole lot of heart. This recipe is that exact feeling, perfected over years, and I’m so excited to share it with you.
Gathering Your Flavor Dream Team
Here’s the beautiful part: the ingredient list is short, sweet, and probably already in your kitchen. This is all about quality over quantity, so let’s break it down.
- 2 tablespoons olive oil: Our cooking base! It adds a lovely fruity depth and keeps everything from sticking. Extra virgin is great, but any olive oil you have works perfectly.
- 1 tablespoon minced garlic: The aromatic superstar! Don’t be shy here. I use pre-minced for speed, but 3-4 fresh cloves, finely minced, will give you an incredible, vibrant punch.
- 1 ¼ cups Barilla ditalini pasta: The humble hero! I love Barilla for its consistent quality and perfect cook time. Ditalini’s tiny tube shape is ideal for trapping all that creamy sauce in every single bite. If you can’t find it, small shells or even orzo are fantastic stand-ins.
- 2 cups chicken broth: This is our secret weapon for flavor and cook-time! It infuses the pasta with a savory richness as it simmers. For a vegetarian version, a robust vegetable broth works wonders.
- ¼ cup heavy whipping cream: The key to that luxurious, velvety texture. This is what transforms it from a simple sauce into a decadent dream. For a lighter option, half-and-half will work, though the sauce will be a tad less rich.
- 2 tablespoons butter: Because… butter. It adds a final layer of richness and a beautiful glossy sheen to the sauce. I always use unsalted so I can control the final seasoning.
- ¼ cup grated Parmesan cheese: The flavor bomb! It brings that salty, nutty, umami kick that ties the whole dish together. Pro Chef Tip: Please, please grate it yourself from a block if you can! The pre-shredded stuff has anti-caking agents that can make your sauce a little grainy. Freshly grated Parmesan melts like a dream.
- Salt and black pepper, to taste: The essential finishers. Season in layers! I add a pinch of salt with the garlic, and then the final seasoning at the end, after the Parmesan is in.
- Fresh parsley, chopped (for garnish): Don’t skip this! That little pop of green color and fresh, herbal flavor cuts through the richness beautifully and makes the dish look restaurant-worthy.
Let’s Get Cooking: Your Foolproof Roadmap to Creamy Bliss
Ready to see the magic happen? This is a one-pan wonder, meaning flavor and easy cleanup go hand-in-hand. Follow these steps, and you’ll have a perfect pasta in no time.
- Sauté the Pasta & Garlic: Grab a good-sized skillet (one that has a lid!) and place it over medium-low heat. Add your olive oil and minced garlic. We’re not looking for color on the garlic, just to wake it up and make your kitchen smell incredible—about 30-60 seconds is all it takes. Now, add the dry ditalini pasta right into the skillet! Stir it around for a minute or two until the pasta is lightly toasted and every piece is glistening with that garlicky oil. This little toast adds a wonderful nutty flavor to the final dish.
- Simmer in Broth: Carefully pour in the 2 cups of chicken broth. It will sizzle and steam—that’s the good stuff! Turn the heat up to high and bring it to a lively boil. Once boiling, immediately reduce the heat to a gentle simmer and cover the skillet with a lid. Let it cook for 8-10 minutes. You’ll know it’s ready when most of the broth has been absorbed by the pasta, leaving just a bit of starchy, flavorful liquid in the bottom of the pan. Give it a stir halfway through to make sure nothing is sticking.
- Create the Creamy Sauce: Uncover your skillet—it’s transformation time! Pour in the heavy whipping cream, give everything a good stir, and let it come back to that gentle simmer. Let it bubble away for 2-3 minutes, untouched. This allows the cream to thicken slightly and mingle with the starchy pasta water left from the broth, creating the base of our incredible sauce.
- The Grand Finale: Butter & Cheese: This is the most important step! Remove the skillet from the heat entirely. Why? If the pan is too hot when you add the cheese, it can cause the fats to separate and make your sauce oily. So, off the heat, add in your cold butter and that glorious freshly grated Parmesan cheese. Now, stir, stir, stir! You’ll see it come together into a smooth, glossy, and incredibly creamy sauce that clings to every piece of pasta. The residual heat is perfect for melting everything into silky perfection.
- Season and Serve: Now, taste it! This is your moment. Season with salt and freshly cracked black pepper to your liking. Remember, the Parmesan and broth are already salty, so start with a little and add more if needed. Give it one final stir, transfer to bowls, and top with a generous sprinkle of that fresh, chopped parsley.
How to Serve It Up in Style
This pasta is the star of the show, so let’s make it shine! I love serving this family-style, right out of the warm skillet in the middle of the table—it just feels more welcoming. For individual plates, use a ladle or large serving spoon to get a good helping of that saucy goodness into a shallow bowl. The high edges keep everything cozy.
While this dish is a complete meal in a bowl for me on a cozy night, it also plays incredibly well with others. For a more balanced dinner, pair it with a simple crisp arugula salad with a lemony vinaigrette to cut through the richness. It’s also phenomenal alongside some garlic bread for the ultimate carb-loaded comfort feast (no judgment here!). And if you have any extra Parmesan, set out a small bowl for people to add an extra sprinkle on top. Perfection!
Make It Your Own: Delicious Twists & Swaps
The beauty of this recipe is its versatility. Once you’ve mastered the basic formula, the world is your pasta oyster! Here are a few of my favorite ways to mix it up.
- Add Some Protein: Turn this from a side to a main event! Sauté some diced chicken breast or Italian sausage with the garlic at the beginning. For a quicker option, stir in a can of drained, flaked tuna or some shredded rotisserie chicken at the very end, just to warm through.
- Go Veggie-Loaded: Boost the nutrition and color! Stir in a couple of big handfuls of fresh spinach or chopped kale right after you add the cream—it will wilt beautifully into the sauce. Sun-dried tomatoes or sautéed mushrooms are also incredible additions.
- Herb It Up: Feel free to play with the herbs! While parsley is classic, fresh basil, thyme, or a teaspoon of Italian seasoning added with the garlic can create a whole new flavor profile.
- Lemon Zest Brightness: For a brighter, fresher take, stir in the zest of one lemon along with the butter and Parmesan. The citrusy pop lifts all the rich flavors and is absolutely divine.
- Fully Vegetarian: It’s an easy swap! Just use a high-quality vegetable broth instead of chicken broth. The rest of the recipe is already vegetarian-friendly.
Beau’s Kitchen Confidential
This recipe has been my trusty sidekick for years, and it’s evolved in little ways. I used to be nervous about toasting the pasta, thinking I’d burn it, but trust me—that light toast is a game-changer for flavor. The biggest lesson I learned the hard way? Always take the pan off the heat before adding the cheese. I can’t tell you how many times I ended up with a greasy, broken sauce in my early days because I was impatient. Letting the pan cool for just a minute makes all the difference for that smooth, restaurant-quality finish. This dish is a testament to the fact that the best cooking isn’t about rigid rules; it’s about understanding the little techniques that make a big impact.
Your Questions, Answered!
I’ve made this pasta more times than I can count, and I’ve heard all your wonderful questions. Here are the answers to the most common ones.
- Q: My sauce turned out a bit watery. What happened?
A: No worries, this is an easy fix! The sauce will continue to thicken as it sits. If it’s still too thin for your liking after adding the butter and cheese, just return it to low heat for another minute or two, stirring constantly. You can also let it stand, off the heat, for 5 minutes before serving—it makes a world of difference.
- Q: Can I use a different type of pasta?
A: Absolutely! Small shapes like small shells (pastina), orzo, or even elbow macaroni work great. Just be aware that the cooking time may vary slightly depending on the size and shape, so keep an eye on the liquid level and check for doneness a minute or two earlier.
- Q: How do I store and reheat leftovers?
A: Store any leftovers in an airtight container in the fridge for up to 2 days. The pasta will absorb the sauce as it sits. To reheat, add a splash of broth, cream, or even milk to a saucepan with the pasta and warm it over low heat, stirring gently, until it’s creamy and hot again. The microwave works too, just add that splash of liquid and stir every 30 seconds.
- Q: Is there a way to make this lighter?
A: For sure! You can swap the heavy cream for half-and-half or even whole milk, though the sauce will be less rich. Using a low-sodium broth and going easy on the added salt and butter can also help lighten it up without sacrificing too much flavor.

Creamy Garlic Butter Ditalini Pasta
Description
Creamy Garlic Butter Ditalini Pasta
Your new 20-minute comfort food obsession
Tender ditalini pasta bathed in a velvety, garlic-infused, Parmesan-laced sauce. Easy, soulful, and pure comfort in a bowl.
Ingredients
-
2 tbsp olive oil
-
1 tbsp minced garlic (or 3–4 fresh cloves)
-
1¼ cups ditalini pasta (or small shells, orzo, elbow macaroni)
-
2 cups chicken broth (or vegetable broth for vegetarian version)
-
¼ cup heavy cream (or half-and-half for lighter version)
-
2 tbsp butter (unsalted)
-
¼ cup freshly grated Parmesan cheese
-
Salt and black pepper, to taste
-
Fresh parsley, chopped, for garnish
Optional Add-ins: sautéed chicken, Italian sausage, tuna, fresh spinach, kale, sun-dried tomatoes, mushrooms, lemon zest, herbs like basil or thyme
Instructions
-
Sauté Pasta & Garlic:
Heat olive oil over medium-low heat in a large skillet. Add garlic and cook 30–60 sec until fragrant. Add dry pasta, stir, and toast lightly for 1–2 min. -
Simmer in Broth:
Pour in chicken broth, bring to a boil, then reduce to a gentle simmer and cover. Cook 8–10 min, stirring halfway, until pasta absorbs most broth and is tender. -
Create Creamy Sauce:
Uncover, add heavy cream, and simmer 2–3 min to thicken slightly. -
Butter & Cheese Finish:
Remove from heat. Stir in butter and Parmesan until smooth and glossy. -
Season & Serve:
Taste and adjust salt and pepper. Serve immediately, topped with fresh parsley.
Notes
-
Serve family-style in the skillet or in shallow bowls.
-
Pair with garlic bread or a crisp arugula salad with lemon vinaigrette.
-
Extra Parmesan on the side for sprinkling is always a good idea.
Nutrition
- Calories: 380 Cal Per Serving
- Fat: 22g
- Carbohydrates: 35g
- Protein: 10g
A Quick Note on Nutrition
Hey, let’s keep it real. This is a comfort food dish, and it’s meant to be enjoyed as such! It’s rich, satisfying, and soul-warming. The nutritional info per serving (based on the recipe as written) comes in around 380 calories, with 22g of fat, 35g of carbs, and 10g of protein. The majority of the fat comes from the olive oil, butter, cream, and cheese—which are also the sources of its incredible flavor and creamy texture. The protein comes from the cheese and the chicken broth. If you’re watching your sodium, I highly recommend using a low-sodium chicken broth, as that gives you full control over the final seasoning. Remember, food is about joy and nourishment, not just numbers. So savor every delicious, comforting bite!
You Did It! Now, Dig In.
And there you have it! In just about 20 minutes, you’ve created a dish that’s so much more than the sum of its parts. You’ve taken simple, humble ingredients and transformed them into a bowl of pure, creamy, garlicky joy. This is the kind of recipe you’ll come back to again and again—on busy weeknights, when you need a quick pick-me-up, or when you just want to treat yourself to something truly delicious.
I hope this Creamy Garlic Butter Ditalini becomes a beloved favorite in your home, just like it is in mine. Remember, the best kitchen is a happy one, filled with good smells, good food, and even better company. Thanks for cooking with me today!
Final Thoughts: Your New Go-To Meal is Served
So, there you have it. In the time it takes to watch half a sitcom, you can create a dish that feels like a culinary hug—a bowl of pure, uncomplicated comfort that’s both incredibly satisfying and surprisingly sophisticated.
This Creamy Garlic Butter Ditalini is more than just a recipe; it’s a reminder that you don’t need a fancy degree or a pantry full of obscure ingredients to make a truly memorable meal. You just need a few quality staples, one trusty pan, and the desire to treat yourself to something wonderful. It’s the perfect proof that the best cooking is often the simplest, straight from the heart.
I have a feeling this is going to become your new secret weapon—the recipe you whip up when time is short but standards are high. So go ahead, give yourself permission to enjoy that big, steaming, cheesy bowl. You’ve earned it.

French Onion Boursin Pasta : Cozy, Creamy Twist on a Fall Favorite
French Onion Boursin Pasta: Your New Cozy Comfort Obsession
Hey friends, Beau here! Let’s talk about that magical, soul-warming moment when you take a bite of something so deeply comforting, it just… hits differently. You know the feeling. The world outside might be getting a little crisp, the days a little shorter, and all you crave is a meal that feels like a warm, delicious hug from the inside out. If you’re nodding along, then my friend, you and I are about to embark on a culinary journey to pure bliss.
You’ve probably seen that incredibly viral French Onion Pasta taking the internet by storm. It’s a genius concept, right? Taking all the rich, savory, deeply caramelized flavors of a classic French onion soup and turning it into a fork-twirlable, pasta-loaded dream. I fell in love with it instantly. But you know me—I can’t leave a good thing alone. I’m always thinking, “How can we make this cozier? Richer? Even more ‘slip-into-your-sweatpants’ satisfying?”
And that’s how this little piece of magic was born: French Onion Boursin Pasta. We’re taking that fantastic foundation and leveling it up with one of my all-time favorite secret weapons: that glorious, creamy, flavor-packed Boursin cheese. By swapping out the usual heavy cream and Parmesan for a whole package of Boursin’s Caramelized Onion & Herbs variety, we’re not just making a sauce; we’re creating a silky, herb-infused, onion-laced dream that coats every single noodle in a blanket of flavor. It’s golden, it’s gooey with melted Gruyère, and it’s about to become your go-to comfort meal this season and beyond. So, grab your favorite skillet, and let’s make some magic together!
A Tale of Two Soups and One Happy Accident
This recipe honestly feels like it was always meant to be. It reminds me of my college days, back when my “gourmet” cooking involved a lot of ramen noodles and questionable spice blends. But every Sunday night, my roommate Jamie and I had a tradition: we’d splurge on a big pot of French onion soup from the diner down the street. We’d cradle those steaming, crock-laden bowls, scraping up every last bit of cheesy, broth-soaked bread, talking about our weeks and our big, hazy dreams. That soup was more than food; it was a ritual of comfort and connection.
Years later, when I first started experimenting with one-pan pastas, that memory came flooding back. The goal was always to get maximum flavor with minimum fuss. One night, staring into my pantry, I saw a can of French onion soup next to a box of ditalini pasta. The lightbulb went off. But the real “aha!” moment came when I reached for the cream and found I was out. Panic? For a second. Then I spotted the Boursin cheese I’d bought for a party. I tossed it in, gave it a stir, and watched it melt into the most luxuriously creamy, herb-flecked sauce I could have imagined. It was a happy accident that brought the cozy essence of those college nights right into my adult kitchen, and now, I’m so excited to share it with you.
Gathering Your Flavor All-Stars
Here’s the beautiful part: this recipe doesn’t require a laundry list of fancy ingredients. It’s all about a few key players that do all the heavy lifting. Let’s break it down.
- ¼ cup butter, divided: We use this in two stages. The first half is for toasting the pasta, giving it a wonderfully nutty base flavor. The second half gets swirled in at the end, adding a final layer of richness and a gorgeous glossy sheen to the sauce.
- ½ lb ditalini or pasta rings: I love these small shapes because they cradle the sauce in every single bite. Their nooks and crannies are perfect for this dish. Chef’s Insight: If you can’t find ditalini, small shells (conchiglie) or even orzo will work beautifully!
- ½ cup white wine: This is our deglazing hero! It lifts all the delicious browned bits from the bottom of the pan (that’s called the *fond*, fancy, right?) and adds a subtle acidity that balances the richness. Substitution Tip: No wine? No problem. Just use an additional ½ cup of beef broth with a squeeze of lemon juice.
- 2+ cups beef broth: This forms the base of our cooking liquid, deepening that savory, umami flavor. You might not need the full two cups, but it’s good to have extra on hand. The pasta will absorb it as it cooks, creating the sauce.
- 1 can French onion soup (10.5 oz): This is our ultimate flavor shortcut! It’s packed with the deep, caramelized onion essence we’re after. Make sure you don’t drain it—you’re adding the whole, glorious can, liquid and all.
- Salt & black pepper, to taste: Always season with purpose! I hold off on adding too much salt until the end because the broths and cheeses are already salty. Freshly cracked black pepper at the finish is a must for me.
- 1 package Boursin cheese (Caramelized Onion & Herbs): The star of the show! This soft, spreadable cheese is a powerhouse of flavor, infused with onion, chives, and a gentle touch of garlic. It melts into the most incredible, creamy sauce imaginable.
- 1 cup grated Gruyère cheese: What’s French onion soup without that iconic, slightly nutty, melty cheese topping? Gruyère is the classic choice for a reason. Substitution Tip: If Gruyère is hard to find, a good Swiss or even a sharp white cheddar will do in a pinch.
Let’s Get Cooking: Your Step-by-Step Guide to Creamy Perfection
Okay, team, aprons on! This is where the fun begins. We’re building this entire dish in one pan, which means incredible flavor and minimal cleanup. My kind of cooking!
- Toast the Pasta. In a large, deep skillet or Dutch oven, melt 2 tablespoons of your butter over medium heat. Once it’s foaming just a bit, add your dry ditalini pasta. Now, here’s a little chef hack: toast that pasta, stirring it almost constantly, for about 3-4 minutes, until it turns a light golden brown and smells wonderfully nutty. This simple step adds a deep, toasty dimension to the final dish that you are going to LOVE.
- Deglaze with Wine. Carefully pour in your ½ cup of white wine. It will sizzle and steam—that’s the sound of flavor! Use your wooden spoon to scrape up any of those lovely browned bits from the bottom of the pan. Let the wine simmer and bubble away until it’s reduced by about three-quarters and the pan looks almost dry again. This cooks off the raw alcohol taste and leaves behind its delicious fruity essence.
- Simmer with Broth. Now, we’re going to channel our inner Italian nonna and cook the pasta the *risotto* way. Add 1 cup of the beef broth and give everything a good stir. Let the pasta simmer and absorb the liquid, stirring occasionally to prevent sticking. Once the first cup is mostly absorbed, add another ½ cup. We’re going to keep this gradual process going for about 10-12 minutes total. The goal is to add just enough liquid to cook the pasta without making it soupy.
- Add the Soup. After you’ve added about 1.5 to 2 cups of broth and the pasta is starting to get tender, stir in the entire can of French onion soup. Continue to cook, stirring frequently. The starches from the pasta will mingle with the broths and soup, naturally creating a luscious, clinging sauce. If the pasta still has a bite to it and the sauce is looking too thick, add a splash more broth until it reaches that perfect, saucy consistency.
- The Cheesy Finish. This is the moment of truth! Turn the heat down to low. Drop in the remaining 2 tablespoons of butter, the entire package of Boursin (you can just plop it right in, no need to crumble it perfectly), and your grated Gruyère. Now, stir, stir, stir! You’ll watch as the cheeses melt and emulsify with the starchy pasta water, transforming everything into a rich, creamy, and dreamy sauce that coats every single noodle. Chef’s Tip: Taking the pan off the heat for a minute before adding the cheese can prevent it from breaking or becoming greasy.
- Season and Serve. Give your masterpiece a taste. This is where you make it yours. Does it need a pinch more salt? A generous crack of black pepper? Adjust accordingly. Then, serve it immediately while it’s hot, gooey, and utterly irresistible.
How to Serve This Cozy Masterpiece
Presentation is part of the fun, even for a cozy weeknight meal! I like to ladle this pasta into wide, shallow bowls—it gives the sauce plenty of room to pool deliciously. For that final restaurant-worthy touch, I’ll top each bowl with an extra little sprinkle of Gruyère and a fresh crack of black pepper.
Now, what to serve with it? You absolutely cannot go wrong with a thick slice of crusty, warm bread for mopping up every last bit of that incredible sauce. A simple, bright arugula salad with a lemony vinaigrette is my go-to side; the peppery, acidic greens cut through the richness of the pasta perfectly. And if you really want to lean into the French onion theme, some quick, cheesy crostini on the side will make everyone at the table feel extra fancy.
Make It Your Own: Delicious Twists & Swaps
One of the best things about this recipe is its flexibility. Want to mix it up? Here are a few of my favorite variations:
- The “Mushroom Lover’s” Twist: Before you toast the pasta, sauté 8 oz of sliced cremini mushrooms in the butter until they’re beautifully browned. Remove them, then proceed with the recipe, adding them back in with the French onion soup. Earthy heaven!
- Add Some Protein: For a heartier meal, stir in 2 cups of shredded rotisserie chicken or sliced seared steak at the same time you add the cheeses, just to warm it through.
- Go Vegetarian: It’s super easy! Just swap the beef broth for a rich, savory vegetable broth. The Boursin and French onion soup still provide tons of flavor.
- Garlic & Herb Explosion: If you can’t find the Caramelized Onion Boursin, the classic Garlic & Fine Herbs flavor works absolutely perfectly here. It’s a different, but equally delicious, herby profile.
- Fresh Herb Finish: Brighten up the whole dish by stirring in a handful of fresh, chopped parsley or chives right before serving. The pop of color and fresh flavor is incredible.
Beau’s Kitchen Notes & Stories
This recipe has become a staple in my home, and it’s evolved in the best ways. I’ve learned that the key is patience—don’t rush the toasting or the gradual addition of the broth. Let the pasta work its starchy magic. I’ve also made this for picky kids (just call it “Mac and Cheese Soup” and they’re instantly on board) and for fancy dinner parties, and it’s a hit every single time.
One of my favorite kitchen fails-turned-win happened with this dish. I once accidentally used a full pound of pasta without doubling the liquid. It was… thick. But I thinned it out with a little extra broth and cream, and it was still delicious! It just goes to show that cooking is an adventure, not a science. Don’t be afraid to trust your gut and taste as you go!
Your Questions, Answered!
Q: My sauce turned out a bit greasy. What happened?
A: This usually happens if the heat is too high when you add the cheeses. Cheese can “break” if it gets too hot too fast, causing the fats to separate. Next time, make sure you’ve reduced the heat to low or even take the pan off the burner for a minute before stirring in the Boursin and Gruyère. Stirring constantly until they’re fully melted and incorporated will help it stay smooth and creamy.
Q: Can I make this ahead of time?
A: You can! The pasta will thicken significantly as it sits. To reheat, place it in a saucepan over low heat and add a splash of broth or milk, stirring gently until it’s warm and saucy again. It might not be *quite* as perfect as fresh, but it’s still mighty tasty.
Q: I can’t find ditalini. What’s the best substitute?
A> No worries! Any small pasta shape that’s great at holding sauce will work. My top picks are small shells, orecchiette, orzo, or even elbow macaroni. The cooking time might vary slightly, so just keep an eye on the texture.
Q: Is there a way to make this less rich?
A> Absolutely. You can use a light butter alternative and reduce the amount of Gruyère cheese by half. The Boursin is non-negotiable for flavor, but you can use the lighter version of Boursin if you can find it!
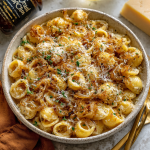
French Onion Boursin Pasta : Cozy, Creamy Twist on a Fall Favorite
Description
A creamy, cheesy, ultra-comforting pasta that turns the flavors of French onion soup into a fork-twirlable, cozy dinner. Perfect for weeknights or any time you crave a warm, indulgent hug from the inside out.
Ingredients
-
¼ cup butter, divided
-
½ lb ditalini or small pasta rings (small shells, orzo, or orecchiette work too)
-
½ cup white wine (or ½ cup beef broth + 1 tsp lemon juice)
-
2+ cups beef broth (or vegetable broth for vegetarian version)
-
1 can (10.5 oz) French onion soup, undrained
-
Salt & freshly ground black pepper, to taste
-
1 package Boursin cheese, Caramelized Onion & Herbs
-
1 cup grated Gruyère cheese (or Swiss/sharp cheddar)
Optional Twists:
-
8 oz cremini mushrooms, sautéed
-
2 cups shredded rotisserie chicken or sliced steak
-
Fresh parsley or chives for garnish
Instructions
-
Toast the Pasta:
Melt 2 tbsp butter in a large deep skillet or Dutch oven over medium heat. Add dry pasta and toast for 3–4 minutes, stirring constantly until lightly golden and nutty. -
Deglaze with Wine:
Pour in white wine. Scrape up browned bits (fond) with a wooden spoon. Let wine reduce by ~¾. -
Simmer with Broth:
Add 1 cup beef broth. Stir and let pasta absorb the liquid. Gradually add another ½–1 cup broth over 10–12 minutes, stirring occasionally. -
Add the Soup:
Stir in French onion soup and cook until pasta is tender and sauce is thick but creamy. Add more broth if needed. -
Cheesy Finish:
Reduce heat to low. Add remaining 2 tbsp butter, Boursin cheese, and Gruyère. Stir until fully melted and emulsified. -
Season & Serve:
Taste and adjust salt/pepper. Serve immediately, topped with extra Gruyère and optional fresh herbs.
Notes
-
Sauce too greasy? Lower heat before adding cheeses and stir constantly.
-
Make ahead? Reheat gently with a splash of broth or milk.
-
Can’t find ditalini? Use small shells, orzo, elbow macaroni, or orecchiette.
-
Lighter version? Use less Gruyère, lighter butter, or light Boursin.
Nutritional Information*
I’m all about balance—enjoying those decadent, comforting meals and also nourishing our bodies. Here’s a rough breakdown of what you’re getting in one serving of this pasta. Remember, this is an estimate and can vary based on the specific brands you use.
Per Serving (approx., serves 4):
Calories: 520 | Protein: 16g | Carbohydrates: 42g | Fat: 32g | Fiber: 2g
This dish is a hearty, satisfying meal that’s packed with energy (thanks to the carbs and fats). The protein comes from the cheeses and the beef broth. To round it out into a perfectly balanced meal, I always recommend serving it with that simple green salad I mentioned earlier. It adds fiber, vitamins, and a refreshing contrast that makes the whole experience even more enjoyable.
*Please note: This nutritional information is an estimate provided by an online calculator. For precise dietary needs, it’s always best to calculate using the exact ingredients and brands you use.
Final Thoughts from My Kitchen to Yours
Well, there you have it, my foodie friends—my ultimate twist on the cozy classic we all adore. This French Onion Boursin Pasta is more than just a recipe; it’s a reminder that the best meals are often the simplest ones, made with a little bit of love and a whole lot of flavor. It’s about taking a beloved idea and making it your own, just like I did with that happy Boursin accident.
I truly hope this recipe finds its way into your regular rotation and brings as much joy to your table as it has to mine. Cooking is my love language, and sharing these creations with you is what Feastical is all about. If you make it (and I really hope you do!), tag me on social @Feastical so I can see your beautiful creations! Now, go forth, get your
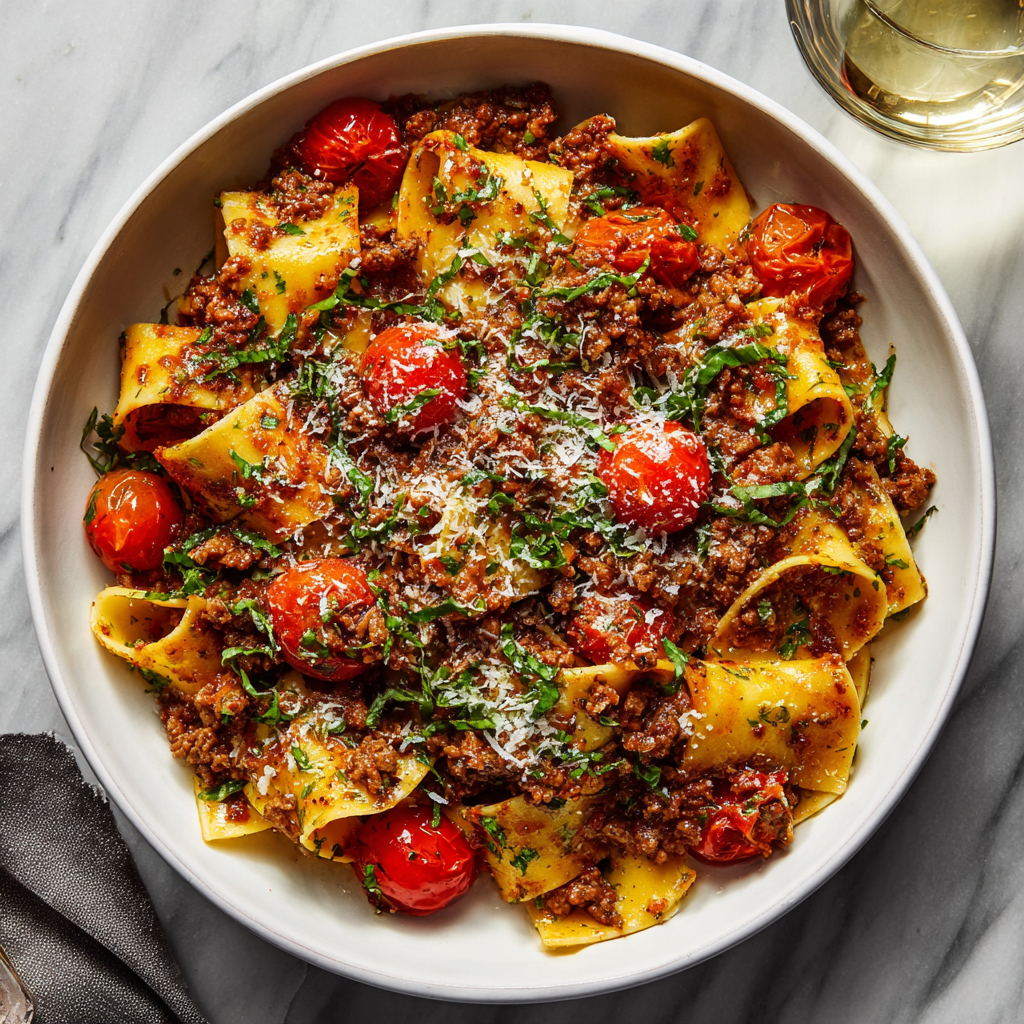
Simple Bolognese with Cherry Tomatoes & Herbs
Your New Favorite Bolognese is Simmering on the Stove
Hey friends, Beau here from Feastical! Let’s talk about one of life’s greatest simple pleasures: walking into a house where a pot of Bolognese has been simmering on the stove for hours. That rich, meaty, herbaceous aroma just wraps around you like a welcome home hug. It’s the smell of weekends well spent, of laughter around the dinner table, and of food that feeds more than just your stomach—it feeds your soul.
Now, I know what you’re thinking. “Beau, a *real* Bolognese is an all-day affair!” And you’re not wrong. The traditional version is a masterpiece of patience. But here’s my little secret: you can capture all that deep, comforting flavor in under an hour. My Simple Bolognese with Cherry Tomatoes & Herbs is my weeknight warrior, my Sunday supper star, and my go-to when I need to deliver a serious dose of coziness without spending my entire day in the kitchen.
We’re taking a few smart shortcuts (hello, canned cherry tomatoes for a naturally sweeter, brighter sauce!) and focusing on building layers of flavor quickly. The result is a hearty, rustic, and incredibly satisfying sauce that clings to every groove of your favorite pasta. So, tie on your apron, grab your favorite wooden spoon, and let’s make a memory together. This is more than just a recipe; it’s an invitation to slow down and savor the moment.
The Sauce That Started It All
This Bolognese recipe always takes me back to my first tiny apartment kitchen. It was about the size of a postage stamp, with questionable linoleum and a stove that had exactly one reliable burner. I was broke, but I wanted to impress a few friends I’d invited over for a “fancy” dinner party. A traditional Bolognese was out of the question—I didn’t have the time, the budget for expensive cuts, or the patience.
So, I got creative. I grabbed the basics—ground chuck, some cans of cherry tomatoes I found on sale, and the sad-looking carrots and celery wilting in my fridge’s crisper drawer. I threw it all in my one good pot and let it bubble away while we played cards. The entire apartment filled with this incredible smell. When we finally sat down to eat, crammed around a wobbly card table, there was a moment of pure silence, followed by a chorus of “Wow.” It wasn’t fancy, but it was made with heart. It was the meal that made me realize that the best food isn’t about perfection; it’s about connection. And this sauce? It’s a master connector.
Gathering Your Flavor Makers
This is where the magic begins! I’ve broken down the “why” behind each ingredient so you can feel like a total kitchen pro. Don’t be afraid to make it your own!
- 1/2 cup extra-virgin olive oil: We use a generous amount to create a luxurious base for sautéing our veggies. It adds a fruity depth you just don’t get with other oils. Chef’s Insight: A good glug of quality olive oil at the end can also brighten everything up!
- 2 medium onions, coarsely chopped: The sweet, savory foundation of our flavor base (the soffritto). They melt down and become the soul of the sauce.
- 4 garlic cloves, peeled and chopped: A non-negotiable for me! It provides that pungent, aromatic kick that makes the entire kitchen smell incredible.
- 2 celery stalks, coarsely chopped: Adds a subtle, earthy bitterness that balances the sweetness of the carrots and onions.
- 2 large carrots, coarsely chopped: My secret weapon for a touch of natural sweetness! It cuts through the acidity of the tomatoes beautifully. Substitution Tip: No fresh carrots? A tablespoon of tomato paste stirred in with the veggies will add a similar deep, sweet richness.
- 2 pounds ground chuck beef (80/20 blend is ideal): Chuck has the perfect fat-to-meat ratio. That fat equals flavor, folks! It renders down and makes the sauce incredibly rich and satisfying. Substitution Tip: Feel free to use a mix of half pork and half beef for a more traditional flavor, or ground turkey for a lighter version.
- 4 (14 oz) cans cherry tomatoes, crushed: This is our star shortcut! Cherry tomatoes are naturally sweeter and less acidic than regular plum tomatoes, giving you a more complex, fruity sauce with zero effort. Chef’s Hack: I just squish them with my clean hands right in the can—it’s therapeutic!
- 1/2 cup chopped flat-leaf parsley & 16 fresh basil leaves, chopped: Fresh herbs are a game-changer. Parsley adds a bright, clean finish, while basil brings that classic, sweet Italian aroma. Substitution Tip: In a pinch, you can use 2 tablespoons of dried basil and 1/4 cup of dried parsley, but the flavor won’t be quite as vibrant.
- 1 teaspoon dried oregano: Dried oregano has a more concentrated, earthy flavor that holds up beautifully to long simmering.
- 1/2 teaspoon crushed red pepper flakes (optional): I always add these! They don’t make the sauce spicy, just give it a gentle, warm hum in the background.
- Salt and freshly ground black pepper, to taste: Your most important tools! Season in layers—a little when you cook the veggies, more when you add the meat and tomatoes.
- 1/2 cup freshly grated Pecorino Romano: This salty, sharp cheese is the perfect finisher. It melts into the sauce, adding a layer of umami and saltiness. Substitution Tip: Parmigiano-Reggiano is a great, slightly milder substitute.
- 2 pounds pasta (mezzi rigatoni, pappardelle, or your favorite): Choose a shape with nooks and crannies to hold the chunky sauce. Mezzi rigatoni is my top pick, but pappardelle offers a wonderfully elegant, “slurpable” experience.
Let’s Get Cooking: Building the Perfect Bolognese
Okay, team. This is where we turn simple ingredients into something spectacular. Read through these steps once before you start—it’s like having me right there in the kitchen with you, whispering chef hacks in your ear.
- Build Your Flavor Foundation: Heat the olive oil in a large, heavy-bottomed pot or Dutch oven over medium heat. Add your onions, garlic, celery, and carrots. Now, here’s your first pro tip: don’t rush this! We’re not looking to brown them, just to soften them and make them fragrant. This should take a good 8-10 minutes. You’re building the base of your entire sauce, so give it the love it deserves. Stir often to prevent the garlic from burning.
- Brown That Beef: Crank the heat up to medium-high and add the ground chuck. Use your wooden spoon to break it apart into small, bite-sized crumbles. We want a good, deep brown color on the meat, not just gray it. This browning (the Maillard reaction, for my science geeks) is where a ton of the deep, meaty flavor comes from. Let it sit for a minute or two before stirring to get a proper sear.
- Bring in the Tomatoes and Herbs: Once the beef is beautifully browned, it’s time for the main event. Stir in your hand-crushed cherry tomatoes, the fresh basil, parsley, dried oregano, and those optional red pepper flakes. The pot will sizzle and sing! This is a good time to season generously with salt and pepper. Give everything a huge, joyful stir, making sure to scrape up any of those delicious browned bits from the bottom of the pot. That’s pure flavor gold.
- The Simmer of Success: Bring the sauce to a lively simmer—you should see bubbles breaking the surface. Then, immediately reduce the heat to low. Let it cook uncovered for 30-40 minutes, stirring occasionally. This uncovered simmer is key! It allows the sauce to thicken and the flavors to concentrate and meld together into one harmonious, delicious symphony. You’ll know it’s ready when the oil starts to glisten on the surface and the sauce has thickened to a rich, spoon-coating consistency.
- Cook Your Pasta Like a Pro: While the sauce is doing its thing, bring a large pot of water to a rolling boil. Salt it aggressively—it should taste like the sea! This is your one chance to season the pasta from the inside out. Cook your chosen pasta until it’s al dente, which means “to the tooth.” It should have a slight bite in the center. THIS IS CRUCIAL: Before you drain the pasta, scoop out about one cup of that starchy, salty pasta water. This liquid magic is our secret weapon for creating a silky, emulsified sauce that clings to every noodle. Drain the pasta, but do not rinse it.
- The Grand Finale: The Toss: This is my favorite part. Add the drained pasta directly to the pot with your finished Bolognese sauce. Pour in about half of your reserved pasta water. Now, toss, toss, toss! Use tongs to lift and swirl the pasta through the sauce. The starch from the pasta water will help the sauce cling beautifully. If it looks a bit dry, add more pasta water a splash at a time until it’s perfectly saucy. Finish by tossing in most of your grated Pecorino Romano, letting it melt right into the sauce.
How to Serve This Masterpiece
Presentation matters, even for a rustic, family-style meal! I love serving this Bolognese family-style right out of the pot in the middle of the table—it feels so communal and inviting. Grab a big, beautiful, shallow bowl for your pasta. Use tongs or a pasta fork to create a lovely, high nest of sauced pasta. Drizzle a tiny bit of extra-virgin olive oil over the top for a gorgeous sheen.
Now, for the final flourish: a generous snowfall of the remaining Pecorino Romano cheese and a few fresh basil leaves torn right over the top. Serve it with a simple side salad with a sharp vinaigrette to cut through the richness, and don’t forget a basket of warm, crusty bread for mopping up every last bit of sauce from your plate. That’s the best part, and anyone who says otherwise is just wrong.
Make It Your Own: Delicious Twists & Swaps
Once you’ve mastered the base recipe, the world is your oyster! Or, you know, your pasta bowl. Here are a few of my favorite ways to mix it up.
- The “Tuscan Sun” Twist: Stir in 1/4 cup of rinsed capers and the zest of one lemon along with the fresh herbs. The briny, bright pop cuts through the richness in the most incredible way.
- Umami Bomb (Vegetarian-Friendly!): Replace the ground beef with one pound of sliced cremini mushrooms and one cup of cooked brown lentils. The mushrooms provide a meaty texture, and the lentils add a wonderful earthiness that stands up to the robust sauce.
- Spicy ‘Nduja Arrabbiata: For a fiery kick, add a tablespoon of ‘nduja (a spreadable spicy Italian sausage) when you brown the beef. It will melt into the sauce, infusing it with heat and a deep pork flavor.
- Dairy-Free & Still Delicious: Simply omit the Pecorino Romano cheese. The sauce is so flavorful on its own, you won’t miss it! Finish with a drizzle of your best olive oil instead.
- The “Half & Half” Lighter Version: Use one pound of ground beef and one pound of ground turkey or chicken. You still get that beefy flavor but with a leaner profile.
Beau’s Brain Dump & Kitchen Confessions
This recipe has been a living, evolving thing in my kitchen for years. I once accidentally doubled the red pepper flakes, and my friends and I spent the entire meal sweating and laughing, reaching for more bread and water. It was a delicious mistake! I’ve learned that the type of pot you use really matters—a heavy Dutch oven distributes heat evenly and prevents scorching, so you can let that sauce simmer away without worry. And don’t be afraid to let the sauce go a little longer if you have the time. An extra 15-20 minutes on the lowest heat setting only makes it better. Some of my best kitchen thinking happens while I’m just stirring a pot, watching the bubbles slowly pop on the surface. It’s my therapy.
Your Bolognese Questions, Answered!
I’ve gotten a lot of questions about this recipe over the years. Here are the ones I hear most often.
- Q: My sauce is a bit too acidic. What can I do?
A: This can happen, especially with certain tomato brands. The trick is to balance it with a pinch of sweetness. Stir in a teaspoon of sugar or, even better, a grated carrot, and let it simmer for another 10 minutes. The natural sugars will work their magic. - Q: Can I really make this ahead of time?
A: Absolutely! In fact, I think it tastes even better the next day. Let the sauce cool completely, then store it in an airtight container in the fridge for up to 5 days, or freeze it for up to 3 months. Reheat it gently on the stove, adding a splash of water or broth to loosen it up. - Q: The sauce seems too watery. How do I thicken it?
A: No panic! First, let it simmer uncovered for a bit longer—the excess liquid will evaporate. If you’re really in a rush, you can mash a few of the sauce’s carrot pieces against the side of the pot with your spoon; their natural starch will help thicken it instantly. - Q: Is it okay to use a food processor for the veggies?
A: You bet! Pulse the onions, celery, and carrots until they are finely chopped, but be careful not to puree them. You want some texture. This is a huge time-saver and creates a more traditional, fine-textured soffritto.
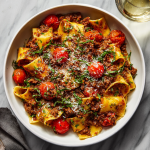
Simple Bolognese with Cherry Tomatoes & Herbs
Description
Rich, hearty, and packed with flavor, this Bolognese comes together in under an hour—perfect for weeknights, Sunday suppers, or any time you want comfort in a bowl.
Ingredients
Base:
-
½ cup extra-virgin olive oil
-
2 medium onions, coarsely chopped
-
4 garlic cloves, chopped
-
2 celery stalks, coarsely chopped
-
2 large carrots, coarsely chopped
Protein & Sauce:
-
2 lbs ground chuck (80/20), or half pork/half beef
-
4 (14 oz) cans cherry tomatoes, crushed
-
½ cup chopped flat-leaf parsley
-
16 fresh basil leaves, chopped
-
1 tsp dried oregano
-
½ tsp crushed red pepper flakes (optional)
-
Salt and freshly ground black pepper, to taste
Finishing Touches:
-
½ cup freshly grated Pecorino Romano (or Parmigiano-Reggiano)
-
2 lbs pasta (mezzi rigatoni, pappardelle, or favorite shape)
-
Extra basil leaves for garnish
Instructions
-
Build the Flavor Base: Heat olive oil in a large Dutch oven over medium heat. Add onions, garlic, celery, and carrots. Sauté 8–10 minutes until softened and fragrant.
-
Brown the Meat: Increase heat to medium-high, add ground chuck, and break into small pieces. Brown without stirring too much to develop deep flavor (Maillard reaction).
-
Add Tomatoes & Herbs: Stir in crushed cherry tomatoes, basil, parsley, oregano, and optional red pepper flakes. Season with salt and pepper. Scrape up browned bits from the pot.
-
Simmer: Bring to a simmer, then reduce heat to low. Cook uncovered 30–40 minutes, stirring occasionally, until thickened and rich.
-
Cook Pasta: Meanwhile, bring a large pot of salted water to a boil. Cook pasta al dente. Reserve 1 cup of pasta water, then drain.
-
Combine Pasta & Sauce: Add pasta to the sauce along with half the reserved pasta water. Toss to coat, adding more water if needed for a silky sauce. Mix in most of the Pecorino Romano.
-
Serve: Plate pasta with extra cheese and torn basil leaves. Drizzle a touch of olive oil if desired. Serve with a side salad and crusty bread.
Notes
-
Too acidic? Add a teaspoon of sugar or a grated carrot.
-
Too watery? Simmer uncovered longer or mash a few carrot pieces to thicken.
-
Food processor? Pulse veggies for a fine texture without pureeing.
Nutrition
- Calories: 580 Cal Per Serving
- Fat: 26g
- Saturated Fat: 9g
- Carbohydrates: 55g
- Fiber: 5g
- Protein: 28g
Breaking It Down: The Good Stuff
I’m all about balance and enjoying real food. Here’s a general nutritional snapshot per serving (this is an estimate and can vary based on your specific ingredients and portion sizes). This is hearty, wholesome food that’s packed with protein to keep you full and satisfied. The carrots and tomatoes provide a great dose of Vitamin A and Lycopene, and using a whole-wheat pasta would bump up the fiber even more. Remember, it’s not about one meal, but about a lifestyle of cooking and savoring delicious, real food with the people you love.
Per Serving (approx.): Calories: 580 | Protein: 28g | Fat: 26g | Saturated Fat: 9g | Carbohydrates: 55g | Fiber: 5g | Sugar: 9g | Sodium: 720mg
Final Thoughts from My Kitchen to Yours
Well, there you have it. My heart-on-a-plate, my simple Bolognese with a cherry tomato twist. I hope this recipe finds its way into your regular rotation and becomes a part of your own family’s story. The real magic of cooking isn’t just in the eating; it’s in
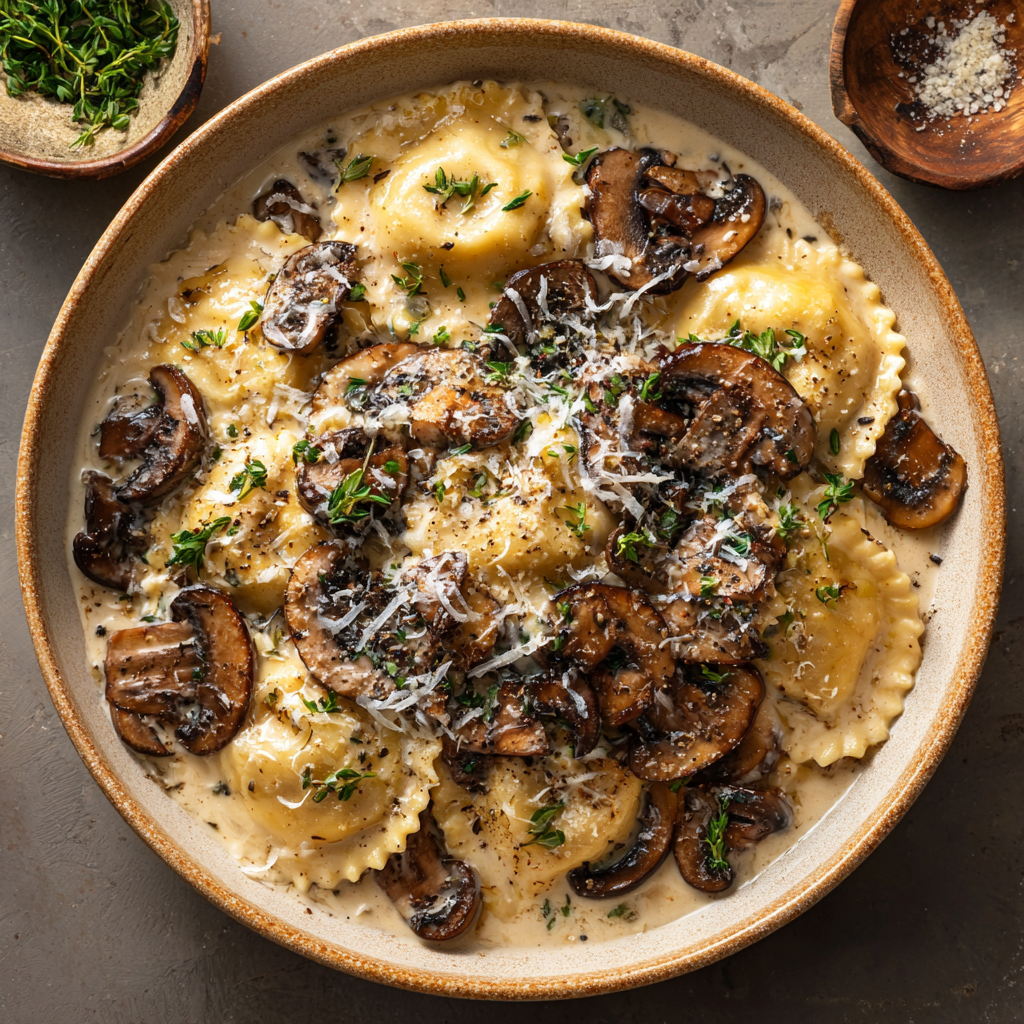
Ravioli in Creamy Mushroom Sauce
Ravioli in Creamy Mushroom Sauce: Your New Favorite Comfort Food
Hey friends, Beau here from Feastical! Let’s talk about one of life’s simple, soul-satisfying truths: there are few things better than a big, cozy bowl of pasta at the end of a long day. Especially when that pasta involves plump, tender ravioli swimming in a sauce so rich, so creamy, and so packed with savory flavor that you’ll want to lick the bowl clean. I’m talking about my recipe for Ravioli in Creamy Mushroom Sauce.
This isn’t just any weeknight dinner; this is a “feels fancy but comes together in 30 minutes” kind of miracle. It’s the dish you make when you want to treat yourself without the fuss. We’re taking gorgeous mushroom-stuffed ravioli and bathing them in a luxurious sauce made with sautéed mushrooms, a touch of garlic, a splash of broth, and a generous pour of cream, all brought together with a snowy shower of Parmesan cheese. The result? Pure, unadulterated comfort food elegance.
Whether you’re cooking for a special date night, a meat-free Monday that actually excites you, or just because you deserve it, this recipe is your new best friend. It’s hearty, vegetarian-friendly (just use veggie broth!), and has that incredible umami depth that makes every bite a little event. So, grab your favorite skillet, and let’s turn your kitchen into the coziest Italian trattoria this side of… well, your house!
The Night I Discovered Food Could Be a Warm Hug
This recipe takes me right back to my first tiny apartment after culinary school. My kitchen was about the size of a postage stamp, but it was all mine. I’d just gotten home from a long, rainy double shift, feeling totally drained and a little lonely. The thought of a boring frozen pizza was almost too much to bear.
But then I spotted a package of mushroom ravioli in the fridge, a lone carton of cream, and a handful of mushrooms starting to whisper my name. In that moment, I wasn’t a tired chef; I was just someone who needed a warm, homemade hug. I threw it all together in one pan, the scent of garlic and thyme filling my little space, and when I took that first bite, everything just felt… right. The world outside was still wet and cold, but in my kitchen, with that bowl of creamy, dreamy pasta, I was warm, content, and reminded exactly why I fell in love with cooking in the first place. It’s a feeling I still chase with every recipe I create, and one I hope this dish brings to you, too.
Gathering Your Delicious Cast of Characters
One of the best things about this recipe is its simplicity. We’re using a few powerhouse ingredients to create maximum flavor. Here’s what you’ll need:
- 2 lbs Mushroom Ravioli: The star of the show! Using a high-quality store-bought ravioli is a fantastic shortcut. Look for ones in the refrigerated section for the best texture. Chef’s Insight: If you can’t find mushroom-stuffed, cheese ravioli work beautifully and let the mushroom sauce truly shine.
- 3 tablespoons Olive Oil: Our cooking fat of choice. It adds a fruity depth that complements the earthiness of the mushrooms.
- 4 cups Mushrooms (Cremini or Mixed), sliced: Cremini (aka baby bellas) are my go-to for their robust, meaty texture and deeper flavor compared to white buttons. Substitution Tip: Feel free to get fancy! A mix of shiitake, oyster, and cremini would be absolutely incredible.
- 3 Garlic Cloves, minced: The aromatic heart of the sauce. Please, use fresh garlic here—it makes a world of difference compared to the jarred stuff.
- 2 cups Heavy Cream: This is what creates that luscious, silky sauce we’re dreaming of. For a slightly lighter version, you can use half-and-half, but the sauce won’t be quite as thick.
- 1 cup Chicken or Vegetable Broth: This adds a layer of savory flavor and helps deglaze the pan, pulling up all those tasty browned bits from the mushrooms. Pro Tip: Using vegetable broth keeps this dish 100% vegetarian!
- 1/2 cup grated Parmesan Cheese: For salty, nutty, cheesy goodness. I always recommend grating your own from a block of Parmigiano-Reggiano—it melts so much better and doesn’t have the anti-caking agents found in the pre-shredded stuff.
- 1/2 teaspoon Dried Thyme or Italian Seasoning: A little herbal magic. Thyme and mushrooms are a match made in heaven. Chef’s Insight: If you have fresh thyme, even better! Use about 1 teaspoon of fresh leaves.
- Salt and Black Pepper, to taste: Your essential flavor finishers. Don’t be shy!
- Fresh Parsley or Chives, for garnish: A pop of color and fresh flavor to brighten up the rich dish right at the end.
- Optional: 1/4 teaspoon Truffle Oil: The ultimate luxury upgrade. A tiny drizzle at the end elevates the entire dish with an intoxicating, earthy aroma. A little goes a very long way!
Let’s Get Cooking: Your Path to Pasta Perfection
Ready to see some magic happen? This entire dish comes together in the time it takes to boil water. Follow these steps, and you’ll have a restaurant-quality meal on your table in no time.
- Cook the Ravioli: Bring a large pot of well-salted water to a rolling boil. Cook your ravioli according to the package directions. Chef’s Hack: Salt your pasta water until it tastes like the sea! This is your one chance to season the pasta itself from the inside out. Once cooked, drain the ravioli but DO NOT rinse them. That starchy coating helps the sauce cling to every nook and cranny. Set them aside for their saucy destiny.
- Sauté the Mushrooms: While the pasta water is heating up, place a large skillet over medium heat. Add the olive oil. Once the oil is shimmering, add your sliced mushrooms in a single layer if possible. Here’s the key: don’t crowd the pan! If you dump them all in, they’ll steam and get soggy. We want them to sear and develop a beautiful golden-brown color. Let them cook, without moving them too much, for about 5-7 minutes until they’ve released their water and started to brown. Then, give them a good stir and cook for another 3-5 minutes until they’re tender and deeply flavorful.
- Wake Up the Aromatics: Push the mushrooms to the side of the skillet. Add the minced garlic and dried thyme to the cleared space. This allows the garlic to toast gently and become fragrant without burning, which only takes about 60 seconds. You’ll know it’s ready when you get that incredible, mouth-watering smell. Now, mix the garlic and thyme into the mushrooms.
- Deglaze the Pan: Pour in the chicken or vegetable broth. As it hits the hot pan, use your spoon or spatula to scrape up all those delicious browned bits (the “fond”) from the bottom of the skillet. This is pure flavor gold! Let it simmer for 2-3 minutes, allowing the liquid to reduce slightly.
- Create the Creamy Dream: Now for the good stuff! Reduce the heat to medium-low and stir in the heavy cream and the grated Parmesan cheese. Keep stirring until the cheese has melted into the cream, creating a smooth, homogenous sauce. Let it simmer gently—don’t let it boil vigorously—for 5-7 minutes, until the sauce has thickened enough to coat the back of a spoon.
- The Grand Finale: Carefully add the cooked and drained ravioli to the skillet with the creamy mushroom sauce. Using a gentle folding motion, toss the ravioli until every single one is lovingly coated in that velvety sauce. Let them heat through for a minute. Taste the sauce! This is the most important step. Does it need more salt? A crack of black pepper? Adjust the seasoning now to your liking.
- Garnish and Serve: Take the skillet off the heat. If you’re using the truffle oil, drizzle it over the top now. Finish with a generous sprinkle of fresh parsley or chives for that beautiful, fresh finish.
How to Serve This Cozy Masterpiece
Presentation is part of the fun! I love serving this family-style, right out of the skillet I cooked it in—it feels rustic, welcoming, and means less cleanup. But if you’re plating individually, here’s how to make it look stunning:
Use a pair of tongs to gently place a serving of ravioli into a warm, shallow bowl. Spoon plenty of that extra creamy sauce and mushrooms over the top. Give it one last flourish of fresh herbs and maybe an extra light dusting of Parmesan. The goal is for every ravioli to be peeking out from a pool of that gorgeous sauce.
What to serve on the side? Keep it simple. A crisp, green salad with a sharp vinaigrette (like my Easy Lemon Vinaigrette) is the perfect counterpoint to the rich pasta. For a real treat, a slice of warm, crusty garlic bread is non-negotiable for sopping up every last drop of sauce. And let’s be real, a glass of chilled Pinot Grigio or a light-bodied red like Pinot Noir would be the perfect dining companion.
Make It Your Own: Delicious Twists & Swaps
One of my favorite things about cooking is making a recipe your own. This creamy mushroom ravioli is a fantastic canvas for your creativity! Here are a few of my favorite variations:
- Add a Protein Punch: For the meat-lovers, sauté some diced pancetta or bacon in the skillet before adding the mushrooms. Remove it, then cook the mushrooms in the rendered fat for an insane flavor boost. Stir the crispy bits back in at the end. Diced chicken breast or thighs would also be wonderful here—just cook them first, set them aside, and add them back with the ravioli.
- Go Green: Add a pop of color and nutrients by stirring in a couple of handfuls of fresh spinach or chopped kale right after you add the cream. It will wilt beautifully into the sauce.
- Sun-Dried Tomato Bliss: Chop up a quarter cup of oil-packed sun-dried tomatoes and add them along with the garlic. Their sweet, tangy flavor is a fantastic contrast to the earthy mushrooms.
- Lighter Cream Sauce: If you want to lighten things up a bit, you can substitute half or all of the heavy cream with full-fat coconut milk for a dairy-free version. The flavor will be different but still deliciously creamy.
- Herbaceous Lift: Stir in a tablespoon of prepared pesto at the very end, right before serving, for a bright, herby kick.
A Few More Thoughts From My Kitchen to Yours
This recipe has been a staple in my home for years, and it’s evolved in tiny ways. I used to be scared of crowding the mushrooms, so I’d cook them in two batches. Now, if I’m in a hurry, I just use my biggest skillet and make it work! I’ve also learned that the sauce continues to thicken as it sits, so if it seems a little thin right off the heat, give it a minute—it will likely be perfect by the time you get it to the table.
The funniest kitchen fail I’ve had with this dish was the time I was chatting with a friend and accidentally used a tablespoon of cinnamon instead of paprika I thought was in a similar jar. We had a good laugh, ordered pizza, and I now LABEL ALL MY SPICE JARS. A lesson learned the hard, but humorous, way!
Your Ravioli Questions, Answered!
I get a lot of questions about this recipe, so I’ve gathered the most common ones here to help you out.
Q: My sauce turned out too thin. How can I thicken it?
A: No worries, this happens! The easiest fix is to let it simmer for a few more minutes over low heat. The sauce will reduce and thicken naturally. If you’re really in a pinch, you can make a quick slurry by mixing 1 teaspoon of cornstarch with 1 tablespoon of cold water, then whisking it into the simmering sauce. It should thicken up within a minute.
Q: Can I make this ahead of time?
A> You can, but with a caveat. The sauce can be made 1-2 days ahead and stored in the fridge. I recommend cooking the ravioli fresh when you’re ready to serve, as they can become mushy when stored in the sauce. To reheat the sauce, do it gently in a saucepan over low heat, adding a splash of broth or cream to loosen it up.
Q: My ravioli are sticking together after I drained them. Help!
A> This is a common pasta problem! The best prevention is to make sure your pot of water is large enough and at a vigorous boil before adding the ravioli. After draining, toss them with a tiny bit of olive oil to create a protective coating. If they’ve already stuck, a very quick dip back into the hot water can help loosen them.
Q: Can I use frozen ravioli?
A> Absolutely! You don’t even need to thaw them. Just cook them directly from frozen, but they may need an extra minute or two in the boiling water. Just follow the package instructions for the best result.
Ravioli in Creamy Mushroom Sauce
Description
Imagine tender mushroom-stuffed ravioli bathed in a rich, velvety sauce made with sautéed mushrooms, garlic, broth, cream, and Parmesan. It’s elegant enough for date night but easy enough for a weeknight—ready in about 30 minutes.
Ingredients
Pasta:
-
2 lbs mushroom ravioli (or cheese ravioli if unavailable)
Sauce:
-
3 tbsp olive oil
-
4 cups sliced mushrooms (cremini or mixed)
-
3 garlic cloves, minced
-
2 cups heavy cream (or half-and-half for a lighter version)
-
1 cup chicken or vegetable broth
-
½ cup freshly grated Parmesan cheese
-
½ tsp dried thyme or Italian seasoning
-
Salt and freshly cracked black pepper, to taste
Garnish & Optional Luxury:
-
Fresh parsley or chives
-
¼ tsp truffle oil (optional, for an earthy aroma)
Instructions
-
Cook Ravioli: Bring a large pot of salted water to a boil. Cook ravioli according to package directions. Drain (do not rinse).
-
Sauté Mushrooms: Heat olive oil in a large skillet. Add mushrooms in a single layer, letting them brown without overcrowding, 5–7 min. Stir and cook another 3–5 min.
-
Add Aromatics: Push mushrooms aside, sauté garlic and thyme for 1 min, then mix into mushrooms.
-
Deglaze: Pour in broth and scrape up browned bits. Simmer 2–3 min.
-
Make Creamy Sauce: Lower heat, stir in cream and Parmesan. Simmer gently 5–7 min until thickened.
-
Combine Ravioli: Fold cooked ravioli into the sauce. Taste and adjust seasoning.
-
Garnish & Serve: Drizzle truffle oil if using. Sprinkle with parsley or chives. Serve family-style or plated with extra sauce.
Notes
-
Pair with a crisp salad or garlic bread.
-
A glass of Pinot Grigio or light Pinot Noir elevates the meal.
Nutrition
- Calories: 610 Cal Per Serving
- Fat: 38g
- Saturated Fat: 20g
- Carbohydrates: 44g
- Fiber: 3g
Nutritional Information*
Okay, let’s talk nutrition real quick. I’m all about balance, and while this is definitely a rich, indulgent dish, it’s also packed with real, whole-food ingredients. Here’s a rough breakdown per serving (remember, this is an estimate and can vary based on your specific ingredients):
- Calories: 610
- Fat: 38g
- Saturated Fat: 20g
- Carbohydrates: 44g
- Fiber: 3g
- Sugar: 4g
- Protein: 18g
- Sodium: 750mg
Mushrooms are a great source of B vitamins and antioxidants, and using a whole-wheat or high-fiber ravioli can boost the nutritional profile even more. This is a dish to be enjoyed soulfully, so savor every creamy, comforting bite!
*Please note: Nutritional information is provided as a courtesy and is an estimate only. We recommend using your preferred nutrition calculator for exact numbers based on the specific brands and quantities you use.
Final Thoughts & Happy Cooking!
And there you have it, my friends—my go-to recipe for the most decadent, satisfying, and surprisingly easy Ravioli in Creamy Mushroom Sauce. It’s a dish that proves you don’t need complicated techniques or a million ingredients to create something truly special in the kitchen. It’s about layering flavors, trusting
Creamy Tuscan Ravioli with Sun-Dried Tomatoes & Spinach
Your New Favorite Comfort Food is Here: Creamy Tuscan Ravioli
Hey friends, Beau here! Let’s get right to it: have you ever dreamed of a dinner that feels like a fancy restaurant splurge but comes together in your kitchen with less fuss than a box of mac and cheese? A dish so creamy, so packed with flavor, and so downright satisfying that it becomes an instant staple in your recipe rotation? Well, stop dreaming, because I’m about to hand you the keys to the kingdom with this Creamy Tuscan Ravioli.
Imagine this: plump, cheesy ravioli swimming in a velvety garlic cream sauce that’s rich without being overly heavy. We’re tossing in vibrant sun-dried tomatoes for a sweet, tangy punch, a mountain of fresh spinach for a pop of color and goodness, and just a whisper of red pepper flakes to give it a little secret kick. It’s the kind of meal that makes you feel like a total rockstar in the kitchen, even on a busy Tuesday night.
This recipe is my love letter to feel-good food that doesn’t take all day. It’s inspired by those incredibly popular “marry me” pasta flavors you’ve seen all over social media, but we’re giving it a Feastical twist with ravioli. Why? Because those little pasta pillows hold the cheesy filling and creamy sauce in every single bite, creating a perfect symphony of texture and taste. So, tie on your favorite apron, grab your biggest skillet, and let’s make some magic happen. Dinner is about to get a serious upgrade!
A Little Taste of Tuscany (From My Tiny Apartment Kitchen)
This recipe always takes me back to my first real, solo apartment. The kitchen was basically a closet with a stove, but it was all mine. I was determined to impress a date with a homemade meal that screamed “I have my life together,” but my budget and skills were, let’s say, modest. I had a package of cheese ravioli, some cream about to turn, and a jar of sun-dried tomatoes my mom had given me “for emergencies.”
I started throwing things together, praying it would work. The moment that cream hit the garlic and the sun-dried tomatoes started to sizzle, my entire apartment filled with this incredible, earthy, aromatic scent. It didn’t smell like a cramped kitchen; it smelled like a rustic Italian trattoria. The date was a success (the dish got more compliments than I did!), but more importantly, I learned a powerful lesson that night: the most memorable meals aren’t about fancy techniques or expensive ingredients. They’re about confidence, a little bit of love, and not being afraid to play with your food. This ravioli has been my go-to comfort dish ever since, and I’m so thrilled to finally share the official version with you.
Gathering Your Flavor All-Stars
Here’s your shopping list for this flavor fiesta! Don’t stress if you need to make a swap or two—I’ve included my favorite chef insights and substitutions right alongside each ingredient. Cooking is all about making it work for you!
- 2 lbs Fresh Cheese or Spinach-Filled Ravioli: The star of the show! I love using fresh ravioli from the refrigerated section for the best texture, but frozen works perfectly, too. The beauty of this dish is that the filling adds another layer of cheesy goodness. Feel free to use tortellini for a fun twist!
- 3 Tablespoons Butter: Our sauce base. It adds a rich, nutty foundation that olive oil just can’t replicate here. For a dairy-free version, a high-quality vegan butter works wonders.
- 4 Garlic Cloves, Minced: Fresh is best! The pungent, aromatic flavor of fresh garlic is non-negotiable for that authentic Tuscan vibe. No jarred stuff today, friends!
- 2 Cups Heavy Cream: This is what creates that luxurious, velvety sauce. For a lighter option, you can use half-and-half, but be aware the sauce will be a bit thinner. I don’t recommend milk, as it can curdle easily.
- 1 Cup Chicken Broth: This little secret weapon thins the cream just enough and adds a savory depth that balances the richness. Use vegetable broth to keep it vegetarian!
- 1 Cup Grated Parmesan Cheese: Please, please grab a wedge and grate it yourself! The pre-shredded stuff contains anti-caking agents that can make your sauce grainy. Freshly grated Parmesan melts into a silky dream.
- 1/2 Cup Sun-Dried Tomatoes, Chopped: I prefer the ones packed in oil for extra flavor, but dry-packed are great too—just give them a quick soak in hot water to plump them up. They bring a sweet, tangy, and intensely tomatoey punch.
- 4 Cups Fresh Spinach: It looks like a lot, but I promise it wilts down to nothing! It adds a beautiful color and a touch of earthy freshness. You can swap in kale, just remove the tough stems and cook it a minute longer.
- 1/4 Teaspoon Red Pepper Flakes (Optional): My favorite “chef’s choice” ingredient. It doesn’t make the dish spicy, just gives it a gentle, warm hum in the background that wakes up all the other flavors.
- 1/2 Teaspoon Italian Seasoning: A convenient blend of herbs like oregano, basil, and thyme. It’s a great flavor shortcut! If you don’t have any, a pinch of dried oregano and basil will do the trick.
- Salt and Freshly Cracked Black Pepper, to Taste: Season as you go! Taste your sauce at the end and adjust. The Parmesan is salty, so you may not need much extra salt.
- Fresh Basil or Parsley, for Garnish: The grand finale! A sprinkle of fresh green herbs adds a pop of color and a bright, fresh aroma that takes the dish to the next level.
Let’s Get Cooking: Your Step-by-Step Guide to Creamy Perfection
Ready to create some kitchen magic? Follow these steps, and you’ll have a restaurant-worthy dish on the table in no time. I’ve packed this section with all my favorite little hacks to ensure your success.
- Cook Your Ravioli: Bring a large pot of well-salted water to a rolling boil. Chef’s Hack: Salt your water until it tastes like the sea! This is your one and only chance to season the pasta itself. Cook the ravioli according to the package directions for *al dente*. They’ll spend a little more time in the sauce, so you don’t want them mushy. Drain them, but do NOT rinse. That starchy coating helps the sauce cling to every nook and cranny.
- Build Your Flavor Base: While the pasta cooks, place a large skillet over medium heat. Add the butter and let it melt and foam slightly. Toss in your minced garlic and sauté for just about 60 seconds until it’s incredibly fragrant. Watch it closely! Burnt garlic is bitter, and we want sweet, aromatic goodness.
- Wake Up the Tomatoes: Stir in your chopped sun-dried tomatoes and cook for another 1-2 minutes. You’ll see them glisten and smell their intense, concentrated flavor releasing into the butter. This simple step makes a world of difference.
- Create the Velvety Sauce: Now for the magic! Pour in the chicken broth and heavy cream. Add the Italian seasoning and those optional red pepper flakes. Give it a good stir and let it come to a gentle simmer. Let it bubble away for about 5 minutes, stirring occasionally. You’ll see it start to thicken slightly and reduce. This is where the flavors get to know each other.
- Bring in the Cheese: Reduce the heat to low. Now, gradually sprinkle in your freshly grated Parmesan cheese, stirring constantly. Pro Tip: Adding the cheese off the heat or on very low heat prevents it from seizing up and becoming stringy. You’re looking for a smooth, luscious, unified sauce.
- Wilt the Spinach: Add your massive pile of fresh spinach to the skillet. It might seem like it won’t all fit, but just use tongs to gently toss it into the warm sauce. In about 2 minutes, it will wilt down beautifully and turn a vibrant green.
- The Grand Finale: Carefully add your cooked and drained ravioli to the skillet. Gently fold them into the sauce, making sure each one gets lovingly coated. I like to use a rubber spatula or tongs to be gentle and avoid tearing the pasta.
- Taste and Shine: This is the most important step! Grab a spoon and taste your creation. Does it need a pinch more salt? A crack of black pepper? Adjust the seasoning to your liking. Then, transfer it to a serving dish and shower it with your fresh basil or parsley. You did it!
How to Serve This Stunning Dish
Presentation is part of the fun! You’ve made something beautiful, so let’s show it off. I love serving this family-style, right out of the skillet I cooked it in (it makes for fewer dishes and looks rustic and inviting). Place the skillet on a trivet in the middle of the table and watch everyone’s eyes light up.
For a more plated look, use a pair of tongs to place a generous portion in the center of a shallow bowl. Twist the ravioli a little as you lift for a elegant look. Ladle extra sauce over the top and don’t be shy with that fresh herb garnish. A little extra sprinkle of Parmesan on top never hurt anybody, either!
What to serve with it? A simple, crisp green salad with a sharp vinaigrette is the perfect partner to cut through the richness of the pasta. For a real treat, a slice of warm, crusty garlic bread is essential for sopping up every last drop of that incredible sauce. Trust me, you won’t want to leave a single bit behind.
Make It Your Own: Delicious Recipe Variations
One of the best things about this recipe is its flexibility. Feel like switching it up? Here are a few of my favorite twists:
- Protein Power-Up: Add some grilled chicken breast slices, sautéed shrimp, or even Italian sausage crumbles for a heartier meal. Just cook your protein first in the skillet, set it aside, and add it back in when you toss the ravioli with the sauce.
- Mushroom Lover’s Dream: Sauté a cup of sliced cremini or baby bella mushrooms with the garlic. They add a wonderful, earthy, umami flavor that pairs beautifully with the sun-dried tomatoes.
- Lighter & Brighter: Swap the heavy cream for full-fat coconut milk for a dairy-free version that’s surprisingly delicious and has a subtle tropical note. You’ll also want to use nutritional yeast or a vegan Parmesan in place of the cheese.
- Go Green: Feel free to mix up the greens! A handful of arugula wilts down quickly and adds a lovely peppery note. Just stir it in at the very end.
- Sun-Dried Tomato Pesto Swirl: For an extra flavor bomb, stir in a tablespoon of sun-dried tomato pesto along with the cream and broth. It intensifies the tomato flavor and adds even more herbaceous depth.
Beau’s Chef Notes & Kitchen Confessions
This recipe has been a work in progress since that fateful date night in my tiny apartment. I’ve learned a thing or two along the way! Originally, I just used cream and cheese, but adding the chicken broth was a game-changer—it lifted the whole dish and kept it from feeling too heavy.
One time, I was filming a video for the blog and got so caught up in chatting that I completely forgot the ravioli boiling on the stove. Let’s just say we had Creamy Tuscan Ravioli *Soup* that night. It was still delicious, but a great reminder that timing is everything! The moral of the story? Don’t be afraid of a little mishap. Good ingredients and a good attitude can save almost anything.
Your Questions, Answered!
I’ve seen a lot of comments and questions on my other pasta recipes, so I’ve gathered the most common ones here to help you out.
Q: My sauce turned out a bit grainy. What happened?
A: This is almost always the cheese! Pre-shredded bagged Parmesan contains cellulose to prevent clumping, and it doesn’t melt smoothly. For a perfectly silky sauce, always grate your Parmesan fresh from a block. Also, make sure your heat is on low when you add it.
Q: Can I make this ahead of time?
A: You can, but with a caveat. The sauce can be made 1-2 days ahead and stored separately. Reheat it gently on the stove, adding a splash of broth or cream to loosen it up. I highly recommend cooking the ravioli fresh and combining them just before serving, as the pasta can absorb the sauce and become soft if stored together.
Q: My sauce is too thin! How can I thicken it?
A> No worries! Let it simmer for a few more minutes to reduce further. If you’re still in a pinch, make a quick slurry by mixing 1 teaspoon of cornstarch with 1 tablespoon of cold water. Whisk it into the simmering sauce, and it should thicken up in a minute or two.
Q: Is it freezer-friendly?
A> I don’t recommend freezing this one. Cream-based sauces tend to separate and become watery when thawed. It’s best enjoyed fresh or stored in the fridge for up to 3 days.
Creamy Tuscan Ravioli with Sun-Dried Tomatoes & Spinach
Description
Hey friends! Imagine plump cheese-filled ravioli swimming in a velvety garlic cream sauce, studded with sun-dried tomatoes, fresh spinach, and just a hint of red pepper flakes. This dish is indulgent, comforting, and surprisingly easy to make—perfect for a weeknight dinner or a special treat!
Ingredients
Pasta & Protein:
-
2 lbs fresh cheese or spinach-filled ravioli (or tortellini for a twist)
Sauce:
-
3 tbsp butter
-
4 garlic cloves, minced
-
2 cups heavy cream (or half-and-half for a lighter option)
-
1 cup chicken broth (or vegetable broth for vegetarian)
-
1 cup freshly grated Parmesan cheese
-
½ cup sun-dried tomatoes, chopped (oil-packed or rehydrated)
-
4 cups fresh spinach (or kale/arugula)
-
¼ tsp red pepper flakes (optional)
-
½ tsp Italian seasoning
-
Salt and freshly cracked black pepper, to taste
Garnish:
-
Fresh basil or parsley
-
Extra Parmesan (optional)
Instructions
-
Cook the Ravioli: Bring a large pot of salted water to a boil. Cook ravioli according to package instructions until al dente. Drain, but do not rinse—starch helps the sauce cling.
-
Build the Sauce: In a large skillet over medium heat, melt butter. Add garlic and sauté for 1 minute until fragrant. Stir in sun-dried tomatoes for 1–2 minutes.
-
Add Cream & Broth: Pour in heavy cream and chicken broth. Stir in Italian seasoning and red pepper flakes. Simmer gently for 5 minutes until slightly thickened.
-
Incorporate Cheese: Lower heat and gradually whisk in Parmesan until smooth. Avoid high heat to prevent the cheese from seizing.
-
Wilt the Greens: Add spinach to the sauce, tossing until wilted and vibrant green (about 2 minutes).
-
Combine with Ravioli: Gently fold the cooked ravioli into the sauce, ensuring each piece is coated. Taste and adjust seasoning with salt and pepper.
-
Serve & Garnish: Plate the ravioli in bowls or serve family-style. Sprinkle with fresh basil or parsley and extra Parmesan.
Notes
-
Protein Boost: Add cooked chicken, shrimp, or Italian sausage.
-
Mushroom Lover: Sauté mushrooms with garlic before adding tomatoes.
-
Dairy-Free: Swap cream for coconut milk and Parmesan for nutritional yeast or vegan Parmesan.
-
Extra Flavor: Stir in sun-dried tomato pesto with the cream for an herbaceous punch.
Nutrition
- Calories: 640 Cal Per Serving
- Sodium: 780mg
- Fat: 42g
- Carbohydrates: 42g
- Protein: 20g
Nutritional Information (For Your Info!)
Hey, I’m all about balance! This is a rich, indulgent dish, and it’s okay to enjoy that fully. But I also believe in being informed. Here’s a rough breakdown per serving (remember, this is an estimate and can vary based on your specific ingredients):
Calories: 640 | Fat: 42g | Saturated Fat: 22g | Carbohydrates: 42g | Fiber: 4g | Sugar: 5g | Protein: 20g | Sodium: 780mg
To lighten it up, you can try using half-and-half, increasing the spinach, and opting for a whole-wheat ravioli. But sometimes, your soul needs a creamy, cheesy hug in a bowl, and that’s more than okay. Listen to your cravings!
Final Thoughts from My Kitchen to Yours
And there you have it, my friends—my all-time favorite Creamy Tuscan Ravioli. This dish is more than just a recipe; it’s a reminder that incredible food doesn’t have to be complicated. It’s about the joy of creating something with your own two hands that brings people together around the table.
I hope this recipe becomes a trusted friend in your kitchen, just like it has in mine. It’s perfect for a cozy date night, a surefire way to impress guests, or just a fantastic way to treat yourself after a long day. You deserve it.
Did you make it? Did you add your own twist? I’d love to hear all about it! Tag me on social @Feastical or drop a comment on the blog. Seeing your creations absolutely makes my day.
Until next time, keep your spatula close and your passion for food closer.
– Beau

Valentine Spritz Cookies : Buttery Heart Cookies with Sparkling Sugar & Chocolate Drizzle
Valentine Spritz Cookies: Buttery Hearts of Joy
Hey there, friend! Beau here, welcoming you back to my kitchen. Is there anything better than the smell of butter and sugar toasting together in the oven? It’s the universal scent of happiness, if you ask me. And when Valentine’s Day rolls around, I believe that happiness deserves to be shaped into something extra special.
That’s why I’m so excited to share my all-time favorite recipe for Valentine Spritz Cookies with you today. These aren’t just any cookies; they’re little, tender, melt-in-your-mouth bites of pure, buttery joy. We’re pressing them into adorable heart shapes, showering them with sparkling sugar that catches the light, and finishing them with a luxurious drizzle of chocolate. They’re elegant enough to make you feel like a pastry pro, but I promise you, they are wonderfully simple to make.
Whether you’re whipping up a batch for your sweetheart, your kids’ classroom party, or just because you deserve a pretty treat, these cookies are the answer. They’re the edible equivalent of a warm hug, and they have this magical way of making any day feel a little more celebratory. So, grab your cookie press, and let’s create some kitchen magic together!
A Love Story, Started by a Cookie Press
My love affair with spritz cookies started not in a fancy culinary school, but in my Nana’s warm, always-flour-dusted kitchen. She had this old, heavy metal cookie press that looked like it had seen a hundred Christmases. To me, it was a magical machine. I’d stand on a step-stool, watching in awe as she’d fill the tube, twist the handle, and—*poof*—a perfect little tree or wreath would appear on the baking sheet. It felt like edible witchcraft.
One Valentine’s Day, she let me take the reins. I remember my small, chubby hands struggling to hold the press steady. My first few attempts were… abstract, to say the least. Blobby hearts, misshapen stars. But Nana just smiled, sprinkled on the red sugar, and said, “Beau, darling, it’s not about perfection. It’s about the love you press into it.” When those slightly lopsided, glittering hearts came out of the oven, I felt a pride I’d never known. We boxed them up in a old shoebox lined with wax paper and delivered them to the neighbors. That day, I learned that the best recipes are the ones that come with a story and a whole lot of heart.
Gathering Your Cookie Crew: The Ingredients
This is a simple, classic recipe, but each ingredient plays a starring role. Here’s everything you’ll need to create these buttery masterpieces.
- 3 cups (6 sticks) Butter, softened: This is the soul of the spritz cookie. We use a generous amount for that signature rich, tender crumb that literally melts in your mouth. Chef’s Insight: True “softened” butter should yield slightly to pressure but still hold its shape. Don’t let it get oily or melted, or your cookies will spread too much.
- 2 cups Granulated Sugar: Sweetens the deal and helps create a light texture when creamed with the butter.
- 2 large Eggs: Our binding agents, giving the dough structure and a lovely richness.
- 4 tbsp Milk: A splash of milk adds moisture and helps bring the dough together into a pliable, press-able consistency.
- 2 tsp Vanilla Extract: The classic flavor enhancer. Use the good stuff—it makes a difference!
- 1 tsp Almond Extract: This is my secret weapon! It adds a subtle, sophisticated nuttiness that makes people say, “Wow, what is that amazing flavor?” Substitution Tip: If you’re not an almond fan, you can use an extra teaspoon of vanilla or try a bit of lemon extract for a bright twist.
- 7 cups All-Purpose Flour: The backbone of our cookie. It gives the dough the perfect structure for pressing. Chef’s Hack: For a foolproof measurement, fluff your flour with a spoon, spoon it into your measuring cup, and level it off. No packed flour here!
- 2 tsp Baking Powder: Our little leavening friend that gives the cookies a slight lift, keeping them tender instead of dense.
For the Festive Decorations:
- Sparkling Sugars (red, pink, white): This is where the magic happens! Sparkling sugar (or sanding sugar) has larger crystals that won’t melt in the oven, giving your cookies that gorgeous, shimmery finish.
- 1 cup Semi-Sweet or Milk Chocolate Chips: For that luxurious drizzle. I love the contrast of semi-sweet against the sweet cookie, but milk chocolate is a dreamy, classic choice.
- 2 tsp Canola Oil or Shortening: A tiny bit mixed with the chocolate helps it thin out to a perfect drizzling consistency. It prevents the chocolate from seizing up and sets with a beautiful sheen.
- Optional Garnishes: Get creative! Crushed freeze-dried strawberries add a tart pop and pretty pink color. Edible gold flakes make them utterly luxurious. A sprinkle of flaky sea salt? Divine.
Let’s Get Pressing: The Step-by-Step Guide
Ready to make some cookie magic? Follow these steps, and you’ll be a spritz superstar in no time. I’ve packed this section with all my favorite chef hacks to ensure your success!
- Preheat and Prep. Fire up your oven to 375°F (190°C). This is a crucial first step because spritz dough works best when it goes onto a hot baking sheet. Chef’s Hack: I don’t grease my baking sheets. The small amount of butter in the dough is usually enough to prevent sticking, and greasing can cause the cookies to spread and lose their defined shape.
- Cream the Butter and Sugar. In a large bowl, beat the softened butter and granulated sugar together on medium-high speed. We’re not just mixing here; we’re “creaming.” Beat for a good 2-3 minutes until the mixture is pale, fluffy, and light. This step incorporates air, which is key for a delicate texture. Chef’s Insight: You’ll know it’s ready when it looks almost like a light, whipped frosting.
- Incorporate the Wet Team. Beat in the eggs, one at a time, letting each one fully incorporate before adding the next. Then, mix in the milk, vanilla, and that magical almond extract. Scrape down the sides of the bowl to make sure everything is homogenous.
- Welcome the Dry Ingredients. In a separate bowl, whisk together the flour and baking powder. This ensures the baking powder is evenly distributed. Now, with your mixer on low speed, gradually add the flour mixture to the wet ingredients. Chef’s Pro-Tip: Mix *just* until the dough comes together and no dry streaks of flour remain. Overmixing can lead to tough cookies, and we want tender!
- Press with Passion! Load your cookie press according to the manufacturer’s instructions. Fit it with the heart-shaped disk. Now, press the cookies directly onto your cool, ungreased baking sheets. Chef’s Hack: If the dough is too soft and won’t press nicely, pop the loaded press in the fridge for 10-15 minutes. If it’s too stiff and crumbly, let it warm up a tad or knead in a teaspoon of milk.
- Sparkle Time. Before baking, generously sprinkle the cookies with your sparkling sugars. This is the time to do it, so the sugar adheres and bakes on.
- Bake to Perfection. Slide the sheets into your preheated oven and bake for 7-9 minutes. We’re looking for the very edges to just barely start turning a light golden brown. The tops should still look pale. Do not overbake! They continue to cook on the hot pan. Let them cool on the baking sheet for exactly 2 minutes before transferring them to a wire rack to cool completely.
- The Chocolate Finale. Once the cookies are completely cool, melt your chocolate chips with the oil in a microwave-safe bowl. Do this in 20-second bursts, stirring well between each, until smooth. Transfer to a small zip-top bag, snip a tiny corner, and drizzle away! Or, dip half of each heart for a classic look. Add any extra garnishes while the chocolate is still wet.
Sharing the Love: How to Serve These Beauties
Presentation is part of the fun! These cookies are almost too pretty to eat… almost. Here’s how I love to serve them up.
For a simple, elegant touch, arrange them on a beautiful cake stand or a rustic wooden board. The varying colors of sugar and the artistic chocolate drizzles create a stunning visual. They’re the star of any dessert table.
My absolute favorite way to share them is by gifting them. Find a cute cellophane bag, tie it with a satin ribbon, and you have a homemade gift that speaks volumes. Or, layer them in a festive box or tin between sheets of parchment paper. They ship surprisingly well (just make sure the chocolate is fully set) and are a wonderful way to send a taste of home to a loved one far away.
And let’s not forget the kids! Pile these heart cookies onto a plate with a big glass of cold milk for an after-school surprise that will absolutely make their day.
Mix It Up! Fun Recipe Variations
Once you’ve mastered the classic, feel free to get playful! Here are a few of my favorite twists on this versatile recipe.
- Chocolate-Hazelnut Dream: Replace 1 cup of the flour with 3/4 cup unsweetened cocoa powder and use 1 teaspoon of hazelnut extract instead of almond. Drizzle with melted white chocolate for a stunning contrast.
- Lemon-Raspberry Bliss: Omit the almond extract and use 2 teaspoons of lemon zest and 1 teaspoon of lemon extract. After pressing, place a single dried raspberry in the center of each heart before baking.
- Funfetti Valentine: Fold in 1/2 cup of Valentine-colored sprinkles or jimmies into the dough along with the flour. It’s a confetti party in every bite!
- Gluten-Free Swap: You can successfully make these with a 1:1 gluten-free all-purpose flour blend. Just ensure your blend contains xanthan gum for binding.
- “Red Velvet” Spritz: Add 2 tablespoons of red food gel (for a vibrant color) and 1 tablespoon of unsweetened cocoa powder to the wet ingredients. The flavor is subtle and oh-so-pretty.
Beau’s Kitchen Chronicles: A Few Parting Thoughts
This recipe has been a labor of love over the years. I’ve learned that the dough has a personality—sometimes it’s a little stubborn in the press on a humid day, and sometimes it’s perfectly compliant. The key is to not get frustrated. If a batch doesn’t turn out picture-perfect, I promise they will still taste incredible. Crumble them over ice cream! My Nana’s wisdom holds true: it’s always about the love, not the perfection. I once made a batch where I accidentally used salted butter and forgot to add the extra salt. They were a bit one-dimensional, but my friends still devoured them. It’s all part of the delicious journey.
Your Questions, Answered!
I’ve gotten a lot of questions about spritz cookies over the years. Here are the answers to the most common ones.
Q: My dough won’t press out of the cookie press! What am I doing wrong?
A: This is the #1 question! Usually, the dough is too warm. Spritz dough needs to be cool and firm to hold its shape. Pop the loaded press in the fridge for 10-15 minutes. Conversely, if it’s crumbly, it might be too cold or have a bit too much flour. Let it warm up slightly or knead in a teaspoon of milk.
Q: Why did my cookies spread and lose their shape?
A: This can happen for a few reasons: 1) Your butter was too soft or melted. 2) You over-mixed the dough after adding the flour. 3) Your baking sheets were greased or warm when you pressed the dough. Always use cool, ungreased sheets.
Q: Can I make the dough ahead of time?
A: Absolutely! You can wrap the dough tightly in plastic wrap and refrigerate it for up to 3 days. Let it sit at room temperature until it’s pliable enough to press. You can also freeze the dough log for up to 3 months.
Q: My cookies are too hard. What happened?
A: The most likely culprit is overbaking. Remember, we want just a hint of gold on the very edges. They firm up as they cool. Also, double-check your flour measurement—too much flour can make them dry and crumbly.

Valentine Spritz Cookies : Buttery Heart Cookies with Sparkling Sugar & Chocolate Drizzle
Description
Hey there! Nothing says love like the sweet, buttery aroma of cookies fresh from the oven. These Valentine Spritz Cookies are tender, melt-in-your-mouth bites pressed into adorable heart shapes, topped with sparkling sugar, and finished with a chocolate drizzle. Perfect for gifting, sharing, or treating yourself!
Ingredients
For the Cookies:
-
3 cups (6 sticks) unsalted butter, softened
-
2 cups granulated sugar
-
2 large eggs
-
4 tbsp milk
-
2 tsp vanilla extract
-
1 tsp almond extract
-
7 cups all-purpose flour
-
2 tsp baking powder
For Decoration:
-
Sparkling sugar (red, pink, white)
-
1 cup semi-sweet or milk chocolate chips
-
2 tsp canola oil or shortening
-
Optional: crushed freeze-dried strawberries, edible gold flakes, or flaky sea salt
Instructions
-
Preheat Oven & Prep: Preheat oven to 375°F (190°C). Use cool, ungreased baking sheets for best results.
-
Cream Butter & Sugar: Beat butter and sugar until pale and fluffy, 2–3 minutes.
-
Add Wet Ingredients: Beat in eggs one at a time, then add milk, vanilla, and almond extract. Scrape down sides.
-
Incorporate Dry Ingredients: Whisk flour and baking powder, then mix into wet ingredients on low speed until just combined.
-
Press the Cookies: Fit cookie press with heart-shaped disk. Press cookies onto baking sheets. If dough is too soft, chill 10–15 minutes; if crumbly, let it warm slightly.
-
Decorate & Bake: Sprinkle sparkling sugar on cookies and bake 7–9 minutes until edges are lightly golden. Cool 2 minutes on sheet, then transfer to a wire rack.
-
Chocolate Drizzle: Melt chocolate with oil in short microwave bursts. Drizzle over cooled cookies or dip halves. Add optional garnishes before chocolate sets.
Notes
-
Butter Matters: Softened, not melted butter keeps shapes intact.
-
Mix Gently: Overmixing after flour can make cookies tough.
-
Make Ahead: Dough can be refrigerated up to 3 days or frozen up to 3 months.
-
Prevent Spreading: Use cool, ungreased sheets; avoid over-soft butter.
Nutrition
- Calories: 210 Cal Per Serving
- Sugar: 11g
- Fat: 12g
- Carbohydrates: 23g
- Protein: 2g
Nutritional Nibble
Let’s be real, we’re here for a buttery, celebratory treat! But I believe in transparency. Here’s a general breakdown per 3 cookies (because who can stop at one?).
Calories: ~210 | Sugar: 11g | Fat: 12g | Carbs: 23g | Protein: 2g
These are a treat, and they’re meant to be enjoyed as such! The joy and connection they bring are just as important as the ingredients. Savor them mindfully, share them generously, and enjoy every delicious bite.
Final Thoughts from My Kitchen to Yours
Well, friend, we’ve done it! We’ve taken simple, beautiful ingredients and transformed them into edible tokens of affection. I hope this recipe brings as much laughter and light into your kitchen as it has into mine over the years.
Remember, the true secret ingredient in these Valentine Spritz Cookies is the fun you have making them. So put on some good music, maybe pour yourself a little coffee, and enjoy the process. Don’t stress over a lopsided heart or a broken cookie—those are often the tastiest ones, anyway.
I’d love to see your creations! Tag me @FeasticalBeau on social media so I can share in your baking joy. From my heart to yours, happy baking!
With love and a full cookie jar,
Beau