
Zesty Lemon Barbecued Shrimp Skewers : Bright, Bold, and Grilled to Perfection
Sunshine on a Skewer: Your New Go-To Grilling Recipe
Hey, friends! Beau here, welcoming you back to Feastical. Is there anything better than that first perfect grill session of the season? The smell of charcoal (or gas, no judgment here!), the sound of a cold drink can cracking open, and the anticipation of something seriously delicious hitting those hot grates. It’s pure magic. But sometimes, we get stuck in a burger-and-dog rut, and our taste buds start begging for something new.
Well, get ready to make them very, very happy. Today, we’re diving fork-first into my Zesty Lemon Barbecued Shrimp Skewers. This isn’t your heavy, smothered-in-sweet-sauce barbecue. Oh no. This is something brighter, bolder, and infinitely more vibrant. We’re talking plump, juicy shrimp, kissed by fire and cloaked in a tangy, slightly sweet, and utterly addictive lemon-based marinade that will have you licking your fingers shamelessly.
These skewers are my secret weapon. They come together in a flash, cook in minutes, and have this incredible ability to turn a simple Tuesday dinner into a mini-celebration or make you the undisputed star of any backyard potluck. They’re healthy, packed with protein, and feel incredibly fancy without any of the fuss. So, grab your apron, your favorite tongs, and let’s fire up some flavor together. You’re about to fall in love with grilling all over again.
A Coastal Memory That Stuck
This recipe always takes me right back to a rickety wooden dock on the Gulf Coast. I was about ten years old, visiting my grandparents, and my grandpa—a man of few words but immense culinary wisdom—decided it was time I learned to grill. We had just caught a bucket of shrimp, and instead of his usual butter-and-garlic treatment, he whipped up this zesty, ketchup-based concoction that had me skeptical. “Trust the process, Beau,” he’d say.
As those shrimp hit the old, rusty grill, the sizzle was a symphony. The tangy, lemony aroma mixed with the salty sea air is a scent memory burned into my brain. That first bite was a revelation—smoky, bright, and so different from anything I’d had. It taught me that barbecue isn’t just one flavor; it’s a feeling. It’s about creating joy around fire and food. Every time I make these skewers, I get a little taste of that sunny afternoon and my grandpa’s simple, brilliant cooking. It’s a feeling I’m so excited to share with you.
Gathering Your Flavor All-Stars
This recipe is all about the harmony of a few simple ingredients. Here’s what you’ll need to create this citrusy masterpiece. Don’t stress if you’re missing an item or two—I’ve got your back with some easy swaps!
For the Marinade:
- 1/4 cup ketchup: This is our sweet, tangy base. It gives the sauce body and that classic “barbecue” vibe without being overpowering. If you’re not a ketchup fan, tomato paste thinned with a tablespoon of water and a pinch of sugar works great.
- 3 scallions, thinly sliced: They add a mild, fresh oniony bite. The green parts give a gorgeous pop of color, too!
- 3 tablespoons lemon juice: Freshly squeezed is always best for that vibrant, sunny zing! It tenderizes the shrimp and balances the sweetness. In a pinch, bottled lemon juice will do the job.
- 1 tablespoon honey: A touch of natural sweetness to caramelize on the grill. Maple syrup or agave nectar are perfect vegan-friendly substitutes.
- 1 tablespoon apple cider vinegar: This adds another layer of tang and acidity that makes the flavors pop. White wine vinegar or even a squeeze of extra lemon juice can stand in.
- 1 tablespoon Worcestershire sauce: The secret umami bomb! It adds a deep, savory complexity. For a gluten-free or vegetarian version, use tamari or coconut aminos.
- 1 teaspoon sesame seeds: A tiny addition that brings a subtle nutty flavor and a nice little crunch.
- 1/4 teaspoon allspice: Don’t skip this! It adds a warm, slightly peppery depth that makes the sauce truly special. A tiny pinch of cloves or nutmeg can mimic some of that warmth.
- 1/2 teaspoon salt & 1/2 teaspoon black pepper: The essential flavor enhancers. Season with confidence!
For the Skewers:
- 2 pounds extra-large shrimp (16–20 count): I recommend peeled and deveined with the tails ON. The tails make for a beautiful presentation and a perfect little handle for eating. Trust me on this one.
- 12-inch wooden skewers: Crucial step alert! Soak these in water for at least 30 minutes before grilling. This prevents them from turning into kindling on your grill!
- Lemon wedges, for serving: Because an extra squeeze of fresh lemon right before you eat is a non-negotiable game-changer.
Let’s Get Grilling: Your Foolproof Guide
Ready to create some magic? Follow these steps, and you’ll have perfect, restaurant-quality shrimp skewers right in your own backyard. I’m walking you through every step with my favorite chef hacks to ensure success.
- Make the Flavor Potion. In a medium-sized mixing bowl, combine all of your marinade ingredients: the ketchup, scallions, lemon juice, honey, apple cider vinegar, Worcestershire sauce, sesame seeds, allspice, salt, and pepper. Grab a whisk and go to town until everything is beautifully blended and smooth. Give it a little taste—isn’t that bright and exciting? Chef’s Hack: Whisking vigorously not only mixes everything but also helps emulsify the ingredients, creating a smoother sauce that will cling to your shrimp better.
- Marinate with Love. Now, introduce your beautiful shrimp to the marinade. Dump them right into the bowl and use your hands or a spoon to toss them gently, making sure every single shrimp gets coated in that zesty goodness. Cover the bowl with plastic wrap and let it hang out in the fridge. 30 to 60 minutes is the sweet spot. Chef’s Warning: Don’t marinate for much longer than an hour! The acid in the lemon juice will start to “cook” the shrimp, giving them a weird, rubbery texture. We want them tender and perfect for the grill!
- Fire Up the Grill. While the shrimp are getting happy, preheat your grill to a solid medium-high heat. You want those grates nice and hot so we get a gorgeous sear and those classic grill marks. Aim for about 400-450°F (200-230°C). Chef’s Hack: If you’re using a gas grill, close the lid to let it heat up quickly. For charcoal, wait until the coals are covered in white-gray ash and glowing red.
- Skewer Like a Pro. Time for the most satisfying part! Pull your soaked skewers out of the water. Take each marinated shrimp and thread it onto a skewer, piercing through the tail and the thicker head end. I like to put 4-5 shrimp on each skewer, leaving a little space between them so the heat can circulate and cook them evenly. Chef’s Tip: If you crowd them, they’ll steam instead of grill. A little breathing room is the key to that perfect char.
- The Main Event: Grill Time! Place your shrimp skewers directly on the hot grill grates. Now, here’s the crucial part: shrimp cook FAST. Set a timer for 2 to 3 minutes on the first side. You’ll see them start to turn pink and opaque from the bottom up. Flip them once and grill for another 2 to 3 minutes on the other side. They’re done when they’re completely pink, firm to the touch, and have a few beautiful, slightly charred spots. Chef’s Mantra: “Pink and opaque, don’t overcook!” The second they curl into a tight “C” shape, they’re ready to come off. An “O” shape means they’re overdone and chewy.
- Serve Immediately! The final, most important step. Get those gorgeous skewers off the grill and onto a platter. Serve them up right away with plenty of fresh lemon wedges on the side. Food this good shouldn’t wait!
How to Serve These Sunshine Skewers
Presentation is part of the fun! I love piling these skewers high on a big, rustic wooden board or a bright, colorful platter. Scatter some extra lemon wedges and maybe a few spare slices of scallion over the top for a pop of green. It looks abundant, inviting, and seriously impressive.
Now, what to serve *with* them? The possibilities are endless! For a light, summery meal, these skewers are incredible on a bed of fluffy quinoa or coconut rice, with a simple arugula salad on the side. For a classic backyard BBQ spread, pair them with grilled corn on the cob, a tangy potato salad, or my famous No-Fuss Creamy Coleslaw. You can even slide the grilled shrimp off the skewers and into warm tortillas for the most incredible shrimp tacos—just add some slaw and a drizzle of hot sauce. However you plate them, you’re in for a treat.
Make It Your Own: Fun Flavor Twists
One of the best things about this recipe is its flexibility. Feel like shaking things up? Here are a few of my favorite riffs on this classic:
- Spicy Cajun Kick: Add 1 teaspoon of smoked paprika and 1/2 teaspoon of cayenne pepper (or your favorite Cajun seasoning blend) to the marinade. The smokiness and heat pair perfectly with the lemon.
- Garlic Lover’s Dream: Mince 3-4 cloves of fresh garlic and whisk them right into the marinade. Because let’s be real, garlic makes everything better.
- Herbaceous & Fresh: Stir in 2 tablespoons of freshly chopped herbs like parsley, cilantro, or dill into the marinade right before you add the shrimp. The fresh herbs will brighten the flavor profile even more.
- Pineapple Paradise: Add chunks of fresh pineapple or bell peppers between the shrimp on the skewers. They grill up beautifully and add a wonderful sweet and smoky element.
- No-Grill? No Problem! You can absolutely cook these under your oven’s broiler! Just place the skewers on a baking sheet lined with foil and broil for 2-3 minutes per side, watching carefully so they don’t burn.
Beau’s Back-Pocket Tips & Stories
This recipe has been a part of my life for so long, it’s evolved in some funny ways. I once, in a frantic pre-party rush, forgot to soak the skewers. The result? Flaming shrimp sabers that had my guests both alarmed and highly entertained. We ended up rescuing the shrimp and finishing them in a cast-iron skillet on the grill—crisis averted, and a new “pan-seared” variation was born! The lesson? Don’t panic. Cooking is an adventure, and sometimes the “mistakes” lead to delicious discoveries.
Over the years, I’ve learned that the quality of the shrimp really matters. If you can find wild-caught shrimp, they often have a better texture and more flavor. But frozen shrimp are a fantastic and affordable option—just be sure to thaw them completely in the fridge overnight before marinating. This recipe is a testament to the fact that the best food doesn’t have to be complicated; it just has to be made with love and a little bit of zesty enthusiasm.
Your Questions, Answered!
I get a lot of questions about grilling shrimp, so let’s tackle the most common ones head-on.
Q: My shrimp always stick to the grill! What am I doing wrong?
A: Great question! Sticking is usually a heat or cleanliness issue. First, make sure your grill grates are screaming hot and clean. I like to brush them thoroughly, then dip a folded paper towel in oil, grab it with tongs, and wipe the grates right before adding the food. Also, don’t move the shrimp too soon! Let them sear for a full 2 minutes before you try to flip them; they’ll release naturally when they’re ready.
Q: Can I make these shrimp ahead of time?
A: You can definitely get a head start! You can whip up the marinade and thread the shrimp onto the skewers a few hours ahead. Keep them separate in the fridge, and only pour the marinade over the shrimp about 30-60 minutes before grilling. This prevents the shrimp from getting mushy. I don’t recommend grilling them too far in advance, as they are truly best served hot off the grill.
Q: Help! I overcooked my shrimp. Are they salvageable?
A: We’ve all been there! Overcooked shrimp become tough and rubbery. While you can’t truly “un-cook” them, you can chop them up and give them a new life! Toss them into a pasta salad, fold them into a creamy risotto, or use them as a topping for a leafy green salad. The other ingredients and dressings will help mask the texture a bit.
Q: Is there a way to make this recipe gluten-free?
A> Absolutely! Just double-check your Worcestershire sauce, as some brands contain gluten. Simply swap it for a gluten-free tamari or coconut aminos, and you’re all set for a delicious, gluten-free meal.

Zesty Lemon Barbecued Shrimp Skewers : Bright, Bold, and Grilled to Perfection
Description
This recipe is all about the harmony of a few simple ingredients. Here’s what you’ll need to create this citrusy masterpiece. Don’t stress if you’re missing an item or two—I’ve got your back with some easy swaps!
Ingredients
For the Marinade
-
¼ cup ketchup
-
3 scallions, thinly sliced
-
3 tbsp fresh lemon juice
-
1 tbsp honey (or maple syrup/agave)
-
1 tbsp apple cider vinegar
-
1 tbsp Worcestershire sauce (or tamari for gluten-free)
-
1 tsp sesame seeds
-
¼ tsp allspice
-
½ tsp salt
-
½ tsp black pepper
For the Skewers
-
2 lbs extra-large shrimp (16–20 count), peeled and deveined (tails on)
-
12-inch wooden skewers, soaked in water for 30 minutes
-
Lemon wedges, for serving
Instructions
In a medium bowl, whisk together ketchup, scallions, lemon juice, honey, vinegar, Worcestershire sauce, sesame seeds, allspice, salt, and pepper until smooth and emulsified. Taste and adjust seasoning.
Add shrimp to the bowl and toss to coat evenly. Cover and refrigerate for 30–60 minutes (no longer, or the acid will start “cooking” the shrimp).
Heat grill to medium-high (400–450°F / 200–230°C). Brush and oil grates well to prevent sticking.
Thread shrimp onto soaked skewers, piercing once through the tail and once through the head end. Place 4–5 shrimp per skewer, leaving small gaps between them for even cooking.
Grill shrimp for 2–3 minutes per side, turning once, until pink, firm, and lightly charred in spots. Do not overcook — remove as soon as they curl into a loose “C” shape.
Transfer to a platter, sprinkle with extra scallions, and serve immediately with fresh lemon wedges for squeezing over top.
Notes
-
Always soak wooden skewers — 30 minutes prevents flare-ups.
-
Don’t over-marinate; acid from lemon can toughen shrimp.
-
Use wild-caught shrimp for the best flavor and texture.
-
Clean and oil grill grates before cooking for easy release.
Nutrition
- Calories: 240 Cal Per Serving
- Fat: 4g
- Saturated Fat: 1g
- Carbohydrates: 18g
- Protein: 30g
Light, Lean, and Protein-Packed
One of the reasons I love this recipe so much is that it feels indulgent but is actually really light and healthy! Shrimp are a fantastic source of lean protein, and they’re low in calories and fat. The marinade gets its sweetness from natural honey, and the flavor comes from vibrant ingredients like lemon and spices, not cups of sugar or oil.
Here’s a quick look at the nutritional profile per serving (assuming this recipe serves 4):
- Calories: 240
- Protein: 30g (Amazing for post-workout recovery!)
- Fat: 4g
- Saturated Fat: 1g
- Carbohydrates: 18g
- Sugar: 10g
- Fiber: 1g
- Sodium: 780mg
Remember, these are estimates and can vary based on the exact ingredients you use. But overall, this is a meal you can feel fantastic about serving to your family and friends.
Final Thoughts
And there you have it, my friends! My all-time favorite recipe for Zesty Lemon Barbecued Shrimp Skewers. This dish is more than just a meal; it’s a burst of summer sunshine, a trip down memory lane, and a guaranteed way to bring people together around the grill. It’s proof that with a few simple ingredients and a little bit of confidence, you can create something truly spectacular.
I hope this recipe becomes a reliable, go-to favorite in your own repertoire—the one you pull out when you want a guaranteed win without any of the stress. It’s a reminder that the best grilling isn’t about complicated techniques; it’s about fresh, vibrant flavors and the simple joy of cooking for the people you love.
So, don’t be surprised when these skewers become the most requested item at your cookouts. You now hold the secret to a dish that’s effortlessly impressive, deceptively easy, and packed with so much zesty, sunny flavor.
Now I want to hear from you! Did you give this recipe a twist? Did it bring a little taste of the coast to your backyard? Share your grilling stories and photos with me using the hashtag #FeasticalGrill. Happy grilling
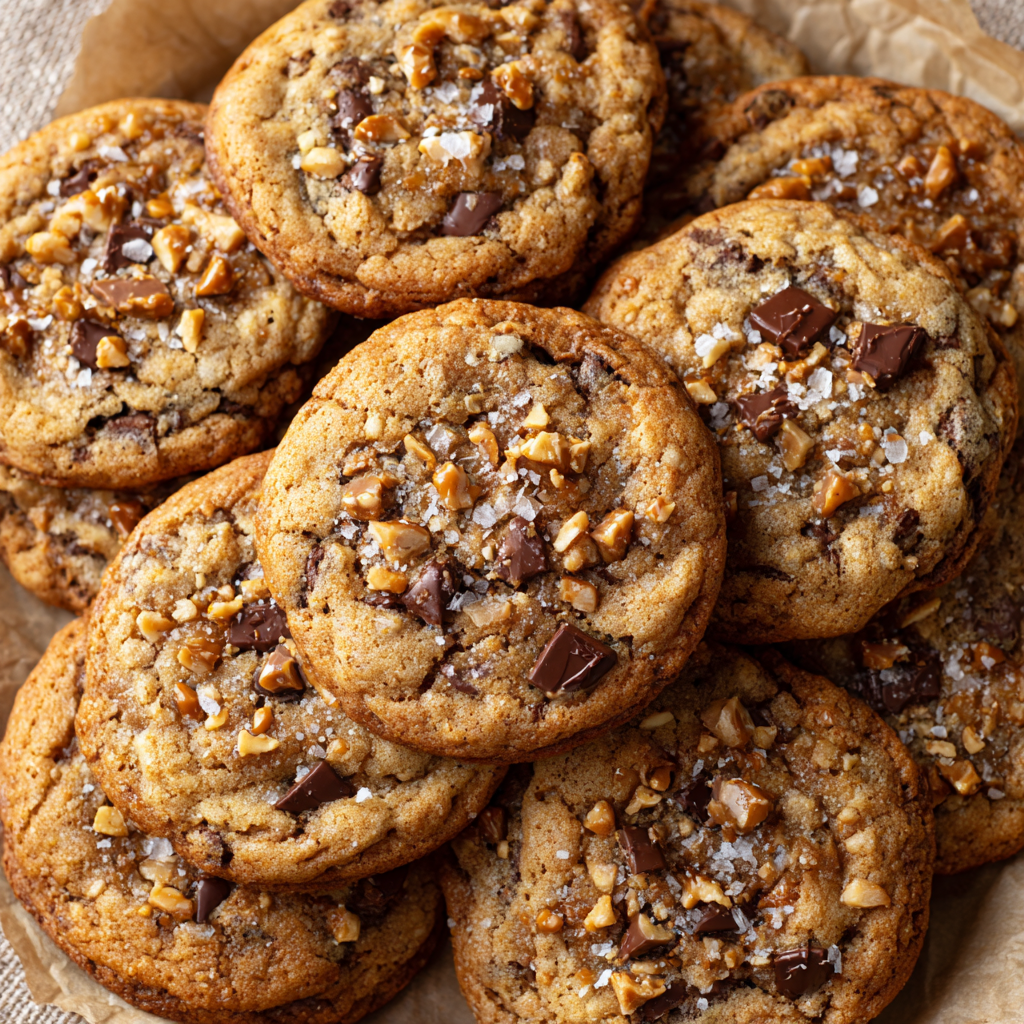
Toffee Chocolate Chip Cookies : Chewy, Buttery & Loaded with Sweet Crunch
The Toffee Chocolate Chip Cookie That Will Change Your Baking Game
Hey friends, Beau here! Let’s get real for a second. Is there anything in this world quite as magical as a warm, freshly baked chocolate chip cookie? It’s a universal language of comfort, a little edible hug that says, “Hey, everything’s going to be alright.” But what if I told you we could take that classic, that icon of coziness, and level it up into something truly extraordinary?
Welcome to my ultimate Toffee Chocolate Chip Cookies. We’re talking chewy, buttery centers that practically melt in your mouth, crispy golden edges that give you that perfect satisfying crunch, and little pockets of gooey chocolate and buttery toffee bits in every single bite. This isn’t just a cookie; it’s an experience. The deep, almost caramel-like flavor from the brown sugar, the rich chocolate, the sweet crunch of toffee, and just a whisper of flaky sea salt on top… it’s a symphony of textures and flavors that will have you closing your eyes in pure bliss.
I know you might be thinking, “Beau, my classic recipe is just fine!” And hey, I hear you. But trust me on this one. These cookies are the star of the bake sale, the hero of the potluck, and the secret weapon you’ll pull out when you want to impress your in-laws or just treat yourself after a long day. They’re surprisingly simple to make, but the result feels gourmet. So, tie on your favorite apron, preheat that oven, and let’s bake some memories together. Your kitchen is about to smell incredible.
A Cookie Jar Full of Memories
This recipe always takes me right back to my Aunt Carol’s kitchen. She wasn’t a fancy chef, but she was a wizard with a mixing bowl. Her cookie jar was a legendary, brightly painted ceramic monstrosity that was never, ever empty. One rainy afternoon, I was watching her bake her famous chocolate chip cookies when she did something that shocked my ten-year-old self. She reached into the pantry, pulled out a bag of toffee bits, and dumped a whole cup into the dough!
I was scandalized. “You can’t change the recipe!” I insisted. She just winked, handed me a beater to lick, and said, “Beau, the best adventures happen when you’re willing to break a few rules.” That first warm cookie was a revelation. The familiar chocolatey goodness was now punctuated with these incredible bursts of buttery, crunchy toffee. It was a game-changer. That afternoon taught me one of my most cherished kitchen philosophies: respect the classics, but never be afraid to add your own twist. This recipe is my love letter to Aunt Carol and her magical, never-empty cookie jar.
Gathering Your Cookie Dream Team
Alright, let’s gather our ingredients! Using great ingredients is the first secret to a fantastic cookie. Here’s the lineup and a little chef’s insight on why each one matters.
- 4 ½ cups all-purpose flour: This is the structural backbone of our cookie. It gives them that perfect chewy texture. Chef’s Tip: For the most accurate measure, fluff your flour with a spoon, then spoon it into your measuring cup and level it off. No packing it down!
- 2 teaspoons baking soda + 1 teaspoon baking powder: Our dynamic leavening duo! The baking soda helps with spread and browning, while the baking powder gives a little lift. Using both creates the ideal texture.
- 1 teaspoon fine sea salt: Salt is the flavor enhancer! It makes the chocolate taste richer and the toffee taste sweeter, balancing everything out beautifully.
- 2 cups unsalted butter, softened: The king of flavor and texture! Using unsalted butter lets you control the salt level. Chef’s Tip: “Softened” means your butter should give slightly when you press it, but not be greasy or melted. This is key for creaming!
- 2 cups packed light brown sugar + 1 cup granulated sugar: Brown sugar is the MVP here, giving us that moist, chewy texture and deep molasses flavor. The granulated sugar helps create those delightfully crisp edges.
- 4 large eggs, at room temperature: Room temp eggs incorporate much more easily into the butter and sugar, creating a smoother, more emulsified dough. Quick Hack: Place cold eggs in a bowl of warm water for 5-10 minutes to take the chill off.
- 4 teaspoons vanilla extract: Don’t be shy! A generous pour of good vanilla adds a warm, aromatic depth that makes the cookies smell and taste incredible.
- 3 cups semi-sweet chocolate chips: I love the rich, not-too-sweet balance of semi-sweet, but this is your canvas! Substitution: Feel free to use milk chocolate, dark chocolate, or even chopped chocolate bars for those gorgeous, uneven chocolate puddles.
- 2 cups toffee bits: The star of the show! You can find these in the baking aisle near the chocolate chips. They add that irresistible buttery crunch.
- 1 cup chopped pecans or walnuts (optional): If you’re a nut lover, this adds another fantastic layer of texture and a toasty flavor.
- 1 tablespoon espresso powder (optional): My secret weapon! It won’t make your cookies taste like coffee, but it will deepen and intensify the chocolate flavor in a magical way. Highly recommend!
- Flaky sea salt, for topping: The finishing touch! A tiny sprinkle right when they come out of the oven creates that perfect sweet-and-salty situation.
Let’s Bake! Your Step-by-Step Guide to Cookie Perfection
Ready to get your hands dirty? Follow these steps, and you’ll be a cookie hero in no time. I’ve packed this section with all my favorite little hacks to ensure your success.
- Preheat Oven to 350°F (175°C). This seems simple, but a properly preheated oven is non-negotiable for even baking. Chef’s Hack: I like to use an oven thermometer to make sure my oven is telling me the truth—they can be sneaky like that! Line your baking sheets with parchment paper. This prevents sticking and makes cleanup an absolute dream.
- Mix Your Dry Ingredients. In a large bowl, grab your whisk and give the flour, baking soda, baking powder, salt, and that optional espresso powder a really good whisking. This isn’t just about mixing; we’re aerating the flour, which leads to a more tender cookie. Doing this now ensures no one gets a bitter pocket of baking soda later. Set this bowl aside.
- Cream Butter & Sugars. Now, in the bowl of your stand mixer (or a large bowl if you’re using a hand mixer), plop in that softened butter, brown sugar, and granulated sugar. Beat it on medium-high speed for a full 2-3 minutes. We’re not just mixing here; we’re “creaming.” This process whips tiny air bubbles into the butter, which will expand in the oven and give our cookies a lovely, light texture. You’ll know it’s ready when the mixture turns pale and becomes wonderfully light and fluffy. Scrape down the sides of the bowl with a spatula to make sure everything is incorporated.
- Add Eggs & Vanilla. Crack in your room-temperature eggs, one at a time, beating well after each addition. This allows the egg to fully emulsify into the butter-sugar mixture, creating a smooth, cohesive dough. Then, pour in that glorious vanilla and mix until it’s just combined.
- Combine Wet & Dry. With your mixer on low speed, gradually add the dry ingredients to the wet. Pro Tip: Don’t overmix at this stage! Mix just until the last streaks of flour disappear. Overmixing develops gluten and can lead to tough cookies, and we want chewy, not tough.
- Fold in the Goodies. Now for the fun part! Take your chocolate chips, toffee bits, and optional nuts, and dump them all in. Use a sturdy spatula or a wooden spoon to fold them in by hand. This ensures everything gets evenly distributed without overworking the dough.
- Scoop & Bake. Using a cookie scoop (about 2 tablespoons in size), portion out your dough onto the prepared baking sheets, leaving about 2 inches between each one. They need room to spread and become the beautiful, golden puddles they’re destined to be! Bake for 10-12 minutes. They’re done when the edges are a gorgeous golden brown, but the centers still look a little soft and underdone. Chef’s Secret: This is the key to a soft, chewy center! They will continue to cook on the hot baking sheet as they cool.
- The Finishing Touch. As soon as you pull the trays out of the oven, immediately sprinkle a tiny pinch of flaky sea salt over the top of each cookie. Let them cool on the baking sheet for a solid 5 minutes—this is a test of your willpower, I know! Then, transfer them to a wire rack to cool completely. This stops the cooking process and helps them set up perfectly.
How to Serve These Masterpieces
Okay, you’ve baked the most incredible cookies. How do you serve them? Let me count the ways!
For the ultimate experience, serve these cookies still slightly warm. The chocolate will be gloriously melty, and the toffee will have that perfect soft crunch. Placing a few on a rustic wooden board with a cold glass of milk is a classic for a reason.
Want to get fancy? Crumble one over a scoop of high-quality vanilla bean ice cream for an insane sundae. Or, for the grown-ups in the room, pair a cookie with a freshly brewed cup of coffee or a glass of cold-brew—the flavors are a match made in heaven.
If you’re gifting them (lucky friends!), stack them in a cellophane bag tied with a pretty ribbon, or arrange them in a festive tin with layers of parchment paper in between. They travel like a dream and spread joy wherever they go.
Make It Your Own: Delicious Recipe Variations
This recipe is your playground! Once you’ve mastered the base, feel free to get creative. Here are a few of my favorite twists:
- Salted Caramel Pretzel: Swap out 1 cup of the toffee bits for 1 cup of crushed pretzel pieces and ½ cup of caramel bits. The sweet, salty, crunchy combo is out of this world.
- Dark Chocolate & Orange Zest: Use dark chocolate chips instead of semi-sweet. Add the zest of one large orange to the butter-sugar mixture when creaming. The bright, citrusy note cuts through the richness beautifully.
- Gluten-Free Goodness: No problem! Simply replace the all-purpose flour with a 1:1 gluten-free baking blend. The texture will be just as chewy and delicious.
- Double Toffee Delight: For the toffee super-fans, use chocolate-toffee bits (like Heath Bits ‘O Brickle) instead of plain toffee bits. It’s a toffee explosion in every bite!
- Bourbon-Spiked: For a sophisticated adult twist, replace 1 teaspoon of the vanilla extract with 2 teaspoons of bourbon. It adds a warm, oaky note that pairs wonderfully with the toffee.
Beau’s Kitchen Confidential
This recipe has been a living, evolving thing in my kitchen for years. I’ve learned that the single best thing you can do for your cookie game is to chill the dough. I know, I know, the wait is torture. But if you can scoop the dough and then pop the baking sheets in the fridge for just 30-60 minutes before baking, you’ll be rewarded with thicker, chewier cookies with even more complex flavor. The flour has time to hydrate, and the butter firms up, preventing overspreading.
Also, a funny story: I once ran out of vanilla mid-recipe and had to use a combination of vanilla and a splash of almond extract. My friends declared it the “best batch ever” and demanded to know my secret. Sometimes the best kitchen accidents become happy discoveries!
Your Cookie Questions, Answered!
I’ve baked a lot of these cookies and answered even more questions. Here are the most common ones to help you troubleshoot.
- My cookies spread too much and got flat. What happened? This is almost always a butter issue! Your butter was likely too warm or melted. Make sure it’s just softened. Also, double-check that your baking soda and powder are fresh, and try chilling your dough as mentioned above. A hot baking sheet can also cause spreading, so let your pans cool between batches.
- My cookies are too cakey. How can I make them chewier? A cakey texture often comes from overmixing the dough after adding the flour, or using too much flour. Remember to mix until *just* combined and measure your flour using the spoon-and-level method. Using more brown sugar than granulated also promotes chewiness.
- Can I freeze the cookie dough? ABSOLUTELY! In fact, I almost always have a log of this dough in my freezer. Scoop the dough balls onto a parchment-lined sheet, freeze them solid (about 1-2 hours), then transfer them to a freezer bag. You can bake them straight from frozen—just add 1-2 minutes to the baking time. It’s the best way to have fresh cookies on demand!
- Why is my toffee melting and making a mess? Toffee bits are designed to hold their shape, but they can soften and melt a little in a very hot oven. This is normal and actually creates delicious buttery pockets! If they’re burning, your oven might be running hot. Again, an oven thermometer is your best friend here.
Toffee Chocolate Chip Cookies : Chewy, Buttery & Loaded with Sweet Crunch
Description
A Cookie Worth Melting For
Hey friends, Beau here! Let’s be honest—few things in life beat a warm, gooey chocolate chip cookie. It’s comfort, nostalgia, and happiness all rolled into one golden bite. But today, we’re taking that classic and giving it a major upgrade.
Ingredients
Dry Ingredients
-
4 ½ cups all-purpose flour
-
2 tsp baking soda
-
1 tsp baking powder
-
1 tsp fine sea salt
Wet Ingredients
-
2 cups (4 sticks) unsalted butter, softened
-
2 cups packed light brown sugar
-
1 cup granulated sugar
-
4 large eggs, room temperature
-
4 tsp vanilla extract
Mix-Ins
-
3 cups semi-sweet chocolate chips
-
2 cups toffee bits
-
1 cup chopped pecans or walnuts (optional)
-
1 tbsp espresso powder (optional – enhances chocolate flavor)
-
Flaky sea salt, for topping
Instructions
Preheat your oven to 350°F (175°C) and line baking sheets with parchment paper.
(Tip: Use an oven thermometer for accuracy—many ovens run hotter or cooler than expected.)
In a large bowl, whisk together flour, baking soda, baking powder, salt, and espresso powder (if using). Set aside.
In another large bowl, beat together butter, brown sugar, and granulated sugar on medium-high speed for 2–3 minutes, until light and fluffy. Scrape down the bowl as needed.
Add the eggs one at a time, beating well after each. Mix in vanilla until smooth and creamy.
Add the dry ingredients gradually, mixing on low speed until just combined. Don’t overmix—this keeps your cookies chewy, not cakey!
Using a spatula, gently fold in the chocolate chips, toffee bits, and nuts (if using).
Scoop dough into 2-tablespoon-sized balls, spacing them 2 inches apart on your baking sheet.
Bake for 10–12 minutes, until the edges are golden brown but centers still look soft.
Right out of the oven, sprinkle each cookie with a pinch of flaky sea salt.
Let cookies cool on the pan for 5 minutes, then transfer to a wire rack to cool completely.
Notes
-
Chill the dough: Refrigerate for 30–60 minutes before baking for thicker, chewier cookies.
-
Measure flour correctly: Spoon and level—don’t scoop! Too much flour = dense cookies.
-
Soft butter, not melted: Butter that’s too warm makes cookies spread too much.
-
Mix-ins matter: Chop your chocolate or use chunks for those melty “puddles” of chocolate.
Nutrition
- Calories: 220 Cal Per cookie
- Sugar: 17g
- Fat: 12g
- Saturated Fat: 7g
- Carbohydrates: 26g
Nutritional Information (Because We’re All About Balance!)
Let’s be real, we’re not eating cookies for their vitamin content. But I believe in being transparent, so you can enjoy every single bite mindfully. The following is an approximate calculation per cookie, based on the recipe making 48 cookies.
- Calories: 220
- Fat: 12g
- Saturated Fat: 7g
- Carbohydrates: 26g
- Sugar: 17g
- Protein: 2g
- Sodium: 120mg
Remember, this is a treat meant to be savored and shared. It’s a part of life’s joy! Bake them, share them with people you love, and enjoy every delicious moment.
Final Thoughts from My Kitchen to Yours
Well, my friend, there you have it—my heart and soul in cookie form. This recipe is more than just a list of ingredients and steps; it’s an invitation to create, to share, and to find a little bit of joy in the simple act of baking.
I hope these Toffee Chocolate Chip Cookies bring as much happiness to your kitchen as they have to mine. I hope your house fills with that incredible warm, sugary smell, and I hope you get to see the smiles on the faces of the people you share them with. That’s what Fe

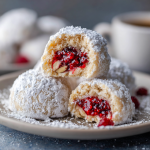
Raspberry-Filled Almond Snowball Cookies : A Festive, Melt-in-Your-Mouth Treat
Raspberry-Filled Almond Snowball Cookies – A Festive, Melt-in-Your-Mouth Treat
A Little Cookie That Feels Like a Holiday Hug
Hey friends, Beau here from Feastical! Can we talk about that one magical cookie for a second? You know the one. It’s the cookie that makes everyone’s eyes light up when they spot it on the dessert tray. The one that looks like a delicate, snow-dusted treasure and tastes like a little bite of pure, buttery joy. I’m talking, of course, about our star of the show today: the Raspberry-Filled Almond Snowball Cookie.
Now, I’m a firm believer that the best recipes are the ones that look like you fussed for hours but are secretly a joy to make. These cookies are exactly that. We’re taking a tender, melt-in-your-mouth almond dough, wrapping it around a vibrant pocket of tangy raspberry jam, and giving it a generous, snowy roll in powdered sugar. The result? A cookie with a gorgeous flavor contrast that’s elegant enough for your fanciest holiday party but simple enough to whip up on a cozy Tuesday afternoon.
If you’ve ever been intimidated by filled cookies, let me be the first to tell you: you’ve got this. We’re going to walk through this together, step-by-step, with all my favorite chef hacks to ensure your snowballs are perfect. So, preheat those ovens in your mind, grab your favorite mixing bowl, and let’s create some edible magic that’s sure to become a new family favorite.
The Snowball That Started It All
This recipe takes me right back to my grandma’s kitchen, which always smelled like butter and happiness in December. She had a classic snowball cookie recipe (you might know them as Russian Tea Cakes or Mexican Wedding Cookies) that was my absolute favorite. One particularly chaotic baking day, a jar of her homemade raspberry jam took a tumble off the counter and, in a brilliant (or desperate?) save, I smeared a little of the salvaged jam onto a piece of the raw dough before I rolled it.
What came out of the oven was a revelation. That single, jammy experiment transformed her beloved, classic cookie into something entirely new and exciting. The sweet, nutty cookie paired with the bright, tangy raspberry was a match made in heaven. Grandma arched an eyebrow, took one bite, and simply said, “Well, I guess we’re doing it this way from now on.” And we did. That happy little accident is the heart and soul of this recipe—a reminder that sometimes, the best creations come from a little mess and a lot of love.
Gathering Your Cookie-Making Crew (The Ingredients!)
Part of the beauty of this recipe is its simplicity. You likely have most of these ingredients in your pantry already. Here’s your shopping list and a little “chef’s insight” on each one to set you up for success.
- 1 cup (2 sticks) unsalted butter, softened: This is the foundation of our cookie’s tender, melt-in-your-mouth texture. Using unsalted butter lets us control the salt level perfectly. “Softened” is key here! It should be cool to the touch but leave a slight indent when you press it. Pro tip: if you forgot to take it out, cut the sticks into tablespoons and let them sit for 15-20 minutes.
- 1 cup powdered sugar (plus extra for coating): We use powdered sugar in the dough for a finer, more delicate crumb than granulated sugar would provide. And that snowy exterior? That’s the extra! Don’t be shy with it.
- 1 tsp vanilla extract: The warm, classic flavor that makes everything taste like home. Use the real stuff if you can—it makes a difference.
- ½ tsp almond extract: This is the secret weapon! It amplifies the nutty flavor of the almonds and gives the cookie that unforgettable, bakery-quality taste. A little goes a long way.
- 2¼ cups all-purpose flour: The structure of our cookie. For a lighter cookie, fluff your flour with a spoon before you scoop it into your measuring cup, and level it off. No packing!
- ½ cup finely ground almonds (or almond flour): This adds a wonderful nutty flavor and a slightly denser, more crumbly texture. You can buy almond flour or simply pulse sliced or slivered almonds in a food processor until they’re a fine meal.
- ¼ tsp salt: Don’t skip this! Salt is the flavor enhancer that makes the butter and almonds sing. It balances the sweetness perfectly.
- ½ cup seedless raspberry jam or preserves: I prefer seedless for a smooth, uninterrupted jammy experience, but seeded works just fine if that’s what you have! Preserves have slightly larger fruit pieces, which I love. Feel free to experiment with other flavors, too—more on that later!
Let’s Get Rolling: Your Foolproof Cookie Guide
Ready to make some magic? Follow these steps, and you’ll be a snowball pro in no time. I’ve sprinkled in my best tips to make the process smooth and fun.
- Cream the Butter & Sugar: In a large bowl, beat the softened butter and 1 cup of powdered sugar together on medium speed for 2-3 minutes. We’re not just mixing here; we’re “creaming.” This incorporates air into the dough, which helps give our cookies that lovely light texture. Stop when it’s pale, fluffy, and smooth. Now, add the vanilla and almond extracts and mix just until combined. Chef’s Hack: If your butter is still a bit cold, you can dice it and beat it alone for 30 seconds to soften it up before adding the sugar.
- Mix the Dry Ingredients: In a separate bowl, whisk together your all-purpose flour, ground almonds, and salt. This ensures the salt and baking powder are evenly distributed. Now, with your mixer on low speed, gradually add the dry ingredients to the wet butter mixture. Mix until just combined and no dry streaks remain. The dough will be soft—that’s exactly what we want! Chef’s Hack: Overmixing at this stage can develop the gluten in the flour and make the cookies tough. A gentle hand is your friend.
- Chill the Dough: This is a non-negotiable rest period! Wrap the dough in plastic wrap and chill it in the fridge for at least 30 minutes. This firms up the butter, making the dough much easier to handle and roll. It also prevents the cookies from spreading too much in the oven. Chef’s Hack: If you’re in a hurry, you can pop the bowl of dough into the freezer for 15 minutes instead.
- Preheat & Prep: While the dough chills, preheat your oven to 350°F (175°C). This ensures a consistent temperature for even baking. Line two baking sheets with parchment paper. Trust me, this makes cleanup a dream and prevents any sticking.
- Shape the Cookies (The Fun Part!): Unwrap your chilled dough. Scoop out about 1 tablespoon of dough. I use a small cookie scoop for uniformity, but a tablespoon measure works great. Flatten the dough slightly in the palm of your hand to make a small disc. Now, spoon about ¼ teaspoon of raspberry jam into the center. This is the sweet surprise! Gently fold the dough over the jam, pinching the edges to seal it completely. Then, roll it gently between your palms to form a smooth ball. Chef’s Hack: Make sure the jam is fully enclosed! Any leaks will bubble out and burn. If the dough gets too soft, just put it back in the fridge for 10 minutes.
- Bake to Perfection: Place your shaped cookies about 2 inches apart on the prepared baking sheets. They don’t spread a ton, but they need a little room to breathe. Bake for 12-15 minutes. You’re looking for the bottoms to be a very light golden brown, while the tops should still be pale. They might look a little underdone, but they’ll firm up as they cool! Let them cool on the baking sheet for 5 minutes before transferring them to a wire rack. This initial cooling period helps them set.
- Coat in Sugar & Create the Snowy Magic: Once the cookies are completely cool to the touch, it’s time for their snowy makeover! Place some extra powdered sugar in a shallow bowl. Gently roll each cookie in the sugar until it’s fully coated. For that extra-thick, professional-looking snowy finish, let them sit for 10 minutes after the first coat, then give them a second roll. It’s a game-changer!
How to Serve These Edible Snowballs
Presentation is part of the fun with these cookies! I love piling them high on a beautiful cake stand or a rustic wooden board. They look absolutely stunning next to darker cookies like chocolate crinkles or gingerbread, creating a beautiful contrast on your holiday dessert table.
And let’s talk about pairings. These cookies are a match made in heaven with a hot cup of coffee, cutting through the richness beautifully. They’re also divine with a mug of black tea or a spicy chai latte. For a truly decadent treat, serve them alongside a small glass of dessert wine or a flute of prosecco—the raspberry and almond flavors pop wonderfully with the bubbles.
Make It Your Own: Delicious Recipe Twists
Once you’ve mastered the classic, the fun really begins! This dough is a fantastic base for all sorts of flavor adventures. Here are a few of my favorite variations:
- Lemon Blueberry Bliss: Swap the almond extract for vanilla, and use blueberry jam or lemon curd in the center. Add a teaspoon of lemon zest to the dough for a bright, sunny twist.
- Chocolate Hazelnut Dream: Replace the ground almonds with ground hazelnuts and fill the center with a small square of high-quality dark chocolate or a dab of Nutella. Pure heaven.
- Apricot & Cardamom: Use apricot preserves and add ½ teaspoon of ground cardamom to the dry ingredients. This is a wonderfully warm and sophisticated flavor combination.
- Gluten-Free & Great: You can easily make these gluten-free by using a 1:1 gluten-free all-purpose flour blend. The texture is virtually identical!
- Dairy-Free Delight: Use a high-quality vegan butter stick. I’ve had great success with this swap, and the cookies still come out wonderfully tender and buttery.
Beau’s Brain Dump & Kitchen Stories
This recipe has evolved so much since that first jammy accident in my grandma’s kitchen. I’ve found that using a higher-quality, fruit-forward raspberry jam makes a world of difference in the final product. And that double-roll in powdered sugar? That was a tip I picked up from a baker friend who swore it was the secret to a bakery-style finish. She was right!
One of my favorite kitchen memories involving these cookies was the year I decided to make a triple batch for all my neighbors. Let’s just say my kitchen looked like a powdered sugar bomb went off, and I had little white footprints all through the house. But the joy on my neighbors’ faces was worth every second of the cleanup. Food is love, my friends, and these cookies are one of my favorite ways to spread it.
Your Questions, Answered!
Over the years, I’ve gotten a few repeat questions about these snowball cookies. Here are the answers to the most common ones!
Q: My jam leaked out everywhere! What did I do wrong?
A: Ah, the classic leak! This usually happens for one of two reasons: 1) The jam wasn’t fully enclosed. Make sure you pinch the dough seam really well. 2) You used too much jam. A little goes a long way! Stick to that ¼ teaspoon. If your jam is very runny, you can thicken it by mixing in a tiny pinch of cornstarch before using it.
Q: Why are my cookies flat and not holding their ball shape?
A: The most likely culprit is that your dough wasn’t chilled enough. The butter was too warm when it went into the oven, causing it to spread. Always make sure you give that dough its full 30-minute chill time. Also, double-check that your baking powder is fresh!
Q: Can I freeze these cookies?
A: Absolutely! They are fantastic freezer-friendly cookies. You can freeze the shaped, unbaked dough balls on a tray before transferring them to a freezer bag. Bake straight from frozen, adding 1-2 minutes to the baking time. You can also freeze the fully baked and cooled cookies—just note you may need to give them another light roll in powdered sugar after they thaw to freshen up their snowy look.
Q: The powdered sugar melts into the cookie. How do I get that perfect white finish?
A> This is why we wait for the cookies to cool completely before coating them! Rolling them while they’re even slightly warm will cause the sugar to melt and become sticky and translucent. Let them cool on the wire rack, and for that perfect, dry snow look, don’t skip the second roll after 10 minutes.
Raspberry-Filled Almond Snowball Cookies : A Festive, Melt-in-Your-Mouth Treat
Description
Hey friends, Beau here from Feastical! Let’s talk about a cookie that feels like a hug in edible form — buttery, nutty, and dusted in powdered sugar like freshly fallen snow. These Raspberry-Filled Almond Snowball Cookies are everything we love about holiday baking: simple to make, stunning to serve, and so delicious they disappear faster than you can say “save me one!”
Ingredients
-
1 cup (2 sticks) unsalted butter, softened
-
1 cup powdered sugar, plus extra for rolling
-
1 tsp vanilla extract
-
½ tsp almond extract
-
2¼ cups all-purpose flour
-
½ cup finely ground almonds (or almond flour)
-
¼ tsp salt
-
½ cup seedless raspberry jam or preserves
Instructions
1. Cream the Butter & Sugar
In a large bowl, beat the butter and 1 cup powdered sugar together until light and fluffy (about 2–3 minutes). Mix in the vanilla and almond extracts.
2. Add Dry Ingredients
Whisk together flour, ground almonds, and salt in a separate bowl. Gradually add to the butter mixture and mix until combined.
3. Chill the Dough
Wrap the dough in plastic wrap and refrigerate for 30 minutes (this helps prevent spreading).
4. Shape & Fill
Preheat oven to 350°F (175°C) and line baking sheets with parchment. Scoop out 1 tablespoon of dough, flatten slightly, and place about ¼ teaspoon of raspberry jam in the center. Seal and roll into a smooth ball.
5. Bake
Place balls 2 inches apart on the prepared sheet. Bake for 12–15 minutes, until bottoms are lightly golden. Cool on the sheet for 5 minutes, then transfer to a rack to cool completely.
6. Coat in Powdered Sugar
Roll the cooled cookies in powdered sugar to coat. For that perfect snowy look, let them rest for 10 minutes and roll again.
Notes
-
Chill that dough! It keeps your cookies round and tender.
-
Don’t overfill — just a touch of jam does the trick.
-
Double roll = bakery magic. Two coats of powdered sugar give that signature “snowball” look.
-
Switch it up! Try apricot, blueberry, or lemon curd for fun flavor twists.
Nutrition
- Calories: 135 kcal per Cookie
- Sugar: 7g
- Fat: 8g
- Carbohydrates: 15g
- Protein: 1g
Let’s Talk Nutrition (The Real Talk)
Alright, let’s be real. These are a holiday treat, a buttery, sugary delight meant to be savored and enjoyed. I’m all about balance, so here’s a quick nutritional snapshot per cookie (based on a batch of 32) so you can indulge mindfully.
Approximate Nutrition per Cookie: Calories: ~135 kcal | Fat: 8g | Carbs: 15g | Sugar: 7g | Protein: 1g
The fat comes primarily from the butter and almonds, which provide the rich flavor and texture we love. The carbs and sugar are from the flour, powdered sugar, and jam. Remember, these are estimates, and your exact numbers can vary based on the specific brands of ingredients you use and the exact size of your cookies. My philosophy? Enjoy one (or two!) with your favorite warm beverage, savor every single bite, and soak in the happiness they bring.
Your New Go-To Holiday Cookie
And there you have it, my friends! Your complete guide to creating the most incredible Raspberry-Filled Almond Snowball Cookies. This recipe is a testament to the fact that the most beloved dishes often come from a place of love, a little experimentation, and a willingness to embrace a happy accident.
I hope this recipe brings as much warmth and joy to your kitchen as it has to mine over the years. It’s more than just a cookie; it’s a little edible piece of holiday magic. So, go forth, bake up a storm, and don’t forget to share them with someone you love. And when you do, be sure to tag me @Feastical on social media—I can’t wait to see your beautiful, snowy creations!
Final Thoughts: A Cookie to Carry in Your Heart
So, there you have it—the story, the secrets, and the simple steps to creating a cookie that’s so much more than the sum of its parts. These Raspberry-Filled Almond Snowball Cookies are a perfect little package: a buttery, nutty exterior giving way to a vibrant, tangy heart. They are proof that you don’t need complicated techniques to create something truly extraordinary and memorable.
This recipe is a keeper, not just because it’s delicious, but because of the experience it creates. It’s a recipe that invites you to slow down, to get your hands a little dusty with powdered sugar, and to create something with your own two hands that will genuinely delight the people you share it with. From my grandma’s kitchen to that first jam-spattered “accident,” to the countless batches I’ve made since, this cookie is woven with memories. And now, it’s yours to make your own.
Whether you stick faithfully to the classic raspberry-almond combo or embark on a flavor adventure with lemon, chocolate, or cardamom, you’re not just baking—you’re creating a new tradition. You’re making edible hugs for a chilly day, snowy treasures for a holiday table, and little bites of pure, uncomplicated joy.
So, preheat that oven, roll up your sleeves, and bake a batch of happiness. I have a feeling this is one recipe that will find its way into your permanent collection, ready to be passed down with your own stories and kitchen secrets for years to come.
Happy Baking,
Beau

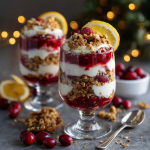
Christmas Morning Cranberry Cream Parfaits : Bright, Buttery & Beautifully Layered
Wake Up to a Little Jar of Christmas Joy
Hey friends, Beau here! Can you smell it? That’s the smell of Christmas morning happening in kitchens everywhere. It’s a magical mix of fresh pine, roasting coffee, sizzling bacon, and… well, anticipation. But let’s be real for a second. While everyone else is dreaming of a big, complicated breakfast casserole that keeps you chained to the oven for hours, I’m over here dreaming of something different. Something bright, beautiful, and blissfully easy.
I’m talking about my Christmas Morning Cranberry Cream Parfaits. Imagine this: layers of vibrant, spiced cranberry compote that’s equal parts sweet and tart, clouds of fluffy mascarpone whipped cream that feels like a dream, and a buttery, crunchy oat crumble that adds the most satisfying texture. Each spoonful is a celebration—a perfect bite that wakes up your taste buds and makes the morning feel special without any of the stress.
This isn’t just a recipe; it’s your ticket to actually enjoying the morning. You can make every component ahead of time, so when the chaos of present-opening erupts and the family is buzzing with excitement, you can be the cool, calm, and collected chef who simply pulls these gorgeous parfaits out of the fridge and gets a chorus of “oohs” and “aahs.” So, let’s ditch the stress and create a new, delicious tradition together. Your spatula and your sanity will thank you.
The Cranberry Sauce That Started It All
This recipe honestly started with a happy accident, as the best ones often do. A few years back, I got a little overzealous at the farmers’ market and bought what can only be described as a “cranberry surplus.” My fridge was a sea of little red jewels, and I had to get creative. I started whipping up a quick compote, inspired by my Grandma Jean’s famous cranberry sauce, but I gave it my own twist with a dash of orange zest and a whisper of cardamom.
One sleepy Christmas morning, I found myself with a bowl of this compote, some leftover whipped cream from a pie, and a container of granola. In a moment of “why not?” genius, I layered them all in a glass. The first bite was a revelation. The tart cranberries cut through the rich cream, and the crunchy granola added a texture I didn’t know I needed. It was an instant hit with my family, and it’s since evolved into this more refined, intentionally delicious parfait. It’s a reminder that sometimes, the most magical holiday moments come from a little improvisation and a lot of love.
Gathering Your Parfait Players
Here’s your shopping list for this festive creation. Don’t be intimidated by the number of ingredients—most are pantry staples, and I’ve got plenty of swaps and chef secrets to share for each one.
For the Cranberry Compote:
- 24 oz fresh or frozen cranberries: The star of the show! Frozen work perfectly here, so no need to stress if you can’t find fresh. They bring that iconic, wake-up-your-mouth tartness.
- 1 cup granulated sugar: Balances the cranberries’ pucker-power. You can adjust this to your taste—start with ¾ cup if you prefer things less sweet.
- ½ cup orange juice & 2 tablespoons orange zest: This citrus duo is the cranberry’s best friend. The zest, in particular, adds incredible fragrant oils that make the compote sing. Use a microplane if you have one!
- 1 teaspoon ground cinnamon & ¼ teaspoon ground cardamom (optional): Cinnamon is classic comfort. The cardamom is my secret weapon—it adds a warm, floral, almost exotic depth that makes people say, “Wow, what is that?”
- 2 teaspoons pure vanilla extract: A splash of vanilla rounds out all the sharp, bright flavors with its warm, sweet aroma. Always use the real stuff!
For the Whipped Cream Layer:
- 2 cups heavy whipping cream: Make sure it’s very cold! This is the key to getting those stiff, beautiful peaks.
- 16 oz mascarpone cheese: This is what takes the cream from great to legendary. It adds a rich, velvety texture and a subtle tang. Chef’s Swap: Softened cream cheese works in a pinch, but the flavor will be tangier.
- ⅔ cup powdered sugar: Dissolves effortlessly into the cream, preventing any grittiness. It also helps stabilize our whipped layer.
- 2 teaspoons vanilla extract & a pinch of salt: Vanilla for flavor, salt to make all the other flavors pop. Trust me on the salt!
- 2 tablespoons orange liqueur (optional): For a truly “adults-only” version, a splash of Grand Marnier or Cointreau is absolutely divine.
For the Oat Crumble:
- 1½ cups old-fashioned rolled oats: They give the crumble a wonderful chewy-crisp texture. Don’t use instant oats here.
- ⅔ cup all-purpose flour: The binder. For a gluten-free version, almond flour works beautifully and adds a lovely nutty flavor.
- ⅔ cup brown sugar: Brings molasses-rich sweetness and helps the crumble clump together perfectly.
- ½ cup unsalted butter, cold and cubed: Cold butter is non-negotiable! It creates those perfect, flaky pockets as it melts in the oven.
- ½ cup chopped pecans or walnuts (optional): For extra crunch and toasty flavor. Toast them first for an even bigger flavor boost!
- 1 teaspoon ground cinnamon & a pinch of salt: Because every layer deserves a little spice and balance.
- 2 tablespoons shredded coconut (optional): My “tropical twist” – it toasts up with the oats and adds a delightful, subtle chew.
Let’s Build Some Magic: The Step-by-Step
Alright, team, aprons on! We’re going to tackle this one component at a time. It’s a simple process, and I’ll be right here with my best chef hacks to guide you.
Step 1: Make the Cranberry Compote
Grab a medium saucepan. Toss in all your compote ingredients—the cranberries, sugar, orange juice, zest, cinnamon, vanilla, and that optional cardamom if you’re feeling fancy. Now, place it over medium heat. You’ll hear a symphony of pops and sizzles as the cranberries start to burst open. Stir it often with a wooden spoon for about 10-12 minutes. You’re looking for the mixture to thicken to a jam-like consistency. Pro-Tip: To test if it’s ready, drag your spoon across the bottom of the pan; the path should stay clear for a second or two before filling in. Once it’s perfect, take it off the heat and let it cool completely. This is crucial—a hot compote will melt our beautiful whipped cream!
Step 2: Bake the Oat Crumble
While the compote is cooling, preheat your oven to 350°F (175°C). In a mixing bowl, combine the oats, flour, brown sugar, cinnamon, and salt. Now, for the fun part: cutting in the butter. You can use a pastry cutter, two forks, or my favorite method—clean fingers! Work the cold butter into the dry ingredients until you have a mixture that looks like coarse, wet sand with some pea-sized butter chunks remaining. Those chunks are gold—they’ll melt into delicious, buttery pockets. Fold in the nuts and coconut if you’re using them. Spread this out in an even layer on a baking sheet lined with parchment paper. Bake for 15-18 minutes, stirring once halfway through, until it’s fragrant and golden brown. Let it cool completely on the sheet—it will crisp up as it cools.
Step 3: Whip the Cream Layer to Perfection
This is where we create the cloud. For the best results, chill your mixing bowl and whisk attachment in the freezer for 10-15 minutes before you start. A cold bowl is your secret weapon for maximum volume. Now, in that chilled bowl, combine the cold heavy cream, mascarpone, powdered sugar, vanilla, and that all-important pinch of salt. Start on low speed to combine, then ramp it up to medium-high. Whip it until you get stiff, luscious peaks. Don’t walk away! Over-whipping can turn it grainy. If you’re adding the orange liqueur, now is the time to gently fold it in with a spatula until just combined.
Step 4: The Grand Finale – Assembling the Parfaits
Time for the most satisfying part! Grab your favorite glasses, mason jars, or even pretty bowls. We’re building layers. Start with a spoonful of the cooled cranberry compote at the bottom. Next, add a generous layer of the mascarpone cream. Then, sprinkle a hearty amount of the cooled oat crumble. Repeat the layers once or twice more, finishing with a final dollop of cream, a drizzle of compote, and a sprinkle of crumble on top for a gorgeous presentation. And just like that, you’ve created edible holiday magic.
How to Serve These Stunners
Presentation is part of the fun! I love using clear glasses or vintage-inspired mason jars so you can see all those beautiful, festive layers. These parfaits are fantastic made fresh, but they’re also the ultimate make-ahead breakfast. You can assemble them the night before, cover them tightly with plastic wrap, and let them chill in the fridge. The crumble might soften a tiny bit, but it’ll still be delicious.
When you’re ready to serve, take them out about 15 minutes before eating to take the chill off. For the final touch, add a little garnish. A fresh mint leaf, a dusting of powdered sugar, a few extra cranberries, or a tiny sprinkle of orange zest makes them look like they came from a fancy bakery. Serve them with a hot cup of coffee or a mimosa, and watch them disappear!
Make It Your Own: Delicious Twists & Swaps
One of the best things about this recipe is how adaptable it is. Feel free to play around and make it suit your family’s tastes or dietary needs!
- Lemon-Berry Bliss: Not a cranberry fan? Swap the cranberry compote for a mixed berry compote (using frozen berries is easy!) and use lemon juice and zest instead of orange.
- Vegan Wonder: Use coconut cream instead of heavy cream and mascarpone. For the compote, a plant-based butter works fine, and for the crumble, use coconut oil or vegan butter.
- Gingerbread Spice: Add a teaspoon of ginger and a ¼ teaspoon of nutmeg and cloves to the compote for a true gingerbread flavor. You could even add some chopped crystallized ginger to the crumble.
- Chocolate-Cherry Delight: Replace the cranberries with pitted cherries and add a tablespoon of cocoa powder to the crumble mixture for a decadent, dessert-like twist.
- Nut-Free & Gluten-Free: Simply omit the nuts from the crumble and use a certified gluten-free oat and almond flour blend. Easy peasy!
Beau’s Kitchen Chronicles
This recipe has been on quite a journey in my kitchen. The first time I made the crumble, I got a phone call and completely forgot about it in the oven. Let’s just say I learned the hard way that “golden brown” happens a lot faster than “completely blackened and smoking!” So, set a timer, friends. My other big lesson was patience with the compote. I used to try to assemble the parfaits when it was still warm, and I’d end up with a delicious but homogenous pink mush. Letting every component cool completely is the single most important tip for achieving those stunning, distinct layers that make this dish so special. It’s a lesson in restraint that pays off in every beautiful bite.
Your Parfait Questions, Answered!
Q: My compote is too runny. What did I do wrong?
A: No worries! This usually means it just needs a little more time on the heat to reduce and thicken. If it’s still too thin after cooling, you can mix a teaspoon of cornstarch with a tablespoon of cold water, stir it into the simmering compote, and cook for another minute or two until thickened.
Q: Can I make this completely ahead of time?
A: Absolutely! You can make all three components up to 2 days in advance. Store them separately in airtight containers in the fridge (the compote and cream) and at room temperature (the crumble). Assemble the parfaits the morning of, or the night before for ultimate convenience.
Q: My whipped cream is soupy and won’t thicken. Help!
A: This almost always boils down to temperature. Your bowl, whisk, and cream all need to be ice-cold. If it’s still not working, you can try placing your mixing bowl over a larger bowl filled with ice water while you whip. This usually does the trick!
Q: Is there a way to make this less sweet?
A: For sure! You can reduce the sugar in the compote to ¾ or even ½ cup, as the tartness of the cranberries can handle it. In the cream layer, you can cut the powdered sugar down to ⅓ cup. Taste as you go!
Christmas Morning Cranberry Cream Parfaits : Bright, Buttery & Beautifully Layered
Description
Bright, festive, and blissfully easy, these parfaits feature layers of tart-sweet cranberry compote, fluffy mascarpone cream, and buttery oat crumble. Perfect for make-ahead Christmas morning indulgence!
Ingredients
Cranberry Compote:
-
24 oz fresh or frozen cranberries
-
1 cup granulated sugar (adjust to taste)
-
½ cup orange juice
-
2 tbsp orange zest
-
1 tsp ground cinnamon
-
¼ tsp ground cardamom (optional)
-
2 tsp pure vanilla extract
Mascarpone Whipped Cream:
-
2 cups heavy whipping cream, cold
-
16 oz mascarpone cheese, softened
-
⅔ cup powdered sugar
-
2 tsp vanilla extract
-
Pinch of salt
-
2 tbsp orange liqueur (optional)
Oat Crumble:
-
1½ cups old-fashioned rolled oats
-
⅔ cup all-purpose flour (or almond flour for GF)
-
⅔ cup brown sugar
-
½ cup cold unsalted butter, cubed
-
½ cup chopped pecans or walnuts (optional)
-
1 tsp ground cinnamon
-
Pinch of salt
-
2 tbsp shredded coconut (optional)
Instructions
Step 1: Make Cranberry Compote
-
In a medium saucepan, combine cranberries, sugar, orange juice, zest, cinnamon, cardamom, and vanilla.
-
Cook over medium heat, stirring often, 10–12 minutes until thickened to jam-like consistency.
-
Let cool completely.
Step 2: Bake Oat Crumble
-
Preheat oven to 350°F (175°C).
-
In a bowl, combine oats, flour, brown sugar, cinnamon, and salt.
-
Cut in cold butter until mixture resembles coarse sand with pea-sized chunks.
-
Stir in nuts and coconut if using.
-
Spread on a parchment-lined baking sheet. Bake 15–18 min, stirring halfway. Cool completely.
Step 3: Whip Mascarpone Cream
-
Chill mixing bowl and whisk for 10–15 minutes.
-
Whip cream, mascarpone, powdered sugar, vanilla, and salt until stiff peaks form.
-
Gently fold in orange liqueur if using.
Step 4: Assemble Parfaits
-
Layer in glasses or jars: compote → cream → crumble. Repeat 1–2 times.
-
Finish with a dollop of cream, drizzle of compote, and a sprinkle of crumble.
-
Optional garnish: fresh mint, extra cranberries, or orange zest.
Notes
-
Compote too runny? Simmer longer or add 1 tsp cornstarch + 1 tbsp water.
-
Whipped cream won’t thicken? Make sure bowl and cream are ice-cold; try whisking over ice water.
-
Make-ahead: Prep components up to 2 days in advance. Assemble just before serving or the night before.
-
Adjust sweetness: Reduce sugar in compote or cream to taste
A Quick Bite on Nutrition
Okay, let’s keep it real. This is a celebratory holiday treat, and it’s meant to be indulgent! That said, it’s made with real, whole-food ingredients. Cranberries are packed with antioxidants and vitamin C. The oats in the crumble provide a good source of fiber, which is great for keeping you full and satisfied. While this parfait is richer in calories and sugar, it’s all about balance and enjoying special moments. You’re getting a mix of carbohydrates for energy, fats from the cream and nuts for satiety, and a little protein to round it out. So serve it up, savor every single spoonful, and enjoy the festive spirit guilt-free!
Your New Christmas Morning Tradition
And there you have it, my friends—your secret weapon for a stress-free, spectacular Christmas morning. This recipe is more than just a list of ingredients and steps; it’s an invitation to slow down, to create something beautiful with your hands, and to share a moment of pure, delicious joy with the people you love most.
I can’t wait for you to try it. When you do, please tag me @feastical on social media or shoot me an email. I love seeing your creations and hearing your stories. From my kitchen to yours, I’m wishing you a holiday season filled with warmth, laughter, and food that tastes like a hug.
Final Thoughts: Your Ticket to a Joyful, Flavorful Morning
So, there you have it, friends—the blueprint for a Christmas morning that’s as joyful for the cook as it is for everyone gathered around the tree. This little jar of Christmas joy is more than just a recipe; it’s a promise. A promise that you can be present for the magic, the laughter, and the unwrapping chaos, instead of being a slave to a hot oven.
It’s a reminder that the most cherished holiday traditions often start with a simple, happy accident and a dash of creativity. They don’t have to be complicated or stressful to be deeply special and incredibly delicious.
I hope this recipe becomes a bright spot in your holiday, giving you the gift of time and a truly spectacular breakfast. You deserve a morning that feels as festive and wonderful as you’ve worked to make it for everyone else.
Now, I’m turning it over to you. Whip up these parfaits, make them your own, and soak in every moment of the season.
From my kitchen to yours, Merry Christmas, and may your day be filled with love, peace, and fantastic food.
Stay Cozy,
Beau

Chocolate Toffee Butter Cookies : Soft, Sweet & Irresistibly Crunchy
Chocolate Toffee Butter Cookies: Your New Favorite Sweet & Salty Crunch
Hey there, friends! Beau here, welcoming you back to my kitchen. You know that feeling when you bite into a cookie and it’s just… perfect? I’m talking about that moment when it practically melts on your tongue, but then you get this incredible crunch, a burst of chocolate, and a rich, buttery flavor that makes you close your eyes and just sigh. That’s the magic we’re creating today.
I’m so excited to share my recipe for these Chocolate Toffee Butter Cookies. They’re the lovechild of a classic shortbread and your favorite chocolate chip cookie, all dressed up for a party. They’re soft, they’re sweet, they’re irresistibly crunchy, and they have this sophisticated sweet-and-salty thing going on that will have everyone begging for the recipe.
Whether you’re a baking pro or someone who considers “from scratch” a minor miracle, this recipe is for you. We’re keeping it simple, soulful, and seriously satisfying. So, tie on your favorite apron, find that trusty spatula, and let’s make some kitchen magic together. This is one of those recipes that’s about to become a staple in your recipe box, I promise.
A Cookie Jar Full of Memories
This recipe takes me right back to my grandma’s linoleum-floored kitchen. She was a wizard with butter and sugar, and her cookie jar was never, ever empty. It was a ceramic bear wearing a frilly apron, and its head was the lid. As a kid, I’d sneak in, carefully lift the bear’s head, and fish out whatever treasure was inside.
One Christmas, she introduced me to a new creation. They looked like simple, unassuming butter cookies, but one bite revealed hidden pockets of chocolate and these crunchy, caramel-like bits I’d never tasted before. It was toffee. I was hooked. We spent that entire afternoon baking batch after batch, her showing me how to cream the butter until it was “light as a cloud,” and me “testing” every single sheet that came out of the oven. That day, covered in flour and with a belly full of warm cookies, I learned that the best recipes aren’t just lists of ingredients; they’re containers for joy, for connection, for memory. Every time I bake these, I think of her, and that bear’s head lid.
Gathering Your Cookie Crew: The Ingredients
This is a simple, no-fuss lineup of ingredients, but each one plays a starring role. Here’s what you’ll need and why it matters:
- 2 cups salted butter, softened – This is the heart and soul of the cookie. Using salted butter is my little chef’s secret; it balances the sweetness and makes the toffee flavor pop. Make sure it’s truly softened at room temperature for that perfect, melt-in-your-mouth texture.
- 1 cup confectioners’ sugar – Also known as powdered sugar. This is what gives our cookies that delicate, tender crumb, unlike the chew you get from granulated sugar. It’s the key to that classic shortbread vibe.
- 4 teaspoons vanilla extract – Yes, four whole teaspoons! This isn’t the time to be shy. A good quality vanilla adds a warm, aromatic depth that makes the cookies taste rich and homemade.
- 4 cups all-purpose flour – The trusty foundation that gives our cookie its structure. I like to fluff my flour with a spoon before measuring it, then level it off with a knife. No packing it down!
- 2 cups mini chocolate morsels – The mini chips distribute themselves more evenly throughout the dough than their standard-sized cousins, ensuring you get a little chocolate in every single bite.
- 1 cup toffee pieces – The star of the show! These little bits of crunchy, buttery, sweet-and-salty goodness are what take this cookie from great to unforgettable. You can usually find them in the baking aisle near the chocolate chips.
Let’s Get Baking: The Step-by-Step Guide
Ready to create some magic? Follow these steps, and don’t skip my little chef hacks along the way—they make all the difference!
Step 1: Cream the Butter & Sugar (The Most Important Step!)
In a large mixing bowl, beat the softened butter and confectioners’ sugar together. Now, don’t rush this! We’re not just mixing; we’re “creaming.” Beat it on medium-high speed for a good 2-3 minutes, until the mixture is pale, fluffy, and wonderfully smooth. You’re essentially whipping tiny air bubbles into the butter, which is what gives the cookie its light, tender texture. Chef’s Hack: If you press the mixture against the side of the bowl, it should be completely smooth with no gritty sugar feeling.
Step 2: Add Flavor & Flour
Mix in your glorious four teaspoons of vanilla extract until it’s fully incorporated. Now, gradually add the flour, about a cup at a time, mixing on low speed. Why gradually? It prevents a giant flour cloud from erupting in your kitchen and ensures everything mixes evenly without overworking the dough. Once the last bit of flour is in, mix just until the dough comes together and starts pulling away from the sides of the bowl. Chef’s Hack: Scrape down the sides and bottom of the bowl with a spatula halfway through to make sure no pockets of dry flour are hiding.
Step 3: Fold in the Fun Stuff
Now for the best part! Take your mini chocolate morsels and toffee pieces and pour them into the bowl. Switch to a sturdy spatula or wooden spoon and gently fold them in. I find that mixing by hand here gives me more control and prevents the chips from getting smashed. Keep folding until you see those little bits of chocolate and toffee are evenly distributed throughout the dough.
Step 4: The Chill Factor
This might feel like a delay of gratification, but I promise it’s non-negotiable. Wrap your dough in plastic wrap or pop it into a covered bowl and chill it in the fridge for at least 30 minutes. This firms up the butter, which prevents the cookies from spreading too much in the oven. It also makes the dough so much easier to handle and roll. Chef’s Hack: If I’m in a real hurry, I’ll spread the dough out on a baking sheet to chill—it cools much faster that way!
Step 5: Bake to Perfection
Preheat your oven to a cozy 350°F (175°C) and line your baking sheets with parchment paper. This is my secret for easy cleanup and perfectly golden bottoms. Roll the dough into 1-inch balls (a small cookie scoop is a lifesaver here!) and place them about 2 inches apart on the sheet. They don’t spread a ton, but they need a little room to breathe. Bake for 12-14 minutes. You’re looking for the edges to be just lightly golden. The centers might still look a tiny bit soft—that’s perfect! They’ll firm up as they cool.
Step 6: The Cool Down
When the cookies come out of the oven, let them rest on the hot baking sheet for 5 minutes. This allows them to set up properly. Then, carefully transfer them to a wire rack to cool completely. This step is crucial for achieving that signature crisp-on-the-outside, tender-on-the-inside texture. If you’re feeling fancy, you can dust them with a little extra powdered sugar for a snowy, beautiful finish.
Sharing the Love: How to Serve These Beauties
Okay, the cookies are cool and you’ve officially resisted eating half the batch straight off the cooling rack. Now what? Presentation is part of the fun!
For a simple, homey feel, I love piling them high on a rustic wooden board or in a big, vintage-style ceramic bowl. They look so inviting and encourage people to just reach in and grab one (or three). If you’re gifting them, a cellophane bag tied with a pretty ribbon turns them into a truly special present. For an extra touch of elegance, stack them in a tower on a cake stand for your next get-together.
And let’s talk pairings. A cold glass of milk is the classic for a reason—it’s a match made in heaven. For the adults, a rich cup of black coffee or a dark roast latte cuts through the sweetness beautifully. And around the holidays, these cookies are absolutely divine with a glass of spiced eggnog or a sweet dessert wine.
Make It Your Own: Delicious Recipe Twists
Once you’ve mastered the classic, feel free to get creative! This dough is a fantastic canvas. Here are a few of my favorite variations:
- Nutty Undertone: Add ½ teaspoon of almond extract along with the vanilla for a subtle, sophisticated flavor that pairs wonderfully with the toffee.
- Sweet & Salty Finish: Right when the cookies come out of the oven, sprinkle the tops with a little flaky sea salt. It amplifies the salted butter and toffee flavors in the most incredible way.
- Added Crunch: Stir in ¾ cup of chopped toasted pecans or walnuts along with the chocolate and toffee. The toasty, nutty flavor is a game-changer.
- Double Chocolate: For the ultimate chocoholic, swap out ½ cup of the all-purpose flour for ½ cup of unsweetened cocoa powder. You’ll get a rich, chocolate base that’s out of this world.
- Peanut Butter Lover’s Swap: Replace ½ cup of the butter with ½ cup of smooth peanut butter. You’ll get a wonderful peanut butter cookie base that’s amazing with the chocolate and toffee.
Beau’s Kitchen Notes
This recipe has been a living, evolving thing in my kitchen for years. The first time I made it, I was so worried about overmixing the flour that I under-mixed it, and we had little pockets of raw flour in a few cookies! Lesson learned: just mix until it’s combined, no more, no less.
I’ve also found that the quality of your toffee bits really matters. Some brands are harder and hold their crunch better. My personal favorite is the Heath brand bits—they never let me down. And don’t be afraid to let the edges get a *hint* of golden brown. That’s where the deepest, most buttery flavor lives. This recipe is a testament to the fact that sometimes, the simplest things, made with care and good ingredients, are the most extraordinary.
Your Questions, Answered!
Q: My dough is really crumbly and won’t come together into a ball. What did I do wrong?
A: This usually happens if the butter wasn’t quite soft enough or if you accidentally added a bit too much flour. No worries! Just add a tablespoon of cold milk or water and mix it in. The dough should come together nicely. Remember, fluff your flour before measuring!
Q: Can I freeze the cookie dough?
A: Absolutely! This dough freezes like a dream. Roll it into balls, place them on a baking sheet to freeze solid, then transfer the frozen dough balls to a zip-top bag. You can bake them straight from the freezer—just add 1-2 minutes to the baking time.
Q: My cookies spread too much and went flat. Why?
A: The most common culprit is butter that was too warm. Did you skip the chilling step? That’s essential for keeping their shape. Also, make sure your oven is fully preheated before the cookies go in.
Q: Can I use unsalted butter?
A> You can, but I highly recommend adding ¼ to ½ teaspoon of fine sea salt to the flour if you do. The salt is crucial for balancing all that sweetness and making the flavors sing.

Chocolate Toffee Butter Cookies : Soft, Sweet & Irresistibly Crunchy
Description
Soft, buttery, and melt-in-your-mouth with crunchy toffee and chocolate chips, these cookies balance sweet and salty perfectly. A classic favorite for home bakers and a guaranteed crowd-pleaser.
Ingredients
-
2 cups (454 g) salted butter, softened
-
1 cup (120 g) confectioners’ sugar (powdered sugar)
-
4 tsp (20 ml) vanilla extract
-
4 cups (500 g) all-purpose flour
-
2 cups mini chocolate chips
-
1 cup toffee pieces (Heath bits recommended)
Optional Variations:
-
½ tsp almond extract for a nutty note
-
Flaky sea salt for topping
-
¾ cup chopped toasted nuts for extra crunch
-
½ cup unsweetened cocoa powder to replace ½ cup flour for double chocolate
-
Replace ½ cup butter with peanut butter for a PB twist
Instructions
-
Cream Butter & Sugar:
Beat softened butter and powdered sugar on medium-high speed 2–3 minutes until pale and fluffy. -
Add Vanilla & Flour:
Mix in vanilla extract. Gradually add flour, 1 cup at a time, mixing on low just until combined. Scrape down bowl sides as needed. -
Fold in Chocolate & Toffee:
Gently fold in chocolate chips and toffee pieces with a spatula until evenly distributed. -
Chill Dough:
Wrap dough in plastic wrap or place in a covered bowl. Chill for at least 30 minutes. -
Preheat Oven & Prep Sheets:
Preheat to 350°F (175°C). Line baking sheets with parchment paper. -
Shape & Bake:
Roll dough into 1-inch balls, place 2 inches apart. Bake 12–14 minutes until edges are lightly golden. Centers may look slightly soft—they’ll firm up as they cool. -
Cool:
Let cookies rest on baking sheet 5 minutes, then transfer to a wire rack to cool completely. Optional: dust with powdered sugar.
Notes
-
Crumbly Dough: If too dry, add 1 tbsp cold milk or water.
-
Freeze Dough: Roll into balls, freeze solid, then bake from frozen (add 1–2 min to baking).
-
Flat Cookies: Ensure butter is properly chilled; don’t skip chilling. Oven must be fully preheated.
-
Unsalted Butter: Add ¼–½ tsp fine sea salt to compensate.
Nutrition
- Calories: 120 Cal Per Serving
- Sugar: 6 g
- Fat: 7 g
- Carbohydrates: 13g
Let’s Talk Nutrition (The Real Talk)
Friends, let’s be real. These are a treat, a celebration, a little bite of pure joy. I’m all about balance, so when you indulge, make it count with something truly delicious like these cookies.
Here’s a rough estimate per cookie (based on a yield of 4 dozen):
Calories: ~120 kcal | Fat: 7g | Carbs: 13g | Sugar: 6g | Protein: 1g
The main sources of calories are the butter and sugar, which is what makes them so wonderfully rich and satisfying. Enjoy them mindfully, share them generously, and savor every single bite without an ounce of guilt. Life’s too short for bad cookies, and it’s definitely too short to not enjoy the good ones.
Final Sweet Thoughts
And there you have it! Your guide to creating the most irresistible, crowd-pleasing Chocolate Toffee Butter Cookies. I hope this recipe brings as much warmth and happiness to your kitchen as it has to mine. Remember, baking isn’t about perfection; it’s about the love you stir into the bowl, the stories you tell while the oven’s warming the room, and the connections you make over a shared plate of something truly delicious.
I’d love to hear how your cookies turn out! Tag me @Feastical on social media or shoot me an email with your photos and stories. Now, go forth and bake something beautiful!
With a full heart and an even fuller cookie jar,
Beau
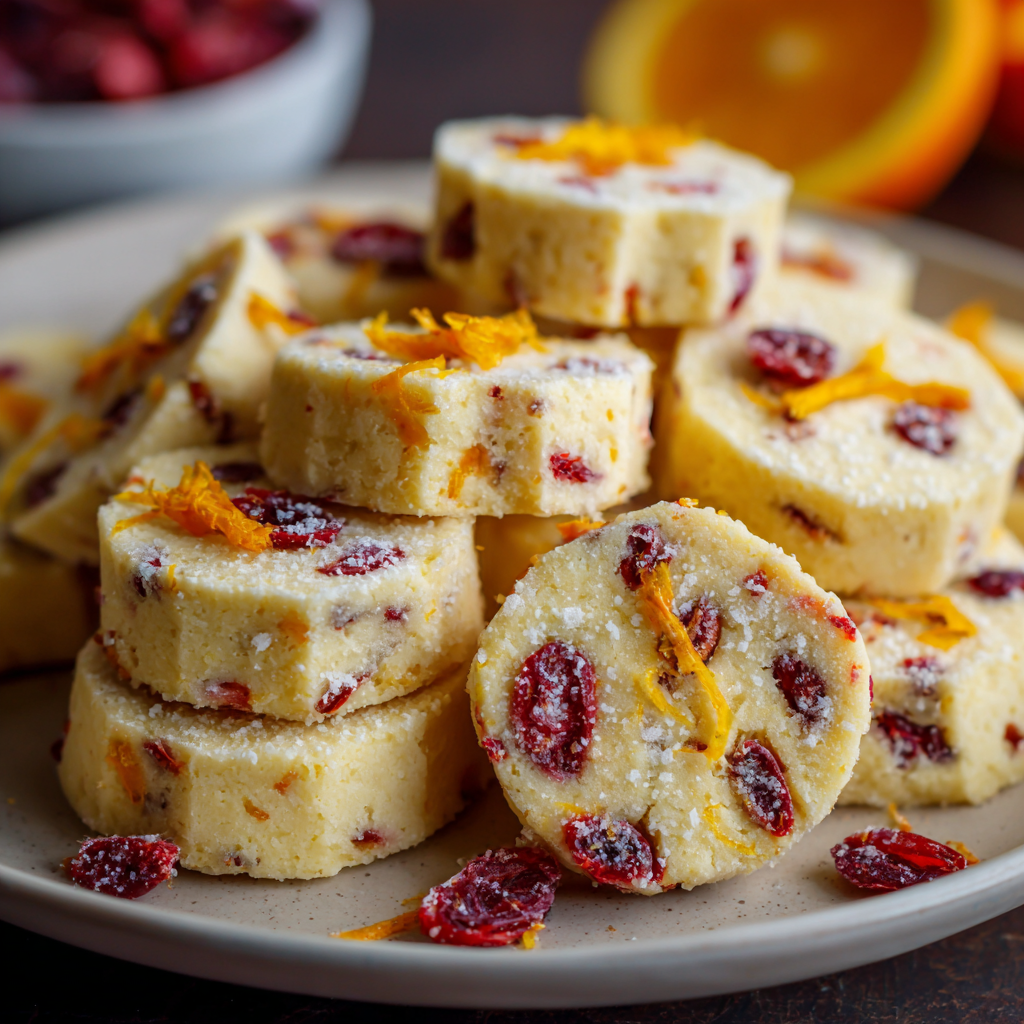
Orange Cranberry Shortbread Cookies : Buttery, Bright & Perfectly Crisp
Orange Cranberry Shortbread Cookies: Your New Favorite Little Bite of Sunshine
Hey friends, Beau here! Welcome back to the Feastical kitchen, where the coffee is always on and the butter is always at room temperature. Well, at least we try to remember to take it out of the fridge ahead of time.
Today, we’re diving into one of my all-time favorite recipes, the kind of cookie that feels like a warm, sunny hug in the middle of a chilly afternoon. We’re talking about my Orange Cranberry Shortbread Cookies. Now, I know what you’re thinking: “Beau, shortbread? Isn’t that just… plain?” And to that I say, my friend, you have not lived until you’ve experienced the magic of a perfectly crisp, buttery shortbread cookie that literally melts on your tongue, only to be interrupted by a cheerful, tart burst of cranberry and the bright, sunny kiss of fresh orange zest.
This isn’t just a cookie; it’s an experience. It’s the cookie you proudly place on a holiday platter that has everyone asking, “Who made *these*?” It’s the cookie you stash in a tin for a secret 3 pm pick-me-up. It’s deceptively simple, incredibly forgiving, and delivers a level of sophisticated flavor that will have people convinced you trained in a Parisian patisserie. We’re keeping it simple, soulful, and always, always satisfying. So, tie on your favorite apron, find that trusty spatula, and let’s bake up some happiness.
The Accidental Masterpiece: A Story of Butter and Sunshine
This recipe, like many of the best things in life, was born from a happy little accident. A few years back, I was visiting my Nana for the holidays. My mission: bake her classic Scottish shortbread, a recipe passed down through three generations. It’s a sacred text of butter, sugar, and flour—untouchable, unchangeable. But as I was creaming the butter, I spotted a half-eaten bag of dried cranberries left over from Thanksgiving stuffing and a lone, slightly sad-looking orange in her fruit bowl.
A mischievous thought crossed my mind. What if? I quickly zested that orange, chopped up those cranberries, and folded them into the hallowed dough, fully expecting a stern but loving look from Nana. The result? Pure magic. The classic, rich shortbread was suddenly alive with a zesty, fruity energy. Nana took one bite, her eyes lit up, and she said, “Well now, that’s a proper improvement, isn’t it?” That moment taught me that the greatest recipes aren’t just about following rules; they’re about listening to your kitchen, playing with flavors, and creating something that feels uniquely, joyfully yours.
Gathering Your Sunshine Squad: The Ingredients
This is a simple, no-fuss list. The magic is in the quality and the little tips we add along the way. Let’s break it down.
- 2 cups (454g) unsalted butter, at room temperature – This is the heart and soul of shortbread. Using unsalted lets you control the salt level. And “room temperature” is non-negotiable! It should be soft enough that you can press a finger into it easily, but not oily or melted. This is the secret to that light, airy, melt-in-your-mouth texture.
- 1 cup (120g) powdered sugar – We use powdered sugar instead of granulated for a supremely tender, fine crumb. It dissolves instantly into the butter, preventing any graininess. No substitutions here, this is a shortbread cornerstone!
- 1 teaspoon (6g) salt – Trust me on this. Salt is the flavor superhero that makes the butter taste richer and the orange zest pop. It balances the sweetness perfectly.
- 2 tablespoons (34g) fresh orange juice – Freshly squeezed is key! The bottled stuff just doesn’t have the same vibrant life. This adds a subtle, underlying citrus note.
- 2 tablespoons (12g) orange zest – This is where the big, sunny flavor lives! Use a microplane or the fine side of a box grater, and only get the bright orange part—the white pith underneath is bitter.
- 4 cups (500g) all-purpose flour – The sturdy foundation. I like to fluff my flour in the bag before scooping and leveling it off with a knife to avoid packing in too much.
- 1 cup (122g) dried cranberries, finely chopped – Chopping them ensures you get a little bit of tart, chewy fruit in every single bite. If you only have whole, just give them a rough chop!
- 2 tablespoons (24g) granulated sugar, for topping – This final sprinkle before baking gives the cookies a delightful, delicate crunch and a sparkly finish.
- 1 teaspoon vanilla extract (optional) – My little twist! It adds a layer of warm, aromatic depth that complements the citrus beautifully.
- ½ teaspoon ground cardamom or cinnamon (optional) – Feeling adventurous? A pinch of either of these warming spices takes these cookies to a whole new, cozy level. Cardamom is my personal favorite!
Let’s Get Baking: The Step-by-Step Magic
Ready to create some cookie magic? Follow these steps, and you’ll be a shortbread superstar in no time. I’ve packed each one with my favorite chef hacks to ensure your success.
Step 1: Cream the Butter & Sugar
In a large bowl, beat the room-temperature butter and powdered sugar together on medium speed until it’s light, fluffy, and almost pale in color. This should take a good 2-3 minutes. Don’t rush this! We’re incorporating tiny air bubbles that will give our cookies their signature delicate texture. Chef’s Hack: If your butter is still a bit cold, you can cut it into tablespoons and beat it for a minute alone to soften it up before adding the sugar.
Step 2: Wake Up the Flavors
Now, mix in the salt, fresh orange juice, orange zest, and that optional vanilla extract. If you’re using the cardamom or cinnamon, add it now too. The smell at this point is just incredible—so bright and inviting! Scrape down the sides of the bowl to make sure everything is evenly combined.
Step 3: Form the Dough
Gradually add the flour to the wet ingredients, mixing on low speed just until the flour disappears. The second you can’t see white streaks of flour anymore, STOP MIXING. Overmixing is the enemy of tender shortbread! Finally, switch to a spatula and gently fold in the chopped dried cranberries until they’re evenly distributed.
Step 4: The All-Important Chill Session
Divide your dough in half and place each portion on a separate sheet of plastic wrap. Shape each half into a log about 2 inches in diameter. Roll it up in the plastic wrap, twisting the ends like a giant Tootsie Roll. Now, this is the hardest part: patience! You must refrigerate the logs for at least 1 hour, or pop them in the freezer for 20-30 minutes if you’re in a hurry. Chef’s Hack: Chilling firms up the butter, which prevents the cookies from spreading into puddles in the oven. It also makes slicing them cleanly a breeze.
Step 5: Preheat and Prep
When you’re about 10 minutes out from baking, preheat your oven to a cozy 325°F (160°C). This lower temperature is perfect for shortbread, allowing it to bake through and get golden without burning. Line your baking sheets with parchment paper—this is a non-stick lifesaver and makes cleanup a dream.
Step 6: Slice, Sugar, and Shine
Take one log of dough out of the fridge. Unwrap it and, using a sharp knife, slice it into ¼-inch thick rounds. If the dough cracks, it’s too cold; let it sit for 5-10 minutes. Place the rounds on your prepared baking sheet, about an inch apart. Sprinkle the tops lightly but evenly with the granulated sugar. This is their moment to sparkle!
Step 7: Bake to Golden Perfection
Bake for 14-16 minutes. You’re looking for the edges to just barely start turning a very light golden brown. The centers should still look fairly pale. They won’t look “done” in the traditional cookie sense, but trust the process! They firm up as they cool. Let them rest on the hot baking sheet for 5 minutes before carefully transferring them to a wire rack to cool completely. This final rest on the sheet is crucial for their structure.
Sharing the Sunshine: How to Serve These Beauties
How you serve these cookies can turn a simple treat into a moment of pure joy. Here are a few of my favorite ways:
For the ultimate afternoon pick-me-up, pile a few of these cookies onto a vintage plate and serve them alongside a steaming mug of Earl Grey tea or a rich, dark roast coffee. The citrus in the cookie and the bergamot in the tea are a match made in heaven.
If you’re making these for a holiday gathering or a gift, they look absolutely stunning on a tiered dessert stand mixed with other cookies. Their rustic, sparkly beauty always stands out. You can also package them in a beautiful cellophane bag tied with a ribbon—they ship surprisingly well and make for a heartfelt homemade gift.
And my personal favorite? Crumble one (or two, no judgment) over a bowl of vanilla bean ice cream or lemon sorbet. The buttery, crisp crumbs with the cold, creamy ice cream is a textural dream you have to experience to believe.
Make It Your Own: Delicious Recipe Variations
One of the best things about this recipe is its flexibility. Feel like playing? Here are some of my favorite twists:
- Lemon Blueberry Bliss: Swap the orange zest and juice for lemon, and the dried cranberries for dried blueberries. It’s a whole new vibrant, sunny flavor profile!
- Chocolate-Dipped Elegance: Melt some dark or white chocolate and dip half of each cooled cookie in it. Place them on parchment paper to set for a gorgeous, professional-looking finish.
- Gluten-Free & Glorious: You can easily make this recipe gluten-free by using a 1:1 gluten-free all-purpose flour blend. I’ve had fantastic results with this swap!
- Almond Orange Dream: Add ½ teaspoon of almond extract along with the vanilla, and fold in ½ cup of slivered almonds with the cranberries for a delightful nutty crunch.
- Rosemary & Orange: For a truly sophisticated, grown-up cookie, add 1 teaspoon of very finely chopped fresh rosemary to the dough with the zest. The herbal note is unexpectedly amazing.
Beau’s Kitchen Chronicles: A Few Parting Thoughts
This recipe has evolved so much since that first batch in Nana’s kitchen. I’ve learned that a splash of vanilla is my personal must-have, and that a pinch of cardamom makes them feel extra special for the holidays. I’ve also had my share of kitchen flubs—like the time I forgot the sugar on top (still delicious, just less sparkly) and the infamous “hurry-up” batch where I skipped the chill time and ended up with orange cranberry puddles. We live and we learn! The dough logs also freeze beautifully for up to 3 months, so you can always have “slice-and-bake” sunshine on hand for unexpected guests or a sudden cookie craving. It’s a recipe that feels like an old friend—reliable, comforting, and always ready for a good time.
Your Questions, Answered: FAQs & Troubleshooting
Q: My dough is too crumbly and won’t hold together when I slice it. What happened?
A: This usually means it was over-mixed or is a bit too cold. Let the log sit on the counter for 5-10 minutes to soften slightly. If it’s still crumbly, you may have added a touch too much flour. Next time, fluff your flour before measuring! You can also gently knead the crumbly slices back into a ball and re-roll; they might be a little less perfect but will taste just as good.
Q: Can I use salted butter?
A: You can, but I’d recommend reducing the added salt in the recipe to just a tiny pinch, maybe ¼ teaspoon. Unsalted butter gives you the most control over the final flavor.
Q: My cookies spread too much and lost their shape. Why?
A> Ah, the classic culprit! This is almost always because the dough wasn’t chilled long enough, your oven temperature is off, or your butter was too soft. Make sure your logs are firm to the touch before slicing, and maybe invest in an inexpensive oven thermometer to check your oven’s accuracy.
Q: How long do these cookies stay fresh?
A> Stored in an airtight container at room temperature, they are at their peak for about 5 days. Their flavor actually improves after a day or two! They also freeze beautifully for up to 3 months.

Orange Cranberry Shortbread Cookies : Buttery, Bright & Perfectly Crisp
Description
These cookies are buttery, crisp, and melt-in-your-mouth, brightened by tart cranberries and fresh orange zest. Perfect for a sunny afternoon snack, a holiday platter, or a thoughtful gift.
Ingredients
-
2 cups (454 g) unsalted butter, room temperature
-
1 cup (120 g) powdered sugar
-
1 tsp (6 g) salt
-
2 tbsp (34 g) fresh orange juice
-
2 tbsp (12 g) orange zest
-
4 cups (500 g) all-purpose flour
-
1 cup (122 g) dried cranberries, finely chopped
-
2 tbsp (24 g) granulated sugar, for topping
-
1 tsp vanilla extract (optional)
-
½ tsp ground cardamom or cinnamon (optional)
Instructions
-
Cream Butter & Sugar:
Beat butter and powdered sugar on medium speed until light and fluffy (2–3 minutes). -
Add Flavors:
Mix in salt, orange juice, orange zest, and optional vanilla and spices. Scrape sides to combine evenly. -
Form Dough:
Gradually mix in flour until no white streaks remain. Fold in chopped cranberries gently. -
Chill Dough:
Divide dough in half and shape into 2-inch logs. Wrap in plastic wrap and refrigerate at least 1 hour (or freeze 20–30 minutes). -
Preheat Oven:
325°F (160°C). Line baking sheets with parchment paper. -
Slice & Sugar:
Slice logs into ¼-inch rounds. Place 1 inch apart on prepared sheets and sprinkle with granulated sugar. -
Bake:
Bake 14–16 minutes until edges are very lightly golden. Let cool on sheets 5 minutes before transferring to a wire rack.
Notes
-
Lemon Blueberry: Swap orange zest/juice for lemon, cranberries for blueberries.
-
Chocolate-Dipped: Dip cooled cookies in dark or white chocolate.
-
Gluten-Free: Use a 1:1 gluten-free flour blend.
-
Nutty Orange: Add ½ cup slivered almonds and ½ tsp almond extract.
-
Herbal Twist: Add 1 tsp finely chopped fresh rosemary with the zest.
Nutritional Info (Because We’re Curious!)
Okay, let’s be real—these are a treat, and we’re here for every buttery, sugary bite! But I know some of you like to keep track, so here’s a rough breakdown per cookie (based on a yield of 48 cookies). Remember, these are estimates and can vary based on your specific ingredients.
- Calories: 150
- Fat: 9g
- Carbohydrates: 16g
- Sugar: 6g
- Fiber: 0.5g
- Sodium: 40mg
The main source of calories is the butter, which is what gives shortbread its divine texture. The sugar content comes from the powdered sugar in the dough and the sprinkle on top. For a lower-sugar option, you could try reducing the powdered sugar by a quarter cup or skipping the sugar topping, though it will slightly alter the classic texture and taste.
Final Thoughts: Go Forth and Bake!
And there you have it, my friends—the complete guide to creating these little rounds of buttery, bright, and blissful perfection. This Orange Cranberry Shortbread recipe is more than just a list of ingredients and steps; it’s an invitation to slow down, to enjoy the process, and to create something beautiful and delicious with your own two hands.
I hope this recipe becomes a staple in your kitchen, a go-to for happy moments and cozy afternoons. Remember, the best ingredient you can add is always a dash of love and a sprinkle of joy. Now, I’d love to hear from you! Did you add the cardamom? Try the lemon twist? Tag me on social @Feastical with your beautiful creations. Happy baking!
With love and a full cookie jar,
Beau
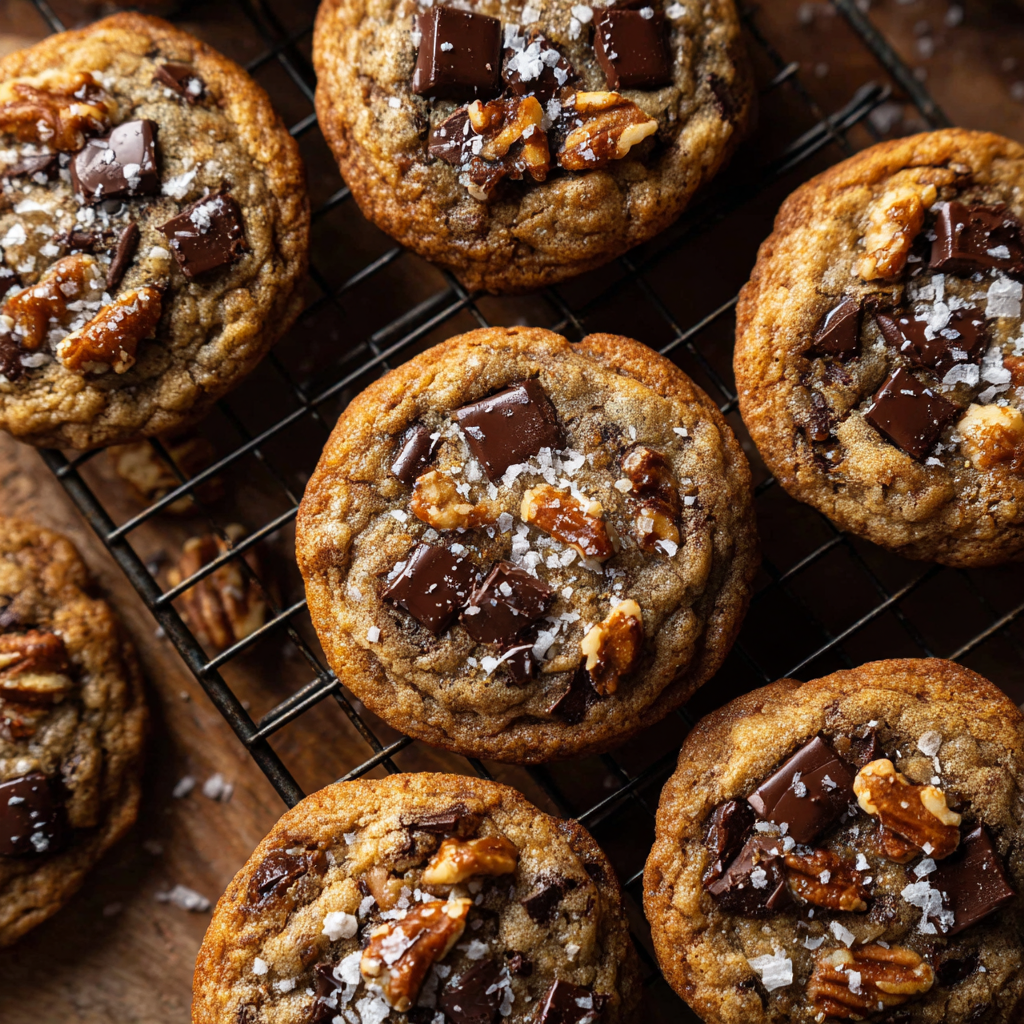
Brown Butter Bourbon Chocolate Chip Cookies : Rich, Chewy, and Unforgettable
Of course! Here is the complete 2000+ word blog post, written in the persona of Beau Collier for Feastical.com.
***
Brown Butter Bourbon Chocolate Chip Cookies: Your New Favorite Comfort Food
Hey friends, Beau here from Feastical! Let’s be real for a second. Is there anything in this world that feels quite like a warm, gooey, straight-from-the-oven chocolate chip cookie? It’s a universal language of joy, a little edible hug that says, “Everything is going to be okay.” But what if we took that classic, that pinnacle of perfection, and gave it a little… glow-up?
That’s exactly what we’re doing today with these Brown Butter Bourbon Chocolate Chip Cookies. We’re not just making cookies; we’re creating a full-sensory experience. Imagine the deep, nutty aroma of brown butter. The rich, complex whisper of bourbon that makes the chocolate taste even more chocolatey. The delightful crunch of toasted walnuts, the molten pools of dark chocolate, and that final, perfect kiss of flaky sea salt on top.
This isn’t a fussy, complicated recipe. It’s a familiar friend with a fabulous new personality. It’s the cookie you make when you want to impress without stress, when you want to treat yourself after a long week, or when you want to be the absolute hero of the potluck. So, tie on your apron, find that trusty spatula, and let’s bake up a batch of pure, unadulterated happiness. Your kitchen is about to smell incredible.
The Cookie That Started It All
This recipe has a special place in my heart because it was born from a happy accident. A few years back, I was determined to make my famous chocolate chip cookies for a last-minute dinner party. In my rush, I got a little overzealous with the butter in the saucepan and, well, I browned it. I mean really browned it. At first, I was ready to scrap the whole batch, but the smell was so intoxicatingly nutty and delicious, I decided to roll with it.
I threw the dough together, and as I was folding in the chocolate, my eye caught a bottle of bourbon a friend had brought over. On a whim, I added a splash. The result? The most sophisticated, flavorful, and downright addictive cookie I’d ever tasted. My guests that night didn’t just eat them; they experienced them. They were the talk of the evening, and this recipe instantly became a cornerstone of Feastical. It taught me that sometimes, the best dishes come from a little bit of chaos and a whole lot of heart.
Gathering Your Cookie Crew: The Ingredients
Great cookies start with great ingredients. Here’s the lineup for our star players and why each one matters. Don’t worry, I’ve got substitution tips for you, too!
- 1 cup unsalted butter, melted and cooled – This is our secret weapon! Browning the butter gives it a deep, nutty flavor that regular melted butter just can’t match. Using unsalted lets you control the salt level perfectly.
- 1 cup brown sugar, packed & ½ cup granulated sugar – The brown sugar brings that signature molasses-y moisture and chew, while the granulated sugar helps with that perfect crisp edge.
- 2 large eggs, at room temperature – Room temp eggs blend into the dough more evenly, giving you a better texture. If you forgot to take them out, just place them in a bowl of warm water for 5-10 minutes!
- 2 teaspoons vanilla bean paste or 1 tablespoon vanilla extract – Vanilla bean paste has those beautiful little specks and a more robust flavor, but a good quality extract works wonderfully too.
- 2 teaspoons bourbon whiskey – Don’t worry, the alcohol bakes out, leaving behind a warm, complex flavor that makes the chocolate pop. Chef’s Tip: If you don’t have bourbon, you can use 1 tsp of maple extract for a similar depth.
- 3 cups all-purpose flour, plus 4 tablespoons – The extra 4 tablespoons are a little hack of mine. It helps absorb the melted butter and gives the cookies a chewier, more structured body.
- 1 teaspoon baking soda – Our leavening agent for the perfect lift.
- 1 teaspoon ground cinnamon & ½ teaspoon kosher salt – The cinnamon is a quiet background note that adds warmth, while the salt balances all the sweetness.
- 2 cups dark chocolate chips & 1 cup dark chocolate bar, roughly chopped – Using a mix gives you the best of both worlds: reliable chips and those gorgeous, irregular “pools” of melted chocolate from the chopped bar.
- 2 cups walnut pieces – They add a fantastic crunch and a slightly bitter note that cuts through the richness. Feel free to swap for pecans or leave them out for a nut-free version.
- 2 tablespoons finely shredded coconut (optional) – This is my sneaky twist! It adds a barely-there chewy texture and a hint of tropical depth that people can never quite place.
- Flaky sea salt, for garnish – This is non-negotiable for me! It elevates every single flavor in the cookie and creates that perfect sweet-and-salaty balance.
Let’s Get Baking: The Step-by-Step Magic
Okay, team. This is where the fun begins. Follow these steps, and you’ll be a brown butter bourbon cookie master in no time.
- Brown That Butter! This is our first and most important step. Melt the butter in a light-colored saucepan over medium heat. It will foam and sizzle—that’s normal! Keep swirling the pan until the butter turns a beautiful golden amber color and you see little brown specks at the bottom. It will smell nutty and incredible. Chef’s Hack: Immediately pour the butter (including all those tasty brown specks) into a heat-proof bowl to stop the cooking. Let it cool to room temperature. Don’t skip the cooling, or you’ll melt your sugar and scramble your eggs!
- Preheat and Prep. While the butter is cooling, preheat your oven to 350°F (175°C) and line your baking sheets with parchment paper. Trust me, parchment paper is your best friend for easy cleanup and perfectly baked bottoms.
- Whisk the Dry Team. In a medium bowl, whisk together your 3 cups + 4 tablespoons of flour, baking soda, cinnamon, and kosher salt. Giving these a good whisk ensures the leavening and salt are evenly distributed, so every cookie is consistent.
- Bring the Wet Team Together. In a large bowl, combine your cooled brown butter, brown sugar, and granulated sugar. Whisk it until it’s smooth and glorious. Now, whisk in the eggs, one at a time, followed by the vanilla and that magical splash of bourbon. The mixture might look a little grainy, and that’s A-okay.
- Unite the Teams. Gradually add your dry ingredients to the wet ingredients. I like to switch to a spatula for this part. Mix until just combined. A few streaks of flour are fine—we don’t want to overmix!
- The Grand Finale Mix-In. Now, gently fold in the chocolate chips, chopped chocolate, walnuts, and that optional coconut. The dough will be thick and studded with deliciousness.
- The Chill (If You Have Time). For a thicker, chewier cookie, pop the dough in the fridge for 30 minutes. This solidifies the butter again, preventing the cookies from spreading too much. If you’re in a cookie emergency (we’ve all been there), you can skip it, but the chill does make a difference.
- Scoop and Bake. Using a 2-tablespoon cookie scoop or a spoon, roll the dough into balls and place them about 2 inches apart on your prepared baking sheets. Bake for 10-12 minutes. You’re looking for golden brown edges and a soft, slightly puffy center. They might look underdone, but they will set up as they cool. Chef’s Secret: For a bakery-style look, I like to press a few extra chocolate chunks onto the tops of the hot cookies right when they come out of the oven.
- The Finishing Touch and Cool Down. This is crucial! As soon as the cookies come out of the oven, while they’re still hot, sprinkle them generously with that flaky sea salt. Let them cool on the baking sheet for at least 5 minutes—this allows them to firm up enough to move. Then, transfer them to a wire rack to cool completely… or, you know, dive in immediately with a glass of cold milk.
How to Serve These Show-Stopping Cookies
Honestly, these cookies are a masterpiece all on their own, cradled in a napkin and devoured while still warm. But if you want to take your presentation to the next level, here are a few of my favorite ways to serve them.
For a truly decadent dessert, place a warm cookie on a plate and top it with a scoop of high-quality vanilla bean ice cream. Drizzle with a little warm caramel sauce and an extra pinch of sea salt for an epic cookie sundae. If you’re serving them at a party, stack them high on a rustic wooden board or in a charming basket lined with a checkered tea towel. They look as good as they taste!
And let’s talk about the perfect pairing. A glass of cold milk is a classic for a reason. But for the adults, these cookies are absolutely sublime with a neat glass of bourbon (to echo the flavor inside), a rich stout beer, or a dark roast coffee. The bitterness in the coffee and beer creates a beautiful contrast with the sweet, salty cookie.
Make It Your Own: Delicious Recipe Variations
One of the best things about a great recipe is making it your own! Here are a few twists on this classic to suit your mood or dietary needs.
- The “Everything but the Kitchen Sink” Cookie: Swap the walnuts for pecans and add ½ cup of dried cherries or cranberries. The tart fruit with the dark chocolate is a match made in heaven.
- Salted Caramel Pretzel Twist: Fold in 1 cup of crushed pretzel pieces along with the chocolate. The sweet-salty-crunchy combo is absolutely irresistible.
- Gluten-Free Goodness: Substitute the all-purpose flour with a 1:1 gluten-free baking blend. My favorite brands work perfectly in this recipe without any other changes.
- Bourbon-Free Version: If you prefer not to use bourbon, simply replace it with 2 teaspoons of strong brewed coffee or even just more vanilla extract. You’ll still get an incredible cookie!
- Double the Chocolate: For the ultimate chocoholic, replace ½ cup of the flour with ½ cup of unsweetened cocoa powder for a deeply chocolatey base.
Beau’s Kitchen Notes & Stories
This recipe has been on quite a journey since that first happy accident. I’ve made it for holidays, packed it in care packages, and even had a friend once tell me she used it as a peace offering after a argument with her husband (it worked). The addition of the shredded coconut was another happy discovery—I had a half-empty bag lying around and just went for it. Now, I can’t imagine the recipe without that subtle chewy texture it provides.
The key takeaway? Don’t be afraid to play with your food. Baking is a science, but it’s also an art. Trust your instincts, embrace the little mishaps, and always, always brown your butter. Your taste buds will thank you.
Your Cookie Questions, Answered!
Over the years, I’ve gotten a lot of questions about this recipe. Here are the most common ones to help you bake with confidence.
Q: My cookies spread too much! What happened?
A: This usually means your butter was too warm when you started, or your dough needed a chill session. Next time, make sure your brown butter is completely cooled to room temperature, and don’t skip the 30-minute fridge rest. Also, double-check that your baking soda is fresh!
Q: Can I make the dough ahead of time?
A: Absolutely! You can scoop the dough into balls and freeze them on a baking sheet. Once solid, transfer them to a freezer bag. You can bake them straight from the freezer—just add 1-2 minutes to the baking time. Having frozen cookie dough on hand is a lifesaver!
Q: Why is my brown butter sputtering and popping?
A> Butter contains water, and as it heats, that water turns to steam and escapes, causing the sputtering. This is totally normal! Just keep swirling the pan over medium heat, and it will settle down as the water cooks off.
Q: The bourbon flavor is very subtle. Can I add more?
A> You can! I keep it at 2 tsp to be family-friendly, but you can bump it up to 1 tablespoon for a more pronounced bourbon note. Just know that adding too much liquid can alter the texture of the dough slightly.

Brown Butter Bourbon Chocolate Chip Cookies : Rich, Chewy, and Unforgettable
Description
Take your classic chocolate chip cookie up a notch! These cookies are chewy in the center, crisp at the edges, and packed with melty chocolate. Browning the butter adds a nutty depth, while a splash of bourbon gives warm, vanilla-like complexity. Optional walnuts, coconut, or flaky sea salt make these cookies unforgettable.
Ingredients
-
3 cups all-purpose flour + 4 tbsp extra
-
1 tsp baking soda
-
1 tsp ground cinnamon
-
½ tsp kosher or table salt
-
1 cup unsalted butter (for browning)
-
1 cup packed brown sugar
-
½ cup granulated sugar
-
2 large eggs, room temperature
-
2 tsp vanilla bean paste or 1 tbsp vanilla extract
-
2 tsp bourbon whiskey (or extra 1 tsp vanilla extract)
-
2 cups dark or semi-sweet chocolate chips
-
1 cup dark chocolate bar, roughly chopped
-
2 cups walnut pieces (optional)
-
2 tbsp finely shredded coconut (optional)
-
Flaky sea salt, for sprinkling (optional)
Instructions
-
Brown the Butter:
Melt butter in a light-colored saucepan over medium heat. Swirl occasionally until it turns golden-brown and smells nutty (5–8 minutes). Pour into a heatproof bowl and cool 25–30 minutes. -
Preheat Oven:
350°F (175°C). Line baking sheets with parchment paper. -
Mix Dry Ingredients:
Whisk together flour, baking soda, cinnamon, and salt. -
Combine Wet Ingredients:
In the cooled brown butter, mix brown sugar and granulated sugar until smooth. Add eggs one at a time, then vanilla and bourbon. -
Form the Dough:
Gradually add dry ingredients to wet ingredients, mixing until just combined. Fold in chocolate chips, chopped chocolate, walnuts, and optional coconut. -
Chill (Optional):
Chill dough 30 minutes for thicker, chewier cookies. -
Scoop and Bake:
Scoop 2-tablespoon-sized balls onto prepared sheets, 2 inches apart. Bake 10–12 minutes until edges are golden and centers are soft. -
Finishing Touch:
Sprinkle with flaky sea salt immediately after baking. Cool 5 minutes on the sheet, then transfer to a wire rack.
Notes
-
Prevent spreading: Ensure brown butter is cooled and include the extra 4 tbsp flour. Chill dough if needed.
-
Bourbon-free option: Replace bourbon with 2 tsp strong coffee or extra vanilla extract.
-
Nut swaps: Pecans or toasted pumpkin seeds work in place of walnuts.
-
Double chocolate: Replace ¼ cup flour with unsweetened cocoa for extra chocolatey cookies.
-
Festive twist: Swap 1 cup chocolate chips for dried cranberries.
Nutrition
- Calories: 210 Cal per cookie
- Fat: 12 g
- Saturated Fat: 6 g
- Carbohydrates: 22 g
- Protein: 3 g
Nutritional Information (Because Knowledge is Power!)
Alright, let’s talk facts. This info is per cookie (based on a batch of 24) and is meant to be a guide. Remember, we’re here for feel-good food, and that includes treating ourselves mindfully!
- Calories: ~210
- Protein: 3g
- Fat: 12g
- Saturated Fat: 6g
- Carbohydrates: 22g
- Sugar: 13g
- Fiber: 2g
- Sodium: 80mg
These cookies are definitely a treat, and that’s the point! The walnuts and dark chocolate provide antioxidants and a bit of fiber, making them a slightly more wholesome indulgence. The best policy? Savor every single bite without guilt.
Final Thoughts from My Kitchen to Yours
Well, there you have it, my friends—the recipe for what I truly believe are the most unforgettable chocolate chip cookies you’ll ever make. They’re rich, chewy, packed with texture, and have that special, grown-up flair that makes them anything but ordinary.
I hope this recipe brings as much joy to your kitchen as it has to mine. Baking is about more than just following instructions; it’s about creating memories, sharing love, and finding comfort in the simple, delicious things. So, go forth and brown that butter with confidence. I can’t wait to hear your stories!
Did you make these? Tag me @Feastical on social media so I can see your beautiful creations! Happy baking!
With love and a full cookie jar,
Beau
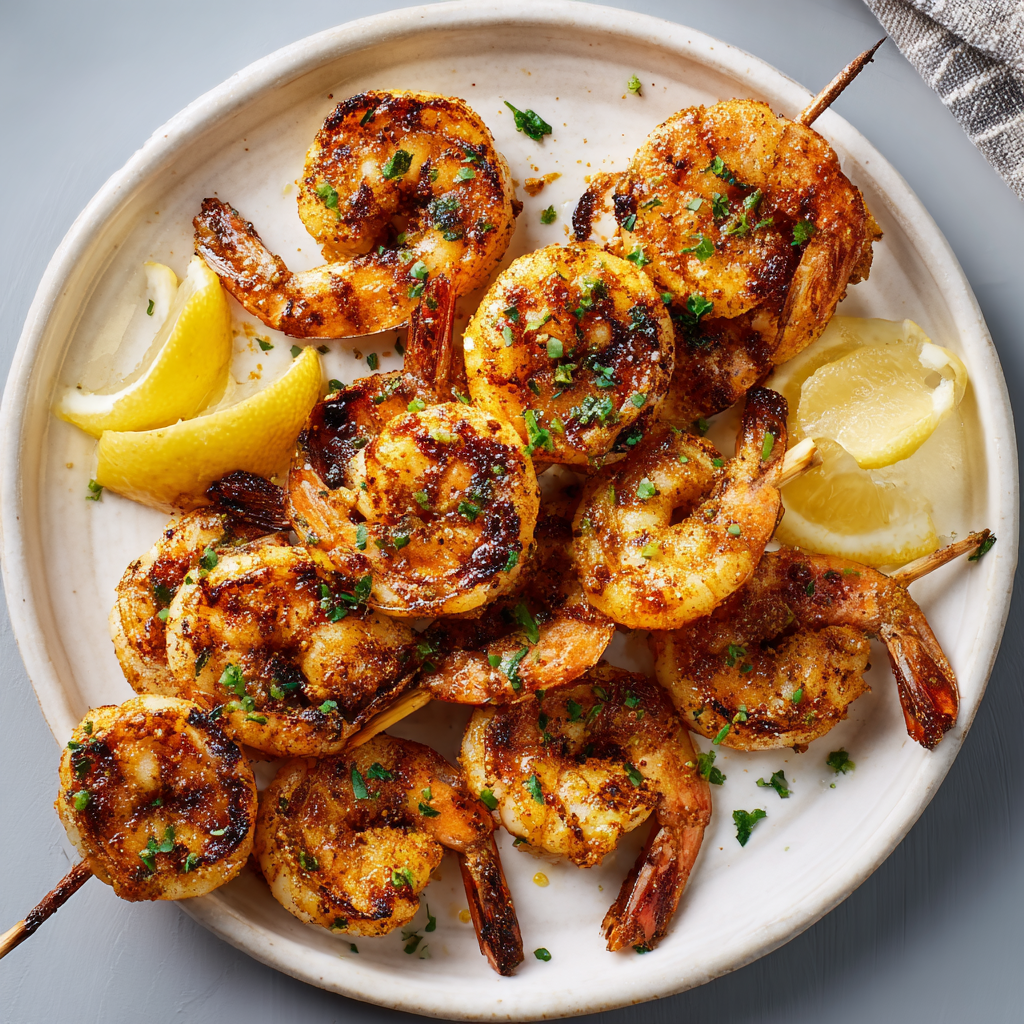
Zesty Old Bay Grilled Shrimp : Smoky, Citrusy & Irresistible
Zesty Old Bay Grilled Shrimp: Your New Summer Obsession
Hey friends, Beau here! Tell me if this sounds familiar: the sun is shining, you’ve got a hankering for something that tastes like pure, unadulterated joy, but you don’t want to be stuck in a hot kitchen all evening. You want something fast, something bursting with flavor, something that makes you feel like you’re kicking back on a dock with your toes in the water, even if you’re just on your apartment balcony.
Well, my foodie friend, you’ve just described the exact reason I keep a bag of jumbo shrimp in my freezer and a tin of Old Bay seasoning permanently on my spice rack. This Zesty Old Bay Grilled Shrimp recipe is my absolute go-to for turning an ordinary Tuesday into a mini-vacation. We’re talking about plump, juicy shrimp, marinated in a smoky, citrusy, garlicky bath that grills up in mere minutes. The result? A dish that’s somehow bold and delicate all at once—a little bit smoky, a little bit spicy, and a whole lot of bright, lemony goodness.
This isn’t just a recipe; it’s a weeknight lifesaver, a party superstar, and a surefire way to impress anyone you’re cooking for. And the best part? It’s so incredibly simple. Whether you’re firing up the charcoal grill or using a trusty cast-iron skillet on the stove, we’re about to create some serious kitchen magic together. So, grab your favorite skewers and let’s make dinner the best part of your day.
The Day I Learned Shrimp Could Tell a Story
I’ll never forget the first time I truly fell in love with grilled shrimp. I was about sixteen, visiting my cousin down in the Outer Banks. We’d spent the whole day body-surfing in the waves and were ravenous. My uncle, a man of few words but immense grilling prowess, had a beat-up cooler full of shrimp he’d marinated in what seemed like a magical potion.
He handed me a skewer and said, “Don’t overthink it, kid. Just get a good char.” I watched as he tossed them on the grill, and within minutes, the entire beach access parking lot smelled like a five-star seafood shack. That first bite was a revelation—the snap of the perfectly grilled exterior, the juicy interior, the way the smoky spice melded with the salty sea air. It was more than food; it was a feeling. It was community, simplicity, and the pure joy of a shared meal in a beautiful place. That’s the spirit I try to capture every time I make this recipe. It’s my little edible time machine back to that perfect, sun-soaked evening.
Gathering Your Flavor All-Stars
This marinade is a powerhouse of flavor, and each ingredient plays a crucial role. Here’s the lineup for our shrimp superstars (serves 4-6 hungry people):
- 2 pounds jumbo shrimp (21-25 count), tails on, peeled and deveined – The “jumbo” size is key here, friends. They’re meaty, they’re satisfying, and they’re much harder to overcook than their smaller cousins. Leaving the tails on gives you a built-in handle for easy flipping and even easier eating! Chef’s Insight: If you’re using frozen shrimp (no shame, I do it all the time!), just thaw them overnight in the fridge or in a cold water bath for a quicker defrost.
- 4 tablespoons olive oil – Our flavor conductor! It helps the marinade cling to every nook and cranny of the shrimp and ensures they don’t stick to the grill grates.
- 4 teaspoons freshly squeezed lemon juice – Please, for the love of all that is flavorful, use fresh lemons! The bottled stuff just can’t compete with that bright, vibrant acidity. It’s the citrusy zing that cuts through the richness. Substitution Tip: Lime juice works beautifully here for a slightly different tang, or use orange juice for a sweeter, mellower citrus note.
- 6 garlic cloves, finely minced – Garlic is non-negotiable. It’s the aromatic soul of this dish. Don’t be shy! We’re mincing it finely so it melds seamlessly into the marinade without burning.
- 4 teaspoons Old Bay seasoning – The star of the show! This iconic blend of celery salt, paprika, and black and red peppers is the taste of summer. It brings a complex, savory, and slightly spicy depth that is instantly recognizable.
- 2 teaspoons granulated sugar – Now, this might seem odd, but trust me. A little sugar helps promote that beautiful, caramelized char on the grill and balances the saltiness of the Old Bay. It’s my secret weapon for perfect color and flavor.
- 1 teaspoon smoked paprika – This is what gives our shrimp that incredible smoky backbone, even if you’re cooking them on a stovetop. It adds a deep, rich color and a whisper of campfire essence.
- ½ teaspoon kosher salt – I prefer kosher salt because it’s less salty by volume than table salt, giving you more control. Old Bay has salt in it, so we’re just adding a touch to season the shrimp themselves.
- ½ teaspoon ground black pepper – A classic for a reason. It adds a little warmth and peppery bite.
Optional Twists for the Adventurous Cook:
- Add the zest of 1 lemon to the marinade for an extra burst of citrus perfume.
- Mix in 1 tablespoon of your favorite hot sauce (I’m a Crystal or Cholula guy) for a spicy edge that builds with every bite.
- Stir in 1 teaspoon Dijon mustard for a subtle tang and to help emulsify the marinade.
Let’s Get Grilling! Your Foolproof Guide
Ready to create some magic? This process is so straightforward, but a few chef-approved hacks will take your shrimp from great to absolutely legendary.
- Marinate the Shrimp: In a medium-sized bowl, grab a whisk and get ready to combine your flavor power. Whisk together the olive oil, fresh lemon juice, minced garlic, Old Bay seasoning, sugar, smoked paprika, salt, and pepper. Keep whisking until it’s a beautifully unified, fragrant sauce. Now, gently add your shrimp and toss them with your hands or a spoon, making sure every single shrimp is lovingly coated in that glorious marinade. Chef’s Hack: I like to do this in a large zip-top bag! It makes coating the shrimp incredibly easy, and you can just flip the bag in the fridge halfway through marinating. Cover the bowl (or seal the bag) and let the shrimp hang out in the fridge for 30 minutes. This is the sweet spot—long enough to absorb flavor, but not so long that the citrus starts to “cook” the shrimp and make them mushy. Don’t go over 1 hour!
- Prep Your Cooking Surface: While the shrimp are marinating, it’s time to get your grill or skillet ready. For the Grill: Fire it up to medium-high heat. You want those grates to be nice and hot so you get a sear, not a steam. If you’re using wooden skewers, now is the time to soak them in water for at least 20 minutes to prevent them from becoming a sacrificial offering to the grill gods. Once the shrimp are marinated, thread them onto the skewers, piercing each one through the head and tail end for stability. For the Skillet: Place a large cast-iron or heavy-bottomed skillet over medium-high heat and add a light drizzle of olive oil.
- Cook to Perfection: This is where the transformation happens! Grill Method: Place your shrimp skewers directly on the hot grill grates. Now, here’s the key—walk away! Well, not far. But don’t fiddle with them. Let them cook for 2-3 minutes on the first side. You’ll see the bottoms turn pink and get those beautiful, slightly-charred grill marks. Flip them once and cook for another 2-3 minutes on the second side. The shrimp are done when they’re opaque all the way through and have formed a firm “C” shape. Skillet Method: Make sure your pan is hot before adding the shrimp. Cook them in a single layer, in batches if needed to avoid crowding the pan. Crowding = steaming, and we don’t want steamed shrimp! Sear for 2-3 minutes per side until pink and lightly caramelized.
- The Grand Finale: As soon as the shrimp come off the heat, I like to give them one final squeeze of fresh lemon juice. It just wakes all the flavors right up. Serve them immediately while they’re hot and juicy!
How to Serve Your Shrimp Masterpiece
Okay, you’ve got this gorgeous pile of smoky, zesty shrimp. Now what? The possibilities are endless, which is why I make this so often!
The Classic: Pile them high on a platter with a generous garnish of fresh chopped parsley, extra lemon wedges for squeezing, and maybe a few extra pinches of Old Bay for the true enthusiasts at the table. This is perfect for a crowd-pleasing appetizer or a main course with simple sides.
The “Bowl” Life: My personal weeknight favorite. Lay down a bed of fluffy white rice, cilantro-lime rice, or quinoa. Top with the grilled shrimp, a vibrant corn and black bean salsa, some sliced avocado, and a dollop of sour cream or Greek yogurt. It’s a complete, healthy, and utterly delicious meal.
Taco Tuesday Upgrade: Warm up some corn or flour tortillas. Flake the shrimp (or leave a few whole) and top with a crunchy cabbage slaw, a drizzle of chipotle crema, and a sprinkle of cotija cheese. Instant fiesta!
Salad Superstar: Turn a simple green salad into a main event. Toss mixed greens with a light lemon vinaigrette and top with the warm grilled shrimp, cherry tomatoes, cucumbers, and red onion. The warmth of the shrimp slightly wilts the greens in the most delightful way.
Make It Your Own: 5 Flavorful Twists
Once you’ve mastered the base recipe, have some fun with it! Here are a few of my favorite ways to mix things up:
- Spicy Cajun Swap: Replace the Old Bay with your favorite Cajun or Creole seasoning blend. The flavor profile shifts to a more robust, earthy heat that’s absolutely incredible.
- Mediterranean Magic: Swap the Old Bay for a blend of dried oregano, thyme, and a pinch of crushed red pepper flakes. Add a tablespoon of chopped fresh oregano to the marinade. Serve with feta cheese and kalamata olives.
- Coconut Lime Twist: For a tropical vibe, replace the olive oil with melted coconut oil and the lemon juice with fresh lime juice. Add a tablespoon of chopped cilantro to the marinade. It’s like a vacation on a plate!
- Garlic Butter Bliss: After the shrimp are cooked, melt 3 tablespoons of butter in the skillet with an extra clove of minced garlic. Toss the hot shrimp in this garlic butter bath for an insanely rich and decadent finish.
- Low-Carb / Keto Friendly: This recipe is already naturally low-carb! Just omit the teaspoon of sugar. The shrimp will still caramelize beautifully thanks to the natural sugars in the shrimp and the oil.
Beau’s Back-Pocket Tips & Stories
This recipe has been a staple in my kitchen for years, and it’s evolved in fun ways. I once accidentally used a whole tablespoon of smoked paprika instead of a teaspoon (I was chatting and not paying attention!), and you know what? It was one of the best batches I’ve ever made—super smoky and intense. Don’t be afraid to play with the ratios to suit your taste.
My biggest piece of advice? DO NOT OVERCOOK THE SHRIMP. They cook in a flash, and the line between perfectly juicy and rubbery is a thin one. As soon as they’re opaque and have curled into a “C,” they’re done. If they’ve curled into a tight “O,” they’re a bit overdone, but still tasty. Learn to trust your eyes and the timer!
Your Grilled Shrimp Questions, Answered!
Q: Can I marinate the shrimp for longer than an hour?
A: I don’t recommend it! The acid in the lemon juice will start to break down the delicate protein in the shrimp, giving them a mushy, ceviche-like texture. Thirty minutes to one hour is the perfect window for flavor without compromising that perfect snap.
Q: My shrimp are sticking to the grill! What am I doing wrong?
A: Two likely culprits! First, make sure your grill grates are thoroughly cleaned and properly preheated. A hot grill is a non-stick grill. Second, ensure your marinade has enough oil to coat the shrimp. You can also give the grates a quick brush with an oil-soaked paper towel held with tongs right before adding the shrimp.
Q: Can I bake this Old Bay shrimp instead?
A> Absolutely! While you’ll miss the smoky char, baking is a great hands-off method. Arrange the marinated shrimp in a single layer on a parchment-lined baking sheet and bake at 400°F (200°C) for 6-8 minutes, or until pink and opaque.
Q: I can’t find Old Bay where I live. What can I use instead?
A> No problem! You can make a quick DIY blend. Mix together: 2 tsp celery salt, 1 tsp paprika, 1/4 tsp black pepper, 1/4 tsp mustard powder, a pinch of ground nutmeg, a pinch of ground ginger, and a pinch of crushed red pepper flakes. It won’t be identical, but it’ll be delicious!

Zesty Old Bay Grilled Shrimp : Smoky, Citrusy & Irresistible
Description
This Zesty Old Bay Grilled Shrimp is the ultimate summer dish—quick, flavorful, and perfect for a weeknight dinner or backyard party. Juicy shrimp are marinated in a citrusy, garlicky, smoky Old Bay mix and cooked to perfection in just minutes. Serve them on rice, in tacos, or on their own for a light and satisfying meal.
Ingredients
-
2 lbs jumbo shrimp (21–25 count), peeled and deveined, tails on
-
4 tbsp olive oil
-
4 tsp freshly squeezed lemon juice
-
6 garlic cloves, minced
-
4 tsp Old Bay seasoning
-
2 tsp granulated sugar
-
1 tsp smoked paprika
-
½ tsp kosher salt
-
½ tsp ground black pepper
Optional Twists:
-
Zest of 1 lemon for extra brightness
-
1 tbsp hot sauce for heat
-
1 tsp Dijon mustard for tang
Instructions
-
Marinate the Shrimp:
In a medium bowl or zip-top bag, whisk together olive oil, lemon juice, garlic, Old Bay, sugar, smoked paprika, salt, and pepper. Add shrimp and toss to coat. Chill 30–60 minutes. -
Prep the Grill or Skillet:
-
Grill: Preheat to medium-high. Soak wooden skewers 20 minutes if using. Thread shrimp onto skewers.
-
Skillet: Heat a large cast-iron or heavy pan over medium-high and drizzle with olive oil.
-
-
Cook the Shrimp:
-
Grill: Cook shrimp 2–3 minutes per side until opaque and curled into a “C.”
-
Skillet: Cook in a single layer, 2–3 minutes per side. Avoid crowding.
-
-
Finish & Serve:
Squeeze fresh lemon over the shrimp and serve immediately. Great with rice, tacos, salads, or as an appetizer.
Notes
-
Don’t overcook shrimp: They cook quickly. Perfectly cooked shrimp are opaque and form a loose “C” shape.
-
Marinating time: 30–60 minutes is ideal; longer can make shrimp mushy.
-
Non-stick grill: Clean, preheated grates and a little oil prevent sticking.
-
Alternative cooking: Bake at 400°F (200°C) for 6–8 minutes on a parchment-lined sheet if you don’t want to grill.
Nutrition
- Calories: 220 Cal Per Serving
- Fat: 10g
- Carbohydrates: 4 g
- Protein: 30 g
Straight Talk on Nutrition
Hey, I’m all about feel-good food, and that includes knowing what’s going into your body. The great news is that this recipe is not only delicious but also packs a solid nutritional punch!
Shrimp are a fantastic source of lean protein, keeping you full and satisfied without a lot of fat. They’re also famously low in calories and rich in nutrients like selenium (great for your immune system) and iodine (important for thyroid health).
Final Thoughts: Your New Summer Secret is Served
Well, there you have it, friends. This isn’t just a recipe; it’s your ticket to easier, brighter, and more flavorful evenings. The Zesty Old Bay Grilled Shrimp has earned its permanent spot in my summer rotation because it’s more than the sum of its parts—it’s a feeling. It’s the sizzle on the grill, the smell that brings everyone to the table, and the juicy, satisfying bite that turns a simple meal into a memory.
You now have everything you need to make it your own. Whether you stick to the classic marinade or venture into a spicy Cajun or tropical coconut-lime twist, you’re not just cooking dinner—you’re creating a little bit of magic. You’re proving that incredible food doesn’t have to be complicated.
So, the next time the sun is shining and you’re dreaming of that taste of pure joy, you know exactly what to do. Grab that tin of Old Bay, fire up the grill, and give yourself the gift of a meal that’s fast, flavorful, and downright unforgettable.
Now get out there and make some stories of your own. Happy grilling!

Sourdough Discard Coffee Cake : Buttery, Cinnamon-Rich, and Crowd-Pleasing
Sourdough Discard Coffee Cake: Your New Favorite Way to Bake with Starter
Hey friends, Beau here from Feastical! Let’s talk about that beautiful, bubbly jar sitting on your counter. You know the one. It’s your sourdough starter, your culinary pet, your ticket to incredible, crusty loaves of bread. But for every glorious loaf, there’s that little bit of leftover discard. For too long, that discard has been the unsung hero (or maybe the forgotten culprit) of our fridge, waiting for its moment to shine.
Well, my friends, that moment is now. And it’s arriving in the form of the most insanely delicious, buttery, cinnamon-rich Sourdough Discard Coffee Cake you will ever taste. This isn’t just a “use-up-your-starter” recipe. This is a “you-will-actively-hope-you-have-discard-just-to-make-this” recipe. Imagine the most tender, fluffy vanilla cake you’ve ever had, swirled with ribbons of deep, dark cinnamon sugar and topped with a crisp, buttery crumble that crackles with every bite. It’s the kind of treat that makes your entire kitchen smell like a cozy bakery and turns an ordinary Tuesday morning into a celebration.
So, grab your favorite mixing bowl and that jar of discard. We’re about to turn your kitchen into the heart of the home, one incredible slice of coffee cake at a time. Let’s get baking!
A Lazy Sunday and a Happy Accident
I have to confess, this recipe wasn’t born from meticulous planning. It came from a lazy Sunday morning, a serious craving for something sweet, and a jar of discard that was looking a little… assertive. My starter, which I’ve lovingly named “Bubbles,” was peaking, but I’d already baked my weekly bread. There was a whole cup of Bubbles’ discarded self just sitting there, and I couldn’t bear to compost it.
I started throwing ingredients into a bowl with the kind of hopeful chaos that usually ends in a smoke alarm serenade. But as I mixed the tangy starter into the sweet, vanilla-kissed batter, something magical happened. The kitchen filled with this incredible, yeasty-sweet aroma that promised something special. When that cake came out of the oven, golden and crackled, and I took the first warm, meltingly tender bite, I knew I’d stumbled onto something legendary. It was the perfect marriage of my sourdough obsession and my undying love for classic, soul-warming desserts. Now, it’s a Feastical staple, and I’m so excited to share that happy accident with you.
Gathering Your Coffee Cake Crew
Here’s the all-star cast of ingredients that’s going to make this coffee cake the star of your kitchen. Don’t be intimidated by the list—it’s mostly pantry staples! I’ve included some of my favorite chef insights and swaps to make this recipe your own.
For the Cake Batter:
- 1 cup (2 sticks) butter, softened – This is the backbone of our rich, tender crumb. For the best texture, make sure it’s truly softened at room temperature. A quick chef’s hack? Cut it into tablespoons and let it sit for 20-30 minutes.
- 3 cups white sugar – It seems like a lot, but it balances the tang of the sourdough discard and creates a beautifully moist cake.
- 4 teaspoons vanilla extract – The secret weapon for depth of flavor. Don’t be shy with it!
- 4 large eggs – They provide structure and richness. Pull them out with the butter to come to room temperature for a smoother batter.
- 2 cups whole milk – Whole milk gives the cake a luxurious richness. Buttermilk is a fantastic substitute if you have it—it adds a wonderful tang that pairs perfectly with the sourdough.
- 2 cups sourdough discard or active starter – The star of the show! It doesn’t matter if it’s fresh from the feed or has been in the fridge for a week. It adds a subtle tang and incredible moisture. This is a no-waste recipe, so no stress!
- 8 teaspoons baking powder – This is our primary leavening agent, giving the cake its beautiful lift. Make sure yours is fresh for the best rise.
- 6 cups all-purpose flour – The trusty foundation of our cake. For a slightly more tender crumb, you can swap one cup for cake flour.
- 1/2 teaspoon salt – A must for balancing all the sweetness and making the flavors pop.
- 1 teaspoon ground cardamom (optional) – My little twist! It adds a warm, floral, almost citrusy note that makes this coffee cake truly next-level. If you’re a cinnamon purist, feel free to skip it.
For the Cinnamon Sugar Filling & Topping:
- 3 cups brown sugar – We’re using brown sugar here for its deep molasses flavor and moisture. It creates those gooey, delicious ribbons inside the cake.
- 10 tablespoons all-purpose flour – This is our key to a crumbly, not-sandy, topping. It helps bind the melted butter and sugar into perfect little clusters.
- 8 teaspoons ground cinnamon – Because you can never have too much cinnamon in a coffee cake, right? Use the good stuff—the aroma is half the experience.
- 12 tablespoons butter, melted – This gets mixed right into our sugar and flour to create that irresistible, buttery crumble.
- Pinch of sea salt (optional) – A tiny pinch sprinkled over the top before baking enhances all the flavors and gives a lovely salty-sweet contrast.
Let’s Build This Beautiful Cake: Step-by-Step
Ready to create some magic? Follow these steps, and you’ll be a coffee cake champion in no time. I’ve packed this section with all my favorite kitchen hacks to ensure your bake is perfect.
- Preheat and Prep. Fire up your oven to 350°F (175°C). Now, grab your 9×13 inch pan (or two 8×8 pans for thicker, square slices) and give it a good greasing with butter or non-stick spray. I’m a big fan of lining the bottom with a sling of parchment paper—it makes getting those beautiful slices out a total breeze. Chef’s Hack: A well-prepped pan is the first step to a stress-free serving experience!
- Cream the Butter and Sugar. In a large bowl, beat the softened butter and white sugar together. We’re not just mixing them; we’re creaming them. Beat on medium-high speed for a good 2-3 minutes until the mixture is pale, fluffy, and almost white. This step is crucial for incorporating air, which gives our cake a light and tender texture.
- Incorporate the Wet Ingredients. Add the eggs one at a time, beating well after each addition. This ensures they emulsify properly into the butter mixture. Now, mix in the vanilla extract, followed by the milk and the sourdough discard. Don’t worry if the batter looks a little curdled at this point—the sourdough can sometimes cause that. It will all come together beautifully once we add the dry ingredients.
- Combine the Dry Ingredients. In a separate bowl, whisk together the flour, baking powder, salt, and that optional (but highly recommended) cardamom. Whisking is key here—it evenly distributes the baking powder so you get a uniform rise with no bitter spots.
- Bring the Batter Together. Gradually add the dry ingredients to the wet ingredients, mixing on low speed just until the flour disappears. Chef’s Pro-Tip: Do NOT overmix! A few streaks of flour are okay. Overmixing develops gluten and can lead to a tough cake. We want tender and fluffy.
- Create the Cinnamon Crumble. In a medium bowl, stir together the brown sugar, 10 tablespoons of flour, and cinnamon. Pour in the melted butter and stir with a fork until the mixture forms clumps and resembles wet sand. This is your moment—snack on a little. I won’t tell.
- Layer It Up! Now for the fun part. Pour half of your cake batter into the prepared pan and spread it into an even layer. It might be thick, and that’s fine. Sprinkle half of your cinnamon sugar crumble evenly over the batter. Carefully spread the remaining batter over the top. This can be a little tricky, but dollop it gently and pat it down—it doesn’t have to be perfect. Top with the remaining crumble, covering every glorious inch.
- Bake to Golden Perfection. Slide the pan into your preheated oven and bake for 40-45 minutes. You’ll know it’s done when the top is a deep golden brown, the crumble is crisp, and a toothpick inserted into the center of the cake layer (avoid the gooey filling) comes out clean or with a few moist crumbs. Chef’s Note: Ovens can vary, so start checking at the 35-minute mark.
- The Hardest Part: Let it Cool. Remove the cake from the oven and place the pan on a wire rack. Let it cool for at least 30 minutes before you even think about slicing. This allows the structure to set, so you get clean, beautiful slices instead of a delicious, crumbly mess. (Though both are acceptable in my book!).
How to Serve This Masterpiece
Okay, the cake has cooled (mostly). Now what? This coffee cake is incredibly versatile. For the ultimate comfort food experience, serve it slightly warm. The heat makes the cinnamon swirls extra gooey and the crumble extra crisp. I love it with a hot cup of black coffee, the bitterness cutting perfectly through the sweet, rich cake.
Feeling indulgent? A dollop of freshly whipped cream or a scoop of vanilla bean ice cream turns this from a breakfast treat into a decadent dessert. For a beautiful presentation, dust the top with a little powdered sugar right before serving. If you’ve baked it in a 9×13, you can cut it into generous squares right in the pan. If you used the parchment sling, you can lift the whole cake out and slice it on a cutting board for a more polished look. No matter how you serve it, be prepared for requests for seconds.
Make It Your Own: Delicious Twists & Swaps
The beauty of this recipe is its flexibility. Once you’ve mastered the classic, try one of these fun variations!
- Apple Cinnamon Twist: Fold 1 ½ cups of finely chopped apples (like Granny Smith or Honeycrisp) into the batter. The little pockets of soft, tart apple are a game-changer.
- Blueberry Lemon Bliss: Swap the cinnamon in the filling for the zest of one lemon and fold 1 ½ cups of fresh or frozen blueberries into the batter. The bright, fruity flavor is incredible with the tangy sourdough.
- Nutty Crunch: Add 1 cup of chopped pecans or walnuts to your cinnamon sugar crumble mixture for a wonderful texture and toasty flavor.
- Chocolate Chip Dream: Who says coffee cake can’t have chocolate? Replace half of the cinnamon sugar filling with 1 ½ cups of semi-sweet chocolate chips. You’re welcome.
- Dairy-Free & Gluten-Free Friendly: Use your favorite plant-based butter and milk (oat milk works great). For a gluten-free version, swap the all-purpose flour for a 1:1 gluten-free baking blend. The structure might be slightly more delicate, but it will be just as delicious!
A Few More Thoughts From My Kitchen
This recipe has evolved so much since that first lazy Sunday. I’ve learned that the cardamom was the missing link, and that a pinch of salt on top is non-negotiable. One time, I accidentally used my active, bubbly starter at its peak instead of discard, and you know what? The cake rose even more and had a slightly more pronounced tang. Both ways are fantastic, so don’t stress about it.
The best part about this cake, aside from eating it, is how it brings people together. I can’t tell you how many times I’ve brought this to a potluck or had friends over for coffee, and this cake is always the conversation starter. It’s a hug in cake form, and it never fails to make people smile.
Your Coffee Cake Questions, Answered!
Over the years, I’ve gotten a few repeat questions about this recipe. Here are the answers to the most common ones!
Q: My cinnamon sugar layer sank to the bottom. What happened?
A: This usually happens if the batter is too thin or the pan is overfilled. Make sure your batter is nice and thick (as directed) and that you’re spreading the second layer of batter carefully over the first cinnamon layer. Using a 9×13 pan as recommended gives the perfect depth to prevent sinking.
Q: Can I make this coffee cake ahead of time?
A: Absolutely! This cake is actually even better the next day. Once completely cooled, wrap it tightly in plastic wrap or store it in an airtight container at room temperature for up to 2 days. You can also freeze the whole cake or individual slices for up to 3 months. Just thaw at room temperature and warm gently in the oven.
Q: My cake is browning too quickly on top, but isn’t cooked in the middle. Help!
A: This is a common oven issue! If you see the top getting too dark, simply tent a piece of aluminum foil loosely over the top for the remaining bake time. This will shield the crumble from burning while allowing the center to finish cooking.
Q: I don’t have a stand mixer. Can I still make this?
A: Of course! A good old-fashioned wooden spoon and some elbow grease will work just fine. Just make sure you really cream that butter and sugar together until it’s light and fluffy—it might take a few extra minutes, but you’ve got this!
Sourdough Discard Coffee Cake : Buttery, Cinnamon-Rich, and Crowd-Pleasing
Description
Sourdough Discard Coffee Cake
Tender, buttery, and cinnamon-swirled—your new favorite bake with sourdough discard!
Ingredients
Cake Batter:
-
1 cup (2 sticks) unsalted butter, softened
-
3 cups white sugar
-
4 tsp vanilla extract
-
4 large eggs
-
2 cups whole milk (or buttermilk)
-
2 cups sourdough discard (or active starter)
-
6 cups all-purpose flour (swap 1 cup for cake flour for extra tenderness)
-
8 tsp baking powder
-
½ tsp salt
-
1 tsp ground cardamom (optional)
Cinnamon Sugar Filling & Topping:
-
3 cups brown sugar
-
10 tbsp all-purpose flour
-
8 tsp ground cinnamon
-
12 tbsp unsalted butter, melted
-
Pinch of sea salt (optional)
Optional Add-Ins / Twists:
-
Apples, blueberries, chocolate chips, nuts, or dairy-free/gluten-free substitutions
Instructions
-
Preheat & Prep Pan:
-
Oven to 350°F (175°C). Grease a 9×13 pan and optionally line with parchment for easy slicing.
-
-
Cream Butter & Sugar:
-
Beat softened butter and sugar on medium-high for 2–3 minutes until pale and fluffy.
-
-
Add Wet Ingredients:
-
Beat in eggs one at a time. Mix in vanilla, milk, and sourdough discard. Batter may look curdled—this is normal.
-
-
Combine Dry Ingredients:
-
Whisk flour, baking powder, salt, and optional cardamom in a separate bowl.
-
-
Mix Batter:
-
Gradually add dry ingredients to wet. Mix on low speed until just combined. Do not overmix.
-
-
Make Cinnamon Crumble:
-
Mix brown sugar, 10 tbsp flour, cinnamon, melted butter, and pinch of salt until clumpy.
-
-
Layer the Cake:
-
Spread half the cake batter in pan. Sprinkle half of the crumble over it. Dollop remaining batter on top and gently spread. Top with remaining crumble.
-
-
Bake:
-
40–45 minutes until golden and a toothpick in the center comes out clean. Tent with foil if top browns too quickly.
-
-
Cool:
-
Cool at least 30 minutes before slicing for clean, beautiful pieces.
-
Notes
-
Cinnamon layer sinking? Batter too thin or pan overfilled. Use recommended pan and spread second layer carefully.
-
Make-ahead: Store at room temperature 2 days or freeze up to 3 months.
-
No stand mixer? Use a wooden spoon; beat butter and sugar until light and fluffy.
Nutrition
- Calories: 490 Cal Per Serving
- Fat: 18g
- Carbohydrates: 74g
- Protein: 6g
Nutritional Information (For Your Info!)
Let’s be real—we’re not eating coffee cake for its health benefits. We’re eating it for soul-warming joy! But I know some of you like to keep track, so here’s a general breakdown. This is an estimate and can vary based on specific ingredients and slice size.
Per slice (based on 18 servings):
Calories: ~490 | Protein: 6g | Fat: 18g | Carbohydrates: 74g | Sugar: 45g | Fiber: 1g
Remember, this is a treat meant to be shared and savored. Enjoy every single bite without guilt!
Your Next Kitchen Adventure Awaits
And there you have it, my friends. Your complete guide to baking a Sourdough Discard Coffee Cake that’s guaranteed to impress. This recipe is a celebration of flavor, a solution for food waste, and a testament to the fact that the best recipes often come from a little bit of kitchen intuition and a whole lot of love.
I hope this cake becomes a regular in your baking rotation, just like it is in mine. It’s more than just a recipe;

Fluffy Sourdough Discard Pancakes : Golden, Tangy & Perfect Every Time
Your New Favorite Weekend Ritual is Here
Hey friends, Beau here! Let’s talk about a beautiful Saturday morning scene: the sun is streaming through the kitchen window, the coffee is brewing, and there’s a plate of golden, fluffy pancakes waiting for you. But these aren’t just any pancakes. These are the superheroes of the breakfast table, the ultimate kitchen hack, the glorious transformation of something you might have tossed—your sourdough discard—into the most incredibly flavorful, tender, and satisfying stack you’ve ever sunk a fork into.
If you’ve been nurturing a sourdough starter, you know the daily dilemma. That cup of tangy, bubbly discard stares at you from the counter, whispering, “Don’t waste me!” Well, my friend, I’m here to tell you that your days of guilt are over. These Sourdough Discard Pancakes are the ultimate “win-win.” They use up that discard beautifully, and in return, they gift you a breakfast that’s miles ahead of your standard mix. The sourdough brings a subtle tang that makes the flavors pop, and it works some serious magic to create an unbelievably light, airy texture inside, while the outside crisps up to a perfect, golden-brown.
So, whether you’re a sourdough pro or you just got your first starter from a friend (welcome to the club!), this recipe is your new weekend game-changer. It’s simple, soulful, and tastes like a warm hug from the inside out. Let’s grab that discard and get flipping!
The Pancake That Started It All
This recipe takes me right back to my grandma’s kitchen. She wasn’t a “sourdough person,” but she was a “waste-not, want-not” person through and through. I remember watching her make buttermilk pancakes, and she’d always say, “Beau, the secret is in the tang.” She’d let her batter sit for a bit, claiming it “woke up the flour.” Years later, when I started my sourdough journey, I had a flash of inspiration. That jar of discard on my counter had the same tangy, acidic quality as grandma’s buttermilk, but with a deeper, more complex flavor.
One sleepy Sunday, I decided to experiment. I subbed my discard into my favorite pancake recipe, crossing my fingers. The moment I poured that batter onto the griddle, I knew it was special. It bubbled and puffed in a way I’d never seen before. The first bite was a revelation—it was my grandma’s perfect texture, but with a new, grown-up flavor profile that was entirely my own. It felt like connecting my food heritage with my modern kitchen adventures. Now, every time I make these, I think of her, and it makes that stack of pancakes taste even better.
Gathering Your Pancake Posse
Here’s the dream team of ingredients that’ll come together to create pancake perfection. Don’t be shy about making swaps—cooking is all about making it your own!
Dry Ingredients
- 3 cups all-purpose flour: The trusty foundation of our pancake. It gives us that classic, pillowy structure. For a heartier kick, you can swap in 1 cup of whole wheat flour, but I love the pure, fluffy texture of all-purpose here.
- 6 tablespoons sugar: Just the right amount to balance the tang from the sourdough. Chef’s Insight: Try coconut sugar for a deeper, almost caramel-like flavor. It’s a game-changer!
- 2 teaspoons sea salt: Never underestimate the power of salt! It enhances all the other flavors and makes the sweetness sing.
- 5 teaspoons baking powder: This is our primary leavening agent, creating those big, beautiful bubbles that make the pancakes rise.
- 1 teaspoon baking soda: Our secret weapon! It reacts with the acidity in the sourdough starter, giving us an extra boost of lift and that gorgeous, airy crumb.
- 1 teaspoon ground cinnamon (optional): My little twist for a bit of warmth and coziness. It’s not traditional, but it makes the kitchen smell incredible.
Wet Ingredients
- 2 cups sourdough discard or active sourdough starter: The star of the show! It doesn’t matter if it’s fresh from the fridge or room temp. This is your no-waste hero, bringing that fantastic tang and tenderizing the flour.
- 4 large eggs: They bind everything together and add richness and structure. For a vegan swap, try flax eggs, but the texture will be a bit denser.
- 2 cups whole milk (or almond milk for dairy-free): Whole milk gives us a luxurious richness, but any milk you have on hand works beautifully. Pro Tip: Have a little extra on standby to thin the batter if needed.
- 2 teaspoons vanilla extract: The flavor backbone that makes everything taste like a treat. Pure vanilla is always worth it!
- 6 tablespoons avocado oil or melted coconut oil: Fat = flavor and tenderness. I love the neutral taste of avocado oil, but melted coconut oil adds a lovely, subtle tropical note. Melted butter is also a fantastic option here.
Let’s Make Some Magic: The Flipping Fun Begins!
Alright, team, it’s go-time. This process is simple, but a few chef-approved hacks will ensure your pancakes are absolute perfection.
- Combine the Dry Team. Grab your largest mixing bowl—trust me, you’ll need the space. Add your flour, sugar, sea salt, baking powder, baking soda, and that optional cinnamon. Give it a good whisk. Chef’s Hack: Whisking not only combines everything, it aerates the flour, contributing to a lighter pancake. See? We’re building fluffiness from step one!
- Unite the Wet Crew. In a separate bowl (a 4-cup liquid measuring cup is perfect for pouring later), add your sourdough discard. Crack in the eggs, then pour in the milk, vanilla, and your oil of choice. Now, whisk it all together with gusto until it’s smooth and beautifully combined. Don’t worry if it looks a little lumpy from the starter—that’s just character!
- The Grand Batter Union. Here comes the most crucial step: pour the wet ingredients into the dry ingredients. Now, take your spatula and gently fold them together. I’m talking gentle, people! Stop as soon as you no longer see dry streaks of flour. A few lumps are NOT the enemy; overmixing is! Overmixing develops gluten and leads to tough, chewy pancakes. We want tender. We want fluffy. Let a few lumps live their best life. Pro Tip: If the batter seems excessively thick (this can depend on your starter’s hydration), add a splash more milk, one tablespoon at a time, until it’s a pourable but still thick consistency.
- Heat it Up. Place your griddle or a large non-stick skillet over medium heat. This is the sweet spot for pancakes—hot enough to cook them through without burning the outside. To test if it’s ready, flick a few drops of water onto the surface. If they sizzle and dance, you’re good to go! Lightly coat the surface with a bit of avocado oil, coconut oil, or butter.
- Cook to Golden Bliss. Using a 1/3 cup measure, pour batter onto the hot griddle. I like to use the back of the cup to gently spread it into a nice circle. Now, the hardest part: be patient. Let it cook until you see lots of bubbles forming on the surface and the edges look matte and set, about 2-3 minutes. This is your sign that the bottom is a perfect golden brown.
- The Big Flip. Slide your spatula underneath with confidence and flip those pancakes in one smooth motion. They should be a beautiful, even brown. Let them cook on the second side for another 1-2 minutes until they’re equally golden and cooked through.
- Keep ‘Em Cozy. As you cook subsequent batches, transfer your finished pancakes to a wire rack placed on a baking sheet and keep them in a warm (around 200°F / 95°C) oven. This keeps them warm for everyone without making the bottoms soggy.
Stacking, Topping, and Devouring
You’ve done the hard work, now for the best part: the grand presentation! I’m a firm believer that we eat with our eyes first, so let’s make this stack look as good as it tastes.
I like to stack them high on a warm plate—three is the magic number for me. A generous pat of salted butter melting into all the nooks and crannies is non-negotiable. Then, drown that beautiful stack in pure maple syrup. The way the syrup cascades down the sides is pure breakfast poetry.
But why stop there? Get creative! A handful of fresh berries (blueberries are a classic for a reason), a sprinkle of toasted nuts for crunch, or a dusting of powdered sugar for a touch of elegance. For a real showstopper, fry up some crispy bacon and tuck it right into the stack. The combination of salty, savory, sweet, and tangy is absolutely sublime.
Make It Your Own: Endless Pancake Possibilities
This recipe is your canvas. Once you’ve mastered the classic, play around with these fun twists!
- Lemon Blueberry Bliss: Add the zest of one lemon to the wet ingredients and gently fold in 1 cup of fresh or frozen blueberries into the finished batter. The lemon brightens everything up and pairs perfectly with the tangy sourdough.
- Chocolate Chip Celebration: A no-fail crowd-pleaser. Fold 3/4 cup of semi-sweet chocolate chips into the batter. It turns a weekend breakfast into a bona fide celebration.
- Whole Grain Goodness: Substitute 1 cup of the all-purpose flour with whole wheat flour or spelt flour. You’ll get a heartier, nuttier flavor and a extra boost of fiber.
- Apple Cinnamon Spice: Fold in 1 cup of finely chopped apple (like Honeycrisp or Granny Smith) and add an extra 1/2 teaspoon of cinnamon. It’s like having apple pie for breakfast.
- Tropical Vacation: Use melted coconut oil, replace the milk with canned coconut milk, and fold in 1/2 cup of shredded coconut. Close your eyes, take a bite, and you’re basically on a beach.
Beau’s Kitchen Chronicles
This recipe has truly evolved in my kitchen. I’ve made it for grumpy toddlers who turned into smiling, syrup-covered cherubs. I’ve whipped up a double batch for a houseful of hungry friends after a long night, and it fixed everything. My favorite “oops” moment was the time I accidentally used active, bubbly starter instead of discard. The pancakes were even fluffier and had an almost crumpet-like texture with tons of tiny holes—a happy accident that’s now a deliberate choice when I have the time!
The beauty of this recipe is its flexibility. It forgives you if you’re out of one milk and have to use another. It doesn’t mind if your discard is a week old or from yesterday. It’s a reliable, delicious friend in your recipe repertoire, and I hope it becomes one in yours, too.
Your Pancake Questions, Answered!
I’ve gotten a lot of questions about this recipe over the years, so here are the answers to the most common head-scratchers.
Q: My pancakes are flat and dense. What went wrong?
A: The most common culprit is overmixing the batter! Remember, a few lumps are your friends. The second suspect is old baking powder or soda. If yours has been in the pantry for a while, it might have lost its lifting power. Time for a fresh can!
Q: Can I make the batter the night before?
A: I don’t recommend it for the fluffiest results. The baking powder and soda start working as soon as they hit the liquid, and their power will fade overnight, leading to denser pancakes. For a make-ahead option, mix the dry and wet ingredients separately the night before, then combine them in the morning.
Q: My batter is way too thick! Is that normal?
A: Sourdough starters vary in hydration, so batter thickness can change day-to-day. No worries! Just thin it out with a little extra milk, one tablespoon at a time, until it reaches a pourable but still thick consistency. It should plop off the spatula, not run.
Q: Can I freeze these pancakes?
A: Absolutely! Let them cool completely, then lay them in a single layer on a baking sheet to “flash freeze” for an hour. Once frozen solid, transfer them to a freezer bag. They’ll keep for up to 3 months. Reheat straight from the freezer in a toaster or a 350°F oven until warm and crisp.

Fluffy Sourdough Discard Pancakes : Golden, Tangy & Perfect Every Time
Description
Sourdough Discard Pancakes
Fluffy, tangy, and golden—your new weekend breakfast obsession!
Ingredients
Dry Ingredients:
-
3 cups all-purpose flour (or swap 1 cup for whole wheat/spelt for a heartier pancake)
-
6 tbsp sugar (coconut sugar works beautifully)
-
2 tsp sea salt
-
5 tsp baking powder
-
1 tsp baking soda
-
1 tsp ground cinnamon (optional)
Wet Ingredients:
-
2 cups sourdough discard (or active starter)
-
4 large eggs
-
2 cups milk (whole, almond, or any preferred milk)
-
2 tsp vanilla extract
-
6 tbsp avocado oil, melted coconut oil, or melted butter
Optional Toppings/Flavors:
-
Maple syrup, butter, fresh berries, toasted nuts, powdered sugar, chocolate chips, cooked bacon, etc.
Instructions
-
Mix Dry Ingredients:
In a large bowl, whisk together flour, sugar, salt, baking powder, baking soda, and optional cinnamon. -
Mix Wet Ingredients:
In a separate bowl, whisk together sourdough discard, eggs, milk, vanilla, and oil. -
Combine:
Pour wet ingredients into dry and gently fold with a spatula until just combined. Lumps are okay—do not overmix! Batter should be thick but pourable. Thin with a splash of milk if needed. -
Preheat & Prep Pan:
Heat a griddle or large non-stick skillet over medium heat. Lightly coat with oil or butter. -
Cook Pancakes:
Using a 1/3 cup measure, pour batter onto griddle. Cook 2–3 minutes until bubbles form and edges look set. Flip and cook 1–2 minutes until golden brown. -
Keep Warm (Optional):
Place cooked pancakes on a wire rack in a 200°F (95°C) oven while finishing remaining batches. -
Serve:
Stack high, add butter, drizzle with maple syrup, and optionally top with berries, nuts, chocolate chips, or a dusting of powdered sugar.
Notes
-
Lemon Blueberry: Add zest of 1 lemon + 1 cup blueberries.
-
Chocolate Chip: Fold in ¾ cup chocolate chips.
-
Apple Cinnamon: Fold in 1 cup chopped apple + ½ tsp cinnamon.
-
Tropical: Use coconut milk, melted coconut oil, and fold in ½ cup shredded coconut.
Nutrition
- Calories: 376 Cal Per Serving
- Fat: 15g
- Carbohydrates: 49g
- Fiber: 2g
- Protein: 10g
Breaking Down the Goodness
Now, I’m not a nutritionist, but I believe in knowing what’s going into our bodies. Here’s a general breakdown of what you’re getting in one serving (about two decent-sized pancakes). Remember, these are estimates and can vary based on your specific ingredients and toppings.
These pancakes offer a solid balance. You’re getting a good dose of energy-giving carbohydrates to fuel your day, along with a decent amount of protein from the eggs and milk to keep you feeling full and satisfied. The fat content, especially if you use a healthy oil like avocado or coconut, provides sustained energy and helps your body absorb all the good stuff.
Approximate Nutrition Per Serving:
Calories: 376 | Protein: 10g | Fat: 15g | Carbohydrates: 49g | Fiber: 2g | Sugar: 7g
Your Pancake Journey Awaits
And there you have it, my friends! Your complete guide to turning that jar of sourdough discard into a legendary breakfast experience. This recipe is more than just a list of ingredients and steps; it’s an invitation to slow down, to create something wonderful with your own two hands, and to share it with the people you love.
So this weekend, I challenge you: dust off that starter, fire up the griddle, and fill your home with the irresistible aroma of these golden, tangy, fluffy sourdough discard pancakes. I have a feeling they’re about to become a new tradition in your kitchen, just like they are in mine.
Final Thoughts: Your New Weekend Tradition Awaits
And there you have it, friends—the complete guide to transforming a simple ingredient into an extraordinary breakfast. This recipe is more than just a way to use up sourdough discard; it’s an invitation to create a moment of joy, a delicious pause in a busy world. It’s about the satisfying sizzle on the griddle, the triumphant flip, and the shared smiles around the table.
From my grandma’s “waste-not” wisdom to the modern magic of sourdough, this stack represents a beautiful circle of kitchen love. It’s a recipe that’s forgiving, flexible, and endlessly rewarding. Whether you stick to the classic or embark on your own flavorful adventure with blueberries, chocolate, or spices, you’re not just making pancakes—you’re creating a new ritual.
So this weekend, answer the call of that jar of discard. Pour a cup of coffee, warm up the griddle, and treat yourself to the incredible, tangy, fluffy perfection of these sourdough pancakes. I have a feeling your Saturday mornings will never be the same.
I can’t wait to see your creations! Share your stacked-up masterpieces with me @Feastical and let me know how you made them your own.
Happy flipping