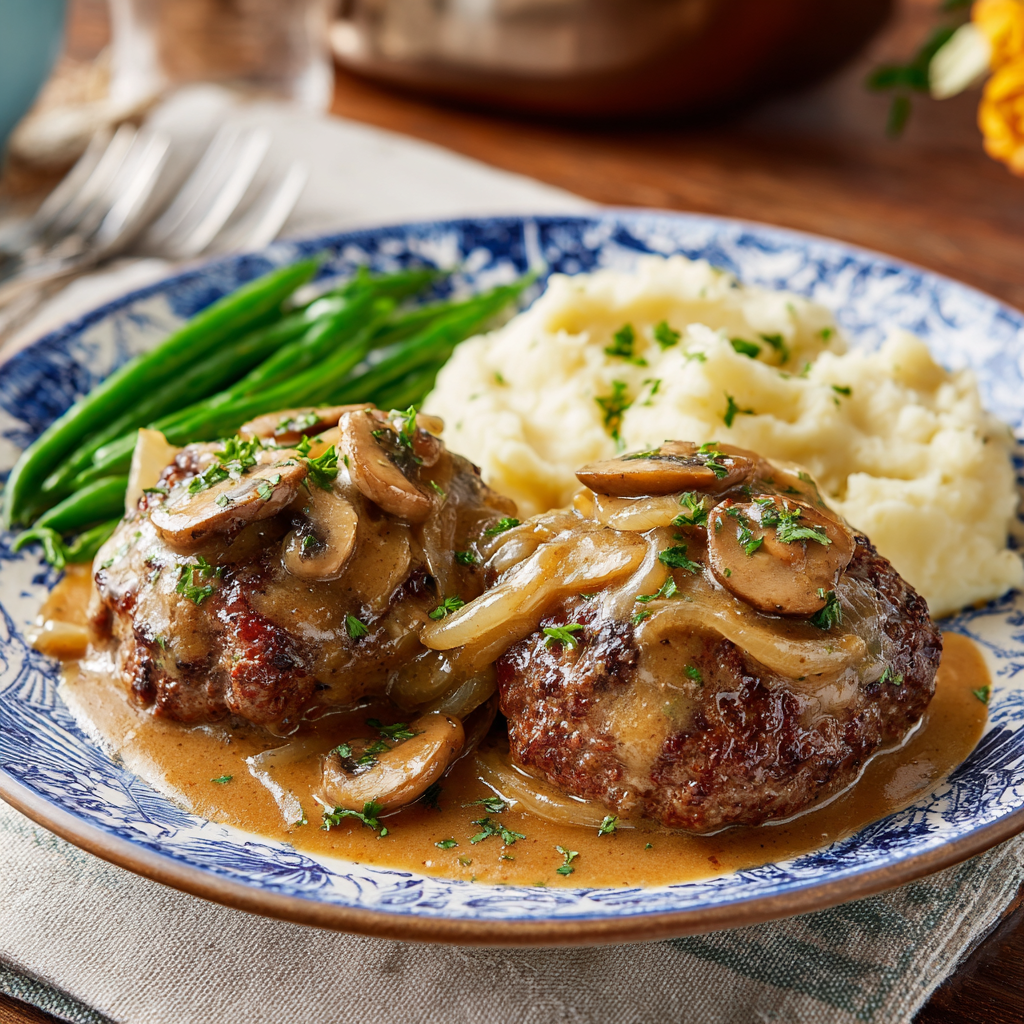
Classic Salisbury Steak with Rich Onion Gravy
More Than Just a TV Dinner: Your New Favorite Classic Salisbury Steak
Hey friends, Beau here! Let’s talk about a dish that feels like coming home. You know the one. It’s the kind of meal that doesn’t just fill your belly; it wraps your soul in a warm, savory blanket and whispers, “Everything’s gonna be okay.” I’m talking about the ultimate comfort food hero: Classic Salisbury Steak with a Rich Onion Gravy that’s so good, you’ll want to drink it with a straw.
Now, I know what some of you might be thinking. “Salisbury steak? Beau, that’s just a fancy name for a hamburger with gravy.” And to that I say, oh, my friend, you are in for the most delicious surprise of your life. This isn’t the mystery meat of cafeteria trays past. This is a tender, flavor-packed patty, simmered low and slow in a gravy that’s deep, savory, and packed with caramelized onion goodness. It’s a dish that transforms simple, humble ingredients into a symphony of comfort.
We’re taking this classic and giving it a few little “Beau-style” upgrades that make all the difference. A dash of smoked paprika for a whisper of warmth, and a gravy that’s built right in the same pan to capture every last bit of flavor from those seared patties. It’s unpretentious, deeply satisfying, and guaranteed to have everyone at your table asking for seconds. So, tie on your apron, grab your favorite skillet, and let’s make a memory together. This is the Salisbury steak recipe that will absolutely, without a doubt, become a regular in your dinner rotation.
The Night I Learned What Comfort Food Really Means
This recipe takes me right back to my first tiny apartment. I was 22, my kitchen was the size of a postage stamp, and my culinary skills were… well, let’s just say I considered ketchup a vegetable. I had just had one of Those Days—you know the kind. Everything that could go wrong, did. I was feeling defeated and desperately homesick for a taste of my grandma’s cooking.
I called her, probably sounding pretty pitiful, and she didn’t miss a beat. “Beau, honey,” she said, “you need a plate of Salisbury steak. It fixes everything.” She walked me through the entire recipe over the phone, her voice calm and steady. I remember the way the aroma of onions and Worcestershire sauce filled my little studio, pushing out all the frustration of the day. When I finally sat down with that steaming plate, gravy pooling into a mountain of mashed potatoes, I got it. It wasn’t just about the food. It was about the act of creating something nurturing and good, even on a bad day. That meal taught me that the kitchen isn’t just where we cook; it’s where we heal, we celebrate, and we find our way back to ourselves. This recipe is that feeling on a plate.
Gathering Your Flavor Dream Team
Here’s everything you’ll need to create this masterpiece. Don’t be shy about reading the notes—they’re packed with my favorite chef hacks and substitution ideas to make this recipe your own!
For the Savory Steaks:
- 3 lbs ground beef (80/20 blend is perfect): The fat is flavor, friends! It keeps the patties juicy and tender. If you’re using leaner beef, just be careful not to overcook them.
- 1 cup dry bread crumbs: Our binding agent and texture-tenderizer. Panko will give you a slightly lighter texture, while traditional breadcrumbs are a classic choice. Gluten-free? Your favorite GF breadcrumbs work beautifully here.
- 2 large eggs: The glue that holds our dream team together! They ensure the patties don’t fall apart during their simmering spa treatment in the gravy.
- ½ tsp salt & ¼ tsp ground black pepper: The essential flavor starters. Don’t skip these!
- 1 can (10.5 oz) condensed French onion soup: This is our secret weapon! It seasons the patties from the inside out and forms the incredible base for our gravy. It’s a huge flavor shortcut we absolutely love.
For That “I-Can’t-Stop-Eating-This” Gravy:
- 2 tbsp all-purpose flour: This is what will thicken our glorious gravy into a silky, spoon-coating sauce. For a gluten-free version, a 1:1 GF flour blend works great.
- The other half of that can of French onion soup: See? No waste here! We’re building layers of that deep, savory onion flavor.
- ½ cup ketchup: Before you raise an eyebrow, trust me! It adds a touch of sweetness, tang, and a beautiful color to the gravy. It’s the “what is that amazing flavor?” secret.
- ½ cup water: This loosens everything up to the perfect gravy consistency.
- 2 tbsp Worcestershire sauce: The umami bomb! This adds a complex, savory depth that is absolutely non-negotiable for the perfect gravy.
- 1 tsp mustard powder: A little background zing that cuts through the richness beautifully.
- My Beau-Twist: 1 tsp smoked paprika: This is my personal upgrade. It doesn’t make it spicy, but it adds a warm, smoky undertone that makes this gravy truly next-level.
- Optional, but highly encouraged: 1 cup sliced mushrooms or ½ cup caramelized onions: For extra texture and a gourmet touch. I almost always throw in some mushrooms!
Let’s Get Cooking: Building Your Comfort Masterpiece
Okay, team! This is where the magic happens. We’re going to build this dish step-by-step, and I’ll be with you the whole way with my best tips and tricks. Read through once before you start—it’s a smooth, simple process!
- Make the Patties. In a large bowl, gently combine the ground beef, bread crumbs, eggs, salt, pepper, and half of the can of French onion soup. Here’s my big chef tip: use your hands! It’s the best tool for the job, but don’t overmix. Just combine until everything is evenly distributed. Overmixing can make the patties tough. Once mixed, form the meat into 10-12 oval-shaped patties, just like the classic diner style. Pro-tip: make a slight indentation in the center of each patty with your thumb. This helps them cook evenly and prevents them from puffing up in the middle!
- Brown the Patties to Perfection. Place a large skillet (one that has a lid!) over medium-high heat. You don’t need oil here—the fat from the beef will render out. Once the skillet is hot, carefully add the patties in a single layer, working in batches if you need to avoid crowding. We’re not cooking them through here; we’re just looking for a beautiful, brown sear on each side. This step is crucial for building flavor in our gravy! It should take about 3-4 minutes per side. Once browned, remove them to a clean plate and set aside. Don’t you dare clean that skillet!
- Build Your Gravy Masterpiece. Look at all those beautiful browned bits (the “fond”) left in the skillet! That’s liquid gold. Reduce the heat to medium. Sprinkle the 2 tablespoons of flour right over the drippings and whisk constantly for about a minute. This cooks the raw flour taste out and creates our thickening base (a simple roux). Now, slowly whisk in the remaining French onion soup, ketchup, water, Worcestershire sauce, mustard powder, and that magical smoked paprika. If you’re using mushrooms or extra onions, toss them in now! Keep whisking until the gravy is smooth and starts to bubble and thicken.
- The Simmering Hug. This is the easiest part. Carefully return the browned patties to the skillet, nestling them right into that glorious gravy. Spoon some of the sauce over the top of each one. Now, cover the skillet with a lid, reduce the heat to low, and let it all simmer together for 15-20 minutes. This gentle cooking finishes cooking the patties through and allows all the flavors to meld and become one big, happy family. You’ll know it’s done when the patties are cooked to 160°F and the gravy has thickened to a perfect, saucy consistency.
Plating Up Your Comfort Food Victory
You’ve done it! Now, let’s serve this beauty the way it deserves. My absolute non-negotiable is a huge, fluffy cloud of creamy mashed potatoes. Ladle one or two patties right alongside that potato mountain, and then—this is important—drown everything in that rich onion gravy. Let it cascade over the steaks and pool into the potatoes. It’s a beautiful thing.
But wait, there’s more! You need something to balance the richness. A simple side of steamed green beans or garlicky sautéed spinach is perfection. For a real nostalgic trip, a scoop of sweet corn or buttery peas is always a win. And if you’re feeling fancy, a little sprinkle of fresh chopped parsley on top adds a pop of color and freshness. The goal? A plate that’s balanced, beautiful, and begging to be eaten.
Make It Your Own: Delicious Twists & Swaps
One of the best things about this recipe is how adaptable it is. Feel like shaking things up? Here are a few of my favorite ways to play with the formula:
- The “Mushroom Lover’s” Dream: Sauté a generous 2 cups of sliced cremini mushrooms along with a diced onion in the skillet before you make the gravy. Remove them before making the roux, then add them back in with the patties. Double the mushrooms, double the fun!
- Give It an Italian Flair: Swap the breadcrumbs for Italian-seasoned breadcrumbs, use a tablespoon of tomato paste instead of ketchup, and add a teaspoon of dried oregano to the patty mix. Bellissimo!
- Lighten It Up: You can absolutely use ground turkey or chicken instead of beef. Because they’re leaner, I like to add a tablespoon of olive oil to the patty mixture to keep them moist. The flavor will be different but still deliciously comforting.
- Slow Cooker Simplicity: Perfect for busy days! After browning the patties, transfer them to your slow cooker. Whisk the gravy ingredients together and pour it over the top. Cook on LOW for 4-6 hours. The meat becomes incredibly tender!
- Spice It Up: Add a pinch of red pepper flakes to the gravy, or a dash of your favorite hot sauce to the patty mixture for a gentle, warming kick.
Beau’s Kitchen Confidential
This recipe has been a living, evolving thing in my kitchen for years. The smoked paprika addition? That came from a happy accident when I knocked the jar into the gravy. Best mistake ever! I also used to be terrified of making gravy from pan drippings—it always felt like a high-stakes science experiment. But the truth is, it’s forgiving. If it gets too thick, add a splash more water. Too thin? Let it simmer uncovered for a few more minutes. The most important ingredient, as my grandma taught me, is the joy you stir into it. Don’t stress about perfection. Just enjoy the process and the incredible smells filling your kitchen.
Your Salisbury Steak Questions, Answered!
Over the years, I’ve gotten a lot of great questions about this recipe. Here are the answers to the most common ones!
Q: My gravy turned out lumpy! What did I do wrong and can I fix it?
A: Don’t worry, this happens to the best of us! It usually means the flour wasn’t fully incorporated. The easiest fix is to strain the gravy through a fine-mesh sieve into a bowl, pressing on any lumps. Then, return the smooth gravy to the pan and continue. For next time, make sure to whisk the flour into the drippings vigorously and add your liquids slowly, whisking the entire time.
Q: Can I make this Salisbury steak ahead of time?
A> Absolutely! This is a fantastic make-ahead meal. Let the whole dish cool completely, then store it covered in the fridge for up to 2 days. The flavors actually get even better! Reheat it gently on the stovetop over low heat, adding a tiny splash of water if the gravy has thickened too much.
Q: Why are my patties falling apart?
A> The two main culprits are not enough binder (the egg and breadcrumbs) or overmixing. Make sure you’re using large eggs and measuring your breadcrumbs correctly. And remember, mix just until combined—a few stray breadcrumbs are totally fine!
Q: Is this recipe freezer-friendly?
A> It sure is! Cool the cooked Salisbury steak and gravy completely, then transfer it to a freezer-safe container. It will keep for up to 3 months. Thaw overnight in the refrigerator before reheating on the stovetop.
Classic Salisbury Steak with Rich Onion Gravy
Description
Salisbury Steak with Onion & Mushroom Gravy
A Comfort Food Classic That Feels Like Home
By Beau – Feastical
Ingredients
For the Salisbury Steaks
-
1 lb ground beef (85–90% lean works best)
-
½ cup breadcrumbs
-
¼ cup milk
-
1 large egg
-
1 tbsp Worcestershire sauce
-
1 tsp garlic powder
-
1 tsp onion powder
-
1 tsp salt
-
½ tsp black pepper
-
2 tbsp olive oil or butter, for frying
For the Onion & Mushroom Gravy
-
2 tbsp butter
-
1 medium onion, thinly sliced
-
8 oz mushrooms, sliced (white or cremini)
-
2 tbsp all-purpose flour
-
2 cups beef broth
-
1 tbsp Worcestershire sauce
-
1 tsp Dijon mustard (optional but adds depth)
-
Salt & pepper, to taste
Instructions
In a large bowl, combine ground beef, breadcrumbs, milk, egg, Worcestershire sauce, garlic powder, onion powder, salt, and pepper.
Mix just until combined — don’t overwork it.
Shape into 4 oval patties, about ¾ inch thick.
Heat olive oil or butter in a large skillet over medium-high heat.
Add patties and cook 4–5 minutes per side, until well browned.
Remove from the skillet and set aside on a plate (they’ll finish cooking in the gravy).
In the same skillet, melt 2 tbsp butter. Add onions and mushrooms.
Sauté for 5–7 minutes until golden and fragrant, scraping up any brown bits from the pan.
Sprinkle flour over the onions and mushrooms; stir well to coat (this forms your roux).
Slowly pour in beef broth while stirring constantly.
Add Worcestershire sauce and Dijon mustard. Stir until smooth.
Simmer over medium heat for 3–5 minutes, until thickened. Season with salt and pepper to taste.
Place the browned patties back into the skillet, spooning some gravy over the top.
Reduce heat to low, cover, and simmer for 10–12 minutes, until the steaks are cooked through and the gravy is rich and glossy.
Notes
-
For extra depth, add a splash of red wine to the pan while sautéing onions.
-
Make it ahead: Gravy and patties reheat beautifully — just add a splash of broth before warming.
-
Don’t skip the Dijon! It brightens the beefy flavor without overpowering it.
Nutrition
- Calories: 480Cal Per Serving
- Fat: 28g
- Carbohydrates: 18g
- Fiber: 2g
- Protein: 32g
Nourishing Your Body & Soul
While I’m all about the joy of eating first and foremost, I know many of you like to keep track of what’s on your plate. Here’s a general nutritional breakdown for one serving (based on 10 servings, without additional sides). Remember, these are estimates and can vary based on your specific ingredients.
This dish is a fantastic source of high-quality protein, thanks to the ground beef, which is essential for muscle repair and keeping you feeling full and satisfied. The carbs from the breadcrumbs and gravy provide a quick source of energy. To make this part of a balanced meal, I always recommend serving it with a generous portion of non-starchy vegetables (like those green beans or spinach) to add fiber, vitamins, and minerals. It’s comfort food you can feel good about!
- Calories: ~380
- Protein: 26g
- Fat: 22g
- Carbohydrates: 15g
- Fiber: 1g
Final Thoughts
And there you have it, my friends! Your guide to creating a Classic Salisbury Steak that’s bursting with more flavor and heart than you ever thought possible. This is more than a recipe; it’s an invitation to slow down, to create something wonderful with your own two hands, and to share that goodness with the people you love.
I hope this dish finds its way to your table on a busy Tuesday, a cozy Sunday, or any day you need a little extra comfort. I’d love to hear how it turns out for you! Tag me on social @FeasticalBeau or leave a comment below with your stories and photos. Until next time, happy cooking, and remember—food always tastes better when it’s made with joy.
Yours in good food and good vibes,
Beau
Prep Time: 15 minutes | Cook Time: 25 minutes | Total Time: 40 minutes | Serves: 10-12
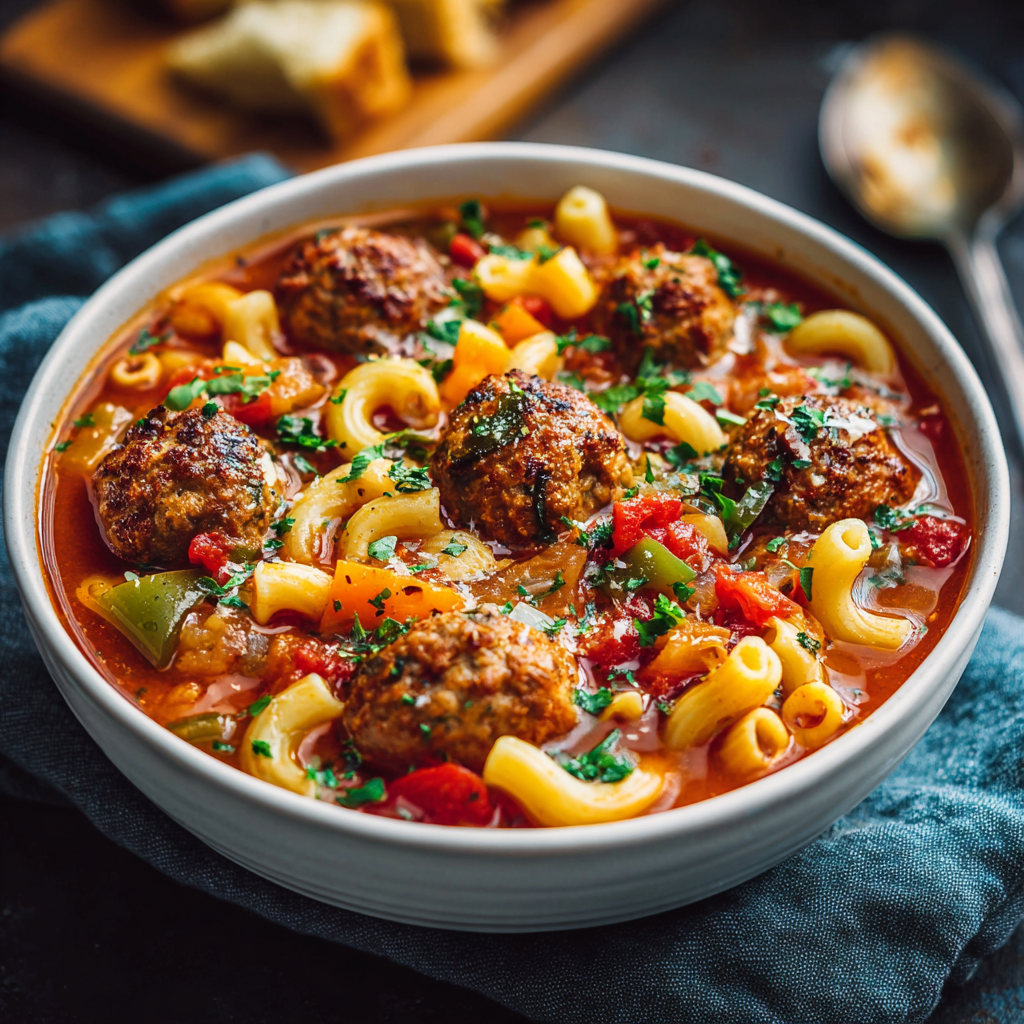
Macaroni Meatball Soup (Hearty, Saucy & Family-Friendly)
Macaroni Meatball Soup: Your New Favorite Comfort Food
Hey friends, Beau here! Let’s talk about that magical, elusive feeling we’re all chasing, especially when the weather turns chilly or a long day has left you feeling a little worn out. I’m talking about that deep-down, soul-warming, everything-is-going-to-be-okay feeling. For me, that feeling almost always comes from a bowl. Not just any bowl, but a steaming, hearty, incredibly inviting bowl of soup.
But we’re not making just any soup today. We’re making a meal. We’re creating a centerpiece. We’re crafting what I like to call a “saucy hug in a bowl.” This, my friends, is my legendary Macaroni Meatball Soup. Imagine the heartiness of your favorite pasta dish and the cozy comfort of a robust tomato soup decided to get together and have the most delicious baby. Tender, savory meatballs swim in a rich, tangy-sweet tomato broth, with plenty of soft macaroni and chunky vegetables in every spoonful. It’s a one-pot wonder that feeds a crowd, reheats like an absolute dream, and has this magical ability to make everyone at the table smile. So, grab your biggest, most trusted soup pot. We’re about to make some serious magic.
The Soup That Saved Supper
This recipe holds a special place in my heart because it truly embodies the Feastical spirit: bringing people together without the stress. I first threw this together during a particularly chaotic week. My fridge was looking sparse, a surprise cold snap had blown in, and my friends were due to arrive for our weekly game night in about an hour. Panic was starting to set in.
Then, I spotted a bag of frozen meatballs and a box of macaroni in the pantry. A memory flashed of my grandmother’s incredibly simple, yet legendary, “spaghetti soup.” I didn’t have her recipe, but I had her spirit. I started chopping, sautéing, and simmering with what I had on hand. The result? A pot of something so deeply satisfying and warmly received that it instantly became a staple. The sound of laughter around the table, the steam fogging up the windows, and the sight of empty bowls—that’s the real recipe. This soup isn’t about perfection; it’s about connection, and it’s a story I’m so excited to share with you.
Gathering Your Flavor Makers
One of the best things about this soup is its beautiful flexibility. Here’s your shopping list, complete with my little chef insights to help you understand the “why” behind each ingredient.
- 2 tbsp Olive Oil: Our cooking fat of choice! It adds a lovely fruity base note. Don’t be shy with it—a good glug builds flavor from the very first step.
- 2 Green Bell Peppers, cut into chunks: They bring a sweet, slightly bitter crunch that softens into pure comfort. No green peppers? Red, yellow, or orange will work beautifully and add a touch of extra sweetness.
- 2 Medium Onions, cut into chunks: The aromatic foundation of our soup. As they sauté, they become sweet and mellow, creating a flavor base that can’t be beat.
- 4 Garlic Cloves, minced: The soul of savory cooking! Please, use fresh garlic here. That pungent, aromatic punch is irreplaceable and will make your kitchen smell incredible.
- 4 (16 oz) cans Crushed Tomatoes: This is the body and soul of our broth. Crushed tomatoes give us that perfect, saucy texture. If you only have diced, that’s okay—just give it a quick blend with an immersion blender for a smoother consistency.
- 2 (6 oz) cans Tomato Paste: This is our flavor concentrator! It deepens the tomato flavor and helps thicken the soup into that “hearty stew” consistency we love.
- 2 tbsp Brown Sugar: Now, don’t freak out! This is my little secret weapon. A touch of brown sugar doesn’t make the soup sweet; it perfectly balances the acidity of the tomatoes, creating a round, rich flavor.
- 4 tbsp Italian Seasoning: Our all-in-one herb blend. It’s a convenient mix of marjoram, thyme, rosemary, and more. If you’re feeling fancy, use 2 tbsp dried oregano and 2 tbsp dried basil for a fresher herb profile.
- 2 tsp Salt & ½ tsp Ground Black Pepper: The essential flavor enhancers. Season boldly! We’re working with a lot of ingredients, and salt makes all the other flavors pop.
- 50 frozen cooked Italian-style Meatballs, thawed: The ultimate time-saver and the star of the show! Using pre-cooked meatballs lets us get this hearty soup on the table in under an hour. I love the Italian-style for the extra herbs and garlic.
- 10 cups Water: Simple, clean, and it lets all our beautiful ingredients shine. For an even richer flavor, you can swap half for a good beef or vegetable broth.
- 4 cups uncooked Macaroni Pasta: The “macaroni” in our masterpiece! Elbow macaroni is classic, but any small pasta like shells, ditalini, or even small penne will work great.
- Optional twist: ½ tsp Crushed Red Pepper Flakes: For my friends who like a little gentle heat! It adds a wonderful, warm buzz in the background.
- Optional finish: Croutons, Grated Parmesan, or a drizzle of Olive Oil: The grand finale! Toppings add texture and a final flavor punch. Don’t skip the Parmesan—it’s a game-changer.
Let’s Get Cooking: Building Your Bowl of Bliss
Okay, team! Pot is out, ingredients are prepped, let’s fire up the stove. Follow these steps, and you’ll have a perfect pot of soup in no time. I’ve packed this section with all my favorite chef hacks to ensure your success.
Step 1: Sauté the Veggies (The Flavor Foundation)
In your large soup pot (I mean it, use the big one!), heat the olive oil over medium heat. Add your bell pepper and onion chunks. We’re not looking to brown them, just to soften them up and wake up their flavors. Sauté for 5-7 minutes, until the onions turn translucent and smell sweet. Chef’s Hack: Add a tiny pinch of salt to the veggies at this stage—it helps them release their moisture and cook more evenly. Now, stir in the minced garlic and cook for just one more minute. You’ll know it’s ready when the incredible aroma hits you. Be careful not to burn the garlic!
Step 2: Build the Base (Where the Magic Happens)
This is where the soup really starts to come to life. Stir in the crushed tomatoes, tomato paste, brown sugar, Italian seasoning, salt, and black pepper. Now, for a pro-move: squirt the tomato paste directly into the hot pot and let it cook for a minute with the veggies before stirring. This “toasts” the paste and deepens its flavor immensely. Give everything a good, thorough stir until the tomato paste is fully incorporated. It will look thick and glorious. Now, add your thawed meatballs and pour in the 10 cups of water. Give it another good stir to combine.
Step 3: Simmer & Let the Flavors Mingle
Bring your pot to a simmer. You’ll see little bubbles breaking the surface gently—that’s what we want. Not a raging boil. Let it bubble away happily for 15-20 minutes, uncovered. This time allows the meatballs to heat through completely and, more importantly, lets all the flavors get to know each other and become best friends. The broth will reduce slightly and become richer. This is a great time to taste it! Adjust the seasoning—does it need another pinch of salt? A bit more pepper? Make it yours!
Step 4: Add the Pasta (The Final Countdown)
Stir in your 4 cups of uncooked macaroni. The soup will be thick, but the pasta will release starch as it cooks, helping to thicken it even more into that saucy consistency we love. Cook uncovered, stirring occasionally to prevent sticking, for 8-10 minutes, or until the pasta is perfectly al dente (tender but with a slight bite). Chef’s Hack: Don’t overcook the pasta! It will continue to soften a bit in the hot soup even after you turn off the heat. We want texture, not mush.
Step 5: Taste and Serve Up the Comfort
Turn off the heat. Do one final taste test. This is your last chance to be the boss of your broth. Now, ladle that beautiful, steamy, hearty soup into deep bowls. This is where the toppings come in—don’t be shy!
How to Serve It Up with Style
Presentation matters, even for a cozy weeknight soup! This dish is a complete meal in a bowl, but a little flair goes a long way. I love serving this in wide, shallow bowls—it shows off all the gorgeous chunky ingredients. The number one, non-negotiable topping is a generous snowfall of freshly grated Parmesan cheese. It adds a salty, umami kick that is simply divine. Next, I’m a sucker for texture, so a handful of crunchy, garlicky croutons or a piece of warm, buttery garlic bread for dipping is a must. For a fresh, bright finish, a light drizzle of a good extra virgin olive oil right at the end or a sprinkle of fresh chopped basil or parsley can really elevate the whole experience. Pair it with a simple green salad with a sharp vinaigrette to cut through the richness, and you have a restaurant-worthy meal right at home.
Make It Your Own: Delicious Twists & Swaps
The beauty of this recipe is its adaptability. Once you’ve mastered the classic, feel free to play with your food! Here are a few of my favorite variations:
- Spicy ‘Nduja Kick: Love heat? Before adding the veggies, sauté a tablespoon of ‘nduja (a spreadable Italian salami) or some chopped spicy Italian sausage with the onions. It will infuse the entire soup with a deep, spicy flavor.
- Hearty Veggie-Packed Version: Want to go meat-free? Skip the meatballs! Instead, add a can of drained and rinsed kidney beans or chickpeas when you add the pasta. Throw in a couple of handfuls of fresh spinach or chopped kale in the last 2 minutes of cooking for a green boost.
- Creamy Tomato Twist: For a richer, creamier soup, stir in 1/2 to 1 cup of heavy cream or half-and-half after you’ve turned off the heat. It adds a luxurious, velvety texture that’s just irresistible.
- Homemade Meatball Magic: Have a little extra time? Make your own meatballs! Mix 1 lb ground beef, 1/2 cup breadcrumbs, 1/4 cup grated Parmesan, 1 egg, and 2 tbsp of the Italian seasoning. Roll into small balls and brown them in the pot before you sauté the veggies. Remove them, then add them back in with the water. The fond (browned bits) from the meatballs will make the broth even more incredible.
Beau’s Kitchen Notes & Stories
This recipe has evolved more than any other in my arsenal. The first time I made it, I was so worried about the simplicity of using water instead of broth. But you know what? It works perfectly, allowing the pure flavors of the tomatoes, herbs, and meatballs to be the stars. Over the years, I’ve learned that the type of pasta matters—small, sturdy shapes are best. And one funny story: I once accidentally used cinnamon instead of pepper (similar-looking shakers in a dim pantry—it happens to the best of us!). It was… interesting. Not terrible, but definitely a one-time experiment! The moral? Taste your spices before you add them. This soup is forgiving, but even I can’t save a cinnamon-tomato situation!
Your Questions, Answered!
I’ve made this soup a hundred times, and I’ve heard all your brilliant questions. Here are the most common ones.
Q: My soup turned out too thick! How can I fix it?
A: No worries, this is an easy fix! The pasta continues to absorb liquid as it sits. Simply thin it out by stirring in a little more water or broth when you reheat it until it reaches your desired consistency.
Q: Can I make this in a slow cooker?
A: Absolutely! Sauté the veggies on the stove first (this step is key for flavor), then transfer them to your slow cooker. Add everything else EXCEPT the pasta. Cook on LOW for 6-8 hours or HIGH for 3-4. About 30 minutes before serving, stir in the uncooked macaroni and cook until tender.
Q: How long will leftovers keep?
A: Stored in an airtight container in the fridge, it will be delicious for 3-4 days. The flavors actually get better the next day! The pasta will soften, but in a good, “stew-like” way.
Q: My pasta got mushy. What did I do wrong?
A> You probably cooked the pasta a little too long in the soup. Remember, it keeps cooking from the residual heat. Next time, aim for an al dente texture in the pot, and know it will soften up perfectly by the time it hits the bowl. You can also cook the pasta separately and add it to each bowl when serving, which prevents mushiness entirely if you plan on having lots of leftovers.
Macaroni Meatball Soup (Hearty, Saucy & Family-Friendly)
Description
Macaroni Meatball Soup
Your New Favorite Comfort Food
By Beau – Feastical
Ingredients
Flavor Base
-
2 tbsp olive oil
-
2 green bell peppers, cut into chunks (or red/yellow/orange)
-
2 medium onions, cut into chunks
-
4 garlic cloves, minced
Tomato Broth
-
4 cans (16 oz each) crushed tomatoes
-
2 cans (6 oz each) tomato paste
-
2 tbsp brown sugar
-
4 tbsp Italian seasoning (or 2 tbsp each oregano & basil)
-
2 tsp salt
-
½ tsp black pepper
-
10 cups water (or half water, half beef broth)
The Hearty Add-Ins
-
50 frozen cooked Italian-style meatballs, thawed
-
4 cups uncooked elbow macaroni (or small pasta of choice)
Optional Boosters
-
½ tsp crushed red pepper flakes (for gentle heat)
-
Croutons, grated Parmesan, or a drizzle of olive oil for topping
Instructions
Heat olive oil in a large soup pot over medium heat. Add bell peppers and onions.
Sauté for 5–7 minutes until softened and fragrant. Add a pinch of salt to help them release moisture.
Stir in garlic and cook for 1 minute more — just until aromatic (don’t let it brown!).
Add crushed tomatoes, tomato paste, brown sugar, Italian seasoning, salt, and pepper.
Let the tomato paste “toast” in the pot for a minute before stirring — this deepens the flavor.
Add meatballs and pour in the water. Stir well to combine.
Bring to a gentle simmer and cook uncovered for 15–20 minutes, allowing the meatballs to heat through and the broth to deepen. Taste and adjust seasoning.
Stir in uncooked macaroni and cook uncovered for 8–10 minutes, stirring occasionally, until al dente.
Remember: the pasta will keep softening even after the heat is off, so don’t overcook.
Turn off the heat and taste one last time. Ladle into bowls and finish with Parmesan, croutons, or a drizzle of olive oil.
Notes
-
Using water instead of broth keeps the soup clean and lets the tomato flavor shine.
-
Small pasta (elbows, ditalini, shells) holds up best — larger shapes go mushy.
-
Taste your spices! (A little cinnamon mishap taught me that one.)
-
This soup thickens as it cools; add a splash of water or broth when reheating.
Nutritional Information (A Quick Look)
Hey, I’m all about feel-good food, and feeling good also means knowing what’s going into your body! This info is per serving (and remember, this makes a whopping 8 servings!). Please note, this is an estimate and can vary based on your specific ingredients, especially the brand of meatballs and pasta you use.
- Calories: ~460
- Protein: 25g (Thanks, meatballs! Great for keeping you full.)
- Fat: 15g
- Carbohydrates: 55g (A hearty balance of energy from the pasta and veggies.)
- Fiber: 6g (The tomatoes and peppers contribute to your daily fiber goals!)
- Sodium: 720mg (If you’re watching your sodium, look for low-sodium tomato products and meatballs.)
Final Thoughts from My Kitchen to Yours
And there you have it! My go-to recipe for when I need a big, satisfying, no-fuss meal that’s guaranteed to please. This Macaroni Meatball Soup is more than just a list of ingredients and steps; it’s a reminder that the best meals are often the simplest ones, made with a generous dash of love and a willingness to just go for it. It’s the recipe I get the most messages and photos about, and nothing makes me happier than seeing your families gathered around a pot of this soup. So, from my Feastical kitchen to yours, I hope this recipe becomes a new favorite in your rotation. Now, go forth, cook with confidence, and don’t forget to tag me @Feastical when you make it—I want to see your beautiful bowls!
Stay cozy and well-fed,
Beau
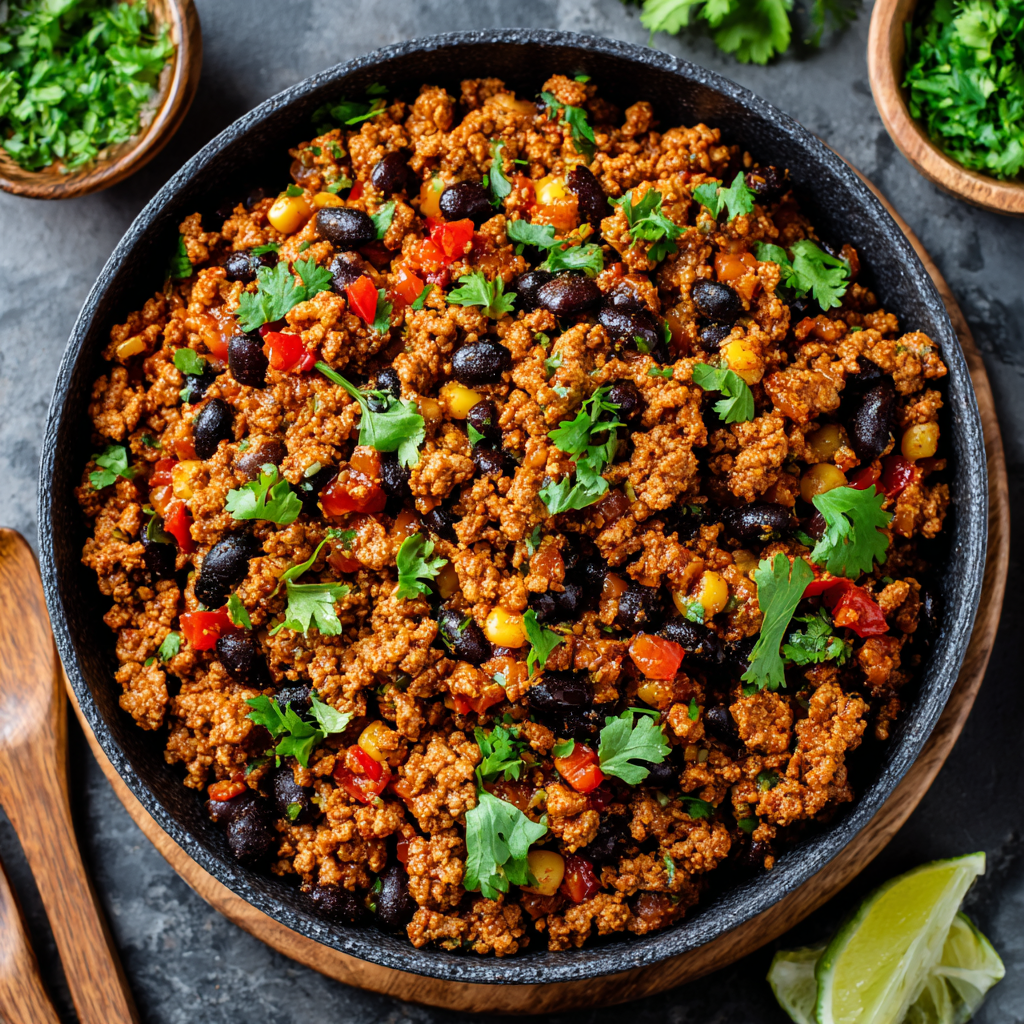
Flavor-Packed Ground Turkey Taco Meat
Flavor-Packed Ground Turkey Taco Meat: Your New Weeknight Hero
Hey friends, Beau here from Feastical! Let’s talk about a universal truth: the undeniable power of Taco Tuesday. It’s the one night of the week that’s guaranteed to make everyone at the table smile. But sometimes, that classic ground beef can feel a little heavy, leaving you in a food coma on the couch when you’d rather be enjoying the evening.
That’s exactly why I created this Flavor-Packed Ground Turkey Taco Meat. Now, I see you. I see that tiny flicker of skepticism in your eye. “Turkey? For tacos? Beau, will it even taste like anything?” Trust me, I get it. I was a skeptic once, too. But my friend, this recipe is a game-changer. We’re not just making bland, lean meat here. We’re building a zesty, bold, and incredibly satisfying flavor bomb that’s lean, mean, and so delicious you might just forget about beef altogether.
This isn’t about depriving yourself; it’s about upgrading your taco game. It’s about feeling fantastic after dinner, ready to tackle a board game or a walk with the dog instead of unbuttoning your jeans. We’re using a powerhouse blend of spices and a few simple chef secrets to create a taco filling that’s smoky, a little spicy, and totally addictive. It’s perfect for stuffing into crunchy shells, piling onto loaded nachos, or meal-prepping for a week of epic lunches. So, grab your favorite skillet and let’s make your next Taco Tuesday the best one yet.
A Taco Tale: How My Nana’s Skillet Inspired Mine
This recipe always takes me back to my Nana’s kitchen. She was a wizard with a cast-iron skillet and could make a feast out of practically anything. She didn’t call it “elevated home cooking” or “meal prepping”—she just called it dinner. I remember one sweltering summer evening when she was supposed to make her famous beef tacos, but all she had pulled from the freezer was a package of ground turkey. My cousins and I were visibly disappointed. Turkey? For tacos?
But Nana just winked, saying, “Flavor isn’t in the meat, honey. It’s in the love and the spices.” She browned that turkey, and the kitchen filled with the most incredible aroma—toasty cumin, smoky paprika, a kick of chili powder. She let it all simmer together until the sauce was thick and glazy, clinging to every morsel. That first bite was a revelation. It was juicy, deeply spiced, and absolutely perfect. She taught me that day that the soul of a dish isn’t in one single ingredient; it’s in the technique and the heart you pour into it. Every time I make this, I think of her, and I hope this recipe becomes a happy memory in your kitchen, too.
Gathering Your Flavor Arsenal
Here’s everything you’ll need to create this masterpiece. Don’t just think of these as ingredients; think of them as your flavor-building team. I’ve included some notes and swaps so you can make this your own!
- 24 oz Ground Turkey: I prefer 93% lean for the best balance of flavor and leanness. The 99% lean can get a bit dry, so a little fat goes a long way! Chef’s Insight: For a plant-based twist, crumbled super-firm tofu or a plant-based ground “meat” works wonderfully here.
- 3 tbsp Chili Powder: This is the foundation of our spice blend, providing that classic, earthy taco flavor. Make sure it’s pure chili powder, not a pre-mixed “taco seasoning.”
- 4 tsp Ground Cumin: The warm, nutty soul of the dish. Toasting it in the skillet with the meat unlocks its full potential.
- 2 tsp Ground Paprika: For color and a sweet, peppery note. This is where the magic starts.
- 2 tsp Salt: Crucial for balancing and enhancing all the other spices. Don’t be shy!
- 1 tsp Garlic Powder & 1 tsp Onion Powder: These pantry heroes provide a savory, aromatic base that’s always reliable.
- 1 tsp Dried Oregano: Adds a subtle, earthy complexity that makes the flavor profile sing.
- ½ tsp Cayenne Pepper: Our heat agent! Start with ¼ tsp if you’re sensitive to spice, or go wild and add more if you love it.
- 1 cup Water: This seems simple, but it’s the key to a saucy, cohesive filling. It helps the spices bloom and form a delicious “sauce” that coats the meat.
- 2 tbsp Apple Cider Vinegar: My secret weapon! A splash of acidity brightens all the rich, savory flavors and keeps the turkey from tasting flat.
- 3 tsp Brown Sugar: A touch of sweetness to round out the spice and acidity, creating a perfectly balanced bite.
Optional Power-Ups:
- ½ tsp Smoked Paprika or Chipotle Powder: For a gorgeous, smoky depth. Highly recommended!
- 1 can Black Beans or Corn (drained): Toss these in during the last few minutes of simmering to stretch the recipe and add fun texture.
Let’s Get Cooking: Building the Flavor, Step-by-Step
Alright, team, fire up the stove! This is where the magic happens. Follow these steps, and you’ll have restaurant-quality taco meat in under 20 minutes.
- Brown the Turkey: Heat a large skillet over medium heat. No oil needed—the turkey has enough fat to get things going. Add the ground turkey and cook, breaking it up with a wooden spoon or spatula, until it’s no longer pink. This should take about 6-8 minutes. Chef’s Hack: Don’t stir it constantly! Let it sit for a minute at a time to get some nice, little browned bits on the bottom of the pan. That’s called fond, and it’s pure flavor gold.
- Mix the Seasoning: While the turkey is browning, grab a small bowl and combine your chili powder, cumin, paprika, salt, garlic powder, onion powder, oregano, and cayenne. Giving the dry spices a quick mix before adding them to the pan ensures every single bit of turkey gets an even coat of flavor. No bland pockets here!
- Season & Simmer: Once the turkey is cooked through, sprinkle your homemade spice mix over the meat. Pour in the water, apple cider vinegar, and sprinkle the brown sugar over everything. Give it a really good stir, making sure to scrape up all those delicious browned bits from the bottom of the pan. You’ll hear a little sizzle and smell an incredible aroma—that’s how you know you’re on the right track.
- Simmer Uncovered: Reduce the heat to medium-low and let the mixture simmer uncovered for 8-10 minutes. Stir it occasionally. You’ll watch the liquid reduce and transform into a thick, glossy sauce that clings to the turkey. This step is non-negotiable! It’s what turns a bunch of separate ingredients into a cohesive, deeply flavored taco filling. When most of the liquid has been absorbed and the meat looks saucy and irresistible, you’re done!
Let’s Get This Party Started: Serving Your Taco Meat
Now for the best part: the assembly! This turkey taco meat is incredibly versatile. Here are a few of my favorite ways to serve it up:
- The Classic Taco Bar: Set out a spread of warm corn or flour tortillas, and let everyone build their own masterpiece. My go-to toppings: creamy avocado slices, a sharp pico de gallo, a sprinkle of cotija or cheddar cheese, a dollop of cool sour cream or Greek yogurt, and a generous squeeze of fresh lime juice.
- Epic Taco Salad: Pile this meat onto a bed of crisp romaine lettuce with black beans, corn, cherry tomatoes, and a crunchy tortilla strip topping. Drizzle with a creamy cilantro-lime dressing.
- Loaded Baked Potatoes: Swap out your usual chili for this taco meat! Bake a few russet or sweet potatoes until tender, split them open, and load them up with the turkey, cheese, and all the fixings.
- Meal Prep Burrito Bowls: Divide cooked rice or quinoa among meal prep containers. Top with a generous scoop of this taco meat, some roasted veggies, and a separate container of salsa or guacamole. Lunch for the week is solved!
Make It Your Own: Flavorful Twists & Swaps
Once you’ve mastered the base recipe, have fun with it! Cooking is all about creativity. Here are a few ways to mix things up:
- Pineapple & Pepper Fiesta: For a sweet and savory kick, sauté 1 cup of diced bell peppers and ½ cup of diced onion with the turkey. In the last 5 minutes of simmering, stir in ½ cup of crushed pineapple (well-drained). It’s a tropical vacation in a taco.
- Green Chile & Lime Zing: Swap the water for 1 cup of mild green enchilada sauce. Stir in a 4-oz can of diced green chiles and the juice of one whole lime at the end. Bright, tangy, and so good.
- “Creamy” Avocado Twist (Dairy-Free): For a richer, creamier texture, stir in ¼ cup of mashed ripe avocado during the last two minutes of cooking. It melts into the sauce, making it incredibly lush without any dairy.
- Pumpkin Power-Up: Sounds wild, but it’s delicious! Add ½ cup of pure pumpkin puree along with the water. It adds a subtle sweetness, a beautiful color, and a boost of nutrients. You won’t taste “pumpkin,” just more depth.
Beau’s Kitchen Notes & Stories
This recipe has been a work in progress for years. The apple cider vinegar was a happy accident one day when I was out of lime juice, and now I’ll never go back. It adds that necessary zing that keeps you coming back for another bite. I also used to be impatient and wouldn’t let it simmer long enough, resulting in a slightly watery filling. Trust me, that 8-10 minute simmer is what transforms it from “good” to “can I eat this with a spoon straight from the pan?” good. This is also my most-stolen recipe by my friends. I’ll get a text with a photo of their taco night with the caption, “Making your turkey stuff!” It always makes my day. Food is meant to be shared, so please, steal this one and make it your own!
Your Taco Questions, Answered!
I’ve gotten a lot of questions about this recipe over the years. Here are the most common ones to help you out:
Q: My taco meat turned out a bit dry. What happened?
A: The most common culprit is overcooking the turkey in the first step. Remember, you just want to cook it until it’s no longer pink, not until it’s browned and crispy. Also, that 1 cup of water is essential for keeping it moist and saucy—don’t skip it! Using 99% lean turkey can also contribute to dryness, so I recommend 93% lean.
Q: Can I make this ahead of time?
A: Absolutely! This is a fantastic make-ahead recipe. Let it cool completely, then store it in an airtight container in the fridge for up to 4 days. The flavors actually get even better as they mingle. You can also freeze it for up to 3 months.
Q: Is there a way to make this in a slow cooker or Instant Pot?
A> For the Instant Pot: Use the Sauté function to brown the turkey. Add all other ingredients, give it a stir, and cook on High Pressure for 5 minutes. Quick release the pressure. For a slow cooker: Brown the turkey on the stove first, then transfer it and all other ingredients to the slow cooker. Cook on Low for 4-6 hours or High for 2-3.
Q: My family is spice-averse. How can I tone down the heat?
A> No problem! Simply omit the cayenne pepper entirely. The rest of the spices provide tons of flavor without the burn. You can also reduce the chili powder to 2 tablespoons if you’re very sensitive.

Flavor-Packed Ground Turkey Taco Meat
Description
Flavor-Packed Ground Turkey Taco Meat
Lean, zesty, and perfect for Taco Tuesday!
By Beau – Feastical
Ingredients
For the Turkey Taco Meat
-
24 oz ground turkey (93% lean recommended)
-
3 tbsp chili powder
-
4 tsp ground cumin
-
2 tsp ground paprika
-
2 tsp salt
-
1 tsp garlic powder
-
1 tsp onion powder
-
1 tsp dried oregano
-
½ tsp cayenne pepper (adjust to taste)
-
1 cup water
-
2 tbsp apple cider vinegar
-
3 tsp brown sugar
Optional Add-Ins
-
½ tsp smoked paprika or chipotle powder (for smoky depth)
-
1 can black beans or corn (drained)
Instructions
Heat a large skillet over medium heat. Add ground turkey and cook, breaking it up, until no longer pink (6–8 minutes). Don’t stir constantly—let it brown slightly to develop flavor.
In a small bowl, combine chili powder, cumin, paprika, salt, garlic powder, onion powder, oregano, and cayenne.
Sprinkle the spice mix over the cooked turkey. Add water, apple cider vinegar, and brown sugar. Stir well, scraping up any browned bits from the skillet.
Reduce heat to medium-low. Let the mixture simmer 8–10 minutes, stirring occasionally, until the liquid reduces into a thick, glossy sauce that coats the turkey.
If using black beans, corn, or additional vegetables, stir them in during the last few minutes of simmering.
Notes
-
To reduce spice, omit cayenne or reduce chili powder to 2 tbsp.
-
Prevent dryness: cook turkey until just done, and don’t skip the water.
-
Instant Pot: Sauté turkey, add remaining ingredients, cook on high pressure 5 minutes.
-
Slow Cooker: Brown turkey first, add all ingredients, cook Low 4–6 hours or High 2–3 hours.
Nourishing Your Body & Soul
While I’m all about the flavor first, I also love knowing that what I’m eating makes me feel good. Compared to traditional ground beef taco meat, this turkey version is a fantastic lean protein option. It’s lower in saturated fat but still packed with protein to keep you full and satisfied. The spices aren’t just for taste—ingredients like cumin and chili powder are loaded with antioxidants. Remember, the sodium and other nutritional stats are an estimate and can vary based on the exact brands of ingredients you use and your chosen toppings. So, load up on those fresh veggie toppings for extra fiber and vitamins! This is comfort food that loves you back.
Prep time: 10 mins | Cook time: 20 mins | Total time: 30 mins | Servings: 6
Per serving (approx.): Calories: 190 | Protein: 22g | Fat: 8g | Carbs: 4g | Sugar: 2g | Sodium: 550mg
Final Thoughts
And there you have it! Your guide to the most flavorful, satisfying, and downright awesome ground turkey taco meat out there. This recipe proves that eating a little lighter doesn’t mean sacrificing an ounce of flavor. It’s quick enough for a hectic Wednesday but special enough for a festive Friday gathering with friends.
I hope this recipe finds its way into your regular rotation and becomes a trusted friend in your kitchen, just like it is in mine. The best meals are the ones that bring people together and make you feel good from the inside out. Now, I’d love to hear from you! Did you add the smoky paprika? Try the pineapple twist? Tag me on social @Feastical or shoot me an email—I love seeing your creations.
Happy cooking, and until next time, keep those forks (and spatulas) ready!
– Beau

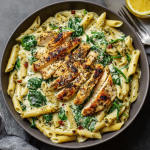
Creamy Pesto Chicken Florentine Pasta
Your New Favorite Comfort Food is Here: Creamy Pesto Chicken Florentine Pasta
Hey friends, Beau here! Let’s be real for a second. Some nights, you just need a dinner that feels like a warm, comforting hug. You know the one—the kind of meal that makes you close your eyes after the first bite and just sigh with happiness. You’re not looking for a fussy, three-hour culinary project. You want something soul-satisfying, delicious, and honestly, a little bit indulgent. If you’re nodding your head, then my friend, you and I are on the same wavelength, and you’ve absolutely come to the right place.
Today, we’re whipping up a dish that sits firmly in my “Top 10 Most Requested” category: my Creamy Pesto Chicken Florentine Pasta. Imagine this: tender, juicy chicken strips, fresh spinach that’s just wilted into perfection, and hearty penne pasta, all swimming in a sauce that’s the best of both worlds—creamy, dreamy Alfredo meets the vibrant, herby punch of fresh pesto. It’s rich without being overly heavy, and it’s got just enough green to make you feel virtuous while you’re indulging.
This isn’t just a recipe; it’s your secret weapon for impressing dinner guests, treating your family on a busy weeknight, or simply giving yourself a well-deserved delicious moment. So, tie on that apron, find that trusty spatula, and let’s create some kitchen magic together. This is one of those feel-good foods that brings people together, and I can’t wait for you to try it.
The Night This Pasta Saved the Day
This recipe has a special place in my heart because it was born from a classic “kitchen sink” scenario. Picture this: It was a rainy, downright gloomy Tuesday. I’d just gotten back from a long trip, my fridge was looking pretty sad, and my motivation to cook was at an all-time low. All I had were some lonely chicken breasts, a bag of spinach that needed to be used ASAP, and a half-used jar of pesto hanging out in the door.
I was about to just order a pizza (no shame in that game!), but then I remembered a packet of Alfredo sauce mix tucked away in the pantry—a little guilty secret I keep for emergencies. In a moment of “what the heck” inspiration, I decided to marry the pesto with the Alfredo. The result? Pure, unplanned genius. The vibrant pesto cut through the richness of the Alfredo, the spinach added a pop of color and earthiness, and the chicken made it a full, satisfying meal. My wife walked in, took one whiff, and said, “Okay, what’s the special occasion?” I just smiled. It was the occasion of turning a blah night into something truly special with a little creativity and zero fuss.
Gathering Your Flavor Dream Team
One of the things I love most about this dish is its flexibility. Don’t stress if you’re missing an ingredient or two; I’ve got you covered with swaps. Here’s what you’ll need to feed a hungry crew (about 8 servings).
- 4 tbsp Olive Oil: Our cooking fat of choice! It adds a fruity depth you don’t get from butter. Extra virgin is great, but any olive oil will work perfectly.
- 4 cloves Garlic, finely chopped: The aromatic heart of the dish. Please, for the love of flavor, use fresh garlic! That pre-minced stuff in a jar just doesn’t sing the same song.
- 8 skinless, boneless Chicken Breast Halves, cut into strips: I like breasts for their lean, clean canvas, but Chef’s Hack: chicken thighs would be incredible here for even more juiciness and flavor.
- 4 cups fresh Spinach Leaves: Don’t be alarmed by the volume—it wilts down to almost nothing! It’s our Florentine flair, adding color, nutrients, and a lovely earthy note.
- 2 (4.5 oz) packets dry Alfredo Sauce Mix: I call this my “weeknight warrior.” It’s a fantastic shortcut for a consistently creamy sauce. No shame! Substitution Tip: Feel free to make a from-scratch Alfredo sauce if you’re feeling fancy.
- 4 tbsp Pesto (store-bought or homemade): The star of the show! A good quality store-bought pesto is fine, but if you have basil growing on your windowsill, my homemade pesto recipe will take this to another level.
- 1 lb (16 oz) dry Penne Pasta: I love penne because the little tubes catch all that glorious sauce. Rigatoni, fusilli, or fettuccine would also be great friends here.
- 2 tbsp grated Romano Cheese: For a salty, sharp finish. Parmesan works just as well if that’s what you have on hand.
- Optional twist: ½ cup Sun-Dried Tomatoes, chopped: Chef’s Insight: I highly recommend this! They add a wonderful tangy-sweetness and a beautiful pop of red that makes the dish look restaurant-worthy.
- Optional finish: Squeeze of Lemon Juice and extra Basil: This is my pro move. A quick squeeze of fresh lemon juice right at the end brightens the entire dish and cuts the richness beautifully.
Let’s Get Cooking: Your Step-by-Step Guide
Okay, team! Time to turn these ingredients into a masterpiece. We’re going to work like a well-oiled machine, multitasking to get this dinner on the table in under an hour. Read through all the steps once, then let’s dive in!
- Cook the Pasta: First things first, bring a large pot of heavily salted water to a rolling boil. I’m talking seawater-level salty—this is your one chance to season the pasta from the inside out! Add the penne and cook according to package directions until it’s al dente, which means “to the tooth.” You want a little bite to it, as it will continue to cook a bit in the sauce later. Once it’s done, drain it, but Chef’s Hack: reserve about a cup of that starchy pasta water! We might use it to thin our sauce later. Set the drained pasta aside.
- Sauté the Chicken: While the pasta is bubbling away, place a large skillet over medium-high heat and add your olive oil. Let it get nice and hot. Season your chicken strips generously with salt and pepper. Add them to the skillet in a single layer—don’t crowd the pan, or they’ll steam instead of getting that beautiful golden-brown color! You might need to do this in two batches. Cook for about 6-8 minutes, turning occasionally, until they’re cooked through and have a lovely sear. Remove the chicken from the skillet and set it aside on a plate.
- Wilt the Spinach & Wake Up the Garlic: See all those delicious browned bits left in the skillet? That’s flavor gold! Reduce the heat to medium and add the chopped garlic. Sauté for just 30-60 seconds until it becomes incredibly fragrant—be careful not to burn it, or it’ll turn bitter. Now, toss in all that fresh spinach. It might seem like a mountain, but just keep stirring. In a minute or two, it will magically wilt down into a dark green, silky pile. Once it’s wilted, remove the skillet from the heat.
- Create the Dreamy Sauce: Now, in a separate medium saucepan, prepare your Alfredo sauce according to the packet directions. Usually, this involves whisking the powder with milk and/or butter and cooking until it thickens. Once your Alfredo sauce is smooth and luxurious, take it off the heat and stir in the 4 tablespoons of pesto. Watch as it turns from a plain white sauce into a vibrant, herby, green-speckled wonder. Give it a taste and season with a pinch of salt and pepper if needed.
- The Grand Finale: Combine It All! This is the fun part. Pour that gorgeous pesto-Alfredo sauce into the large skillet with the wilted spinach and garlic. Add the cooked, drained penne and the sautéed chicken strips back into the skillet. Gently toss everything together until every single piece of pasta and chicken is coated in that glorious sauce. If the sauce seems a little too thick for your liking, this is where that reserved pasta water comes in! Add a splash (a tablespoon at a time) to loosen it up to your perfect consistency. Let it all heat through for a couple of minutes over low heat.
Plating Up Your Masterpiece
You’ve done it! Now, let’s serve this beauty with a little flair. I like to use a pair of tongs to create a nice, high nest of pasta in the center of a warm bowl. Make sure you get plenty of those chicken strips and spinach bits in each serving.
Now, for the finishing touches: grab your microplane or cheese grater and shower the top with that grated Romano cheese. It adds a salty, umami kick that is just irresistible. If you’re using the sun-dried tomatoes, now’s the time to scatter them over the top for a burst of color and tang. Finally, for that “chef’s kiss” moment, tear a few fresh basil leaves over everything and give it one last tiny squeeze of fresh lemon juice. This brightens the whole dish and makes the flavors pop!
What to serve with it? A simple, crisp green salad with a lemony vinaigrette is the perfect partner to balance the richness of the pasta. A slice of crusty, warm garlic bread is also non-negotiable in my house—you’ll need it to scoop up every last drop of that sauce!
Make It Your Own: Delicious Twists & Swaps
One of my core kitchen beliefs is that a recipe is a guide, not a gospel. Feel free to get creative and make this Creamy Pesto Chicken Florentine Pasta work for you!
- Seafood Lover’s Delight: Swap the chicken for about a pound of large shrimp or even scallops. Sauté them just like the chicken until they’re pink and cooked through. The seafood pairs beautifully with the pesto.
- Vegetarian Vibes: Easy! Simply omit the chicken. To bulk it up, add a can of drained and rinsed chickpeas or white beans when you combine everything. You could also add sautéed mushrooms for a deep, savory flavor.
- Creamy Tomato Swirl: Love a rosé sauce? Stir in 2-3 tablespoons of tomato paste into the sauce along with the pesto. It creates a beautiful pink sauce with an incredible depth of flavor.
- Gluten-Free & Lighter: No problem! Use your favorite gluten-free penne pasta. For a lighter sauce, you can swap the Alfredo sauce mix for a simple sauce made from blended low-fat cream cheese, milk, and a little Parmesan.
- Extra Veggie Power: Feel free to add more vegetables! Sliced zucchini, bell peppers, or asparagus tips can be sautéed with the spinach for an even more nutrient-packed meal.
Beau’s Kitchen Notes & Stories
This recipe has evolved so much since that first rainy night. I’ve made it for countless family gatherings, potlucks, and even for new parents as a “welcome home” meal. It’s always a hit. One time, I accidentally used a spicy arrabbiata sauce mix instead of Alfredo, and you know what? It was a happy accident! It gave the dish a spicy kick that my brother-in-law still raves about.
My biggest piece of advice? Don’t skip the lemon juice at the end. I know it seems like a small thing, but it truly is the secret weapon that balances the entire dish, making it taste fresher and less heavy. It’s the little details that make a home-cooked meal feel truly special.
Your Questions, Answered!
Over the years, I’ve gotten a lot of questions about this recipe. Here are the most common ones to help you out.
- Can I make this ahead of time? Absolutely! You can assemble the entire dish, let it cool, and store it in an airtight container in the fridge for up to 2 days. When you’re ready, reheat it gently in a skillet over low heat, adding a splash of milk or chicken broth to loosen the sauce back up.
- My sauce is too thick! What did I do wrong? Don’t worry, this is an easy fix! The sauce continues to thicken as it sits. Just thin it out with a little bit of warm milk, chicken broth, or that magical reserved pasta water I mentioned earlier. Add it a tablespoon at a time until it reaches your desired consistency.
- Can I use frozen spinach? You can, but I prefer fresh for its brighter flavor and texture. If you use frozen, make sure it’s completely thawed and that you squeeze out ALL the excess water in a clean kitchen towel. Otherwise, you’ll water down your beautiful sauce.
- Why is my pesto sauce turning brown? Basil in pesto is sensitive to heat and can oxidize, turning a darker color. To keep it vibrant green, stir the pesto in at the very end, right before you combine everything, and only heat it through gently.
Creamy Pesto Chicken Florentine Pasta
Description
Creamy Pesto Chicken Florentine Pasta
Your New Favorite Comfort Food is Here
Hey friends, Beau here! You know those nights when you just need a meal that feels like a hug from the inside out? That’s exactly what this Creamy Pesto Chicken Florentine Pasta delivers — tender, juicy chicken strips, fresh spinach, hearty penne, and a sauce that’s part creamy Alfredo, part herby pesto perfection.
It’s rich, satisfying, and ready in under an hour. Whether you’re feeding family, impressing guests, or just treating yourself, this one’s pure feel-good magic.
Ingredients
Main Ingredients
-
4 tbsp olive oil
-
4 cloves garlic, finely chopped
-
8 skinless, boneless chicken breast halves, cut into strips (or use chicken thighs for extra flavor)
-
4 cups fresh spinach leaves
-
2 (4.5 oz) packets dry Alfredo sauce mix (or homemade sauce – see note)
-
4 tbsp pesto (store-bought or homemade)
-
1 lb (16 oz) penne pasta
-
2 tbsp grated Romano cheese (Parmesan works too)
Optional Add-Ons
-
½ cup sun-dried tomatoes, chopped
-
Fresh basil leaves, torn
-
Squeeze of fresh lemon juice
Instructions
Bring a large pot of heavily salted water to a boil. Add the penne and cook until al dente (a little firm to the bite). Drain and reserve 1 cup of pasta water for later.
Heat olive oil in a large skillet over medium-high heat. Season chicken strips with salt and pepper, then cook 6–8 minutes until golden and cooked through. Remove from skillet and set aside.
In the same skillet, reduce heat to medium. Add chopped garlic and cook for 30–60 seconds, until fragrant. Add spinach and stir until just wilted. Remove from heat.
In a medium saucepan, prepare Alfredo sauce according to packet directions. Once smooth and thickened, stir in the pesto until evenly combined and vibrant green. Season with salt and pepper to taste.
Pour the pesto Alfredo sauce into the skillet with the spinach and garlic. Add cooked pasta and chicken, and toss to coat evenly.
If the sauce is too thick, stir in a splash of reserved pasta water until creamy and smooth.
Plate the pasta with tongs, making sure each portion gets a good mix of chicken and spinach. Sprinkle with Romano cheese, sun-dried tomatoes (if using), and torn basil leaves.
Finish with a squeeze of fresh lemon juice for brightness.
Notes
-
Don’t skip the lemon juice at the end — it cuts the richness and makes every flavor pop.
-
Save your pasta water — it’s liquid gold for thinning sauce without losing flavor.
-
Reheat gently with a splash of milk or broth to revive the sauce’s creaminess.
Nutrition
- Calories: 520 Cal Per Serving
- Fat: 22 g
- Carbohydrates: 42 g
- Protein: 36 g
Nutritional Breakdown (Approximate)
I’m all about balance! While this is a comforting, indulgent dish, it’s helpful to know what you’re enjoying. Here’s a rough nutritional estimate per serving (based on 8 servings, using the standard ingredients and without optional add-ons). Remember, these values can vary based on the specific brands you use.
- Calories: ~520
- Protein: 36g (The chicken and cheese pack a powerful protein punch to keep you full and satisfied!)
- Fat: 22g (This comes from the healthy olive oil, the nuts in the pesto, and the dairy in the sauce.)
- Carbohydrates: 42g (Primarily from the life-giving pasta!)
- Fiber: 3g (Thank you, spinach and whole-wheat penne if you use it!)
- Sodium: ~600mg (Be mindful of the sodium in the Alfredo packet and cheese. Using low-sodium versions can help control this.)
Final Thoughts from My Kitchen to Yours
Well, there you have it, my friends—my go-to recipe for when I need a guaranteed win at the dinner table. This Creamy Pesto Chicken Florentine Pasta is more than just a list of ingredients and steps; it’s a reminder that the best meals often come from a little bit of creativity and a whole lot of heart.
I hope this recipe becomes a beloved favorite in your home, just like it is in mine. It’s a testament to the fact that feel-good food doesn’t have to be complicated. It’s about the joy of creating something delicious and the warmth of sharing it with the people you love.
If you make it (and I really hope you do!), I’
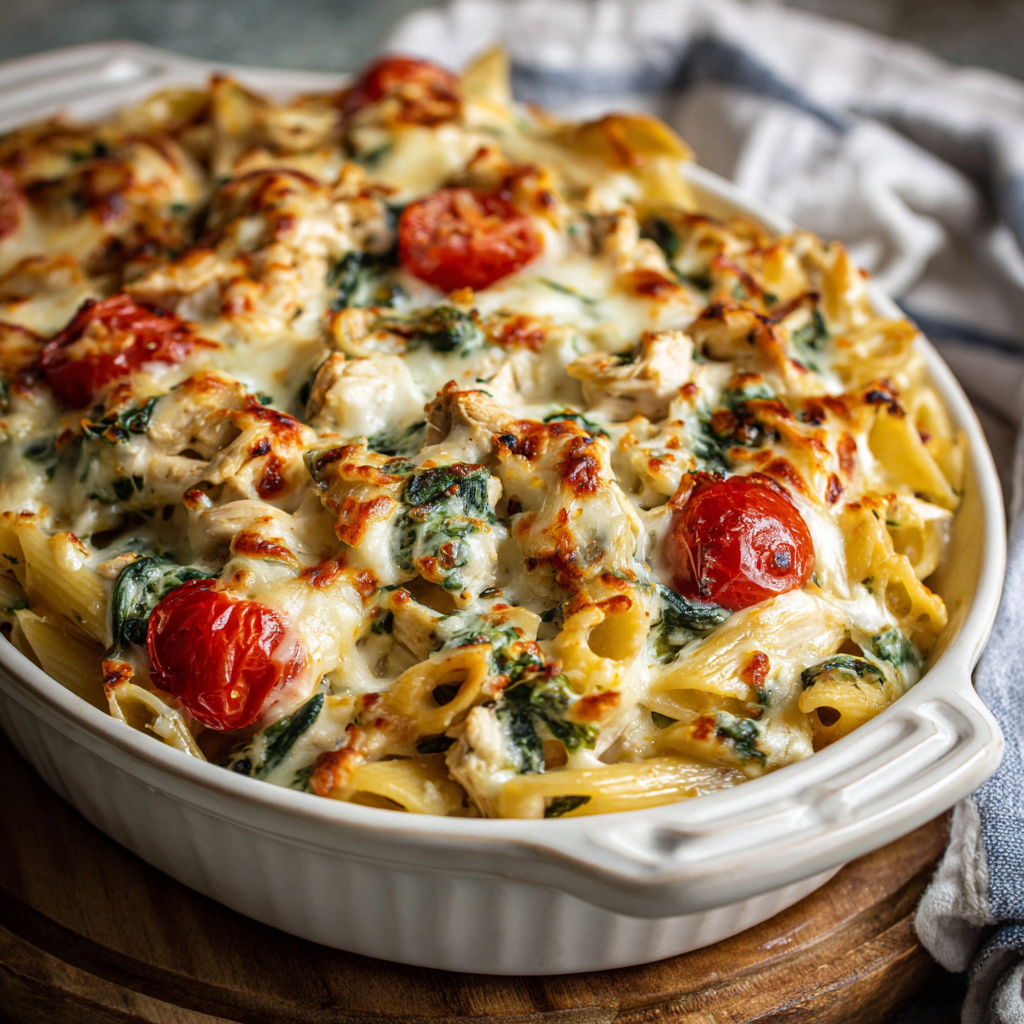
Chicken, Spinach & Cheese Pasta Bake (Creamy, Cheesy & Crowd-Pleasing)
Your New Favorite Comfort Food is Waiting
Hey friends, Beau here! Let me ask you a question: is there anything better than the smell of a cheesy, bubbling pasta bake wafting from your oven? It’s a universal signal that says, “Drop everything, good times and great food are ready.” It’s the edible equivalent of your favorite cozy sweater. And today, I’m beyond excited to share with you what might just become your new go-to masterpiece: my Creamy Chicken, Spinach & Cheese Pasta Bake.
This isn’t just any pasta dish. This is the one you make when you need to feed a hungry crowd, when you want to impress without the stress, or when you simply need a big, warm, culinary hug at the end of a long day. We’re talking tender penne pasta, juicy shredded chicken, and vibrant spinach, all swirled together in a luxuriously creamy sauce that’s shockingly easy to make. The secret? A double-cheese dream team of melty mozzarella and rich, silky cream cheese that creates a sauce so good, you’ll want to eat it with a spoon.
So, preheat your ovens and grab your favorite baking dish. We’re about to create some serious magic together. This recipe is designed for real life—it’s forgiving, flexible, and guaranteed to bring everyone running to the table.
The Pasta Bake That Started It All
This particular recipe holds a special place in my heart because it truly started it all. Years ago, before Feastical was even a twinkle in my eye, I was tasked with bringing a dish to my first big, chaotic, wonderful family potluck. My cousins, aunts, uncles—everyone would be there. I was nervous. I wanted to make something that would stand out, but that also wouldn’t have me chained to the stove all day.
I stared into my pantry, saw a box of penne, and the idea just clicked. I threw in leftover rotisserie chicken, the last of a bag of spinach that needed a purpose, and the last blocks of cream cheese and mozzarella from the fridge. I crossed my fingers, popped it in the oven, and hoped for the best. The result? Let’s just say the dish came home completely empty, save for a few glorious, crispy cheese bits on the side. My cousin still texts me every time she makes it for her own family. That’s the power of a great pasta bake—it doesn’t just fill bellies; it creates connections and becomes part of your own family’s story.
Gathering Your Cast of Characters
One of the things I love most about this recipe is its beautiful simplicity. Let’s break down these ingredients. Think of this as our pre-game huddle before we get cooking!
- 1 lb (16 oz) Penne Pasta: Penne is my go-to here because those little tubes are perfect for catching all the creamy sauce and little bits of chicken and spinach. Chef’s Insight: Don’t overcook it! We’re going for al dente, as it will continue to soften and soak up flavor in the oven.
- 2 tsp Olive Oil: Just enough to get our onions sizzling and happy.
- 2 Medium Onions, Chopped: They form the sweet, savory base of our flavor profile. If you’re in a rush, frozen diced onions work in a pinch!
- 6 Cups Cooked Chicken, Chopped or Shredded: This is your chance to be a kitchen hero with leftovers! A store-bought rotisserie chicken is your best friend here—it’s flavorful, moist, and saves you so much time. Substitution Tip: Leftover Thanksgiving turkey works amazingly well, too!
- 2 (14 oz) Cans Italian-Style Diced Tomatoes, Undrained: The “Italian-style” usually means they’re packed with basil, oregano, and garlic, which adds a built-in flavor boost. The juice is key for creating our sauce, so don’t drain it!
- 2 (10 oz) Packages Fresh Spinach: It looks like a mountain when you start, but it wilts down into a lovely, nutrient-packed layer. Substitution Tip: A 16-oz bag of frozen chopped spinach, thoroughly thawed and squeezed dry, works perfectly.
- 2 (8 oz) Packages Cream Cheese, Softened: This is the magic ingredient for that luscious, creamy sauce without making a roux. Chef’s Hack: Take it out of the fridge an hour before, or microwave it (without the foil!) for 15-20 seconds to soften it up for easy mixing.
- 3 Cups Shredded Mozzarella Cheese: Because what’s a pasta bake without that iconic, stretchy, golden-brown cheesy top? We’re stirring half into the mix and saving the rest for that glorious crust.
- ½ Cup Grated Parmesan Cheese (Optional): I highly recommend this “optional” twist! It adds a sharp, salty, nutty flavor that takes the cheesy top to a whole new level.
- 1 tsp Garlic Powder, 1 tsp Italian Herbs, Pinch of Red Pepper Flakes (Optional): This is your flavor playground. The red pepper flakes don’t make it spicy, just add a subtle warmth. Feel free to add fresh minced garlic with the onions if you’re feeling fancy!
Let’s Build Some Deliciousness: Step-by-Step
Alright, team, it’s game time. Put on some good music, and let’s get this show on the road. Follow these steps, and you’ll have a perfect pasta bake every single time.
- Preheat & Prep: First things first, get that oven roaring to 375°F (190°C). This gives it plenty of time to come to the right temperature. While it’s heating, lightly grease your favorite large baking dish (or two medium ones if you’re planning to freeze one for a rainy day). A little spray or a swipe of butter does the trick. Chef’s Hack: If you’re using a metal pan, you can get away with a slightly shorter bake time. Glass or ceramic might need the full 30 minutes.
- Pasta Perfect: Bring a large pot of well-salted water to a rolling boil. Cook your penne according to the package directions, but shave a minute or two off the time. We want it al dente—still with a little bite. Why? Because it’s going to continue cooking and absorbing that saucy goodness in the oven, and we don’t want it turning to mush. Drain it well and set it aside.
- Sauté Your Aromatics: In a large skillet (the bigger, the better for mixing later!), heat your olive oil over medium heat. Add the chopped onions and cook them for about 5-7 minutes, until they’re soft and translucent. You’ll know they’re ready when your kitchen starts smelling incredible. Now, add your mountain of fresh spinach in batches, stirring until it’s all wilted down into a dark green, manageable pile.
- Create the Sauce: This is where the magic happens! To the skillet with your onions and spinach, add the two cans of diced tomatoes (with all their juices), the cooked chicken, and your seasonings (garlic powder, Italian herbs, and red pepper flakes if using). Give it all a good stir. Now, add those two blocks of softened cream cheese. Chef’s Pro-Tip: Break them up into chunks with your spoon as you stir. Within a few minutes, they’ll melt into the tomatoes and juices, creating the most gorgeous, creamy, pink-hued sauce. It’s a beautiful thing.
- The Grand Mix: In a large bowl—and I mean large—combine the drained pasta and the entire contents of your skillet. Now, stir in half (about 1.5 cups) of your shredded mozzarella cheese. Mix it all until every single piece of penne is coated in that creamy, cheesy sauce and everything is evenly distributed.
- Top & Bake: Pour this glorious mixture into your prepared baking dish and spread it out evenly. Now, for the pièce de résistance: sprinkle the remaining 1.5 cups of mozzarella cheese over the top, followed by that optional-but-highly-recommended Parmesan cheese. This is what creates that iconic, bubbly, golden-brown crust we all dream about.
- Bake to Perfection: Slide that dish into your preheated oven and bake, uncovered, for 25-30 minutes. You’re looking for the cheese to be completely melted, the sauce to be bubbling enthusiastically around the edges, and the top to have those perfect golden-brown spots.
- The Most Important Step: Rest! I know, I know, it’s tempting to dive right in. But trust me on this one. Let the bake sit on the stovetop for 5-10 minutes after it comes out of the oven. This allows the sauce to thicken up slightly and the layers to set, making it infinitely easier to serve up perfect, neat portions.
How to Serve This Crowd-Pleaser
Presentation is part of the fun! You’ve worked hard, so let’s make it look as good as it tastes.
I love serving this right from the baking dish at the table—it’s rustic, inviting, and lets everyone admire that gorgeous cheesy top. Use a large spoon or a serving spatula to scoop out hearty portions. For a little freshness and color contrast, I always serve it with a simple side salad tossed in a bright, tangy vinaigrette. The acidity helps cut through the richness of the pasta beautifully.
A crusty loaf of garlic bread or some warm, buttery dinner rolls are non-negotiable in my book. They’re essential for mopping up every last bit of sauce from your plate. For a drink pairing, a crisp, cold lager or a glass of Pinot Grigio complements the creamy, cheesy flavors perfectly. And for the kids (or the kids at heart), a tall glass of ice-cold milk is the ultimate partner.
Make It Your Own: Fun Recipe Twists
The beauty of this recipe is its flexibility. Don’t be afraid to play with it and make it your own! Here are a few of my favorite variations:
- “Everything But the Kitchen Sink” Veggie Boost: Sauté some sliced mushrooms or chopped bell peppers along with the onions. A cup of frozen corn or peas stirred in at the end adds a lovely pop of color and sweetness.
- Spicy Southwest Fiesta: Swap the Italian-seasoned tomatoes for a can of Rotel diced tomatoes with green chiles. Use a Monterey Jack cheese instead of mozzarella and add a teaspoon of cumin. Top with crushed tortilla chips for a fun crunch!
- Sun-Dried Tomato & Artichoke Heart Elegance: Feeling fancy? Replace one can of diced tomatoes with 1 cup of chopped sun-dried tomatoes (in oil, drained) and a 14-oz can of artichoke hearts, drained and chopped. It feels incredibly luxurious.
- Gluten-Free & Lighter Options: This recipe adapts beautifully! Use your favorite gluten-free penne pasta. To lighten it up, you can use reduced-fat cream cheese and part-skim mozzarella. I’ve even had success substituting one package of cream cheese with plain Greek yogurt for a tangy, protein-packed twist (just stir it in at the very end, off the heat).
A Few More Thoughts From My Kitchen
This recipe has evolved so much since that first potluck. I’ve learned that it’s virtually foolproof. I once accidentally used a block of strawberry cream cheese (don’t ask how that happened during a frantic kitchen cleanup) and had to start all over—so maybe double-check your labels, folks! A true kitchen disaster story for another day.
Over time, I’ve found that the quality of your canned tomatoes really makes a difference. Splurging on a good brand with real Italian herbs can elevate the entire dish. Also, this bake freezes like a dream. Assemble it completely but don’t bake it. Wrap it tightly in a double layer of foil and freeze for up to 3 months. When you’re ready, bake it from frozen, adding about 20-30 minutes to the baking time.
Your Questions, Answered!
I’ve gotten a lot of questions about this recipe over the years. Here are the most common ones to ensure your success.
- Can I make this ahead of time? Absolutely! You can assemble the entire bake, cover it, and refrigerate it for up to 24 hours before you need to bake it. You might need to add 5-10 minutes to the baking time since it’s going into the oven cold.
- My sauce seems a bit dry. What happened? No worries! This can happen if the pasta soaks up too much liquid. Next time, reserve a cup of the starchy pasta water before you drain the penne. If the mixture seems dry before baking, just stir in a splash of that water, some milk, or even a bit of chicken broth to loosen it up.
- The top is browning too fast! Help! Ovens can be feisty. If your cheese top is getting darker than you’d like before the inside is bubbly, simply place a loose sheet of aluminum foil over the top for the remainder of the baking time. This will slow down the browning without trapping too much steam.
- What’s the best way to reheat leftovers? To revive that creamy texture, reheat individual portions in the microwave with a damp paper towel over the top. For a larger portion, cover it with foil and warm it in a 350°F oven for 20-25 minutes, until heated through.

Chicken, Spinach & Cheese Pasta Bake (Creamy, Cheesy & Crowd-Pleasing)
Description
Creamy Chicken, Spinach & Cheese Pasta Bake
The ultimate comfort food — creamy, cheesy, and loaded with love.
Ingredients
Pasta & Base
-
1 lb (16 oz) penne pasta
-
2 tsp olive oil
-
2 medium onions, chopped
-
6 cups cooked chicken, chopped or shredded (rotisserie works great)
-
2 (14 oz) cans Italian-style diced tomatoes, undrained
-
2 (10 oz) packages fresh spinach (or 1 bag frozen, thawed and squeezed dry)
Creamy Sauce & Cheese
-
2 (8 oz) packages cream cheese, softened
-
3 cups shredded mozzarella cheese, divided
-
½ cup grated Parmesan cheese (optional but highly recommended)
Seasonings
-
1 tsp garlic powder
-
1 tsp Italian herbs
-
Pinch red pepper flakes (optional)
-
Salt & pepper, to taste
Instructions
Preheat oven to 375°F (190°C). Lightly grease a large baking dish (or two medium ones if you want to freeze one).
Bring a large pot of salted water to a boil. Add penne and cook 1–2 minutes shy of al dente (it will finish cooking in the oven). Drain and set aside.
In a large skillet, heat olive oil over medium heat. Add onions and cook 5–7 minutes, until soft and translucent.
Add spinach in batches, stirring until wilted.
Add diced tomatoes (with their juices), cooked chicken, and seasonings to the skillet. Stir to combine.
Add softened cream cheese in chunks and stir until fully melted and smooth — forming a creamy, pink-hued sauce.
In a large mixing bowl, combine the drained pasta with the sauce mixture.
Add 1½ cups mozzarella cheese and stir until evenly coated.
Pour into the prepared baking dish. Top with remaining 1½ cups mozzarella and sprinkle with Parmesan (if using).
Bake uncovered for 25–30 minutes, until bubbly and golden-brown on top.
Let the dish rest 5–10 minutes before serving — this helps the sauce set beautifully.
Notes
-
Refrigerate: Up to 3 days in an airtight container.
-
Freeze (unbaked): Assemble, wrap tightly, and freeze for up to 3 months.
-
Reheat: Bake covered at 350°F for 25 minutes or microwave portions with a splash of milk to keep it creamy.
Nutrition
- Calories: 480 Cal Per Serving
- Fat: 24 g
- Carbohydrates: 32 g
- Fiber: 3 g
- Protein: 30 g
Nutritional Information (Approximate)
I’m all about balance and enjoying the foods you love, so here’s a rough nutritional breakdown per serving (based on 16 servings). Remember, these are estimates and can vary based on the specific brands and ingredients you use.
- Calories: 480
- Protein: 30g
- Fat: 24g
- Carbohydrates: 32g
- Fiber: 3g
- Sodium: 540mg
This dish is a fantastic source of protein, thanks to the chicken and cheese, which helps keep you full and satisfied. The spinach adds a boost of iron and vitamins A and C. To make it a more balanced meal, I always recommend pairing it with that side salad we talked about to add more fiber and fresh nutrients to your plate.
Final Thoughts From My Kitchen to Yours
And there you have it, my friends! My all-time favorite Chicken, Spinach & Cheese Pasta Bake. This recipe is more than just a list of ingredients and steps; it’s a trusty companion for busy weeknights, a hero for potlucks, and a guaranteed smile-maker for your family.
I hope this recipe finds its way into your regular rotation and becomes a part of your own story, just like it’s a part of mine. Cooking is about so much more than food—it’s about the memories we create around the table. So, whip up this bake, gather your people, and enjoy every cheesy, creamy, comforting bite.
I’d love to hear how it turns out for you! Tag me on social @Feastical or shoot me an email with your photos and stories. Happy baking!
With a full heart and an even fuller plate,
Beau
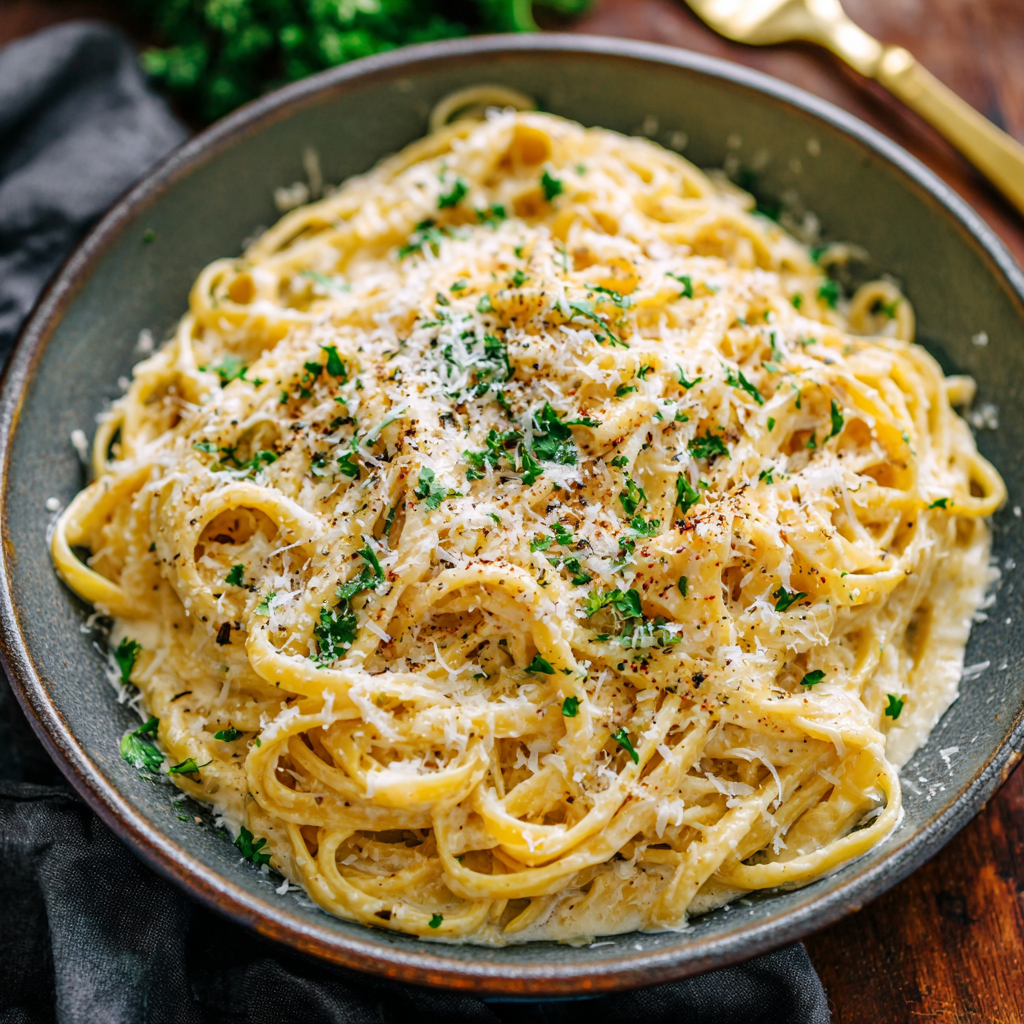
To-Die-For Fettuccine Alfredo (Ultra Creamy & Indulgent)
Your New Go-To Fettuccine Alfredo Recipe (It’s a Game-Changer!)
Hey friends, Beau here from Feastical! Let’s talk about a dish that needs no introduction, but deserves a standing ovation: Fettuccine Alfredo. We’ve all had it, right? That sometimes-gloopy, often-lukewarm pasta dish from a chain restaurant that promises comfort but delivers… well, disappointment. I’m here to tell you that a life-changing, soul-soothing, real Fettuccine Alfredo is not only possible in your own kitchen, but it’s also just 30 minutes away.
This isn’t just a recipe; it’s an experience. This is the version I make for friends after a long week, for family celebrations, or when I just need a big, warm, cheesy hug on a plate. We’re talking about a sauce so luxuriously creamy, so velvety and rich, that it clings to every single strand of fettuccine like a perfectly tailored suit. It’s bold, unapologetically indulgent, and crafted with simple, high-quality ingredients that do all the talking.
So, if you’re ready to trade in those jarred sauces and underwhelming takeout orders for a from-scratch masterpiece that will have everyone at the table asking for seconds (and the recipe!), you’ve come to the right place. Grab your biggest pot, your favorite wooden spoon, and let’s create some magic together.
The Night I Fell in Love with Alfredo
My love affair with this dish started not in a fancy Italian restaurant, but in my tiny first apartment kitchen. I was 22, broke, and trying to impress a date. The plan was spaghetti and meatballs, a safe bet. But as fate would have it, I discovered a science experiment growing in my tomato sauce jar about an hour before she was due to arrive. Panic mode! All I had was butter, cream, and a sad-looking block of Parmesan in the back of my fridge.
I frantically whipped together what I thought was an Alfredo sauce, praying it wouldn’t curdle. The result was… shockingly good. Not perfect, mind you, but it was creamy, cheesy, and comforting. We sat on the floor because I didn’t own a table, twirling fettuccine and laughing. That messy, improvised meal was a bigger hit than any perfectly planned dinner could have ever been. It taught me that the best food isn’t about perfection; it’s about the feeling it creates. This recipe is that night, refined over a decade, and shared with you.
Gathering Your Alfredo A-Team
Simplicity is key here, friends. Because we’re using so few ingredients, the quality of each one truly matters. This is where we build our flavor foundation, so let’s break it down.
- 48 oz dry fettuccine pasta: I love the classic wide, flat ribbons of fettuccine—they’re like little edible spoons for that glorious sauce. Chef’s Insight: Don’t break the pasta! Let it soften in the water for a minute before gently coaxing it into the pot.
- 2 cups (4 sticks) unsalted butter: This is the rich, velvety base of our sauce. Using unsalted butter lets us control the salt level perfectly. Substitution Tip: If you only have salted butter, that’s okay! Just be extra cautious when adding salt later.
- 1 ½ pints heavy cream: For that signature, decadent creaminess. There’s no skimping here—half-and-half or milk will not give you the same luxurious texture. This is our indulgence, let’s lean into it!
- Salt and freshly ground black pepper, to taste: Freshly ground is a non-negotiable for me. The pre-ground stuff just doesn’t have the same bright, pungent kick.
- 2 dashes garlic salt: This is my little secret weapon. It gives a subtle, rounded garlic flavor without the risk of burning minced garlic. It’s the background singer that makes the lead vocals pop.
- 1 ½ cups grated Romano cheese: Romano brings a sharp, tangy, and slightly salty punch that cuts through the richness. It’s the bold flavor anchor.
- 1 cup grated Parmesan cheese: Parmesan offers that nutty, umami depth we all know and love. The combination of the two is pure magic. CRUCIAL TIP: Please, please, please buy a block of cheese and grate it yourself! Pre-shredded bags contain anti-caking agents that can make your sauce grainy and prevent it from melting smoothly.
- Optional twist: pinch of nutmeg or splash of white wine: A tiny pinch of nutmeg is a classic Italian move that enhances the creaminess without tasting like dessert. A splash of a dry white wine (like Sauvignon Blanc) added with the cream will add a wonderful layer of complexity.
- Optional garnish: chopped parsley or cracked pepper: A sprinkle of fresh parsley adds a pop of color and freshness, while extra cracked pepper gives a nice little bite.
Let’s Get Cooking: Crafting the Creamy Dream
Okay, team. Mise en place! That’s just a fancy way of saying “get all your ingredients prepped and measured before you start.” It makes the process feel like a smooth, professional dance instead of a frantic kitchen scramble. Ready? Let’s go.
- Cook the Pasta to Perfection: Bring a large stockpot of heavily salted water to a rolling boil. You want the water to taste like the sea—this is our one chance to season the pasta from the inside out. Add the fettuccine and cook according to package directions until it’s al dente, which means “to the tooth.” It should have a slight bite to it. Chef’s Hack: Right before you drain the pasta, scoop out about ½ cup of that starchy, salty pasta water. This liquid gold is our secret weapon for adjusting the sauce consistency later. Drain the pasta, but do not rinse it! Rinsing washes away the starch that helps the sauce cling.
- Start the Sauce – Low and Slow: While the pasta is cooking, let’s build our sauce. In a large saucepan or deep skillet, melt the butter over medium heat. You don’t want it to sizzle or brown, just melt gently. Once melted, pour in the heavy cream and give it a good stir. Bring it to a gentle simmer—you’ll see little bubbles forming around the edges. Watch it closely! We never want a raging boil. Season with salt, a generous amount of black pepper, and those two dashes of garlic salt. Let it simmer gently for 5-7 minutes, stirring frequently. This allows the flavors to meld and the sauce to reduce slightly, thickening it up.
- The Grand Cheese Addition: Now, turn the heat down to low. This is the most critical step! Gradually sprinkle in your grated Romano and Parmesan cheese, whisking constantly. I add a handful at a time, letting it melt fully before adding the next. This patience prevents the cheese from clumping and seizing. You’ll see the sauce transform before your eyes into a smooth, velvety, gorgeous blanket. If the sauce seems a little too thick, now is the time to add a splash of that reserved pasta water, one tablespoon at a time, until it reaches your desired consistency.
- The Big Toss – Where Magic Happens: Add your drained, hot fettuccine directly into the sauce pan. Using a pair of tongs, lift and toss the pasta, coating every single inch in that creamy, cheesy goodness. I like to let it sit over the lowest heat for just a minute, tossing one more time. This allows the pasta to really drink in the sauce and become one harmonious dish.
Plating Up Your Masterpiece
Alfredo waits for no one! This dish is best served immediately, straight from the pan to the plate while it’s still piping hot and silky. I love using warmed, shallow bowls—it makes the meal feel extra special and keeps the heat in.
Twirl a generous nest of fettuccine onto each plate. For a beautiful finishing touch, garnish with a little extra sprinkle of freshly grated Parmesan, a crack of black pepper, and a vibrant sprinkle of chopped fresh parsley. The green against the creamy white is just stunning.
What to serve with it? A simple, crisp green salad with a sharp vinaigrette is the perfect partner to cut through the richness. A loaf of warm, crusty garlic bread is also non-negotiable in my house—you’ll need it to scoop up every last drop of sauce left on the plate. Trust me, there will be drops.
Make It Your Own: Delicious Twists & Swaps
Once you’ve mastered the classic, the world is your oyster (or, well, your pasta bowl!). Here are a few of my favorite ways to mix it up.
- Protein Power-Up: Add grilled chicken breast, sautéed shrimp, or even some crispy pancetta or bacon bits. Stir them in at the very end with the pasta.
- Veggie Delight: Steam some broccoli florets or fresh peas and toss them in with the pasta. The bright, fresh flavors are a fantastic contrast to the rich sauce.
- Mushroom Lover’s Dream: Sauté a pound of sliced cremini mushrooms in a tablespoon of the butter until golden brown, then remove them and proceed with the recipe. Stir them back in at the end.
- Kick of Heat: Add a pinch of red pepper flakes to the butter as it melts for a subtle, warming spice that runs through the entire dish.
- Lighter(ish) Version: For a slightly lighter sauce, you can substitute one stick of butter with ¼ cup of cream cheese. It still gives you a creamy, tangy result with a bit less fat.
Beau’s Kitchen Notes & Stories
This recipe has been my culinary security blanket for years. I’ve made it for heartbroken friends, for joyful new neighbors, and for myself after a tough day. It’s a constant. The biggest lesson I’ve learned? Don’t rush the cheese! I can’t tell you how many times early on I got impatient, dumped it all in at once, and ended up with a stringy, clumpy mess. Low heat and gradual incorporation is the golden rule.
Also, a funny story: I once made a triple batch for a big family potluck. In my haste, I accidentally used a container of powdered Parmesan from a pizza party the week before. Let’s just say… we ordered pizza that night. It was a salty, non-melting disaster. A hard-learned lesson in always using the real deal!
Your Alfredo Questions, Answered!
Q: My sauce turned out grainy/oily. What happened?
A: This is almost always a heat issue. If the heat is too high when you add the cheese, the fats can separate. Next time, make sure your heat is on low when incorporating the cheese. Also, double-check that you’re using freshly grated cheese, not pre-shredded.
Q: Can I make this ahead of time?
A: I don’t recommend it for the best texture. Alfredo is a “right now” kind of dish. As it sits, the pasta continues to absorb the sauce, making it thick and less creamy. If you must, keep the sauce and pasta separate and combine them gently over low heat right before serving, adding a splash of cream or pasta water to loosen it up.
Q: How can I reheat leftovers?
A: Leftovers? I’m impressed! The best way is gently on the stovetop over low heat. Add a tablespoon or two of milk or cream and stir slowly until it warms through. The microwave will likely cause it to separate.
Q: Can I freeze Fettuccine Alfredo?
A: Unfortunately, I don’t advise it. Cream-based sauces tend to separate and become watery and grainy upon thawing. This is truly a “enjoy the same day” recipe.

To-Die-For Fettuccine Alfredo (Ultra Creamy & Indulgent)
Description
My love affair with Alfredo didn’t start in Italy—it started in my tiny first apartment when I was 22. I was broke, trying to impress a date, and my tomato sauce had… gone bad. All I had left was butter, cream, and a sad wedge of Parmesan.
Desperation led to improvisation, and somehow, magic happened. That meal—eaten on the floor with no table—was creamy, cheesy, and unforgettable. I’ve spent years refining it into the recipe you’re about to make today.
Ingredients
For the Pasta & Sauce
-
48 oz fettuccine pasta
-
2 cups (4 sticks) unsalted butter
-
1 ½ pints heavy cream
-
Salt & freshly ground black pepper, to taste
-
2 dashes garlic salt
-
1 ½ cups freshly grated Romano cheese
-
1 cup freshly grated Parmesan cheese
Optional Add-Ons
-
Pinch of nutmeg or splash of dry white wine
-
Chopped parsley or extra cracked pepper for garnish
Pro Tip: Always grate your own cheese! Pre-shredded cheese contains anti-caking agents that make sauces grainy.
Instructions
Bring a large pot of salted water to a boil. Add the fettuccine and cook until al dente. Reserve ½ cup of the pasta water before draining (don’t rinse the pasta—those starches help the sauce cling!).
In a large skillet or saucepan, melt the butter over medium heat. Add the heavy cream and bring to a gentle simmer. Season with salt, pepper, and garlic salt. Simmer 5–7 minutes, stirring occasionally, until slightly thickened.
Reduce the heat to low. Gradually whisk in the Romano and Parmesan cheeses, one handful at a time, until fully melted and smooth.
If the sauce becomes too thick, add a splash of the reserved pasta water to loosen it.
Add the hot pasta directly into the sauce. Toss gently to coat every strand in that luscious creaminess. Let it sit over low heat for 1–2 minutes to fully absorb the sauce.
Plate the pasta into warm bowls. Top with extra Parmesan, fresh parsley, and cracked pepper. Serve with a crisp green salad or warm garlic bread for the ultimate comfort meal.
Notes
-
Don’t rush the cheese—low heat is your best friend.
-
Save your pasta water! It’s the secret to perfect sauce texture.
-
Alfredo doesn’t wait. Serve it fresh, creamy, and piping hot.
-
Reheat leftovers gently with a splash of cream or milk.
Nutrition
- Calories: 680 Cal Per Serving
- Fat: 45 g
- Carbohydrates: 45 g
- Protein: 17 g
Let’s Talk Nutrition (The Real Talk!)
Friends, let’s be real. This is an indulgent, celebratory dish. It’s rich, creamy, and comforting, and it’s not pretending to be a light salad. It’s a treat, and treats are an important part of a happy, balanced life!
This nutritional information is an estimate per serving, based on the ingredients listed. Remember, your specific brands and exact measurements can cause variations. The majority of the calories come from the delicious fats in the butter, cream, and cheese—that’s what makes it so satisfying! The pasta provides energy-sustaining carbohydrates, and the cheese offers a good amount of protein and calcium. Enjoy it mindfully, savor every single bite, and pair it with a fresh side salad to round out your meal.
Final Thoughts from My Kitchen to Yours
And there you have it! Your guide to creating a truly unforgettable, to-die-for Fettuccine Alfredo that will wow your family and become a staple in your recipe rotation. It’s simple, it’s soulful, and it proves that the most satisfying meals often come from a handful of good ingredients and a little bit of love.
I’d love to hear how it turns out for you! Tag me on social @Feastical or leave a comment on the blog with your creations, your twists, and your kitchen stories. Remember, food is about connection, and I’m so glad we could connect over this bowl of pure comfort. Until next time, keep your whisks busy and your plates full!

Zesty Salmon Tacos with Corn-Bean Salsa & Creamy Toppings
Zesty Salmon Tacos: Your New Favorite Taco Night Game-Changer
Hey there, friends! Beau here, welcoming you back to my kitchen. Let’s be real for a second: sometimes, taco night can get a little… predictable. Don’t get me wrong, I love a classic ground beef taco as much as the next person, but every once in a while, our taste buds deserve a vacation. They crave something that’s simultaneously light and indulgent, fresh and deeply satisfying.
That’s exactly where these Zesty Salmon Tacos swoop in to save the day. Imagine this: flaky, tender salmon fillets with those irresistible crispy edges, all kissed with a bold Cajun seasoning and a bright splash of lemon. We’re tucking that beautiful fish into warm, soft tortillas and piling them high with a confetti-like corn and black bean salsa that bursts with freshness in every single bite. A drizzle of cool, creamy toppings and a sprinkle of melty cheese brings it all together in a symphony of textures and flavors that will have everyone at the table asking for seconds.
This isn’t just a recipe; it’s a 30-minute ticket to a restaurant-quality meal right in your own dining room. It’s perfect for a busy weeknight, a surefire hit for casual gatherings with friends, and the ultimate answer to that “I need something delicious and different, STAT” craving. So, grab your favorite skillet and let’s make some magic happen.
Taco Tuesdays and Coastal Memories
This recipe always takes me back to a sun-drenched afternoon I spent on the Pacific coast a few years ago. I stumbled into this tiny, unassuming beach shack that smelled like heaven—a mix of smoky charcoal, sizzling fish, and fresh lime. I ordered their fish tacos, not knowing my life was about to change. They were simple: perfectly grilled local fish, a vibrant mango salsa, and a creamy sauce I couldn’t quite place. I sat there at a wobbly picnic table, my feet in the sand, and I swear I heard angels singing with every bite.
Driving home, I couldn’t stop thinking about those tacos. I wanted to recreate that feeling of casual, coastal bliss, but with a pantry-friendly twist. I swapped the white fish for nutrient-packed salmon, the mango for a classic corn and black bean salsa, and set out to make a taco that felt both special and completely approachable. This recipe is my love letter to that beach shack. It’s the taste of a warm breeze and a carefree day, all wrapped up in a warm tortilla.
Gathering Your Taco Toolkit: The Ingredients
Here’s everything you’ll need to build these flavor-packed masterpieces. I’ve included some of my favorite chef insights and easy swaps to make this recipe work for you!
For the Zesty Salmon:
- 8 (3 oz) salmon fillets: I prefer skinless for easy flaking, but skin-on works too—just crisp it up! Chef’s Insight: Look for fillets that are bright pink and firm to the touch. If you’re using frozen, thaw them slowly in the fridge overnight for the best texture.
- 4 tbsp butter, melted: This gives the salmon incredible richness and helps the seasoning stick. For a lighter option, extra virgin olive oil works beautifully.
- 4 tbsp lemon juice: The fresh acidity cuts through the richness of the salmon and butter. Pro Tip: Roll your lemon on the counter firmly before juicing to get every last drop!
- 1 tsp Cajun seasoning: This is our flavor powerhouse! It brings warmth, a little heat, and a ton of complexity. Substitution Tip: No Cajun blend? Mix ½ tsp paprika, ¼ tsp garlic powder, ¼ tsp onion powder, a pinch of oregano, and a pinch of cayenne.
- Zest of 1 lime + pinch of smoked paprika (optional): My secret weapons! The lime zest adds a fragrant pop, and the smoked paprika gives a subtle, smoky depth that’s just incredible.
For the Vibrant Corn & Bean Salsa:
- 2 cans (15.25 oz each) whole kernel corn, drained: Canned corn is a weeknight hero—sweet, convenient, and always ready. For a charred flavor, sauté it in a dry skillet for 5-7 minutes until it gets little brown spots.
- 2 cans (15 oz each) black beans, drained and rinsed: Rinsing is key! It washes away the starchy canning liquid and makes the salsa taste fresher. They add fantastic protein and fiber.
- 2 tomatoes, diced: Use Roma tomatoes for less watery seeds, or any juicy, ripe tomato you have on hand.
- ½ cup diced red onion: They provide a sharp, crunchy bite. If raw onion is too strong for you, soak the diced pieces in cold water for 10 minutes to mellow them out.
- ½ cup chopped fresh cilantro: Don’t skip this! It’s the “fresh” in our fresh salsa. For the cilantro-haters in the crowd, flat-leaf parsley is a great, herbaceous substitute.
- Juice of 1 lime: This brightens up the entire salsa and ties all the flavors together.
- Salt and pepper to taste: Season, taste, and season again! The beans and corn need a good amount of seasoning to shine.
For Serving & The Fun Finishes:
- 16 corn tortillas, warmed: Corn tortillas are my go-to for their authentic flavor and sturdy texture. Warming them is non-negotiable! It makes them pliable and delicious. See my hack in the instructions!
- 1 cup shredded mild Cheddar cheese: The creamy, melty factor. Pepper Jack cheese is a fantastic swap if you want a little kick.
- 1 cup sour cream (optional): The cool, creamy contrast to the spicy salmon. I like to thin mine with a splash of lime juice for drizzling.
- 1 cup guacamole (optional): Because everything is better with guac. Store-bought is totally fine—we’re keeping it real here!
- Sliced jalapeños or pickled red onions: Highly recommended for a hit of heat and tang! They take the flavor profile to a whole new level.
Let’s Get Cooking: Building Your Taco Masterpiece
Alright, team! It’s go-time. We’re going to multitask like pros and have this feast on the table in no flat. Follow these steps, and you’ll be a salmon taco champion.
- Preheat and Prep: First things first, fire up your oven to 375°F (190°C). While it’s heating, line a baking sheet with foil or parchment paper. This is our secret for the world’s easiest cleanup. No one wants to scrub a baking sheet after a fantastic meal, right? Place your salmon fillets on the sheet, giving them a little room to breathe.
- Transform the Salmon: In a small bowl, whisk together the melted butter and lemon juice. Using a pastry brush (or just a spoon), generously drizzle this glorious mixture over each salmon fillet. Now, sprinkle the Cajun seasoning evenly over the top. Don’t be shy! This is where the flavor lives. If you’re using the optional lime zest and smoked paprika, now’s the time to dust it on. Pop the baking sheet into the preheated oven and bake for 15-18 minutes. You’ll know it’s done when the salmon flakes easily with a fork. Chef’s Hack: For those crispy edges, I sometimes flip the oven to broil for the last 1-2 minutes. Watch it closely!
- Create the Salsa: While the salmon is working its magic in the oven, let’s make the salsa. This is the fun, confetti-making part! Grab a large mixing bowl and add your drained corn, rinsed black beans, diced tomato, red onion, and chopped cilantro. Squeeze the fresh lime juice all over everything, then season with a good pinch of salt and pepper. Give it a good stir, then let it hang out on the counter. This “marinating” time allows the flavors to get to know each other and become best friends.
- The Tortilla Trick – This is a Game Changer: This might be the most important step. Do not serve cold, stiff tortillas. My foolproof method? Heat a dry skillet or griddle over medium-high heat. Warm each tortilla for about 30 seconds per side, until it’s soft, pliable, and has a few golden-brown spots. Then, immediately place them in a clean kitchen towel folded over in a tortilla warmer. The towel traps the steam and keeps them warm and soft until you’re ready to serve. You can also warm a stack of 5-6 at a time in the microwave for 30-45 seconds, wrapped in a damp paper towel.
- The Grand Finale – Assembly Time! Your kitchen should be smelling absolutely incredible by now. Take the salmon out of the oven and let it rest for a minute. Then, use a fork to flake it into beautiful, large chunks. Now, create a taco assembly line! Lay out your warm tortillas, the flaked salmon, the vibrant salsa, shredded cheese, and all your creamy toppings. Let everyone build their own masterpiece. It’s interactive, fun, and means less work for you!
How to Serve These Beauties
Presentation is part of the fun! I love serving these family-style. Pile the warm tortillas on a big wooden board or a platter, place the bowl of flaked salmon in the center, and surround it with all the toppings in little bowls—the salsa, the cheese, the guacamole, and sour cream. It creates a beautiful, colorful spread that gets everyone excited to eat.
For the perfect plate, I like to serve two to three tacos per person. They’re hearty but not overly heavy. A simple side can round out the meal beautifully. A handful of crispy tortilla chips for scooping up any leftover salsa is a must. A light cilantro-lime rice or a simple side salad with a lime vinaigrette also pairs wonderfully. And don’t forget the lime wedges! A final squeeze of fresh lime juice right before you take that first bite really makes all the flavors sing.
Make It Your Own: Delicious Recipe Variations
The beauty of this recipe is its flexibility. Play around and make it suit your mood and dietary needs!
- Spicy Sriracha Mayo Drizzle: Whisk together ½ cup mayonnaise, 2 tablespoons of sriracha, and a tablespoon of lime juice. Drizzle this over your tacos for a creamy, spicy kick that’s absolutely addicting.
- Mango-Avocado Salsa Swap: Swap the corn and bean salsa for a tropical version. Dice one ripe mango and one avocado, and mix it with the red onion, cilantro, and lime juice. It’s sweet, creamy, and a perfect pairing with the salmon.
- Grill Master Edition: Fire up the grill! Brush the salmon with the butter-lemon mixture and seasoning, then grill over medium-high heat for 4-6 minutes per side. You’ll get an incredible smoky flavor. You can even warm the tortillas right on the grill grates for a few seconds.
- Gluten-Free & Low-Carb Friendly: This recipe is naturally gluten-free as long as your seasonings are certified GF. For a low-carb option, skip the tortilla and serve your salmon and salsa over a bed of crisp romaine lettuce for a fantastic taco salad.
- Creamy Cilantro-Lime Sauce: In a blender, combine ½ cup sour cream, ½ cup fresh cilantro, 2 tablespoons lime juice, 1 clove of garlic, and a pinch of salt. Blend until smooth for a restaurant-worthy green sauce.
Beau’s Kitchen Notes & Stories
This recipe has been a staple in my home for years, and it’s evolved in so many fun ways. I once accidentally used chili powder instead of Cajun seasoning (they were in identical jars!), and you know what? They were still delicious! It taught me that cooking is about spirit, not just precision.
I also have a funny memory of my niece, who was about five at the time, declaring she “hated fish.” I gave her a taco without telling her what was in it. She devoured two of them before asking, “What kind of chicken is this, Uncle Beau?” The look on her face when I told her it was salmon was priceless. It’s now one of her favorite meals. Sometimes, the best way to a person’s heart (and their palate) is through a well-disguised taco.
Your Questions, Answered!
I’ve gotten a lot of questions about this recipe over the years. Here are the most common ones to help you out.
Q: Can I use a different type of fish?
A: Absolutely! This method works wonderfully with firm white fish like cod, halibut, or mahi-mahi. The cooking time might vary slightly depending on the thickness of the fillets. Just cook until the fish is opaque and flakes easily.
Q: My tortillas keep breaking when I fold them. Help!
A: This almost always means they aren’t warm enough! The heat makes the starch molecules flexible. Make sure you’re warming them properly in a hot skillet or steamy microwave. Also, don’t overfill them—two or three chunks of salmon and a scoop of salsa is plenty.
Q: How can I make this less spicy for my kids?
A: Easy! Use a mild Cajun seasoning or simply make your own blend without cayenne pepper. You can also season the salmon with just a simple mix of garlic powder, paprika, salt, and pepper. The salsa itself is very kid-friendly!
Q: Can I make any part of this ahead of time?
A: For sure! The corn and bean salsa can be made up to a day in advance and stored in the fridge—the flavors will get even better. You can also mix the butter, lemon, and seasoning for the salmon ahead of time. I’d recommend cooking the salmon fresh, but you can flake it and gently reheat it if needed.

Zesty Salmon Tacos with Corn-Bean Salsa & Creamy Toppings
Description
Hey there, friends! Beau here, and today we’re shaking up taco night with something light, fresh, and bursting with flavor — Zesty Salmon Tacos. These tacos bring together flaky, Cajun-spiced salmon, a bright corn and black bean salsa, and creamy toppings for a flavor explosion in every bite. They’re quick enough for a busy weeknight but impressive enough to serve to guests.
Ingredients
For the Zesty Salmon:
-
8 (3 oz) salmon fillets (skinless or skin-on)
-
4 tbsp melted butter (or olive oil)
-
4 tbsp lemon juice
-
1 tsp Cajun seasoning
-
Zest of 1 lime
-
Pinch of smoked paprika (optional)
For the Corn & Black Bean Salsa:
-
2 cans (15.25 oz) whole kernel corn, drained
-
2 cans (15 oz) black beans, drained and rinsed
-
2 tomatoes, diced
-
½ cup diced red onion
-
½ cup chopped cilantro
-
Juice of 1 lime
-
Salt and pepper to taste
For Serving:
-
16 corn tortillas, warmed
-
1 cup shredded Cheddar cheese (or Pepper Jack)
-
1 cup sour cream, thinned with lime juice (optional)
-
1 cup guacamole (optional)
-
Sliced jalapeños or pickled red onions (optional)
Notes
-
Warm tortillas = happy tacos. Cold tortillas will crack!
-
Make-ahead magic: The salsa can be prepared a day in advance — it only gets better with time.
-
For picky eaters: Use mild seasoning and skip the jalapeños — even kids will love it!
-
Feeling fancy? Grill the salmon instead of baking it for smoky, charred perfection.
Nutrition
- Calories: 290 Cal Per Serving
- Carbohydrates: 25 g
- Fiber: 5 g
- Protein: 17 g
Nutritional Lowdown (Because We Care!)
One of the things I love most about this recipe is that it’s a celebration of feel-good food that’s also genuinely good for you. Let’s break it down (approximate values per taco, without optional sour cream/guacamole):
These tacos are a fantastic source of high-quality protein (about 17g per taco) from the salmon and black beans, which helps keep you full and satisfied. The salmon is also packed with Omega-3 fatty acids, which are brilliant for heart and brain health.
You’re also getting a great dose of fiber (around 5g) from the corn, beans, and tortillas, which is great for digestion. The fresh veggies in the salsa provide a hit of vitamins and antioxidants. While there is fat from the salmon and butter, it’s mostly the “good” kind of fat that your body needs.
It’s a balanced, nutrient-dense meal that proves healthy eating doesn’t have to be boring or restrictive. It’s about enjoying vibrant, delicious food that makes you feel amazing from the inside out.
Final Thoughts: More Than a Meal, It’s a Moment
So, there you have it. What started as a simple craving and a fond memory from a beachside shack has turned into one of the most requested recipes in my own home. These Zesty Salmon Tacos are more than just a meal; they’re a reminder that the best dinners are the ones that break the routine and transport us, even for just a moment.
They prove that “special” doesn’t have to mean “complicated.” In just 30 minutes, you can create a dish that feels celebratory, nourishing, and deeply satisfying all at once. It’s a recipe that invites you to play, to customize, and to gather around the table with the people who matter most.
I hope this recipe brings as much joy and flavor to your kitchen as it has to mine. I have a feeling that after one bite, with that flaky, spiced salmon and the fresh, confetti-like salsa, your standard taco night might just be forever changed.
Now, I’d love to hear from you! Did you stick to the script or make it your own with a crazy-good variation? Tag me in your photos or leave a comment below—seeing your culinary creations is my favorite part of the day.
Until next time, keep making life delicious.
– Beau

Sourdough Butter Crackers: Crispy, Tangy, and Totally Addictive
Sourdough Butter Crackers: Your New Favorite Snack Secret
Hey friends, Beau here! Let’s have a little heart-to-heart about that jar living in the back of your fridge. You know the one. It’s the sourdough starter discard that you lovingly feed, but then feel a tiny pang of guilt every time you have to pour some off. I’ve been there, staring into the abyss of that tangy, bubbly paste, wondering if there’s a better way. Well, my fellow food-lovers, I’m here to tell you that there is, and it’s a game-changer.
Forget complicated loaves that demand your entire Saturday. Today, we’re turning that discard into pure, unadulterated snack-time gold: Sourdough Butter Crackers. Imagine the flakiest, most buttery cracker you’ve ever had, then give it a subtle, sophisticated tang that makes it utterly irresistible. These crackers are crisp, they’re satisfying, and they come together in less time than it takes to watch your favorite sitcom. They’re the perfect vehicle for cheese, a stunning addition to a charcuterie board, or just a dangerously addictive snack all on their own. So, let’s roll up our sleeves, rescue that discard from the compost bin, and bake up a batch of pure, crunchy joy.
The Accidental Crackers That Stole My Heart
This recipe was born from a happy little kitchen accident. A few years back, I was in a serious sourdough phase, baking loaf after loaf. My kitchen counter was a flour-dusted laboratory of fermentation. One evening, I was prepping for a pizza night and had a bowl of discard left over. Instead of tossing it, I had one of those “what if?” moments. I threw it in a bowl with some flour, a generous glug of melted butter, and a pinch of salt, rolled it out with more hope than precision, and slid it into the oven alongside a focaccia.
What emerged was a revelation. The thin sheet of dough had puffed up in spots, turned a beautiful golden brown, and snapped with a perfect crispness. I broke off a piece, and my eyes went wide. It was a cracker! But not just any cracker—it had a depth of flavor that store-bought versions could only dream of. That batch never even made it to the pizza party; my wife and I devoured them straight off the baking sheet, standing over the stove. From that day on, these crackers became a Feastical staple, a delicious testament to the magic that happens when we play with our food.
Gathering Your Cracker Crew: The Ingredients
One of the best things about this recipe is its simplicity. You likely have everything you need right in your pantry. Let’s break it down:
- 1 ½ cups (400g) Sourdough Starter Discard: This is your star player! Make sure it’s stirred down. It doesn’t matter if it’s fresh from a feed or has been in the fridge for a week—the tangier, the better. The sourdough not only adds incredible flavor but also gives the crackers a unique, tender-yet-crisp texture. No starter? No problem! You can substitute with 1 ½ cups of a thick, plain yogurt and buttermilk mixture (half and half), though you’ll miss the signature tang.
- 3 cups (360g) All-Purpose Flour: The trusty foundation of our cracker. It gives the dough structure. If your dough feels a little too sticky when you mix it, don’t be shy—add an extra tablespoon or two of flour until it comes together nicely.
- 16 tbsp (226g) Unsalted Butter, Melted: This is where the magic happens. Using melted butter (instead of cutting it in) ensures every single nook and cranny of this dough gets coated in rich, delicious fat. This is what creates that incredible, flaky, “melt-in-your-mouth” quality. I use unsalted so I can control the salt level perfectly.
- 2 tsp (10g) Fine Sea Salt: This is a key flavor agent, so don’t skimp! Fine sea salt incorporates evenly throughout the dough. If you only have coarse kosher salt, just use a little less, as it’s saltier by volume.
- Optional Twists (Get Creative!): This is your playground. I love adding 1 tsp of garlic powder for a savory punch or ½ tsp of cracked black pepper for a little heat. Smoked paprika or chili flakes are also fantastic contenders.
- Toppings for the Finish: This is non-negotiable for that professional touch. A sprinkle of sesame seeds, flaky sea salt, or everything bagel seasoning takes these from great to “can-I-have-the-recipe-now?!” status.
Let’s Get Baking: Your Step-by-Step Guide to Cracker Perfection
Ready to see how easy this is? Follow these steps, and you’ll be a cracker-making pro in no time.
- Preheat and Prep: Fire up your oven to a nice, even 350°F (175°C). This is the perfect temperature to cook the crackers through and get them golden without burning. While it’s heating, line your baking sheets with parchment paper. Chef’s Hack: If you don’t have parchment, a light coating of butter or non-stick spray will work, but parchment makes cleanup a dream and ensures nothing sticks.
- Mix the Dough: In a large bowl, combine the sourdough discard, flour, melted butter, salt, and any of your chosen optional seasonings. I like to use a sturdy spatula at first, then I get my hands in there to bring it all together into a smooth, slightly soft dough. Little Chef Tip: If the dough feels too wet, add a sprinkle of flour. If it’s too dry, a tiny splash of water will do the trick. You’re in control!
- Divide and Conquer: Turn the dough out onto a lightly floured surface and divide it in half. This makes it much easier to roll out thinly. Working with one half at a time keeps the process manageable and stress-free.
- Roll It Thin (The Secret to Crispiness!): This is the most important step! Place one half of the dough between two sheets of parchment paper. Now, roll it out until it’s incredibly thin—about 1/8 of an inch thick, or even thinner if you can. You should almost be able to see the parchment paper through it. Why so thin? A thin roll guarantees a crispy, snappy cracker instead of a soft, bready one. Trust me on this!
- Score and Top: Peel off the top layer of parchment. Now, use a knife, a pizza cutter, or a pastry wheel to score the dough into whatever size squares or shapes you like. Don’t cut all the way through—just score the surface. This makes them easy to break apart after baking. Now, sprinkle your chosen toppings evenly over the dough and gently press them in with the palm of your hand or the bottom of a measuring cup.
- Bake to Golden Bliss: Carefully slide the parchment paper with the scored dough directly onto your prepared baking sheet. Bake for 15-18 minutes, but keep a close eye on them. Ovens can vary! You’re looking for a beautiful, even golden brown color and a firm, crisp feel. Pro Move: Rotate the baking sheet halfway through baking for an perfectly even bake, especially if your oven has hot spots.
- The Cool Down: This is the final test of your patience! Let the crackers cool completely on the baking sheet. They will continue to crisp up as they cool. Once they’re at room temperature, break them apart along the scored lines.
How to Serve These Homemade Masterpieces
Okay, you’ve baked the world’s best crackers. Now what? The possibilities are endless! For a simple, elegant appetizer, arrange them on a wooden board with a wedge of sharp cheddar, a creamy brie, or a tangy blue cheese. A dollop of fig jam or honey on the side is pure magic. They are also the ultimate soup and salad companion—imagine dunking one of these into a steaming bowl of tomato basil soup. Absolute heaven.
For your next party, create a dedicated cracker and dip station. These crackers are sturdy enough to hold up to thick, chunky salsas, robust hummus, or a warm spinach and artichoke dip. And don’t forget about charcuterie! Their tangy flavor is a perfect match for salty prosciutto, spicy soppressata, and peppery salami. Honestly, they’re so good you might just find yourself eating them straight from the jar—I won’t tell!
Make It Your Own: Delicious Recipe Variations
Once you’ve mastered the basic recipe, the fun really begins. Here are a few of my favorite ways to mix things up:
- Everything Bagel Twist: Swap the sea salt in the dough for everything bagel seasoning, and then sprinkle more on top before baking. It’s a flavor explosion in every bite.
- Herb Garden Delight: Add two tablespoons of finely chopped fresh herbs to the dough. Rosemary and thyme are a classic combination, but dill or chives are also fantastic.
- Whole Wheat & Honey: Substitute half of the all-purpose flour with whole wheat flour for a nuttier, heartier cracker. Add a tablespoon of honey to the dough to balance the earthiness with a touch of sweetness.
- Cheesy Pleaser: Stir in ½ cup of finely grated Parmesan or sharp cheddar cheese into the dough. The cheese melts into the cracker, making it even more irresistible.
- Gluten-Free Friendly: You can use a 1:1 gluten-free all-purpose flour blend in place of the regular flour. The texture will be slightly more delicate, but just as delicious!
Beau’s Kitchen Notes & Stories
Over the years, this recipe has seen many iterations. I once accidentally used cold, cubed butter instead of melted, and you know what? It created a flakier, almost pie-crust-like texture that was incredible. So if you have the time, feel free to try that method! Another time, my niece decided to “decorate” a batch with an entire container of rainbow sprinkles before I could stop her. We baked them anyway, and while they were… interesting… with cheese, they were a huge hit with her kindergarten class. The point is, don’t be afraid to experiment. The best family recipes often come from happy little kitchen mishaps.
Your Cracker Questions, Answered!
Q: My crackers are soft and not crispy. What did I do wrong?
A: The number one culprit is that the dough wasn’t rolled thin enough. Remember, paper-thin is the goal! The second most common issue is not letting them cool completely on the baking sheet. They crisp up as they cool. If they’re still soft after cooling, you can pop them back in the oven for a few more minutes.
Q: Can I make the dough ahead of time?
A: Absolutely! You can wrap the dough tightly in plastic wrap and keep it in the fridge for up to 3 days. Let it sit at room temperature for about 20 minutes before rolling, as it will firm up in the fridge.
Q: How should I store these crackers, and how long do they last?
A: To keep them super crisp, store them in an airtight container at room temperature. They’ll stay perfect for about a week… if they last that long! You can also freeze the baked crackers for up to 2 months.
Q: My dough is too sticky to handle. Help!
A> No worries! Just add a little more flour, one tablespoon at a time, until the dough becomes smooth and manageable. Different starter consistencies and flour brands can affect the hydration, so a small adjustment is totally normal.

Sourdough Butter Crackers: Crispy, Tangy, and Totally Addictive
Description
Turn that sourdough starter discard into crunchy, buttery, melt-in-your-mouth crackers. With a subtle tang, golden crisp, and endless flavor possibilities, these crackers are perfect for cheese boards, soups, dips, or just snacking straight from the jar.
Ingredients
For the Dough:
-
1 ½ cups (400 g) sourdough starter discard (stirred down)
-
3 cups (360 g) all-purpose flour
-
16 tbsp (226 g) unsalted butter, melted
-
2 tsp (10 g) fine sea salt
Optional Flavor Twists:
-
1 tsp garlic powder
-
½ tsp cracked black pepper
-
½ tsp smoked paprika or chili flakes
Toppings:
-
Flaky sea salt, sesame seeds, or everything bagel seasoning
Instructions
1. Preheat & Prep
-
Preheat oven to 350°F (175°C).
-
Line baking sheets with parchment paper.
2. Mix the Dough
-
In a large bowl, combine starter discard, flour, melted butter, salt, and any optional seasonings.
-
Mix with a spatula, then use your hands to form a smooth, slightly soft dough.
-
Adjust with extra flour or a splash of water if needed.
3. Divide & Roll
-
Turn dough onto a lightly floured surface and divide in half.
-
Roll each half between two sheets of parchment paper until about 1/8 inch thick (thin is key!).
4. Score & Top
-
Peel off the top parchment sheet.
-
Score the dough into squares or rectangles (don’t cut all the way through).
-
Sprinkle chosen toppings evenly and press lightly.
5. Bake to Golden Bliss
-
Transfer dough with parchment to baking sheet.
-
Bake 15–18 minutes, watching closely.
-
Rotate halfway through for even baking.
6. Cool & Break Apart
-
Let crackers cool completely on the baking sheet.
-
Break along scored lines.
Serving Suggestions
-
Pair with cheeses: brie, cheddar, blue cheese.
-
Serve with dips: hummus, salsa, or spinach-artichoke dip.
-
Charcuterie boards love these crackers—salty meats, tangy cheeses, sweet jams.
-
Or just snack straight from the jar!
Notes
-
Soft Crackers: Dough wasn’t rolled thin enough or didn’t cool completely. Re-bake briefly if needed.
-
Sticky Dough: Add flour 1 tbsp at a time until manageable.
-
Flaky Texture: Try using cold, cubed butter instead of melted for a pie-crust-like texture.
Nutrition
- Calories: 170 Cal Per Serving
- Fat: 10 g
- Carbohydrates: 17 g
Quick Nutrition & Prep Info
Let’s be real, we’re not eating crackers for their health benefits, but it’s always good to know what you’re enjoying! Here’s the approximate breakdown per serving (based on 16 servings):
- Prep Time: 10 mins
- Bake Time: 15–18 mins
- Total Time: ~30 mins
- Calories: ~170
- Fat: 10g
- Carbs: 17g
- Protein: 2g
Remember, these are homemade with simple, real ingredients, and you control the salt and butter. That’s a win in my book!
Your New Go-To Snack Awaits
And there you have it, friends—the humble sourdough discard, transformed into a snack that’s worthy of any celebration, big or small. This recipe is more than just a way to avoid food waste; it’s a reminder that the simplest things in the kitchen often bring the most joy. It’s about the sound of a satisfying snap, the rich taste of butter, and the proud feeling of saying, “I made these!”
So the next time you’re about to toss that discard, I hope you’ll remember this recipe. Whip up a batch, share them with someone you love, and savor every crispy, tangy bite. From my Feastical kitchen to yours, happy baking!
Final Thoughts: More Than Just a Cracker
So there you have it—the secret to turning your “discard” into a moment of pure, crunchy delight. This recipe is about more than just preventing food waste; it’s about reclaiming a little piece of your kitchen creativity. It’s a reminder that some of the best discoveries aren’t found in a meticulously planned recipe, but in a happy accident and the courage to ask, “what if?”
Don’t let that jar of starter sit in guilt any longer. You now hold the key to transforming it into something truly special. So go on, preheat that oven, melt that butter, and fill your kitchen with the irresistible, toasty aroma of homemade crackers. You’re not just baking a snack; you’re creating a new tradition. Trust me, once you taste that buttery, tangy snap, you’ll wonder how you ever settled for anything less.
Happy baking!
—Beau
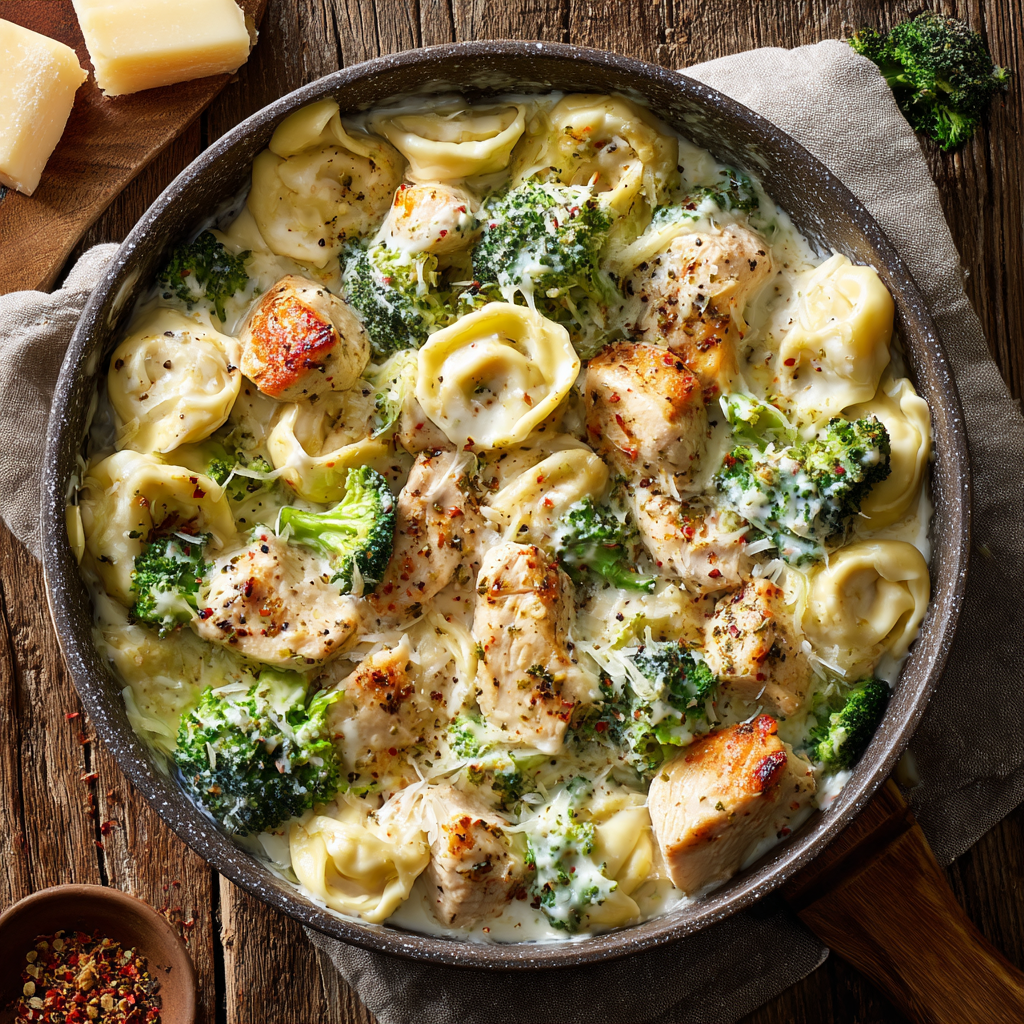
Creamy Garlic Parmesan Tortellini with Chicken & Broccoli : One-Pan Comfort Dinner
Your New Favorite One-Pan Wonder is Here!
Hey, friends! Beau here from Feastical, coming at you from my kitchen, which currently smells like a cozy Italian grandmother’s dream. We all have those nights, right? The ones where you’re craving something that tastes like a million bucks, something rich and comforting that makes you close your eyes and sigh with happiness after the first bite, but you absolutely do not have the energy for a million steps and a mountain of dishes.
Well, my foodie friend, I’m about to hand you the keys to your new go-to dinner. This Creamy Garlic Parmesan Tortellini with Chicken & Broccoli is the culinary equivalent of your favorite cozy sweater. It’s a hug in a bowl. We’re talking juicy, seasoned chicken, tender cheese-filled tortellini, and bright green broccoli florets, all swimming in a luxuriously velvety sauce that’s bursting with garlic and nutty Parmesan cheese. The best part? You can make the entire glorious thing in basically one pan. Seriously. We keep the cleanup minimal and the flavor maximum. So, tie on your apron, grab your favorite wooden spoon, and let’s create some magic that will have everyone at the table asking for seconds.
Where the Magic Began: A Happy Accident
This recipe, like so many of the best ones, was born from a little bit of chaos and a whole lot of “what’s in the fridge?” It was a rainy Tuesday a few years back. I had friends coming over last-minute, my fridge was looking a little sparse, and I had zero plans for dinner. Sound familiar? I had a package of tortellini I was saving for… something, a lonely head of broccoli, and some chicken breasts. The classic “clean out the fridge” scenario.
I started browning the chicken, my mind racing. A jarred sauce felt like a cop-out. Then I remembered the block of real Parmigiano-Reggiano I had stashed away. I started making a simple pan sauce with butter, a truly irresponsible amount of garlic, and cream. I tossed in the cheese, let it melt into something silky and spectacular, and then threw in the cooked tortellini, chicken, and broccoli. I held my breath as my friends took their first bites. The silence that followed was broken by a chorus of “Oh, WOW.” It was an instant hit. That happy accident is now a certified Feastical classic, and it all started with a little kitchen improvisation.
Gathering Your Flavor All-Stars
Here’s your shopping list for comfort food greatness. Don’t be intimidated by the ingredients list; it’s mostly pantry staples that come together to create something truly special.
- 4 boneless, skinless chicken breasts, cut into bite-sized pieces – This is our protein powerhouse! I like to cut them into uniform, bite-sized pieces so they cook evenly and get a nice sear. Chef’s Tip: For super tender chicken, you can use chicken thighs instead. They have a bit more fat and stay incredibly juicy.
- 2 tablespoons olive oil – Our trusty cooking fat for getting that beautiful golden color on the chicken.
- Salt and pepper, to taste – The foundation of all good seasoning! Don’t be shy here.
- 2 teaspoons garlic powder & 2 teaspoons Italian seasoning – We’re giving the chicken a flavor boost from the inside out. The garlic powder adds a deep, savory base note.
For the Show-Stopping Sauce:
- 8 tablespoons (1 stick) butter – This is the rich, velvety base of our sauce. It’s comfort food, folks, we’re going for it!
- 8 cloves garlic, minced – Yes, eight! We’re not vampires here. This is a garlic Parmesan sauce, and we mean it. Fresh is best for that bright, aromatic punch.
- 2 cups heavy cream – This is what gives the sauce its luxurious, silky texture. Substitution Tip: For a slightly lighter version, half-and-half will work in a pinch, but the sauce won’t be quite as thick.
- 1 cup chicken broth – This adds a savory depth and thins the cream just enough to create a perfect sauce consistency.
- 2 cups grated Parmesan cheese – Use the good stuff! Freshly grated Parmigiano-Reggiano from a wedge will melt smoother and taste infinitely better than the pre-shredded kind, which often contains anti-caking agents. Chef’s Insight: The nutty, salty flavor of real Parmesan is the soul of this dish.
- 2 teaspoons Italian seasoning & Salt/Black Pepper – Bringing it all together.
- Pinch of red pepper flakes (Optional) – My secret weapon! A little heat balances the richness beautifully.
- 1/4 cup white wine (Optional) – If you have a bottle open, deglaze the pan with a splash of dry white wine (like a Sauvignon Blanc) after sautéing the garlic. It adds a wonderful layer of complexity.
For the Pasta & Veggies:
- 40 oz cheese tortellini – The star of the show! You can use fresh or frozen—both work perfectly. The little pockets of cheese are a delightful surprise in every bite.
- 4 cups broccoli florets, lightly steamed or blanched – Our green veggie hero! It adds color, texture, and makes you feel a little virtuous. Chef’s Hack: No need to dirty another pot! You can quickly microwave the florets with a tablespoon of water for 2-3 minutes until bright green and tender-crisp.
- 1 cup baby spinach (Optional) – I love stirring in a handful of spinach at the very end. It wilts down instantly and adds another pop of color and nutrients.
- 2 tablespoons fresh parsley, chopped (for garnish) – A fresh, green finish that makes the dish look restaurant-worthy.
Let’s Get Cooking: Your Step-by-Step Guide to Deliciousness
Alright, team, fire up the stove! This is where the magic happens. Follow these steps, and you’ll have a flawless dinner on the table in no time.
- Season and Sear the Chicken. In a large bowl, toss your bite-sized chicken pieces with the olive oil, salt, pepper, garlic powder, and Italian seasoning. Get in there with your hands and make sure every piece is nicely coated. Heat a large skillet or Dutch oven over medium-high heat. Add the chicken in a single layer (you might need to do this in two batches to avoid steaming) and cook for 5-7 minutes, turning occasionally, until it’s beautifully golden brown and cooked through. Chef’s Hack: Don’t crowd the pan! Giving the chicken space is the secret to getting a good sear instead of steaming it. Remove the chicken from the pan and set it aside on a plate. All those tasty brown bits left in the pan? That’s liquid gold—don’t you dare wash it out!
- Create the Aromatic Base. Reduce the heat to medium. In the same pan, melt the stick of butter. Once it’s foaming slightly, add all of that glorious minced garlic. Sauté it for just 1-2 minutes until it becomes incredibly fragrant. Watch it closely! We want it golden and sweet, not bitter and burnt. (If you’re using the optional white wine, pour it in now and let it simmer for a minute, scraping up all those browned bits from the chicken with your spoon.)
- Build Your Velvety Sauce. Slowly pour in the heavy cream and chicken broth. Give it a good stir to combine everything. Bring the mixture to a gentle simmer—you’ll see little bubbles around the edges. Now, reduce the heat to low. Gradually sprinkle in the grated Parmesan cheese, stirring constantly. Chef’s Tip: Adding the cheese off the heat or on very low heat prevents it from clumping and seizing. Patience is key for a smooth sauce! Keep stirring until the cheese is fully melted and the sauce has thickened slightly. Stir in the Italian seasoning, a pinch of salt and pepper, and your optional red pepper flakes. Give it a taste and adjust the seasoning—this is your moment to make it perfect for you.
- Cook the Tortellini & Broccoli. While you’re building the sauce, cook your tortellini according to the package directions in a separate pot of salted water. In the last 2 minutes of the tortellini’s cooking time, add your broccoli florets to the boiling water to blanch them. This way, you cook both the pasta and the veggie in one pot! Drain them both together.
- The Grand Finale: Bring It All Together! Add the drained tortellini and broccoli directly into the simmering garlic Parmesan sauce. Then, gently fold in the cooked chicken and any accumulated juices from the plate. If you’re using the optional spinach, toss it in now—it will wilt in seconds. Let everything simmer together for 2-3 minutes, just so the flavors can marry and the ingredients heat through.
- Garnish and Serve Immediately. Turn off the heat. Sprinkle the entire dish with the fresh chopped parsley for a burst of color and freshness. Grab your bowls and dig in while it’s hot and bubbling!
How to Serve This Masterpiece
This dish is a complete meal in a bowl, but a little presentation goes a long way! I love serving it family-style, right out of the skillet in the middle of the table—it feels so welcoming and celebratory. For individual plates, use a shallow pasta bowl and make sure you get a little bit of everything in each serving: chicken, tortellini, broccoli, and lots of that incredible sauce.
If you want to round out the meal, here are a few of my favorite pairings:
- A Simple Green Salad: A crisp salad with a sharp, lemony vinaigrette cuts through the richness of the pasta perfectly.
- Garlic Bread: Is it even a question? You’re going to want something to scoop up every last drop of that sauce. Crusty, buttery garlic bread is non-negotiable in my house.
- A Glass of Dry White Wine: A crisp Pinot Grigio or Sauvignon Blanc complements the garlic and Parmesan flavors beautifully.
Make It Your Own: Delicious Twists & Swaps
One of the best things about this recipe is its flexibility. Don’t be afraid to play with it and make it suit your tastes or what you have on hand!
- Seafood Lover’s Delight: Swap the chicken for large shrimp or even scallops. Sauté them just like the chicken until pink and cooked through.
- Vegetarian Powerhouse: Easy! Simply omit the chicken. You can add in other veggies like sautéed mushrooms, sun-dried tomatoes, or roasted red peppers for extra heartiness.
- Different Pasta, Different Vibe: No tortellini? Use a short pasta like penne or rigatoni. Ravioli would also be a fantastic substitute.
- Sun-Dried Tomato & Spinach: Add ½ cup of chopped sun-dried tomatoes (the oil-packed kind, drained) along with the spinach for a sweet, tangy twist.
- Gluten-Free Friendly: Look for gluten-free cheese tortellini (many brands now make them!) and ensure your chicken broth is certified GF.
Beau’s Kitchen Notes & Stories
This recipe has seen a lot of iterations in my kitchen over the years. I once, in a sleep-deprived haze, accidentally used a whole cup of grated Pecorino Romano instead of Parmesan. It was MUCH saltier and sharper, but you know what? My brother loved it and now requests it that way. So don’t fear the mistakes—they might lead to your new favorite version!
The biggest evolution has been in the technique. I used to cook the tortellini directly in the sauce to make it a true one-pot meal, but I found it made the sauce too starchy and the tortellini could get mushy. Boiling them separately is one extra pot, but it guarantees a perfect texture for both the pasta and the sauce. Trust me on this one.
Your Questions, Answered!
I’ve made this dish a zillion times and have heard all your questions. Here are the most common ones.
- My sauce is too thin! How can I thicken it? No worries! Let it simmer for a few more minutes off the heat—it will continue to thicken as it sits. If it’s still too runny, create a quick slurry by mixing 1 tablespoon of cornstarch with 2 tablespoons of cold water. Stir this into the simmering sauce and it should thicken up in a minute or two.
- My sauce broke/got grainy. What happened? This usually happens if the heat is too high when you add the cheese, causing the fats to separate. Always add the Parmesan on low heat and stir constantly. If it does break, you can sometimes save it by removing it from the heat and vigorously whisking in a tablespoon of cold cream.
- Can I make this ahead of time? You can! Assemble the entire dish, let it cool completely, and store it in an airtight container in the fridge for up to 2 days. Reheat it gently on the stovetop over low heat, adding a splash of broth or cream to loosen the sauce back up.
- Can I freeze this creamy tortellini? I don’t recommend freezing this one, unfortunately. Cream-based sauces tend to separate and become watery when thawed, and the tortellini can get mushy.

Creamy Garlic Parmesan Tortellini with Chicken & Broccoli : One-Pan Comfort Dinner
Description
This one-pan (well, almost—see my tip!) comfort meal is everything you want after a long day: tender chicken, cheesy tortellini, vibrant broccoli, and a luscious garlic-Parmesan sauce. Rich, creamy, and loaded with flavor, it’s perfect for weeknight dinners, casual entertaining, or when you just want a hug in a bowl.
Ingredients
For the Chicken:
-
4 boneless, skinless chicken breasts, cut into bite-sized pieces
-
2 tablespoons olive oil
-
Salt and black pepper, to taste
-
2 teaspoons garlic powder
-
2 teaspoons Italian seasoning
For the Sauce:
-
8 tablespoons (1 stick) unsalted butter
-
8 cloves garlic, minced
-
2 cups heavy cream (or half-and-half for a lighter version)
-
1 cup chicken broth
-
2 cups grated Parmesan cheese (freshly grated is best!)
-
2 teaspoons Italian seasoning
-
Salt and black pepper, to taste
-
Pinch of red pepper flakes (optional)
-
1/4 cup dry white wine (optional, for deglazing)
Pasta & Veggies:
-
40 oz cheese tortellini (fresh or frozen)
-
4 cups broccoli florets (lightly steamed or blanched)
-
1 cup baby spinach (optional)
Garnish:
-
2 tablespoons fresh parsley, chopped
Instructions
1. Season & Sear the Chicken
-
Toss chicken with olive oil, salt, pepper, garlic powder, and Italian seasoning.
-
Heat a large skillet or Dutch oven over medium-high heat.
-
Cook chicken in a single layer 5–7 minutes, turning occasionally, until golden and cooked through. Remove and set aside.
2. Create the Aromatic Base
-
Reduce heat to medium. Melt butter in the same pan.
-
Add minced garlic and sauté 1–2 minutes until fragrant (not browned).
-
Optional: Add white wine and scrape up browned bits.
3. Build the Sauce
-
Pour in heavy cream and chicken broth, bring to a gentle simmer.
-
Reduce heat to low, then gradually stir in Parmesan cheese until smooth.
-
Stir in Italian seasoning, red pepper flakes (if using), salt, and pepper. Taste and adjust seasoning.
4. Cook Tortellini & Broccoli
-
Boil tortellini according to package directions. In the last 2 minutes, add broccoli to blanch. Drain both together.
5. Combine Everything
-
Add cooked tortellini, broccoli, and chicken (with any juices) to the sauce.
-
Stir in spinach, if using, and simmer 2–3 minutes to heat through.
6. Garnish & Serve
-
Sprinkle with fresh parsley. Serve immediately while hot.
Notes
-
Seafood Option: Swap chicken for shrimp or scallops.
-
Vegetarian: Omit chicken and add mushrooms, sun-dried tomatoes, or roasted red peppers.
-
Different Pasta: Penne, rigatoni, or ravioli work beautifully.
-
Sun-Dried Tomato & Spinach: Add ½ cup sun-dried tomatoes for a sweet-tangy twist.
-
Gluten-Free: Use GF tortellini and certified GF chicken broth.
-
Thicker Sauce: Simmer longer or use a cornstarch slurry (1 tbsp cornstarch + 2 tbsp water).
Nutrition
- Calories: 560 Cal Per Serving
- Fat: 30g
- Carbohydrates: 34g
- Protein: 36g
A Quick Look at the Good Stuff
Now, let’s be real—this is a hearty, comforting dish. It’s not a salad, and it’s not meant to be! It’s a balanced, satisfying meal that’s packed with protein from the chicken and cheese, carbs from the tortellini for energy, and great vitamins from the broccoli. The estimated nutritional info below is for one generous serving (based on 6 servings). Remember, these are estimates and can vary based on your specific ingredients.
- Calories: ~560
- Protein: 36g (Great for muscle repair and keeping you full!)
- Carbohydrates: 34g (Your body’s primary fuel source.)
- Fat: 30g (Provides energy and helps absorb vitamins.)
- Fiber: 3g (Thanks, broccoli!)
Final Thoughts from My Kitchen to Yours
And there you have it! Your new secret weapon for a ridiculously delicious, impressively easy weeknight dinner. This Creamy Garlic Parmesan Tortellini is more than just a recipe; it’s a reminder that the best meals don’t have to be complicated. They just have to be made with a little bit of love (and a good amount of garlic and Parmesan).
I truly hope this recipe becomes a regular in your home, creating its own happy memories around your table. If you make it—and I really hope you do—I’d love to see it! Tag me @Feastical on social media so I can share in your culinary victory. Now go forth, cook with confidence, and enjoy every single bite.
Until next time, keep your spatula close and your passion for food closer,
Beau

Melt-in-Your-Mouth Eggnog Sugar Cookies: Buttery, Spiced & Holiday-Perfect
Let’s Bake Some Holiday Magic!
Hey there, friend! Beau here, welcoming you back to my kitchen at Feastical. Can you smell it? That unmistakable aroma of butter, sugar, and warm spice that seems to hug the whole house the moment you turn on the oven? It’s the scent of happiness, if you ask me, and it’s exactly what we’re whipping up today.
I’m a firm believer that some recipes are more than just a list of ingredients—they’re a feeling. And these Melt-in-Your-Mouth Eggnog Sugar Cookies? They are the very essence of a cozy, joyful, and utterly delicious holiday season. We’re taking the classic sugar cookie, that blank canvas of pure potential, and giving it a full-on festive glow-up. We’re infusing it with the rich, creamy, and gently spiced soul of your favorite holiday drink.
Imagine a cookie that’s soft without being cakey, buttery without being greasy, and spiced with just the right amount of nutmeg to make it taste like Christmas, without shouting it from the rooftops. The texture is pure magic—they truly do live up to their “melt-in-your-mouth” name. They’re the kind of cookie you sneak a second of before they’ve even cooled, the kind you pack into tins for neighbors, and the kind that disappears from the platter before the carols have even finished playing. So, tie on your favorite apron, my friend. We’re about to create some serious kitchen magic together.
A Cookie That Tastes Like My Grandma’s Laugh
This recipe always takes me right back to my grandma’s kitchen, a place that always smelled like cinnamon and unconditional love. Every Christmas Eve, she’d make a huge batch of homemade eggnog, whipping it by hand until her arm nearly fell off. It was a production, and we all got a small, precious glass. But without fail, she’d always have a little leftover—just about a cup’s worth—sitting in a mason jar in the fridge.
One year, I caught her sneaking that last cup into her sugar cookie dough. I was scandalized! “Grandma, you’re wasting the good stuff!” I cried. She just winked, dusted a little extra nutmeg on top of the dough balls, and said, “Beau, honey, we’re not wasting it. We’re preserving the magic.” When those cookies came out of the oven, I understood. They tasted like her eggnog, but in a soft, portable, buttery form. They tasted like her laugh—warm, a little spicy, and full of joy. That’s the spirit I’ve tried to bottle in this very recipe.
Gathering Your Cookie Crew: The Ingredients
Here’s the dream team that’s going to make these cookies legendary. I’ve included a few of my chef-y insights and easy swaps to make this recipe work for you, no matter what’s in your pantry.
- 2 cups (4 sticks) unsalted butter, softened: This is the foundation of our melt-in-your-mouth texture. Using unsalted lets you control the salt level. Chef’s Tip: “Softened” is key! It should be cool to the touch but leave a slight indent when you press it. Don’t melt it! If you’re in a pinch, cut the sticks into tablespoons and let them sit out for 20-30 minutes.
- 3 cups granulated sugar: For that classic sweetness and helps create a slightly crisp edge while keeping the center tender.
- 2 large eggs: Our binding agents, bringing everything together. Make sure they’re at room temperature to prevent the butter from seizing up.
- 1 cup eggnog: The star of the show! Use store-bought for convenience or homemade for that extra-special touch. The richer the eggnog, the richer the cookie. Substitution Tip: No eggnog? Combine 1 cup of whole milk with 1 extra teaspoon of vanilla extract and 1.5 teaspoons of ground nutmeg.
- 1 tsp ground nutmeg: This is what gives it that signature “eggnog” spice. Feel free to add an extra 1/4 tsp if you’re a nutmeg fanatic like me!
- 2 tsp vanilla extract: The warm, floral notes of vanilla are the perfect partner for the nutmeg. Use pure vanilla extract for the best flavor.
- 6 cups all-purpose flour: The structure of our cookie. Chef’s Hack: For the most accurate measurement, fluff your flour with a spoon, spoon it into your measuring cup, and level it off. Don’t pack it in!
- 2 tsp baking powder: This is our leavening agent, giving the cookies a lovely, soft lift.
- 1 tsp salt: The secret weapon! Salt balances the sweetness and makes all the other flavors pop. If you only have salted butter, reduce this to a 1/2 teaspoon.
- Optional Topping (Cinnamon-Sugar Mix): Just combine 1/4 cup sugar with 1 tsp of cinnamon. It adds a delightful sparkle and crunch.
- Optional Topping (Eggnog Glaze): Whisk together 1 cup of powdered sugar with 1-2 tablespoons of eggnog until you reach a drizzling consistency.
Let’s Get Baking: The Step-by-Step Magic
Alright, team, let’s fire up the oven and get our hands dusty. Follow these steps, and you’ll be a cookie hero in no time.
- Preheat and Prep. Get that oven preheating to a cozy 350°F (175°C). This is your first step for an even bake. Line your baking sheets with parchment paper. Trust me on this—it prevents sticking, makes cleanup a dream, and is my number one kitchen hack for perfect cookies every single time.
- Creaming is Key. In a large bowl, beat the softened butter and granulated sugar together. Now, don’t rush this! We’re not just mixing; we’re “creaming.” Beat it on medium-high speed for a solid 2-3 minutes until it becomes pale, fluffy, and almost whipped. This step incorporates air into the dough, which is a big part of achieving that perfect, tender texture. If you skip it, your cookies will be dense.
- Incorporate the Wet Team. Beat in the eggs, one at a time, letting each one fully incorporate before adding the next. This helps create an emulsion. Then, pour in that glorious eggnog, the vanilla, and the nutmeg. Mix until it’s a smooth, fragrant, liquid dream. It might look a little curdled at this point—don’t you worry one bit. That’s totally normal and will fix itself when we add the flour.
- Whisk the Dry Goods. In a separate bowl, grab a whisk and give the flour, baking powder, and salt a good whisking. This does two things: it combines everything evenly, and it aerates the flour one more time, making for a lighter cookie. No one wants a pocket of baking powder in their bite!
- The Grand Union. Now, with your mixer on low speed, gradually add the dry ingredients to the wet mixture. I add it in about three parts to avoid a flour blizzard in my kitchen. Mix just until the flour disappears and a soft dough forms. Do not overmix! Overmixed dough = tough cookies. You’ll know it’s ready when there are no more dry streaks.
- Scoop and Space. Using a tablespoon or a small cookie scoop (my personal favorite for uniform cookies), drop rounded tablespoons of dough onto your prepared baking sheets. Give them about 2 inches of space to spread and become the beautiful, puffy cookies they’re destined to be.
- Bake to Perfection. Pop them into your preheated oven and bake for 8-10 minutes. You’re looking for the edges to be just lightly golden. The centers should still look soft and might even seem a tiny bit underdone—that’s perfect! They will continue to cook on the hot baking sheet. This is the secret to a soft, melt-in-your-mouth center.
- The Patient Cool-Down. Let the cookies rest on the hot baking sheet for 5 full minutes. This allows them to set up so they don’t fall apart when you move them. Then, ever so gently, transfer them to a wire rack to cool completely. This step ensures they don’t get soggy on the bottom.
- The Finishing Touch. If you’re using the cinnamon-sugar topping, sprinkle it on while the cookies are still warm so it sticks. If you’re going for the eggnog glaze, wait until they are completely cool, then drizzle that creamy goodness over the top with a spoon or a piping bag.
Sharing the Joy: How to Serve These Beauties
Okay, the hard part is over (waiting for them to cool is always the hardest part for me!). Now, let’s talk presentation. These cookies are stars all on their own, piled high on a rustic wooden board or a vintage cake stand. But why stop there?
For the ultimate holiday experience, serve them alongside a cold glass of milk, a warm mug of spiced hot chocolate, or—you guessed it—a creamy glass of eggnog. They are the perfect companion to your coffee break, a wonderful addition to any cookie swap, or a sweet little gift packed in a cellophane bag with a festive ribbon.
I love setting out a platter of these with small bowls of the optional glazes and some extra sprinkles, letting my friends and family decorate their own. It’s a fun, interactive, and delicious way to get everyone involved in the holiday spirit!
Make It Your Own: Delicious Recipe Variations
Feel like playing around? This dough is a fantastic base for all sorts of festive fun. Here are a few of my favorite twists:
- The Spiced Cider Twist: Replace the eggnog with an equal amount of spiced apple cider and swap the nutmeg for a blend of 1 tsp cinnamon and 1/4 tsp allspice. It’s like autumn and winter had a delicious cookie baby.
- Boozy & Bold: For an adult-only version, replace 2 tablespoons of the eggnog with dark rum, spiced rum, or bourbon. The alcohol bakes out, leaving behind an incredible, deep flavor.
- Gluten-Free Goodness: You can easily make these gluten-free! Simply substitute the all-purpose flour with a 1:1 gluten-free baking blend. I’ve had great success with brands like Bob’s Red Mill or King Arthur.
- Brown Butter Bliss: Take the flavor to a whole new level by browning the butter first. Let it cool completely and solidify again before creaming it with the sugar. It adds a nutty, caramel-like depth that is absolutely unforgettable.
- Chewy Cranberry Delight: Fold in 1 cup of dried cranberries into the dough at the very end. The tart bursts of fruit are a fantastic contrast to the sweet, spiced cookie.
Beau’s Kitchen Chronicles: A Few Parting Thoughts
This recipe has been a living, evolving thing in my kitchen. The first time I made them, I was so nervous about the dough being soft that I added nearly an extra cup of flour. Let’s just say we ended up with hockey pucks that year—deliciously spiced hockey pucks, but hockey pucks nonetheless. I learned my lesson: trust the dough! Its softness is its power.
Over the years, I’ve found that a cookie scoop is my best friend for uniformity, and that letting the dough chill for just 15-20 minutes if my kitchen is particularly warm helps prevent overspreading. But mostly, I’ve learned that the best ingredient you can add to any recipe is a dash of joy and a willingness to get a little flour on your nose. It’s all part of the fun.
Your Questions, Answered!
I’ve gotten a lot of questions about these cookies over the years, so I’ve compiled the most common ones right here for you.
Q: My cookies spread too much! What happened?
A: This is usually a temperature issue. The most common culprits are butter that was too warm or melted, or an oven that wasn’t fully preheated. Make sure your butter is just softened, not greasy, and always let your oven come to full temp. If your kitchen is hot, a 15-minute chill of the dough balls on the baking sheet can work wonders.
Q: My cookies are cakey and puffy, not flat and soft. Why?
A: This often points to too much flour. Remember my tip about spooning and leveling! Overmixing the dough after adding the flour can also develop too much gluten, leading to a cakier texture. Mix just until combined.
Q: Can I make the dough ahead of time?
A> Absolutely! You can scoop the dough into balls, freeze them solid on a baking sheet, and then transfer them to a freezer bag. When you’re ready to bake, just place the frozen dough balls on a parchment-lined sheet and add 1-2 minutes to the baking time. Fresh-baked cookies anytime!
Q: Can I use low-fat eggnog?
A> You can, but the flavor and texture won’t be as rich and luxurious. The fat in the eggnog contributes to that melt-in-your-mouth quality. For the best results, I always recommend full-fat eggnog.

Melt-in-Your-Mouth Eggnog Sugar Cookies: Buttery, Spiced & Holiday-Perfect
Description
These cookies are the edible embodiment of the holiday season: buttery, soft, lightly spiced with nutmeg, and infused with creamy eggnog. They’re soft without being cakey, rich without being greasy, and absolutely irresistible. Perfect for cookie swaps, gift tins, or a cozy treat with a mug of cocoa.
Ingredients
Cookie Dough:
-
2 cups (4 sticks) unsalted butter, softened
-
3 cups granulated sugar
-
2 large eggs, room temperature
-
1 cup eggnog (full-fat recommended)
-
1 tsp ground nutmeg
-
2 tsp vanilla extract
-
6 cups all-purpose flour
-
2 tsp baking powder
-
1 tsp salt (or ½ tsp if using salted butter)
Optional Toppings:
-
Cinnamon-sugar: 1/4 cup sugar + 1 tsp cinnamon
-
Eggnog glaze: 1 cup powdered sugar + 1–2 tbsp eggnog
Instructions
1. Preheat & Prep
-
Preheat oven to 350°F (175°C).
-
Line baking sheets with parchment paper.
2. Cream Butter & Sugar
-
In a large bowl, beat butter and granulated sugar on medium-high for 2–3 minutes until pale and fluffy.
3. Add Wet Ingredients
-
Beat in eggs, one at a time, fully incorporating each.
-
Add eggnog, vanilla, and nutmeg; mix until smooth.
4. Combine Dry Ingredients
-
Whisk together flour, baking powder, and salt in a separate bowl.
5. Make the Dough
-
Gradually add dry ingredients to wet on low speed in 3 parts.
-
Mix just until no dry streaks remain; do not overmix.
6. Scoop Cookies
-
Using a tablespoon or cookie scoop, drop dough onto prepared sheets, spacing 2 inches apart.
7. Bake
-
Bake 8–10 minutes until edges are lightly golden; centers may appear slightly underdone.
-
Cool on sheet 5 minutes, then transfer to wire racks to cool completely.
8. Optional Toppings
-
While warm: sprinkle cinnamon-sugar.
-
Once cooled: drizzle eggnog glaze.
Notes
-
Spiced Cider Twist: Replace eggnog with spiced apple cider; swap nutmeg for 1 tsp cinnamon + 1/4 tsp allspice.
-
Boozy Upgrade: Add 2 tbsp dark or spiced rum in place of some eggnog.
-
Gluten-Free: Use a 1:1 gluten-free baking blend.
-
Brown Butter Cookies: Brown the butter first for a nutty depth, then let cool before mixing.
-
Cranberry Addition: Fold in 1 cup dried cranberries at the end for tart bursts.
Nutrition
- Calories: 140 Cal Per Serving
- Sugar: 9g
- Fat: 7g
- Carbohydrates: 18g
Nutritional Info (For My Curious Foodies)
I’m all about balance, and that includes knowing what’s in the food we love to share. Here’s a rough nutritional breakdown per cookie (without glaze), based on a yield of 48 cookies. Remember, this is an estimate and can vary based on specific ingredients used.
- Calories: ~140
- Fat: 7g
- Carbohydrates: 18g
- Sugar: 9g
- Protein: 2g
These are a treat, through and through, and they’re meant to be savored and shared with people you love. So enjoy every single buttery, spiced bite without an ounce of guilt!
Final Thoughts from My Kitchen to Yours
Well, my friend, we’ve done it. We’ve taken a simple idea and turned it into a platter full of holiday joy. I hope these Eggnog Sugar Cookies become a cherished part of your traditions, just like they are in mine. I hope your kitchen fills with that incredible smell, that you get to see the smile on someone’s face when they take that first bite, and that you feel that warm, fuzzy feeling that only comes from baking something with love.
Thank you for spending this time with me in my Feastical kitchen. If you make these (and I really hope you do!), tag me on social @Feastical so I can see your beautiful creations! Now, go forth and bake something wonderful.
With a full heart and an even fuller cookie jar,
Beau