
Crispy Air Fryer Firecracker Chicken and Rice Bowls : Sweet, Spicy & High-Protein
Crispy, Crunchy, Sweet Heat: Your New Favorite Bowl Is Here
Hey friend, Beau here. Let me paint you a picture: It’s a Tuesday night. You’re craving something that packs a punch—something crispy, sweet, spicy, and satisfying enough to feel like a real treat, but simple enough that you’re not doing dishes for hours. You open the fridge… and the inspiration just isn’t striking. Sound familiar?
Well, pull up a chair and let me introduce you to your new kitchen hero: Crispy Air Fryer Firecracker Chicken and Rice Bowls. This isn’t just another chicken recipe. This is a textural masterpiece, a flavor explosion, and your ticket to a seriously delicious dinner in about 30 minutes flat. We’re talking golden-brown, shatteringly crisp chicken bites, straight from your air fryer, tossed in a sticky-sweet-spicy glaze that’s legitimately addictive. Then, we pile it all over fluffy rice with some fresh, crunchy veggies to balance everything out.
This dish is the beautiful love child of your favorite takeout and the sheer convenience of your countertop appliances. It’s high-protein, meal-prep magic, and it brings the kind of bold, feel-good flavor that makes you want to cook. So, grab your favorite apron (or don’t, I’m not the boss of you), and let’s make your kitchen smell incredible. Trust me, your spatula is ready for this.
The Night the “Firecracker” Was Born
This recipe has a little story, as the best ones often do. It was born one chaotic, beautiful summer evening a few years back. My friends had all spontaneously descended on my place—the kind of gathering where you’re suddenly feeding eight people with a fridge that only planned for two. I had chicken breasts, some leftover rice, and a serious need to impress without stressing.
I started breading and air frying chicken, craving that crunch. For the sauce, I began frantically pulling bottles from the door: buffalo sauce for tangy heat, honey for sweetness to calm the chaos, soy for that deep savory note. A splash of rice vinegar for brightness, a reckless pinch of red pepper flakes for personality. I tossed the crispy chicken in this haphazard, simmered concoction, served it over rice with whatever veggies I could find, and held my breath. The silence that followed—broken only by the sound of forks scraping bowls and a unanimous “Wow, what *is* this?”—told me everything. One friend dubbed it “Firecracker” Chicken for its explosive flavor, and the name just stuck. It was a reminder that sometimes, the best recipes come from a little kitchen chaos and a lot of heart.
Gathering Your Flavor Fireworks
Here’s everything you’ll need to create this magic. Don’t sweat it if you need to make a swap or two—I’ve got your back with some chef insights.
- 1½ lbs boneless, skinless chicken breasts, cubed: The star of our show! Chicken breasts are lean and get super tender inside that crispy crust. Chef’s Tip: For even more flavor and juiciness, you can use chicken thighs. Just trim any excess fat.
- ½ cup all-purpose flour: Our first coating layer. It helps the egg wash stick, creating the crucial foundation for crunch. Substitution: For a gluten-free version, a 1:1 GF flour blend works perfectly.
- 2 eggs, beaten: The “glue” that binds the flour to the panko, ensuring our crispy shell stays put.
- 1 cup panko breadcrumbs: The secret to an ultra-crispy, airy crust that doesn’t get soggy. Panko’s flaky texture is irreplaceable here. Substitution: Regular breadcrumbs will work in a pinch, but they create a denser, sandier crust.
- ½ tsp garlic powder & ½ tsp paprika: Our simple seasoning squad. Garlic powder adds savory depth, while paprika gives a subtle sweetness and gorgeous color. Chef’s Insight: Smoked paprika is a fantastic twist here for a hint of smokiness.
- Salt and black pepper, to taste: The essentials. Season every layer for the best flavor!
- Olive oil spray: The key to getting that golden-brown, restaurant-quality finish in the air fryer without deep-frying.
For the Legendary Firecracker Sauce:
- ¼ cup buffalo sauce: This is our heat base. I love Frank’s RedHot for its perfect vinegar-tang balance. It’s not just heat—it’s flavor. Chef’s Note: If you’re sensitive to heat, start with a mild buffalo or even mix it with a little ketchup.
- 3 tbsp honey: The sweet yin to the spicy yang. It caramelizes beautifully and creates that sticky, glossy coating we crave. Substitution: Pure maple syrup or agave nectar are great vegan alternatives.
- 1 tbsp soy sauce: Adds umami and saltiness, rounding out the sweet and spicy. Use tamari for a gluten-free option.
- 1 tsp rice vinegar: A tiny splash of acidity to make all the flavors pop and prevent the sauce from being too cloying. Lemon juice works too!
- ½ tsp red pepper flakes: Adjustable heat! This is where you control the “fire” in your firecracker. Start with ¼ tsp if you’re wary, or go up to 1 tsp if you love the burn.
For Building Your Bowls:
- 3 cups cooked jasmine rice: Fluffy, fragrant, and the perfect neutral base. Pro-Tip: Cook your rice with a tiny bit of coconut milk for an incredible aromatic twist.
- 2 cups steamed broccoli & 1 cup shredded carrots: Fresh, colorful, and nutritious crunch. They balance the richness of the chicken perfectly.
- 2 green onions, sliced & Sesame seeds (optional): The finishing touches! Green onions add a fresh bite, and sesame seeds give a nutty flavor and professional look.
Let’s Get Cooking: Crispy Chicken Magic
Alright, team! Let’s transform these ingredients into something spectacular. Read through once, then get your stations ready. I’ll be with you every step of the way with my favorite hacks.
- The Coating Station: Set up three shallow bowls or plates. In the first, place your flour mixed with the garlic powder, paprika, salt, and pepper. In the second, beat your eggs until uniform. In the third, pour out your panko breadcrumbs. Chef’s Hack: Do this assembly-line style, left to right (flour -> egg -> panko), to keep one hand for dry ingredients and one for wet, minimizing clumpy fingers!
- Bread Like a Boss: Take your cubed chicken and toss it in the flour mixture, shaking off any excess. This dry layer is crucial. Next, dunk it into the egg wash, letting the excess drip off. Finally, press it firmly into the panko, ensuring every nook and cranny is coated. Don’t just drop it in—press! This ensures maximum crispiness. Place the breaded pieces on a clean plate as you go.
- Air Fry to Perfection: Preheat your air fryer to 400°F (this helps the chicken start crisping immediately). Arrange the chicken in a single layer in the basket—don’t overcrowd! You want hot air to circulate. Give them a very light but thorough spray with olive oil. This mimics frying and gives you that gorgeous golden color. Cook for 12-15 minutes, pausing to shake the basket or flip the pieces halfway through. They’re done when they’re deeply golden and the internal temperature hits 165°F. Pro-Tip: If your air fryer is small, cook in batches. It’s worth it for that perfect crunch.
- Whip Up the Firecracker Sauce: While the chicken cooks, combine the buffalo sauce, honey, soy sauce, rice vinegar, and red pepper flakes in a small saucepan. Whisk it together and let it simmer over medium-low heat for just 2-3 minutes. You’ll see it bubble and thicken slightly. Chef’s Insight: Simmering melds the flavors and creates a stickier sauce that will cling to the chicken beautifully. Remove it from the heat.
- The Grand Toss: Once the chicken is out of the air fryer and still piping hot, transfer it to a large mixing bowl. Pour that glorious, warm firecracker sauce over the top. Using a rubber spatula or tongs, gently toss and fold until every single piece is glistening and coated. Listen to that sizzle! The heat from the chicken helps the sauce adhere perfectly.
Building Your Ultimate Flavor Bowl
This is where it all comes together, and you get to be an artist! Start with a generous base of fluffy, warm jasmine rice in your favorite deep bowl. The rice is your canvas. Next, arrange a pile of that saucy, crispy firecracker chicken right in the center—let it be the star. Tuck your steamed broccoli and bright shredded carrots around the sides for that fresh, colorful contrast.
Now, the garnish game: a generous scattering of sliced green onions adds a pop of green and a sharp, fresh flavor. A sprinkle of sesame seeds isn’t just pretty; it adds a tiny nutty crunch that elevates the whole experience. For an extra kick, drizzle a little extra buffalo sauce or sriracha on the side. The goal is a bowl that’s as beautiful as it is delicious—a perfect balance of hot and cool, crispy and tender, spicy and sweet. Dig in immediately while that chicken is at its peak crispiness!
Make It Your Own: Endless Twists!
Love the blueprint but want to switch it up? Here are some of my favorite ways to riff on this recipe.
- Shrimp Firecracker Bowls: Swap the chicken for large, peeled shrimp. Bread them the same way, but reduce the air fryer time to 6-8 minutes at 400°F until pink and crispy. Toss in the sauce just before serving.
- “Zen” Veggie Version: For a fantastic vegetarian option, use extra-firm tofu or cauliflower florets. Press and cube the tofu, or break the cauliflower into bite-sized pieces. Follow the same breading and cooking process—you’ll get amazingly crispy, flavorful bites that soak up the sauce perfectly.
- Korean BBQ Fusion: Change up the sauce! Use ¼ cup gochujang (Korean chili paste) instead of buffalo sauce, keep the honey, and add 1 tbsp of minced ginger. It creates a deeper, fermented, spicy-sweet flavor that’s incredible.
- Lower-Carb “No-Rice” Bowl: Serve your firecracker chicken over a huge bed of crisp romaine lettuce or shredded cabbage for a crunchy, refreshing low-carb option. It’s incredibly satisfying and light.
- Mango Tango Twist: Add ¼ cup of pureed ripe mango to the firecracker sauce for a tropical, fruity sweetness that pairs amazingly with the heat. Garnish with fresh cilantro instead of green onions.
A Few More Thoughts From My Kitchen
This recipe has become a staple in my home, and it’s evolved in fun ways. I’ve learned that doubling the sauce recipe is never a bad idea—some folks (me) like to have extra for drizzling or dipping. Also, while the air fryer is my go-to for ease and less mess, this chicken can be baked on a wire rack over a sheet pan at 425°F for about 18-20 minutes. It won’t be *quite* as airy-crisp, but it’s still delicious.
The funniest thing? I now keep a jar of “Firecacker Dry Spice Mix” (garlic powder, paprika, a pinch of cayenne) in my pantry just for this recipe. It’s my little secret to making the breading even faster. Remember, cooking should be fun. If your breading isn’t perfect or your kitchen is a bit messy, you’re doing it right. The flavor is what people remember.
Your Questions, Answered
Q: My breading fell off in the air fryer! What happened?
A: The most common culprit is not pressing the panko on firmly enough. A good, firm press ensures it adheres. Also, make sure you’re shaking off excess flour after the first step, and letting the excess egg drip off. A thick, gloopy layer of egg can cause slippage.
Q: Can I make this ahead for meal prep?
A> Absolutely! This is a meal-prep champion. For the crispiest results, store the cooked, sauced chicken separately from the rice and veggies in airtight containers for up to 4 days. Reheat the chicken in the air fryer at 380°F for 3-4 minutes to re-crisp. Assemble your bowl fresh!
Q: How can I make it less spicy for my kids?
A> Easy! Use a mild buffalo sauce or even substitute it with ¼ cup of barbecue sauce mixed with a tablespoon of hot sauce (or none at all). Omit the red pepper flakes entirely. You can always serve extra red pepper flakes or hot sauce on the side for the heat-lovers.
Q: My sauce got too thick and sticky. Help!
A> No worries! Just add a teaspoon of warm water at a time and whisk it back in over low heat until it reaches a pourable, glaze-like consistency. Remember, it will also thin out slightly when it hits the hot chicken.

Crispy Air Fryer Firecracker Chicken and Rice Bowls : Sweet, Spicy & High-Protein
Description
Crispy, Crunchy, Sweet Heat: Firecracker Chicken & Rice Bowls
Hey friend — if you’re craving something crispy, sticky, sweet, and just spicy enough to wake up your taste buds, this is your bowl.
These Crispy Air Fryer Firecracker Chicken & Rice Bowls bring major takeout vibes without the deep fryer or delivery wait. Golden, ultra-crunchy chicken bites get tossed in a glossy sweet-heat glaze, then piled over fluffy rice with fresh veggies for balance. It’s bold, satisfying, and ready in about 30 minutes.
Let’s make your Tuesday night a lot more exciting.
Ingredients
For the Crispy Chicken
-
1½ lbs boneless, skinless chicken breasts, cubed
-
½ cup all-purpose flour
-
2 eggs, beaten
-
1 cup panko breadcrumbs
-
½ tsp garlic powder
-
½ tsp paprika
-
Salt & black pepper, to taste
-
Olive oil spray
For the Firecracker Sauce
-
¼ cup buffalo sauce
-
3 tbsp honey
-
1 tbsp soy sauce
-
1 tsp rice vinegar (or lemon juice)
-
½ tsp red pepper flakes (adjust to taste)
For the Bowls
-
3 cups cooked jasmine rice
-
2 cups steamed broccoli
-
1 cup shredded carrots
-
2 green onions, sliced
-
Sesame seeds (optional)
Instructions
1️⃣ Set Up the Breading Station
-
Bowl 1: Flour + garlic powder + paprika + salt + pepper
-
Bowl 2: Beaten eggs
-
Bowl 3: Panko breadcrumbs
Coat chicken in flour, dip in egg, then press firmly into panko.
Tip: Really press the crumbs on for maximum crunch.
2️⃣ Air Fry to Crispy Perfection
Preheat air fryer to 400°F (200°C).
Arrange chicken in a single layer (don’t overcrowd).
Lightly spray with olive oil.
Cook 12–15 minutes, flipping halfway, until golden and internal temp reaches 165°F.
Cook in batches if needed — crispiness is worth it.
3️⃣ Make the Firecracker Sauce
In a small saucepan over medium-low heat, combine:
-
Buffalo sauce
-
Honey
-
Soy sauce
-
Rice vinegar
-
Red pepper flakes
Simmer 2–3 minutes until slightly thickened and glossy.
4️⃣ Toss It Together
Transfer hot chicken to a bowl.
Pour warm sauce over the top and toss gently until evenly coated.
5️⃣ Build Your Bowls
Start with rice.
Top with saucy crispy chicken.
Add broccoli and carrots.
Finish with green onions and sesame seeds.
Serve immediately while the chicken is at peak crunch.
Notes
-
Don’t overcrowd the air fryer — airflow = crunch.
-
Use panko, not regular breadcrumbs.
-
Simmering the sauce makes it stick better.
-
If reheating, pop chicken back in the air fryer for 3–4 minutes to revive crispiness.
-
Want extra sauce? Double it. No regrets.
Nutritional Info (A Quick Note!)
While I’m all about flavor first, it’s great to know what’s fueling you! These figures are per serving (one bowl as outlined) and are estimates. Using cooking spray instead of deep frying significantly cuts the fat. This bowl is a fantastic source of lean protein (~42g) from the chicken to keep you full and satisfied, with complex carbs from the rice and veggies for energy. The fat content is primarily from the cooking process and the eggs. To lower calories or carbs, see the variation for a no-rice bowl option, or use cauliflower rice. As always, for precise dietary needs, use your preferred nutrition calculator with the exact brands and quantities you use.
Final Thoughts
And there you have it, friends! From a chaotic summer night to your weeknight dinner table, this Crispy Air Fryer Firecracker Chicken is more than just a recipe—it’s a promise of a seriously delicious, surprisingly easy meal that never fails to impress. It has that magical combo of being both comfort food and excitement on a plate.
I hope you make it, love it, and make it your own. Tag me @Feastical if you do—I live for seeing your creations! Now, go forth, get that air fryer humming, and enjoy every last sweet, spicy, crispy bite. Until next time, keep your spatulas handy and your flavor game strong.
— Beau
Jalapeño Popper Chicken and Pasta Bowls : Creamy, Spicy High-Protein Meal Prep
Jalapeño Popper Chicken & Pasta Bowls: Your New Meal Prep Obsession
Hey there, friend! Beau here, from Feastical. Let’s get real for a second. How many times have you stared into the abyss of your fridge on a Wednesday night, wishing dinner would just… appear? And not just any dinner, but something that feels like a cozy, flavorful hug—something that actually makes you look forward to lunch the next day? If you’re nodding along, I’ve got you. I’m about to share a recipe that became an instant legend in my kitchen, and I think it’s going to rock yours too.
Imagine everything you love about those dangerously addictive jalapeño poppers—the creamy, cheesy filling, the smoky bacon, that perfect spicy-savory kick—but transformed into a hearty, protein-packed meal that you can make once and enjoy all week. That’s the magic of these Jalapeño Popper Chicken and Pasta Bowls. It’s the ultimate culinary crossover event: part comfort food classic, part genius meal prep strategy. We’re talking tender seasoned chicken and twirly pasta all swirled in a luscious sauce that’s bold, creamy, and just spicy enough to wake up your taste buds. It reheats like an absolute dream, making your future self a very happy camper. So, grab your favorite skillet and let’s turn up the flavor. This is feel-good food that works as hard as you do.
Game Day Snack, Turned Weeknight Hero
This recipe has its roots in one of my favorite life chapters: the “Friendsgiving and Football Sundays” era. My buddy Mike would always, without fail, show up with a platter of homemade jalapeño poppers so good they’d cause a minor stampede. We’d hover by the snack table, debating the merits of bacon-wrapped versus breadcrumb-topped, while the game played in the background. They were the undisputed MVP of every gathering.
But one Monday, facing a fridge with leftover popper filling and some chicken, I had a “what if” moment. What if I took that iconic flavor combo and built a whole darn meal around it? A little sautéing, a little pasta-twirling, and voilà—the first iteration of these bowls was born. It was an instant hit, and it stuck. Now, it’s less about the sidelines and more about simplifying my week. It carries that same nostalgic, celebratory flavor but in a format that fuels my days. It’s a little reminder that the best recipes often start with a happy memory and a willingness to play with your food.
Gathering Your Flavor All-Stars
Here’s the beautiful part: this recipe uses simple, honest ingredients that pack a major punch. Let’s break them down so you can shop and cook with confidence.
- 12 oz Penne or Rotini Pasta: These shapes are my go-to because their nooks and crannies trap every bit of that creamy sauce. Chef’s Insight: Using a good, starchy pasta and saving some of the cooking water is your secret weapon for a silky, restaurant-quality sauce later.
- 1 ½ lbs Boneless, Skinless Chicken Breast: Our lean protein powerhouse. I dice it into bite-sized pieces for quick, even cooking. Substitution Tip: Chicken thighs work fantastically here for an even juicier, richer result.
- 1 tbsp Olive Oil: Just enough to get our chicken beautifully golden.
- ½ tsp Garlic Powder & ½ tsp Paprika: This dynamic duo gives the chicken a flavorful foundation. The paprika adds a whisper of sweetness and color.
- 4 oz Light Cream Cheese, softened: The creamy backbone of our sauce. I use light to keep things a tad lighter, but full-fat will deliver maximum indulgence. Pro Tip: Let it sit on the counter for 20-30 minutes before you start cooking. It blends into the sauce like a dream.
- ½ cup Light Cream or Half-and-Half: This creates the luxurious texture. For a richer sauce, use heavy cream. For a lighter version, whole milk will work in a pinch.
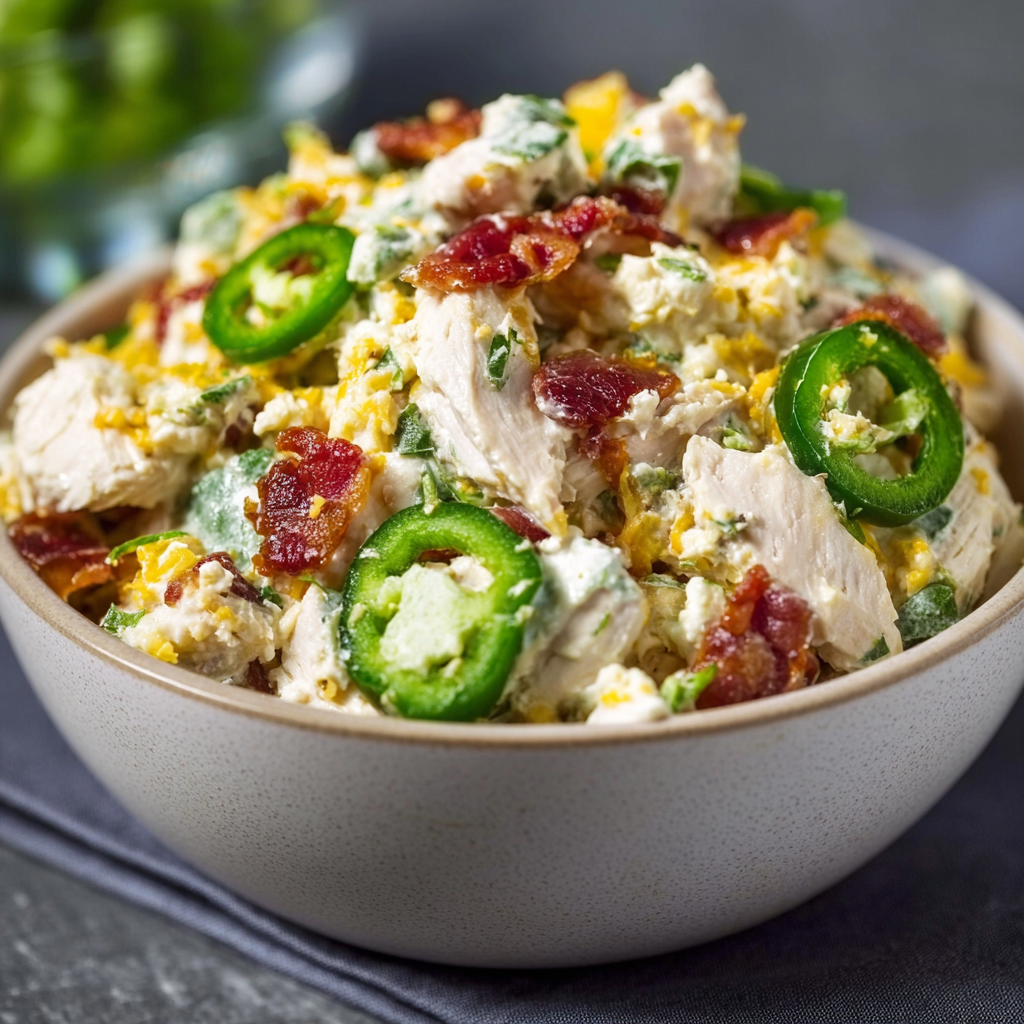
- ½ cup Shredded Cheddar Cheese: Sharp cheddar brings that classic, tangy popper flavor. Chef’s Hack: Shred your own cheese from a block! Pre-shredded cheese contains anti-caking agents that can make your sauce slightly grainy.
- 2–3 Jalapeños, finely diced: The star of the show! Heat Control: For mild spice, remove ALL the seeds and white membranes. For a bigger kick, leave some in. Always wash your hands thoroughly after handling!
- 2 cloves Garlic, minced: Fresh garlic sautéed with the jalapeños is non-negotiable for that aromatic base flavor.
- 3 slices Cooked Bacon, crumbled: That essential smoky, salty, crunchy element. I bake my bacon on a sheet pan for easy clean-up.
- ½ tsp Onion Powder: It deepens the savory notes of the sauce beautifully.
- Salt and Black Pepper: Season at every stage—it’s what makes flavors pop!
- Optional Garnish: Chopped green onions or extra bacon crumbles add a fresh finish and great color.
Let’s Build Those Bowls! Your Step-by-Step Roadmap
Ready to cook? Follow these steps and you’ll have a flawless, restaurant-worthy dish. I’m chatting you through each one with my best tips.
- Pasta Prep is Key: Bring a large pot of well-salted water to a boil. Cook your pasta according to package directions for al dente—it will continue to cook a bit in the sauce. Here’s the crucial part: Before you drain it, scoop out about ½ cup of that starchy pasta water and set it aside. This liquid gold will help us adjust the sauce consistency later. Drain the pasta and let it hang out.
- Chicken Time – Get That Golden Color: While the pasta cooks, heat the olive oil in a large skillet over medium-high heat. Pat your diced chicken dry with a paper towel (this helps it brown, not steam!). Toss it with the garlic powder, paprika, salt, and pepper. Add it to the hot skillet in a single layer—don’t crowd the pan! Let it cook undisturbed for 5-6 minutes until you get a gorgeous golden sear on one side, then stir and cook for another 2-3 minutes until cooked through. Remove the chicken to a plate. See those delicious browned bits left in the pan? That’s flavor. We’re using it.
- Build the Flavor Base: In that same skillet (no need to wash it!), reduce the heat to medium. Add the diced jalapeños and minced garlic. Sauté for just 1-2 minutes until fragrant and slightly softened. You’re waking up their flavors and taming the raw edge of the garlic.
- Create the Creamy Dream Sauce: Lower the heat to medium-low. Add the softened cream cheese and the cream or half-and-half. Use a whisk or a wooden spoon to stir constantly until the cream cheese melts completely and the mixture is smooth and homogenous. This takes a couple of minutes of gentle encouragement.
- Cheese, Please! Sprinkle in the shredded cheddar and onion powder. Keep stirring until the cheese is fully melted into a velvety, cohesive sauce. Take a taste! This is when you adjust seasoning with a pinch more salt or pepper.
- The Grand Reunion: Add the cooked chicken and any accumulated juices back to the skillet. Give it a good stir to coat. Now, dump in all that cooked pasta. Toss everything together until every piece of pasta and chicken is gloriously coated in the jalapeño popper sauce. If the sauce seems a bit thick, add a splash of that reserved pasta water, a tablespoon at a time, until it loosens to your perfect consistency.
- The Finishing Touch: Turn off the heat. Stir in most of the crumbled bacon, saving a little for topping. The residual heat will warm it through and let its smoky flavor infuse the whole dish.
How to Serve & Savor
You’ve done it! Now, let’s plate it up for maximum enjoyment. For a family-style dinner, I love piling the whole skillet right in the middle of the table with a big spoon—it’s rustic and inviting. For meal prep, simply divide the mixture evenly among four airtight containers. When serving, a little garnish goes a long way. A sprinkle of the remaining bacon, a handful of chopped green onions, or even a tiny extra pinch of shredded cheddar makes it look and taste special. This dish is rich and satisfying all on its own, but if you want a side, a simple green salad with a sharp vinaigrette or some roasted broccoli are perfect for cutting through the creaminess. Don’t forget a big glass of iced tea or a cold beer!
Make It Your Own: 5 Flavor Twists
The beauty of this recipe is its flexibility. Here are some of my favorite ways to mix it up:
- “Loaded” Southwest Style: Swap the cheddar for pepper jack cheese. Stir in a drained can of black beans and a cup of fresh or frozen corn kernels with the chicken.
- Lighten It Up: Use whole wheat or chickpea pasta. Swap the cream for plain, unsweetened almond milk or broth (the sauce will be thinner but still delicious). Add a couple of handfuls of fresh spinach at the very end and stir until just wilted.
- Smoky Chipotle Swap: Replace the jalapeños with 1-2 chipotle peppers in adobo sauce, minced. You’ll get a deeper, smokier heat that’s incredible.
- Turkey & Different Noodle: Use ground turkey instead of chicken breast. Swap the pasta for zucchini noodles (“zoodles”) for a low-carb version—just add them raw at the very end and toss until coated.
- Extra Veggie Power: Sauté ½ cup of diced red bell pepper and ½ cup of diced onion with the jalapeños for added sweetness and texture.
Beau’s Kitchen Notebook
This recipe has evolved from that first “leftover experiment” into a true weeknight warrior. I’ve learned a few things along the way: First, don’t rush the sauce. Letting the cream cheese melt slowly on lower heat prevents any weird graininess. Second, this dish is a meal prep CHAMPION. The flavors actually meld and get better after a day or two in the fridge. If the sauce tightens up when reheating, just add a tiny splash of milk or broth. And lastly, a funny confession: I once accidentally used a habanero instead of a jalapeño (they look similar at my farmer’s market!). Let’s just say we called that batch “Fire-Breathing Dragon Bowls” and ate it with copious amounts of yogurt. Know your peppers, friends!
Your Questions, Answered
Q: My sauce turned out grainy. What happened?
A: This usually happens if the heat was too high when melting the cheese, causing the proteins to seize. Next time, keep the heat on medium-low and add shredded cheese off the direct heat, letting it melt gently. Using pre-shredded cheese can also contribute to this.
Q: Can I freeze these bowls?
A: You can, but with a caveat. Cream-based sauces can sometimes separate when thawed and reheated. For best texture, I recommend enjoying this fresh or storing it in the fridge for up to 4 days. If you must freeze, thaw overnight in the fridge and reheat gently on the stove with a splash of milk, stirring frequently.
Q: It’s too spicy for my family! How can I fix it?
A> No problem! Dairy is your best friend for taming heat. Stir in an extra tablespoon or two of cream cheese or a splash of cream. Serving it with a dollop of sour cream or cool, creamy avocado on the side will also help balance the spice level.
Q: What’s the best way to reheat for meal prep?
A> For the creamiest results, reheat gently in the microwave with a damp paper towel over the container, stirring every 60 seconds. Or, reheat in a skillet on the stove over medium-low heat, adding that splash of liquid to bring the sauce back to life.

Jalapeño Popper Chicken and Pasta Bowls : Creamy, Spicy High-Protein Meal Prep
Description
Jalapeño Popper Chicken & Pasta Bowls: Your New Meal Prep Obsession
Hey there, friend! If you love the creamy, cheesy, smoky magic of jalapeño poppers but need something hearty enough for dinner (and tomorrow’s lunch), this recipe is about to become your weekly go-to.
These Jalapeño Popper Chicken & Pasta Bowls combine tender seasoned chicken, twirly pasta, crispy bacon, and a creamy, slightly spicy cheese sauce that reheats beautifully. It’s bold, comforting, and packed with protein—perfect for busy weeks when you want flavor without fuss.
Let’s cook.
Ingredients
-
12 oz penne or rotini pasta
-
1½ lbs boneless, skinless chicken breast, diced
-
1 tablespoon olive oil
-
½ teaspoon garlic powder
-
½ teaspoon paprika
-
Salt and black pepper, to taste
-
4 oz cream cheese (softened)
-
½ cup half-and-half or light cream
-
½ cup sharp cheddar cheese, freshly shredded
-
2–3 jalapeños, finely diced (seeds removed for less heat)
-
2 cloves garlic, minced
-
3 slices cooked bacon, crumbled
-
½ teaspoon onion powder
-
Optional garnish: green onions, extra bacon, extra cheddar
Instructions
Bring a large pot of salted water to a boil. Cook pasta until al dente.
Before draining, reserve ½ cup of pasta water. Drain and set aside.
Heat olive oil in a large skillet over medium-high heat.
Season diced chicken with garlic powder, paprika, salt, and pepper.
Cook 6–8 minutes until golden and fully cooked. Remove and set aside.
In the same skillet, reduce heat to medium. Add jalapeños and minced garlic.
Sauté 1–2 minutes until fragrant.
Lower heat to medium-low. Add softened cream cheese and half-and-half.
Stir until smooth and melted.
Add cheddar and onion powder, stirring until fully combined and creamy.
Return chicken to the skillet. Add cooked pasta and toss to coat evenly.
If sauce is too thick, add reserved pasta water a little at a time until desired consistency is reached.
Stir in most of the crumbled bacon. Garnish with remaining bacon and green onions. Serve warm.
Notes
-
Shred your own cheese for a smoother sauce.
-
Keep heat low when melting cheese to prevent graininess.
-
Control the spice by removing jalapeño seeds and membranes.
-
Add spinach at the end for extra nutrients.
-
If reheating, add a splash of milk to loosen the sauce.
Nutritional Breakdown (Per Serving, Approximate)
Here’s a look at what’s fueling you in one of these delicious bowls. Remember, these are estimates and can vary based on specific brands and ingredient amounts used.
- Calories: ~580
- Protein: 45g (Fantastic for keeping you full and supporting muscle!)
- Carbohydrates: 52g
- Fat: 22g
- Fiber: 3g
Prep Time: 10 minutes | Cook Time: 20 minutes | Total Time: 30 minutes | Servings: 4
Final Thoughts
And there you have it, my friend—your ticket to a week of delicious, no-stress meals that taste anything but ordinary. This Jalapeño Popper Chicken and Pasta recipe is more than just a list of ingredients and steps; it’s a formula for flavorful wins, both in the kitchen and for your busy life. It proves that meal prep doesn’t have to be bland and that indulgent flavors can absolutely be part of a balanced routine.
I hope this dish brings as much joy to your table as it has to mine. When you make it, I’d love to hear how it turned out! Tag me on social or drop a comment over on Feastical. Now, go forth, cook with confidence, and remember: the best meals are the ones shared, even if it’s just you and your future, very grateful self. Happy cooking!
Beau
Pumpkin Chocolate Chip Mini Loaves : Moist, Cozy & Perfectly Spiced
Pumpkin Chocolate Chip Mini Loaves: Your New Favorite Fall Hug
Hey friends, Beau here! Can we just take a moment to appreciate that gorgeous, golden-orange glow happening outside the kitchen window right now? The leaves are putting on their final, fiery show, the air has that crisp, apple-cider scent, and suddenly, all I want to do is turn on the oven and fill the house with the smell of something warm, spiced, and undeniably cozy. If you’re feeling that same pull, you and I are on the exact same delicious wavelength.
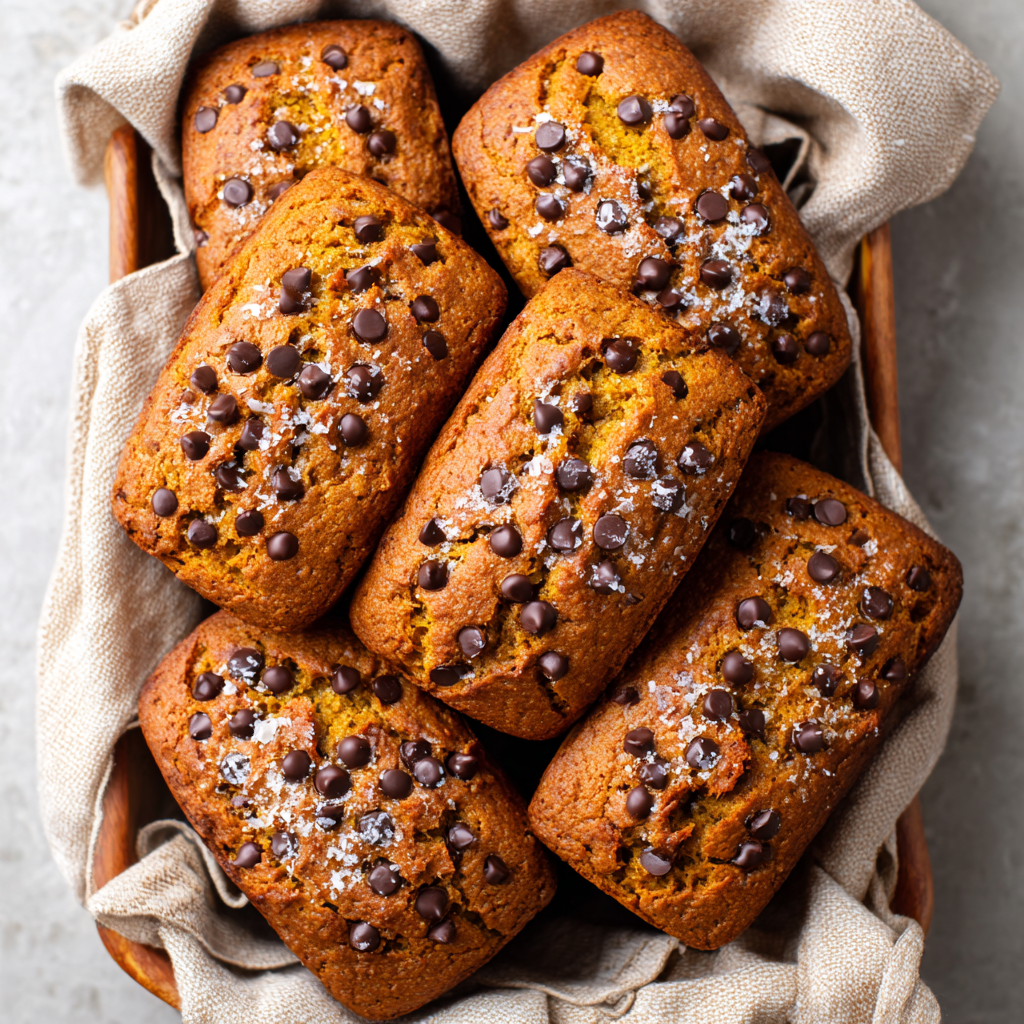
That’s why today, we’re not just making pumpkin bread. We’re leveling up. We’re making Pumpkin Chocolate Chip Mini Loaves. Think of all the best parts of autumn—the moist, tender crumb of perfect pumpkin bread, the warm hug of cinnamon and spice, and the joyful surprise of melty chocolate chips in every single bite—all baked into adorable, personal-sized packages. These mini loaves are the ultimate feel-good food. They’re perfect for tucking into lunchboxes, sharing with a neighbor (instant friendship points!), or enjoying with your afternoon coffee while you watch the world go by. They’re simple to make, soul-satisfying to eat, and they make your kitchen smell like a fall fairy tale. So, grab your favorite mixing bowl and let’s bake a little bit of magic together.
The Loaf That Started It All
This recipe takes me right back to my grandma’s linoleum-floored kitchen. She was the queen of “a little of this, a little of that” cooking, but her pumpkin bread was a sacred, written-down recipe. Every October, she’d bake a full-sized loaf, and the whole family would hover, waiting for that first warm slice. My personal innovation, even as a kid, was to immediately press chocolate chips into my piece while it was still steaming (genius, I know).
Years later, when I was in my first apartment with a kitchen the size of a postage stamp, I wanted to recreate that feeling. But a big loaf felt like a commitment. So, I grabbed a mini loaf pan I’d found at a thrift store and poured the batter in. What came out was pure joy—individual little cakes of autumn, each with more crusty edge (the best part!) and the perfect ratio of chocolate to spiced pumpkin. It was a hit at my first Friendsgiving and has been a Feastical staple ever since. It’s that beautiful blend of nostalgia and practicality, just like grandma would’ve wanted (though she’d probably still side-eye the chocolate chips).
Gathering Your Cozy Ingredients
Here’s everything you need to create these autumnal wonders. I’ve added my quick chef notes to help you understand the “why” behind each item and how to swap things if you need to!
- 1 cup pumpkin puree: Not pumpkin pie filling! We want plain, pure pumpkin. This is our moisture and flavor MVP. Pro tip: if your can has more than a cup, freeze the extra in an ice cube tray for future smoothies or oatmeal!
- ½ cup brown sugar & ¼ cup granulated sugar: The dynamic duo! Brown sugar brings deep molasses notes and moisture, while white sugar helps create a tender crumb and that lovely, delicate crust. For a deeper flavor, use all brown sugar.
- ½ cup vegetable oil: This keeps our loaves incredibly moist for days. Melted coconut oil or a mild olive oil work great too for a slight twist.
- 2 large eggs: Our binders and structure-builders. Bring them to room temperature for easier mixing and a smoother batter.
- 1 tsp vanilla extract: The flavor enhancer. It rounds out all the spices and makes the chocolate taste even more chocolatey.
- 1½ cups all-purpose flour: The foundation. For a gluten-free version, a trusted 1:1 GF blend works beautifully here.
- 1 tsp baking soda & ½ tsp baking powder: Our leavening dream team. They work together to give our mini loaves that perfect rise and light texture.
- 1½ tsp pumpkin pie spice, ½ tsp cinnamon, ½ tsp salt: The flavor orchestra! The double spice action guarantees that warm, cozy aroma. The salt is non-negotiable—it makes all the other flavors pop.
- ¾ cup chocolate chips: The joy factor! I use semi-sweet, but dark, milk, or even pumpkin spice chips are fantastic. Toss them in a spoonful of the measured flour to help prevent sinking.
Let’s Get Baking: Step-by-Step with Chef Beau
Ready? Put on some tunes, clear your counter, and let’s do this. It’s easier than you think!
- Preheat & Prep: Fire up your oven to 350°F (175°C). Now, show your mini loaf pans some love. Grease them generously with butter or baking spray, or line them with parchment slings for foolproof removal. This small step saves big frustration later!
- The Wet Team Mix: In a large bowl, combine your pumpkin puree, both sugars, oil, eggs, and vanilla. Grab your whisk and go to town! We want this mixture completely smooth, silky, and emulsified. You’ll see it transform from separate ingredients into a gorgeous, cohesive, caramel-colored batter. This is where the magic starts.
- The Dry Team Unites: In a separate bowl, whisk together the flour, baking soda, baking powder, spices, and salt. A quick whisk here does two things: it combines everything evenly, and it aerates the flour a bit, keeping our loaves light. Chef’s Hack: If you’re worried about over-mixing, you can actually sift these together right over the wet ingredients in the next step. Less dishes = happier chef.
- Marry the Teams (Gently!): Add the dry ingredients to the wet ingredients. Now, switch to a spatula. We’re going to fold, not beat. Gently stir from the bottom up until the last streak of flour disappears. A few tiny lumps are totally fine—over-mixing is the enemy of tender bread! This is the secret to that perfect, soft crumb.
- Chocolate Chip Party: Dump in those chocolate chips and give the batter just a few folds to distribute them evenly. I always sneak a taste of the batter here (it’s a chef’s prerogative).
- Pan & Bake: Divide the batter evenly among your prepared pans, filling each about ¾ of the way full. This gives them room to rise into perfect little domes. Slide them into the middle of your preheated oven and bake for 20-30 minutes. The smell will be divine. Start checking at 20 minutes—a toothpick inserted into the center should come out with just a few moist crumbs (not wet batter).
- The Cool Down: This is the hardest part! Let the loaves cool in their pans on a wire rack for 10 minutes. This allows them to set. Then, run a knife around the edges and gently lift them out to cool completely on the rack. Resisting the urge to cut one open immediately is a true test of willpower.
How to Serve These Mini Marvels
The beauty of these loaves is in their versatility. Here are my favorite ways to enjoy them:
For the ultimate warm and cozy experience, slice a still-slightly-warm loaf and spread it with a generous smear of salted butter. Watch it melt into all the nooks and crannies. Pair it with a big mug of black coffee or a chai tea latte.
Want to make it a simple dessert? Place a slice on a plate, add a small scoop of vanilla bean ice cream or a dollop of freshly whipped cream, and drizzle the whole thing with a little caramel sauce. You’re welcome.
For gifting, let the loaves cool completely, then wrap them in clear cellophane and tie them with a rustic piece of twine or a ribbon. Tuck in a handwritten tag—it’s a heartfelt gift that says “I’m thinking of you” better than any store-bought item. They also freeze beautifully for up to 3 months, so you can always have a taste of fall on hand!
Mix It Up! Fun Variations to Try
Once you’ve mastered the classic, have fun playing with these twists!
- Maple Pecan Delight: Replace the chocolate chips with ½ cup chopped toasted pecans. Swap the granulated sugar for pure maple syrup and add a teaspoon of maple extract with the vanilla.
- Double Chocolate Pumpkin: For the chocoholics! Replace ¼ cup of the flour with unsweetened cocoa powder and use dark chocolate chunks. It’s like a rich, spiced brownie in loaf form.
- Streusel-Topped Crunch: Before baking, sprinkle the tops with a quick streusel: mix 3 tbsp flour, 2 tbsp brown sugar, 1 tbsp granulated sugar, ¼ tsp cinnamon, and 2 tbsp cold cubed butter with a fork until crumbly. Bake as usual.
- Dairy-Free & Vegan Friendly: Use dairy-free chocolate chips. Replace the eggs with “flax eggs” (2 tbsp ground flaxseed mixed with 5 tbsp water, let sit 5 mins). The oil already makes it dairy-free!
- Bourbon Spice: Add 1-2 tablespoons of bourbon or whiskey to the wet ingredients for a wonderfully deep, adult-friendly flavor. It pairs amazingly with the chocolate.
Chef Beau’s Corner: Notes & Stories
This recipe is a living, breathing thing in my kitchen. I’ve made it in muffin tins (bake for 18-22 mins), in a bundt pan (bake for 45-55 mins), and even as a cake with cream cheese frosting for birthdays. It’s incredibly forgiving. One time, I was out of pumpkin pie spice and just used 2 full teaspoons of cinnamon and a pinch each of nutmeg and ginger. It was different, but still absolutely delicious.
My biggest lesson learned? The type of chocolate chip matters. I once used cheap chocolate chips that refused to melt properly, creating weird little waxy pockets. Now, I splurge on the good stuff—a high-quality semi-sweet or dark chocolate bar chopped up makes all the difference, creating glorious pools of chocolate throughout. Trust me on this one.
Your Questions, Answered
Q: My loaf sank in the middle! What happened?
A: This usually means it needed just a few more minutes to bake, or there was a bit too much leavener. Make sure your baking soda and powder aren’t expired. Use the toothpick test—it should come out clean or with dry crumbs, not wet batter.
Q: Can I use fresh pumpkin puree?
A> Absolutely! Just make sure it’s cooked, pureed, and drained well. Fresh pumpkin often has more water than canned. Spread it on a paper towel for a bit to remove excess moisture for the best texture.
Q: Why is my bread dense/gummy?
A> The most common culprit is over-mixing the batter after adding the flour. Mix until just combined! Also, ensure your baking soda and powder are fresh for proper rise.
Q: How do I store these?
A> Once completely cool, store in an airtight container at room temp for up to 4 days. They get more moist the second day! For longer storage, wrap tightly and freeze for up to 3 months.

Pumpkin Chocolate Chip Mini Loaves : Moist, Cozy & Perfectly Spiced
Description
Hey friends, Beau here! When the leaves turn golden and the air gets that crisp, cozy bite, there’s only one logical thing to do—turn on the oven. These Pumpkin Chocolate Chip Mini Loaves are everything we love about fall wrapped into adorable, personal-sized treats.
Ingredients
-
1 cup pumpkin puree (not pumpkin pie filling)
-
½ cup brown sugar
-
¼ cup granulated sugar
-
½ cup vegetable oil
-
2 large eggs (room temperature)
-
1 teaspoon vanilla extract
-
1½ cups all-purpose flour
-
1 teaspoon baking soda
-
½ teaspoon baking powder
-
1½ teaspoons pumpkin pie spice
-
½ teaspoon cinnamon
-
½ teaspoon salt
-
¾ cup semi-sweet chocolate chips
Instructions
-
Preheat & Prep
Preheat oven to 350°F (175°C). Grease 6 mini loaf pans or line with parchment paper. -
Mix Wet Ingredients
In a large bowl, whisk together pumpkin puree, brown sugar, granulated sugar, oil, eggs, and vanilla until smooth. -
Mix Dry Ingredients
In a separate bowl, whisk flour, baking soda, baking powder, spices, and salt. -
Combine
Gently fold dry ingredients into wet ingredients until just combined. Do not overmix. -
Add Chocolate Chips
Fold in chocolate chips evenly. -
Fill & Bake
Divide batter evenly among pans, filling each about ¾ full.
Bake for 20–30 minutes, or until a toothpick inserted in the center comes out clean or with a few moist crumbs. -
Cool
Let cool in pans for 10 minutes, then transfer to a wire rack to cool completely.
Notes
-
Don’t overmix after adding flour—this keeps the texture soft and tender.
-
Toss chocolate chips in a little flour to prevent sinking.
-
Use room-temperature eggs for smoother batter.
-
Check early—mini loaves bake faster than full-sized loaves.
-
For extra richness, use dark chocolate instead of semi-sweet.
A Quick Nutritional Glance
Hey, we’re all about balance here at Feastical! While these are a treat, it’s good to know what you’re enjoying. This info is an estimate per mini loaf (assuming the recipe makes 6).
Calories: ~320 | Carbohydrates: 42g | Protein: 5g | Fat: 15g | Saturated Fat: 4g | Cholesterol: 55mg | Sodium: 280mg | Fiber: 2g | Sugars: 26g
Remember, using sugar alternatives or different mix-ins will change these values. But mostly, remember to savor each delicious, cozy bite—that’s the best kind of nourishment.
Final Thoughts from My Kitchen to Yours
And there you have it, friends—my heartwarming, chocolate-chip-studded, mini loaf manifesto. This recipe is more than just a list of ingredients; it’s an invitation to slow down, to create something with your hands, and to fill your space with the kind of aroma that feels like home. Whether you’re baking these for a quiet morning, a bustling potluck, or as a little “you got this” gift for a friend, I hope they bring as much joy to your kitchen as they have to mine.
Baking should be fun, not fussy. So if you spill a little flour, or if one loaf comes out a little lopsided (hello, character!), just roll with it. That’s where the real memories are made. Now, I’d love to hear from you! Tag @Feastical on social media when you make these so I can see your beautiful creations. Happy baking, and until next time, keep it simple, soulful, and satisfying.
Cheers,
Beau
Loaded Cottage Cheese Salad : High-Protein, Creamy & Seriously Addictive
Say Goodbye to Boring Lunches: Your New Protein-Packed Obsession Awaits
Hey there, friend! Beau here, welcoming you back to the Feastical kitchen. Let’s get real for a second. How many times have you stared into the fridge at lunchtime, hoping a magical, delicious, and actually satisfying meal will materialize? You’re not alone. We’ve all been there, stuck in a rut of sad sandwiches and same-old salads that leave us hungry an hour later. Well, my fellow foodie, I’m about to hand you the keys to a lunchtime revolution. Forget everything you thought you knew about cottage cheese. We’re taking this humble, protein-packed staple and transforming it into a Loaded Cottage Cheese Salad that’s creamy, crunchy, savory, and seriously addictive.
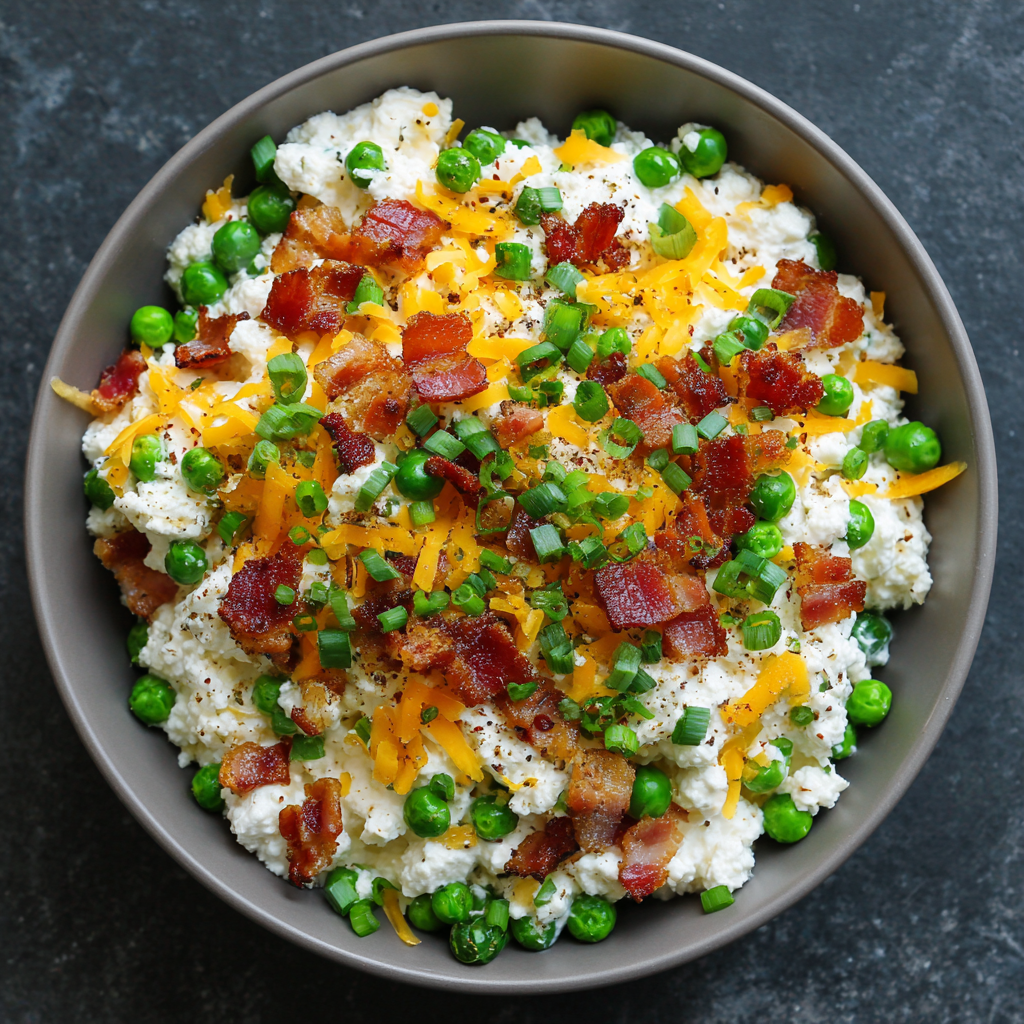
This isn’t just a salad; it’s a textural party in a bowl. Imagine cool, creamy cottage cheese hugged by sharp cheddar, dotted with sweet little pops of pea, studded with crispy, salty bacon, and finished with a fresh bite of green onion. Every spoonful is a perfect balance of rich and fresh, hearty and light. It’s the ultimate high-protein powerhouse that feels indulgent but is deceptively simple to make. Perfect for meal prep, a stellar side at your next barbecue, or that glorious desk lunch that actually makes you look forward to a break. So, grab your favorite mixing bowl and let’s make something that tastes like a cool, creamy hug. Trust me, this one’s a game-changer.
A Bowlful of Summer Memories
This recipe takes me straight back to my grandma’s sun-drenched kitchen table in the middle of July. She was a master of “making do” and creating feasts from simple ingredients. Her version of this salad was a staple at every potluck and family reunion. I can still see her, humming along to the radio, folding together big tubs of cottage cheese and cool peas she’d just shelled from the garden. The “loaded” part for her was always crispy bacon ends saved from breakfast and the sharpest cheddar she could find at the local deli.
Back then, I’d sneak spoonfuls when she wasn’t looking, mesmerized by how something so simple could taste so incredibly good. It was the taste of summer afternoons, of laughter echoing in the backyard, and of that special kind of contentment that only comes from food made with love. My version today is a direct love letter to hers—just a little amplified. I’ve kept her soulful, no-fuss spirit but added my own chef’s touch to make the flavors pop even more. Every time I make it, I’m not just making lunch; I’m stirring up a whole batch of sunny, delicious memories.
Gathering Your Flavor Crew
Here’s the beautiful part: you only need a handful of simple ingredients to create this flavor masterpiece. Quality matters, but fancy doesn’t. Let’s break it down.
- 2 cups cottage cheese: This is our creamy, high-protein base. I prefer full-fat for the richest flavor and creamiest texture—it clings to all the goodies better. But low-fat works perfectly if that’s your preference! For an extra tangy kick, try small-curd.
- ¾ cup cooked bacon, crumbled: The salty, smoky superstar. I bake a whole tray of thick-cut bacon for maximum crispiness and easy cleanup. Pro-Tip: Save your bacon fat! It’s liquid gold for frying potatoes or eggs.
- 1 cup cheddar cheese, shredded: Sharp cheddar is my go-to for a punchy flavor that stands up to the creaminess. Always shred your own from a block. Pre-shredded cheese contains anti-caking agents that can make your salad less creamy.
- 1 cup green peas, cooled: These little green gems add sweetness and a delightful pop. Freshly steamed are fantastic, but frozen peas (thawed under cool water) are my secret weapon for convenience and year-round perfection.
- ½ cup green onions, chopped: They add a necessary fresh, mild oniony bite and a gorgeous splash of color. Use both the white and green parts!
- ¼ tsp black pepper: Freshly cracked is always best. It’s not just seasoning; it’s a flavor enhancer that wakes up the whole bowl.
- Optional: 1–2 tbsp sour cream or Greek yogurt: This is my chef’s hack for an extra-luxurious, tangy creaminess. If your cottage cheese seems a bit dry, this brings it all together beautifully.
Let’s Build Some Deliciousness: Your Step-by-Step Guide
Ready to assemble the dream team? Follow these simple steps, and I’ll walk you through with all my favorite kitchen hacks along the way.
- Bacon Time (The Best Time): If your bacon isn’t already cooked, let’s get it crispy! I line a baking sheet with foil, lay out the strips, and bake at 400°F (200°C) for 15-20 minutes. No splatter, perfectly even cooking. Let it cool on paper towels, then chop or crumble. For quick work, use kitchen shears to snip it right into the bowl later!
- Peas, Please: If using frozen peas, simply place them in a colander and run under cool water for a minute until thawed. Shake off all the excess water—we don’t want a watery salad! If using fresh, steam briefly until bright green and tender, then cool completely.
- The Foundation: Grab a large, comfortable mixing bowl. Plop in your 2 cups of cottage cheese. Give it a quick stir to loosen it up.
- The Big Fold: Now, gently add in your shredded cheddar, cooled peas, most of your chopped green onions (save a pinch for garnish!), and the glorious bacon crumbles. Here’s the key: use a folding motion with a spatula. We want to combine everything evenly without mashing the peas or overworking the cottage cheese into soup.
- Season & Smooth: Crack in that black pepper. If you’re using the optional sour cream or Greek yogurt, add it now. This is the time to taste! Does it need a tiny pinch of salt? (The bacon and cheddar are already salty, so be careful.) Give it one more gentle fold until everything is happily combined and coated in creamy goodness.
- The Patient Part: Cover the bowl and chill for at least 30 minutes. I know, waiting is hard! But this step is non-negotiable. It lets the flavors get to know each other, mellow, and marry into something truly magical. Overnight is even better!
- The Grand Finale: When you can’t wait a second longer, pull it out of the fridge. Give it a stir, transfer to a serving bowl or your lunch container, and sprinkle with those reserved green onions for a fresh, colorful finish. Dig in and experience the crunch, the cream, and the pure joy.
How to Serve This Star of the Show
This salad is the ultimate versatile player. Here’s how I love to enjoy it:
The Main Event: Scoop a generous portion into a bowl for the ultimate high-protein, low-carb lunch. It’s satisfying all on its own.
The Perfect Sidekick: It’s a phenomenal side dish for grilled chicken, burgers, or BBQ ribs. The cool creaminess is the perfect contrast to smoky, hot-off-the-grill mains.
Meal Prep Hero: Divide into four airtight containers for grab-and-go lunches all week. The flavors just get better!
Snack Attack Savior: Serve it with a side of sturdy crackers, cucumber slices, or endive leaves for scooping. It’s a fantastic, healthy dip!
Presentation Pro-Tip: For a pretty presentation, serve it in a hollowed-out tomato or avocado half. A final crack of pepper and a small drizzle of hot honey? Chef’s kiss.
Make It Your Own: Delicious Twists & Swaps
Once you’ve mastered the classic, the playground is open! Here are some of my favorite ways to mix it up:
- The “Everything Bagel”: Swap the bacon for chopped everything bagel seasoned smoked salmon, use chives instead of green onions, and add a tablespoon of everything bagel seasoning to the mix. Unreal.
- Garden Fresh Veg-Out: Add ½ cup of finely chopped radishes for extra crunch and a peppery bite, and a quarter cup of fresh dill. So refreshing!
- Southwest Fiesta: Substitute the cheddar with pepper jack cheese. Add ⅓ cup of black beans (rinsed), a handful of corn kernels, and a tablespoon of chopped cilantro. A squeeze of lime juice brightens it all up.
- Light & Lean: Use low-fat cottage cheese, swap bacon for turkey bacon or chopped baked chicken breast, and add diced cucumber for more volume.
- Dairy-Free Dream: Use a high-quality plain, unsweetened dairy-free yogurt or “cottage cheese” style almond or soy product as the base. Swap the cheddar for your favorite vegan shreds, and use a vegan bacon alternative or smoky roasted chickpeas.
Beau’s Kitchen Notes & Nudges
Over the years, this recipe has seen some fun experiments. One time, I accidentally used habanero cheddar—let’s just say it was a “spicy” surprise for my unsuspecting Uncle Frank! Another favorite evolution is adding a tiny dollop of horseradish for a subtle kick that cuts through the richness. The core of the recipe, though, remains unchanged: simple ingredients, treated well, combined with joy. Don’t stress about exact measurements. Love bacon? Add a little more. Not a pea fan? Try chopped celery. This is your kitchen, your rules. The goal is to make something that makes you do a little happy dance with the first bite.
Your Questions, Answered!
Q: My salad turned out watery. What happened?
A: The most common culprit is not draining the peas well enough! Make sure they are thoroughly cooled and you’ve shaken the colander like you mean it. Also, letting it chill allows the cottage cheese to release some moisture, which then gets absorbed by the other ingredients. If it’s still wet after chilling, you can gently drain off any excess liquid or stir in an extra tablespoon of shredded cheese to help thicken it.
Q: Can I make this ahead of time?
A: Absolutely! In fact, I encourage it. Making it a day ahead allows the flavors to develop beautifully. Just hold off on adding the final green onion garnish until you’re ready to serve to keep them bright and fresh.
Q: What’s the best cottage cheese brand to use?
A: I find that brands with a smaller, more tender curd (like Good Culture or Daisy) tend to integrate more smoothly. But honestly, use what you love and what’s available. Full-fat will always give you the creamiest, most indulgent result.
Q: I’m not a big bacon person. Any other protein ideas?
A> Tons! Chopped ham, diced smoked turkey, flaked tuna (drained very well), or even a can of rinsed and drained chickpeas for a vegetarian protein boost would be fantastic. Get creative!

Loaded Cottage Cheese Salad : High-Protein, Creamy & Seriously Addictive
Description
Hey there, friend! If you’re stuck in a lunch rut of bland sandwiches and salads that leave you hungry an hour later, this one’s for you. This Loaded Cottage Cheese Salad is creamy, crunchy, savory, and packed with protein to keep you satisfied. It’s quick to make, perfect for meal prep, and tastes like comfort food in a bowl—without feeling heavy.
Ingredients
-
2 cups cottage cheese (full-fat or low-fat)
-
¾ cup cooked bacon, crumbled
-
1 cup sharp cheddar cheese, freshly shredded
-
1 cup green peas (fresh or frozen, thawed and drained well)
-
½ cup green onions, chopped
-
¼ teaspoon freshly cracked black pepper
-
Optional: 1–2 tablespoons sour cream or plain Greek yogurt (for extra creaminess)
Instructions
-
Cook the Bacon
Bake at 400°F (200°C) for 15–20 minutes until crispy. Cool and crumble. -
Prepare the Peas
If using frozen peas, rinse under cool water until thawed. Drain very well to avoid excess moisture. -
Mix the Base
In a large bowl, stir the cottage cheese to loosen it slightly. -
Add the Good Stuff
Gently fold in cheddar cheese, peas, bacon, green onions (reserve a little for garnish), and black pepper. -
Adjust & Chill
Add sour cream or Greek yogurt if desired. Taste and adjust seasoning. Cover and refrigerate for at least 30 minutes to let flavors blend. -
Serve
Stir gently, garnish with remaining green onions, and enjoy!
Notes
-
Drain well: Watery peas are the #1 reason this salad turns runny. Shake off excess water thoroughly.
-
Shred your own cheese: Pre-shredded cheese contains anti-caking agents that affect texture.
-
Let it chill: The flavor improves significantly after resting.
-
Meal prep friendly: Store in airtight containers for up to 3–4 days.
-
Make it lighter: Use turkey bacon and low-fat cottage cheese.
-
Add crunch: Finely chopped celery or radishes are great additions.
Nutritional Snapshot (A Per-Serving Estimate)
While I’m all about flavor first, it’s pretty awesome when something this tasty is also nourishing. Here’s a rough breakdown for one serving (based on using full-fat cottage cheese and regular bacon):
- Calories: ~320
- Protein: ~22g (This is the star! It keeps you full and satisfied.)
- Carbohydrates: ~8g
- Fat: ~22g
- Notable Nutrients: A great source of calcium (from the dairy), and the peas add a bit of fiber, Vitamin C, and Vitamin K.
Disclaimer: Nutritional information is an estimate based on the ingredients listed and will vary with specific brands, substitutions, and portion sizes. For precise dietary needs, use a trusted nutrition calculator with your exact ingredients.
Final Thoughts
And there you have it, friend—my not-so-secret weapon for beating lunchtime boredom and fueling your day with real, delicious food. This Loaded Cottage Cheese Salad proves that eating well doesn’t have to be complicated, expensive, or bland. It’s a testament to the magic that happens when a few humble ingredients come together with a little bit of love (and crispy bacon).
I hope this recipe finds a happy home in your kitchen and becomes a new favorite for you, just like it is for me. Give it a try, make it your own, and most importantly, enjoy every single creamy, crunchy, savory bite. If you make it, I’d love to hear how it turned out! Tag me over on the Feastical social channels or drop a comment on the blog. Now, go forth and feast!
Until next time, keep your whisks handy and your hearts full,
Beau
Copycat Chipotle Chicken Burrito Bowls : Easy High-Protein Meal Prep
Copycat Chipotle Chicken Burrito Bowls: Easy High-Protein Meal Prep That’s Bold, Fresh, and Better Than Takeout
Hey there, friend! Beau here, back with another Feastical favorite. Let’s talk about a universal truth: we’ve all stood in that Chipotle line, dreaming of a perfectly layered burrito bowl, only to get home and realize… you’re already hungry again? Or maybe you’re like I used to be, staring into the abyss of your fridge on a Sunday night, dreading another week of uninspired lunches.
Well, grab your favorite cutting board and crank up some tunes, because we’re about to solve all of that. Today, we’re making Copycat Chipotle Chicken Burrito Bowls that are honestly better than the original. Why? Because you are the chef. You control the smoky chipotle kick, the fluffy mound of cilantro-lime rice, and the glorious avalanche of fresh toppings. This isn’t just a recipe; it’s your ticket to a week of victorious lunches and stress-free dinners.
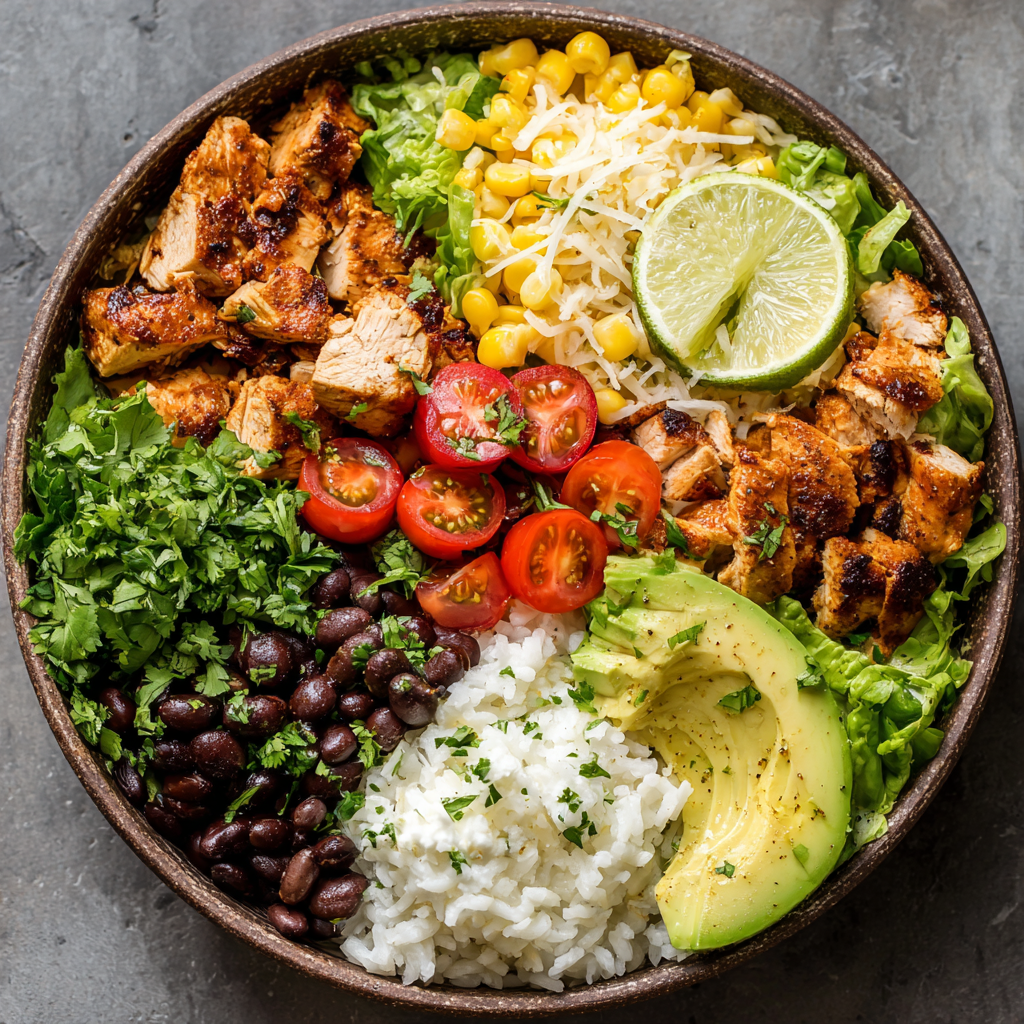
These bowls are the ultimate high-protein, flavor-packed meal prep hero. They’re balanced, endlessly customizable, and they store like a dream. Think of juicy, marinated chicken thighs, tender rice zipped up with lime, hearty beans, sweet corn, and all the crisp, fresh goodness you can handle. It’s a warm hug of flavor that also happens to be a nutritional powerhouse. So, let’s ditch the takeout line and the lunchtime regret. Your kitchen is about to become the best Chipotle in town.
The Little Red Booth That Inspired It All
This recipe takes me back. Way back to my college days, when a “fancy” dinner out meant splitting a giant Chipotle burrito bowl with my roommate, Alex. We’d grab our foil-clad treasures, slide into that signature little red booth, and perform the sacred ritual of mixing. Every single ingredient had to be perfectly distributed—a bit of chicken, a grain of rice, a speck of corn in each forkful. It was our cheapskate’s feast and our weekly therapy session.
One Tuesday, after a particularly brutal exam, we hit our usual spot only to find a line snaking out the door. We were hangry, defeated, and out of luck. As we trudged back to our apartment, I had a lightbulb moment. “We have chicken in the freezer. We have rice. How hard could it be?” What followed was a chaotic, cumin-dusted kitchen experiment that, honestly, wasn’t half bad. It was missing something, though—that deep, smoky soul. Years (and many, many trials) later, I finally cracked the code: the magic is in the marinade and the layers of flavor. Now, this recipe is my love letter to those early kitchen adventures and those little red booths. It’s the taste of friendship, figured out.
Gathering Your Flavor Arsenal
Here’s everything you’ll need to build four magnificent bowls. I’ve added my little chef insights and swaps so you can make this recipe your own, no matter what’s in your pantry.
For the Legendary Chicken Marinade
- 1 ½ lbs boneless, skinless chicken thighs or breasts: I’m a thigh guy for this. They stay juicier through the cook and reheating process, and they soak up marinade like a dream. Breasts work perfectly if that’s your preference—just don’t overcook them!
- 2 tbsp olive oil: The base of our marinade. It carries flavor and helps the chicken get a beautiful sear.
- 2 chipotle peppers in adobo, minced + 1 tbsp adobo sauce: This is the SECRET WEAPON. It gives that iconic smoky heat. Find the small cans in the international aisle. Don’t be shy with the adobo sauce—it’s liquid gold.
- 2 cloves garlic, minced: Fresh is best here! It adds a pungent backbone that powdered garlic just can’t match.
- Juice of 1 lime: Fresh acidity to balance the smoke and tenderize the chicken.
- 1 tsp cumin, 1 tsp chili powder, ½ tsp oregano: The holy trinity of warmth, earthiness, and a hint of herbal fragrance. If your chili powder is super spicy, adjust to taste.
- ½ tsp salt, ½ tsp black pepper: The essential flavor enhancers. Season with confidence!
For the Zingy Cilantro-Lime Rice
- 2 cups jasmine rice (uncooked): I love jasmine for its floral scent and perfect stickiness. White or brown rice works great—just adjust liquid and cook time per package.
- Juice of 1 lime: We add this after cooking so the flavor stays bright and vibrant.
- 2 tbsp chopped fresh cilantro: If you’re in the “cilantro tastes like soap” club, no worries! Just swap in fresh parsley or even a little chopped scallion.
- Salt to taste: A pinch to make all the flavors pop.
For Building Your Bowls
- 1 cup black beans, drained & rinsed: Protein and fiber powerhouse! Pinto beans are a fantastic alternative.
- 1 cup corn: I use frozen corn warmed in a skillet for a minute for a touch of char. Fresh off the cob in summer is sublime.
- 1 cup cherry tomatoes, halved: For juicy, sweet bursts. Grape tomatoes work just as well.
- 1 avocado, sliced: Creamy, healthy fat. A squeeze of lime on top keeps it gorgeously green.
- ½ cup shredded lettuce: I like romaine or iceberg for crunch. Add it fresh when serving.
- Optional MVP Toppings: A dollop of Greek yogurt (my protein-packed sour cream swap!), shredded cheese, pickled red onions, or a killer fresh salsa.
Let’s Build Some Flavor: Step-by-Step
Follow these steps, and you’re guaranteed bowl perfection. I’ve tucked my favorite kitchen hacks right in there with you.
- Marinate Like a Pro. In a medium bowl, whisk together the olive oil, minced chipotle peppers, adobo sauce, garlic, lime juice, and all the dry spices. It should look like a gorgeous, speckled, fragrant paste. Add your chicken and use your hands (I wear disposable gloves for this) to massage every nook and cranny with that marinade. Chef’s Hack: Throw it all into a large zip-top bag, squeeze out the air, and seal. Less mess, and you can really squish it around to coat evenly. Pop it in the fridge for at least 30 minutes, but oh baby, if you can let it go overnight? The flavor penetration is next-level.
- Cook Your Rice. While the chicken marinates, cook your rice according to the package directions. My foolproof method for jasmine: rinse it until the water runs clear (removes excess starch for fluffier rice!), then use a 1:1.25 rice-to-water ratio. Bring to a boil, reduce to the lowest simmer, cover, and cook for 15 minutes. Off the heat, let it steam, covered, for 10 more minutes. Critical Tip: Fluff it with a fork FIRST, then gently fold in the lime juice, cilantro, and salt. This keeps the grains separate and perfect.
- Conquer the Chicken. Heat a grill pan, skillet, or actual grill over medium-high heat. Get it nice and hot—a drop of water should sizzle and dance. Shake off excess marinade and lay your chicken down. Don’t touch it! Let it cook for 6-8 minutes per side, until you get beautiful grill marks and it’s cooked through (165°F internal). Resting is Non-Negotiable: Transfer the chicken to a plate, tent it loosely with foil, and let it rest for 5-10 minutes. This lets the juices redistribute so every slice is moist. Then, slice it against the grain for maximum tenderness.
- Assemble Your Masterpiece. This is the fun part! Grab your meal prep containers or serving bowls. Start with a hearty base of cilantro-lime rice. Then, artfully (or just hunger-ly) arrange your sliced chicken, black beans, corn, and tomatoes. Meal Prep Wisdom: Keep your cold, wet toppings (lettuce, avocado, salsa, yogurt) separate in little containers or baggies. Add them fresh when you’re ready to eat to avoid soggy sadness.
Serving Up the Goodness
If you’re eating immediately, this is a choose-your-own-adventure moment. Pile everything high in a big, wide bowl—I love the visual feast of all those colors and textures. Give it a gentle toss to mix a few of the flavors, or eat it in delicious, distinct layers.
For a family dinner or casual gathering, I set up a “bowl bar” right on the kitchen counter. Put the rice, chicken, beans, and all the toppings in separate bowls with serving spoons. Let everyone build their own perfect combination. It’s interactive, fun, and guarantees happy eaters. Don’t forget the extra lime wedges and hot sauce on the side!
Make It Your Own: 5 Flavorful Twists
The beauty of this blueprint is its flexibility. Here are some of my favorite riffs:
- Steak Fan? Swap the chicken for 1.5 lbs of flank or skirt steak. Use the same marinade, then grill to your preferred doneness and slice thinly.
- Go Veggie-Powered. For a fantastic vegan bowl, replace the chicken with 2 cans of drained, rinsed black beans added directly to the marinade (simmer for 10 mins to infuse flavor) OR with large, thick slices of portobello mushroom caps marinated and grilled.
- Tex-Mex Vibes. Swap the cilantro-lime rice for Mexican-style rice: sauté the uncooked rice with a bit of onion and tomato paste before boiling in chicken or veggie broth.
- Lower-Carb Love. Ditch the rice base and use a big bed of shredded lettuce or cauliflower rice. Sauté the cauliflower rice with a little of the adobo sauce for major flavor.
- Fajita-Style. Add a skillet of sautéed bell peppers and onions to your topping lineup. It’s an easy way to get more veggies and that classic fajita sizzle.
Beau’s Kitchen Notes
This recipe has lived many lives in my kitchen. The first time I made it for my now-wife, I was so nervous I accidentally used smoked paprika instead of chili powder. It was… different. But she loved it, and it taught me that even “mistakes” can lead to delicious discoveries. Over time, I learned that the real key is balance—the smoky heat needs the fresh lime, the creamy avocado needs the crisp lettuce. It’s a harmony in a bowl.
I also highly recommend doubling the chicken marinade and freezing half with a fresh batch of chicken. Future you will send past you a thank-you note on a particularly hectic Monday.
Your Questions, Answered
Q: My chicken turned out dry. What happened?
A: Two likely culprits: overcooking or not resting. Chicken thighs are more forgiving, but breasts can go from juicy to sawdust in minutes. Use a meat thermometer (165°F is the goal) and let it rest! Slicing it too soon lets all the juices run out.
Q: Can I make this ahead of time?
A> Absolutely! It’s a meal prep STAR. Cook the components and store them separately in airtight containers for 3-4 days. Assemble cold toppings fresh when you eat. The flavors often get better as they mingle!
Q: The chipotle peppers are too spicy for me. Help!
A> No problem! Start with just one pepper, or even just the adobo sauce for flavor without intense heat. You can also remove the seeds from the peppers before mincing, as that’s where a lot of the heat resides.
Q: My rice is mushy/gummy.
A> You might be using too much water or not rinsing the rice first. Rinsing removes surface starch. Also, after cooking, let it steam off the heat—and fluff it with a fork, not a spoon, to avoid smashing the grains.

Copycat Chipotle Chicken Burrito Bowls : Easy High-Protein Meal Prep
Description
Copycat Chipotle Mexican Grill Chicken Burrito Bowls
Easy High-Protein Meal Prep That’s Bold, Fresh & Better Than Takeout
Hey friend! If you’ve ever stood in line at Chipotle dreaming about the perfectly layered burrito bowl — only to be hungry again a few hours later — this recipe is your upgrade.
These homemade chicken burrito bowls are smoky, zesty, protein-packed, and completely customizable. You control the spice, the portions, and the toppings. They’re perfect for meal prep, weeknight dinners, or setting up a DIY bowl bar for friends and family.
Ingredients
For the Chipotle Chicken Marinade
-
1½ lbs boneless, skinless chicken thighs (or breasts)
-
2 tbsp olive oil
-
2 chipotle peppers in adobo, minced
-
1 tbsp adobo sauce
-
2 cloves garlic, minced
-
Juice of 1 lime
-
1 tsp cumin
-
1 tsp chili powder
-
½ tsp dried oregano
-
½ tsp salt
-
½ tsp black pepper
For the Cilantro-Lime Rice
-
2 cups jasmine rice (uncooked)
-
Juice of 1 lime
-
2 tbsp fresh cilantro, chopped
-
Salt to taste
For Building the Bowls
-
1 cup black beans, drained & rinsed
-
1 cup corn (fresh, frozen, or lightly charred)
-
1 cup cherry tomatoes, halved
-
1 avocado, sliced
-
½ cup shredded lettuce
Optional toppings:
-
Greek yogurt or sour cream
-
Shredded cheese
-
Salsa
-
Pickled red onions
-
Extra lime wedges
Instructions
1️⃣ Marinate the Chicken
In a bowl, whisk together olive oil, chipotle peppers, adobo sauce, garlic, lime juice, and spices.
Coat chicken thoroughly and refrigerate at least 30 minutes (overnight is even better).
2️⃣ Cook the Rice
Rinse rice until water runs clear.
Cook according to package instructions. Once done, fluff with a fork, then stir in lime juice, cilantro, and salt.
3️⃣ Cook the Chicken
Heat a skillet or grill pan over medium-high heat.
Cook chicken 6–8 minutes per side until internal temperature reaches 165°F (74°C).
Rest 5–10 minutes, then slice against the grain.
4️⃣ Assemble the Bowls
Layer bowls with:
-
Cilantro-lime rice
-
Sliced chicken
-
Beans and corn
-
Tomatoes
-
Lettuce and avocado
Add optional toppings just before serving.
Notes
-
Store rice, chicken, and beans together.
-
Keep lettuce, avocado, and sauces separate until ready to eat.
-
Bowls stay fresh 3–4 days in airtight containers.
-
Double the chicken and freeze half for future meals.
Fueling Your Day (Approximate Per Bowl)
One of these powerhouse bowls gives you roughly: Calories: 560 | Protein: 42g | Carbohydrates: 58g | Fat: 18g | Fiber: 8g
This is a balanced, high-protein, high-fiber meal that’s packed with vitamins from all the fresh veggies. Using Greek yogurt instead of sour cream bumps the protein even higher. Remember, these numbers are a guide—they’ll vary slightly based on your specific ingredients and portion sizes.
Prep Time: 15 minutes (plus marinating) | Cook Time: 20 minutes | Total Time: 35 minutes | Servings: 4
Final Thoughts from My Kitchen to Yours
And that’s it, friend! You’ve just unlocked the secret to a week of incredible, healthy, and deeply satisfying meals. This recipe is more than a copycat; it’s an upgrade. It’s the joy of creating something vibrant and nourishing with your own two hands.
I hope these bowls bring as much fun to your kitchen and as much fuel to your week as they have to mine. Remember, cooking is about playing, tasting, and making it work for you. So tweak those spices, pile on those toppings, and make it a Feastical. Don’t forget to tag me @feastical if you make them—I love seeing your creations!
Now, go forth and build the bowl of your dreams. Until next time, keep it simple, soulful, and always satisfying.
– Beau

Homemade Turkey Breakfast Sausage : Lean, Flavorful & Easy
Homemade Turkey Breakfast Sausage: Your New Morning Game-Changer
Hey friends, Beau here from Feastical! Let’s talk about a morning miracle, shall we? You know that moment when the aroma of sizzling sausage fills your kitchen, promising a seriously good day ahead? Now, imagine that feeling, but better. Because today, we’re making that magic happen with a recipe that’s kinder to your waistline but doesn’t skimp on an ounce of flavor: my Homemade Turkey Breakfast Sausage.
If your experience with turkey sausage is a dry, bland, vaguely-spiced puck… I need you to forget it. Right now. Consider it a kitchen reset. What we’re crafting together is juicy, savory, and humming with the warm, cozy spices that make breakfast the best meal of the day. We’re talking sage that whispers of Sunday suppers, a touch of smokiness from paprika, and just a hint of maple sweetness to round it all out.
The best part? You control everything. No more squinting at labels with unpronounceable ingredients or wondering about the salt content. This is pure, simple, feel-good food made with pantry staples you probably already have. Whether you’re piling these patties onto a sandwich, crumbling them into a breakfast bowl, or serving them alongside some fluffy scrambled eggs, this recipe is about to become your go-to. It’s lean, it’s flavorful, and I promise you, it’s incredibly easy. Let’s get our hands a little messy and make breakfast legendary.
Why This Sausage Holds a Special Place in My Kitchen
This recipe isn’t just about a healthier swap; it’s tied to a really sweet memory. Years ago, before Feastical was even a whisper of an idea, I had a good friend staying over who was trying to eat a bit cleaner but missed the big, hearty breakfasts we used to make. One groggy morning, faced with a pack of ground turkey and a serious craving for sausage, we decided to experiment.
We must have pulled every dried herb and spice from my cupboard. There was a lot of sniffing jars and arguing over thyme vs. rosemary (thyme won, by the way). That first batch was… edible. But over the next few visits, it became our thing. He’d roll into town, and the first question was, “When are we making the sausage?” We tweaked, we tasted, we perfected. Now, every time I shape these patties, I think of those lazy, laughing mornings and the simple joy of creating something delicious with a friend. Food memories are the best kind, aren’t they?
Gathering Your Flavor Arsenal
Here’s the beautiful lineup. The magic is in how these simple players work together. Don’t be shy with the spices—they’re what transform the turkey from mild to magnificent!
- 1 lb lean ground turkey (93/7 or 94/6): The lean star of our show. It’s a blank, protein-rich canvas. Using lean meat means we’ll build flavor with our spices and a touch of oil for cooking. For juicier results, you can use 85/15, but the calories will adjust.
- 1 tsp dried sage: The non-negotiable heart of breakfast sausage. It gives that classic, earthy, slightly peppery flavor. If you have fresh, use 3-4 finely chopped leaves.
- ½ tsp each dried thyme, garlic powder, onion powder, smoked paprika: Our flavor squadron! Thyme adds a subtle floral note, garlic and onion powders deliver savory depth without raw bite, and smoked paprika brings a warm, smoky undertone that makes everything taste richer.
- ½ tsp salt, ¼ tsp black pepper: The essential enhancers. They wake up all the other flavors. Always taste and adjust to your liking!
- 1 tbsp maple syrup (optional): My secret weapon! A tiny bit balances the savory herbs and promotes beautiful browning. Don’t worry, it won’t taste sweet—just deeply rounded.
- 1 tbsp olive oil (for cooking): A little fat for the pan ensures we get those gorgeous, crispy golden edges without sticking.
Let’s Make Some Sausage Magic: Step-by-Step
Ready? This is the fun, hands-on part. Put on some good music, and let’s dive in.
- Combine with Care: In a large bowl, add the ground turkey and all your spices—sage, thyme, garlic powder, onion powder, smoked paprika, salt, pepper, and that optional but glorious maple syrup. Now, here’s Chef Beau’s Big Tip #1: Use your hands! It’s the best tool for the job. Mix everything gently until it’s just combined. Do not overmix! Overworking the meat will make your sausages dense and tough. We want them tender.
- Shape Your Patties: Divide the mixture into 8 equal portions. I like to gently roll each into a ball, then press it flat into a patty about ½-inch thick. Don’t pack them too tightly; a light touch is key. Pro Tip: Make a small indentation with your thumb in the center of each patty. This helps them cook evenly and prevents them from puffing up into little meatballs in the pan.
- Heat the Pan: Place a large skillet (non-stick or cast-iron are my go-tos) over medium heat. Add the olive oil and let it get nice and shimmery. A properly heated pan is the difference between a good sear and a steamed sausage.
- Cook to Perfection: Carefully add your patties to the skillet. You should hear a gentle sizzle. Let them cook, undisturbed, for 4-5 minutes on the first side. You’re looking for a beautiful, deep golden-brown crust. Flip them and cook for another 4-5 minutes on the other side. The most reliable method? Use an instant-read thermometer. Cook until the internal temperature reaches a safe 165°F.
- The Crucial Rest: This might be the hardest step because it smells so good! Transfer the cooked patties to a plate and let them rest for 2-3 minutes. This allows the juices to redistribute throughout the meat, ensuring every bite is moist and flavorful, not dry.
How to Serve Your Homemade Masterpiece
Okay, the hard work is done (though it was pretty easy, right?). Now for the fun part: devouring them. Here are my favorite ways to serve these flavor-packed patties:
The Classic Plate: This is pure comfort. Serve 2-3 patties alongside creamy scrambled eggs, crispy hash browns, and maybe a fluffy biscuit or slice of toasted sourdough. Drizzle a little extra maple syrup over the whole plate if you’re feeling decadent.
The Breakfast Bowl: My weekday hero! Start with a base of quinoa or greens, add a crumbled sausage patty, a soft-boiled or fried egg, some sautéed peppers and onions, and a sprinkle of cheese. Meal prep heaven.
The Ultimate Sandwich: Toast an English muffin, bagel, or biscuit. Add a patty (or two!), a slice of sharp cheddar or melty American cheese, a fried egg, and a smear of avocado or a dollop of hot sauce. You just won breakfast.
Make It Your Own: Flavor Twists & Swaps
Once you master the base recipe, the world is your sausage! Try one of these easy twists to keep things exciting.
- Apple & Sage: Add ½ cup of finely grated apple (squeeze out excess moisture) to the meat mixture. It adds a lovely moisture and subtle fruitiness that pairs perfectly with the sage.
- Spicy Kick: Add ¼ tsp of red pepper flakes or a few shakes of your favorite hot sauce to the mix. For a smoky heat, use a ½ teaspoon of chipotle powder instead of the smoked paprika.
- Maple-Dijon Glaze: While the patties rest, mix 1 tbsp maple syrup and 1 tsp Dijon mustard in the still-warm skillet. Let it bubble for 30 seconds, then pour the glossy glaze over the patties.
- Italian Herb Twist: Swap the sage and thyme for 1 tsp of Italian seasoning and add a pinch of fennel seeds. You’ve just made a killer turkey sausage for pasta or pizza!
- Ground Chicken or Pork: This spice blend works wonderfully with ground chicken or a 50/50 mix of ground turkey and pork for extra richness. Adjust cooking time slightly based on fat content.
Chef Beau’s Notebook Scribbles
This recipe has lived in my kitchen for years, and it’s evolved in the best ways. I used to be afraid of the maple syrup, thinking it would make the sausage taste like pancakes. Trust me, it doesn’t—it just creates this incredible depth of flavor and caramelization. I also learned the hard way about overmixing; one batch turned out so rubbery my dog even gave me a skeptical look.
Now, I always double or triple the recipe. I cook what I need for the week and freeze the rest of the raw patties on a parchment-lined sheet. Once frozen solid, I pop them into a freezer bag. Then, on any busy morning, I can pull out a patty or two and cook them straight from frozen (just add a couple extra minutes to the cook time). It’s my ultimate kitchen hack for a healthy, homemade breakfast in minutes.
Your Questions, Answered
Q: My turkey sausage always turns out dry. What am I doing wrong?
A: Two likely culprits: 1) Overcooking. Turkey is lean, so it goes from juicy to dry quickly. Use that meat thermometer and pull it at 165°F. 2) Overmixing. Handle the meat gently and mix just until combined to keep the texture tender.
Q: Can I make this into links instead of patties?
A: Absolutely! You’ll need sausage casings, which you can find at specialty butchers or online. Follow the instructions for stuffing the casings. You can also form the mixture into loose, link-shaped logs without casings—just handle them very gently when flipping in the pan.
Q: How long does homemade turkey sausage last in the fridge?
A: Cooked patties will keep well in an airtight container for 3-4 days. They reheat beautifully in a skillet over low heat, in the microwave, or even in the air fryer for a few minutes to re-crisp.
Q: My patties are sticking to the pan!
A: Ensure your pan is properly preheated with the oil before adding the patties. Also, don’t move them too early! Let that first side form a crust before you attempt to flip. A good non-stick or well-seasoned cast iron pan is your best friend here.

Homemade Turkey Breakfast Sausage : Lean, Flavorful & Easy
Description
Hey friends, Beau here from Feastical! If you’ve ever been disappointed by dry, bland turkey sausage, today’s recipe is your reset button. This Homemade Turkey Breakfast Sausage is juicy, savory, warmly spiced, and completely customizable. No mystery ingredients. No excess salt. Just real pantry staples doing big flavor work.
Ingredients
-
1 lb lean ground turkey (93/7 or 94/6 recommended)
-
1 teaspoon dried sage
-
½ teaspoon dried thyme
-
½ teaspoon garlic powder
-
½ teaspoon onion powder
-
½ teaspoon smoked paprika
-
½ teaspoon salt
-
¼ teaspoon black pepper
-
1 tablespoon maple syrup (optional but recommended)
-
1 tablespoon olive oil (for cooking)
Instructions
In a large bowl, combine ground turkey, sage, thyme, garlic powder, onion powder, smoked paprika, salt, pepper, and maple syrup.
Use your hands to mix just until combined.
Do not overmix — this keeps the sausage tender.
Divide into 8 equal portions.
Roll into balls, then gently flatten into ½-inch thick patties.
Press a small indentation in the center of each patty to help them cook evenly.
Heat olive oil in a skillet over medium heat.
Cook patties 4–5 minutes per side, undisturbed, until golden brown and cooked through.
Internal temperature should reach 165°F (74°C).
Transfer to a plate and rest 2–3 minutes before serving to lock in juices.
Notes
-
Use a thermometer — lean turkey dries out if overcooked.
-
Don’t press down on patties while cooking.
-
If using extra-lean turkey, add 1–2 teaspoons olive oil to the mixture for added moisture.
-
Freeze raw patties on a tray, then store in a freezer bag for up to 3 months.
Nourishment on Your Plate
One of the best things about making your own sausage is knowing exactly what’s fueling your body. This recipe is a fantastic source of lean protein to keep you full and energized all morning. Here’s a general breakdown per serving (2 patties), but remember, exact numbers can vary based on the exact lean/fat ratio of your turkey and any substitutions you make.
- Calories: ~180
- Protein: 22g (That’s a powerhouse start to your day!)
- Carbohydrates: 1g (The maple syrup adds a negligible amount.)
- Fat: 9g (Mostly the healthy fats from the turkey and olive oil.)
- Sodium: ~300mg (Far less control than most store-bought varieties!)
By skipping the preservatives and controlling the salt and fat, you’re choosing a wholesome, satisfying option that truly tastes like real food. It’s a small change that makes a big difference in how you feel.
The Final Sizzle
And there you have it, friends! My not-so-secret weapon for a healthier, happier, and downright delicious breakfast. This Homemade Turkey Breakfast Sausage proves that “better-for-you” doesn’t have to mean bland or boring. It’s about smart seasoning, a gentle touch, and the joy of creating something with your own two hands.
I hope this recipe brings as much warmth and flavor to your kitchen table as it has to mine. Remember, cooking is an adventure—don’t be afraid to tweak the spices, try the apple variation, or double the batch for the freezer. Make it yours.
If you give this a try (and I really hope you do), tag me over on @Feastical or drop a comment on the blog. I love seeing your creations and hearing your kitchen stories. Now, go forth and make your mornings sizzle!
With a spatula in hand,
Beau Collier

Baked Marinated Chicken Salad : Juicy, Flavor-Packed & Healthy
Welcome to the Salad That Changed My Mind
Hey friends, Beau here! Let’s be real for a second. How many times have you looked at a salad and thought, “That’s… fine, I guess.” We’ve all been there. A pile of limp greens, a few sad cherry tomatoes, and a piece of dry, flavorless chicken that feels more like a chore than a meal. I used to think salads were just the thing you ate when you were supposed to eat something healthy, not something you actually craved. That all changed in my kitchen one Tuesday night when I was tired, hungry, and staring into an abyss of the usual dinner suspects.
I wanted something that felt nourishing but didn’t skimp on satisfaction. Something that tasted like I’d put love into it, without actually spending all night doing it. Enter the hero of our story: the Baked Marinated Chicken Salad. This isn’t just a salad; it’s a flavor-packed, juicy, textural masterpiece that will make you forget every boring salad you’ve ever suffered through. The magic is all in the marinade—a simple, garlicky, herby bath that seeps deep into the chicken, ensuring every single bite is bursting with savory goodness. We then bake it to juicy perfection, slice it over the crispiest, freshest veggies we can find, and bring it all together with a tangy little dressing. It’s a meal that feels light yet incredibly hearty, and the best part? It’s a meal-prep dream. Make it once, and you’ve got lunches or dinners sorted for days. So, grab your favorite bowl and let’s turn the humble salad into the main event you actually look forward to.
The Chicken That Started It All: A Little Kitchen Confession
This recipe has its roots in a minor kitchen disaster, as the best ones often do. Years ago, I was trying to impress a date with my “culinary skills.” I decided on chicken, thinking, “How hard could it be?” I threw some breasts in a pan with zero seasoning, cranked the heat, and proceeded to create what can only be described as chicken-flavored shoe leather. It was dry, tough, and tragically bland. My poor date was so polite, chewing with a determined smile. Needless to say, there was no second dinner date.
But that failure taught me a crucial lesson: flavor and moisture start long before the heat hits. I became obsessed with marinades. I played with oils, acids, herbs, and spices, learning how they work together to tenderize and infuse. This baked marinated chicken is the glorious, foolproof result of all those experiments. It’s my apology to that long-ago date and my gift to you—a guaranteed way to get succulent, flavorful chicken every single time, without any guesswork. It’s the foundation that makes this salad not just good, but truly unforgettable.
Gathering Your Flavor Arsenal
Here’s everything you’ll need to build this epic salad. Think of this list as your roadmap to maximum flavor. I’ve included my insider tips for each ingredient because knowing the “why” makes you a more confident cook!
For the Marinated Chicken:
- 2 large chicken breasts: Look for breasts that are roughly the same size so they cook evenly. Chef’s Insight: If you have time, lightly pound the thicker ends to an even thickness. This is a game-changer for preventing dry ends and undercooked centers!
- 3 tbsp olive oil: The base of our marinade. It carries flavor and helps create a beautiful golden exterior. Sub Tip: Avocado oil works great here too.
- 2 tbsp lemon juice: The acid is KEY! It gently breaks down proteins, tenderizing the chicken and allowing all the other flavors to dive deep. Chef’s Insight: Freshly squeezed is always best, but bottled works in a pinch.
- 2 cloves garlic, minced: Savory, aromatic heaven. Don’t be shy! Sub Tip: ½ tsp of garlic powder can work if you’re fresh out.
- 1 tsp dried oregano: Brings a warm, slightly earthy Mediterranean vibe. Chef’s Insight: Rubbing dried herbs between your palms before adding them wakes up their oils and intensifies the flavor.
- ½ tsp paprika: For subtle smokiness and a gorgeous color. Smoked paprika is a fun twist if you want more of a kick!
- ½ tsp salt & ¼ tsp black pepper: The essential flavor enhancers. Seasoning the chicken directly in the marinade is non-negotiable for tasty results.
For the Salad Base & Dressing:
- 4 cups mixed greens: The fresher, the better! I love a spring mix for variety, but romaine or spinach are fantastic sturdy bases. Chef’s Insight: Wash and spin your greens dry—this keeps the salad crisp and prevents a watery dressing.
- 1 cup cherry tomatoes, halved: Little bursts of sweetness and acidity. Sub Tip: Grape tomatoes or diced regular tomatoes work too.
- 1 cucumber, sliced: For that essential cool, crunchy refreshment. I prefer English cucumbers for their thinner skin and fewer seeds.
- ½ red onion, thinly sliced: Provides a sharp, peppery bite that cuts through the richness. Pro Tip: Soak the slices in ice water for 10 minutes to mellow their sharpness if you prefer a gentler flavor.
- ¼ cup crumbled feta cheese (optional): Salty, tangy, creamy perfection. It’s optional, but highly recommended! Goat cheese or shaved parmesan are delicious alternatives.
- For the Simple Dressing: 2 tbsp olive oil, 1 tbsp balsamic vinegar, 1 tsp honey, salt and pepper. Whisk it right in a small bowl—it’s the perfect light finish. Chef’s Hack: Make it in the bottom of your big salad bowl before adding greens. Less dishes!
Let’s Build Your Masterpiece: Step-by-Step
Follow these steps, and you’re guaranteed success. I’m chatting you through each one with all my favorite hacks!
- Marinate Like a Pro: In a medium bowl (or a large zip-top bag—my favorite for easy clean-up!), whisk together the olive oil, lemon juice, garlic, oregano, paprika, salt, and pepper until it looks like a beautiful, emulsified sauce. Add your chicken breasts and turn them over several times, making sure every nook and cranny is lovingly coated. Chef’s Commentary: This is where the magic starts! If using a bag, press out the air, seal it, and massage the marinade into the chicken from the outside. It’s weirdly satisfying. Pop it in the fridge for at least 30 minutes. For the ultimate flavor infusion, let it go for up to 8 hours. The longer, the better, but even 30 minutes makes a world of difference.
- Preheat and Prep: About 10 minutes before you’re ready to cook, take the chicken out of the fridge. Letting it sit briefly at room temperature helps it cook more evenly. Preheat your oven to a hot 400°F (200°C). Line a baking sheet with parchment paper or foil for the easiest cleanup ever. Trust me, future-you will thank present-you for this step.
- Bake to Juicy Perfection: Place the marinated chicken breasts on your prepared baking sheet. Give them a little space so they roast instead of steam. Slide that sheet into your preheated oven and set your timer for 20-25 minutes. Chef’s Non-Negotiable Tip: DO NOT just guess if it’s done. Use an instant-read meat thermometer. Pull the chicken out when the thickest part reads 165°F (74°C). This is the single best way to avoid dry chicken.
- The Critical Rest: Once out of the oven, transfer the chicken to a clean plate or cutting board and walk away for 5-10 minutes. I know it’s tempting to slice right in, but this rest time is crucial! It allows the juices, which have rushed to the surface during baking, to redistribute throughout the meat. If you slice immediately, all those delicious juices will just run out onto the cutting board, leaving you with drier chicken.
- Slice and Assemble: While the chicken rests, build your salad base. In a large, beautiful bowl, combine your crisp mixed greens, halved cherry tomatoes, cucumber slices, and red onion. If you soaked your onions, pat them dry first. Whisk up that simple dressing in a small jar or right in the bottom of your salad bowl. Now, take your rested chicken and slice it against the grain into thin, beautiful strips. This makes it tender and easy to eat. Artfully pile that gorgeous, juicy chicken on top of your mountain of veggies. Sprinkle with the crumbled feta cheese.
- The Grand Finale: Just before serving, give your dressing one last whisk and drizzle it over the whole glorious creation. Toss gently at the table to mix everything together, or let everyone admire your handiwork before digging in!
How to Serve It Up in Style
This salad is a star on its own, but presentation is half the fun! For a family-style meal, I love serving it in one big, rustic wooden bowl right in the center of the table. It’s inviting and lets everyone dig in. For meal prep, layer it smartly: dressing at the bottom of a mason jar, followed by hardy veggies like cucumbers and tomatoes, then the chicken, and finally the greens and feta on top. Seal it up, and when you’re ready to eat, just shake and pour into a bowl—perfect, crisp salad every time!
To turn this into a more substantial feast, I’ll sometimes add a side of warm, crusty bread for dipping in any leftover dressing, or a simple bowl of soup. It’s also fantastic served on a large platter for a summer BBQ or potluck—it always disappears first. Remember, we eat with our eyes first, so don’t be afraid to make it colorful and bountiful!
Make It Your Own: Delicious Twists & Swaps
The beauty of this recipe is its versatility. Play around and make it suit your mood or dietary needs!
- Mediterranean Fling: Add a handful of Kalamata olives, roasted red peppers, and a sprinkle of fresh dill. Swap the feta for creamy goat cheese.
- Sweet & Savory Crunch: Toss in a quarter cup of dried cranberries or fresh apple slices and a handful of toasted pecans or walnuts. A maple-Dijon dressing would be killer here.
- Fiesta Bowl Style: Use a lime juice and cilantro marinade for the chicken with a pinch of cumin. Serve the salad over a bed of romaine with black beans, corn, avocado slices, and a creamy cilantro-lime dressing. Skip the feta or use cotija cheese.
- Low-Carb / Keto-Friendly: The recipe is already pretty perfect! Just omit the honey in the dressing and ensure your chosen salad greens are low-carb (like spinach or romaine). Load up on the healthy fats from the olive oil, cheese, and avocado (if you add it!).
- Herb-Lover’s Dream: Add a tablespoon of chopped fresh rosemary or thyme to the marinade, and finish the salad with a generous handful of fresh basil or parsley.
Beau’s Kitchen Notes & Stories
This recipe has been my faithful friend for years—it’s been there for lazy weeknights, last-minute guests, and countless meal-prep Sundays. The one thing I’ve learned? Don’t skip the marinade time. I’ve tried rushing it, and the difference is noticeable. The chicken is still good, but it’s not “close-your-eyes-and-sigh” good.
It’s also evolved in my kitchen. I sometimes sear the marinated chicken in a scorching-hot oven-safe skillet for 2 minutes per side before popping the whole skillet in the oven. That caramelized crust is next-level! And one time, I accidentally used lime juice instead of lemon and added a dash of chili powder—a happy accident that birthed the “Fiesta” variation. Cooking is about adventure, so make this recipe yours!
Your Questions, Answered
Q: Can I use chicken thighs instead of breasts?
A: Absolutely! Boneless, skinless thighs are actually harder to dry out and are incredibly flavorful. Just increase the baking time slightly, checking for an internal temp of 165°F. They may take 25-30 minutes.
Q: My chicken turned out rubbery. What happened?
A: The most common culprit is overcooking. An instant-read thermometer is your best friend. Pull it at 165°F, and let it rest! Also, ensure you’re slicing against the grain (look for the lines running through the meat and cut perpendicular to them).
Q: How long can I store the marinated chicken before cooking?
A: You can safely marinate it in the fridge for up to 24 hours. The acid in the lemon juice will start to change the texture if left much longer, making it a bit mushy. The 30-minute to 8-hour window is the sweet spot.
Q: Can I grill the chicken instead of baking it?
A: Yes! This marinade is fantastic for grilling. Preheat your grill to medium-high and cook for 6-8 minutes per side, or until it reaches 165°F. You’ll get those beautiful, flavorful grill marks.
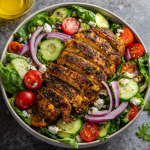
Baked Marinated Chicken Salad : Juicy, Flavor-Packed & Healthy
Description
This Baked Marinated Chicken Salad is fresh, vibrant, and deeply satisfying. The secret? A simple lemon-garlic marinade that transforms ordinary chicken into juicy, flavor-packed perfection. Paired with crisp veggies and a light tangy dressing, this is the kind of meal that feels both nourishing and crave-worthy.
Ingredients
For the Marinated Chicken
-
2 large chicken breasts
-
3 tablespoons olive oil
-
2 tablespoons lemon juice
-
2 cloves garlic, minced
-
1 teaspoon dried oregano
-
½ teaspoon paprika
-
½ teaspoon salt
-
¼ teaspoon black pepper
For the Salad
-
4 cups mixed greens (spring mix, romaine, or spinach)
-
1 cup cherry tomatoes, halved
-
1 cucumber, sliced
-
½ red onion, thinly sliced
-
¼ cup crumbled feta cheese (optional but recommended)
For the Simple Dressing
-
2 tablespoons olive oil
-
1 tablespoon balsamic vinegar
-
1 teaspoon honey
-
Salt and pepper to taste
Instructions
In a bowl or zip-top bag, whisk together olive oil, lemon juice, garlic, oregano, paprika, salt, and pepper.
Add chicken and coat thoroughly. Marinate in the refrigerator for at least 30 minutes (up to 8 hours for deeper flavor).
Preheat oven to 400°F (200°C).
Place chicken on a lined baking sheet and bake for 20–25 minutes, or until internal temperature reaches 165°F (74°C).
Let rest for 5–10 minutes before slicing.
In a large bowl, combine mixed greens, tomatoes, cucumber, and red onion.
Slice rested chicken against the grain and place on top. Sprinkle with feta.
Whisk olive oil, balsamic vinegar, honey, salt, and pepper.
Drizzle over salad just before serving and toss gently.
Notes
-
Pound chicken to even thickness for uniform cooking.
-
Don’t skip resting time—this keeps the meat juicy.
-
Use a meat thermometer to prevent overcooking.
-
Slice against the grain for tenderness.
-
For grilling: cook 6–8 minutes per side over medium-high heat.
Nourishment Breakdown (Approximate, per serving)
This isn’t just about empty calories; it’s about fueling your body with delicious, wholesome food. Here’s a general look at what you’re getting in one hearty serving (including chicken, salad, feta, and dressing):
- Calories: ~350
- Protein: ~35g (Excellent for muscle repair and keeping you full!)
- Carbohydrates: ~12g (Mostly from the fiber-rich veggies, making it a lower-carb meal.)
- Fat: ~20g (Primarily healthy fats from olive oil and cheese, essential for nutrient absorption.)
- Fiber: ~3g (Thanks to all those beautiful greens and veggies.)
This salad is a fantastic balance of lean protein, healthy fats, and complex carbohydrates. It’s a meal that provides sustained energy and keeps those mid-afternoon hunger pangs at bay.
One Last Bite of Wisdom
Friends, this Baked Marinated Chicken Salad is more than a recipe; it’s a reminder that eating well should be a joy, not a punishment. It’s proof that with a little foresight (that marinade!) and simple techniques, you can create something truly spectacular out of everyday ingredients. It’s become a staple in my home, and I sincerely hope it finds a happy place in yours, too.
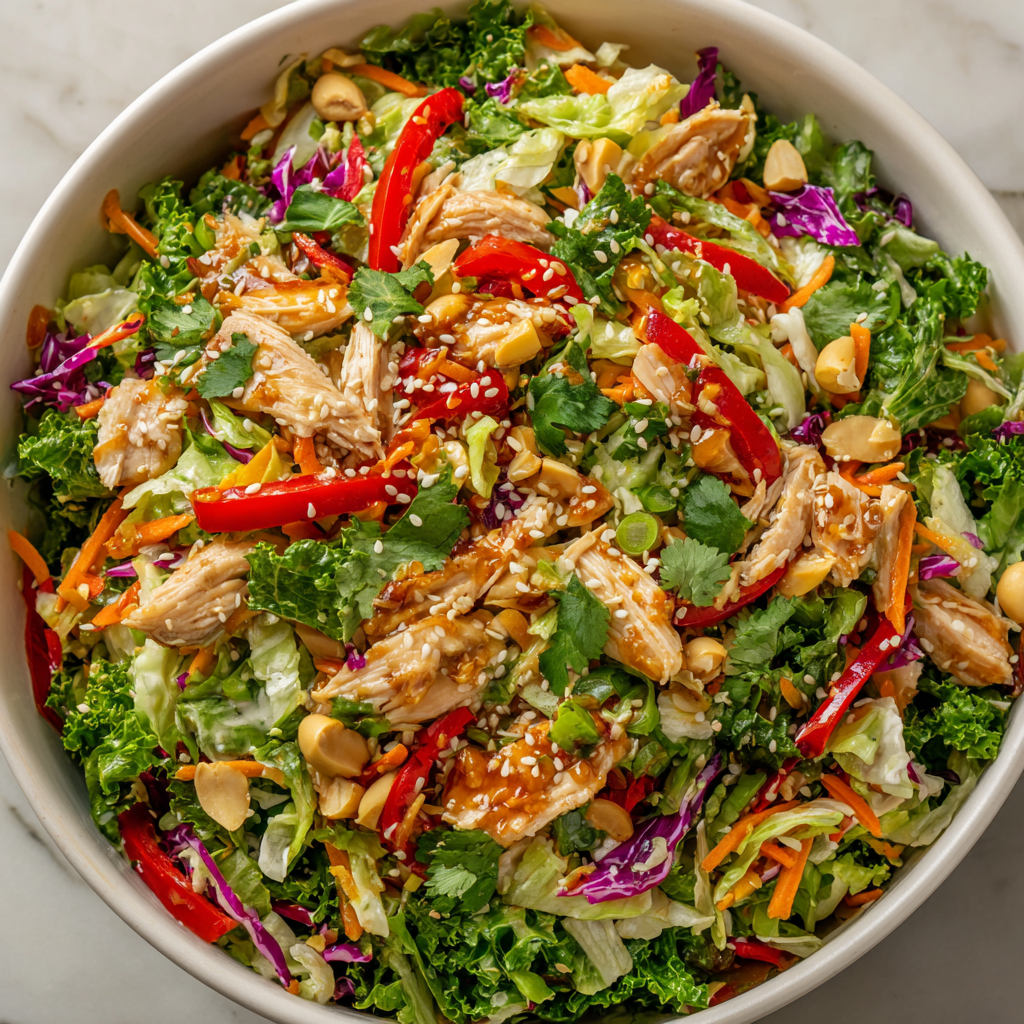
Crunchy Sesame Chicken Salad : Fresh, Flavor-Packed & Easy
Crunchy Sesame Chicken Salad: Your New Go-To Bowl of Fresh, Flavor-Packed Joy
Hey friends, Beau here from Feastical! Let’s talk about that all-too-common lunchtime dilemma. You know the one: you’re craving something that feels indulgent but won’t leave you in a carb-coma, something satisfying but still bright and fresh, something you can actually get excited about pulling from the fridge. You stare into the abyss of sad, wilted greens and think, “There has to be a better way.”
Well, my food-loving friend, there absolutely is. I’m talking about my Crunchy Sesame Chicken Salad. This isn’t just a salad; it’s a textural symphony in a bowl. Imagine tender, savory chicken nestled in a confetti of crisp cabbages and sweet peppers, all tossed in a sweet-savory sesame dressing that dances on your palate. Then, we crown the whole thing with a generous sprinkle of something crunchy—because joy, in my kitchen, always has a crunch.
This recipe is my weeknight hero, my meal-prep MVP, and my guaranteed potluck crowd-pleaser. It comes together in about 15 minutes flat (especially if you use a rotisserie chicken hack I’ll share later), and it’s endlessly adaptable to whatever you have on hand. It’s the perfect bridge between wanting to eat well and wanting to eat something downright delicious. So, grab your biggest, most beautiful bowl, and let’s make a salad you’ll actually dream about.
The Salad That Saved a Rainy Day (And My Sanity)
This recipe was born out of sheer necessity—and a little bit of kitchen chaos. Picture this: It was one of those gloomy, pouring-rain Sundays where the grocery delivery got delayed, and my planned dinner was a no-go. I stood in front of the fridge, surveying the landscape. Some leftover roasted chicken from last night’s dinner, half a head of cabbage languishing in the crisper, a lone bell pepper, and a near-empty bag of carrots. My stomach growled in protest.
I had two options: resort to cereal for dinner (we’ve all been there) or get creative. I started chopping, shredding, and whisking, driven by a craving for something both hearty and refreshing. I whisked together a quick sesame dressing, a formula I’ve tinkered with for years. When I poured it over that mountain of veggies and chicken and gave it a big, joyful toss, something magical happened. The colors popped, the aroma of ginger and sesame filled the kitchen, and that first forkful was a revelation. It was crunchy, savory, slightly sweet, and incredibly satisfying.
My family, who had been skeptically eyeing my “clean-out-the-fridge experiment,” demolished the entire bowl. That rainy-day throw-together has now become a requested staple. It taught me that the best dishes often aren’t meticulously planned—they’re crafted with a little intuition, a dash of necessity, and a whole lot of love for bold flavors and great texture. Every time I make it, I think of that cozy, chaotic Sunday and smile.
Gathering Your Flavor All-Stars
Here’s where the fun begins! This salad is a fantastic mix of pantry staples and fresh produce. Don’t stress about exact measurements—a little more of this or that is always welcome. Let’s break it down:
- 2 cups cooked chicken breast, sliced or shredded: The hearty star! Use leftover grilled, roasted, or poached chicken. My ultimate weeknight hack? A store-bought rotisserie chicken—it’s flavorful, moist, and saves you so much time. For a vegetarian twist, crispy baked tofu or chickpeas are phenomenal.
- 3 cups green cabbage, thinly sliced: Our major crunch factor. It’s sturdy, affordable, and holds the dressing perfectly without getting soggy. Chef’s Insight: A mandoline slicer makes quick, uniform work of this, but a sharp knife works just fine!
- 1 cup purple cabbage, thinly sliced: Adds a gorgeous pop of color and a slightly peppery flavor. If you only have one type of cabbage, just use 4 cups total. No biggie!
- 1 cup shredded carrots: For sweetness and color. Pre-shredded bagged carrots are a totally acceptable time-saver here. I won’t tell.
- 1 red bell pepper, thinly sliced: Brings a sweet, juicy crunch. Yellow or orange peppers work beautifully too for a rainbow effect.
- 3 green onions, chopped: A mild, oniony bite that’s fresher than a regular onion. Use both the white and green parts!
- ¼ cup fresh cilantro, chopped: This adds a vital bright, herbal note. If you’re part of the “cilantro tastes like soap” club, swap in fresh parsley or even a little fresh mint for a different kind of freshness.
- ¼ cup sliced almonds or crispy chow mein noodles: The *pièce de résistance* of crunch! Almonds add a toasty note, while chow mein noodles give that classic “Asian salad” vibe. I often use both! Toasted sesame seeds are also a great topping.
For the Magical Sesame Dressing:
- ¼ cup soy sauce: Our salty, umami backbone. For a gluten-free version, use tamari or coconut aminos (which are slightly sweeter).
- 2 tbsp rice vinegar: The gentle, clean tang that balances the richness. White wine vinegar or apple cider vinegar can sub in a pinch.
- 1 tbsp honey: A touch of sweetness to round out the edges. Maple syrup or agave work for a vegan version.
- 1 tbsp sesame oil: DO NOT SKIP THIS. This is the flavor heart of the dressing—that deep, nutty, unmistakable sesame taste. Keep it in a cool, dark place to preserve its flavor.
- 1 tbsp olive oil: Helps carry the flavors and adds body. Any neutral oil like avocado or grapeseed works.
- 1 tsp fresh grated ginger: The zippy, warming secret weapon! Fresh is best here—just grate a peeled knob on a microplane. In a real pinch, ¼ tsp of ground ginger can work, but the flavor is less vibrant.
- 1 clove garlic, minced: Because almost everything is better with garlic. Feel free to add two if you’re a garlic fiend like me.
Let’s Build That Bowl: A Step-by-Step Dance
This isn’t rocket science—it’s a joyful assembly of goodness. Follow these steps, and you’ll have a flawless salad every single time.
Step 1: The Chop & Prep Party. Grab your largest mixing bowl—I’m talking the one you’d use for a giant batch of pasta salad. This gives you plenty of room to toss without making a mess. Thinly slice your green and purple cabbage, shred the carrots, slice the bell pepper into thin strips, and chop those green onions and cilantro. Add it all to the big bowl. Chef’s Hack: If you’re prepping ahead of time, you can store all these chopped veggies together in the fridge for a day. The cabbages are hardy and won’t mind!
Step 2: Welcome the Chicken. Take your cooked chicken and either shred it with two forks or slice it into bite-sized pieces. Add it right on top of the vibrant veggie mountain. Using a rotisserie chicken? Shred it while it’s still slightly warm—it soaks up the dressing even better. Gently toss the chicken and veggies together just to start mingling them.
Step 3: Whisk the Liquid Gold. In a separate small bowl or a glass measuring cup, combine the soy sauce, rice vinegar, honey, sesame oil, olive oil, grated ginger, and minced garlic. Now, whisk it like you mean it! You want that honey fully dissolved and everything emulsified into a beautifully smooth, fragrant dressing. Pro Tip: Taste it! Dip a piece of cabbage in. Want more tang? Add a splash more vinegar. More sweetness? A drizzle more honey. This is your dressing—make it sing to your taste buds.
Step 4: The Grand Toss. Pour that glorious dressing over your salad. Here’s the key: don’t be shy, but don’t drown it all at once. You can always add more, but you can’t take it out. I usually pour about ¾ of it over, toss thoroughly with a pair of tongs or two large spoons, then assess. If it looks like it needs more, add the rest. The goal is every single piece gets a shiny, flavorful kiss of that sesame goodness.
Step 5: The Crunch Finale (Timing is Everything!). DO NOT add your crunchy topping (almonds, noodles, etc.) until the very second before serving. This is the cardinal rule of crunch preservation. If you toss them in and then let the salad sit, they’ll get soggy from the dressing. We want that explosive, satisfying crunch in every bite. So, sprinkle that golden, toasty, crunchy goodness right on top as your final flourish.
Step 6: Rest or Rush? You can serve this immediately for maximum crispness. OR, you can cover it and pop it in the fridge for 20-30 minutes. This “marry time” lets the flavors meld beautifully and slightly softens the cabbage, making it even more pleasant to eat. Both ways are winners.
How to Serve Your Masterpiece
Presentation is part of the fun! I love serving this salad in a wide, shallow bowl so all the gorgeous colors can shine. For a family-style meal, bring the whole big bowl to the table and let everyone dig in.
For meal prep or individual lunches, divide the dressed salad (remember, hold the crunchy topping!) between four airtight containers. Keep a small baggie of your almonds or noodles separate and sprinkle them on right before you eat to maintain that perfect texture.
While this salad is a complete meal in itself, it plays wonderfully with others. Want to make it more substantial? Serve it over a bed of warm quinoa or brown rice—the grains soak up the extra dressing deliciously. For a lighter touch, wrap big spoonfuls in butter lettuce or romaine leaves for fresh, hand-held lettuce cups. And honestly, a side of crispy spring rolls or a warm bowl of miso soup turns this into a feast fit for any occasion.
Make It Your Own: 5 Flavorful Twists
The beauty of this recipe is its versatility. Once you’ve mastered the base, play around! Here are some of my favorite riffs:
- The “Everything Crunch” Upgrade: Go wild with the topping! Mix toasted sliced almonds, sesame seeds, chopped peanuts, and those crispy chow mein noodles. More crunch, more flavor, more fun.
- Spicy Sesame Kick: Add some heat! Whisk 1-2 teaspoons of sriracha or a tablespoon of chili-garlic sauce into the dressing. Garnish with thinly sliced fresh jalapeño for an extra punch.
- Fruity & Fresh: Add 1 cup of mandarin orange segments (drained well) or diced fresh mango in the summer. The sweet fruit against the savory dressing is a knockout combination.
- Plant-Powered Protein Swap: Ditch the chicken for one 15-oz can of chickpeas, drained, rinsed, and patted dry. For extra flavor, toss them with a little soy sauce and air-fry or bake until slightly crispy before adding to the salad.
- Creamy Sesame Dream: For a richer, creamier dressing, stir a tablespoon or two of tahini (sesame seed paste) or even a dollop of smooth peanut butter into the dressing mixture. It becomes luxuriously thick and clings to every ingredient.
Beau’s Kitchen Notes & Rambles
This recipe has evolved like a good friendship over the years. I started with just green cabbage and now I crave the color of the purple. I’ve learned that the dressing tastes even better if you let the minced garlic and ginger sit in the vinegar for a few minutes before adding the oils—it mellows the raw bite just a touch.
One funny fail: I once got overzealous with a new, super-powered sesame oil and used a full TWO tablespoons. Friends, it was like eating a salad dressed in perfume. A little of that potent, toasted sesame oil goes a very long way! One tablespoon is the sweet spot.
Most importantly, this recipe is a reminder that cooking shouldn’t be stressful. No red bell pepper? Use sugar snap peas. Out of rice vinegar? A squeeze of fresh lime juice is fantastic. It’s a framework for a delicious, healthy, crunchy meal. Make it, share it, and make it your own.
Your Questions, Answered!
Q: Can I make this salad ahead of time?
A: Absolutely, with one strategic move! You can chop all the veggies and chicken, make the dressing, and store them separately in the fridge for up to 2 days. Combine and toss everything (except the crunchy topping!) no more than a few hours before serving for the best texture. The dressed salad will keep for about a day, but the cabbage will soften—it’ll still taste great, just less crisp.
Q: My dressing tastes too salty. What did I do wrong?
A> No worries—this is fixable! If your soy sauce is particularly salty or you measured a bit heavy, the dressing can be intense. Balance it by whisking in a bit more honey or a splash more rice vinegar. For next time, try using a reduced-sodium soy sauce or tamari, which gives you more control.
Q: What’s the best way to cook chicken for this if I don’t have leftovers?
A> My favorite easy method is poaching. Place 1-2 chicken breasts in a pot, cover with water or broth, add a slice of ginger and a green onion if you have it. Bring to a simmer, cover, turn off the heat, and let it sit for 15-20 minutes. It comes out perfectly tender and juicy for shredding. Pan-searing with a little salt and pepper is also fantastic.
Q: The salad got watery after sitting in the fridge. Help!
A> Cabbage can release a little water, especially once salted by the dressing. It’s not a failure! Just give it a good stir before serving. To minimize this, make sure your cabbage is thoroughly dried after washing, and don’t dress the salad too far in advance. If there’s a lot of liquid at the bottom, you can drain a bit off before serving.

Crunchy Sesame Chicken Salad : Fresh, Flavor-Packed & Easy
Description
Crunchy Sesame Chicken Salad: Your New Go-To Bowl of Fresh, Flavor-Packed Joy
Hey friends! If you’re craving something fresh, crunchy, and satisfying—but still light enough to keep you energized—this Crunchy Sesame Chicken Salad is about to become your weekly favorite.
It’s loaded with crisp cabbage, colorful veggies, tender chicken, and a sweet-savory sesame dressing that ties everything together beautifully. And let’s not forget the crunch on top—because texture is everything.
Ready in about 15 minutes and perfect for meal prep, potlucks, or busy weeknights, this salad proves healthy can absolutely be exciting.
Ingredients
For the Salad
-
2 cups cooked chicken breast, shredded or sliced
-
3 cups green cabbage, thinly sliced
-
1 cup purple cabbage, thinly sliced
-
1 cup shredded carrots
-
1 red bell pepper, thinly sliced
-
3 green onions, chopped
-
¼ cup fresh cilantro, chopped
-
¼ cup sliced almonds or crispy chow mein noodles (add just before serving)
-
Optional: 1 tablespoon toasted sesame seeds
For the Sesame Dressing
-
¼ cup soy sauce (or tamari for gluten-free)
-
2 tablespoons rice vinegar
-
1 tablespoon honey (or maple syrup)
-
1 tablespoon sesame oil
-
1 tablespoon olive oil
-
1 teaspoon fresh grated ginger
-
1 garlic clove, minced
Instructions
In a large bowl, combine green cabbage, purple cabbage, carrots, bell pepper, green onions, and cilantro.
Toss in the shredded or sliced chicken and gently mix to combine.
In a small bowl, whisk together soy sauce, rice vinegar, honey, sesame oil, olive oil, ginger, and garlic until smooth and well blended.
Pour about ¾ of the dressing over the salad and toss well. Add more dressing as needed until lightly coated (not soggy).
Right before serving, sprinkle with almonds or crispy noodles and sesame seeds.
Serve immediately or chill for 20–30 minutes to let flavors meld.
Notes
-
Use rotisserie chicken for a quick shortcut.
-
Slice cabbage very thin for better texture.
-
Always add crunchy toppings just before serving.
-
Taste and adjust dressing—add more vinegar for tang or honey for sweetness.
-
If prepping ahead, store dressing separately and combine before serving.
Nutritional Breakdown (A Happy Bonus!)
While I’m all about flavor first, it’s always nice to know what’s fueling your body. This nutritional info is for one serving (approximately ¼ of the recipe), including almonds for the topping. Remember, these are estimates—actual values can vary based on your specific ingredients and portions.
This salad is a fantastic source of lean protein from the chicken, keeping you full and satisfied. The colorful cabbages, carrots, and pepper deliver a powerful punch of Vitamins A, C, and K, along with fiber for good digestion. The healthy fats from the sesame oil, olive oil, and almonds help your body absorb those fat-soluble vitamins. It’s a balanced, nutrient-dense meal that proves eating well doesn’t mean sacrificing an ounce of enjoyment.
Final Thoughts from My Kitchen to Yours
And there you have it, folks—my beloved Crunchy Sesame Chicken Salad in all its glory. This recipe represents everything I love about cooking at Feastical: it’s approachable, packed with real flavor, and designed to bring a little joy to your everyday table.

Creamy Polish Pasta Casserole with Kielbasa & Sauerkraut
When Comfort Food Gets a Polish Passport
Hey there, friend! Beau here, welcoming you back to the Feastical kitchen. You know that feeling when you walk into a house and dinner is already in the oven? That warm, savory, “everything is going to be okay” aroma that wraps around you like a favorite sweater? That’s exactly the vibe we’re crafting today. We’re taking a delicious detour from the usual weeknight rotation and building a casserole that’s so packed with flavor, it might just give your slow cooker a complex.
I’m talking about my Creamy Polish Pasta Casserole with Kielbasa & Sauerkraut. Now, I see you. Maybe you just glanced at “sauerkraut” and got a little nervous. Maybe you’re thinking, “Beau, that’s for hot dogs, not my pasta night.” Trust me, I was once in your shoes. But here’s the secret: when you bake it into this creamy, cheesy, smoky masterpiece, that tangy sauerkraut transforms. It becomes this incredible background note that cuts through the richness, making every bite more interesting and utterly addictive. It’s the unexpected guest at the party who ends up being the life of it.
This isn’t just a thrown-together dish; it’s a hug in a baking dish. Tender penne cradles slices of smoky kielbasa, all tangled up in a velvety, Dijon-kissed cheese sauce and that brilliant, tangy kraut. The whole thing gets crowned with a layer of Swiss cheese that bakes up into a gorgeous, golden-brown blanket. It’s hearty, it’s satisfying, and it has this incredible way of turning a regular Tuesday into a celebration. So, grab your favorite wooden spoon and let’s build some delicious memories together.
The Potluck That Changed My Mind
I have to confess, my relationship with sauerkraut was strictly transactional for most of my life. Ballpark? Sure. On a Reuben? Absolutely. But in a pasta bake? I wasn’t sold. That all changed a few winters ago at a neighborhood potluck. It was one of those “bring your family’s heritage dish” parties, and my friend Anya, whose grandparents hailed from Poland, showed up with a giant, steamy dish that had everyone circling like sharks.
One bite and my culinary world tilted. The tangy kraut wasn’t sour; it was bright and almost sweet against the smoky sausage. The creaminess was unreal. I immediately cornered Anya (politely, with a fork still in my hand) and begged for the story. She laughed and said it was her Babcia’s “use-what-you-have” dish, born from cold winters and a well-stocked pantry. It was food that fed a family, warmed a home, and carried history in every spoonful. I went home that night with a hastily scribbled recipe on a napkin and a mission. I’ve tinkered with it over the years, but the soul of Anya’s Babcia’s dish is right here in this recipe. It’s a reminder that the best food often comes from tradition, simplicity, and a willingness to try something wonderfully unexpected.
Gathering Your Flavor Crew
Here’s the cast of characters that’s going to make this dinner a star. I’ve added my little chef notes next to each one because knowing your ingredients is half the battle won!
- 4 cups penne pasta, cooked and drained: Penne is my go-to here because those little tubes are perfect for trapping all the creamy sauce and little bits of goodness. Chef’s Tip: Cook it just to al dente! It’s going to soak up sauce and bake, so we don’t want it mushy.
- 2 tbsp butter & 2 tbsp flour: Our dynamic duo for the roux, the base of our luxurious sauce. This combo thickens everything up beautifully.
- 2 ½ cups milk: Whole milk will give you the richest sauce, but 2% works in a pinch. We’re building flavor, so let’s not go skim here.
- 1 cup sour cream: This is our magic ingredient for tangy, luscious creaminess. Pull it out of the fridge when you start so it’s not ice-cold when you add it.
- 1 tsp garlic powder: Yes, powder! In a baked sauce like this, it distributes flavor more evenly than fresh minced garlic, which can sometimes burn or get bitter.
- 2–3 tbsp Dijon mustard: Don’t skip this! It adds a sophisticated sharpness that balances the richness. Start with 2 tbsp and add the third after tasting if you’re a mustard fan.
- 16 oz sauerkraut, drained: The star of the show! Be sure to drain it really, really well and give it a quick squeeze to remove excess liquid. We want the flavor, not the brine.
- 4 green onions, chopped: A fresh, mild onion bite. The green parts look gorgeous for color, too!
- 1 ½ lbs Polska kielbasa, sliced: Look for a good quality Polish sausage. It’s typically pre-cooked (smoked), so we’re just heating it through and letting its smoky flavor permeate the dish. A great sub is any smoked sausage.
- 3 cups Swiss cheese, shredded and divided: I love the nutty, mild melt of Swiss here. Pro Hack: Shred it yourself! Pre-shredded cheese has anti-caking agents that can make your sauce grainy. The 5 minutes it takes is 100% worth it.
- Salt and pepper to taste: Your trusty sidekicks. Go easy on the salt initially, as the kielbasa, cheese, and kraut bring their own.
Let’s Build This Beauty, Step-by-Step
Okay, team! Aprons on? Let’s do this. I’ll walk you through each step with the little tricks I’ve learned to make this foolproof.
Step 1: Preheat & Prep. Fire up that oven to a cozy 350°F (175°C). Grab your 9×13 baking dish and give it a light coat of butter, oil, or a quick spray. This little step guarantees a golden crust and easy cleanup—no stuck-on cheese disasters!
Step 2: Pasta Party. Cook your penne in a big pot of well-salted water. Remember, we’re aiming for al dente—it should still have a slight bite to it. Drain it well and let it hang out in the colander. No one wants a watery casserole.
Step 3: Sauce Time (The Heart of the Operation!). In a medium saucepan, melt the butter over medium heat. Once it’s foaming, sprinkle in the flour and whisk it constantly for a full minute. You’re toasting the flour, which cooks out that raw taste. It should look like a pale, bubbly paste. Now, slowly stream in the milk while whisking like your dinner depends on it (it does!). This prevents lumps. Keep whisking until the mixture thickens and coats the back of a spoon, about 5-7 minutes. Chef’s Hack: If you do get a few lumps, don’t panic! A quick blitz with an immersion blender or a vigorous whisking will usually fix it.
Step 4: Finish the Sauce. Take the saucepan off the heat. This is crucial! If you add the sour cream to boiling sauce, it might curdle. Whisk in the garlic powder, Dijon mustard, and that full cup of sour cream until it’s silky smooth. Now taste it! This is your moment. Add salt and pepper. Remember, the kraut and sausage are salty, so season judiciously.
Step 5: The Big Combine. In your greased baking dish, toss the drained pasta with the creamy sauce. Now, for the fun part: add the well-drained sauerkraut, most of the green onions (save a pinch for garnish!), the sliced kielbasa, and 2 cups of your freshly shredded Swiss cheese. Stir it all together until every noodle is in on the action. It’s going to look incredible already.
Step 6: The Cheesy Blanket. Smooth the mixture into an even layer. Take the remaining 1 cup of Swiss cheese and sprinkle it evenly over the top, creating that iconic, gooey, golden lid we’re all dreaming of.
Step 7: Bake to Perfection. Slide that dish of potential into the oven. Bake for 35-40 minutes. You’re looking for the edges to be bubbling enthusiastically and the top to be a beautiful, spotted golden brown.
Step 8: The Tortuous, Essential Wait. I know, I know. It smells amazing. But let it rest on the counter for 5-10 minutes before you dive in. This allows the sauce to set slightly, making it easier to serve up perfect squares instead of a delicious lava flow.
How to Serve It Up Like a Pro
This casserole is a full meal superstar all on its own – no sides required. But a little flourish makes dinner feel special. I like to scoop out generous portions with a big serving spoon. Garnish with the reserved chopped green onions for a pop of fresh color and flavor. A little sprinkle of fresh parsley or dill is also fantastic if you have it.
If you want to round out the meal, something green and simple is the perfect partner. A crisp side salad with a bright vinaigrette cuts through the richness beautifully. Or, for a hot side, my go-tos are roasted asparagus, Brussels sprouts (tossed with a little caraway seed to echo Polish flavors!), or simple steamed green beans. The goal is balance: the casserole is hearty and creamy, so a fresh or crisp side acts as the perfect palate cleanser between those gloriously comforting bites.
Make It Your Own: Flavor Twists & Swaps
One of my favorite things about this recipe is its flexibility. Play with it! Here are a few of my favorite riffs:
- The “Mushroom & Thyme” Twist: Sauté 8 oz of sliced cremini mushrooms until golden and add them in with the kielbasa. Throw in a teaspoon of fresh thyme leaves for an earthy, aromatic vibe.
- Lighter Touch: Use turkey kielbasa, low-fat milk, and light sour cream. You can also swap half the Swiss for a sharp, flavorful cheddar so you use less cheese but still get big taste.
- Kraut-Curious? Try This: If you’re still unsure about straight sauerkraut, rinse it under cold water after draining. This removes some of the sharper tang, leaving a mellower flavor that’s a great gateway.
- From Poland to Bavaria: Swap the Swiss cheese for a good German Emmentaler or a creamy Havarti. Use a hearty Bavarian-style beer mustard instead of Dijon for a deeper flavor.
- Veggie-Packed Version: Add a cup of frozen peas or corn (no need to thaw) or a cup of finely chopped roasted red peppers when you combine everything. An easy way to sneak in more color and nutrients.
Beau’s Kitchen Notes
This recipe has evolved from that napkin scribble into a Feastical favorite. The biggest lesson? Drain that sauerkraut like your casserole’s texture depends on it. I learned this the hard way with a slightly soupy batch early on. A good squeeze in a clean kitchen towel is the ultimate pro move.
Over time, I’ve also played with the mustard level. I found that a full 3 tablespoons gives it that fantastic “what is that amazing flavor?” quality without being outright mustardy. I encourage you to taste the sauce before you assemble and adjust to your own palate. That’s what cooking is all about! This dish also has a beautiful way of bringing people together. It’s been the centerpiece of game days, snowy night dinners, and “I’m bringing you a meal” deliveries for friends. It’s hearty, travel-friendly, and always, always a hit.
Your Questions, Answered
Q: Can I make this ahead of time?
A: Absolutely! Assemble the entire casserole (right up to adding the top cheese), cover tightly, and refrigerate for up to 24 hours. When you’re ready, you may need to add 5-10 minutes to the bake time since it’s going in cold. It’s a lifesaver for busy days or entertaining.
Q: My sauce seemed a bit thick/grainy. What happened?
A: Two likely culprits: 1) The roux cooked too long before adding the milk, or the heat was too high when you added the sour cream. Keep the heat medium and take the pot off the burner before stirring in the sour cream. 2) Pre-shredded cheese can sometimes cause graininess. Shredding your own is the best fix for next time!
Q: Can I freeze this casserole?
A: You bet! It freezes beautifully for up to 4 months. Assemble it (unbaked) in a freezer-safe dish, wrap it tightly in plastic wrap and foil. Thaw overnight in the fridge before baking as directed. You can also freeze leftovers in individual portions for the ultimate easy future meal.

Creamy Polish Pasta Casserole with Kielbasa & Sauerkraut
Description
Hey friend! If you love cozy casseroles and bold, comforting flavors, this one is for you. Inspired by traditional Polish ingredients like smoky kielbasa and tangy sauerkraut, this creamy pasta bake brings everything together in one bubbling, golden dish.
Ingredients
-
4 cups penne pasta (uncooked, then cooked al dente)
-
2 tablespoons butter
-
2 tablespoons all-purpose flour
-
2 ½ cups milk (whole or 2%)
-
1 cup sour cream (room temperature)
-
1 teaspoon garlic powder
-
2–3 tablespoons Dijon mustard
-
16 oz sauerkraut, well-drained and squeezed dry
-
4 green onions, chopped (reserve some for garnish)
-
1 ½ pounds Polska kielbasa, sliced
-
3 cups Swiss cheese, freshly shredded (divided)
-
Salt and black pepper to taste
Instructions
1. Preheat
Preheat oven to 350°F (175°C). Lightly grease a 9×13-inch baking dish.
2. Cook the Pasta
Cook penne in well-salted water until just al dente. Drain thoroughly and set aside.
3. Make the Cream Sauce
In a saucepan over medium heat, melt butter.
Whisk in flour and cook for 1 minute to form a roux.
Slowly whisk in milk and cook until thickened (about 5–7 minutes).
Remove from heat and whisk in:
-
Sour cream
-
Garlic powder
-
Dijon mustard
Season lightly with salt and pepper.
4. Combine
In the baking dish, combine:
-
Cooked pasta
-
Sliced kielbasa
-
Drained sauerkraut
-
Green onions (reserve some)
-
2 cups shredded Swiss cheese
Pour sauce over everything and gently stir to combine.
5. Top & Bake
Sprinkle remaining 1 cup Swiss cheese evenly on top.
Bake for 35–40 minutes, until bubbly and golden.
6. Rest & Serve
Let rest for 5–10 minutes before serving. Garnish with reserved green onions.
Notes
-
Drain sauerkraut extremely well. Excess liquid can thin the sauce.
-
Cook pasta slightly firm. It continues cooking in the oven.
-
Shred your own cheese for smoother melting.
-
If sauce feels too thick before baking, stir in 2–3 tablespoons milk.
-
Taste the sauce before combining—adjust mustard or seasoning to your preference.
Final Thoughts
When Comfort Food Gets a Polish Passport
Hey there, friend! Beau here, and we’ve just taken a delicious journey together through a dish that’s become one of my absolute favorites. As I sit here typing this, the lingering aroma of that baked casserole still warming my kitchen, I’m reminded why I fell in love with cooking in the first place. It’s not just about following a recipe—it’s about the stories we create around the table and the traditions we carry forward with every meal.
This Creamy Polish Pasta Casserole with Kielbasa & Sauerkraut is more than the sum of its humble ingredients. It’s a bridge between cultures, a conversation starter, and proof that the most memorable dishes often come from the most unexpected combinations. That tangy sauerkraut you were nervous about? It’s now the very thing that makes you reach for seconds. The smoky kielbasa that ties everything together? It’s carrying generations of Polish culinary wisdom in every slice.
I think about Anya’s Babcia, who probably never imagined her “use-what-you-have” winter casserole would one day find its way into my little Feastical kitchen, let alone onto your dinner table. That’s the beautiful thing about food—it travels, it evolves, and it connects us across time and distance. When you serve this to your family tonight, or bring it to a potluck next weekend, you’re not just feeding people. You’re continuing a story. You’re adding your own chapter to a recipe that has warmed homes and hearts for decades.
And honestly? That’s what Feastical is all about. It’s not about perfection or fancy techniques. It’s about showing up with a wooden spoon, a little curiosity, and the willingness to try something wonderfully unexpected. It’s about the laughter around the table, the satisfied sighs after that first bite, and the way a simple Tuesday night can feel like a celebration when the oven’s been working its magic.
So here’s my final thought for you, friend: Don’t be afraid of the ingredients that make you pause. Don’t shy away from the sauerkrauts of the world. Some of the best culinary adventures begin with a raised eyebrow and a “well, why not?” Because the next time someone asks you to bring a dish, you’ll have this one in your back pocket. And when they lean in, fork poised, and ask, “What’s in this? It’s amazing!” you’ll get to smile and say, “Oh, just a little something with a Polish passport.”
Now go forth, make that casserole, and build some delicious memories. I’ll be right here in the Feastical kitchen, saving you a seat at the table.

Soft Pistachio Rolls with Cream Cheese Frosting : Bakery-Style Sweet Rolls
The Morning Magic of a Warm, Nutty Roll
Hey friends, Beau here! Let me paint you a picture. It’s a slow Saturday morning. The sun is just starting to filter through the kitchen window, and there’s a quiet hum to the house. But then, an aroma begins to drift from the oven—a hypnotic blend of buttery yeast, toasting nuts, and sweet, creamy frosting. That, my friends, is the smell of pure, unadulterated happiness. It’s the scent of my Soft Pistachio Rolls with Cream Cheese Frosting coming to life.
If you’ve ever stood in line at a fancy bakery, gazing longingly at those impossibly fluffy, beautifully swirled sweet rolls, I’m here to let you in on a secret: you can absolutely create that magic in your own kitchen. I’m not talking about a “good for homemade” version. I’m talking about a show-stopping, “did you really make these?!” masterpiece. These rolls are everything you want: a tender, pillowy dough wrapped around a rich, nutty pistachio filling, all smothered in a luscious pistachio-kissed cream cheese frosting that melts into every nook and cranny.
Yes, baking with yeast can feel like a leap of faith. But think of it less as a science experiment and more as a cozy collaboration with a tiny living ingredient. We’re guiding it, not controlling it. And the reward? A pan of golden-brown, fragrant rolls that turn your kitchen into the heart of the home. So, tie on your favorite apron, put on some good music, and let’s bake something spectacular together. This recipe is my love letter to weekend mornings, to shared plates, and to the stunning, versatile pistachio. Let’s dig in!
Grandma’s Apron & The Pistachio Epiphany
My love affair with sweet rolls started, like most of my best food memories, in my grandma’s flour-dusted kitchen. She was the queen of the cinnamon roll, and I was her devoted sous-chef, forever covered in sticky dough and brown sugar. But the real magic wasn’t just in the eating (though that was divine); it was in the ritual. The patient waiting for the dough to rise, the scent that promised something wonderful was coming, the shared silence of the first warm, gooey bite.
Years later, on a trip, I wandered into a tiny patisserie and saw a vibrant green roll in the case. A pistachio roll. It was elegant, a little exotic, and I had to try it. That first bite was a revelation—the familiar, comforting texture of a soft sweet roll, but with this sophisticated, earthy, and wonderfully nutty flavor. It felt like my grandma’s cozy tradition had put on a beautiful, fancy coat. I knew right then I had to create my own version for Feastical. I wanted to bridge that gap between nostalgic comfort and “treat-yourself” elegance. This recipe is that bridge. Every time I make it, I smell my grandma’s kitchen and feel that little thrill of discovering something new. It’s the best of both worlds, swirled into one perfect pan.
Gathering Your Bakery-Grade Ingredients
Here’s where we set the stage for success. Using great ingredients and understanding their role is half the battle in baking. Let’s break it down.
- 1¼ cup whole milk, warmed to 110°F: The foundation of our tender dough. Whole milk gives us richness and fat for a soft crumb. Chef’s Insight: If you’re out of milk, full-fat canned coconut milk is a fantastic dairy-free swap that adds wonderful flavor.
- ⅓ cup + 2 tbsp granulated sugar, divided: We use a little sugar to wake up the yeast, and the rest to sweeten the dough. Don’t skip the “divided” part!
- 1½ tbsp active dry yeast: Our magical leavener. Make sure your yeast is fresh for the best rise. If your milk-yeast mixture doesn’t get foamy after 10 minutes, start over—your yeast might be asleep.
- 6 tbsp unsalted butter, room temperature: For the dough. Room temp is key! It should be soft but not melted. This butter creates flavor and a beautiful, pliable texture.
- 2 large eggs, whisked: They add structure, richness, and that beautiful golden color. Let them sit out with the butter to come to room temp.
- 5½ cups all-purpose flour: I prefer all-purpose here for the perfect balance of softness and structure. Pro Tip: Fluff your flour in the bag, then spoon it into your measuring cup and level it off. Don’t scoop directly—it packs in too much flour!
- ½ tsp salt: The flavor enhancer. It balances all the sweetness and makes the other ingredients pop.
For the Pistachio Filling:
- ¼ cup unsalted butter, room temperature: The glue for our filling. Soft butter spreads like a dream.
- ⅓ cup pistachio paste: The star! You can find this at specialty stores or online. Chef’s Hack: In a pinch, blend 1 cup of shelled, roasted pistachios with ¼ cup of a neutral oil (and a touch of honey or sugar if you like) until super smooth.
- ⅓ cup sugar: Granulated sugar adds a slight crunch and sweetness to the swirl.
- ¾ cup roasted pistachios, chopped: For texture! The little nutty bites in every slice are everything. Use unsalted if possible.
For the Cream Cheese Frosting:
- 1 cup cream cheese, room temperature: Non-negotiable room temp! Cold cream cheese will make your frosting lumpy.
- 4 tbsp unsalted butter, room temperature: Partner in crime for the cream cheese.
- ½ cup pistachio paste: Doubling down on that beautiful flavor and color.
- 1¾ cup powdered sugar: Sift it! This prevents lumps in your silky-smooth frosting.
- ½ tsp vanilla extract: The quiet background singer that makes the whole chorus sound better.
Let’s Get Baking: The Step-By-Step Guide
Ready? Let’s walk through this together. I promise, if you follow these steps, you’ll be a sweet roll hero.
- Wake Up the Yeast: In a large bowl or the bowl of your stand mixer, warm your milk to about 110°F (just warmer than your finger). It should feel warm, not hot. Stir in the 2 tablespoons of sugar and all the yeast. Give it a gentle stir and walk away for 5-10 minutes. You’re looking for a foamy, frothy “bloom” on the surface. This is your sign that the yeast is alive and ready to party! Chef’s Tip: No thermometer? The “baby bottle” test works—a drop on your wrist should feel warm, not scalding.
- Make the Dough: To the foamy yeast mixture, add the remaining sugar, soft butter, and whisked eggs. Mix on low until just combined. Now, add about half of the flour and all of the salt. Mix until it starts to come together. Gradually add the remaining flour until the dough pulls away from the sides of the bowl. It will be slightly tacky to the touch—that’s perfect! Too much flour makes dry rolls. Knead with a dough hook (or by hand on a floured surface) for 8-10 minutes until smooth and elastic. Kitchen Story: This is my “zone out” time. I love the rhythmic motion of kneading—it’s edible therapy.
- The First Rise (The Patience Part): Place your beautiful smooth dough in a lightly greased bowl. Turn it once to coat, then cover the bowl tightly with plastic wrap or a damp kitchen towel. Let it rise in a warm, draft-free spot for about 2 hours, or until doubled in size. Overnight Option: For ultimate flavor and easy morning bakes, pop the covered bowl in the fridge right after shaping. It will rise slowly overnight. Let it sit at room temp for an hour before rolling out the next day.
- Craft the Filling & Assemble: While the dough rises, mix the softened butter and pistachio paste for the filling until creamy. Set aside. Once the dough is puffy, punch it down (the fun part!) to release the air. On a lightly floured surface, roll it out into a roughly 20×12-inch rectangle. Spread the pistachio filling evenly over the entire surface, leaving a tiny border at one long edge. Sprinkle the chopped pistachios over the paste. Now, starting with the long edge closest to you, roll the dough up tightly into a log, pinching the clean edge to seal.
- Slice & Second Rise: Using a sharp serrated knife (or my favorite hack—unflavored dental floss!), cut the log into 12 even rolls. Place them cut-side up in a greased 9×13-inch baking pan. Cover loosely and let them rise again for about 1 hour, until they’re puffy and touching. They won’t quite double this time, but they’ll look plump and friendly.
- Bake to Golden Perfection: Preheat your oven to 350°F (175°C). Bake the rolls for 25-30 minutes. The true test? An instant-read thermometer inserted into the center of a roll should read 190°F. They should be golden brown on top. Let them cool in the pan for about 20 minutes—just enough so the frosting won’t completely melt into a puddle, but they’re still wonderfully warm.
- Frost & Feast: As the rolls cool, make the frosting. Beat the room-temp cream cheese and butter until smooth. Beat in the pistachio paste and vanilla. Gradually add the sifted powdered sugar and beat until fluffy and dreamy. Spread generously over the warm rolls. Finish with an extra sprinkle of chopped pistachios for that bakery-style finish. Now, try to wait just five more minutes before you dive in. I dare you.
Serving Your Masterpiece
Presentation is part of the joy! I love serving these rolls right from the pan, placed in the middle of the table for everyone to gather around. For a special brunch, you can plate individual rolls on simple white plates—that vibrant green frosting and sprinkle of nuts looks stunning against a plain backdrop. A dusting of extra powdered sugar just before serving adds a snowy, elegant touch.
What to serve with them? A strong cup of black coffee is my go-to to cut through the sweetness. For a full spread, pair them with crispy bacon, fresh fruit salad, or a simple savory frittata. The sweet-and-savory combo is unbeatable. And remember, these are best enjoyed the day they’re made, but a quick 10-second zap in the microwave the next day brings back that just-baked warmth.
Make It Your Own: Delicious Twists
Once you’ve mastered the base, the world is your oyster (or, you know, your pistachio). Here are a few fun spins:
- Orange-Cardamom Dream: Add the zest of one orange to the dough and ½ teaspoon of ground cardamom to the filling. The citrus and spice with pistachio is a classic, heavenly combination.
- Chocolate Pistachio Swirl: Sprinkle ½ cup of mini chocolate chips or chopped dark chocolate over the pistachio filling before rolling. Because chocolate makes everything better.
- Dairy-Free Delight: Use canned coconut milk for the dough and a vegan butter substitute. For the frosting, use vegan cream cheese and butter. The pistachio flavor still shines brilliantly.
- Almond Joy Variation: Swap the pistachio paste for almond butter or paste, and use sliced almonds. Add a handful of shredded coconut to the filling. Top the frosting with toasted coconut flakes.
- “Clean Out the Pantry” Morning Buns: Use this same dough base! Swap the pistachio filling for cinnamon-sugar, apple butter, or leftover pastry cream mixed with berries.
Beau’s Kitchen Notes
This recipe has evolved in my kitchen over dozens of batches. The biggest game-changer was discovering the overnight refrigerated rise. Not only does it develop deeper flavor, but it also makes a weekend morning treat totally stress-free. I also learned (the hard way) that rushing the “room temperature” step for butter and cream cheese is a one-way ticket to lumpy frosting and tough dough. Patience, young grasshopper!
And a funny story: I once tried to speed up the first rise by placing the bowl on a heating pad set to “low.” Let’s just say I created a yeasty, doughy monster that overflowed its bowl and tried to conquer my countertop. Lesson learned: a warm, draft-free spot means just that—not an active heat source! Trust the process.
Your Questions, Answered
Q: My dough didn’t rise! What happened?
A: The most common culprits are old/dead yeast or liquid that was too hot and killed the yeast. Always test your yeast first, and use a thermometer to be safe. Also, make sure your rising spot is truly warm (on top of the fridge or in an off oven with the light on are great spots).
Q: Can I make these without a stand mixer?
A: Absolutely! A sturdy wooden spoon and some elbow grease will work just fine for mixing. You’ll just need to knead by hand on a floured surface for the full 8-10 minutes. Consider it your arm workout for the day.
Q: My filling oozed out everywhere while baking. Help!
A: This usually means the rolls were under-proofed (didn’t rise enough in the second rise) or you may have rolled the log too loosely. Make sure they are nice and puffy before baking, and roll that dough snugly!
Q: What’s the best way to store leftovers?
A: Cover the pan tightly with foil or transfer rolls to an airtight container. They’ll keep at room temp for 1-2 days. For longer storage, freeze unfrosted rolls individually on a baking sheet, then transfer to a freezer bag. Thaw and warm, then frost fresh.
Final Thoughts
The Morning Magic of a Warm, Nutty Roll
As that pan of golden-brown pistachio rolls emerges from your oven, filling your kitchen with the intoxicating aroma of butter, toasted nuts, and sweet dough, you’ll understand exactly why I do what I do. This, right here, is the heart of Feastical—not just a recipe, but an invitation to slow down, to create something with your own hands, and to share it with the people you love.
These Soft Pistachio Rolls with Cream Cheese Frosting are more than the sum of their ingredients. They’re a bridge between generations—connecting my grandma’s flour-dusted kitchen with that little patisserie in Europe that first opened my eyes to the magic of pistachio in a sweet roll. They’re proof that you don’t have to choose between nostalgic comfort and elegant sophistication. You can have both, swirled together in one perfect, pillowy bite.
I hope this recipe becomes a tradition in your home the way it has in mine. Maybe it’s the centerpiece of your holiday brunch, the surprise you bring to a sleepy friend who needs cheering up, or simply the way you declare to your family that Saturday mornings are sacred. Whatever story these rolls become part of, I hope they bring you the same warmth, joy, and delicious connection they’ve brought me.
So tie on that apron, get a little flour on your favorite jeans, and remember: baking from scratch isn’t about perfection. It’s about presence. It’s about the magic that happens when you slow down long enough to let dough rise, to let butter soften, to let yeast work its quiet miracle. And it’s about that moment when you pull apart a warm, gooey roll, watch the frosting melt into every crevice, and take that first incredible bite.
Print
Soft Pistachio Rolls with Cream Cheese Frosting : Bakery-Style Sweet Rolls
Description
There’s something magical about pulling a pan of warm, nutty sweet rolls from the oven. These Soft Pistachio Rolls are pillowy, buttery, and swirled with rich pistachio filling, then topped with a dreamy pistachio cream cheese frosting that melts into every layer.
Ingredients
For the Dough
-
1¼ cup whole milk, warmed to 110°F (43°C)
-
⅓ cup + 2 tbsp granulated sugar, divided
-
1½ tbsp active dry yeast
-
6 tbsp unsalted butter, room temperature
-
2 large eggs, room temperature
-
5½ cups all-purpose flour
-
½ tsp salt
For the Pistachio Filling
-
¼ cup unsalted butter, room temperature
-
⅓ cup pistachio paste
-
⅓ cup granulated sugar
-
¾ cup roasted pistachios, finely chopped
For the Pistachio Cream Cheese Frosting
-
1 cup cream cheese, room temperature
-
4 tbsp unsalted butter, room temperature
-
½ cup pistachio paste
-
1¾ cup powdered sugar, sifted
-
½ tsp vanilla extract
Instructions
In a large bowl, combine warm milk and 2 tablespoons sugar.
Sprinkle yeast over the top and let sit 5–10 minutes until foamy.
If it doesn’t foam, start over — your yeast may be inactive.
Add remaining sugar, butter, and eggs to the yeast mixture. Mix until combined.
Add half the flour and salt. Gradually add remaining flour until a soft, slightly tacky dough forms.
Knead 8–10 minutes (by hand or mixer) until smooth and elastic.
Place dough in a lightly greased bowl. Cover and let rise in a warm place for about 2 hours, or until doubled in size.
Mix butter and pistachio paste until smooth.
Punch down dough and roll into a 20×12-inch rectangle.
Spread pistachio mixture evenly over dough. Sprinkle chopped pistachios and sugar on top.
Roll tightly into a log and seal the edge.
Cut into 12 rolls using a serrated knife or dental floss.
Place in a greased 9×13-inch pan. Cover and let rise 1 hour, until puffy and touching.
Preheat oven to 350°F (175°C).
Bake 25–30 minutes until golden brown and internal temperature reaches 190°F (88°C).
Cool 15–20 minutes before frosting.
Beat cream cheese and butter until smooth.
Add pistachio paste and vanilla. Gradually beat in powdered sugar until fluffy.
Spread generously over warm rolls and garnish with extra chopped pistachios.
Notes
-
Use room-temperature butter and cream cheese for smooth texture.
-
Don’t over-flour — slightly tacky dough makes softer rolls.
-
Let rolls fully proof before baking to prevent dense texture.
-
For overnight prep: refrigerate shaped rolls and bake the next morning.
Nutritional Information*
While we bake for joy and flavor, it’s good to know what’s in our treats. Here’s a rough breakdown per roll (including frosting):
- Calories: ~420
- Total Fat: 22g
- Saturated Fat: 10g
- Cholesterol: 70mg
- Sodium: 180mg
- Total Carbohydrates: 50g
- Dietary Fiber: 2g
- Sugars: 25g
- Protein: 8g
Final Thoughts
The Morning Magic of a Warm, Nutty Roll
As that pan of golden-brown pistachio rolls emerges from your oven, filling your kitchen with the intoxicating aroma of butter, toasted nuts, and sweet dough, you’ll understand exactly why I do what I do. This, right here, is the heart of Feastical—not just a recipe, but an invitation to slow down, to create something with your own hands, and to share it with the people you love.
These Soft Pistachio Rolls with Cream Cheese Frosting are more than the sum of their ingredients. They’re a bridge between generations—connecting my grandma’s flour-dusted kitchen with that little patisserie in Europe that first opened my eyes to the magic of pistachio in a sweet roll. They’re proof that you don’t have to choose between nostalgic comfort and elegant sophistication. You can have both, swirled together in one perfect, pillowy bite.
I hope this recipe becomes a tradition in your home the way it has in mine. Maybe it’s the centerpiece of your holiday brunch, the surprise you bring to a sleepy friend who needs cheering up, or simply the way you declare to your family that Saturday mornings are sacred. Whatever story these rolls become part of, I hope they bring you the same warmth, joy, and delicious connection they’ve brought me.
So tie on that apron, get a little flour on your favorite jeans, and remember: baking from scratch isn’t about perfection. It’s about presence. It’s about the magic that happens when you slow down long enough to let dough rise, to let butter soften, to let yeast work its quiet miracle. And it’s about that moment when you pull apart a warm, gooey roll, watch the frosting melt into every crevice, and take that first incredible bite.