Creamy Mushroom Tortellini : Earthy, Luxurious, and One-Pan Easy
The Coziest Bowl of Comfort: Creamy Mushroom Tortellini
Hey there, friends! Beau here, welcoming you back to Feastical. You know those evenings when you’re craving something that feels like a restaurant-quality treat, but your energy level is firmly planted in the “I just want one pan and twenty minutes” camp? I have those nights all the time. That exact craving—the tug-of-war between luxurious flavor and simple effort—is what inspired this little masterpiece: my One-Pan Creamy Mushroom Tortellini.
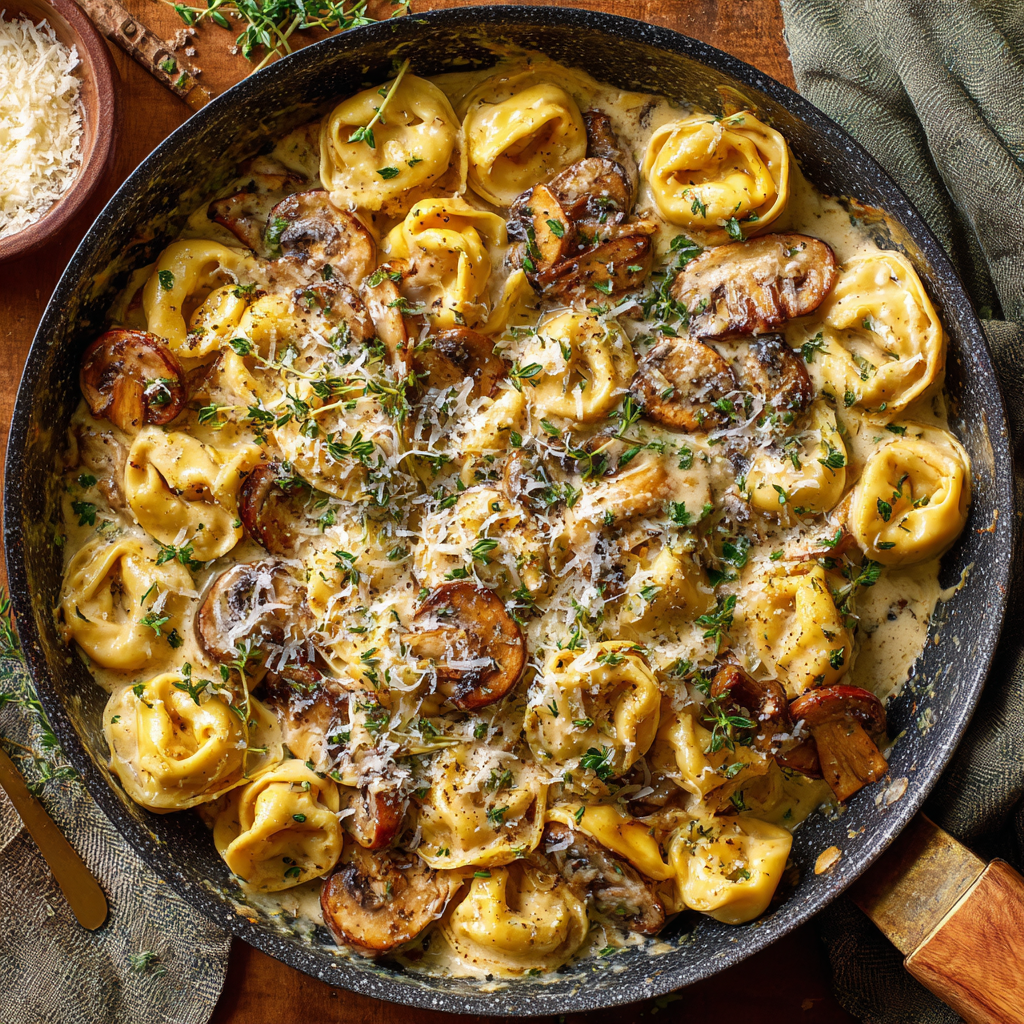
This isn’t just pasta; it’s a hug in a bowl. Imagine tender, cheesy tortellini nestled in a velvety, luxurious sauce that’s rich with the deep, earthy soul of golden-brown mushrooms. Each bite is perfumed with fragrant garlic and a whisper of thyme, and it all comes together in a single skillet with minimal fuss. The sauce clings to every nook and cranny of the pasta, making sure you get the perfect, creamy bite every single time.
It’s the kind of dish that impresses dinner guests but is honest enough for a Tuesday night solo feast. Whether you’re a seasoned cook or you’re still on a first-name basis with your takeout guy, this recipe is your new weeknight champion. So, grab your favorite skillet, and let’s turn simple ingredients into a seriously soul-satisfying meal. Trust me, your spatula is about to become a hero.
A Lesson in Umami & a Happy Little Accident
This recipe always takes me back to my early catering days. I was tasked with a last-minute vegetarian option for a wedding, and let’s just say the pressure was on. I had mountains of beautiful cremini mushrooms, some fresh pasta, and a serious need to create something memorable. In my haste, I ended up reducing the cream sauce a bit too much with the pasta already in the pan. Instead of a separate sauce, it thickened into this glorious, clingy glaze that coated every single tortellini perfectly.
The bride’s vegetarian aunt sought me out specifically to rave about the pasta, calling it “the most flavorful bite of the night.” That “mistake” taught me a beautiful lesson: sometimes, the best recipes aren’t about precision, but about feeling. Letting the pasta finish cooking directly in the sauce allows it to drink up all that mushroom-garlic-thyme goodness, transforming it from mere ingredients into a cohesive, magical dish. That happy accident is now the heart of this method, and I think of that beaming aunt every single time I make it.
Gathering Your Flavor Friends
Here’s your shopping list for cozy perfection. I’ve included my insider tips for each ingredient because knowing the “why” makes you a more confident cook!
- 1 (20 oz) package cheese tortellini – Fresh or refrigerated is best here. The delicate pasta cooks quickly and absorbs the sauce beautifully. In a pinch, dried cheese tortellini works, but you may need a splash more broth and a slightly longer cook time.
- 2 tablespoons butter or olive oil – My chef’s insight: I often use one tablespoon of each! The butter gives incredible flavor for sautéing the mushrooms, while a little olive oil helps prevent the butter from burning. Pure olive oil works great for a dairy-free version.
- 8 oz cremini or button mushrooms, sliced – Cremini (baby bellas) are my first choice for their deeper, earthier flavor, but classic white buttons are a perfect, affordable substitute. Don’t wash them—just wipe with a damp paper towel to keep them from getting soggy.
- 2 cloves garlic, minced – Fresh is non-negotiable for me here. That sharp, aromatic punch is the backbone of the sauce. If you’re in a true bind, ½ teaspoon of garlic powder can stand in.
- 1 teaspoon fresh thyme (or 1/4 tsp dried) – Thyme and mushrooms are a match made in heaven. Fresh thyme leaves add a lovely, subtle piney note. If using dried, remember it’s more potent, so use less.
- 1/2 cup vegetable or chicken broth – This is our deglazing liquid! It lifts all the flavorful browned bits (the “fond”) from the pan, creating the base of our sauce. Use low-sodium so you can control the salt.
- 3/4 cup heavy cream – For that luxurious, velvety texture. For a lighter version, half-and-half will work, but the sauce will be slightly less rich and thick. For a dairy-free swap, try full-fat canned coconut milk (the flavor will be subtly sweet).
- Salt and pepper, to taste – Season in layers! I add a pinch when cooking the mushrooms, then again at the end with the Parmesan.
- 1/4 cup grated parmesan cheese – Use the good stuff you grate yourself. The pre-grated kind often contains anti-caking agents that can make your sauce grainy. This adds a salty, nutty, umami finish.
- Optional: chopped parsley for garnish – A pop of fresh green color and a bright flavor contrast. It’s the little black dress of garnishes—simple but makes everything look finished.
Let’s Get Cooking: Your Foolproof Roadmap to Delicious
Okay, team! Let’s fire up the stove. This is where the magic happens, and I’ll be with you for every step with my best tips and hacks.
- The Golden Start: In a large, deep skillet or sauté pan, heat your butter/oil over medium heat. Once it’s shimmering (or the butter is melted and foamy), add all those sliced mushrooms in a single layer if you can. Chef’s Hack: Don’t crowd the pan! If you pile them in, they’ll steam and get soggy. We want them to sear and turn a beautiful golden brown, which builds incredible flavor. Let them cook, undisturbed, for 4-5 minutes before stirring. This will take about 6-8 minutes total.
- Wake Up the Aromatics: Push the mushrooms to the side of the pan. In the cleared space, add the minced garlic and thyme. Sauté them for just about 1 minute—until fragrant. Watch it closely! Garlic burns in a heartbeat. The goal is to wake up their oils and perfume the entire pan.
- The Flavor Lift (Deglazing!): Pour in your broth. It will sizzle and steam gloriously! Immediately, use your wooden spoon to scrape up all those delicious browned bits stuck to the bottom of the pan. This is pure flavor gold. Let it simmer for 2-3 minutes so the liquid reduces just slightly.
- Create the Velvet: Stir in the heavy cream. Bring the mixture to a gentle simmer—you’ll see small bubbles forming around the edges. Let it bubble gently for 2 minutes to allow the cream to thicken a touch and meld with the mushroom broth.
- The Pasta Plunge: Add the entire package of tortellini directly into the creamy mushroom sauce. Gently stir to coat and submerge them. Let them cook in the sauce for 5-7 minutes, stirring occasionally. This is the key step! The tortellini will cook through and release a bit of starch, which helps thicken the sauce into a luxurious, clingy coating. The sauce is ready when it coats the back of a spoon.
- The Finishing Touches: Turn off the heat. Stir in the grated Parmesan cheese until it melts smoothly into the sauce. Now, taste! This is your moment. Season with salt and freshly ground black pepper until it sings. Garnish with that pretty parsley if you’re using it.
Plating Your Masterpiece
Presentation is part of the joy! I love using shallow pasta bowls for this dish. Use tongs or a large spoon to swirl a generous portion into the bowl, making sure to get plenty of those saucy mushrooms. A final light dusting of Parmesan over the top and that parsley garnish adds a professional touch. For the full “cozy night in” experience, serve it alongside a simple arugula salad with a lemony vinaigrette (the peppery greens cut through the richness perfectly) and a slice of crusty, warm bread for sauce-mopping duty. It’s also fantastic with a side of roasted asparagus or green beans. Light some candles, pour a glass of Pinot Noir or a crisp Chardonnay, and dig in!
Make It Your Own: Delicious Twists & Swaps
The beauty of this recipe is its adaptability. Once you’ve mastered the base, play around! Here are a few of my favorite riffs:
- The Protein Boost: Add ½ pound of sliced Italian sausage (cooked and crumbled) or shredded rotisserie chicken with the tortellini. For a seafood twist, stir in a handful of baby spinach and some cooked, chopped bacon at the end.
- The Veggie Lover: Sauté a handful of chopped sun-dried tomatoes (oil-packed, drained) with the mushrooms. Or, stir in a couple of large handfuls of fresh baby spinach right after adding the cream—it will wilt beautifully into the sauce.
- The Herb Garden: Swap the thyme for fresh rosemary (use just ½ tsp, finely chopped) or sage for a more autumnal, robust flavor. A tablespoon of chopped fresh tarragon at the end is also divine.
- The “Creamy” Dairy-Free: Use olive oil, vegetable broth, and full-fat canned coconut milk. Finish with a sprinkle of nutritional yeast instead of Parmesan for a cheesy flavor.
- The Ultra-Gourmet: Use a mix of wild mushrooms like shiitake, oyster, and chanterelle. Finish the dish with a drizzle of white truffle oil and a spoonful of mascarpone cheese instead of Parmesan for insane decadence.
Beau’s Kitchen Notes
This recipe has become a true Feastical staple, and I’ve made it probably a hundred different ways. It’s evolved from that first catering accident into my go-to “I need something good, fast” meal. One funny story: I once accidentally used pumpkin spice seasoning instead of thyme (similar-looking jars in a pre-coffee haze!). It was… interesting! Not terrible, but definitely a Halloween-themed twist I don’t recommend. The biggest lesson? Taste as you go. Your mushrooms might be saltier, your broth richer. Adjust the final seasoning to your palate. And don’t stress about perfection—a slightly too-thick sauce just means it’s extra luxurious!
Your Questions, Answered
Q: My sauce is too thin! How can I thicken it?
A: No worries! Let it simmer for a few more minutes uncovered—the excess liquid will evaporate. You can also make a quick slurry by mixing 1 teaspoon of cornstarch with 1 tablespoon of cold water and stirring it into the simmering sauce. It will thicken up in about a minute.
Q: Can I make this ahead of time?
A: You can prep the mushroom mixture (through step 3) ahead of time. When ready to eat, reheat it, add the cream and tortellini, and finish cooking. I don’t recommend cooking the pasta fully ahead, as it can become mushy upon reheating.
Q: What’s the best substitute for heavy cream?
A: Half-and-half is the next best thing, though the sauce will be a bit lighter. For a dairy-free version, canned full-fat coconut milk is your best bet for creaminess.
Q: My tortellini seems dry/sticky. What happened?
A: This usually means the sauce reduced too much before the pasta was done. Just add a splash more broth or cream, stir, and let it cook for another minute. The pasta will release more starch and help recreate the creamy consistency.

Creamy Mushroom Tortellini : Earthy, Luxurious, and One-Pan Easy
Description
This creamy mushroom tortellini is the perfect quick comfort meal. It’s rich, warm, and full of cozy flavor — and the best part? It comes together in just one pan. Perfect for busy nights or whenever you want something satisfying without a lot of work.
Ingredients
-
1 (20 oz) package cheese tortellini (fresh or refrigerated)
-
2 tbsp butter or olive oil
-
8 oz cremini or button mushrooms, sliced
-
2 garlic cloves, minced
-
1 tsp fresh thyme (or ¼ tsp dried)
-
½ cup low-sodium vegetable or chicken broth
-
¾ cup heavy cream
-
Salt & black pepper, to taste
-
¼ cup grated Parmesan cheese
-
Optional: chopped parsley
Instructions
-
Sauté the mushrooms:
Heat butter or oil in a large skillet over medium heat. Add mushrooms and cook for 5–7 minutes until golden. -
Add aromatics:
Stir in garlic and thyme. Cook 1 minute until fragrant. -
Deglaze:
Pour in broth and scrape up any browned bits. Simmer 2 minutes. -
Add cream:
Stir in the heavy cream and bring to a gentle simmer. -
Cook the tortellini:
Add the tortellini straight into the sauce. Cook 5–7 minutes, stirring occasionally, until tender and the sauce thickens. -
Finish:
Turn off heat. Stir in Parmesan. Season with salt and pepper. Garnish with parsley if you like.
Notes
-
Don’t overcrowd the mushrooms — they won’t brown properly.
-
If the sauce is too thick: add a splash of broth or cream.
-
If the sauce is too thin: simmer uncovered for 1–2 extra minutes.
-
For extra flavor: use a mix of mushroom types (cremini + shiitake is amazing).
Nutritional Information*
Let’s talk about what’s in your comforting bowl. This information is for one serving (approximately ¼ of the recipe) and is an estimate based on the specific ingredients listed. Remember, variations will change these values!
Per Serving: Calories: ~480 | Protein: 19g | Carbohydrates: 42g | Fat: 28g (Saturated Fat: 16g) | Fiber: 3g | Sugar: 4g | Sodium: Will vary based on broth and cheese used.
*Disclaimer: This nutritional data is provided as a courtesy and is an estimate only. We recommend calculating exact values based on the specific brands and ingredients you use for the most accurate information.
Final Thoughts from My Kitchen to Yours
And there you have it, friends—my heartfelt, one-pan wonder. This Creamy Mushroom Tortellini is more than a recipe; it’s a reminder that incredible food doesn’t have to be complicated. It’s about layering simple flavors with love and a bit of kitchen confidence. I hope this dish finds its way onto your table on busy weeknights, lazy Sundays, and every time you need a reliable dose of delicious comfort.
Did you try it? Did you add your own spin with extra veggies or a different herb? I’d love to hear about your kitchen adventures! Tag me @Feastical on social or drop a comment on the blog. Until next time, keep your spatula close and your appetite closer. Happy cooking!
– Beau

One-Pan Tortellini Skillet: Cheesy, Easy, and Weeknight-Ready
The Weeknight Hero We All Deserve: The One-Pan Tortellini Skillet
Hey friends, Beau here! Can we talk about the sacred hour between 5 and 6 PM? You know the one. The clock is ticking, stomachs are rumbling (yours included), and the siren call of takeout menus is getting louder by the second. The last thing you want is a sink full of dishes staring you down. I get it. I’ve been there more times than I’d like to admit. That’s exactly why this dish isn’t just a recipe—it’s a lifeline.
Welcome to the glorious, cheesy, comforting world of the One-Pan Tortellini Skillet. This is the kind of meal that feels like you fussed for hours, but secretly comes together in the time it takes to watch your favorite sitcom rerun. We’re talking pillowy cheese-filled tortellini, bathed in a rich, garlicky tomato sauce, all simmered together in one single pan, then crowned with a blanket of melty, bubbly mozzarella. It’s the culinary equivalent of a warm hug, and it requires barely any cleanup. I built Feastical on the idea that food should bring joy, not stress, and this skillet is that philosophy in delicious, tangible form. So, grab your favorite large skillet, and let’s turn a chaotic weeknight into a cozy, satisfying feast.
My Love Affair with Tortellini: A Story from a Tiny Apartment Kitchen
This recipe takes me right back to my first apartment. The kitchen was so small, you could practically stir a pot on the stove while sitting on the couch. My culinary ambitions were big, but my counter space and budget were… not. One rainy Tuesday, feeling uninspired, I stared into my nearly-empty fridge. All I had was a package of cheese tortellini, a jar of marinara from my mom, and a sad little nub of mozzarella. In a moment of “what’s the worst that could happen?” I threw it all in my one decent skillet with a splash of water, slapped on a lid, and crossed my fingers.
What emerged 15 minutes later was nothing short of magic. The tortellini had plumped up perfectly in the sauce, the cheese had melted into a gooey masterpiece, and the whole thing tasted like comfort incarnate. It was the first time I truly understood that great food isn’t about fancy techniques or a million ingredients—it’s about smart, simple combinations that make life better. That humble skillet meal became a weekly ritual, a symbol of making something wonderful out of what you have. This recipe is that same spirit, just polished up with a few of the tricks I’ve learned along the way.
Gathering Your Flavor Arsenal: Ingredients & Insights
Here’s everything you’ll need to create this weeknight wonder. Don’t stress about perfection—cooking is about playing!
- 1 tbsp olive oil: Our cooking fat of choice! It adds a subtle fruitiness and helps our onions soften beautifully. No olive oil? Any neutral oil like avocado or canola works just fine.
- 1 small onion, diced: The flavor foundation. Onions add a sweet, savory depth. Pro tip: a yellow or white onion is perfect here. If you’re in a real pinch, 1 tsp of onion powder stirred into the sauce will do in a hurry.
- 3 cloves garlic, minced: The aroma that sells the whole show! Fresh is best, but ¾ tsp of garlic powder can step in. Trust me, don’t skip this.
- 20 oz cheese tortellini (fresh or refrigerated): The star! I love the triple-cheese or ricotta-spinach varieties. Chef’s Insight: Using fresh or refrigerated (not frozen) tortellini is key—they cook quickly and evenly in the sauce. Frozen can work, but you’ll need to simmer a bit longer.
- 2 cups marinara sauce: Your favorite jarred sauce is your best friend here. Pick one you love to eat on its own! Raid your pantry.
- 1 cup broth (chicken or vegetable): This is the secret sauce (literally)! It thins the marinara just enough to create a simmering liquid that cooks the pasta. Use low-sodium so you can control the salt.
- 1 tsp Italian seasoning: A little herbaceous magic. No blend? A pinch each of dried oregano, basil, and thyme will create the same cozy vibe.
- 1½ cups shredded mozzarella cheese: For that iconic, stretchy, golden-brown top. Pre-shredded is convenient, but a block you shred yourself melts even creamier (it doesn’t have anti-caking agents).
- Salt & pepper to taste: Always season as you go! Taste before adding the cheese.
- Optional: red pepper flakes, fresh basil for garnish: The flourish! Red pepper flakes add a gentle heat, and a few torn basil leaves make it look (and smell) restaurant-worthy.
Let’s Get Cooking: Your Foolproof Step-by-Step Guide
Ready? Apron optional, appetite required. Let’s dive into the simple steps.
Step 1: The Aromatic Base. Heat your olive oil in a large, deep skillet or sauté pan over medium heat. Add the diced onion and a pinch of salt. Cook, stirring occasionally, for about 5 minutes until they’re soft and translucent. This isn’t the time for high heat—we want sweetness, not char. Now, add the minced garlic and stir for just 45-60 seconds until fragrant. Chef Hack: Smelling that gorgeous garlic means it’s ready! Any longer and it risks turning bitter.
Step 2: The One-Pan Simmer. To the pan with your onions and garlic, add the uncooked tortellini, marinara sauce, broth, and Italian seasoning. Give it a really good stir, making sure the tortellini is mostly submerged in the saucy liquid. This is where the magic happens—the pasta cooks right in the flavor. Bring it to a gentle bubble, then reduce the heat to medium-low and cover the pan with a tight-fitting lid.
Step 3: The Perfect Cook. Let it simmer covered for 8-10 minutes. Give it a gentle stir halfway through to prevent any sticking and to make sure everything is cooking evenly. You’ll know it’s done when the tortellini is tender and plump, and the sauce has thickened slightly. If the sauce looks too thin, simmer uncovered for another 2-3 minutes.
Step 4: The Cheesy Finale. This is the best part. Uncover the skillet and turn off the heat. Sprinkle the shredded mozzarella evenly over the entire surface. Now, cover the pan again for just 2-3 minutes. The residual heat will melt the cheese into the most perfect, gooey blanket without overcooking the pasta. Want a bit of browning? Pop the uncovered skillet under a preheated broiler for 1-2 minutes (watch it like a hawk!).
Step 5: Serve with Love. Garnish with a sprinkle of red pepper flakes and fresh basil if you’ve got it. Serve it right from the skillet at the table for maximum “wow” factor and minimal dishes.
How to Serve It Up: From Skillet to Table
Presentation is easy when your food looks this good! I love to place the whole skillet right in the middle of the table with a big serving spoon. It encourages everyone to dig in family-style, which is what Feastical is all about. For a complete meal, here are my go-to pairings:
• The Simple Side Salad: A crisp mix of romaine and arugula with a light, tangy lemon vinaigrette cuts through the richness of the pasta perfectly.
• Garlic Bread 2.0: While the skillet simmers, toss some crusty bread with garlic butter and broil it until golden. It’s mandatory for sauce-mopping duty.
• For a Lighter Touch: Some simple steamed broccoli or roasted asparagus spears on the side add a pop of color and freshness.
Serve it in shallow bowls, and don’t forget to scrape up every last bit of that cheesy, saucy goodness!
Make It Your Own: Delicious Twists & Swaps
The beauty of this recipe is its flexibility. Play with it! Here are a few of my favorite riffs:
1. The Protein Power-Up: Add ½ pound of Italian sausage (casings removed) or ground beef to the skillet after the onions. Brown it well before adding the garlic. For a quicker option, stir in 1-2 cups of shredded rotisserie chicken or pre-cooked meatballs with the tortellini.
2. Veggie-Loaded Delight: Add 1 cup of chopped spinach or kale in the last 2 minutes of cooking, letting it wilt into the sauce. Sliced mushrooms or bell peppers can be sautéed with the onions at the start.
3. Creamy Dreamy Version: Stir in ¼ cup of heavy cream or full-fat coconut milk along with the marinara for a rosé-style sauce that’s incredibly indulgent.
4. Dietary Swaps: Gluten-Free: Use your favorite GF cheese tortellini. Dairy-Free/Vegan: Opt for vegan tortellini (many stores carry them now!), use a plant-based marinara, and top with dairy-free mozzarella shreds or a sprinkle of nutritional yeast for a cheesy flavor.
5. Herb Garden Fresh: In the summer, swap the dried Italian seasoning for a handful of fresh chopped basil and oregano stirred in at the end.
Beau’s Kitchen Notes: A Few Parting Wisdom Nuggets
This recipe has been my trusty sidekick for years, and it’s evolved with me. The biggest lesson? Trust the simmer. That covered cooking time is non-negotiable for perfectly cooked tortellini. I once got impatient and cranked the heat—let’s just say I learned about scorched tomato sauce the hard way. Low and slow is the way to go.
Also, don’t be afraid to let the cheese just “melt” with the lid on versus broiling. It creates this wonderfully creamy, almost sauce-like layer that my friends now demand. This dish is a canvas—I’ve seen readers add a spoonful of pesto, a dash of cream cheese, or even a sprinkle of feta on top. Make it yours, and it will never let you down.
Your Questions, Answered: FAQs & Troubleshooting
Q: My sauce is too thin/watery! What did I do wrong?
A: No panic! This usually means the simmer wasn’t quite strong enough or your skillet was too crowded. Simply remove the lid, turn the heat up to medium, and let it bubble for 3-5 more minutes until it reduces to your desired thickness. It will thicken a bit more off the heat, too.
Q: Can I use frozen tortellini?
A: You can, but you’ll need to adjust. Add the frozen tortellini straight in (no need to thaw) and extend the covered simmering time by about 5-7 minutes. You may also need a touch more broth if the sauce gets too thick before the pasta is tender.
Q: Help! My tortellini is sticking to the bottom of the pan.
A: This is a sign your heat was a touch too high, or you forgot the stir-halfway step. It’s okay! Gently scrape the bottom as you stir. Next time, ensure you’re at a gentle, not rolling, simmer and give that mid-cook stir.
Q: Can I make this ahead of time?
A: It’s best served fresh, but you can prep components! Sauté the onions and garlic ahead of time. Then, when ready, combine with the other ingredients and cook as directed. If you have leftovers, they reheat surprisingly well with a splash of broth or water to loosen the sauce.

One-Pan Tortellini Skillet: Cheesy, Easy, and Weeknight-Ready
Description
Cheesy, saucy, and ready in about 20 minutes, this skillet meal is comfort in a pan. Tortellini cooks directly in a garlicky tomato sauce, then gets topped with melty mozzarella—all in one pan for minimal cleanup.
Ingredients
-
1 tbsp olive oil (or neutral oil)
-
1 small onion, diced
-
3 cloves garlic, minced
-
20 oz cheese tortellini (fresh or refrigerated)
-
2 cups marinara sauce (your favorite jarred)
-
1 cup broth (chicken or vegetable, low-sodium)
-
1 tsp Italian seasoning (or ½ tsp each dried oregano, basil, thyme)
-
1½ cups shredded mozzarella cheese
-
Salt & pepper, to taste
-
Optional: red pepper flakes, fresh basil for garnish
Optional Add-Ins:
-
½ lb Italian sausage (casings removed) or rotisserie chicken for extra protein
-
1 cup chopped spinach, kale, mushrooms, or bell peppers
-
¼ cup heavy cream or coconut milk for a creamy sauce
Instructions
1. Cook Aromatics
-
Heat olive oil in a large skillet over medium heat.
-
Sauté onion 5 min until soft and translucent.
-
Add garlic, cook 45-60 sec until fragrant.
2. Combine & Simmer
-
Add uncooked tortellini, marinara, broth, and Italian seasoning.
-
Stir to submerge pasta, bring to a gentle bubble.
-
Cover, reduce heat to medium-low, and simmer 8-10 min until tortellini is tender.
-
Stir halfway through. Add more broth if sauce is too thick.
3. Add Cheese
-
Turn off heat, sprinkle mozzarella evenly over the skillet.
-
Cover 2-3 min to melt cheese.
-
Optional: broil 1-2 min for a golden-brown top.
4. Serve
-
Garnish with red pepper flakes and fresh basil.
-
Serve straight from the skillet with crusty bread or a simple salad.
Notes
-
Protein Boost: Add sausage, chicken, or meatballs.
-
Veggie Upgrade: Stir in spinach, kale, mushrooms, or bell peppers.
-
Creamy Version: Add cream or coconut milk for a rosé-style sauce.
-
Dietary Swaps: Gluten-free tortellini, vegan cheese, plant-based broth.
-
Frozen Tortellini: Extend simmer 5-7 min; add a touch more broth.
Nutritional Information (A General Guide)
While I’m a chef, not a dietitian, I believe in having a general idea of what’s in our food. Here’s a per-serving estimate based on the core recipe using full-fat cheeses and standard tortellini. Remember, this can vary based on your specific ingredient brands and any modifications you make.
Per Serving (Approximately 1/4 of the recipe):
Calories: ~430 | Protein: 20g | Carbohydrates: 38g | Fat: 22g | Saturated Fat: 9g | Cholesterol: 65mg | Sodium: 900mg* | Fiber: 3g | Sugar: 6g
*Note on Sodium: This number is highly dependent on your choice of marinara sauce, broth, and tortellini. Using low-sodium broth and sauce, and seasoning to taste at the end, gives you complete control. For precise dietary needs, please consult a nutritionist or use a calculator with your exact ingredients.
Final Thoughts: Your New Weeknight Best Friend
And there you have it, friends—the One-Pan Tortellini Skillet in all its simple, cheesy glory. This recipe is more than just a list of steps; it’s permission to take a deep breath on a busy night and still put something incredibly delicious and soul-nourishing on the table. It’s proof that great cooking doesn’t have to be complicated or create a mountain of dishes.
I hope this becomes a regular in your rotation, just like it is in mine. Give it a try, play with the variations, and make it your own. And when you do, I’d love to hear about it! Tag me over on the blog or socials with #Feastical so I can see your creations. Now, go forth, conquer that witching hour, and enjoy every last bite. Happy cooking!
– Beau
Prep Time: 5 mins | Cook Time: 15 mins | <

Tortellini Soup with Spinach & Italian Sausage: Cozy in Every Spoonful
Tortellini Soup with Spinach & Italian Sausage: Cozy in Every Spoonful
Hey, friends! Beau here from Feastical, and I have to tell you—there’s a pot of pure magic simmering on my stove right now. It’s the kind of recipe that makes your kitchen smell like a tiny, wonderful Italian grandmother lives there (the good kind, who pinches your cheeks and then stuffs you full of pasta). We’re talking about my soul-warming, belly-hugging Tortellini Soup with Spinach and Italian Sausage.
Let’s be real. Some nights, you need more than just dinner. You need an edible comfort blanket. You need something that comes together faster than you can decide what to watch on TV, yet tastes like it’s been lovingly tended to for hours. That’s this soup. It’s a hearty, brothy, flavor-packed bowl where plump cheese tortellini and savory Italian sausage swim in a rich tomato-garlic broth, all brightened up by a generous handful of fresh spinach. It’s a complete, satisfying meal in one pot, and it has this magical ability to make everything feel just a little bit better. So, tie on your favorite apron (or don’t, I’m not the boss of you), and let’s make some cozy together.
The Night This Soup Saved the Day
This recipe isn’t just a list of ingredients to me; it’s a kitchen superhero. I vividly remember the first time it became a legend in my home. It was a few years back, deep in a dreary, rainy fall. My best friend showed up at my door looking like a soaked, deflated balloon after a truly punishing day at work. The plan for a fancy, multi-course dinner went straight out the window. What we needed was instant, no-fuss comfort.
I raided the fridge and pantry with a mission: feel-better food, stat. I had some Italian sausage, a bag of frozen tortellini, a can of tomatoes, and a wilting bag of spinach. Twenty minutes later, we were hunched over steaming bowls at my kitchen island, the rain pattering against the window. We didn’t talk much at first—just the sound of spoons clinking and satisfied sighs. Then, about halfway through the bowl, she looked up, smiled a real smile for the first time that day, and said, “Beau, this is exactly what I needed.” That’s the power of simple, soulful food. It’s not just fuel; it’s a lifeline, a warm hug from the inside out. This soup has been my go-to rescue recipe ever since.
Gathering Your Flavor Allies
Here’s the beautiful part: this flavor powerhouse comes from simple, accessible ingredients. Each one plays a crucial role. Let’s break it down:
- 1 tbsp olive oil: Our trusty cooking fat. It adds a fruity base note and prevents the good stuff from sticking. Don’t sweat it if you only have vegetable or avocado oil.
- 1 lb Italian sausage (mild or spicy): This is your flavor foundation. I use bulk sausage with the casings removed for easy browning. Spicy sausage adds a wonderful kick, but mild is perfect for everyone. Chef’s Insight: For a leaner option, try Italian turkey sausage. The flavor is still fantastic!
- 1 small onion, diced: The unsung hero that builds sweetness and depth. Yellow or white onion works perfectly here.
- 3 cloves garlic, minced: Non-negotiable for that aromatic, soul-satisfying base. Fresh is best! If you’re in a pinch, ¾ tsp of garlic powder can sub in.
- 4 cups chicken or vegetable broth: The body of our soup. I prefer low-sodium broth so I can control the salt level. Using a rich homemade stock? Lucky you—it’ll be incredible.
- 1 (14 oz) can diced tomatoes: They bring a bright, tangy acidity and body. Don’t drain them! The juices are part of the liquid. Fire-roasted tomatoes are a fabulous upgrade for a smoky hint.
- 1 tsp Italian seasoning: A little herbaceous magic in one jar. It’s a blend of oregano, basil, thyme, and more. No Italian seasoning? A ½ tsp each of dried oregano and basil will do the trick.
- 2 cups fresh spinach: Our pop of color and freshness! It wilts down dramatically, so don’t be shy. Substitution Tip: Kale (stems removed) or Swiss chard work great too—just chop them and let them simmer a minute or two longer.
- 9 oz refrigerated cheese tortellini: The delightful, pillowy treasure in every bite. I love the three-cheese variety. Pro Tip: Look for them in the refrigerated pasta section, not the dry goods aisle. For a fun twist, try spinach & cheese or meat-filled tortellini.
- Salt & pepper to taste: Your final flavor adjusters. Always taste before you serve!
- Optional: Grated Parmesan for topping: Highly recommended! That salty, umami-rich finish takes each bowl to the next level.
Let’s Get Cooking: Your Flavor Journey in a Pot
This is where the magic happens, and it’s so straightforward. Follow these steps, and you’re guaranteed a winner.
- Build Your Flavor Base: In a large Dutch oven or heavy-bottomed pot, heat the olive oil over medium heat. Add the Italian sausage (casings removed). Here’s my little chef hack: Use your spoon or a spatula to break the sausage into bite-sized crumbles as it cooks. We’re not just cooking it through; we want it beautifully browned. Those little caramelized bits on the bottom of the pot? That’s liquid gold, my friend. It should take about 5-7 minutes.
- Sweat the Aromatics: Once the sausage is browned, add the diced onion right into the pot. No need to drain the fat (unless there’s an excessive amount)—that’s flavor! Sauté for 3-4 minutes until the onion turns soft and translucent. Now, add the minced garlic and stir for just 30-60 seconds until incredibly fragrant. Watch it closely! Burnt garlic is bitter, and we want sweet, aromatic bliss.
- Create the Broth: Pour in the chicken broth, the entire can of diced tomatoes (with their juices!), and the Italian seasoning. Give everything a big, happy stir, scraping up any of those delicious browned bits from the bottom of the pot. This is called “deglazing,” and it’s the secret to a deeply flavorful broth. Bring the pot to a gentle boil.
- Simmer for Soul: Once boiling, reduce the heat to a steady, low simmer. Let it bubble happily for about 5 minutes. This is your flavor-melding time, letting the tomatoes soften and the herbs infuse the broth.
- The Green & The Pasta: Stir in the fresh spinach. It will look like a mountain, but it wilts down in seconds. Now, add the entire package of cheese tortellini. Critical Tip: Check your tortellini’s package directions for cook time. Simmer the soup just until the tortellini are tender and float to the top, usually 3-5 minutes for fresh, refrigerated pasta. Do not let it boil vigorously or overcook, or your tortellini will become mushy.
- The Final Touch: Remove the pot from the heat. Taste your creation! Season with salt and freshly cracked black pepper until it sings to you. This is your moment.
How to Serve Up the Cozy
Presentation is part of the fun, even for a rustic, comforting soup like this! Ladle generous portions into deep, wide bowls. The steam rising up is part of the experience. Now, grab that block of Parmesan and shower the top with a snowy layer of fresh grating. The heat of the soup will slightly melt it into creamy, salty pockets of joy.
I love serving this with a thick slice of crusty, warm garlic bread or a fluffy piece of focaccia for dunking. A simple side salad of mixed greens with a bright, lemony vinaigrette cuts through the richness perfectly. For a truly effortless dinner, that’s it! You’ve done it. Light a candle, put on some tunes, and savor every spoonful.
Make It Your Own: Delicious Twists & Swaps
This soup is incredibly versatile. Play with it! Here are some of my favorite riffs:
- The “Kick It Up” Version: Use hot Italian sausage. Add a pinch of red pepper flakes with the garlic. Top with a swirl of spicy ‘nduja paste or a drizzle of chili oil at the end.
- The “Green Goddess” Twist: Swap the spinach for kale (add it a minute earlier to soften) or arugula (add it right at the end for a peppery bite). Stir in a big handful of fresh basil or parsley just before serving.
- The Creamy Dream: For a luxurious, creamy texture, stir in ½ cup of heavy cream, half-and-half, or full-fat coconut milk (for dairy-free) during the last 2 minutes of cooking. It becomes incredibly silky.
- Protein Swap: Not a sausage fan? Use ground chicken or turkey, and add an extra ½ tsp of fennel seeds and ¼ tsp red pepper flakes to mimic Italian sausage flavors. Pre-cooked shredded rotisserie chicken works great too—just add it with the broth to heat through.
- Vegetarian/Vegan Friendly: Skip the sausage and use a flavorful veggie broth. Sauté 8 oz of sliced mushrooms with the onion for a “meaty” texture. Use your favorite vegan cheese tortellini (many brands make them now!). Finish with a sprinkle of nutritional yeast instead of Parmesan.
Beau’s Kitchen Notes
This recipe has evolved from my “kitchen sink” rescue meal into a tested-and-perfected favorite. A funny thing I’ve learned: the tortellini are sneaky. They continue to absorb liquid even after you turn off the heat. If you know you’ll have leftovers, I sometimes undercook the tortellini by a minute or even store the cooked tortellini separately from the soup broth and combine them when reheating. This keeps the pasta perfectly al dente. Also, confession time: I’ve absolutely used frozen tortellini in a pinch. Just add them straight from the freezer and add a couple minutes to the simmer time. It still works like a charm. The goal here is deliciousness, not perfection!
Your Questions, Answered
Q: My tortellini got mushy. What happened?
A: The most common culprit is overcooking. Fresh tortellini cooks very quickly. The moment they float and are tender, they’re done. Also, they will soften more as they sit in the hot broth. For best results, serve immediately or use the “store separately” tip above for leftovers.
Q: Can I make this soup ahead of time?
A: Absolutely, with one strategy. You can cook the soup base (through step 4) and store it in the fridge for up to 2 days. When ready to serve, reheat the base to a simmer and then add the spinach and fresh tortellini to cook. This ensures perfect texture.
Q: It’s a bit too spicy/not spicy enough. How can I adjust?
A> Flavor control is key! If it’s too mild, a pinch of red pepper flakes at the table works. Too spicy? Stir in a teaspoon of sugar or a splash of cream to help mellow the heat. Remember, you can always add more heat, but you can’t take it away.
Q: Can I freeze this soup?
A> I don’t recommend freezing it with the tortellini in it, as they become very grainy and unpleasant upon thawing. Instead, freeze the sausage and broth base only. Thaw, reheat, and then add fresh spinach and tortellini.

Tortellini Soup with Spinach & Italian Sausage: Cozy in Every Spoonful
Description
A hearty, brothy, flavor-packed soup where plump cheese tortellini and savory Italian sausage swim in a rich tomato-garlic broth, brightened with fresh spinach. Comfort in a bowl, ready in about 30 minutes.
Ingredients
-
1 tbsp olive oil (or vegetable/avocado oil)
-
1 lb Italian sausage, casings removed (mild or spicy)
-
1 small onion, diced
-
3 cloves garlic, minced
-
4 cups chicken or vegetable broth (low-sodium preferred)
-
1 (14 oz) can diced tomatoes (with juice)
-
1 tsp Italian seasoning (or ½ tsp each oregano & basil)
-
2 cups fresh spinach (or kale/Swiss chard)
-
9 oz refrigerated cheese tortellini
-
Salt & pepper, to taste
-
Optional: grated Parmesan for topping
Instructions
1. Brown the Sausage
-
Heat olive oil in a large pot over medium heat.
-
Add sausage and break into crumbles. Cook 5-7 min until browned.
2. Sauté Aromatics
-
Add onion; cook 3-4 min until soft.
-
Stir in garlic 30-60 sec until fragrant.
3. Build the Broth
-
Pour in broth, tomatoes, and Italian seasoning.
-
Scrape browned bits from bottom of pot (deglazing).
-
Bring to a gentle boil, then reduce to low simmer for 5 min.
4. Add Greens & Pasta
-
Stir in spinach; let wilt.
-
Add tortellini; simmer 3-5 min until tender (follow package instructions).
-
Avoid overcooking to prevent mushy pasta.
5. Season & Serve
-
Remove from heat; taste and adjust salt & pepper.
-
Serve in bowls; top with grated Parmesan.
-
Optional sides: crusty bread, focaccia, or a fresh salad.
Notes
-
Kick It Up: Use hot sausage + red pepper flakes; drizzle chili oil.
-
Green Twist: Swap spinach for kale or arugula; add fresh herbs at the end.
-
Creamy Version: Stir in ½ cup cream, half-and-half, or coconut milk at the end.
-
Protein Swap: Ground chicken/turkey or shredded rotisserie chicken works great.
-
Vegetarian/Vegan: Skip sausage, sauté mushrooms, use vegan tortellini, finish with nutritional yeast.
-
Nutritional Information*
Here’s a general breakdown per serving (based on 6 servings, using mild Italian pork sausage and regular cheese tortellini). Remember, this is an estimate, and ingredients vary:
- Calories: ~420
- Protein: 25g (Thanks, sausage and cheesy pasta!)
- Carbohydrates: 30g
- Fat: 23g
- Fiber: 3g
*For specific dietary needs, please calculate using your exact ingredients and brands. To reduce calories/fat, opt for Italian turkey sausage and light cheese tortellini. The spinach adds a great boost of vitamins A, C, and K!
One Last Spoonful of Thought
And there you have it, my friends—my go-to bowl of comfort, my rainy-day rescuer, my “I-need-something-awesome-now” dinner hero. This Tortellini Soup with Spinach and Italian Sausage proves that incredible flavor doesn’t need to be complicated. It’s about gathering simple ingredients and turning them into something greater than the sum of their parts: a moment of pure, delicious comfort.
I truly hope this recipe finds its way into your regular rotation and becomes a story in your own home. Maybe it’ll be the soup you make after a long day, the one you serve to a friend in need, or the easy winner for a busy weeknight. However you enjoy it, make it with a pinch of love and a dash of fun. That’s the Feastical way.
If you make it (and I really hope you do!), tag me @feastical or drop a comment on the blog. I love seeing your creations! Now, go forth and simmer something splendid.
With a full belly and a happy heart,
Beau
Ultimate Moist Chocolate Cake : Deep, Rich & Unforgettable
The Ultimate Moist Chocolate Cake: Your New Go-To Recipe for Pure Joy
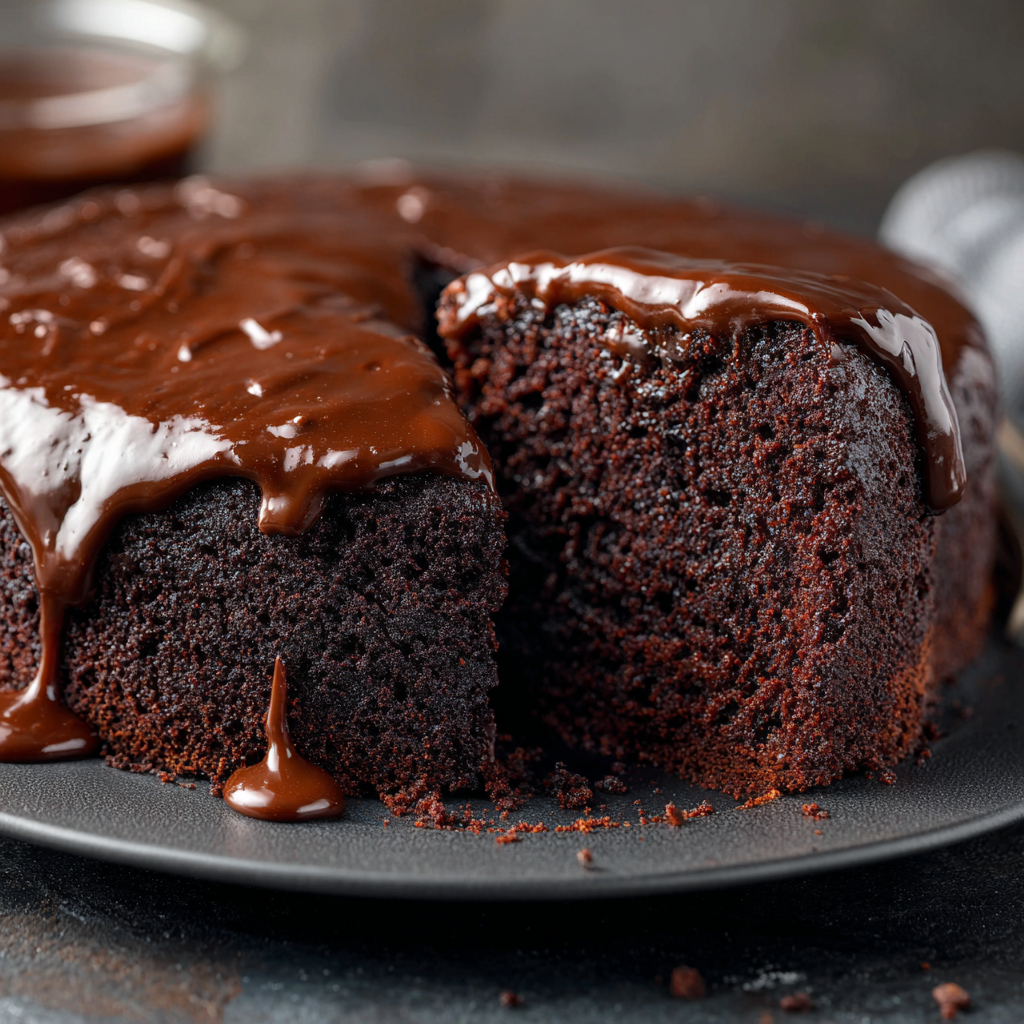
Hey friends, Beau here! Let’s talk about magic. Not the rabbit-out-of-a-hat kind, but the kind that happens when flour, sugar, cocoa, and a whole lot of heart come together in a warm oven. I’m talking about that moment you slide a cake tester into a deeply bronzed chocolate cake and it comes out clean. That’s the magic I live for, and it’s the magic I want to share with you today.
This isn’t just *any* chocolate cake recipe. This is the Ultimate Moist Chocolate Cake—the one I’ve tweaked, tested, and triumphantly served for years. It’s the cake that gets requested for birthdays, potlucks, and “just because it’s Tuesday” nights. It’s deeply chocolatey without being bitter, incredibly tender without being dense, and sweet in the most satisfying way. The secret? A combination of rich cocoa, tangy buttermilk, and yes, a generous pour of hot coffee that amplifies the chocolate flavor to superstar levels. Don’t worry, it won’t taste like coffee—it just tastes like more and better chocolate. So, tie on your favorite apron, clear your counter, and let’s bake a memory. This cake is about to become your kitchen’s new best friend.
Why This Cake? A Slice of Memory
Every great recipe has a story, and this one starts in my Grandma Mo’s kitchen. She was a woman who believed chocolate was a primary food group and that a cake’s worth was measured by the silence that fell after the first bite. Her version was legendary, always dusted with a snowdrift of powdered sugar and served with a glass of cold milk. My job, as her official “batter-licker,” was to scrape the bowl. I remember the shock of the thin, almost soupy batter. “Grandma,” I’d whisper, “is it supposed to be like this?” She’d just wink and say, “That’s where the magic hides, Beau.”
And she was right. That loose batter baked up into the most impossibly moist, cloud-soft cake I’d ever eaten. This recipe is my homage to hers—updated with a touch more cocoa and a dash of vanilla, but holding true to her fundamental wizardry. When I pull this cake out of the oven, the smell alone transports me right back to her linoleum-floored kitchen. It’s more than dessert; it’s a warm, chocolatey hug from the past. Now, let’s make some new memories with it.
Gathering Your Chocolate Dream Team
Here’s everything you’ll need. I’ve included my chef-y notes next to each one because knowing your ingredients is the first step to kitchen confidence!
- 3 ½ cups all-purpose flour: The sturdy foundation. For a slightly lighter crumb, you can swap in cake flour, but all-purpose works beautifully here.
- 4 cups granulated white sugar: Yes, it’s a lot! This balances the intense cocoa and creates that tender, moist texture. For a deeper flavor, you can use 2 cups white and 2 cups light brown sugar.
- 1 ½ cups unsweetened cocoa powder: The star! Use a good-quality natural or Dutch-process cocoa. Dutch-processed will give you a darker, slightly mellower cake. This is where the deep, rich flavor lives.
- 3 teaspoons baking soda: Our leavening agent. It reacts with the acidic buttermilk and coffee to give the cake its magnificent rise. Make sure it’s fresh!
- 1 ½ teaspoons salt: The flavor enhancer. It makes the chocolate taste more like chocolate. Never skip it.
- 4 large eggs: They provide structure and richness. Bring them to room temperature for a smoother, more cohesive batter.
- 2 cups buttermilk: The secret weapon for tenderness and a subtle tang. Chef’s Hack: No buttermilk? No panic. Add 2 tablespoons of white vinegar or lemon juice to a measuring cup, then top with regular milk to make 2 cups. Let it sit for 5 minutes until it curdles slightly. Works like a charm!
- 1 cup melted butter: For luxurious moisture and flavor. I use unsalted. You can also use an equal amount of neutral oil (like vegetable or canola) for an even more moist crumb.
- 2 tablespoons vanilla extract: That’s right, tablespoons! Vanilla is the supporting actor that makes the chocolate star shine brighter.
- 2 cups hot coffee: The magic potion. It blooms the cocoa powder, deepening its flavor. The cake will NOT taste like coffee—I promise. If you’re avoiding caffeine, use hot decaf or even just hot water in a pinch.
- Optional: 1 teaspoon cinnamon or ½ teaspoon espresso powder: My pro-tips for extra depth. A pinch of cinnamon adds warmth, while a bit of instant espresso powder punches up the chocolate flavor even more.
Let’s Bake: Step-by-Step to Chocolate Heaven
Ready? Let’s do this. Read through all the steps first, then let’s get mixing. Remember, baking is a vibe—put on some tunes and enjoy the process.
- Preheat & Prep: Fire up your oven to 350°F (175°C). This gives it time to reach the perfect, steady temperature. Now, grab your pans. For two 9-inch round cake pans or one 9×13-inch pan, give them a good coat of butter or non-stick spray, then dust with flour or a spoonful of cocoa powder (to avoid white specks!). Tap out the excess. Lining the bottoms with parchment paper is my foolproof insurance policy for easy release.
- Mix the Dry Team: In a large bowl—trust me, you’ll need the space—whisk together the flour, sugar, cocoa powder, baking soda, salt, and any optional add-ins like cinnamon. Whisking does two things: it combines everything evenly and aerates the mixture, which is a great head start for a tender cake.
- Meet the Wet Team: In another bowl, crack in your room-temp eggs and give them a light beat. Then, whisk in the buttermilk, melted (but slightly cooled) butter, and that glorious vanilla. It’ll look a bit lumpy and separated at first, but just whisk until it’s a smooth, homogenous mixture.
- The Big Merge: Pour the wet ingredients into the dry ingredients. Now, here’s a crucial tip: mix until just combined. A few streaks of flour are okay! Overmixing is the enemy of tenderness, as it develops the gluten in the flour and can lead to a tough cake. Use a spatula and fold gently.
- The Magic Pour: Slowly and carefully, stir in the hot coffee. The batter will be very thin—this is normal and exactly what you want! Don’t freak out. This liquid batter is what steams in the oven, creating that unbelievable, melt-in-your-mouth moisture. Grandma Mo knew her stuff.
- Pan & Bake: Carefully divide the batter evenly between your prepared pans. Slide them into the center of your preheated oven. Resist the urge to open the oven door for at least 30 minutes! Let the heat work its magic. Bake for 35-40 minutes, or until a toothpick or cake tester inserted into the center comes out with a few moist crumbs (not wet batter).
- The Patience Test: This is the hard part. Let the cakes cool in their pans on a wire rack for about 15-20 minutes. Then, run a knife around the edges and invert them onto the rack to cool completely. Frosting a warm cake is a recipe for a delicious but sloppy mess. Let’s avoid the heartbreak.
Serving It Up: The Grand Finale
Once your cakes are completely cool, the fun begins! This cake is a blank canvas for your favorite frosting. A rich chocolate ganache poured over the top is pure decadence. A fluffy cream cheese frosting offers a lovely tangy contrast. For a classic birthday vibe, you can’t beat a thick layer of chocolate buttercream. If you’re keeping it simple, a dusting of powdered sugar or a pile of fresh berries and a dollop of whipped cream is absolute perfection.
Slice with a sharp knife dipped in hot water for clean cuts. Serve it on your prettiest plate, maybe with a scoop of vanilla bean ice cream on the side. Watch as the first slice disappears, followed by happy, chocolate-smeared smiles. That’s the whole point, isn’t it?
Make It Your Own: Recipe Variations
One great recipe should inspire many. Here are a few ways to play with this chocolate cake base:
- Mexican Chocolate Twist: Add 1 ½ teaspoons of cinnamon and a tiny pinch of cayenne pepper to the dry ingredients. Frost with a cinnamon-spiced buttercream.
- Chocolate Peanut Butter Paradise: Swirl 1 cup of creamy peanut butter into your chosen frosting, or spread a layer between the cake layers. Garnish with chopped salted peanuts.
- Black Forest Style: Poke small holes in the baked and cooled cake layers and brush with a bit of cherry liqueur or syrup. Fill and top with whipped cream and dark sweet cherries.
- Dairy-Free Delight: Use your favorite plant-based milk for the buttermilk hack, substitute the butter with an equal amount of coconut oil or vegan butter, and ensure your chocolate is dairy-free.
- Cupcake Craze: This batter makes fantastic cupcakes! Line muffin tins and fill cups ⅔ full. Bake for 18-22 minutes. You’ll get about 36 decadent cupcakes perfect for parties.
Beau’s Chef Notes & Kitchen Stories
Over the years, I’ve learned a few things about this cake. First, it’s virtually foolproof—it has forgiven me for distracted baking more than once. Second, it tastes even better the next day. The flavors meld and the crumb becomes even more tender. I often bake it a day ahead of an event.
One time, I was filming a tutorial for the blog and, in my chatty excitement, I accidentally added the coffee before combining the wet and dry ingredients. I had a momentary panic, then just mixed it all together anyway. You know what? It baked up exactly the same. This recipe is resilient and wants to be delicious. So don’t stress. Have fun with it. That’s the real secret ingredient.
FAQs & Troubleshooting: Your Questions, Answered
- Q: Can I really taste the coffee?
A: Nope! The coffee simply intensifies the rich, dark chocolate flavor. If you’re serving someone who is sensitive to the taste, they’ll never know it’s there. It’s a chef’s trick for maximum chocolate impact. - Q: My batter was so thin I thought I messed up. Did I?
A: You did everything perfectly! This is a hallmark of this recipe. That thin, pourable batter is the key to the cake’s legendary moist texture. Have faith! - Q: Can I make this cake ahead of time?
A: Absolutely. Bake the layers, let them cool completely, wrap them tightly in plastic wrap, and freeze for up to a month. Thaw at room temperature before frosting. You can also store the frosted cake, covered, at room temperature for a day or in the fridge for up to 3 days. - Q: The center of my cake sank a little. What happened?
A: This usually means it needed just a few more minutes in the oven, or your baking soda might be old. Next time, test for doneness in a couple of spots, and make sure your leavener is fresh.

Ultimate Moist Chocolate Cake : Deep, Rich & Unforgettable
Description
Ultimate Moist Chocolate Cake
Why You’ll Love It
Rich, deeply chocolatey, and incredibly moist—this cake uses cocoa, buttermilk, and a splash of hot coffee to amplify flavor. Perfect for birthdays, potlucks, or “just because.”
Ingredients
Dry Ingredients:
-
3 ½ cups all-purpose flour
-
4 cups granulated sugar (or 2 cups sugar + 2 cups light brown sugar)
-
1 ½ cups unsweetened cocoa powder
-
3 tsp baking soda
-
1 ½ tsp salt
-
Optional: 1 tsp cinnamon or ½ tsp instant espresso powder
Wet Ingredients:
-
4 large eggs, room temperature
-
2 cups buttermilk (or 2 cups milk + 2 tbsp vinegar, sit 5 min)
-
1 cup melted butter (or neutral oil)
-
2 tbsp vanilla extract
-
2 cups hot coffee (or hot water/decaf)
Instructions
1. Prep
Preheat oven to 350°F (175°C).
Grease and flour 2×9-inch round pans or 1x9x13-inch pan. Line with parchment for easy release.
2. Mix Dry Ingredients
In a large bowl, whisk together flour, sugar, cocoa, baking soda, salt, and optional add-ins.
3. Mix Wet Ingredients
In another bowl, beat eggs lightly. Whisk in buttermilk, melted butter, and vanilla until smooth.
4. Combine
Pour wet into dry ingredients. Fold gently until just combined. Batter will be slightly lumpy—do not overmix.
5. Add Coffee
Stir in hot coffee slowly. Batter will be thin—this is normal and key to a moist cake.
6. Bake
Divide batter into prepared pans. Bake 35-40 minutes (9×13-inch pan may take slightly longer).
Toothpick should come out with a few moist crumbs.
7. Cool
Cool 15-20 minutes in pans, then remove to a wire rack. Let cool completely before frosting.
Notes
-
Thin batter is normal—key to moistness.
-
Coffee intensifies chocolate without tasting like coffee.
-
To avoid sinking centers, ensure fresh baking soda and check doneness in multiple spots.
-
Cake can be baked ahead: wrap cooled layers, freeze up to a month, thaw before frosting.
Nutritional Information (Per Serving)
Please note: This is an approximate estimate for 1 of 20 slices, calculated without frosting. It’s a treat, meant to be savored and shared!
- Calories: ~340
- Total Fat: 15g
- Saturated Fat: 9g
- Carbohydrates: 48g
- Fiber: 3g
- Sugars: 30g
- Protein: 4g
Prep Time: 15 mins | Bake Time: 40 mins | Total Time: 55 mins | Servings: 20
Final Thoughts: Share the Love
And there you have it, friends—my heart, in chocolate cake form. This recipe is more than a list of instructions; it’s an invitation to create something wonderful, to fill your home with an incredible aroma, and to gather people you love around the table.
I’d love to hear how your baking adventure goes! Did you add a twist? Did it become an instant family favorite? Tag me @Feastical or use #FeasticalRecipe so I can see your beautiful creations. Remember, in this kitchen and in life, the sweetest moments are the ones we share. Now, go preheat that oven and bake some joy.
With a full heart and an empty mixing bowl,
Beau

Taco Meat Quesadillas : Crispy, Cheesy, and Packed with Flavor
Easy Taco Meat Quesadillas in the Air Fryer: Your New Go-To Comfort Food
Hey friend, Beau here! Grab a seat—or better yet, pull up a stool at my kitchen island. Let’s talk about one of life’s greatest culinary magic tricks: transforming last night’s taco night into today’s crispy, gooey, downright triumphant meal. I’m not talking about a sad, soggy microwave reheat. Oh no. I’m talking about Taco Meat Quesadillas, cooked to golden perfection in the air fryer.
If you’ve ever stared at a container of leftover taco meat and thought, “We just did this,” I’m here to hand you a culinary wand. This recipe is the epitome of what I stand for at Feastical: simple, soulful, and satisfying. It’s for the busy weeknights, the hungry after-school crowds, the “I just need something delicious and I need it NOW” moments. We’re taking three basic components—tortillas, meat, cheese—and elevating them into something that crackles with every bite and oozes with cheesy, savory joy.
The air fryer is our secret weapon here. It works its hot, circulating air magic to get that tortilla unbelievably crispy without the fuss of a skillet or the grease of deep-frying. In about the time it takes to find a good show to binge, you’ll have a plate of hot, melty, perfectly crisp wedges ready to dunk into all your favorite fixings. So, let’s ditch the “leftover blues” and turn that fantastic taco flavor into a whole new experience. Your spatula and your stomach will thank you.
The Night That Started It All: A Tale of Tortillas and Triumph
This recipe was born out of pure, beautiful kitchen chaos. Picture it: My nephew’s birthday party, a mountain of ground beef seasoned to taco perfection, and a hungry crowd that had already demolished two batches of my famous guac. As the party wound down, we were left with what my mom would call “a nice problem to have”—a solid bowl of leftover taco meat and a pack of tortillas staring us down.
My sister, in full hostess-recovery mode, was about to just shove it all in the fridge. But I had a flashback to my college days, making “desperation quesadillas” on a cheap electric griddle. “Hand me that cheese,” I said, a glint in my eye. We piled the leftovers into tortillas, but instead of firing up the stove, I tossed them into the air fryer on a whim. Eight minutes later, we sliced into the crispiest, most incredible quesadillas any of us had ever tasted. The kids came running back from their video games, asking, “Did you make MORE food?!” That’s the sign of a winner. Now, I almost hope for taco meat leftovers just so I can make these again. It’s the little kitchen rescues that become lifelong traditions.
Gathering Your Flavor Toolkit: Ingredients & Insights
Here’s the beautiful part: you likely have most of this already. This isn’t a fussy list. It’s a launchpad.
- 4 Flour Tortillas (8-inch): The vessel of joy! I like the medium 8-inch size—they’re the perfect personal portion. The burrito-sized ones can get unwieldy. Chef’s Insight: For an extra layer of flavor, look for “street taco” size corn tortillas and make mini quesadillas, or use a spinach or tomato herb wrap for a colorful twist.
- 1 Cup Leftover Taco Meat: The star! This is where the flavor lives. Whether you used my classic beef blend, lean ground turkey, or a fantastic plant-based crumble, it all works. Substitution Tip: No leftovers? No sweat! Simply brown ½ lb of ground meat with 2 tbsp of your favorite taco seasoning and a splash of water.
- 1 ½ Cups Shredded Cheese: The glue that holds our happiness together. I’m a sucker for a Monterey Jack and sharp cheddar blend—Jack melts like a dream, and cheddar brings the tang. Chef’s Insight: For the love of all things crispy, please shred your own cheese from a block. The pre-shredded stuff has anti-caking agents that can make the melt a bit grainy. Trust me on this one; the extra minute is worth it.
- Cooking Spray or Oil: Our crisp-enhancer. A light spritz of avocado or olive oil spray is all you need. Chef’s Hack: If you don’t have spray, put a tiny bit of oil on a paper towel and gently rub it on the tortilla. We’re just looking for a light gloss, not a deep fry!
- The Supporting Cast (Optional but Highly Recommended): Salsa, guacamole, sour cream, pico de gallo, a squeeze of lime, pickled jalapeños, a sprinkle of fresh cilantro. This is where you make it your own!
Building Your Crispy Masterpiece: Step-by-Step
Ready? This is the fun part. I’ll walk you through it like you’re right here with me.
- Assemble with Confidence: Lay out two of your tortillas on a clean cutting board. Evenly divide the taco meat and spread it over one half of each tortilla, leaving a small border around the edge. Why only half? Because we’re going to fold these beauties over for the perfect cheese-to-crisp ratio! Now, shower that meat with your glorious shredded cheese. Don’t be shy—the cheese acts as both flavor and delicious edible glue. Top with the remaining two tortillas and gently press down.
- Prep for the Crisp: Lightly spray or brush the top of each assembled quesadilla with oil. This is key for that golden finish. I do this right on the cutting board before they go into the basket.
- Preheat for Perfection: Get that air fryer humming! Preheat it to 375°F (190°C) for about 3 minutes. A hot start ensures an immediate sizzle and prevents a soggy bottom. It’s a small step that makes a huge difference.
- Air Fry to Golden Glory: Carefully place your quesadilla in the basket. If you’re making two, give them some space! Don’t overcrowd—air needs to circulate. Cook for 6-8 minutes, but here’s my pro tip: Flip it halfway through! At the 3-4 minute mark, use a spatula or tongs to carefully flip the quesadilla. This gives you even crispiness on both sides. You’re looking for a deep, golden brown with a few bubbly, toasted spots.
- The Rest & The Slice: Once they’re gorgeously golden, transfer your quesadilla to the cutting board. This is crucial: let it rest for 1-2 minutes! This allows the molten cheese to set just a bit, so when you cut it, it doesn’t all gush out. Then, use a sharp knife or pizza cutter to slice into wedges. Listen to that satisfying crunch.
Let’s Dish It Up: Serving Suggestions
Presentation is part of the fun! I love serving these on a big, rustic wooden board or a brightly colored platter. Pile the wedges high so everyone can grab one. In the center, place little bowls of all your dippers and toppings: a vibrant red salsa, a bowl of creamy guacamole (sprinkled with a little extra salt and lime), and a dollop of cool sour cream.
Want to make it a full fiesta? Plate a couple of wedges alongside a scoop of Mexican rice and some simple black beans simmered with a bit of cumin and garlic. For a lighter touch, a crisp green salad with lime vinaigrette cuts through the richness beautifully. Don’t forget the final flourish: a sprinkle of fresh chopped cilantro or a few thin slices of radish for a peppery crunch. The goal is a plate that’s as joyful to look at as it is to eat.
Mix It Up! Delicious Recipe Variations
The basic formula is your playground. Here are a few of my favorite ways to switch it up:
- Buffalo Chicken Twist: Swap the taco meat for shredded rotisserie chicken tossed in buffalo sauce. Use a blue cheese or ranch dressing for dipping instead of salsa. Game day, meet quesadilla.
- Breakfast-for-Dinner Quesadilla: Scrambled eggs, crispy bacon or chorizo, diced potatoes, and cheddar cheese. Serve with a side of salsa verde or hot sauce. Brunch just got a major upgrade.
- Veggie-Packed Fiesta: Skip the meat and sauté bell peppers, onions, black beans, and corn with taco seasoning. The beans add great protein and texture. Perfect for Meatless Monday!
- “Everything But The Kitchen Sink” Quesadilla: Got random bits in the fridge? A spoonful of leftover rice, some roasted veggies, a few slices of avocado inside (add after cooking), and different cheese blends like pepper jack or cotija. This is a no-waste winner.
- Dessert Quesadilla: Yes, really! Spread a tortilla with Nutella or peanut butter, add sliced bananas or strawberries, a sprinkle of mini chocolate chips, and a light dusting of powdered sugar after air frying. Cook at 350°F for just 4-5 minutes until warm and crispy.
Beau’s Chef Notes & Kitchen Chatter
This recipe has become a weekly staple in my house. It’s evolved from that first “aha!” moment into my most-requested quick fix. One funny fail I had early on? I got overzealous with the filling. I piled it so high that when I flipped it, a cascade of cheese and meat met a fiery death at the bottom of my air fryer. Lesson learned: a thin, even layer is your friend. The cheese needs to melt and bind, not explode!
I’ve also learned that every air fryer is a little different. Get to know yours! The first time you make these, peek in at the 5-minute mark. If they’re browning too fast, turn the temp down a smidge. If they’re pale, let them go another minute. You’re the boss of your crunch. This recipe is a template for confidence. Once you master this, you’ll be air frying everything from grilled cheese to empanadas.
Your Questions, Answered: FAQs & Troubleshooting
Q: My quesadilla is getting too brown on the outside before the cheese is fully melted inside. Help!
A: Ah, the classic air fryer conundrum! First, make sure your filling isn’t straight-from-the-fridge cold. Let your meat and cheese sit out for 10 minutes before assembling. Second, try lowering the temperature to 360°F and adding a minute or two to the cook time. The lower, slower heat allows the interior to warm up without over-toasting the exterior.
Q: Can I make these ahead of time?
A: You can assemble them ahead! Wrap the uncooked quesadillas tightly in plastic wrap and store in the fridge for up to 4 hours. When ready, let them sit at room temp for 5-10 minutes, then air fry as directed, adding an extra minute if needed. I don’t recommend freezing the assembled ones, as the tortillas can get gummy.
Q: I don’t have an air fryer. Can I still make these?
A: Absolutely! My original method was in a skillet. Heat a non-stick or cast-iron pan over medium heat with a tiny bit of butter or oil. Cook the quesadilla for 2-3 minutes per side, pressing down lightly with a spatula, until golden and crispy. You can also bake them on a sheet pan at 400°F for about 10-12 minutes, flipping halfway.
Q: The edges are crispy, but the very center of the tortilla seems a bit soft. What gives?
A: This usually means there’s a bit too much moisture from the filling or the tortilla itself. Pat your taco meat with a paper towel if it seems wet. Also, make sure you’re not overloading the center—spread the filling evenly. Lastly, a quick 30-second pre-toast of the tortilla in a dry skillet can help create a moisture barrier.

Taco Meat Quesadillas : Crispy, Cheesy, and Packed with Flavor
Description
Transform leftover taco meat into crispy, cheesy, golden quesadillas in the air fryer! Perfect for weeknights, after-school snacks, or whenever you need a fast, satisfying meal. No soggy reheats here—just crunchy tortillas, melty cheese, and savory filling in every bite.
Ingredients
-
4 flour tortillas (8-inch)
-
1 cup leftover taco meat (beef, turkey, or plant-based)
-
1½ cups shredded cheese (cheddar, Monterey Jack, or a blend)
-
Cooking spray or a light brush of oil
Optional Toppings & Dips:
Salsa, guacamole, sour cream, pico de gallo, lime wedges, pickled jalapeños, fresh cilantro
Instructions
1. Assemble the Quesadillas
-
Lay two tortillas on a cutting board.
-
Spread taco meat evenly over half of each tortilla, leaving a small border.
-
Sprinkle cheese on top of the meat.
-
Fold the tortilla over the filling to create a half-moon shape.
-
Lightly spray or brush the top with oil for extra crispiness.
2. Preheat the Air Fryer
Preheat to 375°F (190°C) for 3 minutes.
3. Air Fry
-
Place quesadillas in the basket with space around each one.
-
Cook 6-8 minutes, flipping halfway through, until golden and crispy.
4. Rest & Slice
Let rest 1-2 minutes before slicing into wedges. This keeps the cheese from spilling out.
Serving Suggestions
-
Serve with salsa, guacamole, or sour cream.
-
Pair with Mexican rice, black beans, or a crisp salad.
-
Sprinkle fresh cilantro or thin radish slices on top for extra color and flavor.
Variations
-
Buffalo Chicken: Swap meat for shredded chicken tossed in buffalo sauce; serve with ranch or blue cheese dressing.
-
Breakfast Quesadilla: Scrambled eggs, bacon or chorizo, diced potatoes, cheddar cheese.
-
Veggie Fiesta: Sautéed peppers, onions, corn, and black beans with taco seasoning.
-
Leftovers Remix: Add small bits of leftover rice, roasted veggies, or multiple cheese types.
-
Dessert Quesadilla: Nutella or peanut butter, sliced bananas/strawberries, mini chocolate chips; cook at 350°F for 4-5 minutes.
Notes
-
Cheese not melting? Let meat and cheese sit at room temp 10 minutes before cooking.
-
Tortilla too soft in center? Avoid overfilling; pat meat dry if needed. Pre-toast tortilla for a moisture barrier.
-
No air fryer? Use a skillet over medium heat 2-3 minutes per side, pressing lightly, or bake at 400°F (200°C) for 10-12 minutes, flipping halfway.
Nutritional Information (A Quick Note)
As a chef who believes in balance and real food, I think it’s helpful to have a ballpark idea of what you’re enjoying. This info is for one serving (roughly half of one 8-inch quesadilla), using 90/10 lean ground beef and a blend of cheddar and Monterey Jack cheeses. Remember, these numbers can change based on your specific ingredients and toppings!
- Calories: ~380
- Protein: 20g (Fantastic for keeping you full!)
- Carbohydrates: 30g
- Fat: 22g
To lighten it up, use lean ground turkey or a plant-based meat, load up on veggie toppings, opt for a reduced-fat cheese, or use a high-fiber, low-carb tortilla. Food should nourish and delight—you get to decide what that balance looks like for you.
Final Thoughts from My Kitchen to Yours
And there you have it, friend—the humble taco meat quesadilla, reborn as a crispy, cheasy, air-fried hero. This recipe is more than just a way to use up leftovers; it’s a reminder that the best meals often come from a little creativity and a lot of heart. They’re unfussy, deeply satisfying, and guaranteed to put a smile on everyone’s face at the table.
So the next time you see that container in the fridge, don’t think “leftovers.” Think “opportunity.” I’d love to hear how your quesadilla adventure turns out! Tag me on social @feastical with your golden-brown creations. Now, go forth and make something delicious. Your kitchen is waiting.
With a crispy crunch,
Beau Collier

Crunchwrap-Style Quesadilla : Crispy, Cheesy, Taco-Inspired Goodness
The Crunchwrap-Style Quesadilla: Your New Favorite Kitchen Hack
Hey friends, Beau here from Feastical! Let’s cut straight to the chase: have you ever stood in your kitchen, torn between three different cravings? You want the gooey, melted perfection of a quesadilla. You’re dreaming of that loud, satisfying CRUNCH of a tostada. And your soul is whispering for the zesty, bold punch of a really good taco. Choosing just one feels like a culinary compromise we shouldn’t have to make.
Well, guess what? We don’t have to. I’m about to introduce you to your new best friend for busy weeknights, lazy lunches, and “I-need-something-awesome-now” moments: the Crunchwrap-Style Quesadilla.
This isn’t just a recipe; it’s a kitchen revolution wrapped in a flour tortilla. We take one giant tortilla, load the center with layers of flavor and texture, and then masterfully fold it all into a neat, sealed package. A quick sizzle in a hot pan transforms it into a golden-brown, portable masterpiece where every single bite has it all—melted cheese, savory filling, a crispy middle layer, and cool, fresh toppings. It’s genius in its simplicity and absolutely glorious to eat. So, tie on your apron, grab your favorite spatula, and let’s make some magic happen.
The Night That Sparked a Delicious Idea
This recipe was born from a very specific, very relatable type of hunger: the late-night, post-hangout munchies. Picture it: me and a couple of buddies, years ago, deep in a movie marathon. The credits roll, our stomachs start singing in unison, and the options are… uninspiring. We had random tortillas, some leftover taco meat from Taco Tuesday (which is a state of mind, not just a day), a half-eaten bag of chips, and the usual fridge suspects.
Someone mumbled, “I wish we could just… crunchwrap this situation.” It was like a lightning bolt hit the kitchen. We started layering, folding, and giggling like mad scientists. That first attempt was messy—cheese definitely escaped—but the moment we bit into that hot, crunchy, cheesy, fully-loaded package? We knew we’d stumbled onto something special. It was the perfect solution for that “everything but the kitchen sink” craving. Now, I’ve refined that chaotic genius into a foolproof method you can recreate any night of the week. It’s proof that the best meals often come from a little improvisation and a lot of appetite.
Gathering Your Flavor Arsenal
Here’s the beautiful part: this recipe is incredibly flexible. Think of this list as your blueprint. As long as you have the structural heroes—the big tortilla and the crunchy layer—you can customize the rest to your heart’s content.
- 1 large flour tortilla (burrito size): This is your canvas! The bigger, the better. It gives you plenty of room to layer and fold. If you only have medium tortillas, just scale your fillings down a touch.
- ½ cup shredded cheese: I’m a fan of a Mexican blend (cheddar, Monterey Jack, Asadero), but use what you love. A pepper jack brings the heat! Chef’s Insight: Pre-shredded bagged cheese works in a pinch, but block cheese you shred yourself melts creamier and smoother, without the anti-caking agents.
- ⅓ cup cooked taco-seasoned ground beef or turkey: This is your flavor anchor. Brown up ½ pound of ground meat with a tablespoon of your favorite taco seasoning. Leftover rotisserie chicken, sautéed veggies, or even black beans are fantastic swaps for the meat-eaters and vegetarians alike.
- 1 tostada shell (or a small handful of sturdy tortilla chips): This is the CRUNCH. The tostada shell is the classic move, creating a perfect crispy layer. No tostadas? A few restaurant-style tortilla chips will give you that fantastic texture without sacrificing structural integrity.
- ¼ cup shredded lettuce: Iceberg is classic for its crispness, but romaine or green leaf lettuce work great too. Pro Tip: Shred it thinly so it lays flat and doesn’t push your folds open.
- 1–2 tablespoons taco sauce, sour cream, or spicy mayo: The saucy element is crucial—it adds moisture and tang. I love a creamy chipotle sauce or classic red taco sauce. Important: Keep your sauce in the center, not too close to the edges, to prevent a soggy tortilla.
- Optional MVP Toppings: Diced tomatoes, sliced jalapeños, avocado slices, a sprinkle of cilantro, or a spoonful of cool guacamole. These are your finishing flourishes!
Let’s Build & Sizzle: Your Step-by-Step Roadmap
Ready to become a folding expert? Follow these steps, and you’ll have a perfectly sealed, restaurant-worthy crunchwrap quesadilla in minutes.
- Prep Your Station: Lay your large tortilla flat on a clean cutting board or plate. Have all your fillings prepped and within arm’s reach. Warm your taco meat slightly—it helps melt the cheese faster. Heat a medium or large non-stick or cast-iron skillet over medium heat while you assemble.
- The Cheesy Foundation: Sprinkle a small handful of your shredded cheese in the very center of the tortilla, leaving a good 3-inch border clean all around. This first cheese layer acts like delicious glue, helping to fuse the tortilla to the tostada.
- Layer the Warmth: Spoon your warm, seasoned meat (or veggie alternative) evenly over the cheese. Pat it down gently so it’s an even layer, not a mountain.
- Add the Crunch: Carefully place your tostada shell (or a neat layer of chips) on top of the meat. If using chips, try to keep them in the center. Listen for that satisfying *tap*—that’s the sound of texture being built!
- Top It Off: Now, layer on your lettuce, a drizzle of your chosen sauce, and any other optional fresh toppings like tomato or jalapeño. Remember: keep everything contained within the diameter of the tostada shell below.
- The Master Fold: Here’s the fun part! Starting at any point, fold the bare edge of the tortilla up and over the center mound of filling. Move slightly to the right, fold another section inward, overlapping the previous fold. Continue all the way around. You’ll end up with a neat hexagon (or pentagon—no stress!) with a little exposed filling in the center. The folds should hold on their own. Chef’s Hack: If a fold won’t stay, a tiny dab of water or sour cream on the tortilla edge acts as a “paste” to help it stick.
- Seal the Deal in the Skillet: Carefully transfer your folded masterpiece to the preheated skillet, placing it folded-side down first. This is key! Cooking the folded side first seals the package. Let it cook for 2-3 minutes, until beautifully golden brown and sealed.
- The Final Crisp: Using a wide spatula, confidently flip your crunchwrap. Cook for another 2-3 minutes on the second side until it’s also golden and crisp. You should hear a delightful sizzle the whole time. If cheese sneaks out, just nudge it back with your spatula—it’ll become a tasty, crispy fringe.
- Rest and Devour: Slide it onto a plate and let it rest for just one minute (this helps the cheese set slightly, making slicing cleaner). Then, slice it in half, revealing the gorgeous cross-section of layers, and dig in immediately!
How to Serve This Handheld Hero
The beauty of this dish is that it’s a complete meal in one hand! But if you want to turn it into a full fiesta, I’ve got you covered.
For the ultimate experience, serve it sliced in half on a plate with some extra sauce for dipping—a side of cool creamy cilantro lime ranch or classic salsa roja is perfection. If you’re feeding a crowd, make a few, slice them into wedges, and arrange them on a platter for easy sharing (they disappear fast!).
Want to round out the meal? Keep it simple with a side of chips and fresh guacamole, a light Mexican street corn salad, or just some refreshing watermelon cubes. And the beverage? An ice-cold Mexican coke, a fizzy limeade, or your favorite cerveza will complete the vibe perfectly.
Mix It Up! 5 Delicious Twists on the Classic
Once you master the basic fold, the world is your tortilla. Here are some of my favorite ways to riff on this recipe:
- Breakfast Crunchwrap: Swap the taco meat for scrambled eggs, crispy breakfast sausage or bacon, and a layer of hash browns or tater tots. Use cheese and a drizzle of hot sauce or creamy salsa. The ultimate weekend brunch fix.
- “Fiesta Veggie” Powerhouse: Sauté bell peppers, onions, zucchini, and black beans with taco seasoning. Use this as your base layer. Add cheese, crunch, lettuce, and a creamy avocado-cilantro sauce.
- Buffalo Chicken Crunch: Use shredded rotisserie chicken tossed in buffalo sauce instead of taco meat. Swap the cheese for blue cheese crumbles or a Monterey Jack, and use ranch dressing as your sauce. Celery sticks inside add a fresh crunch!
- Nacho-Style Supreme: Use ground beef with nacho cheese sauce instead of shredded cheese. Add a layer of pickled jalapeños and refried beans before the tostada. Top with lettuce, tomato, and sour cream.
- Low-Carb/Keto Friendly: Use a large, low-carb tortilla or a sturdy lettuce leaf as your outer wrap. For the crunch layer, try a baked cheese crisp (just bake piles of shredded cheese until lacy and firm) or a Parmesan crisp. Load it up with all your favorite fillings!
A Few Notes from My Kitchen to Yours
This recipe has evolved from that messy late-night experiment into a trusted weeknight warrior in my home. I’ve learned a few things along the way. First, don’t overstuff—it’s the number one cause of a busted seam. You can always make a second one with the extra filling! Second, medium heat is your friend. Too hot, and the outside burns before the cheese melts and the folds seal. Too low, and it gets soggy.
And finally, embrace the uniqueness of each one. Some will be perfectly symmetrical; others will be charmingly lopsided. They all taste incredible. The best kitchen tool here is a good, thin, flexible spatula for that flawless flip. Now go forth and fold!
Your Questions, Answered
Q: My tortilla is tearing when I fold it. What did I do wrong?
A: This usually means the tortilla is too cold or dry. Let it sit at room temp for a few minutes, or give it a very quick (5-second) warm-up in the microwave between two damp paper towels. This makes it pliable and less likely to crack.
Q: How do I keep it from getting soggy?
A: Two things: 1) Make sure your cooked meat isn’t watery—drain it well and let any excess sauce reduce. 2) Place your wet ingredients (sauce, tomatoes) in the middle, protected by the crunchy tostada shell and cheese layers, not directly on the bottom tortilla.
Q: Can I make these ahead of time?
A> You can assemble them ahead of time (wrap tightly in plastic wrap) and refrigerate for a few hours before cooking. For best results, cook just before serving. Reheating a cooked one can soften the crunch, so I don’t recommend it.
Q: What’s the best substitute if I can’t find tostada shells?
A> Sturdy, restaurant-style tortilla chips are the next best thing. You can also use a second, smaller flour tortilla, toast it until very crisp in your skillet first, then use it as your crunch layer.

Crunchwrap-Style Quesadilla : Crispy, Cheesy, Taco-Inspired Goodness
Description
Craving a quesadilla, a taco, and a tostada all at once? This Crunchwrap-Style Quesadilla gives you the melty cheese, the bold taco flavor, and the loud satisfying crunch all in one folded tortilla. It’s easy, customizable, and ready in minutes—perfect for weeknights, lazy lunches, or those “I need something amazing now” moments.
Ingredients
Base
-
1 large flour tortilla (burrito size)
-
½ cup shredded cheese (Mexican blend, cheddar, or pepper jack)
-
⅓ cup cooked taco-seasoned beef or turkey
-
1 tostada shell or a handful of sturdy tortilla chips
-
¼ cup shredded lettuce
-
1–2 tbsp taco sauce, sour cream, or chipotle mayo
Optional Add-Ins
Diced tomatoes • jalapeños • avocado • cilantro • guacamole
Instructions
Warm your skillet over medium heat. Lay the tortilla on a cutting board. Have all fillings ready.
Place a small layer of cheese in the center of the tortilla (this acts like glue).
Spread warm taco meat evenly over the cheese.
Place the tostada (or chips) on top. Keep everything centered.
Add lettuce, sauce, and any extras, staying within the tostada area.
Fold the edges of the tortilla inward, working around the circle until you form a sealed shape (hexagon/pentagon). If a fold won’t stick, dab on a little water or sour cream.
Place the Crunchwrap folded-side down in the hot skillet.
Cook 2–3 minutes until golden and sealed. Flip and cook 2–3 minutes more.
Let rest 1 minute, then slice in half and eat immediately.
Notes
-
Warm tortillas fold better — 5 seconds in the microwave helps prevent tearing.
-
Don’t overfill — extra fillings will cause it to pop open.
-
Keep sauces in the center to avoid soggy edges.
-
Medium heat only — too hot burns the outside before the cheese melts.
Nutritional Information*
*This is an approximate estimate for one Crunchwrap-style quesadilla made as written with 90/10 ground beef, a standard flour tortilla, and cheddar cheese. Values will vary with substitutions.
- Calories: ~480
- Total Fat: 28g
- Saturated Fat: 12g
- Protein: 22g
- Total Carbohydrates: 35g
- Dietary Fiber: 3g
- Sugars: 3g
Prep Time: 5 minutes | Cook Time: 5 minutes | Total Time: 10 minutes | Servings: 1
Final Thoughts: Go Create Your Own Masterpiece
And there you have it, folks—the Crunchwrap-Style Quesadilla in all its crispy, cheesy, glorious detail. This recipe is more than just a list of steps; it’s an invitation to play in the kitchen, to combine your favorite flavors, and to create something uniquely satisfying that fits in the palm of your hand.
I hope this becomes a go-to in your recipe rotation, just like it is in mine. Remember, cooking is about joy, not perfection. So if a little cheese leaks, just call it “flavor fringe.” If your folds aren’t geometric art, they’re “rustic.” The goal is a delicious meal that makes you smile.
I’d love to hear how yours turns out! Tag me @Feastical on social media or drop a comment on the blog with your favorite variation

Taco Breakfast Scramble : Hearty, Flavor-Packed Morning Fuel
Wake Up to a Flavor Fiesta: Your New Favorite Morning Ritual
Hey friends, Beau here! Let’s be real for a second. How many mornings have you stood in front of the fridge, door swung wide open, staring at that little container of last night’s taco meat and thought, “What now?” Do you just… reheat it? That feels a little sad for a brand new day. Do you toss it? Absolutely not—we don’t waste good food around here! You feel that tiny pang of morning indecision, the clock is ticking, and your stomach is starting to grumble its complaints.
Well, my fellow foodie, I’m about to change your morning game forever. I want to introduce you to my secret weapon, my go-to, my never-fail, smile-inducing solution: The Taco Breakfast Scramble. This isn’t just throwing eggs and meat together. This is a full-on flavor celebration that transforms humble leftovers into a protein-packed, utterly delicious masterpiece in about the time it takes to brew your coffee. It’s hearty, it’s satisfying, and it proves that the best breakfasts aren’t fussy—they’re clever, resourceful, and packed with personality.
Imagine this: savory, seasoned meat tangled with fluffy, golden eggs, all brought together with a melty blanket of cheese and the bright, fresh kick of pico de gallo. It’s a party on a plate (or wrapped snugly in a warm tortilla) that says, “Yes, today is going to be a good day.” Whether you’re fueling up for a busy workday or lounging into a weekend brunch, this scramble is your ticket to a seriously great morning. So, let’s grab that leftover taco meat and turn “what now?” into “wow, now!”
The Uncle Robbie Brunch Doctrine: Where This All Began
This recipe, like so many of the good ones, has roots in a person. For me, that person is my Uncle Robbie. Robbie wasn’t a chef by trade; he was a mechanic with forearms like tree trunks and a laugh that could shake the windows. But on Sunday mornings after a big Saturday family gathering, he was a kitchen magician. His mission was simple: no leftover shall be left behind.
I remember one particular morning after a huge backyard taco night. There were bowls everywhere—a little seasoned beef here, some stray grilled peppers there, a corner of a cheese block. The adults were moving slow, but us kids were hungry. Uncle Robbie just grinned, fired up the biggest skillet he owned, and started cracking eggs like a conductor leading an orchestra. “Watch and learn, Beau,” he said. “A great cook isn’t someone who follows a recipe perfectly. A great cook is someone who looks at what they’ve got and makes it sing.” He tossed everything in that pan, gave it a heroic stir, and produced a mountainous, glorious scramble that we devoured straight from the skillet, standing around the kitchen island.
That was the lesson: food is joy, resourcefulness is a superpower, and the best meals often come from a little creative chaos. This Taco Breakfast Scramble is my tribute to that doctrine. It’s my “look what you’ve got and make it sing” breakfast. Every time I make it, I think of Robbie’s laugh and that feeling of a kitchen filled with happy, well-fed people. That’s the real secret ingredient.
Gathering Your Flavor Crew: Ingredients & Pro Insights
Here’s the beautiful part: you probably have most of this already. This is about building layers of flavor with simple, powerful players. Let’s break it down.
- 1 cup cooked taco-seasoned ground beef or turkey: The star of the show! This is where the deep, savory, spiced foundation comes from. Chef’s Insight: No leftovers? No problem! Quickly brown 1/2 lb of ground meat with 1-2 tablespoons of your favorite taco seasoning. Drain any excess grease, and you’re in business. This also works amazingly with leftover carnitas, shredded chicken, or even crumbled soy-based taco “meat.”
- 6 large eggs, whisked: The protein-rich glue that holds our fiesta together. Chef’s Tip: Whisk them really well with a pinch of salt until you see a few bubbles. This incorporates air and leads to a fluffier scramble. For a richer texture, add a splash of milk or cream, but it’s not necessary.
- ½ cup shredded cheddar or Mexican blend cheese: Melty, gooey, glorious cheese. Pro Substitution: A pepper jack will add a lovely kick. A Monterey Jack will be milder and creamier. For dairy-free, a good melting vegan cheddar works wonders here.
- ½ cup pico de gallo (store-bought or homemade): This is the FRESH. It brings moisture, acidity, and a crisp texture that cuts through the richness. Why I Love It: Using pico instead of plain diced tomatoes gives you onion, cilantro, and lime juice already in the mix. If you only have salsa, drain it slightly so your scramble doesn’t get watery.
- 2 tablespoons chopped fresh cilantro: The herbal confetti that makes everything pop. Don’t Skip This: If you’re in the “cilantro tastes like soap” camp, swap in fresh chopped chives, green onions, or even a little parsley. We just need that fresh, green note.
- Salt and pepper to taste: Your essential flavor finishers. Remember: Your taco meat and cheese already have salt, so taste before you add more! A few cracks of black pepper at the end is chef’s kiss.
- Optional Power-Ups:
- Avocado slices: For creamy, healthy fats.
- Hot sauce or salsa: For the heat seekers.
- Warm tortillas: To transform it into a burrito.
- A dollop of sour cream or Greek yogurt: For a cool, tangy finish.
Let’s Get Scrambling: Your Foolproof, Flavor-Packed Steps
This comes together so fast, you’ll want to have all your ingredients prepped and ready to go (that’s your mise en place, if we’re feeling fancy). Grab your favorite non-stick or well-seasoned cast iron skillet—let’s cook!
- Warm Your Foundation: Place your skillet over medium heat. Add the leftover taco meat. We’re not cooking it, just warming it through and waking up those spices. Let it sizzle gently for 1-2 minutes. This also gives any delicious fats a chance to coat the pan. Little Chef Hack: If your meat seems a bit dry from the fridge, add a tiny splash of water or broth to help it steam and rehydrate as it warms.
- The Egg Drop: Make sure your meat is evenly distributed in the pan. Now, pour your beautifully whisked eggs right over the top. Let them sit, untouched, for about 20-30 seconds. This is KEY! This allows the bottom layer to begin setting, which creates those lovely, soft curds instead of tiny, dry bits. Patience is a virtue here, friend.
- Gentle & Strategic Stirring: After that short rest, take a spatula and gently push the eggs from the edges toward the center. Tilt the pan to let any uncooked egg flow to the edges. Continue this slow, gentle push-and-fold motion. We’re not making a homogenous paste; we want ribbons of egg and meat. This whole process should take about 3-4 minutes.
- The Cheesy Embrace: When the eggs are about 80% set—still slightly wet and shiny on top—it’s cheese time! Sprinkle that shredded cheese evenly over the whole scramble. Now, stop stirring! Let the residual heat melt the cheese over the next 60-90 seconds. You can even pop a lid on for a minute if you want extra melt.
- Finish with Freshness: Take the skillet off the heat immediately. This is crucial—the eggs will continue to cook from the pan’s residual heat. Now, gently fold in the pico de gallo and most of your chopped cilantro. By adding the fresh ingredients off the heat, they stay bright and crisp, and the eggs won’t overcook. This move separates a good scramble from a great one.
- The Final Taste: Give it one gentle mix. Now, taste it! This is your moment. Does it need a pinch of salt? A crack of pepper? Adjust now. The warmth of the scramble will slightly wilt the fresh ingredients, marrying all the flavors perfectly.
Plating Your Masterpiece: From Bowl to Burrito
How you serve this is half the fun and totally changes the experience! Here are my favorite ways to dish it up:
The Hearty Bowl (My Weekday Go-To): Spoon the scramble directly into a deep, warm bowl. Top with those creamy avocado slices, an extra sprinkle of cilantro, and a drizzle of hot sauce or a dollop of cool sour cream. Grab a fork and dig into pure, unadulterated comfort. It’s substantial, satisfying, and keeps you fueled for hours.
The Breakfast Burrito (The Ultimate Portable Feast): Warm up large flour tortillas over a gas flame or in a dry skillet until soft and pliable. Pile the scramble just off-center, add a line of avocado or a smear of refried beans, and fold in the sides before rolling it up tight. Wrap it in foil for a perfect on-the-go meal. Pro-tip: For extra hold, give the rolled burrito a quick seam-side down in the hot pan for 30 seconds to seal it.
The Brunch Spread (For Impressing Friends): Serve the scramble family-style in the skillet you cooked it in (just make sure it’s presentable!). Place it in the center of the table with a stack of warm tortillas, bowls of extra pico, guacamole, sliced jalapeños, and different hot sauces. Let everyone build their own perfect bite. It’s interactive, delicious, and so easy on the host.
Make It Your Own: Delicious Twists on the Theme
The basic formula is your playground. Here are a few of my favorite spins to keep things exciting:
- “Southwest Veggie” Power-Up: Perfect for Meatless Monday! Replace the taco meat with a can of black beans (rinsed and drained) and a cup of diced bell peppers and onions sautéed with taco seasoning. You get fantastic fiber and a rainbow of color.
- “Everything but the Kitchen Sink” Hash: Add a cup of frozen diced hash brown potatoes (thawed) to the skillet with the meat to warm. Push the mixture to one side, add a little oil to the empty space, and crisp the potatoes before mixing with the eggs. Ultimate hearty brunch fuel.
- The “Green Chile & Chorizo” Fiesta: Swap the taco meat for cooked, crumbled Mexican chorizo. Fold in a 4-oz can of diced green chiles (drained) with the eggs. Use Monterey Jack cheese. Smoky, spicy, and incredibly flavorful.
- Keto/Low-Carb “Nacho” Bowl: Serve your scramble over a bed of crisp romaine lettuce or cauliflower rice. Top with cheese, avocado, and a spoonful of full-fat sour cream. All the flavor, minus the carbs.
- “Sweet & Savory” Tinga Twist: Use leftover shredded chicken tinga (that smoky, chipotle tomato sauce is magic) instead of ground beef. The slightly sweet, smoky sauce with the eggs is an unforgettable combo.
Beau’s Kitchen Notes: The Heart of the Recipe
This recipe has evolved from Uncle Robbie’s “throw everything in” philosophy to my slightly more refined (but still happily chaotic) method. The biggest lesson? Heat control is everything. Medium heat is your friend. Too hot, and your eggs will turn rubbery before the cheese even thinks about melting. Too low, and you’ll get soggy, weeping eggs.
Also, this scramble has become my ultimate fridge-cleanout hero. That last handful of spinach? Wilt it in with the meat. A lonely green onion? Chop it in. A nub of cream cheese? Dollop it in with the cheese for insane creaminess. The spirit of the recipe is adaptability. It’s a delicious, forgiving canvas for your kitchen creativity. Don’t be afraid to play with it—some of my best versions were happy accidents!
Your Questions, Answered: Scramble Success Guaranteed
Q: Can I make this ahead of time for meal prep?
A: You can, but with a strategy! Cook the meat and egg mixture through the cheese-melting step, then let it cool completely without adding the pico and fresh cilantro. Store in an airtight container for 3-4 days. When ready to eat, reheat a portion gently in a skillet or microwave, then stir in the fresh pico and herbs. This keeps the texture and freshness perfect.
Q: My scramble turned out watery! What happened?
A> This usually comes from two places: 1) Using a salsa or pico that wasn’t drained, or 2) Adding the fresh ingredients while the pan was still on high heat, causing the tomatoes to release too much liquid. Always drain your pico slightly, and remember to fold in the fresh stuff off the heat.
Q: What’s the best way to reheat leftovers?
A> The stovetop is king for reheating. A quick warm-up in a non-stick skillet over low heat preserves the texture best. The microwave can work in a pinch, but heat in short 30-second bursts, stirring in between, to avoid overcooking the eggs into rubber.
Q: I don’t have six eggs. Can I make a smaller batch?
A> Of course! The recipe is super scalable. The general rule is about 2 eggs per person, and adjust the meat and toppings accordingly. Just use a smaller skillet so the layer isn’t too thin.

Taco Breakfast Scramble : Hearty, Flavor-Packed Morning Fuel
Description
Transform leftover taco meat into a protein-packed, flavor-packed breakfast in ~10 minutes. Eggs, cheese, and fresh pico come together for a hearty, satisfying meal that works in a bowl, burrito, or family-style skillet.
Ingredients
-
1 cup cooked taco-seasoned ground beef, turkey, or shredded chicken
-
6 large eggs, whisked with a pinch of salt
-
½ cup shredded cheddar or Mexican blend cheese
-
½ cup pico de gallo (drained if very juicy)
-
2 tbsp fresh cilantro, chopped
-
Salt & pepper to taste
Optional Add-Ons:
-
Avocado slices
-
Hot sauce or salsa
-
Warm tortillas (for burritos)
-
Sour cream or Greek yogurt
Flavor Variations:
-
Vegetarian: Swap meat for black beans + sautéed peppers
-
Chorizo & Green Chile: Use chorizo + drained diced green chiles + Monterey Jack cheese
-
Sweet & Savory: Use shredded chicken tinga for smoky-sweet flavor
-
Low-Carb: Serve over romaine or cauliflower rice
Instructions
1. Warm Meat
-
Heat taco meat in a non-stick or cast-iron skillet over medium heat for 1–2 min.
-
Add a splash of water or broth if it’s dry.
2. Add Eggs
-
Pour whisked eggs over the meat, let sit 20–30 sec to start setting.
-
Gently fold eggs from edges to center until mostly cooked, 3–4 min.
3. Add Cheese
-
When eggs are 80% set, sprinkle cheese evenly.
-
Stop stirring and let residual heat melt cheese 60–90 sec (covering lid optional).
4. Finish with Fresh Ingredients
-
Remove skillet from heat. Fold in pico de gallo and most cilantro.
-
Taste, adjust salt and pepper.
5. Serve
-
Bowl: Top with avocado, extra cilantro, hot sauce, or sour cream.
-
Burrito: Warm tortillas, fill with scramble, fold, and optionally sear seam-side down for 30 sec.
-
Brunch Spread: Serve in skillet with tortillas and toppings on the side for build-your-own fun.
Notes
-
Scramble Texture: Medium heat is key. Too high = rubbery eggs; too low = soggy eggs.
-
Leftover Friendly: Reheat gently in a skillet, add fresh pico/herbs after warming.
-
Scalable: About 2 eggs per person; adjust meat and cheese proportionally.
Nutritional Snapshot: Fueling Your Day Right
(Note: The following is an estimate for one serving (approximately 1/3 of the recipe) without optional tortillas or avocado, using 90/10 lean ground beef and cheddar cheese. Values will vary based on your specific ingredients.)
This Taco Breakfast Scramble isn’t just delicious; it’s a nutritional powerhouse designed to keep you full and focused. Each serving packs a serious punch of high-quality protein (around 25g) from the eggs and lean meat, which is essential for building and repairing tissues and keeping you satiated all morning. The healthy fats (about 22g) from the

Cheesy Taco Potato Skillet : One-Pan Comfort Food Magic
Cheesy Taco Potato Skillet – Easy One-Pan Dinner
The Ultimate Weeknight Victory Dance (In a Skillet!)
Hey friends, Beau here from Feastical! Let’s get real for a second. We’ve all been there. It’s 6 PM, the day has officially won, and the chorus of “What’s for dinner?” is echoing through the house. You open the fridge and see… leftover taco meat from Tuesday. You glance at the counter and spot… a few potatoes giving you the side-eye. The temptation to just order pizza is real. But what if I told you that in one pan, in about 25 minutes, you can transform those humble ingredients into a cheesy, crispy, soul-satisfying meal that will have everyone doing a little happy dance?
That, my friends, is the magic of this Cheesy Taco Potato Skillet. This isn’t just a recipe; it’s a weeknight lifesaver, a clean-out-the-fridge masterpiece, and a bowl of pure comfort that tastes like a celebration. We’re talking golden, crispy potatoes, savory taco-seasoned beef (or turkey, or plants!), a blanket of melty cheddar, and all the cool, creamy toppings your heart desires. It’s hearty, it’s flavor-packed, and the best part? It all happens in one single skillet. That means more time enjoying your meal and way less time staring sadly at a sink full of dishes. So, grab your favorite skillet—let’s make dinner the easiest, most delicious part of your day.
Where This Skillet Love Story Began
This recipe has its roots in what I like to call “Beautiful Kitchen Chaos.” Picture a tiny apartment kitchen, post-taco Tuesday, with a container of leftover seasoned beef and a few lonely potatoes. My then-roommate (shoutout to Dave, the human garbage disposal) was hovering, and inspiration struck. “What if we just… fry the potatoes and throw it all together?”
What emerged from that 10 p.m. experiment was nothing short of glorious. We ate it straight from the skillet, standing over the stove, making sounds that were only slightly human. It was more than just using up leftovers; it was the birth of a mindset. It taught me that the best meals often aren’t the most planned or fancy—they’re the resourceful, thrown-together-with-love creations that hit the spot perfectly. Every time I make this now, I think of that laughter-filled kitchen and remember that good food is really about simplicity, satisfaction, and sharing.
Gathering Your Flavor Crew
Here’s your lineup! This is where we build layers of flavor and texture. Don’t stress about exact measurements—cooking is a feel, not a science experiment.
- 3 cups diced potatoes (russet or Yukon gold): Russets are my go-to for maximum crispiness on the outside and fluffy insides. Yukon Golds hold their shape beautifully and have a buttery flavor. No need to peel! The skins add texture and nutrients. Pro tip: Dice them into even, ½-inch pieces so they cook uniformly.
- 1 tablespoon olive oil (or avocado oil): Our cooking fat! Olive oil adds flavor, while avocado oil has a higher smoke point for a great sear. Don’t be shy to add a touch more if the pan looks dry.
- 1/2 cup chopped onion (yellow or white): The aromatic base. They’ll sweeten as they cook and blend perfectly with the savory taco notes. Red onion works for a sharper bite if that’s your jam.
- 1 cup cooked taco meat: The star of the show! This is your leftover ground beef, turkey, chicken, or a plant-based crumble, already seasoned with your favorite taco blend. No leftovers? Simply brown ½ lb of ground meat with 2 tbsp of taco seasoning. Easy!
- 1 cup shredded cheddar cheese: The glorious, melty glue. I prefer shredding a block of medium or sharp cheddar myself—it melts smoother than pre-shredded (which has anti-caking agents). A Mexican blend or pepper jack would be fantastic here too!
- Salt and black pepper to taste: Season as you go! Taste your potatoes and meat. Remember, your taco meat is already seasoned, so you might just need a pinch.
- For Topping & Serving: This is where you make it your own!
- 1/4 cup sour cream (or plain Greek yogurt): Adds a cool, creamy contrast.
- 2 green onions, sliced: For a fresh, mild bite and pop of color.
- Extras (Highly Recommended!): Diced avocado, pickled jalapeños, a squeeze of lime, fresh cilantro, or a drizzle of hot sauce or salsa. Go wild!
Let’s Build Some Skillet Magic!
Ready? Apron optional, appetite required. Follow these steps and you’ll be in cheesy, crispy potato heaven in no time.
- Heat Your Pan: Place a large (10-12 inch) skillet—cast iron is a champion for this!—over medium heat. Add the olive oil and let it warm up for a minute. You want it shimmering, not smoking. Chef’s Hack: A hot pan is key for getting those potatoes crispy instead of soggy.
- Crisp Those Potatoes: Add your diced potatoes in a single layer as much as possible. Let them cook, undisturbed, for 4-5 minutes to develop a golden-brown crust. Then, give them a good stir and continue cooking for another 8-10 minutes, stirring occasionally, until they are tender when pierced with a fork and have crispy edges. Patience is your friend here. Don’t rush the potato-crisping process!
- Soften the Onions: Push the potatoes to the sides of the skillet, creating a little well in the center. Add the chopped onions to that well and let them sauté for 2-3 minutes until they become translucent and fragrant. Then, mix them into the potatoes. This little technique helps the onions cook perfectly without burning the potatoes.
- Welcome the Taco Meat: Now, stir in your cooked taco meat. Break up any clumps and distribute it evenly with the potatoes and onions. Cook for 2-3 minutes, just until everything is piping hot and the flavors have started to mingle. Give it a taste—add a pinch of salt or pepper if needed.
- The Cheesy Blanket: Reduce the heat to low. Sprinkle the shredded cheese evenly over the entire surface of the skillet mixture. Immediately cover the skillet with a lid (or a large baking sheet if you don’t have one). Let it sit for 1-2 minutes, just until the cheese is fully melted and gooey. No peeking! The trapped steam is what melts the cheese perfectly.
- Top & Serve Immediately: Remove the skillet from the heat. Dollop with sour cream, scatter with sliced green onions, and add any other toppings you love. The sizzle is part of the experience! Serve it right from the skillet at the table for maximum comfort-food effect.
How to Serve Up the Goodness
Presentation is part of the fun, even for a cozy skillet meal! Here’s how I like to do it:
Family-Style Feast: Plop the whole skillet in the middle of the table with a stack of plates and all your topping options in little bowls. Let everyone dig in and customize their own perfect bite. It’s interactive and super fun.
The Perfect Plate: Use a big spoon to scoop a generous portion onto a plate or into a shallow bowl. Make sure you get some of that crispy cheese from the edges! Add a vibrant side like a simple green salad with lime vinaigrette or some quick-pickled red onions to cut through the richness.
The Ultimate Comfort Bowl: For a true “hug in a bowl” situation, serve it in a deep bowl, maybe with a side of warm tortillas or tortilla chips for scooping. It’s messy, delightful, and 100% acceptable.
Make It Your Own: 5 Flavor Twists
The basic blueprint is just the beginning. Here are some of my favorite ways to riff on this skillet masterpiece:
- Breakfast-for-Dinner Skillet: Swap the taco meat for cooked, crumbled breakfast sausage or chorizo. In the last minute of cooking, make a few wells in the mixture and crack in some eggs. Cover until the eggs are set to your liking. Top with salsa and avocado.
- Fiesta Veggie Power: Go meatless! Skip the meat and add a can of drained black beans and a cup of fresh or frozen corn when you add the onions. Amp up the seasoning with a dash of smoked paprika and cumin.
- Buffalo Chicken Twist: Use 1 cup of shredded cooked chicken tossed in ¼ cup of buffalo sauce instead of taco meat. Top with blue cheese crumbles and a drizzle of ranch after melting the cheddar.
- Sweet Potato & Black Bean: Swap half the potatoes for diced sweet potatoes. Their natural sweetness is amazing with the taco flavors. Use black beans instead of meat for a hearty vegetarian version.
- “Fully Loaded” Baked Potato Style: After adding the cheese, top with crumbled cooked bacon and a big handful of chopped fresh chives along with the green onions. Swap sour cream for a dollop of ranch dressing.
Beau’s Kitchen Notes & Stories
Over the years, this skillet has seen it all. I’ve made it on camping trips in a cast iron over the fire (epic), and I’ve hastily thrown it together for last-minute game-day crowds. It never fails. One time, I accidentally used habanero hot sauce instead of mild salsa as a topping. Let’s just say we needed extra sour cream and milk, but my spice-loving friends declared it the best version yet! The moral? Don’t be afraid to play. This recipe is a forgiving, flexible friend. It’s evolved from a leftover hack to a legit requested meal in my house. The core remains: crispy potatoes + savory protein + melty cheese = pure joy.
Your Questions, Answered!
Q: My potatoes aren’t getting crispy. What am I doing wrong?
A: The most common culprits are crowding the pan or not letting them sit long enough. Make sure your potato pieces aren’t too small and that they have space in the skillet. Don’t stir them constantly! Let them develop that golden crust for a few minutes between stirs. Also, ensure your oil is hot before adding them.
Q: Can I make this ahead of time?
A: You can prep the components! Dice the potatoes and store them in water in the fridge. Chop the onions. Have your meat cooked. When ready, just drain the potatoes, pat them dry (important!), and start cooking. I don’t recommend assembling and reheating the whole thing, as the potatoes can lose their texture.
Q: What’s the best pan to use?
A: A well-seasoned cast-iron skillet is my #1 choice for unbeatable, even heat and a fantastic sear. A heavy-bottomed stainless steel or non-stick skillet will also work perfectly.
Q: The cheese is browning/burning before it melts. Help!
A> This means your skillet is still too hot. After sprinkling the cheese, remove the pan from the burner entirely before covering it. The residual heat is plenty to melt the cheese beautifully without scorching it.

Cheesy Taco Potato Skillet : One-Pan Comfort Food Magic
Description
This Cheesy Taco Potato Skillet is a fast, one-pan meal that’s perfect for busy nights. Crispy potatoes, seasoned taco meat, and melty cheese come together to create a comforting dinner in under 30 minutes. It’s flexible, budget-friendly, and great for using leftovers. Add your favorite toppings, and you’ve got a complete meal with almost no cleanup!
Ingredients
-
3 cups diced potatoes (½-inch pieces, russet or Yukon gold)
-
1 tbsp olive or avocado oil
-
½ cup chopped onion
-
1 cup cooked taco meat (beef, turkey, chicken, or plant-based)
-
1 cup shredded cheddar cheese
-
Salt & black pepper, to taste
Optional Toppings:
-
Sour cream or Greek yogurt
-
Sliced green onions
-
Avocado, jalapeños, hot sauce, salsa, cilantro
Instructions
Heat oil in a large skillet over medium heat. Add the diced potatoes in an even layer. Cook 4–5 minutes without stirring, then continue cooking 8–10 minutes, stirring occasionally, until crispy and tender.
Push potatoes to the sides. Add onions to the center and cook 2–3 minutes until softened. Mix everything together.
Stir in the cooked taco meat. Cook 2–3 minutes until heated through. Season with a little salt and pepper if needed.
Reduce heat to low. Sprinkle cheese over the skillet, cover with a lid, and let melt for 1–2 minutes.
Top with sour cream, green onions, or your favorite toppings. Serve straight from the skillet!
Notes
-
Don’t overcrowd the skillet: Spread potatoes in a single layer for maximum crispiness.
-
Hot pan = crispy potatoes: Make sure the oil is shimmering before adding them.
-
Use leftovers smartly: Leftover taco meat, roasted potatoes, or shredded chicken all work great.
-
Swap the cheese: Try pepper jack, Mexican blend, or even mozzarella for a milder option.
Nutritional Info (A General Guide)
Please note: The following is an estimate based on the core recipe using 90% lean ground beef and standard ingredients. It will vary with your specific choices and toppings.
Per Serving (Approx. ¼ of the recipe): Calories: ~420 | Protein: 22g | Carbohydrates: 30g | Fat: 24g | Fiber: 3g
This is a balanced meal providing a good source of protein for satiety and carbs for energy. To lighten it up, you can: use lean ground turkey or a plant-based meat, reduce the cheese by half (it’ll still be tasty!), swap half the potatoes for cauliflower florets, or use plain Greek yogurt instead of sour cream. Remember, food is about nourishment AND joy—this dish delivers both!
Dinner, Solved. Happiness, Served.
And there you have it, friends—your new secret weapon for delicious, no-fuss dinners. This Cheesy Taco Potato Skillet is proof that the most beloved meals are often the simplest. It’s resourceful, deeply satisfying, and made for sharing stories over. I hope it becomes a regular in your rotation, a canvas for your own creations, and a reminder that a great meal doesn’t have to be complicated.
I’d love to hear how you make it your own! Tag me @feastical or drop a comment on the blog with your favorite twists. Now, go forth and conquer that skillet. Your fork is waiting!
With a full heart and an empty skillet,
Beau

Creamy Spinach Chicken Casserole with Mozzarella and Cream Cheese
Your New Go-To Comfort Food: The Creamiest Spinach Chicken Casserole Ever
Hey friend, welcome back to my kitchen! Pull up a stool. Can you smell that? It’s the warm, garlicky, cheesy perfume of a casserole baking to golden perfection. That, my friends, is the smell of a problem solved, a busy day soothed, and a hungry family about to be very, very happy. If you’re like me, there are nights when you crave something deeply satisfying—the kind of meal that feels like a culinary hug—but you don’t have the bandwidth for a complicated cooking project. That’s exactly why this Creamy Spinach Chicken Casserole with Mozzarella and Cream Cheese exists.
This isn’t just another casserole recipe. This is your secret weapon. It’s where humble ingredients transform into something magical. Tender, juicy chicken swims in a luxuriously creamy sauce (thanks to my beloved cream cheese), gets pops of freshness from vibrant spinach, and is all blanketed under a stretchy, bubbly layer of mozzarella. It’s comforting, yes, but it’s also packed with flavor and sneaky goodness. It’s the dish that proves comfort food doesn’t have to be guilty food.
I designed this recipe to be foolproof, flexible, and fast. Whether you’re using up leftover rotisserie chicken, feeding a crowd on a weeknight, or prepping lunches that you’ll actually look forward to, this casserole delivers. So, tie on your favorite apron, and let’s make a dish that’s going to earn a permanent spot in your dinner rotation. Trust me, your spatula and your soul will thank you.
The Casserole That Saved My Rainy Day
This recipe always takes me back to one specific, miserably rainy Sunday a few years ago. My friends and I had planned a big, elaborate backyard BBQ. We’re talking marinated ribs, smoked beans, the whole nine yards. But the sky opened up and didn’t stop. Our grand plans were officially washed out, and six hungry, disappointed people were now crammed in my kitchen, staring mournfully at the downpour.
Panic? For a second, maybe. But then I remembered the casserole rule: when in doubt, bake it out. I raided the fridge. Some leftover grilled chicken from Friday? Check. A bag of spinach wilting in the crisper? Check. Blocks of cheese (because I always have cheese)? Double check. In a whirlwind of mixing bowls and laughter, we all pitched in. Someone shredded cheese, someone chopped spinach, and I worked on the creamy base. Within minutes, the scent of garlic and melting cheese replaced our gloom. We ate that casserole straight out of the dish, gathered around the counter, sharing stories as the rain tapped on the window. That impromptu meal turned a soggy disaster into one of my fondest kitchen memories. It taught me that the best food isn’t about perfect ingredients or plans—it’s about the warmth you create with what you have. That’s the spirit I bake into every Feastical recipe.
Gathering Your Flavor Squad
Here’s the beautiful part: every ingredient here plays a key role, and most are pantry heroes. Let’s break it down.
- 2 cups cooked chicken breast, shredded or cubed: The star protein! This is a fantastic way to use up leftover roast chicken or a store-bought rotisserie bird for ultimate convenience. Chef’s Insight: For more flavor, use chicken thighs, or try shredding a flavorful herb-roasted chicken.
- 4 oz cream cheese, softened: This is the magic behind the “creamy” in the title. It gives the sauce an irresistibly rich and velvety body. Pro Tip: Let it sit on the counter for 30 minutes before you start. Soft cream cheese blends smoothly, no lumps allowed!
- 1 cup mozzarella cheese, shredded: Hello, gorgeous, melty topping! I like to use part-skim for great melt without being too greasy. Substitution: Any good melting cheese works—fontina, Monterey Jack, or a Italian blend would be delicious.
- 1/3 cup grated Parmesan cheese (optional): I say “optional,” but I never skip it. Parmesan adds a sharp, salty, umami punch that takes the flavor to the next level. Use the good stuff you grate yourself if you can!
- 3 cups fresh spinach, chopped: Our pop of color and nutrients! It wilts down beautifully into the sauce. Chef’s Hack: Frozen spinach works in a pinch! Just thaw and squeeze out ALL the excess water (seriously, get it really dry) to avoid a soggy casserole.
- 2 cloves garlic, minced: The flavor foundation. Fresh is best here for that aromatic punch.
- 1/2 cup sour cream or plain Greek yogurt: Adds tang and creaminess. Greek yogurt is my healthy-ish swap that works perfectly and adds a bit of protein.
- Salt and pepper to taste: Your essential seasonings. Don’t be shy—season as you go!
- 1/2 tsp onion powder: This little powerhouse delivers a sweet, savory onion flavor without any chopping. It’s a casserole’s best friend.
- 1/2 tsp paprika: For a hint of warmth and a beautiful color. Smoked paprika would add a fantastic, subtle smoky note.
- Olive oil for sautéing: Just a splash to wake up the garlic and spinach.
Let’s Build Some Deliciousness: Step-by-Step
Ready? This comes together faster than you can say “cheese please.” Here’s your roadmap to casserole glory.
- Preheat & Prep: Crank that oven to 375°F (190°C). This gives it time to get perfectly hot while you assemble. Lightly grease your 9×9 baking dish with a bit of butter, oil, or non-stick spray. Trust me, this makes cleanup a dream.
- Wake Up the Greens: In a skillet, heat a good splash of olive oil over medium heat. Add your minced garlic and let it sizzle for just 30 seconds until fragrant—don’t let it burn! Toss in all that fresh spinach. It will look like a mountain, but watch it wilt down in 2-3 minutes. Give it a stir, then set it aside. Chef’s Commentary: This quick sauté is crucial! It cooks out the raw bite of the garlic and removes excess moisture from the spinach, so your casserole stays creamy, not watery.
- Create the Creamy Dream: In a large mixing bowl, plop in your softened cream cheese, sour cream (or yogurt), onion powder, paprika, and a good pinch of salt and pepper. Now, grab a sturdy spoon or spatula and mix, mix, mix until it’s completely smooth and combined. This is your sauce base. Taste it! Adjust the seasoning now—this is your chance to make it perfect.
- The Big Fold-In: To that beautiful creamy base, add your cooked chicken, the sautéed spinach and garlic, and HALF of your shredded mozzarella. Gently fold everything together until it’s evenly coated. The smell right now is insane.
- Pan & Top It: Scoop the entire mixture into your prepared baking dish. Use your spatula to spread it into a nice, even layer. Now, for the grand finale: sprinkle the remaining mozzarella and that optional (but highly recommended) Parmesan all over the top. Be generous! This creates that iconic golden, cheesy crust.
- Bake to Bubbly Perfection: Slide the dish into your preheated oven, uncovered. Bake for 20-25 minutes. You’re looking for the edges to be bubbling enthusiastically and the top to be spotted with gorgeous golden brown patches. Little Chef Hack: If you want more browning, switch your oven to broil for the last 1-2 minutes, but WATCH IT LIKE A HAWK. Broilers can turn triumph to tragedy in seconds.
- The Crucial Rest: I know, I know. It’s hard. But when you pull it out, let it sit on the stove for a solid 5 minutes. This allows the sauce to thicken up just a bit and makes it easier to slice. It’s worth the wait, I promise!
How to Serve This Cheesy Masterpiece
Presentation is part of the fun! Here’s how I like to plate it up for maximum enjoyment.
I love using a big serving spoon to scoop out hearty portions, making sure everyone gets plenty of that cheesy top layer. For a simple, classic comfort food plate, serve it alongside a pile of buttery egg noodles, steamed white rice, or creamy mashed potatoes—they’re perfect for soaking up every last drop of that amazing sauce. If you’re leaning into the cozy vibe, a warm, crusty loaf of garlic bread or soft dinner rolls is non-negotiable.
Want to keep it lighter or add a fresh crunch? A simple side salad with a sharp vinaigrette (like a lemon-Dijon dressing) cuts through the richness beautifully. Think crisp romaine, a few cherry tomatoes, and some thinly sliced red onion. It’s the perfect fresh contrast to the warm, creamy casserole. No matter how you serve it, the goal is to create a plate that makes you smile the moment you see it.
Make It Your Own: Creative Twists & Swaps
The beauty of a casserole is its flexibility. Here are a few of my favorite ways to remix this recipe.
- Sun-Dried Tomato & Artichoke Twist: Feeling fancy? Fold in 1/2 cup of chopped oil-packed sun-dried tomatoes and a 14-oz can of artichoke hearts (drained and chopped) with the spinach. It gives major Mediterranean vibes.
- “Everything Bagel” Style: Before baking, sprinkle the cheesy top with a generous tablespoon of Everything Bagel Seasoning. The sesame seeds, garlic, and onion create an incredible, crunchy crust.
- Mushroom Lover’s Dream: Sauté 8 oz of sliced cremini mushrooms with the garlic and spinach. They add a wonderful meaty texture and deep, earthy flavor.
- Gluten-Free & Low-Carb Friendly: This recipe is naturally gluten-free as written! For a true low-carb or keto version, just ensure your sour cream/yogurt has no added sugars. You can serve it over cauliflower rice or with zucchini noodles.
- Spicy Southwest Version: Swap the paprika for chili powder. Add a diced jalapeño (seeds removed for less heat) to the spinach sauté, and use a Pepper Jack cheese instead of mozzarella. Serve with avocado and a dollop of cool sour cream.
A Few More Notes from My Kitchen to Yours
This recipe has evolved from that rainy-day “kitchen sink” experiment into the polished, beloved dish it is today. The biggest lesson? The squeeze. If you ever use frozen spinach, you must squeeze out the water with the strength of someone trying to wring out a sopping wet towel. I’ve made the mistake of being lazy, and you end up with a delicious but slightly weepy casserole. Lesson learned!
I also love that this dish is a fantastic meal-prep ally. You can assemble the entire casserole (without baking), cover it tightly, and refrigerate it for up to 24 hours. Just add a few extra minutes to the bake time since it’s going in cold. It also freezes beautifully after baking. Just thaw overnight in the fridge and reheat in the oven until warmed through. It’s like giving your future self a delicious gift.
Your Questions, Answered
Q: Can I use uncooked chicken?
A: I don’t recommend it for this specific recipe. The quick bake time isn’t long enough to safely and thoroughly cook raw chicken. Using pre-cooked chicken ensures perfect texture and food safety. It’s the shortcut that makes this so easy!
Q: My sauce seems too thick before baking. Did I do something wrong?
A: Not at all! The mixture is meant to be quite thick. The sour cream/cream cheese combo is rich. As it bakes, the cheeses melt, the chicken and spinach release a little moisture, and it all comes together into a perfectly creamy, scoopable consistency. Trust the process.
Q: The top isn’t browning as much as I’d like. Help?
A> No worries! This usually means your oven rack is too low or your oven runs cool. For the last 3-5 minutes of baking, move the dish to the top rack. You can also switch to broil for 1-2 minutes, but do not walk away! Keep the oven door cracked and watch it constantly to prevent burning.
Q: Can I make this dairy-free?
A> You can certainly try! Use a high-quality dairy-free cream cheese and sour cream alternative, and a dairy-free mozzarella shred that melts well. The flavor will be different, but it can still be tasty. I’d add a bit more seasoning (maybe some nutritional yeast for a cheesy flavor) to boost it.
Nutritional Information (Per Serving, based on 4 servings)
While we’re all about the flavor and comfort first, it’s nice to know what’s in your food! This information is an estimate calculated using standard ingredients and can vary based on specific brands and modifications you make.
- Calories: 320
- Protein: 28 g
- Fat: 22 g
- Saturated Fat: 11 g
- Carbohydrates: 6 g
- Fiber: 1 g
- Sodium: 420 mg
This dish is a fantastic source of high-quality protein from the chicken and cheese, and the spinach adds a boost of vitamins A, C, and K, along with iron. To reduce sodium, use low-sodium chicken and go easy on added salt. Remember, balance is key! Pairing it with a fresh salad or some steamed vegetables makes for a wonderfully rounded meal.
Final Thoughts
So there you have it—the story, the secrets, and the step-by-step guide to what just might become your new favorite comfort food. This Creamy Spinach Chicken Casserole isn’t just a recipe; it’s a reminder that the best meals often come from simplicity, resourcefulness, and a little bit of love stirred into the mix.
It’s the dish that turns a rainy-day disappointment into a cherished memory, a weeknight rush into a moment of genuine warmth, and a handful of simple ingredients into something that feels like a celebration. Whether you stick to the classic version or make it your own with a creative twist, this casserole is built to deliver—every single time.
In a world that’s often too busy, too complicated, and too demanding, there’s something profoundly satisfying about pulling a golden, bubbling dish from the oven and gathering everyone around the table. It’s nourishment for both body and soul. So, the next time you need a surefire win in the kitchen—a meal that promises comfort, flavor, and ease—remember this casserole. It’s waiting to become your story, your solution, and your new go-to hug on a plate.

Best Homemade Italian Meatballs Recipe You Must Try
Hey, Let’s Talk About the Best Hug You Can Eat
Picture this: It’s Sunday evening. The house is filled with that unmistakable, soul-stirring aroma of garlic toasting in olive oil, sweet tomatoes simmering, and herbs doing their magic. A pot of sauce is bubbling away on the stove, and bobbing in that rich, red sea are perfectly golden, tender, homemade Italian meatballs. This isn’t just dinner; it’s a memory in the making, a guaranteed mood-lifter, and quite possibly the best thing you’ll scoop onto a plate this week.
I’m Beau, and if you’ve been around Feastical for even five minutes, you know I live for food that feels as good as it tastes. And let me tell you, this recipe? It’s the heavyweight champion of feel-good food. We’re not talking dense, chewy, or bland spheres. Oh no. We’re crafting juicy, flavor-packed, impossibly tender meatballs that are steeped in a robust tomato sauce until they become one glorious, comforting entity. Whether you pile them high on a mountain of spaghetti, stuff them into a crusty sub with melted mozzarella, or just eat them straight from the pot with a fork (no judgment here), this is the best homemade Italian meatballs recipe you need in your life. So, tie on your apron, crank up some Sinatra, and let’s get our hands a little messy. It’s totally worth it.
The Meatball That Started It All
My love affair with meatballs started not in a fancy restaurant, but in my Nonna’s tiny, steam-fogged kitchen. I was maybe eight years old, perched on a stool, my job being the official breadcrumb-measurer and cheese-taster. Nonna never measured a thing—it was a palmful of this, a pinch of that. But her hands moved with a confident, gentle rhythm. She’d mix the meat with her fingers, saying, “Beau, you gotta talk to the food. Tell it it’s going to be delicious.” Then came the best part: rolling. We’d line them up on a baking sheet, a little army of potential joy. The sizzle as they hit the hot oil was our applause. That first bite, straight from the simmering pot, was a revelation: savory, cheesy, tender, and swimming in love. This recipe is my love letter to those afternoons. It’s my attempt to bottle that feeling of warmth, family, and pure, unadulterated deliciousness. When I make these, I’m back on that stool, and I hope they bring a little of that magic to your table, too.
Gathering Your Flavor All-Stars
Great meatballs are about balance and quality. Here’s what you’ll need and why each player is crucial to the team.
- 1 lb ground beef (80/20): The star. The 80/20 blend gives you the perfect fat-to-lean ratio for juicy, flavorful meatballs that won’t dry out. Chef’s Insight: Don’t go extra lean here—the fat is flavor and moisture!
- 1/2 lb ground pork: The co-star. Pork adds a subtle sweetness and extra tenderness that beef alone can’t achieve. It’s the classic Italian-American combo for a reason.
- 1/2 cup grated Parmesan cheese: The salty, umami punch. Use the good stuff you grate yourself from a block. The pre-grated powdery kind won’t melt or taste the same.
- 1/2 cup breadcrumbs (preferably Italian-style): The binder and texture-tenderizer. They soak up moisture and keep everything together. Sub Tip: No Italian-style? Use plain and add an extra 1/4 tsp of dried oregano and basil. Panko works in a pinch for a slightly lighter texture.
- 2 cloves garlic, minced: The aromatic heart. Fresh is non-negotiable. Let it speak up!
- 1/4 cup fresh parsley, finely chopped: The fresh, bright note. It cuts through the richness beautifully. Dried parsley is a sad substitute here—go fresh.
- 2 eggs: The glue. They bind everything into a cohesive, rollable mixture.
- 1/4 cup milk: The moisturizer. It soaks into the breadcrumbs, creating a “panade” that guarantees a tender, never-tough interior.
- 1 tsp salt & 1/2 tsp black pepper: The essential enhancers. Season with confidence!
- 1 tsp dried oregano & 1/2 tsp crushed red pepper flakes (optional): The earthy warmth and the subtle kick. The red pepper flakes don’t make it spicy, just interesting.
- 2 cups marinara sauce: The cozy blanket. Use your favorite jarred brand for ease, or your own homemade if you’re feeling extra. You’ll need enough to cover the meatballs in the pot.
- Olive oil for frying: For that beautiful, caramelized sear that adds tons of flavor to the final sauce.
Let’s Build Some Meatball Magic: Step-by-Step
Follow these steps, and you’re golden. Literally.
Step 1: The Gentle Mix. In a large bowl, combine the beef, pork, Parmesan, breadcrumbs, garlic, parsley, eggs, milk, salt, pepper, oregano, and red pepper flakes. Here’s the most important tip of the day: use your hands. It’s the best tool for the job. Mix everything until it’s just combined. I mean it—stop as soon as you see no more dry streaks. Overmixing is the #1 way to end up with tough, dense hockey pucks. We want light and tender!
Step 2: The Roll Call. With lightly damp hands (this prevents sticking), scoop and roll the mixture into golf ball-sized spheres. Consistency is key here so they cook evenly. Pro-Tip: Use a small cookie scoop for perfectly uniform meatballs—it’s a game-changer for speed and size.
Step 3: The Golden Sear. Heat a few tablespoons of olive oil in a large skillet over medium heat. Don’t crowd the pan! Give those meatballs some personal space. Work in batches if you need to. Sear them for about 2-3 minutes per side, just until they develop a gorgeous, deep brown crust. We’re not cooking them through here—just building flavor. That browned bit on the bottom of the pan? Flavor gold. Don’t you dare wash it out.
Step 4: The Simmer & Swirl. In a large pot, heat your marinara sauce over low heat. Transfer your beautifully browned meatballs into the sauce. Gently spoon some sauce over the top. Now, let it all get to know each other. Cover and let it simmer on low for 25-30 minutes. This slow simmer cooks the meatballs through gently and lets all those incredible flavors from the sear melt into the sauce. Give the pot an occasional gentle swirl to make sure nothing’s sticking.
How to Serve Up the Cozy
The beauty of these meatballs is their versatility. Here are my favorite ways to serve them:
The Classic Spaghetti Night: Serve a generous heap over a bed of al dente spaghetti or linguine. Top with extra grated Parmesan and a few fresh basil leaves. This is the undisputed champion for a reason.
The Epic Meatball Sub: Split a soft Italian sub roll, toast it lightly, and spoon in 3-4 meatballs and plenty of sauce. Blanket with shredded mozzarella and pop under the broiler until bubbly and golden. Prepare for nap immediately after.
The Appetizer Hero: Skewer smaller, cocktail-sized meatballs with toothpicks for the ultimate party snack. Keep a bowl of warm sauce on the side for dipping.
Just The Good Stuff: Honestly? A bowl of meatballs and sauce, a hunk of crusty garlic bread for dragging through the sauce, and a simple green salad is a perfect meal.
Make It Your Own: Delicious Twists
Once you’ve mastered the classic, play around! Here are 5 fun variations:
- Turkey Twist: Swap the beef and pork for 1.5 lbs of ground turkey (93/7). Add an extra tablespoon of olive oil to the mix to keep them moist, and use 2 extra cloves of garlic for maximum flavor.
- Cheese-Stuffed Surprise: Take your golf-ball sized meatball, flatten it slightly in your palm, and place a small cube of mozzarella or a teaspoon of ricotta in the center. Gently fold the meat around the cheese and seal tightly. Prepare for a glorious, cheesy center.
- Herb Garden Delight: Add 2 tablespoons of finely chopped fresh basil and 1 teaspoon of fresh thyme leaves to the mix for an ultra-fresh, aromatic spin.
- Bake, Don’t Fry (For Ease): Want less hands-on time? Arrange your rolled meatballs on a parchment-lined baking sheet. Drizzle with olive oil and bake at 400°F for 20 minutes, then transfer to the sauce to simmer for the final 10. They’ll be slightly less crusty but just as tasty.
- Spicy Arrabbiata Style: Simmer the meatballs in a spicy arrabbiata sauce (add an extra teaspoon of red pepper flakes to your sauce) and finish with a garnish of spicy Calabrian chili oil.
A Few More Secrets From My Kitchen
Over the years, I’ve learned a few things. First, chilling the shaped meatballs in the fridge for 20-30 minutes before searing helps them hold their shape better. Second, this recipe doubles (or even triples) like a dream for a crowd. Freeze them after searing, then pop frozen meatballs straight into simmering sauce (just add 10-15 extra minutes). And my funniest kitchen fail? I once used quick oats instead of breadcrumbs in a sleepy haze. They… absorbed *everything*. We ended up with very hearty, very dense “healthballs.” Not recommended. Stick to the plan, friends. The plan is good.
Your Questions, Answered
Q: My meatballs are falling apart in the pan! What did I do wrong?
A: This usually means the mixture is too wet (too much milk/egg) or wasn’t bound enough. Next time, try adding a couple more tablespoons of breadcrumbs. Also, make sure your oil is nice and hot before adding them—a good sear forms a crust that locks them together.
Q: Can I make these ahead of time?
A: Absolutely! You can prepare the mixture, roll the meatballs, and store them covered in the fridge up to a day ahead. Or, cook the entire recipe and let the meatballs cool in the sauce. They taste even better the next day after the flavors have married.
Q: Are the red pepper flakes really optional?
A> Technically, yes. But I highly recommend them. They don’t add noticeable heat, just a warm, complex depth in the background that makes people say, “Wow, what’s in these?” It’s the secret weapon.
Q: How do I know when they’re done cooking in the sauce?
A> After the 25-30 minute simmer, they should be cooked through. The safest way is to use an instant-read thermometer; the internal temperature should reach 160°F. If you don’t have one, carefully cut one in half—it should be uniformly cooked with no pink in the center.

Best Homemade Italian Meatballs Recipe You Must Try
Description
Juicy, flavor-packed, tender meatballs simmered in rich marinara sauce—perfect over spaghetti, in subs, or straight from the pot. This recipe delivers comfort, nostalgia, and a little kitchen magic in every bite.
Ingredients
-
1 lb ground beef (80/20)
-
½ lb ground pork
-
½ cup grated Parmesan cheese
-
½ cup breadcrumbs (Italian-style preferred)
-
2 cloves garlic, minced
-
¼ cup fresh parsley, chopped
-
2 eggs
-
¼ cup milk
-
1 tsp salt
-
½ tsp black pepper
-
1 tsp dried oregano
-
½ tsp crushed red pepper flakes (optional)
-
2 cups marinara sauce
-
Olive oil for frying
Instructions
In a large bowl, combine beef, pork, Parmesan, breadcrumbs, garlic, parsley, eggs, milk, salt, pepper, oregano, and red pepper flakes. Mix gently by hand until just combined. Avoid overmixing.
With lightly damp hands, shape the mixture into golf ball-sized meatballs (about 1½ inches). Use a cookie scoop for uniformity.
Heat olive oil in a skillet over medium heat. Sear meatballs 2–3 minutes per side until golden brown. Don’t crowd the pan—work in batches. Remove and set aside.
Heat marinara sauce in a large pot over low heat. Gently add seared meatballs. Cover and simmer 25–30 minutes until cooked through (internal temp 160°F). Occasionally swirl the pot to prevent sticking.
Serve over pasta, in subs, or as-is with crusty bread. Optional: sprinkle with fresh basil, extra Parmesan, or a drizzle of olive oil.
Notes
-
Cheese-Stuffed: Insert a cube of mozzarella or teaspoon of ricotta inside each meatball.
-
Turkey Version: Swap beef/pork with 1½ lbs ground turkey. Add extra olive oil for moisture.
-
Herby: Add 2 tbsp fresh basil or 1 tsp thyme to the mix.
-
Bake Instead of Fry: Bake at 400°F for 20 minutes, then simmer in sauce for 10 minutes.
-
Spicy Arrabbiata: Use a spicy tomato sauce and extra red pepper flakes.
Nutritional Info (Because We’re Curious!)
Let’s keep it real: this is a hearty, comforting dish. Here’s a rough breakdown per serving (about 3-4 meatballs with sauce), based on a 6-serving yield. Remember, these values can vary based on the specific brands of meat and sauce you use.
Per Serving:
Calories: ~340 | Protein: 22g | Carbohydrates: 7g | Fat: 24g | Fiber: 1g
Prep Time: 15 minutes | Cook Time: 30 minutes | Total Time: 45 minutes | Servings: 5–6
The protein from the meat and cheese makes it satisfying, and by using a measured amount of good oil for searing, you control the fat. Pair it with a whole-wheat pasta or a big salad to round out the meal beautifully.
Final Thoughts
And there you have it—my heart, my Nonna’s spirit, and my best advice for creating the best homemade Italian meatballs you’ll ever make. This recipe isn’t about perfection; it’s about the joy of creating something delicious with your own two hands. It’s about the smell that fills your kitchen and the smiles around your table. So go on, give it a try. Roll those meatballs with love, simmer that sauce with patience, and get ready for the compliments. And when someone asks for the recipe? You can just smile and send them to Feastical. Now, if you’ll excuse me, I think I hear a meatball sub calling my name. Happy cooking, friends!