Creamy Tomato Garlic Pasta : Quick, Easy & Full of Flavor
Weeknight Magic: Your New Go-To Creamy Tomato Garlic Pasta
Hey there, friend! Beau here, welcoming you back to my kitchen corner at Feastical. You know those nights? The clock is ticking, stomachs are rumbling, and the takeout menus are starting to look a little too tempting. We’ve all been there. But what if I told you that in the same amount of time it takes for delivery to even think about arriving, you could be twirling forks into a bowl of pure, unadulterated comfort? That’s the magic of this Creamy Tomato Garlic Pasta.
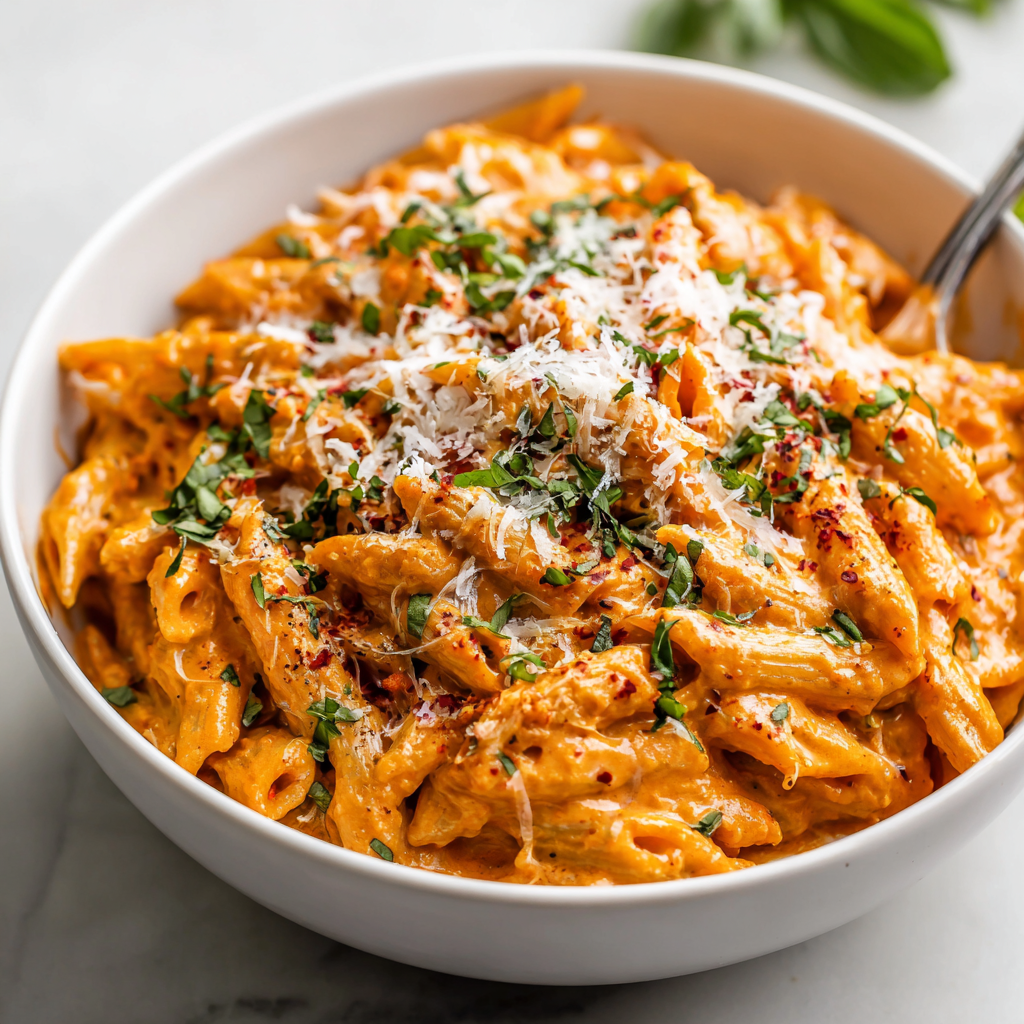
This isn’t just another pasta recipe. This is your culinary secret weapon—a dish that looks and tastes like you fussed for hours but comes together with the beautiful, breezy effort of a weeknight warrior. We’re talking about a sauce that’s the best of all worlds: the bright, tangy heart of crushed tomatoes, the warm, aromatic punch of gently sautéed garlic, all swirled into a luxuriously creamy, velvety embrace. It clings to every noodle, promising (and delivering) maximum flavor in every single bite.
Whether you’re cooking for a special someone, feeding a hungry family, or simply treating yourself to a solo dinner that feels like a celebration, this pasta answers the call. It’s forgiving, flexible, and fundamentally delicious. So, tie on your apron, grab your favorite wooden spoon, and let’s turn simple ingredients into a memory-making meal. Ready to make your kitchen smell incredible? Let’s dig in!
The Pasta That Started It All
This recipe takes me right back to my first “real” apartment—you know, the one with the linoleum floors that squeaked and the stove that had exactly one reliable burner. I was broke, proud, and determined to cook my way through it. My culinary repertoire was… limited. But I had a bag of pasta, a can of tomatoes, a few cloves of garlic, and a splash of cream left over from a roomie’s coffee habit.
One desperate, hungry night, I threw them all together. I remember the sizzle of the garlic hitting the oil, the way the crushed tomatoes bubbled and thickened, and the transformative moment the cream swirled in, turning the sauce from rustic to rich. That first forkful was a revelation. It tasted like more than the sum of its parts. It tasted like competence. It tasted like home, even in that tiny, echoey kitchen. It became my signature “I’ve got this” dish for years, and now, I’m so thrilled to share my perfected version with you. Every time I make it, I get a little nostalgic for that squeaky floor and the feeling of creating something wonderful from almost nothing.
Gathering Your Flavor Arsenal
Here’s the beautiful part: the ingredient list is short, sweet, and probably already in your pantry. Using great-quality basics makes all the difference here.
- 8 oz Pasta: Penne, fettuccine, rigatoni, or spaghetti—choose your fighter! I love shapes with nooks that trap the creamy sauce. Chef’s Insight: Don’t overcook it! We’ll finish it in the sauce, so aim for al dente.
- 1 Tbsp Olive Oil: Our cooking fat and flavor foundation. A good extra virgin olive oil adds a fruity note.
- 4 Cloves Garlic, minced: The aromatic superstar. Fresh is non-negotiable here—jarred just won’t give you that same vibrant kick. Pro Tip: Smash the cloves with the flat of your knife first; the skins will slip right off.
- 1 Can (15 oz) Crushed Tomatoes: The soul of the sauce. I prefer crushed for their perfect balance of texture and smoothness. Substitution: Diced tomatoes work too; just crush them a bit with your spoon while they simmer.
- ½ tsp Red Pepper Flakes (optional): The subtle “is there something spicy in here?” background note. It builds warmth, not heat. Omit if sensitive, but I highly recommend it!
- 1 tsp Dried Basil & ½ tsp Salt: Our dried herb base and primary seasoner. Dried basil mellows beautifully in the simmer. We’ll add fresh at the end for a pop. Remember: Season in layers! You can always add more salt later.
- ½ Cup Heavy Cream: The magic ingredient that creates that luxurious, silky texture. Substitution: For a lighter version, half-and-half works, but the sauce will be a bit thinner. For a dairy-free twist, full-fat coconut cream is a surprisingly delicious option.
- ¼ Cup Grated Parmesan Cheese: Our salty, umami-packed finisher. It thickens and seasons the sauce in one go. Chef’s Plea: Please grate it fresh from a block if you can! The pre-grated stuff often contains anti-caking agents that can make your sauce grainy.
- Fresh Basil or Parsley, for garnish: The vibrant, green finish that makes the dish look and taste restaurant-fresh.
Let’s Get Cooking: Step-by-Step to Perfection
Step 1: Pasta Prep with a Purpose. Bring a large pot of generously salted water to a rolling boil. Add your pasta and cook according to package directions, but aim for al dente—it should still have a slight bite. Here’s the #1 Chef Hack: Before you drain it, scoop out about ½ cup of the starchy pasta water and set it aside. This liquid gold is our secret weapon for adjusting the sauce consistency later. Drain the pasta and let it hang out for a minute.
Step 2: Awaken the Aromatics. While the pasta cooks, heat the olive oil in a large skillet or Dutch oven over medium heat. Add the minced garlic. Now, listen up: we’re not looking for color, just fragrance. Sauté for just 1-2 minutes until it becomes incredibly aromatic. If it starts to brown, lower your heat immediately—burnt garlic tastes bitter. This step builds the flavor foundation.
Step 3: Build the Tomato Base. Carefully pour in the crushed tomatoes (they might splatter!). Add the red pepper flakes, dried basil, and salt. Give it a good stir. Bring the sauce to a lively simmer, then reduce the heat to let it bubble gently for 8-10 minutes. This simmer time is crucial—it cooks out the raw tomato taste and allows the flavors to marry and concentrate. You’ll see the sauce darken slightly and thicken.
Step 4: The Creamy Transformation. Reduce the heat to low. This is important so the cream doesn’t curdle. Pour in the heavy cream and stir until the sauce turns a beautiful, uniform rosy pink. Let it simmer gently for another 2-3 minutes. You’ll feel the sauce thicken as it coats the back of your spoon. Taste it! This is your moment to adjust seasoning—more salt? A pinch more pepper flakes? Make it yours.
Step 5: The Grand Unification. Stir the grated Parmesan into the sauce until it melts smoothly. Add the drained pasta directly into the skillet. Using tongs, toss and fold vigorously until every inch of pasta is gloriously coated. If the sauce seems a bit thick or tight, add a splash of that reserved pasta water, one tablespoon at a time, until it loosens to a creamy, clinging consistency. The starch in the water helps the sauce bind to the pasta perfectly.
Plating Your Masterpiece
We eat with our eyes first, so let’s make it beautiful! I love using a pair of tongs to lift and twirl the pasta into a warm, shallow bowl, creating some height. Spoon any extra sauce from the pan right over the top. Now, the final touches: a generous sprinkle of freshly grated Parmesan, a few cracks of black pepper, and a vibrant scatter of torn fresh basil leaves or chopped parsley.
This dish is a complete meal in a bowl, but if you want to round it out, it plays wonderfully with a simple side. A crisp, green salad with a sharp vinaigrette cuts through the richness perfectly. For a cozy night, a slice of crusty, garlic-rubbed bread is mandatory for sauce-mopping duty. Pour a glass of a light red like a Pinot Noir or a crisp white like a Pinot Grigio, and dinner is served!
Make It Your Own: Delicious Twists & Swaps
The beauty of this recipe is its adaptability. Once you’ve mastered the base, try one of these fun variations!
- Protein Power-Up: Add 1 lb of cooked protein to the sauce. Sautéed shrimp (add in the last 2 minutes), shredded rotisserie chicken, or even Italian sausage (cook it first, then use the rendered fat to cook your garlic!) are fantastic.
- Vegan & Dairy-Free Delight: Swap the heavy cream for full-fat coconut cream and use a vegan Parmesan alternative or 2 tablespoons of nutritional yeast for that cheesy flavor. It’s shockingly creamy and delicious.
- Loaded Veggie Version: Sauté 1 cup of sliced mushrooms or a handful of spinach with the garlic. For roasted veggies like bell peppers or zucchini, toss them in at the end.
- Herb Garden Swap: Use 1 teaspoon of dried oregano instead of basil for a deeper, more earthy flavor profile. Finish with fresh oregano or thyme.
- Spicy Arrabbiata-Style: Double the red pepper flakes and add a pinch more while sautéing the garlic for a true kick. Skip the cream for a lighter, fiery sauce.
Beau’s Kitchen Notes
This recipe has been my trusty sidekick for years, and it’s evolved from that first apartment experiment. The biggest lesson? Don’t rush the garlic or the simmer. Patience in those two steps builds a depth of flavor that can’t be beat. One time, I got a phone call and let the garlic go just a little too far toward golden—the whole sauce had a faint bitter note. I saved it with an extra pinch of sugar and a laugh, but I learned my lesson!
Also, I firmly believe recipes are guidelines, not commandments. If you only have 3 cloves of garlic, use three. If you want it extra creamy, add another glug of cream. Cook with your senses—taste, smell, look. That’s how you make a recipe truly yours.
Your Questions, Answered
Q: My sauce is too thick! What did I do wrong?
A: No worries, this is an easy fix! Your sauce may have reduced a bit too much. Simply thin it back out with a splash of that reserved pasta water, regular water, or even a little more cream, until it reaches your desired consistency.
Q: Can I make this ahead of time?
A: You can! The sauce (without the pasta mixed in) will keep beautifully in the fridge for 3-4 days. Reheat it gently on the stove, adding a splash of water or milk to loosen it. Cook fresh pasta to toss with it when you’re ready to serve for the best texture.
Q: Why did my sauce look “grainy” or separate when I added the cheese?
A> This usually happens if the heat was too high when adding the dairy (cream or cheese) or if you used pre-grated Parmesan, which can contain additives. Always lower the heat before adding cream, and grate your cheese fresh from a block for a silky-smooth melt.
Q: What’s the best pasta to use?
A> You really can’t go wrong. Short, sturdy shapes like penne, rigatoni, or shells are fantastic for holding the creamy sauce. Long pastas like fettuccine or linguine are classic and elegant. Choose what makes you happy!
Creamy Tomato Garlic Pasta : Quick, Easy & Full of Flavor
Description
This isn’t just another pasta recipe. This is your weeknight secret weapon—a dish that looks and tastes like you fussed for hours but comes together with breezy, low-effort joy. Bright tomatoes, silky cream, fragrant garlic… it’s all here, clinging to every noodle like a hug you can eat.
Ingredients
-
8 oz pasta – penne, fettuccine, rigatoni, spaghetti… choose your favorite.
-
1 tbsp olive oil
-
4 cloves garlic, minced
-
1 (15 oz) can crushed tomatoes
-
½ tsp red pepper flakes (optional but highly recommended)
-
1 tsp dried basil
-
½ tsp salt
-
½ cup heavy cream
-
¼ cup grated Parmesan (freshly grated if possible)
-
Fresh basil or parsley for garnish
Instructions
1. Cook the Pasta
-
Bring salted water to a boil.
-
Cook pasta to al dente.
-
Before draining, scoop out ½ cup pasta water (trust me—you’ll use it).
2. Sauté the Garlic
-
Heat olive oil over medium.
-
Add garlic and cook until fragrant (1–2 minutes).
Careful not to brown it—burnt garlic = bitter sauce.
3. Build the Tomato Base
-
Add crushed tomatoes, red pepper flakes, dried basil, and salt.
-
Simmer 8–10 minutes until slightly thickened and rich.
4. Make It Creamy
-
Lower heat.
-
Stir in the heavy cream until the sauce turns a rosy pink.
-
Simmer 2–3 more minutes. Taste and adjust seasoning.
5. Bring It All Together
-
Add Parmesan and stir to melt.
-
Toss in cooked pasta.
-
Add splashes of reserved pasta water until the sauce is perfectly silky and clinging.
Notes
-
Don’t rush the garlic—low and slow builds flavor.
-
Always grate Parmesan fresh if possible for smooth melting.
-
Taste the sauce before adding the pasta—it’s easier to adjust seasoning early.
-
A splash of pasta water can fix anything: too thick? Too dry? Pasta water is your friend.
Nutritional Information*
*Please note: This is an estimated breakdown based on the specific ingredients listed. Values will vary with substitutions.
Per Serving (recipe makes 4 servings):
Calories: ~410 | Total Fat: 19g | Saturated Fat: 9g | Cholesterol: 45mg | Sodium: 480mg | Total Carbohydrates: 48g | Dietary Fiber: 3g | Sugars: 5g | Protein: 12g
This dish is a satisfying balance of carbs, fats, and protein. The tomatoes provide a dose of vitamins A and C, along with lycopene. To boost the fiber, consider using a whole-wheat or legume-based pasta. For a lower-fat version, try the half-and-half substitution mentioned above, but remember that fat carries flavor and creates that luxurious mouthfeel we all love.
Final Thoughts from My Kitchen to Yours
And there you have it—your new secret weapon for deliciousness. This Creamy Tomato Garlic Pasta is more than just a recipe; it’s a reminder that incredible food doesn’t have to be complicated. It’s about the joy of creating, the comfort of a hearty meal, and the connections we make over a shared bowl of something made with love.
I hope this recipe finds its way into your regular rotation and becomes a story in your own kitchen. Maybe it’ll be the dish you make after a long day, the one you impress a date with, or the easy dinner you whip up for your best friends. However you enjoy it, I’m just thrilled to be part of your cooking journey.
Give it a try, tag me @feastical if you share it, and let me know how it turned out! Now, go forth and cook something feastical.
With a full heart and an empty bowl,
Beau
Easy Chinese Scallion Pancakes Recipe : Crispy & Flaky Homemade Delight
Easy Chinese Scallion Pancakes Recipe | Crispy & Flaky Homemade Delight
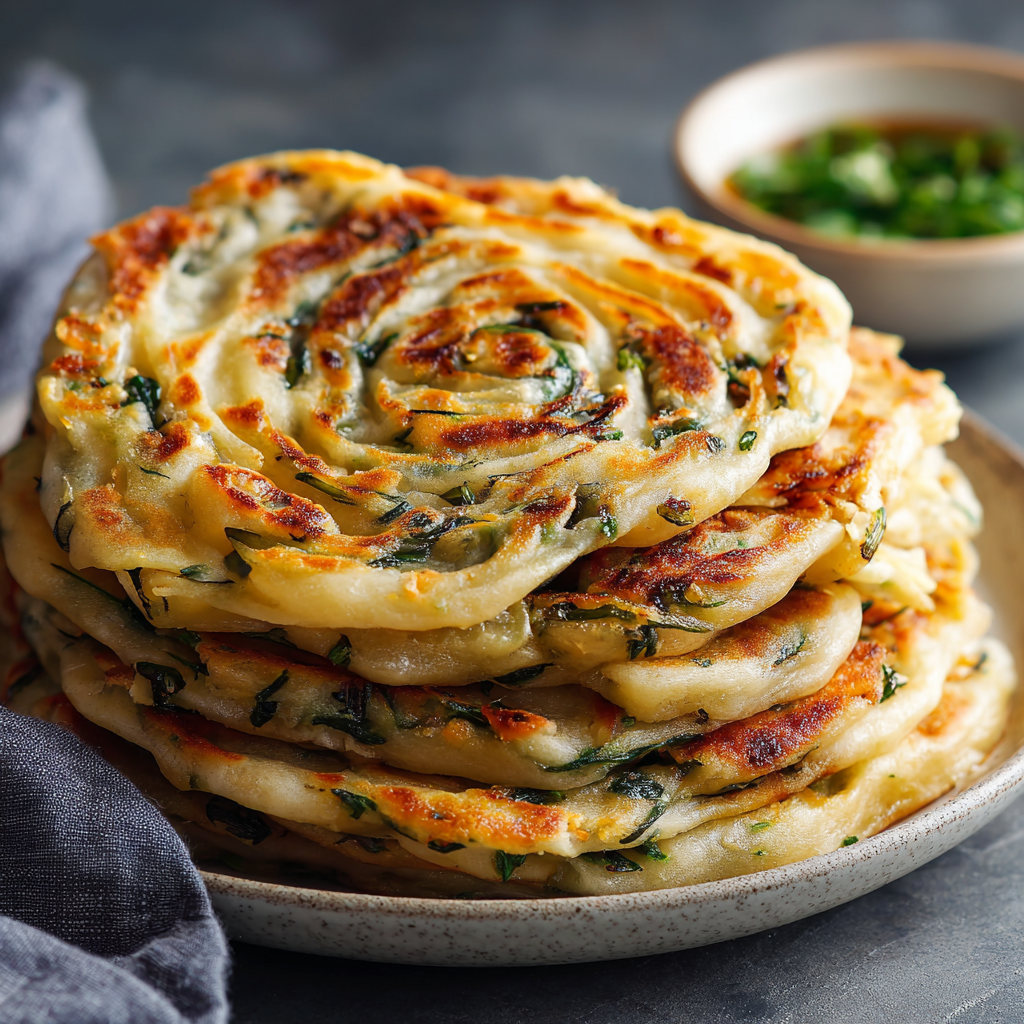
Hey friends, Beau here from Feastical! Let’s talk about one of life’s simple, perfect pleasures: the crispy, chewy, savory, and impossibly flaky Chinese scallion pancake. If you’ve ever wandered through a night market or sat in a bustling dim sum hall, you know the magic. That shatter-crisp exterior giving way to tender, layered insides, all singing with the bright, oniony punch of fresh scallions. It’s a hug for your taste buds, wrapped in a golden-brown package.
But here’s the best part: that magic isn’t locked away in restaurant kitchens. I’m going to show you, step-by-step, how to create this iconic street food right on your own stovetop. No fancy ingredients, no mysterious techniques—just flour, water, scallions, and a little bit of kitchen love. This recipe is a game-changer. It’s for those “I need something delicious NOW” moments, for impressing your friends with your newfound culinary skills, or for just treating yourself to a snack that feels like a celebration. So, tie on your apron, grab your rolling pin (or even a wine bottle!), and let’s make some edible layers of joy together.
The First Bite: My Scallion Pancake Awakening
I’ll never forget my first real scallion pancake. I was about nineteen, wide-eyed and hungry, stuffed into a tiny storefront in New York’s Chinatown with some college friends who swore they knew the spot. The air was thick with the scent of sesame oil and roasting meats. We ordered a mountain of food, but when that unassuming, oil-blotched pancake hit the table, torn into ragged wedges, everything else faded. I took a bite and my brain short-circuited. It wasn’t a “pancake” as I knew it; it was a textural symphony. Crispy, then chewy, then soft, with bursts of salty green onion. It was savory dough perfected.
I became obsessed. For years, I’d only get my fix from restaurants, convinced it was a chef’s secret too complex for my home kitchen. Then, one snowy Sunday, with a craving hitting hard and no takeout in sight, I decided to crack the code. There were a few… let’s call them “dense frisbee” attempts. But finally, getting my hands in that dough, feeling it transform from shaggy to smooth, rolling and coiling it like a pastry chef—that’s when the real connection happened. Now, every time I make them, that noisy, happy little restaurant comes right back to my kitchen. That’s the power of a great recipe; it’s a time machine and a taste adventure, all on one plate.
Gathering Your Flaky Treasure Ingredients
See? I told you it was simple. This is a pantry superhero recipe. Here’s everything you’ll need to create four glorious, personal-sized pancakes.
- 2 cups all-purpose flour: The workhorse! All-purpose gives you the perfect balance of structure and tenderness for those flaky layers. If you want to experiment, you can swap out 1/4 cup with bread flour for a slightly chewier bite, but standard AP flour is absolutely perfect.
- 3/4 cup hot water + 1/4 cup cold water: This is the SECRET WEAPON! The hot water (just off the boil) “cooks” some of the flour, making the dough more pliable and tender, which is key for rolling it super thin. The cold water finishes the job, giving us the right texture to knead. It’s a classic Chinese technique for a reason!
- 1/2 teaspoon salt: Mixed right into the dough, this builds foundational flavor in every single layer. Don’t skip it.
- 4 tablespoons vegetable oil (plus more for frying): We use a neutral, high-heat oil like avocado, canola, or grapeseed. The oil in the dough helps create separation between the layers. For frying, you just need a thin coating in the pan—we’re not deep-frying!
- 1/2 cup finely chopped scallions: The STAR! Use the green and white parts. Chop them finely so they don’t tear the dough when you roll. Pro-tip: if your scallions are very thick, slice them lengthwise first, then chop, for more manageable pieces.
Let’s Get Rolling: Your Step-by-Step Guide to Flaky Perfection
Ready to create some layers? Follow these steps, and I’ll be right there with you with all my best chef hacks.
- Make the Dough: In a mixing bowl, combine your flour and salt. Make a well in the center and slowly pour in the HOT water. I use a chopstick or fork to stir immediately—it will look clumpy and shaggy. That’s good! Now, add the cold water and keep mixing until a rough dough ball forms. Don’t worry about it being pretty.
- Knead to Smooth: Dump that shaggy ball onto a very lightly floured surface. Here’s where you put on a fun song and knead for a solid 8-10 minutes. You’re looking for a supremely smooth, soft, and slightly elastic dough. It should feel like a soft earlobe. If it sticks, add a tiny sprinkle of flour. This kneading develops the gluten just enough to make the dough strong and rollable. When it’s smooth, form it into a ball, place it back in the bowl, cover it with a damp kitchen towel or plastic wrap, and let it rest for 30 minutes. This relaxes the gluten, making it a dream to roll out later. Go have a coffee!
- Divide and Conquer: After its rest, the dough will be even more pliable. Divide it into 4 equal pieces. Keep the ones you’re not working with under the damp cloth so they don’t dry out.
- Create the Layers (The Fun Part!): Take one piece. On a lightly oiled surface (this prevents sticking better than flour here), roll it out into a thin circle, about 8-9 inches across. Don’t stress about a perfect circle—rustic is beautiful! Now, brush the entire surface with a thin, even layer of oil (about 1/2 tablespoon per pancake). This is what creates the flaky separation! Sprinkle a generous quarter of your chopped scallions evenly over the surface.
- Roll and Coil: Starting from the edge closest to you, tightly roll the dough up into a long log, like a yoga mat. Now, take one end of that log and coil it into a tight snail/spiral, tucking the end underneath. Flatten this coil gently with your hand. Let it rest for 5 minutes (this relaxes it again), then finally, roll it out once more into a 6-7 inch circle. You’ll see the swirls! That’s your flaky future. Repeat with the remaining dough pieces.
- Pan-Fry to Golden Glory: Heat a heavy non-stick or cast-iron skillet over medium heat. Add enough oil to just coat the bottom. Once the oil shimmers, carefully slide in a pancake. Cook for 2-3 minutes on the first side, until beautifully golden brown and crispy. Flip, add another tiny drizzle of oil around the edges if the pan looks dry, and cook for another 2-3 minutes. Press down gently with your spatula to ensure even contact. You should hear a lovely sizzle. Transfer to a wire rack (this keeps them crispy) while you cook the rest. Slice into wedges and serve immediately—they’re best straight from the pan!
How to Serve Your Masterpiece
Presentation is part of the fun! I love piling the wedges high on a wooden board or a simple plate. The key is the dip. While they are heavenly plain, a great dipping sauce elevates them. My go-to is a 50/50 mix of soy sauce and rice vinegar, with a few drops of chili oil and a sprinkle of sesame seeds. For a shortcut, straight chili crisp or sesame oil is divine. Serve them as an appetizer, a side to stir-fries, or even for a wildly impressive breakfast alongside scrambled eggs. They are best hot and fresh, but honestly, they rarely last long enough to get cold!
Get Creative: Flavor Twists & Swaps
Once you master the classic, the world is your scallion pancake! Here are a few of my favorite riffs:
- Everything Spice Scallion Pancake: Add a tablespoon of “Everything Bagel” seasoning to the scallions for a garlicky, seedy crunch that’s out of this world.
- Cheesy Pull-Apart Version: Sprinkle a mix of grated Parmesan and mozzarella over the scallions before rolling. The melted cheese creates an incredible pull-apart effect.
- Spicy Szechuan Style: Brush the dough with chili oil instead of plain oil, and mix a teaspoon of ground Szechuan pepper into the scallions for a tingly, aromatic kick.
- Vegan Delight: This recipe is naturally vegan! Just ensure your dipping sauce is too. You can also add finely chopped shiitake mushrooms sautéed with garlic for an umami bomb.
- Gluten-Free Friendly: Swap the all-purpose flour for a good-quality 1:1 gluten-free flour blend (like Bob’s Red Mill). You may need a touch more water, and handle the dough a bit more gently when rolling.
Beau’s Chef Notes & Kitchen Confessions
This recipe has been my kitchen companion for years, and it’s evolved with me. My biggest “aha” moment was realizing the oiled surface for rolling is a game-changer—no more tough, over-floured dough. I’ve also learned that letting the coiled dough rest for those five minutes before the final roll is non-negotiable for preventing spring-back. And a confession: my first batch ever was so thick I could have used it as a doorstop. I was too timid with the rolling pin! Don’t be like past Beau. Roll that dough thin with confidence. It’s more resilient than you think, and those thin layers are what crisp up so beautifully. Embrace the imperfections; each pancake has its own character.
Your Questions, Answered!
Q: My dough is tough and hard to roll. What did I do wrong?
A: This usually means the gluten is too tight. Next time, make sure you let the dough rest for the full 30 minutes (and the 5 minutes after coiling). Also, be sure you’re using *hot* water to start—it really does make the dough more tender. If it’s happening now, just let the tough piece sit covered for 10 more minutes and try again.
Q: The scallions keep poking holes in my dough when I roll it.
A: Chop them finer! A sharp knife is your friend. If the pieces are too long or thick, they act like little daggers. You want them in small, manageable pieces that will lay flat.
Q: Can I make these ahead of time?
A: Absolutely! You can roll and coil the pancakes up to the final shape, then layer them between parchment paper, wrap well, and refrigerate for a day or freeze for a month. Let them come to room temperature before rolling out and frying. You can also cook them fully, let them cool, and re-crisp in a toaster oven or air fryer.
Q: Why aren’t my pancakes getting crispy?
A: Two likely culprits: 1) Your pan isn’t hot enough before adding the pancake. Wait for the oil to shimmer. 2) You’re moving it too soon! Let it cook undisturbed for the full 2-3 minutes to form that golden crust. Also, don’t overcrowd the pan; cook one at a time.

Easy Chinese Scallion Pancakes Recipe : Crispy & Flaky Homemade Delight
Description
Hey friends, Beau here from Feastical! If you’ve ever craved a snack that’s crispy, chewy, flaky, and packed with savory scallion goodness, you’re in the right place. Chinese Scallion Pancakes look and taste like something you’d order from a restaurant, but they’re shockingly simple to make at home — no special equipment or ingredients required. With just flour, water, oil, and scallions, you’ll create layers that puff, crisp, and practically beg to be dipped in something tasty.
Ingredients
For the Dough
-
2 cups all-purpose flour
-
¾ cup hot water
-
¼ cup cold water
-
½ tsp salt
-
1 tbsp vegetable oil (for brushing dough)
For the Filling
-
½ cup finely chopped scallions (green onions)
For Cooking
-
2–3 tbsp vegetable oil (for pan-frying)
Instructions
In a bowl, mix the flour and salt. Slowly stir in the hot water until the dough becomes shaggy. Add the cold water and mix until a rough dough forms.
Move the dough to a lightly floured surface. Knead for 8–10 minutes until smooth and soft. Cover with a slightly damp towel and let it rest for 30 minutes — this is key for easy rolling.
Cut the dough into 4 equal pieces. Working with one piece at a time, roll it into a thin circle (about 8–9 inches). Brush lightly with oil and sprinkle with scallions.
Roll the dough into a long log. Coil it into a spiral (like a cinnamon roll), tuck the end under, and gently flatten. Let the spiral rest 5 minutes. Then roll it out again into a 6–7 inch circle.
Heat a thin layer of oil in a non-stick pan over medium heat. Place the pancake in and cook 2–3 minutes per side until golden and crispy. Repeat with the remaining dough.
Cut into wedges. Serve immediately with dipping sauce!
Notes
-
Chop scallions finely so they don’t poke through the dough.
-
Let the dough rest twice — once before dividing, once after coiling. This makes the dough easy to roll thin.
-
Don’t overcrowd the pan. One pancake at a time gives the best crisp.
-
A wire rack keeps them crispy instead of steaming on a plate.
Nutritional Information*
*Please note: These are estimates based on the specific ingredients listed and can vary with substitutions.
Per Pancake (1 of 4): Calories: Approximately 180 | Carbohydrates: 25g | Protein: 4g | Fat: 7g (Saturated Fat: 0.5g) | Sodium: 290mg | Fiber: 1g | Sugar: 0g
This recipe is a great source of energy from complex carbs. Using a heart-healthy oil like avocado increases the good fats. Scallions add a touch of Vitamin K and antioxidants. Remember, this is a treat meant to be enjoyed for its incredible flavor and texture!
Prep Time: 40 minutes (includes resting) | Cook Time: 10 minutes | Yield: 4 pancakes
Final Thoughts from My Kitchen to Yours
There you have it, friends—the secret to impossibly flaky, crispy, soul-satisfying scallion pancakes is now in your hands. This isn’t just a recipe; it’s a skill, a party trick, and a direct line to pure comfort food joy. The process of making them is half the fun—getting your hands in the dough, watching simple ingredients transform, and that triumphant moment you see those golden layers puff up in the pan.
I hope this recipe becomes a staple in your home, just like it is in mine. Make them on a lazy weekend, for a fun appetizer, or when you just need a taste of something wonderfully authentic and homemade. Don’t forget to tag me @feastical if you make them—I LOVE seeing your creations! Now, go forth, roll with confidence, and get ready to fall in love with your own cooking. Happy feasting!
– Beau

Strawberry Crunch Cake Recipe : The Ultimate Dessert Delight
Strawberry Crunch Cake Recipe – The Ultimate Dessert Delight
Hey friends, Beau here from Feastical! Tell me if this sounds familiar: you’re scrolling, dreaming of a dessert that’s equal parts nostalgic comfort and outright celebration. Something that doesn’t just sit on a plate but *announces* itself with a cheerful, crackly crunch and a burst of sweet strawberry sunshine. Well, pull up a stool, because the dessert of your dreams is officially within reach.
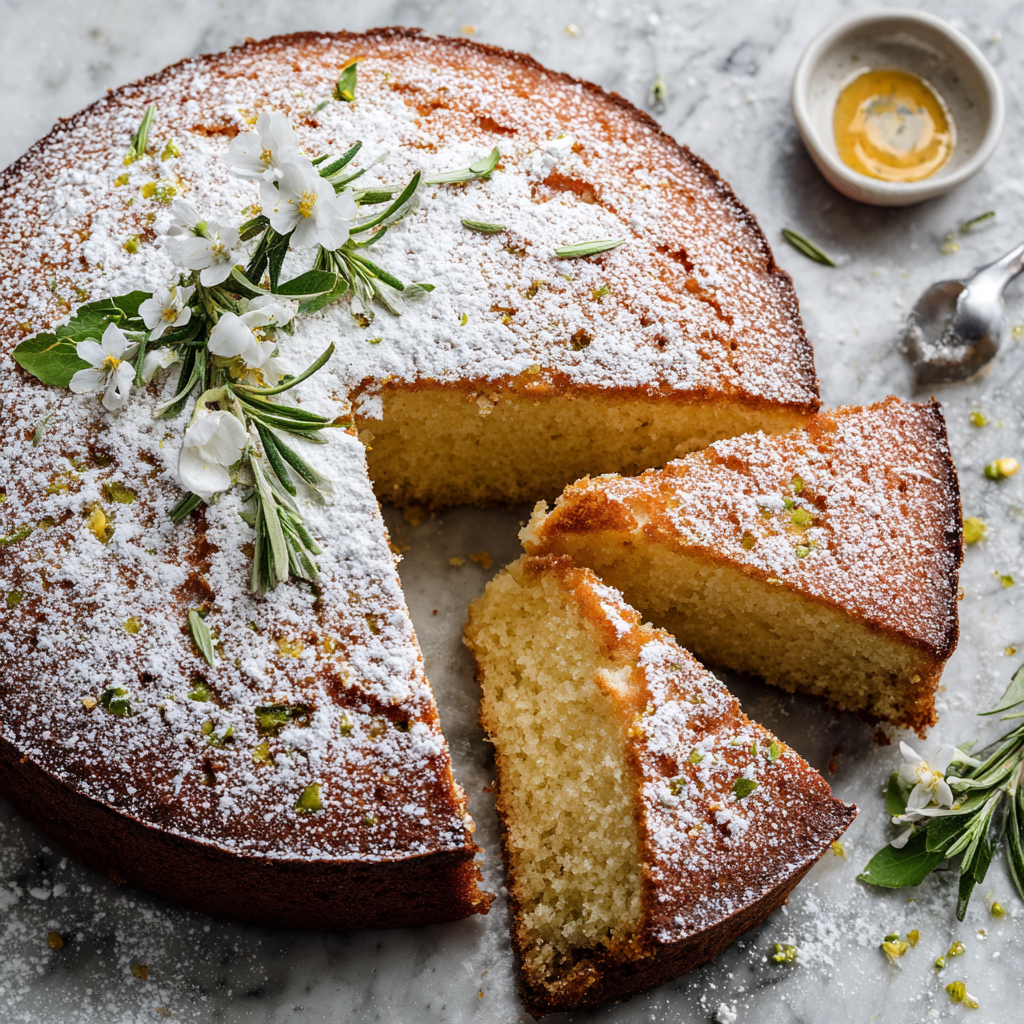
This Strawberry Crunch Cake is my love letter to unapologetic joy. We’re talking impossibly soft vanilla cake layers, a ribbon of just-tart-enough homemade strawberry filling, clouds of vanilla whipped cream, and that iconic, buttery, strawberry-speckled crunch topping that’s pure magic. It looks like you spent all day in a fancy bakery, but I’ve woven in all my favorite kitchen hacks to keep it totally approachable. Whether it’s for a birthday, a potluck where you want to be the undisputed hero, or just a Tuesday that needs a serious upgrade, this cake is your answer. Let’s roll up our sleeves and make something truly unforgettable together!
A Crunch That Takes You Back
This cake always throws me right back to sticky-summer childhood afternoons at my grandma’s. The prize at the end of a long day of playing outside wasn’t just a popsicle—it was those iconic strawberry shortcake ice cream bars from the truck. That *snap* of the pink coating, the creamy vanilla center, the way it melted faster than you could eat it… pure bliss.
Years later, as I started messing around in my own kitchen, I became obsessed with recreating that specific textural symphony—the soft, the creamy, the crunchy—but in cake form. After more than a few experiments (let’s just say not all crunches are created equal), I landed on this beautiful beast. It captures that same childhood magic but feels grown-up and special. Every time I press that crunchy topping into the frosting, I’m not just decorating a cake; I’m tapping into a happy memory. And now, I get to share that feeling with you. How cool is that?
Gathering Your Flavor Party
Here’s the cast of characters for our masterpiece. I’ve added my little chef insights and swaps so you can make this cake your own with what you’ve got!
For the Cake:
- 1 box white or vanilla cake mix: Our trusty foundation! I’m all for from-scratch, but a good mix is a brilliant shortcut for reliably tender, fluffy layers. Chef’s Tip: Look for a mix with “pudding in the mix” for extra moisture.
- 3 large eggs: They give our cake structure and rich texture. Bring them to room temperature for a smoother, better-rising batter.
- 1 cup water: Simple hydration. For a richer flavor, try using whole milk instead.
- 1/2 cup vegetable oil: This keeps the cake incredibly moist. You can swap in an equal amount of melted (and cooled) butter if you want a more pronounced buttery flavor.
- 1 tsp vanilla extract: The secret scent of happiness. Always use pure vanilla if you can—it makes a world of difference.
For the Strawberry Filling:
- 1 cup fresh or frozen strawberries (chopped): Frozen work perfectly here and are often picked at peak ripeness! No need to thaw completely.
- 1/4 cup sugar: Sweetens and helps pull the juices out of the berries.
- 1 tbsp lemon juice: A bright splash of acidity that makes the strawberry flavor pop and balances the sweetness.
- 1 tbsp cornstarch + 2 tbsp water (slurry): Our thickening agent. This turns the juicy berries into a perfect, spreadable, glossy filling that won’t soak the cake.
For the Frosting:
- 1 1/2 cups heavy whipping cream: Must be cold, cold, cold! This is the key to getting stiff, fluffy peaks. Don’t sub with half-and-half or milk.
- 1/2 cup powdered sugar: Sweetens and stabilizes the cream slightly. Sift it to avoid lumps.
- 1 tsp vanilla extract: Because vanilla and whipped cream are a match made in heaven.
For the Iconic Crunch Topping:
- 15 Golden Oreos (crushed): The “shortcake” base of our crunch! Golden Oreos have that perfect vanilla flavor. Chef’s Hack: Toss them in a zip-top bag and use a rolling pin to crush—therapeutic and effective.
- 1/4 cup freeze-dried strawberries (crushed): The flavor superstar! They give an intense, pure strawberry punch and that gorgeous pink color without adding moisture. Find them in the snack or dried fruit aisle.
- 3 tbsp melted butter: The glue that brings our crunchy miracle together and adds that irresistible, buttery note.
Let’s Build Some Magic: Step-by-Step
Follow these steps, and you’ll have a showstopper. I’m walking you through each one with my best tips!
- Bake the Cake: Fire up your oven to 350°F (175°C). Grease and line two 9-inch round pans with parchment paper—this guarantees easy release. In a big bowl, combine the cake mix, eggs, water, oil, and vanilla. Beat with a hand mixer on medium for 2 full minutes. This aerates the batter for a lighter cake. Divide the batter evenly between your pans and smooth the tops. Bake for 25-30 minutes, until a toothpick poked in the center comes out clean. Let them cool in the pans for 10 minutes, then turn out onto a wire rack to cool completely. Patience is key here—warm cakes will melt the frosting!
- Make the Strawberry Filling: While the cakes cool, let’s make the filling. In a small saucepan, combine the strawberries, sugar, and lemon juice. Cook over medium heat, stirring often, until the berries break down and get juicy, about 5-7 minutes. Whisk the cornstarch and water into a smooth slurry in a little bowl. Stir this into the bubbling strawberry mixture. Keep stirring for another minute or two until the filling thickens beautifully and turns glossy. Remove from heat, pour into a bowl, and let it cool to room temperature. It will thicken more as it cools.
- Whip the Frosting: Now for the clouds! Ensure your heavy cream is ice-cold. In a chilled bowl (I sometimes pop my mixing bowl in the freezer for 10 minutes), combine the cream, powdered sugar, and vanilla. Beat on medium-high speed until stiff peaks form. This means when you lift the beaters, the peak stands straight up and doesn’t flop over. Don’t walk away! Over-beating turns cream into butter. Once it’s perfect, pop it in the fridge until you’re ready to assemble.
- Prepare the Crunch Topping: This is the fun part! Crush your Golden Oreos and freeze-dried strawberries separately until they’re coarse crumbs (a few bigger pieces are okay for texture!). Combine them in a bowl. Pour the melted butter over the top and stir until every crumb is coated and the mixture starts to clump together. Set this aside—try not to snack on it all!
- Assemble Your Masterpiece: Place your first cake layer on your serving plate or cake stand. Spread a thin layer of whipped cream frosting over it as a base. Then, spoon your cooled strawberry filling on top, spreading it almost to the edges. Gently place the second cake layer on top. Now, frost the entire outside of the cake with the remaining whipped cream. Don’t worry about it being perfectly smooth—the “naked cake” rustic look is perfect here! Finally, take handfuls of your crunch topping and gently press it onto the sides and top of the cake. Cover every inch you can!
- Chill and Serve: Carefully transfer your finished cake to the refrigerator. Let it chill for at least 1 hour before slicing. This gives the cake time to set, making for clean, gorgeous slices that showcase all those beautiful layers.
How to Serve This Showstopper
Presentation is part of the fun! Use a long, sharp knife, and dip it in hot water before each slice for super-clean cuts. Wipe the blade clean between slices. I love serving this on a simple white cake stand to let those pink and gold crunch bits really shine.
For the ultimate experience, pair each slice with a glass of cold milk, a scoop of vanilla bean ice cream on the side, or a flute of sparkling rosé for the adults. It’s a celebration on a plate, so serve it with a big smile!
Make It Your Own: Delicious Twists
This recipe is a fantastic canvas. Here are a few ways to play with it:
- Lemon-Berry Bliss: Use a lemon cake mix. Add the zest of one lemon to the cake batter and the whipped cream. Keep the strawberry filling or swap for a mixed berry medley.
- Chocolate-Dipped Strawberry: Use a chocolate cake mix. For the crunch, use regular chocolate sandwich cookies (instead of Golden Oreos) with the freeze-dried strawberries.
- Summer Peach Crunch: Swap the strawberries in the filling for ripe peaches. Use peach-flavored yogurt cookies or biscoff cookies for the crunch topping, and omit the freeze-dried strawberries.
- Gluten-Free Friendly: Use your favorite gluten-free vanilla cake mix and gluten-free vanilla sandwich cookies for the crunch. The rest of the ingredients are naturally GF!
- Mini Crunch Cakes: Bake the batter in a 9×13 pan. Once cool, cut into squares. Serve each square with a dollop of whipped cream, a spoonful of strawberry filling, and a generous sprinkle of the crunch topping. Instant individual desserts!
Beau’s Kitchen Notes
This cake has evolved from a messy experiment into my go-to “wow” dessert. The biggest game-changer was discovering freeze-dried strawberries for the topping—before that, I was trying to use strawberry gelatin or fresh berries, which just made the topping soggy. Lesson learned: moisture is the enemy of crunch!
And a funny story: the first time I made this for friends, I was so focused on the crunch I completely forgot to sweeten the whipped cream. We served it anyway, calling it a “deconstructed, not-too-sweet artisan version.” They saw right through me, but we laughed and sprinkled a little extra sugar on top. Even the “mistakes” can be delicious! The cake is forgiving, so have fun with it.
Your Questions, Answered
Q: Can I make any part of this ahead of time?
A: Absolutely! The cake layers can be baked, cooled, wrapped tightly in plastic wrap, and frozen for up to a month. Thaw in the fridge overnight. The strawberry filling can be made and stored in the fridge for up to 3 days. The crunch topping can be made and kept in an airtight container at room temp for 2 days. Only whip the cream the day you plan to assemble.
Q: My whipped cream frosting is soft/runny. What happened?
A> This usually means 1) your cream or bowl wasn’t cold enough, or 2) you under-whipped it. Make sure everything is chilled, and beat until you have definite, firm peaks. If it’s a warm day, keep the bowl nestled in a larger bowl of ice while you whip.
Q: Can I use cool whip or store-bought frosting instead?
A> You can, but the texture and flavor will be different. For a similar effect with less work, you could use a store-bought *stabilized* whipped cream or a vanilla buttercream. The light, fresh flavor of homemade whipped cream is a huge part of this cake’s charm, though!
Q: The cake sunk in the middle. Why?
A> This is often due to under-baking or opening the oven door too early. Ensure your oven is preheated and use that toothpick test—it should come out with just a crumb or two, not wet batter. Let the cakes bake undisturbed for the first 20 minutes.

Strawberry Crunch Cake Recipe : The Ultimate Dessert Delight
Description
Hey friends, Beau here from Feastical! If you’re craving a dessert that’s bright, nostalgic, and full of flavor, this Strawberry Crunch Cake delivers big-time. Think soft vanilla cake layers, a sweet-tart homemade strawberry filling, fluffy whipped cream frosting, and that iconic strawberry shortcake ice-cream-bar crunch. It’s impressive, fun, and surprisingly simple to make — perfect for birthdays, family gatherings, or whenever you want a dessert that steals the show.
Ingredients
For the Cake
-
1 box white or vanilla cake mix
-
3 large eggs (room temperature)
-
1 cup water (or milk for a richer cake)
-
1/2 cup vegetable oil
-
1 tsp vanilla extract
For the Strawberry Filling
-
1 cup fresh or frozen strawberries, chopped
-
1/4 cup sugar
-
1 tbsp lemon juice
-
1 tbsp cornstarch + 2 tbsp water (slurry)
For the Whipped Cream Frosting
-
1 1/2 cups cold heavy whipping cream
-
1/2 cup powdered sugar
-
1 tsp vanilla extract
For the Strawberry Crunch Topping
-
15 Golden Oreos, crushed
-
1/4 cup freeze-dried strawberries, crushed
-
3 tbsp melted butter
Instructions
1. Bake the Cake
-
Preheat oven to 350°F (175°C).
-
Grease and line two 9-inch round pans.
-
In a bowl, mix cake mix, eggs, water (or milk), oil, and vanilla.
-
Beat for 2 minutes.
-
Divide batter into pans and bake 25–30 minutes.
-
Cool completely before assembling.
2. Make the Strawberry Filling
-
In a saucepan, combine strawberries, sugar, and lemon juice.
-
Cook 5–7 minutes until juicy.
-
Stir in cornstarch slurry and cook until thick and glossy.
-
Cool completely.
3. Make the Whipped Cream Frosting
-
In a cold bowl, add heavy cream, powdered sugar, and vanilla.
-
Beat until stiff peaks form.
-
Keep chilled until assembly.
4. Make the Strawberry Crunch
-
Crush Oreos and freeze-dried strawberries.
-
Mix with melted butter until crumbly. Set aside.
5. Assemble the Cake
-
Place the first cake layer on a plate.
-
Add a thin layer of whipped cream frosting.
-
Spread strawberry filling on top.
-
Add the second cake layer.
-
Frost the entire cake with whipped cream.
-
Press the strawberry crunch onto the sides and top.
-
Chill for at least 1 hour for clean slices.
Notes
-
Cold cream = perfect whipped frosting.
-
Don’t overbeat the cream — stop as soon as peaks hold.
-
Make sure cake layers are fully cooled before frosting.
-
Freeze-dried strawberries give crunch and flavor without getting soggy.
-
Use hot water on your knife for bakery-style slices.
Nutritional Info (Approximate)
Prep Time: 20 mins | Cook Time: 30 mins | Chill Time: 60 mins | Servings: 12
Approximate values per slice: 340 calories | 18g fat | 42g carbs | 3g protein
Please note: This is an estimate based on the specific ingredients listed and standard cooking methods. Values can vary significantly based on ingredient brands, precise measurements, and optional substitutions.
Final Slice of Thought
And there you have it, friend—the whole delicious story of my favorite Strawberry Crunch Cake. This isn’t just a recipe; it’s an invitation to create a moment of pure, shared happiness. It proves that stunning desserts don’t have to be complicated, and that the best flavors are often the ones that spark a happy memory.
So, I really hope you give this one a try. Take a picture, share it with someone you love, and don’t forget that satisfying *crunch* with every bite. Thanks for hanging out in the kitchen with me. Until next time, keep making life delicious!
With a full heart and a sweet tooth,
Beau
Super Moist Banana Bread Recipe : The Only One You’ll Ever Need
Super Moist Banana Bread Recipe – The Only One You’ll Ever Need
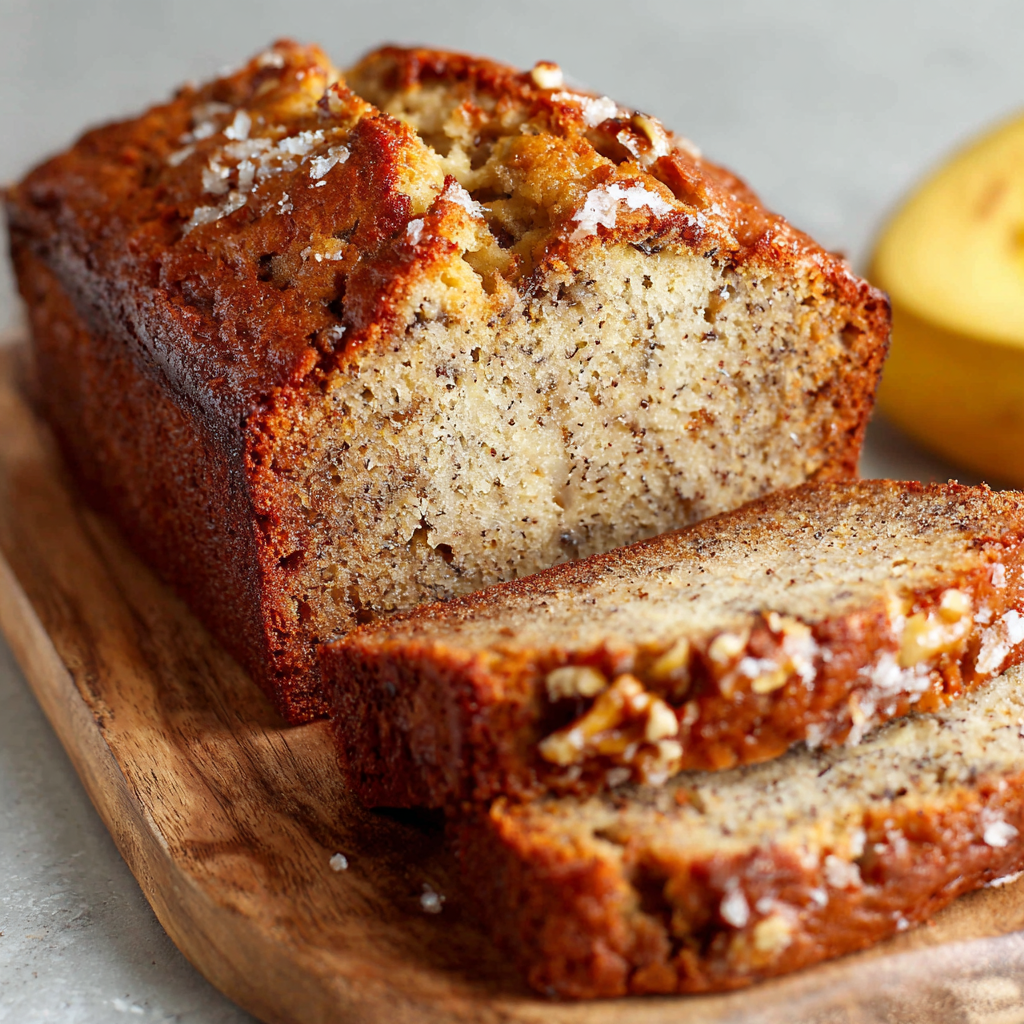
Hey friends, Beau here! Let’s talk about one of life’s simple, glorious pleasures: a slice of warm banana bread, steaming from the oven, with a pat of butter slowly melting into its craggy top. It’s more than a recipe; it’s a kitchen hug, a way to turn those sad, speckled bananas on your counter into pure, unadulterated joy. If you’ve ever searched for that perfectly moist, banana-forward, not-too-sweet loaf that holds together beautifully but still feels light—your quest ends right here, right now.
I’ve baked more banana bread than I can count. Some were fine, some were doorstops, and a precious few were revelation-level good. This recipe is the culmination of all those trials. It’s the one I scribbled on a notecard, splattered with batter and love, that now lives permanently on my fridge. We’re talking rich, tender crumb, deep banana flavor, and a method so simple you can do it with one bowl and a fork. No stand mixer required, no fancy techniques. Just you, a few humble ingredients, and about an hour until banana bread bliss. So, grab those ripe bananas, and let’s make your kitchen smell incredible.
Why This Loaf Feels Like Home
This recipe takes me straight back to my grandma’s linoleum-floored kitchen. She wasn’t a “fancy” baker, but she was a great one. Her secret weapon? Patience. She’d let her bananas ripen on the windowsill until they were practically black, then she’d mash them with this focused, rhythmic energy that promised something wonderful was coming. The smell that filled her house was my childhood’s signature scent—sweet, spiced, and comforting.
I remember one rainy Saturday, I must have been about ten, and I was determined to make it myself. I got the steps mixed up, added the baking soda directly to the melted butter (it fizzed like a volcano!), and somehow still ended up with a loaf that we devoured while playing cards at the table. That messy, imperfect, delicious experience taught me the most important kitchen lesson: it’s hard to truly ruin something made with good intentions. This recipe captures that spirit—forgiving, flexible, and always, always satisfying. It’s the edible equivalent of a well-worn sweater.
Gathering Your Banana Bread Dream Team
Here’s what you’ll need. I’ve added my little chef notes next to each one because knowing the “why” makes you a more confident cook!
- 3 large, very ripe bananas, mashed – This is non-negotiable, friends! The blacker, the better. They should smell intensely sweet and mash easily. This is where all that deep, complex banana flavor and natural moisture comes from. No yellow bananas allowed for peak flavor!
- 1/2 cup (1 stick) unsalted butter, melted – Unsalted lets you control the salt level. Melting it gives us that dense, rich texture we love. For a dairy-free swap, an equal amount of melted coconut oil works beautifully and adds a lovely hint of flavor.
- 3/4 cup packed brown sugar – Brown sugar is my hero here. The molasses in it adds moisture and a subtle caramel note that white sugar just can’t match. For a deeper flavor, use dark brown sugar.
- 2 large eggs – They bind everything together and add structure. Make sure they’re at room temperature to blend seamlessly into the batter. In a pinch, you can quickly warm cold eggs by placing them in a bowl of warm water for 5 minutes.
- 1/4 cup plain yogurt or sour cream – The “secret” ingredient for ultimate moisture and a slight tang that balances the sweetness. Greek yogurt, regular yogurt, or full-fat sour cream all work. This is what guarantees that super moist texture days later!
- 1 tsp pure vanilla extract – The flavor enhancer. It rounds out all the other flavors. Don’t skip it!
- 1 1/2 cups all-purpose flour – The foundation. For a slightly denser, nuttier loaf, you can swap in 3/4 cup of whole wheat flour, but keep the rest all-purpose for the best rise.
- 1 tsp baking soda – Our leavening agent. It reacts with the acidic bananas and yogurt to give the bread its lift. Make sure it’s fresh for the best results!
- 1/2 tsp salt – Crucial! It heightens every other flavor and prevents the bread from tasting flat.
- 1/2 tsp cinnamon (optional but highly recommended) – My personal touch. It adds a whisper of warmth that complements the banana perfectly.
- 1/2 cup chopped walnuts, pecans, or chocolate chips (optional) – The fun mix-ins! Walnuts add a toasty crunch, chocolate chips make it a dessert. Or, be wild and do both!
Let’s Bake: Your Simple, One-Bowl Journey to Awesome
See? I told you it was easy. Follow these steps, and you’re golden.
- Prep Your Arena. Preheat your oven to 350°F (175°C). Grease a 9×5-inch loaf pan really well with butter or non-stick spray, or line it with parchment paper for the world’s easiest cleanup. A well-prepped pan means your beautiful loaf will slide right out.
- Banana Mash Party. In a large mixing bowl, peel and mash those very ripe bananas with a fork or potato masher. You want them mostly smooth, but a few small lumps are totally fine—they’ll create little pockets of intense banana flavor! This is your stress relief step. Mash with gusto.
- Combine the Wet Crew. To the mashed bananas, add the melted (and slightly cooled) butter, brown sugar, eggs, yogurt (or sour cream), and vanilla. Whisk it all together until it’s smooth and homogenous. You’ll see the batter take on a creamy, caramel-colored look. It already smells amazing, right?
- Dry Ingredients, Assemble! Right on top of the wet mixture, sprinkle the flour, baking soda, salt, and cinnamon (if using). Here’s my big tip: DO NOT STIR YET. Just let the dry ingredients sit there like a little island. This prevents you from accidentally overmixing when you do combine.
- The Gentle Fold. Now, using a rubber spatula or a wooden spoon, gently fold the dry ingredients into the wet ingredients. Stop the moment you see the last streak of flour disappear. A few tiny lumps are absolutely okay. Overmixing is the enemy of tender banana bread—it develops the gluten and can make it tough.
- Fold in the Fun. If you’re using nuts or chocolate chips, fold them in now with just one or two turns to distribute them evenly.
- Into the Oven. Pour the batter into your prepared loaf pan and smooth the top. For a pretty, professional touch, you can sprinkle a few extra nuts or chocolate chips on top. Bake for 55 to 65 minutes. The key is the toothpick test: insert it into the very center of the loaf. It should come out with just a few moist crumbs attached, not wet batter.
- The Crucial Cool-Down. This is the hardest part! Let the loaf cool in the pan on a wire rack for at least 10 minutes. This allows it to set. Then, run a knife around the edges and carefully turn it out to cool completely on the rack. I know, I know… you want to cut into it immediately. But waiting ensures it slices cleanly and the flavors have settled. Your patience will be rewarded.
How to Serve Your Masterpiece
Okay, the loaf is cool (or, let’s be real, still slightly warm because you couldn’t wait). Now for the fun part! The beauty of this banana bread is its versatility.
For Breakfast or a Snack: A simple, thick slice is perfect all on its own. But let’s level up. A smear of creamy peanut or almond butter adds protein and makes it feel like a meal. A drizzle of honey or a dollop of Greek yogurt is fantastic too.
For Dessert: Toast a slice under the broiler for just a minute until the edges get crispy. Top it with a scoop of vanilla ice cream or a generous spoonful of whipped cream. It transforms into a decadent, homey dessert that will wow guests.
The Ultimate Combo: My personal favorite? A warm slice with a thin layer of salted butter. The slight saltiness against the sweet, moist bread is a match made in heaven. Serve it with a big mug of coffee or a cold glass of milk.
Make It Your Own: Delicious Twists & Swaps
Once you’ve mastered the base recipe, the kitchen playground opens up! Here are a few of my favorite riffs.
- Chocolate Lover’s Dream: Fold in 1/2 cup of chocolate chips AND 1/4 cup of cocoa powder when you add the flour. You get a marbled, decadent chocolate-banana loaf.
- Gluten-Free & Fabulous: Swap the all-purpose flour for a 1-to-1 gluten-free baking blend. The yogurt helps keep it moist, so you won’t miss the gluten at all.
- Morning Glory Loaf: Add 1/2 cup of old-fashioned oats to the dry ingredients and fold in 1/2 cup of shredded carrot and 1/4 cup of raisins with the nuts. It’s like a healthier morning muffin in loaf form!
- Tropical Vacation: Fold in 1/2 cup of shredded sweetened coconut and 1/4 cup of chopped macadamia nuts. It’s like a piña colada in banana bread form.
- Double Nut Crumble: Before baking, mix 2 tbsp of brown sugar, 2 tbsp of chopped nuts, and 1 tbsp of cold butter into a crumble. Sprinkle it over the batter for a sweet, crunchy topping that’s next-level good.
Beau’s Kitchen Confidential
This recipe has lived a life! It started as a scribble on the back of an envelope, tweaked through countless batches. I once accidentally used a whole cup of yogurt instead of a quarter cup (I was… distracted). The result? The most absurdly moist, almost pudding-like bread that my friends still request. It was a happy accident that taught me just how forgiving this loaf can be.
Over time, I learned that letting the batter rest for 10 minutes before baking (while the oven finishes preheating) allows the flour to fully hydrate and results in an even more uniform crumb. I also started keeping peeled, overripe bananas in a bag in my freezer. When I have three, I thaw them (they’ll be mushy and perfect) and make this bread. No banana ever goes to waste in my house, and I always have emergency banana bread potential on hand. It’s a good life policy.
Your Questions, Answered
Q: My banana bread is raw in the middle but dark on top. What happened?
A: This usually means your oven is too hot! Ovens can run hot. Next time, try lowering the temperature to 325°F and baking for a little longer. You can also tent the loaf with aluminum foil for the last 20 minutes of baking if the top is browning too quickly.
Q: Can I use this batter for muffins?
A> Absolutely! This recipe makes about 12 standard muffins. Fill liners 2/3 full and bake at 350°F for 18-22 minutes. Do the toothpick test—they bake much faster!
Q: My bread is dense and gummy. Where did I go wrong?
A: The most common culprits are overmixing the batter (which develops gluten) or using bananas that weren’t ripe enough. Very ripe bananas have more sugar and liquid, which is key. Also, make sure your baking soda is fresh!
Q: How long does it stay fresh, and can I freeze it?
A: Wrapped tightly at room temp, it’s delicious for 3 days. For longer storage, wrap the whole loaf or individual slices in plastic wrap and then foil. Freeze for up to 3 months. Thaw at room temperature or pop a frozen slice straight into the toaster!

Super Moist Banana Bread Recipe : The Only One You’ll Ever Need
Description
If you’ve got a few overripe bananas sitting on the counter, you’re already halfway to something amazing. This banana bread is the kind that fills your whole kitchen with the coziest smell and comes out unbelievably soft, moist, and full of real banana flavor. It’s the perfect “anytime” bake—easy enough for beginners, comforting enough to feel special, and delicious whether you eat it plain, warm, toasted, or dressed up with a little butter. No fancy equipment required—just a bowl, a fork, and about an hour.
Ingredients
-
3 very ripe bananas, mashed
-
½ cup (1 stick) unsalted butter, melted
-
¾ cup packed brown sugar
-
2 large eggs
-
¼ cup plain yogurt or sour cream
-
1 teaspoon vanilla extract
-
1 ½ cups all-purpose flour
-
1 teaspoon baking soda
-
½ teaspoon salt
-
½ teaspoon cinnamon (optional but recommended)
-
½ cup nuts or chocolate chips (optional)
Instructions
-
Prep your pan
Preheat oven to 350°F (175°C). Grease a 9×5-inch loaf pan or line it with parchment. -
Mash the bananas
In a large bowl, mash the bananas until mostly smooth. -
Mix wet ingredients
Add melted butter, brown sugar, eggs, yogurt/sour cream, and vanilla. Whisk until smooth. -
Add dry ingredients
Sprinkle flour, baking soda, salt, and cinnamon on top of the wet mixture.
Gently fold until just combined—stop when no flour streaks remain. -
Add mix-ins
Fold in nuts or chocolate chips if you want. -
Bake
Pour into the loaf pan. Bake 55–65 minutes, or until a toothpick comes out with just a few moist crumbs. -
Cool before slicing
Let the loaf cool in the pan for 10 minutes, then transfer to a rack to cool completely.
Notes
-
Don’t overmix once you add flour; it keeps the bread tender.
-
If the top browns too fast, tent it with foil during the last 20 minutes.
-
For muffins, bake at 350°F for 18–22 minutes.
Nutritional Info (Because We’re Curious!)
Okay, let’s keep it real: this is a treat, made with love and real ingredients. Here’s a rough breakdown per slice (based on 10 slices, without optional add-ins). Remember, these are estimates, and your specific ingredients may vary slightly.
- Calories: ~260
- Protein: 4g
- Carbohydrates: 36g
- Fat: 11g
- Fiber: 1g
If you’re looking to lighten it up a touch, you can successfully reduce the brown sugar to 1/2 cup and replace the butter with 1/3 cup of unsweetened applesauce (though the texture will be slightly different). But honestly, I’m a believer in enjoying the real, satisfying deal in reasonable portions. Life’s too short for bad banana bread!
Your New Go-To Recipe
And there you have it, my friend—the only banana bread recipe you’ll ever need. It’s simple, soulful, and guaranteed to make your kitchen smell like a home. It’s the recipe you’ll memorize, the one you’ll gift to new neighbors, and the treat you’ll whip up when you need a little comfort.
I hope this recipe becomes a staple in your home, just like it is in mine. Food is about connection, and sharing this little piece of my kitchen with you is what Feastical is all about. Now, I’d love to hear from you! Did you add chocolate chips? Try the tropical twist? Tag me on social or drop a comment on the blog and tell me all about your baking adventure.
Until next time, keep those forks ready and your ovens warm. Happy baking!
– Beau
Orange Blossom Olive Oil Cake : A Fragrant Mediterranean Delight
Orange Blossom Olive Oil Cake: Your New Go-To for a Taste of Sunshine
Hey there, friends! Beau here, welcoming you back to my kitchen at Feastical. Ever have one of those days where you’re craving something sweet, but not cloyingly so? Something that feels a little bit fancy, a little bit exotic, but is secretly one of the simplest things you’ll ever whisk together? If you nodded yes (and I have a feeling you did), then you and I are about to become best cake-buddies.
Today, we’re baking an Orange Blossom Olive Oil Cake. Just saying the name feels like a mini-vacation, doesn’t it? Picture this: a cake with an impossibly tender, moist crumb, a delicate golden hue, and a fragrance that dances between bright citrus and the subtle, magical whisper of orange blossoms. It’s not heavy or overly sweet. Instead, it’s elegant, refreshing, and utterly captivating. This is the cake you bring to a spring brunch to impress without stress, the one you slice for an afternoon pick-me-up with tea, and the dessert that proves sometimes the most stunning flavors come from the fewest, finest ingredients. So, tie on your apron, and let’s bake a little Mediterranean sunshine right into your day.
A Whiff of Memory: Where This Cake Really Came From
This recipe always takes me back to a tiny, sun-drenched farmers market I stumbled upon years ago. I was meandering past stalls overflowing with produce when this incredible, perfumed air stopped me in my tracks. I followed my nose to a small booth selling honey and found the source: a bottle of orange blossom water. The lovely vendor, seeing my curiosity, dipped a tiny spoon into her jar of orange blossom honey and handed it to me. The flavor was transcendent – floral, honeyed, and subtly citrusy all at once. It was like tasting sunshine and flower petals.
I bought a bottle of that water immediately, my mind racing with possibilities. My first experiment was this cake. I wanted to capture that feeling of discovery, that light, aromatic joy, in a dessert you could share. Every time I bake it, the scent that fills my kitchen transports me right back to that warm, buzzing market. It’s more than a recipe; it’s a delicious little time capsule. Now, I get to share that adventure with you.
Gathering Your Sunshine: Ingredients & Why They Matter
This cake is a beautiful lesson in how quality ingredients shine. Here’s what you’ll need and my quick chef insights on each one:
- 1¼ cups all-purpose flour: The reliable foundation. For a slightly more tender crumb, you can substitute with 1 cup all-purpose and ¼ cup cake flour.
- ½ tsp baking powder & ¼ tsp baking soda: Our leavening dream team. The baking powder gives lift, and the baking soda reacts with the acidic orange juice and yogurt for a beautiful, even rise. Make sure they’re fresh!
- ¼ tsp salt: The flavor enhancer. It’s not enough to taste “salty,” but it makes every other flavor, especially the citrus and floral notes, pop. Never skip it.
- 2 large eggs: Bring them to room temperature! This is my #1 tip for a smoother, more voluminous batter that bakes up evenly. Cold eggs can make the olive oil seize up a bit.
- ½ cup granulated sugar: We keep it modest here. This cake is about fragrance and sophistication, not a sugar rush. The orange juice and zest add natural sweetness.
- ⅓ cup extra virgin olive oil: The star! Use a good-quality, fruity EVOO you enjoy the taste of. It gives the cake incredible moisture and a nuanced, sophisticated flavor. Don’t use a super bitter or peppery one.
- ¼ cup Greek yogurt (or sour cream): Our secret weapon for tangy richness and a melt-in-your-mouth texture. Sour cream works perfectly as a swap. For a dairy-free version, unsweetened almond or coconut yogurt works in a pinch.
- ¼ cup fresh orange juice: Please, for the love of flavor, squeeze it fresh! The difference between bottled and fresh is night and day. You’ll need about half a large, juicy orange.
- 1 tbsp orange zest: This is where the big, bright orange flavor lives. Use a microplane to get the fragrant zest without the bitter white pith.
- 1 tsp orange blossom water: The magic potion. A little goes a very long way! Find it in Middle Eastern markets, specialty food stores, or online. If you can’t find it, an extra ½ tsp of vanilla extract and the zest of a whole orange will still make a lovely cake.
- Powdered sugar, for dusting: The simple, elegant finish. It’s like a light snowfall on our sunny cake.
Let’s Bake: Simple Steps to Citrusy Bliss
Ready? This comes together so easily. Let’s walk through it, step-by-step, with all my favorite kitchen hacks sprinkled in.
Step 1: Prep Like a Pro. Preheat your oven to 350°F (175°C). Take an 8-inch round cake pan and give it a light coating of olive oil or baking spray. Then, cut a circle of parchment paper to line the bottom. This guarantees your cake will release perfectly without a single crumb left behind. No parchment? A light dusting of flour over the oil works too.
Step 2: Whisk the Dry Team. In a medium bowl, whisk together your flour, baking powder, baking soda, and salt. Whisking by hand for 30 seconds does two great things: it combines everything evenly, and it aerates the flour a little, keeping our cake light. Set this bowl aside.
Step 3: Wake Up the Wet Team. In a larger bowl, add your room-temperature eggs and sugar. Now, grab your whisk (or hand mixer on medium) and beat them for a good 2-3 minutes. We’re not just mixing; we’re looking for the mixture to become pale yellow, slightly thickened, and fluffy. This incorporates air, which is crucial for the cake’s texture.
Step 4: The Flavor Parade. Here’s where the magic happens. Slowly drizzle in the olive oil while whisking constantly. Embrace that vibrant green color! Then, whisk in the Greek yogurt, followed by the fresh orange juice, zest, and finally, that precious teaspoon of orange blossom water. The kitchen should smell incredible already.
Chef’s Hack: Pour your orange blossom water into a spoon first, then into the bowl. It’s potent, and this prevents an accidental glug that could overwhelm the cake.
Step 5: The Gentle Merge. Add your bowl of dry ingredients to the wet ingredients. Now, switch to a spatula. Fold gently until just combined and you see no more dry flour streaks. A few small lumps are totally fine! Overmixing is the enemy of a tender crumb—it develops the gluten and can make the cake tough.
Step 6: Into the Oven. Pour the beautiful, fragrant batter into your prepared pan and smooth the top with the spatula. Give the pan a gentle tap on the counter to release any big air bubbles. Slide it onto the middle rack of your preheated oven.
Step 7: The Bake & The Test. Bake for 30-35 minutes. Start checking at 30. The cake is done when the top is a lovely golden brown, the edges pull away slightly from the pan, and most importantly, a toothpick or cake tester inserted into the center comes out clean or with a few moist crumbs (not wet batter).
Step 8: The All-Important Cool. Let the cake cool in the pan on a wire rack for about 15 minutes. This allows it to set. Then, run a knife around the edge, invert it onto the rack, peel off the parchment, and let it cool completely. I know it’s hard to wait, but dusting with powdered sugar on a warm cake will just make it melt and disappear!
Serving Up Sunshine: How to Enjoy Your Masterpiece
Once your cake is completely cool, it’s showtime! Place it on a pretty cake stand or plate. Grab a fine-mesh sieve and fill it with a couple tablespoons of powdered sugar. Hold it over the cake and give it a gentle tap for a gorgeous, snowy dusting.
This cake is a versatile superstar. For a sublime afternoon treat, serve a slice with a cup of hot tea—Earl Grey or a floral jasmine are perfect companions. At brunch, pair it with fresh berries and a dollop of lightly sweetened whipped cream or a spoonful of that orange blossom honey if you have it. Want to fancy it up for dessert? A scoop of vanilla bean ice cream or a pour of chilled dessert wine turns it into a restaurant-worthy finale. It’s also stunning all on its own, letting those beautiful, subtle flavors take center stage.
Make It Your Own: Delicious Twists & Swaps
The beauty of this recipe is its adaptability. Here are a few ways to play with it:
- Lemon Lavender: Swap the orange juice and zest for lemon. Add ½ tsp of culinary-grade dried lavender buds to the dry ingredients. The lemon and lavender with the floral olive oil is next-level elegant.
- Yogurt Glaze: Whisk together ½ cup powdered sugar, 1 tbsp Greek yogurt, ½ tsp orange blossom water, and a splash of orange juice until smooth. Drizzle artfully over the cooled cake for extra moisture and a pretty finish.
- Almond Orange: Replace ¼ cup of the all-purpose flour with finely ground almond flour for a nutty depth. A ½ tsp of almond extract added with the wet ingredients pairs beautifully with the orange.
- Blood Orange & Rosemary: Use blood orange juice and zest for a stunning pink-tinged crumb and berry-like flavor. Add ½ tsp of very finely minced fresh rosemary to the dry ingredients for an intriguing, savory-herbal note.
- Dairy-Free/Vegan Option: Use a plant-based yogurt (unsweetened coconut works great). For the eggs, a commercial egg replacer or a “flax egg” (1 tbsp ground flaxseed mixed with 2.5 tbsp water per egg, let sit 5 mins) works well in this oil-based cake.
Beau’s Kitchen Notes & Stories
This cake has become a Feastical staple, and it’s evolved in fun ways. The first time I made it, I got overzealous with the orange blossom water (lesson learned: measure the potent stuff!). My kitchen smelled like a perfume counter, but the cake was still oddly good—just very, very floral. I’ve learned that letting it sit, wrapped, for a day actually improves the flavor, as the floral notes mellow and marry perfectly with the citrus.
One of my favorite memories is bringing this to a potluck where a friend, who “doesn’t really like cake,” ate two slices. He kept saying, “It’s just so… different and light!” That’s the magic. It surprises people in the best way. Don’t be afraid of the olive oil; it’s what makes this cake stay moist for days. Seriously, it might be even better on day two!
Your Questions, Answered
Q: My olive oil cake is dense/gummy in the center. What happened?
A: This usually points to underbaking or under-mixing the eggs/sugar. Ensure you beat the eggs and sugar until properly pale and fluffy (full 2-3 mins!). Also, use the toothpick test—it should come out clean. Oven temps can vary, so it might need a few extra minutes.
Q: Can I use a different pan, like a loaf pan or bundt?
A: Absolutely! A standard loaf pan will work; the bake time will increase to about 45-55 minutes. A bundt pan is gorgeous! Double the recipe for a standard bundt and bake for 40-50 minutes. Always do the toothpick test.
Q: Where do I find orange blossom water?
A: Check the international aisle of your grocery store (often near Middle Eastern or Mediterranean products), specialty food shops, or online. Brands like Cortas or Al Wadi are common and reliable.
Q: Can I make this without the orange blossom water?
A: You sure can! It will be a lovely, simple orange olive oil cake. Boost the citrus by using the zest of a whole orange and maybe add ½ tsp of vanilla or almond extract for complexity.

Orange Blossom Olive Oil Cake : A Fragrant Mediterranean Delight
Description
If you’re craving a dessert that’s light, bright, and super easy to make, this cake is for you. It’s soft, moist, and bursting with fresh orange flavor, with just a hint of floral sweetness from orange blossom water. Best part? You only need one bowl and simple ingredients—no fancy equipment required. This is the perfect cake for brunch, snacks, or anytime you want something homemade without the fuss.
Ingredients
-
1 ¼ cups all-purpose flour
-
½ tsp baking powder
-
¼ tsp baking soda
-
¼ tsp salt
-
2 large eggs (room temp)
-
½ cup granulated sugar
-
⅓ cup extra virgin olive oil
-
¼ cup Greek yogurt (or sour cream)
-
¼ cup fresh orange juice
-
1 tbsp orange zest
-
1 tsp orange blossom water
-
Powdered sugar, for dusting
Instructions
Preheat oven to 350°F (175°C). Grease an 8-inch round cake pan and line the bottom with parchment paper.
In a bowl, whisk together:
flour, baking powder, baking soda, and salt.
In a bigger bowl, whisk the eggs and sugar for about 2 minutes, until pale and slightly fluffy.
Add olive oil, whisking as you pour. Then add the yogurt, orange juice, orange zest, and orange blossom water.
Add the dry ingredients to the wet ingredients and gently fold with a spatula until just combined. Don’t overmix.
Pour batter into the pan and bake for 30–35 minutes, or until a toothpick comes out clean.
Let the cake cool for 15 minutes in the pan, then transfer to a rack. Dust with powdered sugar once fully cooled.
Notes
-
Use fresh orange juice—it makes a huge difference in flavor.
-
Room-temperature eggs mix better and help the cake rise.
-
If you can’t find orange blossom water, replace it with an extra ½ tsp vanilla plus more zest.
-
The cake tastes even better the next day as the flavors blend.
Nutritional Information (For Your Info!)
Hey, we’re all about balance here at Feastical! While this is a treat, it’s made with wholesome ingredients. This nutritional breakdown is for one slice (assuming 8 slices per cake) and is an estimate. Remember, using different brands can slightly alter the values.
- Calories: ~240
- Carbohydrates: 28g
- Protein: 4g
- Total Fat: 13g (The good fat from olive oil!)
- Saturated Fat: 2g
- Fiber: 1g
- Sugar: 16g
- Sodium: 120mg
Prep Details: Prep Time: 15 mins | Cook Time: 35 mins | Total Time: 50 mins | Servings: 8
Final Slice of Thought
And there you have it, friends—my heartfelt recipe for a cake that’s as delightful to make as it is to eat. This Orange Blossom Olive Oil Cake is proof that incredible flavor doesn’t need complication. It’s about letting a few beautiful ingredients sing in harmony.
I hope this recipe brings a little Mediterranean warmth to your kitchen and creates some delicious memories of your own. When you make it, I’d love to hear how it turns out! Tag me @Feastical or drop a comment on the blog. Now, go enjoy that well-deserved slice. You’ve earned it.
Until next time, keep cooking with joy and eating with heart,
Beau

Oven-Baked Cheesy Tacos : Crispy, Loaded & Irresistible
Oven-Baked Cheesy Tacos: The Ultimate Crispy, Gooey Comfort Food
Hey friends, Beau here from Feastical! Let’s talk about a universal truth: the best moments in life often happen around a table loaded with delicious, unpretentious food. You know the kind I mean—the dishes that make everyone’s eyes light up, that spark a chorus of “oh my gosh, you have to try this,” and leave you happily fighting over the last crispy corner. Today, we’re creating exactly that kind of magic with my Oven-Baked Cheesy Tacos.
If you’re dreaming of tacos with the perfect crunch, a seriously molten cheese pull, and a filling that’s bursting with flavor, you’ve landed in the right kitchen. This isn’t just another taco recipe; it’s a game-changer. We’re taking everything we love about taco night—the savory seasoned meat, the creamy beans, the sharp cheese—and giving it a crispy, oven-baked hug. The result? A taco that holds its shape, delivers maximum flavor in every bite, and, let’s be real, is way more fun to eat than a standard soft taco.
Whether you’re wrangling a hungry family on a busy Wednesday, prepping for a game-day feast that’ll have your friends singing your praises, or just satisfying a major comfort food craving, this recipe is your new secret weapon. It’s simple, endlessly customizable, and absolutely, 100% guaranteed to bring everyone to the table with a smile. So, preheat that oven, grab your favorite sheet pan, and let’s make a meal that’s basically a high-five for your taste buds.
The Taco That Started It All: A Kitchen Mishap Turned Masterpiece
I have to confess, the genesis of these crispy wonders was a happy accident. Picture this: It was a chaotic Tuesday evening, the kind where you’re rummaging through the fridge hoping dinner will magically assemble itself. I had taco filling simmering, but my tortillas were a day past their prime—stiff, a little dry, and threatening to crack if I looked at them wrong. My grand plan of a classic taco bar was crumbling faster than a bad pie crust.
In a moment of “what’s the worst that could happen?” inspiration, I decided to brush those sad tortillas with a little oil, fold them over the filling with a generous fistful of cheese, and throw them in the hot oven. I figured at best, we’d have edible nachos. At worst, well, we had a pizza place on speed dial. But what emerged 12 minutes later was nothing short of a revelation. The tortillas had transformed into golden, flaky shells. The cheese had fused everything into a perfect, gooey package. They were crispy, they were cheesy, they were *perfect*. That “mistake” became an instant family legend and the star of more gatherings than I can count. It taught me that sometimes, the best recipes come from a little kitchen chaos and a willingness to play with your food.
Gathering Your Flavor Arsenal: Ingredients & Insider Tips
Here’s everything you’ll need to build these epic tacos. I’ve tossed in some chef-y insights and swaps so you can make this recipe your own.
- 10 small flour or corn tortillas: The vessel of joy! Flour tortillas give a soft-but-crispy, slightly chewy result. Corn tortillas offer a more authentic, sturdy crunch. Chef’s Tip: If using corn, warm them for a few seconds in a dry skillet first to make them pliable and prevent splitting.
- 1 lb ground beef or ground turkey: The hearty base. I love 85/15 beef for flavor, but lean turkey works beautifully for a lighter option. For a vegetarian twist, see the variations below!
- 1 packet taco seasoning + ½ cup water: The flavor shortcut we all love. Feel free to use 2-3 Tbsp of your own homemade blend if you have one!
- 1 ½ cups shredded cheddar cheese (or Mexican blend): The glue that holds our dreams together. Pre-shredded bags are convenient, but shredding a block of sharp cheddar yourself melts creamier and doesn’t have anti-caking agents.
- 1 cup refried beans (optional but highly recommended): Our secret weapon for extra creaminess and heft. They add a wonderful texture and help keep the filling moist. Use canned for ease, or mash your own pinto beans with a bit of broth.
- Olive oil spray or brushing oil: The key to that irresistible golden-brown, crispy shell. Don’t skip it!
- Toppings (The Parade of Joy): This is where personality shines! I always set out a topping bar with diced tomatoes, shredded crisp lettuce, cool sour cream, zesty salsa or hot sauce, pickled jalapeños for heat, and a big bowl of guacamole for that creamy, dreamy finish.
Let’s Build Some Tacos: Your Step-by-Step Roadmap to Crispy Bliss
Follow these steps, and you’ll be a taco-baking pro in no time. I’ve sprinkled in my favorite hacks to ensure your success.
Step 1: Prep the Filling. Grab a large skillet and place it over medium-high heat. Crumble in your ground meat and cook it through, breaking it up as you go, until it’s nicely browned. Once cooked, drain off any excess fat. Now, sprinkle over that taco seasoning and pour in the ½ cup of water. Give it a good stir, reduce the heat to a simmer, and let it bubble away for 3-5 minutes until the liquid reduces and creates a glossy, flavorful coating on the meat. Chef’s Hack: Let this mixture cool for a few minutes before assembling—it prevents the tortillas from getting soggy!
Step 2: Assemble with Love. Preheat your oven to a hot 400°F (200°C). Line a large baking sheet with parchment paper or foil for easy cleanup. Now, lay out your tortillas. Spread a tablespoon or so of refried beans on one half of each tortilla—this acts as a delicious moisture barrier. Next, spoon a heaping portion of your taco meat over the beans. Finally, crown it with a generous pinch of that glorious shredded cheese. Gently fold the bare half of the tortilla over the filling to create a half-moon shape. Press down lightly and arrange them on your baking sheet, leaving a little breathing room between each one.
Step 3: Bake to Perfection. Here’s the magic step. Lightly but evenly spray or brush the tops of your folded tacos with oil. This is what gives you that gorgeous, crispy, blistered top. Slide the sheet into your preheated oven. Bake for 10-12 minutes, but here’s the pro move: flip them halfway through! At the 5-6 minute mark, carefully flip each taco over. This ensures even browning and crispiness on both sides. They’re done when they’re beautifully golden and you can see the cheese bubbling enthusiastically at the edges.
Step 4: The Grand Finale. Pull that sheet of golden, cheesy wonders out of the oven. Let them rest for just a minute or two—the filling is like molten lava! This brief pause lets the cheese set slightly, making them easier to handle. Then, transfer them to a platter and get ready for the fun part: the topping station!
How to Serve These Crispy Beauties
Presentation is part of the joy! I love serving these family-style on a big, rustic wooden board or platter, letting the golden edges of the tacos peek out. Place your topping bowls all around in a colorful, inviting spread. Encourage everyone to build their own perfect bite. The contrast of the hot, crispy taco with the cool, fresh toppings is what makes each mouthful an event. They’re fantastic with a side of Spanish rice, a simple black bean salad, or just a big pile of tortilla chips and extra salsa for dipping. Don’t forget the napkins—the good, messy kind of eating is mandatory here.
Make It Your Own: Delicious Recipe Variations
The beauty of this recipe is its flexibility. Once you’ve mastered the basic technique, the world is your taco! Here are a few of my favorite twists:
- “Buffalo Chicken” Style: Swap the taco meat for 2 cups of shredded rotisserie chicken mixed with ½ cup of buffalo sauce and 4 oz of softened cream cheese. Use a Monterey Jack and blue cheese crumble blend. Top with celery sticks and ranch dressing.
- Breakfast-for-Dinner Tacos: Fill with scrambled eggs, cooked breakfast sausage, diced potatoes, and cheddar cheese. Serve with salsa verde and a dollop of sour cream.
- Fully Loaded Veggie: Sauté a mix of bell peppers, onions, corn, and black beans with taco seasoning. Use pepper jack cheese and add a spoonful of corn salsa inside before baking.
- BBQ Pulled Pork: Use leftover or store-bought pulled pork tossed in your favorite BBQ sauce. Coleslaw makes an amazing crunchy topping instead of lettuce.
- Low-Carb/Keto-Friendly: Use sturdy, low-carb tortillas. Increase the meat and cheese, and skip the beans. Load up on avocado, sour cream, and pico de gallo for toppings.
Beau’s Chef Notes & Kitchen Stories
This recipe has been a work in progress ever since that fateful dry-tortilla night. I’ve learned that a light hand with the filling prevents burst seams, and that a really hot oven is non-negotiable for the perfect crunch. One time, I got overzealous with the cheese and created what my nephew lovingly called “Taco Volcanoes” as it erupted onto the pan. We just scraped the crispy cheese off the sheet—aka “taco lace”—and fought over those bits like they were gold. It’s now a requested add-on! The lesson? Embrace the little kitchen “flaws”; they often taste the best. These tacos have soundtracked so many movie nights, casual dinners, and last-minute gatherings in my home. I hope they become a reliable, joy-sparking recipe in yours, too.
FAQs & Troubleshooting: Your Questions, Answered
Q: Can I make these ahead of time?
A: You can! Assemble the tacos up to the point of baking, cover the sheet pan tightly, and refrigerate for up to 4 hours. Let them sit at room temp for 10 minutes and add 1-2 minutes to the bake time. For longer storage, freeze the unbaked tacos on the sheet pan, then transfer to a freezer bag. Bake from frozen, adding 4-5 extra minutes.
Q: My tacos came out soggy. What happened?
A: The usual culprits are: 1) Filling was too hot/wet when assembling. Let it cool slightly. 2) Not enough oil on the tortilla. That light coating is crucial for crisping. 3) Oven wasn’t hot enough. Use an oven thermometer to check! 4) They were overcrowded on the pan, steaming each other. Give them space.
Q: Can I use an air fryer instead?
A: Absolutely! They come out incredibly crispy. Air fry at 375°F for 6-8 minutes, flipping halfway. Work in batches to avoid crowding the basket.
Q: The edges are burning before the middle is hot.
A: Your oven might be running hot, or the rack is too high. Try lowering the temperature to 375°F and baking on a middle rack. Also, ensure your filling isn’t ice-cold when it goes in.

Oven-Baked Cheesy Tacos : Crispy, Loaded & Irresistible
Description
If you love tacos that are crispy on the outside, gooey with melted cheese, and packed with flavor, this recipe is for you. These oven-baked tacos are easy to assemble, great for weeknight dinners, and perfect for sharing. Just fill, fold, bake — and enjoy the crunch!
Ingredients
-
10 small flour or corn tortillas
-
1 lb (450 g) ground beef or ground turkey
-
1 packet taco seasoning
-
½ cup water
-
1–1½ cups shredded cheddar or Mexican-blend cheese
-
1 cup refried beans (optional but creamy and delicious)
-
Oil spray or 2–3 tbsp oil for brushing
Optional toppings:
Lettuce, tomatoes, salsa, sour cream, guacamole, jalapeños
Instructions
1. Make the Filling
-
Heat a skillet over medium-high heat.
-
Cook the ground meat until browned. Drain any extra fat.
-
Add taco seasoning + ½ cup water.
-
Simmer 3–5 minutes until thickened.
-
Let the filling cool slightly so the tortillas don’t get soggy.
2. Assemble the Tacos
-
Preheat oven to 400°F (200°C).
-
Line a baking sheet with parchment or foil.
-
Spread a thin layer of refried beans on half of each tortilla.
-
Add a spoonful of taco meat + some cheese.
-
Fold the tortillas in half and press gently.
3. Bake
-
Lightly spray or brush the tops with oil.
-
Bake for 10–12 minutes, flipping halfway for even crispiness.
-
Remove from the oven and let them rest 1–2 minutes.
4. Serve
Serve warm with your favorite toppings and enjoy the crispy, cheesy goodness!
Notes
-
Warm corn tortillas first so they don’t crack.
-
Don’t overfill the tacos — too much filling makes them burst.
-
For extra crispiness, bake for 1–2 extra minutes.
-
Try an air fryer: 375°F for 6–8 minutes (flip halfway).
Nutritional Info (A Quick Glance)
Here’s a rough nutritional breakdown per serving (2 tacos), calculated using 85/15 ground beef, flour tortillas, and cheese, but without optional toppings or beans. Remember, this is an estimate—your specific ingredients will vary!
Prep Time: 15 mins | Cook Time: 12 mins | Servings: 5
Approximate Per Serving: 390 calories | 22g protein | 23g fat | 25g carbohydrates
To lighten it up: Use lean ground turkey or chicken, low-fat cheese, and load up on fresh vegetable toppings. The beans add fiber and make the tacos more filling without a huge calorie jump!
Final Thoughts from My Kitchen to Yours
And there you have it, friends—my heart-on-a-sheet-pan recipe for Oven-Baked Cheesy Tacos. This is more than just a method for cooking tacos; it’s an invitation to make dinner fun, to gather without stress, and to create a meal that feels like a celebration, even on a random Tuesday. I love that this recipe empowers you to play, to adapt, and to feed the people you care about with something truly special and ridiculously tasty.
So, the next time you’re staring into the fridge, wondering what’s for dinner, I hope you remember these crispy, cheesy wonders. Give them a try, make them your own, and most importantly, share them with someone. Food tastes better together. Thanks for letting me share one of my all-time favorite Feastical creations with you. Now, go preheat that oven—your crispy, cheesy, irresistible taco night awaits!
With a full heart and a crispy shell,
Beau
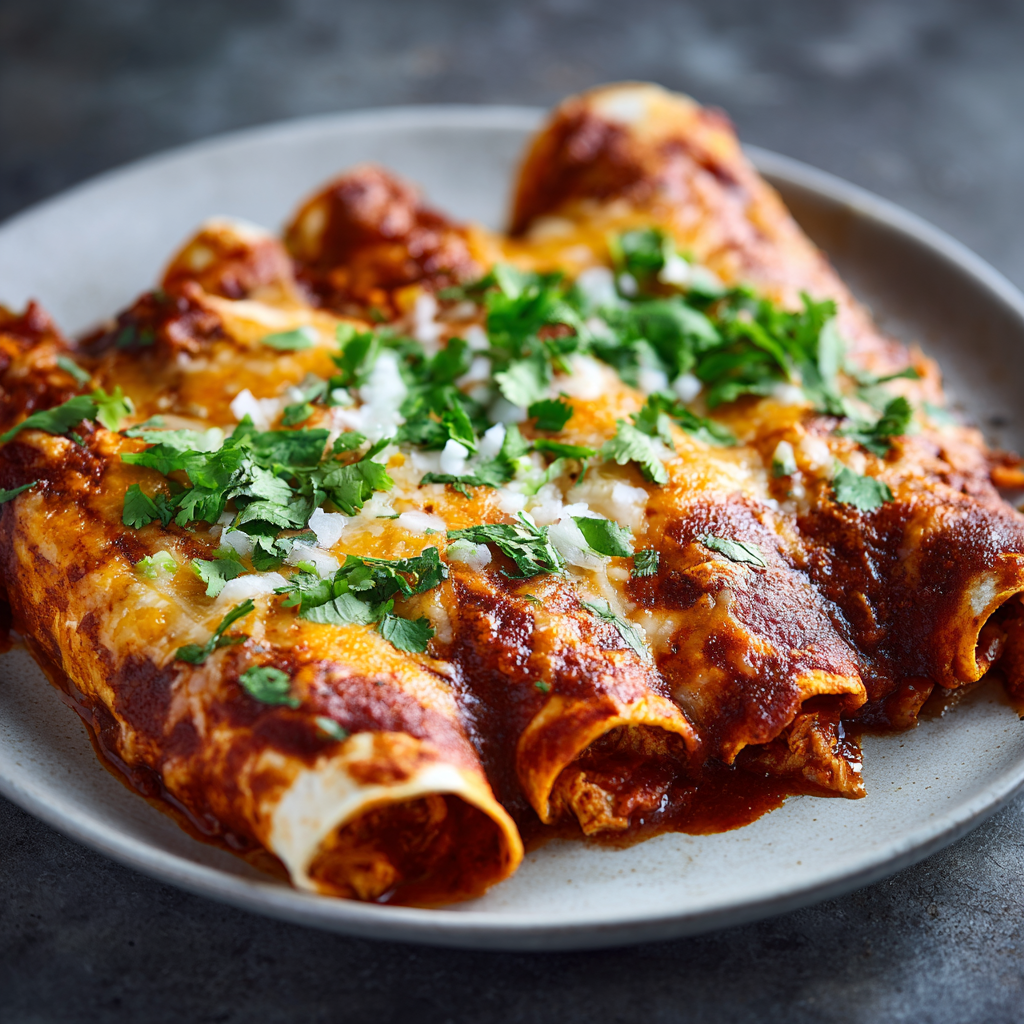
Authentic Chicken Enchiladas with Red Chile Sauce : Bold & Flavorful Recipe
Authentic Chicken Enchiladas: The Ultimate Comfort Food Hug
Hey there, friends! Beau here, welcoming you back to my kitchen. Today, we’re diving fork-first into a dish that’s more than just a meal—it’s a flavor-packed experience. I’m talking about Authentic Chicken Enchiladas smothered in a bold, smoky Red Chile Sauce. This isn’t a quick, canned-sauce kinda deal. This is the real, soul-satisfying magic of dried chiles toasted to perfection, blended into a velvety sauce, and wrapped around tender chicken and melty cheese. Every bite is a warm, cheesy, slightly spicy hug that feels like a celebration, whether it’s a Tuesday or a feast-day.
I know “authentic” can sound intimidating, but trust me, we’re keeping it wonderfully simple. This recipe is about technique, not complexity. We’re toasting chiles, whizzing up a sauce that’ll make your whole house smell incredible, and rolling up little parcels of joy. The result? A casserole dish of pure gold—enchiladas that are saucy, bold, and layered with flavor in every single forkful. So, tie on your favorite apron, crank up some good tunes, and let’s create some kitchen magic together. This is the feel-good food you’ve been craving.
My Enchilada Epiphany: A Story of Sauce and Soul
My love affair with these enchiladas started on a dusty, sun-baked road trip through New Mexico years ago. I stumbled into a tiny, family-run spot that was really just a glorified kitchen with a few tables. The air was thick with the scent of roasting chiles—a smell that’s equal parts earthy, smoky, and promising. I ordered the enchiladas, not knowing I was about to have a culinary revelation.
What arrived was a humble, unpretentious plate. But one taste of that sauce—oh, that sauce! It wasn’t just spicy; it had depth. It was fruity, rich, and complex, clinging perfectly to the soft tortillas. It tasted of the land, of patience, of tradition. That meal taught me a powerful lesson: the soul of cooking often lies in its simplest, most foundational elements. I came home obsessed, determined to recreate that feeling in my own kitchen. This recipe is my homage to that roadside stop—a taste of memory, shared with you.
Gathering Your Flavor Toolkit: Ingredients & Chef Insights
Great food starts with great ingredients. Here’s everything you’ll need, along with my little chef-y notes to guide you. Don’t stress about perfection—cooking is an adventure!
For the Red Chile Sauce (The Heart of the Dish!):
- 4 dried New Mexico or guajillo chiles: New Mexico chiles give a classic, rich red color and mild heat with a touch of sweetness. Guajillos are a bit earthier and brighter. You can use one type or a mix for a more complex flavor. Chef’s Insight: Look for chiles that are still pliable, not brittle, and have a vibrant color. This means they’re fresh and full of flavor!
- 2 cups chicken broth: Use a good-quality, low-sodium broth. This is the base of your sauce, so it matters! Sub Tip: Vegetable broth works perfectly for a vegetarian version.
- 2 cloves garlic & 1/2 small onion: Our aromatic all-stars. They build a savory foundation for the chiles.
- 1 tablespoon vegetable oil: For sautéing the blended sauce. This quick cook unlocks a deeper, richer flavor.
- 1/2 teaspoon ground cumin: Just a hint to add a warm, earthy backbone. Don’t overdo it—we want the chiles to shine.
- Salt to taste: Salt is the magic wand that wakes up all the other flavors. You’ll add it at the end, after simmering.
For the Enchiladas:
- 2 cups cooked, shredded chicken: A rotisserie chicken is your weeknight superhero here! For the best flavor, poach a couple of bone-in, skin-on chicken breasts or thighs in the broth you’ll use for the sauce.
- 8–10 corn tortillas: Non-negotiable for authenticity. Corn tortillas have the right texture and flavor. Chef’s Hack: If you’re gluten-free, you’re already set—corn tortillas are naturally GF!
- 1 1/2 cups shredded cheese: I love Monterey Jack for its superb meltiness, or a Mexican blend for a little extra kick. Sub Tip: A sharp white cheddar or even Oaxaca cheese would be fantastic.
- 1/4 cup chopped fresh cilantro (optional): A bright, fresh finish for those who love it. If you’re a cilantro-skeptic, just leave it off.
- Vegetable oil: Just a shallow pool for a quick fry to soften the tortillas. This step prevents cracking and adds flavor.
Let’s Get Cooking: Your Step-by-Step Roadmap to Enchilada Bliss
Ready to roll? Follow these steps, lean into the process, and remember—messy rolls taste just as good as perfect ones!
- Wake Up Those Chiles! Heat a dry skillet over medium heat. Toast your dried chiles for about 1-2 minutes per side, pressing down with a spatula until they become fragrant and slightly puffed. Why we do it: Toasting unlocks incredible smoky, nutty flavors you just can’t get from an un-toasted chile. It’s the game-changer!
- Simmer to Soften. In a saucepan, combine the toasted chiles and chicken broth. Bring to a boil, then reduce heat and let it simmer for 10 minutes. The chiles will soften and rehydrate, making them blendable.
- Blend Your Liquid Gold. Carefully pour the chiles and broth into a blender. Add the garlic, onion, and cumin. Hold the lid down tightly with a towel (hot liquids can explode!), and blend until completely smooth—this could take a full minute. Chef’s Tip: Want a super-smooth sauce? Strain it through a fine-mesh sieve after blending. I often skip it for a more rustic texture.
- Cook the Sauce. In the same saucepan, heat 1 tbsp of oil over medium heat. Pour in your gorgeous red puree—it will sizzle! Let it simmer gently for 8-10 minutes, stirring occasionally. It will thicken slightly and darken in color. Now, season with salt. Taste it! This is your moment to adjust.
- Prep Station Assembly. Preheat your oven to 375°F (190°C). Lightly grease a 9×13 baking dish. Set up a station: a plate with shredded chicken, a bowl of most of the cheese (save some for topping!), a plate for dipped tortillas, and your baking dish. Have your sauce in a shallow bowl or pie plate.
- The Tortilla Tango. In a small skillet, heat about 1/4 inch of oil over medium heat. Fry each tortilla for literally 10-15 seconds per side, just until soft and pliable. Transfer to a paper towel-lined plate. Chef’s Hack: This quick fry is KEY. It waterproofs the tortilla so it won’t disintegrate in the saucy bake.
- Dip, Fill, Roll, Repeat! Take a softened tortilla and dip it fully into the warm red sauce. Lay it in your baking dish, fill it with a line of chicken and a pinch of cheese, and roll it up snugly. Place it seam-side down. Repeat, packing them in side-by-side. Don’t worry if they’re cozy!
- Smother and Bake. Pour the remaining sauce over the top of your rolled enchiladas, making sure every bit is covered. Sprinkle on the reserved cheese. Bake, uncovered, for 20-25 minutes, until the cheese is beautifully melted and bubbly and the edges are just starting to golden.
- The Final Flourish. Let the enchiladas rest for 5 minutes after baking—this helps them set. Then, sprinkle with fresh cilantro if using. This rest period is a test of your willpower, but it’s worth it!
Plating Up the Party: How to Serve Your Masterpiece
Presentation is part of the fun! I like to serve two enchiladas per person. Use a wide, shallow bowl or plate to cradle all that glorious sauce. For a classic plato del día feel, add simple, refreshing sides that cut through the richness. A crisp, lime-kissed shredded lettuce or cabbage salad is perfect. A scoop of cool, creamy guacamole or simply sliced avocado is non-negotiable in my book. Don’t forget a dollop of tangy sour cream or Mexican crema and a few quick-pickled red onions for a bite of acid. And of course, a wedge of lime on the side for that final bright squeeze. This isn’t just dinner; it’s a vibrant, colorful fiesta on a plate.
Make It Your Own: Delicious Twists & Tweaks
Once you’ve mastered the classic, the enchilada world is your oyster! Here are a few of my favorite spins:
- Cheese-Only Enchiladas (Enchiladas Suizas-Style): Skip the chicken and fill the tortillas with a blend of shredded Monterey Jack and a bit of tangy cotija cheese. Top with the red sauce and an extra generous handful of cheese before baking. Pure, melty comfort.
- Green Chile & Pork: Swap the red sauce for a tangy green salsa verde and use slow-cooked, shredded pork (carnitas) for the filling. Top with crumbled queso fresco instead of melted Jack.
- Black Bean & Sweet Potato (Vegetarian): Roast diced sweet potatoes until tender and mix with seasoned black beans and a little corn for the filling. A hearty, satisfying veggie option.
- Seafood Twist: Use large, cooked shrimp or flaky white fish like cod. Keep the red sauce, but add a splash of lime juice to it and use a lighter hand on the cheese to let the seafood shine.
- Breakfast Enchiladas: Fill tortillas with scrambled eggs, crispy chorizo or bacon, and diced potatoes. Smother with the red sauce, top with cheese, and bake until bubbly. The ultimate brunch showstopper.
Beau’s Kitchen Notes: The Story Behind the Bite
This recipe has been a living, evolving thing in my kitchen. I’ve definitely had my share of “learning experiences”—like the time I used tortillas straight from the fridge and they cracked into a million pieces (hence the hot oil step!). Or when I was too eager and dumped all my sauce in the blender without securing the lid… let’s just say my kitchen walls got a spicy new paint job. The recipe you see here is the refined, “learned-from-my-mistakes” version. Over time, I’ve played with adding a pinch of Mexican oregano or a teaspoon of tomato paste to the sauce for complexity, but I always come back to this pure, chile-forward version. It’s honest, it’s bold, and it never fails to bring people to the table with big smiles. That’s the real magic.
Your Questions, Answered: Enchilada 101
Q: My tortillas keep cracking when I roll them! What am I doing wrong?
A: This is the #1 issue! The fix is simple: you must warm/soften them first. The quick fry in oil is traditional and best, but you can also wrap stacks of 5 in a damp paper towel and microwave for 30-45 seconds until pliable. The tortilla needs to be warm and flexible to behave.
Q: Can I make these ahead of time?
A: Absolutely! You can assemble the whole dish (cover tightly) and refrigerate it for up to a day before baking. You may need to add 5-10 minutes to the bake time since it’s starting cold. You can also freeze the unbaked, assembled dish for up to 3 months. Thaw in the fridge before baking.
Q: The sauce is too spicy/not spicy enough for me. Help!
A> You’re in control! For less heat, make sure you’ve removed all the chile seeds and inner membranes (the placenta), where most capsaicin lives. For more heat, add 1-2 dried arbol chiles (they’re tiny but mighty!) to your blend, or stir in a pinch of cayenne to the finished sauce.
Q: My enchiladas came out soggy. How do I avoid that?
A> Sogginess usually comes from over-saucing or not frying the tortillas. Make sure you just *dip* the tortilla in sauce—don’t let it soak. And that quick fry creates a protective barrier. Also, letting them rest for 5 minutes after baking helps them firm up.
Authentic Chicken Enchiladas with Red Chile Sauce : Bold & Flavorful Recipe
Description
These enchiladas are the real deal: soft corn tortillas filled with tender chicken, rolled up and smothered in a smoky, homemade red chile sauce. No canned shortcuts — just toasted dried chiles, simple ingredients, and bold, soulful flavor. This is Mexican comfort food at its best.
Ingredients
Red Chile Sauce
-
4 dried New Mexico or guajillo chiles
-
2 cups chicken broth (or veggie broth)
-
2 cloves garlic
-
½ small onion
-
1 tbsp vegetable oil
-
½ tsp ground cumin
-
Salt to taste
Enchiladas
-
2 cups cooked, shredded chicken
-
8–10 corn tortillas
-
1½ cups shredded cheese (Monterey Jack or Mexican blend)
-
¼ cup chopped fresh cilantro (optional)
-
Oil for lightly frying tortillas
Instructions
1. Make the Red Chile Sauce
-
Toast the chiles: Heat a dry skillet over medium. Toast chiles 1–2 minutes per side until fragrant.
-
Simmer: In a saucepan, combine toasted chiles + broth. Simmer 10 minutes until soft.
-
Blend: Carefully blend chiles, broth, garlic, onion, and cumin until smooth.
-
Cook the sauce: In a saucepan, heat 1 tbsp oil. Add the blended sauce (it will sizzle) and simmer 8–10 minutes. Add salt to taste.
2. Prep and Fill the Tortillas
-
Preheat oven to 375°F (190°C). Lightly grease a 9×13 baking dish.
-
Heat ¼ inch of oil in a skillet.
-
Quickly fry each tortilla 10–15 seconds per side until soft and flexible.
-
Dip each tortilla in the warm chile sauce.
-
Fill with shredded chicken + a pinch of cheese, roll, and place seam-side down in the baking dish.
3. Bake
-
Pour remaining sauce over enchiladas.
-
Sprinkle with the rest of the cheese.
-
Bake 20–25 minutes until bubbly and melted.
-
Rest for 5 minutes before serving.
-
Garnish with cilantro if desired.
Serving Ideas
-
Lime-dressed lettuce or cabbage
-
Sliced avocado or guacamole
-
Sour cream/Mexican crema
-
Quick-pickled red onions
-
Lime wedges
Notes
Tortillas cracking? Warm them first — the quick oil fry is best.
Too spicy / not spicy?
-
Less heat → remove all seeds
-
More heat → add 1–2 dried arbol chiles
Soggy enchiladas? Don’t soak tortillas; just dip quickly. Frying helps prevent sogginess.
Nutritional Info (Because We Love Balance!)
Here’s a general breakdown for two enchiladas (based on using low-sodium broth, a rotisserie chicken breast, and Monterey Jack cheese). Remember, this is home cooking, not lab science—your mileage may vary!
- Calories: ~380
- Carbohydrates: 30g (Hello, delicious corn tortillas!)
- Protein: 26g (Thanks, chicken and cheese! A solid, satisfying amount.)
- Fat: 18g
- Prep Time: 30 minutes of hands-on fun
- Cook Time: 25 minutes of aromatic anticipation
- Servings: 4 happy people (or 2 very hungry ones with leftovers for lunch—winner!)
This dish is a great source of protein. To lighten it up slightly, you can use less cheese or a reduced-fat variety, and increase the proportion of chicken in the filling.
Final Thoughts: Share the Flavor, Share the Love
And there you have it, friends—my heart-on-a-plate recipe for Authentic Chicken Enchiladas. This dish embodies everything I love about cooking: it’s transformative (from dried pods to glorious sauce!), it’s communal, and it’s deeply satisfying. I hope you feel the joy in making it and the warmth in sharing it. Don’t be afraid to get your hands a little saucy, to taste and adjust as you go, and to make it your own.
If you make these (and I truly hope you do), snap a pic and tag me @Feastical—I love seeing your kitchen creations! Now, go forth, simmer that sauce, roll those enchiladas, and gather your people around the table. That’s where the real magic happens. Until next time, keep cooking with heart!
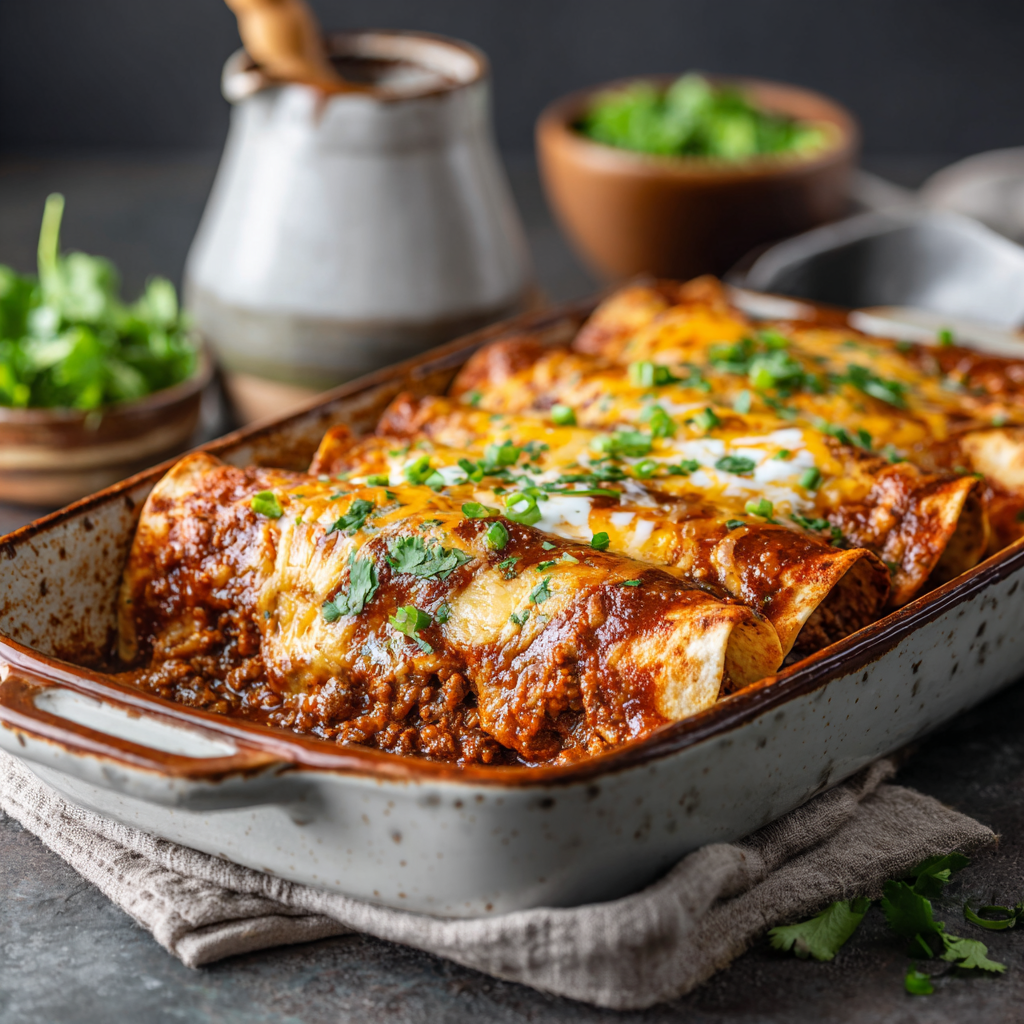
Beef Enchiladas with Homemade Enchilada Gravy : Rich & Hearty Tex-Mex Favorite
Beef Enchiladas with Homemade Enchilada Gravy: Your New Tex-Mex Best Friend
Hey friends, Beau here from Feastical! Let’s talk about a truth we all know: few things in this world hit the spot quite like a steaming hot, gloriously cheesy, sauce-smothered beef enchilada. It’s the edible equivalent of your favorite cozy sweater. But here’s my little kitchen confession—for years, I relied on the canned stuff for the sauce. It was fine. It got the job done. But it never quite sang the soulful, smoky, depth-of-flavor hymn I was craving. That all changed the day I discovered the magic of homemade enchilada gravy.
This recipe isn’t just about assembling ingredients; it’s about building flavor from the ground up. That rich, brick-red gravy is the star—a from-scratch wonder that transforms simple ground beef and tortillas into a hearty Tex-Mex favorite with complexity and heart. We’re talking about a sauce so good, you might just want to eat it with a spoon. (No judgment here, I’ve done it.) Whether you’re feeding your family on a busy Tuesday or impressing a table full of friends, these beef enchiladas deliver maximum comfort with a beautiful, bold punch of flavor. So, tie on your apron, grab your favorite whisk, and let’s make a meal that tastes like a celebration, no special occasion required.
The Enchilada Epiphany: A Tale of Two Sauces
My love affair with this dish started in a most unlikely place: my college apartment’s “kitchen,” which was really just a sad corner with a hotplate and a perpetually sticky mini-fridge. My roommate, Miguel, hailed from San Antonio, and one homesick Sunday, he declared he was taking over our dubious culinary space. I watched, skeptical, as he toasted spices right in the oil, whisked in flour, and created this aromatic, copper-colored paste. “That’s the flavor, man,” he said. “The *sofrito* for the soul.” He poured in broth, and like magic, it thickened into this velvety, intense gravy that made my canned sauce look like tinted water.
That first bite was a revelation. The sauce wasn’t just a topping; it was the experience—deeply savory, with a subtle heat that warmed you from the inside out, hugging the tender beef and melted cheese in every forkful. It was more than food; it was a taste of home, of tradition, of craft. That afternoon, we didn’t just eat enchiladas; we feasted. And I knew right then that the extra ten minutes to make the gravy from scratch wasn’t an extra step—it was the entire point. This recipe is my homage to that lesson: that the best meals are built on foundational love, one simple, scratch-made component at a time.
Gathering Your Flavor Arsenal
Here’s everything you’ll need to create this masterpiece. I’ve included my best tips and swaps so you can cook with confidence, no matter what’s in your pantry!
For the Legendary Enchilada Gravy:
- 1/4 cup vegetable oil: Our cooking fat. It has a neutral flavor that lets the spices shine. Canola or avocado oil work great too.
- 1/4 cup all-purpose flour: This combines with the oil to make a roux, which is our magic thickener. For a gluten-free version, a 1:1 gluten-free flour blend works perfectly.
- 3 tablespoons chili powder: Not cayenne! We’re talking about the mild, earthy blend of ground dried chilies. This is the color and soul of the gravy. For a deeper flavor, use 2 tbsp regular chili powder and 1 tbsp ancho chili powder.
- 1 teaspoon garlic powder: Yes, powder! In the sauce, it integrates seamlessly without burning. Trust me on this one.
- 1/2 teaspoon ground cumin: The quintessential warm, smoky Tex-Mex note. Toasting it in the roux wakes up its oils.
- 1/4 teaspoon dried oregano: Preferably Mexican oregano if you have it—it’s more citrusy than the Mediterranean kind.
- 2 cups beef broth: The liquid base for our gravy. Use low-sodium if you can, so you control the salt. Chicken or vegetable broth are fine in a pinch.
- Salt to taste: Always add this at the end, after the gravy has reduced and you can really taste it.
For the Enchilada Filling & Assembly:
- 1 pound ground beef: I like an 80/20 blend for flavor, but leaner works too. For a twist, try ground turkey or a plant-based crumble.
- 1/2 onion, finely chopped: Yellow or white onion adds sweet, aromatic depth. No onion? A teaspoon of onion powder in the beef will do.
- 2 cloves garlic, minced: Fresh is best here for that pungent kick in the filling.
- 1 teaspoon chili powder & 1/2 teaspoon cumin: We’re seasoning the beef too, building layers of flavor.
- 8–10 flour or corn tortillas: Chef’s Insight: Flour tortillas are plush and tender, while corn offer authentic flavor and are naturally gluten-free. The key? Warm them up before rolling to prevent cracks!
- 2 cups shredded cheese: A mix of cheddar and Monterey Jack is my go-to for ultimate meltiness. Pre-shredded bags are convenient, but block cheese you shred yourself melts creamier (it doesn’t have anti-caking agents).
- Chopped cilantro & sliced green onions: The fresh, green confetti finish that adds color and a bright pop. Don’t skip it!
Let’s Get Rolling: Your Step-by-Step Roadmap to Enchilada Bliss
Follow these steps, and you’ll have a bubbling pan of heaven in no time. I’ve packed each one with my favorite kitchen hacks!
Step 1: Conquer the Gravy. In a medium saucepan, heat the oil over medium heat. Whisk in the flour and cook, stirring constantly, for about 1 minute. You’ve just made a blond roux! Now, whisk in all those dry spices (chili powder, garlic powder, cumin, oregano). This is the magic moment—toasting the spices in the fat blooms their flavor and turns the mixture into a fragrant, brick-red paste. Cook for another 30 seconds until it smells amazing. Chef’s Hack: Have your broth measured and ready. Slowly pour it in while whisking vigorously to avoid lumps. Bring it to a simmer and let it cook for about 8-10 minutes, stirring occasionally, until it’s thick enough to coat the back of a spoon. It will continue to thicken as it cools. Season with salt to taste, then set aside.
Step 2: Build the Filling. While the gravy simmers, brown the ground beef with the chopped onion in a large skillet over medium-high heat. Break it up with a spatula as it cooks. Once the beef is no longer pink and the onions are soft, drain off most of the excess fat. Stir in the minced garlic, 1 tsp chili powder, and 1/2 tsp cumin. Cook for just one more minute—you’ll smell the garlic and spices waking up. Remove from heat.
Step 3: The Tortilla Tango. Preheat your oven to 375°F (190°C) and lightly grease a 9×13 inch baking dish. Now, let’s prevent tortilla tears! Stack your tortillas and wrap them in a damp paper towel. Microwave for 30-45 seconds, or wrap in foil and warm in the oven for 5 minutes. This makes them pliable and rollable.
Step 4: Roll Call. Lay a warm tortilla flat. Spoon a hearty line of the beef filling down the center, then sprinkle with a small handful of cheese. Roll it up snugly and place it seam-side down in your prepared dish. Repeat, packing them in snugly. A little overlap is fine—it’s cozy!
Step 5: Sauce & Cheese, The Grand Finale. Pour that glorious homemade enchilada gravy all over the rolled tortillas, making sure to cover the ends so they don’t dry out. Sprinkle the remaining cheese evenly over the top. This creates that irresistible, golden, bubbly crust.
Step 6: Bake to Perfection. Bake, uncovered, for 20-25 minutes, until the cheese is melted and the sauce is bubbling around the edges. If you want extra browning, pop it under the broiler for the last 1-2 minutes (watch it like a hawk!). Let it rest for 5 minutes after baking—this lets everything set so your first serving is picture-perfect, not a saucy landslide.
How to Serve Up the Good Vibes
Presentation is part of the fun! I like to scoop out two enchiladas per plate, making sure they’re generously sauced. The finishing touches are non-negotiable for that restaurant-quality look and taste: a vibrant shower of chopped fresh cilantro and sliced green onions. From there, it’s all about building your perfect bite. I love to add a cool, creamy dollop of sour cream or tangy Mexican crema right on top. A side of simple cilantro-lime rice or slow-cooked refried beans turns this into a feast. For a fresh counterpoint, a quick side salad of chopped romaine, tomato, avocado, and a squeeze of lime juice is perfect. And hey, don’t forget the chips and salsa for nibbling while you dish it up!
Make It Your Own: Delicious Twists & Swaps
This recipe is a fantastic blueprint. Once you’ve mastered the classic, play around with these fun variations!
- Cheesy Chicken Enchiladas: Swap the ground beef for 3 cups of shredded cooked chicken (rotisserie chicken is a lifesaver!). Stir the chicken into the gravy itself for an extra-moist filling.
- Black Bean & Sweet Potato (Vegetarian): Replace the beef with a can of drained black beans and 2 cups of diced, roasted sweet potatoes. The sweetness plays beautifully with the smoky gravy.
- Green Chile & Pork: Use ground pork instead of beef and add a 4-oz can of diced green chiles to the filling. You can even use a green enchilada sauce instead of the red gravy for a completely different vibe.
- Spicy Chipotle Kick: Add 1-2 minced chipotle peppers in adobo sauce to the beef filling for a deep, smoky heat. A little goes a long way!
- Lighter Version: Use ground turkey or lean ground beef, low-fat cheese, and serve over a bed of crisp lettuce as an “enchilada bowl” instead of rolling in tortillas.
Beau’s Kitchen Notes & Stories
This recipe has been a work in progress for years, and it’s evolved with every potluck and family dinner. I once accidentally used hot paprika instead of sweet paprika in a similar spice mix (they look identical!). Let’s just say we had “Fire-Breathing Dragon Enchiladas” that night. Lesson learned: label your spice jars! Over time, I learned that letting the gravy simmer for those full 10 minutes is crucial—it cooks out the raw flour taste and lets the spices fully marry. I also started warming my tortillas directly over a low gas flame for a few seconds each if I’m feeling fancy; it gives them a wonderful, slightly charred flavor. The biggest evolution? Doubling the gravy recipe every single time. My friends and family now expect a little extra container of “liquid gold” to take home. It’s that good.
Your Questions, Answered
Q: Can I make these enchiladas ahead of time?
A: Absolutely! Assemble the whole dish (cover tightly), and refrigerate for up to 24 hours before baking. You may need to add 5-10 minutes to the bake time since it’s going in cold. You can also freeze the unbaked dish for up to 3 months. Thaw in the fridge overnight before baking.
Q: My sauce tastes a bit bland. What happened?
A: The most common culprit is underseasoning or old spices. Chili powder loses its potency over time. Make sure your spices are fresh (less than a year old). Also, don’t forget to salt the gravy at the *end* of its cooking time. Salt early in a reducing sauce can become too concentrated.
Q: My tortillas are cracking when I roll them! Help!
A> This is almost always because the tortillas are too cold. Warm them up! The steam from the microwave or oven makes the gluten (in flour) or masa (in corn) pliable. For corn tortillas, some cooks also like to dip them briefly in hot oil to soften them, but warming works great.
Q: Can I use corn tortillas instead of flour?
A: 100% yes! It’s the more traditional choice and adds a wonderful corn flavor. Just be extra diligent about warming them to prevent cracks, as they are less flexible than flour tortillas to start with.
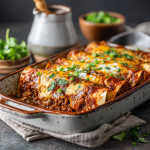
Beef Enchiladas with Homemade Enchilada Gravy : Rich & Hearty Tex-Mex Favorite
Description
These enchiladas are cozy, cheesy, and absolutely packed with flavor — the kind of dish that feels like a warm hug. The real star is the homemade enchilada gravy: smoky, rich, and miles better than anything canned. Once you make it from scratch, you’ll never go back.
Ingredients
Enchilada Gravy
-
¼ cup vegetable oil
-
¼ cup all-purpose flour
-
3 tbsp chili powder (regular Tex-Mex style)
-
1 tsp garlic powder
-
½ tsp ground cumin
-
¼ tsp dried oregano (Mexican if available)
-
2 cups beef broth
-
Salt to taste
Enchilada Filling
-
1 lb ground beef
-
½ onion, finely chopped
-
2 cloves garlic, minced
-
1 tsp chili powder
-
½ tsp cumin
Assembly
-
8–10 flour or corn tortillas
-
2 cups shredded cheese (cheddar + Monterey Jack works great)
-
Chopped cilantro & green onions
Instructions
1. Make the Gravy
-
Heat oil in a saucepan over medium heat.
-
Whisk in flour and cook 1 minute to form a blond roux.
-
Add chili powder, garlic powder, cumin, and oregano. Cook 30 seconds until fragrant.
-
Slowly whisk in beef broth to avoid lumps.
-
Simmer 8–10 minutes, stirring often, until thickened.
-
Salt to taste and set aside.
2. Make the Beef Filling
-
In a skillet, cook ground beef and onion over medium-high heat until browned.
-
Drain excess fat.
-
Stir in garlic, chili powder, and cumin; cook 1 more minute.
-
Remove from heat.
3. Prep the Tortillas
-
Warm tortillas wrapped in a damp paper towel for 30–45 seconds in the microwave or wrap in foil and warm in the oven 5 minutes.
-
Warm tortillas = no cracking when you roll.
4. Assemble
-
Preheat oven to 375°F (190°C) and grease a 9×13 baking dish.
-
Lay a tortilla flat. Add some beef filling and a sprinkle of cheese.
-
Roll snugly and place seam-side down.
-
Repeat until the dish is full.
5. Sauce & Bake
-
Pour enchilada gravy evenly over the rolled tortillas.
-
Top with the remaining cheese.
-
Bake 20–25 minutes until bubbly and melted.
-
Let rest 5 minutes.
Notes
-
Chicken Enchiladas: Use shredded chicken and mix it into some gravy.
-
Vegetarian: Black beans + roasted sweet potatoes.
-
Spicy: Add minced chipotle peppers to the beef.
-
Lighter: Use ground turkey and reduced-fat cheese.
Nutritional Information*
*Please note: This is an estimate for informational purposes, based on a serving of 2 flour tortilla enchiladas with cheese and gravy, using 85% lean ground beef. Values can vary based on specific ingredients and brands used.
- Calories: ~420
- Protein: 28g (Great for keeping you full!)
- Carbohydrates: 26g
- Dietary Fiber: 2g
- Total Fat: 24g
- Saturated Fat: 10g
- Cholesterol: 85mg
- Sodium: ~800mg (Using low-sodium broth helps manage this.)
This dish is a hearty, balanced meal providing a solid source of protein. To lighten it up, refer to the variations above, such as using lean ground turkey, less cheese, or loading up on veggie-based sides.
Final Thoughts from My Kitchen to Yours
Friends, at the end of the day, cooking is about so much more than just feeding ourselves. It’s about the ritual, the aroma that fills your home, the act of creating something tangible and delicious with your own two hands. These beef enchiladas with homemade gravy are a celebration of that process. They prove that a little extra care—toasting those spices, whisking that roux—creates a difference you can taste in every single, soul-satisfying bite.
So I encourage you to give this recipe a try. Embrace the process, maybe put on some good music while you stir, and don’t stress about perfection. Even a slightly messy, saucy, cheese-pulled enchilada made with love is a masterpiece. I hope this dish finds its way to your table and becomes one of your own cherished, go-to recipes. Now, go forth and feast! And don’t forget to tag @Feastical if you make them—I love seeing your kitchen creations.
With a full heart and an even fuller plate,
Beau Collier
Barbacoa Beef Tacos : Bold, Tender & Bursting with Flavor
The Taco That Will Change Your Taco Tuesday Forever
Hey friends, Beau here! Let’s get real for a second. We’ve all had tacos. The quick-and-easy Tuesday night kind, the questionable late-night drive-thru variety, maybe even the fancy restaurant ones with ingredients you need a dictionary to pronounce. But I’m here to tell you about a different beast entirely. I’m talking about Barbacoa Beef Tacos – the kind of tacos that don’t just feed your stomach, they feed your soul. This isn’t just another recipe; it’s a flavor journey to the heart of traditional, slow-cooked goodness, and I’m so excited to guide you through it.
Imagine this: beef so tender it shreds at the mere sight of a fork, bathed in a sauce that’s smoky, spicy, earthy, and bright all at once. It’s been simmering for hours, filling your kitchen with an aroma that will have your family wandering in, asking “Is it ready yet?” on a loop. This barbacoa is the ultimate crowd-pleaser, the superstar of your meal prep, and the secret weapon for your next gathering. It’s deceptively simple to make but delivers a complexity of flavor that will have everyone thinking you trained under a Mexican abuela. So, tie on your apron, grab your slow cooker or Dutch oven, and let’s make some magic happen. This is feel-good food at its most spectacular.
My First Bite: A Flavor Revelation
My love affair with barbacoa started not in a fancy restaurant, but in a dusty parking lot at a farmers’ market in Austin, Texas. I was visiting a friend, and he insisted we get breakfast tacos from a little portable smoker that looked like it had seen a thousand battles. Skeptical but hungry, I ordered one. The vendor pulled meat from a deep, steaming pan – it was dark, glistening, and smelled like heaven had a spice rack. He piled it onto a fresh corn tortilla, topped it with raw onion and cilantro, and handed it over.
Friends, I took one bite, and my entire concept of what a taco could be just… exploded. The beef was impossibly juicy and rich, with a deep, smoky heat that built slowly. It wasn’t “hot,” it was flavorful. It was complex in a way that shouted of time, care, and tradition. I stood there, probably with sauce on my chin, in a state of pure culinary bliss. That single taco taught me more about the power of slow-cooked, well-spiced food than any cookbook ever had. This recipe is my heartfelt attempt to bring a slice of that parking-lot magic right into your kitchen. It’s the taste of a perfect memory, and I can’t wait for you to make it one of yours.
Gathering Your Flavor Arsenal
Here’s everything you’ll need to build these incredible barbacoa beef tacos. Don’t be intimidated by the list – it’s mostly spices and pantry staples coming together to create something extraordinary. I’ve added my notes so you know exactly why each ingredient is there and how you can play around with it.
- 3 lbs beef chuck roast, cut into large chunks: Chuck is the king here. It’s marbled with fat, which means it becomes unbelievably tender and flavorful during the long, slow cook. Chef’s Insight: Don’t trim off all the fat! It’s your flavor friend. If chuck isn’t available, beef brisket or cheek (if you can find it) are fantastic, authentic alternatives.
- 3 chipotle peppers in adobo sauce + 1 tbsp adobo sauce: This is the soul of the dish! Chipotles are smoked jalapeños, and they bring that essential smoky depth and gentle heat. The adobo sauce is tangy, sweet, and spicy all at once. Sub Tip: For less heat, use 2 peppers and scrape out the seeds. For no heat but still smoky flavor, use 1-2 tsp of smoked paprika instead.
- 1 tbsp ground cumin & 1 tbsp dried oregano: The earthy, warm base notes. Cumin is non-negotiable for that authentic taste. Use Mexican oregano if you have it—it’s a bit more citrusy than Mediterranean oregano.
- 1/2 tsp ground cloves: The secret weapon! This might seem like a tiny amount, but it adds a warm, sweet complexity that makes the flavor profile sing. Don’t skip it!
- 1 tbsp apple cider vinegar: A touch of acidity to balance the richness and help tenderize the meat. Lime juice or even a light vinegar like rice vinegar works in a pinch.
- 1/2 onion, chopped & 4 cloves garlic: The aromatic foundation. No need to get fancy here—just rough chops are fine, as they’ll be blended.
- 1 cup beef broth: This creates the braising liquid. Use low-sodium so you can control the salt. Chicken broth or even water works, but beef broth gives the deepest flavor.
- Juice of 1 lime: Fresh lime juice brightens everything up. We add it at the blending stage for a subtle lift.
- Salt & pepper to taste: Season as you go! Taste your sauce before pouring it over the beef.
For Serving (The Fun Part!):
- Corn or flour tortillas: Personally, I’m team warm corn tortillas for that authentic, slightly chewy texture, but soft flour tortillas are a delicious, pillowy alternative. Pro Hack: Warm them directly over a gas flame for a few seconds each side for a gorgeous, slightly charred flavor.
- Chopped onions & fresh cilantro: The classic, crunchy, fresh topping. It’s a non-negotiable contrast to the rich beef.
- Lime wedges: A final squeeze of fresh lime juice is a game-changer. It wakes up every single flavor.
- Crumbled queso fresco: A mild, salty, crumbly cheese that adds creaminess without overpowering. Cotija is a saltier, firmer alternative.
- Pickled onions or jalapeños (optional): My personal favorite add-on! The sharp vinegar from pickled onions cuts through the fat beautifully. A quick pickle is easy: just slice an onion, submerge in 1/2 cup vinegar, 1 cup warm water, 1 tbsp sugar, and 1 tsp salt for 30+ minutes.
Let’s Get Cooking: Low & Slow is the Way to Go
Okay, team. The prep is minimal; the patience is maximal. But trust me, every minute is worth it. Here’s your step-by-step guide to barbacoa bliss.
- The Flavor Bomb Sauce: Grab your blender. To it, add everything except the beef and serving ingredients: chipotle peppers, adobo sauce, cumin, oregano, cloves, vinegar, chopped onion, garlic, beef broth, lime juice, salt, and pepper. Now, blend until it’s as smooth as a salsa. Chef’s Hack: Take a quick taste with a clean spoon. This is your chance to adjust! Want more smokiness? Add another half pepper. More tang? A splash more vinegar. You’re the boss of this sauce.
- Meet Your Meat: Place your gorgeous chunks of beef chuck roast into your slow cooker or a large Dutch oven. Give them a quick seasoning with a pinch of salt and pepper. Then, pour that beautiful, smooth, brick-red sauce you just made all over the meat. Use a spoon or spatula to make sure every nook and cranny of the beef is acquainted with the sauce. Pop the lid on.
- The Long, Aromatic Wait (Slow Cooker Method): Set your slow cooker to LOW for 7-8 hours. This is the ideal method. The low, gentle heat breaks down the connective tissue in the chuck roast without toughening the meat, resulting in ultimate tenderness. (Dutch Oven Method): No slow cooker? No problem! Preheat your oven to 325°F (160°C). Cover your Dutch oven with a tight-fitting lid and place it in the oven. Cook for 3-4 hours. Either way, your job is to resist the urge to open the lid too often. Let the magic happen.
- The Grand Reveal & Shred: When the time is up, open that lid. You’ll be greeted by the most incredible smell and beef that literally falls apart when poked with a fork. Carefully remove the big chunks of beef to a bowl or cutting board. Use two forks (or your hands if it’s cool enough!) to shred all the meat. Discard any large, unrendered pieces of fat.
- Soak It All Up: Here’s a critical step for maximum flavor: return all that shredded beef back into the pot with all that amazing cooking liquid. Give it a good stir. Let it simmer on the “Warm” setting (or on the stovetop over low heat) uncovered for about 10-15 minutes. This lets the beef drink up more of that sauce and allows the liquid to thicken slightly into a perfect, juicy coating.
- Taco Assembly Time! Warm your tortillas. Pile high with that saucy, tender barbacoa beef. Now, top it like you mean it! I go in this order: beef, a sprinkle of onions and cilantro, a crumble of queso fresco, a few pickled onions, and a huge squeeze of fresh lime. Then, dive in.
How to Serve These Flavor-Packed Tacos
Presentation is part of the fun! I love setting up a DIY taco bar for friends and family. It’s interactive, relaxed, and lets everyone build their perfect bite. Place the big pot of shredded barbacoa beef right in the center (keep it warm on a trivet or a low warming setting). Surround it with bowls of all your toppings: the chopped onion, fresh cilantro, lime wedges, crumbled cheese, pickled veggies, and even some diced avocado or a drizzle of crema if you’re feeling fancy. Have a basket of warm tortillas wrapped in a kitchen towel nearby to keep them soft and pliable.
Don’t limit yourself to just tacos! This barbacoa is incredibly versatile. Serve it over a bowl of cilantro-lime rice for a hearty burrito bowl, stuff it into quesadillas with melty cheese, or pile it onto crispy tostadas. For a next-level comfort food move, spoon it over a baked potato or some creamy polenta. Leftovers (if you’re lucky enough to have any) are a gift to your future self.
Make It Your Own: Delicious Twists & Swaps
Once you’ve mastered the classic, play around! Here are a few of my favorite ways to mix it up.
- Pineapple & Habanero Twist: Add 1/2 cup of fresh pineapple chunks to the blender when making the sauce. Swap one chipotle pepper for 1 deseeded habanero (careful, it’s hot!) for a sweet, fiery, tropical barbacoa that’s absolutely incredible.
- “Carnitas-Style” Crispy Version: After shredding and simmering, spread the beef in a single layer on a baking sheet. Broil for 3-5 minutes, stirring once, until the edges get deliciously crispy. It adds a wonderful texture contrast.
- Instant Pot Speed Run: Short on time? Use your pressure cooker! Sear the beef chunks using the “Sauté” function. Add the sauce, seal the lid, and cook on High Pressure for 60-70 minutes. Let the pressure release naturally for 15 minutes, then shred and simmer.
- Lamb Barbacoa: For a truly traditional take, use a boneless lamb shoulder instead of beef. The gamey flavor of lamb pairs phenomenally well with these smoky, spicy spices.
- Leaner Option: Use beef round or bottom round roast. Just know it has less fat, so it might not be quite as melt-in-your-mouth tender as chuck, but it will still be full of flavor.
A Few Extra Nuggets from My Kitchen
This recipe has been a living, evolving thing in my kitchen for years. I’ve made it for everything from casual Sundays to big game-day parties. One time, I accidentally used a whole can of chipotles instead of three peppers (a classic “not enough coffee” morning). It was… intense. We called it “Dragon’s Breath Barbacoa,” and while my brother loved it, I learned to always measure the spicy stuff with a clear head! Over time, I’ve dialed in the perfect balance for my taste, but the beauty is that you can do the same. Make it once as written, then tweak it to be yours. Maybe you love more garlic, or maybe you want to add a bay leaf to the pot while it cooks. Trust your palate. That’s what home cooking is all about.
Your Questions, Answered
Q: My sauce seems too thin after shredding. How can I thicken it?
A: No worries! The simmering step after shredding usually does the trick. If it’s still too watery, mix 1 tablespoon of cornstarch with 2 tablespoons of cold water to create a slurry. Stir this into the beef and sauce in the pot and cook for another 5-10 minutes on a higher simmer until it thickens up.
Q: Can I make this ahead of time?
A: Absolutely, and it might even be better! The flavors deepen and marry overnight. Cook and shred the beef, then store it in its sauce in an airtight container in the fridge for up to 4 days. Reheat gently on the stove or in the microwave.
Q: Is it freezer-friendly?
A> You bet. Freeze the cooked and shredded barbacoa (with its sauce) in a sealed container or freezer bag for up to 3 months. Thaw overnight in the fridge before reheating.
Q: The beef is a bit tough. What happened?
A> This almost always means it needs more time. Chuck roast has tough connective tissue that needs a long, slow cook to break down into gelatin (which is what makes it tender and juicy). If it’s not shredding easily, just give it another 30-60 minutes and check again. Patience is key!

Barbacoa Beef Tacos : Bold, Tender & Bursting with Flavor
Description
Barbacoa Beef Tacos (Slow Cooker or Dutch Oven)
Tender, juicy, smoky, and unbelievably flavorful. The taco that transforms Taco Tuesday.
Ingredients
For the Barbacoa Beef
-
3 lbs beef chuck roast, cut into large chunks
-
3 chipotle peppers in adobo + 1 tbsp adobo sauce
-
1 tbsp ground cumin
-
1 tbsp dried oregano (Mexican preferred)
-
½ tsp ground cloves
-
1 tbsp apple cider vinegar
-
½ onion, roughly chopped
-
4 garlic cloves
-
1 cup beef broth (low-sodium)
-
Juice of 1 lime
-
Salt & pepper to taste
For Serving
-
Warm corn or flour tortillas
-
Chopped onions
-
Fresh cilantro
-
Lime wedges
-
Crumbled queso fresco or cotija
-
Optional: pickled onions, pickled jalapeños, avocado, crema
Instructions
1. Make the Sauce
-
Add to a blender:
-
chipotle peppers + adobo
-
cumin
-
oregano
-
cloves
-
vinegar
-
onion
-
garlic
-
beef broth
-
lime juice
-
salt & pepper
-
-
Blend until smooth.
2. Prep the Beef
-
Place beef chunks into your slow cooker or Dutch oven.
-
Season lightly with salt + pepper.
-
Pour the blended sauce all over the beef.
3. Cook Low & Slow
Slow Cooker:
-
Cook on LOW for 7–8 hours (best method).
Dutch Oven (Oven):
-
Preheat oven to 325°F (160°C).
-
Cover and cook 3–4 hours until tender.
4. Shred & Soak
-
Remove beef and shred with two forks.
-
Return shredded beef to the pot.
-
Stir it into the sauce.
-
Simmer on warm/low for 10–15 minutes to thicken and deepen flavor.
5. Serve
Warm your tortillas.
Fill with juicy barbacoa.
Top with onion, cilantro, lime, cheese, and anything you like.
Enjoy the BEST tacos ever.
Notes
-
Less spicy: Use 1–2 chipotles or remove seeds.
-
More smoky: Add ½ tsp smoked paprika.
-
Crispy version: Spread shredded beef on a sheet pan and broil 3–5 minutes.
-
Instant Pot option: High Pressure 60–70 min + 15 min natural release.
Nutritional Information*
*Please note: The following is an approximate estimate calculated for the barbacoa beef only (about 4-5 oz serving), not including tortillas or toppings. Values can vary based on specific ingredients and portion sizes.
- Calories: ~280
- Protein: 35g (Excellent source!)
- Fat: 14g (Mostly the good, flavorful marbling from the chuck roast)
- Carbohydrates: 4g
- Fiber: 1g
This barbacoa is a fantastic source of high-quality protein and iron. To keep your overall meal balanced, pair it with fiber-rich sides like black beans, a fresh corn salad, or a big helping of crunchy lettuce in your taco. Remember, the toppings are where you can add loads of fresh veggies!
Final Thoughts: The Taco That Will Change Your Taco Tuesday Forever
So here we are, at the end of our barbacoa journey. What started as a simple recipe has hopefully become an invitation—an invitation to slow down, to savor the process, and to gather people around a meal that’s made with more than just ingredients, but with intention.
This isn’t just about beef and spices. It’s about the patience that turns tough cuts into tender, shreddable perfection. It’s about the alchemy of smoke, acid, and earth that happens in your pot. It’s about the joy of building your own taco, exactly how you like it, and the shared silence that falls over a table when everyone takes that first, incredible bite.
Zesty Fish Taco Sauce Recipe : Creamy, Tangy and Irresistible
Forget Bland, It’s Time for a Flavor Fiesta!
Hey there, friend! Beau here, welcoming you back to my kitchen at Feastical. Let’s be real for a second: what’s the absolute make-or-break moment of a fish taco? Is it the perfectly flaky fish? Sure, that’s important. The crisp, fresh slaw? Definitely a contender. But I’m willing to bet my favorite cast iron skillet that when you close your eyes and dream of that perfect, restaurant-quality taco, it’s that magical, creamy, tangy sauce drizzled over the top that you’re really craving. That sauce is the encore, the confetti, the flavor hug that brings every single element into delicious harmony.
Too often, we settle for a sad squirt of plain mayo or sour cream, and our tacos feel… incomplete. A little shy. Well, no more! Today, we’re banishing blandness for good. I’m sharing my secret weapon: my Zesty Fish Taco Sauce. This isn’t just a condiment; it’s the culinary conductor of your taco orchestra. It’s creamy from a dream team of sour cream and mayo, electrified with fresh lime, warmed with smoky spices, and has just enough of a kick to keep things interesting. The best part? You whip it up in under 5 minutes with ingredients you probably already have. So, grab a bowl and let’s turn your taco night from a Tuesday routine into a full-blown fiesta!
The Sauce That Started It All: A Beachside Revelation
This sauce recipe has a permanent spot in my heart and recipe box, and it all goes back to a sun-bleached, sandy-toes kind of day. Years ago, my wife and I were on a tiny, no-frills trip down the California coast. We stumbled upon this literal shack on the beach that promised “World’s Best Fish Tacos.” Skeptical but hungry, we ordered. What arrived was life-changing: beer-battered cod, simple cabbage, a warm tortilla, and this unidentifiable, creamy orange-ish sauce that made the entire universe make sense. It was tangy, it was smoky, it was everything. I spent the rest of the vacation trying to reverse-engineer it from memory, asking for “extra sauce” with a not-so-subtle wink.
Back in my own kitchen, the experimentation began. Batch after batch, I tweaked and tasted. Too much garlic? Too little smoke? Was that cumin or coriander? Finally, after what felt like the hundredth attempt (my friends were very happy, if slightly sauced-out, taste-testers), I nailed it. That “aha!” moment—when the flavors clicked—was pure kitchen magic. Now, every time I make this sauce, it’s not just about tacos; it’s a little taste of that salty air, that beachside bliss, and the joy of cracking a delicious code. It’s my mission to pass that “aha!” moment on to you.
Gathering Your Flavor All-Stars
Here’s the beautiful part: this sauce is greater than the sum of its simple parts. Let’s meet the team and talk about why each one is a MVP (Most Valuable Player).
- ½ cup sour cream – This is our creamy, tangy base. It brings a lovely lightness and a pleasant acidity. Chef’s Insight: For a richer tang, use full-fat. If you need a substitute, plain Greek yogurt works brilliantly—it’s just a bit thicker and tangier.
- ¼ cup mayonnaise – The mayo is our secret for richness and that luxurious, clingy texture that coats every bite perfectly. It balances the tang of the sour cream. Chef’s Insight: Use a good-quality mayo you like the taste of on its own.
- 1 tablespoon fresh lime juice – NON-NEGOTIABLE! Bottled juice just won’t give you that bright, vibrant zing. The fresh juice is the wake-up call for your taste buds. Chef’s Insight: Roll your lime on the counter firmly before juicing to get every last drop.
- 1 teaspoon lime zest – This is the flavor booster rocket. The zest holds incredible aromatic citrus oils that the juice alone doesn’t have. It makes the lime flavor pop! Sub Tip: No fresh limes? Use an extra squeeze of juice, but seek out a tiny bit of zest from a lemon as a last resort.
- 1 teaspoon hot sauce (adjust to taste) – This is your dial. I love Cholula or Tapatío for their vinegary kick, but Sriracha works for a sweeter, garlicky heat. Start with a teaspoon and add more after tasting. Chef’s Hack: Have a heat-loving friend and a spice-averse one? Make the base sauce mild and set out hot sauce for personal drizzles!
- 1 garlic clove, finely minced – Fresh garlic adds a pungent, savory depth that powdered garlic can’t match. Chef’s Insight: Use a microplane to get it super fine—it will incorporate seamlessly and distribute flavor evenly.
- 1 teaspoon ground cumin – The earthy, warm soul of the sauce. It’s the flavor bridge between the spices and the creaminess. Chef’s Tip: For next-level flavor, toast whole cumin seeds in a dry pan for 30 seconds, then grind them fresh. The aroma is unreal.
- ½ teaspoon smoked paprika – This is the magic dust! It gives that subtle, smoky backbone that makes the sauce taste complex and “chef-y.” Do not use regular paprika here—the smoked version is key.
- Salt and pepper to taste – Always season in stages. The other ingredients have salt, so taste before you add!
- Optional: 1 tablespoon chopped fresh cilantro or dill – Cilantro is the classic fresh, herbal finish. If you’re one of those folks who thinks it tastes like soap (no judgment!), try fresh dill for a bright, grassy note, or simply leave it out.
Let’s Make Some Magic: Step-by-Step
Ready? This is so easy, you’ll have it memorized after one go. Let’s walk through it together, with my commentary so you feel like I’m right there with you.
- The Foundation: Grab a medium-sized mixing bowl. Plop in your sour cream and mayonnaise. Take a whisk or a fork and mix them until they are completely smooth and homogenous. No streaks of mayo or lumps of sour cream! This is about creating a perfectly unified, creamy canvas. Chef’s Hack: If your sour cream is straight from the fridge, let it sit on the counter for 10 minutes first. Room-temp ingredients blend together much more smoothly.
- The Zing Zone: Now, add your freshly squeezed lime juice, that precious lime zest, your chosen hot sauce, and the finely minced garlic. Stir, stir, stir! You’ll see the color lighten slightly and the aroma will start to hit you. That’s the good stuff. Chef’s Tip: When zesting, only get the bright green outer layer. The white pith underneath is bitter—avoid it!
- The Spice Cabinet Spotlight: Time for the warm, smoky notes. Sprinkle in the ground cumin and smoked paprika. Add a pinch of salt and a few grinds of black pepper. Stir vigorously until the spices are fully incorporated and the sauce takes on a beautiful, pale orangey-pink hue. Chef’s Insight: Don’t just dump and stop stirring. Make sure those ground spices are fully dissolved into the fat of the mayo and sour cream to prevent any gritty texture.
- The Fresh Finish (Optional): If you’re using fresh herbs, now’s the time. Fold in your chopped cilantro or dill gently. This keeps them bright and fresh rather than bruised and over-mixed.
- The Patient Perfection Step: This might be the hardest part, but it’s crucial. Cover the bowl with plastic wrap or transfer the sauce to a jar or squeeze bottle. Pop it in the fridge for at least 15 minutes, but ideally 30 minutes to an hour. Why? This chilling time allows the flavors to get to know each other, mellow out, and marry. The garlic mellows, the spices bloom, and the sauce thickens up just a touch. It’s transformative. Trust me, Beau, on this one.
How to Serve Your Masterpiece
Okay, the sauce is chilled and perfect. Now, let’s talk presentation! This sauce is a star, so let it shine.
For classic fish tacos, I love loading up a warm corn or flour tortilla with your cooked fish (grilled mahi-mahi, beer-battered cod, blackened tilapia—all are winners!). Add a crunchy cabbage slaw or some pickled red onions for bite. Then, take a spoon and drizzle generously with your Zesty Sauce. Don’t be shy! You can also serve it on the side in a small bowl for dipping.
But don’t stop at tacos! This sauce is a flavor MVP in so many places: a dip for sweet potato fries or crispy shrimp, a spread for fish sandwiches or burgers, a dollop on grilled chicken or roasted veggies, or even a surprise topping for a Mexican-inspired eggs Benedict. Once you taste it, you’ll want to put it on everything.
Make It Your Own: Fun Flavor Twists
This recipe is your springboard. Play with it! Here are a few of my favorite riffs:
- The “Chipotle Crema” Swap: Replace the hot sauce and smoked paprika with 1-2 finely chopped chipotle peppers in adobo sauce (plus a teaspoon of the adobo sauce). It’s smoky, spicy, and deeply flavorful.
- The “Everything Bagel” Vibe: Stir in 2 tablespoons of everything bagel seasoning at the end. Fantastic as a dip or on a breakfast sandwich with smoked salmon.
- Herb Garden Explosion: Go heavy on the herbs! Add 2 tablespoons total of a mix of chopped cilantro, chives, and parsley. Super fresh and green.
- Dairy-Free & Lighter Option: Swap the sour cream and mayo for an equal amount (¾ cup) of plain, unsweetened dairy-free yogurt or a vegan mayonnaise/sour cream blend. The flavor profile still works beautifully.
- Sweet & Smoky Kick: Add a teaspoon of pure maple syrup or honey along with the spices. It creates an incredible sweet-heat-smoke balance that’s addictive on grilled fish.
Beau’s Kitchen Notebook
This sauce has evolved in my kitchen. The first version was garlic-heavy (my breath could ward off vampires for a week). I learned that chilling time is the silent hero. I’ve also made this in a food processor when I’m tripling the batch for a party—it’s faster, but I still prefer the control of hand-mixing for a single portion.
One funny story: I once accidentally used cinnamon instead of cumin (those jars look similar in a dim pantry!). Let’s just say it was… interesting. Not taco material, but it sparked the idea for a sweet cinnamon crema for churros! Every mistake is a new recipe in disguise. The point is, don’t stress. Taste as you go, trust your palate, and make it how you like it.
Your Questions, Answered!
Q: How long does this sauce last in the fridge?
A: Stored in an airtight container, it will stay fresh and delicious for 5-7 days. The flavors often get even better on day two!
Q: My sauce turned out too thin/runny. What happened?
A> Don’t worry! This can happen if the sour cream was warm or a bit watery. The fix is easy: chill it. As it cools, it will thicken up nicely. For future batches, make sure your sour cream is well-stirred and cold before using.
Q: Can I make this sauce ahead of time?
A> Absolutely, and I encourage it! Making it a few hours or even a day ahead allows the flavors to develop fully. Just give it a good stir before serving.
Q: Is there a substitute for mayonnaise? I’m not a fan.
A> You can use all sour cream, but the texture will be tangier and less rich. For a mayo-free version, try using all Greek yogurt, or for creaminess, blend in half an avocado. The flavor will change, but it’ll still be delicious!

Zesty Fish Taco Sauce Recipe : Creamy, Tangy and Irresistible
Description
Zesty Fish Taco Sauce
A creamy, tangy, smoky sauce that transforms any fish taco into a restaurant-quality bite. Ready in under 5 minutes!
Ingredients
-
½ cup sour cream (full-fat recommended; Greek yogurt works too)
-
¼ cup mayonnaise
-
1 tbsp fresh lime juice
-
1 tsp lime zest
-
1 tsp hot sauce (Cholula, Tapatío, or your favorite)
-
1 garlic clove, finely minced
-
1 tsp ground cumin
-
½ tsp smoked paprika
-
Salt & black pepper, to taste
-
Optional: 1 tbsp chopped cilantro or dill
Instructions
In a medium bowl, whisk together the sour cream and mayonnaise until smooth.
Stir in the lime juice, lime zest, hot sauce, and minced garlic until fully combined.
Mix in the cumin, smoked paprika, salt, and pepper.
Stir until the sauce turns a pale orange-pink color and the spices are fully incorporated.
Fold in cilantro or dill for a fresh finish.
Cover and refrigerate for 15–30 minutes to let the flavors blend and the sauce thicken.
Notes
-
Chipotle Crema: Replace hot sauce + smoked paprika with 1–2 minced chipotle peppers in adobo.
-
Herb Forward: Add 2 tbsp mixed cilantro, chives, and parsley.
-
Dairy-Free: Use dairy-free yogurt or vegan sour cream/mayo.
-
Sweet & Smoky: Add 1 tsp honey or maple syrup for balance.
Nutritional Info (A Quick Note)
Please note: The following is an estimate provided by an online nutrition calculator. For precise dietary needs, consult a professional.
Per 2-tablespoon serving: Calories: ~90 | Total Fat: 9g | Saturated Fat: 2.5g | Cholesterol: 10mg | Sodium: 85mg | Total Carbohydrates: 1g | Dietary Fiber: 0g | Sugars: 0.5g | Protein: 0.5g
While this is a condiment, its bold flavor means a little goes a long way in making healthy proteins like fish and veggies incredibly satisfying! Using light sour cream or Greek yogurt can adjust these numbers to fit your goals.
The Final Bite
And there you have it, friend! You’re now armed with the knowledge to create a fish taco sauce that will have everyone asking, “What’s your secret?” Remember, cooking is about joy, not perfection. This recipe is forgiving, flexible, and built for fun.
So, the next time taco night rolls around (or burger night, or dip night, or “I-just-need-something-tasty” night), you know exactly what to do. Whip up this batch of creamy, tangy, irresistible magic. Drizzle it with confidence. Share it with love.
Thanks for hanging out in my virtual kitchen. I hope this sauce becomes a staple in your home, creating its own delicious memories. Now, go forth and sauce everything! Don’t forget to tag @Feastical if you share your creations—I love seeing your kitchen wins.
Until next time, keep it flavorful,
Beau