
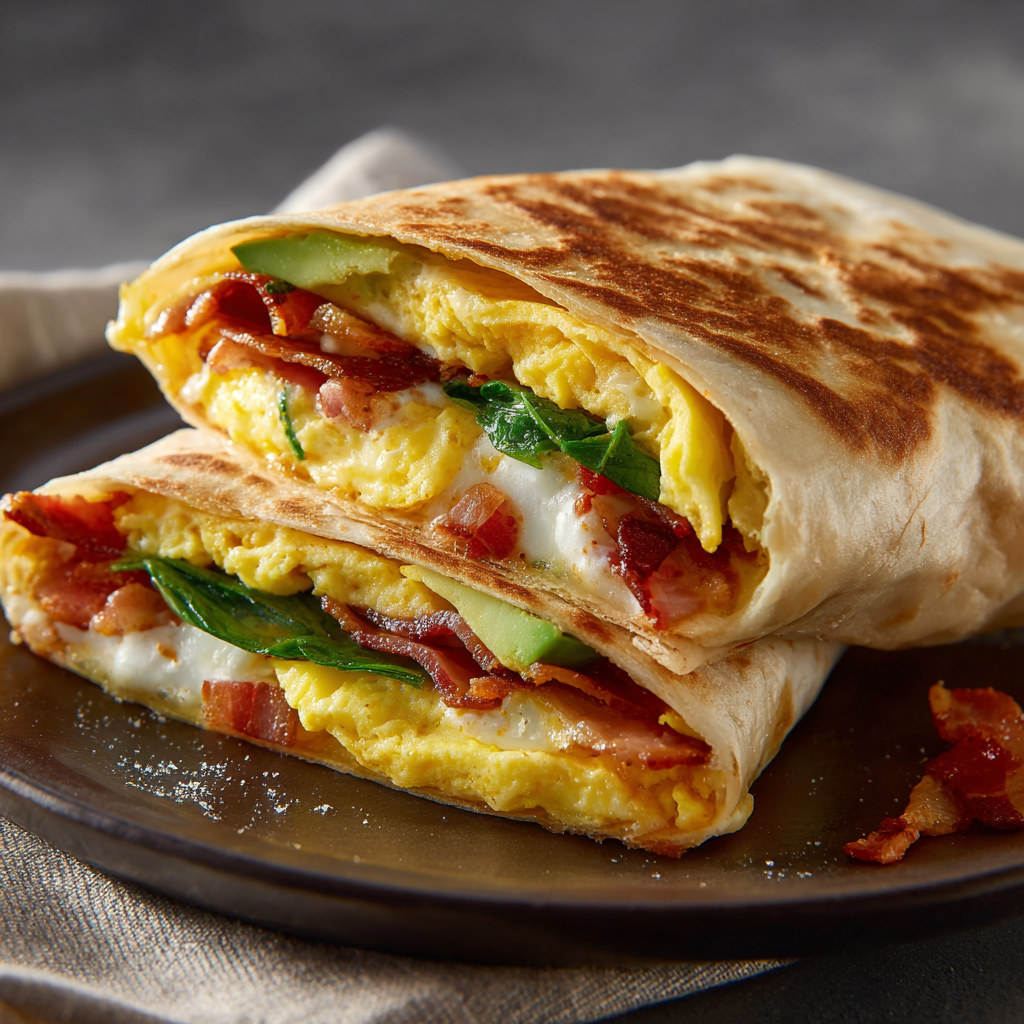
High-Protein Egg Muffins with Cottage Cheese, Veggies & Turkey Bacon
Fluffy, Protein-Packed Egg Muffins to Power Your Mornings
Hey there, friend! Beau here, from Feastical. Let’s talk about mornings. You know the drill: the alarm blares, you’re scrambling (no egg pun intended) to get out the door, and the siren call of the drive-thru or a sad, skipped breakfast starts whispering in your ear. We’ve all been there. But what if I told you the secret to conquering those chaotic mornings—and fueling your body with something genuinely delicious—is waiting for you in a humble muffin tin?
Today, we’re ditching the sugar-laden pastries and the underwhelming toast. We’re making my High-Protein Egg Muffins with Cottage Cheese, Veggies & Turkey Bacon. These aren’t your average, sometimes-rubbery egg cups. Oh no. By blending creamy cottage cheese right into the eggs, we create a cloud-like, ultra-fluffy texture that’s packed with protein to keep you satisfied for hours. They’re loaded with colorful confetti of veggies and the savory crunch of turkey bacon. Think of them as your meal-prep superhero: freezer-friendly, low-carb, perfect for post-workout fuel, and so darn tasty you’ll actually look forward to eating them.
So, whether you’re a seasoned meal-prepper or someone who just wants a real breakfast more than once in a blue moon, this recipe is your new best friend. Grab your blender and your favorite mug of coffee—let’s make mornings something to celebrate.
The Breakfast That Built a Habit (And Saved My Sanity)
This recipe has a special place in my heart, and it all started during a seriously hectic chapter. I was juggling long hours, my kitchen was more of a passing thought than a creative space, and my breakfast was… inconsistent, to say the least. I’d either grab nothing or something I’d regret by 10:30 AM when the hunger monster struck.
One Sunday, fueled by desperation and a carton of eggs, I started experimenting. I remembered my grandma’s trick of adding a splash of milk to scrambled eggs for fluffiness. But I had cottage cheese. I threw it in the blender with the eggs, crossed my fingers, and poured the surprisingly frothy mixture into a muffin tin alongside whatever veggies were wilting in the drawer. The result? A revelation. They were insanely fluffy, savory, and I had breakfast for the whole week. That simple batch was a tiny act of self-care that created a ripple effect. It gave me back control of my mornings, one delicious, protein-packed muffin at a time. Now, they’re a Feastical staple I just have to share with you.
Gathering Your Flavor Power Team
Here’s everything you’ll need. Don’t stress about exact measurements—this recipe is wonderfully forgiving and open to your fridge’s creativity!
- 6 large eggs: The superstar structure. They provide the base protein and hold everything together. For a richer flavor, try using pasture-raised eggs if you can find them.
- 1/2 cup cottage cheese: The secret weapon for fluffiness! Blending it creates an airy, almost soufflé-like texture and adds a huge protein boost. Use full-fat for ultimate creaminess, or low-fat if you prefer. Don’t like curds? Blend it until completely smooth—you won’t even know it’s there!
- 1/4 cup bell peppers, diced: I love the sweet crunch of red or orange bells, but green works too! This is your color and vitamin C. No peppers? Try diced mushrooms or zucchini.
- 1/4 cup spinach or kale, finely chopped: A sneaky veggie boost! Chopping it finely ensures it blends seamlessly into the egg mixture. Frozen spinach (thawed and squeezed VERY dry) works in a pinch.
- 2 slices cooked turkey bacon, chopped: Savory, smoky flavor and a delightful crunch. For a pork option, use regular bacon. Vegetarian? Skip it or add a pinch of smoked paprika for that smoky note.
- Salt & pepper to taste: The essential flavor enhancers. I like to season the mixture well, as baked eggs can taste a bit bland otherwise.
- Optional: 1/4 cup shredded cheese, chili flakes, green onions: The fun zone! A sprinkle of cheddar, pepper jack, or feta takes it over the top. Chili flakes add heat, and green onions give a fresh finish.
Let’s Get Cooking: Your Foolproof Guide to Fluffy Muffins
Ready to see the magic happen? Follow these steps, and you’ll be a breakfast meal-prep pro in no time.
- Prep Your Stage: Preheat your oven to 375°F (190°C). This is crucial for even cooking. Now, grease your muffin tin really well with non-stick spray or butter, or use silicone liners for absolutely zero sticking. I’m a silicone liner fan—they make cleanup a dream.
- The Blender Magic: Crack your 6 eggs into the blender. Add the 1/2 cup of cottage cheese. Here’s my pro tip: Add a pinch of salt and pepper right into the blender. Now, blend on high for 20-30 seconds until the mixture is completely smooth, frothy, and pale yellow. You’re literally whipping air into it, which is the key to that cloud-like texture! No blender? A hand mixer or even vigorous whisking in a bowl will work, but blend if you can.
- Fold in the Goodies: Pour your fluffy egg mixture into a large bowl. This gives you room to stir. Add your diced bell peppers, chopped spinach/kale, and the chopped turkey bacon. If you’re using shredded cheese or green onions, add most of it now, saving a little for the top. Gently fold everything together until just combined. Don’t overmix!
- Fill ‘Em Up: Using a measuring cup or ladle, evenly divide the mixture among the 12 muffin cups. Fill them about 3/4 of the way full. They will puff up a little but won’t overflow. If you saved a bit of cheese or green onions, sprinkle it on top now for a pretty finish.
- Bake to Perfection: Slide the tin into your preheated oven. Bake for 20-22 minutes. You’re looking for the tops to be set, lightly golden, and for a toothpick inserted in the center to come out clean. Chef’s Hack: Ovens vary, so start checking at 18 minutes. If they look like they’re browning too quickly, they’re done!
- The Cool Down (The Hardest Part!): Let the muffins cool in the tin for about 5 minutes. This helps them set and makes them easier to remove. Then, run a butter knife around the edges and pop them out. Transfer to a wire rack to cool completely before storing if you’re meal-prepping.
How to Serve Your Masterpiece
These muffins are the ultimate versatile player! Enjoy them straight out of the oven, warm and fluffy. For meal prep, let them cool completely, then store them in an airtight container in the fridge for up to 5 days.
My favorite ways to serve: Grab two and go for a complete, on-the-go breakfast. Pair one with a side of sliced avocado and hot sauce for a more substantial plate. Crumble one over a fresh green salad for a lunchtime protein punch. They’re delicious cold, at room temp, or gently reheated for 30-45 seconds in the microwave.
Make It Your Own: 5 Delicious Twists
The basic formula is your canvas! Here are some of my favorite ways to switch it up:
- Mediterranean Marvel: Swap the turkey bacon for 1/4 cup crumbled feta cheese and add 2 tbsp chopped sun-dried tomatoes and a tsp of dried oregano.
- Southwest Fiesta: Use pepper jack cheese, add a handful of black beans (rinsed and drained), a few kernels of corn, and a dash of cumin. Top with salsa and avocado when serving!
- Everything Bagel Style: Stir 2 tablespoons of Everything Bagel seasoning into the egg mixture. So good with a schmear of cream cheese on the side.
- Dairy-Free & Whole30: Omit the cottage cheese and shredded cheese. Add an extra egg and a splash of compliant almond milk or coconut milk to maintain the liquid volume.
- “Clean Out the Fridge” Special: This is its true calling. Leftover roasted broccoli? Diced ham? Caramelized onions? A handful of herbs? Chop it small and throw it in!
A Few More Thoughts from My Kitchen
This recipe has evolved from that first desperate batch! I’ve learned that blending the cottage cheese is non-negotiable for the best texture. I also used to sauté my veggies first, but honestly? Dicing them small and adding them raw works great and saves a pan to wash—they steam perfectly as the muffins bake.
Funny story: I once accidentally used a muffin tin I’d used for blueberry muffins without washing it well enough. Let’s just say my first bite of a “savory” egg muffin with a hint of blueberry was… an interesting surprise. Moral of the story: grease a clean tin!
Your Questions, Answered
Q: Can I freeze these egg muffins?
A: Absolutely! They are a freezer champion. Let them cool completely, then place them in a single layer on a baking sheet to flash-freeze for 1 hour. Once solid, transfer to a freezer bag. They’ll keep for 2-3 months. Reheat from frozen in the microwave for 60-90 seconds.
Q: Why are my egg muffins watery?
A: Watery veggies are the usual culprit! If using frozen spinach or zucchini, make sure to thaw and squeeze it in a clean kitchen towel until it’s very dry. Same goes for fresh mushrooms—they release a lot of water, so I’d recommend sautéing them first.
Q: Can I make these without a muffin tin?
A: Yes! Pour the mixture into a greased 8×8 baking dish and bake for 25-30 minutes. You’ve got a fantastic crustless egg bake—just slice into squares.
Q: They stuck to the pan! Help!
A: We’ve all been there. Next time, grease the tin more generously, use silicone liners, or try a light coating of avocado oil spray (it has a high smoke point and great release). Running a knife around the edges while they’re still warm is key.

High-Protein Egg Muffins with Cottage Cheese, Veggies & Turkey Bacon
Description
Tired of rushed mornings and skipped breakfasts? These savory egg muffins are a game-changer. Ultra-fluffy from cottage cheese, loaded with colorful veggies, and topped with turkey bacon, they’re freezer-friendly, low-carb, and packed with protein. Perfect for meal prep or on-the-go mornings.
Ingredients
-
6 large eggs
-
½ cup cottage cheese (full-fat or low-fat)
-
¼ cup bell peppers, diced (any color)
-
¼ cup spinach or kale, finely chopped
-
2 slices cooked turkey bacon, chopped (or pork bacon, or omit for vegetarian)
-
Salt & pepper, to taste
Optional Add-Ons:
-
¼ cup shredded cheese (cheddar, pepper jack, feta)
-
Chili flakes
-
Green onions
Instructions
-
Prep the Oven & Tin: Preheat to 375°F (190°C). Grease muffin tin or use silicone liners.
-
Blend Eggs & Cottage Cheese: In a blender, combine eggs, cottage cheese, salt, and pepper. Blend 20–30 seconds until smooth and frothy.
-
Fold in Veggies & Bacon: Pour mixture into a bowl. Gently fold in bell peppers, spinach/kale, turkey bacon, and optional cheese or green onions.
-
Fill Muffin Cups: Divide mixture evenly among 12 muffin cups, filling ~¾ full. Sprinkle remaining cheese or green onions on top if desired.
-
Bake: 20–22 minutes until tops are set and lightly golden. Toothpick should come out clean.
-
Cool & Remove: Let muffins cool 5 minutes in tin, run a knife around edges, then transfer to a wire rack.
Notes
-
Ensure veggies are dry to avoid watery muffins.
-
Grease tins well or use silicone liners for easy removal.
-
Blend cottage cheese for the best fluffy texture.
-
Muffin tin unavailable? Bake in 8×8 pan for a crustless egg bake (25–30 min).
Nutritional Information (Per Muffin, Recipe Makes 6)
Please note: This is an estimate based on the exact ingredients listed with full-fat cottage cheese and no optional cheese. Values will vary with substitutions.
- Calories: ~90
- Protein: 9g – The star of the show! This helps keep you full and supports muscle repair.
- Carbohydrates: 2g – Naturally low-carb, making these friendly for many eating styles.
- Fat: 5g – Healthy fats from the egg yolks to help absorb all those good vitamins.
These muffins are a balanced, whole-food option that delivers high-quality protein and energy to start your day right.
Your New Breakfast Routine Starts Now
And there you have it! My go-to recipe for taking back the morning, one fluffy, protein-packed bite at a time. What I love most about these egg muffins is how they prove that eating well doesn’t have to be complicated, time-consuming, or boring. It’s a little act of preparation that pays you back tenfold in energy and satisfaction throughout the week.
I hope you give them a try and make them your own. Tag me over on @Feastical if you do—I love seeing your creations and your own fun twists! Now, go forth, blend those eggs, and conquer your day.
With a full belly and a happy heart,
Beau

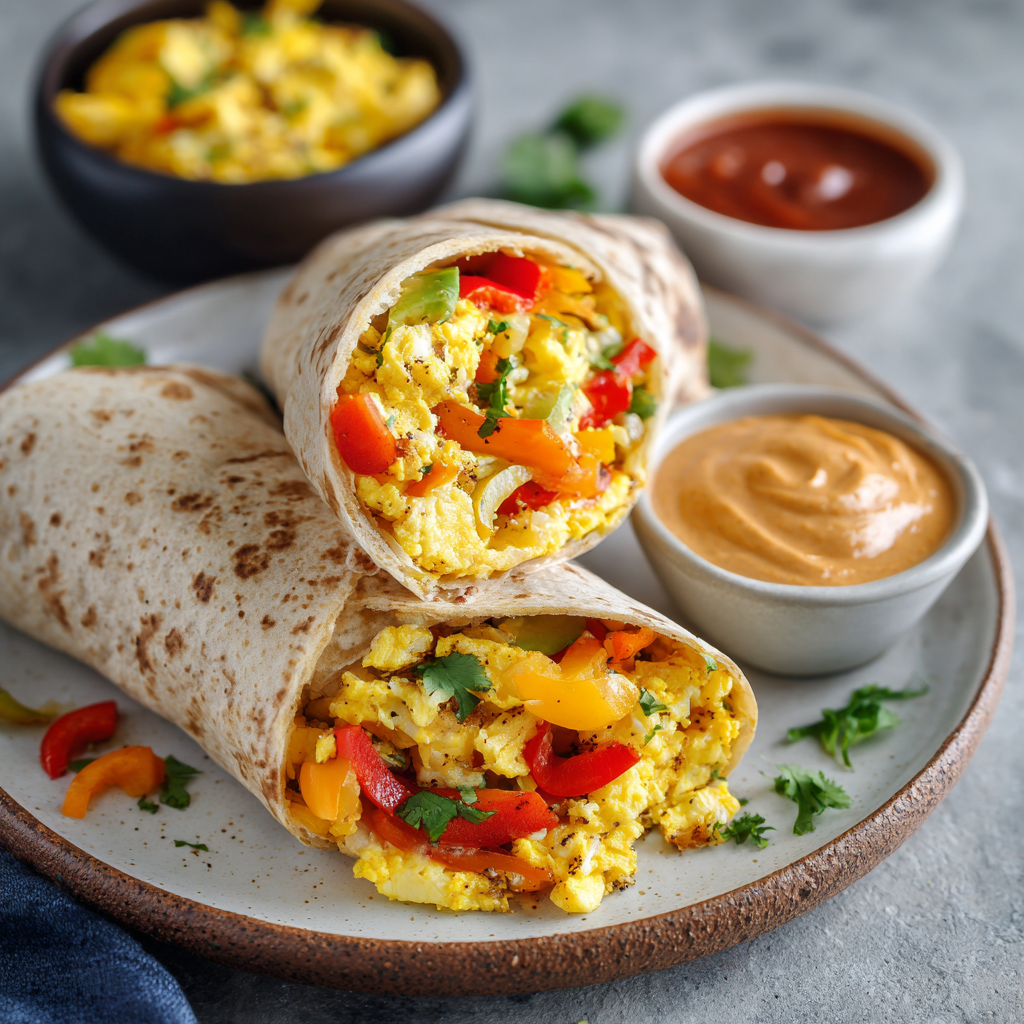
Breakfast Burrito Meal Prep Boxes with Eggs, Turkey Sausage & Salsa
Breakfast Burrito Meal Prep Boxes: Your Secret to Sunny Mornings
Hey friends, Beau here from Feastical! Let’s talk about Monday mornings. Or Tuesday. Or honestly, any morning where the alarm feels like a personal attack and the idea of scrambling eggs feels like climbing a mountain. We’ve all been there, staring into the fridge, willing breakfast to magically appear. What if I told you it could?
Forget the sad, expensive drive-thru sandwich. I’m talking about a hearty, protein-packed, flavor-filled breakfast that’s ready for you in minutes, already waiting in your fridge like a culinary superhero. Enter the ultimate game-changer: Breakfast Burrito Meal Prep Boxes.
This isn’t just meal prep; it’s a promise to your future self. A promise of savory, fluffy scrambled eggs, perfectly seasoned turkey sausage, and sweet, tender peppers and onions, all prepped and waiting for their moment. Pair it with a bright, zesty salsa, and you’ve got a breakfast that actually makes you excited to get out of bed. It’s customizable, it’s satisfying, and it turns the most chaotic part of your day into a calm, delicious victory lap. So, grab your favorite skillet and let’s build a week of wins, one tasty box at a time.
The “Aha!” Moment in a Messy Kitchen
This recipe was born from pure, unadulterated kitchen chaos. Picture it: me, years ago, trying to get out the door for an early shoot, juggling camera gear while attempting to make a breakfast burrito. Eggs were flying, a tortilla was tragically burned, and I somehow got salsa on my shirt. I ended up eating a sad granola bar in the car, vowing never again.
Later that week, I was prepping lunch components—chopping veggies, cooking chicken—and it hit me like a cast-iron pan to the head. Why don’t I do this for breakfast? Why am I trying to be a short-order cook for myself at 6 AM when I could just be an assembler? I cooked up a big batch of my favorite burrito fillings, divvied them into containers, and felt like I’d discovered fire. The next morning, I simply warmed a tortilla, piled in the goods, and was out the door in five minutes with a happy stomach and a clean shirt. It was freedom. It was flavor. It was the start of a beautiful, stress-free morning tradition. Now, I’m sharing that freedom with you.
Your Breakfast Building Blocks: Ingredients & Insights
Great food starts with great ingredients, but “great” doesn’t have to mean “complicated” or “expensive.” Here’s everything you’ll need, plus my little chef’s notes to help you shop and swap like a pro.
- 8 large eggs: The star of the show, providing rich protein and that classic, comforting texture. Chef’s Insight: For the fluffiest scramble, I let my eggs sit at room temperature for about 10 minutes before cracking. If you’re in a hurry, it’s not a deal-breaker, but it makes a difference!
- ½ cup milk (optional): A splash of milk or cream makes the eggs incredibly tender and fluffy. Substitution Tip: No milk? Use water, a dollop of sour cream, or even skip it entirely for a denser, more diner-style scramble.
- 1 lb turkey sausage: I love the leaner, savory punch of turkey sausage. You can use ground or links (just remove the casings). Chef’s Insight: Brown it well! That caramelized, golden-brown crust is packed with flavor. Don’t stir it too much—let it get some good color.
- 2 bell peppers, diced: Color and sweetness! I like using one red and one green for visual pop. Substitution Tip: Any color pepper works. Hate peppers? Try diced zucchini or mushrooms instead.
- 1 small onion, diced: The aromatic foundation. Yellow or white onions are perfect here for their balance of sweet and pungent flavor once cooked.
- 1 tsp olive oil: Just enough to sauté our veggies to perfection. Avocado oil or a pat of butter also works wonderfully.
- Salt and pepper to taste: Your best friends. Season in layers—a little on the veggies, a little on the eggs. Taste as you go!
- 1 cup salsa (for serving): The zingy finish! Use your favorite store-bought brand (roasted tomato or verde are fantastic) or your own homemade. Chef’s Insight: Keeping it separate in the box is key to preventing sogginess.
- Optional Garnishes: Shredded cheese (cheddar, Monterey Jack), avocado slices, hot sauce, sour cream, or a stack of tortillas (flour or corn).
Let’s Get Cooking: Step-by-Step with Chef Beau
Ready to roll up your sleeves? This process is a dance, and I’ll be your guide. We’ll work efficiently, using one pan for multiple steps to build flavor and save on dishes. Let’s do this!
- Cook the Sausage: Heat a large non-stick or cast-iron skillet over medium-high heat. Add the turkey sausage (no oil needed—it has its own fat). Break it up with a spatula and let it cook undisturbed for a few minutes to get a nice sear. Then, stir and continue cooking until it’s browned and cooked through, about 6-8 minutes. Chef’s Hack: Use a potato masher to break up ground meat perfectly! Transfer the cooked sausage to a bowl, leaving any tasty drippings in the pan.
- Sauté the Veggies: In that same glorious, flavorful pan, add the teaspoon of olive oil. Toss in your diced peppers and onion. Season with a pinch of salt and pepper. Cook, stirring occasionally, until they’ve softened and the onions are turning translucent, about 5-7 minutes. You want them tender but still with a slight bite—they’ll soften more when reheated. Scoop them into the bowl with the sausage.
- Master the Scramble: This is where magic happens. In a medium bowl, crack your eggs. Add the milk (if using), and a generous pinch of salt and pepper. Whisk vigorously until completely uniform and slightly frothy. Wipe out your skillet if there are lots of veggie bits (or don’t—extra flavor!), and return it to medium-low heat. Add a tiny bit of butter or oil. Pour in the eggs. Let them sit for 20 seconds, then gently push the cooked edges toward the center with a spatula, letting the uncooked eggs flow to the edges. Repeat until the eggs are just set but still slightly glossy and soft. Chef’s Golden Rule: REMOVE THEM FROM THE HEAT A MOMENT BEFORE THEY LOOK DONE. They’ll keep cooking from residual heat, ensuring a tender, not rubbery, scramble.
- The Grand Assembly: Grab four airtight meal prep containers. Now, we divide and conquer! Evenly portion the scrambled eggs, the sausage & veggie mix into each box. I like to keep them in little piles—it’s visually appealing and makes reheating more even. Put your salsa in a small separate container or a reusable sauce cup. If you’re adding cheese, sprinkle it on top of the hot ingredients so it melts slightly when reheated.
- Store for Success: Let the components cool to room temperature (about 15-20 minutes) before putting the lids on. This prevents condensation, which equals sogginess. Pop them in the fridge. They’ll be your breakfast besties for up to 4 days.
How to Serve Your Masterpiece
The beauty of this meal prep is in its versatility! Here’s how to enjoy your box each morning:
The Classic Burrito: Warm a large flour tortilla directly over a gas flame, in a dry skillet, or for 15 seconds in the microwave. Dump the contents of one box onto the tortilla, add salsa, and any extra cheese or avocado. Fold in the sides, roll it up tightly, and devour. Perfect for eating on the go.
The Knife-and-Fork Bowl: Not in a wrapping mood? Simply microwave the box (without the salsa cup) for 60-90 seconds until hot. Top with the chilled salsa for a delicious temperature contrast, add avocado slices, and dig in with a fork. It’s hearty, satisfying, and feels a bit fancier.
The “Everything” Breakfast Plate: Warm your components and serve them alongside a couple of crispy hash brown patties or a piece of buttered toast. A dollop of sour cream and a dash of hot sauce take it over the top for a leisurely weekend-style breakfast on a weekday.
Make It Your Own: 5 Flavorful Twists
Once you master the basic formula, the world is your breakfast burrito! Here are some of my favorite ways to mix it up.
- Southwest Fiesta: Add a can of drained black beans and a cup of frozen corn (add with the peppers). Season the eggs with a teaspoon of chili powder and cumin. Serve with chipotle salsa and cilantro.
- Green Chile & Potato: Swap the peppers for a cup of frozen diced potatoes (or leftover roasted potatoes). Cook them until crispy before adding the onions. Stir in a 4-oz can of diced green chiles with the eggs. Use pepper jack cheese.
- Mediterranean Vibes: Use chicken or lamb sausage. Swap bell peppers for a bunch of chopped spinach (add at the very end of cooking the onions). Crumble in some feta cheese instead of shredded cheese. Serve with a side of tzatziki instead of salsa.
- Vegetarian Powerhouse: Omit the sausage. Use a can of rinsed black beans or a plant-based chorizo crumble. Add an extra bell pepper and a diced zucchini for more bulk. You won’t miss the meat!
- Lower-Carb Style: Ditch the tortilla and serve over a bed of fresh spinach or chopped romaine for a breakfast salad. The warm ingredients will slightly wilt the greens—it’s incredible.
Beau’s Kitchen Confidential Notes
This recipe has evolved from my “desperation prep” into a cherished routine. I’ve learned a few things along the way! First, don’t be afraid to season boldly. Turkey sausage and eggs can handle it. Second, the quality of your salsa makes a huge difference—find one you love! Finally, this is a fantastic “clean out the fridge” recipe. That last handful of cherry tomatoes? Chop ’em up. A partial bag of spinach? Wilt it in. A lone leftover baked potato? Cube and fry it. This recipe is a framework for deliciousness, so make it work for you. My dog, Biscuit, now knows the sound of the egg whisk means something good is happening, and he plants himself firmly under my feet hoping for a tiny sausage crumb. Some traditions are just the best.
Your Questions, Answered
Q: Can I freeze these breakfast burrito boxes?
A: You can, but with a caveat. The scrambled eggs and veggies can become a bit watery when thawed. For best freezing results, assemble actual burritos (wrap in tortillas), wrap them tightly in foil or parchment paper, and freeze. Reheat from frozen in the oven or air fryer. The component boxes are best kept in the fridge.
Q: My eggs get watery when I microwave them. Help!
A: This usually means they were slightly overcooked initially or reheated too long. The key is gentle reheating. Microwave in 30-second bursts, stirring in between. Covering the box with a damp paper towel can help distribute heat more evenly and prevent rubberiness.
Q: What’s the best way to reheat for a crispy tortilla?
A: For a restaurant-quality experience, reheat the filling in the microwave. Then, warm your tortilla separately in a dry skillet until pliable and slightly toasted. Assemble and eat immediately. For a pre-assembled frozen burrito, an air fryer at 375°F for 10-12 minutes is pure magic.
Q: Can I use bacon or pork sausage instead?
A: Absolutely! That’s the beauty of it. Just note that pork sausage and bacon will release more fat. You may want to drain some off after cooking before sautéing your veggies, or just use less added oil.

Breakfast Burrito Meal Prep Boxes with Eggs, Turkey Sausage & Salsa
Description
Say goodbye to rushed mornings and sad granola bars. These breakfast burrito meal prep boxes are loaded with fluffy scrambled eggs, savory turkey sausage, sautéed peppers and onions, and a side of zesty salsa. Assemble, store, and enjoy a hearty, protein-packed breakfast in minutes—perfect for busy weekdays.
Ingredients
-
8 large eggs
-
½ cup milk (optional, for fluffier eggs)
-
1 lb turkey sausage (ground or links, casings removed)
-
2 bell peppers, diced (any color)
-
1 small onion, diced
-
1 tsp olive oil (or butter)
-
Salt and pepper, to taste
-
1 cup salsa (for serving)
Optional Add-Ons:
-
Shredded cheese (cheddar, Monterey Jack)
-
Sliced avocado
-
Hot sauce, sour cream
-
Tortillas for rolling
Instructions
1. Cook the Sausage
-
Heat a large skillet over medium-high.
-
Add turkey sausage, break it up, and let it sear undisturbed for a few minutes.
-
Stir and cook until browned and fully cooked, about 6–8 minutes.
-
Transfer to a bowl, leaving drippings in the pan.
2. Sauté the Veggies
-
In the same skillet, add olive oil.
-
Sauté peppers and onion with salt and pepper until tender-crisp, 5–7 minutes.
-
Mix with cooked sausage.
3. Scramble the Eggs
-
Whisk eggs with milk, salt, and pepper.
-
Wipe out the skillet or use a clean one over medium-low heat with a little butter/oil.
-
Pour in eggs, let set 20 seconds, then gently push cooked edges to center. Repeat until softly set. Remove slightly underdone to finish cooking from residual heat.
4. Assemble Meal Prep Boxes
-
Evenly divide eggs, sausage, and veggie mix into 4 airtight containers.
-
Store salsa separately.
-
Optional: Sprinkle cheese on hot ingredients to melt slightly.
5. Store
-
Let cool 15–20 minutes before sealing.
-
Refrigerate up to 4 days.
Notes
-
Freeze: Assemble as burritos for best results, wrap tightly, reheat in oven/air fryer.
-
Reheat Eggs: Microwave in short bursts with damp paper towel to prevent rubberiness.
-
Crispy Tortilla: Warm tortilla separately in skillet or air fryer before rolling.
-
Swap Protein: Bacon or pork sausage works; drain excess fat if needed.
Nutritional Information (Per Serving, without tortilla or optional add-ons)
Let’s be real—we eat this because it’s delicious. But it’s a wonderful bonus that it’s also a powerhouse start to your day! Here’s the breakdown for one box (eggs, sausage, veggies, ¼ cup salsa):
- Calories: ~370
- Protein: 32g (This is what keeps you full and focused all morning!)
- Carbohydrates: 8g
- Dietary Fiber: 2g
- Total Fat: 22g (Mostly from the eggs and turkey sausage, providing sustained energy)
Final Thoughts: From Chaos to Calm, One Box at a Time
And just like that, you’ve got it—your ticket to sunny, stress-free mornings. What started as a moment of chaos in my kitchen has become one of my most trusted tools for taking back the day. This isn’t just about breakfast; it’s about starting your morning with a win. It’s about giving your future self the gift of time, nourishment, and a little moment of delicious peace before the world starts making its demands.
These Breakfast Burrito Meal Prep Boxes are more than a recipe—they’re a blueprint for a better routine. They prove that eating well doesn’t have to be complicated or time-consuming. With a little upfront effort, you can transform the most hectic part of your day into a calm, flavorful, and deeply satisfying ritual. Whether you’re rolling it up, digging in with a fork, or customizing it to your heart’s desire, you’re fueling your body and setting a positive tone for everything that follows.
So, here’s to less scrambling in the morning and more savoring. To clean shirts and happy stomachs. To turning “I don’t have time” into “I’ve already got it handled.” Give it a try this week, and feel the difference. Your morning self will thank you.
Now, I’d love to hear from you! Did you try a twist? Find a favorite combo? Tag @Feastical with your creations. Let’s build a community of people who believe every day deserves a great start.

Everything Bagel Breakfast Wrap with Cream Cheese, Egg & Turkey
Your Favorite Bagel Just Got a Deliciously Portable Upgrade
Hey there, Feastical friends! Beau here, back in the kitchen and buzzing with excitement to share one of my all-time favorite morning hacks. Let’s be real—we all have those mornings. You know the ones. The alarm blares, your to-do list is already a mile long, and that deep, soulful craving for an everything bagel hits you like a ton of bricks. But who has time to toast, schmear, and neatly assemble (only to watch it crumble in your hands) when you’re already running five minutes late?
That’s where this little miracle worker comes in: The Everything Bagel Breakfast Wrap. Imagine all the iconic, savory, sesame-and-garlic-packed flavor of your favorite bagel, but wrapped up tight in a soft tortilla with creamy cheese, fluffy eggs, and lean protein. It’s the ultimate homage to that classic deli counter order, transformed into a neat, handheld, protein-packed parcel of joy. It’s cozy, it’s craveable, and it proves that a truly satisfying breakfast doesn’t have to be a production. So, grab your favorite skillet and let’s turn that chaotic morning rush into a delicious, manageable moment. Your taste buds (and your schedule) will thank you.
More Than a Bagel: A New York State of Mind
This recipe isn’t just about convenience for me—it’s a little taste of nostalgia. Back in my early cooking days, I spent a wild, wonderful summer living in a tiny Brooklyn apartment with two of my best friends. Our Sunday ritual was sacred: a bleary-eyed walk to the legendary bagel shop on the corner. The line would spill out the door, the air thick with the smell of boiling dough and coffee. We’d emerge clutching paper bags, warm and slightly greasy, our everything bagels loaded with a scandalous amount of cream cheese.
We’d eat them on the fire escape, watching the city wake up, trying desperately not to get poppy seeds everywhere (a losing battle, always). This wrap is my love letter to those simple, perfect mornings. It captures that essential, unforgettable flavor combo but packages it for the reality of my life now—a life that often involves needing one hand free to sip coffee while the other manages, well, everything else. It’s that New York deli spirit, ready for your kitchen, wherever you are.
Gathering Your Flavor Arsenal
Here’s what you’ll need to build your wrap. Think of this as your flavor blueprint—simple, quality ingredients that do the heavy lifting.
- 2 Large Eggs: Our protein-packed, fluffy foundation. Chef’s Insight: For an even fluffier, lighter scramble, I’ll sometimes use 1 whole egg + 2 egg whites. It’s a great way to bump up the protein without the extra fat.
- 2–3 Slices of Deli Turkey Breast: Adds savory, lean substance. Substitution Tip: Not a turkey person? Thinly sliced ham, crispy bacon, or even a smashed veggie burger patty work beautifully. For a vegetarian twist, try sautéed sliced mushrooms or tempeh.
- 1 Tablespoon Whipped Cream Cheese: The essential “schmear.” Why Whipped? It spreads like a dream straight from the fridge—no tearing your delicate tortilla! Regular cream cheese works too; just let it soften a bit first.
- 1 Large Tortilla or Wrap: The vessel. I love a whole wheat or spinach tortilla for extra fiber, or a high-protein wrap to really keep you full. The key is pliability—look for ones that bend without cracking.
- 1 Teaspoon Everything Bagel Seasoning: The star of the show! Chef’s Hack: If you don’t have a jar, make your own by mixing sesame seeds, poppy seeds, dried minced garlic, dried minced onion, and a pinch of salt. It’s a game-changer for avocado toast, too.
- Optional Superstars: This is your playground! A handful of baby spinach, a few slices of creamy avocado, a drizzle of hot sauce or sriracha mayo, or even some thin slices of red onion or tomato can take this wrap to the next level.
Let’s Build Your Breakfast Masterpiece
Ready? This comes together faster than you can find your missing sock. Let’s cook with confidence!
- Scramble Like a Pro: Crack your eggs into a bowl, add a tiny splash of water or milk (this creates steam for fluffiness!), and whisk with a fork until uniform. Heat a nonstick skillet over medium-low heat with a small pat of butter or a spray of oil. Pour in the eggs. As they begin to set at the edges, gently push them toward the center with a spatula, letting the uncooked egg flow to the edges. Chef’s Tip: Low and slow is the secret to soft, pillowy curds, not rubbery sheets! Remove from heat just before they look fully done—they’ll carryover cook to perfection.
- Warm and Welcome Your Wrap: While your eggs rest, warm your tortilla. You can do this directly over a low gas flame for a few seconds per side (watch it closely!), in a dry skillet for 20-30 seconds, or even in the microwave for about 10 seconds covered with a damp paper towel. Why bother? A warm tortilla is infinitely more flexible and less likely to crack when you fold it. Trust me on this one.
- The Art of the Schmear: Lay your warmed tortilla flat on a plate or cutting board. Using a spoon or butter knife, spread that glorious whipped cream cheese in a generous layer over the center, leaving about a 2-inch border all around. This is your flavor glue!
- Layer It Up: Now for the fun part—assembly! Pile your fluffy scrambled eggs right on top of the cream cheese. Follow with the slices of turkey. If you’re using spinach, avocado, or other veggies, this is their moment to shine. Layer them on now.
- The Signature Sprinkle: Here’s where the magic happens. Take your everything bagel seasoning and sprinkle it liberally over the entire filling. Don’t be shy—this is what gives every bite that iconic, addictive flavor.
- Wrap It Tight, Toast It Right: Time to fold! Fold the sides of the tortilla in over the filling, then, starting from the bottom, roll it up tightly away from you, like a burrito. For an optional, next-level finish, place the seam-side down back into your (now empty) skillet over medium heat. Toast for 1-2 minutes per side until it’s golden brown and slightly crispy. This seals the deal and adds wonderful texture.
How to Serve Your Savory Bundle of Joy
This wrap is the ultimate shape-shifter. For a true “on-the-go” experience, just wrap it in some parchment paper or foil, and you’ve got a breakfast you can eat during your commute (safely, of course!). If you have a luxurious minute to sit down, slice it in half on a sharp diagonal—the beautiful cross-section is seriously Instagram-worthy. Plate it with a side of fresh fruit, a few crispy hash browns, or simply a big mug of your favorite coffee. The beauty is in its simplicity and portability. It’s a full breakfast experience, neatly contained.
Make It Your Own: 5 Delicious Twists
The classic is king, but your kitchen is your kingdom! Here are a few ways to riff on this theme:
- The Lox & Loaded: Swap the turkey for smoked salmon (lox) and add a few capers and some very thin slices of red onion. Instant fancy brunch vibes.
- The Veggie Delight: Ditch the meat! Add sautéed bell peppers, onions, and mushrooms with the eggs, and use a layer of hummus or mashed avocado alongside the cream cheese.
- The Spicy Southwest: Add a quarter of a diced jalapeño to your scrambled eggs, use pepper jack cheese instead of cream cheese, and finish with a drizzle of chipotle sauce.
- The “Everything” Greek: Use a spread of tzatziki instead of cream cheese, add chopped spinach and diced tomato, and use a sprinkle of everything seasoning mixed with a pinch of dried oregano.
- The Lower-Carb Option: Skip the tortilla altogether! Use a large, sturdy piece of romaine lettuce or butter lettuce as your wrap. It’s fresh, crunchy, and utterly delicious.
Beau’s Behind-the-Scenes Notes
This recipe has become a true workhorse in my kitchen. It started as a desperate attempt to use up leftover tortillas and has evolved into my most-requested “brunch-for-dinner” item. I’ve made it for sleepy houseguests, packed it for early flights, and even served a fancy-pants version (see: The Lox & Loaded) at a casual baby shower. The funniest fail? I once got overzealous with the everything seasoning and created a “poppy seed storm” all over my black sweatpants. I looked like I had a serious case of culinary dandruff. Lesson learned: sprinkle over the plate, not your lap! The recipe is forgiving, fast, and endlessly adaptable—everything I love in a good meal.
Your Questions, Answered
Q: My tortilla keeps cracking when I try to roll it. Help!
A: This is almost always a temperature issue! Make sure you warm your tortilla properly before spreading. A cold tortilla is a brittle tortilla. Also, don’t overfill it—leave that border for folding.
Q: Can I make these ahead of time for meal prep?
A: Absolutely! Assemble the wraps, wrap them tightly in plastic wrap or foil, and store in the fridge for up to 2 days. I’d hold off on the optional pan-toasting until you’re ready to eat, though. You can reheat in a skillet, air fryer, or microwave (remove foil first!).
Q: What’s the best way to get really fluffy eggs?
A: My golden rules: 1) Don’t over-whisk—just until blended. 2) Use medium-low heat. 3) Don’t stir constantly! Let them set a bit, then gently push. Patience makes perfect fluff.
Q: I can’t find everything bagel seasoning. What can I use?
A> No problem! A mix of sesame seeds, a pinch of garlic powder, and a pinch of onion powder will get you close. Or, just embrace a different direction and use your favorite herb blend or everything-but-the-elote seasoning!

Everything Bagel Breakfast Wrap with Cream Cheese, Egg & Turkey
Description
All the savory, sesame-and-garlic flavor of an everything bagel—without the crumbly mess. Fluffy scrambled eggs, creamy whipped cream cheese, lean turkey, and a sprinkle of everything bagel seasoning, all wrapped in a warm tortilla. Ready in under 10 minutes, portable, and protein-packed, it’s perfect for rushed mornings or leisurely brunches alike.
Ingredients
-
2 large eggs (or 1 whole egg + 2 egg whites for extra protein)
-
2–3 slices deli turkey breast (or ham, bacon, sautéed mushrooms/tempeh)
-
1 tbsp whipped cream cheese (softened if regular)
-
1 large tortilla or wrap (whole wheat, spinach, or high-protein)
-
1 tsp everything bagel seasoning
Optional Add-Ins:
-
Handful of baby spinach
-
Sliced avocado
-
Drizzle of hot sauce, sriracha mayo, or hummus
-
Thin slices of red onion or tomato
Instructions
-
Scramble the Eggs
Whisk eggs with a splash of water or milk. Heat a nonstick skillet over medium-low with butter or oil. Pour in eggs and gently stir occasionally until just set, soft, and fluffy. Remove from heat. -
Warm the Tortilla
Heat briefly over a low flame, in a dry skillet, or microwave for 10 seconds covered with a damp paper towel. Warmth = pliability. -
Spread the Cream Cheese
Lay the tortilla flat. Spread whipped cream cheese in the center, leaving ~2-inch borders. -
Layer the Fillings
Add scrambled eggs, turkey slices, and any optional veggies or extras. -
Sprinkle Everything Seasoning
Generously cover the fillings with everything bagel seasoning. -
Wrap & Toast (Optional)
Fold the sides in, then roll from the bottom up. For a golden, slightly crispy finish, place seam-side down in the skillet 1–2 minutes per side. -
Serve
Slice in half diagonally for a gorgeous presentation. Enjoy hot with fruit, hash browns, or on-the-go wrapped in parchment.
Notes
-
No cracking: Warm tortilla, don’t overfill.
-
Meal prep: Assemble, store tightly wrapped in the fridge up to 2 days; toast or reheat just before eating.
-
Fluffy eggs: Medium-low heat, gentle stirring, slight carryover cooking.
-
No everything seasoning? Use a simple mix of sesame seeds, garlic powder, and onion powder.
Breaking It Down (The Healthy Stuff)
Let’s talk fuel! This wrap is designed to be satisfying and balanced. The eggs and turkey deliver a solid punch of high-quality protein (around 24g), which is key for keeping you full and energized all morning. Using a whole wheat tortilla adds fiber for digestive health. The fats come primarily from the eggs and cream cheese, providing sustained energy. Of course, exact numbers will vary based on your specific brands and additions (avocado will add healthy fats, extra cheese adds more protein and fat). Think of this not as a restrictive “diet” food, but as a nourishing, real-food option that tastes indulgent while providing the steady energy you need to tackle your day.
The Last Bite
And that’s it, friends! The Everything Bagel Breakfast Wrap: proof that the most satisfying meals often come from the simplest ideas. It’s a hug in edible form, a tribute to classic flavors, and a testament to making your morning work for you. I hope this recipe finds its way into your regular rotation and becomes as beloved in your home as it is in mine. Remember, cooking is about joy, not perfection. If a few poppy seeds escape, consider it confetti for a breakfast well made.
Did you try it? What fun variations did you create? Tag me over on Feastical.com or on social—I love seeing your kitchen creations! Now, go enjoy that wrap. You’ve earned it.
With a full heart and an even fuller plate,
Beau
“`
Crispy Breakfast Smash Wrap with Egg and Cheese
The Crispy Breakfast Smash Wrap: Your New Favorite 10-Minute Morning Miracle
Hey there, friend! Beau here, welcoming you back to the Feastical kitchen. You know that feeling on a busy morning? When you’re standing in front of the fridge, the clock is ticking, and you’re caught between the siren call of a drive-thru and the sad reality of plain toast? I’ve been there more times than I’d like to admit. That exact moment of “I want something delicious, fast, and I want it NOW” is what sparked the creation of this little piece of magic: The Crispy Breakfast Smash Wrap.
This isn’t just another breakfast burrito. Oh no. This is a game-changer, a flip-your-morning-upside-down (literally!) kind of recipe. We’re talking about cracking an egg directly into a hot pan and then smashing a tortilla right on top of it. The egg becomes one with the tortilla, frying into a lacy, crispy layer of golden goodness that cradles molten cheese and whatever other treasures you toss in. It’s part quesadilla, part fried egg sandwich, and 100% addictive. The best part? From craving to first crispy bite is about 10 minutes flat. It’s the hero your hectic mornings deserve, and I can’t wait to walk you through it. So, tie on an apron (or don’t, I won’t tell), and let’s make a mess and a masterpiece together.
The “Aha!” Moment: A Sticky Tortilla and a Happy Accident
I wish I could say I dreamed up this technique in a moment of culinary brilliance, but the truth is, it was a happy, sticky accident. Picture it: a tiny apartment kitchen, a serious case of Sunday morning hunger, and a serious shortage of clean dishes. I was trying to make a simple egg and cheese wrap, but my spatula skills were… lacking. The egg slid everywhere, the tortilla refused to cooperate, and in a moment of sheer, hangry frustration, I just grabbed the tortilla and pressed the runaway egg right into the skillet.
There was a glorious sizzle. I held it there for a second, thinking I’d ruined everything. But when I peeked? Magic. The egg had fused to the tortilla, creating this wonderfully crispy seal. I flipped it, piled on cheese, folded it, and took a bite. The crunch. The gooey cheese. The perfect egg-to-carb ratio. I literally did a little dance right there by the stove. It was one of those beautiful kitchen lessons: sometimes the best recipes come from leaning into the mess, not running from it. That “smash” technique became our little secret weapon, and now, I’m thrilled to share it with you.
Gathering Your Smash Wrap Toolkit
Simplicity is key here, friends. Each ingredient plays a specific role in creating that perfect crispy-gooey texture. Here’s what you’ll need and why it matters:
- 1 Large Egg: This is the glue (and the protein-packed star!). A fresh, large egg will give you the perfect amount of “smash” coverage. Chef’s Insight: For an even richer flavor, try a pasture-raised egg—the yolk color is unreal!
- 1 Small Flour Tortilla (8-inch): The vehicle for all this goodness. A small tortilla is crucial—it needs to be fully covered by the smashed egg to seal properly. Substitution Tip: A corn tortilla works in a pinch but can be more fragile. For a low-carb version, a sturdy, small coconut or almond flour wrap can be fun to experiment with.
- ¼ cup Shredded Cheese: The melty heart of the wrap. I’m a cheddar guy for its sharp tang, but the world is your oyster. Chef’s Insight: Pre-shredded bags are convenient, but shredding a block of cheese yourself gives you a creamier melt (no anti-caking agents!). A Monterey Jack or pepper jack blend is fantastic here.
- Butter, Oil, or Cooking Spray: For the pan. Butter gives incredible flavor, while a neutral oil like avocado or light olive oil offers a higher smoke point for a crisper finish. Don’t skimp!
- The “Make It Yours” Extras (Optional but Highly Encouraged):
- Turkey Bacon or Ham: For a salty, savory punch. Pre-cook it and crumble or chop it fine.
- Avocado: Sliced and added after cooking for a cool, creamy contrast.
- Handful of Spinach: Toss it on just before you add the cheese—it wilts in seconds for a green boost.
- Hot Sauce, Salsa, or Sriracha Mayo: The mandatory flavor finisher. I always have Cholula within arm’s reach.
Step-by-Step: Let’s Get Smashing!
Ready to create some crispy magic? Follow these steps, and you’ll be a smash wrap pro in no time. I’ve tucked my favorite little hacks in each step to set you up for success.
- Heat Your Pan: Place a non-stick or well-seasoned cast-iron skillet over medium heat. Let it get properly warm for a minute—this ensures an even cook and prevents sticking. Add a small pat of butter or a teaspoon of oil and swirl it around. You should hear a gentle sizzle if you flick in a tiny drop of water. Chef’s Hack: If your stove runs hot, err on the side of medium-low. We want a golden crisp, not a burnt tortilla!
- The Grand Smash: Crack your egg directly into the center of the hot, greased pan. Immediately take your tortilla and place it directly on top of the raw egg. Now, using a flat spatula (or even the bottom of a small plate or measuring cup), press down firmly and evenly on the tortilla. You’re smashing the egg outwards until it reaches (and preferably slightly overlaps) the edges of the tortilla. Hold the pressure for a good 5-10 seconds to create that essential bond. Chef’s Commentary: This is the satisfying part! Don’t be shy. A good smash means no escape routes for the egg or cheese later.
- Cook the Egg Side: Let the wrap cook, untouched, for about 2-3 minutes. You’ll know it’s ready when you can gently lift a corner with your spatula and see a lacy, golden-brown fried egg crust, and the egg white is fully set. The tortilla should be firmly attached. If the yolk is on top, it will still be runny at this stage—that’s perfect!
- The Confident Flip: Here’s the only slightly tricky move. Slide your spatula completely under the wrap. In one smooth, confident motion, flip it over. You should now have the bare tortilla side down against the pan. Chef’s Hack: If you’re nervous, you can use two spatulas! The key is commitment—a hesitant flip is more likely to cause a mess.
- Load & Fold: Now, quickly sprinkle your shredded cheese evenly over the entire egg-covered side. Add any other fillings that need to melt or warm through (like pre-cooked meat or spinach). Let it cook for about 30 seconds to start melting the cheese, then fold the wrap in half, like a quesadilla. Press down gently with your spatula.
- Crisp to Perfection: Cook for about 1-2 minutes on the first side until beautifully golden brown, then carefully flip and cook for another 1-2 minutes on the other side. You’re looking for an even, crisp exterior and listening for that satisfying sizzle. Chef’s Tip: If you want extra crispness, press down lightly after each flip.
- Serve Immediately: Slide your masterpiece onto a cutting board, let it rest for just 30 seconds (so the cheese doesn’t volcanically erupt), then slice in half and serve right away. Crispy food waits for no one!
How to Serve Your Masterpiece
Presentation is part of the fun! While this wrap is a superstar all on its own, a little plating flair makes it feel extra special. I love to slice it in half on a diagonal – those melty cheese pulls are Instagram gold. Serve it on a simple, bright plate with a few quick sides:
- Fresh & Bright: A handful of cherry tomatoes, a wedge of lime for squeezing, or a simple side of fresh fruit (think berries or melon) cut through the richness perfectly.
- Dippin’ Delights: This wrap is made for dunking. Put a little bowl of cool, creamy avocado crema, spicy salsa, or my personal favorite, a chipotle ranch, right on the plate.
- The Full Feast: For a lazy weekend brunch, pair it with crispy hash browns or a simple arugula salad with a lemon vinaigrette. Don’t forget a big mug of strong coffee or a fresh orange juice.
The beauty is, it’s just as happy wrapped in a paper towel for a car-bound breakfast as it is on a fancy plate. No judgment here!
5 Tasty Twists on the Classic Smash Wrap
Once you’ve mastered the basic technique, the canvas is yours to paint! Here are a few of my favorite riffs to keep things exciting:
- The Southwestern Fiesta: Use a pepper jack cheese. After flipping, add a spoonful of black beans, a sprinkle of corn, and a few slices of jalapeño. Top with cilantro and a drizzle of crema after cooking.
- The “Everything Bagel”: Before smashing the tortilla, sprinkle everything bagel seasoning into the pan with the raw egg. Use scallion cream cheese as your spread inside instead of shredded cheese. Mind. Blown.
- Mediterranean Sunshine: Swap the cheese for a smear of herbed goat cheese or feta crumbles. After cooking, tuck in some chopped Kalamata olives, cucumber slices, and a sprinkle of dill.
- Pizza My Heart: Use shredded mozzarella. After flipping, add a few mini pepperoni slices and a tiny spoonful of marinara sauce (not too much, or it gets soggy!). Fold and crisp, then dip in more marinara.
- Green Goddess (Veggie-Packed): Sauté some mushrooms and spinach before you start. After the flip, use the veggies and a shredded Gruyère or Swiss cheese. So savory and satisfying.
Beau’s Kitchen Notes: The Evolution of a Smash
This recipe has become a living thing in my kitchen. I’ve made it for sleepy roommates, for kids who swore they didn’t like eggs (they devoured it), and for myself more times than I can count. The biggest lesson? Embrace the imperfect smash. Your first one might have an egg escape route. It might tear a little. That’s okay! It will still taste incredible. I’ve also learned that letting the pan get properly hot is non-negotiable for that signature crunch. And one more confession: I sometimes make two and stack them with extra cheese in the middle for a “smash wrap sandwich” when I’m extra hungry. Don’t tell my nutritionist friend. Some kitchen secrets are just too good to keep.
Your Questions, Answered!
Q: My tortilla is burning before the egg is set! What am I doing wrong?
A: Your heat is too high, my friend! Dial it back to medium-low. We’re aiming for a golden-brown crisp, which requires a slightly gentler heat to cook the egg through without scorching the tortilla. Patience is a virtue here.
Q: Can I make these ahead of time for meal prep?
A: You can, but with a caveat. The crispy texture is best enjoyed fresh. If you must prep, cook them completely, let them cool, and store in the fridge for up to 2 days. Reheat in a toaster oven or air fryer to bring back some crunch—the microwave will make it soggy.
Q: Help! My wrap fell apart when I flipped it.
A> This usually means one of two things: 1) The egg wasn’t fully set/cooked enough on the first side to create a strong bond with the tortilla. Let it cook another 30-60 seconds next time. Or 2) You didn’t get a full, even smash. Really press that tortilla down so the egg spreads to the very edges, creating a full seal.
Q: Can I add raw veggies like onions or peppers?
A> I’d recommend sautéing them first. Raw, dense veggies won’t cook through in the short time the wrap is in the pan and can make the inside watery. A quick cook in the same pan before you start your egg adds flavor and ensures the right texture.

Crispy Breakfast Smash Wrap with Egg and Cheese
Description
Busy morning? This Crispy Breakfast Smash Wrap is the ultimate solution. A fried egg fused with a tortilla forms a golden, lacy crust that cradles gooey cheese and optional fillings. Quick, crunchy, and satisfying, it’s ready in just 10 minutes and perfect for breakfast at home or on the go.
Ingredients
-
1 large egg
-
1 small flour tortilla (8-inch)
-
¼ cup shredded cheese (cheddar, Monterey Jack, or pepper jack)
-
1 tsp butter, oil, or cooking spray
Optional Add-Ins:
-
Turkey bacon or ham (pre-cooked and chopped)
-
Sliced avocado
-
Handful of spinach
-
Hot sauce, salsa, or sriracha mayo
Instructions
-
Heat the Pan
Preheat a non-stick or cast-iron skillet over medium heat. Add butter or oil. -
Smash the Egg
Crack the egg into the center of the hot pan. Place the tortilla directly on top. Press firmly with a spatula for 5–10 seconds to spread the egg to the edges. -
Cook the Egg Side
Let it cook 2–3 minutes until the egg white is set and the egg has bonded to the tortilla. Look for a lacy golden edge. -
Flip
Slide a spatula under the wrap and flip it carefully. The tortilla side is now against the pan. -
Add Cheese & Fillings
Sprinkle cheese and any optional fillings on the egg side. Let them melt for about 30 seconds. -
Fold & Crisp
Fold the wrap in half and press gently. Cook 1–2 minutes per side until golden and crispy. -
Serve
Slice in half on a diagonal and enjoy immediately. Optional: serve with salsa, avocado crema, or fresh fruit.
Notes
-
Medium-low heat prevents burning the tortilla before the egg cooks.
-
Firm smash ensures the egg spreads to the edges for a sealed wrap.
-
Sauté dense veggies first to avoid watery wraps.
-
Meal prep caution: Best fresh, but can store for up to 2 days and reheat in toaster oven or air fryer for crunch.
Nutritional Snapshot (A General Guide)
Hey, I’m a chef, not a dietitian, but I believe in knowing what’s going into your body! Here’s a general breakdown for one basic wrap made with a standard 8-inch flour tortilla, one large egg, ¼ cup cheddar, and 1 tsp olive oil. Remember, this changes with your choice of extras and substitutions.
- Calories: ~320
- Protein: 18g (The egg and cheese are a powerful protein duo!)
- Carbohydrates: 20g
- Fat: 19g
- Fiber: 2g
Want to lighten it up? Use a low-carb, high-fiber tortilla, egg whites (though you’ll lose some binding power), and reduced-fat cheese. Want to boost it? Add avocado for healthy fats or a slice of turkey bacon for extra protein. It’s a wonderfully adaptable template for your nutritional needs.
The Final, Crispy Bite
And there you have it! The humble, glorious, crispy breakfast smash wrap. More than just a recipe, I hope it becomes a tool in your kitchen arsenal—a reliable, delicious, and endlessly customizable solution for those mornings when you need a win. It’s proof that great food doesn’t have to be complicated. It just needs to be made with a little bit of joy (and a good, firm smash).
I’d love to hear how your wrap turns out! Tag me on social @Feastical with your creations and your own crazy variations. Until next time, keep your skillet hot and your creativity hotter. Happy cooking, friends!
— Beau

Buffalo Chicken Breakfast Wrap with Scrambled Eggs & Ranch Drizzle
Spicy, Creamy & Incredibly Easy: My Buffalo Chicken Breakfast Wrap
Hey there, friend! Beau here, from Feastical. Let’s talk about that beautiful, sometimes chaotic, window of time we call breakfast. I don’t know about you, but I’m usually caught between two powerful urges: the need for something seriously delicious to fuel my day, and the desire to not turn my kitchen into a disaster zone before 9 AM. Sound familiar?
That’s exactly why this Buffalo Chicken Breakfast Wrap is my new morning hero—and I have a feeling it’s about to be yours, too. It’s for the days when you crave big, bold flavor but need “grab-and-go” simplicity. We’re talking tender, spicy buffalo chicken, the fluffiest scrambled eggs you’ve ever made, and a cool, creamy ranch drizzle, all hugged by a warm tortilla. It’s the best parts of game-day snacks and a hearty breakfast, having a party in your hand.
This isn’t just another wrap recipe. It’s a flavor experience. The fiery tang of the buffalo sauce gets mellowed out by the rich eggs and that herbaceous ranch, creating a symphony in every bite. It’s high in protein to keep you full, incredibly customizable, and comes together faster than you can brew your first cup of coffee. So, let’s ditch the boring breakfast routine and make a morning meal you’ll actually look forward to. Grab your favorite skillet, and let’s get wrapping!
The Story Behind The Spice: A Game-Day Morning Tradition
This recipe was born out of a happy accident on a lazy Sunday morning. My cousin Lex, a buffalo sauce fanatic (I’m talking puts-it-on-everything level), was staying over after a big family gathering. We were rummaging through the fridge, battling mild hangovers and major hunger, staring at leftovers: some roasted chicken, a nearly empty bottle of buffalo sauce, eggs, and tortillas.
Lex looked at me and said, “Beau, I have a wild idea. Don’t judge me.” Ten minutes later, we were sitting on the porch, silently devouring these messy, glorious, spicy chicken and egg bundles. It was a revelation! The spicy, vinegary punch of the chicken with the creamy eggs was a combo we couldn’t believe we’d never tried. That messy “fridge forage” wrap has now evolved into this polished recipe, but it still brings me right back to that sunny, lazy, laughter-filled morning. It’s proof that the best kitchen creations often start with a little improvisation and a lot of appetite.
Gathering Your Flavor Arsenal: Ingredients & Chef Insights
Here’s everything you’ll need to create this masterpiece. Don’t stress if you’re missing an item—I’ve got substitution tips for every single one. Cooking is about playing, not perfection!
- 1/2 cup cooked, shredded chicken: This is your superstar. I love using the leftovers from a simple roasted chicken or a store-bought rotisserie bird (the ultimate time-saver!). For a quicker option, canned chicken (drained well) works in a pinch. Want to go plant-based? Pulled jackfruit or seasoned chickpeas are fantastic swaps.
- 1 1/2 tablespoons buffalo sauce: The heart of the heat! I’m loyal to Frank’s RedHot for that classic flavor, but use your favorite. For a milder wrap, start with 1 tbsp. For extra fire, add a dash of cayenne or a spoonful of sriracha to the mix.
- 2 large eggs (or 3 egg whites): Our creamy, protein-packed base. The whole eggs give richness, while using just whites makes it super lean. My pro tip? Add a splash of water or milk when scrambling—it creates steam for incredibly fluffy eggs.
- 1 large tortilla: The cozy blanket. I use whole wheat or a high-protein spinach wrap for extra nutrients, but a classic flour tortilla is divine. For a low-carb version, a large lettuce leaf or a low-carb tortilla works beautifully.
- 1 tablespoon ranch dressing: The cool, creamy counterpoint. Bottled is easy, but if you have 5 minutes, mix some Greek yogurt with dried dill, garlic powder, onion powder, and a squeeze of lemon for a healthier, tangy “ranch” drizzle.
- The Fun Extras (Optional but Highly Recommended):
- A handful of fresh spinach or arugula: Adds a pop of color, freshness, and vitamins.
- Shredded cheese: Cheddar, Monterey Jack, or even blue cheese crumbles for the ultimate buffalo experience.
- Sliced green onions or chopped chives: A little oniony bite and gorgeous green flecks.
- Extra hot sauce: For the brave souls at the table!
Let’s Build The Perfect Wrap: Step-by-Step
Follow these steps, and you’ll have a restaurant-quality breakfast wrap in minutes. I’m sharing all my little chef hacks along the way!
- Wake Up Your Chicken: In a small saucepan or skillet over medium heat, toss your shredded chicken with the buffalo sauce. We’re not just heating it; we’re letting the sauce cling to and caramelize slightly on the chicken. This takes about 2-3 minutes. Once it’s warmly coated and smelling amazing, take it off the heat. Chef’s Hack: Add a tiny dab of butter to the pan with the buffalo sauce for an extra-rich, glossy coating.
- Master the Scramble: While the chicken heats, crack your eggs into a bowl, add a pinch of salt and pepper, and that splash of water or milk (about 1 tbsp). Whisk vigorously until uniform. Heat a non-stick skillet over medium-low heat with a spritz of oil or butter. Pour in the eggs and let them sit for 10 seconds before gently pushing them with a spatula from the edges toward the center. Continue until they’re just set but still soft—they’ll finish cooking in the wrap! Chef’s Hack: Low and slow is the secret to tender, not rubbery, eggs. Remove them from the heat just before they look fully done.
- The Warm Embrace: Lay your tortilla directly on a gas burner for 5-10 seconds per side (flip with tongs!) or warm it in a dry skillet for 30 seconds. This makes it pliable and prevents cracking. Chef’s Hack: Warming is non-negotiable for a pliable, non-rippy wrap.
- The Art of Assembly: Place your warm tortilla on a plate. Layer your fluffy scrambled eggs slightly off-center, closer to the bottom third. Top with the saucy buffalo chicken. Now, add your extras—a sprinkle of cheese, a handful of greens, those green onions. Finish with a generous drizzle of your ranch dressing or Greek yogurt sauce.
- The Perfect Fold & Crisp (Optional but Game-Changing): Here’s the wrap magic: fold the bottom edge up over the filling, then fold in the sides, and roll tightly away from you to form a neat package. For an extra treat, place the wrap seam-side down in a skillet over medium heat for 1-2 minutes per side. This toasts the tortilla to a golden crisp and melts any cheese inside. Chef’s Hack: The quick pan-toast transforms it from good to “I-can’t-believe-I-made-this” great.
Serving It Up: From Plate to Picnic
This wrap is incredibly versatile. For a cozy sit-down breakfast, slice it in half on a diagonal (showing off those beautiful layers!) and serve it with a side of fresh fruit or crispy potato wedges. If you’re running out the door, simply wrap it tightly in parchment paper or foil—it becomes the ultimate portable meal. The parchment paper “handle” means no messy fingers. It’s perfect for a desk breakfast, a post-workout refuel, or a hearty picnic lunch. I sometimes even make two, wrap them up, and stash one in the fridge for the next day—it’s that good cold, too.
Make It Your Own: Delicious Variations
The beauty of this wrap is its adaptability. Play with these ideas to create your signature version!
- The “Everything” Veggie Load: Sauté some diced bell peppers, onions, and mushrooms before adding your eggs to scramble. It’s a fantastic way to pack in more veggies.
- Blue Cheese & Celery Crunch: Swap the ranch for a blue cheese dressing or crumble, and add a handful of very finely chopped celery for that classic buffalo-wing crunch and flavor.
- Southwest Fiesta: Use a chipotle hot sauce instead of buffalo, swap ranch for avocado crema or plain Greek yogurt, and add black beans and corn to the mix.
- Lower-Carb Power Bowl: Ditch the tortilla altogether! Serve the buffalo chicken and scrambled eggs in a bowl over a bed of cauliflower rice or sautéed spinach. Drizzle with ranch and top with avocado.
- Meal Prep Marvel: Cook a big batch of buffalo chicken and scrambled eggs. Store them separately in the fridge. Each morning, assemble a fresh wrap in under 2 minutes. Breakfast for the week, solved.
Beau’s Kitchen Notes: A Few Parting Thoughts
Over the years, this wrap has seen many iterations. The first one, as I mentioned, was a glorious mess. I’ve learned that the key is balance: not too much sauce (soggy tortilla alert!), not too little (dry chicken sadness). I also firmly believe that toasting the assembled wrap is the step that elevates it from “quick bite” to “crave-worthy meal.” It locks in the fillings and adds texture. And don’t be afraid to let the eggs be a little soft—they continue to cook from the residual heat. Most importantly, have fun with it! This recipe is a template for your creativity.
Your Questions, Answered: FAQs & Troubleshooting
- Q: My wrap always falls apart when I try to eat it! Help!A: This usually comes down to two things: overfilling or a cold tortilla. Make sure you’re not packing in too much filling, and always warm your tortilla first. The fold-and-roll technique (bottom up, sides in, roll tight) is also crucial. If you’re still nervous, a quick toast in the pan will seal the seam.
- Q: Can I make this ahead of time for meal prep?A: Absolutely! Cook the chicken and eggs, and store them separately in airtight containers for up to 3 days. Assemble the wraps fresh each morning for the best texture. You can assemble one the night before, wrap it tightly in foil, and refrigerate it—just give it a quick pan-toast in the morning to revive it.
- Q: It’s too spicy for my kids/my milder palate. Any ideas?A: No problem! Toss the chicken in a milder sauce like BBQ or even a honey-mustard. You can also mix the buffalo sauce with a little melted butter or ranch to temper the heat. The recipe is completely flexible.
- Q: My scrambled eggs turned out watery. What happened?A: Watery eggs are often a sign of too-high heat or crowding in the pan. Cook your eggs over medium-low heat, and make sure your skillet isn’t too small. Also, be sure your cooked chicken isn’t leaking excess sauce into the wrap, as that can add moisture.

Buffalo Chicken Breakfast Wrap with Scrambled Eggs & Ranch Drizzle
Description
Busy morning? This Buffalo Chicken Breakfast Wrap delivers bold flavor with minimal effort. Spicy buffalo chicken, soft scrambled eggs, and cool ranch come together in a warm tortilla for a high-protein breakfast you can make in about 10 minutes. It’s filling, customizable, and perfect for grab-and-go days.
Ingredients
-
1/2 cup cooked, shredded chicken
-
1–1½ tbsp buffalo sauce (adjust to taste)
-
2 large eggs (or 3 egg whites)
-
1 large tortilla (flour, whole wheat, or high-protein)
-
1 tbsp ranch dressing (or Greek yogurt ranch)
-
1 tsp oil or butter (for cooking)
Optional Add-Ins
-
Shredded cheddar, Monterey Jack, or blue cheese
-
Fresh spinach or arugula
-
Sliced green onions or chives
-
Extra hot sauce
Instructions
-
Heat the Chicken
In a small skillet over medium heat, toss the shredded chicken with buffalo sauce. Warm for 2–3 minutes until coated and fragrant. Set aside. -
Scramble the Eggs
Whisk eggs with a pinch of salt and pepper (add 1 tbsp water or milk for fluffiness). Cook in a non-stick pan over medium-low heat with oil or butter, stirring gently until just set and soft. -
Warm the Tortilla
Heat the tortilla in a dry pan for 20–30 seconds per side until flexible. -
Assemble
Layer eggs down the center of the tortilla. Top with buffalo chicken, optional add-ins, and drizzle with ranch. -
Roll & Toast (Optional)
Fold sides in, roll tightly. Toast seam-side down in a pan for 1–2 minutes per side for a crispy finish.
Notes
-
Low and slow eggs = fluffy, not rubbery.
-
Warm tortillas roll without cracking.
-
Balance the sauce to avoid sogginess—don’t overdo it.
-
Meal prep smart: Store chicken and eggs separately; assemble fresh.
Nutritional Breakdown (A Rough Guide)
Disclaimer: I’m a chef, not a dietitian! These are estimates based on the core ingredients (using whole eggs, a whole wheat tortilla, and 1 tbsp regular ranch). Your numbers will vary with substitutions.
This wrap is a fantastic high-protein start to the day. One serving (as written) comes in at approximately 320-350 calories, with a mighty 28-30 grams of protein to keep you satisfied. You’re looking at about 14-18g of carbs (mostly from the tortilla and any veggies), 17-20g of fat (the healthy fats from eggs and a bit from dressing), and a couple grams of fiber. To lower the calories/fat, use egg whites, a light ranch or Greek yogurt sauce, and a low-carb tortilla. To boost it, add cheese and avocado! It’s all about what makes you feel great.
The Last Bite: Final Thoughts
And there you have it, friend—my go-to recipe for turning an ordinary morning into something genuinely exciting. This Buffalo Chicken Breakfast Wrap is more than just food; it’s a reminder that breakfast doesn’t have to be boring or complicated to be incredible. It’s about layering flavors you love into one convenient, delicious package.
I hope this recipe brings as much joy to your kitchen as it has to mine. Give it a try, tag me over on Feastical with your creations, and don’t forget to play with your food! Got a killer variation? I’d love to hear it. Now, go enjoy that wrap. You’ve earned it.
With a full heart and a happy plate,
Beau
Prep Time: 5 minutes | Cook Time: 10 minutes | Total Time: 15 minutes | Servings: 1
Southwest Breakfast Wrap with Eggs, Peppers & Chipotle Crema
Spicy, Satisfying, and Seriously Delicious: Your New Favorite Morning Fuel
Hey friends, Beau here! Grab your favorite mug of coffee and pull up a stool. Let’s talk about the most important meal of the day, and how we’re going to make it anything but boring. We’ve all been there: staring into the fridge, willing breakfast to magically appear, only to settle for the same old toast or a sad, lonely granola bar. I’m on a mission to end those morning blues with flavor that wakes you up in the best way possible.
Enter the hero of our story today: The Southwest Breakfast Wrap. This isn’t just food; it’s a handheld sunrise packed with fluffy eggs, sweet-tangy peppers, and a smoky, creamy chipotle sauce that sings. It’s the perfect marriage of hearty and fresh, spicy and soothing. Whether you’ve got a chaotic Monday ahead or a lazy Sunday to savor, this wrap is your ticket to a seriously good start.
The best part? It’s built for real life. We’re talking one pan, about 15 minutes, and ingredients that won’t have you running to three different specialty stores. You can eat it straight from the skillet, wrap it up for the road, or even prep a bunch for the week. This recipe is my love letter to busy foodies who believe that amazing flavor shouldn’t be sacrificed on the altar of a busy morning. So, let’s fire up the stove and make a morning worth smiling about.
The Morning That Sparked a Wrap Obsession
This recipe was born from pure, unadulterated hunger on a road trip through Arizona. My partner and I had pulled over at one of those blink-and-you’ll-miss-it roadside stands, lured in by the incredible smell of roasting chiles and fresh tortillas. I ordered something called a “Sunrise Burrito” from a woman who looked like she’d been crafting perfect breakfasts for 50 years.
That first bite was a revelation. The eggs were impossibly fluffy, the peppers had a sweet char, and this mysterious, smoky-creamy sauce tied it all together. I must have looked like a cartoon character, with my eyes wide open. It was more than fuel; it was an experience. I spent the rest of the drive (much to my partner’s amusement) trying to deconstruct every flavor. When I got home, it became my kitchen mission to recreate that magic, but in a way that fit into my own morning rhythm. This wrap is the happy result—a little taste of that roadside stand joy, right in your own kitchen.
Gathering Your Flavor Arsenal
Here’s everything you’ll need to build your masterpiece. Don’t stress about exact measurements; cooking is a feeling, not a science experiment!
- 3 large eggs: The hearty, protein-packed base. For a lighter version, you can swap in 4-5 egg whites, but I love the richness the yolks bring. Chef’s Insight: Let your eggs sit on the counter for 10 minutes before cracking—they’ll fluff up better!
- 1/4 cup each of bell peppers and onions, diced: I use a mix of red and green peppers for color and sweetness. The onions add that crucial savory depth. Substitution Tip: No fresh peppers? A handful of frozen fajita veggie mix works in a pinch!
- 1 tsp olive oil or butter: Olive oil for a lighter, fruitier note, butter for that classic, rich diner-style taste. Why not a combo? A little of both is my secret.
- 1 large tortilla: The vessel! I love a whole wheat or a low-carb wrap for extra fiber, but a classic flour tortilla is always a winner for its perfect pliability. Pro Move: Look for “burrito-sized” tortillas—they’re easier to roll.
- 2 tbsp salsa: Your favorite jarred chunky salsa is perfect here. It adds moisture and a bright, tomatoey kick.
- Optional Power-Ups: A handful of black beans (for fiber), a sprinkle of shredded cheddar or pepper jack cheese (for melty goodness), a few spinach leaves (for a green boost), or sliced avocado (for creamy healthy fats).
For The Legendary Chipotle Crema:
- 1/4 cup plain Greek yogurt: This gives us the creamy tang with a big protein boost. Sour cream is a classic substitute if that’s what you have.
- 1 tsp adobo sauce (from canned chipotle peppers): This is the flavor MVP! It’s smoky, spicy, and slightly sweet. Heads up: Start with 1 tsp and add more if you’re a heat seeker!
- A squeeze of fresh lime juice: Cuts through the richness and makes all the flavors pop. Please, please use fresh lime.
- A tiny pinch of salt: Just to bring the crema together.
Let’s Build Your Breakfast Masterpiece: Step-by-Step
Follow these steps, and you’ll be a wrap-rolling pro in no time. I’m chatting you through every little trick!
- The Crema First: In a small bowl, mix together the Greek yogurt, adobo sauce, lime juice, and salt until smooth and beautifully pink. Taste it! Adjust the lime or spice to your liking. Set this flavor bomb aside. Chef’s Hack: Doing this first lets the flavors marry while you cook everything else.
- Sizzle Those Veggies: Heat the oil or butter in a non-stick skillet over medium heat. Toss in your diced peppers and onions. We’re not just softening them; we’re looking for a little golden-edged char and sweetness. Let them sizzle undisturbed for a minute or two before stirring. This builds flavor! Cook for 4-5 minutes total.
- Egg Time: Push the veggies to one side of the pan. If the pan looks dry, add another tiny drizzle of oil. Crack your eggs right into the empty space, whisk them quickly with a fork right in the pan (less dishwashing!), and let them set for 15 seconds before scrambling them gently with the veggies. Cook until they’re just set—soft and fluffy, not dry and bouncy. Remove everything to a plate. Key Tip: Season your eggs with a pinch of salt and pepper right as they start to set.
- Tortilla TLC: In the now-empty (but still warm) pan, place your tortilla. Heat for about 30 seconds per side until it’s warm, pliable, and has a few light toast marks. This prevents cracking when you roll.
- The Grand Assembly: Lay your warm tortilla flat. Spread a generous tablespoon of your chipotle crema down the center, leaving a 2-inch border at the top and bottom. Pile on your fluffy egg and veggie scramble. Top with salsa and any optional add-ins (beans, cheese, avocado).
- The Roll-Up: Fold the sides of the tortilla in over the filling. Then, starting from the edge closest to you, roll it forward tightly, tucking the filling in as you go. You’ve got a burrito!
- Optional Crispy Finish (Highly Recommended): Place your wrap seam-side down back in the warm, dry pan. Cook over medium-low heat for 1-2 minutes per side until beautifully golden and crisp. This seals the deal and adds incredible texture.
How to Serve It Up Like a Pro
This wrap is a complete meal in your hand, but a little plating magic never hurts! For a cozy weekend brunch, slice the wrap in half on a sharp diagonal to show off all the beautiful layers inside. Serve it on a simple plate with extra chipotle crema and salsa for dipping. A side of fresh fruit (think mango or pineapple) is fantastic for balancing the smoky spice.
If you’re prepping for on-the-go, let the wrap cool completely before wrapping it tightly in parchment paper and then foil. The parchment prevents sogginess, and the foil keeps it warm(ish) and secure. Toss it in your bag—breakfast is served, anywhere!
Make It Your Own: Delicious Twists & Swaps
This recipe is a canvas! Here are a few of my favorite ways to riff on it:
- The “Fiesta” Version: Add 1/4 cup of drained, rinsed black beans and 2 tbsp of corn kernels to the veggie sauté. Top with chopped cilantro.
- Meat Lover’s Delight: Before the veggies, cook 2 strips of chopped bacon or 1/4 cup of crumbled breakfast sausage. Remove, then use the flavorful fat to cook your veggies and eggs.
- Green Goddess Swap: Swap the peppers and onions for a big handful of fresh spinach and diced zucchini. Use an avocado crema (blend avocado with the yogurt) instead of chipotle for a fresh, green vibe.
- Sweet Potato Power-Up: Add 1/4 cup of roasted, diced sweet potato to the filling for extra fiber and a touch of natural sweetness.
- Dairy-Free Dream: Use avocado oil and skip the cheese. For the crema, blend 1/4 cup of unsweetened coconut yogurt or silken tofu with the adobo and lime.
Beau’s Kitchen Notes & Stories
This recipe has seen it all in my kitchen! I’ve made it for groggy house guests, as a “breakfast-for-dinner” lifesaver, and even as a prepped-and-frozen stash for brutal work weeks. One hilarious fail? The first time I made the crema, I accidentally used the entire chipotle pepper, not just the sauce. Let’s just say we needed a fire extinguisher for our mouths and a gallon of milk! Start with the sauce, friends. You can always add more heat.
Over time, I’ve learned the absolute key is not overcooking the eggs. They continue to cook from residual heat, so taking them off the pan when they look slightly underdone guarantees pillowy perfection in the final wrap. Trust me on this one.
Your Questions, Answered!
Q: My wrap always falls apart when I roll it! Help!
A: Two likely culprits: 1) Your tortilla wasn’t warmed enough. A cold tortilla cracks. 2) You’re over-stuffing it. Be generous, but leave that border for folding. The fold-sides-then-roll-forward technique is key.
Q: Can I make these ahead of time?
A: Absolutely! Assemble the wraps (without crisping), wrap tightly in plastic wrap, and store in the fridge for up to 2 days. Reheat in a dry skillet or an air fryer to get the crisp back. You can also freeze them for up to a month—thaw in the fridge overnight before reheating.
Q: It got a bit soggy. What happened?
A: Sogginess usually comes from the salsa or crema soaking into the tortilla. The fix: spread the crema, then add a layer of cheese or spinach before the hot eggs. This creates a moisture barrier. Also, the post-assembly skillet toast seals the tortilla.
Q: I can’t find chipotle peppers in adobo. Any substitutes?
A> No problem! Mix 1/4 cup Greek yogurt with 1/2 tsp smoked paprika, 1/4 tsp cumin, a pinch of garlic powder, and a squeeze of lime. It won’t be identical, but it’ll be deliciously smoky.

Southwest Breakfast Wrap with Eggs, Peppers & Chipotle Crema
Description
Mornings don’t have to be boring. This Southwest Breakfast Wrap is quick, flavorful, and filling—perfect for busy school mornings or a relaxed weekend brunch. Fluffy eggs, sweet peppers, and a smoky chipotle-style sauce come together in one warm, handheld meal that keeps you energized without a lot of effort.
Ingredients
For the Wrap
-
3 large eggs
-
1/4 cup bell peppers, diced
-
1/4 cup onion, diced
-
1 tsp olive oil or butter
-
1 large flour or whole-wheat tortilla
-
2 tbsp salsa
Optional Add-Ins
-
Shredded cheddar or pepper jack cheese
-
Black beans (rinsed and drained)
-
Fresh spinach
-
Sliced avocado
For the Smoky Yogurt Sauce
-
1/4 cup plain Greek yogurt
-
1 tsp adobo sauce (or smoked paprika if unavailable)
-
1 tsp fresh lime juice
-
Pinch of salt
Instructions
-
Make the Sauce
Mix yogurt, adobo sauce, lime juice, and salt in a small bowl. Set aside. -
Cook the Veggies
Heat oil or butter in a non-stick skillet over medium heat. Sauté peppers and onions for 4–5 minutes until soft and lightly golden. -
Scramble the Eggs
Push veggies to one side. Crack eggs into the pan, lightly scramble, then mix with veggies. Cook just until fluffy and set. -
Warm the Tortilla
Heat the tortilla in the pan for about 30 seconds per side so it’s soft and flexible. -
Assemble
Spread the sauce down the center of the tortilla. Add the egg mixture, salsa, and any extras you like. -
Roll & Toast (Optional)
Fold in the sides and roll tightly. Toast seam-side down in the pan for 1–2 minutes per side for a crispy finish.
Notes
-
Don’t overcook the eggs – remove them while still soft; they finish cooking in the wrap.
-
Warm tortillas roll better and won’t crack.
-
Meal prep friendly: Wrap tightly and refrigerate up to 2 days. Reheat in a skillet or air fryer.
-
Too spicy? Use less adobo or swap in smoked paprika.
Nutritional Breakdown (For the Basic Version)
Here’s a snapshot of the good stuff you’re putting into your body. Remember, these numbers will change with your choice of add-ins like cheese, avocado, or beans!
Per Serving (1 wrap): Calories: ~290 | Protein: 20g | Carbohydrates: 18g | Dietary Fiber: 3g | Total Fat: 15g | Saturated Fat: 4g | Cholesterol: 370mg | Sodium: ~400mg (will vary with salsa & crema seasoning).
This wrap is an excellent source of high-quality protein to keep you full and focused all morning. The eggs provide choline for brain health, and the peppers are loaded with Vitamin C. Using Greek yogurt in the crema adds extra protein and probiotics. It’s a balanced, energizing start that tastes anything but “diet.”
The Last Bite
And there you have it, friends—your passport to a morning that’s anything but ordinary. This Southwest Breakfast Wrap is more than just a recipe; it’s a reminder that taking a few extra minutes for yourself in the morning can set the tone for an amazing day. It’s hearty, flavorful, and filled with the kind of cozy satisfaction that makes you feel like you can tackle anything.
I hope this recipe becomes a trusted friend in your kitchen rotation. Give it a try, play with the variations, and most importantly, make it your own. And when you do, I’d love to hear about it! Tag me on social or drop a comment over on Feastical.com. Now, go forth and wrap up something delicious.
Until next time, keep your spatula close and your hunger for adventure closer!
– Beau

Peanut Butter Banana Protein Wrap (No Eggs, No Cooking)
Good Mornings Start with a Good Wrap (and Zero Fuss)
Hey there, kitchen friend! Beau here, from Feastical. Let’s be real for a second. How many of those picture-perfect “morning routine” reels have you scrolled past today? You know the ones—where someone calmly whips up a three-egg omelet with artfully arranged avocado roses while the sunrise perfectly hits their marble countertop. Meanwhile, you’re trying to remember if you brushed your teeth while simultaneously searching for your keys and wondering if a handful of cereal counts as a balanced breakfast.
I feel you. Deeply. Some mornings, the most ambitious culinary feat we can manage is successfully operating the coffee maker. But here’s the beautiful truth: fueling your body with something delicious, satisfying, and genuinely good for you doesn’t require a chef’s hat or a spare hour. It just requires a little know-how and the right recipe in your back pocket.
That’s exactly why I’m so excited to share one of my all-time favorite, no-fail, life-saving creations: The Peanut Butter Banana Protein Wrap. This isn’t just a recipe; it’s your new secret weapon. It’s the answer to the hungry 3 PM slump, the “I-snoozed-my-alarm” breakfast scramble, and the “I-need-a-snack-that-actually-holds-me-over” dilemma. It requires zero cooking, zero eggs, and about five minutes of your precious time. What you get in return is a soft, sweet, creamy, protein-packed bundle of joy that tastes like a treat but fuels you like a champ. So, let’s ditch the stress and embrace the simple, delicious joy of a wrap that has your back. Grab your favorite tortilla, and let’s get wrapping!
The Origin Story: A Tale of Two Messy Kids & One Brilliant Mom
This wrap, in spirit, takes me straight back to my childhood kitchen. My brother and I were a whirlwind of energy, constantly racing out the door for school or soccer practice. My mom, the true genius of our home, was a master of the “grab-and-go gourmet.” Her classic move? The iconic peanut butter and banana sandwich on whole wheat. It was our edible superhero cape.
But here’s the funny part—we were notoriously messy eaters. Banana slices would tumble out, peanut butter would end up on our shirts (and sometimes in our hair), and by the time we got to practice, it was less a snack and more a crumbly, sticky situation. I remember thinking, “There’s got to be a less chaotic way to enjoy this magic combo!” The evolution to the wrap was my own “aha!” moment years later, sparked by that nostalgic flavor and a deep desire for a cleaner, even more satisfying package. It’s my mom’s love, wrapped up (literally) with a chef’s twist for the beautifully busy life I live now. Every time I make one, it feels like a little high-five to her and a win for present-day, always-on-the-run me.
Gathering Your Flavor Crew: Simple Ingredients, Big Impact
Part of the beauty here is the short, sweet ingredient list. Each one plays a starring role. Let’s meet the team:
- 1 Whole Wheat or High-Protein Tortilla: This is your edible canvas! I love a whole wheat wrap for its nutty flavor and extra fiber, but a spinach herb or a legit high-protein wrap (they make some with added pea or whey protein right in the tortilla) kicks the nutrition up another notch. Chef’s Insight: Let it come to room temperature for 30 seconds out of the fridge—it’s way less likely to tear when you roll.
- 2 Tablespoons Natural Peanut Butter: The creamy, dreamy heart of the operation. Go for the “natural” kind where the ingredients are just peanuts and maybe salt. The oil separation is normal—just give it a good stir! Substitution Tip: Any nut or seed butter works wonders. Almond butter, cashew butter, or sunflower seed butter (perfect for school-friendly, nut-free needs) are all fantastic allies.
- 1/2 Ripe Banana, Sliced: Nature’s perfect sweetener and texture wizard. The riper the banana, the sweeter and more fragrant your wrap will be. Chef’s Hack: Slice it on the diagonal! You get longer, flatter pieces that layer beautifully and are less likely to roll out when you take a bite.
- 2 Tablespoons Plain Greek Yogurt OR 1 Scoop Vanilla Protein Powder + Splash of Milk: This is your protein powerhouse and secret creaminess agent. Greek yogurt adds tangy richness and a probiotic boost. Protein powder (mixed with just enough milk to make a thick paste) is a pure, potent protein punch. My Pick: I use Greek yogurt 80% of the time for its real-food vibe, but I always have the protein powder option for those days I need maximum fuel after a workout.
- Optional Flavor Boosters: This is where you make it yours! A sprinkle of cinnamon feels like a warm hug. A dash of chia seeds adds crunch and omega-3s. A light drizzle of honey or pure maple syrup can satisfy a serious sweet tooth. A few dark chocolate chips? Absolutely chef-approved.
Let’s Build Your Flavor Burrito: A Step-by-Step Guide
Ready? This is the fun, almost therapeutic part. Follow these steps, and you’ll have a perfect wrap every single time.
- Prepare Your Station: Lay your tortilla flat on a cutting board or clean counter. Have all your ingredients—peanut butter jar open, banana sliced, yogurt ready—within arm’s reach. This is “mise en place” (everything in its place) for the home cook, and it makes the process smooth and speedy.
- Spread the Love (The Peanut Butter Layer): Using a butter knife or small spatula, spread the peanut butter evenly over the center of the tortilla. Leave about a 2-inch border at the top and bottom, and a 1-inch border on the sides. Pro-Tip: If your peanut butter is super thick, warming the jar in a bowl of warm water for a minute or giving it a really vigorous stir will make it much more spreadable and less likely to tear your tortilla.
- Add Your Protein Punch:
- If using Greek Yogurt: Dollop the yogurt right over the peanut butter and spread it gently into an even layer. The two will swirl together beautifully—don’t worry about perfect marbling!
- If using Protein Powder: In a small bowl, mix your scoop of protein powder with just a splash of milk—start with a teaspoon. Keep adding a few drops at a time until you have a thick, spreadable paste that’s not runny. Then, layer it on just like the yogurt.
- Banana Ballet: Artfully arrange your banana slices in a single, slightly overlapping line down the center of the spread. This is the sweet core of your wrap! Rolling Hack: Keeping the filling in a tight, vertical column in the middle is the golden rule for a roll that doesn’t burst.
- The Sprinkle Stage (Optional but Awesome): Now’s the time for your cinnamon, chia seeds, or a tiny drizzle of honey. If you’re adding chocolate chips, tuck a few in with the bananas.
- The Art of the Roll: This is the only “technical” part, and it’s easy. Fold the left and right sides (the 1-inch borders you left) inward over the ends of the banana column. Then, starting from the side closest to you, use your fingers to tightly roll the wrap away from you, tucking the filling in as you go. Imagine you’re rolling a sleeping bag as tight as possible. Chef’s Confidence Boost: If it’s messy the first time, no sweat! The flavor is all there. You’ll be a pro by your third wrap.
- Seal & Serve: For immediate eating, I love slicing it in half on a sharp diagonal—it just looks more appetizing! If you’re packing it to go, wrap it tightly in parchment paper or foil, twisting the ends like a giant candy wrapper. This keeps it secure and makes for zero-mess eating later.
How to Serve Your Masterpiece
This wrap is beautifully versatile. For a cozy breakfast at home, slice it in half, place it on a plate, and maybe add a few extra banana slices and a sprinkle of chia seeds on the side for presentation. Pair it with your favorite mug of coffee or tea.
For a kid-friendly (or just fun) twist, skip the big wrap and use small, street-taco-sized tortillas. Make mini wraps and slice them into “pinwheels” – they’re perfect for little hands and snack plates.
Taking it on the road? The parchment paper or foil wrap is non-negotiable. Tuck it into your lunchbox or bag. You can even prep a few ahead of time and store them in the fridge, wrapped and ready to grab. It’s the ultimate portable power pack.
Mix It Up! 5 Delicious Twists on the Classic
Once you’ve mastered the basic blueprint, the flavor world is your oyster! Here are some of my favorite riffs:
- The Tropical Vacation: Swap peanut butter for almond butter. Use the Greek yogurt option, and add a tablespoon of shredded coconut and a few diced strawberries or mango alongside the banana.
- The Chocolate Lover’s Dream: Use chocolate protein powder for your spread. Add the banana and a sprinkle of mini dark chocolate chips. It’s basically a healthy-ish candy bar.
- The “Everything but the Kitchen Sink” Powerhouse: Add a tablespoon of old-fashioned oats and a few chopped walnuts or pecans with the banana for incredible texture and staying power.
- The Berry Bliss: Mash a few raspberries or blueberries and swirl them into the Greek yogurt before spreading. Layer with banana or swap the banana for fresh berry slices altogether.
- The Vegan & Dairy-Free Star: Use sunflower seed butter, a plant-based protein powder mixed with almond milk, and a dairy-free yogurt alternative. Just as delicious and completely inclusive.
Beau’s Kitchen Notes & Stories
This recipe has been my faithful companion for years, and it’s evolved in funny ways. I once tried to add a whole, unsliced banana and just roll the tortilla around it like a log (don’t ask what I was thinking). The structural failure was immediate and spectacular. Lesson learned: slice your bananas, friends!
I’ve also learned that the ripeness of your banana totally changes the vibe. A just-yellow banana gives a cleaner, less sweet flavor. A banana with lots of brown spots? It’s like adding caramelized sugar—deeply sweet and amazing. Use what you have and love the result.
Finally, this wrap was the first “recipe” my now-teenage niece ever made for herself independently. She sent me a slightly blurry photo with the caption, “Look Uncle Beau, I did it!” That message is worth more than any 5-star review. It’s proof that good food is about confidence, joy, and connection.
Your Questions, Answered
Q: My wrap gets soggy if I make it ahead. How can I prevent that?
A: This is the most common issue! The culprit is usually the banana. The key is to create a moisture barrier. Spread the peanut butter thickly and make sure it completely covers the tortilla in the center—it acts as a sealant. You can also pack the sliced banana separately in a little bag and add it just before eating. For a morning prep, making it right before you walk out the door is usually safe.
Q: Can I use a different fruit?
A: Absolutely! Thinly sliced apple or pear are fantastic, crunchy alternatives. Berries work well too, though they can be a bit juicier. Just pat them very dry before adding.
Q: My protein powder paste is too clumpy/gritty. Help!
A: Great question. The type of protein powder matters. Whey or casein protein blends into a smoother paste than some plant-based ones (like brown rice protein). Make sure you’re adding liquid very slowly, drop by drop, and mashing/stirring vigorously with a fork or small whisk. Let it sit for 30 seconds after mixing to allow the powder to fully absorb the liquid, then stir again.
Q: Is this actually filling enough for a meal?
A> For most people, yes—especially with the protein boost from yogurt or powder. But listen to your body! If you need more, it’s easy to scale up. Use a larger burrito-sized tortilla, add an extra tablespoon of nut butter, a whole banana, and a scoop of chia seeds. It becomes a seriously substantial meal.
Peanut Butter Banana Protein Wrap (No Eggs, No Cooking)
Description
Peanut Butter Banana Protein Wrap
5 minutes • No cooking • Big energy
A soft, sweet, creamy wrap that tastes like a treat but fuels you like a champ. Perfect for busy mornings, post-workout fuel, or a grab-and-go snack.
Ingredients
-
1 whole wheat or high-protein tortilla
-
2 tbsp natural peanut butter
-
½ ripe banana, sliced
-
Protein boost (choose one):
-
2 tbsp plain Greek yogurt
-
or 1 scoop vanilla protein powder mixed with a splash of milk to make a thick paste
-
-
Optional add-ins: cinnamon, chia seeds, drizzle of honey/maple syrup, a few dark chocolate chips
Instructions
-
Lay out the tortilla on a flat surface.
-
Spread peanut butter evenly over the center, leaving a small border.
-
Add protein layer: spread Greek yogurt or protein paste over the peanut butter.
-
Arrange banana slices in a line down the center.
-
Sprinkle extras if using.
-
Roll it up: fold sides in, then roll tightly from the bottom up.
-
Slice or wrap and enjoy!
Notes
-
Let tortillas warm slightly so they don’t tear.
-
Slice bananas diagonally—they stay put better.
-
For make-ahead, keep banana slices dry and sealed under the peanut butter to prevent sogginess.
Nutritional Highlights (A Quick Look)
Let’s talk about what’s fueling you! This breakdown is for the core recipe using a whole wheat tortilla, natural peanut butter, 1/2 banana, and 2 tbsp of non-fat Greek yogurt.
You’re looking at a fantastic balance: Around 320-350 calories packed with 18-22 grams of protein to keep you full and support your muscles. The healthy fats from the peanut butter aid in nutrient absorption and sustained energy. The banana and whole wheat tortilla provide complex carbohydrates and fiber (about 5-7g) for digestive health and steady blood sugar. It’s a nutrient-dense choice that delivers satisfaction without weighing you down. Remember, these numbers can shift based on your specific brands and additions, but the core profile remains a home run.
The Last Bite
And there you have it, friend! The humble, glorious, no-cook Peanut Butter Banana Protein Wrap. More than just a recipe, I hope this becomes a reliable tool in your kitchen toolkit—a little parcel of deliciousness you can create for yourself on the good days and the crazy ones.
At Feastical, we believe good food shouldn’t be complicated or stressful. It should be about flavor, joy, and feeding yourself well, exactly as you are. This wrap embodies that spirit perfectly. So, the next time you’re staring into the abyss of a busy day, remember: you’re five minutes and a few simple ingredients away from a warm hug in food form. Now, go wrap up some goodness!
Made it? I’d love to see your creations! Tag me @Feastical on socials so I can cheer you on. Until next time, keep it simple and savor every bite.
– Beau

Oreo Swirl Sourdough Bread : A Sweet Twist on Artisan Baking
Oreo Swirl Sourdough Bread: The Wildly Delicious Crossroads of Bakery & Cookie Jar
Hey friend, Beau here. Pull up a stool, grab a coffee, and let me ask you something: Have you ever stared at your bubbling sourdough starter on the counter and thought, “My beautiful, tangy, ancient-grain-honoring friend… what if we got a little wild today?”
I’m talking about tossing the rulebook out the kitchen window. I’m talking about swerving away from the classic boule and into a lane that smells suspiciously like a midnight snack raid. Because today, we’re not just baking bread. We’re creating an experience. We’re making Oreo Swirl Sourdough Bread.
Imagine it: the satisfyingly crisp, crackly crust of a perfect artisan loaf. You tap it and hear that glorious hollow thump. But then you slice in, and a stunning black-and-white marbled swirl greets you like a secret handshake. The rich aroma of cocoa and toasted wheat mingles with the nostalgic scent of… are those Oreos? Oh yes, they are. And hidden within, like little creamy treasures, are soft pockets of melted cream cheese.
This isn’t a gimmick; it’s a revelation. It’s the soulful, tangy depth of sourdough meeting the playful, universally loved joy of an Oreo cookie, all wrapped up in a loaf you can proudly slice for breakfast (don’t judge me), dessert, or the most epic bread pudding of your life. It’s the showstopper that proves baking doesn’t always have to be serious. Sometimes, it just needs to be spectacularly delicious. So, if you’re ready to turn your kitchen into the place where a bakery and a cookie shop had a beautiful, flour-dusted love child, let’s dig in. Your starter is ready for its close-up.
The Happy Accident That Started It All
This recipe was born from a classic case of “kitchen chaos meets sweet inspiration.” A few months back, my nephew was helping me bake. His mission: classic sourdough. My mission: keep a seven-year-old from coating the entire kitchen in flour. We were shaping our loaves when he held up his Oreo-stuffed face and said, “Uncle Beau, what if bread was chocolate?”
Now, most chefs might have politely redirected. But something about the cocoa powder tin sitting right there, next to the leftover cream cheese from bagels, sparked an idea. What if we did make it chocolate? And what if we added… the cookies? The result was a lopsided, wildly swirled, slightly messy loaf that filled the house with the most incredible smell. When we sliced it, the reveal was pure magic. His eyes went wide. “We invented the best bread ever,” he whispered. And you know what? He wasn’t wrong. That moment of playful, unplanned creativity reminded me why I love cooking—it’s about joy, connection, and sometimes, just being silly with the people you love. This loaf is a tribute to that spirit.
Gathering Your Delicious Cast of Characters
Here’s everything you’ll need to bring this marbled masterpiece to life. I’ve added my notes so you know exactly why each ingredient is here and how you can swap things if needed.
- 500g Bread Flour: The backbone. Its higher protein content (around 12-13%) gives our loaf the strength and chewy, airy crumb we crave. Chef’s Insight: If you only have all-purpose, it’ll work, but your crumb might be a tad less open and chewy.
- 300g Water: This gives us a nice, workable dough. Chef’s Tip: Use lukewarm water (about 85°F/30°C) to give your starter a cozy welcome and help the fermentation along.
- 60g Active Sourdough Starter: The heart and soul! Make sure it’s ripe and bubbly, having doubled or tripled since its last feeding. This is where our tangy, complex flavor and beautiful rise come from.
- 63g Sugar: A touch of sweetness to balance the sourdough tang and complement the Oreos. It also gives the crust a lovely golden color. Sub Tip: You can use brown sugar for a deeper, molasses-like note.
- 10g Salt: Non-negotiable for flavor and gluten structure. It makes all the other ingredients sing.
- 2–3 tbsp Cocoa Powder: For that gorgeous chocolate half of our swirl. Use a good-quality, unsweetened cocoa powder. Chef’s Hack: Sift it! This prevents lumpy, dusty cocoa explosions when you knead it into the dough.
- Crushed Oreos: “As much as your soul desires” is the official measurement. I use about 12-15 standard Oreos. Pro Move: Pulse them in a food processor or smash them in a bag for a mix of fine crumbs and small chunks for varied texture.
- Cubes/Chunks of Cream Cheese: The hidden treasure! Use cold, full-fat cream cheese and cut it into ½-inch cubes. The coldness helps them stay distinct and create gooey pockets rather than melting completely into the dough.
Let’s Bake: Your Step-by-Step Roadmap to Swirled Glory
Follow these steps, and you’ll be a swirl master in no time. I’ve packed each one with the little tips I’ve learned from making this loaf more times than I can count.
- Mix & Autolyse: In a large bowl, combine the bread flour, water, active sourdough starter, and sugar. Use your hands or a spatula to mix until no dry flour remains. It will be shaggy and messy—perfect! Cover the bowl and let it rest for 30 minutes. This “autolyse” (fancy baker word for rest) allows the flour to fully hydrate, making the gluten develop more easily and giving us a smoother, happier dough.
- Add the Salt & Knead: Uncover the bowl and sprinkle the salt over the dough. Now, get your hands in there! Knead it right in the bowl or on a lightly floured surface for about 8-10 minutes. You’re looking for a smooth, supple, and slightly elastic dough. It should pass the “windowpane test”: gently stretch a small piece—if you can see light through it without it tearing immediately, you’re golden.
- Bulk Fermentation: Place your beautiful dough back in a clean, lightly oiled bowl. Cover it with a damp towel or plastic wrap. Let it sit at room temperature until it has roughly doubled in size. This can take 4-8 hours depending on your kitchen’s warmth and starter vigor. During this time, perform 3-4 sets of “stretch and folds” (about once an hour). Just wet your hand, grab one side of the dough, stretch it up, and fold it over the center. Rotate the bowl and repeat on all four sides. This builds incredible strength without needing to knead again.
- Create the Swirl: Once your dough is puffy and lively, it’s showtime! Gently turn it out onto a surface. Divide it into two equal halves. Take one half and knead the sifted cocoa powder into it until it’s uniformly chocolate brown. No streaks! Now, using a rolling pin, roll out both the plain and chocolate doughs into rectangles of roughly the same size (about 9×12 inches). Sprinkle the crushed Oreos and scatter the cold cream cheese cubes evenly over both rectangles.
- Roll & Shape: Carefully stack one rectangle on top of the other. I like putting the chocolate on bottom for a more dramatic crust contrast. Starting from a long edge, tightly roll the stacked doughs into a log, like a giant cinnamon roll. Pinch the seam to seal. You can now twist the log gently for an even more dramatic swirl, or simply place it seam-side down into your prepared banneton or loaf pan. Tuck the ends under for a tidy look.
- Final Proof: Cover your shaped loaf and let it proof again until it’s puffy and springs back slowly when gently poked. This usually takes 1-2 hours. Don’t rush it—this final rise is key to an open, airy crumb.
- Bake to Perfection: Preheat your oven (with a Dutch oven inside if you have one) to 450°F (232°C). If using a Dutch oven, carefully transfer your proofed loaf into the preheated pot, score the top with a sharp blade or lame to control expansion, cover, and bake for 20 minutes. Remove the lid and bake for another 20-25 minutes until the crust is deeply golden and the loaf sounds hollow when tapped. If baking on a sheet, create steam by placing a pan of water in the bottom of the oven.
- The Cruelest (But Wisest) Step – Cool: I know, I know. The smell is torture. But you must let the loaf cool completely on a wire rack before slicing—at least 2 hours. Slicing too soon releases steam and turns the interior gummy. Trust me, the wait makes the first slice an event.
How to Serve Your Masterpiece
This bread is a star all on its own, but a little styling goes a long way. For the ultimate experience, slice it thick on a wooden cutting board. The contrast of the dark crust against the stunning black-and-white swirl inside is art you can eat. Serve it plain to let the flavors shine, or take it over the top.
My favorite way? A thick slice, lightly toasted, with a slather of salted butter that melts into all the nooks and crannies. For dessert, it’s incredible with a scoop of vanilla bean ice cream or a drizzle of warm chocolate ganache. You can also cube it, toast it lightly, and use it as the base for the most decadent bread pudding or French toast bake of your life. Breakfast will never be the same.
Get Creative: Twists on the Swirl
Once you’ve mastered the classic, the playground is open! Here are a few ways to make this recipe your own.
- Cookies & Cream Extravaganza: Use Golden Oreos instead of classic for a vanilla-forward twist. Or, mix in a handful of white chocolate chips with the crushed cookies for extra sweetness.
- Mint Chocolate Chip: Add ½ teaspoon of peppermint extract to the chocolate dough and use mint Oreo thins. It’s like a cool, refreshing slice of your favorite ice cream.
- Peanut Butter Paradise: Swap the cream cheese for small, frozen dollops of natural peanut butter. Sprinkle some chopped peanut butter cups in with the Oreos for a PB-choc dream.
- Gluten-Free Friendly: Use a 1:1 gluten-free bread flour blend and gluten-free sandwich cookies (like Glutino’s version). Your starter will need to be fed with GF flour as well.
- Fruity Swirl: For a brighter note, omit the cocoa powder. Knead 2 tbsp of freeze-dried strawberry or raspberry powder into one half of the dough for a beautiful pink swirl, and pair with a fruit-flavored cream cheese.
Beau’s Bench Notes
This recipe has evolved from that first lopsided loaf into something I make for every potluck and family gathering—it’s always the first thing to disappear. A funny thing I’ve learned: the cream cheese. If you use room-temperature cream cheese, it will melt completely into the dough, which is still tasty, but you lose those magical pockets. Keeping it cold is the secret hack for that perfect, melty-but-distinct bite.
Also, don’t stress if your swirl isn’t “perfect.” Each loaf bakes up with its own unique, marbled personality. Some look like stormy skies, some like abstract art. They all taste incredible. Baking is about the joy of creation, not factory-line perfection. Have fun with it!
Your Questions, Answered
Q: My dough didn’t rise much during bulk fermentation. What happened?
A: This almost always points to a starter that wasn’t active enough. Make sure your starter is at its peak—bubbly, domed, and doubling about 4-8 hours after feeding. Also, check your kitchen temp; if it’s chilly, place the dough in the oven with the light on for a gentle warmth.
Q: The swirl merged and looks more gray than distinct black-and-white. Why?
A> This happens if the dough was over-kneaded after adding the cocoa, or if it was rolled too thin and the layers compressed. Handle the two doughs gently when stacking and rolling. A little blending is natural and still delicious!
Q: Can I make this with commercial yeast instead of sourdough starter?
A> Absolutely! For a “poolish” method, mix 150g of the flour and 150g of the water with 3g of instant yeast the night before. The next day, use that as your base, adding the remaining ingredients (reduce water slightly). The flavor will be less tangy but still amazing.
Q: My cream cheese leaked out everywhere during baking!
A> That means the chunks might have been too close to the surface or the dough wasn’t sealed tightly enough during shaping. Bury those creamy treasures well within the dough log and pinch your seams securely.
Oreo Swirl Sourdough Bread : A Sweet Twist on Artisan Baking
Description
A crisp, crackly sourdough loaf with a dramatic black-and-white Oreo swirl and pockets of creamy sweetness. Playful, impressive, and absolutely delicious.
Ingredients
Base Dough
-
500 g bread flour
-
300 g lukewarm water (about 85°F / 30°C)
-
60 g active sourdough starter (bubbly and at peak)
-
63 g sugar (white or brown)
-
10 g salt
Swirl & Fill
-
2–3 tbsp unsweetened cocoa powder, sifted
-
12–15 Oreos, crushed (mix of crumbs & chunks)
-
4 oz cream cheese, cold and cut into ½-inch cubes
Instructions
-
Mix & Rest (Autolyse)
In a large bowl, mix flour, water, starter, and sugar until no dry flour remains. Cover and rest 30 minutes. -
Add Salt & Knead
Sprinkle in salt and knead (by hand) 8–10 minutes until smooth and elastic. Dough should stretch thin without tearing. -
Bulk Fermentation
Place dough in a lightly oiled bowl, cover, and let rise until nearly doubled (4–8 hours).
Perform 3–4 stretch-and-folds, about once per hour. -
Divide & Color
Turn dough out and divide in half. Knead cocoa powder into one half until evenly chocolate-colored. -
Roll & Fill
Roll both doughs into similar rectangles (about 9×12 in).
Sprinkle crushed Oreos and scatter cold cream cheese cubes evenly over both. -
Stack & Shape
Stack rectangles, roll tightly into a log, pinch seam closed.
(Optional) Gently twist for extra swirl. Place seam-side down in a floured banneton or loaf pan. -
Final Proof
Cover and proof 1–2 hours, until puffy and slowly springy when poked. -
Bake
Preheat oven to 450°F (232°C) with a Dutch oven inside (if using).
Transfer loaf, score, cover, and bake 20 minutes.
Uncover and bake 20–25 minutes more, until deeply golden and hollow-sounding. -
Cool
Cool completely on a rack (at least 2 hours) before slicing.
Notes
-
Keep cream cheese cold so it forms gooey pockets instead of melting away.
-
Sift cocoa to avoid clumps.
-
Don’t overwork the dough after stacking—gentle handling keeps the swirl distinct.
A Quick Note on Nutrition
Look, we’re making a dessert bread stuffed with cookies and cream cheese. This is a treat, through and through. That said, using a sourdough base does offer some benefits—the fermentation can help pre-digest some of the gluten and make certain nutrients more bioavailable. This recipe yields one gorgeous loaf. Based on slicing it into 10 generous slices, you’re looking at approximately per slice: Calories: ~280 | Carbs: 40g | Fat: 8g | Protein: 6g. These are estimates, and your exact numbers will vary based on the specific brands you use and how generously you applied the “soul desires” measurement to the Oreos!
The Last Slice
And there you have it, friend. More than just a recipe, this Oreo Swirl Sourdough is an invitation to play, to experiment, and to find pure joy in the simple act of baking something unexpectedly wonderful. It bridges the gap between the patient craft of artisan bread and the instant gratification of a sweet treat.
So, feed your starter, crush those cookies, and get ready for that moment of awe when you slice into your first loaf. I can’t wait for you to experience it. Tag me over on Feastical with your creations—I live for those photos. Now, go preheat that oven. Your new favorite loaf is waiting.
With a full heart and a flour-dusted apron,
Beau

Creamy Beef Pasta : Easy 30-Minute Comfort Food
The Magical 30-Minute Dinner That Feels Like a Warm Hug
Hey friends, Beau here! Let’s be real for a second. Some nights, you just need dinner to be three things: fast, easy, and deeply comforting. You’re not looking for a culinary project; you’re looking for a delicious solution that will have everyone at the table nodding in happy, sauce-coated approval. That’s exactly why this Creamy Beef Pasta recipe has a permanent spot in my weekly rotation.
This isn’t just pasta with meat sauce. This is a luxuriously creamy, cheesey, savory wonder that coats every single noodle in a hug of flavor. It’s the kind of dish that makes you forget about the long day you just had. The best part? We’re talking about 30 minutes from fridge to fork. I built my site, Feastical, on recipes like this—real food that brings people together without the stress. So, grab your favorite big skillet, and let’s turn a regular weeknight into something special.
More Than Just Pasta: A Pot of Memories
This recipe always takes me back to my early days in my first apartment, with a kitchen barely bigger than a postage stamp. My friends and I were all broke, busy, and perpetually hungry. Our currency was “one-pot meals,” and whoever could make the most satisfying dish with the least fuss and cheapest ingredients was the hero of the night.
This creamy beef pasta was my champion. I’d throw it together using the basics—ground beef, an onion, some cream, and whatever pasta was on sale. The moment that creamy, cheesy sauce came together and I tossed the pasta in, the tiny kitchen would fill with this incredible, savory smell. My friends would materialize like magic, plates in hand. It wasn’t fancy, but it was made with heart, and it fed more than just our stomachs; it fed our camaraderie. That’s the spirit I want to bring to your kitchen tonight.
Your Flavor Line-Up: Simple Ingredients, Big Taste
Here’s everything you’ll need. I’ve included some of my favorite insights and swaps so you can make this recipe your own.
- 12 oz Pasta (Penne, Fusilli, or Shells): Shapes with nooks and crannies are your best friend here—they trap the creamy sauce perfectly. No-fuss elbow macaroni works great in a pinch, too!
- 1 lb Ground Beef (80/20 blend): A little fat means a lot of flavor. For a leaner option, use 90/10 or even ground turkey or Italian sausage for a different twist!
- 1 Small Onion, diced: The sweet, aromatic base of our sauce. No onion? A teaspoon of onion powder stirred in with the garlic will do in a crisis.
- 3 Cloves Garlic, minced: Fresh is best for that punch of flavor! If you only have jarred, use about 1 tablespoon.
- 1 tsp Italian Seasoning: Your flavor shortcut! It’s a perfect blend of oregano, basil, thyme, and rosemary. No blend? Use ½ tsp dried oregano and ½ tsp dried basil.
- Salt & Pepper to taste: Season as you go! Taste your food at every stage.
- 2 tbsp Tomato Paste: This is our secret weapon for depth and richness, not for a tomato-y sauce. It adds a beautiful savory backbone (umami!).
- 1 cup Beef Broth: Lifts all the tasty browned bits from the pan and adds savory depth. Low-sodium is my go-to so I can control the salt.
- 1 cup Heavy Cream: For that luscious, luxurious texture. For a lighter version, half-and-half will work, but the sauce will be a bit thinner.
- ½ cup Grated Parmesan Cheese: Use the good stuff from the refrigerated section, not the shelf-stable canister. It melts so much better and tastes infinitely richer.
- Fresh Parsley for garnish (optional): A little pop of color and fresh flavor makes it look (and taste) like it came from a restaurant.
Let’s Get Cooking: Your Foolproof Roadmap to Delicious
Follow these steps, and you really can’t go wrong. I’ve packed each one with my favorite kitchen hacks.
Step 1: Pasta Power. Get a large pot of well-salted water boiling and cook your pasta according to the package directions for al dente. Why al dente? It has a slight bite and won’t turn to mush when we toss it in the sauce later. Chef’s Hack: Before you drain it, scoop out about ½ cup of that starchy pasta water and set it aside. This liquid gold is the key to making your sauce silky and helping it cling to every noodle.
Step 2: Brown That Beef. While the pasta cooks, heat a large skillet or Dutch oven over medium-high heat. Add the ground beef and diced onion. Cook, breaking it up with your spoon, until the beef is no longer pink and the onion is soft. Chef’s Tip: Don’t be afraid to get a little fond (those delicious browned bits) on the bottom of the pan! If there’s a lot of excess fat, you can drain some off, but leave a tablespoon or two for flavor.
Step 3: Build the Flavor Base. Lower the heat to medium. Add the minced garlic, Italian seasoning, and a good pinch of salt and pepper. Stir and cook for just about 60 seconds until incredibly fragrant. You’re waking up those dried herbs and mellowing the garlic.
Step 4: The Secret’s in the Paste. Push the beef mixture to the side and add the tomato paste right onto the hot surface of the pan. Let it cook and “toast” for about 30 seconds before stirring it into the beef. This simple trick deepens its flavor dramatically!
Step 5: Deglaze and Simmer. Pour in the beef broth and use your spoon to scrape up all those glorious browned bits from the bottom of the pan. Let this simmer for 4-5 minutes. You’ll see it reduce slightly and the flavors start to marry.
Step 6: Create the Creamy Dream. Reduce the heat to low. Stir in the heavy cream and the grated Parmesan cheese. Keep stirring until the cheese is fully melted and the sauce is beautifully combined and heated through. It will thicken as it heats. Taste it now and adjust the seasoning—this is your moment!
Step 7: The Grand Union. Add the drained, cooked pasta directly into the skillet with the creamy beef sauce. Toss everything together until every piece of pasta is gleaming and coated. If the sauce seems a bit thick, add that reserved pasta water a splash at a time until it reaches your perfect consistency. The starch in the water acts as a magic binder.
Dishing It Up: How to Make it a Meal
This dish is a superstar all on its own, but a little presentation goes a long way! I love serving it family-style right in the skillet I cooked it in (less dishes!). Use tongs or a large serving spoon to heap portions into shallow bowls.
A final sprinkle of extra Parmesan and a flourish of chopped fresh parsley or even a little basil makes it look restaurant-worthy. For the perfect cozy meal, pair it with a simple side salad with a bright vinaigrette to cut through the richness, or some warm, crusty garlic bread for… well, for mopping up every last drop of that incredible sauce. No judgment here!
Make It Your Own: 5 Tasty Twists
Got leftovers or dietary needs? Want to switch it up? Here are my favorite ways to play with this recipe:
- “Everything But The Kitchen Sink” Veggie Load: Add a diced bell pepper and a handful of sliced mushrooms when you cook the onion. Spinach stirred in at the very end until wilted is another winner.
- Spicy Arrabbiata Twist: Love heat? Add ½ to 1 teaspoon of red pepper flakes with the garlic. You could also swap the tomato paste for ½ cup of your favorite marinara sauce for a more pronounced tomato flavor.
- Lighter Swap: Use ground turkey or chicken, and swap the heavy cream for half-and-half or even whole milk mixed with a tablespoon of flour (add it with the garlic to cook out the raw taste). The sauce will be lighter but still delicious.
- Cheese Lover’s Dream: Stir in a handful of shredded mozzarella or Italian blend cheese at the end for an epic, stretchy, cheesy pull.
- “Clean Out The Fridge” Pasta: This sauce is the perfect vehicle for leftover cooked veggies—broccoli, peas, or roasted cauliflower. Just stir them in when you add the pasta to warm through.
Beau’s Kitchen Confidential
This recipe has evolved more than my taste in kitchen aprons! The original version, born in that tiny apartment, was even simpler—often using a jar of Alfredo sauce because I didn’t know how easy it was to make my own creamy base. The moment I realized I could create that luxurious texture from scratch with just cream, Parmesan, and a little pasta water was a game-changer. It went from a “cheat meal” to a legit “chef’s meal” I was proud to serve.
One funny fail? I once got overzealous with the Parmesan and added a huge cupful straight from the bag into the hot sauce. It clumped up into a cheesy, rubbery ball instead of melting smoothly. Lesson learned: grate it fresh and add it gradually off the heat! Now you know, so you can skip that little kitchen drama.
Your Questions, Answered
Q: My sauce seems too thin/runny. What did I do wrong?
A: No worries! First, let it simmer for a few more minutes on low heat—the cream will reduce and thicken. If it’s still too thin, make a quick slurry by mixing 1 teaspoon of cornstarch with 1 tablespoon of cold water. Stir it into the simmering sauce and let it cook for a minute. Also, remember that saucy pasta thickens as it sits in the bowl!
Q: Can I make this ahead of time or freeze it?
A: You can absolutely make it ahead! Store it in the fridge for up to 3 days. Reheat it gently on the stove with a splash of broth or milk to loosen the sauce. I don’t recommend freezing the fully assembled dish, as the creamy sauce can separate when thawed. However, you can freeze the cooked beef mixture (before adding cream/cheese) for up to 3 months.
Q: What’s the best pasta shape to use?
A> My top picks are shapes that “hold” sauce: rigatoni, penne, fusilli (corkscrews), or shells. Avoid long, smooth pasta like spaghetti or linguine for this particular recipe—the chunky beef and creamy sauce cling better to shorter, textured shapes.
Q: Can I use milk instead of heavy cream?
A> You can, but the sauce will be much less rich and more prone to curdling if heated too aggressively. If using milk, I recommend making a roux first (melt 2 tbsp butter, whisk in 2 tbsp flour, cook 1 min, then slowly whisk in the milk) to create a stable base before adding the beef mixture and cheese.

Creamy Beef Pasta : Easy 30-Minute Comfort Food
Description
Fast, cozy, and crowd-pleasing. This creamy beef pasta is rich, cheesy, and deeply comforting—perfect for busy weeknights when you want big flavor with minimal effort. From fridge to fork in about 30 minutes.
Ingredients
-
12 oz pasta (penne, rigatoni, fusilli, or shells)
-
1 lb ground beef (80/20 preferred)
-
1 small onion, diced
-
3 cloves garlic, minced
-
1 tsp Italian seasoning
-
Salt & black pepper, to taste
-
2 tbsp tomato paste
-
1 cup beef broth (low sodium)
-
1 cup heavy cream
-
½ cup grated Parmesan cheese
-
Fresh parsley, chopped (optional, for garnish)
Instructions
-
Cook Pasta
Bring a large pot of salted water to a boil. Cook pasta until al dente.
Reserve ½ cup pasta water, then drain. -
Brown Beef
In a large skillet over medium-high heat, cook ground beef and onion, breaking up the meat, until beef is browned and onion is soft. Drain excess fat if needed. -
Season
Reduce heat to medium. Add garlic, Italian seasoning, salt, and pepper. Cook 1 minute, until fragrant. -
Toast Tomato Paste
Push beef to one side. Add tomato paste to the pan and cook 30 seconds, then stir into the beef. -
Deglaze & Simmer
Pour in beef broth, scraping up browned bits. Simmer 4–5 minutes until slightly reduced. -
Make It Creamy
Lower heat. Stir in heavy cream and Parmesan until smooth and gently thickened. -
Combine
Add pasta to the skillet and toss to coat. Add reserved pasta water a little at a time if needed to loosen the sauce. -
Serve
Garnish with parsley and extra Parmesan. Serve hot.
Notes
-
Salt pasta water well—it flavors the whole dish.
-
Grate Parmesan fresh for the smoothest sauce.
-
Sauce thickens as it sits; add pasta water to refresh.
Nutritional Information*
*Please note: This is an estimate provided by an online nutrition calculator. For precise dietary needs, consult a professional.
Per Serving (based on 4 servings):
Calories: ~540 | Total Fat: 32g | Saturated Fat: 17g | Cholesterol: 115mg | Sodium: 580mg | Total Carbohydrates: 38g | Dietary Fiber: 2g | Sugars: 4g | Protein: 27g
This is a hearty, satisfying meal. To boost fiber, you can use whole wheat or legume-based pasta. Using lean ground beef (90/10) and half-and-half can reduce the fat and calorie count if you’re looking for a lighter version.
One Last Bite of Wisdom
Friends, that’s all there is to it! This Creamy Beef Pasta proves that incredible, comforting food doesn’t have to be complicated or take all night. It’s about simple techniques, quality ingredients, and cooking with a dash of joy. I hope this recipe becomes a trusted friend in your kitchen, just like it is in mine.
Did you try it? Did you add your own spin with extra veggies or a different cheese? I’d love to hear about it! Share your creations and stories with me over on Feastical.com. Until next time, keep your spatula close and your appetite closer. Happy cooking!
— Beau
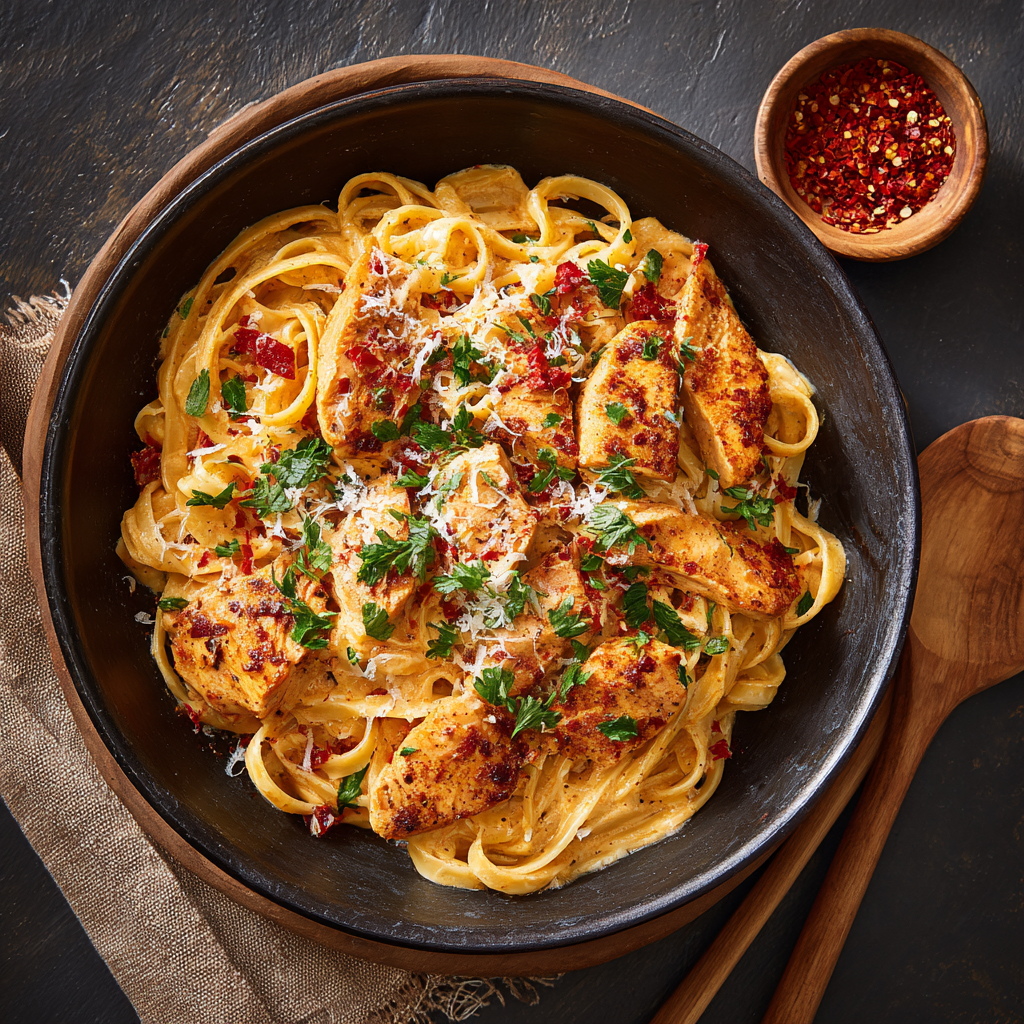
Easy Cowboy Butter Chicken Linguine : Creamy 30-Minute Dinner Win
When Weeknights Get Wild, Bring in the Cowboy Butter
Hey friends, Beau here from Feastical. Let’s be real for a second. Some days, by the time 5 PM rolls around, my kitchen feels less like a creative sanctuary and more like a chaotic pit stop between “all the things.” The family is hungry, the clock is ticking, and the siren call of takeout menus gets louder by the minute. Sound familiar?
I get it. That’s exactly why I created recipes like this Easy Cowboy Butter Chicken Linguine. This isn’t just another pasta dish. This is your secret weapon, your 30-minute ticket to a dinner that tastes like you fussed over it for hours. We’re talking tender linguine and juicy chicken, all swirled in a sauce that’s the culinary equivalent of a confident wink—rich, creamy butter, a smoky whisper of paprika, a cheeky kick of red pepper, and the bright zing of lemon. It’s bold, comforting, and utterly irresistible.
This “cowboy butter” sauce? Think of it as compound butter’s more adventurous, ready-for-anything cousin. Traditionally used for slathering on steaks, I’ve unleashed it into a creamy pasta situation, and let me tell you, the results are nothing short of magical. So, if you’re staring into the fridge wondering what’s for dinner, take a deep breath. Grab your favorite skillet. We’re about to wrangle some serious flavor, and I’m right here with you, every step of the way.
The Night We “Needed” Cowboy Butter
This recipe’s spirit animal is my Uncle Roy. Roy wasn’t a real cowboy, but he wore flannel like one and grilled with the fierce determination of a pioneer settling the Wild West. Every family camping trip, without fail, he’d pull out his trusty tub of “special butter”—a magical mix he’d melt over everything from trout to corn on the cob. To us kids, it was legendary.
One rainy Tuesday years later, feeling blah and nostalgic, I tried to recreate that taste from memory. I didn’t have a grill or a campfire, just a humble skillet in my city apartment. I tossed the butter with garlic and spices, let it sizzle, and threw in some chicken and pasta. The moment that first creamy, smoky, slightly spicy forkful hit my tongue, it wasn’t just dinner. It was the crackle of a phantom campfire, the sound of laughter echoing off a lake, and the pure, uncomplicated joy of a meal made with heart. That’s the feeling I’m sharing with you today.
Gathering Your Posse: Ingredients & Insights
Here’s your flavor posse. Remember, great food is about intuition, so don’t stress!
- 12 oz Linguine: The perfect ribbon-like shape to hold onto all that creamy sauce. Chef’s Insight: Salting your pasta water like the sea is non-negotiable—it’s the only chance to season the pasta itself!
- 1 lb Chicken Breast, sliced: Slicing it into even strips ensures quick, uniform cooking. Substitution Tip: Chicken thighs are fantastic here for even more juicy, forgiving flavor. Pre-cooked rotisserie chicken? Shred it and stir in at the end to heat through.
- Salt & Pepper to taste: Your foundational tools. Season that chicken generously!
- 1 tbsp Olive Oil: For searing. A neutral oil like avocado works too.
- ½ cup (1 stick) Butter: The “cowboy” foundation. Unsalted is best so you control the salt level. For a deeper flavor, use half regular, half European-style cultured butter.
- 3 Cloves Garlic, minced: Fresh is key! That pre-minced stuff just doesn’t sing the same song.
- 1 tbsp Dijon Mustard: The secret weapon! It adds tang, depth, and helps emulsify the sauce. No Dijon? A teaspoon of regular yellow mustard in a pinch, but the flavor profile will shift.
- 1 tsp Smoked Paprika: This is what gives the “cowboy” butter its campfire soul. Don’t skip it! Sweet paprika can sub, but you’ll miss that smoky magic.
- ½ tsp Red Pepper Flakes: The friendly kick. Start here—you can always add more! For sensitive palates, use ¼ tsp.
- 1 tbsp Fresh Lemon Juice: The bright spark that cuts through the richness. Bottled juice works, but fresh truly elevates it.
- 1 tsp Chopped Parsley, plus more for garnish: Fresh herbs make it pop. Dried parsley can work (use ½ tsp), but it’s mostly for color.
- ½ cup Heavy Cream: For lush, creamy luxury. For a lighter sauce, half-and-half will work, but the sauce will be slightly thinner.
- ½ cup Grated Parmesan Cheese: Use the good stuff you grate yourself! The pre-grated kind often has anti-caking agents that can make your sauce grainy.
Let’s Ride: Your Step-by-Step Guide to Pasta Glory
Okay, team. Pots ready, pans hot? Let’s do this. We’re multitasking like a pro.
1. Cook the Pasta: Get a large pot of well-salted water boiling. Cook your linguine until it’s just al dente—it should still have a slight bite. Chef’s Hack: Set a timer for 1-2 minutes less than the package says. The pasta will finish cooking in the sauce! Before you drain it, SCOOP OUT ABOUT ½ CUP OF THAT STARCHY PASTA WATER. This liquid gold will help our sauce cling to every noodle. Drain the pasta and set it aside.
2. Sear the Chicken: While the pasta boils, pat your chicken strips very dry with a paper towel (this is the key to a good sear!). Season them aggressively with salt and pepper. Heat the olive oil in a large skillet or Dutch oven over medium-high heat. Add the chicken in a single layer—don’t crowd the pan! Let it cook undisturbed for 3-4 minutes per side until beautifully golden and cooked through. Transfer the chicken to a plate. See those tasty browned bits left in the pan? That’s flavor foundation. We’re using that.
3. Wrangle the Cowboy Butter: Reduce the heat to medium. Add the stick of butter to the same pan. Let it melt and get a little foamy. Now, add the minced garlic, Dijon, smoked paprika, red pepper flakes, lemon juice, and parsley. Stir and let it sizzle together for 2-3 minutes. Your kitchen will smell unreal. You’re toasting the spices and mellowing the garlic, building a flavor base.
4. Create the Creamy Sauce: Pour in the heavy cream and add the grated Parmesan. Whisk or stir constantly until the cheese melts and the sauce becomes smooth and cohesive. It will thicken quickly. This is where you assess: if it looks too thick (like it might clump on the pasta), splash in a few tablespoons of that reserved pasta water to loosen it up. You can always add more.
5. The Grand Roundup: Add the drained linguine and the cooked chicken (and any juices from the plate) directly into the glorious sauce. Using tongs, toss and fold everything together for a good 1-2 minutes, until every single strand of pasta is gleaming and coated, and the chicken is reheated. The pasta will drink up some of that sauce—add another splash of pasta water if you want it saucier.
How to Serve It Up (The Feastical Way)
Presentation is part of the joy! I like to use a big, shallow serving bowl or plate individual portions in wide pasta bowls. Use your tongs to give each serving a nice twist and lift, creating height on the plate. Drizzle any extra sauce from the pan right over the top.
The final flourish is everything: a final sprinkle of chopped fresh parsley, an extra crack of black pepper, and maybe a little more grated Parmesan if you’re feeling fancy. This dish is rich and bold, so I love serving it with something simple and fresh on the side. A crisp green salad with a sharp vinaigrette, some garlic bread for soaking up every last drop, or simply some roasted broccoli are perfect partners. Pour a glass of a crisp Pinot Grigio or a chilled lager. Dinner is served, and it’s a total win.
Switch Up the Trail: Recipe Variations
Got dietary needs or just want to play? Here are some delicious detours:
- Shrimp & Scallop Coastal Twist: Swap the chicken for a pound of large shrimp and scallops. Sear them quickly in the pan after seasoning, then set aside. Proceed with the sauce and toss them in at the very end to just heat through.
- Mushroom & Spinach “Herbivore” Delight: Skip the chicken. Sauté 8 oz of sliced cremini mushrooms until golden after searing (add a touch more oil). When making the sauce, stir in a couple of large handfuls of fresh spinach right before adding the pasta, letting it wilt.
- Sun-Dried Tomato & Artichoke Heart Fiesta: Add ½ cup of chopped sun-dried tomatoes (oil-packed, drained) and a cup of quartered artichoke hearts (from a jar, drained) to the sauce when you add the cream. It adds amazing tang and texture.
- Gluten-Free Roundup: Use your favorite gluten-free linguine. Just be extra gentle when tossing, as GF pasta can be more fragile. Reserve that pasta water—it’s even more crucial here!
- Lighter Wrangler: Use half the butter and substitute the heavy cream with full-fat coconut milk for a dairy-free (but still creamy) version. The flavor will be different but deliciously rich.
Beau’s Kitchen Notes & Stories
This recipe is a living, breathing thing in my house. Sometimes I add a teaspoon of Worcestershire sauce to the butter for an extra umami punch (Uncle Roy would approve). My partner loves it with a double dose of red pepper flakes—truly a “spur-jangling” version! The first time I made it, I forgot to reserve the pasta water and my sauce was a little too tight. Lesson learned: that starchy water is your best friend. Don’t be like past Beau. Set a measuring cup by the colander as a visual reminder! This dish also reheats beautifully. A splash of cream or water when warming it up brings it right back to life.
FAQs: Your Questions, Answered
Q: My sauce turned out too thin/watery. What happened?
A: This usually means the heat was too low when adding the cream, or there was too much liquid in the pan from the chicken. Fix: Let it simmer on medium heat for a few extra minutes to reduce and thicken. You can also create a quick slurry with a teaspoon of cornstarch and a tablespoon of cold water, whisk it in, and let it bubble for a minute.
Q: Can I make this ahead of time?
A: You can prep components! Slice the chicken and make the cowboy butter mixture (melted butter with spices) ahead. Store separately. Cook fresh pasta when ready. The assembled dish is best eaten right away, but leftovers are still tasty.
Q: It’s too spicy for my kids! How can I tone it down?
A> No problem! Omit the red pepper flakes entirely from the main sauce. You can add a pinch to the adults’ portions at the end, or serve the flakes on the side for everyone to customize their bowl.
Q: Can I use a different pasta shape?
A> Absolutely! Fettuccine, tagliatelle, or even a short, sturdy shape like rigatoni or cavatappi work great. Just adjust the cooking time per the package.

Easy Cowboy Butter Chicken Linguine : Creamy 30-Minute Dinner Win
Description
When weeknights feel hectic and everyone’s hungry now, this Cowboy Butter Chicken Linguine comes to the rescue. It’s rich, buttery, a little smoky, and just spicy enough to keep things exciting—yet still comforting and familiar. Tender chicken, silky linguine, and a creamy cowboy butter sauce come together fast, making this a perfect “looks fancy, cooks easy” dinner.
Ingredients
-
12 oz linguine
-
1 lb chicken breast, sliced into strips
-
Salt & black pepper, to taste
-
1 tablespoon olive oil
-
½ cup (1 stick) unsalted butter
-
3 cloves garlic, minced
-
1 tablespoon Dijon mustard
-
1 teaspoon smoked paprika
-
½ teaspoon red pepper flakes (optional)
-
1 tablespoon fresh lemon juice
-
½ cup heavy cream
-
½ cup grated Parmesan cheese
-
1 teaspoon chopped parsley, plus more for garnish
Instructions
-
Cook the Pasta
Bring a large pot of well-salted water to a boil. Cook linguine until al dente. Reserve ½ cup pasta water, then drain. -
Cook the Chicken
Season chicken with salt and pepper. Heat olive oil in a large skillet over medium-high heat. Cook chicken for 3–4 minutes per side, until golden and cooked through. Remove and set aside. -
Make the Cowboy Butter Sauce
Reduce heat to medium. Add butter to the same skillet. Once melted, stir in garlic, Dijon mustard, smoked paprika, red pepper flakes, lemon juice, and parsley. Cook 2–3 minutes, stirring, until fragrant. -
Add Cream & Cheese
Stir in heavy cream and Parmesan cheese. Cook gently until smooth and slightly thickened. Add a splash of reserved pasta water if needed. -
Combine Everything
Add linguine and chicken back to the skillet. Toss until well coated and heated through. -
Serve
Garnish with extra parsley, black pepper, and Parmesan. Serve immediately.
Notes
-
Salt your pasta water well—it’s key for flavor.
-
Don’t overcook garlic or it may turn bitter.
-
Reserve pasta water to adjust sauce consistency easily.
-
Use freshly grated Parmesan for smoother melting.
Nutritional Info (A Friendly Breakdown)
Important Note: I’m a cook, not a certified nutritionist. The info below is an estimate generated from common ingredients and can vary based on specific brands and portion sizes. This is for general informational purposes.
This is a hearty, comforting dish. Here’s the approximate breakdown per serving (assuming the recipe serves 4):
- Calories: ~640
- Protein: 35g (Great for keeping you full!)
- Fat: 38g (This is where the rich, satisfying flavor comes from.)
- Carbohydrates: 45g (Primarily from the delicious, energy-giving pasta.)
- Sodium: Will vary based on salt and cheese used.
To lighten it up, see the “Lighter Wrangler” variation above, use less butter/cream, or simply serve with a larger portion of a side salad to balance the plate.
Final Thoughts from My Kitchen to Yours
Friends, this Easy Cowboy Butter Chicken Linguine is more than just a recipe. It’s a reminder that a spectacular dinner doesn’t require hours or a hundred ingredients. It requires a little confidence, a few good staples, and the willingness to create something with love. It’s about turning an ordinary Tuesday into a small celebration.
I hope this dish becomes a reliable, beloved player in your weeknight rotation, just like it is in mine. When you make it, I’d love to hear how it goes! Tag me on social @feastical or drop a comment on the blog. Did you add extra garlic? Try it with shrimp? Let me know your twist!
Now, go forth and conquer that kitchen. You’ve got this. And remember… always save your pasta water.
With a full heart and a full plate,