Shrimp & Brown Rice Bowls : Simple, Healthy, and Freezer-Friendly
Hey There, Bowl Buddy! Let’s Make Dinner the Easy Part of Your Day.
Let’s be real for a second. How many times have you stood in front of the fridge at 6 PM, staring into the abyss, wondering how on earth you’re going to conjure up something that’s both delicious and doesn’t make you feel like you need a nap after eating it? I’ve been there more times than I can count, my friend. That exact feeling—the “hangry-meets-exhausted” vortex—is what inspired me to create this recipe. This isn’t just another shrimp bowl. Nope. This is your new kitchen superhero: Shrimp & Brown Rice Bowls.
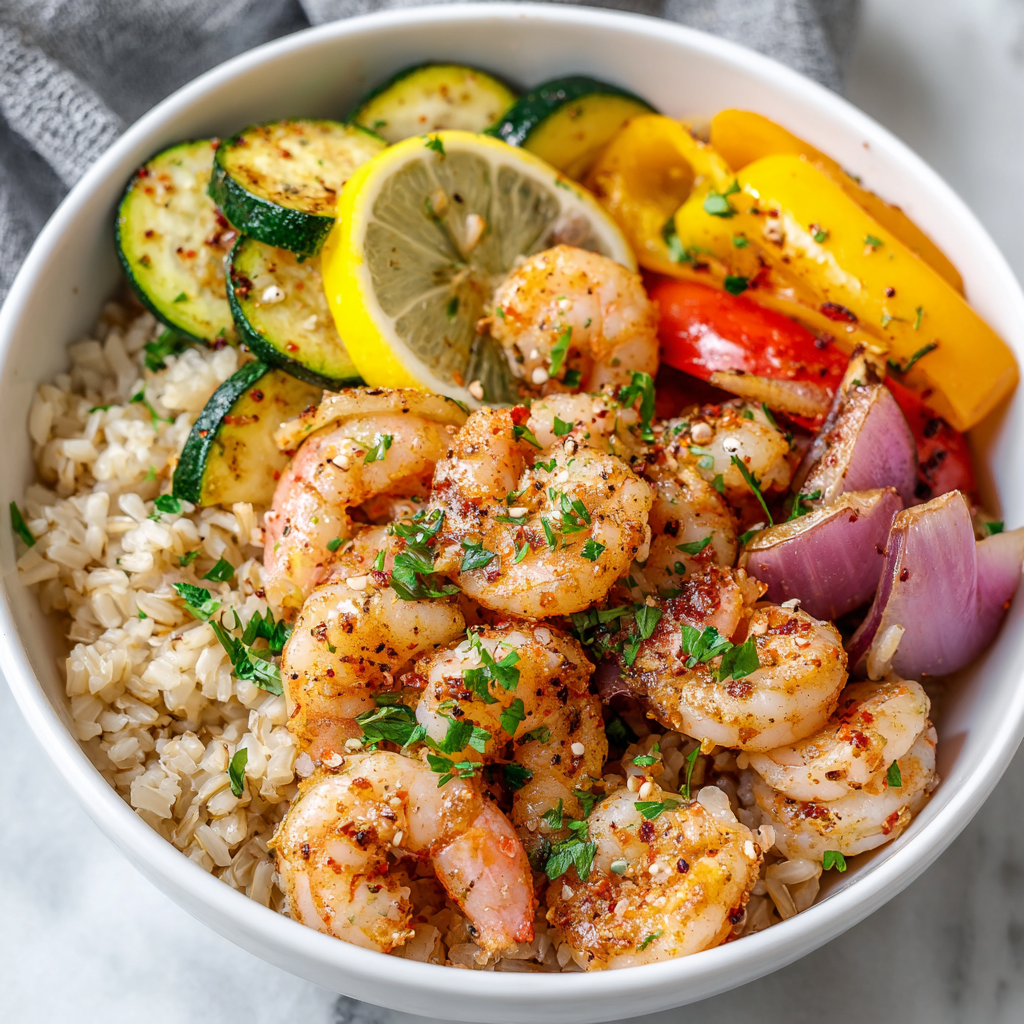
Imagine this: tender, garlicky shrimp with a hint of smoky paprika, piled on top of fluffy, nutty brown rice, alongside a vibrant confetti of sautéed veggies that still have a little crunch. Every bite is a perfect mix of protein, fiber, and flavor. But here’s the real magic trick—this dish is a master of disguise. It’s a stunning, fresh dinner ready in 30 minutes flat and a meal-prep champion you can stash in the freezer for those days when even turning on the stove feels like a big ask. It’s feel-good food that actually fits real life. So, tie on your apron (or don’t, I’m not the boss of you), and let’s make your future self a very, very happy camper.
The Beach Trip That Taught Me About Simple Feasts
This recipe takes me straight back to summer vacations at my grandparents’ cottage. The rule was simple: if you caught it, you helped cook it. My brother and I would spend hours with those dinky little nets in the tidal pools, “catching” maybe five tiny shrimp total, while Grandpa would come back from the fish market with the actual haul. The kitchen would be a chaos of laughter, lemon juice, and the incredible sizzle of shrimp hitting a hot, buttered pan. We’d eat piled-high plates on the porch, listening to the waves, not a phone in sight.
Those meals were never fancy. They were straight-up, honest food shared with people we loved. That’s the spirit I want to bring to your kitchen with these bowls. You don’t need a beach view (though it’s nice!). You just need a single skillet, a few bright ingredients, and the promise of a satisfying meal that leaves you with more time to enjoy your own version of a porch moment—whether that’s catching up on your favorite show or catching up with your people.
Gathering Your Flavor Crew: What You’ll Need
Here’s where the fun starts! These ingredients are easy to find and even easier to love. I’ve added my little chef notes to help you shop and swap like a pro.
- 1 cup uncooked brown rice – The hearty, nutty foundation. Chef’s Insight: Brown rice has more fiber and nutrients than white, giving these bowls staying power. Short-grain brown rice is extra chewy and delightful here.
- 450g (1 lb) raw shrimp, peeled and deveined – Our protein star! Pro Tip: Size doesn’t matter hugely, but medium (41/50 count) are perfect for bites. For speed, grab the “easy peel” kind. Frozen is absolutely fine—just thaw in cold water before using.
- 1 tbsp olive oil – Our cooking workhorse. Avocado oil works great too for its high smoke point.
- 2 garlic cloves, minced – Flavor bomb alert! Shortcut: A teaspoon of good-quality jarred minced garlic is a totally acceptable time-saver.
- 1 tsp paprika – Smoky sweetness. For a kick, try smoked paprika or even a dash of chipotle powder.
- ½ tsp chili flakes (optional) – The “wake-up call” for your taste buds. Omit if you’re sensitive to heat, or add extra if you’re a spice warrior!
- Salt and pepper, to taste – The essential dynamic duo. Season in layers as you cook.
- 1 bell pepper, sliced – Color and crunch! I love a red or yellow pepper for sweetness, but green works perfectly.
- 1 zucchini, chopped – Adds a lovely, mild freshness. Yellow summer squash is a seamless swap.
- ½ red onion, sliced – A pop of color and sharp, sweet flavor when cooked. Yellow onion is a fine substitute.
- Juice of ½ lemon – The bright, fresh finish that makes all the flavors sing. Bottled lemon juice works in a pinch, but fresh is best here.
- Fresh parsley or cilantro, for garnish – The green confetti that makes it pretty! Cilantro adds a vibrant, citrusy note, while parsley is more herbal. Use what you love.
Let’s Get Cooking: Your Simple, Sizzling Steps
Ready to see how quickly this comes together? Follow these steps, and you’ll have restaurant-quality bowls on your table before you know it.
- Cook Your Rice. Get your brown rice going first according to the package directions. I like to add a pinch of salt to the water. Chef’s Hack: If you have a rice cooker, this is its moment to shine! Set it and forget it. While the rice simmers, you can prep everything else. This is called “mise en place” (fancy for “get your stuff together”), and it makes the cooking process feel like a breeze.
- Marinate the Shrimp. In a medium bowl, toss your raw shrimp with the minced garlic, paprika, chili flakes, a good pinch of salt and pepper, and that glorious lemon juice. Give it a good mix and let it sit while you chop the veggies. This little 10-minute bath infuses the shrimp with so much flavor.
- Sizzle the Shrimp. Heat the olive oil in a large skillet or pan over medium-high heat. Once the oil is shimmering (a drop of water should sizzle), add the shrimp in a single layer. Don’t crowd the pan! Cook for about 2-3 minutes per side, until they’re pink, opaque, and slightly curled. Do not overcook! They go from perfect to rubbery in seconds. Remove them to a clean plate and let them rest.
- Sauté the Veggies. In that same beautiful, flavorful pan (no need to wash it!), toss in your bell pepper, zucchini, and red onion. Add another tiny pinch of salt. The salt helps draw out their natural sweetness. Sauté for 5-6 minutes, stirring occasionally, until they’re tender-crisp—they should still have a bit of bite. My Tip: I sometimes add a splash of water or broth to the pan and cover it for a minute to help them steam and soften without burning.
- Assemble with Joy. Fluff your cooked brown rice with a fork. Now, the artful part: divide the rice among four bowls. Top with a generous heap of the colorful sautéed veggies, then arrange that gorgeous shrimp right on top. The visual is half the fun!
- The Finishing Touches. Garnish everything with a generous sprinkle of fresh parsley or cilantro. I always, always give it one more tiny squeeze of lemon right at the end. It’s like turning the volume up on the whole dish.
How to Serve These Bowls Like a Pro (Or a Very Smart Home Cook)
Presentation is part of the pleasure! You can keep it super casual and just dig in straight from the skillet family-style (my preferred method on busy nights). But if you want to make it feel special, here are my go-to moves:
Plating for “Oohs” and “Ahhs”: Use a wide, shallow bowl. Start with a fluffy bed of rice, then artfully arrange the veggies and shrimp on top, letting some of each ingredient peek through. Drizzle a tiny bit of extra virgin olive oil around the edges or a dot of your favorite hot sauce. The fresh herbs are non-negotiable for that pop of color.
Sidekick Suggestions: These bowls are a complete meal, but a simple side salad with a tangy vinaigrette or a wedge of warm, crusty bread for soaking up any lemony, garlicky juices left in the bowl is never a bad idea. For a drink pairing, a crisp glass of Sauvignon Blanc or a chilled sparkling water with lime is perfection.
Make It Your Own: 5 Tasty Twists
Got a different protein in the fridge? Craving different flavors? This recipe is your playground.
- Chicken & Broccoli Swap: Use bite-sized chicken breast or thighs instead of shrimp, and swap the zucchini for broccoli florets. Cook the chicken through first, then remove and proceed with the veggies.
- Mediterranean Vibe: After assembling, add a handful of crumbled feta cheese, some sliced Kalamata olives, and a dollop of tzatziki sauce. Swap the paprika for dried oregano.
- Tropical Teriyaki: Use a store-bought or homemade teriyaki sauce to marinate the shrimp. Add pineapple chunks to the veggie sauté. Garnish with green onion and sesame seeds.
- Spicy Cajun Kick: Replace the paprika and chili flakes with 1.5 tablespoons of your favorite Cajun seasoning. Add sliced andouille sausage to the pan with the veggies for an extra flavor punch.
- Grain-Free & Green: For a lower-carb option, ditch the rice and serve the shrimp and veggies over a big bed of fresh spinach, massaged kale, or cauliflower rice. The heat from the ingredients will gently wilt the greens.
Beau’s Kitchen Corner: Notes from My Counter to Yours
This recipe has been a work-in-progress in my kitchen for years. It started as a desperate “clean out the fridge” throw-together after a long day of recipe testing (we eat a lot of random combos around here!). The first version was… fine. But over time, I learned that the lemon juice in the marinade, not just at the end, was a game-changer. I also learned the hard way that overcooked shrimp is a tragedy—so I set a timer!
One of my favorite evolutions is the freezer trick. I was skeptical at first, but it works shockingly well. Now, I always double the batch. One for now, one for a future “thank you, past Beau” moment. It’s the little things, like having a healthy, homemade meal ready in minutes, that make busy weeks feel so much more manageable.
Your Questions, Answered: FAQ & Fix-It Corner
Q: Can I use frozen shrimp, and how do I thaw them properly?
A: Absolutely! Frozen shrimp are often fresher than “fresh” at the counter. The best way to thaw is to place them in a colander under cold running water for 5-10 minutes. Never thaw them in warm water or at room temperature—it messes with the texture.
Q: My shrimp turned out watery/rubbery. What happened?
A: Two common culprits! 1) Watery: Make sure your shrimp are thoroughly patted dry with a paper towel before marinating. 2) Rubbery: You likely overcooked them. Shrimp cook incredibly fast. As soon as they turn pink and opaque (forming a loose “C” shape), they’re done. Remove them from the heat immediately.
Q: How long do the assembled bowls last in the fridge and freezer?
A: In the fridge, they’re great for 3-4 days in airtight containers. For the freezer, let all components cool completely, then pack them together. They’ll keep for up to 2 months. Reheat from frozen in the microwave (stirring halfway) or thaw overnight in the fridge and reheat in a skillet.
Q: What’s a good substitute for brown rice?
A: Quinoa, farro, or even couscous would be fantastic! Just adjust the cooking method for your chosen grain. For a low-carb option, cauliflower rice is a winner—just sauté it briefly.

Shrimp & Brown Rice Bowls : Simple, Healthy, and Freezer-Friendly
Description
Dinner doesn’t have to be complicated to be delicious. These Shrimp & Brown Rice Bowls are fresh, filling, and ready in about 30 minutes. Juicy, garlicky shrimp with a touch of smoky paprika sit on nutty brown rice and crisp-tender veggies for a balanced meal that works just as well for meal prep as it does for a quick family dinner.
Ingredients
-
1 cup uncooked brown rice
-
1 lb (450 g) raw shrimp, peeled and deveined
-
1 tbsp olive oil
-
2 garlic cloves, minced
-
1 tsp paprika (smoked if you like)
-
½ tsp chili flakes (optional)
-
Salt and black pepper, to taste
-
1 bell pepper, sliced
-
1 zucchini, chopped
-
½ red onion, sliced
-
Juice of ½ lemon
-
Fresh parsley or cilantro, for garnish
Instructions
-
Cook the rice: Prepare brown rice according to package directions; season lightly with salt.
-
Season the shrimp: Toss shrimp with garlic, paprika, chili flakes, salt, pepper, and lemon juice.
-
Cook the shrimp: Heat olive oil in a large skillet over medium-high heat. Cook shrimp 2–3 minutes per side until pink and opaque. Remove and set aside.
-
Sauté the veggies: In the same skillet, add bell pepper, zucchini, and red onion. Cook 5–6 minutes until tender-crisp.
-
Assemble: Divide rice into bowls, top with veggies and shrimp, and garnish with fresh herbs.
Notes
-
Dry shrimp well before cooking to avoid steaming.
-
Don’t overcook shrimp—remove them as soon as they turn pink and opaque.
-
Meal-prep friendly: Store in airtight containers up to 4 days in the fridge or freeze up to 2 months.
-
Swap the grain: Quinoa or cauliflower rice work great.
Feeling Good About What You’re Eating
I’m not a dietitian, but I am a chef who cares about food that fuels you. Here’s a general breakdown of what’s in one of these delicious bowls (calculated per serving, assuming 4 servings and standard ingredients). This is a balanced meal with a great mix of lean protein, complex carbs, and healthy fats to keep you satisfied.
- Calories: ~330
- Protein: 26g (Great for muscle repair and keeping you full!)
- Carbohydrates: 30g (Mostly from the fiber-rich brown rice and veggies)
- Fat: 12g (Mostly the heart-healthy monounsaturated fat from olive oil)
- Fiber: 4g (Helps with digestion and that “full” feeling)
- Sugar: 3g (Natural sugars from the vegetables)
- Sodium: ~400mg (Can be adjusted by controlling added salt)
Your New Weeknight Win is Ready!
And there you have it, friend! From my kitchen counter to yours, a recipe that’s designed to make you feel like a winner, not weary, at dinnertime. These Shrimp & Brown Rice Bowls are proof that healthy, flavorful food doesn’t have to be complicated or time-consuming. It’s about smart choices, a few key flavors, and giving yourself the gift of a plan—whether you’re eating it tonight or pulling a ready-made meal from the freezer on a crazy Thursday.
Final Thoughts: Your Bowl of Wins Awaits
So, there you have it—your blueprint for turning the dreaded “what’s for dinner?” into a resounding “this is for dinner!”
These Shrimp & Brown Rice Bowls are more than just a recipe. They’re a strategy. A strategy for eating well when you’re short on time, for feeling nourished without feeling weighed down, and for reclaiming those precious evening hours. They’re proof that a single, smart recipe can be both a 30-minute fresher-upper and a freezer-stashed lifesaver.
I hope this dish brings a little bit of that breezy, porch-sitting simplicity from my grandparents’ cottage right into your kitchen. Because the best meals aren’t about perfection. They’re about the sizzle in the pan, the bright squeeze of lemon, and the satisfaction of sharing something you made—even if it’s just with yourself.
You’ve got the plan, the tips, and the twists. Now, you’ve got this. Go make your future self a very happy camper, one delicious, garlicky bite at a time.
Garlic Shrimp Skillet : Simple, Zesty, and Ready in Minutes
Your New Weeknight Hero: A Garlic Shrimp Skillet That’s Ready Before You Know It
Hey friends, Beau here! Let’s get real for a second. How many times have you stared into the fridge after a long day, willing something delicious to magically assemble itself? I’ve been there more times than I’d like to admit. That’s why I’m obsessed with recipes that are faster than delivery and taste a million times better. This Garlic Shrimp Skillet is exactly that kind of magic.
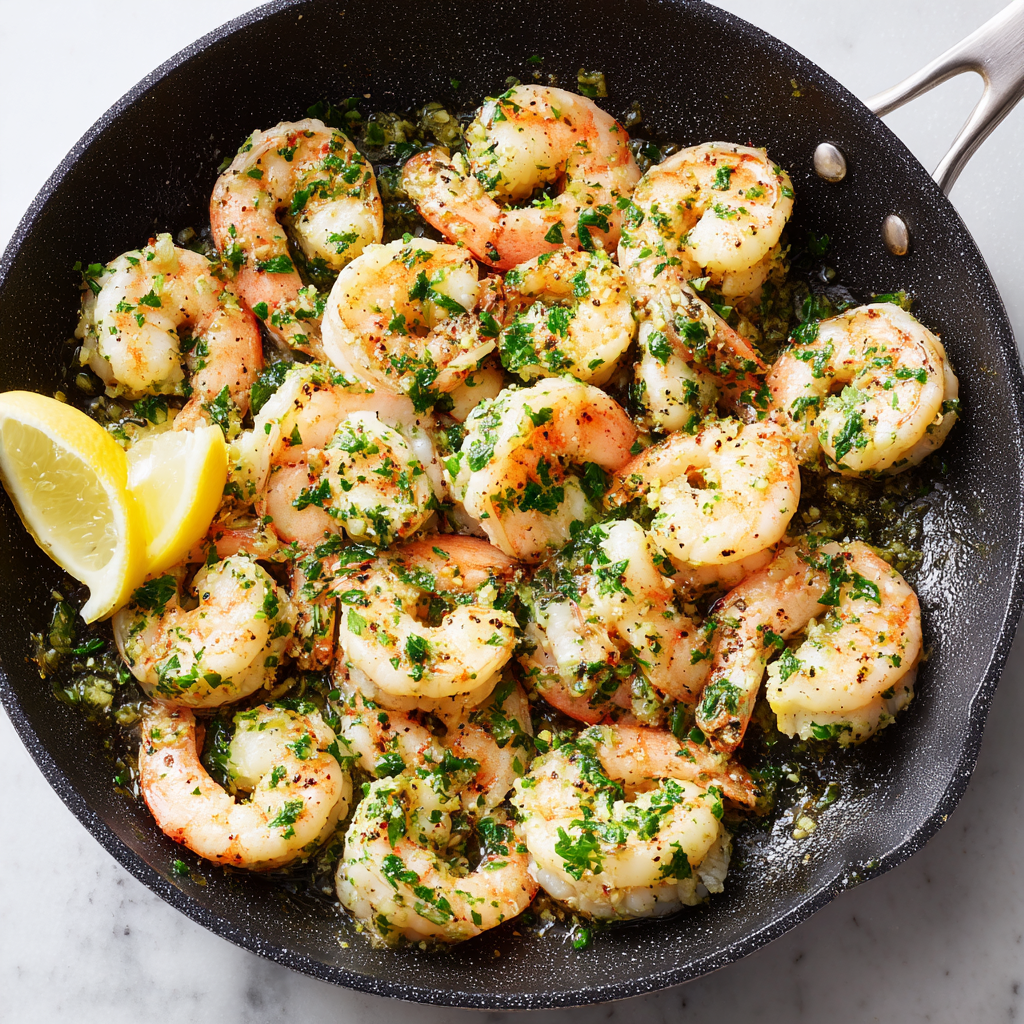
We’re talking about juicy, succulent shrimp swimming in a bath of golden, fragrant garlic, brightened up with a squeeze of lemon and a pop of fresh parsley. The entire dish comes together in under 10 minutes and uses ingredients you probably already have hanging out in your kitchen. This isn’t just cooking; it’s your ticket to a vibrant, feel-good meal that refuses to be a chore.
This recipe is a masterclass in simplicity. It proves that with just a few high-quality ingredients and a hot skillet, you can create something that tastes elegant, healthy, and deeply satisfying. Whether you pile it over a bed of pasta, spoon it onto creamy polenta, or just eat it straight from the pan with a crusty piece of bread (no judgment here!), it’s a guaranteed win. So, grab your favorite skillet and let’s turn up the heat on a boring weeknight.
The Beach, a Bottle of Wine, and a Skillet of Shrimp
This recipe always takes me back to a tiny rented beach house with friends a few summers ago. We’d spent all day in the sun and sand, and everyone was happily exhausted and ravenous. The plan was to grill, but of course, we’d forgotten to buy charcoal. Kitchen chaos ensued.
I rummaged through the cooler and found a bag of frozen shrimp we’d wisely thawing. In the bare-bones kitchen, I found garlic, a lonely lemon, and a sad-looking bunch of parsley in the fridge door. With one large skillet and about ten minutes, I threw it all together. The sizzle of garlic hitting the oil filled the whole cottage, acting like a dinner bell. We gathered around, plates in hand, and devoured the entire skillet right there, standing up, laughing about our grilling fail. It was a reminder that the best meals aren’t about elaborate plans or perfect settings; they’re about good food, made with what you have, shared with people you love. That’s the spirit I want to bring to your kitchen with this dish.
Gathering Your Flavor Arsenal
Here’s everything you need to make this zesty skillet happen. I’ve added my little chef insights for each one because knowing your ingredients is the first step to cooking with confidence!
- 1 lb large shrimp, peeled and deveined: I recommend 21/25 or 26/30 count for the perfect bite-size. The “deveined” part just means that little dark digestive tract is removed—it’s easy to do yourself with a paring knife, but buying them already prepped is the ultimate weeknight hack. For the best texture, pat them very dry with paper towels before cooking.
- 2 tablespoons olive oil: This is our cooking medium and flavor base. Use a good-quality extra virgin olive oil for its fruity notes. In a pinch, avocado oil works great too because of its high smoke point.
- 4 cloves garlic, minced: Garlic is the star! Fresh is non-negotiable here—the pre-minced stuff in jars just doesn’t deliver the same punch. Pro tip: smash the cloves with the flat side of your knife first; the skins will slip right off and mincing becomes a breeze.
- Juice of 1 lemon (plus wedges for serving): Fresh lemon juice is key for that bright, sunny acidity. Roll the lemon on the counter firmly before cutting to get the most juice out of it. The wedges on the side let everyone add an extra zing to their plate.
- 2 tablespoons fresh parsley, chopped: This adds a fresh, clean finish. Flat-leaf (Italian) parsley has a more robust flavor than curly, but use what you can find! If you’re in a real bind, 2 teaspoons of dried parsley will do, but fresh really makes it sing.
- Salt and black pepper to taste: Season as you go! I like to season the shrimp lightly just before they hit the pan. Kosher salt and freshly cracked black pepper are my go-tos for the best flavor.
Let’s Get Cooking: Your Foolproof Steps to Shrimp Perfection
Ready? This goes fast, so have all your ingredients prepped and within arm’s reach (chefs call this mise en place—it’s a game-changer!). Follow these steps, and you’ll have a restaurant-quality dish in minutes.
- Prep is Key. Before you even think about turning on the stove, make sure your shrimp are dry, your garlic is minced, your parsley is chopped, and your lemon is juiced. This recipe moves quickly, and you won’t have time to chop garlic while the shrimp is cooking. Trust me on this!
- Heat the Pan. Place your largest skillet (stainless steel or cast iron works wonderfully) over medium heat. Add the olive oil and let it warm up for about a minute. You want it shimmering but not smoking.
- Wake Up the Garlic. Add the minced garlic to the warm oil. Here’s the most important tip: sauté for only 30 seconds to 1 minute, just until it becomes incredibly fragrant. Do not let it brown! Browned garlic turns bitter, and we want sweet, aromatic flavor. Stir it constantly.
- Cook the Shrimp. Immediately add your dried shrimp to the skillet in a single layer. Don’t overcrowd the pan—if you need to, cook in two batches. Overcrowding steams the shrimp instead of giving them a nice sear. Let them cook undisturbed for 2-3 minutes on the first side, until the bottoms turn pink and opaque about halfway up the sides.
- Flip and Finish. Flip each shrimp and cook for another 1-2 minutes on the other side. They’re done when they’ve formed a loose “C” shape and are opaque throughout. The second side cooks faster! Now, immediately squeeze that fresh lemon juice all over everything. It will sizzle and create an amazing instant pan sauce. Toss in the chopped parsley and give everything a good stir to combine.
- Season and Serve. Remove the skillet from the heat. Taste a shrimp (chef’s privilege!) and season with salt and freshly cracked black pepper as needed. Remember, you can always add more, but you can’t take it out. Serve it straight from the skillet while it’s piping hot!
How to Serve Your Flavor Masterpiece
This garlic shrimp skillet is the ultimate team player. Here are a few of my favorite ways to plate it up:
The Classic Bed: Spoon the shrimp and all that glorious garlic-lemon sauce over a bed of fluffy white rice, creamy polenta, or angel hair pasta. The grains or pasta soak up every last drop of flavor.
Light & Bright: For a healthy, low-carb meal, serve it on top of a big salad of mixed greens, or alongside roasted asparagus, zucchini noodles, or steamed broccoli.
Appetizer Vibes: Pile the shrimp into a bowl with a stack of warm, crusty baguette slices or crostini on the side for dipping. It’s an incredible, impressive starter for a dinner party.
No matter how you serve it, don’t forget those lemon wedges on the side for an extra squeeze of brightness!
Make It Your Own: 5 Tasty Twists
Once you’ve mastered the basic formula, have fun playing with it! Here are some of my favorite variations:
- The Spicy Kick: Add ½ teaspoon of red pepper flakes to the garlic when you sauté it. That gentle heat is incredible.
- Rich & Creamy: After adding the lemon juice, stir in 2-3 tablespoons of cold butter or a splash of heavy cream. Swirl it in off the heat for a luxuriously silky sauce.
- White Wine Elegance: After the garlic is fragrant, pour in ¼ cup of dry white wine (like Sauvignon Blanc). Let it simmer and reduce by half before adding the shrimp. It adds a wonderful depth of flavor.
- Herb Garden Delight: Swap the parsley for other soft herbs. Try a combination of chopped fresh basil, chives, or dill. Each one creates a totally different personality for the dish.
- Protein Swap: Not a shrimp fan? This method works beautifully with thinly sliced chicken breast or scallops. Just adjust the cooking time accordingly (chicken will take a few minutes longer).
Beau’s Kitchen Confidential
This recipe is a living, breathing thing in my house. I’ve made it for last-minute dates (it’s impressively easy), fussy kids (they gobble it up), and tired parents (it’s a lifeline). The biggest evolution? I’ve learned to stop moving the shrimp. Letting them get a proper sear on that first side is the secret to perfect texture. And once, I accidentally used lime instead of lemon because it was all I had—it was a happy accident that led to a fantastic Mexican-inspired version with a pinch of cumin! Don’t be afraid to play.
Your Questions, Answered
Q: Can I use frozen shrimp?
A: Absolutely! It’s what I often do. Just make sure to thaw them completely overnight in the fridge or in a colander under cold running water. The most critical step is to pat them bone-dry with paper towels. Wet shrimp will steam instead of sear.
Q: My shrimp came out rubbery. What happened?
A: This almost always means they were overcooked. Shrimp cook in just a few minutes. Watch for the color change (pink/opaque) and the shape (a loose “C”). The moment they’re done, get them out of the pan and onto a plate. They continue to cook a bit from residual heat.
Q: Can I make this ahead of time?
A: It’s truly best served immediately. However, you can do all the prep ahead—peel the shrimp, mince the garlic, chop the parsley, juice the lemon. Store them separately in the fridge. When you’re ready to eat, the cooking process will take only 5 minutes.
Q: Is dried parsley okay to use?
A: In a pinch, yes. Use about 2 teaspoons of dried parsley. But the flavor is much more muted and earthy compared to the vibrant, fresh green flavor you get from the real thing. If you can, grab that fresh bunch!

Garlic Shrimp Skillet : Simple, Zesty, and Ready in Minutes
Description
After a long day, dinner should be fast, flavorful, and stress-free. This Garlic Shrimp Skillet delivers all three. Juicy shrimp cook in a fragrant garlic and olive oil bath, finished with bright lemon and fresh parsley. It’s elegant enough to impress, yet simple enough for a busy weeknight—and it’s on the table in about 10 minutes.
Ingredients
-
1 lb large shrimp, peeled and deveined
-
2 tbsp olive oil
-
4 cloves garlic, minced
-
Juice of 1 lemon (plus wedges for serving)
-
2 tbsp fresh parsley, chopped
-
Salt and black pepper, to taste
Instructions
-
Prep first: Pat shrimp very dry with paper towels. Season lightly with salt and pepper.
-
Heat oil: Warm olive oil in a large skillet over medium heat until shimmering.
-
Garlic aroma: Add garlic and sauté 30–60 seconds until fragrant (do not brown).
-
Cook shrimp: Add shrimp in a single layer. Cook 2–3 minutes without moving, until pink on the bottom. Flip and cook 1–2 minutes more until opaque.
-
Finish: Squeeze lemon juice over the skillet, sprinkle with parsley, and toss gently. Remove from heat. Taste and adjust seasoning.
-
Serve hot with extra lemon wedges.
Notes
-
Dry shrimp = better sear. Moisture causes steaming.
-
Don’t overcrowd the pan. Cook in batches if needed.
-
Watch the clock. Overcooked shrimp turn rubbery—pull them as soon as they’re opaque.
-
Fresh garlic matters. It gives the best flavor here.
Nourishing Your Body
One of the things I love most about this dish is how wonderfully it fits into a healthy lifestyle. It’s packed with lean protein, healthy fats, and flavor without any heavy sauces or unnecessary carbs. Here’s a quick look at what you’re getting per serving (about ¼ of the recipe):
Calories: ~210 | Protein: 24g | Carbohydrates: 2g | Fat: 12g | Sugar: 0g
Shrimp are a fantastic source of selenium, vitamin B12, and iodine. The olive oil provides heart-healthy monounsaturated fats, and the garlic and lemon offer a boost of antioxidants. It’s naturally low-carb, gluten-free, and can easily be made dairy-free. It’s proof that healthy eating can be incredibly delicious and satisfying.
Final Thoughts
And there you have it, friends—my go-to recipe for when life is moving a mile a minute but my stomach is demanding something fantastic. This Garlic Shrimp Skillet is more than just a recipe; it’s a reminder that great food doesn’t require complexity. It requires good ingredients, a bit of heat, and the willingness to enjoy the simple, wonderful things.
I hope this recipe finds its way into your regular rotation and becomes your secret weapon for easy, elegant meals. When you make it, I’d love to hear how it turned out! Tag me @Feastical or shoot me a message. Now, go forth and create something delicious. Your skillet is waiting!
With a full heart and an even fuller plate,
Beau
Copycat Olive Garden Salad Recipe with Zesty Dressing
Bring the Restaurant Magic to Your Table: The Ultimate Copycat Olive Garden Salad
Hey friends, Beau here from Feastical! Ever have one of those days where all you can think about is that crisp, cold, endlessly refillable salad from Olive Garden? You know the one. That mountain of fresh lettuce, those zippy pepperoncini, those gloriously garlicky croutons, all swimming in that tangy, creamy, herb-infused dressing that you could honestly drink with a straw? Yeah, we’ve all been there. You’re craving that specific flavor, that particular crunch, that little taste of “unlimited possibilities” right in your own dining room.
Well, pull up a chair, because today we’re cracking the code. I’m sharing my tried-and-true, taste-tested-to-perfection Copycat Olive Garden Salad Recipe with the Zesty Dressing. This isn’t just a salad; it’s a time machine to your favorite booth, a party-starter for pasta night, and proof that the best restaurant flavors are totally within your reach. We’re keeping it simple, soulful, and incredibly satisfying—no fancy techniques, just real, feel-good food that brings everyone together. So, grab your biggest bowl and let’s recreate some magic!
My Love Affair with the Bottomless Bowl
My obsession with this salad started way back in my high school days. It was the go-to spot for any “big” celebration—graduation dinners, birthdays, even “hey, I made it through finals” rewards. But for me, the real star wasn’t just the pasta. It was that first bite of salad. I’d watch the server bring that giant, chilled bowl over, the dressing already clinging to every leaf, and my mouth would water before it even hit the table.
There was an art to it. You had to strategize: get a bit of everything in one forkful—the cool iceberg, a sliver of sharp onion, a briny olive, the kick of a pepperoncini, and a crouton soaked in dressing. It was a perfect symphony of textures and flavors. I must have eaten my weight in those salads over the years. When I started Feastical, I knew I had to figure out how to bottle that feeling (figuratively, of course!). It took a few tries—my kitchen notebook is full of scribbled dressing ratios—but when I finally nailed it? Pure joy. Now, I get to have that celebratory, “life is good” feeling any night of the week, and so do you.
Gathering Your Salad Symphony
Here’s everything you need to build this iconic salad. The beauty is in its simplicity, but each ingredient plays a crucial role. Don’t stress if you need to swap something out—I’ve got your back with tips!
For the Salad:
- 1 bag (10 oz) iceberg lettuce mix: The classic base! That crisp, watery crunch is non-negotiable for authenticity. Chef’s Insight: If you can’t find a mix, use half a head of chopped iceberg and half a head of romaine for a little more color and substance.
- ½ red onion, thinly sliced: They provide a sharp, peppery bite that cuts through the creamy dressing. Pro Hack: To mellow the raw onion flavor, soak your slices in ice water for 10 minutes. They’ll stay crunchy but lose some of their harshness.
- 1 tomato, chopped or wedged: Adds a juicy, fresh sweetness. I prefer Roma tomatoes for their meatier texture and fewer seeds.
- ½ cup black olives, whole or sliced: Little pockets of salty, briny goodness. Use canned or jarred—whatever you have!
- 6–8 pepperoncini peppers: The secret weapon! These mild, tangy Italian peppers give the salad its signature kick and a gorgeous pop of color. Don’t skip ’em!
- 1 cup croutons: Garlic and herb croutons are the move here. They’re the edible spoons that soak up all that glorious dressing.
- ¼ cup grated Parmesan cheese: The savory, salty finish. For the best flavor, grate it fresh off the block if you can.
For the Zesty Dressing:
- ½ cup mayonnaise: This is the base that gives the dressing its creamy, luxurious body. Use a good-quality mayo for the best flavor.
- ⅓ cup white vinegar: The tang! White vinegar has the clear, sharp acidity that defines this dressing. Sub Tip: In a pinch, you can use white wine vinegar for a slightly fruitier note.
- ¼ cup olive oil: Adds richness and helps emulsify everything into a silky-smooth texture. Extra virgin olive oil gives the best flavor.
- 1 tsp lemon juice: A bright, fresh high note that balances the richness. Always use fresh-squeezed if possible!
- 1 tsp garlic powder: We’re using powder here for that consistent, mellow garlic flavor throughout. It’s key to the OG taste.
- 1 tsp Italian seasoning: The herbaceous soul of the dressing. This blend of oregano, basil, thyme, and rosemary is everything.
- ½ tsp salt & ¼ tsp black pepper: Essential flavor enhancers. Season to taste!
- ½ tsp sugar: A tiny bit to round out the sharp edges of the vinegar. It makes all the difference.
- 1 tbsp grated Parmesan cheese: Yes, cheese in the dressing too! It adds a subtle umami depth and helps thicken it slightly.
Let’s Build the Perfect Bite: Step-by-Step
This comes together in a flash, but a few simple tricks make it absolutely perfect. Let’s do this!
- The Chill Factor: First things first—get your salad bowl nice and cold. I like to pop my empty serving bowl in the freezer for 10-15 minutes while I prep. A cold bowl keeps every bite refreshingly crisp from the first serving to the last.
- Prep Your Veggies: Thinly slice your red onion (remember the ice water bath trick if you want it milder!). Chop your tomato. Drain your olives and pepperoncini. Having everything ready to go (what chefs call mise en place) makes assembly a breeze.
- Whisk That Dressing: This is where the magic happens. In a medium bowl or a large jar with a tight lid, combine all of your dressing ingredients: mayo, vinegar, olive oil, lemon juice, garlic powder, Italian seasoning, salt, sugar, pepper, and that tablespoon of Parmesan. Whisk vigorously until completely smooth and creamy, or seal the jar and shake it like a Polaroid picture for about 30 seconds. Taste it! Adjust salt, pepper, or a touch more vinegar to your liking. Chef’s Secret: Letting the dressing sit for 15-20 minutes before serving allows the dried herbs to rehydrate and the flavors to marry beautifully.
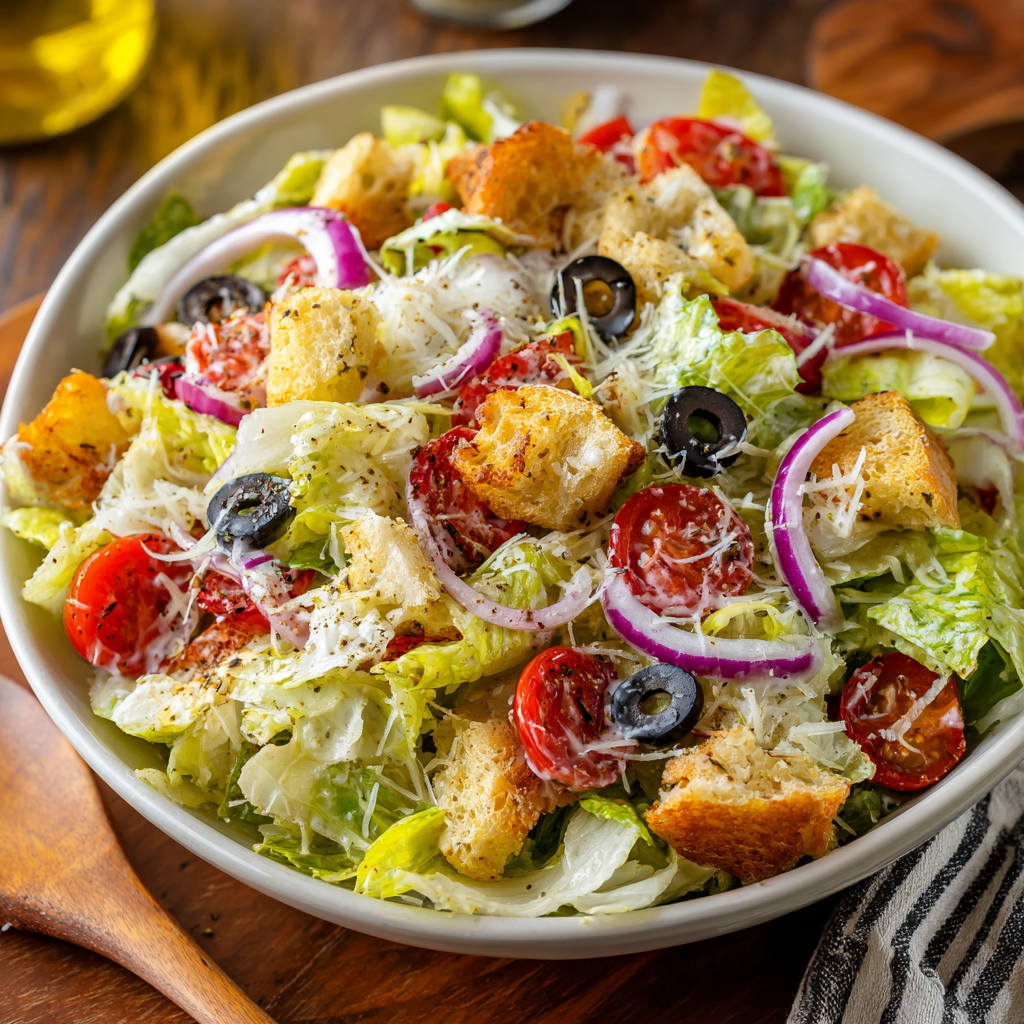
- Assemble with Love: In your chilled bowl, add the iceberg lettuce mix. Artfully scatter over the red onion, tomatoes, black olives, and pepperoncini. Hold the croutons and the ¼ cup of Parmesan for now! Adding them too early means soggy croutons and cheese that clumps.
- The Grand Toss: Just before you’re ready to serve, drizzle about half of the dressing over the salad. Using clean hands or two large salad servers, toss gently but thoroughly. Add more dressing a little at a time until every leaf is lightly and evenly coated. You may not need all the dressing—save any extra in the jar for tomorrow!
- The Final Flourish: Now, shower the top of your perfectly dressed salad with the garlic croutons and the remaining ¼ cup of grated Parmesan cheese. This gives you that gorgeous, restaurant-style presentation with maximum crunch and flavor.
How to Serve It Like a Pro
Presentation is part of the fun! I love serving this salad in one big, beautiful, chilled bowl right in the center of the table—it feels abundant and welcoming. Use a pair of stylish salad servers so everyone can dig in. This salad is the ultimate sidekick to any pasta dish, especially a hearty baked ziti or a simple spaghetti with meatballs. It’s also fantastic alongside a classic chicken parmesan or a simple grilled chicken breast for a lighter meal.
Want to make it a main event? Easy! Add some grilled shrimp, sliced grilled chicken, or canned chickpeas right on top for a protein boost. Serve it with a slice of warm, crusty bread to sop up any extra dressing left on your plate (the best part, honestly).
Make It Your Own: Delicious Twists & Swaps
The basic blueprint is perfect, but kitchens are for playing! Here are a few of my favorite riffs on this classic.
- The “Everything but the Kitchen Sink”: Add thin slices of salami or pepperoni, shredded mozzarella cheese, and roasted red peppers for a hearty, antipasto-style salad.
- Green Goddess Version: Swap the black olives for sliced green olives or capers. Add a handful of chopped fresh parsley and a sprinkle of chopped anchovy (trust me!) to the dressing for a deeper, brinier flavor profile.
- Lighter & Creamier Dressing: Replace half the mayonnaise with plain Greek yogurt. You’ll get the same creamy texture with a tangier, protein-packed punch.
- Gluten-Free & Vegan Friendly: Use your favorite gluten-free croutons or roasted chickpeas for crunch. For a vegan dressing, swap the mayo for vegan mayo and use a vegan Parmesan alternative or nutritional yeast.
- Summer Garden Fresh: In peak season, add thinly sliced radishes, cucumber, and fresh sweet corn cut off the cob. It’s a celebration of summer veggies!
A Few Notes from My Kitchen
This recipe has evolved from a “close enough” experiment to my absolute go-to. The biggest lesson? Don’t dress the salad until the very last second. I learned this the hard way after bringing a pre-dressed salad to a potluck. Let’s just say it was more of a “lettuce soup” by the time we ate. Not my finest moment!
Also, the dressing keeps amazingly well. I almost always double the dressing recipe and keep a jar of it in the fridge. It thickens up when cold, so just let it sit at room temp for a few minutes and give it a good shake before using it on everything from salads to sandwiches for the next week. It’s that good.
Your Questions, Answered!
Q: Can I make the dressing ahead of time?
A: Absolutely! In fact, I encourage it. Making it a few hours or even a day ahead allows the flavors to develop and deepen. Just store it in a sealed jar in the fridge. It may separate a bit, so give it a vigorous shake or whisk before using.
Q: My dressing seems too thick/vinegary. Help!
A: No problem! If it’s too thick, whisk in a teaspoon of water or milk at a time until it reaches your desired consistency. If it’s too sharp or vinegary for your taste, balance it out with a tiny bit more sugar or a touch more mayonnaise to mellow it.
Q: What’s the best lettuce to use if I can’t find a mix?
A: The heart of the salad is that crisp, watery texture of iceberg. I’d use ¾ of a head of chopped iceberg and ¼ of a head of romaine to get close to the mix. Avoid softer greens like spinach or spring mix for this particular copycat.
Q: How long will the dressed salad last?
A: Honestly, not long—it’s best enjoyed immediately. The lettuce wilts quickly. If you have leftovers, they’ll be edible but very soggy. Your best bet is to store undressed components separately and assemble fresh portions as you want them.

Copycat Olive Garden Salad Recipe with Zesty Dressing
Description
Hey friends, Beau here from Feastical! Let’s be honest—some salads are just there, and then there are salads you genuinely crave. The Olive Garden salad falls squarely into that second category. It’s cold, crisp, tangy, and somehow impossible to stop eating. That iconic combination of crunchy iceberg lettuce, briny olives, zippy pepperoncini, and that creamy, herb-packed dressing has turned a simple starter into a legend.
Ingredients
-
For the Salad
-
10 oz iceberg lettuce mix (or chopped iceberg)
-
½ red onion, thinly sliced
-
1 Roma tomato, chopped
-
½ cup black olives, sliced
-
6–8 peponcini peppers
-
1 cup garlic croutons
-
¼ cup grated Parmesan cheese
For the Dressing
-
½ cup mayonnaise
-
⅓ cup white vinegar
-
¼ cup olive oil
-
1 tsp lemon juice
-
1 tsp garlic powder
-
1 tsp Italian seasoning
-
½ tsp salt
-
¼ tsp black pepper
-
½ tsp sugar
-
1 tbsp grated Parmesan cheese
-
Instructions
-
Make the dressing:
Whisk (or shake in a jar) all dressing ingredients until smooth. Chill 15–20 minutes for best flavor. -
Assemble the salad:
In a large bowl, add lettuce, red onion, tomato, olives, and pepperoncini. -
Dress & toss:
Drizzle with dressing and toss gently until evenly coated. -
Finish:
Top with croutons and Parmesan just before serving.
Notes
-
Chill the bowl for extra crunch.
-
Add croutons last to keep them crispy.
-
Dressing keeps 5–7 days refrigerated.
Nutritional Info (Per Serving)
Makes about 6 servings. Nutrition is an estimate and will vary based on specific ingredients and portion sizes.
- Calories: ~190
- Total Fat: 16g
- Saturated Fat: 2.5g
- Cholesterol: 5mg
- Sodium: 450mg (varies based on olives, cheese, and dressing salt)
- Total Carbohydrates: 9g
- Dietary Fiber: 2g
- Sugar: 3g
- Protein: 3g
Remember, salads are a fantastic way to pack in veggies! The olives and pepperoncini provide unique phytonutrients, and using olive oil in the dressing gives you those good-for-you monounsaturated fats.
Your New Go-To Celebration Salad
And there you have it, friends—your ticket to unlimited salad, right at home. This Copycat Olive Garden Salad is more than just a recipe; it’s a reminder that the best meals are often the simplest ones, shared with good people. It’s about that crunch, that tang, that feeling of “ahhh, this is it.”
I hope this recipe becomes a regular in your rotation, the star of your next family dinner, or your secret weapon for potlucks. Give it a try, tweak it to your heart’s content, and most importantly, have fun with it. Food is love, remember? And this salad is a big, delicious hug in a bowl.
Final Thoughts
So there you have it—the secret to bringing that iconic, crave-worthy Olive Garden salad right to your own kitchen. It’s more than just a recipe; it’s an invitation to slow down, gather around the table, and share something simple yet truly special. Whether you’re recreating a favorite memory or starting a new tradition, this salad has a way of turning an ordinary meal into a moment of connection.
What I love most about this recipe is how it proves that restaurant magic isn’t about complicated techniques or hard-to-find ingredients—it’s about paying attention to the little things. The chill of the bowl, the tang of the dressing, the crunch of a perfectly timed crouton. It’s a reminder that good food doesn’t have to be fussy; it just has to be made with care.
I hope this recipe becomes a staple in your home just like it is in mine—a reliable, crowd-pleasing classic that never fails to bring a smile. Keep that dressing jar stocked, your bowl chilled, and don’t be afraid to make it your own. After all, the best meals are the ones shared with people you love, topped with plenty of cheese and a whole lot of joy.
Now go forth, toss with confidence, and enjoy that bottomless bowl feeling—any day of the week.
With love and a full salad bowl,
Beau from Feastical

Thai-Inspired Pineapple Fried Rice Recipe (Quick & Flavorful)
Your New Favorite Weeknight Escape: Thai-Inspired Pineapple Fried Rice
Hey friends, Beau here! Let’s talk about dinner magic. You know the kind I mean—when you stare into the fridge, see a bunch of seemingly unrelated bits and bobs, and somehow, twenty minutes later, you’re sitting down to a plate that tastes like a tropical vacation. That’s the sheer, joyful power of a great fried rice. And today, we’re not just making any fried rice. We’re crafting a bowl of sunshine: my Thai-Inspired Pineapple Fried Rice.
This isn’t just a recipe; it’s a 20-minute ticket to flavor town. We’re talking sweet bursts of caramelized pineapple, savory, slightly chewy grains of rice, a confetti of colorful veggies, and that incredible umami depth that makes you close your eyes and just *sigh*. It’s a symphony of sweet, savory, and salty, all dancing together in one skillet. Best part? It’s incredibly forgiving, uses up leftover rice (a chef’s secret weapon!), and is flexible enough to make your own. Whether you’re a weeknight warrior in need of a quick win or you want to impress your friends with something that looks way more fancy than the effort required, this dish is your new best friend. So, grab your favorite wok or large skillet, and let’s turn up the heat!
The Night I Fell for a Bowl of Rice
My love affair with this dish started not in a fancy restaurant, but at a rickety plastic table on a humid Bangkok night. I was traveling, completely out of my element, and my stomach was giving me the “feed me something familiar, but not *too* familiar” plea. A friendly vendor saw my confused face and, with a smile, pointed to his sizzling wok. What came out was a masterpiece served in a hollowed-out pineapple: steaming fried rice studded with bright yellow chunks of fruit, dotted with peas and carrots, and smelling like pure heaven.
That first bite was a revelation. The warmth of the curry powder hugged the sweet pineapple, the savory rice grounded it all, and a squeeze of lime made everything pop. It was comfort food, but with an adventurous soul. It was the culinary equivalent of a postcard, and I’ve been trying to recreate that feeling in my own kitchen ever since. This recipe is my heartfelt version—a little souvenir I’m thrilled to share with you. It brings that street-food magic right to your table, no passport required.
Gathering Your Sunshine-In-A-Bowl Ingredients
Here’s the beautiful part: the ingredient list is simple and flexible. This is where we build our flavor foundation. I’ll give you the classic roadmap and some handy detours.
- 2 cups cooked jasmine rice (day-old is BEST): This is the non-negotiable secret weapon! Day-old, chilled rice is drier, so it fries up perfectly separate and slightly chewy, not mushy. Chef’s Hack: No leftover rice? Spread freshly cooked rice on a baking sheet and pop it in the fridge for 20 minutes to dry out.
- 1 cup fresh pineapple chunks: The star! Fresh pineapple gives you that vibrant sweet-tart punch and holds its texture. Canned works in a pinch, but be sure to drain it *very* well.
- ½ cup diced red bell pepper: For color, crunch, and a subtle sweetness. Yellow or orange bell peppers work just as beautifully.
- ½ cup frozen peas and carrots: My weeknight heroes. They add pops of color and nutrition without any prep. No need to thaw!
- 2 green onions, sliced: A fresh, allium kick. We’ll use the white parts for cooking and the green tops for a vibrant garnish.
- 2 cloves garlic, minced: The aromatic heartbeat of the dish. Don’t be shy here.
- 2 eggs, lightly beaten: Our protein-packed ribbon that weaves through the rice. It adds richness and body.
- 2 tbsp soy sauce: The salty, savory backbone. Use tamari for a gluten-free version.
- 1 tbsp fish sauce (optional for umami): This is the flavor bomb. It doesn’t make the dish taste “fishy”—it adds an incredible, complex savory depth (umami). If you’re new to it, just try it!
- 1 tsp curry powder: Our warm, golden spice hug. Use a good-quality Thai yellow curry powder if you can find it.
- 2 tbsp oil (vegetable or sesame): A high-smoke point oil for frying. I use a mix: 1.5 tbsp vegetable and ½ tbsp toasted sesame oil for fragrance.
- ¼ cup roasted cashews or chopped peanuts (optional): For the essential crunch and nutty richness. Highly recommended!
- Lime wedges and cilantro for garnish: The non-optional finishing touches! The bright acid and fresh herbs wake up every single flavor.
Let’s Get Cooking: Your Step-by-Step Roadmap to Perfect Fried Rice
Ready? Apron on, fan on (things will sizzle!), and let’s create some magic. The key to great fried rice is high heat, quick movement, and having all your ingredients prepped and within arm’s reach (this is called *mise en place*—fancy for “get your stuff together”).
- Heat the Pan: Place your largest skillet or wok over medium-high heat and let it get properly hot for a minute. Add the oil and swirl it around. You should see it shimmer—that’s how you know you’re ready to rock.
- Sizzle the Aromatics & Veggies: Add the minced garlic and diced red bell pepper. Stir-fry for just 1-2 minutes. We’re not looking to soften the pepper completely, just to wake up the garlic’s aroma and take the raw edge off the pepper. You’ll smell the magic start.
- Scramble the Eggs: Here’s a fun trick: push the garlic and pepper to one side of the pan. Pour your beaten eggs into the empty space. Let them set for about 15-20 seconds, then gently scramble them right there in the pan until just set. Now, mix everything together! You’ve got a beautiful, rustic start.
- Introduce the Rice & Seasonings: Add your day-old rice, breaking up any clumps with your spoon or spatula. Drizzle the soy sauce and fish sauce (if using) over the rice, and sprinkle the curry powder evenly. Now, stir-fry like you mean it for 1-2 minutes, ensuring every grain gets coated in that golden, savory goodness.
- The Grand Finale Mix-In: Time for color and sweetness! Toss in the pineapple chunks, frozen peas and carrots, and the white parts of your sliced green onions. Keep everything moving for another 2-3 minutes. The peas and carrots will heat through, and the pineapple will get little caramelized edges. That’s what we want!
- Garnish and Serve: Kill the heat. Immediately stir in most of the green onion tops. Transfer to a serving dish (or a hollowed-out pineapple for serious fun!) and top with crunchy cashews or peanuts, fresh cilantro leaves, and those all-important lime wedges.
How to Serve This Tropical Masterpiece
Presentation is part of the joy! For a casual family dinner, I pile it high into a big, colorful bowl and let everyone dig in family-style. For a “wow” factor with guests, serve it in the hollowed-out pineapple half—it’s a guaranteed conversation starter and keeps the rice warm. This dish is a complete meal in a bowl, but if you want to build a feast, pair it with simple starters like fresh spring rolls with peanut sauce, a tangy cucumber salad, or some satay skewers. Don’t forget the most important step: instruct everyone to squeeze that lime wedge over their portion right before eating. That burst of acid is what ties the whole sunny, savory, sweet package together.
Make It Your Own: Delicious Twists & Swaps
The beauty of this recipe is its adaptability. Play with it! Here are a few of my favorite riffs:
- Protein Power-Up: Add ½ cup of diced cooked chicken, shrimp, or tofu in step 3 after scrambling the eggs. Give it a quick sear before adding the rice.
- Spicy Kick: Love heat? Add 1-2 thinly sliced Thai bird’s eye chilies with the garlic, or stir in a spoonful of sriracha or chili-garlic sauce with the soy sauce.
- Veggie-Loaded: Clear out the fridge! Thinly sliced mushrooms, sweet corn, or chopped broccoli florets are all fantastic additions. Just add harder veggies (like broccoli) with the bell pepper.
- Pineapple Swap: Not a pineapple fan? Try using diced mango for a different tropical twist. The sweetness plays just as nicely with the curry and soy.
- Nut-Free & Gluten-Free: Simply omit the nuts, and use tamari instead of soy sauce. The flavor is still incredible.
Beau’s Kitchen Notes & Stories
This recipe has evolved from that Bangkok street cart into my ultimate “clean-out-the-kitchen” hero. I’ve made it after long days, for last-minute potlucks, and even for a cozy date night at home. The one constant? It always brings smiles. A funny memory: I once was so eager to make it I used freshly cooked, steaming-hot rice. Let’s just say I ended up with a delicious, albeit slightly *paste-like*, pineapple rice. We still ate it, but I learned the day-old rice lesson the hard way so you don’t have to! Also, don’t stress about precision. Fried rice is a feeling. Taste as you go—want it saltier? A dash more soy. Need more tang? Another squeeze of lime. You’re the boss of this bowl.
Your Questions, Answered (Let’s Troubleshoot!)
- Q: My rice is sticky/mushy. What happened?A: This almost always means the rice was too fresh and moist. Next time, definitely use day-old, cold rice. If you’re in a bind, spread fresh rice thin and chill it fast. Also, make sure your pan is hot enough to fry, not steam, the rice.
- Q: Can I make this vegetarian or vegan?A: Absolutely! For vegan, omit the eggs and fish sauce. Use a vegan “fish” sauce or just a bit more soy sauce/tamari. Add extra-firm tofu for protein. The dish is still packed with flavor.
- Q: What’s the best substitute for fish sauce?A: If you don’t have it or avoid it, you can use an extra tablespoon of soy sauce mixed with a tiny pinch of sugar. While not identical, it adds the needed salt and a hint of complexity.
- Q: How do I store and reheat leftovers?A: Leftovers keep beautifully for 2-3 days in the fridge. Reheat in a skillet over medium heat with a tiny splash of water to refresh the rice. The microwave can make it a bit rubbery.

Thai-Inspired Pineapple Fried Rice Recipe (Quick & Flavorful)
Description
Thai-Inspired Pineapple Fried Rice (20-Minute Recipe)
Ingredients
-
2 cups cooked jasmine rice (day-old, cold)
-
1 cup fresh pineapple, diced
-
½ cup red bell pepper, diced
-
½ cup frozen peas & carrots
-
2 green onions, sliced (whites and greens separated)
-
2 cloves garlic, minced
-
2 eggs, lightly beaten
-
2 tbsp oil (vegetable or vegetable + a little sesame)
-
2 tbsp soy sauce (or tamari)
-
1 tbsp fish sauce (optional)
-
1 tsp curry powder
-
¼ cup roasted cashews or peanuts (optional)
-
Lime wedges & cilantro (for serving)
Instructions
-
Heat oil in a large skillet or wok over medium-high heat.
-
Add garlic and bell pepper; stir-fry 1–2 minutes until fragrant.
-
Scramble eggs: Push veggies to one side, pour in eggs, scramble until just set, then mix.
-
Add rice: Break up clumps. Stir in soy sauce, fish sauce (if using), and curry powder. Fry 1–2 minutes.
-
Finish: Add pineapple, peas & carrots, and green onion whites. Stir-fry 2–3 minutes until heated through and lightly caramelized.
-
Serve: Remove from heat, garnish with green onion tops, nuts, cilantro, and squeeze of lime.
Notes
-
Day-old rice = fluffy, not mushy.
-
High heat + quick stirring = best texture.
-
Add cooked chicken, shrimp, or tofu if you want protein.
Nutrition
- Calories: 370Cal per serving
- Fat: 12 g
- Carbohydrates: 55 g
- Protein: 10 g
A Quick Note on Nutrition (Per Serving, Serves 4)
While we’re all about flavor first at Feastical, I know many of you like to have the info! This is a hearty, balanced meal. One serving (about ¼ of the recipe, without added protein) provides roughly: ~370 calories, 10g of protein, 12g of fat (mostly from healthy oils and nuts), and 55g of carbohydrates. It’s a great source of Vitamin C from the pineapple and peppers, and the eggs/veggies add fiber and nutrients. Remember, these are estimates—the joy of cooking at home is you control what goes in!
Prep Time: 10 minutes | Cook Time: 10 minutes | Total Time: 20 minutes
Final Thoughts from My Kitchen to Yours
And that’s it, friends! My go-to recipe for when I need a quick, feel-good meal that never fails to delight. This Thai-Inspired Pineapple Fried Rice is more than the sum of its parts—it’s a vibrant, hearty, and endlessly customizable dish that proves weeknight dinners don’t have to be boring. They can be a mini-adventure. I hope this recipe becomes a trusted friend in your kitchen, just like it is in mine. Now, I’d love to hear from you! Did you add an extra twist? Serve it in a pineapple boat? Tag me @Feastical or shoot me an email—I love seeing your creations. Until next time, keep your spatula handy and your sense of adventure hungry.
Happy cooking,
Beau

Mouthwatering Mississippi Pot Roast (Crockpot Recipe)
The Pot Roast That Broke the Internet (And My Weeknight Dinner Slump)
Hey there, friend! Beau here, from Feastical. Let’s talk about a culinary magic trick. You know the one: where you toss a few humble ingredients into a pot, walk away for hours, and return to a meal that tastes like you’ve been lovingly tending to it all day. That’s not just a fantasy—it’s the glorious, juicy, soul-satisfying reality of Mississippi Pot Roast.
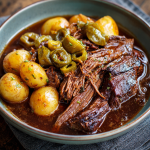
This isn’t your grandma’s pot roast (though she’d absolutely approve). This is a phenomenon. A chuck roast meets a packet of ranch, a packet of au jus, a stick of butter, and a handful of tangy pepperoncini peppers. Then, the slow cooker works its low-and-slow alchemy. What emerges is something extraordinary: meat so tender you can shred it with a glance, bathed in a rich, savory, slightly tangy, and utterly addictive gravy. It’s bold, it’s comforting, and it requires roughly five minutes of actual effort from you. My mission at Feastical is to find recipes that bring people together without stressing you out, and this, my friend, is the poster child for that philosophy. So, grab your crockpot and let’s make a dinner legend.
Why This Roast Holds a Special Place in My Kitchen
I’ll never forget the first time I made this. It was during a chaotic, rainy “Sunday Scaries” kind of afternoon. My fridge was bare, my energy was lower than a slow cooker on the “keep warm” setting, and my family was eyeing me like, “So… what’s the plan, chef?” I remembered a food blogger friend raving about this “crazy packet pot roast.” Skeptical but desperate, I threw it together.
The smell that filled my house over the next few hours was nothing short of hypnotic—savory, herby, with a mysterious tang. When I finally lifted the lid, I was greeted by a roast that had practically melted into itself. That first bite was a revelation. It was the warm, flavorful hug we all needed. My picky nephew, who usually regards meat with suspicion, asked for thirds. Now, it’s my not-so-secret weapon for potlucks, hectic weeknights, and any time I need a guaranteed win. It’s more than a recipe; it’s a memory-maker, and that’s what feel-good food is all about.
Gathering Your Flavor Arsenal
Here’s the beautiful shortlist. Each one plays a starring role in creating that iconic taste.
- 3–4 lb chuck roast: This is the MVP. Chuck roast is marbled with fat, which slowly renders and bastes the meat from within, making it incredibly tender. Don’t substitute a lean cut here—the fat is your flavor friend! A quick sear in a hot pan before slow cooking is a chef’s hack for extra depth, but honestly? You can skip it and still get amazing results.
- 1 packet ranch dressing mix: This little powerhouse adds a punch of herbs, garlic, onion, and buttermilk flavor. It’s the secret backbone! For a homemade twist, you can use a blend of dried dill, parsley, garlic powder, onion powder, and a touch of salt.
- 1 packet au jus gravy mix: This brings the savory, beefy, umami-rich foundation. Together with the ranch, it creates a complex gravy base without any roux-making. If you can’t find “au jus,” a brown gravy mix works in a pinch.
- ½ cup (1 stick) unsalted butter: Trust the process! The butter melts into the juices, creating an unbelievably rich and silky sauce. It’s the magic potion that brings everything together. I use unsalted to control the sodium, as the seasoning packets are plenty salty.
- 6–8 pepperoncini peppers: The game-changer! These mild, tangy, slightly sweet peppers cut through the richness and add a subtle “what is that amazing flavor?” zing. Don’t be scared—they don’t make it spicy, just incredibly interesting.
- Optional: A splash of pepperoncini juice: This is my pro-tip. Adding a tablespoon or two of the brine from the jar amplifies that delicious tang and balances the savory notes perfectly. Give it a try!
Let’s Make Some Magic: Your Foolproof Guide
Ready? This is where the “easy” part really shines. Active voice? More like active for five minutes, then passive relaxation for eight hours.
- Prep Your Star Player. Take your chuck roast out of the fridge for about 20-30 minutes before cooking if you have time. This helps it cook more evenly. Pat it dry with paper towels—this is a key step for a good sear if you choose to do one! (Chef’s Insight: I often skip the sear for a true dump-and-go, but if you want that extra caramelized flavor, heat a tablespoon of oil in a skillet over high heat and sear the roast for 2-3 minutes per side until beautifully browned. Then transfer it to the slow cooker.)
- The Dump-and-Go (The Beautiful Part). Place the roast directly into your slow cooker. Sprinkle the entire packet of ranch seasoning and the entire packet of au jus gravy mix evenly over the top of the roast. It’s going to look like a lot of seasoning. It is. And it’s perfect.
- Add the Richness & The Zing. Slice the stick of butter into a few chunks and place them right on top of the seasoned roast. Now, scatter the pepperoncini peppers all around and over the roast. If you’re using that splash of pepperoncini juice, drizzle it over everything now.
- Let Time Do the Work. Cover with the lid. That’s it. Seriously. Set your slow cooker to LOW for 8 hours or HIGH for 4-5 hours. Low and slow is always my preference for maximum tenderness. Do not open the lid to peek! You let the precious heat and steam escape.
- The Grand Reveal & Shred. After the time is up, open the lid to the most incredible aroma. The roast should be fork-tender, practically falling apart when you nudge it. Using two forks, shred the meat right in the pot. Stir it all together, letting those incredible juices coat every single strand. (Chef’s Hack: For extra richness, you can mix a tablespoon of cornstarch with two tablespoons of the pot juices in a small bowl, then stir it back into the pot and let it cook on HIGH for 15 minutes to thicken the gravy slightly.)
How to Serve This Flavor Fiesta
Now for the fun part! This pot roast is the ultimate team player. My absolute favorite way is piled high on a toasted, buttered bun for the most epic Italian beef-style sandwich. Don’t forget a little bowl of the extra juice for dipping (it’s called “au jus” for a reason!).
For a classic dinner plate, serve it over a big cloud of creamy mashed potatoes, buttered egg noodles, or a scoop of polenta. The gravy soaks in and it’s pure heaven. Want to keep it lighter? It’s amazing over cauliflower rice or with a side of roasted green beans or a crisp garden salad to balance the richness. No matter how you plate it, get ready for compliments.
Make It Your Own: Delicious Twists & Swaps
Love the base recipe? Try these fun spins!
- Spicy Kick: Add 2-3 sliced jalapeños (seeds removed for less heat) along with the pepperoncinis. Or use hot pickled cherry peppers instead!
- Pork or Chicken Version: Use a pork shoulder (butt) or boneless, skinless chicken thighs. Cook times will be similar. For chicken breasts, reduce time to 3-4 hours on LOW to avoid drying out.
- “Everything in the Pot” Meal: Add hearty veggies during the last 2 hours of cooking. Baby potatoes, chunked carrots, and pearl onions become tender and soak up all the flavor.
- Lower-Sodium & Whole30-ish: Use homemade ranch seasoning (skip the buttermilk powder) and a salt-free beef broth powder. Swap the butter for ghee. Ensure your pepperoncinis are compliant (no added sugar or preservatives).
- Instant Pot Speed Run: Use the sauté function to sear the roast. Add everything else. Cook on High Pressure for 60-75 minutes, then natural release for 15 minutes. Shred and serve!
Beau’s Backstage Notes
This recipe is a beautiful example of how dishes evolve in the home kitchen. It started as a viral sensation for its simplicity, and now every cook adds their own little stamp. My stamp is that splash of pepperoncini juice and a love for the sandwich version. I’ve made this for football Sundays, busy Tuesdays, and even a fancy “I don’t feel like cooking” dinner party. It never fails.
Funny story: I once accidentally used a stick of salted butter and the pre-salted au jus packet. Let’s just say we were all very… hydrated… the next day. Lesson learned: unsalted butter is your pal here! The recipe is forgiving, but it teaches you little lessons like that.
Your Questions, Answered
Q: Is it really spicy from the pepperoncini?
A: Not at all! Pepperoncinis are very mild on the heat scale (usually 100-500 Scoville units). They provide a bright, tangy, pickled flavor, not heat. If you’re sensitive to spice, you’ll still love this.
Q: My gravy is too thin! How can I thicken it?
A: Easily fixable! After shredding, mix 1-2 tablespoons of cornstarch with an equal amount of cold water to make a slurry. Stir it into the pot juices, put the lid back on, and cook on HIGH for 15-20 minutes until thickened. Alternatively, you can remove the meat, pour the juices into a saucepan, and simmer on the stovetop to reduce.
Q: Can I cook this on HIGH the whole time?
A: You can (4-5 hours), but LOW for 8 hours is highly recommended. The longer, slower cook breaks down the connective tissue in the chuck roast more effectively, leading to that legendary “fall-apart” texture. High heat can sometimes make the meat a bit more stringy.
Q: I don’t have a slow cooker. Can I make it in the oven?
A: Absolutely! Preheat your oven to 300°F. Follow all steps in a heavy, oven-safe Dutch oven with a lid. Cook for about 4 hours, or until fork-tender, checking occasionally.
Mouthwatering Mississippi Pot Roast (Crockpot Recipe)
Description
Mississippi Pot Roast (Classic Slow Cooker Recipe)
Ingredients
-
3–4 lb chuck roast
-
1 packet ranch dressing mix
-
1 packet au jus gravy mix
-
½ cup (1 stick) unsalted butter
-
6–8 pepperoncini peppers
-
1–2 tbsp pepperoncini juice (optional)
Instructions
-
Add the roast to the slow cooker.
-
Sprinkle ranch mix and au jus mix evenly over the roast.
-
Place butter on top of the roast in chunks.
-
Add pepperoncini peppers (and juice if using).
-
Cover and cook
-
LOW: 8 hours (recommended)
-
HIGH: 4–5 hours
-
-
Shred the meat in the slow cooker using two forks and stir into the juices.
-
Serve hot over mashed potatoes, noodles, or on sandwich rolls.
Notes
-
No need to add water—the roast creates its own gravy.
-
For thicker gravy, stir in a cornstarch slurry and cook 15 minutes on HIGH.
-
Mild and tangy, not spicy.
Nutritional Info & Prep Details
Please note: The following is an estimate based on the specified ingredients and 6 servings. Nutritional values can vary based on specific brands and ingredient sizes.
- Calories: ~480
- Protein: 40g
- Fat: 35g
- Carbohydrates: 4g
- Prep Time: 5 minutes
- Cook Time: 8 hours (on low)
- Total Time: 8 hours 5 minutes
This is a high-protein, keto-friendly meal when served with appropriate sides like cauliflower mash or a salad. The carbs come primarily from the seasoning packets.
The Final Simmer
So there you have it—the recipe that changed my weeknight dinner game and brought so many smiles to my table. Mississippi Pot Roast is proof that the most beloved dishes aren’t always the most complicated. They’re the reliable, flavorful, heartwarming ones that give you your time back.
I hope you give it a try and make it your own. Tag me @Feastical when you do—I love seeing your kitchen creations! Now, go forth, set that slow cooker, and get ready for a standing ovation at dinner. Until next time, keep it simple, soulful, and satisfying.
Happy cooking,
Beau
“`

Irresistible Smoked Queso Dip Recipe : Perfect for Game Day or BBQs
The Ultimate Crowd-Pleaser: Your New Go-To Smoked Queso Dip
Hey friends, Beau here! Can you smell that? It’s the sweet, unmistakable scent of hickory smoke weaving through the air, mingling with the mouthwatering aroma of melting cheese and sizzling sausage. If there’s one sound that signals a great gathering is about to happen, it’s the collective “ooooh” that erupts when you walk out of the kitchen—or from behind your smoker—carrying a cast-iron skillet full of this bubbling, glorious, Irresistible Smoked Queso Dip. This isn’t just a dip; it’s a conversation starter, a chip-magnet, and frankly, the life of the party. Perfect for game day, essential for BBQs, and absolutely mandatory for any occasion where friends, family, and good vibes are on the menu.
We’ve all had mediocre queso. The kind that separates into an oily pool with stubborn cheese globs, or that tastes like it has never met a real spice in its life. I’m here to tell you those days are over. This recipe is my love letter to effortless, soul-satisfying entertaining. It’s bold, it’s cheesy, and it has that incredible smoky depth that only comes from low and slow cooking. The best part? It’s incredibly simple. You’re basically a fantastic stirrer away from dip nirvana. So, grab your favorite apron, fire up that smoker (or grill!), and let’s make some magic that will have everyone asking you for the recipe. Get your chips ready – it’s go time.
More Than Just a Dip: A Smoky Beginning
This recipe honestly started as a happy accident, born from my eternal curiosity (and a serious hunger). I’d just gotten my first real smoker—a hand-me-down barrel smoker from my uncle that I named “Old Reliable.” I was obsessed with smoking everything: meats, veggies, even fruit! One lazy Sunday, prepping for a backyard football watch party, I realized I’d forgotten to make an appetizer. Panic set in. All I had was some cheese, sausage, and a can of tomatoes.
In a moment of “what’s the worst that could happen?” inspiration, I threw it all in my trusty cast iron skillet and slid it into Old Reliable alongside some pork ribs. Two hours later, something magical had happened. The smoke had woven itself into every creamy, cheesy bite, transforming my thrown-together ingredients into something legendary. That dip disappeared in 10 minutes flat. My friends still talk about it. It taught me a beautiful lesson: sometimes the best recipes aren’t about fancy techniques, but about putting good things together and letting the process—and a little bit of smoke—do the hard work. That spirit of easy, joyful cooking is what I want to share with you today.
Gathering Your Flavor Arsenal: The What & Why
Here’s everything you’ll need to build this smoky masterpiece. Think of this list as your flavor blueprint—each ingredient plays a crucial role. I’ve also included my favorite swaps because hey, we’re all about making it work in your kitchen with what you’ve got!
- 1 lb Velveeta cheese, cubed: Don’t @ me, cheese purists! Velveeta is the MVP here for its unparalleled meltability and creamy stability. It’s the glue that holds our queso universe together without splitting. Chef’s Insight: Cubing it helps it melt evenly and quickly.
- 1 lb spicy breakfast sausage or chorizo, browned and drained: This is our protein-packed flavor bomb. Spicy breakfast sausage gives a fantastic savory kick, while chorizo adds a deeper, smoky paprika note. Substitution Tip: Ground beef, turkey, or even a plant-based crumble work great too. Just season it well!
- 1 can (10 oz) Rotel (Diced Tomatoes & Green Chilies), undrained: The dynamic duo! The tomatoes bring a needed tangy brightness, and the green chilies provide the perfect level of accessible heat. This is the “zing” in our dip. Chef’s Insight: Keep the juices from the can—they add liquid and flavor.
- 1 cup shredded pepper jack cheese: We’re layering our cheese flavors! Pepper jack introduces more melty cheese goodness and extra little flecks of heat. It makes the flavor profile more interesting than just one cheese.
- ½ cup diced yellow onion: Our aromatic foundation. When smoked low and slow, the onion sweetens and softens beautifully into the dip, adding depth without crunch.
- ½ cup diced jalapeños (seeds removed for milder heat): Fresh zip and texture! Dicing them yourself lets you control the heat level. Remember, the ribs and seeds are where most of the fire lives. Substitution Tip: For zero heat, use diced green bell pepper. For more fire, toss in a serrano or two.
- ½ tsp smoked paprika: This is our flavor amplifier. It doubles down on that smoky essence, giving the dip an almost bacon-like aroma. It’s a tiny ingredient with a huge impact.
- ¼ tsp garlic powder: We use powder instead of fresh here because it blends seamlessly into the sauce without risking burnt garlic bits. It’s the subtle, allium backbone.
- Optional for garnish: Chopped fresh cilantro & sliced green onions: These aren’t just pretty! They add a vital pop of fresh, herbal color and flavor right at the end, cutting through the richness perfectly.
Let’s Get Smokin’: Your Step-by-Step Roadmap to Queso Bliss
Alright, team, let’s do this. Follow these steps, embrace the stir, and you’ll be a queso hero in no time.
Step 1: Fire Up & Prep. First things first, get your smoker preheated to a steady 250°F (120°C). I like using a mild wood like apple or cherry for this, but hickory or pecan are classic and fantastic. Chef’s Hack: If you’re using a pellet grill, you’re golden. If using a charcoal smoker, add a small water pan to the chamber to help keep the environment moist and prevent the cheese from drying out at the edges.
Step 2: Brown That Sausage. While the smoker comes to temp, grab a skillet and brown your sausage (or meat of choice) over medium-high heat. Break it up into nice, small crumbles as it cooks. Once it’s beautifully browned and cooked through, drain off the excess grease. This step is crucial for flavor and texture—no one wants a greasy dip!
Step 3: The Dump & Stir (Round 1). Now, for the fun, no-fuss part. In a cast-iron skillet or a disposable aluminum pan, simply combine everything: your cubed Velveeta, browned sausage, the entire can of Rotel (juice and all!), shredded pepper jack, diced onion, diced jalapeños, smoked paprika, and garlic powder. Give it one good, initial stir to mix the ingredients. It will look chunky and disjointed—that’s perfect. Trust the process.
Step 4: Into the Smoke. Carefully place your uncovered skillet or pan directly onto the smoker grates. Close the lid and walk away. Let the smoke work its magic for 30 minutes. Pro Tip: This is a great time to prep your garnishes, set out the chips, and maybe sneak a snack.
Step 5: The Stirring Ritual. After 30 minutes, open the lid (ah, that smell!). You’ll see the cheese just starting to slump and melt. Grab a heat-resistant spatula or spoon and give the mixture a thorough, gentle stir. This helps combine the melting cheeses with the other ingredients. Repeat this stirring ritual every 30 minutes. Each time, the dip will become smoother, more cohesive, and infused with more smoky flavor. Total smoke time is 1.5 to 2 hours.
Step 6: The Grand Finale. You’ll know it’s done when the entire mixture is molten, bubbling lazily at the edges, and completely smooth. The onions and peppers will be tender, and the color will be a gorgeous, creamy orange-yellow. Carefully remove it from the smoker (remember, that handle is HOT!). Give it one final stir, sprinkle generously with your chopped cilantro and green onions, and serve immediately!
Dippin’ & Dazzlin’: How to Serve This Masterpiece
Presentation is part of the fun! I’m a huge believer in serving this dip right in the cast-iron skillet it cooked in—it holds heat for ages and looks rustic and inviting. Place the hot skillet on a trivet or a thick wooden board in the center of your table. Surround it with an arsenal of dippers: a big bowl of sturdy restaurant-style tortilla chips is non-negotiable. But let’s get creative! Add a platter of crisp bell pepper strips, carrot sticks, and cucumber rounds for a fresh, crunchy contrast. Warm, soft pretzel bites or chunks of crusty bread are also phenomenal for scooping up every last cheesy bit. And here’s a pro move: this queso makes an insane topping for baked potatoes, nachos, or even scrambled eggs the next morning (if you have leftovers, which is a big IF).
Make It Your Own: Delicious Twists on the Classic
The beauty of this recipe is its adaptability. Once you master the base, the world is your cheesy oyster. Here are a few of my favorite spins:
- The “Fully Loaded” BBQ Twist: Stir in ½ cup of your favorite BBQ sauce during the last 30 minutes of smoking, and top with a handful of crispy fried onions or crushed BBQ potato chips right before serving.
- White Queso Elegance: Swap the Velveeta for a white American cheese or a Monterey Jack. Use ground chicken or turkey sausage, a can of mild green chilies, and add a cup of frozen corn kernels for sweetness and pop.
- Tex-Mex Fiesta: Use spicy chorizo. When you stir in the final 30 minutes, add a rinsed and drained can of black beans and a cup of fresh or frozen fire-roasted corn.
- Vegetarian/Vegan Delight: Skip the meat! Use a plant-based ground “meat” crumble or simply add more veggies like sautéed mushrooms and zucchini. For vegan queso, use store-bought vegan cheese sauce or a homemade cashew-based cheese. The smoky flavor will still be incredible.
- The “Creamy Dreamy” Version: For an even richer dip, add an 8-oz block of softened cream cheese to the mix before it goes in the smoker. It adds a wonderful tang and luxurious texture.
Beau’s Kitchen Notes: The Inside Scoop
This recipe has been on quite a journey since that first smoky experiment. I’ve learned that the type of wood truly changes the personality of the dip—mesquite makes it bold and almost spicy, while fruitwoods keep it sweet and mellow. I once accidentally used “Hot” Rotel instead of Original when cooking for my neighbor’s sweet grandmother. Let’s just say she needed an extra glass of sweet tea, but she powered through like a champ! Now I always double-check the can. The biggest evolution has been embracing the stir. That regular, gentle agitation is the secret to a perfectly emulsified, non-greasy dip. It’s not a “set it and forget it” deal, but that 30-minute stir is a perfect little kitchen break to enjoy the process.
Your Queso Questions, Answered!
Q: Can I make this in an oven or slow cooker instead?
A: Absolutely! For the oven: Combine everything in an oven-safe dish, cover, and bake at 350°F until bubbly and melted, stirring occasionally. For a slow cooker: Dump everything in, cook on LOW for 2-3 hours, stirring every hour. You’ll miss the smoke flavor, but it will still be delicious. Try adding a teaspoon of liquid smoke as a cheat.
Q: My queso seems oily or has separated. What happened?
A: This usually happens if the heat was too high, causing the cheese fats to break. Next time, ensure your smoker temp is steady at 250°F or lower. If it separates, a quick fix is to whisk in a splash of milk or cream and stir vigorously—it can often bring it back together.
Q: How do I store and reheat leftovers?
A: Store cooled dip in an airtight container in the fridge for up to 4 days. Reheat gently in a saucepan over low heat, adding a tablespoon of milk or water to loosen it up, stirring constantly. The microwave also works in 30-second bursts, stirring in between.
Q: It’s too spicy for my crowd! How can I tone it down?
A: No problem! Use mild sausage, mild Rotel, remove all the seeds and ribs from your jalapeños, and substitute Monterey Jack for the pepper jack cheese. You can also stir in an extra 4 oz of plain cream cheese at the end to mellow the heat.

Irresistible Smoked Queso Dip Recipe : Perfect for Game Day or BBQs
Description
This Smoked Queso Dip is rich, creamy, and packed with bold smoky flavor that turns any gathering into an event. Melty cheese, savory sausage, and just the right amount of heat come together low and slow for a dip that disappears fast. Perfect for game day, BBQs, or anytime you want something unforgettable and easy.
Ingredients
-
1 lb Velveeta cheese, cubed
-
1 lb spicy breakfast sausage or chorizo, browned and drained
-
1 can (10 oz) Rotel diced tomatoes & green chilies, undrained
-
1 cup shredded pepper jack cheese
-
½ cup yellow onion, finely diced
-
½ cup jalapeños, diced (seeds removed for less heat)
-
½ tsp smoked paprika
-
¼ tsp garlic powder
-
Optional garnish: chopped cilantro and sliced green onions
For serving: tortilla chips, pretzel bites, bread chunks, or fresh veggies
Instructions
-
Preheat the Smoker
Heat your smoker to 250°F (120°C) using hickory, pecan, apple, or cherry wood. -
Brown the Sausage
Cook sausage in a skillet over medium heat until fully browned. Drain excess grease. -
Combine Ingredients
In a cast-iron skillet or disposable aluminum pan, add cubed Velveeta, cooked sausage, Rotel (with juice), pepper jack, onion, jalapeños, smoked paprika, and garlic powder. Stir once to combine. -
Smoke the Queso
Place the uncovered pan in the smoker. Smoke for 1½–2 hours, stirring every 30 minutes, until completely melted, smooth, and bubbling. -
Finish & Serve
Remove from the smoker, stir well, garnish with cilantro and green onions if desired, and serve hot.
Notes
-
Low and slow is key – higher heat can cause the cheese to separate.
-
Stir regularly to keep the queso smooth and evenly smoky.
-
Control the heat by choosing mild or hot Rotel and adjusting jalapeños.
-
Keep it warm by serving in the cast-iron skillet or a small slow cooker.
-
Leftovers reheat best with a splash of milk over low heat.
The Straight Talk: Nutritional Info
Okay, let’s be real here: this is a celebration dip, a treat meant to be shared and enjoyed with gusto. I’m all about balance, so enjoy this as part of a fun gathering! The following is a rough estimate per serving (about a generous ¼ cup scoop), and will vary based on your specific ingredients and dippers.
- Calories: ~210
- Protein: 10g (Thank you, sausage and cheese!)
- Fat: 17g
- Carbohydrates: 5g
- Prep Time: 15 mins | Cook Time: 2 hrs | Total Time: 2 hrs 15 mins | Servings: 10
Final Thoughts: Share the Love (& the Cheese)
And there you have it, friends—my heart and soul in a skillet. This Irresistible Smoked Queso Dip is more than a recipe; it’s a catalyst for connection. It’s about the laughter shared while waiting for that first stir, the friendly fight over the last chip-full, and the simple joy of creating something incredibly delicious without stress. I hope this recipe becomes a staple in your home, a tradition for your game days, and a dish that makes you feel like the rock

Pesto Chicken Zoodles with Sun-Dried Tomatoes : Low-Carb, Flavor-Packed Skillet
Welcome to Your New Favorite Weeknight Hero!
Hey friends, Beau here from Feastical! Let’s talk about that beautiful, busy point in the evening where hunger is real, the clock is ticking, and you want something that tastes like a vacation but feels like pulling on your favorite cozy sweater. Sound familiar? That’s exactly where this little powerhouse of a recipe comes in. Today, we’re whipping up a skillet of pure joy: Pesto Chicken Zoodles with Sun-Dried Tomatoes.
This isn’t just another “healthy” dish that leaves you dreaming of carbs. Oh no. This is a flavor-packed, low-carb celebration that’s ready in about 20 minutes flat. We’re talking tender, golden chicken tossed with vibrant, herby pesto, sweet-tangy sun-dried tomatoes, and fresh zucchini noodles that soak up all that goodness while still keeping a lovely crunch. A whisper of red pepper flakes wakes everything up just right. It’s light but deeply satisfying, fancy-feeling but shockingly simple to make. Whether you’re deep in a wellness journey, just trying to eat a few more veggies, or simply need a reliably delicious dinner, this skillet has your back. So, grab your favorite pan and let’s turn a handful of simple ingredients into a meal that’ll have everyone asking for seconds.
The Zoodle Incident & A Kitchen Revelation
I have to confess, my first date with a spiralizer did not go smoothly. Picture it: me, a mountain of zucchini confetti, and a sauce that was… well, let’s call it “experimental.” It was a mess, both in the bowl and on the floor. I remember thinking, “This is it? This is the healthy pasta alternative everyone raves about?” It tasted like watery disappointment. I almost gave up on zoodles for good.
But then, on a trip to a tiny Italian trattoria, I had a revelation. They served zucchini not as a sad pasta stand-in, but as its own glorious thing—quickly kissed by heat, tossed with bold, concentrated flavors that could stand up to it. That’s the secret! Zoodles shouldn’t try to be spaghetti; they should be the crisp, fresh vehicle for something incredibly flavorful. That memory sparked this recipe. The boldness of the pesto, the punchy sun-dried tomatoes, and the savory chicken create a sauce so delicious and clingy that the zoodles become the star, not an afterthought. It was my kitchen “aha!” moment, and I’ve been perfecting this quick skillet ever since.
Gathering Your Flavor Dream Team
Simple ingredients, massive flavor payoff—that’s the Feastical motto. Here’s what you’ll need. I’ve popped in my chef-y insights and swaps to make this recipe your own.
- 2 boneless, skinless chicken breasts, cubed: The classic lean protein. Chef’s Tip: For even more flavor and tenderness, use chicken thighs! They’re harder to overcook and stay super juicy. Just pat them dry before cubing.
- Salt and pepper to taste: Don’t be shy here. Seasoning the chicken well at the start is your first layer of flavor. It makes all the difference.
- 1 tbsp olive oil: Our cooking workhorse. If your sun-dried tomatoes are oil-packed, you can use a teaspoon of that flavorful oil here instead!
- 2 medium zucchini, spiralized: Look for firm, bright green zucchinis. Chef’s Hack: No spiralizer? A julienne peeler or even a standard veggie peeler creating wide ribbons works in a pinch!
- ⅓ cup basil pesto (store-bought or homemade): The heart of the dish! A good-quality store-bought pesto is totally fine. If you’re feeling fancy, my homemade pesto recipe is a game-changer. For a dairy-free version, look for or make a nut-based pesto.
- ¼ cup sun-dried tomatoes, chopped (oil-packed, drained): These are non-negotiable for their sweet, tangy, concentrated flavor. Always go for oil-packed—they’re softer and more flavorful than the dry ones. Don’t toss that oil! It’s liquid gold for dressings or cooking.
- ¼ tsp crushed red pepper flakes (optional): The “secret” kick. It doesn’t make the dish spicy, just beautifully warm and complex. Trust me on this one.
- Fresh basil or Parmesan for garnish: The finishing touches! A few torn basil leaves add freshness, and a sprinkle of Parmesan (or a dairy-free alternative) adds a salty, umami punch.
Let’s Get Cooking: Your Simple, Sizzling Steps
This comes together faster than you can decide what to watch tonight. Follow these steps for perfect, non-soggy, flavor-packed results every time.
- Heat the Stage: Add your olive oil to a large skillet and place it over medium heat. Let it get shimmering hot—this ensures our chicken gets a nice sear instead of steaming. A hot pan is your first secret weapon against bland food.
- Brown the Chicken: While the pan heats, season your cubed chicken generously with salt and pepper. Add it to the hot skillet in a single layer. Here’s my big tip: don’t move it right away! Let it sit for 2-3 minutes to develop a beautiful golden-brown crust. Then, stir and continue cooking for another 4-5 minutes until cooked through. Remove the chicken to a clean plate. This prevents overcooking and keeps it tender.
- Wake Up the Tomatoes: In the same pan (with all those delicious chicken bits still in there!), toss in your chopped sun-dried tomatoes. Stir them around for just about 60 seconds. This quick fry in the flavorful oil wakes up their taste and makes them even more delicious.
- Zoodle Time – Be Quick! Now, reduce the heat to medium-low. Add your spiralized zucchini directly to the skillet. Here’s the critical move: toss, don’t stew! You’re just warming them through and letting them soften slightly, about 2-3 minutes. We want “al dente” zoodles with a bit of bite, not a watery mush. If there’s a lot of liquid in the pan, crank the heat up for the last 30 seconds to evaporate it.
- The Grand Toss: Return the cooked chicken to the skillet. Add the pesto and the red pepper flakes (if using). Now, using a gentle folding motion, toss everything together until it’s beautifully and evenly coated in that gorgeous green pesto. The residual heat will warm everything through perfectly. Taste it! This is your moment to add an extra pinch of salt or pepper if needed.
- Serve with Love: Get it out of the pan and onto plates immediately. Garnish with fresh basil and/or a sprinkle of Parmesan. Dinner is served, just like that!
How to Plate This Beauty
Presentation is part of the fun! For a restaurant-style look, use tongs to create a little nest of zoodles on the plate, then artfully pile the chicken and tomatoes on top. Drizzle any extra pesty sauce from the pan over everything. A final flourish of bright green basil leaves and a snow-like dusting of Parmesan makes it irresistible.
What to serve with it? It’s a complete meal in a skillet, but if you’re feeding a crowd or want to round it out, I love it with a simple side of garlic-rubbed toasted bread (for the non-low-carb folks at the table) or a crisp, clean arugula salad with a lemon vinaigrette. It cuts through the richness beautifully. And a chilled glass of Pinot Grigio or Sauvignon Blanc? Perfection.
Make It Your Own: 5 Flavorful Twists
This recipe is a fantastic blueprint. Here’s how to play with it!
- “Creamy” Dreamy: Stir in 2-3 tablespoons of heavy cream, crème fraîche, or (for dairy-free) full-fat coconut milk right after the pesto for a luxurious, creamy sauce.
- Seafood Swap: Replace the chicken with large shrimp or scallops. Cook them quickly after the tomatoes, just until opaque, then remove and add back at the end.
- Veggie Powerhouse: Make it vegetarian! Skip the chicken and add a can of drained, rinsed white beans or chickpeas when you add the tomatoes. For more veg, toss in a handful of spinach with the zoodles.
- Pesto Remix: Swap the basil pesto for sun-dried tomato pesto (double the tomato punch!) or a vibrant kale pesto. Each one creates a totally different vibe.
- Cheesy Baked Finish: Transfer the finished mixture to a baking dish, top with a mix of mozzarella and Parmesan, and broil for 2-3 minutes until bubbly and golden for a baked casserole version.
Beau’s Kitchen Notebook
This recipe lives in my weekly rotation, and it’s evolved in funny ways. I once accidentally used a whole teaspoon of red pepper flakes (note: do not measure while chatting animatedly). Let’s just say it was *fiery*, but my heat-loving cousin declared it the best thing ever. Another time, I subbed in yellow summer squash for half the zucchini, and the color was so cheerful! The biggest lesson? Zoodles wait for no one. Have all your ingredients prepped and ready before you heat the pan, because once you start, it’s a fast, delicious blur. This dish forgives improvisation but rewards a bit of prep.
Your Questions, Answered
Q: My zucchini released so much water and the dish got soupy. What happened?
A: The most common culprit is overcrowding the pan or cooking the zoodles too long. Use the largest skillet you have, don’t add salt to the zoodles directly (the pesto has salt), and keep the sauté quick and hot. If it looks watery, just crank up the heat at the end and toss constantly for an extra minute to evaporate the liquid.
Q: Can I make this ahead of time?
A> You can prep the components! Cube and season the chicken, spiralize the zucchini (store it in a sealed container with a paper towel to absorb moisture), and chop the tomatoes. But for the best texture, cook and assemble just before serving. Leftovers are tasty, but the zoodles will soften.
Q: What’s the best store-bought pesto brand?
A: I’m a fan of brands that use olive oil and have a short ingredient list, like DeLallo or Seggiano. Check the refrigerated section near the pasta for fresher options. Or, try your local gourmet market—they often have fantastic fresh pesto.
Q: Is this recipe gluten-free and keto-friendly?
A> Yes and yes! All the ingredients are naturally gluten-free (just double-check your pesto label for any additives). With only 9g net carbs per serving, it fits beautifully into a keto lifestyle.
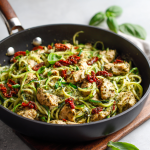
Pesto Chicken Zoodles with Sun-Dried Tomatoes : Low-Carb, Flavor-Packed Skillet
Description
This Pesto Chicken Zoodles skillet is the perfect balance of light and satisfying. Tender chicken, bold basil pesto, and sweet-tangy sun-dried tomatoes come together with fresh zucchini noodles for a low-carb dinner that feels comforting, vibrant, and a little bit fancy—ready in just 20 minutes.
Ingredients
-
2 boneless, skinless chicken breasts, cubed
-
Salt and black pepper, to taste
-
1 tbsp olive oil
-
2 medium zucchini, spiralized
-
⅓ cup basil pesto (store-bought or homemade)
-
¼ cup sun-dried tomatoes, chopped (oil-packed, drained)
-
¼ tsp crushed red pepper flakes (optional)
-
Fresh basil or grated Parmesan, for garnish
Instructions
-
Cook the Chicken
Heat olive oil in a large skillet over medium heat. Season chicken with salt and pepper, then add to the pan. Cook 6–7 minutes, stirring occasionally, until golden and cooked through. Remove chicken to a plate. -
Warm the Tomatoes
In the same skillet, add sun-dried tomatoes and cook for about 1 minute to release their flavor. -
Add the Zoodles
Lower heat to medium-low. Add zucchini noodles and toss gently for 2–3 minutes, just until slightly tender but not watery. -
Combine & Finish
Return chicken to the skillet. Add pesto and red pepper flakes (if using). Toss gently until everything is evenly coated and warmed through. -
Serve
Plate immediately and garnish with fresh basil or Parmesan.
Notes
-
Don’t overcook the zoodles—they should be tender-crisp, not soft.
-
Use a large skillet to avoid excess moisture from the zucchini.
-
Chicken thighs can be used for extra juiciness.
-
Taste before salting at the end—pesto and sun-dried tomatoes are already salty.
Nutritional Breakdown (Per Serving)
Approximate values for 1 of 2 servings: Calories: 410 | Protein: 35g | Total Carbs: 9g | Dietary Fiber: 3g | Net Carbs: 6g | Fat: 26g
This dish is a nutritional powerhouse! The high-quality protein from the chicken helps keep you full, while the healthy fats from the olive oil, pesto (often made with pine nuts and olive oil), and sun-dried tomatoes support nutrient absorption and satiety. Zucchini is low in calories but provides vitamin C, potassium, and antioxidants. It’s a meal that fuels your body without weighing you down, perfect for a balanced, energy-sustaining diet.
Dig In & Enjoy the Good Vibes
And there you have it, friends—my go-to recipe for when life is moving fast but I still want to eat something that feels special. This Pesto Chicken Zoodles skillet is proof that eating well doesn’t have to be complicated, time-consuming, or boring. It’s a bowlful of vibrant, herby, tangy goodness that comes together in the time it takes to set the table.
Final Thoughts
So there you have it—a recipe that’s more than just dinner; it’s a reminder that good food doesn’t have to be complicated. This Pesto Chicken Zoodles skillet is proof that with a handful of fresh ingredients and a few smart tricks, you can turn an ordinary weeknight into something that feels a little like magic. It’s quick, vibrant, and packed with flavor—exactly what busy lives and hungry bellies need.
Whether you’re cooking for one, for a family, or just meal-prepping your way to better eats, this dish is here to make things easier—and more delicious. Remember: it’s not about perfection. It’s about tossing together real ingredients with a little confidence, and ending up with a meal that truly satisfies. So don’t stress over the spiralizer, don’t worry if your pan’s a little crowded—just cook, taste, and enjoy.
I hope this recipe brings as much ease and joy to your kitchen as it has to mine. Give it a try, make it your own, and share your twists. Food is always better when it’s shared—even if it’s just across a screen.
Now go grab that skillet and treat yourself to something good. You’ve earned it.
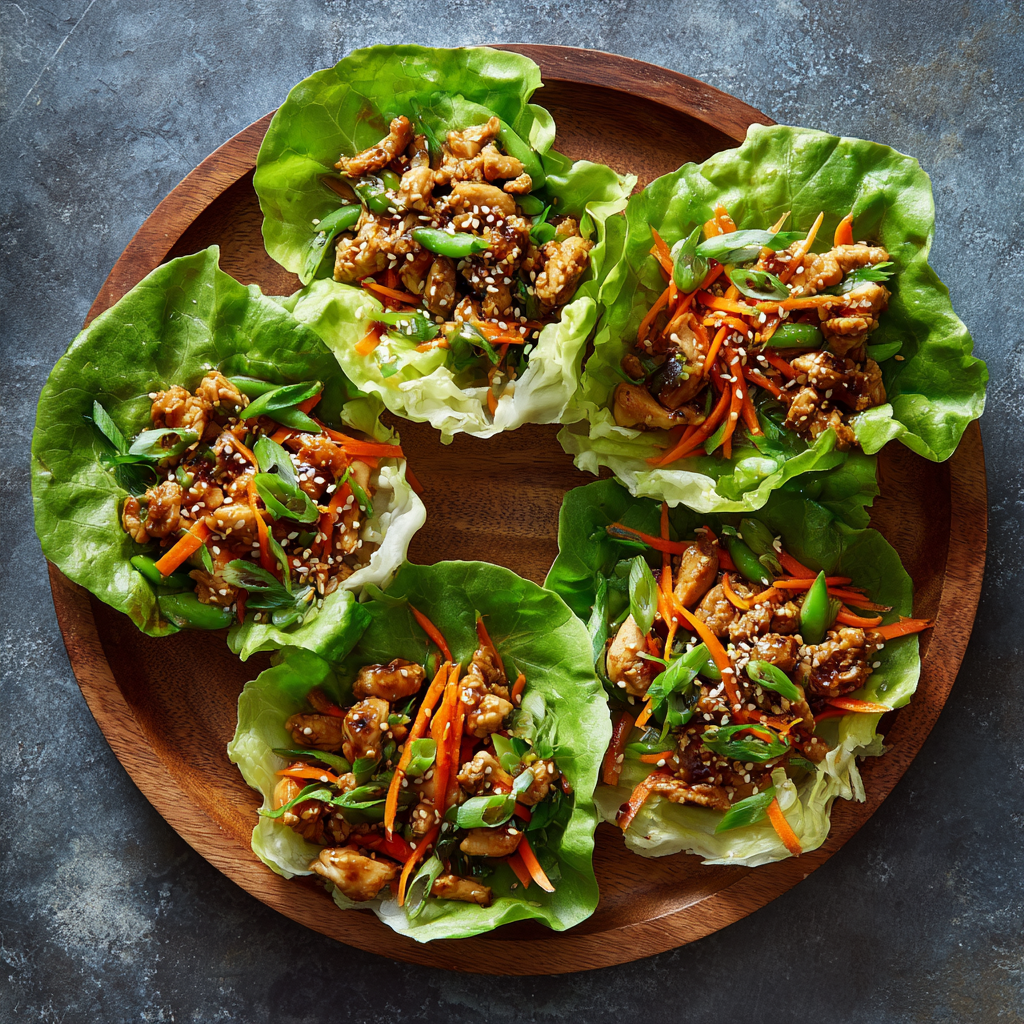
Honey Ginger Chicken Lettuce Cups : Fresh, Fast & Flavor-Packed
The Dinner That Feels Like a Fresh Start: Honey Ginger Chicken Lettuce Cups
Hey friends, Beau here from Feastical! Ever have one of those days where you stare into the fridge, willing dinner to magically appear? You want something that feels light but is still totally satisfying, something that won’t weigh you down but will absolutely wake up your taste buds. Yeah, me too. That’s exactly why these Honey Ginger Chicken Lettuce Cups are my go-to superhero on a busy weeknight.
We’re talking juicy, savory-sweet stir-fry with a gingery kick, tucked into cool, crisp cups of butter lettuce. It’s a fork-optional, flavor-mandatory kind of meal. This isn’t just “healthy food”—it’s a vibrant, textural party in your mouth. The crunch of the snap peas, the slight sweetness of the carrot, that sticky honey-ginger glaze hugging every bit of chicken… it’s a symphony of fresh, fast, and fabulous.
The best part? It comes together faster than your favorite delivery app could ever dream of. In about 20 minutes, you go from “what’s for dinner?” to sitting down to a meal that feels special, nourishing, and downright delicious. So, let’s ditch the complicated steps and the mountain of dishes. Grab your favorite skillet and let’s make a meal that’s as fun to assemble as it is to eat. Trust me, your spatula (and your family) will thank you.
My Love Letter to Lettuce Cups (And A Kitchen Disaster)
My obsession with lettuce cups started not in some fancy restaurant, but in my own kitchen, during what I lovingly call The Great Taco Salad Spill of 2019. Picture it: a heaping, glorious taco salad, beautifully arranged in a giant, crispy tortilla bowl. I went to carry it to the table for a photo (priorities, people!), and… physics happened. The bowl cracked, sending seasoned ground beef, shredded cheese, and a river of salsa straight onto the floor. My dog was thrilled. I was devastated.
In a desperate, hungry rage, I looked at the sad, intact inner leaves of the romaine heart I’d used for garnish. I scooped the surviving filling into one, took a bite, and had a full-on culinary epiphany. It was better. Lighter, fresher, and you could actually taste all the components! That mess taught me that sometimes, the simplest vessel is the best one. These Honey Ginger Chicken Lettuce Cups are the elegant, Asian-inspired evolution of that messy lesson. They prove that food doesn’t need to be complicated or heavy to be utterly soul-satisfying. Sometimes, dinner is literally in your hands.
Gathering Your Flavor Arsenal
Here’s the beautiful cast of characters for our 20-minute dinner show. I’ve added my little chef-y notes to help you shop and swap with confidence!
- 1 lb ground or finely diced chicken breast or thighs: Thighs are my secret for guaranteed juiciness and richer flavor, but breast works great for a leaner option. If you’re dicing, aim for small, bite-sized pieces so they cook in a flash.
- 1 tbsp sesame oil (or any neutral oil): Toasted sesame oil is a flavor POWERHOUSE. It gives that authentic, nutty base note. If you don’t have it, avocado or vegetable oil works—just add a sprinkle of sesame seeds later for that flavor.
- 2 garlic cloves, minced & 1 tbsp fresh ginger, grated: The dynamic duo! Please, please use fresh. That jarred stuff can’t compete. Pro tip: Keep ginger in the freezer and grate it frozen—no peeling, no mess!
- 1 cup shredded carrots & 1 cup snap peas, trimmed and sliced: Our crunch committee. Buy pre-shredded carrots to save time! For snap peas, a quick diagonal slice makes them look fancy and helps them cook evenly.
- 2 tbsp low-sodium soy sauce, 1 tbsp honey, 1 tbsp rice vinegar: The simple, magical trifecta for our glaze. Soy for salt, honey for sweet, vinegar for bright tang. For gluten-free, use tamari or coconut aminos.
- 1 tsp cornstarch mixed with 2 tsp water (optional): This is your “sauce control” button. Want it thicker and clingier? Use it. Like it looser? Skip it. Easy.
- Butter lettuce leaves (about 12): The perfect, soft, cup-shaped vessel. Bibb or little gem lettuce are perfect twins. Romaine hearts can work in a pinch—use the small, cup-like inner leaves.
- Sesame seeds & green onions (for garnish): Don’t you dare skip these! They add visual pop, a tiny crunch, and a fresh oniony finish that ties the whole dish together.
Let’s Get Cooking: Your Foolproof Roadmap to Delicious
Ready? Apron on, music up, let’s do this. We’re using the stir-fry method: high heat, quick moves, big flavor.
- The Sizzle Start: Heat that sesame oil in a large skillet or wok over medium-high heat. You want it shimmering but not smoking. Add your chicken, breaking it up with a spoon if it’s ground. Cook, stirring occasionally, until it’s no longer pink and getting some golden spots. This is where flavor foundation is built! Chef Hack: Don’t crowd the pan! If you’re doubling the recipe, cook the chicken in two batches. Steaming = sad, pale chicken.
- Wake Up the Aromatics: Push the chicken to the side. Add the minced garlic and grated ginger right into the center of the pan. Let them sizzle and become fragrant for just 30 seconds—you’ll smell it! This quick bloom unlocks all their oils and flavor. Now, stir them into the chicken.
- Crunch Time: Toss in your shredded carrots and sliced snap peas. Stir-fry for 2-3 minutes. We want them vibrant and tender-crisp, not mushy. They should still have a happy snap to them! Chef Hack: Having all your veggies prepped and in little bowls before you start cooking (your mise en place) makes this step feel like a TV cooking show. No frantic chopping!
- Create the Glaze: While the veggies are cooking, quickly whisk together the soy sauce, honey, and rice vinegar in a small bowl. Pour this glorious mixture over everything in the skillet. It will bubble and sizzle beautifully. Stir to coat every piece and let it simmer together for about 2 minutes.
- Sauce Control (Optional): If you want a thicker, glossier sauce that really coats the filling, give your cornstarch slurry a final stir and drizzle it into the center of the skillet. Stir constantly—you’ll see it thicken almost immediately. Take the pan off the heat once it’s perfect.
- The Grand Finale – Assembly: Carefully separate your butter lettuce leaves, giving them a quick rinse and pat dry. Arrange them on a big platter like little edible bowls. Spoon the warm honey ginger chicken mixture right into the center of each leaf. Top generously with sliced green onions and a shower of sesame seeds. Serve immediately and watch the smiles appear.
How to Serve These Beauties
Presentation is half the fun here! I love serving this family-style. Pile the warm chicken filling in a beautiful bowl right in the center of the table, with the platter of lettuce leaves and bowls of garnishes (extra green onions, sesame seeds, maybe some sliced chili) around it. Let everyone build their own perfect cup. It’s interactive, it’s fun, and it means less work for you!
While these lettuce cups are a complete meal on their own, they love company. For a more substantial spread, pair them with a simple side of jasmine rice or cauliflower rice to soak up any extra sauce. A light, crunchy Asian-inspired cucumber salad with a little rice vinegar and salt would be a phenomenal sidekick. And to drink? A crisp lager, chilled green tea, or sparkling water with a slice of lime are all perfect matches.
Make It Your Own: Endless Twists & Swaps
This recipe is a fantastic blueprint. Play with it! Here are a few of my favorite riffs:
- The “Other Bird” Version: Swap the chicken for ground turkey or even ground pork for a slightly richer flavor. Just adjust cooking time as needed until fully cooked.
- Plant-Powered Perfection: Crumble in extra-firm tofu or tempeh when you’d add the chicken. For a heartier veggie mix, add diced shiitake mushrooms or chopped water chestnuts for an extra crunch.
- Sweet & Heat: Add 1-2 teaspoons of sriracha or a few dashes of chili garlic sauce to the glaze mixture. Garnish with thin slices of fresh jalapeño for those who dare!
- Nutty Delight: Stir in a handful of chopped cashews or peanuts right at the end for a fantastic textural contrast and rich flavor.
- Citrus Zing: Add the zest of one lime or orange to the glaze, or squeeze a wedge over your assembled cup right before eating for a bright, fresh pop.
Beau’s Back-Pocket Kitchen Notes
Over the years, this recipe has seen it all in my kitchen. I’ve made it for first dates (impressive but not fussy), for sick friends (feels healing), and for myself on countless “I need something good” nights. The biggest evolution? Embracing the mess. These are meant to be eaten with your hands, and a little drippy sauce is a sign of a good time. I also learned that doubling the garlic and ginger is never a bad idea—it’s your kitchen, your rules.
One funny fail: I once tried to use iceberg lettuce because it was on sale. Friends, it’s too stiff and watery! The cup cracked the second I tried to pick it up, leading to… you guessed it, another floor salad. Stick with the soft, pliable butter or Bibb. They’re the cozy, edible blankets your filling deserves.
Your Questions, Answered
Q: My filling is getting watery in the skillet! Help!
A: This usually means the pan wasn’t hot enough when you added the veggies, or they were added frozen/wet. Make sure your pan is nice and hot before adding, and always pat your fresh veggies dry. The cornstarch slurry also helps tighten everything up.
Q: Can I make this ahead of time?
A> Absolutely! Cook the filling completely, let it cool, and store it in an airtight container in the fridge for up to 2 days. Reheat gently in a skillet. Keep the lettuce leaves separate and store them wrapped in a damp paper towel in a bag in the fridge. Assemble just before serving to keep the lettuce crisp.
Q: My lettuce cups keep falling apart when I eat them. What am I doing wrong?
A> Two tips: 1) Don’t overfill them! They’re delicate. A heaping spoonful is plenty. 2) Use two leaves nested together for a sturdier “double-walled” cup. It’s my go-to move for extra saucy fillings.
Q: What’s the best substitute for soy sauce to make this gluten-free?
A> Tamari is your best friend here—it’s naturally gluten-free and has a very similar flavor profile. Coconut aminos are a great, slightly sweeter option too.

Honey Ginger Chicken Lettuce Cups : Fresh, Fast & Flavor-Packed
Description
These Honey Ginger Chicken Lettuce Cups are the perfect answer to busy nights when you want something fresh but still satisfying. Juicy chicken is cooked in a sweet-savory honey ginger sauce, then spooned into crisp lettuce cups for a fun, hands-on meal that’s ready in about 20 minutes.
Ingredients
-
1 lb ground chicken (or finely diced chicken breast or thighs)
-
1 tbsp sesame oil (or neutral oil)
-
2 cloves garlic, minced
-
1 tbsp fresh ginger, grated
-
1 cup shredded carrots
-
1 cup snap peas, sliced
-
2 tbsp low-sodium soy sauce (or tamari for gluten-free)
-
1 tbsp honey
-
1 tbsp rice vinegar
-
1 tsp cornstarch mixed with 2 tsp water (optional, for thicker sauce)
-
Butter lettuce leaves (about 12)
-
Green onions and sesame seeds, for garnish
Instructions
-
Cook the Chicken
Heat sesame oil in a large skillet over medium-high heat. Add chicken and cook, breaking it up, until fully cooked and lightly browned. -
Add Aromatics
Push chicken to one side. Add garlic and ginger to the pan and cook for about 30 seconds until fragrant. Stir into the chicken. -
Add Vegetables
Stir in carrots and snap peas. Cook 2–3 minutes until tender-crisp. -
Make the Sauce
In a small bowl, mix soy sauce, honey, and rice vinegar. Pour into the skillet and stir well. Simmer for 2 minutes. -
Thicken (Optional)
If desired, stir in the cornstarch mixture and cook until the sauce thickens, about 30 seconds. -
Serve
Spoon the warm chicken mixture into lettuce leaves. Garnish with green onions and sesame seeds. Serve immediately.
Notes
-
Use fresh ginger and garlic for the best flavor.
-
Don’t overfill the lettuce cups—two small spoonfuls are perfect.
-
Double up lettuce leaves if you want sturdier cups.
-
Nutritional Info (A Quick Breakdown)
Alright, let’s talk numbers for those who are curious! This info is for approximately three lettuce cups (one serving), using chicken breast and including all the sauce.
Per Serving: Calories: ~290 | Protein: 28g | Carbohydrates: 12g | Dietary Fiber: 3g | Total Sugars: 7g (primarily from honey and carrots) | Total Fat: 14g
Why this is a nutritional win: This meal is a fantastic source of lean protein from the chicken, keeping you full and satisfied. The carbs are relatively low and come from good sources like vegetables and a touch of honey. Using lettuce as the “wrap” instead of a tortilla or bread saves a significant amount of carbs and calories, making this a naturally low-carb, gluten-friendly option. The sesame oil provides healthy fats, and the colorful veggies add vitamins and fiber. It’s a balanced, energizing meal that won’t leave you in a food coma!
Your New Weeknight Secret Weapon
So there you have it, my food-loving friend. These Honey Ginger Chicken Lettuce Cups are more than just a recipe—they’re a reminder that eating well doesn’t have to be complicated, time-consuming, or boring. It’s about fresh ingredients, big flavors, and the simple joy of sharing a meal that makes everyone feel good.
I hope you make them, love them, and put your own spin on them. Tag me @Feastical if you do—I live for seeing your kitchen creations. Now go forth, stir-fry with confidence, and remember: the best meals are the ones made with a little bit of love and a whole lot of flavor. Until next time, keep your spatula close and your appetite closer!
Final Thoughts
In the end, it’s about the contrast: the warm, savory-sweet sizzle of the filling meeting the cool, crisp cup. The vibrant colors against the pale green lettuce. The quiet simplicity of a meal that requires nothing but your hands and your appetite.
This is more than a recipe; it’s a feeling. It’s the feeling of lightness, of vitality, of having created something wonderfully delicious without any struggle. Keep this one in your back pocket. Let it be your secret weapon for busy nights, for feeling good, for feeding people you love. That’s the real magic of a great dinner.
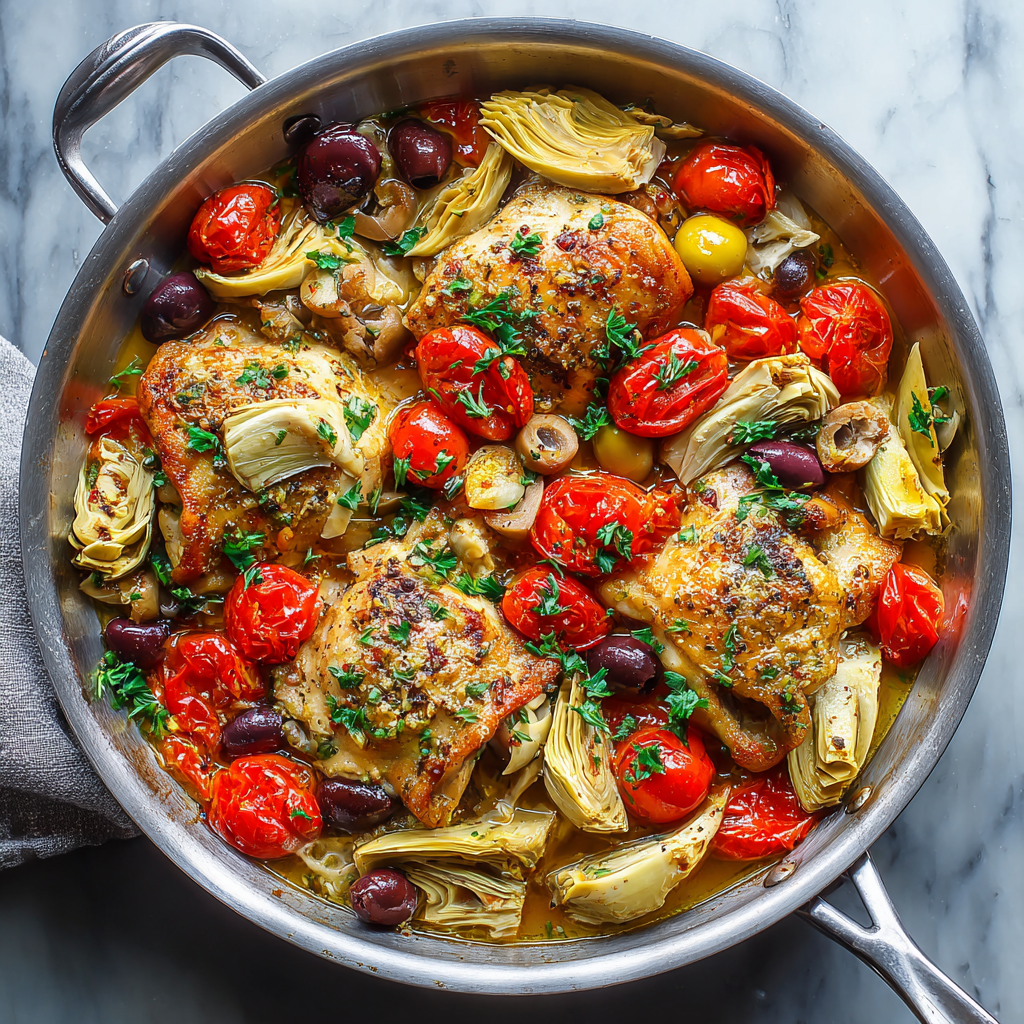
Mediterranean Chicken with Artichokes, Olives & Cherry Tomatoes
Mediterranean Chicken: A Sunny, One-Pan Escape to Your Dinner Table
Hey friends, Beau here. Can we just agree that some nights, you want a meal that feels like a vacation? Something that conjures up images of sun-drenched coastlines, bustling markets, and the kind of simple, honest food that’s made for sharing and laughter around a big table. But, you know, without the flight hassle, the packing, or the whole “figuring out a foreign currency” thing.
That’s exactly the magic I’m bringing to your kitchen today. This isn’t just another chicken recipe. This is a one-pan Mediterranean masterpiece—a passport to flavor town. We’re talking tender, golden-seared chicken thighs, simmering in their own glorious juices with sweet, burst cherry tomatoes, briny kalamata olives, and those meaty, tender artichoke hearts that just soak up all the goodness. The air fills with the scent of garlic, oregano, and olive oil, and for a moment, you’re not just making dinner; you’re crafting a mood, an experience, a warm hug in a skillet.
The best part? This culinary escape takes under an hour and uses just one pan. I’m all about big flavor, not a big mess. So, whether you’re a weeknight warrior looking for a reliable hero or you want to impress guests with minimal fuss, this dish is your new best friend. Grab your favorite skillet, and let’s turn your kitchen into a little corner of the Mediterranean.
A Taste of Memory: Where This Recipe Really Came From
This recipe always takes me back to a tiny, family-run taverna on a Greek island. The tables were wobbly, the chairs mismatched, and the menu was basically, “Tell us what you feel like.” The owner, Yianni, just started bringing out plates. One of them was a simple clay pot of chicken, tomatoes, and olives, simmering away until it was fall-apart tender. It was rustic, unpretentious, and utterly unforgettable.
Back home, I must have tried to recreate that flavor a dozen times. My early attempts were… well, let’s call them “learning experiences.” Too many spices, not enough simmering, you name it. But then I realized the secret wasn’t in a long list of ingredients; it was in the technique and the quality of a few key players. Searing the chicken to build a flavorful “fond” (those tasty browned bits at the bottom of the pan) is non-negotiable. Letting the tomatoes burst and mingle with the olive oil and garlic creates the sauce’s soul. It’s a lesson in patience and simplicity that Yianni would probably nod approvingly at. Every time I make this now, I’m back at that wobbly table, listening to the sea.
Gathering Your Sunshine: Ingredients & Chef Insights
Here’s your shopping list for flavor. Don’t stress if you need to swap something—cooking is about making it work for you! I’ve included my best tips for each.
- 4 boneless, skinless chicken thighs (or 2 large breasts): I highly recommend thighs. They’re more forgiving, staying juicy and tender through the braising process. If you use breasts, pound them to an even thickness so they cook at the same rate.
- 2 tbsp good olive oil: This is the backbone of Mediterranean cooking. Use the best extra-virgin olive oil you have for drizzling or finishing; a regular olive oil is perfect for searing here.
- 3 garlic cloves, minced: Fresh is best! Don’t be shy with it. That pungent, aromatic punch is essential.
- 1 cup cherry or grape tomatoes: The little bursts of sweetness! In winter, when tomatoes are sad, use the best-quality canned cherry tomatoes you can find. Drain them slightly.
- 1 cup canned or jarred artichoke hearts, quartered: I prefer the tender, brine-packed ones in a jar over the canned (which can be metallic). Give them a quick rinse to remove excess brine.
- ½ cup kalamata olives, pitted: That salty, briny punch is irreplaceable. No kalamatas? Castelvetrano olives offer a buttery, milder alternative.
- ½ cup low-sodium chicken broth: Low-sodium lets you control the salt level. Vegetable broth works great for a pescatarian twist!
- 1 tsp dried oregano: Rub it between your palms as you add it to wake up the oils. Fresh oregano is lovely too—use about 1 tablespoon chopped.
- Salt & pepper to taste: Season your chicken generously before searing. That’s Flavor Rule #1.
- Chopped fresh parsley (for garnish): That fresh, green finish makes everything pop. Fresh dill or basil would also be stunning.
- Farro or couscous, for serving: Farro is my hearty, nutty whole-grain favorite. Couscous is the 5-minute, fluffy classic. Orzo or crusty bread are also perfect for sopping up the sauce.
Let’s Get Cooking: Your Step-by-Step Journey
Alright, team. Aprons on, music up. Let’s turn these ingredients into magic. Remember, we’re building layers of flavor here, so follow each step with love (and maybe a little dance move while you stir).
Step 1: The Golden Sear
Pat your chicken thighs completely dry with paper towels. This is the *secret* to getting a beautiful, crisp sear instead of a steam. Season them liberally on both sides with salt, pepper, and that awakened dried oregano. Heat your olive oil in a large skillet or Dutch oven over medium-high heat until it shimmers. Carefully add the chicken. Now, the hard part: don’t touch it! Let it sear undisturbed for a good 4-5 minutes, until it releases easily and has a gorgeous golden-brown crust. Flip and sear the other side for 3-4 minutes. It won’t be cooked through yet—that’s perfect! Remove to a plate. See those gorgeous browned bits in the pan? That’s liquid gold, called “fond.” We’re using it next.
Step 2: Building the Flavor Base
Reduce the heat to medium. In that same glorious pan with all the chicken drippings and fond, add your minced garlic. Stir for just 30 seconds until fragrant—don’t let it burn! Now, toss in all those cherry tomatoes. Let them hang out for 4-5 minutes, shaking the pan occasionally. You’ll hear them sizzle, then start to soften and their skins will wrinkle and split. As they burst, they release their sweet juices, which mingles with the fond and oil to start our sauce. Use your spatula to gently press a few to help them along.
Step 3: The Braising Bath
Time to bring the band together! Add the quartered artichoke hearts and pitted olives to the pan, giving everything a good stir. Pour in the chicken broth and use your spatula to scrape up any remaining fond from the bottom of the pan—that’s pure flavor. Now, nestle the seared chicken thighs back into the pan, along with any juices that accumulated on the plate. The sauce should come about halfway up the chicken.
Step 4: Simmer to Perfection
Cover the pan with a lid, reduce the heat to low, and let it simmer gently for 15-20 minutes. This gentle braising is what transforms the chicken from seared to succulent and lets all the flavors marry. If you used chicken breasts, check at 12-15 minutes. The chicken is done when it reaches 165°F internally or the juices run clear. The sauce will have reduced slightly and become incredibly fragrant.
Step 5: The Grand Finale
While the chicken simmers, cook your farro or couscous according to package directions. When the chicken is done, taste the sauce. Does it need another pinch of salt or a crack of pepper? Adjust now. To serve, spoon a generous bed of your chosen grain onto a plate or shallow bowl. Top with a chicken thigh and plenty of the chunky, vibrant sauce, artichokes, and olives. Finish with a generous sprinkle of fresh, chopped parsley. That green garnish isn’t just pretty—it adds a vital fresh note.
How to Serve It: Beyond the Plate
Presentation is part of the fun! I love serving this family-style right in the skillet (on a trivet, please!) in the middle of the table. Let everyone dig in and create their own plate. For a real Mediterranean vibe, add a few small bowls on the table: a dollop of tangy, whole-milk Greek yogurt or tzatziki for cooling contrast, a wedge of lemon for squeezing, and a basket of warm, crusty bread or grilled pita for wiping the skillet clean. A simple arugula salad with a lemon vinaigrette on the side is the perfect crisp, peppery counterpoint to this rich, savory dish. Don’t forget the drinks—a crisp, cold glass of Assyrtiko wine or even sparkling water with lemon makes it a celebration.
Make It Your Own: Delicious Recipe Variations
The beauty of this dish is its adaptability. Play with it!
- Lemon & Herb Bliss: Add the zest of one lemon to the sauce with the broth, and stir in 2 tablespoons of chopped fresh herbs (like dill, parsley, and mint) right before serving.
- Spanish Twist: Swap the olives for manzanilla olives, add a pinch of smoked paprika (pimentón) with the oregano, and throw in some roasted red pepper strips with the artichokes.
- Seafood Swap: For a pescatarian option, use large, wild-caught shrimp or firm white fish fillets (like cod or halibut). Sear them quickly first, then add them back for just the last 5 minutes of simmering to heat through.
- Creamy Dreamy: For a richer, stew-like sauce, stir in ¼ cup of heavy cream or full-fat coconut milk (for dairy-free) during the last 2 minutes of cooking. Heat gently—do not boil.
- Feta Fanatic: Crumble a handful of high-quality Greek feta cheese over the dish just before serving. The salty, creamy tang is absolutely incredible.
Beau’s Kitchen Notes: The Real Talk
This recipe has been a work in progress for years. My first attempt? I used *canned black olives* (I know, I know) and didn’t sear the chicken properly. It was… fine. But fine isn’t what we’re after! The breakthrough was learning to trust the sear and to source better olives and artichokes. It makes all the difference. Also, don’t be afraid if your sauce seems a little loose after braising. Once you plate it over a grain, it’s the perfect consistency. And if you have leftovers (lucky you!), they taste even better the next day. The flavors deepen and meld in the fridge. Just reheat gently on the stove.
Your Questions, Answered: FAQs & Troubleshooting
- Q: My chicken turned out dry. What happened?
A: The most likely culprit is overcooking. If using breasts, they cook faster than thighs. Always use a meat thermometer and pull the chicken at 165°F. Also, ensuring a good sear locks in those juices before the braise! - Q: Can I make this ahead of time?
A: Absolutely! You can sear the chicken and make the entire sauce base (through Step 3) up to a day ahead. Store separately in the fridge. When ready, gently reheat the sauce, add the chicken, and complete the braising step. It might need a few extra minutes since it’s starting cold. - Q: I don’t like olives. What can I use instead?
A: No problem! Try adding 2 tablespoons of briny capers (rinse them first) or even some chopped sun-dried tomatoes for a different kind of savory punch. - Q: My sauce is too thin/too thick. Help!
A: Too thin? Uncover the pan after braising and let it simmer for another 3-5 minutes to reduce. Too thick? Add a splash more broth or even a little water to loosen it up to your liking.
Mediterranean Chicken with Artichokes, Olives & Cherry Tomatoes
Description
This Mediterranean Chicken is an easy, one-pan dinner that brings bright, coastal flavors to your table without any fuss. Juicy chicken simmers with tomatoes, olives, artichokes, garlic, and oregano for a meal that feels special yet works perfectly on a busy weeknight.
Ingredients
-
4 boneless, skinless chicken thighs (or 2 large chicken breasts, pounded evenly)
-
2 tbsp olive oil
-
3 garlic cloves, minced
-
1 cup cherry or grape tomatoes
-
1 cup artichoke hearts, quartered (drained)
-
½ cup kalamata olives, pitted
-
½ cup low-sodium chicken broth
-
1 tsp dried oregano
-
Salt and black pepper, to taste
-
Fresh parsley, chopped (for garnish)
For serving (optional): couscous, farro, rice, or crusty bread
Instructions
-
Sear the Chicken
Pat the chicken dry and season with salt, pepper, and oregano. Heat olive oil in a large skillet over medium-high heat. Sear chicken 4–5 minutes per side until golden. Remove to a plate (it will finish cooking later). -
Build the Sauce
Lower heat to medium. Add garlic and cook for 30 seconds until fragrant. Add tomatoes and cook 4–5 minutes until they soften and begin to burst. -
Simmer
Stir in artichokes and olives. Pour in chicken broth, scraping up any browned bits from the pan. Return chicken (and juices) to the skillet. -
Cook Through
Cover and simmer on low for 15–20 minutes, until chicken is tender and cooked through (165°F / 74°C). -
Serve
Taste and adjust seasoning. Garnish with fresh parsley and serve over your favorite grain or with bread.
Notes
-
Use chicken thighs for juicier results; they’re more forgiving than breasts.
-
Don’t skip the sear—it adds big flavor to the sauce.
-
Rinse artichokes lightly to remove excess brine if they’re very salty.
-
Sauce too thin? Simmer uncovered for a few extra minutes.
-
Leftovers taste even better the next day as flavors deepen.
Nutritional Info (A General Guide)
Disclaimer: The following is an estimate for one serving (one chicken thigh with sauce), served over ¾ cup of cooked whole-wheat couscous, using standard ingredients. Values can vary based on specific brands and portion sizes.
- Calories: ~450 kcal
- Protein: 35g (Excellent for staying full!)
- Carbohydrates: 28g
- Dietary Fiber: 5g (Thanks, artichokes and whole grains!)
- Sugars: 4g (Naturally occurring from tomatoes)
- Fat: 22g (Mostly from the healthy monounsaturated fats in olive oil and olives)
This dish is a fantastic balanced meal, providing high-quality protein, complex carbs, and healthy fats. It’s naturally gluten-free if you serve it with quinoa or a GF grain, and can be dairy-free as written.
Final Thoughts: Your Kitchen, Your Escape
So there you have it, friends. More than just a recipe, this is a formula for a delicious, stress-free, and deeply satisfying meal. It proves that incredible food doesn’t need a dozen complicated steps or a sink full of dishes. It needs a few good ingredients, a little technique,

Easter Magic Bars: Irresistible White Chocolate & Peanut Butter Delight
Easter Magic Bars: Your New Spring Tradition Starts Here!
Hey friends, Beau here from Feastical! Grab a cup of coffee and pull up a chair. I want to talk about something that happens every spring in my kitchen. It’s that moment when you need a dessert that’s guaranteed to make people’s eyes light up. Something that says “celebration” without you spending the whole day chained to the oven. Sound familiar? That’s exactly why I’m so excited to share these Easter Magic Bars with you today.
Imagine this: a buttery graham cracker crust, a river of sweetened condensed milk, a confetti of white and peanut butter chips, toasty pecans, and a joyful sprinkle of pastel Easter candies. Every bite is a perfect symphony of creamy, crunchy, chewy, and downright magical. The best part? You literally layer the ingredients in a pan and bake. No fancy skills required, just a heart ready for some serious flavor.
Whether you’re hosting the big Easter feast, heading to a potluck, or just want to sweeten up a regular spring weekend, this recipe is your secret weapon. It’s the dessert that looks like you fussed for hours but secretly came together in minutes. So, let’s ditch the stress and embrace the magic. Trust me, your spatula and your family will thank you.
The “Magic” Behind the Bars: A Sweet Slice of Memory
This recipe always takes me back to my grandma’s linoleum-floored kitchen. She was the queen of “dump cakes” and “magic” desserts – the kind where you’d look at the simple ingredients skeptically, but after a trip to the oven, something transcendent appeared. Her version of magic bars was a classic, studded with chocolate chips and coconut.
One particularly rainy Easter, my job was to crush the graham crackers. I took my frustration with the canceled egg hunt out on those crackers, whacking the bag with a rolling pin like a tiny, aproned superhero. Grandma just smiled, handed me the can of sweetened condensed milk (my favorite job—sneaking a fingerful was mandatory), and let me scatter the toppings. When those bars came out of the oven, glowing and bubbling, the whole house smelled like sweet, toasty comfort. That day, I learned that the real “magic” isn’t just in the ingredients; it’s in the memories you bake right into them. My version today is a nod to her, but with a springtime twist she would have loved.
Gathering Your Cast of Characters
Here’s everything you’ll need to create this masterpiece. I’ve added my little chef insights because knowing your ingredients makes you a more confident cook!
- ½ cup unsalted butter, melted – This is the foundation of our crust. Using unsalted lets you control the salt level. Chef’s Tip: If you only have salted butter, that’s okay! Just skip any added salt in the crust. Melt it gently so it doesn’t separate.
- 1½ cups graham cracker crumbs – The classic base. You can buy pre-crushed or pulse whole crackers in a food processor. Substitution: For a nuttier flavor, try using digestive biscuits or even Biscoff cookie crumbs!
- 1 can (14 oz.) sweetened condensed milk – The magical “glue” that holds everything together and creates that iconic chewy, gooey layer. Don’t substitute with evaporated milk—it’s not the same!
- 1 pkg. (12 oz.) white chocolate morsels – They add creamy sweetness and beautiful melted pockets. Chef’s Insight: For better quality, you can chop up a bar of baking white chocolate, but the morsels hold their shape a bit better.
- 1 pkg. (12 oz.) peanut butter morsels – The nutty, salty-sweet counterpart to the white chocolate. This combo is absolutely irresistible. Substitution: If you have a peanut allergy, use butterscotch chips for a similar vibe.
- 1 cup chopped pecans – They bring essential crunch and a toasty, rich depth. Chef’s Tip: Toast them in a dry pan for 3-4 minutes before chopping to unlock incredible flavor!
- 1 cup candy-coated chocolate eggs or pastel M&M’s, plus extra for topping – The Easter cheer! They add color and a fun crunch. Insight: Using the mini eggs gives a great texture. Reserve a small handful to press on top halfway through baking so they stay pretty on the surface.
Let’s Make Some Magic: Step-by-Step
Alright, team! Time to get our hands (minimally) dirty. Follow these steps, and you’ll be a magic bar pro in no time.
Step 1: Prep Your Stage. First, preheat your oven to 350°F (175°C). Now, let’s talk about your pan. Take a 9×13-inch baking dish and line it with parchment paper, leaving some overhang on the sides. This is my NUMBER ONE hack for perfect bars! It creates a sling so you can lift the entire batch out of the pan to cool and slice. No sticking, no scratching your pan, just clean, beautiful bars.
Step 2: Create the Buttery Foundation. In a medium bowl, combine the melted butter and graham cracker crumbs. Mix it until every last crumb is shimmering and coated. It should feel like wet sand. Dump this into your prepared pan and press it down FIRMLY and evenly. I mean it—get in there with the bottom of a measuring cup or a glass to really compact it. A solid crust prevents crumbling later.
Step 3: The Magical “Glue”. Slowly and evenly pour the entire can of sweetened condensed milk over the crust. Use a spatula or just tilt the pan to help it spread into every corner. This sweet, sticky river is what transforms our separate layers into one cohesive, gooey wonder.
Step 4: The Confetti Layer. Now for the fun part! Sprinkle the white chocolate morsels evenly across the milky surface. Follow with the peanut butter morsels. Don’t just dump them in one spot—rain them down from a height for the best distribution. Next, scatter your toasted chopped pecans. Finally, add most of your Easter candies, gently pressing them down just so they nestle in.
Step 5: Bake & The Mid-Bake Trick. Slide the pan into your preheated oven. Set your timer for 15 minutes. When it goes off, carefully pull the oven rack out a bit. Take the reserved candies and press them lightly onto the top surface. This ensures they stay visible and don’t all sink to the bottom. Push the rack back in and bake for another 10-15 minutes (25-30 minutes total). You’re looking for golden edges and a top that looks set, though it will still be soft.
Step 6: The Test of Patience. This is the hardest step! Remove the pan from the oven and let it cool completely on a wire rack. I mean completely. If you try to cut warm magic bars, they’ll be a delicious but messy puddle. For the cleanest slices, I often pop the whole pan in the fridge for an hour after it reaches room temperature.
Step 7: Slice & Celebrate! Once completely cool, use the parchment paper sling to lift the giant bar block out of the pan. Place it on a cutting board and use a sharp knife to slice into squares or rectangles. Pro tip: wipe your knife clean between cuts for super neat edges.
How to Serve These Show-Stopping Bars
Presentation is part of the fun! You can keep it simple and leave them stacked on a plate, letting their colorful tops do all the talking. For a more festive touch, arrange them on a cake stand lined with a pastel napkin.
These bars are rich, so I love serving them with a side of fresh berries (strawberries or raspberries are perfect) or a dollop of barely-sweetened whipped cream to cut through the sweetness. A cold glass of milk, a hot coffee, or even a scoop of vanilla bean ice cream alongside turns it into a next-level dessert.
Thinking of gifting them? Layer a few in a clear cellophane bag tied with a ribbon, or stack them in a mason jar for an adorable, portable treat. They’re the happiest little edible gifts!
Make It Your Own: Creative Twists
The beauty of magic bars is their versatility. Here are a few ways to riff on this classic:
- The Chocolate Lover’s Swap: Replace the white chocolate morsels with semi-sweet or dark chocolate chips. Use Halloween M&M’s for fall or red and green for Christmas!
- Nutty Variations: Not a pecan person? Try walnuts, almonds, or macadamia nuts. For a nut-free version, use sunflower seeds or even pretzel pieces for that salty crunch.
- Coconut Dream: Add 1 cup of sweetened shredded coconut over the condensed milk layer for a classic “Hello Dolly” bar vibe. It’s heavenly.
- Birthday Party Version: Use rainbow sprinkles and colorful candy-coated chocolates instead of Easter ones. It’s an instant party on a plate.
- Gluten-Free Friendly: Use certified gluten-free graham crackers or gluten-free cookie crumbs for the crust. Everything else is naturally GF (just check your candy labels).
Beau’s Kitchen Notes
This recipe has evolved in my kitchen more times than I can count. I’ve learned a few things: First, toasting the nuts is non-negotiable for me now—it adds a whole new dimension. Second, the mid-bake candy trick was born from a minor kitchen disaster where all my beautiful candies disappeared into the abyss! Now it’s my standard move.
Funny story: I once accidentally used a can of evaporated milk instead of sweetened condensed. Let’s just say the resulting “bars” were… a soupy, sad puddle. We ended up scooping it over ice cream, which saved the day, but it was a great reminder to double-check your cans! The kitchen is for experiments, but some mistakes become delicious salvages.
Your Questions, Answered
Q: My bars are too gooey and won’t hold their shape when cut. What happened?
A: The most common culprit is cutting them before they are completely cool. These bars need time to set up as they cool. Pop them in the fridge! Another possibility is under-baking. The edges should be a clear golden brown.
Q: Can I make these ahead of time?
A: Absolutely! In fact, I think they taste even better the next day. Once cooled and sliced, store them in an airtight container at room temperature for up to 3 days, or in the fridge for up to a week.
Q: What can I use instead of peanut butter chips?
A> Butterscotch chips are a fantastic substitute. You could also use regular semi-sweet chocolate chips for a more traditional flavor, or even caramel baking bits.
Q: Can I freeze Easter Magic Bars?
A: Yes, they freeze beautifully! Place sliced bars in a single layer on a parchment-lined sheet to freeze solid, then transfer to a freezer bag or container. They’ll keep for up to 3 months. Thaw at room temperature or in the fridge.

Easter Magic Bars: Irresistible White Chocolate & Peanut Butter Delight
Description
Say goodbye to complicated desserts and hello to these show-stopping Easter Magic Bars! Layers of buttery graham cracker crust, sweetened condensed milk, white and peanut butter chips, toasted pecans, and pastel Easter candies make every bite a symphony of chewy, crunchy, and festive magic. Perfect for potlucks, Easter brunch, or a weekend treat, they look impressive but are ridiculously easy to make.
Ingredients
Crust:
-
½ cup unsalted butter, melted
-
1½ cups graham cracker crumbs
Magic Layer:
-
1 can (14 oz.) sweetened condensed milk
-
1 pkg (12 oz.) white chocolate morsels
-
1 pkg (12 oz.) peanut butter morsels
-
1 cup chopped pecans (toasted for extra flavor)
-
1 cup candy-coated chocolate eggs or pastel M&M’s, plus extra for topping
Chef Tips:
-
Parchment paper lining with overhang = easy lifting & neat bars.
-
Toast nuts to enhance crunch and flavor.
-
Reserve some candy for topping halfway through baking so colors stay bright.
Notes
-
Cut only after completely cool to prevent gooey bars.
-
Check baking edges—they should be golden brown.
-
Mid-bake candy press keeps colors visible.
-
Use parchment sling for easy removal.
Nutritional Information (Estimated)
Please note: The following is an approximate estimate per serving (based on 18 bars) generated from the listed ingredients. For precise dietary tracking, I recommend using a dedicated nutrition calculator with your specific brands.
- Calories: ~280
- Total Fat: 16g
- Saturated Fat: 8g
- Carbohydrates: 30g
- Sugar: 24g
- Protein: 4g
Remember, these are a celebratory treat meant to be enjoyed in the spirit of togetherness and holiday joy!
Final Thoughts from My Kitchen to Yours
And there you have it, friends—my foolproof recipe for Easter Magic Bars. More than just a dessert, this is a recipe for creating moments. It’s simple enough to make with kids, impressive enough for guests, and delicious enough to become a requested tradition.
I hope you’ll bake a batch, fill your home with that incredible smell, and share the magic with people you love. That’s what Feastical is all about: feel-good food that brings us together. If you make them (and I really hope you do!), tag me on social or leave a comment on the blog. I love seeing your kitchen creations!
Until next time, keep your spatula close and your oven warm.
– Beau