Spinach and Cheese Puff Pastry Rolls : Flaky, Cheesy, and Crowd-Pleasing
Spinach and Cheese Puff Pastry Rolls: Your New Go-To Party Hero
Hey friends, Beau here from Feastical! Let’s talk about that magical moment at a gathering. You know the one: you bring out a tray of something warm from the oven, and before you can even say “dig in,” a hush falls over the room, followed by a chorus of “oh my gosh, what *are* these?” That’s the power of a perfect appetizer. And today, I’m handing you the keys to that kingdom with my Spinach and Cheese Puff Pastry Rolls.
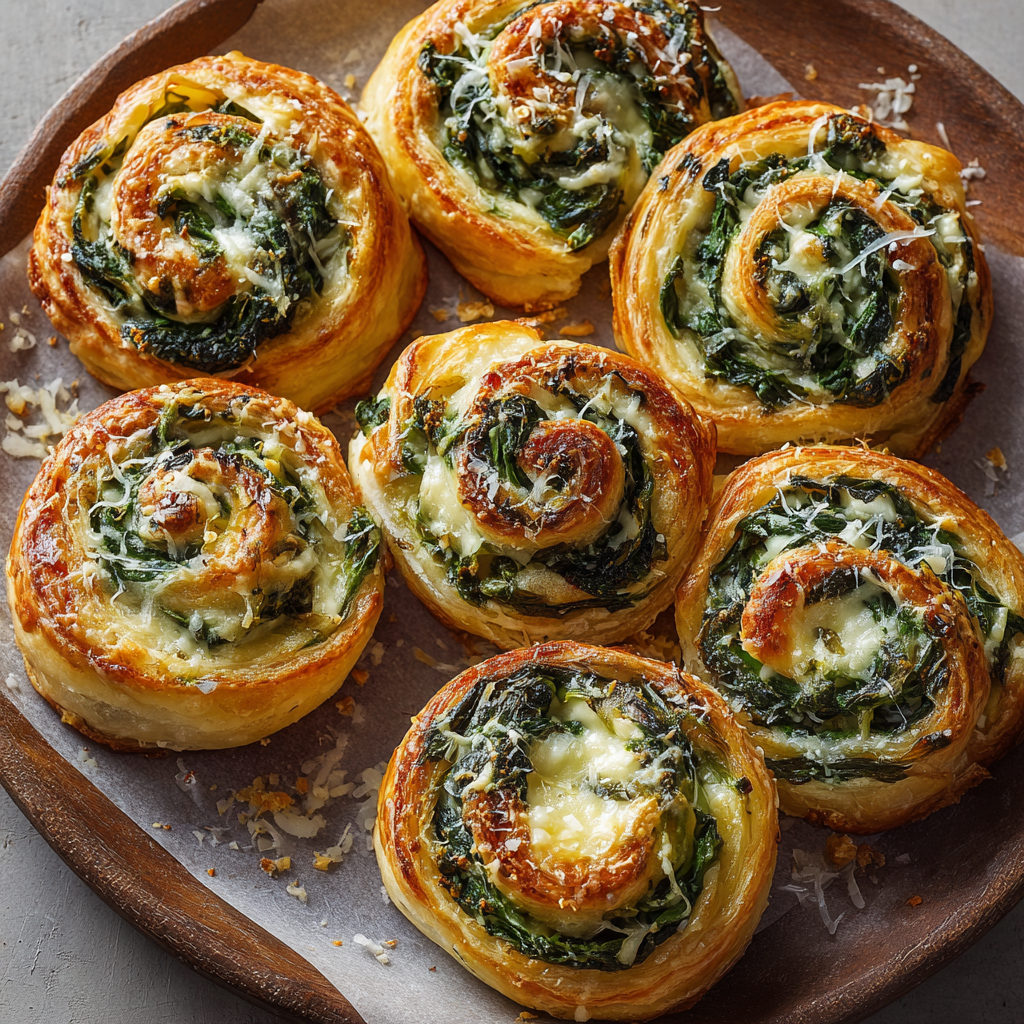
Imagine this: layers of impossibly flaky, buttery pastry wrapped around a creamy, savory heart of spinach, ricotta, mozzarella, and Parmesan. They bake up golden brown, puffing into beautiful, swirled little pinwheels of joy. One bite delivers a satisfying crunch, then an instant melt-in-your-mouth creaminess that’s packed with flavor. They’re elegant enough for a dinner party, simple enough for a cozy movie night, and guaranteed to vanish faster than you can say “seconds, please.” The best part? They look like you spent hours in the kitchen, but our little secret is that they come together with stunning ease. So, tie on your apron, and let’s make some kitchen magic that’s sure to bring everyone together.
The Little Pinwheel That Could: A Kitchen Memory
This recipe always takes me back to my early days of “hosting,” which was really just inviting a few pals over to my tiny apartment with the kitchen the size of a postage stamp. I wanted to impress, but my chef skills (and budget) were… developing. I needed a slam dunk. I remembered my grandma making something similar with leftover dough and greens from the garden, always calling them her “little savory snails.” I took that idea, grabbed some store-bought puff pastry (a true modern kitchen hero), and whipped up a batch. The reaction was everything. My friend Mike, who famously “doesn’t eat green things,” ate three before asking what was in them. The laughter, the clinking of glasses, the shared delight over something so simple—that’s the real recipe. These rolls became my signature welcome dish, a promise of good times and full bellies. They’re not just food; they’re a warm, cheesy handshake.
Gathering Your Flaky, Cheesy Crew: Ingredients
Here’s the beautiful lineup. I’ve added some notes because knowing the *why* makes you a more confident cook!
- 300g fresh spinach: The green glory! We’re wilting it down, which concentrates its mild, earthy flavor. Chef’s Insight: You can swap this with frozen chopped spinach that’s been thoroughly thawed and squeezed *very* dry in a clean kitchen towel. This is actually a fantastic time-saver!
- 3 tbsp olive oil: For sautéing. It adds a fruity depth. Butter works wonderfully here too for a richer flavor.
- 3 garlic cloves, minced: The aromatic backbone. Don’t be shy! Smash them with the side of your knife first to easily peel and release their oils.
- 1 large egg (for the filling): Our binding agent. It brings the cheesy filling together and helps it set beautifully as it bakes, so it doesn’t ooze out.
- Salt & ½ tsp freshly ground black pepper: Seasoning superstars. Always taste your filling before rolling! The cheeses have salt, so start with a pinch and adjust.
- 250g ricotta cheese: The creamy, dreamy base. It’s mild and luscious. For a tangier kick, try full-fat cottage cheese blended until smooth.
- ½ cup shredded mozzarella cheese: Hello, stretchy, gooey goodness! Use low-moisture mozzarella for the best melt. A pre-shredded Italian blend works in a pinch.
- ½ cup grated Parmesan cheese: The flavor powerhouse. It adds a salty, nutty, umami punch. Freshly grated from a wedge is always superior to the canned stuff.
- 1 sheet puff pastry: The flaky star of the show. Thaw it in the fridge overnight or on the counter for about 40 minutes. You want it pliable but still cold.
Let’s Build Some Delicious Spirals: Step-by-Step
Follow these steps, and you’ll be a puff pastry pro in no time. I’m chatting you through each one!
- Prep Your Stage: Preheat your oven to 190°C (375°F) and line a baking sheet with parchment paper. This is non-negotiable for easy cleanup and no sticking! Let the sheet hang out in the oven as it heats.
- Wake Up the Greens: In a large pan or skillet, heat the olive oil over medium heat. Add the minced garlic and sauté for just about 60 seconds until it’s fragrant—don’t let it brown! Now, add all that fresh spinach. It will look like a mountain, but watch it magically wilt down in minutes. Give it a few stirs until it’s fully limp and dark green. Transfer it to a colander to cool. Chef’s Hack: Once it’s cool enough to handle, grab handfuls and SQUEEZE out as much liquid as you can. This is the secret to preventing a soggy filling! Then, give it a rough chop.
- Mix the Dreamy Filling: In a large mixing bowl, combine the well-squeezed spinach, ricotta, mozzarella, Parmesan, the egg, salt, and pepper. Use a fork to mix it all together until it’s homogenous and happy. Give it a taste—this is your moment to adjust the seasoning. Remember, you’re the boss of your flavor.
- Roll & Fill: Lightly dust your counter with flour. Unfold your puff pastry sheet (if it comes folded) and roll it out just slightly with a rolling pin to smooth any seams and create an even rectangle. Now, spread your spinach and cheese mixture over the entire surface, leaving a tiny 1 cm border clean along one of the long edges—this will be your “seam.”
- The Roll-Up: Starting from the long edge opposite your clean seam, begin to tightly roll the pastry over the filling. Use your fingers to gently tuck and roll, creating a log. Think “tight sushi roll.” When you get to the end, gently press the clean edge into the log to seal it. A little dab of water on that edge can act as glue.
- Slice & Arrange: Using a sharp serrated knife, carefully slice your log into 12 even pieces, about 2–3 cm thick. Saw gently back and forth; don’t press down or you’ll squish the swirls. Place each slice, spiral-side-up, on your prepared baking sheet, leaving a little room for them to puff up.
- Bake to Golden Perfection: Slide the tray into your preheated oven and bake for 20-25 minutes. You’re looking for the pastry to be deeply golden brown and puffed, and you might see some cheesy bits bubbling. Your kitchen will smell unbelievable.
- The (Brief) Wait: This is the hardest part! Let the rolls cool on the tray for at least 5-10 minutes. This allows the cheesy filling to set slightly, so you get a perfect bite instead of a lava-hot cheese eruption (tasty, but dangerous!).
How to Serve These Savory Stars
Presentation is part of the fun! I love piling these warm spirals high on a rustic wooden board or a simple white platter to let their golden color shine. Scatter a few fresh herbs like parsley or chives over the top for a pop of green. For dipping, a side of warm marinara sauce is a classic, crowd-pleasing move. But don’t stop there! A cool, lemony garlic aioli, a spicy chipotle mayo, or even a simple drizzle of balsamic glaze takes them to the next level. Serve them as the star of your appetizer spread, alongside a crisp green salad for a light lunch, or as the savory component of a festive brunch buffet next to some fresh fruit. They’re delicious warm, at room temperature, and yes, even cold straight from the fridge the next day (ask me how I know).
Make It Your Own: Delicious Twists & Swaps
The basic recipe is a masterpiece, but your kitchen, your rules! Here are some of my favorite spins:
- Sun-Dried Tomato & Feta: Swap the Parmesan for crumbled feta cheese and add ¼ cup of finely chopped, oil-packed sun-dried tomatoes to the filling. Mediterranean vibes, unlocked!
- “Everything Bagel” Style: Before baking, brush the tops of the rolls with a beaten egg wash (just an extra egg whisked with a splash of water) and generously sprinkle with everything bagel seasoning. It adds crunch and that iconic flavor.
- Mushroom & Thyme: Sauté 100g of finely chopped mushrooms (cremini are perfect) with the garlic until golden, then add the spinach. Stir in a tablespoon of fresh thyme leaves for an earthy, aromatic twist.
- Make it Meaty: Brown 100g of Italian sausage or finely chopped bacon, let it cool, and mix it into the cheese filling. It adds a hearty, savory punch perfect for a crowd.
- Dairy-Free/Vegan Option: Use a plant-based puff pastry (check the label). For the filling, swap the ricotta for blended firm tofu or a vegan ricotta, use vegan mozzarella shreds, and nutritional yeast instead of Parmesan. Skip the egg and use a tablespoon of cornstarch or a flax “egg” as a binder.
Beau’s Kitchen Notes & Stories
This recipe has been a living, evolving thing in my kitchen. The first time I made it, I forgot to squeeze the spinach… let’s just say the rolls were delicious but *very* moist. Lesson learned! I’ve also learned that puff pastry is forgiving. If your log cracks a little while rolling, just pinch it back together—it will bake up just fine. I once made a double batch for a big game day and shaped one log into a giant “S” for our team before slicing. They were lopsided, hilarious, and a huge hit. Food should be fun, not fussy. Don’t stress about perfect spirals; they all taste incredible. These rolls also freeze like a dream before baking—just slice, place on a tray to flash freeze, then bag them up. Bake from frozen, adding a few extra minutes. Having a tray of these in the freezer is like having a secret weapon for last-minute guests!
Your Questions, Answered
Q: Can I make these ahead of time?
A: Absolutely! You can assemble the whole log, wrap it tightly in plastic wrap, and keep it in the fridge for up to 24 hours before slicing and baking. You can also freeze the sliced, unbaked rolls on a tray, then transfer to a bag for up to 3 months. Bake from frozen, adding 5-10 minutes.
Q: My filling leaked out a bit while baking. What happened?
A: No worries, they’ll still taste great! This usually happens if the filling is too wet (remember to SQUEEZE that spinach!) or if the log wasn’t rolled tightly enough, or the seam wasn’t sealed. It’s a cosmetic issue, not a culinary crime.
Q: My pastry didn’t puff much. Why?
A: Puff pastry needs to be cold to puff properly. If your kitchen was very warm or you handled the dough too much, the butter layers can melt before hitting the oven. Ensure your pastry is cold when you start, and don’t let the filled log sit out too long before baking.
Q: Can I use phyllo dough instead?
A: You can, but it’s a different technique! Phyllo would be more like a layered strudel or bundle. You’d need to brush layers with butter or oil. Stick with puff pastry for this specific flaky, layered spiral effect.

Spinach and Cheese Puff Pastry Rolls : Flaky, Cheesy, and Crowd-Pleasing
Description
These Spinach and Cheese Puff Pastry Rolls are the kind of appetizer that instantly steals the spotlight. Flaky, buttery puff pastry wraps around a creamy, savory filling of spinach, ricotta, mozzarella, and Parmesan, baking up into golden, irresistible pinwheels. They’re elegant enough for a dinner party, easy enough for a casual get-together, and guaranteed to disappear fast.
Ingredients
Filling
-
300 g fresh spinach (or frozen, thawed and very well squeezed dry)
-
3 tbsp olive oil
-
3 garlic cloves, minced
-
250 g ricotta cheese
-
½ cup shredded mozzarella (low-moisture works best)
-
½ cup grated Parmesan cheese
-
1 large egg
-
Salt, to taste
-
½ tsp freshly ground black pepper
Pastry
-
1 sheet puff pastry, thawed
-
Flour, for dusting
Instructions
-
Preheat & Prep
Preheat oven to 190°C (375°F). Line a baking sheet with parchment paper. -
Cook the Spinach
Heat olive oil in a large skillet over medium heat. Add garlic and sauté about 1 minute until fragrant. Add spinach and cook until fully wilted. Transfer to a colander, let cool, then squeeze out as much liquid as possible and roughly chop. -
Make the Filling
In a bowl, mix spinach, ricotta, mozzarella, Parmesan, egg, salt, and pepper until well combined. Taste and adjust seasoning. -
Assemble
Lightly flour your work surface. Roll puff pastry just enough to smooth seams. Spread filling evenly over the pastry, leaving a 1 cm border on one long edge. -
Roll & Slice
Roll the pastry tightly into a log, sealing at the clean edge (a little water helps). Using a serrated knife, slice into 12 even pieces. -
Bake
Arrange rolls cut-side up on the baking sheet. Bake 20–25 minutes, until puffed and deep golden brown. -
Cool Slightly & Serve
Let cool 5–10 minutes before serving.
Notes
-
Dry spinach is key: excess moisture causes soggy rolls.
-
Keep pastry cold for maximum puff.
-
Make ahead: assemble the log and refrigerate up to 24 hours before baking.
-
Freeze unbaked slices: bake straight from frozen, adding 5–10 minutes.
Nutritional Info (Per Roll)
Let’s be real, we’re here for the flavor and joy of sharing food. But for those who like to know, here’s a general breakdown per roll (based on 12 rolls). Remember, this is an estimate, and ingredients can vary.
Calories: 130 | Protein: 5g | Fat: 9g (Saturated Fat: 4g) | Carbohydrates: 7g | Fiber: 1g | Sugars: 0.5g | Sodium: 180mg
These pack a nice bit of protein and calcium from the cheeses, and spinach adds a boost of Vitamin A, iron, and folate. It’s a satisfying bite that’s more balanced than many appetizers out there!
Final Thoughts from My Kitchen to Yours
And there you have it, friends—the full story of my beloved Spinach and Cheese Puff Pastry Rolls. More than just a recipe, this is a formula for creating moments of connection. It’s about the joy of pulling something beautiful and delicious from your own oven and sharing it with people you love. It’s forgiving, flexible, and endlessly rewarding. So the next time you’re wondering what to bring, what to serve, or just what to make for a Tuesday night treat that feels special, remember these little flaky spirals. I hope they become a staple in your kitchen, creating your own stories and memories. Now, go preheat that oven! And as always, thanks for hanging out in my kitchen. Don’t forget to share your creations with me over on Feastical—I love seeing what you make!
Happy cooking,
Beau

Creamy Cajun Shrimp Pasta : Bold, Spicy & Ready in 30 Minutes
Creamy Cajun Shrimp Pasta: Your New Weeknight Hero
Hey friends, Beau here from Feastical! Let’s cut straight to the chase: some nights, you want a dinner that feels like a celebration, but you absolutely do not want to spend hours making it. You want big, bold, restaurant-worthy flavor that somehow, miraculously, comes together in the time it takes to watch an episode of your favorite show. Sound familiar? That’s exactly why this Creamy Cajun Shrimp Pasta is my go-to, my secret weapon, my “wow, you made this?” weeknight knockout.
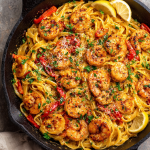
Picture this: plump, juicy shrimp, seared in a smoky, spicy Cajun crust. A velvety, creamy sauce that’s rich but not heavy, with just a hint of bright lemon to cut through it all. That sauce doesn’t just sit next to the pasta—it clings to every single noodle, hugging it with flavor. Toss in some colorful, crisp-tender veggies, and you’ve got a meal that’s a feast for the eyes and a party for your taste buds. This isn’t just dinner; it’s a 30-minute vacation to a flavor-filled New Orleans kitchen, no travel required. So, grab your biggest skillet and your favorite wooden spoon. We’re about to make magic happen, fast.
The Night This Pasta Saved Dinner (And My Pride)
This recipe has a permanent spot in my rotation because of one hilariously chaotic Tuesday a few years back. I’d promised my friends a “culinary experience” for game night. Naturally, I’d planned an elaborate, three-hour menu. Also naturally, I lost track of time watching pre-game commentary. Panic set in at 6 PM with seven hungry people arriving at 7. I stared into my fridge like it held the answers to a test I hadn’t studied for.
Shrimp. Cream. Bell pepper. Pasta. The Cajun seasoning I put on literally everything. In a moment of inspired desperation, I just started cooking on instinct—searing the shrimp, building a quick pan sauce, tossing it all together with a prayer. The result? A silent table (the best compliment) followed by a chorus of “Beau, this is incredible!” and “What’s *in* this?!” The joke was on them; it was just me, a few staples, and the pressure of a ticking clock. It taught me that the best meals aren’t always the most planned ones. Sometimes, they’re the ones born from a little chaos and a whole lot of flavor. This pasta is that lesson, served up in a bowl.
Gathering Your Flavor All-Stars
Here’s everything you’ll need. Don’t just think of these as ingredients; think of them as your flavor dream team. I’ve got some notes and swaps for you, because your kitchen, your rules.
- 12 oz Fettuccine or Penne Pasta: Fettuccine is my MVP for holding that creamy sauce, but penne is fantastic for trapping little bits of shrimp and pepper in every bite. Use what you love!
- 1 lb Large Shrimp, peeled & deveined: I buy them this way to save time. “Large” (31/40 count) is perfect—they’re substantial but cook quickly. For a swap, try chicken breast sliced into strips, or even scallops!
- 2 tbsp Cajun Seasoning (plus extra): This is the star. Check the salt content! Some blends are saltier than others. My chef insight: if yours is salt-free, you’ll want to season more generously with salt later. Love heat? Add a pinch of cayenne or red pepper flakes.
- 1 tbsp Olive Oil & 2 tbsp Butter: The dynamic duo. Oil handles the high heat for searing, butter brings the irresistible, rich flavor. It’s a non-negotiable combo for me.
- 4 cloves Garlic, minced & 1 Small Onion, chopped: The aromatic base. This is what makes your kitchen smell incredible and builds deep flavor. Fresh is best here!
- 1 Red Bell Pepper, thinly sliced: Adds sweetness, color, and a lovely crunch. Got a yellow or orange pepper? Throw it in for a rainbow effect.
- 1 cup Heavy Cream: For that luxurious, velvety sauce. For a lighter version, half-and-half works, but the sauce will be a bit thinner. I don’t recommend milk.
- ½ cup Chicken Broth: Adds a savory depth and loosens the cream just right. Vegetable broth is a great easy swap.
- ½ cup Grated Parmesan Cheese: Use the real, freshly grated stuff from the fridge section if you can. The pre-canned powder doesn’t melt the same way. It adds a salty, nutty umami punch.
- Juice of ½ Lemon: The secret weapon! This little bit of acidity wakes up the entire dish, balancing the richness. Don’t skip it.
- Chopped Parsley & Salt/Pepper: The fresh parsley isn’t just a pretty green sprinkle; it adds a pop of freshness. And always, always taste and season at the end!
Let’s Get Cooking: Your Foolproof Roadmap
Follow these steps, and you’re golden. I’ve packed them with my favorite little hacks to make sure you succeed on the first try.
Step 1: Pasta Prep. Get a big pot of salted water boiling (it should taste like the sea!). Cook your pasta according to the package directions, but here’s a pro move: just before you drain it, scoop out about ½ cup of that starchy pasta water. This liquid gold is your insurance policy for the perfect saucy consistency. Drain the pasta and set it aside.
Step 2: Shrimp School. Pat your shrimp very dry with paper towels. This is crucial for getting a good sear instead of a steam. Toss them in a bowl with the Cajun seasoning until they’re evenly coated. They should look happily dusted in spice.
Step 3: Sear & Set. In a large skillet, heat the olive oil and 1 tablespoon of the butter over medium-high heat. When the butter is foaming, add the shrimp in a single layer. Don’t crowd them! Work in batches if you need to. Sear for 2-3 minutes per side until they’re pink, slightly curled, and have a beautiful crust. They cook fast! Remove them to a plate. They’ll finish cooking later in the sauce.
Step 4: Veggie Sauté. In that same, now-flavor-packed skillet, melt the remaining tablespoon of butter. Add the onion and bell pepper. Sauté for about 3-4 minutes until they start to soften. Now add the garlic and cook for just 30 more seconds until fragrant—we’re toasting it, not burning it!
Step 5: Build the Dream Sauce. Pour in the chicken broth to deglaze the pan. Use your spoon to scrape up all those delicious brown bits from the shrimp—that’s pure flavor! Let it simmer for a minute, then pour in the heavy cream. Stir and let it simmer gently for 2-3 minutes to let the flavors mingle and the sauce reduce slightly.
Step 6: Bring It All Together. Turn the heat to low. Stir in the grated Parmesan and lemon juice until the cheese is melted and the sauce is smooth. Now, return the shrimp (and any juices on the plate!) to the skillet. Add the cooked pasta. Toss everything with a loving enthusiasm until every noodle is coated. My key hack: if the sauce feels too thick, add that reserved pasta water a tablespoon at a time until it’s perfectly silky and clinging.
Step 7: The Final Taste. This is the most important step. Have a taste! Need more salt? A crack of black pepper? Another pinch of Cajun seasoning for more kick? Now’s the time to make it perfect for YOU.
Step 8: Garnish & Serve. Dish it up hot, right out of the skillet. Finish it with a generous sprinkle of chopped parsley. It adds color and a fresh finish that makes the whole dish sing.
Plating It Up Like a Pro (The Easy Way!)
This dish is so vibrant, it practically plates itself! I like to use tongs to give the pasta a little twist as I lift it into shallow bowls—it looks restaurant-fancy with zero effort. Make sure each bowl gets plenty of those gorgeous shrimp and colorful peppers peeking through. That final sprinkle of bright green parsley is your edible confetti, so don’t be shy with it.
What to serve alongside? Since this is a complete meal with protein, veg, and carbs, I keep it simple. A crisp green salad with a tangy vinaigrette is the perfect cool counterpoint to the spicy, creamy pasta. A loaf of warm, crusty garlic bread is also a no-brainer for soaking up any extra sauce left in the bowl (the best part, if you ask me). For drinks, a cold lager, a glass of chilled Pinot Grigio, or even sparkling water with lemon all work beautifully.
Make It Your Own: 5 Flavorful Twists
Love the base recipe? Amazing! Want to play around? Even better. Here are some of my favorite ways to mix it up.
- The “Cajun Chicken” Swap: Not a shrimp person? Use 1 lb of boneless, skinless chicken breasts or thighs, cut into bite-sized pieces. Sear them just like the shrimp until cooked through. It’s just as delicious and hearty.
- Vegetarian/Vegan Delight: Skip the shrimp! Add a can of drained and rinsed chickpeas or white beans when you build the sauce for protein. Use all olive oil, swap the cream for full-fat coconut milk or a vegan cream alternative, use veggie broth, and skip the Parmesan or use a vegan substitute. It’s creamy, dreamy, and plant-based.
- Sun-Dried Tomato & Spinach: Love color? After building the sauce, stir in ½ cup of chopped sun-dried tomatoes (the kind packed in oil, drained) and a couple of big handfuls of fresh baby spinach. Let it wilt into the hot sauce. The tomatoes add a sweet, tangy punch.
- Smoky Andouille Edition: Want to go full Louisiana? Slice up 8 oz of andouille sausage and sauté it after the shrimp. Remove it, then proceed with the veggies. Add it back with the shrimp at the end. It adds a fantastic smoky, meaty layer.
- Lighter Cream Sauce: To lighten things up a touch, you can replace half the heavy cream with an equal amount of 2% milk. The sauce will be a little less rich but still wonderfully creamy. Just be careful not to let it boil vigorously.
Beau’s Kitchen Confidential
This recipe is a living thing in my kitchen. It started as that panicked game-night save, but over the years, friends and family have added their own stamps on it. My sister insists on adding sweet corn. My best friend throws in a handful of chopped artichoke hearts. That’s the beauty of a solid framework—you can build your own masterpiece on it.
One funny lesson learned? The power of the pasta water. I used to skip reserving it, and on nights when my sauce reduced a bit too much, I’d be stuck with a thick, gloppy situation. Adding plain water just diluted the flavor. That starchy pasta water is the magical glue that binds sauce to noodle and saves the day every time. Now I chant “save the water” like a kitchen mantra while I drain my pasta!
Your Questions, Answered
Q: My sauce is too thin! How can I thicken it?
A: Don’t panic! First, let it simmer for a few extra minutes to reduce. If it still needs help, make a quick slurry: mix 1 teaspoon of cornstarch with 1 tablespoon of cold water until smooth. Stir it into the simmering sauce and cook for another minute until thickened.
Q: My sauce is too thick and gloppy. Help!
A: This is where that reserved pasta water is your hero! Add it back in, a few tablespoons at a time, while tossing the pasta, until it reaches a silky, cohesive consistency. A little splash of extra broth or cream works too.
Q: How spicy is this? Can I make it kid-friendly?
A> The heat level depends entirely on your Cajun seasoning. For a milder dish, use a “mild” Cajun blend or make your own with paprika, garlic powder, onion powder, oregano, and just a touch of cayenne. You can always add more heat at the end with red pepper flakes, but you can’t take it away!
Q: Can I make this ahead of time?
A> You can prep the ingredients (chop veggies, season shrimp) ahead. But for the best texture, I recommend cooking and serving it fresh. The pasta can absorb the sauce if it sits too long. If you have leftovers, they’ll still taste great! Reheat gently on the stove with a small splash of broth or cream to loosen it up.
Creamy Cajun Shrimp Pasta : Bold, Spicy & Ready in 30 Minutes
Description
This Creamy Cajun Shrimp Pasta is the perfect answer to busy nights when you still want bold, comforting flavor. Juicy Cajun-spiced shrimp, tender pasta, and a silky cream sauce come together in about 30 minutes for a dinner that feels restaurant-worthy without the stress. It’s rich, a little spicy, and incredibly satisfying.
Ingredients
-
12 oz pasta (fettuccine or penne work best)
-
1 lb large shrimp, peeled and deveined
-
2 tbsp Cajun seasoning (adjust to taste)
-
1 tbsp olive oil
-
2 tbsp butter, divided
-
1 small onion, finely chopped
-
4 cloves garlic, minced
-
1 red bell pepper, thinly sliced
-
1 cup heavy cream
-
½ cup chicken broth
-
½ cup grated Parmesan cheese
-
Juice of ½ lemon
-
Salt and black pepper, to taste
-
Fresh parsley, chopped (for garnish)
Instructions
-
Cook the Pasta
Boil pasta in well-salted water according to package directions. Reserve ½ cup pasta water, then drain. -
Season the Shrimp
Pat shrimp dry and toss with Cajun seasoning until evenly coated. -
Sear the Shrimp
Heat olive oil and 1 tbsp butter in a large skillet over medium-high heat. Sear shrimp 2–3 minutes per side until pink and lightly browned. Remove and set aside. -
Sauté the Veggies
In the same skillet, melt remaining butter. Add onion and bell pepper; cook 3–4 minutes until softened. Add garlic and cook 30 seconds. -
Make the Sauce
Pour in chicken broth and scrape up browned bits. Add heavy cream and simmer 2–3 minutes. Stir in Parmesan and lemon juice until smooth. -
Combine
Return shrimp to the skillet, add pasta, and toss to coat. Add reserved pasta water a little at a time if needed to loosen the sauce. -
Finish & Serve
Taste and adjust seasoning. Garnish with parsley and serve hot.
Notes
-
Dry shrimp well before cooking for the best sear.
-
Adjust the heat by using mild Cajun seasoning or adding extra cayenne if you like it spicy.
-
Too thick? Add a splash of pasta water or broth.
-
Too thin? Simmer the sauce a few extra minutes to reduce.
Nutritional Information (Approximate)
Here’s a general breakdown per serving (based on 4 servings). Remember, this is an estimate and can vary based on specific brands and ingredient amounts you use.
- Calories: ~580
- Protein: 30g – Thanks to that hefty serving of shrimp!
- Carbohydrates: 50g – Primarily from the pasta and veggies.
- Fat: 30g – The cream, butter, and Parmesan contribute to the rich, satisfying texture.
This dish is a balanced, hearty meal in one bowl. To adjust the nutrition, you can explore the variations above, like using a lighter cream or adding more vegetables. Cooking at home allows you to control the ingredients, which is always a win!
Ready, Set, Cook!
And there you have it, friends—my passport to a delicious, stress-free dinner. This Creamy Cajun Shrimp Pasta proves that incredible flavor doesn’t require a complicated process or a sink full of dishes. It’s about bold spices, simple techniques, and the joy of sharing something truly tasty.
I hope this recipe becomes a trusted friend in your kitchen, just like it is in mine. Give it a try, make it your own with one of the fun twists, and most importantly, enjoy the process. That’s what Feastical is all about. Now, I’d love to hear how it goes! Tag me on social or leave a comment on the blog when you make it. Happy cooking!
Final Thoughts: Why This Pasta Earns a Permanent Spot in Your Rotation
Let’s be real: life is busy. But that doesn’t mean dinner has to be boring, complicated, or come from a takeout box. This Creamy Cajun Shrimp Pasta is the beautiful proof. It’s the recipe that meets you exactly where you are—whether you’re a kitchen newbie or a seasoned cook—and delivers a result that feels special every single time.
What I love most about this dish isn’t just its speed or its spectacular flavor. It’s its confidence. It teaches you foundational skills: how to properly sear, how to build a pan sauce, how to balance richness with acidity, and the transformative power of that starchy pasta water. It’s a masterclass in weeknight cooking disguised as a simple, soul-satisfying meal.
This pasta is more than just a combination of ingredients; it’s a reminder. A reminder that the best meals often come from a bit of intuition, not just a rigid recipe. A reminder that you can turn a few pantry staples and 30 minutes into something that makes people pause and savor. It’s your culinary secret weapon—reliable enough for a hectic Tuesday, yet impressive enough for casual Friday night guests.
So, bookmark it, print it, or commit it to memory. Make it as written the first time, then make it your own. Add the andouille, swap the protein, toss in that handful of spinach about to wilt in your fridge. This recipe is a trusted framework, but your kitchen is the canvas.
Here’s to less stress, more flavor, and dinners that feel like a celebration—even on a Wednesday. You’ve got this.
Happy Cooking,
Beau
Feastical

Creamy Sweet & Sour Chinese Dip with Crunchy Veggie Twist
The Dip That Makes the Party: My Creamy Sweet & Sour Chinese Dip
Hey friends, Beau here! Grab a stool and let’s chat for a sec. You know that moment at a party, right? The one where you’re circling the snack table, bypassing the usual suspects, and hoping—praying—for something that actually makes your taste buds sit up and do a little dance. Well, my mission at Feastical is to make sure you’re never the one doing the hopeful circling. You’re the one creating the snack table showstopper. And this, right here, is your secret weapon.
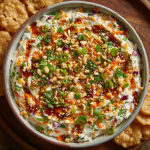
I’m talking about my Creamy Sweet & Sour Chinese Dip with a Crunchy Veggie Twist. This isn’t just a dip; it’s a whole experience in a bowl. We’re taking that beloved, tangy-sweet sauce we all adore from takeout and turning it into a luxurious, spreadable celebration. Imagine the creamiest, fluffiest cream cheese base, packed with a confetti of crunchy carrots, salty roasted peanuts, crisp water chestnuts, and fresh herbs. Then, the grand finale: a generous, glistening pour of that iconic sweet and sour sauce right over the top. It’s cool, creamy, crunchy, sweet, savory, and tangy all in one glorious bite.
Whether it’s game day, a holiday potluck, or just a “Hey, let’s have people over” kind of Thursday, this dip is your ticket to becoming a legend. It’s deceptively simple to make but looks and tastes like you fussed for hours. So, tie on that apron—or don’t, I’m not here to judge your level of formality—and let’s make a dip that disappears faster than you can say, “Wait, did you try that dip?”
A Happy Accident & The Birth of a Party Legend
Okay, story time. This recipe was born from what I like to call a “beautiful fridge clean-out crisis.” It was the afternoon before a big family BBQ a few summers back. My mission was to create a quick appetizer, but my fridge was sending mixed signals: a lonely block of cream cheese, half a bag of carrots, a jar of sweet and sour sauce leftover from egg rolls, and a rogue can of water chestnuts staring me down. I had some green onions and cilantro hanging on for dear life. Desperation, as they say, is the mother of delicious invention.
I started blending things together, thinking it would be a simple veggie spread. But when I tasted it, it was good… but it was missing that “WOW.” That’s when I spotted the sweet and sour sauce. On a whim, I just poured it right over the top of the whole mixture. The visual alone was a game-changer—that vibrant red-orange cascade against the pale, speckled cream cheese was instant party vibes. I chilled it, brought it out with some chips, and… silence. The good kind. The kind followed by a chorus of “What IS this?” and “Beau, you have to give me the recipe.”
That happy accident is now a non-negotiable request at every gathering. It taught me that the best recipes often come from playing with what you have and listening to that little voice that says, “You know what might be crazy good? This.”
Your Flavor Toolkit: What You’ll Need
Here’s the crew that’s going to make this magic happen. I’ve added my little chef-y notes beside each one because knowledge is power (and tastier dip).
- 24 oz (three 8-oz blocks) cream cheese, softened: This is our lush, velvety canvas. Pro Tip: Let it sit on the counter for a good 1-2 hours. Room-temp cream cheese blends into a dreamy, fluffy cloud without any lumpy struggles. In a pinch, you can microwave it (out of the foil!) in 15-second bursts, but patience yields the creamiest results.
- 1 ⅓ cups grated carrots: They add a sweet crunch and gorgeous color. Use the large holes on your box grater for the perfect texture—not too mushy, not too chunky.
- ⅔ cup chopped roasted peanuts: Salty, crunchy, essential! They give that incredible textural contrast. If you have a peanut allergy, swap them for chopped cashews or even sunflower seeds for a similar crunch.
- ½ cup chopped water chestnuts: The secret weapon! They don’t add much flavor, but their incredible, juicy CRUNCH is irreplaceable. Don’t skip these—they’re what make people go, “What IS that delightful texture?”
- ½ cup finely chopped green onions: We’re using both the white and green parts for a mild, allium kick. They bring a necessary fresh bite.
- 4 tbsp soy sauce: Our umami powerhouse. It seasons the entire dip with savory depth. For a gluten-free version, use tamari or coconut aminos.
- 2 tbsp chopped fresh cilantro: A bright, herbal note. If you’re one of those folks who thinks cilantro tastes like soap (no judgment!), flat-leaf parsley is a perfect, friendly substitute.
- 2 cloves garlic, minced: Because almost everything is better with garlic. Fresh is best here for that pungent zing!
- 1 tsp sesame oil (optional but amazing): This is my “chef’s twist.” Just a teaspoon adds a deep, nutty, aromatic background note that screams “Asian-inspired.” A little goes a very long way!
- A generous bottle of sweet and sour sauce: The crowning glory! You can use a good store-bought brand or make your own simple version with pineapple juice, vinegar, sugar, and ketchup. Don’t be shy with the pour.
- Toasted sesame seeds & extra green onions for garnish: We eat with our eyes first! These add a final pop of color and a toasty finish.
- Crispy wonton chips or your favorite crackers for serving: The vessel matters! The sturdy crunch of a wonton chip stands up beautifully to this hearty dip.
Let’s Build This Flavor Masterpiece: Step-by-Step
Ready to get your hands in the game? Follow these steps, and I’ll walk you through every little hack and “why” along the way.
- The Fluffy Foundation: In a large mixing bowl, take your beautifully softened cream cheese. Using a hand mixer (or some serious elbow grease with a sturdy spatula), beat it on medium speed for about 1-2 minutes until it’s completely smooth, pale, and fluffy. Chef’s Hack: This aeration step is crucial! It lightens the dip and makes folding in all our crunchy bits so much easier. No one wants a dense, pasty base.
- The Crunchy Mix-In: Now, drop the mixer. We’re going gentle from here on out. Add the grated carrots, chopped peanuts, water chestnuts, green onions, cilantro, minced garlic, soy sauce, and that magical teaspoon of sesame oil (if using) to the bowl with the cream cheese. Grab your trusty spatula. Using a gentle folding motion, incorporate everything until it’s just evenly combined. Why fold? We want to preserve all those wonderful, distinct bits of crunch! Over-mixing will start to break them down and make the dip watery.
- The Great Plating: Choose your serving dish. A wide, shallow bowl or a pretty pie plate works best—you want surface area for that sauce! Transfer your creamy, crunchy mixture into the dish. Use the back of your spoon or spatula to spread it into an even layer, swooping the top if you’re feeling fancy. You can even push it up the sides a little to create a “well” for the sauce.
- The Grand Finale (The Sauce Pour!): Here’s the fun part. Take your bottle of sweet and sour sauce. Start in the center and pour in a slow, steady stream, moving outwards in a spiral or just drizzling it artfully all over. Pro Tip: Don’t stir it in! The visual contrast of the bright sauce against the creamy dip is half the appeal. Let it pool and drip into the crevices. Be generous—you want plenty in every scoop.
- Garnish & Chill: Immediately sprinkle the top with toasted sesame seeds and a few more chopped green onions for a pop of green. Now, cover it loosely and pop it in the fridge for at least 30 minutes. This chill time is non-negotiable. It allows the flavors to get to know each other, the cream cheese to firm up slightly for the perfect scoop, and the whole thing to become gloriously cold and refreshing.
- Serve & Celebrate: Pull it out of the fridge, place it right in the center of your table surrounded by bowls of crispy wonton chips, sturdy crackers, or even fresh veggie sticks, and watch the magic happen. Tell everyone to dig deep to get all the layers in one scoop!
How to Serve It & Be the Host with the Most
Presentation is key with this dip! You’ve put in the love, now let’s make it look as incredible as it tastes.
I love serving this on a large board or platter. Place the beautiful, sauced-up bowl right in the center. Then, create a “dipper bar” around it. Crispy wonton chips are my absolute first choice—their light, airy crunch is the perfect companion. You can find them in the Asian aisle or make your own by frying or baking wonton wrappers. Next, add a bowl of fortune cookies or Chinese noodle crackers for thematic fun. For a lighter option, don’t forget sliced bell peppers, cucumber rounds, or endive leaves—the cool, crisp veggies are amazing with the rich dip. Finally, stick a few colorful cocktail picks or small serving spoons right in the dip to encourage sharing.
The goal is to create an inviting, abundant spread that says, “Come on over, the party’s right here.” Trust me, this setup will be the bustling hub of your gathering.
Make It Your Own: 5 Tasty Twists
Got a different crowd or craving? This recipe is a fantastic playground for customization. Here are a few of my favorite spins:
- The “Big Heat” Version: Add 1-2 finely chopped jalapeños (seeds removed for less fire) to the mix-in step. You could also swirl in a tablespoon of sriracha or chili garlic sauce into the cream cheese base for a spicy kick that cuts through the sweetness.
- Protein-Packed Power Dip: Fold in 1 cup of finely chopped cooked chicken or shredded rotisserie chicken to turn this from an appetizer into a seriously satisfying lunch spread. Serve with celery sticks for a full meal vibe.
- Tropical Escape: Add ½ cup of well-drained, crushed pineapple (canned or fresh) to the mix-ins. The pineapple plays directly into the sweet and sour flavors and adds a juicy burst. Garnish with toasted coconut flakes instead of sesame seeds.
- Lighter & Brighter: Swap the full-fat cream cheese for Neufchâtel or a whipped cream cheese spread. You can also use low-sodium soy sauce. The flavor will still be incredible, just a tad lighter.
- “Everything but the…” Version: Love the flavor of an everything bagel? Add 1 tablespoon of everything bagel seasoning to the cream cheese base. It adds onion, garlic, sesame, and poppyseed notes that are just next-level good.
Beau’s Kitchen Confidential: A Few Parting Thoughts
Over the years, this dip has evolved in tiny, delicious ways. The sesame oil was a later addition—a tip from a friend who runs a amazing sushi joint. The water chestnuts were always there; their crunch is non-negotiable in my book. I’ve learned that the quality of your sweet and sour sauce does matter. Taste a couple of brands and find one you love, or take 10 minutes to whip up a quick homemade version—the flavor difference is noticeable.
One funny fail? The time I tried to “healthify” it by using a tofu-based cream cheese alternative for a vegan friend. Let’s just say the texture was… educational. We ordered pizza that night. The lesson: some recipes have a soul, and this one’s soul is creamy, cheesy, and unapologetically indulgent. And we love it for that!
Your Questions, Answered (Let’s Troubleshoot!)
Q: Can I make this dip ahead of time?
A: Absolutely! You can assemble the entire dip (including the sauce and garnish) up to 24 hours in advance. Just keep it tightly covered in the fridge. The flavors will meld even more beautifully. The wonton chips are best made or opened day-of for maximum crunch.
Q: My dip seems a bit runny or soft. What happened?
A: Two likely culprits: 1) The cream cheese wasn’t full-fat or was too warm. Full-fat cream cheese holds its structure best. 2) The veggies (especially the carrots) might have been very wet. A quick tip: after grating your carrots, place them in a clean kitchen towel or paper towels and give them a gentle squeeze to remove excess moisture. Also, that 30-minute chill is essential for firming everything up!
Q: I’m not a fan of peanuts. What else can I use?
A: No problem! Chopped cashews, almonds, or even shelled edamame would be fantastic. For a nut-free version, try roasted sunflower seeds or pumpkin seeds (pepitas). They all bring that essential salty crunch.
Q: What’s the best way to store leftovers?
A: Cover the dip tightly with plastic wrap or in an airtight container. It will keep well in the fridge for 3-4 days. The sauce may bleed into the cream cheese a bit more, but it will still taste delicious! I don’t recommend freezing it, as the texture of the cream cheese and crunchy elements will suffer.
Creamy Sweet & Sour Chinese Dip with Crunchy Veggie Twist
Description
This Creamy Sweet & Sour Chinese Dip is a guaranteed crowd-pleaser. It’s cool, creamy, crunchy, sweet, and tangy—all in one scoop. With a smooth cream cheese base, loads of crisp veggies and peanuts, and a glossy layer of sweet and sour sauce on top, it comes together quickly but tastes like something special. Perfect for parties, potlucks, or anytime you want a snack that disappears fast.
Ingredients
Dip Base
-
24 oz cream cheese (3 blocks), softened
-
1⅓ cups grated carrots
-
⅔ cup chopped roasted peanuts
-
½ cup chopped water chestnuts
-
½ cup finely chopped green onions
-
4 tbsp soy sauce (or tamari for gluten-free)
-
2 tbsp chopped fresh cilantro (or parsley)
-
2 cloves garlic, minced
-
1 tsp sesame oil (optional but recommended)
Topping & Serving
-
Sweet and sour sauce (store-bought or homemade)
-
Toasted sesame seeds (optional)
-
Extra chopped green onions (optional)
-
Wonton chips, crackers, or fresh veggies for dipping
Instructions
-
Whip the Cream Cheese
In a large bowl, beat the softened cream cheese until smooth and fluffy. -
Fold in the Crunch
Add carrots, peanuts, water chestnuts, green onions, cilantro, garlic, soy sauce, and sesame oil. Gently fold until evenly combined. -
Spread & Top
Transfer the mixture to a shallow serving dish and smooth the top. Pour sweet and sour sauce generously over the surface—do not mix it in. -
Garnish & Chill
Sprinkle with sesame seeds and green onions. Refrigerate for at least 30 minutes before serving. -
Serve
Serve cold with wonton chips, crackers, or veggie sticks.
Notes
-
Soft cream cheese is key: Let it sit at room temperature for the smoothest texture.
-
Too watery? Lightly squeeze grated carrots with paper towels before mixing.
-
Make-ahead friendly: This dip can be made up to 24 hours in advance.
-
Nut-free option: Swap peanuts for sunflower seeds or pumpkin seeds.
Nutritional Info (For Your Peace of Mind)
Here’s a quick breakdown per serving (assuming about 12 servings from the batch). Remember, this is an estimate and can vary based on specific brands and ingredient amounts you use:
- Calories: ~210
- Total Fat: 16g
- Saturated Fat: 8g
- Carbohydrates: 9g
- Fiber: 1g
- Sugars: 5g
- Protein: 5g
- Sodium: ~300mg
This is a rich, celebratory dip meant to be enjoyed as part of a spread. Pairing it with fresh vegetable dippers is a great way to balance things out. To lower the sodium, use low-sodium soy sauce and be mindful of the sweet and sour sauce brand you choose.
The Final Scoop: Why This Dip is a Forever Favorite
So there you have it, my foodie friends—the story, the secrets, and the step-by-step to creating a dip that’s guaranteed to spark joy (and conversation) at any table. What I love most about this recipe, beyond its insane deliciousness, is its spirit. It’s unpretentious, it’s playful, and it’s meant to be shared. It proves that the most memorable dishes often come from a place of creativity and a desire to bring people together over something genuinely tasty.
I hope you make it,
Sourdough Discard Pretzel Bites: Golden, Soft & Irresistible
Sourdough Discard Pretzel Bites: Golden, Soft & Irresistible
The Happy Accident That Became a Kitchen Hero
Hey friends, Beau here from Feastical! Let’s be real for a second. If you’re a sourdough enthusiast like me, you’ve probably found yourself in a weekly standoff with a jar of discard. You love the tangy flavor it promises, but you hate the idea of wasting it. It sits there in the fridge, a quiet, bubbly reminder of your baking ambitions. Do you make another loaf? Pancakes? Waffles? Again?
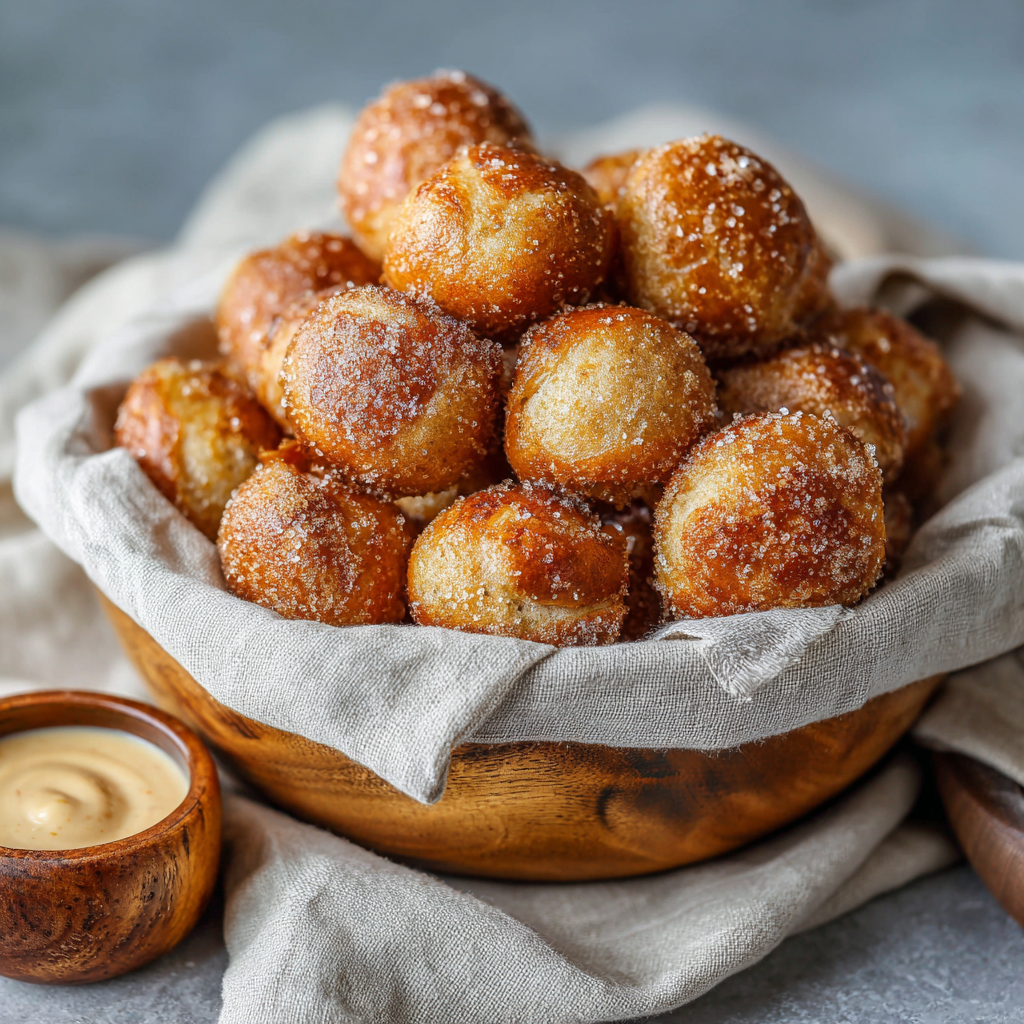
Well, I’m about to hand you the ultimate solution—a recipe so good, so universally beloved, you might start *hoping* for extra discard. I’m talking about Sourdough Discard Pretzel Bites. Imagine the soft, pillowy inside of a perfect pretzel, with that distinctive, shiny, golden-brown crust that gives way to a satisfying, chewy bite. Now, infuse it with the subtle, complex tang of your sourdough starter. That’s what we’re making today.
These little nuggets of joy are more than just a snack; they’re a kitchen experience. They’re perfect for game day, movie night, or just because it’s Tuesday and you deserve a warm, salty treat. They come together with surprisingly little fuss, and the act of boiling the dough before baking—the secret to that iconic pretzel texture—is downright magical to watch. So, let’s roll up our sleeves, rescue that discard from the fridge, and make something spectacular together.
My First Pretzel & Why These Bites Just Make Sense
My love affair with pretzels started not in a bakery, but at a baseball game. I was a kid, and the smell of warm, doughy pretzels and yellow mustard was more intoxicating than the popcorn or the hot dogs. It was pure, simple, carb-loaded joy. Fast forward to my early days of sourdough baking, and I was determined to capture that magic at home.
My first from-scratch pretzel attempt was… ambitious. Shaping those classic knots was a comedic exercise in dough-ropes-gone-wild. They looked less like elegant pretzels and more like abstract art. Delicious abstract art, but still. That’s when the “bite-sized” lightbulb went off. By cutting the dough into small pieces, I eliminated the shaping stress entirely. Suddenly, pretzel-making became accessible, fast, and incredibly fun. Adding my sourdough discard was the final masterstroke—it gave the dough incredible flavor and tenderness, and it solved my “what do I do with this?” dilemma in the most delicious way possible. These bites are the happy marriage of childhood nostalgia and my grown-up chef’s desire to use every last bit of goodness in the kitchen.
Gathering Your Cast of Characters
Here’s everything you’ll need to bring these pretzel bites to life. Don’t stress if you’re missing an item or two—I’ve got notes and swaps for you right here.
- 1 cup + 2 tbsp warm water: Think baby-bottle warm, not hot. Too hot and it’ll upset the yeast. If you don’t have a thermometer, it should feel pleasantly warm on your wrist.
- 1 tbsp brown sugar: This is the yeast’s favorite snack, helping it wake up and get bubbly. It also adds a whisper of molasses depth. White sugar works in a pinch!
- 1¼ tsp active dry yeast: The little engine that makes our dough rise. Make sure yours isn’t ancient for the best results.
- 200g (about ¾ cup) sourdough discard: This is our star! Use it straight from the fridge. Its acidity adds fantastic flavor and softness. Chef’s Insight: The hydration of your starter can vary. If your dough seems too wet, add a sprinkle more flour. Too dry? A teaspoon of extra water.
- 4 cups all-purpose flour: The trusty workhorse. For a slightly chewier bite, you can swap in one cup of bread flour.
- 2 tsp salt: Crucial for flavor. I use fine sea salt in the dough. Save the coarse stuff for topping.
- 4 tbsp melted butter: Adds richness and makes the crumb incredibly tender. For a dairy-free version, olive oil or a neutral oil like avocado works beautifully.
- 2 quarts water + ½ cup baking soda (for boiling): This is the **magic step**! The alkaline bath is what gives pretzels their distinctive, deep-brown, flavor-packed crust. Don’t skip it!
- 1 egg yolk + 1 tbsp water (for egg wash): The final touch for that professional, glossy sheen. A little milk or cream can be used instead of the egg wash if needed.
Let’s Get Our Hands Doughy: The Step-by-Step
Ready to create some magic? Follow these steps, and don’t forget to read my little chef hacks along the way—they make all the difference!
Step 1: Wake Up the Yeast. In a large mixing bowl, combine the warm water, brown sugar, and yeast. Give it a quick stir and walk away for 5-10 minutes. You want to see a foamy, creamy layer on top—this is your sign that the yeast is alive and ready to party! Chef Hack: If your kitchen is cold, let this mixture sit in the oven with just the light on for a cozy, draft-free spot.
Step 2: Bring the Dough Together. To the yeasty water, add your sourdough discard, flour, and salt. Mix with a wooden spoon or dough hook until it’s a shaggy mess. Now, stream in the melted butter. Keep mixing until a rough dough forms.
Step 3: Knead to Perfection. Turn the dough out onto a lightly floured surface. Knead for about 5 minutes. You’re not aiming for windowpane perfection like with bread; you just want a smooth, soft ball of dough that’s not sticky. If it sticks to your hands, add a tiny bit more flour. Chef Hack: Set a timer! It’s easy to over-knead, and 5 minutes of steady, rhythmic kneading is usually just right.
Step 4: The First Rise. Place your lovely dough ball into a lightly greased bowl, turn it once to coat, and cover it with a damp kitchen towel or plastic wrap. Let it rise in a warm spot for about 1 hour, or until roughly doubled in size. Don’t fret over the clock—go by the dough, not the timer.
Step 5: Shape the Bites. Punch down the dough (the most satisfying step!) and turn it out. Divide it into 8 equal pieces. Roll each piece into a rope about ¾-inch thick. No need to be precise! Using a bench scraper or a sharp knife, cut each rope into 10-ish bite-sized pieces. Chef Hack: Don’t roll the ropes too thin, or you’ll end up with tiny, dense bites. Plump ropes make plump, soft bites.
Step 6: The Infamous Baking Soda Bath. Preheat your oven to a hot 450°F (230°C). Line two baking sheets with parchment paper. In a large, wide pot (a Dutch oven is perfect), bring the 2 quarts of water and ½ cup of baking soda to a rolling boil. It will foam up—that’s normal! Working in batches, gently drop about 10-15 dough pieces into the boiling water. They’ll sink, then float to the top in about 30 seconds. That’s your cue! Use a slotted spoon to transfer them to your prepared baking sheets.
Step 7: Top and Bake. Whisk the egg yolk with a tablespoon of water and brush it generously over every bite. This is your glue for toppings! Sprinkle immediately with coarse salt (or cinnamon sugar if you’re going sweet). Bake for 12-15 minutes, rotating the pans halfway, until they are a deep, glorious golden brown.
How to Serve These Little Clouds of Joy
Pull them from the oven and try to resist eating one immediately (I never can). The ideal way to serve these is warm, piled high in a big bowl or on a wooden board. For the classic experience, serve with a side of spicy brown mustard or a simple cheese sauce for dipping (a warm beer cheese sauce is next-level). If you went the cinnamon sugar route, a bowl of vanilla cream cheese frosting or even just a dusting of powdered sugar is divine.
They’re the ultimate shareable food for a crowd, but honestly, making a batch just for yourself with a good book and a cup of coffee is a perfect form of self-care. They’re best the day they’re made, but if you have leftovers, see my Chef’s Notes for the best way to bring them back to life!
Make It Your Own: 5 Tasty Twists
The basic recipe is a blank canvas! Here are some of my favorite ways to play with it:
- Everything Bagel Bliss: Before baking, top with an everything bagel seasoning mix. The onion, garlic, sesame, and poppy seeds are a savory match made in heaven.
- Cheddar Jalapeño Popper: Knead 1 cup of shredded sharp cheddar and ¼ cup of finely diced pickled jalapeños into the dough after the first rise. Top with a little extra cheese before baking.
- Sweet Cinnamon Sugar Swirl: After rolling out the dough ropes, brush them with melted butter and sprinkle heavily with a cinnamon-sugar mix. Fold the rope over itself, roll slightly to seal, then cut into bites. After baking, roll the warm bites in more cinnamon sugar.
- Garlic Parmesan Herb: Brush the baked bites with garlic butter (melted butter + minced garlic) and immediately toss in a bowl with grated Parmesan and dried Italian herbs.
- Whole Grain Twist: Substitute 1.5 cups of the all-purpose flour with whole wheat or rye flour for a heartier, nuttier flavor. You may need a touch more water.
Beau’s Kitchen Notes & Stories
This recipe has been a work in progress for years. The first time I made them, I was so excited I forgot the salt in the dough. They were… sad. Lesson learned! I also learned that the baking soda bath isn’t as scary as it seems. Yes, it foams, but just use a big pot and you’re golden (literally).
Over time, I’ve started adding the butter *after* the initial mix, which seems to create a more tender crumb. And if I’m planning ahead, I sometimes let the shaped bites do a slow, cold rise in the fridge overnight. I boil and bake them straight from the fridge the next day—the flavor is even more complex! To reheat leftovers, a quick 5-minute stint in a 350°F oven or a 30-second zap in the microwave brings them right back. A quick brush of water before reheating in the oven helps revive the crust.
Your Questions, Answered
Q: My dough didn’t rise much. What happened?
A: The most common culprits are old yeast or liquid that was too hot, which can kill the yeast. Always test your yeast in step one to ensure it’s active. Also, a cold kitchen can slow the rise—find a warmer spot!
Q: Can I skip the baking soda boil?
A: Technically, yes, but you’ll lose the classic pretzel flavor, color, and chewy crust. They’ll be more like soft dinner rolls. The bath is what makes a pretzel a pretzel!
Q: My pretzel bites are dense, not soft and airy.
A: This usually means the dough was over-kneaded or, more likely, the first rise wasn’t long enough. Let the dough truly double in size. Also, make sure you’re not using discard that is *extremely* old and acidic, as this can weaken the gluten over time.
Q: Can I freeze these?
A> Absolutely! Freeze the baked and cooled bites on a tray, then transfer to a bag. Reheat from frozen in a 375°F oven for 10-12 minutes. You can also freeze the shaped, unboiled/unbaked dough pieces on a tray, then bag them. Boil and bake straight from frozen, adding a few extra minutes to the bake time.
Quick Nutrition & Prep Info
Prep Time: 20 minutes | Cook Time: 15 minutes | Rise Time: 1 hour | Total Time: ~1 hour 35 minutes | Servings: 8 (about 80 bites)
Estimated nutrition per serving (about 10 bites, plain with salt):
Calories: ~230 | Fat: 6g | Carbohydrates: 38g | Protein: 6g | Sodium: ~500mg (varies with topping)
Note: This is an estimate provided by an online nutrition calculator. Values can vary significantly based on specific ingredients used and topping choices.
Go Forth and Bake with Joy!
And there you have it, friends—your new secret weapon for sourdough discard and your next guaranteed party hit. What I love most about this recipe is how it turns something considered a “waste product” into the star of the show. It’s a little lesson in kitchen thrift and a huge lesson in deliciousness.
I hope you have as much fun making these as I do. Don’t forget to tag me @Feastical if you share your creations online—I love seeing your kitchen triumphs! Now, go grab that jar of discard, put on some good music, and get ready for your kitchen to smell like a professional bakery. Happy baking!
Print
Sourdough Discard Pretzel Bites: Golden, Soft & Irresistible
Description
These Sourdough Discard Pretzel Bites are the perfect way to turn extra sourdough discard into a warm, salty snack everyone loves. They’re soft and fluffy on the inside, chewy on the outside, and baked to a beautiful golden brown. With a quick dough, a simple baking-soda bath, and endless topping options, they’re ideal for game day, parties, or cozy nights at home.
Ingredients
Dough
-
1 cup + 2 tbsp warm water
-
1 tbsp brown sugar
-
1¼ tsp active dry yeast
-
200 g (about ¾ cup) sourdough discard (unfed)
-
4 cups all-purpose flour
-
2 tsp salt
-
4 tbsp butter, melted
Baking Soda Bath
-
2 quarts water
-
½ cup baking soda
Topping
-
1 egg yolk + 1 tbsp water (egg wash)
-
Coarse salt (or toppings of choice)
Instructions
-
Activate the Yeast
In a large bowl, mix warm water, brown sugar, and yeast. Let sit 5–10 minutes until foamy. -
Make the Dough
Add sourdough discard, flour, and salt. Mix until shaggy, then stir in melted butter. Knead on a floured surface for about 5 minutes until smooth and soft. -
First Rise
Place dough in a greased bowl, cover, and let rise in a warm spot for about 1 hour, or until doubled. -
Shape the Bites
Punch down dough. Divide into 8 pieces, roll each into a rope, and cut into bite-sized pieces. -
Boil
Preheat oven to 450°F (230°C). Bring water and baking soda to a boil. Boil dough pieces in batches for about 30 seconds, then transfer to lined baking sheets. -
Bake
Brush with egg wash, sprinkle with salt, and bake for 12–15 minutes until deep golden brown. -
Serve
Enjoy warm with mustard, cheese sauce, or your favorite dip.
Notes
-
Don’t skip the baking soda bath – it’s key for classic pretzel flavor and color.
-
Too sticky dough? Add flour a tablespoon at a time.
-
Sweet version: Skip salt and sprinkle with cinnamon sugar after baking.
-
Best fresh: Reheat leftovers briefly in the oven to restore texture.
Final Thoughts
These Sourdough Discard Pretzel Bites are more than a recipe—they’re a celebration of the happy accidents and simple joys that make home baking so special. They transform that jar of “almost-waste” into a centerpiece of comfort, connection, and pure, uncomplicated delight.
Remember, baking is a conversation between you and your ingredients. Don’t be afraid to listen, adjust, and make these bites your own. Whether you keep them classic or venture into a cheesy, spicy, or sweet variation, you’re not just making a snack. You’re creating a moment: the shared laughter over a bowl of warm bites, the quiet satisfaction of a Tuesday treat, or the pride of mastering a technique that once seemed mysterious.
So, here’s to less waste, more flavor, and the kind of baking that feels like a hug. Your sourdough starter isn’t just a project anymore—it’s a gateway to endless possibilities, starting with these golden, irresistible bites.
Now, go rescue that discard and create something wonderful. I can’t wait to hear how it goes.
Happy baking,
Beau

Sourdough Discard Cinnamon Roll Bites: Sweet, Gooey & Golden
Sourdough Discard Cinnamon Roll Bites: Sweet, Gooey & Golden
Your Sourdough Discard’s Greatest Adventure Starts Here
Hey friends, Beau here! Let’s talk about that jar in your fridge. You know the one. It’s filled with sourdough discard, that tangy, bubbly byproduct of your starter’s life. For so long, we’ve been told it’s “waste,” but I’m here to shout from the rooftops (or at least from my cozy kitchen) that it’s pure, untapped flavor potential. Tossing it feels like a tiny culinary heartbreak, doesn’t it? What if I told you that in less than 40 minutes, that discard could transform into the most irresistible, pull-apart-able, icing-drenched bites of cinnamon-sugar heaven you’ve ever tasted?
That’s the magic of these Sourdough Discard Cinnamon Roll Bites. We’re not making a project out of this. No overnight rises, no intricate laminating. This is a quick, feel-good bake that delivers all the soul-warming comfort of a classic cinnamon roll in a fun, shareable, pop-in-your-mouth format. The sourdough discard brings a subtle tang and incredible tenderness to the dough, making each bite uniquely delicious. So, if your sweet tooth is calling and your discard jar is pleading for purpose, grab your favorite mixing bowl. We’re about to bake some serious joy.
The Lazy Sunday That Started It All
This recipe was born from a classic “kitchen clean-out” moment. It was a lazy Sunday morning. The coffee was brewing, my starter was fed and happy, but I had a cup of discard staring me down. My craving was for something sweet and cinnamony, but my ambition was at an all-time low. I glanced at my biscuit ingredients and had a wild thought: “What if I just… combine the vibes?”
I mixed the discard with flour, baking powder, and a hopeful heart. I rolled it out, slathered it with butter and cinnamon sugar, and instead of neat rolls, I just chopped it into rustic squares and rolled them into little, imperfect balls. The result? Pure chaos… and pure magic. They baked up golden, fluffy, and when I drizzled that simple glaze over the top, my family descended on the kitchen like cheerful vultures. That happy, messy experiment became an instant staple. It proved that the best recipes aren’t always the most precise—they’re the ones that solve a craving, use what you have, and create a delicious memory.
Gathering Your Sweet Symphony
Here’s everything you’ll need. Remember, baking is part science, part soul—so let’s talk about why each ingredient is here and how you can make it your own.
- 1 cup sourdough discard (unfed, 100% hydration): This is your superstar! Use it straight from the fridge. Its acidity makes the dough incredibly tender. Chef’s Insight: Don’t have exactly a cup? You can slightly adjust the flour and milk. The dough should be soft, not sticky.
- 2 cups all-purpose flour (plus extra for dusting): The reliable foundation. It gives our bites structure. Sub Tip: For a slightly heartier bite, swap out ½ cup for whole wheat flour.
- 2 tbsp granulated sugar: Just a touch to lightly sweeten the dough itself.
- 1 tbsp baking powder: Our leavening hero! This is what gives us the quick, beautiful rise—no yeast, no wait. Make sure it’s fresh for the best puff.
- ½ tsp salt: The flavor enhancer. It balances the sweetness and makes everything pop.
- 6 tbsp butter, melted (divided): We use this in two ways. Most goes into the dough for richness, the rest gets brushed on top for that gorgeous, golden finish.
- ¼ cup milk (as needed): The connector. Start with a couple tablespoons and add just until the dough comes together. The moisture needs of discard can vary!
- For the Cinnamon Filling:
- 3 tbsp butter, softened: Soft, not melted! This makes it spreadable like a paste.
- ⅓ cup brown sugar: Its molasses notes add deep, caramel-like warmth. Light or dark works!
- 1 tbsp cinnamon: The spice of life! Use the good stuff for the best aroma.
- For the Vanilla Glaze:
- 1 cup powdered sugar: Sift it if it’s lumpy for the smoothest drizzle.
- 1–2 tbsp milk: Add slowly to reach your perfect consistency.
- ½ tsp vanilla extract: The aromatic finish. A splash of almond extract is also a dream here.
Let’s Bake: Step-by-Step to Bite-Sized Bliss
Ready? Tie on your apron, and let’s get our hands in there. This process is as satisfying as the eating part, I promise.
- Make the Dough: In a large bowl, combine the sourdough discard, 2 cups of flour, sugar, baking powder, and salt. Give it a quick whisk to distribute the baking powder evenly. Pour in 4 tablespoons of the melted butter. Now, use a fork or your hands to mix until it looks shaggy and crumbly. Chef’s Hack: Here’s where you listen to the dough. Add the milk, a tablespoon at a time, just until the dough gathers into a soft ball that pulls away from the bowl. It should be tacky but not overly sticky. If you add too much milk, just sprinkle in a tiny bit more flour.
- Roll It Out: Lightly flour your clean countertop. Turn out the dough and knead it gently just 4-5 times to bring it together. Then, using a rolling pin (or a wine bottle in a pinch!), roll it out into a rough rectangle, about ¼ inch thick. Don’t stress about perfect edges—rustic is charming!
- Create the Filling Layer: Spread the 3 tablespoons of softened butter evenly over the entire surface of your dough rectangle, leaving just a tiny border. In a small bowl, mix the brown sugar and cinnamon. Sprinkle this mixture generously and evenly over the buttered dough. Gently press it down with your hand so it adheres.
- Cut and Shape: Using a pizza cutter or a sharp knife, cut the dough into roughly 1.5 to 2-inch squares. Don’t worry if they’re not uniform! Now, take each square and gently roll it between your palms to form a loose ball. The filling will peek out—that’s good! This method gives you those gorgeous, pull-apart layers.
- Bake to Golden Perfection: Preheat your oven to 375°F (190°C). Line a baking sheet with parchment paper (for easy cleanup!). Place the dough balls on the sheet, leaving a little space between them as they’ll puff up. Brush the tops with the remaining 2 tablespoons of melted butter. This is the secret to that irresistible, glossy, golden-brown top! Bake for 15-18 minutes, until they’re beautifully puffed and golden.
- Glaze and Devour: While the bites bake, whisk together the powdered sugar, vanilla, and enough milk to make a thick but drizzle-able glaze. Let the bites cool on the pan for just 5 minutes—you want them warm, not piping hot, so the glaze doesn’t just melt off. Drizzle the glaze over the top in a zig-zag motion or just pour on the love. Serve immediately for maximum gooeyness!
Serving Up the Good Stuff
Presentation is part of the fun! Pile these warm, glazed bites high on a simple wooden board or in a big, beautiful bowl. They’re meant for sharing and grabbing. I love serving them straight from the pan, with extra glaze on the side for the true enthusiasts at the table. For the ultimate experience, pair them with a strong cup of coffee or a cold glass of milk. They’re perfect for brunch buffets, afternoon pick-me-ups, or as a sweet ending to a casual dinner. Watch them disappear—it’s the best compliment a chef can get!
Make It Your Own: Delicious Twists & Swaps
The beauty of this recipe is its flexibility. Once you’ve mastered the basic magic, try one of these fun spins!
- Apple Pie Twist: Add ½ cup of finely chopped, peeled apple and a pinch of nutmeg to the cinnamon-sugar filling. It’s like autumn in every bite.
- Chocolate Chip Happiness: Fold ⅓ cup of mini chocolate chips into the dough itself. The melty chocolate with the cinnamon filling is next-level.
- Citrus Zing: Add the zest of one orange or lemon to the dough. Then, swap the vanilla in the glaze for fresh citrus juice. Bright and beautiful!
- Vegan Friendly: Use plant-based butter and your favorite non-dairy milk. The recipe works like a charm.
- Gluten-Free Adaptation: Swap the all-purpose flour for a 1:1 gluten-free baking blend. The texture will be slightly more delicate but just as delicious.
A Few More Thoughts From My Kitchen
Over the dozens of times I’ve made these, I’ve learned a few things. First, the dough’s stickiness really depends on your specific discard’s hydration and thickness. That’s why the milk is “as needed.” Trust your instincts—you want a workable, soft dough. Second, if you’re in a huge hurry, you can skip rolling them into balls and just bake the cut squares! You’ll get more crispy edges, which is also amazing. Finally, this recipe is a gateway. Once you see how easy and rewarding it is to bake with discard, you’ll never look at that jar the same way again. It’s not waste; it’s a secret ingredient waiting for its moment.
Your Questions, Answered
- Q: My dough is too sticky to handle! What do I do?
A: No panic! Just sprinkle a little more flour onto your work surface and onto the top of the dough. Knead it in gently, a tablespoon at a time, until it’s just tacky but not sticking to your hands. Remember, a little sticky is better than a dry, tough dough. - Q: Can I make these ahead of time?
A: Absolutely! You can assemble the bites up to the point of baking, cover the tray tightly, and refrigerate overnight. In the morning, just brush with butter and bake—you might need an extra minute or two. You can also freeze the un-baked bites on a tray, then transfer to a bag. Bake from frozen, adding 3-5 minutes to the bake time. - Q: Why baking powder and not yeast?
A: Great question! We’re using the sourdough discard for flavor and tenderness, not for leavening (since it’s unfed). Baking powder gives us the instant, reliable rise we want for a quick, no-wait recipe. It’s the best of both worlds: sourdough flavor, biscuit-style ease. - Q: My bites are dry. What happened?
A: This usually means the dough was over-floured or they were baked a minute or two too long. Next time, be conservative with extra flour and check them at the 15-minute mark. Ovens vary, so yours might be perfect a minute early!
Nutritional Info (Because We’re Curious!)
Please note: The following is an estimate provided by an online nutrition calculator. Values can vary based on specific ingredients used and serving size.
Prep Time: 20 minutes | Cook Time: 18 minutes | Total Time: 38 minutes | Servings: 18-20 bites
Estimated per bite: Calories: ~120 | Fat: 5g | Saturated Fat: 3g | Carbohydrates: 17g | Sugar: 8g | Protein: 2g
These are a treat, meant to be enjoyed mindfully and shared generously. The sourdough discard adds a probiotic element (though baking reduces live cultures), and using it reduces food waste, which is a nutritional win for the planet!
Print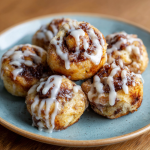
Sourdough Discard Cinnamon Roll Bites: Sweet, Gooey & Golden
Description
Got sourdough discard sitting in your fridge? Don’t toss it! These Sourdough Discard Cinnamon Roll Bites turn that extra discard into soft, buttery, cinnamon-sugar bites in under 40 minutes. No yeast, no long rising—just easy mixing, quick baking, and warm, cozy results. Perfect for brunch, snacks, or sharing straight from the pan.
Ingredients
Dough
-
1 cup sourdough discard (unfed, 100% hydration)
-
2 cups all-purpose flour (plus more for dusting)
-
2 tbsp granulated sugar
-
1 tbsp baking powder
-
½ tsp salt
-
6 tbsp butter, melted (divided)
-
¼ cup milk (as needed)
Cinnamon Filling
-
3 tbsp butter, softened
-
⅓ cup brown sugar
-
1 tbsp ground cinnamon
Vanilla Glaze
-
1 cup powdered sugar
-
1–2 tbsp milk
-
½ tsp vanilla extract
Instructions
-
Make the Dough
In a large bowl, mix sourdough discard, flour, sugar, baking powder, and salt. Stir in 4 tbsp melted butter. Add milk a little at a time until a soft, slightly tacky dough forms. -
Roll It Out
Turn dough onto a floured surface. Knead gently 4–5 times, then roll into a rectangle about ¼-inch thick. -
Add the Filling
Spread softened butter over the dough. Mix brown sugar and cinnamon, then sprinkle evenly over the top. Lightly press it in. -
Cut & Shape
Cut dough into 1½–2 inch squares. Roll each square loosely into a ball. -
Bake
Preheat oven to 375°F (190°C). Place dough balls on a parchment-lined baking sheet. Brush with remaining melted butter.
Bake 15–18 minutes, until puffed and golden. -
Glaze
Whisk powdered sugar, milk, and vanilla until smooth. Drizzle over warm bites and serve.
Notes
-
Dough too sticky? Sprinkle in a little more flour, one tablespoon at a time.
-
Extra gooey tops: Drizzle glaze while the bites are still warm.
-
Make-ahead: Assemble and refrigerate overnight, then bake fresh.
-
Flavor boost: Add orange zest to the dough or mini chocolate chips to the filling
Final Thoughts: Bake, Share, Repeat
And there you have it, friends—the recipe that turns a fridge staple into a tableful of smiles. This is what Feastical is all about: simple, soulful food that brings people together without the stress. These Sourdough Discard Cinnamon Roll Bites are more than just a recipe; they’re a reminder that some of the best things in life are unplanned, a little messy, and incredibly sweet.
I’d love to hear how your batch turns out! Did you add a twist? Did your family go crazy for them? Tag me @Feastical or drop a comment on the blog. Now, go preheat that oven and give your discard the glorious, sugary send-off it deserves. Happy baking!
With love and a full plate,
Beau

Cheesy Garlic Breadsticks : Twisted, Buttery, and Loaded with Flavor
Cheesy Garlic Breadsticks – Twisted, Buttery, and Loaded with Flavor
Hey friends, Beau here from Feastical! Let’s talk about one of life’s greatest, simplest pleasures: the smell of garlic and cheese hitting a hot oven. It’s the unofficial scent of “good times about to happen.” If you’ve ever found yourself at a pizza place, secretly more excited for the breadsticks than the actual pizza… raise your hand. (My hand is WAY up).
Today, we’re not just making breadsticks. We’re creating LEGENDARY, pull-apart, twisty, dangerously addictive Cheesy Garlic Breadsticks that belong at the center of every game night, movie marathon, and “I-deserve-a-treat” Tuesday. These aren’t an afterthought; they’re the main event. We’re talking soft, fluffy interiors, crisp, golden edges, a garlic butter soak that gets into every nook, and a blanket of melted cheese that’s absolutely mandatory.
The best part? We’re keeping it wonderfully simple. Whether you’re a from-scratch warrior or a savvy shortcut-taker, I’ve got you covered. This recipe is designed for maximum flavor with minimum fuss, because delicious food should bring joy, not stress. So, tie on your apron, and let’s turn your kitchen into the best pizzeria in town.
The Great Breadstick Diplomacy of 2012
This recipe always takes me back to my first “real” apartment after college. My roommate Mike and I had a standing Friday night ritual: cheap pizza and video games. But the pizza joint’s breadsticks? Those were a luxury item on our shoestring budget. One particularly ambitious (and hungry) Friday, I decided to crack the code. The mission: recreate those iconic, cheesy, garlicky sticks at home.
The first attempt was… a solid “C.” The garlic burned. The cheese slid off. But attempt number three? Magic. I brought a pan out to the living room, and the smell alone paused the game. What followed was a silent, focused, beautiful destruction of the entire batch. No words, just happy chewing and satisfied sighs. Those breadsticks became our currency—they patched up arguments, celebrated paychecks, and welcomed new friends. They taught me that the simplest foods, made with a little love, are often the ones that build the best memories. That’s the spirit I’m bringing to this recipe today.
Gathering Your Flavor Arsenal
Here’s everything you’ll need to create this masterpiece. I’ve included my chef notes and swaps so you can make this recipe work with what you’ve got!
- 1 tube refrigerated pizza dough (or 1 lb homemade dough) – This is our fantastic shortcut! I love the kind found in the dairy section. It’s reliable and saves hours. Chef’s Insight: Let it sit at room temp for 20-30 minutes before stretching—it becomes much more cooperative.
- 3 tablespoons unsalted butter, melted – The rich, fatty vehicle for our garlic. Salted butter works too; just maybe ease up on any added salt later.
- 3-4 large garlic cloves, minced – Fresh is non-negotiable here, friends. The pre-minced stuff in water doesn’t toast the same way. That toasted, fragrant garlic flavor is the soul of the dish.
- 1 ½ cups shredded low-moisture mozzarella cheese – The melt-master. Pre-shredded is convenient, but block cheese you shred yourself melts creamier (no anti-caking agents).
- ½ cup freshly grated Parmesan cheese – The flavor booster. The nutty, salty punch takes it to the next level. Please, for the love of all that is cheesy, avoid the canned powder here.
- 2 tablespoons chopped fresh parsley – For that little pop of color and fresh flavor at the end. In a pinch, 2 teaspoons dried parsley or Italian seasoning works.
- ½ teaspoon Italian seasoning (optional) – A little oregano, basil, and thyme never hurt anybody.
- ¼ teaspoon red pepper flakes (optional) – My favorite “optional” item. A subtle heat in the background is just *chef’s kiss*.
- ½ teaspoon kosher salt – To season the garlic butter. If using table salt, use half the amount.
- Marinara sauce, ranch, or garlic aioli for serving – Because dipping is a requirement, not a suggestion.
Let’s Get Twisty: Your Step-by-Step Guide
Follow these steps, and you’re guaranteed golden, cheesy success. I’m walking you through every part!
Step 1: Preheat & Prep. Fire up your oven to 400°F (200°C). Line a large baking sheet with parchment paper. Why parchment? It guarantees no sticking and makes cleanup a dream. No scrubbing baked-on cheese today!
Step 2: Roll & Relax. On a lightly floured surface, roll or stretch your room-temp dough into a rough rectangle, about 10×14 inches. Don’t stress about perfect corners! If it snaps back, let it rest for 5 more minutes. It’s just being shy.
Step 3: Create the Garlic Butter Elixir. In a small bowl, mix the melted butter, minced garlic, and kosher salt. This is the moment. Smell it. That’s the sound of victory right there. Pro Tip: Let it sit for a minute so the garlic flavor infuses into the butter.
Step 4: The Butter Baptism. Using a pastry brush (or the back of a spoon), coat the entire surface of the dough with the garlic butter. Get right to the edges. This buttery layer is what’s going to create that incredible flavor and golden color.
Step 5: The Cheesy Blanket. Sprinkle the shredded mozzarella evenly over the buttered dough, followed by the grated Parmesan. Add the optional Italian seasoning and red pepper flakes now if you’re using them. Don’t skimp! Every bite should be cheesy.
Step 6: The Fold & Slice. Here’s the fun part! Carefully fold the dough in half lengthwise, like you’re closing a giant cheesy book. Gently press the edges to seal it slightly. Now, using a pizza cutter or sharp knife, slice the folded log into 1-inch wide strips. You’ll get about 10-12 strips.
Step 7: Twist & Shout! Grab one strip from each end, give it a gentle but confident 2-3 twists, and place it on your prepared baking sheet. Leave a little space between them—they need room to puff and get crispy. Chef’s Hack: The twisting creates gorgeous texture and traps the cheese inside, creating glorious pockets.
Step 8: Bake to Perfection. Pop them into your preheated oven for 12-15 minutes. You’re looking for deep golden brown edges and bubbly, melted cheese. Ovens vary, so start checking at 12 minutes.
Step 9: The Final Flourish. The second they come out of the oven, sprinkle them with the fresh chopped parsley. It adds a fresh contrast and makes them look professionally fabulous.
Step 10: Serve Immediately! These are at their peak within 10 minutes of leaving the oven. The cheese is stretchy, the butter is aromatic, and life is good.
How to Serve These Golden Wonders
Presentation is part of the fun! I like to pile these breadsticks high on a big wooden board or a large platter. Scatter some extra parsley around, and put your dipping sauces in the center in small bowls. For a real crowd-pleaser, offer a trio: classic marinara, cool creamy ranch, and a zesty garlic aioli. It’s a DIY dipping bar that turns snack time into an event. These are perfect alongside a big, crisp salad (to balance things out, you know), a bowl of soup, or as the undisputed star of your appetizer spread.
Make It Your Own: Delicious Twists
Once you master the classic, the world is your cheesy, garlicky oyster. Try these fun variations:
- Pepperoni Stick Surprise: Before folding, scatter a layer of mini pepperoni over the cheese. It’s like a pepperoni pizza in breadstick form!
- Everything Bagel Breadsticks: Swap the garlic butter for everything bagel seasoning mixed with the butter. Top with cheese and an extra sprinkle of seasoning after baking.
- Breakfast Breadsticks: Use the twisted dough method, but brush with herb butter (no garlic). After baking, top with a drizzle of honey and crumbled cooked bacon. Unreal.
- Three-Cheese Herb Garden: Add ½ cup of shredded sharp cheddar and 2 tablespoons of chopped fresh chives or basil to the cheese mix. Rich and herby!
- Dairy-Free Delight: Use your favorite plant-based butter and vegan mozzarella/Parmesan shreds. The garlic and herb flavors are still fantastic!
Beau’s Kitchen Notes
This recipe is a living, breathing thing in my kitchen. I’ve made it probably a hundred times. The “twist” technique was born from a happy accident—I was trying to make a braid, failed miserably, and twisted instead. The result was BETTER! The twists create more surface area for crisping and make them so fun to eat. Also, a confession: I once accidentally used salted butter AND the full salt in the garlic butter. They were… intensely salty. We still ate them (because, cheese), but it was a good lesson in tasting as you go. Now, I always do a quick taste of the garlic butter before brushing. Cook, learn, adapt, eat. That’s the Feastical way.
FAQs & Troubleshooting
Q: My dough is too sticky to handle! Help!
A: No worries! Just add a light dusting of flour to your hands and the dough. Don’t over-flour the dough itself, just use enough to prevent sticking. Chilling it for 10 minutes can also help firm it up.
Q: Can I make these ahead of time?
A: You can prep them up to the “twist and place on sheet” step a few hours ahead. Cover tightly with plastic wrap and refrigerate. Bake straight from the fridge, adding 1-2 extra minutes. For best results, bake fresh!
Q: Why is my cheese browning/burning before the dough is done?
A: Your oven rack might be too high, or your oven runs hot. Next time, try baking on the middle rack. You can also tent the breadsticks loosely with foil halfway through baking if the cheese is getting too dark.
Q: Can I use garlic powder instead of fresh?
A> I strongly recommend fresh for that true, aromatic toastiness. If you *must* use powder, mix ¾ teaspoon of garlic powder into the melted butter. The flavor will be different but still tasty.
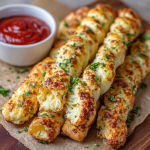
Cheesy Garlic Breadsticks : Twisted, Buttery, and Loaded with Flavor
Description
Ingredients
-
1 tube refrigerated pizza dough (or 1 lb homemade dough, room temp)
-
3 tbsp unsalted butter, melted
-
3–4 garlic cloves, minced
-
½ tsp kosher salt
-
1½ cups shredded low-moisture mozzarella
-
½ cup freshly grated Parmesan
-
½ tsp Italian seasoning (optional)
-
¼ tsp red pepper flakes (optional)
-
2 tbsp fresh parsley, chopped (for finishing)
-
Marinara, ranch, or garlic aioli (for dipping)
Instructions
-
Preheat oven to 400°F (200°C). Line a baking sheet with parchment.
-
Roll dough on a lightly floured surface into a rough 10×14-inch rectangle.
-
Make garlic butter: Mix melted butter, minced garlic, and salt.
-
Brush dough evenly with garlic butter, edge to edge.
-
Add cheese: Sprinkle mozzarella, then Parmesan. Add Italian seasoning and red pepper flakes if using.
-
Fold & cut: Fold dough in half lengthwise. Gently press. Cut into 1-inch strips (10–12).
-
Twist: Twist each strip 2–3 times and place on the baking sheet with space between.
-
Bake 12–15 minutes until golden and bubbly.
-
Finish: Sprinkle with parsley. Serve hot with dipping sauce.
Notes
-
Let dough sit at room temp 20–30 minutes for easy stretching.
-
For extra crisp bottoms, lightly spray parchment before placing twists.
-
Bake on the middle rack to prevent cheese from browning too fast.
Nutritional Info (Because We’re Curious!)
Okay, let’s be real—these are a treat, not a health food. But it’s always good to know what you’re enjoying! This estimated breakdown is for one breadstick (assuming the recipe makes 12). Remember, these values can vary based on the specific brands of dough and cheese you use.
- Calories: ~150-180
- Total Fat: 8-10g
- Saturated Fat: 4-5g
- Carbohydrates: 15-18g
- Protein: 5-7g
- Sodium: ~300-400mg
The protein and carbs come from the dough and cheese, providing a satisfying bite. To lighten it up slightly, you could use part-skim cheeses and brush with a bit less butter—but honestly, sometimes you just need the full, glorious experience.
Final Thoughts
And there you have it, my friends—your new secret weapon for impressing a crowd or just treating yourself right. These Cheesy Garlic Breadsticks are more than a recipe; they’re a ticket to a good time. They’re proof that with a few simple ingredients and a couple of clever twists, you can create something truly magical and memorable in your own kitchen.
I hope you make them, love them, and maybe even create your own “Breadstick Diplomacy” moment. If you do, I’d love to hear about it! Tag me @feastical or shoot me an email. Now, go forth and bake. And remember… always twist with confidence.
With love and a full plate,
Beau
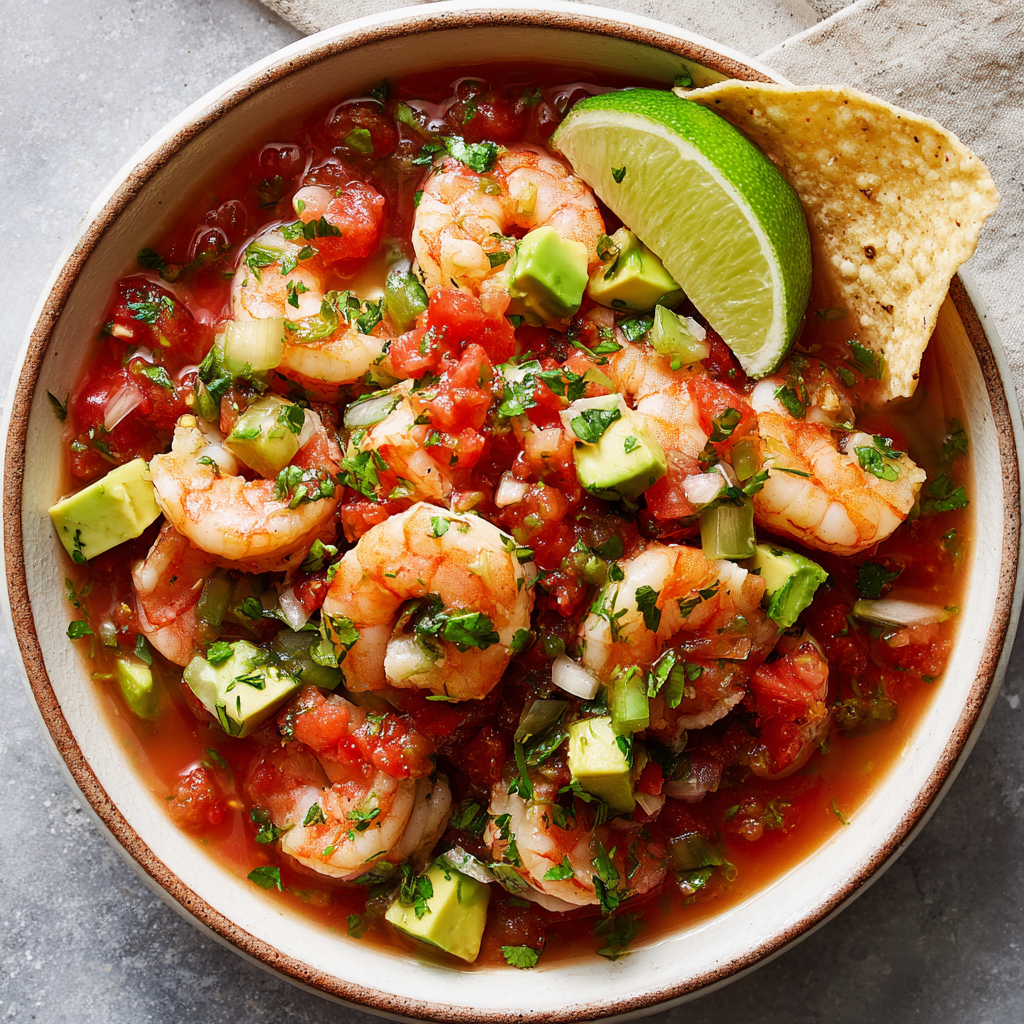
Mexican Shrimp Cocktail (Coctel de Camarones)
Let’s Dive Into a Bowl of Sunshine: My Ultimate Mexican Shrimp Cocktail
Hey there, friends! Beau here, welcoming you back to my kitchen at Feastical. Today, we’re not just making a recipe; we’re creating a vibrant, shareable, flavor-packed experience. We’re talking about my go-to dish for when I want to impress a crowd without breaking a sweat: Mexican Shrimp Cocktail, or Coctel de Camarones.
Forget everything you know about the tiny, pink, sauce-drowned shrimp cocktail from fancy parties of yore. This is its infinitely cooler, bolder, more refreshing cousin. Imagine plump, juicy shrimp swimming in a zingy, tomato-lime elixir, mingling with crisp cucumber, creamy avocado, and just the right kick of jalapeño. It’s a cross between a chunky salsa, a seafood salad, and the most delicious, drinkable gazpacho you’ve ever had (yes, you spoon it up and sip the sauce – rules are made to be broken!).
This dish is the life of the party. It’s perfect for hot summer days, game-day gatherings, or when you just need a big, bold flavor to wake up your taste buds. It comes together faster than you can say “¡qué rico!” and gets better as it chills, making it the ultimate make-ahead appetizer or light meal. So, grab your favorite chopping board and a big bowl. We’re about to make something that tastes like a beach vacation in a glass. Let’s get to it!
A Beachside Memory & The Birth of a Obsession
My love affair with Coctel de Camarones didn’t start in a fancy restaurant. It began on a sun-bleached plastic stool at a tiny palapa-style shack on a Mexican beach, years ago. The air smelled like salt and grilled fish, and the only menu was whatever the fisherman caught that morning. I ordered the “coctel,” not knowing what to expect.
What arrived was a literal glass goblet, frosty from the ice, overflowing with a crimson treasure. It was served with a spoon, saltine crackers, and a warning to “eat it slow.” One bite – a perfect forkful of shrimp, avocado, and that spicy, tangy sauce – and I was hooked. It was cooling yet spicy, fresh yet deeply savory. I must have eaten three that afternoon. I’ve been trying to recreate that perfect balance of ocean-fresh flavor and street-food soul ever since. This recipe is my homage to that perfect beachside moment. Every time I make it, I’m transported back to that plastic stool, with sandy feet and a totally happy heart.
Gathering Your Flavor Crew: Ingredients & Insights
Here’s your shopping list for this fiesta in a bowl. I’ve added my chef-y notes and swaps so you can make it your own!
- 1 lb medium shrimp, peeled & deveined: The star! You can start with raw or pre-cooked. I prefer raw for maximum tenderness and control. If frozen, thaw overnight in the fridge.
- Kosher salt: For seasoning the shrimp boil. It makes all the difference in bringing out their natural sweetness.
- 1 cup red onion, chopped: Their sharp, peppery bite mellows beautifully in the limey marinade. For less bite, soak your chopped onions in ice water for 10 minutes, then drain.
- 1 cup cucumber, peeled & diced: Our crunch factor! Peeling it ensures no bitterness and a perfect, crisp texture that holds up.
- ½ cup celery, chopped: An underrated hero. It adds a clean, aromatic crunch that’s different from the cucumber. Don’t skip it!
- 1 jalapeño, minced: The gentle heat source. Remove seeds and ribs for “mild,” keep some for “medium,” go all-in for “hot.” Want smokiness? Use a minced chipotle in adobo instead.
- 1 cup chopped tomato: Use Roma/plum tomatoes for less water, or any juicy, ripe tomato you have. This is our fresh fruitiness.
- 1 avocado, diced: The creamy dream. Add it right before serving or mixing to keep it from turning to mush. A ripe Haas avocado is perfect.
- 1 ½ cups tomato juice (or Clamato): The base of our “broth.” Clamato adds a deeper, briny flavor that’s traditional and fantastic. Plain tomato juice works great too. For a smoother sauce, use V8.
- ½ cup ketchup: Trust me! This isn’t for burgers here. It adds body, a touch of sweetness, and that familiar tang that makes the sauce utterly drinkable.
- ¼ cup fresh lime juice: NON-NEGOTIABLE. Bottled juice lacks the bright, fragrant punch. This is the wake-up call for the whole dish.
- 2 tbsp chopped cilantro: The fragrant finish. If you’re part of the “cilantro tastes like soap” club, just leave it out or use a little fresh parsley or oregano.
- Hot sauce to taste (Valentina or Cholula works great): Your personal heat dial. I add a few big dashes of Valentina for its balanced chili-garlic-vinegar flavor. Start small, you can always add more!
Building Your Cocktail, Step-by-Step with Chef Beau
Ready to assemble the magic? Let’s walk through it. I’m right here with you, sharing all my little kitchen hacks.
Step 1: The Shrimp (Your Blank Canvas)
If you’re starting with raw shrimp, bring a pot of well-salted water (it should taste like the sea) to a boil. Have a bowl of ice water ready. Drop the shrimp in the boiling water and cook for just 2-3 minutes—until they turn pink and curl into a loose “C” shape. Chef Hack: Throw a slice of lemon or a bay leaf in the boiling water for subtle flavor. Immediately scoop them into the ice bath. This “shocking” stops the cooking and keeps them snappy. Drain and pat dry. If using pre-cooked shrimp, just give them a quick rinse under cold water and pat dry. Set aside.
Step 2: The Veggie Chorus Line
Get your big, beautiful mixing bowl—this is where the party happens. Chop all your veggies (onion, cucumber, celery, jalapeño, tomato) to a similar, bite-sized dice. Consistency is key here so you get a bit of everything in each spoonful. Add them to the bowl. Chef Hack: I like to mix these veggies with the chilled shrimp now, before the sauce goes in. It lets everyone get acquainted.
Step 3: The “Liquid Gold” Sauce
In a separate bowl or a large measuring cup (easier for pouring!), whisk together the tomato juice, ketchup, fresh lime juice, chopped cilantro, and your chosen hot sauce. Taste it right now! This is your moment. Want more lime? Add it. More heat? Dash away. More tang? A splash of red wine vinegar works wonders. Remember, the flavors will meld and mellow once it hits the cold shrimp and veggies, so season boldly.
Step 4: The Grand Finale Mix
Here comes the fun part. Dice your avocado and gently fold it into the shrimp and veggie bowl. Now, slowly pour your vibrant red sauce over everything. Using a large, gentle folding motion (like you’re turning a page in a book), mix it all together until every piece is beautifully coated. Chef Hack: Avoid aggressive stirring—we want to keep those avocado pieces dignified and intact!
Step 5: The Essential Chill
Cover the bowl tightly with plastic wrap and pop it in the fridge for at least 30 minutes. This isn’t just about getting it cold. This is where the alchemy happens. The salt and acid from the lime and sauce gently “cook” the veggies ever so slightly, the flavors marry, and the whole thing transforms from separate ingredients into a harmonious, craveable dish. An hour or two is even better.
How to Serve This Showstopper
Presentation is half the fun! For that authentic feel, serve it in large margarita glasses, mason jars, or even clear punch bowls. The layers of red sauce, pink shrimp, and green avocado are gorgeous. I love to set out a big communal bowl with a ladle for casual gatherings. Don’t forget the dippers! Classic saltine crackers are a must for scooping. A big basket of sturdy tortilla chips (the restaurant-style ones) is also perfect. For a lighter touch, plantain chips or even endive leaves for a low-carb option. Garnish with extra lime wedges, cilantro sprigs, and a few dashes of hot sauce on the rim for the brave. Serve it cold, serve it with a smile, and watch it disappear.
Make It Your Own: Flavor Twists & Swaps
This recipe is a fantastic playground. Here are a few of my favorite riffs:
- The Surf & Turf: Add ½ cup of finely diced, cooked steak or crab meat alongside the shrimp for a luxurious upgrade.
- Fruit Fiesta: Dice in some ripe mango or pineapple for a sweet-and-spicy tropical vibe. It’s incredible.
- “Bloody Maria” Style: Spike the sauce with 2-3 oz of good tequila or vodka before mixing. Adults only, and absolutely delicious.
- Purely Plant-Based: Swap the shrimp for 2-3 cups of cooked, chilled hearts of palm (sliced into “coins”) or large, meaty chunks of roasted king oyster mushroom. Use all tomato juice, not Clamato.
- Extra Creamy Dreamy: Stir in ¼ cup of Mexican crema or sour cream into the sauce for a richer, tangier, slightly pink dressing.
Beau’s Kitchen Notes & Stories
This recipe has been on quite a journey with me. I’ve made it for fancy potlucks in a crystal trifle dish (got laughs and raves) and for beach picnics straight out of the cooler tub. The biggest lesson? Don’t skip the chill time. I once got impatient and served it immediately—it was good, but the onions were too sharp and the flavors hadn’t yet become friends. The 30-minute wait is the secret ingredient you can’t see. Also, I’ve learned to always make a little extra sauce; people love to slurp it up! This dish is forgiving, fun, and always a hit. It reminds me that the best food isn’t fussy—it’s fresh, full of life, and meant to be shared with good company.
Your Questions, Answered!
Q: Can I make this ahead of time?
A: Absolutely! You can chop all veggies (except avocado) and make the sauce up to a day ahead. Store separately. Cook and chill the shrimp. Combine everything, add the avocado, and chill for at least 30 minutes before serving. It’s actually better on day two, though the avocado will soften.
Q: My sauce seems too thin/too thick. Help!
A: No worries! If it’s too thin (the veggies are floating), add a touch more ketchup or a few tablespoons of tomato paste. If it’s too thick (more like a paste), simply whisk in a splash of extra tomato juice, lime juice, or even a bit of cold water until it’s a soupy, spoonable consistency.
Q: What’s the best way to store leftovers?
A: Cover tightly and refrigerate for up to 2 days. The texture of the cucumber and avocado will soften, but the flavor will still be amazing. I don’t recommend freezing it, as the veggies will turn to mush upon thawing.
Q: Is there a way to make it less spicy for kids?
A: For sure! Omit the jalapeño entirely and use a mild hot sauce (or none at all). You can also serve the hot sauce on the side so everyone can customize their own bowl.
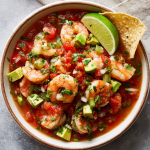
Mexican Shrimp Cocktail (Coctel de Camarones)
Description
This Mexican Shrimp Cocktail is light, refreshing, and full of bold flavor. Juicy shrimp are mixed with crisp vegetables and a tangy tomato-lime sauce that’s slightly spicy and incredibly refreshing. It’s easy to make, perfect for warm days or gatherings, and even better after chilling. Think of it as a cross between a shrimp salad and a salsa you can eat with a spoon.
Ingredients
-
1 lb medium shrimp, peeled and deveined
-
Salt (for cooking shrimp)
-
1 cup red onion, finely chopped
-
1 cup cucumber, peeled and diced
-
½ cup celery, chopped
-
1 jalapeño, minced (optional, to taste)
-
1 cup chopped tomatoes (Roma preferred)
-
1 avocado, diced
-
1½ cups tomato juice or Clamato
-
½ cup ketchup
-
¼ cup fresh lime juice
-
2 tbsp fresh cilantro, chopped (optional)
-
Hot sauce, to taste
Instructions
-
Cook the shrimp
Bring a pot of well-salted water to a boil. Add shrimp and cook for 2–3 minutes, just until pink. Drain and transfer to ice water to stop cooking. Pat dry and chop into bite-sized pieces if desired. -
Prepare the vegetables
In a large bowl, combine red onion, cucumber, celery, jalapeño, and tomatoes. -
Make the sauce
In a separate bowl, whisk together tomato juice, ketchup, lime juice, cilantro, and hot sauce. Taste and adjust seasoning. -
Combine
Add shrimp to the vegetables. Gently fold in the avocado. Pour the sauce over everything and mix gently until well combined. -
Chill
Cover and refrigerate for at least 30 minutes before serving.
Notes
-
Add avocado last to keep it from getting mushy
-
For less onion bite, soak chopped onion in cold water for 10 minutes
-
Make it ahead (without avocado) for even better flavor
Nutritional Snapshot (A Note from Beau)
Now, I’m not a nutritionist, but I am a believer in eating food that makes you feel good. Here’s a general look at what’s in a serving of this vibrant dish (based on 4 servings). It’s packed with lean protein from the shrimp, healthy fats from the avocado, and a ton of vitamins and antioxidants from all those fresh veggies. It’s naturally low in carbs if you go easy on the crackers. Most importantly, it’s made from real, whole ingredients you can feel great about sharing with your family and friends. Food is fuel, but it’s also joy—and this recipe is brimming with both.
Estimated per serving: Calories: ~220 | Protein: 20g | Fat: 7g | Carbs: 16g | Fiber: 4g
Final Thoughts & A Big Thank You
And there you have it, my friends—my heart-on-a-plate (or in a glass) recipe for Mexican Shrimp Cocktail. It’s more than just a list of ingredients and steps; it’s a celebration of bright flavors, simple techniques, and the pure joy of sharing a great meal. I hope this recipe finds its way to your table on a sunny afternoon, brings laughter to your next gathering, or simply becomes your new favorite thing to make when you’re craving something fresh and fabulous.
Thanks for letting me share my kitchen and my stories with you. Remember, cooking isn’t about perfection—it’s about the love you stir into it. Now, go grab that fork and spoon, and dig into something Feastical!
With a full heart and an empty bowl,
Beau Collier

Light Parmesan Shrimp : Crispy, Low-Carb, and Packed with Flavor
Light Parmesan Shrimp: Your New Favorite Crunchy, Low-Carb Obsession
Hey friends, Beau here! Let’s talk about that magical moment when you sink your teeth into something that’s crispy, savory, and satisfyingly crunchy, but doesn’t leave you feeling like you need a three-hour nap afterwards. Sounds like a dream, right? I’m telling you, it’s totally possible, and it’s sitting right here in this recipe for my Light Parmesan Shrimp.
We’ve all been there. You crave that classic, golden-brown, Parmesan-crusted shrimp, but the idea of heavy breading, deep frying, and the subsequent carb coma is enough to make you reach for a salad instead. (And listen, I love a good salad, but sometimes you just need that CRUNCH). That’s why I played around in the Feastical kitchen for weeks—burning a batch or two, I won’t lie—until I landed on this beautifully simple, low-carb, high-protein masterpiece.
The secret? A dynamite duo of finely grated Parmesan and almond flour. Together, they create a coating that bakes (or air fries!) up into the most gorgeous, shatteringly crisp shell, clinging to plump, juicy shrimp. It’s gluten-free, it’s packed with flavor, and it comes together in about 20 minutes. Whether you’re a keto warrior, just watching your carbs, or simply someone who loves incredibly delicious food, this recipe is about to become your weeknight superhero. So, grab your favorite baking sheet, and let’s make your kitchen smell absolutely incredible.
The Beachside Bite That Inspired It All
This recipe always takes me back to a tiny, sun-bleached seafood shack on a family trip to the Gulf Coast. I was about ten, and my big splurge was a basket of fried shrimp so large I could barely see over it. The crunch was legendary, the shrimp were sweet, and I dunked each one in a river of tartar sauce. It was pure, unadulterated joy on a paper plate.
But as I got older and my cooking style evolved towards “feel-good food that *actually* makes you feel good,” I wanted to recapture that magic—the fun, the crunch, the celebration—without the heaviness. I wanted the spirit of that beachside bite to live on in my kitchen, ready for a random Tuesday. That’s what Feastical is all about: taking those beloved, nostalgic flavors and giving them a light, bright, accessible twist. This Light Parmesan Shrimp is exactly that. It’s my grown-up, chef-hacked version of that memory, and I get that same rush of happiness every time I pull a perfectly crispy batch out of the oven. Now, let’s make some new memories, shall we?
What You’ll Need: A Breakdown of Flavor Builders
Here’s your shopping list for crispy perfection. I’ve added my chef notes so you know exactly why each ingredient is a star player.
- 1 lb large shrimp, peeled and deveined – Size matters here! Go for large (31/40 count) or jumbo. They hold up better to the coating and stay juicy. Pro Tip: If they’re frozen, thaw them overnight in the fridge or under cold running water. Pat them incredibly dry with paper towels—this is the #1 secret for the coating to stick!
- 1/2 cup almond flour – Not almond meal! Almond flour is finely ground, giving us that smooth, crisp finish. It’s our low-carb, gluten-free breadcrumb hero. It toasts beautifully and adds a subtle nutty flavor.
- 1/3 cup finely grated Parmesan cheese – Use the real deal, freshly grated from a block if you can. The pre-grated stuff in a canister often has anti-caking agents that don’t melt as well. This is our flavor bomb and helps create that irresistible savory crust.
- 1/2 teaspoon garlic powder – It distributes flavor evenly throughout the dry mix. You could mince fresh garlic, but powder ensures no burnt bits and consistent taste in every bite.
- 1/4 teaspoon smoked paprika – This is my little flavor cheat code. It doesn’t make things spicy, but adds a whisper of smokiness and a gorgeous red-gold color to the finished crust. Regular paprika works too, but smoked is next-level.
- Salt and pepper to taste – I start with 1/2 tsp kosher salt and a few cracks of black pepper. Remember, the Parmesan is salty, so taste your dry mix (before dipping the shrimp!) and adjust.
- 2 eggs, beaten – Our all-important glue! Beaten eggs help the crispy coating cling to the shrimp for dear life.
- Olive oil spray or cooking spray – The final touch for browning and crunch. A light spritz makes all the difference between pale and perfectly golden.
Let’s Get Cooking: Step-by-Step to Crispy Bliss
Don’t let the crispy result fool you—this process is straightforward. Follow these steps, lean on my tips, and you’re guaranteed success.
- Preheat and Prep. Fire up your oven to 400°F (200°C) or your air fryer to 375°F (190°C). If baking, line a sheet pan with parchment paper or a silicone mat. This prevents sticking and makes cleanup a breeze. Chef’s Hack: Give the lined pan a *very* light spray. It gives the shrimp underside a head start on crisping.
- Create Your Flavor Station. In a shallow bowl or pie plate, whisk together the almond flour, grated Parmesan, garlic powder, smoked paprika, salt, and pepper. Get in there with a fork and break up any Parmesan clumps. In a second shallow bowl, beat the two eggs until uniform. Chef’s Hack: Set up your station: shrimp → eggs → dry mix → prepared pan. This “assembly line” keeps one hand for wet and one for dry, avoiding claw-fingers!
- The Coating Dance. Take one of your very dry shrimp, dunk it fully into the beaten egg, let the excess drip off, then immediately drop it into the almond-Parmesan mix. Use your dry hand to scoop the mixture over the shrimp, pressing gently to ensure a thick, even, beautiful coating. Place it on your prepared pan. Repeat with love for all shrimp, leaving a little space between each so they crisp up instead of steam.
- The Key to Golden Perfection. Once all your shrimp are gloriously coated and on the pan, give them a light but even spray with your olive oil spray. This mimics the effect of frying, helping every nook and cranny turn golden brown and delicious.
- Bake or Air Fry to Glory.
- For Oven: Bake at 400°F for 12-14 minutes. I always flip them halfway through with tongs for even browning on both sides. They’re done when the coating is crisp and golden and the shrimp are opaque and firm.
- For Air Fryer: Cook at 375°F for 8-10 minutes, flipping halfway. You may need to work in batches to avoid crowding. The air fryer gives an extra-crispy finish in less time—a fantastic option!
- The Most Important Step. Let them rest for just 2-3 minutes on the pan after they come out. This allows the crust to set and become truly crunchy. Dive in immediately after that!
Serving It Up: How to Make It a Meal
Okay, you have this stunning plate of crispy, golden shrimp. Now what? These little flavor bombs are incredibly versatile.
For a simple, stunning presentation, pile them high on a platter with generous lemon wedges for squeezing. The bright acid cuts through the richness perfectly. Add a sprinkle of fresh chopped parsley or chives for color.
To make it a low-carb feast, serve them over a big bed of zucchini noodles (“zoodles”) or a crisp romaine salad with a light lemon vinaigrette. They’re also amazing next to roasted asparagus, garlicky sautéed spinach, or cauliflower mash.
Want a dipping sauce? My go-to is a quick lemon-garlic aioli (mix 1/2 cup mayo with 1 minced garlic clove, lemon zest, and a squeeze of juice). A lighter option is simply Greek yogurt with lemon and dill. And hey, if you’re not strictly low-carb, these shrimp make an incredible, protein-packed topping for a Caesar salad or stuffed into a warm lettuce wrap.
Get Creative: 5 Flavorful Twists to Try
Once you master the basic recipe, the world is your oyster (or shrimp!). Here are some of my favorite riffs:
- “Everything Bagel” Shrimp: Add 1 tablespoon of everything bagel seasoning to the dry mix. Serve with a creamy dill dip.
- Spicy Cajun Kick: Swap the smoked paprika for 1 teaspoon of your favorite Cajun or Creole seasoning. Amp up the heat with a pinch of cayenne.
- Lemon-Herb Delight: Add the zest of one lemon and 1 teaspoon of dried Italian herbs (or 1 tbsp fresh) to the dry mixture. The lemon zest baked in is a game-changer.
- Pork Panko Option (For Non-Keto/Low-Carb): For an extra-crispy, still low-carb coat, replace half the almond flour with crushed pork panko (pork rinds). It’s insanely crunchy!
- Pesto-Drizzled: Keep the coating simple and after baking, drizzle the warm shrimp with a tablespoon of store-bought or homemade pesto. Unreal flavor.
Beau’s Kitchen Notes & Stories
This recipe has seen some… experiments. My first batch, I used almond *meal* (too coarse) and didn’t dry the shrimp. The result was a sad, clumpy, sliding mess. Lesson learned! The evolution to the perfect crisp was all about the details: super-fine flour, bone-dry shrimp, and that trusty oil spray.
This is also my ultimate “impress with minimal stress” appetizer for parties. I often double the batch. I’ll prep the coated shrimp on sheets ahead of time, keep them in the fridge, and then just pop them in the oven when guests arrive. The “oohs” and “aahs” when I bring out a sizzling platter never get old. It’s proof that eating light doesn’t mean sacrificing flavor or fun.
FAQs & Troubleshooting: Your Questions, Answered
Q: My coating is falling off! What did I do wrong?
A: Almost always, this is due to wet shrimp. Pat them *aggressively* dry with paper towels. Also, make sure your egg is fully beaten and you’re letting the excess drip off before coating. A gentle press in the dry mix helps it adhere.
Q: Can I use frozen cooked shrimp?
A: I don’t recommend it. Pre-cooked shrimp will overcook and become rubbery by the time the coating is crisp. Always start with raw shrimp for the best texture.
Q: How do I store and reheat leftovers?
A: Store in an airtight container in the fridge for up to 2 days. To reheat, skip the microwave (it’ll make them soggy). Use a toaster oven, air fryer, or regular oven at 375°F for 5-7 minutes to re-crisp.
Q: Is there a nut-free alternative to almond flour?
A> Absolutely! Sunflower seed flour works beautifully as a 1:1 swap. Just note it can turn a bit greenish (a harmless reaction with baking soda/powder, but we’re not using any here, so you should be fine!). Crushed pork rinds (pork panko) are another great nut-free, low-carb option.
Light Parmesan Shrimp : Crispy, Low-Carb, and Packed with Flavor
Description
Light Parmesan Shrimp (Low-Carb & Extra Crispy)
Ready in 20 minutes | Oven or Air Fryer
Ingredients
-
1 lb large raw shrimp, peeled & deveined
-
½ cup almond flour (fine, not almond meal)
-
⅓ cup finely grated Parmesan cheese
-
½ tsp garlic powder
-
¼ tsp smoked paprika
-
Salt & black pepper, to taste
-
2 large eggs, beaten
-
Olive oil spray or cooking spray
-
Lemon wedges, for serving (optional)
Instructions
Prep
-
Preheat oven to 400°F (200°C) or air fryer to 375°F (190°C).
-
Line a baking sheet with parchment (lightly spray).
Coat
3. Pat shrimp very dry with paper towels.
4. In a shallow bowl, mix almond flour, Parmesan, garlic powder, paprika, salt, and pepper.
5. In another bowl, beat eggs.
6. Dip shrimp in egg, let excess drip off, then press into Parmesan mixture.
7. Place on pan in a single layer. Lightly spray tops with oil.
Cook
-
Oven: Bake 12–14 minutes, flipping halfway, until golden and shrimp are opaque.
-
Air Fryer: Cook 8–10 minutes, flipping halfway (cook in batches if needed).
-
Rest 2–3 minutes before serving. Squeeze with lemon if desired.
Nutritional Information*
This is where you can feel really good about diving in! Per serving (approximately 1/4th of the recipe):
- Calories: ~230
- Protein: 25g (Hello, muscle fuel!)
- Carbohydrates: 4g (Net carbs are even lower thanks to the fiber in almond flour)
- Dietary Fiber: 2g
- Fat: 13g (Mostly healthy, satisfying fats from the almond flour and olive oil)
*Please note: Nutritional information is an estimate based on the ingredients listed and can vary with specific brands, substitutions, and portion sizes. It’s provided as a courtesy guide.
Final Thoughts from My Kitchen to Yours
And that’s it, my friends! Your path to incredibly delicious, guilt-free crispy shrimp is clear. This Light Parmesan Shrimp recipe embodies everything I love about cooking: it’s simple, it’s joyful, it brings people together, and it makes you feel fantastic after eating it.
Remember, cooking isn’t about perfection. It’s about the sizzle, the smell, the laughter in the kitchen, and the shared “mmmms” around the table. If your shrimp aren’t perfectly uniform or you get a little messy with the coating, you’re doing it right. You’re creating something real and full of love.
I hope this recipe becomes a trusted, go-to in your home like it is in mine. Give it a try, tag me @Feastical if you share it online, and let me know which variation you loved most. Now, go grab that fork (or just your fingers) and dig into that crispy, flavorful goodness. Happy cooking!
Cheers,
Beau
Sheet-Pan Shrimp & Veggies : One-Pan, Bold Flavor, No Fuss
Sheet-Pan Shrimp & Veggies – Your New Weeknight Hero (One Pan, 30 Minutes, No Kidding!)
Hey friends, Beau here. Let me paint a picture I know all too well: it’s 6 PM. You’re staring into the fridge, the cabinets, and then back at the clock. The family’s hungry, you’re tired, and the last thing you want is a sink full of dishes. The takeout menus are calling your name, but your wallet (and maybe your wellness goals) are giving you the side-eye.
Sound familiar? You’re not alone. That exact scenario is why I created Feastical—to prove that real, soul-satisfying food doesn’t have to be complicated or create a culinary crime scene in your kitchen. Today, I’m handing you the ultimate key to unlocking your weeknight freedom: the glorious, the mighty, the supremely easy Sheet-Pan Shrimp and Roasted Vegetables.
This isn’t just a recipe; it’s a strategy. One sheet pan. Thirty minutes, start to finish. The result? Juicy, spice-kissed shrimp and a rainbow of tender-crisp veggies, all caramelized at the edges from a hot oven. It’s healthy, it’s vibrant, and the flavor is unbelievably bold for something so simple. We’re talking minimal prep, maximum applause. So, let’s ditch the stress, grab a single pan, and make a dinner that tastes like you spent all afternoon on it. Trust me, this one’s a game-changer.
Why This Recipe Has a Permanent Spot in My Rotation
This recipe takes me straight back to my early twenties, living in my first apartment with a kitchen the size of a postage stamp. I had two bowls, one decent knife, and a baking sheet I used for everything—cookies, frozen pizza, you name it. My mom, the queen of practical magic in the kitchen, visited one chaotic Tuesday and saw me about to boil another sad packet of ramen.
She laughed, opened my nearly bare fridge, and pulled out a forgotten bell pepper, a half-used onion, and a bag of frozen shrimp from the freezer. “We’re not surrendering to Tuesday,” she declared. In ten minutes, she had everything chopped, tossed with oil and what spices I had (paprika was the hero), and thrown on my one trusty sheet pan. Twenty minutes later, we were eating a meal that felt restaurant-worthy. It was the moment I truly understood that good cooking isn’t about fancy tools or complex techniques; it’s about smart, flavorful combinations and respecting your ingredients (and your time). This dish is that lesson, perfected. Every time I make it, I think of my mom and that tiny kitchen, and I’m reminded that the best meals often come from the simplest plans.
Gathering Your Flavor Arsenal
Here’s the beautiful part: the ingredient list is short, sweet, and flexible. This is your canvas! Here’s what you’ll need for the base recipe, plus my chef-y notes to guide you.
- 450g (1 lb) raw shrimp, peeled and deveined – The star! I prefer large (21/25 or 31/40 count) for a meatier bite. Get them with tails on or off—your call. Thaw frozen shrimp overnight in the fridge or in a cold water bath for 30 minutes. Pat them very dry with paper towels; this is the secret to getting them to roast, not steam.
- 1 red bell pepper & 1 yellow bell pepper, sliced – Color and sweetness! They roast into lovely, soft strips. No yellow? Use two reds or an orange. Green bell peppers work but are a bit more bitter.
- 1 zucchini, sliced into half-moons – Adds a lovely texture and soaks up all the delicious spices. Yellow squash is a perfect twin here.
- 1 red onion, cut into wedges – Roasting tames the sharp bite and brings out its natural sweetness. It gets those gorgeous, slightly charred edges that are pure flavor gold.
- 2 tbsp olive oil – Divided. Our cooking medium and flavor carrier. A good extra-virgin olive oil adds fruitiness, but avocado oil works great for a higher smoke point.
- 1 tsp smoked paprika – THIS IS NON-NEGOTIABLE. It gives the entire dish a warm, deep, subtly smoky backbone. If you only have sweet paprika, add a tiny pinch of cumin or chipotle powder for depth.
- ½ tsp garlic powder & ½ tsp onion powder – These dried friends distribute flavor evenly and efficiently. They’re the workhorses of quick seasoning. Fresh minced garlic can burn at this high heat.
- ½ tsp dried oregano – A touch of herby, Mediterranean flair. Thyme or an Italian herb blend are fabulous substitutes.
- Salt and freshly cracked black pepper, to taste – Season in layers! Don’t be shy.
- Juice of ½ lemon – The bright, fresh finish that makes everything pop. We’ll toss the shrimp in it before roasting for a flavor infusion.
- Fresh parsley, chopped (for garnish) – A little green for freshness and color. Cilantro or chives would also be lovely here.
Let’s Get Cooking: Your Foolproof Roadmap
Ready? This is where the magic happens. Follow these steps, lean into the tips, and you’re guaranteed a win.
- Preheat and Prep. Crank your oven to 220°C (425°F). This high heat is crucial for getting caramelization without steaming. While it heats, line your sheet pan with parchment paper. (My #1 hack for zero-scrub cleanup!). If you don’t have parchment, a light grease with oil will do.Chef’s Tip: If you have the time, pop the empty sheet pan in the oven as it preheats. A hot pan gives the veggies an instant sear, kicking off the browning process the second they hit the metal.
- Veggie Toss, Round One. In a large bowl, combine your sliced bell peppers, zucchini, and red onion. Drizzle with 1 tablespoon of the olive oil. Sprinkle over half of your smoked paprika, garlic powder, onion powder, oregano, salt, and pepper. Now, get your hands in there! Toss everything until every single veggie piece is lovingly coated. This hands-on method is way better than a spoon.Chef’s Tip: Why season the veggies first? They take longer to cook than the shrimp. Giving them this solo time with the spices allows their flavors to deepen beautifully.
- Roast the Veggies. Spread the seasoned veggies out on your prepared pan in a single, even layer. No piling! We want hot air to circulate. Slide the pan into your hot oven and set a timer for 10 minutes. This head start is the key to perfectly cooked everything.
- Shrimp Prep. While the veggies roast, take your dried-shrimp and place them in the same bowl (fewer dishes!). Add the remaining 1 tbsp olive oil, the rest of your spices, and the juice from half a lemon. Toss to coat. The acid in the lemon juice will start to “cook” the shrimp slightly on the surface, helping the spices cling.
- Combine and Conquer. When the 10-minute timer beeps, pull the pan out. The veggies should be just starting to soften and maybe get a few brown spots. Quickly add the shrimp mixture to the pan, nestling them amongst the veggies. Try to get the shrimp in a single layer too.Chef’s Tip: Work quickly here so the oven doesn’t lose too much heat. Use tongs to arrange everything—it’s faster and keeps your fingers safe.
- The Final Roast. Pop the pan back into the oven for 8-10 minutes. The exact time depends on the size of your shrimp. You’re looking for them to be opaque, pink, and curled into a loose “C” shape. Do not walk away for the last few minutes—shrimp go from perfect to rubbery in a flash!
- Serve with Style. Once out of the oven, give everything a gentle stir. Taste and adjust seasoning with an extra pinch of salt if needed. Scatter the chopped fresh parsley over the top for that final, fresh touch.
How to Plate This Beauty (It’s Easy, I Promise!)
You’ve done the hard part! Now, let’s turn this sheet-pan wonder into a complete, Instagram-worthy meal. Here are my favorite ways to serve it:
- The Simple Scoop: Just grab a big spoon and serve it straight from the pan onto plates. It’s rustic, honest, and totally acceptable. Drizzle with a little extra virgin olive oil or a squeeze of the remaining lemon half right at the table.
- Over a Bed of Grains: This is my go-to for a hearty meal. Spoon the shrimp and veggies over a fluffy mound of quinoa, couscous, or brown rice. The grains soak up all the delicious, spiced juices from the pan. It’s a texture and flavor dream.
- With a Side of Bread: Got a crusty baguette or some warm pita? Perfect! This dish is basically begging for something to scoop up every last bit of flavor. It’s also fantastic tucked into tortillas for quick shrimp fajita-style wraps.
- Salad Adjacent: For a lighter feel, serve it alongside a simple, crisp green salad with a lemony vinaigrette. The contrast between the warm, roasted ingredients and the cool, crunchy lettuce is fantastic.
Make It Your Own: 5 Delicious Twists
Once you master the base, the world is your oyster (or, well, your shrimp!). Here are some of my favorite spins on this versatile recipe:
- Mediterranean Vibe: Swap the smoked paprika for 1 tsp dried Italian seasoning. Add halved cherry tomatoes and kalamata olives to the veggie mix. After roasting, crumble over some feta cheese and fresh dill.
- Spicy Cajun Kick: Replace the spice blend with 2 tsp of your favorite Cajun or Creole seasoning. Add sliced andouille sausage to the pan with the veggies for the first 10 minutes. Garnish with sliced green onions.
- Lemon-Herb Brightness: Use fresh herbs! Toss the shrimp with the zest and juice of a whole lemon, 2 tbsp chopped fresh dill or parsley, and 2 minced garlic cloves. Keep the veggies simple with just salt, pepper, and oil.
- Asian-Inspired Glaze: For the shrimp, mix 1 tbsp olive oil, 1 tbsp soy sauce (or tamari), 1 tbsp honey, 1 tsp grated ginger, and 1 minced garlic clove. Toss the veggies in just oil, salt, and pepper. Drizzle any leftover glaze over everything after roasting and garnish with sesame seeds.
- Veggie Swap-Out: Don’t limit yourself! Broccoli florets, asparagus, sliced mushrooms, or sweet potato cubes are all fantastic. Just remember: harder veggies (like potatoes) might need a 5-10 minute head start before adding the softer ones.
Beau’s Kitchen Notebook
This recipe has been a living, breathing part of my kitchen for years, and it’s evolved with me. I’ve made it on busy Tuesday nights, for casual Friday dinners with friends, and even for a simple, impressive date night at home. The biggest lesson? Don’t overcrowd the pan. If you double the recipe, use TWO sheet pans. Giving everything space is the non-negotiable secret to roasting, not steaming. If things look a little crowded, they’ll still taste good, but you won’t get those beautiful caramelized edges we’re after.
Also, I’ve learned to listen to my oven. They all have personalities! If yours runs hot, check the shrimp at 7 minutes. If it’s a slow-and-steady type, you might need the full 10. Use your eyes and nose—they’re your best tools. Finally, in the summer, I love taking this outside! I make the foil packet version (all ingredients in a giant foil pouch) and throw it on the grill. It’s a whole different, smoky adventure.
Your Questions, Answered (Before You Even Ask!)
Q: My veggies are soggy. What happened?
A: The usual culprit is overcrowding the pan. When veggies are piled on top of each other, they steam in their own moisture instead of roasting. Always use a large enough pan and spread things out. Also, make sure you’re patting your shrimp and any rinsed veggies bone dry before tossing with oil.
Q: Can I use frozen vegetables?
A: You can, but be cautious. Frozen veggies (like bell pepper strips or broccoli) release a lot of water as they cook. I recommend thawing them completely and drying them very, very well first. For best results, fresh is the way to go for this quick-roast method.
Q: How do I know when the shrimp are done?
A> Look for three signs: 1) The color turns from gray/translucent to a solid pinky-white opaque. 2) The flesh feels firm to the touch. 3) They curl into a loose “C” shape. If they curl into a tight “O,” they’re likely overcooked. Start checking at the 8-minute mark!
Q: Can I prep this ahead for meal prep?
A> Absolutely! Chop all your veggies and store them in an airtight container in the fridge. Pat your shrimp dry and keep them in a separate container. Combine and season just before roasting. Leftovers keep beautifully in the fridge for 3 days and reheat well in a skillet or microwave.

Sheet-Pan Shrimp & Veggies : One-Pan, Bold Flavor, No Fuss
Description
When dinner needs to be fast, healthy, and cleanup-light, this Sheet-Pan Shrimp & Veggies has your back. Juicy shrimp roast alongside colorful vegetables in one hot oven, picking up smoky spices and caramelized edges—all with a single pan and minimal prep. It’s the kind of recipe you’ll memorize after one try.
Ingredients
-
1 lb (450 g) raw shrimp, peeled and deveined
-
1 red bell pepper, sliced
-
1 yellow bell pepper, sliced
-
1 zucchini, sliced into half-moons
-
1 red onion, cut into wedges
-
2 tbsp olive oil, divided
-
1 tsp smoked paprika
-
½ tsp garlic powder
-
½ tsp onion powder
-
½ tsp dried oregano
-
Salt and black pepper, to taste
-
Juice of ½ lemon
-
Fresh parsley, chopped (optional garnish)
Instructions
-
Preheat oven to 425°F (220°C). Line a large sheet pan with parchment paper.
-
Season veggies: In a bowl, toss bell peppers, zucchini, and red onion with 1 tbsp olive oil, half the spices, salt, and pepper. Spread in a single layer on the sheet pan.
-
Roast veggies for 10 minutes.
-
Season shrimp: While veggies roast, toss shrimp with remaining olive oil, spices, salt, pepper, and lemon juice.
-
Add shrimp to the pan, nestling them among the veggies.
-
Roast again for 8–10 minutes, until shrimp are pink, opaque, and just curled.
-
Finish & serve: Sprinkle with fresh parsley and serve hot.
Notes
-
Dry shrimp well before seasoning to avoid steaming.
-
Don’t overcrowd the pan—use two pans if doubling the recipe.
-
Cut veggies evenly so they cook at the same rate.
-
Watch the shrimp closely at the end; overcooking makes them rubbery.
Final Thoughts: This Is More Than Just Dinner
Friends, if you take only one thing from our time together today, let it be this: good food is not a reward for having unlimited time and energy. It is your right, no matter how busy life gets.
This Sheet-Pan Shrimp & Veggies isn’t just a recipe you’ll make once. It’s a framework for reclaiming your evenings. It’s the confidence to know that with a hot oven, a single pan, and a few humble ingredients, you can create something that nourishes both body and spirit. It’s the smell of paprika and roasting vegetables filling your kitchen, and the quiet satisfaction of placing a colorful, healthy meal on the table without a mountain of dishes waiting for you.
It proves my core belief at Feastical: that the most impactful cooking is often the simplest. It’s not about perfection; it’s about possibility. It’s about looking at that pepper and onion in your fridge and seeing a feast, not just scraps. It’s the culinary equivalent of a deep breath on a chaotic night.
So tonight, or any night the clock feels like it’s winning, remember this pan. Remember that you have this strategy in your back pocket. Turn on the oven, chop with abandon, and let the heat do the work.
Here’s to simple food, done well. Here’s to your weeknight victory.
Stay hungry,

Air Fryer Shrimp : Crispy, Golden, and Guilt-Free
Crispy, Golden, and Guilt-Free: Your New Favorite Air Fryer Shrimp
Hey there, friend! Beau here, welcoming you back to my kitchen at Feastical. Raise your hand if you’ve ever had that sudden, undeniable craving for crispy, golden fried shrimp. You know the one—it hits you out of nowhere, and suddenly, nothing else will do. But then the thought of dragging out the heavy pot, the messy oil, and the lingering smell… well, it can cool that craving real fast. What if I told you we could capture all that perfect crunch, that juicy, sweet bite, and that utterly satisfying feel, without any of the greasy fuss? Grab your favorite apron (or don’t—I won’t tell), because today we’re making magic happen with my go-to recipe for Crispy Air Fryer Shrimp.
This isn’t just a “good for an air fryer” recipe. This is a “better-than-takeout, why-would-I-ever-deep-fry-again” kind of recipe. We’re talking shrimp so perfectly cooked, so shatteringly crispy on the outside and tender on the inside, that you’ll be doing a little happy dance right there by the counter. The air fryer is our secret weapon, blasting each piece with hot, circulating air to create a beautifully even, golden-brown crust that locks in all the natural sweetness of the shrimp. It’s quick, it’s clean, and it’s downright delicious. Whether you’re whipping up a speedy weeknight dinner, prepping protein for your salads, or setting out a crowd-pleasing platter of appetizers, this recipe is about to become your crunchy, reliable best friend. Let’s get cooking!
From Beachside Shacks to My Kitchen Counter: A Shrimp Story
My love affair with crispy shrimp started long before I owned an air fryer—or even knew what one was. It goes back to family vacations down the Carolina coast. Every single trip, without fail, we’d find a little weathered seafood shack with picnic tables out front. The air smelled like salt and Old Bay, and the soundtrack was the sizzle of shrimp hitting the fryer basket. My dad would order a heaping mountain of them, served in a red-and-white-checkered paper boat with a mountain of fries and coleslaw on the side. We’d sit there, our feet sandy, peeling the crispy shells of batter off with our fingers and dipping the hot, juicy shrimp into tangy cocktail sauce. It was pure, unfiltered joy.
For years, I tried to recreate that magic at home, but my stovetop attempts were always a bit… heavy. The breading would soak up oil, or I’d overcrowd the pan and end up with steamed shrimp. The dream of that light, crisp texture felt out of reach. Then, the air fryer entered my kitchen (after much skeptical side-eyeing from me, I’ll admit). The first time I tried this method, I took one bite, closed my eyes, and was instantly transported back to those sunny, breezy afternoons. That’s the power of a great recipe—it’s not just about feeding your body; it’s about feeding your soul with a taste of a wonderful memory. Now, I get to make that memory any night of the week, with zero cleanup. Let’s bring that beach vacation vibe to your dinner table.
Gathering Your Cast of Characters
Simple ingredients, big flavor. That’s the Feastical way. Here’s everything you’ll need to create this crispy masterpiece. I’ve included my chef-y insights and swaps so you can make this recipe your own.
- 1 lb large shrimp (31/40 count), peeled and deveined – The star of the show! I prefer “large” because they hold up beautifully to the breading and cook evenly. The key here is to pat them bone-dry with paper towels. Any extra moisture is the enemy of crispiness. Chef’s Tip: If you’re feeling fancy, leave the tail on for a pretty presentation and a built-in handle for dipping.
- 1/2 cup all-purpose flour – Our first coating. This initial dusting helps the egg wash cling to the shrimp, creating the essential glue for our crispy shell. Easy Swap: For a gluten-free version, use your favorite 1:1 gluten-free flour blend. It works like a charm.
- 2 large eggs, beaten – The glue in our breading station! A quick beat with a fork is all you need. For a slightly richer flavor, you can add a tablespoon of water or milk to thin it out just a touch.
- 1 cup panko breadcrumbs – The secret to that incredible, airy crunch! Panko is made from bread without crusts, resulting in larger, flakier crumbs that toast up lighter and crisper than traditional breadcrumbs. Don’t substitute with regular fine breadcrumbs here—the texture won’t be the same. Flavor Boost: You can use Italian-seasoned panko, but I prefer to season my own so I can control the salt.
- 1/2 teaspoon garlic powder & 1/2 teaspoon paprika – Our flavor dynamos. Garlic powder adds savory depth that permeates the breading, while paprika gives a subtle sweetness and that gorgeous golden color. Spicy Twist: Swap the paprika for smoked paprika or a pinch of cayenne for a kick.
- Salt and freshly ground black pepper – Season at every stage! Don’t be shy. I season the shrimp directly, and I often add a little pinch to the flour and panko too. It ensures every bite is perfectly seasoned.
- Cooking spray or olive oil spray – The finishing touch. A light, even mist of oil is crucial. It helps the panko brown and crisp up to perfection in the hot air. I use a refillable oil mister for the most control.
Let’s Get Crispy: Your Step-by-Step Roadmap
Ready to see some kitchen magic? Follow these steps, and you’ll have restaurant-quality shrimp in about 20 minutes flat. I’ve packed each step with my favorite hacks to guarantee success.
- Preheat Your Air Fryer: Crank that bad boy to 400°F (200°C). Just like preheating your oven, this ensures the cooking environment is hot and ready the second your shrimp hit the basket, leading to immediate sizzle and superior crispness. This takes about 3-5 minutes, which is the perfect amount of time to prep your shrimp.
- Prep the Shrimp: Lay your peeled and deveined shrimp on a double layer of paper towels. Top with another paper towel and press gently to absorb every last drop of water. This is the #1 most important step for crispiness! Transfer them to a bowl and sprinkle with salt, pepper, garlic powder, and paprika. Toss to coat evenly. Let them hang out while you set up your station.
- Create Your Breading Assembly Line: Get three shallow bowls or plates. In the first, place your flour. In the second, beat your eggs until smooth. In the third, place your panko breadcrumbs. I like to line them up in order: flour, egg, panko. Keep one hand for dry ingredients (flour and panko) and one hand for wet (egg) to avoid ending up with “club hands” covered in breading.
- Bread Like a Boss: Working with one shrimp at a time, dredge it in the flour, shaking off any excess. Next, dunk it fully into the egg wash, letting the excess drip off. Finally, press it firmly into the panko crumbs, rolling it around and gently patting to ensure a solid, even coat. Place the breaded shrimp on a clean plate or baking sheet. Repeat until all your shrimp are gloriously coated.
- Air Fry to Perfection: Lightly spray the preheated air fryer basket with oil. Arrange your shrimp in a single layer, making sure they aren’t touching or overlapping. Do not overcrowd! You want that hot air to circulate freely. Work in batches if you need to—it’s worth it. Give the tops of the shrimp a light, even mist with your cooking spray. This mimics the effect of frying, helping the panko brown beautifully.
- Cook and Flip: Slide the basket in and cook for 8-10 minutes. At the halfway mark (around the 4-5 minute mark), pull the basket out and give each shrimp a careful flip with tongs. This ensures even browning on all sides. You’ll know they’re done when the coating is a deep, golden brown and the shrimp are pink and opaque.
- Serve Immediately: Transfer your crispy air fryer shrimp to a serving platter. They are at their absolute peak of crunchiness right out of the fryer, so don’t let them sit! Now, the best part… diving in.
How to Serve Your Masterpiece
Presentation is part of the fun! I love piling these golden beauties high on a big white platter or in a rustic basket lined with parchment paper. It makes them look abundant and irresistible. Now, for the supporting cast:
Dipping Sauce Bar: Set out small bowls with an array of dips. Classic cocktail sauce is a must. But let’s get creative! A creamy, zesty remoulade, a spicy sriracha mayo (just mix mayo with sriracha and a squeeze of lime), or a sweet chili sauce are all fantastic. For a lighter option, a squeeze of fresh lemon or lime wedge is perfection.
Make It a Meal: Turn this appetizer into dinner! Serve these shrimp over a big bed of crunchy slaw, tucked into warm tortillas for shrimp tacos with avocado and cilantro, or on top of a bowl of garlicky pasta or zucchini noodles. Pair with simple sides like air fryer french fries, coconut rice, or a bright, citrusy salad to cut through the richness.
Shake It Up! Creative Twists on the Classic
Once you’ve mastered the basic blueprint, the world is your oyster… or shrimp! Here are a few of my favorite ways to mix things up.
- The Spicy Cajun Kick: Add 1 teaspoon of Cajun or Creole seasoning to the flour. The blend of spices like cayenne, thyme, and oregano adds incredible depth and a warm heat that’s just so good.
- Gluten-Free & Extra Crunchy: Use gluten-free flour and swap the panko for crushed gluten-free cornflakes or gluten-free crispy rice cereal. You get an amazing, shattery crunch and a slightly sweet note that pairs wonderfully with the shrimp.
- Tropical Coconut Shrimp: Replace half of the panko with unsweetened shredded coconut. Add a pinch of sugar to the coconut-panko mixture if you like it a touch sweeter. Serve with a mango-lime salsa or a simple pineapple dipping sauce for a vacation on a plate.
- Lemon-Herb Delight: Add the zest of one lemon to the panko breadcrumbs, along with 2 tablespoons of finely chopped fresh parsley or dill. This creates a beautifully bright, fragrant coating that feels fresh and elegant.
- Buffalo Style (No Breading Needed!): For a super-fast, low-carb option, skip the breading altogether. Toss your dried, seasoned shrimp with 1-2 tablespoons of hot sauce and 1 tablespoon of melted butter or olive oil. Air fry as directed. They’ll be saucy, spicy, and delicious for a buffalo shrimp salad or wrap.
Beau’s Kitchen Notes & Stories
This recipe has seen a few… experiments in my kitchen. There was the “Great Overcrowding Incident of 2021,” where I learned that piling shrimp in willy-nilly results in steamed, soggy breading. Batch cooking is your friend! I’ve also learned that the type of oil spray matters. I love using avocado oil spray for its high smoke point and neutral flavor, but any good cooking spray will do the trick.
The recipe has evolved, too. I used to just season the shrimp, but adding a little seasoning to the flour and panko makes a world of difference. It’s those little tweaks, born from happy accidents and many, many taste tests (a tough job, but someone’s gotta do it), that turn a good recipe into a great one. Most importantly, have fun with it! Cooking should feel like a joyful experiment, not a rigid science project.
Your Questions, Answered
Q: My breading is falling off! What did I do wrong?
A: The most common culprit is not letting the excess egg wash drip off. After dipping in the egg, hold the shrimp over the bowl for a second and give it a gentle shake. A thick layer of egg can act as a slippery slide for the panko. Also, make sure you’re pressing the shrimp firmly into the panko to help it adhere.
Q: Can I use frozen shrimp?
A> Absolutely! Just thaw them completely first. The best method is to place them in a sealed bag and submerge in cold water for about 15-20 minutes. Then, pat them incredibly dry—even more so than fresh shrimp, as they tend to retain more moisture.
Q: Why are my shrimp not getting crispy?
A> Let’s troubleshoot! 1) Were they thoroughly dried? 2) Did you preheat the air fryer? 3) Did you spray them with oil? The oil is essential for browning. 4) Did you overcrowd the basket? Air needs space to circulate. Check these boxes, and you’ll be golden.
Q: Can I make these ahead of time?
A> You can bread the shrimp up to 2 hours ahead and keep them covered on a plate in the fridge. For the best texture, cook them just before serving. If you have leftovers, they reheat surprisingly well in the air fryer at 375°F for 3-4 minutes to re-crisp.
Air Fryer Shrimp : Crispy, Golden, and Guilt-Free
Description
Sometimes you just need crispy shrimp—but without the mess, oil, and heaviness of deep frying. This Air Fryer Shrimp gives you that perfect golden crunch with juicy, tender shrimp inside, using just a light spray of oil. It’s fast, easy, and ideal for weeknight dinners, appetizers, salads, or tacos.
Ingredients
-
1 lb (450 g) large shrimp, peeled and deveined
-
½ cup all-purpose flour
-
2 large eggs, beaten
-
1 cup panko breadcrumbs
-
½ tsp garlic powder
-
½ tsp paprika (smoked if you like)
-
Salt and black pepper, to taste
-
Cooking spray or olive oil spray
Instructions
-
Preheat air fryer to 400°F (200°C).
-
Dry the shrimp thoroughly with paper towels. Season lightly with salt, pepper, garlic powder, and paprika.
-
Set up breading station:
-
Bowl 1: flour
-
Bowl 2: beaten eggs
-
Bowl 3: panko breadcrumbs
-
-
Bread the shrimp: Dredge shrimp in flour, dip in egg, then press into panko until fully coated.
-
Air fry: Lightly spray the air fryer basket. Arrange shrimp in a single layer. Spray tops lightly with oil.
-
Cook 8–10 minutes, flipping halfway, until golden brown and shrimp are pink and cooked through.
-
Serve immediately while hot and crispy.
Notes
-
Dry shrimp well—moisture prevents browning.
-
Don’t overcrowd the air fryer; cook in batches if needed.
-
Use panko, not regular breadcrumbs, for the best crunch.
-
Spray lightly with oil to help the coating turn golden.
Nutritional Information (A Guilt-Free Breakdown)
One of the best things about air frying is how it transforms traditionally indulgent foods into something you can feel good about enjoying more often. By using just a light mist of oil instead of submerging in quarts of it, we cut out a massive amount of fat and calories.
Per Serving (approximately ¼ of the recipe):
Calories: ~250 | Protein: 22g | Carbohydrates: 15g | Fat: 12g | Fiber: 1g
Compared to a typical deep-fried shrimp appetizer from a restaurant, which can easily clock in at over 400 calories and 20+ grams of fat per serving, this is a game-changer. You’re getting a fantastic source of lean protein from the shrimp, and the carbs come primarily from the light breading. It’s a balanced
Final Thoughts
And there you have it—your ticket to crispy, golden shrimp that are as fun to make as they are to eat.
This recipe is more than just a cooking method; it’s a little kitchen revolution. It takes that craving for something crunchy, indulgent, and deeply satisfying and delivers it without the mess, guilt, or hassle. With just a handful of simple ingredients and about 20 minutes, you can transform a weeknight dinner into a celebration, or turn a casual gathering into a memorable feast.
But beyond the technique—the careful drying, the mindful breading, the hot air fryer blast—what I hope you take away is the spirit of this dish. It’s about bringing a taste of joy to your table, whether that’s the memory of a sunny beach day or the simple pleasure of a perfectly cooked meal shared with people you love.
So the next time that craving hits, don’t push it aside. Meet it with confidence, grab your air fryer, and make some magic. You’ve got this.
Now, I’d love to hear from you! Did you stick with the classic or try a fun twist? What’s your favorite dipping sauce? Share your stories and photos with me—because the best part of any recipe is the community and joy it creates.
Until next time, keep your kitchen messy, your heart full, and your shrimp crispy.
Happy cooking,
Beau