
Viral Chicken Crust Caesar Salad Pizza (High-Protein, Low-Carb Dinner)
Forget Everything You Knew About Pizza Night (In the Best Way Possible)
Hey friends, Beau here! Grab a seat at the counter and let’s talk about one of life’s great dilemmas: the tug-of-war between craving a seriously satisfying pizza and wanting to feel good after eating it. You know the feeling. You want that crispy, savory, top-it-with-everything goodness, but sometimes, the heavy dough can leave you feeling… well, like you need to unbutton your jeans and take a long nap.
What if I told you there’s a way to have your pizza and eat it too—a version that’s packed with protein, light on carbs, and so wildly flavorful it’ll make you wonder why you ever settled for less? Enter the sensation that’s taken kitchens by storm: the Viral Chicken Crust Caesar Salad Pizza.
This isn’t just a “healthified” recipe; it’s a full-on flavor revolution. We’re talking a golden, sturdy crust made from seasoned ground chicken and Parmesan, baked to perfection, then crowned with a heap of crisp, garlicky Caesar salad. It’s warm meets cool, savory meets fresh, and “I’m being good” meets “This is absolutely incredible.” It’s the ultimate high-protein, low-carb dinner that feels like a treat, not a task. So, preheat that oven and let’s turn pizza night on its head, together.
The Night a Kitchen “Oops” Turned Into a “Wow!”
This recipe reminds me of a chaotic, laughter-filled dinner party I threw a few years back. I’d promised my friends a “gourmet pizza night,” but in my classic Beau-style enthusiasm, I completely lost track of time. The dough never got made. There I was, with a kitchen full of hungry people, a ton of ground chicken meant for meatballs, and a serious need for a miracle.
Panic (and a dash of desperation) is the mother of invention, my friends. I figured if people put chicken on pizza, why not make the pizza *from* chicken? I quickly mixed that ground chicken with some Parmesan and herbs, smashed it onto a sheet pan, and crossed my fingers. Twenty minutes later, we had a crust! We topped it with whatever we had left—which, luckily, was the fixings for a Caesar salad. The moment we took that first bite, the room went quiet… then erupted with “WHAT IS THIS?!” and “You need to make this forever!” What started as a kitchen fail became the most-requested recipe in my friend group. It just goes to show: the best meals often come from a little chaos and a whole lot of heart.
Gathering Your Flavor All-Stars
Here’s the beautiful part: this show-stopping dinner comes together with simple, easy-to-find ingredients. Each one plays a key role in creating that magic texture and flavor.
For the Incredible Chicken Crust:
- 1 lb ground chicken: I prefer a mix of dark and white meat for maximum flavor and juiciness, but all breast works too! Chef’s Insight: If your chicken seems super wet, blot it lightly with a paper towel. This helps the crust get crispier.
- 1/2 cup grated Parmesan cheese: The real, fresh-grated stuff is your best friend here. It acts as the binder (no breadcrumbs needed!) and adds a salty, nutty punch. Substitution Tip: In a pinch, the pre-grated kind works, but fresh melts and binds better.
- 1 large egg: Our trusty binder, holding our chicken “dough” together.
- 1 teaspoon garlic powder: We’re building flavor right into the crust. Garlic powder distributes more evenly than fresh here.
- 1/2 teaspoon Italian seasoning: That classic herb blend whispers “pizza” from the very first bite.
- 1/4 teaspoon each salt & black pepper: The essential flavor enhancers. Don’t skip ’em!
For the Fresh & Zesty Caesar Topping:
- 2 cups chopped romaine lettuce: Chop it up! You want bite-sized pieces that are easy to eat on a slice. Romaine has the perfect crunch. Chef’s Hack: After chopping, give it a spin in a salad spinner or pat dry with a towel. A dry salad means a crispy salad that won’t wilt as fast on the warm crust.
- 1/4 cup Caesar dressing: Use your favorite brand, or go homemade for extra glory. This is the creamy, garlicky glue of our topping.
- 1/4 cup shaved or shredded Parmesan: More cheese? Always. Shaved curls look gorgeous, but shredded blends in deliciously.
- Fresh cracked black pepper & optional lemon/red pepper flakes: The finishing touches! A squeeze of bright lemon juice or a pinch of heat takes this over the top.
Let’s Build This Masterpiece, Step-by-Step
Ready to see how it all comes together? It’s easier than you think. Follow these steps, and you’ll be a chicken crust pro in no time.
- Preheat & Prep: Fire up your oven to 400°F (200°C). This hot temperature is key for a crispy crust. Line a baking sheet with parchment paper—this prevents sticking and makes cleanup a dream. No parchment? A light spray of oil will do.
- Mix the “Dough”: In a medium bowl, add your ground chicken, grated Parmesan, egg, garlic powder, Italian seasoning, salt, and pepper. Now, roll up your sleeves and use your hands to mix it all together! Get in there and make sure it’s uniformly combined. It’ll be a bit sticky, and that’s A-OK. Chef’s Tip: Don’t overmix! Just combine until everything is incorporated. Overworking can make the crust a bit tough.
- Shape Your Crust: Plop the chicken mixture onto your prepared baking sheet. Use your hands to press it out into a circle or rectangle, about 1/4 to 1/3 inch thick. Pro Hack Alert: Make the edges slightly thicker than the center to create a natural “crust” rim that holds in the topping! If it sticks to your hands, wet your fingertips with a little water.
- Bake to Golden Perfection: Slide that pan into your preheated oven. Bake for 18-22 minutes. You’re looking for the crust to be fully cooked through (no pink in the middle) and the edges to be a beautiful, golden brown. The top will be firm to the touch.
- The Crucial Rest: When the crust comes out, resist the urge to top it immediately! Let it rest on the pan for about 5 minutes. This lets the proteins set and firms it up, making it sturdy enough to hold your salad.
- Toss the Topping: While the crust rests, toss your chopped romaine with the Caesar dressing and most of your extra Parmesan in a bowl. Go easy—you can always add more dressing, but you can’t take it away!
- The Grand Finale: Pile that cool, crisp salad right on top of the warm, savory crust. Sprinkle with the remaining Parmesan, a hearty crack of black pepper, and any optional extras like lemon zest or red pepper flakes.
- Slice & Serve Immediately! Use a sharp knife or pizza cutter to slice it up. The contrast of the warm crust and cool salad is everything. Dig in right away for the ultimate texture experience.
How to Serve It Up Like a Pro
Presentation is part of the fun! Since this is a knife-and-fork kind of pizza, I love serving it right on a big wooden cutting board in the center of the table. Let everyone gather ’round and grab a slice. For a complete meal, pair it with something simple that won’t compete: a light, tangy marinated white bean salad or some roasted asparagus spears with a squeeze of lemon. And because we’re keeping it real, a chilled glass of crisp Pinot Grigio or a sparkling water with lime makes the perfect sipping companion. It’s casual, interactive, and guaranteed to get everyone talking.
Make It Your Own: Delicious Twists & Swaps
The beauty of this recipe is its flexibility. Once you’ve mastered the basic formula, the world is your oyster! Here are a few of my favorite spins:
- The “Everything Bagel” Pizza: Mix 1 tbsp of everything bagel seasoning into the chicken crust. Top with a simple salad of arugula, red onion, and a creamy dill dressing. Unreal.
- Buffalo Blue Cheese: After baking, brush the crust with a light layer of buffalo sauce. Top with a salad of celery, carrots, and romaine tossed in a blue cheese dressing. Game day perfection.
- Mediterranean Magic: Swap the Caesar for a Greek salad! Top the baked crust with chopped cucumbers, tomatoes, Kalamata olives, and red onion tossed in a lemon-oregano vinaigrette. Crumble some feta on top.
- Pesto & Mozzarella: Spread a thin layer of basil pesto over the warm crust. Add slices of fresh mozzarella (buffalo mozzarella is amazing here) and let it melt slightly before topping with a simple tomato and arugula salad.
- Dairy-Free/Keto Friend: Use a dairy-free Parmesan alternative in the crust and for topping. For the dressing, there are some great vegan Caesar options, or make a creamy tahini-lemon dressing.
A Few More Thoughts From My Kitchen to Yours
Over the years, this recipe has become a true workhorse in my weekly rotation. I’ve learned that pressing the crust evenly is the secret to it baking perfectly—no thin spots to break! I also love making a big batch of the chicken crust mixture and forming it into personal-sized “crusts” for individual pizzas. It’s a fantastic meal prep strategy; bake the crusts, let them cool, and store them in the fridge for up to 3 days. When you’re ready, just reheat in the toaster oven and add your fresh salad. It’s faster than delivery! The first time I made it for my niece, she looked at me skeptically and said, “Uncle Beau, chicken can’t be pizza.” One bite later, she was a believer. That’s the power of a great recipe—it turns doubters into fans.
Your Questions, Answered!
Q: My crust is a bit soggy in the middle. What happened?
A: This usually means it needs more baking time! Ovens vary, so if your crust looks golden but feels soft, give it another 3-5 minutes. Also, ensure you’re blotting your ground chicken if it’s very wet, and don’t skip the resting step—it lets residual heat finish the job.
Q: Can I use ground turkey instead?
A> Absolutely! Ground turkey works beautifully. Just note that lean ground turkey breast can be a bit drier, so you might add an extra tablespoon of Parmesan or a dash of olive oil to the mix for moisture.
Q: How do I store and reheat leftovers?
A: Store the baked crust and salad separately for best results. Keep the crust in an airtight container in the fridge for up to 3 days. Reheat it in the oven or toaster oven to re-crisp. Assemble with fresh salad when ready to eat. The assembled pizza doesn’t save well, as the lettuce wilts.
Q: Can I add other toppings under the salad?
A> You bet! After the crust is baked, you can add a thin layer of marinara, a sprinkle of mozzarella, or even some cooked bacon bits. Pop it back in the oven for 2-3 minutes to melt, then add your cool salad on top. Warm cheese + cool lettuce = YES.

Viral Chicken Crust Caesar Salad Pizza (High-Protein, Low-Carb Dinner)
Description
Viral Chicken Crust Caesar Salad Pizza – Pizza Night, Reinvented
What if pizza night could feel indulgent and energizing? This Viral Chicken Crust Caesar Salad Pizza delivers all the savory satisfaction you crave—without the heavy dough.
Instead of traditional crust, we’re using a seasoned ground chicken base baked until golden and sturdy. Then we top it with a crisp, garlicky Caesar salad for that perfect warm-meets-cool bite. It’s high-protein, low-carb, and surprisingly easy to make.
Once you try it, regular pizza might start feeling optional.
Ingredients
For the Chicken Crust
-
1 lb ground chicken
-
½ cup freshly grated Parmesan cheese
-
1 large egg
-
1 teaspoon garlic powder
-
½ teaspoon Italian seasoning
-
¼ teaspoon salt
-
¼ teaspoon black pepper
For the Caesar Topping
-
2 cups chopped romaine lettuce (dry and crisp)
-
¼ cup Caesar dressing
-
¼ cup shaved or shredded Parmesan
-
Fresh cracked black pepper
-
Optional: squeeze of lemon, red pepper flakes
Instructions
Preheat oven to 400°F (200°C).
Line a baking sheet with parchment paper or lightly grease it.
In a bowl, combine ground chicken, Parmesan, egg, garlic powder, Italian seasoning, salt, and pepper.
Mix gently with your hands until just combined. Do not overmix.
Transfer mixture to the baking sheet. Press into a circle or rectangle about ¼–⅓ inch thick.
Tip: Make the edges slightly thicker to create a natural rim.
Bake for 18–22 minutes, until fully cooked through and golden around the edges.
If the center feels soft, bake an additional 3–5 minutes.
Let rest for 5 minutes before topping.
In a bowl, toss chopped romaine with Caesar dressing and most of the extra Parmesan.
Pile the dressed salad onto the warm crust.
Top with remaining Parmesan, cracked pepper, and optional lemon or red pepper flakes.
Slice and serve immediately for the best texture contrast.
Notes
-
Blot wet chicken with a paper towel before mixing if needed.
-
Don’t skip resting time—it helps the crust firm up.
-
Keep lettuce dry so it stays crisp on the warm crust.
-
Use freshly grated Parmesan for best binding and flavor.
-
Store components separately if making ahead.
What’s On The Plate (Nutritionally Speaking!)
Now, I’m not a nutritionist, but I am a chef who cares about feeling good. Here’s a general breakdown of what you’re getting in one serving of this pizza (about 1/4 of the recipe), which is pretty awesome:
- Calories: ~320
- Protein: ~32g (This is the superstar! That chicken crust is a protein powerhouse.)
- Carbohydrates: ~4g (Mostly from the veggies and a touch in the dressing. Truly low-carb.)
- Fat: ~20g (The good, flavorful fats from the chicken, Parmesan, and dressing that keep you satisfied.)
Remember, these numbers can vary based on the specific brands of chicken, cheese, and dressing you use. But the core idea remains: you’re getting a massive plate of delicious food that’s high in protein, low in carbs, and free from the refined flour and sugar of traditional pizza. It’s fuel that tastes like a celebration.
The Bottom Line: Just Make It
Friends, if you take one recipe from Feastical this month and make it, let it be this one. The Viral Chicken Crust Caesar Salad Pizza is more than just a trend—it’s a legitimately delicious, smart, and satisfying way to eat. It proves that eating well doesn’t mean sacrificing flavor or fun. It’s a recipe that invites you to play, to customize, and to gather people around your table for something truly special.
So, what are you waiting for? That chicken isn’t going to crust itself. I can’t wait for you to experience the magic. When you make it, tag me @Feastical or use #FeasticalFeast—I love seeing your creations!
Until next time, keep your spatula close and your appetite closer.
– Beau
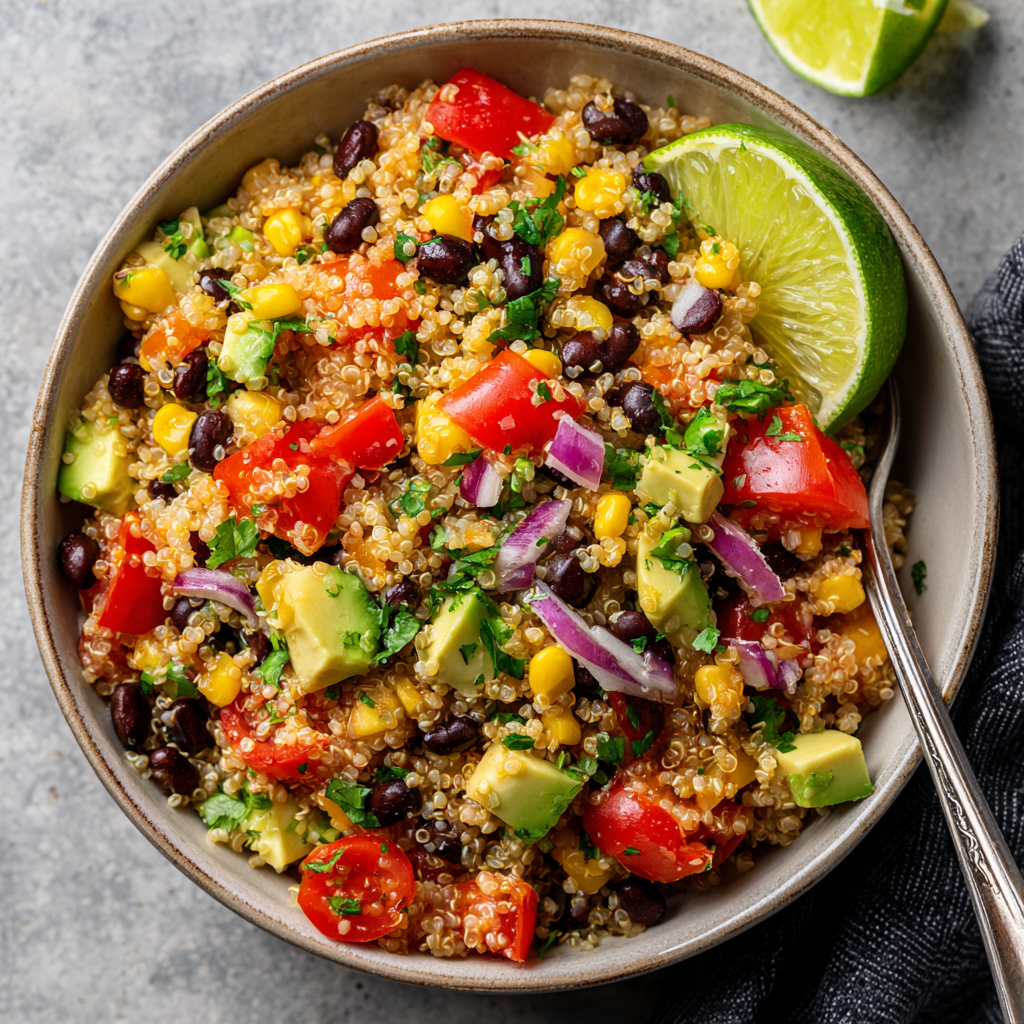
Southwest Quinoa Salad (Fresh, Protein-Packed & Flavorful)
Let’s Make a Salad That Actually Excites You!
Hey friends, Beau here! Can we talk about something real for a second? I feel like the word “salad” has gotten a bad rap. For too long, it’s been synonymous with boring, rabbit-food lunches that leave you dreaming of a cheeseburger by 3 PM. Well, I’m here to change that narrative, one incredibly flavorful, satisfying forkful at a time. Today, we’re not just making a salad; we’re creating a vibrant, protein-packed fiesta in a bowl that you’ll actually crave.
Enter the hero of the hour: my Southwest Quinoa Salad. This isn’t a side note on your plate; it’s the main event. Imagine fluffy, nutty quinoa hugging sweet corn, hearty black beans, and crisp, colorful veggies, all drenched in a zesty lime-cumin dressing that sings with flavor. It’s fresh, it’s filling, and it’s packed with so much goodness that you’ll feel fantastic after eating it. Whether you’re meal-prepping for a busy week, needing a stunning dish for a potluck, or just wanting a delicious dinner that comes together without fuss, this recipe is your new best friend. So, tie on that apron, grab your favorite chopping knife, and let’s turn your kitchen into a Southwest cantina. Trust me, your taste buds will thank you.
The Backyard BBQ That Started It All
This recipe has a special place in my heart because it was born from a classic “kitchen sink” moment. A few summers back, I was hosting a last-minute backyard BBQ. The grill was fired up, friends were on their way, and I realized my side dish game was… lacking. I had a bag of quinoa, some cans of beans and corn from the pantry, and a crisper drawer full of peppers and herbs that needed love.
In a bit of a panic (and with zero time to run to the store), I started tossing things together. I whipped up a quick lime dressing, praying the flavors would work. The result? A massive, colorful bowl of this quinoa salad that disappeared faster than the burgers! My friend Sarah, who usually eyes my “healthy” creations with skepticism, came back for thirds. That’s when I knew I had stumbled onto something magic. It was the ultimate proof that the most beloved dishes aren’t always meticulously planned—sometimes, they’re the delicious, joyful results of cooking with what you’ve got and a whole lot of heart.
Gathering Your Flavor Party
Here’s the beautiful cast of characters that makes this salad so incredible. I’ve included my little chef insights and swaps so you can make it your own with what you have on hand.
- 1 cup uncooked quinoa: Our fantastic, protein-rich base. Chef’s Insight: Rinsing it well under cold water is non-negotiable! It washes off the natural coating called saponin, which can taste bitter. Trust me on this.
- 2 cups water or vegetable broth: The cooking liquid. Pro Swap: Use low-sodium vegetable broth instead of water for an instant, deep flavor upgrade. It’s a game-changer.
- 1 cup canned black beans, rinsed and drained: For that creamy, hearty texture and plant-based protein. Pro Tip: Rinsing gets rid of the starchy canning liquid and keeps your salad from getting gloopy.
- 1 cup corn kernels: Sweet pops of sunshine! Fresh, canned, or thawed frozen all work perfectly. If you have 5 extra minutes, char fresh or frozen corn in a dry skillet for a smoky twist.
- 1 red bell pepper, diced: Color, crunch, and a mild sweetness. Yellow or orange bell peppers are great subs for a different color palette.
- 1 cup cherry tomatoes, halved: Juicy, acidic bursts. Chef’s Hack: If your tomatoes are very watery, give the halved pieces a gentle squeeze over the sink to remove some seeds and juice before adding.
- ¼ cup red onion, finely diced: A sharp, pungent kick. Too strong for you? Soak the diced onion in ice water for 10 minutes before adding. It tames the bite beautifully.
- ¼ cup chopped fresh cilantro: The herb that screams “fresh!” The “I hate cilantro” swap: Flat-leaf parsley or even fresh chopped chives work wonderfully.
- 1 avocado, diced: Our creamy, luxurious finishing touch. Add it just before serving to keep it from browning.
For the Zesty Lime Dressing:
- 3 tablespoons extra virgin olive oil: The smooth, rich base of our dressing.
- Juice of 1 large lime (about 2-3 tbsp): The bright, zingy star. Always taste your lime juice! If it’s not very juicy or potent, use a second one.
- 1 teaspoon honey or maple syrup: A tiny touch to balance the acidity. Vegan? Use maple syrup.
- ½ teaspoon ground cumin: The warm, earthy soul of Southwest flavor.
- ½ teaspoon chili powder: For subtle heat and depth. Smoked paprika is a delicious, milder alternative.
- Salt and black pepper to taste: Your flavor finishers. Don’t be shy!
Let’s Build Some Deliciousness (Step-by-Step)
Okay, team! Let’s get cooking. This process is simple, but these little tips will ensure your salad is absolutely perfect.
Step 1: The Quinoa Foundation. First, grab that quinoa and put it in a fine-mesh strainer. Run it under cool water, swishing it with your hand, for a good 30-60 seconds until the water runs clear. This is your secret to non-bitter, fluffy quinoa! Dump the rinsed quinoa into a medium saucepan and add your broth or water. Bring it to a lively boil over high heat, then immediately reduce the heat to the lowest setting. Cover it tightly with a lid and let it simmer gently for 15 minutes. No peeking! That steam is doing important work.
Step 2: The Fluff & Cool. After 15 minutes, turn off the heat. Here’s a pro move: leave the lid on and let it sit for 5 more minutes. This allows the quinoa to steam further and absorb any last bit of liquid. Now, take off the lid, grab a fork, and fluff it up! See those lovely little spirals separating? Perfection. Spread the quinoa out on a large baking sheet or plate to cool down faster. We want it at room temp so it doesn’t wilt our fresh veggies when we mix.
Step 3: Chop & Prep the Party. While the quinoa cooks and cools, let’s get chopping! Dice your bell pepper and red onion, halve the cherry tomatoes, chop the cilantro, and drain/rince your beans and corn. Pile everything except the avocado into a large, beautiful mixing bowl—the bigger, the easier to toss.
Step 4: Whisk That Magic Dressing. In a small bowl or a glass jar with a lid, combine the olive oil, fresh lime juice, honey (or maple syrup), cumin, chili powder, a big pinch of salt, and a few cracks of black pepper. Whisk vigorously until it’s emulsified and lovely, or pop the lid on the jar and give it a good shake. Taste it! Does it need more lime? More salt? Adjust until it makes your tongue happy.
Step 5: The Grand Assembly. By now, your quinoa should be cool. Add it to the big bowl with all your colorful veggies and beans. Give it a gentle preliminary toss. Now, drizzle that gorgeous dressing over everything. Using a large spoon or salad tongs, fold everything together until every grain of quinoa is kissed with flavor. Hold off on the avocado!
Step 6: The Chill & Final Touch. For the best flavor marriage, cover the bowl and pop it in the fridge for at least 20-30 minutes. This lets the flavors get to know each other and mingle. Right before you’re ready to serve, dice your avocado and gently fold it into the salad. This keeps it nice and green and creamy.
How to Serve This Show-Stopper
This salad is incredibly versatile! Here are my favorite ways to plate it up:
As a Standalone Main: Pile it high in a deep bowl for a satisfying, healthy lunch or light dinner. It’s complete with protein, complex carbs, and healthy fats.
The Ultimate Sidekick: It’s the perfect partner for grilled chicken, fish (think lime-marinated shrimp or blackened salmon), or even tucked into tacos and fajitas instead of rice.
Party-Perfect Presentation: For a potluck or BBQ, serve it in a large, clear glass bowl to show off all those vibrant colors. Garnish the top with a few extra cilantro leaves and lime wedges. You can also spoon it into individual little cups or mason jars for a cute, portable serve.
With a Crunch: Serve it with a big basket of sturdy tortilla chips for scooping. The contrast of the cool, fresh salad with the salty crunch is absolutely addictive.
Make It Your Own: Fun Twists & Swaps
Got leftovers or want to switch it up? Here are some of my favorite riffs on this classic:
- The “Spicy Fiesta” Version: Add a diced jalapeño (seeds removed for less heat) to the veggie mix. Swap the chili powder for chipotle powder for a smoky kick, and add a pinch of cayenne to the dressing.
- Mediterranean Remix: Swap black beans for chickpeas, cilantro for parsley, cumin for dried oregano, and add in some chopped Kalamata olives and crumbled feta cheese. Use a lemon dressing instead of lime.
- Deconstructed Taco Bowl: Serve the salad over a bed of crisp romaine lettuce. Top with crushed tortilla chips, a dollop of Greek yogurt (or sour cream), and a spoonful of zesty salsa.
- Extra Protein Power: Fold in 1-2 cups of shredded rotisserie chicken, cooked and crumbled ground turkey, or a can of drained tuna after mixing.
- Vegan & Nutty: Add ½ cup of toasted pepitas (pumpkin seeds) or slivered almonds with the avocado for an amazing crunch and healthy fat boost.
Beau’s Kitchen Notes
This recipe has evolved into my ultimate “clean out the fridge” hero. Over the years, I’ve tossed in everything from leftover roasted sweet potato cubes to chopped mango for a sweet surprise. The dressing is also a superstar on its own—I often double it and keep it in a jar in the fridge to drizzle over grilled veggies or a simple green salad all week. One funny fail? I once forgot to rinse the quinoa. Once. Let’s just say my friends politely asked if I’d invented a new “bitter greens” recipe. Lesson permanently learned! The beauty of this dish is its flexibility, so don’t stress—taste as you go and make it yours.
Your Questions, Answered!
Q: My salad turned out a bit soggy. What happened?
A: The usual culprit is adding the avocado too early or not draining your canned ingredients well enough. Always add avocado last, right before serving. Also, make sure your beans and corn are thoroughly drained and patted dry with a paper towel if needed. If using freshly cooked corn, let it cool completely.
Q: Can I make this ahead of time for meal prep?
A: Absolutely! It’s a meal-prep dream. Prep and combine everything except the avocado and dressing. Store the dry mix and the dressing separately in the fridge for up to 4 days. Add the dressing and diced avocado to individual portions when you’re ready to eat.
Q: The flavor is a little bland. How can I fix it?
A: No problem! This is an easy fix. First, check your seasoning. It likely needs more salt. Add it in ¼ teaspoon increments, tossing and tasting as you go. A splash more fresh lime juice can also wake everything up. Finally, don’t underestimate the power of the chili—adding a tiny pinch more chili powder or cumin can deepen the flavor profile.
Q: Is quinoa really gluten-free?
A> Yes! Quinoa is naturally gluten-free, making this salad a fantastic option for anyone with gluten sensitivities or celiac disease. Just be sure to check that any packaged broth or spices you use are certified gluten-free if needed.

Southwest Quinoa Salad (Fresh, Protein-Packed & Flavorful)
Description
Let’s be honest—salads have suffered from a serious image problem. But this Southwest Quinoa Salad? It’s bold, colorful, satisfying, and packed with flavor. Think fluffy quinoa, hearty black beans, sweet corn, crisp peppers, creamy avocado, and a zesty lime-cumin dressing that ties it all together.
Ingredients
For the Salad
-
1 cup uncooked quinoa, rinsed well
-
2 cups water or vegetable broth
-
1 cup canned black beans, rinsed and drained
-
1 cup corn kernels (fresh, canned, or thawed frozen)
-
1 red bell pepper, diced
-
1 cup cherry tomatoes, halved
-
¼ cup red onion, finely diced
-
¼ cup chopped fresh cilantro (or parsley)
-
1 avocado, diced (add just before serving)
For the Lime Dressing
-
3 tablespoons extra virgin olive oil
-
Juice of 1 large lime (2–3 tablespoons)
-
1 teaspoon honey or maple syrup
-
½ teaspoon ground cumin
-
½ teaspoon chili powder
-
Salt and black pepper, to taste
Instructions
Rinse quinoa thoroughly under cold water using a fine-mesh strainer.
In a saucepan, combine quinoa and water (or broth). Bring to a boil, then reduce heat to low, cover, and simmer for 15 minutes.
Remove from heat and let sit covered for 5 minutes. Fluff with a fork and allow to cool completely.
In a large mixing bowl, combine black beans, corn, bell pepper, cherry tomatoes, red onion, and cilantro.
In a small bowl, whisk together olive oil, lime juice, honey, cumin, chili powder, salt, and pepper until well combined.
Taste and adjust seasoning if needed.
Add the cooled quinoa to the bowl with the vegetables. Pour the dressing over the mixture and toss gently until evenly coated.
Chill for at least 20–30 minutes for best flavor.
Right before serving, gently fold in diced avocado.
Serve chilled or at room temperature.
Notes
-
Cool quinoa completely before mixing to keep veggies crisp.
-
Drain canned ingredients well to avoid soggy salad.
-
Char the corn in a dry skillet for a smoky flavor boost.
-
Add avocado last to prevent browning.
Feeling Good About What You’re Eating
Let’s talk nourishment! This Southwest Quinoa Salad isn’t just a flavor bomb; it’s a nutritional powerhouse. Quinoa is a complete protein, meaning it contains all nine essential amino acids your body needs—a rarity in the plant world. Black beans add even more protein and a hefty dose of gut-friendly fiber. The colorful veggies like bell peppers and tomatoes are loaded with vitamins (hello, Vitamin C!) and antioxidants. The healthy fats from the avocado and olive oil help your body absorb all those fat-soluble vitamins and keep you feeling satisfied. It’s a balanced, energizing meal that truly fuels you from the inside out.
The Last Bite
And there you have it, friends—my all-time favorite Southwest Quinoa Salad, unpacked with all the love, tips, and stories from my kitchen to yours. I hope this recipe becomes a reliable, joyful staple in your home, just like it is in mine. Remember, cooking isn’t about perfection; it’s about the fun of creating something delicious that brings people together. So play with the variations, make it your own, and don’t forget to share it with someone you love (or just enjoy it all yourself—no judgment here!).
If you make it, I’d be absolutely thrilled to see your creation! Tag me on social @Feastical or @BeauCollier so I can cheer you on. Now, go grab that fork and dig into something truly satisfying. Until next time, keep cooking with joy!
Hungry for more? Explore all my feel-good recipes at Feastical.com!
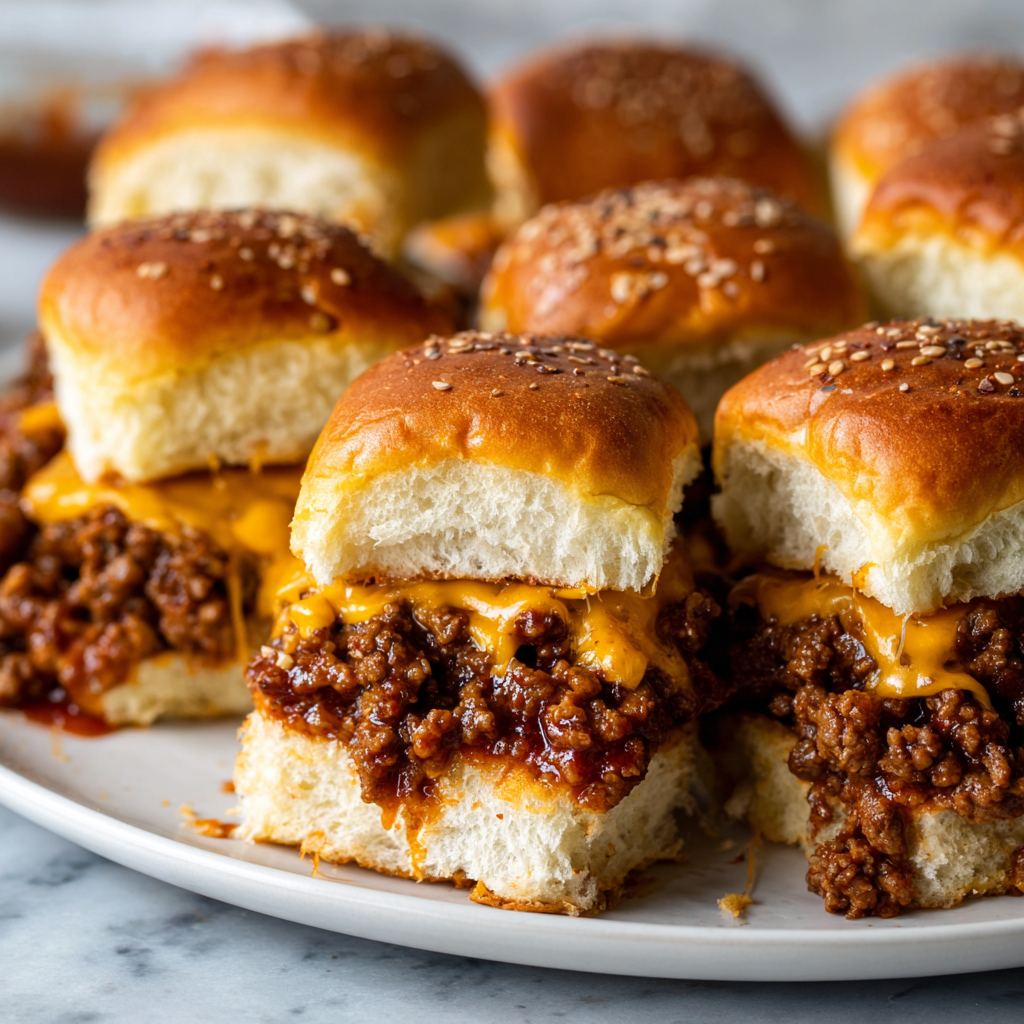
Easy Sloppy Joe Sliders (Cheesy, Saucy & Crowd-Pleaser Mini Sandwiches)
Easy Sloppy Joe Sliders: Your New Secret Weapon for Happy Crowds
Hey friends, Beau here from Feastical! Let’s talk about a universal truth: nothing brings people together like a truly great, slightly messy, utterly delicious bite of food. You know the kind I mean. The dish that makes everyone’s eyes light up, the one that disappears from the platter faster than you can say, “Wait, did you try one?” For me, that magic is perfectly captured in a tray of warm, gooey, Easy Sloppy Joe Sliders.
We’re taking the classic, nostalgic flavor of a Sloppy Joe—that tangy, sweet, savory, meaty sauce we all loved as kids—and leveling it up for any gathering. Imagine: soft slider buns, a hearty scoop of that iconic filling, and a blanket of melted cheddar cheese, all baked until the tops are golden and the cheese is bubbling. It’s comfort food, perfected for sharing.
Whether you’re feeding your family on a busy weeknight, hosting the big game, or need a surefire hit for a potluck, this recipe is your trusty sidekick. It’s incredibly simple, wildly satisfying, and guaranteed to earn you those “oh-my-gosh-this-is-so-good” compliments. So, preheat your oven and grab your favorite skillet. We’re about to make your kitchen the most popular room in the house.
More Than Just a Messy Sandwich: A Saucy Childhood Memory
My love for Sloppy Joes runs deep, straight back to my dad’s “Saturday Special.” He wasn’t a fancy cook, but man, could he master the art of the one-skillet wonder. He’d brown the beef, glug in the ketchup and Worcestershire with a confident hand, and let it all simmer into this glorious, glistening mess.
The rule was simple: you had to eat it over the plate because at least one bite was escaping the bun. My brother and I would sit there, grinning with sauce on our cheeks, comparing who had the sloppier “Joe.” It wasn’t just dinner; it was an event. It was laughter, zero pretension, and the joyful understanding that some foods are meant to be a little unruly. That’s the spirit I wanted to bottle up with these sliders—all that fun, nostalgia, and flavor, but in a format perfect for passing around with friends. It’s my dad’s Saturday Special, all grown up and ready for a party.
Gathering Your Flavor Arsenal: The Ingredients & Why They Work
This is where the magic starts! The beauty of this recipe is in its simple, powerful ingredients. Each one plays a key role in building that signature Sloppy Joe flavor. Here’s what you’ll need (and my insider tips for each):
- 1 lb ground beef (80/20 blend is ideal): The star! The 80/20 blend gives you enough fat for incredible flavor and juiciness without being greasy. Chef’s Insight: For a lighter twist, ground turkey or chicken works beautifully—just add a tablespoon of olive oil to the pan.
- ½ small onion, finely diced & 1 clove garlic, minced: Our aromatic base. They add a sweet, savory depth that makes the sauce taste homemade and complex. Sub Tip: No fresh onion? A teaspoon of onion powder in a pinch will do.
- ¾ cup ketchup: The sweet-tangy backbone. It gives the sauce body and that familiar, beloved taste. Chef’s Hack: For a richer flavor, swap out ¼ cup of the ketchup for barbecue sauce.
- 1 tablespoon tomato paste: The flavor booster! It concentrates the tomatoey goodness and helps thicken the sauce beautifully.
- 1 tablespoon brown sugar: Balances the acidity from the tomatoes and ketchup with a touch of molasses-rich sweetness. Sub Tip: Honey or maple syrup are great in a 1:1 swap.
- 1 tablespoon Worcestershire sauce: The secret umami weapon. It adds a savory, slightly tangy depth you can’t quite place but would definitely miss. Insight: If you’re gluten-free, check the label or use a certified GF brand like Lea & Perrins.
- 1 teaspoon yellow mustard: Don’t skip it! It’s not for heat, but for a bright, tangy note that cuts through the richness.
- Salt and black pepper to taste: Season in layers! Taste after simmering and adjust.
- 12 slider buns: Soft, pillowy potato rolls or classic Hawaiian sweet rolls are my top picks. They hold up to the sauce without getting tough.
- 6 slices cheddar cheese, halved: For that glorious, melty finish. Fun Twist: Pepper jack, provolone, or even Swiss are fantastic alternatives.
- 1 tablespoon butter & Sesame seeds (optional): The bakery-style finish! Brushing the tops with melted butter and a sprinkle of seeds gives a gorgeous color and a hint of toasty flavor.
Building Your Slider Masterpiece: A Step-by-Step Journey
Ready to cook? Let’s do this together. I’ll walk you through each step with my favorite kitchen hacks to ensure slider perfection.
- Brown the Beef: Grab a large skillet and place it over medium heat. Add your ground beef. Use a wooden spoon or spatula to break it up into crumbles as it cooks. We’re looking for a nice, even brown here—no gray meat! Once it’s fully cooked, this is the most important step: drain the excess grease. Tip it carefully into a bowl (I save an old can). This keeps your sliders saucy, not greasy.
- Sauté the Aromatics: With the beef still in the pan, add your finely diced onion. Cook for 2-3 minutes, stirring often, until they turn soft and translucent. Now, add the minced garlic. Ah, that smell! Cook it for just 30 seconds until fragrant. Garlic burns fast, so keep it moving.
- Create the Signature Sauce: Here’s where flavor town pops off! To the beef and onion mixture, add the ketchup, tomato paste, brown sugar, Worcestershire sauce, mustard, salt, and pepper. Stir everything until it’s one happy, cohesive, saucy family.
- The Flavor-Infusing Simmer: Reduce the heat to low and let the mixture simmer gently for 8-10 minutes. Don’t rush this! The simmering thickens the sauce and lets all those flavors get to know each other deeply. You’ll know it’s ready when it’s thick enough to mound on a spoon. Give it a taste and do a final seasoning check. More pepper? A pinch more sugar? Make it yours.
- Assemble with Love: Preheat your oven to 350°F (175°C). Take your package of slider buns and, without separating them, slice the whole sheet in half horizontally, creating a top “lid” and a bottom base. Place the bottom halves in a greased 9×13 baking dish. Spoon that glorious Sloppy Joe mixture evenly over the buns. Now, layer on your halved cheese slices—cover every saucy inch!
- The Buttery Finish: Place the top bun “lid” back on. If you’re using the butter (highly recommended!), melt it and gently brush it over the top of the buns. Sprinkle with sesame seeds for that professional bakery look.
- Bake to Golden, Bubbly Perfection: Slide the dish into your preheated oven. Bake for 10-12 minutes. You’re waiting for the cheese to be fully melted and the top of the buns to turn a beautiful golden brown.
- Slice & Serve the Joy: Carefully remove the tray from the oven. Let it cool for just a minute or two—the cheese will be lava-hot! Use a sharp knife to slice between the buns, creating individual sliders. Transfer to a platter, grab some napkins (trust me), and serve immediately!
How to Serve These Saucy Sensations
Presentation is part of the fun! I love serving these right in the baking dish for a rustic, family-style feel. Pile them high on a big wooden board or platter for a crowd. The key is to keep things casual and finger-friendly.
What to serve on the side? You need something to cut through that rich, savory goodness. A big, crunchy green salad with a sharp vinaigrette is perfect. For a classic combo, go for dill pickle spears and a bowl of crispy potato chips or oven-baked sweet potato fries. And for the ultimate comfort meal, a simple creamy coleslaw is a match made in heaven. Don’t forget a mountain of napkins—the sloppier, the better!
Make It Your Own: 5 Flavorful Twists to Try
Love the base recipe? Awesome! Now let’s play. Here are some of my favorite ways to mix it up:
- The “Cowboy” Style: Add ½ cup of finely diced bell peppers (any color) when you cook the onions. For a smoky kick, stir in a tablespoon of chipotle in adobo (minced) with the sauce ingredients.
- Italian-Inspired Sliders: Swap the cheddar for mozzarella or provolone. Add a teaspoon of dried oregano and a ¼ cup of grated Parmesan cheese to the meat sauce. Divine!
- Turkey & Veggie Boost: Use ground turkey and add ½ cup of finely grated zucchini or carrots to the skillet with the onion. They’ll cook down and add moisture and nutrients without anyone noticing.
- Spicy Kick: Like it hot? Add a diced jalapeño (seeds removed for less heat) with the onion. A dash of cayenne pepper or a few shakes of your favorite hot sauce in the simmering step will do the trick.
- Hawaiian Sweet Twist: Use Hawaiian sweet rolls. Swap the cheddar for Swiss cheese, and add a 8-oz can of drained, crushed pineapple to the meat sauce in the last 2 minutes of simmering. Sweet, savory, and utterly addictive.
Beau’s Kitchen Notes & Stories
This recipe has been a Feastical workhorse for years, and it’s evolved from my dad’s simple stovetop version. The baking step was a game-changer I discovered by accident when I made too much filling and decided to pile it onto rolls and melt the cheese in the oven. The way the buns get slightly toasted on top while staying soft underneath? *Chef’s kiss*.
A funny story: I once brought these to a potluck and a friend’s toddler, completely covered in sauce, declared them “happy sandwiches.” I think that’s the best review I’ve ever gotten. The name stuck in our friend group. So remember, you’re not just making sliders; you’re making “happy sandwiches.”
Your Sloppy Joe Slider Questions, Answered
- Q: Can I make these ahead of time?
A: Absolutely! You can prepare the Sloppy Joe meat sauce up to 2 days in advance and store it in the fridge. When you’re ready, reheat the sauce gently, assemble the sliders, and bake as directed. You can also assemble the entire tray (unbaked) a few hours ahead, cover, and refrigerate. Just add 2-3 extra minutes to the bake time if starting from cold. - Q: How do I prevent the bottom buns from getting soggy?
A: Great question! The key is ensuring your meat sauce has thickened properly during the simmering step. It should be thick, not runny. Also, don’t let the assembled, unbaked tray sit for too long before going in the oven. Baking them right away helps toast the bottom bun and prevent sogginess. - Q: Can I freeze these?
A: The cooked meat sauce freezes wonderfully for up to 3 months. Thaw overnight in the fridge and reheat. I don’t recommend freezing the fully assembled and baked sliders, as the buns can become mushy upon reheating. - Q: My sauce tastes a little too tangy/sweet. How can I fix it?
A> No problem! Taste as you cook. If it’s too tangy, add a teaspoon more brown sugar. If it’s too sweet, a splash of apple cider vinegar or a squeeze of yellow mustard will balance it back out. Remember, seasoning is personal!

Easy Sloppy Joe Sliders (Cheesy, Saucy & Crowd-Pleaser Mini Sandwiches)
Description
There’s something irresistible about a warm, saucy, slightly messy sandwich. These Easy Sloppy Joe Sliders take that classic sweet-and-savory flavor you love and turn it into the perfect shareable bite. Soft slider buns, rich beef filling, and melty cheddar cheese baked until golden—this is comfort food made party-ready.
Ingredients
-
1 lb ground beef (80/20 recommended)
-
½ small onion, finely diced
-
1 clove garlic, minced
-
¾ cup ketchup
-
1 tablespoon tomato paste
-
1 tablespoon brown sugar
-
1 tablespoon Worcestershire sauce
-
1 teaspoon yellow mustard
-
Salt and black pepper, to taste
-
12 slider buns (Hawaiian rolls or potato rolls work great)
-
6 slices cheddar cheese, halved
-
1 tablespoon melted butter (optional)
-
Sesame seeds (optional)
Instructions
In a large skillet over medium heat, cook the ground beef, breaking it into crumbles. Cook until fully browned. Drain excess grease.
Add the diced onion to the skillet and cook for 2–3 minutes until softened. Stir in the garlic and cook for 30 seconds until fragrant.
Stir in the ketchup, tomato paste, brown sugar, Worcestershire sauce, mustard, salt, and pepper. Mix well.
Reduce heat to low and let simmer for 8–10 minutes, until thickened. The mixture should be thick—not runny.
Preheat oven to 350°F (175°C).
Slice the slider buns in half horizontally without separating them individually. Place the bottom halves in a greased 9×13-inch baking dish.
Spread the Sloppy Joe mixture evenly over the buns. Layer the halved cheddar slices on top. Place the top buns back on.
Brush with melted butter and sprinkle with sesame seeds if desired.
Bake for 10–12 minutes, until the cheese is melted and the tops are lightly golden.
Let cool slightly, then slice into individual sliders and serve warm.
Notes
-
Use fresh cheese slices – They melt more smoothly than pre-shredded cheese.
-
Make ahead option – Prepare the meat mixture up to 2 days in advance and refrigerate.
-
Add crunch – Serve with pickles or coleslaw for contrast.
-
Spice it up – Add diced jalapeños or a dash of hot sauce for heat.
Nutritional Information*
*Please note: The following is an approximate estimate calculated using a standard online nutrition calculator and based on the specific ingredients listed. Values can vary based on exact brands and portion sizes.
- Prep Time: 10 minutes
- Cook Time: 20 minutes
- Total Time: 30 minutes
- Yield: 12 sliders
- Serving Size: 1 slider
- Calories: ~210
- Protein: 11g
- Carbohydrates: 18g
- Fat: 11g
Final Thoughts
Easy Sloppy Joe Sliders: Your New Secret Weapon for Happy Crowds
Hey friends, Beau here from Feastical! As we wrap up this culinary adventure together, I want to leave you with one final thought: cooking for the people you love doesn’t have to be complicated to be memorable. In fact, it’s often the simplest dishes that create the deepest connections.
These Easy Sloppy Joe Sliders embody everything I believe about food—they’re approachable, adaptable, and absolutely packed with flavor. They’re the kind of recipe that becomes a legend in your friend group, the one people start requesting before you even ask what to bring to the party. “Are you making those slider things?” they’ll text. And you’ll smile, because you know exactly what they mean.
What I love most about this recipe is its beautiful duality. On one hand, it’s weeknight-easy—a thirty-minute meal that transforms ground beef and pantry staples into something the whole family gets excited about. On the other hand, it’s party-perfected—a platter of golden, cheesy, saucy goodness that commands attention at any gathering. It’s comfort food that dresses up or down, depending on your mood.
I think my dad would get a kick out of seeing his Saturday Special evolve into this. The same saucy joy we experienced as kids, now shared around potluck tables and game day spreads. That’s the beautiful thing about recipes—they’re living stories. They grow and change as we do, carrying forward the best parts of our memories while creating new ones.
So whether you’re making these for a chaotic Tuesday night dinner with your little ones (who will absolutely have sauce on their cheeks—embrace it!) or as the star of your holiday appetizer spread, know that you’re doing something wonderful. You’re creating a moment. A “happy sandwich” moment, as my friend’s toddler so perfectly put it.
A few parting thoughts before you head to the kitchen:
Don’t stress about perfection. If your onions are a little chunkier than mine, if you use a different cheese, if you forget the sesame seeds—it’s going to be delicious anyway. The magic is in the making.
Taste as you go. This is the number one secret to becoming a better cook. Your palate knows what it likes, so trust it. Add a little more brown sugar if you’re craving sweetness, an extra dash of Worcestershire if you want that savory depth.
Make it yours. I’ve given you a foundation, but the best recipes are the ones you adapt. Maybe your family’s version becomes the “Cowboy Style” with bell peppers and chipotle. Maybe your signature twist is the Hawaiian sweet version with pineapple. Wherever this recipe takes you, I’d love to hear about it.
And remember: The sloppier, the better. Life’s too short for tidy food that doesn’t make you smile. These sliders are an invitation to let go, to lean into the mess, to laugh with sauce on your chin. That’s real connection. That’s what Feastical is all about.
Thank you for spending time in my virtual kitchen. Now go preheat that oven, grab your favorite skillet, and make some memories. Your people are waiting.
Happy cooking, and even happier eating!

Creamy Broccoli and Chicken Penne : Comforting, Cheesy & Weeknight Easy
Creamy Broccoli and Chicken Penne – Your New Weeknight Hug in a Bowl
Hey friends, Beau here from Feastical! Let’s talk about those nights. You know the ones. You’re buzzing through the door, the day’s to-do list is still echoing in your brain, and everyone’s stomach is starting to sound like a grumpy symphony. You want something that feels like a reward, not a punishment. Something creamy, comforting, and downright delicious, but you definitely do not want to summon every pot and pan in the kitchen.
That’s exactly why this Creamy Broccoli and Chicken Penne lives in my permanent weeknight rotation. It’s the culinary equivalent of your favorite cozy sweater. We’re talking tender pasta, juicy bites of chicken, crisp-tender broccoli, all swirled in a luxuriously smooth sauce that’s rich with garlic and nutty Parmesan. It’s balanced, it’s satisfying, and the best part? You can have it on the table, steaming and fabulous, in about the time it takes to watch a sitcom. This isn’t just dinner; it’s a fast track to feeling good. So, tie on that apron (or don’t, I won’t judge), and let’s make a meal that gathers everyone around the table with zero stress.
The Night This Pasta Saved the Day
This recipe has a permanent spot in my heart because of one hilariously chaotic Tuesday a few years back. I’d promised my niece and nephew I’d cook them “a fancy restaurant dinner” at my place. Of course, life happened, I got stuck in traffic, and arrived home to two very hungry, very skeptical little food critics. The clock was ticking, and my grand plans for a multi-course meal evaporated. I scanned the fridge: some leftover roasted chicken, a head of broccoli begging to be used, and the usual pasta/cream/cheese staples. In a mild panic, I threw it all together in one big, hopeful skillet.
The moment I lifted the lid to toss it all, that incredible garlic-Parmesan aroma filled the kitchen. Their eyes went wide. The first bite was met with absolute silence (the highest compliment from a kid), followed by a unified, “Can we have this every time?” It was a victory snatched from the jaws of a weeknight meltdown. It proved that the best meals aren’t about complexity; they’re about flavor, speed, and the simple joy of sharing a hot, hearty plate with people you love. That’s the spirit of Feastical, right there in that skillet.
Gathering Your Flavor Team: Ingredients & Smart Swaps
Here’s everything you’ll need to create this weeknight masterpiece. I’ve added my little chef insights and swaps so you can make this your own with what you’ve got!
- 12 oz Penne Pasta: The perfect shape for cradling all that creamy sauce. Chef’s Tip: Want to go one-pot? Use a pot large enough to cook the pasta and build the sauce later. Swap: Any short pasta works—rigatoni, fusilli, or even shells.
- 2 cups Cooked Chicken Breast, chopped: The ultimate time-saver! I use a rotisserie chicken or leftover grilled chicken. Chef’s Tip: Shred it for a more integrated texture. Swap: Cook 2 fresh chicken breasts in the pan with a little oil before starting the sauce, then set aside.
- 2 cups Broccoli Florets: Fresh, crisp, and green for balance. Chef’s Tip: Cut them into bite-sized pieces so they cook quickly and evenly with the pasta.
- 2 tbsp Butter: Our sauce’s rich, silky foundation. Chef’s Tip: Unsalted is best so you control the seasoning.
- 3 Garlic Cloves, minced: The aromatic soul of the dish. Don’t be shy! Chef’s Tip: For a mellower flavor, sauté the minced garlic in the butter for just 45 seconds until fragrant, but not browned.
- 1 ½ cups Heavy Cream or Half-and-Half: Heavy cream gives a luscious, restaurant-style thickness. Half-and-half is lighter but still delicious. Chef’s Tip: Let it come to room temp for a minute to prevent curdling when you add it to the hot pan.
- 1/2 cup Grated Parmesan Cheese: Use the good stuff from the refrigerated section, not the shelf-stable canister. It melts like a dream and packs real flavor.
- Salt & Black Pepper to taste: Your essential flavor enhancers. Season in layers!
- Optional: Red Pepper Flakes & Extra Parmesan: A pinch of flakes adds a lovely warm buzz, and extra cheese is never optional in my book—it’s a requirement.
Let’s Get Cooking: Your Step-by-Step Roadmap to Delicious
Follow these steps, chat with me along the way, and you’ll have a perfect pasta dish in no time. We’re doing this “one-pot style”—cooking components separately but bringing them together in a beautiful, saucy union.
- Cook Pasta & Broccoli: Bring a large pot of well-salted water to a rolling boil. Salting the water is your first chance to season the pasta itself—make it taste like the sea! Add the penne and cook according to package directions for al dente. About 2-3 minutes before the pasta is done, add the broccoli florets right into the boiling water. This blanches them perfectly—crisp-tender and bright green. Drain everything together and set aside. Chef’s Hack: Reserve about ½ cup of that starchy pasta water! It’s liquid gold for adjusting your sauce consistency later.
- Make the Aromatic Base: While the pasta cooks, grab a large skillet or Dutch oven (something with high sides). Melt the butter over medium heat. Once it’s foaming slightly, add the minced garlic. Stir constantly for about 1 minute. You’ll know it’s ready when the kitchen smells incredible and the garlic is fragrant but hasn’t taken on any color. Burnt garlic is bitter—we want sweet and aromatic!
- Build the Velvety Sauce: Pour in your heavy cream. Give it a good stir to combine it with the buttery garlic. Let it simmer gently (small bubbles around the edges) for 3-4 minutes. This allows it to reduce and thicken slightly. Now, turn the heat down to low. Sprinkle in the grated Parmesan cheese and whisk or stir constantly until it’s completely melted and the sauce is smooth. Chef’s Hack: Removing the pan from direct heat for a minute when you add the cheese can prevent any potential graininess.
- The Grand Unification: Time to bring the family together! Add the chopped cooked chicken, the drained pasta, and broccoli to the creamy sauce in the skillet. Using tongs or a big spoon, toss everything gently but thoroughly until every piece of pasta, every floret of broccoli, and every bit of chicken is gloriously coated in that creamy, cheesy sauce. If the sauce seems a little thick, splash in a bit of that reserved pasta water, a tablespoon at a time, until it loosens to your liking.
- Season & Shine: This is the final touch. Taste it! Does it need a pinch more salt? A few cracks of fresh black pepper? Now’s the time. Stir in a pinch of red pepper flakes if you’re using them for that subtle kick. Give it one final toss.
Plating Up the Comfort
I love serving this family-style, right out of the skillet in the middle of the table with a big, inviting salad on the side. But for that extra “wow” on a plate:
- Use a pasta fork or tongs to give each portion a gentle twist as you plate it, creating a nice height.
- Finish with a final shower of freshly grated Parmesan and maybe a light sprinkle of chopped fresh parsley or basil for a pop of color.
- A simple side like a crisp Caesar salad, garlic bread for dunking, or just some roasted cherry tomatoes adds perfection.
- Don’t forget the beverage! A chilled glass of Pinot Grigio, a crisp lager, or even sparkling water with lemon pairs beautifully.
Make It Your Own: Flavor Twists & Swaps
This recipe is a fantastic canvas. Play with it!
- Sun-Dried Tomato & Spinach: Add ½ cup chopped sun-dried tomatoes (oil-packed, drained) and a couple of big handfuls of fresh spinach when you combine everything. The spinach wilts beautifully in the hot sauce.
- Mushroom Lover’s Dream: Sauté 8 oz of sliced cremini mushrooms in the butter until golden before adding the garlic. Use the liquid they release to build an even deeper flavor base.
- Lighter Version: Swap the heavy cream for whole milk or evaporated milk. Thicken the sauce with an extra ¼ cup of Parmesan or a tablespoon of cornstarch slurry (1 tbsp cornstarch + 2 tbsp cold water) stirred in at the end.
- Different Protein: Swap the chicken for cooked Italian sausage, shrimp (add raw shrimp in step 4 and cook until pink), or keep it veggie by adding white beans or chickpeas for protein.
- Cheese Swap: Try Asiago, Romano, or a mix for a different salty, nutty profile. For a touch of melty goodness, stir in a handful of shredded mozzarella at the very end.
Beau’s Kitchen Notebook
This recipe is a living, breathing thing in my house. I’ve made it so many times I could probably do it in my sleep. The biggest evolution? I used to dirty three pans—one for pasta, one for broccoli, one for sauce. Now, I’m all about efficiency. Boiling the broccoli with the pasta was a game-changer. Another funny fail: I once got overzealous with the heat when adding the cheese and ended up with a slightly grainy, broken sauce. My nephew, ever the honest critic, said it tasted like “sandy mac and cheese.” Lesson learned: low and slow when melting cheese into cream! Now, I keep the heat gentle and stir with love. It always turns out silky.
Your Questions, Answered!
- Q: Can I make this ahead of time?
A: You can prep components! Cook the pasta and broccoli, then toss them with a tiny bit of oil to prevent sticking. Store separately from the sauce. The sauce can be made 1-2 days ahead and stored in the fridge. Reheat the sauce gently, then combine everything. Note: The pasta will absorb sauce as it sits, so you may need to add a splash of milk or broth when reheating. - Q: My sauce seems too thin/too thick. Help!
A> Too thin? Let it simmer a few minutes longer to reduce. You can also create a quick slurry (1 tsp cornstarch + 1 tbsp cold water) and whisk it in. Too thick? This is where that reserved pasta water is a hero! Add it a tablespoon at a time until it reaches the perfect creamy consistency. Regular broth or milk works in a pinch too. - Q: Can I use frozen broccoli?
A: Absolutely! No need to thaw. Just add the frozen florets to the pasta water about 4-5 minutes before the pasta is done. They’ll heat through perfectly. - Q: How do I store and reheat leftovers?
A: Store in an airtight container in the fridge for 3-4 days. Reheat in a skillet over medium-low heat with a splash of milk or water to revive the sauce. The microwave works too, but stir it every 30 seconds to heat evenly.

Creamy Broccoli and Chicken Penne : Comforting, Cheesy & Weeknight Easy
Description
Some nights call for something cozy, creamy, and guaranteed to please everyone at the table. This Creamy Broccoli and Chicken Penne is exactly that. Tender pasta, juicy chicken, bright green broccoli, and a silky garlic-Parmesan sauce come together in one simple, satisfying dish. It’s comforting without being complicated—and it’s ready in about 25 minutes.
Ingredients
-
12 oz penne pasta
-
2 cups cooked chicken breast, chopped or shredded
-
2 cups broccoli florets (bite-sized)
-
2 tablespoons butter
-
3 garlic cloves, minced
-
1½ cups heavy cream (or half-and-half)
-
½ cup freshly grated Parmesan cheese
-
Salt and black pepper, to taste
-
Optional: red pepper flakes, extra Parmesan, chopped parsley
Instructions
Bring a large pot of salted water to a boil. Add the penne and cook until al dente according to package directions.
About 2–3 minutes before the pasta is done, add the broccoli florets to the same pot. Drain everything together.
Tip: Reserve ½ cup of the pasta water before draining—it helps adjust the sauce later.
In a large skillet over medium heat, melt the butter. Add the minced garlic and cook for about 1 minute until fragrant (do not brown).
Pour in the heavy cream and bring to a gentle simmer. Let it cook for 3–4 minutes, stirring occasionally, until slightly thickened.
Lower the heat and stir in the grated Parmesan until fully melted and smooth.
Add the cooked chicken, drained pasta, and broccoli to the skillet. Toss gently until everything is evenly coated in the sauce.
If the sauce feels too thick, add a splash of reserved pasta water until it reaches your desired consistency.
Season with salt, pepper, and optional red pepper flakes.
Plate immediately and top with extra Parmesan or fresh parsley if desired. Serve warm.
Notes
-
Use freshly grated Parmesan for a smoother sauce—it melts better than pre-shredded cheese.
-
Keep the heat low when adding cheese to prevent a grainy texture.
-
Short on time? Rotisserie chicken works perfectly.
-
Want it lighter? Use half-and-half instead of heavy cream.
-
Add extra veggies like spinach or mushrooms for more flavor and nutrients.
Nutritional Information*
*Please note: These are estimates based on the specific ingredients listed (using heavy cream and rotisserie chicken) and standard nutritional calculation software. Values will vary with substitutions.
Per Serving (Approx. 1/4 of recipe):
- Calories: ~520
- Protein: 34g
- Carbohydrates: 40g
- Fat: 25g
- Saturated Fat: 14g
- Fiber: 3g
- Sugar: 4g
Prep Time: 10 mins | Cook Time: 15 mins | Total Time: 25 mins | Servings: 4
Final Thoughts from My Kitchen to Yours
And that’s it, friends! My go-to, no-fail, always-impresses Creamy Broccoli and Chicken Penne. I hope this recipe finds its way into your weekly lineup and becomes a story in your own home—the night you “threw something together” and it became an instant classic. Remember, cooking isn’t about perfection; it’s about the joy in the process and the people you share it with.

Oven Fried Feta Rolls with Chili Honey : Crispy, Creamy, and Spicy-Sweet
The Appetizer That Steals the Show (Every. Single. Time.)
Hey friends, Beau here from Feastical. Let me paint you a picture. It’s 20 minutes before your friends arrive. You’re juggling a dozen things, the music’s on, and you realize… you need a knockout appetizer. Something that says, “I’m a culinary genius who has it all together,” but actually whispers, “This was so easy and fun to make.” Enter the hero of our story today: Oven Fried Feta Rolls with Chili Honey.
Imagine this: the sharp, tangy bite of feta cheese, mellowed by creamy ricotta, all bundled up in layers of paper-thin, buttery phyllo pastry. We bake them until they’re impossibly golden and crisp—like little edible pieces of sunshine. Then, just when you think it can’t get better, we drizzle the whole situation with a warm, spicy-sweet chili honey. It crackles over the hot pastry, seeps into the flaky layers, and creates a flavor symphony of savory, creamy, crispy, and sweet-heat that will absolutely blow your mind.
This isn’t just another recipe; it’s your new secret weapon. It’s the dish people will beg you to make again. It’s proof that feel-good food doesn’t need to be complicated, just crafted with a little love and a lot of flavor. So, preheat that oven, grab your favorite mixing bowl, and let’s make some magic happen together. Trust me, your spatula is about to become very popular.
My Love Letter to Feta (And a Very Patient Yia Yia)
My obsession with feta cheese started young, in my Yia Yia’s kitchen. She’d crumble it over everything—salads, pastries, even watermelon. To me, it was the “grown-up” cheese, salty and bold. One afternoon, I decided to be her “sous-chef” as she made spanakopita. My job? Keep the phyllo sheets covered with a damp cloth. My five-year-old attention span? Not up to the task. I’d get distracted, the cloth would slide, and the delicate pastry would dry into a brittle sheet before her wise eyes.
Instead of getting frustrated, she’d just smile, crumble a little extra feta into a bowl for me to snack on, and say, “Patience, Beau. The good things take care.” She’d show me how the butter made the layers separate, creating a hundred little pockets of crispiness. That lesson in patience and the transformative power of simple ingredients—feta, phyllo, butter—stuck with me. These Oven Fried Feta Rolls are my playful, simplified homage to those afternoons. They capture that magical, shattering crispness and the soul-satisfying saltiness of the cheese, but they’re quick enough for a weeknight and chic enough for your fanciest gathering. It’s the taste of nostalgia, with a modern, spicy-sweet kick.
Gathering Your Flavor Arsenal
Here’s the beautiful part: the ingredient list is short, sweet, and mighty. Each one plays a starring role. Let’s break it down:
- 1 cup crumbled feta cheese: The star! I prefer a good, firm Greek or Bulgarian feta in brine for the best tangy punch. If you’re using a block, crumble it yourself for the perfect texture. Chef’s Insight: The salt level in feta can vary. Taste a crumble before adding extra seasoning to your filling.
- 1/2 cup ricotta cheese: The creamy co-star. Ricotta adds a luscious, mild creaminess that balances feta’s sharpness and makes the filling pipeable and smooth. Full-fat is my go-to for richness, but part-skim works too.
- 8 sheets phyllo pastry (thawed): The crispy, flaky vehicle. Find it in the freezer aisle. Key Tip: Thaw it overnight in the fridge, not on the counter. Keep it covered with a damp kitchen towel while you work to prevent it from drying out and cracking.
- 3 tablespoons melted butter or olive oil (for brushing): This is what gives us that gorgeous golden color and crisp texture. Butter delivers incredible flavor, while olive oil offers a lovely, fruity note. I often use a 50/50 blend for the best of both worlds.
- Freshly ground black pepper, to taste: Don’t skip this! A few cracks of pepper cut through the richness and add a subtle warmth.
For the Chili Honey Glaze:
- 1/4 cup honey: Pure, liquid gold. Use a good-quality wildflower or clover honey. The floral notes are divine here.
- 1/2–1 teaspoon red chili flakes: Our heat regulator! Start with 1/2 tsp for a gentle warmth, or go for the full teaspoon (or more!) if you love a spicy kick. Substitution Tip: You can use 1-2 teaspoons of chopped fresh chili (like Fresno or jalapeño) or a few generous shakes of your favorite hot sauce.
Let’s Build Some Crispy, Cheesy Magic: A Step-by-Step Guide
Ready? Apron on, let’s go! Follow these steps, and you’ll be a phyllo pro in no time.
- Preheat & Prep: Fire up your oven to 400°F (200°C). This hot temperature is crucial for instant puff and crispness. Line a baking sheet with parchment paper—no sticking, easy cleanup. Chef Hack: If you have a convection setting, use it! It circulates the air for even browning.
- Make the Filling: In a medium bowl, combine the crumbled feta, ricotta, and several grinds of black pepper. Mash and stir with a fork until it’s mostly smooth and cohesive. You want it creamy enough to hold its shape when scooped. Give it a taste—is it amazing? Good. Set it aside.
- Master the Phyllo Layers: Unroll your thawed phyllo sheets onto a clean, dry surface. Immediately cover the stack with plastic wrap and then a lightly damp (not wet!) kitchen towel. This is your security blanket against dry, crackly pastry. Working quickly, take one sheet and lay it flat. Brush it lightly but evenly with your melted butter or oil. Place a second sheet directly on top and brush again. For these rolls, two layers give the perfect balance of sturdiness and delicate flakiness. Pro-Tip: Don’t worry about perfection! A few wrinkles or imperfect brushing just adds rustic charm.
- Cut & Fill: Using a sharp knife or pizza cutter, slice your buttered double-layer into roughly 4×6 inch rectangles. You’ll get about 4-5 rectangles per double layer. Place a heaping teaspoon of the cheese mixture near the bottom edge of a rectangle.
- The Rolling Technique: Fold the left and right sides of the phyllo rectangle inward over the filling (like you’re starting a burrito). Then, starting from the bottom, roll it up snugly towards the top. Place the roll seam-side down on your prepared baking sheet. Repeat with the remaining phyllo and filling. A little cheese peeking out? No big deal! It just gets extra crispy.
- Bake to Golden Perfection: Give the tops of your rolls one final, generous brush with butter or oil. This ensures an all-over golden glow. Slide them into the hot oven and bake for 15-20 minutes. You’re looking for a deep, golden brown and an audible crispness when you tap them.
- Whip Up the Chili Honey: While the rolls bake, combine the honey and chili flakes in a small saucepan. Warm it over the lowest heat for just 2-3 minutes, until the honey is fluid and the chili infuses its spice. Remove from heat and let it sit. The flavors meld as it cools slightly.
- The Grand Finale: The moment of truth! Pull your gorgeous, crackling rolls from the oven. Let them cool for just a minute on the sheet. Then, using a spoon, drizzle that warm, spicy honey all over them. The sizzle sound is pure music. Serve immediately while they’re hot and the contrast between the crispy shell and molten filling is at its peak.
How to Serve These Golden Gems
Presentation is part of the fun! I love piling these rolls high on a rustic wooden board or a simple white platter to let their golden color shine. Drizzle any remaining chili honey artistically around the plate and maybe sprinkle a few extra chili flakes or a tiny pinch of flaky sea salt on top for drama.
These are incredibly versatile. Serve them as the ultimate appetizer with a side of extra honey for dipping. They’re also a fantastic side dish to a simple grilled lemon-herb chicken or a bright Greek salad. For a next-level brunch, pair them with a chilled glass of dry rosé or a spicy Bloody Mary. The key is to serve them warm, when the textures are at their most thrilling.
Make It Your Own: Delicious Twists & Swaps
One recipe, endless possibilities! Here are some of my favorite ways to mix it up:
- The Herb Garden: Stir 2 tablespoons of finely chopped fresh dill, mint, or chives into the cheese filling. It adds a gorgeous fresh, green flavor.
- Mediterranean Twist: Add 2 tablespoons of finely chopped, oil-packed sun-dried tomatoes or a handful of chopped Kalamata olives to the cheese mix for a salty, umami punch.
- Nutty & Sweet: Sprinkle a few toasted pine nuts or chopped walnuts over the cheese filling before you roll. The crunch and toasted flavor are incredible.
- Vegan Friendly: Use a firm, tangy vegan feta and vegan ricotta. Brush the phyllo with melted vegan butter or olive oil. The method stays exactly the same!
- Spice It Differently: Swap the chili honey for a garlic-herb butter drizzle (melt butter with minced garlic and parsley) or a balsamic glaze for a sweet-tart finish.
Beau’s Kitchen Confidential
This recipe has been a Feastical staple for years, and it’s evolved from a slightly fussy fried version to this brilliant oven-baked method. My biggest “aha!” moment was realizing that brushing the phyllo layers with a mixture of butter and olive oil gave me the flavor of butter with the easy, non-burn quality of oil. I’ve also learned that a slightly thicker filling (thanks to a good drain of the ricotta in a fine-mesh strainer for 10 minutes) prevents any potential sogginess.
A funny story? The first time I tested these, I got so excited about the chili honey that I drizzled it before baking. Let’s just say I created caramelized, slightly burnt honey phyllo rocks. Delicious in flavor, but a dental hazard! Now I know: the hot-from-the-oven rolls are the perfect canvas for that warm honey. Live, learn, and keep cooking!
Your Questions, Answered
Q: My phyllo keeps tearing and drying out! Help!
A: Don’t panic! First, ensure it’s fully thawed in the fridge. Second, that damp towel over the unused stack is non-negotiable. Work quickly and confidently—small tears can be patched with a little butter and an extra scrap of phyllo. It’s very forgiving once baked.
Q: Can I make these ahead of time?
A> Absolutely! You have two great options: 1) Assemble the rolls, place them on the baking sheet, and refrigerate, covered, for up to 4 hours before baking. 2> Freeze them solid on the sheet, then transfer to a freezer bag. Bake from frozen, adding 5-7 extra minutes. Do not add the honey until after baking, fresh from the oven.
Q: My rolls are soggy on the bottom. What happened?
A> This usually means the filling was too wet (ricotta not drained enough) or they were placed on a hot baking sheet immediately after coming out of the oven. Always use parchment paper and let them cool for a minute on the sheet before transferring to a serving plate.
Q: Is there a good substitute for phyllo?
A> Phyllo is unique, but in a pinch, you can use egg roll wrappers for a chewier, different (but still tasty!) texture. The baking time may be slightly less, so keep an eye on them.

Oven Fried Feta Rolls with Chili Honey : Crispy, Creamy, and Spicy-Sweet
Description
Oven-Fried Feta Rolls with Chili Honey
Flaky, golden phyllo rolls filled with tangy feta and creamy ricotta, finished with a warm drizzle of sweet-spicy chili honey. Perfect as an appetizer, brunch treat, or show-stopping snack.
Ingredients
Filling:
-
1 cup crumbled feta cheese (Greek or Bulgarian, drained if needed)
-
½ cup ricotta cheese (full-fat preferred)
-
Freshly ground black pepper, to taste
Phyllo & Assembly:
-
8 sheets phyllo pastry (thawed)
-
3 tbsp melted butter or olive oil (or 50/50 mix)
Chili Honey Glaze:
-
¼ cup honey
-
½–1 tsp red chili flakes (adjust to taste)
Optional Variations & Garnishes:
-
Fresh herbs (dill, mint, chives)
-
Sun-dried tomatoes or Kalamata olives
-
Toasted pine nuts or walnuts
-
Balsamic glaze or garlic-herb butter in place of chili honey
Instructions
-
Preheat & Prep:
-
Preheat oven to 400°F (200°C).
-
Line a baking sheet with parchment paper.
-
-
Make the Filling:
-
In a medium bowl, combine feta, ricotta, and black pepper. Mash with a fork until mostly smooth.
-
-
Prepare the Phyllo:
-
Keep unused sheets covered with plastic wrap and a lightly damp towel.
-
Lay one sheet flat, brush with butter/oil. Stack a second sheet on top and brush again.
-
-
Cut & Fill:
-
Slice double-layer phyllo into ~4×6-inch rectangles.
-
Place a teaspoon of filling near the bottom edge of each rectangle.
-
-
Roll the Phyllo:
-
Fold left and right sides over filling. Roll from bottom to top snugly. Place seam-side down on baking sheet.
-
-
Bake:
-
Brush tops with more butter/oil. Bake 15–20 minutes until deep golden and crisp.
-
-
Make Chili Honey:
-
While baking, warm honey and chili flakes over low heat 2–3 minutes. Let sit briefly to infuse.
-
-
Serve:
-
Drizzle warm chili honey over hot rolls. Serve immediately.
-
Notes
-
Preheat & Prep:
-
Preheat oven to 400°F (200°C).
-
Line a baking sheet with parchment paper.
-
-
Make the Filling:
-
In a medium bowl, combine feta, ricotta, and black pepper. Mash with a fork until mostly smooth.
-
-
Prepare the Phyllo:
-
Keep unused sheets covered with plastic wrap and a lightly damp towel.
-
Lay one sheet flat, brush with butter/oil. Stack a second sheet on top and brush again.
-
-
Cut & Fill:
-
Slice double-layer phyllo into ~4×6-inch rectangles.
-
Place a teaspoon of filling near the bottom edge of each rectangle.
-
-
Roll the Phyllo:
-
Fold left and right sides over filling. Roll from bottom to top snugly. Place seam-side down on baking sheet.
-
-
Bake:
-
Brush tops with more butter/oil. Bake 15–20 minutes until deep golden and crisp.
-
-
Make Chili Honey:
-
While baking, warm honey and chili flakes over low heat 2–3 minutes. Let sit briefly to infuse.
-
-
Serve:
-
Drizzle warm chili honey over hot rolls. Serve immediately.
-
Nutritional Info (Approximate)
Here’s a rough breakdown per roll (based on a yield of 12 rolls). Remember, this is an estimate, and your specific ingredients will cause variations.
- Calories: ~120
- Total Fat: 7g
- Saturated Fat: 4g
- Carbohydrates: 10g
- Protein: 4g
- Sodium: ~180mg
While this is an indulgent treat, baking instead of deep-frying saves significant calories and fat. The protein from the cheese helps make it satisfying. As always, enjoy these flavorful bites as part of a balanced diet!
Final Thoughts from My Kitchen to Yours
Friends, that’s the beauty of cooking, isn’t it? Taking a few humble ingredients and turning them into something that creates genuine joy around the table. These Oven Fried Feta Rolls with Chili Honey are more than just an appetizer; they’re a conversation starter, a memory maker, and proof that the most impressive dishes are often the simplest to create.
I hope you make them, share them, and love them as much as I do. Tag me @feastical when you do—I live for seeing your kitchen creations! Now, go forth, get that phyllo crispy, and drizzle with abandon. Until next time, keep your kitchen messy and your heart full.
Hungry for more? Browse all my feel-good recipes at Feastical.com.
– Beau
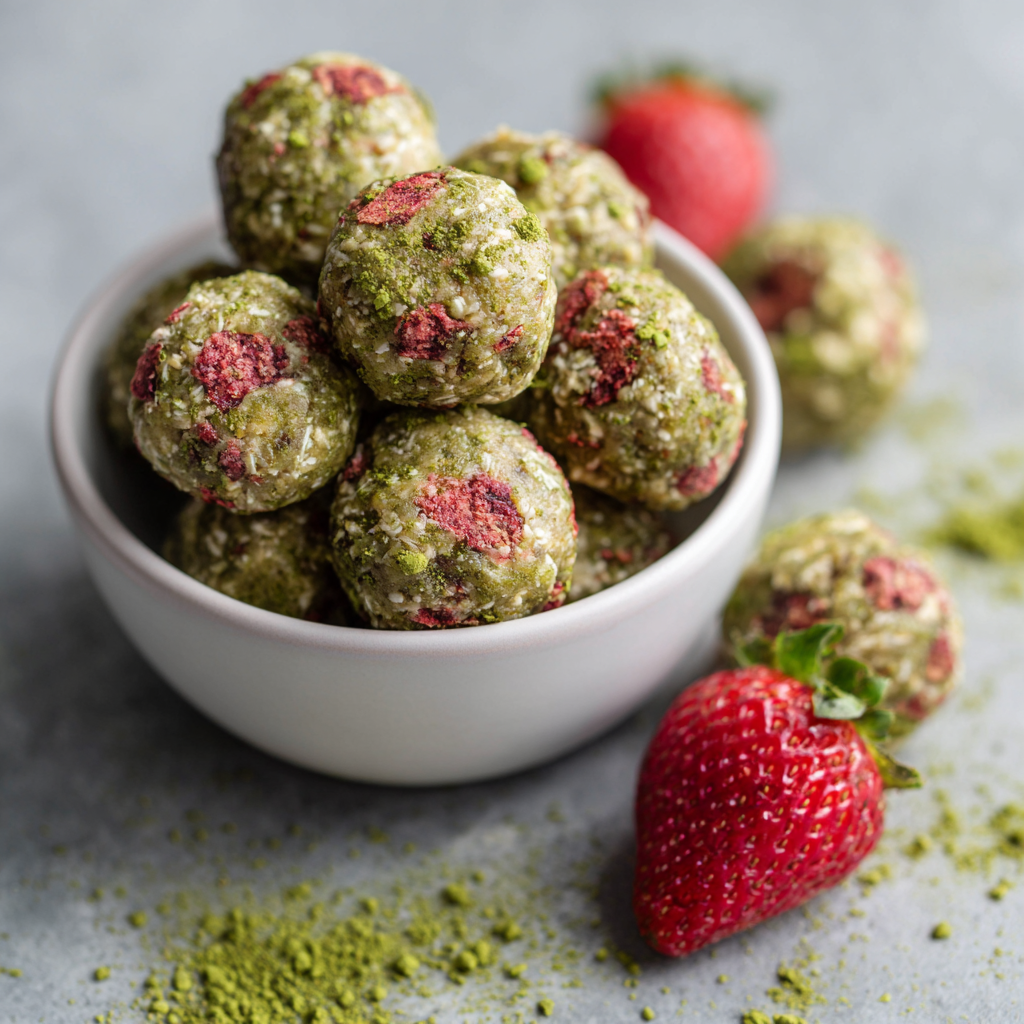
Strawberry Matcha Energy Bites : No-Bake, Nutritious & Perfect for Snacking
Strawberry Matcha Energy Bites: Your New Favorite Feel-Good Snack
Hey there, friend! Beau here, welcoming you back to my kitchen corner at Feastical. You know me—I’m all about that soulful, satisfying food that feels like a high-five for your taste buds and doesn’t turn your kitchen into a war zone. Today, we’re ditching the oven and rolling up our sleeves for something magical, portable, and packed with wholesome goodness: Strawberry Matcha Energy Bites.
Let’s be real. Life moves fast. Between work, errands, chasing dreams (or maybe just the dog), we often reach for a snack that’s quick… but maybe not so kind to our energy levels. I wanted to create a little powerhouse of a treat that you can make in under 20 minutes, stash in the fridge, and grab whenever you need a boost. These bites are the perfect marriage of sweet, earthy, and vibrant. The sunny, berry sweetness of strawberry plays so nicely with the gentle, grassy notes of matcha. It’s a flavor combo that feels both indulgent and incredibly clean.
Think of these as your edible secret weapon. They’re perfect for that 3 PM slump, a pre-workout nibble, tossing in a lunchbox, or just when you want a little something sweet that won’t leave you crashing. They’re no-bake, meaning zero heat stress for you, and endlessly adaptable. So, tie on your favorite apron (or don’t—we’re keeping it casual), and let’s make some bite-sized joy together!
The Day Matcha Met Strawberry in My Kitchen
This recipe was born from a happy little accident, as the best kitchen stories often are. A few springs ago, I was determined to create a “green” energy bite for St. Patrick’s Day. I had my oats, my almond butter, my honey… and a brand-new tin of vibrant matcha powder. I mixed it all up, gave it a taste, and thought, “Hmm. This is very… healthy-tasting.” It needed a friend.
As I stood there pondering, my eyes landed on a bag of freeze-dried strawberries I’d bought for my morning cereal. On a whim, I crushed a handful and stirred them in. The color transformed from a solid earthy green to this beautiful, speckled pink-and-green confetti. The taste? Perfection. The strawberries’ bright, candy-like sweetness cut right through the matcha’s earthiness, creating a balance I hadn’t even known I was looking for. My “St. Paddy’s Day” bite instantly became an “Any Day” bite. It was a reminder that the best recipes aren’t always planned—sometimes, they’re discovered when you’re playful and willing to experiment with what you already have on hand.
What You’ll Need to Make These Berry-Matcha Powerhouses
Here’s the beautiful part: this is a pantry-friendly recipe. You probably have half of this stuff already! Let’s break it down.
- 1 cup rolled oats (old-fashioned oats): Our hearty, fiber-filled base. They give the bites structure and a lovely chewy texture. Chef’s Tip: Don’t use instant or quick-cook oats here—they’re too fine and can make the bites gummy. Rolled oats are the perfect sturdy choice.
- ½ cup almond butter: The glue that holds our dream team together! It adds healthy fats, protein, and a rich, nutty flavor. Swaps: Any nut or seed butter works. Try creamy peanut butter for a classic twist, or sunflower seed butter for a nut-free version.
- ¼ cup honey or maple syrup: Our natural sweetener and binder. Honey gives a floral note, while maple syrup keeps it vegan and adds a deeper, caramel-like flavor. Insight: If your nut butter is very runny, you can reduce this by a tablespoon. We want a moldable, slightly sticky dough, not soup!
- ¼ cup freeze-dried strawberries, crushed: The star of the show! Freeze-dried fruit packs an insane punch of pure, concentrated strawberry flavor without adding any moisture. Chef’s Must: Crush them with your hands or in a bag before measuring for even distribution. You can find these in the snack aisle or with the dried fruit.
- 1–2 tsp matcha powder: This is where the magic (and antioxidants) live! Matcha is finely ground green tea leaves. Pro Tip: Use culinary-grade matcha for baking and mixing—it’s more affordable than ceremonial grade and perfect for recipes. Start with 1 tsp for a subtle flavor, or go for 2 for a more pronounced, earthy matcha kick.
- 1 tsp vanilla extract: The flavor enhancer. It rounds out all the other ingredients and adds a warm, comforting background note. Always use pure vanilla if you can!
- A generous pinch of salt: Never skip this! Salt makes the sweet flavors pop and balances the nut butter beautifully. It’s the difference between “good” and “wow.”
Let’s Get Rolling: Your Foolproof Step-by-Step Guide
Ready? This is the easiest “cooking” you’ll do all week. We’re basically making edible playdough, and I’m here for it.
Step 1: The Big Mix. Grab a medium-sized mixing bowl. To it, add your almond butter, honey (or maple syrup), and vanilla extract. Stir, stir, stir with a sturdy spoon or spatula until it’s one smooth, gloriously shiny mixture. This is your glue base. No fancy mixer needed—just some good old-fashioned arm power.
Step 2: Welcome the Dry Crew. Now, dump in your rolled oats, matcha powder, crushed freeze-dried strawberries, and that all-important pinch of salt. Here’s my little hack: I like to stir the matcha into the dry oats first with a fork to break up any clumps before adding it to the wet mix. It ensures you don’t get a pocket of super-concentrated green powder.
Step 3: Bring It All Together. Now, fold everything together until every single oat is coated in that gorgeous green-and-pink-speckled mixture. It will look a bit crumbly at first, but keep mixing. The friction and pressure from stirring will help the oils in the nut butter bind everything. You’re looking for a dough that holds together when you pinch it between your fingers. If it seems too dry, add a tiny drizzle more of honey or nut butter. Too sticky? A tablespoon more oats will fix it.
Step 4: The Chill (Optional but Helpful). If your dough feels super soft or sticky from warm ingredients, pop the whole bowl in the fridge for about 10 minutes. This firms up the fats and makes rolling a cleaner, less sticky job. If your kitchen is cool and your dough feels manageable, you can skip right ahead!
Step 5: Roll, Roll, Roll Your Bites! Scoop out about a tablespoon of dough. I use a small cookie scoop for perfect uniformity, but a spoon works great. Roll it between your palms to form a smooth, round ball. If the dough is sticking to your hands, lightly dampen your palms with water or a tiny bit of oil. Place each finished bite on a plate or parchment-lined tray. Repeat until all the dough is transformed into little spheres of potential energy!
Step 6: Set & Store. For the best texture, let the bites firm up in the fridge for at least 30 minutes in an airtight container. This lets the oats soften slightly and the flavors really mingle. Then, they’re ready for snacking!
How to Serve & Savor Your Creation
The beauty of these bites is their grab-and-go nature, but let’s talk presentation because eating with your eyes is half the fun!
For a simple yet beautiful snack plate, pile a few energy bites in a small bowl or on a pretty plate. Sprinkle a little extra crushed freeze-dried strawberry or a dusting of matcha powder over the top for a “chef-y” touch. They look fantastic on a brunch or picnic spread alongside fresh fruit and a pot of tea.
My absolute favorite way to enjoy them? With a hot cup of jasmine green tea or a cold glass of oat milk. The flavors complement each other perfectly. For a next-level dessert, roll the finished bites in a coating like unsweetened shredded coconut, finely chopped nuts, or even a light roll in cocoa powder for a chocolate-strawberry-matcha situation (trust me, it works!).
Pack them in small reusable bags or containers for your purse, gym bag, or your kid’s backpack. They’re the perfect road trip companion or desk drawer savior.
Make It Your Own: 5 Delicious Twists to Try
Got the basic version down? Awesome! Now let’s play. This recipe is a blank canvas for your cravings.
- Chocolate-Dipped Delight: Melt ½ cup of dark chocolate chips with a teaspoon of coconut oil. Dip half of each chilled energy bite into the chocolate, let the excess drip off, and place on parchment paper. Sprinkle with sea salt and let set in the fridge. Decadence, achieved.
- Tropical Vacation Bite: Swap the freeze-dried strawberries for freeze-dried pineapple or mango. Use coconut butter instead of almond butter, and roll the finished bites in unsweetened shredded coconut. Instant island vibes.
- Protein Power-Up: Stir 2-3 tablespoons of your favorite vanilla or unflavored protein powder into the dry ingredients. You may need to add an extra teaspoon or two of honey or a splash of milk if the dough gets too dry. Perfect for post-workout recovery.
- Nut-Free & Seedy: Use sunflower seed butter or tahini (for a more earthy flavor) instead of almond butter. Make sure your oats are certified gluten-free if needed. A perfect safe option for lunchboxes.
- “Cheesecake” Berry Bite: Reduce the matcha to ½ teaspoon for just a hint of color. Add 2 tablespoons of cream cheese (softened) to the wet ingredients and use freeze-dried raspberries instead of strawberries. So creamy and tangy!
A Few Notes from My Kitchen to Yours
Over the years, this recipe has become a Feastical staple, and I’ve learned a thing or two. First, the quality of your matcha does matter for flavor. A stale or low-quality powder can taste bitter. Find a bright green, fragrant culinary grade you love. Second, these bites are forgiving! I once accidentally used chunky peanut butter and whole freeze-dried berries I forgot to crush. The texture was wild, but they were still delicious. The goal is fuel and flavor, not perfection.
This recipe also scales like a dream. Double it for a party or a big batch to freeze. I love seeing your twists, so if you invent a new variation, tag me on social—I might just feature your brilliant idea!
Your Questions, Answered!
Q: My dough is too crumbly and won’t hold a ball shape. Help!
A: No worries! This usually means the mixture is a bit too dry. Add more binding agent. Mix in an extra tablespoon of nut butter or honey/maple syrup, one at a time, until it comes together. The warmth of your hands as you mix and roll can also help melt the fats and bind it.
Q: Can I use fresh strawberries instead of freeze-dried?
A: I don’t recommend it for this no-bake recipe. Fresh fruit adds too much water, which will make the oats soggy and prevent the bites from holding their shape. Freeze-dried fruit gives that intense strawberry flavor without the moisture. It’s key for the right texture!
Q: How long do these last, and can I freeze them?
A: They keep beautifully! Store them in an airtight container in the fridge for up to 2 weeks. For longer storage, freeze them in a single layer on a tray, then transfer to a freezer bag for up to 3 months. Let them thaw for a few minutes at room temperature before eating—they’re like a little frozen treat!
Q: Is the matcha taste very strong?
A: It’s beautifully balanced. Starting with 1 teaspoon gives a lovely, subtle earthy background that pairs with the strawberry. If you’re a matcha lover, go for 2 teaspoons for a more prominent flavor. You’re in control!

Strawberry Matcha Energy Bites : No-Bake, Nutritious & Perfect for Snacking
Description
Strawberry Matcha Energy Bites
A no-bake, portable, and wholesome snack that combines earthy matcha, sweet strawberry, and the satisfying chew of oats. Perfect for a quick pick-me-up, lunchbox treat, or pre-workout fuel.
Ingredients
Base:
-
1 cup old-fashioned rolled oats
-
½ cup almond butter (or nut/seed butter of choice)
-
¼ cup honey or maple syrup
-
¼ cup freeze-dried strawberries, crushed
-
1–2 tsp matcha powder (culinary grade)
-
1 tsp vanilla extract
-
Pinch of salt
Optional Coatings & Variations:
-
Unsweetened shredded coconut
-
Finely chopped nuts
-
Cocoa powder
-
Dark chocolate drizzle
Instructions
-
Mix the Wet Ingredients:
-
In a medium bowl, stir together almond butter, honey (or maple syrup), and vanilla extract until smooth and shiny.
-
-
Combine the Dry Ingredients:
-
In a separate bowl, toss rolled oats, matcha powder, crushed freeze-dried strawberries, and salt. (Tip: Mix matcha with oats first to prevent clumps.)
-
-
Bring It Together:
-
Fold the dry ingredients into the wet mixture. The dough should be slightly crumbly but stick together when pinched.
-
Adjust texture: add more nut butter or honey if too dry, more oats if too sticky.
-
-
Chill (Optional):
-
Refrigerate dough for 10 minutes if it feels soft or sticky for easier rolling.
-
-
Roll the Bites:
-
Scoop about 1 tbsp of dough and roll into a ball. Use damp hands if needed.
-
Place on a parchment-lined tray and repeat until all dough is used.
-
-
Set & Store:
-
Chill in an airtight container for at least 30 minutes before eating.
-
Store in the fridge for up to 2 weeks or freeze for up to 3 months.
-
Notes
-
Crumbly Dough: Add more honey or nut butter to bind.
-
Fresh Strawberries? Not recommended—freeze-dried works best.
-
Matcha Flavor: Start with 1 tsp for subtle flavor; 2 tsp for earthy punch.
-
Make Ahead: Store in fridge or freeze; thaw before eating for best texture.
A Quick Look at the Good Stuff Inside
Now, I’m not a nutritionist, but I love knowing what’s fueling my body. These bites are a snack, not a meal replacement, but they’re packed with wholesome ingredients. Here’s a rough estimate per bite (assuming the recipe makes 12):
- Calories: ~110
- Protein: 3g (Thanks, oats & nut butter!)
- Carbohydrates: 11g
- Dietary Fiber: 2g (Keeping things moving!)
- Sugars: 5g (Primarily from natural honey and fruit)
- Healthy Fats: 6g (The satisfying, slow-burning kind)
They’re a fantastic source of antioxidants from both the matcha and strawberries, and the combo of fiber, healthy fats, and complex carbs makes them a sustained energy source, not a sugar spike. Always remember, exact numbers can vary based on your specific brands and measurements.
Final Thoughts Before You Dig In
And there you have it, my friend—your ticket to easy, delicious, feel-good snacking. These Strawberry Matcha Energy Bites are more than just a recipe; they’re a reminder that taking care of yourself can be simple, colorful, and downright tasty.
I hope you love making (and eating!) them as much as I do. Remember, the kitchen is your playground. Don’t stress over exact measurements or perfect roundness. What matters is the joy of making something with your own hands that makes your body and taste buds happy.
If this recipe brought a little spark of joy to your day, I’d be so grateful if you shared it with a friend or over on your social channels. Tag @Feastical so I can cheer you on! Now, go enjoy those bites. You’ve earned them.
With love and a full jar of snacks,
Beau
Love this recipe? Save it for later!

Strawberry “Sushi” Rolls : Fun, Kid-Friendly Snack with a Sweet Twist
Strawberry “Sushi” Rolls: The Playful Snack That’s Stealing the Show
Hey there, friend! Beau here, from Feastical. Pull up a chair and let’s talk about one of my favorite things in the whole world: food that makes you smile. I’m not just talking about taste (although that’s huge), I’m talking about food that’s flat-out fun. The kind of creation that makes kids’ eyes go wide with wonder and brings a silly, happy grin to your own face. That’s the magic we’re cooking up today with these utterly delightful Strawberry “Sushi” Rolls.
Forget the raw fish and wasabi—we’re taking all the playful artistry of sushi and giving it a sweet, sunshiny twist. Imagine tender, lightly sweetened rice and juicy bites of fresh strawberry, all wrapped up in a colorful fruit leather “nori” and sliced into perfect, adorable little rounds. And because every great sushi experience needs a dipping sauce, we’re whipping up a side of chocolate “soy sauce” that’s pure genius. It’s a no-bake, no-fuss recipe that comes together in about 15 minutes, but the joy it brings lasts all day.
Whether you’re looking for a clever lunchbox surprise, a show-stopping treat for a birthday party, or just a way to turn a regular Tuesday afternoon into something special, you’ve found your recipe. This is more than a snack; it’s a tiny, edible adventure. So, grab your favorite little helpers (or enjoy some peaceful solo kitchen time—I won’t judge!), and let’s roll up something seriously fun.
The Little Kitchen Helper & The “Aha!” Moment
This recipe was born from a classic Collier family scenario: a rainy afternoon, a four-year-old with boundless energy (my nephew, Leo), and a desperate need for a project that didn’t involve crayons on the walls. We were puttering in the kitchen, and Leo was utterly fascinated by the sushi rolls I was making for dinner, intently watching me spread the rice and roll it all up. “Uncle Beau, can I make one?” he asked, with those big, hopeful eyes.
I looked at the raw salmon and thought, “Nope, not today.” But the spark was there. I saw his fascination with the process—the spreading, the filling, the rolling. So, we pivoted. I quickly cooked a tiny pot of rice, stirred in a little sugar and vanilla, grabbed some strawberries from the fridge, and found a pack of fruit leather tucked in the pantry. We created our own sweet, silly version of “sushi,” and when we sliced that first roll and he dipped it in chocolate syrup, his triumphant “WOAH!” said it all. It was a hit. He felt like a master chef, and I had stumbled onto one of the most joyful, simple recipes in my arsenal. It reminded me that the best food memories often come from playful improvisation and sharing the process with someone you love.
Gathering Your Sweet Sushi Supplies
Here’s the beautiful part: you only need a handful of simple, happy ingredients. Let’s break them down.
- 1 cup cooked sushi rice (seasoned with a little sugar and vanilla): The heart of our “sushi”! Short-grain sushi rice is perfect because it gets nice and sticky, helping our rolls hold their shape. Chef’s Insight: After cooking, while it’s still warm, gently fold in a teaspoon of sugar and a 1/4 teaspoon of vanilla extract. This gives it that subtle dessert-like sweetness. No sushi rice? Short-grain Arborio (risotto rice) works in a pinch!
- 1/2 cup chopped fresh strawberries: The juicy, ruby-red star. Hull and chop them into small, pea-sized pieces so they distribute evenly and make rolling easier. For peak flavor, use the reddest, ripest berries you can find.
- 2–3 fruit leather strips (for wrapping): This is our colorful, chewy substitute for seaweed (nori). Any flavor works—strawberry, mixed berry, even tropical. Substitution Tip: In a real pinch, you can use a large, soft fruit roll-up, but fruit leather tends to be sturdier and less sticky to handle.
- Optional: shredded coconut for texture: A light sprinkle adds a lovely, tropical flair and a tiny bit of extra texture. Toasting it first brings out a wonderful nutty flavor!
For the Chocolate “Soy Sauce” Dip:
- 2 tablespoons chocolate syrup: The savory soy sauce stand-in! Use your favorite brand. Chef’s Hack: For a richer, darker “sauce,” try using a tablespoon of melted chocolate chips thinned with a tiny bit of coconut oil.
- 1 teaspoon milk or water (to thin, if needed): Just a splash to get it to the perfect dippable consistency. Almond milk or oat milk work great for a dairy-free version.
Let’s Roll! Your Step-by-Step Guide to Sweet Sushi Success
Ready to play with your food? Follow these steps for perfect little rolls every single time.
- Prep Your Rice & Berries: First, make sure your sweetened rice has cooled down to just barely warm or room temperature. Hot rice will melt the fruit leather and make a sticky mess. While it cools, chop your strawberries. Grab a sheet of parchment paper—this will be your rolling helper and keep your hands clean.
- Assemble Your Sushi Mat (Sort Of): Lay one strip of fruit leather flat on your parchment paper. If your strips are small, you can slightly overlap two to create a wider sheet. The parchment should be bigger than your fruit leather.
- Spread the Rice: Take about 1/3 to 1/2 cup of your cooled rice and place it in the center of the fruit leather. With slightly damp fingers (this is KEY to prevent sticking!), gently press and spread the rice into a thin, even layer, leaving about a 1-inch border at the top and bottom. Don’t press too hard—we want a fluffy layer, not a dense paste.
- Add the Strawberries (& Coconut!): Sprinkle a generous line of your chopped strawberries horizontally across the center of the rice. If you’re using coconut, sprinkle a little over the strawberries now. The goal is a colorful, filled line down the middle.
- The Roll-Up: Here’s the fun part! Using the parchment paper underneath to guide you, start lifting the edge of the fruit leather closest to you. Gently fold it over the strawberry filling, tucking it in snugly. Now, continue rolling forward, using the parchment to pull and tighten as you go, just like rolling a sleeping bag. You’ll end up with a neat, compact log wrapped in parchment.
- Slice with Confidence: Unwrap your beautiful log. Get a sharp knife and run the blade under cool water (the damp knife trick prevents sticking!). Gently slice the log into 1-inch pieces. If the ends are a little messy, those are the chef’s treats—pop them in your mouth for quality control!
- Whip Up the Dip: In a small bowl or adorable ramekin, stir together the chocolate syrup and a splash of milk or water until smooth. Aim for the consistency of, well, soy sauce! Add liquid a few drops at a time.
How to Serve These Adorable Bites
Presentation is half the fun with this recipe! For the full “sushi bar” experience, arrange the sliced rolls on a clean wooden board or a white platter. Place the little bowl of chocolate “soy sauce” right in the center. You can even add small piles of extra shredded coconut or tiny strawberry pieces as “garnish” on the side. For kids, I love serving them on a partitioned plate with the dip in one section and the rolls in another. It’s a guaranteed smile-maker at snack time, a brilliant addition to a party platter (next to the pigs-in-a-blanket, of course), or a sweet surprise peeking out of a lunchbox. Serve immediately for the best texture, or cover and chill for up to 3-4 hours before serving.
Mix It Up! Fun Flavor Twists & Swaps
The beauty of this concept is how easily you can adapt it. Don’t be afraid to get creative!
- Tropical Dream: Swap strawberries for diced mango or pineapple. Use a tropical-flavored fruit leather (mango or pineapple), and roll the outside of the log in toasted coconut for a piña colada vibe.
- Peanut Butter & Jelly Roll: After spreading the rice, add a very thin smear of creamy peanut butter or almond butter, then a line of strawberry pieces or even a few whole blueberries. This adds protein and tastes like a childhood classic.
- “Green” Dragon Roll: For a fun color twist, use kiwi slices instead of strawberries! The green looks amazing against the rice and fruit leather.
- Vibrant Vegan: This recipe is naturally nearly vegan! Just ensure your sugar is vegan-friendly (some refined white sugar uses bone char) and use water or plant-based milk in the chocolate dip.
- Nut-Free & Seed Twist: For a nut-free PB&J version, use sunflower seed butter. You can also sprinkle chia seeds or hemp hearts into the rice for a nutrient boost.
A Few Chef’s Notes From My Kitchen to Yours
Over the years, this recipe has seen some funny iterations. Once, I tried using mashed banana in the filling—delicious, but it made the rolls extremely soft and harder to slice (great for a parfait-style deconstruction, though!). I’ve learned that the damp-hands trick is non-negotiable, and that letting the rolled log sit for 5 minutes in the parchment before slicing helps it firm up just enough. The biggest evolution? The dip. We started with just plain syrup, then moved to syrup with a pinch of salt (sublime!), and sometimes I even mix in a tiny bit of orange zest for a chocolate-orange vibe. The recipe is your playground—make it your own!
Your Questions, Answered
- Q: My rice is super sticky and messy to spread. Help!
A: Make sure your hands are lightly damp with cold water. This creates a barrier. Also, ensure the rice is cool enough to handle. If it’s still hot, it will be extra sticky. - Q: Can I make these ahead of time?
A: You can! Assemble the rolls and slice them, then store them in a single layer in an airtight container in the fridge for 3-4 hours. The fruit leather may soften slightly, but they’ll still be delicious. I’d make the dip fresh, though. - Q: My fruit leather ripped while rolling. What did I do wrong?
A: You might have spread the rice too thick or the fruit leather was very dry. Try a slightly thinner rice layer, and if your fruit leather feels brittle, let it sit out of the package for 10 minutes to soften up a bit before using. - Q: What can I use instead of sushi rice?
A: Short-grain white rice or even cooked, cooled quinoa will work. They won’t be as sticky, so your rolls might be a bit more delicate, but the flavor will still be great.

Strawberry “Sushi” Rolls : Fun, Kid-Friendly Snack with a Sweet Twist
Description
Strawberry “Sushi” Rolls
A playful, sweet twist on sushi—sticky rice, fresh strawberries, chewy fruit leather, and a chocolate “soy sauce” dip. Perfect for kids, parties, or a joyful snack!
Ingredients
Sweet Sushi Rolls:
-
1 cup cooked short-grain sushi rice (cooled to room temp, lightly sweetened with 1 tsp sugar + ¼ tsp vanilla)
-
½ cup chopped fresh strawberries
-
2–3 fruit leather strips (strawberry, mixed berry, or tropical)
-
Optional: shredded coconut for texture
Chocolate “Soy Sauce” Dip:
-
2 tbsp chocolate syrup
-
1 tsp milk or water (or plant-based milk)
Instructions
-
Prep Rice & Berries:
-
Cook and season rice with sugar and vanilla. Let it cool slightly.
-
Chop strawberries into small, pea-sized pieces.
-
-
Assemble Your Roll:
-
Lay a strip of fruit leather on parchment paper. Slightly overlap strips if needed to make a wider sheet.
-
With damp fingers, spread ⅓–½ cup of rice evenly on the fruit leather, leaving ~1-inch border at top and bottom.
-
-
Add Filling:
-
Sprinkle chopped strawberries along the center of the rice.
-
Optional: sprinkle shredded coconut over the strawberries.
-
-
Roll It Up:
-
Using the parchment paper as a guide, fold the edge closest to you over the filling.
-
Roll forward, keeping the log tight and neat.
-
-
Slice the Rolls:
-
Wet a sharp knife under cool water. Slice log into 1-inch pieces.
-
Pop the ends into your mouth—they’re the chef’s treats!
-
-
Make the Chocolate Dip:
-
Mix chocolate syrup with milk/water until smooth and dippable. Adjust consistency as needed.
-
Notes
-
Sticky Rice: Use damp fingers to spread rice; ensure rice is cool to prevent sticking.
-
Fruit Leather Cracks: If brittle, let sit 10 minutes outside packaging before rolling.
-
Make Ahead: Assemble and slice rolls up to 3–4 hours ahead; make dip fresh.
-
Rice Substitutes: Short-grain white rice or cooled quinoa works if sushi rice isn’t available.
A Quick Peek at the Nutrition
(Approximate, per serving of 4 pieces with dip)
Let’s keep it real: this is a treat, and it’s meant to be enjoyed as such! It’s a fun way to get a serving of fruit into your day (or your kid’s day) and uses simple ingredients. The strawberries provide a dose of vitamin C and fiber, and using real fruit leather (check the label for ones with simple ingredients) is a better choice than many processed snacks. The chocolate dip is a small, controlled amount of sweetness for dipping. It’s a snack you can feel good about sharing, knowing it’s sparking joy and creativity alongside its sweet flavor.
The Joy is in the Making (and the Eating!)
And there you have it, my friend—your ticket to the most fun 15 minutes you’ll spend in the kitchen this week. These Strawberry “Sushi” Rolls prove that you don’t need fancy techniques or hours of time to create something truly special. All you need is a playful spirit, a few simple ingredients, and maybe a tiny sous-chef or two.
At Feastical, we believe food is connection. It’s memory. It’s a rainy afternoon turned into a core childhood memory for my nephew Leo. I hope this recipe brings that same spark of connection and playful joy to your table. So go on, give it a roll. And when you do, I’d love to see your creations! Tag me over on the Feastical social channels.
Until next time, keep your spatula close and your sense of adventure closer. Happy cooking!
— Beau

Strawberry Stuffed French Toast Roll-Ups : Fun, Sweet & Brunch-Perfect
Strawberry Stuffed French Toast Roll-Ups: Your New Brunch BFF
Let’s Make Brunch a Party!
Hey friend, Beau here! Grab your favorite mug of coffee and pull up a chair. I want to talk about one of life’s simple, perfect pleasures: a lazy weekend brunch. You know the feeling. The sun is streaming in, there’s no rush to be anywhere, and your biggest decision is whether to go sweet or savory. Well, I’m here to tell you that with these Strawberry Stuffed French Toast Roll-Ups, you don’t have to choose. You get the best of both worlds, wrapped up in one adorable, dippable, absolutely irresistible package.
These aren’t just French toast. Oh no. This is French toast that decided to put on a fancy coat, get a fun new shape, and throw a flavor party in your mouth. We’re taking soft bread, stuffing it with a luscious sweet cream cheese and fresh strawberry filling, giving it a quick swim in a custardy bath, and pan-frying it to golden-brown perfection. And then—because we believe in joy around here—we’re rolling it in a hug of cinnamon sugar while it’s still warm. The result? A handheld bite of pure happiness that’s crispy on the outside, creamy and fruity on the inside, and guaranteed to bring smiles to the table.
Whether you’re cooking for a houseful of hungry kids, impressing your friends at a girls’ brunch, or just treating yourself to something special, this recipe is your ticket to hero status. It’s easy, fun, and feels way fancier than the 20 minutes of active time it asks for. So, let’s ditch the boring breakfast routine and make something that tastes like a celebration. Your spatula and I are ready when you are!
A Berry Sweet Memory
This recipe always takes me straight back to my Grandma Lou’s kitchen in late spring. She had this wild, slightly overgrown strawberry patch in her backyard. To her, it was a nuisance; to my brother and me, it was a treasure trove. We’d be sent out with little baskets, coming back with stained fingers, sun-kissed necks, and maybe three strawberries for the bowl and ten for our mouths.
She’d shake her head, laugh that deep, rumbly laugh of hers, and set to work. Her version was simpler—just thick slices of challah dipped in egg and fried in a skillet older than my dad—but she always served it with a bowl of those macerated, sun-warmed berries on the side. The juice would bleed into the toast, and it was pure magic. These roll-ups are my homage to that memory. They capture that same juicy-berry, custardy-bread essence but in a fun, shareable form. It’s my way of saying that the best recipes aren’t just about flavor; they’re about the stories and the people we make them with. Every time I dice a strawberry for these, I’m right back in that sunny kitchen with her.
What You’ll Need: Simple Stars of the Show
Here’s the beautiful part: the ingredient list is short, sweet, and probably already in your kitchen. Let’s break it down so you know exactly why each player is on the team.
- 6 slices sandwich bread – White, wheat, or brioche work great. The key is a soft, fresh loaf that will roll without cracking. Pro-tip: Slightly stale bread (day-old) actually absorbs the egg mixture better without getting soggy!
- 4 oz (about ½ cup) cream cheese, softened – This is our creamy glue and flavor base. Leave it on the counter for 30 minutes before you start. For a lighter twist, try Neufchâtel. For a dairy-free version, a thick coconut cream or vegan cream cheese works beautifully.
- ½ cup diced fresh strawberries – Fresh is best here for that bright, juicy pop! Dice them small so they roll easily. In a pinch, well-drained frozen thawed strawberries will do, but fresh brings the sunshine.
- 2 large eggs – The backbone of our “custard” dip. They create that classic French toast coating and help the roll-ups get gorgeous and golden.
- ¼ cup milk – Any kind you have! Whole milk makes it extra rich, but almond, oat, or soy milk are perfect for dietary swaps. It just lightens up the egg mixture.
- ¼ cup granulated sugar + 1 tsp ground cinnamon – This dynamic duo creates the magical crackly crust. Mix them in a shallow bowl wide enough to roll your creations in. Feel free to add a pinch of nutmeg or cardamom for extra warmth.
- Butter for the pan – Not oil, my friend. Butter gives that irresistible flavor and perfect golden-brown sear. For a dairy-free cook, a good vegan butter or even coconut oil is a great stand-in.
Let’s Get Rolling: Your Foolproof Guide
Okay, team! Let’s transform these simple ingredients into brunch legends. Follow these steps, lean into the little hacks I’ve learned (often the hard way!), and you’ll have perfect roll-ups every single time.
- Prep the Bread: First, gently cut the crusts off your bread slices. Don’t toss them! Save them for breadcrumbs or to feed the birds. Now, take a rolling pin (or a sturdy glass, a wine bottle, whatever works) and firmly but gently roll over each slice. We want to flatten it to about ¼-inch thickness. This makes it pliable and prevents cracking when you roll. Chef’s Hack: If a slice does tear a little, don’t panic. A little extra cream cheese acts as a delicious “spackle” to seal it up.
- Create the Filling & Roll: In a small bowl, give your softened cream cheese a quick stir to make it spreadable. Lay out your flattened bread slices. Spread a thin, even layer of cream cheese over each one, leaving a tiny border at the top edge. Sprinkle a generous pinch of diced strawberries down the center. Now, starting from the bottom, roll it up as tightly as you can, like a little sushi roll. The cream cheese will seal the edge. Place it seam-side down on a plate. Repeat with all slices! Chef’s Tip: Don’t overstuff! About a tablespoon of filling total per roll-up is perfect. Too much and it’ll ooze out during cooking.
- The Custard Bath: In a shallow dish (a pie plate is perfect), vigorously whisk the eggs and milk together until completely smooth and homogenous. You want no streaks of egg white. This is your golden dunking pool. Chef’s Insight: A tiny splash of vanilla extract or a pinch of salt in this mixture is a secret flavor booster!
- Dip & Pan-Fry: Heat a large non-stick or cast-iron skillet over medium heat. Add a good knob of butter (about ½ tablespoon) and let it melt and get slightly foamy. Working with a few roll-ups at a time, quickly dip each one into the egg mixture, rolling it to coat all sides. Let any excess drip off, then place it seam-side down in the hot skillet. Don’t crowd the pan! Cook for 1-2 minutes per side, using tongs to carefully turn them, until all sides are a deep, golden brown. Add more butter to the pan as needed between batches. Chef’s Hack: The seam side down first helps seal it shut. And keep that heat at a steady medium—too hot and the sugar burns, too low and they get soggy.
- The Cinnamon Sugar Hug: While your roll-ups are still hot from the skillet, roll them gently in the bowl of cinnamon sugar. Coat them evenly on all sides. The residual heat and butter will help the sugar stick, creating that delightful, slightly crackly, sweet crust. This step is non-negotiable for maximum joy.
How to Serve ‘Em Up in Style
Presentation is part of the fun! You can serve these beauties straight from the cinnamon sugar bowl onto a platter, but let’s get creative.
For a family-style feast, pile them high on a big plate or wooden board. Drizzle them with a little extra strawberry sauce (just simmer some diced berries with a spoonful of sugar and a splash of water or lemon juice until saucy) or a generous swirl of maple syrup. A dollop of whipped cream on the side never hurt anybody.
For individual plates, I love serving 2-3 roll-ups per person with a little ramekin of warm syrup for dipping. Sprinkle a few extra fresh strawberry slices and a dusting of powdered sugar over the top. It looks like you ordered it from the fanciest brunch spot in town.
And don’t forget the balance! These are rich and sweet, so a side of crispy bacon, savory breakfast sausages, or even a simple fresh fruit salad makes the perfect companion. For drinks, strong coffee, a frothy cappuccino, or a mimosa are the ideal cheering squad.
Mix It Up! Fun Flavor Twists
The basic formula here is your canvas. Once you’ve mastered the classic strawberry, the world is your brunch oyster. Here are a few of my favorite spins:
- Mixed Berry Bliss: Swap the strawberries for a mix of blueberries, raspberries, and blackberries. The flavor is complex and gorgeous.
- Apple Pie Roll-Ups: Sauté finely diced apples with a bit of butter, brown sugar, and cinnamon until soft. Let cool, then use this instead of the strawberries. Taste like fall in every bite.
- Chocolate-Hazelnut Dream: Use chocolate-hazelnut spread (like Nutella) as your filling, either alone or swirled with the cream cheese. Skip the fruit. Roll in cinnamon sugar or just powdered sugar. It’s dessert for breakfast, and I’m here for it.
- Savory Spin: Go savory! Fill with a mix of shredded cheddar cheese and finely chopped ham or cooked bacon. Omit the cinnamon sugar. After frying, you can roll them in everything bagel seasoning or just serve with a side of sour cream or ketchup for dipping.
- Dairy-Free/Vegan: Use your favorite plant-based cream cheese and milk. For the egg wash, a “flax egg” (1 tbsp ground flax + 2.5 tbsp water per egg, let sit 5 mins) works surprisingly well for binding and browning. Use vegan butter or coconut oil for frying.
Beau’s Kitchen Notebook
This recipe has seen some things in my kitchen! The first time I made them, I was so excited I forgot to flatten the bread. Let’s just say I had some very “stuffed” and very “exploded” French toast logs. Lesson learned! The rolling pin is your friend.
Over time, I’ve also learned these are an incredible make-ahead hack for busy mornings. You can assemble the roll-ups (through step 2) the night before, place them on a tray, cover tightly, and refrigerate. In the morning, just dip, fry, and sugar. It cuts the morning chaos in half.
Most importantly, this recipe is meant to be forgiving and fun. If the filling oozes a bit, it’s delicious caramelized bits in the pan. If they’re not perfectly cylindrical, they’re perfectly homemade. The goal is delicious food and a happy cook, not Instagram-perfect stress. Now go make some memories (and maybe a little mess).
Your Questions, Answered!
Q: My bread keeps cracking when I roll it. Help!
A: This usually means the bread isn’t flattened enough or it’s too dry/fresh. Roll harder with that pin! If it’s very fresh, letting the flattened slices sit for 5 minutes can dry them out just enough to be more flexible. A tiny tear is fine—the cream cheese seals it.
Q: Can I bake these instead of pan-frying?
A: You can! For a slightly healthier version, arrange the dipped roll-ups on a parchment-lined baking sheet, spray lightly with cooking spray, and bake at 400°F (200°C) for 12-15 minutes, turning halfway, until golden. Then roll in sugar. They won’t be *quite* as crispy but are still delicious.
Q: The filling keeps leaking out while cooking. What am I doing wrong?
A: Two likely culprits: 1) Overfilling. Less is more! A thin smear of cream cheese and a sprinkle of berries is plenty. 2) The pan wasn’t hot enough when you added the roll-ups. A properly hot pan will set the exterior almost immediately, sealing the filling inside.
Q: How do I keep them warm for a crowd?
A: As you finish batches, place them on a wire rack set over a baking sheet and keep them in a warm oven (about 200°F/95°C). Don’t cover them or stack them, or they’ll lose their crispiness. Do the cinnamon sugar coating right before serving.

Strawberry Stuffed French Toast Roll-Ups : Fun, Sweet & Brunch-Perfect
Description
Strawberry Stuffed French Toast Roll-Ups
Soft bread, luscious cream cheese, fresh strawberries, a golden custard bath, and a cinnamon sugar hug—handheld brunch perfection!
Ingredients
Roll-Ups:
-
6 slices sandwich bread (white, wheat, or brioche)
-
4 oz (½ cup) cream cheese, softened
-
½ cup diced fresh strawberries
Custard Dip:
-
2 large eggs
-
¼ cup milk (dairy or plant-based)
Cinnamon Sugar Coating:
-
¼ cup granulated sugar
-
1 tsp ground cinnamon
For Frying:
-
Butter or vegan butter/coconut oil
Instructions
-
Prep the Bread:
-
Cut off the crusts and roll each slice flat with a rolling pin or sturdy glass to about ¼-inch thick.
-
-
Make the Filling & Roll:
-
Spread a thin layer of cream cheese over each flattened bread slice, leaving a small border at the top.
-
Sprinkle diced strawberries down the center.
-
Roll from the bottom, tucking the seam underneath. Use a little cream cheese to seal if needed.
-
-
Make the Custard:
-
Whisk eggs and milk together until smooth. Optional: add a splash of vanilla or pinch of salt for extra flavor.
-
-
Pan-Fry Roll-Ups:
-
Heat a skillet over medium heat with butter.
-
Dip each roll-up in the custard to coat, let excess drip off, then place seam-side down in the pan.
-
Cook 1–2 minutes per side until golden brown. Repeat with remaining roll-ups, adding more butter as needed.
-
-
Cinnamon Sugar Hug:
-
While still warm, roll the French toast in the cinnamon sugar mixture until fully coated.
-
-
Serve:
-
Serve 2–3 roll-ups per person with maple syrup, extra strawberry sauce, whipped cream, or fresh berries.
-
Notes
-
Bread Flexibility: Flatten bread well; let it sit 5 minutes if very fresh. Tiny tears are fine—seal with cream cheese.
-
Overfilling Alert: Use about 1 tbsp filling per roll-up to prevent leaks.
-
Pan Temperature: Medium heat is key; too hot burns sugar, too low makes soggy rolls.
-
Make Ahead: Assemble roll-ups through step 2 and refrigerate overnight; dip, fry, and sugar in the morning.
-
Keep Warm: Place cooked roll-ups on a wire rack in a 200°F oven until serving.
Nutritional Info (A Peek Under the Hood)
Please note: This is an approximate estimate for 1 roll-up, calculated using standard ingredients. Values will vary based on specific brands, bread used, and exact amounts of filling and butter.
Per Roll-Up (approx.):
Calories: ~140 | Total Fat: 7g | Saturated Fat: 4g | Cholesterol: 50mg | Sodium: 150mg | Total Carbohydrates: 16g | Dietary Fiber: 1g | Sugars: 7g | Protein: 4g
This is a treat, through and through—a delightful balance of carbs for energy, protein and fat from the eggs and cream cheese to help keep you satisfied, and of course, that sweet strawberry joy. To lighten it up, use whole wheat bread, light cream cheese, and a sugar substitute in the cinnamon mix. Remember, food is about nourishment AND joy, and this recipe is packed with both.
Final Thoughts: Strawberry Stuffed French Toast Roll-Ups—Your New Brunch BFF
Let’s Make Brunch a Party!
Hey friend, Beau here! Grab your favorite mug of coffee and pull up a chair. I want to talk about one of life’s simple, perfect pleasures: a lazy weekend brunch. You know the feeling. The sun is streaming in, there’s no rush to be anywhere, and your biggest decision is whether to go sweet or savory. Well, I’m here to tell you that with these Strawberry Stuffed French Toast Roll-Ups, you don’t have to choose. You get the best of both worlds, wrapped up in one adorable, dippable, absolutely irresistible package.
These aren’t just French toast. Oh no. This is French toast that decided to put on a fancy coat, get a fun new shape, and throw a flavor party in your mouth. We’re taking soft bread, stuffing it with a luscious sweet cream cheese and fresh strawberry filling, giving it a quick swim in a custardy bath, and pan-frying it to golden-brown perfection. And then—because we believe in joy around here—we’re rolling it in a hug of cinnamon sugar while it’s still warm. The result? A handheld bite of pure happiness that’s crispy on the outside, creamy and fruity on the inside, and guaranteed to bring smiles to the table.

Strawberry Cloud Milk : Korean-Inspired Whipped Drink with Dreamy Aesthetic
Strawberry Cloud Milk: The Korean-Inspired Whipped Drink That’s Pure Joy in a Glass
The Day I Fell for a Pink Cloud
Hey there, friend! Beau here. Let me ask you something: have you ever scrolled through social media, seen a drink so gorgeous it stopped your thumb mid-swipe, and thought, “I could never make that”? I’ve been there. The layers, the colors, the perfect cloud of cream on top—it all looks like it requires a barista degree and a magic wand.
Well, I’m here to tell you a delicious secret: you absolutely can. And it’s easier than finding your missing spatula on a chaotic Tuesday night. Today, we’re diving headfirst into the world of Strawberry Cloud Milk. This isn’t just a drink; it’s a mood. It’s the edible equivalent of a pastel sunset, a sip of pure, unadulterated cafécore vibes you can create right in your own kitchen.
Inspired by the stunning, aesthetic drinks popping up in Korean cafes and all over TikTok, this Strawberry Cloud Milk is my homemade take on that viral magic. We’re talking sweet, fresh strawberry puree, creamy cold milk, and a fluffy, dreamy cloud of whipped cream that lives up to its name. It’s sweet but not cloying, beautiful but not fussy, and the perfect project for when you want to treat yourself (or impress your friends) with something that looks like a million bucks but costs pennies to make.
So, if you’re ready to bring a little whimsy into your day, grab your favorite glass. We’re about to whip up some joy, one pink, cloud-topped sip at a time.
A Seoul-Full Discovery & A Kitchen Revolution
My love affair with this style of drink started on a trip to Seoul a few years back. Wandering the vibrant, neon-lit streets, I’d duck into tiny, impossibly cool cafes to escape the buzz. Every single one was a masterclass in aesthetic—minimalist decor, soft music, and drinks that looked like works of modern art.
I’ll never forget the first time I ordered a “Strawberry Milk.” It arrived not as a simple pink glass, but as a spectacle. The deep red strawberry syrup swirled at the bottom like lava, the milk formed a distinct, creamy layer in the middle, and on top sat this impossibly tall, airy mound of whipped cream, dusted with something pink. It was almost too pretty to drink. (Keyword: almost. I demolished it.)
That moment stuck with me. It wasn’t just about flavor—it was about experience. It was the care, the presentation, the simple act of turning a basic combination into something that sparked genuine delight. Back home in my own kitchen, that memory became my mission. How could I recreate that feeling of discovery and beauty with what I had on hand? This Strawberry Cloud Milk recipe is the happy, bubbly answer. It’s my little homage to those Seoul cafes, blended with my own belief that feel-good food should always be within reach, no passport required.
Gathering Your Cloud-Making Supplies
Here’s the beautiful part: this stunning drink requires just a handful of simple ingredients. This is where quality and a few chef secrets make all the difference. Let’s break it down.
- 1/2 cup fresh strawberries, hulled and chopped – The heart of the drink! Fresh, ripe berries give the brightest, most authentic flavor. If they’re a little tart, that’s perfect—we’ll sweeten them up. Chef’s Insight: In a pinch, frozen and thawed strawberries work beautifully and often have more intense syrup.
- 1–2 teaspoons granulated sugar or honey – This is to macerate the berries and draw out their natural juices, creating our quick “syrup.” Start with 1 tsp and add more if your berries are very tart. Substitution Tip: Maple syrup, agave, or a zero-calorie sweetener like monk fruit all work great here.
- 1 cup milk of choice – The canvas for our cloud! Whole dairy milk gives the richest, creamiest layer. But the beauty is in the customization. Substitution Tip: Oat milk is my top non-dairy pick—it’s naturally creamy and slightly sweet. Almond milk works for a lighter version, or use soy or cashew for extra protein.
- A generous handful of ice – Essential for that chilly, refreshing contrast and for helping to keep those gorgeous layers distinct when you pour.
- 1/2 cup heavy cream (for homemade cloud) OR store-bought whipped cream – The CLOUD! Making it fresh takes 2 minutes and is a game-changer. You’ll need 1-2 tbsp of powdered sugar and a drop of vanilla for homemade. Chef’s Insight: For a stable, pipeable homemade cloud, make sure your cream and bowl are very cold.
- Optional Garnish: Freeze-dried strawberry powder – This is the pro garnish that screams “café quality.” It adds a burst of concentrated strawberry flavor and that gorgeous dusty-pink finish. A little goes a long way!
Crafting Your Edible Masterpiece: Step-by-Step
Alright, let’s get building! This is less about hardcore cooking and more about joyful assembly. Follow these steps, and you’ll have a picture-perfect drink every single time.
- Create the Strawberry Base. In a small bowl, take your chopped strawberries and sprinkle the sugar or honey over them. Now, get in there with a fork and mash them vigorously! You’re looking for a chunky-saucy consistency with lots of juicy syrup. Chef’s Hack: If you want a completely smooth syrup, you can blitz this in a small blender or food processor. I love the rustic texture of little fruit bits, though—it feels more homemade.
- Prep Your Stage. Grab your prettiest clear glass—a highball or a mason jar works perfectly. Fill it to the brim with ice. This isn’t just to cool the drink; the ice acts as a barrier to help slow the pouring milk, which is the secret to that stunning layered look.
- The First Layer: Strawberry Magic. Take your mashed strawberry mixture and pour it directly over the ice. Watch as that vibrant red-pink syrup cascades down through the cracks and settles gloriously at the bottom. This is your foundation.
- The Slow Pour for the Perfect Layer. Here’s the most important technique! Take your cup of milk. Instead of dumping it in, pour it very slowly over the back of a spoon held just above the strawberry layer. The spoon disperses the force of the pour, allowing the milk to gently float on top of the denser strawberry syrup. This is how you get that crisp, Instagram-worthy separation. Patience is your best friend here.
- Building the Cloud. If you’re making fresh whipped cream, whip your cold heavy cream with a tbsp of powdered sugar and a tiny splash of vanilla until you have soft, fluffy peaks. Using a spoon or a piping bag, pile a luxurious amount of whipped cream (homemade or store-bought) on top of the milk layer. Don’t be shy! This is the “cloud,” after all. Make it tall and dreamy.
- The Final Flourish. If you have freeze-dried strawberry powder, dust a little over the cloud for that professional, pretty-in-pink finish. You can also add a tiny fresh strawberry slice on the rim for extra charm.
- The Grand Finale: To Stir or Not to Stir? Present your drink in all its layered glory. Let everyone ooh and aah. Then, hand them a long straw or a spoon. The fun is in the first few sips, tasting each distinct layer, and then mixing it all together into one unified, creamy, fruity bliss.
How to Serve This Pink Dream
Presentation is half the fun with this drink! Here’s how to turn it from a kitchen creation into a full experience.
The Vessel: A clear glass is non-negotiable. You’ve worked hard for those layers—show them off! A classic tall glass, a cute mason jar, or even a stemless wine glass all make fantastic choices.
The Setup: Serve it immediately after making it, while the layers are sharp and the cloud is firm. Place it on a cute coaster or a small plate, maybe with a little pink napkin. It’s all about the vibes.
Pairing Ideas: This drink is a star on its own, but it also plays well with others. It’s the perfect sweet counterpart to a buttery, flaky croissant for a weekend brunch. For an afternoon pick-me-up, pair it with shortbread cookies or a slice of vanilla pound cake. It’s also a fantastic, refreshing dessert drink after a spicy meal like Korean fried chicken or tacos.
Make It Your Own: Dreamy Variations
The basic blueprint of fruit + milk + cloud is a playground for creativity. Here are some of my favorite twists to keep things exciting.
- Blueberry Breeze Cloud: Swap strawberries for mashed blueberries and a teaspoon of lemon juice. The deep purple syrup against the white milk is absolutely majestic.
- Matcha Green Cloud: Skip the fruit layer. Instead, mix 1 tsp of high-quality matcha powder with 2 tbsp of hot water and a little sugar to form a paste. Pour that over the ice, then add milk. Top with a plain whipped cream cloud. Sophisticated and stunning.
- Vegan Dream Cloud: Use oat milk and make your cloud with chilled full-fat coconut cream (from a can). Whip it with a little maple syrup—it’s incredibly rich and holds its shape perfectly.
- “Grown-Up” Boozy Cloud: For a fun evening treat, add a shot (1.5 oz) of vanilla vodka, strawberry liqueur, or even a light rum to the milk before you pour it. The cloud on top balances it beautifully.
- Chocolate-Strawberry Swirl: Add a tablespoon of chocolate syrup to the bottom of the glass before adding the strawberry mash. You’ll get a triple layer of chocolate, strawberry, and milk. Trust me on this one.
Beau’s Kitchen Confidential Notes
This recipe has evolved from a strict café copycat to my own personal feel-good ritual. I’ve made it with my nieces, using a handheld milk frother to whip the cream, which they think is the coolest gadget ever. I’ve made a giant pitcher of the strawberry base for a summer picnic, letting everyone build their own clouds—it was a huge hit!
The biggest lesson? Embrace the imperfections. Sometimes the layers blend a little. Sometimes the cloud slouches. It doesn’t matter one bit. The second that straw goes in and you taste that sweet, creamy, strawberry harmony, any worry about it being “perfect” just melts away. It’s a drink that reminds me to find joy in the making, not just the result. Now, if you’ll excuse me, I think it’s time for my mid-afternoon cloud break…
Your Questions, Answered
Q: My layers mixed together immediately! What did I do wrong?
A: No worries! This usually means the milk was poured too quickly. Remember the spoon trick! Also, ensure your glass is packed with ice—it’s a crucial buffer. Finally, make sure your strawberry mixture is nice and syrupy; if it’s too thick, add a tiny splash of water or milk to loosen it.
Q: Can I make this ahead of time for a party?
A> You can prep the components! Make the strawberry syrup (step 1) and keep it in a jar in the fridge for up to 3 days. Keep your milk cold and your cream ready to whip. Assemble each drink fresh to order for the best layers and a perky cloud.
Q: My whipped cream keeps falling flat/sinking. Help!
A> This is all about temperature and stability. For homemade, your heavy cream must be very cold. Chill your mixing bowl and beaters in the freezer for 10 minutes before starting. Whip just to soft peaks. For extra stability, add a tiny pinch of cornstarch (1/4 tsp) to the cream before whipping.
Q: Is this drink super sweet?
A> You are in complete control! The sweetness comes only from the sugar you add to the strawberries and a little in the whipped cream. Start with less—you can always add more. Using very ripe, sweet berries also minimizes the need for added sugar.

Strawberry Cloud Milk : Korean-Inspired Whipped Drink with Dreamy Aesthetic
Description
Strawberry Cloud Milk – Korean-Inspired Whipped Drink
A visually stunning, layered drink with sweet strawberry syrup, creamy milk, and a fluffy whipped cloud on top. Perfect for brunch, an afternoon pick-me-up, or just a little joyful indulgence.
Ingredients
Strawberry Base:
-
½ cup fresh strawberries, hulled and chopped
-
1–2 tsp granulated sugar or honey (adjust to taste)
Milk Layer:
-
1 cup milk of choice (whole milk for creaminess, oat milk for dairy-free, or almond/soy/cashew for lighter versions)
-
A generous handful of ice
Cloud Topping:
-
½ cup heavy cream (or store-bought whipped cream)
-
1–2 tbsp powdered sugar
-
¼ tsp vanilla extract
Optional Garnish:
-
Freeze-dried strawberry powder or a fresh strawberry slice
Instructions
-
Prepare Strawberry Base:
-
In a small bowl, mash the strawberries with sugar or honey until chunky-saucy. For a smoother syrup, blitz in a blender.
-
-
Prep Glass & Ice:
-
Fill your clear glass with ice to create a cooling barrier for layers.
-
-
Add Strawberry Layer:
-
Pour the strawberry mash over the ice. Let it settle at the bottom.
-
-
Slow Pour Milk:
-
Pour milk very slowly over the back of a spoon held just above the strawberry layer. This helps create distinct layers.
-
-
Make the Cloud:
-
Whip cold heavy cream with powdered sugar and vanilla until soft peaks form. Pile generously on top of the milk.
-
-
Garnish & Serve:
-
Dust with freeze-dried strawberry powder or place a fresh strawberry slice on the rim. Serve immediately with a straw or spoon.
-
Notes
-
Layering Trick: Pour milk slowly over a spoon and use plenty of ice to maintain separation.
-
Whipped Cream Stability: Chill bowl and beaters before whipping; whip to soft peaks. Optional: add ¼ tsp cornstarch for extra hold.
-
Make Ahead: Prep strawberry syrup in advance (up to 3 days). Keep milk cold and cream ready to whip; assemble just before serving.
-
Control Sweetness: Start with minimal sugar; adjust to taste. Very ripe strawberries reduce added sugar needs.
Nutritional Snapshot
Please note: The following is an approximate estimate for one serving made with whole dairy milk, 1 tsp of granulated sugar, and homemade whipped cream. Values will change significantly with substitutions like non-dairy milk or sugar alternatives.
- Calories: ~250-300
- Total Carbohydrates: 25g
- Sugars: 18g (includes natural sugars from milk and strawberries)
- Total Fat: 15g
- Protein: 6g
- Fiber: 2g
Think of this as a decadent treat or a dessert drink. It’s a wonderful source of calcium and vitamin C from the strawberries and milk. To lighten it up, use unsweetened almond milk and skip the whipped cream for a simple, layered strawberry milk.
Final Thoughts
And there you have it—your ticket to creating a little edible magic. This Strawberry Cloud Milk is more than a recipe; it’s a reminder that the most joyful moments in the kitchen often come from the simplest, prettiest projects. It doesn’t need to be complicated to feel special.
So, the next time you’re craving something sweet, refreshing, and downright beautiful, I hope you’ll give this a whirl. Mix it up with different fruits, make it
Savory Strawberry Avocado Salsa : Fresh, Colorful & Perfect for Summer
Savory Strawberry Avocado Salsa: Your New Summer Obsession
When Sweet Meets Savory: A Flavor Fiesta
Hey friends, Beau here! Grab a chair and let’s talk about the magical moment when summer’s sweetest berry decides to crash the savory party. I’m not just talking about a fruit salad here. I’m talking about a full-on, confetti-throwing, taste-bud-tingling Savory Strawberry Avocado Salsa that’s about to become your new go-to for everything from poolside snacking to fancy-ish Friday night dinners.
Picture this: juicy, ripe strawberries, their natural sweetness perfectly tempered by creamy, buttery avocado. A hit of zippy red onion and fresh cilantro, all brought to life with a generous squeeze of sunny lime juice. It’s a symphony in a bowl—bright, fresh, and utterly addictive. This isn’t just a dip; it’s a vibrant condiment, a salad topper, a taco’s best friend, and the life of any party you bring it to. And the best part? You can whip it up in about ten minutes flat, no fancy skills required. If your kitchen had a “summer mode,” this recipe would be the ON switch. So, let’s ditch the complicated and celebrate the simple, spectacular flavors of the season together.
The Backyard BBQ That Started It All
This recipe has a fun little origin story. A few summers back, I was hosting a last-minute backyard BBQ. You know the drill—friends texting “On our way!” and your fridge looking… creative. I had a pint of strawberries destined for shortcake, a few perfectly ripe avocados, and the usual salsa suspects. In a moment of “what’s the worst that could happen?” inspiration, I chopped it all together. I was fully prepared for my friends to politely nibble and then raid the chip bag.
But the opposite happened. That bowl disappeared faster than the ice in the cooler. People were scooping it with chips, slathering it on burgers, and one friend even ate it straight with a spoon. The chorus of “What IS this?” and “You HAVE to give me the recipe!” was the best kind of kitchen win. It taught me a beautiful lesson: some of the best dishes aren’t planned; they’re discovered when you play with your food. This salsa is now a non-negotiable part of my summer, and I have a feeling it’s about to become part of yours, too.
Gathering Your Flavor Crew
Here’s your all-star cast of ingredients. Each one plays a crucial role in the harmony of this dish!
- 1 cup fresh strawberries, diced – The sweet heart of the salsa. Look for berries that are fragrant and bright red. Don’t use frozen here—they’ll get too mushy. Chef’s Tip: If your strawberries aren’t super sweet, don’t sweat it! The savory elements will balance everything out beautifully.
- 1 ripe avocado, diced – Our creamy, dreamy counterpoint. A perfectly ripe avocado should yield slightly to gentle pressure. Substitution Tip: In a pinch, a ripe mango can add a similar creamy-sweet texture for a tropical twist.
- ¼ small red onion, finely chopped – This gives the salsa its essential zing and a bit of crunch. Red onion is milder and prettier than white or yellow. Chef’s Hack: Soak the chopped onion in cold water for 5 minutes and pat dry to take the sharpest edge off if you’re sensitive to its bite.
- Juice of 1 lime – The bright, zesty magic that wakes up all the flavors and keeps the avocado looking fresh. Always use fresh lime juice—the bottled stuff just doesn’t compare here.
- 2 tbsp chopped fresh cilantro – The herby, fresh finish. If cilantro tastes like soap to you (it’s a genetic thing!), simply swap in fresh mint or parsley for a different but equally delicious herbal note.
- Salt & pepper to taste – Don’t skip these! Salt is a flavor enhancer and is absolutely essential to making the strawberries and avocado sing.
- Optional: ½ a jalapeño, seeded and finely diced – For my friends who like a little fire! This adds a fantastic slow-building heat. Remove the seeds and white ribs for less spice, or leave ’em in for maximum kick.
Let’s Make Some Magic: Step-by-Step
Ready to create this colorful masterpiece? Follow these simple steps, and I’ll walk you through every little chef hack I know.
- Prep Your Veg (and Fruit!) Like a Pro. Hull and dice your strawberries into nice, bite-sized pieces. For the avocado, slice it in half, remove the pit, score the flesh in a grid pattern while still in the skin, and scoop it out with a spoon for perfect, easy dice. Finely chop your red onion and cilantro. If using jalapeño, wear gloves or wash your hands *immediately* after handling—trust me on this one. Chef’s Commentary: Having everything prepped and ready to go (this is called your *mise en place*) makes the assembly feel like a fun TV cooking show and takes only minutes.
- The Gentle Toss. In a medium-sized mixing bowl, gently combine the strawberries, avocado, red onion, cilantro, and jalapeño (if using). I like to use a silicone spatula or my hands. The key word is GENTLE. We want to keep those beautiful avocado cubes intact, not turn them into guacamole. Pro Tip: Add the avocado last, right before the lime juice, to minimize handling and browning.
- Zest and Juice (Yes, Zest!). Before you cut and juice your lime, use a fine grater or microplane to zest a little of the bright green skin off. Add this zest to the bowl—it packs an incredible punch of fragrant lime oil. Then, roll the lime on the counter under your palm to loosen up the juices, cut it in half, and squeeze every last drop over your mixture. The acid is crucial for flavor and acts as a barrier against oxidation for the avocado.
- Season to Perfection. Now, give it a light sprinkle of salt and a crack of black pepper. Toss one more time, just to distribute. Chef’s Hack: Taste it with a chip! The saltiness of the chip will affect the final taste, so it’s the perfect way to test your seasoning. Adjust until it makes your taste buds do a happy dance.
- The Rest (If You Can Wait!). You can absolutely serve this salsa immediately—it’s fantastic. But if you have 10-15 minutes, let it hang out in the fridge. This brief rest allows the flavors to get to know each other and mingle into something even more wonderful.
How to Serve This Sunshine in a Bowl
This salsa is the ultimate social butterfly of food—it gets along with everyone! Here are my favorite ways to serve it up:
- The Classic: Pile it high in a colorful bowl surrounded by sturdy tortilla chips. I love salty, thick-cut rounds or lightly salted pita chips for scooping.
- Over the Grill: This is a game-changer. Spoon it generously over grilled chicken breasts, salmon fillets, shrimp skewers, or even a simple grilled pork chop. The cool, fresh salsa cuts through the richness of the meat perfectly.
- Taco & Bowl Superstar: Elevate your Taco Tuesday! Add a hefty scoop to fish tacos, carnitas, or black bean tacos. It’s also incredible on grain bowls or a simple bed of greens.
- With Your Morning Eggs: Seriously! Try it on top of scrambled eggs or an omelet for a brunch that feels luxe but is secretly effortless.
Make It Your Own: Delicious Twists
Once you master the base, the playground is open! Here are a few fun variations to keep things exciting all summer long:
- Tropical Twist: Swap the strawberries for ripe mango or pineapple. Add a tablespoon of toasted coconut flakes right before serving.
- Herb Swap: Not a cilantro fan? Use fresh basil for a more Italian vibe, or mint for a super refreshing, garden-fresh feel.
- Add a Crunch: Stir in ⅓ cup of fresh, raw corn kernels (cut right off the cob) or diced cucumber right before serving for an extra layer of texture.
- Creamy & Dreamy: For a richer, dip-ier version, gently fold in ¼ cup of crumbled cotija or feta cheese. The salty, tangy cheese is *chef’s kiss* with the strawberry.
- Protein Power Bowl: Turn it into a light meal by adding a can of rinsed and drained black beans or chickpeas. It becomes a hearty, colorful bean salad instantly.
Beau’s Kitchen Notes & Stories
This recipe has been on quite a journey from that first backyard experiment. I’ve learned that the ripeness of the avocado is non-negotiable—a hard avocado just won’t give you that luxurious creaminess. I’ve also had my share of kitchen comedy, like the time I forgot to seed the jalapeño and served a “surprise fire” salsa to my spice-averse aunt. (Sorry, Aunt Margie! We had milk on standby.)
Over the years, I’ve found this salsa is the ultimate peacemaker at potlucks. It sits proudly between the seven-layer dip and the pasta salad, charming everyone. It’s a reminder that the best cooking often feels less like following rules and more like putting together a playlist—you’re just mixing great tastes that you love until they feel right.
Your Questions, Answered
Q: Can I make this salsa ahead of time?
A: You can prep the components ahead! Dice the strawberries, onion, cilantro, and jalapeño and store them in one container. Dice the avocado and store it separately with a squeeze of lime juice on top. Combine everything just before serving for the best texture and color.
Q: My avocado is browning! What did I do wrong?
A: No mistake—avocados just oxidize! The lime juice is your best defense. Make sure all avocado pieces are well-coated. If you need to store leftovers, press plastic wrap directly onto the surface of the salsa to limit air exposure. It’ll still taste great for a few hours, even if it darkens a bit.
Q: Is there a way to make this sweeter/savvier?
A: Absolutely! For a sweeter profile, add a tiny drizzle of honey or agave. For a deeper savory note (my personal favorite hack), add a pinch of smoked paprika or chipotle powder. It adds a wonderful smoky complexity.
Q: What are the best chips to use?
A: You want a chip with some structural integrity! Thick restaurant-style tortilla chips, multigrain chips, or even plantain chips (a personal fave) hold up beautifully to the chunky salsa without breaking.
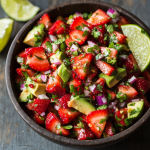
Savory Strawberry Avocado Salsa : Fresh, Colorful & Perfect for Summer
Description
Savory Strawberry Avocado Salsa – Bright, Sweet & Savory
A fresh, colorful salsa that combines sweet strawberries, creamy avocado, zesty lime, and aromatic herbs. Perfect as a dip, taco topper, salad accent, or grilled protein companion. Ready in 10 minutes!
Ingredients
Salsa Base:
-
1 cup fresh strawberries, diced (choose fragrant, fully red berries)
-
1 ripe avocado, diced (or substitute with ripe mango for a tropical twist)
-
¼ small red onion, finely chopped
-
2 tbsp chopped fresh cilantro (or mint/parsley if preferred)
-
Juice of 1 lime (plus optional zest)
-
Salt & black pepper, to taste
Optional Heat:
-
½ jalapeño, seeded and finely diced
Serving:
-
Thick-cut tortilla chips, pita chips, plantain chips, or fresh veggie dippers
Optional Garnishes / Twists:
-
¼ cup crumbled cotija or feta cheese
-
⅓ cup fresh corn kernels or diced cucumber
-
Pinch of smoked paprika or chipotle powder
-
Tiny drizzle of honey or agave
Instructions
-
Prep Ingredients:
-
Hull and dice strawberries.
-
Halve avocado, remove pit, score flesh in a grid, and scoop out cubes.
-
Finely chop red onion, cilantro, and jalapeño (if using).
-
-
Assemble Salsa:
-
In a medium bowl, gently combine strawberries, red onion, cilantro, and jalapeño.
-
Add avocado last, just before lime juice, to prevent browning.
-
-
Zest & Juice Lime:
-
Optional: zest a little lime peel into the bowl for extra fragrance.
-
Roll lime under palm and squeeze fresh juice over the salsa.
-
-
Season & Toss:
-
Sprinkle with salt and pepper. Gently toss to combine. Taste and adjust as needed.
-
-
Rest or Serve Immediately:
-
Serve right away for maximum freshness or chill 10–15 minutes to let flavors mingle.
-
Notes
-
Avocado Browning: Coat avocado with lime juice; press plastic wrap onto surface for storage.
-
Make Ahead: Prep fruit, onion, herbs, and jalapeño separately; add avocado and lime juice just before serving.
-
Chip Choice: Use thick, sturdy chips to hold chunky salsa without breaking.
Nourishment Notes (Goodness in Every Bite!)
Here’s the beautiful thing about this recipe: it’s as good for you as it is delicious. This is whole-foods cooking at its brightest. Strawberries bring a mega-dose of vitamin C and antioxidants. Avocado provides those glorious heart-healthy monounsaturated fats and fiber to keep you full and satisfied. The red onion and cilantro are packed with phytonutrients, and the lime juice is a fantastic source of, you guessed it, more vitamin C!
Approximate Nutritional Info (per ¼ cup serving):
Calories: ~80 | Fat: 6g (mostly the good kind!) | Carbs: 6g | Fiber: 3g | Sugar: 2g (natural) | Protein: 1g
It’s gluten-free, vegan, dairy-free, and naturally sweetened. It’s proof that eating well doesn’t mean sacrificing an ounce of flavor.
Final Thoughts from My Kitchen to Yours
So there you have it, friends—my not-so-secret weapon for winning summer. This Savory Strawberry Avocado Salsa is more than a recipe; it’s a vibe. It’s about embracing bold flavor combinations, feeding people you love with food that makes them light up, and remembering that cooking should be fun, not fussy.
I hope you make this, share it, and make it your own. Tag me @Feastical if you do—I love seeing your kitchen creations. Now, go grab those strawberries and show them the savory side of life. Happy scooping!
With a full heart and a full bowl,
Beau