
Zesty Fish Taco Sauce : Creamy, Tangy & Perfectly Spiced
Welcome to Flavor Town: Your Fish Tacos Are About to Level Up!
Hey friends, Beau here from Feastical! Grab a stool and pull up to the kitchen island. Have you ever taken a bite of a fish taco and thought, “This is good… but it could be legendary?” You’re not alone. I’ve been there, staring at a perfectly grilled piece of fish, wondering what magic ingredient was missing. That magic, my friends, isn’t just one ingredient—it’s a symphony of them, all whirled together into what I now call my Zesty Fish Taco Sauce.
This isn’t just another white sauce. This is the secret handshake of the taco world. It’s creamy without being heavy, tangy without puckering your lips, and spiced with just the right amount of warmth to make your taste buds do a little happy dance. The best part? You can whip it up in about five minutes flat with ingredients that are probably lounging in your fridge and pantry right now, wondering when they’ll get their moment to shine.
Whether you’re a grill master, an air-fryer aficionado, or a sheet-pan supper champion, this sauce is the unifying force that ties your crispy fish, crunchy slaw, and soft tortilla into one unforgettable experience. It’s the difference between a Tuesday night dinner and a mini-vacation for your mouth. So, let’s ditch the store-bought bottles and make something fresh, vibrant, and bursting with real flavor. Your fish tacos are waiting for their crowning glory!
The Beach Day That Changed My Taco Game Forever
This sauce recipe was born from a happy accident, as the best kitchen stories often are. Picture this: a sun-bleached beach day with my family, a cooler full of slightly-sandy fish tacos I’d prepped at home, and one crucial container left on the kitchen counter. Yep, the sauce. My “special sauce.” I was devastated for about two minutes until I decided to MacGyver something with what we had. A squeeze of lime from the fish marinade, a few packets of mayo and sour cream from a nearby takeout spot, a dash of hot sauce from my brother’s backpack (don’t ask), and a pinch of the smoky paprika I’d brought for the grill.
I mixed it all together in a paper cup with a plastic fork, fully expecting a culinary disaster. But when we drizzled it over our slightly-warm, very sandy tacos, something miraculous happened. Everyone went quiet. Then came the chorus of, “Whoa, what *is* this?” It was brighter, zestier, and more *alive* than my original recipe. That messy, improvised beach-side sauce taught me a beautiful lesson: sometimes, the best flavors come from a place of fun, necessity, and a little bit of chaos. Now, every time I make this version, I’m right back on that beach, laughing with my family and tasting that first perfect, tangy bite.
Gathering Your Flavor All-Stars
Let’s meet the dream team! Here’s everything you need to build this creamy, zesty masterpiece. Remember, great ingredients make a great sauce, but I’ve got your back with swaps if you need them.
- ½ cup sour cream: This is our creamy, tangy base. It brings a delightful coolness that balances the heat. Chef’s Insight: For a lighter version, plain Greek yogurt works beautifully and adds a protein boost. If you want it extra rich, use full-fat sour cream.
- ¼ cup mayo: The other half of our creamy dream team! Mayo adds body and a subtle richness that makes the sauce luxuriously smooth. Chef’s Insight: I’m a fan of avocado oil or olive oil-based mayo for a cleaner flavor, but your favorite brand works perfectly.
- 1 tbsp lime juice (freshly squeezed): Non-negotiable! Fresh lime juice is the “zesty” in our zesty sauce. That bright, citrusy punch cuts through the creaminess. Pro Tip: Roll your lime on the counter firmly before cutting to get the most juice out of it.
- 1 tsp hot sauce (like Cholula or Sriracha): This is where you customize your spice level. Cholula gives a vinegary, garlicky heat, while Sriracha is a bit sweeter and thicker. Chef’s Insight: Start with a teaspoon and add more after tasting. You can always add heat, but you can’t take it away!
- ½ tsp garlic powder: We’re using powder here for a consistent, mellow garlic flavor that won’t overpower. Substitution Tip: In a pinch, a tiny bit of very finely minced fresh garlic works, but let the sauce sit for 15 minutes so the raw edge mellows.
- ½ tsp smoked paprika: The secret weapon! This isn’t regular paprika. Smoked paprika adds a deep, smoky sweetness that gives the sauce incredible complexity and a gorgeous orangey-red hue.
- ¼ tsp cumin: Just a whisper! Cumin adds an earthy, warm undertone that whispers “taco” without shouting it. A little goes a long way.
- Salt to taste: The flavor enhancer. Always add a pinch, stir, taste, and decide if it needs more. It makes all the other flavors pop.
- Optional: 1 tsp honey: If you like a hint of sweetness to round out the tang and heat, this is your friend. A must-try if you’re using a very vinegary hot sauce.
- Optional: Finely chopped cilantro or jalapeño: For the adventurers! Cilantro adds a fresh, herbal note, and a bit of finely minced jalapeño (seeds removed for less heat) gives a fantastic fresh chili crunch.
Let’s Make Some Magic: Step-by-Step
Ready? This is the easiest part. We’re not cooking, we’re creating. Get out a medium-sized mixing bowl and a whisk or a trusty fork.
- The Creamy Foundation: Scoop your sour cream and mayo into the bowl. Squeeze in that glorious fresh lime juice. Now, take your whisk and start blending. Chef’s Hack: Go for a figure-eight motion. It incorporates everything more evenly than just stirring in circles. You’re looking for a smooth, uniform, pale mixture. See? We’re already halfway there!
- The Flavor Bomb Drop: Here’s where the personality comes in. Sprinkle in the garlic powder, smoked paprika, and cumin. Add your chosen hot sauce and that initial pinch of salt. Pro Tip: If your spices have been sitting in the pantry for a while, give the jars a little shake or stir before measuring. It wakes up the oils and flavor!
- The Grand Unification: Whisk, whisk, whisk! Get in there and make sure every single spice granule and droplet of hot sauce is fully embraced by the creamy base. No one wants a surprise pocket of plain sour cream. The color should transform into a beautiful, creamy coral shade from the paprika and hot sauce.
- The Taste Test (The Most Important Step): Dip a clean spoon or the tip of your finger in and have a taste. Be your own chef! Ask yourself: Is it tangy enough? Maybe a tiny extra squeeze of lime. Need more heat? Add another ¼ tsp of hot sauce. Missing something? This is where you might add that optional honey for balance or another tiny pinch of salt. Your kitchen, your rules.
- The Patience Phase (Worth It!): If you can possibly wait, cover the bowl with plastic wrap or pop the sauce into a sealed container and refrigerate it for at least 15-30 minutes. Why? This chilling time allows the flavors to get to know each other, mingle, and deepen. The sharp edges soften, and the sauce becomes a harmonious, cohesive superstar. If you’re in a taco emergency, it’s still delicious right away—I promise.
How to Serve Your Sauce Like a Pro
Okay, sauce is ready. Let’s talk presentation! You’ve crafted this beautiful condiment, so let it shine.
The classic move is to drizzle it generously over your assembled fish tacos. I love using a squeeze bottle for restaurant-style zig-zags, or just a spoon works perfectly. But don’t stop there! This sauce is a multi-talented MVP. Serve it in a small bowl on the side for dipping. It’s incredible with sweet potato fries, crispy roasted cauliflower, or even as a veggie dip for bell peppers and cucumber slices.
Think beyond the taco, too. It makes a killer dressing for a taco salad (just thin it out with a touch more lime juice or water). Slather it on a fish sandwich or use it as a burger sauce for a Southwestern twist. When you make a sauce this good, it deserves to be the star of the whole meal spread.
Make It Your Own: Delicious Twists & Swaps
One of my favorite things about this recipe is its flexibility. Play with it! Here are a few of my favorite variations.
- The “Everything But the Elote” Sauce: Fold in 2 tablespoons of finely crumbled cotija cheese and ¼ teaspoon of chili powder. It turns into a creamy, cheesy sauce that’s insane on shrimp tacos or grilled corn.
- Herb Garden Delight: Stir in 2 tablespoons of finely chopped fresh herbs. I love a combo of cilantro, dill, and chives. It’s fresh, green, and perfect for a springtime fish fry.
- Spicy Avocado Crema: Add half a ripe avocado to the blender with all the other ingredients and blend until ultra-smooth and dreamy green. It’s richer, thicker, and packed with good fats.
- Dairy-Free & Lighter: Swap the sour cream for unsweetened, plain coconut yogurt or a dairy-free sour cream alternative. Use a vegan mayo. The flavor profile is slightly different but still absolutely delicious and inclusive for all your guests.
- Sweet Chipotle Twist: Replace the hot sauce and smoked paprika with 1-2 teaspoons of minced chipotle peppers in adobo sauce (start with 1 tsp, it’s potent!). Add that teaspoon of honey. This gives a deep, smoky, sweet, and spicy vibe that’s completely addictive.
Beau’s Kitchen Notes & Stories
This sauce has been my faithful kitchen companion for years now, and it’s evolved with me. The original beach version didn’t have smoked paprika—I added that later after a friend brought some back from Spain. It was a game-changer! I also used to insist on only Cholula, but one day I ran out and used Sriracha. My daughter actually preferred it, so now I list both. Recipes are living things, meant to be adapted.
A funny story: I once accidentally used cinnamon instead of cumin (those identical spice jars will get you every time!). We dubbed it “Desert Taco Sauce” and it was… interesting. Not my finest moment, but we laughed through the whole weird meal. It’s a good reminder to always, always smell your spices before adding!
Your Questions, Answered
Q: How long does this fish taco sauce last in the fridge?
A: Stored in an airtight container, it will stay fresh and delicious for up to 5-7 days. The flavors continue to meld and get even better on day two!
Q: My sauce turned out too thin/runny. What happened?
A> No worries! This usually happens if the sour cream was a bit watery. Easy fix: whisk in an extra tablespoon of mayo or let it sit, covered, in the fridge for an hour. The chilling time often thickens it up perfectly. For instant thickening, a tiny sprinkle of powdered garlic or onion can help.
Q: Can I make this sauce ahead of time for a party?
A: Absolutely, and I encourage it! Making it a day ahead is brilliant. The flavors have a full 24 hours to become best friends, resulting in an even more incredible sauce. Just give it a good stir before serving.
Q: Is this sauce spicy? My kids don’t like heat.
A: The base recipe as written has just a gentle warmth. For a completely mild version, you can omit the hot sauce entirely. The smoked paprika provides flavor, not heat. You can also use a very mild hot sauce like Tapatío or just add an extra pinch of paprika for color.

Zesty Fish Taco Sauce : Creamy, Tangy & Perfectly Spiced
Description
Zesty Fish Taco Sauce (5-Minute Creamy Taco Magic)
Prep Time: 5 minutes
Chill Time (optional): 15–30 minutes
Yield: About ¾ cup (6–8 servings)
Ingredients
-
½ cup sour cream
-
¼ cup mayonnaise
-
1 tablespoon fresh lime juice
-
1 teaspoon hot sauce (Cholula, Sriracha, or mild for kids)
-
½ teaspoon garlic powder
-
½ teaspoon smoked paprika
-
¼ teaspoon ground cumin
-
Salt, to taste
Optional Add-Ins
-
1 teaspoon honey (balances tang & heat)
-
1–2 tablespoons chopped cilantro
-
Finely minced jalapeño (seeds removed)
Instructions
-
In a medium bowl, whisk together sour cream, mayo, and lime juice until smooth.
-
Add hot sauce, garlic powder, smoked paprika, cumin, and a pinch of salt.
-
Whisk until fully combined and creamy.
-
Taste and adjust seasoning—add more lime, salt, heat, or honey as desired.
-
Chill for 15–30 minutes for best flavor, or use immediately.
Notes
-
Drizzle over fish, shrimp, or chicken tacos
-
Use as a dipping sauce for fries or roasted veggies
-
Thin with lime juice for taco salad dressing
-
Spread on burgers or fish sandwiches
Nutritional Info (For the Curious Foodie!)
While we’re all about flavor first at Feastical, I know some folks like to keep track. Here’s a general breakdown per tablespoon (remember, a little goes a long way!):
- Calories: ~45
- Fat: 4.5g (The majority comes from the mayo and sour cream, using the good fats to carry all our delicious flavors.)
- Carbohydrates: 1g
- Protein: 0.5g
Prep Time: 5 minutes | Chill Time (optional but recommended): 15-30 minutes | Total Time: 5-20 minutes
Perfect For: Fish tacos, shrimp tacos, chicken tacos, dipping sauces, salad dressings, burger spreads!
Final Thought
And there you have it, friends—the not-so-secret sauce to your best fish tacos ever. It’s more than just a recipe; it’s a five-minute project that builds confidence and brings a ton of joy to the table. I love knowing that this little sauce is making its way into your kitchen, maybe becoming part of your own family’s stories and beach trips.
So the next time you’re staring at that beautiful piece of fish, wondering what it needs, remember: the power is in your hands (and your whisk). Don’t be afraid to taste, adjust, and make it yours. That’s what real, feel-good cooking is all about.
If you make it, I’d love to hear how it turned out! Tag me @Feastical or drop a comment on the blog. Now, go forth and sauce with abandon. Your taste buds will thank you.
Until next time, keep it simple, soulful, and satisfying,
Beau

Cannoli Dip : Sweet, Creamy & Dessert-Ready in Minutes
Say Hello to Your New Favorite Party Trick: Cannoli Dip!
Hey friends, Beau here! Welcome back to the Feastical kitchen, where we’re about to turn a little chaos into a whole lot of creamy, dreamy deliciousness. Ever been in that classic dessert dilemma? You know the one: you want to serve something stunning that tastes like it took hours of loving labor, but you also want to actually enjoy the party, not spend the whole night wrestling with pastry bags in the kitchen.
Well, grab your favorite mixing bowl and a big spoon, because I’ve got the solution that’s going to make you the MVP of every potluck, game day spread, and girls’ night in from here on out. We’re taking everything we adore about a classic Italian cannoli—the lightly sweet, impossibly creamy ricotta filling, those delightful pops of chocolate, that hint of vanilla—and we’re throwing the rulebook out the window. No deep frying. No tricky pastry tubes. Just one irresistible, scoopable, dippable bowl of joy.
This Cannoli Dip is the culinary equivalent of your favorite cozy sweater. It’s simple, soulful, and guaranteed to bring smiles. It’s the recipe you’ll memorize, the one you’ll make on a whim when friends drop by, and the secret weapon you’ll pull out when you need a guaranteed crowd-pleaser in 20 minutes flat. So, let’s ditch the fuss, embrace the flavor, and make a dessert that’s all about gathering ’round and digging in together. Ready? Let’s get mixing!
A Sicilian Secret, A Brooklyn Kitchen, and Me
This recipe, for me, is a happy little rebellion. My first taste of a real cannoli was in my Nonna’s Brooklyn apartment. The air smelled like espresso and fried dough, and she’d present these perfect, fragile shells filled to order so they stayed crackling crisp. It was magic, but also… intimidating. For years, I thought making cannoli was a sacred art I couldn’t touch.
Then, one chaotic Thanksgiving, I had a mini kitchen meltdown. The pie crust tore, the timer was beeping, and I had a bowl of leftover ricotta filling just sitting there. In a moment of “what the heck” inspiration, I grabbed some broken sugar cones from the pantry, plopped the bowl of filling on a platter, and told everyone to just dive in. The result? That bowl was scraped clean faster than the pies! The laughter and mess of everyone scooping and dipping together was even more fun than the pristine pastries. It taught me a beautiful lesson: sometimes, the best recipes aren’t about perfect technique, but perfect joy. This dip is that moment, captured in a bowl.
Gathering Your Flavor Crew: Simple Ingredients, Big Impact
Here’s the beautiful part—this dip comes together with just a handful of simple players. But, as with any great team, each one brings something special to the table. Let’s meet them:
- 1 cup whole-milk ricotta cheese (well-drained): This is the heart and soul of our dip. Chef’s Insight: For the creamiest, least-grainy texture, seek out “whole milk” ricotta and don’t skip the draining step! The better the ricotta, the better the dip. A quick drain removes excess whey and prevents a watery dip.
- ½ cup powdered sugar (more to taste): Our sweetener of choice. Why powdered? It dissolves instantly into the ricotta, creating a silky-smooth texture without any graininess. Granulated sugar just won’t do the same magic trick.
- ½ teaspoon pure vanilla extract (optional but highly recommended): The flavor enhancer. This tiny splash adds a warm, aromatic depth that makes the whole thing taste more complex and “bakery-quality.” Almond extract (just a ¼ tsp) is a fantastic alternative for a different vibe!
- ¼ cup mini chocolate chips: The classic crunch and chocolatey burst. Pro Tip: Mini chips are key! They distribute perfectly on your dipper and won’t sink to the bottom as easily. For a grown-up twist, try chopping up a dark chocolate bar into small, rustic pieces.
- Optional: 2-3 tablespoons of mascarpone or full-fat cream cheese: The Luxury Upgrade. Adding a dollop of either of these will send the creaminess into overdrive, making the dip richer and slightly more stable. It’s my go-to when I want to make it extra-indulgent.
Let’s Make Some Magic: Your Foolproof Dip Roadmap
Alright, team! Time to turn these ingredients into the star of the show. This isn’t just a list of steps—it’s a walk-through with all my favorite kitchen hacks. Put on some tunes, and let’s do this.
- The Drain Game (The Most Important 10 Minutes): If your ricotta looks at all watery, give it a quick drain. Spoon it into a fine-mesh strainer set over a bowl, or line the strainer with a coffee filter or paper towel. Let it sit for 10-30 minutes. Chef’s Hack: No time? Gently press the ricotta against the side of its container with a spoon to push out some liquid, then pour it off. Every bit of moisture you remove is creaminess you add back in flavor!
- The Sweet Whisk: In a medium mixing bowl, combine your well-drained ricotta, powdered sugar, and vanilla. Now, grab a whisk or a sturdy fork. I like to start by mashing the ricotta and sugar together to break up any lumps, then switch to a vigorous whisking motion. Watch for the Transformation: You’re looking for it to go from grainy to smooth and noticeably fluffier. This takes about 1-2 minutes of good elbow grease. A hand mixer on low works too, but I love the control of doing it by hand.
- The Fold-In Finale: Add your mini chocolate chips to the bowl. Here’s where we switch tools. Use a rubber spatula and a gentle folding motion—cutting down through the center and lifting up from the bottom—to incorporate them. Why fold? We just worked hard to make the dip fluffy! Stirring aggressively will deflate it. Be gentle, and stop as soon as the chips are evenly distributed.
- The Patience Payoff (The Chill): Cover the bowl with plastic wrap and pop it into the fridge for at least 15-30 minutes. This isn’t optional, folks! The chill time lets the flavors get to know each other and the dip to firm up just enough to be perfectly scoopable. It transforms from “mixed ingredients” to a cohesive, irresistible dessert.
- Taste & Tweak: Right before serving, give it one last taste. Want it sweeter? Fold in another tablespoon of powdered sugar. Dreamier? A pinch of cinnamon or orange zest can be amazing here. Make it yours!
Let’s Get This Party Started: How to Serve Your Masterpiece
Presentation is half the fun! Ditch the boring bowl. Scoop your chilled dip into a wide, shallow serving dish—a colorful ceramic bowl, a vintage pie plate, even a hollowed-out small pumpkin in the fall! Now, create a “dipper station” around it. Think about texture contrasts:
- The Classics: Broken waffle cones or sugar cones are my #1. They mimic the cannoli shell experience perfectly! Also, crisp biscotti (almond is classic), sturdy graham crackers, or buttery shortbread cookies.
- The Fresh & Fruity: Sliced strawberries, apple wedges (a spritz of lemon juice prevents browning), firm pear slices, or even sweet pineapple chunks. The bright fruit cuts through the richness beautifully.
- The Unexpected: Don’t sleep on pretzel rods or twists for that epic sweet-and-salty combo. Plain or cinnamon pita chips also work wonders.
Garnish the dip itself with a final sprinkle of mini chips, a dusting of cocoa powder, or a few chopped pistachios for color. Then, just set it in the middle of the table and watch the magic happen.
Make It Your Own: 5 Delicious Twists on the Theme
Once you’ve mastered the basic blueprint, the flavor world is your oyster! Here are a few of my favorite ways to play with this recipe:
- The Citrus Zing: Fold in the zest of one small orange or lemon along with the chocolate chips. It adds a breathtakingly fresh, bright note that’s absolutely incredible.
- The “Turtle” Dream: Swap half the chocolate chips for chopped, toasted pecans and add a tiny drizzle of caramel sauce on top before serving. Trust me on this one.
- The Berry Swirl: After chilling, gently swirl in 2-3 tablespoons of a good-quality raspberry or strawberry preserves. You get pretty ribbons of fruity flavor in every bite.
- The Dairy-Free Delight: Use a high-quality, well-drained dairy-free ricotta (Kite Hill makes a great one) and vegan mini chocolate chips. The method stays exactly the same!
- The Espresso Buzz: Dissolve 1-2 teaspoons of instant espresso powder into the vanilla extract before adding it to the ricotta. It creates a subtle mocha flavor that’s pure sophistication.
Beau’s Notebook: The Wisdom from My Countertop
This recipe has been a living, evolving thing in my kitchen. I’ve learned that on a hot day, it chills faster in a shallow container. I’ve discovered that a tiny pinch of sea salt in the mix makes all the flavors pop louder. And I’ve definitely had the “uh-oh” moment of using watery ricotta—lesson learned! The beauty of this dip is its forgiving nature. Too thick? A teaspoon of milk can loosen it. Too sweet? A bit more ricotta balances it out. It’s a recipe that encourages play, not perfection. The version I’m giving you today is my tried-and-true favorite, the one I make when I just want guaranteed smiles. But don’t be afraid to write your own notes in the margins!
Your Questions, Answered: Let’s Troubleshoot Together
Q: My dip turned out a bit grainy. What happened?
A: This usually comes from the ricotta itself. Next time, seek out a high-quality, whole-milk brand and don’t skip the draining step. Whisking thoroughly until it’s truly smooth before adding the chips also helps massively. The mascarpone/cream cheese add-in also creates a smoother mouthfeel.
Q: Can I make this ahead of time?
A: Absolutely! It’s actually better after a few hours. You can make it up to 24 hours in advance. Store it covered tightly in the fridge. I recommend folding in the chocolate chips right before serving so they stay perfectly intact and don’t bleed color.
Q: What’s the best substitute for powdered sugar?
A> For texture, you really need powdered sugar. In a pinch, you can blend granulated sugar in a clean coffee grinder or high-power blender until it’s a fine powder. Just know that most homemade versions won’t be quite as fine as commercial, which contains a bit of cornstarch.
Q: The dip is too runny! How can I fix it?
A> First, chill it longer—sometimes that’s all it needs. If it’s still too loose, you can gently fold in a tablespoon of mascarpone, cream cheese, or even a little extra powdered sugar to help thicken it up. Remember, it’s a dip, not a brick—it should be scoopable!

Cannoli Dip : Sweet, Creamy & Dessert-Ready in Minutes
Description
If you love classic Italian cannoli but don’t love frying shells and filling tubes, this Cannoli Dip is about to be your new favorite party trick. It has all the flavors you crave—sweet ricotta, vanilla, and chocolate—without the fuss. It comes together in minutes, chills quickly, and is perfect for dipping cookies, cones, or fresh fruit.
Ingredients
-
1 cup whole-milk ricotta cheese, well drained
-
½ cup powdered sugar, plus more to taste
-
½ tsp vanilla extract
-
¼ cup mini chocolate chips
-
Optional: 2–3 tbsp mascarpone or cream cheese (for extra creaminess)
For serving (optional but fun):
Broken waffle cones, biscotti, graham crackers, strawberries, apple slices, or pretzels
Instructions
-
Drain the ricotta:
If the ricotta is watery, place it in a fine-mesh strainer or lined sieve for 10–20 minutes. -
Mix the base:
In a bowl, whisk together ricotta, powdered sugar, vanilla, and mascarpone/cream cheese (if using) until smooth and fluffy. -
Fold in chocolate:
Gently fold in the mini chocolate chips with a spatula. -
Chill:
Cover and refrigerate for 15–30 minutes to let flavors meld and texture firm up. -
Serve:
Spoon into a serving bowl, garnish with extra chocolate chips if desired, and serve with your favorite dippers.
Notes
-
Drain well: Excess moisture is the #1 cause of runny dip.
-
Use powdered sugar: It dissolves smoothly and keeps the texture silky.
-
Mini chips matter: They distribute better and don’t sink.
-
Make ahead: You can prepare this up to 24 hours in advance.
-
Flavor boost: Add orange zest or a pinch of cinnamon for a classic bakery vibe.
Nutritional Info (For Your Inner Food Scientist)
Alright, let’s talk numbers—not because we’re counting, but because it’s good to know what’s fueling the fun! This nutritional information is an estimate per serving (assuming the recipe serves 6), calculated using the base ingredients without optional add-ins.
- Prep Time: 10 minutes
- Chill Time: 15-30 minutes
- Total Time: 25-40 minutes
- Servings: 4-6
Per serving (approximate):
Calories: 140 | Protein: 4g | Fat: 7g | Saturated Fat: 4.5g | Carbohydrates: 14g | Sugar: 12g | Calcium: 80mg
Chef’s Context: This is a dessert, and it’s meant to be enjoyed as part of a fun gathering! The ricotta provides a decent hit of protein and calcium, which is a nice bonus. Pairing it with fresh fruit dippers adds fiber and vitamins, making your dessert spread a bit more balanced. Remember, it’s all about the experience of sharing something homemade and delicious.
One Last Bite of Inspiration
And there you have it, friends—the dip that’s more than a dip. It’s a conversation starter, a time-saver, and a pure, unadulterated joy-bringer. It proves that you don’t need fancy skills or all day to create something that feels special and tastes like a celebration.
So the next time you’re looking to spread a little sweetness, I hope you remember this bowl of creamy, chocolaty goodness. Whip it up, gather your people, and listen for the happy silence that follows the first scoop. That’s the sound of a recipe working its magic. Thanks for cooking with me today. Now go forth, dip boldly, and as always… make it feastical!
P.S. If you make this (and I really hope you do), tag me @feastical on social media—I love seeing your kitchen creations!

Tzatziki Sauce : Cool, Creamy & Full of Mediterranean Flavor
The Secret to the Creamiest, Dreamiest Tzatziki Sauce You’ll Ever Make
Hey friends, Beau here from Feastical! Let me paint you a picture. It’s a hot summer day, the grill is smoking, the smell of lemon and oregano-chicken is in the air, and you need something… cool. Something creamy. Something that cuts through the richness and makes every single bite sing. That magical potion? It’s not in a fancy bottle. It’s right in your fridge, waiting to be whisked together in under 10 minutes. I’m talking about homemade Tzatziki sauce.
This isn’t just a “dip.” This is a Mediterranean superhero. It’s a sauce, a spread, a salad dressing, and a veggie’s best friend all rolled into one gloriously tangy, garlicky, refreshing bowl of bliss. Store-bought versions? Forget ‘em. They’re often watery, lack that garlic punch, or taste just… off. The real deal is so simple, so pure, and so much better when you make it yourself. It’s one of those foundational recipes that instantly makes you feel like a kitchen rockstar. So, tie on your apron, grab your grater, and let’s make a batch of sunshine together. This tzatziki recipe is about to become your go-to for everything from weeknight dinners to impressive party platters.
The Tzatziki That Taught Me to Slow Down
My love affair with tzatziki started not in a fancy restaurant, but at a wobbly plastic table on a sun-drenched Greek island years ago. I was traveling, young, and always in a rush to see the next sight. I ordered a simple souvlaki, and it came with this unassuming white sauce. One bite stopped me in my tracks. It was cool yet vibrant, soothing yet packed with garlic. It was perfection.
But the real lesson came when I tried to recreate it back home. My first attempts were disastrous—watery, bland, a sad imitation. I was rushing, skipping steps, not respecting the process. Then I remembered the old woman who ran that island taverna. She wasn’t rushing. She grated the cucumber slowly, squeezed the life out of it with strong, patient hands, and let the whole mixture sit quietly before serving. She understood that the magic wasn’t just in the mixing, but in the care. Now, every time I make this sauce, I think of that lesson: the best flavors come from a little patience and a lot of heart. It’s a dip that teaches you to savor the process.
Gathering Your Tzatziki Toolkit: Simple Ingredients, Big Impact
Here’s the beautiful part: you only need a handful of fresh, happy ingredients. Quality matters here, but don’t stress—this is about feel-good cooking, not a strict exam.
- 1 English (or Hot House) Cucumber – About ½ of a large one. Why English? Fewer seeds and thinner skin mean less prep and less water. It’s our MVP for crisp texture. Chef’s Tip: In a pinch, a regular cucumber works—just peel it and scoop out the seedy middle with a spoon.
- 1 ½ cups Plain Greek Yogurt – Go for full-fat (5% or 10%). Trust me, Beau. The richness and tang are irreplaceable, and it yields a luxuriously thick sauce. Substitution: 2% works, but avoid non-fat for best texture. For a dairy-free version, use a thick, plain coconut or almond milk yogurt.
- 2-3 cloves Garlic, finely minced or grated – This is the soul of the dish. Start with 2 if you’re cautious, but 3 gives that authentic, lively kick. Chef’s Insight: Grate the garlic on a microplane for a paste that distributes flavor evenly and mellows beautifully in the yogurt.
- 2 tablespoons Extra Virgin Olive Oil – Plus more for drizzling. A good, fruity olive oil adds a subtle richness and binds everything together. It’s the silky finish.
- 1 tablespoon Fresh Lemon Juice – About ½ a lemon. Freshly squeezed, please! Bottled juice can’t match the bright, clean acidity. Tip: Roll the lemon on the counter under your palm before cutting to get more juice out.
- 1 tablespoon Fresh Dill, finely chopped – This is the classic herb. It adds a grassy, anise-like freshness. Variation: Fresh mint is a fantastic (or additional!) herb. Try 1 tbsp mint or 1 ½ tbsp of a dill-mint combo.
- ½ teaspoon Kosher Salt, plus more to taste – Kosher salt dissolves better and seasons more evenly than table salt. We’ll also use a pinch for the cucumber.
- ¼ teaspoon Freshly Cracked Black Pepper – Always crack it fresh. The pre-ground stuff just doesn’t sing the same tune.
Crafting Your Creamy Masterpiece: Step-by-Step
This is where the fun begins. We’re not just mixing; we’re building layers of flavor and texture. Follow these steps, and you’ll have perfect tzatziki every single time.
Step 1: Tame the Cucumber (The Most Important Step!)
Grate your cucumber on the large holes of a box grater. Pile the gratings into the center of a clean, thin kitchen towel (a flour sack towel is perfect) or several layers of strong paper towels. Sprinkle with a tiny pinch of salt—this helps draw out water. Now, gather the towel’s edges and twist, twist, TWIST over the sink. Squeeze with all your might until no more water drips out. You’ll be shocked at how much liquid comes out! Beau’s Hack: This is the #1 secret to non-watery tzatziki. Don’t skip it! Well-drained cucumber means a thick, luscious sauce.
Step 2: Build the Flavor Base
In a medium mixing bowl, add your thick Greek yogurt. To it, add the grated garlic, fresh lemon juice, olive oil, chopped dill, salt, and pepper. Give this a good stir with a spoon or spatula until it’s beautifully combined and smooth. Tip: Mixing the flavors into the yogurt first lets the garlic and lemon mellow and marry before we add the cucumber.
Step 3: The Grand Union
Unwrap your squeezed, dry cucumber shreds and add them to the yogurt mixture. Gently fold them in until they’re evenly distributed. You’ll see the sauce transform—the white yogurt gets flecked with green and the texture becomes wonderfully complex.
Step 4: The Patience Payoff (Chill Time!)
Cover the bowl tightly with plastic wrap or transfer to an airtight container. Pop it in the fridge for at least 1 hour, but ideally 2-4 hours. This is non-negotiable for maximum flavor! While it chills, the garlic flavor softens and permeates the sauce, the cucumber chills and crisps up the texture, and all the ingredients become best friends. It’s worth the wait, I promise.
Step 5: Serve & Shine
When you’re ready to serve, give the tzatziki one last stir. Taste and adjust seasoning—maybe a tiny pinch more salt or a squeeze of lemon. Transfer to a serving bowl, drizzle with a little extra virgin olive oil, and maybe a sprig of fresh dill for that “chef’s kiss” presentation.
How to Serve Your Homemade Tzatziki: Let’s Get Creative!
This sauce is the ultimate culinary multitasker. Here’s how to let it shine:
- The Classic Dipping Station: Pile it in a bowl surrounded by warm, fluffy pita bread (toasted or grilled is amazing), crunchy cucumber slices, bell pepper strips, carrot sticks, and radishes. Instant party platter!
- The Ultimate Sauce for Grilled Goods: It’s destiny with grilled chicken souvlaki, lamb kebabs, pork chops, or fish. Dollop it generously on top or on the side. It cuts through the smoky char like a dream.
- Gyro & Sandwich Superstar: This is its birthplace! Slather it inside pita pockets or flatbreads with grilled meat, tomatoes, red onion, and fries (yes, fries!). Also incredible as a spread for turkey burgers, veggie wraps, or falafel sandwiches.
- The Secret Salad Dressing: Thin it out with a splash of water or more lemon juice and drizzle it over a Greek salad, a grain bowl, or a simple lettuce and tomato salad. Creamy, healthy dressing in seconds.
- With “Scoops”: Serve alongside baked potato wedges, crispy roasted chickpeas, or even as a cool topping for a spicy chili or baked potato.
Make It Your Own: 5 Flavorful Twists
Once you master the base, the playground is open! Here are some of my favorite riffs:
- The Herb Garden: Swap dill for fresh mint, or use a combination. Add a teaspoon of chopped fresh oregano or chives for another layer.
- Lemony Zing: Add the zest of half the lemon along with the juice for an extra-bright, aromatic punch.
- Spicy Fiesta Tzatziki: Finely mince a jalapeño (seeds removed for less heat) or add a pinch of red pepper flakes or a dash of hot sauce. Perfect for Mexican-inspired bowls or grilled corn.
- “Everything Bagel” Style: Stir in a tablespoon of Everything Bagel seasoning. Sounds wild, but it’s addictive on bagel chips or as a veggie dip.
- Beetroot Tzatziki (Pink & Pretty!): Replace half the grated cucumber with finely grated, cooked beetroot (well-drained!). You get a stunning pink color and a subtly sweet, earthy flavor.

Tzatziki Sauce : Cool, Creamy & Full of Mediterranean Flavor
Description
Tzatziki is one of those simple sauces that makes everything better. Creamy Greek yogurt, crisp cucumber, fresh herbs, and garlic come together to create a cool, refreshing condiment that balances rich or grilled foods perfectly. It takes just a few minutes to make, but the flavor tastes like something you’d get at a great Mediterranean restaurant.
Ingredients
-
1 cup plain Greek yogurt (full-fat recommended)
-
½ large English cucumber, grated
-
2 cloves garlic, finely minced or grated
-
1 tbsp fresh lemon juice
-
1 tbsp extra-virgin olive oil, plus more for drizzling
-
1 tbsp fresh dill, finely chopped (or mint)
-
½ tsp salt, plus a pinch for cucumber
-
¼ tsp black pepper
Instructions
-
Prepare the cucumber:
Grate the cucumber, sprinkle lightly with salt, then squeeze firmly in a clean towel or paper towels to remove as much liquid as possible. -
Mix the base:
In a bowl, combine Greek yogurt, garlic, lemon juice, olive oil, dill, salt, and pepper. -
Combine:
Fold the drained cucumber into the yogurt mixture until evenly mixed. -
Chill:
Cover and refrigerate for at least 1 hour to allow flavors to develop. -
Serve:
Stir, taste, adjust seasoning if needed, and drizzle with olive oil before serving.
Notes
-
Drain the cucumber well – this is the key to thick, creamy tzatziki.
-
Use full-fat yogurt for the richest texture and flavor.
-
Let it rest – chilling makes the garlic milder and the flavors more balanced.
-
Too thick? Add a teaspoon of water or lemon juice to loosen it.
-
Too strong? More yogurt will mellow garlic or lemon flavors.
Beau’s Kitchen Notes: The Heart of the Sauce
This recipe has lived in my kitchen for years, and it’s evolved from that rushed, watery first attempt to this tried-and-true formula. A funny story? I once made a triple batch for a big family BBQ and forgot to add the garlic. I realized it as I was setting it out! I had to quickly mince garlic, stir it in, and pretend it needed “just 10 more minutes to chill.” The lesson? Always taste as you go, and don’t be afraid to fix a mistake—it’s just cooking! Also, the sauce thickens even more overnight, so leftovers on day two are arguably even better. If it separates a tiny bit, just give it a good stir. It’s alive with flavor, and that’s a beautiful thing.
Final Thoughts
This tzatziki is more than a recipe—it’s a kitchen companion. It’s the cool, creamy counterpoint to a smoky grill, the vibrant lift in a wrap, and the dip that disappears first at every gathering. But its greatest secret isn’t in the ingredients or the technique—it’s in the care.
The mindful grating, the thorough squeezing, the patient chilling—these aren’t just steps; they’re small acts of respect for the process. They transform five humble ingredients into something greater than the sum of its parts: a sauce that feels both timeless and entirely your own.
So make it. Share it. Drizzle it over your summer, one generous spoonful at a time. And remember: the creamiest, dreamiest tzatziki doesn’t come from a secret ingredient, but from the simple choice to slow down and savor—both in making it, and in enjoying it.
Thanks for cooking with me. Now go grab that cucumber and change your culinary world.
With gratitude,
Beau
Feastical

Cowboy Caviar : Colorful, Zesty & Totally Addictive Bean Salad
Why This Colorful, Crunchy Bowl of Joy Belongs at Your Next Gathering
Hey there, friend! Beau here, welcoming you back to Feastical. Let’s talk about that magical moment at a party when one dish disappears faster than the ice in the summer punch bowl. You know the one—it’s not the fussy, plated appetizer. It’s the big, bold, beautiful bowl in the center of the table, brimming with color, begging to be scooped up with a crispy tortilla chip. That, my friend, is the power of Cowboy Caviar.
This isn’t just a bean salad. Oh no. This is a vibrant, textural fiesta in a bowl. It’s the ultimate crossroad where a hearty salad meets a downright addictive dip. One minute you’re politely spooning a bit onto your plate as a side, the next you’re hunched over the bowl, chip in hand, committed to getting every last bite of black bean, sweet corn, and crunchy pepper coated in that tangy, garlicky vinaigrette. It’s the culinary equivalent of a crowd-pleasing hit song—familiar enough to sing along to, but zesty enough to get everyone on the dance floor.
The beauty of Cowboy Caviar, besides its rainbow-like appearance, is its glorious no-fuss attitude. There’s no oven, no fussy techniques, just a little chopping, a quick shake of a jar, and a gentle toss. It’s the hero of busy weeknights, last-minute potlucks, and “I-need-something-healthish-but-also-delicious” snack attacks. So, tie on your metaphorical apron, grab your favorite knife, and let’s make a bowl of sunshine that’s guaranteed to steal the spotlight.
A Tale of Tailgates & Torn Chip Bags
I have to confess, my first encounter with Cowboy Caviar wasn’t in some fancy test kitchen. It was in a parking lot outside a football stadium, the air crisp with autumn and the scent of grilled burgers. A friend’s mom, who we all secretly believed was a culinary wizard, pulled out this massive Tupperware bowl. It looked like a confetti explosion had happened inside it. She ripped open a bag of sturdy tortilla chips, and we descended.
I remember the silence that fell over our rowdy group—the kind of silence only achieved by truly fantastic food. There was just the crunch of chips, the occasional “mmm,” and the frantic scraping of spoons against plastic to get that perfect, bean-laden scoop. That bowl was demolished in minutes, and the recipe was demanded immediately. It was food that created a moment, a shared, happy, messy experience. That’s the spirit I want to bring into your kitchen. This recipe is my homage to that tailgate—a little less parking lot, but all the same vibrant, communal joy.
Gathering Your Rainbow: Ingredients & Chef Insights
Here’s where the magic starts. These are the players in our colorful cast. Don’t stress about perfection—this recipe is famously forgiving and flexible.
- 1 can (15 oz) black beans, drained and rinsed – The hearty, protein-packed anchor. Rinsing them well is my non-negotiable hack—it washes away that starchy canning liquid for a cleaner, brighter flavor and better texture.
- 1 can (15 oz) sweet corn, drained – Hello, sweet pops of sunshine! In the summer, by all means, use fresh kernels from 2-3 grilled cobs for a next-level smoky sweetness. Frozen (thawed) corn works like a charm, too.
- 1 red bell pepper, diced – For sweetness and that gorgeous crimson color.
- 1 green bell pepper, diced – The classic crunch and a fresh, slightly bitter note that balances everything.
- 1 small red onion, finely diced – Its sharp, pungent bite mellows beautifully in the dressing. If raw onion is too intense for you, give the diced pieces a quick 5-minute soak in cold water, then drain. It tames the fire significantly!
- 1 jalapeño, seeded and minced (optional for heat) – Our flavor spark plug! Seeding it removes most of the heat, leaving a bright, green pepper flavor. For more kick, leave some seeds in. No jalapeño? A pinch of red pepper flakes will do.
- ½ cup chopped fresh cilantro – The herbaceous high note. If cilantro tastes like soap to you (it’s a genetic thing!), flat-leaf parsley or even fresh chopped basil make a lovely, friendly substitute.
For the Zesty Vinaigrette:
- ⅓ cup extra virgin olive oil – The silky base of our dressing. A good, fruity olive oil makes a difference here.
- 2 tbsp red wine vinegar – My favorite for its sharp, clean tang. Apple cider vinegar is a fantastic plan B.
- 1 tbsp fresh lime juice (about 1 lime) – Fresh is key! That bottled stuff just can’t compete with the bright, floral zing of a real lime.
- 1 tsp honey or maple syrup – A tiny touch to round out the sharp edges of the vinegar and lime. Don’t worry, it won’t make it sweet—just perfectly balanced.
- ½ tsp garlic powder – I know, I know. Fresh garlic is king. But here, garlic powder integrates seamlessly without any harsh raw bite, giving you consistent garlic flavor in every bite.
- 1 tsp chili powder – (My secret addition for depth!) It adds a warm, earthy layer that’s just incredible.
- Salt & freshly cracked black pepper to taste – Season boldly! This is a big bowl of ingredients that needs a good flavor backbone.
Let’s Build That Bowl: Step-by-Step with Chef Beau
Okay, team. Let’s get mixing. This is the easy, rhythmic part I love—it’s almost therapeutic.
- The Great Chop. Grab your favorite cutting board and chef’s knife. Dice your bell peppers into nice, even, bite-sized pieces. Finely dice the red onion—you want little flavor bursts, not big overwhelming chunks. Mince the jalapeño, remembering that seeds = heat. Give the cilantro a rough chop. Toss all these colorful veggies into a large mixing bowl. I’m talking bigger than you think you need. We need tossing room!
- Bean & Corn Time. Drain and rinse your black beans in a colander under cold water. Shake off the excess water. Do the same with the corn. Add them to the bowl. See the rainbow forming? I love this part.
- Shake It Up, Baby! (The Dressing). Now, for the glue that holds the party together. You can use a small bowl and a whisk, but my go-to method is a mason jar with a tight lid. Add all the vinaigrette ingredients: olive oil, red wine vinegar, lime juice, honey, garlic powder, chili powder, salt, and pepper. Screw the lid on tightly and give it a vigorous 30-second shake until it’s fully emulsified and looks creamy. Taste it! Dip a piece of bell pepper in. Adjust with more salt, pepper, or a squeeze of lime if needed. Chef’s Hack: Making the dressing in the jar means you can store any leftovers right in the same container.
- The Big Toss. Pour about three-quarters of your glorious dressing over the bean and veggie mixture. Grab two large spoons or salad tongs and gently, but thoroughly, toss everything together. You want every single black bean and kernel of corn to get kissed by that dressing. Add more dressing if it looks like it needs it—you might not use it all. Trust your eyes.
- The Patience Test. This is the hardest step for me. Cover the bowl with plastic wrap or a lid and pop it in the fridge for at least 30 minutes, but ideally 1-2 hours. I know, I know, you want to eat it NOW. But this chilling time is non-negotiable magic. It allows the flavors to mingle, get cozy, and intensify. The sharp edges of the onion mellow, the beans soak up the dressing, and everything becomes exponentially more delicious. It’s worth the wait, I promise.
How to Serve Your Cowboy Caviar Like a Pro
Alright, the wait is over. Your Cowboy Caviar is chilled, vibrant, and ready for its debut. How you serve it depends on the vibe you’re going for!
The Ultimate Dip: Transfer your creation to a beautiful, wide, shallow bowl. This gives everyone easy chip access from all angles. Surround it with a mountain of sturdy tortilla chips—the scoop-shaped ones are MVP here. For a fun twist, offer plantain chips or even crispy pita wedges.
The Stellar Side Dish: Spoon it generously next to grilled chicken, fish tacos, juicy burgers, or pulled pork sandwiches. It cuts through rich, smoky flavors like a dream with its bright acidity.
The Main Event (Yes, Really!): For a fantastic, light summer meal, pile a huge scoop of Cowboy Caviar onto a bed of crisp romaine or butter lettuce, top with sliced avocado or grilled shrimp, and call it dinner. You’ll feel fantastic.
Garnish Game: A final flourish never hurts. A lime wedge on the side for an extra squeeze, a few whole cilantro leaves, or a quick grating of cotija cheese takes it from great to “can I get this recipe?”
Make It Your Own: 5 Flavorful Twists
This recipe is your canvas. Play with it! Here are some of my favorite riffs:
- The “Everything But The Kitchen Sink” Tex-Mex: Add a can of drained and rinsed black-eyed peas or pinto beans. Throw in a diced ripe avocado (add just before serving) and a diced mango for sweet-heat dynamite.
- Italian Cowboy: Swap the black beans for chickpeas, the cilantro for chopped basil and parsley, and the lime juice for lemon. Use a vinaigrette with balsamic vinegar and add a handful of chopped sun-dried tomatoes and mini mozzarella balls (ciliegine). Serve with crostini.
- Protein Power Bowl: Transform it into a hearty lunch by layering it over quinoa or brown rice and topping it with shredded rotisserie chicken, sliced steak, or a couple of soft-boiled eggs.
- Creamy Dreamy Version: For a richer, dip-ier texture, fold in ¼ cup of sour cream or Greek yogurt into the dressing before you toss. It becomes luxuriously creamy and clings to chips even better.
- No-Onion, No-Problem: Not an onion fan? Substitute with the white parts of 2-3 finely chopped green onions (scallions) for a much milder, fresher allium flavor.
Beau’s Kitchen Notes & Stories
This recipe has been on more journeys with me than my favorite pair of oven mitts. I’ve doubled it for a neighborhood block party (it was gone in 20 minutes), scaled it down for a solo Netflix binge snack, and even used it as a filling for quick quesadillas with shredded cheese. One time, I accidentally used a whole habanero instead of a jalapeño. Let’s just say we called that batch “Texas Inferno Caviar” and served it with a gallon of iced tea. The beauty is in its resilience and adaptability.
Over the years, I’ve learned that the longer it sits (within reason—up to 3 days), the better it gets. The flavors just keep marrying. Also, a little secret: if you’re in a serious hurry, you can skip the chill time. It’ll still be delicious. But if you have even 30 minutes to spare, give it that gift. It’s the difference between a good dish and a legendary one.
Your Questions, Answered!
Q: How long does Cowboy Caviar last in the fridge?
A: It’s a champion of meal prep! Stored in an airtight container, it stays fresh and tasty for 3-4 days. The veggies will soften a bit but the flavor will be incredible.
Q: Mine turned out a bit watery after chilling. What happened?
A> No worries! This usually happens if the beans and corn weren’t drained thoroughly enough, or if the juicy veggies (like tomatoes, if you added them) release liquid. Just give it a good stir before serving and drain off any excess liquid at the bottom of the bowl with a spoon. Using a slotted spoon to serve it helps too.
Q: Can I make this ahead of time for a party?
A> Absolutely, and I highly recommend it! Chop all your veggies and make the dressing the night before. Keep them separate in the fridge. Then, just combine and toss 1-2 hours before the party starts for the perfect flavor meld without any sogginess.
Q: Is this Cowboy Caviar actually healthy?
A> You bet! It’s packed with plant-based protein and fiber from the beans, vitamins from all the fresh vegetables, and healthy fats from the olive oil. It’s naturally gluten-free and can easily be made vegan (just ensure your sweetener is vegan). It’s sustenance that makes you feel good.

Cowboy Caviar : Colorful, Zesty & Totally Addictive Bean Salad
Description
Cowboy Caviar is one of those magical dishes that fits anywhere—game day, potlucks, picnics, or weeknight snacking. It’s fresh, vibrant, and loaded with texture from beans, crisp vegetables, and a zesty lime vinaigrette. Best of all, there’s no cooking involved—just chop, mix, and chill.
Ingredients
For the salad
-
1 can (15 oz) black beans, drained and rinsed
-
1 can (15 oz) sweet corn, drained
-
1 red bell pepper, diced
-
1 green bell pepper, diced
-
1 small red onion, finely diced
-
1 jalapeño, seeded and minced (optional)
-
½ cup fresh cilantro, chopped
For the dressing
-
⅓ cup extra-virgin olive oil
-
2 tbsp red wine vinegar (or apple cider vinegar)
-
1 tbsp fresh lime juice
-
1 tsp honey or maple syrup
-
½ tsp garlic powder
-
1 tsp chili powder
-
Salt and black pepper, to taste
Instructions
-
Combine the base:
In a large bowl, add black beans, corn, bell peppers, red onion, jalapeño, and cilantro. -
Make the dressing:
In a small bowl or jar, whisk (or shake) together olive oil, vinegar, lime juice, honey, garlic powder, chili powder, salt, and pepper. -
Toss it together:
Pour most of the dressing over the salad and gently toss until everything is well coated. Add more dressing if needed. -
Chill for flavor:
Cover and refrigerate for at least 30 minutes (1–2 hours is best) to let the flavors blend. -
Serve:
Stir once more and serve chilled with tortilla chips, or as a side dish.
Notes
-
Drain well: Rinse and dry beans and corn thoroughly to avoid excess liquid.
-
Adjust the heat: Leave jalapeño seeds in for spice, or skip it entirely for a mild version.
-
Make it ahead: This dish tastes even better after sitting and keeps well for 3–4 days.
-
Add avocado last: If using avocado, fold it in just before serving to keep it fresh.
-
Use sturdy chips: Scoop-style tortilla chips work best.
Nutritional Breakdown (A Per-Serving Guide)
Let’s talk facts! This is an approximation for a ½ cup serving (which is modest—you’ll likely have more, and that’s okay!).
Calories: ~150 | Protein: 5g | Carbohydrates: 18g | Dietary Fiber: 5g (That’s 20% of your daily goal!) | Total Fat: 7g (mostly the heart-healthy monounsaturated kind from olive oil) | Sugar: 4g (natural from the corn and peppers).
It’s a nutrient-dense, energy-boosting dish. The fiber and protein combo helps keep you full and satisfied, making it a brilliant snack or side that supports your goals without sacrificing flavor one bit.
Final Thought
So there you have it—my heartfelt, chip-dipping love letter to Cowboy Caviar. It’s more than a recipe; it’s a tool for connection, a burst of color on a grey day, and proof that the most satisfying food is often the simplest to make.
I hope you make this for your next gathering, your next quiet night in, or just for yourself because you deserve a bowl of something vibrant and delicious. When you do, I’d love to hear about it! Tag me over on Feastical or shoot me a message and tell me your twist on it.
Now, go forth and make a little magic in that kitchen of yours. And remember: good food, shared with good people (even if that’s just you), is always a celebration. Until next time, keep your spatula close and your appetite adventurous.

Hot Pizza Dip : Cheesy, Meaty, and Made to Share
Hot Pizza Dip: Your New Go-To Recipe for Fun, Flavor, and Feeding a Crowd
Hey friends, Beau here from Feastical! Pull up a chair and let’s talk about one of life’s greatest culinary truths: everything is better when it’s dippable. We’re not just talking about a sad bowl of salsa next to a bag of chips. I’m talking about something warm, bubbling, and packed with so much flavor it feels like a party in a dish. That’s exactly what this Hot Pizza Dip is.
Imagine the gooey cheese pull of your favorite pizza, the tangy-sweet kiss of marinara, the savory bite of pepperoni, all baked together until the edges are perfectly golden and crispy. Now, imagine scooping that glorious mess up with a crispy baguette slice. That’s the magic we’re making today. This isn’t just another appetizer; it’s the MVP of your game-day spread, the star of your book club night, and the hero of your “I don’t feel like cooking” Tuesday. It comes together with about 5 minutes of hands-on work and delivers maximum comfort and joy. So, preheat your oven, grab your favorite oven-safe dish, and let’s turn pizza night into dip night. Trust me, your people will thank you.
The Night We Dip-Fied Pizza (And Never Looked Back)
This recipe was born from a classic Collier family scenario: an impromptu gathering, a nearly empty fridge, and a serious craving for pizza. It was a rainy Sunday during football season. Friends had piled in, the game was on, and the collective hunger was real. The problem? We’d already ordered pizza the night before, and my grocery run was still a day away.
I did a quick pantry raid and found a block of cream cheese, a jar of my homemade marinara (a staple in my fridge!), a bag of shredded mozzarella, and the last of a pepperoni stick. The idea hit me like a lightning bolt—what if I layered these like a deconstructed pizza and baked it? I scraped it all into my little cast iron skillet, threw it in the oven, and held my breath. Twenty minutes later, I presented this bubbling, cheesy, red-speckled creation to the crew with a “Dip into this and tell me what you think.” The silence that followed—broken only by the sound of enthusiastic chewing and the occasional “oh, wow”—said it all. The dip was gone in minutes, the game was forgotten, and we spent the next hour debating what to call it. “Pizza Fondue”? “Dip-zza”? We settled on the beautifully simple “Hot Pizza Dip,” and it’s been a Feastical favorite ever since. It’s proof that the best recipes often come from a little chaos and a willingness to play with your food.
Gathering Your Flavor All-Stars
Here’s what you’ll need to build your dip masterpiece. Think of it as a flavorful, layered construction project!
- 8 oz cream cheese, softened: This is our rich, tangy, and incredibly creamy foundation. Chef’s Insight: Let it sit on the counter for 30-60 minutes before you start. A soft block spreads like a dream and creates a seamless base. For a lighter twist, Neufchâtel cheese works perfectly.
- 1 cup marinara or pizza sauce: The soul of the operation! Use a sauce you love to eat on its own. Substitution Tip: No jarred sauce? A can of crushed tomatoes simmered for 10 minutes with a pinch of garlic powder, dried oregano, and salt will do the trick.
- 1½ cups shredded mozzarella cheese: The star of the show for that iconic, stretchy cheese pull. Chef’s Hack: I highly recommend shredding your own from a block. Pre-shredded cheese contains anti-caking agents that can make it less melty. But in a pinch, the bagged stuff will still get you there!
- ¼ cup grated Parmesan (optional but highly encouraged): This is our flavor booster. It adds a salty, nutty, umami punch that takes the cheese layer to the next level.
- ½ cup sliced pepperoni: Our savory, salty, slightly crispy topping. Fun Twist: Mini pepperonis are adorable and give you more coverage per bite. You can also swap in cooked Italian sausage, diced ham, or even sautéed mushrooms for a veggie version.
- Italian seasoning (for garnish): A light sprinkle after baking wakes up all those dried herbs and makes the dip look professionally finished.
- Crackers, breadsticks, or toasted baguette for dipping: The vehicle for flavor! My personal favorite is a thinly sliced and lightly toasted baguette—it’s sturdy enough to scoop and has a wonderful crunch.
Building Your Bubbly Masterpiece: Step-by-Step
Ready? This is the easy (and fun!) part. Follow these steps, and you’ll be a dip architect in no time.
- Preheat and Prep: Fire up your oven to 375°F (190°C). This is the perfect temperature to get everything hot, bubbly, and golden without burning the top too quickly. While it heats, grab your baking dish. A 9-inch pie plate, an 8×8 baking dish, or a small (8-inch) cast-iron skillet works beautifully. No need to grease it!
- Create the Creamy Base: Take your softened cream cheese and plop it right into the center of your dish. Using a spatula or the back of a spoon, spread it into an even layer, pushing it all the way to the edges. Think of this as laying down the perfect, velvety foundation for your flavor house. Pro Tip: If your cream cheese is still a bit cold, drop the block in the microwave for 10-15 seconds to make it spreadable.
- Add the Saucy Heart: Now, spoon your marinara sauce over the cream cheese layer. Here’s my little trick: dollop it in several spots, then gently spread it with the back of the spoon. This helps prevent the two layers from mixing too much, giving you that beautiful, distinct cheesy and saucy strata in every scoop.
- Blanket It in Cheese: Time for the mozzarella! Sprinkle it evenly over the marinara, covering every saucy inch. If you’re using the Parmesan, mix it in with the mozzarella or sprinkle it on top for an extra flavor crust. This layer is what creates that irresistible, Instagram-worthy cheese pull.
- The Pepperoni Finale: Artfully (or just enthusiastically!) arrange your pepperoni slices over the cheese. I like to overlap them slightly for maximum meaty coverage. For extra crispness, you can add half the pepperoni now and the other half in the last 5 minutes of baking.
- Bake to Bubbly Perfection: Slide your masterpiece into the preheated oven. Bake for 20-25 minutes. You’re looking for the entire dish to be visibly bubbling around the edges, the cheese to be fully melted and possibly just starting to get a few golden spots, and the pepperoni to look a bit crisped. Your kitchen will smell unreal.
- Garnish and Serve Immediately: Carefully remove the dip from the oven (remember, the dish is HOT!). Give it a light sprinkle of Italian seasoning for that fresh herb aroma. Now, call everyone to the table—this dip is best enjoyed piping hot, straight from the oven!
How to Serve This Dip Like a Pro
Presentation is part of the fun! I love serving this dip right in the dish it was baked in, placed on a heatproof trivet or a large wooden board. The visual of the bubbling cheese is half the appeal. Surround your central dish with an array of dippers for people to choose from. I always offer a mix of textures: crispy (toasted baguette slices, pita chips, sturdy crackers), soft (pretzel rods, breadsticks), and even fresh (thick slices of bell pepper, cucumber rounds, or celery sticks for a cool contrast). Don’t forget a small, sturdy serving spoon or spreader for scooping. And have napkins handy—this is gloriously messy, communal eating at its best.
Make It Your Own: Delicious Twists on the Classic
The beauty of this recipe is its versatility. Once you’ve mastered the basic blueprint, the canvas is yours to paint! Here are a few of my favorite riffs:
- Supreme Style: Before adding the cheese, scatter a handful of finely diced green bell pepper, sliced black olives, and thin onion rings over the marinara layer. You can even add a few slices of pickled jalapeño for a kick.
- Hawaiian Luau: Swap the pepperoni for diced Canadian bacon or ham. Add a layer of well-drained crushed pineapple over the marinara before the cheese. The sweet and salty combo is a crowd-pleaser!
- Veggie Lover’s Dream: Skip the meat and load it up! Sauté some sliced mushrooms, spinach, and diced red onion until soft, then spread that mixture over the marinara. A sprinkle of roasted red peppers on top adds gorgeous color.
- Spicy ‘Nduja Kick: For the adventurous, mix 2-3 tablespoons of spicy ‘nduja or softened spicy Italian sausage into the cream cheese base. It infuses the entire dip with a warm, meaty heat.
- Breakfast Pizza Dip: Yes, really! Use a garlic-herb cream cheese spread, a layer of cooked breakfast sausage crumbles, and top with mozzarella and cheddar. After baking, top with a drizzle of maple syrup. Serve with toasted English muffin dippers.
Beau’s Kitchen Notes & Stories
Over the years, this dip has seen some things. It’s been doubled and served in a giant skillet for a Super Bowl party (just increase the bake time by 5-10 minutes). It’s been made in individual ramekins for a fancy-but-easy appetizer course. Once, in a true moment of inspiration (or desperation), I didn’t have a baking dish free, so I made it in a foil-lined pie tin on the grill while camping—it was a hit. The recipe is wonderfully forgiving. The biggest evolution has been my insistence on room-temperature cream cheese. I learned the hard way that trying to spread a cold block leads to a torn-up layer and a frustrated chef. Now, setting out the cream cheese is the very first thing I do, even before I decide I’m making the dip. It’s a tiny habit that makes the whole process joyful. Remember, cooking should feel like play, not a chore.
Your Hot Pizza Dip Questions, Answered
Q: Can I make this dip ahead of time?
A: Absolutely! You can assemble the entire dip (up through the pepperoni layer) in your baking dish, cover it tightly with plastic wrap, and refrigerate it for up to 24 hours. When you’re ready, bake it straight from the fridge, adding maybe 5 extra minutes to the cook time since it’s starting cold.
Q: My dip seems a bit oily on top. What happened?
A> No worries! That’s just the natural fat from the pepperoni and cheese melting out. It’s totally normal, especially if you use full-fat cheese and pepperoni. You can blot the top gently with a paper towel after baking if you prefer, but I think it’s part of the delicious charm.
Q: What can I use instead of cream cheese?
A> For a similar tangy creaminess, try ricotta cheese (whole milk works best). You might want to stir a pinch of salt into it first. For a dairy-free version, a plain, thick vegan cream cheese spread works as a base.
Q: How do I reheat leftovers?
A> The microwave works in a pinch (use short bursts, stirring in between), but to regain that perfect melted texture, reheat it in the oven at 350°F in an oven-safe dish for 10-15 minutes. It won’t be quite as pristine as the first bake, but it’ll still be delicious.

Hot Pizza Dip : Cheesy, Meaty, and Made to Share
Description
This Hot Pizza Dip turns everything you love about pizza—melty cheese, tangy sauce, and savory toppings—into a warm, scoopable snack. It’s quick to assemble, bakes in minutes, and disappears fast at parties, game nights, or casual get-togethers.
Ingredients
-
8 oz cream cheese, softened
-
1 cup marinara or pizza sauce
-
1½ cups shredded mozzarella cheese
-
¼ cup grated Parmesan cheese (optional)
-
½ cup sliced pepperoni
-
½ tsp Italian seasoning (for garnish)
-
Crackers, breadsticks, or toasted baguette (for serving)
Instructions
-
Preheat oven to 375°F (190°C).
-
Spread the softened cream cheese evenly in a small baking dish or oven-safe skillet.
-
Spoon marinara over the cream cheese and gently spread into a smooth layer.
-
Sprinkle mozzarella (and Parmesan, if using) evenly on top.
-
Add pepperoni slices over the cheese.
-
Bake for 20–25 minutes, until bubbly and lightly golden.
-
Garnish with Italian seasoning and serve hot with your favorite dippers.
Notes
-
Softened cream cheese spreads easily and creates clean layers—leave it out 30–60 minutes before starting.
-
Shred your own cheese for the best melt (pre-shredded can be less stretchy).
-
Make it ahead: Assemble, cover, and refrigerate up to 24 hours; bake with 5 extra minutes.
-
Customize it: Swap pepperoni for cooked sausage, mushrooms, olives, or bell peppers.
-
Crispier topping: Add half the pepperoni at the start and the rest in the last 5 minutes.
Nutritional Information (A Chef’s Perspective)
Let’s keep it real: this is a celebratory, shareable comfort food dish. I’m not a nutritionist, but I believe in enjoying food mindfully. The following is an approximate breakdown per serving (based on 6 servings, without dippers), calculated using standard ingredients. Remember, variations will change these numbers!
- Calories: ~260
- Protein: 9g (Hello, cheese and pepperoni!)
- Fat: 22g (This is where the rich, satisfying flavor comes from)
- Carbohydrates: 6g (Primarily from the marinara sauce)
To balance it out, I love serving it with plenty of fresh veggie dippers alongside the bread. It turns the experience into a more rounded snack or appetizer. As always, this is about joy and sharing, so serve it, enjoy it, and savor the moment with your people.
Final Slice of Thought… I Mean, Dip!
At the end of the day, recipes like this Hot Pizza Dip are about more than just food. They’re about gathering. They’re about that collective “ooooh” when you bring something bubbling and cheesy to the table. They’re about the conversations that happen while everyone is leaning in, scooping, and sharing. This dip has saved my hosting bacon more times than I can count, and it’s brought smiles to countless faces around my table. I hope it does the same for you. Don’t be afraid to tweak it, to make it your own, and to create your own kitchen stories around it. Now, go forth and dip! And don’t forget to tag @Feastical if you make it—I love seeing your creations.
Until next time, keep it simple, soulful, and always satisfying.
– Beau

Fajita Beef Taco Meal Prep Bowls : Easy, Flavor-Packed Lunches for the Week
Ditch the Sad Desk Lunch: Your New Favorite Weekday Hero is Here!
Hey friends, Beau here! Let’s get real for a second. How many times have you stared into the abyss of your fridge at 7 AM, or worse, peered at a depressing takeout container at your desk at noon, and thought, “There has to be a better way”? I’ve been there. We all have. The dream of having delicious, homemade, actually-exciting food ready to go feels just out of reach, lost in a sea of busy schedules and tired evenings.
Well, my fellow food lovers, I’m about to change your lunch game forever. I’m talking about a recipe that’s become a non-negotiable in my own kitchen rotation: Fajita Beef Taco Meal Prep Bowls. This isn’t just “meal prep.” This is building a flavor fortress for your week. Imagine tender, perfectly spiced ground beef, crispy smoky roasted potatoes, and a confetti of fresh, crunchy veggies, all coming together in a symphony of texture and taste that makes you actually look forward to lunchtime.
These bowls are the ultimate kitchen hack for the busy foodie. They’re hearty, packed with protein to keep you fueled, endlessly customizable, and they hold up like champions in the fridge. We’re combining the sizzling, savory spirit of fajita night with the smart, strategic magic of meal prep. So, tie on your apron, grab your favorite cutting board, and let’s spend a little time together this weekend to set your future self up for a week of wins. Your taste buds (and your 12 PM self) will thank you!
Why This Dish? A Tale of Taco Tuesdays & Kitchen Confidence
This recipe has its roots in pure, unadulterated chaos—specifically, the beautiful, delicious chaos of family taco night when I was a kid. My dad was (and still is) the Master of the Skillet on these nights. He’d have every burner going: one for sizzling steak strips, another for sautéing peppers and onions until they were sweet and charred, and a precarious pot of beans always threatening to bubble over.
The kitchen would be a steam-filled, spice-scented war zone, and we loved it. But the best part came after the feast. My mom, the genius of practicality, would inevitably look at the leftovers—a little beef, a handful of peppers, a few rogue roasted potato wedges from another meal—and declare, “Lunch bowls!” She’d artfully assemble them into containers, and like magic, my school lunch the next day was the envy of the cafeteria.
These meal prep bowls are my homage to that magic. They capture that festive, “everyone dig in” feeling of taco night but streamline it into a single, brilliant blueprint for the week ahead. It’s about turning cooking from a daily demand into a joyful, weekly ritual that pays delicious dividends. It’s the food version of giving yourself a high-five every single day at lunch.
Gathering Your Flavor Arsenal: A Guide to What Goes In
Here’s everything you need to build four incredible, satisfying bowls. Think of this list as your flavor blueprint—simple, accessible, and packed with potential.
- 1 lb ground beef (85/15 or 90/10 lean/fat ratio): This is your hearty base. The little bit of fat adds incredible flavor and ensures your beef stays juicy. Chef’s Insight: For a richer taste, try ground chuck! Easy Swap: Ground turkey, chicken, or a plant-based crumble work beautifully here.
- 4 medium potatoes, chopped (about 1-inch cubes): I love Yukon Golds for their creamy interior that gets fluffy and crispy edges. Russets work too for a fluffier bite. They’re our carb-tastic, comforting foundation.
- 1 tbsp olive oil: For roasting those potatoes to crispy perfection.
- 1 tsp smoked paprika: This is the secret weapon! It gives the potatoes a deep, almost bacony, smoky flavor without any fuss.
- 1 tsp garlic powder: An easy, no-burn way to get garlicky goodness into every potato bite.
- Salt & pepper to taste: The undisputed champions of flavor. Don’t be shy!
- 1 cup diced tomatoes: Fresh, juicy, and bright. Use Roma/plum tomatoes for less watery dice. Pro Tip: If you’re not a fan of raw tomato, a scoop of mild salsa in its place is genius.
- 1 cup diced red onion: They add a sharp, crisp bite and gorgeous color. Soaking them in cold water for 5 minutes after dicing tames their intensity if you prefer a milder onion flavor.
- ½ cup chopped bell peppers (optional but highly recommended!): Color = nutrients and joy! I use a mix of red and green for sweetness and a classic fajita vibe.
- Taco or fajita seasoning (for the beef): Your shortcut to big flavor. Use 2-3 tablespoons of your favorite store-bought blend, or whip up a batch of my simple homemade mix (equal parts chili powder, cumin, paprika, with a pinch of oregano and cayenne).
- Taco sauce or hot sauce (for topping): The finishing flare! This keeps the bowls from drying out and adds a tangy, spicy kick. I’m loyal to a classic red taco sauce for this.
- Fresh cilantro or parsley (optional garnish): A pop of green herbaceousness makes everything feel fresher and more restaurant-quality.
Let’s Build Some Bowls: Your Foolproof Roadmap to Success
Follow these steps, and you’ll have four gorgeous bowls ready for the fridge in under an hour. I’m walking you through every bit of it!
- Fire Up & Chop: First, preheat your oven to 425°F (220°C). This high heat is key for crispy potatoes. While it heats, chop your potatoes into nice, even 1-inch cubes. Consistency is your friend here—it means they’ll all cook at the same rate. Chef’s Hack: No need to peel them! The skin adds texture, nutrients, and saves you time.
- Roast Those Spuds: On a large baking sheet, toss your potato cubes with the olive oil, smoked paprika, garlic powder, salt, and pepper. Get your hands in there and massage those flavors in! Arrange them in a single layer—no crowding! This ensures they roast instead of steam. Pop them in the oven for 25-30 minutes, flipping halfway through. You’ll know they’re done when they’re golden brown and fork-tender.
- Brown the Beef: While the potatoes work their magic, place a large skillet over medium-high heat. Add your ground beef and cook, breaking it up with a wooden spoon, until it’s beautifully browned and no pink remains. Tilt the skillet and spoon out most of the excess fat (I drain it into an old jar). Important Tip: Don’t drain all the fat! That little bit left behind carries tons of flavor into your seasoning.
- Season to Perfection: Reduce the heat to medium-low. Sprinkle your taco or fajita seasoning over the beef. Add a splash of water (about ¼ cup)—this helps the spices bloom and creates a light, flavorful sauce that coats every morsel. Stir and let it simmer for 2-3 minutes until fragrant. Taste and adjust salt if needed!
- Veggie Prep Station: As everything cooks, dice your tomatoes, onions, and bell peppers. Keep them separate for now—we’re building layers of flavor and texture!
- The Grand Assembly: Grab your four meal prep containers (these are my favorite part!). Start with a base of those glorious roasted potatoes. Next, layer on a generous portion of the seasoned beef. Then, artfully pile on your fresh veggies: tomatoes, onions, and peppers. Pro Assembly Tip: Let the beef and potatoes cool just slightly before adding the fresh veggies. This keeps everything crisp!
- The Finishing Touch: Right before you seal the lids, drizzle each bowl with a healthy zigzag of taco sauce or hot sauce. This is crucial—it keeps the whole dish moist and infuses every component with flavor as it sits. Sprinkle with fresh cilantro if you’re using it. Let the containers cool, uncovered, on the counter for about 15-20 minutes before putting the lids on and refrigerating. This prevents condensation from making your crispy potatoes soggy.
How to Serve & Savor Your Masterpiece
The beauty of these bowls is they are ready to go! But let’s talk about the experience. When lunchtime hits, you can enjoy them straight from the fridge—the contrast between the cool, crisp veggies and the savory, room-temp beef and potatoes is fantastic. If you have a microwave, a 60-90 second zap will warm the base beautifully while leaving the veggies refreshingly crisp.
Think beyond the container! If you’re eating at home, dump the contents into a real bowl and give it a fresh stir. Top with extra goodies like a dollop of cool sour cream or Greek yogurt, a few slices of creamy avocado, a squeeze of lime juice, or a handful of crushed tortilla chips for an extra crunch. The whole point is to make a meal that feels special, not just “prepped.”
Make It Your Own: 5 Delicious Twists on the Theme
The true magic of this recipe is its flexibility. Play with it!
- The “Fiesta Ranch” Twist: Swap the taco sauce for a drizzle of ranch dressing mixed with a little lime juice and taco seasoning. It’s creamy, tangy, and utterly addictive.
- Go Southwestern with Corn & Black Beans: Add ½ cup of corn kernels (roasted from frozen is easy!) and a rinsed can of black beans to your veggie mix. It bulks up the bowls and adds fantastic fiber.
- Cheeseburger Bowl Style: Love that diner flavor? Season the beef with a mix of onion powder, mustard powder, and Worcestershire sauce. Top with pickles, diced white onion, and a sprinkle of cheddar cheese. Use ketchup and mustard as your “sauce.”
- Low-Carb/Keto Friendly: Replace the potatoes with cauliflower florets roasted with the same spices. They get wonderfully caramelized and are the perfect vehicle for all the other flavors.
- Mediterranean-Inspired: Use ground lamb or turkey seasoned with oregano, garlic, and lemon zest. Swap the potatoes for roasted chickpeas, the tomatoes for chopped cucumber, and the taco sauce for a lemony tahini or tzatziki drizzle.
Beau’s Brain Dump: Extra Tips & Kitchen Stories
This recipe has evolved from a “clean out the fridge” scramble to my most-requested meal prep by friends. One funny fail? The time I used *only* fresh garlic on the potatoes and roasted them a bit too long. Let’s just say we had some very… *enthusiastically* browned garlic bits. Powder is safer for this application, trust me!
Over time, I’ve learned the real key is in the layering and the sauce. Keeping the fresh elements separate from the warm ones until assembly is a game-changer for texture. And that final drizzle of sauce? It’s not just garnish; it’s the moisture lock and flavor booster that makes the last bite as good as the first. Don’t skip it!
Your Questions, Answered!
Q: How long do these bowls last in the fridge?
A: Perfectly for 4 days. By day 5, the veggies start to lose their perfect crunch. They don’t freeze super well due to the fresh veggies and potatoes, which can get grainy.
Q: My potatoes came out soggy. What happened?
A: Two likely culprits: 1) The pan was overcrowded, causing them to steam instead of roast. Use two sheets if needed! 2) They were covered or put in the container while still piping hot, creating steam. Let everything cool a bit first!
Q: Can I use sweet potatoes instead?
A: Absolutely! Sweet potatoes are fantastic. Just note they may cook a little faster, so check them at the 20-minute mark. The sweet and smoky combo is divine.
Q: Is this recipe gluten-free/dairy-free?
A: It is naturally gluten-free and dairy-free as written! Just double-check your taco seasoning and taco sauce labels to ensure no hidden gluten or dairy additives.

Fajita Beef Taco Meal Prep Bowls : Easy, Flavor-Packed Lunches for the Week
Description
Fajita Beef Taco Meal Prep Bowls – Your Weekday Hero
Intro:
No more sad desk lunches! These bowls combine savory seasoned beef, crispy roasted potatoes, and fresh veggies for a meal that’s hearty, protein-packed, and totally customizable. Prep once, enjoy all week.
Ingredients
Protein & Base:
-
1 lb ground beef (85/15 or 90/10; turkey, chicken, or plant-based crumble optional)
-
4 medium potatoes, chopped into 1-inch cubes (Yukon Gold or Russet)
-
1 tbsp olive oil
-
1 tsp smoked paprika
-
1 tsp garlic powder
-
Salt & black pepper
Veggies & Flavor:
-
1 cup diced tomatoes (Roma/plum for less moisture)
-
1 cup diced red onion (soak 5 min in cold water for milder flavor)
-
½ cup chopped bell peppers (optional)
-
Taco or fajita seasoning: 2–3 tbsp store-bought or homemade (chili powder + cumin + paprika + pinch of oregano + cayenne)
-
Taco sauce or hot sauce, for drizzling
-
Fresh cilantro or parsley, for garnish (optional)
Optional Twists:
-
Add black beans & corn
-
Swap potatoes for cauliflower for low-carb
-
Use sweet potatoes for a sweet-smoky combo
-
Mediterranean twist: ground lamb/turkey, roasted chickpeas, cucumber, lemon-tahini drizzle
Instructions
1. Roast the Potatoes
-
Preheat oven to 425°F (220°C).
-
Toss potato cubes with olive oil, smoked paprika, garlic powder, salt, and pepper. Spread in a single layer.
-
Roast 25–30 min, flipping halfway, until golden and fork-tender.
2. Cook the Beef
-
In a large skillet over medium-high heat, cook beef, breaking it up, until browned. Drain excess fat, leaving a little for flavor.
-
Reduce heat, sprinkle in taco/fajita seasoning, add ¼ cup water, and simmer 2–3 min until coated and fragrant. Taste and adjust seasoning.
3. Prep the Veggies
-
Dice tomatoes, onions, and bell peppers; keep separate until assembly.
4. Assemble the Bowls
-
Layer roasted potatoes in four meal prep containers.
-
Top with seasoned beef.
-
Add fresh veggies on top.
-
Drizzle with taco sauce or hot sauce and sprinkle with cilantro if desired.
-
Let cool 15–20 min before sealing and refrigerating.
Notes
-
Soggy potatoes? Don’t overcrowd the pan, and let containers cool before sealing.
-
Too spicy? Use mild taco seasoning or skip hot sauce until serving.
-
Sweet potato swap: Roast a few minutes less than regular potatoes.
Nutritional Information (Per Bowl, Approximate)
Please remember, I’m a cook, not a dietitian! These estimates are based on the core recipe using 90/10 beef and standard ingredients. Your specific brands and modifications will alter the numbers.
- Calories: ~400-450
- Protein: ~25g (Excellent for staying full and fueled!)
- Carbohydrates: ~30g
- Fat: ~20g
- Fiber: ~4-5g (Add black beans or corn to boost this even more!)
Prep Time: 15 mins | Cook Time: 30 mins | Total Time: 45 mins | Servings: 4 bowls
Final Thoughts
And there you have it, friends! My complete, heart-and-soul guide to the Fajita Beef Taco Meal Prep Bowls that have saved my lunch sanity more times than I can count. This isn’t about restrictive planning or eating the same boring thing; it’s about gifting your future self the joy of a truly delicious, homemade meal in the middle of a hectic day.
It’s about reclaiming that feeling of “taco night” any day of the week. So give it a try this weekend. Put on some good music, get your chopping rhythm going, and fill your kitchen with the incredible smell of smoky paprika and sizzling beef. Then, sit back and enjoy the peace of mind that comes with knowing a week of wonderful lunches is waiting for you.
If you make them, I’d love to hear about it! Tag me on social @Feastical or drop a comment on the blog. Now go forth, prep, and conquer your week—one fantastically flavorful bite at a time. Until next time, keep it simple, soulful, and satisfying.
Hungry for more?
Beau
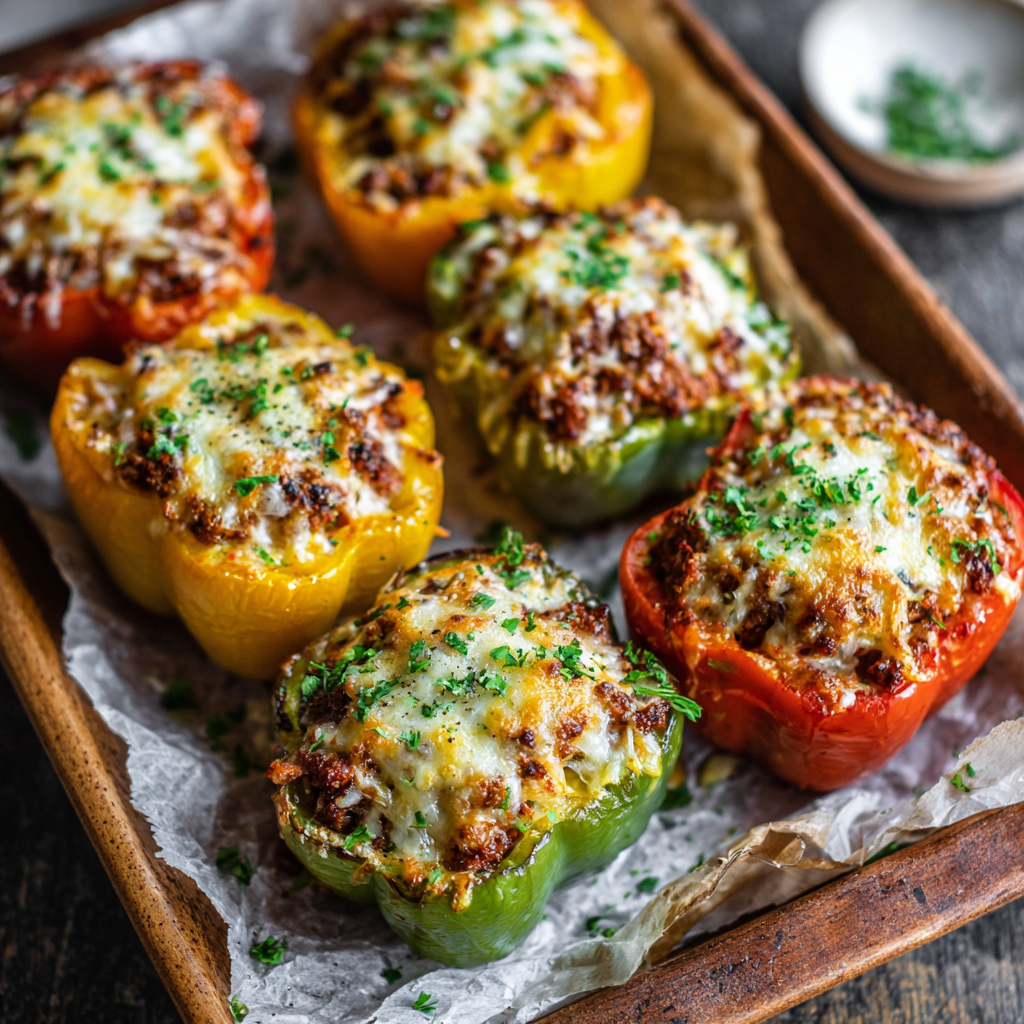
Cheesy Stuffed Bell Peppers : Oven-Baked Comfort Food
Your New Favorite Comfort Food: Cheesy Stuffed Bell Peppers
Hey there, friend! Beau from Feastical here, and I’ve gotta tell you—I think I’ve found one of the most satisfying, hug-in-a-bowl meals to ever come out of a home oven. We’re talking about Cheesy Stuffed Bell Peppers. You know the ones. They look like they belong in a cozy restaurant window, all colorful and bubbling with golden cheese, but the secret is they’re ridiculously simple to make. They’re the culinary equivalent of your favorite cozy sweater.
This isn’t just a recipe; it’s a weeknight dinner hero, a meal-prep champion, and a crowd-pleasing side dish all rolled into one vibrant, edible bowl. Whether you’re feeding a hungry family, impressing a date, or just treating yourself to a delicious solo dinner, these peppers have got your back. They’re forgiving, endlessly customizable, and they make your kitchen smell like a home chef’s dream. So, tie on your apron, grab your favorite baking sheet, and let’s turn some simple ingredients into a symphony of comfort.
The Secret’s in the Stuffed Pepper (And My Grandma’s Kitchen)
My love for stuffed peppers goes way back. I can still picture my grandma’s kitchen on a crisp Sunday afternoon. There’d always be a Pyrex dish in the center of the table, steaming with green bell peppers she’d grown herself, stuffed to the brim with a savory, tomato-y filling. To me, it felt like magic—how a humble vegetable could become a vessel for so much flavor and heart.
She’d call it “clean out the fridge” night, but it was so much more. A little leftover rice from last night’s takeout, the last bit of ground beef, that half-jar of pasta sauce—it all found a new purpose. She taught me that great cooking isn’t about fancy techniques; it’s about creativity, resourcefulness, and sharing. This recipe is my love letter to that lesson. It’s a blueprint, a foundation you can build on with whatever you have on hand. Every time I pull a tray of these from the oven, that cheesy, savory aroma takes me right back to her table. Let’s make some new memories, shall we?
Gathering Your Flavor Crew: The Ingredients
Here’s what you’ll need to gather. Think of this list as your friendly guide—I’ve added some notes and swaps so you can rock this recipe no matter what’s in your pantry!
- 4 large bell peppers (any color!) – The edible bowls! Red and yellow are sweeter, green have a classic, slightly bitter bite. Pick the ones that look the plumpest and shiniest for the best structure.
- 1 lb ground meat – I typically use 85/15 ground beef for flavor, but ground turkey, chicken, or even a plant-based crumble work perfectly. This is your protein powerhouse.
- 1 cup cooked rice or quinoa – Day-old rice is perfect here—it soaks up the flavors without getting mushy. Quinoa is a fantastic gluten-free, protein-packed alternative.
- 1/2 onion, diced – Yellow or white onion adds a sweet, savory base. No onion? A tablespoon of onion powder in a pinch will do.
- 1 cup shredded cheese – I’m a cheddar-for-sharpness, mozzarella-for-gooey-stretch kinda guy. A Mexican blend or pepper jack would also be incredible. Buy a block and shred it yourself for the best melt!
- 1/2 cup tomato sauce or salsa – This is our flavor binder and moisture magic. Plain tomato sauce, marinara, or even a chunky salsa (for a kick!) all work. Chef’s Insight: Salsa adds instant seasoning.
- 2 cloves garlic, minced – Non-negotiable flavor booster. If you’re out, 1/2 tsp of garlic powder can sub in.
- Salt, black pepper, and 1 tsp Italian seasoning – The seasoning dream team. Feel free to use oregano, thyme, or a sprinkle of paprika instead.
- A drizzle of olive oil – For sautéing and giving those pepper tops a lovely sheen.
Let’s Get Building: Step-by-Step Magic
Ready to assemble your edible masterpieces? Follow these steps, and I’ll walk you through every little chef hack I know.
Step 1: Prep Your Oven & Peppers. First, preheat that oven to 375°F (190°C). This is our sweet spot for cooking the peppers through without burning the cheese. Now, take your bell peppers. Slice them in half from top to bottom (through the stem) and carefully cut out the seeds and white ribs. Pro Tip: Leave the stems on—they give the peppers a fun, rustic look and a little handle for eating! If your peppers wobble on the baking sheet, shave a tiny sliver off the bottom to create a flat base.
Step 2: Build the Flavor Base. Heat a large skillet over medium heat with a glug of olive oil. Add your diced onion and cook for 4-5 minutes until soft and translucent. Now, add the minced garlic and stir for just 30 seconds until fragrant—don’t let it burn! Add your ground meat, breaking it up with a wooden spoon. Cook until no pink remains. This is where you season well with salt, pepper, and that Italian seasoning.
Step 3: Create the Filling. Turn the heat down to low. To your beautiful, browned meat mixture, stir in the cooked rice and your tomato sauce or salsa. Let it all get friendly for about 2 minutes, stirring until everything is perfectly combined and heated through. Give it a taste! This is your last chance to adjust the seasoning. Need more salt? A pinch more herbs? Now’s the time.
Step 4: Stuff ‘Em & Top ‘Em. Grab your pepper halves and arrange them on a baking sheet (I line mine with foil or parchment for super easy cleanup). Generously spoon the filling into each pepper cavity, pressing down lightly and mounding it up. Don’t be shy! Then, crown each one with a glorious heap of shredded cheese. A final tiny drizzle of olive oil over the peppers themselves helps them roast beautifully.
Step 5: Bake to Golden Perfection. Slide that tray into your preheated oven. Bake for 25-30 minutes. You’re looking for the peppers to be tender enough to easily pierce with a fork (but not collapsing) and the cheese to be gloriously melted, bubbly, and with maybe a few golden-brown spots. Chef’s Hack: For extra tender peppers, you can par-boil the hollowed-out halves for 5 minutes before stuffing, but I love the slight bite they keep when baked raw.
How to Serve These Beauties
Presentation is part of the fun! I like to serve these straight from the baking sheet, family-style. The vibrant colors are a feast for the eyes. Slide a spatula under each pepper half and place it on a plate. The cheese will be lava-hot and delightfully stretchy—a mandatory photo op!
These peppers are a complete meal on their own, but if you want to round things out, here are my favorite pairings: a simple crisp green salad with a tangy vinaigrette to cut the richness, a slice of crusty garlic bread for mopping up any delicious drippings, or a cool dollop of sour cream or Greek yogurt on the side. For a fresh twist, a sprinkle of chopped cilantro or parsley right before serving adds a wonderful pop of color and flavor.
Make It Your Own: Delicious Twists & Swaps
The true beauty of this recipe is its flexibility. Here are a few of my favorite ways to mix it up:
- The Tex-Mex Fiesta: Use ground chorizo or seasoned ground beef, black beans instead of half the rice, corn kernels, and top with pepper jack cheese. Serve with avocado and lime wedges!
- The Italian Night Special: Use Italian sausage (casings removed), mix in a tablespoon of tomato paste with the sauce, and stir in a handful of fresh chopped spinach. Top with a mix of mozzarella and grated Parmesan.
- The Vegetarian Delight: Skip the meat! Use a full can of rinsed black beans or lentils, and add 1 cup of finely chopped mushrooms (cooked with the onions) for a “meaty” texture. You might need an extra 1/4 cup of tomato sauce for moisture.
- The “Clean Out the Fridge”: Got leftover taco meat? Cooked quinoa? A bit of corn and some diced zucchini? Chop it all up, mix it with a binding agent like sauce or a beaten egg, and stuff away! This is my grandma’s spirit recipe.
- The Low-Carb Version: Replace the rice with 2 cups of finely chopped cauliflower rice (sauté it with the onions to soften). You’ll get all the volume and texture with fewer carbs.
Beau’s Chef Notes & Kitchen Confessions
This recipe has been my trusty sidekick for years, and it’s evolved more than my music taste. I’ve learned that the best stuffed pepper is the one you want to eat. Don’t stress over perfection. Once, I forgot to cook the rice ahead of time and used instant rice straight into the skillet with an extra splash of broth—it worked in a pinch! Another time, I only had two peppers, so I stuffed the extra filling into hollowed-out zucchini boats. Delicious chaos.
My biggest tip? Let them rest for 5 minutes after baking. I know it’s tempting to dive right in, but this allows the filling to set just a bit, making them easier to serve and even more flavorful. Trust me on this one. Also, any leftover filling is amazing in a wrap for lunch the next day.
Your Questions, Answered (Before You Even Ask!)
Q: My peppers are still a bit firm after 30 minutes. What gives?
A: No worries! Ovens and pepper sizes vary. Simply cover the tray loosely with foil (to prevent the cheese from over-browning) and bake for another 5-10 minutes. The par-boiling trick mentioned in the steps is a great safeguard if you always like them super soft.
Q: Can I make these ahead of time?
A: Absolutely! This is a fantastic make-ahead meal. Assemble the stuffed peppers completely, cover tightly, and refrigerate for up to 24 hours. When ready, bake straight from the fridge, adding maybe 5-10 extra minutes to the cook time.
Q: Why is my filling dry?
A: This usually means the meat was very lean or the rice soaked up all the moisture. Next time, try using a higher-fat meat (85/15 beef), or add an extra 1/4 cup of tomato sauce or a splash of beef broth to the filling mix. A beaten egg can also help bind and add moisture.
Q: Can I freeze stuffed peppers?
A> You bet. Assemble them (unbaked), wrap each individually in plastic wrap, and place in a freezer bag. They’ll keep for 2-3 months. Thaw in the fridge overnight before baking as directed. The peppers will be softer after freezing, but still delicious!

Cheesy Stuffed Bell Peppers : Oven-Baked Comfort Food
Description
Colorful, cheesy, and ridiculously satisfying—these stuffed bell peppers are a weeknight hero, meal-prep champion, and crowd-pleaser all in one. Packed with protein, veggies, and a gooey cheesy top, they’re comfort food that smells as good as it tastes.
Ingredients
Peppers & Filling:
-
4 large bell peppers (any color)
-
1 lb ground meat (beef, turkey, chicken, or plant-based crumble)
-
1 cup cooked rice or quinoa (day-old rice works best)
-
½ onion, diced
-
2 cloves garlic, minced
-
½ cup tomato sauce or salsa
-
1 cup shredded cheese (cheddar, mozzarella, Mexican blend, or pepper jack)
-
1 tsp Italian seasoning
-
Salt & black pepper to taste
-
Drizzle of olive oil
Optional Twists:
-
Tex-Mex: chorizo, black beans, corn, pepper jack, avocado
-
Italian: Italian sausage, spinach, mozzarella + Parmesan
-
Vegetarian: black beans + mushrooms, extra tomato sauce
-
Low-carb: replace rice with sautéed cauliflower rice
Instructions
1. Prep Peppers
-
Preheat oven to 375°F (190°C).
-
Slice peppers in half lengthwise, remove seeds and ribs. Leave stems on for a rustic look.
-
If peppers wobble, shave a small sliver from the bottom for stability.
2. Cook Filling
-
Heat olive oil in a skillet over medium heat.
-
Sauté onion for 4–5 min until translucent. Add garlic and cook 30 sec.
-
Add ground meat, breaking it up, and cook until no pink remains. Season with salt, pepper, and Italian seasoning.
-
Stir in cooked rice/quinoa and tomato sauce. Heat 2 min. Taste and adjust seasoning.
3. Stuff & Top Peppers
-
Arrange pepper halves on a lined baking sheet.
-
Spoon filling into each pepper, mounding slightly.
-
Top with shredded cheese and a drizzle of olive oil.
4. Bake
-
Bake 25–30 min until peppers are tender and cheese is bubbly and golden.
-
Optional: cover with foil for extra-soft peppers or par-boil peppers 5 min before stuffing for tenderness.
5. Serve
-
Serve straight from the baking sheet or plate individually.
-
Optional: garnish with parsley/cilantro, serve with a salad, crusty bread, or a dollop of Greek yogurt.
Notes
-
Assemble ahead: refrigerate for up to 24 hours, then bake with an extra 5–10 min.
-
Freeze unbaked: wrap individually, freeze 2–3 months, thaw overnight in fridge before baking.
Nutritional Info (For Your Peace of Mind)
Please note: The following is an approximate estimate for one pepper half (using 85/15 ground beef, white rice, and cheddar cheese) and will vary based on your specific ingredients and swaps.
- Calories: ~380
- Protein: 25g
- Carbohydrates: 25g
- Fat: 20g
- Fiber: 3g
This dish is naturally gluten-free (just check your seasoning blends and sauces) and packed with protein and vitamin C from the peppers. Using lean ground turkey, quinoa, and low-fat cheese can easily adjust the numbers to fit your dietary goals. Remember, cooking at home lets you control exactly what goes into your food!
Final Thoughts: Dig In!
And there you have it, friend—my ultimate guide to Cheesy Stuffed Bell Peppers. This recipe is more than just a list of instructions; it’s an invitation to get creative, to use what you have, and to create something truly satisfying with your own two hands.
I hope these colorful, cheesy bundles of joy bring as much comfort and delight to your table as they have to mine. Remember, the best kitchen is a happy, slightly messy one where good food and good times are shared. Now, go preheat that oven! I can’t wait for you to take that first bite of golden, bubbly cheese and savory filling. Don’t forget to tag @feastical if you share a photo—I love seeing your creations!
Until next time, keep it simple, soulful, and always delicious.
– Beau

Salmon Rice Seaweed Bites : High-Protein Sushi Snack Remix
Salmon Rice Seaweed Bites: Your New Favorite No-Roll Sushi Snack
Hey friends, Beau here! Grab a stool at my kitchen island and let’s talk about one of life’s greatest culinary joys: sushi. I’m talking about that magical combo of fresh fish, seasoned rice, and crispy seaweed that makes your taste buds do a happy dance. But let’s be real for a second—sometimes, rolling perfect sushi at home feels like trying to solve a Rubik’s cube blindfolded. It can be messy, time-consuming, and let’s just say my early attempts looked more like abstract art than edible food.
That’s exactly why I’m so pumped to share my Salmon Rice Seaweed Bites with you today. Think of them as sushi’s cool, laid-back cousin who shows up to the party in comfy clothes but is somehow still the most delicious thing there. We’re taking all the epic flavors you love—flaky salmon, hearty rice, crunchy veggies, and that savory, umami-packed seaweed—and turning them into a simple, scoop-and-devour snack. No bamboo mats, no tricky rolling techniques, just pure, uncomplicated yum.
These little power bites are my go-to for a lightning-fast lunch, a protein-packed post-workout refuel, or an impressive (yet secretly easy) appetizer when friends pop over. They’re fresh, they’re satisfying, and they’re loaded with good-for-you stuff that actually tastes amazing. So, if you’ve ever stared longingly at sushi and thought, “I wish you were easier,” this recipe is your answer. Let’s make mealtime fun again!
The Day Sushi Got a Whole Lot Simpler
This recipe was born from a beautiful kitchen disaster, as the best ones often are. A few years back, I was determined to make a grand sushi platter for a casual game night. I had the rice cooker going, the salmon beautifully marinated, and all my veggies prepped. Then, I realized I had completely forgotten to buy nori sheets—the big ones you need for rolling. All I had were these little snack-size squares. Panic set in for about 30 seconds before I had a “why not?” moment.
I started scooping the salmon rice mixture onto those little squares, topping them with a slice of avocado and a dot of sriracha mayo. I passed them around, calling them “sushi nachos.” They were gone in 60 seconds flat. My friends raved more about those messy, imperfect bites than any fancy roll I’d ever painstakingly crafted. It was a revelation: the flavor wasn’t in the perfect roll; it was in the perfect combination of ingredients, served with zero stress and maximum joy. That night, these Seaweed Bites officially earned a permanent spot in my recipe repertoire.
What You’ll Need: A Tour of Flavor & Flexibility
Here’s your shopping list for these flavor bombs. The best part? Almost every ingredient has a handy swap, so you can make this work with what’s in your fridge right now.
- Cooked Salmon (about 1 cup, flaked): The star of the show! I love using leftover grilled or baked salmon. Chef’s Insight: For ultimate convenience, a high-quality canned salmon (boneless, skinless) works wonders in a pinch and is a pantry superhero. It’s packed with the same great omega-3s.
- Brown Rice (1 cup, cooked and cooled): I prefer short-grain brown rice for its slightly chewy texture and nutty flavor. Sub Tip: Any rice works! White sushi rice, jasmine rice, or even quinoa for a extra protein boost. The key is to let it cool so your bites aren’t soggy.
- Cherry Tomatoes, sliced: They add little bursts of juicy sweetness and a pop of color. Chef’s Hack: If your tomatoes are very watery, give the slices a quick pat with a paper towel.
- Cucumber, finely chopped: For that essential fresh crunch. I prefer English cucumbers for fewer seeds. Sub Tip: Diced bell pepper or jicama would be fantastic crunchy stand-ins.
- Red Onion, finely diced: A tiny bit gives a great sharp bite. Pro Move: Soak the diced onion in cold water for 5 minutes to mellow the sharpness if you prefer a gentler flavor.
- Seaweed Sheets (snack-size/nori sheets): Your edible “spoon”! Look for the packs of small squares or rectangles. Chef’s Insight: Keep these sealed tight until the last second—they love to steal moisture from the air and get chewy.
- Mayonnaise (1-2 tbsp): Our binding agent that adds creaminess. Sub Tip: Use Greek yogurt or a vegan mayo for a tangier, lighter twist.
- Dijon Mustard (1 tsp): My secret weapon! It adds a subtle depth and complexity that plain mayo just doesn’t have. Fun Twist: Try a 1/2 tsp of wasabi paste instead for a classic sushi kick!
- Salt & Pepper: Season to taste. Remember, your salmon and mayo might already have some salt, so taste as you go!
Let’s Build Some Bites: Your Stress-Free Roadmap
Ready to assemble? This is the fun, no-pressure part. I’ll walk you through each step with my favorite kitchen hacks to ensure crispy seaweed and perfect bites every single time.
Step 1: The Flake & Mix
First, get your salmon into a nice, medium-sized mixing bowl. If you’re using leftover cooked fillets, simply use a fork to flake it apart. For canned salmon, drain it well. My Pro Tip: Give the canned salmon a quick check with your fingers for any tiny bones or cartilage—it’s usually clean, but a quick once-over never hurts! Add in your cooled rice, tomatoes, cucumber, and onion.
Step 2: The Creamy Glue
Now, dollop in your mayo and Dijon mustard. Here’s where you get to personalize. Start with 1 tablespoon of mayo, mix it all up, and see how it looks. Want it creamier? Add the second tablespoon. I like to use a flexible silicone spatula for this—it folds everything together gently without smashing the ingredients. Season with a pinch of salt and pepper, mix again, and taste. This is YOUR flavor profile. More mustard? Go for it. A squeeze of lemon? Absolutely.
Step 3: The Pre-Crisp (Optional but Game-Changing)
This is my secret for maximum crunch. While you’re mixing, take your package of seaweed squares and quickly toast them over a low gas flame for 1-2 seconds per side. They’ll turn a brighter green and get super crisp. No gas stove? Pop them in a single layer under the broiler for 10-15 seconds, WATCHING THEM LIKE A HAWK. They burn in a blink. This step makes a world of difference in texture!
Step 4: The Assembly Line
Lay your toasted (or untoasted) seaweed squares out on a clean plate or platter. Using a small spoon or a cookie scoop, place a generous, heaping mound of the salmon mixture onto the center of each square. Don’t be shy! The beauty is in the rustic, piled-high look. Chef’s Hack: Work quickly once the seaweed is out of the package to keep it crisp. If you’re not serving immediately, keep the salmon mix and seaweed separate until the last minute.
Step 5: The Grand Finale
You are officially done! Serve these beauties immediately. The goal is to hand them to your friends or family while the seaweed still has that satisfying *snap* when you bite into it. It’s a full-sensory experience!
How to Serve These Little Wonders
Presentation is half the fun! I love serving these on a large, rustic wooden board or a simple white platter to let the colors pop. Scatter a few extra cucumber slices or lemon wedges around the edges for garnish. For a fun, interactive meal, set up a “build-your-own-bite” station with the bowl of salmon salad, a plate of seaweed squares, and little bowls of toppings like sesame seeds, sliced green onion, extra sriracha, or pickled ginger. It’s a surefire hit for gatherings!
For a complete light meal, pair them with a simple miso soup or a crisp, green salad with a ginger-soy dressing. They’re perfect for packed lunches, too—just keep the components separate in a bento box and assemble right before you eat to avoid a soggy situation.
Mix It Up! 5 Delicious Twists on the Theme
Once you’ve mastered the basic blueprint, the flavor world is your oyster (or, well, your salmon!). Here are a few of my favorite riffs:
- The Spicy Tuna Remix: Swap the salmon for drained canned tuna. Add 1 tbsp of sriracha and a sprinkle of toasted sesame seeds to the mix. Top each bite with a tiny slice of avocado.
- The California Dreamin’: Fold in small chunks of imitation crab (surimi) and mashed avocado. A sprinkle of everything bagel seasoning on top is divine.
- Vegan Power Bowl Bite: Replace the salmon with mashed, seasoned chickpeas or crumbled super-firm tofu. Use vegan mayo. It’s incredibly hearty and satisfying.
- Greek Island Fusion: Use cooked quinoa instead of rice, and mix in chopped kalamata olives, diced red pepper, and a sprinkle of crumbled feta. Bind it with a lemon-oregano vinaigrette instead of mayo.
- Breakfast Sushi: Yep, you read that right! Use cooled, cooked quinoa or rice, flaked smoked trout, a dab of cream cheese, and everything bagel seasoning. A game-changer for brunch.
A Few More Thoughts From My Kitchen to Yours
This recipe has evolved more than any other on Feastical. It started as a “kitchen sink” salvage operation and has morphed into this beloved, customizable staple. I’ve made it on camping trips (pre-mix the salad, pack the seaweed), for last-minute potlucks, and more times than I can count for a quick solo dinner.
The biggest lesson it’s taught me? Don’t let the “right” way to do something stop you from making delicious food your way. Sushi purists might raise an eyebrow, but I’ve yet to meet a single person who, after tasting one of these bites, didn’t immediately ask for the recipe. Food is about joy, connection, and flavor—not just perfect technique. So have fun, play with your food, and make it yours!
Your Questions, Answered
Q: My seaweed got soggy immediately. What did I do wrong?
A: This is the #1 issue, and it’s all about timing and moisture. First, make sure your rice and salmon are cooled completely before mixing. Toast your seaweed (see Step 3 above) – this creates a slightly more moisture-resistant barrier. Most importantly, assemble right before serving. If you must prep ahead, keep the mix and seaweed completely separate until go-time.
Q: Can I make the salmon salad mixture ahead of time?
A: Absolutely! In fact, it gets better! The flavors meld beautifully in the fridge. Store it in an airtight container for up to 2 days. The veggies might soften slightly, but it will still taste fantastic.
Q: I don’t like raw onion. Any other ideas?
A: Totally! Try finely sliced green onion (scallion) for a milder bite. Or, swap it out entirely for finely diced celery for crunch, or a tablespoon of chopped fresh herbs like dill or chives.
Q: Is there a low-carb option for the rice?
A: For sure. Riced cauliflower, steamed and thoroughly dried, is a great substitute. You could also simply skip the grain altogether and make a salmon salad “boat” by using a larger piece of romaine lettuce or butter lettuce as the base instead of seaweed.

Salmon Rice Seaweed Bites : High-Protein Sushi Snack Remix
Description
All the flavor of sushi, none of the rolling stress! These bites combine flaked salmon, seasoned rice, fresh veggies, and crispy seaweed for a quick, protein-packed snack or lunch. Perfect for solo meals, brunch, or entertaining—no bamboo mats required!
Ingredients
Salmon Rice Mixture:
-
1 cup cooked salmon, flaked (fresh, grilled, baked, or canned boneless/skinless)
-
1 cup cooked brown rice, cooled (short-grain preferred; swap with white rice, quinoa, or riced cauliflower for low-carb)
-
¼ cup cherry tomatoes, sliced
-
¼ cup cucumber, finely chopped
-
2 tbsp red onion, finely diced (optional; soak in cold water 5 mins for milder flavor)
-
1–2 tbsp mayonnaise (or Greek yogurt/vegan mayo)
-
1 tsp Dijon mustard (or wasabi paste for a sushi kick)
-
Salt and pepper to taste
For Assembly:
-
8–12 snack-size nori/seaweed squares
-
Optional toppings: sliced avocado, sesame seeds, green onion, sriracha, pickled ginger
Instructions
1. Make the Salmon Rice Mixture
-
Flake the salmon into a mixing bowl. If using canned salmon, drain well.
-
Add cooled rice, cherry tomatoes, cucumber, and onion.
-
Add mayonnaise and Dijon mustard. Mix gently until combined.
-
Season with salt and pepper to taste. Taste and adjust mayo or mustard if desired.
2. Toast the Seaweed (Optional but Recommended)
-
For extra crunch: toast snack-size seaweed squares over low flame for 1–2 seconds per side, or under a broiler for 10–15 seconds. Watch carefully to avoid burning.
3. Assemble the Bites
-
Lay seaweed squares on a clean plate or platter.
-
Spoon a generous mound of the salmon rice mixture onto the center of each square.
-
Add optional toppings like avocado, sesame seeds, or sriracha. Serve immediately.
Pro Tips:
-
Keep the rice and salmon mixture and seaweed separate until serving to prevent sogginess.
-
For meal prep: store the mixture in the fridge for up to 2 days; assemble right before eating.
-
Low-carb option: use riced cauliflower or lettuce leaves instead of rice.
Notes
-
Spicy Tuna Remix: Use canned tuna + 1 tbsp sriracha + sesame seeds. Top with avocado.
-
California Dreamin’: Mix in imitation crab + mashed avocado + everything bagel seasoning.
-
Vegan Power Bite: Use mashed chickpeas or crumbled firm tofu + vegan mayo.
-
Greek Island Fusion: Swap rice for quinoa, add olives, red pepper, feta, and lemon-oregano vinaigrette.
-
Breakfast Sushi: Use smoked trout + cream cheese + everything bagel seasoning over cooled quinoa or rice.
Final Thoughts
Let’s talk about why these bites make you feel as good as they taste. This is approximate for one serving (about half the recipe), using canned pink salmon, brown rice, and 1.5 tbsp of regular mayo.
Each serving is packing roughly 20-25 grams of complete protein, thanks to the dynamic duo of salmon and rice. That’s a major win for keeping you full and fueled. The salmon (especially wild-caught) is a prime source of those famous Omega-3 fatty acids, which are heroes for heart and brain health.
Using fiber-rich brown rice and all those fresh veggies adds a solid dose of dietary fiber for happy digestion. Seaweed is a natural source of iodine and other minerals. While the mayo adds a bit of fat, it’s part of what helps your body absorb the fat-soluble vitamins in the salmon and veggies. It’s a balanced, power-packed little package!
Go Forth and Scoop!
Well, friends, that’s the story of my couldn’t-be-easier Salmon Rice Seaweed Bites. I hope this recipe finds its way into your regular rotation, not just because it’s healthy and quick, but because it’s a reminder that cooking should be playful. It’s about taking flavors you love and serving them up in a way that fits your real, busy, beautiful life.
So the next time a sushi craving hits, skip the stress and the takeout menu. Raid your pantry, flake that salmon, and in about 10 minutes, you’ll have a plate full of vibrant, delicious bites that are sure to impress—especially yourself. Don’t forget to tag me @Feastical if you make them! I love seeing your kitchen creations. Now, go make something fantastic!

Greek Yogurt & Chia Pudding Breakfast Bowl : A Nourishing Power Combo
Good Mornings Start Here: Your New Favorite Power Breakfast
Hey there, friend! Beau here from Feastical. Can we talk about breakfast for a second? Not the rushed, half-toasted, coffee-spilling kind of breakfast. I mean the kind of morning meal that makes you pause, take a deep breath, and think, “Yeah, I’ve got this.” The kind that fuels your body and actually brings a little joy to your day. If your a.m. routine feels more like a chore than a choice, I’m about to change the game.
Today, I’m sharing my absolute go-to: the Greek Yogurt & Chia Pudding Breakfast Bowl. Think of it as the superhero team-up of the breakfast world. We’ve got creamy, protein-packed Greek yogurt joining forces with the magical, fiber-filled gel-power of chia pudding. They’re piled high with fresh banana, a generous crunch of granola, and a golden drizzle of honey. It’s a symphony of textures and flavors—cool, creamy, crunchy, and sweet—all harmonizing in one beautiful bowl.
The best part? There’s zero cooking involved. This is assembly-line breakfast bliss. It’s for the busy bees, the meal-preppers, the “I-want-something-delicious-but-I’m-not-functional-yet” crowd (I see you!). It’s nourishing, satisfying, and feels indulgent without any of the guilt. So, let’s ditch the boring breakfast blues and build a bowl that’s going to make your taste buds and your energy levels do a happy dance. Grab your favorite bowl, and let’s get layered!
The Chia Seed Revelation: A Sticky (But Worthwhile) Discovery
I’ll be honest, my first encounter with chia seeds was…educational. Picture a younger Beau, having just read about their “superfood” status, deciding to just toss a spoonful into a glass of water and drink it. Big mistake. Within minutes, it turned into a gelatinous science experiment clinging to the sides of the glass. Not my finest culinary moment.
But then, a brilliant friend saw my struggle and introduced me to the magic of planned patience—aka, chia pudding. She showed me that when you give those tiny seeds time to work their magic in milk overnight, they transform into this lush, tapioca-like pudding that’s a dream to eat. It was a lightbulb moment! This wasn’t a weird health fad; it was a secret weapon for effortless, delicious eating.
Now, that lesson in patience is the heart of this bowl. That overnight wait for the chia pudding isn’t a hassle; it’s a gift to your future self. It’s you, the night before, giving your morning a high-five. Every time I spoon into this creamy creation, I think of that early kitchen fail and smile, because sometimes the best recipes come from a little mess and a whole lot of learning.
Gathering Your Bowl’s Best Friends
This is where the fun begins! Each ingredient plays a specific, delicious role. Here’s your shopping list, plus my chef-y two cents on each one.
- ½ cup Plain Greek Yogurt: This is our protein powerhouse and creamy base. I love the tang of plain—it balances the sweetness perfectly. Chef’s Insight: Go for full-fat if you can. It’s richer, more satisfying, and keeps you fuller longer. For a dairy-free swap, coconut yogurt is a superstar here.
- ½ cup Chia Pudding (see below): The fiber-filled star of the show. It adds a wonderful, pudding-like texture and a nutrient boost.
- 1 Ripe Banana, sliced: Nature’s perfect sweetener and creaminess booster. Pro Tip: The more speckled, the better! Those brown spots mean maximum sweetness and flavor.
- ¼ cup Granola: Our crunch factor! This is where you can personalize. Love nuts? Get a nutty granola. Into coconut? Go for it. Substitution Tip: No granola? Toasted oats, chopped nuts, or even a crumbled-up graham cracker work in a pinch.
- 1 tsp Honey (or Maple Syrup): The golden ribbon that ties it all together. It adds a floral, warm sweetness. For a vegan bowl, pure maple syrup is an identical swap in both flavor and function.
For the Chia Pudding (Make Ahead Magic):
- 2 tbsp Chia Seeds: Don’t let their size fool you! These tiny guys expand to create the pudding. Black or white work just fine.
- ½ cup Milk (any kind): The liquid canvas. I often use unsweetened almond milk, but dairy, oat, soy—they all work! The richer the milk, the richer the pudding.
- Optional: A splash of Vanilla Extract or a drizzle of Sweetener: If you know you want a sweeter pudding base, add a ¼ tsp of vanilla or a teaspoon of maple syrup right into the mix before it sets.
Building Your Breakfast Masterpiece: A Step-by-Step Guide
Ready to assemble? Follow these steps for bowl-building success. I’ve tucked my favorite kitchen hacks in along the way!
- Prep Your Pudding (The Night Before, You Hero!): In a jar or small bowl, combine the 2 tablespoons of chia seeds with ½ cup of your chosen milk. If you’re using vanilla or sweetener, add it now. Whisk it really, really well—I’m talking 30 seconds of vigorous stirring. This prevents clumping. Let it sit for 5 minutes, then give it another good stir. Cover and pop it in the fridge for at least 2-4 hours, but overnight is truly best. Chef’s Hack: Making a big batch? Quadruple this in a big mason jar. You’ll have pudding ready for 4 days of awesome mornings!
- The Great Layer (It’s Not Just Pretty, It’s Strategic): Grab your serving bowl—the wider, the better, for maximum topping real estate! Spoon in your ½ cup of Greek yogurt on one side. On the other side, spoon in your now-set, glorious chia pudding. I love this side-by-side look because you get distinct pockets of flavor and texture in every spoonful.
- Top It Like a Pro: Here’s where you get creative. Slice that ripe banana right over the top. Scatter your granola generously across the center, letting it crunchify both the yogurt and the pudding. Finally, take your honey and drizzle it in a zig-zag, lazy river pattern over everything. That honey will seep into the granola and banana, creating little pockets of sweetness.
- The Moment of Truth: You have two fantastic options. For maximum crunch, dig in immediately! Your granola will be super crisp against the cool, creamy base. If you prefer a softer, more cohesive bite (where the granola soaks up a little moisture and the flavors meld), let the bowl sit for 3-5 minutes before you start. Both ways are delicious—it’s all about your texture preference!
How to Serve This Bowl of Sunshine
This bowl is a complete meal in one, so it doesn’t need much fuss! I love enjoying it with a big mug of black coffee or a bright, herbal tea. The key is in the vessel: use a wide, shallow bowl. It makes the beautiful layers visible and gives you plenty of room to mix and scoop without making a mess.
For a truly special weekend brunch, set up a “Breakfast Bowl Bar!” Put out bowls of the yogurt, a big jar of chia pudding, and an array of toppings: different berries, chopped nuts, nut butters, shredded coconut, dark chocolate chips, and multiple sweetener options. Let everyone build their own masterpiece. It’s interactive, fun, and guarantees happy faces all around.
Make It Your Own: 5 Flavor Twists to Try
The core formula is your playground. Here are a few of my favorite riffs on this classic combo:
- Tropical Escape: Use coconut milk for the chia pudding and coconut yogurt. Top with fresh mango, pineapple chunks, toasted coconut flakes, and a drizzle of passion fruit purée if you’re feeling fancy.
- Berry Bliss: Layer a handful of fresh mixed berries (strawberries, blueberries, raspberries) with the banana. Swap the honey for a berry compote or a quick mash of raspberries with a bit of lemon juice.
- Chocolate Peanut Butter Cup: Stir a tablespoon of unsweetened cocoa powder into the chia pudding mix before it sets. Top the bowl with a dollop of peanut butter (or any nut butter), a few dark chocolate chips, and a sprinkle of sea salt.
- Apple Pie Delight: Sauté some diced apple with cinnamon and a touch of maple syrup until soft. Let it cool, then use it as your main fruit topping along with a cinnamon-spiced granola.
- Savory-Leaning Option: Sounds wild, but trust me! Use plain yogurt and unsweetened chia pudding. Top with sliced avocado, everything bagel seasoning, a soft-boiled egg, and a sprinkle of hemp seeds. A completely different, protein-packed savory bowl!
Beau’s Kitchen Notes & Stories
This recipe has evolved more than my taste in kitchen aprons (remember the neon spaghetti-strap ones? Yikes.). It started as just yogurt and granola, then the chia pudding entered the chat and changed everything. My wife is obsessed with the Tropical Escape version, while my nephew will only eat the Chocolate PB Cup one. That’s the beauty—it’s a family favorite because everyone can tailor it.
A funny note: I once tried to shortcut the chia pudding by using hot milk to make it “set faster.” Friends, it just made a weird, clumpy soup. Lesson re-learned: some things, like good coffee, deep friendships, and perfect chia pudding, are worth the wait. Embrace the overnight chill. Your future, well-fed self will thank you.
Your Questions, Answered!
Q: My chia pudding is still runny after 4 hours! What did I do wrong?
A: No panic! This usually means the ratio was off or it wasn’t stirred enough. First, ensure you’re using a 2 tbsp chia to ½ cup liquid ratio. Second, the initial stir is crucial. Stir very well, wait 5 mins, and stir again. If it’s still thin, simply whisk in an extra teaspoon of chia seeds and let it sit another hour.
Q: Can I make this entire bowl the night before?
A> You can, but with a caveat. Prep the components separately: keep the yogurt, pudding, and toppings (especially granola and banana) in their own containers. Assemble in the morning so your granola stays crunchy and your banana doesn’t brown. If you must fully assemble, omit the granola and add it fresh.
Q: I don’t like the “tapioca” texture of chia seeds. Any fix?
A> Absolutely! Give the soaked mixture a few pulses with an immersion blender or in a small food processor before chilling. It becomes a smooth, uniform pudding, almost like a thick mousse. All the benefits, none of the texture.
Q: How long does the chia pudding last in the fridge?
A> It keeps beautifully for 4-5 days in a sealed container. Making a big batch on Sunday is one of the smartest meal prep moves you can make for your week.

Greek Yogurt & Chia Pudding Breakfast Bowl : A Nourishing Power Combo
Description
This breakfast bowl is your new go-to for busy mornings, post-workout fuel, or a mindful start to the day. Creamy Greek yogurt meets fiber-packed chia pudding, topped with banana, granola, and a drizzle of honey. No cooking required—just layer, drizzle, and enjoy!
Ingredients
For the Bowl:
-
½ cup plain Greek yogurt (full-fat for richness; coconut yogurt for dairy-free)
-
½ cup chia pudding (see recipe below)
-
1 ripe banana, sliced
-
¼ cup granola (or substitute toasted oats/nuts)
-
1 tsp honey or maple syrup
For the Chia Pudding (Make Ahead):
-
2 tbsp chia seeds
-
½ cup milk (any kind)
-
Optional: ¼ tsp vanilla extract or 1 tsp sweetener
Instructions
1. Prep the Chia Pudding (Night Before)
-
In a jar or bowl, combine 2 tbsp chia seeds with ½ cup milk.
-
Add vanilla or sweetener if desired. Whisk for 30 seconds to prevent clumps.
-
Let sit 5 minutes, stir again, then cover and refrigerate 2–4 hours or overnight.
2. Build the Bowl
-
Scoop ½ cup Greek yogurt into your serving bowl.
-
Add ½ cup chia pudding next to the yogurt for a layered effect.
-
Top with sliced banana and granola.
-
Drizzle with honey (or maple syrup).
Pro Tip: For extra crunch, eat immediately. For softer, blended flavors, let sit 3–5 minutes.
Instructions
-
Runny chia pudding? Stir well, wait, or whisk in an extra tsp of chia seeds.
-
Assemble night before? Keep granola and banana separate until morning.
-
Smooth pudding option? Pulse soaked chia in a blender for a mousse-like texture.
-
Make-ahead batch: Chia pudding lasts 4–5 days in fridge.
A Quick Look at the Good Stuff (Approximate, for 1 Bowl)
Let’s be clear: I’m a chef, not a dietitian. But I love knowing how my food fuels me! These numbers are estimates based on using full-fat Greek yogurt, unsweetened almond milk, and a standard granola.
- Calories: ~300-350
- Protein: ~15g (Thanks, Greek yogurt! This helps with satiety.)
- Fiber: ~7g (A huge boost from those mighty chia seeds, great for digestion.)
- Healthy Fats & Carbs: You’re getting a balanced mix of complex carbs from the banana and granola, plus healthy fats from the seeds, yogurt, and granola nuts. This combo provides sustained energy, not a sugar crash.
Prep Info: Active Time: 5 mins | Chia Pudding Chill Time: 2-4 hours (best overnight) | Servings: 1 beautiful, filling bowl.
One Last Bite of Wisdom
And there you have it—your passport to better mornings. This bowl is more than just a recipe; it’s a reminder that taking a few minutes to nourish yourself can be simple, delicious, and even a little bit fun. It’s proof that healthy eating doesn’t have to be complicated or bland.
So here’s my challenge to you: try it this week. Make that little jar of chia pudding tonight. Tomorrow morning, take five minutes to build your bowl. Sit down, even if it’s just for a few peaceful moments, and enjoy it. I have a feeling it might just become your new morning ritual.
Thanks for hanging out in the kitchen with me! If you make it (and I really hope you do), tag me over on @Feastical so I can see your beautiful creations. Now, go forth and conquer your day, one delicious, power-packed spoonful at a time.
With a full belly and a happy heart,
Beau

Gluten-Free Protein Bagels : 3 Ingredient High-Protein Snack
The Bagel Breakthrough You Didn’t Know You Needed: 3-Ingredient, Gluten-Free & Packed with Protein
Hey there, friend! Beau here, welcoming you back to my kitchen corner at Feastical. Let’s have a real talk for a second. How many times have you stared into the abyss of your pantry or the grocery store’s “health food” aisle, desperately seeking a snack that’s actually satisfying? Something that’s gluten-free, high in protein, and tastes like a treat, not a punishment. I’ve been there too, my friend. The cardboard-like textures, the ingredient lists longer than a novel, the sneaky sugars hiding in “protein” bars… it’s enough to make you want to throw in the tea towel.
But what if I told you the ultimate solution was already in your fridge and pantry, waiting to be transformed? What if you could whip up a batch of genuinely delicious, chewy-on-the-inside, crisp-on-the-outside bagels with just three simple ingredients and about 35 minutes of your time? No yeast, no complicated rising, no mysterious additives. Just pure, feel-good fuel.
These Gluten-Free Protein Bagels are my absolute go-to for busy mornings, essential post-workout refueling, or that 3 PM slump when you need something substantial. They’re fluffy, they’re satisfying, and they hold everything from a schmear of cream cheese to a stack of turkey and avocado like champions. This isn’t just a recipe; it’s a kitchen revolution in bagel form. So, preheat that oven, grab your favorite mixing bowl, and let’s bake some magic that will change your snack game forever.
My “A-Ha!” Moment: From Kitchen Flop to Flourless Fortune
This recipe’s origin story is a classic case of happy accident meets stubborn hunger. A few years back, I was deep in recipe testing for a completely different project—a gluten-free flatbread, if memory serves. I was out of my usual flour blends and started playing with a simple combo of Greek yogurt and a single gluten-free flour. My goal was something pliable and quick. What I pulled out of the oven, however, was dense, oddly moist, and decidedly not flatbread.
Frustrated, I almost tossed the whole experiment. But as I poked at the warm, golden disc, a wild thought hit me: the shape, the slight chew… it reminded me of a bagel’s top half. I sliced it in half, threw it in the toaster, and slathered it with a generous swipe of almond butter. One bite later, my kitchen was filled with the kind of victory whoop usually reserved for game-winning touchdowns. The texture was spot-on! It was that perfect marriage of soft interior and toaster-ready exterior I’d been missing in store-bought GF options. That “flop” became the foundation for every batch I’ve made since. It taught me that sometimes the best recipes aren’t meticulously planned; they’re discovered when you’re willing to play with your food.
Gathering Your Kitchen Allies: The Simple Trio
Here’s the beautiful part. You likely have these staples on hand right now. Let’s break down why each one is a superstar and how you can swap things if needed.
-
- 1 Cup Gluten-Free Flour Blend
This is your foundation. I use a reliable store-bought blend that contains xanthan gum (this is key for structure and chew!). My go-to is a simple rice flour/potato starch/tapioca blend. Chef’s Insight: Avoid using straight coconut or almond flour here—they behave very differently and will leave you with a crumbly mess. If your blend doesn’t have xanthan gum, add ½ teaspoon. - 1 Cup Plain Greek Yogurt
The magic binder and protein powerhouse! The tanginess gives these bagels their distinctive “bagel-shop” flavor, while the proteins create a fantastic texture. Substitution Tip: For a dairy-free version, use a thick, plain plant-based yogurt (like coconut or almond milk yogurt). Just make sure it’s very thick, not runny. Full-fat yogurt yields a slightly richer, softer bagel, while non-fat gives a chewier, protein-packed result. Both work beautifully!
- 1 Cup Gluten-Free Flour Blend
1.5 Teaspoons Baking Powder
Our leavening hero. This is what gives our dough its lift and creates those lovely air pockets inside. Chef’s Must-Do: Make sure your baking powder is fresh! If it’s been in the back of your cupboard for a year, it won’t do its job. Test it by stirring a little into hot water—if it doesn’t fizz vigorously, it’s time for a new tin.
- Optional: Everything Bagel Seasoning or Toppings of Choice
This is where personality shines! I’m an everything-bagel-seasoning devotee, but don’t stop there. Think sesame seeds, poppy seeds, dried garlic flakes, coarse salt, or even a cinnamon-sugar sprinkle for a sweet version.
Let’s Get Baking: Your Foolproof Roadmap to Bagel Bliss
Ready? This is where the fun happens. I’ll walk you through every step, sharing all the little hacks I’ve learned over countless batches.
- Preheat & Prep: Fire up your oven to 375°F (190°C). Line a baking sheet with parchment paper or a silicone mat. This little step prevents sticking and makes cleanup a dream. No liner? A light spray of oil will work in a pinch.
- The Great Mix-Off: In a medium mixing bowl, combine your gluten-free flour and baking powder. Give them a quick whisk to distribute the baking powder evenly. Now, add the entire cup of Greek yogurt. Chef’s Hack: I like to use a sturdy spatula or even my (clean!) hands for this part. It will seem dry at first, but keep mixing. It’ll come together into a soft, slightly sticky dough. If it feels too sticky to handle, add a dusting (just a teaspoon or so) more flour.
- Divide & Conquer: Lightly dust your hands and a clean work surface with a bit of gluten-free flour. Plop your dough ball onto the surface and divide it into four equal parts. I just press it into a rough square and cut it like a pizza. Pro Tip: Using a kitchen scale here is the secret to perfectly uniform bagels. Aim for about 4 ounces (113g) per piece.
- Shape Those Beauties: Now, take each piece of dough and roll it into a smooth ball. Press your finger directly through the center of the ball to make a hole. Then, gently widen the hole by rotating your finger or twirling the dough around your fingers until the hole is about 1.5 inches across. Don’t be shy—the hole will shrink a bit as it bakes! Place each shaped bagel on your prepared baking sheet.
- Top It Off (Optional but Recommended): If you’re using toppings, now’s the time! For seeds or seasoning, a quick brush with an egg wash (1 egg beaten with 1 tbsp water) will help them stick. For a simpler approach, just lightly spray the top of each bagel with water or olive oil and press the seasoning on. It works like a charm!
- Bake to Golden Perfection: Slide your tray into the preheated oven and bake for 25-30 minutes. You’re looking for a beautifully golden-brown top and a firm exterior. Kitchen Story Time: My oven has a hot spot, so at the 20-minute mark, I always rotate the tray. It’s a small move that ensures even browning on all four bagels.
- The Patience Payoff: Once they’re gorgeously golden, take them out and let them cool on the baking sheet for at least 10-15 minutes. I know it’s tempting to dive right in, but this resting time lets the structure set. They’ll be warm, but not doughy. Then, transfer to a wire rack to cool completely if you’re storing them.
How to Serve Your Masterpiece: Let’s Get Creative!
The beauty of a great bagel is its versatility. Here’s how I love to enjoy mine:
The Classic: Slice, toast until just crisp, and slather with cream cheese (regular or dairy-free). A sprinkle of everything seasoning on top of the cream cheese? *Chef’s kiss*.
The Power Breakfast: Top a toasted half with mashed avocado, a sprinkle of chili flakes, a squeeze of lime, and a perfectly fried or poached egg. This is my ultimate Saturday morning fuel.
The Sweet Treat: Try a toasted bagel with a thick layer of almond or peanut butter, sliced bananas, and a drizzle of honey. It’s a protein-packed dessert-for-breakfast situation.
Straight-Up Snackin’: Honestly, they’re fantastic just warm from the oven, plain. The subtle tang and chewy texture are satisfying all on their own.
Make It Your Own: 5 Flavorful Twists
Once you’ve mastered the basic blueprint, the flavor world is your oyster! Here are a few of my favorite riffs:
- Everything-but-the-Kitchen-Sink Bagel: The classic. Fold 2 tablespoons of everything bagel seasoning right into the dough before shaping, then top with more after the egg wash.
- Cinnamon Raisin Delight: Mix 1 teaspoon of cinnamon into the dry ingredients. After mixing the dough, gently knead in ¼ cup of raisins (soak them in warm water for 10 minutes first to plump up!). Sprinkle the tops with cinnamon sugar before baking.
- Cheesy Herb: Fold ½ cup of shredded sharp cheddar and 1 tablespoon of dried Italian herbs into the dough. The cheese gets melty and creates incredible flavor pockets.
- 100% Whole Grain: Substitute the GF flour blend with a whole-grain gluten-free blend or oat flour (certified GF). The texture will be heartier and nuttier—perfect for a savory sandwich.
- Mini Bagel Bites: Divide the dough into 8 pieces instead of 4. Shape into mini bagels and reduce baking time to 18-22 minutes. Perfect for parties or kid-friendly snacks!
Beau’s Bagel Chronicles: A Few Parting Thoughts
This recipe has become such a staple in my home that I barely think about it—I just make it. It’s evolved from that first accidental flatbread into my most-requested “healthy hack” by friends. I’ve made them on camping trips (mixed in a zip-top bag, baked in a portable oven!), brought them to potlucks, and even shipped them to my sister during her college finals. They freeze like a dream, which means a quick, healthy breakfast is always within reach. The biggest lesson? Don’t fear the sticky dough. Embrace it! A little extra flour on your hands is all you need. This recipe is forgiving, fast, and fundamentally delicious. That’s the Feastical spirit.
Your Questions, Answered: No-Bagel-Fiasco Zone
Q: My dough is super sticky and impossible to shape! What did I do wrong?
A: Don’t panic! This usually means your yogurt was a bit wetter than usual or your flour blend is extra thirsty. The fix is easy: sprinkle your dough, hands, and work surface with a little more gluten-free flour (a tablespoon at a time) until it’s just manageable. It should still be soft, but not glue-like.
Q: Why are my bagels so dense and not fluffy inside?
A: The two most common culprits are over-mixing or old baking powder. Once the dough comes together, stop mixing! Overworking it develops the starches and leads to density. And always check that baking powder for fizz—it’s the lifeline of this recipe.
Q: Can I make these ahead of time? How do I store them?
A: Absolutely! They store beautifully. Let them cool completely, then pop them in an airtight container or bag. They’ll last 3-4 days on the counter. For longer storage, freeze them for up to 3 months. I slice mine before freezing so I can toss a half straight into the toaster.
Q: Are these really high in protein?
A> They are! Between the Greek yogurt and the protein in many gluten-free flour blends, each bagel packs a satisfying 8-12 grams of protein (depending on your specific brands), making them a fantastic, balanced snack or meal component.

Gluten-Free Protein Bagels : 3 Ingredient High-Protein Snack
Description
Say goodbye to dry, store-bought gluten-free bagels! These 3-ingredient protein bagels are soft on the inside, slightly crisp on the outside, and packed with protein to fuel your morning, workout, or afternoon snack. No yeast, no complicated rising, and no long ingredient lists—just simple, wholesome ingredients that come together in about 35 minutes.
Ingredients
-
1 cup gluten-free flour blend (with xanthan gum; add ½ tsp if your blend doesn’t contain it)
-
1 cup plain Greek yogurt (or thick plant-based yogurt for dairy-free)
-
1½ tsp baking powder
-
Optional toppings: everything bagel seasoning, sesame seeds, poppy seeds, coarse salt, or cinnamon-sugar
Instructions
-
Preheat & Prep: Preheat oven to 375°F (190°C). Line a baking sheet with parchment paper or a silicone mat.
-
Mix the Dough: In a medium bowl, whisk together gluten-free flour and baking powder. Add the Greek yogurt and mix with a spatula or clean hands until a soft, slightly sticky dough forms. If too sticky, sprinkle a little extra flour until manageable.
-
Divide & Shape: Dust your hands and work surface lightly with flour. Divide dough into 4 equal pieces. Roll each piece into a smooth ball, then press your finger through the center to make a hole. Widen the hole to about 1.5 inches across. Place on the prepared baking sheet.
-
Add Toppings (Optional): Brush tops with water or olive oil (or an egg wash for extra stickiness) and sprinkle toppings of choice.
-
Bake: Bake 25–30 minutes until golden brown and firm to the touch. Rotate tray halfway for even browning if needed.
-
Cool: Let bagels cool on the sheet for 10–15 minutes, then transfer to a wire rack. They’re ready to enjoy warm or stored for later.
Notes
-
Sticky dough? Dust hands and work surface with a little extra flour.
-
Dense bagels? Avoid over-mixing and always check that baking powder is fresh.
-
Storage: Cool completely, store in an airtight container 3–4 days, or freeze up to 3 months. Slice before freezing for easy toasting.
-
Protein boost: Greek yogurt + protein in GF flour gives 8–12g protein per bagel.
The Nourishing Numbers (Approximate!)
Here’s a general nutritional breakdown per bagel (based on using non-fat Greek yogurt and a standard GF flour blend, without toppings). Remember, exact numbers will vary with your specific ingredients.
- Calories: ~120-140
- Protein: 10-12g
- Carbohydrates: 20-22g
- Fiber: 2-3g
- Fat: 1-2g (higher if using full-fat yogurt)
This snack is a fantastic source of sustained energy, thanks to the balanced mix of protein and complex carbs. It’s gluten-free, can easily be made dairy-free, and fills you up without weighing you down.
Final Thoughts
And there you have it, my friend—the secret to never settling for a sad, store-bought gluten-free snack again. These bagels are proof that eating well doesn’t require a dozen ingredients or hours of effort. It’s about smart, simple combos that deliver on flavor and function.
I hope this recipe finds its way into your regular rotation and brings as much joy and convenience to your kitchen as it has to mine. When you make them, I’d love to see your creations! Tag me @feastical on social media and show me your topped-and-toasted masterpieces.
Now, go forth and bake! And remember, in this kitchen and in life, keep it simple, soulful, and always satisfying.
With a full heart and a full plate,
Beau