Homemade Oatmeal Cream Pies : Soft, Chewy & Better Than Store-Bought
Your Favorite Childhood Treat, All Grown Up (And Way More Delicious!)
Hey there, friend! Beau here. Let’s talk about one of life’s simple, magical pleasures: that perfect bite of a soft, chewy oatmeal cookie hugging a cloud of sweet vanilla cream. You know the one I mean. It came wrapped in cellophane, lived at the bottom of lunchboxes, and tasted like pure, unadulterated joy. For years, I thought that specific brand of happiness could only come from a store-bought box. Then, one rainy afternoon in my tiny apartment kitchen, I decided to try making them from scratch. Let me tell you, friends—the homemade version isn’t just a copy. It’s a revelation.
These Homemade Oatmeal Cream Pies are everything you loved about the original, but dialed up to eleven. The cookies are softer, with a deeper, more complex flavor thanks to a hint of molasses and cinnamon. The cream filling is silky, rich, and lacks that vaguely “mysterious” aftertaste. They taste like love, not a laboratory. And the best part? Making them is a total blast. It’s a forgiving, fun recipe that fills your kitchen with the most incredible smell. So, tie on your apron, find that spatula (check the dishwasher!), and let’s bake some happiness together.
The Lunchbox Swap That Started It All
My obsession with these treats goes way back to third grade. I was the kid with the “weird” homemade snacks—whole wheat date bars, zucchini muffins, you name it. My mom meant well (love you, Mom!), but all I wanted was what my friend Mike had: those perfectly uniform, cream-filled oatmeal cakes. One fateful Tuesday, we negotiated The Great Trade: my exceptionally wholesome apple-oat bran puck for his glorious, plasticky-wrapped pie. That first bite was a symphony of sugary, processed bliss. It was also, I later realized, the moment I became a food detective. Even at eight, I was trying to figure out what made things taste the way they did. Years later, recreating that memory from scratch—but better—felt like closing a delicious, sweet loop. Now, I get to share that upgraded nostalgia with you. No trades required.
Gathering Your Delicious Crew: Ingredients & Insights
Here’s the lineup for these legendary cookies and their fluffy filling. Don’t just grab and go—read my little chef notes! Knowing your ingredients is the first step to becoming a kitchen rockstar.
For the Soft & Chewy Oatmeal Cookies:
- 1 cup (2 sticks) unsalted butter, softened: This is non-negotiable for that tender crumb. “Softened” means it should give easily when pressed but not be oily or melted. Pro tip: if you forgot to take it out, cut it into chunks and let it sit for 15-20 minutes.
- 3/4 cup packed brown sugar & 1/2 cup granulated sugar: The brown sugar brings molasses notes and moisture for chewiness, while the white sugar helps with spread and crisp edges. Pack that brown sugar tight!
- 2 large eggs: They bind everything together and add richness. Make sure they’re at room temperature to blend seamlessly with the butter.
- 1 tablespoon molasses: THIS is the secret flavor agent! It gives that unmistakable, deep, almost-spicy note that makes you say “Yep, that’s the taste.” Don’t skip it! Blackstrap is too strong; light or golden molasses is perfect.
- 1 teaspoon pure vanilla extract: The flavor foundation. The better the vanilla, the better the cookie. It’s worth the splurge.
- 1 1/2 cups all-purpose flour: The structure-builder. For a slightly more tender cookie, you can swap 1/2 cup with cake flour.
- 1/2 teaspoon baking soda: Our leavening agent. It helps the cookies puff up and then settle into that perfect chew.
- 1/2 teaspoon salt: The flavor enhancer. It makes the sweet pop and balances everything. I use fine sea salt.
- 1 teaspoon ground cinnamon: Warmth and coziness in a powder. It whispers “hello” in every bite.
- 1 1/2 cups quick-cooking oats: They give the classic texture without being too bulky. If you only have old-fashioned rolled oats, give them a few pulses in the food processor. Do not use steel-cut.
For the Fluffy Vanilla Cream Filling:
- 1/2 cup (1 stick) unsalted butter, softened: Yes, more butter. This is the base of our filling, and it needs to be very soft for ultimate fluffiness.
- 1 1/2 cups powdered sugar (confectioners’ sugar): Sift it! I know it’s an extra step, but it prevents a gritty filling. Trust me on this.
- 1 teaspoon pure vanilla extract: Doubling down on that good vanilla flavor.
- 1-2 tablespoons milk or heavy cream: This is your consistency adjuster. Start with one, add more as needed. Heavy cream makes it extra rich.
- Tiny pinch of salt: Just a smidge to cut the sweetness and make the vanilla sing.
Let’s Get Baking: The Step-by-Step Fun
Okay, team! Let’s turn these ingredients into magic. Follow along, and don’t worry—it’s easier than you think.
- Preheat & Prep: Fire up your oven to 350°F (175°C). Line your baking sheets with parchment paper. This isn’t just for easy clean-up; it prevents the bottoms from over-browning and is a lifesaver. No parchment? A silicone baking mat works great too.
- Cream the Butter & Sugars: In a large bowl, use an electric mixer (hand or stand) to beat the softened butter, brown sugar, and granulated sugar together on medium-high speed. We’re going for light, fluffy, and almost pale in color. This should take a good 2-3 minutes. This step incorporates air, which is key for texture! Chef’s Hack: Scrape down the bowl halfway through to make sure everything is getting friendly.
- Add the Wet Team: Beat in the eggs, one at a time, making sure each is fully incorporated before adding the next. Then, add the molasses and vanilla. Mix until the batter looks smooth and cohesive. It might look a little curdled at first—that’s the molasses doing its thing. Keep mixing; it’ll come together.
- Whisk the Dry Crew: In a separate bowl, whisk together the flour, baking soda, salt, and cinnamon. This ensures the leavening and salt are evenly distributed so every cookie bakes the same. Give it a good whisk for about 30 seconds.
- Combine with Care: With your mixer on low speed, gradually add the dry ingredients to the wet ingredients. Mix just until no dry flour remains. Overmixing at this stage can lead to tough cookies. We want tender!
- Fold in the Oats: Using a sturdy spatula, fold in the quick oats by hand. This gives you control and ensures you don’t overwork the dough. The dough will be thick and spoonable—perfect!
- Scoop & Space: Use a tablespoon cookie scoop or a regular spoon to drop rounded tablespoons of dough onto your prepared sheets. Leave about 2 inches between them—they will spread! For perfectly uniform cookies, I weigh my dough balls to about 1.5 ounces each, but eyeballing is totally fine.
- Bake to Perfection: Bake for 9-11 minutes. You want the edges to be just set and lightly golden, but the centers should still look soft and slightly puffed. They will finish setting as they cool. Key Tip: Do not overbake! Taking them out when they look slightly underdone is the secret to a supremely soft, chewy cookie.
- The Cool Down: Let the cookies cool on the baking sheet for 5 minutes. This allows them to firm up enough to move. Then, transfer them to a wire rack to cool completely. They must be completely cool before you add the filling, or it will melt into a sad puddle.
- Make the Fluffy Cloud (The Filling!): While the cookies cool, make the filling. In a clean bowl, beat the very soft butter on medium speed until it’s smooth and creamy. Gradually add the sifted powdered sugar on low speed (unless you want a sugar blizzard in your kitchen). Once incorporated, add the vanilla, a pinch of salt, and 1 tablespoon of milk/cream. Whip on medium-high for 2-3 minutes until it’s very light, fluffy, and white. If it seems too thick, add the remaining liquid a teaspoon at a time. It should be spreadable but hold its shape.
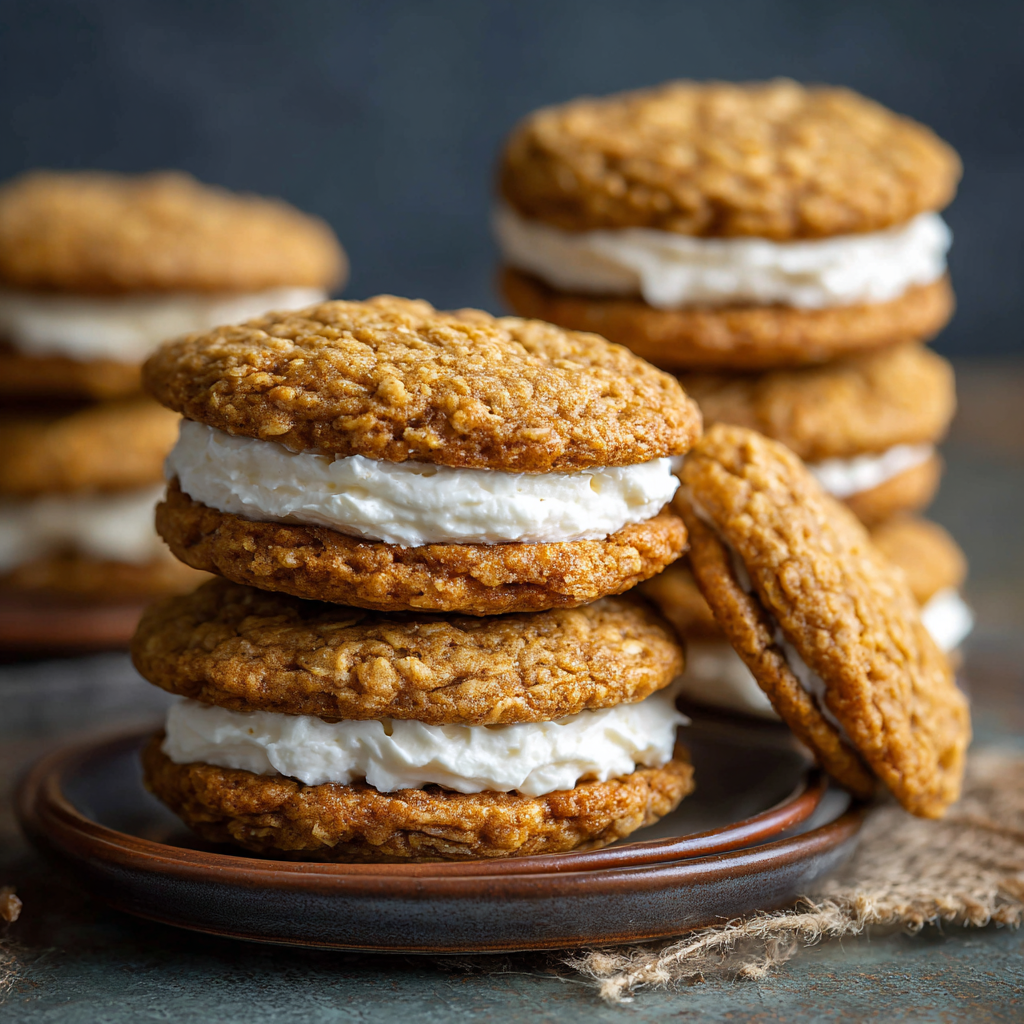
- Sandwich Time! Flip half of your cooled cookies upside down. Spread or pipe a generous dollop (about 1.5 tablespoons) of filling onto the flat bottom of each. Gently press a second cookie on top, flat side down, to form a sandwich. Give it a slight squeeze so the filling peeks out the edges just a little. Perfection!
How to Serve Your Masterpiece
Presentation is part of the fun! These pies are stunningly casual. Pile them high on a rustic wooden board or a vintage cake stand for a real “bakery counter” feel. For a lunchbox throwback, wrap them individually in parchment paper and tie them with baker’s twine. They pair perfectly with a tall glass of cold milk (the classic move), a cup of strong black coffee to cut the sweetness, or even a mug of hot apple cider. They’re the ultimate shareable treat, but I won’t judge if you sneak one (or two) for yourself with your morning coffee. Your secret is safe with me.
Make It Your Own: Delicious Twists & Swaps
Once you’ve mastered the classic, the kitchen playground opens up! Here are a few of my favorite riffs:
- Salty Sweet Sensation: Add 1/2 cup of crushed potato chips (yes, really!) to the cookie dough along with the oats. The salt and savory crunch is mind-blowing.
- Chocolate Dream: Replace the vanilla filling with a chocolate buttercream: add 1/4 cup of sifted cocoa powder to the filling ingredients and an extra splash of milk.
- Peanut Butter Paradise: Add 1/2 cup of creamy peanut butter to the cookie dough (reduce butter to 3/4 cup). For the filling, mix 1/4 cup peanut butter into the vanilla cream.
- “Everything Nice” Spice: Boost the cozy factor by adding an extra 1/2 tsp cinnamon, 1/4 tsp nutmeg, and 1/4 tsp ginger to the dry ingredients.
- Gluten-Free Friendly: Use a 1:1 gluten-free all-purpose flour blend (like Bob’s Red Mill) and certified GF oats. The texture is fantastic!
Beau’s Kitchen Chronicles: A Few Parting Thoughts
This recipe has been my edible science project for years. I’ve learned that the molasses is truly the soul of the cookie flavor, and that letting the butter get truly soft for the filling is the difference between “good” and “cloud-like.” One time, I accidentally used baking powder instead of soda. The cookies puffed up like little mushroom caps and were cakey, not chewy—a happy accident that taught me to always label my jars! These pies also get even better after a few hours, once the filling has softened the cookies slightly from the inside out. If you can wait, it’s worth it. But let’s be real… who can wait?
Your Questions, Answered
Q: My cookies spread too much and got flat. What happened?
A: This usually means your butter was too warm or melted. Next time, ensure it’s just softened. Also, check that your baking soda is fresh and that you didn’t accidentally use baking powder.
Q: Can I make the dough ahead of time?
A: Absolutely! Scoop the dough balls onto a sheet, freeze them solid, then transfer to a freezer bag. Bake straight from frozen, adding 1-2 minutes to the bake time. Fresh cookies on demand!
Q: My filling is runny/gritty. Help!
A: Runny means your butter might have been too soft or warm. Pop the whole bowl in the fridge for 10 minutes, then re-whip. Gritty means the powdered sugar wasn’t sifted. You can try to beat it for longer, but sifting next time is the sure fix.
Q: How do I store these, and how long do they last?
A: Keep them in an airtight container at room temperature for up to 3 days. For longer storage (up to a week), refrigerate them. Let them come to room temp before eating for the best texture. They also freeze beautifully for up to 3 months.

Homemade Oatmeal Cream Pies : Soft, Chewy & Better Than Store-Bought
Description
XXK
Nutritional Info*
*Because knowledge is power, even with dessert! This is an approximate breakdown per finished cream pie (based on 12 pies).
- Calories: ~320
- Protein: 3g
- Total Fat: 15g
- Saturated Fat: 9g
- Carbohydrates: 45g
- Dietary Fiber: 1g
- Sugars: 25g
Remember, these are homemade with real ingredients—no preservatives, artificial flavors, or high-fructose corn syrup. Enjoying a treat you made yourself, with love, is always a win in my book. Balance is key, friends!
Final Thoughts from My Kitchen to Yours
And there you have it—the roadmap to your new favorite homemade treat. This recipe is more than just a list of steps; it’s an invitation to play, to create, and to reconnect with a simple joy. Whether you’re baking these for giggling kids, for a nostalgic book club, or just for a quiet moment with your favorite mug, I hope they bring a little extra sweetness to your day. Food is my love language, and sharing this recipe feels like passing along a big, warm, delicious hug. Thanks for letting me be part of your kitchen adventure. Now, go forth and bake! And be sure to tag @Feastical if you share your creations—I love seeing your masterpieces.
With a full heart and a happy spoon,
Beau
Loved this recipe? Save it for later!

Creamy Au Gratin Potatoes Recipe : Classic Comfort Side Dish
The Ultimate Creamy Au Gratin Potatoes: Your New Go-To Comfort Food
Hey friends, Beau here from Feastical! Tell me if this sounds familiar: you’re planning a dinner that needs a side dish that’s more than just a side dish. Something that whispers, “Welcome home,” from the oven. Something that steals the show with its golden, bubbly top and a creamy, cheesy interior that makes everyone at the table go completely silent for a second, just to savor it. That, my friends, is the magic of a perfect pan of Creamy Au Gratin Potatoes.
This isn’t just a recipe; it’s a warm hug on a plate. It’s the culinary equivalent of your favorite cozy sweater. We’re talking layers upon layers of tender, thinly sliced potatoes, bathed in a luxuriously smooth cheese sauce, baked until the edges are crisp and the center is pure, unadulterated comfort. Whether it’s anchoring your holiday feast, elevating a simple weeknight roast chicken, or being the star of a “breakfast for dinner” spread (trust me on this), this dish delivers every single time.
I know “au gratin” can sound a little fancy, but I’m here to pull back the curtain. With a few simple techniques and the spirit of a home cook (not a stressed-out chef!), we’re going to create something spectacular together. So, tie on your apron, grab your favorite baking dish, and let’s make some memories—and a seriously delicious mess.
The Story Behind My Love for This Dish
My obsession with au gratin potatoes started in my grandma’s kitchen, which always smelled like butter and possibility. She didn’t call them “au gratin,” of course. To us, they were simply “Cheese Potatoes,” and they only appeared on the most special of Sundays or when the whole, loud, wonderful family descended for the holidays.
I remember standing on a step-stool, “helping” by slowly grating a block of extra-sharp cheddar into a mountain that always seemed to shrink before it hit the sauce. The sound of her whisk rhythmically scraping the bottom of her old saucepan is a permanent soundtrack in my mind. The real magic, though, happened when she’d pull the steaming, bubbling dish from the oven. That moment of collective anticipation as she placed it on the trivet—the *oohs* and *aahs* as the cheese strings stretched from serving spoon to plate—it taught me that food is so much more than fuel. It’s the centerpiece of connection, a delicious catalyst for laughter and stories. Every time I make this recipe, I’m right back on that step-stool, and that’s exactly the feeling I want to share with you.
What You’ll Need: A Chef’s Guide to the Ingredients
Great food starts with great ingredients, but let’s keep it simple and smart. Here’s your shopping list, complete with my favorite tips and swaps to make this recipe your own.
- 2 lbs Yukon Gold or Russet Potatoes: The foundation! Yukon Golds are my top pick—their creamy, buttery texture and thin skin are perfect. Russets are a classic choice, giving you that fluffy, starchy interior that soaks up sauce beautifully. No need to peel Yukon Golds if you give them a good scrub!
- 2 tbsp Unsalted Butter & 2 tbsp All-Purpose Flour: This dynamic duo is your roux, the backbone of our creamy sauce. Cooking the flour in the butter for just a minute or two gets rid of the raw flour taste and ensures a smooth, lump-free gravy.
- 1 ½ cups Whole Milk & 1 cup Heavy Cream: The luxurious body of our sauce. The milk provides the base, while the cream adds that irresistible richness. For a slightly lighter version, you can use all whole milk, but the cream is what makes it truly indulgent.
- 1 ½ cups Shredded Sharp Cheddar Cheese: The flavor star! Use a block and shred it yourself—I promise it’s worth the extra minute. Pre-shredded cheese contains anti-caking agents that can make your sauce grainy. Sharp cheddar gives that tangy punch that cuts through the richness.
- ½ cup Shredded Gruyère or Parmesan Cheese (optional but highly recommended): The secret weapon. Gruyère adds a nutty, complex depth, while Parmesan brings a salty, umami kick. Using a blend takes your gratin from great to “can I have the recipe?”
- 1 tsp Garlic Powder: A little chef hack. Garlic powder distributes flavor evenly throughout the sauce without the risk of burnt garlic bits. Fresh minced garlic is great too—add it to the butter right before the flour.
- Salt and Black Pepper to taste: Season in layers! Don’t be shy. Potatoes need a good amount of salt to shine.
- Optional: Chopped Fresh Thyme or Parsley: A bright, fresh garnish for a pop of color and a hint of herbal freshness right at the end.
Let’s Get Cooking: Your Foolproof Step-by-Step Guide
Ready? Let’s transform these simple ingredients into a masterpiece. Follow these steps, lean into the process, and remember: the best cooking comes with a side of fun.
- Prep Like a Pro: Preheat your oven to 375°F (190°C) and grease a 9×13-inch baking dish with butter or a light spray of oil. This is your canvas. While the oven heats, peel (if using Russets) and slice your potatoes. A mandoline slicer is your best friend for getting uniform, 1/8-inch thick slices—this ensures even cooking. No mandoline? A sharp knife and some patience work just fine! To prevent browning, you can keep the slices in a bowl of cold water while you make the sauce. Just be sure to pat them very dry with a clean kitchen towel before layering.
- Build Your Flavor Base (The Roux): In a medium saucepan over medium heat, melt the 2 tablespoons of butter. Once it’s foamy, sprinkle in the 2 tablespoons of flour. Immediately start whisking! You’ll cook this for about 1-2 minutes until it smells toasty and nutty, like warm pie crust. This is the flavor foundation.
- Create the Creamy Dream (The Béchamel): Now, slowly stream in the milk and cream while whisking constantly. This constant motion is the key to preventing lumps. Keep whisking as the mixture comes to a gentle simmer. It will start to thicken beautifully after 3-4 minutes. You’re looking for a consistency that nicely coats the back of a spoon.
- Cheese, Please! (The Mornay): Turn the heat down to low. Stir in the garlic powder, a good pinch of salt, and a few grinds of black pepper. Now, add your shredded cheeses in handfuls, letting each handful melt completely before adding the next. This patience gives you a velvety, smooth sauce. Taste it! This is your moment to adjust the seasoning. Does it need more pepper? A pinch more salt? Make it yours.
- Layer with Love: Time to assemble! Arrange half of your potato slices in the prepared dish—it’s okay if they overlap a bit. Pour half of that glorious cheese sauce over the top, using a spatula to nudge it into all the nooks and crannies. Repeat with the remaining potatoes and sauce. Give the dish a gentle tap on the counter to settle everything.
- Bake to Perfection: Cover the dish tightly with aluminum foil and bake for 45 minutes. This covered time is when the magic happens—the potatoes become tender in the steamy, cheesy environment. Then, remove the foil (hello, beautiful top layer!), and bake for another 20-25 minutes. You’re waiting for that gorgeous golden-brown top and bubbles erupting around the edges.
- The Most Important Step: Rest! I know it’s tempting to dive right in, but let the gratin rest for a full 10 minutes after pulling it from the oven. This allows the sauce to set slightly, making it easier to slice and serve perfect, non-runny portions. Sprinkle with fresh herbs right before serving.
How to Serve Your Au Gratin Masterpiece
Presentation is part of the joy! For a family-style vibe, just place that beautiful baking dish right in the center of the table with a big serving spoon. The sight and smell will do all the talking.
For a more plated look, use a sturdy spatula or pie server to lift out a perfect, cheesy stack. Pair it with something that can stand up to its richness. It’s the ideal partner for a simple roasted chicken, a garlic-herb crusted pork loin, or a seared steak. For a holiday spread, it’s non-negotiable alongside glazed ham and roasted green beans. And don’t forget a bright, simple side salad with a vinaigrette dressing to cut through the decadence. Leftovers (if you have any!) are spectacular reheated for breakfast with a couple of fried eggs on top.
Make It Your Own: Delicious Recipe Variations
The classic is perfect, but the kitchen is your playground! Here are a few of my favorite twists:
- The “Everything but the Kitchen Sink” Version: Add ½ cup of diced ham or cooked, crumbled bacon between the potato layers. A handful of thawed, frozen peas or chopped broccoli florets stirred into the sauce adds color and veggies.
- French Onion Twist: Thinly slice and slowly caramelize 2 large yellow onions in a bit of butter before you start. Layer these sweet onions between the potatoes and cheese sauce for an incredible depth of flavor.
- Lighter & Leaner: Swap the whole milk and cream for 2 ½ cups of 2% or whole milk. Use a mix of sharp cheddar and part-skim mozzarella. The result is still creamy and satisfying, just a touch lighter.
- Sweet Potato Gratin: Use half Yukon Gold and half sweet potatoes. Add a pinch of smoked paprika or a dash of maple syrup to the cheese sauce for a sweet-savory autumnal vibe.
- Extra Herby & Garlicky: Stir 2 tablespoons of chopped fresh thyme or chives into the cheese sauce. Add 2-3 cloves of minced fresh garlic to the butter when making your roux for a more potent garlic kick.
Beau’s Chef Notes & Kitchen Confessions
This recipe has been my faithful companion for years, and it’s evolved with me. I once tried to speed things up by using pre-sliced potatoes from the store… let’s just say they were too thick and never got tender. Lesson learned! The thin slice is non-negotiable.
Another confession: I’ve absolutely forgotten to cover it with foil for the first bake. The result? A prematurely dark top and undercooked potatoes underneath. We live and we learn! The foil is your friend for that initial tenderizing steam bath. Most importantly, this dish is about generosity and joy. Don’t stress over perfect layers. As long as there are potatoes, cheese sauce, and heat, you’re going to end up with something downright delicious.
FAQs & Quick Troubleshooting
Q: Can I make au gratin potatoes ahead of time?
A: Absolutely! Assemble the entire dish (through step 5), cover tightly, and refrigerate for up to 24 hours. When ready to bake, you may need to add 10-15 minutes to the covered baking time since you’re starting from cold.
Q: My sauce looks grainy or separated. What happened?
A: This usually means the sauce got too hot when the cheese was added. Always melt cheese over low heat. If it happens, don’t panic! A splash of warm milk and a vigorous whisk can sometimes bring it back together. It will still taste great.
Q: Why are my potatoes still crunchy?
A: Two likely culprits: the slices were too thick, or the dish wasn’t covered for the first part of baking. The covered steaming phase is crucial for tenderness. Ensure your slices are no thicker than 1/8-inch.
Q: Can I freeze baked au gratin potatoes?
A: I don’t recommend it. Dairy-based sauces can separate and become watery when thawed and reheated. This dish is best enjoyed fresh or within 3-4 days from the fridge.

Creamy Au Gratin Potatoes Recipe : Classic Comfort Side Dish
Description
If you’re craving a side dish that’s more than just a side, one that whispers “welcome home” and steals the show, you’ve just found it. Layers of tender potatoes, smothered in velvety cheese sauce, baked until golden and bubbly—this is comfort food at its finest. Whether it’s a holiday feast, a weeknight roast, or breakfast-for-dinner, this dish delivers every single time.
Ingredients
Potatoes & Base
-
2 lbs Yukon Gold or Russet potatoes
-
2 tbsp unsalted butter
-
2 tbsp all-purpose flour
Creamy Sauce
-
1 ½ cups whole milk
-
1 cup heavy cream
-
1 ½ cups shredded sharp cheddar cheese
-
½ cup shredded Gruyère or Parmesan cheese (optional but recommended)
-
1 tsp garlic powder
-
Salt and black pepper to taste
Optional Toppings / Garnish
-
Fresh thyme or parsley, chopped
Tips & Swaps:
-
Yukon Gold: creamy, buttery, thin-skinned—no need to peel.
-
Russet: classic starchy option; peel for best results.
-
Cheese: shred from a block for smooth, melty results; pre-shredded can get grainy.
-
Herbs: fresh thyme or parsley adds a bright, herbal pop.
Instructions
1. Prep
-
Preheat oven to 375°F (190°C).
-
Grease a 9×13-inch baking dish.
-
Peel (if using Russets) and thinly slice potatoes (1/8-inch thick). Keep in cold water to prevent browning, then pat dry before layering.
2. Make the Roux (Flavor Base)
-
In a medium saucepan, melt butter over medium heat.
-
Add flour and whisk for 1–2 minutes until toasty and fragrant.
3. Create the Creamy Sauce (Béchamel)
-
Slowly whisk in milk and cream, stirring constantly.
-
Bring to a gentle simmer until thickened, about 3–4 minutes.
4. Add Cheese (Mornay Sauce)
-
Reduce heat to low. Stir in garlic powder, salt, pepper, and shredded cheeses gradually, letting each handful melt completely.
-
Taste and adjust seasoning as needed.
5. Assemble the Gratin
-
Layer half of the potato slices in the dish.
-
Pour half of the cheese sauce over potatoes, spreading to cover.
-
Repeat with remaining potatoes and sauce.
-
Tap dish gently to settle layers.
6. Bake
-
Cover with foil and bake for 45 minutes.
-
Remove foil and bake 20–25 minutes more, until top is golden and bubbly.
7. Rest & Serve
-
Let rest 10 minutes before slicing.
-
Garnish with fresh herbs if desired.
-
Serve family-style or plated with your favorite main dish.
Notes
-
Thin potato slices (1/8-inch) = tender perfection.
-
Covering with foil for the first bake creates a steamy, soft interior.
-
Don’t stress over perfect layering—generosity and cheese are key!
A Quick Note on Nutrition
Let’s be real—this is a celebratory, comforting side dish, and it’s proudly rich and indulgent. The nutritional info below is per serving (based on 8 generous servings) to help you plan. The protein comes from the dairy, and the potatoes provide energy-boosting carbohydrates and a bit of fiber, especially if you leave the skins on your Yukon Golds. To lighten it up a bit, refer to the “Lighter & Leaner” variation above. Remember, food is about nourishment for the soul, too, and this dish delivers that in spades!
Per Serving: Calories: 310 | Fat: 20g | Saturated Fat: 12g | Carbohydrates: 25g | Protein: 9g | Sodium: 280mg | Fiber: 2g
Final Thoughts from My Kitchen to Yours
There you have it, my tried-and-true path to the creamiest, cheesiest, most soul-satisfying au gratin potatoes. This recipe is a testament to the idea that the most beloved foods are often the simplest ones, made with care and shared with people you love.
I hope this becomes a staple in your home, a recipe your own family starts to request by name. So go ahead, get that cheese bubbling, let the aroma fill your kitchen, and create your own story around the table. And when you do, I’d love to hear about it! Tag me over on Feastical or drop a comment on the blog.
Until next time, keep your whisks ready and your hearts full. Happy cooking!
– Beau

Easy First Birthday Cake Recipe : Baby-Friendly and Delicious
Hey There, Birthday Party Planners!
Welcome back to Feastical, your go-to spot for food that feels like a celebration. Today, we’re diving into one of the sweetest kitchen projects you’ll ever tackle: your little one’s very first birthday cake. Now, I know this can feel a bit daunting. You want it to be special, adorable, and—most importantly—perfectly safe and gentle for that tiny, curious palate. No sugar rush, no mystery ingredients, just pure, wholesome, smash-worthy goodness.
I’m Beau, and around here, we believe that marking life’s big moments starts in the kitchen. This isn’t just about baking a cake; it’s about creating the centerpiece for a memory you’ll cherish forever. Those photos of frosting-smeared giggles? Priceless. That’s why I’ve crafted this Easy First Birthday Cake Recipe to be incredibly simple, naturally sweetened, and so delicious the whole family will sneak a slice. We’re using ingredients you can feel great about, and I’ll walk you through every step with my favorite chef hacks. So, tie on your apron, grab your cutest mixing bowl, and let’s make a cake that’s as full of love as your home is right now.
Why This Cake? A Little Kitchen Nostalgia
This recipe takes me right back to my niece’s first birthday. My sister, who is a wizard with a spreadsheet but gets nervous around a whisk, was determined to make the cake herself. She called me in a panic: “Beau, it has to be perfect, but I don’t want her eating a bowl of frosting and food coloring!” We spent a sunny afternoon in her kitchen, mashing bananas and laughing as we taste-tested the batter (the perks of a no-raw-egg recipe!).
The look on my niece’s face when that little cake was placed in front of her—eyes wide, hands cautiously poking the soft crumb—was pure magic. She went from curious to jubilant in about three seconds flat. It wasn’t a picture-perfect bakery cake; it was lopsided, with yogurt frosting swooped on by a proud, amateur-mom-chef. And it was absolutely perfect. That day cemented my belief that the best first birthday cake isn’t about elaborate decoration; it’s about love, safety, and the start of a beautiful, messy, delicious relationship with food. That’s the spirit I’ve baked right into this recipe for you.
Gathering Your Simple, Wholesome Ingredients
Here’s the beautiful part: you probably have most of this in your kitchen already. We’re building flavor and texture with whole foods. Let’s break it down:
- 1 cup mashed ripe bananas (about 2 bananas) – This is our natural sweetener superstar! The spottier the banana, the sweeter and more flavorful your cake. Chef’s Insight: Mash them until completely smooth with no chunks for an even crumb.
- 1/4 cup unsweetened applesauce – Adds moisture and a hint of tartness to balance the banana’s sweetness. It also helps keep the cake beautifully tender. Substitution Tip: You can use an equal amount of pureed pears or even pumpkin puree for a fun twist.
- 1/4 cup whole milk or plant-based milk – Whole milk adds richness, but oat, almond, or coconut milk work flawlessly for dairy-free needs. The goal is just a bit of liquid for the perfect batter consistency.
- 1/4 cup melted coconut oil or unsalted butter – I love the very subtle tropical note coconut oil adds, but melted butter gives a classic, comforting flavor. Use what you love! Pro Hack: Make sure it’s cooled slightly before mixing so it doesn’t “cook” the other ingredients.
- 1 teaspoon vanilla extract – The essence of celebration! Pure vanilla adds a warm, aromatic depth that makes the cake taste “special.”
- 1 large egg – Our binder and leavening helper. It gives the cake structure so it’s soft but not gummy. For an egg-free version, see the variations section below!
- 1 cup all-purpose or whole wheat flour – All-purpose gives a lighter, classic crumb. Whole wheat pastry flour adds a nutty wholesomeness and extra fiber. If using standard whole wheat, swap half with all-purpose to keep it light.
- 1 teaspoon baking powder & 1/2 teaspoon baking soda – Our dynamic rising duo! They work together to give this dense fruit-based batter the perfect, gentle lift. Check the dates on yours—fresh leaveners are key.
- 1/2 teaspoon cinnamon – The secret warmth! Just a half-teaspoon complements the banana beautifully without being overpowering for little taste buds.
For the Frosting:
- 1 cup full-fat plain Greek yogurt or whipped cream cheese – Greek yogurt is my go-to: tangy, protein-rich, and spreadable straight from the fridge. Full-fat is crucial for creaminess. Cream cheese frosting is a bit richer and holds swirls better for decorating.
- 1 teaspoon vanilla extract – A must to flavor the frosting.
- Optional: a drizzle of maple syrup – If you’re serving toddlers over 1 and want a hint more sweetness for the frosting, a teaspoon of pure maple syrup does the trick beautifully. For baby’s slice, you can skip it!
Let’s Bake! Your Step-by-Step Guide to Smash Cake Success
Ready? Let’s turn these simple ingredients into a birthday masterpiece. I’ll be with you at every step, sharing my best tips.
- Preheat & Prep: Fire up your oven to 350°F (175°C). This is the golden temperature for even, gentle baking. Now, grab your pans. I adore using two 6-inch round pans for a perfect little layered cake, or even a single 6-inch for a charming, one-layer “smash” cake. Grease the pans lightly with a bit of your chosen oil or butter, then line the bottom with a circle of parchment paper. This guarantees a clean release every single time—no cake casualties on the big day!
- The Wet Team Mix-Up: In a large bowl, combine your beautifully mashed bananas, applesauce, milk, slightly cooled melted oil/butter, vanilla, and the egg. Whisk it all together until it’s smooth and homogenous. You’ll see the mixture emulsify and become creamy. This is your flavor base, and it already smells amazing.
- The Dry Team Whisk: In a separate bowl, whisk together your flour, baking powder, baking soda, and cinnamon. Why whisk? It aerates the flour and ensures our leavening agents are evenly distributed, so you don’t get any bitter baking soda pockets. Little Chef Hack: If you’re worried about dense spots, you can sift these together. I often just give it a good 30-second whisk.
- The Gentle Merge: This is the most important step! Add the dry ingredients to the wet ingredients. Now, put your inner mixer on low. Use a spatula and fold gently, just until the last streak of flour disappears. A few tiny lumps are okay! Overmixing develops gluten in the flour, which can make the cake tough. We want tender, soft, and melt-in-your-mouth.
- Pan & Bake: Divide the batter evenly between your prepared pans. Tap them gently on the counter to release any air bubbles. Slide them into the center of your preheated oven. Bake for 20-25 minutes. The cake is done when the top springs back lightly to the touch, the edges are just pulling away from the pan, and a toothpick inserted into the center comes out clean or with a couple of moist crumbs (not wet batter).
- The Patience Test (Cooling!): Let the cakes cool in their pans on a wire rack for about 10 minutes. Then, run a knife around the edge, invert them, peel off the parchment paper, and let them cool completely on the rack. I know it’s tempting, but do not frost a warm cake! The frosting will melt into a puddle. Use this time to whip up your frosting!
- Frosting Magic: Simply stir the Greek yogurt (or softened cream cheese) with the vanilla (and optional maple syrup) until smooth. Pop it in the fridge to firm up slightly while the cakes cool. This makes it much easier to spread.
- Decorate & Celebrate! Once the cakes are completely cool, place one layer on your cake stand or plate. Add a dollop of frosting, spread it, top with the second layer (if using), and frost the top and sides. Get creative! Use the back of a spoon to make soft swirls. Decorate with a rainbow of fresh berries, banana slices, or a sprinkle of freeze-dried fruit powder for a natural “sprinkle” effect.
How to Serve Your First Birthday Masterpiece
Presentation is part of the fun! For the guest of honor, place the whole smash cake or a large slice right on their high chair tray. Strip them down to a diaper or put on a dedicated “smash outfit”—things are about to get gloriously messy. Have your camera ready and just let them explore. Poking, squishing, tasting… it’s all part of the experience!
For party guests and family, slice the rest of the cake like you normally would. It’s perfectly sweet and delicious for all ages. I love serving it with a side of fresh berries and maybe an extra dollop of that Greek yogurt frosting. It’s a humble, wholesome cake that speaks volumes of love. Remember, the messier the hands, the bigger the smiles in those photos!
Make It Your Own: Delicious Twists & Swaps
This recipe is wonderfully adaptable. Here are a few of my favorite spins:
- Blueberry Bliss: Fold 1/2 cup of fresh or frozen (and thawed) blueberries into the batter at the very end. They create little bursts of flavor and a gorgeous color.
- Peanut Butter Protein Punch (For non-allergic babies): Replace the coconut oil with 1/4 cup of smooth, unsweetened peanut butter (warmed to make it runny). It adds incredible flavor and staying power.
- Sweet Potato Spice: Substitute the mashed banana with an equal amount of pureed, cooked sweet potato or butternut squash. Increase the cinnamon to 1 tsp and add a pinch of nutmeg. A wonderful fall-inspired option!
- Egg-Free & Dairy-Free Delight: For the egg, use a “flax egg” (1 Tbsp ground flaxseed mixed with 2.5 Tbsp water, let sit 5 mins). Use plant-based milk and coconut oil. For frosting, a thick, plain coconut yogurt can work, or simply use a dairy-free cream cheese alternative.
- Mini Muffin Mania: Turn this into perfect, grab-and-go baby muffins! Pour the batter into a greased mini muffin tin and bake for 12-15 minutes. Great for little hands and party favors!
Beau’s Kitchen Notes & Stories
This cake has evolved in my kitchen more times than I can count. The first version was literally just banana, apple, and oat flour—it was tasty but dense! Through testing (and many happy baby taste-testers in my friend circle), I found the balance of leavening agents and the egg to give it that celebratory cake texture. One time, I accidentally used baking soda instead of powder for the full amount… let’s just say we got a volcanic, bitter cake that only the dog was interested in. A good reminder to always double-check your cans!
The beauty of this recipe is its flexibility. It’s a template for love. Don’t stress if it’s not perfectly level or if the frosting is a bit rustic. That’s the charm. The memory is in the making and the sharing, not in the precision. Just have fun with it!
Your Questions, Answered
Q: Can I make this cake ahead of time?
A: Absolutely! Bake the cake layers up to two days in advance. Let them cool completely, wrap tightly in plastic wrap, and store at room temperature. Frost the day of the party. You can also frost the whole cake and store it, covered, in the fridge for up to a day.
Q: My cake is dense/gummy. What happened?
A: This usually points to two things: 1) Overmixing the batter after adding the flour, or 2) The bananas weren’t ripe enough. Super ripe, spotty bananas are sweeter and incorporate better. Also, ensure your baking powder/soda are fresh!
Q: What can I use instead of Greek yogurt for frosting?
A> Whipped full-fat cream cheese is a fantastic, stable alternative. For a dairy-free option, try whipping a thick coconut cream (chill a can of full-fat coconut milk and scoop out the solid cream) with a little vanilla.
Q: Is this cake safe for babies under 1?
A> While it’s made with baby-friendly ingredients, it’s always best to consult your pediatrician and introduce individual ingredients first. The cake contains common allergens like egg, dairy (if used), and wheat. For baby’s first taste, a plain, unfrosted piece is a great start.

Easy First Birthday Cake Recipe : Baby-Friendly and Delicious
Description
Welcome to Feastical, your go-to spot for food that feels like a celebration. Today, we’re tackling a truly special kitchen project: your little one’s very first birthday cake. This cake is naturally sweetened, soft, safe for tiny taste buds, and perfect for that iconic “smash cake” moment. Think minimal sugar, wholesome ingredients, and maximum cuteness.
Ingredients
For the Cake:
-
1 cup mashed ripe bananas (about 2 bananas)
-
1/4 cup unsweetened applesauce
-
1/4 cup whole milk or plant-based milk
-
1/4 cup melted coconut oil or unsalted butter
-
1 tsp vanilla extract
-
1 large egg (or 1 flax egg for egg-free version: 1 Tbsp ground flax + 2.5 Tbsp water, sit 5 mins)
-
1 cup all-purpose or whole wheat flour
-
1 tsp baking powder
-
1/2 tsp baking soda
-
1/2 tsp cinnamon
For the Frosting:
-
1 cup full-fat plain Greek yogurt or whipped cream cheese
-
1 tsp vanilla extract
-
Optional: 1 tsp maple syrup (for extra sweetness for older toddlers)
Instructions
1. Preheat & Prep
-
Oven: 350°F (175°C).
-
Grease two 6-inch round pans or a single 6-inch pan. Line with parchment for easy removal.
2. Mix the Wet Ingredients
-
In a large bowl, combine mashed bananas, applesauce, milk, melted coconut oil/butter, vanilla, and egg. Whisk until smooth.
3. Mix the Dry Ingredients
-
In a separate bowl, whisk together flour, baking powder, baking soda, and cinnamon.
4. Combine Wet & Dry
-
Fold dry ingredients into wet ingredients gently until just combined. A few lumps are okay! Overmixing = dense cake.
5. Bake
-
Divide batter between pans. Tap gently to release air bubbles.
-
Bake 20–25 minutes. Done when tops spring back lightly, edges pull slightly from pan, and a toothpick comes out with a few moist crumbs.
6. Cool
-
Cool cakes in pans 10 minutes. Run a knife around edges, invert, remove parchment, and cool completely on a wire rack.
7. Make Frosting
-
Stir Greek yogurt or softened cream cheese with vanilla (and optional maple syrup). Chill slightly to firm up.
8. Decorate & Celebrate
-
Frost cooled cake layers. Spread frosting between layers and over top and sides.
-
Decorate with fresh fruit, banana slices, or a sprinkle of freeze-dried fruit powder.
-
Smash cake: Place for baby to explore, squish, and taste—messy, fun, and memorable!
Notes
-
Blueberry Bliss: Fold in 1/2 cup fresh or thawed blueberries.
-
Peanut Butter Protein Punch: Swap coconut oil for 1/4 cup smooth peanut butter (for non-allergic kids).
-
Sweet Potato Spice: Use 1 cup pureed cooked sweet potato instead of banana; add 1 tsp cinnamon + pinch nutmeg.
-
Egg-Free & Dairy-Free: Use flax egg, plant milk, coconut oil, and coconut yogurt or dairy-free cream cheese.
-
Mini Muffins: Pour batter into a mini muffin tin; bake 12–15 mins—perfect for little hands!
A Quick Look at the Good Stuff (Nutritional Info)
This information is per slice (based on 8 servings from a 6-inch layer cake frosted with Greek yogurt). Please note, this is an estimate.
- Calories: 140
- Fat: 6g
- Saturated Fat: 4g
- Carbohydrates: 18g
- Fiber: 1g
- Sugar: 6g (all naturally occurring from banana & applesauce)
- Protein: 3g
- Sodium: 100mg
Prep Time: 15 minutes | Cook Time: 25 minutes | Total Time: 40 minutes + cooling | Servings: 8 small slices or 1 perfect smash cake
Final Thoughts From My Kitchen to Yours
And there you have it—your roadmap to a joyful, delicious, and truly memorable first birthday cake. This isn’t just a recipe; it’s a little container for one of life’s biggest little moments. As you bake, remember that the love you stir into the batter is the most important ingredient of all.
I’d love to see your creations! If you make this cake, tag me @Feastical on social media so I can celebrate with you. Here’s to sticky fingers, giant smiles, and the start of a beautiful lifetime of sharing food and joy with your little one. Happy baking, and happy birthday to your amazing baby!
With love and a spatula,
Beau Collier

Healthy Banana Chocolate Chip Muffins : Moist, Sweet & Guilt-Free Treat
Healthy Banana Chocolate Chip Muffins: Your New Go-To Guilt-Free Treat
Hey friends, Beau here from Feastical! Let’s talk about a universal kitchen truth: the fate of the overripe banana. You know the ones I mean. They start to get those freckles, then they soften, and suddenly, they’re staring you down from the fruit bowl, whispering, “Don’t you dare throw me away.” For years, my answer was always banana bread—and don’t get me wrong, I love a good loaf. But lately? I’ve been obsessed with something even better, faster, and perfectly portable: Healthy Banana Chocolate Chip Muffins.
This isn’t just another muffin recipe. This is my kitchen’s answer to the “I need something wholesome but I also really want chocolate” dilemma that hits around 3 PM (and, let’s be honest, sometimes 10 AM). We’re making a muffin that’s soft, moist, and packed with real banana flavor, sweetened naturally, and studded with just enough dark chocolate to feel like a treat. It’s the kind of bake that makes you feel like a superstar—because you’re creating something deliciously satisfying that’s also genuinely good for you. Whether you’re packing lunchboxes, need a breakfast you can grab on the way out the door, or just crave a cozy snack with your coffee, this recipe has got your back. So, let’s preheat that oven and turn those forgotten bananas into something magical!
The Muffin That Started It All
My love for these muffins goes way back to my Aunt Maggie’s kitchen. She wasn’t a fancy chef, but she had a sixth sense for turning simple things into soul food. Every Sunday afternoon, her house would fill with the smell of something baking. One rainy day, I was there, probably complaining about being bored, when she plopped a bowl in front of me with three very spotted bananas. “Mash,” was her only instruction. What emerged from her oven 30 minutes later were these lumpy, gorgeous, chocolate-speckled muffins. We ate them warm, the chocolate still gooey, while playing cards at her Formica table. She called them her “Clear-the-Counter” muffins. No fuss, no fancy ingredients, just pure, simple joy. That’s the spirit I bring to this recipe every time—a little nostalgia, a lot of love, and the belief that the best food doesn’t have to be complicated.
Gathering Your Goodness: What You’ll Need
Here’s the beautiful part: this is a pantry-friendly recipe. We’re using whole, feel-good ingredients that work together like a dream team. Let’s break it down:
- 3 ripe (spotty!) bananas, mashed – This is your sweetener superstar and what gives the muffins incredible moisture. The spottier, the better—they’re sweeter and their flavor is more intense. No ripe bananas? Bake unripe ones at 300°F for 15-20 minutes until blackened!
- 2 large eggs – Our binding agents, giving the muffins structure and a tender crumb. For a vegan swap, I’ve had great success with flax eggs (2 tbsp ground flax + 5 tbsp water, let sit 10 mins).
- 1/3 cup honey or pure maple syrup – Natural liquid sweetness that blends seamlessly. Honey gives a floral note, maple syrup a deeper, caramel-like flavor. Both are perfect.
- 1/4 cup coconut oil (melted) or olive oil – Fat = flavor and tenderness. I love the subtle tropical hint from coconut oil, but a light olive oil works beautifully for a fruitier undertone. Just make sure it’s melted and cooled slightly.
- 1/4 cup milk (any kind you love) – Dairy, almond, oat—you choose! This just loosens the batter to the perfect consistency. My current fave is creamy oat milk.
- 1 tsp pure vanilla extract – The flavor enhancer. It rounds out all the other notes. Don’t skip it!
- 1 1/2 cups whole wheat flour or oat flour – Whole wheat adds a nutty depth and fiber. For a gluten-free option, oat flour (just blended oats!) is my top choice—it makes the muffins incredibly tender.
- 1 tsp baking soda – Our leavening hero. It reacts with the acidic bananas to give these muffins their perfect rise and airy texture.
- 1/2 tsp cinnamon – A warm whisper of spice that makes the banana flavor sing. Trust me on this.
- 1/4 tsp salt – The secret weapon! It balances all the sweetness and makes the chocolate taste even richer.
- 1/2 cup dark chocolate chips (or chunks) – The happy surprise in every bite. I use at least 70% dark for less sugar and a more grown-up, bittersweet contrast. But semi-sweet or mini chips are totally fair game, especially for kids.
Let’s Get Baking: Simple Steps to Muffin Heaven
Ready? Put on some tunes, tie your apron, and let’s do this. It comes together in one bowl (plus one for dry stuff) in about 10 minutes flat.
- Preheat & Prep. Fire up your oven to 350°F (175°C). This is crucial for an even bake. Line a 12-cup muffin tin with paper liners or give each cup a quick spritz of non-stick spray. I’m a liner guy—less mess, easy cleanup.
- Banana Party. In a large mixing bowl, peel and mash those ripe bananas with a fork until you have a chunky, pudding-like consistency. A few small lumps are totally fine—they give lovely bursts of flavor! This is your wet base.
- Mix the Wet Team. To the bananas, add the eggs, honey/maple syrup, melted (and slightly cooled) oil, milk, and vanilla. Whisk it all together with gusto until it’s one harmonious, slightly frothy liquid. You’ll see the magic starting right here.
- Whisk the Dry Crew. In a separate, smaller bowl, whisk together your flour of choice, baking soda, cinnamon, and salt. This ensures the baking soda is evenly distributed so you don’t get any bitter pockets. Chef Hack: Sift if your flour is lumpy, but a good whisk usually does the trick!
- The Gentle Merge. Pour the dry ingredients into the wet ingredients. Now, use a spatula and fold gently. I mean it—GENTLY. Stop when you just barely see no more dry flour streaks. A slightly lumpy batter is a tender muffin. Overmixing is the #1 reason muffins turn out tough or dense. We’re not building muscle here, we’re being delicate.
- Chocolate Time! Sprinkle in those glorious dark chocolate chips and fold maybe 3-4 more times, just to disperse them. Reserve a small handful to press on top of the muffins before baking for that professional, “I-want-to-eat-you-now” look.
- Fill ‘Em Up. Divide the batter evenly among the 12 muffin cups. I like using an ice cream scoop for less mess and equal portions. They should be about 3/4 full. Top with the reserved chocolate chips.
- Bake to Perfection. Slide the tin into your preheated oven. Bake for 18-22 minutes. Start checking at 18 minutes—a toothpick inserted into the center of a muffin should come out with just a moist crumb or two (not wet batter). The tops will be golden and spring back when lightly touched.
- The Cool Down. This is the hardest part! Let the muffins cool in the tin on a wire rack for 5 full minutes. This lets them set. Then, carefully transfer them directly onto the rack to cool completely. Resisting the urge to eat one immediately is a true test of willpower… but I won’t judge if you fail.
Serving Up the Good Vibes
How you serve these is half the fun! Warm, they are a gooey, comforting dream. At room temperature, they’re the ideal packed snack. Here are my favorite ways to enjoy them:
- Breakfast of Champions: Slice one in half, give it a quick toast, and smear it with almond butter or a dollop of Greek yogurt. Pair with a piece of fruit and your favorite coffee for a killer start to the day.
- Snack Attack Solution: Tuck one into a lunchbox (yours or your kid’s) alongside some cheese sticks and carrot sticks. It’s the wholesome treat that makes everyone smile.
- Dessert Mode, Activated: Warm a muffin for 10 seconds, place it in a bowl, and top with a small scoop of vanilla bean ice cream. Drizzle with a little extra melted peanut butter. You’re welcome.
Store them in an airtight container at room temperature for up to 3 days, or freeze them for up to 3 months for instant muffin gratification anytime.
Make It Your Own: Fun Recipe Twists
Once you’ve mastered the base recipe, the canvas is yours to play with! Here are some of my favorite spins:
- The “Everything But The…” Muffin: Fold in 1/2 cup of a mix-in combo like chopped walnuts or pecans + shredded coconut. It adds amazing texture!
- Peanut Butter Chocolate Swirl: Add 1/4 cup of natural peanut butter to the wet ingredients. Swirl an extra tablespoon into the batter with a knife before baking for a marbled effect. Banana + PB + chocolate is a holy trinity.
- Berry Bliss: Replace the chocolate chips with 2/3 cup of fresh or frozen blueberries or raspberries. Toss them in a teaspoon of flour first to prevent sinking.
- Double Chocolate Decadence: For the chocoholics, replace 1/4 cup of the flour with unsweetened cocoa powder. You get a deep, chocolate-banana flavor that’s absolutely divine.
- Superfood Boost: Stir in 2 tablespoons of chia seeds or ground flaxseed with the dry ingredients for an extra fiber and omega-3 punch.
Beau’s Kitchen Notes & Stories
This recipe has been my trusty sidekick for years, evolving from Aunt Maggie’s original. The biggest lesson I’ve learned? Embrace the ripe banana. I used to think they were past their prime, but now I buy extra bunches just to let them ripen for this purpose. I also used to be a militant over-mixer, thinking a smooth batter was the goal. Nope! Lumpy is lovely. One funny fail: I once used frozen bananas and didn’t drain the excess liquid. Let’s just say I invented “banana chocolate chip soup cakes.” Not my finest hour, but a great lesson in banana prep! Now, this recipe is on permanent rotation, and I love hearing how you make it your own.
Your Questions, Answered
- Q: My muffins turned out dense/gummy. What happened?
A: The most common culprit is overmixing the batter after adding the flour. Gluten develops when you mix too much, leading to toughness. Also, double-check your baking soda is fresh! If it’s old, it won’t give you that nice rise. - Q: Can I make these gluten-free?
A: Absolutely! Swap the whole wheat flour for an equal amount of oat flour (just blend rolled oats until fine). It works like a charm and adds a wonderful, tender texture. - Q: Can I use white flour or another sweetener?
A: Sure! All-purpose flour works 1:1. For sweetener, you can use an equal amount of pure maple syrup, honey, or even agave. I don’t recommend granular sugars like coconut sugar here unless you dissolve it in the wet ingredients first, as it can change the texture. - Q: How do I store and freeze them?
A: Room temp in a sealed container for 3 days. To freeze, let them cool completely, then wrap individually in cling film and pop them in a freezer bag. Thaw at room temp or warm in a toaster oven straight from frozen.

Healthy Banana Chocolate Chip Muffins : Moist, Sweet & Guilt-Free Treat
Description
Hey friends! Let’s talk about overripe bananas—the ones that get all spotted and soft and make you think, “Please don’t throw me away.” These bananas are magic in baking, and today, we’re turning them into Healthy Banana Chocolate Chip Muffins—soft, moist, naturally sweet, and packed with just enough chocolate to feel like a treat. Perfect for breakfast, snacks, or a cozy dessert!
Ingredients
-
3 ripe bananas, mashed (the more spotted, the sweeter!)
-
2 large eggs (or 2 flax eggs for vegan)
-
1/3 cup honey or pure maple syrup
-
1/4 cup coconut oil (melted) or olive oil
-
1/4 cup milk (dairy or plant-based)
-
1 tsp pure vanilla extract
-
1 1/2 cups whole wheat flour (or oat flour for gluten-free)
-
1 tsp baking soda
-
1/2 tsp cinnamon
-
1/4 tsp salt
-
1/2 cup dark chocolate chips or chunks (70% cacao recommended)
Instructions
-
Preheat Oven: 350°F (175°C). Line a 12-cup muffin tin with paper liners or lightly grease.
-
Mash Bananas: In a large bowl, mash bananas until mostly smooth (a few lumps are perfect).
-
Mix Wet Ingredients: Add eggs, honey/maple syrup, melted oil, milk, and vanilla. Whisk until combined.
-
Combine Dry Ingredients: In a separate bowl, whisk together flour, baking soda, cinnamon, and salt.
-
Fold Together: Gently fold the dry ingredients into the wet until just combined—do not overmix! Batter should be slightly lumpy.
-
Add Chocolate: Fold in chocolate chips, reserving a few to sprinkle on top.
-
Fill Muffin Cups: Divide batter evenly into the 12 cups (about 3/4 full). Top with reserved chips.
-
Bake: 18–22 minutes, until a toothpick inserted comes out with a few moist crumbs.
-
Cool: Let muffins sit 5 minutes in the tin, then transfer to a wire rack to cool completely.
Notes
-
Perfectly Sweet: Use extra-ripe bananas—they’re naturally sweeter and more flavorful.
-
Don’t Overmix: Overmixing = dense muffins. Fold gently for a tender crumb.
-
Freezing Hack: Cool completely, wrap individually, and freeze. Thaw or toast for an instant snack.
-
Mix-Ins: Try nuts, shredded coconut, peanut butter swirls, or berries for variety.
Nourishment Breakdown (Because Knowledge is Power!)
Here’s the good news about what you’re eating! These numbers are approximate and based on using whole wheat flour, honey, coconut oil, and 70% dark chocolate chips. Remember, these are treats with benefits!
Per Muffin (1 of 12): Calories: ~150 | Protein: 4g | Fat: 6g | Carbohydrates: 22g | Fiber: 3g | Sugar: 5g
What makes these a healthier choice? We’re using whole grains for fiber and nutrients, natural sweeteners (bananas + honey) that metabolize differently than refined sugar, and good fats from coconut oil. The dark chocolate adds antioxidants. It’s a balanced bite that gives you lasting energy, not a sugar crash.
Final Thoughts from My Kitchen to Yours
And there you have it, friends—my not-so-secret weapon for turning simple ingredients into pure, feel-good joy. These Healthy Banana Chocolate Chip Muffins are more than just a recipe; they’re a reminder that taking care of yourself can (and should) be delicious. They’re proof that “healthy” doesn’t mean bland or boring. It can mean moist, chocolatey, and deeply satisfying.
I hope this recipe finds a cozy spot in your kitchen routine, just like it has in mine. Bake a batch, share one with a neighbor, pack one for a hike, or just enjoy one quietly with your morning coffee. That’s what Feastical is all about—food that brings people together and makes the everyday a little more special.
Happy baking! And if you make them, I’d love to hear about it. Tag me @Feastical or shoot me an email. Now, go conquer

French Dip Tortilla Roll Ups: Easy, Cheesy, and Dippable Snack Bites
French Dip Tortilla Roll Ups: Easy, Cheesy, and Dippable Snack Bites
Hey friends, Beau here! Let’s be real for a second. Is there anything more universally satisfying than that moment you dunk a perfectly crafted French Dip sandwich into a steaming cup of savory au jus? The way the bread soaks up that rich, beefy goodness, the melty cheese, the tender roast beef… it’s a hug for your taste buds. But what if I told you we could capture all that magic in a fun, dippable, no-fuss bite-sized package that’s ready in about 20 minutes?
Welcome to your new favorite snack, appetizer, or heck, even a killer lunch: French Dip Tortilla Roll Ups. We’re taking everything glorious about the classic and giving it a clever, crispy tortilla twist. Imagine: a warm flour tortilla wrapped around layers of thinly sliced roast beef and gooey Swiss cheese, toasted until golden, and sliced into perfect little pinwheels ready for a deep, delicious dive into homemade au jus.
This isn’t just a recipe; it’s your secret weapon for game day, a last-minute potluck, or those nights when you want something incredibly satisfying without a ton of effort. I live for recipes like this—simple, soulful, and guaranteed to make everyone gather around the plate. So, tie on your apron (or don’t, no judgment here), and let’s turn your kitchen into the most delicious snack spot in town.
The Night That Inspired These Roll Ups
This recipe was born from a classic “fridge forage” situation. Picture it: A few years back, my friends dropped by unexpectedly after a movie. We were all starving, but the pickings were slim. I had some leftover tortillas from taco night, deli roast beef from lunches, and a block of Swiss cheese that was just begging to be used. The only mission was to create something hot, cheesy, and crowd-pleasing, stat.
As I started layering, it hit me—this tasted just like the French Dip sandwiches my dad would always order at our favorite old diner. The only thing missing was the dip! A quick rummage through the pantry revealed a packet of au jus gravy mix, and a star was born. The moment we bit into those crispy, juicy roll ups and dragged them through the rich sauce, we all went silent (a true miracle with this crew). That happy, spontaneous kitchen experiment is now a Feastical staple, and I’m so thrilled to share it with you. It’s proof that the best recipes often come from a little improvisation and a lot of love.
What You’ll Need to Make the Magic Happen
Here’s your simple lineup. I’ve added a few notes and swaps because I want this to work with what you have!
- 4 large flour tortillas: The burrito-sized ones are perfect. They’re flexible and give you plenty of room to roll. Chef’s Insight: If your tortillas are straight from the fridge, warm them for 10-15 seconds in the microwave. It makes them much more pliable and prevents cracking when you roll!
- 1 lb thinly sliced deli roast beef: This is the star. Ask your deli counter to slice it “shaved” or “as thin as possible.” It makes rolling a breeze and ensures every bite is packed with flavor. Substitution Tip: Leftover homemade pot roast or even thinly sliced grilled steak works amazingly here!
- 1½ cups shredded Swiss or provolone cheese: Swiss is traditional for that classic French Dip tang, but provolone is a mellower, super-melty alternative. Chef’s Insight: Buy a block and shred it yourself. Pre-shredded cheese has anti-caking agents that can sometimes prevent that ultra-smooth melt we’re after.
- 1 tbsp horseradish sauce or mayo (optional spread): This is our flavor booster! A thin layer adds a creamy base and a little zing. Substitution Tip: Dijon mustard, garlic aioli, or even a smear of cream cheese would be delicious.
- 1 tbsp butter (for toasting): For that beautiful, golden-brown, buttery crisp exterior. You can use a neutral oil, but butter gives the best flavor.
- 1 packet au jus gravy mix & 1½ cups water: The easy, flavorful dip that brings it all home. It’s a pantry hero for a reason!
Let’s Get Rolling: Your Step-by-Step Guide
Ready? This comes together so fast. I’ll walk you through each step with my favorite kitchen hacks to ensure crispy, cheesy success.
- Prep Your Station: Preheat a large non-stick skillet or griddle over medium heat. Get out a cutting board and grab your ingredients. This is a “mise en place” moment—having everything ready makes the assembly line fly. Chef’s Hack: If you’re making a big batch, keep your tortillas under a slightly damp paper towel to prevent them from drying out while you work.
- Build the Flavor Layers: Lay a tortilla flat. If you’re using it, spread a very thin layer (about a teaspoon) of horseradish sauce or mayo across the surface, leaving a ½-inch border around the edge. This keeps the roll from getting soggy. Layer on the roast beef, slightly overlapping the slices, and sprinkle a generous handful of cheese evenly over the top. Don’t skimp—the cheese is the glue!
- The Tight Roll: This is the only tricky part, and it’s not tricky at all. Start at the bottom and fold it over the filling, tucking it in snugly. Continue rolling tightly away from you, keeping the sides as even as possible, until you have a neat log. Place it seam-side down. Repeat with the remaining tortillas.
- Slice & Sizzle: Using a sharp serrated knife, gently cut each roll into 3-4 pieces. I find pressing down gently (not sawing) gives the cleanest cuts. Melt your butter in the hot skillet. Place the roll ups seam-side down first. This is crucial! It seals the roll so they don’t unravel. Toast for 2-3 minutes per side, or until beautifully golden brown and you can see the cheese starting to ooze out the sides. Chef’s Tip: Don’t crowd the pan! Cook in batches if needed to ensure they get crispy, not steamed.
- Whip Up the Au Jus: While the roll ups are toasting, make your dip. Simply whisk the au jus packet with 1½ cups of cold water in a small saucepan. Bring it to a simmer over medium heat, whisking occasionally, until slightly thickened, about 3-5 minutes. Pour it into a small bowl or ramekin for dipping. Easy peasy!
How to Serve These Cheesy Bites
Presentation is part of the fun! I love serving these straight from the skillet onto a big wooden board or platter. Place the bowl of warm au jus right in the center and scatter the golden roll ups around it. It’s inviting and encourages everyone to dig in.
For a full spread, these pair beautifully with a simple, crisp green salad dressed with a bright vinaigrette to cut through the richness. If it’s game day, surround them with other dippable friends like crispy potato wedges, celery sticks, or even some spicy pickled peppers. And don’t forget the napkins—the best food is often a little messy!
Mix It Up! 5 Tasty Twists on the Classic
Once you master the basic blueprint, the world is your flavor oyster. Here are a few of my favorite ways to switch things up:
- The “Philly” Version: Swap the roast beef for shaved steak (quickly sautéed with onions and peppers), use provolone, and skip the au jus for a side of cheesy beer cheese sauce.
- BBQ Ranch Style: Use shredded rotisserie chicken tossed in a bit of BBQ sauce. Spread the tortilla with ranch dressing instead of horseradish, use cheddar cheese, and serve with extra ranch for dipping.
- Caprese-inspired: A veggie-forward option! Spread with pesto, layer with fresh mozzarella slices, sun-dried tomatoes, and fresh spinach. Toast as usual and serve with a warm marinara dipping sauce.
- Spicy Southwest: Add a layer of sliced jalapeños or a drizzle of chipotle sauce over the roast beef. Use pepper jack cheese and serve with a warm queso dip instead of au jus.
- Low-Carb/Keto Friendly: Use low-carb tortillas or even large lettuce leaves (like butter lettuce) as your wrap. You’ll just want to eat them with a fork if you go the lettuce route, but the flavor is all there!
Beau’s Kitchen Notes & Stories
Over the years, this recipe has seen some fun evolutions. One time, I accidentally bought “hot” horseradish sauce instead of the mild stuff. Let’s just say those roll ups had some SERIOUS personality—my brother drank two glasses of milk, but still finished his plate! It taught me to always taste your ingredients first.
I’ve also learned that these freeze surprisingly well before toasting. Assemble the whole rolls (unsliced), wrap them tightly in plastic wrap, and freeze. Thaw in the fridge overnight, slice, and toast as directed. It’s a fantastic make-ahead trick for hectic weeks.
Most importantly, this recipe is about joy and sharing. Don’t stress about perfection. If a little cheese leaks out, that’s the cook’s treat. If a roll up unravels a bit, just call it “deconstructed.” The goal is deliciousness, not perfection.
Your Questions, Answered
- Q: My tortillas are cracking when I roll them. Help!
A: This almost always means the tortillas are too cold or dry. Simply warm them for a few seconds in the microwave (stack them on a plate with a damp paper towel) to make them soft and flexible. Also, don’t overfill them! - Q: Can I make these ahead of time for a party?
A: Absolutely! You have two great options: 1) Assemble, roll, and slice them up to 4 hours ahead. Cover tightly and refrigerate, then toast just before serving. 2) Toast them completely, let them cool, and then reheat on a baking sheet in a 375°F oven for 5-8 minutes until hot and crispy again. - Q: My roll ups are unraveling in the pan!
A> The two key fixes are: 1) Always start cooking them seam-side down to seal that edge. 2) Make sure you’re not over-spreading the sauce or fillings all the way to the edge. Leave a clean border to help the tortilla stick to itself. - Q: Is there a from-scratch au jus I can make?
A: For sure! If you have time, simmer 2 cups of beef broth with a splash of soy sauce, a minced garlic clove, a pinch of onion powder, and a dash of Worcestershire sauce for 10-15 minutes. Thicken with a cornstarch slurry if you like it a bit richer. The packet is for convenience, but homemade is divine.

French Dip Tortilla Roll Ups: Easy, Cheesy, and Dippable Snack Bites
Description
French Dip Tortilla Roll Ups
Easy, cheesy, golden-crispy bites with rich au jus for dipping
Ingredients
-
4 large flour tortillas (burrito size)
-
1 lb thinly sliced deli roast beef
-
1½ cups shredded Swiss or provolone cheese
-
1 tablespoon horseradish sauce or mayonnaise (optional)
-
1 tablespoon butter (for toasting)
-
1 packet au jus gravy mix
- 1½ cups water
Instructions
-
Assemble roll ups
Lay tortillas flat. Spread a thin layer of horseradish sauce or mayo if using. Layer roast beef evenly, then sprinkle with cheese. -
Roll tightly
Roll each tortilla tightly into a log. Place seam-side down. -
Slice
Cut each roll into 3–4 pinwheels using a sharp knife. -
Toast
Heat butter in a non-stick skillet over medium heat. Cook roll ups seam-side down first, then turn and toast all sides until golden and cheese is melted (2–3 minutes per side). -
Make au jus
In a small saucepan, whisk au jus mix with water. Simmer 3–5 minutes until slightly thickened. -
Serve
Serve warm roll ups with au jus for dipping.
Notes
-
Extra flavor: Add Dijon mustard or garlic aioli
-
Cheese swap: Mozzarella, cheddar, or pepper jack
-
Make-ahead: Assemble up to 4 hours ahead; toast before serving
- Bake option: Bake at 400°F (200°C) for 10–12 minutes, flipping once
Nutritional Information (For Your Info!)
A quick note: I’m a chef, not a dietitian. This info is an estimate based on the standard recipe using a calorie-tracking calculator and common brands. For precise dietary needs, please calculate with your specific ingredients.
Per serving (approx. 3 roll ups):
Calories: ~320 | Protein: 20g | Fat: 14g | Carbohydrates: 28g | Fiber: 1g | Sugar: 2g
These are a satisfying snack or light meal! To boost the fiber, you can use a whole wheat or high-fiber tortilla. The protein comes primarily from the lean roast beef and cheese, making these bites both tasty and filling.
Final Thoughts from My Kitchen to Yours
And there you have it, friends—my go-to recipe for turning a classic sandwich into a fun, dippable, downright irresistible snack. What I love most about these French Dip Tortilla Roll Ups is how they bring people together. There’s something about a shareable, hands-on dish that gets the conversation flowing and the smiles going.
I hope you make them, love them, and maybe even create your own signature twist. That’s what Feastical is all about: finding joy in the process and sharing the delicious results. If you do make them, I’d be thrilled if you tagged me on social @feastical so I can see your beautiful creations!
Now, go forth and dip with confidence. Until next time, keep your kitchen messy and your heart full.
Warmly,
Beau

Healthy Butter Chicken Bowl : Spice-Forward, Creamy, and Lightened-Up
That Butter Chicken Craving? Let’s Make It Happen (The Feel-Good Way)
Hey friends, Beau here from Feastical! Let’s talk about that moment. You know the one. It hits out of nowhere—a deep, undeniable craving for something rich, creamy, and spiced to perfection. You’re dreaming of butter chicken. But maybe you’re also thinking, “I want to feel amazing after I eat it, not like I need to unbutton my jeans and take a three-hour nap.” I get it. We all deserve that hug-in-a-bowl feeling without the heaviness that sometimes tags along.
That’s exactly why I’m obsessed with this Healthy Butter Chicken Bowl. We’re taking all the soul-warming magic of the classic—the tender, spice-kissed chicken, that velvety tomato sauce that you want to drink with a spoon—and giving it a lighter, brighter twist. We’re using smart swaps like tangy Greek yogurt and just a kiss of light cream to keep it luxuriously creamy but surprisingly lean. The spices? Oh, we’re turning them up. This is a spice-forward, flavor-packed party in a bowl.
It’s a one-pan wonder (okay, maybe two pans, but who’s counting?) that comes together faster than ordering takeout. It’s weeknight-friendly, meal-prep glorious, and absolutely guaranteed to make your kitchen smell like a dream. So, grab your favorite apron and your biggest spoon. We’re about to make a butter chicken that loves you back.
My First Butter Chicken & The Quest for “The One”
My love affair with butter chicken started, like many great food stories, in a slightly chaotic, utterly delicious way. I was at a potluck years ago, and someone brought this giant, unassuming dish covered in foil. They peeled it back, and this incredible aroma of garam masala, tomatoes, and cream just wafted out and commanded the attention of the entire room. I piled my plate high, took one bite, and was instantly transported. It was pure comfort. But afterwards, I felt… weighed down. For a guy who loves to feel energetic and good in my own skin, it became a mission: could I recreate that magical first-bite feeling in a way that fit my lifestyle?
After more experiments than I care to admit (some too dry, some lacking depth, one infamous “orange soup” incident), this version was the winner. It’s the recipe I make when I need a guaranteed smile, when friends come over, or when I just want a fantastic lunch for the week. It’s my kitchen’s feel-good hug, and now, I’m so excited to share it with you.
Gathering Your Flavor Arsenal
Here’s everything you’ll need to build your healthy butter chicken masterpiece. Don’t stress if you’re missing an item—I’ve got swaps and insights for you!
For the Chicken Marinade:
- 1 lb boneless, skinless chicken breast or thighs, cubed: Thighs are my secret for ultra-juicy, forgiving meat. Breasts are leaner and great for a protein boost. You truly can’t go wrong.
- 1/2 cup plain Greek yogurt (full-fat or 2%): This is our marinade MVP! It tenderizes the chicken like a dream and adds a tangy base. Chef’s Insight: Full-fat gives the creamiest result, but any plain Greek yogurt works.
- 1 teaspoon garam masala: The heart of the dish. It’s a warm, aromatic blend of spices like cardamom, cinnamon, and cloves. Please use fresh, if possible—it makes all the difference.
- 1/2 teaspoon each of turmeric, cumin, and paprika: Turmeric for golden color and earthiness, cumin for that deep, smoky note, paprika for warmth and color.
- 1/2 teaspoon salt: Crucial for flavoring the chicken from the inside out.
- Juice of 1/2 lemon: A bright punch that wakes up all the spices and aids in tenderizing.
For the Sauce:
- 1 tablespoon olive oil or light butter: We’re keeping it light but still flavorful. Avocado oil works great too for a high-heat sauté.
- 1/2 small onion, finely diced: The sweet, savory foundation of our sauce. A yellow or white onion is perfect here.
- 2 garlic cloves, minced: Non-negotiable flavor booster. Pro-tip: use a microplane for the garlic—it almost melts into the sauce.
- 1 teaspoon grated fresh ginger: Fresh is best! That zippy, warm flavor is irreplaceable. Keep a knob in the freezer and grate it frozen—no peeling needed!
- 1 teaspoon garam masala, 1/2 teaspoon cumin: Yes, we’re adding more! Blooming them in the oil unlocks their full, potent fragrance.
- 1/2 teaspoon chili powder (optional): This is for heat. Want it mild? Skip it. Want a kick? Add it! Cayenne pepper is a fine substitute.
- 1 cup tomato puree or crushed tomatoes: Puree gives a smoother sauce, crushed tomatoes offer a bit more texture. Both are delicious.
- 1/3 cup light cream, coconut milk, or more Greek yogurt: The creamy finish! Light cream is luxurious, coconut milk adds a slight sweetness (great for dairy-free), and extra Greek yogurt keeps it super lean and tangy.
- Salt to taste: Always season in layers.
- Fresh cilantro for garnish: The fresh, herbal pop that makes the whole dish sing.
To Serve:
- Cooked basmati rice, quinoa, or cauliflower rice: The perfect vessel for that glorious sauce. Basmati is traditional and fragrant, cauliflower rice keeps it low-carb.
- Optional extras: A warm piece of naan for dipping, a quick cucumber salad, or some simple steamed greens like spinach.
Let’s Get Cooking: Your Step-by-Step Roadmap
Follow these steps, and you’ll have a restaurant-worthy bowl in no time. I’m chatting you through each one with my best tips!
- Marinate the Chicken: In a medium bowl, combine the cubed chicken, Greek yogurt, all the marinade spices (garam masala, turmeric, cumin, paprika, salt), and the lemon juice. Get in there with your hands and massage it all together until every piece of chicken is thoroughly coated. Chef’s Hack: Want next-level flavor? Do this step in the morning, cover the bowl, and let it hang out in the fridge all day. The longer it marinates, the happier your chicken will be. Minimum? Aim for 30 minutes while you prep everything else.
- Sauté the Aromatics: While the chicken marinates, heat the olive oil or light butter in a large skillet or saucepan over medium heat. Add the diced onion and cook, stirring occasionally, for 4-5 minutes until it’s soft and translucent. Add the minced garlic and grated ginger and cook for another 1 minute—just until incredibly fragrant. Don’t let the garlic brown! Burnt garlic tastes bitter.
- Bloom the Spices: This is the magic step! Add the garam masala, cumin, and optional chili powder to the onion mixture. Stir constantly for about 30 seconds. You’ll know it’s working when the spices smell amazing and coat the onions in a fragrant paste. This toasts the spices and unlocks their essential oils for maximum flavor.
- Build the Sauce Base: Pour in your tomato puree or crushed tomatoes. Be careful, it might splatter a bit! Stir everything together, scraping up any tasty bits from the bottom of the pan. Let this simmer gently for 5-7 minutes. This cooks the raw tomato flavor and lets the sauce thicken slightly. Season with a pinch of salt here.
- Cook the Chicken: While the sauce simmers, heat a separate non-stick pan over medium-high heat. No need to add oil—the marinade has enough. Add the marinated chicken pieces in a single layer (you might need to do this in batches to avoid steaming). Let them cook undisturbed for 3-4 minutes to get a nice sear, then flip and cook for another 3-4 minutes until cooked through and browned on all sides. Chef’s Tip: Don’t crowd the pan! Giving the chicken space is the key to that beautiful browning, not boiling.
- Bring It All Together: Once the chicken is cooked, add it directly into the simmering tomato sauce. Pour in your choice of cream (light cream, coconut milk, or a big dollop of Greek yogurt). Stir gently to combine. Let it all simmer together for another 2-3 minutes so the flavors marry and the sauce becomes beautifully creamy. Give it a final taste and add more salt if needed.
Building Your Perfect Bowl
This is where you make it your own! Presentation is part of the fun and makes the meal feel extra special.
Start with a big, wide bowl—we need real estate for all the good stuff. Spoon a generous bed of fluffy basmati rice, nutty quinoa, or light cauliflower rice right in the center. Ladle that gorgeous, creamy butter chicken and sauce right over the top, letting it cascade down the sides. The visual of that vibrant orange-red sauce against the white rice is just *chef’s kiss*.
Now, garnish with a generous handful of fresh, chopped cilantro. For a pop of color and cool contrast, add a few thin slices of cucumber or a quick salad of diced cucumber, tomato, and red onion with a squeeze of lemon. If you’ve got it, a wedge of warm, buttery naan on the side is the ultimate utensil for scooping up every last drop of sauce. Dinner is served, and it’s a masterpiece.
Mix It Up! Creative Twists on the Classic
Once you’ve mastered the base recipe, the world is your butter chicken oyster. Here are a few of my favorite ways to switch it up:
- Vegan “Butter” Chickpeas: Swap the chicken for two cans of rinsed chickpeas! Marinate them in the spiced yogurt (use a dairy-free yogurt) for 15 minutes, then roast in the oven at 400°F for 20 minutes until slightly crispy. Fold them into the sauce at the end. Hearty, protein-packed, and divine.
- Extra Veggie Power Bowl: Add a cup of small cauliflower florets or diced sweet potato to the sauce after you add the tomatoes. Let them simmer until tender. You get more veggies and a wonderful textural contrast.
- Coconut Lime Dream: Use full-fat coconut milk for your cream and add the zest of one lime to the sauce at the very end, along with a big squeeze of lime juice. It’s tropical, tangy, and incredibly refreshing.
- Tikka Masala Twist: Add 1 tablespoon of tomato paste when you bloom the spices, and use 2/3 cup of light cream. It creates a slightly different, equally delicious flavor profile that’s a bit richer.
- Instant Pot / Pressure Cooker Hack: Use the sauté function for steps 2-4. Add the raw marinated chicken on top of the sauce (don’t stir it in). Pressure cook on high for 6 minutes, quick release, then stir in the cream. Faster and the chicken is fall-apart tender!
Beau’s Kitchen Notes & Stories
This recipe has been a living, evolving thing in my kitchen. The first time I made a “healthy” version, I was so scared to lose the creaminess that I messed up the spice balance. My friend took one bite and said, “Tastes… healthy?” which is chef-code for “needs work.” It was a learning moment! The key is bold spices first, smart creaminess second.
Now, it’s my go-to for casual dinner parties. I once tripled the recipe for a backyard gathering and served it straight from my biggest cast-iron skillet. People hovered around it with their bowls until it was gone. That’s the sign of a winner. Don’t be afraid to make a double batch—the leftovers might just be better than day one.
Your Questions, Answered
Q: My sauce is too thin/too thick. Help!
A: No worries! If it’s too thin, let it simmer uncovered for a few extra minutes to reduce and concentrate. If it’s too thick (or if you want more sauce), simply stir in a splash of water, chicken broth, or even a bit more of your chosen cream until it reaches your perfect consistency.
Q: Can I use chicken tenderloins or another cut?
A: Absolutely! Chicken tenderloins work great—just reduce the cooking time by a minute or two so they don’t dry out. You can also use a whole chicken breast and slice it after cooking for a different look.
Q: How long does the marinated chicken last in the fridge?
A: You can safely marinate it for up to 24 hours. The acid in the lemon and yogurt will tenderize it beautifully, but much longer and the texture can start to change. Overnight is the sweet spot for maximum flavor.
Q: My yogurt split when I added it to the hot sauce! What happened?
A: This is common if the yogurt is cold and the sauce is boiling. To prevent “curdling,” take the sauce off the heat and let it cool for a minute. Stir a spoonful of the warm sauce into the yogurt to temper it, then stir this mixture back into the main pot. Gentle heat is key!

Healthy Butter Chicken Bowl : Spice-Forward, Creamy, and Lightened-Up
Description
Healthy Butter Chicken Bowl
Creamy, spice-forward comfort with a lighter twist
Ingredients
Chicken Marinade
-
1 lb boneless, skinless chicken breast or thighs, cubed
-
½ cup plain Greek yogurt
-
1 teaspoon garam masala
-
½ teaspoon turmeric
-
½ teaspoon cumin
-
½ teaspoon paprika
-
½ teaspoon salt
-
Juice of ½ lemon
Sauce
-
1 tablespoon olive oil or light butter
-
½ small onion, finely diced
-
2 garlic cloves, minced
-
1 teaspoon fresh grated ginger
-
1 teaspoon garam masala
-
½ teaspoon cumin
-
½ teaspoon chili powder (optional)
-
1 cup tomato puree or crushed tomatoes
-
⅓ cup light cream, coconut milk, or Greek yogurt
-
Salt to taste
For Serving
-
Cooked basmati rice, quinoa, or cauliflower rice
- Fresh cilantro, chopped
Instructions
-
Marinate the chicken
In a bowl, mix chicken with yogurt, spices, salt, and lemon juice. Coat well and marinate at least 30 minutes (up to 24 hours). -
Cook aromatics
Heat oil or butter in a large skillet over medium heat. Sauté onion for 4–5 minutes until soft. Add garlic and ginger; cook 1 minute until fragrant. -
Bloom spices
Stir in garam masala, cumin, and chili powder. Cook 30 seconds, stirring constantly. -
Simmer the sauce
Add tomato puree. Simmer 5–7 minutes until slightly thickened. Season lightly with salt. -
Cook the chicken
In a separate pan over medium-high heat, cook marinated chicken in batches for 6–8 minutes until browned and cooked through. -
Combine & finish
Add chicken to sauce. Stir in cream (or yogurt/coconut milk). Simmer 2–3 minutes until creamy. Adjust salt. -
Serve
Spoon over rice or grain of choice. Garnish with fresh cilantro.
Notes
-
Dairy-free: Use coconut milk + dairy-free yogurt
-
Extra protein: Use chicken thighs for juicier results
-
Low-carb: Serve with cauliflower rice
- Vegan: Swap chicken for chickpeas or tofu
Nutritional Highlights (A Quick Peek)
This is where our healthy twist really shines! Please note: This is a general estimate for one serving of the butter chicken sauce with chicken only (about 1/3 of the recipe), without rice or sides. Actual values can vary based on your specific ingredients and brands.
- Calories: ~350
- Protein: ~32g (Fantastic for keeping you full and supporting muscle!)
- Carbohydrates: ~10g (Mostly from the tomatoes and onions—the sauce itself is relatively low-carb.)
- Fat: ~18g (The healthy fats from oil, yogurt, and a bit of cream.)
Why It’s a Win: By using Greek yogurt as the marinade base and a moderate amount of light cream, we significantly cut down on saturated fat compared to traditional versions packed with butter and heavy cream, while boosting protein. The spices aren’t just for flavor—ingredients like turmeric and ginger are celebrated for their anti-inflammatory properties.
Final Thoughts
So, there you have it—your path from craving to creation. This isn’t about denying yourself the rich, comforting flavors you love. It’s about embracing them in a way that leaves you feeling nourished, energized, and utterly satisfied.
Remember, the heart of great cooking isn’t perfection; it’s connection. It’s the smell of spices toasting in your pan, the sizzle of marinated chicken, and the joy of sharing a bowl that you made with your own hands. This recipe is your template, your launchpad. Make it once as written, then make it yours. A little more chili, a shower of cilantro, a side of tangy pickle—it’s all yours to command.
That initial potluck butter chicken taught me about pure comfort. The journey of creating this version taught me that comfort can feel light. It can be both a celebration and a part of your everyday wellness. You don’t have to choose.
Now, I’m passing the spoon to you. Whip up this feel-good hug in a bowl, share it with someone you care about, or savor it all for yourself with zero guilt. That’s the Feastical spirit—food that loves you back.
Can’t wait to hear how yours turns out. Tag me with your creations, and until next time, keep cooking with joy, friends.

Savory Protein Pancakes : Cheesy, Herby, and Packed with Fuel
Savory Protein Pancakes: Your New Secret Weapon for Delicious Fuel
Hey friends, Beau here from Feastical! Let’s talk about a little kitchen rebellion I’ve been loving lately. We’ve all been there, staring at the same carton of eggs, the same tub of yogurt, thinking, “Okay, scramble or bowl?” It’s reliable, it’s fine… but sometimes, fine just doesn’t cut it. We crave something that feels special without needing a culinary degree or an hour of prep time. We want something that packs a serious protein punch but doesn’t taste like you’re punishing yourself. Enter the hero we didn’t know we needed: Savory Protein Pancakes.
Forget everything you know about pancakes being a syrup-drenched, dessert-for-breakfast affair. These bad boys are a whole different game. Imagine something soft and fluffy like your favorite pancake, but savory, cheesy, and flecked with fresh, green herbs. They’re golden on the outside, tender on the inside, and they come together in one bowl in about five minutes flat. They’re the ultimate proof that “healthy” and “incredibly satisfying” can exist in the same bite. Whether you need a post-workout refuel, a brain-food lunch, or a weekend brunch showstopper that will have everyone asking for the recipe, these pancakes are your answer. So, grab your favorite non-stick pan and let’s flip the script on breakfast together.
The Pancake Pivot: A Story of Savory Salvation
This recipe was born out of a classic “fridge forage” moment. Picture it: a rainy Sunday, post-gym hunger hitting hard, and my sweet tooth was on strike. I had some gorgeous Greek yogurt about to turn, a bunch of chives waving at me from the herb pot, and a serious craving for something substantial. I was about to make my usual yogurt bowl when I remembered the simple magic of two-ingredient banana pancakes (you know the ones!). A lightbulb went off. What if I took that same simple principle—protein + binder—and made it… savory?
I whisked, I folded, I crossed my fingers, and spooned that chive-and-cheese-studded batter into a hot pan. The first flip was a moment of truth. They were perfect—lightly golden, puffed up, smelling like a cozy herb garden. I took a bite, still standing at the stove, and did a little happy dance right there in my kitchen. It was the comfort of a pancake with the heartiness of an omelet, all in one neat, handheld package. That “aha!” moment is what Feastical is all about: taking simple, real ingredients and turning them into something that makes your day a little brighter, and your belly a lot happier. This recipe is that kitchen experiment success story, and I’m so pumped to share it with you.
Gathering Your Flavor Arsenal: The Ingredients
Here’s the beautiful part: you probably have most of this in your kitchen right now. This isn’t a fancy list; it’s a smart, flavorful team where every player has a job.
- 1/2 cup plain Greek yogurt: This is our superstar. It adds a ton of protein, a lovely tang, and incredible moisture. Chef’s Insight: Full-fat yogurt gives the richest flavor and texture, but any fat percentage works. For a dairy-free swap, a thick, plain plant-based yogurt (like coconut or soy) is your best bet.
- 2 large eggs: Our binders and leaveners! They hold everything together and help the pancakes puff up beautifully. Let them come to room temp for a smoother batter.
- 1/4 cup oat flour or whole wheat flour: Just enough to give the batter structure. Chef’s Hack: No oat flour? Just pulse rolled oats in a blender or food processor until fine. It works like a charm and adds a wholesome, nutty vibe.
- 1/4 cup shredded cheese: The melty, glorious glue. I love sharp cheddar for punch, mozzarella for epic stretch, or feta for a salty, crumbly kick. Use what you love!
- 1/2 teaspoon baking powder: Our little puff-maker. It gives these pancakes their lift and light texture. Make sure yours is fresh for the best results.
- 1/4 teaspoon salt: Crucial for making all the flavors pop. Don’t skip it, especially if using a mild cheese.
- 1 tablespoon chopped fresh herbs: The breath of fresh air! Parsley, chives, or dill are classics. Pro Tip: If you only have dried herbs, use 1 teaspoon. The flavor will be more muted, but it’ll still be delicious.
- Optional Flavor Boosters: This is your playground! A crack of black pepper, a pinch of garlic powder, or a sprinkle of chili flakes can take these in so many fun directions.
Let’s Get Flipping: The Foolproof Method
Ready to see some magic happen? This process is so simple, you’ll have it memorized after one try.
- The Foundation: In a medium bowl, whisk together your Greek yogurt and eggs until they’re completely smooth and homogenous. No streaks of yolk or white! This is the base of our batter, so take an extra 30 seconds here for a perfectly smooth texture. Chef’s Hack: A fork works just as well as a whisk for this job—no need to dirty extra tools.
- The Dry Team Joins In: Sprinkle in the flour, baking powder, salt, and any of your chosen dry seasonings (garlic powder, etc.). Switch to a spatula or spoon and stir until just combined. A few small lumps are totally fine! Overmixing is the enemy of tender pancakes.
- The Fun Fold: Now, gently fold in your shredded cheese and fresh herbs. You want them evenly distributed, but we’re not beating the batter. The mixture will be thick, spoonable, and dotted with deliciousness.
- Pan Prep is Key: Heat a quality non-stick skillet or griddle over medium heat. Not high—medium is the sweet spot. Give it a full 2-3 minutes to heat evenly. Lightly grease it with a brush of oil, a pat of butter, or a spritz of cooking spray. To test if it’s ready, flick a tiny drop of water on it; it should sizzle and dance.
- Spoon & Shape: Using a large spoon or a 1/4-cup measure, drop the batter onto the hot pan. I like to make 4 smaller pancakes (about 3-4 inches across) for easier flipping. Use the back of your spoon to gently nudge them into a nice round shape if needed.
- The Patient Cook & Flip: Let them cook for 2-3 minutes on the first side. You’ll know it’s time to flip when the edges look set, the bottom is golden brown, and little bubbles have formed on the surface and start to pop. Slide your spatula underneath with confidence and flip! Cook for another 1-2 minutes on the second side until golden and cooked through. If you’re unsure, you can peek by making a tiny slit in the side of one pancake.
Plating Up Your Protein Powerhouse
How you serve these can take them from a quick snack to a full-blown meal. Here are my favorite ways:
- The Simple Stack: Pile them high on a plate with an extra sprinkle of fresh herbs and a generous dollop of cool Greek yogurt or sour cream on top. The hot/cold, tangy/savory combo is *chef’s kiss*.
- The Avocado Smash: Mash a ripe avocado with a squeeze of lime and a pinch of salt. Slather it over the pancakes. Add a sprinkle of everything bagel seasoning or red pepper flakes for crunch and heat.
- The Breakfast Bowl Upgrade: Crumble one or two pancakes on top of a big bowl of greens, roasted veggies, and a soft-boiled egg. It’s like the world’s best, most substantial crouton.
- With a Sidekick: Serve alongside a simple mixed green salad, some crispy roasted potatoes, or a few slices of ripe tomato for a complete, satisfying lunch or dinner.
Make It Your Own: Endless Twists & Swaps
The basic formula is your canvas. Here’s how to paint your masterpiece:
- The “Everything Bagel” Pancake: Fold in 1 tablespoon of everything bagel seasoning with the herbs. Top with the classic yogurt, extra seasoning, and thinly sliced smoked salmon or radishes for the ultimate brunch vibe.
- Sun-Dried Tomato & Spinach: Add 2 tablespoons of chopped oil-packed sun-dried tomatoes and a handful of finely chopped fresh spinach to the batter. Use mozzarella cheese. Mediterranean flavor bomb, achieved.
- Southwest Fiesta: Add a pinch of cumin and chili powder to the batter. Use pepper jack cheese and cilantro. Top with salsa, a drizzle of hot sauce, and a spoonful of black beans.
- Gluten-Free & Grain-Free: Swap the oat flour for 1/4 cup of almond flour or chickpea flour (gram flour). Note: chickpea flour has a stronger, earthier flavor that works beautifully with savory recipes.
- Dairy-Free Delight: Use a thick, unsweetened plant-based yogurt (I like coconut or soy) and your favorite dairy-free shredded cheese. The flavor will be slightly different, but the texture will be spot-on.
Beau’s Kitchen Notebook
This recipe has become such a staple in my house that I now make a double or triple batch on meal prep Sundays. The cooked pancakes keep beautifully in the fridge for up to 4 days and reheat like a dream in the toaster or a warm oven. They’re my secret weapon for a grab-and-go breakfast that actually tastes good. I’ve even been known to pack them cold in a lunchbox with some cherry tomatoes and hummus for dipping—they’re that versatile! The biggest evolution? I started adding a tiny pinch of smoked paprika to the batter. It doesn’t make them taste smoky, per se, but it adds this incredible depth of flavor that makes people go, “What is *in* these?!” Try it. Trust me.
Your Questions, Answered
- Q: My pancakes are raw in the middle/burning on the outside. Help!
A: This is almost always a heat issue! Your pan is too hot. Savory batters, especially thick ones like this, need medium, steady heat to cook through without scorching. Reduce the heat, let the pan cool slightly, and try again. Patience is a pancake virtue. - Q: Can I make the batter ahead of time?
A: You can mix it up and let it sit in the fridge for an hour or two, but the baking powder will start to lose its oomph, so they may not be as fluffy. For best results, cook ’em fresh. The good news is, it takes 5 minutes to mix! - Q: Why are my pancakes flat, not fluffy?
A: Two likely culprits: 1) Your baking powder is old and inactive (time for a new can!). 2) You overmixed the batter after adding the flour. Stir until just combined—lumps are your friends. - Q: Can I freeze these?
A: Absolutely! Let cooked pancakes cool completely, then layer them between parchment paper in a freezer bag. They’ll keep for up to 2 months. Reheat straight from frozen in a toaster or a 350°F oven until warm.

Savory Protein Pancakes : Cheesy, Herby, and Packed with Fuel
Description
Savory Protein Pancakes
Fluffy, cheesy, high-protein pancakes perfect for breakfast, lunch, or post-workout fuel
Ingredients
-
½ cup plain Greek yogurt
-
2 large eggs
-
¼ cup oat flour or whole wheat flour
-
¼ cup shredded cheese (cheddar, mozzarella, or feta)
-
½ teaspoon baking powder
-
¼ teaspoon salt
-
1 tablespoon chopped fresh herbs (chives, parsley, or dill)
-
Optional: black pepper, garlic powder, chili flakes, or smoked paprika
- Oil or butter, for cooking
Instructions
-
Mix the base
In a medium bowl, whisk together the Greek yogurt and eggs until completely smooth. -
Add dry ingredients
Stir in the flour, baking powder, salt, and any optional seasonings until just combined. Do not overmix. -
Fold in flavor
Gently fold in the shredded cheese and fresh herbs. The batter will be thick. -
Heat the pan
Heat a non-stick skillet over medium heat and lightly grease with oil or butter. -
Cook the pancakes
Spoon about ¼ cup batter per pancake onto the skillet. Cook for 2–3 minutes until bubbles form and the bottom is golden. Flip and cook another 1–2 minutes until cooked through. - Serve warm
Enjoy immediately or keep warm while cooking remaining pancakes.
Notes
-
Gluten-free: Use oat flour or almond flour
-
Dairy-free: Use thick plant-based yogurt and dairy-free cheese
-
Extra flavor: Add everything bagel seasoning or sun-dried tomatoes
- Meal prep: Store cooked pancakes in the fridge up to 4 days or freeze up to 2 months
The Fuel Breakdown (A Chef’s Perspective)
Okay, let’s talk numbers, but let’s keep it real. I’m not a dietitian, but as a chef who cares about feeling good, I love knowing what’s fueling me. This recipe makes two servings of two substantial pancakes each. Per serving, you’re looking at roughly:
- Calories: ~220
- Protein: ~20g (That’s the superstar! From the yogurt, eggs, and cheese.)
- Carbohydrates: ~10g (Mostly from the flour and a bit from the yogurt.)
- Fat: ~12g (The good, satisfying kind from eggs, cheese, and yogurt.)
These numbers can vary based on your specific brand of yogurt, cheese type, and exact measurements. But the key takeaway? This is a balanced, protein-packed meal or snack that will keep you full and energized for hours, without any weird ingredients or sugar spikes. It’s real food, doing real good.
Final Thoughts
And there you have it, friends—my not-so-secret weapon for turning everyday ingredients into something extraordinary. These Savory Protein Pancakes are more than just a recipe; they’re a mindset shift. They prove that healthy eating can be thrilling, that quick meals can be crave-worthy, and that your favorite flavors can come in a fluffy, portable package.
I hope you give them a try and make them your own. Tag me @Feastical when you do—I live for seeing your kitchen creations! Remember, cooking is about joy, connection, and feeding yourself well, in every sense of the word. Now go forth, whisk with abandon, and flip with confidence. Your next favorite meal is just a pancake flip away.
With a full belly and a happy heart,
Beau

Savory Cottage Cheese Plate : Fresh, Filling & Full of Flavor
Your New Favorite 5-Minute Meal: The Ultimate Savory Cottage Cheese Plate
Forget Everything You Thought You Knew About Cottage Cheese
Hey friends, Beau here! Let’s talk about that moment. You know the one. It’s 3:17 PM, your stomach is doing that low, grumbly rumble, and you’re staring into the fridge like it’s a magic eight-ball that’s gonna solve all your problems. You want something substantial, something that will actually keep you going, but you also have approximately zero energy for actual cooking. Sound familiar?
I’ve been there more times than I can count. And that, my friends, is exactly why I want to introduce you to your new kitchen hero: The Savory Cottage Cheese Plate. This isn’t your grandma’s sweet-and-fruity cottage cheese bowl (though no shade to grandma!). This is a bold, flavor-packed, crunchy-creamy masterpiece that comes together faster than you can find your missing spatula. It’s protein-rich, endlessly customizable, and so satisfying, it blurs the line between a genius snack and a legit light meal.
I’m talking creamy, cool cottage cheese transformed with a sprinkle of everything bagel magic, surrounded by a colorful army of crisp veggies and hearty crackers. It’s a textural party, a flavor fiesta, and the answer to your hangry prayers. So, let’s ditch the complicated recipes for a second and build something beautiful, simple, and downright delicious together.
A Little Backstory: My Cottage Cheese Revelation
My own journey with cottage cheese started, like many great food stories, in my grandma’s kitchen. But her version was strictly a sweet affair—a dollop with canned peaches, a drizzle of honey. It was fine, but it never felt like food to me, you know? It felt like a side act.
The revelation hit me years later, after a long morning spent testing recipes for the blog. I was ravenous, the kitchen was a disaster zone, and all I had was the “boring” stuff: some leftover cottage cheese, the last bits of a veggie tray, and the eternal bottom of a cracker box. In a moment of desperation, I sprinkled some everything bagel seasoning (my eternal pantry crush) on the cheese, shoved everything on a plate, and took a bite.
Friends, it was a flavor explosion. The creamy, mild cheese was the perfect canvas for the garlic, onion, and sesame. The cucumber added a cool, watery crunch that cut through the richness. It was filling, it was fast, and it felt… clever. I’d accidentally created my perfect fuel. Now, I want to share that “aha!” moment with you, along with all the fun twists and tricks I’ve learned since.
Gathering Your Cast of Characters
Here’s the beautiful part: this is less of a strict recipe and more of a flavorful framework. These are your building blocks. Feel free to audition other ingredients from your fridge!
- 1/2 cup Cottage Cheese (Low-fat or Full-Fat): This is your creamy, protein-packed star. Chef’s Insight: I personally go for full-fat or 4% milkfat. The extra bit of fat makes it incredibly lush and satisfying, helping you stay full longer. But low-fat works perfectly if that’s your preference! Look for a brand with small or medium curds for the best texture.
- 1/2 tsp Everything Bagel Seasoning: The flavor transformer! This magical blend of sesame seeds, poppy seeds, dried garlic, dried onion, and salt is what turns bland into brilliant. Substitution Tip: No everything seasoning? No panic! A mix of toasted sesame seeds, a pinch of garlic powder, onion powder, and flaky sea salt will get you 90% of the way there.
- 1/2 cup Raw Veggies (Carrot sticks, cucumber slices, bell peppers, cherry tomatoes): Your crunch crew and color department. Chef’s Insight: I love the sweet snap of bell peppers and the refreshing coolness of cucumber together. Radishes, sugar snap peas, or even lightly steamed asparagus spears are fantastic players here too.
- 6–8 Whole Grain or Seed Crackers: The vehicle for deliciousness and a source of complex carbs. They add a nutty, toasty element and that essential snap. Substitution Tip: Use what you love! Seeded crisps, simple water crackers, or even sturdy pita chips work great. For a low-carb option, try using endive leaves or extra cucumber slices as dippers.
- Optional Extras for Leveling Up:
- Sliced Hard-Boiled Egg: For a mega-protein boost. It’s classic diner vibes, in the best way.
- Pickles (Dill or Cornichons): A briny, tangy punch that cuts the creaminess beautifully.
- Avocado Slices: Adds creamy, healthy fats. A few slices take this plate into serious meal territory.
- A Drizzle of Olive Oil & Cracked Black Pepper: Simple, elegant, and always a good idea.
Let’s Build Your Masterpiece (Step-by-Step)
Ready? This is the fastest, most satisfying kitchen project you’ll do all week. I’ll walk you through it.
- The Foundation: Grab your favorite plate or a wide, shallow bowl. I’m a big fan of using a plate because it gives us plenty of real estate to play with. Spoon that glorious cottage cheese right onto the center. Don’t just plop it—use the back of your spoon to make a little well or swoosh it to the side. We eat with our eyes first, and a little styling goes a long way!
- The Flavor Bomb: Now, take your everything bagel seasoning and sprinkle it evenly over the cottage cheese. Watch the seeds and spices cling to the curds! This isn’t just a topping; it’s a seasoning that gets integrated as you eat. Chef’s Hack: If you’re feeling fancy, toast your everything bagel seasoning in a dry pan for 30 seconds before sprinkling. It unlocks even deeper, nuttier flavors.
- The Crunch Corral: Time for your veggies! Wash, dry, and slice them into bite-sized sticks or pieces. Arrange them in little piles or a colorful ring around the mound of cottage cheese. Think of your plate like a clock—maybe carrots at 12 o’clock, cucumbers at 3, and those gorgeous red pepper strips at 6. It’s fun, it’s organized, and it makes you feel like a pro.
- The Carb-y Companions: Tuck your crackers in amongst the veggies or stack them neatly on the side. If they’re prone to getting soggy (looking at you, rice crackers), you can even serve them on a separate tiny plate or napkin. Chef’s Tip: For extra flavor, try lightly rubbing a cracker with a cut clove of garlic before adding it to the plate. A micro-hack with mega results.
- The Optional Flourish (Go for it!): This is where you personalize. Fan out a few avocado slices. Add a halved hard-boiled egg. Dot the plate with a couple of cornichons. Maybe finish the whole thing with a twist of black pepper and a tiny drizzle of good olive oil over the cottage cheese. There are no rules, only delicious possibilities.
- The Grand Finale: That’s it! You’re done. Seriously. Grab a fork (or just use a cracker as your shovel), take a seat, and enjoy immediately. Dive in, mixing a bit of creamy cheese, a crunchy veggie, and a piece of cracker in every bite. Savor the contrast. You just made something awesome.
How to Serve & Savor It
This plate is the definition of versatile. Here’s how I love to enjoy it:
- The Perfect Desk Lunch: It’s my absolute go-to when I’m working from home. No microwave needed, no sad, soggy salads. It’s refreshing, energizing, and keeps me fueled for hours without the afternoon crash.
- Post-Workout Refuel: That 18+ grams of protein is exactly what your muscles are craving after a workout. The carbs from the veggies and crackers help replenish glycogen stores. It’s a recovery meal that doesn’t feel like “health food.”
- Impressive-Looking Snack for Guests: Double or triple the ingredients and arrange it all on a big wooden board or platter. It looks abundant, thoughtful, and modern. Your friends will think you’re a culinary genius, and you’ll know the secret: it took 10 minutes.
- With a Side of Soup: On a cooler day, pair this plate with a warm mug of tomato soup or a light broth. It’s a fantastic, balanced combo that feels cozy and complete.
Mix It Up! 5 Delicious Twists on the Theme
Once you master the basic blueprint, the world is your oyster (and you could probably put those on here too!). Here are some of my favorite riffs:
- The “Everything But The” Mediterranean: Swap everything bagel seasoning for a mix of za’atar and sumac. Add kalamata olives, a sprinkle of feta cheese, and a drizzle of lemon-infused olive oil. Serve with warm pita wedges.
- The Garden Herb Fresh: Stir a tablespoon of finely chopped fresh dill, chives, and parsley directly into the cottage cheese. Top with cracked pepper and serve with sliced radishes and sugar snap peas. Tastes like spring!
- The Southwest Fiesta: Season the cheese with chili powder, cumin, and a pinch of smoked paprika. Top with a spoonful of salsa or pico de gallo, a few slices of jalapeño, and some crushed tortilla chips for your crackers.
- The Protein Powerhouse (Keto-Friendly): Skip the crackers. Use the cottage cheese as a base and pile on sliced turkey or chicken, a halved soft-boiled egg, avocado, and a few cherry tomatoes. Drizzle with ranch or green goddess dressing.
- The Sweet & Savory Bridge: For those who can’t quit the sweet cottage cheese vibe entirely, try this: Use everything seasoning, but add a small handful of blueberries or sliced strawberries on the side. The sweet bursts with the savory are unexpectedly amazing.
Beau’s Kitchen Notebook
This “recipe” has truly evolved into my most-made kitchen hack. I’ve served it to skeptical friends who now text me photos of their own creations. I’ve eaten it standing over the kitchen sink at 11 PM. The beauty is in its non-recipe nature.
One funny story: I once ran out of everything bagel seasoning mid-prep. In a pinch, I used the “crumbs” at the bottom of a bag of everything bagel chips. It was a glorious, ultra-savory, super-crunchy mess that might have been even better. Moral of the story? Don’t be afraid to improvise. Your fridge and pantry are full of potential flavor bombs. This plate is your invitation to play with your food, in the very best way.
Your Questions, Answered
Q: I’m not a huge fan of the texture of cottage cheese. Any tips?
A: Absolutely! Try giving it a few pulses in a food processor or blending it with a stick blender until it’s mostly smooth, like a ricotta or thick yogurt. The flavor is all there, but the texture becomes beautifully creamy and uniform. This is also a fantastic spread for toast!
Q: Can I make this ahead of time for meal prep?
A: You can prep the components, but I’d advise assembling right before eating. Cut your veggies and store them in an airtight container with a damp paper towel for up to 3 days. Keep your seasoned cottage cheese in a separate container. Assemble your plate when ready, so the crackers stay crisp and the veggies fresh.
Q: What’s the best way to store leftover cottage cheese?
A: Always store it in the coldest part of your fridge, tightly sealed in its original container or a glass jar. To prolong freshness, turn the container upside down when you store it. This creates a vacuum seal that can help prevent spoilage.
Q: My cottage cheese seems a bit watery. What should I do?
A: No problem! Just drain it in a fine-mesh strainer for a few minutes before using. You can also stir it well—sometimes the liquid (whey) just separates and needs to be reincorporated. For a thicker, Greek yogurt-like consistency, draining it for 15-20 minutes does wonders.

Savory Cottage Cheese Plate : Fresh, Filling & Full of Flavor
Description
Forget bland, boring cottage cheese. This Savory Cottage Cheese Plate turns a simple ingredient into a bold, protein-packed meal or snack in just five minutes. Creamy cottage cheese, crunchy veggies, hearty crackers, and everything-bagel seasoning come together for a satisfying plate that’s perfect for busy afternoons, work-from-home lunches, or post-workout fuel.
Ingredients
-
½ cup cottage cheese (full-fat or low-fat)
-
½ teaspoon everything bagel seasoning
-
½ cup raw vegetables
(carrot sticks, cucumber slices, bell peppers, cherry tomatoes) -
6–8 whole-grain or seed crackers
Optional Add-Ons
-
Sliced hard-boiled egg
-
Avocado slices
-
Dill pickles or cornichons
-
Drizzle of olive oil
- Cracked black pepper
Instructions
-
Plate the cottage cheese: Spoon cottage cheese onto a plate or shallow bowl and spread slightly.
-
Season: Sprinkle evenly with everything bagel seasoning.
-
Add crunch: Arrange vegetables around the cottage cheese.
-
Finish the plate: Add crackers and any optional toppings.
- Serve immediately and enjoy by mixing creamy, crunchy, and savory bites.
Notes
-
Full-fat cottage cheese creates a richer, more filling plate.
-
If cottage cheese feels watery, drain briefly or stir well before serving.
-
Not a fan of curds? Blend cottage cheese until smooth for a whipped texture.
- Use extra cucumber slices or endive leaves instead of crackers for low-carb dipping
Nutritional Snapshot (Because Knowledge is Power!)
Please note: The following is an approximate estimate based on using full-fat cottage cheese, 1 cup of mixed veggies, 7 whole grain crackers, and 1/2 a sliced avocado as an optional add-on. Values will vary based on your specific ingredients and brands.
- Prep Time: 5 minutes
- Cook Time: 0 minutes
- Servings: 1
- Per Serving (Approximate):
- Calories: 380
- Protein: 22g (That’s a powerhouse!)
- Carbohydrates: 25g
- Dietary Fiber: 8g (Great for gut health!)
- Total Fat: 22g (Mostly the healthy, satisfying kind from the avocado and cheese)
Final Thoughts: Your New Favorite 5-Minute Meal
Let’s be real—life is busy, and hunger doesn’t wait. In those moments when you need something real, something satisfying, but can’t face another complicated recipe or sad desk salad, remember this: the ultimate savory cottage cheese plate has your back.
It’s more than just a snack. It’s a reminder that good food doesn’t have to be hard. It’s a celebration of texture, a canvas for creativity, and a protein-packed powerhouse that actually keeps you going. Whether you’re fueling a busy afternoon, refueling after a workout, or just treating yourself to something clever and delicious, this plate delivers.
So, the next time you’re staring into the fridge, wondering what to make of your hunger, I hope you give this a try. Grab that tub of cottage cheese and see it not as a “diet food,” but as a blank slate for flavor. Sprinkle, crunch, drizzle, and dig in.
Here’s to simple, satisfying food that makes you feel good. Here’s to your new kitchen hack. Now, go build something delicious.
Beau

Mediterranean Mini Board : Fresh, Savory, and Snack-Style Simple
Your New Favorite Kitchen Escape: The Mediterranean Mini Board
Hey there, friend! Beau here. Let’s talk about those beautiful, chaotic, wonderful days when you want to eat something that feels like a celebration, but your energy reserves are screaming for a nap on the couch. You know the ones. Maybe it’s a busy Tuesday, you’re working from home and need a lunch that doesn’t come from a sad plastic container. Or perhaps friends just popped over unexpectedly, and you want to whip up something that looks like you fussed, without actually doing any fussing. I hear you. I live there.
That’s exactly why I’m obsessed with what I call the Mediterranean Mini Board. It’s not just a snack plate or a boring lunch—it’s a tiny, transportive vacation. One bite and you’re tasting sunshine, salty sea air, and the simple joy of fresh, honest food. We’re talking juicy tomatoes that burst in your mouth, crisp cucumbers, creamy feta that crumbles just right, and savory little bites of chicken, all coming together in a harmony that’s both light and deeply satisfying.
The best part? This isn’t a recipe with rigid rules. It’s a formula for freedom. No cooking required (unless you want to!), minimal prep, and maximum flavor payoff. It’s high in protein to keep you going, packed with fresh veggies, and endlessly customizable. So, let’s ditch the stress and dive into building a mini masterpiece that’s as fun to look at as it is to eat. Grab your favorite small board or plate, and let’s get assembling!
Why This Board Feels Like Home
This little board takes me straight back to my first real trip to the Greek islands. I remember sitting at a tiny, wobbly table by the water, the sun warm on my shoulders. The waiter brought over a simple plate—not a menu item, just what was fresh. It had chunks of tomato, slices of cucumber, a slab of feta drenched in golden olive oil, a few olives, and some grilled bread. It was so stunningly simple, yet it was one of the most memorable meals of the trip. There was no pretension, just perfect ingredients enjoying each other’s company.
When I got home, I tried to recreate that feeling. I’d pile similar things on a big board for parties, but I missed the personal, just-for-me magic. Then one afternoon, rummaging for a solo lunch, I grabbed a small cutting board and started arranging leftovers: some rotisserie chicken, the last of the cherry tomatoes, a bit of cucumber, and a crumbling end of feta. I drizzled it all with good oil and a sprinkle of oregano. As I sat there, eating directly off the board, it clicked. This was it! The personal vacation plate. The “I-deserve-something-good” lunch. It’s become my go-to ever since—a little edible reset button that always brings a smile.
Gathering Your Mediterranean Sunshine
Here’s the beautiful lineup for your mini escape. Think of this as your flavor palette—you’re the artist!
- 1/2 cup cherry tomatoes, halved: I like the sweetness of cherry or grape tomatoes. Halving them lets their juicy insides mingle with everything else. Chef’s Tip: If you have time, toss them with a tiny pinch of salt and let them sit for 5 minutes. It intensifies their flavor beautifully!
- 1/2 cup cucumber slices: Persian or English cucumbers are my MVP here—thin-skinned, crisp, and seedless. No peeling needed! If using a standard cuke, you might want to peel it and scoop out the watery seeds.
- 1/4 cup feta cheese, cubed or crumbled: This is your salty, creamy star. I prefer buying a block and cubing it for better texture. For a authentic Greek flavor, seek out feta made with sheep’s milk (or a sheep/goat blend). Substitution: For a dairy-free version, try marinated tofu cubes or a creamy vegan “feta” made from almonds.
- 1/2 cup cooked chicken bites: The easy protein boost! I use leftover grilled chicken, a rotisserie chicken from the store, or even the pre-cooked grilled chicken strips. Chef’s Insight: Give the chicken a quick warm-up in a pan with a teaspoon of olive oil and a pinch of dried oregano. It makes a world of difference!
- The Supporting Cast (Optional but Highly Recommended):
- A handful of olives: Kalamata olives are the classic. Their briny, deep flavor is essential for me.
- A scoop of hummus: Creamy, garlicky, and perfect for dipping. Store-bought is totally fine—get your favorite flavor!
- A few pita chips or warm pita bread: For scooping and crunch. I love to quickly toast a pita and cut it into triangles.
- Tzatziki sauce: Cool, creamy, and herby. It’s a fantastic dip for the chicken and veggies.
- Fresh herbs: A sprinkle of fresh dill, oregano, or mint is like a flavor confetti. Don’t skip it if you have some!
- Extra Virgin Olive Oil & Flaky Sea Salt: The finishing touch. A drizzle of good oil and a pinch of flaky salt elevate everything.
Building Your Bite-Sized Getaway: A Step-by-Step Guide
Okay, let’s assemble! This is the fun, creative part. There’s no wrong way, but I’ll walk you through my favorite method.
- Choose Your Canvas. Grab a small wooden board, a nice plate, or even a large pasta bowl. Something with a little lip can be great for containing dips. Your canvas sets the stage!
- Place Your Dips (If Using). If you’re including hummus or tzatziki, start by placing a small bowl or ramekin on the board. This acts as an anchor for everything else. Chef’s Hack: For a rustic look, scoop the hummus directly onto the board and use the back of a spoon to make a swoosh or well in the center for a drizzle of olive oil.
- Arrange the Big Players. Now, start placing your tomato halves, cucumber slices, feta cubes, and chicken bites in little piles or clusters around the dip bowl. Don’t just dump them—place them with intention! Let them touch and mingle a bit. I like to put the chicken slightly apart so it stays warm if you heated it.
- Scatter the Accents. Take your olives and fresh herbs and scatter them artfully in the gaps. Fill in empty spaces with pita chips or bread triangles. The goal is a board that looks abundant and inviting, not sparse or overly neat. Pro Tip: Use different colors and textures next to each other. Green cucumber next to red tomato next to white feta—it’s edible art!
- The Grand Finale. Just before serving, give the whole board a light drizzle of your best extra virgin olive oil. Sprinkle everything with a little black pepper, a pinch of flaky sea salt, and any remaining fresh herbs. This final gloss and seasoning wakes up all the flavors.
- Serve Immediately. The beauty of this is in its freshness. Hand it over with a smile (or keep it for yourself!), a fork, and maybe a napkin. Dig in, mixing and matching bites as you go.
How to Serve This Little Star
Presentation is half the fun! For a solo lunch, I honestly just set the board right on my desk or coffee table with a fork and a big glass of sparkling water with lemon. It feels special. For sharing with one or two others, place the board in the center of the table with a few small plates and forks for everyone. Encourage people to graze and create their own perfect bites.
Beverage pairings? A crisp, cold glass of Sauvignon Blanc or a Greek Assyrtiko wine is magic. For a non-alcoholic option, sparkling lemonade or mint-infused iced tea is perfection. The key is something refreshing that cleanses the palate between those creamy, salty, savory flavors.
Make It Your Own: Endless Twists & Tweaks
The true spirit of this board is adaptability. Here are some of my favorite ways to mix it up:
- The Seafood Swap: Replace the chicken with a handful of cooked, peeled shrimp, a small can of high-quality tuna (drained), or even some flaked grilled salmon. Sprinkle with fresh dill!
- Vegan Vibes: Skip the chicken and feta. Add marinated chickpeas (tossed in olive oil, lemon, and smoked paprika), creamy avocado slices, marinated artichoke hearts, and that almond-based feta. You won’t miss a thing.
- Italian Cousin: Transform it with mini mozzarella balls (ciliegine), fresh basil, sliced pepperoni or salami, roasted red peppers, and a dollop of pesto instead of hummus.
- Breakfast Board: Yes! Use hard-boiled egg slices, a few slices of prosciutto, some berries, Greek yogurt with honey instead of hummus, and whole-grain crackers.
- Spice It Up: Add a spoonful of harissa paste next to the hummus, include peppadew peppers, or sprinkle everything with a dash of chili flakes or za’atar seasoning for a Middle Eastern kick.
Beau’s Boardroom Confidential
Over the years, this mini board has been my kitchen’s greatest hit for impromptu gatherings. I once made one for my neighbor who was having a rough day, and she said it was better than flowers! The recipe has evolved from that initial memory—I almost always warm the protein now, and I’ve become religious about that finishing drizzle of great olive oil. It’s the difference between “yum” and “WOW.”
My funniest fail? I once tried to get too fancy and arranged everything in perfect concentric circles. It looked… strange and stiff. My friend took one look and immediately mixed it all up with her fork! Lesson learned: embrace the rustic, gathered look. It’s supposed to be inviting, not intimidating.
Your Questions, Answered!
Q: Can I make this ahead of time?
A: You can prep the components ahead! Chop veggies, cube chicken and feta, and store them separately in containers in the fridge. But, assemble and add the oil, salt, and herbs right before serving to keep everything crisp and vibrant.
Q: My cucumber gets watery and makes the board soggy. Help!
A> Great catch! After slicing, pat your cucumber dry with a clean kitchen towel or paper towel. This removes excess surface moisture. Also, assemble just before eating.
Q: What’s the best chicken to use if I don’t have leftovers?
A> A store-bought rotisserie chicken is your best friend here. It’s flavorful, moist, and ready to go. Just tear or chop it into bite-sized pieces. Pre-cooked grilled chicken strips from the salad aisle are a solid backup.
Q: Is there a low-carb option?
A> Absolutely! Simply omit the pita chips or bread. The board is already packed with protein and veggies. You can add more olives, nuts (like almonds or walnuts), or even some sliced bell peppers for extra crunch without the carbs.

Mediterranean Mini Board : Fresh, Savory, and Snack-Style Simple
Description
When you want a meal that feels special but takes almost no effort, this Mediterranean Mini Board is the answer. Fresh vegetables, creamy feta, savory chicken, and bold Mediterranean flavors come together in minutes. It’s light yet satisfying, high in protein, and perfect for a quick lunch, easy dinner, or effortless entertaining.
Ingredients
-
-
½ cup cherry tomatoes, halved
-
½ cup cucumber slices (English or Persian preferred)
-
¼ cup feta cheese, cubed or crumbled
-
½ cup cooked chicken, bite-sized (grilled or rotisserie)
Optional Add-Ons
-
Kalamata or green olives
-
Hummus or tzatziki
-
Pita bread or pita chips
-
Fresh herbs (dill, oregano, mint)
-
Extra virgin olive oil
- Black pepper or flaky sea salt
-
Instructions
-
-
Prepare the base: Wash and cut tomatoes and cucumber. Pat cucumber dry.
-
Arrange the board: Place tomatoes, cucumber, feta, and chicken in small clusters on a plate or board.
-
Add extras: Include olives, dips, and pita if using.
-
Finish: Drizzle lightly with olive oil and sprinkle with herbs, pepper, and salt.
- Serve immediately and enjoy fresh.
-
Notes
-
Warm the chicken briefly with olive oil and oregano for extra flavor.
-
Use block feta instead of pre-crumbled for better texture.
-
Salt tomatoes lightly and let sit 5 minutes to boost flavor.
- Assemble just before serving to keep everything crisp.
Nourishment You Can Feel Good About
Let’s be clear: I’m a chef, not a nutritionist. But I love food that makes you feel energized and happy, and this board delivers. The estimates below are for a serving (about half the board) including chicken, feta, veggies, and a tablespoon of hummus, but without pita.
You’re looking at roughly 300-350 calories, with a powerhouse of 25-30 grams of protein from the chicken and feta to keep you full. The carbs are minimal (around 8-10g), mostly from the veggies and hummus, and they’re the good, complex kind. The healthy fats (about 18-20g) come from the olive oil, feta, and hummus, which help your body absorb all the wonderful vitamins from the tomatoes and cucumbers.
It’s a balanced, satisfying meal that fuels your body with real, whole ingredients. No crash, just delicious, steady energy.
Final Thoughts
So there you have it—your passport to a five-minute Mediterranean escape. This Mediterranean Mini Board is more than a recipe; it’s a reminder that eating well doesn’t have to be complicated. It’s about embracing fresh flavors, playing with your food, and creating a little moment of joy, whether you’re alone or with someone you love.
I hope this becomes your secret weapon for busy days, unexpected guests, or whenever you need a tasty reset. Give it a try, tag me @feastical if you make one—I love seeing your creations! Now, go grab that board and build something beautiful. Your taste buds will thank you.
Until next time, keep it simple, soulful, and always satisfying.
– Beau

Protein Snack Plate : Simple, Fresh & Power-Packed
The Snack That Saves the Day: Your New Go-To Protein Power Plate
Hey there, friend! Beau here, coming to you from my kitchen, probably with a smudge of something delicious on my apron. Let’s talk about something real for a second. How often does 3 PM hit and your energy just… vanishes? Or you’re running between appointments, and your stomach starts singing the hunger blues? We’ve all been there, reaching for a bag of chips or a sugary bar that leaves us crashing an hour later. I used to do it all the time, until I figured out a secret weapon that’s so simple, it’s almost silly: the Protein Snack Plate.
This isn’t just a snack. This is a flavor-packed, energy-boosting, life-hacking masterpiece that comes together in about five minutes flat. No cooking, no fancy techniques—just honest, feel-good food that makes your body say “thank you.” It’s the edible equivalent of putting on your favorite cozy sweater. We’re talking creamy hummus, perfectly jammy hard-boiled eggs, veggies with a serious crunch, and those salty little bursts of joy we call olives. It’s balanced, it’s beautiful, and it’s designed to keep you fueled and focused. So, let’s ditch the snack-time guilt and build something truly powerful together. Grab your favorite plate, and let’s get into it!
Picnics, My Grandpa, and the Perfect Portable Bite
This plate takes me right back to the Blue Ridge Mountains, sitting on a checkered blanket with my grandpa. He was a man of few words but immense practicality. Our fishing trips always involved a rusty old cooler packed not with elaborate meals, but with perfect, simple components: boiled eggs from his chickens, crisp radishes from the garden, a hunk of cheese, and some pickles from my grandma’s cellar. He’d lay it all out on a paper towel and call it a “power spread.”
We’d eat with our fingers, listening to the creek, and I never felt hungry or sluggish. It was food that fueled the adventure. My Protein Snack Plate is a direct love letter to those moments. It’s that same philosophy—uncomplicated, satisfying nourishment that fits into your real, busy, wonderful life. It’s food that doesn’t complicate your day; it enhances it. Every time I arrange one now, I smile, thinking of that checkered blanket and the simple wisdom that the best food doesn’t need to be fussy to be fantastic.
Your Building Blocks: Simple Ingredients, Big Flavor
Here’s the beautiful part: this is less of a strict recipe and more of a delicious formula. You can mix, match, and substitute based on what’s in your fridge. Here’s what I love to include, and why each one is a superstar.
- 2 Hard-Boiled Eggs, halved: The protein-packed anchor. I love a slightly jammy yolk for maximum flavor and texture. Chef’s Insight: Older eggs peel easier! Can’t do eggs? Swap in a handful of baked tofu cubes or chickpeas.
- 1/4 cup Hummus (classic or flavored): Creamy, dreamy, and packed with plant-based protein and fiber. It’s the delicious “glue” of the plate. Sub Tip: Any bean dip works—white bean, edamame, or even a thick tzatziki.
- 1/2 cup Raw Veggies (carrots, cucumber, bell pepper, celery): Your crunchy, hydrating, vitamin-loaded crunch factor. Cut them into sticks or chips for easy dipping. Chef’s Hack: Soak veggie sticks in ice water for 15 minutes before plating for an extra-snappy crunch.
- 1/4 cup Olives (Kalamata or Green): These little salty, briny gems add a huge punch of flavor and healthy fats. They’re the surprise element that makes every bite interesting.
- Optional Boosters: This is where you play! A few whole grain crackers for scooping, a handful of cherry tomatoes, a sprinkle of Everything Bagel Seasoning on the eggs, a few slices of avocado, or a couple cubes of cheese. Make it yours!
Let’s Assemble! Your Roadmap to Snacking Bliss
Ready? This is the fun part. We’re not just throwing food on a plate; we’re creating a little masterpiece that’s as pleasing to your eyes as it is to your stomach.
- The Foundation – Choose Your Vessel: Grab your favorite plate, a small cutting board, or even a meal prep container with sections. Using something you love makes the experience more joyful. I’m a sucker for a brightly colored ceramic plate.
- The Egg-cellent Centerpiece – Prep Your Eggs: If you haven’t boiled your eggs yet, here’s my foolproof method: Place eggs in a pot, cover with cold water by an inch. Bring to a rolling boil, then immediately cover and remove from heat. Let sit for 9-10 minutes for a perfect set-but-soft yolk. Plunge into an ice bath to stop cooking. Peel, slice in half, and admire your handiwork. A sprinkle of paprika or everything seasoning here is *chef’s kiss*.
- The Creamy Dream – Plop the Hummus: Spoon your hummus into a small bowl or just make a generous dollop right on the plate. I like to use the back of the spoon to make a little well in the center—perfect for holding a drizzle of olive oil or a few extra olives later.
- The Crunch Factor – Arrange the Veggies: Take your refreshed, crisp veggie sticks and fan them out or group them together. Place them so they’re easily accessible for dipping right into that hummus. Think about color—red bell pepper next to green cucumber is just pretty!
- The Flavor Bombs – Scatter the Olives & Extras: Tuck your olives into any empty spaces. They’re like little edible decorations. Now, add any optional items: crackers standing up in the hummus, tomatoes sprinkled around, avocado on the side. There are no rules, only delicious possibilities.
- The Final Flourish – Season & Serve: Give the whole plate a light finishing touch. A tiny drizzle of good olive oil over the eggs and hummus, a crack of black pepper, maybe a pinch of flaky sea salt. This step takes it from “snack” to “snack *experience*.”
How to Serve This Bad Boy
Presentation is part of the fun, but so is practicality! For a lazy afternoon at home, serve it right on that beautiful plate with a big glass of iced herbal tea. If you’re taking it on the go, a bento-box-style container with dividers is your best friend—it keeps everything in its place until you’re ready to munch at your desk or in the car.
This plate is incredibly versatile. It’s the perfect light lunch alongside a cup of soup. It’s a stellar pre- or post-workout fuel. It’s my secret weapon when friends pop by unexpectedly—it looks like you fussed, but we know the truth! For kids, make it a “build-your-own” activity; they love having little compartments of food to choose from.
Mix It Up! 5 Delicious Twists on the Formula
Boredom is the enemy of healthy habits. Keep things exciting with these fun spins on the classic plate!
- Mediterranean Mezze: Swap hummus for tzatziki, add a few cubes of feta cheese, some pepperoncini, and use cucumber and tomato as your main veggies. Serve with pita bread.
- Everything Bagel: Coat your hard-boiled eggs liberally in Everything Bagel Seasoning. Use green onion cream cheese instead of hummus, and add sliced radishes and seeded crackers.
- Southwestern Fiesta: Use a black bean dip or seasoned guacamole instead of hummus. Add a spoonful of corn salsa, some jalapeño slices (if you like heat), and swap the olives for a few tortilla chips for scooping.
- Deconstructed Salad (No Fork Needed): Think of a Cobb salad! Add strips of grilled chicken or turkey, crumbled blue cheese, avocado, and cherry tomatoes. Use a creamy ranch or blue cheese dressing for dipping.
- Sweet & Savory Protein: For a unique twist, include a small handful of almonds or walnuts, a few slices of apple or pear, and pair it with a cinnamon-honey cottage cheese instead of hummus. The eggs still work perfectly here for savory balance!
Beau’s Behind-the-Scenes Notes
This “recipe” has evolved more than any fancy dish on my site. It started as just eggs and salt on a napkin during a busy cooking photo shoot! Over time, I kept adding whatever was in the fridge test kitchen—a spoonful of leftover dip, the last few olives in the jar, the last handful of baby carrots. I realized I’d stumbled onto something golden: the ultimate clean-out-the-fridge, feel-amazing meal.
One of my favorite kitchen stories involves my nephew, who claimed he “hated healthy food.” I made him one of these plates but called it a “Superhero Power Board” and let him arrange the olives into a smiley face. He ate every single bite. The lesson? A little fun goes a long way. Don’t overthink it. Let this plate be your kitchen canvas.
Your Questions, Answered
Q: How far in advance can I prep this plate?
A: You can prep components 2-3 days ahead! Keep peeled eggs, washed/cut veggies, and hummus in separate airtight containers in the fridge. Assemble the plate just before eating to keep the veggies crisp and the eggs fresh.
Q: My hard-boiled eggs are impossible to peel! Help!
A: Join the club! The trick is to use eggs that are at least a week old (fresh eggs are peel-nightmares). Also, that ice bath is non-negotiable. Shocking them stops the cooking and creates steam between the shell and the egg, making peeling a breeze.
Q: I’m not a fan of olives. What’s another salty swap?
A: Absolutely! Try capers, pickled onions, a few slices of pepperoni or salami, a sprinkle of sunflower seeds, or even a small handful of Parmesan crisps.
Q: Is this actually filling enough for a meal?
A: For a light lunch, absolutely! The combo of protein, fat, and fiber is designed for staying power. If you need more heft, simply double the eggs and hummus, or add a more substantial side like a cup of lentil soup or a whole grain roll.

Protein Snack Plate : Simple, Fresh & Power-Packed
Description
When afternoon hunger hits and energy starts to dip, this Protein Power Snack Plate comes to the rescue. It’s quick, balanced, and packed with protein, healthy fats, and crunch—no cooking required. Perfect for busy days, light lunches, or anytime you need fuel without the crash, this plate proves that simple food can still feel satisfying and special.
Ingredients
-
2 hard-boiled eggs, halved
-
¼ cup hummus (classic or flavored)
-
½ cup raw vegetables (carrots, cucumber, bell pepper, celery)
-
¼ cup olives (Kalamata or green)
Optional Add-Ons
-
Whole grain crackers or pita
-
Cherry tomatoes
-
Avocado slices
-
Cheese cubes
- Everything bagel seasoning or paprika
Instructions
-
Prepare the eggs: Peel and slice hard-boiled eggs in half.
-
Plate the hummus: Spoon hummus onto a plate or into a small bowl.
-
Add veggies: Arrange raw vegetables around the hummus for easy dipping.
-
Finish the plate: Add olives and any optional extras.
-
Season & serve: Sprinkle eggs with seasoning and enjoy immediately.
Notes
-
Toss veggies in ice water for 10–15 minutes for extra crunch.
-
Older eggs are much easier to peel than very fresh ones.
-
Prep components ahead of time and assemble just before eating for best texture.
-
Swap eggs for tofu or chickpeas if you want a plant-based option.
The Good Stuff: What’s Fueling You
Let’s break down the goodness in our classic build (with 2 eggs, 1/4 cup hummus, 1/2 cup mixed veggies, and 1/4 cup olives). Remember, these are estimates, and variations will change the numbers!
Per Serving (Approximate):
Calories: ~300-350 | Protein: 16-18g | Carbohydrates: 12-15g | Fiber: 5-7g | Fat: 20-22g
Why this combo rocks: The protein from the eggs and hummus helps repair muscles and keeps you full. The healthy fats from the eggs, olives, and hummus (thank you, olive oil and tahini!) support your brain and help absorb all the fantastic vitamins from the colorful veggies. The fiber keeps your digestion happy and your energy levels steady—no sugar crash in sight. It’s a balanced, nutrient-dense little package.
Final Thoughts
And that’s it, my friend! The humble, glorious Protein Snack Plate. It’s proof that eating well doesn’t require a culinary degree or hours in the kitchen. It’s about being a little intentional, playing with flavors and textures you love, and giving your body the quality fuel it deserves to tackle your amazing life.
I hope this becomes your new 3 PM savior, your easy lunch hero, your “I-don’t-feel-like-cooking” dinner MVP. Give one of the variations a spin, tag me on social with your creations, and most importantly, enjoy every crunchy, creamy, salty, satisfying bite. Until next time, keep your kitchen messy and your heart full.
Happy Snacking,