
Steak Pasta Salad : Hearty, Savory, and Perfect for Leftovers
Steak Pasta Salad: The Hero of Leftovers & Hearty Appetites
Hey friends, Beau here from Feastical! Let’s talk about that beautiful piece of steak you grilled last night. You savored every bite, but now you’re staring at a few glorious slices in the fridge, wondering, “What’s next?” Do not—I repeat, do not—just nuke it and call it a day. We’re about to level up those leftovers into something so spectacular, it might just become the main event.
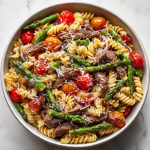
Welcome to my Steak Pasta Salad. This isn’t your average, timid side dish. This is a bold, savory, seriously satisfying meal that brings tender steak, hearty pasta, crisp-tender asparagus, and bursts of juicy tomato together in one glorious bowl. It’s dressed in a punchy, garlicky parmesan vinaigrette that clings to every noodle and morsel. It’s the perfect union of “I need something substantial” and “I want it to taste incredible.” Whether you serve it slightly warm right after tossing or chilled for a fantastic make-ahead lunch, this salad has your back. It’s forgiving, flexible, and built for real life. So, grab that leftover steak (or cook some fresh, no judgment!), and let’s turn yesterday’s dinner into today’s masterpiece.
The Backyard BBQ That Started It All
This recipe was born from a classic Collier family scenario: my dad, the Grill Master, always overestimates. Every summer BBQ, he’d fire up enough ribeyes to feed a small army, “just in case.” We’d feast like kings, but the next day, Mom would open the fridge, see the foil-wrapped treasure, and give me The Look. “Beau, make this into something good.”
One particularly hot August afternoon, with a pile of pasta from last night’s dinner also hanging around, I got to work. I tossed the steak with the pasta, threw in whatever looked fresh from the garden—asparagus, cherry tomatoes, a bit of red onion for bite—and whisked up a dressing with my favorite trio: olive oil, balsamic, and a heap of parmesan. It was a throw-together act of kitchen salvation. But when my brother, the self-proclaimed “Leftover Hater,” took a bite and went back for thirds, I knew we had a winner. It became our signature post-BBQ ritual, proving that the best meals aren’t always planned—they’re created with a little ingenuity and a lot of love for good food.
Gathering Your Flavor Crew
Here’s everything you’ll need to build this powerhouse salad. I’ve added my little chef notes to help you shop, swap, and understand why each ingredient is a star player.
- 3 cups cooked pasta (shells, rotini, or penne): These shapes are my go-to because they have nooks and crannies that trap the dressing and little steak bits perfectly. Chef’s Tip: Cook it al dente! It holds up much better when tossed and won’t get mushy.
- 1 1/2 cups cooked steak, sliced thin: Leftover grilled steak (ribeye, strip, sirloin) is the MVP here. Chef’s Insight: Slice it against the grain for the most tender bite. No leftovers? Quickly pan-sear a small steak seasoned with salt and pepper.
- 1 cup roasted or sautéed asparagus, chopped: Adds a wonderful earthy crunch. Substitution Tip: No asparagus? Try broccolini, green beans, or even zucchini ribbons.
- 1 cup cherry tomatoes, halved: They bring juicy, sweet acidity that brightens the whole dish. Chef’s Tip: Give them a little sprinkle of salt after halting; it pulls out even more flavor.
- 1/4 cup red onion, finely sliced: Provides a necessary sharp bite. Quick Hack: If raw onion is too strong for you, soak the slices in ice water for 10 minutes. It tames the bite beautifully.
- 1/2 cup shredded or shaved parmesan cheese: Salty, umami, non-negotiable. Use a microplane for fluffy shreds or a vegetable peeler for elegant shavings.
For the Savory Parmesan Dressing:
- 1/3 cup extra virgin olive oil: The rich, fruity base of our dressing. A good EVOO makes a difference here.
- 2 tablespoons balsamic vinegar or red wine vinegar: Balsamic adds a touch of sweet depth, red wine vinegar is brighter and more tangy. Pick your personality!
- 1 teaspoon Dijon mustard: This is your secret weapon. It emulsifies the dressing (keeps it from separating) and adds a subtle, complex sharpness.
- 1 garlic clove, minced: Fresh is best! It infuses the oil with potent, aromatic flavor.
- Salt and freshly cracked black pepper to taste: Season confidently. This dressing needs to carry the whole salad.
Let’s Build That Bowl: A Step-by-Step Dance
Ready to assemble? Follow these steps, and I’ll walk you through with all my favorite kitchen hacks to ensure perfection.
- Pasta Prep is Key. Cook your pasta in well-salted water according to the package directions, but shave a minute off the suggested time for that perfect al dente bite. Drain it and give it a quick rinse under cold water. This stops the cooking instantly and washes away excess starch, so your noodles stay distinct and don’t clump together. Let it drain well while you prep the rest. Little Chef Hack: Drizzle a tiny bit of olive oil over the drained pasta and give it a toss to prevent sticking if you’re not assembling immediately.
- Veggie Victory. While the pasta cooks, tackle your asparagus. My favorite method is roasting: toss spears with a drizzle of oil, salt, and pepper, and pop them in a 425°F oven for 10-12 minutes until bright green and crisp-tender. Let them cool slightly, then chop into bite-sized pieces. For the tomatoes, halve them and do that little salt trick I mentioned. Thinly slice your red onion. Commentary: This is the “mise en place” moment—having everything prepped makes the final toss feel like magic, not work.
- Steak Spotlight. Take your beautiful leftover steak and slice it thinly against the grain. See those lines running through the meat? You want your knife to go perpendicular to them. This shortens the muscle fibers, making every piece melt-in-your-mouth tender. If the steak is cold from the fridge, that’s perfectly fine—it’ll come to room temp in the salad.
- Shake Up The Dressing. In a small bowl or—my preferred tool—a mason jar with a lid, combine the olive oil, vinegar, Dijon, minced garlic, a big pinch of salt, and several cracks of black pepper. Whisk vigorously or seal the jar and shake it like you’re cheering on your favorite team. Taste it! Dip a piece of asparagus or pasta in. It should be bold. Adjust with more salt, pepper, or a splash of vinegar until it makes your taste buds sing.
- The Grand Toss. In a large, spacious bowl (bigger than you think you need!), combine the cooled pasta, sliced steak, chopped asparagus, tomatoes, red onion, and most of the parmesan cheese (save a little for garnish!). Now, pour that fantastic dressing over the top. Using two large spoons or salad tongs, gently but thoroughly toss everything together. You want every single component to get a glossy, flavorful coat. Pro Tip: Toss from the bottom up to avoid crushing the tomatoes and to distribute the steak evenly.
- To Serve or to Savor Later? You have options! For immediate gratification, portion it out onto plates or into shallow bowls right now. The pasta will be cool, the steak slightly chilled, and the flavors bright. If you have time, cover the bowl and let it chill in the fridge for 30-60 minutes. This allows the flavors to marry and deepen incredibly. Either way, finish it with a final flourish of the reserved parmesan cheese.
Plating Up Your Masterpiece
How you serve this salad can turn a weeknight meal into a little occasion. For a casual family dinner, I pile it high in a big, rustic serving bowl and let everyone dig in family-style. If I’m feeling fancy for guests, I use a ring mold or a measuring cup to pack individual portions neatly onto plates, creating a beautiful, restaurant-worthy stack. Tuck a few extra parmesan shavings on top and maybe a fresh crack of pepper.
This salad is a complete meal on its own, but if you want to round things out, I love it with a simple side of garlic bread to sop up any extra dressing at the bottom of the bowl, or a light, crisp white wine like a Sauvignon Blanc. For lunch the next day? Pack it in a sealed container—it travels like a dream and tastes even better as the flavors continue to mingle.
Make It Your Own: Delicious Twists & Swaps
The beauty of this recipe is its flexibility. Play with it! Here are a few of my favorite riffs:
- The “Greek Gorgeous” Swap: Use crumbled feta instead of parmesan, add kalamata olives and cucumber chunks, and swap the dressing for a lemon-oregano vinaigrette. Bellissimo!
- Southwest Fiesta: Swap the asparagus for grilled corn and black beans. Use a lime-cilantro dressing with a pinch of cumin and chili powder. Queso fresco or cotija cheese would be fantastic here.
- No Steak? No Problem! (Protein Swaps): Grilled chicken, shrimp, or even chickpeas for a vegetarian version are stellar substitutes. The dressing works with just about anything.
- Go Green: Want to lighten it up? Swap half the pasta for hearty greens like chopped kale or spinach. Massage the kale with a bit of the dressing first to soften it.
- Creamy Dreamy Version: Stir a tablespoon of good mayonnaise or a dollop of Greek yogurt into the dressing for a richer, creamier texture that clings luxuriously.
Beau’s Kitchen Notes & Stories
This recipe has evolved in my kitchen more times than I can count. The first version was just steak, cold pasta, and bottled Italian dressing (we all start somewhere!). The asparagus came into play after a particularly good deal at the farmer’s market, and the homemade dressing was a game-changer. I’ve learned that letting it sit for at least 20 minutes after tossing is the real secret—it’s like the ingredients need a little time to get acquainted and become best friends.
One funny fail? I once tried to use angel hair pasta. Friends, do not recommend. It turned into a delicate, impossible-to-toss steak noodle sculpture. Stick with the sturdy, shape-holding pasta—it’s a salad, not an art project (unless you want it to be!).
Your Questions, Answered
Q: Can I make this ahead of time?
A: Absolutely, and it’s awesome for meal prep! Assemble the salad (hold back the tomatoes if you’re making it more than 4 hours ahead, as they can get a bit too soft) and store it in an airtight container in the fridge for up to 3 days. The flavors get better each day!
Q: My dressing isn’t emulsifying—it’s separating. Help!
A: No sweat! That little teaspoon of Dijon is your emulsifier. Make sure you’re whisking or shaking really well. If it separates again in the fridge, just give it another good shake before using.
Q: What’s the best way to reheat leftover steak if I don’t have any?
A: Great question. To keep it tender, bring it to room temp, then sear it in a very hot pan for just 30-60 seconds per side. Let it rest before slicing. Avoid the microwave if you can—it tends to toughen the meat.
Q: Is this salad good served warm?
A: Yes! If you prefer a warm pasta salad, skip the cold rinse on the pasta. Toss everything while the pasta and steak are still warm. The heat will slightly wilt the veggies and make the cheese deliciously melty. It’s a different, but equally delicious, experience.
Steak Pasta Salad : Hearty, Savory, and Perfect for Leftovers
Description
Steak Pasta Salad
Ingredients
Salad
-
3 cups cooked pasta (rotini, penne, or shells), al dente
-
1½ cups cooked steak, thinly sliced (ribeye, sirloin, or strip)
-
1 cup asparagus, roasted or sautéed and chopped
-
1 cup cherry tomatoes, halved
-
¼ cup red onion, thinly sliced
-
½ cup shaved or shredded parmesan cheese
Parmesan Vinaigrette
-
⅓ cup extra virgin olive oil
-
2 tablespoons balsamic vinegar or red wine vinegar
-
1 teaspoon Dijon mustard
-
1 garlic clove, minced
-
Salt and freshly cracked black pepper, to taste
Instructions
-
Cook pasta in well-salted water until al dente. Drain and rinse briefly under cold water. Set aside.
-
Prepare asparagus by roasting at 425°F (220°C) with olive oil, salt, and pepper for 10–12 minutes, or sauté until tender-crisp. Chop once cooled.
-
Make dressing: In a small bowl or jar, whisk together olive oil, vinegar, Dijon mustard, garlic, salt, and pepper until emulsified.
-
Assemble salad: In a large bowl, combine pasta, sliced steak, asparagus, tomatoes, red onion, and most of the parmesan.
-
Dress & toss: Pour dressing over salad and toss gently until evenly coated.
-
Finish: Garnish with remaining parmesan and extra black pepper. Serve immediately or chill 30–60 minutes before serving.
Notes
-
Slice steak against the grain for tenderness
-
Chill for deeper flavor or serve slightly warm
-
Keeps well in the fridge for up to 3 days
Nutritional Information (Approximate)
Here’s a rough breakdown per serving (based on 4 servings). Remember, these are estimates and can vary based on specific ingredients and quantities used.
- Calories: 450
- Protein: 30g (A fantastic, satisfying source thanks to that steak!)
- Fat: 22g (Mostly from the healthy olive oil, steak, and cheese)
- Carbohydrates: 35g
- Fiber: 3g (From the asparagus, tomatoes, and whole-grain pasta if you use it)
- Sugar: 4g (Naturally occurring from the tomatoes and balsamic)
This salad is a wonderfully balanced meal, providing a great mix of protein for staying power, complex carbs for energy, and veggies for vitamins and fiber. To reduce calories or fat, you can slightly reduce the oil in the dressing or use a leaner cut of steak.
Final Bites of Wisdom
So there you have it, friends—my not-so-secret weapon for transforming humble leftovers or simple ingredients into a meal that feels special, satisfying, and straight-up delicious. This Steak Pasta Salad embodies everything I love about cooking: it’s resourceful, packed with flavor, and meant to be shared (or happily enjoyed solo on the couch, I won’t tell).
The next time you see that leftover steak, I hope you see possibility. I hope you hear the sizzle of the grill in memory and get excited to create something new. Cooking is a story, and every recipe is a chapter. Thanks for letting me share this one with you. Now, go make it, tweak it, love it, and tell me all about it over at Feastical!
Until next time, keep your knives sharp and your plates full,
Beau
Mediterranean Orzo Salad : A Fresh Greek-Inspired Favorite
Sunshine in a Bowl: My Go-To Mediterranean Orzo Salad
Hey friends, Beau here! Let’s talk about that magical moment when you need a dish that does it all. You know the scene: a last-minute potluck invite, a backyard barbecue where you want to shine, or just a Tuesday where your soul (and your fridge) needs a serious dose of color and cheer. That’s when I turn to my absolute favorite, this Mediterranean Orzo Salad.
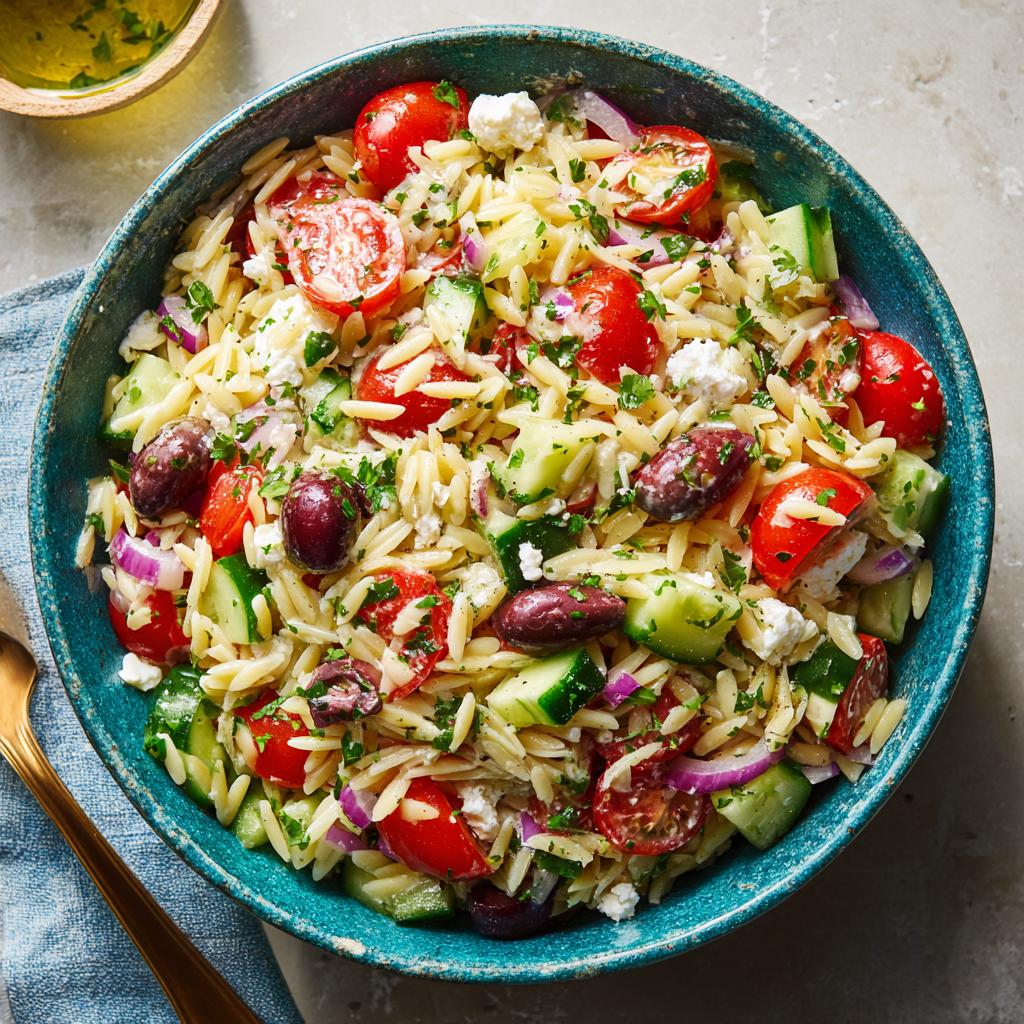
This isn’t just a side dish; it’s a vibrant, zesty, feel-good experience in a bowl. Imagine tender little orzo pearls, each one hugging a bright lemon-herb dressing, mingling with juicy tomatoes, crisp cucumbers, briny olives, and creamy pockets of feta. Every forkful is a mini-vacation to a sunny Greek isle. It’s the kind of recipe that makes people ask for the recipe before they’ve even finished their first helping. The best part? It comes together in about the time it takes to boil water for pasta. So, grab your favorite chopping board and your sunniest bowl. We’re about to make something truly special that tastes like a warm, flavorful hug.
The Picnic That Started It All
This recipe has a special place in my heart because it’s tied to one of my favorite food memories. A few summers back, some friends and I planned a spontaneous beach picnic. The rule was simple: everyone brings one thing that travels well and tastes great at room temperature. I panicked for a second, then raided my kitchen. I had some orzo, a lemon, and the usual veggie drawer suspects. I threw this salad together in a whirlwind, tossed it in my trustiest lidded bowl, and hoped for the best.
We spread out our blanket as the sun set, and when I popped the lid on this salad, the “oohs” and “aahs” were instant. The bright colors against the blue bowl looked like a painting. That tangy, herby aroma hit the salty sea air, and it was pure magic. We passed it around, forks clinking, laughing as we tried to get the perfect bite with a little bit of everything. It was the star of the spread, and it taught me a beautiful lesson: the best food isn’t always the most complicated. It’s fresh, it’s honest, and it’s made for sharing in good company. Now, every time I make it, I get a little taste of that perfect evening.
Gathering Your Sunshine Ingredients
Here’s everything you’ll need to create this flavor fiesta. Don’t stress if you’re missing an item—I’ve got your back with swaps and chef-y insights.
- 1 1/2 cups orzo pasta: Orzo is our starchy foundation. It’s like tiny rice-shaped pasta that holds dressing like a dream. Chef’s Tip: If you can’t find orzo, small pastina, ditalini, or even couscous will work in a pinch!
- 1 cup cherry tomatoes, halved: I love the sweet burst they give. Use the reddest, ripest ones you can find. Yellow or heirloom cherry tomatoes add gorgeous color!
- 1 cup cucumber, diced: For that essential crunch. I prefer English or Persian cucumbers as they have fewer seeds and a thinner skin, so no peeling needed.
- 1/2 cup Kalamata olives, sliced: These are the MVP for that salty, briny depth. Don’t substitute with canned black olives if you can help it—the flavor is worlds apart. If you’re not an olive fan, try chopped pepperoncini for a different zing.
- 1/3 cup red onion, finely chopped: A little goes a long way for sharpness. Pro Hack: Soak the chopped onion in ice water for 10 minutes before adding. It tames the bite beautifully!
- 1/2 cup crumbled feta cheese: The creamy, tangy treasure. Buy a block and crumble it yourself for better texture and flavor than pre-crumbled. For a vegan twist, a good vegan feta or even creamy white beans work wonderfully.
- 2 tbsp chopped fresh parsley: The fresh herbal finish. Flat-leaf (Italian) parsley has more flavor than curly. Don’t skip this—it’s the fresh pop the salad needs.
For the Lemon-Herb Dressing:
- 1/4 cup extra virgin olive oil: The rich, fruity backbone of our dressing. Use the good stuff here; you’ll taste the difference.
- 2 tbsp freshly squeezed lemon juice: Fresh is non-negotiable for that bright, sunny zing. Bottled juice just can’t compete.
- 1 garlic clove, minced: Our aromatic anchor. If you’re sensitive to raw garlic, you can grate it into a paste for a mellower, more integrated flavor.
- 1 tsp dried oregano: The classic Greek herb. Rubbing it between your palms before adding wakes up its essential oils. If you have fresh, use 1 tablespoon chopped.
- Salt and freshly cracked black pepper to taste: Season in layers! We’ll season the dressing and the salad for perfect balance.
Let’s Build Some Flavor: Step-by-Step
Alright, team! Let’s get cooking. Follow these steps, and you’ll have a flawless salad every single time.
- Cook the Orzo to Perfection: Bring a large pot of well-salted water to a rolling boil—it should taste like the sea. Add the orzo and cook according to package directions, usually 8-10 minutes, until it’s al dente (has a slight bite). My Big Tip: Set a timer! Pasta waits for no one. Once done, drain it in a colander and immediately give it a quick rinse under cold water. This stops the cooking, cools it down, and washes away excess starch so your salad isn’t gummy. Let it drain well.
- Whisk Up That Sunshine Dressing: While the orzo cooks, make your dressing. In a small bowl or a jar with a lid, combine the olive oil, fresh lemon juice, minced garlic, dried oregano, a big pinch of salt, and a few grinds of pepper. Whisk vigorously or shake the jar until the mixture is beautifully emulsified—thick and combined. Give it a taste. Need more zip? Add a splash more lemon. More herbiness? A pinch more oregano. This is your moment to tailor it.
- The Chopping Medley (The Fun Part!): Halve those juicy tomatoes, dice the cucumber into similar-sized pieces, slice your Kalamata olives, finely chop the red onion (remember the ice water bath trick!), and give your parsley a rough chop. I like to do all this on one big cutting board—it looks like a confetti party.
- The Grand Toss: In a large, beautiful serving bowl (this salad deserves to be shown off!), combine the well-drained, cooled orzo with the tomatoes, cucumber, olives, onion, and parsley. Now, pour that vibrant dressing all over everything. Using a large spoon or spatula, gently toss and fold everything together until every single piece is lovingly coated in that lemony, herby goodness.
- The Feta Finale: Here’s the key step—add the crumbled feta cheese last and fold it in gently. We want to preserve those lovely creamy crumbles, not turn them into mush. Once the feta is distributed, take one final taste. Does it need another pinch of salt or a crack of pepper? Now’s the time.
- The Patience Payoff: Cover the bowl and let the salad chill in the fridge for at least 15-30 minutes before serving. This is not punishment; it’s magic! This resting time allows the orzo to fully absorb the dressing and all the flavors to get to know each other and become best friends. Trust me, it’s worth the wait.
How to Serve This Star Dish
Presentation is part of the joy! Here’s how I love to serve this Mediterranean masterpiece:
I always bring it to the table in that big, beautiful bowl so everyone can admire its colors. For a simple family meal, it’s perfect as is with a piece of grilled chicken or fish nestled right on top. For a cookout or potluck, I’ll sometimes serve it in a hollowed-out large round bread (like a peasant boule) for a real “wow” factor—the bread soaks up the delicious dressing and gets eaten too!
Garnish with an extra sprinkle of fresh parsley, a few whole Kalamata olives, and maybe a thin lemon slice on the rim of the bowl. It’s a complete meal on its own, but it also pairs incredibly well with anything from the grill: lemon-herb chicken skewers, garlic shrimp, or even some smoky grilled eggplant for my veggie friends. Don’t forget some crusty bread on the side for scooping up every last bit.
Make It Your Own: Delicious Twists
One of the best things about this salad is its flexibility. Play with it! Here are some of my favorite riffs:
- The Protein Power-Up: Turn it into a hearty main course by adding a can of rinsed chickpeas, a cup of chopped grilled chicken, or a handful of cooked shrimp right at the end.
- The Garden Lover’s Dream: Add a handful of baby spinach or arugula (add just before serving), some roasted red pepper strips, or artichoke hearts for extra veggie goodness.
- The Herb Swap: Swap the parsley for fresh dill or mint. Dill gives a fantastic Greek-island vibe, and mint adds an incredible layer of freshness.
- The Vegan Delight: Skip the feta or use a vegan alternative. Add extra olives or some creamy avocado chunks for richness. For the dressing, a teaspoon of Dijon mustard adds great body and flavor.
- The Italian Cousin: Change the flavor profile! Use basil instead of parsley, sun-dried tomatoes instead of fresh, and mozzarella pearls instead of feta. Swap the oregano for a pinch of red pepper flakes.
Beau’s Kitchen Notes
This recipe has evolved in my kitchen over countless picnics, potlucks, and weeknight dinners. I used to add the feta with everything else, but I found it just dissolved into the background. Adding it last ensures you get those perfect salty, creamy pockets in every bite. I also learned the hard way that skipping the “rinse under cold water” step for the orzo leads to a clumpy, pasty salad. Don’t be like Past Beau—rinse that pasta!
It’s also become my ultimate make-ahead secret. I often whip it up the night before a gathering. The flavors marry and deepen overnight, making it even more delicious. Just hold back on adding the fresh parsley until you’re ready to serve to keep it bright green. Food, like the best memories, often gets better with a little time.
Your Questions, Answered
Q: Can I make this salad ahead of time?
A: Absolutely! It’s one of the best make-ahead dishes. Prepare it completely, cover, and refrigerate for up to 2 days. The orzo will continue to absorb the dressing, so you might want to have a little extra lemon juice and olive oil on hand to freshen it up before serving. Add extra fresh herbs then, too.
Q: My salad turned out a bit bland. What happened?
A: The two most common culprits are underseasoning and not using enough acid. Remember to salt your pasta water generously—it’s the first chance to season the orzo itself. Second, always taste your dressing before adding it. It should be bold and punchy on its own. If it’s bland, add more lemon juice, salt, or oregano until it sings.
Q: How do I prevent a soggy salad?
A> The cold-water rinse on the orzo is step one. Step two is ensuring your cucumbers and tomatoes are dry after washing. A quick pat with a paper towel works wonders. Also, if making far in advance, you can store the dressing separately and toss it in an hour before serving.
Q: What’s the best way to store leftovers?
A: Keep it covered in the fridge for 3-4 days. It may dry out a little as the orzo absorbs more liquid. A tiny drizzle of olive oil and a fresh squeeze of lemon will bring it right back to life.
Mediterranean Orzo Salad : A Fresh Greek-Inspired Favorite
Description
This Mediterranean Orzo Salad is the kind of dish that fits every occasion—potlucks, picnics, cookouts, or easy weeknight dinners. Tender orzo is tossed with juicy tomatoes, crisp cucumber, briny Kalamata olives, and creamy feta, all wrapped in a lemony herb dressing that tastes like summer vacation. It’s fast, fresh, and always a crowd favorite.
Ingredients
Salad
-
1½ cups orzo pasta
-
1 cup cherry tomatoes, halved
-
1 cup cucumber, diced (English or Persian preferred)
-
½ cup Kalamata olives, sliced
-
⅓ cup red onion, finely chopped
-
½ cup feta cheese, crumbled
-
2 tablespoons fresh parsley, chopped
Lemon-Herb Dressing
-
¼ cup extra virgin olive oil
-
2 tablespoons fresh lemon juice
-
1 garlic clove, minced
-
1 teaspoon dried oregano (or 1 tablespoon fresh)
-
Salt & freshly cracked black pepper, to taste
Instructions
-
Cook the orzo
Bring a large pot of well-salted water to a boil. Cook orzo according to package directions (8–10 minutes) until al dente. Drain and rinse briefly under cold water to stop cooking. Drain well. -
Make the dressing
In a small bowl or jar, whisk together olive oil, lemon juice, garlic, oregano, salt, and pepper until emulsified. Taste and adjust seasoning. -
Prep the vegetables
Halve tomatoes, dice cucumber, slice olives, finely chop onion, and chop parsley.
Tip: Soak chopped red onion in ice water for 10 minutes to mellow its bite. -
Assemble the salad
In a large bowl, combine cooled orzo, tomatoes, cucumber, olives, onion, and parsley. Pour dressing over the top and toss gently to coat. -
Add feta last
Fold in feta gently so it stays in creamy pockets instead of dissolving. -
Chill & serve
Cover and refrigerate for 15–30 minutes to let flavors meld. Taste once more before serving and adjust seasoning if needed.
Notes
-
Protein Boost: Add chickpeas, grilled chicken, or shrimp
-
Extra Veggies: Roasted red peppers, artichokes, spinach, or arugula
-
Herb Swap: Use dill or mint instead of parsley
-
Vegan: Skip feta or use vegan feta; add avocado for richness
-
Italian-Style: Swap feta for mozzarella pearls and oregano for basil
Nutritional Snapshot (Per Serving)
While I’m all about flavor first, it’s nice to know what’s fueling you! This information is per serving (based on 6 servings) and is an estimate. Remember, using high-quality olive oil provides healthy monounsaturated fats.
- Calories: ~290
- Protein: 7g (Thank you, orzo and feta!)
- Carbohydrates: 32g
- Fat: 15g (Mostly the good-for-you kind from olive oil and olives)
- Fiber: 2g (Add chickpeas to bump this up!)
- Prep Time: 10 minutes
- Cook Time: 10 minutes
- Total Time: 20 minutes (plus optional chilling)
Final Thoughts from My Kitchen to Yours
And there you have it, friends—my beloved Mediterranean Orzo Salad in all its glory. This recipe is more than just a list of ingredients and steps; it’s a passport to easy, joyful eating. It’s proof that a handful of simple, fresh ingredients can create something that feels like a celebration.
I hope this salad finds its way onto your picnic blankets, your dinner tables, and into your weekly lunch rotations. It’s a constant reminder of why I started Feastical: to share food that brings us together, feeds our bodies, and warms our hearts without ever feeling like a chore.
Now, I’d love to hear from you! Did you add a personal twist? Did it become the star of your party? Tag me or share your stories. Until next time, keep your kitchens messy, your flavors bold, and your hearts full. Happy cooking!
— Beau
Pizza Tortellini Pasta Salad : All Your Favorite Flavors in One Bowl
Pizza Tortellini Pasta Salad: Your New Go-To Party Hero
Hey friends, Beau here! Let’s talk about that magical moment when you’re staring into the fridge, trying to dream up something that will please absolutely everyone at your backyard bash. You’ve got the pizza lovers, the salad seekers, the pasta fanatics, and the “just-give-me-something-awesome” crowd. What if I told you you could win them all over with one simple, spectacular bowl?
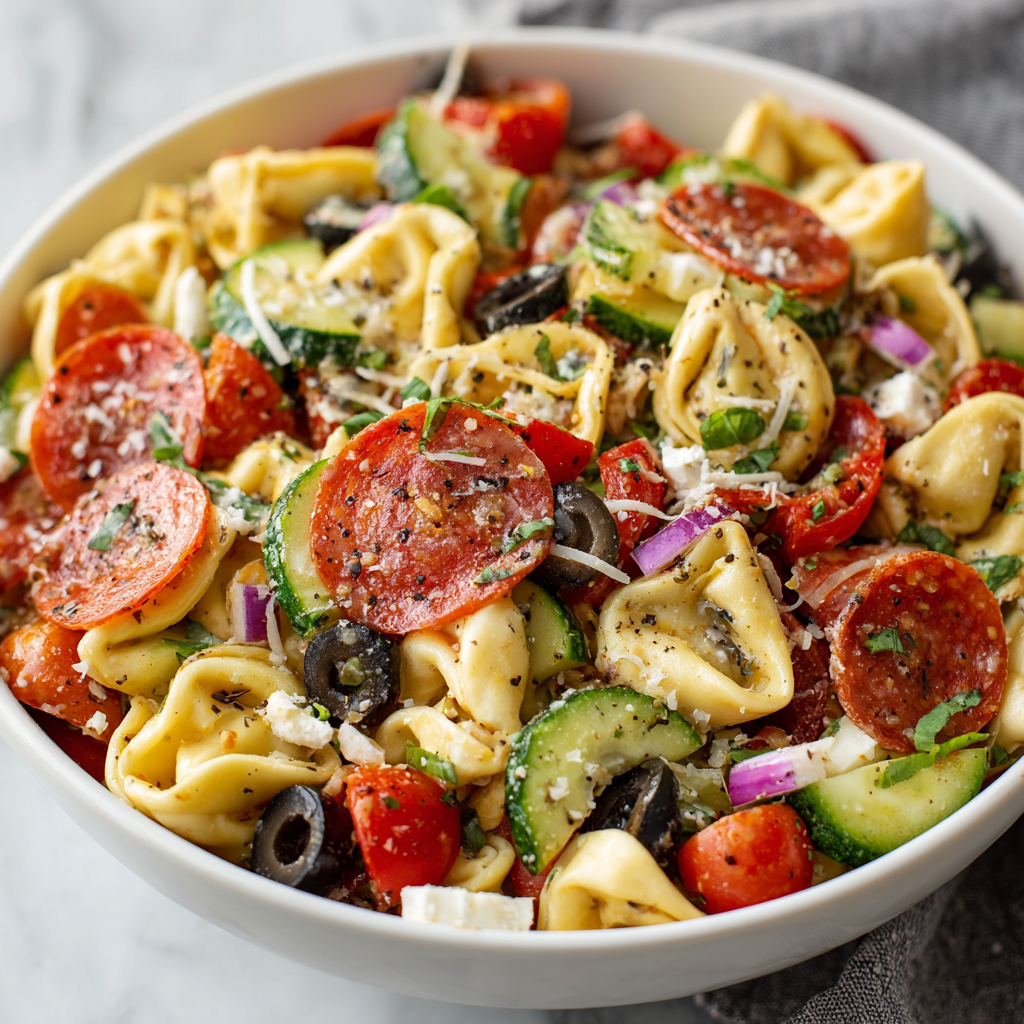
Enter the Pizza Tortellini Pasta Salad. This isn’t just a side dish; it’s a main event in a bowl. Imagine all the cheesy, savory, zesty joy of your favorite pepperoni pizza, but twisted into a refreshing, chillable, totally shareable pasta salad. It’s got plump cheese tortellini, crispy pepperoni, crunchy veggies, and a tangy Italian dressing that ties it all together like a flavor ribbon. It’s the life of the picnic, the potluck superstar, and your secret weapon for no-fuss dinners all summer long. So, tie on that apron, grab your biggest mixing bowl, and let’s make something that’s guaranteed to disappear faster than you can say, “seconds, please!”
The Night We Made Dinner Out of “Pizza Scraps”
This recipe was born from pure, beautiful kitchen chaos. Picture this: It’s a hot summer night years ago, and my friends spontaneously decide my place is the cookout spot. Problem was, my grocery run wasn’t until the next morning. I had a half-empty bag of frozen cheese tortellini, the last handful of pepperoni from a Friday night pizza, and a crisper drawer full of “hopeful” veggies—a lone cucumber, a bell pepper with a lot of personality, and a pint of cherry tomatoes hanging on for dear life.
In a moment of “what’s the worst that could happen?” inspiration, I boiled the tortellini, chopped everything in sight, whisked together a quick dressing, and tossed it all into a giant serving platter. I set it on the table with a joking, “Voilà, deconstructed pizza salad!” The silence that followed was the good kind, broken only by forks clinking and people asking, “What’s in this? Can I have the recipe?” That thrown-together, scrappy bowl became an instant legend in our friend group. It taught me that the best recipes often aren’t planned—they’re discovered when you’re just having fun with what you’ve got.
Gathering Your Flavor Crew: Ingredients & Insights
Here’s your shopping list for joy. Remember, cooking is a conversation, not a monologue—feel free to chat back with substitutions!
- 1 (20 oz) package cheese tortellini: The hearty, chewy foundation. I use refrigerated cheese tortellini for the best texture, but frozen works great too! For a twist, try spinach & ricotta or a meat-filled tortellini.
- 1 cup cherry tomatoes, halved: Little bursts of sweet acidity. If they’re extra juicy, give the halves a gentle squeeze over the sink to ditch some seeds and prevent a soggy salad.
- 1 cup diced cucumber: For that essential cool, crunchy contrast. I leave the peel on for color and nutrients, but peel it if you prefer!
- 1/2 cup sliced black olives: They bring a salty, briny depth that just screams pizza. Not an olive fan? Try chopped artichoke hearts or pepperoncini for a different kind of tang.
- 1/2 cup mini pepperoni or diced regular pepperoni: The classic pizza vibe! Mini pepperoni are adorable and ready to go. For a crispy treat, sauté regular diced pepperoni for a minute until it curls and gets slightly crisp.
- 1/2 cup chopped red bell pepper: Color and a sweet, grassy crunch. Yellow or orange bell peppers are just as happy here.
- 1/4 cup sliced red onion: A sharp, pungent kick that cuts through the richness. If raw onion is too intense for you, soak the slices in ice water for 10 minutes to mellow them out perfectly.
- 1/2 cup shredded mozzarella or parmesan cheese: More cheese? Always yes. Freshly shredded mozzarella melts dreamily into the warm pasta, while Parmesan adds a salty, umami punch. Or use both—I won’t tell.
- 1/4 cup chopped fresh basil or parsley: The fragrant, green finish. Basil leans into the Italian pizza vibe, while parsley is a brighter, more peppery note. Don’t skip the fresh herbs—they make it sing.
For the Zesty Italian Dressing:
- 1/3 cup Italian dressing: The flavorful glue. A good store-bought works in a pinch, but my homemade Italian dressing is stupidly easy and tastes infinitely better.
- 1 teaspoon dried oregano: The quintessential pizza herb. Rub it between your palms as you add it to wake up its oils and aroma.
- 1/4 teaspoon garlic powder: It disperses flavor evenly without the bite of raw garlic. Garlic lovers, feel free to add a minced clove to the dressing!
- Optional: red pepper flakes for a kick: My personal must-add. Just a pinch adds a warm, background heat that keeps you coming back for another forkful.
Let’s Build Some Magic: Step-by-Step
Ready? This is the fun part. We’re not just making food; we’re building layers of flavor and texture.
- Cook & Cool the Tortellini: Bring a large pot of well-salted water to a rolling boil. Cook the tortellini according to the package directions—usually just 2-3 minutes for fresh, or until they float happily to the top. Chef’s Hack: Don’t overcook them! Mushy tortellini is a sad tortellini. As soon as they’re done, drain them and give them a quick rinse under cold water. This stops the cooking instantly and washes away excess starch so your salad isn’t gummy. Let them drain and cool completely in the colander while you prep the veggies.
- Chop & Prep Your Veggie Squad: While the pasta cools, get chopping! Halve those tomatoes, dice the cucumber and bell pepper, slice the olives and onion, and have your pepperoni at the ready. This is your chance to get everything uniform so you get a perfect bite every time. Toss all these colorful friends into your biggest, most beautiful mixing bowl.
- The Grand Toss: Now, add the completely cooled tortellini and your cheese to the bowl with the veggies and pepperoni. Pro Tip: If the tortellini is even slightly warm, it can melt the cheese prematurely and wilt the veggies. Patience here pays off in perfect texture.
- Dress to Impress: In a small jar or bowl, whisk together the Italian dressing, dried oregano, garlic powder, and red pepper flakes (if using). Drizzle this golden elixir over the entire salad. Here’s my secret: start with ¾ of the dressing, toss, then taste. You can always add more, but you can’t take it out! Toss everything gently but thoroughly until every tortellini and veggie piece is glistening with flavor.
- The Chill Time (The Hardest Part): Cover the bowl and pop it into the fridge for at least 30 minutes. I know, the wait is torture, but trust me! This chill session lets the flavors mingle, get cozy, and intensify. The tortellini soaks up the dressing, and everything becomes wonderfully harmonious.
- The Final Flourish: Right before serving, sprinkle the chopped fresh basil or parsley over the top. This adds a pop of fresh color and aroma that’s absolutely irresistible. Give it one final gentle toss, and you’re ready to serve up some smiles.
How to Serve It Like a Pro
Presentation is part of the fun! Dump this beauty into a large, shallow serving platter or a big rustic bowl so all the colors can shine. For a picnic or potluck, I’m a huge fan of transporting it in a giant, lidded mason jar or a sealable container—just give it a shake when you arrive!
What to serve with it? It’s a superstar all on its own, but it also plays incredibly well with others. Pile it next to grilled chicken sausages, juicy burgers, or lemon herb grilled chicken for a complete feast. For a lighter spread, it’s perfect with a simple green salad and some crusty garlic bread for dipping into any leftover dressing at the bottom of the bowl (the best part).
Make It Your Own: Delicious Twists & Swaps
The beauty of this salad is its versatility. Play with it! Here are a few of my favorite riffs:
- Greek Pizza Salad: Swap pepperoni for diced grilled chicken, use kalamata olives instead of black olives, add some crumbled feta cheese, and switch the dressing to a Greek lemon-oregano vinaigrette. Add some chopped fresh dill – unbelievable.
- Veggie Lover’s Dream: Skip the pepperoni and load up on roasted veggies! Toss diced zucchini, eggplant, and mushrooms with olive oil, roast until caramelized, and fold them in. A sprinkle of nutritional yeast can add a cheesy vibe for a vegan option.
- Antipasto Power Bowl: Channel your favorite antipasto platter. Add diced salami, chopped marinated artichoke hearts, chunks of fresh mozzarella (ciliegine), and a drizzle of balsamic glaze over the top along with the dressing.
- Spicy ‘Nduja Arrabbiata: For the heat seekers! Add a tablespoon of spicy ‘nduja or chopped Calabrian chiles to the dressing. Swap the mozzarella for sharp provolone. It’s got a kick you’ll love.
- Gluten-Free/Dairy-Free Friendly: Use your favorite gluten-free cheese tortellini (many great brands out there now!). For dairy-free, find a vegan tortellini and use vegan mozzarella shreds or just skip the extra cheese—the dressing and other flavors are so robust, you won’t miss it.
Beau’s Kitchen Notebook
Over the years, this salad has become my culinary Swiss Army knife. I’ve made it for beach days (in a cooler packed with ice), for new parents as part of a meal train (it keeps for days!), and even as a “desk lunch” that makes all my coworkers jealous. The one universal truth? It always gets better the longer it sits. Leftovers on day two are arguably superior.
A funny story: I once brought it to a friend’s potluck where someone else had brought a very similar, but store-bought, version. Let’s just say mine was gone in 15 minutes, and the other bowl… well, it became a lesson in the power of fresh ingredients and a little love. The moral? Homemade wins, every time.
Your Questions, Answered!
Q: Can I make this ahead of time?
A: Absolutely! In fact, I encourage it. You can assemble the entire salad (hold the fresh herbs) up to 24 hours in advance. Store it covered in the fridge. The flavors will meld beautifully. Add the fresh basil or parsley just before serving so it stays bright and green.
Q: My salad seems a little dry after chilling. What happened?
A: No worries! The tortellini and veggies can soak up the dressing. Just mix up another tablespoon or two of Italian dressing and gently toss it in before serving. Easy fix.
Q: What’s the best way to store leftovers?
A: In a sealed container in the fridge for 3-4 days. The texture of the veggies will soften a bit, but the flavor will still be fantastic. I don’t recommend freezing it, as the tortellini and veggies can become mushy upon thawing.
Q: Is there a way to make it lighter?
A: For sure! Use whole-wheat or low-carb tortellini, lean turkey pepperoni, part-skim mozzarella, and load up on extra veggies like broccoli florets or shredded carrots. You can also use a light Italian dressing or make your own with olive oil, red wine vinegar, and herbs.

Pizza Tortellini Pasta Salad : All Your Favorite Flavors in One Bowl
Description
This Pizza Tortellini Pasta Salad is the answer to feeding everyone at once. It takes everything you love about pepperoni pizza—cheese, savory bites, zesty herbs—and transforms it into a cool, shareable pasta salad that’s perfect for BBQs, potlucks, picnics, and easy summer dinners. It’s bold, crowd-pleasing, and guaranteed to disappear fast.
Ingredients
Pasta Salad
-
1 (20 oz) package cheese tortellini (fresh or frozen)
-
1 cup cherry tomatoes, halved
-
1 cup diced cucumber
-
½ cup sliced black olives
-
½ cup mini pepperoni or diced regular pepperoni
-
½ cup chopped red bell pepper
-
¼ cup thinly sliced red onion
-
½ cup shredded mozzarella or parmesan cheese
-
¼ cup fresh basil or parsley, chopped
Zesty Pizza-Style Dressing
-
⅓ cup Italian dressing (store-bought or homemade)
-
1 teaspoon dried oregano
-
¼ teaspoon garlic powder
-
Optional: pinch of red pepper flakes
Instructions
-
Cook the tortellini
Bring a large pot of well-salted water to a boil. Cook tortellini according to package directions until just al dente. Drain and rinse briefly under cold water to stop cooking. Let cool completely. -
Prep the mix-ins
While pasta cools, chop tomatoes, cucumber, bell pepper, onion, olives, and pepperoni. Add them to a large mixing bowl. -
Assemble the salad
Add cooled tortellini and shredded cheese to the bowl with the vegetables and pepperoni. -
Make the dressing
In a small bowl or jar, whisk together Italian dressing, oregano, garlic powder, and red pepper flakes (if using). -
Toss and chill
Pour about ¾ of the dressing over the salad and gently toss to coat. Add more dressing as needed. Cover and refrigerate for at least 30 minutes to let flavors meld. -
Finish and serve
Sprinkle with fresh basil or parsley just before serving. Give a final gentle toss and enjoy.
Notes
-
Cool pasta fully before mixing to avoid sogginess
-
Start with less dressing — tortellini absorbs a lot as it chills
-
Day-two leftovers taste even better
Nutritional Information*
*Please note: The following is an approximate estimate calculated using standard ingredients and serving sizes. Values will vary based on specific brands and any modifications you make.
- Prep Time: 15 minutes
- Cook Time: 10 minutes
- Total Time: 25 minutes (plus chilling)
- Servings: 6
Per Serving (Approximate):
Calories: 410 | Protein: 17g | Fat: 22g | Carbohydrates: 34g | Fiber: 3g | Sugar: 4g
This dish is a satisfying balance of carbs, protein, and fats, thanks to the cheese-filled pasta and pepperoni. The veggies add fiber, vitamins, and a freshness that balances the richer components perfectly.
Final Thoughts from My Kitchen to Yours
So there you have it, friends—the Pizza Tortellini Pasta Salad in all its glorious, customizable, crowd-feeding splendor. It’s more than a recipe; it’s a reminder that the best kind of cooking is the kind that brings people together without stressing you out. It’s forgiving, fun, and packed with flavor.
I hope this recipe becomes a repeat player in your summer lineup, the dish you’re always asked to bring, and the one that reminds you that awesome food doesn’t have to be complicated. Now, I’d love to hear from you! Did you add a crazy ingredient? Did your kids gobble it up? Tag me @Feastical on social or drop a comment on the blog—I live for your kitchen stories.
Until next time, keep your spoons ready and your gathering joyful. Happy cooking!
– Beau
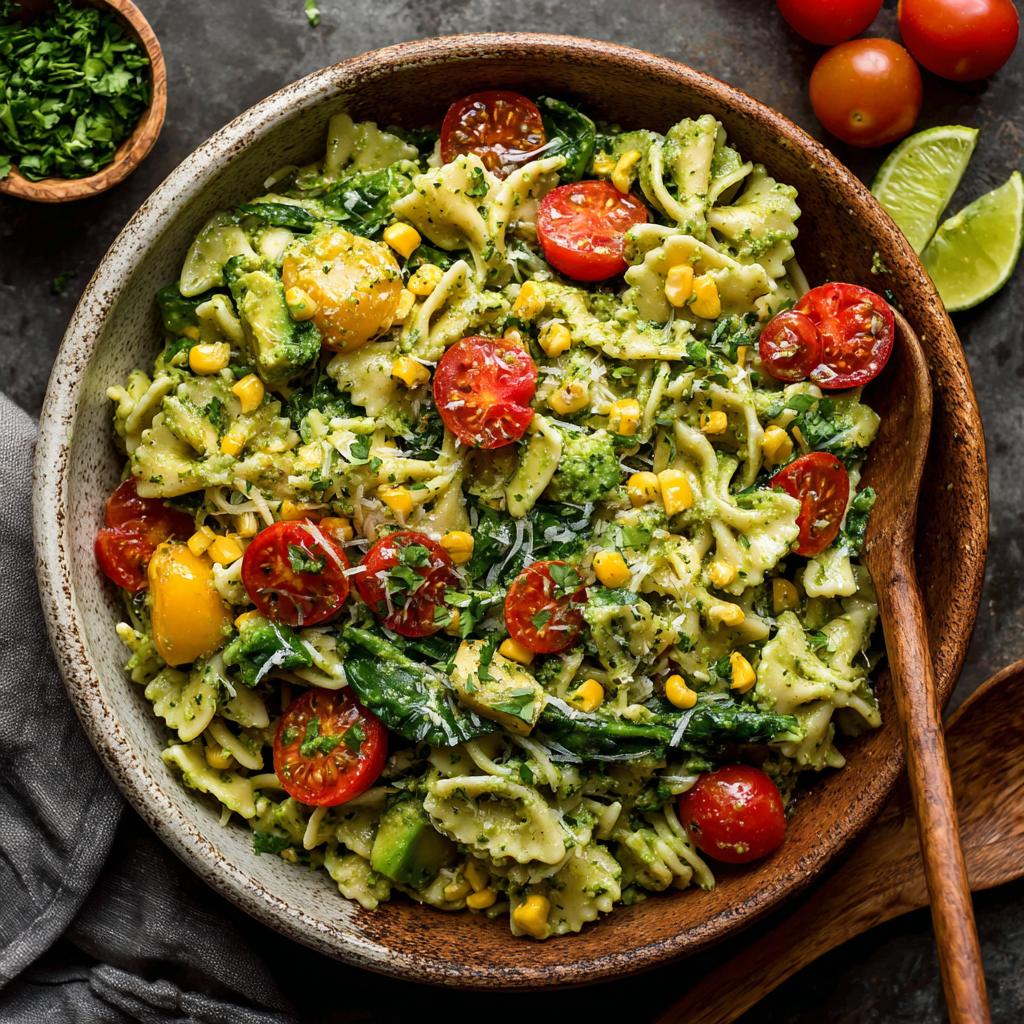
Avocado Pasta Salad with Spinach Pesto : Creamy, Fresh & Wholesome
Let’s Make a Bowl of Sunshine: Avocado Pasta Salad with Spinach Pesto
Hey friends, Beau here! Tell me if this sounds familiar: the sun is blazing, your porch is calling, and the last thing you want to do is hover over a hot stove for hours. You need something for the neighborhood BBQ, the family picnic, or just a fridge-friendly lunch that makes you actually excited to open the fridge door. You want fresh, you want creamy, you want flavor that pops… but you also want to be out of the kitchen in, like, 20 minutes. I hear you. Loud and clear.
That’s exactly why I’m obsessed with this Avocado Pasta Salad with Spinach Pesto. This isn’t your average, mayo-heavy, kinda-sad deli pasta salad. Nope. This is a vibrant, feel-good twist that packs a serious nutritional punch without sacrificing an ounce of deliciousness. We’re talking twirly pasta hugged by the creamiest, greenest, most herbaceous avocado-spinach pesto you’ve ever tasted, tossed with juicy tomatoes, sweet corn, and extra chunks of buttery avocado. It’s a party in a bowl, and everyone’s invited.
This recipe is my go-to for bringing people together. It’s the dish that disappears first at potlucks, the one that gets recipe requests texted to you before you’ve even left the gathering. It’s vegetarian, easily customizable, and proof that “healthy” and “decadently creamy” can absolutely be best friends. So, tie on your favorite apron (or don’t—I won’t tell), and let’s make a batch of pure, uncomplicated joy.
The Picnic That Started It All
This recipe was born from a minor kitchen panic, and honestly, aren’t those the best kind? A few summers back, my wife and I were scrambling to put together a last-minute picnic at the park. The plan was a classic pesto pasta salad, but—plot twist—my basil plant looked… well, let’s just say it had seen better days. It was a sad, sun-scorched little thing. I had a gorgeous ripe avocado and a bag of fresh spinach on the verge of wilting. In a classic “use what you’ve got” moment, I threw it all in the blender with the remaining cilantro and a generous squeeze of lime.
The result was a revelation. The avocado created this unbelievably lush, creamy base that made the pesto cling to every nook of the rotini. The spinach kept it vibrantly green and added a fresh, earthy depth, while the lime cut through the richness perfectly. We tossed it with some quick pantry staples, and off we went. Sitting on that blanket, watching the sunset, digging into this cool, creamy, incredibly satisfying salad… it was a total “why haven’t I always done this?!” moment. Now, it’s less of a recipe and more of a summer tradition. It’s a reminder that the best dishes often come from a little improvisation and a lot of heart.
Gathering Your Feel-Good Ingredients (Serves 6)
Here’s the beautiful cast of characters for our starring dish. I love this lineup because it’s flexible—most of these items are pantry heroes or easy fridge finds.
- 12 oz rotini or fusilli pasta: Those twists and spirals are clutch for catching every drop of our creamy pesto. Chef’s Insight: Gluten-free? Swap in your favorite chickpea or brown rice pasta—it works beautifully.
- 1 large, perfectly ripe avocado, divided: The magic maker! We’ll use half in the pesto for creaminess and half diced into the salad for texture. Pro Tip: Your avocado is ready when it yields gently to a squeeze near the stem. Too hard? Speed-ripen it in a paper bag with a banana.
- 1 cup cherry tomatoes, halved: Little bursts of juicy sweetness. I love a mix of red and yellow for extra color!
- 1 cup corn kernels: Fresh off the cob is amazing in season, but no stress—frozen (thawed) or canned (drained) corn is a fantastic, year-round shortcut that adds a lovely sweet crunch.
- 1/2 cup fresh spinach leaves: The “green” in our green pesto! It’s mild, packed with nutrients, and helps us get an extra veggie boost without a strong flavor.
- 1/2 cup fresh cilantro, including tender stems: This brings a bright, citrusy herbaceous note. Not a cilantro fan? No drama! Fresh basil or even flat-leaf parsley are glorious substitutes.
- 1 clove garlic: For that essential, aromatic punch. If you’re sensitive to raw garlic’s bite, try roasting the clove first for a mellower, sweeter flavor.
- Juice of 1 lime: Fresh is key here! The acid brightens all the flavors and keeps our avocado pesto looking vibrant green. In a pinch, lemon juice works too.
- 2 tbsp extra virgin olive oil: This helps bring the pesto together and adds a fruity richness. Use the good stuff you love for drizzling.
- Salt & freshly cracked black pepper to taste: Your flavor anchors. Don’t be shy—seasoning wakes up every single ingredient.
Let’s Get Cooking: Step-by-Step with Chef Beau
This is where the magic happens, and it’s so simple. We’re basically boiling, blending, and tossing. My kind of cooking!
- Cook Your Pasta to Perfection. Bring a large pot of well-salted water to a rolling boil. Add your pasta and cook according to the package directions for “al dente”—it should have a pleasant bite to it. Why? Mushy pasta in a cold salad is a sad thing. Once cooked, drain it in a colander and immediately give it a quick rinse under cold water. This stops the cooking process, cools it down fast, and washes away excess starch so your salad isn’t gummy. Let it drain well while you make the pesto.
- Whip Up the Dreamy Green Pesto. In your blender or food processor, combine the fresh spinach, cilantro, garlic clove, lime juice, olive oil, and HALF of your ripe avocado (pit and skin removed, of course). Add a big pinch of salt and a few cracks of pepper. Chef’s Hack: Start by pulsing a few times to break everything down, then blend on high until it’s completely smooth and gorgeous. If it’s struggling to blend, add a single tablespoon of water or pasta cooking water to get it moving. Taste it! This is your moment. Adjust with more salt, lime, or pepper until it makes you do a little happy dance.
- The Grand Toss Assembly. Grab your biggest, most beautiful mixing bowl. To the cooled, drained pasta, add the halved cherry tomatoes, the corn, and the remaining avocado, diced into perfect, creamy chunks. Gentle reminder: Toss the diced avocado in a tiny squeeze of lime juice first if you’re worried about browning—though we’ll be eating this so fast, it’s rarely an issue!
- Marry the Pesto and Pasta. Pour that incredible, vibrant green pesto all over the pasta and veggies. Now, using a large spoon or silicone spatula, gently but thoroughly toss everything together. You want every single piece of pasta to be coated in that creamy green goodness. Get in there and make sure nothing’s hiding at the bottom of the bowl!
- The Final Touch (The Most Important Step!). Taste it. Again! Does it need another pinch of salt? A squeeze more lime? This is your dish, tailor it to your taste buds. Once it’s perfect, you can dive right in or pop it in the fridge to chill for 30 minutes, which lets the flavors get to know each other even better.
How to Serve This Star of the Show
Presentation is part of the fun! I love serving this salad in a wide, shallow bowl so all the colorful ingredients are visible. For a casual backyard feed, just set the big bowl on the table with a giant serving spoon and let everyone dig in. For individual plates, use a large spoon to twirl and lift the pasta into a nice mound, making sure to get plenty of those colorful veggies peeking through.
This salad is a fabulous main dish for a light lunch, but it also plays incredibly well with others at a spread. Pair it with grilled lemon-herb chicken or black bean burgers for a fuller meal. It’s the perfect sidekick to classic BBQ fare like ribs or pulled pork sandwiches, cutting through the richness with its fresh, creamy vibe. Don’t forget a final flourish—a little extra cracked pepper, a few cilantro leaves, or a light drizzle of olive oil right before serving makes it look restaurant-worthy.
Make It Your Own: 5 Flavorful Twists
The beauty of this recipe is its adaptability. Play with it! Here are some of my favorite riffs:
- The Protein Power-Up: Add 1-2 cups of shredded rotisserie chicken, a can of drained chickpeas, or a handful of crumbled feta or goat cheese for a more substantial meal.
- Herb Swap: As mentioned, if cilantro isn’t your thing, use fresh basil for a more classic pesto vibe, or parsley for a clean, bright flavor.
- Spice It Up: Add a jalapeño (seeds removed for less heat) to the blender with the pesto ingredients, or stir in a diced jalapeño with the veggies. A pinch of red pepper flakes works wonders too.
- Veggie Delight: Clear out the crisper! Thinly sliced bell peppers, crunchy cucumber, or blanched broccoli florets are fantastic additions.
- Dairy-Free Creamy Dream: It’s already vegan as written, but for an even richer, “cheesier” pesto without dairy, add 2 tablespoons of nutritional yeast to the blender. It adds a wonderful savory, umami depth.
Beau’s Chef Notes & Kitchen Confessions
Over the years, this recipe has seen some fun evolutions. I once accidentally used a whole serrano pepper instead of half, and let’s just say it was a… *spicy* surprise at a family reunion! My uncle still talks about it. Lesson learned: taste your peppers first.
I’ve also learned that this salad’s flavor is at its peak the day it’s made, but it’s still delicious the next day. The avocado in the pesto may darken slightly (it’s just oxidation—totally safe!), but the flavor remains fantastic. If I know I’m making it ahead, I’ll sometimes stir in the diced fresh avocado just before serving to keep it picture-perfect.
Most importantly, this recipe is a framework, not a rulebook. Don’t have lime? Use lemon. Out of spinach? Use arugula for a peppery kick. The goal is a delicious, no-stress dish that brings people to the table. That’s always a win in my book.
Your Questions, Answered!
Q: How do I keep the avocado from browning?
A: The lime juice in the pesto is the first line of defense! It acidulates the avocado, slowing down oxidation. For the diced avocado in the salad, toss it in a teaspoon of lime juice before adding it to the bowl. Storing the salad with plastic wrap directly on the surface (pressed onto the pesto) also helps limit air exposure. But honestly, it’s usually gone before it has a chance to brown!
Q: Can I make this ahead of time?
A: Absolutely! You can cook the pasta and make the pesto sauce up to a day in advance. Store them separately in airtight containers in the fridge. Combine everything (adding your fresh diced avocado at the last minute) 30 minutes to an hour before serving for the best texture and brightest color.
Q: My pesto is too thick! What did I do wrong?
A> Nothing’s wrong! Blenders and avocado sizes vary. Simply thin it out with a tablespoon of water, pasta cooking water, or a touch more olive oil or lime juice until it reaches a creamy, pourable consistency.
Q: Is this pasta salad healthy?
A> I’m so glad you asked! I believe “healthy” means nourishing your body with real, whole ingredients, and this salad is packed with them. Avocados provide heart-healthy fats and fiber, spinach is loaded with vitamins, and the veggies add antioxidants. It’s a balanced, satisfying dish that makes you feel great.

Avocado Pasta Salad with Spinach Pesto : Creamy, Fresh & Wholesome
Description
When the weather’s warm and the last thing you want is a heavy, mayo-laden salad, this Avocado Pasta Salad with Spinach Pesto delivers everything you’re craving. Twisty pasta is coated in a luxuriously creamy avocado-spinach pesto, then tossed with juicy tomatoes, sweet corn, and extra chunks of buttery avocado. It’s fresh, vibrant, naturally dairy-free, and comes together in about 20 minutes — perfect for picnics, BBQs, and fridge-friendly lunches.
Ingredients
Pasta Salad
-
12 oz rotini or fusilli pasta
-
1 large ripe avocado, divided
-
1 cup cherry tomatoes, halved
-
1 cup corn kernels (fresh, thawed frozen, or canned & drained)
Spinach Avocado Pesto
-
½ cup fresh spinach leaves
-
½ cup fresh cilantro (or basil or parsley)
-
1 clove garlic
-
Juice of 1 lime
-
2 tablespoons extra virgin olive oil
-
Salt and freshly cracked black pepper, to taste
Instructions
-
Cook the pasta
Bring a large pot of well-salted water to a boil. Cook pasta according to package directions until al dente. Drain and rinse briefly under cold water to stop cooking. Let drain well. -
Make the pesto
In a blender or food processor, combine spinach, cilantro, garlic, lime juice, olive oil, and half of the avocado. Season with salt and pepper. Blend until smooth and creamy, adding 1–2 tablespoons of water or pasta water if needed. -
Assemble the salad
Transfer cooled pasta to a large bowl. Add tomatoes, corn, and remaining avocado, diced. Pour pesto over the top. -
Toss and taste
Gently toss until everything is evenly coated. Taste and adjust seasoning with more salt, pepper, or lime juice as needed. -
Serve or chill
Serve immediately or refrigerate for 30 minutes to allow flavors to meld.
Serving Suggestions
-
Serve as a light main dish or hearty side
-
Pair with grilled chicken, shrimp, or veggie burgers
-
Finish with extra black pepper, herbs, or a drizzle of olive oil before serving
Notes
-
Toss diced avocado with a little lime juice to prevent browning
-
Chill pasta completely before mixing to avoid sogginess
-
Best enjoyed the day it’s made, but still tasty next day
Nutritional Information (Per Serving)
Let’s talk about the good stuff fueling your body! This nutritional breakdown is an estimate for one serving (about 1.5 cups) based on the standard recipe. Remember, variations will change these numbers.
- Calories: ~320
- Total Fat: 17g (Mostly the good, monounsaturated kind from avocado and olive oil!)
- Saturated Fat: 2.5g
- Carbohydrates: 36g
- Fiber: 6g (That’s over 20% of your daily goal—awesome!)
- Sugar: 4g (Naturally occurring from the veggies)
- Protein: 8g
- Sodium: Varies based on salting, but it’s easy to control.
This salad is a fantastic source of Vitamin C (from lime and spinach), Vitamin K, Folate, and Potassium. It’s a meal that truly tastes as good as it makes you feel.
Final Thoughts from My Kitchen to Yours
Well, friend, we’ve done it! We’ve taken a handful of simple, fresh ingredients and transformed them into a show-stopping pasta salad that’s guaranteed to become a warm-weather staple in your home. I hope this recipe brings as much easy joy to your table as it has to mine.
Remember, cooking isn’t about perfection. It’s about the laughter in the kitchen, the stories shared over the bowl, and the simple pleasure of creating something delicious with your own two hands. So, make this Avocado Pasta Salad your own. Tweak it, love it, and share it with someone special.
If you make it (and I really hope you do!), I’d love to see your creation. Tag me over on

Tuscan Tortellini Pasta Salad : Bold, Bright, and Bursting with Flavor
Tuscan Tortellini Pasta Salad: Bold, Bright, and Bursting with Flavor
Hey there, friend! Beau here, welcoming you back to my kitchen corner at Feastical. Have you ever needed a dish that does it all? I’m talking about the superstar that shows up to the backyard BBQ, shines at the potluck table, and saves the day on a “what’s-for-dinner-tonight?” Wednesday. Well, pull up a chair, because I’m about to share one of my all-time go-to recipes: my Tuscan Tortellini Pasta Salad.
This isn’t your average, timid pasta salad. No, sir. This is a vibrant, hearty, flavor-packed masterpiece that eats like a full meal. We’re combining plump, cheese-filled tortellini with the salty punch of salami, creamy bursts of fresh mozzarella, and a whole garden’s worth of crunchy, colorful veggies. The whole beautiful mess gets tossed in a garlicky, herb-flecked Italian dressing that soaks into every nook and cranny. It’s fresh, it’s satisfying, and it brings a serious dose of Mediterranean sunshine to your table.
The best part? It comes together in under 30 minutes. Seriously. While the pasta cooks, you can chop and whisk, and before you know it, you’ve created a culinary hug in a bowl. So, whether you’re a seasoned pro or you’re just figuring out that a spatula isn’t for digging in the garden, this recipe is for you. Let’s make something delicious that’s guaranteed to bring people together.
The Potluck That Started It All
This recipe has a special place in my heart, and it all started with a slightly chaotic, totally wonderful neighborhood block party years ago. My mission was simple: bring a dish that could please a crowd, from picky kids to foodie grandparents, and survive a few hours on a picnic table in the sun.
I remember standing in my kitchen, staring at an empty bowl, thinking about the flavors of Tuscany—rustic, bold, and unpretentiously delicious. I had some cheese tortellini in the fridge (a forever favorite), and the wheels started turning. I chopped, I whisked, and I tossed it all together with a hopeful heart. When I got to the party, I placed it next to the usual suspects—the potato salads and baked beans. Friends, it was gone in 20 minutes. People I’d never met were asking for the recipe! That’s when I knew this tortellini salad wasn’t just a side dish; it was a people connector, a conversation starter, and an instant mood-lifter. Every time I make it now, I think of laughing in the sunshine with good neighbors, and that’s the real secret ingredient.
Gathering Your Flavor All-Stars
Here’s everything you’ll need to create this masterpiece. Don’t stress if you’re missing an item—I’ve got swap ideas for you right here!
- 1 (20 oz) package cheese tortellini, cooked and cooled: The hearty foundation. Those little pasta pockets filled with creamy ricotta or cheese blend are flavor sponges. Chef’s Insight: For a gluten-free twist, many brands now offer fantastic GF tortellini!
- 1 cup cherry tomatoes, halved: They add juicy, sweet bursts. Use the reddest, ripest ones you can find for the best flavor.
- 1 cup cucumber, chopped: For a crucial, refreshing crunch. I like to leave the skin on for extra color and nutrients.
- 1/2 cup sliced black olives: They bring that briny, savory depth that screams “Mediterranean.” Not an olive fan? Try capers for a similar salty kick.
- 1/2 cup chopped salami or prosciutto: Our savory, salty star. I love the robust flavor of a good hard salami, but thinly sliced prosciutto torn into bits is an elegant swap.
- 1/2 cup diced bell pepper (any color): Color and crunch! I often use a mix of red and yellow for maximum visual pop.
- 1/2 cup fresh mozzarella balls (bocconcini), halved: Little pillows of creamy, mild cheese that balance the saltiness beautifully.
- 1/4 cup red onion, thinly sliced: A bit of sharp, peppery bite. Soaking the slices in cold water for 5 minutes tames their intensity if you’re sensitive to it.
- 1/4 cup chopped fresh parsley: This isn’t just garnish! The fresh, grassy flavor brightens the whole dish.
For the Zesty Italian Dressing:
- 1/3 cup extra virgin olive oil: The rich, fruity base of our dressing. A good EVOO makes a noticeable difference here.
- 3 tablespoons red wine vinegar: Our tangy backbone. It cuts through the richness and makes flavors sing.
- 1 teaspoon Dijon mustard: The secret weapon! It adds a subtle complexity and helps emulsify the dressing (fancy word for keeping it from separating).
- 1 garlic clove, minced: Fresh is best for that unmistakable aromatic punch.
- 1/2 teaspoon dried oregano: The classic Italian herb. Rubbing it between your palms before adding wakes up its oils.
- Salt and pepper to taste: Season boldly. This dressing needs to flavor a whole bowl of ingredients!
Let’s Build Some Deliciousness: Step-by-Step
Ready to cook? Follow these steps, and I’ll walk you through with all my favorite chef hacks to ensure perfect results.
- Cook & Cool Your Tortellini. Bring a large pot of salted water to a rolling boil and cook your tortellini according to the package directions—usually just 3-4 minutes. Pro-Tip: Don’t overcook! We want them al dente so they hold their shape in the salad. The second they’re done, drain them in a colander and give them a quick rinse with cold water. This stops the cooking instantly and washes away excess starch, preventing a gummy salad. Let them cool completely while you prep the veggies.
- Chop Your Veggies & Meats. This is the fun, therapeutic part! Halve those tomatoes, dice the cucumber and peppers, slice the onions, and chop the salami and parsley. Toss them all (except the parsley for now) into a large, spacious mixing bowl. Give your mozzarella balls a gentle halving. Chef’s Hack: Use kitchen shears to quickly snip the salami into small pieces—it’s faster than using a knife!
- Whisk Up That Magic Dressing. In a small bowl or a jar with a tight-fitting lid, combine the olive oil, red wine vinegar, Dijon mustard, minced garlic, oregano, and a big pinch of salt and pepper. Whisk vigorously until it’s beautifully smooth and slightly thickened, or shake that jar like you mean it! Taste it. Does it need more tang? Add a splash of vinegar. More richness? A drizzle of oil. Make it yours.
- The Grand Toss. Add your perfectly cooled tortellini to the bowl with all your colorful ingredients. Now, pour that glorious dressing over the top. Using a large spoon and fork (or clean hands, my favorite tools!), gently but thoroughly toss everything together. You want every single tortellini and veggie piece to get a shiny, flavorful coat.
- Chill & Garnish. Fold in most of your fresh parsley, saving a little for garnish on top. For the best flavor marriage, cover the bowl and let it chill in the fridge for at least 30 minutes before serving. This gives the pasta time to soak up all the dressing’s goodness. Right before serving, give it one more gentle toss, sprinkle with the remaining parsley, and get ready for the compliments!
How to Serve This Tuscan Masterpiece
Presentation is part of the fun! Here’s how I love to plate it up:
For a family-style feast, I bring the whole beautiful bowl to the table. The colors are so inviting, it’s a centerpiece in itself. If I’m feeling fancy for guests, I’ll serve individual portions in wide, shallow pasta bowls or even in large, sturdy mason jars for a portable picnic look.
What to serve it with? It’s a complete meal on its own, but it plays incredibly well with others. For a cookout, it’s the perfect partner to juicy grilled chicken, burgers, or lemon-herb shrimp skewers. For a lighter lunch, just add a hunk of crusty, warm bread for dipping into any extra dressing at the bottom of the bowl. Don’t forget a final flourish—a little extra crack of black pepper or a small drizzle of your best olive oil right before serving makes it restaurant-level special.
Make It Your Own: Creative Twists & Swaps
The beauty of this salad is its flexibility. Here are a few ways to riff on it:
- Go Vegetarian/Vegan: Simply omit the salami. For vegan fare, use vegan cheese tortellini (available in many stores), skip the mozzarella, and add a can of rinsed, drained chickpeas for protein and heartiness. A sprinkle of nutritional yeast in the dressing can add a cheesy flavor.
- Swap the Protein: Not a salami person? Try diced grilled chicken, flaked tuna, or even crispy pancetta. For a seafood twist, add some cooked, chilled shrimp at the end.
- Seasonal Veggie Switch-Up: Use what’s fresh! In spring, add asparagus tips (blanched). In summer, throw in some grilled zucchini or corn kernels. In fall, roasted butternut squash cubes are incredible.
- Dressing Detour: Love pesto? Swap the Italian dressing for 1/2 cup of homemade or high-quality store-bought basil pesto thinned with a tablespoon of olive oil or pasta water. Creamy fan? Mix 1/4 cup of mayo or Greek yogurt into the dressing for a richer, tangier coat.
- Cheese Please: Swap the mozzarella for crumbled feta (a saltier, tangier option) or shaved Parmesan for a more intense, nutty flavor.
Beau’s Chef Notes & Kitchen Chatter
Over the years, this recipe has become a true friend in my kitchen. It’s evolved from that first block party version—I started adding the Dijon after a happy accident one day when I ran out of my usual prepared dressing, and now I’ll never go back! It adds that “what is that amazing flavor?” layer.
A funny story: I once brought this to a friend’s potluck and accidentally used cinnamon instead of dried oregano. (Look, the jars were identical, and I was in a hurry!). We ended up calling it “Tuscan Fall Fusion Salad,” and you know what? It was… interesting. But let’s just say I now keep my spices VERY clearly labeled. The lesson? Always taste your dressing before committing!
This salad’s magic truly happens as it chills. Making it a few hours ahead, or even the night before, is not just okay—it’s encouraged. The flavors get to know each other and become best friends.
FAQs & Troubleshooting Your Tortellini Salad
Q: Can I make this salad ahead of time?
A: Absolutely! In fact, I recommend it. Prepare it up to 24 hours in advance, cover tightly, and store in the fridge. The flavors meld beautifully. If it seems a little dry after chilling, just stir in a fresh tablespoon of olive oil and a squeeze of lemon juice before serving.
Q: My salad seems a bit soggy. What happened?
A: The main culprit is usually adding warm tortellini to the salad. Ensure your pasta is completely cooled—even chilled—before mixing. Also, make sure your veggies (especially cucumbers and tomatoes) are thoroughly dried after washing. A salad spinner is your best friend here!
Q: What’s the best way to store leftovers?
A: Keep it in an airtight container in the fridge. It will stay delicious for 3-4 days. Note that the cucumbers may soften a bit after day two, but the flavor will still be fantastic.
Q: Can I use a different pasta?
A: Of course! Cheese ravioli works great. For a non-stuffed pasta, try rotini, farfalle (bow-ties), or penne. Just cook al dente and follow the same cool-down process.

Tuscan Tortellini Pasta Salad : Bold, Bright, and Bursting with Flavor
Description
This Tuscan Tortellini Pasta Salad is the kind of dish that shows up and steals the spotlight. It’s hearty enough to be dinner, vibrant enough for a potluck, and easy enough for a busy weeknight. Plump cheese tortellini are tossed with savory salami, creamy mozzarella, crisp vegetables, and a zesty homemade Italian dressing that clings to every bite. Fresh, satisfying, and ready in under 30 minutes—this is a true crowd-pleaser.
Ingredients
Pasta Salad
-
1 (20 oz) package cheese tortellini, cooked and cooled
-
1 cup cherry tomatoes, halved
-
1 cup cucumber, chopped
-
½ cup sliced black olives
-
½ cup chopped salami or prosciutto
-
½ cup diced bell pepper (any color or mix)
-
½ cup fresh mozzarella balls (bocconcini), halved
-
¼ cup red onion, thinly sliced
-
¼ cup fresh parsley, chopped
Zesty Italian Dressing
-
⅓ cup extra virgin olive oil
-
3 tablespoons red wine vinegar
-
1 teaspoon Dijon mustard
-
1 garlic clove, minced
-
½ teaspoon dried oregano
-
Salt and freshly cracked black pepper, to taste
Instructions
-
Cook the tortellini
Bring a large pot of well-salted water to a boil. Cook tortellini according to package directions until just al dente. Drain and rinse briefly under cold water to stop cooking. Set aside to cool completely. -
Prep the mix-ins
While the pasta cools, chop tomatoes, cucumber, bell pepper, red onion, salami, mozzarella, and parsley. Add everything except parsley to a large mixing bowl. -
Make the dressing
In a small bowl or jar, whisk together olive oil, red wine vinegar, Dijon mustard, garlic, oregano, salt, and pepper until smooth and emulsified. Taste and adjust seasoning. -
Assemble the salad
Add cooled tortellini to the bowl with the vegetables and meats. Pour dressing over the top and gently toss until evenly coated. -
Chill and finish
Fold in most of the parsley. Cover and refrigerate for at least 30 minutes to allow flavors to meld. Garnish with remaining parsley before serving.
Notes
-
Cool pasta completely before mixing to avoid sogginess
-
Dry vegetables well after washing
-
This salad tastes even better after a few hours (or overnight!)
-
Refresh leftovers with a splash of olive oil and lemon juice
Nutritional Information (Approximate)
Here’s a general breakdown per serving (based on 6 servings). Remember, this is a hearty, meal-worthy salad!
- Calories: 390
- Protein: 15g
- Fat: 22g
- Carbohydrates: 32g
- Fiber: 3g
- Sugar: 4g
Disclaimer: Nutritional info is an estimate calculated using online tools and can vary based on specific ingredient brands and portion sizes. For precise dietary needs, it’s best to calculate using your exact ingredients.
Final Thoughts
And there you have it, friends—my heartwarming, crowd-pleasing Tuscan Tortellini Pasta Salad in all its glory. This recipe is more than just a list of ingredients and steps; it’s a ticket to creating your own happy memories around the table. It’s proof that incredible food doesn’t have to be complicated.
I hope you’ll whip up a batch for your next gathering, a busy weeknight, or just because you deserve a vibrant, delicious meal. When you do, I’d love to hear about it! Tag me over on Feastical.com or share your photos. Nothing makes me happier than seeing my recipes come to life in your kitchen.
Now, go grab that fork (or your favorite serving spoon), and let’s dig into the good life, one flavorful bite at a time. Happy cooking!
— Beau
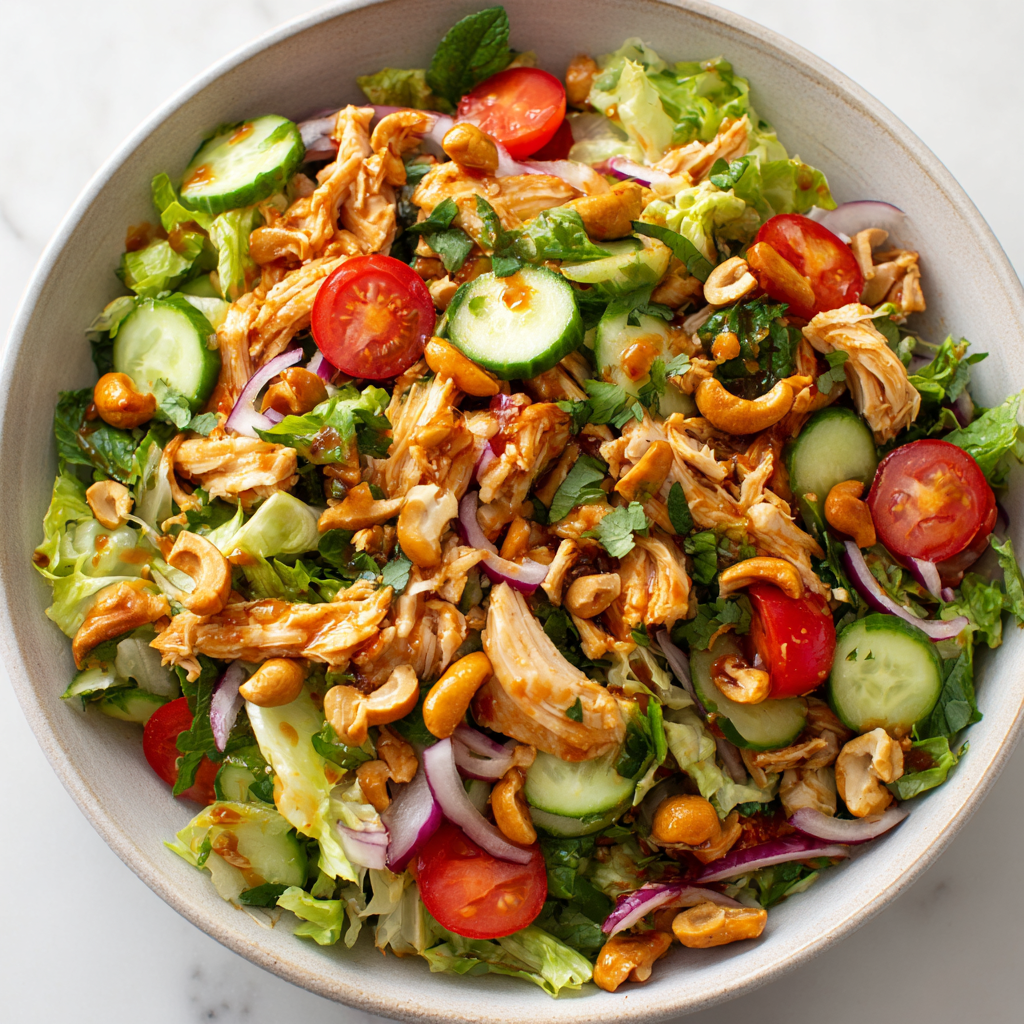
Thai Chicken Salad: Fresh, Crunchy, and Packed with Sweet Heat
Thai Chicken Salad: Your New Go-To for a Fresh & Flavorful Feast
Hey friends, Beau here from Feastical! Let’s be real for a second. How many times have you stood in front of the fridge, craving something… *alive*? Something that doesn’t come from a sad, floppy bag of pre-washed greens and a lonely bottle of ranch? I’ve been there more times than I can count, especially after a long day when the kitchen feels more like a chore zone than a creative space.
That’s exactly why I’m so pumped to share this recipe with you today. This isn’t just a salad. This is a flavor festival in a bowl. We’re talking about a Thai Chicken Salad that’s a total game-changer: wildly crunchy, perfectly balanced between sweet and spicy, and so satisfying it can easily be the main event. It’s the salad that makes you forget you’re eating a salad, you know?
Imagine this: tender, savory shredded chicken tangled up with the crispest cucumbers and juicy tomatoes. Then, we’re throwing in a handful of buttery roasted cashews for that irresistible crunch. The magic, though, is all in the dressing—a bright, zingy, sweet-heat situation that hugs every single ingredient. It’s like sunshine for your taste buds. Best part? You can whip this vibrant, healthy meal together in about 15 minutes flat. No fancy skills required. Just you, a few simple ingredients, and a serious craving for something delicious. Let’s get that fork ready!
The Rainy Market Day That Inspired This Bowl of Sunshine
This recipe has a little story, as the best ones often do. A few years back, my wife and I got caught in a sudden, torrential downpour at a weekend farmers’ market. We dashed under the nearest awning, which happened to belong to a tiny, family-run Thai food stall. The incredible aroma of lemongrass, chili, and lime pulled us in like a tractor beam.
We ordered their special “market salad,” and the wonderful lady running the stall handed us two overflowing bowls. Sitting on a wet bench, watching the rain, we took our first bites. It was an explosion—cool, crunchy vegetables against a dressing so vibrant it practically sang. It was the exact opposite of the gloomy weather. That moment of pure, unexpected joy is what I try to capture every time I make this salad. It’s my kitchen hack for bringing a little bit of that sunny, market-day energy right to your table, no matter what the weather looks like outside.
Gathering Your Flavor Party: The Ingredients
Here’s the crew! This is a flexible, forgiving list. The goal is fresh textures and bold flavors. Don’t stress if you’re missing one thing—I’ve got swaps for you.
- 2 cups cooked, shredded chicken: The hearty star of the show. I’m a huge fan of using a rotisserie chicken here—it’s juicy, flavorful, and the ultimate time-saver. No shame in that game! Otherwise, poach or bake a couple of chicken breasts. Chef’s Insight: Save the broth from poaching! It’s liquid gold for soups or cooking rice.
- 4 cups mixed salad greens: The fresh, crisp base. I love a blend with some spinach or butter lettuce for tenderness and romaine for crunch. Anything sturdy works!
- ½ cup cherry tomatoes, halved: Little bursts of juicy sweetness. Sub Tip: No cherries? Dice any ripe tomato you have. Just squeeze out the excess seeds and juice so your salad doesn’t get watery.
- ½ cup cucumber, thinly sliced: For that essential cool, refreshing crunch. I like to use English cucumbers—no peeling or seeding needed! Chef’s Hack: Toss the slices with a tiny pinch of salt for 5 minutes, then pat dry. This “quick-pickle” step keeps them extra crisp.
- ¼ red onion, thinly sliced: A sharp, colorful bite. If raw onion is too intense for you, soak the slices in ice water for 10 minutes. It mellows the flavor beautifully.
- ⅓ cup roasted cashews: Our crunch factor and a source of creamy, rich flavor. Pro Move: Give them a quick chop so you get a bit of cashew in every forkful. Almonds or peanuts work great too!
- Fresh cilantro for garnish: The fragrant, herbal finish that screams “Thai cuisine.” If you’re one of those folks who thinks cilantro tastes like soap (no judgment!), fresh mint or Thai basil are incredible substitutes.
For the “Can’t-Live-Without-It” Thai Dressing:
- 2 tablespoons lime juice: The essential, puckery tang. Freshly squeezed is a million times better than bottled here.
- 1 tablespoon soy sauce or fish sauce: The savory, salty depth. Use soy sauce for a vegetarian version, or fish sauce (my personal pick) for that authentic, umami-rich punch.
- 1 tablespoon honey or maple syrup: The sweet to balance the sour and spicy. Agave nectar works too!
- 1 teaspoon sesame oil: A tiny amount makes a huge impact, adding a toasty, nutty aroma. Don’t skip it!
- 1 garlic clove, minced: The flavor backbone. A microplane grater gets it super fine so it melds perfectly into the dressing.
- 1 small red chili, finely chopped (optional): Our heat source! Remove the seeds for milder spice, or leave them in for a kick. A dash of sriracha or crushed red pepper flakes can stand in.
- 1 tablespoon chopped fresh herbs: I use cilantro and mint together. It’s like a flavor party in your dressing!
Let’s Build That Salad: Simple Steps to Deliciousness
This is where the magic happens, and it’s honestly more fun than work. Follow these steps, throw in my little hacks, and you’ll have a restaurant-quality salad in minutes.
- Make the Dressing First. In a small bowl or, better yet, a mason jar with a lid, combine the lime juice, soy/fish sauce, honey, sesame oil, minced garlic, chopped chili, and fresh herbs. Whisk vigorously or shake the jar until everything is beautifully emulsified and smooth. Chef’s Tip: Doing this first allows the flavors to get to know each other and mellow out while you prep the other ingredients. Taste it! Adjust to your liking—more honey for sweetness, more lime for zing.
- Prep Your Veggies & Chicken. Halve those tomatoes, thinly slice the cucumber and red onion, and chop your cashews if you like. If your chicken isn’t already shredded, go ahead and pull it into bite-sized strips or shreds using two forks. Time-Saving Hack: Do all this chopping and shredding right on your largest cutting board. You can just slide everything straight into the big salad bowl—less cleanup!
- Assemble the Base. In your largest mixing bowl (bigger than you think you need—tossing room is key!), add the mixed greens. Pile the shredded chicken, tomatoes, cucumber, and red onion right on top. Assembly Insight: I like to place the chicken in the center and arrange the colorful veggies around it. It just looks pretty and makes tossing even easier.
- The Grand Toss! Right before you’re ready to serve, pour about three-quarters of your fantastic dressing over the salad. Using clean hands or two large spoons, gently but thoroughly toss everything together. Lift from the bottom to coat every leaf and piece of chicken. Pro Tossing Move: Add the dressing gradually. You can always add more, but you can’t take it out! The goal is a light, glossy coat, not a swimming pool.
- Final Flourish. Transfer your gorgeous, dressed salad to a serving platter or individual bowls. Drizzle with the remaining dressing if you like it extra saucy. Scatter the roasted cashews over the top and finish with a generous handful of fresh cilantro leaves. This keeps the nuts crunchy and the cilantro bright and fresh.
Serving It Up Style
Presentation is part of the fun! Here’s how to make this salad shine:
For a family-style feast, pile it all onto a big, beautiful platter. Let everyone serve themselves. For individual lunches, layer it in wide, shallow bowls so you get a bit of everything in each bite. If you’re feeling fancy, serve it in little crisp lettuce cups (Butter lettuce or Romaine hearts work great) for a fun, hands-on appetizer.
What to serve with it? This salad is a complete meal on its own! But if you want to round things out, it’s fantastic with a side of steamed jasmine rice (to soak up any extra dressing), crispy spring rolls, or a simple bowl of coconut soup. For drinks, I love it with an ice-cold lager, a crisp white wine like Sauvignon Blanc, or a sparkling limeade.
Make It Your Own: Delicious Twists & Swaps
The beauty of this recipe is its versatility. Play with it!
- Tropical Twist: Add ½ cup of diced ripe mango or fresh pineapple. The sweet fruit against the spicy dressing is absolute heaven.
- Change Up the Protein: Not a chicken person? Try it with grilled shrimp, thinly sliced flank steak, or even crispy tofu cubes (press and pan-fry them for the best texture).
- Go Full Veggie/Vegan: Swap the chicken for a can of rinsed and drained chickpeas or edamame. Use maple syrup instead of honey and soy sauce instead of fish sauce. You’ve got a powerhouse vegan meal!
- Extra Crunch: Add shredded carrots, thinly sliced bell peppers, or even some crispy wonton strips on top.
- Peanut Lover’s Dream: Swap the cashews for peanuts, and add a tablespoon of creamy peanut butter to the dressing. Thin it out with a splash of warm water until it’s pourable.
Beau’s Kitchen Notes & Stories
This recipe has been a constant in my kitchen for years, and it’s evolved with me. The first time I made it, I was so heavy-handed with the fish sauce that my poor dog left the room. Lesson learned: taste as you go! Now, I make a double batch of the dressing almost every week and keep it in the fridge. It’s my secret weapon for instantly jazzing up grilled meats, noodles, or even just a simple bowl of steamed veggies.
I also learned the hard way that adding the nuts too early means soggy nuts—and nobody wants that. So now, they’re always the very last sprinkle, the grand finale. Cooking is all about these little lessons, and sharing them is my favorite part of running Feastical.
Your Questions, Answered
- Can I make this salad ahead of time? Absolutely! Prep is your friend. Keep all the components separate: dressing in a jar, chopped veggies and chicken in containers, nuts and herbs separate. Assemble and toss right before you eat. The dressed salad is best eaten immediately, but the components will stay fresh for 2-3 days in the fridge.
- My dressing is too spicy/sour/salty! Help! No panic! If it’s too spicy, add more honey and a splash of neutral oil. Too sour? Balance with more honey or a tiny pinch of sugar. Too salty? Add more lime juice and a bit more oil. The key is balancing the four flavor elements: sweet, sour, salty, spicy.
- What’s the best way to shred chicken? My two favorite methods: 1) Use two forks to pull it apart. 2) For super fine shreds, pop slightly cooled chicken into your stand mixer and use the paddle attachment on low speed for 20-30 seconds. It works like a charm!
- Can I use bottled dressing? You *can*, but I really encourage you to try the homemade version. It takes 2 minutes and tastes infinitely better, with no preservatives or weird additives. Promise it’s worth the tiny extra effort!
Thai Chicken Salad: Fresh, Crunchy, and Packed with Sweet Heat
Description
This Thai Chicken Salad is bright, bold, and incredibly satisfying. Tender shredded chicken, crisp vegetables, and crunchy cashews are tossed in a zesty lime dressing with just the right balance of sweet, salty, and heat. It comes together in about 15 minutes and works perfectly as a light dinner, hearty lunch, or make-ahead meal.
Ingredients
Salad
-
2 cups cooked chicken, shredded (rotisserie works great)
-
4 cups mixed salad greens (romaine, butter lettuce, or spinach)
-
½ cup cherry tomatoes, halved
-
½ cup cucumber, thinly sliced
-
¼ red onion, thinly sliced
-
⅓ cup roasted cashews, roughly chopped
-
Fresh cilantro (or mint), for garnish
Thai Lime Dressing
-
2 tablespoons fresh lime juice
-
1 tablespoon soy sauce or fish sauce
-
1 tablespoon honey or maple syrup
-
1 teaspoon sesame oil
-
1 garlic clove, minced
-
1 small red chili, finely chopped (optional)
-
1 tablespoon chopped fresh herbs (cilantro, mint, or both)
Instructions
-
Make the dressing
Whisk (or shake in a jar) lime juice, soy/fish sauce, honey, sesame oil, garlic, chili, and herbs until well combined. Taste and adjust as needed. -
Prepare the salad base
In a large bowl, add greens, shredded chicken, tomatoes, cucumber, and red onion. -
Toss
Pour most of the dressing over the salad and gently toss until evenly coated. -
Finish & serve
Top with roasted cashews and fresh herbs. Add extra dressing if desired and serve immediately.
Notes
-
Best texture: Add cashews just before serving so they stay crunchy.
-
Milder onion: Soak sliced red onion in cold water for 5–10 minutes, then drain.
-
Extra protein: Grilled shrimp, steak strips, or crispy tofu work beautifully.
-
Meal prep: Store salad components and dressing separately for up to 3 days.
-
More heat: Add chili oil, sriracha, or extra fresh chili to the dressing.
Nutritional Information (A General Guide)
Please note: The following is an approximate estimate per serving (recipe serves 3), calculated using rotisserie chicken (white meat), soy sauce, and honey. Values can vary based on specific ingredients and portion sizes.
- Calories: ~350
- Protein: 28g (Excellent for keeping you full and satisfied!)
- Carbohydrates: 14g
- Dietary Fiber: 3g
- Sugars: 8g (Mostly from natural sources like honey and tomatoes)
- Total Fat: 22g (Primarily healthy fats from cashews and sesame oil)
- Saturated Fat: 4g
This salad is a fantastic source of lean protein, healthy fats, and vitamins from all those fresh vegetables. It’s a balanced, energizing meal that won’t weigh you down.
Final Thoughts from My Kitchen to Yours
And there you have it, friends—my absolute favorite way to turn a simple salad into a moment of pure joy. This Thai Chicken Salad is more than just a recipe; it’s a reminder that healthy, feel-good food can be bursting with flavor and fun to make. It’s about embracing those bright, bold tastes and textures that make every bite an adventure.
I hope this recipe finds its way into your regular rotation, becoming your own quick fix for a delicious, no-fuss dinner or a show-stopping lunch. Give one of the fun variations a try, make it your own, and most importantly, enjoy the process. Thanks so much for letting me share this kitchen favorite with you. Now go grab that fork and dig into something spectacular!
With flavor and gratitude,
Beau
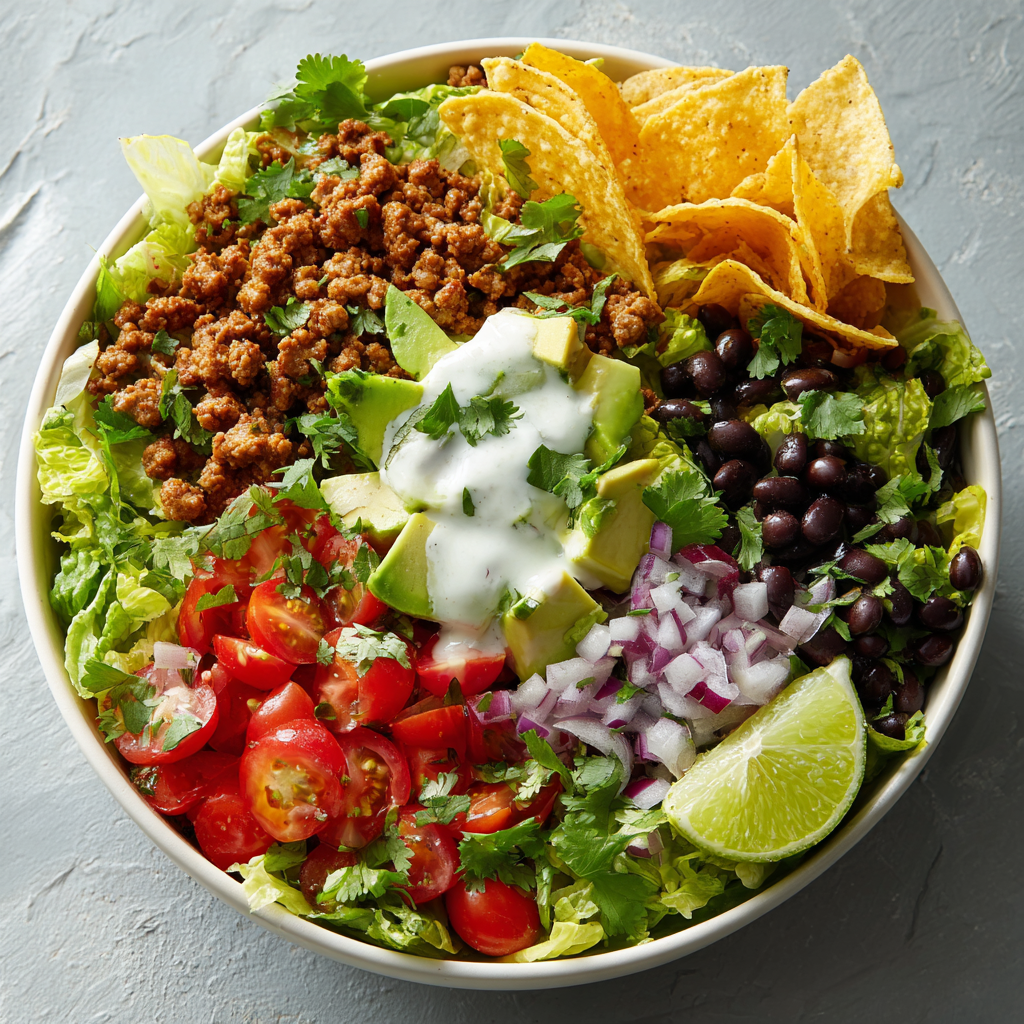
Turkey Taco Salad Recipe : Fresh, Flavorful, and Perfectly Satisfying
Healthy Turkey Taco Salad: Your New Favorite 20-Minute Meal
Hey friends, Beau here from Feastical! Let’s talk about that beautiful moment when a craving for big, bold flavor crashes headfirst into the desire for something actually good for you. For a long time, I thought those two things lived on opposite sides of the kitchen. Taco Tuesday meant indulgence, and “healthy” meant… well, often something a lot less exciting.
Then, this Turkey Taco Salad waltzed into my life and changed the game. We’re talking seasoned lean ground turkey, hearty black beans, and a confetti of the crispiest, freshest veggies, all wrapped up in a creamy, zesty cilantro-lime dressing that you’ll want to put on everything. It’s got all the soul-satisfying, fiesta-in-your-mouth vibes of your favorite tacos, but it comes together in a single bowl (or skillet!) in about 20 minutes flat.
This isn’t just a “salad.” This is a meal. It’s protein-packed, fiber-filled, and vibrantly delicious. It’s perfect for a fast weeknight dinner, a seriously impressive lunch, or even meal prep that you’ll actually look forward to. So, grab your favorite big bowl and let’s build something incredibly tasty, together.
Taco Night, Reinvented
This recipe was born out of pure, hilarious necessity. Picture this: It’s a sweltering summer weeknight, my tiny apartment kitchen feels like a sauna, and my friends are due to arrive for our standing “Taco Tuesday” hang in 45 minutes. The problem? I’d completely forgotten to buy tortillas. A chef’s nightmare, right?
Panic set in for about 30 seconds. Then, I looked at the spread on my counter: the sizzling turkey, the bright tomatoes, the cool avocado, and a giant bowl of romaine I was planning to use for side salads. Lightbulb moment. What if we just tossed it all together? I whisked up a quick dressing with the yogurt, lime, and cilantro I had, and the Turkey Taco Salad was officially invited to the party.
The result? Not a single person missed the tortillas. We passed around the big serving bowl, everyone built their own mountain of goodness, and there was nothing left but happy smiles and empty plates. It was a reminder that the best recipes often come from a little chaos, a lot of flavor, and the simple goal of feeding people you love.
Gathering Your Flavor Crew
Here’s everything you need to create this flavor fiesta. Don’t stress if you’re missing an item or two—I’ve got swaps and ideas for you right here.
For the Salad & Turkey:
- 1 lb lean ground turkey: I love the 93/7 blend here. It’s lean but still juicy, and it soaks up all those amazing spices. Chef’s Tip: Ground chicken or even extra-lean beef works great too!
- 1 tablespoon olive oil: Just enough to get our turkey browning nicely without sticking.
- The Spice Brigade (1 tsp chili powder, ½ tsp cumin, ½ tsp garlic powder, ¼ tsp paprika): This is your flavor foundation. No need for a packet! This blend gives you smoky, warm, savory depth. Feeling bold? Add a pinch of cayenne.
- Salt and pepper to taste: Always season as you go. Taste your turkey after it’s cooked and adjust!
- 1 (15 oz) can black beans, drained and rinsed: For plant-based protein and creamy, hearty texture. Rinsing removes excess sodium and that starchy can liquid.
- 4 cups chopped romaine lettuce: The crunchy, hydrating base. Kale or chopped butter lettuce are fantastic, sturdy subs.
- 1 cup cherry tomatoes, halved: Little bursts of sweet acidity. Use whatever tomatoes look best at the market.
- ¼ red onion, thinly sliced: For a sharp, crunchy bite. Soaking the slices in ice water for 5 minutes tames their intensity if you prefer.
- 1 avocado, sliced: Our creamy, healthy-fat hero. Add it right before serving to keep it pretty and green.
- Fresh cilantro & lime wedges: The finishing flourishes! They add a huge pop of fresh aroma and brightness.
For the Cilantro Lime Dressing:
- ½ cup plain Greek yogurt: The creamy, tangy, protein-packed base of our dressing. Sour cream is a direct 1:1 swap if that’s your preference.
- ½ cup fresh cilantro (stems are okay!): Don’t you dare toss those flavorful stems! They blend up beautifully. Not a cilantro fan? Try fresh parsley or even a mix of basil and mint.
- Juice of 1 lime: Fresh is key here for that vibrant zing. Start with one, you can always add more.
- 1 clove garlic: For a little savory backbone. If you’re sensitive to raw garlic, use ¼ tsp garlic powder instead.
- 1–2 tablespoons olive oil: This helps emulsify and smooth out the dressing.
- Salt & a splash of water: Salt to wake up all the flavors, and water just to thin it to a perfect drizzling consistency.
Let’s Build Your Masterpiece (Step-by-Step!)
This comes together so fast, it’s almost magic. I recommend getting all your veggies chopped first—it makes the process feel like a fun, professional cooking show.
Step 1: Spice & Sizzle the Turkey. Heat that olive oil in a large skillet over medium heat. Crumble in your ground turkey. Let it get a nice sear on one side before you start breaking it up—this builds flavor! Once it’s mostly browned, sprinkle over all your spices (chili powder, cumin, garlic powder, paprika, salt, and pepper). Stir like crazy, letting those spices toast and coat every morsel for about a minute. You’ll smell the magic happening. Chef’s Hack: If things look dry, add a tablespoon of water or broth to help the spices form a nice coating on the meat.
Step 2: Welcome the Beans. Toss in your drained and rinsed black beans. Stir them into the spiced turkey and let everything hang out and get friendly for 2-3 minutes, just until the beans are heated through. Take the skillet off the heat and let it cool slightly while you make the dressing. This prevents your crisp lettuce from wilting when you assemble.
Step 3: Whiz Up the Dressing. In your blender or small food processor, combine the Greek yogurt, cilantro, lime juice, garlic, olive oil, and a big pinch of salt. Blitz it until it’s smooth and gorgeously green. Check the consistency—if it’s too thick for drizzling, add a splash of water, one teaspoon at a time, until it’s perfect. Taste it! Need more lime? More salt? This is your moment to make it yours.
Step 4: The Grand Assembly. You can do this family-style on one big platter or build individual bowls. I’m a big platter person—it looks so abundant and inviting. Lay down your crisp romaine as the foundation. Artfully (or just enthusiastically!) scatter over the cherry tomatoes and red onion. Spoon the warm turkey and bean mixture right over the top. Nestle those creamy avocado slices in there. Now, the pièce de résistance: drizzle that vibrant green dressing over everything.
Step 5: Finish & Serve. A final shower of fresh cilantro leaves and a few lime wedges on the side for an extra squeeze, and you are DONE. Serve it immediately for the best mix of warm turkey, cool veggies, and creamy dressing.
How to Serve It Up Like a Pro
This salad is a beauty, so let it shine! I love using a wide, shallow bowl or a big wooden board for serving. The key is layering. Start with the lettuce, then the colder veggies, then the warm turkey mixture. This keeps the lettuce from getting soggy. Place the avocado on top where it can be seen, and always add the dressing last.
For a fun interactive meal, set up a “taco salad bar” with all the components in separate bowls. Include extra toppings like shredded cheese, crushed tortilla chips for crunch, sliced jalapeños, or a scoop of corn salsa. Let everyone build their own perfect bowl. It’s a guaranteed crowd-pleaser!
Pair it with a light, crisp beer, a citrusy margarita (skinny or regular!), or just a big glass of ice water with extra lime. It’s that versatile.
Make It Your Own: 5 Delicious Twists
Once you’ve got the basic blueprint down, the sky’s the limit. Here are a few of my favorite riffs on this recipe:
- The “Fiesta Bowl”: Serve it over a base of cilantro-lime rice or quinoa instead of lettuce for a heartier, scoopable bowl.
- Vegetarian Powerhouse: Skip the turkey entirely! Use two cans of black beans, or swap in a bag of plant-based ground “meat.” Add roasted sweet potato cubes for extra substance.
- Cheesy & Crunchy: Add a handful of shredded sharp cheddar or crumbled cotija cheese right before serving. A generous handful of crushed tortilla chips or strips adds the perfect textural contrast.
- Different Protein, Same Vibes: Leftover shredded chicken or rotisserie chicken works amazingly. Just warm it with the spices. For a seafood twist, try sautéed shrimp seasoned with the same spice mix.
- Creamy Avocado Dressing: Blend the avocado into the dressing! Add half the avocado to the blender with the other dressing ingredients for an ultra-creamy, dreamy green sauce.
Beau’s Kitchen Notes
This recipe has become a true workhorse in my kitchen. I’ve made it for post-gym lunches, last-minute dinners, and even packed it for picnics (I keep the dressing in a separate jar). The biggest evolution? The dressing. It started as a simple lime vinaigrette, but the Greek yogurt version stole the show with its creamy tang and protein boost.
A funny tidbit: I once accidentally used frozen ground turkey without fully thawing it. I ended up breaking it apart in the pan as it thawed and cooked, and you know what? It worked just fine in a pinch! Not my recommended method, but a good reminder that cooking is forgiving. The goal is to get a delicious meal on the table, not perfection.
FAQs & Quick Fixes
Q: Can I make this ahead for meal prep?
A: Absolutely! This is a meal prep superstar. Store the cooked (and cooled) turkey-bean mixture, chopped veggies, and dressing in separate containers in the fridge for up to 4 days. Assemble your bowl just before eating to keep everything crisp.
Q: My dressing is too thick/tangy/garlicky. Help!
A: No problem! Too thick? Add water, a teaspoon at a time. Too tangy? Balance it with a tiny drizzle of honey or maple syrup. Too garlicky? It will mellow slightly overnight, but for next time, use half a clove or garlic powder.
Q: The lettuce gets wilted and sad by the next day. What gives?
A: This is the #1 salad mistake! The enemy is moisture + time. The key is separation. Never store a fully dressed salad. Keep components apart, dress only what you’ll eat immediately, and you’ll have crisp leftovers.
Q: Can I use frozen corn or other veggies?
A: You bet! A cup of frozen corn (thawed or sautéed quickly in the turkey pan) is a fantastic addition. Diced bell peppers are great too—you can even sauté them with the turkey.

Turkey Taco Salad Recipe : Fresh, Flavorful, and Perfectly Satisfying
Description
This Healthy Turkey Taco Salad gives you everything you love about tacos—savory spices, creamy avocado, fresh crunch—without the heaviness. Lean ground turkey, black beans, and crisp veggies come together with a creamy cilantro-lime dressing for a fast, satisfying meal that’s great for busy weeknights or make-ahead lunches.
Ingredients
Turkey & Salad
-
1 lb lean ground turkey (93/7 recommended)
-
1 tablespoon olive oil
-
1 teaspoon chili powder
-
½ teaspoon ground cumin
-
½ teaspoon garlic powder
-
¼ teaspoon paprika
-
Salt and black pepper, to taste
-
1 (15 oz) can black beans, drained and rinsed
-
4 cups romaine lettuce, chopped
-
1 cup cherry tomatoes, halved
-
¼ red onion, thinly sliced
-
1 avocado, sliced
-
Fresh cilantro and lime wedges, for serving
Cilantro-Lime Dressing
-
½ cup plain Greek yogurt
-
½ cup fresh cilantro (leaves and tender stems)
-
Juice of 1 lime
-
1 clove garlic
-
1–2 tablespoons olive oil
-
Salt, to taste
-
1–3 tablespoons water (to thin)
Instructions
-
Cook the turkey
Heat olive oil in a skillet over medium heat. Add ground turkey and cook until browned, breaking it up as it cooks. -
Season
Stir in chili powder, cumin, garlic powder, paprika, salt, and pepper. Cook for 1–2 minutes until fragrant. -
Add beans
Mix in black beans and cook until heated through. Remove from heat and let cool slightly. -
Make the dressing
Blend Greek yogurt, cilantro, lime juice, garlic, olive oil, and salt until smooth. Add water as needed for a drizzleable consistency. -
Assemble
Divide romaine into bowls. Top with tomatoes, red onion, turkey-bean mixture, and avocado. -
Finish
Drizzle with dressing, garnish with cilantro, and serve with lime wedges.
Notes
-
Meal prep smart: Store turkey, veggies, and dressing separately for up to 4 days. Assemble just before eating.
-
Milder onion flavor: Soak sliced red onion in cold water for 5 minutes, then drain.
-
Extra crunch: Add crushed tortilla chips or toasted pepitas right before serving.
-
Protein swaps: Ground chicken, shredded rotisserie chicken, or seasoned shrimp work well.
-
Dairy-free option: Use a dairy-free yogurt or avocado-based dressing.
Nutritional Breakdown (A Approximate Per Serving)
This info is for one generous serving (about ¼ of the recipe), using lean ground turkey and the Greek yogurt dressing. Remember, this is fuel for your body that tastes incredible!
- Calories: ~350
- Protein: 25g (Helps keep you full and satisfied!)
- Carbohydrates: 20g
- Fiber: 8g (That’s a great boost for your daily goals!)
- Fat: 18g (Mostly the good, healthy fats from avocado and olive oil.)
As always, these are estimates. Your exact numbers will depend on the specific brands and amounts you use. The takeaway? This is a balanced, nutrient-dense meal that delivers on flavor and fuel.
Final Thoughts
So there you have it, friends—my go-to recipe for when I want a meal that feels indulgent but fuels me right. This Turkey Taco Salad is proof that healthy eating doesn’t have to be boring or restrictive. It’s vibrant, it’s packed with texture and flavor, and it comes together in the time it would take to wait for delivery.
I hope this recipe finds its way into your regular rotation and brings as much joy to your table as it has to mine. Remember, cooking is about playing, tasting, and sharing. Don’t be afraid to tweak it and make it your own. And when you do make it, I’d love to hear about it! Tag me over on Feastical or on social media.
Now, go forth and build the most epic taco salad bowl you can imagine. Happy cooking!
– Beau
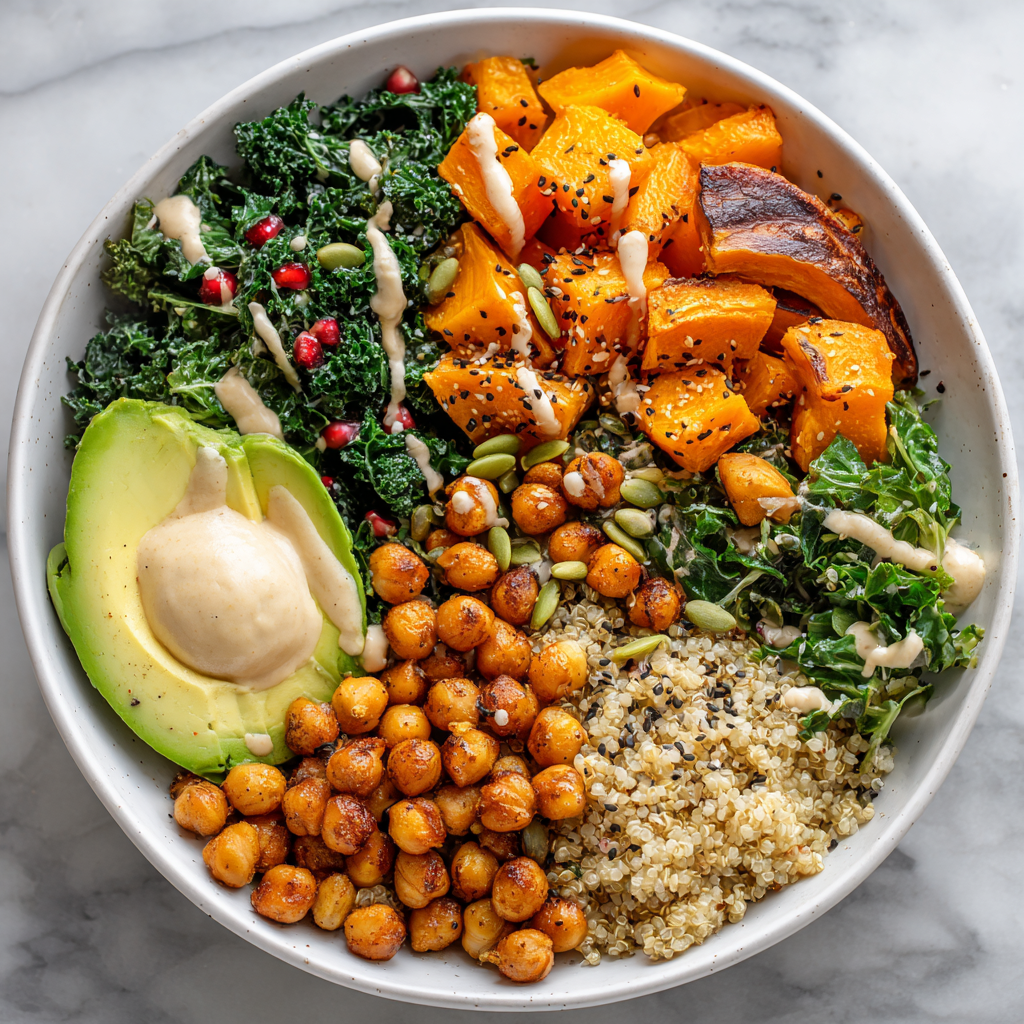
Butternut Squash Buddha Bowl: Cozy, Colorful, and Naturally Nourishing
Butternut Squash Buddha Bowl: Your Ticket to Cozy, Colorful, & Naturally Nourishing Vibes
Hey there, friend! Beau here, welcoming you back to my cozy corner of the internet at Feastical. You know what I’m absolutely loving right now? That magical moment when dinner isn’t just a meal, but a giant, edible hug. It’s the kind of food that makes you feel vibrant from the inside out, looks like a piece of art on your table, and somehow manages to be wildly satisfying without weighing you down. Enter the star of today’s show: the Butternut Squash Buddha Bowl.
Now, if you’re picturing a bland pile of rabbit food, let me stop you right there. This bowl is anything but. We’re talking about sweet, cinnamon-kissed roasted squash, creamy avocado, protein-packed chickpeas, and fluffy quinoa, all coming together in a symphony of textures and flavors. It’s a warm, hearty, and completely plant-powered feast that proves nourishing yourself can be the most delicious part of your day. Whether you’re a veggie veteran or just looking to add more color to your plate, this bowl is your new best friend. So, tie on your favorite apron, and let’s build something beautiful together!
The Bowl That Saved My Weeknight Sanity
I have to confess, my love affair with Buddha bowls didn’t start in some fancy restaurant. It began in my own kitchen, during one of those chaotic weeks where my schedule was packed, my energy was low, and my creativity was running on empty. I was staring into the abyss of my fridge, willing something delicious to materialize, when I spotted a lone butternut squash rolling around in the crisper drawer.
I cubed it up, tossed it with the first things I grabbed—olive oil, a daring dash of cinnamon, salt, and pepper—and threw it in the oven. While it roasted, filling my kitchen with that incredible caramelized scent, I scrambled. I cooked some quinoa, rinsed a can of chickpeas, and sliced an avocado that was perfectly ripe (a true kitchen miracle!). I piled it all into a big, wide bowl, drizzled it with tahini, and took a bite. And just like that, the chaos of the week melted away. This simple, throw-together meal was exactly what I needed: grounding, gorgeous, and deeply satisfying. It became my go-to “reset button” meal, and I’ve been perfecting it ever since. It’s a reminder that the best food often comes from a place of simplicity and a little bit of kitchen intuition.
Your Buddha Bowl Blueprint: Ingredients & Insights
Here’s everything you’ll need to create this masterpiece. Think of this list as your palette—each ingredient adds a unique color, texture, and flavor to the final bowl. I’ve included my favorite chef notes and swaps so you can make it your own!
-
- 2 cups butternut squash, peeled and cubed: The sweet, nutty heart of the bowl. Chef’s Insight: Look for a squash that feels heavy for its size with a firm, matte skin. No time to wrestle with a whole squash? Pre-cubed from the grocery store is a total weeknight win!
- 1 tablespoon olive oil: For roasting our squash to caramelized perfection. Substitution Tip: Avocado oil or melted coconut oil work beautifully here too.
- ½ teaspoon cinnamon: My not-so-secret weapon! It amplifies the squash’s natural sweetness in the most magical way. Chef’s Insight: Don’t skip this! It’s the flavor twist that makes people go, “Wow, what’s in this?”
- Salt and pepper to taste: The essential flavor enhancers. Season every layer!
- 1 cup cooked quinoa or brown rice: The hearty, wholesome base. Chef’s Insight: I’m a quinoa guy for the extra protein, but brown rice brings a wonderful chewy, comforting texture. Cook it in veggie broth instead of water for a major flavor boost.
- 1 cup canned chickpeas, drained and rinsed: Our plant-powered protein for staying power. Chef’s Hack: Pat them super dry with a towel, then toss them on the baking sheet with the squash for the last 15 minutes to get them a little crispy! So good.
- 1 cup kale or spinach: A pop of green and nutrients. Chef’s Insight: If using kale, give it a quick 30-second massage with a tiny drop of oil and a pinch of salt. It transforms it from tough to tender and sweet.
- 1 small avocado, sliced: For that dreamy, creamy factor and healthy fats.
1 tablespoon tahini or hummus (for drizzle): The “sauce” that brings it all together. Substitution Tip: Tahini is my go-to for its rich, slightly bitter edge, but hummus thinned with a little lemon juice or water makes a fantastic, creamy drizzle too.
- Optional Toppings (The Fun Part!): Pumpkin seeds for crunch, pomegranate seeds for a juicy burst, microgreens for a fancy finish, or even a sprinkle of feta or goat cheese if you’re feeling it.
Let’s Build Your Bowl: A Step-by-Step Journey
Ready to cook? Follow these steps, and you’ll have a restaurant-worthy bowl in no time. I’ve sprinkled in my favorite kitchen hacks to make everything flow smoothly.
- Preheat and Prep (The Warm-Up): Fire up your oven to 400°F (200°C). This high heat is key for getting those gorgeous caramelized edges on your squash. While it heats, peel and cube your butternut squash. Pro-Tip: Line your baking sheet with parchment paper. It makes cleanup an absolute breeze and prevents any sticking.
- Season and Roast (The Main Event): In a bowl, toss your squash cubes with the olive oil, cinnamon, salt, and pepper. Get your hands in there and make sure every single cube is lovingly coated. Spread them out in a single layer on your baking sheet—crowding is the enemy of crispness! Roast for 25-30 minutes, giving them a stir halfway through. You’ll know they’re done when you can easily pierce a cube with a fork and the edges are tinged with golden-brown deliciousness.
- Multi-Task Like a Pro (The Symphony): While the squash works its magic, let’s tackle everything else. Cook your quinoa or rice if you haven’t already. Warm your chickpeas in a small pan over medium heat with a pinch of salt and maybe a sprinkle of paprika if you’re feeling fancy. Prep your greens—sauté your spinach or give that kale a good massage.
- The Art of Assembly (The Grand Finale): Here’s where the fun really begins. Grab your widest, prettiest bowls. Start with a fluffy bed of your grain. Then, artistically arrange your greens, the warm roasted squash, the chickpeas, and those lovely avocado slices. There’s no wrong way to do this—make it colorful and inviting!
- Drizzle and Devour (The Finishing Touch): Finish your creation with a generous drizzle of tahini or your thinned hummus sauce. Scatter over your chosen toppings (I’m a pumpkin seed guy myself). And just like that, you’ve created a nourishing masterpiece. Serve immediately while everything is warm and vibrant.
How to Serve Your Cozy Creation
Presentation is half the joy of a Buddha bowl! I love serving these in wide, shallow bowls so all the gorgeous colors and textures are on display. For a true “feast for the senses” moment, bring the whole spread to the table family-style. Set out the big bowl of roasted squash, the pot of quinoa, and all the toppings in little dishes. Let everyone build their own perfect bowl—it’s interactive, fun, and guarantees happy eaters. This dish is fantastic warm, but it’s also great at room temperature, making it a brilliant packed lunch for the next day. Just pack the avocado and sauce separately and add them right before you eat to keep things fresh.
Make It Your Own: 5 Flavorful Twists
The beautiful thing about this bowl is its versatility. Play with these variations and make it a weekly staple that never gets old!
- The “Harvest Harvest” Twist: Swap the butternut squash for cubed sweet potato or a mix of both. Add roasted Brussels sprout halves and a sprinkle of dried cranberries.
- The Protein Power-Up: For an extra protein kick, add a soft-boiled egg, a handful of baked tofu cubes, or even some seasoned ground turkey or chicken.
- The Zesty Mexican Fiesta: Season the squash and chickpeas with cumin and chili powder instead of cinnamon. Use cilantro-lime rice as your base, top with a salsa verde drizzle, and add a squeeze of lime.
- The Creamy Dream: Blend the tahini with lemon juice, a clove of garlic, and a little water for a more traditional, zippy tahini sauce. Or, go for a creamy cilantro-lime dressing.
- The Deconstructed Falafel Bowl: Crumble a few store-bought or homemade falafel balls over the top. Use a hummus base, add lots of diced cucumber and tomato, and finish with a generous dollop of tzatziki.
Beau’s Kitchen Notes & Stories
This recipe has been a living, evolving thing in my kitchen. I first made it exactly as written above, but then one day I was out of tahini. In a panic, I thinned out some roasted red pepper hummus with a splash of water, and a new favorite was born! My partner is obsessed with adding a drizzle of hot honey over the top for a sweet-heat combo that’s just incredible.
The biggest lesson this bowl taught me? Embrace the “clean-out-the-fridge” spirit. See a lonely bell pepper? Roast it. Half a red onion? Thinly slice and quick-pickle it. A handful of nuts? Toast ’em and sprinkle ’em. This template is your playground. The goal is a bowl full of things you love that make you feel amazing. Don’t overthink it—just build, taste, and enjoy.
Your Questions, Answered (Let’s Troubleshoot!)
- Q: My squash came out soggy, not caramelized. What happened?
A: The two most common culprits are overcrowding the pan (they steam instead of roast) and not having your oven fully preheated. Give those cubes space and make sure your oven is piping hot before they go in. Patting the cubes dry before oiling can also help! - Q: Can I meal prep this bowl?
A: Absolutely! It’s a meal prep superstar. Roast the squash, cook the grain, and store them separately in the fridge for up to 4 days. Keep the avocado, fresh greens, and sauce separate until you’re ready to assemble and eat to keep everything fresh. - Q: My bowl tastes a bit bland. How can I amp up the flavor?
A: Season every single component! Don’t just salt the squash—salt your quinoa as it cooks, season your chickpeas as you warm them. The magic is in the layers. Also, a big squeeze of fresh lemon juice over the finished bowl can brighten everything up instantly. - Q: What’s a good tahini substitute if I don’t like the flavor?
A> No problem! A simple lemon-garlic yogurt sauce (Greek yogurt, lemon, garlic, salt), a store-bought green goddess dressing, or even just a really good, high-quality extra virgin olive oil drizzled over the top would be delicious.
Butternut Squash Buddha Bowl: Cozy, Colorful, and Naturally Nourishing
Description
This Butternut Squash Buddha Bowl is warm, comforting, and full of vibrant plant-based goodness. Sweet roasted squash, fluffy quinoa, creamy avocado, and protein-rich chickpeas come together in one balanced, satisfying bowl. It’s easy to make, perfect for meal prep, and customizable with your favorite toppings or sauces.
Ingredients
-
2 cups butternut squash, peeled and cubed
-
1 tablespoon olive oil
-
½ teaspoon ground cinnamon
-
Salt and black pepper, to taste
-
1 cup cooked quinoa or brown rice
-
1 cup canned chickpeas, drained and rinsed
-
1 cup kale or spinach
-
1 small avocado, sliced
-
1 tablespoon tahini or hummus (for drizzling)
Optional Toppings
Pumpkin seeds, pomegranate seeds, microgreens, feta or goat cheese
Instructions
-
Roast the squash
Preheat oven to 400°F (200°C). Toss squash with olive oil, cinnamon, salt, and pepper. Spread on a baking sheet and roast for 25–30 minutes, stirring halfway, until tender and caramelized. -
Prepare the base
While squash roasts, cook quinoa or rice if not already prepared. -
Warm the chickpeas & greens
Lightly warm chickpeas in a pan with a pinch of salt. Sauté spinach briefly or massage kale with a little olive oil and salt. -
Assemble the bowls
Divide quinoa between bowls. Top with roasted squash, chickpeas, greens, and avocado. -
Finish & serve
Drizzle with tahini or hummus and add desired toppings. Serve warm.
Notes
-
For crispier squash: Don’t overcrowd the pan and make sure the oven is fully preheated.
-
Meal prep friendly: Store grains, squash, and chickpeas separately for up to 4 days. Add avocado and sauce just before eating.
-
Extra flavor: Add lemon zest, smoked paprika, or cumin to the squash.
-
Protein boost: Add tofu, a soft-boiled egg, or grilled chicken if desired.
-
Sauce upgrade: Thin tahini with lemon juice, garlic, and water for a classic drizzle.
Nourishment on Your Terms (A Quick Nutritional Glance)
While I’m all about flavor first, I also love knowing that what I’m eating is fueling my body well. This bowl is a fantastic balance of macronutrients. The complex carbs from the squash and quinoa give you sustained energy, the chickpeas and quinoa provide plant-based protein to keep you full, and the healthy fats from the avocado and olive oil help absorb all the wonderful fat-soluble vitamins from the veggies. It’s packed with fiber, vitamins A and C (thank you, squash!), and iron. Remember, these are estimates and can vary based on your specific ingredients and portion sizes. Most importantly, listen to your body and build a bowl that makes you feel fantastic!
Estimated Per Serving (Based on 2 servings): Calories: ~380 | Protein: 11g | Carbohydrates: 42g | Fat: 18g | Fiber: 12g
Final Thoughts: Your Bowl Awaits
And there you have it, friends—my ultimate guide to building a Butternut Squash Buddha Bowl that’s as cozy as it is colorful. This isn’t just a recipe; it’s a celebration of simple, wholesome ingredients coming together to create something truly greater than the sum of its parts. It’s proof that eating well can be an act of joy, creativity, and deep satisfaction.
I hope you give this a try and make it your own. Tag me over on @Feastical if you do—I love seeing your kitchen creations! Now, go forth, roast some squash, and build a bowl that feels like a warm hug. Until next time, keep your spatula close and your curiosity in the kitchen even closer.
Greek Chickpea Salad Recipe : Quick, Fresh, and Healthy Mediterranean Delight
Greek Chickpea Salad Recipe – Healthy, Quick, and Packed with Flavor
Hey there, friend! Beau here from Feastical. Ever have one of those days where you’re staring into the fridge, dreaming of something that’s both ridiculously good for you and tastes like a sun-drenched vacation? You want vibrancy. You want crunch. You want flavor that pops. But you also have approximately 20 minutes before your next meeting or your stomach starts staging a full-on rebellion.
I hear you. That’s exactly why this Greek Chickpea Salad has become my go-to, my culinary superhero, my answer to the “what’s for lunch?” blues. It’s not just a salad; it’s a bright, refreshing, and incredibly satisfying Mediterranean party in a bowl. We’re talking plump chickpeas, juicy tomatoes, crisp cucumber, briny olives, and tangy feta, all dancing together in a simple, zesty lemon-oregano dressing.
This recipe is for the busy bee, the meal-prep champion, the “I-want-to-eat-better-but-don’t-want-to-sacrifice-flavor” foodie. It’s nourishing, colorful, and so simple to make that you’ll wonder why you ever settled for a sad desk lunch. So, grab your favorite chopping board and a big, welcoming bowl. We’re about to make something magical that’s as easy on the eyes as it is on your schedule.
Why This Salad Feels Like a Sunny Afternoon to Me
This recipe always takes me back to my first real taste of a Greek summer. I was fresh out of culinary school, backpacking with friends, and we found ourselves at a tiny, family-run taverna on a cliffside in Santorini. The air smelled like salt and oregano. We ordered a feast of small plates, but the star of the show was a massive, rustic bowl of horiatiki, the classic Greek village salad.
What stuck with me wasn’t just the stunning view (though, wow), but the stunning simplicity. The tomatoes tasted like candy, the cucumbers were impossibly crisp, the feta was creamy and sharp, and the olive oil was pure gold. There were no fancy techniques, just incredible ingredients treated with respect. I came home dreaming of those flavors but wanted to create something with a bit more heft, something that could be a full meal. Adding protein-packed chickpeas was my “aha!” moment. It transformed that beautiful memory into a sturdy, everyday delight I could enjoy in my own kitchen, no passport required. Every time I make this, I get a little taste of that sunny, carefree afternoon.
Your Shopping List for Sunshine in a Bowl
Here’s everything you’ll need. The beauty of this salad is in its flexibility, so I’ve packed each item with my favorite chef insights and swap ideas.
- 1 can (15 oz) chickpeas, drained and rinsed: Our hearty, plant-based protein base. Chef’s Tip: Give them a good rinse in a colander to remove the starchy canning liquid – it makes a world of difference in flavor and texture. For extra credit, pat them dry with a clean kitchen towel to help the dressing cling better. No chickpeas? White beans or even lentils work beautifully.
- 1 cup cherry tomatoes, halved: Little bursts of juicy sweetness. I love the color pop of a mix of red and yellow ones. If it’s peak summer, use the most gorgeous heirloom tomatoes you can find and chop them into chunks.
- 1 cucumber, diced: For that essential fresh crunch. I prefer English or Persian cucumbers for their thin, less-bitter skin and minimal seeds. If using a standard cuke, you might want to peel it and scoop out the seedy center.
- 1/4 red onion, thinly sliced: A sharp, peppery kick. Secret Hack: If raw onion is too intense for you, soak the slices in a small bowl of ice water for 10 minutes. It tames the bite perfectly!
- 1/2 cup Kalamata olives, pitted and halved: The salty, briny soul of the Mediterranean. Don’t skip these! They add incredible depth. If you only have black olives, use them, but Kalamatas are worth seeking out.
- 1/2 cup crumbled feta cheese: Creamy, tangy, and utterly irresistible. For the best flavor, buy a block of feta in brine and crumble it yourself. Pre-crumbled feta often has anti-caking agents that can make it drier.
- 2 tablespoons fresh parsley, chopped: A final herby lift. Flat-leaf (Italian) parsley has a more robust flavor than curly, but use what you have! Dill or mint are also fantastic additions here.
For the Zesty Lemon-Oregano Dressing:
- 3 tablespoons extra virgin olive oil: Use the good stuff here! It’s the backbone of the dressing.
- 1 tablespoon red wine vinegar: Adds a sharp, clean acidity. White wine vinegar or even a splash of balsamic (for a sweeter note) can sub in.
- Juice of 1 lemon: Freshly squeezed, always. This brings the sunshine. About 2-3 tablespoons.
- 1 teaspoon dried oregano: The quintessential Greek herb. Rubbing it between your palms before adding it to the dressing wakes up its oils and intensifies the aroma.
- Salt and black pepper to taste: Season with abandon, but remember the feta and olives are already salty, so taste as you go!
Let’s Build Your Masterpiece: Step-by-Step
Ready? This is the fun, no-stress part. We’re chopping, whisking, and tossing our way to happiness.
- Prep Your Stars: Drain and rinse your chickpeas thoroughly in a colander. Let them shake off the excess water while you chop. Halve the cherry tomatoes, dice the cucumber, thinly slice the red onion (remember the ice water bath trick if you’re sensitive!), and halve the olives. Chop your parsley. Add everything (except the feta!) to a large, beautiful mixing bowl. This is your canvas.
- Wake Up the Dressing: In a small bowl or a mason jar (my favorite – just screw on the lid and shake!), combine the olive oil, red wine vinegar, fresh lemon juice, and the dried oregano. Give it a good whisk or vigorous shake until it looks creamy and emulsified. Now, taste it! This is your moment. Does it need more zing? Add a squeeze of lemon. More herbiness? A pinch more oregano. Season with salt and pepper. The dressing should make you go “Mmm!” all on its own.
- The Grand Toss: Pour that glorious dressing right over your waiting vegetables and chickpeas. Using a large spoon or (clean!) hands, gently toss everything together. You want every nook and cranny of every chickpea to get a little love from the dressing. See how the colors start to glisten? That’s the magic happening.
- The Feta Finale: Here’s my pro move: hold the feta! Crumble it generously over the top of the tossed salad, but don’t mix it in just yet. This keeps those lovely crumbles distinct and creamy instead of getting smashed and dissolving into the dressing. It looks prettier this way, too.
- Let the Magic Happen: Walk away. Seriously, this is the hardest but most important step for flavor development. Let the salad sit at room temperature for 10-15 minutes. In that time, the acidic dressing will gently marinate the vegetables, the flavors will mingle and get to know each other, and everything will become even more delicious. If you’re prepping ahead, cover and refrigerate, but let it come close to room temp before serving for the best taste.
How to Serve Your Greek Chickpea Salad Like a Pro
Now for the best part: eating! This salad is incredibly versatile.
For a light, stand-alone lunch, pile it high into a deep bowl with a slice of crusty, warm pita bread on the side for scooping. The ultimate utensil!
As a vibrant side dish, it’s the perfect partner for simply grilled chicken, fish, lamb chops, or even some juicy burgers. It cuts through the richness and adds a fresh element to any plate.
My favorite way? Meal Prep Power! This salad keeps wonderfully in the fridge for 3-4 days. I portion it into airtight containers (again, keeping the feta on top if possible) for grab-and-go lunches all week. The flavors actually get better on day two and three.
Want to level up? Serve it over a bed of peppery arugula, stuff it into a pita pocket with a swipe of hummus, or spoon it onto grilled flatbread for a quick and easy Mediterranean-inspired pizza.
Make It Your Own: Delicious Twists & Swaps
Once you’ve mastered the base recipe, play with it! Here are a few of my favorite riffs:
- Protein Powerhouse: Add 1 cup of cooked, shredded chicken, a can of drained tuna, or a handful of grilled shrimp right on top. Instant, balanced main course.
- The Vegan Voyage: Simply omit the feta or swap it for a creamy vegan feta alternative. For extra umami, add a handful of toasted pine nuts or sunflower seeds.
- Herb Garden Explosion: Toss in a big handful of fresh chopped dill and mint along with the parsley. It brightens the entire salad to another level.
- Pepper & Artichoke Twist: Add 1/2 cup of chopped roasted red peppers and 1/2 cup of quartered marinated artichoke hearts. Drain them well, but their marinade adds another lovely layer of flavor.
- “Everything But The Kitchen Sink” Grain Bowl: Fold in 1-2 cups of cooked and cooled quinoa, farro, or couscous. It bulks up the salad, adds a wonderful chewy texture, and makes it even more filling.
A Few More Nuggets From My Kitchen
Over the years, this salad has seen many iterations. I’ve made it for last-minute potlucks (it’s always a hit), packed it for picnics, and even served it as a condiment next to slow-cooked lamb. The one constant? It never fails to make people smile.
A funny story: I once accidentally used a whole lemon’s worth of zest instead of juice in the dressing. It was intensely lemony, but in the best way possible! Now I often add a teaspoon of zest along with the juice for an extra fragrance punch. Don’t be afraid of happy accidents.
The recipe has evolved to be more of a guideline than a rigid rule. Got a bell pepper that needs using? Chop it in. A handful of spinach? Why not! This salad is forgiving and wants you to make it with what you love and have on hand.
Your Questions, Answered
- Can I make this ahead of time? How long does it keep? Absolutely! It’s a meal-prep dream. Store it in an airtight container in the fridge for 3-4 days. The veggies may release a little water, so just give it a stir before serving. I add the feta fresh each day if prepping for the whole week.
- My salad got a bit watery after sitting. What did I do wrong? No mistakes here! Cucumbers and tomatoes naturally release moisture, especially when salted. To prevent a pool at the bottom, you can salt your diced cucumber lightly in a colander, let it sit for 10 minutes, then pat it dry before adding to the bowl. Or, just embrace it – that flavorful liquid is great for dipping bread!
- I’m not a fan of feta. What else can I use? No problem! Creamy goat cheese (chèvre) crumbles are a fantastic substitute. For a dairy-free option, a sprinkle of nutritional yeast or some sliced avocado can provide that creamy, rich element.
- Can I use dried chickpeas instead of canned? For sure! Cook 3/4 cup of dried chickpeas according to package directions until tender (this yields about 1.5 cups cooked). Using dried gives you ultimate control over texture and is often more economical. Just factor in the soaking/cooking time.
Feeling Good About What You’re Eating
While I’m all about flavor first, it feels great to know this dish is nourishing you from the inside out. This isn’t just empty calories; it’s fuel with benefits.
Chickpeas are a stellar source of plant-based protein and fiber, which help keep you full and satisfied. The array of colorful vegetables provides a spectrum of vitamins, antioxidants, and hydration. The heart-healthy monounsaturated fats from the olive oil help your body absorb all those fat-soluble nutrients from the veggies. And while feta is a cheese, it’s typically lower in fat and calories than many others, while still delivering a big calcium punch.
It’s a balanced, wholesome dish that proves healthy eating doesn’t have to be boring or restrictive. It’s a celebration of real, good food.
Print
Greek Chickpea Salad Recipe : Quick, Fresh, and Healthy Mediterranean Delight
Description
This Greek Chickpea Salad is fresh, colorful, and incredibly easy to make. It comes together in about 15 minutes and is perfect for lunch, meal prep, or a light dinner. Made with protein-rich chickpeas, crisp vegetables, feta cheese, and a zesty lemon-oregano dressing, it’s a satisfying Mediterranean-style dish that’s both nourishing and full of bright flavor.
Ingredients
-
1 can (15 oz) chickpeas, drained and rinsed
-
1 cup cherry tomatoes, halved
-
1 cucumber, diced
-
1/4 red onion, thinly sliced
-
1/2 cup Kalamata olives, pitted and halved
-
1/2 cup feta cheese, crumbled
-
2 tablespoons fresh parsley, chopped
Lemon-Oregano Dressing
-
3 tablespoons extra virgin olive oil
-
1 tablespoon red wine vinegar
-
Juice of 1 lemon (about 2–3 tablespoons)
-
1 teaspoon dried oregano
-
Salt and black pepper, to taste
Instructions
-
Prepare the salad:
In a large bowl, add chickpeas, tomatoes, cucumber, red onion, olives, and parsley. -
Make the dressing:
In a small bowl or jar, whisk together olive oil, red wine vinegar, lemon juice, oregano, salt, and pepper. -
Combine:
Pour the dressing over the salad and toss gently until everything is well coated. -
Finish:
Sprinkle feta cheese over the top. Taste and adjust seasoning if needed. -
Rest (optional but recommended):
Let the salad sit for 10–15 minutes before serving to allow flavors to blend.
Notes
-
For milder onion flavor: Soak sliced red onion in cold water for 10 minutes, then drain.
-
Meal prep friendly: Store in an airtight container in the fridge for up to 4 days. Add feta just before serving if possible.
-
Extra flavor boost: Add a pinch of lemon zest or a splash of olive brine.
-
Make it a full meal: Add grilled chicken, shrimp, tuna, or cooked quinoa.
-
Vegan option: Skip the feta or use a plant-based alternative.
Final Thoughts
And there you have it, friend – my beloved, no-fuss, always-delicious Greek Chickpea Salad. It’s more than a recipe; it’s a reminder that the most satisfying food is often the simplest. It’s about fresh ingredients, bold flavors, and the joy of creating something beautiful and nourishing with your own two hands.
I hope this recipe finds its way into your regular rotation, bringing a little bit of Mediterranean sunshine to your busy days. Remember, the kitchen is your playground. Taste as you go, tweak it to your heart’s content, and most importantly, share it with someone you love.
If you make it, I’d be over the moon to hear how it turned out! Tag me @feastical on social or drop a comment on the blog. Now, go forth and enjoy every last crunchy, zesty, creamy bite. Until next time, keep cooking with heart!
– Beau

Matcha Green Tea Latte with Almond Milk : Calm, Creamy & Antioxidant-Rich
Your Daily Cup of Calm: The Ultimate Matcha Almond Milk Latte
Hey there, friend! Beau here, welcoming you back to my cozy corner of the internet at Feastical. Pull up a stool, grab your favorite mug, and let’s talk about one of my absolute favorite rituals that doesn’t involve turning on the oven. I’m a comfort food guy through and through, but sometimes the coziest, most feel-good creations aren’t a towering casserole or a gooey cookie—they’re a warm, soothing drink you cradle in your hands while the world slows down for a minute. That’s where our star today comes in: the Matcha Green Tea Latte with Almond Milk.
Now, I know “ceremonial grade” and “antioxidant-rich” can sound a little… serious. Maybe even intimidating. But trust me, this isn’t about being fancy or following a strict wellness trend. This is about creating a moment of delicious, intentional calm in your day. It’s that five-minute pause between meetings, that quiet companion for a good book, or that gentle nudge of focus you need without the coffee jitters.
This recipe is simplicity itself—just a few gorgeous ingredients dancing together in a cup. We’re talking earthy, vibrant matcha meeting the subtly sweet, creamy embrace of almond milk. It’s a hug in mug form, my friends. And the best part? It comes together faster than you can find that missing spatula in the back of your utensil drawer (we’ve all been there). So, whether you’re a matcha newbie or a seasoned sipper, let’s make something beautiful, healthy, and soul-satisfying together.
My First Sip: A Story of Serendipity & Green Tea
I’ll never forget my first real matcha experience. It wasn’t in a sleek café or a formal tea ceremony. Nope. It was in the cramped, steamy kitchen of my college apartment, during finals week. My roommate Kai, who was from Kyoto, found me buzzing like a hummingbird on my fourth cup of burnt, diner-style coffee. He gave me a look, silently walked over, and started whisking this brilliant green powder in a bowl. The sound was rhythmic, almost meditative.
He handed me the bowl. “Try this,” he said. “It’s focus, but quieter.” I took a sip. The flavor was… different. Grassy, rich, deep, but then it finished clean and smooth. The frantic energy faded, replaced by this incredible, calm alertness. I could actually *think*. We spent the rest of that week studying with our matcha “focus sessions,” and it became our little ritual. That experience taught me that food (and drink!) isn’t just fuel—it’s a feeling. It’s a tool for connection and creating the moment you need. Every time I make this latte, it takes me back to that tiny kitchen, the smell of textbooks, and the gift of a calmer mind. That’s the spirit I want to bring to your kitchen today.
Gathering Your Goodies: A Closer Look at the Ingredients
Great food starts with great ingredients, and this latte is no exception. Here’s everything you’ll need and why each one is a rockstar:
- 1 tsp Matcha Green Tea Powder: This is the heart of the drink! Look for ceremonial grade if you can—it’s made from the youngest tea leaves, has a sweeter, more delicate flavor, and vibrantly green color. Chef’s Insight: Avoid “culinary grade” for drinking straight; it’s better for baking. Your matcha should smell fresh and grassy, not stale or dull.
- 2 tbsp Hot Water (not boiling!): Crucial step! Water just under a boil (about 175°F/80°C) is perfect. Boiling water can scorch the delicate matcha, making it taste bitter. Think of it as gently waking up the tea, not shouting at it.
- 1 cup Unsweetened Almond Milk: Our creamy base. I love almond milk for its light, nutty sweetness that doesn’t overpower the matcha. Substitution Tip: Any plant milk works wonders! Oat milk creates an incredibly creamy, latte-shop texture. Coconut milk adds a tropical twist, and cashew milk is luxuriously smooth.
- 1–2 tsp Maple Syrup or Honey (optional): A touch of natural sweetness to balance matcha’s earthiness. I’m a maple syrup guy—its caramel notes are a dream with green tea. Chef’s Insight: Start with 1 tsp, whisk, taste, then add more. You can always add, but you can’t take away!
- Optional: A dash of vanilla extract or a pinch of cinnamon: The “secret handshake” of flavor. Vanilla adds a warm, bakery-like aroma, while cinnamon gives a subtle spicy kick. Try one, or be bold and skip them to savor matcha’s pure taste.
Let’s Make Magic: Your Step-by-Step Guide
Ready? Let’s transform these simple ingredients into your new favorite ritual. I’ll walk you through every step with my favorite kitchen hacks.
- Sift & Scoop: First, take your matcha powder and sift it through a fine-mesh strainer into your mug or a small bowl. This breaks up any clumps and ensures a silky-smooth latte. No sifter? Just give your matcha tin a good shake and tap it gently before measuring. Chef Hack: I use a dedicated little tea strainer for this—it lives right in my matcha tin!
- The Perfect Whisk: Add your 2 tablespoons of hot water (remember, not boiling!). Now, here’s where the fun begins. If you have a bamboo whisk (chasen), use a gentle “M” or “W” motion to whisk briskly until a lovely froth forms on top and no powder lumps remain. No traditional whisk? No panic! A small wire whisk, a milk frother, or even a small jar with a tight lid (shake it like a polaroid picture!) works beautifully. The goal is a smooth, vibrant green paste.
- Heat & Froth the Milk: While your matcha paste rests, heat your almond milk. You can do this in a small saucepan over medium heat until steaming, or in the microwave for 60-90 seconds. We want it hot but not boiling. Then, froth it! Use that same milk frother, a French press (pump the plunger up and down vigorously), or just whisk it by hand. Frothing creates that luxurious, café-style texture that makes this feel like a treat.
- The Grand Unification: Slowly pour your hot, frothy almond milk into your matcha paste. I like to pour it in two stages: first, a little splash to thin out the paste and whisk it smooth, then the rest in a steady stream. This guarantees no green tea lumps at the bottom of your mug!
- The Finishing Touches: Now, taste. Add your maple syrup or honey a teaspoon at a time, stirring gently between each addition. This is your moment. Add that dash of vanilla or sprinkle of cinnamon if you’re feeling it. Give it one final, gentle stir from the bottom up.
And there you have it. In less time than it takes to brew a pot of coffee, you’ve crafted a moment of wellness and warmth.
Serving with Soul: How to Enjoy Your Creation
This latte is a vibe all on its own, but how you serve it can make the ritual even sweeter.
First, choose your vessel wisely. I’m a big believer in drinking from what brings you joy. Is it a giant, hand-thrown ceramic mug you can wrap both hands around? A sleek, white espresso cup that makes you feel like a barista? Use that. The experience starts with the touch.
For a true café look, hold back a spoonful of that glorious milk froth with a spoon as you pour, then gently dollop it on top of the finished latte. It looks gorgeous and gives you that perfect first sip of foam. A final, light dusting of matcha powder or cinnamon right on top adds a professional flourish and a hint of aroma.
Pairing? Oh yes. This latte is fantastic with a buttery shortbread cookie, a simple piece of dark chocolate, or a lightly sweetened almond biscotti. The subtle sweetness and creamy fat complement the earthy tea notes perfectly. Find a sunny spot, take a deep breath, and sip slowly. That’s the Feastical way.
Make It Your Own: Delicious Twists & Swaps
Once you’ve mastered the classic, the kitchen playground opens up! Here are a few of my favorite riffs on this green tea theme:
- Iced Matcha Latte: My summer go-to! Whisk matcha with 2 tbsp of cold water. Fill a tall glass with ice, pour over your frothed cold almond milk (shake it in a jar for froth!), and sweeten. It’s refreshing, energizing, and gorgeous in a glass.
- Matcha “Golden Milk” Latte: Add ¼ tsp of turmeric, a pinch of black pepper (helps absorption!), and a pinch of ginger to the almond milk before heating. Sweeten with honey. Anti-inflammatory, warming, and so good for you.
- White Chocolate Matcha: For a decadent treat, stir in 1-2 squares of finely chopped quality white chocolate into the hot almond milk until melted before frothing. It’s creamy, dreamy, and subtly sweet.
- Protein-Powered Matcha: Blend your finished hot latte with a scoop of vanilla or unflavored collagen peptides or plant-based protein powder for a filling, post-workout sipper. Just be sure to use a blender for a smooth result.
- Coconut Matcha Dream: Use coconut milk beverage for the liquid and add a drop of coconut extract along with the vanilla. Sweeten with honey and imagine you’re on a beach.
Beau’s Kitchen Notes & Stories
This recipe has evolved so much since that first bowl in my college kitchen. Back then, we used whatever cheap matcha we could find and whisked it with a fork! The spirit was there, but the technique… needed work. Over the years, I’ve learned that the little things—the water temp, the sifting, the quality of the matcha—make a monumental difference in taking a drink from “good” to “where have you been all my life?”
One of my favorite kitchen fails turned happy accident was the day I ran out of almond milk and used chai-spiced oat milk instead. Whoa. It was a flavor explosion and inspired the “Golden Milk” variation above. So, don’t be afraid to play. The worst that happens is you make a drink you don’t love, and you learn for next time. The best that happens? You invent your new signature sip.
Your Questions, Answered (Let’s Troubleshoot!)
Q: My matcha is clumpy and won’t dissolve! Help!
A: No worries! This is the #1 issue. First, always sift your powder. Second, make sure you’re making a smooth paste with the hot water *before* adding the milk. If you still get clumps, try using a small blender or shaking everything in a sealed jar. Clump crisis averted.
Q: Why does my latte taste bitter?
A: Two likely culprits: 1) Your water was too hot (boiling water burns matcha), or 2) The matcha powder itself is lower quality or past its prime. Try cooler water and investing in a small tin of good ceremonial grade—it’s a game-changer.
Q: Can I make a bigger batch ahead of time?
A> For the best flavor and texture, I recommend making it fresh. However, you can mix the matcha paste (powder + water) and keep it covered in the fridge for a few hours. When ready, heat your milk, combine, and enjoy. I don’t recommend mixing the whole latte and reheating it, as the almond milk can separate.
Q: I don’t have any sweetener. Is it still good?
A> Absolutely! A high-quality ceremonial grade matcha is naturally slightly sweet and umami-rich. Try it straight first—you might find you love its pure, earthy character.
A Sip of Goodness: Nutritional Highlights
Let’s talk about why this latte makes your body feel as good as your taste buds. This is for the version made with 1 cup unsweetened almond milk and 1 tsp maple syrup.
Coming in at around 50-60 calories, this is a light yet satisfying drink. The star, matcha, is a nutritional powerhouse. Because you’re consuming the whole ground tea leaf, you get a mega-dose of antioxidants, specifically EGCg, which is renowned for its cellular health benefits. It also contains a unique amino acid called L-Theanine, which promotes calm, focused alertness—that’s the “quiet focus” I talked about! You’ll also get a gentle, sustained energy boost from its caffeine (about 1/3 the amount of a cup of coffee), without the jitters or crash.
The unsweetened almond milk keeps it low in sugar and carbs, while adding a bit of vitamin E and healthy fats. It’s naturally dairy-free, vegan-friendly (if you use maple syrup), and gluten-free. It’s less about counting anything and more about pouring a cup of pure, plant-based goodness.
Print
Matcha Green Tea Latte with Almond Milk : Calm, Creamy & Antioxidant-Rich
Description
Your Daily Cup of Calm: Matcha Almond Milk Latte
Earthy, creamy, and soothing—your five-minute ritual of calm.
Hey friends! This latte is comfort in a cup: earthy matcha meets creamy almond milk for a gentle, focused energy without coffee jitters. Perfect for a cozy pause, reading nook, or mid-afternoon reset.
Ingredients
-
1 tsp matcha green tea powder – ceremonial grade for sweetness & vibrancy
-
2 tbsp hot water (~175°F / 80°C) – just under boiling to avoid bitterness
-
1 cup unsweetened almond milk – sub: oat, coconut, or cashew milk
-
1–2 tsp maple syrup or honey (optional) – start small, adjust to taste
-
Optional: dash vanilla extract or pinch cinnamon – adds warm depth
Instructions
1. Sift & Make Matcha Paste
-
Sift matcha into a mug or small bowl to remove clumps
-
Add 2 tbsp hot water
-
Whisk briskly (M or W motion) until smooth and frothy
-
No bamboo whisk? Use a small wire whisk, frother, or shake in a jar
2. Heat & Froth Milk
-
Heat almond milk on stove (medium) or microwave (60–90 sec) until steaming
-
Froth with whisk, milk frother, or French press for creamy texture
3. Combine
-
Pour a small splash of hot milk into matcha paste; whisk to smooth
-
Pour in remaining milk steadily
-
Add maple syrup/honey teaspoon by teaspoon, then optional vanilla or cinnamon
-
Stir gently bottom-up for even flavor
4. Serve
-
Pour into your favorite mug
-
Top with froth, optional dusting of matcha or cinnamon
-
Sip slowly, enjoy the calm
Notes
-
Clumpy matcha: Always sift; make smooth paste before adding milk; blender or jar shake works
-
Bitter latte: Water too hot or matcha quality low; use cooler water and good ceremonial grade
-
No sweetener: High-quality matcha can be enjoyed straight for earthy, umami flavor
-
Make ahead: Matcha paste (powder + water) can be stored in fridge for a few hours; combine with milk fresh
Final Thoughts
Well, friends, we’ve reached the bottom of the mug. I hope this recipe brings a little slice of peaceful, delicious ritual into your daily hustle. At Feastical, it’s all about food that feels like a warm hug and never a chore, and this latte is exactly that—a warm hug you can drink.
The beauty of this recipe is in its simplicity and its power. It’s a five-minute act of self-care, a mindful break, and a delicious way to fuel your body with clean energy. So, the next time you need a reset, skip the noisy coffee run. Instead, heat some water, grab your whisk, and create your own moment of calm, creamy, antioxidant-rich joy.
Thanks for cooking (and sipping!) with me today. If you make this, I’d love to hear about it! Tag me over on social or drop a comment on the blog. Until next time, keep finding the feast in every moment.
Cheers,