Cold Vegetable Pizza : The Ultimate Party Starter
The Secret to the Ultimate Party Starter? This Cold Vegetable Pizza.
Hey friends, Beau here from Feastical! Grab a stool and pull up to the counter—I’ve got a story and a recipe that’s about to become your new secret weapon. Ever been to a party, spotted a vibrant tray of what looks like a veggie garden on a crispy crust, and watched it disappear before the chips and dip? That, my friends, is the magic of Cold Vegetable Pizza. It’s not gourmet in the fancy-pants sense, but in the “I-need-three-more-squares-please” sense, it’s absolutely elite.
We’re talking a golden, buttery crescent roll crust. A creamy, tangy, ranch-infused cheese layer that acts like flavor glue. And a confetti of the crispest, freshest vegetables you can chop. It’s cool, crunchy, creamy, and utterly addictive. Best of all? It’s a breeze to make. No stressing over hot ovens while guests are at the door. You make it ahead, chill it, and become the hero who brought the dish everyone raves about. So, if you’re ready to win your next potluck, game day gathering, or family picnic, you’re in the right kitchen. Let’s make some memories and one killer appetizer.
My First Bite: A Backyard BBQ Revelation
I’ll never forget the first time I met this beauty. It was my Aunt Margie’s legendary 4th of July bash, a sea of denim shorts, sparklers, and the hum of a hundred conversations. The picnic table groaned under the weight of every classic: baked beans, coleslaw, a mountain of burgers. But off to the side, looking almost too pretty to eat, was this rectangular mosaic of color. I was a skeptical kid, eyeing the veggies with suspicion. But one bite? Revelation.
The crust was subtly sweet and flaky. The cool, creamy layer hit with that herby, savory ranch punch. And then—CRUNCH. A symphony of fresh vegetables, each one singing its own note. I went back for a second, then a third square, dodging my mom’s raised eyebrow. That dish, more than the fireworks, defined the feeling of that summer day: joyful, communal, unpretentiously delicious. It was the first time I realized party food isn’t just about feeding people; it’s about creating a shared experience, a delicious landmark in a happy memory. That’s the spirit I want to bring to your table with this recipe.
Gathering Your Colorful Crew: Ingredients & Insights
Here’s where the fun begins. Think of this as building your dream team. Every player has a role, and I’ve got some insider tips to make sure they all shine.
- 2 packages crescent roll dough: The foundation! This is our shortcut to a flaky, tender, slightly sweet crust that bakes up golden and holds everything together. Chef’s Tip: If you can find the “sheets” version (without perforations), grab them! It saves time on pinching seams. No sheets? No problem—just pinch those seams together really well.
- 2 packages (8 oz each) cream cheese, softened: The backbone of our creamy layer. Full-fat is king here for the richest texture and best stability. Let it sit on the counter for a good hour—truly soft cheese blends seamlessly, no lumps allowed!
- 1 packet Ranch dressing mix (about 2 tablespoons): The flavor bomb. This little packet is pure magic, packing in dried herbs, garlic, and onion. It’s the unmistakable soul of the dish. For a homemade twist, you can use 2 tbsp of a DIY ranch seasoning blend.
- 1 cup mayonnaise: Our secret weapon for creaminess and tang. It thins the cream cheese just enough to make it spreadable and adds a lovely depth. I use a good-quality, real mayo for the best flavor.
- 2 cups each cauliflower & broccoli florets: The crunch captains! Chop them small—think rice-grain size or just a tad bigger. You want them to lie flat and be easy to eat in one bite. Pro Hack: A food processor makes quick work of this! Pulse a few times until you get perfect, tiny bits.
- 3 green onions, sliced: A pop of mild, peppery flavor and a gorgeous green stripe. Use the white and light green parts for bite, and the dark green tops for a vibrant garnish.
- 2 cups cherry tomatoes, halved: Juicy, sweet bursts of color. Halve them, then give them a gentle squeeze over the sink to remove excess seeds and juice. This keeps our pizza from getting soggy!
- 1 cup shredded cheddar cheese: The cheesy confetti! It adds a sharp, salty finish and melds all the veggies together. A pre-shredded bag works for convenience, but freshly shredded off the block melts into the mix more cohesively.
Building Your Masterpiece: Step-by-Step with Beau
Okay, team. Let’s roll up our sleeves (and that dough). Follow these steps, and you’ll have a flawless pizza that’s as fun to make as it is to eat.
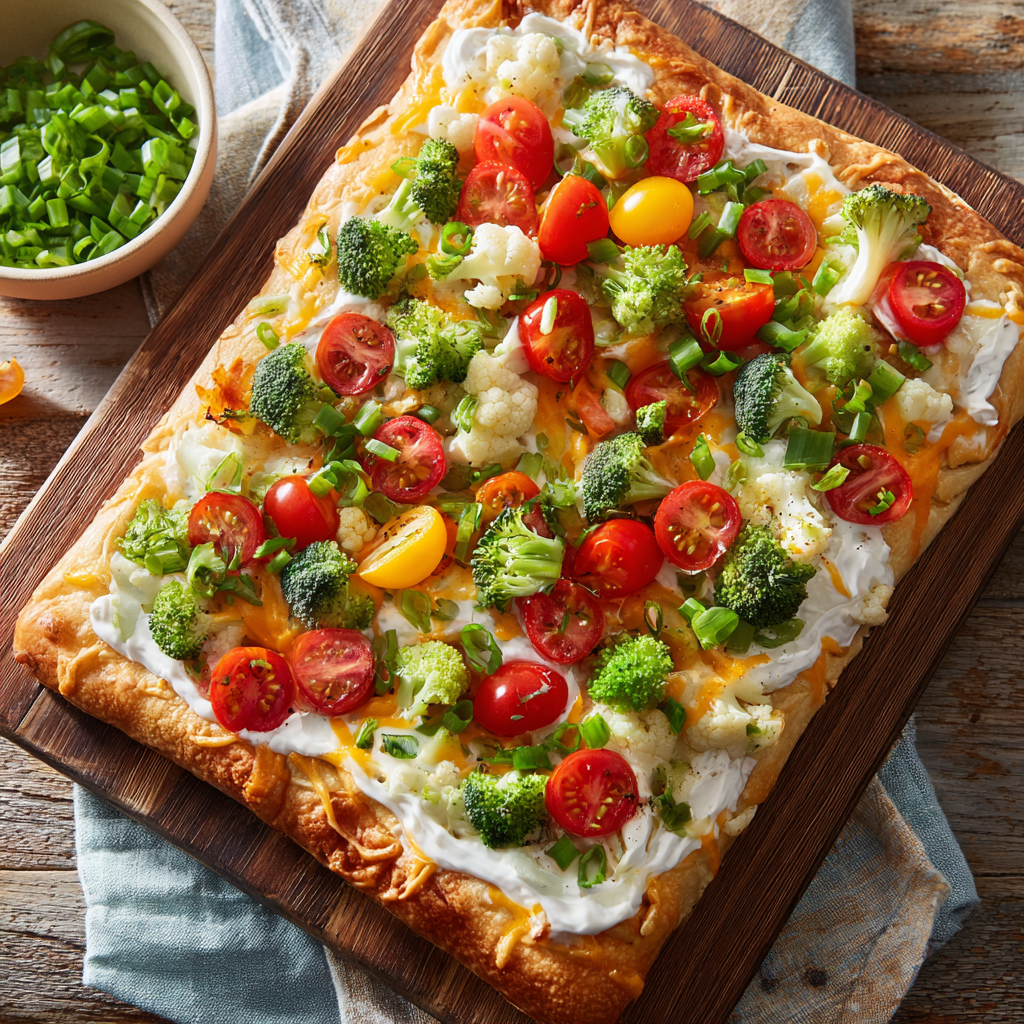
- Heat & Sheet: Fire up your oven to 375°F (190°C). Grab a large baking sheet (a half-sheet pan, about 13×18 inches, is perfect). Unroll your crescent dough and lay it out on the ungreased sheet. Here’s the crucial part: pinch every single seam together, and don’t be shy about it. You’re creating one unified, solid canvas. For a cute little edge, you can even fold and pinch a small border around the rectangle. This gives it a real “pizza crust” look.
- Bake to Golden: Slide that pan into your preheated oven and bake for 10-12 minutes. You’re looking for a beautiful, even golden brown. Keep an eye on it—ovens can be sneaky! Once it’s gorgeous, pull it out and let it cool completely on the pan. I mean it—walk away. Let it chill. A warm crust will melt our creamy layer into a sad, runny mess. Patience is your best ingredient here.
- Whip the “Frosting”: While the crust is cooling, let’s make the good stuff. In a large mixing bowl, combine the softened cream cheese, the ranch packet, and the mayo. Use a hand mixer or a sturdy spatula and some elbow grease to beat it until it’s utterly smooth, creamy, and lump-free. Taste it (you know you want to). Isn’t that just heavenly? Set this aside.
- Veggie Prep Party: This is your zen moment. Chop all your veggies. Remember: small, uniform pieces. Squeeze those tomato halves. Pile your broccoli and cauliflower into little colorful mountains. Slice those green onions. Having everything prepped and ready makes assembly a joy.
- Assemble with Love: Time for the grand construction! Take your completely cool crust. Using an offset spatula or the back of a spoon, spread the ranch-cream cheese mixture in an even layer all the way to the edges. Now, artist time: scatter your chopped veggies over the top. I like to do it in little sections to ensure even distribution—some broccoli here, some cauliflower there, tomatoes for pops of red, green onions for a confetti finish. Finally, shower the whole thing with that shredded cheddar.
- The Chill Factor: This is non-negotiable. Cover the whole pan loosely with plastic wrap or foil and refrigerate for at least 2 hours, but ideally 3-4 or even overnight. This chill time lets the flavors marry, the crust set up perfectly, and makes it incredibly easy to slice into clean squares. Trust the process!
How to Serve It & Steal the Show
Presentation is part of the fun! Once your pizza is thoroughly chilled, use a sharp chef’s knife to slice it into squares—I usually go for about 1.5 to 2-inch squares for perfect two-bite appetizers. A small offset spatula or a flat pie server is the perfect tool for lifting them off the pan without messing up those beautiful layers.
Arrange them on a simple platter or a rustic wooden board. For a little extra flair, sprinkle a few extra slices of green onion or some chopped fresh parsley or dill over the top. I love serving this alongside other finger foods like meatballs, a simple cheese board, or some spiced nuts. It’s the bright, fresh counterpoint to richer dishes. And don’t forget the napkins!
Make It Your Own: Delicious Twists & Swaps
The beauty of this recipe is its versatility. Play with it! Here are a few of my favorite riffs:
- The Everything Bagel: Swap the ranch mix for 2 tbsp of everything bagel seasoning. Use a cream cheese/sour cream blend (equal parts), and top with extra seasoning, red onion, and capers after adding the veggies.
- Garden Herb Freshness: For a lighter flavor, skip the ranch packet. Blend the cream cheese with 1/2 cup of Greek yogurt, 1/4 cup of finely chopped fresh herbs (dill, chives, parsley), a minced garlic clove, and salt & pepper to taste.
- Southwest Fiesta: Add 1/2 tsp cumin and 1/4 tsp smoked paprika to the cream cheese mix. Top with black beans (rinsed and dried well), corn, diced red bell pepper, and jalapeño. Use a Monterey Jack cheese instead of cheddar.
- Lighter & Brighter: Use Neufchâtel or light cream cheese, light mayo, and fat-free Greek yogurt (in a 1:1:1 ratio for the creamy layer). Load up on extra veggies—add diced bell peppers or shredded carrots!
- Gluten-Free Friend: Use your favorite gluten-free crescent dough or a pre-baked gluten-free pizza crust. Just spread your topping on the cooled crust and proceed as directed.
Beau’s Kitchen Chronicles: Notes from the Counter
This recipe has been a constant in my repertoire since that fateful BBQ. Over the years, I’ve learned a few things: First, the “cool completely” step is the hill I will die on. I once got impatient at a tailgate and created a delicious but structurally unsound veggie soup on a cracker. Lesson learned! Second, this is the ultimate “clean out the veggie drawer” recipe. Got a lonely carrot? A few radishes? Chop ’em small and toss ’em on. The more color, the better.
It’s also evolved into my go-to “welcome to the neighborhood” dish. It’s approachable, feeds a crowd, and tells people you’re happy they’re here. I’ve made it for book clubs, baby showers, and even just a Tuesday night when I wanted dinner to feel like a party. That’s the Feastical spirit—turning simple ingredients into little celebrations.
Your Questions, Answered: FAQs & Fixes
Q: My crust got soggy! What happened?
A: The usual suspects: 1) The crust wasn’t 100% cool before topping. 2) The veggies (especially tomatoes) had too much moisture. Squeeze ’em! 3) It wasn’t served cold enough. Make sure it chills for those full 2+ hours to let everything set up.
Q: Can I make this further ahead?
A> You absolutely can! Assemble the whole pizza (up through adding the cheese) up to 24 hours in advance. Cover tightly and refrigerate. The flavors get even better. Slice just before serving.
Q: Any veggie substitutions you recommend?
A> The world is your oyster! Finely diced red, yellow, or orange bell peppers add sweetness and color. Shredded carrots are great. Even finely chopped celery or radishes for extra crunch. Just keep pieces small and dry.
Q: The cream cheese layer is too thick to spread. Help!
A> Your cream cheese might still be too cold, or your mayo/cream cheese ratio could be off. Let the mixture sit for 10 more minutes to soften. If it’s still stubborn, add a tiny splash of milk or buttermilk (a teaspoon at a time) to loosen it up.

Cold Vegetable Pizza : The Ultimate Party Starter
Description
Looking for an easy party appetizer that always disappears first? Cold Vegetable Pizza is the answer. It’s colorful, crunchy, creamy, and super simple to make. With a flaky crescent crust, a ranch-cream cheese spread, and a layer of fresh chopped veggies, it’s the kind of make-ahead dish that saves time and impresses guests. Perfect for potlucks, game nights, and family gatherings.
Ingredients
Ingredients
Crust
-
2 packages crescent roll dough
Creamy Layer
-
2 packages (8 oz each) cream cheese, softened
-
1 cup mayonnaise
-
1 packet ranch dressing mix (about 2 tablespoons)
Vegetable Topping
-
2 cups broccoli florets, finely chopped
-
2 cups cauliflower florets, finely chopped
-
2 cups cherry tomatoes, halved and seeds removed
-
3 green onions, sliced
-
1 cup shredded cheddar cheese
Instructions
-
Preheat oven to 375°F (190°C).
-
Form the crust: Unroll crescent dough onto a large baking sheet. Press seams together to seal and form one rectangle.
-
Bake for 10–12 minutes until golden brown. Cool completely.
-
Make the spread: In a bowl, mix softened cream cheese, mayo, and ranch seasoning until smooth.
-
Spread the mixture evenly over the cooled crust.
-
Add toppings: Sprinkle chopped vegetables evenly over the top. Finish with shredded cheddar.
-
Chill at least 2 hours (or overnight) until firm.
-
Slice into squares and serve cold.
Notes
-
Cool the crust fully before adding the spread or it will melt and turn runny.
-
Chop veggies small so slices hold together and are easy to bite.
-
Remove tomato seeds to prevent sogginess.
-
Make ahead: Best made 4–24 hours in advance.
-
Cleaner slices: Use a sharp knife and wipe it between cuts.
-
Lighter option: Swap half the mayo for plain Greek yogurt.
Let’s Talk Nutrition (The Real Talk)
Look, I’m all about balance. This Cold Vegetable Pizza is a celebration dish, and it’s rich and indulgent—as many great party foods are. The crescent roll crust and creamy cheese layer deliver the bulk of the calories, fat, and carbs. But here’s the flip side: you’re also getting a generous serving of fresh, raw vegetables packed with fiber, vitamins, and antioxidants. That’s a win in my book.
If you’re mindful, you can use the lighter variation tips I shared. But when I’m bringing this to a gathering, I make it as written, enjoy a couple of squares with zero guilt, and fill the rest of my plate with lean proteins and greens. Food is about joy and community first. This recipe delivers both in spades.
Final Thoughts
And there you have it, friends—the full story behind the legendary Cold Vegetable Pizza. It’s more than just a recipe; it’s a ticket to being the most popular person at the picnic, the potluck, or the family reunion. It’s proof that the most beloved dishes are often the simplest, the ones that taste like shared laughter and good times.
I hope you’ll give it a try and make it your own. Tag me @Feastical when you do—I love seeing your kitchen creations! Now, go preheat that oven, chop those veggies, and get ready to make a platter of happiness. Until next time, keep your counters floured and your hearts full.
Cheers,
Beau
Lentil Soup with Turmeric and Greens : Hearty, Healing & Plant-Powered
Your New Go-To Bowl of Sunshine: Lentil Soup with Turmeric & Greens
Hey friends, Beau here! Let’s talk about the ultimate kitchen hug. You know the feeling—when the day has been a bit too long, the wind is howling a little too much, or you just need something that makes you feel good from the inside out. That’s where this magical pot of Lentil Soup with Turmeric and Greens comes strutting in. This isn’t just soup; it’s a golden, steaming bowl of comfort that’s also secretly a nutritional powerhouse.
I’m a firm believer that the best foods are the ones that do double duty. They’ve got to taste incredible, like something your soul remembers, but they also have to fuel you, heal you, and make you glow. This soup? It’s the MVP of that category. We’re talking protein-packed lentils, humble veggies that turn sweet and tender, a broth kissed with warm, earthy turmeric, and a pop of vibrant greens that says, “Yeah, we’ve got this.” It’s plant-powered, but it’s so hearty and satisfying that it wins over even the most devoted carnivores at my table.
The best part? It all happens in one pot with minimal fuss. No fancy techniques, no obscure ingredients hiding in the back of a specialty store. Just simple, real food coming together to create something truly greater than the sum of its parts. So, tie on your favorite apron (or don’t—I won’t tell), grab your sturdiest pot, and let’s make a big, beautiful batch of sunshine together.
Why This Soup? A Story from My “Survival” Days
This recipe has roots in what I affectionately call my “Survival” era. Picture this: It was my first year living solo in a tiny apartment with a kitchen the size of a postage stamp. My budget was tight, my time was tighter (between work and just figuring out adult life), and my cooking confidence was… well, let’s say my spice rack consisted of salt, pepper, and a sad packet of taco seasoning.
One particularly gloomy, rainy week, I was feeling run-down and surviving on toast. I called my grandma, feeling sorry for myself. She listened patiently and then said, “Beau, honey, you need a healing pot.” She talked me through a basic soup formula over the phone: an onion, some lentils, whatever veggies I had, and “that yellow spice in the back of the cabinet—turmeric, it’s good for you.” I scrounged up a potato, a couple of carrots, and a lone can of tomatoes. That first pot was simple, maybe even a little clumsy, but as it simmered, my whole apartment filled with the most incredible, comforting smell. Eating that soup felt like a turning point. It was nourishing, cheap, easy, and it made so many lunches. It taught me that good food doesn’t have to be complicated or expensive; it just has to be made with a little intention. This recipe is the evolved, love-letter version of that survival soup, and it never fails to bring me right back to that cozy, empowered feeling.
Gathering Your Sunshine Squad: Ingredients & Insights
Here’s the dream team for our soup. Think of this as building layers of flavor and texture—every player has a role!
- 1 tbsp Olive Oil: Our cooking fat of choice. It adds a lovely, fruity base note. Chef’s Insight: If you want a richer flavor, a pat of butter or a scoop of coconut oil works wonders here too.
- 1 small Onion, diced: The aromatic foundation. Yellow, white, or even a sweet Vidalia onion will do. This is where the “soul” of the soup starts.
- 2-3 Garlic Cloves, minced: Non-negotiable for depth! Pro Tip: Don’t just mince—smash the cloves with the flat of your knife first to release their oils. The flavor difference is real.
- 2 Carrots, chopped: For sweetness and color. No need to peel them perfectly—just give ’em a good scrub. The skins have nutrients!
- 1 medium Potato, diced: Our hearty, starchy anchor. Yukon Golds are my favorite here—they hold their shape but also break down a bit to naturally thicken the broth. Russets work too, but might get more tender.
- 1 tsp Ground Turmeric: The golden hero! It gives the soup its beautiful color and earthy, slightly peppery flavor. Health Note: Pairing it with black pepper (which we add later) can help your body absorb its beneficial properties.
- ½ tsp Cumin: The optional-but-highly-recommended flavor booster. It adds a warm, nutty undertone that complements the turmeric beautifully.
- 1 cup Dried Green or Brown Lentils, rinsed: Our plant-powered protein source. Important: Green/brown lentils hold their shape perfectly in soup. Avoid red lentils for this recipe unless you want a creamier, porridge-like texture (which is a delicious variation!).
- 1 can (14 oz) Diced Tomatoes: For acidity and body. The juices help deglaze the pot and build a more complex broth. Fire-roasted tomatoes are a fantastic upgrade if you have them.
- 4 cups Vegetable Broth (or water): The liquid gold. Using a good-quality, low-sodium veggie broth adds a ton of flavor. Water works in a pinch—just be a bit more generous with your seasoning.
- 2 big handfuls Fresh Spinach or Kale: Our green finish! Spinach wilts instantly for a tender bite. Kale (stems removed, leaves torn) is heartier and adds a nice texture. Use what you love or have on hand.
- Salt & Pepper to taste: The seasonings that make everything pop. I always add pepper generously with turmeric.
- Lemon Wedges, for serving: The secret weapon! A squeeze of bright, fresh lemon juice just before eating lifts all the flavors and adds a whole new dimension. Don’t skip it!
Let’s Get Cooking: Building the Pot, Step-by-Step
Okay, team, pot’s on the stove. Let’s build some flavor.
Step 1: The Aromatic Base. In your largest soup pot or Dutch oven, heat the olive oil over medium heat. Toss in your diced onion. We’re not just softening it—we’re going for a light golden color, which adds a layer of sweet, caramelized flavor. This takes about 5-7 minutes. Stir occasionally and be patient! Once the onions are translucent and happy, add the minced garlic. Stir for just 30-60 seconds until it becomes incredibly fragrant. Chef’s Hack: If the garlic or onion starts to brown too fast, just add a tiny splash of broth or water to the pan to cool things down and scrape up any tasty bits.
Step 2: Blooming the Spices. This is a game-changer! Add your chopped carrots and potatoes to the pot. Then, sprinkle the turmeric (and cumin, if using) directly over the veggies. Stir everything around for 1-2 minutes. You’ll see the color brighten and smell the spices waking up. “Blooming” the spices in the oil like this unlocks their full flavor potential, so your soup won’t taste like raw spice powder.
Step 3: The Hearty Additions. Now, pour in your rinsed lentils, the entire can of diced tomatoes (juice and all!), and your 4 cups of vegetable broth. Give it a good stir, scraping the bottom of the pot to get all those flavorful bits up. Turn the heat up to high and bring the whole beautiful mess to a lively boil.
Step 4: The Simmer & Wait. Once boiling, immediately reduce the heat to low, cover the pot with a lid (leave it slightly ajar), and let it simmer gently. Set a timer for 25 minutes. This is when the magic happens—the lentils and potatoes cook, the flavors meld, and your kitchen starts to smell like a dream. Resist the urge to stir too much; just let it be.
Step 5: The Green Finale. After 25 minutes, check that the lentils and potatoes are tender. If they are, it’s go-time! Turn off the heat. Stir in your massive handfuls of spinach or kale. The residual heat will wilt them perfectly in just 2-3 minutes. This keeps them bright green and vibrant instead of overcooked and sad. Now, season with salt and pepper. Start with a teaspoon of salt and a good few cranks of pepper, taste, and adjust. Remember, you can always add more, but you can’t take it out!
Let’s Dish It Up: Serving Your Golden Masterpiece
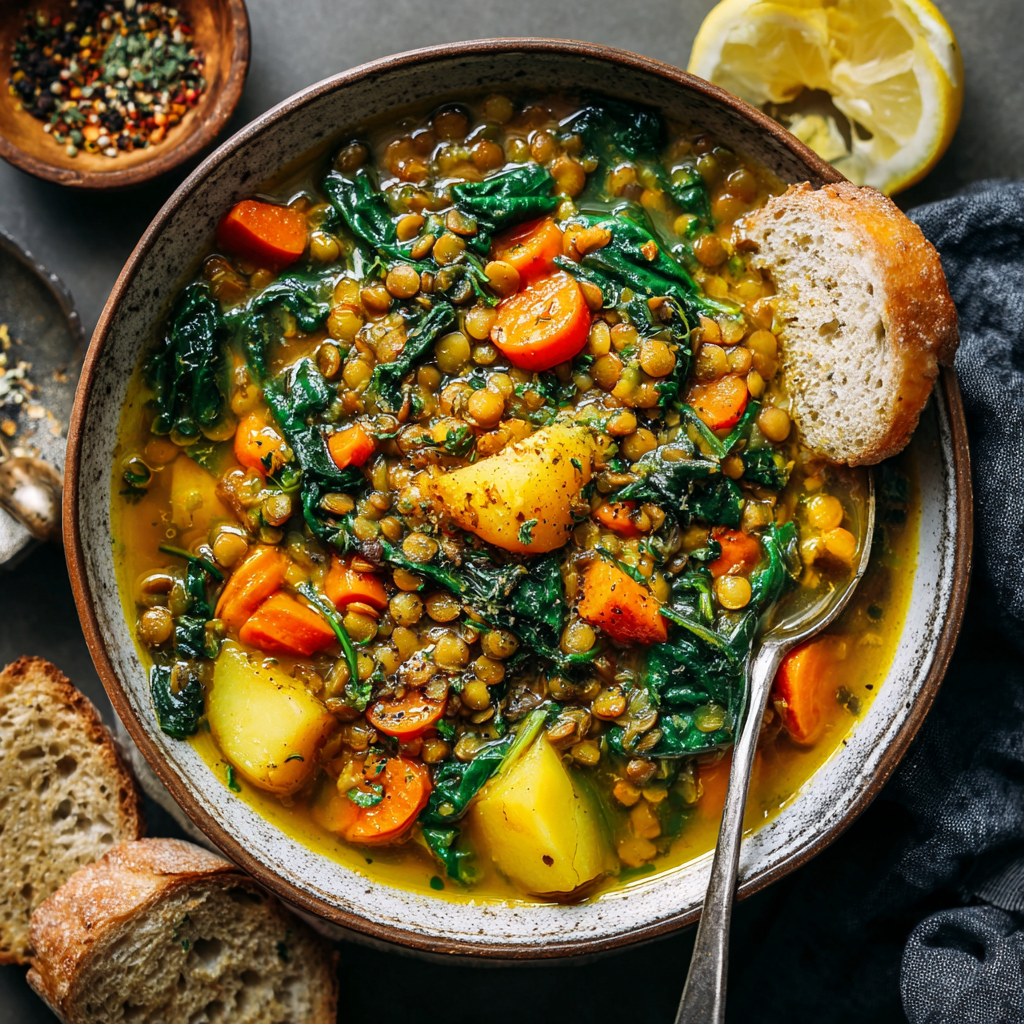
Presentation is part of the joy! Ladle that gorgeous, golden soup into deep, warm bowls. The contrast of the yellow broth, orange carrots, and green spinach is a feast for the eyes before you even take a bite.
Now, the toppings bar is open! This is where you make it your own. I highly recommend a generous squeeze of fresh lemon juice over the top—it’s non-negotiable in my house. Beyond that, consider a drizzle of good olive oil, a dollop of creamy yogurt or coconut yogurt, a sprinkle of red pepper flakes for heat, or some fresh herbs like chopped parsley or dill. For a crunch factor, try toasted pumpkin seeds (pepitas) or some rustic croutons.
What to serve with it? A thick slice of crusty, buttered sourdough bread is the classic move for dipping and scooping. For a lighter option, a simple side salad with a lemony vinaigrette complements the soup perfectly. It’s a complete, satisfying meal that feels special but took barely any effort.
Make It Your Own: Fun Flavor Twists
Got the base recipe down? Awesome! Now let’s play. Here are a few of my favorite riffs:
- The “Creamy” Dream: Stir in ½ cup of full-fat coconut milk or a scoop of plain Greek yogurt (or vegan alternative) during the last 5 minutes of cooking. It adds incredible richness and a lovely silky texture.
- Moroccan-Inspired: Add ½ teaspoon each of ground cinnamon and ginger when you add the turmeric. Finish with a handful of chopped dried apricots and a sprinkle of cilantro.
- Smoky & Hearty: Sauté 4-6 ounces of chopped smoked sausage (like andouille) or tempeh bacon with the onions at the very beginning. It adds a deep, smoky flavor that’s absolutely divine.
- Red Lentil & Lemon Detour: Swap the green lentils for red lentils. They’ll cook faster (check at 15-20 minutes) and break down completely, creating a thicker, smoother, dal-like soup. Double the lemon at the end!
- The “Clean-Out-The-Fridge” Version: Got a stray celery stalk, a parsnip, or some zucchini? Chop it up and throw it in with the carrots and potatoes. Greens turning? Toss them in at the end. This soup is wonderfully forgiving.

Lentil Soup with Turmeric and Greens : Hearty, Healing & Plant-Powered
Description
When you want something warm, filling, and feel-good, this lentil soup is a perfect choice. It’s simple to make, budget-friendly, and packed with plant protein, fiber, and colorful vegetables. Turmeric adds a warm golden tone and gentle earthy flavor, while fresh greens bring brightness at the end. One pot, everyday ingredients, and pure comfort in every spoonful.
Ingredients
-
1 tbsp olive oil
-
1 small onion, diced
-
2–3 garlic cloves, minced
-
2 carrots, chopped
-
1 medium potato, diced (Yukon Gold or similar)
-
1 tsp ground turmeric
-
½ tsp ground cumin (optional)
-
1 cup dried green or brown lentils, rinsed
-
1 can (14 oz / 400 g) diced tomatoes
-
4 cups vegetable broth (or water)
-
2 big handfuls fresh spinach or chopped kale
-
Salt and black pepper, to taste
-
Lemon wedges, for serving
Instructions
-
Sauté aromatics
Heat olive oil in a large pot over medium heat. Add onion and cook 5–7 minutes until soft and lightly golden. Add garlic and cook 30–60 seconds. -
Add vegetables & spices
Stir in carrots and potato. Sprinkle turmeric and cumin over the vegetables and cook 1–2 minutes, stirring, to bring out the spice flavor. -
Add lentils & liquids
Add lentils, diced tomatoes with juices, and broth. Stir well and bring to a boil. -
Simmer
Reduce heat to low, cover loosely, and simmer about 25 minutes, until lentils and potatoes are tender. -
Finish with greens
Turn off heat and stir in spinach or kale. Let wilt in the hot soup for 2–3 minutes. -
Season & serve
Add salt and black pepper to taste. Serve hot with a squeeze of fresh lemon juice.
Notes
-
Rinse lentils well and check for small debris before cooking.
-
Cooking spices briefly in oil helps them taste richer and smoother.
-
Add black pepper with turmeric — they pair well in flavor.
-
If soup gets too thick, add a splash of hot water or broth.
-
A Parmesan rind simmered in the pot adds extra savory depth (remove before serving).
Beau’s Kitchen Notes & Stories
This recipe is a living thing in my kitchen. It’s evolved from that bare-bones survival soup to this beloved version, and it still changes slightly every time I make it. Sometimes I add a knob of grated ginger with the garlic for an extra zing. Other times, I’ll throw in a parmesan rind while it simmers if I have one in the freezer—it melts into the broth, adding a subtle, savory umami that’s just incredible (just fish it out before serving!).
A funny story: I once, in a very sleepy morning haze, accidentally used curry powder instead of turmeric. I realized it as soon as I opened the jar, but I rolled with it. The result? A fantastic, totally different (and delicious) curry lentil soup! It was a great reminder that mistakes in the kitchen are often just opportunities for a new creation. So don’t stress. Taste as you go, trust your instincts, and make it yours.
Your Questions, Answered: FAQs & Fixes
Q: Can I make this in a slow cooker or Instant Pot?
A: Absolutely! For a slow cooker, sauté the onion, garlic, and spices in a pan first (for best flavor), then add everything except the greens to the cooker. Cook on LOW for 6-8 hours or HIGH for 3-4. Stir in greens at the end. For an Instant Pot, use the Sauté function for Step 1 & 2. Add everything except greens, seal, and cook on High Pressure for 10 minutes. Quick release, then stir in greens.
Q: My soup is too thick/thin! Help!
A: No worries! Soup is fluid (pun intended). Too thick? Simply add more broth or water, ½ cup at a time, until it’s your desired consistency. Too thin? Let it simmer uncovered for an extra 5-10 minutes to reduce and concentrate. You can also mash a few of the potatoes and lentils against the side of the pot with a spoon to help thicken it naturally.
Q: Can I freeze this soup?
A: You bet! This soup freezes like a champion. Let it cool completely, then portion it into airtight containers or freezer bags, leaving a little space for expansion. It will keep for up to 3 months. Thaw overnight in the fridge and reheat gently on the stove. Note: If using potatoes, they can become a little grainy after freezing but will still taste great. Kale holds up better than spinach in the freezer.
Q: I don’t have fresh greens. Can I use frozen?
A: Of course! Frozen spinach or kale is a fantastic pantry staple. No need to thaw—just stir in a handful straight from the freezer at the end and let it heat through.
Breaking It Down: The Goodness Inside
Let’s talk about why this soup makes you feel so amazing. This nutritional breakdown is for one serving (about ¼ of the recipe), but remember, it’s an estimate. Using low-sodium broth and watching added salt will affect the numbers.
Calories: ~220 | Protein: 12g | Carbohydrates: 30g | Dietary Fiber: 8g | Sugars: 5g |
Final Thoughts: More Than Just Soup
This Lentil Soup with Turmeric and Greens is so much more than a recipe. It’s a reminder that the most powerful food doesn’t come from a fancy restaurant or a complicated cookbook. It comes from a single pot, a handful of humble ingredients, and the simple intention to nourish yourself and the people you love.
It’s a bowl that teaches resilience—born from my own “survival” days, proving that good health and deep comfort don’t require a big budget or advanced skills. It’s a lesson in flexibility, inviting you to play, adapt, and make it your own with whatever you have on hand. And most of all, it’s a reliable source of warmth. On dreary days, hectic weeks, or whenever you need a reset, this soup is there. It’s a tangible, edible hug that fuels your body and brightens your spirit.
So here’s to the simple, the wholesome, and the profoundly good. May your kitchen be filled with its golden aroma, and may every steaming bowl feel like a little bit of sunshine, scooped straight from the pot.
One-Pot Chicken Parmesan Pasta : A Comfort Classic Made Easy
One-Pot Chicken Parmesan Pasta: A Comfort Classic Made Easy
Hey there, friend! Beau here, welcoming you back to my kitchen corner at Feastical. Let’s talk about a universal truth: we all crave that epic, cheese-pulled, soul-warming goodness of Chicken Parmesan, but who has the time (or the pile of dishes) for the whole breading-and-frying orchestra on a regular Wednesday? I know I don’t.
That’s why I’m practically doing a happy dance to share this recipe with you today. This One-Pot Chicken Parmesan Pasta is my weeknight warrior, my secret weapon for when the family is hangry and the clock is ticking. It captures every single thing we love about the classic—tender chicken, rich marinara, pools of melted mozzarella, that salty punch of Parmesan—but it all comes together in one single skillet. No boiling pasta separately, no breading stations, no oven preheating. Just one pot, 30 minutes, and maximum flavor.
This isn’t just about saving time (though, wow, does it ever). It’s about creating a meal that feels like a generous, comforting hug without the culinary gymnastics. The pasta cooks right in the sauce, soaking up all that herby, garlicky, chicken-y goodness, so every single bite is infused with flavor. It’s the ultimate feel-good food that looks like you fussed, but secretly, you got to sip a glass of wine while it simmered. Sounds like a plan, right? Let’s grab that skillet and make some magic.
The Night That Inspired a One-Pot Revolution
This recipe was born out of pure, unadulterated hunger and a serious lack of clean pans. Picture it: a few years back, after a long day of recipe testing (read: delicious chaos), I promised my wife an epic Chicken Parm. But when I opened the cabinet, my baking sheets were MIA, and the sink was already hosting a party of dirty bowls. Classic.
But the craving was real. So, I looked at my trusty deep skillet, then at the chicken, then at the box of pasta, and had a “what if…” moment. What if I just… cooked it all together? Could the pasta absorb the sauce and broth like a risotto? Would the cheese melt into a gooey, unified blanket of joy? I threw caution (and a few extra cloves of garlic) to the wind.
The result was a eureka moment so loud I probably startled the neighbors. Not only did it work, it was INCREDIBLE. The pasta was more flavorful than if I’d boiled it in plain water, the chicken stayed juicy, and the cheese created this luscious, cohesive sauce that coated every nook and cranny. We scraped that skillet clean. It was a messy, beautiful triumph that immediately earned a permanent spot in our dinner rotation. Sometimes, the best recipes come from a happy accident and a desperate desire to avoid doing the dishes.
Gathering Your Flavor Arsenal
Here’s the beautiful part: you likely have most of this in your kitchen right now. This is pantry-raid cooking at its finest. Let’s break it down:
- 2 tablespoons olive oil: Our cooking fat of choice. It adds a fruity depth that butter can’t quite match here. Extra virgin is great, but any olive oil works.
- 1 lb boneless, skinless chicken breast, diced: I cut it into bite-sized chunks for quick, even cooking. Chef’s Insight: For even more tender, flavorful chicken, try using thighs! They’re harder to overcook and add a richer taste.
- Salt and black pepper, to taste: Don’t be shy here. Seasoning the chicken directly is your first layer of flavor. I use coarse kosher salt for better control.
- 3 cloves garlic, minced: The aromatic heartbeat of the dish. Fresh is best! If you’re in a pinch, ¾ teaspoon of garlic powder works.
- 2 cups marinara sauce: The foundation. Use your favorite jarred brand—this is a no-judgment zone. Or, if you have a stash of homemade, this is its time to shine!
- 2 cups chicken broth: This is the liquid magic that cooks our pasta and creates the sauce. Low-sodium is my go-to so I can control the salt level. Veggie broth works for a swap.
- 8 oz penne or rigatoni pasta (uncooked): Short, sturdy shapes are key. They hold the sauce perfectly. Penne, rigatoni, ziti, or fusilli are all fantastic. Avoid long pasta like spaghetti for this one-pot method.
- 1/2 teaspoon dried basil & 1/2 teaspoon dried oregano: Our dried herb duo. They bloom in the simmering sauce, releasing all their earthy, Italian-inspired flavor. Rubbing them between your palms before adding wakes up their oils!
- 1 cup shredded mozzarella cheese: For that iconic, stretchy, melty goodness. I like to use a low-moisture, pre-shredded blend for convenience, but fresh mozzarella torn into pieces is next-level.
- 1/2 cup grated Parmesan cheese: The flavor booster. Please, for the love of all things cheesy, use real Parmigiano-Reggiano if you can. The pre-grated stuff in a can doesn’t melt or taste the same.
- Optional: chopped fresh parsley or basil for garnish: This isn’t just for looks! A sprinkle of fresh green right at the end adds a pop of color and a bright, fresh flavor that cuts through the richness beautifully.
Let’s Build Your One-Pot Wonder: Step-by-Step
Ready? Tie on your apron (or don’t, I’m not the boss of you), and let’s get cooking. Follow these steps, and you’ll have dinner on the table before you know it.
- Brown That Chicken: Heat your olive oil in a large, deep skillet or Dutch oven over medium heat. Add your diced chicken, season it well with salt and pepper, and let it sauté without moving it for a few minutes to get a nice golden sear. Then, stir it around until it’s cooked through. This browning equals big flavor. Chef’s Hack: Don’t crowd the pan! If you pile it all in, the chicken will steam instead of brown. Cook in two batches if needed. Once done, scoop it out onto a plate and let it hang out.
- Wake Up the Aromatics: In that same beautiful, flavorful pan (see? We’re using all those tasty browned bits!), add the minced garlic. Cook it for just 30 seconds until it’s fragrant. You’ll smell it—that’s your cue to move on. You don’t want it to burn and turn bitter.
- The Big Pour & Simmer: Now, pour in your marinara sauce and chicken broth. Add the dried basil and oregano. Give it a good stir, scraping up any delicious bits stuck to the bottom of the pan. This is called “deglazing,” and it’s a fancy term for “getting all the good flavor into your sauce.” Now, stir in your uncooked pasta. Yes, right from the box!
- The Patient Simmer: Bring the whole mixture to a lively boil. Then, immediately reduce the heat to low, cover the skillet with a tight-fitting lid, and let it simmer for 12-15 minutes. Stir it once or halfway through to prevent any sticking. You’ll know it’s done when the pasta is al dente (tender but with a slight bite) and most of the liquid has been absorbed into a lush sauce. Pro Tip: If your stove runs hot, check it at the 10-minute mark. You can always add a splash more broth if it’s drying out.
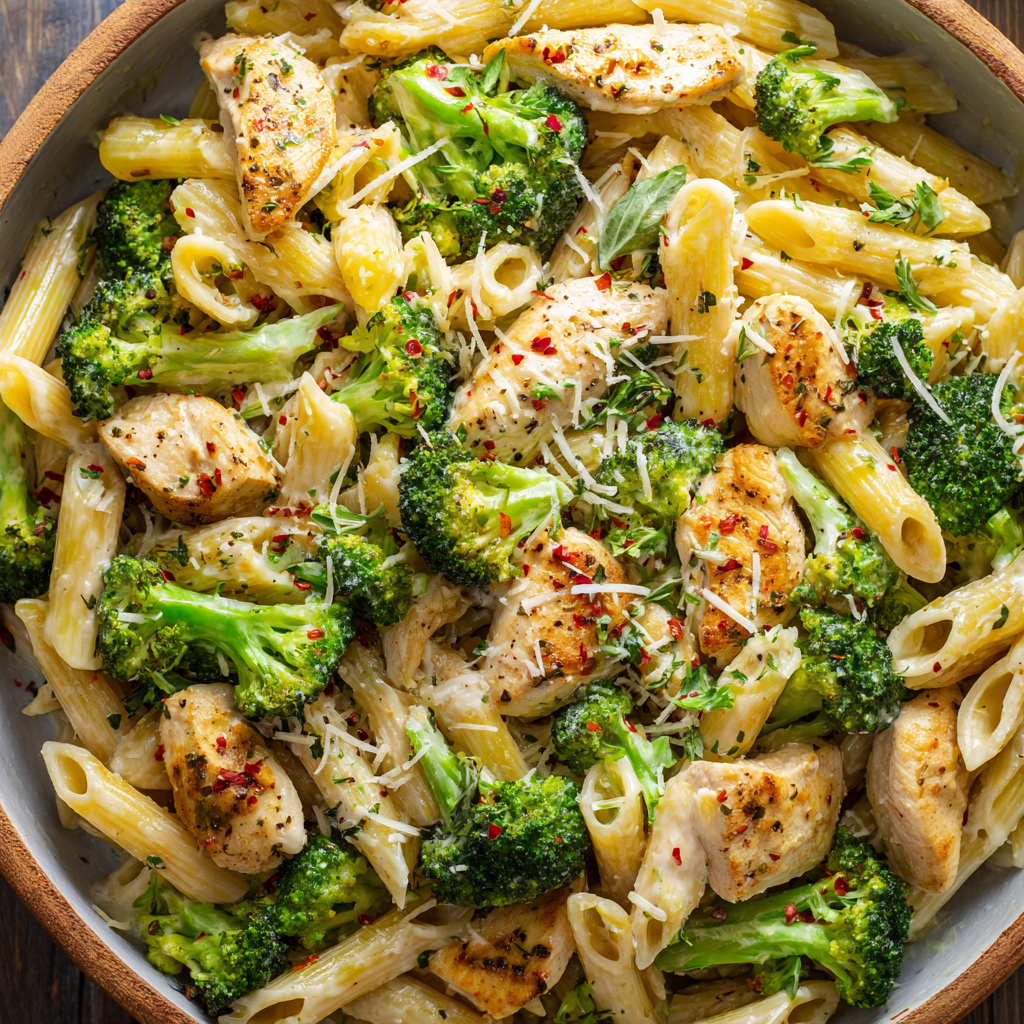
- The Cheesy Grand Finale: Turn off the heat. Stir the cooked chicken back into the skillet. Now, sprinkle over both the mozzarella and Parmesan. Gently fold the cheeses into the pasta until they start to melt into a glorious, creamy sauce. Don’t over-stir—let the residual heat do the work.
- The Rest (The Hardest Part): This is crucial! Let the skillet sit, covered, for 2-3 minutes off the heat. This allows the sauce to thicken up perfectly and the flavors to marry. Use this time to set the table, toss a quick salad, or just admire your handiwork.
- Garnish & Serve: Give it one final gentle stir, then dish it up into bowls. Top with a generous sprinkle of fresh parsley or basil for that perfect finish. And dig in!
How to Serve It Up in Style
This dish is a complete meal in a bowl, but a few simple sides can turn it into a feast. I love serving it family-style, right from the skillet in the middle of the table—it’s inviting and means fewer dishes!
- The Essential Side: A simple, crisp green salad with a tangy vinaigrette (like my Easy Lemon Garlic Dressing) is the perfect counterpoint to the rich, cheesy pasta. It cuts through and cleanses the palate.
- The Bread Basket: A loaf of warm, crusty garlic bread or some soft, buttery breadsticks are non-negotiable for sauce-mopping duties. It’s a rule.
- Veggie Boost: For a greener meal, sauté some spinach or broccoli florets on the side, or stir a handful of fresh baby spinach into the pasta right before adding the cheese—it wilts beautifully.
- Presentation Tip: For a pretty touch, serve individual portions in shallow pasta bowls. Use a spoon to twirl the pasta high, creating a nice mound. Finish with an extra dusting of Parmesan and that fresh herb garnish. A little drizzle of good olive oil over the top just before serving adds a lovely sheen and flavor.
Make It Your Own: Delicious Twists & Swaps
The beauty of this recipe is its flexibility. Play with it! Here are a few of my favorite riffs:
- “Spicy Arrabbiata” Style: Love heat? Use a spicy arrabbiata marinara sauce, and add a pinch of red pepper flakes when you cook the garlic. Top with creamy ricotta dollops to balance the spice.
- Vegetarian Powerhouse: Skip the chicken! Add a can of drained and rinsed white beans (cannellini or great northern) or sliced mushrooms when you add the sauce. You’ll still get great protein and a hearty, meaty texture.
- Creamy Tomato Dream: For an extra-indulgent, rosé-style sauce, stir in ¼ cup of heavy cream or full-fat coconut milk (for dairy-free) along with the cheeses. It becomes unbelievably luxurious.
- “Everything but the Kitchen Sink” Veggie Load: Boost the nutrition by adding diced bell peppers, zucchini, or sliced onions. Sauté them with the garlic for a few minutes before adding the liquids.
- Gluten-Free & Whole Wheat: This method works perfectly with your favorite gluten-free pasta (just check the liquid needs on the box) or whole wheat pasta. The sauce clings just as well!
Beau’s Kitchen Notes & Stories
Over the years, this recipe has become a true friend in my kitchen. I’ve made it on lazy Sundays, for last-minute potlucks (it travels great in the skillet with a lid!), and even doubled it for a crowd. The biggest evolution? Realizing that letting it sit for those few final minutes off the heat is the absolute secret to the perfect saucy consistency—not too runny, not too thick.
A funny story: I once taught this recipe to my nephew, who was in his first apartment. He called me, panicked, because he only had a tiny saucepan. Let’s just say we learned that “one-pot” doesn’t mean “one pot that’s too small.” A big, deep skillet is your best friend here to prevent bubbly, tomatoey overflow! Now, he owns a proper 12-inch skillet and makes this weekly.
Your Questions, Answered
Q: My pasta turned out a bit hard/still crunchy. What happened?
A: This usually means there wasn’t quite enough liquid, or the heat was too high so the liquid evaporated too fast before the pasta could cook. Next time, make sure your lid is on tight during simmering, and add an extra 1/4 to 1/2 cup of broth at the beginning if your skillet seems to lose moisture quickly. You can also rescue it by stirring in a splash more broth and cooking for a few more minutes, covered.
Q: Can I use a different type of pasta?
A: Absolutely! Stick with short shapes with grooves or tubes that trap sauce. Penne, rigatoni, farfalle, and rotini are all winners. Avoid long pasta (spaghetti, fettuccine) and tiny pasta (orzo) as they cook very differently.
Q: How do I store and reheat leftovers?
A: Leftovers keep beautifully! Store in an airtight container in the fridge for 3-4 days. Reheat gently in the microwave with a splash of broth or water to loosen the sauce, or in a skillet over low heat, stirring often. The pasta will absorb more liquid as it sits, so that extra splash is key.
Q: Is it okay to use frozen chicken?
A> It’s best to thaw it first. If you add frozen diced chicken directly, it will release a lot of water and throw off your liquid ratio, potentially making the sauce watery and unevenly cooked. Thaw it in the fridge overnight or in a bowl of cold water for quicker results.

One-Pot Chicken Parmesan Pasta : A Comfort Classic Made Easy
Description
Hey friend! Beau here from Feastical. When a craving for classic Chicken Parmesan hits, but the sink is already full and time is tight, this one-pot wonder saves the day. Tender chicken, herby marinara, melty mozzarella, and salty Parmesan come together in a single skillet—no boiling, no breading, no baking. Just big flavor in about 30 minutes.
Ingredients
-
2 tbsp olive oil
-
1 lb boneless, skinless chicken breast, diced (or thighs for extra juiciness)
-
Salt & black pepper, to taste
-
3 cloves garlic, minced
-
2 cups marinara sauce
-
2 cups chicken broth (low-sodium preferred)
-
8 oz uncooked short pasta (penne, rigatoni, ziti, or rotini)
-
½ tsp dried basil
-
½ tsp dried oregano
-
1 cup shredded mozzarella cheese
-
½ cup freshly grated Parmesan cheese
-
Optional garnish: chopped fresh basil or parsley
Instructions
-
Brown the chicken
Heat olive oil in a large, deep skillet over medium heat. Add chicken, season with salt and pepper, and cook until lightly golden and just cooked through. Transfer to a plate. -
Bloom the garlic
In the same skillet, add garlic and cook 30 seconds until fragrant (don’t let it brown). -
Build the sauce
Stir in marinara, chicken broth, basil, and oregano. Scrape up any browned bits. Add the uncooked pasta and stir to combine. -
Simmer
Bring to a boil, then reduce heat to low. Cover and simmer 12–15 minutes, stirring once halfway, until pasta is al dente and the sauce is thickened. Add a splash of broth if needed. -
Cheesy finish
Turn off heat. Stir the chicken back in. Sprinkle mozzarella and Parmesan over the top and gently fold until melty and creamy. -
Rest & serve
Cover and let rest 2–3 minutes to thicken. Garnish with fresh herbs and serve hot.
Notes
-
Short pasta only: Tubes and twists cook evenly and hold sauce best.
-
Don’t rush the simmer: Too high heat can evaporate liquid before pasta cooks.
-
Extra saucy? Add ¼–½ cup more broth at the end.
-
Spinach boost: Stir in a handful of baby spinach right before the cheese—it wilts perfectly.
-
Make it spicy: Add red pepper flakes with the garlic.
Nutritional Information*
Okay, let’s talk nourishment. This is a balanced, satisfying meal that fuels you up. Here’s a rough breakdown per serving (based on 4 servings, using the ingredients listed):
- Calories: ~480
- Protein: ~35g (Thanks, chicken and cheese! Great for keeping you full.)
- Carbohydrates: ~40g (The pasta gives us the energy to keep going.)
- Fat: ~20g (The good fats from olive oil and the richness from cheese.)
- Fiber: ~3g
- Sugar: ~5g (Primarily from the natural tomatoes in the marinara.)
*Please note: This is an estimate generated from the listed ingredients. Nutritional values can vary significantly based on the specific brands of marinara, cheese, and pasta you use. For precise dietary tracking, I recommend using a calculator with your exact products.
Final Thoughts
This One-Pot Chicken Parmesan Pasta is more than just a recipe—it’s a celebration of flavor, simplicity, and real-life cooking. It’s the answer to those nights when you want something deeply satisfying, impressively delicious, but entirely achievable. It proves that a home-cooked meal doesn’t have to be complicated to feel special, and that the best dishes often come from a blend of inspiration and practicality.
From my kitchen’s “happy accident” to your family table, this skillet wonder is designed to deliver joy—the joy of more time, fewer dishes, and a shared meal that brings everyone together. So here’s to less time at the sink and more time at the table, savoring those cheesy, saucy, perfectly cozy bites. You’ve got this.

Breakfast Sausage Muffins : Savory, High-Protein Morning Boost
Rise, Shine, and Conquer Your Morning: The Ultimate Breakfast Sausage Muffin
Hey friends, Beau here from Feastical! Let’s get real for a second. How many of you have stared into the fridge at 7 AM, bleary-eyed, wondering how on earth you’re supposed to fuel your day with… air? Or worse, grabbed something that tastes like cardboard and leaves you hungry an hour later? I’ve been there, trust me. The morning scramble is real, but your breakfast doesn’t have to be a scramble of the sad, last-minute variety.
That’s exactly why I’m so fired up to share this recipe with you today. We’re putting an end to boring, rushed, and unsatisfying mornings. I’m talking about my legendary Breakfast Sausage Muffins. Imagine this: a fluffy, savory muffin, warm from the oven, packed with perfectly seasoned halal turkey sausage and gooey pockets of melted cheddar cheese. It’s a handheld hug of protein and flavor that says, “I’ve got you,” no matter how crazy your day gets.
These little powerhouses are the secret weapon you’ve been searching for. They’re meal-prep magic, freezer-friendly gold, and absolutely family-approved. Whether you’re sprinting to catch the bus, need a post-gym refuel, or just want a cozy weekend bite that feels special, this recipe delivers. We’re keeping it simple, soulful, and seriously satisfying. So, tie on that apron (or don’t—we’re casual here), and let’s make mornings something to actually look forward to!
The “Aha!” Moment That Started It All
This recipe wasn’t born in a flash of gourmet inspiration; it was born out of pure, unadulterated hunger on a chaotic Tuesday. Picture it: me, years ago, trying to get out the door for an early meeting, my stomach growling like a bear, and my kitchen looking… well, post-apocalyptic. I had some leftover cooked sausage from dinner, a few eggs, and a sad half-bag of shredded cheese. The classic scramble felt too time-consuming, and toast felt too flimsy.
In a moment of “what if?” madness, I threw it all into a muffin tin with some basic pantry staples. I crossed my fingers and popped it in the oven. Twenty minutes later, I was holding a warm, savory, perfectly portable breakfast. I ate two straight from the tin, burning my fingers because I couldn’t wait. That was the “aha!” moment. This wasn’t just a thrown-together meal; it was a solution. I packed the rest for the week, and every single morning felt like a tiny victory. It evolved from that scrappy experiment into this perfected, foolproof formula I’m sharing with you. It’s proof that the best kitchen creations often come from needing a delicious, no-fuss way to feed a hungry human!
Gathering Your Flavor Arsenal
Here’s everything you’ll need to build these muffin miracles. I’ve included my chef insights and swaps so you can make this recipe your own!
- 1 lb halal turkey sausage, cooked and crumbled: I love using halal turkey sausage for its lean protein and fantastic seasoning. It’s juicy, flavorful, and a great lighter option. Chef’s Tip: If you can’t find halal turkey sausage, any ground breakfast sausage (pork, chicken, or plant-based) works beautifully. Just cook it until no pink remains and drain any excess fat.
- 1 1/2 cups all-purpose flour (or gluten-free 1:1 blend): The foundation of our muffin. A standard gluten-free blend like Bob’s Red Mill works seamlessly here for a perfect texture swap.
- 1 cup shredded sharp cheddar cheese: The sharper, the better for that classic, tangy punch! Pre-shredded is convenient, but block cheese you shred yourself melts creamier (it doesn’t have anti-caking agents).
- 1 cup milk (halal-certified if needed): Whole milk gives the richest texture, but any milk—dairy or unsweetened almond/oat milk—will do the job.
- 2 large eggs: Our binding agents and moisture magic. Let them sit out for 10 minutes to come to room temperature for a smoother batter.
- 2 tbsp melted butter (or neutral oil): Butter adds incredible flavor, but avocado oil or melted coconut oil are great dairy-free options.
- 1 tbsp baking powder: NOT baking soda. This is our leavening hero that gives these savory muffins their beautiful rise and fluffy lift.
- 1/2 tsp garlic powder & 1/2 tsp onion powder: The dynamic duo of savory depth! They amplify the sausage flavor without any chopping required.
- Salt and black pepper to taste: Season as you go! I start with 1/2 tsp salt and a few cracks of pepper, then adjust after folding in the sausage.
- Optional MVP Add-Ins: Chopped green onions, diced bell peppers, or a pinch of smoked paprika. Toss in 1/4 to 1/2 cup of your favorite veg for extra color and nutrition!
Let’s Get Baking: Your Foolproof Blueprint
Follow these steps, and you’re guaranteed muffin success. I’m walking you through each one with my favorite kitchen hacks!
Step 1: Preheat & Prep. Fire up your oven to 375°F (190°C). This is the perfect temperature for a golden top and a cooked-through center. Now, grab your muffin tin. This is crucial: grease it well with butter, oil, or non-stick spray. Even if it’s non-stick, do it. Trust me, nothing’s sadder than a muffin that won’t let go.
Step 2: Cook the Sausage. Heat a skillet over medium heat. Add your sausage (if using links, remove the casings first). Cook, breaking it up with a spoon, until it’s browned, cooked through, and crumbly. Drain any fat and then let it cool on a plate for a few minutes. Pro Hack: Cooling it slightly prevents it from melting the cheese when you mix it in and stops it from “cooking” the eggs in your batter.
Step 3: Mix the Dry Team. In a large mixing bowl, whisk together your flour, baking powder, garlic powder, onion powder, salt, and pepper. Whisking aerates the flour and ensures the baking powder is evenly distributed, which is the secret to an even rise. No one wants a baking powder pocket!
Step 4: Unite the Wet Team. In a separate bowl (or a large measuring cup), whisk the milk, eggs, and melted butter until they’re completely combined and smooth. See those little strands of cooked egg white from the hot butter? That’s okay! That’s just flavor in the making.
Step 5: The Gentle Merge. Pour the wet ingredients into the dry ingredients. Now, channel your inner gentle giant. Using a spatula, fold the mixture together until the flour is *just* moistened. Lumps are your friends! Overmixing is the #1 enemy of tender muffins—it develops the gluten and leads to toughness. A few dry streaks are fine; they’ll incorporate in the next step.
Step 6: The Big Fold-In. To that slightly lumpy batter, add your cooled sausage, shredded cheese, and any optional add-ins like bell peppers. Now, fold everything together gently until it’s evenly distributed. The batter will be thick and hearty—that’s exactly what we want!
Step 7: Portion with Love. Using a spoon or cookie scoop, divide the batter evenly among your 12 prepared muffin cups. Fill them about 3/4 of the way full. This gives them room to puff up into perfect muffin tops. For extra crunch, sprinkle a little extra cheese on top of each one.
Step 8: Bake to Golden Perfection. Slide the tin into your preheated oven. Bake for 18-22 minutes. You’re looking for beautifully golden tops and a clean toothpick inserted into the center of a muffin. Ovens vary, so start checking at 18 minutes.
Step 9: The Patient Cool-Down. This is the hardest part! Let the muffins cool in the tin for 5 full minutes. This allows them to set and makes them much easier to remove. Then, run a butter knife around the edges and transfer them to a wire rack to cool completely for storage, or dig in while they’re warm and glorious!
How to Serve These Savory Gems
Okay, you’ve got a tray of golden, cheesy, sausage-studded beauty. Now what? The possibilities are endless!
For the Classic Cozy Experience: Slide two warm muffins onto a plate. Pair them with a dollop of cool sour cream or Greek yogurt and a side of fresh fruit or a simple arugula salad. The contrast of hot and cold, savory and fresh, is absolute perfection with a cup of good coffee.
For the Grab-and-Go Champion: Let the muffins cool completely, then toss them into a zip-top bag or container. They are the ultimate portable breakfast. Tuck one into your lunchbox with an apple, or grab two for a power-packed mid-morning snack.
For the Brunch Star: Arrange a whole platter of these muffins alongside other favorites—maybe some fresh berries, crispy bacon, and a pitcher of mimosas. They look gorgeous and are the heartiest item on the table, guaranteed to impress your guests without any last-minute fuss.
Make It Your Own: 5 Flavor Twists
Once you’ve mastered the base recipe, the kitchen playground opens up! Here are a few of my favorite spins:
- “Everything Bagel” Style: Swap the cheddar for everything bagel seasoning mixed into the batter and sprinkled on top. Use cooked breakfast sausage and add a tablespoon of everything bagel seasoning to the dry ingredients.
- Southwest Fiesta: Use chorizo-style sausage (or add 1 tsp chili powder & 1/2 tsp cumin to your turkey sausage). Swap cheddar for pepper jack cheese and fold in a 1/4 cup of drained canned green chiles and some fresh cilantro.
- Veggie-Packed Delight: Perfect for using up leftovers! Use a plant-based sausage crumble or just skip it. Fold in 1/2 cup each of finely chopped sautéed mushrooms, spinach (wilted and squeezed dry), and sun-dried tomatoes.
- French Toast Inspired: A sweeter-savory option! Use maple-flavored sausage. Reduce the salt in the batter and add a teaspoon of pure maple syrup to the wet ingredients. A pinch of cinnamon is delicious here too.
- Bacon & Swiss: Swap the turkey sausage for 8 oz of cooked, crumbled bacon. Swap the cheddar for shredded Swiss or Gruyère cheese. Add 1 teaspoon of dried thyme to the dry ingredients for an incredible flavor combo.
Beau’s Kitchen Confidential
This recipe is my kitchen workhorse, and like any good friend, it’s evolved with me. The first time I made them, I was so eager I forgot the baking powder. Let’s just say we had some very dense, hockey-puck-esque “muffins.” A valuable (and slightly embarrassing) lesson was learned! Now, I always whisk my dry ingredients right by the oven so I can’t miss them.
I also learned that these muffins freeze like a dream. I double the batch almost every time. Once cooled, I freeze them in a single layer on a baking sheet before bagging them up. On crazy mornings, I just grab one, microwave it for 45-60 seconds, and boom—hot, homemade breakfast in under a minute. It feels like a secret superpower. Don’t be afraid to play with the add-ins based on what’s in your fridge. That’s how the best family recipes are born!
Your Questions, Answered
Q: My muffins turned out a bit dry. What happened?
A: The most common culprits are overmixing the batter or overbaking. Remember, mix until *just* combined, and check for doneness at the 18-minute mark. Using a dark-colored muffin tin can also cause faster baking, so you may need to reduce the temperature by 25°F if you notice over-browning.
Q: Can I make these ahead of time?
A: Absolutely! They are the *ultimate* make-ahead food. Store cooled muffins in an airtight container in the fridge for up to 4 days, or in the freezer for up to 3 months. Reheat in the microwave, toaster oven, or a regular oven until warmed through.
Q: My muffins didn’t rise very much. Why?
A: First, check the date on your baking powder—it loses potency over time. Second, make sure you used baking *powder*, not baking soda. And third, ensure your oven was fully preheated before the muffins went in. A cold start can hinder the rise.
Q: Can I use silicone muffin liners?
A> You can! They work great. No greasing needed, and they pop right out. Just place them on a baking sheet for stability, as they can be floppy to move when full.

Breakfast Sausage Muffins : Savory, High-Protein Morning Boost
Description
Busy mornings get a lot easier with these breakfast sausage muffins. They’re fluffy, cheesy, packed with halal turkey sausage, and perfect for meal prep. Bake a batch once and you’ve got a warm, protein-rich breakfast ready to grab all week. Simple ingredients, big flavor, zero morning stress.
Ingredients
-
1 lb halal turkey sausage, cooked and crumbled
-
1½ cups all-purpose flour (or gluten-free 1:1 blend)
-
1 cup shredded cheddar cheese
-
1 cup milk
-
2 large eggs
-
2 tbsp melted butter or neutral oil
-
1 tbsp baking powder
-
½ tsp garlic powder
-
½ tsp onion powder
-
½ tsp salt (adjust to taste)
-
¼ tsp black pepper
Optional add-ins (up to ½ cup total): chopped green onions, diced bell peppers, cooked spinach, or olives
Instructions
-
Preheat oven to 375°F (190°C). Grease a 12-cup muffin tin well.
-
Cook sausage in a skillet over medium heat until fully browned and crumbly. Drain and let cool slightly.
-
Mix dry ingredients in a large bowl: flour, baking powder, garlic powder, onion powder, salt, and pepper.
-
Mix wet ingredients in another bowl: milk, eggs, and melted butter.
-
Combine wet and dry mixtures. Stir gently until just combined — do not overmix.
-
Fold in sausage, cheese, and any optional add-ins.
-
Fill muffin cups about ¾ full.
-
Bake 18–22 minutes, until golden and a toothpick comes out clean.
-
Cool 5 minutes in the pan, then remove to a rack.
Notes
-
Let sausage cool slightly before mixing so it doesn’t affect the batter texture.
-
Don’t overmix — a slightly lumpy batter makes softer muffins.
-
Shred cheese from a block for better melting.
-
Double the batch and freeze — they reheat great.
-
For dairy-free, use plant milk and oil instead of butter and cheese substitute if desired.
Nutritional Info (Per Muffin)
Here’s a general breakdown based on the specific ingredients listed. Remember, values can vary based on brands and specific substitutions (like using lower-fat cheese or milk).
- Calories: ~230
- Protein: 12g (A solid protein punch to keep you full!)
- Carbohydrates: 18g
- Fat: 12g
- Fiber: 1g
- Sugar: 2g
- Sodium: ~360mg
These muffins strike a fantastic balance. The protein from the eggs, sausage, and cheese provides sustained energy, while the carbs give you a quick boost. They’re a far more balanced and satisfying choice than a sugary pastry or a plain carb-heavy breakfast.
Final Thoughts
And there you have it, friends—your new go-to recipe for winning the morning. These Breakfast Sausage Muffins are more than just food; they’re a little act of self-care, a tool for less stressful days, and a seriously delicious bite of comfort.
I hope you bake up a batch and fill your kitchen with that incredible savory aroma. Most of all, I hope they give you a few extra minutes of peace (or sanity!) in your busy routine. Food should make life better, not harder. This recipe is proof that it can.
If you make them, I’d love to hear how it goes

Cottage Cheese Banana Pancakes : High Protein, Naturally Sweet Breakfast
Rise, Shine, and Flip: The Secret to Pancakes That Actually Love You Back
Hey, friend! Beau here, welcoming you back to my kitchen corner at Feastical. Ever have one of those mornings where you stare into the fridge, willing a magical, delicious, and actually good for you breakfast to materialize? You crave the cozy, comforting ritual of pancakes—that golden-brown sizzle, the stackable joy—but maybe your energy levels (or your goals) are begging for something more substantial than a carb crash waiting to happen. I’ve been there more times than I’ve burned toast (and that’s saying something).
That’s why I’m practically doing a happy dance to share my go-to, never-fail, “wow, these are actually healthy?!” miracle breakfast: Cottage Cheese Banana Pancakes. Forget everything you think you know about “diet food.” These pancakes are light, impossibly fluffy, and pack a serious protein punch that keeps you full and focused all morning. They’re naturally sweet from a ripe banana, creamy from the cottage cheese, and they come together in one blender in about five minutes flat. It’s the feel-good, taste-even-better solution to your breakfast dilemmas. So, tie on that apron—or don’t, we’re keeping it simple—and let’s make a stack that’ll make your taste buds and your body do a little celebration.
The “Aha!” Moment: A Pancake Revelation
This recipe was born out of pure, unadulterated kitchen desperation. A few years back, I was deep in a post-workout breakfast rut. Eggs were getting boring, protein shakes felt like a chore, and regular pancakes left me dragging by 10 AM. One Sunday, staring at a sad, spotty banana and a tub of cottage cheese, I had a “what if?” moment. I remembered my grandma’s old trick of adding ricotta to pancakes for tenderness. Cottage cheese is ricotta’s protein-packed cousin, I reasoned. I threw everything into my blender, crossed my fingers, and poured the batter onto a hot skillet.
The first whiff was promising—sweet banana and warm cinnamon. The first flip revealed a perfect, golden surface. But the real magic happened with the first bite. They were incredibly tender, slightly creamy, and had a subtle, satisfying richness that traditional pancakes lack. My wife wandered in, skeptical of my “weird pancake experiment,” stole a bite off my plate, and her eyes went wide. “These are your best pancakes. Ever.” And just like that, a staple was born. Now, it’s not a weekend in our house without the whir of the blender and the scent of these protein-packed beauties on the griddle.
Gathering Your Goodies: Simple Ingredients, Big Flavor
Here’s the beautiful part: you only need a handful of simple, wholesome ingredients. I bet most are already in your kitchen. Let’s break them down, because knowing your “why” makes you a better cook!
- 1 Ripe Banana: The star of the natural sweetness show. The spottier, the better! Those brown spots mean maximum sugar conversion, which equals sweeter, more flavorful pancakes without a grain of refined sugar. Chef’s Insight: No ripe banana? A 1/4 cup of unsweetened applesauce or pumpkin puree works in a pinch, though the flavor profile will change.
- 2 Large Eggs: Our binding agents and a key source of protein and structure. They give the pancakes lift and a lovely, tender crumb. Substitution Tip: For a dairy-free version, you can try using flax eggs (2 tbsp ground flaxseed + 5 tbsp water, let sit 5 mins), though the texture will be a bit denser.
- 1/2 Cup Cottage Cheese: The secret weapon! It adds a huge boost of protein (casein, for the slow-and-steady energy releasers) and creates an unbelievably moist, creamy texture. Don’t worry—you won’t taste “cottage cheese.” It melts right into deliciousness. Chef’s Insight: I use small-curd, 4% milkfat for the best flavor and texture, but any fat percentage or even lactose-free works great. For a smoother batter, use small curd or give it a quick blitz in the food processor first.
- 1/4 Cup Oats (Rolled or Quick): Our flour substitute! Oats add heart-healthy fiber, a lovely nutty flavor, and help soak up moisture for the perfect batter consistency. Substitution Tip: To make these gluten-free, ensure you’re using certified gluten-free oats. You can also swap the oats for 1/4 cup of whole wheat flour or all-purpose flour if that’s what you have.
- 1/2 Teaspoon Baking Powder: Our little lift machine. It’s what gives these dense-ish ingredients their delightful, fluffy rise. Make sure yours is fresh for maximum puff!
- 1/2 Teaspoon Cinnamon (Optional, but Highly Recommended): The flavor booster. Cinnamon and banana are a match made in heaven. It adds warmth and depth that makes these taste like a treat. Feel free to add a pinch of nutmeg or vanilla extract, too!
- Pinch of Salt: Never skip the salt! It balances the sweetness and enhances every other flavor in the batter.
- Butter or Oil for Cooking: For that perfect, non-stick golden crust. I love the flavor of butter, but a neutral oil like avocado or coconut works beautifully, especially if you’re cooking over medium-high heat.
Let’s Get Flippin’: Your Foolproof Guide to Fluffy Perfection
Ready to make magic? This is the easiest pancake method you’ll ever meet. Get your blender and your favorite non-stick skillet or griddle ready.
- Blend It All Together. Seriously, that’s it. Add your ripe banana, eggs, cottage cheese, oats, baking powder, cinnamon, and salt directly into the blender jar. No need to mash the banana first! Put the lid on securely and blend on high for 30-45 seconds. Stop and scrape down the sides if needed, then blend again for another 15-20 seconds until the batter is completely smooth and no oat bits remain. Chef’s Hack: A smooth batter is key here. If you see whole oats, you’ll get dense spots in your pancakes. Give it a good, thorough blend!
- The Rest is Best. Let the batter sit in the blender for 2-3 minutes. This allows the oats to absorb some of the liquid and the baking powder to start activating. You’ll see the batter thicken slightly. This small wait guarantees pancakes that hold their shape beautifully on the griddle.
- Heat & Grease Your Stage. While the batter rests, place a large non-stick skillet or griddle over medium heat. Let it get properly hot—a drop of water should skitter and sizzle. Add a small pat of butter or a light drizzle of oil and swirl to coat the surface. Chef’s Tip: Medium heat is your friend. Too hot, and the outside burns before the inside cooks. Too low, and you lose that nice browning.
- Pour & Watch for Bubbles. Using a 1/4-cup measuring cup or a ladle, pour the batter onto the hot skillet to form small-to-medium rounds. I like to keep them on the smaller side (about 4 inches across) for easier flipping. Now, the hardest part: be patient! Cook for 2-3 minutes. You’ll know it’s time to flip when the top surface is covered in little bubbles that pop and stay open, and the edges look set and slightly dry.
- The Grand Flip. Slide your spatula completely underneath the pancake with confidence. A decisive, gentle flip is better than a hesitant one! Cook on the second side for 1-2 minutes, until it’s golden brown and feels springy to the touch in the center. Chef’s Hack: Don’t press down on the pancakes with your spatula! You’ll squeeze out all the lovely air and moisture we worked so hard to create.
- Keep ‘Em Warm. As you finish each pancake, transfer it to a wire rack set over a baking sheet in a warm (200°F) oven. This keeps them all hot and prevents the bottoms from getting soggy, which can happen if you stack them on a plate right away.
Stack ‘Em High & Dress ‘Em Right: How to Serve Your Masterpiece
This is the fun part! These pancakes are a dream canvas for all your favorite toppings. I love building a little “breakfast bar” when we have guests.
For the classic Feastical treatment, I go for a double hit of protein and freshness: a generous dollop of Greek yogurt (it’s like a creamy, tangy frosting), a handful of fresh berries or sliced bananas, a light drizzle of pure maple syrup or honey, and a final sprinkle of chopped nuts or a pinch of extra cinnamon. The contrast of the warm, creamy pancakes, cool yogurt, and sweet fruit is absolute perfection.
Want to keep it super simple? A smear of almond butter and a few banana slices is a power-packed option. For a decadent (but still pretty wholesome) treat, try a spoonful of chocolate-hazelnut spread or a sprinkle of dark chocolate chips cooked right into the pancakes. However you top them, serve them immediately with a big cup of coffee or tea, and savor every bite of your homemade, healthy triumph.
Make It Your Own: 5 Delicious Twists to Try
Once you’ve mastered the base recipe, the world (or at least your kitchen) is your oyster! Here are a few of my favorite ways to mix it up:
- Blueberry Lemon Zest: Fold 1/2 cup of fresh or frozen blueberries into the batter after blending. Add the zest of one small lemon to the blender with the other ingredients. The bright lemon makes the berries sing!
- Chocolate Peanut Butter Cup: Add 2 tablespoons of cocoa powder and 2 tablespoons of powdered peanut butter (like PB2) to the blender. Stir in 1/4 cup of dark chocolate chips after blending. Top with sliced bananas for the full experience.
- Pumpkin Spice Everything Nice: Replace the banana with 1/2 cup of canned pumpkin puree. Increase the cinnamon to 1 teaspoon and add 1/4 teaspoon each of ginger and nutmeg. Hello, fall!
- Tropical Vibes: Use the banana, but add 1/4 cup of crushed pineapple (well-drained) and 2 tablespoons of shredded coconut to the batter. A splash of coconut extract is magic here.
- Savory “Everything Bagel” Style: Omit the cinnamon and banana. Add 1 tablespoon of everything bagel seasoning to the batter and blend. Cook as usual and top with smoked salmon, a schmear of cream cheese, and fresh dill for an incredible savory brunch flip.
Beau’s Kitchen Notes: The Evolution of a Favorite
I’ve made these pancakes probably a hundred times, and they’ve taught me a lot. The first few batches, I was convinced they needed flour to hold together—nope! The cottage cheese and eggs are miracle workers. I’ve also learned that letting the batter rest is non-negotiable for the perfect flip.
One funny fail: I once decided to “amp up the protein” by adding unflavored protein powder. Let’s just say I created delicious, sweet-tasting hockey pucks that even the dog looked at suspiciously. Lesson learned: if it ain’t broke, don’t fix it. The simple, whole-food combo here is perfectly balanced. These pancakes have also become my secret weapon for using up overripe bananas. No more sad banana bread when you can have protein pancakes instead! They freeze beautifully, too—just lay cooled pancakes on a parchment-lined sheet, freeze solid, then transfer to a bag. Reheat in the toaster for a 2-minute weekday win.
Your Questions, Answered: Pancake Peace of Mind
Q: My pancakes are turning out gummy or soggy in the middle. What did I do wrong?
A: This usually points to two things: 1) The heat was too high, causing the outside to brown before the inside could cook through. Dial it back to a true medium heat. 2) They weren’t quite ready to flip. Wait for those bubbles to pop and stay open, and the edges to look fully set.
Q: Can I make the batter the night before?
A: I don’t recommend it for the best texture. The baking powder will activate overnight, and the oats will absorb all the liquid, leaving you with a thick, gloppy batter that won’t cook evenly. The 5-minute blend in the morning is totally worth it for fresh, fluffy results.
Q: I don’t have a blender. Can I make these?
A> You can! Mash the banana very well with a fork in a bowl. Add the eggs and cottage cheese and whisk vigorously until as smooth as possible (some small cottage cheese curds are okay). Stir in the oats, baking powder, cinnamon, and salt. Let rest 5 minutes to allow the oats to soften a bit more before cooking.
Q: Do these taste like cottage cheese?
A> I get this question a lot! The honest answer is no, not at all. The banana and cinnamon are the dominant flavors. The cottage cheese completely melts into the batter, acting as a creamy protein powerhouse that just makes the texture incredibly rich and satisfying. Even cottage cheese skeptics are usually converted!
Cottage Cheese Banana Pancakes : High Protein, Naturally Sweet Breakfast
Description
Want pancakes that taste cozy and sweet but also keep you full and energized? These cottage cheese banana pancakes are the perfect upgrade. They’re soft, fluffy, naturally sweet, and loaded with protein — all made in a blender with just a few simple ingredients. Ideal for busy mornings or relaxed weekend breakfasts.
Ingredients
-
1 ripe banana
-
2 large eggs
-
½ cup cottage cheese
-
¼ cup rolled or quick oats
-
½ tsp baking powder
-
½ tsp cinnamon (optional)
-
Pinch of salt
-
Butter or oil for the pan
Instructions
-
Blend batter:
Add banana, eggs, cottage cheese, oats, baking powder, cinnamon, and salt to a blender. Blend 30–45 seconds until completely smooth. -
Rest briefly:
Let the batter sit for 2–3 minutes so the oats can absorb moisture and thicken slightly. -
Heat pan:
Warm a non-stick skillet over medium heat. Lightly grease with butter or oil. -
Cook:
Pour small rounds (about ¼ cup each) into the pan. Cook 2–3 minutes until bubbles form and edges look set. -
Flip:
Turn and cook another 1–2 minutes until golden and cooked through. -
Serve warm with fruit, yogurt, nut butter, or a light drizzle of maple syrup.
Notes
-
Use a very ripe banana for better sweetness and flavor.
-
Keep pancakes small — they flip more easily.
-
Cook on medium heat so the inside cooks before the outside browns too fast.
-
If batter thickens while sitting, add 1–2 teaspoons of milk and stir.
-
These freeze well — reheat in a toaster or pan.
Feeling Good About What You’re Eating
I’m not a dietitian, but I am a chef who believes in knowing what’s fueling your body. Here’s a general breakdown per serving (about 3-4 medium pancakes, or half the recipe), calculated using 4% cottage cheese and without toppings. Remember, this is an estimate, and your specific ingredients may cause variations.
This stack delivers a fantastic balance: around 250 calories, a whopping 16 grams of protein to keep you satiated, about 22 grams of carbs (from the banana and oats for energy), and 10 grams of fat for staying power. You’re also getting around 3 grams of fiber. Compare that to a similar-sized stack of traditional buttermilk pancakes, which might have 5-7g of protein and significantly more refined carbs and sugar, and you can see why this recipe feels like such a win. It’s a breakfast that truly powers your day.
The Last Bite: Why This Recipe Earned a Permanent Spot in My Rotation
At the end of the day, the recipes that stick are the ones that solve a problem, bring joy, and taste fantastic. These Cottage Cheese Banana Pancakes check every box. They solve the “healthy vs. delicious” breakfast debate. They bring the joy of a weekend pancake ritual any day of the week. And the taste? Well, I think you’ll agree it’s a home run.
They’ve become more than just a recipe for me; they’re a reminder that eating well doesn’t mean sacrificing flavor or comfort. It’s about smart, simple swaps and celebrating real, good food. I hope this recipe finds its way into your regular rotation, creating its own cozy memories in your kitchen. Now, I’d love to hear from you! Did you try a fun variation? Did they pass the kid (or partner) test? Tag me on social @Feastical or drop a comment on the blog—I love seeing your creations.
Until next time, keep your spatula handy and your heart (and stomach) full,
Beau</strong
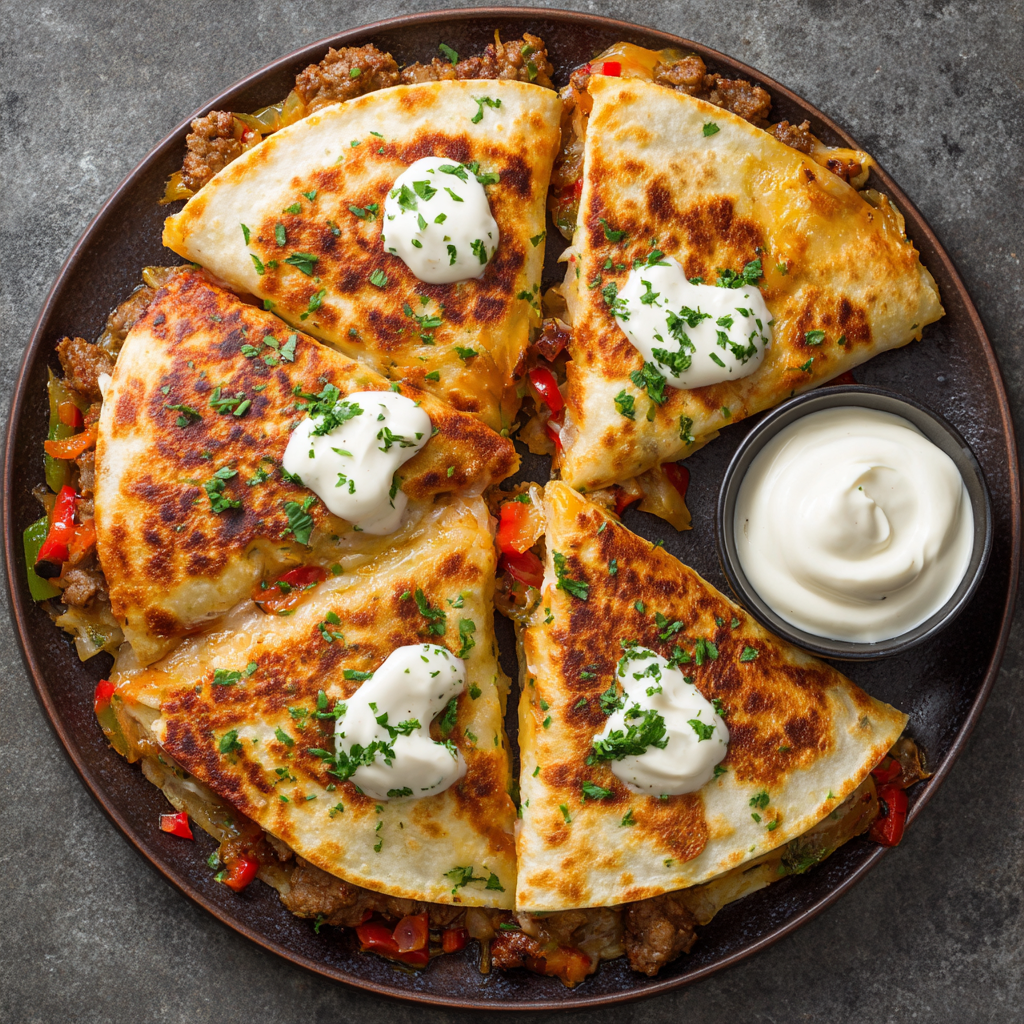
Sausage Quesadillas : Smoky, Cheesy, and Loaded with Flavor
Cheesy Sausage Quesadillas: Your New Weeknight Hero
Hey there, friend! Beau here, from Feastical. Let’s be real for a second: we’ve all stared into the fridge at 6 PM, willing a delicious, satisfying dinner to magically appear. You want something hearty, something that feels like a treat, but you don’t have the energy for a culinary masterpiece. Sound familiar? That’s exactly why I’m so fired up to share these Sausage Quesadillas with you today.
This isn’t just a recipe; it’s your secret weapon. Imagine this: a hot, crispy tortilla giving way to a river of melted cheese, packed with savory sausage and sweet, charred peppers and onions. And then, you dip it into a cool, smoky, and tangy chipotle crema that takes every single bite to a whole new level. It’s smoky, cheesy, loaded with flavor, and—here’s the best part—it comes together in about 25 minutes, using just one skillet. This is the kind of feel-good food I built Feastical for: simple, soulful, and guaranteed to make everyone at the table smile. So, let’s ditch the dinner drama and make something spectacularly easy and delicious together.
The Quesadilla That Saved Game Day
This recipe brings me back to my early 20s, crammed into a tiny apartment with three buddies, watching football every Sunday. Our food budget was… let’s call it “creative.” We lived on a rotation of pasta, frozen pizza, and whatever we could scrounge. One particularly dire Sunday, all we had was half a pack of sausage links, a lone bell pepper, a sad-looking onion, a block of cheddar, and a package of tortillas. Desperation, as they say, is the mother of invention (and also of some pretty fantastic kitchen creations).
We sliced, sizzled, and piled everything into those tortillas, cooking them in a battered skillet until they were golden and oozing. We didn’t have sour cream, but we mixed mayo with a packet of Taco Bell hot sauce we’d saved. It was messy, cheesy perfection. That day, the humble quesadilla transformed from a quick snack into a legitimate, crowd-pleasing meal. It was the hit of the game. Every time I make this recipe now, I think of those loud, laughter-filled afternoons. It’s proof that the best meals aren’t about fancy ingredients; they’re about good food shared with good people.
Gathering Your Flavor Crew
Here’s the beautiful part: this recipe is incredibly flexible. Think of this list as your blueprint, not a rulebook. I’ll walk you through each ingredient and give you my favorite swaps.
- 1/2 lb Sausage (Italian or Breakfast Style): This is your flavor anchor. Italian sausage brings fennel and garlic notes, while breakfast sausage is sage-y and milder. For a leaner option, use chicken or turkey sausage. Chef’s Insight: Remove the casings if using links—just squeeze the meat right out!
- 1/2 cup Bell Peppers, thinly sliced: I love a mix of red and green for color and sweetness. Any color works! Don’t have fresh? A handful of frozen mixed peppers will do in a pinch.
- 1/2 cup Onion, thinly sliced: Yellow onion is perfect for its balance of sweet and pungent when cooked. Red onion adds a nice bite if you’re into that.
- 1 cup Shredded Cheese: The glue that holds it all together! A melty blend like Monterey Jack and cheddar is my go-to. Pre-shredded bags are convenient, but grating your own cheese from a block melts creamier and smoother.
- 4 Flour Tortillas (8-10 inch): The vessel of joy. Use the larger “burrito-size” tortillas for hearty portions. For a gluten-free twist, corn tortillas work (you might just need a few more).
- 1 tbsp Olive Oil or Butter: For that perfect golden, crispy exterior. Butter gives incredible flavor, while oil has a higher smoke point.
For the Chipotle Crema:
- 1/2 cup Sour Cream or Greek Yogurt: Sour cream is classic and rich. Greek yogurt makes a tangier, protein-packed version. I use both interchangeably!
- 1 Chipotle Pepper in Adobo Sauce: This little can is a flavor powerhouse! Start with one pepper for medium heat. For less heat, use just 1 tsp of the sauce. Pro Tip: Freeze the leftover peppers and sauce in an ice cube tray for future recipes!
- 1 tsp Lime Juice: A bright squeeze to cut through the richness. Lemon juice works too.
- Pinch of Salt: Just a tiny bit to wake up all the other flavors in the crema.
Let’s Build Some Crispy, Cheesy Magic
Ready? Grab your favorite skillet (cast iron is a champ for this), and let’s get cooking. I’ll guide you through each step with my best hacks to guarantee quesadilla success.
- Brown the Sausage: Crumble your sausage into a cold, large skillet. Turn the heat to medium. Cooking it from cold helps render the fat slowly, giving you a better sear and flavor. Break it up with your spatula as it cooks until it’s nicely browned and no longer pink. Use a slotted spoon to transfer it to a bowl, leaving that glorious flavorful fat in the pan. Chef’s Hack: Don’t drain it! That fat is liquid gold for cooking your veggies.
- Sizzle the Veggies: Toss your sliced peppers and onions right into the sausage drippings. If your sausage was lean, add a drizzle of oil. Sauté them over medium-high heat for 5-7 minutes. We’re not just softening them—we want some beautiful caramelization and char on the edges. That’s where the deep, sweet flavor comes from. Season them with a tiny pinch of salt to help them sweat. Once they’re soft and fragrant, scoop them into the bowl with the sausage.
- Whizz Up the Crema: While the skillet is free, make your sauce. Plop the sour cream, chipotle pepper, lime juice, and salt into a small blender or food processor. Blitz it until completely smooth. No blender? No sweat! Just mince the chipotle pepper super fine and whisk everything together in a bowl. Taste it! Want more smoke? Add another pinch of sauce. Set it aside.
- The Art of Assembly: This is the fun part. Wipe your skillet clean with a paper towel. Lay one tortilla flat on a cutting board. On ONE HALF of the tortilla, sprinkle a light layer of cheese. This first layer acts as the “glue.” Top with a hearty amount of the sausage and veggie mixture, then another generous handful of cheese. The double-cheese method is key—it seals the deal. Fold the empty half of the tortilla over the filling, creating a perfect half-moon.
- Crisp to Perfection: Heat your skillet over medium heat. Add about half a tablespoon of oil or butter and swirl it around. Carefully place your assembled quesadilla in the pan. Cook for 2-3 minutes, until the bottom is a deep, golden brown. Chef’s Golden Rule: Don’t press down with your spatula! You’ll squeeze out the precious, melty cheese. Just let it be. Peek underneath to check the color. When it’s perfect, confidently flip it. Cook for another 2-3 minutes until the second side is equally gorgeous and the cheese is audibly bubbling inside. Repeat with the remaining quesadillas.
How to Serve These Beauties
Presentation is part of the fun! Let the quesadilla rest on a cutting board for just 60 seconds after cooking—this lets the cheese set slightly so it doesn’t all gush out when you cut it. Then, use a sharp knife or pizza cutter to slice it into 3 or 4 wedges.
Arrange the wedges on a plate with a good-sized dollop of that vibrant chipotle crema right in the center for dipping. Now, let’s build the scene:
- The Classic Spread: A simple side of black beans or a quick corn and tomato salad balances the richness.
- For a Fun Appetizer: Make mini quesadillas using small tortillas and slice them into strips for the ultimate game-day finger food.
- The Full Fiesta Plate: Go all out! Serve with a scoop of guacamole, pico de gallo, and a lime wedge for squeezing. Don’t forget an ice-cold beer or a zesty margarita.
The beauty is on the inside, so let those cheesy, loaded cross-sections shine!
Make It Your Own: 5 Delicious Twists
Once you master the basic formula, the world is your quesadilla! Here are some of my favorite ways to mix it up.
- Spicy Chorizo & Potato: Swap Italian sausage for Mexican chorizo. Add 1/2 cup of cooked, diced potatoes (leftover roasted potatoes are amazing here) for a hearty, breakfast-for-dinner vibe.
- BBQ Chicken & Apple: Use shredded cooked chicken tossed in your favorite BBQ sauce instead of sausage. Add a handful of very thin apple slices for a sweet crunch. Use a Colby Jack cheese blend.
- Breakforilla Supreme: Use breakfast sausage. After cooking the veggies, scramble 2-3 eggs right in the same pan, then mix them with the sausage and veggies. Perfect for brunch!
- Veggie-Packed “Everything” Quesadilla: Skip the meat! Use black beans or pinto beans as the protein. Add sliced mushrooms, zucchini, or spinach to the pepper and onion mix. It’s incredibly satisfying.
- White Pizza Quesadilla: Go Italian! Use Italian sausage, but swap the cheese for ricotta mixed with garlic powder and mozzarella. Skip the chipotle crema and serve with warm marinara for dipping.
A Few Notes from My Kitchen to Yours
This recipe has been a work in progress since that first apartment experiment. The chipotle crema was the game-changer—it adds a cool, complex element that makes the dish feel complete. A funny lesson learned: I once tried to flip a too-full quesadilla too early, and let’s just say I spent more time cleaning cheese off the stovetop than eating. Patience is a virtue here!
I also highly recommend investing in a good, heavy-bottomed skillet. It distributes heat evenly, preventing burnt spots and giving you that all-over, perfect crisp. Most of all, have fun with it. Cooking should feel like a creative escape, not a chore. If you want to add a jalapeño, do it. Prefer pepper jack cheese? Go for it. This is your kitchen, your rules.
Your Quesadilla Questions, Answered
Q: My quesadilla is soggy! What did I do wrong?
A: The #1 culprit is too much filling or wet ingredients. Make sure your sausage and veggie mixture isn’t watery—let it drain if needed. Also, ensure your skillet is properly preheated before adding the quesadilla, and don’t crowd the pan. That initial sizzle is crucial for crispness.
Q: Can I make these ahead of time?
A: You can prep the filling (sausage & veggies) and the crema up to 2 days ahead. Store them separately in the fridge. Assembly and cooking are best done right before serving for maximum crispness. You can keep cooked quesadillas warm in a 200°F oven on a wire rack (so they don’t steam).
Q: The cheese melts out and makes a mess. Help!
A: This usually means the heat is too high, cooking the outside before the inside cheese can melt and bind. Stick to medium heat. Also, make sure you’re using enough “glue” cheese on both the bottom and top of the filling, as the recipe suggests.
Q: Can I bake these instead of pan-frying?
A> Absolutely! For a lighter option or to cook several at once, preheat your oven to 425°F (220°C). Assemble the quesadillas on a baking sheet, brush the tops lightly with oil, and bake for 8-10 minutes, flipping once halfway through, until crispy and golden.

Sausage Quesadillas : Smoky, Cheesy, and Loaded with Flavor
Description
Need a fast, filling dinner that feels like a treat but takes almost no effort? These cheesy sausage quesadillas are the answer. Crispy tortillas, melty cheese, savory sausage, and sweet sautéed peppers and onions come together in one pan in about 25 minutes. Perfect for busy nights, after-school meals, or sharing with family.
Ingredients
For the quesadillas:
-
½ lb (225 g) Italian or breakfast sausage
-
1 bell pepper, thinly sliced
-
1 small onion, thinly sliced
-
1 cup shredded mozzarella or cheddar (or a blend)
-
4 medium flour tortillas
-
1 tbsp olive oil or butter
-
Salt and black pepper to taste
Quick Chipotle Crema (optional but recommended):
-
½ cup sour cream or plain Greek yogurt
-
1 chipotle pepper in adobo sauce (or 1 tsp adobo sauce for mild heat)
-
1 tsp lime juice
-
Pinch of salt
Instructions
-
Cook sausage:
Heat a skillet over medium heat. Add sausage and cook, breaking it up, until browned and fully cooked. Remove to a bowl. -
Cook vegetables:
In the same skillet, add peppers and onions. Cook 5–7 minutes until soft and lightly browned. Season lightly with salt and pepper. Add to the sausage and mix. -
Make crema (if using):
Blend or finely mince chipotle pepper and mix with sour cream, lime juice, and salt until smooth. Set aside. -
Assemble quesadillas:
Lay out tortillas. Sprinkle cheese over one half of each tortilla, add sausage-veggie mixture, then a bit more cheese. Fold over to close. -
Cook:
Wipe skillet clean. Add a little oil or butter over medium heat. Cook each quesadilla 2–3 minutes per side until golden and crisp and cheese is melted. -
Serve:
Rest 1 minute, slice into wedges, and serve with chipotle crema or your favorite dip.
Notes
-
Shred your own cheese if possible — it melts smoother.
-
Medium heat is best so the tortilla crisps without burning before the cheese melts.
-
Don’t overfill or flipping becomes messy.
-
Cooked filling can be made up to 2 days ahead and refrigerated.
-
Great add-ins: corn, black beans, mushrooms, or spinach (cook them first).
Nutritional Information (Approximate)
I believe food is about joy first, but it’s always helpful to know what you’re enjoying! This info is for one serving (about 1/2 of a large quesadilla with crema), based on the original recipe using Italian sausage, full-fat sour cream, and cheddar cheese.
- Calories: 450
- Protein: 22g (Great for keeping you full!)
- Carbohydrates: 28g
- Fat: 28g
- Fiber: 2g
Remember: These numbers can vary widely based on your specific ingredients. To lighten it up, use turkey sausage, low-fat cheese, Greek yogurt for the crema, and a whole-wheat tortilla. You can easily boost the fiber by adding black beans or using a high-fiber tortilla.
Final Thoughts
And that’s it, my friend! You are now fully equipped to conquer dinner (or lunch, or a killer snack) with these epic Sausage Quesadillas. This recipe embodies everything I love about cooking: it’s adaptable, forgiving, and always delivers on comfort and flavor. It’s a reminder that a few simple ingredients, treated with a little love and a hot skillet, can create something truly special.
I’d love to hear how your quesadilla adventure goes. Did you try a fun variation? Snap a pic of that cheesy pull and tag me on social or shoot me an email through the site. Your kitchen stories are my favorite thing. Until next time, keep your skillet hot and your kitchen full of laughter.
Happy cooking,
Beau

Easy Sausage Calzones : Cheesy, Folded & Freezer-Friendly
The Ultimate Comfort Food Hack: Easy Sausage Calzones
Hey friends, Beau here! Let me paint you a picture: It’s a Tuesday night. You’re tired, maybe a little hangry, and the thought of figuring out dinner feels like solving a complex math problem. The pizza delivery app is calling your name, but your wallet (and maybe your desire for something actually satisfying) is saying “nah.” Sound familiar? What if I told you there’s a third option? A glorious, golden, cheese-filled, handheld option that’s easier than you think and a thousand times more rewarding than waiting for a delivery driver.
Welcome to the wonderful world of Easy Sausage Calzones. This isn’t just a recipe; it’s your new secret weapon for winning weeknights, impressing friends without stress, and filling your freezer with love. Think of it as pizza’s cool, sophisticated cousin who showed up in a neat little package. A flaky, chewy crust giving you a big hug, and inside? A party of savory Italian sausage, gooey mozzarella, creamy ricotta, and your favorite flavors, all baked to bubbly perfection.
The best part? These calzones are a total chameleon. Bake ‘em fresh for a crowd, pack ‘em cold for lunch, or freeze a batch for that future you who will be eternally grateful. They’re forgiving, fun to make, and scream “you’ve got this” even if your kitchen confidence is still warming up. So, tie on that apron (or don’t, I’m not judging), and let’s turn some simple ingredients into pure, foldable magic.
My Calzone Epiphany: A Dorm Room Delight
My love affair with the calzone started in a… let’s call it a “humble” college kitchenette. My roommate, Dave, and I lived on a steady diet of ramen and questionable dining hall fare. One night, fueled by a serious craving and a tiny bit of homesickness for my Nonna’s cooking, we decided to get ambitious. We pooled our cash for pizza dough, a single link of sausage, and the cheapest block of cheese we could find. Our “calzones” were tragically misshapen, probably undercooked in the middle, and we had to use ketchup for dipping (don’t @ me, we were desperate).
But when we pulled those lumpy, golden-brown parcels out of our toaster oven? Pure joy. It was more than food; it was an event. We felt like culinary geniuses. That shared creation, that messy, cheesy victory, turned a boring Wednesday into a core memory. It taught me that great food isn’t about perfection—it’s about the experience, the sharing, and the triumphant feeling of making something delicious with your own two hands. Every time I make these now, I think of that tiny kitchen and smile. I’ve refined the recipe a bit since then (goodbye, ketchup), but the spirit of easy, shareable, soul-warming fun is exactly the same.
What You’ll Need: A Tour of Flavor
Gathering your ingredients is the first step to success. Here’s your shopping list, along with my little chef-notes to set you up for a win.
- 1 lb pizza dough (store-bought or homemade): This is your blank canvas! I often grab a ball from the bakery section of my grocery store – it’s a fantastic shortcut. If you’re feeling fancy, your favorite homemade dough works beautifully. Chef’s Tip: Let it sit at room temp for 30-60 minutes before shaping. It becomes much more relaxed and easy to work with.
- ¾ lb Italian sausage, cooked and crumbled: Savory, herby, and packed with flavor. I prefer mild Italian sausage for its classic taste, but hot sausage is a fantastic kick if you like heat. Substitution: Ground beef, turkey, or chicken sausage work great. For a veggie twist, seasoned plant-based crumbles or sautéed lentils are awesome.
- 1 cup shredded mozzarella cheese: The glue of melty, stretchy goodness. I like to shred my own from a block—it melts smoother than the pre-shredded kind (which has anti-caking agents).
- ½ cup ricotta cheese: This is the secret weapon! It adds a luscious, creamy texture and a subtle tang that balances the salty sausage. Chef’s Insight: Give your ricotta a quick stir in a bowl before using. This lightens it up and makes it easier to spread.
- ¼ cup marinara or pizza sauce (plus more for dipping): The flavor booster. Use your favorite jarred sauce or a simple homemade one. Tip: Don’t overdo the sauce inside the calzone, or it can make the dough soggy. We’ll have plenty for dipping!
- ½ tsp Italian seasoning: A little herbal magic. This simple blend wakes up all the other flavors.
- 1 egg (for egg wash): The golden glow-maker. A quick brush of beaten egg gives the crust that professional, shiny, deep-golden finish.
- Optional fillings: sautéed peppers, onions, mushrooms: This is your playground! Sauté any veggies you love first to remove excess moisture. Spinach, olives, or even a few pepperoni slices are all welcome here.
Let’s Get Folding: Your Step-by-Step Guide
Ready to build? Follow these steps, and you’ll be a calzone-connoisseur in no time. I’ve packed each one with my favorite hacks to make the process smooth and fun.
- Preheat & Prep: Crank your oven to 400°F (200°C). This hot oven is key for a crispy crust and a fully cooked interior. Line a baking sheet with parchment paper – your best friend for easy cleanup and no sticking.
- Divide and Conquer the Dough: On a lightly floured surface, divide your dough into 4 equal pieces. Think of them as little pillows of potential. Roll or gently stretch each piece into an oval or circle about ¼-inch thick. Chef’s Hack: If the dough keeps snapping back, cover it and let it rest for 5 minutes. It’s just being stubborn and needs to relax its gluten.
- Mix the Magic Filling: In a medium bowl, combine the cooked sausage, mozzarella, ricotta, that ¼ cup of marinara, and the Italian seasoning. If you’re adding those optional sautéed veggies, toss them in now. Mix until everything is happily combined.
- Fill & Fold – The Big Moment! Spoon a generous amount of filling onto ONE HALF of each dough circle, leaving a 1-inch border all the way around. This border is your sealing zone. Carefully fold the bare half of the dough over the filling to create a half-moon shape. Now, seal the deal: starting at one end, crimp the edges together by folding and pinching, or press down firmly with the tines of a fork. Pro Tip: A good seal is non-negotiable! You don’t want any cheesy escape artists during baking.
- Vent and Shine: Use a sharp paring knife to cut 2-3 small slits (about 1-inch long) on the top of each calzone. This lets steam escape so they don’t puff up like balloons and burst. Finally, whisk that egg with a splash of water and gently brush it over the tops. This gives them that gorgeous, golden-brown, bakery-worthy finish.
- Bake to Golden Perfection: Transfer your calzones to the prepared baking sheet, giving them a little room to breathe. Bake for 18-22 minutes. You’re looking for a deep golden-brown crust and maybe even a glimpse of bubbling cheese through the vents. The smell in your kitchen will be your final clue—it’ll be irresistible.
How to Serve Your Masterpiece
Okay, they’re out of the oven. RESIST the urge to bite in immediately (seriously, that cheese is lava). Let them cool on the sheet for a good 5-7 minutes. This allows the filling to set slightly, making them easier to handle and saving the roof of your mouth.
Now, for the fun part: presentation! I love serving these on a big, rustic wooden board or platter. Pile them high, scatter some fresh basil or parsley over the top for a pop of color, and put a big bowl of warm marinara sauce right in the center for dipping. For a full Italian-inspired feast, pair them with a simple, crisp green salad with a tangy vinaigrette to cut through the richness. They’re also fantastic alongside some roasted garlic broccoli or zucchini. Don’t forget napkins—the good, sturdy kind. This is hands-on, happy eating.
Mix It Up: Your Calzone, Your Rules
The basic recipe is a classic for a reason, but don’t be afraid to play with your food! Here are a few of my favorite twists:
- The “Supreme”: Add those sautéed bell peppers, onions, and mushrooms, plus a handful of sliced black olives and a sprinkle of pepperoni.
- Chicken Pesto Paradise: Swap the sausage for cooked, shredded chicken. Use pesto instead of marinara in the filling, and mix the mozzarella with some sun-dried tomatoes. Divine.
- Breakfast-for-Dinner Calzone: Fill with scrambled eggs, cooked breakfast sausage or bacon, and a mix of cheddar and mozzarella cheeses. A dash of hot sauce in the filling? Yes, please.
- Veggie Lover’s Dream: Skip the meat. Load it up with sautéed spinach, artichoke hearts, roasted red peppers, and feta or goat cheese along with the mozzarella.
- White Pizza Pocket: Omit the red sauce. Mix ricotta with minced garlic, chopped fresh spinach, and plenty of mozzarella. After baking, drizzle with a little olive oil and cracked black pepper.
A Few More Thoughts from My Kitchen
This recipe has been a staple in my life for years, and it’s evolved in the best ways. I used to be terrified of dough, but pizza dough is so forgiving—if you get a small tear, just pinch it closed or patch it with a tiny scrap of dough. No one will know!
My biggest “aha” moment was mastering the freezer step. Let the baked calzones cool completely, then wrap each one individually in plastic wrap and toss them in a freezer bag. They keep for up to 3 months. To reheat, you don’t even need to thaw! Just bake from frozen at 375°F for 25-30 minutes, until heated through. It’s like having a personal pizzeria in your freezer. Game. Changer.
Your Questions, Answered
Q: My calzone leaked cheese everywhere! What did I do wrong?
A: Ah, the great cheese escape! This usually means either the seal wasn’t tight enough (really crimp those edges!) or you cut the steam vents too deep. Small, shallow slits are all you need. Also, make sure you’re not overfilling—leave that 1-inch border.
Q: Can I make these ahead of time and bake them later?
A> Absolutely! Assemble the calzones, place them on a parchment-lined sheet, and instead of baking, pop the whole sheet in the freezer for 1-2 hours until solid. Then transfer the frozen, unbaked calzones to a freezer bag. When ready to bake, add a few extra minutes to the baking time straight from frozen. You can also refrigerate assembled calzones for a few hours before baking.
Q: The middle of my dough seems undercooked. Help?
A> This can happen if the dough is rolled too thick or the oven temp is off. First, make sure your oven is fully preheated. Next time, try rolling the dough just a touch thinner. If it’s browning too fast but still raw inside, tent the calzones loosely with foil for the last 5-10 minutes of baking.
Q: What’s the best way to reheat leftovers?
A> To retain the crisp crust, reheat in a 350°F oven or toaster oven for 10-15 minutes. The microwave will work in a pinch but will make the crust soft.

Easy Sausage Calzones : Cheesy, Folded & Freezer-Friendly
Description
When you’re craving pizza night flavors but want something more filling and fun to eat, sausage calzones are the perfect answer. They’re warm, cheesy, handheld, and surprisingly simple to make with store-bought dough. Great for weeknight dinners, meal prep, or sharing with family and friends.
Ingredients
-
1 lb (450 g) pizza dough (store-bought or homemade)
-
¾ lb (340 g) Italian sausage
-
1 cup shredded mozzarella cheese
-
½ cup ricotta cheese
-
¼ cup marinara or pizza sauce (plus extra for dipping)
-
½ tsp Italian seasoning
-
1 egg, beaten (for egg wash)
-
Optional: sautéed peppers, onions, or mushrooms
Instructions
-
Preheat oven to 400°F (200°C). Line a baking sheet with parchment paper.
-
Cook sausage in a skillet over medium heat until fully browned. Crumble and let cool slightly.
-
Make filling: In a bowl, mix cooked sausage, mozzarella, ricotta, marinara sauce, and Italian seasoning. Add optional cooked veggies if using.
-
Shape dough: Divide dough into 4 equal pieces. Roll each into a circle about ¼-inch thick.
-
Fill: Spoon filling onto one half of each circle, leaving a 1-inch border around the edge.
-
Fold & seal: Fold dough over to form a half-moon. Press edges firmly and crimp with a fork to seal.
-
Vent & brush: Cut 2 small slits on top of each calzone. Brush tops with beaten egg.
-
Bake 18–22 minutes, until golden brown and crisp.
-
Cool 5 minutes before serving. Serve with warm marinara for dipping.
Notes
-
Let dough rest at room temperature 30 minutes — it’s easier to roll.
-
Don’t overfill or the calzones may burst open.
-
Always cook vegetables first to remove extra moisture.
-
For extra crisp crust, bake on the lower oven rack.
-
These freeze well after baking — reheat in the oven for best texture.
Nutritional Information (Per Calzone)
Hey, I believe in transparency and balance. Here’s a general breakdown for one calzone made as written. Remember, variations will change these numbers!
- Calories: ~500
- Protein: 25g
- Carbohydrates: 35g
- Fat: 30g
- Fiber: 2g
These are hearty! To lighten things up, you can use turkey sausage, part-skim cheeses, and load up on veggie fillings. Pairing with a big salad also helps create a balanced, fulfilling meal.
Final Thoughts
And there you have it, friends—your passport to calzone confidence. This recipe is more than just a list of steps; it’s an invitation to get creative, to make a mess, to fill your home with incredible smells, and to share something truly delicious. Whether you’re feeding a family, meal-prepping for one, or need a guaranteed crowd-pleaser for game day, these Easy Sausage Calzones have got your back.
So what are you waiting for? Grab that dough, get that cheese melting, and make your own kitchen memory. I can’t wait to hear how yours turn out. Tag me over on Feastical if you share a photo! Now, if you’ll excuse me, I think it’s time to raid my own freezer for one of these bad boys. Happy cooking!
— Beau

Crispy Baked Popcorn Chicken : Kid-Friendly, Crunchy, and Oven-Fried
Crispy Baked Popcorn Chicken – Your New Favorite Snack (Without the Fryer!)
Hey friends, Beau here from Feastical! Let’s talk about a universal truth: the irresistible, almost magnetic pull of perfectly crispy, bite-sized chicken. You know the kind I mean. The sort that disappears from a platter in minutes, leaving behind only a few lonely crumbs and a chorus of “did you get the last one?”
But here’s the thing. As much as we all love that classic drive-thru vibe, I don’t always love the aftermath of deep-frying at home. The lingering smell, the vat of oil to deal with, the feeling that maybe I should have just worn sweatpants. That’s why I became obsessed with cracking the code for the ultimate oven-baked popcorn chicken.
This isn’t a sad, baked imitation. This is the real deal: juicy, tender chunks of chicken wrapped in a shatteringly crisp, golden coat that actually stays crunchy. We’re achieving that magical texture with a simple, genius coating you probably already have in your pantry. It’s a weeknight hero, a game-day superstar, and a lunchbox game-changer all in one. So, tie on your favorite apron, and let’s make some magic happen that’s fun, easy, and seriously delicious.
The Popcorn Chicken Pact: A Kitchen Memory
This recipe always takes me back to my grandma’s linoleum-floored kitchen. She had a rule: one “fun” dinner a week, which almost always meant her version of finger food. Her specialty was pan-fried chicken bits, which she’d let me “help” coat. My little hands would be a mess of flour and egg, and she’d tell me the secret was in the “double dunk.”
We’d eat them straight from the paper-towel-lined bowl, dipping them into a ridiculous array of sauces she’d concoct, while she’d tell stories. It wasn’t fancy, but it was pure joy. When I started Feastical, I knew I needed my own version of that memory—a recipe that was just as fun to make as it was to eat, but a bit easier on the cook (and the cleanup!). This baked method is my tribute to those afternoons: all the crunch, all the flavor, and all the togetherness, with a modern, no-fuss twist. Every time I make it, I swear I can smell her perfume and hear her laugh. Food memory magic, right?
Gathering Your Crunch Crew: Ingredients & Why They Matter
Simple ingredients, big flavor payoff. Here’s what you need and why each one is a key player in our crunchy symphony:
- 1½ lbs boneless, skinless chicken breasts or thighs: The star! Breasts are lean and give that classic nugget feel. Thighs are my personal favorite—they’re more forgiving and stay incredibly juicy. For maximum kid-friendliness, I often use a mix! Cut into true 1-inch “popcorn” bites for even cooking.
- 2 cups crushed cornflakes or crispy rice cereal: This is our CRUNCH secret weapon! Cornflakes give a deeper, toasty flavor and golden color. Crispy rice cereal is a fantastic, slightly lighter alternative. Crush them just enough to have some texture—you want tiny shards, not dust. (Pro tip: toss them in a bag and roll with a rolling pin!)
- ½ cup all-purpose flour: The first layer of our coating trio. It creates a dry base for the egg to stick to, ensuring our crunchy coating has something to grip onto. For a gluten-free version, your favorite 1:1 GF flour blend works perfectly here.
- 2 large eggs, beaten: Our “glue.” Beaten eggs create that essential sticky layer that locks the crunchy coating onto the chicken. No skipping this step!
- ½ tsp garlic powder & ½ tsp paprika: Flavor boosters! Garlic powder is a must for savory depth. Paprika adds a subtle sweetness and that gorgeous color. Feel free to play with smoked paprika for a different vibe.
- Salt and black pepper: Season every layer! I season the chicken lightly, the flour mixture, and even give the final coated bites a tiny pinch before baking. It makes all the difference.
- Your favorite dipping sauces & optional parsley: The fun finale! Ranch, honey mustard, BBQ, sriracha mayo—go wild. A sprinkle of fresh chopped parsley at the end makes it look pretty, but it’s totally optional.
Let’s Get Cooking: The Step-by-Step to Crunchtown
Ready? This is where the fun begins. Follow these steps, and you’ll be a popcorn chicken pro in no time.
- Prep Your Station & Oven: First, preheat your oven to a hot 400°F (200°C). This high heat is crucial for mimicking that “fried” crispiness. Line a large baking sheet with parchment paper or give it a light spritz of cooking spray. Trust me, this prevents sticking and makes cleanup a dream.
- The Coating Trio (A.K.A. The Dredging Line): Get three shallow bowls or plates. In the first, whisk together your flour, garlic powder, paprika, salt, and pepper. In the second, beat the two eggs until smooth. In the third, place your crushed cereal. Line them up: Flour → Egg → Crunch. This “assembly line” is your best friend for efficiency.
- The Art of the Dredge: Take a chicken piece and toss it in the flour mixture. Shake off the excess—this isn’t a thick batter, just a light dusting. Next, dip it fully into the egg, let the excess drip off. Finally, roll it in the crushed cereal, pressing gently so a good amount adheres. Place it on your prepared baking sheet. Repeat! Chef’s Hack: Use one hand for the dry steps (flour and cereal) and the other for the wet egg hand. This keeps you from getting “club hands” coated in everything!
- Spacing is Key: Arrange the coated chicken pieces in a single layer with a little space between them. No crowding! If they’re touching, they’ll steam instead of getting crisp. Use two baking sheets if you need to.
- Bake to Golden Perfection: Slide the sheet into your preheated oven. Bake for 10-12 minutes, then take it out and carefully flip each piece. This ensures even browning and crunch on all sides. Return to the oven for another 10-13 minutes, until the chicken is cooked through (internal temp of 165°F) and the coating is a deep, glorious golden brown.
- The Final Touch: Let the chicken rest on the baking sheet for just 2-3 minutes after baking. This helps the coating set and become extra crunchy. Then, transfer to a plate, sprinkle with a little parsley if you like, and serve immediately with those dipping sauces!
How to Serve Your Crunchy Masterpiece
Presentation is part of the fun! Dump these golden bites into a big, welcoming bowl lined with parchment or a clean tea towel (for that casual, “dig in!” feel). For a plate, I love pairing them with something fresh to cut through the richness: think celery sticks, carrot coins, and cucumber slices. For a full meal, they’re amazing on top of a simple green salad, tucked into warm buttered biscuits as sliders, or served alongside some creamy mac and cheese and roasted broccoli. Don’t forget a few small bowls for an array of dipping sauces—let everyone create their own perfect bite!
Get Creative! 5 Fun Twists on the Classic
Once you’ve mastered the basic formula, the world is your crunchy oyster. Try these swaps:
- Spicy Buffalo Style: Add 1-2 tablespoons of hot sauce (like Frank’s) to the beaten eggs. After baking, toss the hot chicken in a mix of melted butter and more hot sauce. Instant buffalo bites!
- Herb & Parmesan Crisp: Mix ½ cup of finely grated Parmesan cheese and 1 tablespoon of Italian seasoning into your crushed cereal coating. Savory, cheesy, incredible.
- “Everything Bagel” Chicken: Replace half of the cereal crumbs with Everything Bagel Seasoning. The onion, garlic, sesame, and poppy seeds create an unreal flavor bomb.
- Sweet & Smoky BBQ: Add ½ tsp of smoked paprika and a pinch of brown sugar to the flour mixture. After baking, brush lightly with your favorite BBQ sauce and pop under the broiler for 60 seconds to caramelize.
- Gluten-Free & Dairy-Free: As mentioned, use a GF flour blend and ensure your cereal is certified gluten-free (many cornflakes and rice cereals are). The recipe is naturally dairy-free as written!
Beau’s Kitchen Notes & Stories
This recipe has evolved more than any other on Feastical! It started with panko breadcrumbs (great, but not *quite* crunchy enough), then tried crushed crackers (too heavy), before landing on the cereal revelation. The first time I used cornflakes, I did a literal happy dance in my kitchen. My dog, Biscuit, was very confused but supportive.
A funny fail: I once tried to “save time” by tossing all the chicken in a bag with the coating. It created a sad, clumpy, uneven mess. The three-bowl dredge is non-negotiable for that perfect, professional-looking crust. Embrace the process—it’s part of the therapy!
FAQs: Your Questions, Answered
Q: My coating came out soft/soggy. What happened?
A: The most common culprits are overcrowding the pan (steam is the enemy of crispiness!) or not preheating the oven fully. Make sure your oven is fully to temp and give those bites some space. Using a wire rack on top of your baking sheet can also help air circulate for maximum crunch on all sides.
Q: Can I make this ahead of time?
A> You can do the coating up to 2 hours ahead! Place the coated, un-baked pieces on the parchment-lined sheet, cover loosely, and refrigerate. Bake straight from the fridge, adding a minute or two to the cook time. I don’t recommend freezing the unbaked coated chicken, as the cereal can get soggy.
Q: What’s the best way to reheat leftovers?
A> To preserve crunch, avoid the microwave. Reheat in a toaster oven or regular oven at 375°F for 5-8 minutes, or in an air fryer at 370°F for 3-4 minutes. They’ll crisp right back up!
Q: Can I use an air fryer?
A> Absolutely! This recipe is air fryer-friendly. Cook in a single layer at 380°F for 10-12 minutes, shaking the basket halfway through. No need to flip!

Crispy Baked Popcorn Chicken : Kid-Friendly, Crunchy, and Oven-Fried
Description
If you love crunchy, bite-sized chicken but don’t want the mess of deep frying, this crispy baked popcorn chicken is the perfect solution. It’s golden, crunchy, juicy inside, and super easy to make with simple pantry ingredients. Great for snacks, lunches, or quick dinners — and perfect with your favorite dipping sauces.
Ingredients
-
1½ lbs (700 g) boneless, skinless chicken breasts or thighs, cut into 1-inch pieces
-
2 cups crushed cornflakes or crispy rice cereal
-
½ cup all-purpose flour
-
2 large eggs, beaten
-
½ tsp garlic powder
-
½ tsp paprika (smoked or regular)
-
¾ tsp salt
-
½ tsp black pepper
-
Cooking spray or a little oil for the pan
-
Optional: chopped parsley for garnish
Instructions
-
Preheat oven to 400°F (200°C). Line a baking sheet with parchment paper or lightly grease it.
-
Prepare coating bowls:
-
Bowl 1: Mix flour, garlic powder, paprika, salt, and pepper.
-
Bowl 2: Add beaten eggs.
-
Bowl 3: Add crushed cereal.
-
-
Coat the chicken:
Dip each chicken piece into the flour mixture, then into the egg, then into the crushed cereal. Press gently so the coating sticks well. -
Arrange on pan:
Place coated pieces in a single layer with space between them. Lightly spray the tops with cooking spray. -
Bake:
Bake for 10–12 minutes. Flip pieces and bake another 10–13 minutes until golden and cooked through (internal temp 165°F / 74°C). -
Rest & serve:
Let rest 2–3 minutes for extra crispiness. Serve hot with your favorite dipping sauces.
Notes
-
Don’t overcrowd the pan — space helps them get crispy instead of soft.
-
Use thighs for extra juiciness or breasts for a leaner bite.
-
Crush cereal to small flakes, not powder — texture = crunch.
-
For extra browning, bake on a wire rack set over the baking sheet.
-
Works great in an air fryer at 380°F (195°C) for 10–12 minutes, shaking halfway.
Nutritional Information (A Note from Beau)
Hey, I’m all about balance! Because we’re baking instead of deep-frying, this recipe is naturally lighter. Here’s a rough estimate per serving (about ¼ of the recipe), but remember, values can change based on your specific ingredients and sauce choices.
Per Serving: Calories: ~280 | Protein: 25g | Carbohydrates: 22g | Fat: 10g | Fiber: 1g
This is a great source of lean protein! To lighten it further, you can use chicken breast and an egg-white wash. The carbs come primarily from the coating, which provides that satisfying crunch we love. It’s a feel-good treat you can feel good about serving.
Final Thoughts: Go Forth and Get Crunchy!
And there you have it, friends—my love letter to crispy, baked, utterly addictive popcorn chicken. This recipe proves that you don’t need a deep fryer to achieve that crave-worthy crunch, just a few simple ingredients and a hot oven. It’s about creating those little moments of joy, whether it’s a quiet Tuesday dinner, feeding a crowd on game day, or recreating a sweet kitchen memory of your own.
I hope this recipe finds its way into your regular rotation and becomes a source of your own kitchen stories. Give it a try, play with the variations, and most importantly, have fun with it. Don’t forget to snap a pic and tag me over at @Feastical—I love seeing your creations!
Until next time, keep your ovens hot and your forks ready.
With love and a side of crunch,
Beau Collier
Prep Time: 15 mins | Cook Time: 25 mins | Servings: 4
Final Thoughts: More Than Just a Snack
Friends, what we’ve made here is more than just a batch of crispy chicken bites. It’s proof that you don’t need a fryer to create something truly crave-worthy—just a little ingenuity, a few simple ingredients, and the willingness to get your hands a little messy in the name of fun. This recipe is a testament to the idea that the best food memories aren’t about perfection; they’re about the laughter in the kitchen, the shared anticipation as smells fill the air, and the collective “mmm” that follows the first crunchy bite.
Whether you’re making this for a busy Tuesday dinner, prepping for game day, or recreating that nostalgic finger-food feeling, you’re not just cooking—you’re creating a moment. You’re building your own version of that paper-towel-lined bowl, your own array of dipping sauces, your own stories to tell.
So here’s to ditching the vat of oil without ditching the joy. To recipes that work as hard as you do. And to finding that perfect, golden crunch right in your own oven.
Now, go grab that last piece before someone else does. You deserve it.
With love and crunch,
Beau from Feastical
Low-Point Chicken Nachos (Only 3 WW Points)
Low-Point Chicken Nachos That Actually Taste Like a Party (Only 3 WW Points!)
Hey friends, Beau here from Feastical! Let’s talk about one of life’s great dilemmas: the intense, soul-deep craving for a loaded plate of nachos versus the desire to feel good about what you’re eating. For the longest time, I felt like I had to choose between the two. I’d stare longingly at those melty, crunchy, gloriously topped chips, then sigh and reach for a rice cake. Not exactly the same vibe, right?
Well, I’m here to tell you that the era of sad, FOMO-induced snacks is over. Today, we’re making magic. We’re crafting a plate of Chicken Nachos so ridiculously flavorful, so texturally perfect, and so utterly satisfying that you’ll do a double-take when I remind you the whole glorious plate is just 3 PersonalPoints on Weight Watchers. Yes, you read that right. Three.
This isn’t about deprivation; it’s about clever, feel-good creation. We’re using a few brilliant ingredient swaps and some classic kitchen love to build a snack (or heck, a full dinner—no judgment here) that tastes like a warm hug from your favorite taqueria. So, grab your favorite apron and let’s turn that craving into a celebration. Your spatula and your taste buds are about to become best friends.
The Nacho Negotiation: A Kitchen Confession
This recipe was born from a very specific, very relatable moment. Picture it: A big game Sunday a few years back. Friends were over, and the spread was legendary—except for me. I was deep in my wellness journey, watching a mountainous platter of fully-loaded nachos make its way around the room like a delicious, cheesy comet. Each pass was a tiny torture.
I finally cracked. I retreated to the kitchen, determined to make something I could enjoy. I rummaged through the fridge: leftover salsa chicken, those high-fiber tortillas I’d been experimenting with, a little tub of light queso. In a flash of “what’s the worst that could happen?” energy, I baked the tortillas into chips, piled everything on, and gave it a zap. The first bite was a revelation. It was crispy, savory, creamy, and spicy—everything I was craving! I brought my little personal plate back to the couch, and I kid you not, three people asked if they could try a bite. My “diet” food got devoured. That’s the moment I knew: feeling good about your food should never mean missing out on the fun. This recipe is that delicious pact with myself, and now, I’m so excited to share it with you.
Your Nacho Blueprint: Simple Ingredients, Big Flavor
Here’s the beautiful part: this recipe is all about smart staples. No weird, hard-to-find items. Just a few key players that do the heavy lifting on flavor while keeping things light. Let’s break it down:
- 2 Xtreme Wellness High Fiber Tortillas (1 WW point each): This is our game-changing base. These tortillas are soft and pliable, but when baked, they transform into crispy, sturdy chips that can hold all our toppings without getting soggy. The fiber content is a hero, keeping you full and happy. Chef’s Insight: Don’t have this brand? Any high-fiber, low-point tortilla or flatbread will work. The mission is maximum crunch for minimum points.
- Cooking Spray (like PAM) & Salt: Our dynamic duo for perfect chips. A light mist of spray helps the salt adhere and promotes even, golden baking. Substitution Tip: If you have an oil mister with your favorite avocado or olive oil, that works great too—just be mindful of a light coating.
- 1 Cup Shredded Salsa Chicken (0 WW points): The hearty, flavorful star. I make a big batch of this in my slow cooker weekly—it’s the ultimate healthy meal prep. How-to: Just toss 1-2 boneless, skinless chicken breasts into your slow cooker and cover with 1 cup of your favorite salsa (I like a verde salsa for a brighter flavor!). Cook on low for 6-8 hours or high for 3-4, then shred with two forks. It’s juicy, tender, and packed with flavor.
- 5 Tbsp Trader Joe’s Queso (1 WW point for the whole amount!): Our melty, creamy glue. TJ’s Queso is a legend for a reason—it’s deliciously cheesy and surprisingly low in points. Chef’s Insight: If you don’t have a Trader Joe’s nearby, look for any light or “skim milk” queso dip at your grocery store. Always check the label for the best points value.
- 3 Tbsp Trader Joe’s Fat-Free Sour Cream (0 WW points): The cool, tangy finish. This adds that essential creamy element that balances the spice. Substitution Tip: Plain, non-fat Greek yogurt is a fantastic, protein-packed alternative with the same tangy kick.
Optional Flair: Want to add a zero-point flavor bomb? Dice up some fresh tomatoes, onions, jalapeños, or cilantro for a bright, fresh topping. A squeeze of lime juice over the whole plate is also a game-changer.
Building Your Masterpiece: Step-by-Step
Alright, team. Let’s get building. This process is fast, fun, and fills your kitchen with the best smells. Follow these steps, and you’ll have a perfect plate in about 20 minutes flat.
- Preheat & Prep: Fire up your oven to 350°F (175°C). This is our tool for transformation. While it heats, grab your tortillas. Using a sharp knife or a pizza cutter, slice each tortilla into 8 triangles—just like you’re cutting a pizza. This creates the perfect chip size.
- Make Your Chips: Lay the tortilla triangles in a single layer on a baking sheet. Give them a very light mist with your cooking spray—we’re talking a quick pass, not a drenching. Then, sprinkle a pinch of salt over them. This little step makes all the difference, seasoning the base layer of our dish. Pop the sheet into the preheated oven and bake for 12-15 minutes. You’re looking for golden edges and a crisp texture. Chef’s Hack: For extra-even cooking, give the sheet a quick rotate halfway through. And don’t crowd the pan! If needed, use two sheets.
- Warm Your Toppings: While your homemade chips are getting crispy, warm up your salsa chicken and queso. I usually just microwave the chicken for 60 seconds and the queso for 30 seconds. You want everything warm and ready for assembly. Hot toppings + hot chips = no sad, cold nachos.
- The Grand Assembly: Take your beautiful, golden chips out of the oven. Leave the oven on! Immediately, spread the warm shredded chicken evenly over the chips. Then, dollop and drizzle that warm queso all over the top. Don’t be shy! The goal is cheesy coverage.
- The Final Melt: Here’s the pro move. Slide the entire loaded sheet back into the oven for just 2-3 minutes. This melts the queso perfectly into the chicken and chips, bonding everything together in glorious harmony. If you’re in a rush, a 60-second blast in the microwave works too, but the oven gives a slightly better texture.
- Finish & Serve: Carefully remove your nacho creation from the oven. Immediately, add your cool, creamy dollops of fat-free sour cream. This contrast of temperatures and textures is key. Add any fresh toppings you like (hello, jalapeño slices!), and serve right away. Nachos wait for no one!
How to Serve & Savor
This recipe makes one incredibly generous personal plate—the kind you can curl up on the couch with. But let’s talk presentation and pairing, because we eat with our eyes first!
Plating: I love serving these right on the baking sheet lined with parchment paper for that rustic, “dig in” feel. For a prettier presentation, use a wide, shallow bowl or a small platter. The key is to avoid piling them too high, which can lead to uneven topping distribution. We want every chip to have its moment in the spotlight.
The Perfect Pairings: While these nachos are a complete meal on their own, they play well with others! For a true feast, pair them with a big, crisp side salad with a zesty lime vinaigrette (zero-point dressing, of course). If you’re serving a crowd, multiply the recipe and let everyone build their own mini sheet-pan nachos. Drink pairing? A sparkling water with lots of lime, an icy light beer, or a refreshing unsweetened iced tea are all fantastic companions.
Make It Your Own: Delicious Variations
The beauty of this framework is its flexibility. Once you’ve mastered the base, the nacho world is your oyster! Here are a few of my favorite twists:
- Buffalo Chicken Nachos: Swap the salsa chicken for shredded chicken tossed in 2-3 tbsp of your favorite zero-point Buffalo hot sauce. Use a light blue cheese dressing (thin it with a little buttermilk or yogurt) instead of sour cream. Spicy, tangy, and incredible.
- BBQ “Pizza” Nachos: Use shredded chicken tossed in 2 tbsp of sugar-free BBQ sauce. Top with diced red onion, a sprinkle of smoked paprika, and fresh cilantro. The queso still works, or try a light sprinkle of part-skim mozzarella (just track it!).
- Fully Loaded Veggie Nachos: Keep it zero-point on the toppings! Skip the chicken and load up with black beans (rinsed and drained), roasted corn, diced bell peppers, onions, and jalapeños. Add extra salsa and maybe a sprinkle of nutritional yeast for a cheesy flavor.
- Breakfast Nachos: Who says nachos are just for dinner? Use the baked chips as a base. Top with scrambled egg whites, a crumbled turkey sausage patty, and a drizzle of the queso. Top with pico de gallo. Game-changing brunch.
- Shrimp & Avocado Nachos: For a pescatarian twist, replace the chicken with cooked, chopped shrimp seasoned with chili powder and lime. Add a few thin slices of avocado (track the healthy fat points) for creamy richness.
Beau’s Kitchen Notes
This recipe has become a weekly staple in my house, and it’s evolved in fun ways. I started making the chips in my air fryer for an even quicker crunch (380°F for 5-6 minutes, shaking once). Sometimes, I’ll double or triple the chicken and chip base and build a huge platter for movie night with my partner—we just track our portions. It feels so normal and festive.
A funny lesson learned: I once got overzealous with the cooking spray on the chips. I mean, I *soaked* them, thinking “more crispiness!” Wrong. They came out oddly tough and fried in spots. A light, even mist is truly the secret. It’s a lesson in restraint that makes the end result even better. Food metaphors, am I right?
Your Nacho Questions, Answered
- Q: My tortilla chips are chewy, not crispy. What happened?
A: This usually means they were either under-baked or crowded on the pan. Ensure they’re in a single layer with a little space between them, and bake until the edges are distinctly golden brown. Ovens vary, so yours might need an extra minute or two. - Q: Can I make these ahead of time?
A: Nachos are best enjoyed immediately. However, you can prep all the components ahead! Bake the chips and store them in an airtight container at room temp. Keep your chicken and queso separate in the fridge. When ready, warm the toppings, spread everything on the chips, and do the final melt. It’s a 5-minute assembly. - Q: I can’t find Xtreme Wellness or Trader Joe’s products. Help!
A> No problem! The formula is simple: Low-point tortilla + low-point cheese sauce + lean protein. Look for any high-fiber, low-carb tortilla (like Ole Xtreme Wellness or Mission’s Carb Balance). For queso, scout your grocery dairy/dip aisle for a “light” version. Compare labels to find the lowest points option. The community in WW apps is great for finding specific brand recommendations in your area. - Q: How do I accurately track this?
A> I track it as: 1 serving of the specific tortillas (2), 1 serving of the specific queso (1), and 0 for the chicken, salsa, cooking spray, and fat-free sour cream. Always double-check the barcodes in your app for the most accurate points, as formulas can change.

Low-Point Chicken Nachos (Only 3 WW Points)
Description
Low-Point Chicken Nachos (Only 3 WW Points!)
Crispy, cheesy, flavorful nachos that actually feel indulgent—but are just 3 PersonalPoints. Perfect for a snack, game day, or even a full meal.
Ingredients
-
2 high-fiber, low-point tortillas (1 WW point each) – e.g., Xtreme Wellness or similar
-
Cooking spray & pinch of salt
-
1 cup shredded salsa chicken (0 WW points) – leftover or prepped in slow cooker
-
5 tbsp light queso (1 WW point total) – Trader Joe’s or any low-fat/light cheese dip
-
3 tbsp fat-free sour cream (0 WW points) – or plain non-fat Greek yogurt
-
Optional toppings: diced tomatoes, onions, jalapeños, cilantro, squeeze of lime
Instructions
1. Preheat & Prep
-
Preheat oven to 350°F (175°C).
-
Slice each tortilla into 8 triangles (like pizza slices).
2. Make Crispy Chips
-
Lay tortilla triangles in a single layer on a baking sheet.
-
Lightly mist with cooking spray and sprinkle with salt.
-
Bake 12–15 minutes, turning halfway if needed, until golden and crispy.
3. Warm Toppings
-
While chips bake, warm your salsa chicken (60 sec in microwave) and queso (30 sec in microwave).
4. Assemble Nachos
-
Spread the warm chicken evenly over chips.
-
Drizzle/dollop the queso over the chicken and chips.
5. Melt & Finish
-
Return the loaded nachos to the oven for 2–3 minutes to meld the cheese and chicken.
-
Remove and add sour cream and optional fresh toppings (jalapeños, tomatoes, lime juice, cilantro).
Serving Suggestions
-
Serve on the baking sheet for a casual, “dig-in” feel or a small platter for a prettier presentation.
-
Pair with a zesty salad or sparkling water, light beer, or unsweetened iced tea.
Notes
-
Air fryer option: 380°F for 5–6 minutes, shaking halfway for extra crunch.
-
Don’t over-spray the chips—light mist only.
-
Prep components ahead: chips at room temp, chicken/queso in fridge; assemble and melt when ready.
Nutritional Information*
Here’s a breakdown for the entire recipe as written (one generous serving):
- Calories: ~290
- Protein: 27g (This high protein count is a huge win for staying full!)
- Carbohydrates: 25g
- Dietary Fiber: 12g (Nearly half the carbs are fiber—that’s the magic of those tortillas.)
- Fat: 9g
- WW PersonalPoints: 3
*This is an approximation based on the specific brands listed. Always calculate using your own tracker with the exact products you use for the most accurate points count.
Prep Details: Prep Time: 5 minutes | Cook Time: 15 minutes | Total Time: 20 minutes | Servings: 1
Final Thoughts from My Kitchen to Yours
Friends, this recipe is more than just a list of ingredients and steps. It’s a reminder that taking care of yourself can and should be delicious. It’s proof that with a little creativity, you don’t have to give up the foods that feel like celebration.
These Low-Point Chicken Nachos are my go-to for busy weeknights, solo movie dates, and anytime I need a guaranteed smile from my plate. They’re simple, they’re fast, and they absolutely deliver on the comfort food promise. I hope this recipe finds its way into your regular rotation and brings you as much joy as it has brought me.

Sausage Flatbread Pizza : Creamy, Sweet & Spicy in Every Bite
Sausage Flatbread Pizza – Creamy, Sweet & Spicy in Every Bite
Hey friends, Beau here from Feastical! Let’s talk about the beautiful chaos of a weeknight. You know the scene: stomachs are rumbling, time is ticking, and the siren call of takeout menus is getting louder. But what if I told you that in less time than it takes for delivery to arrive, you could be pulling a golden, bubbling, flavor-packed masterpiece out of your own oven?
That’s the magic of this Sausage Flatbread Pizza. It’s my go-to hero when I want something that feels gourmet, tastes incredibly complex, but asks for practically zero effort. We’re talking about a crispy flatbread canvas slathered with luscious, cool ricotta, piled high with savory crumbled sausage and deeply sweet caramelized onions, then finished with a drizzle of spicy-sweet hot honey that makes your taste buds sit up and applaud.
This isn’t just a recipe; it’s a strategy. A strategy for winning the weeknight, for impressing your friends without breaking a sweat, and for creating that warm, satisfied feeling that only a truly great meal can bring. So, grab your favorite baking sheet and let’s turn your kitchen into the best pizzeria in town—no dough-tossing skills required.
The Night We Fell for Flatbread Pizza
I have to confess, my love affair with flatbread pizza started in a moment of sheer desperation. It was a rainy Tuesday, my fridge was sending out mixed signals (half an onion, some ricotta from a pasta project, and a lonely tube of sausage), and my better half was giving me that classic “I’m-hungry-but-don’t-want-to-be-a-bother” look. The classic pizza delivery felt too predictable.
On a whim, I spotted a package of naan bread in the freezer—leftover from a long-forgotten curry night. Lightbulb moment. I toasted it up, smeared on that ricotta, and used up every bit of those fridge stragglers. When I pulled it out of the oven and drizzled it with the spicy honey I keep for my fried chicken, the kitchen went silent. Then came the sound: that perfect crunch followed by a happy sigh. It was a 30-minute miracle that felt like a cozy Friday night. That’s the beauty of cooking; sometimes the best recipes aren’t planned, they’re rescued from the depths of the fridge and become lifelong favorites.
Your Flavor Toolkit: What You’ll Need
Here’s the beautiful part: this recipe is more of a blueprint than a rigid rulebook. The ingredients are simple, and I’ve got swaps for days. This is what you’ll need to gather:
- 2 Flatbreads or Naan: This is our foundation. I love the chewy-yet-crispy texture of naan, but any store-bought flatbread or even a pre-baked pizza crust works. Chef’s Insight: If you have pita bread, use it! Just watch the baking time as it can crisp up faster.
- ½ cup Ricotta Cheese: Our creamy, dreamy base. It’s milder than tomato sauce and creates the perfect backdrop for the other flavors. Substitution Tip: No ricotta? Whole-milk cottage cheese blended until smooth, or even a soft goat cheese, would be fantastic.
- 1 tsp Olive Oil: A little drizzle adds richness and helps the flatbread get gorgeously golden.
- ½ lb Italian Sausage: The flavor anchor. I use spicy Italian sausage for that kick, but sweet/mild works too. Chef’s Insight: For a lighter option, remove the sausage from its casing and crumble it as it cooks for perfect, bite-sized pieces.
- 1 Small Onion, thinly sliced: This is non-negotiable for that sweet, umami depth. Yellow or white onions are perfect here.
- 1 tsp Butter: The secret weapon for caramelizing. Butter brings out the onion’s natural sugars like nothing else.
- Salt & Pepper, to taste: Season at every stage – it builds layers of flavor.
- 2 tbsp Hot Honey: The superstar finish! It’s the magical balance of sweet and heat. DIY Hack: No store-bought? Gently warm 2 tbsp of honey with ¼ tsp of red pepper flakes (or a pinch of cayenne) for 30 seconds. Let it cool slightly. Instant magic.
- Optional: Fresh Thyme or Arugula: A sprinkle of thyme before baking adds an herby perfume. A handful of peppery arugula tossed on top after baking adds a fresh, green crunch that cuts through the richness beautifully.
Let’s Build Some Magic: Step-by-Step
Ready? Apron on, oven preheating, let’s do this. We’ll tackle this in three easy acts: the onions, the assembly, and the grand finale.
- Caramelize Those Onions (The Patient Part): In a skillet, melt your butter over medium-low heat. Add your thinly sliced onions and a pinch of salt. The salt helps draw out the moisture. Now, here’s the chef hack: be patient. Don’t crank the heat! Let them cook slowly, stirring maybe every 5 minutes, for 10-15 minutes. You’re waiting for them to turn a soft, golden brown and smell incredibly sweet. This step is what gives the pizza its sophisticated flavor base. While they’re working their magic, you can cook your sausage.
- Prep & Preheat: Crank your oven to 400°F (200°C). This hot oven will give us a crisp crust without drying out the toppings. Place your flatbreads on a baking sheet – no need for parchment, but a light spritz of oil on the sheet never hurts.
- The Creamy Base: Spoon that ricotta onto the flatbreads and spread it evenly, leaving just a tiny border for the “crust.” Drizzle lightly with the olive oil and season with a crack of black pepper and a tiny pinch of salt (remember, the sausage and onions are seasoned too).
- Top It Up: Now for the fun part! Scatter the cooked, crumbled sausage evenly over the ricotta. Follow it with those glorious, golden caramelized onions. The beauty is in the rustic distribution – no need to be perfect.
- Bake to Perfection: Slide the baking sheet into your hot oven. Bake for 10-12 minutes. You’re looking for the edges of the flatbread to be deeply golden and crisp, and the toppings to be heated through and bubbling in spots. If you love extra crispness, a minute under the broiler at the end will do the trick (watch it like a hawk!).
- The Grand Finale: The second it comes out of the oven, that’s when the magic happens. Drizzle the hot honey generously all over the top. If you’re using arugula or fresh herbs, toss them on now. The residual heat will slightly wilt the greens, which is exactly what you want. Slice it up and serve immediately – this is peak eating experience!
How to Serve This Showstopper
Presentation is part of the joy! I like to place the whole baked flatbreads right on a big wooden cutting board in the center of the table. It feels communal and inviting. Slice them into rustic wedges or rectangles with a pizza cutter or sharp knife.
This pizza is a complete meal in itself, but if you’re feeding a crowd or want to round things out, keep it simple. A bright, lemony arugula salad with a sharp vinaigrette is the perfect foil to the rich, creamy pizza. For a cozy night in, a bowl of roasted tomato soup for dipping would be absolutely divine. And let’s not forget the drinks: a crisp lager, a glass of chilled Pinot Noir, or even a sparkling lemonade all make fantastic companions.
Make It Your Own: Delicious Twists
The fun doesn’t stop here. This recipe is a perfect playground for creativity. Here are a few of my favorite spins:
- The “Everything But The Kitchen Sink” Veggie: Swap the sausage for a mix of roasted veggies! Try thin slices of bell pepper, zucchini, and mushrooms tossed in olive oil and roasted at 400°F for 15 minutes before adding them to the pizza.
- Fig & Prosciutto Elegance: For a fancier appetizer version, use the ricotta base, top with a few thin slices of prosciutto and fresh, sliced figs (or a dollop of fig jam). Bake as directed and finish with the hot honey and a sprinkle of chopped rosemary.
- Break-for-Brunch Pizza: Before baking, use the back of a spoon to create small wells in the ricotta. Crack an egg into each well. Bake until the egg whites are set but the yolks are still runny. Finish with hot honey and chopped chives. Mind-blowing brunch material.
- White Chicken & Spinach: Use shredded rotisserie chicken and a handful of fresh baby spinach (it wilts perfectly in the oven) instead of sausage. A little sprinkle of garlic powder in the ricotta takes it up a notch.
- Dairy-Free Delight: Use a creamy, plain plant-based yogurt or spreadable cashew cheese instead of ricotta. Opt for a plant-based sausage crumble or use those roasted veggies from variation #1.
A Few Notes From My Kitchen to Yours
This recipe has become such a staple in my home that it’s evolved in little ways. I almost always double the caramelized onions and keep the extra in the fridge—they’re amazing on burgers, in omelets, or just on a cracker with cheese. Also, I’ve learned that letting the ricotta come to room temperature for 10 minutes before spreading makes it infinitely easier to work with.
The biggest lesson? Don’t skip the hot honey. I mean it! That sweet-heat finish is what transforms this from a simple sausage pizza to a “wow, what is that flavor?!” experience. It’s the culinary equivalent of a perfect high-five at the end of a meal.
Your Questions, Answered
Q: My flatbread got soggy in the middle. What happened?
A: This usually means either the ricotta was spread too thickly, or the toppings were too wet. Make sure your cooked sausage is drained of excess grease and your onions are properly caramelized (not steaming in their own liquid). Also, ensure your oven is fully preheated for that instant crisp.
Q: Can I make these ahead of time?
A: You can absolutely prep the components! Caramelize the onions and cook the sausage up to 3 days ahead. Store them separately in the fridge. Assemble and bake when you’re ready for the freshest, crispiest result.
Q: What’s the best way to reheat leftovers?
A: To revive the crunch, skip the microwave. Reheat slices in a toaster oven or regular oven at 375°F for 5-7 minutes, or in a dry skillet over medium heat until the bottom re-crisps.
Q: I don’t have a skillet for the onions. Can I bake them?
A: Yes! Toss sliced onions with the butter (melted), a little oil, salt, and pepper on a parchment-lined sheet. Roast at 400°F for 20-25 minutes, stirring once, until golden. It’s a hands-off caramelization method I love.

Sausage Flatbread Pizza : Creamy, Sweet & Spicy in Every Bite
Description
Sausage Flatbread Pizza – Creamy, Sweet & Spicy
A weeknight hero: crispy flatbread, creamy ricotta, savory crumbled sausage, sweet caramelized onions, and a finishing drizzle of spicy-sweet hot honey. Ready in about 30 minutes.
Ingredients
-
2 flatbreads or naan (store-bought, pre-baked works too)
-
½ cup ricotta cheese
-
1 tsp olive oil
-
½ lb Italian sausage (sweet, mild, or spicy)
-
1 small onion, thinly sliced
-
1 tsp butter
-
Salt & pepper, to taste
-
2 tbsp hot honey (or honey + ¼ tsp red pepper flakes)
-
Optional: Fresh thyme or arugula
Chef Notes & Substitutions:
-
Use pita bread or pre-baked pizza crust if you prefer.
-
Substitute ricotta with smooth cottage cheese or soft goat cheese.
-
Turkey sausage works for a lighter version.
-
Hot honey can be DIY: warm honey + red pepper flakes.
Instructions
1. Caramelize the Onions
-
Melt butter in a skillet over medium-low heat.
-
Add onions and a pinch of salt. Cook slowly, stirring every 5 minutes, for 10–15 minutes until soft, golden, and sweet.
2. Cook the Sausage
-
Remove sausage from casing, crumble into a skillet, and cook over medium heat until browned and fully cooked. Drain excess grease.
3. Prep the Flatbread
-
Preheat oven to 400°F (200°C).
-
Place flatbreads on a baking sheet. Lightly drizzle with olive oil.
4. Add the Ricotta Base
-
Spread ricotta evenly over flatbreads, leaving a small border.
-
Season lightly with salt and pepper.
5. Layer Toppings
-
Scatter cooked sausage evenly over the ricotta.
-
Top with caramelized onions. Optional: sprinkle fresh thyme.
6. Bake
-
Bake in preheated oven 10–12 minutes until flatbread edges are golden and crisp.
-
Optional: 1 minute under the broiler for extra crispness.
7. Finish & Serve
-
Drizzle hot honey over the pizza immediately.
-
Optional: top with arugula or fresh herbs.
-
Slice into wedges or rectangles and serve hot.
Notes
-
Caramelized onions can be doubled and stored for other meals.
-
Let ricotta sit at room temperature 10 minutes before spreading for easier handling.
-
Don’t skip the hot honey – it transforms the flavor from “good” to “wow.”
Nutritional Information (Per Serving)
Estimated for 1 of 4 servings (¼ of the total recipe). Please note: This is an estimate and can vary based on specific ingredients used and portion sizes.
- Calories: ~460
- Protein: 21g
- Carbohydrates: 32g
- Fat: 28g
- Sugar: 8g
This pizza is a satisfying balance of protein, carbs, and fats. Using leaner turkey sausage or increasing the veggie-to-sausage ratio can lower the fat content, while whole-grain flatbread can add fiber. Remember, it’s all about balance and enjoyment!
Final Slice of Thought
So there you have it, friends—my not-so-secret weapon for turning an ordinary evening into a little feast. This Sausage Flatbread Pizza proves that incredible flavor doesn’t need to be complicated. It’s about smart shortcuts (thank you, store-bought flatbread!), layering a few powerhouse ingredients, and finishing with a flourish that makes everyone smile.
I hope this recipe finds its way into your regular rotation and becomes your own Tuesday night hero. Give it a try, play with the variations, and most importantly, have fun with it. That’s what Feastical is all about. Now, go forth and bake something awesome! And when you do, tag me or drop a comment—I’d love to see your delicious creations.
Until next time, keep it flavorful!
– Beau