
One-Pan Sweet & Tangy BBQ Sausage Rice
Dinnertime SOS? This One-Pan Wonder’s Got Your Back!
Hey friends, Beau here! Ever have one of those nights where your energy’s running on fumes, the family’s hangry chorus is reaching operatic levels, and the thought of tackling Mount Dishmore after cooking feels… well, impossible? Yeah, we’ve all been there. That’s exactly why this One-Pan Sweet & Tangy BBQ Sausage Rice is my weeknight superhero. Imagine plump, juicy sausage slices caramelized to perfection, nestled in fluffy rice that’s soaked up every drop of smoky BBQ magic, all tangled with vibrant peppers and onions. It’s pure comfort in a skillet – sweet, tangy, smoky, and deeply satisfying – and the cleanup? Just *one pan*. Seriously! No fancy techniques, no obscure ingredients hiding in the back of your spice drawer, just honest, feel-good food that comes together faster than you can say “pass the fork.” It’s the kind of meal that turns chaotic evenings into cozy gatherings, where everyone scrapes their plates clean and you still have energy left for that slice of pie (or maybe just the couch!). Let’s ditch the stress and dive into flavor town!
Smoke Signals & Skillet Memories: Where This Dish Was Born
This recipe? It’s got roots in a cloud of campfire smoke and the glorious chaos of a family reunion years ago. Picture it: My uncle’s backyard, about 20 hungry cousins running wild, and a massive cast-iron skillet perched precariously over flickering flames. We’d thrown in whatever we had – leftover grilled sausages, some wobbly camping chairs, half a bag of rice, and a bottle of sticky-sweet BBQ sauce that was probably older than me. It was desperation cooking, pure and simple. But magic happened in that smoky pan! The rice puffed up, absorbing the sausage drippings and that tangy sauce, the veggies softened into sweet submission… and suddenly, that haphazard mash-up became the star of the picnic table. Everyone hovered around, plates in hand, scooping seconds before the pan even cooled. That smoky, communal joy – the simplicity, the big flavors born from humble ingredients – stuck with me. This recipe is my polished-up, kitchen-friendly homage to that happy accident. It captures that same soul-warming, effortless vibe, minus the risk of tipping the skillet into the fire! Every time I make it, I get a little whiff of campfire nostalgia and a big dose of dinnertime victory.
Your Flavor Arsenal: Simple Staples, Big Impact
Gather these kitchen pals – most are probably already hanging out in your fridge or pantry! Here’s the lowdown:
- 1 lb sausage (Italian or smoked), sliced into rounds: This is your flavor anchor! Italian brings herby notes, smoked adds extra campfire vibes. Kielbasa works great too! Veggie? Swap in plant-based sausage or hearty chickpeas.
- 1 cup long-grain white rice: The perfect texture sponge! It stays fluffy and separate. Avoid short-grain (it gets gluey). Brown rice? See FAQs for adjustments!
- 2 cups chicken broth: Liquid gold for flavor depth! Low-sodium is best so you control salt. Veggie broth keeps it plant-friendly.
- ½ cup BBQ sauce: The soul of the tang! Use your favorite bottled kind – smoky, sweet, or spicy. My hack? A dash of liquid smoke amps it up if your sauce is mild.
- 1 small onion, diced: Sweet, aromatic base. Yellow or white onion works best here.
- 1 bell pepper, diced: Color and crunch! Red, orange, or yellow add sweetness; green gives a brighter tang.
- 2 garlic cloves, minced: Essential savory punch! Don’t skip this flavor booster.
- 1 tbsp olive oil: Our cooking starter. Avocado oil works too.
- 1 tsp smoked paprika: That “campfire” magic dust! Regular paprika lacks the depth, so smoked is key.
- ½ tsp black pepper: Freshly cracked = best flavor pop!
- Salt, to taste: Season as you go, especially at the end. Broth and sausage add salt!
- Fresh parsley, chopped (for garnish): A bright, fresh finish that makes it pretty! Chives or green onions are fab subs.
Let’s Get Sizzling: Your Foolproof Roadmap
Grab your trustiest large skillet (12-inch is ideal!) with a tight-fitting lid. Here’s how we build flavor, layer by layer:
- Heat 1 tbsp olive oil in your skillet over medium heat. Swirl it around to coat the bottom. **Chef’s Tip:** Listen for that gentle sizzle when you add a tiny piece of sausage – that’s when the oil’s perfectly ready! Preheating prevents sticking and ensures a good sear.
- Add the sliced sausage rounds. Spread them out in a single layer (work in batches if needed!). Brown for 3-4 minutes per side, getting them nicely caramelized. **Chef’s Hack:** Don’t stir constantly! Let them sit and develop those gorgeous brown, flavorful bits (fond) on the pan – that’s pure gold for our sauce later! Scoop out the sausage onto a plate once browned; we’ll add it back later. This prevents overcooking.
- In that same glorious, sausage-y pan (don’t wipe it out!), add the diced onion and bell pepper. Cook, stirring occasionally, for about 3 minutes, until they start to soften and the onions turn translucent. **Chef’s Insight:** We’re building layers! The veggies soak up all that leftover sausage flavor and fond. If things look dry, a tiny splash of broth works wonders.
- Add the minced garlic, smoked paprika, and black pepper. Sauté for 1 minute, stirring constantly. **Crucial Step Alert!** Garlic burns fast. Smell that incredible aroma? That’s your cue to move on – don’t let it turn bitter! The paprika blooms in the oil, releasing its smoky perfume.
- Stir in the uncooked rice. Coat every grain in the oil and spices, letting it toast slightly for about 30 seconds. **Why Toast?** This quick toast gives the rice a nutty edge and helps it cook up fluffy instead of mushy.
- Pour in the chicken broth and BBQ sauce. Stir everything together, scraping up all those delicious browned bits from the bottom of the pan – that’s pure flavor! Bring the mixture to a lively simmer. **Chef’s Hack:** Use a wooden spoon or spatula to really get into the corners and lift that fond. It dissolves into the liquid, making your sauce incredible!
- Nestle the browned sausage pieces back into the simmering rice mixture. Cover the skillet tightly with the lid, reduce the heat to low, and let it work its magic. Cook for 18-20 minutes. **Patience is Key:** Resist the urge to peek! Lifting the lid lets precious steam escape, which can lead to undercooked rice. Trust the process. You’ll know it’s done when the rice is tender and has absorbed all the liquid.
- Remove the skillet from the heat. Let it stand, covered, for 5 minutes. This resting time is crucial! It allows the rice to steam further and become perfectly fluffy. **No Skipping!** This step prevents a gummy texture.
- Uncover, fluff the rice gently with a fork, mixing the sausage and veggies throughout. Taste and season with salt if needed (remember the sausage and broth add salt!). Garnish generously with fresh chopped parsley. **Fluffing Finesse:** Use a fork, not a spoon, to gently separate the grains without smashing them. The parsley adds a pop of color and fresh flavor that cuts through the richness.
Dishing Up the Good Stuff
This dish is a complete meal superstar right out of the pan! I love serving it family-style – just plonk that beautiful, steaming skillet right in the center of the table (use a trivet!). Let everyone dig in and marvel at the layers. Want to fancy it up for guests? Spoon it into wide, shallow bowls. That fresh parsley garnish? Non-negotiable for that pop of green! A simple side salad with a bright vinaigrette cuts through the richness perfectly, or go full comfort mode with some warm, buttered cornbread for dunking into any saucy bits left behind. Cold beer, sweet iced tea, or even a zesty lemonade are perfect beverage buddies.
Make It Your Own: Delicious Twists & Swaps
This recipe is begging for your personal touch! Here are some tasty spins:
- Spicy Fiesta: Swap in spicy Andouille sausage, add a diced jalapeño (seeds in for heat!) with the bell pepper, and use a chipotle BBQ sauce. Top with cool avocado slices or a dollop of sour cream.
- Veggie-Packed Powerhouse: Omit sausage, sauté 1 cup sliced mushrooms and 1 cup diced zucchini with the onions. Stir in 1 (15oz) can rinsed black beans or kidney beans with the rice. Use veggie broth and ensure BBQ sauce is vegan.
- Pineapple Sweet Heat: Stir in ½ cup diced fresh pineapple (canned works, drained well) with the broth and BBQ sauce. Adds juicy sweetness! Great with smoked sausage.
- Cheesy Comfort Bomb: After fluffing, sprinkle 1 cup shredded sharp cheddar or Monterey Jack over the top. Cover again for 2-3 minutes off heat until melty and glorious.
- Creole Kick: Use Andouille sausage, swap smoked paprika for 1 tsp Creole seasoning, and stir in ½ cup diced celery with the onions and peppers (the “holy trinity”!).
Beau’s Back-Porch Musings
This recipe has become my trusty weeknight workhorse, but it wasn’t always this streamlined! There was the infamous “Great Rice Glue Incident of ’22” where I used the wrong rice, peeked constantly, and ended up with something resembling savory mortar. Lesson learned: trust the lid and the timer! Over time, I realized browning the sausage separately first (even though it feels like an extra step) makes ALL the difference in texture and flavor depth. The real beauty? It’s endlessly adaptable. Found some wrinkly peppers hiding? Toss ’em in! Got a half-used jar of peach BBQ sauce? Perfect! That’s what feel-good cooking is all about – using what you have, embracing a little imperfection, and creating something delicious that brings people together. Leftovers? Honestly, they might be even better the next day as the flavors meld. Just reheat gently with a splash of broth or water to refresh it. This dish feels like a warm hug from your skillet – simple, satisfying, and always there when you need it.
Your Questions, Answered!
Let’s tackle those common kitchen quandaries:
- Q: Can I use brown rice instead of white?
A: Absolutely! But it needs more liquid and time. Use 2.5 cups broth and increase simmer time to 40-45 minutes. Check for doneness – brown rice stays chewier. You might need an extra splash of broth near the end if it dries out. - Q: My rice is still crunchy/hard after 20 minutes! Help!
A: Don’t panic! Likely culprits: 1) The heat was too low – ensure a steady, gentle simmer under the lid. 2) You peeked too much! Steam is vital. 3) Your pan lid isn’t tight-fitting – try wrapping foil under the lid for a better seal. Add 2-3 tbsp hot broth or water, cover tightly, and cook another 5-7 mins on low. - Q: Can I make this vegetarian or vegan?
A: 100%! Skip the sausage or use a plant-based version. Sauté extra veggies like mushrooms, zucchini, or eggplant. Swap chicken broth for veggie broth. Double-check your BBQ sauce is vegan (no honey/anchorovies). Add beans (black, kidney, pinto) for protein when you add the rice. It’s deliciously hearty! - Q: How do I store and reheat leftovers?
A: Let it cool completely, then store airtight in the fridge for up to 4 days. Reheat gently on the stovetop over medium-low heat with a splash of broth or water to prevent drying out, stirring occasionally. Microwaving works too – cover and use medium power, stirring halfway through. The rice will absorb more flavor overnight!

One-Pan Sweet & Tangy BBQ Sausage Rice
- Total Time: 30 mins
Description
Hey friends, Beau here! Ever have one of those nights when your energy’s low, the family’s hangry, and the thought of tackling Mount Dishmore after cooking feels impossible? That’s why this One-Pan Sweet & Tangy BBQ Sausage Rice is my weeknight superhero. Juicy sausage slices caramelized to perfection, nestled in fluffy rice soaked with smoky BBQ goodness, plus vibrant peppers and onions—all in one skillet. Comfort food without the cleanup chaos. Let’s turn that dinner stress into a cozy win!
Ingredients
-
1 lb sausage (Italian, smoked, or kielbasa), sliced into rounds
-
1 cup long-grain white rice
-
2 cups low-sodium chicken broth (or veggie broth)
-
½ cup BBQ sauce (your favorite smoky, sweet, or spicy kind)
-
1 small onion, diced
-
1 bell pepper (red, orange, yellow, or green), diced
-
2 garlic cloves, minced
-
1 tbsp olive oil (or avocado oil)
-
1 tsp smoked paprika
-
½ tsp freshly cracked black pepper
-
Salt, to taste
-
Fresh parsley, chopped (for garnish)
Veggie or plant-based swap: Use plant-based sausage or chickpeas, veggie broth, and vegan BBQ sauce.
Instructions
-
Heat oil in a large (12-inch) skillet over medium heat. Test by adding a small sausage piece—it should sizzle gently.
-
Brown sausage slices in a single layer, 3-4 minutes per side, without stirring too much. This forms tasty browned bits (fond). Remove and set aside.
-
In the same pan, add onion and bell pepper. Cook 3 minutes until soft and translucent, scraping up any sausage bits.
-
Add garlic, smoked paprika, and black pepper. Sauté 1 minute, stirring constantly—watch the garlic so it doesn’t burn!
-
Stir in uncooked rice, toasting it for 30 seconds in the oil and spices.
-
Pour in chicken broth and BBQ sauce. Scrape the pan bottom to release all flavorful browned bits. Bring to a simmer.
-
Nestle sausage back into the skillet, cover tightly, reduce heat to low, and cook 18-20 minutes without peeking.
-
Remove from heat and let rest, covered, 5 minutes.
-
Fluff rice gently with a fork, taste and season with salt if needed, and sprinkle with fresh parsley.
Notes
-
Spicy Fiesta: Andouille sausage, diced jalapeño, chipotle BBQ sauce, topped with avocado or sour cream.
-
Veggie-Packed: Sauté mushrooms and zucchini with onions, add rinsed beans, use veggie broth & vegan BBQ sauce.
-
Pineapple Sweet Heat: Stir in diced pineapple with broth and BBQ sauce—perfect with smoked sausage.
-
Cheesy Comfort: After fluffing, sprinkle shredded cheddar, cover off heat 2-3 mins to melt.
-
Creole Kick: Use Andouille sausage, swap smoked paprika for Creole seasoning, add diced celery.
- Prep Time: 10 mins
- Cook Time: 20 mins
Nutrition
- Calories: 420 Cal per serving
- Fat: 20g
- Carbohydrates: 35g
- Protein: 18g
Nutritional Info (Approximate per serving):
Prep time: 10 mins | Cook time: 20 mins | Total: 30 mins | Serves 4
~420 calories | 35g carbs | 20g fat | 18g protein
Final Thoughts: More Than Just a Meal
This one-pan dish isn’t just about saving time—it’s about reclaiming joy in cooking. It’s a reminder that great food doesn’t require complexity, just thoughtful combinations and a little patience. Whether you’re riffing on global flavors or sticking to the classic, the result is the same: a hearty, satisfying meal that leaves you with a clean kitchen and a full belly. So next time chaos strikes, grab that skillet and let simplicity (and a dash of BBQ sauce) save the day. Happy cooking, friends!
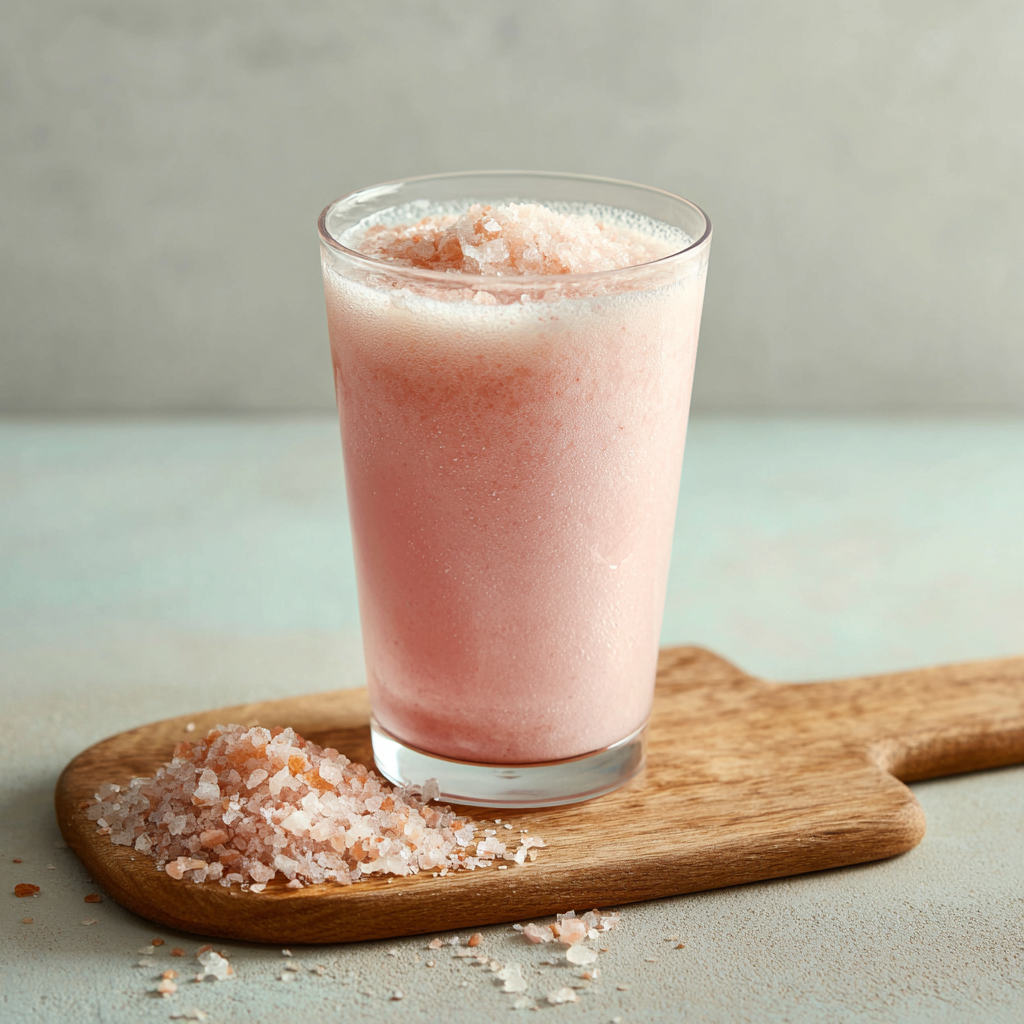
Pink Salt Diet Drink
Wake Up Your Wellness: The Pink Salt Diet Drink That Feels Like a Sunrise Hug
Hey friends! Beau here from Feastical, coming at you with a tiny jar of magic that’s about to become your new morning ritual. Ever have those days where you wake up feeling like your batteries are at 5%? Maybe last night’s extra slice of pizza is whispering regrets, or your energy’s dragging before coffee even kicks in. What if I told you a 2-minute, 3-ingredient drink could be your reset button? That’s exactly why I’m obsessed with this Pink Salt Diet Drink – it’s not some fancy potion, just pure, simple science meeting grandma-level wisdom in your favorite mug.
Think of it as your internal tide coming in. Himalayan pink salt isn’t just pretty; it’s packed with 84 trace minerals missing from regular salt. Paired with warm water (and a citrusy wink if you’re feeling fancy), this duo works backstage like a hydration dream team. We’re talking gentle digestion support, craving-taming superpowers, and metabolism love – all before your toast pops. No crazy diets, no expensive supplements. Just you, some pink sparkly salt, and a quiet moment that says, “Hey body, I’ve got you.” Whether you’re a yoga-at-dawn warrior or a snooze-button champion, this sip is your ticket to feeling refreshed, balanced, and ready to rock. Let’s make mornings feel less like a chore and more like a high-five!
That Time My Taste Buds (And Energy) Did a 180
Okay, story time! Picture me five years ago: post-holiday season, feeling as sluggish as a bear in January. My buddy Marco, this zen master surfer-chef from Hawaii, visited and made this “weird salty lemon water” every dawn. I wrinkled my nose – salt in water? But after three days of watching him glow like a human lighthouse, I caved. The first sip? Honest truth? I almost spat it out! It tasted like ocean mist met a tart cloud. But Marco just grinned: “Trust the process, Beau.”
By day five, magic happened. I woke up actually craving that briny tang. My energy didn’t just spike – it flowed steadily, like a calm river. Even my notorious 3 p.m. cookie monster cravings quieted down. It wasn’t a miracle, but a quiet reminder: sometimes the simplest things reset us best. Now, it’s my non-negotiable morning hug in a mug. That first warm, mineral-rich sip? It’s my tiny daily rebellion against rushed mornings. And hey, if this salt-obsessed surfer could convert a comfort-food chef like me, imagine what it’ll do for you!
Your 3-Ingredient Power Trio
Grab these pantry rockstars – each plays a starring role:
- ¼ tsp Himalayan Pink Salt: The MVP! Unlike regular salt, it’s mined from ancient seabeds, loaded with magnesium, potassium, and calcium. This is what balances your electrolytes and kicks hydration into high gear. Chef’s tip: Look for deep pink chunks (like “Fine Himalayan Pink Salt” from Redmond Real Salt) – paler versions may be less mineral-rich!
- 1 cup Warm Filtered Water: Warmth helps the salt dissolve fast and is gentler on your tummy than icy water. Filtered ensures no funky chlorine tastes. Swap: Room temp works if you’re in a rush, but warm is ideal for absorption.
- 1 tsp Fresh Lemon Juice or Raw Apple Cider Vinegar (optional): Lemon adds vitamin C and aids digestion; ACV (like Bragg’s) brings gut-friendly enzymes. Insight: Start without if new to salty drinks! Add lemon first – it’s friendlier than vinegar. Hate tart? Skip it! Your drink, your rules.
Brewing Your Liquid Sunshine: A Step-By-Step Ritual
Ready? Let’s turn these humble ingredients into liquid gold. Here’s how to nail it:
- Warm Your Water Gently: Heat filtered water until it’s pleasantly warm to touch – think “baby bottle test” warm (about 110°F/43°C). NO boiling! Scalding hot water destroys delicate minerals in the salt. I use an electric kettle with temp control, but microwaving 30 seconds works too. Chef Hack: Prep water before bed so it’s ready when your alarm screams!
- Dissolve That Pink Gold: Sprinkle salt into your warm water. Stir vigorously for 15-20 seconds until zero crystals remain. Why? Undissolved salt = gritty surprise! I use a small whisk or fork – way faster than a spoon. Pro Tip: If your salt’s chunky, grind it slightly in a mortar first. Smooth sips only!
- Citrus Kiss (Optional but Awesome): Squeeze in lemon juice or ACV. Stir again! If using ACV, start with ½ tsp – its tang packs a punch. Fun Twist: Add lemon zest for aromatic vibes! Feeling fancy? Rim your glass with pink salt.
- Sip Slow, Feel the Glow: Drink this immediately on an empty stomach – ideally 30 mins before breakfast. Savor it slowly over 5-10 minutes; don’t chug! This lets minerals absorb gradually. Critical Hack: Use your “sip time” mindfully. Breathe. Plan your day. It’s hydration and meditation.
The Science Behind Pink Salt – Why This Tiny Mineral Powerhouse Works
You might be wondering: Why pink salt? Isn’t all salt basically the same? Nope! Himalayan pink salt is like the superhero version of table salt—less processed, more natural, and packed with trace minerals that your body craves.
How Pink Salt Differs from Regular Salt
Table salt is heavily refined, stripped of most minerals, and often contains anti-caking agents. Pink salt, on the other hand, is mined from ancient sea beds in the Himalayas, retaining over 84 trace minerals, including magnesium, potassium, calcium, and iron. These minerals help with:
-
Electrolyte balance (preventing dehydration and muscle cramps)
-
Digestion (stimulating stomach acid for better nutrient absorption)
-
pH balance (helping your body stay slightly alkaline, which can reduce inflammation)
Why Warm Water Matters
Cold water can shock your system, especially first thing in the morning. Warm water, however:
-
Enhances digestion by gently waking up your gut
-
Helps dissolve salt fully for better absorption
-
Promotes circulation, giving you that “glowy” feeling
The Lemon/ACV Bonus
Adding lemon juice or apple cider vinegar isn’t just for taste—it turbocharges the benefits:
-
Lemon juice provides vitamin C, supports liver detox, and balances pH.
-
Apple cider vinegar contains enzymes and probiotics that aid digestion and stabilize blood sugar.
Bottom Line: This drink isn’t just hydration—it’s a nutrient-rich reset for your body, helping everything from energy levels to digestion.
Beyond Mornings – Unexpected Ways to Use Pink Salt Water
This drink isn’t just a sunrise ritual—it’s a versatile wellness tool you can use all day. Here’s how:
1. Pre-Workout Hydration Boost
Skip the sugary sports drinks! A pink salt water sip before exercise helps:
-
Prevent muscle cramps (thanks to magnesium & potassium)
-
Improve endurance (better electrolyte balance = less fatigue)
-
Speed up recovery (reduces post-workout soreness)
Pro Tip: Add a squeeze of orange juice for extra potassium if you’re doing intense training.
2. Midday Slump Savior
That 3 p.m. crash? Instead of reaching for coffee (which can dehydrate you), try:
-
½ tsp pink salt + 1 cup water + a dash of lime
The minerals help stabilize blood sugar, reducing cravings and fatigue.
3. Post-Meal Digestive Aid
Had a heavy meal? A small glass of pink salt + warm water + ACV can:
-
Stimulate stomach acid (helping break down food faster)
-
Reduce bloating (by balancing fluids in the gut)
4. Hangover Helper
Overdid it last night? Pink salt water replenishes lost electrolytes, eases headaches, and rehydrates you faster than plain water.
5. Stress & Sleep Support
Magnesium in pink salt helps calm the nervous system. Try a warm cup before bed with:
-
¼ tsp pink salt + 1 cup warm water + 1 tsp raw honey
This combo can promote relaxation and deeper sleep.
Bottom Line: This drink isn’t just for mornings—it’s a multi-purpose wellness hack for energy, digestion, and recovery.
Common Mistakes (And How to Fix Them)
Even the simplest rituals can go wrong if you’re not careful. Here’s what NOT to do with your pink salt drink—and how to fix it.
Mistake #1: Using Too Much Salt
🚫 Problem: More salt ≠ better! Excess sodium can cause bloating or high blood pressure.
✅ Fix: Stick to ¼ tsp per cup (or ⅛ tsp if sensitive to salt).
Mistake #2: Not Dissolving the Salt Fully
🚫 Problem: Gritty, overly salty sips that make you gag.
✅ Fix: Stir vigorously for 20+ seconds or pre-dissolve in a little hot water before adding the rest.
Mistake #3: Drinking It Too Fast
🚫 Problem: Chugging it like a shot means your body can’t absorb minerals properly.
✅ Fix: Sip slowly over 5-10 minutes for optimal absorption.
Mistake #4: Using Low-Quality Salt
🚫 Problem: Some “pink salt” is just dyed table salt with minimal minerals.
✅ Fix: Buy authentic Himalayan pink salt (look for deep pink color & reputable brands like Redmond Real Salt).
Mistake #5: Expecting Instant Miracles
🚫 Problem: Giving up after one try because you didn’t feel different.
✅ Fix: Consistency is key! Try it for 7-10 days to notice real changes in energy and digestion.
Bottom Line: Small tweaks make a big difference—master the basics, and this drink will work like magic.
Making Your Morning Sip Special
This isn’t medicine – it’s a ritual! Serve it in your favorite mug (mine’s a chunky handmade ceramic one). Morning light hitting that pale pink liquid? Pure bliss. For bonus coziness, cradle the mug while you sip near a window. No garnish needed, but a thin lemon float looks pretty for Instagram! Key Timing: Best enjoyed solo before food. If midday cravings hit, have another pre-lunch. Just always drink it slow and empty-stomached for max benefits.
Shake Up Your Salt Sip: 5 Flavorful Twists
Keep it fresh with these riffs (all start with base salt + water):
- Spicy Sunrise: Add a pinch of cayenne + ½ tsp honey. Boosts circulation!
- Ginger Zinger: Stir in ½ tsp fresh grated ginger. Fights bloat like a champ.
- Cucumber-Mint Chill: Muddle 2 cucumber slices + 3 mint leaves in glass first. Strain if needed. Ultra-refreshing for summer.
- ACV Immune Boost: Swap lemon for 1 tsp ACV + ½ tsp turmeric. Earthy & anti-inflammatory.
- Low-Sodium Swap: Sensitive to salt? Use ⅛ tsp pink salt + ¼ tsp cream of tartar (for potassium).
Beau’s Behind-The-Scenes Scoop
Confession: My first batch used waaay too much salt – tasted like the Dead Sea! Lesson learned: precision matters. Over time, I started adding lemon religiously after noticing it eased my occasional heartburn. And ACV? That entered the mix during a brutal flu season; felt like armor for my immune system! Funny story: My dog, Biscuit, once lapped up my forgotten glass. He then pranced around like a puppy! (Don’t worry – vet-approved in tiny amounts for pets). The real evolution? Mindset. This went from “weird health hack” to sacred me-time. Some days I journal while sipping; others, I just stare at birds. It’s less about the drink, more about claiming a peaceful moment in our chaotic world. Your turn to make it yours!
Your Pink Salt Drink Questions – Answered!
Q: Can I drink this cold?
A: You can, but warm is better! Cold water shocks your system; warm mimics body temp for faster absorption. If you prefer cold, dissolve salt in warm water first, then add ice.
Q: Why empty stomach? Can I have it with food?
A> Empty stomach ensures minerals absorb directly without competing with digestion. Having it with food dilutes benefits. Wait 30 mins post-drink before eating!
Q: It tastes too salty! Help!
A> Two fixes: 1) Reduce salt to ⅛ tsp and gradually increase. 2) Add more lemon/ACV to balance. Also – ensure FULL dissolving! Undissolved grains amp up saltiness.
Q: I have high blood pressure. Is this safe?
A> Consult your doctor first! While pink salt has less sodium than table salt, it’s still sodium. Many BP meds affect electrolyte balance – better safe than sorry.

Pink Salt Diet Drink
Description
Hey friends! If you’ve ever woken up feeling drained or sluggish, this 3-ingredient pink salt drink might just become your new morning ritual. It’s simple, gentle, and packed with natural minerals to boost hydration, support digestion, and calm cravings — all before your coffee even kicks in. Ready to start your day feeling refreshed and balanced? Let’s make this little jar of magic.
Ingredients
-
¼ tsp Himalayan Pink Salt (preferably fine, mineral-rich variety)
-
1 cup warm filtered water (about 110°F / 43°C)
-
1 tsp fresh lemon juice or raw apple cider vinegar (optional)
Instructions
-
Warm your water gently until pleasantly warm but not boiling (think baby bottle warm). This helps the salt dissolve quickly and soothes your tummy.
-
Add the pink salt to the warm water. Stir vigorously for 15–20 seconds until fully dissolved—no gritty crystals!
-
Optional: Stir in lemon juice or apple cider vinegar. Lemon adds vitamin C and a bright zing; ACV offers gut-friendly enzymes. Start small if you’re new to it.
-
Sip slowly on an empty stomach, ideally 30 minutes before breakfast. Let each small sip hydrate and awaken your body.
Notes
-
Use filtered water for the purest taste and mineral absorption.
-
If your salt is coarse, gently crush it before mixing.
-
Warm water is ideal, but room temp works if you’re in a rush. Avoid ice-cold for mornings.
-
Make it a ritual: enjoy your sip mindfully, breathe deeply, and set your intention for the day.
-
Try prepping warm water the night before for a smooth morning start.
Nutrition
- Calories: 0
- Sugar: 0g
- Sodium: 480mg (¼ tsp pink salt)
- Fat: 0g
- Carbohydrates: 0g
Simple & Pure: What’s In Your Glass
Per serving: ~0 calories, 0g fat, 0g carbs, 0g sugar. Rich in trace minerals: Magnesium (muscle function), Potassium (fluid balance), Calcium (bone health), plus iron, zinc, and more! Note: Exact minerals vary by salt source. Not a significant sodium source at ¼ tsp (about 480mg sodium – roughly 20% daily value).
Final Thoughts: Why This Tiny Ritual Feels Like Self-Care
In a world of complicated health trends, this drink is refreshingly simple. No fancy equipment, no expensive ingredients—just you, warm water, and a pinch of ancient minerals.
What I love most isn’t just the physical benefits (though those are amazing). It’s the mental reset. That 5-minute pause where you sip slowly, breathe, and start your day intentionally. No rushing, no chaos—just a quiet moment that says, “I’m taking care of myself today.”
So whether you’re a wellness newbie or a seasoned health nut, give this little ritual a try. Your body—and your mornings—might just thank you.

Gooey Apple Cider Snickerdoodle Skillet Cookie
When Fall Cravings Call for Cookie Comfort
Hey there, friend! Beau here from Feastical, and let’s talk about that magical moment when crisp air hits, sweaters come out of hiding, and your soul starts whispering: “I need something warm, gooey, and spiced to the nines.” Enter my Apple Cider Snickerdoodle Skillet Cookie—a dessert hug in cast-iron form. Imagine your favorite snickerdoodle (you know, that soft, cinnamon-kissed classic) getting cozy with tangy-sweet apple cider, then baked into a giant, shareable masterpiece with crackly edges and a cloud-like center. This isn’t just a cookie; it’s a fall experience. Perfect for game nights, impromptu gatherings, or when you deserve a solo treat with zero guilt. Grab your favorite skillet—let’s turn your kitchen into a seasonal sanctuary where every bite tastes like crunchy leaves and happy memories.
The Campfire Inspiration
Picture this: Me, age 10, wrapped in a flannel blanket by a crackling Ohio campfire. My grandpa’s handing out mugs of hot cider, and my mom pulls a cast-iron skillet from the embers, revealing a puffy, sugar-dusted snickerdoodle bigger than my head. We’d tear into it with spoons, laughing as steam escaped and cinnamon mingled with woodsmoke. That cookie became our autumn ritual—a symbol of simplicity and togetherness. Years later, while experimenting in my tiny Brooklyn apartment, I wondered: “What if I infused that cookie magic with grandpa’s cider?” After three batches (and one near-smoke alarm incident), this skillet dream was born. Now, every time I pull it from the oven, I’m back at that campfire. Food memories? They’re the best heirlooms.
Your Fall Flavor Toolkit
For the Cookie:
- ½ cup apple cider (reduced to concentrate) – Pro tip: Boil it down! This syrupy gold adds tangy depth. Swap with 2 tbsp boiled-down apple juice in a pinch.
- 1½ cups all-purpose flour – The trusty backbone. For gluten-free, use a 1:1 blend like Bob’s Red Mill.
- ½ tsp cream of tartar – Snickerdoodle’s secret weapon! Creates that signature tang and chew. No sub here—it’s essential!
- ½ tsp baking soda – Lift and fluff master. Check the expiry date—old soda = flat cookies.
- ¼ tsp salt – Balances sweetness. Use sea salt for a gentle crunch.
- ½ cup butter, softened – Room temp is KEY! Cold butter = lumpy dough. Vegan? Miyoko’s oat butter works beautifully.
- ½ cup granulated sugar – Classic sweetness. For deeper flavor, try coconut sugar.
- ¼ cup brown sugar – Optional but game-changing. Adds moisture and caramel notes. Dark brown sugar = extra goo!
- 1 egg – Binder and richness. Flax egg (1 tbsp ground flax + 3 tbsp water) for plant-based magic.
- 1 tsp vanilla extract – Warmth amplifier. Splurge on real vanilla—it sings with the cider.
For the Coating:
- 2 tbsp granulated sugar – Sparkly crown maker.
- 1 tsp cinnamon – The cozy hug. Saigon cinnamon has the best kick!
Optional Icing:
- ½ cup powdered sugar – Cloud-like drizzle.
- 1 tbsp apple cider – Double the apple love! Milk works too.
- Pinch of ground nutmeg – Subtle warmth. Freshly grated if you’re fancy!
Let’s Bake Some Magic!
Step 1: Cider Alchemy
Simmer ½ cup apple cider in a small saucepan over medium heat. Stir occasionally until it reduces to 2-3 tbsp of thick, amber syrup (about 8-10 mins). Chef hack: Swirl the pan toward the end to prevent burning—it’s ready when it coats the spoon like honey. Let it cool slightly. (Hot cider + eggs = scrambled surprises!)
Step 2: Dry Team Unite
In a medium bowl, whisk together flour, cream of tartar, baking soda, and salt. Pro insight: Whisking = no sifter needed! Aerates the flour for a tender crumb.
Step 3: Butter Bliss
In a large bowl, beat softened butter, granulated sugar, and brown sugar (if using) with a hand mixer until fluffy and pale—about 2 mins. Watch the texture: Proper creaming traps air, making cookies rise. Beat in the egg, vanilla, and cooled cider concentrate. Tip: Scrape the bowl sides! Hidden pockets of butter ruin the party.
Step 4: Gentle Union
Gradually add dry ingredients to wet ingredients, mixing on low until just combined. Overmixing = tough cookies! Stop when no flour streaks remain.
Step 5: Skillet Charm
Press dough evenly into a greased 8-inch cast-iron skillet. Use damp hands—it prevents sticking! Mix cinnamon and sugar for coating, then sprinkle generously over the top. Chef’s flourish: Gently pat it in so it adheres.
Step 6: Bake to Perfection
Bake at 350°F (175°C) for 18-22 mins. Key doneness test: Edges should be golden and pull away from the skillet; center will look soft but set (it firms while cooling). Rest 10 mins before slicing—patience rewards you with gooey layers!
Step 7: Icing Finale (Optional)
Whisk powdered sugar, 1 tbsp cider, and nutmeg. Drizzle over warm cookie. Want drama? Serve with extra cider for dipping!
The Science Behind the Perfect Snickerdoodle
What makes a snickerdoodle so irresistibly soft, tangy, and slightly chewy? It all comes down to chemistry—the kind that turns simple pantry staples into a cookie that feels like a warm hug. Let’s break down the key players in this doughy masterpiece.
Cream of Tartar: The Secret Weapon
Snickerdoodles stand out from other sugar cookies because of cream of tartar, a byproduct of winemaking. This acidic powder reacts with baking soda to create carbon dioxide bubbles, giving the cookie its signature lift and tender crumb. Without it, you’d just have a sweet, flat disc—delicious, but not a true snickerdoodle.
Butter: The Temperature Game
Room-temperature butter is non-negotiable. Too cold, and it won’t cream properly with sugar, leading to a dense texture. Too melted, and your cookies will spread into a greasy puddle. The ideal butter should leave a slight indentation when pressed but still hold its shape.
Sugar: The Sweet Balance
Granulated sugar provides structure and crisp edges, while brown sugar (if used) adds moisture and caramel notes. The combination ensures a cookie that’s crispy on the outside, soft in the middle.
Apple Cider Reduction: Flavor Booster
Reducing apple cider into a syrup intensifies its tart-sweet essence without adding excess liquid. This trick prevents a soggy dough while packing in autumnal flavor.
Baking Time: The Jiggle Test
A perfectly baked skillet cookie should have firm edges but a slightly wobbly center when pulled from the oven. Residual heat continues cooking it as it cools, so pulling it a minute early guarantees gooey perfection.
The Psychology of Comfort Food
Why do we crave warm, spiced desserts when the leaves start to fall? It’s not just about taste—it’s about nostalgia, biology, and a little bit of science.
Nostalgia in Every Bite
Food memories are powerful. The scent of cinnamon or the first bite of a soft cookie can transport us back to childhood campfires, holiday gatherings, or grandma’s kitchen. This skillet cookie isn’t just dessert; it’s a time machine.
Seasonal Cravings: It’s Biological
Cooler temperatures trigger a desire for calorie-dense, carb-rich foods—a primal instinct to store energy. Spices like cinnamon and nutmeg also have warming properties, making them especially appealing in fall.
The Comfort of Shared Food
A skillet cookie is inherently communal. There’s something deeply satisfying about digging into a shared dessert, breaking down barriers, and creating new memories. It’s why this recipe shines at gatherings—it’s not just food; it’s an experience.
The Role of Texture
The contrast of a crackly sugar-cinnamon crust against a pillowy-soft center is textbook comfort food psychology. Our brains love variety in texture, making each bite more satisfying than the last.
Cast Iron Skillet Magic—Why It’s the Ultimate Baking Tool
A cast-iron skillet isn’t just for searing steaks—it’s a dessert game-changer. Here’s why it’s the MVP of this recipe (and your kitchen).
Even Heat Distribution
Cast iron retains and distributes heat evenly, preventing hot spots that can lead to uneven baking. That means no burnt edges or undercooked centers—just consistent, golden perfection.
The Crispy Edge Effect
The skillet’s thick walls and base create a caramelized crust on the cookie’s edges while keeping the center luxuriously soft. It’s the best of both worlds: a cookie with the texture diversity of a brownie.
Nostalgic Presentation
Serving dessert straight from the skillet feels rustic and inviting. It encourages communal eating, sparks conversation, and makes even a weeknight treat feel special.
Versatility Beyond Baking
Once you’ve mastered this cookie, your skillet can transition seamlessly to savory dishes—think cornbread, frittatas, or even a deep-dish pizza. It’s the ultimate multitasker.
Seasoning = Non-Stick Success
A well-seasoned cast-iron skillet develops a natural non-stick surface over time. For this recipe, a light grease ensures easy release, but the more you use it, the better it performs.
Sharing is Caring (Or Not!)
Slide that skillet right onto the table—rustic charm is the vibe! Scoop warm wedges into bowls and top with a cloud of vanilla ice cream. The heat melts the ice cream into a cider-spiked cream dream. For adults, pair with bourbon-spiked hot cider. Kid-friendly? Add rainbow sprinkles to the icing! Pro presentation: Dust with extra cinnamon and place mini caramel apples on the side. Autumn in a bite!
Make It Your Own
1. Caramel Apple Explosion: Press ½ cup soft caramel bits into dough before baking. Post-bake, drizzle with salted caramel sauce.
2. Nutty Professor: Fold in ⅓ cup toasted pecans or walnuts for crunch.
3. Oatmeal Spice Upgrade: Replace ½ cup flour with rolled oats + ¼ tsp cardamom.
4. Chocoholic Twist: Add ½ cup white chocolate chips—they complement cider beautifully.
5. Dairy-Free Delight: Use vegan butter + flax egg. Top with coconut whipped cream.
Beau’s Backstage Pass
This recipe’s a scrappy survivor! Batch #1 was a cider-soggy mess. Batch #2? Dry as sawdust. Finally nailed it by reducing cider to syrup—concentrated flavor without excess liquid. Funny story: My dog, Biscuit, once snatched a cooling skillet off the counter… we both learned about “too hot to handle” that day! Over the years, I’ve added brown sugar (for goo-factor) and nutmeg (for intrigue). It’s evolved like a good friendship—comfortable but full of surprises. Final tip: Leftovers? Reheat slices in the toaster oven. Almost better than day one!
Your Questions, My Answers
Q: My cookie turned out cakey, not gooey. Help!
A: Overbaking’s the culprit! Ovens vary—start checking at 16 mins. It should jiggle slightly in the center when pulled. Remember, residual heat cooks it further while resting.
Q: Can I use store-bought apple cider reduction?
A: Absolutely! Look for boiled cider syrup (King Arthur Flour makes a great one). Use 2 tbsp straight from the bottle. DIY’s cheaper, but we love shortcuts!
Q: No cast iron? What’s my move?
A: An 8-inch cake pan works! Grease it well. Baking time may drop by 1-2 mins since metal heats faster. No oven-safe skillet? Portion dough into muffin tins for “snickerdoodle cups” (bake 12-15 mins).
Q: Why did my cookie sink in the middle?
A: Two likely issues: 1) Over-creaming butter/sugar introduced too much air (just mix until combined), or 2) Old baking soda. Test soda by dropping a pinch in vinegar—it should fizz aggressively!

Gooey Apple Cider Snickerdoodle Skillet Cookie
- Total Time: 45 minutes
Description
Hello, friend! Crisp air, cozy sweaters, and the sweet scent of cinnamon are calling. This Apple Cider Snickerdoodle Skillet Cookie is like a warm hug baked right in your cast iron — soft, cinnamon-kissed dough infused with tangy reduced apple cider, baked into a giant, gooey treat with crackly edges. Perfect for sharing (or not), game nights, or simply treating yourself. Let’s get baking and bring that autumn magic to your kitchen!
Ingredients
For the Cookie:
-
½ cup apple cider (reduced to about 2–3 tbsp concentrate)
-
1½ cups all-purpose flour (or gluten-free 1:1 blend)
-
½ tsp cream of tartar
-
½ tsp baking soda
-
¼ tsp salt
-
½ cup unsalted butter, softened (vegan substitute: oat or plant butter)
-
½ cup granulated sugar
-
¼ cup brown sugar (optional but recommended)
-
1 large egg (or 1 flax egg: 1 tbsp ground flax + 3 tbsp water)
-
1 tsp vanilla extract
For the Coating:
-
2 tbsp granulated sugar
-
1 tsp cinnamon
Optional Icing:
-
½ cup powdered sugar
-
1 tbsp apple cider (or milk)
-
Pinch of ground nutmeg
Instructions
-
Make the cider concentrate:
Pour ½ cup apple cider into a small saucepan. Simmer over medium heat, stirring occasionally, until it reduces to 2-3 tbsp thick syrup (8-10 mins). Let cool completely before adding to dough. -
Mix dry ingredients:
In a bowl, whisk together flour, cream of tartar, baking soda, and salt. -
Cream butter & sugars:
In a large bowl, beat softened butter with granulated and brown sugar until pale and fluffy (about 2 minutes). Beat in egg, vanilla, and cooled cider concentrate. -
Combine wet & dry:
Gradually add dry ingredients, mixing on low just until combined. Don’t overmix! -
Prepare skillet & coat:
Grease an 8-inch cast-iron skillet. Press dough evenly into the skillet. Mix cinnamon and sugar, then sprinkle generously on top. Lightly press to adhere. -
Bake:
Bake at 350°F (175°C) for 18-22 minutes. The edges should be golden and slightly pulling away; center will be soft but set. -
Cool & optional icing:
Let cool 10 minutes in skillet. For icing, whisk powdered sugar, cider, and nutmeg, then drizzle over warm cookie. -
Serve:
Slice warm, serve solo or with vanilla ice cream. Perfect paired with bourbon-spiked cider or cozy tea.
Notes
-
Reduce cider carefully—swirl pan toward end to avoid burning.
-
Room temp butter is essential for fluffy texture.
-
Use damp hands to press dough into skillet—less sticking!
-
Watch baking time closely; underbake slightly for gooey center.
-
Leftovers reheat well in toaster oven or warm gently in microwave.
- Prep Time: 15 minutes
- Cook Time: 18-22 minutes
Nutrition
- Calories: 300 Cal per serving
- Sugar: 22g
- Sodium: 110mg
- Fat: 15g
- Carbohydrates: 35g
- Protein: 3g
Nourishment Notes (Because Balance!)
Prep time: 15 mins | Cook time: 20 mins | Total: 35 mins | Serves 6–8
Per serving: ~300 calories | 35g carbs | 15g fat (9g saturated) | 3g protein | 110mg sodium | 22g sugars
Note: Icing adds ~50 calories/serving. Vegan/dairy-free swaps reduce saturated fat.
Final Thoughts: More Than Just a Cookie
This Apple Cider Snickerdoodle Skillet Cookie isn’t just a dessert—it’s a celebration of fall, a nod to tradition, and a testament to the power of simple ingredients done right. Whether you’re serving it at a gathering or indulging solo, it’s a reminder that the best recipes are the ones that evoke joy, comfort, and maybe a little bit of mischief (because yes, you should eat it straight from the skillet).

Loaded Breakfast Sweet Potatoes with Cottage Cheese & Eggs
Rise, Shine, and Dig In: Your New Breakfast Obsession Awaits!
Hey friends, Beau here! Ever have one of those mornings where you’re torn between something sweet, something savory, and something that won’t leave you hangry by 10 AM? *raises hand* That’s exactly why I created these Loaded Breakfast Sweet Potatoes. Forget choosing between fuel and flavor – this powerhouse breakfast wraps both in one gorgeous, edible package. Imagine creamy clouds of cottage cheese hugging golden eggs, all piled into a caramelized sweet potato canoe. It’s like your favorite brunch spot decided to move into your kitchen!
Now, I know what you’re thinking: “Beau, sweet potatoes for breakfast?” Trust me, once you try this combo, you’ll be a convert. Sweet potatoes are nature’s energy bars – packed with fiber and vitamins – while eggs and cottage cheese deliver a protein punch that’ll keep your engine humming. The best part? You can bake the sweet potatoes ahead (hello, meal prep magic!), and customize these bad boys like a breakfast taco bar. Whether you’re rushing out the door or savoring a lazy Sunday, this dish adapts to your vibe. Ready to make mornings epic? Let’s get cooking!
How a Campfire Mishap Became Breakfast Gold
This recipe actually started with a camping fail that turned delicious! Last fall, my buddies and I were roasting sweet potatoes in the campfire coals. One got seriously charred (shoutout to overzealous marshmallow flames!), so I split it open to salvage the insides. All we had left in the cooler? Eggs, cottage cheese, and bacon bits. We scrambled everything together right in that smoky potato skin – and boom! Breakfast revelation. That messy, ash-flecked creation tasted like victory.
Back home, I recreated it (minus the campfire grit!) for my niece Lily. She’d been in a breakfast rut, eating cereal every single day. When she took her first bite, her eyes got huge: “Uncle Beau, it’s like a baked potato… but for morning!” Now she requests “Lily’s Sunshine Potatoes” every sleepover. That’s the magic of this dish – it turns ordinary ingredients into a little adventure on a plate. Who knew a camping blunder would become our family’s favorite sunrise ritual?
Your Flavor Toolkit: Simple Ingredients, Big Impact
- 2 medium sweet potatoes – Pick plump ones with smooth skin! They roast up sweeter and creamier than skinny spuds. Swap tip: Butternut squash works in a pinch.
- 2 eggs (per serving) – Farm-fresh if possible! That vibrant yolk makes the dish pop. Chef insight: Room-temperature eggs fry more evenly.
- ½ cup cottage cheese – Full-fat for maximum creaminess. Substitution: Greek yogurt (strained overnight) or ricotta.
- Optional power-ups:
- Sliced avocado – For buttery richness
- Sautéed spinach – Wilt with garlic! (10/10 nutrition boost)
- Crumbled sausage – Cook ahead & freeze for instant glory
- Shredded sharp cheddar – Melts into dreamy pockets
- Chopped chives – Fresh oniony zing!
Pro Tip: Microwave sweet potatoes for speed, but oven baking? That’s where the caramelized magic happens. Your call, chef!
Let’s Build Your Breakfast Masterpiece
- Bake those taters! Preheat oven to 400°F (200°C). Scrub potatoes, poke holes with a fork (steam escape hatches!), and rub skins with olive oil. Bake directly on the rack for 40-45 minutes until fork-tender. Chef hack: Place a baking sheet underneath to catch drips – saves oven cleanup!
- Egg time! While potatoes bake, cook eggs your way. For fried: Heat butter in a skillet until sizzling, crack eggs in, cover for 1 minute for perfect runny yolks. For fluffy scrambled: Whisk eggs with 1 tbsp milk before cooking. Commentary: Don’t stir scrambles constantly – let them form big curds!
- Fluff & stuff! Slice potatoes lengthwise. Gently fluff insides with a fork (like you’re fluffing a pillow!). Season with salt and pepper. Critical tip: Create a “well” in the center to hold toppings!
- Layer the love! Spoon cottage cheese into each potato half. Top with eggs. Add any extras now – avocado fans, this is your moment! Hot tip: If using cheese, add it before eggs so it melts.
- The grand finale! Sprinkle with chives, extra pepper, or hot sauce. For crunch lovers: A handful of toasted pepitas!
Timing Trick: Bake potatoes the night before. Reheat at 350°F while prepping eggs – breakfast in 10 minutes flat!
The Science Behind Sweet Potatoes: Why This Spud’s a Superfood
Sweet potatoes aren’t just a trendy ingredient—they’re a nutritional powerhouse backed by science. Unlike regular potatoes, their vibrant orange hue signals a high beta-carotene content, which converts to vitamin A in the body (a single medium sweet potato delivers over 400% of your daily needs!). But the benefits don’t stop there: their complex carbs release energy slowly, preventing mid-morning crashes, while their fiber content (6g per potato) supports gut health.
What makes them ideal for breakfast? A 2020 study in Nutrients journal found that meals with sweet potatoes stabilized blood sugar levels better than grain-based breakfasts. Pair that with eggs’ high-quality protein (all nine essential amino acids!) and cottage cheese’s casein (a slow-digesting protein), and you’ve got a meal that fuels you for hours.
Fun fact: The skin holds half the fiber, so baking them whole maximizes nutrition. For skeptics who think sweet potatoes are too sweet, a pinch of salt and pepper balances their natural sugars. Pro tip: Purple sweet potatoes (loaded with antioxidants) make a stunning twist—their earthy flavor pairs perfectly with savory toppings like crumbled feta or crispy sage.
Global Breakfast Inspirations: Reinventing the Loaded Potato
Why limit loaded potatoes to American flavors? Borrowing from global cuisines can turn this dish into a world tour. Here’s how:
Japanese Okonomiyaki Style
Mash the baked sweet potato with miso paste, top with a fried egg, and drizzle with kewpie mayo + bonito flakes. Add pickled ginger for tang!
Indian Masala Twist
Sauté onions, cumin, and turmeric, then mix into the potato flesh. Top with a spiced omelet, cilantro chutney, and a sprinkle of sev (crunchy chickpea noodles).
Middle Eastern Shakshuka Version
Fill the potato with garlicky labneh, then nestle eggs poached in tomato sauce right into the center. Finish with za’atar and pomegranate seeds.
Brazilian Brigadeiro Sweet
For dessert-for-breakfast lovers: Mix cocoa powder into the potato, top with coconut whipped cream, and crushed hazelnuts.
These variations prove sweet potatoes are a blank canvas. The key? Balance textures (creamy + crunchy) and flavors (sweet + savory + spicy). Even picky eaters will love customizing their own adventure!
Meal Prep Magic: How This Recipe Saves Your Week
For busy folks, this dish is a lifesaver. Here’s how to streamline it:
1. Sweet Potato Batch-Cooking
Bake 6-8 potatoes on Sunday. Store unpeeled in the fridge (up to 5 days) or freeze (wrap individually in foil). Reheat in the toaster oven for 10 minutes—no microwave sogginess!
2. Topping Kits
Prep toppings in small containers:
-
Pre-fried eggs (store in ice water; reheat in warm water for 1 minute)
-
Portioned cottage cheese (mix in herbs or hot sauce to jazz it up)
-
Pre-cooked bacon or sausage crumbles
3. Assembly Line Breakfasts
On hectic mornings, grab a potato, split it, and layer toppings in 2 minutes flat. For office meals, pack components separately and assemble at work.
Bonus: Kid-Friendly Hack
Let kids build their own “potato boats” with toppings in muffin tins (cheese, berries, etc.). They’ll eat veggies without a fight!
Plate It Pretty (Or Just Dig In!)
Slide those loaded potatoes onto colorful plates – the orange against white dishes looks stunning! Garnish with extra herbs or microgreens for a restaurant-worthy touch. Pair with a simple fruit salad or crispy turkey bacon strips. For “grab-and-go” mode? Wrap halves in foil burrito-style (great for commuters!). And hey, no judgment if you eat it straight from the baking sheet… we’ve all been there.
Mix It Up: 5 Delicious Twists
- Mediterranean: Swap cottage cheese for tzatziki + top with feta, olives, and sun-dried tomatoes.
- Southwest Fiesta: Black beans, corn, salsa, and a dollop of avocado crema (cottage cheese + lime + mashed avocado).
- Veggie Power: Sautéed mushrooms, kale, and everything bagel seasoning. Vegan? Use tofu scramble!
- Sweet Tooth: Cinnamon-roasted sweet potatoes with almond butter, berries, and honey-sweetened ricotta.
- Pizza Lover’s: Marinara sauce, mozzarella, pepperoni bits, and fresh basil (yes, with eggs – it works!).
Behind the Apron: Real Kitchen Confessions
This recipe’s gone through more glow-ups than my Instagram feed! Version 1.0 involved microwaved potatoes so overcooked, they resembled sweet potato jerky. Lesson learned: Patience makes perfect potatoes! Now I bake extras weekly – cold baked sweet potatoes? Amazing diced into salads or mashed for pancakes. Funny story: My dog Duke once stole a cooling potato off the counter. He dragged it under the couch like a prized bone… leaving orange dust trails for days. Now I guard them like Fort Knox! Pro tip: For extra caramelization, slice baked potatoes in half BEFORE the final 5 minutes in the oven. The edges crisp up like candy!
Your Questions, My Answers
Q: My sweet potato skin gets tough. Help!
A: Rub skins generously with oil before baking! The fat softens the skin. If microwaving, wrap in a damp paper towel.
Q: Can I make this dairy-free?
A: Absolutely! Swap cottage cheese for avocado mash or seasoned silken tofu. Skip cheese or use nutritional yeast.
Q: Eggs keep sliding off the potato. SOS!
A: Fluff that potato flesh DEEP! Create a crater. Layer cottage cheese first as “glue,” then nestle eggs in. Scrambled eggs stay put better than fried.
Q: How long do leftovers keep?
A: Store components separately! Baked potatoes (no toppings): 4 days fridge. Assembled potatoes? Best eaten fresh. Reheat potatoes at 350°F until warm.

Loaded Breakfast Sweet Potatoes with Cottage Cheese & Eggs
Description
Hey friends, Beau here! If you’re stuck choosing between sweet, savory, and sustaining for breakfast, say hello to your new obsession. These Loaded Breakfast Sweet Potatoes pack creamy cottage cheese, golden eggs, and all your favorite toppings into a caramelized sweet potato “canoe.” Fuel and flavor? Check and check. Meal prep magic? Absolutely. Let’s turn mornings into something epic!
Ingredients
-
2 medium sweet potatoes (plump with smooth skin for caramelized magic)
-
2 eggs per serving (room temp if possible)
-
½ cup full-fat cottage cheese (or Greek yogurt/ricotta substitute)
Optional Power-Ups:
-
Sliced avocado
-
Sautéed spinach (garlic is a must!)
-
Crumbled cooked sausage
-
Shredded sharp cheddar
-
Chopped fresh chives
Instructions
1. Bake the Sweet Potatoes
Preheat oven to 400°F (200°C). Scrub and poke holes in the potatoes. Rub skins with olive oil. Bake directly on the rack 40-45 mins until fork-tender. (Pro tip: Place a baking sheet below to catch drips!)
2. Cook Your Eggs
Your choice:
-
Fried: Heat butter in skillet until sizzling, crack eggs, cover for 1 min for runny yolks.
-
Scrambled: Whisk eggs + 1 tbsp milk; cook gently, forming big soft curds.
3. Fluff & Fill
Slice baked potatoes lengthwise. Fluff the insides with a fork—make a “well” for toppings. Season with salt and pepper.
4. Layer the Goodness
Spoon cottage cheese into the potato boats, top with eggs, then add your power-ups. For melty cheese, add before eggs!
5. Garnish & Serve
Sprinkle chopped chives, cracked pepper, or hot sauce. Toasted pepitas add perfect crunch.
Notes
-
Mediterranean: Tzatziki, feta, olives, sun-dried tomatoes
-
Southwest: Black beans, corn, salsa, avocado crema
-
Veggie Power: Mushrooms, kale, everything bagel seasoning (try tofu scramble for vegan)
-
Sweet Tooth: Cinnamon sweet potatoes, almond butter, berries, honeyed ricotta
-
Pizza Lover’s: Marinara, mozzarella, pepperoni bits, basil
Nutrition
- Calories: 450 Cal
- Fat: 24g
- Carbohydrates: 35g
- Fiber: 7g
- Protein: 22g
Fuel Breakdown (Base Recipe + Avocado)
Prep time: 10 mins | Cook time: 40 mins | Total: 50 mins
Serves: 2
Per serving: ~450 calories | 22g protein | 35g carbs | 24g fat | 7g fiber
Final Thoughts: More Than Just a Meal
This recipe isn’t just about food—it’s about joy. It turns breakfast from an afterthought into a celebration, whether you’re camping under stars or racing to a meeting. The sweet potato’s versatility teaches us to embrace imperfections (charred or not!), while its nutrition proves eating well doesn’t mean sacrificing flavor. So here’s to mornings that feel like a hug on a plate—one loaded bite at a time. Now, go shine!
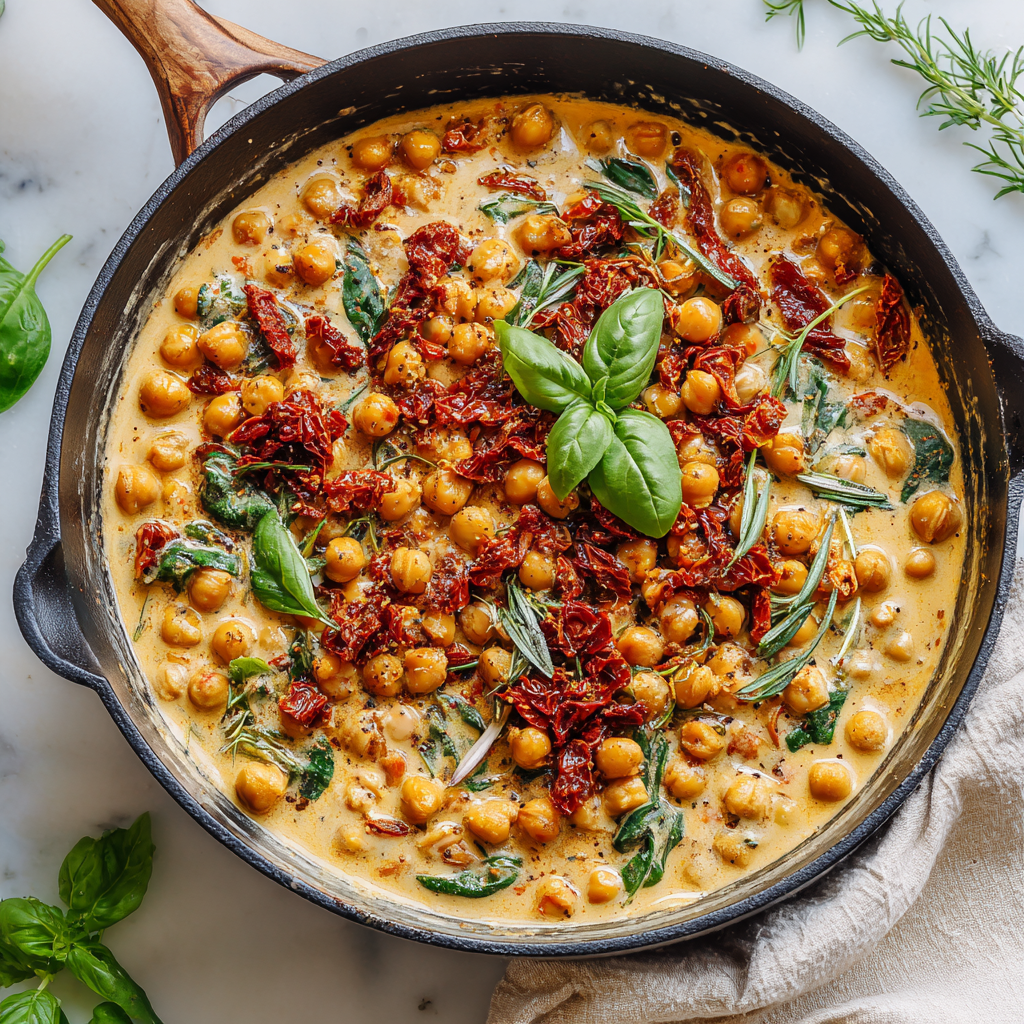
Creamy Tuscan Chickpea Skillet with Sundried Tomatoes
Sunshine in a Skillet: Your New Favorite Tuscan Chickpea Delight
Hey there, Feastical family! Beau here, ready to share one of those magical recipes that feels like stumbling upon a hidden trattoria in a sun-drenched Italian alleyway – except you’re in your comfiest socks with zero travel required. Imagine this: plump chickpeas swimming in a luscious, herb-kissed tomato cream sauce, studded with intense sundried tomatoes and vibrant greens. It’s hearty, it’s plant-powered, and it whispers “comfort” with every spoonful. This Creamy Tuscan Chickpea Skillet? It’s the culinary equivalent of that friend who’s effortlessly cool, ridiculously kind, and always leaves you feeling nourished. Whether you’re a weeknight warrior battling the 5 PM hunger monster or hosting your plant-based crew, this one-pan wonder delivers big flavors without the big fuss. Ready to make your kitchen smell like a Tuscan dream? Grab your favorite skillet – let’s turn humble ingredients into pure gold!
A Taste of Tuscany… in My Tiny Apartment Kitchen
This recipe takes me straight back to my first “big kid” apartment, where my “kitchen” was basically a glorified closet with a hotplate. I was broke, dreaming of Italian summers, and surviving on beans and pantry staples. One rainy Tuesday, craving warmth, I threw chickpeas, the last sad bits of a jar of sundried tomatoes, and some wilting spinach into a pan with whatever else I had. As that incredible aroma filled my tiny space – the sweet-tang of tomatoes, the earthy hum of chickpeas, the garlic doing its glorious thing – something magical happened. It wasn’t just dinner; it felt like an escape. My roommate wandered in, sniffing the air like a bloodhound, and declared it “restaurant-level good.” That accidental masterpiece became our weekly ritual, eaten straight from the pan while watching old movies. It taught me a beautiful lesson: soul-satisfying food isn’t about fancy techniques or expensive ingredients. It’s about heart, a dash of creativity, and letting simple, good things shine. This skillet? It’s that cozy memory, perfected just for you.
Your Flavor-Packed Toolkit: Ingredients & Smart Swaps
Gather these beauties! Don’t stress about perfection – cooking is an adventure, not a precision drill.
- 2 cans chickpeas (drained & rinsed) or 3 cups cooked chickpeas: Our protein-packed stars! Chef’s Tip: Give them a good rinse to remove that starchy can liquid (aquafaba lovers, save it for another use!). Dried chickpeas cooked from scratch? Even better – soak overnight, then simmer until tender.
- 2 tbsp olive oil: The flavorful foundation. Swap Smart: Use the oil from your sundried tomato jar for an extra flavor bomb!
- 1 small onion, diced: Sweetness and depth. Yellow or white works best here. Red onion can be a bit sharp.
- 3 garlic cloves, minced: Non-negotiable aroma! Chef’s Hack: Use a microplane for super-fine mincing – it distributes flavor like magic.
- ½ cup oil-packed sundried tomatoes, chopped: Little bursts of intense, tangy sunshine! Insight: Oil-packed are softer and more flavorful than dry. Reserve that flavorful oil!
- 2 tbsp tomato paste (or ½ cup tomato sauce): Deep, rich tomato base. Pro Move: Cook the paste for a full minute with the spices – it “blooms” and loses any raw taste, becoming super flavorful.
- ½ cup vegetable broth: The liquid gold for our sauce. Creamier Dream: Swap half the broth for unsweetened plant milk (cashew or oat milk are champs!) for extra lusciousness.
- 1 tsp Italian seasoning (or mix of oregano + thyme): The Tuscan soul. Fresh is Fab: Got fresh herbs? Toss in a tbsp of chopped oregano or thyme at the very end!
- ½ tsp smoked paprika: Adds warmth and subtle smokiness – the secret whisperer! Regular paprika works, but you’ll miss that cozy depth.
- 2 cups fresh spinach (or a handful of fresh basil): Pop of color and freshness. Substitute: Kale (remove tough stems) or Swiss chard work great too – add them a minute earlier to soften.
- 2 tbsp nutritional yeast or grated parmesan: Cheesy umami boost (optional but awesome!). Dietary Note: Nutritional yeast keeps it vegan and adds B vitamins!
- Salt & pepper to taste: Your flavor finishers. Chef’s Mantra: Season in layers! A pinch when sautéing onions, another after adding broth, and a final adjustment at the end.
Let’s Get Sizzling: Your Foolproof Skillet Journey
Ready? This comes together faster than you can say “Mangia!” Keep that skillet moving and your senses engaged.
- Heat the Stage: Grab your trustiest skillet (a 10 or 12-inch works best) and place it over medium heat. Add the olive oil (or that glorious sundried tomato oil!). Let it shimmer for about 30 seconds – you want it hot but not smoking. Chef’s Tip: Swirl the pan to coat the bottom evenly. This is where the flavor party starts!
- Sweat the Aromatics: Toss in the diced onion. Sauté, stirring occasionally, for about 5 minutes. We’re not looking for browning here, just soft, translucent sweetness. Watch Closely: If the onions start sizzling too aggressively, nudge the heat down slightly. Patience = flavor foundation!
- Garlic & Tomato Tango: Add the minced garlic and chopped sundried tomatoes. Stir constantly for about 2 minutes. Smell that? Heaven! Critical Hack: Don’t let the garlic brown! Burnt garlic turns bitter. Keep it moving and lower the heat if needed – we want fragrant, not fried.
- Bloom the Flavor Base: Push the onion/garlic/tomato mix to one side. Add the tomato paste, Italian seasoning, and smoked paprika right onto the cleared spot in the pan. Let it sizzle and mingle for a full minute, stirring it into the paste. This “blooms” the spices and cooks out any raw tomato paste taste, creating an incredibly rich, deep flavor base. Game Changer! This step is non-negotiable for max flavor impact.
- Chickpea Celebration & Simmer Down: Add the drained chickpeas and vegetable broth (or broth + plant milk for creaminess). Stir everything together with enthusiasm, making sure those chickpeas are well coated in the gorgeous sauce. Bring it to a gentle simmer (small bubbles breaking the surface, not a rolling boil). Let it bubble happily for 5-7 minutes. Chef’s Insight: This simmer time allows the chickpeas to soak up all that amazing flavor and the sauce to thicken slightly. Stir occasionally to prevent sticking.
- Green Glory & Cheesy Hug (Optional): Turn off the heat (residual heat is plenty!). Pile in the fresh spinach or basil. Gently stir until the greens are just wilted and beautifully vibrant – about 1 minute. If using nutritional yeast or parmesan, stir it in now. It will melt into the sauce, adding body and savory goodness. Gentle Touch: Overcooking the greens makes them sad and dull. Wilt them quickly for maximum freshness!
- Taste the Sunshine: Grab a spoon (careful, it’s hot!). Taste your masterpiece. This is YOUR moment! Season generously with salt and freshly ground black pepper until it sings. Final Beau Wisdom: Trust your palate. Need more tang? A tiny splash of balsamic vinegar works wonders. Craving more herbiness? Toss in extra fresh basil.
Plating Perfection: Serving Your Tuscan Masterpiece
This skillet is a showstopper straight from the stove! For maximum cozy vibes, serve it family-style right in the pan (set it on a trivet!). Ladle generous portions into shallow bowls. It’s incredibly versatile: Spoon it over creamy polenta or fluffy couscous for pure comfort. Love carbs? It’s divine tangled with al dente pasta (penne or rigatoni are perfect pockets for sauce!) or piled onto thick slices of crusty, toasted sourdough to soak up every drop. Garnish is key: A final flourish of fresh basil leaves, a sprinkle of extra nutritional yeast or parmesan, maybe a drizzle of good olive oil, or even a pinch of red pepper flakes for a gentle kick. Pair it with a simple green salad dressed in lemon vinaigrette for a complete, feel-good feast!
Make It Your Own: Delicious Twists on the Theme
This recipe loves to play dress-up! Try these fun spins:
- Protein Power-Up: Add 1 cup of cooked, shredded chicken or Italian sausage (browned first) along with the chickpeas for a meatier version.
- Mediterranean Meets Creamy: Stir in ¼ cup of chopped Kalamata olives and 2 tbsp of capers with the spinach. Finish with a dollop of vegan cashew cream or regular cream for extra decadence.
- Spicy Arrabbiata Vibe: Kick up the heat! Add ½ tsp crushed red pepper flakes when you add the garlic. Perfect for spice lovers!
- Lemony Fresh & Herbaceous: Brighten it up! Stir in the zest and juice of half a lemon right at the end with the spinach. Swap Italian seasoning for fresh dill or parsley.
- Veggie Loaded Extravaganza: Sauté 1 diced bell pepper (any color) and ½ cup sliced mushrooms with the onions for extra veggie goodness.
Beau’s Backstory & Kitchen Confessions
This recipe has been my trusty sidekick for years, evolving from that desperate pantry raid into a Feastical fan favorite. The biggest game-changer? Learning to “bloom” the tomato paste and spices – seriously, that minute of sizzling unlocks flavor dimensions you wouldn’t believe! I once (okay, maybe twice) forgot to drain the chickpeas properly. Lesson learned: watery sauce city! Now I shake them in the colander like maracas. Funny kitchen moment? I was filming this for the site and got so enthusiastic stirring, I sent a rogue chickpea flying – it landed perfectly in my coffee mug. Multitasking fail? Or accidental flavor fusion? You decide! The beauty of this dish is its resilience. Sauce too thick? Splash in more broth. Too thin? Let it simmer a tad longer. It forgives, adapts, and always delivers soul-warming goodness. It’s proof that simple ingredients, cooked with heart, create pure magic.
Your Questions, Answered: Smooth Skillet Success
Let’s tackle those common head-scratchers before they happen!
- Q: My sauce seems too thin/watery! Help?A: Don’t panic! First, ensure you drained the chickpeas REALLY well. If it’s still thin, let it simmer uncovered for a few extra minutes to reduce and thicken. If you used tomato sauce instead of paste, it will be thinner – next time, try reducing the broth slightly or adding an extra tablespoon of tomato paste. A tiny sprinkle of cornstarch (mixed with cold water first!) can also help in a pinch, but simmering is usually the best fix.
- Q: Can I make this ahead of time?A: Absolutely! It actually tastes even better the next day as the flavors meld. Let it cool completely, then store it airtight in the fridge for up to 3 days. Reheat gently on the stovetop over medium-low heat, adding a splash of broth or water if it seems thick. Avoid the microwave if you can – it can make the chickpeas a bit tough.
- Q: I don’t have nutritional yeast. What’s the best parmesan substitute for vegans?A: No problem! While nutritional yeast adds a unique cheesy/nutty flavor, you have options: 1) Use a store-bought vegan parmesan alternative. 2) Blend ¼ cup raw cashews (soaked if not using a high-speed blender) with 1 tbsp lemon juice and 1 tbsp nutritional yeast (if you have it) or miso paste for umami. 3) Simply omit it! The dish is still delicious without, though you might add an extra pinch of salt.
- Q: The sundried tomatoes are overpowering! How can I balance it?A: Ah, sundried tomatoes can vary in intensity! Next time, start with ⅓ cup and add more if you like. To rescue this batch: Stir in a teaspoon of maple syrup or a pinch of sugar to counter the tartness. Adding a splash of plant milk or cream can also mellow it. More chickpeas or broth can dilute the intensity slightly too. Taste and adjust!

Creamy Tuscan Chickpea Skillet with Sundried Tomatoes
- Total Time: 30 minutes
Description
Hello, kitchen friend! This one-pan Tuscan chickpea skillet feels like a warm hug from Italy without ever leaving your home. Plump chickpeas swim in a rich, herb-infused tomato cream sauce with sundried tomatoes and fresh greens. It’s comforting, plant-powered, and perfect for a quick weeknight dinner or a cozy meal with friends. Let’s bring a little Tuscan sunshine to your table!
Ingredients
-
2 cans chickpeas (drained and rinsed) or 3 cups cooked chickpeas
-
2 tbsp olive oil (or oil from sundried tomato jar for extra flavor)
-
1 small onion, diced
-
3 garlic cloves, minced
-
½ cup oil-packed sundried tomatoes, chopped
-
2 tbsp tomato paste (or ½ cup tomato sauce)
-
½ cup vegetable broth
-
1 tsp Italian seasoning (or ½ tsp oregano + ½ tsp thyme)
-
½ tsp smoked paprika
-
2 cups fresh spinach (or basil, kale, or Swiss chard)
-
2 tbsp nutritional yeast or grated parmesan (optional)
-
Salt and pepper, to taste
Instructions
-
Heat the oil: In a 10-12 inch skillet, warm the olive oil over medium heat until shimmering.
-
Sauté onion: Add diced onion and cook, stirring occasionally, until soft and translucent, about 5 minutes.
-
Add garlic and sundried tomatoes: Stir in minced garlic and chopped sundried tomatoes. Cook for 2 minutes, stirring constantly to prevent garlic from browning.
-
Bloom the tomato paste & spices: Push the onion mixture to one side of the skillet. Add tomato paste, Italian seasoning, and smoked paprika in the cleared space. Let it cook for 1 minute, stirring to “bloom” the flavors.
-
Add chickpeas and broth: Stir chickpeas and vegetable broth into the skillet, mixing everything together. Bring to a gentle simmer and cook for 5-7 minutes to let the flavors meld and sauce thicken slightly.
-
Add greens and cheese: Remove skillet from heat. Stir in fresh spinach (or other greens) until just wilted, about 1 minute. Mix in nutritional yeast or parmesan if using.
-
Season: Taste and adjust seasoning with salt and pepper. Add a splash of balsamic vinegar for brightness if desired.
-
Serve: Enjoy straight from the skillet or serve over creamy polenta, couscous, pasta, or crusty bread.
Notes
-
Rinse chickpeas well to avoid watery sauce. Drain thoroughly or shake in a colander like maracas!
-
To make it creamier, replace half the broth with unsweetened plant milk like cashew or oat milk.
-
Want a protein boost? Add cooked shredded chicken or browned Italian sausage.
-
For spice lovers, toss in ½ tsp crushed red pepper flakes with the garlic.
-
Store leftovers in an airtight container in the fridge for up to 3 days; flavors deepen overnight!
- Prep Time: 10 minutes
- Cook Time: 20 minutes
Nutrition
- Calories: 280 Cal per serving
- Fat: 10g
- Carbohydrates: 25g
- Fiber: 8g
- Protein: 12g
Nourishment Notes (Because Feeling Good Matters!)
This dish isn’t just tasty; it’s packed with goodness! Here’s a quick snapshot per serving (approx., based on using vegetable broth and nutritional yeast):
- Calories: ~280
- Fat: ~10g (Mostly heart-healthy fats from olive oil)
- Protein: ~12g (Thanks, mighty chickpeas!)
- Carbohydrates: ~25g (Rich in fiber for happy digestion!)
- Fiber: ~8g (A significant boost towards your daily goal!)
Prep Time: 10 mins | Cook Time: 15 mins | Total Time: 25 mins | Serves: 4
Final Thoughts: Why This Recipe Deserves a Spot in Your Regular Rotation
This Creamy Tuscan Chickpea Skillet isn’t just another recipe—it’s a celebration of simplicity, flavor, and comfort. It proves that you don’t need fancy ingredients or complicated techniques to make something truly special.
-
It’s adaptable (swap veggies, adjust spices, add protein).
-
It’s quick (30 minutes from pantry to plate).
-
It’s nourishing (packed with plant-based goodness).
-
It’s soul-warming (like a hug from an Italian grandmother).
Whether you’re cooking for one, feeding a family, or impressing guests, this dish delivers every time. So grab that skillet, turn up the heat, and let the flavors of Tuscany transform your kitchen—and your weeknight dinners—into something magical.
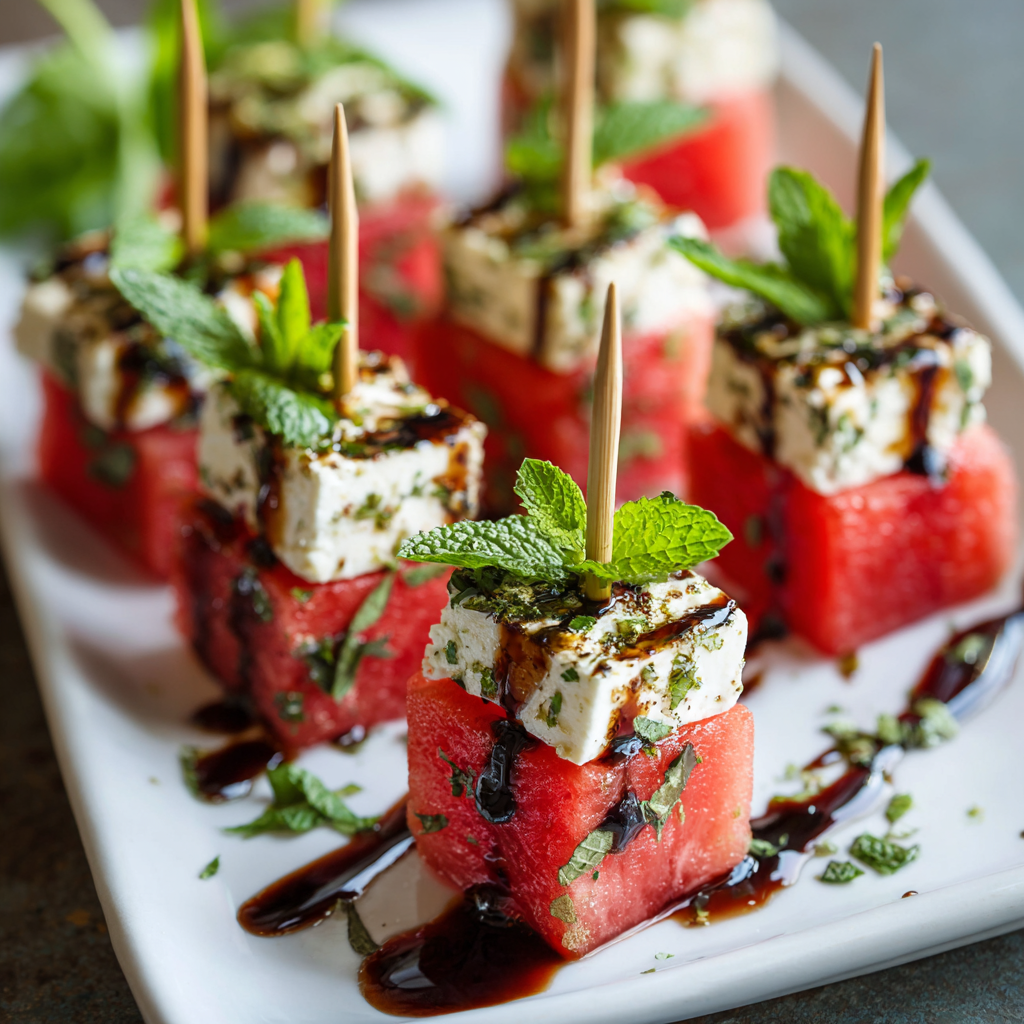
Easy Watermelon Feta Skewers with Fresh Mint
When Summer Sings on a Skewer: Your New Go-To Party Hero
Hey friends! Beau here from Feastical, and if your summer gatherings have been missing that “WOW” factor without turning your kitchen into a sauna, I’ve got your back. Picture this: juicy crimson watermelon, creamy salty feta, and fresh mint leaves playing tag on a skewer, all dressed up in a tangy balsamic gown. These Watermelon Feta Skewers aren’t just an appetizer—they’re edible confetti that celebrates sunshine! Perfect for pool parties, backyard BBQs, or when you need a 10-minute “look-I-slaved-all-day” hack. No fancy skills required—just a knife, some toothpicks, and that gorgeous produce haul from the farmers’ market. Trust me, these little flavor fireworks will disappear faster than ice cream in July. Let’s make your next gathering deliciously unforgettable!
The Picnic That Started It All
Rewind to my first summer in Austin—temps soaring past 100°F, and my brilliant idea to host a lakeside picnic. I’d planned elaborate grilled dishes, but the heat had other plans. Frantic, I raided my cooler: leftover watermelon from breakfast, feta from a Greek salad, and mint growing like a weed in my yard. On a whim, I stabbed them onto toothpicks and drizzled balsamic glaze (meant for bruschetta). The result? Friends abandoned burgers for these refreshing bites! Sarah, my now-wife, still teases how my “kitchen panic” birthed our most-requested summer staple. Every time I make them, I’m back at that sunny lakeshore—sweaty but victorious, proving that magic happens when simplicity meets desperation.
Your Flavor Dream Team (and Their Understudies!)
- 24 watermelon cubes (½-inch) – Go seedless for hassle-free snacking! Pick a melon that feels heavy for its size with a creamy yellow spot—it’s nature’s “ripe” sticker. Swap: Honeydew or cucumber for a different crunch.
- 12 feta cheese cubes (½-inch) – Buy blocks, not crumbles! Creamy French feta melts luxuriously, while Greek feta holds shape. Vegan? Marinated tofu or avocado work shockingly well.
- 12 fresh mint or basil leaves – Mint = bright coolness; basil = peppery warmth. Rub a leaf before buying—it should scream fragrance! Sub: Thai basil or even arugula for a spicy kick.
- Premade balsamic glaze – Chef hack: Grab the thickest bottle you find—runny glaze = sad skewers. Or simmer 1 cup balsamic + 2 tbsp honey for 15 mins until syrupy. Game changer!
Pro Tip: Chill EVERYTHING. Cold watermelon won’t weep on your platter, and firm feta cubes won’t crumble during assembly. Trust me—temperature is your silent sous-chef here.
Let’s Build Flavor Towers (No Hard Hat Required!)
Step 1: Cube that melon like a boss! Slice watermelon into 1-inch slabs, then into strips, and finally into ½-inch cubes. Hack: Use a ruler or the width of your thumb as a guide—uniform pieces = pretty skewers. Pat cubes dry with paper towels (soggy skewers are party poopers).
Step 2: Feta surgery time! Cut cheese block into 12 even cubes—slightly smaller than watermelon since it’s denser. Chef secret: Wipe your knife with olive oil between cuts to prevent sticking. Life. Changing.
Step 3: Herb TLC! Rinse mint/basil, then spin dry in a salad spinner or pat gently. Why? Water dilutes balsamic magic. Keep leaves whole—no one wants herb confetti.
Step 4: Skewer assembly line! Thread in this order: watermelon cube → mint leaf (folded like a taco!) → feta cube → watermelon topper. Tip: Pierce feta dead-center—it crumbles less than edges. Use 4-inch skewers for stability, or cute toothpicks for bite-sized joy.
Step 5: Chill out, literally. Arrange skewers on a parchment-lined tray, cover with plastic wrap, and refrigerate 20+ minutes. This lets flavors mingle like old friends at a reunion!
Step 6: Drizzle drama! Right before serving, zig-zag balsamic glaze over skewers. Pro move: Use a squeeze bottle for control, or dip a fork in glaze and wave it over the platter Jackson Pollock-style!
The Science Behind the Perfect Bite
Why do these skewers work so well? It’s not just luck—it’s science! The magic lies in the interplay of textures, temperatures, and taste receptors. Watermelon is 92% water, making it a natural hydrator in summer heat, while its high lycopene content (the pigment that makes it red) subtly enhances sweetness. Feta, on the other hand, is a salty, fatty counterpoint that triggers umami receptors. When chilled, the fat in feta firms up, creating a creamy-but-stable bite that contrasts with watermelon’s crisp juiciness.
Then there’s the mint. Its menthol compounds activate TRPM8 receptors in your mouth, literally tricking your brain into perceiving coolness—even if the skewer isn’t ice-cold. Balsamic glaze adds the final flourish: its acetic acid and concentrated sugars (from reduction) balance sweetness and acidity, while its thick viscosity clings to ingredients without dripping. Fun fact: The glaze’s dark color also creates visual contrast, making the dish look more flavorful before you even take a bite.
For optimal enjoyment, serve at 40–50°F (standard fridge temp). Warmer, and the feta softens; colder, and the watermelon’s flavor numbs. Pro tip: Sprinkle a pinch of flaky salt just before serving—it amplifies sweetness and umami by 20%, according to a 2020 Food Chemistry study.
A Global Tour of Sweet-Salty Pairings
This skewer isn’t just a party trick—it’s part of a centuries-old culinary tradition. From Italy’s melone e prosciutto to Thailand’s mango-sticky rice with salted coconut cream, cultures worldwide celebrate the sweet-salty dance.
-
Middle Eastern Inspiration: Watermelon + feta echoes Palestinian fattoush salads with watermelon and akawi cheese. For authenticity, add a sprinkle of za’atar.
-
Asian Twist: In Vietnam, ripe fruit is dipped in chili-salt mixes. Try skewers with a tamarind glaze and crushed peanuts.
-
European Elegance: The French serve chèvre with honeydew. Swap feta for goat cheese and drizzle lavender honey.
-
Latin Flair: Mexicans pair jicama with lime and Tajín. Substitute watermelon for jicama and add a sprinkle of chamoy.
Even drinks join the party! Spain’s rebujito (sherry + soda + salt) and India’s aam panna (mango + cumin + salt) prove this combo transcends borders. The takeaway? Your skewers are a passport—experiment with global flavors to keep guests guessing.
The Lazy Chef’s Guide to Impressive Entertaining
Hosting anxiety is real, but these skewers are your secret weapon. Here’s how to maximize impact with minimal effort:
1. Delegate Like a Pro: Turn assembly into a party activity! Set up a “skewer bar” with prepped ingredients—kids and guests love DIY projects.
2. Shortcut City:
-
Buy pre-cubed watermelon (most grocers sell it).
-
Use pre-marinated feta from the olive bar.
-
Opt for freeze-dried mint in a pinch (rehydrate in ice water for 5 mins).
3. Leftover Alchemy:
-
Blend leftover watermelon + feta into a gazpacho.
-
Toss extra mint into mojitos or herb butter.
-
Reduce balsamic glaze further to make a steak sauce.
4. Presentation Hacks:
-
No skewers? Layer ingredients in martini glasses.
-
Freeze glaze into dots on parchment; use as edible “confetti.”
-
Line platters with edible leaves (e.g., banana or grape).
5. Disaster-Proofing:
-
Cheese too soft? Roll cubes in chopped pistachios.
-
Melon underwhelming? Spritz with lime juice.
-
Glaze too thick? Warm the bottle in hot water for 10 seconds.
Remember: The messier the kitchen, the better the stories. Embrace imperfections!
Plating Perfection: Make ‘Em Insta-Famous
Presentation is everything with these jewels! Skip boring plates—layer skewers on a chilled slate board or rustic wooden tray. Scatter extra mint leaves and watermelon balls around them like confetti. For pool parties? Nestle skewers upright in a halved watermelon “vase” filled with ice. Serve immediately after glazing to keep textures crisp. Pair with sparkling rosé or icy lemonade for maximum refreshment. Warning: Guests will swarm these like seagulls on fries!
Mix It Up, Maverick!
Feeling fancy? Try these twists:
- Mediterranean Vacation: Add kalamata olives between layers + swap mint for oregano.
- Spicy Sweetheart: Sprinkle skewers with chili-lime salt before glazing.
- Berry Burst: Alternate watermelon with fresh raspberries or blueberries.
- Protein Power: Thread in grilled shrimp or prosciutto-wrapped melon cubes.
- Dessert Edition: Swap feta for mascarpone, add a drizzle of honey, and skip herbs.
Confessions of a Skewer Addict
This recipe’s evolved more than my taste in aprons! Early versions used balsamic vinaigrette (too acidic) and crumbled feta (messy!). The “double watermelon” sandwich technique? Born when Sarah’s nephew kept flicking feta off the skewer—now the cheese stays put! Funny story: I once subbed rosemary for mint during a garden mishap… my dog gave me side-eye. Lesson learned: stick to soft herbs! These skewers now travel to every potluck I attend—they’re my edible business card. Make them your own, and remember: perfection is overrated. A lopsided skewer still tastes like summer!
Your Burning Skewer Questions, Answered!
Q: Can I make these ahead?
A: Absolutely! Assemble skewers (without glaze) up to 4 hours ahead. Store covered in the fridge. Glaze JUST before serving—balsamic makes watermelon soggy after 30+ minutes.
Q: My feta keeps crumbling! Help?
A: Three tricks: 1) Use firm Greek feta blocks (not pre-crumbled). 2) Freeze cheese for 15 mins before cubing. 3) Use a sharp knife—no sawing! Crumbled feta? No shame—pile it on top post-assembly!
Q: Balsamic glaze hack for sugar-conscious folks?
A: Simmer 1 cup high-quality balsamic vinegar (no sugar added) with 1 tbsp maple syrup until reduced by half. Or skip glaze and sprinkle with flaky sea salt!
Q: Can I use wooden skewers for a crowd?
A: Yes—soak them in water for 30 mins first! Prevents scorching if serving outdoors, and stops splinters. Or use reusable metal picks for eco-points.
Easy Watermelon Feta Skewers with Fresh Mint
- Total Time: 10 minutes
Description
Craving an easy, crowd-pleasing dish that screams sunshine? These Watermelon Feta Skewers are your go-to! Juicy melon, creamy feta, and mint, stacked and drizzled with balsamic glaze—refreshing, tangy, and totally addictive. They’re ready in 10 minutes, no cooking required, and always steal the spotlight at any summer table.
Ingredients
-
24 watermelon cubes (½-inch, chilled)
-
12 feta cubes (½-inch, firm block style)
-
12 fresh mint or basil leaves
-
Premade balsamic glaze (or DIY: 1 cup balsamic + 2 tbsp honey, reduced)
-
12 small skewers or sturdy toothpicks
Instructions
-
Cube watermelon & feta evenly. Pat watermelon dry.
-
Fold mint leaf and layer: watermelon → mint → feta → watermelon.
-
Chill assembled skewers 20 mins.
-
Drizzle with balsamic glaze just before serving.
Notes
-
Use Greek feta for sturdiness.
-
Add olives or raspberries for flair.
-
Sub in cucumber or tofu for a fun twist.
-
Skewers too soggy? Glaze at the last second!
- Prep Time: 10 mins
Nutrition
- Calories: 40 Cal
- Fat: 3g
- Carbohydrates: 3g
- Protein: 2g
Light & Bright Bites
Prep Time: 10 minutes | Total Time: 10 minutes | Servings: 12 skewers
Per Skewer: Calories: ~40 kcal | Protein: ~2g | Fat: ~3g | Carbs: ~3g
Diet Notes: Naturally gluten-free, vegetarian, low-carb. Vegan? Use tofu feta!
Final Thoughts
These skewers are more than a recipe—they’re a mindset. They remind us that summer’s best moments are uncomplicated: the crunch of ripe fruit, the laughter of friends, and the joy of sharing food that looks as vibrant as it tastes. Whether you stick to the classic combo or riff with global flavors, the real secret ingredient is fun. So grab that melon, channel your inner kitchen rebel, and let every bite sing of sunshine. After all, the best memories aren’t just made—they’re skewered.

Lemon Pasta with Tomatoes and Basil
Sunshine in a Bowl: My Go-To Lemon Pasta with Tomatoes & Basil
Hey there, Feastical friends! Beau here, and I’ve gotta tell you about the dish that’s been saving my sanity on busy weeknights and lighting up my dinner table like a summer afternoon: this outrageously good Lemon Pasta with Tomatoes and Basil. Picture this: al dente pasta tangled in a creamy, zesty Parmesan sauce, studded with sweet, blistered tomatoes and ribbons of fresh basil. It’s bright, it’s comforting, and it tastes like pure sunshine scooped straight into a bowl. Seriously, if happiness had a flavor, this would be it.
You know those days when you’re rummaging through the fridge, hoping dinner magically assembles itself? That’s where this hero comes in. It’s faster than takeout (we’re talking 25 minutes flat!), uses simple ingredients that sing, and feels like a hug for your taste buds. No fancy skills needed—just a pot, a pan, and a craving for something downright delicious. Whether you’re cooking solo after a long day or feeding a crowd of hungry pals on the patio, this pasta delivers big flavor without the big effort. So grab your favorite wooden spoon, crank up some tunes, and let’s turn your kitchen into the happiest place on earth tonight. Trust me, your spatula’s gonna thank you.
Why This Pasta Tastes Like Summer Vacation
Okay, story time! This recipe? It’s basically my edible love letter to the summers I spent at my grandma’s lakeside cottage. She had this wild, sprawling basil plant that smelled like heaven, and she’d send me out with a colander to pick tomatoes warm from the vine. One sweltering August afternoon, she whipped up a “cleaning out the fridge” pasta—lemony, creamy, bursting with those sun-ripened tomatoes and fragrant basil. We ate it on her rickety porch, legs sticky from lake water, while fireflies blinked over the water. That messy, joyful bowl tasted like freedom and bare feet and pure summer magic.
Years later, when I launched Feastical, I knew I had to recreate that feeling. I tweaked her throw-it-together spirit into this recipe—keeping the soulful simplicity but adding that silky Parmesan-cream hug (sorry, Nonna, your margarine tub wasn’t cutting it!). Every time I make it, I’m right back on that porch. It’s more than dinner; it’s a passport to lazy afternoons, loud laughter, and the kind of meals that stick to your ribs and your memories. Now you get to make your own sunshine stories with it. How cool is that?
Your Sunshine Squad: What You’ll Need
Gather these simple rockstars—they’re about to make magic! Pro tip: Quality matters here, especially with the lemon and cheese. Fresh is your friend!
- 1 dry pint cherry or grape tomatoes, halved (about 350g) – Little bursts of sweetness! Halving them lets their juices mingle with the sauce. Swap with diced ripe heirlooms in season.
- ½ packed cup fresh basil, chopped (20g) – The fragrant heart of the dish! Tear (don’t chop!) at the last second to avoid bruising. In a pinch? Arugula adds peppery zing.
- ⅓ cup + 1 tbsp olive oil, divided (80ml) – Use the good stuff! The 1 tbsp sizzles the tomatoes; the rest builds the sauce base. Extra virgin is key for flavor.
- 1 tsp salt, plus more to taste – Pasta water should taste like the sea! Diamond Crystal kosher salt is my MVP for even seasoning.
- ½ tsp ground black pepper, plus more to taste – Freshly cracked adds a warm punch. I always add an extra twist at the end.
- 1 lb linguine, spaghetti, or fettuccine (455g) – Long noodles = perfect sauce carriers! Linguine is my goldilocks pick—holds sauce beautifully.
- 2 lemons, zest and juice – Zest FIRST before juicing! Organic lemons avoid bitter wax. This is your sunshine—don’t skimp!
- ⅓ cup heavy cream (80g) – Creates that dreamy, silky texture. Half-and-half works, but sauce will be thinner. For richness? Go full cream.
- 1 cup freshly shredded Parmesan cheese (100g) – NON-NEGOTIABLE. Pre-grated stuff won’t melt right. Grab a wedge and shred it yourself—it’s worth the elbow grease!
Let’s Make Some Sunshine: Step-by-Step
Ready to rock? This comes together FAST, so have everything prepped (mise en place, chefs!). Let’s dive in:
- Pasta Power: Bring a huge pot of water to a rolling boil. Salt it generously (like 2 tbsp!)—this seasons the pasta from within. Add your noodles and cook until al dente (usually 1-2 minutes LESS than the package says). Chef Hack: Set a timer! Mushy pasta = sadness. Before draining, SCOOP OUT 1 CUP OF THAT STARCHY PASTA WATER. This liquid gold thickens the sauce magically. Drain the pasta but don’t rinse it—you want that starch clinging!
- Tomato Tango: While the pasta cooks, heat 1 tbsp olive oil in a large skillet over medium heat. Toss in those halved tomatoes, sprinkle with a pinch of salt and pepper. Sauté just until they soften and start to blister (4-5 mins)—you want plump jewels, not mush! Chef Insight: Hearing a gentle sizzle? Perfect. If they pop wildly, lower the heat. Remove from heat.
- Sauce Symphony: In a big bowl (big enough for tossing!), whisk together the remaining ⅓ cup olive oil, lemon zest, lemon juice, heavy cream, shredded Parmesan, and ½ cup of that reserved pasta water. Whisk like you mean it! It’ll look a bit split at first—keep going until it’s creamy and emulsified. Pro Tip: Warm bowl = happy sauce. Run it under hot water first!
- The Grand Toss: Immediately add the hot, drained pasta to the sauce bowl. Toss vigorously with tongs for 1-2 minutes. The heat melts the cheese, the starch thickens it, and the sauce clings to every strand. Too thick? Add more pasta water, 1 tbsp at a time.
- Fold in the Joy: Gently fold in the sautéed tomatoes and ALL that glorious chopped basil. Beau’s Rule: Be gentle! We’re preserving tomato shape and basil freshness. Taste it—this is CRUCIAL. Need more zing? Extra lemon juice. More depth? Another pinch of salt or Parmesan.
Plating Your Sunshine Masterpiece
Serve this beauty IMMEDIATELY while it’s gloriously hot and creamy. Twirl high piles into shallow bowls (show off those saucy strands!). Top with extra shredded Parmesan, a flurry of fresh basil leaves, and a final crack of black pepper. Want that *chef’s kiss* touch? Drizzle a tiny bit of your best olive oil over the top. Pair it with a crisp green salad and crusty bread for mopping—because that sauce is liquid gold. For a summer vibe? Eat it al fresco with a chilled glass of Pinot Grigio. Pure bliss!
Make It Your Own: Delicious Twists
This recipe’s a canvas! Get creative:
- Protein Power-Up: Fold in 2 cups shredded rotisserie chicken or 1 lb sautéed shrimp (add shrimp with tomatoes!).
- Veggie Delight: Swap tomatoes with roasted asparagus or zucchini ribbons. Add baby spinach with the basil.
- Lighter Touch: Use half-and-half instead of cream and swap ½ the pasta for zucchini noodles.
- Garlic Lovers: Sauté 3 minced garlic cloves with the tomatoes (bliss!).
- Dairy-Free Dream: Use full-fat coconut milk instead of cream and nutritional yeast or vegan Parmesan.
Beau’s Back-Porch Wisdom
This recipe’s evolved like my favorite worn-in apron! Early versions used bottled lemon juice (yikes!) and pre-grated “green can” Parmesan (double yikes!). Lesson learned: FRESH IS EVERYTHING. I also used to drown it in cream—turns out, less is more when you let the pasta water work its starchy magic. One hilarious fail? I once zested a lemon AFTER juicing it. Let’s just say wrestling a slippery lemon half is not my finest kitchen moment! Now I keep a microplane permanently attached to my lemon zester. The biggest win? Realizing this dish thrives on imperfection. Tomatoes split? Flavor bombs! Sauce a little loose? Just call it “brothy.” It’s meant to be easy, joyful, and forgiving—just like those summer days at Nonna’s.
Your Lemon Pasta Questions, Answered!
Let’s tackle those kitchen hiccups before they happen:
- Q: My sauce looks grainy/separated! Help!
A: Don’t panic! This usually means the cheese hit cold pasta or the bowl was too cool. Fix: Ensure your pasta is PIPING HOT when tossed. Warm your mixing bowl first (hot water rinse!). If it happens, whisk in hot pasta water, 1 tbsp at a time, vigorously. It should come back together. - Q: Can I make this ahead?
A: Honestly? It’s best fresh. The cream can make leftovers feel heavy, and basil wilts. If you MUST, cook components separately: sauce base (hold cream/cheese), pasta, tomatoes. Combine gently with warmed cream/cheese when reheating. Add fresh basil only at serving. - Q: My pasta soaked up all the sauce! It’s dry.
A: You needed more pasta water, friend! Next time, reserve that full cup. For now: Warm ¼ cup broth or water with a splash of cream and lemon juice. Toss it into the pasta over low heat until saucy again. - Q: Can I use bottled lemon juice?
A: *Deep chef sigh.* Please don’t! Fresh lemon zest and juice are the SUNSHINE here. Bottled lacks brightness and can taste metallic. No fresh lemons? Make a different pasta tonight—this one needs the real deal!

Lemon Pasta with Tomatoes and Basil
- Total Time: 25 mins
Description
Need a fast, feel-good dinner that tastes like a summer getaway? This 25-minute lemon pasta wraps tender noodles in a silky Parmesan-lemon sauce, with blistered cherry tomatoes and fresh basil folded in for juicy bursts and garden-bright flavor. It’s cozy, vibrant, and flat-out delicious—like sunshine for your taste buds.
Ingredients
-
1 lb linguine or spaghetti
-
1 dry pint cherry tomatoes, halved
-
½ cup fresh basil, chopped
-
⅓ cup + 1 tbsp olive oil
-
2 lemons, zest + juice
-
⅓ cup heavy cream
-
1 cup freshly grated Parmesan
-
1 tsp salt + ½ tsp black pepper
Instructions
-
Boil pasta in salted water until al dente. Reserve 1 cup pasta water, then drain.
-
Blister tomatoes in 1 tbsp olive oil over medium heat, 4–5 mins. Set aside.
-
Mix sauce: In a large warm bowl, whisk remaining olive oil, lemon zest + juice, cream, Parmesan, and ½ cup pasta water.
-
Toss pasta in sauce while hot. Stir vigorously until creamy. Add more water if needed.
-
Fold in tomatoes and basil. Season to taste.
-
Serve hot, topped with extra cheese, basil, and black pepper.
Notes
-
Add grilled shrimp or rotisserie chicken for protein.
-
Try roasted asparagus or sautéed spinach instead of tomatoes.
-
Go dairy-free with coconut milk + vegan Parmesan.
-
Use whole wheat pasta for extra fiber.
- Prep Time: 10 mins
- Cook Time: 15 mins
Nutrition
- Calories: 470 Cal
- Fat: 20g
- Carbohydrates: 55g
- Protein: 16g
Nutrition & Prep Info (Because We Care!)
Prep Time: 10 minutes | Cook Time: 15 minutes | Total Time: 25 minutes | Servings: 6
Per Serving (approx): Calories: ~470 kcal | Protein: ~16g | Fat: ~20g | Carbs: ~55g
Vegetarian & packed with fresh, vibrant flavor!
Final Thoughts: Why This Dish is a Keeper
This Lemon Pasta with Tomatoes and Basil isn’t just a recipe—it’s a celebration of simplicity, freshness, and the joy of cooking. It’s quick enough for a weeknight but elegant enough for a dinner party. It’s adaptable, forgiving, and endlessly customizable. Most importantly, it’s a reminder that the best meals don’t have to be complicated.
Every bite is a burst of sunshine, a tribute to summer, and a testament to the magic that happens when great ingredients come together. Whether you’re cooking for one or a crowd, this dish will never let you down. So grab those lemons, tear that basil, and get ready to fall in love with pasta all over again. Happy cooking!
Grilled Vegetable Hummus Wraps
Grilled Vegetable Hummus Wraps: Your New Veggie-Packed Obsession
Hey friends, Beau here! Ever have one of those days when you’re craving something fresh, vibrant, and ridiculously satisfying—but don’t wanna spend hours chained to the stove? *raises hand* That’s exactly why I’m obsessed with these Grilled Vegetable Hummus Wraps. Picture this: smoky charred zucchini, sweet caramelized onions, and creamy hummus all hugged by a toasty lavash wrap, with a kiss of honey-balsamic glaze and melty mozzarella. It’s like a Mediterranean vacation in your lunchbox! Whether you’re meal-prepping for crazy workweeks or need a lightning-fast dinner after soccer practice, these wraps are your golden ticket. They’re vegetarian without feeling “virtuous,” packed with garden-goodness, and legit ready in 25 minutes flat. Oh, and that satisfying CRUNCH when you bite into one? Pure magic. So toss that sad desk salad—we’re making flavor the main event today!
Sunset Picnics & Kitchen Mishaps: Why These Wraps Taste Like Home
Alright, story time! These wraps? They’re basically edible nostalgia for me. Back when I first launched Feastical, my wife and I were broke as a joke but determined to have “date nights.” We’d grab whatever veggies were on sale, fire up our rusty apartment grill pan (which smoked up the entire kitchen—sorry, neighbors!), and stuff everything into pitas with hummus. One Tuesday, I got fancy and drizzled balsamic glaze… only to trip and spill half the bottle onto our wraps. Best. Mistake. Ever. That tangy-sweet punch transformed our sad little wraps into something we’d crave all week. Now, every time I make ’em, I’m right back on that tiny balcony, laughing over charred zucchini while the sunset turns everything gold. Food’s not just fuel, y’know? It’s those messy, joyful moments that stick with you.
Your Flavor Squad: Simple Ingredients, Big Impact
- 4 lavash wraps – The MVP! Thin, pliable, and crisps up beautifully. Chef’s hack: If you can’t find lavash, whole wheat tortillas or even pita pockets work great!
- ½ cup hummus – Your flavor glue! Creamy hummus adds protein and makes every bite lush. Feastical tip: Swap in roasted red pepper hummus for extra zing.
- 2 medium zucchini, sliced – The green goddess! Grill ’em until tender with sexy char marks. Sub alert: Summer squash or eggplant slices are fab too.
- 1 large red onion, sliced – Nature’s caramel! Grilling tames its bite into sweet perfection. No onions? Try bell peppers for crunch.
- 1 tbsp olive oil – Liquid gold for grilling. Insider scoop: Infuse it with garlic for bonus points!
- 2 tbsp balsamic vinegar + 1 tbsp honey – The dynamic duo! Whisk together for a glossy, tangy-sweet glaze. Vegan? Maple syrup rocks here.
- ½ tsp Italian seasoning + ½ tsp kosher salt – Flavor awakeners! Pro move: Add smoked paprika for depth.
- 2 oz reduced-fat mozzarella, shredded – Melty goodness! Lactose-free? Nutritional yeast or vegan cheese slays.
See? No fancy-pants ingredients—just smart combos that sing together!
Let’s Build Some Deliciousness: Your Foolproof Roadmap
Step 1: Fire up the grill (or pan!)
Get your grill or heavy skillet screamin’ hot over medium heat. No grill? NO STRESS. A cast-iron pan gives killer char! Chef’s secret: Brush the grates with oil so veggies don’t do the clingy tango.
Step 2: Veggie VIP treatment
Toss zucchini and onion slices with olive oil, salt, and Italian seasoning in a bowl. Massage it in like they’re at a spa! Grill 4-5 minutes per side until tender with those gorgeous black stripes. Watchdog tip: Don’t crowd the pan—give ’em space to breathe, or they’ll steam instead of sear!
Step 3: Whip up that magic glaze
While veggies sizzle, grab a small bowl. Whisk balsamic vinegar and honey until smooth. Boom—you just made restaurant-worthy bling in 10 seconds! Set aside.
Step 4: Assembly line joy
Lay lavash flat (like a flavor blankie!). Spread hummus evenly, leaving a 1-inch border. Critical hack: Thin hummus with a splash of water if it’s stubborn—it’ll roll easier!
Step 5: Load ’em up!
Layer grilled veggies over hummus, then sprinkle with mozzarella. Drizzle glaze like you’re Jackson Pollock—be generous! Rolling pro-tip: Fold sides in first, then roll tightly away from you. Toothpicks optional but handy for messy rollers!
Step 6: Seal the deal (optional but epic)
Pop wraps seam-side down on the grill/skillet for 1-2 minutes per side. You’ll hear that glorious sizzle as cheese melts and lavash turns golden-crisp. Trust me: This step is WORTH IT for texture heaven!
The Art of Grilling Vegetables to Perfection
Grilling vegetables might seem simple, but mastering the technique is what takes these wraps from good to mind-blowing. The key lies in balancing texture and flavor—achieving those beautiful char marks while keeping the veggies tender, not mushy. Here’s how to nail it every time:
Choosing the Right Vegetables
Not all veggies grill equally. For wraps, you want a mix of sturdy and quick-cooking options:
-
Zucchini & Summer Squash: Mild, slightly sweet, and hold their shape well. Slice them into ¼-inch planks for even cooking.
-
Red Onions: Their natural sugars caramelize beautifully, adding depth. Keep slices thick (½-inch) so they don’t burn.
-
Bell Peppers: For extra crunch and color. Remove seeds and flatten halves for maximum grill contact.
-
Eggplant: A meaty alternative. Salt slices first to remove bitterness, then pat dry before grilling.
Prepping Like a Pro
-
Dry Your Veggies: Moisture is the enemy of char. Pat slices dry with a towel before oiling.
-
Oil Wisely: Toss veggies in just enough olive oil to coat (about 1 tbsp per pound). Too much = flare-ups; too little = sticking.
-
Season Generously: Salt draws out flavor, and Italian seasoning adds herbal brightness. For smokiness, add a pinch of paprika or cumin.
Grilling Techniques
-
High Heat, Short Time: Grill at medium-high (400°F) for 2-3 minutes per side. Look for grill marks before flipping.
-
Don’t Crowd the Pan: Overlapping veggies steam instead of sear. Work in batches if needed.
-
The Finger Test: Poke a zucchini slice. It should yield slightly but still have structure (think “al dente”).
Pro Tip: Grill extra veggies! They’re fantastic in salads, grain bowls, or as a side dish later in the week.
Hummus—The Flavor Anchor
Hummus isn’t just a spread; it’s the glue that binds these wraps with creamy, savory richness. Here’s how to elevate your hummus game:
Homemade vs. Store-Bought
Store-bought hummus works in a pinch, but homemade lets you control texture and flavor:
-
Basic Recipe: Blend 1 can chickpeas (drained), ¼ cup tahini, 2 tbsp lemon juice, 1 garlic clove, ½ tsp cumin, and 3 tbsp ice water until smooth. Salt to taste.
-
Texture Hack: Peel chickpeas for ultra-silky hummus (time-consuming but worth it!).
Flavor Variations
-
Roasted Red Pepper: Add ½ cup jarred roasted peppers for sweetness.
-
Spicy Harissa: Mix in 1 tbsp harissa paste for a North African kick.
-
Herb-Infused: Stir in fresh basil, dill, or parsley after blending.
Spreading Like a Chef
-
Warm It Up: Cold hummus can tear lavash. Microwave for 10 seconds to make it spreadable.
-
Thin Layer, Big Impact: Spread 2 tbsp per wrap, leaving a border. Too thick = messy rolling.
Pro Tip: For extra tang, swirl in a spoonful of Greek yogurt or tahini sauce (mix tahini with lemon juice and water).
The Wrap & Roll Masterclass
The final step—assembling and rolling—is where many falter. Follow these steps for tight, grillable wraps:
Choosing Your Wrap
-
Lavash: Thin, pliable, and crisps beautifully. Find it near deli wraps or pita bread.
-
Alternatives: Whole wheat tortillas (warm first) or collard greens for a low-carb option.
Layering Order Matters
-
Hummus Base: Acts as a moisture barrier to prevent sogginess.
-
Veggies: Distribute evenly, avoiding the edges.
-
Cheese: Sprinkle mozzarella after veggies so it melts evenly.
-
Glaze: Drizzle post-cheese to prevent soaking into the wrap.
Rolling Techniques
-
Fold Sides In: Like a burrito, tuck in the left and right edges.
-
Roll Tightly Away from You: Use your fingers to tuck ingredients in as you go.
-
Seal with Heat: Grill seam-side down first to “glue” it shut.
Pro Tip: For meal prep, wrap in parchment paper and foil. Reheat in a toaster oven to maintain crispness.
Plating Like a Pro (Minimal Effort, Max Wow)
Slice these bad boys diagonally—show off those colorful layers! Stack ’em high on a wooden board with extra balsamic glaze drizzled around like edible art. Pair with lemon-dusted arugula or crispy carrot sticks for crunch contrast. Packing for lunch? Wrap in parchment paper and tie with twine (looks chic, stops sogginess!). Perfect with iced mint tea or a crisp rosé. Remember: food this pretty deserves a ‘gram moment!
Shake It Up: 5 Tasty Twists
1. Greek Goddess: Swap mozzarella for feta + add kalamata olives and diced tomatoes.
2. Protein Powerhouse: Add grilled chicken, chickpeas, or crispy tofu.
3. Vegan Vibes: Skip cheese or use vegan mozz, and ensure hummus is dairy-free.
4. Spicy Fiesta: Mix chipotle powder into hummus + top with pickled jalapeños.
5. Rainbow Roll: Throw in grilled bell peppers, purple cabbage, or shredded beets!
Beau’s Backstage Pass: Real Talk & Revelations
Confession: My first version of this was a WRECK. I used soggy tortillas, under-salted veggies, and didn’t grill the wraps. Lesson learned: texture is everything! Now I always double the glaze (because #drizzlelife) and add a pinch of red pepper flakes for subtle heat. These wraps also evolved into my ultimate meal-prep hack—grill veggies ahead, store in jars, and assemble daily! Funny story: My kid once tried to “improve” them by adding rainbow sprinkles. We compromised with sunflower seeds for crunch. Moral? Play with your food! Recipes aren’t rules—they’re launchpads.
Your Burning Questions: Solved!
Q: My wraps keep falling apart! Help?
A: Three fixes: 1) Don’t overstuff (leave that 1-inch border!). 2) Warm lavash 5 seconds in the microwave—it’s more flexible. 3) Roll TIGHTLY, tucking sides in like a burrito. Still rebellious? Secure with toothpicks pre-grilling.
Q: Can I make these ahead?
A: Absolutely! Grill veggies + make glaze up to 3 days ahead. Store separately in the fridge. Assemble wraps cold, then grill just before serving. Avoid pre-assembling more than 2 hours early—lavash gets soggy.
Q: Balsamic glaze too tart?
A: Sweeten it up! Add an extra ½ tsp honey or simmer the glaze 2 minutes to mellow acidity. Or cheat with store-bought glaze (I won’t tell!).
Q: No grill? Alternatives?
A: Your broiler is a hero! Arrange veggies on a sheet pan 6 inches from heat for 3-4 mins per side. Air fryer? 400°F for 8 mins, shaking halfway. Still killer results!

Grilled Vegetable Hummus Wraps
- Total Time: 25 mins
Description
Say hello to your new lunch obsession! These Grilled Veggie Hummus Wraps are smoky, creamy, tangy, and totally crave-worthy—ready in 25 minutes and perfect for meal prep or quick weeknight dinners. With zucchini, caramelized onion, and a dreamy balsamic drizzle, every bite feels like a sunny bite of the Mediterranean.
Ingredients
-
4 lavash wraps (or whole wheat tortillas)
-
½ cup hummus (try roasted red pepper for extra zing)
-
2 medium zucchini, sliced
-
1 large red onion, sliced
-
1 tbsp olive oil
-
2 tbsp balsamic vinegar + 1 tbsp honey (or maple syrup)
-
½ tsp Italian seasoning + ½ tsp kosher salt
-
2 oz shredded mozzarella (or vegan cheese)
Instructions
-
Grill the Veggies: Toss zucchini & onion with oil, salt, and seasoning. Grill 4–5 mins per side until charred.
-
Mix the Glaze: Whisk balsamic vinegar and honey until smooth.
-
Assemble Wraps: Spread hummus on lavash, layer veggies, cheese, and drizzle glaze.
-
Wrap & Grill: Roll tightly, then grill seam-side down for 1–2 mins per side until crisp and melty.
-
Slice & Serve: Cut diagonally and serve with extra glaze or a fresh salad.
Notes
-
Warm lavash before rolling for flexibility.
-
Add grilled chicken or chickpeas for protein.
-
Try chipotle hummus + jalapeños for spice.
-
Grill ahead, assemble fresh = perfect meal prep.
-
Store leftover grilled veggies in jars for 3 days.
- Prep Time: 15 mins
- Cook Time: 10 mins
Nutrition
- Calories: 260 Cal
- Fiber: 5g
- Protein: 10g
Fuel Notes: Good For You, Tastes Like Joy
Prep: 15 min | Cook: 10 min | Total: 25 min | Serves: 4
Per Serving: ~260 kcal | Protein: 10g | Fat: 10g | Carbs: 30g | Fiber: 5g
Vegetarian | Meal-Prep Friendly | High Fiber | Nut-Free
Final Thoughts: Why This Recipe Wins
These wraps are more than a meal—they’re a flexible formula for creativity. Grill your farmers’ market haul, experiment with global flavors (think pesto hummus or za’atar-spiced veggies), or pack them for picnics. They’re proof that plant-based eating doesn’t mean sacrificing satisfaction. So grab those veggies, fire up the grill, and let every bite remind you: good food should be fun.

Strawberry Lemonade Slush
Beat the Heat with Your New Favorite Summer Sipper!
Hey friends! Beau here from Feastical, and I can practically hear the ice clinking in your glasses already. When that summer sun starts blazing like a broiler, there’s nothing quite like an icy-cold, fruity drink to make everything right with the world. That’s why I’m absolutely obsessed with this Strawberry Lemonade Slush – it’s like liquid sunshine with a juicy berry hug! Forget those neon-colored store-bought mixes; we’re using real, ripe strawberries and fresh-squeezed lemons for a burst of pure, natural flavor that’ll make your taste buds dance the cha-cha. Whether you’re chilling poolside, hosting a backyard BBQ, or just surviving a sticky afternoon, this 5-minute wonder transforms basic ingredients into pure refreshment magic. It’s sunshine in a glass, my friends – tart, sweet, and so frosty it’ll give you that happy brain-freeze shiver. So grab your blender (and maybe a paper umbrella for maximum fun), and let’s turn up the cool factor!
Sunshine, Sprinklers, and the Best Slush Ever
This recipe takes me straight back to my Grandma Lou’s backyard circa 1998. Picture this: It was one of those scorching Midwest afternoons where the air felt like soup. My cousins and I had been running through the sprinkler like wild things, collapsing onto the grass, utterly spent. Suddenly, Grandma emerged from her kitchen screen door, balancing a huge, frosty pitcher on a tray. “Who needs a little liquid relief?” she called out. That pitcher held her legendary strawberry-lemon slush – the same recipe I’m sharing with you today! We raced over, dripping wet, and gulped it down so fast our foreheads ached. But oh, that sweet-tart icy rush! That moment – sticky fingers, sun-warmed grass, and that incredible shared brain freeze – cemented this drink as pure, unadulterated summer joy in my book. Every time I make it now, I swear I can hear the squeak of that old screen door and feel Grandma Lou’s satisfied smile. It’s more than a drink; it’s a happy place.
Your Simple Squad of Sunshine & Berries
Gather these bright stars – quality matters!
- 4 cups ice: The backbone of the slush! Use standard cubes or crushed. Chef’s Tip: For an extra creamy texture, freeze some coconut water into ice cubes first!
- 2 cups fresh strawberries, hulled & washed: Ripe, juicy berries = maximum flavor! Swap Savvy: No fresh berries? Frozen strawberries work brilliantly – just thaw slightly and reduce ice by 1 cup.
- 1½ cups water: Keeps everything sippable. Flavor Boost: Swap half the water with chilled sparkling water for a fizzy finish!
- ¾ cup fresh lemon juice (about 4 lemons): Non-negotiable! Bottled juice can’t match the vibrant zing. Chef’s Trick: Roll lemons firmly on the counter before juicing to get every last drop.
- ½ cup sugar: Balances the tartness. Sweet Swap: Use honey, agave, or maple syrup. Start with ⅓ cup and adjust to taste – berries vary in sweetness!
Blend Your Way to Slushy Bliss (It’s Seriously Easy!)
- The Big Chill Dump: Toss EVERYTHING – ice, strawberries, water, lemon juice, and sugar – straight into your blender pitcher. Why this order? Putting liquids near the blades helps everything blend smoothly from the start. No fancy layering needed!
- Blend to Frosty Perfection: Secure that lid TIGHTLY (trust me, icy explosions are no joke!). Start on low speed, then ramp up to high. Blend for 45-60 seconds. Watch for the Magic: You want a thick, vibrant pink slush where no big ice chunks remain, but it still holds its shape when scooped – think fluffy snow cone vibes, not smoothie soup! If it struggles, pause, stir gently with a spoon (blender OFF!), and blend again in short bursts.
- Taste & Tweak: Stop the blender. Grab a spoon and taste! This is crucial. Berries vary wildly in sweetness and tartness. Need more zing? Add 1 tbsp lemon juice. Too tart? Blend in 1-2 tbsp more sugar or sweetener. Pro Move: Add a tiny pinch of salt – it makes all the flavors pop!
- The Grand Finale: Once it’s perfectly balanced and gloriously slushy, pour or scoop it immediately into chilled glasses. The colder the glass, the longer your slush stays frosty! Garnish with flair (see below!), serve with a sturdy straw or spoon, and prepare for the happy sighs.
Make it Look as Good as it Tastes!
Presentation is half the fun! Pour your vibrant slush into frosty mason jars, vintage glasses, or even hollowed-out lemons for serious wow-factor. Slide a lemon wheel or a whole fresh strawberry onto the rim. A sprig of fresh mint adds a gorgeous pop of green and a refreshing aroma. For the kiddos (or kids-at-heart!), add a colorful paper umbrella or a fun reusable straw. This slush is the ultimate solo refresher, but it also shines alongside grilled chicken skewers, fresh summer salads, or piled-high nachos at your next BBQ. Sunshine served, Beau-style!
Mix It Up! Your Slush, Your Rules
Get creative with these tasty twists:
- Berry Bonanza: Swap half the strawberries for raspberries or blueberries. Hello, triple berry lemonade slush!
- Herbal Cool Down: Blend in 5-6 fresh basil or mint leaves with the strawberries for a sophisticated herbal kick.
- Tropical Escape: Replace ½ cup water with chilled coconut water and add a splash of pineapple juice. Instant vacation vibes!
- Sparkling Spritz: Top off each glass with a splash of chilled prosecco or club soda right before serving for effervescent fun (adults only for the bubbly!).
- Creamy Dream: Add ¼ cup plain Greek yogurt or a splash of coconut milk before blending for a lusciously smooth, creamy-textured slush.
Beau’s Back-Porch Wisdom
This recipe is practically family heirloom status! Grandma Lou’s original version used a hand-crank ice crusher (remember those?) and simple syrup. I’ve streamlined it for the blender age, but the soul is the same. One hilarious kitchen fail involved me trying to quadruple the batch in my tiny college blender – let’s just say strawberry slush volcano is NOT a good look for rented carpet! Lesson learned: don’t overfill! The beauty of this slush is its flexibility. Over the years, I’ve made it for bridal showers, post-lawn-mowing rewards, and even as a “smoothie” for my picky toddler (shhh!). It never fails to bring smiles. Remember, taste as you go – your berries, your lemons, your perfect sweetness. That’s the real secret!
Slush SOS: Fixes for Common Hiccups
Q: My slush is too watery! Help!
A: Don’t panic! Add more ice (½ cup at a time) and blend again. Using super ripe or frozen-then-thawed berries adds more liquid. Next time, start with less water (1 cup) and add more only if needed after blending.
Q: Can I make this ahead for a party?
A: It’s best enjoyed immediately for peak texture. However, you can prep the strawberry puree (blend berries, lemon juice, and sweetener) and store it in the fridge for up to 24 hours. When ready to serve, blend the puree with fresh ice and water. Quick party trick!
Q: My blender is struggling! Is it dying?
A: Probably not! Slush is thick. Ensure you aren’t overfilling the pitcher (max ¾ full). Start slow, use the pulse function, and stop to stir/scrape down the sides with the blender OFF. If it’s really stuck, add a tiny splash more water (1 tbsp at a time) to get things moving.
Q: Can I use frozen strawberries instead of fresh?
A: Absolutely! It’s a great shortcut. Use them straight from the freezer, but reduce the ice to 3 cups (since the berries are already frozen) to avoid a too-thick blend that strains your motor. You might also need slightly less sweetener as frozen berries are often picked at peak ripeness.

Strawberry Lemonade Slush
- Total Time: 5 minutes
Description
Craving cool-down bliss in a glass? This Strawberry Lemonade Slush is your shortcut to sunshine—with juicy strawberries, tart lemons, and ice blended into a frosty, flavor-packed dream. Grandma Lou’s backyard classic, now blender-approved and better than any bottled mix. It’s the sip of the season!
Ingredients
-
4 cups ice (try coconut water ice for a twist)
-
2 cups fresh or slightly thawed frozen strawberries
-
1½ cups water (or half sparkling water for fizz!)
-
¾ cup fresh lemon juice (about 4 lemons)
-
½ cup sugar (or to taste – honey/agave works too)
Instructions
-
Add to Blender: Ice, strawberries, lemon juice, water, and sugar.
-
Blend: Start low, then high for 45–60 secs until thick, slushy, and scoopable.
-
Taste Test: Adjust lemon or sweetener as needed. Pinch of salt = flavor booster!
-
Serve Cold: Pour into chilled glasses. Garnish with lemon slices, mint, or berries.
Notes
-
Berry Mix: Try raspberries or blueberries.
-
Herbal Vibe: Add fresh mint or basil.
-
Tropical Touch: Swap water with coconut water + pineapple splash.
-
Creamy Option: Add ¼ cup Greek yogurt or coconut milk.
-
Party Mode: Top with prosecco for a bubbly twist!
- Prep Time: 5 mins
Nutrition
- Calories: ~120 per serving
Simple & Satisfying Sip
Prep Time: 5 minutes | Total Time: 5 minutes | Servings: 4
Per Serving (approx): Calories: ~120 kcal, Sugar: ~24g (mostly natural from fruit!), Vitamin C: Excellent source, Hydrating. A naturally sweet, refreshing treat!
Final Thoughts: More Than Just a Drink
This Strawberry Lemonade Slush isn’t just a recipe—it’s a celebration of summer in a glass. Whether you’re reliving childhood memories, hosting friends, or just beating the heat, its vibrant flavors and frosty texture never disappoint. The best part? It’s endlessly adaptable. Swap fruits, adjust sweetness, or spike it for a party—every version feels like a new discovery.
So grab your blender, embrace the mess (strawberry splatters are a badge of honor!), and raise a glass to simple, sunny joys. Here’s to staying cool, one slushy sip at a time. Cheers!
Honeydew Smoothie Bowl
Wake Up to Sunshine in a Spoon
Hey foodie friends! Beau here, and I’ve got a secret weapon for beating the summer slump—or honestly, any day needing a splash of joy. Picture this: It’s 8 AM, your kitchen’s already warm, and you’re craving something that tastes like vacation but fuels you like a superhero. Enter my Honeydew Smoothie Bowl—a lush, green paradise that’s equal parts refreshing, creamy, and packed with good-for-you vibes. No fancy equipment or chef skills required! Just grab that lonely honeydew rolling around your fridge (you know the one), and let’s turn it into a bowl so vibrant, you’ll want to Instagram it before your first bite. Trust me, this isn’t just breakfast; it’s a 10-minute trip to the tropics. 🌴✨
That One Life-Changing Melon
Rewind to my college days—tiny apartment, broken AC, and a heatwave that made even my spatula sweat. My roommate Luisa and I were surviving on iced coffee until she brought home a bruised honeydew marked down to $1. Skeptical but desperate, we blended it with frozen banana scraps and mint from our dying windowsill plant. That first spoonful? Pure magic. We ate it straight from the blender jar, laughing at how a $1 melon made us feel like we’d cracked the code to happiness. Now, every time I make this bowl, I’m back in that sticky kitchen, reminded that joy often comes from the simplest, chilliest bites. Food memories? They’re the best souvenirs.
Your Tropical Toolkit
- 1 ripe honeydew melon, halved & scooped – The star! Pick one that smells sweet near the stem. No honeydew? Sub with cantaloupe or frozen pineapple chunks.
- 1 frozen banana – Your natural “ice cream” base. Chef hack: Peel & freeze spotty bananas in ziplocks for creaminess on demand!
- 1 handful frozen mixed berries – I use raspberries for a zingy contrast. Swap with mango if you want pure tropics.
- 1½ tsp maca powder – Optional energy boost! Skip it or use matcha if you’re new to superfoods.
- Juice of ½ lime – Brightens everything up. No fresh lime? Lemon juice works too.
- 10 fresh mint leaves – The “aha!” flavor. Sub with basil for a fun twist.
Topping Squad: Melon balls, lime slices, mint leaves, frozen berries. Go wild with toasted coconut or bee pollen too!
Let’s Make Sunshine!
- Scoop & Save: Halve your honeydew and scoop flesh into the blender. Keep that gorgeous melon half—don’t toss it! We’re using it as a bowl later. Pro tip: Scrape the inside with a spoon to remove stringy bits for silky texture.
- Frozen Power-Up: Drop in banana, berries, maca, lime juice, and mint. Layer frozen stuff closest to the blade to help your blender work smarter, not harder.
- Blend Like You Mean It: Pulse 30 sec, then blend 1 min on high. Stuck? Add 1 tbsp coconut water or milk. Want it thicker? Toss in 2 ice cubes. Blend until it looks like mint-green soft serve.
- Bowl Magic: Pour into your saved melon half (it’s Insta-gold!) or regular bowls. Work fast—smoothie bowls firm up quick!
- Top It Like a Pro: Artfully scatter toppings. Place berries first so they “bleed” into the base, then add mint and lime for pop.
Serving Vibes
Serve immediately with a spoon and a smile! This bowl is best enjoyed cold, so chill your melon bowl for 10 minutes beforehand if you’re extra. Pair it with strong coffee for a “rise-and-shine” moment, or as a post-yoga refresher. Kids love it in cups with reusable straws—call it “Hulk Smash Smoothie” for bonus points. 💚
The Science of Sweetness – Why Honeydew is a Smoothie Bowl Superstar
Honeydew melon isn’t just a pretty face in the produce aisle—it’s a nutritional powerhouse disguised as summer’s candy. Unlike its flashier cousin, the watermelon, honeydew’s subtle sweetness and creamy texture make it the perfect canvas for layered flavors. But what exactly makes this melon a smoothie bowl MVP? Let’s geek out for a sec.
Hydration Hero: Honeydew is 90% water, making it nature’s electrolyte drink. Blending it with frozen fruit creates a luscious, spoonable texture without diluting flavor (unlike ice cubes, which can turn smoothies into sad slushies). After a morning workout or a night of questionable hydration choices, this bowl is a delicious reset.
Sugar, But Smarter: A cup of honeydew has just 14g of natural sugar (compared to 20g in a banana), balanced by 1.4g of fiber to slow absorption. That means no mid-morning energy crash—just steady fuel. The lime juice in the recipe isn’t just for zing; its acidity tempers sweetness, so your taste buds stay intrigued.
Vitamin VIP Lounge: One serving of this bowl delivers a full day’s vitamin C (thanks to melon + lime) and a third of your vitamin K needs (courtesy of mint). Maca powder, though optional, adds adaptogenic benefits—helping your body handle stress like a zen smoothie-sipping monk.
Pro Tip: Honeydew’s mildness is a flavor chameleon. Blend it with matcha for an earthy twist, or add spirulina for an ocean-blue “mermaid bowl” that’s still sweet enough for skeptics.
The Art of the Topping – How to Turn Breakfast into a Sensory Experience
A smoothie bowl without toppings is like a sunset without colors—technically fine, but why miss the magic? Toppings aren’t just garnish; they’re texture architects, flavor punctuations, and nutrient boosters. Here’s how to engineer the perfect bite:
Crunch Factor: Toasted coconut flakes or sliced almonds add contrast to the creamy base. For a next-level move, toss them with a pinch of cayenne and lime zest—sweet, spicy, and tart in one bite.
Temperature Play: Mix room-temperature toppings (like fresh melon balls) with frozen berries. The interplay of warm-from-your-hand fruit and icy bits keeps each spoonful dynamic.
Strategic Layering:
-
First Layer (Stick): Press granola or chia seeds into the blend right after pouring—they’ll adhere like edible glitter.
-
Second Layer (Bleed): Place juicy toppings (berries, pomegranate arils) near the edges so their colors “bleed” into the base.
-
Third Layer (Pop): Delicate items (edible flowers, mint) go last so they stay camera-ready.
Flavor Bridges: Use toppings to tie flavors together. If your blend has lime, add lime zest to toasted coconut. If you used mint, garnish with a mint-infused honey drizzle.
Funky Upgrades:
-
Pickled ginger: For a sushi bowl vibe.
-
Tajín seasoning: On mango chunks for a Mexican-inspired kick.
-
Bee pollen: Adds floral notes and a protein boost (just ½ tsp does the trick).
Kid Hack: Let them “paint” their toppings with yogurt “glue” (Greek yogurt thinned with honey) to stick sprinkles or cereal in designs.
The Smoothie Bowl Mindset – Why This Recipe is More Than a Meal
This honeydew bowl isn’t just food—it’s a tiny rebellion against rushed mornings and joyless eating. Here’s why it’s a lifestyle upgrade:
The 10-Minute Vacation: Blending tropical flavors triggers sensory memories. The mint transports you to a breezy balcony in Bali; the honeydew tastes like poolside brunch. Psychologists call this “grounding”—using food to anchor yourself in positivity before tackling emails.
Low-Effort, High-Reward Cooking: For beginners, this recipe is a confidence builder. No knives skills? Pre-cut melon works. No blender? Mash banana and melon with a fork for a “deconstructed” bowl. It’s cooking without the pressure.
The Instagram Effect: Studies show arranging food beautifully increases enjoyment (thanks, brain aesthetics!). The melon bowl vessel isn’t just cute—it subconsciously signals “this is special,” turning breakfast into self-care.
Community Connection: Smoothie bowls are shareable. Double the batch and invite your roommate to decorate their half. Text a photo to your mom with the caption “Eating my greens!” (No need to mention it’s fruit). Food joy is contagious.
Sustainability Win: Using the melon shell cuts waste. Overripe bananas? Frozen for later. Wilting mint? Blended into glory. This recipe teaches flexible, fridge-friendly cooking.
Mix It Up, Chef!
- Creamy Dream: Add ¼ cup Greek yogurt or silken tofu for protein punch.
- Tropical Wave: Swap honeydew for frozen mango + ½ cup coconut milk.
- Berry Burst: Skip berries in the blend; top with granola + fresh strawberries.
- Green Goddess: Toss in a handful of spinach (trust me, you won’t taste it!).
- Dairy-Free Delight: Use almond milk to thin instead of water.
Beau’s Backstage Tips
This recipe’s gone through more glow-ups than my Instagram feed! Originally, I used watermelon, but honeydew’s milder sweetness lets other flavors shine. One time, I added too much lime—my face puckered like I’d kissed a lemon!—so start with half. Also, if your melon’s shy on flavor, drizzle ½ tsp honey pre-blend. Funny story: My dog, Biscuit, once stole a melon half off the counter. Now he gets “pup bowls” with blended melon (no lime!) in his dog bowl. 🐾
Smoothie Bowl SOS
Q: My smoothie’s too runny! Help?
A: No stress! Toss in ¼ cup rolled oats or a spoon of chia seeds and re-blend. Or freeze it in popsicle molds—fails become wins!
Q: Can I make this ahead?
A: Blend the base and store it airtight in the freezer for 2 days. Let it thaw 10 mins, re-blend with 1 tbsp liquid, then top.
Q: Maca tastes weird to me. Alternatives?
A: Try vanilla protein powder, hemp seeds, or just skip it! The bowl’s still nutrient-packed.
Q: My honeydew isn’t sweet enough.
A: Ripen it fast: Place in a paper bag with a banana overnight. The banana’s ethylene gas works wonders!

Honeydew Smoothie Bowl
- Total Time: 10 minutes
Description
Mornings feeling heavy? Cool down with this bright, minty honeydew smoothie bowl—a creamy, dreamy blend of fruit and fresh herbs served right in its own melon shell. It’s summer in every bite: light, energizing, and totally Instagram-worthy. No blender drama, just feel-good fuel in 10 minutes flat.
Ingredients
-
1 ripe honeydew melon (scooped & halved)
-
1 frozen banana
-
1 handful frozen mixed berries (or mango)
-
1½ tsp maca powder (optional)
-
Juice of ½ lime
-
10 fresh mint leaves
Instructions
-
Scoop honeydew flesh into a blender. Save one melon half as a bowl.
-
Add banana, berries, maca, lime juice, and mint to blender.
-
Blend until smooth (add coconut water/milk if needed; for thickness, use ice cubes).
-
Pour into melon half or a bowl.
-
Top like an artist with fruit, herbs, or your favorite crunchy bits.
-
Serve cold—enjoy immediately!
Notes
-
Greek yogurt = extra protein
-
Add spinach = hidden greens
-
Almond milk = dairy-free dream
-
Not sweet enough? Add ½ tsp honey
-
Runny? Add oats or chia seeds to fix texture
- Prep Time: 10 mins
Nutrition
- Calories: 160 per serving
Quick Nutrition Facts
Prep: 10 mins · Serves: 2 · Calories: ~160/serving
High in: Vitamin C (70% DV), Vitamin A · Vegan/Gluten-Free
Note: Stats include base only; toppings add extra goodness!
Final Thoughts
This honeydew smoothie bowl is a reminder that nourishing yourself can be playful, vibrant, and deeply personal. Whether you’re a college student with a $1 melon or a busy parent sneaking spinach into a “Hulk” bowl, it proves good food doesn’t need complexity—just curiosity. So grab that blender, embrace the mess (topings on the floor count as confetti), and taste the sunshine. Here’s to meals that feed your body and your soul.