
Jack-O’-Lantern Stuffed Peppers
Spooky, Savory, and Seriously Fun: Meet Your New Halloween Tradition!
Hey friends, Beau here! Can you smell that? There’s a crispness in the air that has nothing to do with the weather and everything to do with the season. It’s that magical time of year when the leaves start to turn, cozy sweaters make their grand reappearance, and our thoughts drift toward all things pumpkin-spiced and spooky. But let’s be real—while I’ll never say no to a PSL, what I truly crave are dinners that bring that same festive, fun energy to the table.
If you’ve been around Feastical for a while, you know my mantra: food should be a warm hug, not a chore. And Halloween? It’s the perfect excuse to play with your food! That’s why I’m so pumped to share these Jack-O’-Lantern Stuffed Peppers with you today. We’re taking a classic comfort food—the humble, hearty stuffed pepper—and giving it a full-on Halloween makeover. Imagine tender orange bell peppers, each one hand-carved with a silly or spooky grin, stuffed to the brim with a savory, cheesy, tomato-y filling that smells like pure happiness when it comes out of the oven.
This isn’t just a meal; it’s an event. It’s the kind of dinner that makes kids (and let’s be honest, adults too) light up with excitement. It’s wholesome, incredibly satisfying, and proof that you don’t need a special occasion to make dinnertime a little more special. So, grab your favorite knife and let’s create some kitchen magic together. These edible jack-o’-lanterns are about to become the star of your Halloween spread!
A Halloween Kitchen Memory
This recipe always takes me right back to my mom’s kitchen, circa the mid-90s. Halloween was a *big deal* in our house. It wasn’t just about the candy; it was a whole production. My mom, the queen of festive spirit, would go all out. One year, she decided our regular Tuesday dinner of stuffed peppers needed a holiday upgrade. I remember her sitting at the kitchen table with a paring knife, her brow furrowed in concentration as she carefully carved wobbly triangle eyes and a jagged smile into a bright orange bell pepper.
My brother and I were instantly mesmerized. We abandoned our crayons and scrambled onto our chairs to watch, begging to help. She let us design the faces—I went for a classic, friendly pumpkin, while my brother, ever the rebel, insisted on a scary, fanged monster. When they came out of the oven, bubbling and fragrant, it felt like we had created something truly magical. We didn’t just eat dinner that night; we devoured our own edible artwork. That’s the spirit I want to bring to your table—a little bit of nostalgia, a whole lot of fun, and a meal that’s as memorable as it is delicious.
Gathering Your Spooky Supper Squad
Here’s everything you’ll need to bring these grinning gourds to life. Don’t stress about being exact—cooking is about intuition and making it your own!
- 6 large orange bell peppers: The canvas for our edible art! Look for peppers that are smooth, have a flat bottom so they stand up straight, and are roughly the same size for even cooking. The bigger, the better—more room for stuffing!
- 1 lb ground beef (or ground turkey): I love the rich, savory flavor of 80/20 beef here, but lean turkey is a fantastic, lighter alternative. For a plant-based twist, lentils are your best friend!
- 1 small onion, diced: The aromatic base of our filling. A yellow or white onion works perfectly here, adding a touch of sweetness once sautéed.
- 2 cloves garlic, minced: Because is it even a Beau Collier recipe without garlic? Fresh is best—it adds a punchy, aromatic depth that powder just can’t match.
- 1 (14.5 oz) can diced tomatoes, undrained: This adds moisture and a tangy, bright acidity that cuts through the richness of the meat. Fire-roasted tomatoes are my secret weapon for an extra layer of flavor.
- 1 cup cooked rice: This is our filler-upper! White, brown, or even cauliflower rice all work. Pro Chef Hack: Use day-old rice or quick-cook grains to save time. The rice soaks up all the delicious juices as it bakes.
- 1 cup shredded cheddar or mozzarella cheese (plus extra for topping): The glorious, melty glue that holds everything together. I’m a cheddar guy for its sharpness, but mozzarella gives you that epic cheese-pull photo op. A blend is even better!
- 1 tsp Italian seasoning: A convenient flavor bomb of oregano, basil, thyme, and rosemary. No Italian blend? A half-teaspoon each of dried oregano and basil will do the trick.
- 1/2 tsp paprika: This isn’t just for color (though it gives the filling a lovely warmth)! It adds a subtle, sweet smokiness that complements the beef beautifully.
- Salt & pepper, to taste: The undisputed champions of seasoning. Don’t be shy—season every layer of your cooking for the best flavor.
- 2 tbsp olive oil: For sautéing our aromatics and browning the meat. Any neutral oil will work here.
Let’s Carve Some Culinary Magic: Your Step-by-Step Guide
Alright, team! Let’s fire up the oven and get creating. Follow these steps, and you’ll have a tray of perfect jack-o’-lantern peppers in no time.
Step 1: Prep Like a Pro. First things first, preheat your oven to 375°F (190°C). This ensures it’s perfectly hot and ready when your peppers are stuffed. Grab a 9×13 inch baking dish and give it a light coating of oil or non-stick spray. Now, for the fun part: take your beautiful orange bell peppers. Slice the tops off (save them!) and carefully remove all the seeds and white membranes from inside. Rinse them out to make sure you got everything. Now, using a small, sharp paring knife (and maybe a little help from a steady-handed adult or kid), carve simple jack-o’-lantern faces into one side of each pepper. Think triangles for eyes and a fun zig-zag or square smile. Chef’s Tip: Don’t carve too deep! You just want to pierce the flesh, not cut huge holes that will let the filling leak out.
Step 2: Build the Flavor Foundation. Heat the olive oil in a large skillet over medium heat. Toss in your diced onion and cook until it becomes soft and translucent, about 3-4 minutes. Add the minced garlic and cook for just another 30 seconds until it’s fragrant—you’ll know it’s ready when your kitchen smells incredible. Now, add the ground beef (or turkey), breaking it up with your spoon as it cooks. Sprinkle in the Italian seasoning, paprika, and a good pinch of salt and pepper. Cook until the meat is no longer pink, about 5-7 minutes. If there’s a lot of excess grease, you can drain it off, but a little adds great flavor!
Step 3: The Big Mix. Turn the heat down to low. To your beautifully browned meat mixture, add the entire can of diced tomatoes (with their juices!) and your cup of cooked rice. Give it all a good stir until everything is combined and heated through. Now, take the skillet off the heat and stir in that one cup of shredded cheese. This is the “special sauce”—the cheese will melt and create a creamy, cohesive filling that’s impossible to resist.
Step 4: Stuff ‘Em! Arrange your carved pepper jack-o’-lanterns in your prepared baking dish. Using a spoon, generously fill each pepper with the meat and rice mixture, pressing down gently as you go to pack it in. Fill them all the way to the top! If you’re feeling extra, sprinkle a little more cheese on top of each one—because more cheese is always the answer.
Step 5: Bake to Perfection. Cover the baking dish tightly with aluminum foil. This is crucial! The foil creates a steamy environment that gently cooks the peppers and makes them tender. Bake covered for 25 minutes. Then, carefully remove the foil (steam is hot!) and bake for another 10-15 minutes, uncovered. You’re waiting for the peppers to be easily pierced with a knife and the cheese on top to be gloriously golden and bubbly.
Plating Your Masterpiece
Presentation is part of the fun! Let these peppers be the star. Carefully lift each one out of the dish with a spatula and place it right in the center of a dinner plate. The carved face will be smiling right up at you! For a complete spooky supper, serve them alongside a simple green salad dressed as “witch’s potion” (a green goddess or zesty vinaigrette) or a handful of “bat wings” (baked potato wedges or sweet potato fries). Don’t forget to put the pepper lids off to the side like little chef’s hats—it’s a adorable finishing touch!
Mix It Up! Creative Twists on the Classic
This recipe is a fantastic template for creativity. Here are a few of my favorite ways to switch it up:
- Mexican Fiesta: Swap the Italian seasoning for taco seasoning, use black beans instead of rice, and top with pepper jack cheese and a dollop of sour cream after baking.
- Italian Wedding: Use ground pork or a pork/beef blend, swap the rice for cooked orzo pasta, and stir in a handful of chopped fresh parsley and a pinch of red pepper flakes.
- Vegetarian Ghoul: Replace the meat with two cups of cooked quinoa or lentils and a cup of chopped mushrooms for a hearty, plant-powered version.
- Buffalo Boo-falo: For a kick, mix in 1/2 cup of buffalo sauce into the filling and use a blue cheese or ranch dressing for dipping.
Beau’s Chef Notes & Kitchen Stories
This recipe has evolved so much since my mom first made it. My biggest hack? I now toast my uncooked rice in the skillet with the onions for a minute before adding the meat. It gives the rice a nutty depth that is just next-level. Also, a little confession: I am notoriously bad at carving symmetrical faces. My jack-o’-lanterns usually end up with a goofy, lopsided charm, and I’ve decided that’s part of their appeal! They have personality. Don’t aim for perfection; aim for fun. The first time I made these for a Halloween party, my friend’s daughter proudly declared my wobbly-faced pepper “the cutest thing she’d ever eaten.” That’s a win in my book.
FAQs: Your Questions, Answered
Q: Can I make these stuffed peppers ahead of time?
A: Absolutely! You can assemble the peppers completely—stuff them, put them in the dish, cover them—and then refrigerate for up to 24 hours before baking. When you’re ready, just pop them in the oven. You might need to add 5-10 minutes to the baking time since they’ll be going in cold.
Q: My peppers are still a bit firm after baking. What happened?
A: This usually means the peppers were particularly thick-walled. No worries! Just cover them back up with the foil and pop them back in the oven for another 5-10 minutes. The steam will continue to soften them up. For guaranteed tender peppers, you can blanch them for 2-3 minutes in boiling water before carving and stuffing.
Q: The filling is leaking out of the carved faces! How do I prevent that?
A: This is a common one. The key is to not over-stuff the peppers and to press the filling down firmly so it’s compact. Also, make sure your carving cuts are clean and not too large. If a little leaks, it’s no big deal—it just adds to the “spooky” effect!
Q: Can I use a different color pepper?
A: Of course! Orange are the most pumpkin-like, but you can use red, yellow, or even green peppers for a different monstrous vibe. Just note that green peppers have a slightly more bitter flavor and a thicker skin.

Jack-O’-Lantern Stuffed Peppers
- Total Time: 50–55 mins
Description
✨ A Halloween dinner that’s spooky, cozy, and totally fun! These carved orange peppers, stuffed with a cheesy beef-and-rice filling, are the edible jack-o’-lanterns your table has been waiting for. Perfect for kids and adults alike, they’re hearty, playful, and guaranteed to spark smiles before the first bite.
Ingredients
-
6 large orange bell peppers (flat-bottomed, for carving)
-
1 lb ground beef (or turkey; lentils for vegetarian)
-
1 small onion, diced
-
2 cloves garlic, minced
-
1 (14.5 oz) can diced tomatoes (fire-roasted = extra flavor!)
-
1 cup cooked rice (white, brown, or cauliflower)
-
1 cup shredded cheddar or mozzarella (plus extra for topping)
-
1 tsp Italian seasoning
-
½ tsp paprika
-
Salt & pepper to taste
-
2 tbsp olive oil
Instructions
1. Prep Peppers: Preheat oven to 375°F (190°C). Slice tops off peppers, remove seeds/membranes, and carve simple jack-o’-lantern faces. Place in a greased 9×13″ baking dish.
2. Cook Filling: In a skillet, heat oil. Sauté onion 3–4 min, add garlic 30 sec. Stir in beef, seasoning, paprika, salt, and pepper. Cook until browned, 5–7 min.
3. Mix It Up: Add diced tomatoes + rice. Stir to combine. Off heat, fold in cheese.
4. Stuff Peppers: Spoon filling into each pepper, packing gently. Top with extra cheese if desired.
5. Bake: Cover with foil. Bake 25 min. Remove foil and bake 10–15 more until peppers are tender and cheese is bubbly.
- Prep Time: 15 mins
- Cook Time: 35–40 mins
Nutrition
- Calories: 360 Cal Per Stuffed Pepper
- Carbohydrates: 28g
- Protein: 22g
Nutritional Info (Approximate, per pepper)
Calories: 360 | Protein: 22g | Carbohydrates: 28g | Fat: 18g | Fiber: 4g
Final Thoughts
So there you have it, friends—more than just a recipe, but a ticket to a spooky, savory, and seriously fun Halloween tradition. These Jack-O’-Lantern Stuffed Peppers are the perfect reminder that the best holiday magic isn’t just found in a candy bowl; it’s created together in the kitchen, surrounded by laughter, a few messes, and the incredible aroma of a meal made with joy.
Whether you’re hosting a full-blown Halloween feast, looking for a festive weeknight dinner, or simply wanting to make a core memory with your favorite little goblins and ghosts, this dish delivers. It’s hearty, customizable, and proof that playing with your food is always encouraged.

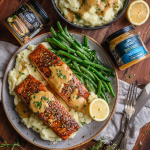
Creamy Honey Mustard Salmon with Garlic Mash
Why This Salmon Dish Will Become Your Weeknight Hero
Hey friends, Beau here! Let’s talk about that magical intersection where “I need dinner STAT” meets “but I reeeeally want something fancy.” You know those nights—when takeout menus taunt you, but your soul craves that warm, homemade hug? That’s exactly why I created this Creamy Honey Mustard Salmon with Garlic Mash. It’s your golden ticket to a restaurant-worthy plate in under 30 minutes, using ingredients that won’t make your wallet weep. Picture this: tender salmon fillets swimming in a luscious sauce that’s equal parts sweet honey kick and tangy Dijon pep talk, all snuggled atop fluffy mashed potatoes loaded with roasted garlic goodness. We’re talking crispy-edged green beans on the side for that perfect crunch. No culinary acrobatics required—just real food, real flavor, and real life saving. Trust me, this isn’t just dinner; it’s a high-five to your future self.
The Campfire Salmon That Started It All
Okay, story time! This recipe? It’s basically my taste buds’ love letter to a chilly night years ago in the Blue Ridge Mountains. My buddy Leo—who swore cooking meant “opening a bag of chips”—dared me to make something “fancy” over a campfire. Challenge accepted! I whipped up a makeshift honey-mustard glaze with packets from a gas station (!), slathered it on wild-caught salmon, and “baked” it in foil near the embers. Served with instant mash (don’t judge!) and foraged greens. Sounds wild, right? But when Leo took that first bite? Silence. Then: “Dude. You’ve ruined gas station hot dogs for me forever.” That messy, smoky magic taught me something: great food isn’t about perfection. It’s about joy, improvisation, and that moment when everyone leans back with a happy sigh. This recipe? It’s that campfire victory… minus the pine needles in your potatoes.
Gather Your Flavor Squad (Plus Handy Swaps!)
Here’s what you’ll need for 4 happy bellies:
- 800g salmon fillets – Skin-on for crispy edges, or skinless if texture isn’t your jam. Insider tip: Wild-caught has richer flavor, but sustainable farmed works beautifully too!
- 2 tbsp Dijon mustard – The tangy backbone! Swap with whole-grain mustard for texture, or yellow mustard in a pinch (reduce honey slightly—it’s sweeter).
- 1 tbsp honey – Raw local honey = floral depth! Maple syrup works for vegan vibes.
- 150g light cream cheese or Greek yogurt – Cream cheese = ultra-luxe silkiness. Yogurt = brighter tang. BOTH are winners!
- 600g cooked potatoes, mashed – Yukon Golds are my MVP (naturally buttery!). Russets work—just add extra garlic love.
- 3 cloves garlic, roasted – Non-negotiable hack: Roast whole cloves in foil with olive oil while prepping salmon. Sweet, mellow GAME CHANGER.
- 1 tbsp olive oil + 2 tbsp butter – For mash richness. Vegan? Use plant butter + a splash of broth.
- Fresh herbs (chives, parsley) – Fold into mash or sprinkle on top. Dried herbs work (1 tsp each).
- Steamed green beans or asparagus – Chef’s secret: Toss with lemon zest right after steaming!
- Lemon zest + pinch of paprika – Zest wakes up the glaze; paprika adds smoky warmth. Omit if needed—but WHY? 😉
Let’s Build Your Flavor Masterpiece (No Stress Allowed!)
Step 1: Preheat & Prep (5 mins)
Fire up that oven to 375°F (190°C). Line a baking sheet with parchment paper (hello, easy cleanup!). Beau’s Bonus: Lightly oil the paper so your salmon lifts off like a dream. Pat salmon fillets SUPER dry with paper towels—this is CRUCIAL for crispy edges, friends! Season lightly with salt and pepper.
Step 2: Whip Up That Magic Glaze (3 mins)
Grab a small bowl. Plop in the Dijon, honey, cream cheese (or yogurt), lemon zest, and paprika. Whisk like you mean it! Texture Check: If it’s too thick, add 1 tsp warm water. Too thin? More cream cheese. Taste it—adjust honey or mustard until your tongue does a happy dance.
Step 3: Glaze & Bake (12-15 mins)
Arrange salmon on the baking sheet. Slather that gorgeous glaze all over the tops and sides—get generous! Pro Move: Reserve 2 tbsp glaze for drizzling later. Bake until salmon flakes easily with a fork (thicker fillets might need 15 mins). Watchdog Tip: Don’t overcook! Salmon should be slightly translucent in the center when pulled.
Step 4: Garlic Mash Heaven (10 mins)
While salmon bakes, mash your pre-cooked potatoes (I boil mine ahead!). Squeeze roasted garlic cloves from their skins—they’ll be soft and caramelized. Add to potatoes with olive oil, butter, herbs, salt, and pepper. Mash until creamy, but leave SOME lumps for rustic charm. Hack Alert: Warm your milk/cream before adding if using—cold milk = gluey mash!
Step 5: Veggie Flash (5 mins)
Steam beans or asparagus until crisp-tender (about 4 mins). Immediately toss with a squeeze of lemon juice, zest, and a pinch of flaky salt. Keeps ’em vibrant!
Plating Like a Pro (Minimal Effort, Max Wow)
Slide a swoosh of that dreamy garlic mash onto each plate—use the back of a spoon to make a creamy “nest.” Gently place a glazed salmon fillet right on top. Scatter your bright green veggies alongside. Drizzle reserved glaze over the salmon like edible gold. Finish with extra herbs and a crack of black pepper. Boom! You just turned Tuesday into Tuscany. Serve with crusty bread for sauce-mopping emergencies.
Mix It Up! 5 Tasty Twists
1. Coconut Curry Twist: Swap Dijon for 1 tbsp curry powder + 1/2 cup coconut milk in the glaze. Serve with cilantro-lime mash.
2. Pescatarian Feast: Add shrimp to the baking sheet last 5 mins. Glaze everything!
3. Veggie Power: Use thick cauliflower steaks instead of salmon. Roast 20 mins.
4. Spicy Kick: Add 1 tsp sriracha or harissa to the glaze. Balance with extra honey.
5. Dairy-Free Delight: Use coconut yogurt + nutritional yeast in glaze. Olive oil mash.
Beau’s Backstage Kitchen Confessions
This recipe? It’s evolved more than my taste in aprons! Originally, I used heavy cream—delicious, but nap-inducing. Switching to light cream cheese or yogurt kept it lush but lively. And that paprika? Total accident! Knocked it into the bowl once… best “oops” ever. Funny story: I once subbed beet puree for half the Dijon (don’t ask), turning the salmon bright pink. My niece declared it “mermaid salmon” and ate TWO servings. Lesson? Play with your food! Now, I make double glaze—it’s killer on roasted carrots or as a sandwich spread. Make it yours, friends. That’s the real recipe.
Your Salmon SOS Station
Q: My glaze split! Looks curdled. Help?
A: Don’t panic! Overheating dairy can cause this. Remove salmon. Whisk 1 tbsp hot water into glaze—often brings it back. Still iffy? Strain it. Next time, ensure cream cheese is room temp before mixing.
Q: Salmon’s cooked outside but raw inside. What now?
A: Oven temps vary! If glaze is browning too fast, tent loosely with foil. If center’s underdone, broil 1-2 mins watching LIKE A HAWK. Thicker fillets? Start skin-side down 5 mins before flipping & glazing.
Q: Can I prep this ahead?
A: Totally! Make glaze 2 days ahead (store sealed). Roast garlic 3 days ahead. Day-of: assemble & bake. Reheat mash with splash of milk.
Q: Hate mustard. Any hope?
A: You do you! Try tahini + lemon juice + honey. Or pesto + Greek yogurt. Still creamy, still dreamy.
Creamy Honey Mustard Salmon with Garlic Mash
- Total Time: 25–30 mins
Description
✨ Meet your new weeknight hero! Juicy salmon fillets baked in a luscious honey-Dijon glaze, nestled on roasted garlic mashed potatoes, with bright green veggies on the side. It’s restaurant-level comfort in under 30 minutes—balanced, bold, and beautiful on the plate. The kind of dinner that turns “what’s for dinner?” into a happy sigh.
Ingredients
-
800g salmon fillets (skin-on for crisp edges, or skinless)
-
2 tbsp Dijon mustard (swap with whole-grain for texture)
-
1 tbsp honey (maple syrup works too)
-
150g light cream cheese or Greek yogurt
-
Zest of 1 lemon + pinch of paprika
-
600g cooked potatoes (Yukon Gold or Russet), mashed
-
3 roasted garlic cloves
-
1 tbsp olive oil + 2 tbsp butter
-
Fresh herbs (chives, parsley)
-
Steamed green beans or asparagus
Instructions
1. Prep Salmon (5 min): Preheat oven to 375°F (190°C). Line tray with parchment, pat salmon dry, season with salt + pepper.
2. Make Glaze (3 min): Whisk Dijon, honey, cream cheese/yogurt, lemon zest, and paprika until smooth.
3. Bake (12–15 min): Brush salmon with glaze (reserve a little for later). Bake until flaky but slightly translucent in the center.
4. Garlic Mash (10 min): Mash potatoes with roasted garlic, olive oil, butter, salt, pepper, and herbs. Keep a few rustic lumps!
5. Veggies (5 min): Steam beans or asparagus, then toss with lemon juice + zest.
6. Plate & Serve: Spoon mash onto plates, top with salmon, add veggies, drizzle with extra glaze, finish with herbs.
Notes
-
Pat salmon dry for crisp edges.
-
Don’t overbake—slightly translucent = juicy perfection.
-
Roast garlic while salmon cooks for a time-saver.
- Prep Time: 10 mins
- Cook Time: 15–20 mins
Nutrition
- Calories: 570 Cal Per Serving
- Fat: 26g
- Carbohydrates: 35g
- Protein: 44g
Quick Bite Breakdown (Per Serving)
Calories: 570 | Protein: 44g | Carbs: 35g | Fat: 26g
Note: Using Greek yogurt lowers fat by ~5g. Veggie sides boost fiber!
Final Thoughts: Your New Weeknight Victory Lap
So there you have it, friends—the story, the blueprint, and all my backstage secrets to a dish that’s so much more than the sum of its parts.
This Creamy Honey Mustard Salmon isn’t just about feeding your body; it’s about feeding your spirit. It’s a reminder that you don’t need a special occasion or hours to spare to create something truly wonderful. In the time it takes for a delivery driver to get lost, you can be sitting down to a meal that feels like a celebration.
It’s forgiving, flexible, and designed for real life. Burned the garlic a little? It’s fine—we’ll call it smoky. Sauce too thick? A splash of water fixes it. Made a pink “mermaid” version by accident? Own it! The goal isn’t perfection; it’s that feeling of accomplishment and the pure joy of eating something delicious that you made.
This recipe is my love letter to easy elegance, and I truly hope it earns a spot in your regular rotation. It’s been a staple in my kitchen since that fateful campfire night, and I have a feeling it’s about to become a hero in yours, too.
Now go forth, cook with confidence, and don’t forget to tag me with your creations! I can’t wait to see them.
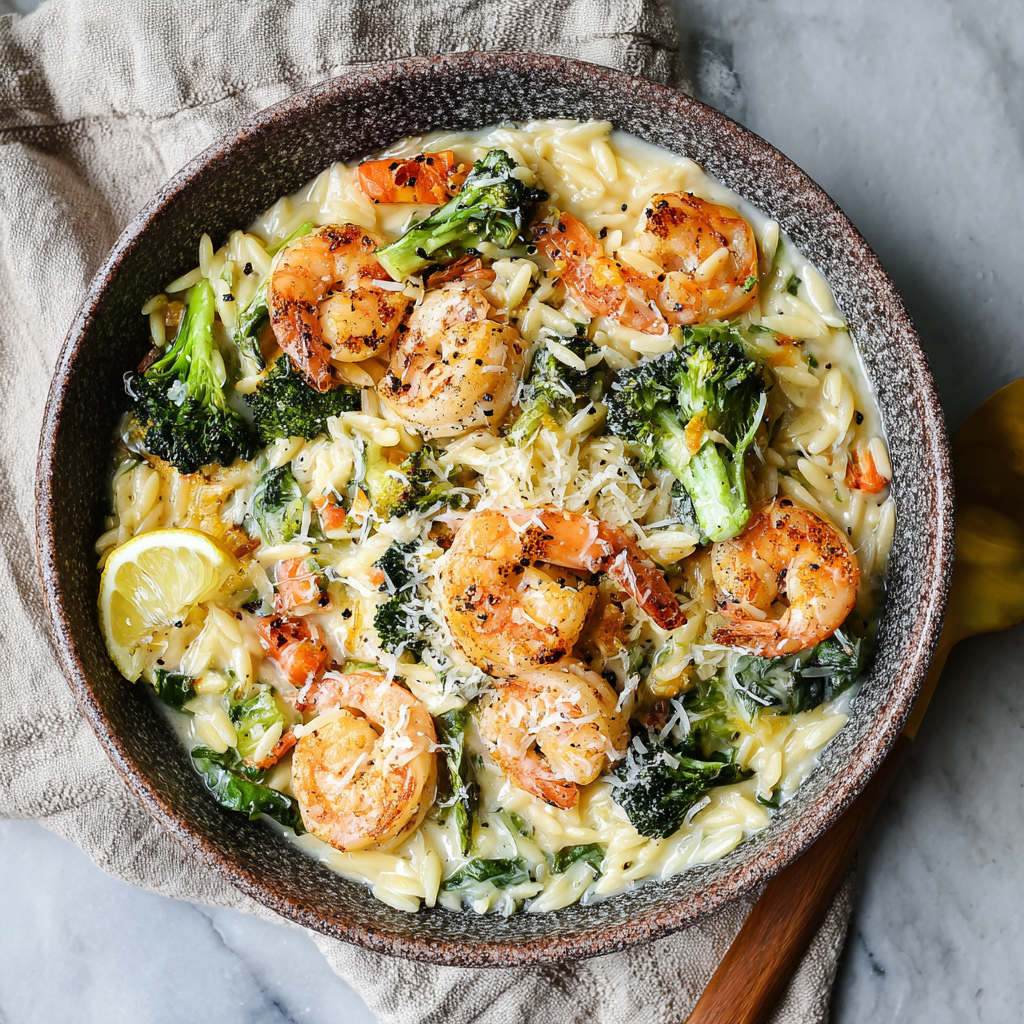
Creamy Garlic Shrimp & Parmesan Veggie Orzo
Your Weeknight Luxury Bowl Is Calling!
Hey kitchen friends! Beau here from Feastical, and I’ve got a confession: sometimes I want restaurant-level wow factor without the fuss. That’s where this Creamy Garlic Shrimp & Parmesan Veggie Orzo struts in like a culinary superhero. Imagine plump, garlicky shrimp dancing with tender orzo pasta in a velvety Parmesan sauce, all brightened up with lemon and roasted greens. It’s the kind of dish that makes you feel fancy while secretly knowing it came together faster than your takeout app could load. 🍤✨
Why do I adore this recipe? Because it’s the ultimate multitasker. It cuddles you after a rough day (that sauce feels like a edible hug!), impresses unexpected guests, and even handles Tuesday-night-I’m-tired vibes. The magic? Bold flavors layered like a pro, but with zero stress. We’re talking 25 minutes start-to-slurp—yes, really! Orzo soaks up that garlicky cream like a dream, while roasted veggies add pops of color and freshness. Trust me, one bite and you’ll be doing a happy fork-tap dance. Ready to cook joy? Let’s roll!
The Beach Hut Kitchen Experiment
Picture this: me, 22 years old, crammed in a tiny Rhode Island beach rental with six friends. We’d spent all day surfing, and our stomachs were roaring louder than the waves. The “kitchen” was basically a hot plate and a dented skillet, but I was determined to avoid yet another pizza night. Enter: a bag of frozen shrimp, half a lemon, and some sad-looking broccoli. Sound familiar? 😄
I threw everything together with pasta and a splash of cream from the corner store, crossing my fingers. What emerged was a creamy, garlicky miracle that had us all scraping the pan with spoons. My buddy Marc—who’d sworn he “didn’t do seafood”—ended up licking his bowl. That chaotic, laughter-filled meal became this recipe’s scrappy origin story. Every time I make it now, I’m back in that salty-aired hut, reminded that great food isn’t about perfection—it’s about flavor, heart, and sharing the stoke.
Gather Your Flavor Crew
Makes 4 generous servings
- 700g peeled shrimp – Pro tip: Size 26/30 (large) gives the best bite. Thaw frozen shrimp in cold water for 10 mins! Wild-caught swaps beautifully with chicken or scallops.
- 1 tbsp olive oil – Extra virgin for fruity notes. Avocado oil works if you’re searing hot.
- 1 tbsp light butter – My sneaky richness hack! Regular butter or ghee are A-OK.
- 1 tbsp minced garlic – Fresh is fire here. In a pinch? ½ tsp garlic powder + 1 tsp oil.
- 150ml light cream or evaporated milk – Evaporated milk is my MVP for lush texture without heaviness. Dairy-free? Full-fat coconut milk shines.
- 200g cooked orzo pasta – Cook it al dente! It’ll keep absorbing sauce. No orzo? Tiny pastina or risotto rice.
- 1 cup roasted broccoli + spinach – Roast broccoli at 425°F for 15 mins for crispy edges. Fresh spinach wilts in the skillet—no pre-cooking!
- 50g grated Parmesan – Microplane it yourself for meltier magic. Romano or Asiago add funky twists.
- 1 tsp lemon zest – The flavor sparkler! Use organic lemons if possible.
- 1 tbsp lemon juice – Freshly squeezed, please—bottled just can’t compete.
Let’s Build Flavor Town!
Step 1: Shrimp’s Hot Date with Garlic
Fire up a large skillet over medium heat. Add olive oil and butter—when the butter stops foaming, you’re golden. Toss in shrimp and garlic. Chef secret: Arrange shrimp in a single layer! Crowding steams them. Sauté 2-3 minutes per side until they curl into plump, pink commas. DO NOT overcook—they’ll finish warming in the sauce later. Transfer shrimp to a plate, leaving garlicky goodness behind.
Step 2: Creamy Dream Sauce Action
Pour light cream into the skillet (it’ll sizzle—good sign!). Scrape up any shrimp bits—that’s flavor gold! Simmer gently 1 minute. Watch the heat: Boiling = grainy sauce. Sprinkle Parmesan while whisking. When it melts into velvet, hit it with lemon juice. Taste? Adjust salt or tang here!
Step 3: Orzo-Veggie Reunion Party
Dump cooked orzo and veggies into the sauce. Fold gently—you’re coaxing everyone to mingle, not mud wrestle. Hack alert: If sauce thickens too much, splash in 2 tbsp pasta water or broth. Add shrimp back in, along with any juices. Warm through 1 minute—shrimp just need a quick dip in the hot tub!
Step 4: The Grand Finale
Kill the heat. Stir in lemon zest and crack black pepper over the top. Why off-heat? Zest oils stay bright and vibrant! Let it rest 2 minutes—this lets orzo drink up extra sauciness.
Plate It Like a Pro (Minimal Effort, Max Wow)
Scoop into shallow bowls—deep ones hide the beauty! Top with extra Parmesan snowdrifts and a lemon wedge. For fancy points: Microplane extra zest over each bowl. Pair with crusty bread (sauce-mopping required) and a simple arugula salad with lemon vinaigrette. Got a crisp Sauvignon Blanc? Pour it! This dish loves zesty wines that cut through richness.
Shake It Up, Chef!
This recipe’s a canvas—paint it your way!
- Mediterranean Twist: Swap broccoli for sun-dried tomatoes + artichokes. Finish with basil and feta.
- Spicy Cajun: Toss shrimp in 1 tsp Cajun seasoning pre-sear. Add diced andouille sausage!
- Spring Garden: Use asparagus + peas instead of broccoli. Stir in fresh mint at the end.
- Dairy-Free Delight: Coconut milk + 2 tbsp nutritional yeast instead of cream/Parmesan.
- Chicken Comfort: Sauté diced chicken thighs first, then proceed. Sage + white wine = heaven.
Beau’s Backstage Scoop
Funny story: I once made this for a date and accidentally used whipping cream instead of light cream. It was so rich, we could only eat half… but she asked for leftovers as a “goodnight kiss.” 😉 Over time, I’ve tweaked it toward balance—less cream, more lemon, roasted veggies for texture. The biggest lesson? Don’t stress the shrimp timing. Pull them out early—they’ll finish cooking later. This dish also taught me the power of acid: that lemon juice isn’t just “brightness,” it’s the conductor making all flavors sing together. Last tip: Double the batch. Cold orzo straight from the fridge? Chef’s secret midnight snack.
Your Questions, My Answers!
Q: Can I use frozen shrimp without thawing?
A: Technically yes—add 2-3 mins to cook time—but they’ll release water and dilute flavor. Quick thaw: Seal in a bag, submerge in cold water 10 mins. Pat DRY before cooking!
Q: Sauce broke/curdled! Help!
A: Stay calm! Remove from heat. Whisk in 1 tbsp cold butter or cream. If it’s still fussy, blend with an immersion blender. Prevention: Keep heat medium-low when adding dairy.
Q: Can I prep components ahead?
A: Absolutely! Roast veggies, cook orzo (toss with oil to prevent sticking), and zest lemon 1 day ahead. Sauté shrimp + make sauce fresh for best texture.
Q: Orzo alternatives for gluten-free?
A: Risotto rice (cook separately first) or quinoa! For quinoa, reduce sauce simmer time—it soaks less than orzo.
Creamy Garlic Shrimp & Parmesan Veggie Orzo
- Total Time: 25 mins
Description
✨ A weeknight luxury that feels fancy but takes just 25 minutes! Plump shrimp, silky Parmesan cream sauce, and roasted veggies meet tender orzo for a comforting yet vibrant bowl. It’s rich, zesty, and surprisingly light—perfect for dinner that impresses without the stress. Ready to upgrade Tuesday night into a mini celebration?
Ingredients
-
700g peeled shrimp (26/30 size, thawed & patted dry)
-
1 tbsp olive oil
-
1 tbsp light butter (or regular)
-
1 tbsp minced garlic
-
150ml light cream or evaporated milk (coconut milk for dairy-free)
-
200g cooked orzo pasta (al dente)
-
1 cup roasted broccoli + fresh spinach
-
50g freshly grated Parmesan (or Romano/Asiago)
-
1 tsp lemon zest
-
1 tbsp fresh lemon juice
-
Salt & cracked black pepper to taste
Instructions
1. Sear Shrimp: Heat oil + butter in skillet. Add shrimp & garlic, cook 2–3 min per side until just pink. Remove, set aside.
2. Make Sauce: Pour cream into skillet, scrape browned bits. Gently simmer 1 min, whisk in Parmesan. Add lemon juice, taste & adjust.
3. Orzo & Veggies Join: Stir in cooked orzo + veggies. If too thick, loosen with splash of pasta water. Return shrimp with juices, warm through.
4. Finish & Serve: Off heat, stir in zest + black pepper. Rest 2 min. Plate in shallow bowls, top with Parmesan & lemon wedges.
Notes
-
Don’t overcook shrimp—let them finish in the sauce.
-
Zest goes in last to stay bright.
-
Orzo keeps soaking sauce—reserve pasta water for adjustments.
- Prep Time: 10 mins
- Cook Time: 15 mins
Nutrition
- Calories: 525Cal
- Fat: 20g
- Carbohydrates: 38g
- Protein: 45g
Nutrition Per Serving (Because Knowledge Is Yummy)
Calories: 525 • Protein: 45g • Carbs: 38g • Fat: 20g
Note: Using light cream/evaporated milk and light butter keeps this lighter than traditional creamy pasta. Veggies add fiber and vitamins!
Final Thoughts: Your New Go-To Is Served
So there you have it, friends—your ticket to a seriously satisfying meal that’s equal parts comfort and sophistication. This Creamy Garlic Shrimp & Orzo bowl isn’t just a recipe; it’s a reminder that cooking should be a joy, not a chore. It’s about creating a little moment of luxury for yourself, exactly when you need it most.
Whether you’re recreating my beach hut experiment on a single hot plate or whipping it up in your own kitchen after a long day, remember the core of this dish: bold, simple flavors, a creamy texture that feels like a treat, and the flexibility to make it your own.
Don’t be afraid to play, to substitute, or to make a happy little accident—that’s often where the best kitchen memories are made. This recipe is built for real life, with all its chaos and cravings. So grab that skillet, trust your instincts, and get ready for the happy silence that falls when everyone is too busy enjoying their food to talk.
Now get in there and cook some joy. You’ve absolutely got this.
With a full heart and an even fuller plate,
Beau

Gluten-Free Pretzels
Forget Everything You Thought You Knew About Gluten-Free Baking
Hey friends, Beau here! Let’s talk about one of life’s simple, soul-satisfying pleasures: a perfectly soft, warm, chewy pretzel. You know the one. The kind that’s gleaming with a golden-brown crust, dusted with just the right amount of coarse salt, and just begging to be dipped into a pool of tangy mustard or a river of smooth cheese sauce. For a long time, if you were navigating a gluten-free life, that experience felt like a distant memory, something you could only get from a specialty bakery for a small fortune. Well, my foodie friends, those days are officially over.
I’m so excited to share this recipe with you today because it’s a total game-changer. We’re making incredibly soft, authentically chewy, gluten-free pretzels right in your own kitchen. And before you get that nervous look—the one I get when I mention yeast dough to someone new—I promise you, this is approachable. This recipe is my kitchen-tested, friend-approved, absolutely foolproof method for bringing that iconic soft pretzel magic home. We’re going to walk through every step together, and I’ll share all my favorite chef hacks to ensure your success. So, tie on your favorite apron, and let’s turn your kitchen into the best gluten-free bakery in town!
The Pretzel That Started It All
This recipe has a special place in my heart because it was born out of a serious craving and a little bit of stubbornness. A few years back, I was at a huge outdoor market with my niece, who has to eat gluten-free. The air was filled with this incredible aroma—that unmistakable scent of baking dough and salt—coming from a classic soft pretzel stand. We watched as person after person walked away with a warm, twisted knot of joy, and her little face just fell. She was such a good sport about it, but as her fun uncle who believes no one should miss out on a food memory because of dietary needs, I took it as a personal challenge.
We went straight home, flour flying everywhere, and embarked on what became a multi-weekend mission. There were a few… let’s call them ‘dense, hockey-puck-shaped learning experiences.’ But finally, after tweaking the flour blend and mastering the boil, we pulled a batch out of the oven that was pure perfection. The look on her face when she took that first, triumphant bite—cheesy mustard dip on her nose and all—was worth every single failed attempt. That’s the magic of food, right there. It’s not just about filling your stomach; it’s about filling your heart, too.
Gathering Your Gluten-Free Pretzel Crew
Here’s the dream team of ingredients that’s going to make these pretzels happen. Using the right stuff is half the battle in gluten-free baking, so let’s break it down.
- 2 ½ cups gluten-free all-purpose flour blend (with xanthan gum): This is non-negotiable, friends. You must use a blend that already includes xanthan gum. It’s the magic binder that replaces the gluten, giving the dough the elasticity and structure it needs to hold that classic pretzel shape. My go-to brands are Bob’s Red Mill 1-to-1 or Cup4Cup. Chef’s Insight: Don’t pack your flour! Spoon it gently into your measuring cup and level it off for the most accurate measurement.
- 1 tbsp sugar: This isn’t for sweetness; it’s lunch for the yeast! The sugar gives the yeast a quick energy boost, helping it get foamy and active, which is what gives our pretzels their perfect rise and airy texture.
- 2 ¼ tsp instant yeast (1 packet): Instant yeast is our best friend here because we can mix it right in with the dry ingredients. No proofing required! Just make sure it’s not expired for maximum puff power.
- 1 tsp salt: For flavor. Simple as that. It balances the yeast and enhances all the other ingredients.
- 1 cup warm water (110°F/43°C): The Goldilocks of water. Too hot, and you’ll kill the yeast. Too cold, and it won’t wake up. If you don’t have a thermometer, it should feel warm to the touch but not hot. Think perfect bathwater.
- 1 tbsp olive oil: This adds a little richness and helps keep the dough tender. A neutral oil like avocado oil works great too.
- 6 cups water & ¼ cup baking soda (for boiling): This is the SECRET WEAPON! The alkaline bath is what gives pretzels their iconic chewy, slightly tangy crust and that deep mahogany color. It’s a science experiment that tastes amazing.
- 1 egg, beaten (for egg wash): This gives the pretzels their beautiful, glossy sheen and helps the coarse salt stick. For an egg-free version, you can use a bit of melted butter or dairy-free milk, though the shine won’t be as pronounced.
- Coarse salt: Pretzel salt or coarse kosher salt is ideal. The big flakes give you that fantastic salty crunch in every bite.
Let’s Get Twisting: Your Step-by-Step Guide to Pretzel Perfection
Alright, team! Let’s do this. Read through these steps once before you start—it’ll make the process feel like a breeze.
Step 1: Wake Up the Yeast
In a large mixing bowl, combine that cup of warm water and the tablespoon of sugar. Sprinkle the yeast over the top and give it a gentle stir. Now, walk away for 5-10 minutes. This is your first test of patience! When you come back, you should see a foamy, frothy layer on top. This is your sign that the yeast is alive, happy, and ready to get to work. If you don’t see foam, your yeast might be old or your water was too hot/cold. It’s okay to start over here—it’s worth it!
Step 2: Create the Dough
Add your gluten-free flour, salt, and olive oil to the yeasty water. Using a stand mixer with a paddle attachment (or a sturdy wooden spoon and some arm muscle), mix everything on medium speed until a soft, sticky dough forms. Gluten-free dough is notoriously sticker than regular wheat dough, and that’s okay! Resist the urge to add more flour. We want it a bit tacky. Let the mixer run for a full 2-3 minutes to ensure everything is perfectly combined.
Step 3: The Rise & Shine
Scrape down the sides of the bowl, cover it with a clean kitchen towel or plastic wrap, and find a warm, draft-free spot for it to rest. I like to turn my oven on to the “warm” setting for just a minute, then turn it off and place the bowl inside. Let the dough rise for 30-45 minutes. It won’t double in size like a wheat dough, but it will become slightly puffy and fuller.
Step 4: Shape It Up!
Once risen, preheat your oven to 400°F (200°C) and line a large baking sheet with parchment paper. Now, bring your 6 cups of water and ¼ cup of baking soda to a rolling boil in a wide, shallow pot or saucepan. While that heats up, turn your dough out onto a surface lightly dusted with gluten-free flour. Divide it into 6-8 equal pieces. Roll each piece into a rope about 18-20 inches long. Chef’s Hack: If the dough is too sticky to handle, lightly oil your hands instead of using more flour. To shape the classic pretzel, form a U-shape with the rope, then cross the ends over each other twice before pressing them down onto the bottom of the U. Voilà! You can also keep it simple and make pretzel bites or sticks.
Step 5: The Magical Bath
Gently lower each shaped pretzel into the boiling baking soda water. Don’t crowd the pot; do one or two at a time. They will float. Boil them for 20-30 seconds—no longer!—then carefully remove them with a slotted spoon or spider strainer, letting the excess water drip off, and place them on your prepared baking sheet. You’ll see them already starting to look like real pretzels!
Step 6: Bake to Golden Glory
Brush each pretzel generously with the beaten egg wash. This is what gives them that professional bakery shine. Sprinkle immediately with your coarse salt. Pop them in the oven and bake for 15-18 minutes, until they are a deep, beautiful golden brown. Your kitchen will smell absolutely incredible.
How to Serve Up These Soft & Salty Wonders
The second these beauties are out of the oven, you’ll want to dive in, but be careful—that cheese sauce awaits! Let them cool for just a minute or two on the baking sheet. Serve them warm and whole for that classic fairground experience, or slice them up for easy sharing. The dipping options are endless: spicy brown mustard, a rich beer cheese sauce, a sweet honey mustard, or even a warm nacho cheese dip. For a sweet twist, skip the salt, bake them, and then brush with melted butter and roll in cinnamon sugar. Honestly, they’re incredible all on their own.
Mix It Up! Pretzel Variations to Try
Once you’ve mastered the classic, the pretzel world is your oyster! Here are a few of my favorite twists:
- Cinnamon Sugar: Omit the salt. After baking, brush with melted butter and roll in a mixture of cinnamon and sugar.
- Everything Bagel: Replace the coarse salt with an “Everything Bagel” seasoning blend for a savory, oniony kick.
- Stuffed Pretzel Bites: Before rolling into balls, wrap a small piece of dough around a cube of mozzarella string cheese for gluten-free mozzarella sticks, or a piece of pepperoni.
- Dairy-Free: Use a vegan egg wash (like aquafaba or plant milk) and serve with dairy-free cheese dip or mustard.
- Pretzel Dogs: Roll the dough into longer, thinner ropes and wrap them around your favorite gluten-free hot dogs before boiling and baking.
Beau’s Kitchen Notes & Stories
This recipe has evolved so much from those first hockey pucks! The biggest lesson I learned was to embrace the stickiness of gluten-free dough. My first instinct was to keep adding flour until it felt like the dough I was used to, but that’s a one-way ticket to dense-town. Trust the process and trust the recipe. A little oil on your hands is a far better solution than too much flour.
And a funny story: during one of my early test batches, I was so focused on getting the twist right that I completely forgot the baking soda bath. I baked them, and they came out looking like sad, pale little breadsticks. They tasted fine, but they were NOT pretzels. That’s when I truly understood the transformative power of that boil. It’s not just a step; it’s the heart of the pretzel. Don’t skip it!
Your Gluten-Free Pretzel Questions, Answered
Q: My dough is so sticky I can’t handle it! What did I do wrong?
A: You probably didn’t do anything wrong! Gluten-free dough is just stickier by nature. Instead of adding more flour (which can make them dry), lightly oil your hands, your work surface, and your rolling pin. This will prevent sticking without altering the hydration of the dough.
Q: Can I make this dough ahead of time?
A: You can! After the first rise, you can cover the bowl tightly and store it in the refrigerator for up to 24 hours. Let it sit at room temperature for about 20 minutes before shaping and proceeding with the recipe. The cold ferment can actually add more flavor!
Q: Why did my pretzels come out tough?
A: The most common culprit is over-boiling. Thirty seconds is all you need! Any longer and the outside can become too tough and chewy. Also, make sure you’re using a good quality gluten-free flour blend—not all are created equal for yeast recipes.
Q: I’m allergic to eggs. What can I use instead of the egg wash?
A: No problem! You can use melted vegan butter, dairy-free milk, or even a tablespoon of aquafaba (the liquid from a can of chickpeas) brushed on top. The color won’t be *quite* as deep and glossy, but they’ll still be delicious.

Gluten-Free Pretzels
- Total Time: 35 minutes
Description
Hey friends, Beau here! Let’s talk about one of life’s simple pleasures: a perfectly soft pretzel. That golden-brown, lightly salted, melt-in-your-mouth wonder that begs to be dunked in mustard or cheese sauce. If you’ve been gluten-free, you probably thought this was a distant dream. Not anymore! This recipe is approachable, foolproof, and utterly delicious.
Ingredients
Dough:
-
2 ½ cups gluten-free all-purpose flour blend (with xanthan gum)
-
1 tbsp sugar
-
2 ¼ tsp instant yeast (1 packet)
-
1 tsp salt
-
1 cup warm water (110°F / 43°C)
-
1 tbsp olive oil
Boil Bath:
-
6 cups water
-
¼ cup baking soda
Topping:
-
1 egg, beaten (or melted butter/plant milk for egg-free)
-
Coarse salt
Instructions
1. Wake Up the Yeast
-
Combine warm water and sugar in a large bowl. Sprinkle yeast on top, stir gently, and let sit 5–10 minutes until foamy.
2. Create the Dough
-
Add flour, salt, and olive oil to yeast mixture. Mix on medium speed (stand mixer or wooden spoon) until soft, sticky dough forms.
3. Rise & Shine
-
Cover bowl with a towel or plastic wrap. Let dough rest in a warm spot for 30–45 min until slightly puffy.
4. Shape It Up
-
Preheat oven to 400°F (200°C) and line a baking sheet with parchment.
-
Bring water and baking soda to a rolling boil.
-
Turn dough onto lightly floured surface. Divide into 6–8 pieces. Roll each into an 18–20 inch rope and shape into pretzels (or make bites/sticks). Tip: Lightly oil hands if dough is sticky.
5. The Magical Bath
-
Boil each pretzel for 20–30 sec in the baking soda water, remove with slotted spoon, and place on baking sheet.
6. Bake to Golden Glory
-
Brush with egg wash and sprinkle with coarse salt. Bake 15–18 min until deep golden brown.
Notes
-
Embrace the stickiness of gluten-free dough—more flour = denser pretzels.
-
Don’t skip the baking soda bath; it’s the magic behind that chewy crust.
-
Cold-fermenting the dough up to 24 hours adds flavor.
- Prep Time: 20 min
- Cook Time: 15 min
Nutrition
- Calories: 190
- Fat: 4 g
- Carbohydrates: 34 g
- Protein: 4 g
Nutritional Information*
Prep Time: 20 min | Rise Time: 45 min | Cook Time: 15 min | Servings: 6-8
*Approximate values per pretzel (based on recipe making 8):
Calories: 190 | Protein: 4g | Carbs: 34g | Fat: 4g
Please note: Nutritional information is an estimate and can vary greatly based on the specific brands of ingredients you use.
Final Thoughts
Friends, what started as a mission to cure a niece’s craving has become one of my most cherished recipes to share. These pretzels are more than just a snack; they are a testament to the fact that dietary restrictions don’t have to mean a life without iconic, joy-filled foods. They are proof that with a little knowledge, the right ingredients, and a dash of courage, you can recreate—and even exceed—the flavors you thought were lost to memory.
This journey through gluten-free baking is one of patience and discovery. It asks you to forget old rules and embrace new, stickier ones. It rewards precision but also invites creativity, encouraging you to twist, stuff, and dip your way to your own perfect pretzel moment. So whether you’re making these for yourself, for a loved one who eats gluten-free, or simply for the thrill of a baking challenge, know that you are creating more than just food. You’re creating connection, joy, and the kind of warm, salty, delicious memories that truly make a house a home.

No-Bake Energy Balls
Your New Favorite Grab-and-Go Snack is Just 10 Minutes Away
Hey friends, Beau here! Let’s be real for a second. How many times has that 3 PM slump hit you like a ton of bricks, sending you on a desperate scavenger hunt through the pantry for something—anything—that isn’t a bag of chips or a sad, forgotten candy bar from last Halloween? Your energy is crashing, your focus is fading, and your stomach is staging a full-scale mutiny. We’ve all been there. That exact feeling, my friends, is precisely why I’m so obsessed with the magic of No-Bake Energy Balls.
These little power-packed spheres of joy are the ultimate kitchen hack for busy lives. They’re the answer to your hangry prayers, the hero of your hectic afternoon, and the perfect pre-workout fuel that actually tastes like a treat. The best part? You don’t need to turn on your oven, you probably have most of the ingredients in your pantry right now, and they come together faster than you can decide what to watch on Netflix tonight.
We’re talking a simple, wholesome mix of gluten-free oats, creamy nut butter, a touch of natural sweetness from maple syrup, and a powerhouse punch of seeds for staying power. They’re customizable, kid-friendly, and so satisfying. Think of them as a protein bar’s cooler, more delicious cousin—the one that knows how to have a good time without any of the processed junk. So, let’s ditch the crummy cravings and whip up a batch of these feel-good bites together. Your future self, brimming with energy and satisfaction, will thank you.
A Batch of Energy Balls and a Side of Nostalgia
This recipe takes me right back to my early days in a tiny apartment kitchen with counter space the size of a postage stamp. I was constantly testing recipes for Feastical, and my wonderful (and incredibly patient) friends were my unofficial taste-testers. One Tuesday, my buddy Leo was coming over after his marathon training runs, and he’d always be ravenous. I wanted to have something ready for him that was quick, energy-dense, and wouldn’t weigh him down.
I remember scrounging through my cabinets, pulling out a half-empty jar of almond butter, some oats, a bottle of maple syrup from a recent trip to Vermont, and the last of a bag of chocolate chips. I mixed it all together in one bowl, rolled them into little lumpy balls, and tossed them in the fridge. When Leo tried one, his eyes lit up. “Dude, what are these? They’re incredible!” He promptly nicknamed them “Power Pellets” and would always ask if I had a stash for him. That was the moment I knew this wasn’t just a recipe; it was a tool for connection, a way to show care through food, even something as simple as a no-bake snack. It’s a feeling I hope you get to share, too.
Gathering Your Energy-Ball Arsenal
The beauty of this recipe is in its flexibility, but let’s talk about what each ingredient brings to the party. This is your culinary toolkit for creating the perfect bite!
- 1 cup gluten-free rolled oats: This is the foundation, the heartiness that gives these balls their substance. Chef’s Insight: Make sure you’re using rolled oats (sometimes called old-fashioned oats), not quick oats. Rolled oats have a better texture and hold up perfectly without getting mushy. They’re naturally gluten-free, but always check the packaging if you have a severe allergy.
- 1/2 cup nut butter: This is the glue that holds everything together and provides healthy fats and protein. Substitution Tip: Creamy peanut butter is a classic, but almond butter, cashew butter, or even sunflower seed butter (for a nut-free version) work beautifully! Just make sure it’s a natural, stir-able kind. The super-processed, oily separated ones can sometimes change the texture.
- 1/4 cup maple syrup or honey: Our natural sweetener! It adds just enough sweetness to feel like a treat and helps bind the ingredients. Substitution Tip: Pure maple syrup keeps this recipe vegan, but raw honey works great too. If you need a sugar-free option, a sticky liquid like date syrup is a fantastic swap.
- 2 tbsp chia seeds or flaxseeds: Don’t let their size fool you—these tiny seeds are nutritional powerhouses, adding fiber, omega-3s, and a lovely little crunch. Chef’s Insight: If you use flaxseed, I recommend ground flaxseed (flax meal) for easier digestion and a smoother texture, but whole works in a pinch!
- 1/4 cup mini chocolate chips or dried fruit (optional): The fun mix-in! This is where you can really make these your own. Substitution Tip: Mini chocolate chips are my weakness, but chopped dried cranberries, raisins, chopped apricots, or even cacao nibs for a less-sweet chocolatey crunch are all amazing.
- 1/2 tsp vanilla extract: The flavor enhancer. A splash of vanilla adds a warm, comforting depth that makes these taste like they came from a fancy bakery.
- Pinch of salt: The secret weapon! Salt balances the sweetness and makes all the other flavors pop. Trust me on this one.
Let’s Get Rolling: Your Foolproof Guide
Ready to make some magic? Grab a medium-sized mixing bowl and a spatula—that’s seriously all the equipment you need. Let’s do this!
Step 1: The Big Mix. In your bowl, combine the rolled oats, nut butter, maple syrup, chia or flax seeds, vanilla extract, and that all-important pinch of salt. Now, dig in with a sturdy spatula or wooden spoon and mix until everything is fully combined. You’ll know it’s ready when there are no dry spots of oats left and the mixture looks uniformly sticky. Chef’s Hack: If your nut butter is straight from the fridge and a little stiff, pop it in the microwave for 15-20 seconds to loosen it up. It makes mixing a total breeze.
Step 2: The Fun Part. Now, stir in your chosen mix-ins! Fold those chocolate chips or dried fruit pieces evenly throughout the mixture. This is also a great time to taste-test (one of the best perks of being the chef!). Does it need a pinch more salt? A tiny drizzle more maple syrup? Adjust to your liking.
Step 3: Ball Time! Here’s where you get hands-on. Using a tablespoon or a small cookie scoop, portion out the mixture. Then, roll each portion between your palms to form a smooth, compact ball, about 1 inch in diameter. Chef’s Hack: If the mixture is too sticky to handle, lightly wet your hands with cold water. This creates a non-stick barrier and makes rolling clean, perfect balls incredibly easy. If the mixture is too dry and crumbly, see the troubleshooting section below—it’s a simple fix!
Step 4: The Chill Session. Place your beautiful energy balls on a plate or baking sheet lined with parchment paper. Pop them in the refrigerator for at least 20-30 minutes to let them firm up. This chilling step is crucial—it allows the oats and chia seeds to soak up the moisture, transforming your mixture from sticky to perfectly firm and chewy. Chef’s Insight: I know it’s tempting to skip this, but patience is key here! It makes all the difference in the final texture.
And that’s it! You’ve just created a week’s worth of healthy snacks. See? I told you it was easy.
How to Serve & Savor Your Creation
Once they’re set, transfer your energy balls to an airtight container. They’ll keep happily in the fridge for up to two weeks (if they last that long!), or you can freeze them for up to three months for a ready-to-go stash.
I love grabbing one with my morning coffee for a sustained energy boost, tossing a couple in a small container for a mid-afternoon pick-me-up at my desk, or even having one as a post-dinner treat that satisfies my sweet tooth without the sugar crash. They’re the perfect portable snack for hikes, road trips, or just stashing in your bag for whenever hunger strikes.
Mix It Up: Endless Flavor Possibilities
The basic formula is your playground! Once you’ve mastered the classic, try one of these delicious twists:
- Cranberry Orange Bliss: Swap the chocolate chips for dried cranberries and add the zest of one orange to the mixture. So bright and refreshing!
- Almond Joy Delight: Use almond butter, swap half the oats for unsweetened shredded coconut, and use dark chocolate chips. You’ll feel like you’re on a tropical vacation.
- Gingerbread Spice: Add a teaspoon of molasses along with the maple syrup, and mix in ½ tsp of cinnamon, ¼ tsp of ginger, and a pinch of nutmeg and cloves. Holiday flavors all year round!
- Protein Power-Up: For an extra protein kick, stir in 2-3 tablespoons of your favorite vanilla or chocolate protein powder. You may need to add a teaspoon of milk or water if the mixture gets too dry.
- Sunflower Seed Crunch (Nut-Free): Use sunflower seed butter and pumpkin seeds (pepitas) instead of chia seeds. A perfect safe option for school lunches.
Beau’s Kitchen Notes & Stories
This recipe has evolved so much since that first batch for Leo. I’ve made them for countless potlucks, new parents (the ultimate gift!), and as a quick fix for my own crazy days. I once accidentally used steel-cut oats instead of rolled oats—do not recommend, friends. We ended up with a batch of… let’s call them “texturally challenging pebbles.” Lesson learned!
The other beautiful thing about this recipe is that it’s a fantastic one to make with kids. There’s no hot oven involved, and they love getting their hands dirty to roll the balls. It’s a wonderful way to get them excited about cooking and eating wholesome ingredients. Don’t stress about making them perfectly round. Lumpy, imperfect, made-with-love balls taste just as good, I promise.
Your Questions, Answered!
Q: My mixture is too dry and crumbly! It won’t stick together when I try to roll it. What did I do wrong?
A: No worries, this is an easy fix! The dryness usually means your nut butter was a bit too thick or you measured your oats a little too generously. Simply add more moisture. Add another tablespoon of nut butter or maple syrup (or even a tiny splash of milk) and mix it in. It should come together perfectly.
Q: My mixture is too wet and sticky! How can I salvage it?
A: This means you might have a particularly runny nut butter or added a touch too much syrup. The solution is to add more dry ingredients. Mix in another tablespoon or two of oats or some extra chia seeds until the consistency is firm enough to roll.
Q: Can I make these without nut butter?
A: Absolutely! For a nut-free version, sunflower seed butter is my top recommendation. Tahini (sesame seed paste) also works, but it will give a more savory, halva-like flavor, so you might want to add a little extra sweetener.
Q: How long do they really last, and can I freeze them?
A: In an airtight container in the fridge, they’ll stay fresh and delicious for up to 2 weeks. They are also a fantastic candidate for freezing! Place them in a single layer on a baking sheet to freeze solid, then transfer to a freezer bag. They’ll keep for up to 3 months. Thaw in the fridge or just grab one and let it thaw for 10-15 minutes on the counter.
Print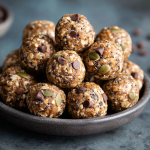
No-Bake Energy Balls
Description
Hey friends, Beau here! We all know that 3 PM slump—the one that sends you rummaging through the pantry for anything remotely edible. Enter these No-Bake Energy Balls: tiny, power-packed snacks that are nutritious, portable, and downright addictive.
Ingredients
Base Ingredients:
-
1 cup gluten-free rolled oats
-
½ cup nut butter (almond, peanut, cashew, or sunflower seed for nut-free)
-
¼ cup maple syrup or honey
-
2 tbsp chia seeds or flaxseeds
-
½ tsp vanilla extract
-
Pinch of salt
Optional Mix-Ins:
-
¼ cup mini chocolate chips or dried fruit
Instructions
1. The Big Mix:
-
Combine oats, nut butter, maple syrup, chia/flax seeds, vanilla, and salt in a medium bowl. Mix until uniform and sticky.
Chef’s Hack: Warm cold nut butter 15–20 sec in microwave for easier mixing.
2. Mix-Ins:
-
Fold in chocolate chips, dried fruit, or any other desired add-ins. Taste and adjust sweetness or salt if needed.
3. Roll Time:
-
Using a tablespoon or small cookie scoop, portion the mixture and roll between palms into 1-inch balls.
Tip: Wet hands slightly for non-stick rolling. Too dry? Add a bit more nut butter or maple syrup. Too wet? Add oats or chia seeds.
4. Chill Session:
-
Place balls on parchment-lined tray and refrigerate 20–30 min until firm and chewy.
Notes
-
First batch for friends taught me patience: proper chilling is key for perfect texture.
-
Kids love rolling these—no oven required and hands-on fun!
-
Imperfectly shaped balls taste just as good as perfect ones.
Nutrition
- Calories: 120 Cal per ball
- Fat: 7 g
- Carbohydrates: 12 g
- Fiber: 2 g
- Protein: 3 g
Quick Nutritional Overview
(Approximate values per ball, based on a batch of 14 using peanut butter and chocolate chips)
- Calories: 120
- Protein: 3g
- Carbohydrates: 12g
- Fat: 7g
- Fiber: 2g
Remember, these are estimates and can vary based on your specific ingredients and brands. They’re a source of healthy fats, complex carbs, and a little protein for lasting energy!
Final Thoughts
What began as a desperate kitchen experiment to feed a hungry friend has revealed itself to be so much more than a recipe. These no-bake energy balls are a testament to the idea that the most powerful solutions are often the simplest. They are nutrition science made accessible, a creative outlet made edible, and a gesture of care made delicious.
Gluten-Free Popcorn Snack
Your New Favorite Snack is Popping Off: The Ultimate Guide to Gluten-Free Popcorn
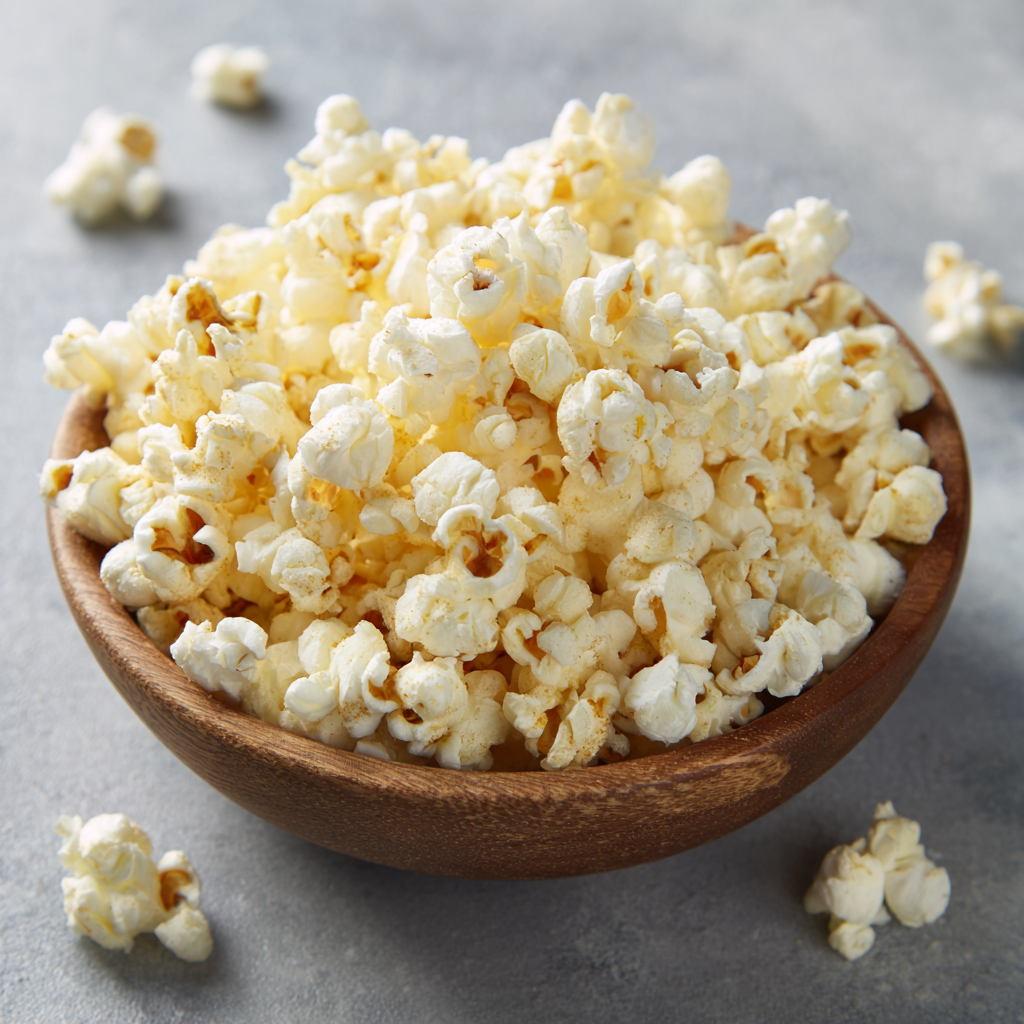
Hey there, friend! Beau here, from Feastical. Let’s talk about something near and dear to my heart: the perfect snack. You know the one. It’s that 3 PM slump savior, the movie night MVP, the “I-need-a-little-something-crunchy” hero. I’m talking about popcorn. But not just any popcorn—we’re crafting the most incredibly delicious, can’t-stop-eating-it, gluten-free popcorn you’ve ever tasted.
Now, I know what you might be thinking. “Beau, popcorn is just… popcorn. How complicated can it be?” And you’re right! At its heart, it’s beautifully simple. But that’s the magic of it. With just a few little chef secrets and a dash of creativity, we can transform those humble kernels into a snack that’s truly feastical. Whether you’re living a gluten-free lifestyle, cooking for someone who is, or just looking for a cleaner, healthier munch, you’ve landed in the right place.
This isn’t about complicated recipes or hard-to-find ingredients. This is about reclaiming the joy of a simple, satisfying snack and making it your own. We’re going to pop it, season it, and fall in love with it all over again. So, grab your favorite pot or dust off that air popper—we’re about to make your kitchen smell like a cozy cinema and your taste buds do a happy dance. Let’s get popping!
The Night We Burned the Popcorn & Found Our Favorite Tradition
I’ll never forget the first “official” movie night at my first apartment. The furniture was a hodgepodge of hand-me-downs, the TV was… well, let’s just say it wasn’t a flat screen. But the one thing I was determined to get right was the popcorn. I had this grand vision of myself, effortlessly shaking a pot over the flame like a culinary wizard, producing a giant, fluffy bowl of perfection.
Reality, as it often does, had other plans. I got distracted by the opening credits of our film, and the unmistakable scent of smoke suddenly filled the room. I’d completely scorched the first batch! We spent the next ten minutes waving towels at the smoke detector, laughing until our sides hurt. It was a disaster. But it was our disaster. We started over, and that second, perfectly golden batch tasted like victory. That little kitchen fail taught me a valuable lesson: it’s not about perfection. It’s about the experience, the people you share it with, and the joy of creating something simple and delicious together. That’s the spirit we’re bringing into the kitchen today—no pressure, just good fun and even better food.
Gathering Your Gluten-Free Popcorn Dream Team
The beauty of this recipe is in its simplicity. You only need a few key players to create snack-time magic. Here’s what you’ll need:
- ½ cup Plain Popcorn Kernels: This is your star player! I always recommend buying plain kernels from a reputable brand to ensure they haven’t been cross-contaminated with gluten during processing. Look for labels that say “Certified Gluten-Free” if you have celiac disease or a serious sensitivity. This little bag of potential is about to become your best friend.
- 1-2 tbsp Oil (for stovetop method): This is your conductor, helping to distribute heat evenly. My go-to is a good avocado oil or refined coconut oil because they have a high smoke point and a neutral flavor. Chef’s Insight: If you want that classic movie theater taste, coconut oil is your secret weapon!
- Salt to taste: The essential enhancer. I highly recommend using a fine sea salt or even popcorn salt, which is super fine and sticks to the kernels beautifully without falling to the bottom of the bowl.
- Optional Flavor Boosters: This is where the party starts!
- Melted Butter or Ghee: For that rich, classic flavor. For a dairy-free option, a high-quality olive oil or vegan butter works wonderfully.
- Nutritional Yeast: Don’t let the name scare you! This gives a delicious, cheesy, umami flavor that’s naturally gluten-free and packed with B vitamins.
- Cinnamon Sugar: A sweet twist for those with a sweet tooth. Just mix a little cinnamon with your favorite GF sugar.
- Your Favorite Seasoning Blend: Think smoked paprika, chili lime, ranch seasoning (check the label for GF!), or everything bagel spice. The world is your seasoning oyster!
Let’s Get Popping: Your Foolproof Guide to Perfect Popcorn
Alright, team! Time to turn up the heat. Follow these steps, and you’ll be a popcorn pro in no time. I’m walking you through the stovetop method—it’s my favorite because it feels rustic and gives you the most control.
Step 1: The Heat-Up
Grab a large, heavy-bottomed pot with a tight-fitting lid. A Dutch oven is perfect for this. Add your oil and two or three test kernels. Place the pot over medium-high heat and put the lid on. Chef’s Hack: Those test kernels are your little canaries in the coal mine. When you hear one of them pop, you’ll know your oil is at the perfect temperature to add the rest.
Step 2: The Main Event
Once your test kernel pops, it’s showtime! Carefully remove the pot from the heat, add the remaining ½ cup of kernels, give them a quick shake to coat them in the hot oil, and immediately put the lid back on. Wait 30 seconds—this allows all the kernels to heat up to roughly the same temperature, so they pop more uniformly. Then, return the pot to the heat.
Step 3: The Shake & Bake
Now, the fun part. As the kernels start popping, gently shake the pot back and forth over the burner every 10-15 seconds. This keeps the unpopped kernels (called “old maids”) settled at the bottom where the heat is and prevents the popped ones from burning. You’ll hear the glorious symphony of popping! Chef’s Tip: Leave the lid slightly ajar to let steam escape. This ensures your popcorn stays crisp and not soggy.
Step 4: Know When to Walk Away
Listen carefully. When the pops slow to about 2-3 seconds between each one, it’s time to take the pot off the heat. Don’t wait for every last kernel to pop, or you’ll risk burning the whole batch. Immediately pour the popcorn into your largest serving bowl.
Step 5: The Flavor Finale
This is the most important step for getting seasoning to stick! If you’re using melted butter or oil, drizzle it over the hot popcorn while using your other hand to toss the popcorn continuously. The motion helps distribute the fat evenly. Then, while the popcorn is still slightly damp from the fat, sprinkle your salt and other dry seasonings over the top, tossing as you go. This double-action—fat first, then seasoning—is the ultimate hack for perfectly seasoned popcorn in every single bite.
How to Serve Your Gluten-Free Masterpiece
Presentation is part of the fun! Dump that beautifully seasoned popcorn into a giant, colorful bowl that everyone can gather around. For a solo snack session, I love just eating it straight from the pot (chef’s privilege!). For movie night, set out a few smaller bowls with different seasonings so everyone can customize their own portion. Don’t forget the napkins—this is a happily messy affair!
Mix It Up! 5 Delicious Gluten-Free Popcorn Twists
The basic recipe is just the beginning. Here are a few of my favorite ways to shake things up:
- Truffle Parmesan: Drizzle with white truffle oil and toss with finely grated Parmesan cheese (or a nutritional yeast alternative) and black pepper.
- Spicy Sriracha-Lime: Whisk together melted butter (or vegan butter), a squeeze of lime juice, and a generous squeeze of Sriracha. Drizzle and toss, then finish with a sprinkle of lime zest.
- Everything Bagel: Toss with a bit of garlic powder, onion powder, sesame seeds, poppy seeds, and coarse salt.
- Cookie Dough Delight: For a sweet treat, toss with melted coconut oil, a drizzle of maple syrup, a pinch of salt, and mini dairy-free chocolate chips.
- Dill Pickle: Spritz with a little olive oil spray and toss with dried dill, garlic powder, onion powder, and a touch of citric acid or salt for that tangy punch.
Beau’s Kitchen Notes & Stories
This recipe has evolved so much from that first smoky batch in my apartment. I’ve learned that the type of pot matters (thin pots burn easily!), that shaking is non-negotiable, and that the 30-second wait after adding the kernels is a game-changer. I’ve also had my fair share of kitchen experiments—one time I tried adding the seasoning too early and created a spice cloud that made us all cough! Another time, I overdid the liquid smoke… let’s just say a little goes a very, very long way.
The best part? This recipe is a living thing. It changes based on what I’m craving, what’s in my pantry, and who I’m sharing it with. Don’t be afraid to make it your own. That’s what cooking is all about.
Your Gluten-Free Popcorn Questions, Answered!
Q: Is all popcorn naturally gluten-free?
A: Yes, plain popcorn kernels are a whole grain and are naturally gluten-free. The danger of cross-contamination comes from processing (if it’s processed in a facility that also handles wheat) or from pre-packaged popcorn with added flavorings. Always check labels on any pre-made product and opt for certified gluten-free kernels if you need to be extra cautious.
Q: Why did my popcorn turn out tough or chewy?
A: Chewy popcorn is almost always a steam issue. The lid was likely on too tight, trapping all the steam inside the pot which then re-softens the popped kernels. Next time, leave the lid slightly ajar to let the steam escape, and you’ll have perfectly crisp popcorn every time.
Q: I have so many unpopped kernels! What am I doing wrong?
A: A few old maids are normal, but a lot of them usually means your oil wasn’t hot enough when you added the main batch of kernels, or your heat was too low. That’s why the “test kernel” method is so crucial—it ensures your oil is at the perfect popping temperature before you commit the whole crew.
Q: Can I make this in the microwave?
A: Absolutely! You can buy reusable microwave popcorn bowls or use the classic brown paper bag method. Put ¼ cup of kernels in a lunch-sized brown paper bag, fold the top over twice, and microwave on high for 2-3 minutes, or until the pops are 2 seconds apart. It’s a quick, oil-free method!

Gluten-Free Popcorn Snack
- Total Time: 7 minutes
Description
Hey friends, Beau here from Feastical! We’re turning humble popcorn kernels into a snack you’ll crave nonstop—crispy, flavorful, and completely gluten-free. Perfect for movie nights, solo snacking, or sharing with friends.
Ingredients
Base Popcorn:
-
½ cup plain popcorn kernels (look for “Certified Gluten-Free” if needed)
-
1–2 tbsp oil (avocado or refined coconut oil recommended)
-
Salt to taste
Optional Flavor Boosters:
-
Melted butter or ghee (or vegan alternatives)
-
Nutritional yeast (cheesy umami flavor)
-
Cinnamon sugar (for a sweet twist)
-
Seasoning blends: smoked paprika, chili lime, ranch, everything bagel spice, or your favorite
Instructions
1. Heat-Up:
-
In a large, heavy-bottomed pot with a tight-fitting lid, add oil and 2–3 test kernels.
-
Heat over medium-high until the test kernels pop.
2. Add the Main Batch:
-
Remove pot from heat, add remaining kernels, shake to coat, and cover.
-
Let sit 30 sec to heat kernels evenly, then return to heat.
3. Shake & Bake:
-
As kernels pop, gently shake pot every 10–15 sec to prevent burning and keep unpopped kernels at the bottom.
-
Optional: leave lid slightly ajar to release steam for crisp popcorn.
4. Know When to Walk Away:
-
When popping slows to 2–3 seconds between pops, remove from heat and pour into a large serving bowl.
5. Seasoning Finale:
-
Drizzle melted butter or oil over hot popcorn while tossing to coat.
-
Sprinkle salt and dry seasonings while popcorn is slightly damp for perfect adhesion.
Notes
-
Pot Choice: Heavy-bottomed pots prevent burning; thin pots scorch easily.
-
Shaking: Keeps kernels from burning and ensures uniform popping.
-
30-Second Wait: Crucial for even popping and fewer unpopped kernels.
-
Make It Your Own: Popcorn is flexible! Adjust seasonings, oils, and mix-ins to match your taste and pantry.
- Prep Time: 2 min
- Cook Time: 5 min
Nutritional Information*
*Nutritional info is estimated for plain, air-popped popcorn with 1 tbsp of avocado oil.
- Prep Time: 2 min
- Cook Time: 5 min
- Servings: 4
- Calories per serving: ~120
- Protein: 2g
- Carbs: 15g
- Fat: 6g (from healthy fats in avocado oil)
It’s a whole-grain, fiber-filled snack you can feel great about!
Final Thoughts
Well, friend, we’ve been on quite a journey together. From ancient caves to modern kitchens, from smoky first attempts to perfectly seasoned masterpieces. I hope this guide has shown you that gluten-free popcorn is so much more than a “safe” snack—it’s a blank canvas for creativity, a vehicle for connection, and a timeless treat that’s as healthy or indulgent as you want it to be.
The true magic of popcorn, I’ve learned, isn’t just in the pop. It’s in the process. It’s in the anticipation as those test kernels heat up, the joyful sound of the full-on popping symphony, and the shared laughter as you toss it with your favorite flavors. It’s a reminder that the most satisfying things in life are often the simplest. They don’t require fancy ingredients or complicated techniques. They just require a little intention.

Black Velvet Cupcakes with Orange Frosting
Black Velvet Cupcakes with Orange Frosting: Your New Halloween Obsession
Hey friends, Beau here from Feastical! Let’s talk about that moment. You know the one. You walk into a Halloween party, your arms laden with a plate of something homemade, and before you even get your coat off, a hush falls over the room. All eyes are on your creation. That, my friends, is the power of a truly show-stopping dessert. And let me tell you, these Black Velvet Cupcakes with a shock of bright Orange Frosting are the ultimate party rockstars.
We’re not just talking about a chocolate cupcake dyed black. Oh no. This is a whole vibe. Imagine the deepest, darkest, most velvety crumb you’ve ever sunk your teeth into—moist, tender, and with just the right hint of cocoa. Now, picture topping that midnight masterpiece with a cloud of creamy, citrus-kissed orange frosting so vibrant it practically glows. The contrast is dramatic, elegant, and downright fun. They’re spooky without being kitschy, sophisticated enough for your foodie friends, and an absolute blast to make. So, preheat that oven, grab your favorite mixing bowl, and let’s create some kitchen magic that’s sure to cast a spell on everyone.
A Spooky (and Sweet) Kitchen Memory
This recipe always takes me back to my first Halloween in my own apartment. I was determined to host a party that would be legendary. The playlist was fire, the decorations were… well, cobwebby, but the food? I knew the menu needed a centerpiece. I wanted a dessert that was equal parts creepy and craveable. I started with my favorite red velvet recipe, a family heirloom of sorts, and had a wild idea: what if we went to the dark side? After a few… very messy… experiments with food coloring (my fingertips were black for a week, a story for another time), I finally nailed it. The moment I piped that first swirl of orange frosting onto the jet-black cake, I knew we had a winner. The cupcakes were the undisputed star of the party, and they’ve been a Feastical Halloween tradition ever since. They’re a reminder that the best memories are often baked with a little bit of creativity and a whole lot of love.
Gathering Your Magical Ingredients
Here’s everything you’ll need to conjure up a batch of these deliciously dark treats. Don’t just think of this as a grocery list; think of each ingredient as a key player in our delicious drama!
For the Black Velvet Cupcakes:
- 1 1/4 cups all-purpose flour: The trusty foundation of our cupcake structure. For a slightly denser, tender crumb, you can swap it with cake flour, but all-purpose works beautifully here.
- 1 cup granulated sugar: Our sweetener and a key player in creating that beautifully moist texture.
- 1/4 cup unsweetened cocoa powder: This isn’t a full-on chocolate cake, and that’s intentional! The cocoa adds a deep, rich background note that makes the “black velvet” flavor complex and delicious.
- 1 tsp baking soda & 1/2 tsp baking powder: Our dynamic leavening duo! They work together to give these cupcakes a perfect, domed rise. Make sure they’re fresh for the best lift.
- 1/2 tsp salt: The secret weapon! Salt enhances all the other flavors and balances the sweetness perfectly. Never skip it.
- 1 cup buttermilk: This is the KEY to an incredibly moist and tender crumb. The acidity also reacts with the baking soda for a great rise. No buttermilk? No problem! Make a quick DIY version by adding 1 tbsp of lemon juice or white vinegar to a cup of regular milk and let it sit for 5 minutes.
- 1/2 cup vegetable oil: Oil keeps the cupcakes moist for days, far better than butter would in this recipe. I use a neutral oil like canola or avocado.
- 2 large eggs: They bind everything together and add richness. Bring them to room temperature for a smoother batter that emulsifies better.
- 1 tsp vanilla extract: A touch of warm, sweet vanilla to round out all the flavors.
- Black gel food coloring: Chef’s pro-tip: You MUST use a gel-based coloring, not a liquid one. The gel is super concentrated, so you get that deep, dark black color without throwing off the liquid balance of your batter. I usually use about 1-2 tablespoons of gel to get that perfect midnight shade.
For the Orange Frosting:
- 1 cup (2 sticks) unsalted butter, softened: The base of our frosting. Unsalted lets us control the salt level. “Softened” is crucial here—it should be cool to the touch but yield easily when poked. Leave it on the counter for an hour before you start.
- 4 cups powdered sugar: Provides the sweetness and structure. Sift it if it’s lumpy for an ultra-smooth frosting.
- 2–3 tbsp heavy cream or milk: This loosens the frosting to the perfect piping consistency. Heavy cream will give you a richer, slightly sturdier frosting.
- 1 tsp vanilla extract: A classic pairing that works wonderfully with the orange.
- Orange gel food coloring: Again, gel is the way to go! Start with a little and add until you get that perfect, vibrant jack-o-lantern orange.
Let’s Get Baking: The Step-by-Step Magic
Ready to make some magic? Follow these steps, and you’ll be a cupcake wizard in no time. I’ve packed this section with all my favorite chef hacks to ensure your success!
- Preheat and Prep: Fire up your oven to 350°F (175°C). This gives it plenty of time to reach the perfect, steady temperature. Line your muffin tin with your favorite cupcake liners. I’m a sucker for simple black or orange liners to really make the colors pop!
- Combine the Dry Team: In a large bowl, grab your whisk and thoroughly combine the flour, sugar, cocoa powder, baking soda, baking powder, and salt. Whisking here does two things: it combines everything evenly, and it aerates the flour, which leads to a lighter cupcake. No one wants a pocket of baking soda in their bite!
- Unite the Wet Team: In a separate medium bowl, whisk together the buttermilk, vegetable oil, eggs, and vanilla extract. Whisk until it’s completely smooth and homogenous. This is where room-temperature eggs really help—they incorporate much more easily.
- Make the Batter: Now, pour your wet ingredients into the dry ingredients. Here’s my big tip: switch to a spatula and mix by hand until the batter is just combined. A few lumps are totally okay! Over-mixing is the enemy of tender cupcakes, as it develops the gluten in the flour and can make them tough. We want tender and velvety!
- Go to the Dark Side: This is the fun part! Add your black gel food coloring. Start with a tablespoon and mix it in. You’ll likely need to add more. Keep going until the batter is a deep, inky, uniform black. Don’t be shy! This is where the gel coloring earns its keep.
- Fill and Bake: Using a cookie scoop or a spoon, divide the batter evenly between the 12 liners, filling each one about 2/3 of the way full. This gives them space to rise into perfect domes without overflowing. Slide them into your preheated oven and bake for 18-20 minutes. You’ll know they’re done when the tops spring back lightly when touched, and a toothpick inserted into the center comes out with just a moist crumb or two.
- The Cool Down: This is the hardest part—waiting! Let the cupcakes cool in the pan for about 5 minutes, then transfer them to a wire rack to cool completely. I cannot stress this enough: they must be completely cool before you frost them. Otherwise, that beautiful orange frosting will melt right off into a puddle. Patience, young padawan.
- Create the Frosting: While the cupcakes cool, let’s make that glorious frosting. In a stand mixer fitted with the paddle attachment (or using a hand mixer), beat the softened butter on medium-high speed for a good 2-3 minutes until it’s pale, fluffy, and smooth. Gradually add the powdered sugar, one cup at a time, with the mixer on low speed (unless you want a sugar dust cloud!). Once incorporated, add the vanilla and 2 tablespoons of cream. Ramp the speed back up to medium-high and beat for a full 2-3 minutes until incredibly light and fluffy. Add your orange gel coloring and beat until uniform. If the frosting is too thick, add more cream, one teaspoon at a time.
- Frost and Devour: Fit a piping bag with your favorite tip (I love a large open star tip for big, beautiful swirls) and fill it with the orange frosting. Pipe generous swirls onto each completely cooled cupcake. And just like that, you’ve created edible art!
How to Serve These Spooky Stars
Presentation is part of the fun! Place them on a stark white platter to make the black and orange colors really sing. For a extra Halloween touch, you could sprinkle on some black sprinkles or even a few orange nonpareils. They’re the perfect centerpiece for your Halloween dessert table, a terrifyingly tasty treat for your kid’s classroom party, or just a fabulous way to treat yourself on a cozy fall night. Pair them with a cold glass of milk, a hot coffee, or a glass of dessert wine for the ultimate experience.
Mix It Up! Fun Recipe Variations
Want to put your own spin on this classic? Go for it!
- Chocolate Orange: Add the zest of one orange to the cupcake batter and a tablespoon of orange juice to the frosting for an intense citrus-chocolate flavor.
- Cream Cheese Frosting Lover: Swap the buttercream for a tangy cream cheese frosting. Just beat 8 oz of softened cream cheese with 1/2 cup of softened butter, then add the powdered sugar and vanilla. It’s a classic pairing for a reason!
- Spooky Sprinkles: Fold black and orange sprinkles right into the batter for a funfetti-style surprise inside.
- Gluten-Free Ghouls: Use a 1:1 gluten-free all-purpose flour blend in place of the regular flour. The results are fantastic!
- Boozy Adult Version: Add a tablespoon of Grand Marnier or another orange liqueur to the frosting for a sophisticated kick.
Beau’s Chef’s Notes
This recipe has evolved so much since that first messy kitchen experiment. My biggest lesson learned? Gel food coloring is non-negotiable. I once used an entire bottle of liquid black coloring trying to get the right shade and ended up with a runny, bitter mess. Never again! I also love playing with the cocoa powder; sometimes I use a dark Dutch-processed cocoa for an even deeper chocolate flavor. The best part of this recipe, though, is how it brings people together. I love seeing the looks of surprise and delight when someone takes that first bite. The dark cake is so unexpected, and the bright orange frosting just makes everyone smile. It’s more than a cupcake; it’s a experience.
Your Questions, Answered!
Let’s tackle some common questions to make sure your baking is foolproof.
Q: My cupcakes turned out greenish-black, not jet black! What happened?
A: Ah, the cocoa powder strikes again! Natural cocoa powder is acidic and can sometimes react with the food coloring. The best fix is to use a black cocoa powder (like the kind used in Oreos!) or a Dutch-process cocoa, which is neutral. If you only have natural cocoa, just be prepared to use a little extra black gel coloring to overcome the reddish undertones.
Q: Can I make these without food coloring?
A: You can absolutely make the cupcakes without the dye—they’ll be a lovely deep chocolate color and will taste just as amazing. For the frosting, you could try using a natural coloring like a reduction of carrot or pumpkin juice, but the color will be much more subtle. For that classic Halloween look, gel coloring is really the most effective route.
Q: My frosting is too runny/too thick. How can I fix it?
A: Frosting is all about balance! Too runny? Gradually beat in a little more powdered sugar, a quarter cup at a time, until it firms up. Too thick? Add more liquid, but just a teaspoon of cream or milk at a time. The consistency should be stiff enough to hold a peak but smooth enough to pipe easily.
Q: Can I make these ahead of time?
A: Absolutely! The unfrosted cupcakes can be baked, cooled, and stored in an airtight container at room temperature for a day, or frozen for up to 2 months. The frosting can be made and stored in the fridge for up to a week; just let it come to room temperature and re-whip it before piping. Frosted cupcakes are best enjoyed the same day but will keep at room temperature for a day.

Black Velvet Cupcakes with Orange Frosting
Description
Hey friends, Beau here from Feastical! These cupcakes aren’t just chocolate dyed black—they’re velvet-rich, with a cloud of vibrant orange frosting that practically glows. Perfect for Halloween parties, dessert tables, or a cozy fall night treat.
Ingredients
For the Black Velvet Cupcakes:
-
1 1/4 cups all-purpose flour (or cake flour for a slightly denser crumb)
-
1 cup granulated sugar
-
1/4 cup unsweetened cocoa powder (natural for subtle chocolate undertones)
-
1 tsp baking soda
-
1/2 tsp baking powder
-
1/2 tsp salt
-
1 cup buttermilk (or 1 cup milk + 1 tbsp lemon juice/vinegar, let sit 5 min)
-
1/2 cup vegetable oil (neutral, like canola or avocado)
-
2 large eggs, room temperature
-
1 tsp vanilla extract
-
1–2 tbsp black gel food coloring
For the Orange Frosting:
-
1 cup (2 sticks) unsalted butter, softened
-
4 cups powdered sugar, sifted if needed
-
2–3 tbsp heavy cream or milk
-
1 tsp vanilla extract
-
Orange gel food coloring, to desired intensity
Instructions
1. Preheat and Prep:
-
Preheat oven to 350°F (175°C).
-
Line a 12-cup muffin tin with cupcake liners (black or orange works beautifully).
2. Combine Dry Ingredients:
-
In a large bowl, whisk together flour, sugar, cocoa, baking soda, baking powder, and salt.
3. Mix Wet Ingredients:
-
In a separate bowl, whisk together buttermilk, oil, eggs, and vanilla until smooth.
4. Make the Batter:
-
Pour wet into dry ingredients. Fold gently with a spatula until just combined; a few lumps are fine.
-
Add black gel coloring gradually, mixing until uniform and deep black.
5. Fill and Bake:
-
Divide batter evenly among liners, filling ~2/3 full.
-
Bake 18–20 min, until tops spring back and a toothpick comes out with a few moist crumbs.
6. Cool:
-
Cool in pan 5 min, then transfer to a wire rack until completely cooled before frosting.
7. Make the Frosting:
-
Beat butter 2–3 min until pale and fluffy.
-
Gradually add powdered sugar, mixing on low until incorporated.
-
Add vanilla and 2 tbsp cream, beat medium-high 2–3 min.
-
Mix in orange gel coloring until uniform. Adjust consistency with more cream or sugar if needed.
8. Frost:
-
Fill a piping bag fitted with your favorite tip (large star tip recommended). Pipe generous swirls onto cooled cupcakes.
Notes
-
Display on a white platter to make colors pop.
-
Add black or orange sprinkles for extra fun.
-
Pair with milk, coffee, or dessert wine.
Nutrition
- Calories: 360 Cal
- Fat: 17 g
- Carbohydrates: 50 g
- Protein: 4 g
Nutritional Information*
*Please note: This is an estimated calculation provided by an online nutrition calculator. It should not be considered a substitute for a professional nutritionist’s advice.
Per cupcake (approx.): Calories: 360 | Protein: 4g | Carbohydrates: 50g | Fat: 17g | Fiber: 2g
Final Thoughts
Creating these Black Velvet Cupcakes with Orange Frosting is about so much more than following a recipe. It’s a journey that encompasses kitchen chemistry, artistic expression, and even a touch of cultural reflection. From the precise science of creaming butter to the playful art of piping and presentation, every step is an opportunity to create something truly special. This recipe is a gateway—a chance to build new Halloween traditions in your own home, to fill your kitchen with the warm scents of cocoa and citrus, and to experience the pure joy of presenting a creation that causes a room to fall silent in awe. So this Halloween, embrace the process. Don’t just bake cupcakes; craft an experience, share a story, and create a delicious memory that, like the best Halloween tales, will be retold for years to come. Happy baking, and happy haunting

Chocolate Pumpkin Bundt Cake
Your New Favorite Fall Cake is Calling
Hey friends, Beau from Feastical here! Is there anything better than the smell of something incredible baking in the oven on a crisp autumn day? That warm, spicy, chocolatey aroma that just seems to hug the whole house? If you’re nodding along, then you and I are about to become best kitchen friends, because I’m sharing the recipe for what might just be my all-time favorite fall dessert: this absolutely divine Chocolate Pumpkin Bundt Cake.
Now, I know what you might be thinking. Chocolate and pumpkin? Trust me, I was a skeptic once, too. But let me tell you, this isn’t just a cake; it’s a experience. The pumpkin doesn’t scream “PIE!”—instead, it works its silent magic, creating a cake so impossibly moist and tender you’ll wonder how you ever baked without it. Paired with the deep, rich notes of cocoa and a hint of warm spice, every bite is a perfect harmony of cozy fall flavor and indulgent chocolate satisfaction.
And the best part? It’s stunningly simple. The Bundt pan does most of the fancy work for you, creating a beautiful, swirly, impressive-looking cake that’s just begging to be the centerpiece of your next gathering (or your next Tuesday night, because why not?). So, preheat that oven, grab your favorite mixing bowl, and let’s create some magic together. This Chocolate Pumpkin Bundt Cake is about to become your go-to recipe for feeling good all season long.
The Happy Accident That Started It All
This cake has a fun little origin story that involves a classic Beau move: getting a little too ambitious on a Sunday and nearly causing a kitchen catastrophe. A few years back, I was determined to make my famous double chocolate muffins, but I’d gotten so excited at the farmer’s market that I’d also bought a giant, beautiful sugar pumpkin. There I was, with a half-made muffin batter and a bowl of gorgeous, fresh pumpkin purée I’d just roasted, staring at them both on the counter.
Instead of choosing one, my brain went, “Why not both?” I’m not gonna lie, the first attempt was… interesting. Let’s just say I learned the hard way that there’s a difference between pumpkin purée and pumpkin pie filling! But after a little tweaking (and a lot of tasting), I landed on this magical combination. The memory of that messy, flour-dusted kitchen and the triumphant moment when the flavors finally clicked always makes me smile. It’s a reminder that some of the best creations come from a little curiosity and a willingness to play with your food. This cake is my happy accident, and now, I’m so thrilled to share it with you.
Gathering Your Cake-Making Crew
Here’s your shopping list for this autumnal masterpiece. Remember, baking is a science, but it’s also about love and a little intuition. I’ve included my best tips and swaps to make this recipe work for you!
- 2 cups all-purpose flour: The trusty foundation of our cake. For a slightly lighter crumb, you can swap in 1 cup of cake flour, but all-purpose works perfectly.
- 3/4 cup unsweetened cocoa powder: This is where the deep chocolate flavor comes from! Use a good-quality natural cocoa powder (like Hershey’s) for that classic taste. Chef’s Insight: Don’t use Dutch-processed cocoa here, as the acid in the natural cocoa reacts with the baking soda for the perfect rise.
- 2 tsp baking powder & 1 tsp baking soda: Our dynamic leavening duo! They work together to give this dense, moist cake a beautiful, light lift. Make sure they’re fresh for the best results.
- 1 tsp cinnamon & 1/2 tsp nutmeg: The warm, cozy soul of the cake. Feel free to add a pinch of cloves or ginger if you’re feeling extra spicy!
- 1/2 tsp salt: Never skip the salt! It’s the flavor enhancer that makes the chocolate and spices pop.
- 1 cup pumpkin purée: Crucial note: Make sure it’s 100% pure pumpkin purée, NOT pumpkin pie filling. The pie mix is pre-sweetened and spiced and will throw the whole recipe off. Sub Tip: You can use fresh purée from a sugar pumpkin (so good!) or canned—both work great.
- 1 cup granulated sugar & 1 cup brown sugar: The white sugar provides sweetness and structure, while the brown sugar adds a molasses-like moisture and depth. Using both is my secret for the perfect texture.
- 1/2 cup vegetable oil: Oil keeps this cake incredibly moist far longer than butter would. I use a neutral oil like canola or avocado.
- 4 large eggs: They bind everything together and add richness. Bring them to room temperature for a smoother, more emulsified batter.
- 1 tsp vanilla extract: The flavor bridge that ties the chocolate and pumpkin together beautifully.
- 1 cup buttermilk: The final key to a tender crumb! The acidity tenderizes the gluten and reacts with the baking soda. Quick Hack: No buttermilk? No problem! Add 1 tablespoon of lemon juice or white vinegar to a measuring cup, then fill it with regular milk to the 1-cup line. Let it sit for 5 minutes until it curdles slightly. Good to go!
Let’s Bake This Beautiful Cake: Step-by-Step
Alright, team, let’s get mixing! Follow these steps, and you’ll have a flawless cake. I’m walking you through each one with all my best kitchen hacks.
Step 1: Prep Like a Pro. Preheat your oven to 350°F (175°C). Now, here’s the most important step for a Bundt cake: GREASE THAT PAN LIKE YOUR CAKE’S LIFE DEPENDS ON IT. There’s nothing sadder than a beautiful cake that sticks. I use a pastry brush to coat every nook and cranny with softened butter or baking spray, then I dust it with a light coating of flour or cocoa powder (cocoa prevents a white dusty look on a chocolate cake!). Tap out any excess. Chef’s Hack: After greasing, pop the pan in the fridge for 10 minutes. The cold helps the fat set, creating an even better non-stick barrier.
Step 2: Combine the Dry Goods. In a medium bowl, whisk together your flour, cocoa powder, baking powder, baking soda, cinnamon, nutmeg, and salt. Whisking by hand for a good 30 seconds is my preferred method—it not only combines everything but also aerates the flour, leading to a lighter cake. Set this bowl aside.
Step 3: The Wet Team Assembles. In a large mixing bowl, combine the pumpkin purée, granulated sugar, brown sugar, and vegetable oil. Whisk them until they’re smooth and well-combined. Next, add the eggs one at a time, whisking well after each addition. Finally, whisk in the vanilla. You should have a smooth, slightly thick, and gorgeous caramel-colored mixture.
Step 4: The Grand Unification. This is where we avoid overmixing! Add about one-third of your dry ingredient mixture to the wet ingredients. Gently fold it in with a spatula until it’s just combined. Now, pour in half of the buttermilk and fold again. Repeat: another third of the dry, the rest of the buttermilk, and finally the last of the dry ingredients. Mix until you no longer see streaks of flour, but don’t go crazy—a few lumps are totally fine. Overmixing leads to a tough, dense cake, and we want tender and soft!
Step 5: Into the Pan and Oven. Carefully pour your beautiful, thick batter into your prepared Bundt pan. Use your spatula to smooth the top and tap the pan gently on the counter a few times to release any large air bubbles. Slide it into the center of your preheated oven and bake for 45-55 minutes. You’ll know it’s done when the top is springy to the touch and a toothpick or skewer inserted into the center comes out with just a few moist crumbs attached (not wet batter).
Step 6: The Patient Cool-Down. This is the hardest part! When the cake is done, pull it out and let it cool in the pan on a wire rack for exactly 15 minutes. This allows the cake to set and firm up slightly. Any less and it might fall apart; any more and the steam can make it stick. After 15 minutes, place the wire rack on top of the pan and, with confidence, flip it over. The cake should release with a satisfying *thud*. Let it cool completely before glazing.
Step 7: The Ganache Glory (Optional but Highly Recommended). For the ganache, heat the heavy cream in a saucepan over medium heat until it just begins to simmer (small bubbles around the edges). Do not let it boil! Place your chocolate chips in a heatproof bowl. Pour the hot cream over the chips, let it sit for 2 minutes to melt them, then whisk slowly until you have a smooth, glossy, heavenly chocolate glaze. Drizzle it artfully (or enthusiastically!) over your completely cooled cake.
How to Serve Your Masterpiece
This cake is a star all on its own! For the ultimate experience, place it on a beautiful cake stand to show off those elegant Bundt curves. A simple dusting of powdered sugar looks wonderfully rustic if you skipped the ganache. When slicing, use a sharp, thin knife and wipe it clean between cuts for perfect pieces. This cake is rich, so a modest slice is plenty. I love serving it with a dollop of barely-sweetened whipped cream or a scoop of vanilla bean ice cream on the side. The contrast of warm cake and cold cream is pure bliss. And of course, a big mug of coffee or a glass of cold milk is the perfect beverage companion.
Make It Your Own: Fun Flavor Twists
This recipe is a fantastic canvas for your creativity! Here are a few of my favorite riffs:
- Orange Zest: Add the zest of one orange to the wet ingredients. Chocolate and orange are a match made in heaven!
- Espresso Boost: Dissolve 1-2 teaspoons of instant espresso powder into the buttermilk before adding it. It won’t taste like coffee, but it will amplify the chocolate flavor incredibly.
- Spice It Up: Add a 1/4 teaspoon of cayenne pepper to the dry ingredients for a subtle, warm kick that’s amazing with chocolate.
- Gluten-Free: Swap the all-purpose flour for a 1:1 gluten-free baking blend. The pumpkin keeps it so moist, you won’t miss a thing!
- Cream Cheese Swirl: Before baking, dollop a mixture of 4 oz softened cream cheese, 1/4 cup sugar, and 1 egg yolk over the batter in the pan and swirl it in with a knife.
Beau’s Kitchen Notes & Stories
This cake has been on quite a journey since that first messy experiment! It’s been the star of my Thanksgiving table for three years running, and it’s even traveled to a few potlucks (always a hit). One time, I was so eager to try it that I tried to flip it out of the pan after only 5 minutes. Let’s just say I had to perform “cake surgery” with a spatula and then cover the entire thing in extra ganache to hide the evidence. The lesson? Patience, young grasshopper.
I’ve also learned that this cake actually tastes even better the next day. The flavors have more time to mingle and get to know each other, making it the ultimate make-ahead dessert. Just keep it covered at room temperature. Honestly, this recipe is a testament to the idea that the best things in life are often simple, a little messy, and made with a whole lot of heart.
Your Questions, Answered
Q: My cake stuck to the pan! What did I do wrong and how can I save it?
A: Oh, we’ve all been there! The most common culprit is not greasing the pan thoroughly enough. Those intricate designs need love! Next time, be religious about buttering and flouring every crevice. If it does stick, let it cool completely. Then, you can gently pry the stuck pieces out and use them as a “trifle” base layered with whipped cream and berries. For this cake, just patch it together with ganache—it’s a delicious bandage!
Q: Can I make this into cupcakes or a layer cake instead?
A: Absolutely! For cupcakes, fill liners 2/3 full and bake for 18-22 minutes. For a layer cake, divide the batter between two greased and lined 9-inch round pans and bake for 30-35 minutes. A cream cheese frosting would be divine!
Q: How should I store this cake, and how long will it last?
A> Because it’s so moist, it keeps wonderfully. Store it covered at room temperature for up to 3 days. If your kitchen is very warm, or if you’ve used a dairy-based glaze, you might want to refrigerate it after day one. It can also be frozen (without glaze) for up to 3 months. Wrap it tightly in plastic wrap and then foil.
Q: My batter seemed really thick. Is that normal?
A> Yes! This is a thick batter, and that’s exactly what we want. A thinner batter wouldn’t hold up to the Bundt pan’s design and might spill over during baking. Thick batter = moist, dense, perfect cake.

Chocolate Pumpkin Bundt Cake
Description
Hey friends, Beau from Feastical here! This cake isn’t just chocolatey and pumpkiny—it’s an experience. Perfectly moist, tender, and spiced just right, it’s a showstopper for holidays, gatherings, or any crisp autumn day when you want your kitchen to smell like heaven.
Ingredients
Dry Ingredients:
-
2 cups all-purpose flour
-
3/4 cup unsweetened cocoa powder (natural, not Dutch-processed)
-
2 tsp baking powder
-
1 tsp baking soda
-
1 tsp cinnamon
-
1/2 tsp nutmeg
-
1/2 tsp salt
Wet Ingredients:
-
1 cup pumpkin purée (100% pure, NOT pie filling)
-
1 cup granulated sugar
-
1 cup brown sugar
-
1/2 cup vegetable oil (neutral oil like canola or avocado)
-
4 large eggs, room temperature
-
1 tsp vanilla extract
-
1 cup buttermilk (or 1 cup milk + 1 tbsp lemon juice/vinegar, let sit 5 mins)
Optional Ganache:
-
1 cup chocolate chips
-
1/2 cup heavy cream
Instructions
Step 1: Prep Your Pan
-
Preheat oven to 350°F (175°C).
-
Grease Bundt pan thoroughly with butter or spray, then dust with flour or cocoa powder. Tip: Chill for 10 min to set the coating.
Step 2: Mix Dry Ingredients
-
Whisk flour, cocoa, baking powder, baking soda, cinnamon, nutmeg, and salt in a medium bowl.
Step 3: Mix Wet Ingredients
-
In a large bowl, whisk pumpkin, granulated sugar, brown sugar, and oil until smooth.
-
Add eggs one at a time, whisking after each. Stir in vanilla.
Step 4: Combine Batter
-
Fold one-third of the dry mixture into the wet ingredients.
-
Add half the buttermilk, fold gently.
-
Repeat with another third of dry, remaining buttermilk, and final dry. Do not overmix—some lumps are fine.
Step 5: Bake
-
Pour batter into prepared Bundt pan. Smooth top and tap gently to release air bubbles.
-
Bake 45-55 min until springy and a toothpick comes out with a few moist crumbs.
Step 6: Cool
-
Cool in pan 15 min on a wire rack. Flip carefully to release cake. Cool completely before glazing.
Step 7: Ganache (Optional)
-
Heat heavy cream until simmering. Pour over chocolate chips, let sit 2 min, then whisk until smooth. Drizzle over cooled cake.
Notes
-
Dust with powdered sugar if skipping ganache.
-
Slice with a sharp knife, wipe between cuts.
-
Serve with lightly sweetened whipped cream or vanilla ice cream.
-
Pairs perfectly with coffee or cold milk.
Nutrition
- Calories: 340 Ca per slice, 1/12 cake
- Fat: 15 g
- Carbohydrates: 48 g
- Protein: 6 g
Nutritional Information*
*This is an approximate estimate for 1 slice (1/12th of the cake) without the chocolate ganache topping. Values can vary based on specific ingredients used.
Per Serving: Calories: 340 | Protein: 6g | Carbohydrates: 48g | Fat: 15g | Fiber: 3g
Final Thoughts
This Chocolate Pumpkin Bundt Cake is more than the sum of its parts. It’s a testament to the idea that the most beloved recipes are often born from curiosity, perfected through practice, and shared with love. It represents a perfect harmony of flavors—the deep, familiar comfort of chocolate elevated by the subtle, earthy sweetness of pumpkin and warm spice. It’s a recipe that respects the science of baking while leaving just enough room for your own personal flair, whether that’s a zest of orange, a dash of espresso, or a beautifully set table.
But perhaps its greatest magic lies in its ability to create a moment. The process of making it fills your home with an aroma that feels like a warm embrace on a cool day. The final product, majestic in its simplicity, has the power to gather people, to become the sweet, indulgent centerpiece of laughter and connection. It’s a cake for a quiet Tuesday with a book, a boisterous holiday feast, and everything in between.
So, I encourage you to not just make this cake, but to truly experience it. Embrace the process, learn from the chemistry, enjoy the presentation, and share it widely. Let it become a part of your own story, your own traditions, and your own collection of go-to recipes that make life a little sweeter, one delicious, moist, chocolatey slice at a time.

Brown Butter Pecan Cookies
Brown Butter Pecan Cookies: Your New Favorite Cookie Obsession
Hey friends, Beau here! Let’s talk about cookies for a second. We all have our go-to, the classic chocolate chip that never lets you down. But sometimes, you’re craving something a little… more. Something with a deeper, richer flavor that makes your kitchen smell like a cozy fall afternoon, even if it’s the middle of July. That, my friends, is where these Brown Butter Pecan Cookies come in. They’re not just cookies; they’re an experience.
Imagine this: a cookie with edges that are just shy of crisp, giving way to a center so soft and chewy it practically melts in your mouth. Now, add the warm, toasty, almost caramel-like magic of brown butter and the earthy crunch of perfectly toasted pecans. It’s a symphony of texture and flavor in every single bite. This isn’t just a recipe; it’s my secret weapon for turning an ordinary day into something special. It’s the cookie I bring to potlucks that has everyone asking for the recipe before they’ve even finished their first one. So, tie on your favorite apron, put on some good music, and let’s make something incredible together. You’re about to fall in love.
The Cookie That Started It All
This recipe takes me right back to my grandma’s kitchen. She was a wizard with butter and flour, and her pecan sandies were the stuff of legend. They were always perfectly delicate and crumbly, stored in a big blue tin on the counter. But me? I’ve always been a chewy cookie guy. I wanted that soft, yielding center.
One rainy afternoon, I was attempting to recreate her magic but aiming for my ideal texture. I got distracted on a phone call and left the butter bubbling away on the stove a little too long. Instead of just melted, it turned this gorgeous golden brown and smelled intensely nutty. I almost tossed it, thinking I’d ruined it, but decided to roll with it. That happy accident was a revelation! That browned butter, combined with my love for chewy cookies and her toasted pecans, created something entirely new and unforgettable. It’s my humble, chewy homage to her classic—a little piece of family history, reimagined with a modern, deeply flavorful twist.
Gathering Your Cookie Crew: The Ingredients
Here’s the lineup for these superstar cookies. Using quality ingredients here makes a real difference, so let’s break it down.
- 1 cup (2 sticks) unsalted butter – This is the star of the show! We’re browning it to unlock its nutty, caramel potential. Using unsalted lets you control the salt level perfectly.
- 1 ¼ cups packed brown sugar – This is our secret weapon for that moist, chewy texture and deep molasses flavor. Pack it firmly into your measuring cup!
- ¼ cup granulated sugar – The white sugar helps create a slightly crisp exterior, giving us that perfect textural contrast.
- 2 large eggs – They bind everything together and add richness. Make sure they’re at room temperature to emulsify smoothly with the warm brown butter.
- 2 tsp pure vanilla extract – Don’t skimp! The vanilla complements the brown butter beautifully. If you have vanilla bean paste, a teaspoon of that would be incredible here.
- 2 ½ cups all-purpose flour – The foundation. For a more tender cookie, you can fluff your flour with a spoon, sprinkle it into your measuring cup, and level it off. No packing!
- 1 tsp baking soda – Our leavening agent that gives the cookies their perfect rise and spread.
- ½ tsp salt</strong – Absolutely crucial. It balances the sweetness and makes all the other flavors pop. I use fine sea salt.
- 1 tsp cinnamon (optional but highly recommended) – This is my little chef’s hack. It adds a whisper of warm spice that makes the cookies taste even cozier.
- 1 ½ cups toasted pecans, chopped – Toasting is NON-NEGOTIABLE. It transforms them from bland and soft to crunchy, flavorful powerhouses.
Let’s Get Baking: The Step-by-Step Guide
Okay, team. Let’s do this. Follow these steps, and you’ll be a brown butter connoisseur in no time.
Step 1: Brown That Butter! This is the most important step. Slice your butter and melt it in a light-colored skillet or saucepan over medium heat. It will foam and crackle. Keep stirring gently with a whisk or silicone spatula. Soon, you’ll see little brown bits forming at the bottom. Once it smells incredibly nutty and takes on a beautiful amber-gold color, it’s done! This usually takes 5-8 minutes. Chef’s Hack: Immediately pour it into a heatproof bowl to stop the cooking. This includes all those delicious browned bits! Let it cool for about 15-20 minutes. You want it warm, not hot, so it doesn’t cook the eggs in the next step.
Step 2: Toast Your Pecans. While the butter cools, spread your pecans on a baking sheet and toast them in a 350°F (175°C) oven for 6-8 minutes, until fragrant. Let them cool, then give them a rough chop.
Step 3: Combine Wet Ingredients. In a large mixing bowl, whisk the slightly cooled brown butter with the brown and granulated sugars. Whisk for a good minute—it should look smooth and glossy. Add the room-temperature eggs one at a time, whisking well after each until fully incorporated. Whisk in the vanilla.
Step 4: Combine Dry Ingredients. In a separate bowl, whisk together the flour, baking soda, salt, and that optional cinnamon. This ensures everything is evenly distributed so you don’t get a pocket of baking soda in one cookie.
Step 5: Bring It All Together. Gradually add the dry ingredients to the wet ingredients, mixing with a spatula just until no flour streaks remain. Chef’s Hack: Don’t overmix! Overworking the dough leads to tough cookies. Gently fold in the toasted pecans until they’re evenly distributed.
Step 6: The Chill Time. Cover the bowl and chill the dough for at least 30 minutes. I know, I know—waiting is the hardest part! But this step is crucial. It allows the flour to hydrate, deepens the flavors, and prevents the cookies from spreading too thin in the oven. For an even more intense flavor, you can chill it overnight.
Step 7: Bake to Perfection. Preheat your oven to 350°F (175°C). Line your baking sheets with parchment paper. Scoop the dough into balls (about 2 tablespoons each) and place them about 2 inches apart. Bake for 10-12 minutes. Chef’s Hack: You want the edges to look set and golden, but the centers should still look soft and slightly underbaked. They will continue to cook on the hot baking sheet out of the oven. This is the secret to that dreamy, chewy center!
Step 8: The Cool Down. Let the cookies cool on the baking sheet for at least 5 minutes. This allows them to set up properly. Then, transfer them to a wire rack to cool completely… or, you know, grab a glass of milk and enjoy one warm. I won’t tell.
How to Serve These Beauties
These cookies are glorious all on their own, still warm from the oven with a cold glass of milk. For pure nostalgia, that’s the way to go. To fancy them up for a gathering, place a few on a beautiful wooden board or a vintage cake stand. A tiny sprinkle of flaky sea salt on top right when they come out of the oven elevates them to gourmet status. They also make an incredible ice cream sandwich—just sandwich a scoop of high-quality vanilla bean or butter pecan ice cream between two cookies. Trust me on this one.
Mix It Up! Recipe Variations
- Chocolate Chip Brown Butter Pecan: Fold in 1 cup of semi-sweet or dark chocolate chips along with the pecans. The ultimate mash-up.
- Maple Glaze Drizzle: Whisk together ½ cup powdered sugar with 2 tablespoons of pure maple syrup and a splash of milk. Drizzle over the cooled cookies for a fall-inspired treat.
- Spiced Twist: Add ¼ teaspoon of nutmeg and a pinch of cloves along with the cinnamon for a more complex spice profile.
- Salty Sweet: Use salted roasted pecans and finish the baked cookies with a flake of Maldon sea salt.
- Gluten-Free: Substitute the all-purpose flour with a 1:1 gluten-free baking blend. The texture will be slightly more delicate but just as delicious.
Beau’s Chef Notes & Kitchen Stories
This recipe has evolved so much since that first accidental batch. I’ve learned that browning the butter is a practice in patience and paying attention—it’s my few minutes of kitchen meditation. I’ve also learned that the chill time is your best friend. One time, I was too impatient and baked a test cookie immediately. It turned into a flat, greasy puddle. We called it the “cookie crisp” and ate it anyway, but it was a valuable lesson!
These cookies have become my signature “thank you” gift for neighbors, my go-to for bake sales, and my mandatory contribution to Friendsgiving. They’re more than a recipe; they’re a little container of joy I get to share. Don’t be afraid to make them your own—that’s what cooking is all about!
FAQs & Troubleshooting
Q: My butter burned! What do I do?
A: Ah, it happens to the best of us. Brown butter can go from perfect to burnt surprisingly fast. If it smells acrid and the bits are black, it’s best to start over. Use a light-colored pan so you can easily see the color change, and keep the heat at a steady medium.
Q: My cookies spread too much and are flat.
A: This is almost always due to the butter being too warm or the dough not being chilled enough. Make sure your browned butter has cooled sufficiently before adding it to the sugars. And never skip the 30-minute chill! It firms up the butter fat again, preventing overspreading.
Q: My cookies are too cakey and puffy.
A: This usually means you可能有 over-measured your flour. Try fluffing the flour in the bag, spooning it into your measuring cup, and leveling it off with a knife instead of dunking the cup directly into the bag. Also, make sure your baking soda is fresh!
Q: Can I freeze the cookie dough?
A: Absolutely! Scoop the dough balls onto a parchment-lined sheet, freeze until solid, and then transfer to a freezer bag. You can bake them straight from the freezer; just add 1-2 minutes to the baking time. It’s the best way to have fresh cookies on demand!
Brown Butter Pecan Cookies
- Total Time: 60 minutes
Description
Hey friends, Beau here! These cookies aren’t just cookies—they’re an experience. Edges slightly crisp, centers soft and chewy, loaded with toasted pecans, and infused with the deep, caramel-like flavor of brown butter. Perfect for cozy afternoons, bake sales, or an indulgent treat any day of the week.
Ingredients
-
1 cup (2 sticks) unsalted butter
-
1 ¼ cups packed brown sugar
-
¼ cup granulated sugar
-
2 large eggs, room temperature
-
2 tsp pure vanilla extract
-
2 ½ cups all-purpose flour
-
1 tsp baking soda
-
½ tsp salt
-
1 tsp cinnamon (optional, highly recommended)
-
1 ½ cups toasted pecans, chopped
Instructions
Step 1: Brown the Butter
-
Melt butter in a light-colored skillet over medium heat. Stir gently as it foams and crackles. Brown bits will appear and it will smell nutty.
-
Pour into a heatproof bowl to stop cooking. Let cool 15-20 minutes.
Step 2: Toast the Pecans
-
Spread pecans on a baking sheet and toast in 350°F (175°C) oven for 6-8 minutes. Let cool, then roughly chop.
Step 3: Combine Wet Ingredients
-
Whisk cooled brown butter with brown and granulated sugars until smooth.
-
Add eggs one at a time, whisking after each. Stir in vanilla.
Step 4: Mix Dry Ingredients
-
Whisk flour, baking soda, salt, and optional cinnamon in a separate bowl.
Step 5: Combine
-
Gradually fold dry ingredients into wet ingredients with a spatula until no flour streaks remain.
-
Gently fold in toasted pecans.
Step 6: Chill
-
Cover dough and chill at least 30 minutes. For more flavor, chill overnight.
Step 7: Bake
-
Preheat oven to 350°F (175°C). Line baking sheets with parchment paper.
-
Scoop dough balls (~2 tbsp each) 2 inches apart. Bake 10-12 minutes. Edges should be set, centers soft.
Step 8: Cool
-
Let cookies cool on the sheet 5 minutes, then transfer to a wire rack. Enjoy warm or fully cooled.
Notes
-
Use unsalted butter to control saltiness.
-
Toast pecans at 350°F (175°C) for 6-8 minutes to maximize flavor.
-
Chill dough at least 30 minutes to prevent spreading and intensify flavor.
- Prep Time: 15 minutes
Nutrition
- Calories: 210 Cal
- Carbohydrates: 22 g
- Protein: 3 g
Nutritional Information (Approximate, Per Cookie)
Calories: 210 | Protein: 3g | Carbohydrates: 22g | Fat: 12g | Saturated Fat: 5g | Fiber: 1g | Sugar: 12g
Final Thoughts
Embarking on the journey to make these Brown Butter Pecan Cookies is about more than following a recipe; it’s about embracing a philosophy of baking. It’s a lesson in patience—waiting for the butter to brown perfectly, allowing it to cool, letting the dough chill, and resisting the urge to overbake. It’s a lesson in transformation—watching simple, raw ingredients like butter and pecans undergo a metamorphosis through heat, emerging with profound new depths of flavor and character. And ultimately, it’s a lesson in reward.
The reward is in the process itself, the mindful act of creating something from scratch. It’s in the incredible aroma that becomes a part of your home. And it’s most certainly in that first warm bite, a perfect balance of crisp and chew, sweet and salty, simple and complex. This cookie is a testament to the idea that small details make a big difference. That happy accidents (like my first batch of browned butter) can lead to beautiful discoveries. And that sharing something made with this level of care is one of the simplest and most genuine forms of connection.
So, I hope you don’t just save this recipe for a special occasion. I hope you make it on a random Tuesday, just because. Let it be your new signature treat, your go-to gift, your secret weapon for brightening a day. This cookie has been a constant little joy in my life, and my greatest hope is that it now becomes one in yours. Happy baking, friends. Now, go preheat that oven—your new favorite cookie obsession awaits.

Creamy Buffalo Chicken & Ranch Rice Bowls
Hey friends, Beau here! Ever have one of those days where you’re craving the fiery kick of buffalo wings but need something *actually* filling? Like, “I just chased three toddlers around the playground and my energy tank is on E” kind of hungry? That’s exactly where I was when this glorious mashup was born. Picture this: tender shredded chicken drenched in tangy buffalo sauce, swirled with cool ranch and melty cheeses, all piled high over fluffy rice. It’s comfort food with attitude—like your favorite sports bar appetizer grew up, got a degree, and became a well-balanced meal.
Best part? We’re talking **20 minutes flat** from fridge to fork. Seriously. I whipped this up last Tuesday after my dog decided rolling in mud was the ultimate pre-dinner activity (bless you, Luna). While she got a bath, these bowls got devoured by my family with zero complaints—just happy, sauce-smeared grins. Whether you’re feeding hangry teens, meal-prepping for chaos-filled weeks, or just treating yourself, this recipe’s your golden ticket. No fancy skills needed. Just big flavor, minimal fuss, and maximum satisfaction. Ready to make magic happen? Let’s go!
This dish actually started as a happy accident during my college days. My roommate Dex and I were *obsessed* with buffalo wings. We’d order them every game night, drowning in blue cheese and regret (RIP our wallets). One rainy Sunday, we were broke but craving that spicy-saucy goodness. All we had? Leftover rotisserie chicken, a sad packet of ranch, cream cheese for bagels, and instant rice. Desperation = inspiration! We tossed it all in a skillet, added hot sauce, and prayed.
What emerged was… shockingly glorious. We called it “Garbage Bowl Glory” and ate it straight from the pan, high-fiving over our broke-genius moment. Fast-forward 10 years: I’ve refined it (goodbye, instant rice; hello, nutty brown rice!), but that same messy, joyful spirit remains. Every time I make it, I grin remembering Dex wearing buffalo sauce like war paint, yelling, “WE’VE CRACKED THE CODE, BEAU!” Some recipes feel like home—this one tastes like youth, rebellion, and the beauty of kitchen improv.
Gather Your Flavor Arsenal
Here’s your grocery hit list! Pro tip: Shortcuts are encouraged—rotisserie chicken is your BFF here. Measurements serve 5 hungry humans.
- 1.2 kg (about 2.5 lbs) cooked shredded chicken – Leftovers or rotisserie work great! Chef’s hack: Simmer raw chicken breasts in broth with garlic for 15 mins if starting fresh. More flavor, less dryness!
- ½ cup buffalo sauce – I love Frank’s RedHot for balance. Too spicy? Cut it with 1 tbsp melted butter or honey. Too mild? Add cayenne!
- ¼ cup light ranch dressing – Bottled is fine, but my 2-minute homemade ranch elevates it! Vegans: Swap in cashew-based ranch.
- 3 cups cooked brown rice – Nutty and filling! Use day-old rice—it fries better! Cauliflower rice (see Twist below) cuts carbs.
- 150g low-fat cream cheese – Soften it! Cold cream cheese won’t melt smoothly. Dairy-free? Kite Hill almond cream cheese rocks.
- 100g shredded sharp cheddar – Sharp = bold flavor punch. Pre-shredded? Toss with 1 tsp cornstarch to prevent clumping.
- Chopped green onions – For fresh crunch! No greens? Thinly slice celery leaves or chives.
- Optional: Crumbled bacon – Because bacon makes everything better. Turkey bacon works too!
Twist Alert: Swap brown rice for cauliflower rice! Sauté it with garlic first to avoid sogginess. Carbs drop, veggie power rises!
Let’s Build Your Flavor Bomb (Step-by-Step!)
Total Time: 20 mins (yes, really!)
- Prep like a pro. Shred your chicken, cook rice (if not using leftovers), and chop those green onions. Beau’s Tip: Warm your cream cheese in the microwave for 15 seconds—it blends like a dream!
- Unite the saucy squad. Heat a large skillet over LOW heat. Add chicken, buffalo sauce, ranch, and cream cheese. Stir gently until the cream cheese melts into a luscious, orange-hued sauce—about 3-4 minutes. KEY HACK: Low heat prevents the dairy from curdling. Patience = creamy payoff!
- Cheese it up! Sprinkle in cheddar. Stir until it’s gooey and fully incorporated (1-2 mins). Resist high heat! Burnt cheese is sad cheese.
- Rice, meet glory. Divide warm rice among bowls. Spoon the buffalo chicken mixture lavishly over the top. Hungry hack: Warm your bowls first! Cold bowls = sad, lukewarm food.
- Top it like it’s hot. Scatter green onions and bacon (if using) over each mountain of goodness. Extra flair: Drizzle reserved ranch or extra buffalo sauce!
Beau’s Big Wisdom: If your sauce feels too thick, splash in 2 tbsp chicken broth. Too thin? Simmer uncovered for 2 mins. This recipe is FORGIVING—no stress allowed!
Feast with Flair
This bowl is a showstopper straight from the skillet, but let’s make it Instagram-worthy! Pile high in wide, shallow bowls so the colors pop. Garnish with extra green onions and a zigzag of ranch. For crunch? Add celery sticks on the side (it’s the classic wing companion!). Feeling fancy? Serve with chilled cucumber slices or pickled carrots to tame the heat. Perfect for game nights—set out toppings like extra cheese, jalapeños, or blue cheese crumbles so everyone can customize!
Shake It Up, Sugar!
This recipe is a canvas—paint it your way!
- Buffalo Chickpea Power: Swap chicken for 3 cups roasted chickpeas (tossed in buffalo pre-bake!). Vegan & protein-packed!
- Pizza Bowl Riot: Add ¼ cup marinara to the sauce, top with pepperoni and mozzarella. Bake until bubbly!
- BBQ Ranch Twist: Use BBQ sauce instead of buffalo, add black beans and corn. Sweet, smoky heaven!
- Keto Dream: Cauliflower rice + extra bacon + full-fat cheeses. Garnish with avocado!
- “Buffalo Mac” Fusion: Stir cooked elbow pasta into the sauce instead of rice. Kid-approved!
Beau’s Backstory Bites
This dish evolved from my “Garbage Bowl” days (RIP, Dex’s stained couch cushion) to a Feastical fan favorite! The biggest upgrade? Browning the cream cheese slightly before adding liquids—adds a nutty depth. Confession: I once subbed Greek yogurt for ranch during a pantry emergency… and it was accidentally brilliant! Tangier, but delicious. My kids now demand it monthly—they call it “Daddy’s Fire Bowls.” Pro tip: Double the batch! It reheats beautifully (add a splash of water when microwaving). Also: Luna the mud-dog remains my chief taste-tester. She approves, especially if bacon’s involved.
Beyond the Bowl: Leftover Reinvention
Hey friends, Beau here! So you made a giant batch of this buffalo chicken magic and even after two days, you’ve got leftovers staring back at you. The thought of eating the exact same thing again might feel a little… meh. I get it. But what if I told you that the leftover buffalo chicken and rice mixture is not an end, but a magnificent beginning? This stuff is the ultimate culinary chameleon. With a little creativity, you can transform it into three completely new meals, fighting food waste and keeping your taste buds on their toes. Let’s talk leftover glow-up!
First, let’s make Buffalo Chicken Stuffed Peppers. This is a hands-down favorite in my house. Take 2-3 large bell peppers (any color!), slice them in half lengthwise, and remove the seeds. Grab your leftover buffalo chicken and rice mixture—if it seems a bit dry, stir in a tablespoon or two of extra ranch or some chicken broth. Pack this filling generously into each pepper half. Place them in a baking dish, and if you’re feeling decadent, sprinkle a little extra cheese on top. Pour about a half-inch of water or broth into the bottom of the dish (this steams the peppers and prevents burning), cover with foil, and bake at 375°F (190°C) for 25-30 minutes. Uncover and bake for another 10 minutes until the tops are golden and the peppers are tender. You’ve just created a brand-new dinner that’s vibrant, healthy, and packed with flavor.
Next up, Buffalo Chicken Quesadillas. This might be the easiest and most delicious transformation yet. Grab a large flour tortilla. Spread a layer of your leftover mixture over one half. If you have it, add a handful of fresh spinach or arugula for a peppery kick and a pop of green. Sprinkle with a little more cheddar or maybe some pepper jack for extra heat. Fold the other half of the tortilla over the filling. Now, cook it in a lightly buttered or oiled skillet over medium heat for about 3-4 minutes per side, until the tortilla is golden brown and crispy and the cheese inside is utterly molten. Slide it onto a cutting board, let it rest for a minute (crucial for clean slicing!), and cut into wedges. Serve with a side of cool ranch or blue cheese dressing for dipping and maybe some celery sticks. It’s a crispy, cheesy, flavor-packed hand-held miracle.
Finally, let’s go for the ultimate comfort food remake: Buffalo Chicken Chili. This is genius because it stretches your leftovers even further. In a pot, sauté a diced onion until soft. Add your leftover buffalo chicken and rice mixture. Pour in a can of crushed tomatoes and two cups of chicken broth. Now, let’s deepen the flavor: add a can of drained and rinsed white beans (cannellini or great northern) and a teaspoon of cumin. Bring it to a boil, then reduce to a simmer for 15-20 minutes, letting all those flavors get to know each other. The rice will thicken the chili beautifully. Serve it in bowls topped with—you guessed it—a dollop of ranch, extra green onions, and a sprinkle of cheese. It’s hearty, warming, and a completely unique take on two classic dishes. One leftovers, three incredible, distinct meals. That’s what I call a win-win-win.
Your Questions, My Answers!
Q: Can I make this ahead for meal prep?
**A:** Absolutely! Store components separately: rice in containers, sauce/chicken mix in another. Recombine when reheating (add a tbsp of broth to keep it moist). Lasts 4 days fridge or 3 months frozen.
Q: Help! My sauce looks grainy/separated. Fixable?
**A:** Don’t panic! Graininess = heat too high. Remove from burner, whisk in 1 tbsp cold milk or broth until smooth. Next time, keep that flame low and steady!
Q: What if I hate ranch? Any subs?
**A:** Blue cheese dressing is classic with buffalo! Or try cilantro-lime crema (sour cream + lime zest + minced cilantro). Even Caesar dressing works!
Q: Can I use frozen cauliflower rice?
**A:** Yes—but THAW AND DRAIN IT FIRST. Sauté in a hot skillet with oil for 5 mins to evaporate moisture. Wet rice = sad, soggy bowls.
Creamy Buffalo Chicken & Ranch Rice Bowls
- Total Time: 20 minutes
Description
Hey friends, Beau here! Ever have one of those days where you’re craving the fiery kick of buffalo wings but need something actually filling? Picture this: tender shredded chicken drenched in tangy buffalo sauce, swirled with cool ranch and melty cheeses, all piled high over fluffy rice. Comfort food with attitude—like your favorite sports bar appetizer grew up and became a well-balanced meal.
Ingredients
-
1.2 kg (2.5 lbs) cooked shredded chicken – leftovers or rotisserie work great
-
½ cup buffalo sauce – Frank’s RedHot is perfect
-
¼ cup light ranch dressing – bottled or homemade
-
150 g low-fat cream cheese – softened
-
100 g shredded sharp cheddar cheese
-
3 cups cooked brown rice
-
Chopped green onions – for garnish
-
Optional: crumbled bacon
Instructions
-
Prep: Shred chicken, cook rice if needed, and chop green onions. Warm cream cheese in microwave 15 seconds to melt smoothly.
-
Cook sauce: Heat a large skillet over low heat. Add chicken, buffalo sauce, ranch, and cream cheese. Stir gently for 3–4 minutes until the cream cheese melts into a creamy, orange sauce. (Low heat prevents curdling!)
-
Add cheese: Sprinkle in shredded cheddar and stir 1–2 minutes until melted and gooey.
-
Assemble bowls: Divide warm rice among bowls. Spoon buffalo chicken mixture over the top.
-
Garnish: Sprinkle green onions and crumbled bacon, if using. Drizzle extra ranch or buffalo sauce for flair.
Chef’s Hack: If sauce is too thick, add 2 tbsp chicken broth. Too thin? Simmer uncovered for 2 minutes.
Notes
-
Too spicy? Mix buffalo sauce with 1 tbsp melted butter or honey.
-
Too mild? Add a pinch of cayenne or extra hot sauce.
-
Swap brown rice for cauliflower rice for a lower-carb version. Sauté first with garlic to prevent sogginess.
- Prep Time: 10 minutes
- Cook Time: 10 minutes
Nutrition
- Calories: 560Cal
- Fat: 21 g
- Carbohydrates: 39 g
- Protein: 53 g
Nutrition Per Serving (1/5 recipe)
Calories: 560 | Protein: 53g | Carbs: 39g | Fat: 21g
Note: Using cauliflower rice drops carbs to 15g and calories to 480. Bacon adds 70 cal/serving.
Final Thoughts
This Buffalo Ranch Chicken Bowl is so much more than the sum of its parts. It’s a testament to the fact that the best food doesn’t have to be complicated or time-consuming. It’s about understanding flavors, embracing shortcuts without guilt, and cooking in a way that serves your life, not the other way around. It’s a recipe that remembers where it came from—a messy, joyful accident between friends—but isn’t afraid to evolve and adapt to become something reliable, nourishing, and endlessly customizable.
It’s a dish that meets you where you are. For the busy parent, it’s a 20-minute lifesaver. For the meal prepper, it’s a blueprint for a successful week. For the creative cook, it’s a springboard for innovation. And for everyone, it’s a guaranteed deliverer of comfort and joy, a big, flavorful hug in a bowl. So whether you make it exactly as written the first time or immediately start twisting it into your own creation, just remember the core spirit: good food is about connection. Connection to those you feed, connection to your own needs, and connection to the simple, powerful pleasure of a meal made with intention. Now go forth, create, and most importantly, enjoy every single bite.