
Strawberry-Lemonade Bars
Sunshine in a Square: Meet Your New Favorite Summer Treat!
Hey friends, Beau here! Can you smell that? It’s the sweet perfume of ripe strawberries mingling with zippy lemon zest – summer’s officially knocking, and I’ve got just the thing to swing the door wide open. These Strawberry-Lemonade Bars are like bottling up a perfect sunny day and turning it into dessert. Imagine classic lemon bars got a juicy berry upgrade: buttery shortbread crust hugging a tangy-sweet filling that’s creamy, dreamy, and blushing pink. They’re the rockstars of picnics, potlucks, and those “I deserve something fabulous” Tuesday afternoons. No fancy skills needed – just a love for bright flavors and sticky fingers. So tie on that apron (or don’t, I won’t tell!), and let’s make some magic happen!
Why’s this recipe a Feastical favorite? It’s that glorious balance – lip-puckering lemon meets mellow strawberry sweetness, all anchored by that melt-in-your-mouth crust. They’re make-ahead champs (hello, stress-free entertaining!), and watching faces light up after that first bite? Pure joy, folks. Whether you’re a baking pro or just conquered microwave popcorn, these bars are your golden ticket to delicious. Ready to bake some sunshine? Let’s roll!
Grandma’s Porch & The Lemonade Stand That Started It All
This recipe? It’s basically summer vacation at my Grandma Ellie’s house, distilled into a 9×13 pan. Picture it: sticky Georgia afternoons, cicadas singing, and me – a determined 8-year-old running a wildly overpriced lemonade stand (50 cents a cup! Highway robbery!). Grandma, the ultimate accomplice, would sneak me sugar and lemons. One sweltering day, she emerged not with lemonade, but with a plate of her famous lemon bars dusted with snowy sugar. “Too hot for liquid sunshine, Beau-Beau,” she’d wink. “Try sunshine you can chew.”
Years later, when I first experimented adding strawberries to her recipe, it wasn’t just about flavor. It was capturing that memory – the tart punch of childhood ambition (and slightly sour homemade lemonade!) mellowed by the sweetness of her love, just like the berries soften the lemon’s edge. Baking these now, I still catch a whiff of her lilac perfume and hear that screen door slam. That’s the magic of food, isn’t it? It’s never just ingredients. It’s a time machine on a dessert plate. Now, let’s make some new memories!
Gathering Your Sunshine Squad: Ingredients & Smart Swaps
Don’t sweat the details, but here’s the lowdown on our flavor all-stars. Fresh is fantastic, but I’ve got your back with easy swaps!
Crust:
- Cooking spray: For easy release! Butter works too.
- ½ cup + 1 tbsp (115g) granulated sugar: Sweetens the base. Swap in coconut sugar for a hint of caramel.
- 1 tsp finely grated lemon zest: Brightens the crust. Chef’s Tip: Zest before juicing!
- ¼ tsp kosher salt: Balances sweetness. If using table salt, halve it.
- 2½ cups (300g) all-purpose flour: The structure. Gluten-free 1:1 blend? Works like a charm.
- 1 cup + 2 tbsp (2¼ sticks / 255g) unsalted butter, melted: Creates that tender, crumbly magic. Salted butter? Just skip the added salt above.
Filling:
- 1½ cups (8 oz) fresh strawberries, hulled: The berry heart! Frozen work great – thaw and drain well.
- 1½ cups (300g) granulated sugar: Sweetens the tang. Reduce slightly if berries are super ripe.
- 3 tbsp cornstarch: Key thickener! Arrowroot powder is a solid 1:1 sub.
- 1 tbsp finely grated lemon zest: Intense citrus punch! Don’t skip – it’s the soul.
- 1½ cups fresh lemon juice (8-12 lemons): Chef’s Must: Fresh squeezed only! Bottled lacks vibrancy. Roll lemons hard before juicing for max yield!
- ½ tsp kosher salt: Makes the flavors pop.
- 4 large eggs + 3 large egg yolks: Creates the luscious, custardy texture. Extra yolks = extra richness!
Finishing:
- Confectioners’ sugar, for dusting: The pretty “snowfall” finish. Optional but oh-so-pretty!
Baking the Sunshine: Let’s Get Layering!
Grab your favorite mixing bowl and that trusty spatula – here’s where the fun begins! We’re building in layers: crust first, then that glorious pink filling.
- Prep & Preheat: Fire up your oven to 350°F (175°C). Line a 9×13 inch baking pan with parchment paper, letting it hang over the sides (this is your magic handle for lifting out bars later!). Give it a light spray with cooking spray – no sticking allowed!
- Mix the Crust: In a medium bowl, stir together the sugar, lemon zest, salt, and flour until they’re best friends. Pour in the melted butter and mix with a fork (or your fingers!) until it looks like damp sand and holds together when pinched. Chef’s Hack: Mix while the butter’s still warm for easier blending!
- Press & Bake (Crust): Dump the crumbly mixture into your prepped pan. Press it down firmly and evenly with your fingers, the bottom of a glass, or a measuring cup – get it compact! This prevents a soggy bottom later. Bake for 18-20 minutes, just until the edges are lightly golden. It’ll smell like buttery heaven! Let it cool slightly while you make the filling – warm is okay, hot is not!
- Blitz the Berries & Whisk the Wet: Puree those hulled strawberries in a blender or food processor until completely smooth. No chunks! In a large bowl, whisk together the sugar, cornstarch, lemon zest, lemon juice, and salt until dissolved. Whisk in the eggs and egg yolks until smooth and pale yellow. Finally, whisk in the strawberry puree until you have a gorgeous, vibrant pink liquid. Chef’s Tip: Strain the puree if you want seedless perfection!
- Pour & Bake (Filling): Slowly pour the strawberry-lemon filling over the slightly cooled crust. Gently place the pan back in the oven. Bake for 30-35 minutes. The key? It’s done when the edges are set, but the center still has a slight jiggle – like set Jell-O, not liquid. It will firm up as it cools! Overbaking leads to cracks. Trust the jiggle!
- Cool Completely & Chill: This is the patience part! Let the pan cool completely on a wire rack at room temperature. No shortcuts! Once cool, cover loosely and refrigerate for at least 2 hours (overnight is golden!). This sets the filling perfectly for clean slices.
- Slice & Shine: Use the parchment paper “handles” to lift the entire bar slab out onto a cutting board. Slice into squares (wipe the knife clean between cuts for neat edges!). Dust generously with confectioners’ sugar right before serving. Boom! Sunshine served.
Sunshine Presentation: Serving Up the Good Vibes
These bars are stunners all on their own! For maximum “wow”:
- Dust that snowy confectioners’ sugar just before serving – it dissolves fast on the cold filling.
- Plate them on a bright white dish or vibrant ceramic platter – let that pink pop!
- Add tiny fresh mint leaves or a delicate edible flower (like a viola or borage blossom) on top for a fancy touch.
- Serve slightly chilled for the best texture – that cool, creamy filling against the buttery crust is *chef’s kiss*.
- Pair with a glass of sparkling water with a lemon twist or a scoop of vanilla bean ice cream for over-the-top indulgence!
Make It Your Own: Berry Delicious Twists!
Love the base? Let’s play! Here are some fun spins on the classic:
- Mixed Berry Bonanza: Swap strawberries for raspberries, blueberries, or blackberries (or a combo!). Adjust sugar slightly depending on berry tartness.
- Lime-Aid Bars: Replace lemon zest and juice with fresh lime for a vibrant tropical twist. Pair with coconut in the crust!
- Boozy Berry: Add 1 tbsp limoncello or strawberry liqueur to the filling for a grown-up kick.
- Dairy-Free Delight: Use a plant-based butter stick (like Miyoko’s or Earth Balance) in the crust and ensure your sugar is vegan. The filling is naturally dairy-free!
- Gluten-Free Sunshine: Use a trusted 1:1 gluten-free flour blend in the crust (like Bob’s Red Mill).
- Mini Marvels: Bake in a parchment-lined muffin tin for adorable individual portions (reduce baking time by 5-10 mins!).
Beau’s Backstory: From Flop to Fabulous!
Confession time: My first batch of these was… a pink puddle. Seriously. I underestimated the cornstarch and overestimated my patience (didn’t chill it!). Lesson learned: cornstarch is your thickening BFF, and chilling is non-negotiable! Over the years, I’ve tweaked it – adding the extra egg yolks for silkiness, straining the berry puree for elegance (though rustic is charming too!), and learning that slightly underbaking the filling is the secret to dreamy texture.
The funniest fail? Using frozen berries without draining… my filling was so watery it practically waved hello! Now I always drain thawed berries like my dessert depends on it (because it does!). This recipe is resilient, though. It’s survived oven mishaps, toddler “helpers,” and my own occasional forgetfulness. It’s become my go-to for last-minute invites because it always impresses. That sweet-tart punch? It never gets old. Pass me a square!
Your Berry Burning Questions, Answered!
Let’s tackle those common kitchen conundrums:
- Q: My filling cracked! What went wrong?
A: Overbaking is the usual culprit. Remember, we want a *slight* jiggle in the center at 35 minutes. It sets fully as it cools. Also, avoid drastic temperature changes – let it cool gradually at room temp before chilling. If cracks happen, just dust extra sugar on top – it hides a multitude of sins! - Q: Can I use frozen strawberries?
A: Absolutely! They work great year-round. Thaw them completely first, then drain off ALL the excess liquid (press them gently in a sieve). Using the liquid will make your filling too thin. Measure the berries *after* draining. - Q: Why is my crust soggy?
A: Two main reasons: 1) Not pressing the crust firmly enough before baking – get it compact! 2) Pouring the filling onto a piping hot crust. Let the crust cool slightly (10-15 mins) before adding the filling. That quick cool-down creates a barrier. - Q: How long do these bars keep?
A: Stored airtight in the fridge, they’re fabulous for 4-5 days. The sugar dusting will absorb, so re-dust before serving. You can also freeze the undusted bars (well-wrapped) for up to 2 months! Thaw overnight in the fridge. - Q: Is bottled lemon juice okay?
A: I strongly recommend fresh lemons! Bottled juice lacks the bright, vibrant flavor and can taste flat or even slightly bitter. Rolling the lemons firmly on the counter before juicing gets you every last drop!

Strawberry-Lemonade Bars
- Total Time: 55 minutes
Description
Craving that summer-in-a-bite vibe? These Strawberry-Lemonade Bars are buttery, blushing-pink bites of joy that balance zesty lemon tang with juicy strawberry sweetness. With a crisp shortbread base and silky, fruit-forward filling, they’re picnic heroes, potluck rockstars, and Tuesday afternoon pick-me-ups. No fancy gear, no stress—just good vibes and big flavor. Chill, slice, and serve joy.
Ingredients
For the crust:
-
Cooking spray or butter
-
½ cup + 1 tbsp granulated sugar
-
1 tsp lemon zest
-
¼ tsp kosher salt
-
2½ cups all-purpose flour (GF 1:1 works too)
-
1 cup + 2 tbsp unsalted butter, melted
For the filling:
-
1½ cups fresh (or thawed & drained) strawberries
-
1½ cups granulated sugar
-
3 tbsp cornstarch
-
1 tbsp lemon zest
-
1½ cups fresh lemon juice (~8–12 lemons)
-
½ tsp kosher salt
-
4 large eggs + 3 large egg yolks
Finish:
-
Confectioners’ sugar, for dusting
Instructions
-
Preheat oven to 350°F (175°C). Line a 9×13 pan with parchment, leaving overhang. Lightly spray.
-
Make crust: Mix sugar, zest, salt, and flour. Stir in warm melted butter until crumbly. Press into pan. Bake 18–20 mins, until lightly golden. Cool slightly.
-
Make filling: Purée strawberries. In a bowl, whisk sugar, cornstarch, zest, juice, salt, eggs, and yolks. Add purée and whisk smooth.
-
Bake bars: Pour filling over crust. Bake 30–35 mins until edges are set and center jiggles. Cool completely, then chill 2+ hours.
-
Serve: Lift from pan, slice, and dust with sugar before serving.
Notes
-
Frozen berries? Thaw, drain, then measure.
-
Add limoncello or use limes for a twist.
-
Crust soggy? Let it cool slightly before pouring filling.
- Prep Time: 20 mins
- Cook Time: 35 mins
Nutrition
- Calories: 190 cal Per bar
- Fat: 8g
- Carbohydrates: 28g
- Protein: 2g
Nutritional Nibbles (Per Bar, Approx):
- 🔥 Calories: ~190
- 💪 Carbs: 28g
- 🧈 Fat: 8g (Saturated Fat: 5g)
- 🍬 Sugar: 19g
- 🌾 Fiber: 1g
- 🥚 Protein: 2g
Remember, this is a treat! Enjoy every sunny bite mindfully.
Final Thoughts: A Slice of Sunshine
These strawberry-lemonade bars aren’t just dessert—they’re edible nostalgia. They capture the carefree joy of summer, the thrill of a childhood lemonade stand, and the comfort of a grandma’s kitchen. Every bite is a reminder that the best recipes aren’t about perfection; they’re about sticky fingers, shared laughs, and the courage to tweak traditions (hello, strawberries!).
So whether you’re baking them for a special occasion or just because the sun is shining, know this: You’re not just making bars. You’re bottling sunshine, one square at a time. Now go forth, bake boldly, and don’t forget to lick the spoon.

Homemade Fries Seasoning
Why Settle For Ordinary When Legendary Fries Are 5 Minutes Away?
Hey friends, Beau here! Let’s talk about a universal truth: crispy fries are happiness. But you know what transforms that happiness into a full-blown kitchen victory dance? That magical sprinkle of seasoning that makes your taste buds sing. We’ve all been there—staring at a plate of golden fries, willing them to taste like the carnival, diner, or food-truck legend you’re craving. Store-bought blends? Meh. They’re either too salty, too bland, or packed with unpronounceable extras. Today, we’re fixing that for good. I’m sharing my secret weapon Homemade Fries Seasoning—a bold, savory, umami-packed blend that’ll make you the MVP of snack time. Seriously, this shaker is about to become your kitchen BFF. It’s not just for fries either (though holy wow, does it shine there). Think roasted potatoes, popcorn, grilled corn… even avocado toast! Best part? You probably have everything in your pantry right now. Ready to make your fries unforgettable? Let’s shake things up!
How a Rainy Day & Stubborn Cravings Birthed This Blend
Picture this: It’s pouring rain outside my Austin apartment, sophomore year of college. My roommate Jax and I are obsessively rewatching The Lord of the Rings (extended editions, obviously). We’re starving, dreaming of these epic loaded fries from a food truck downtown… but the rain might as well be Mount Doom between us and those spuds. Jax groans, “Dude, we have potatoes. And spices. How hard can it be?” Famous last words. Our first attempt? Salt and pepper. Sad. Attempt two? Cajun spice overload—we coughed for ten minutes. Then, like Gandalf appearing at dawn, inspiration struck. I started riffing: garlic powder (because everything’s better with garlic), paprika for smoke, ginger for zing… and that dash of sesame oil I stole from my sushi kit. When we sprinkled that hot, experimental mix onto oven fries? Magic. Jax just stared, fry mid-air: “Beau… this is it.” That messy, rainy-day “aha!” moment? It’s the heart of this recipe. Every time I make it, I’m back on that couch, triumphant.
Your Flavor Arsenal: Simple Ingredients, Big Impact
Grab these pantry heroes! Pro tip: Freshness is key—if your spices smell like dust, so will your fries. Here’s why each one rocks:
- 1 tablespoon onion powder – Sweet, savory depth. No fresh onions? This is your instant umami boost. Chef swap: Use ½ tbsp onion + ½ tbsp shallot powder for extra fancy vibes.
- 1 tablespoon garlic powder – Non-negotiable for that “can’t-stop-eating” factor. Insider hack: Granulated garlic works too, but powder clings better to fries!
- 2 tablespoons salt – Flavor amplifier! I use kosher salt—it’s less intense than table salt. Watching sodium? Halve this and add a pinch of citric acid for brightness.
- 2 teaspoons paprika – Smoked paprika = earthy campfire vibes, sweet paprika = mellow sunshine. Your call! Spice lovers: Swap 1 tsp for chili powder.
- ⅛ teaspoon sesame oil (optional) – The secret umami weapon! Adds a nutty, “what IS that amazing flavor?” note. Critical: Mix in RIGHT before using—never store it with dry ingredients (it clumps!).
- 1 teaspoon grated ginger – Fresh is best! That zippy warmth cuts through richness. No fresh ginger? ¼ tsp ground ginger works (but fresh is magic).
- ⅛ cup dried parsley – That’s 2 tablespoons. Herby freshness & color! Pro move: Crush it between your palms before adding—releases more flavor.
- 1 teaspoon dried parsley (extra) – Yes, more! We’re going for visual pop. Think confetti for your fries.
Let’s Mix Magic: Your Foolproof Seasoning Journey
This isn’t rocket science—it’s flavor science (way more fun). Follow these steps for seasoning perfection:
- Gather your squad: Pull out all spices, a small mixing bowl, and a whisk or fork. Chef hack: Set bowls on a damp paper towel—they won’t slide while you whisk!
- Dry team unite! Add onion powder, garlic powder, salt, paprika, BOTH portions of dried parsley, and grated ginger to the bowl. Key tip: Whisk aggressively for 1 full minute. Why? We’re breaking up ginger clumps and making everything BFFs. Texture matters!
- Jar it up: Funnel your blend into an airtight jar or spice shaker. Mason jars work, but an old spice jar with big holes is MVP for sprinkling. Storage pro-tip: Keep it in a cool, dark place (not over the stove!). Good for 3 months—if it lasts that long.
- Fry time = sesame time (if using): When fries come out hot and crispy, drizzle sesame oil over them FIRST—just a teeny bit! Toss quickly. Then shower with seasoning. Why? The oil helps the spice cling like glitter. Skip this if you’re oil-free.
- Shake, shake, shake! Sprinkle seasoning generously over fries while they’re piping hot. Toss immediately. Golden rule: Seasoning sticks to hot food. Cold fries = sad, sandy fries.
See? Five minutes, one life-changing shaker. Now go forth and season!
Beyond the Basket: Serving Your Flavor-Bomb Fries
Don’t just dump these beauties in a bowl! Make ’em shine: Pile fries high on a warmed cast-iron skillet or rustic wooden board for that gastro-pub vibe. Add texture with quick-pickled red onions (soak slices in vinegar + sugar for 10 mins). Dunking sauce is mandatory—my garlic aioli (mayo + minced garlic + lemon zest) loves this seasoning. For next-level indulgence, melt sharp cheddar over fries, then add seasoning. Game day? Serve in paper cones with tiny forks. Remember: seasoned fries deserve the spotlight!
Shake It Up! 5 Flavor Twists You’ll Obsess Over
This blend is your flavor playground. Try these riffs:
- Fiery Fandango: Add 1 tsp cayenne + ½ tsp chipotle powder. Perfect for buffalo wings nights!
- Lemon-Herb Zing: Swap parsley for dried dill + add 2 tsp lemon zest. Killer on sweet potato fries.
- Umami Bomb (vegan): Skip sesame oil, add 1 tsp mushroom powder + ½ tsp nutritional yeast. Hello, depth!
- Taco Tuesday Twist: Mix in 1 tsp cumin + ½ tsp oregano. Sprinkle on nacho fries with jalapeños.
- Low-Sodium Love: Halve the salt, add 1 tsp onion salt + ½ tsp kelp granules for savory notes.
Beau’s Backstage Pass: Real Talk & Recipe Evolution
Confession: That first batch in college? We used powdered ginger because my grater vanished (probably with Jax’s smoothie). It worked… but fresh ginger makes it SING. Over the years, I’ve tweaked this for friends’ diets—like swapping salt for kelp when my buddy Marco went low-sodium. Biggest lesson? Don’t fear the sesame oil. Yes, it’s potent, but that ⅛ tsp is the “secret sauce” people beg me about at BBQs. One time, I accidentally used toasted sesame oil—double the nuttiness!—and now I won’t go back. Also, a reader once emailed saying her toddler calls this “sprinkle sparkles.” Best compliment ever. Pro tip: Double or triple the batch! It gifts beautifully in mason jars with a “Fries Not Included” tag.
Your Seasoning SOS: Fixes & FAQs
Q: Help! My seasoning tastes bitter.
A) Check your paprika’s age—stale paprika turns bitter. B) Did sesame oil sit in the mix? Oil goes rancid fast—only add it last minute! C) Overcooked spices? Never heat the dry blend solo.
Q: Can I use garlic/onion salt instead?
Totally! But adjust: For every 1 tbsp powder, use ¾ tbsp garlic/onion salt AND reduce main salt by half. Taste as you go—you can always add more salt later.
Q: Why won’t the seasoning stick to my fries?
Timing is everything! Fries must be piping hot when seasoned. If baking, spritz fries lightly with oil post-oven BEFORE sprinkling. For extra grip, toss fries in a bowl with seasoning—don’t just shower from above.
Q: How long does it keep?
Dry mix (no sesame oil): 3 months in a dark pantry. With sesame oil added? Use immediately—it’s a one-time wonder. Ginger may clump over time—just break it up with a fork!

Homemade Fries Seasoning
- Total Time: 5 minutes
Description
Why settle for meh when your kitchen can crank out diner-worthy fries with one powerful shake? This bold, garlicky, herby seasoning is your golden ticket to fry nirvana—ready in minutes, no weird stuff, and customizable for days. Whether it’s rainy movie night or backyard BBQ season, this blend brings crispy joy to every bite. Hot tip: Make extra. You’ll want it on everything.
Ingredients
-
1 tbsp onion powder
-
1 tbsp garlic powder
-
2 tbsp kosher salt
-
2 tsp paprika (smoked or sweet)
-
1 tsp grated fresh ginger (or ¼ tsp ground)
-
⅛ cup dried parsley (2 tbsp)
-
1 tsp extra dried parsley (for garnish)
-
Optional: ⅛ tsp sesame oil (add fresh before using)
Instructions
-
Mix dry ingredients: In a bowl, whisk onion powder, garlic powder, salt, paprika, ginger, and parsley until evenly combined.
-
Store: Transfer to an airtight shaker or jar. Keep cool and dry.
-
To use: Toss hot fries with a drizzle of sesame oil (if using), then generously sprinkle seasoning. Toss to coat.
-
Bonus use: Try it on popcorn, roasted veggies, or grilled corn!
Notes
-
Only add sesame oil right before serving—never store it in the mix.
-
Want heat? Add 1 tsp cayenne or chili powder.
-
For best results, season fries while they’re hot and just out of the oven or fryer.
- Prep Time: 5 mins
Nutrition
- Calories: 5 cal Per tsp
- Sodium: 400mg
- Fat: 0g
- Carbohydrates: 1g
Quick Nutrition Notes
Per teaspoon (approx): Calories 5, Sodium ~400mg, Carbs <1g, Fat 0g, Sugar 0g. Sodium mostly comes from salt—reduce if needed (see variations!). This is flavor-packed, so a little goes far!
Final Thoughts: More Than Just a Spice Blend
This isn’t just about fries—it’s about transforming the ordinary into the extraordinary. Whether it’s a rainy-day craving or a party centerpiece, this seasoning is a reminder that joy hides in the details. The best part? You’re not following a rigid recipe; you’re creating a ritual. Maybe it’s the way your kid sneaks extra pinches of the mix, or how your friends now demand “Beau’s fries” at every potluck.
So, keep experimenting. Burn a batch? Toss it—lesson learned. Run out of paprika? Try turmeric. The kitchen is your playground, and this shaker is your ticket to legendary snacking. Now go forth and make memories, one crispy, flavor-packed bite at a time.

Zucchini Cheese Bread
The Coziest, Cheesiest Way to Use Up That Zucchini Bounty
Hey there, fellow flavor-chaser! Beau here from Feastical, and I’ve got a confession: I’m borderline obsessed with turning summer’s veggie overload into pure comfort magic. Picture this: a golden-brown loaf warm from the oven, steaming as you slice it open to reveal tender zucchini ribbons and molten pockets of sharp cheddar. That’s right—we’re talking Zucchini Cheese Bread, the savory superstar that’ll make you forget zucchini’s ever been soggy or bland. This isn’t just “another zucchini recipe.” Nope. It’s a fluffy, cheesy hug disguised as bread, perfect for breakfast toast, soup-dunking, or sneaking a slice straight from the pan (no judgment here!). I’ve fine-tuned this beauty over countless coffee-fueled mornings and backyard BBQs, and trust me: it’s the ultimate crowd-pleaser. Whether you’re drowning in garden zucchinis or just craving something soul-warming, this loaf’s got your back. So tie on that apron—let’s bake some joy!
Grandma’s Garden & My First Kitchen Win
Rewind to my 10-year-old self, covered in flour and beaming like I’d discovered fire. Grandma Collier’s garden was a jungle of emerald zucchinis that summer, and she’d challenged me to “make ’em delicious.” My first attempt? Let’s just say it resembled green sludge. But then, she whispered her secret: “Beau, sweetness is easy. Make it savory.” We grated those zukes right into her dented blue bowl, folded in sharp cheddar till it looked like sunshine confetti, and baked it into this very bread. The moment that first warm slice hit my tongue—crispy edges, fluffy center, with that salty-cheesy punch—I felt like a kitchen superhero. Grandma winked, “Told ya, kiddo. Zucchini’s just a shy friend waiting for cheese.” Thirty years later, every time I shred zucchini, I still smell her rosemary bushes and feel that giddy kid pride. Food memories? They stick. Especially the cheesy ones.
Your Flavor Toolkit: Simple, Swap-Friendly & Full of Secrets
Grab these pantry pals—no fancy stuff required! Pro tip: don’t squeeze that zucchini (its moisture keeps things dreamily tender).
-
- 1½ cups zucchini, shredded (do not squeeze!) – The star! Its subtle sweetness and moisture give the bread incredible tenderness. Swap: Yellow squash works too!
- ¼ cup green onion, sliced – Optional but *chef’s kiss* for a gentle oniony kick. Skip if sensitive, or sub chives.
- 2 large eggs – Our binding buddies. Room temp blends smoother! Vegan? Try flax eggs (2 tbsp ground flax + 5 tbsp water).
¾ cup sour cream – Secret weapon for tangy richness and cloud-like crumb. Swap: Plain Greek yogurt (same tang, extra protein!).
- ¼ cup butter, melted and cooled – Adds buttery depth. Dairy-free? Coconut oil or neutral oil works.
- 1½ cups sharp cheddar, shredded – Freshly grated melts better! Sharpness cuts the zucchini’s mildness. Feisty twist: Swap half for pepper jack!
- 2 cups all-purpose flour – The trusty base. Gluten-free? 1:1 GF blend (like Bob’s Red Mill) rocks here.
- 1½ tsp baking powder + ½ tsp baking soda – Our rise heroes. Check expiry dates—they lose power over time!
- ½ tsp salt – Balances flavors. I use sea salt for cleaner taste.
Let’s Bake This Beauty: Tips & Tricks for Loaf Perfection
Follow these steps—and my sneaky hacks—for a no-fail, fabulous bake!
- Preheat oven to 350°F (175°C). Grease or line a 9×5 loaf pan. Pro hack: Use parchment paper slings for easy lifting later!
- Whisk eggs, sour cream, and cooled melted butter until smooth. Don’t rush! A silky base = even texture. See tiny butter lumps? Warm bowl slightly by hand.
- Stir in zucchini, cheese, and green onions. Fold gently—you want those zuke ribbons intact! Chef’s insight: This “wet team” mingles flavors before meeting flour.
- In another bowl, whisk flour, baking powder, baking soda, and salt. Aerating dry ingredients prevents dense spots. No extra bowl? Sift dry mix onto wet later.
- Gradually mix dry ingredients into wet until JUST combined. Seriously—stop when no flour streaks remain! Overmixing = tough bread. Use a spatula, not whisk, for control.
- Pour batter into pan. Smooth top gently. Bonus flavor: Sprinkle extra cheese on top before baking!
- Bake 45-55 mins until golden and toothpick comes out clean. Watch like a hawk at 45 mins! Ovens vary. Tap test: Top should spring back lightly.
- Cool in pan 10 mins, then transfer to wire rack. Waiting is agony, but slicing hot bread crumbles it. Distract yourself by washing dishes… or pouring coffee!
The Science Behind the Perfect Zucchini Cheese Bread
Ever wonder why some zucchini bread turns out gummy while others are perfectly tender? The secret lies in chemistry—and a few key baking principles. Let’s break it down so you can nail this recipe every time.
Moisture Management: The Zucchini Factor
Zucchini is about 95% water, which is both a blessing and a curse. Unlike other quick breads (like banana or pumpkin), zucchini releases moisture during baking. If you squeeze it dry beforehand, you risk a dense, dry loaf. But if you leave it too wet, the bread can turn soggy. The solution? Use freshly shredded, un-squeezed zucchini—its natural moisture hydrates the flour just enough without making the batter watery.
The Role of Dairy: Sour Cream’s Magic
Why sour cream instead of milk or yogurt? Two reasons:
-
Fat Content: Sour cream has a higher fat percentage (about 20%) than yogurt, which keeps the crumb tender without weighing it down.
-
Acidity: The lactic acid in sour cream reacts with baking soda, creating tiny air bubbles for a fluffier texture. (Greek yogurt works in a pinch but yields a slightly denser crumb.)
Cheese Science: Melting vs. Browning
Not all cheeses behave the same in baking! Sharp cheddar is ideal because:
-
Low Moisture: Prevents excess steam, which can make bread gummy.
-
High Fat: Melts evenly without separating.
-
Flavor Punch: Aged cheddar has crystallized tyrosine (those crunchy bits), which adds bursts of umami.
Pro Tip: Toss shredded cheese in 1 tsp of flour before folding it in—this prevents sinking to the bottom.
Gluten Development: Less is More
Overmixing = tough bread. Why? Vigorous stirring activates gluten, creating a chewy, muffin-top-like texture. For a tender loaf:
-
Whisk wet and dry ingredients separately to distribute leaveners evenly.
-
Fold gently until just combined—some lumps are okay!
Baking Temperature: The Goldilocks Zone
350°F (175°C) is the sweet spot:
-
Hotter? The crust browns too fast before the center cooks.
-
Cooler? The bread dries out.
Test for doneness: A toothpick should come out with moist crumbs (not wet batter)—carryover heat will finish the job as it cools.
Global Twists on Zucchini Cheese Bread
Why stick to one flavor profile when you can take this loaf on a world tour? Here are five international riffs to spice up your zucchini game.
1. Italian-Inspired: Caprese Style
-
Add-ins: ½ cup diced sun-dried tomatoes + ¼ cup fresh basil ribbons + 1 cup mozzarella pearls.
-
Swap: Replace sour cream with ricotta for extra creaminess.
-
Serve with: A drizzle of balsamic glaze.
2. French Provençal
-
Add-ins: 1 tbsp herbes de Provence + ½ cup grated Gruyère + 1 tsp lemon zest.
-
Secret: Brush the baked loaf with garlic-infused olive oil while warm.
3. Indian Spiced
-
Add-ins: 1 tsp cumin + ½ tsp turmeric + 1 chopped green chili + ¼ cup cilantro.
-
Cheese Swap: Paneer or Amul cheddar for authenticity.
-
Pair with: Mint chutney or chai.
4. Mexican Fiesta
-
Add-ins: 1 cup roasted corn + 1 diced jalapeño + ½ tsp smoked paprika.
-
Cheese Swap: Oaxaca or Cotija.
-
Top with: Crema and pickled red onions.
5. Japanese Okonomiyaki Style
-
Add-ins: ¼ cup shredded cabbage + 1 tbsp bonito flakes + ½ cup Kewpie mayo in the batter.
-
Post-Bake: Drizzle with tonkatsu sauce and more bonito flakes.
Why These Work: Zucchini’s mildness makes it the perfect canvas for bold flavors. Each twist keeps the bread’s structure intact while delivering a cultural punch.
Beyond the Loaf—Creative Uses for Leftovers
Stale zucchini cheese bread? No problem. Transform it into these next-level dishes.
1. Savory Bread Pudding
-
Recipe: Cube 3 cups of leftover bread. Whisk 2 eggs + 1 cup milk + ½ tsp mustard. Add bread, ½ cup extra cheese, and bake at 375°F for 25 mins.
-
Upgrade: Toss in cooked bacon or caramelized onions.
2. Gourmet Croutons
-
Method: Cut into 1-inch cubes, toss with olive oil and garlic powder, and bake at 300°F until crispy (15 mins).
-
Perfect for: Caesar salads or butternut squash soup.
3. Breakfast Strata
-
Layers: Alternate bread slices with spinach, ham, and cheese. Pour over an egg-milk mixture (4 eggs + 1.5 cups milk). Refrigerate overnight, then bake.
4. Zucchini Bread Grilled Cheese
-
How-to: Slice bread thickly, butter the outside, and fill with extra cheddar and tomato slices. Griddle until golden.
5. Cheesy Bread Crumbs
-
Process: Pulse dried bread in a food processor. Use to top mac and cheese or baked pasta.
Pro Tip: Freeze leftover slices wrapped in foil—they reheat beautifully in a toaster oven
Serving Up the Cozy: How to Enjoy Your Masterpiece
This bread wears many delicious hats! Slice it thick while slightly warm—hello, melty cheese—and slather with herb butter or cream cheese. For brunch, toast slices and top with avocado and fried eggs. Soup season? It’s the ultimate dunking side for tomato bisque. Pack cold slices in lunches (they stay moist for days!), or cube and toast for croutons. My favorite? Midnight snack straight from the breadbox, no accompaniments needed. Pure cheesy bliss.
Shake It Up: 5 Tasty Twists to Try
Customize this loaf like your favorite playlist!
- “Everything Bagel” Style: Fold in 2 tbsp everything seasoning + swap cheddar for everything-spiced cream cheese chunks.
- Mediterranean Magic: Add ¼ cup chopped sun-dried tomatoes + ⅓ cup crumbled feta + 1 tsp dried oregano.
- Spicy Southwest: Mix in 1 diced jalapeño + ½ cup corn kernels + swap cheddar for pepper jack. Top with cilantro after baking!
- Gluten-Free/Dairy-Free: Use GF flour blend, vegan butter, dairy-free sour cream, and Violife cheddar shreds.
- Bacon Lover’s: Fold in ½ cup crispy chopped bacon + extra cheddar. (Grandma’s fave upgrade!)
Beau’s Backstory: How This Recipe Grew (Like a Zucchini!)
This loaf’s been on quite the journey! Version 1.0 was denser than a brick because I squeezed the zucchini silly—rookie move. Then came my “more cheese is better” phase (true, but balance matters!). I’ve baked it in heatwaves, snowstorms, and once while my dog “helped” by stealing a zucchini (RIP, Buddy). The big win? Realizing sour cream beats milk or yogurt for moisture without sogginess. These days, I grate extra zucchinis and freeze them in 1.5 cup bags—summer flavor year-round! Funny thing? My kids call it “green cake” and devour it like dessert. Joke’s on them—they’re eating veggies! Moral: Good recipes evolve, just like our taste buds. Keep experimenting!
Your Questions, Solved: Avoiding Zucchini Bread Woes
Q: Why’s my bread soggy in the middle?
A: Classic culprit: underbaking or squeezed zucchini! That natural moisture needs proper bake time. Use the toothpick test—no wet crumbs. If top browns too fast, tent with foil.
Q: Can I use frozen zucchini?
A: Absolutely! Thaw completely, but DO squeeze it this time—frozen zukes hold excess water. Pat dry, then measure. Pro tip: Salt thawed zucchini, wait 10 mins, THEN squeeze for best results.
Q: My cheese sank to the bottom. Help!
A: Toss shredded cheese in 1 tbsp flour before adding! This coating helps it “float” in the batter. Also, avoid overmixing after adding cheese.
Q: Can I make muffins instead?
A: Yes! Fill lined muffin cups ¾ full. Bake at 375°F (190°C) for 20-25 mins. Perfect for grab-and-go goodness!

Zucchini Cheese Bread
- Total Time: 1 hour
Description
This isn’t just a way to use up garden zucchini—it’s a cozy, savory dream wrapped in a golden crust. Think: fluffy crumb, sharp cheddar pockets, and just enough green goodness to feel virtuous. Whether you’re slicing it for a brunch spread or sneaking warm bites in your kitchen, this Zucchini Cheese Bread brings major comfort with zero soggy vibes. One bowl, endless flavor, and that fresh-baked smell? Irresistible.
Ingredients
-
1½ cups shredded zucchini (no need to squeeze!)
-
¼ cup green onions, sliced (optional)
-
2 large eggs
-
¾ cup sour cream (or Greek yogurt)
-
¼ cup melted butter (or coconut oil)
-
1½ cups sharp cheddar, shredded
-
2 cups all-purpose flour
-
1½ tsp baking powder
-
½ tsp baking soda
-
½ tsp salt
Instructions
-
Preheat oven to 350°F (175°C). Grease or line a 9×5″ loaf pan.
-
Mix wet ingredients: Whisk eggs, sour cream, and cooled butter until smooth.
-
Add zucchini, cheese & onions, stir gently.
-
Combine dry ingredients in another bowl: flour, baking powder, baking soda, salt.
-
Fold dry into wet just until no flour streaks remain.
-
Pour into pan, smooth top, and sprinkle extra cheese if desired.
-
Bake 45–55 mins, until a toothpick comes out clean. Cool 10 mins in pan, then transfer to rack.
Notes
-
Don’t squeeze zucchini—it adds moisture!
-
Toss cheese in 1 tbsp flour before mixing in to prevent sinking.
-
Want muffins? Bake at 375°F for 20–25 mins.
- Prep Time: 10 mins
- Cook Time: 50 mins
Nutrition
- Calories: 220 cal Per slice
- Fat: 12g
- Carbohydrates: 20g
- Protein: 7g
Nutritional Nibbles (Per Slice, Approx.)
Calories: 220 | Fat: 12g | Carbs: 20g | Protein: 7g | Sugars: 2g | Sodium: 300mg
Note: Stats vary with swaps. Using Greek yogurt? Saves 30 calories! Adding bacon? Worth every delicious calorie.
Final Thoughts: Why This Recipe Wins Every Time
Zucchini cheese bread isn’t just a recipe—it’s a celebration of resourcefulness and comfort. It turns a humble vegetable into something crave-worthy, bridges sweet and savory cravings, and adapts to nearly any dietary whim. Whether you’re a novice baker or a seasoned pro, this loaf teaches timeless lessons: respect your ingredients, embrace imperfections (slightly sunken cheese is still delicious!), and share generously. After all, the best recipes are the ones that spark joy—and maybe a little nostalgia. Now go forth and bake your heart out!
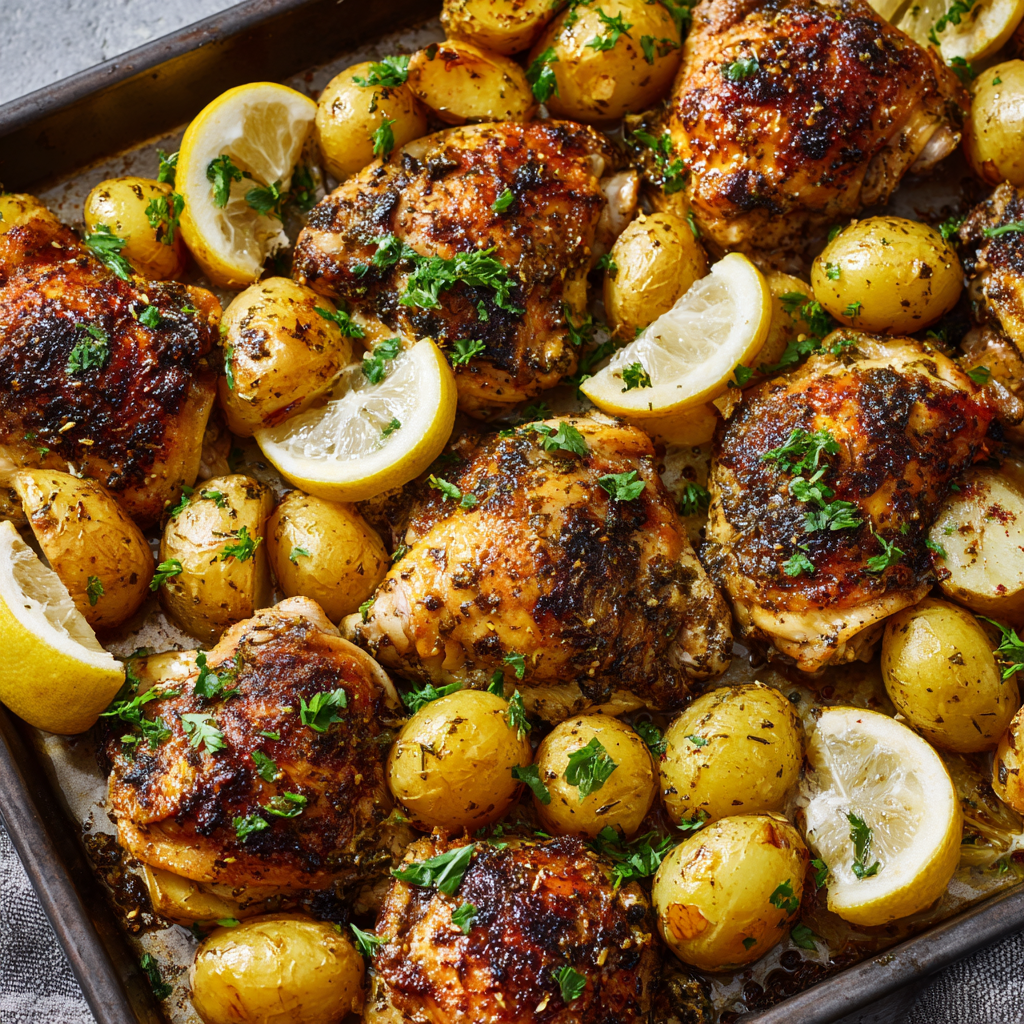
Greek Lemon Chicken and Potatoes
Hey There, Sunshine! Let’s Make Magic in a Pan
Picture this: golden chicken thighs crackling in the oven, lemon and garlic perfuming your kitchen, and potatoes turning into little pillows of joy. That’s Greek Lemon Chicken and Potatoes, folks – and it’s about to become your new weeknight superhero. I’m Beau, and at Feastical, we live for dishes that hug your soul without hogging your time. This recipe? It’s rustic Mediterranean comfort on a single sheet pan, where juicy chicken and tender potatoes party in a zesty lemon-herb marinade. No fancy skills needed – just big flavors and even bigger smiles. Whether you’re feeding a rowdy family or meal-prepping like a boss, this one’s your golden ticket. So tie on that apron (or don’t – I won’t tell), and let’s turn your kitchen into a sun-drenched Athenian taverna!
Opa! My Big Fat Greek Kitchen Memory
This dish takes me straight back to my buddy Dimitri’s tiny Athens apartment. We’d just hauled our backpacks up five flights when his yiayia (that’s Greek for “force-of-nature grandma”) shoved a chipped ceramic dish into the oven. Minutes later, lemony steam fogged the windows as she scolded us in rapid-fire Greek for not eating enough. No fancy tools – just her gnarly hands tossing potatoes with olive oil, muttering about “malákas tourists.” When that crispy-skinned chicken hit our plates, silence fell. Even Dimitri stopped Instagramming. That first bite? Sunshine and garlic and pure love. Yiayia’s been gone 10 years now, but every time I make this, I swear I hear her yell, “Éla, Beau! Mángia!” (Translation: “Get over here and eat!”). Some recipes feed your stomach. This one? It feeds your heart.
Your Flavor Arsenal: Simple Stars, Big Impact
- 4 lbs skin-on, bone-in chicken thighs – Skin = crispy gold. Bones = juicy magic. Swap breasts if you must, but thighs forgive overcooking!
- 3 medium russet potatoes, peeled & quartered – Russets suck up flavor like sponges. Yukons work too (no peeling needed!).
- ½ cup fresh lemon juice – Bottled? I’ll side-eye you. Fresh zest boosts brightness!
- ½ cup Greek olive oil – Extra virgin here, folks. Cheap oil = sad chicken. Use avocado oil for higher smoke point.
- 6 cloves garlic, minced – Measure with your heart. Pre-minced jars? Only in emergencies.
- 1 tbsp dried oregano – Rub it between palms first – wakes up the oils! Fresh? Triple the amount.
- 1 tbsp kosher salt – Flakes cling better. Table salt? Use ¾ tbsp to avoid salt bombs.
- 1 tsp dried rosemary – Crush it! No rosemary? Thyme’s a chill cousin.
- 1 tsp black pepper – Freshly ground, please. Pepper mills are cheap thrills.
- 1 pinch cayenne pepper – Not for heat, for depth. Paprika works too.
- 1 cup chicken broth, divided – Low-sodium = you control salt. Veggie broth? Go for it!
- 1 tsp fresh oregano (garnish) – Optional but pretty. Parsley or dill shine too.
Let’s Build Some Delicious: Layer by Layer
Step 1: Fire Up & Prep
Crank that oven to 425°F (220°C). Grab your biggest sheet pan or roasting dish – no crowding allowed! Lightly grease it. Why? Stuck potatoes = tears. Pro tip: Line with foil first for easier cleanup (I won’t judge).
Step 2: Marinate Like a Mediterranean Maven
In a bowl big enough to double as a kiddie pool, whisk lemon juice, olive oil, garlic, dried oregano, rosemary, salt, pepper, and cayenne. Taste it! Should make you pucker and grin. Toss chicken and potatoes in this liquid gold until coated. Massage it into the chicken skin – yes, get handsy! Let it sit 10 mins (or up to 2 hours fridge-bound for deeper flavor penetration).
Step 3: Arrange for Maximum Crispness
Place chicken skin-side UP (non-negotiable for crunch!). Nestle potatoes cut-side down around them – this creates more browned edges. Pour HALF the broth around the edges (not over chicken!). Why? Steam keeps potatoes tender without making skin soggy.
Step 4: Roast, Then Rally
Bake uncovered 25 mins. Chicken skin should start gilding. Slide pan out, pour remaining broth around edges (it’ll sizzle – music to my ears!). This keeps everything succulent. Bake another 25-30 mins until chicken hits 165°F internally and potatoes pierce easily with a fork. Chef’s hack: Broil 2 mins at the end for next-level crispiness!
Step 5: Rest & Shower With Love
Let it rest 5 mins (juices redistribute!). Garnish with fresh oregano or lemon zest. Squeeze extra lemon juice if you’re a citrus rebel.
The Science Behind the Crispy Skin & Tender Potatoes
Ever wonder why this Greek Lemon Chicken and Potatoes turns out so perfectly crispy yet tender every time? Let’s geek out on the culinary science behind it.
The Maillard Reaction: Your Secret Weapon
That golden, crackling chicken skin? Thank the Maillard reaction—a chemical dance between amino acids and reducing sugars that happens at high heat (around 300°F and up). When you roast chicken at 425°F, the skin’s proteins and sugars transform into complex, savory flavors and a deep brown crust. That’s why we insist on skin-on, bone-in thighs—they withstand high heat without drying out, while the fat renders slowly, basting the meat in its own juices.
The Potato Paradox: Crisp Outside, Fluffy Inside
Russet potatoes are starch powerhouses. When you cut them into quarters and place them cut-side down, two things happen:
-
Direct contact with the hot pan creates a caramelized crust (again, Maillard magic).
-
Steam from the broth softens the interior while preventing the outside from burning.
If your potatoes stay hard, it’s likely because:
-
They were too large (cut smaller or parboil first).
-
The pan was overcrowded (steam couldn’t circulate).
-
You skipped the broth (moisture is key!).
The Acid Edge: Why Lemon Juice Matters
Lemon juice isn’t just for flavor—it’s a tenderizer. The acid breaks down muscle fibers in the chicken, making it juicier. But don’t marinate too long (more than 2 hours), or the texture turns mushy. The garlic and oregano? They’re not just tasty—they contain allicin and essential oils, which amplify savory depth when heated.
The Broth Trick: Steam vs. Sog
Pouring broth around (not over!) the chicken keeps the potatoes moist while letting the skin crisp. The liquid evaporates, creating steam that cooks the potatoes evenly. Adding it in two stages prevents the pan from drying out without making the chicken soggy.
Pro Tip: For extra crispiness, pat the chicken skin dry before marinating and let it sit uncovered in the fridge for an hour pre-roasting.
Greek Lemon Chicken Around the World: Global Twists
This dish is a blank canvas—here’s how to adapt it to global flavors while keeping its soul intact.
1. Italian Sunshine Version
-
Swap oregano for rosemary + basil.
-
Add sun-dried tomatoes and kalamata olives to the pan.
-
Finish with a drizzle of balsamic glaze.
2. Middle Eastern Spiced-Up
-
Replace lemon juice with preserved lemon paste.
-
Add cumin, coriander, and a pinch of sumac to the marinade.
-
Toss in chickpeas for extra heft.
3. Spanish Fiesta Twist
-
Use smoked paprika instead of cayenne.
-
Add sliced chorizo to roast alongside the chicken.
-
Garnish with chopped parsley and manchego cheese.
4. Asian-Inspired Zing
-
Swap lemon for yuzu or lime juice.
-
Add ginger and soy sauce to the marinade.
-
Toss in bok choy during the last 10 minutes.
5. American Comfort Hack
-
Use sweet potatoes instead of russets.
-
Add maple syrup + mustard to the marinade for a sweet-savory kick.
-
Crumble bacon on top before serving.
Why It Works: The core technique—high heat, acid, and fat—translates across cuisines. The marinade’s acidity balances richness, while the roasting method ensures texture contrast.
The Psychology of Comfort Food: Why This Dish Feels Like a Hug
Food isn’t just fuel—it’s memory, comfort, and connection. Here’s why this Greek Lemon Chicken and Potatoes hits all the right emotional notes.
1. Nostalgia in Every Bite
The combo of garlic, lemon, and herbs triggers olfactory memories (smell is closely linked to emotion). For many, it recalls family gatherings, travels, or even fictional Mediterranean escapes (thanks, Mamma Mia!).
2. The “Effort vs. Reward” Ratio
This dish feels fancy but requires minimal work—a psychological win. Sheet-pan meals tap into our love for:
-
One-pot simplicity (less cleanup = less stress).
-
Visual appeal (golden chicken + vibrant herbs = Instagram joy).
3. Umami + Acid = Happiness
The umami from chicken fat and garlic, paired with bright lemon, creates a balanced flavor profile that stimulates dopamine. Science says: Fat + acid = craveability.
4. The Ritual of Sharing
In Greece, food is communal. Serving this family-style taps into primal bonding—breaking bread (or potatoes) together fosters connection.
Pro Tip: Lean into the vibe—play Greek music, light a candle, and eat outdoors if possible. Context elevates taste!
Plating: Keep It Real, Keep It Greek
Scoop potatoes and chicken onto a big platter family-style – rustic is the vibe here. Drizzle pan juices over top (liquid gold alert!). Pair with tangy tzatziki or a simple chopped cucumber-tomato salad. Crusty bread? Non-negotiable for mopping. For true taverna energy, serve with chilled Assyrtiko wine and shout “Opa!” when you clink glasses.
Shake It Up: Your Recipe, Your Rules
Lemon Lovers Unite: Add 2 sliced lemons to the pan pre-roast – they caramelize beautifully.
Veggie Power: Toss in bell peppers, red onions, or artichokes with potatoes.
Spice Odyssey: Add 1 tsp smoked paprika to marinade for a subtle smokiness.
Dairy-Free Delight: Swap chicken broth for veggie broth; garnish with olives instead of yogurt.
Sheet Pan Supper: Add cherry tomatoes and feta last 5 minutes – instant Greek salad vibes!
Beau’s Backstage Tidbits
This recipe’s evolved more than my taste in aprons! Early versions used boneless skinless chicken (mistake – goodbye crispness!). One chaotic Tuesday, I forgot broth and used white wine – happy accident! Now I alternate. Pro tip: Double the marinade and freeze half with raw chicken for future you. True story: My dog Apollo once stole a thigh off the counter. He now sits vigil every time I make this. Smart pup. Remember: Cooking’s about joy, not perfection. Burnt a potato? Call it “rustic char.” Sauce too lemony? More bread for dipping! Just gather people and feed them. That’s the real recipe.
FAQs: Let’s Fix Those Kitchen Oops Moments
Q: My chicken skin’s flabby! Help!
A: Three culprits: Overcrowded pan (steam softens skin), low oven temp (crank it up!), or adding broth too early. Pat chicken skin DRY pre-marinate. Broil at the end!
Q: Potatoes still hard after 50 mins. Why?
A: Size matters! Cut uniform 1.5-inch chunks. Russets can be stubborn – parboil them 5 mins before marinating if rushed. Or switch to Yukon Golds.
Q: Can I use chicken breasts?
A: Sure, but reduce cook time to 35-40 mins total. Breasts dry out faster – brine them in 1 cup water + 1 tbsp salt for 30 mins first.
Q: Make ahead tips?
A: Marinate chicken/potatoes up to 24 hours ahead. Roast day-of. Leftovers? Shred chicken into pitas with tzatziki tomorrow!

Greek Lemon Chicken and Potatoes
- Total Time: 1 hour
Description
Sunshine in a dish? You got it. This Greek Lemon Chicken & Potatoes recipe wraps zesty lemon, bold herbs, crispy golden chicken, and melt-in-your-mouth potatoes into a comforting, no-fuss sheet pan supper. It’s cozy, craveable, and comes with zero culinary drama. Whether you’re gathering your crew or flying solo with leftovers, this one brings big Greek flavors with minimal cleanup. Dive in—and don’t forget the crusty bread.
Ingredients
-
4 lbs bone-in, skin-on chicken thighs
-
3 russet potatoes, peeled & quartered
-
½ cup fresh lemon juice
-
½ cup Greek olive oil
-
6 garlic cloves, minced
-
1 tbsp dried oregano
-
1 tbsp kosher salt
-
1 tsp dried rosemary
-
1 tsp black pepper
-
Pinch of cayenne (or paprika)
-
1 cup chicken broth, divided
-
Optional garnish: fresh oregano or lemon zest
Instructions
-
Prep: Preheat oven to 425°F (220°C). Lightly grease a large sheet pan.
-
Marinate: In a large bowl, whisk lemon juice, oil, garlic, herbs, salt, pepper, and cayenne. Toss chicken and potatoes to coat. Let sit 10–120 minutes.
-
Arrange: Place chicken skin-up. Nestle potatoes cut-side down. Pour half the broth around edges.
-
Roast: Bake 25 mins. Add remaining broth. Roast another 25–30 mins (chicken to 165°F, potatoes tender). Broil 2 mins for crispy skin.
-
Finish: Rest 5 mins. Garnish with fresh herbs or lemon zest. Serve family-style.
Notes
-
Use Yukon Golds for quicker cook time.
-
Don’t crowd the pan—crisp > steam.
-
Double the marinade and freeze with raw chicken for next time.
-
Add sliced lemon or feta for a flavor twist!
- Prep Time: 10 mins
- Cook Time: 50 mins
Nutrition
- Calories: 520 cal Per serving
- Fat: 35g
- Carbohydrates: 18g
- Protein: 35g
Nutritional Nibbles (Because Balance!)
Prep: 10 mins | Cook: 50 mins | Serves: 4
Per serving: ~520 cal | 35g fat | 18g carbs | 35g protein
*Note: Stats vary based on ingredient sizes. Want lighter? Remove chicken skin pre-cooking (but… why?).
Final Thoughts: More Than a Recipe
This Greek Lemon Chicken and Potatoes isn’t just dinner—it’s a celebration of simplicity, science, and soul. Whether you’re a kitchen newie or a seasoned cook, it teaches timeless lessons:
-
Trust the process (high heat + patience = crispy perfection).
-
Adapt freely (recipes are guidelines, not rules).
-
Food is love (share it loudly).
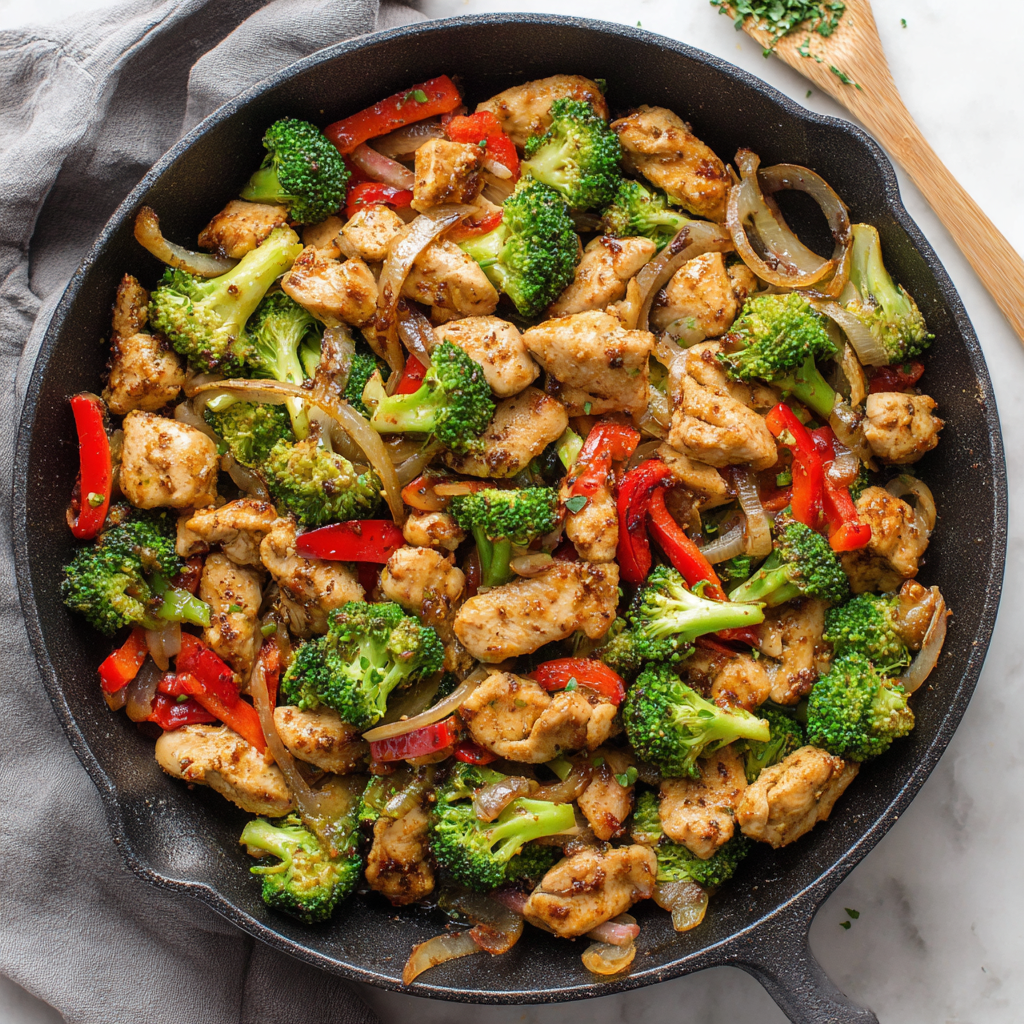
Chicken Stir Fry
Your New Weeknight BFF: Chicken Stir Fry That’s Faster Than Takeout!
Hey friends, Beau here! Let’s talk real life for a sec. You’re juggling work, family, or maybe just a serious Netflix backlog—and dinner’s gotta happen. *Now.* Enter my Chicken Stir Fry: that sizzling, saucy hero that’s saved more weeknights than I can count. Picture juicy chicken, crisp-tender veggies, and a glossy ginger-soy sauce with just enough kick to make things interesting. It’s not just dinner; it’s a 20-minute flavor vacation that’ll have you doing a happy dance by the stove. Best part? You likely have 90% of this already in your fridge. No fancy skills required—just a hot pan and that trusty spatula you found hiding behind the blender. Ready to make magic? Let’s wok and roll! 😉
Why This Stir Fry Tastes Like Home to Me
Flashback to my college days: tiny apartment, tinier budget, and a sad microwave. One rainy Tuesday, my roommate burst in with a dented wok from a thrift store. “We’re cooking REAL food tonight!” We tossed in whatever we had—cheap chicken thighs, half-wilted veggies, and a sauce made with soy packets swiped from the dining hall. That chaotic, slightly-too-salty stir fry became our ritual. It wasn’t fancy, but it tasted like victory. Now, every time I make this recipe, I think about how food doesn’t need to be perfect to be perfect. It’s about the joy in the sizzle, the laughter over shared plates, and knowing that sometimes… the messiest kitchens make the best memories.
What You’ll Need (and Why!)
- 4 cups water + 2 cups white rice → Fluffy rice is our cozy base! Chef hack: Rinse rice first for less sticky results.
- ⅔ cup low-sodium soy sauce → Salt control is key! Swap with tamari for gluten-free.
- ¼ cup brown sugar → Balances saltiness. Honey or maple syrup work too!
- 1 tbsp cornstarch → Our sauce thickener. Arrowroot or tapioca starch? Go for it.
- 1 tbsp minced fresh ginger → Zing alert! Powdered in a pinch? Use 1 tsp.
- 1 tbsp minced garlic → Flavor bomb. Pre-minced jarred garlic? I won’t tell!
- ¼ tsp red chili flakes → Gentle heat. Omit or double—you’re the boss here.
- 3 skinless, boneless chicken breasts → Slice thin against the grain for tenderness. Thighs work great too!
- 2 tbsp sesame oil, divided → Nutty depth! Save half for veggies to avoid smoking.
- 1 head broccoli, 1 onion, 1 cup carrots, 1 bell pepper, 1 can water chestnuts → Crunch central! Chef insight: Water chestnuts add juicy crunch—don’t skip ’em!
Let’s Make It Happen: Sizzle, Sauce, Repeat!
Step 1: Rice First! → Boil water, stir in rice, cover, and simmer 18 mins. Chef hack: Throw a kitchen towel under the lid for fluffier grains! Off heat? Let it steam 5 mins.
Step 2: Sauce Whisk Party → Whisk soy sauce, brown sugar, cornstarch, ginger, garlic, and chili flakes. Pro tip: Taste it! Want tang? Add 1 tsp rice vinegar.
Step 3: Chicken Dance → Heat 1 tbsp sesame oil on HIGH. Add chicken in a single layer—don’t crowd! Sear 2 mins/side until golden. Remove to a plate. (Story time: Crowding = steamed chicken. We want caramelized bits!)
Step 4: Veggie Jam Session → Add remaining oil. Toss in broccoli, onion, carrots first—they’re tough! Stir-fry 3 mins. Add peppers and water chestnuts last. Chef hack: Heard the sizzle? That’s the sound of flavor!
Step 5: The Grand Reunion → Chicken back in! Pour sauce over everything. Stir 1-2 mins until glossy and thick. Watch the magic: Cornstarch needs bubbling liquid to activate. No thick sauce? Crank the heat!
Plate It Like a Pro (Minimal Effort, Max Vibes)
Scoop fluffy rice into bowls, top with stir fry, and let that sauce drizzle down. Garnish with sliced green onions, sesame seeds, or a squeeze of lime. Pair with a cold beer or iced tea—this meal’s all about easy joy. Chopsticks optional, big smiles mandatory!
Shake It Up: 5 Fun Twists!
1. Sweet & Tangy → Swap soy sauce for teriyaki. Add pineapple chunks!
2. Spicy Firecracker → Double chili flakes + 1 tbsp sriracha in sauce.
3. Low-Carb Love → Serve over cauliflower rice or zucchini noodles.
4. Protein Swap → Beef strips, shrimp, or tofu (press it dry first!).
5. Thai Twist → Use coconut aminos + 1 tbsp peanut butter in sauce. Top with crushed peanuts!
Beau’s Backstage Kitchen Notes
This recipe’s evolved more than my taste in aprons! Early versions used bottled stir-fry sauce (shh!), but homemade is GAME-CHANGING. One time, I added the cornstarch directly to the pan—hello, lumpy sauce disaster! Now I whisk it cold. Lesson learned. 😅 Also? This dish LOVES leftovers. That half-bell pepper? Toss it in. Wilted spinach? Yes! Stir fry is your fridge’s best friend. Make it yours, share it loud, and tag me @Feastical—I live for your kitchen wins!
Stir Fry SOS: Your Questions, Answered!
Q: Sauce too thin?
A: Mix 1 tsp cornstarch + 1 tbsp cold water. Stir in while bubbling!
Q: Can I use frozen veggies?
A: Absolutely! Thaw first or add frozen—just cook longer to evaporate water.
Q: Leftovers?
A: Store in fridge 3 days. Reheat in a skillet (microwave = soggy veggies!).
Q: Veggies mushy?
A: Overcooking! High heat + quick cooking keeps ’em crisp. Cut uniformly!
Chicken Stir Fry
Description
Hey friends, Beau here! Let’s be real: life’s busy. Whether you’re chasing deadlines, toddlers, or just trying to keep your houseplants alive (been there), dinner has to happen fast.
Enter: this Chicken Stir Fry—a sizzling, saucy hero packed with juicy chicken, crisp veggies, and a glossy ginger-soy glaze that tastes way fancier than it is. It’s a 20-minute flavor vacation made with fridge staples and zero stress. No special tools, no obscure ingredients—just a skillet and your trusty spatula. Ready to turn “what’s for dinner?” into a mic-drop moment?
Notes
-
Sweet & Tangy: Sub teriyaki for soy sauce. Add pineapple chunks!
-
Spicy Firecracker: Double chili flakes + 1 tbsp sriracha.
-
Low-Carb Love: Serve over cauliflower rice or spiralized zucchini.
-
Protein Swap: Use shrimp, beef strips, or crispy tofu (press it first!).
-
Thai Vibes: Use coconut aminos + 1 tbsp peanut butter in the sauce. Top with crushed peanuts.
Nutrition
- Calories: 375Cal Per Serving
- Sugar: 8g
- Sodium: 720mg
- Fat: 10g
- Carbohydrates: 40g
- Protein: 25g
Quick Nutrition Snapshot (Per Serving)
Calories: 375 | Fat: 10g | Carbs: 40g | Protein: 25g | Sugar: 8g | Sodium: 720mg
Final Thoughts: Why Stir Fry is the Ultimate Kitchen Canvas
Stir fry isn’t just a recipe—it’s a mindset. It’s about embracing improvisation, forgiving mistakes (burnt garlic? call it “charred depth”), and turning scraps into something spectacular. Whether you’re a meal-prep warrior or a “what’s left in the fridge?” cook, this dish meets you where you are.
So next time life feels chaotic, remember: all you need is a hot pan, a few staples, and the courage to crank the heat. And hey, if dinner turns into a slightly smoky, wildly delicious adventure? That’s just another story for your stir fry legacy.

Chicken Enchiladas
Why These Chicken Enchiladas Feel Like a Fiesta in Every Bite
Hey foodie friends! Beau here from Feastical, and if there’s one dish that screams “gather ’round the table” louder than a mariachi band, it’s these soul-warming Chicken Enchiladas. Picture this: tender shredded chicken hugged by a creamy, tangy filling, all rolled up in a soft tortilla, then smothered in a smoky tomato-chili sauce and a blanket of melted cheddar. It’s Tex-Mex magic that’s hearty, cheesy, and ridiculously satisfying—without demanding hours in the kitchen. Seriously, under an hour from fridge to fiesta!
Now, I know what you’re thinking: “Beau, enchiladas seem fussy.” But trust me, this recipe? It’s your weeknight superhero. Whether you’re cooking for a crowd, meal-prepping for the fam, or just treating yourself to a flavor vacation, these enchiladas deliver. They’re forgiving, flexible, and packed with bold, comforting flavors that taste like a sunny afternoon in your abuela’s kitchen (even if you’ve never met her!). So grab your favorite skillet, crank up some tunes, and let’s turn simple ingredients into pure joy. Because at Feastical, we believe good food should feel like a high-five for your taste buds—no chef’s hat required.
The Midnight Enchilada Rescue Mission
Let me take you back to my college days—picture a tiny apartment kitchen at 2 a.m., my roommate Dave and I ravenous after a late-night study session (or, okay, maybe a concert). All we had was sad leftover rotisserie chicken, a lone onion, and half a tub of sour cream. Desperation breeds genius, right? We tossed everything into tortillas, drowned them in taco sauce, and baked ’em till the cheese screamed “EAT ME!”
What emerged was… life-changing. Crispy-edged tortillas, oozy filling, and that smoky sauce melding into something wildly delicious. We devoured the pan like wolves, sauce on our chins, laughing at our culinary “hack.” That messy, joyful moment became our ritual—the “Midnight Enchilada Rescue.” It taught me that cooking isn’t about perfection; it’s about heart, hustle, and turning “not enough” into “more than enough.” Every time I make these now, I taste freedom. And maybe a little nostalgia for those sleep-deprived, cheese-fueled adventures.
Your Flavor Squad: Ingredients & Pro Tips
Grab these pantry heroes—they’re flexible! Swap freely based on what’s in your fridge.
- 1 tbsp olive oil – Or any neutral oil. Avocado oil works great for higher heat! Chef’s tip: Lightly brush your baking dish with this too to prevent sticking.
- 4 skinless, boneless chicken breasts – About 1.5 lbs total. Shortcut? Use rotisserie chicken! Shred 3 cups. Thighs add richer flavor if you prefer.
- 1 onion, chopped – Yellow or white. No onion? Try 1 tsp onion powder in the sauce.
- 1¾ cups shredded Cheddar, divided – Sharp cheddar brings the party! Mix in Monterey Jack or pepper jack for extra oomph.
- ½ pint sour cream – Full-fat = creamier dreams. Greek yogurt works for tang with less fat.
- 1 tbsp dried parsley – Brightens the filling. Fresh cilantro? Yes, please—use 2 tbsp!
- ½ tsp dried oregano & ½ tsp black pepper – Oregano’s earthy, pepper adds zing. Mexican oregano if you have it!
- 1 (15 oz) can tomato sauce – Plain, unseasoned. Fire-roasted tomatoes? Blitz ’em for depth!
- ⅓ cup chopped green bell pepper – Adds crunch. Poblano peppers? Roast first for smoky sweetness.
- 1 clove garlic, minced – Non-negotiable flavor bomb! Sub ½ tsp garlic powder in a pinch.
- 1 tbsp chili powder – The soul of the sauce! Spice lovers: add ½ tsp chipotle powder.
- ½ tsp salt (optional) – Taste as you go! Low-sodium? Skip canned sauce salt.
- ½ cup water (optional) – Thins sauce if needed. Chicken broth = bonus flavor!
- 8 (10-inch) flour tortillas – Corn tortillas? Warm first to avoid cracking!
- 1 (12 oz) jar taco sauce – Mild, medium, or hot—you rule! Green enchilada sauce? Delicious twist!
Let’s Roll: Your Foolproof Enchilada Assembly Line
Don’t stress—we’re building flavor layers like a tasty lasagna! Follow these steps for golden, bubbly perfection.
- Cook & Shred the Chicken: Heat oil in a large skillet over medium heat. Add chicken breasts and cook 6-8 mins per side until no pink remains (165°F internal). Hack: Cover the skillet to trap steam—juicier chicken! Transfer to a plate, let rest 5 mins, then shred with two forks. Pro move: Toss chicken with 1 tbsp sauce—keeps it moist!
- Sizzle the Aromatics: In the same skillet (flavor town!), sauté onion and green pepper 3-4 mins until soft. Add garlic—stir 30 seconds until fragrant! Tip: Scrape up those tasty browned chicken bits!
- Make the Filling: Reduce heat to low. Add shredded chicken, ¾ cup cheddar, sour cream, parsley, oregano, and black pepper. Stir gently until creamy and combined. Texture check: It should mound on a spoon. Too thick? Add 1 tbsp milk. Remove from heat.
- Simmer the Sauce: In a saucepan, combine tomato sauce, chili powder, salt (if using), and water. Bring to a gentle bubble over medium heat, then simmer 10 mins. Chef’s secret: Add 1 tsp cumin here for warmth!
- Roll & Nestle: Preheat oven to 350°F (175°C). Grease a 9×13″ baking dish. Spoon ⅓ cup filling onto each tortilla, roll tightly, and place seam-side down in the dish. Packing tip: Fit them snugly—they cozy up in the oven!
- Smother & Cheese: Pour taco sauce evenly over tortillas. Sprinkle with remaining 1 cup cheese. Extra credit: Dot with extra sour cream!
- Bake to Bubbly Bliss: Bake uncovered 20-25 mins until cheese melts and edges turn golden. Want crisp tops? Broil 1-2 mins at the end—watch closely!
Dishing Up the Good Stuff
Let’s make it a meal! Pull those enchiladas from the oven—let them rest 5 minutes (trust me, they hold together better). Garnish with fresh cilantro, diced avocado, or a dollop of cool sour cream. Serve alongside: fluffy cilantro-lime rice, smoky black beans, or a crisp romaine salad with lime vinaigrette. For brunch? Top with a fried egg! And don’t forget the margaritas—this feast deserves a toast.
Mix It Up: 5 Tasty Twists
This recipe loves a remix! Try these crowd-pleasing spins:
- Green Chile & Corn: Stir 1 cup corn kernels and 4 oz diced green chiles into the filling. Swap taco sauce for green enchilada sauce!
- Beefy & Bold: Replace chicken with 1 lb browned ground beef or turkey. Add 1 tsp cumin to the filling.
- Veggie Fiesta: Skip meat! Use 2 cups roasted sweet potatoes + black beans. Add 1 tsp smoked paprika.
- Creamy Verde: Blend 1 cup spinach into the sour cream filling. Use salsa verde instead of taco sauce.
- Spicy Pineapple: Add ½ cup diced pineapple to filling. Top sauce with sliced jalapeños!
Beau’s Backstory: Why This Recipe Sticks
Over the years, this enchilada recipe became my culinary security blanket. I’ve made it for potlucks (always first to disappear), sick friends (cheese therapy!), and even my toddler—who now demands “roll-y cheese” weekly. The biggest evolution? Embracing shortcuts. Rotisserie chicken? Game-changer. Jarred taco sauce? Still delicious. One hilarious fail: I once used cinnamon instead of cumin (don’t ask). We ate cereal that night. Lesson? Label your spices! Now, I keep these staples stocked for last-minute magic. Because sometimes, the best meals are the ones that feel like a hug from your pan.
Enchilada SOS: Your Questions, Answered
Q: My tortillas ripped while rolling! Help?
A: Warm tortillas first! Microwave wrapped in a damp towel for 30 seconds, or heat briefly in a dry skillet. Flexible tortillas = no tears. Corn tortillas? Fry lightly in oil first.
Q: Why is my filling dry?
A: Two fixes: 1) Don’t overcook chicken—pull at 165°F. 2) Add 2-3 tbsp chicken broth or extra sour cream to the filling mixture. Moisture is key!
Q: Can I make these ahead?
A: Absolutely! Assemble (unbaked) up to 24 hours ahead. Cover tightly and refrigerate. Add 5-10 mins baking time if cold. Freeze unbaked for 3 months—thaw overnight first.
Q: Sauce too spicy for kids?
A: Use mild taco sauce, or swap half with tomato sauce. Serve with extra sour cream—it cools the heat!

Chicken Enchiladas
- Total Time: 50 mins
Description
Hey foodie friends! Beau here. If there’s one dish that screams gather ’round the table louder than a mariachi band, it’s these soul-warming Chicken Enchiladas.
Imagine this: tender shredded chicken, folded into a creamy, tangy filling, all wrapped in soft tortillas, smothered in a smoky tomato-chili sauce, and blanketed in melty cheddar. It’s Tex-Mex comfort that hits every note—bold, cheesy, and deeply satisfying. And guess what? You’ll be digging in less than an hour from now.
Ingredients
Grab these heroes from your fridge and pantry. This recipe’s super forgiving—feel free to riff!
-
1 tbsp olive oil – Or avocado oil. Also brush your baking dish with it!
-
4 boneless, skinless chicken breasts (1.5 lbs) – Or 3 cups rotisserie chicken (shortcut magic!).
-
1 onion, chopped – Yellow or white. No onion? Try 1 tsp onion powder in the sauce.
-
1¾ cups shredded cheddar (divided) – Sharp cheddar, or mix in Monterey Jack/pepper jack.
-
½ pint sour cream – Greek yogurt works too!
-
1 tbsp dried parsley – Or 2 tbsp chopped fresh cilantro.
-
½ tsp dried oregano + ½ tsp black pepper
-
1 (15 oz) can tomato sauce – Fire-roasted tomatoes blitzed in a blender = big flavor.
-
⅓ cup green bell pepper, chopped – Or poblano (roasted = wow!).
-
1 garlic clove, minced – Garlic powder works in a pinch.
-
1 tbsp chili powder – Add ½ tsp chipotle powder for heat.
-
½ tsp salt (optional)
-
½ cup water or chicken broth – To thin out the sauce.
-
8 (10-inch) flour tortillas – Corn? Warm them first to avoid cracks.
-
1 (12 oz) jar taco sauce – Mild, medium, or hot—your call!
Notes
-
Green Chile & Corn: Add 1 cup corn + 4 oz green chiles to the filling. Use green enchilada sauce.
-
Beef It Up: Use 1 lb ground beef or turkey. Add 1 tsp cumin to the filling.
-
Veggie Style: Sub roasted sweet potatoes + black beans. Add 1 tsp smoked paprika.
-
Creamy Verde: Blend spinach into the sour cream. Top with salsa verde.
-
Sweet Heat: Add ½ cup diced pineapple to the filling. Top with sliced jalapeños!
- Prep Time: 15 mins
- Cook Time: 35 mins
Nutrition
- Calories: 425 Cal Per serving
- Fat: 20g
- Carbohydrates: 28g
- Protein: 30g
Quick Bite Stats
Prep: 15 mins | Cook: 35 mins | Total: 50 mins | Serves: 8
Per serving: 400–450 cal | 20g fat | 28g carbs | 30g protein
Note: Stats vary with swaps like Greek yogurt or low-fat cheese.
Final Thoughts: More Than a Meal
These chicken enchiladas aren’t just dinner—they’re a passport to memory, science, and global connection. Whether you stick to the classic recipe or riff with international flavors, the joy lies in the process: the sizzle of onions, the smell of chili powder toasting in the sauce, the cheese bubbling under the broiler. It’s a dish that rewards improvisation, making it perfect for both kitchen newbies and seasoned cooks.
So next time you’re rolling tortillas, remember: you’re part of a story that spans centuries and continents. And if you accidentally grab cinnamon instead of cumin? Well, that’s just another tale to tell. Now go forth, feast boldly, and keep the fiesta alive. ¡Buen provecho!

Greek Chicken Meatballs with Lemon Orzo
Greek Chicken Meatballs with Lemon Orzo: Your New Weeknight Sunshine
Hey friends, Beau here! Ever have one of those days where you need a dinner that feels like a Mediterranean vacation but cooks faster than your delivery app can load? That’s exactly why I created these Greek Chicken Meatballs with Lemon Orzo. Picture this: juicy herb-kissed meatballs tumbling over pillows of citrusy orzo, all showered with tangy feta and fresh parsley. It’s sunshine on a plate, ready in 35 minutes flat! As someone who believes weeknight dinners should thrill your taste buds without draining your soul, this recipe is my love letter to busy foodies. No fancy techniques, no obscure ingredients—just big, bright flavors that’ll make you do a little happy dance at the stove. Whether you’re cooking for picky kids, impressing a date, or just treating yourself (you deserve it!), this dish wraps you in that “everything’s gonna be okay” warmth. So tie on that apron that’s probably splattered with last night’s dinner adventures—we’re making magic!
My Big Fat Greek Kitchen Epiphany
This recipe? It’s got roots in my most gloriously chaotic food memory. Picture 22-year-old me, backpacking through Greece, stumbling into a tiny family taverna after getting caught in a surprise rainstorm. The nonna in the kitchen didn’t speak a word of English, but she saw my drowned-rat expression and plunked down a steaming plate of something with golden orbs nestled in lemony grains. One bite—BAM! The tender chicken, the zing of lemon, the herby perfume—it was like a culinary hug. I tried recreating it for months after coming home, tweaking spices until my roommate begged, “Please, no more test meatballs!” But when I finally nailed that balance of bright and savory? Absolute fireworks. Now, every time I make this, I’m back in that cozy taverna, rain drumming on the roof, reminded that the best meals aren’t just fed—they’re felt.
Your Flavor Arsenal (Plus My Chef Secrets!)
For the Chicken Meatballs:
- 1 lb ground chicken – Thigh meat for extra juiciness! Swap with turkey if needed.
- ½ cup breadcrumbs – Panko works great, or crush stale sourdough for bonus flavor points.
- ¼ cup grated Parmesan – Adds umami depth. Skip for dairy-free? Try nutritional yeast.
- ¼ cup finely chopped red onion – Soak in ice water for 5 mins to mellow the bite!
- 2 cloves garlic, minced – Pro tip: grate it on a microplane for no bitter chunks.
- 1 large egg – Your binding MVP. Chia egg (1 tbsp chia + 3 tbsp water) works for egg-free.
- 2 tbsp fresh parsley, chopped – Dried works in a pinch (use 2 tsp), but fresh is game-changing.
- 1 tsp dried oregano – Rub between palms before adding—awakens the oils!
- ½ tsp salt + ¼ tsp black pepper – Season aggressively—chicken needs love.
- Zest of 1 lemon – Sunshine in zest form! Avoid the bitter white pith.
For the Lemon Orzo:
- 1 cup orzo pasta – Looks like rice, cooks like pasta. No sub here—it’s essential!
- 2 cups vegetable or chicken broth – Use low-sodium to control salt levels. Water works, but broth = flavor town.
- 2 tbsp olive oil – Extra virgin for that fruity kick right at the end.
- ¼ cup crumbled feta – Salty, tangy bliss. Halloumi works for a squeaky twist!
- ¼ cup fresh parsley, chopped – Save some for garnish—it’s your color pop.
- Juice of 1 lemon – Fresh-squeezed only! Bottled tastes flat here.
- Salt and pepper, to taste – Feta is salty, so taste before adding extra.
Let’s Get Rollin’ (Literally!)
Step 1: Meatball Mixology (5 mins)
In a big bowl, combine ground chicken, breadcrumbs, Parmesan, red onion, garlic, egg, parsley, oregano, salt, pepper, and lemon zest. Here’s my golden rule: mix with your hands! Squish it gently between fingers—just 30 seconds—until just combined. Overworking = tough meatballs. Feeling fancy? Fry a tiny patty to test seasoning!
Step 2: Roll Call (5 mins)
Scoop about 1 tbsp of mix per meatball. Wet your hands—this prevents sticking!—and roll into 1-inch balls. Pro hack: use a small cookie scoop for speed and uniformity. They’ll cook evenly, no rogue underdone giants.
Step 3: Sear & Sizzle (10 mins)
Heat 1 tbsp olive oil in a non-stick skillet over medium. Add meatballs in a single layer (crowd them and they’ll steam!). Don’t touch them for 4 mins—let that golden crust form! Flip, cook another 4-5 mins until internal temp hits 165°F. Transfer to a plate. They’ll finish cooking in the orzo later—promise!
Step 4: Orzo Alchemy (10 mins)
In same skillet (keep those tasty brown bits!), bring broth to a boil. Add orzo, stir, then simmer uncovered 8-10 mins. Stir occasionally until liquid is mostly absorbed and orzo is al dente. Critical timing tip: Undercook by 1 minute—it keeps cooking off-heat!
Step 5: The Grand Finish (3 mins)
Kill the heat. Stir in olive oil, lemon juice, feta, parsley, salt, and pepper. Fold gently—don’t smash the orzo! Add meatballs back in, nestling them into the grains. Cover for 2 mins: this lets flavors mingle and meatballs soak up lemony goodness.
Plating Like a Pro
Spoon that lemony orzo into shallow bowls. Top with meatballs—let some peek out temptingly. Garnish with extra crumbled feta, a shower of parsley, and thin lemon slices for drama. For the ✨experience✨: drizzle with good olive oil, add cracked black pepper, and serve with warm pita or a crisp cucumber-tomato salad. Family-style in a big rustic bowl? Absolutely encouraged—just pass the tongs!
Shake It Up! 5 Tasty Twists
1. Spanakopita Style: Fold ½ cup chopped spinach and 2 tbsp dill into meatball mix. Serve orzo with a dollop of tzatziki!
2. Heat Seeker: Add 1 tsp smoked paprika to meatballs + red pepper flakes to orzo. Garnish with pickled jalapeños.
3. Grain Swap: Use quinoa or couscous instead of orzo. Cook according to package, then toss with lemon dressing.
4. Meat-Free Magic: Swap chicken for 1.5 cups cooked lentils + 1 egg. Add 2 tbsp oat flour to bind.
5. Lemon-Burst Upgrade: Stir 1 tsp lemon zest into orzo + top with lemon herb gremolata (lemon zest, parsley, garlic).
Beau’s Backstage Tips
This recipe’s evolved more than my taste in kitchen aprons! Originally, I baked the meatballs—but skillet-searing? Game-changer for that caramelized crust. And confession: I once dumped lemon juice into boiling broth (mistake!). Now I add it OFF-heat to keep that vibrant zing. Funny story: My niece calls these “flavor marbles” and insists on counting them—so I make them extra small for her. Want to prep ahead? Mix meatballs (keep raw) and stash in the fridge for 1 day, or freeze raw for 3 months. Orzo? Cook it fresh—leftovers get gummy. Finally: double the recipe. Trust me, you’ll want lunch tomorrow!
Your Questions, My Answers
Q: My meatballs fell apart! Help?
A: Three likely culprits: 1) Too much lemon juice in the mix (zest only for meatballs!), 2) Skipping the egg (it’s your glue!), or 3) Flipping too early. Let them crust up first!
Q: Orzo turned mushy. Sad face.
A: You might’ve overcooked it or stirred too aggressively. Cook until al dente (bite-test at 8 mins!), and fold gently at the end. Also: broth ratio matters. If liquid’s gone but orzo’s still hard? Add 2 tbsp hot water.
Q: Can I air-fry the meatballs?
A: Yes! Spray basket with oil, cook at 375°F for 10-12 mins, shaking once. But—you’ll miss the flavor-packed skillet fond. Sear first, then finish in air fryer for best results.
Q: Feta too salty for my taste?
A: Rinse it under cold water first! Or swap with creamy goat cheese. For dairy-free, try briny kalamata olives or capers.

Greek Chicken Meatballs with Lemon Orzo
Description
Hey friends! Ever crave a dinner that feels like a Mediterranean vacation—but cooks faster than your food delivery app can load? Enter: Greek Chicken Meatballs with Lemon Orzo.
Think: juicy, herb-packed meatballs rolling over lemony orzo pearls, all kissed with tangy feta and fresh parsley. It’s weeknight-easy, dinner party-pretty, and absolutely loaded with sunshine. No fancy tools. No exotic ingredients. Just BIG flavor in under 35 minutes.
Ingredients
For the Chicken Meatballs
-
1 lb ground chicken (thigh meat = juicier!)
-
½ cup breadcrumbs (Panko or crushed sourdough)
-
¼ cup grated Parmesan
-
¼ cup finely chopped red onion (soaked 5 mins in ice water if strong)
-
2 cloves garlic, minced (or grated!)
-
1 large egg
-
2 tbsp fresh parsley, chopped (or 2 tsp dried)
-
1 tsp dried oregano
-
½ tsp salt + ¼ tsp black pepper
-
Zest of 1 lemon
For the Lemon Orzo
-
1 cup orzo
-
2 cups low-sodium chicken or vegetable broth
-
2 tbsp olive oil
-
¼ cup crumbled feta
-
¼ cup fresh parsley, chopped
-
Juice of 1 lemon
-
Salt + black pepper to taste
Notes
-
Spanakopita Style: Add chopped spinach + dill to meatballs. Serve with tzatziki.
-
Heat Seeker: Smoked paprika in meatballs, red pepper flakes in orzo.
-
Grain Swap: Sub quinoa or couscous. Cook separately, then toss with lemon + olive oil.
-
Meat-Free Marvel: Use 1½ cups cooked lentils + 1 egg + 2 tbsp oat flour.
-
Lemon-Burst Boost: Add zest to orzo + top with gremolata (lemon zest, garlic, parsley).
Nutrition
- Calories: 420 Cal Per Serving
- Fat: 20g
- Saturated Fat: 6g
- Carbohydrates: 32g
- Fiber: 2g
- Protein: 28g
Nutritional Nibbles (Per Serving, Serves 4)
Calories: ~420 | Protein: 28g | Carbs: 32g | Fat: 20g (Saturated: 6g) | Fiber: 2g | Sugar: 2g | Sodium: 680mg
Note: Stats vary based on broth sodium levels and cheese amounts. Want it lighter? Use lean ground chicken breast and reduce feta by half.
Final Thoughts
This dish embodies everything I love about cooking: big flavors, simple techniques, and room for creativity. Whether you stick to the classic version or venture into global twists, the core principles remain—respect the ingredients, balance bright and savory, and most importantly, have fun. Food should feel like an adventure, not a chore. So grab that skillet, crank up the Greek music, and let every bite transport you to a seaside taverna—no passport required.
Your Turn: Tag me with your #FlavorMarbles creations—I’ll feature my favorites!
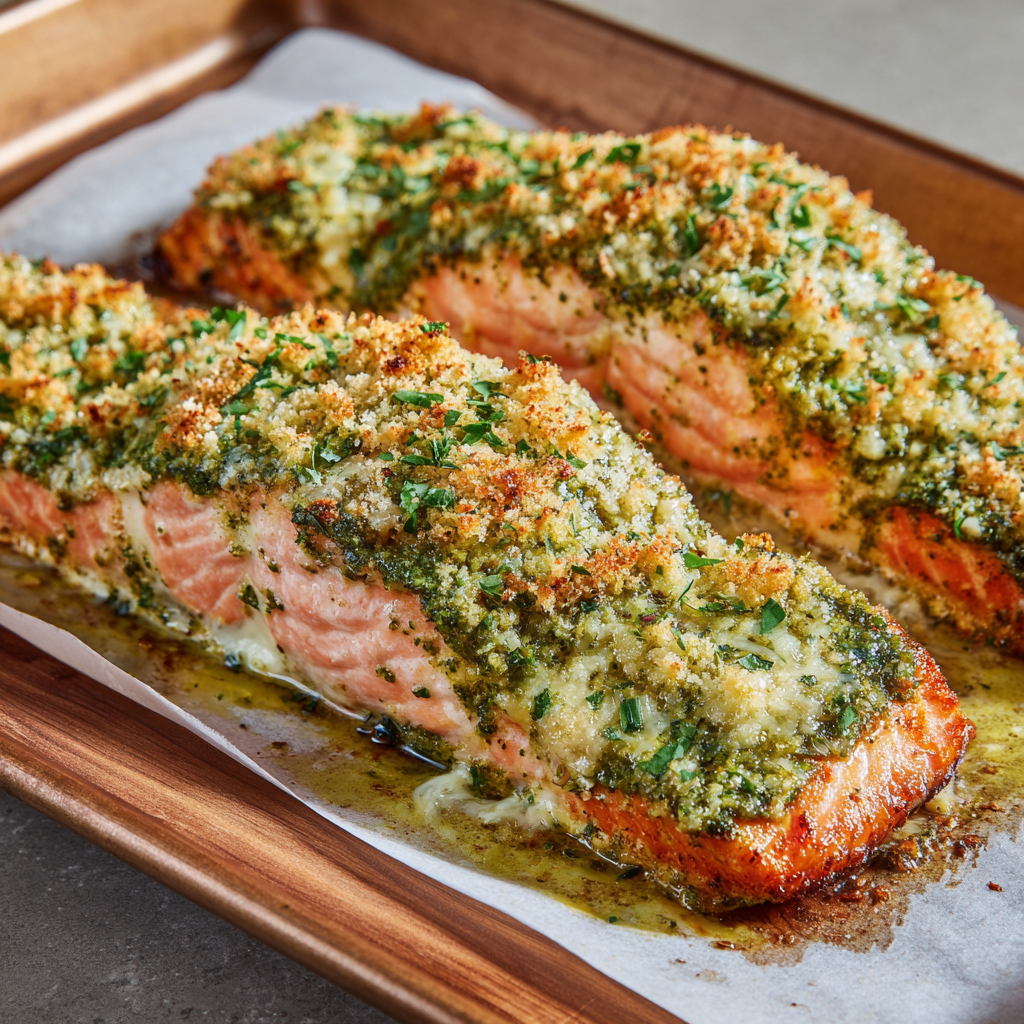
Pesto Salmon Bake
When Weeknight Magic Meets Dinner Party Wow: Pesto Salmon Bake
Hey friends, Beau here from Feastical! Let’s talk about that eternal kitchen dilemma: How do you whip up something that feels special without turning your cozy weeknight into a stress marathon? You know what I mean—those nights when you’re juggling work emails, a rogue laundry pile, and a serious craving for flavor that hugs your soul. That’s exactly why this Pesto Salmon Bake is my forever MVP. Picture this: tender, flaky salmon fillets slathered in vibrant, herby pesto, then crowned with a golden, Parmesan-breadcrumb crust that crackles like autumn leaves under a fork. It’s restaurant-worthy gorgeousness, but guess what? You’ll spend more time choosing a Netflix show than cooking it. Seriously—10 minutes of prep, 15 minutes in the oven, and boom: dinner magic. Whether you’re cooking solo or feeding a hungry crew, this dish is your edible high-five. It’s wholesome (hello, omega-3s!), satisfying, and tastes like sunshine on a plate. So tie on that apron, crank up your favorite playlist, and let’s turn simple ingredients into something unforgettable. Trust me—your spatula’s gonna thank you.
Sunset Dinners & Kitchen Mishaps: Why This Dish Stole My Heart
Okay, story time! This recipe was born during a chaotic-but-charming beach trip with my college buddies. We’d rented a tiny cottage with a kitchen the size of a toaster oven. Our grand plan? Gourmet seafood feast. Reality? We forgot half the groceries, and our “grill master” accidentally torched the shrimp. Panic mode! Then I spotted wild salmon fillets and a jar of pesto in the fridge. Desperate, I slapped them together, topped ’em with crushed crackers (fancy breadcrumbs, who?), and baked ’em. Friends, it was a revelation. We ate straight from the sheet pan, watching the sunset, laughing at our near-disaster. That salmon became our inside joke—the “salvation salmon.” Now, I make it monthly for my family, tweaking it over the years (RIP cracker crumbs), but always chasing that same feeling: effortless joy. Food isn’t just fuel; it’s the stories we share. And this bake? It’s a delicious little scrapbook.
Your Flavor Toolkit: Ingredients & Pro Hacks
Gather these simple stars—no Michelin skills required! I’ve sprinkled in substitutions because life happens (and hey, creativity rocks).
- 24 oz salmon fillets (4 x 6 oz portions) – Skin-on for crispy texture, or skinless for ease. Pro tip: Look for bright, firm flesh! Swap with Arctic char or trout if salmon’s MIA.
- 6–7 tbsp pesto – Homemade? Killer! Store-bought? Zero shame. Basil classic or swap in kale-walnut pesto for fun. Vegan? Use dairy-free pesto—flavor still slays.
- ⅓ cup fresh breadcrumbs – Whirl day-old baguette in a blender. Dry crumbs? They’ll work, but fresh adds buttery crunch. Gluten-free? Panko-style GF crumbs FTW.
- ⅓ cup freshly grated Parmesan – Microplane it! Pre-grated won’t melt as dreamily. Veggie pals? Nutritional yeast adds cheesy vibes.
Chef insight: Pesto’s oil helps the crust adhere—no egg wash needed! Also, salmon thickness varies; adjust bake time later. Thicker fillets? Add 2-3 minutes. Easy-peasy.
Let’s Build That Golden Wonder: Step-by-Step
Ready? Channel your inner kitchen rockstar. I’ve tucked hacks into every step!
- Preheat & Prep: Fire up that oven to 400°F (200°C). Grab a baking sheet—line it with parchment (lazy cleanup win!) or lightly grease a dish. Hack: Crumple the parchment first, then flatten—it stays put!
- Salmon Placement: Arrange fillets skin-side down (if using skin-on) on the sheet. No skin? No sweat—just place ’em pretty side up. Tip: Pat fish dry with paper towels. Moisture = soggy crust. Sadness avoided!
- Pesto Bliss: Slather 1.5-2 tbsp pesto over each fillet like you’re frosting a cake. Edge-to-edge coverage, folks! Chef secret: Leave a tiny border to prevent pesto lava spills in the oven.
- Crunch Time: In a bowl, mix breadcrumbs and Parmesan. Sprinkle generously over pesto—press lightly so it sticks. Golden rule: Don’t skimp! This is the “crown,” not a sprinkle.
- Bake to Perfection: Slide into oven. Bake 12-15 mins until salmon flakes easily (poke a fork in the thickest part—should be opaque). Topping should be GBD: Golden, Brown, Delicious! Watch closely: Overcooked salmon = sad, dry fish. Set a timer!
- Broiler Boost (Optional): Crank to broil for 1-2 mins for extra crisp. DO NOT WALK AWAY. Seriously—it’s a crumb inferno waiting to happen. Stand guard!
Pro hack: Rest salmon 2 mins after baking. Juices redistribute = mega-moist bites. Resist fork-attacking immediately—I know, it’s hard!
Plating Like a Pro (Minimal Effort, Max Style)
This beauty shines solo, but let’s make it a feast! Slide a spatula under each fillet—keep that crust intact. Plate atop:
- Lemon-herb quinoa or orzo
- Roasted asparagus or cherry tomatoes
- Simple arugula salad with lemon vinaigrette
Garnish: Extra Parmesan shavings, cracked black pepper, or basil confetti. Wine pair? Crisp Sauvignon Blanc or Pinot Grigio. Boom—dinner is served!
Mix It Up! 5 Tasty Twists
Got leftovers or a wild hair? Try these riffs:
- Mediterranean: Add halved olives + sun-dried tomatoes under the crust.
- Spicy Kick: Mix 1 tsp chili flakes into pesto. Finish with lemon zest.
- Veggie-Packed: Layer spinach or thin zucchini slices under salmon.
- Nut-Free: Swap pesto for basil-avocado puree (same green joy!).
- Sheet-Pan Supper: Add baby potatoes + broccoli to the tray—bake together!
Remember: Cooking is play. Make it yours!
Beau’s Backstage Notes: Laughs & Lessons
This recipe’s evolved like my taste in kitchen towels (goodbye, neon dinosaurs!). Early versions involved actual croutons smashed with a wine bottle—classy, right? Now, I’m obsessed with adding lemon zest to the breadcrumbs for zing. Funny fail: Once subbed cilantro pesto (don’t ask). My kids called it “green monster fish.” Lesson learned! Now, it’s my go-to for last-minute guests. I’ll even prep the crumb mix ahead—stash it in a jar. The real secret? This dish forgives. Salmon slightly under? It’ll carryover cook. Crumb topping burnt? Scrape it off, add fresh, broil quick. Cooking’s about heart, not perfection. And sharing it? That’s the best part.
Your Questions, My Answers: Salmon SOS
Q: Can I use frozen salmon?
A: Absolutely! Thaw overnight in the fridge. Pat extra dry—frozen fish holds more moisture. Bake time may increase 2-4 mins.
Q: Help! My crust slid off. Salvageable?
A: Happens to the best of us! Press crumbs gently post-bake. Next time: Chill salmon 10 mins after adding topping—it “sets” the pesto glue.
Q: What sides won’t steal the spotlight?
A: Keep it light! Try garlic sautéed green beans, lemon rice, or crusty bread to mop up pesto drippings. Avoid heavy creams.
Q: Leftovers? How to reheat without rubber fish?
A: Cover loosely with foil. Bake at 275°F (135°C) for 10-12 mins. Microwaving murders the texture—just don’t!

Pesto Salmon Bake
- Total Time: 20 minutes
Description
Hey friends! Whether you’re juggling 50 tabs or just trying to escape the dinner rut, this Pesto Salmon Bake is your hero. In under 30 minutes, you’ll have buttery salmon coated in bold pesto and a golden Parm-breadcrumb topping so good, you might eat it straight from the pan. It’s foolproof, wildly satisfying, and elegant enough to impress—even if you’re still in sweatpants.
Ingredients
-
4 salmon fillets (about 6 oz each; skin-on or off)
-
6–7 tbsp pesto (store-bought or homemade basil, arugula, or kale pesto)
-
⅓ cup fresh breadcrumbs (or Panko; GF if needed)
-
⅓ cup grated Parmesan cheese (freshly grated = melty magic)
-
Optional: Lemon zest, chili flakes, or fresh herbs for extra flair
Instructions
1. Preheat & Prep
-
Preheat oven to 400°F (200°C).
-
Line a baking sheet with parchment or lightly grease a baking dish.
-
Pat salmon dry (important for a crisp topping!).
2. Add the Pesto Love
-
Place salmon skin-side down.
-
Spread 1½–2 tbsp pesto on each fillet—cover generously but not overflowing.
3. Breadcrumb Crown
-
Mix breadcrumbs and Parmesan in a bowl.
-
Spoon evenly over each fillet and press gently. Want extra zing? Add 1 tsp lemon zest or a pinch of chili flakes here.
4. Bake It
-
Bake for 12–15 minutes, depending on thickness (internal temp should hit 125–130°F).
-
Optional: Broil 1–2 minutes at the end for max crunch—watch carefully!
5. Rest & Serve
-
Let salmon rest 2 minutes before serving. This keeps it juicy and perfect.
Notes
-
Use fresh Parmesan: Pre-shredded won’t melt or brown as nicely.
-
Breadcrumbs count: Homemade = soft crunch. Panko = sharper crunch.
-
Crust falling off? Chill salmon 10 minutes after topping before baking—it sets the pesto.
-
Don’t overbake! Dry salmon is sad salmon. Pull it when just opaque.
-
Leftovers? Reheat gently, covered in foil, at 275°F for 10–12 mins.
- Prep Time: 10 minutes
- Cook Time: 10 minutes
Nutrition
- Calories: 390Cal Per Serving
- Sodium: 420mg
- Fat: 25g
- Carbohydrates: 4g
- Protein: 35g
Nutritional Nibbles (Per Serving)
Prep: 10 mins · Cook: 15 mins · Serves: 4
Calories: 390 · Fat: 25g · Carbs: 4g · Protein: 35g · Sodium: 420mg
Note: Stats based on standard ingredients. Swaps will change values!
Final Thoughts: Why This Dish Deserves a Spot in Your Rotation
The Pesto Salmon Bake is more than just a recipe—it’s a culinary lifesaver. Whether you’re a busy parent, a cooking newbie, or an entertainer looking for a foolproof crowd-pleaser, this dish delivers every time. It’s:
✅ Fast (25 minutes start to finish)
✅ Versatile (endless variations)
✅ Healthy (packed with omega-3s and protein)
✅ Impressive (looks and tastes gourmet)
So next time you’re stuck between “I want something delicious” and “I don’t want to cook forever,” remember this golden rule: Pesto + Salmon + Crunch = Dinner Victory.
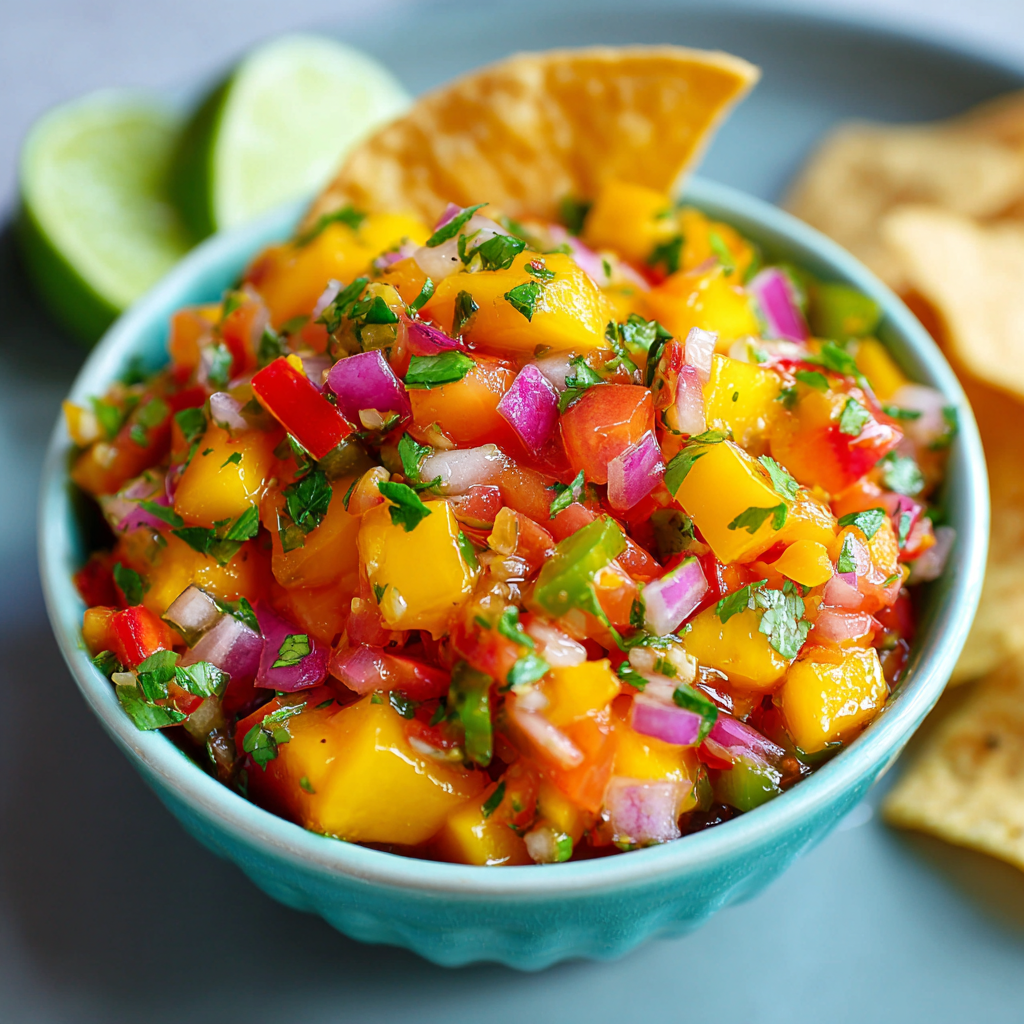
PEACH MANGO SALSA
Sunshine in a Bowl: Your New Favorite Peach Mango Salsa
Hey friends, Beau here! Picture this: It’s a golden summer afternoon. You’re barefoot in the grass, the grill’s humming, and there’s a bowl of something so bright and joyful on the picnic table that everyone keeps drifting toward it like bees to blossoms. That’s exactly where this Peach Mango Salsa comes in. This isn’t just a condiment—it’s a confetti explosion of summer’s best flavors. Juicy peaches? Check. Tropical mango? Absolutely. A little zing, a little crunch, and that perfect sweet-heat dance? Oh yeah. Whether you’re dunking tortilla chips, crowning grilled fish, or just eating it with a spoon (zero judgment here), this salsa turns any meal into a fiesta. At Feastical, we’re all about food that feels like a celebration, and this recipe? It’s pure, unfiltered sunshine. Ready to make your taste buds do a happy dance? Let’s chop!
That One Unforgettable Backyard Bash
Okay, story time! Last July, my buddy Rico hosted this epic potluck. I brought what I thought was a humble bowl of peach-mango salsa. Cut to two hours later: Rico’s Aunt Margarita (yes, really!) was literally guarding it from overeager cousins, my neighbor asked for the recipe mid-chip-dip, and we caught Rico’s dog, Churro, trying to sneak a lick. Why did it vanish so fast? Because it tastes like vacation! I first made this salsa years ago after a Florida trip where I tasted mangoes so ripe, they practically sang. Back home, I grabbed peaches from my farmer’s market stand, added a jalapeño for fun, and bam—magic. Now, every time I make it, I’m back in Rico’s backyard: sticky fingers, laughter, and that moment when everyone goes quiet because they’re too busy eating. Food memories? They’re the best kind.
Gather Your Sunshine Squad
Fresh, ripe ingredients are non-negotiable here—this salsa’s charm is all about peak flavor! Here’s your lineup:
- 1 cup ripe mango, diced – Chef’s tip: Go for Ataulfo (champagne) mangoes if you can! They’re buttery-sweet. No fresh mango? Frozen works (thaw first!), but drain excess juice.
- 1 cup ripe peaches, diced – Sub alert: Nectarines work if peaches are mealy. Skip canned—they’re too mushy.
- ⅓ cup red onion, finely diced – Soak in ice water for 5 minutes if raw onion bites too hard. It mellows the sharpness!
- ⅓ cup red bell pepper, diced – Adds crunch! Yellow or orange bells work too—green ones can overpower.
- ½ jalapeño, minced – Heat hack: Scrape out seeds and ribs unless you want fiery drama. For zero heat, use ¼ bell pepper instead.
- 2 tbsp chopped cilantro – For the cilantro-haters: Swap in fresh basil or mint. It’s a game-changer!
- 2 tbsp fresh lime juice – Bottled is a last resort. Fresh lime = brighter zing!
- ¼ tsp salt (or to taste) – Start here. Salt makes flavors POP, but you can always add more.
Let’s Make Some Magic: Chop, Toss, Devour!
This is the fun part—no cooking, just vibes! Follow these steps for salsa perfection:
- Dice like a pro (but keep it chill!). Chop mango and peaches into ¼-inch cubes. Chef’s hack: Score mango flesh in a grid, then scoop with a spoon! For peaches, slice cheeks off the pit first. Toss them into a big bowl—the more room, the easier to mix.
- Crunch time. Add red onion, bell pepper, and jalapeño. Pro tip: Dice the onion smaller than everything else—it distributes flavor better without dominating.
- Herbs and zing! Sprinkle cilantro over the top. Pour lime juice and salt right over the herbs—it helps “wake up” their flavor as you gently fold everything together. Key word: Gently! Don’t mash those tender peaches. Use a rubber spatula in a lifting motion.
- The patience test (optional but awesome). Cover and chill 15–20 minutes. Why wait? This lets the salt coax out juices, creating a light, glossy “salsa syrup” at the bottom. Stir once more before serving!
Beau’s bonus hacks: If your fruit is super juicy, drain excess liquid after chilling. For extra depth, add a pinch of cumin or smoked paprika!
Serving Up Sunshine
This salsa is a social butterfly! Serve it in a colorful bowl with sturdy tortilla chips or plantain chips for dipping. But don’t stop there! It’s killer on grilled chicken, fish tacos, or seared shrimp. Spoon it over cream cheese as a quick appetizer, or mix into avocado toast. For breakfast? Yes! Try it with scrambled eggs or a breakfast burrito. The colors make it a table centerpiece—garnish with a lime wedge or extra cilantro.
Mix It Up: Your Salsa, Your Rules!
Play with these twists to make it your signature:
- Tropical Fire: Add ¼ cup diced pineapple and a minced habanero (use gloves!).
- Berry Bright: Swap peaches for strawberries or raspberries in summer.
- No-Heat Fiesta: Skip jalapeño and add ½ diced cucumber for cool crunch.
- Protein Power: Stir in ½ cup black beans and ¼ cup corn for a hearty salad.
- Herb Swap: Use mint instead of cilantro and add 1 tsp honey for a Persian vibe.
Beau’s Back-Porch Wisdom
This salsa has been my summer wingman for years! Funny story: Once, I forgot the salt. BIG mistake. It tasted like sweet sadness. Lesson learned! Over time, I’ve tweaked it—less onion, more lime, always ripe fruit. It’s evolved from a party dip to my go-to “mood booster” when winter feels endless. I’ll make a batch, eat it with coconut rice, and pretend I’m on a beach. It’s also a kitchen lifesaver. Got slightly bruised peaches? Dice ’em up—they’re still perfect here. Just promise me one thing: Don’t stress the knife skills. Rustic chunks taste better than perfect cubes anyway!
Your Salsa Questions, Answered!
Q: My salsa got watery overnight! Help?
A: Fruit releases juice as it sits. Drain excess liquid before serving, or add 1 tbsp diced cucumber to soak it up. Make it fresh the day of for best texture!
Q: Can I make this ahead?
A: Totally! Mix everything except salt and lime juice. Add those 1 hour before serving. It keeps for 2 days max—after that, fruit gets mushy.
Q: Too spicy! How do I fix it?
A> Stir in 1 tsp honey or agave to balance heat. Add more diced mango or peach. Next time, taste your jalapeño first—some are firecrackers!
Q: Not sweet enough?
A> Your fruit might be underripe. Add ½ tsp honey or a pinch of sugar. Or, roast peaches/mangoes for 10 mins first to caramelize sugars!

PEACH MANGO SALSA
- Total Time: 10 minutes
Description
Hey friends, Beau here! Imagine it’s a warm summer afternoon—barefoot in the grass, grill sizzling in the background, and a bowl of Peach Mango Salsa on the table glowing like edible confetti. Juicy peaches and tropical mango bring the sweet; bell pepper and onion bring the crunch; and just the right touch of jalapeño and lime make it pop.
Ingredients
-
1 cup ripe mango, diced
(Ataulfo/Champagne mangoes = silky-sweet perfection; thawed frozen works too—drain well!) -
1 cup ripe peaches, diced
(Nectarines work too; skip canned!) -
⅓ cup red onion, finely diced
(Soak in ice water 5 min to mellow) -
⅓ cup red bell pepper, diced
(Or orange/yellow—adds crunch & color!) -
½ jalapeño, minced
(Seed it for mild, keep seeds for heat!) -
2 tbsp chopped fresh cilantro
(Sub mint or basil if preferred) -
2 tbsp fresh lime juice
(About 1 juicy lime) -
¼ tsp salt, or to taste
(Start small—taste and adjust)
Instructions
1. Dice with Delight
-
Cut peaches and mango into ¼” cubes.
-
Pro tip: Score mango flesh in a grid and scoop with a spoon!
-
Toss all fruit into a large mixing bowl.
2. Add the Crunch Crew
-
Add diced onion, bell pepper, and jalapeño.
-
Keep onion smaller to blend better without overpowering.
3. Lime & Herb Lift
-
Sprinkle chopped cilantro on top.
-
Pour lime juice and salt over everything and gently fold.
-
Use a rubber spatula and lift from the bottom to keep it chunky, not mushy!
4. Chill (Optional but Recommended)
-
Let sit for 15–20 minutes to let flavors mingle.
-
Stir gently before serving and drain any excess liquid if needed.
Notes
-
Salt matters: Don’t forget it! It’s the secret to bringing out fruit flavor.
-
Juicy fruit? Drain salsa slightly after chilling or serve with a slotted spoon.
-
Ripe but bruised fruit? Use it! Slightly soft fruit is perfect here.
-
Not a knife skills champ? Rustic chunks = charm and flavor. Don’t stress it.
- Prep Time: 10 minutes
Nutrition
- Calories: 80 Cal Per ¼ of recipe ~½ cup
- Sugar: 14g
- Carbohydrates: 18g
- Fiber: 2g
Nutritional Info (Per Serving, ¼ of Recipe)
Calories: ~80 | Carbs: 18g | Fiber: 2g | Sugar: 14g | Protein: 1g | Fat: 0g
Note: Values are estimates. Fruit sugars are natural, and this salsa is packed with vitamins A and C!
Final Thoughts: More Than a Recipe—A Memory Maker
This Peach Mango Salsa isn’t just about ingredients—it’s a catalyst for connection. It’s the bowl passed around at picnics, the conversation starter at potlucks, and the taste that transports you to sunnier days. Whether you stick to the classic recipe or riff with your own twists, remember: Cooking is play. Burn the jalapeño? Add honey. Fruit too firm? Roast it. The best dishes, like the best memories, are imperfectly perfect. Now go forth, chop with abandon, and let every bite taste like summer

MANGO AVOCADO SALSA
Sunshine in a Bowl: Your New Favorite Mango Avocado Salsa
Hey foodie friends! Beau here from Feastical, and I’ve got a little secret weapon that turns every meal into a tropical vacation: my outrageously good Mango Avocado Salsa. Picture this – sweet, juicy mango dancing with creamy avocado, crunchy bell pepper, and a zippy lime kick that’ll make your taste buds do the cha-cha. It’s like summer decided to throw a fiesta in your mouth! Whether you’re topping fish tacos, scooping it with chips, or spooning it over grilled chicken, this salsa brings instant joy to the table. I call it “sunshine food” because one bite literally brightens your day – no passport required. Forget complicated recipes; this beauty comes together in 10 minutes flat. So grab your favorite chopping board and let’s make magic happen!
How This Salsa Became My Beachside BFF
Okay, story time! Picture me, 22 years old, backpacking through Costa Rica. I stumbled into this tiny beach shack where a grandma named Rosa was tossing chopped mangoes and avocados like she was conducting a salsa orchestra. She handed me a bowl with warm tortilla chips, winked, and said, “Para el alma” (“for the soul”). Friends, that salsa tasted like ocean breezes and pure happiness. Fast forward to my sister’s wedding BBQ last summer – I recreated Rosa’s magic, and it disappeared faster than kids near an ice cream truck. Watching my niece giggle with mango juice dripping down her chin? That’s the moment I knew this recipe wasn’t just food – it’s a memory-maker. Every time I make it, I’m back on that sun-soaked beach, sand between my toes and joy in my bowl.
Gather Your Flavor All-Stars
Here’s your VIP ingredient list – fresh, simple, and packed with personality:
- 2 ripe mangos, diced – Go for Ataulfo (champagne) mangos if you can! They’re buttery-sweet with less stringiness. No ripe mangos? Frozen thawed mango works in a pinch, but drain it well.
- 2 ripe avocados, diced – Pro tip: Squeeze the stem end – if it yields gently, it’s perfect. Too hard? Bury it in rice overnight. Too soft? Make guac tomorrow!
- 1 red bell pepper, diced – Adds crunch and color. Yellow or orange bells work too – rainbow vibes are encouraged!
- ¼ red onion, finely diced – Soak in ice water for 5 minutes to tame the bite if you’re onion-shy.
- 1 jalapeño, finely chopped – Chef’s hack: Leave seeds for fire, remove for mild. For zero heat, try poblano pepper.
- ¼ cup chopped cilantro – Love it or hate it? No judgment! Swap with fresh parsley or basil for a twist.
- Juice of 1 lime – Roll it on the counter first to maximize juice. Bottled? Okay in emergencies, but fresh is best.
- Pinch of salt – Flaky sea salt (like Maldon) makes flavors pop like fireworks!
Let’s Chop, Toss & Taste!
Ready to rock this salsa? Follow these easy steps – I’ve packed ’em with my favorite kitchen hacks:
- Dice like a pro: First, cube your mangos and avocados into ½-inch pieces. Chef’s secret: Score the mango flesh in a grid while still in the skin, then scoop out with a spoon – no wrestling required! For avocados, make lengthwise and crosswise cuts with a butter knife (not through the skin), then spoon out. Toss avocado pieces immediately with half the lime juice to prevent browning.
- Chop the crunch crew: Dice bell pepper and red onion into small, uniform pieces (about ¼-inch). Finely mince jalapeño – safety tip: Wear disposable gloves if you’re sensitive to capsaicin! Roughly chop cilantro, stems and all (they have great flavor).
- Combine with care: In a large bowl, gently fold together mango, avocado, bell pepper, onion, jalapeño, and cilantro. Key move: Use a rubber spatula and lift from the bottom – we want chunky, not mushy!
- Zest it up: Drizzle remaining lime juice over everything. Add salt. Fold again gently – think “hugging” the ingredients, not squishing them. Taste! Need more zing? Add lime. More kick? Extra jalapeño.
- Rest for magic: Let it chill for 10 minutes if you can. Why? This lets the flavors mingle like old friends at a reunion. Stir once more before serving.
Showtime: Serving Your Masterpiece
This salsa’s a total social butterfly! Serve it in a colorful bowl with sturdy tortilla chips for dipping – I love blue corn chips for contrast. For a main event, pile it high on grilled shrimp tacos, flaky white fish, or citrus-marinated chicken. It’s killer on breakfast too – try it with huevos rancheros or avocado toast. Garnish with extra cilantro leaves and lime wedges for that “wow” factor. Pro plating tip: Use a slotted spoon if there’s excess juice (save it for marinades!).
Shake It Up: 5 Fun Twists
Customize your salsa adventure with these riffs:
- Fiery Fiesta: Add ½ tsp smoked paprika + 1 minced serrano pepper.
- Protein Power: Fold in 1 cup cooked black beans or grilled corn kernels.
- Tropical Swap: Replace mango with diced pineapple or peaches.
- No-Onion Nirvana: Substitute diced cucumber for red onion.
- Creamy Dream: Stir in ¼ cup crumbled cotija cheese or vegan feta.
Beau’s Backstage Notes
This salsa’s been on quite the journey! Originally, I made it with just mango and avocado until my kid knocked a bell pepper into the bowl – best kitchen accident ever! Now I add peppers for crunch. True story: I once brought it to a potluck where someone mistook it for dessert and ate it with a spoon (no regrets!). Over time, I learned two game-changers: 1) Cutting everything similar sizes makes each bite perfect, and 2) Adding lime to avocado FIRST keeps it gorgeously green. It’s evolved, but the soul remains – fresh, joyful, and ridiculously easy. Make it your own!
Salsa SOS: Your Questions Answered
Q: My avocados turned brown! How do I prevent this?
A: Acid is your avocado’s BFF! Toss diced avocado immediately with lime juice before mixing. If prepping ahead, press plastic wrap directly onto the salsa surface to limit air exposure. Still some browning? Just stir – it’s usually only surface-deep!
Q: Can I make this ahead for a party?
A: Absolutely! Prep ingredients separately: Store diced avocado (tossed in lime) and mango in airtight containers for up to 24 hours. Combine everything 30 mins before serving. Avoid freezing – textures get weird.
Q: Help! My salsa turned too watery.
A: No stress! Drain excess liquid with a slotted spoon. Next time, pat diced mango dry if using frozen, and seed your tomatoes if adding them. For thicker texture, add 2 tbsp finely chopped jicama.
Q: I’m not a spicy food fan. How do I adjust heat?
A: Skip jalapeño seeds/membranes (that’s where the heat lives), or use ½ a pepper. For zero heat, substitute diced cucumber or jicama. Always taste your jalapeño first – heat levels vary wildly!

MANGO AVOCADO SALSA
- Total Time: 10 minutes
Description
Hey foodie friends! Beau here, and today I’m handing you the keys to a quick escape—in salsa form. This Mango Avocado Salsa is vibrant, fresh, and wildly addictive. We’re talking golden mango cubes dancing with creamy avocado, sweet bell pepper crunch, a zing of lime, and just enough jalapeño to keep things interesting.
Ingredients
-
2 ripe mangos, diced
✨Tip: Ataulfo/Champagne mangos are ideal—smooth, sweet, and no stringy fibers. -
2 ripe avocados, diced
✨Tip: Toss with lime right away to prevent browning! -
1 red bell pepper, diced
(Yellow/orange work too—bring the rainbow!) -
¼ red onion, finely diced
(Soak in ice water 5 min if you want it milder) -
1 jalapeño, finely chopped
(Seed for mild, leave seeds for kick) -
¼ cup chopped fresh cilantro
(Not a fan? Sub with parsley or basil.) -
Juice of 1 lime
(Fresh is best. Roll before juicing to get max juice.) -
Pinch of sea salt
(Maldon or kosher salt makes flavors pop)
Instructions
1. Dice & Prep (5–7 min)
-
Cube mango and avocado into ½” pieces.
-
Toss avocado in half the lime juice to keep it vibrant.
-
Dice bell pepper and red onion; mince jalapeño.
-
Roughly chop cilantro, stems and all.
2. Mix with Care (2–3 min)
-
In a large bowl, gently combine mango, avocado, bell pepper, onion, jalapeño, and cilantro.
-
Add remaining lime juice and a pinch of salt.
-
Fold gently with a spatula—no mashing!
-
Taste and adjust: More lime? More salt? More fire?
3. Chill (Optional – 10 min)
Let it rest in the fridge to let the flavors mingle. Stir again before serving.
Notes
-
Cut fruit/veg similar size = better texture & flavor in every bite.
-
Lime juice on avocado early = no sad browning.
-
Use a slotted spoon to serve if juice builds up.
-
Don’t overmix—chunky > mushy every time.
-
Best served fresh, but it keeps well 24 hrs if airtight.
- Prep Time: 10 minutes
Nutrition
- Calories: 140 Ca Per ¼ of recipe
- Fat: 9g
- Carbohydrates: 16g
- Fiber: 5g
- Protein: 2g
Nutritional Perks (Because Balance!)
Per Serving (¼ recipe): Calories: ~140 • Carbs: 16g • Fiber: 5g • Fat: 9g (mostly heart-healthy monounsaturated!) • Protein: 2g • Vitamin C: 60% DV • Vitamin A: 25% DV
Note: Values are estimates. Avocado sizes vary!
Final Thoughts: More Than Just a Recipe
This Mango Avocado Salsa isn’t just a dish—it’s a vibe. It’s the crunch of a beachside lunch, the laughter of a family BBQ, and the quiet satisfaction of nailing the perfect bite. Whether you’re a kitchen newbie or a seasoned chef, its simplicity invites creativity. Swap mango for peaches, add a dash of Tajín, or toss in some quinoa for heft.
But perhaps its greatest power? Connection. Food is a universal language, and this salsa—with its global roots and crowd-pleasing flair—brings people together. So chop, taste, and adjust. Make it yours. And when you serve it, watch the room light up. After all, sunshine is best when shared.