
Garlic Bread Rolls
Garlic Bread Rolls: Your New Favorite Side Dish is Here!
Hey friends, Beau here from Feastical! Let’s talk about one of life’s greatest, simplest pleasures: the smell of garlic and butter hitting warm bread. Is there anything that makes a house feel more like a home? I’m convinced it’s impossible to be in a bad mood when that aroma is wafting from your oven. It’s a universal signal that something seriously delicious is about to go down.
Today, we’re not just making garlic bread; we’re leveling it up. We’re creating the ultimate, irresistible, pull-apart Garlic Bread Rolls. Imagine this: soft, fluffy, cloud-like dinner rolls, each one infused with a savory, garlicky, buttery glaze, baked until they’re golden brown and begging to be pulled apart. They’re the love child of your favorite restaurant’s garlic bread and a classic, comforting dinner roll. They’re perfect for sopping up pasta sauce, essential next to a hearty salad, and honestly, they’re a meal all on their own when you just need a little carb-loaded hug.
This recipe is my go-to for a reason. It’s incredibly approachable, whether you’re a kitchen newbie or a seasoned pro. We’re using a fantastic shortcut (pizza dough!) to get these beauties on your table with minimal fuss and maximum flavor. So, tie on your favorite apron, grab your trusty baking dish, and let’s make some magic happen. These garlic bread rolls are about to become the star of your dinner table.
The First Bite: A Garlicky Love Story
This recipe takes me right back to my grandma’s kitchen. Sunday dinners at her house were a sacred tradition—a chaotic, beautiful, and incredibly loud affair with aunts, uncles, and cousins spilling out of every room. The centerpiece was always a giant pot of her famous spaghetti and meatballs, but for me, the real star was the bread.
She’d take these humble, store-bought rolls, split them open, and slather them with a mysterious mixture of butter, garlic powder, and a few herbs she’d never reveal. She’d toast them in her ancient oven until the edges were crisp and the butter was bubbling. The fight for the last one was a competitive sport among us cousins. It wasn’t fancy, but it was everything. It was the taste of family, of comfort, of being together.
These garlic bread rolls are my homage to her. I’ve taken that core memory of flavor and texture and baked it into something even more shareable and fun. It’s that same soul-warming feeling, but now we all get to pull apart our own piece of the loaf. It’s a recipe built not just on ingredients, but on nostalgia, and I can’t wait for you to make your own memories with it.
Gathering Your Garlicky Arsenal
One of the best things about this recipe is the short and sweet ingredient list. You probably have most of this in your kitchen right now! Here’s what you’ll need to create these little pockets of joy.
- 1 lb pizza dough (store-bought or homemade): This is our superstar shortcut! Using pre-made pizza dough saves so much time and effort. You can find it in the refrigerated section of most grocery stores. If you’re feeling ambitious, by all means, use your favorite homemade dough! The beauty is in the flexibility.
- 4 tbsp unsalted butter, melted: Unsalted is key here, folks. It lets us control the salt level perfectly. We’re melting it down to create our flavor-infused glaze. This is the rich, decadent base that makes everything glorious.
- 2–3 garlic cloves, minced: Fresh is best! Please, please use fresh garlic. The pre-minced stuff in a jar just doesn’t deliver the same potent, aromatic punch. Mince it finely so it distributes evenly and doesn’t burn. For true garlic lovers, lean towards 3 cloves!
- 1 tbsp fresh parsley, chopped (or 1 tsp dried): This adds a pop of color and a fresh, slightly peppery flavor that cuts through the richness of the butter. If you’re using dried, it’s totally fine—it’s what my grandma used! But if you have fresh on hand, it really brightens up the final dish.
- ½ tsp salt: This is crucial for balancing and enhancing all the other flavors. I use fine sea salt. If you’re using salted butter, you might want to reduce this to a ¼ teaspoon.
- ¼ cup grated Parmesan cheese (optional): I say “optional,” but in my kitchen, it’s mandatory. A sprinkle of good Parmesan right at the end adds a salty, nutty, umami kick that takes these rolls into the stratosphere. Feel free to use the pre-grated kind for convenience, but freshly grated from a wedge will melt and taste even better.
Let’s Get Baking: Building Your Garlic Masterpiece
Ready to transform these simple ingredients into golden perfection? Follow these steps, and you’ll be a garlic bread roll hero in no time. I’ve packed this section with all my favorite chef hacks to ensure your success!
Step 1: Prep Your Stage. First things first, preheat your oven to 375°F (190°C). This is our sweet spot—hot enough to get a beautiful golden-brown crust and cook the dough through, but not so hot that our garlic burns. While it’s heating, grab a round 9-inch baking dish or a 10-inch cast iron skillet. Give it a light coating with butter, oil, or a quick spritz of non-stick spray. This prevents any sticking and helps those bottoms get beautifully crisp.
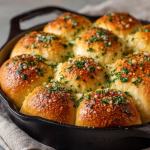
Step 2: Shape Your Rolls. Take your pizza dough and place it on a lightly floured surface. No need to knead it! Just gently pat it into a rough rectangle. Using a sharp knife or a bench scraper (my personal favorite tool for this), divide the dough into 12 equal pieces. Don’t stress about them being perfectly identical—rustic is charming! Now, take each piece and roll it between your palms to form a smooth ball. This creates a nice, tight surface tension, which helps them rise upwards and bake evenly. Arrange them in your prepared dish, placing them close together but not squished. They should just be touching. This is the secret to getting that amazing pull-apart effect!
Step 3: The Patient Rise. Loosely cover the baking dish with a clean kitchen towel or a piece of plastic wrap. Let the dough balls rest and rise in a warm, draft-free spot for about 20-30 minutes. You’ll know they’re ready when they look slightly puffy and have snuggled up against each other. This short rest makes them extra light and tender.
Step 4: Create the Garlic Butter Elixir. While the dough is resting, make the magic potion! In a small bowl, combine the melted butter, finely minced garlic, chopped parsley, and salt. Give it a good whisk. Take a deep breath—that right there is the scent of happiness. If you’re adding Parmesan, hold it for now; we’ll use it at the very end.
Step 5: The First Butter Bath. Once your rolls have puffed up, it’s time for their first buttery shower. Using a pastry brush, gently brush half of the garlic butter mixture over the tops of the rolls. Get in between the cracks a little bit! This initial layer soaks into the dough as it bakes, infusing it with garlic flavor from the inside out.
Step 6: Bake to Golden Perfection. Pop the dish into your preheated oven and bake for 20-25 minutes. You’re looking for a deep, golden-brown top and a sound that’s more hollow than doughy when you tap the top. If you have an instant-read thermometer, the internal temperature should read between 190-200°F (88-93°C).
Step 7: The Grand Finale Glaze. This is the most important step! As soon as you pull the rolls out of the oven, immediately brush them with the remaining garlic butter. The heat of the fresh-out-of-the-oven rolls will sizzle and welcome that second layer, creating an incredible glossy finish and an explosive final hit of garlic flavor. Now, if you’re using it, sprinkle that Parmesan cheese over the top. It’ll stick perfectly to the butter and get a little melty.
How to Serve These Garlicky Clouds
You’ve done it! Now, the best part: serving them. For the full experience, serve these garlic bread rolls warm, right from the baking dish. Place the whole dish in the center of the table and let everyone pull apart their own roll—it’s interactive and fun! They are the ultimate sidekick to a big bowl of spaghetti and meatballs, a creamy soup, or a fresh garden salad. Honestly, they’re so good they can stand alone with a little marinara sauce for dipping. For a next-level brunch move, split one open and make a mini breakfast sandwich with scrambled eggs and bacon. The possibilities are endless!
Mix It Up: Your Rolls, Your Rules!
The basic recipe is a perfect classic, but feel free to get creative and make it your own! Here are a few of my favorite twists:
- Cheesy Stuffed: Before rolling the dough into balls, place a small cube of mozzarella or a teaspoon of shredded cheddar in the center and seal the dough around it. You’ll get a glorious, melty, cheesy surprise in the middle!
- Herb Garden: Add ½ teaspoon of dried Italian seasoning or a tablespoon of fresh chopped chives and basil to the butter mixture along with the parsley.
- Spicy ‘Nduja: For a kick, whisk a tablespoon of ‘nduja or a pinch of red pepper flakes into the melted butter. It adds a incredible spicy, porky depth.
- Everything Bagel: Right after the final butter brush, sprinkle the tops generously with everything bagel seasoning instead of Parmesan.
- Vegan Friendly: Super easy swap! Use a vegan pizza dough (check the label), vegan butter, and skip the Parmesan or use a plant-based alternative.
Beau’s Chef Notes & Kitchen Stories
This recipe has evolved so much since my first attempt, which I can tell you was a comedic disaster. I once, in a hurry, tried to skip the melting step and just mix cold butter with garlic. It was… chunky. And not in a good way. I’ve learned that melted butter is non-negotiable for that perfect, even coverage.
Another time, I got overzealous with the garlic and used five giant cloves. Let’s just say we had the whole house to ourselves that night—even the dog left the room! I’ve found that 2-3 is the perfect balance of flavor without venturing into vampire-repelling territory.
The biggest game-changer for me was discovering the double-brush technique. Brushing once before baking infuses the flavor, and brushing right after baking creates that irresistible glossy top and fresh garlic aroma. Don’t skip it! This recipe is forgiving, fun, and meant to be shared. I hope it finds its way into your regular rotation and creates some fantastic kitchen memories for you, just like it has for me.
Your Garlic Bread Roll Questions, Answered!
Q: Can I make these ahead of time?
A: Absolutely! You have two great options. 1) Prep the night before: Assemble the rolls in the baking dish, cover tightly with plastic wrap, and refrigerate overnight. The next day, let them sit on the counter for about 30 minutes to take the chill off before brushing with butter and baking. They might need a minute or two longer in the oven. 2) Freeze after baking: Bake them completely, let them cool, then freeze in a zip-top bag. Reheat in a 350°F (175°C) oven for 10-15 minutes until warm.
Q: My garlic burned and tasted bitter! What happened?
A: Ah, the classic garlic burn. This usually happens if the garlic is too large or if the oven is too hot. The key is to mince it very finely so it can cook gently in the butter without burning. Using a lower oven temperature (375°F is perfect) also prevents it. If you’re really worried, you can gently cook the minced garlic in the melted butter for just 30 seconds on the stovetop before adding the parsley and salt. This mellows the flavor and makes it even more resistant to burning.
Q: My rolls didn’t puff up much. Why?
A: This is almost always due to the dough being too cold or not getting enough rest. Make sure your dough is at room temperature when you start shaping it. Also, ensure your rising spot is nice and warm (on top of the preheating oven is a great spot). If your kitchen is chilly, the rise will just take a little longer. Be patient and wait until you see them visibly puff up.
Q: Can I use garlic powder instead of fresh?
A: You can, but the flavor profile will be different. Fresh garlic gives a sharper, more aromatic punch. Garlic powder provides a more mellow, all-over garlic flavor. If you use powder, I’d recommend about 1 to 1.5 teaspoons. Mix it directly into the melted butter.
Garlic Bread Rolls
Description
Hey friends! Beau here. These soft, buttery rolls are infused with garlic and herbs, baked golden, and perfect for pasta, soups, salads, or just enjoying on their own.
Ingredients
-
1 lb pizza dough (store-bought or homemade)
-
4 tbsp unsalted butter, melted
-
2–3 garlic cloves, minced
-
1 tbsp fresh parsley, chopped (or 1 tsp dried)
-
½ tsp salt
-
¼ cup grated Parmesan cheese (optional)
Instructions
1. Prep
-
Preheat oven to 375°F (190°C).
-
Grease a 9-inch round baking dish or 10-inch cast iron skillet.
2. Shape Rolls
-
On a lightly floured surface, pat dough into a rectangle.
-
Cut into 12 pieces, roll each into a ball, and place close together in the dish.
3. Let Rise
-
Loosely cover and let rise 20–30 min in a warm spot until puffy.
4. Make Garlic Butter
-
Combine melted butter, garlic, parsley, and salt in a small bowl. Set aside (reserve half for after baking).
5. First Butter Bath
-
Brush half the garlic butter over rolls, getting into the cracks.
6. Bake
-
Bake 20–25 min until golden brown and hollow-sounding when tapped.
7. Finish
-
Brush with remaining garlic butter while hot.
-
Sprinkle Parmesan if using. Serve warm and pull apart.
Notes
-
Cheesy Stuffed: Place a cube of mozzarella or teaspoon of cheddar inside each roll before shaping.
-
Herby: Add dried Italian seasoning or fresh chives/basil to the butter mixture.
-
Spicy: Mix in 1 tbsp ‘nduja or red pepper flakes.
-
Everything Bagel: Sprinkle seasoning instead of Parmesan.
-
Vegan: Use vegan dough and butter; skip or substitute Parmesan.
Nutrition
- Calories: 170 kcal per roll
- Sugar: 1g
- Fat: 7g
- Saturated Fat: 3.5g
- Protein: 4g
Nutritional Information*
Yield: 12 Rolls | Serving Size: 1 Roll
Calories: ~170 | Total Fat: 7g | Saturated Fat: 3.5g | Carbohydrates: 22g | Sugar: 1g | Protein: 4g | Sodium: 240mg
*Please note: This is an estimated nutritional breakdown based on the ingredients used. It will vary if you make substitutions. This information is provided as a courtesy from a recipe calculator and should not be considered a guarantee.
Final Thoughts: Pass the Rolls, Please!
And there you have it! From a simple ball of pizza dough to a glorious, golden, pull-apart masterpiece that’s going to have everyone asking for seconds.
These garlic bread rolls are more than just a side dish; they’re a experience. They’re about the joy of pulling apart a warm, buttery roll and sharing that moment with the people you love. They’re proof that the most memorable recipes aren’t always the most complicated ones—they’re the ones made with a little shortcut and a whole lot of heart.
I hope this recipe finds its way onto your table for countless weeknight dinners, festive holiday feasts, and everything in between. I hope it becomes your new secret weapon, your go-to comfort food, and a recipe that you’re excited to pass on.

Lemon Curd Cake
Sunshine on a Plate: My Ultimate Lemon Curd Cake
Hey friend, Beau here! Is there anything better than a cake that tastes like a burst of sunshine? You know the one—it’s bright, it’s tangy, and it has this incredible way of making everything feel just a little bit brighter. If you’re craving a slice of pure, citrusy joy, you’ve landed on the right recipe. Today, we’re diving headfirst into my all-time favorite Lemon Curd Cake.
This isn’t just any cake. This is a masterpiece of textures and flavors. We’re talking about a supremely soft, buttery vanilla cake that’s so moist it practically melts in your mouth. And nestled right in the middle? A layer of lush, silky, homemade lemon curd that’s the perfect balance of sweet and spectacularly tart. It’s the kind of dessert that gets people talking, asking for the recipe, and sneaking back into the kitchen for just one more sliver.
Whether you’re planning a spring brunch, need a show-stopping dessert for a gathering, or are simply treating yourself to a well-deserved pick-me-up (my favorite reason to bake), this lemon curd cake is your answer. It looks fancy but I promise, it’s built on simple, feel-good techniques. So, tie on your favorite apron, grab your mixing bowl, and let’s bake up some happiness together.
The Lemon Tree in Nana’s Yard
This recipe always takes me right back to my Nana Collier’s backyard in Florida. She had this massive, gnarly old lemon tree that seemed to produce fruit year-round. As a kid, I’d visit in the summer, and the scent of those sun-warmed lemons would hit you the second you stepped out of the car. It’s a smell I forever associate with pure, simple happiness.
Nana wasn’t a fancy baker, but she was a brilliant one. Her version of this cake was a simple loaf, swirled with a jar of lemon curd from the store. She’d serve it still slightly warm from the oven, with a dusting of powdered sugar that would melt into little snowy craters on the golden crust. We’d eat it on her screened porch, listening to the cicadas, with sticky fingers and happy smiles. This cake is my homage to her—a slightly fancied-up version of that memory. It’s my way of capturing that sunshine and sharing it with you.
Gathering Your Sunshine: The Ingredients
Great cakes start with great ingredients! Here’s everything you’ll need to create this zesty masterpiece. Don’t worry—I’ve packed this section with all my best chef insights and substitution hacks to make it foolproof.
For the Lemon Curd (The Heart of the Operation!):
- 3 large egg yolks – These are the rich, silky foundation of your curd. Save the whites for a healthy omelet or a whiskey sour later!
- ½ cup granulated sugar – Sweetens and balances the intense tartness of the lemon.
- ¼ cup fresh lemon juice – Chef’s Insight: Please, for the love of all that is good and zesty, use fresh-squeezed juice! The bottled stuff just doesn’t have the same bright, vibrant flavor. You’ll need about 2 large lemons.
- 1 tbsp lemon zest – This is where the powerful lemon oil lives. Zesting is my favorite kitchen aromatherapy.
- 4 tbsp unsalted butter, cubed – Added off the heat, this gives the curd its luxurious, velvety texture and rich flavor.
For the Cake (The Fluffy Cloud):
- 1 cup (2 sticks) unsalted butter, softened – Chef’s Hack: “Softened” means cool to the touch but your finger can leave a gentle indent. NOT melted. This is key for creaming and creating a light, airy crumb.
- 1 ½ cups granulated sugar – The perfect amount of sweetness to complement the tangy curd.
- 4 large eggs, at room temperature – Room temp eggs incorporate into the batter much more smoothly, leading to a better rise and texture.
- 1 tbsp lemon zest – We’re packing lemon flavor into every single component!
- 2 tbsp fresh lemon juice – A little extra zing in the batter itself.
- 2 ½ cups all-purpose flour – The workhorse of the cake. For a lighter cake, you can swap ½ cup with cake flour.
- 2 ½ tsp baking powder – Our leavening agent. Make sure it’s fresh for a good rise!
- ½ tsp salt – Never skip the salt! It balances the sweetness and enhances all the other flavors.
- 1 cup whole milk, at room temperature – Whole milk gives the best richness and moisture. A great dairy-free sub is full-fat canned coconut milk (shaken first!).
Let’s Get Baking: The Step-by-Step Guide
Alright, team! Let’s walk through this together. I’ve broken it down into simple, manageable steps with all my favorite kitchen hacks sprinkled throughout. You’ve got this!
Step 1: Make the Lemon Curd (Do This First!)
We start with the curd so it has plenty of time to cool down and thicken up while we make the cake.
In a medium saucepan (non-reactive, like stainless steel, is best), whisk together the 3 egg yolks, ½ cup sugar, ¼ cup lemon juice, and 1 tbsp lemon zest until smooth. Place the pan over medium heat and start whisking. And I mean whisking. Don’t stop! You’re preventing the eggs from scrambling.
After about 5-8 minutes, you’ll feel the mixture start to thicken. Keep going until it coats the back of a spoon, and when you run your finger through it, the line holds its shape. Immediately remove it from the heat and drop in your cubed butter. Whisk until all the butter has melted and the curd is silky smooth.
Chef’s Hack: For an ultra-smooth curd, pour it through a fine-mesh sieve into a bowl. This catches any tiny bits of cooked egg. Press plastic wrap directly onto the surface of the curd (this prevents a skin from forming) and pop it in the fridge to chill for at least an hour.
Step 2: Prep and Preheat
Preheat your oven to 350°F (175°C). This is non-negotiable for even baking! Grab two 8-inch round cake pans. Grease the bottoms and sides generously with butter or non-stick spray, then line the bottoms with a circle of parchment paper. This guarantees your cakes will release perfectly. Trust me, it’s a game-changer.
Step 3: Create the Cake Batter
In a medium bowl, whisk together your 2 ½ cups flour, 2 ½ tsp baking powder, and ½ tsp salt. This aerates the dry ingredients and ensures the baking powder is evenly distributed.
In the bowl of a stand mixer fitted with the paddle attachment (or a large bowl with a hand mixer), beat the softened butter and 1 ½ cups sugar together on medium-high speed for a full 3-5 minutes. Don’t rush this! You want it to become very pale, fluffy, and almost white. This “creaming” process is what gives the cake its light texture.
Scrape down the bowl. With the mixer on medium, add the 4 eggs, one at a time, beating well after each addition. Scrape the bowl again. Mix in the 1 tbsp lemon zest and 2 tbsp lemon juice.
Now, with the mixer on low, add the dry ingredients in three parts, alternating with the 1 cup of milk in two parts. Start and end with the dry ingredients. Mix until just combined—no more! Overmixing at this stage leads to a tough cake.
Step 4: Bake to Golden Perfection
Divide the beautiful batter evenly between your two prepared pans. I like to use a kitchen scale for perfect accuracy, but eyeballing it works too! Smooth the tops with a spatula.
Bake for 28-32 minutes, or until the cakes are golden, the edges just start to pull away from the pan, and a toothpick inserted into the center comes out clean or with a few moist crumbs.
Chef’s Hack: Avoid opening the oven door for the first 20 minutes to prevent the cakes from sinking.
Step 5: The All-Important Cool Down
Let the cakes cool in their pans on a wire rack for 15 minutes. Then, run a knife around the edge, invert them onto the rack, peel off the parchment paper, and let them cool completely. A warm cake will melt the curd and create a mess, so patience is key here!
Step 6: The Grand Assembly
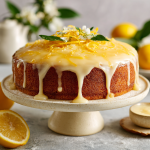
Place one cooled cake layer on your serving plate or cake stand. Give your now-thickened lemon curd a good stir. Spread the entire batch of lemon curd evenly over the top of this first layer, leaving a small border around the edge to prevent squishing out.
Gently place the second cake layer on top. And voila! You have a stunning, elegant naked cake. The beauty is in the simplicity.
How to Serve This Slice of Sunshine
This cake is gorgeous all on its own, but a little flair never hurt anybody! For a classic look, a light dusting of powdered sugar is simply elegant. If you’re feeling fancy, top it with a dollop of freshly whipped cream and a few thin slices of lemon or a sprinkle of extra zest. For a special occasion, a drizzle of a simple lemon glaze (just mix powdered sugar and lemon juice) takes it over the top. Serve it with a hot cup of tea or a cold glass of milk and watch those happy smiles appear.
Mix It Up! Fun Recipe Variations
This recipe is a fantastic canvas for your creativity! Here are a few of my favorite twists:
- Berry Bliss: Fold ¾ cup of fresh raspberries or blueberries into the cake batter for a burst of berry goodness.
- Lavender Lemon: Infuse the milk for the cake with 1 tbsp of culinary lavender by heating them together and letting it steep for 30 minutes before straining and cooling.
- Coconut Dream: Substitute the milk with canned coconut milk and add ½ cup of toasted coconut flakes to the batter for a tropical vibe.
- Gluten-Free Friend: Swap the all-purpose flour for a 1:1 gluten-free baking blend. My favorite brands work like a charm here.
- Lemon Meringue Cake: Skip the second cake layer! Pile the lemon curd onto the single layer and top with a fluffy, toasted meringue for a pie-inspired treat.
Beau’s Chef Notes & Kitchen Stories
This recipe has evolved so much from Nana’s simple loaf. I’ve tested it more times than I can count, and my friends have never complained about being official taste-testers! One time, I was so excited to bring it to a picnic that I assembled it in the car. Let’s just say a sudden stop led to a slightly… lopsided… cake. It was still delicious, but I learned my lesson about transport!
The biggest game-changer for me was learning to press plastic wrap directly on the curd. I used to skip this, and I’d end up with a weird rubbery skin on top. Now, it’s perfect every time. Also, using room temperature ingredients is the secret handshake of professional bakers. It truly makes a world of difference in the texture of your cake. Don’t stress, just plan ahead!
Your Questions, Answered (FAQs & Troubleshooting)
Q: Can I use store-bought lemon curd?
A: Absolutely! I’m all about working smarter, not harder. A good-quality store-bought jar (about 10-11 oz) will work perfectly and save you time. Homemade is a special treat, but no shame in the store-bought game!
Q: My curd isn’t thickening! What did I do wrong?
A> This usually means it didn’t get quite hot enough. Don’t panic! You can pour it back into the pan and cook it for a few more minutes over low heat, whisking constantly, until it thickens. If you’re really in a bind, a tiny pinch of cornstarch mixed with a teaspoon of cold water and whisked in can help rescue it.
Q: Why did my cake sink in the middle?
A: The most common culprits are: 1) The oven door was opened too early, letting out crucial heat. 2) The baking powder might be old and lost its potency (check the expiration date!). 3) The cake was underbaked. Use that toothpick test!
Q: Can I make this into cupcakes?
A: You sure can! Line a muffin tin with liners, fill them ⅔ full, and bake for 18-22 minutes. Once cooled, use a apple corer or a knife to carve out a little core from the top of each cupcake, fill with lemon curd, and replace the top bit. Frost with lemon buttercream!
Lemon Curd Cake
Description
Hey friends! Beau here. This cake is a burst of sunshine on a plate: soft, buttery vanilla cake with a luscious layer of tangy lemon curd in the middle. Perfect for brunch, gatherings, or a special treat, it looks fancy but is surprisingly simple to make.
Ingredients
Lemon Curd:
-
3 large egg yolks
-
½ cup granulated sugar
-
¼ cup fresh lemon juice (~2 lemons)
-
1 tbsp lemon zest
-
4 tbsp unsalted butter, cubed
Cake:
-
1 cup (2 sticks) unsalted butter, softened
-
1 ½ cups granulated sugar
-
4 large eggs, room temperature
-
1 tbsp lemon zest
-
2 tbsp fresh lemon juice
-
2 ½ cups all-purpose flour (or 2 cups AP + ½ cup cake flour for lighter crumb)
-
2 ½ tsp baking powder
-
½ tsp salt
-
1 cup whole milk, room temperature (or full-fat canned coconut milk for dairy-free)
Optional:
-
Powdered sugar, whipped cream, extra lemon slices for garnish
Instructions
1. Make Lemon Curd
-
In a medium saucepan, whisk egg yolks, sugar, lemon juice, and zest.
-
Cook over medium heat, whisking constantly until thick (coats the back of a spoon, ~5–8 min).
-
Remove from heat, add butter, whisk until smooth.
-
Optional: strain through a sieve, cover with plastic wrap directly on curd, chill ≥1 hr.
2. Prep Cake
-
Preheat oven to 350°F (175°C).
-
Grease two 8-inch round cake pans and line bottoms with parchment.
3. Make Cake Batter
-
Whisk flour, baking powder, and salt in a bowl.
-
Beat butter and sugar on medium-high 3–5 min until pale and fluffy.
-
Add eggs one at a time, beating well; mix in lemon zest and juice.
-
Add dry ingredients in 3 parts, alternating with milk in 2 parts. Mix until just combined.
4. Bake
-
Divide batter evenly between pans; smooth tops.
-
Bake 28–32 min until golden and toothpick comes out clean.
-
Cool 15 min in pans, then invert onto wire rack, remove parchment, cool completely.
5. Assemble Cake
-
Place one cake layer on serving plate.
-
Spread lemon curd evenly over top.
-
Place second layer on top.
-
Optional: dust with powdered sugar, top with whipped cream, lemon slices, or extra zest.
Notes
-
Store-Bought Curd: Fine to use 10–11 oz jar to save time.
-
Cake Sinking: Avoid opening oven early; check baking powder freshness.
-
Cupcakes: Bake 18–22 min; core tops to fill with curd.
-
Flavor Twists: Add berries, lavender, toasted coconut, or use a gluten-free flour blend.
Nutrition
- Calories: 360 kcal per slice
- Fat: 18g
- Carbohydrates: 44g
Nutritional Information*
Yield: 12 Slices
Serving Size: 1 slice
Calories: ~360
Fat: 18g
Saturated Fat: 11g
Carbohydrates: 44g
Sugar: 28g
Protein: 5g
Sodium: 180mg
*Please note: This is an estimate generated by an online calculator. Values can vary based on specific ingredients used.
Final Thoughts
And there you have it, my friend—a cake that’s pure, unadulterated sunshine, baked right in your own kitchen.
This Lemon Curd Cake is more than just a dessert; it’s a mood-lifter, a celebration of bright flavors, and a beautiful, shareable piece of joy. It proves that with a few simple steps and a handful of wholesome ingredients, you can create something truly magical that feels both special and comforting.
Whether you’re baking it to honor a sweet memory, to brighten a grey day, or simply to treat the people you love, I hope this cake brings as much happiness to your table as it has to mine. It’s a reminder that sometimes, the simplest pleasures—the zest of a lemon, the smell of a cake in the oven, a shared slice with a friend—are the sweetest ones of all.
Parmesan Bread Bites
Your New Go-To Party Snack Is Here!
Hey friends, Beau here from Feastical! Let’s be real for a second. Is there anything in this world better than the smell of warm, buttery, garlicky bread wafting through your kitchen? I’m gonna go out on a limb and say a hard, resounding nope. It’s the universal signal for “get in here, something amazing is about to happen.” And today, that amazing something is my utterly irresistible, dangerously easy, and wildly delicious Parmesan Bread Bites.
Imagine this: little golden pillows of pizza dough, baked until they’re puffed and perfect, then tossed in a garlic-herb butter bath and showered with a snowstorm of salty, nutty Parmesan cheese. They’re soft on the inside, slightly crisp on the edges, and absolutely bursting with flavor in every single bite. The best part? You’re literally about 25 minutes away from this reality, and I’m going to show you exactly how to make it happen.
Whether you’re gearing up for game day, hosting a last-minute book club, need a movie-night snack upgrade, or just… well, Tuesday, this recipe is your secret weapon. They’re snackable, shareable, and I promise you, they will vanish from the plate in minutes. So, grab your favorite baking sheet and let’s turn that dough into a little bit of magic.
The Little Bite That Started It All
This recipe takes me right back to my early days, just figuring things out in my first apartment kitchen. It was tiny, the oven was… questionable at best, and my budget was, let’s say, “creative.” But I loved having people over. The problem? I wanted to be out with my friends, not stuck in the kitchen all night playing a complicated recipe.
One night, a crew was coming over to watch the game, and I had a packet of store-bought pizza dough in the fridge staring me down. Inspiration struck. I chopped it up, baked the pieces, and drowned them in the only things I had: butter, a sad-looking shaker of garlic powder, and a wedge of Parm I’d been saving for a special occasion. They were a total hack job, but my friends absolutely lost their minds over them. They weren’t fancy, but they were made with a whole lot of heart and the simple joy of feeding people you love. That’s the spirit I’ve carried into every recipe here at Feastical, and it’s baked right into these little bites.
Gathering Your Flavor Arsenal
Part of what makes these bites so magical is their simplicity. You only need a handful of pantry staples to create pure snack-time bliss. Here’s your shopping list:
- 1 lb pizza dough (store-bought or homemade): This is your blank canvas! I always keep a ball of store-bought dough in the fridge for emergencies—it’s a total lifesaver. If you’re feeling ambitious, my easy homemade dough is fantastic here. Let it come to room temperature for about 30 minutes before you start; it’ll be much easier to work with.
- 3 tbsp unsalted butter, melted: The rich, glorious glue that holds all our flavor onto the bread. Using unsalted lets you control the sodium level, especially since Parmesan is already plenty salty. For a richer flavor, try using browned butter!
- ½ tsp garlic powder: I know, I know. “Fresh is best!” But trust me, for this application, garlic powder is the MVP. It distributes evenly and gives you that classic, almost nostalgic garlic bread flavor without any risk of burning. It’s our little chef secret.
- ½ tsp Italian seasoning: This little jar is a powerhouse of flavor. It’s the perfect blend of oregano, basil, thyme, and rosemary. If you don’t have a blend, just use ¼ tsp dried oregano and ¼ tsp dried basil.
- ¼ tsp salt: Just a pinch to enhance all the other flavors. If you’re using salted butter, you can probably skip this.
- ½ cup grated Parmesan cheese: Do not, I repeat, do not use the pre-shaken stuff in the green canister for this. Grab a wedge of real Parmigiano-Reggiano or a good-quality Parmesan and grate it yourself. The flavor and texture are a complete game-changer. It melts and clings to the bites so much better.
- Optional: chopped fresh parsley and dipping sauce (like marinara or ranch): The parsley adds a pop of fresh color and flavor at the end. And while these bites are incredible on their own, a side of warm marinara for dipping or some cool, creamy ranch is never a bad idea.
Let’s Get These Bites Baking!
Okay, team. Aprons on! This process is so simple and satisfying. Follow these steps, and you’ll be a Parmesan Bread Bite pro in no time.
- Preheat and Prep: Fire up that oven to 400°F (200°C). This is the perfect temperature to get our bites beautifully golden and cooked through without burning. While it’s heating, line a standard baking sheet with parchment paper. No mess, no sticking, no fuss. My kind of cleanup!
- Shape the Bites: Take your room-temperature pizza dough and place it on a clean, lightly floured surface. Using a sharp knife or a pair of kitchen shears (my personal hack!), cut the dough into roughly 1-inch pieces. Don’t stress about them being perfect spheres—rustic is charming! You can give them a quick roll between your palms to smooth them out a bit, but it’s not strictly necessary.
- Bake to Golden Perfection: Arrange your dough pieces on the prepared baking sheet. Give them a little space to breathe and puff up—they don’t need a ton of room, but they shouldn’t be touching. Pop them in the oven and bake for 12-15 minutes. You’re looking for them to be puffed up, light golden brown on top, and sound a little hollow if you tap them. Your kitchen is about to smell incredible.
- Mix the Flavor Bomb: While the bites are baking, it’s sauce time! In a medium-sized bowl big enough to hold all your bites, melt the butter. Whisk in the garlic powder, Italian seasoning, and salt until it’s a beautifully fragrant, herb-speckled liquid gold.
- The Warm Toss: This is the most important step! As soon as those bites come out of the oven, carefully add them to the bowl with the butter mixture. Use a spatula or a big spoon to gently toss them until every single nook and cranny is coated in that gorgeous, garlicky butter. Doing this while they’re piping hot helps them soak up all that flavor.
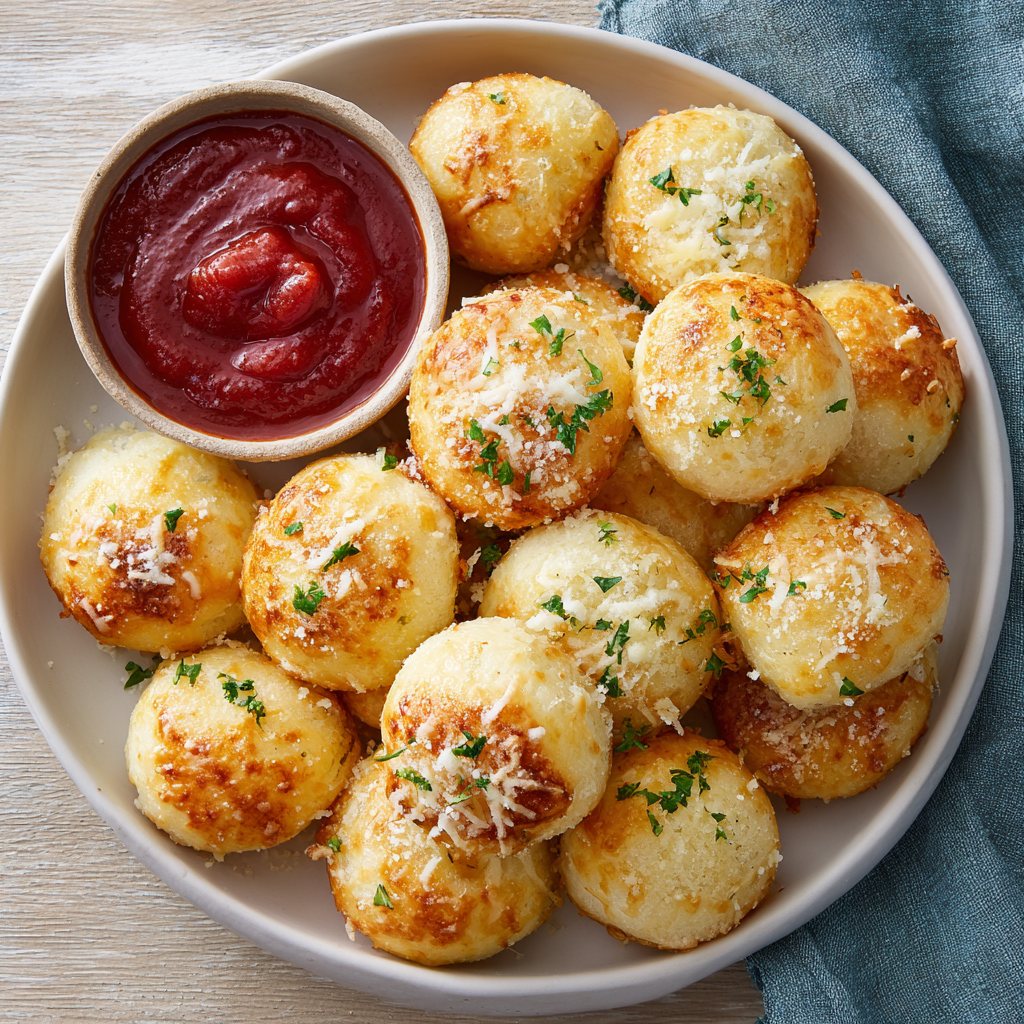
- The Cheesy Finale: Immediately after tossing, sprinkle your freshly grated Parmesan cheese over the warm bites. Toss one more time to distribute the cheese evenly. The residual heat will gently melt the cheese, creating a delicious, slightly creamy, slightly crispy coating that is just… *chef’s kiss*.
How to Serve ‘Em Up!
Transfer your masterpiece to a serving platter. Give them a final flourish with a sprinkle of chopped fresh parsley for that beautiful color contrast. Pile them high and stick a couple of small bowls in the center for marinara, ranch, or even a spicy marinara for dipping. Honestly, they’re so good they don’t even need a dip, but it’s a fun addition. Serve them warm and watch the happy chaos ensue!
Mix It Up! Endless Flavor Possibilities
The beauty of this recipe is its adaptability. Once you master the basic formula, the flavor world is your oyster! Here are a few of my favorite twists:
- Everything Bagel: Swap the Italian seasoning and Parmesan for everything bagel seasoning. It’s a savory, salty, sesame-seed-loaded dream.
- Three-Cheese Garlic: Add 2 tablespoons of grated mozzarella and 2 tablespoons of grated asiago cheese to the Parmesan for an ultra-cheesy, stretchy situation.
- Spicy ‘Nduja: For the spice lovers! Finely chop a tablespoon of spicy ‘nduja or soppressata and mix it right into the melted butter before tossing.
- Veggie-Packed: Add some finely chopped sun-dried tomatoes or a handful of fresh spinach (finely chopped) to the dough before you cut and bake it.
- Dairy-Free/Vegan: Use your favorite vegan pizza dough, vegan butter, and a high-quality vegan Parmesan cheese alternative. It works like a charm!
Beau’s Chef Notes & Kitchen Stories
This recipe has evolved from my “questionable oven” days. I’ve learned that letting the dough truly come to room temp is the difference between easy-to-shape dough and a frustrating sticky situation. If you’re in a hurry, you can gently warm the dough (still in its bag) by placing it in a bowl of warm water for 10-15 minutes.
One time, I was filming these for a video and got a little too enthusiastic with my tossing. I sent a rogue, butter-soaked bread bite flying across the kitchen. It hit the wall with a soft *thud* and left a perfect buttery smear. My dog, Gus, thought it was the best day of his life. So, maybe toss with a little less vigor than I did! The recipe has stuck, but my tossing technique… still a work in progress.
Your Questions, Answered!
Q: My bread bites turned out a little dense. What did I do wrong?
A: This usually happens if the dough was too cold when you baked it, or if the pieces were packed too closely together on the pan. Room temp dough and a little breathing room are key for that perfect puff!
Q: Can I make these ahead of time?
A: You can prep the dough pieces and keep them covered on the baking sheet in the fridge for a few hours before baking. For the best experience, I recommend baking and serving them fresh. You can reheat leftovers in the air fryer or a 350°F oven for a few minutes to crisp them back up!
Q: My cheese is clumping and not sticking. Help!
A: This is almost always a temperature issue. The bites MUST be piping hot when you add the cheese. The heat helps it melt and adhere. If they’ve cooled down too much, the cheese will just fall off. Toss that Parmesan on ASAP!
Q: Can I use air fryer Parmesan bread bites?
A: Absolutely! They work great in the air fryer. Arrange the dough bites in a single layer in your air fryer basket (you’ll likely need to work in batches). Air fry at 375°F for 6-8 minutes, shaking the basket halfway through, until golden brown. Then toss in the butter and cheese as usual.
Parmesan Bread Bites
- Total Time: 25 minutes
Description
Hey friends! Beau here. Nothing says “welcome” like warm, buttery, garlicky bread, and these Parmesan Bread Bites are snack perfection. Golden, fluffy on the inside, slightly crisp on the edges, and packed with flavor—they’re ready in about 25 minutes and guaranteed to disappear fast.
Ingredients
-
1 lb pizza dough (store-bought or homemade, room temp)
-
3 tbsp unsalted butter, melted
-
½ tsp garlic powder
-
½ tsp Italian seasoning
-
¼ tsp salt
-
½ cup freshly grated Parmesan cheese
-
Optional: chopped fresh parsley and dipping sauce (marinara, ranch)
Instructions
Preheat oven to 400°F (200°C). Line a baking sheet with parchment paper.
On a lightly floured surface, cut dough into roughly 1-inch pieces. Rustic shapes are fine. Place on the baking sheet with a little space between each.
Bake for 12–15 minutes until golden and puffed. They should sound slightly hollow when tapped.
While baking, melt butter in a medium bowl. Whisk in garlic powder, Italian seasoning, and salt.
Add hot baked bites to the butter mixture. Gently toss to coat. Immediately sprinkle with Parmesan cheese and toss again so it melts slightly.
Transfer to a serving platter. Optional: sprinkle chopped parsley and serve with dipping sauces. Best enjoyed warm.
Notes
-
Perfect Puff: Let dough come to room temperature before baking.
-
Cheese Stick: Bites must be hot when adding Parmesan.
-
Air Fryer Option: Air fry at 375°F for 6–8 min in a single layer.
-
Prep Ahead: Cut dough pieces and store covered in fridge; bake just before serving.
-
Flavor Variations: Everything Bagel seasoning, three-cheese mix, or spicy additions like ‘nduja.
- Prep Time: 10 minutes
- Cook Time: 12–15 minutes
Nutrition
- Calories: 190 kcal per 5-bite serving
- Sugar: 1g
- Fat: 8g
- Carbohydrates: 24g
- Protein: 6g
Quick Nutrition Note
Prep Time: 10 min | Bake Time: 15 min | Yield: About 30 bites
Serving Size: 5 bites | Calories: ~190 | Fat: 8g | Saturated Fat: 4g | Carbs: 24g | Sugar: 1g | Protein: 6g | Sodium: 320mg
*Please note: Nutritional information is an estimate and can vary based on the specific ingredients you use.
Final Thoughts: Your New Secret Weapon
And just like that, you’re armed with the recipe for the easiest, most crowd-pleasing snack on the planet. These Parmesan Bread Bites are proof that you don’t need a ton of time, money, or fancy ingredients to create something truly memorable and delicious. They’re the ultimate edible hug—warm, cheesy, garlicky, and made for sharing.
So the next time you’re staring into the fridge wondering what to make, remember that ball of pizza dough. In less than half an hour, you can transform it into pure magic. I hope these bites bring as much laughter and joy to your table as they have to mine over the years.
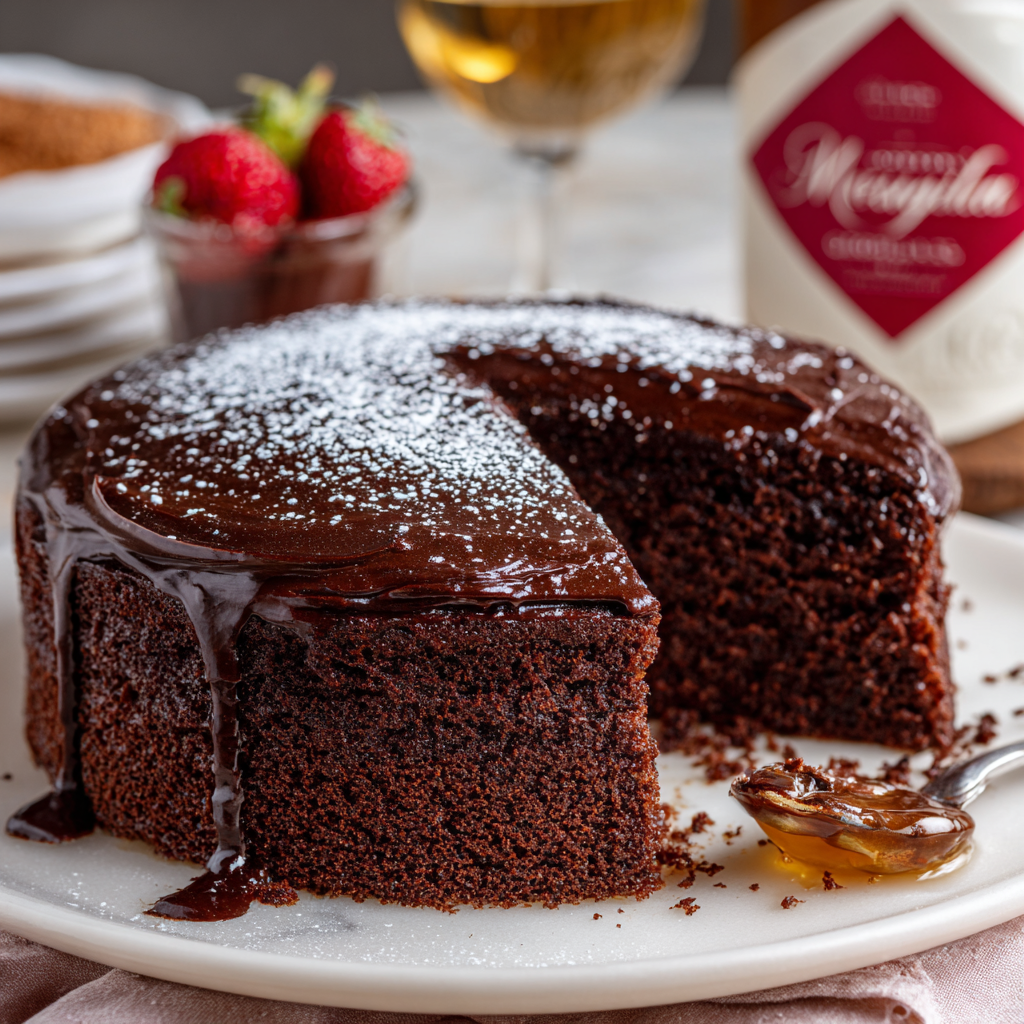
Moist Chocolate Cake
Your New Go-To Moist Chocolate Cake Recipe (Seriously, It’s a Game-Changer)
Hey friends, Beau from Feastical here! Let’s have a real talk for a second. Is there anything in this world more universally comforting, more celebratory, more downright soul-satisfying than a perfect slice of chocolate cake? I’m not talking about a dry, crumbly, “meh” piece of cake. I’m talking about the moist chocolate cake of your dreams. The kind that’s so deeply chocolatey, so tender, and so melt-in-your-mouth good that you have to close your eyes for a second after the first bite. The kind that makes you wonder if you should just eat it with a fork or if it’s socially acceptable to just dive in face-first.
Well, my foodie friends, that cake is right here. This isn’t just a recipe; it’s my kitchen workhorse, my secret weapon for birthdays, potlucks, and those “I just need chocolate cake NOW” moments. It’s incredibly simple to make, but the results are pure magic. We’re using a simple, one-bowl method (minimal cleanup for the win!) and one secret ingredient that takes the chocolate flavor to a whole new level. So, preheat that oven, grab your favorite mixing bowl, and let’s bake a cake that’s about to become a legend in your household. Get ready to fall in love.
The Cake That Started It All
This cake recipe takes me right back to my grandma’s kitchen. Her house always smelled like a beautiful mix of fresh linen, garden soil, and, without fail, something sweet baking in the oven. For every single birthday in our family, without exception, she would make her famous chocolate cake. It was a towering, glorious thing, slathered in a fudgy frosting that would crack when you cut into it.
I remember standing on a wobbly wooden stool, “helping” her by carefully pouring the flour while she held the measuring cup. My job was always to add the vanilla extract – a sacred duty I took very seriously. But the most vivid memory is of her adding a cup of hot, strong coffee to the batter. Little-kid me was horrified! “Coffee?! Grandma, that’s going to taste so bitter!” I’d protest. She’d just wink and say, “Trust me, Beau-Beau. It’s the magic.” And oh, was she right. That coffee doesn’t make the cake taste like coffee; it just makes the chocolate taste more like chocolate. It’s the ultimate kitchen trick, and it’s one I’ve carried with me ever since. Every time I make this cake, it’s like getting a warm, chocolatey hug from her.
Gathering Your Chocolate Dream Team
Here’s everything you’ll need to create this masterpiece. The beauty of this list is its simplicity – you probably have most of this in your pantry right now! Let’s break it down.
- 1 ¾ cups all-purpose flour: The sturdy foundation of our cake. For a slightly lighter crumb, you can sift it first, but it’s not totally necessary. For a gluten-free swap, a 1:1 GF baking blend works wonderfully here.
- ¾ cup unsweetened cocoa powder: This is where the magic starts! Use a good-quality cocoa powder for the best, richest flavor. I’m a huge fan of Dutch-processed cocoa for its deep, mellow flavor, but natural unsweetened cocoa works perfectly too.
- 2 cups granulated sugar: Sweetens the deal and helps create that beautifully tender crumb.
- 1 ½ tsp baking powder & 1 ½ tsp baking soda: Our dynamic leavening duo! They work together to give this cake its impressive rise and airy texture. Make sure they’re not expired for maximum lift.
- 1 tsp salt: Do not skip this! Salt is the flavor enhancer that makes all the chocolatey goodness pop and prevents the cake from tasting flat.
- 2 large eggs: They should be at room temperature to incorporate better into the batter, giving the cake structure and richness.
- 1 cup whole milk: The fat content in whole milk adds incredible moisture and tenderness. For a dairy-free version, unsweetened almond or oat milk are great substitutes.
- ½ cup vegetable oil: Oil, unlike butter, keeps this cake supremely moist and soft for days. Canola or a light olive oil also work.
- 2 tsp vanilla extract: The classic flavor backbone that complements the chocolate so well.
- 1 cup boiling water & 1 cup hot brewed coffee: Here’s the secret weapon! The hot liquid “blooms” the cocoa powder, intensifying its flavor. The coffee is the ultimate enhancer – it makes the chocolate taste richer and deeper without a trace of coffee flavor. If you’re avoiding caffeine, just use all boiling water.
Let’s Bake! Your Step-by-Step Guide to Cake Victory
Don’t let the number of steps fool you—this process is a breeze. Read through once, then let’s get mixing!
Step 1: Prep Like a Pro. First things first, preheat your oven to 350°F (175°C). This is non-negotiable for even baking. Now, grab your two 9-inch round cake pans. My absolute best hack for ensuring a cake that releases perfectly every time? Line the bottoms with a circle of parchment paper, then grease the parchment and the sides of the pan with a little butter or baking spray, and finally dust it with a light coating of cocoa powder (instead of flour) to avoid any white spots on your beautiful chocolate cake. Set those aside.
Step 2: The Dry Team Assembles. In a large bowl—seriously, make sure it’s big enough for all the ingredients—whisk together your flour, cocoa powder, sugar, baking powder, baking soda, and salt. Give it a really good whisk for about a minute. This not only combines everything but also aerates the dry ingredients, which helps with our texture. Taste the air—it already smells amazing, right?
Step 3: The Wet Team Joins the Party. Now, make a well in the center of your dry ingredients and add in the eggs, milk, vegetable oil, and vanilla extract. Using a hand mixer (or a sturdy whisk and some serious elbow grease), beat everything together on medium speed for a full two minutes. This step is crucial for building the structure of the cake, so set a timer! The batter will be thick and glorously shiny.
4. The Secret Weapon: Hot Liquid. Here’s where things get interesting. Carefully pour in the boiling water and hot coffee. The batter will look thin and soupy. This is exactly what you want! Don’t panic. It’s this thin batter that steams in the oven, creating an unbelievably moist and tender crumb. Gently stir until the water is just combined. You’ll have a liquidy, pourable batter. Chef’s hack: I sometimes add the hot liquid in two batches to avoid any splashing.
Step 5: Bake to Perfection. Immediately pour the batter evenly into your prepared pans. I like to use a kitchen scale to ensure each pan has exactly the same amount of batter for even layers. Pop them into your preheated oven and bake for 30-35 minutes. Do NOT open the oven door before the 30-minute mark! The cakes are done when a toothpick inserted into the center comes out with a few moist crumbs clinging to it, or with just a tiny smear of melted chocolate. It shouldn’t have wet batter.
Step 6: The All-Important Cool Down. This is the hardest part: patience. Let the cakes cool in their pans on a wire rack for exactly 10 minutes. This allows them to set up enough to handle. Then, run a knife around the edge of each pan, invert them onto the wire rack, and carefully peel off the parchment paper. Let them cool completely before you even *think* about frosting. I’m serious! Frosting a warm cake is a one-way ticket to a melted, sliding mess. For a speed-up, you can pop them in the fridge for a bit once they’re no longer hot to the touch.
How to Serve This Beauty
Once your cakes are completely cool, the fun begins! For a classic look, slather a generous amount of chocolate fudge frosting or vanilla buttercream between the layers and all over the top and sides. I love a rustic, “naked cake” look where you can see a little of the cake through the frosting. Garnish with a sprinkle of flaky sea salt, some chocolate shavings, or a handful of fresh raspberries for a pop of color and tartness. A giant glass of cold milk or a hot cup of coffee is the only mandatory beverage pairing.
Mix It Up! Delicious Variations
This recipe is a fantastic blank canvas. Here are a few of my favorite ways to play with it:
- Mocha Madness: Add 1 teaspoon of instant espresso powder to the dry ingredients for an extra coffee kick.
- Chocolate Orange: Swap the vanilla extract for orange extract and add the zest of one orange to the batter for a bright, citrusy twist.
- Peppermint Patty: Add 1 teaspoon of peppermint extract to the batter and frost with a fluffy white mint frosting.
- “Cupcake” It: This batter makes about 24 perfect cupcakes. Just reduce the baking time to 18-22 minutes.
- Dairy-Free/Vegan: Use plant-based milk, swap the eggs for flax eggs (2 tbsp ground flaxseed + 6 tbsp water, let sit 5 mins), and use a vegan frosting. The oil already makes it dairy-free!
Beau’s Chef Notes & Kitchen Stories
This recipe has been with me for over a decade, and it’s evolved in tiny ways. I used to be a butter-only guy, but I was converted to the church of oil after realizing it genuinely creates a moister cake that stays soft for longer. The coffee tip is 100% from my grandma, and I will never, ever make a chocolate cake without it.
One time, I was filming a video for the blog and I was so busy chatting to the camera that I completely forgot to add the sugar. I baked it, frosted it, and took a bite live on camera… and my face must have been a picture. It was the most bitter, tragic hockey puck you’ve ever tasted. So learn from my mistake: always double-check your ingredients are in the bowl! It’s a tough lesson, but hey, even pros mess up. That’s what makes cooking real and fun.
FAQs & Troubleshooting: Your Questions, Answered
Q: My cake sunk in the middle! What happened?
A: Ah, the classic cake sink. This usually happens for one of three reasons: 1) The oven door was opened too early, causing a temperature drop before the structure had set. 2) The cake was underbaked. 3) There was too much leavening (baking soda/powder). Make sure your measurements are level and your baking agents are fresh!
Q: Can I make this cake ahead of time?
A: Absolutely! This cake actually tastes better the next day as the flavors have more time to meld. You can bake the layers, let them cool completely, wrap them tightly in plastic wrap, and store them at room temperature overnight or in the freezer for up to 3 months. Thaw overnight before frosting.
Q: The batter was so thin—is that normal?
A> YES! I promise. This is the most common thing people worry about, but it’s perfectly normal. That thin batter is the secret to its incredibly moist and tender texture. Trust the process.
Q: My cake is a little dry. What did I do wrong?
A> The most likely culprit is overbaking. Ovens can vary, so your cake might be done a few minutes before or after the recommended time. Start checking at the 30-minute mark. Also, be sure to measure your flour correctly—scooping directly from the bag can pack in too much flour. Instead, spoon the flour into your measuring cup and level it off.

Moist Chocolate Cake
Description
Hey friends! Beau here. If you’ve ever bitten into a dry chocolate cake and sighed in disappointment, today’s your redemption. This moist, deeply chocolatey cake is tender, melt-in-your-mouth delicious, and surprisingly easy to make. With a secret ingredient that amplifies the chocolate flavor (hint: it’s coffee), this recipe is perfect for birthdays, potlucks, or “I need chocolate NOW” moments.
Ingredients
Dry Ingredients:
-
1 ¾ cups all-purpose flour
-
¾ cup unsweetened cocoa powder
-
2 cups granulated sugar
-
1 ½ tsp baking powder
-
1 ½ tsp baking soda
-
1 tsp salt
Wet Ingredients:
-
2 large eggs, at room temperature
-
1 cup whole milk (or plant-based milk)
-
½ cup vegetable oil
-
2 tsp vanilla extract
Secret Weapon:
-
1 cup boiling water
-
1 cup hot brewed coffee
Instructions
Preheat oven to 350°F (175°C). Line two 9-inch round pans with parchment, grease, and dust lightly with cocoa powder.
In a large bowl, whisk together flour, cocoa, sugar, baking powder, baking soda, and salt. Aerating the dry mix helps make the cake fluffy.
Make a well in the center. Add eggs, milk, oil, and vanilla. Beat on medium speed for 2 minutes until shiny and smooth.
Carefully pour in boiling water and hot coffee. The batter will be thin—this is normal and ensures a moist, tender cake. Stir until just combined.
Divide batter evenly between pans. Bake 30–35 minutes. Check doneness by inserting a toothpick—it should come out with a few moist crumbs.
Cool cakes in pans for 10 minutes, then invert onto a wire rack and remove parchment. Let cool completely before frosting.
Notes
-
Even Layers: Use a kitchen scale to divide batter evenly.
-
No Coffee? Replace with hot water; chocolate flavor will still shine.
-
Faster Cooling: Once slightly cooled, refrigerate for 10–15 minutes.
-
Moisture Hack: Don’t overbake and measure flour correctly—spoon and level instead of scooping.
Nutrition
- Calories: 320 kcal (per slice
- Fat: 13g
- Saturated Fat: 2g
- Carbohydrates: 48g
- Protein: 4g
Nutritional Information (Per Slice, Unfrosted)
This is a rough estimate and will vary based on specific ingredients used.
Yield: 12 slices | Prep Time: 20 min | Bake Time: 35 min | Cool Time: 1 hr
Calories: ~310 | Fat: 12g | Saturated Fat: 2.5g | Carbohydrates: 47g | Sugar: 28g | Protein: 4g | Sodium: 280mg
Final Thoughts
And there you have it—the only chocolate cake recipe you’ll ever need. It’s a testament to the fact that the most legendary dishes are often the simplest ones, passed down through generations and perfected with love (and a little bit of coffee). This cake is more than just a dessert; it’s a promise of a good time, a reason to gather, and a guaranteed way to make any day feel a little more special.
Whether you’re celebrating a milestone, comforting a friend, or simply treating yourself after a long week, this cake is your answer. It’s forgiving, flexible, and foolproof. So, don your apron, embrace the magic, and get ready to make someone’s day with a single, sublime bite.
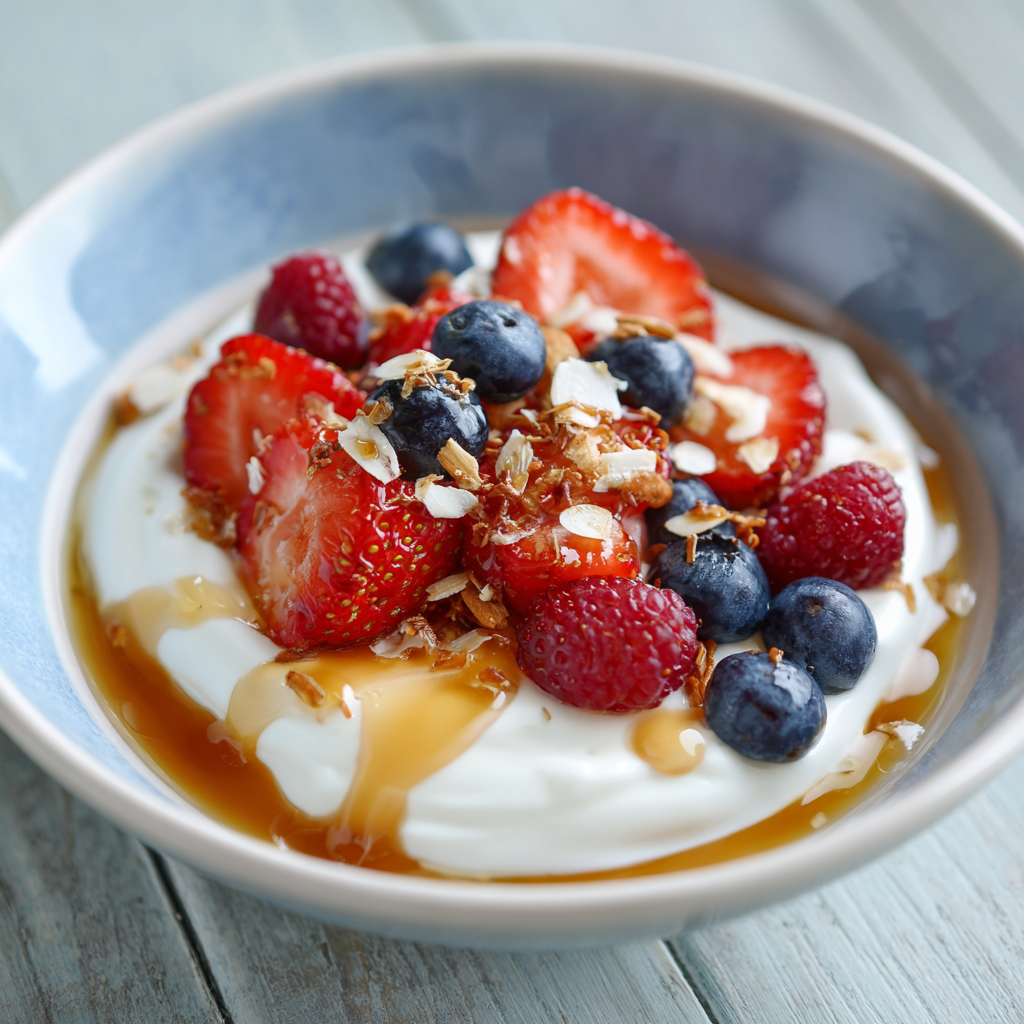
Greek Yogurt with Fruit & Honey
Your New Favorite Bowl of Sunshine: Greek Yogurt with Fruit & Honey
Hey there, friend! Beau here, welcoming you back to my kitchen at Feastical. Let’s be real for a second. We all have those days. You know the ones. You’re buzzing between meetings, shuttling kids to practice, or just trying to remember what day it is, and your stomach starts singing the hunger opera. You need something now—something that’s going to hit the spot, fuel your body, and not leave you crashing an hour later. You stare into the fridge, willing inspiration to strike.
Well, I’m here to tell you that the answer isn’t hiding in the back behind the pickles. It’s right there, front and center: a tub of creamy Greek yogurt. But we’re not just going to eat it plain with a sad spoon, are we? No way. We’re about to transform it into a masterpiece. We’re talking about a bowl of Greek yogurt with fresh, vibrant fruit and a golden drizzle of honey that is so much more than the sum of its parts. It’s a protein-packed power-up, a probiotic paradise, and a dessert-worthy treat all in one beautiful, simple bowl.
This isn’t just a “recipe”; it’s a foundation for creativity. It’s a five-minute project that feels like a warm hug for your soul. It’s naturally gluten-free, endlessly customizable, and so satisfying you’ll wonder why you ever reached for that processed snack bar. So, grab your favorite bowl—you know, the one that just *feels* right—and let’s make something delicious together.
A Little Slice of Heaven on a Hot Arizona Day
This dish takes me right back to my grandma’s porch in Phoenix. Summers there weren’t just hot; they were a full-blown atmospheric event. The kind of heat that makes the asphalt wavy and slows the whole world down to a crawl. After a morning of trying (and failing) to stay cool, my grandma would call me into her kitchen, which always smelled like lemons and sunshine.
She wouldn’t say much. She’d just pull out a small, chilled bowl. In it was the thickest, creamiest yogurt I’d ever seen, topped with peaches she’d picked up at the farmer’s market that were so ripe they were practically singing. A generous swirl of local honey went over the top—not a meager drizzle, mind you, a proper swirl. She called it “a little slice of heaven,” and she was right. That cool, tangy, sweet combination was pure magic. It wasn’t just food; it was a moment of peace, a break from the heat, and a whole lot of love served in a simple ceramic bowl. That’s the feeling I try to capture every single time I make this.
Gathering Your Sunshine Squad: The Ingredients
Here’s the beautiful part: you only need a few key players to make magic happen. But choosing the right ones makes all the difference. Let’s break it down.
- 1 cup Plain Greek Yogurt (2% or Whole Milk): This is your canvas. I highly recommend going for 2% or whole milk fat for ultimate creaminess and satisfaction. The fat carries flavor and makes it feel like a real treat. Chef’s Insight: “Plain” is crucial here—it lets you control the sweetness. Avoid pre-flavored yogurts; they’re often loaded with sugar.
- 1/2 cup Fresh Berries (strawberries, blueberries, raspberries): The burst of joy! Berries add a pop of color, a ton of antioxidants, and a lovely sweet-tart flavor. Substitution Tip: No fresh berries? Frozen work beautifully! Just thaw them in a sieve over a bowl—the juices that drain out make an incredible syrup to drizzle on top.
- 1-2 tsp Honey: The liquid gold! Honey adds natural sweetness and a floral complexity that sugar just can’t match. Chef’s Insight: The quality matters. If you can, source local raw honey. It’s not just a myth—it can help with seasonal allergies and tastes incredible.
- Optional: Sprinkle of Chia Seeds, Sliced Almonds, or Granola: The crunch crew! This is where you add texture and staying power. A tablespoon of chia seeds adds fiber and omega-3s, almonds give a satisfying crunch and healthy fats, and a sprinkle of granola makes it feel like dessert. Substitution Tip: Need it gluten-free? Just ensure your granola is certified GF. For a nut-free option, try sunflower seeds or pumpkin seeds!
Let’s Build the Perfect Bite: Step-by-Step
Okay, team! Let’s assemble our masterpiece. This is less about cooking and more about crafting an experience. Follow these steps for yogurt bowl perfection.
- The Foundation: Spoon your Greek yogurt into your bowl. Now, here’s a pro tip most people skip: give it a stir! Sometimes Greek yogurt can separate a tiny bit in the tub. Stirring it smooths it out and makes it extra creamy. Use the back of your spoon to make a nice, smooth surface for your toppings—it’s like frosting a cake!
- The Fruit Layer: Scatter your beautiful fresh fruit over the yogurt. Don’t just dump it in one clump! Distribute it evenly so you get a little fruit in every single bite. If you’re using strawberries, slice them. For blueberries or raspberries, just give them a quick rinse and pat dry. Chef’s Hack: If your fruit isn’t super sweet, toss the berries with a tiny pinch of sugar and let them sit for 5 minutes. This draws out their natural juices and creates a mini syrup.
- The Drizzle: Take your honey and drizzle it over the fruit and yogurt. Don’t be shy! I like to do a zig-zag pattern across the whole bowl. If your honey is too thick to drizzle (it happens!), just pop the jar in a bowl of warm water for a few minutes to loosen it up. Chef’s Commentary: This is where the art happens. That golden honey weaving through the white yogurt and bright red berries… it’s a thing of beauty.
- The Crunch Factor (Optional but Highly Recommended): This is your final flourish! Sprinkle your chosen crunch element—chia seeds, almonds, granola—over the top. Important hack: If you’re using granola and you know you might not eat it all right away, serve the granola on the side. This keeps it from getting soggy and maintains that perfect crunch until the very last spoonful.
And that’s it! You’ve just created a restaurant-quality, nourishing snack in under five minutes. See? I told you it was easy.
How to Serve This Bowl of Joy
Presentation is part of the fun! Serve this immediately in your favorite bowl to keep everything fresh and crisp. I’m a big believer that food tastes better in a bowl you love. For a fancy brunch or just to treat yourself, layer the ingredients in a tall parfait glass. Start with yogurt, then fruit, then a drizzle of honey, and repeat. You get beautiful layers and every spoonful is a perfect mix of everything. Pair it with a big mug of coffee for the perfect morning start or a cup of herbal tea for a calming afternoon pick-me-up.
Mix It Up! Your Creative Playground
The fun doesn’t stop with berries! This recipe is a blank canvas. Here are a few of my favorite twists:
- Tropical Vacation: Use mango and pineapple chunks. Substitute the honey with a drizzle of coconut cream and top with toasted coconut flakes.
- Apple Pie Delight: Sauté diced apples with a pinch of cinnamon until soft. Let them cool, then use them as your fruit topping. A sprinkle of oat-based granola completes the pie vibe.
- Chocolate Covered Strawberry: Hull and slice strawberries. Top the yogurt, then drizzle with melted dark chocolate instead of honey. Yes, it’s as good as it sounds.
- Savory-Sweet Twist: Sounds wild, but trust me. Use full-fat yogurt, top with sliced cucumbers, fresh dill, a pinch of sea salt, and then just a tiny, tiny drizzle of honey. It’s refreshing and complex.
Beau’s Chef Notes: A Few Parting Thoughts
This recipe has been with me for years, and it’s evolved in tiny ways. I used to just use whatever yogurt was on sale, but I’ve learned that splurging on a high-quality, local brand if you can find it is 100% worth it for taste and supporting small businesses. I also went through a phase of adding about ten different superfood seeds to the point where it tasted like I was eating a bird feeder. I’ve since learned that simplicity is key. One, maybe two toppings max, is the way to go.
The funniest kitchen fail related to this? I once tried to make my own yogurt from scratch for this very dish. Let’s just say it did not go well. I ended up with a pot of vaguely sour milk and a lesson in humility. Some things are just better left to the experts! I’ll stick to doctoring up the good store-bought stuff.
Your Questions, Answered!
Q: My yogurt is so tart! Did I get a bad batch?
A: Not at all! Plain Greek yogurt is naturally tangy—that’s its charm. The honey and sweet fruit are there to balance it perfectly. If it’s still too tart for your taste, you can add a tiny bit more honey or mix in a drop of vanilla extract, which adds a perceived sweetness without more sugar.
Q: Can I make this ahead of time for meal prep?
A: You can *kind of* meal prep this. The best way is to portion the yogurt into jars. Keep your toppings (especially the fruit and granola) in separate small containers or bags. Assemble right before you eat to avoid a soupy, soggy situation. If you don’t mind softer fruit, you can layer it the night before, but hold the granola until the morning.
Q: Is there a good vegan substitute for the Greek yogurt?
A> Absolutely! The vegan yogurt game is strong these days. Look for a plain, unsweetened coconut yogurt or a soy-based yogurt. Just check the label to find one that’s nice and thick to mimic the creamy texture of Greek yogurt. Agave nectar or maple syrup are perfect plant-based substitutes for the honey.
Q: My honey always hardens and is impossible to drizzle. Help!
A> This is a super common problem! Honey crystallizes naturally over time. It’s still perfectly good to eat. To fix it, simply place the honey jar (without the lid) in a bowl of very warm water for 5-10 minutes. Give it a stir, and it should return to its lovely, drizzly state.
Greek Yogurt with Fruit & Honey
- Total Time: 5 minutes
Description
When the day feels like it’s moving faster than you are, this simple bowl of goodness is your reset button. Creamy Greek yogurt meets juicy fruit and golden honey for a snack that’s as nourishing as it is beautiful. It’s five minutes of effort for a whole lot of flavor, energy, and joy. Think of it as breakfast, snack, or even dessert—made fresher, lighter, and better.
Ingredients
-
1 cup plain Greek yogurt (2% or whole milk for best creaminess)
-
½ cup fresh berries (strawberries, blueberries, raspberries—or thawed frozen fruit)
-
1–2 tsp honey
-
Optional toppings: chia seeds, sliced almonds, or gluten-free granola
Instructions
1. Smooth Base – Stir yogurt and spread it evenly in your favorite bowl.
2. Fruity Layer – Scatter berries on top for color, sweetness, and tang.
3. Golden Drizzle – Swirl honey over fruit and yogurt.
4. Crunch Factor (Optional) – Sprinkle chia seeds, nuts, or granola for texture.
Notes
-
Tropical Twist – Mango, pineapple & toasted coconut.
-
Apple Pie Bowl – Cinnamon apples + oat granola.
-
Chocolate Strawberry – Strawberries with melted dark chocolate instead of honey.
-
Savory-Sweet – Yogurt, cucumber, dill, sea salt, tiny honey drizzle.
- Prep Time: 5 min
Nutrition
- Calories: 200 Cal Approx., with 2% yogurt, berries, 1 tsp honey, 1 tbsp almonds
- Carbohydrates: 18g
- Protein: 15g
Nutritional Information*
Prep Time: 5 min
Servings: 1
Approx per serving (with 2% yogurt, 1/2 cup berries, 1 tsp honey, and 1 tbsp almonds):
Calories: 200 | Protein: 15g | Carbs: 18g | Fat: 6g
Final Thoughts: Your Five-Minute Ticket to a Better Day
Well, friend, there you have it. Your secret weapon against hangry afternoons and boring breakfasts is officially unlocked.
This bowl is so much more than just yogurt and fruit. It’s a promise to yourself that eating well doesn’t have to be complicated, time-consuming, or expensive. It’s a five-minute act of self-care that pays you back in energy, joy, and pure deliciousness. Whether you’re fueling up for a busy day or winding down with a light, sweet treat, this simple combination is there for you.
Remember my grandma’s porch? That feeling of cool, peaceful relief in the middle of a chaotic day? That’s what this bowl is all about. It’s your own little slice of heaven, no matter what the weather is like outside.
So don’t be afraid to make it your own. Raid your fridge, get creative with those toppings, and find your perfect combination. This isn’t a strict recipe; it’s an invitation to play with your food and discover what makes your taste buds happiest.
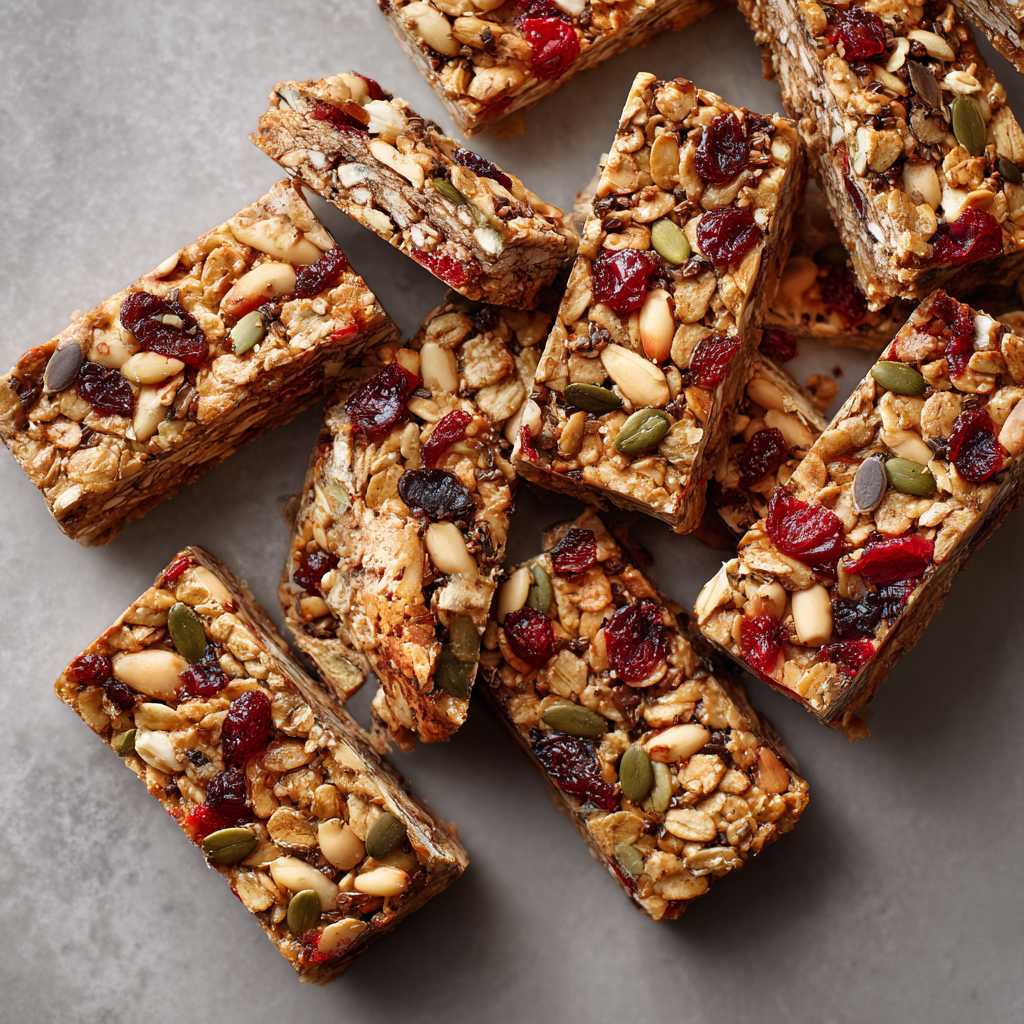
Gluten-Free Granola Bars
No-Bake Gluten-Free Granola Bars: Your New Favorite Grab-and-Go Snack!
Hey there, Feastical friends! Beau here, coming to you from my kitchen where the counter is currently dusted with a fine layer of gluten-free oats and there’s a jar of honey sitting suspiciously close to the edge. You know what that means—it’s snack time experimentation, and today, we’re crafting the ultimate homemade gluten-free granola bars.
Let’s be real, we’ve all been there: it’s 3 PM, your stomach is staging a full-blown rebellion, and you’re staring into the abyss of your pantry. Store-bought bars from brands like MadeGood or Kind are absolute lifesavers, and I always have a few tucked away for emergencies. But there’s something incredibly satisfying about whipping up a batch of your own. You control the ingredients, the sweetness, and you get to fill your whole house with the incredible, toasty, nutty aroma of goodness. These bars are chewy, packed with energy, and hold together perfectly without any weird binders or gums. They’re the kind of snack that feels like a treat but fuels your body right. So, tie on your favorite apron, and let’s make something delicious together!
The Trail Mix That Started It All
This recipe takes me right back to my first big hiking trip out west. I was young, overly ambitious, and my idea of “trail food” was a bag of pretzels and a questionable sandwich. About halfway up a stunning but grueling trail, a seasoned hiker saw me looking, well, pathetic. She chuckled, reached into her pack, and handed me a homemade granola bar. It was nothing like the crumbly, dry ones I’d tried before. It was dense, moist, and packed with chunks of nuts and fruit. It was pure fuel and kindness, all wrapped in wax paper. That simple bar completely changed my hike—and my perspective on portable food. I’ve been chasing that perfect bar ever since, and friends, I’m thrilled to tell you: this is the one. It’s the taste of adventure and community, right in your kitchen.
Gathering Your Gluten-Free Granola Bar Crew
Here’s the beautiful part: this recipe is more of a template. It’s incredibly forgiving! Here’s what you’ll need for the base, along with my chef-ly two cents on each one.
- 2 cups gluten-free rolled oats – This is our foundation! Make sure the package is certified gluten-free if you have a sensitivity. Regular oats are often cross-contaminated. These give us that classic chewy texture and heartiness.
- 1/2 cup nut or seed butter – This is our glue and our richness. I’m a peanut butter purist, but almond butter, cashew butter, or even sunflower seed butter (for a nut-free version!) work fantastically. The natural oils bind everything together beautifully.
- 1/3 cup honey or maple syrup – Our natural sweetener and second binder. Honey gives a slightly chewier bar, while maple syrup offers a lovely depth and keeps it vegan. Agave syrup works in a pinch, too!
- 1/4 cup sunflower seeds or chopped nuts – Hello, crunch! Sunflower seeds are my go-to for a little texture and a boost of nutrients. Chopped almonds, pecans, or walnuts are also stellar choices. Toast them lightly first for a next-level flavor explosion.
- 1/4 cup dried fruit or mini chocolate chips – The fun mix-ins! I love a combination of tart cherries and mini dark chocolate chips. Raisins, cranberries, chopped apricots—the sky’s the limit. This is where you make these bars truly yours.
- 1/2 tsp vanilla extract – The flavor enhancer. It adds a warm, sweet aroma that makes the whole kitchen smell like a bakery. Don’t skip it!
- A generous pinch of salt – The ultimate flavor balancer. It makes the sweet ingredients taste sweeter and the nutty ingredients pop. Trust me on this.
Let’s Build These Bars: A Step-by-Step Guide
This is a no-bake situation, friends. We’re talking 10 minutes of active time. You’ve got this!
Step 1: The Warm Embrace. Grab a medium saucepan and place it over low heat. Add your nut (or seed) butter and honey. Warm them together, stirring constantly, for just 1-2 minutes until they melt into a smooth, gorgeous, pourable liquid. You’re not cooking it, just warming it through! Chef Hack: Warming this mixture is the secret to a perfectly cohesive bar. It makes everything easier to mix and helps the bars hold their shape later. Remove it from the heat and immediately stir in that vanilla extract and pinch of salt. Give it a whiff. Amazing, right?
Step 2: The Big Mix. In a large mixing bowl, combine your gluten-free oats, sunflower seeds (or nuts), and your chosen dried fruit/chocolate chips. Now, pour that warm, gooey, delicious liquid from the saucepan over the dry ingredients. Take a sturdy spatula and mix, mix, mix! Get in there and make sure every single oat and seed is coated in that sticky-sweet mixture. It might take a minute, but keep going until there are no dry spots left.
Step 3: The Press & Chill. Line an 8×8-inch baking pan with parchment paper, leaving some overhang on two sides. This is your non-stick lifeline and will make removing the bars later a total breeze. Transfer your oat mixture into the prepared pan. Now, here’s the most important step: PRESS, PRESS, PRESS! Use the bottom of a measuring cup or a glass, really pack that mixture down as firmly and evenly as you can. This compacts the bars and ensures they don’t crumble when you slice them. Chef Hack: Place a second piece of parchment paper on top of the mixture before you press. This prevents the mixture from sticking to your glass or hands!
Step 4: The Patience Game. Pop the pan into the refrigerator for at least 1-2 hours, or until the whole slab is completely firm. I know, the waiting is the hardest part! But this chilling step is what sets the bars. They need time to cool and solidify into perfect, sliceable bars.
Step 5: Slice & Celebrate! Once firm, use the parchment paper overhang to lift the entire granola slab out of the pan. Place it on a cutting board and slice it into bars or squares using a sharp knife. For clean cuts, wipe your knife blade clean between slices.
How to Serve Up These Beauties
These bars are the definition of grab-and-go perfection! Wrap them individually in parchment paper or stash them in a small airtight container for a quick breakfast with your coffee, a pre-workout boost, or an afternoon pick-me-up at your desk. They’re also fantastic crumbled over a bowl of Greek yogurt or alongside a handful of fresh berries for a more complete snack. However you enjoy them, do it with a smile!
Make It Your Own: Delicious Variations
The fun doesn’t stop here! This recipe is a blank canvas. Here are a few of my favorite twists:
- Chocolate Lover’s Dream: Stir in 2 tablespoons of cocoa powder into the wet mixture and use chocolate chips as your mix-in. You could even drizzle melted chocolate on top after slicing.
- Tropical Vacation: Use coconut oil instead of nut butter, and use a mix of dried mango, pineapple, and shredded coconut for your add-ins.
- Superfood Seed Boost: Add 2 tablespoons each of chia seeds and ground flaxseed to the dry ingredients for an extra omega-3 punch.
- Apple Pie Bar: Stir in 1 teaspoon of cinnamon into the dry ingredients and use finely chopped dried apples and walnuts for your mix-ins.
- Nut-Free Zone: Use sunflower seed butter and pumpkin seeds to keep things completely nut-free for school lunches.
Beau’s Chef Notes & Kitchen Stories
This recipe has evolved more times than I can count. The first time I made them, I was so impatient I only chilled them for 20 minutes. Let’s just say I ended up with a delicious, albeit crumbly, “granola bark” that I ate with a spoon! Lesson learned. The pressing and chilling are non-negotiable for perfect bars.
Another time, my nephew was “helping” me and decided that “1/4 cup of chocolate chips” was merely a suggestion. We ended up with what we affectionately called “Chocolate Bars with Oat Surprises.” They were a mess to slice but were a huge hit. Don’t be afraid to play around and find your family’s perfect ratio!
FAQs & Troubleshooting: Your Questions, Answered!
Q: My bars are too crumbly! What did I do wrong?
A: This usually boils down to two things: 1) Not enough binding liquid, or 2) Not pressing firmly enough. Next time, try adding an extra tablespoon of nut butter or honey. And really put some muscle into pressing that mixture into the pan! If it’s already happened, no worries—you’ve got fantastic granola cereal for yogurt.
Q: Can I use quick oats instead of rolled oats?
A: You can, but the texture will be different. Rolled oats give a chewier, heartier bar. Quick oats will result in a softer, more uniform texture. Both are delicious, just be prepared for the change!
Q: How should I store these homemade granola bars?
A: Because they are naturally moist, they are best kept in an airtight container in the refrigerator for up to 2 weeks. They also freeze beautifully for up to 3 months! Just wrap them individually and toss them in a freezer bag for a ready-to-go snack.
Q: My bars are super hard after chilling. Help!
A: This likely means the wet mixture was heated a little too long or too hot, causing it to harden too much. Next time, gentle warmth is key—just enough to make it pourable. Let the bars sit at room temperature for 5-10 minutes before eating; they’ll soften up nicely.
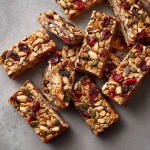
Gluten-Free Granola Bars
- Total Time: 53 minute
Description
There’s something magical about homemade snacks—you get all the flavor, none of the mystery ingredients, and the joy of creating something that fuels your day. These no-bake gluten-free granola bars are chewy, satisfying, and endlessly customizable. Whether you need a quick breakfast, an afternoon pick-me-up, or fuel for your next adventure, this recipe has you covered. The best part? They come together in minutes, no oven required! Grab your oats, a little nut butter, and let’s build your new favorite grab-and-go snack.
Ingredients
-
2 cups gluten-free rolled oats
-
½ cup nut or seed butter (peanut, almond, cashew, or sunflower seed butter)
-
⅓ cup honey or maple syrup
-
¼ cup sunflower seeds or chopped nuts
-
¼ cup dried fruit or mini chocolate chips
-
½ tsp vanilla extract
-
Pinch of salt
Instructions
1. Warm & Whisk – In a saucepan, gently warm nut butter + honey until smooth. Stir in vanilla and salt.
2. Mix It Up – In a bowl, combine oats, seeds/nuts, and dried fruit or chocolate. Pour in warm mixture and stir until every oat is coated.
3. Press & Chill – Line an 8×8 pan with parchment. Press mixture in firmly (use another parchment sheet to keep it neat).
4. Refrigerate – Chill 1–2 hours until set.
5. Slice & Enjoy – Lift out, cut into bars, and store.
Notes
-
Chocolate Lover’s Dream – Add cocoa powder + chocolate drizzle.
-
Tropical Vibes – Mango, pineapple, coconut flakes.
-
Apple Pie Twist – Cinnamon, dried apples, walnuts.
-
Nut-Free – Sunflower seed butter + pumpkin seeds.
- Prep Time: 10 min active | 1–2 hrs chill
Nutrition
- Calories: 180 Cal per bar, approx.
- Fat: 9g
- Carbohydrates: 18g
- Protein: 4g
Nutritional Info (Approximate, Per Bar)
This is based on a recipe yielding 12 bars, using peanut butter, honey, sunflower seeds, and chocolate chips.
Calories: ~180 | Protein: 4g | Carbohydrates: 18g | Fat: 9g
Final Thoughts: Your Pantry, Transformed.
And just like that, you’re a certified gluten-free granola bar artisan! No more mystery ingredients, no more settling for a bar that’s just okay. You’ve now got the power to create a snack that’s not only bursting with real, honest ingredients but also packed with your own unique flavor twist.
This recipe is more than a list of steps—it’s an invitation to play, to customize, and to fill your kitchen with the incredible smell of toasted oats and honey. It’s a reminder that the most satisfying foods are often the simplest ones, made with intention and a little bit of love.
Whether you’re wrapping these up for a hectic week of lunches, fueling a weekend adventure, or simply satisfying that 3 PM craving with something you made yourself, I hope these bars bring you a moment of joy and a whole lot of energy.
So here’s to less pantry-staring and more bar-making. You’ve got this!
Apples with Nut Butter
The Snack That Feels Like a Hug: My Love Letter to Apples & Nut Butter
Hey friends, Beau here from Feastical! Let’s be real for a second. We all have those days. You know the ones. You’re running between meetings, scrambling to get the kids to practice, or just trying to remember if you actually had lunch. Your stomach starts singing that familiar, grumbly tune, and the siren call of the vending machine or a bag of chips gets louder and louder. It’s in these moments that we need a hero—a snack that’s not just fast, but truly good for us. Something that feels like a treat but fuels our bodies without the dreaded sugar crash.
Well, I’m here to tell you about the ultimate snack MVP that has saved my hangry self more times than I can count: the beautiful, timeless, and utterly perfect duo of crisp apples and creamy nut butter. This isn’t just slicing an apple and plopping some peanut butter on a plate. Oh no. This is an art form, a moment of delicious peace in a chaotic day, and honestly, one of the most satisfying flavor and texture combos on the planet.
We’re talking about that incredible crunch giving way to sweet, juicy tartness, followed immediately by the rich, salty, velvety smoothness of nuts. It’s a symphony in your mouth that takes all of five minutes to create. It’s naturally gluten-free, packed with fiber to keep you full and healthy fats to keep you energized, and it’s so portable you can take this gourmet snack anywhere. So, grab your favorite knife and let’s turn this simple concept into your new go-to kitchen ritual. I’m going to share all my chef-y secrets to make it absolutely legendary.
A Core Memory: Why This Combo Means So Much
This snack takes me right back to my grandma’s kitchen table. After school, I’d burst through her screen door, greeted by the always-present smell of something baking. But before any cookies were allowed, there was the “appetizer.” Grandma Collier would be at the counter, her hands moving with a quiet, practiced ease. She’d take a giant, gorgeous Red Delicious apple (her favorite, though I’ve branched out since then!) and slice it perfectly around the core into wedges.
Then came the magic. She wouldn’t just scoop peanut butter from the jar. Oh no. She’d spoon some into a little ramekin, drizzle in just a tiny bit of honey, and give it a swirl with her knife. She called it her “fancy peanut butter sauce.” We’d sit at her checkered tablecloth, dipping our apple slices and talking about my day. It wasn’t about the food itself; it was about the pause, the connection, the simple act of sharing something wholesome and delicious. It was my first lesson that the best food isn’t always the most complicated—it’s the food made with a little bit of love and intention. That’s the feeling I want to bring to you with this recipe.
Gathering Your A-Team: It’s All About Quality
The beauty of this “recipe” is its simplicity, which means each ingredient really gets to shine. Choosing great components here makes all the difference. Here’s what you’ll need for one perfect serving.
- 1 Apple (any variety): This is your star! The variety you choose changes the entire game. Chef’s Insight: For a tart, firm crunch that holds up beautifully against creamy butter, go for Granny Smith. For a super sweet and juicy experience, Honeycrisp or Fuji are my go-tos. Gala and Braeburn offer a lovely middle ground. Don’t be afraid to mix and match!
- 2 tbsp Nut Butter: The creamy co-star. Substitution Tip: While classic peanut butter is always a winner, try almond butter for a slightly more sophisticated, earthy flavor, or cashew butter for incredible creaminess. For a nut-free option, sunflower seed butter (sunbutter) is a fantastic and delicious alternative that gives a similar experience.
- Optional Toppings: This is where you get to play!
- A sprinkle of Cinnamon: Adds warmth and helps regulate blood sugar. It’s a no-brainer pairing with apples.
- A drizzle of Honey or Maple Syrup: For a touch of extra natural sweetness if your apple is a bit tart or your nut butter is unsweetened.
- Chia Seeds or Hemp Hearts: An easy boost of omega-3s, fiber, and protein. They add a fun little crunch, too!
- Dark Chocolate Chips or Cacao Nibs: Because apples, nut butter, and chocolate are a holy trinity. A few chips sprinkled on top feel decadent.
- Raisins or Dried Cranberries: For little chewy, sweet bursts.
- Granola: For the ultimate crunch factor.
- Secret Weapon: A Squeeze of Lemon Juice: Not listed above, but keep a lemon half in your fridge. A quick squeeze over your sliced apples prevents them from turning brown, keeping your snack looking fresh and appetizing for hours. This is my #1 pro tip!
Building Your Masterpiece: A Step-by-Step Guide with Chef Hacks
Okay, let’s get into it! I’m walking you through this step-by-step like you’re right here in the Feastical kitchen with me. We’re going for maximum flavor and minimum fuss.
Step 1: The Wash & Dry
First things first, give that beautiful apple a good rinse under cool water. I like to give it a gentle scrub with my hands to remove any waxy residue. Dry it completely with a kitchen towel. A dry apple is easier to handle and slice safely. Chef Hack: If you’re really prepping for later, you can wash your apples in a sink with a splash of vinegar and water, which helps remove more of the surface wax and pesticides, then dry thoroughly.
Step 2: The Slice (Safely and Smartly!)
Place your apple on a stable cutting board. To safely core and slice, I have two favorite methods. Method 1 (The Wedge): Slice the apple straight down next to the core on all four sides. You’ll be left with four clean pieces of apple and a rectangular core to discard. Then, lay each flat piece on its side and slice it into wedges. Method 2 (The Classic Slice): Simply slice the apple crosswise into round, thin slices. Use a small round cookie cutter or even a knife tip to pop out the core from each slice. This method is fantastic for little kids and makes for perfect dippers! Chef Hack: If you, like me, sometimes can’t get through a whole apple in one sitting, slice just half of it and save the other half (with the core and seeds still intact) for later. It will brown much less quickly than pre-sliced pieces.
Step 3: The Anti-Browning Shield
This is the step that separates the pros from the amateurs! As soon as your apple is sliced, squeeze a little fresh lemon juice over all the pieces. Use your fingers or a pastry brush to gently coat each slice. The citric acid in the lemon juice acts as a barrier against oxygen, which is what causes the browning. Don’t worry, you won’t taste it—it just keeps your apples looking bright, fresh, and gorgeous.
Step 4: The Nut Butter Prep
Scoop your two tablespoons of nut butter into a small bowl. If your nut butter has been sitting in the pantry, give the jar a really good stir first to reincorporate the natural oils. Now, taste it. Is it a little thick? Add a tiny drop of warm water or a drizzle of honey and stir. This will loosen it up to a perfect, dippable consistency. Chef Hack: For the ultimate luxurious experience, warm the nut butter for 10-15 seconds in the microwave. It becomes incredibly pourable, aromatic, and feels like a warm hug for your apple slices.
Step 5: The Assembly & Garnish
Arrange your beautiful, non-browned apple slices on a plate or in a container. Place your bowl of prepared nut butter right in the center. Now, unleash your inner artist with those toppings! A flurry of cinnamon, a artistic drizzle of honey, a sprinkle of chia seeds… go for it! This is your snack. Make it beautiful and make it yours.
How to Serve It Up: Beyond the Plate
While a simple plate is perfect, let’s think outside the box! For a fun, interactive snack for kids (or kids-at-heart), spear apple slices onto skewers or popsicle sticks and serve them with the nut butter dip on the side—it’s an instant party. Pack it for lunch by using a small, airtight container for the nut butter and placing the lemon-juice-treated apple slices right next to it in a divided container. For a more elegant dessert platter, arrange an assortment of different apple varieties with multiple small bowls of different nut butters and toppings for a build-your-own apple bite bar. It’s a total crowd-pleaser!
Shake It Up: 5 Delicious Twists to Try
Once you’ve mastered the classic, the flavor world is your oyster! Here are a few of my favorite ways to remix this perfect snack:
- The “Apple Pie” Twist: Use almond butter, and top your apples with a drizzle of honey, a generous sprinkle of cinnamon, and a few raisins. It tastes just like a deconstructed apple pie!
- The Tropical Vacation: Swap the nut butter for coconut butter (manna) and top with unsweetened shredded coconut and a few macadamia nuts. Close your eyes and you’re on a beach.
- The Chocolate Lover’s Dream: Use peanut butter, drizzle with melted dark chocolate, and add a tiny sprinkle of flaky sea salt. Unreal.
- The Savory-Sweet Option: This one’s for the adventurous! Try spreading sharp white cheddar cheese on your apple slice first, then a tiny dollop of almond butter. Trust me on this one.
- The Protein Power-Up: Stir a scoop of vanilla or chocolate protein powder into your nut butter with a tiny bit of milk or water to thin it out. Now your snack is a serious fuel-up.
From My Kitchen to Yours: A Few Parting Thoughts
This recipe has evolved so much from my grandma’s simple swirl of honey. I’ve used this combo as a base for everything from post-workout fuel to a quick canapé for unexpected guests (just top a slice with nut butter, a sliver of prosciutto, and a sage leaf—you’re welcome). I once tried to get fancy and caramelize the apples in a pan with butter and cinnamon before adding the nut butter. It was delicious, but it definitely crossed the line from “5-minute snack” into “dessert territory.” Sometimes, simple is best.
The real beauty of apples and nut butter is its flexibility. It’s a recipe that asks “what do you feel like today?” and then becomes exactly that. It’s forgiving, hard to mess up, and always, always satisfying. It’s a reminder that taking five minutes for yourself to create something nourishing is an act of self-care. So don’t just eat—savor, experiment, and enjoy.
Your Questions, Answered!
Q: My nut butter is super hard and oily. How do I get it to a dippable consistency?
A: This is the most common issue! Natural nut butters love to separate. First, make sure you stir the entire jar vigorously when you first open it. For a stubborn jar, you can warm the closed jar in a bowl of warm water for 10-15 minutes, then stir. For your serving, if it’s still thick, just add a tiny bit of a neutral oil (like avocado or light olive oil), warm water, or honey to your two tablespoons and stir until it smooths out.
Q: How can I keep my apple slices from turning brown if I’m packing them for lunch?
A: The lemon juice trick is your best friend! A light coating is all you need. You can also use a rubber band to keep the apple halves together if you’ve only sliced partway through. There are also kitchen gadgets like the Apple-Prepper that core and slice an apple but keep it held together in its original shape until you’re ready to eat it. So cool!
Q: Can I use apple sauce instead of apple slices?
A: Absolutely! While you lose the satisfying crunch, it becomes a different, but still delicious, snack. Try layering unsweetened applesauce in a jar with your nut butter and granola for a killer parfait.
Q: What’s the best apple for this? You mentioned a few, but I’m overwhelmed at the store!
A> Don’t be overwhelmed! It’s all about personal taste. My all-around, never-fail recommendation is Honeycrisp. It’s sweet, tart, incredibly crisp, and juicy. It’s the perfect balance for any nut butter. Think of it as the crowd-pleasing choice. If you see one, grab it!

Apples with Nut Butter
Description
We all have those days—when lunch was a blur, dinner feels miles away, and the vending machine is calling our name. What we really need in those moments is a snack that fuels our body and soothes the soul. Enter: the timeless duo of crisp apples and creamy nut butter.
Ingredients
-
1 Apple (Honeycrisp = balanced sweet & tart, Granny Smith = crisp & tart, Fuji = super sweet—pick your vibe)
-
2 tbsp Nut Butter (peanut, almond, cashew, or sunflower for nut-free)
Optional Toppings:
-
Cinnamon (warmth + blood sugar balance)
-
Honey or maple syrup (extra sweetness)
-
Chia seeds or hemp hearts (fiber + omega-3 boost)
-
Dark chocolate chips or cacao nibs (decadence!)
-
Raisins, cranberries, or granola (chewy/crunchy contrast)
-
Fresh lemon juice (pro tip: prevents browning)
Instructions
1. Wash & Dry: Rinse and dry your apple so it’s easy to slice.
2. Slice It: Either wedge around the core or slice into rings (kid-friendly and fun to dip).
3. Keep It Fresh: Toss slices with a squeeze of lemon juice to prevent browning.
4. Prep the Nut Butter: Stir well, loosen with a drizzle of honey or warm water if too thick. Microwave 10–15 seconds for a warm, pourable dip.
5. Plate It Up: Fan out apple slices, place nut butter in a small bowl, and sprinkle on your toppings.
Notes
-
Apple Pie Vibes: Almond butter + honey + cinnamon + raisins.
-
Tropical Treat: Coconut butter + shredded coconut + macadamias.
-
Chocolate Fix: Peanut butter + melted dark chocolate + flaky salt.
-
Savory-Sweet: Apple slice + sharp cheddar + almond butter (trust me).
-
Protein Power: Stir protein powder into your nut butter for a fueling snack.
Nutrition
- Calories: 290 Cal
- Carbohydrates: 30g
- Fiber: 7g
- Protein: 10g
The Good Stuff: Nutritional Breakdown (Approximate)
Prep Time: 5 min | Servings: 1
This info is for one serving using a medium apple and 2 tbsp of natural peanut butter. Toppings will alter values.
- Calories: 290
- Protein: 10g
- Carbohydrates: 30g
- Fiber: 7g
- Sugar: 20g (Natural)
- Fat: 16g
Final Thoughts: More Than Just a Snack
In a world that constantly shouts for our attention with flashy packaging and fad diets, the humble apple and a spoonful of nut butter is a quiet, nourishing whisper. It’s a reminder that the best things are often the simplest, and that true wellness isn’t about restriction—it’s about finding joy in foods that love us back.
This isn’t just a snack; it’s a five-minute pause. It’s a moment of intention in a hectic day, a small act of self-care that says, “I deserve something good.” It’s a connection to memories, like the ones in my grandma’s kitchen, and an invitation to create new ones of your own.

Gluten-Free Chocolate Chip Cookies
The Quest for the Perfect Gluten-Free Chocolate Chip Cookie (It Ends Here!)
Hey friends, Beau here from Feastical! Let’s talk about something near and dear to my heart: the perfect chocolate chip cookie. You know the one. It’s got that slightly crisp, buttery edge that gives way to a soft, chewy center just bursting with pockets of melted chocolate. It’s the cookie of childhood memories, of late-night cravings, of “just because” Tuesdays. For the longest time, if you were avoiding gluten, that cookie felt like a distant dream. A delicious, crumbly, often disappointing dream.
Well, consider that dream a reality. After more batches than I care to admit (my friends were very happy taste-testers), I’ve cracked the code. These Gluten-Free Chocolate Chip Cookies are an absolute game-changer. They’re everything you want a classic chocolate chip cookie to be: soft, a little chewy, perfectly sweet, and impossibly good. The best part? You whip them up in one bowl, no fancy techniques required. So, whether you’re baking for someone with celiac disease, a gluten sensitivity, or just curious, these cookies are about to become your new go-to. Let’s preheat that oven and make some magic!
A Cookie Jar Full of Memories
My obsession with this recipe started with my niece, Lily. She was diagnosed with a gluten intolerance a few years back, and my heart just about broke watching her at family gatherings. While everyone else dug into my famous double-chocolate chunk cookies, she’d have a store-bought gluten-free option that tasted more like sweetened cardboard than a treat. I made it my mission to create a cookie so good, no one would ever guess it was gluten-free. The first dozen attempts were… educational. Let’s just say I created some very creative hockey pucks. But then, I finally got it right. I’ll never forget the look on her face when she took that first warm, gooey bite. Her eyes lit up and she said, “Uncle Beau, these are even better than the old ones!” That’s the power of food, right there. It’s not just about ingredients; it’s about making everyone feel included, loved, and happily full.
Gathering Your Cookie Crew: The Ingredients
Here’s the all-star lineup. The beauty of this recipe is in its simplicity, but each ingredient plays a crucial role. Don’t worry, I’ve got plenty of swaps and tips for you!
- 1 ½ cups gluten-free all-purpose flour blend (with xanthan gum): This is the MVP. Using a blend that already includes xanthan gum is my number one tip. Xanthan gum replaces the gluten, acting as the binder that holds everything together and gives the cookie that perfect chew. My favorite brands are Bob’s Red Mill 1-to-1 or King Arthur Measure for Measure.
- 1/2 tsp baking soda: Our leavening agent! It helps the cookies rise and spread just enough, giving them that ideal texture. Make sure yours is fresh for the best lift.
- 1/2 tsp salt: Never skip the salt! It’s the flavor enhancer that makes the chocolate taste richer and the buttery sweetness pop. I use fine sea salt.
- 1/2 cup unsalted butter, softened: “Softened” is key here, friends! Leave it on the counter for an hour. It should be cool to the touch but yield easily when you press it. This creams perfectly with the sugar for a light and fluffy base. For a dairy-free version, a high-quality plant-based butter like Miyoko’s or Melt works wonders.
- 1/2 cup brown sugar & 1/4 cup granulated sugar: The dynamic duo! Brown sugar brings moisture and that deep, molasses-like chew, while granulated sugar helps with spreading and crispness. This ratio is our secret weapon for texture.
- 1 large egg: The other key binder. It brings structure and richness. For an egg-free version, a flax egg (1 tbsp ground flaxseed mixed with 3 tbsp water, let sit for 5 mins) works great.
- 1 tsp vanilla extract: The flavor workhorse. Use the real stuff, please! It makes a world of difference. A dash of almond extract is also a delicious addition.
- 1 cup chocolate chips: The star of the show! I prefer semi-sweet for a balanced sweetness, but dark chocolate or even milk chocolate chips are fantastic. Use chopped chocolate bars for those gorgeous, irregular melty pockets.
Let’s Get Baking: The Step-by-Step Lowdown
Ready? This is where the fun happens. Put on some music, and let’s make some cookies!
Step 1: Preheat & Prep
Preheat your oven to 350°F (175°C). Line a baking sheet with parchment paper. This is non-negotiable for easy cleanup and preventing any sticking. Don’t have parchment? A silicone baking mat is your next best friend.
Step 2: Whisk the Dry Crew
In a medium bowl, whisk together your gluten-free flour blend, baking soda, and salt. Whisking is important here—it ensures the baking soda and salt are evenly distributed so every bite is perfectly balanced. No one wants a pocket of baking soda! Chef’s Hack: If your flour blend is clumpy, give it a quick sift. It makes for a smoother dough.
Step 3: Cream the Butter & Sugars
In a large bowl, combine the softened butter, brown sugar, and granulated sugar. Using a hand mixer or a stand mixer with the paddle attachment, beat them together on medium speed for a good 1-2 minutes. We’re not just mixing; we’re “creaming.” This incorporates air into the dough, which is what gives the cookies a lighter texture. You’ll know it’s ready when the mixture looks pale and fluffy.
Step 4: Bring in the Wet Team
Beat in the egg and vanilla extract until they are fully incorporated and the mixture looks smooth and glossy. Scrape down the sides of the bowl with a spatula to make sure everything is getting to know each other.
Step 5: Combine with Care
Now, gradually add your dry ingredients to the wet ingredients. Mix on low speed until *just* combined. I mean it! The second you no longer see streaks of flour, STOP. Overmixing is the enemy of a tender cookie. It can make them tough.
Step 6: The Grand Finale: Chocolate!
Switch to a sturdy spatula or wooden spoon and fold in those glorious chocolate chips. This gives you more control and prevents overmixing. Feel free to reserve a handful to press on top of the dough balls right before baking—it makes them look bakery-level gorgeous.
Step 7: Scoop & Space
Using a cookie scoop or a tablespoon, drop rounded balls of dough (about 2 tablespoons each) onto your prepared baking sheet. Leave about 2 inches between them. They need their personal space to spread out and become the beautiful cookies they’re destined to be.
Step 8: Bake to Perfection
Bake for 9-11 minutes. Now, here’s the most important tip: THEY WILL LOOK UNDERDONE. The edges should be lightly golden, but the centers will still look soft and puffy. This is perfect! Do not overbake them. They continue to cook on the hot baking sheet out of the oven.
Step 9: The Patience Test
Let the cookies cool on the baking sheet for at least 10 minutes. I know, it’s torture. But this is when they firm up and achieve that ideal chewy-yet-set texture. After that, transfer them to a wire rack to cool completely… or just grab a glass of milk and dig in immediately. I won’t judge.
How to Serve These Beauties
These cookies are a masterpiece all on their own, still warm from the oven with a cold glass of milk. For pure nostalgia, stack them high on a vintage plate. To impress guests, place one on a small dessert plate with a tiny sprinkle of flaky sea salt and a side of vanilla bean ice cream for an incredible ice cream sandwich base. They also pair beautifully with a hot cup of coffee or a cold glass of oat milk. However you serve them, serve them with a smile!
Mix It Up! Recipe Variations
Once you’ve mastered the base, the cookie world is your oyster! Here are a few of my favorite riffs:
- Sea Salt & Dark Chocolate: Swap the chips for chopped 70% dark chocolate and press a few flakes of flaky sea salt on top of each cookie before baking.
- Kitchen Sink Cookies: Fold in 1/2 cup of gluten-free oats, 1/2 cup of chopped nuts (walnuts or pecans are killer), and 1/4 cup of shredded coconut along with the chocolate chips.
- Peanut Butter Cup: Replace 1/4 cup of the chocolate chips with chopped gluten-free peanut butter cups. You can also swirl in 1/4 cup of peanut butter into the wet ingredients.
- M&M Funfetti: Perfect for parties! Use colorful M&M’s instead of chocolate chips for a festive look.
- Double Chocolate: Replace 1/4 cup of the flour with 1/4 cup of unsweetened cocoa powder for the ultimate chocolate lover’s fix.
Beau’s Chef Notes
This recipe has evolved from those early hockey puck days, let me tell you. The biggest lesson learned? Do not overbake. Gluten-free baked goods can go from perfect to dry in a matter of seconds, so trust the timing. Also, if you can, let the dough rest in the fridge for 30 minutes. This allows the flours to fully hydrate and results in a slightly thicker, chewier cookie. But if you’re in a pinch for a quick treat (we’ve all been there), baking them right away works perfectly fine. The dough also freezes beautifully! Scoop it into balls, freeze on a sheet pan, then toss them in a freezer bag. You can bake frozen cookies straight from the freezer; just add 1-2 minutes to the bake time. Fresh, warm cookies anytime? Yes, please.
FAQs & Cookie Troubleshooting
Q: My cookies spread too much and got really flat. What happened?
A: This is usually one of two things: 1) Your butter was too warm. If it’s melted or overly soft, the cookies will spread. We want softened, not melted. 2) Your gluten-free flour blend might not contain xanthan gum. Xanthan gum is crucial for structure. Double-check your flour blend!
Q: My cookies were dry and crumbly. How can I fix that?
A: The most common culprit is overbaking. Remember, they continue to cook on the pan! Take them out when they still look soft in the middle. Also, make sure you’re measuring your flour correctly. Spoon the flour into your measuring cup and level it off. Scooping directly from the bag packs in too much flour, leading to a dry dough.
Q: Can I make this recipe vegan?
A: Absolutely! Use a plant-based butter stick (not the tub kind) and replace the egg with a “flax egg” (1 tbsp ground flaxseed mixed with 3 tbsp water, let sit for 5 mins to gel). Just note the texture might be a tad more delicate.
Q: Why did my cookies cake up and not spread?
A: This often means there was too much flour in the dough (see the measuring tip above!) or your baking soda might be old and lost its potency. Give it a sniff—if it doesn’t fizz with a little vinegar, it’s time for a new box.

Gluten-Free Chocolate Chip Cookies
- Total Time: 20 minutes
Description
Say goodbye to crumbly disappointments—these cookies have it all: golden edges, soft chewy centers, and melty chocolate in every bite. No one will ever guess they’re gluten-free! They come together in one bowl, no fuss, and deliver pure cookie-jar joy.
Ingredients
-
1 ½ cups gluten-free all-purpose flour (with xanthan gum)
-
½ tsp baking soda
-
½ tsp salt
-
½ cup unsalted butter, softened (plant-based works too)
-
½ cup brown sugar
-
¼ cup granulated sugar
-
1 large egg (or flax egg)
-
1 tsp vanilla extract
-
1 cup chocolate chips (semi-sweet, dark, or milk)
Instructions
-
Preheat & Prep → Oven to 350°F (175°C). Line a baking sheet with parchment.
-
Dry Mix → Whisk flour, baking soda, salt.
-
Cream Base → Beat butter + sugars until fluffy (1–2 min).
-
Wet Team → Add egg + vanilla. Mix smooth.
-
Combine → Slowly add dry mix. Stop once flour disappears.
-
Chocolate Time → Fold in chips. Save a few for topping.
-
Scoop & Bake → Drop 2 tbsp dough balls, 2″ apart. Bake 9–11 min until edges golden, centers soft.
-
Patience Test → Cool on pan 10 min (they set as they rest).
Notes
-
Chill dough 30 min for thicker, chewier cookies.
-
Sprinkle with flaky sea salt before baking = bakery vibes.
-
Dough freezes beautifully—bake from frozen, add 2 min.
- Prep Time: 10 min
- Cook Time: 10 min
Nutrition
- Calories: 140 Cal
- Carbohydrates: 18g
- Protein: 2g
Nutritional Info*
Prep Time: 10 min | Cook Time: 10 min | Servings: 18 cookies
*This is an estimate and will vary based on specific ingredients used.
Approx per cookie:
Calories: 160 | Protein: 2g | Carbs: 18g | Fat: 9g
There you have it! My foolproof recipe for cookies that are sure to bring everyone to the table. I hope you love baking them as much as I do. Tag me @feastical on Instagram if you make them—I love seeing your creations! Happy baking!
Final Thoughts: More Than Just a Cookie
Well, friends, there you have it. The end of the quest. What started as a mission to bring a smile to my niece’s face turned into a recipe I’m genuinely so proud to share with all of you.
These cookies are proof that dietary restrictions don’t have to mean sacrificing flavor, texture, or joy. They’re a reminder that the best recipes aren’t just a list of ingredients; they’re a labor of love, a story in every batch, and a way to make sure everyone has a seat at the table (and a cookie in their hand).

Bloody Red Velvet Trifle Cups
Spooky, Sweet, and Seriously Delicious: My Bloody Red Velvet Trifle Cups
Hey there, Feastical family! Beau here, coming at you from a kitchen that’s currently sprinkled with more red velvet crumbs than I’d care to admit. But you know what? That’s the sign of a dessert well-made, and I wouldn’t have it any other way.
With Halloween just around the corner, I know we’re all on the hunt for that perfect recipe. You know the one. It needs to be a total showstopper that makes your guests go “WOW!” but secretly, it can’t be a huge pain to pull together. Because let’s be real, we’d rather be assembling costumes and carving pumpkins than slaving over a complicated dessert all night. Am I right?
Well, my foodie friends, I have the absolute *perfect* solution for you. These Bloody Red Velvet Trifle Cups are my go-to Halloween hero. They’re creepy, elegant, indulgent, and—best of all—incredibly simple to make. We’re talking layers of devilishly moist red velvet cake, a cloud-like creamy cheesecake filling, and a dramatic, “bloody” drizzle that’s equal parts spooky and stunning. They’re individual, which means no messy slicing, and everyone gets their own perfectly layered masterpiece. So, grab your favorite mixing bowl and let’s create some deliciously haunting magic together!
A Spooky Tradition is Born
This recipe honestly came from a happy little accident a few Halloweens ago. I’d ambitiously decided to bake a towering, three-layer red velvet cake for a friend’s costume party. Long story short, I was a bit too enthusiastic with the cooling rack and one of the layers… well, let’s just say it decided to take a leap of faith onto my kitchen floor.
I was left with a pile of perfectly tasty, but tragically crumbled, red velvet cake. I stared at it for a second, my pirate costume feeling increasingly silly, and had a lightbulb moment. I grabbed the clear plastic cups I had for drinks, whipped up a quick cheesecake filling with what I had in the fridge, and layered it all up. A jar of raspberry jam thinned out with a little lemon juice became my impromptu “blood.” I arrived at the party with these ad-hoc trifle cups, and they were the undeniable hit of the night! Everyone loved the individual portions and the creepy-cool presentation. Now, it’s not a proper Halloween in my house without them. Sometimes the best recipes are born from a little bit of chaos!
Gathering Your Spooky Supplies
Here’s everything you’ll need to bring these bloody brilliant trifles to life. Don’t be afraid to get creative with substitutions—cooking is all about making it work for you!
- 1 box red velvet cake mix (plus the ingredients listed on the box): This is our fantastic shortcut! The box mix gives that classic, vibrant red color and chocolatey flavor we’re after. Chef’s Insight: I like to substitute the water called for on the box with buttermilk. It adds a wonderful tang and makes the cake even more tender.
- 1 (8 oz) block cream cheese, softened: This is the rich, tangy heart of our creamy layer. Tip: Please, please let it get to room temperature! This is the #1 secret to a lump-free, silky smooth filling. If you forget, you can microwave it for 15-20 seconds on 50% power.
- 1 cup powdered sugar: It sweetens our filling without the grittiness of granulated sugar. Substitution: You can use a granulated sugar substitute that measures like sugar, but powdered is best for texture.
- 2 cups whipped topping (like Cool Whip), thawed: This gives our filling incredible lightness. Chef’s Choice: For a truly from-scratch vibe, swap this with 2 cups of freshly whipped heavy cream. Just whip it with a tablespoon of sugar until you get stiff peaks!
- 1 cup vanilla pudding (optional): This is my secret weapon for extra creaminess and stability. It makes the filling set up beautifully and stretches it a bit further. Use the pre-made kind or instant pudding mix prepared with milk.
- 1 cup cherry or raspberry pie filling: The star of the show! This is our “blood.” I prefer the seeds in raspberry for a more realistic texture, but cherry has those gorgeous, dramatic clots. You can’t go wrong.
- Clear cups or dessert glasses: Presentation is key! Using clear vessels lets everyone see those awesome, creepy layers. Mason jars, parfait glasses, or even sturdy plastic cups all work perfectly.
Let’s Get Layering! Your Step-by-Step Guide
Okay, team! Let’s break this down. It’s all about the assembly, and I’ll be with you every step of the way with my best hacks.
- Bake that Cake! First, preheat your oven and prepare the red velvet cake mix according to the package directions, but remember my buttermilk tip if you’re using it! Bake it in a 9×13” pan for easy, even cooking. Once it’s done, let it cool completely on a wire rack. I know it’s tempting to dive in, but warm cake will melt our creamy layers! Chef’s Hack: To speed up cooling, you can pop the cake (still in the pan) right into the fridge for about 30 minutes after it’s cooled on the counter for a bit.
- Cube it Up: Once your cake is completely cool, use a serrated knife to cut it into roughly 1-inch cubes. Don’t worry about perfection—rustic, random chunks are perfect for creating nooks and crannies for our filling. This is the fun, slightly destructive part!
- Whip Up the Magic Filling: In a large bowl, beat your softened cream cheese with an electric mixer until it’s completely smooth and creamy. This should take about 2 minutes. Now, gradually beat in the powdered sugar until it’s fully incorporated. Pro Tip: Start your mixer on low speed when adding the powdered sugar unless you want a sweet, white dust cloud all over your kitchen! Finally, gently fold in the whipped topping and the vanilla pudding (if using) with a spatula until the mixture is uniform and dreamy.
- The Grand Assembly: Now for the artistic part! Grab your clear cups. Start with a layer of red velvet cake cubes at the bottom of each cup. Follow that with a generous dollop of your cream cheese filling. I like to use a spoon to spread it to the edges so you can see the distinct layers from the outside. You can repeat these layers once or twice, ending with a final thin layer of the cream cheese mixture.
- Make it “Bloody”: Just before serving, take your cherry or raspberry pie filling. Give it a good stir, and then spoon it right over the top of each trifle cup. Let it cascade down the sides for that truly gruesome, bloody effect. The contrast of the bright red “blood” against the white cream is just *chef’s kiss* spooky.
- The Final Wait: Cover your trifle cups and pop them in the fridge for at least an hour to chill and set. This waiting period is crucial—it allows all the flavors to mingle and become best friends, and it firms up the filling for the perfect spoonful.
How to Serve These Creepy Creations
Presentation is half the fun with these! Line them up on a platter for a seriously impressive dessert table display. For an extra touch of Halloween flair, you can garnish the platter with plastic spiders, creepy-crawly rings, or a few fake cobwebs (kept safely away from the cups themselves, of course!). Provide a long spoon for each cup so your guests can dive all the way down to get a bit of every layer in one glorious bite.
Mix It Up! Spooky Variations
Want to put your own spin on it? Here are a few of my favorite twists:
- Chocolate Lover’s Twist: Add a layer of chocolate pudding or chocolate shavings between the cake and cream layers.
- Boozy Blood: For the adults, stir a tablespoon of Chambord (raspberry liqueur) or Kahúa into the pie filling for an extra kick.
- Fruity Phantom: Add a layer of fresh raspberries or strawberries for a burst of fresh fruit flavor.
- Oreo Graveyard: Crush some Oreo cookies for a “dirt” layer and stick a small Halloween cookie decor on top.
- Lighter Option: Use a sugar-free cake mix, light cream cheese, and fat-free whipped topping to lighten things up without sacrificing flavor.
Beau’s Chef Notes
This recipe has evolved so much since that first crumbly-cake disaster! I’ve learned that the pudding is a game-changer for making the filling more stable, especially if you’re making these a few hours ahead. I also love using a combination of cherry and raspberry pie fillings now for a more complex “blood” look. The best part? Kids absolutely lose their minds over these. I once had my niece declare they were “disgustingly awesome,” which is the highest Halloween compliment I’ve ever received. Remember, baking should be fun, especially around the holidays. If your layers aren’t perfect, who cares? It just adds to the haunted charm!
FAQs & Troubleshooting
Q: Can I make these ahead of time?
A: Absolutely! You can assemble the cups (without the final “blood” drizzle) up to a day in advance. Keep them covered in the fridge. Add the pie filling topping just an hour or so before serving so it doesn’t soak too far down into the cream layers.
Q: My cream cheese filling is lumpy! What do I do?
A> Ah, the classic hurdle. The culprit is almost always cream cheese that’s too cold. If you have small lumps, you can sometimes beat them out with your electric mixer on high for a minute. If that doesn’t work, push the entire mixture through a fine-mesh sieve. It’s a bit of a pain, but it will save your filling! Lesson learned for next time: soften that cheese!
Q: Can I use a homemade red velvet cake instead of a mix?
A: Of course! If you have a favorite from-scratch recipe, by all means, use it! You’ll need one 9×13” cake’s worth. This is a great way to use this recipe when you’re feeling extra ambitious.
Q: The “blood” is sinking into the cream layer. Help!
A> This usually means the cream layer is still a bit too soft. Make sure you chill the assembled cups for that full hour before adding the topping. Also, ensure your pie filling is nice and thick. If it seems runny, you can simmer it in a small saucepan with a teaspoon of cornstarch slurry (equal parts cornstarch and water) to thicken it up before cooling and using.
Bloody Red Velvet Trifle Cups
- Total Time: 1 hour 5 minutes
Description
These Halloween trifles are everything: creepy, elegant, indulgent, and crazy easy to make. Imagine layers of moist red velvet cake, silky cheesecake cream, and a chilling “bloody” raspberry drizzle dripping down the sides. No messy slicing, no stress—just individual cups of haunted happiness. Perfect for parties, trick-or-treat night, or when you want to wow your crew with a dessert that looks straight out of a vampire’s cookbook.
Ingredients
-
1 box red velvet cake mix (plus ingredients on box)
Tip: Swap water with buttermilk for extra tang & tenderness -
8 oz (225g) cream cheese, softened
-
1 cup powdered sugar
-
2 cups whipped topping (or whipped cream)
-
1 cup vanilla pudding (optional, adds creaminess & stability)
-
1 cup cherry or raspberry pie filling (“the blood”)
-
Clear cups, jars, or dessert glasses
Instructions
-
Bake the Cake → Prepare red velvet mix per instructions (use buttermilk if possible). Bake in 9×13″ pan, cool completely.
-
Cube It Up → Cut cooled cake into bite-sized cubes. Rustic chunks = perfect for layers.
-
Mix the Cream → Beat softened cream cheese until smooth. Add powdered sugar, blend well. Fold in whipped topping + pudding (if using) until fluffy.
-
Assemble the Trifles → Layer cake cubes at the bottom of each clear cup. Add a spoonful of cream filling. Repeat until cup is nearly full, ending with cream.
-
Bloody Finale → Spoon pie filling on top, letting it drip down the sides for a gory effect.
-
Chill & Serve → Cover and refrigerate at least 1 hour before serving.
Notes
-
Chocolate Lovers: Add chocolate pudding or shavings.
-
Boozy Version: Stir Chambord into the pie filling for adults.
-
Kids’ Fun: Set up a “decorate your own” topping station.
- Prep Time: 20 min
- Cook Time: 45 min
Nutrition
- Calories: 380 Cal Per Cup
- Fat: 21g
- Carbohydrates: 42g
- Fiber: 1g
- Protein: 5g
Nutritional Information*
*This is an estimate per serving based on the ingredients listed and will vary with specific brands and substitutions.
Per Serving (1 cup): Calories: ~380, Protein: 5g, Carbohydrates: 42g, Fat: 21g, Fiber: 1g
Well, that’s all from my kitchen today, folks! I hope you and your family absolutely love making and devouring these Bloody Red Velvet Trifle Cups as much as I do. They’re a testament to the fact that the best Halloween memories often come from a little bit of mess and a whole lot of sweetness.
Final Thoughts
So there you have it, my ghoulish gourmands! These Bloody Red Velvet Trifle Cups are proof that the most spellbinding creations often come from the simplest ideas (and sometimes, a happy little kitchen accident).
They truly are the ultimate Halloween dessert: effortlessly impressive, wonderfully wicked, and guaranteed to delight both the kids and the kids-at-heart at your party. You get all the glory of a stunning, layered dessert with a fraction of the stress, leaving you more time to perfect your costume and enjoy the festivities.
This Halloween, I hope you embrace the fun, get a little messy, and create something deliciously memorable. Whether you’re hosting a full-blown monster mash or just craving a festive treat, these trifle cups are your perfect partner in crime.
From my haunted kitchen to yours, have a safe, spooky, and incredibly sweet Halloween!
Frankenstein Rice Krispie Treats
Creamy Garlic Shrimp & Parmesan Veggie Orzo—ready in 25 mins! Juicy shrimp, velvety orzo, roasted veggies & lemon. Weeknight luxury bowl!
Frankenstein Rice Krispie Treats: Your New Favorite Spooky Sweet! Hey there, Feastical family! Beau here, coming at you from a kitchen that’s currently sprinkled with more green candy coating than I’d care to admit. But you know what? That’s the sign of a good time, and it’s exactly the kind of happy, delicious mess I live for. With Halloween just around the corner, my brain is buzzing with all things spooky, silly, and spectacularly sweet. And let’s be real, while I love a complicated baking project, sometimes you just need a treat that’s a total scream to make without any of the spooky stress. That’s where these little guys come in. We’re taking the classic, no-bake, crowd-pleasing magic of Rice Krispie Treats and giving them a monstrous makeover that’s perfect for parties, classroom snacks, or just a fun family night in. These Frankenstein Rice Krispie Treats are the ultimate edible craft. They’re soft, chewy, and ridiculously cute. The best part? You don’t need to be a pastry chef to pull these off. Whether you’re a seasoned kitchen wizard or this is your first time wielding a spatula, I’ve got your back. We’re going to create something unforgettable, one marshmallowy, green-dipped square at a time. So put on your favorite Halloween playlist, grab your little monsters (the human kind!), and let’s make some magic happen! The Monster Mash-Up That Started It All This recipe takes me right back to my nephew Leo’s first-grade Halloween party. The sign-up sheet was filled with things like “vegan, gluten-free, nut-aware, spooky ghost cupcakes,” and my head was spinning. I wanted to bring something that every single kid could eat, something that was an activity in itself, and most importantly, something that would taste absolutely amazing. I remembered the universal joy of a classic Rice Krispie Treat—no allergies, no fuss, just pure marshmallow-y bliss. But I wanted to *wow* them. As I was brainstorming, I saw an old Frankenstein movie playing on TV, and it clicked. Those iconic green skin, the crazy hair, the bolts! It was so simple, so visual. That afternoon, my kitchen turned into a mad scientist’s lab. We had green chocolate everywhere, candy eyes staring up from the counter, and the sound of little voices debating who had given their Frankenstein the best hair. The treats were the hit of the party, and Leo declared me the “coolest uncle ever.” That’s a win in my book. Now, it’s a Halloween tradition, and I’m so excited to share that same silly, sweet joy with you and your family. Gathering Your Monster-Making Supplies Here’s the beautiful part: you probably have most of this already in your pantry! This is a simple list, but each ingredient plays a key role in creating our delicious little monsters. 6 cups Rice Krispies cereal: The classic! This is the crisp, airy backbone of our treat. That iconic snap, crackle, pop gives us the perfect texture. Chef’s Insight: Make sure your cereal is fresh for the best crunch. A stale box will make for a sad, soft monster. 1 (10 oz) bag mini marshmallows: The glue that holds our monster together. Minis melt down faster and more evenly than large marshmallows, which is why I always recommend them. Substitution Tip: For a different flavor, you can use marshmallow fluff (about 4 cups) instead. 3 tbsp unsalted butter: This adds richness and, crucially, prevents the marshmallows from turning into a sticky, cement-like glob on your pot. Using unsalted lets you control the flavor. Chef’s Hack: Grease your spatula and your hands with a little extra butter before pressing the mixture into the pan—it’s a lifesaver for preventing stickiness! 12 oz green candy melts (or white chocolate tinted green): This is our monster’s signature green skin! Candy melts (also called candy wafers) are designed to melt smoothly and set with a firm, snappy shell. Substitution Tip: If you can’t find green ones, use white candy melts and mix in a few drops of green gel food coloring. Gel works better than liquid, as it won’t seize up the chocolate. 1/2 cup chocolate chips or black candy melts (for hair/bolts): We’ll melt these down to create Frankenstein’s wild hair and those iconic neck bolts. Black candy melts give a more dramatic, cartoonish look, but semi-sweet chocolate chips work perfectly too and taste delicious. Candy eyes: The pièce de résistance! You can find these in the baking aisle. They bring our monsters to life (literally!). Chef’s Insight: If you can’t find them, you can make your own by dabbing a little white frosting and adding a mini chocolate chip pupil. Building Your Monster: A Step-by-Step Adventure Alright, team, let’s fire up the lab! Follow these steps, and you’ll have a squad of adorable Frankensteins in no time. Read through all the steps once before you start—it’s my number one chef hack for any recipe. Step 1: Prep Your Pan. First things first, grab that 9×13-inch baking pan. Use a little butter or non-stick spray to generously grease it. This is your insurance policy for getting the treats out later without a fight. You can also line it with parchment paper, leaving a little overhang on two sides, which acts like a sling for super-easy removal. Set it aside. Step 2: Melt & Meld (The Butter & Marshmallows). In a large pot (I mean large—this mixture expands!), melt your 3 tablespoons of butter over low heat. I can’t stress the low heat enough. We’re melting, not frying! Once it’s melted, dump in the entire bag of mini marshmallows. Stir constantly with a wooden spoon or silicone spatula until they are completely melted and smooth. This should take about 5-7 minutes. You’ll know it’s ready when there are no more lumpy bits. Chef’s Hack: Take the pot off the heat right when there are just a few unmelted marshmallows left. The residual heat will finish the job without risking burning. Step 3: The Big Mix. As soon as the marshmallow mixture is smooth, remove it from the heat. Immediately pour in all 6 cups of Rice Krispies cereal. Now, fold and stir like your life depends on it! You want every single piece of cereal to be lovingly coated in that gooey marshmallow goodness. Work relatively quickly, as the mixture will start to set as it cools. Step 4: Press and Impress. Immediately transfer the mixture into your prepared pan. Now, here’s the pro tip: take another small piece of parchment paper or butter the palms of your hands lightly. Use this to press the mixture firmly and evenly into every corner of the pan. Pressing it down firmly is what gives you those dense, chewy bars that hold their shape when you dip them later. If you press too lightly, they’ll be crumbly. Step 5: The Cool Down. This is the hardest part: patience! Let the pan cool completely at room temperature. Do not, I repeat, DO NOT try to speed this up in the fridge. That can cause the treats to sweat and become too hard when you dip them. Let nature take its course. Go watch a scary movie. This will take about an hour. Step 6: Slice and Dice. Once completely cool, turn the giant slab of treats out onto a cutting board. Using a sharp knife, cut it into rectangles. I usually aim for about 12 bars, but you can make them smaller for kiddo-sized portions. Wipe your knife clean between cuts for the cleanest edges. Step 7: The Green Dip of Destiny. Now for the fun part! Place your green candy melts in a microwave-safe bowl. Microwave them in 30-second bursts, stirring well between each burst, until completely smooth and melted. Don’t over-microwave! Hold a treat by its base and dip the top into the melted green candy. Gently shake off any excess and place it right-side-up on a sheet of parchment paper. Repeat with all treats. Chef’s Hack: If your melted candy is too thick, add a tiny, tiny amount of coconut oil or vegetable shortening (like 1/4 tsp) to thin it out for a smoother coating. Step 8: Bring Him to Life! While the green coating is still wet, gently press on your candy eyes. Then, melt your chocolate chips or black candy melts (same microwave method). Spoon the melted chocolate into a small Ziploc bag, snip off a tiny corner, and pipe on crazy hair across the top and two little bolts on the sides of the neck. You can also add a stitched mouth or scars. This is where you get creative! Let them set completely at room temperature until the chocolate is firm. How to Serve Your Spooky Squad Presentation is everything, especially when your food is this cute! Pile these Frankenstein Rice Krispie Treats high on a fun platter or a rustic wooden board. They’re the perfect centerpiece for any Halloween party spread. For a real showstopper, arrange them so they’re all looking in different directions—it looks like a whole monster crew coming to life! They’re fantastic as a party favor, packed into treat bags for trick-or-treaters (lucky kids!), or as a sweet surprise in a school lunchbox. Pair them with a tall glass of cold milk or a warm cup of apple cider for the ultimate fall flavor combo. Monster Mash-Ups: Creative Twists Feel like playing mad scientist? Here are a few fun ways to mix up this recipe: Cookies & Cream Monster: Replace 2 cups of the Rice Krispies with roughly crushed chocolate sandwich cookies (like Oreos) for a cookies-and-cream base with a spooky look. Peanut Butter Lover: Add a 1/2 cup of creamy peanut butter to the marshmallow mixture when you melt it. It adds a rich, salty flavor that pairs amazingly with the sweet chocolate. Minty Fresh Frank: Use Andes mint baking chips instead of chocolate chips for the hair. The mint and green chocolate combo is a classic and oh-so-refreshing. Gluten-Free Ghoul: Ensure your Rice Krispies cereal is a certified gluten-free brand (many are!) and you’re good to go for your GF friends. Vampire Edition: Use red candy melts for the coating and give him a little red chocolate blood drip from the mouth for a different kind of monster! Beau’s Chef Notes & Kitchen Stories This recipe has evolved so much since that first batch. I used to struggle with the dipping—my first Frankensteins had such lumpy, thick green coats they looked like they had a skin condition! The trick is truly in the temperature of your candy melts and not over-microwaving. I also used to try and pipe the hair with a fancy tip, but honestly, a Ziploc bag with the corner snipped off gives you the best, messiest, most perfect crazy hair texture. One of my favorite kitchen memories is of my friend’s daughter, who decided her Frankenstein needed a unibrow. She meticulously piped one giant, continuous eyebrow across all of them. They were the most serious-looking monsters I’ve ever seen, and we laughed until we cried. That’s the spirit of this recipe—it doesn’t have to be perfect. It just has to be fun. So if your monster’s eyes are crooked or his hair is a little wild, embrace it! He’s just got more personality. Frankenstein FAQs: Solving Your Monster Problems
Q: My Rice Krispie Treats are rock hard! What did I do wrong? A: The most common culprit is overheating the marshmallows. If you cook them for too long or on too high a heat, they become tough and hard when they set. Always use low heat and take the pot off as soon as the marshmallows are just melted. Also, pressing them too firmly can compact them too much. A firm press is good, but don’t use all your might!
Q: My candy melts are too thick and clumpy. How can I fix them?
A: This is usually caused by overheating, which seizes the cocoa butter in the melts. The best fix is to add a very small amount of paramount crystals, coconut oil, or vegetable shortening (start with 1/4 teaspoon) and stir vigorously. This can often bring them back to a smooth, dippable consistency. If they’re truly scorched, you might need to start over, sadly.
Q: Can I make these ahead of time? A: Absolutely! These are a fantastic make-ahead treat. Once fully assembled and set, store them in a single layer in an airtight container at room temperature for up to 3 days. I don’t recommend refrigerating them, as it can cause the chocolate to sweat and the treats to become stale faster.
Q: The treats are too sticky to cut. Help!
A: This likely means they weren’t fully cooled. Patience is key! If you’re in a pinch, you can pop the whole pan in the freezer for about 15 minutes to firm them up quickly, but room temperature cooling is best. Also, make sure you grease your knife lightly with butter or cooking spray for clean cuts.
Frankenstein Rice Krispie Treats
- Total Time: 1 hr 20 mins
Description
✨ Spooky, silly, and oh-so-sweet! These marshmallowy Rice Krispie squares get a monster makeover with green candy coating, candy eyes, and wild chocolate hair. They’re quick, kid-friendly, and guaranteed to steal the show at any Halloween party. Think of them as edible crafts—messy hands, big laughs, and a tray full of Frankensteins ready to come alive!
Ingredients
-
6 cups Rice Krispies cereal
-
1 (10 oz) bag mini marshmallows (or 4 cups marshmallow fluff)
-
3 tbsp unsalted butter
-
12 oz green candy melts (or white + green gel food coloring)
-
½ cup chocolate chips or black candy melts (for hair/bolts)
-
Candy eyes
Instructions
1. Prep Pan: Grease or line a 9×13″ pan with parchment.
2. Melt Base: Over low heat, melt butter, add marshmallows, stir until smooth. Remove from heat.
3. Mix: Fold in Rice Krispies until evenly coated.
4. Press: Press mixture firmly into pan. Cool 1 hour at room temp.
5. Cut: Turn out slab, cut into rectangles (~12 pieces).
6. Dip: Melt green candy melts. Dip tops of treats, shake off excess, place on parchment.
7. Decorate: Add candy eyes while green coating is wet. Melt chocolate, pipe on hair, bolts, and stitches. Let set until firm.
Notes
-
Cookies & Cream Monster: Swap 2 cups cereal for crushed Oreos.
-
Spicy Frank: Add cinnamon candy eyes for a fiery twist.
-
Vampire Edition: Use red melts + chocolate “fangs.”
- Prep Time: 20 mins
Nutrition
- Calories: 190 Ca Per Treat
- Carbohydrates: 32g
- Protein: 2g
Nutritional Information*
Per treat (approx., based on 12 treats): Calories: 190 | Protein: 2g | Carbs: 32g | Fat: 6g | Fiber: 0g
*Please note: This is an approximate estimate based on the ingredients used. Values can vary significantly based on specific brands and any substitutions you make.
Final Thoughts: Your Monster Masterpiece Awaits
And there you have it! What started as a simple solution for a school party has become one of my all-time favorite Halloween traditions. These Frankenstein Rice Krispie Treats are more than just a dessert; they’re a tiny, edible project filled with laughter, creativity, and that unbeatable homemade taste.
So don’t be afraid to get a little messy, to make a monster with lopsided eyes, or to let the kids take the lead with the piping bag. The magic isn’t in perfection—it’s in the joy of creating something together. These little Frankensteins are guaranteed to bring a smile to everyone who sees them (before they devour them, of course!).