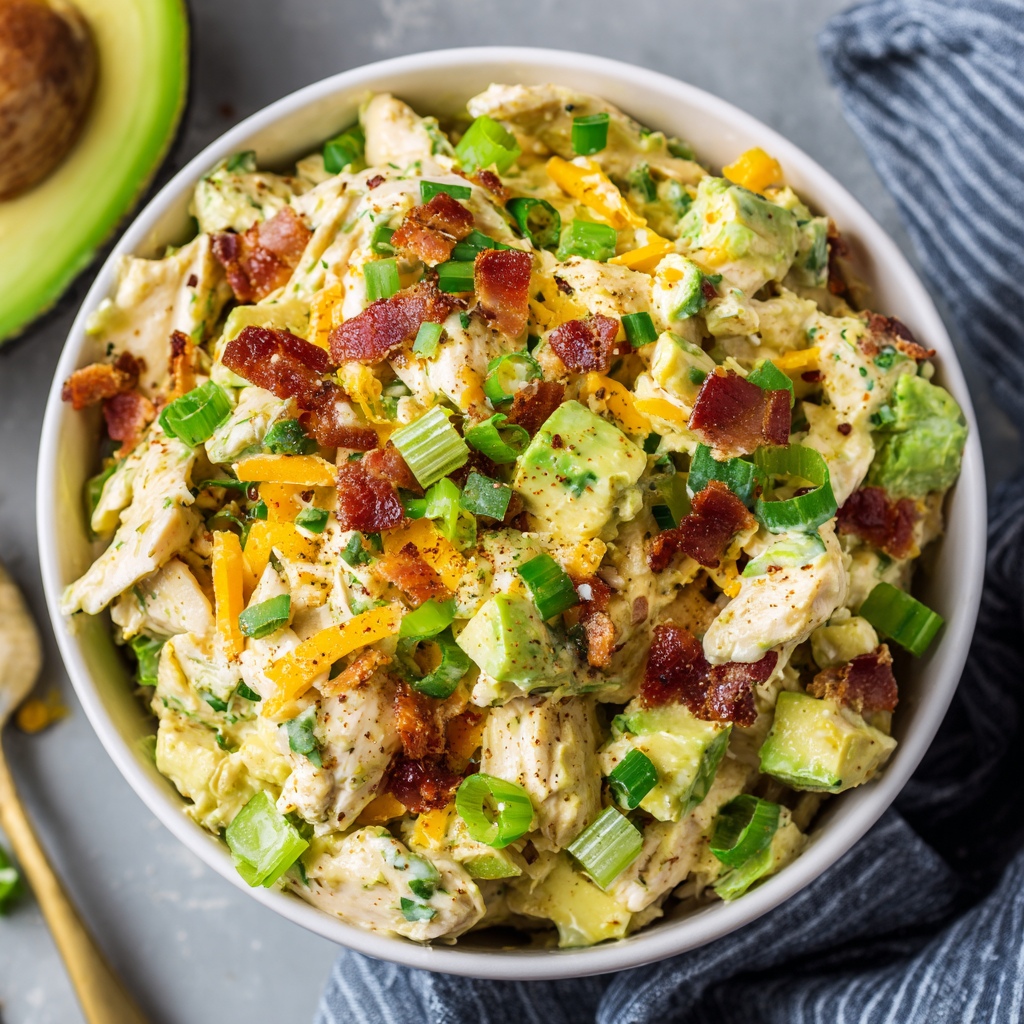
Avocado Bacon Chicken Salad
Hey There, Hungry Friends! Let’s Make Magic in a Bowl
Picture this: it’s 5:30 PM, your stomach’s doing the cha-cha, and you need something fast, fresh, and fabulous that won’t chain you to the stove. Enter my Avocado Bacon Chicken Salad—your new kitchen superhero. This isn’t just another chicken salad; it’s a creamy, crunchy, smoky fiesta where ripe avocados hug crispy bacon, cheddar cheese throws confetti, and a tangy Caesar dressing ties it all together. Perfect for stuffing into wraps, piling onto greens, or scooping straight from the bowl (no judgment here!). Whether you’re a meal-prep ninja or just rescued that lone avocado from doom, this recipe’s your golden ticket. Ready to make your taste buds high-five? Let’s roll!
That One Summer in Texas…
This recipe? It’s got roots in my sweaty-palmed days as a rookie grill cook at a Texas roadhouse. Every Sunday after church, my boss, Big Hank, would toss leftover smoked chicken and bacon ends into a tub with whatever veggies were wilting in the fridge. One scorching July day, I swapped mayo for smashed avocado (we had a surplus!), tossed in extra cheese ’cause why not, and drizzled it with Caesar—a happy accident born of heat and hunger. The crew devoured it in minutes, and Hank gruffly declared it “less terrible than usual.” High praise! Now, when I make it, I still smell that smoky kitchen and hear Hank’s laugh. Food memories? They stick like barbecue sauce on your favorite tee.
Grab These Flavor Friends
- 2 cups cooked chopped chicken – Rotisserie chicken’s my MVP (time-saver!), but grilled leftovers work wonders. Chef hack: Shred it warm—it soaks up dressing better!
- 6 slices cooked bacon, crumbled – Bake it crispy! Turkey bacon? Sure, but add ½ tsp smoked paprika for that campfire vibe.
- 1 large avocado, chopped – Must be ripe but firm! No guac mush here. Sub: ½ cup Greek yogurt + extra lemon if avocados revolt.
- ¾ cup shredded cheddar – Sharp cheddar for punch! Pre-shredded works, but block cheese melts into the mix creamier.
- ¾ cup scallions, thinly sliced – Green and white parts! Adds bite without onion breath. Swap with chives for milder flair.
- ¾ cup celery, diced – The crunch MVP. Too stringy? Peel stalks first or use jicama for sweetness.
- ¼ cup Caesar dressing – Creamy binds it all. Ranch or green goddess rock too—just avoid vinaigrettes (they waterlog).
- Salt and black pepper – Wait to season until after mixing! Avocados vary in saltiness.
Let’s Build Your Flavor Bomb (Step-by-Step!)
Step 1: In a large bowl, combine chicken, bacon, avocado, cheese, scallions, and celery. Chef’s tip: Fold gently with a silicone spatula—avocado bruises easier than your ego after burnt toast!
Step 2: Drizzle Caesar dressing over the top. Hack alert: Start with 3 tbsp! You can add more later, but you can’t un-drown your salad.
Step 3: Toss everything until JUST coated. Think “soft hug,” not “wrestling match.” Over-mixing = sad, mushy avocado confetti.
Step 4: Taste! Now season with salt and pepper. Why wait? Raw avocados absorb salt slowly—give ’em a minute to shine.
Step 5: Serve immediately for crunch-tastic joy, OR chill 30 mins if you can wait (flavors mingle like old pals at a BBQ).
BIG PRO-TIP: Squeeze half a lemon over diced avocado FIRST to keep it gorgeously green. No one wants brown salad sadness!
How to Serve It Like a Boss
This salad’s a social butterfly! Pile it high on butter lettuce cups for a low-carb win, stuff into warm pitas with pickled onions, or slap it between sourdough for a sandwich that’ll make your deli jealous. For dinner? Serve it atop quinoa with extra bacon crumbles and a fried egg—it’s basically confetti for your soul. And hey, if you eat it straight from the mixing bowl at midnight? I’ll pretend I didn’t see.
Shake It Up! 5 Tasty Twists
1. Southwest Fiesta: Swap cheddar for pepper jack, add black beans + corn, and use chipotle ranch.
2. Mediterranean Magic: Skip bacon, add olives + feta, and use Greek yogurt dressing with lemon zest.
3. Keto Crunch: Replace celery with chopped radishes, use full-fat Caesar, and add pumpkin seeds.
4. Apple Walnut Walnut: Add diced apples + candied walnuts, swap cheddar for blue cheese, and use honey-mustard dressing.
5. No-Mayo Vegan: Use chickpeas instead of chicken, tempeh bacon, and avocado-cashew cream dressing.
Beau’s Backstage Gossip
This recipe’s evolved like my hairline—started simple, got bolder! My wife once subbed in blue cheese during a fridge emergency… now we fight over who gets the last bite. Pro tip: Double the batch! It keeps (without avocado) for 3 days. Add avocados fresh each time to avoid slime-town. Oh, and that one time I used frozen peas? Don’t. Just… don’t. Trust me.
Your Burning Questions, Answered
Q: Can I make this ahead without avocado turning brown?
A: Absolutely! Mix everything EXCEPT avocado and dressing. Store covered. When ready, chop avocados, toss with lemon juice, then fold into mix + dressing. Crisis averted!
Q: Why’s my salad watery after chilling?
A: Veggies like celery release liquid! Pat them dry with paper towels before mixing. If it’s too late, drain excess liquid and add a sprinkle of cheese to re-bind.
Q: Help—I hate celery! What’s a crunchy swap?
A: Try diced jicama, cucumber (seeds removed), or even chopped snap peas. Crunch is key, but flavor’s flexible!
Q: Can I use canned chicken?
A: You can, but drain and rinse it well, then pat dry. For best texture, sauté it in butter first. Rotisserie chicken’s still king though!

Avocado Bacon Chicken Salad
- Total Time: 15–45 mins
Description
Need a quick win for dinner, lunch prep, or a snack that doubles as a mic drop? This Avocado Bacon Chicken Salad is your hero. It’s packed with juicy chicken, crispy bacon, creamy avocado, cheddar, and scallions, all wrapped in a luscious Caesar dressing. No mayo, no fuss—just flavor that high-fives you with every bite. Wrap it, spoon it, sandwich it… or eat it straight from the bowl. No shame here.
Ingredients
• 2 cups cooked chopped chicken
• 6 slices crispy bacon, crumbled
• 1 large ripe avocado, diced
• ¾ cup shredded cheddar cheese
• ¾ cup thinly sliced scallions
• ¾ cup diced celery
• ¼ cup Caesar dressing
• Salt & pepper to taste
• Optional: squeeze of lemon juice (to keep avocado bright)
Instructions
-
Combine chicken, bacon, avocado, cheese, scallions, and celery in a large bowl.
-
Drizzle Caesar dressing over the top. Start with 3 tbsp, add more as needed.
-
Gently toss until everything is just coated.
-
Season to taste with salt and pepper.
-
Serve immediately or chill for 30 minutes to let flavors mingle.
Notes
• Use lemon juice on avocado to prevent browning
• For meal prep, mix everything but the avocado and dressing; add fresh before serving
• Swap Caesar with ranch or green goddess for variety
- Prep Time: 15 mins
Nutrition
- Calories: 430 Cal Per Serving
- Sodium: 620mg
- Fat: 32g
- Carbohydrates: 6g
- Protein: 30g
Nutritional Per Serving (approx!)
Calories: 430 • Fat: 32g • Carbs: 6g • Protein: 30g • Fiber: 3g • Sodium: 620mg
Note: Stats vary with ingredient swaps. Want lighter? Use turkey bacon + low-fat dressing!
Final Thoughts: More Than Just a Salad
This Avocado Bacon Chicken Salad isn’t just a recipe—it’s a mindset. It’s about:
-
Permission to improvise (no fancy skills required)
-
Rescuing ingredients (avocados, leftovers, your sanity)
-
Eating like you matter (because you do)
It’s the culinary equivalent of that friend who shows up with snacks and a pep talk when you’re overwhelmed. So next time hunger strikes cha-cha style, remember: magic in a bowl is just a few chops and a fold away. Now go forth and make your taste buds high-five. And if you eat it straight from the mixing bowl? I’ll save you a seat at the club.
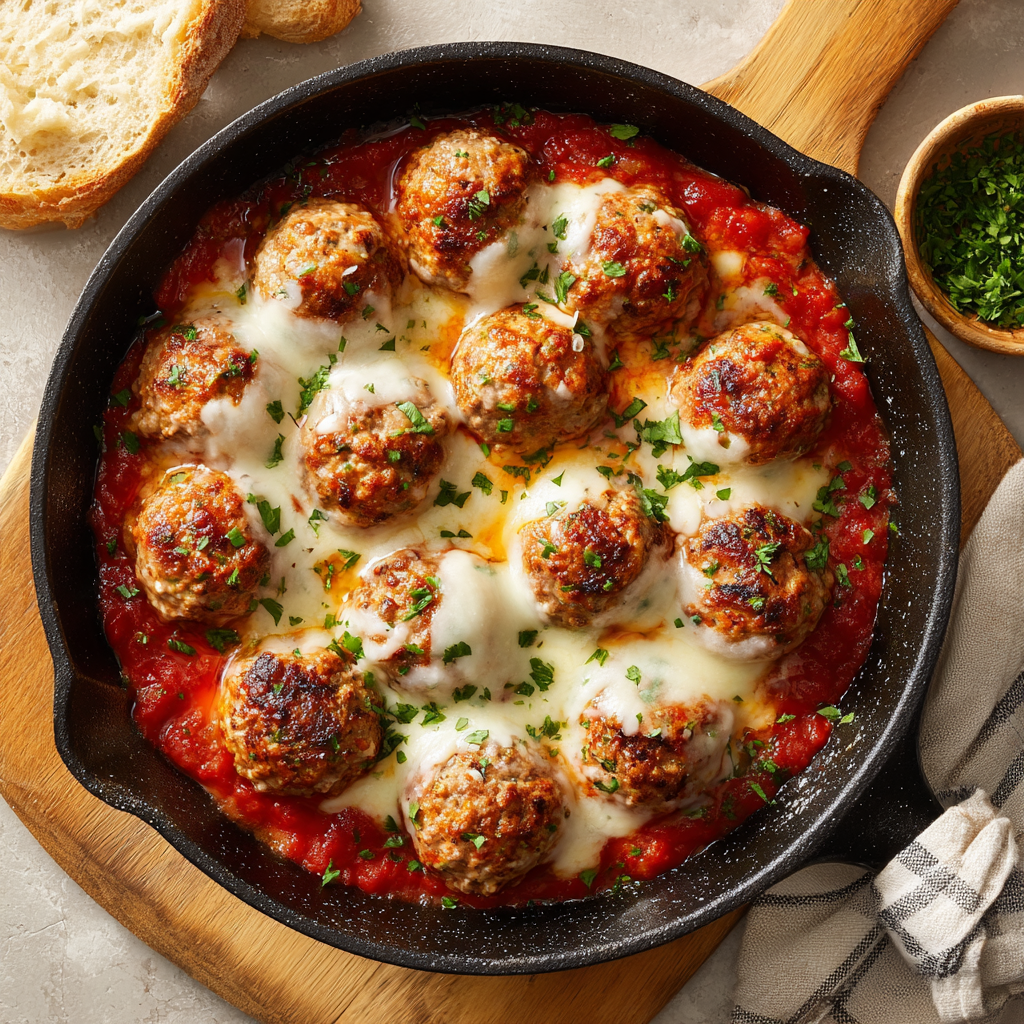
Mozzarella-Stuffed Meatballs
The Ultimate Comfort Food: Mozzarella-Stuffed Meatballs That’ll Steal the Show
Hey friends, Beau here! Let’s talk about that magical moment when you cut into a meatball and molten mozzarella comes spilling out like a delicious secret. Pure. Comfort. Magic. These aren’t just any meatballs—they’re juicy, tender hug with a gooey surprise inside, swimming in a herby tomato sauce that’ll make your kitchen smell like Nonna’s Sunday supper. Whether you’re prepping for pasta night, building a legendary sub, or just need a happy-weeknight win, these mozzarella-stuffed beauties are your new MVP. I promise: they’re easier than you think, and that first cheesy pull? Totally Instagram-worthy. Ready to make your spatula (and your people) very, very happy? Let’s roll!
That Time I Dropped the Cheese (And Why It Was Brilliant)
Picture this: my first dinner party, 22 years old, trying to impress my now-wife Sarah. I’m making classic meatballs when—oops—a mozzarella cube slips off the counter. Without thinking, I stuff it into a half-formed meatball like a culinary Hail Mary. Fast-forward: Sarah takes one bite, cheese cascades down her chin, and she grins: “You genius.” That happy accident became our “cheesy love ball” tradition. Now, our kids giggle when the molten center oozes out (“lava meatballs!”), proving food’s best moments are unplanned. Moral? Sometimes kitchen flubs lead to legendary comfort food.
Gather Your Flavor Squad
Here’s your grocery list—with my chef hacks for success!
- 1 lb lean ground pork & 0.5 lb lean ground beef: The pork keeps ’em juicy; beef adds depth. Swap tip: Use all beef for convenience, or turkey for lighter vibes.
- 1 tbsp Italian seasoning: Your flavor backbone. Chef insight: Toast dried herbs in a dry pan for 30 seconds to wake up their oils!
- 1 egg: The glue! Hack: Lightly beat it first for even distribution.
- 1 tbsp fresh parsley, chopped: Brightens the richness. No fresh? Use 1 tsp dried, but add it to the sauce later.
- 12 oz mozzarella cubes: Critical hack: Freeze these 20 minutes first—less ooze-out during searing!
- Sauce ingredients (olive oil, onion, garlic, canned tomatoes, bay leaf): Sub magic: No fresh herbs? Use 2 tsp dried basil in the sauce.
Let’s Make Some Cheesy Magic!
Step 1: In a large bowl, gently mix pork, beef, Italian seasoning, egg, parsley, salt, and pepper with your hands. Chef’s tip: Overmixing = tough meatballs. Stop when just combined—like you’re folding clouds!
Step 2: Scoop golf-ball-sized portions. Flatten slightly, nestle a mozzarella cube in the center, and seal the meat around it. Roll hack: Wet your palms to prevent sticking!
Step 3: Heat olive oil in a skillet. Sauté onions and garlic over medium heat until soft (2-3 mins). Add crushed tomatoes, bay leaf, herbs, and pepper. Simmer on low. Flavor boost: Add a Parmesan rind to the sauce if you’ve got one!
Step 4: In a separate pan, sear meatballs on all sides until golden. Don’t crowd them! Work in batches. This builds a crust that locks in juices.
Step 5: Gently place meatballs into the simmering sauce. Cover and cook on low for 15-20 mins. Key: Low-and-slow keeps cheese from exploding! They’re done when internal temp hits 165°F.
Plate It Like a Pro (Or Just Grab a Fork!)
Slide these beauties over al dente spaghetti with extra sauce and a snowfall of Parmesan. Or—my fave—pile three into a toasted ciabatta roll with wilted spinach and a garlic mayo swipe. For game day? Skewer them with basil leaves as “cheesy lollipops” with marinara dip! Pro move: Garnish with fresh basil and a drizzle of good olive oil. Comfort never looked so chic.
Shake It Up: 5 Tasty Twists
1. Spicy Arrabbiata: Add red pepper flakes to the sauce and chorizo to the meat mix.
2. Caprese Style: Swap mozzarella for fresh burrata and tuck a basil leaf inside each ball.
3. Gluten-Free: Bind with ¼ cup almond flour instead of breadcrumbs (not listed, but works!).
4. Greek-Inspired: Use lamb, add mint/oregano, and stuff with feta + kalamata bits.
5. Vegetarian Hack: Portobello mushrooms + lentils for the “meat,” stuffed with smoked gouda.
Beau’s Behind-the-Scenes Nuggets
Over the years, I’ve learned: freezing the cheese is non-negotiable (learned after the Great Cheese Leak of 2019!). Also, a combo of pork + beef beats all-beef—fattier pork = juicier bites. Funny story: My dog, Biscuit, once stole a whole meatball off the counter… and spat out the hot cheese! Now he waits politely for cheese-less scraps. Final tip: Double the batch and freeze extras (sans sauce) for emergency pasta nights. They reheat like a dream!
Your Meatball Queries, Solved!
Q: Why did my cheese explode everywhere?
A: Cheese too warm or meat layer too thin. Freeze cubes first and aim for 1.5″ meatballs with even coverage.
Q: Can I bake instead of pan-sear?
A: Yes! Bake at 400°F for 20 mins, then simmer in sauce 10 mins. Less crispy, but easier.
Q: Help—my meatballs are tough!
A: You overmixed or overcooked. Handle meat gently and pull them at 165°F.
Q: Can I make these ahead?
A: Absolutely! Sear meatballs, cool, and refrigerate for 2 days. Simmer in sauce when ready.

Mozzarella-Stuffed Meatballs
- Total Time: 55 mins
Description
Get ready for serious table applause—these mozzarella-stuffed meatballs are juicy, savory, and bursting with melty cheese. Simmered in a herby tomato sauce, they’re perfect over pasta, inside subs, or as irresistible appetizers. Bonus: that first bite cheese pull? Chef’s kiss. Whether you’re feeding family or impressing dinner guests, these meatballs bring cozy Italian flair with a molten twist.
Ingredients
• 1 lb ground pork
• ½ lb lean ground beef
• 1 tbsp Italian seasoning
• 1 egg, lightly beaten
• 1 tbsp chopped parsley (or 1 tsp dried)
• Salt & pepper to taste
• 12 oz mozzarella, cut into ¾-inch cubes (freeze 20 mins)
For the Sauce:
• 2 tbsp olive oil
• ½ onion, chopped
• 2 garlic cloves, minced
• 1 can (28 oz) crushed tomatoes
• 1 bay leaf
• 1 tsp dried basil or oregano
• Salt & pepper to taste
Instructions
-
Mix meatball base: Combine pork, beef, seasoning, egg, parsley, salt & pepper. Mix gently.
-
Stuff meatballs: Scoop and flatten meat, place a mozzarella cube in center, seal and roll.
-
Sear meatballs in batches until golden (or bake at 400°F for 20 mins).
-
Make sauce: Sauté onion and garlic in oil. Add tomatoes, bay leaf, herbs, salt & pepper. Simmer.
-
Simmer meatballs: Place into sauce, cover, and simmer on low 15–20 mins (internal temp: 165°F).
Notes
• Freeze cheese cubes first to avoid leaks
• Don’t overmix meat—light hands = tender meatballs
• Add a Parmesan rind to sauce for rich umami
- Prep Time: 25 mins
- Cook Time: 30 mins
Nutrition
- Calories: 350 Ca Per 3 meatballs + sauce
- Sodium: 550mg
- Fat: 25g
- Carbohydrates: 5g
- Protein: 28g
Nutritional Info (Per 3 Meatballs + Sauce)
Calories: 350 | Fat: 25g | Carbs: 5g | Protein: 28g | Sodium: 550mg
Note: Values are estimates. For lower sodium, skip added salt and use no-salt tomatoes!
Final Thoughts: Why These Meatballs Are a Forever Favorite
There’s something undeniably magical about cutting into a meatball and watching molten cheese spill out. It’s comfort food at its finest—simple enough for a weeknight but impressive enough for guests. Whether you stick to the classic recipe or experiment with global flavors, these mozzarella-stuffed meatballs are versatile, forgiving, and endlessly delicious.
So next time you’re craving something hearty, skip the takeout and make these instead. Because really, what’s better than a dish that feels like a warm, cheesy hug?
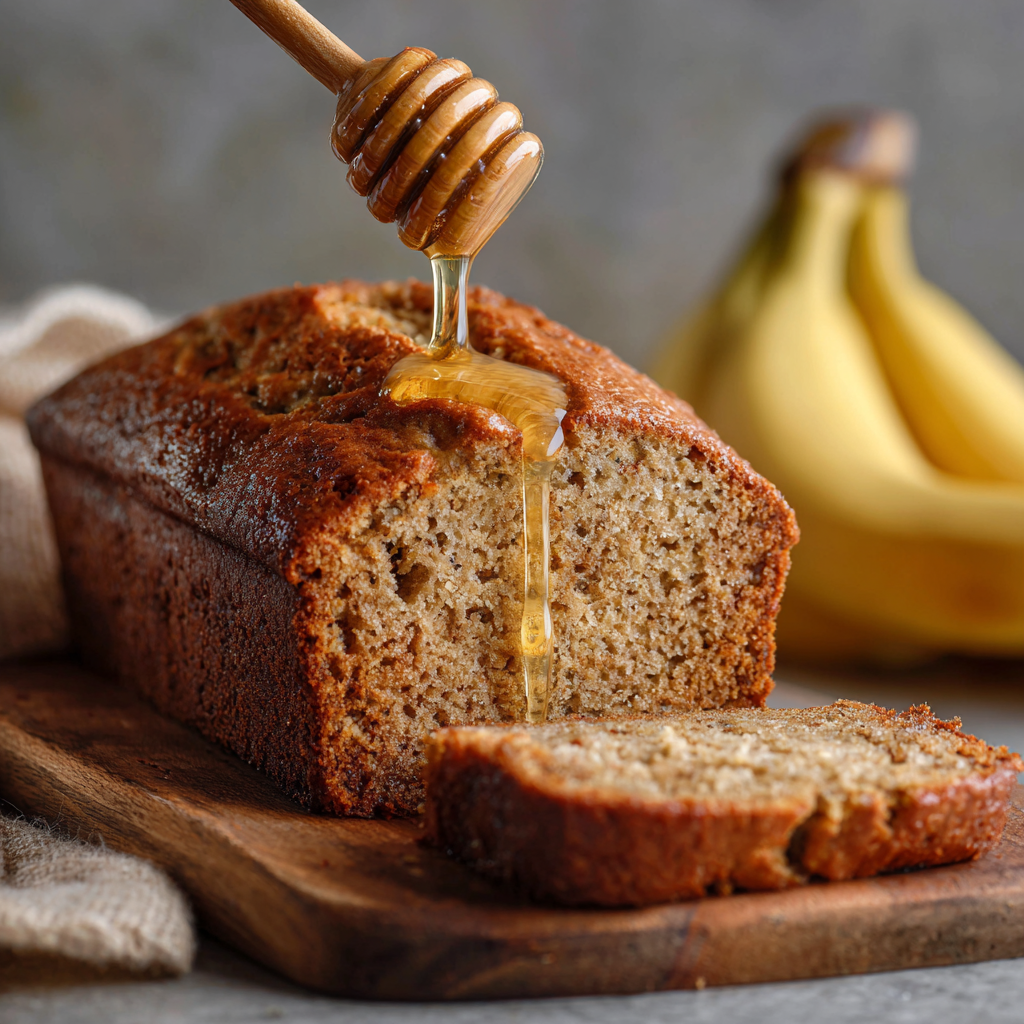
Honey Vanilla Banana Bread
Honey Vanilla Banana Bread: Your New Comfort Food Obsession
Hey friends, Beau here! If your kitchen could smell like a cozy Sunday morning hug, this Honey Vanilla Banana Bread would be the reason. Picture this: golden crust giving way to a moist, tender crumb that whispers sweet nothings of caramelized bananas, wildflower honey, and that unmistakable warmth of real vanilla. It’s not just banana bread—it’s banana bread wearing its fanciest pajamas. 🍌✨
I created this recipe after years of tweaking my grandma’s classic version. See, I wanted that nostalgic magic but with a grown-up twist—less sugar crash, more natural sweetness. Honey steps in like a rockstar sweetener, adding floral notes while keeping things moist for days. And vanilla? We’re not messing around with imitations here. We’re talking about scraping actual vanilla beans or using that gorgeous paste that speckles your batter like edible confetti.
Whether you’re a baking newbie or a spatula-wielding pro, this loaf is your edible happy place. Perfect for breakfast (don’t @ me, it’s basically fruit!), afternoon pick-me-ups with coffee, or dessert with a scoop of vanilla ice cream. Plus—it’s a fantastic way to rescue those sad, speckled bananas winking at you from the counter. Ready to make your kitchen smell like a bakery? Let’s roll!
Oven Mishaps & Grandma’s Wisdom
This recipe takes me straight back to my first apartment’s janky oven—a feisty beast that burned cookies but undercooked everything else. One rainy Tuesday, craving comfort, I attempted banana bread. Disaster struck: I ran out of sugar! Panicking, I subbed honey from this cute farmer’s market jar… and added a glug of vanilla extract because why not? The result? A sunken, oddly fragrant brick. Defeated, I called Grandma. Her chuckle crackled through the phone: “Beau, darlin’, baking’s like life—sometimes messy is delicious.” She was right. That “failure” became the blueprint for this recipe. Now, whenever I pull this loaf from the oven, I see her wink in the steam rising from the crust. It’s proof that kitchen flops can become legendary wins with a little patience (and quality vanilla).
Gather Your Goodies
Pro tip: Measure everything before starting—it’s like a zen ritual for stress-free baking!
- 3 medium or 2 large ripe bananas (≈1½ cups mashed): The spottier, the better! Black-speckled bananas = natural sweetness & moisture. No ripe ones? Bake unpeeled bananas at 300°F for 15 mins to mimic ripeness.
- ⅓ cup unsalted butter, melted: Salted butter works too—just reduce added salt by half. Vegan? Swap equal parts coconut oil.
- ½ cup honey: Use local or wildflower honey for floral depth. Out of honey? Pure maple syrup works beautifully.
- 2 eggs: Room temperature eggs blend smoother. Tip: Place cold eggs in warm water for 5 mins!
- ¼ cup milk: Dairy, almond, oat—all work! Adds tenderness. Feeling indulgent? Buttermilk makes it extra tangy.
- 1 tbsp pure vanilla extract or paste: This is the flavor MVP. Paste adds gorgeous specks; extract delivers intensity. Never use imitation!
- 1¾ cups all-purpose flour: Spoon & level into measuring cups—don’t pack it! For fluffier bread, replace ¼ cup with cornstarch.
- 1 tsp baking soda: Freshness matters. Test by dropping in vinegar—if it fizzes violently, you’re golden.
- ½ tsp salt: Balances sweetness. Flaky sea salt? Even better.
- Optional jazz hands: ¾ cup toasted walnuts, chocolate chips, or a peanut butter glaze swirl. Toss mix-ins in 1 tbsp flour so they don’t sink!
Let’s Bake Some Magic!
Channel your inner pastry chef—we’ve got pro hacks at every step!
- Preheat & Prep: Fire up your oven to 350°F (175°C). Grease a 9×5-inch loaf pan, then line it with parchment paper (let it overhang on sides). Why? Foolproof removal! No wrestling with stuck bread.
- Banana Bash: In a large bowl, mash bananas with a fork or potato masher. Chef’s secret: Leave small lumps for texture pockets—think “rustic charm,” not baby food. Add melted butter (cooled slightly so it doesn’t cook the eggs!), honey, eggs, milk, and vanilla. Whisk like you’re painting rainbows—smooth but not obsessive.
- Dry Dance: In a separate bowl, whisk flour, baking soda, and salt. Critical hack: Aerate the flour by whisking 30 seconds—this prevents dense bread. Ever bite into a bitter baking soda lump? We’re avoiding that tragedy.
- The Gentle Merge: Pour dry ingredients into wet. Using a spatula, fold until just combined. Seriously—stop when you see the last flour streak disappear. Overmixing = tough, sad bread. It should look lumpy and shaggy (like my hair at 6 a.m.).
- Fun Fold-ins: Add nuts or chocolate now! Fold gently—3–4 strokes max. Pro move: Reserve 2 tbsp to sprinkle on top for Instagram glory.
- Pan & Smooth: Pour batter into your prepped pan. Tap the pan firmly 3x on the counter to evict air bubbles. Smooth the top with your spatula—it should look like a buttery sunset.
- Bake ’til Golden: Bake 50–60 minutes. Oven quirks alert: Rotate pan halfway. At 50 mins, do the toothpick test—clean = done! If top browns too fast, tent loosely with foil. Your kitchen should smell like heaven’s bakery.
- Cooling Zen: Cool in pan 10 minutes—this lets the structure set. Then, lift out using parchment overhangs. Transfer to a wire rack. Resist slicing for 1 hour! (I know, torture.) This prevents gummy slices.
Serving: Where Joy Meets The Plate
Slice this beauty thick—it holds up beautifully! For breakfast, toast slices in a buttered skillet until crispy-edged, then drizzle with extra honey. Dessert calls for à la mode action: warm bread + cold vanilla ice cream + flaky salt. Pack slices in lunchboxes with a smear of almond butter, or gift a loaf wrapped in rustic twine (hello, favorite neighbor status!). Pair with black coffee for contrast or spiced chai for cozy vibes. ✨
Make It Your Own!
This recipe’s a canvas—paint it deliciously!
- Nutty Professor: Fold in ½ cup toasted pecans + ¼ cup bourbon-soaked raisins.
- Choco-Loco: Add ⅔ cup dark chocolate chunks + 1 tsp espresso powder (enhances chocolate!).
- Gluten-Free Glow-Up: Swap AP flour for 1:1 GF blend + 1 tsp xanthan gum.
- Vegan Hug: Use flax eggs (2 tbsp ground flax + 5 tbsp water), vegan butter, and oat milk. Top with coconut whipped cream!
- PB&J Remix: Swirl ¼ cup peanut butter into batter before baking. Post-bake, spread with warmed jam.
Beau’s Backstage Notes
This recipe evolved from my “honey panic” moment into a Feastical staple. Early versions used white sugar—good, but honey makes it complex and moist. Once, I added cardamom by accident… now it’s a fan-requested winter variant! Funny story: I tested this 27 times (my friends became banana bread ambassadors). Version #15 was dubbed “The Doorstop” — overmixed and heavy. Lesson learned: gentle folds = tender crumbs. Nowadays, I make quadruple batches during holidays—wrapped in parchment and twine, they’re edible holiday cards. Want next-level? Brown your butter first. It adds a toffee-like depth that’ll make you swoon!
FAQs: Let’s Troubleshoot!
Q: Why’s my bread gummy in the middle?
A: Classic underbaking! Ovens vary—rely on the toothpick test. If top browns before center cooks, tent with foil and bake 5–10 mins longer. Also, ensure bananas are mashed (not puréed) to avoid excess moisture.
Q: Can I use frozen bananas?
A: Absolutely! Thaw them first in a strainer over a bowl. Discard excess liquid (it’s watery, not flavorful). Pro tip: Freeze peeled bananas in chunks for smoothie-ready backups!
Q: How do I store leftovers?
A: Room temp (wrapped) for 2 days. For longer life: refrigerate 1 week, or freeze slices for 3 months. Refresh cold slices in a toaster oven—crispy edges restored!
Q: Can I make muffins?
A: Yes! Fill lined muffin cups ¾ full. Bake 20–25 mins at 350°F. Perfect for on-the-go joy!

Honey Vanilla Banana Bread
- Total Time: 1 hr 15 mins
Description
Say hello to your new go-to comfort bake: a luscious banana bread kissed with real vanilla and naturally sweetened with honey. It’s tender, fragrant, and wildly delicious—perfect for breakfast, dessert, or any time you need a slice of sunshine. Whether you’re cozying up with a warm mug or sharing with friends, this loaf is guaranteed to charm.
Ingredients
• 3 ripe bananas (≈1½ cups mashed)
• ⅓ cup unsalted butter, melted
• ½ cup honey (wildflower or local preferred)
• 2 eggs, room temp
• ¼ cup milk (any kind)
• 1 tbsp pure vanilla extract or paste
• 1¾ cups all-purpose flour
• 1 tsp baking soda
• ½ tsp salt
• Optional: ¾ cup toasted walnuts or chocolate chips
Instructions
-
Preheat oven to 350°F (175°C). Grease and line a 9×5-inch loaf pan with parchment.
-
Mash bananas in a large bowl. Stir in melted butter, honey, eggs, milk, and vanilla.
-
Whisk flour, baking soda, and salt in a separate bowl. Gently fold dry into wet until just combined.
-
Add optional mix-ins, fold gently, then pour into pan. Tap pan to release bubbles.
-
Bake 50–60 mins. Toothpick should come out clean. Tent with foil if browning too fast.
-
Cool in pan 10 mins, then lift onto wire rack. Cool at least 1 hour before slicing.
Notes
• Slight banana chunks = moist, textured crumb
• Don’t overmix! Fold just until flour disappears
• Want café vibes? Toast a slice and drizzle with honey or almond butter
- Prep Time: 15 mins
- Cook Time: 50–60 mins
Nutrition
- Calories: 180 Cal
- Sugar: 13g
- Sodium: 160mg
- Fat: 6g
- Carbohydrates: 29g
- Protein: 3g
Nutritional Goodness (per slice, sans mix-ins)
Calories: 180 • Fat: 6g • Carbs: 29g • Sugars: 13g (naturally from honey & bananas!) • Protein: 3g • Sodium: 160mg
Final Thoughts: More Than Just a Loaf
This Honey Vanilla Banana Bread isn’t just a recipe—it’s a story. From Beau’s oven mishaps to grandma’s wisdom, from kitchen chemistry to creative adaptations, every slice carries intention. Whether you stick to the classic or invent your own spin, baking it is an act of love—for yourself, for others, and for the simple joys of life.
So preheat that oven, mash those bananas, and let the scent of honey and vanilla fill your home. Because sometimes, the best comfort is the kind you can eat.

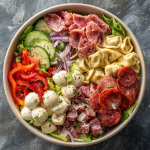
Italian Sub Salad, Two Ways
Say Hello to Your New Favorite Salad (That Tastes Like an Italian Sub!)
Hey friends! Beau here, welcoming you back to Feastical with open arms and a very, very large salad bowl. Ever crave those incredible, punchy flavors of a loaded Italian sub – the tangy peppers, the salty meats, the creamy cheeses – but maybe want something a little fresher, lighter, or just *different* from the usual sandwich routine? Or perhaps you’re looking for a killer crowd-pleaser that doesn’t involve juggling buns? You’ve landed in the perfect spot. Today, we’re diving fork-first into my Italian Sub Salad, Two Ways. This isn’t just lettuce with a sprinkle of deli meat; oh no. This is a full-on flavor explosion that captures the soul of your favorite deli sub, minus the bread. We’re talking layers upon layers of savory salami, spicy pepperoni, creamy provolone and mozzarella, crisp veggies, all tossed in a zippy homemade dressing that’ll make your taste buds sing “That’s Amore!” And the best part? Flexibility is its middle name. Keep it bright, crunchy, and low-carb with just the greens and goodies, OR toss in some tri-color tortellini for a pasta salad version that’s pure, carb-loaded comfort. It’s perfect for potlucks, easy weeknight dinners, or meal prepping lunches that you’ll actually look forward to. So grab your biggest bowl, your favorite wooden spoon, and let’s build a salad that eats like a sandwich masterpiece!
Deli Counters & Daydreams: Where This Salad Was Born
This salad recipe? It’s basically my edible love letter to Saturday mornings growing up. Picture a 10-year-old Beau, nose practically pressed against the glass of our local Italian deli counter, eyes wide as saucers. The air was thick with the scent of garlic, oregano, and that magical tang of cured meats. My dad would always order “The Works” sub – piled impossibly high with every salami, pepperoni, cheese, and pepper they had. It was messy, it was glorious, and sharing it felt like a family event. But honestly? As much as I adored the flavors, even back then I’d sometimes find myself picking out the fillings, savoring them more than the bread! Fast forward to my early catering days, scrambling to feed a hungry crowd at a summer picnic. I needed something big, bold, fast, and transportable. Those deli counter memories flooded back. What if I took *everything* amazing *inside* the sub… and just… let it shine on its own? I threw together the meats, cheeses, peppers, onions, romaine, and whipped up a quick vinaigrette reminiscent of the sub’s oil-and-vinegar kick. The result? Pure magic. People went wild for it! It was that nostalgic punch of flavor, but fresher, easier to eat, and totally adaptable. Adding the tortellini twist came later, inspired by a friend who declared, “This is incredible, Beau… but imagine it with pasta?!” And just like that, a Feastical staple was born. It’s proof that the best recipes often come from happy accidents and delicious memories.
Gathering Your Flavor Arsenal
Here’s everything you need to build this Italian masterpiece. Don’t sweat it if you need to swap something – cooking should be fun, not stressful! This makes a BIG salad, perfect for 6-8 hungry folks or glorious leftovers.
- 2 hearts of romaine, shredded: Our crunchy, sturdy base. Romaine holds up way better than flimsy lettuce against the hefty toppings and dressing. Chef Tip: Wash and spin it *really* dry – nobody likes a soggy salad! Iceberg works too for extra crunch.
- ½ lb salami, sliced and cut into squares: Classic Italian flavor. Get the good stuff from the deli counter if you can! Sub: Hard sausage or even chopped ham works.
- ½ lb provolone, sliced and cut into squares: Mild, creamy, melty goodness. Chef Insight: Cutting it into squares gives perfect bites. Mozzarella sticks work in a pinch.
- 8 oz marinated mini mozzarella balls (ciliegine): Bursts of creamy, tangy flavor! The marinade adds extra zing. Sub: Fresh mozzarella torn into chunks, or skip the marinade and add more dressing.
- 1 cucumber, thinly sliced: Cool, crisp refreshment. I leave the peel on for color and nutrients.
- 1 red bell pepper, sliced into strips: Sweetness and vibrant color. Yellow or orange bells are gorgeous too!
- 1 cup mild pepper rings: Essential tang! Banana peppers or giardiniera work great. Spice Lover? Use hot pepper rings!
- 1 white onion, sliced into strips: Sharp bite that mellows slightly in the dressing. Soak in cold water for 10 mins if raw onion is too intense. Sub: Red onion for color.
- 1 tablespoon black pepper: Freshly cracked is best! It wakes up all the other flavors.
- 1 tablespoon dried basil: Sweet, aromatic herbiness. Rub it between your fingers before adding to release its oils!
- 1 cup Parmesan cheese, cubed (or shaved): Salty, umami punch! Cubes give substance, shaved melts in. Chef Must: Use real Parmigiano-Reggiano if possible.
- ½ lb pepperoni, diced: Our spicy kick! Mini pepperoni works too. Sub: Spicy capicola or soppressata.
For the Zippy Dressing:
- 1 cup red wine vinegar: The bright, tangy backbone. Sub: White wine vinegar or apple cider vinegar in a pinch.
- ½ cup olive oil: Richness and body. Use a good extra virgin for flavor!
- 1 tablespoon garlic powder: Convenient, even garlic flavor. Fresh Hack: Mince 2-3 cloves super fine instead.
- 1 tablespoon dried basil: Echoes the salad seasoning.
- 1 tablespoon brown sugar (or natural sweetener like honey/maple syrup): Balances the vinegar’s sharpness. Crucial for that “deli sub” vibe!
- 2 teaspoons kosher salt: Enhances everything. Note: If using table salt, start with 1 tsp and taste.
Building Your Italian Masterpiece: Step-by-Step
Ready to assemble? This comes together faster than you can say “Mangia!” Let’s do this:
- The Big Toss: Grab your largest salad bowl – seriously, go big or go home! Add the shredded romaine, salami squares, provolone squares, marinated mozzarella balls (drained if very oily, but a little marinade is good!), sliced cucumber, red bell pepper strips, pepper rings, onion strips, black pepper, dried basil, Parmesan cubes, and diced pepperoni. Chef Hack: Layer the ingredients prettily before tossing for a great photo op! Tip: If prepping ahead, keep the dressing separate and add greens last minute to prevent sogginess.
- Whisk Up the Magic (Dressing Time!): In a small bowl or a mason jar (my favorite – just screw the lid on and shake!), combine the red wine vinegar, olive oil, garlic powder, dried basil, brown sugar (or sweetener), and kosher salt. Whisk vigorously (or shake that jar like it owes you money!) until the mixture is completely emulsified – meaning the oil and vinegar aren’t separate anymore, and it looks slightly creamy. Chef Insight: Taste it! Dip a veggie piece in. Want more tang? Add a splash more vinegar. Too sharp? A pinch more sugar. More herbiness? Another pinch of basil. Make it yours!
- Bring It All Together: Pour that gorgeous, zippy dressing over the mountain of salad goodness in your big bowl. Now, channel your inner Italian grandmother! Using clean hands or two large salad spoons, gently but thoroughly toss everything together. You want every single piece coated in that flavorful dressing. Don’t be afraid to get in there! Tip: Tossing from the bottom up ensures even distribution without crushing the delicate ingredients.
- The Flavor Nap (Chill Time): This step is optional but HIGHLY recommended for maximum deliciousness. Cover the bowl loosely with plastic wrap or a lid and pop it into the fridge for at least 30 minutes. Why? This lets the flavors get to know each other intimately. The vinegar mellows the onions slightly, the herbs infuse, the cheeses soak up the dressing… it becomes magical. You *can* serve it immediately, but trust me, the wait is worth it!
- Carb-Lover? Pasta Time! (The “Two Ways” Part): Here’s where the flexibility shines! For the Low-Carb/Lettuce Version: You’re done! Skip to serving. For the Hearty Tortellini Version: Cook one 12-16 oz bag of tri-color cheese tortellini according to package directions. Drain and rinse under *cold* water until completely cool. Gently fold the cooled tortellini into the *entire* dressed salad. OR To Serve Both Styles: Before dressing, split the salad base (meats, cheeses, veggies, seasonings) evenly between two bowls. Add the dressing to both and toss. Add the cooled tortellini to ONE bowl only. Leave the other as the lettuce-based version. Boom! Two incredible salads from one prep session.
Plating Up the Perfect Bite
Presentation is part of the fun! Serve this beauty family-style right in that big bowl – it’s meant to be shared and admired. For individual plates, use shallow pasta bowls or wide plates. Pile it high! Garnish is key: a final shower of extra shaved Parmesan cheese, a few extra pepperoni slices or pepper rings on top, and maybe a fresh sprinkle of chopped parsley or basil if you have it. Those colors pop! Offer crusty bread or garlic breadsticks on the side for scooping up any runaway dressing (it’s that good). For the tortellini version, maybe add a few extra basil leaves. Keep it rustic and inviting – this salad is all about vibrant, shareable joy.
Make It Your Own: Flavor Twists & Swaps
This salad is your canvas! Get creative:
- Mediterranean Mood: Swap salami/pepperoni for grilled chicken or chickpeas, add kalamata olives and artichoke hearts, use feta instead of parmesan, and dress with a lemon-oregano vinaigrette.
- Spicy “Hot Cap” Style: Use spicy capicola instead of some salami, add hot cherry peppers, and kick up the dressing with a pinch of red pepper flakes.
- Vegetarian Delight: Omit meats. Load up on marinated artichokes, roasted red peppers, sun-dried tomatoes, chickpeas, and extra cheeses (like sharp cheddar cubes).
- Gluten-Free Friendly: Skip the tortellini or use GF pasta. Ensure meats/cheeses are GF (check labels!).
- Lighter Touch: Use turkey pepperoni and low-fat mozzarella, reduce the oil in the dressing by 1-2 tbsp (add a splash of water), and bump up the veggies (add cherry tomatoes!).
Beau’s Back-Porch Wisdom
This salad has seen more picnics, potlucks, and lazy Sunday dinners than I can count! It’s evolved beautifully. The tortellini addition? Absolute game-changer for feeding carb-craving crowds. One funny kitchen fail: I once accidentally used powdered sugar instead of brown sugar in the dressing during a pre-coffee morning prep. Let’s just say… it was *uniquely* sweet! Stick to the brown sugar, folks. 😉 Over time, I learned that chilling really does make a difference, and using high-quality deli meats elevates it from good to “OMG.” Don’t skip the Parmesan cubes – they’re little salty treasures! This recipe is forgiving. Short on one veggie? Add more of another. Prefer Swiss to Provolone? Go for it! The core is the vibrant mix of savory, tangy, salty, and fresh. Make it, share it, and watch it disappear. That’s the Feastical spirit!
Your Salad Questions, Answered!
Let’s tackle some common head-scratchers:
- Q: Can I make this ahead of time?A: Absolutely, with strategy! Prep the dressing, chop all the veggies, meats, and cheeses up to 24 hours ahead. Store dressing separately; store salad ingredients (minus greens) mixed together in one container; store greens separately in a bag with a paper towel. Combine greens and other ingredients, add dressing, and toss just before serving (or max 1 hour ahead if you like it softer). Add tortellini *only* when serving cold pasta salad to prevent mushiness.
- Q: My salad got watery/soggy! What happened?A: Sogginess usually comes from: 1) Lettuce not dried thoroughly, 2) Dressing added too far in advance (especially with greens), 3) High-water veggies (like tomatoes – which I omitted for this reason!) releasing liquid. Fixes: Dry romaine *extremely* well. Dress closer to serving. If using tomatoes or cucumbers, add them later or salt them lightly first and drain excess liquid. For leftovers, store undressed components separately.
- Q: Is the dressing too vinegary? How can I adjust?A: Taste is personal! The dressing is intentionally tangy like a classic sub shop oil & vinegar. If it’s too sharp for you *before* tossing: Whisk in more olive oil (1 tbsp at a time) or a touch more sweetener. If it’s too sharp *after* tossing on the salad: The salty meats/cheeses will balance it as it chills. Give it that 30-minute rest! Next time, start with 3/4 cup vinegar.
- Q: Can I use different pasta for the tortellini version?A: You bet! Tri-color tortellini looks festive, but any cheese-filled tortellini or ravioli works. Penne, rotini, or farfalle (bowties) are great sturdy options too. Just cook al dente, cool completely, and toss gently.
Italian Sub Salad, Two Ways
- Total Time: 25–50 mins
Description
Craving the bold, tangy, cheesy goodness of an Italian sub—but want it fresher, lighter, and in salad form? This Italian Sub Salad is your answer. Loaded with salami, pepperoni, provolone, mozzarella, crisp veggies, and a zesty homemade vinaigrette, it’s the perfect no-bread twist. And if carbs are calling? Toss in tortellini for a pasta salad remix that steals the show. Whether you’re feeding a crowd or meal-prepping your week, this one’s a guaranteed flavor hit.
Ingredients
• 2 romaine hearts, shredded
• ½ lb salami, sliced into squares
• ½ lb provolone, sliced into squares
• ½ lb pepperoni, diced
• 8 oz marinated mozzarella balls
• 1 cucumber, sliced
• 1 red bell pepper, sliced
• 1 white onion, sliced
• 1 cup mild pepper rings
• 1 cup cubed or shaved Parmesan
• 1 tbsp black pepper
• 1 tbsp dried basil
Zippy Dressing:
• 1 cup red wine vinegar
• ½ cup olive oil
• 1 tbsp garlic powder
• 1 tbsp dried basil
• 1 tbsp brown sugar or honey
• 2 tsp kosher salt
Optional Add-Ins:
• 12–16 oz cooked, cooled tri-color tortellini (for pasta salad version)
• Fresh basil or parsley for garnish
• Chili flakes for heat
Instructions
-
Toss the Base: In a large bowl, combine romaine, meats, cheeses, veggies, and seasonings.
-
Mix the Dressing: Whisk or shake together all dressing ingredients until well emulsified.
-
Combine: Pour dressing over salad and toss thoroughly from bottom up.
-
Chill (Optional but Awesome): Let sit in fridge for 30 mins for flavors to meld.
-
Serve: Top with herbs, extra cheese, and optional chili flakes. For pasta version, gently fold in tortellini before serving.
Notes
• Dry your greens well to avoid sogginess.
• For vegetarian: skip the meat, add chickpeas and roasted veggies.
• Make it GF: use gluten-free pasta or skip pasta entirely.
- Prep Time: 20 mins
Nutrition
- Calories: 400 Cal
- Sodium: 850mg
- Fat: 30g
- Carbohydrates: 7g
- Protein: 20g
Nutritional Info (Approximate, Lettuce-Only Version per Serving)
Calories: 400 | Fat: 30g | Protein: 20g | Carbohydrates: 7g | Sodium: 850mg
Note: Adding tortellini significantly increases carbs and calories. Sodium can vary based on specific meats/cheeses used.
Final Thoughts
This Italian Sub Salad is more than a recipe—it’s a celebration of bold flavors, textures, and flexibility. Whether you go low-carb or tortellini-loaded, it’s guaranteed to satisfy. The best part? It adapts to your cravings, dietary needs, and occasions effortlessly.
So next time you’re dreaming of an Italian sub but want something fresher (or easier to share), remember: this salad is your answer. Make it, tweak it, and most importantly—enjoy every bite.
Tomato Zucchini Pasta
When Summer Smiles in a Bowl: Tomato Zucchini Pasta
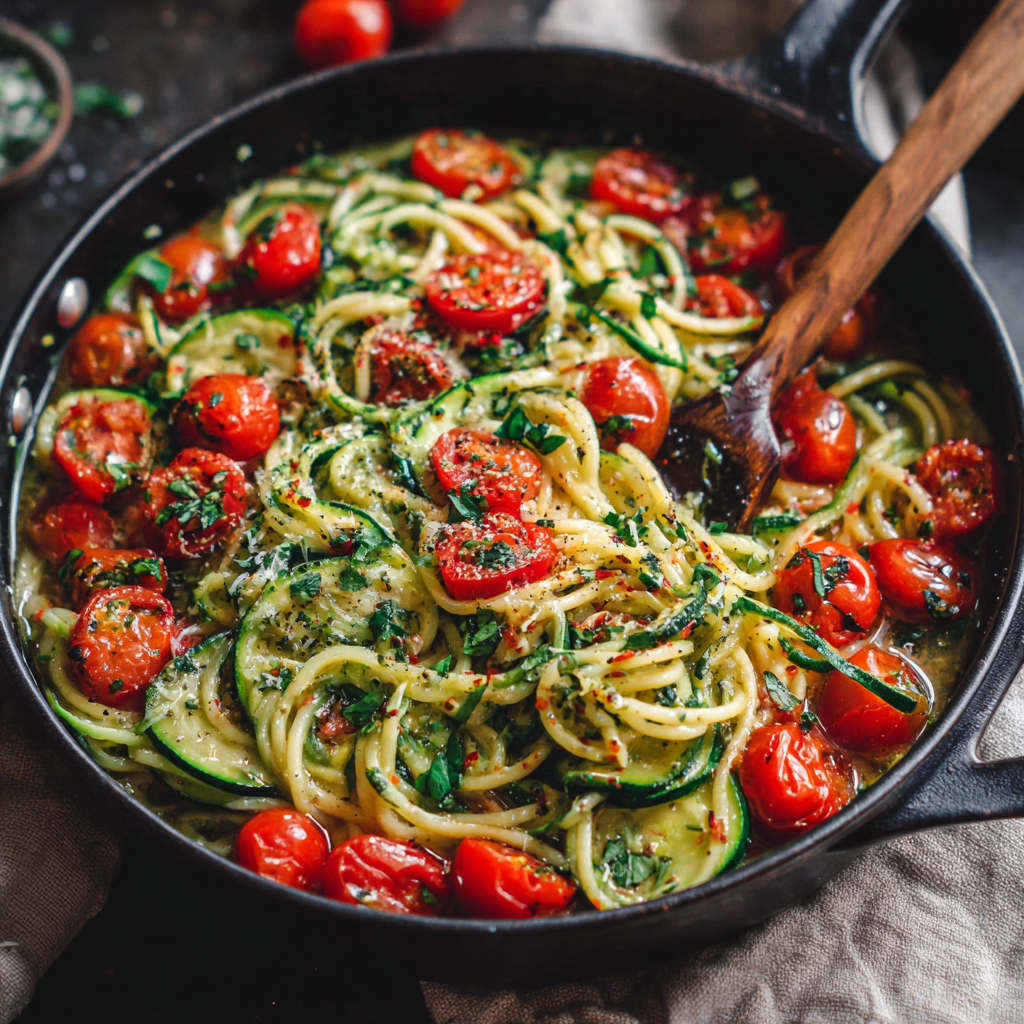
Hey friends, it’s Beau Collier from Feastical! Pull up a stool and let’s chat about something magical that happens when garden treasures meet weeknight ease. Picture this: plump cherry tomatoes bursting with sunshine, tender zucchini ribbons dancing in olive oil, and pasta hugging it all together in a garlicky embrace. This Tomato Zucchini Pasta isn’t just dinner – it’s a 25-minute vacation to Italy via your skillet.
You know I live for those “aha!” kitchen moments where flavor and simplicity high-five. This dish? It’s that moment on repeat. Whether you’re racing against soccer practice or craving a light-but-satisfying meal after a long day, this recipe gets you. We’re talking minimal prep, one-pan wizardry (almost!), and that gorgeous confetti of fresh herbs making everything Instagram-pretty. What I love most? It’s a canvas. Vegetarian as written, but easily adaptable for protein lovers or dairy-free pals. So grab your favorite wooden spoon – let’s turn those summer veggies into a standing ovation!
The Zucchini That Started It All
This recipe takes me straight back to Nonna Rossi’s tiny Brooklyn balcony garden. Every August, her zucchini plants would stage a hostile takeover – and 10-year-old me was her “garden rescue squad.” I’d arrive to find grocery bags bursting with emerald torpedoes on her doorstep. “Bambino,” she’d whisper dramatically, “if we don’t eat these by sunset, they’ll conquer the apartment!”
One sweltering afternoon, we faced down six giant zucchinis. Nonna handed me a knife (“Fingers back, Beau!”) and we sliced like warriors. She taught me her magic: sauté zucchini until it sings (that soft hiss means it’s caramelizing!), blister tomatoes until jammy, and always – ALWAYS – save that starchy pasta water. That day, we fed half the block from one skillet. Mr. Petrovski from 3B even brought crusty bread for “sauce mopping duty.” Thirty years later, when zucchini season hits, I still hear Nonna’s chuckle as I grab my skillet. Some recipes taste like love – this one tastes like love and mild vegetable panic. Mangia!
Gather Your Flavor All-Stars
- 2 medium zucchinis, sliced or diced – Look for firm, glossy skins! Chef’s hack: Salting slices for 10 minutes then patting dry prevents sogginess.
- 2 cups cherry tomatoes, halved – These sweet bombs blister faster than big tomatoes. Swap with sun-dried tomatoes in oil for intense umami!
- 8 oz (220g) pasta – Fusilli’s grooves trap sauce beautifully. Penne, rotini, or spaghetti work too – just avoid egg noodles.
- 2 tbsp olive oil – Extra virgin here, folks! It’s our flavor foundation. For richness, try garlic-infused oil.
- 1 tsp garlic powder – Yes, powder! It evenly coats veggies without burning. Fresh minced garlic? Add it with tomatoes to avoid bitterness.
- 1 tsp black pepper – Freshly cracked is life-changing. Pre-ground works in a pinch.
- 1 tsp fennel seeds – My secret weapon! They add subtle licorice depth. Seed-haters? Use dried basil or oregano.
- ¼ cup vegetable stock – Lifts flavors without heaviness. White wine or pasta water work too!
- ½ tsp cayenne pepper (optional) – Just a whisper for warmth. Skip if sensitive to heat.
- 1 cup grated Parmesan – The salty hug that binds everything. Vegan? Nutritional yeast + pinch of salt shines here.
- Fresh basil or parsley, chopped – Non-negotiable for that bright finish! Sub with 1 tsp dried Italian herbs if desperate.
- ½ tsp chili flakes (optional) – For my spice rebels! Add with fennel seeds for infused heat.
Let’s Make Magic Happen!
Step 1: Cook pasta in well-salted water (tastes like the sea!). Critical move: Scoop out ½ cup starchy pasta water BEFORE draining. That liquid gold thickens our sauce naturally. Drain pasta but don’t rinse – we want those sticky starch surfaces!
Step 2: Heat olive oil in a large skillet over medium. Add zucchini in a single layer – don’t crowd! Sauté 4-5 minutes until edges turn golden. Chef’s confession: I sometimes cheat with ¼ tsp baking soda here for extra caramelization (science rocks!).
Step 3: Toss in tomatoes, garlic powder, pepper, fennel seeds, and cayenne. Stir gently – we want blistered skins, not tomato mush! Cook 3-4 minutes until tomatoes wrinkle and release juices. Smell that? That’s summer sighing happily.
Step 4: Pour in vegetable stock. It’ll sizzle and reduce into a glossy glaze. Simmer 2 minutes – this marries the flavors. If it looks dry, splash in more stock.
Step 5: Reduce heat to low. Add cooked pasta and Parmesan. Toss like you’re turning salad – gentle but confident! Sauce too thick? Add reserved pasta water 1 tbsp at a time. Watch the cheese melt into luscious ribbons. Pro tip: Take skillet off heat before adding cheese to prevent clumping!
Step 6: Scatter fresh herbs and chili flakes over the top. Serve IMMEDIATELY – this dish waits for no one! That heat will wilt herbs just enough to release their perfume.
Plating Like a Pro (Minimal Effort Required!)
Slide portions into shallow bowls – we want to see those colors! Twist pasta high for height, letting zucchini and tomatoes tumble artfully. Finish with extra grated Parmesan snowdrifts and a basil leaf crown. For “wow” factor: drizzle with chili oil or lemon zest. Pair with garlic bread soldiers for sauce-dunking, or keep it light with arugula salad. And friends? Serve it straight from the skillet at the table. That sizzle is dinner theater!
Shake It Up! 5 Tasty Twists
1. Protein Power: Add 1 cup shredded rotisserie chicken or white beans with the stock.
2. Creamy Dream: Stir in ¼ cup ricotta or mascarpone at the end for luxe silkiness.
3. Mediterranean Vibe: Swap Parmesan for feta, add kalamata olives and artichoke hearts.
4. Vegan Victory: Use nutritional yeast instead of Parmesan, and agave instead of honey (if using).
5. Lemony Zing: Add zest of 1 lemon with herbs. Game-changer for brightness!
Beau’s Backstage Notes
This recipe evolved from my “Empty Fridge Fridays” experiments! Originally, I used canned tomatoes and skipped fennel seeds (blasphemy!). One rainy night, I tossed in cherry tomatoes about to turn – their concentrated sweetness made me dance. The fennel? Stole that from my sausage pasta recipe. Genius accident! Over time, I learned two truths: 1) Undercook pasta by 1 minute – it finishes in the skillet, and 2) Always double the garlic (sorry, dates!). Fun story: My dog Luna once stole zucchini off the counter. Now she gets a raw slice while I cook – our weird little ritual. Make this dish yours! Burned the first batch? Congrats – you’ve joined the club. Try again tomorrow!
Your Questions, My Answers!
Q: My sauce feels dry! Help!
A: Fear not! That reserved pasta water is your lifeline. Add it 1 tbsp at a time while tossing. If out, warm broth or even a splash of cream works. Remember: zucchini releases water as it sits!
Q: Can I meal prep this?
A: Absolutely! Cook components separately. Store pasta, sautéed veg, and sauce base in fridge. Recombine in a skillet with splash of water/stock. Note: Fresh herbs should be added AFTER reheating.
Q: Why garlic powder over fresh?
A> Great question! Powder clings evenly without burning during quick sautéing. Fresh garlic can turn bitter if overcooked. Want both? Add minced fresh garlic with tomatoes!
Q: Zucchini turning to mush?
A> Three fixes: 1) Don’t overcrowd the skillet – steam causes sogginess. 2) Slice thicker (¼” minimum). 3) Salt slices, wait 10 mins, then pat dry pre-cooking. You want tender-crisp!

Tomato Zucchini Pasta
- Total Time: 25 mins
Description
When cherry tomatoes burst with sweet juice and zucchini hits that golden edge in olive oil, you know you’re on the brink of something magical. This Tomato Zucchini Pasta is your weeknight hero—ready in under 30 minutes, loaded with garden goodness, and adaptable for any craving. Whether you’re feeding the family or treating yourself to a solo summer dinner, it delivers big flavor with little fuss.
Ingredients
• 2 medium zucchinis, sliced or diced
• 2 cups cherry tomatoes, halved
• 8 oz (220g) pasta (fusilli, penne, or spaghetti)
• 2 tbsp olive oil (extra virgin)
• 1 tsp garlic powder (or 1 clove fresh garlic, minced)
• 1 tsp black pepper
• 1 tsp fennel seeds (or dried basil/oregano)
• ¼ cup vegetable stock (or white wine/pasta water)
• ½ tsp cayenne (optional)
• 1 cup grated Parmesan (or nutritional yeast for vegan)
• Fresh basil or parsley, chopped
• ½ tsp chili flakes (optional)
Instructions
-
Cook pasta in salted water. Reserve ½ cup pasta water before draining.
-
Sauté zucchini in olive oil over medium heat for 4–5 minutes until golden. Don’t crowd the pan!
-
Add tomatoes, garlic, pepper, fennel, and cayenne. Cook 3–4 minutes until tomatoes blister and release juices.
-
Pour in vegetable stock and simmer 2 minutes to create a glaze.
-
Toss in pasta and Parmesan off the heat. Add reserved water as needed to loosen sauce.
-
Top with fresh herbs and chili flakes. Serve immediately.
Notes
• Salt and pat-dry zucchini before cooking for best texture.
• Use the reserved pasta water to keep things saucy.
• Finish with lemon zest or drizzle of chili oil for extra wow.
- Prep Time: 10 mins
- Cook Time: 15 mins
Nutrition
- Calories: 390 Cal Per Serving
- Sodium: 320mg
- Fat: 15g
- Carbohydrates: 48g
- Fiber: 4g
- Protein: 14g
Fueling Your Feast (Per Serving)
Calories: 390 | Fat: 15g | Carbs: 48g | Fiber: 4g | Protein: 14g | Sodium: 320mg
Note: Values estimated. For lower sodium, reduce Parmesan or use low-sodium stock.
Final Thoughts: More Than Just a Meal
This Tomato Zucchini Pasta isn’t just about feeding your body—it’s about feeding your soul. It’s the kind of dish that turns a Tuesday into a tiny celebration, a reminder that joy can simmer in a skillet. Whether you’re cooking solo or feeding a crowd, it’s a testament to how simple ingredients, treated with care, can become something extraordinary.
So here’s to burnt fingers from blistering tomatoes, to the dog begging for zucchini scraps, to the inevitable Parmesan snowstorm on your counter. Cook it, share it, mess it up and try again. Because the best recipes—like the best memories—aren’t about perfection. They’re about showing up, wooden spoon in hand, and letting the kitchen work its magic.
Now go forth and make your own version. And when someone asks, “What’s the secret?” just wink and say, “A little summer, a little love, and a lot of starchy pasta water.”
Chocolate Zucchini Cake
Meet Your New Best Friend: Chocolate Zucchini Cake
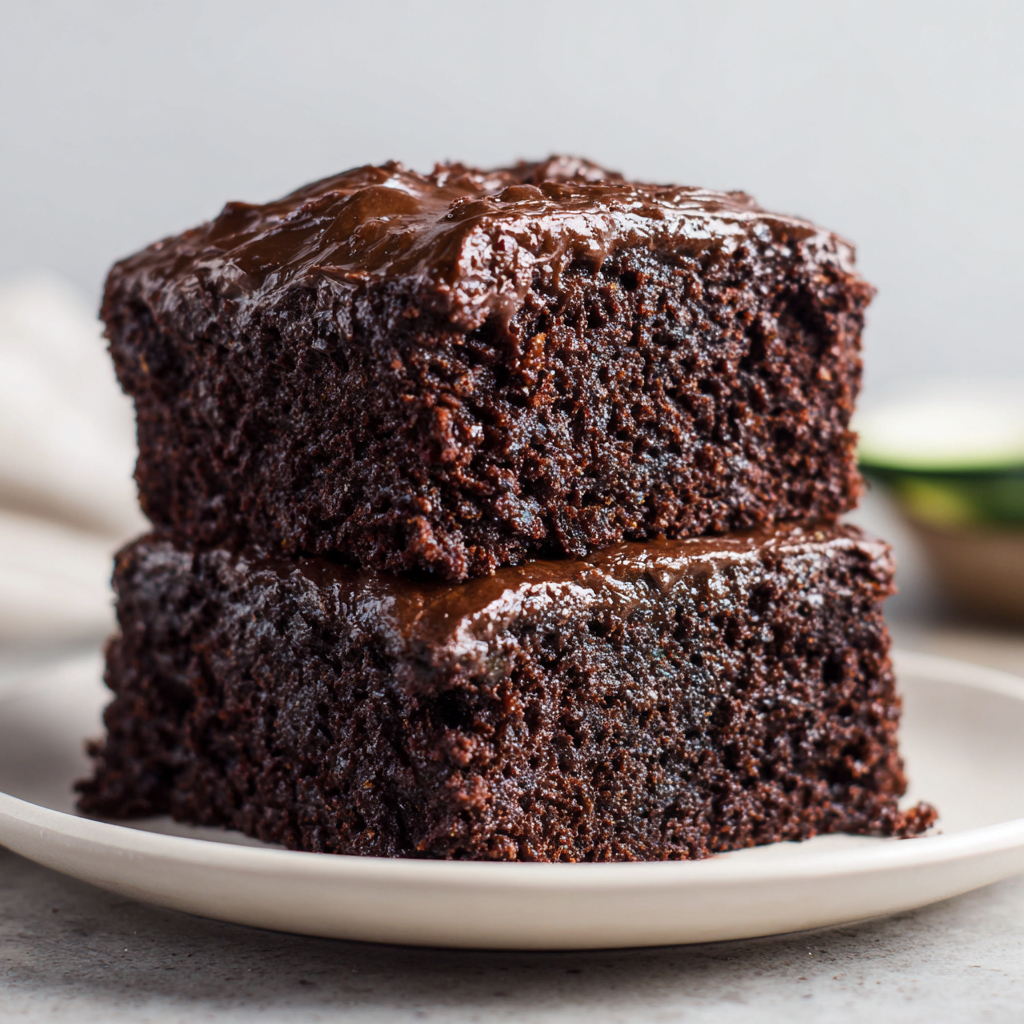
Hey friends! Beau here, welcoming you back to Feastical with a spatula in one hand and a secret ingredient in the other. Today, we’re baking magic into a pan with my Chocolate Zucchini Cake—the ultimate “wink-wink, nudge-nudge” dessert that’ll make you feel like a kitchen superhero. Picture this: a cake so fudgy and rich, your taste buds throw a confetti parade, while zucchini (yes, ZUCCHINI!) sneaks in extra nutrients and moisture like a veggie ninja. No one will guess their chocolate bliss is packed with garden goodness! Whether you’re drowning in summer squash or just craving a healthier treat, this beauty uses simple swaps like oat flour and applesauce to keep things wholesome without sacrificing an ounce of indulgence. So tie on that apron, grab your grater, and let’s turn “eating veggies” into the sweetest little lie you’ll ever tell.
Grandma’s Garden & My Sneaky Sweet Tooth
This recipe takes me straight back to my grandma’s sun-drenched Ohio garden. Every August, her zucchini plants went rogue—overflowing from beds, tumbling onto paths, basically staging a veggie coup. She’d sigh, “Beau, fetch the grater!” and we’d shred mountains of it. One sweltering afternoon, 10-year-old me eyed that green pile suspiciously. “No way that’s going in chocolate cake!” I protested. Grandma just winked, whispering, “It’s our secret.” I watched skeptically as the batter turned velvety brown, all traces of green vanishing. That first bite? Mind-blowing. Moist, decadent, with zero “health food” vibes. It taught me kitchen alchemy: how humble ingredients could transform into joy. Now, whenever I bake this, I still hear her chuckle: “Told ya so, kiddo.”
Your Chocolate Zucchini Cake Toolkit
Gather these simple heroes (and my cheeky tips to make ’em work harder for you!):
- Milk + vinegar – 1½ cups any milk + 1 tsp vinegar. This dynamic duo mimics buttermilk for tenderness. Chef’s hack: Lemon juice works too!
- Oat flour – 3 cups. Lends nutty sweetness and keeps things gluten-free. Swap alert: Blend rolled oats until powdery, or use all-purpose flour if that’s your jam.
- Cocoa powder – ⅔ cup. Go dark for intense chocolate vibes! Insider tip: Dutch-processed adds extra smoothness.
- Arrowroot powder – 2 tbsp. Our moisture-locking secret weapon! Cornstarch works in a pinch.
- Leaveners – 1 tsp baking soda + 1½ tsp baking powder. They’re the cake’s “rise and shine” crew. Check expiration dates—they lose oomph over time!
- Brown sugar – 1¼ cups. Molasses = deep flavor + moisture. For less sweetness, drop to 1 cup.
- Unsweetened applesauce – 1½ cups. Replaces oil for guilt-free lushness. Bonus: Adds natural sweetness.
- Shredded zucchini – ½ cup. Squeeze it DRY (seriously, wring it in a towel!). Excess water = sad, soggy cake.
- Chocolate frosting – 1 cup. Homemade or store-bought—no judgment! Try my avocado frosting for a protein boost.
Let’s Bake This Beauty: Step-by-Step
Ready for cake therapy? Follow these foolproof steps (with my favorite kitchen confessions!):
- Preheat & Prep – Fire up your oven to 350°F (175°C). Grease a 9×13″ pan like you’re buttering up your bestie—generously! Chef’s tip: Line it with parchment paper for lift-out-easy slices.
- Faux Buttermilk – Whisk milk and vinegar in a small bowl. Let it curdle peacefully for 5 minutes. Watch science happen! It’ll look weird—that’s normal.
- Dry Team Unite – In a large bowl, whisk oat flour, cocoa powder, arrowroot, baking soda, and baking powder. Pro move: Sift if your cocoa’s clumpy!
- Wet Team Party – In another bowl, combine applesauce, brown sugar, squeezed-dry zucchini, and the faux buttermilk. Stir until sugar dissolves. Confession: I taste this mix. No regrets.
- Marry the Teams – Pour wet ingredients into dry. Gently fold until just combined. Critical tip: Overmixing = tough cake. Lumps are FINE!
- Pan & Smooth – Pour batter into your prepped pan. Tap it firmly on the counter to bust air bubbles. Smooth the top with a spatula. Feels like spa day for batter.
- Bake to Bliss – Slide into the oven for 30–35 minutes. Chef’s hack: Rotate the pan halfway for even baking. Done when a toothpick comes out clean (or with a few moist crumbs).
- Cool & Frost – Let the cake cool COMPLETELY in the pan. Frosting a warm cake = melty mess. Spread frosting like you’re icing happiness.
Serving: Where Joy Meets Plate
Slice this baby into 12–15 squares. Serve slightly chilled for fudgy texture, or room temp for melt-in-your-mouth vibes. Dust with cocoa powder or sea salt for ✨elegance✨. My move? Top with fresh berries or a dollop of whipped coconut cream. Pair it with cold oat milk latte—trust me, it’s a vibe.
Shake It Up: 5 Delicious Twists
Customize your cake like a playlist!
- Mocha Madness: Add 1 tbsp instant espresso powder to dry ingredients.
- Nutty Buddy: Fold in ½ cup chopped walnuts or pecans.
- Vegan Victory: Use almond milk + vinegar and vegan frosting.
- Spice It Nice: Whisk 1 tsp cinnamon into dry ingredients.
- Berry Burst: Swirl ½ cup raspberries into batter before baking.
Beau’s Backstage Notes
This recipe evolved from my grandma’s oil-heavy original to this lighter, oat-flour superstar. Early tests? Let’s just say I once forgot to squeeze the zucchini… and baked a chocolate swamp. Lesson learned! Now, I stash pre-shredded zucchini in the freezer for cake emergencies. Funny story: My neighbor Dave swore he hated zucchini until he DEVOURED three slices. His face when I revealed the secret? Priceless. Moral: Never underestimate a veggie in disguise. Pro tip: This cake tastes BETTER on day two as flavors mingle. Hide it if you have snackers!
FAQs: Your Cake Queries, Solved!
Q: Can I use regular flour?
A: Absolutely! Swap oat flour for 2.5 cups all-purpose flour. Texture will be slightly denser but still delish.
Q: Why is my cake gummy?
A: Two culprits: overmixed batter or under-squeezed zucchini. Squeeze that zucchini until it’s practically begging for mercy, and mix wet + dry ingredients JUST until combined.
Q: Can I freeze this cake?
A: Yes! Freeze unfrosted slices for up to 3 months. Thaw overnight, then frost. Perfect for surprise cravings!
Q: My cake sunk in the middle. Help!
A: Usually an expired leavener (baking soda/powder). Test them by dropping a pinch in vinegar (it should fizz!). Or, your oven temp might be off—grab an oven thermometer!
Chocolate Zucchini Cake
- Total Time: 45–50 mins
Description
Welcome to your new favorite dessert-with-a-secret! This Chocolate Zucchini Cake is rich, moist, and tastes like a bakery-level treat—yet it’s hiding a green twist that no one will detect. Made with oat flour, applesauce, and a garden-fresh helping of shredded zucchini, it’s a wholesome, indulgent bite perfect for potlucks, picnics, or sneaky veggie wins at home. Time to bake joy into every bite.
Ingredients
• 1½ cups milk + 1 tsp vinegar (let sit 5 min)
• 3 cups oat flour (or blended oats)
• ⅔ cup cocoa powder (Dutch-process if possible)
• 2 tbsp arrowroot powder (or cornstarch)
• 1 tsp baking soda
• 1½ tsp baking powder
• 1¼ cups brown sugar (or 1 cup for less sweet)
• 1½ cups unsweetened applesauce
• ½ cup finely shredded zucchini, squeezed dry
• 1 cup chocolate frosting (store-bought or homemade)
Instructions
-
Preheat oven to 350°F (175°C). Grease a 9×13” pan and line with parchment.
-
In a small bowl, mix milk and vinegar. Set aside.
-
In a large bowl, whisk oat flour, cocoa, arrowroot, baking soda, and baking powder.
-
In another bowl, stir together applesauce, brown sugar, zucchini, and milk mixture until smooth.
-
Combine wet and dry ingredients, mixing gently. Don’t overmix.
-
Pour batter into the pan, smooth the top, and tap the pan to release air bubbles.
-
Bake 30–35 minutes, rotating halfway. Done when a toothpick comes out with crumbs.
-
Cool completely, then frost generously.
Notes
• Squeeze zucchini well—too much water = soggy cake.
• Rotate pan halfway for even baking.
• Chill before slicing for ultra-fudgy texture.
- Prep Time: 15 mins
- Cook Time: 30–35 mins
Nutrition
- Calories: 230 Cal per slice, incl. frosting
- Sugar: 24g
- Fat: 5g
- Carbohydrates: 42g
- Fiber: 4g
- Protein: 3g
Nutritional Perks (Per Slice)
Calories: 230 • Fat: 5g • Carbs: 42g • Fiber: 4g • Sugar: 24g • Protein: 3g
Note: Stats include frosting. For lower sugar, reduce brown sugar to 1 cup or use sugar-free frosting.
Final Thoughts: Why This Cake Wins Every Time
This Chocolate Zucchini Cake isn’t just a recipe—it’s a kitchen rebellion. It proves that treats can be indulgent and wholesome, that veggies can be sneaky but not sketchy, and that the best family recipes are the ones wrapped in stories (and a little bit of frosting).
Whether you’re battling a zucchini surplus, dodging sugar guilt, or just craving a damn good chocolate cake, this one’s your MVP. So go ahead—let the zucchini lurk in the batter, let the oat flour do its gluten-free thing, and most importantly, let yourself enjoy dessert with a side of zero regrets.
Air Fryer S’mores Banana Boats
Why These Air Fryer S’mores Banana Boats Are My New Favorite Campfire-Free Treat
Hey friends, Beau here! Let me paint you a picture: It’s 9 PM. Your sweet tooth is doing cartwheels. You’re this close to raiding the pantry for that emergency chocolate bar. But what if I told you there’s a dessert that’s faster than doom-scrolling TikTok, uses 4 simple ingredients, and tastes like a summer bonfire without the bug bites? Enter these Air Fryer S’mores Banana Boats – your golden ticket to ooey-gooey bliss in under 10 minutes flat.
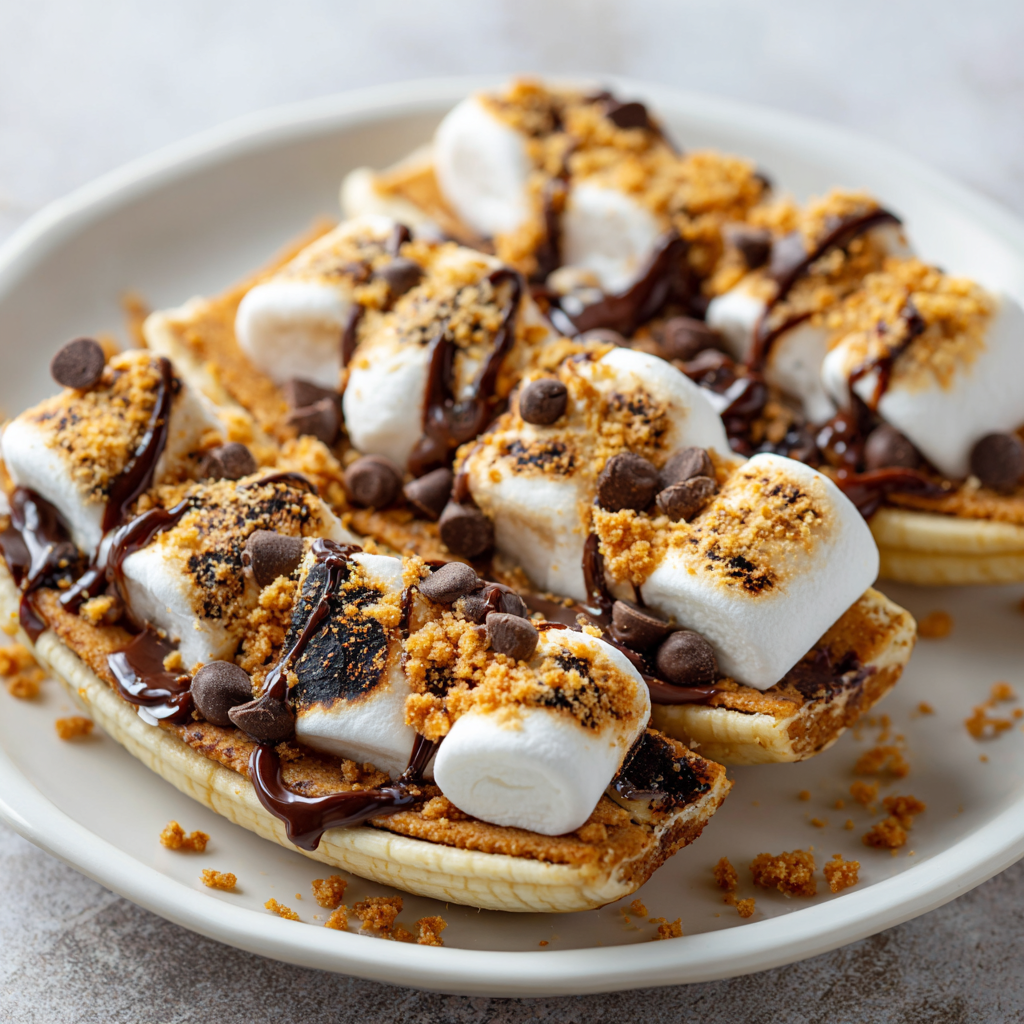
Picture this: Warm bananas cradling molten chocolate and toasty marshmallows, with graham crackers adding that nostalgic crunch. It’s s’mores reimagined for busy weeknights, dorm rooms, or when you’re just too cozy to step outside. No skewers, no smoke in your eyes, no debating whose marshmallow caught fire first. Just pure, uncomplicated joy scooped straight from a banana peel bowl. As someone who once set a marshmallow ablaze so aggressively it became a neighborhood legend (RIP, Larry the Flaming ’Mallow), I adore how the air fryer delivers perfect caramelization every. Single. Time. Ready to turn bananas into magic? Your taste buds are gonna hug you.
That Time a Banana Boat Saved My Rainy Camping Trip
Flashback to 2018: My buddies and I planned this epic lakeside camping trip. We packed the graham crackers, the jumbo marshmallows, the fancy dark chocolate… and then the skies opened up. Torrential rain. For three days. Our campfire was a sad puddle, and morale was lower than my soggy socks. Then, my friend Maya – absolute genius – grabbed our bananas and declared, “The s’mores dream isn’t dead!” Using a rusty camp stove (don’t recommend, but desperation breeds innovation), we split bananas, stuffed ’em, and tentatively heated them in a pan. The result? Steamy, chocolatey salvation that had us laughing through the downpour. It was messy, slightly charred, and absolutely glorious. That moment taught me: Comfort food isn’t about perfection; it’s about making magic with what you’ve got. Now, with the air fryer? We’ve upgraded from “survivalist snack” to “sophisticated treat” – no raincoats required.
Your Banana Boat Toolkit: Simple Ingredients, Big Flavor
Gather these heroes – I promise your pantry already knows most of them:
- 2 ripe bananas – Not green, not brown-splotchy-mushy, but that perfect sunny yellow with maybe a freckle or two. Why? Underripe = starchy, overripe = too sweet. We want balance! (Swap tip: No bananas? Halve apples or pears!)
- 2 graham cracker squares, broken into small pieces – The “crack” in s’mores! Their honey-kissed crunch is non-negotiable for texture. (Chef hack: Blitz ’em in a baggie with a rolling pin for instant crumbs!)
- 2 tbsp semisweet chocolate chips – My MVP! Semisweet melts beautifully without overwhelming sweetness. (Sub alert: Chopped dark chocolate, peanut butter chips, or even caramel bits? Yes, please!)
- 2 tbsp mini marshmallows – Minis are KEY. They melt faster and toast more evenly than big ones. (Pro insight: Freeze them for 10 mins first – less sticky to handle!)
Why these work: The banana’s natural sweetness + rich chocolate + toasty mallow + crunchy graham = harmony. It’s science… delicious science.
Building Your Banana Boat: A Step-by-Step Joyride
Don’t blink – this comes together fast! Let’s fire up that air fryer:
- Prep Your Bananas (The “Dock”): Leave the peels ON! Rinse and pat them dry. Lay each banana flat-side down. Using a paring knife, slice lengthwise through the top peel and flesh (but not through the bottom peel!). Cut deep enough to create a generous pocket – about 1/2 inch down. Gently pry open the slit, using your fingers to slightly loosen the banana inside. (Beau’s “Aha!” Moment: Slightly curving your knife cut helps the pocket hold more filling without splitting!)
- Stuff It Like a Thanksgiving Turkey (But Easier): Time for the fun part! Divide the chocolate chips evenly between the bananas, tucking them deep into the slit. Next, add the mini marshmallows – aim for coverage, not just a pile in the middle. Finally, sprinkle those glorious graham cracker pieces over everything, pressing gently so they stick. (Chef Hack: Layer it! Grahams first for a base, then chocolate, then mallows. Prevents soggy crackers!)
- Air Fry to Golden Perfection: Carefully place the stuffed bananas directly into your air fryer basket, peel-side down. No foil needed! Set to 375°F (190°C). Cook for 5-7 minutes. Why this range? At 5 mins, you get melty chocolate and soft mallows. At 7 mins, the marshmallows turn gorgeously golden-brown and develop that signature campfire char. (Watch Closely Tip: Peek at 5 mins! Air fryers vary wildly. Stop when the mallows look like toasted clouds.)
- The Grand Reveal: Use tongs (or oven mitts!) to carefully lift the boats out. They’ll be HOT. Let them sit for just 60 seconds – the chocolate firms up slightly, making it spoonable, not lava. (Safety First: Warn everyone – that molten chocolate is sneaky hot!)
Digging In: Serving Your Masterpiece
Presentation? Easy-peasy! Serve the bananas right in their peels – nature’s cutest biodegradable bowls. Place each boat on a small plate (juices might escape!). Hand out spoons and watch the magic happen. Encourage everyone to scoop deep, getting banana, chocolate, mallow, and graham in every bite. For extra flair? Drizzle with caramel sauce or sprinkle sea salt flakes after air frying. Best enjoyed immediately while it’s gloriously messy and warm. Pro tip: Have napkins ready – this is happily sticky business!
Set Sail! Flavor Adventures for Your Banana Boat
Once you master the classic, try these voyages:
- Peanut Butter Cup: Swap chocolate chips for peanut butter chips + a dollop of actual peanut butter.
- Tropical Getaway: Use white chocolate chips + shredded coconut + crushed pineapple tidbits (drained well!).
- Cookie Dough Dream: Skip grahams! Add cookie dough bits (safe-to-eat!) + chocolate chips.
- Berry Burst: Layer in fresh raspberries or blueberries before air frying.
- Nutty Buddy: Add chopped toasted pecans or almonds for grown-up crunch.
Dietary Swaps: Use gluten-free graham crackers, dairy-free chocolate chips, or vegan marshmallows! The banana boat welcomes all.
Beau’s Backstory & Banana Wisdom
This recipe evolved from that rainy campfire disaster into my #1 requested dessert for game nights. The biggest upgrade? Discovering the air fryer’s convection power creates an even better toasted mallow than an actual campfire (controversial, I know!). Over time, I learned: Ripe-but-firm bananas are non-negotiable. Too soft, and they turn to mush. Once, I tried adding a sprinkle of cinnamon pre-fry – game-changer! Adds warmth without overpowering. Funny fail? I once forgot to break the graham crackers… ended up with awkward cracker spears. Learn from me: Crush ’em! This dish proves fancy equipment isn’t needed for unforgettable moments. It’s just you, a banana, and a whole lot of delicious nostalgia.
Smooth Sailing: Your Banana Boat Questions, Answered
Q: My banana split open completely! Help?
A: No panic! Likely caused by overstuffing or a too-deep cut. Next time, cut shallower (just 1/2 inch deep) and don’t force the filling. If it happens, carefully wrap the banana loosely in foil before air frying to hold it together. It’ll still taste amazing!
Q: Marshmallows didn’t toast/browned too fast?
A: Air fryer hotspots! Rotate the basket halfway through cooking. If browning too quick, lower temp to 360°F. For pale mallows, cook an extra minute or place them more on top. Mini mallows toast faster than large ones – stick with minis!
Q: Can I make these ahead?
A: You can prep (slice and stuff) bananas 2-3 hours ahead. Keep them covered in the fridge. But air fry JUST before serving – reheating turns bananas rubbery. The magic is in the fresh heat!
Q: Peel sticking to the banana?
A: Annoying, but common if bananas are super ripe. Choose slightly less ripe ones, or after cooking, gently run a spoon between the peel and flesh before scooping. A tiny smear of oil on the inside peel pre-fill can also help.

Air Fryer S’mores Banana Boats
- Total Time: 10 mins
Description
Let’s set the scene: a quiet night, a sweet craving hits, and in under 10 minutes, you’re digging into a melty, chocolatey, marshmallow-loaded banana boat — no firepit or mosquito spray in sight. These Air Fryer S’mores Banana Boats are the perfect blend of nostalgic s’mores flavor and weeknight convenience. Get ready to turn your air fryer into a dessert machine and create a cozy bite of summer magic any time of year.
Ingredients
• 2 ripe bananas (yellow with freckles)
• 2 tbsp semisweet chocolate chips
• 2 tbsp mini marshmallows
• 2 graham cracker squares, crushed
Instructions
-
Prep the bananas: Keep peels on. Slice lengthwise through the top peel and banana flesh, creating a pocket (don’t cut through the bottom!).
-
Stuff your boats: First, layer in crushed graham crackers, followed by chocolate chips and then marshmallows. Press gently.
-
Air fry: Place bananas in the air fryer, peel-side down. Air fry at 375°F (190°C) for 5–7 minutes. Peek at 5 mins — you’re looking for golden, toasted marshmallows and melty chocolate.
-
Cool briefly: Let rest for 1 minute before serving. Use tongs to handle — they’ll be hot!
-
Serve: Spoon straight from the peel. For extra flair, drizzle with caramel or sprinkle sea salt.
Notes
• Use slightly firm bananas to avoid mushiness.
• Freeze mini marshmallows for easier handling.
• Want a twist? Add peanut butter chips, berries, or coconut.
- Prep Time: 5 mins
- Cook Time: : 5–7 mins
Nutrition
- Calories: 180 Cal per banana boat
- Sugar: 18g
- Fat: 5g
- Carbohydrates: 30g
- Fiber: 3g
Quick Bite: Nutritional Notes (Approx Per Boat)
🔥 Calories: ~180 | 🍌 Carbs: 30g | 🥜 Fat: 5g | 🍬 Sugar: 18g | 🌿 Fiber: 3g
Remember: This is a treat! Using dark chocolate or less marshmallows lowers sugar. Bananas offer potassium and fiber!
Final Thoughts: More Than Just a Dessert
Air Fryer S’mores Banana Boats are a testament to culinary creativity—proof that limitations (no campfire, no time) can spark genius. They’re customizable, crowd-pleasing, and just nostalgic enough to feel special. Whether you’re 8 or 80, this recipe delivers joy in every spoonful. So next time that sweet tooth strikes, remember: Adventure awaits in a humble banana peel. Happy air frying!
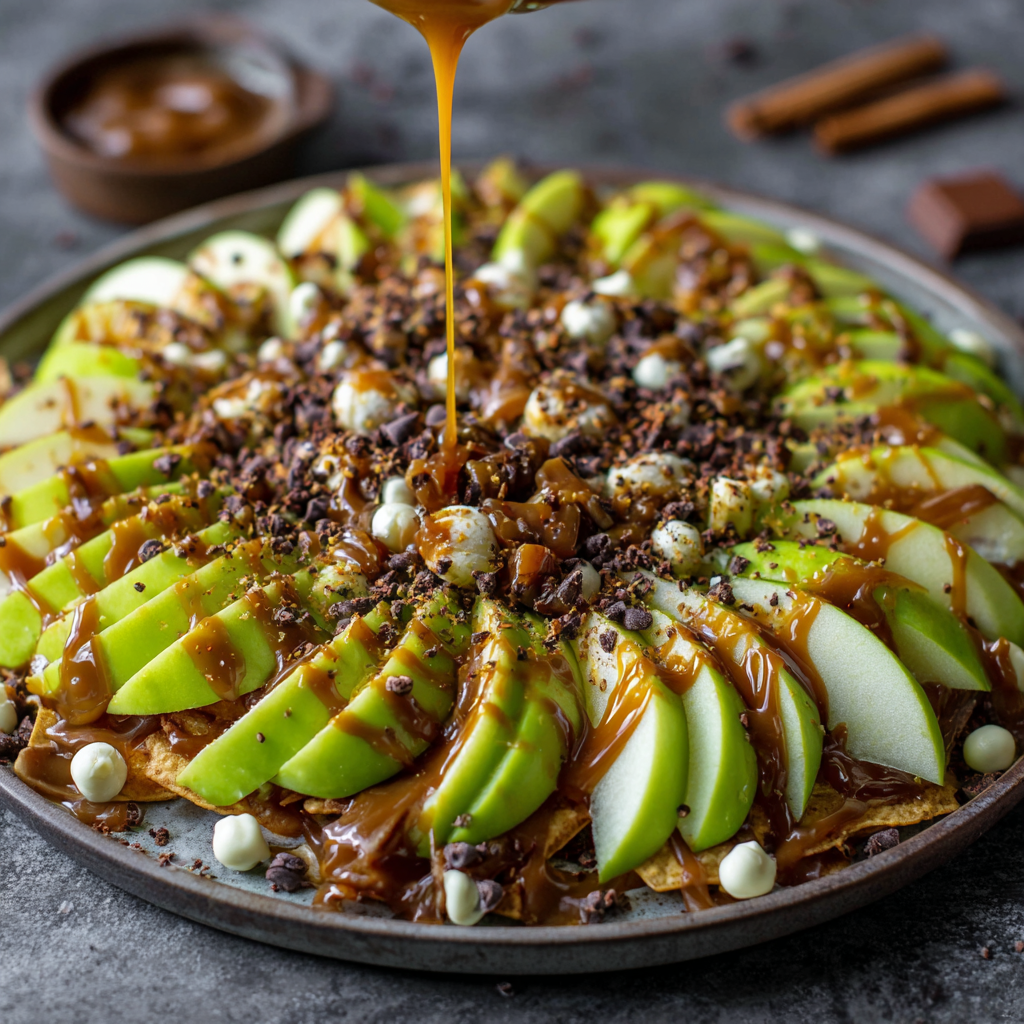
Caramel Apple Nachos
Hey, Apple Lovers! Let’s Make Magic on a Platter
Picture this: It’s a crisp fall afternoon, your favorite flannel’s on, and your kitchen smells like a carnival crossed with a cozy campfire. That’s the vibe we’re chasing today with Caramel Apple Nachos! If you’ve ever stood in line for a caramel-dipped apple only to wrestle with the stick, this is your liberation. We’re ditching the fuss but keeping ALL the joy—tart apples, velvety caramel, white chocolate ribbons, and that irresistible *crunch* from candy bar confetti. Best part? Zero baking, zero stress, and a 10-minute assembly that feels like playtime. Whether you’re hosting game night, bribing kids into homework mode, or just treating yourself (you deserve it!), this recipe’s your edible happy place. So grab those apples—let’s turn snack time into a standing ovation!
Why do I obsess over these? Because food should be fun, friends. No stiff rules, no intimidating techniques—just you, a knife, and a microwave bowl. Think of it as arts-and-crafts… but delicious. Ready to make mouths water? Let’s roll.
My First Bite: A Fairground Epiphany
I’ll never forget my first caramel apple. Age 8, county fair, sticky fingers buried in sawdust as I watched a vendor spin ruby-red apples in copper-colored goo. When he handed me mine, I felt like I’d won a golden ticket. But halfway through? Disaster. The caramel layer cracked like ice, the apple rolled into the dirt, and I may have cried. (Okay, I definitely cried.) Years later, while prepping snacks for my niece’s sleepover, inspiration struck: What if we deconstructed it? Sliced apples = no runaway fruit. Drizzles = no dental hazards. Toppings = confetti-level joy. We arranged them like nachos, and the kids went wild—no tears, just pure, sticky grins. Now, it’s my go-to “happy hack” for turning ordinary days into little celebrations. Life’s too short for sad snacks, right?
Your Treasure List: Simple Stars, Big Flavor
Here’s your lineup (measurements for 4-6 people):
- 4 large green apples (Granny Smith) – Their tartness cuts through sweetness like a zingy superhero. Swap tip: Honeycrisp if you prefer milder tang!
- 1 cup Kraft caramels (unwrapped!) – The O.G. of smooth, buttery goodness. Chef secret: Caramel bits skip the unwrapping torture!
- 1 tbsp water – Just a splash to keep caramel silky, not seized-up cement.
- 1 cup white chocolate chips – Creamy dreaminess that balances caramel. Hack: Add ½ tsp coconut oil when melting for glossier drizzles.
- ½ cup mini chocolate chips – Tiny bursts of cocoa bliss. They cling better than regular chips!
- 1 crushed Heath bar – That buttery toffee CRUNCH. No Heath? Smash pretzels or toasted almonds!
Why these work: Green apples hold their crunch against toppings, while Kraft caramels melt like velvet. Mini chips? They’re the confetti that sticks without sliding!
Let’s Build Edible Rainbows: Step-by-Step
Prep Time: 10 minutes | Tools: Knife, microwave-safe bowls, platter
- Slice & Shine Apples: Core apples, slice into ¼-inch wedges (skin on for color!). Pro tip: Dunk slices in lemon-water (1 tbsp lemon juice + 2 cups water) to prevent browning. Pat dry—soggy nachos are sad nachos!
- Artful Arranging: Layer slices slightly overlapping on a platter. Go circular (sunburst style!) or zig-zag for max drizzle coverage. Chef whisper: Leave no apple behind—edges get love too!
- Melt Caramel: Combine caramels + water in a microwave bowl. Nuke 30 seconds, stir, repeat until smooth (≈90 sec total). Watchdog alert: Over-microwaving makes caramel tough! Stir vigorously between blasts.
- White Chocolate Woozy: Melt white chips in 15-second bursts, stirring after each. Rescue mission: If it thickens, add ½ tsp oil. Should drip like warm honey!
- Drizzle Dynasty: Using spoons (or squeeze bottles for control), zig-zag caramel first, then white chocolate. Channel your inner Jackson Pollock—perfection’s overrated!
- Top It Like It’s Hot: Scatter mini chocolate chips immediately (they’ll stick!). Crush Heath bar in a bag with a rolling pin—cathartic!—then sprinkle like edible glitter.
Critical hack: WORK FAST. Warm toppings + cold apples = happy textural marriage. If caramel hardens? 5-second microwave zap!
The Science of Sweet & Crunchy: Why This Combo Works
Ever wonder why caramel apples feel like a hug for your taste buds? There’s actual science behind the magic! Let’s geek out for a sec:
-
Texture Symphony: Food scientists call it “dynamic contrast”—the interplay of crunchy apples, chewy caramel, and crispy toppings. Your brain registers each layer as a mini surprise, making every bite novel. (Fun fact: The sound of crunching amplifies satisfaction—thanks, Heath bar!)
-
Flavor Balancing Act: Tart apples (high acidity) cut through the fat in caramel and chocolate, preventing “sugar fatigue.” Granny Smiths have malic acid, which brightens rich flavors. Swap them for sweeter apples, and you’ll miss that refreshing zing!
-
Temperature Tricks: Warm caramel on cold apples creates a fleeting “soft-set” texture—firm enough to hold shape but yielding to a bite. Pro tip: If caramel hardens too fast, microwave the whole platter for 5 seconds to reactivate the gooeyness.
-
Sticky Situation Solved: The secret to toppings that stick? Apply melted sauces while they’re hot (but not scalding). Chocolate chips cling best when sprinkled immediately after drizzling—they partially melt into the caramel, acting like edible glue.
Bonus Experiment: Try a “deconstructed” version with cold caramel dip. Notice how the flavors feel flatter? Heat = flavor release! This is why fair vendors dip apples in freshly melted copper kettles.
From Kids’ Treat to Gourmet Dessert: Elevating Your Nachos
Think caramel apple nachos are just for kiddie parties? Think again. With a few tweaks, this recipe moonlights as a showstopper for adults:
1. Boozy Drizzles
-
Spike caramel with 1 tbsp bourbon or rum after melting (cook off the alcohol for 10 sec).
-
Infuse white chocolate with orange liqueur or espresso powder for a sophisticated twist.
2. Cheese Pairing Surprise
Yes, cheese! Serve with a side of sharp cheddar slices or crumbled blue cheese. The saltiness amplifies the apples’ sweetness (a classic Wisconsin move).
3. Exotic Toppings
-
Swap Heath bars for crushed baklava or candied ginger.
-
Drizzle with reduced balsamic glaze for a sweet-tart punch.
4. Plating Like a Pro
-
Use slate boards or marble slabs for a rustic-chic look.
-
Garnish with edible gold leaf or fresh thyme sprigs.
5. The “Apple Rose” Hack
Impress guests by shingling apple slices into rosettes before drizzling. Soak slices in warm saltwater first (1 tsp salt per cup) to make them pliable.
Why It Works: Upgraded ingredients signal “this isn’t kid stuff,” while the familiar format keeps it approachable. Perfect for holiday parties or date nights!
Caramel Apple Nachos Around the World
This recipe’s spirit—fruit + caramel + crunch—exists globally with cultural twists. Take a flavor trip:
1. Mexico: Manzanas Enmeladas
-
Roll apple slices in spicy cajeta (goat’s milk caramel) and dust with chili-lime Tajín. Toppings: Pepitas, coconut flakes.
2. Japan: Ringo Ame
-
Use Fuji apples dipped in ame (clear rice syrup caramel). Top with matcha powder and crushed mochi.
3. France: Pommes Caramélisées
-
Sub salted butter caramel and top with crushed speculoos cookies. Serve with crème fraîche for dipping.
4. Middle East: Toffee Apples
-
Swap caramel for date molasses + tahini. Garnish with pistachios and pomegranate seeds.
5. South Africa: Appelkoos
-
Top with melktert crumbs (cinnamon custard cookies) and dried apricot bits.
Cultural Pro Tip: In many countries, caramelized fruit symbolizes hospitality. Present your nachos on a shared platter to lean into the tradition!
Serving: Where Fun Meets Function
Plop that platter in the center of the table with mini forks or toothpicks (less sticky fingers!). Pair with hot cider for autumn vibes, or cold milk for kiddos. For parties? Set up a “nachos bar” with extra toppings (think: rainbow sprinkles, crushed Oreos, or dried cranberries) and let guests DIY. Pro move: Lay apple slices around a bowl of warm caramel for dunking—interactive deliciousness!
Switch It Up: 5 Delicious Detours
- Salty-Sweet Rebel: Swap caramel for salted peanut butter + honey. Top with chopped peanuts!
- Berry Blast: Use red apples + swap white chocolate for melted dark chocolate. Add freeze-dried raspberries.
- Vegan Victory: Coconut milk caramel + dairy-free chocolate chips. Heath sub? Crushed vegan grahams!
- Protein Power: Add a sprinkle of granola or chia seeds between layers.
- Halloween Twist: Orange candy melts + black sprinkles. BOO-tiful!
Confessions from My Kitchen
True story: I once served these at a fancy dinner party… on a literal hubcap. Why? Because I couldn’t find a platter, and my ’78 Chevy was outside. Guess what? Guests adored the “rustic charm” (and licked it clean). Over the years, I’ve learned: Embrace imperfection! Messy drizzles = personality. Apples brown? Call it “caramel camouflage.” This recipe evolves with your mood—swap toppings, experiment with apple varieties, or add a cinnamon dusting. One constant? It disappears faster than my willpower near a cookie jar.
Your Burning Questions, Answered
Q: Can I make these ahead?
A: Prep toppings and melt sauces separately, but assemble RIGHT before serving. Apples weep if dressed too early!
Q: My caramel turned into a rock. Help?
A: You over-nuked it! Add 1 tsp milk and microwave 10 seconds. Stir like your snack depends on it (it does).
Q: How do I keep apples from browning?
A: The lemon-water bath (step 1) is key! Rinse, dry thoroughly, and don’t skip the pat-down.
Q: Nut allergies?
A: Heath bars contain almonds. Swap for crushed pretzels, seeds, or allergy-friendly toffee bits!

Caramel Apple Nachos
- Total Time: 10 minutes
Description
Tart green apples meet gooey caramel, silky white chocolate, and a candy bar crunch in this 10-minute, no-bake stunner. These Caramel Apple Nachos are everything you crave about a caramel apple, minus the dental hazard and sticky disaster. They’re fun to build, fast to devour, and endlessly customizable—perfect for parties, movie nights, or fall vibes on demand. Grab your platter, let’s drizzle some happiness.
Ingredients
-
4 Granny Smith apples, cored and sliced
-
1 cup Kraft caramels (or caramel bits)
-
1 tbsp water
-
1 cup white chocolate chips
-
½ cup mini chocolate chips
-
1 crushed Heath bar (or pretzels/toasted almonds)
Instructions
-
Prep apples: Slice into wedges and soak briefly in lemon-water (1 tbsp lemon juice + 2 cups water) to prevent browning. Pat dry.
-
Arrange slices: Fan out apples on a platter in a circular or layered pattern.
-
Melt caramel: Microwave caramels + water in 30-second bursts, stirring until smooth.
-
Melt white chocolate: Microwave in 15-second bursts, stir until smooth. Add ½ tsp oil if too thick.
-
Drizzle: Spoon caramel and white chocolate over apples.
-
Top: Scatter mini chocolate chips and crushed Heath bar over everything. Serve immediately!
Notes
-
Add crushed pretzels or granola for texture.
-
Vegan? Use coconut milk caramel and dairy-free chips.
-
Let guests DIY with a toppings bar!
- Prep Time: 10 mins
Nutrition
- Calories: 280 cal Per serving
- Fat: 14g
- Carbohydrates: 36g
- Fiber: 3g
Nutritional Nibbles (Per Serving)
🔥 Calories: ~280 | 🍞 Carbs: 36g | 🥑 Fat: 14g | 🍬 Sugar: 30g | 🌾 Fiber: 3g
Note: This is a treat—savor it joyfully! Sugar comes mainly from fruit + toppings.
Final Thoughts: More Than Just a Snack
Caramel apple nachos are a lesson in joy disguised as dessert. They remind us that:
-
Food Should Be Playful: Life’s too short for fussy recipes that stress you out.
-
Imperfection Is Delicious: Lopsided drizzles and uneven toppings? That’s where the charm lives.
-
Memories Stick Like Caramel: Whether it’s a fairground flashback or making new traditions, this recipe’s real magic is its ability to connect people.
So next time you slice those apples, remember: You’re not just making a snack. You’re creating a little edible happiness—one sticky, crunchy, glorious bite at a time. Now go forth and drizzle like nobody’s watching!

Maple Dijon Chicken Thighs
Hey There, Hungry Friend! Let’s Make Magic in the Kitchen
Picture this: It’s 6 PM on a Wednesday. You’re staring into the fridge like it’s a mystery novel, wondering how to transform that pack of chicken thighs into something that’ll make your taste buds throw a confetti parade. Sound familiar? That’s exactly why I created these Maple Dijon Chicken Thighs – your golden ticket from “meh” to “MORE, PLEASE!” in under an hour. This isn’t just dinner; it’s a symphony of sweet maple whispers and tangy mustard kicks, all hugging juicy chicken like it’s the last dance at a summer cookout. Whether you’re juggling a toddler on your hip or just survived back-to-back Zoom meetings, this dish is your edible high-five. No fancy skills needed – just a bowl, a baking dish, and that bottle of real maple syrup you’ve been saving for “something special.” Spoiler: This is the special.
That Time Maple Dijon Saved My Bacon (Literally)
Rewind to my first apartment in college – a “cozy” (read: microscopic) kitchen where my spice rack doubled as a bookend. One rainy Tuesday, my now-wife Jess dropped by unexpectedly. Panic mode: all I had were sad-looking chicken thighs, mustard packets swiped from a deli, and half a bottle of Aunt Linda’s maple syrup from Vermont. Desperation breeds genius, friends. I whipped up this marinade thinking, “Well, worst case we order pizza.” But when that sweet-savory aroma hit the air? Jess’s eyes went wide as dinner plates. We ate straight from the baking dish, mopping up every glossy drop of sauce with torn bread. Seven years later, she still texts me “MAPLE DIJON EMERGENCY” when she needs comfort food stat. Moral? Sometimes the best recipes aren’t planned – they’re born from beautiful kitchen chaos and a dash of courage.
Your Flavor Dream Team (Plus Handy Swaps!)
Gather these rockstars – measurements are flexible because cooking should feel like jazz, not calculus:
- ¼ cup Dijon mustard: The tangy backbone! (Chef’s secret: it tenderizes chicken like a boss.) Swap with grainy mustard for texture or yellow mustard in a pinch.
- 2 tbsp real maple syrup: Please use the real stuff – pancake syrup will make it cloyingly sweet. Grade A amber = flavor gold.
- 1 tbsp olive oil: Helps the marinade cling and adds richness. Avocado oil works too.
- 2 tsp soy sauce: Umami depth! For gluten-free, tamari or coconut aminos are perfect subs.
- 1 clove garlic, minced: Fresh is best! (Tip: smash it with your knife first for easy peeling.) Powder works in emergencies.
- ½ tbsp dried rosemary: Those piney notes cut through richness. Use fresh if you’ve got it – just double the amount.
- 6 boneless, skinless chicken thighs (2.3 lbs): Thighs stay juicier than breasts! Skin-on? Crank up the broil time for crispy goodness.
Let’s Build Flavor Town (Step by Step!)
Channel your inner kitchen DJ – we’re mixing magic:
- Make the Marinade: Grab a medium bowl. Whisk together Dijon, maple syrup, olive oil, soy sauce, garlic, and rosemary until silky smooth. (Pro tip: Taste it! Adjust sweetness or tang to your liking – no rules here.)
- Marinate Like a Boss: Slide chicken thighs into a resealable bag or shallow dish. Pour marinade over them, squish everything around (get hands-on – it’s therapeutic!), and seal. Refrigerate 30 minutes minimum – but 4-8 hours? Flavor explosion! (Hack: Freeze chicken IN the marinade for future you!)
- Heat Things Up: Preheat oven to 400°F (200°C). Pull chicken from fridge while oven heats – takes the chill off for even cooking.
- Bake to Juicy Perfection: Arrange thighs in a single layer in your trustiest baking dish. Pour every drop of marinade over top – yes, it’s safe! Bake 25-30 minutes until chicken hits 165°F internally. (Chef’s truth: That glossy, bubbling sauce? That’s liquid gold.)
- Broil for Glory (Optional but LIFE-CHANGING): Crank oven to broil. Slide dish to top rack for 2-3 minutes until edges caramelize into sticky-sweet perfection. (Watch closely – sugar burns fast!)
- Sauce It Up: Spoon pan sauce generously over thighs. (This step is mandatory for maximum joy.)
The Science Behind the Flavor (Why This Combo Works So Well)
Ever wonder why maple and Dijon mustard taste like they were made for each other? It’s not luck—it’s science! This pairing is a textbook example of flavor balancing, where contrasting elements create harmony. Here’s how each ingredient plays its part:
-
Dijon Mustard: The sharp, tangy punch comes from acetic acid (vinegar) and compounds like sinigrin, which break down into spicy-isothiocyanates when mixed with liquid. This not only adds depth but also acts as a natural meat tenderizer by breaking down proteins.
-
Maple Syrup: Real maple syrup contains over 60 unique flavor compounds, including vanillin and furanones, which add caramelized, woody sweetness. The sugars caramelize during baking, creating that irresistible sticky glaze.
-
Soy Sauce: Packed with glutamates, it’s an umami bomb that amplifies savoriness. When combined with maple, it mimics the sweet-salty magic of teriyaki—but with more complexity.
-
Rosemary: Its piney, slightly bitter notes (from rosmarinic acid) cut through richness, preventing the dish from tasting cloying.
Pro Tip: Acid (mustard) + fat (olive oil) + sweetness (maple) is the holy trinity of marinades. The acid helps the flavors penetrate the meat, while the oil locks in moisture. Try this ratio with other proteins—pork chops or tofu would shine!
Fun Experiment: Swap the rosemary for thyme or sage. Thyme’s thymol adds earthy warmth, while sage’s camphor notes pair brilliantly with maple (think Thanksgiving vibes).
Meal Prep Magic & Leftover Hacks
This recipe isn’t just a weeknight hero—it’s a meal-prepper’s dream. Here’s how to stretch it into days of deliciousness:
1. Batch-and-Freeze:
-
Marinate chicken thighs in freezer bags (portion 2-3 per bag) and freeze for up to 3 months. Thaw overnight in the fridge, then bake as directed.
-
Bonus: Freeze leftover sauce in ice cube trays. Pop a cube into soups or stir-fries for instant flavor.
2. Leftover Transformations:
-
Maple Dijon Chicken Salad: Shred cold thighs, mix with Greek yogurt, diced apples, and celery. Serve on croissants or over greens.
-
Brunch Hash: Sauté diced potatoes, onions, and leftover chicken. Top with fried eggs and a drizzle of reheated sauce.
-
Pasta Twist: Toss hot pasta with shredded chicken, baby spinach, and warmed sauce. Add crumbled bacon for extra decadence.
3. Sauce Multi-Tasking:
-
Pizza Glaze: Brush onto dough before adding toppings (especially good with caramelized onions and goat cheese).
-
Roasted Veggie Boost: Toss carrots or butternut squash in sauce before roasting.
-
Dip Upgrade: Mix with mayo or sour cream for a quick party dip (add a splash of lemon juice to brighten).
Storage Tips:
-
Cooked chicken lasts 4 days in the fridge or 2 months frozen.
-
Reheat gently—microwave at 50% power or warm in a skillet with a splash of broth to prevent drying.
Global Twists—Take This Recipe Around the World
Maple and Dijon are Canadian-French staples, but this combo plays well with other cuisines. Try these international spins:
1. Japanese-Inspired:
-
Replace Dijon with karashi (Japanese hot mustard) and add 1 tsp grated ginger to the marinade. Serve with steamed rice and pickled daikon.
2. Mediterranean Style:
-
Swap maple syrup for pomegranate molasses and rosemary for za’atar. Garnish with toasted almonds and parsley.
3. Caribbean Flair:
-
Add 1 tbsp jerk seasoning to the marinade and sub soy sauce with coconut aminos. Grill over charcoal for smoky depth.
4. Swedish Fusion:
-
Stir 1 tbsp lingonberry jam into the sauce and pair with buttery mashed potatoes (a nod to Ikea’s meatballs).
Why It Works: Sweet-tangy profiles are universal—they’re found in Korean bulgogi, Moroccan tagines, and even Filipino adobo. Adapt the base to local flavors, and you’ve got endless options
Plate It Like You Mean It
Dump it straight from dish to table for “rustic charm” (aka: I’m hungry NOW). Feeling fancy? Slice thighs diagonally, fan over garlicky mashed potatoes or fluffy quinoa, and drizzle extra sauce like edible art. Garnish with fresh rosemary confetti. Must-have sides: roasted Brussels sprouts (they love maple!) or a crisp green apple salad to cut the richness. And please – crusty bread for sauce-mopping is non-negotiable. Trust me.
Shake It Up! 5 Tasty Twists
This recipe’s your canvas – paint outside the lines:
- Spicy Kick: Add 1 tsp smoked paprika or a pinch of cayenne to the marinade.
- Honey Mustard Happiness: Swap maple for local honey + squeeze of lemon.
- Sheet Pan Hero: Bake thighs alongside chopped sweet potatoes & apples – one-pan wonder!
- Creamy Dream: Stir 2 tbsp Greek yogurt into sauce after baking for velvety richness.
- Pescatarian Power: Use salmon fillets! Bake 15-18 mins at 375°F.
Beau’s Backstage Secrets
This recipe’s evolved more than my taste in aprons! Early versions used waaaaay too much rosemary (RIP, batch #3). Lesson learned: dried herbs intensify in marinades! Now I keep it balanced. Funny story: Once subbed balsamic for soy sauce during a midnight fridge raid – accidentally invented a killer sweet-tart version! Leftovers? Shred into grain bowls or tacos. The sauce even makes epic salad dressing (thin with vinegar). Final thought: Don’t stress perfection. Burnt edges? Call it “caramelized.” Sauce too thick? Splash in broth. Cooking’s about joy, not Instagram filters.
Your Burning Questions (Solved!)
Q: Can I use chicken breasts?
A: Sure, but they dry out faster! Reduce bake time to 20-25 mins and pound them even for quick cooking.
Q: Is the marinade safe after touching raw chicken?
A: YES – boiling in the oven kills bacteria. But if it freaks you out, reserve half marinade before adding chicken.
Q: Sauce too thin/too thick?
A: Thin = simmer on stove 5 mins to reduce. Thick? Whisk in 1-2 tbsp chicken broth or apple cider vinegar.
Q: Can I grill instead?
A: Absolutely! Grill over medium heat 6-8 mins/side. Brush with extra marinade pre-cook only (not while grilling – sugar burns!).
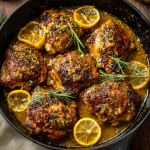
Maple Dijon Chicken Thighs
- Total Time: 40 minutes
Description
Welcome to flavor town! These Maple Dijon Chicken Thighs are the perfect marriage of tangy mustard and sweet maple with juicy, tender meat that practically begs for a spoonful of that golden pan sauce. It’s a fuss-free, flavor-packed dinner ready in under an hour, whether you’re feeding a crew or just feeding your soul. Minimal effort, major payoff.
Ingredients
-
¼ cup Dijon mustard
-
2 tbsp real maple syrup
-
1 tbsp olive oil
-
2 tsp soy sauce (or tamari for gluten-free)
-
1 clove garlic, minced
-
½ tbsp dried rosemary (or 1 tbsp fresh)
-
6 boneless, skinless chicken thighs (about 2.3 lbs)
Instructions
-
Make Marinade: In a bowl, whisk mustard, maple syrup, olive oil, soy sauce, garlic, and rosemary.
-
Marinate Chicken: Place thighs in a bag or dish, pour marinade over, and refrigerate 30 mins to 8 hrs.
-
Bake: Preheat oven to 400°F (200°C). Arrange chicken in a baking dish. Pour marinade over top. Bake 25–30 mins until internal temp hits 165°F.
-
Optional Broil: Broil 2–3 mins for caramelized edges.
-
Serve: Spoon pan sauce over thighs and serve hot.
Notes
-
Pair with mashed potatoes, quinoa, or roasted Brussels sprouts.
-
For crispy skin, use skin-on thighs and broil longer.
-
Leftovers make amazing grain bowls or sandwiches!
- Prep Time: 10 mins
- Cook Time: 30 mins
Nutrition
- Calories: 280 cal Per serving
- Fat: 16g
- Carbohydrates: 6g
- Protein: 27g
Nutritional Highlights (Per Serving)
Calories: ~280 | Protein: 27g | Carbs: 6g | Fat: 16g | Sugar: 5g
Note: Using skin-on thighs adds ~50 calories/serving. Sugar comes naturally from maple syrup!
Final Thoughts: More Than Just a Recipe
This Maple Dijon Chicken Thighs recipe is a reminder that cooking is equal parts creativity and comfort. It’s about:
-
Resourcefulness: Like using deli mustard packets in a pinch.
-
Connection: The dish that won over your future spouse.
-
Adventure: Burning batch #3 led to a better recipe.
So whether you’re a kitchen newbie or a seasoned cook, remember: the best meals aren’t about perfection. They’re about the messy, flavorful, alive moments—like eating straight from the baking dish or texting “MAPLE DIJON EMERGENCY” to someone you love. Now go make magic (and maybe a little mess).

Sourdough Peach Cobbler Cinnamon Rolls
Wake Up to a Slice of Heaven!
Hey friends, Beau here from Feastical! Ever have one of those mornings where you wake up craving something extraordinary? Something that blurs the line between breakfast indulgence and dessert decadence? Let me introduce you to your new kitchen love affair: Sourdough Peach Cobbler Cinnamon Rolls. Imagine this: pillowy, tangy sourdough dough, rolled up with juicy, cinnamon-spiked peaches and a ribbon of brown sugar bliss. But we’re not stopping there. Oh no. We’re crowning these beauties with a buttery, crumbly cobbler topping and drenching them in a luscious cream cheese glaze that’ll make you weak in the knees. It’s like your favorite cozy peach cobbler decided to have the most delicious baby with a classic cinnamon roll, and I am HERE for it.
Now, I know sourdough might sound intimidating if you’re new to the starter life, but trust me – this recipe is your friendly gateway. That natural fermentation gives these rolls an incredible depth of flavor and a tender crumb that commercial yeast just can’t match. Plus, it makes them easier on the tummy! Whether you’re a sourdough pro with a bubbly jar named Bertha on your counter, or you’re just dipping your toes in, this recipe is designed to be approachable and downright fun. Grab your favorite apron (the one with the questionable stains – no judgment here!), and let’s turn your kitchen into a bakery that smells like pure, unadulterated happiness. Your fork is waiting!
Peaches, Grandma, & A Happy Accident
This recipe? It’s pure nostalgia with a side of serendipity for me. Picture it: sweltering Georgia summers at my Grandma Ellie’s farmhouse. Her kitchen was a sanctuary of flour-dusted counters and the perpetual hum of the oven. Her classic cinnamon rolls were legendary – fluffy clouds of dough swirled with cinnamon sugar, always served piping hot on Sunday mornings. One blistering August weekend, we’d picked buckets of sun-ripened peaches from her orchard. Naturally, peach cobbler was on the menu. But in a chaotic, flour-flying moment of “what if?”, teenage me decided to toss a handful of those syrupy, spiced peaches onto Grandma’s cinnamon roll dough before rolling it up. She raised an eyebrow, then chuckled, “Well, Beau Collier, let’s see what kind of trouble you’ve cooked up now.” The result? Pure magic. That happy accident became our late-summer tradition. These Sourdough Peach Cobbler Cinnamon Rolls are my tribute to Grandma Ellie – capturing that perfect blend of her comforting baking and the vibrant joy of peak-season peaches. Every bite takes me right back to her kitchen table, sticky fingers and all.
Gather Your Delicious Arsenal
Here’s your grocery list for pure bliss! Don’t stress about perfection – cooking is an adventure, and substitutions are your co-pilot. I’ll share why each ingredient matters and how to swap if needed.
Cinnamon Roll Dough
- 310g warm milk (1¼ cups): Whole milk creates the richest, tenderest dough, but 2% works! Warm it gently (like baby bathwater, around 105-110°F/40-43°C) to wake up the sourdough starter without killing it.
- 57g unsalted butter, melted (¼ cup): Butter = flavor and tenderness! Salted butter works in a pinch; just reduce the added salt slightly. Vegan? Use a neutral-flavored oil or melted vegan butter.
- 1 large egg (50g): Your dough’s best friend for structure and richness. Flax egg (1 tbsp ground flax + 2.5 tbsp water, sit 5 mins) works for egg-free.
- 100g sugar (½ cup): Feeds the starter and balances the tang. Regular granulated is perfect – no fancy stuff needed here!
- 5g salt (1 tsp): Crucial for flavor depth and controlling yeast activity. Don’t skip it! Use fine sea salt or table salt.
- 200g active sourdough starter (scant 1 cup): The STAR! Ensure it’s bubbly, peaked, and passes the float test (a spoonful floats in water). Not active? Feed it 4-12 hours before baking.
- 650g all-purpose flour (4⅔ cups): The foundation. Spoon & level into your cup! Bread flour adds chew, but AP gives perfect softness. Need whole wheat? Swap 100g max for a nutty hint.
Peach Filling
- 450g fresh peaches, diced (3 cups): Peak-season is dreamy! Frozen/thawed peaches work year-round (drain excess liquid!). Canned? Use well-drained slices in juice (not syrup).
- 50g sugar (¼ cup): Draws out those luscious peach juices. Adjust based on peach sweetness!
- ½ tsp cinnamon: Warmth that sings with peaches.
- ¼ tsp nutmeg: A tiny whisper of complexity. Freshly grated is chef’s kiss!
Cinnamon-Sugar Filling
- 220g brown sugar (1 cup): Light or dark – dark adds deeper molasses notes. Pack it tight!
- 113g unsalted butter, softened (½ cup): Softened, NOT melted, for spreadability. Salted butter? Reduce dough salt slightly.
- 8g cinnamon (1 tbsp): Go for quality! Vietnamese cinnamon has intense flavor.
Crumb Topping
- 56g cold butter, cubed (¼ cup): COLD is key for proper crumbs! Straight from the fridge.
- 100g sugar (½ cup): Granulated white sugar gives that classic cobbler crunch.
- 70g flour (½ cup): All-purpose binds the crumbs.
- 3g cinnamon (1 tsp): Extra cozy vibes!
Cream Cheese Frosting
- 56g unsalted butter, softened (¼ cup): Softened ensures smooth blending.
- 56g cream cheese, softened (¼ cup): Full-fat for tangy richness. Let it warm up!
- 120g powdered sugar (1 cup): Sift it to avoid lumps! Adjust for desired sweetness/thickness.
- 4g vanilla extract (1 tsp): Pure vanilla elevates everything. Bourbon vanilla? Yes, please!
- 60g milk (¼ cup): Whole milk or heavy cream for extra decadence. Adjust for your perfect drizzling consistency.
Let’s Bake Some Magic: Step-by-Step
Ready to create something legendary? Follow these steps – I’ve packed them with my favorite kitchen hacks to guarantee success!
- Make the Dough (The Foundation!): In a large bowl or stand mixer fitted with the dough hook, combine the warm milk, melted butter, egg, sugar, and salt. Give it a good whisk until smooth. Chef’s Hack: Temp check that milk! Too hot kills the starter, too cold slows it down. Add your active sourdough starter and mix gently. Gradually add the flour, mixing on low speed until a shaggy dough forms. Increase speed to medium and knead for 8-10 minutes until the dough is smooth, elastic, and just slightly tacky (it should clean the sides of the bowl but might stick a tiny bit to the bottom). Chef’s Insight: Don’t be tempted to add tons more flour! A slightly tacky dough makes softer rolls. Resist! Transfer dough to a lightly oiled bowl, cover tightly with plastic wrap or a damp towel, and let it rise at room temperature until doubled in size. This usually takes 4-6 hours depending on your kitchen’s warmth. Overnight Option (My Fave!): Pop the covered bowl in the fridge for a slow, cold ferment (8-16 hours). This develops incredible flavor! Just let it sit at room temp for 1-2 hours before rolling the next day.
- Prep the Peach Filling (Juicy Goodness!): While the dough rises (or the next morning), toss the diced peaches with the sugar, cinnamon, and nutmeg in a bowl. Let them sit for at least 10 minutes. This draws out their natural juices and creates that irresistible syrupy goodness. Chef’s Tip: If your peaches are super juicy, drain off maybe 1-2 tablespoons of excess liquid after macerating to prevent soggy rolls.
- Create the Cinnamon-Sugar Paste (The Flavor Bomb!): In a small bowl, mash together the softened butter, brown sugar, and cinnamon until it forms a thick, spreadable paste. Chef’s Hack: Truly softened butter is non-negotiable here! Microwave it in 5-second bursts if needed, but don’t melt it.
- Assemble the Rolls (The Fun Part!): Lightly punch down the risen dough. Turn it out onto a lightly floured surface. Roll it out into a large rectangle, roughly 18×14 inches. Aim for even thickness! Spread the cinnamon-sugar paste evenly over the entire surface, leaving a small border (about ½ inch) along one long edge. Chef’s Tip: An offset spatula makes spreading this sticky paste a breeze! Scatter the prepared peaches (and their lovely juices) evenly over the cinnamon sugar. Starting from the long edge opposite the clean border, roll the dough up tightly into a log, pinching the clean edge to seal it. Chef’s Hack: Use unflavored dental floss to slice the log cleanly! Slide it under the roll, cross the ends over the top, and pull – perfect slices every time, no squishing! Aim for 12 equal rolls. Place them cut-side up in a generously greased 9×13 inch baking dish, leaving a little space between them for rising.
- Make the Crumb Topping (Cobbler Vibes!): In a small bowl, combine the flour, sugar, and cinnamon for the topping. Add the COLD cubed butter. Using your fingertips, a pastry cutter, or a fork, work the butter into the dry ingredients until you have a mixture resembling coarse crumbs with some pea-sized bits. Chef’s Insight: Cold butter is essential for that perfect crumbly texture – don’t let it melt! Sprinkle this crumb topping evenly over the rolls in the pan.
- Final Rise & Bake (Almost There!): Loosely cover the pan with plastic wrap or a clean towel. Let the rolls rise in a warm, draft-free spot until noticeably puffy (they should look relaxed and fill more of the pan). This usually takes about 1 hour, but can vary (especially if dough was refrigerated). Preheat your oven to 375°F (190°C) during the last 20-30 minutes of the rise. Bake for 25-30 minutes, rotating the pan halfway through, until the rolls are golden brown and the crumb topping is crisp. Chef’s Tip: An instant-read thermometer inserted into the center of a roll should read 190-200°F (88-93°C) when done. If the topping browns too quickly, tent loosely with foil.
- Whip Up the Frosting (The Grand Finale!): While the rolls bake, make the frosting. In a medium bowl using a hand mixer or stand mixer, beat the softened butter and cream cheese until completely smooth and creamy. Gradually beat in the powdered sugar until combined. Beat in the vanilla. Slowly add the milk, 1 tablespoon at a time, beating well after each addition, until you reach your desired drizzling consistency. Chef’s Hack: Want thicker frosting? Use less milk. Want it pourable? Add a touch more. Let the baked rolls cool in the pan for 10-15 minutes (just enough so they aren’t scalding hot). Drizzle or spread the luscious cream cheese frosting generously over the warm rolls. Pro Move: Serve immediately – this is peak deliciousness!
Serving Up Sunshine
Okay, deep breaths. You did it! Now, how to serve these masterpieces? Warm is absolutely essential. The aroma alone is worth the effort. Slide a spatula under each roll, scooping up some of that glorious crumble topping and any saucy bits from the pan. Place it on a plate – maybe even a slightly warmed one for extra cozy points. That cream cheese glaze should be oozing seductively down the sides. Pair it with a giant mug of strong black coffee to cut the sweetness, a cold glass of milk for classic comfort, or even a cheeky scoop of vanilla ice cream if you’re leaning fully into dessert territory (no judgment here!). These rolls are rich, so one is often plenty… unless you’re sharing with very enthusiastic friends. Gather around the table and savor every sticky, crumbly, peachy, cinnamon-spiced bite!
Make It Your Own: Delicious Twists!
Love the base recipe? Try these fun spins!
- Berry Bliss: Swap peaches for mixed berries (blueberries, raspberries, blackberries) or just one favorite. Reduce sugar slightly if berries are sweet. A hint of lemon zest in the filling brightens it up!
- Nutty Crunch: Add ½ cup chopped pecans or walnuts to the cinnamon-sugar filling or sprinkle them over the crumb topping before baking for fantastic texture.
- Vegan Victory: Use plant-based milk, vegan butter, and a flax egg. For the frosting, blend soaked cashews with powdered sugar, vanilla, a splash of plant milk, and a squeeze of lemon juice for tang.
- Spiced Up: Add a pinch of cardamom or ginger to the peach filling or the cinnamon sugar for an extra warm kick.
- Print

Sourdough Peach Cobbler Cinnamon Rolls
- Total Time: 1 hour 10 minutes
Description
These aren’t your average cinnamon rolls. Picture pillowy sourdough dough swirled with brown sugar, cinnamon, and syrupy peaches, then topped with a golden cobbler crumble and silky cream cheese glaze. It’s comfort food at its peak—a weekend brunch showstopper or a “just because” baking triumph. Don’t let sourdough scare you—this recipe is beginner-friendly, deeply satisfying, and 100% worth licking your fingers for.
Ingredients
ScaleDough:
-
310g warm milk (1¼ cups)
-
57g unsalted butter, melted (¼ cup)
-
1 large egg
-
100g sugar (½ cup)
-
5g salt (1 tsp)
-
200g active sourdough starter (scant 1 cup)
-
650g all-purpose flour (4⅔ cups)
Peach Filling:
-
450g diced peaches (3 cups)
-
50g sugar (¼ cup)
-
½ tsp cinnamon
-
¼ tsp nutmeg
Cinnamon Sugar Layer:
-
220g brown sugar (1 cup)
-
113g softened butter (½ cup)
-
1 tbsp cinnamon
Crumb Topping:
-
56g cold butter, cubed (¼ cup)
-
100g sugar (½ cup)
-
70g flour (½ cup)
-
1 tsp cinnamon
Cream Cheese Glaze:
-
56g butter, softened (¼ cup)
-
56g cream cheese (¼ cup)
-
120g powdered sugar (1 cup)
-
1 tsp vanilla extract
-
60g milk (¼ cup, adjust for texture)
Instructions
-
Make dough: Mix milk, butter, egg, sugar, salt, and sourdough. Add flour. Knead until soft and elastic (8–10 mins). Cover and rise 4–6 hrs at room temp or overnight in fridge.
-
Peach prep: Toss peaches with sugar, cinnamon, and nutmeg. Let sit 10 mins. Drain excess juice.
-
Cinnamon filling: Mix softened butter, brown sugar, and cinnamon into a paste.
-
Roll & fill: Roll dough into 18×14″ rectangle. Spread paste, scatter peaches. Roll, slice into 12 rolls. Place in greased 9×13″ pan.
-
Crumb topping: Mix flour, sugar, cinnamon, and cold butter until crumbly. Sprinkle over rolls.
-
Final rise: Cover and let rise until puffy (1 hr).
-
Bake at 375°F (190°C) for 25–30 mins until golden.
-
Glaze: Mix all glaze ingredients until smooth. Drizzle over slightly cooled rolls.
- Prep Time: 40 mins
- Cook Time: 30 mins
Nutrition
- Calories: 350 cal Per roll
- Fat: 14g
- Carbohydrates: 50g
- Protein: 6g
-
Final Thoughts: Why This Recipe is Worth Every Minute
Yes, sourdough peach cobbler cinnamon rolls take time. But that’s the point. In a world of instant gratification, baking teaches patience, presence, and the joy of creating something extraordinary from simple ingredients.
These rolls are more than dessert—they’re an experience. The tangy sourdough, the spiced peaches, the buttery crumble, and the luscious frosting come together in a way that feels like a celebration. Whether you’re baking them for a special occasion or just because, they’re a reminder that some of life’s best moments happen around the table, with sticky fingers and full hearts.