
Pumpkin Cream Cheese Chicken Roll-Ups
When Pumpkin Met Chicken: Your New Fall Obsession
Hey friends, Beau here! Grab your favorite mug of cider and pull up a stool – we’re diving fork-first into the coziest kitchen magic happening this season. Picture this: juicy chicken breasts hugging a creamy, herby pumpkin filling, all rolled up into golden spirals that look like autumn sunshine on a plate. These Pumpkin Cream Cheese Chicken Roll-Ups aren’t just dinner – they’re edible hugs for chilly evenings. I know what you’re thinking: “Pumpkin… in chicken?” Trust me, once that warm blend of sweet squash and tangy cream cheese hits your tongue with savory thyme and garlic, you’ll be doing a happy dance by the oven. No breadcrumbs, no fuss – just pure seasonal flavor that’ll make your kitchen smell like a fall fairy tale. Whether you’re cooking for date night or meal-prepping for the week, this dish turns basic chicken into a showstopper that’s easier than pie (pun intended!). Let’s roll up our sleeves and create some delicious memories together!
The Accidental Masterpiece That Started It All
This recipe actually came from a beautiful kitchen disaster! Last October, I was testing pumpkin alfredo sauce when my neighbor knocked with extra chicken breasts. “Beau, my grill died mid-cook – rescue these?” In the chaos, I knocked my pumpkin mixture right onto the chicken. Instead of crying over spilled purée, I thought: “What if I roll this up?” I spread it thin, rolled those bad boys like cinnamon buns, and popped ’em in the oven. Twenty minutes later? Magic. My wife took one bite, did that eyes-closed “mmm” thing, and declared: “This is the taste of fall falling in love.” Now it’s our annual “first leaf pile” tradition – we make these roll-ups, build a fort with blankets, and watch Halloween movies. Funny how the best recipes often start with a happy accident and a hungry neighbor!
Gathering Your Flavor Toolkit
Here’s what you’ll need to make about 4 generous roll-ups (double it for leftovers – they reheat beautifully!):
- 2 large chicken breasts – Butterflied and pounded thin! Look for plump, even breasts. Pro tip: Slide them into a ziplock bag before pounding to avoid chicken shrapnel flying everywhere.
- ½ cup pumpkin purée – NOT pie filling! Pure pumpkin lets the spices shine. In a pinch? Roasted butternut squash works beautifully.
- ¼ cup cream cheese, softened – Full-fat for maximum creaminess, but Neufchâtel works too. Leave it on the counter while prepping chicken – cold cream cheese fights your spatula!
- 1 tsp fresh thyme – Those little leaves pack earthy magic! Dried works (use ½ tsp), but fresh makes it sing. Rosemary or sage make fun autumnal swaps.
- ½ tsp garlic powder – Trust me, powder blends better than fresh here. Onion powder or a pinch of smoked paprika add fun depth.
- Salt & pepper to taste – Season like you mean it! I do ¾ tsp kosher salt and 10 grinds of pepper.
- Olive oil for brushing – Gives that gorgeous golden crust. Melted butter or avocado oil work too.
- Optional: grated Parmesan or chopped herbs for topping – Like jewelry for your chicken! Adds salty crunch.
Chef insight: That pumpkin-cream cheese ratio? Perfection. Too much pumpkin makes it wet; too much cheese overpowers. This blend stays velvety without oozing!
Rolling Up the Cozy (Step-by-Step!)
Ready to make culinary magic? Follow these steps for pumpkin roll-up perfection:
- Preheat & Prep: Fire up your oven to 375°F (190°C). Lightly grease a baking dish – I use the butter wrapper for bonus flavor! Now butterfly those chicken breasts: Slice horizontally through the thickest part, stopping ½ inch from the edge. Open like a book. Cover with plastic wrap and pound to ¼-inch thickness using a rolling pin or skillet. Pro tip: Uneven thickness = uneven cooking. Pound with purpose!
- Whip the Filling: In a bowl, mix pumpkin, cream cheese, thyme, garlic powder, salt, and pepper. Stir until smooth as autumn fog. Taste! Want more zip? Add lemon zest. Hack: Microwave cream cheese 10 seconds if you forgot to soften it.
- Spread & Roll: Divide filling between chicken breasts, spreading evenly but leaving a ½-inch border. Roll tightly from the short end (like a yoga mat!). Secure with 3-4 toothpicks or kitchen twine. Watch out: Overstuffing causes blowouts! 3 tbsp per breast is ideal.
- Bake to Golden Glory: Place rolls seam-side down in your dish. Brush generously with oil. Bake 25-30 mins until internal temp hits 165°F. Secret weapon: Slide an oven-safe thermometer in one roll. No guesswork!
- Rest & Reveal: Let rolls rest 10 minutes! This lets juices redistribute. Remove toothpicks, slice into 1-inch swirls, and watch that gorgeous spiral reveal itself. Patience pays: Cutting too soon = filling avalanche.
See? Easier than carving a friendly jack-o’-lantern!
The Science Behind the Perfect Roll-Up: Why This Combo Works
Ever wonder why pumpkin and chicken—seemingly odd partners—create such magic? Let’s geek out on the culinary science!
1. The Maillard Reaction Meets Sweetness
When chicken browns in the oven, the Maillard reaction occurs—amino acids and sugars create complex, savory flavors. Pumpkin’s natural sugars (yes, pumpkin has sugars!) amplify this, caramelizing subtly alongside the chicken’s proteins. The cream cheese? It’s the buffer. Its fat content prevents the pumpkin from burning while adding tangy contrast to the squash’s earthiness.
2. Texture Harmony
Pounded chicken ensures even cooking, but the roll-up technique is genius:
-
Outer Layer: The chicken’s surface dehydrates slightly, forming a golden “crust.”
-
Inner Layer: The pumpkin-cream cheese mix stays creamy because it’s insulated by the meat, steaming gently like a custard.
Fun fact: Over-stirring the filling incorporates air, making it fluffy. Under-mixing leaves lumps. Aim for “whipped frosting” consistency.
3. Umami Synergy
Pumpkin contains glutamates (natural umami compounds), while chicken’s inherent savoriness (thanks to inosinic acid) creates a double umami punch. Thyme and garlic? They’re not just flavor—thyme’s thymol oil cuts richness, and garlic’s allicin reacts with heat to mellow into sweetness.
4. The Fat Factor
Cream cheese’s fat emulsifies the pumpkin, preventing separation. Without enough fat, the filling would weep moisture during baking, resulting in a soggy spiral. Pro tip: For extra insurance, blot pumpkin purée with a paper towel to remove excess water.
5. Temperature Tricks
Resting the rolls post-bake is non-negotiable. Chicken’s muscle fibers tighten when heated, squeezing out juices. Resting lets them reabsorb, while the residual heat gently finishes cooking the filling. Slice too soon, and you’ll lose 30% of those juices!
Cultural Roots: Pumpkin’s Global Love Affair with Meat
Pumpkin isn’t just for lattes—it’s a global savory star! Here’s how cultures inspire this dish:
1. Italy’s Zucca Ripiena
Stuffed pumpkin blossoms (or whole pumpkins) with ricotta and herbs are a Roman tradition. Our roll-ups riff on this by swapping blossoms for chicken “wrappers.”
2. Thailand’s Gaeng Fak Thong
Thai pumpkin curry often includes chicken, coconut milk, and kaffir lime. The sweet-savory balance mirrors our filling—just swap galangal for thyme!
3. Mexico’s Calabaza en Tacha
Slow-cooked pumpkin with piloncillo (unrefined sugar) and cinnamon appears in Day of the Dead feasts. Savory adaptations pair it with mole and turkey—a nod to pumpkin’s versatility.
4. Hungary’s Tökfőzelék
A creamy pumpkin stew thickened with roux and paired with chicken or sausage. Sound familiar? It’s a deconstructed version of our roll-ups!
Why This Matters
Pumpkin’s mild sweetness makes it a universal “bridge” ingredient. In your roll-ups, it’s a canvas:
-
Sweet: Add maple syrup or brown sugar (½ tsp max!).
-
Spicy: Stir in harissa or gochujang.
-
Earthy: Fold in sautéed mushrooms.
Pro tip: For an international twist, top rolls with:
-
Italian: Brown butter and sage
-
Japanese: Miso glaze and sesame
-
Moroccan: Yogurt and za’atar
Pumpkin Cream Cheese Chicken Roll-Ups: A Meal Prep Powerhouse
This dish isn’t just delicious—it’s a practical gem for busy weeks. Here’s how to maximize it:
1. Batch Cooking
-
Prep Ahead: Assemble rolls (unbaked) and refrigerate for 3 days. Freeze for 3 months—thaw overnight before baking.
-
Sliced Leftovers: Store cooked rolls in 1-inch slices for salads, wraps, or pasta add-ins.
2. Reheating Hacks
-
Oven: 350°F for 10 mins (keeps texture crisp).
-
Air Fryer: 3 mins at 375°F (perfect for single servings).
-
Microwave: 30 seconds with a damp paper towel to prevent drying.
3. Kid-Friendly Adaptations
-
Hidden Veggies: Add ¼ cup finely grated zucchini to the filling.
-
Fun Shapes: Use cookie cutters on sliced rolls for “pumpkin stars.”
-
Dip It: Serve with a side of marinara or ranch for tiny hands.
4. Budget Tips
-
Chicken: Buy family packs, pound/flatten them yourself, and freeze portions.
-
Pumpkin: Use homemade purée (roast sugar pumpkin halves, scrape flesh, blend).
-
Cream Cheese: Non-branded or “brick” versions work best (avoid tubs—they’re whipped and watery).
5. Dietary Swaps
-
Keto: Increase cream cheese to ⅓ cup, reduce pumpkin to ¼ cup.
-
Paleo: Substitute cream cheese with cashew cheese.
-
Low-FODMAP: Omit garlic powder, use infused garlic oil.
Plating Your Pumpkin Masterpiece
Presentation time! Arrange those golden spirals like edible roses on warm plates. Drizzle any pan juices over top – that’s liquid gold! Sprinkle with Parmesan or fresh herbs for flair. Pair with:
- Crispy roasted Brussels sprouts with maple glaze
- Wild rice pilaf with toasted pecans
- A simple arugula salad with apple slices and balsamic
Bonus cozy points: Serve in shallow bowls over creamy polenta to catch every drop of herby pumpkin goodness. Perfect for mopping with crusty bread!
Shake Up Your Swirls!
This recipe loves playing dress-up! Try these tasty twists:
- Italian Stallion: Swap thyme for basil/oregano, add 2 tbsp sun-dried tomatoes to filling, top with marinara
- Southwest Fiesta: Mix in 1 tsp chili powder + ¼ cup black beans/corn, top with avocado crema
- Dairy-Free Dream: Use Kite Hill almond cream cheese + coconut oil brush
- Meatless Marvel: Stuff large portobello caps instead of chicken
- Thanksgiving Remix: Add 2 tbsp cranberry sauce + ¼ tsp sage to filling
Beau’s Backstage Tips
This recipe evolved from my “oops” moment to a reader favorite! Early versions used ricotta, but cream cheese gives better tang. Some funny fails along the way: Once I used pumpkin pie spice by accident – tasted like dessert chicken! Another time, I skipped pounding the chicken… let’s just say we had pumpkin-stuffed chicken nuggets. Lesson learned! Now I keep pre-portioned pumpkin purée in my freezer for roll-up emergencies. The best part? Kids go nuts for the “chicken cinnamon rolls” – I don’t correct them! Pro storage tip: Sliced leftovers in airtight containers make killer next-day salads or wraps. Just microwave 30 seconds – good as new!
Roll-Up Rescue Squad
Q: My filling oozed out everywhere! What happened?
A: Two culprits: Overstuffing or not securing tightly. Stick to 3 tbsp filling per breast, and use toothpicks AND twine if needed. Seam-side down baking helps too!
Q: Chicken’s cooked but filling isn’t hot. Help!
A: Your rolls might be too thick! Pound chicken thinner (¼-inch is key) or let filling sit at room temp before spreading. If it happens, pop slices under the broiler for 2 mins.
Q: Can I prep these ahead?
A: Absolutely! Assemble rolls (don’t bake), wrap tightly in plastic, and refrigerate 24 hours. Add 5-7 mins to bake time straight from fridge. Freeze unbaked rolls up to 3 months – thaw overnight before baking.
Q: Is canned pumpkin okay? Brand recommendations?
A: 100%! Libby’s is my go-to. Avoid “pumpkin pie mix” – it’s pre-sweetened. If your purée looks watery, drain it in a sieve for 10 mins first.

Pumpkin Cream Cheese Chicken Roll-Ups
- Total Time: 50 min
Description
Juicy chicken wrapped around a velvety blend of pumpkin, cream cheese, thyme, and garlic—these roll-ups are like autumn wrapped in a forkful. They’re simple to prep, stunning on the plate, and perfect for everything from date night to meal prep. Bake them once, crave them all season.
Ingredients
-
2 large chicken breasts (butterflied & pounded thin)
-
½ cup pumpkin purée (not pie filling!)
-
¼ cup cream cheese, softened
-
1 tsp fresh thyme (or ½ tsp dried)
-
½ tsp garlic powder
-
Salt & pepper to taste
-
Olive oil for brushing
-
Optional: Parmesan or fresh herbs for garnish
Instructions
-
Preheat oven to 375°F (190°C). Grease a baking dish.
-
Pound chicken to ¼-inch thickness for even cooking.
-
Mix filling: pumpkin, cream cheese, thyme, garlic, salt & pepper until smooth.
-
Spread 3 tbsp filling on each chicken piece, leaving a border.
-
Roll tightly, secure with toothpicks. Place seam-side down in dish.
-
Brush with oil and bake for 25–30 mins or until 165°F inside.
-
Rest 10 mins, slice into spirals, garnish with herbs or Parmesan.
Notes
-
Italian: Add sun-dried tomatoes + marinara
-
Southwest: Mix in black beans + chili powder
-
Meatless: Use portobello caps instead of chicken
- Prep Time: : 20 min
- Cook Time: 30 min
Nutrition
- Calories: 340 Cal Per Roll-Up
- Sugar: 1g
- Fat: 18g
- Carbohydrates: 4g
- Protein: 36g
Nutritional Per Serving (1 roll-up)
- Calories: 340
- Protein: 36g
- Fat: 18g
- Carbs: 4g
- Sugar: 1g
Note: Values estimated using MyFitnessPal. To reduce fat, use reduced-fat cream cheese.
Final Thoughts: More Than a Recipe
These roll-ups aren’t just dinner—they’re a celebration of autumn’s coziest flavors. From their accidental origins to their global inspirations, they prove that the best dishes are born from creativity and curiosity. Whether you’re meal-prepping for chaos or crafting a centerpiece for friends, this recipe adapts to your life like pumpkin spice to a rainy day. So tie on that apron, embrace the swirls, and remember: Every bite is a little hug from the season itself. Happy rolling!
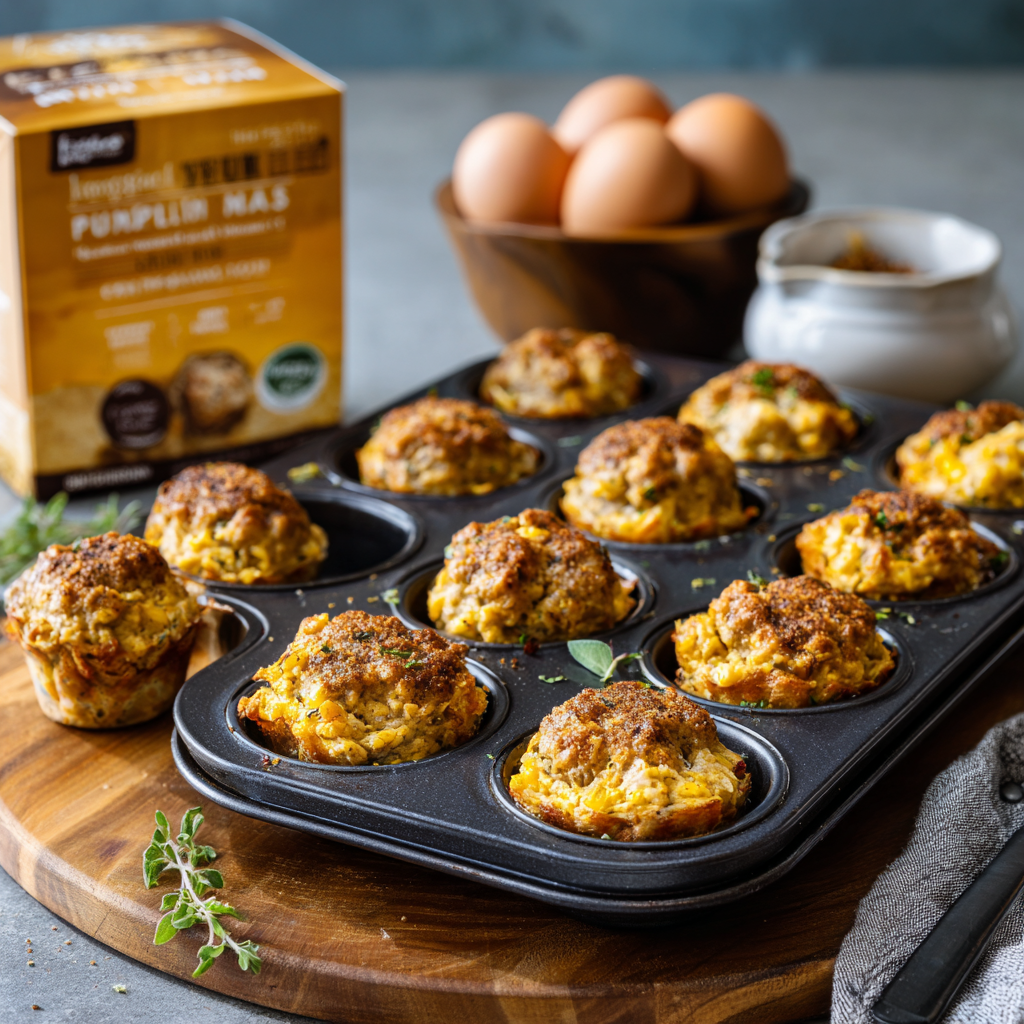
Pumpkin Breakfast Meatball Muffin Cups
Why Your Mornings Need These Pumpkin Meatball Muffin Cups
Hey friends, Beau here from Feastical! 🍂 Ever have one of those mornings where you’re juggling a coffee cup, a cranky toddler, and a to-do list longer than a grocery receipt? Yeah, me too. That’s exactly why I created these Pumpkin Breakfast Meatball Muffin Cups – your edible superhero for chaotic autumn mornings. Imagine if a cozy pumpkin spice latte and a savory breakfast sandwich had a delicious baby. That’s these muffin cups! They’re packed with protein from turkey meatballs and eggs, kissed with maple-cinnamon sweetness, and held together by creamy pumpkin and hearty oats. No fork required! Just grab, go, and conquer your day. Perfect for meal prep, brunch crowds, or when you need a warm hug disguised as food. Trust me, once you try these, you’ll wonder how you ever survived pumpkin spice season without ’em. Let’s bake some magic!
That One Rainy Morning & My “Aha!” Moment
Picture this: It’s pouring rain outside my Oregon kitchen window. My dog, Biscuit, is sulking because walkies are canceled, and my 6-year-old niece, Lily, is “starving” (her words, not mine!). I’m rummaging through the fridge like a raccoon at a campsite – ground turkey, leftover pumpkin purée, eggs… typical November remnants. Lily begs for “doughnuts,” but I’m determined to sneak in protein. On a whim, I roll the turkey into tiny meatballs, whisk pumpkin into eggs, and plop everything into a muffin tin. Twenty minutes later? Lily’s devouring them like candy, shouting “Uncle Beau’s pumpkin balls!” between giggles. The best part? She had zero clue they were healthy. That messy, rainy morning birthed these muffin cups. Now, every time I bake them, I hear Lily’s giggle and smell that wet-earth-and-cinnamon autumn air. Food memories? They’re the best kind.
Ingredients: Your Flavor Toolkit
- ½ lb ground turkey – Lean protein powerhouse! Swap with ground chicken or pork sausage (remove casings) for richer flavor. Chef tip: Use 85% lean for juicier meatballs!
- 1 tsp dried sage – Autumn’s earthy signature. Fresh sage? Use 1 tbsp minced. Hate sage? Thyme or rosemary work beautifully.
- ½ tsp garlic powder – Quick umami depth. Fresh garlic? Mince 1 clove super fine so it cooks fast!
- Salt & pepper to taste – Start with ¼ tsp salt + 3 cracks pepper. Taste-test raw mix (it’s safe!) and adjust.
- ¾ cup pumpkin purée – NOT pie filling! Canned pure pumpkin is your BFF. Chef hack: Freeze leftover purée in ice cube trays!
- ¼ cup rolled oats – The gluten-free binder that adds chew. Instant oats? Okay, but avoid steel-cut – too crunchy!
- 4 eggs – The golden glue! Vegan? Use flax eggs (4 tbsp ground flax + 10 tbsp water, wait 10 mins).
- 2 tbsp maple syrup – Pure maple = autumn vibes. Sugar-free? Monk fruit syrup works. Insider trick: Warm syrup blends easier!
- ½ tsp ground cinnamon – Warmth in a jar. Feeling fancy? Add a pinch of nutmeg or cardamom!
- Olive oil spray or liners – Non-stick insurance! Silicone muffin cups? Even better – zero sticking.
Step-by-Step: Let’s Get Baking!
Step 1: Fire up that oven to 375°F (190°C). Why? Ovens lie! Use an oven thermometer if things usually burn. Trust me, it’s a game-changer.
Step 2: In a bowl, mix turkey, sage, garlic powder, salt, and pepper. Got cold hands? Run ’em under warm water before rolling meatballs – prevents sticking! Roll into 12 little balls (about 1-inch wide). Pro hack: Use a mini cookie scoop for identical cuties!
Step 3: Grab another bowl. Whisk together pumpkin, oats, eggs, maple syrup, and cinnamon until smoother than a jazz playlist. Lumps? No stress – they bake out! Secret weapon: Let this sit 5 minutes. Oats absorb liquid = fluffier texture!
Step 4: Prep your muffin tin. Spray or line cups like you’re armoring a castle. Those pumpkin edges get sticky! Spoon mixture into cups until ¾ full. A cookie scoop here is lightning fast.
Step 5: Now the fun part! Press one turkey meatball into each cup’s center. Don’t dunk it – gently nestle it halfway down. Watch it sink like a tiny, savory island!
Step 6: Bake 20–25 minutes until tops are golden and a toothpick near the meatball comes out clean. Critical tip: Rotate pan halfway! Ovens have hot spots – this prevents lopsided cups. Let cool 10 minutes in the tin. Why? They firm up! Digging in hot = crumbly chaos.
Serving Suggestions: Plate It Pretty
Slide a butter knife around each cup’s edge and pop ’em out warm! Stack 2-3 on a rustic wood board with maple syrup for drizzling, fresh sage leaves, and pomegranate seeds for a festive pop. Packed lunch? Tuck them cold into bento boxes with apple slices. Brunch showstopper? Arrange on a platter with crispy bacon roses (yes, that’s a thing!). My go-to? A drizzle of spicy sriracha-honey over the top with extra black pepper – sweet heat heaven!
The Science Behind the Perfect Pumpkin Meatball Muffin Cup
Ever wonder why these muffin cups turn out so perfectly moist yet sturdy? It’s not just luck—it’s science! Let’s break down the magic happening in your oven:
1. Pumpkin Purée: The Ultimate Moisture Keeper
Pumpkin isn’t just for flavor—it’s a hydration powerhouse. The pectin in pumpkin purée (a natural thickener) binds with eggs and oats, creating a tender crumb without sogginess. Unlike oil or butter, pumpkin distributes moisture evenly, so every bite stays consistent. Pro tip: Canned pumpkin has less water than homemade purée, which is why it’s ideal for baking.
2. The Oat Factor: Structure Meets Chew
Rolled oats act as a stealthy gluten-free binder. When soaked in the wet ingredients, they swell and release starches, forming a gel-like matrix that holds everything together. Instant oats work but lack the texture; steel-cut oats stay too rigid. The result? A muffin cup that’s sturdy enough to hold a meatball but soft enough to eat one-handed.
3. Meatball Physics: Why They Don’t Sink
The key to keeping those turkey meatballs suspended mid-muffin? Density and viscosity. The pumpkin-egg mixture thickens as it bakes, creating a batter dense enough to slow the meatballs’ descent. Chilling the meatballs beforehand firms them up, preventing disintegration. For extra insurance, lightly coat meatballs in oats before nesting them in the batter.
4. Maillard Reaction = Flavor Explosion
That golden-brown top isn’t just pretty—it’s the Maillard reaction at work! When sugars (from maple syrup) and proteins (from eggs and turkey) heat up, they create hundreds of new flavor compounds. Translation: savory, caramelized deliciousness. A 375°F oven is the sweet spot: hot enough to brown but gentle enough to cook through evenly.
5. The Cooling Rule
Resist the urge to eat them straight from the oven! As the muffin cups cool, steam escapes slowly, preventing a gummy interior. Meanwhile, residual heat finishes cooking the center. Patience = perfection.
Fun experiment: Bake one batch at 350°F and another at 400°F. Compare textures—you’ll see why 375°F reigns supreme!
Pumpkin Meatball Muffin Cups Around the World: Global Twists
Who says these muffin cups can’t go globetrotting? Here’s how to adapt them for international flavors:
1. Mediterranean Magic
-
Swap turkey for lamb meatballs seasoned with cumin, coriander, and mint.
-
Replace pumpkin with roasted eggplant purée.
-
Top baked cups with tzatziki and crumbled feta.
2. Thai-Inspired Thrill
-
Mix red curry paste into the turkey meatballs.
-
Use coconut milk instead of eggs for a vegan version.
-
Garnish with chopped peanuts and a drizzle of sweet chili sauce.
3. Indian Spice Journey
-
Season meatballs with garam masala and ginger.
-
Add a spoonful of chutney to the pumpkin mix.
-
Serve with raita and fresh cilantro.
4. French Bistro Twist
-
Use duck confit instead of turkey.
-
Fold caramelized onions into the batter.
-
Finish with a swipe of Dijon mustard.
5. Japanese Umami Boost
-
Mix miso paste into the pumpkin batter.
-
Substitute ground chicken for turkey.
-
Top with bonito flakes and pickled ginger.
Cultural pro tip: In Italy, these might be called “polpette di zucca,” while in Mexico, they’d be “muffins de calabaza.” Serve with stories about their origin for extra mealtime fun!
Kid-Friendly Kitchen: Cooking with Little Helpers
These muffin cups are a fantastic way to get kids excited about cooking! Here’s how to turn baking into a bonding adventure:
Tasks for Tiny Hands (Ages 3–6)
-
Rolling meatballs (let them wear food-safe gloves if they’re squeamish).
-
Sprinkling oats into the batter.
-
Pressing meatballs into the cups (they’ll love the squish!).
Older Kids (Ages 7–12) Can:
-
Crack and whisk eggs (teach the “one-handed crack” trick!).
-
Measure ingredients (math in action!).
-
Set the timer and check for doneness.
Lessons Disguised as Fun:
-
Science: “See how the oats soak up the liquid? That’s called absorption!”
-
Math: “If we double the recipe, how many muffin cups will we make?”
-
Creativity: “What shape should our meatballs be? Stars? Hearts?”
Lily’s Rule: Let them name the creation! “Uncle Beau’s Pumpkin Balls” stuck because kids love silly titles.
Safety First:
-
Use silicone muffin cups (no sharp edges).
-
Assign oven duties to adults only.
-
Teach “clean as you go” with a mini broom for spilled oats.
Bonus: Kids who cook are more likely to try new foods. Lily now begs for seconds—even with sage and garlic
Recipe Variations: Make It Your Own
1. Italian Stallion: Swap sage for 1 tsp Italian seasoning + 2 tbsp grated parmesan in the pumpkin mix. Top baked cups with marinara dip!
2. Southwest Fiesta: Add ¼ cup corn + 2 tbsp chopped green chiles to pumpkin mix. Use taco-seasoned turkey meatballs!
3. Vegan Delight: Use flax eggs, lentils (cooked & mashed) instead of turkey, and coconut aminos instead of maple syrup.
4. Cheese Lover’s Dream: Fold ½ cup shredded cheddar into pumpkin mix OR stuff meatballs with mozzarella pearls!
5. Sweet Tooth Edition: Skip meatballs! Add ¼ cup chocolate chips + extra cinnamon to pumpkin mix. Bake as mini pumpkin cakes!
Chef’s Notes: From My Kitchen to Yours
Fun fact: These muffin cups started as a “clean-out-the-fridge” experiment! Version 1 involved sad zucchini and WAY too much nutmeg (lesson learned). Over time, I tweaked the oat ratio (more = rubbery, less = soup!), tested 7 different meats (pork sausage wins for flavor, turkey for health), and learned that Lily was right – mini foods are just happier. One disaster story? I once forgot the eggs (blame the coffee shortage). The result? Pumpkin-turkey pucks even Biscuit refused. Now I keep a sticky note on my mixer: “EGGS = ESSENTIAL!” Storage tip: They freeze like champs! Cool completely, freeze on a tray, then bag ’em. Reheat frozen in the microwave for 60 seconds – boom, instant autumn.
FAQs and Troubleshooting: Your Questions, Answered
Q: My meatballs sank to the bottom! Help!
A: Did you press them in too hard? Gently place – don’t shove! Also, ensure your pumpkin mix isn’t too runny (thick batter = better floatation). Chilling meatballs 10 mins pre-bake helps too!
Q: Can I use quick oats instead of rolled oats?
A: Absolutely! Texture will be slightly softer. Avoid instant oatmeal packets (they’re pre-sweetened and weird here).
Q: Why are my muffin cups watery inside?
A: Three culprits: 1) Over-measuring pumpkin (scoop, don’t pour – drain excess liquid!), 2) Undercooking (test that toothpick!), or 3) Skipping the cool-down step (they solidify as they rest).
Q: How long do they last?
A: Fridge: 4 days in airtight containers. Freezer: 3 months! Reheat in toaster oven for crisp edges or microwave for speed.

Pumpkin Breakfast Meatball Muffin Cups
- Total Time: 40 min
Description
Meet your new morning MVPs—savory muffin cups made with turkey meatballs, creamy pumpkin, oats, and eggs, kissed with maple and cinnamon. These cozy, portable bites are sweet-meets-savory perfection, ideal for meal prep, brunch trays, or that “I’m late but still need real food” vibe. One bowl, one tin, no stress!
Ingredients
-
½ lb ground turkey
-
1 tsp dried sage (or 1 tbsp fresh)
-
½ tsp garlic powder
-
Salt & pepper (start with ¼ tsp salt + 3 cracks pepper)
-
¾ cup pumpkin purée
-
¼ cup rolled oats
-
4 eggs
-
2 tbsp maple syrup
-
½ tsp ground cinnamon
-
Olive oil spray or liners
Instructions
-
Preheat oven to 375°F (190°C).
-
Mix turkey, sage, garlic, salt & pepper. Roll into 12 mini meatballs.
-
In another bowl, whisk pumpkin, oats, eggs, maple syrup, cinnamon. Let sit 5 mins.
-
Spray or line muffin tin. Fill cups ¾ full with pumpkin mix.
-
Gently press one meatball into each.
-
Bake 20–25 min until golden and set. Cool 10 min in pan before removing.
Notes
-
Drizzle with maple or sriracha-honey
-
Serve with fresh fruit or crispy bacon
-
Pack cold in lunchboxes or freeze for grab-and-go breakfasts
- Prep Time: 15 min
- Cook Time: 25 min
Nutrition
- Calories: 110 Cal Per Muffin Cup
- Sugar: 2g
- Fat: 6g
- Carbohydrates: 5g
- Fiber: 1g
- Protein: 9g
Nutritional Information (Per Muffin Cup)
Calories: 110 | Protein: 9g | Fat: 6g | Carbs: 5g | Sugar: 2g | Fiber: 1g
Note: Stats use 93% lean turkey and pure maple syrup. Values change with subs like sausage or sugar-free syrup!
Final Thoughts: More Than Just a Recipe
These Pumpkin Breakfast Meatball Muffin Cups aren’t just a meal—they’re a memory-maker. From rainy-day experiments to global flavor adventures, they’ve become a symbol of flexibility, family, and fun. Whether you’re meal-prepping for chaos or serving them at a leisurely brunch, they’re proof that the best foods are the ones that adapt to your life. So grab that muffin tin, invite someone you love into the kitchen, and let the magic happen. After all, the secret ingredient is always joy.

Pumpkin & Pesto Chicken Meal Boxes
Hey, Friend! Let’s Flip the Script on Fall Meal Prep
Okay, real talk: when you hear “pumpkin,” your brain probably jumps straight to lattes or pie, right? *Same*. But what if I told you pumpkin’s got serious savory game too? Especially when it buddies up with bright, herby pesto? I know, I know—it sounds wild. But trust me, this Pumpkin & Pesto Chicken Meal Box is the fall flavor mashup you never knew you needed. It’s like autumn decided to throw a party in your lunchbox!
Picture this: juicy roasted chicken, caramelized zucchini with those gorgeous golden edges, and fluffy quinoa soaking up every drop of our secret weapon—a creamy, dreamy pumpkin pesto drizzle. It’s bold, balanced, and so dang satisfying. And the best part? We’re keeping it real simple. No fancy techniques, no obscure ingredients hiding in the back of your spice drawer. Just honest, feel-good food that’ll make your coworkers peek over your shoulder and go, “Ooh, whatcha got there?”
Whether you’re a meal-prep warrior or just trying to dodge the 3 p.m. snack-attack vortex, these boxes are your ticket to winning lunchtime. They’re fresh, filling, and proof that healthy doesn’t mean boring. So, grab your favorite sheet pan—let’s make your taste buds do a happy dance!
That One Rainy Day & My “Why Not?” Moment
This recipe? Total happy accident. Picture it: Last October, rain hammering my kitchen window, and my fridge was looking… bleak. Half a tub of pesto from pasta night. A lonely can of pumpkin purée leftover from muffin experiments. Some chicken breasts thawing. And zucchinis that needed love, stat.
I almost defaulted to plain ol’ grilled chicken (yawn), but then I thought: *What if I just… swirl these together?* Skeptical? You bet. But desperation breeds creativity, right? I whisked that pumpkin and pesto into a vibrant orange-green sauce, drizzled it over roasted chicken and zucchini, and took a bite. Cue the choir of angels! The earthy sweetness of pumpkin hugged the garlicky zing of pesto like they were old friends. My kitchen smelled like an Italian nonna took a fall foliage tour. And just like that, a star was born.
Now, it’s my go-to when I crave something cozy yet fresh. Every bite takes me back to that stormy day—proof that magic happens when you say, “Why not?”
Your Grocery List (Plus My Chef-y Secrets!)
Gather these heroes—you likely have most already! Pro tip: Quality matters, especially with pesto and olive oil. They’re the flavor anchors!
- 2 chicken breasts, roasted and sliced – Go for similar sizes so they cook evenly. Thighs work too for extra juicy vibes!
- 2 cups cooked quinoa – Rinse it first to banish bitterness! Sub with couscous, rice, or cauliflower rice if needed.
- 2 medium zucchini, sliced and roasted – Slice ’em thick (½-inch) so they stay meaty, not mushy. Yellow squash or bell peppers rock here too.
- Olive oil, salt, pepper for roasting – Use the good olive oil! It adds fruity depth. Kosher salt sticks better than table salt.
For the Pumpkin Pesto Drizzle:
- ¼ cup pumpkin purée – NOT pumpkin pie filling! Plain canned is perfect. Shortcut queen? Use it straight from the can.
- 2 tbsp prepared basil pesto – Store-bought is fine (I love Rao’s!), but homemade? Chef’s kiss! Nut-free? Try kale-walnut pesto.
- 1 tbsp olive oil – Extra virgin, please! It smooths out the drizzle.
- 1 tsp lemon juice – Freshly squeezed brightens everything up. Bottled works in a pinch.
- Salt & pepper to taste – Start light—you can always add more!
Let’s Build Those Flavor Bombs, Step by Step!
Don’t sweat the multitasking—we’ll roast everything at once! Preheat that oven to 400°F (200°C). Line two baking sheets with parchment (hello, easy cleanup!).
- Roast the Chicken: Place chicken breasts on one sheet. Drizzle with 1 tbsp olive oil, sprinkle generously with salt and pepper. Rub it in like you’re giving ’em a mini massage! Roast for 22-25 minutes, until internal temp hits 165°F (74°C). Chef hack: Tent loosely with foil after cooking. Resting = juicier slices!
- Roast the Zucchini: Toss zucchini slices on the second sheet with 1 tbsp olive oil, salt, and pepper. Spread ’em out—no overlapping! Roast for 18-20 minutes, flipping halfway. You want golden edges and a little caramelized char. Watch closely—zucchini goes from perfect to weepy fast!
- Cook the Quinoa: While things roast, cook quinoa per package directions (usually 1 part quinoa to 2 parts water). Bring to a boil, then simmer covered for 15 mins. Fluff with a fork! Secret move: Add a pinch of turmeric for golden color, or a bay leaf for aroma.
- Whip the Pumpkin Pesto Drizzle: In a small bowl, whisk pumpkin purée, pesto, olive oil, lemon juice, salt, and pepper until silky-smooth. Taste! Need more zing? Add lemon. Too thick? A splash of water. This is your sauce—own it!
- Slice & Assemble: Slice chicken against the grain (keeps it tender!). Grab 4 meal prep containers. Divide quinoa first, then chicken and zucchini. Key step: Store drizzle separately in little containers or jars. Pour it on JUST before eating to keep everything vibrant and fresh!
Plating Up (Because We Eat With Our Eyes First!)
Whether you’re packing lunch or serving dinner, make it pretty! For meal boxes, layer quinoa on the bottom, stack chicken and zucchini artfully on top. Keep that drizzle separate until go-time. At home? Scoop quinoa onto plates, arrange chicken and zucchini alongside, then zig-zag that gorgeous pumpkin pesto sauce over everything. Garnish with fresh basil, cracked pepper, or toasted pine nuts for crunch. Reheating tip? Microwave chicken and zucchini for 60-90 seconds with a damp paper towel over them to prevent drying. Stir a teaspoon of water into quinoa before nuking. Then, drizzle that sauce and devour!
Shake It Up! 5 Tasty Twists
This recipe loves a remix! Try these:
- Veggie Power: Swap chicken for roasted chickpeas or crispy tofu cubes. Use broccoli or sweet potatoes instead of zucchini.
- Mediterranean Mood: Add kalamata olives, feta crumbles, and sun-dried tomatoes to the quinoa.
- Creamy Dreamy: Stir 2 tbsp Greek yogurt into the drizzle for extra tang and richness.
- Nutty Crunch: Top with toasted pecans, walnuts, or pumpkin seeds.
- Pesto Swap: Use sun-dried tomato pesto or kale pesto for a different vibe!
Beau’s Backstage Notes
Fun fact: The first time I tested this, I dumped the pesto *into* the quinoa thinking it’d be genius. Spoiler: It turned everything swamp-green and weird. Lesson learned—keep that drizzle separate! Over time, I’ve tweaked the ratios (more pumpkin = sweeter, more pesto = bolder) and played with textures (hello, crispy zucchini!). The beauty? It’s forgiving. Forgot lemon juice? A dash of apple cider vinegar works. No quinoa? Farro’s fabulous. This recipe’s like your favorite cozy sweater—adaptable and always comforting. And if your sauce looks… questionable? Just call it “rustic” and lean into it. Some of my best dishes started as “oops” moments!
Your Burning Questions, Answered!
Q: Can I make these ahead? How long do they last?
A: Absolutely! Assemble boxes (without drizzling sauce) and store in the fridge for up to 4 days. Keep sauce separate in airtight containers. The zucchini might soften slightly but still tastes great!
Q: Can I freeze these meal boxes?
A: I don’t recommend it. Zucchini gets watery when thawed, and the sauce can separate. This one’s best fresh or fridge-only!
Q: My pumpkin pesto drizzle is too thick/thin. Help!
A: Too thick? Whisk in warm water, 1 tsp at a time. Too thin? Add more pumpkin purée or a pinch of ground oats (trust me, it works!).
Q: Chicken always turns out dry. What am I doing wrong?
A: Two things! 1) Overcooking—use that meat thermometer! 165°F is the sweet spot. 2) Not resting—let chicken sit 5 minutes before slicing so juices redistribute.
Pumpkin & Pesto Chicken Meal Boxes
- Total Time: 45 min
Description
This fall-forward meal prep magic pairs roasted chicken and golden-edged zucchini with fluffy quinoa and a creamy pumpkin-pesto drizzle that’ll change how you feel about “healthy food.” It’s comforting, herby, and ready in under an hour—with flavors that feel both fresh and indulgent. Perfect for busy weeks, cozy nights, or impressing your lunch crowd.
Ingredients
-
2 boneless chicken breasts
-
2 medium zucchinis, sliced (½-inch)
-
2 cups cooked quinoa
-
Olive oil, salt & pepper for roasting
Pumpkin Pesto Drizzle
-
¼ cup pumpkin purée
-
2 tbsp prepared basil pesto
-
1 tbsp olive oil
-
1 tsp lemon juice
-
Salt & pepper to taste
Instructions
-
Roast Chicken: Preheat oven to 400°F (200°C). Rub chicken with olive oil, salt, pepper. Roast 22–25 min until 165°F. Rest 5 min, then slice.
-
Roast Zucchini: Toss zucchini in oil, salt, pepper. Roast 18–20 min, flipping halfway for caramelized edges.
-
Cook Quinoa: Prepare 1 cup dry quinoa with 2 cups water. Simmer covered for 15 min, then fluff.
-
Make Drizzle: Whisk pumpkin purée, pesto, oil, lemon juice, salt & pepper until smooth. Adjust thickness with water if needed.
-
Assemble Boxes: Divide quinoa, chicken, and zucchini into 4 containers. Store drizzle separately. Add before serving!
Notes
-
Add Greek yogurt to the drizzle for creaminess.
-
Swap chicken for tofu or chickpeas.
-
Top with feta, olives, or toasted nuts for extra flair.
- Prep Time: 15 min
- Cook Time: 30 min
Nutrition
- Calories: 420 Cal Per Box
- Sugar: 4g
- Fat: 18g
- Carbohydrates: 30g
- Fiber: 5g
- Protein: 34g
Nutritional Info (Per Meal Box)
Calories: 420 | Protein: 34g | Fat: 18g | Carbs: 30g | Sugar: 4g
Note: Values are estimates and can vary based on ingredient brands/substitutions.
Final Thoughts: Why This Recipe Is a Game-Changer
This isn’t just another meal prep recipe—it’s a flavor revolution for your lunchbox. It proves that healthy food can be exciting, that pumpkin belongs in savory dishes, and that meal prep doesn’t have to be bland.
Key Takeaways:
✅ Pumpkin is a versatile savory ingredient—don’t limit it to desserts!
✅ Sauces make meal prep fun—keep them separate for freshness.
✅ Texture and color matter—contrast keeps meals enjoyable.
✅ Comfort food can be healthy—with smart ingredient swaps.
So next time you’re staring at a can of pumpkin purée, think beyond the pie. Whip up this Pumpkin & Pesto Chicken Meal Box, and get ready to fall in love with fall flavors all over again. Happy cooking!
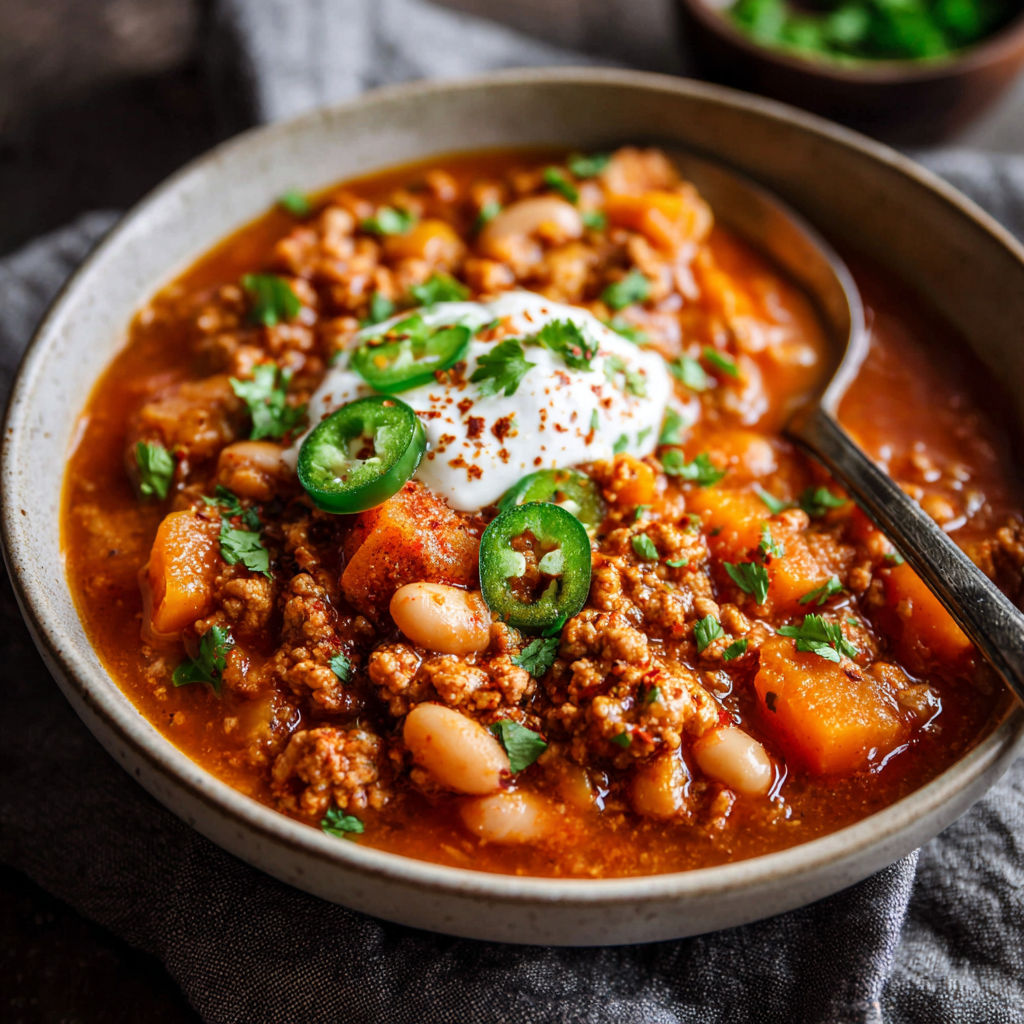
Pumpkin Turkey Chili with White Beans
Why This Chili Feels Like a Cozy Sweater for Your Taste Buds
Hey friends, Beau here! Picture this: It’s a crisp autumn evening, rain tapping the windows, and you’re craving something that warms you from the inside out. Enter my Pumpkin Turkey Chili—a bowl of velvety, smoky magic that’s become a legend in our Feastical community. Forget heavy beef chili; this version lets sweet pumpkin purée mingle with lean turkey, white beans, and smoky spices, creating a hug-in-a-bowl that’s secretly healthy. It’s creamy without cream, hearty without heaviness, and ready in 35 minutes flat. Perfect for game day, meal prep, or impressing your in-laws (I won’t tell if you don’t). Trust me, once you taste that first spoonful? You’ll be texting the recipe to your group chat before you’ve even finished the bowl.
The Chili That Saved My Rain-Soaked Tailgate Party
Flashback to 2017: I’d promised my buddies “the best damn chili of their lives” for our annual football tailgate. But when a downpour drowned our grill plans, I raced to my tiny apartment kitchen with one mission: salvage dinner with pantry staples. Ground turkey? Check. A lonely can of pumpkin purée? Why not. I threw in white beans for bulk, green chiles for zip, and crossed my fingers. Twenty minutes later, my skeptical friends were scraping the pot clean! That “hail mary” chili became our rainy-day tradition—proof that kitchen experiments (and a little pumpkin courage) can create magic. Now, it’s my go-to when fall hits hard. Rain boots optional, appetite required.
Your Chili’s Dream Team (+ Clever Swaps!)
- Ground turkey (1 lb): Lean but flavorful! Swap with ground chicken or plant-based crumbles.
- Onion (1 small, diced): Sweetness base. No onion? Use 1 tsp onion powder in a pinch.
- Garlic (2 cloves, minced): Non-negotiable for depth! Jarred garlic works (1 tsp = 1 clove).
- White beans (1 can, drained): Creamy texture heroes. Cannellini or Great Northern beans are perfect.
- Pumpkin purée (1 cup): NOT pie filling! Adds velvety richness and vitamins. Sweet potato purée works too.
- Diced green chiles (4 oz can): Mild heat and tang. Skip if sensitive—add bell peppers instead.
- Chicken broth (1½ cups): Depth booster. Veggie broth keeps it vegetarian-friendly.
- Cumin + smoked paprika (1 tsp + ½ tsp): The smoky soul! Regular paprika works, but smoked is *chef’s kiss*.
- Salt & pepper: Season as you go—turkey needs love!
Chef’s Whisper: Pumpkin is a stealth thickener! It replaces flour while adding fiber. Your waistline will thank you.
Let’s Build Flavor Town (Step-by-Step!)
- Sizzle your aromatics: Heat 1 tbsp oil in a large pot over medium. Add onion and garlic. Sauté 3-4 mins until soft and fragrant (don’t let garlic brown!). Tip: Add a pinch of salt here—it draws out moisture for faster cooking!
- Brown the turkey: Crumble in ground turkey. Cook 5-6 mins, breaking it up, until no pink remains. Hack: Pat turkey dry with paper towels first—it browns better!
- Spice it up! Stir in cumin, smoked paprika, ½ tsp salt, and ¼ tsp pepper. Toast spices 1 min (smells AMAZING, right?).
- Party in the pot: Add pumpkin, beans, green chiles (with their juice!), and broth. Stir gently—you don’t want mushy beans!
- Simmer to sublime: Bring to a gentle bubble, then reduce heat to low. Simmer uncovered 20-25 mins, stirring occasionally, until slightly thickened. Pro Move: Let it rest 5 mins off-heat—flavors marry like old friends!
Smell that? That’s your kitchen winning fall.
The Science Behind the Cozy Comfort
There’s a reason why a bowl of Pumpkin Turkey Chili feels like slipping into your favorite sweater—it’s science, my friends! The combination of warmth, texture, and nostalgia triggers something deep in our brains. Let’s break it down.
First, temperature matters. Warm foods, especially those served between 140–160°F (the ideal chili temp), activate our thermoreceptors, sending signals to the brain that mimic the sensation of being physically warmed. That’s why a steamy bowl on a chilly day feels like a hug from the inside.
Then there’s umami, the fifth taste sensation. Pumpkin purée, turkey, and white beans are all rich in glutamates—natural compounds that enhance savory depth. When these mingle with smoked paprika and cumin, they create a flavor profile that’s deeply satisfying without being heavy.
But the real MVP? Texture contrast. Creamy pumpkin, tender beans, and crumbled turkey create a mouthfeel that’s both comforting and interesting. Research shows that varied textures in food make eating more pleasurable (hence why we love crunchy toppings on smooth chili).
And let’s not forget psychology. The aroma of simmering spices—cumin, garlic, smoked paprika—triggers memories of fall, family gatherings, and even holiday feasts. Smell is the sense most tied to memory, so when your kitchen fills with those smoky, earthy scents, your brain starts associating the meal with safety and happiness.
So yes, this chili isn’t just delicious—it’s a carefully crafted sensory experience designed to make you feel good.
The Unexpected Health Benefits Hiding in Your Bowl
You might not expect a dish this cozy to also be a nutritional powerhouse, but surprise! Pumpkin Turkey Chili is packed with stealthy health perks.
1. Lean Protein Powerhouse
Ground turkey is lower in saturated fat than beef but still delivers 22g of protein per 3-ounce serving. Protein keeps you full longer, stabilizes blood sugar, and supports muscle repair—ideal for post-workout recovery or busy weeknights.
2. Pumpkin’s Secret Superpowers
That humble can of purée? It’s loaded with beta-carotene (a precursor to vitamin A), which supports vision and immunity. Plus, pumpkin’s natural creaminess replaces heavy cream or flour, cutting calories while adding fiber (3g per serving!). Fiber aids digestion and keeps you satisfied.
3. Gut-Friendly Beans
White beans are a fantastic source of resistant starch—a prebiotic that feeds good gut bacteria. A healthy gut microbiome is linked to better digestion, mood regulation, and even stronger immunity.
4. Anti-Inflammatory Spices
Cumin isn’t just tasty; studies suggest it may help reduce inflammation and improve digestion. Smoked paprika contains antioxidants like vitamin E, while garlic has allicin, a compound with potential heart health benefits.
5. Hydration Boost
Broth-based chilis (like this one) contribute to your daily fluid intake, unlike heavy, cheese-laden versions. Staying hydrated supports metabolism and energy levels.
Pro Tip: For an extra nutrient kick, stir in a handful of spinach at the end or top with avocado for healthy fats.
The Cultural Roots of Chili—And How This Recipe Plays Homage
Chili has a rich, debated history—from Texas cowboy camps to Mexican carne con chile—but one thing’s certain: It’s a dish built on adaptability. My Pumpkin Turkey Chili nods to tradition while breaking a few “rules” in the best way.
A Brief Chili Timeline
-
1800s: Cowboys and trail cooks dried beef, fat, and chilies into “chili bricks” for portable meals.
-
1900s: San Antonio’s “Chili Queens” sold bowls at fiestas, popularizing chili con carne.
-
Modern Day: Vegetarian, white chicken, and even Cincinnati-style (served over spaghetti!) variations emerged.
Why Pumpkin & Turkey Work
Traditionalists might balk at pumpkin in chili, but consider this: Indigenous cultures in the Americas used squash and beans together for millennia. This recipe honors that heritage while embracing modern health trends. Turkey, a leaner protein, reflects today’s preference for lighter meals without sacrificing heartiness.
Global Flavors, Local Comfort
The green chiles add a subtle Southwestern kick, while smoked paprika nods to Spanish pimentón. It’s a melting pot in a pot—just like the best comfort foods should be.
Fun Fact: The first known chili cook-off was held in Texas in 1952. If they’d tasted this version, pumpkin might’ve won sooner!
Bowls of Joy: Serving Your Masterpiece
Ladle that orangey-gold goodness into deep bowls. Top with a bright squeeze of lime, fresh cilantro, or a dollop of Greek yogurt (trust me, the cool tang is magic). For crunch? Tortilla strips or pepitas. Pair with cornbread for dunking—or go wild and serve over baked sweet potatoes. Rainy day bonus: Light a cinnamon candle. You’ve earned the ambiance.
Shake It Up! 5 Tasty Twists
- Bacon Lover’s: Cook 4 chopped bacon strips before step 1. Use drippings to sauté onions!
- Vegetarian Delight: Swap turkey for 2 cups diced mushrooms + 1 cup quinoa. Use veggie broth.
- Pumpkin Pie Spice Edition: Add ¼ tsp cinnamon + pinch nutmeg with the cumin. Sweet-savory heaven!
- Extra Creamy: Stir in ¼ cup cream cheese at the end. Decadent but oh-so-worth it.
- Kick It Up: Add 1 minced jalapeño with the onions or ½ tsp chipotle powder with the spices.
Beau’s Backstage Chili Confessions
This recipe evolved from my “clean out the pantry” days! Originally, I used kidney beans, but white beans made it creamier. Pro tip: Double the batch and freeze flat in ziplock bags—future you will high-five present you on busy nights. Funny story: My dog, Biscuit, once dragged the pot off the counter (RIP, my favorite apron). Now, I keep chili on back burners only. Lesson learned! Over the years, I’ve added smoked paprika for campfire vibes and green chiles for brightness. Make it yours—that’s the joy of cooking!
Your Chili Questions—Answered!
Q: Can I use fresh pumpkin?
A: Absolutely! Roast 1½ cups cubed sugar pumpkin until tender, then purée. But canned is faster and just as tasty.
Q: Why is my chili too thin?
A: Simmer longer uncovered (up to 10 mins). If rushed, mix 1 tbsp cornstarch with 2 tbsp cold water, then stir in.
Q: Can I make it in a slow cooker?
A: Yes! Sauté turkey/onions first (for flavor!), then add everything to the crockpot. Cook on LOW 4-6 hours.
Q: Help—it tastes bland!
A: Turkey needs aggressive seasoning. Boost with ½ tsp extra salt, a dash of cayenne, or 1 tbsp tomato paste in step 3.
Pumpkin Turkey Chili with White Beans
- Total Time: 35 min
Description
This isn’t just chili; it’s your rainy-day MVP. Pumpkin purée adds creamy body and subtle sweetness, while lean turkey and white beans make it hearty without heaviness. Every spoonful delivers cozy spice and fall flavor that warms like your favorite sweater. From tailgates to Tuesday nights, this one’s a bowlful of comfort made simple.
Ingredients
-
1 lb ground turkey (or chicken/veggie crumbles)
-
1 small onion, diced
-
2 garlic cloves, minced
-
1 can white beans, drained
-
1 cup pumpkin purée (not pie filling!)
-
1 (4 oz) can diced green chiles
-
1½ cups chicken or veggie broth
-
1 tsp ground cumin
-
½ tsp smoked paprika
-
Salt & pepper to taste
-
1 tbsp olive oil
Instructions
-
Sauté onion + garlic in oil over medium heat (3–4 min). Add a pinch of salt.
-
Add turkey, breaking it up as it browns (5–6 min).
-
Season with cumin, smoked paprika, ½ tsp salt, and ¼ tsp pepper. Toast spices for 1 min.
-
Stir in pumpkin, beans, green chiles, and broth. Simmer uncovered for 20–25 min, stirring occasionally.
-
Let rest 5 min off heat. Serve hot!
Notes
-
Greek yogurt or sour cream
-
Fresh cilantro or green onions
-
Lime wedges
-
Tortilla chips or pepitas
- Prep Time: 10 min
- Cook Time: 25 min
Nutrition
- Calories: 360 Cal Per Serving
- Fat: 14g
- Carbohydrates: 26g
- Fiber: 7g
- Protein: 32g
Nutrition Per Serving (Because Knowledge is Yummy)
Calories: 360 | Protein: 32g | Fat: 14g | Carbs: 26g | Fiber: 7g | Sugar: 4g | Sodium: 620mg
Note: Toppings not included. Greek yogurt adds 20 cal/tbsp; cilantro/lime add negligible calories.
Final Thoughts: More Than Just a Meal
This Pumpkin Turkey Chili isn’t just dinner—it’s a story in a bowl. It’s the tailgate save, the rainy-day lifeline, the healthy-ish indulgence that doesn’t skimp on flavor. It’s proof that the best recipes aren’t about rigid rules but creativity and joy.
So whether you’re meal-prepping, feeding a crowd, or just craving warmth, remember: Great food connects us—to memories, to each other, and to the simple pleasure of a really good bite. Now go forth, tweak the spices, make yours, and maybe—just maybe—save a spoonful for me

Moroccan Pumpkin & Chickpea Couscous Jars
Fall in a Jar: Your New Portable Flavor Adventure
Hey foodie friends! Beau here from Feastical, coming at you with that cozy autumn energy that makes you want to live in your favorite flannel shirt. Picture this: It’s golden hour, leaves are crunching under your boots, and you’ve got a mason jar packed with layers of Moroccan-spiced magic that tastes like a sunset over Marrakech. That’s what these Pumpkin & Chickpea Couscous Jars are – little edible kaleidoscopes of fall!
Why jars? Because life’s too short for sad desk lunches! These beauties are your ticket to:
- ⚡️ Zero soggy salad syndrome (layering is genius!)
- 🚗 Road trip/picnic/backpack hero status
- 🌶 Warm spices that hug your soul without heavy calories
- 🥄 Minimal cleanup (one jar, one fork, done)
We’re talking fluffy couscous pillows, caramelized pumpkin nuggets, crispy chickpeas that crunch like autumn leaves, plump golden raisins, and a cinnamon-kissed vinaigrette that’ll make you close your eyes and sigh. It’s vegetarian comfort food that actually satisfies, packed with plant-powered protein and fiber. Best part? They take 45 minutes start-to-finish and live happily in your fridge for days. Ready to jar up some joy?
The Picnic That Started It All
This recipe was born from a kitchen disaster turned triumph! Last fall, my wife and I planned this epic apple orchard picnic. I’d spent hours prepping an elaborate Moroccan tagine… only to realize I’d forgotten the dang serving bowl! Picture us in the parking lot, frantically rummaging through grocery bags, finding only empty mason jars meant for apple picking.
“What if we layer it?” my wife suggested. We hastily stacked couscous, roasted squash from last night’s dinner, some chickpeas, and drizzled leftover spiced dressing over top. We shook those jars like maracas right there beside our car trunk. Friends, it was a revelation! The textures stayed perfect – crispy chickpeas didn’t get soggy, squash didn’t mush the couscous. We sat on a blanket eating straight from the jars, laughing at our “gourmet hack.” That happy accident became our most-requested fall meal. Now I always keep jars ready – because sometimes the best recipes come from beautiful messes!
Your Flavor Toolkit: Ingredients & Smart Swaps
Don’t stress about perfection! Here’s your grocery list with pro insights:
- 1 cup couscous, cooked & fluffed – The fluffy cloud base! Chef’s Hack: Cook it in veggie broth instead of water for bonus flavor. Gluten-free? Swap quinoa or millet.
- 1½ cups diced pumpkin or butternut squash – Sweet, earthy fall gold! Pro Tip: Butternut’s neck is easiest to cube evenly. No squash? Sweet potatoes work beautifully.
- 1 cup canned chickpeas, rinsed/drained – Our protein-packed crunch stars! Critical Step: PAT THEM DRY with paper towels before roasting – crispy is key!
- ¼ cup golden raisins – Sweet pops of sunshine! Soak them in warm water for 10 mins if they’re very dry. Not a raisin fan? Try chopped apricots or dried cherries.
- ¼ cup chopped fresh parsley – The fresh green high note! Cilantro or mint make fun twists.
Spiced Lemon Vinaigrette
- 3 tbsp olive oil – Quality matters! Use your best extra-virgin here.
- 1 tbsp lemon juice – Fresh squeezed = brighter flavor. Lime juice works in a pinch!
- 1 tsp honey or maple syrup – Balances spices. Maple keeps it vegan.
- ½ tsp cinnamon – The warm hug spice! Don’t skip – it’s the Moroccan soul.
- ¼ tsp cumin – Earthy depth. Add a pinch of smoked paprika for intrigue.
- Salt & pepper to taste – Season like you mean it! Start with ¼ tsp salt.
Let’s Build Some Deliciousness: Step-by-Step Magic
Step 1: Roast Like a Boss
Preheat your oven to 400°F (200°C). While it heats, toss pumpkin cubes with 1 tbsp olive oil (not the dressing oil!), ½ tsp cinnamon, and ¼ tsp salt on a baking sheet. Chef’s Secret: Line that sheet with parchment paper – zero sticking and easy cleanup! Spread pumpkin in a single layer – overcrowding steams instead of roasts. Now pat those chickpeas RIDICULOUSLY dry with paper towels (wet chickpeas = sad soft beans). Toss them with ½ tbsp oil and pinch of salt on another section of the pan. Roast 20-25 minutes until pumpkin is fork-tender with caramelized edges and chickpeas are golden-crispy. Give the pan a shake halfway!
Step 2: Couscous Cloud Creation
While veggies roast, cook couscous. Place 1 cup dry couscous in a heatproof bowl. Bring 1¼ cups water or broth to a boil, pour over couscous, cover tightly with a plate, and let steam 5 minutes. Fluff with a fork! Game-Changer Hack: Stir in 1 tsp olive oil after fluffing to prevent clumping.
Step 3: Shake Up That Vinaigrette
In a small jar (use a spare mason jar!), combine all vinaigrette ingredients. Screw on the lid and SHAKE IT like you’re cheering on your favorite team! Taste and adjust – need more tang? Add lemon. More sweetness? Drizzle honey. Set aside. Flavor Tip: Letting it sit 10 minutes mellows the spices.
Step 4: The Grand Layering
Grab 4 clean 16-oz mason jars. Here’s the golden layering order for max texture preservation:
- Bottom Layer: Fluffy couscous (about ¼ cup per jar)
- Next: Roasted pumpkin cubes
- Then: Crispy chickpeas
- Followed by: Golden raisins
- Top Crown: Fresh parsley
Pro Move: Gently press down each layer except the parsley. Screw lids on tight! Store dressing separately if prepping ahead.
Shake, Smile, Devour!
When hunger strikes, drizzle 1-2 tbsp dressing into your jar, screw the lid back on, and give it 5 confident shakes! Eat straight from the jar for maximum portable joy, or fancy it up by dumping it into a bowl – the layers look stunning! Perfect with:
- 🍎 Crisp apple slices on the side
- 🥣 A dollop of creamy yogurt or tahini drizzle
- ☕️ Hot spiced chai tea
These shine at room temp or cold – no reheating needed!
Mix It Up! 5 Flavor Adventures
Play with your food! Try these tasty twists:
- Protein Powerhouse: Add ½ cup crumbled feta or diced grilled chicken per jar.
- Mediterranean Mood: Swap raisins for Kalamata olives + add chopped cucumber and oregano.
- Curry Lover’s Dream: Use curry powder instead of cumin in the dressing + add toasted coconut flakes.
- Harissa Heat: Stir ½ tsp harissa paste into the dressing for a smoky kick!
- Harvest Grain Swap: Replace couscous with wild rice blend or cauliflower rice (low-carb!).
Beau’s Backstory & Bonus Wisdom
This recipe has evolved more than my music taste! Originally, I roasted everything together (mistake – chickpeas need higher heat for crunch!). After testing 8 spice blends, the cinnamon-cumin combo won for warmth without overpowering. Funny story: I once used pumpkin pie spice instead of cinnamon during a 2am recipe test… let’s just say it tasted like dessert invaded dinner! Stick with plain cinnamon here.
Over time, I learned the dressing MUST stay separate until serving. I also started adding roasted pumpkin seeds for extra crunch – feel free to toss 2 tbsp on top! These jars taught me that constraints (like forgetting servingware!) breed creativity. Now they’re my fall security blanket – I always have 2 in the fridge for crazy days. Pro tip: Double the chickpeas when roasting – they disappear like popcorn!
Your Questions, Answered!
Q: Can I make these ahead? How long do they last?
A: Absolutely! The un-dressed jars keep beautifully for 3-4 days refrigerated. Store dressing separately in its own small jar. Add dressing only when ready to eat to keep everything crisp!
Q: My chickpeas aren’t crispy! What went wrong?
A: Two likely culprits: 1) Not drying them well enough before roasting (pat like you mean it!), or 2) Overcrowding the pan. They need space! Roast on their own small tray if needed at 400°F. Bonus hack: Toss with ¼ tsp baking powder before roasting for extra crunch!
Q: Can I use frozen pumpkin/squash?
A: You can, but fresh is best for texture. If using frozen, thaw completely, pat VERY dry, and roast 5-7 minutes longer. Frozen tends to release more water, making caramelization harder.
Q: Help! My couscous is clumpy/gummy.
A: Overcooked or too much liquid! Use a 1:1.25 couscous-to-liquid ratio (1 cup couscous + 1¼ cups liquid). Steam ONLY 5 minutes covered, then fluff immediately with a fork. Stir in a tsp of oil after fluffing.

Moroccan Pumpkin & Chickpea Couscous Jars
- Total Time: 45 min
Description
These vibrant jars are your go-to fall meal prep: fluffy couscous, sweet roasted pumpkin, crispy chickpeas, and golden raisins with a cinnamon-lemon vinaigrette. They’re cozy, plant-powered, and perfect for desk lunches, road trips, or picnic surprises. Build them in 45 minutes and enjoy fuss-free flavor all week!
Ingredients
-
1 cup couscous, cooked in broth (or quinoa for gluten-free)
-
1½ cups diced pumpkin (or butternut squash/sweet potato)
-
1 cup canned chickpeas, rinsed, dried
-
¼ cup golden raisins
-
¼ cup chopped parsley
Spiced Lemon Vinaigrette
-
3 tbsp olive oil
-
1 tbsp lemon juice
-
1 tsp honey or maple syrup
-
½ tsp cinnamon
-
¼ tsp cumin
-
Salt & pepper to taste
Instructions
-
Roast: Toss pumpkin with oil, cinnamon, and salt. On the same tray, toss dry chickpeas with oil and salt. Roast at 400°F (200°C) for 20–25 min until golden.
-
Couscous: Pour 1¼ cups boiling broth over 1 cup couscous. Cover 5 min, then fluff with a fork and stir in 1 tsp olive oil.
-
Dressing: Shake vinaigrette ingredients in a small jar. Taste and adjust.
-
Layer Jars: In 4 mason jars (16 oz), layer: couscous → roasted pumpkin → chickpeas → raisins → parsley. Store dressing separately.
-
Serve: Add dressing, shake jar, and dig in—anywhere, anytime!
Notes
-
Dry chickpeas well for maximum crunch.
-
Store dressing separately to keep textures perfect.
-
Add roasted pumpkin seeds or feta for bonus flair!
- Prep Time: 15 min
- Cook Time: 30 min
Nutrition
- Calories: 420 Cal Per Jar
- Sugar: 8g
- Fat: 16g
- Carbohydrates: 56g
- Fiber: 8g
- Protein: 11g
Fuel Your Adventures (Per Jar)
Calories: 420 | Protein: 11g | Fat: 16g | Carbs: 56g | Sugar: 9g | Fiber: 8g
Note: Packed with Vitamin A (pumpkin power!), plant-based protein, and fiber to keep you full. Vegan if using maple syrup!
Final Thoughts: Why This Recipe Sticks
This isn’t just a recipe—it’s a mindset. The Pumpkin & Chickpea Couscous Jar embodies three truths:
-
Constraints spark creativity (forgotten bowls led to a better meal).
-
Food should be joyful (shaking a jar is oddly satisfying).
-
Practicality doesn’t sacrifice flavor.
So here’s your challenge: Make one jar exactly as written, then tweak the next with your own spin. Tag #FeasticalJars so I can cheer you on! Now go forth—your portable fall adventure awaits.
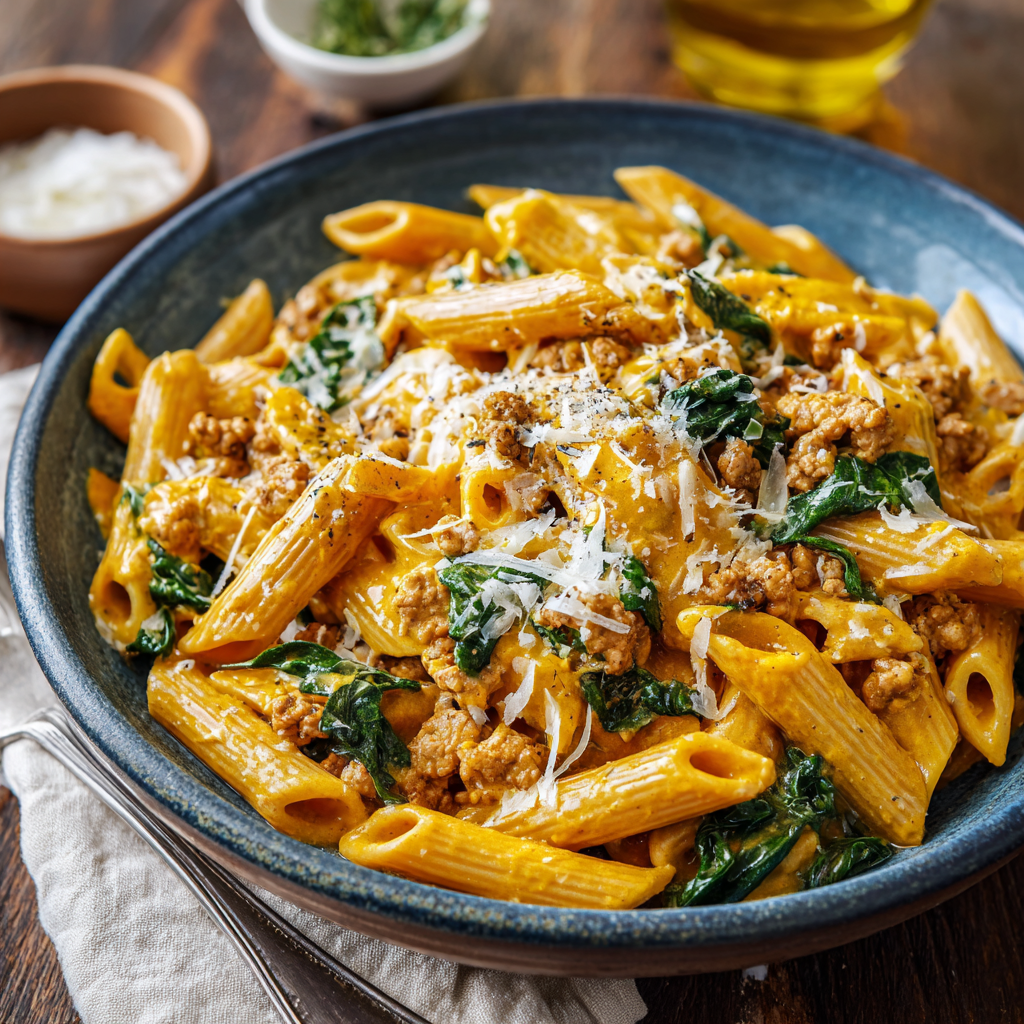
Pumpkin Alfredo Pasta Bowls with Turkey & Spinach
Pumpkin Alfredo Pasta Bowls: Your New Fall Comfort Obsession
Hey friends, Beau here! Grab your coziest sweater and that big wooden spoon you always reach for – we’re about to turn pasta night into a full-blown autumn celebration. Picture this: velvety pumpkin Alfredo sauce hugging whole wheat penne, juicy ground turkey doing a happy dance with garlicky spinach, and that gorgeous orange hue making your bowl look like a harvest moon. This isn’t just dinner; it’s a warm hug after apple picking, a crunchy-leaf-walk reward, and that “aha!” moment when you realize pumpkin belongs in savory dishes just as much as pies. I designed this recipe for those nights when you crave something indulgent but still want to feel good about what’s on your fork – protein-packed, veggie-loaded, and ready in 30 minutes flat. Whether you’re feeding rowdy kiddos, impressing a date, or treating yourself to solo comfort, these bowls deliver big flavor without the fuss. So tie on that apron (or don’t – I won’t judge), and let’s make magic happen!
The Little Orange Sauce That Could
This recipe actually started as a happy accident! Back in my early catering days, I was prepping a giant batch of classic Alfredo for a fall wedding when I realized – yikes – I’d run out of heavy cream. Panic mode! But then I spotted leftover pumpkin purée from pie prep. Desperate times call for desperate measures, right? I stirred it in, crossed my fingers… and wow. The sauce turned this gorgeous sunset orange, gained this silky depth, and suddenly tasted like autumn in a spoon. The bride even hunted me down to rave about “that amazing pumpkin pasta”! Now, every time I make it, I remember that kitchen scramble and how something so simple can become a star. It’s proof that the best recipes often start with a “whoops” and a dash of courage. Bonus? My nephew (a certified pumpkin-hater) devours this – his little face covered in orange sauce is my favorite victory!
Gather Your Flavor Squad
- 10 oz whole wheat penne: The hearty backbone! Whole wheat adds nuttiness and fiber, but regular, gluten-free, or chickpea pasta work great too. Chef hack: Under-cook by 1 minute – it’ll finish in the sauce!
- 1 lb ground turkey: Lean but flavorful! For extra richness, use Italian sausage. Vegetarian? Swap in chopped mushrooms or lentils.
- 2 cups fresh spinach: Don’t skip this! It wilts into silky ribbons. Kale or arugula work too – just chop finely.
- 2 cloves garlic, minced: The flavor spark plug! Use 1 tsp pre-minced if needed, but fresh is best.
- 1 tbsp olive oil: Our cooking MVP. Butter works for extra decadence.
- 1 cup pumpkin purée: Not pie filling! Pure purée gives that velvety texture and earthy sweetness. Roasted butternut squash is a stellar swap.
- ¾ cup milk or cream: Whole milk keeps it lighter; heavy cream = luxe mode. Dairy-free? Unsweetened almond or oat milk rock here.
- ½ cup grated Parmesan: Salty, umami magic! Freshly grated melts smoother. Vegan? Nutritional yeast + pinch of salt.
- ½ tsp nutmeg: The secret whisper! It deepens the pumpkin. Freshly grated if you’re feeling fancy.
- Salt & pepper to taste: Season in layers – trust your taste buds!
Let’s Build That Bowl! (Step-by-Step)
Step 1: Cook your pasta in well-salted water (like the sea!). Drain but RESERVE ½ cup pasta water – it’s liquid gold for adjusting sauce later. Tip: Toss pasta with a drizzle of oil to prevent sticking while it waits.
Step 2: Heat olive oil in a large skillet over medium-high. Add turkey, breaking it up with your spoon. Cook until no pink remains (5-7 mins). Hack: Season turkey NOW with a pinch of salt and pepper – it builds flavor from within!
Step 3: Push turkey to one side. Add minced garlic to the cleared space and sauté for 30 seconds until fragrant (don’t let it brown!). Mix garlic into the turkey.
Step 4: Pile in the spinach! It’ll look like a mountain, but stir constantly. In 1-2 minutes, it’ll wilt down into emerald flecks. Chef’s cheer: “Go, spinach, go!”
Step 5: Reduce heat to medium-low. Add pumpkin purée, milk/cream, Parmesan, nutmeg, ½ tsp salt, and ¼ tsp pepper. Stir gently but constantly. Insight: The sauce might look thin at first – patience is key!
Step 6: Simmer for 3-5 minutes, letting the sauce thicken and flavors marry. It should coat the back of a spoon. Too thick? Splash in reserved pasta water, 1 tbsp at a time.
Step 7: Add cooked pasta! Toss everything vigorously until every nook and cranny is coated in that glorious orange sauce. Taste! Need more salt? Pepper? Nutmeg? Adjust now.
Step 8: Kill the heat. Let it rest for 2 minutes – this lets the sauce cling perfectly. Grab bowls – it’s time!
The Science Behind Pumpkin’s Creamy Magic
Ever wonder why pumpkin purée makes such a velvety Alfredo sauce? It’s not just luck—it’s science! Pumpkin is packed with natural starches and pectin, which act as thickeners when heated, giving the sauce its luscious, cling-to-your-pasta texture without needing excessive cream or flour. Unlike traditional Alfredo, which relies on butter and heavy cream for richness, pumpkin adds body while keeping things lighter.
But there’s more: pumpkin’s subtle sweetness balances the savory umami of Parmesan and the earthiness of garlic. When combined with dairy, the purée emulsifies beautifully, creating a smooth, cohesive sauce that won’t separate easily. This is why adding pasta water (starchy and slightly salty) is crucial—it helps bind everything together, ensuring each bite is perfectly coated.
Nutritionally, pumpkin is a powerhouse. It’s rich in beta-carotene (which converts to vitamin A), fiber, and antioxidants, making this dish a sneaky way to boost your veggie intake. Compared to classic Alfredo, this version cuts saturated fat without sacrificing indulgence. Pro tip: Roasting your own pumpkin (or butternut squash) deepens the flavor, but canned purée is a flawless shortcut for busy nights.
Fun fact: The first recorded “Alfredo” sauce was born in Rome in the early 1900s, made with just butter and Parmigiano-Reggiano. Our pumpkin twist? A 21st-century hug to tradition—equally comforting but with a seasonal wink.
Why Ground Turkey is the Unsung Hero
Ground turkey might seem like a humble choice, but in this dish, it’s a MVP. Unlike beef, turkey absorbs flavors like a sponge, melding seamlessly with the pumpkin’s earthiness and garlic’s punch. Its mildness lets the other ingredients shine, while its lean protein content (about 22g per 3 oz) keeps the meal hearty without weighing you down.
But here’s the key: browning matters. Turkey can dry out if overcooked, so sear it on medium-high heat until just done, then let it finish in the sauce. For extra juiciness, opt for 93% lean (a bit of fat = big flavor). If you’re using Italian sausage (a delicious swap), reduce added salt since sausage is already seasoned. Vegetarians can lean into mushrooms—their umami mimics meat’s savoriness—or lentils for a plant-based protein boost.
Turkey also plays nice with spices. Nutmeg, often overlooked in savory dishes, bridges the gap between pumpkin’s sweetness and the sauce’s richness. A pinch of red pepper flakes or smoked paprika can add warmth without overpowering. And don’t forget the spinach! Its iron content pairs brilliantly with turkey’s protein, making this a well-rounded meal.
Fun twist: Try ground chicken or even crumbled tempeh for variety. The recipe’s flexibility is its superpower—adaptable to pantries, diets, and picky eaters alike.
The Art of Balancing Comfort and Nutrition
This dish is a masterclass in “healthy-ish” comfort food. By swapping heavy cream for milk and pumpkin, you save about 150 calories per serving while adding fiber and vitamins. Whole wheat pasta ups the nutrition further, but the real win is in the balance: carbs for energy, protein for satisfaction, and veggies for vibrancy.
Spinach, though added in a small amount, delivers iron, vitamin K, and a pop of color. Garlic isn’t just flavor—it’s anti-inflammatory. Even the Parmesan (while indulgent) offers calcium and a little goes a long way. The trick is layering textures and nutrients so each bite feels decadent but nourishing.
For dietary tweaks:
-
Keto? Zoodles or shirataki noodles work, but roast cauliflower purée instead of pumpkin for lower carbs.
-
Dairy-free? Coconut milk adds creaminess, and nutritional yeast mimics Parmesan’s funk.
-
Gluten-free? Chickpea or brown rice pasta holds up beautifully.
Leftovers are a bonus: The flavors deepen overnight, and reheating with a splash of broth revives the sauce’s silkiness. Serve with a bright side salad (think arugula + lemon) to cut the richness—a trick that makes the meal feel gourmet without extra work
Making It Pretty (and Tastier!)
Scoop that saucy goodness into deep bowls – we want pools of orange goodness! Top with an extra sprinkle of Parmesan (because cheese is life), a crack of black pepper, and maybe a few red pepper flakes for a gentle kick. For color pop, add a light shower of fresh parsley or microgreens. Serve immediately with crusty bread for sauce-mopping and a simple arugula salad with lemon vinaigrette to cut the richness. Pro move: Warm the bowls first for extra cozy vibes!
Shake It Up! Delicious Twists
- Veggie Powerhouse: Skip turkey, add 1 cup diced zucchini & 1 cup chopped mushrooms with the garlic.
- Chicken Swap: Use shredded rotisserie chicken instead of turkey – stir it in with the sauce to warm through.
- Smoky Chipotle: Add 1 tsp adobo sauce from canned chipotles + ½ tsp smoked paprika for a warm, smoky depth.
- Extra Creamy Dreamy: Stir in 2 oz softened cream cheese with the pumpkin. Ultra-decadent!
- Keto-Friendly: Use zucchini noodles or shirataki noodles. Swap pumpkin for ¾ cup roasted cauliflower purée.
Beau’s Back-Pocket Tips
This recipe is my kitchen chameleon! Over the years, I’ve learned a few things: 1) Leftovers are arguably BETTER. The sauce soaks into the pasta overnight – just splash in a little broth when reheating. 2) That nutmeg? Non-negotiable. It’s the tiny key that unlocks the pumpkin’s soul. 3) Once, I doubled the garlic (accidentally, of course) and my brother declared it the best version ever. So… feel free to experiment! 4) If your sauce ever “breaks” (looks grainy), whisk in a splash of hot water or cream vigorously. Crisis averted! This dish is forgiving – like your favorite flannel shirt.
Your Questions, Answered!
Q: Can I use canned pumpkin pie filling instead of purée?
A: Oh please don’t! Pie filling has sugar and spices already added. It’ll make your sauce weirdly sweet and cloying. Stick to plain pumpkin purée (check the label!).
Q: My sauce is too thin! Help!
A: No sweat! Let it simmer a few minutes longer uncovered. If still thin, mix 1 tsp cornstarch with 1 tbsp cold water, then whisk into the sauce. Simmer 1 minute. OR, toss in a handful of extra Parmesan – it thickens like a dream.
Q: Can I freeze this?
A: Absolutely! Cool completely, then freeze in airtight containers for up to 3 months. Thaw overnight in the fridge. Reheat gently on the stove with a splash of milk or broth. Note: Spinach might get a *tad* softer, but flavor rocks!
Q: Why whole wheat pasta? Does it change the taste?
A: I love the nutty flavor and extra fiber against the creamy sauce, but it’s totally flexible! Regular pasta works perfectly. The key is using a shape with nooks (like penne, rigatoni, shells) to trap that luscious sauce.
Pumpkin Alfredo Pasta Bowls with Turkey & Spinach
- Total Time: 30 min
Description
Get ready to level up pasta night with this velvety pumpkin Alfredo that’s equal parts comfort food and weeknight hero. Ground turkey brings the protein, spinach sneaks in your greens, and that golden-orange sauce? It’s autumn in a bowl. Ready in just 30 minutes, it’s perfect for family dinner, a cozy date, or treating yourself to something special – no heavy cream guilt included!
Ingredients
-
10 oz whole wheat penne (or your favorite pasta)
-
1 lb ground turkey (or mushrooms/lentils for veggie option)
-
2 cups fresh spinach, chopped
-
2 cloves garlic, minced
-
1 tbsp olive oil
-
1 cup pumpkin purée (not pie filling!)
-
¾ cup milk or cream (or unsweetened almond/oat milk)
-
½ cup grated Parmesan
-
½ tsp ground nutmeg
-
Salt & pepper, to taste
Instructions
-
Cook pasta in salted water. Reserve ½ cup pasta water.
-
In skillet, heat oil. Brown turkey (5–7 min). Season with salt & pepper.
-
Add garlic; sauté 30 sec. Stir in spinach until wilted (1–2 min).
-
Lower heat. Stir in pumpkin, milk, Parmesan, nutmeg, salt & pepper.
-
Simmer 3–5 min until thickened. Use pasta water to loosen if needed.
-
Toss pasta into the sauce. Stir to coat. Rest 2 min off heat.
-
Serve in bowls. Top with Parmesan, black pepper, and herbs.
Notes
-
Nutmeg is key – it deepens the pumpkin flavor.
-
Warm your bowls for an extra cozy feel.
-
Add red pepper flakes for a subtle kick.
-
Leftovers? Even better the next day with a splash of broth!
- Prep Time: 10 min
- Cook Time: 20 min
Nutrition
- Calories: 470 Cal Per Serving
- Fat: 18g
- Carbohydrates: 42g
- Protein: 34g
Nourishment Notes (Per Serving)
Calories: 470 | Protein: 34g | Fat: 18g | Carbs: 42g | Sugar: 4g | Fiber: 6g
This packs a protein punch thanks to the turkey and Parmesan! Using whole wheat pasta boosts fiber, and pumpkin delivers vitamin A. Opting for milk instead of cream lowers saturated fat.
Final Thoughts
This Pumpkin Alfredo Pasta Bowl isn’t just a recipe; it’s a mindset. It’s about embracing fall’s coziness without guilt, playing with flavors, and remembering that the best meals often come from happy accidents (like that desperate pumpkin-for-cream swap!). Whether you’re cooking for one or a crowd, it’s a reminder that food should delight and nourish—no compromises. So grab that spoon, tweak it to your taste, and let every bite taste like autumn’s embrace. Happy cooking, friends!
Baked Ziti with Meat Sauce
The Ultimate Comfort Food: Baked Ziti That Tastes Like Home
Hey friends, it’s Beau! Pull up a stool and let’s talk about one of life’s greatest joys: that moment when you pull a bubbling, cheesy, soul-warming baked ziti out of the oven. You know the scene – golden mozzarella stretching like a sunset, that rich meat sauce peeking through the pasta crevices, and that unmistakable aroma of garlic and tomatoes hugging your kitchen like your favorite flannel shirt. This isn’t just dinner; it’s a culinary bear hug, the edible equivalent of your coziest blanket fort. Whether you’re feeding a rowdy game-day crowd, prepping Sunday supper for the family, or just craving leftovers that actually get BETTER overnight (oh yes, they do!), this baked ziti with meat sauce is your new MVP. Forget fussy techniques or hard-to-find ingredients – we’re keeping it real, simple, and packed with the kind of flavor that makes everyone ask, “Seconds, please?” So grab your trustiest baking dish and let’s turn that oven on. Comfort is officially on the menu!
My First Ziti Fiasco (And Why It’s Still Perfect)
Picture this: It’s 2008, and I’m a broke college kid trying to impress my now-wife’s entire family at our first big dinner. I decided baked ziti was my ticket to their hearts – foolproof, right? Wrong. I used *raw* pasta (thinking it would cook in the sauce – bless my naive heart), drowned it in cheap, watery marinara, and topped it with a sad sprinkle of pre-shredded “cheese product.” The result? A crunchy, soupy monstrosity we dubbed “Ziti Soup Surprise.” Her dad took one bite, paused, and deadpanned, “Well, Beau… it’s certainly unique.” We still laugh about it every Thanksgiving! But that disaster taught me the magic of this dish: Even when it’s “wrong,” it’s still pretty darn right when shared with people you love. Now, this recipe is my redemption – the crowd-pleasing, no-fail version born from that hilariously humbling night. It’s proof that kitchen flops make the best stories… and even better do-overs!
Gather Your Flavor All-Stars
Here’s your grocery list for maximum cozy vibes! Pro tip: Measure everything before you start cooking (your future, less-stressed self will thank you).
- 2 tsp olive oil – Our flavorful starting base! Extra virgin adds fruitiness, but regular works. Feeling fancy? Swap in garlic-infused oil!
- 1 lb ground beef – 80/20 fat ratio is my sweet spot for juicy flavor. Swap: Ground Italian sausage (spicy!) or turkey/chicken for leaner vibes.
- 1 cup diced onion – Yellow or sweet onions bring natural sweetness as they soften. No onions? Use 1 tsp onion powder (add with dried herbs).
- 3 cloves garlic, minced – Fresh is best! Chef hack: Use a microplane for super-fine, potent garlic.
- 1 tsp kosher salt – Kosher dissolves evenly! If using table salt, reduce by ¼ tsp to avoid over-salting.
- 2 tsp Italian seasoning – That classic herby hug! Make your own mix with dried oregano, basil, thyme, and rosemary if you’re out.
- ½ tsp black pepper – Freshly cracked adds the best zing. Pre-ground works in a pinch!
- 1 (28 oz) can tomato sauce & 1 (28 oz) can crushed tomatoes – San Marzano tomatoes are gold for sweetness & low acidity! Crushed gives body, sauce ensures silkiness. No crushed? Pulse diced tomatoes briefly.
- 1 lb penne pasta (or ziti) – Penne’s ridges hold sauce beautifully! Cook al dente (firm) – it softens more while baking. Rigatoni works too!
- 2 cups shredded mozzarella, divided – Part-skim melts beautifully, but whole milk is extra luxurious. Always shred your own! Pre-shredded has anti-caking agents that hinder meltiness.
- ½ cup shredded Parmesan – The salty, umami kick! Real Parmigiano Reggiano > the green can. Swap: Pecorino Romano for sharper flavor.
Let’s Build Some Deliciousness, Step-by-Step!
Ready to create magic? Follow these steps for ziti perfection:
- Cook the Pasta Like a Pro: Bring a large pot of well-salted water (it should taste like the sea!) to a rolling boil. Add the penne and cook for 1-2 minutes LESS than the package says for al dente. Why? It’ll soak up that saucy goodness and finish cooking in the oven without turning mushy. Drain it, DO NOT RINSE (the starch helps the sauce cling!), and give it a quick drizzle of olive oil to prevent sticking. Set aside. Chef Hack: Time it so the pasta finishes just as your sauce is simmering!
- Build Your Flavor Foundation (Sauce Time!): Heat the olive oil in a large, deep skillet or Dutch oven over medium-high heat. Add the diced onions and cook for 4-5 minutes, stirring occasionally, until they turn soft and translucent (don’t let them brown!). Now, add the minced garlic – stir constantly for just 30 seconds until fragrant! That quick stir prevents bitter burnt garlic. Add the ground beef, breaking it up thoroughly with a wooden spoon. Cook until no pink remains (about 5-7 mins). Pro Tip: Drain excess fat if it looks greasy (about 2-3 tbsp max left is ideal for flavor).
- Simmer That Soul Into the Sauce: Sprinkle in the salt, black pepper, and Italian seasoning. Stir like you mean it for 30 seconds to wake up those dried herbs! Pour in the tomato sauce and crushed tomatoes. Bring the mixture to a lively simmer, then immediately reduce the heat to low. Let it bubble gently, uncovered, for 10-15 minutes. This isn’t just cooking; it’s flavor melding therapy! The sauce should thicken slightly. Give it a taste – need more salt or herbs? Now’s the time! Chef Hack: Toss in a Parmesan rind while it simmers for insane umami depth (remove before baking!).
- The Big, Beautiful Combine: In a large bowl (or right back in that pasta pot!), combine the drained, slightly undercooked penne with that glorious meat sauce. Now, the cheesy magic starts! Stir in 1 cup of the shredded mozzarella. The heat from the pasta and sauce will start melting it, creating instant creamy pockets. This step = cheesy distribution insurance!
- Assemble Your Masterpiece: Grab a 9×13-inch baking dish and lightly grease it with olive oil or cooking spray (hello, easy cleanup!). Pour the saucy, cheesy pasta mixture in, spreading it out evenly. Now, shower the top with the remaining 1 cup of mozzarella and all the shredded Parmesan. This double-cheese blanket guarantees that golden, bubbly crown we dream about!
- Bake to Perfection (& That Golden Finish!): Preheat your oven to 375°F (190°C). Slide your dish onto the middle rack and bake for 20-25 minutes. You’re looking for molten, bubbly cheese around the edges and the sauce gently bubbling underneath. But wait – the pro move! For that irresistible restaurant-quality golden top, switch your oven to BROIL (HIGH) for the last 2-3 minutes. WATCH IT LIKE A HAWK! It can go from golden to charcoal in seconds. Perfection is achieved when the top is beautifully spotted with brown.
- The Crucial Rest (Patience, Grasshopper!): This is HARD, I know. But resist diving in! Let the baked ziti rest for 5-10 minutes after pulling it out. This allows the sauce to set slightly, making serving cleaner slices and preventing molten-lava-cheese burns. Worth the wait, promise!
Plating Up Pure Comfort
This baked ziti is a hearty superstar all on its own, but let’s make it a full cozy experience! Scoop generous portions into deep bowls – those layers deserve to be seen! Garnish with a sprinkle of fresh chopped basil or parsley for a pop of color and freshness. The ultimate partners in crime? A simple crisp green salad with tangy vinaigrette cuts the richness perfectly. And you absolutely need garlic bread on the side for sauce-mopping duty – crusty bread brushed with garlic butter and toasted is non-negotiable in my house. For a casual gathering? Serve the baking dish right in the center of the table with a big spoon – let everyone dig in family-style!
Make It Your Own: Delicious Twists!
Love the classic but wanna play? Try these easy swaps:
- Meat Lover’s Dream: Swap half the beef for Italian sausage (casings removed) for a spicy, fennel-kissed kick. Or add ¼ lb chopped pancetta with the onions!
- Veggie-Packed Powerhouse: Skip the beef! Sauté 2 cups sliced mushrooms and 1 diced bell pepper with the onions. Stir in 1 cup cooked lentils or chopped spinach at the end of simmering for heartiness.
- Creamy Ricotta Layer: Mix 1 (15oz) tub of whole-milk ricotta with 1 egg, ¼ cup grated Parmesan, salt, and pepper. After adding the pasta/sauce mix to the dish, dollop the ricotta mixture over it before adding the mozzarella/Parmesan top.
- Spicy Arrabbiata Twist: Add ½ – 1 tsp crushed red pepper flakes with the Italian seasoning. Use a spicy tomato sauce or stir in 2 tbsp Calabrian chili paste for serious heat.
- Gluten-Free / Veggie Noodles: Use your favorite GF penne (cook VERY al dente!). For lower carb, try zucchini noodles (add raw *after* baking, tossing with hot pasta/sauce mix, then top cheese and broil briefly).
Beau’s Kitchen Confessions & Pro Insights
This recipe has been my trusty sidekick for over a decade, evolving from that college disaster into the ultimate crowd-feeder. I’ve learned a few things! First, embrace the “ugly” bake – if the cheese bubbles over or gets a dark spot? That’s flavor caramelization, not a flaw! Second, this dish is a leftover wizard. Seriously, day two might be even better as the flavors fully marry. Reheat gently in the oven or microwave with a splash of water or broth. Funny story: I once accidentally used cinnamon instead of paprika in the seasoning (similar containers!). It was… interesting. We called it “Moroccan Mystery Ziti.” Stick to Italian seasoning! Finally, don’t stress perfection. Whether it’s slightly soupy or extra crispy on top, it’s made with love and cheesy goodness – that’s what truly makes it comfort food.
Your Baked Ziti Questions, Solved!
Let’s tackle those common kitchen quandaries:
- “Can I make baked ziti ahead of time?” Absolutely! Assemble the dish completely (through step 5), cover tightly with foil, and refrigerate for up to 24 hours. When ready, bake covered at 375°F for 30 mins, then uncover, add cheese (if it wasn’t topped yet), and bake 15-20 mins more until hot and bubbly. You might need an extra 5-10 mins baking time since it’s cold.
- “Why is my baked ziti dry?” Two main culprits! 1. Overcooked Pasta: If the pasta was mushy before baking, it sucked up too much sauce. Always go al dente! 2. Overbaking: Baking too long evaporates sauce. Stick to 20-25 mins covered, then just broil for color. If reheating leftovers, add a splash of broth, milk, or extra tomato sauce before warming.
- “Can I freeze baked ziti?” Yes, it freezes beautifully! Assemble completely (unbaked), wrap the dish tightly in plastic wrap THEN foil (or use a freezer-safe dish with a lid). Freeze for up to 3 months. Thaw overnight in the fridge, then bake as directed (may need +10-15 mins). You can also freeze individual portions for quick meals!
- “My cheese topping browned too fast/burned!” Ovens vary! If the cheese is browning too quickly before the inside is hot, tent loosely with foil for the first 15 mins of baking, then remove for the last 10 mins + broil. Always broil on HIGH for MAX 3 minutes and WATCH CONSTANTLY – it happens fast!

Baked Ziti with Meat Sauce
- Total Time: 40 mins
Description
When only molten cheese, rich tomato sauce, and pasta perfection will do, this baked ziti brings the love. It’s got everything: juicy beef, creamy melted mozzarella, and that golden top layer that screams “home.” Whether it’s family dinner, meal prep, or next-day leftovers that somehow taste even better, this dish is your nostalgic comfort fix. Bonus? No weird ingredients, just soul-hugging flavor. Let’s make the kind of food memories that last.
Ingredients
-
2 tsp olive oil
-
1 lb ground beef (or Italian sausage/turkey)
-
1 cup diced onion
-
3 garlic cloves, minced
-
1 tsp kosher salt
-
½ tsp black pepper
-
2 tsp Italian seasoning
-
1 (28 oz) can tomato sauce
-
1 (28 oz) can crushed tomatoes
-
1 lb penne or ziti, cooked al dente
-
2 cups shredded mozzarella, divided
-
½ cup shredded Parmesan
Instructions
-
Cook Pasta
Boil in salted water, 1-2 mins shy of al dente. Drain, don’t rinse. -
Make Meat Sauce
Sauté onion in oil (4 mins), add garlic (30 sec), then beef. Brown, drain excess. Season with salt, pepper, Italian seasoning. Add both tomatoes. Simmer 15 mins until thickened. -
Combine & Cheese It
Mix pasta + sauce + 1 cup mozzarella. Stir gently to coat. -
Assemble & Bake
Pour into a greased 9×13” dish. Top with remaining mozzarella and Parmesan. Bake at 375°F for 20–25 mins, then broil 2–3 mins for golden top. -
Rest & Serve
Cool 5–10 mins before slicing. Garnish with fresh basil or parsley.
Notes
-
Cook pasta al dente—it softens more when baked.
-
Don’t skip resting—it sets the dish and prevents cheese burns.
-
Add sausage, ricotta, or spicy chili flakes for your own spin!
- Prep Time: 15 mins
- Cook Time: 25 mins
Nutrition
- Calories: 480 Cal Per Serving
- Fat: 24g
- Carbohydrates: 35g
- Fiber: 4g
- Protein: 28g
Nutritional Info (Approximate per Serving, based on 8 servings)
Calories: ~480 | Protein: ~28g | Carbohydrates: ~35g | Fat: ~24g | Fiber: ~4g | Sugar: ~8g | Sodium: ~900mg
Note: Nutritional values are estimates and can vary based on specific ingredients used (e.g., leaner beef, low-fat cheese).
Final Thoughts: More Than Just a Meal
Baked ziti is comfort, connection, and nostalgia on a plate. From its humble immigrant roots to its place at modern-day potlucks, this dish represents the joy of sharing food with loved ones. Whether you stick to the classic recipe or experiment with twists, the magic lies in its simplicity and heartwarming appeal.
So next time you pull that bubbling dish from the oven, take a moment to savor it—not just for its flavors, but for the memories it creates. After all, the best meals are the ones that feel like home.
Now, who’s ready for seconds? 🍝🔥
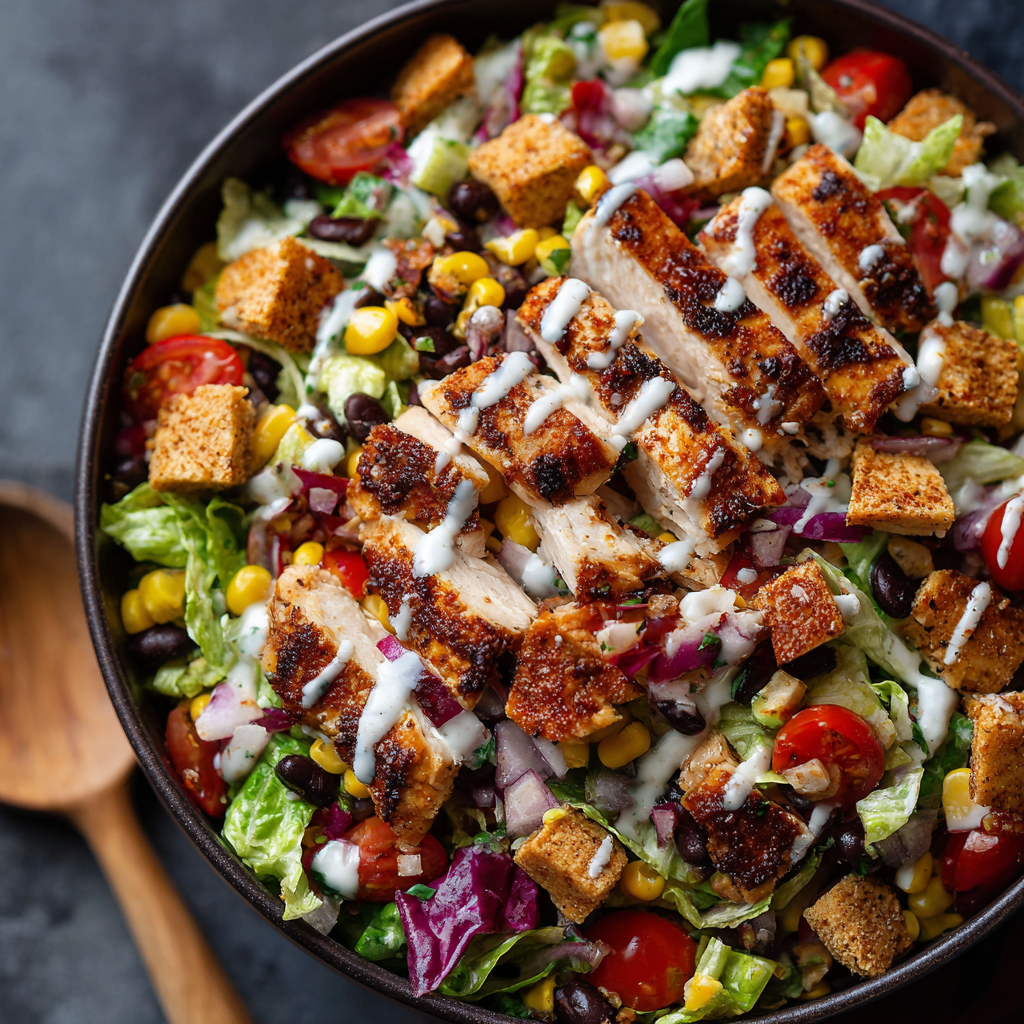
Southwestern Chopped Chicken Salad (Meal Prep)
Hey foodie friend! Beau here from Feastical, waving a spatula in your direction. Ever have those weeks where lunchtime feels like a sad desk salad situation? You know the drill – wilted greens, zero excitement, and that 3pm energy crash hitting harder than a dropped mixing bowl? Yeah, we’ve ALL been there. That’s exactly why I’m practically doing a happy dance to share this Southwestern Chopped Chicken Salad with you today. This ain’t your average rabbit food, folks. It’s a fiesta in a bowl – bursting with vibrant colors, bold Tex-Mex flavors, and enough protein to keep you powered through even the most chaotic afternoons. Think crisp romaine hugging juicy grilled chicken, sweet corn popping like sunshine, creamy black beans, and a crunch of tortilla strips, all tied together with a cool, tangy ranch drizzle. Pure lunchtime magic!
And here’s the real MVP status: it’s a MEAL PREP DREAM. Seriously! Spend about 30 minutes now (less time than scrolling through cat videos!), and you’ve got FOUR lunches ready to grab-n-go. No more frantic morning scrambles or questionable takeout choices. Just pure, feel-good fuel that tastes incredible. Whether you’re a busy parent juggling a million things, a hustling professional glued to your desk, or just someone who wants deliciousness without the daily kitchen drama, this salad is your new best friend. It’s fresh, hearty, satisfying, and packed with the kind of flavors that make you actually *look forward* to lunch. So, ditch the sad desk salad era. Grab your favorite chopping knife, crank up some tunes, and let’s build some seriously epic lunch bowls together!
Why This Salad Has a Permanent Spot in My Heart (And Fridge!)
Okay, confession time. This salad? It basically saved my sanity during the Great Kitchen Renovation Disaster of ’21. Picture this: dust everywhere, contractors wielding hammers like Thor, and my beloved stove… disconnected and looking utterly forlorn. My usual cooking zen was replaced by sheer panic about feeding my family decent meals. Enter: the Southwestern Chopped Chicken Salad! I could grill the chicken outside on the trusty old Weber, chop veggies on a makeshift counter (a.k.a. a cardboard box!), and assemble everything in containers. It became our lifeline!
I vividly remember my then-8-year-old nephew, Leo, visiting during the chaos. He eyed the colorful containers suspiciously. “Uncle Beau, is this *real* food? It looks like confetti!” One bite in, his eyes widened. “Whoa! It’s like a party in my mouth! Can we have this every day?” Seeing a kid who usually lived on pizza crusts devour veggies, beans, and chicken with genuine joy? That sealed the deal. This salad became more than just a meal prep solution; it became a symbol of making something vibrant and nourishing out of chaos. It reminded me that good food doesn’t need a fancy kitchen – just good ingredients and a little love. Now, every time I make it, I smile, thinking of Leo’s “confetti” comment and that dusty, chaotic, deliciously satisfying week.
Gathering Your Flavor Fiesta: The Ingredients
Here’s the beauty squad that makes this salad sing! Don’t stress about perfection – substitutions are totally cool (I’ve got your back!).
- Chicken Seasoning Squad:
- ½ tsp onion powder & ½ tsp garlic powder: Our dynamic flavor duo! They add that deep, savory base without any chopping. Chef Hack: If you’re fresh out, sub 1 tsp of your favorite all-purpose seasoning blend!
- ½ tsp chili powder & ½ tsp ground cumin: The soul of the Southwest! Chili powder brings warmth, cumin adds earthy depth. Spice Level Tip: Love heat? Add an extra pinch of chili powder!
- ½ tsp salt: Essential for waking up all those flavors. Pro Insight: Always season your protein well – it makes EVERYTHING taste better.
- ½ tsp red pepper flakes: A gentle kick! Omit if sensitive, or double down if you like it fiery.
- 1 tbsp olive oil: Helps the spices cling and keeps the chicken juicy. Avocado oil works great too!
- 2 large chicken breasts (12–14 oz total): Our lean, mean protein machine! Time-Saver: Grab a rotisserie chicken! Shred about 2.5-3 cups. Thighs work too for extra juicy richness.
- Salad Base Beauties:
- 4 cups romaine lettuce, chopped: The crisp, sturdy foundation. Sub Power: Butter lettuce, green leaf, or even chopped kale (massage it first!) work wonders.
- 1 cup cherry tomatoes, halved: Little bursts of juicy sweetness! Grape tomatoes are perfect too.
- ½ cup red onions, chopped: Adds bite and vibrant color. Soak ‘Em! Soak in cold water for 10 mins if their sharpness is too much – it mellows them right out.
- ½ red bell pepper, chopped: Sweet crunch and a gorgeous pop of color. Orange or yellow bells are just as happy here!
- 1 cup corn kernels, drained and rinsed: Sweet sunshine! Frozen (thawed) or fresh grilled corn in season is AMAZING.
- 1 can (19 oz) black beans, drained and rinsed: Creamy, protein-packed, fiber-rich goodness! Rinse Well! Gets rid of excess sodium and that starchy can liquid.
- The Grand Finale (To Serve):
- ½ cup Litehouse Homestyle Ranch Dressing: Our cool, creamy counterpart to the bold flavors. Why Litehouse? The homestyle version has fantastic flavor and holds up well in the fridge! But use your favorite ranch or even a cilantro-lime crema.
- ½ cup tortilla strips: The CRUNCH factor! Essential for texture. Chef Secret: Crushed tortilla chips work in a pinch, but the strips stay crunchier longer!
Let’s Build Your Flavor Masterpiece: Step-by-Step
Ready to become a meal prep maestro? Follow these simple steps – I’ve tucked in all my favorite kitchen hacks along the way!
- Chicken Time – Flavor Infusion Station! “In a small bowl, mix together the onion powder, garlic powder, chili powder, cumin, salt, and red pepper flakes. Pat those chicken breasts dry with a paper towel – this is KEY for getting a gorgeous sear! Drizzle the olive oil over the chicken, then rub that amazing spice blend all over every nook and cranny. Let it sit for 5 minutes if you have time (lets the flavors mingle!). Chef Hack: Pound the thicker end of the breast slightly with a pan or rolling pin for even cooking! Heat your grill pan, skillet, or actual grill over medium-high heat. Add the chicken. Grill or sear for 5-6 minutes PER SIDE, or until cooked through (internal temp should hit 165°F). Golden Rule: RESIST the urge to constantly flip! Let it get that beautiful color. Transfer to a plate, cover loosely with foil, and LET IT REST for 5-10 minutes. This keeps it juicy! Then, chop into bite-sized pieces.”
- Chop Chop Symphony! “While the chicken rests (or if you went the rotisserie route!), get chopping. Wash and thoroughly dry that romaine, then chop it nice and fine – we want a true ‘chopped’ salad texture. Halve those cheerful cherry tomatoes. Dice the red onion and bell pepper into similar small-ish pieces for perfect bites. Drain and rinse the black beans and corn really well. Pro Tip: Use a salad spinner for the romaine! Dry lettuce = no sad, soggy salads later. Layering is your friend for meal prep!”
- Assembly Line Awesomeness! “Grab your four trusty meal prep containers (glass is my fave for freshness vibes!). Start with the sturdy base: divide the chopped romaine evenly among them. Now, layer on the color! Add the halved cherry tomatoes, chopped red onion, diced red bell pepper, corn kernels, and black beans. Top each vibrant veggie mountain with the beautiful chopped, seasoned chicken. Storage Secret: DON’T add the dressing or tortilla strips yet! This is crucial for keeping everything crisp. Pop the lids on these colorful bowls of joy.”
- The Crispness Preservation Society! “Divide the ranch dressing into four small containers or little reusable cups. Portion out the tortilla strips into another four small containers or bags. Store these separately alongside your salad containers in the fridge. Meal Prep Win: This extra 2-minute step makes ALL the difference come lunchtime!”
Showtime! Serving Your Southwestern Masterpiece
Lunchtime has arrived! Here’s how to make it feel like a restaurant experience:
Grab your prepped container and those little cups of dressing and tortilla strips. Give the salad a quick shake or gentle stir to mix the layers. Now, the magic touch: drizzle that cool, creamy ranch dressing generously over the top. Finally, shower it with those golden, crunchy tortilla strips – the satisfying sound alone is worth it! Grab a fork, dig in, and experience the glorious textural contrast: crisp lettuce, tender chicken, creamy beans, juicy tomatoes, sweet corn, and that epic CRUNCH. It’s a full-on fiesta! Pair it with a lime wedge for a spritz of brightness if you’re feeling fancy. Enjoy immediately for maximum freshness and crunch!
Shake It Up! Flavorful Variations
Love the base? Let’s get creative! Here are some fun twists:
- Fiesta in a Jar: Layer it vertically! Start with dressing at the bottom (yes, really!), then beans, corn, chicken, peppers, onions, tomatoes, and top with romaine & tortilla strips in a separate bag. Shake vigorously when ready to eat!
- Protein Power Swap: Swap chicken for grilled shrimp (cook just before serving), seasoned lean ground turkey, or even crispy tofu cubes tossed in the spice blend!
- Avocado Obsessed: Add ½ a diced avocado to each bowl JUST before serving (it doesn’t store well pre-chopped). Creamy heaven!
- Dressing Dance: Swap ranch for a zesty cilantro-lime dressing, a chipotle ranch, or a light avocado crema.
- Grain Gain: Make it heartier! Add ½ cup cooked quinoa, brown rice, or farro per bowl for extra staying power.
Beau’s Backstage Pass: Chef’s Notes
This recipe has been on quite the journey! It started years ago as a desperate fridge-clean-out experiment after a Cinco de Mayo party – leftover grilled chicken, half a bag of romaine, rogue black beans, and the last of the tortilla chips. Threw it together with some ranch, took a bite, and went, “WHOA. This is accidentally genius!” It became an instant Feastical favorite. The biggest evolution? The meal prep magic. Early versions got soggy fast. Separating the crunchy elements and dressing was the game-changer!
Funny story: I once tried pre-chopping the avocado for the whole week. Big mistake. HUGE. Opened a container on day three to find… let’s just say it resembled science fiction more than food. Lesson learned: some things are worth the 30-second effort right before eating! The beauty of this salad is its adaptability and resilience. It’s forgiving, flavorful, and consistently delivers that “heck yeah, I made this!” feeling. It’s proof that the best recipes often come from happy accidents and a little kitchen confidence.
Your Salad Questions, Answered!
Let’s tackle those common head-scratchers:
- Q: Help! My lettuce is soggy by day 3. What gives?A: Sogginess is usually a moisture issue! Triple-check your romaine is BONE DRY after washing (salad spinner MVP!). Also, ensure your containers are airtight. Packing warm chicken directly on lettuce is a no-no – let it cool completely first! Finally, keeping dressing and wet ingredients (like tomatoes) separated until serving is key. If tomatoes are super juicy, you can even pack them separately!
- Q: Can I make this vegetarian? It looks so good!A: Absolutely! You have awesome options: Double up on the black beans for protein. Add 1 cup of cooked quinoa or lentils. Use seasoned, roasted chickpeas (toss drained chickpeas with 1 tsp of the chicken spice mix + 1 tsp oil, roast at 400°F for 20-25 mins until crispy!). Firm tofu cubes, marinated and pan-seared in the spice blend, are fantastic too. You won’t miss the chicken!
- Q: How long does this salad actually last in the fridge?A: Properly stored (components separate!), the salad base (lettuce, veggies, chicken) stays fresh and crisp for 4 days. The dressing stays good according to its jar
- Print

Southwestern Chopped Chicken Salad (Meal Prep)
- Total Time: 25 mins
Description
Say goodbye to limp lettuce and hello to this bold, vibrant chopped chicken salad packed with smoky grilled chicken, black beans, sweet corn, and a ranch drizzle that slaps. It’s hearty, fresh, and crunchy in all the right places—and best of all, it’s made for meal prep. Four flavor-packed lunches in under 30 minutes? That’s what we call a fridge win.
Ingredients
ScaleFor Chicken:
-
2 large chicken breasts (or 2.5–3 cups rotisserie chicken)
-
1 tbsp olive oil
-
½ tsp each: onion powder, garlic powder, chili powder, cumin, salt
-
½ tsp red pepper flakes (optional)
For Salad Base:
-
4 cups chopped romaine
-
1 cup cherry tomatoes, halved
-
½ cup red onion, chopped
-
½ red bell pepper, diced
-
1 cup corn kernels (drained)
-
1 can black beans (rinsed and drained)
To Serve:
-
½ cup ranch dressing (Litehouse Homestyle or your favorite)
-
½ cup tortilla strips
Instructions
-
Season & Cook Chicken
Rub chicken with oil and seasoning blend. Grill or sear over medium-high for 5–6 mins per side until 165°F. Rest 5 mins, then chop. -
Prep Veggies
Chop lettuce, halve tomatoes, dice onion and bell pepper. Rinse beans and corn. -
Assemble
Layer romaine, veggies, corn, and beans in 4 meal prep containers. Top with chopped chicken. -
Pack Separately
Store dressing and tortilla strips in small containers until ready to eat.
Notes
-
Dry lettuce well to avoid sogginess.
-
Let chicken cool before adding to salad.
-
Add avocado or cooked quinoa for extra creaminess or staying power.
- Prep Time: 10 mins
- Cook Time: 15mins
Nutrition
- Calories: 460 Cal
- Fat: 18g
- Carbohydrates: 32g
- Fiber: 8g
- Protein: 38g
-
Final Thoughts
This Southwestern Chopped Chicken Salad isn’t just a meal—it’s a solution. A solution to boring lunches, hectic weeknights, and the eternal “What should I eat?” dilemma. It’s flexible, flavorful, and packed with nutrients, making it a win for your taste buds and your health.
Whether you’re a meal prep newbie or a seasoned pro, this recipe is a keeper. It’s proof that good food doesn’t have to be complicated—just smart, fresh, and full of love. So grab those containers, get chopping, and say hello to your new favorite lunch.
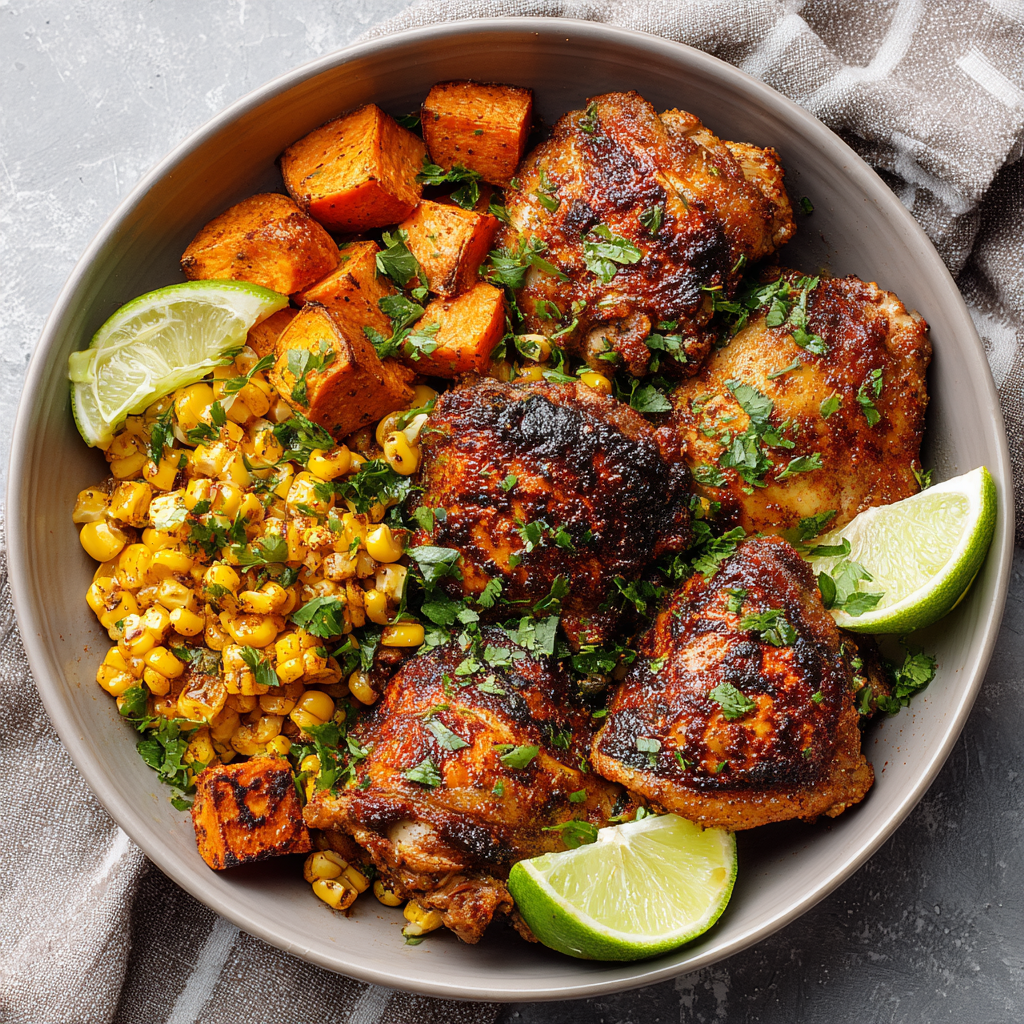
Cajun Chicken Thighs Meal Prep
Spice Up Your Week: Cajun Chicken Thighs Meal Prep That Actually Excites Your Taste Buds!
Hey friends, Beau here! Raise your hand if your midweek meals usually go something like: stare into fridge ➔ sigh ➔ order questionable takeout ➔ regret life choices? 🙋♂️ Yeah, we’ve all danced that tired tango. But what if I told you your meal prep could be the highlight of your week? Like, actually-have-dreams-about-it delicious? Enter these Cajun Chicken Thighs – juicy, spice-kissed, and paired with caramelized sweet potatoes and sunny-sweet corn. This isn’t just fuel, folks. It’s a Mardi Gras parade in a container! I designed this recipe for real humans: 45 minutes start-to-containers, minimal cleanup, and flavors that deepen as they chill. No more sad desk lunches. Let’s make your taste buds do the zydeco!
Why Cajun Chicken? A Little Story From My Louisiana Roots
Picture this: sticky Louisiana summer, me (age 10), perched on my Gran’s porch swing, feet dangling. The air hummed with cicadas and the scent of her holy trinity – onions, celery, bell peppers – sizzling in cast iron. She’d hand me a chipped bowl of spice mix. “Rub it like you mean it, Beau-Beau,” she’d wink. That wasn’t just seasoning; it was magic dust turning humble chicken into fireworks. Years later, sweating over restaurant kitchens, I’d crave that simplicity. This meal prep recipe? It’s my love letter to Gran’s porch – bold flavors without the fuss, scaled for busy lives. Every time that Cajun aroma hits my kitchen, I’m back on that swing, grinning.
Your Flavor Arsenal: Ingredients & Pro Tips
- 8 chicken thighs (bone-in, skin-on): The MVP! Thighs stay juicy through reheating. Swap: Boneless skinless thighs (reduce cook time by 2-3 mins/side) or breasts (but watch closely – they dry out faster!).
- 2.5–3.5 tbsp olive oil: Our flavor conductor. Chef Hack: Use 1 tbsp infused oil (garlic or chili) for the chicken rub – next-level depth!
- 2–3 tbsp Cajun seasoning: The soul! DIY Alert: No store-bought? Mix 2 tsp paprika + 1 tsp each garlic powder, onion powder, oregano, thyme + ½ tsp cayenne + black pepper. Salt to taste!
- 2 sweet potatoes, cubed: Nature’s candy. Pro Tip: Cut even 1-inch cubes for perfect roasting – no mush!
- 1 tsp salt + 1 tsp garlic powder: Potato power-ups. Swap: Onion powder or smoked paprika for smoky vibes.
- 1 cup corn kernels: Sweet sunshine! Insight: Frozen works great, but char it in the chicken skillet after cooking – adds killer smoky notes!
Let’s Get Cooking: Steps That Feel Like a Kitchen Dance Party
Step 1: Season Chicken (The Flavor Foundation)
Rub thighs with 1½ tbsp oil and Cajun seasoning. REALLY get under the skin if using skin-on! Why Marinate? Even 15 mins lets spices penetrate. Got 2 hours? Fridge it! Flavor skyrockets.
Step 2: Roast Sweet Potatoes (Low Effort, High Reward)
Toss cubes with 1 tbsp oil, salt, and garlic powder. Spread on a parchment-lined sheet pan (trust me, cleanup is bliss!). Roast at 425°F (220°C) for 15 mins. HACK: Shake the pan hard – no flipping needed! Roast 10-15 more mins until caramelized and tender.
Step 3: Cook Chicken (Sear = Flavor Gold!)
Heat 1 tbsp oil in a skillet over MEDIUM-HIGH. Place thighs skin-side down (if using). PRESS gently for 30 secs – hello crispy skin! Cook 6-7 mins. Flip. Pro Move: Don’t crowd the pan! Cook in batches if needed. Cook another 6-7 mins until internal temp hits 165°F (74°C). Rest 5 mins before slicing.
Step 4: Corn’s Quick Moment
While chicken rests, toss corn in the same skillet (hello, flavor bonus!) with a pinch of salt. Sauté 2-3 mins until hot and slightly charred. Lazy Win: Microwave frozen corn with 1 tbsp water for 90 secs!
Step 5: Assemble Your Victory Bowls
Divide sweet potatoes, sliced chicken, and corn into 4-5 airtight containers. Stack Smart: Keep chicken slightly elevated above warm veggies to prevent steaming.
The Cajun Spice Breakdown – What Makes This Flavor So Irresistible?
Cajun cuisine isn’t just about heat—it’s about depth. Unlike its cousin Creole cooking (which leans on tomatoes and a more refined French influence), Cajun food is rustic, bold, and built on the “holy trinity” of onions, bell peppers, and celery. But the real magic? The spice blend.
The Science Behind Cajun Seasoning
A well-balanced Cajun rub hits all five taste sensations:
-
Salty (sea salt or kosher salt)
-
Sweet (paprika’s subtle earthiness)
-
Sour (a touch of dried lemon peel or vinegar powder in some blends)
-
Bitter (black pepper, thyme)
-
Umami (garlic and onion powder)
The cayenne or chili powder brings the heat, but it’s the layering of spices that makes Cajun chicken thighs so addictive. When the spices hit the chicken’s fat (especially under crispy skin), they bloom, creating a crust that locks in juices while packing a punch.
Why Chicken Thighs Are the Cajun MVP
Breasts dry out; thighs thrive. Here’s why:
-
Higher fat content (about 10-13g per thigh vs. 3g in breasts) means they stay succulent through reheating.
-
Collagen-rich skin renders into crispy gold when seared.
-
Forgiving cook time—even if you overshoot by a few minutes, thighs stay tender.
Pro Tip: For extra flavor, dry-brine your thighs the night before: rub with salt and 1 tsp of the Cajun mix, then refrigerate uncovered. This seasons the meat deeply and dries the skin for maximum crispiness.
Regional Variations: Louisiana vs. Your Kitchen
Authentic Cajun cooks might use:
-
Tasso ham (a cured, spiced pork) for smoky depth.
-
Filé powder (ground sassafras leaves) for earthy, thickening notes.
-
Beer or stock deglazing after searing for a pan sauce.
But our meal prep version keeps it simple without sacrificing soul.
Sweet Potatoes & Corn – The Supporting Cast That Steals the Show
Sweet Potatoes: Caramelization = Flavor Gold
Roasting sweet potatoes isn’t just about cooking them—it’s about transforming them. At 425°F (220°C), the natural sugars caramelize, turning humble cubes into candy-like bites.
Why This Works for Meal Prep:
-
Reheats beautifully (unlike boiled or mashed, which turn gummy).
-
Fiber-rich (4g per serving) to keep you full longer.
-
Pairs with spice—their sweetness balances Cajun heat.
Next-Level Trick: Toss cubes with 1 tsp maple syrup or honey + a pinch of cinnamon before roasting. The sugars amplify browning, and the spice adds warmth.
Corn: The Sweet Contrast
Fresh, frozen, or even charred, corn brings:
-
Texture (a pop against tender chicken and potatoes).
-
Color (bright yellow = visual appetite trigger).
-
Quick prep (2 minutes in a hot pan vs. labor-intensive sides).
Chef’s Secret: Add 1/2 tsp smoked paprika to the corn while sautéing. It mimics the smokiness of grilled corn without the hassle.
Meal Prep Psychology: Why This Combo Works
Humans eat with their eyes first. The orange, golden, and browned hues signal variety and nutrient density. Plus, the trio covers:
-
Protein (chicken)
-
Complex carbs (sweet potatoes)
-
Veggie/fiber (corn)
No “beige meal” monotony here!
The Reheat Revolution – How to Keep Meal Prep Fresh
The downfall of most meal prep? Soggy, sad leftovers. Here’s how to keep your Cajun bowls tasting like they were just made:
Container Hacks
-
Use divided containers or small mason jars to separate ingredients until eating.
-
Paper towel trick: Place a folded paper towel under the chicken to absorb excess moisture.
-
Vent the lid slightly when microwaving to prevent steam buildup.
Reheating Methods Ranked
-
Oven (Best for Crispiness): 10 mins at 375°F (190°C). Cover chicken with foil to prevent drying.
-
Air Fryer (Fastest): 3-4 mins at 400°F (200°C). Potatoes regain their crunch!
-
Microwave (Convenient): Add a splash of water to corn, cover, and heat 1 min. Then add chicken (heat 30 sec more).
Revival Tricks for Day 4
-
Refresh spices: Sprinkle a pinch of Cajun seasoning post-reheat.
-
Add something fresh: Top with diced avocado, pickled onions, or a squeeze of lime.
-
Repurpose: Shred leftover chicken into a tortilla with cheese for a quick quesadilla.
Serving: More Than Just Dumping in a Bowl!
For meal prep: Layer ingredients separately so corn doesn’t make potatoes soggy. Reheating? Pro Tip: Place chicken ON TOP of potatoes in the microwave (1.5-2 mins on high). Fresh serving? Scatter fresh chopped parsley or green onions. Need creaminess? A dollop of cool Greek yogurt or avocado slices balances the heat beautifully!
Shake It Up: 5 Delicious Twists
1. Creole Remix: Add sliced andouille sausage to the sheet pan last 10 mins of potato roasting.
2. Low-Carb Love: Swap sweet potatoes for cauliflower florets + ½ tsp smoked paprika.
3. Pescatarian Party: Use blackened shrimp (cook 2-3 mins/side) instead of chicken.
4. Mediterranean Mood: Replace Cajun with lemon-herb seasoning + add kalamata olives to corn.
5. BBQ Fusion: Brush chicken with 1 tbsp BBQ sauce last 2 mins of cooking + add black beans to corn.
Beau’s Backstage Notes
This recipe? Born during my “Meal Prep or Perish” phase running a food truck. Batch #1 was so spicy, my firefighter neighbor asked if I needed extinguisher backup! 😂 Over time, I learned: balance is key. Gran’s original used a whole stick of butter – delicious, but not exactly “prep-friendly.” Roasting potatoes separately? Game-changer – no more steamed-spice sadness! Funny story: I once subbed pumpkin for sweet potatoes during fall. My dog Boudin stole a container off the counter. Let’s just say… he approved. Tail wags for days!
FAQs: Your Cajun Chicken Conundrums Solved!
Q: Help! My chicken’s dry. What did I do wrong?
A) Overcooking is the usual suspect. Thighs are forgiving, but 165°F is your North Star! B) Using breasts? They cook faster (aim for 160°F, rest to 165°F). C) Skipped resting? Letting juices redistribute is non-negotiable!
Q: Can I freeze these bowls?
Absolutely! Freeze without corn (it gets watery). Add fresh/frozen corn when reheating. Best within 3 months. Thaw overnight in fridge before microwaving.
Q: My potatoes are mushy/soggy after storing. Fix?
Roast them HOTTER (425°F+) and spread in ONE layer – no overlapping! Let them cool COMPLETELY before assembling bowls. A sprinkle of cornstarch pre-roasting adds crispness too.
Q: Cajun seasoning too intense? Kid-friendly version?
Easily fixed! Make your own blend (see Ingredients) and reduce/omit cayenne. Add 1 tsp brown sugar to the chicken rub – subtle sweetness tames heat beautifully.

Cajun Chicken Thighs Meal Prep
- Total Time: 45 mins
Description
Sick of blah meal prep? These Cajun Chicken Thighs bring serious flavor heat without the kitchen drama. We’re talking juicy, spice-rubbed thighs, caramelized sweet potatoes, and a pop of charred corn—all in under 45 minutes. Packed with protein, fiber, and flavor that only gets better by midweek, these bowls are your new desk-lunch MVPs. Cajun comfort never looked (or tasted) so easy. Ready to prep like a pro? Let’s go!
Ingredients
For the Chicken:
-
8 chicken thighs (bone-in, skin-on or boneless)
-
1½ tbsp olive oil
-
2–3 tbsp Cajun seasoning (DIY: paprika, garlic powder, onion powder, oregano, thyme, cayenne, pepper)
For the Sweet Potatoes:
-
2 sweet potatoes, cubed (1-inch)
-
1 tbsp olive oil
-
1 tsp salt
-
1 tsp garlic powder
For the Corn:
-
1 cup corn kernels (fresh or frozen)
-
Salt to taste
To Serve:
-
Optional: chopped parsley, green onions, avocado, Greek yogurt
Instructions
-
Season Chicken
Rub thighs with oil and Cajun seasoning. Marinate 15 mins (or longer for deeper flavor). -
Roast Potatoes (25–30 mins)
Toss cubes with oil, salt, garlic powder. Roast at 425°F for 15 mins, shake pan, then roast 10–15 mins more until golden. -
Sear Chicken (12–14 mins)
Sear skin-side down in hot skillet 6–7 mins, flip and cook 6–7 mins more until 165°F. Let rest 5 mins. -
Char Corn
In same skillet, sauté corn 2–3 mins with a pinch of salt until golden. -
Assemble Bowls
Divide sweet potatoes, sliced chicken, and corn into 4–5 containers. Cool 10 mins before sealing.
Notes
-
Crispier potatoes? Add 1 tsp cornstarch before roasting.
-
Too spicy? Stir 1 tsp brown sugar into Cajun rub.
-
Add-ins: avocado slices, black beans, or a dollop of Greek yogurt.
- Prep Time: 15 mins
- Cook Time: 30 mins
Nutrition
- Calories: 450 Cal Per Serving
- Fat: 22g
- Carbohydrates: 26g
- Fiber: 4g
- Protein: 35g
Nutritional Per Serving (Approx):
Calories: 450 | Protein: 35g | Fat: 22g | Carbs: 26g | Fiber: 4g | Sugar: 7g
Note: Values vary based on oil used, chicken skin, and exact ingredient sizes. For lower fat: remove skin and reduce oil by ½ tbsp.
Final Thoughts: Why This Meal Prep Changes the Game
This isn’t just “food in boxes.” It’s a flavor experience that gets better as the week goes on. The spices meld, the sweet potatoes sweeten, and the corn’s crunch keeps things exciting. Most importantly, it respects your time without compromising on joy.
So next time you’re tempted by sad takeout, remember: 45 minutes now = 4 days of excitement. Gran would be proud. Now go forth and spice up your week!

Smoky Roasted Sausage and Vegetables
Hey There, Hungry Friends! Let’s Make Magic on a Sheet Pan
Ever have one of those days where your energy’s tank is on “E,” but your stomach’s demanding a five-star performance? Yeah, me too. That’s why I’m practically doing a happy dance to share this Smoky Roasted Sausage and Vegetables recipe with you. Picture this: juicy smoked sausage, vibrant broccoli, sweet bell peppers, and punchy red onions, all tangled up in a smoky, tangy vinaigrette and roasted until the edges caramelize into little flavor bombs. Toss it over fluffy rice? Game over. This isn’t just dinner—it’s a 30-minute hug for your soul, and it all happens on one glorious sheet pan. No fancy skills needed, just a fork and some serious appetite. Whether you’re meal-prepping like a boss or feeding a hungry crew tonight, this dish is your crispy, smoky, soul-soothing MVP. Ready to turn chaos into comfort? Let’s roll up those sleeves!
That One Rainy Night & the Recipe That Saved Dinner
Flashback to last winter: I’d just wrapped up a chaotic photoshoot for the blog, my kitchen looked like a veggie tornado hit it, and my stomach was growling like an angry bear. Rain lashed against the windows, and takeout felt… uninspired. I stared into my fridge, half-delirious, and spotted a lone smoked sausage, some broccoli past its prime, and a wrinkly red onion. Desperation mode: ON. I whisked together pantry staples—smoked paprika for campfire vibes, mustard for tang, vinegar for zing—drowned the veggies and sausage in it, and shoved the whole mess into the oven. Twenty minutes later? Magic. The smoky aroma alone made my dog sit at attention. That haphazard experiment became an instant family obsession. My kid, who usually treats broccoli like kryptonite, inhaled it. Now? It’s our rainy-day ritual. Proof that the best meals aren’t perfect—they’re packed with flavor and forged in happy accidents.
Grab These Flavor Heroes
Smoky Vinaigrette:
- ¼ cup olive oil – Extra virgin’s my ride-or-die for depth. Chef hack: Swap in avocado oil if you’re high-heat roasting!
- 2 tbsp red wine vinegar – Brightens everything up! No red wine vinegar? Apple cider vinegar brings a fruity twist.
- 1 tsp coarse deli or Dijon mustard – Deli mustard adds texture, Dijon’s smoother. Insider tip: Mustard emulsifies the dressing—no separation!
- ¼ tsp garlic powder – Trust me, powder caramelizes better than fresh here. (No burnt garlic bitterness!)
- ¼ tsp dried oregano – Rub it between your fingers before adding—wakes up the oils!
- ½ tsp smoked paprika – Non-negotiable for that campfire soul. Sweet or hot works too—your call!
- ¼ tsp salt + freshly cracked black pepper – Season like you mean it. Crack that pepper fresh—it matters.
- ¼ tsp sugar – Balances acidity and boosts caramelization. Honey works if you’re out!
Sausage & Vegetables:
- 12 oz smoked sausage – Kielbasa, andouille—pick your passion! Vegetarian? Plant-based sausages rock here too.
- 1 lb broccoli crowns, cut into florets – Stems? Save ’em for stir-fries! Florets crisp best.
- 1 bell pepper (any color), sliced – Reds are sweeter, greens are punchier. Mix ’em for confetti vibes!
- 1 red onion, sliced – They sweeten when roasted. Yellow onions work, but red’s prettier in the bowl.
For Serving:
- 1 cup long grain white rice (uncooked) – Jasmine or basmati add fragrance. Short on time? Grab microwave pouches!
- Handful of chopped parsley – Fresh herbs = flavor confetti. No parsley? Chives or cilantro bring their own party.
Let’s Build Some Flavor Layers!
Step 1: Make That Smoky Vinaigrette
Grab a medium bowl. Whisk together olive oil, red wine vinegar, mustard, garlic powder, oregano, smoked paprika, salt, pepper, and sugar. Chef’s secret: Whisk like you’re painting a masterpiece—emulsify until glossy and united. Taste it! Adjust salt or smoke to your mood. Set this liquid gold aside.
Step 2: Prep & Roast (The Fun Part!)
Preheat your oven to 400°F (200°C). On a large sheet pan, toss sausage, broccoli, bell pepper, and red onion with every last drop of the vinaigrette. Critical tip: Spread it in a single layer—no overlapping! Crowding = steaming, and we want crispy, caramelized edges. Slide that pan into the oven. Set a timer for 15 minutes.
Step 3: The Halfway Shuffle
Timer dinged? Pull the pan out (carefully—steam burns are no joke!). Give everything a big, joyful stir with a spatula. Flip those sausages, nudge the broccoli—it’s like tucking them in for round two. This ensures even charring. Roast another 10–15 minutes until veggies are tender-crisp and sausage edges are dark golden. Pro move: Crank the oven to 425°F for the last 5 minutes for extra crunch!
Step 4: Rice Duty
While the magic happens, cook rice per package directions. My hack: Add a bay leaf or a smashed garlic clove to the cooking water—next-level aroma! Once done, fluff with a fork. Let it hang out, covered.
Step 5: Assemble Your Victory Bowls
Scoop fluffy rice into bowls or meal prep containers. Pile high with that smoky roasted goodness. Finish with a shower of chopped parsley. Admire your handiwork. Maybe snap a pic? #SheetPanGlory
Global Twists—How 5 Cultures Would Reinvent This Dish
The beauty of sheet pan meals? They’re a blank canvas. Here’s how different cuisines could remix this recipe.
1. Mexico: Chipotle-Lime Fiesta
-
Swap smoked paprika for ground chipotle.
-
Add corn, black beans, and diced sweet potatoes.
-
Finish with crumbled queso fresco, avocado, and lime crema.
2. Thailand: Sweet & Spicy Basil Stir-Roast
-
Replace vinaigrette with fish sauce, lime juice, brown sugar, and Thai basil.
-
Use chicken sausage and add snap peas and baby corn.
-
Serve with jasmine rice and crushed peanuts.
3. Italy: Garlic-Herb Mediterranean
-
Toss veggies with olive oil, minced garlic, rosemary, and lemon zest.
-
Substitute sausage for Italian chicken sausage.
-
Top with grated Parmesan and toasted pine nuts.
4. India: Curry-Spiced Roast
-
Marinate in yogurt, turmeric, cumin, and garam masala.
-
Add cauliflower and chickpeas.
-
Serve with basmati rice and cilantro-mint chutney.
5. Japan: Miso-Ginger Umami
-
Whisk white miso, ginger, and mirin into the dressing.
-
Roast shiitake mushrooms and kabocha squash.
-
Garnish with sesame seeds and scallions.
Final Thought: A simple formula (protein + veg + bold seasoning) adapts endlessly. The world’s flavors are your sheet pan’s playground.
Plating Like a Pro (Minimal Effort, Max Vibes)
Keep it rustic and real! Pile rice at the bottom of wide, shallow bowls—it’s the fluffy stage for our smoky stars. Spoon the sausage and veggie mix over the top, letting those charred bits and vibrant colors shine. Garnish with parsley for a fresh pop. Craving extra richness? Shave Parmesan over hot bowls (it’ll melt into dreams). Serve with crusty bread to swipe up any rogue vinaigrette. For meal prep? Layer rice first, then the roast, then parsley in airtight containers. Reheat gently to keep textures perfect.
Shake It Up! 5 Delicious Twists
1. Spicy Cajun Kick: Add ½ tsp cayenne to the vinaigrette + swap in andouille sausage. Serve with hot sauce on the side!
2. Mediterranean Sunshine: Use chickpeas instead of sausage. Add zucchini and cherry tomatoes. Finish with feta and lemon zest.
3. Sweet Potato Power: Swap broccoli for cubed sweet potatoes. Add a pinch of cinnamon to the vinaigrette for warmth.
4. Low-Carb Love: Skip rice—serve over cauliflower rice or baby spinach (it’ll wilt beautifully under hot roast!).
5. Apple & Sage Fall Vibes: Add cubed apples with the veggies. Use chicken sausage + fresh sage in the vinaigrette.
Beau’s Backstage Tips & Bloopers
This recipe’s evolved like my favorite jeans—comfier every time. Early tests? I drowned the veggies in oil (soggy city). Lesson: Just enough vinaigrette to coat, not swim! And once, I subbed regular paprika for smoked… my kid asked if I forgot the flavor. Oops. Now, I buy smoked paprika in bulk! Funny story: My dog, Biscuit, once stole a sausage slice mid-photo shoot. I had to bribe him with broccoli to drop it. Priorities, right? Pro tip: Double the vinaigrette batch—it’s killer on salads or grilled chicken tomorrow. This dish’s beauty? It’s resilient. Burn a veggie edge? Call it “charred perfection.” Sausage too crispy? “Texture contrast.” Win-win.
Your Questions, My Answers (Let’s Troubleshoot!)
Q: Can I use frozen veggies? They’re cheaper!
A: Fresh is ideal (less water = better browning), but in a pinch? Thaw frozen broccoli/peppers first, pat super dry with paper towels, and roast at 425°F. Expect softer texture, but flavor still rocks!
Q: My veggies got mushy! What happened?
A: Overcrowding is the usual suspect! If your sheet pan’s smaller than 18×13”, use two pans. Also, slice veggies evenly—tiny broccoli florets cook faster than thick pepper strips. Cut bell peppers into 1-inch pieces, broccoli florets golf-ball sized.
Q: Can I prep this ahead for weekly lunches?
A: Absolutely! Store components separately: rice in one container, sausage/veggie mix in another. Combine when reheating. Keeps 3-4 days. Reheating tip: Microwave at 70% power or warm in a skillet to revive crispiness.
Q: Help! My vinaigrette tastes too sharp/vinegary.
A: Easy fix! Balance it with a pinch more sugar or honey. Next time, add vinegar 1 tbsp at a time. Remember: roasting mellows acidity, but you can always adjust pre-bake.
Smoky Roasted Sausage and Vegetables
- Total Time: 35 mins
Description
When life’s chaos hits and you still want real food with real flavor, this one-pan wonder swoops in like a crispy-edged superhero. Imagine juicy sausage, vibrant veggies, and a smoky vinaigrette that brings it all together—roasted to caramelized perfection in under 30 minutes. Toss it over fluffy rice, and you’ve got soul-satisfying comfort with zero hassle. Sheet pan magic, friends. Let’s roast our way to dinner glory!
Ingredients
Smoky Vinaigrette:
-
¼ cup olive oil
-
2 tbsp red wine vinegar (or apple cider vinegar)
-
1 tsp Dijon or deli mustard
-
¼ tsp garlic powder
-
¼ tsp dried oregano
-
½ tsp smoked paprika
-
¼ tsp salt + cracked black pepper
-
¼ tsp sugar or honey
Veggies & Sausage:
-
12 oz smoked sausage (or plant-based)
-
1 lb broccoli florets
-
1 bell pepper, sliced
-
1 red onion, sliced
For Serving:
-
1 cup uncooked long grain white rice
-
Handful of chopped parsley
Instructions
-
Whisk Vinaigrette
In a bowl, mix all vinaigrette ingredients until glossy. Taste and tweak. -
Prep & Roast
Preheat oven to 400°F. On a large sheet pan, toss sausage and veggies with vinaigrette. Spread in a single layer. Roast 15 mins. -
Flip & Finish
Stir, flip, and roast another 10–15 mins until browned and crisp. For extra char, crank oven to 425°F in the final 5 mins. -
Cook Rice
While roasting, cook rice per package directions. Fluff and keep covered. -
Assemble
Scoop rice into bowls or containers. Top with roasted sausage and veggies. Sprinkle with parsley and admire your edible masterpiece.
Notes
-
Don’t overcrowd the pan—use two sheets if needed!
-
Craving kick? Add cayenne or chili flakes to the vinaigrette.
-
Extra vinaigrette? Use it on salads, grains, or grilled proteins.
- Prep Time: 10 mins
- Cook Time: 25 mins
Nutrition
- Calories: 420 Cal Per Serving
- Fat: 24g
- Carbohydrates: 30g
- Protein: 18g
Nutritional Snapshot (Per Serving)
Approx. 420 calories | 18g protein | 24g fat | 30g carbs
Note: Stats vary based on sausage type, oil used, and rice quantity. Using turkey sausage? Fat drops to ~15g. Vegan sausage? Protein may dip slightly—add chickpeas!
Prep Time: 15 mins | Cook Time: 30 mins | Total Time: 45 mins | Serves: 4
Final Thoughts: Why This Recipe Deserves a Spot in Your Rotation
This smoky roasted sausage and veggie bowl isn’t just dinner—it’s a strategy. It’s fast (30 minutes), flexible (swap ingredients freely), and forgiving (even “mistakes” taste great). It balances health (veggie-packed) with indulgence (hello, crispy sausage), and it travels well for lunches.
Most importantly, it respects your time and cravings. Whether you’re exhausted, nostalgic, or just hungry, this dish delivers. So next time your energy’s on “E,” remember: flavor magic is just a sheet pan away.