Healthy Pumpkin Muffins
Why These Healthy Pumpkin Muffins Are Your New Best Friend
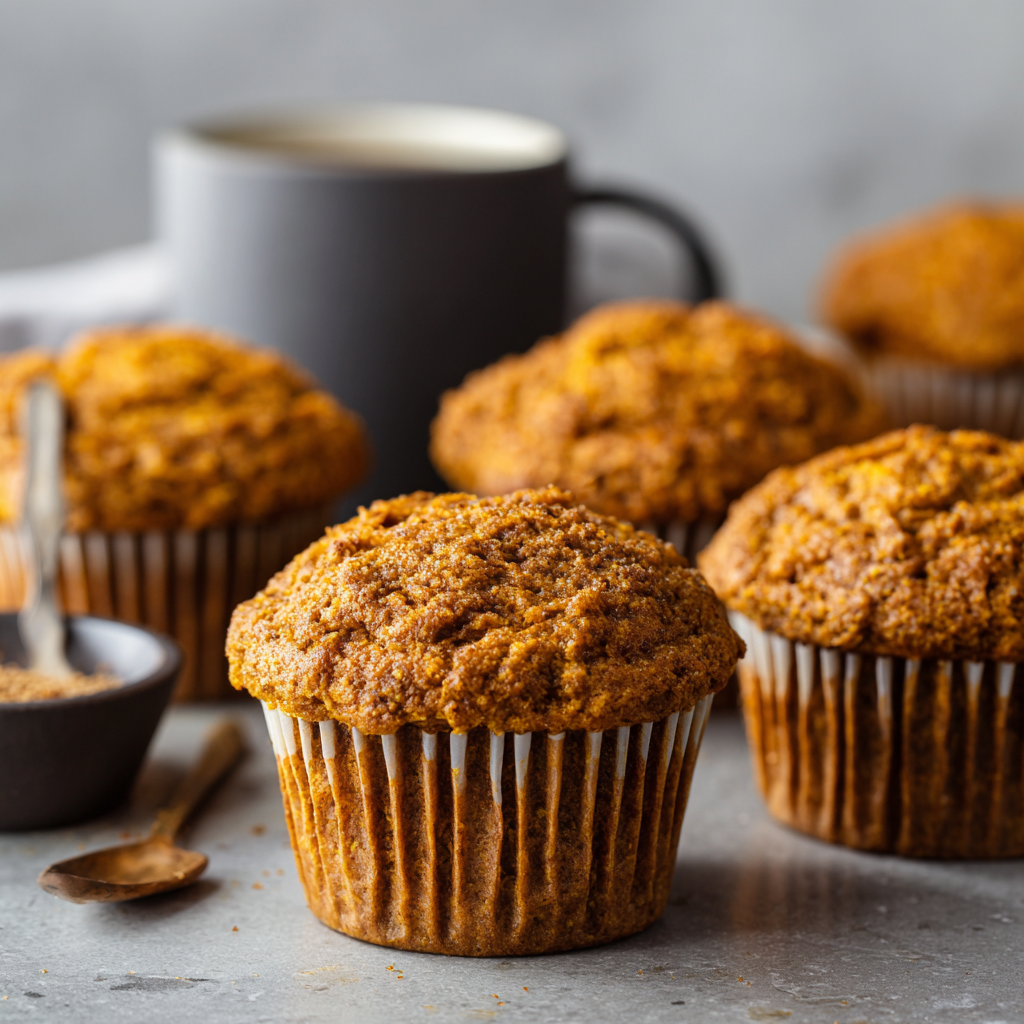
Hey there, friend! Beau here from Feastical. Can we just take a moment to appreciate that magical moment when you open the oven and the scent of cinnamon-kissed pumpkin swirls through your kitchen like a cozy autumn hug? That’s exactly what these Healthy Pumpkin Muffins deliver—a feel-good, soul-warming experience that’ll make your taste buds dance without weighing you down. Picture this: tender crumb, warm spices, and just the right touch of sweetness, all packed into a grab-and-go breakfast or afternoon pick-me-up. I’ve tweaked this recipe over years to nail that perfect balance—moist but not dense, indulgent-tasting but actually nourishing. We’re talking whole wheat flour, naturally sweetened with maple syrup, and loaded with fiber-rich oats and pumpkin. And the best part? They freeze like a dream. Toss ’em in the freezer, and boom—you’ve got instant cozy vibes on busy mornings. No more sad, store-bought muffins! Whether you’re sipping coffee while the leaves fall or sneaking a midnight snack, these little guys are your ticket to happy taste buds and a happy heart. Ready to bake magic together? Let’s do this!
That Time I Burned the First Batch (and Why It Matters)
Okay, story time! Picture my tiny NYC apartment kitchen circa 2018. I was determined to impress my now-wife, Jess, with “healthy” pumpkin muffins for our first autumn together. Spoiler: I got distracted FaceTiming my mom about her dog’s Halloween costume (yes, a pumpkin-themed pug). Next thing I knew—*smoke alarm symphony*. Charred tops, sad centers. Jess walked in coughing, took one look, and burst out laughing. But then? She grabbed a spoon, scooped out the molten pumpkin goo from the middle, and declared it “the best muffin innards ever.” That disaster became our tradition! Now, every October, we intentionally underbake one muffin (“The Jess Special”) just for that gooey nostalgia. It’s a reminder that kitchen flops make the best memories—and that perfection is overrated. These muffins? They’re my redemption arc. And trust me, no smoke alarms required this time.
What You’ll Need (and Clever Swaps!)
- ⅓ cup melted coconut oil – Adds lush moisture! Chef hack: If you hate coconut flavor, use light olive oil. Both bring healthy fats.
- ½ cup maple syrup – Nature’s caramel! Swap: Honey works, but reduce milk by 1 tbsp—it’s thicker.
- 2 large eggs, room temp – Bind everything beautifully. Insight: Cold eggs? Plunge ’em in warm water for 5 mins. Game-changer!
- 1 cup pumpkin purée – NOT pie filling! Pro tip: Canned is easy, but roast a sugar pumpkin if you’re feeling fancy.
- ¼ cup milk (any kind!) – Dairy, almond, oat—all work. Fun twist: Use spiced chai tea for extra warmth.
- 2 tsp pumpkin spice blend – The soul of fall! DIY mix: 1 tsp cinnamon + ½ tsp ginger + ¼ tsp nutmeg + ¼ tsp allspice.
- 1 tsp baking soda – Lift master! Warning: Don’t sub baking powder—it’ll taste metallic.
- 1 tsp vanilla extract – Flavor enhancer. Splurge on pure vanilla if you can!
- ½ tsp salt – Balances sweetness. Sea salt or kosher—both rock.
- 1¾ cups whole wheat flour – Fiber boost! Gluten-free? Use 1:1 GF flour blend.
- ⅓ cup old-fashioned oats – Chewy texture heroes. Crunch hack: Sprinkle extra on top with turbinado sugar!
Let’s Bake! (No Distractions This Time, Promise)
- Preheat oven to 325°F (165°C). Line muffin tin with liners. Why low temp? Prevents domes from collapsing! Also, skip non-stick spray—liners prevent sticking.
- Whisk oil + maple syrup in a large bowl. Chef secret: Whisk aggressively for 1 minute. It emulsifies like mayo, making muffins ultra-tender.
- Beat in eggs. One at a time! Room temp eggs blend smoother. Scrape the bowl—no hidden pockets of oil.
- Stir in pumpkin, milk, spices, baking soda, vanilla, and salt. Watch: The mix will foam slightly—that’s the baking soda activating! Totally normal.
- Add flour + oats. Mix until JUST combined. CRUCIAL TIP: Overmixing = tough muffins. Stop when flour disappears—lumps are fine!
- Divide batter into 12 cups. Sprinkle with oats/turbinado. Portion hack: Use an ice cream scoop for even muffins. Top generously for that Instagram crunch.
- Bake 22-25 mins until toothpick comes out clean. Timing note: Ovens lie! Check at 20 mins. If tops spring back, they’re done.
- Cool 5 mins in pan, then transfer to rack. Why move ’em? Steam makes bottoms soggy. Let ’em breathe!
How to Serve ’Em Up (Beyond Just Your Hand!)
Warm muffins + cold butter = happiness. But let’s get creative! Slice ’em horizontally, toast lightly, and slather with almond butter or Greek yogurt for protein power. Hosting brunch? Stack ’em high on a wooden board with fresh figs and pecans. Kid-approved move: Dunk ’em in warm apple cider! For freezing, let muffins cool completely, then seal in a zip-top bag. They’ll stay perfect for 3 months. Reheat straight from frozen: 30 secs in the microwave or 10 mins in a 300°F oven. Crispy top restored!
5 Fun Twists to Shake Things Up
- Chocolate Craver’s Fix: Fold in ½ cup dark chocolate chips + orange zest. Sweet-salty magic!
- Protein Powerhouse: Replace ¼ cup flour with vanilla protein powder. Post-workout win.
- Nutty Crunch: Add ⅓ cup chopped pecans or walnuts to batter. Top with candied ginger.
- Vegan Vibes: Swap eggs for flax eggs (2 tbsp ground flax + 5 tbsp water). Use almond milk.
- Apple Pie Fusion: Stir in 1 cup grated apple + extra cinnamon. Top with oat streusel.
Beau’s Behind-the-Scenes Scoop
Confession: I’ve made these over 200 times. Seriously. The recipe started as a dense, whole-wheat brick (RIP 2016 batch). But through “research” (read: eating A LOT of muffins), I learned two game-changers: First, melting the oil with syrup creates an emulsion that traps moisture—bye-bye, dry muffins! Second, low-and-slow baking stops the dreaded sinkhole center. Jess still teases me about “The Great Pumpkin Smoke-Out,” but now I bake these for our neighborhood potlucks. Last fall, our mailman traded me a bag of his homegrown pecans for a batch. Real talk: Food connects us. Whether you’re baking these solo with a podcast or with kids smearing batter everywhere, it’s all about the joy. P.S. If you underbake one intentionally? You’re officially part of Team Jess.
Your Questions, Answered!
Q: Can I use fresh pumpkin instead of canned?
A: Absolutely! Roast a sugar pumpkin, scoop flesh, and blend until smooth. Just strain it overnight in a cheesecloth—fresh pumpkin holds more water. You’ll need about 1¼ cups cooked pumpkin for 1 cup purée.
Q: Why did my muffins turn out gummy?
A: Two culprits: Overmixing (develops gluten) or expired baking soda. Test your soda by dropping ½ tsp in vinegar—if it doesn’t bubble violently, replace it! Also, measure flour correctly: Spoon it into the cup, then level. No packing!
Q: Can I sub sugar for maple syrup?
A: Yep! Use ⅔ cup brown sugar + ¼ cup milk. But maple adds depth, so I’d reduce to ⅓ cup sugar + 3 tbsp milk to keep moisture.
Q: How do I prevent flat tops?
A: Oven too hot! Invest in an oven thermometer ($7!). Also, let batter rest 10 mins before baking—this hydrates the oats and flour for better rise.

Healthy Pumpkin Muffins
- Total Time: 35 min
Description
Say hello to your new cozy craving! These Healthy Pumpkin Muffins are tender, spiced just right, and naturally sweetened with maple syrup. They taste like your favorite autumn candle smells—but way more satisfying. Made with whole wheat flour, oats, and real pumpkin, they’re secretly nourishing, freezer-friendly, and kid-approved. Whether it’s breakfast on the go or an afternoon pick-me-up, these muffins bring homemade comfort with every bite. Burned batch or not, you’re in for muffin greatness.
Ingredients
• ⅓ cup melted coconut oil (or light olive oil)
• ½ cup maple syrup
• 2 large eggs, room temp
• 1 cup pumpkin purée (not pie filling)
• ¼ cup milk (any kind)
• 2 tsp pumpkin spice blend
• 1 tsp baking soda
• 1 tsp vanilla extract
• ½ tsp salt
• 1¾ cups whole wheat flour
• ⅓ cup old-fashioned oats (+ more for topping)
• Optional: turbinado sugar for crunchy tops
Instructions
-
Preheat oven to 325°F (165°C). Line a muffin tin with paper liners.
-
In a large bowl, whisk oil and maple syrup vigorously. Add eggs and beat well.
-
Stir in pumpkin, milk, spices, baking soda, vanilla, and salt.
-
Fold in flour and oats until just combined—don’t overmix!
-
Divide batter into 12 cups. Sprinkle tops with oats and turbinado sugar.
-
Bake 22–25 mins until a toothpick comes out clean. Cool 5 mins in pan, then transfer to a rack.
Notes
– Want a gooey center? Underbake one on purpose—”The Jess Special”!
– Freeze fully cooled muffins in a zip bag up to 3 months. Reheat from frozen.
– For a protein boost, sub ¼ cup flour with protein powder.
- Prep Time: 10 min
- Cook Time: 25 min
Nutrition
- Calories: 180 Cal Per Muffin
- Sugar: 8g
- Fiber: 3g
- Protein: 4g
Nutritional Perks (Because Knowledge Is Yummy)
Serving: 1 muffin (makes 12) | Calories: ~180 | Protein: ~4g | Fiber: ~3g | Sugar: ~8g
Pumpkin delivers vitamin A (hello, glowing skin!), oats bring soluble fiber for happy digestion, and whole wheat flour keeps blood sugar steady. Compared to bakery muffins (often 400+ calories!), these are a win!
Final Thoughts: More Than Just a Muffin
These pumpkin muffins are a triple threat: nourishing, nostalgic, and endlessly adaptable. They’re breakfast saviors, lunchbox heroes, and midnight snack champions. But beyond that, they’re a reminder that food is more than fuel—it’s connection. Whether it’s the laugh over a smoke alarm, the joy of gifting a batch to a neighbor, or the quiet moment with coffee and a crumb-strewn plate, these muffins are little vessels of happiness.
So bake them. Share them. Maybe even intentionally underbake one in honor of life’s sweet imperfections. And when someone asks why your kitchen smells like a fall dream? Just wink and say, “That’s the soundtrack of my best mistakes.”

Easy Gluten-Free Oat Waffles
Wake Up to Pure Joy: Easy Gluten-Free Oat Waffles
Hey friends, Beau here! Tell me something: is there any sound more deliciously promising than the sizzle of batter hitting a hot waffle iron on a lazy weekend morning? That crisp, golden aroma swirling through the kitchen, the anticipation of that first syrupy bite… pure magic. But if you’ve ever felt like gluten-free breakfasts meant settling for cardboard-textured “treats,” I’m here to flip that script! These Easy Gluten-Free Oat Waffles are my absolute go-to for a reason. Imagine this: shatteringly crisp edges giving way to a cloud-like, fluffy interior, all made with simple, wholesome ingredients. No fancy gums, no weird aftertaste—just the cozy, nutty goodness of oat flour working its charm. They’re naturally gluten-free (just grab certified GF oats if needed!), endlessly adaptable, and seriously foolproof. Whether you’re wrangling hungry kids, hosting brunch, or just treating yourself to a little “slow morning” luxury, these waffles deliver pure, uncomplicated joy. They taste like a warm hug for your taste buds, proving that feel-good food doesn’t need complicated labels or hard-to-find ingredients. So grab your favorite mug of coffee, fire up that waffle iron, and let’s make breakfast the happiest part of your day!
Why These Waffles Feel Like Home
Okay, confession time: my love affair with these oat waffles started with a near-disaster! Picture it: a snowy Sunday morning years ago, my niece (who’s gluten-sensitive) was visiting. I’d promised her “the best waffles ever,” only to realize my regular flour stash was empty. Cue panic! All I had were rolled oats. In a sweaty-palmed frenzy, I blitzed them into flour, crossed my fingers, and hoped for the best. The batter looked… suspiciously thin. But when that first waffle emerged—golden, crisp, smelling like toasted oats and maple dreams—we both did a happy dance right there in the kitchen. The look on her face, piled high with berries and syrup? Priceless. That messy morning taught me something beautiful: sometimes the best recipes are born from happy accidents and pantry improvisation. These waffles became our tradition. Every time she visits now, it’s “Uncle Beau, waffle time?” That simple bowl of batter connects us, turning an ordinary breakfast into a little ritual of love and laughter. It’s proof that food isn’t just fuel; it’s the glue for our sweetest, syrup-dripped memories.
Your Simple, Soulful Toolkit
Gathering your ingredients is like assembling your breakfast dream team! Here’s what you’ll need (and why each one shines):
- 1½ cups (128g) oat flour (certified GF if needed): The star! Oats add a lovely nutty flavor and natural tenderness. Chef’s Tip: Blitz rolled oats in a blender until fine for instant, budget-friendly flour! Just make sure it’s super fine.
- 2 tsp baking powder: Our fluffy-maker! Gives those waffles their irresistible lift. Must be fresh – test it by stirring ½ tsp into hot water; it should fizz vigorously!
- ½ tsp salt: Balances the sweetness and makes the flavors pop. Don’t skip it!
- Pinch of cinnamon (optional): My favorite cozy upgrade! Adds warmth without overpowering. Swap for nutmeg or cardamom if you’re feeling adventurous.
- ¾ cup room temperature milk (any kind!): Dairy, almond, oat, coconut – they all work! Room temp is key to prevent melted coconut oil or butter from seizing up.
- ¼ cup + 1 tbsp melted coconut oil or 5 tbsp unsalted butter, melted: Creates that dreamy crisp exterior. Coconut oil (refined for neutral taste) is great for dairy-free, while butter adds rich flavor. Let it cool slightly before adding!
- 2 large eggs: The glue! Binds everything and adds structure and fluff. Sub Tip: For vegan, try flax eggs (2 tbsp ground flax + 5 tbsp water, sit 5 mins).
- 2 tbsp maple syrup: Sweetens gently and adds depth. Honey works too, but the flavor changes slightly.
- 1 tsp vanilla extract: The flavor enhancer! Pure vanilla makes it sing.
See? Nothing complicated, just good, honest ingredients ready to transform into breakfast magic. Let’s get mixing!
Let’s Make Some Waffle Magic: Step-by-Step!
Ready to become a waffle wizard? Follow these simple steps – I’ve packed them with my favorite hacks for guaranteed success!
- Preheat Your Waffle Iron: Crank it up to medium-high! A properly hot iron is CRUCIAL for crispness. While it heats (give it a good 5-10 mins), gather your bowls. Chef’s Hack: Place a baking sheet in your oven on its lowest setting to keep cooked waffles perfectly crisp while you finish the batch.
- Whisk the Dry Team: Grab a large bowl and whisk together the oat flour, baking powder, salt, and that optional cinnamon. Whisking = no lumps and even distribution of our fluffy-maker (baking powder!). Set it aside with a smile.
- Unite the Wet Crew: In a medium bowl, combine the room temp milk, slightly cooled melted oil or butter, eggs, maple syrup, and vanilla. Whisk it like you mean it until smooth and gorgeous. Watchpoint: If your melted fat is too hot, it’ll scramble the eggs! Cool it down first.
- The Grand Merge (Gently!): Pour the wet ingredients into the dry. Now, channel your inner zen master: stir with a spatula just until combined. A few lumps? Totally fine! Overmixing = tough waffles. We want tender clouds!
- The Power of Patience (5 mins!): Let the batter sit on the counter. This is non-negotiable magic time! The oats absorb the liquid, thickening the batter for fluffier waffles that won’t stick. Chef’s Secret: This rest also activates the baking powder for maximum lift. Use this time to prep toppings!
- Grease & Glamour: Lightly brush or spray your preheated waffle iron plates with oil or non-stick spray. Do this even if it’s non-stick – oats can be clingy! Reapply between batches if needed.
- Cook to Golden Perfection: Pour the right amount of batter onto the center of the iron (check your iron’s manual for capacity – usually ½ to ⅔ cup). Close the lid and DO NOT PEEK for at least 2-3 minutes! Chef’s Test: Steam slowing down significantly? That’s your cue they’re nearly done. Cook until deeply golden brown and crisp. They release easier when fully cooked!
- Serve the Joy: Use a fork to gently lift the waffle out. Place it directly on that warm baking sheet in the oven if you’re batch cooking. Repeat with the remaining batter, re-greasing as needed.
That’s it! You’ve just crafted waffle greatness. Now, for the best part…
Dress to Impress (Your Taste Buds!)
How you serve these beauties is half the fun! Pile them high – the stackability is real. For the classic: drown them in pure maple syrup and watch it pool in those perfect squares. Feeling fruity? Top with a mountain of fresh berries (strawberries, blueberries, raspberries!) or sautéed cinnamon apples. Craving creamy? A dollop of Greek yogurt or coconut whip adds tangy richness. Nut butter lovers, swirl on some almond or peanut butter before the syrup! For a decadent twist, sprinkle with dark chocolate chips while they’re hot. Serve immediately – that crisp-soft contrast is everything!
Mix It Up! 5 Tasty Twists
These waffles are your blank canvas! Try these easy swaps:
- Berry Blast: Fold 1 cup fresh or frozen blueberries (tossed in 1 tsp oat flour) into the batter after resting.
- Chocolate Chip Celebration: Stir in ½ cup mini chocolate chips (dairy-free if needed) for melty pockets of joy.
- Pumpkin Spice Delight: Add ⅓ cup pure pumpkin puree + 1 tsp pumpkin pie spice to the wet ingredients.
- Protein Power-Up: Stir 2 tbsp vanilla protein powder into the dry ingredients (add an extra splash of milk if batter thickens too much).
- Savory Sensation: Omit the cinnamon, maple syrup, and vanilla. Add ½ cup shredded cheese (cheddar/gruyere), 2 tbsp chopped herbs (chives, parsley), and ¼ tsp garlic powder. Serve with fried eggs!
Beau’s Back-Pocket Waffle Wisdom
Over the years, this recipe has become my trusty sidekick, evolving with every batch. Remember that first panicky oat-blitzing session? Now, I always keep a big jar of homemade oat flour in the pantry – it’s a lifesaver! One hilarious flop involved forgetting the baking powder… let’s just say hockey pucks weren’t on the menu. Lesson learned! The batter thickness can vary slightly depending on your oat flour grind and milk type – if it feels too thick after resting, add a splash more milk. Too thin? Sprinkle in a little extra oat flour. These waffles freeze like a dream too! Cool them completely, layer between parchment paper, and freeze in a zip-top bag. Reheat straight from frozen in the toaster for instant weekday bliss. Honestly, the biggest evolution? Realizing perfection isn’t the goal. A slightly lopsided waffle dripping with syrup and shared with laughter tastes infinitely better than a flawless one eaten alone.
Your Waffle Questions, Answered!
Let’s tackle those common kitchen quandaries:
Q: Can I make the batter ahead of time?
A: I don’t recommend it for the fluffiest results. The baking powder starts working as soon as it gets wet! Mix the dry and wet ingredients separately the night before, then combine and cook in the morning.
Q: Help! My waffles are sticking to the iron!
A> Three likely culprits: 1) The iron wasn’t hot enough before adding batter. 2) It wasn’t greased well enough (reapply between each waffle!). 3) You tried to open it too soon – wait until steam drastically reduces. Also, ensure they’re fully cooked; undercooked waffles stick more.
Q: Why let the batter rest? Can I skip it?
A> Patience, grasshopper! Resting is KEY. It allows the oat flour to hydrate fully, thickening the batter for better structure, fluffiness, and easier release. Skipping it often leads to thinner, gummier waffles that stick. Use the time to brew coffee!
Q: Can I freeze these waffles?
A> Absolutely! It’s my favorite hack. Cool cooked waffles completely on a wire rack. Layer them in a single layer in a freezer bag with parchment between each. Freeze for up to 3 months. Reheat in a toaster, toaster oven, or air fryer until hot and crisp – no thawing needed!

Easy Gluten-Free Oat Waffles
- Total Time: 25 min
Description
These golden oat waffles are everything breakfast should be—crisp on the outside, fluffy within, and made entirely from simple, gluten-free goodness. Whether you’re serving hungry kids or savoring a solo Sunday, this recipe brings you comfort, crunch, and that maple-syrup magic. With no gums, no gluten, and no guesswork, these waffles are the delicious proof that joy lives in the little things—like a hot waffle iron and a big appetite.
Ingredients
• 1½ cups oat flour (certified gluten-free)
• 2 tsp baking powder
• ½ tsp salt
• Pinch cinnamon (optional)
• ¾ cup milk (any kind, room temp)
• ¼ cup + 1 tbsp melted coconut oil or 5 tbsp butter
• 2 large eggs (or flax eggs)
• 2 tbsp maple syrup
• 1 tsp vanilla extract
Optional Toppings
Maple syrup, berries, nut butter, yogurt, dark chocolate chips
Instructions
-
Heat iron to medium-high. Preheat oven to low and place a baking sheet inside to keep waffles warm.
-
Whisk dry ingredients in a large bowl: oat flour, baking powder, salt, cinnamon.
-
Mix wet ingredients in another bowl: milk, melted oil or butter, eggs, syrup, vanilla.
-
Combine wet and dry gently—don’t overmix! Let batter rest 5 minutes.
-
Grease waffle iron and pour in batter (½–⅔ cup per waffle). Cook until steam slows and waffles are golden and crisp.
-
Keep warm in oven while finishing the batch. Serve hot with toppings of choice!
Notes
– Let batter rest for fluffier waffles and easier release
– Freeze leftovers! Toast from frozen for weekday treats
– Use blender oats for DIY oat flour – budget win!
- Prep Time: 10 min
- Cook Time: 15 min
Nutrition
- Calories: 300 Cal Per Waffle
- Sugar: 5g
- Fiber: 3g
- Protein: 7g
Nourishment Notes (Because You Asked!)
Per large waffle (approx): Calories: ~300 | Protein: ~7g | Fiber: ~3g | Sugar: ~5g (excludes toppings). Made with wholesome oats and minimal added sugar, these offer sustained energy thanks to complex carbs and fiber. Using plant-based milk and oil keeps them dairy-free friendly!
Final Thoughts: More Than Just a Waffle
These gluten-free oat waffles are a quiet rebellion against the idea that “healthy” means sacrificing joy. They’re proof that simplicity—oats, eggs, a touch of sweetness—can create something extraordinary. But beyond the recipe, what I love most is how food becomes a catalyst for connection: the niece who lights up at “waffle time,” the friends gathered around a syrup-drizzled stack, or the quiet morning ritual of savoring a crisp bite with coffee in hand.
So here’s my challenge to you: Make these waffles your own. Burn the first batch (I still do sometimes!). Drench them in absurd amounts of toppings. Share them with someone you love. Because the best recipes aren’t just about ingredients—they’re about the memories you fold into the batter. Now go forth and waffle wildly!
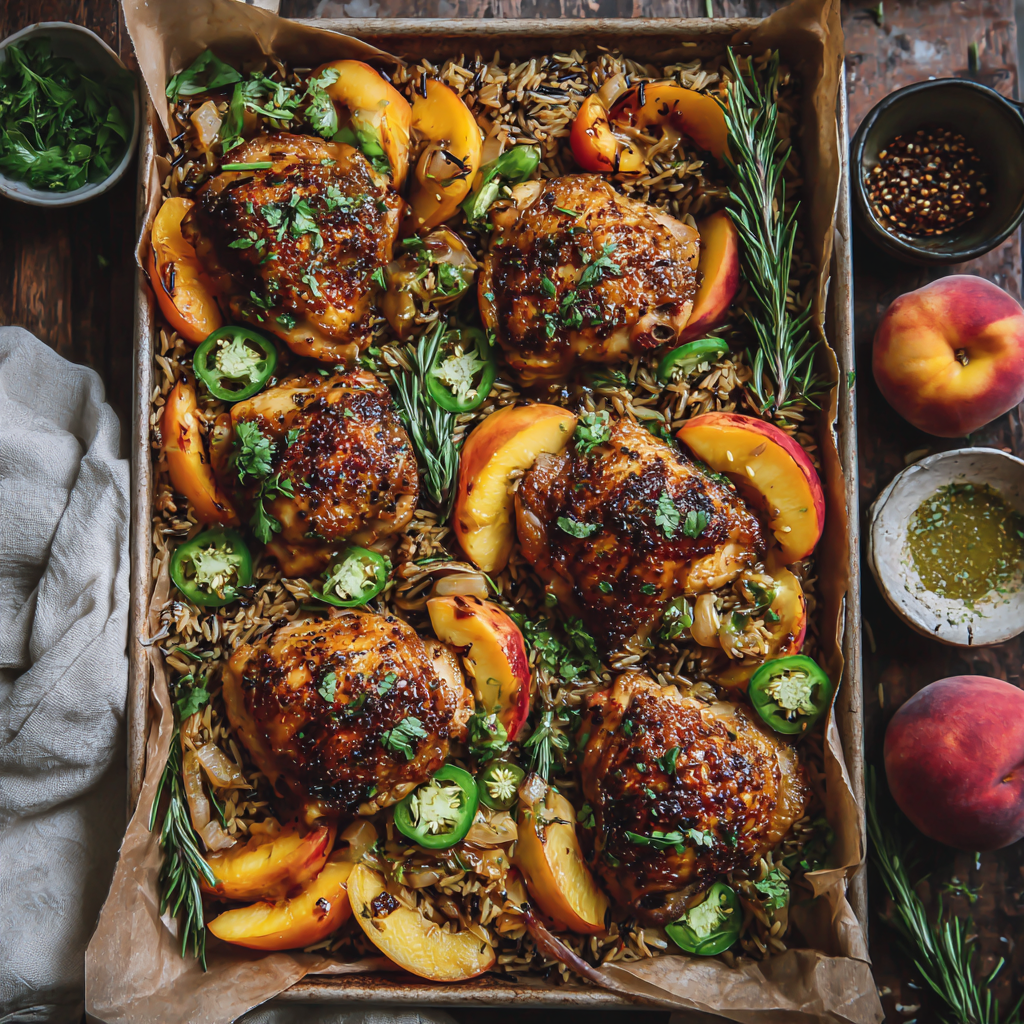
Sweet Heat Peach Chicken & Wild Rice Trays
Sweet Heat Peach Chicken & Wild Rice Trays: Your New Favorite Flavor Party!
Hey friends, Beau here! Grab your favorite apron and let’s talk about a dish that’s about to become your weeknight superhero. Imagine juicy chicken thighs getting cozy with caramelized peaches, spicy jalapeños, and fragrant rosemary, all roasting together on one glorious sheet pan while you kick back. That’s our Sweet Heat Peach Chicken & Wild Rice Trays – a symphony of sweet, spicy, and savory that’ll make your taste buds dance. Perfect for busy families, Whole30 warriors, or anyone craving a fuss-free feast, this recipe is like autumn sunshine on a tray. No fancy skills needed – just big flavors and even bigger smiles. Ready to turn your kitchen into a flavor festival? Let’s roll!
When Life Gave Me Peaches… I Made Magic
Picture this: It’s late summer, and my neighbor Mrs. Henderson – bless her Southern soul – shows up with a bushel of peaches so ripe they’re practically blushing. “Beau, honey,” she says, “do something fun with these!” Challenge accepted. That weekend, I was hosting my rowdy college buddies for our annual “No Rules Grill Night,” but a thunderstorm crashed the party (literally). With hungry mouths to feed and a grill drowning in rain, I pivoted. I tossed chicken thighs with those peaches, grabbed the only spicy thing in my pantry (jalapeños!), and threw it all on a sheet pan. The result? A standing ovation and empty plates in 10 minutes flat. That happy accident taught me: Sometimes the best recipes aren’t planned – they’re born from a little chaos and a lot of ripe fruit!
Gather ‘Round: Your Flavor Arsenal
- 4 bone-in, skin-on chicken thighs – Trust me, the bone keeps ’em juicy, and crispy skin is non-negotiable! Swap with boneless thighs (reduce cook time by 5 mins) or chicken breasts (but watch closely – they dry out faster).
- 3 ripe peaches, sliced – Slightly firm peaches hold up best. No peaches? Try nectarines or even mango for tropical vibes!
- 2 jalapeños, sliced – Seeds in = FIRE. Seeds out = mellow. For zero heat, use bell peppers. Feeling wild? Try a habanero (just one!).
- 2 tbsp olive oil – Our flavor conductor! Avocado oil works too.
- 1 tbsp apple cider vinegar – Brightens everything up. Lemon juice in a pinch!
- 1 tbsp Dijon mustard – Secret weapon for tangy depth. Yellow mustard works but dial back to 2 tsp.
- 1 tbsp maple syrup – Balances the heat. For Whole30, use 1 tsp coconut aminos + a pinch of cinnamon.
- 2–3 rosemary sprigs – Fresh is key! Strip leaves if you dislike “piney” bites, but the stems infuse magic.
- Salt & pepper – Season like you mean it!
- 2 cups cooked wild rice – Nutty goodness! Quinoa or cauliflower rice rock too.
- Extra rosemary/green onions – Because pretty food tastes better 😉
Chef’s Whisper: Arrange ingredients like you’re prepping for a cooking show – it makes the process 10x more fun!
Let’s Get Sizzling: Your Foolproof Roadmap
Step 1: Fire up that oven to 400°F (200°C). Line your sheet pan with parchment – hello, easy cleanup! (Pro Hack: Crumple the parchment first, then flatten – it stays put!)
Step 2: In a bowl big enough for chicken tango time, whisk olive oil, apple cider vinegar, Dijon, and maple syrup until it’s smoother than my dad’s dance moves. Taste it! Adjust with more syrup (sweet) or vinegar (tang).
Step 3: Pat chicken thighs DRY (crucial for crispy skin!), then dunk ’em in the glaze. Massage it like you’re kneading stress away. Let them soak while you slice peaches/jalapeños.
Step 4: Arrange chicken on the pan like sunbathers – don’t crowd ’em! Scatter peaches and jalapeños around like confetti. Tuck rosemary sprigs under peaches – they’ll perfume everything beautifully. Drizzle leftover glaze over fruit.
Step 5: Roast 35-40 mins until chicken skin crackles like autumn leaves and a thermometer reads 165°F. Don’t peek before 25 mins – let that heat work! If peaches char, it’s FLAVOR, not failure.
Step 6: Let chicken rest 5 mins (patience, grasshopper – juices redistribute!). Spoon wild rice into meal prep trays or bowls, top with chicken and fruit rubble. Drizzle those glorious pan juices over everything – that’s liquid gold!
Plating Like a Pro (Minus the Fuss)
This dish practically dresses itself! For family dinners, pile everything on a platter over wild rice and let everyone dig in family-style. Meal preppers: Layer rice first in trays, then chicken + peaches, and spoon juices over top. Garnish with green onions or rosemary confetti – it’s Insta-worthy! Pair with a crisp green apple salad or roasted Brussels sprouts. And please – serve with crusty bread to mop up every drop of that sweet-heat jus!
The Science Behind Sweet & Spicy Flavor Pairing
Ever wonder why the combination of sweet peaches and spicy jalapeños in this dish feels so irresistible? There’s actual science behind it! Our taste buds are wired to respond to five primary flavors: sweet, salty, sour, bitter, and umami. But when you introduce contrasting flavors—like the sugary caramelization of peaches against the fiery kick of jalapeños—your brain goes wild with excitement.
Why Sweet & Heat Work So Well Together:
-
Flavor Layering – Sweetness can tame the intensity of spice, making the heat more enjoyable rather than overwhelming. The maple syrup in this recipe acts as a buffer, allowing the jalapeño’s capsaicin (the compound responsible for heat) to linger without burning your palate.
-
Balanced Complexity – A study from the Journal of Food Science found that dishes with balanced sweet-spicy profiles are perceived as more complex and satisfying. The peaches’ natural sugars caramelize in the oven, deepening their sweetness, while the jalapeños’ spice cuts through richness, preventing the dish from tasting cloying.
-
Endorphin Boost – Spicy foods trigger the release of endorphins (your body’s natural “feel-good” chemicals), while sweetness activates dopamine. Together, they create a euphoric eating experience—no wonder this dish gets standing ovations!
Pro Tip: If you’re nervous about spice levels, start with one jalapeño (seeds removed) and add more after roasting. You can always increase heat, but you can’t take it away!
The Magic of One-Pan Cooking (And Why It’s a Game-Changer)
Let’s talk about the unsung hero of this recipe: the humble sheet pan. One-pan meals aren’t just convenient—they’re culinary powerhouses. Here’s why this cooking method elevates the Sweet Heat Peach Chicken & Wild Rice Trays to legendary status:
1. Concentrated Flavor Development
When ingredients roast together, their juices mingle. The chicken fat renders into the peaches, the jalapeños infuse their spice into the glaze, and the rosemary’s essential oils perfume everything. This creates a symphony of flavors that would be harder to achieve with separate cooking methods.
2. Effortless Texture Contrast
A single pan in a hot oven gives you:
-
Crispy chicken skin (thanks to dry heat and rendered fat)
-
Jammy, caramelized peaches (their sugars concentrate as water evaporates)
-
Charred-but-tender jalapeños (blistered edges = bonus flavor)
3. Time & Energy Efficiency
-
No babysitting required – Once it’s in the oven, you’re free!
-
Minimal cleanup – Parchment paper = no scrubbing baked-on glaze.
-
Versatile leftovers – Repurpose components into salads, grain bowls, or tacos.
Fun Experiment: Try roasting the wild rice with the chicken next time! Spread uncooked rice on the pan, add broth, and let it absorb the drippings for an ultra-savory twist.
The Cultural Roots of Fruit & Meat Pairings
This dish might feel innovative, but pairing fruit with meat is a tradition older than your grandma’s cast iron skillet. Let’s take a delicious history tour:
1. Southern U.S. – Peach & Pork Traditions
In the American South, peaches symbolize hospitality and abundance. Classic pairings like peach-glazed ham or grilled pork chops with peach chutney inspired this recipe’s sweet-savory foundation.
2. North Africa – Tagines with Dried Fruit
Moroccan tagines slow-cook lamb with apricots or dates, balancing richness with fruit acidity. Our jalapeños echo the heat of harissa (a chili paste used in the region).
3. Caribbean – Jerk Chicken & Mango
Jamaican jerk seasoning’s fiery scotch bonnet peppers are often cooled with tropical fruit salsas. This dish’s peach-jalapeño duo is a nod to that contrast.
Why It Matters Today
Global flavors are more accessible than ever. By blending these influences, we create dishes that tell stories—like how Mrs. Henderson’s peaches met Beau’s jalapeño spontaneity. Cooking becomes a celebration of shared culinary heritage.
Try This: Swap peaches for dried figs and add a dash of cinnamon for a Middle Eastern-inspired version.
Shake It Up: 5 Delicious Twists
- Pork Lover’s: Swap chicken for pork chops. Add smoked paprika to the glaze!
- Mediterranean Mood: Use apricots instead of peaches, add olives + feta after baking.
- Veggie Power: Replace chicken with portobello mushrooms + chickpeas. Roast 25 mins.
- Tropical Escape: Sub peaches with pineapple + add a dash of coconut aminos.
- Cozy Curry: Stir 1 tsp curry powder into the glaze. Top with cilantro + toasted coconut.
Beau’s Backstage Banter
This recipe’s been through more makeovers than my high school band! Originally, I used honey instead of maple syrup until my Whole30 friends protested. Then there was the “Great Jalapeño Incident of 2020” – let’s just say I learned the hard way to wear gloves when slicing 12 peppers for a double batch! Over time, I started tucking rosemary UNDER the peaches so it doesn’t scorch. Fun fact: My dog Duke goes nuts when this roasts – he’s a certified peach chicken connoisseur. The biggest lesson? Don’t stress perfection. Burnt peach edges? “Charred caramelization.” Spicy too intense? Yogurt drizzle rescue! Cooking’s an adventure, not a exam.
You Asked, I Answered!
Q: My peaches turned to mush! What happened?
A: You might’ve used super-ripe peaches (save those for eating raw!). Aim for slightly firm ones, and slice ’em thick (½-inch). If they still soften too much, add them halfway through cooking.
Q: Chicken skin isn’t crispy. Help?
A: Two tricks: 1) PAT THOSE THIGHS DRY before glazing. 2) After roasting, broil 2-3 minutes – watch closely!
Q: Can I make this ahead?
A: Absolutely! Prep glaze + chop fruit/veggies up to 24 hours ahead. Store separately. Assemble + roast day-of. Leftovers keep 3 days in fridge.
Q: Too spicy for my kids?
A: Remove jalapeño seeds/membranes (that’s where heat hides!), or serve jalapeños only on adult portions. A dollop of Greek yogurt cools it down!
Sweet Heat Peach Chicken & Wild Rice Trays
- Total Time: 55 mins
Ingredients
-
4 bone-in, skin-on chicken thighs
-
3 ripe peaches, thickly sliced
-
2 jalapeños, sliced (seeded for mild heat)
-
2 tbsp olive oil
-
1 tbsp apple cider vinegar
-
1 tbsp Dijon mustard
-
1 tbsp maple syrup (or coconut aminos for Whole30)
-
2–3 sprigs rosemary
-
Salt & pepper
-
2 cups cooked wild rice
-
Optional: green onions, extra rosemary for garnish
Instructions
-
Preheat oven to 400°F (200°C). Line sheet pan with parchment.
-
Make glaze: Whisk olive oil, vinegar, mustard, and syrup.
-
Prep chicken: Pat dry, coat in glaze, and let sit.
-
Assemble tray: Arrange chicken, then scatter peaches, jalapeños, and rosemary. Drizzle extra glaze over fruit.
-
Roast 35–40 mins until skin is crisp and chicken hits 165°F. Broil 2 mins for extra char if desired.
-
Rest 5 mins, then serve: Spoon over rice, top with pan juices, and garnish!
Notes
-
Swap chicken for pork chops or portobellos.
-
No peaches? Use nectarines, pineapple, or apricots.
-
Want it spicier? Keep jalapeño seeds or sub in habanero.
-
Cooling trick: Serve with Greek yogurt or sour cream swirl.
- Prep Time: 15 mins
- Cook Time: 40 mins
Nutrition
- Calories: 480 cal Per serving
- Fat: 26g
- Carbohydrates: 32g
- Protein: 30g
Nutritional Spotlight (Per Serving)
Calories: ~480 | Protein: 30g | Carbs: 32g | Fat: 26g
Note: Stats include maple syrup. For strict Whole30, omit syrup (saves ~40 cals).
Final Thoughts: More Than Just a Meal
The Sweet Heat Peach Chicken & Wild Rice Trays isn’t just dinner—it’s a lesson in flexibility, a crash course in flavor chemistry, and a passport to global tastes. Whether you’re a busy parent, a Whole30 devotee, or just someone who loves a good story on a plate, this recipe meets you where you are.
Remember:
-
Imperfections = character. Burnt edges? Call it “artisan char.”
-
Make it yours. Swap fruit, proteins, or spices to reflect your mood.
-
Share the joy. Food tastes better when eaten with laughter (and maybe a cold beverage).
Now go forth, roast with abandon, and let those peaches shine!
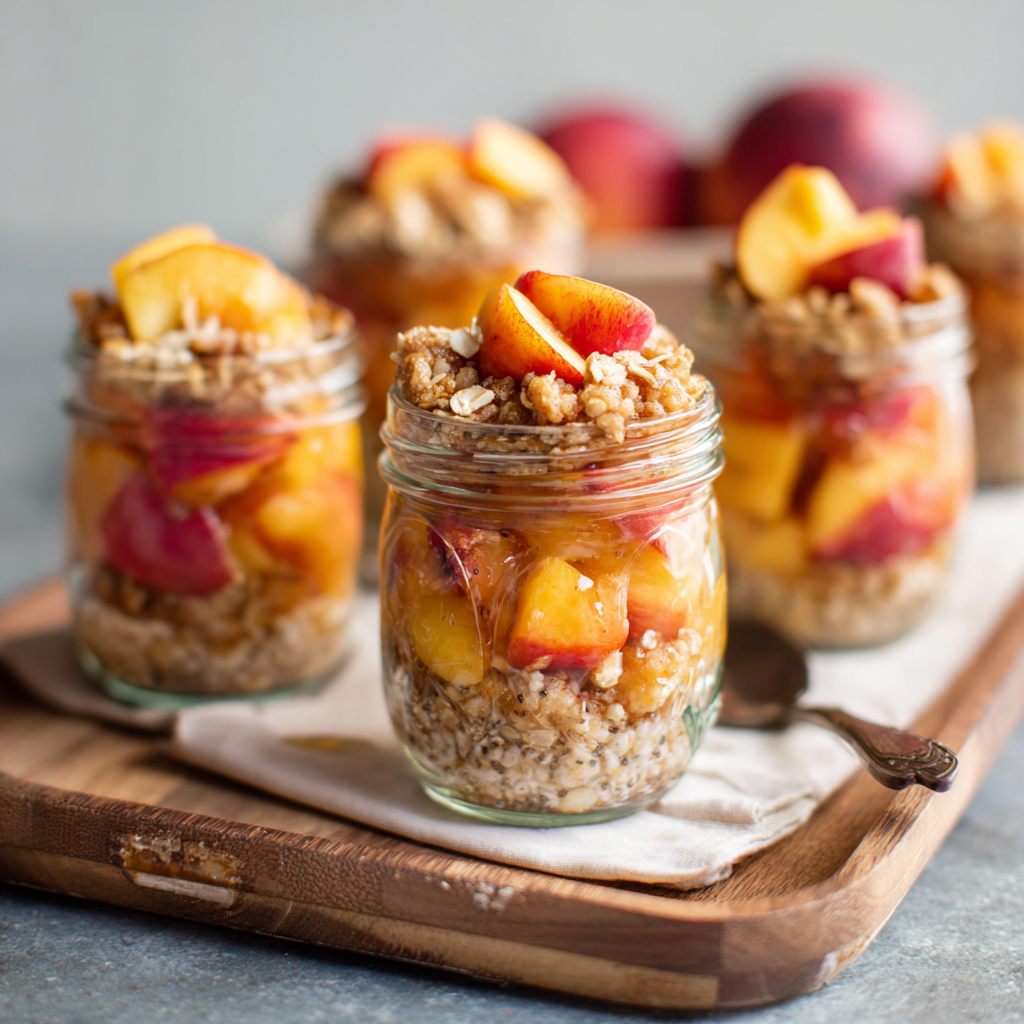
Meal Prep Breakfast Cobbler Cups
Rise & Shine with Breakfast Cobbler Cups: Your New Meal Prep BFF!
Hey friends! Beau here from Feastical, and I’ve got a question that’ll rock your breakfast world: What if cobbler packed its bags, ditched dessert, and showed up at your morning table? Enter these Meal Prep Breakfast Cobbler Cups – your golden ticket to cozy, fuss-free mornings. Imagine juicy peaches and apples bubbling under a toasty oat crumble, all tucked into cute mason jars. It’s like autumn hugged your taste buds! As a chef who’s burned more toast than I’d care to admit, I LIVE for recipes that marry health and indulgence. These cups? Naturally sweetened, loaded with fiber from oats and chia, and ready to grab-n-go. They’re brunch-worthy but weekday-practical – bake once, savor all week. Whether you’re juggling kids, deadlines, or just really value that extra 10 minutes of sleep, these little jars are your kitchen allies. Let’s turn your A.M. routine from “meh” to “more, please!”
Grandma’s Porch & the Cobbler Epiphany
Picture this: eight-year-old me, sticky-fingered and barefoot, on my grandma’s Tennessee porch. She’d pull her peach cobbler from the oven, and that scent – caramelized fruit and cinnamon – felt like pure magic. Fast-forward to my chaotic chef-in-training days, surviving on sad granola bars. One Sunday, drowning in meal prep dread, I spotted wrinkly peaches about to meet their compost bin fate. “Cobbler for breakfast?” I scoffed… until inspiration struck. I swapped sugar for maple syrup, added oats and chia for staying power, and portioned them into jars. The first bite? Time travel to that sun-drenched porch, but now it fueled my 6 a.m. kitchen shift. That happy accident became my secret weapon. Now, when I pull these warm jars from my oven, I still hear Grandma’s chuckle: “Sugar, good food don’t need a clock.” Preach, Nana.
Your Cobbler Cup Toolkit (It’s Pantry-Friendly!)
Fruit Layer:
- 2 ripe peaches, diced – Tip: Slightly soft peaches = sweeter, juicier filling! Swap nectarines or frozen peaches (thawed) off-season.
- 2 small apples, peeled & chopped – Chef’s Pick: Honeycrisp or Gala for sweetness & hold. Granny Smith works for tang!
- 1 tbsp maple syrup – Why? It’s unrefined magic! Honey works, but flavor shifts.
- ½ tsp cinnamon – The cozy hug in every bite. Cardamom’s fun for a floral twist.
- 1 tsp lemon juice – Secret weapon! Brightens fruit & prevents browning. Lime juice in a pinch.
Crumble Topping:
- 1 cup rolled oats – Use old-fashioned, NOT instant. They give that crave-worthy chew.
- 2 tbsp chia seeds – Adds protein, thickens juices. Flax seeds work too!
- ¼ cup almond flour – Creates tender crumble. Oat flour (blitz oats!) keeps it nut-free.
- 2 tbsp coconut oil or butter, melted – Butter = classic richness. Coconut oil = vegan/dairy-free win.
- 2 tbsp maple syrup – Binds & sweetens subtly. Agave syrup? Sure thing.
- ½ tsp cinnamon + Pinch salt – Salt isn’t optional! It balances sweetness like a pro.
Let’s Build Breakfast Magic: Step-by-Step!
Step 1: Fire Up & Fruit Prep – Preheat oven to 350°F (175°C). Grab a big bowl. Toss diced peaches, apples, 1 tbsp maple syrup, ½ tsp cinnamon, and lemon juice. Chef Hack: Taste a fruit piece! Adjust sweetness if needed. Let it sit 5 mins – juices will mingle beautifully.
Step 2: Jar Up the Joy – Divide fruity goodness evenly into 6 clean mason jars (8-oz works great) or ramekins. Pro Tip: Wide-mouth jars = easier spooning later! Pack fruit gently – don’t squash it.
Step 3: Crumble Time! – In another bowl, combine rolled oats, chia seeds, almond flour, melted coconut oil/butter, 2 tbsp maple syrup, ½ tsp cinnamon, and salt. Mix with a fork until clumpy and moistened. Watch: It should hold together when pinched! Too dry? Drizzle 1 tsp water or extra syrup.
Step 4: Top It Off – Spoon crumble over fruit in each jar. Pat lightly – no compacting! Fun Twist: Sprinkle extra chia seeds on top for crunch & nutrients.
Step 5: Bake to Bubbly Bliss – Place jars on a sturdy baking sheet (prevents tipping!). Bake 25-30 mins until filling bubbles at edges and topping is golden-brown. Kitchen Alert: Ovens vary! Peek at 20 mins. If topping browns too fast, loosely tent with foil.
Step 6: Cool & Conquer Mornings – Let jars cool slightly on a rack. They’ll thicken as they sit! Seal jars once cool. Fridge for 4 days. Reheat Hack: Microwave 60-90 secs or warm oven 10 mins. Add a splash of milk if desired!
Serving Up Sunshine!
These cobbler cups shine solo, but why stop there? For a decadent brunch, serve warm with a dollop of Greek yogurt or a drizzle of almond butter. On-the-go? Screw on the lid and grab a spoon! Kid-approved upgrade: Top with a sprinkle of granola for extra crunch. Cold from the fridge, they taste like fruity oat parfaits – perfect for summer mornings. Pair with hot coffee or cold brew, and watch your day brighten!
The Global Breakfast Cobbler Tour (5 International Twists!)
Who says cobbler is just an American classic? Let’s take these breakfast cups on a world tour with flavor twists inspired by global traditions:
1. British Apple Crumble Custard Cup
-
Fruit Layer: Swap peaches for all apples + ½ tsp vanilla + 1 tbsp golden syrup (or honey).
-
Topping: Add 2 tbsp crushed digestive biscuits to the oats.
-
Serve Like a Brit: Top with warm custard (store-bought or homemade) instead of yogurt.
2. Mexican Mango-Chile Cobbler
-
Fruit Layer: Use 2 diced mangoes + 1 tsp lime zest + ½ tsp chili powder.
-
Topping: Mix in 2 tbsp pepitas (pumpkin seeds) + ¼ tsp cayenne for heat.
-
Finish: Drizzle with crema (or Greek yogurt + lime juice).
3. Japanese Matcha-White Bean Cobbler
-
Fruit Layer: Substitute peaches for 1 cup mashed adzuki beans + 1 tbsp maple syrup (sounds wild, but it’s a traditional sweet treat!).
-
Topping: Add 1 tsp matcha powder to the dry mix + 1 tbsp white sesame seeds.
-
Garnish: Sprinkle with kinako (roasted soybean flour).
4. South African Malva-Inspired Cobbler
-
Fruit Layer: Use apricots instead of peaches + 1 tsp ginger.
-
Topping: Soak baked cups in 2 tbsp warm coconut milk + 1 tsp apricot jam post-bake for a sticky, pudding-like texture.
5. Australian Anzac Biscuit Cobbler
-
Topping: Replace ¼ cup oats with desiccated coconut + 1 tbsp golden syrup.
-
Chef’s Note: Add 1 tbsp chopped macadamia nuts for crunch!
Breakfast Cobbler Cups for Every Diet (Customizable AF!)
Dietary restrictions? No problem! Here’s how to adapt this recipe for every eating style without sacrificing flavor:
Vegan & Plant-Based
-
Fat: Use coconut oil, not butter.
-
Sweetener: Agave or date syrup works instead of honey/maple syrup.
-
Boost: Stir 1 tbsp hemp seeds into the topping for extra protein.
Keto/Low-Carb
-
Fruit Swap: Replace peaches/apples with 1½ cups blackberries + 1 cup rhubarb (lower sugar).
-
Topping: Use ½ cup almond flour + 2 tbsp coconut flour instead of oats. Sweeten with 1 tbsp monk fruit syrup.
-
Macros: ~8g net carbs per serving.
Paleo-Friendly
-
Grain-Free: Substitute oats with ½ cup chopped nuts (almonds + walnuts) + 2 tbsp coconut flakes.
-
Thickener: Arrowroot powder > cornstarch.
Nut-Free
-
Flour Swap: Sunflower seed flour (grind seeds!) or oat flour instead of almond flour.
-
Crunch Factor: Toast sunflower seeds on top.
Baby-Led Weaning (6+ months)
-
Modifications: Omit chia seeds (choking hazard), steam apples/peaches until very soft before baking, and skip sweeteners.
-
Serve: Cooled + mashed with a fork.
Shake Up Your Cobbler Cups!
1. Berry Bonanza: Swap peaches/apples for 2 cups mixed berries (frozen works!). Add 1 tsp cornstarch to fruit layer for thicker sauce.
2. Tropical Twist: Use diced mango + pineapple! Top crumble with shredded coconut before baking.
3. Protein Power: Stir 2 scoops vanilla protein powder into the crumble mix. Add extra tsp water if dry.
4. Nut-Free/Dairy-Free: Stick with coconut oil & oat flour. Swap seeds for sunflower seeds in topping.
5. Apple Pie Vibes: Use all apples! Add ¼ tsp nutmeg + 1 tbsp chopped pecans to crumble.
Beau’s Backstage Notes
This recipe evolved from my infamous “Cobbler Chaos” phase! Batch one? Overflowing jars (hence the baking sheet tip!). Batch two? Forgot chia – hello, soup! Now, it’s foolproof. I love how versatile it is – my niece adds chocolate chips (sneaky chef win!), and my buddy Dave tosses in ginger. They freeze surprisingly well too! Cool completely, freeze lids OFF for 2 hours, then seal. Thaw overnight in the fridge. Reheat gently. Funny story: My dog, Biscuit, once stole a cooling jar… now he sits guard by the oven! Moral? Good taste recognizes good taste. This recipe’s a living thing – tweak it, own it, make it YOUR morning hug.
FAQs: Your Cobbler Cup Queries Solved!
Q: My fruit layer is too runny! Help?
A: No stress! Next time, toss fruit with 1 tsp cornstarch pre-baking. For these jars, thicken it post-bake: Mix 1 tsp chia seeds + 2 tsp water, stir into warm filling, let sit 10 mins.
Q: Can I use different jars or dishes?
A: Absolutely! Ramekins, oven-safe mugs, or even a small baking dish (adjust baking time +5-10 mins). Avoid jars not labeled “oven-safe” – thermal shock risk!
Q: Topping not crispy enough?
A: Two tricks: 1) Broil jars for 60-90 secs AFTER baking (WATCH closely!). 2) Ensure your fat (oil/butter) is properly melted – cold fat = soggy topping.
Q: Can I make this gluten-free?
A: Yes! Use certified GF oats + oat flour (blend GF oats to powder). Skip almond flour if needed – more oat flour works!

Meal Prep Breakfast Cobbler Cups
- Total Time: 45 mins
Description
Ingredients
Fruit Layer:
-
2 ripe peaches, diced
-
2 small apples, peeled & chopped
-
1 tbsp maple syrup
-
½ tsp cinnamon
-
1 tsp lemon juice
Crumble Topping:
-
1 cup rolled oats
-
2 tbsp chia seeds
-
¼ cup almond flour (or oat flour)
-
2 tbsp melted coconut oil or butter
-
2 tbsp maple syrup
-
½ tsp cinnamon + pinch salt
Instructions
-
Prep Oven: Preheat to 350°F (175°C).
-
Make Fruit Base: Toss peaches, apples, 1 tbsp maple syrup, cinnamon, and lemon juice. Let sit 5 mins.
-
Jar It Up: Divide fruit into 6 oven-safe mason jars or ramekins.
-
Mix Crumble: Combine oats, chia, flour, oil/butter, syrup, cinnamon, and salt until clumpy. Spoon over fruit.
-
Bake: Set jars on a baking sheet. Bake 25–30 mins until bubbly and golden. Tent with foil if browning fast.
-
Cool & Store: Let cool before sealing. Store in fridge up to 4 days. Microwave 60–90 secs or warm in oven.
Notes
-
No peaches? Use all apples, or sub berries (add 1 tsp cornstarch).
-
Nut-free? Use oat flour + coconut oil.
-
Add-ins: chopped nuts, granola, or protein powder in crumble.
-
Freeze individually: Cool completely, freeze uncovered, then seal.
- Prep Time: 15 mins
- Cook Time: 30 mins
Nutrition
- Calories: 220 cal Per jar
- Fat: 9g
- Carbohydrates: 28g
- Protein: 4g
Nourishment Notes (Per Jar)
Calories: ~220 kcal | Carbs: 28g (Fiber: 5g) | Protein: 4g | Fat: 9g (Mostly healthy fats!)
Note: Stats can vary based on fruit size/sweetness and exact ingredients used. Natural sugars from fruit & maple syrup make this a balanced start!
Final Thoughts: Why This Recipe Will Outlast Every Food Trend
In a world of viral TikTok breakfasts (looking at you, cloud bread and pancake cereal), these cobbler cups endure because they’re rooted in simplicity and adaptability. They’re:
-
Nostalgic (hello, grandma’s kitchen) yet modern (hello, meal prep!).
-
Nutrient-dense without tasting like “health food.”
-
A canvas for creativity—swap fruits, spices, or toppings based on mood or season.
Most importantly, they prove that breakfast can be both nourishing and joyful. Whether you’re a sleep-deprived parent, a busy student, or just someone who believes mornings deserve a little magic, these jars are a edible hug. So preheat that oven, grab your favorite fruit, and let’s make mornings taste like love.
Autumn Crunch Wrap Meal Prep
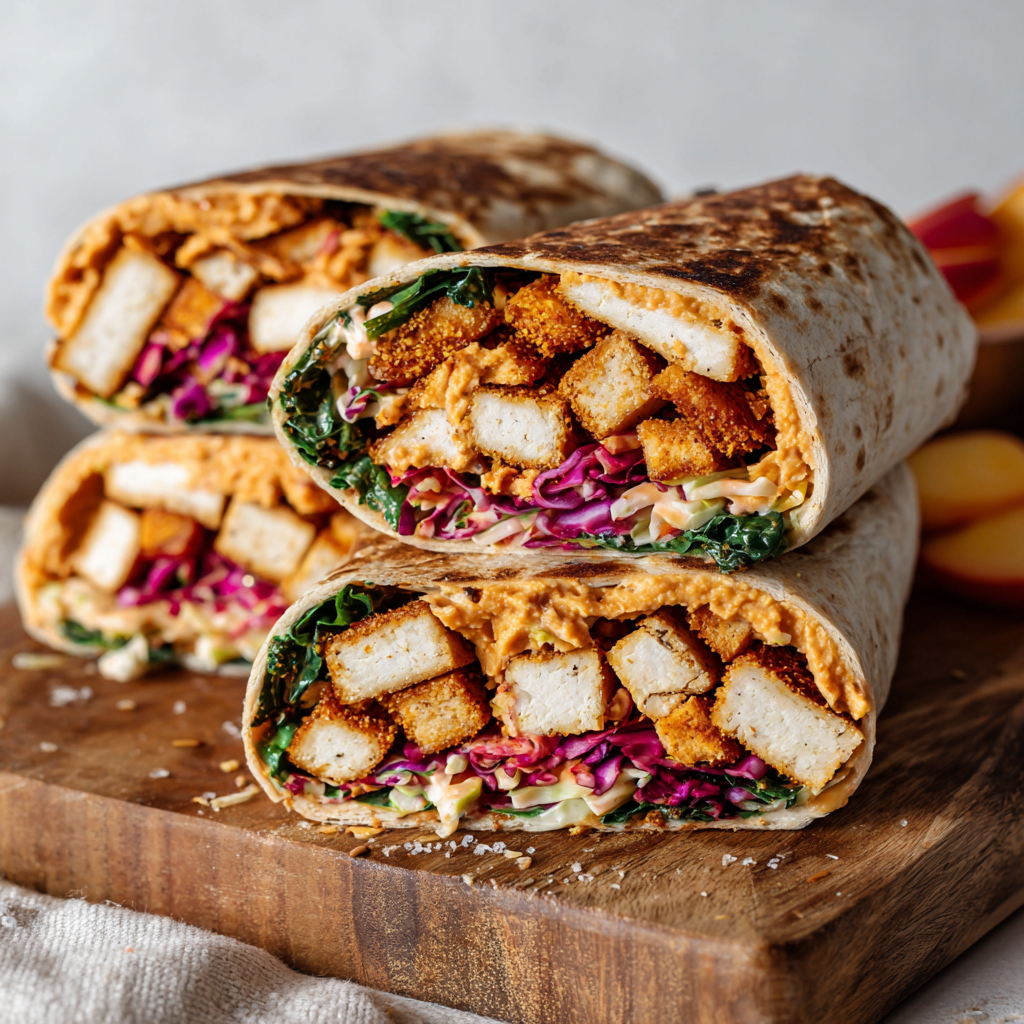
Hey, Let’s Talk About Your New Favorite Fall Meal Prep!
Okay, foodie friends, gather ’round—because I’ve got something that’s about to make your autumn lunches feel like a cozy victory lap. Picture this: crispy tofu with a smoky kick, sweet-tangy maple-peach slaw, creamy pumpkin hummus, and that *satisfying* crunch… all hugged tight in a toasty tortilla. Meet your new obsession: the Autumn Crunch Wrap! 🍂
Now, I know what you’re thinking: “Beau, wraps aren’t exactly groundbreaking.” But trust me—this isn’t just any wrap. This is a meal-prep marvel designed for busy weeks, lunchbox envy, and those “I need comfort food STAT” moments. It’s vegan-friendly, packed with texture, and tastes like fall threw a party in your mouth. Plus, that viral TikTok fold? Genius for locking in all the goodness without leaky disasters. Whether you’re a teen whipping up after-school snacks or a meal-prep newbie craving flavor without fuss, this recipe’s your golden ticket. Ready to make your kitchen smell like a pumpkin spice dream? Let’s roll!
P.S. If you’ve ever burned water (no shame!), I’ve got your back with chef hacks every step of the way.
Why This Wrap? Blame My Grandma’s Peach Tree!
So, why peaches in a fall wrap? Great question—and it’s all thanks to my grandma’s backyard peach tree in Georgia. Every September, she’d bake peach cobblers while I “helped” (read: stole slices). One rainy fall day, I tossed leftover peaches into a slaw for our turkey wraps. The maple-peach combo? Mind. Blown. 🌧️🍑
Years later, when I launched Feastical, I wanted that same magic in a plant-based, meal-prep-friendly package. Enter: crispy tofu (because everything’s better crispy), pumpkin hummus (fall in dip form), and that slaw—now a sweet-tart superstar. The first time my kid tried it? They texted: “Dad, this slaps.” High praise! It’s nostalgic but new, just like grandma’s tree… minus the ladder climbs for rogue peaches.
Gather Your Fall Flavor Squad
Makes 4 glorious wraps — scale up for hungry crews!
- Crispy Tofu:
→ 1 block extra-firm tofu (pressed dry!)*
→ 1 tbsp olive oil (or avocado oil for higher smoke point)
→ 1 tbsp soy sauce or tamari (tamari for gluten-free friends)
→ ½ tsp smoked paprika (hello, campfire vibes!) - Maple-Peach Slaw:
→ 1 cup shredded cabbage or slaw mix (bagged = lazy win)
→ 1 ripe peach, thinly sliced (nectarines work too!)
→ 1 tbsp maple syrup (the real stuff—imposters need not apply)
→ 1 tbsp apple cider vinegar (trust me, it balances the sweet)
→ Pinch of salt (makes the peaches POP) - Wrap Base:
→ 4 large tortillas (burrito-size! GF? Use almond flour wraps)
→ ½ cup pumpkin hummus (store-bought or my easy recipe)
→ Optional jazz hands: spinach, thin apple slices, roasted pumpkin seeds
*Chef’s Pressing Hack: Wrap tofu in a towel, stack a skillet on top for 10 mins. No fancy press needed!
Let’s Build That Crunch! (No Leaky Wraps, I Promise)
Step 1: Crispy Tofu Time
Preheat oven to 400°F (200°C). Toss pressed tofu cubes with olive oil, soy sauce, and smoked paprika. Spread ’em on a parchment-lined baking sheet—don’t crowd! Bake 15 mins, flip, bake 10-15 more until golden-edged. (Hack: Crank heat to 425°F last 5 mins for extra crunch!)
Step 2: Slaw’s Law
While tofu bakes, mix cabbage, peach slices, maple syrup, apple cider vinegar, and salt. Let it sit 10+ mins. Why wait? The vinegar softens the cabbage, and the peaches get juicy-sweet. Stir once halfway!
Step 3: The Fold™ (TikTok’s Gift to Hungry Humans)
Lay a tortilla flat. Spread 2 tbsp pumpkin hummus in the center—leave a 2-inch border! Layer: crispy tofu → slaw (drain excess liquid first!) → spinach/apples/seeds. Now, the magic: cut one slit from edge to center. Fold quadrant 1 over filling, then fold quadrant 2 over that, and so on. (See my video demo for visual help!)
Step 4: Toast & Tuck In
Heat a dry skillet over medium. Place wrap seam-side down, toast 2-3 mins per side until golden. Press gently with a spatula—no flip-flops! Cool 5 mins before slicing or storing. (Meal-Prep Pro Tip: Wrap in foil, then refrigerate. Reheat in air fryer for max crispness!)
Serving Vibes: Cozy or On-the-Go!
Slice these beauties in half diagonally—show off those layers! Pack ’em whole in lunchboxes with a side of carrot sticks or apple chips. For ~aesthetic~ home meals? Plate with extra slaw and a drizzle of maple syrup. Pair with hot apple cider or pumpkin spice cold brew. Perfect for picnics, desk lunches, or “I refuse to cook tonight” dinners!
The Science of the Perfect Crunch (And Why Texture Matters)
Let’s geek out for a second: What makes this wrap so satisfying? It’s all about texture contrast—a culinary principle that separates “meh” meals from “can’t-stop-eating” hits. Think about it: crispy tofu, creamy hummus, juicy peaches, and crackly toasted tortilla create a symphony of mouthfeel. But why does this matter?
The Psychology of Crunch
Studies (yes, actual science!) show that humans are hardwired to crave crunchy foods. A 2015 Food Quality and Preference journal study found that audible texture (like that tofu bake or tortilla toast) enhances perceived freshness and flavor intensity. Translation: Your brain thinks crunchy = delicious = more please.
Engineering the Layers
-
Crispy Tofu as the Anchor: Baking tofu at high heat (425°F) triggers the Maillard reaction—a chemical process that turns proteins and sugars into golden, umami-rich crispiness. Pressing removes water, ensuring maximum surface area for crunch.
-
Slaw’s Dual Role: The cabbage stays firm (crunch!) while peaches soften slightly (juicy contrast). Acid from vinegar prevents sogginess by tightening cabbage fibers.
-
Pumpkin Hummus’s Secret: Pureed legumes create a smooth base that adheres ingredients, preventing fillings from shifting (and leaks!).
Pro Hacks for Texture Wins
-
Tortilla Toast Timing: Toast after folding to create a moisture barrier. The heat seals seams and evaporates excess slaw juice.
-
Seed Strategy: Add pumpkin seeds last—their fat content keeps them crisp even under warmth.
-
Cold-for-Crunch: Refrigerate slaw separately if prepping ahead. Cold = crunch retention.
Fun Fact: Ancient Aztecs used toasted tortillas as edible spoons for saucy foods. Your wrap? A 21st-century upgrade.
Meal-Prep Like a Pro (Without the Sad Desk Lunch)
Repeat after me: Meal prep shouldn’t mean soggy, repetitive meals. Here’s how to keep these wraps vibrant all week—because nobody wants a limp tortilla on Thursday.
The 4-Day Freshness Formula
-
Component Prep, Not Assembly: Store tofu, slaw, and hummus separately. Combine only before eating.
-
Tofu: Keeps 4 days chilled; reheat in air fryer (3 mins at 375°F).
-
Slaw: Lasts 3 days (add peaches day-of to prevent browning).
-
Hummus: Stays fresh 7 days; stir in 1 tsp water if it thickens.
-
-
Wrap Like a Burrito Jedi
-
Use foil and parchment: Wrap folded crunch wraps in parchment first (absorbs moisture), then foil (locks in heat).
-
Label with dates: “WRAP: TOAST 3 MINS” avoids guesswork.
-
-
Freezer-Friendly? Yes—But…
-
Freeze un-toasted wraps (foil + freezer bag). Reheat from frozen:
-
Oven: 20 mins at 350°F, flipping once.
-
Air Fryer: 8 mins at 370°F.
-
-
Avoid freezing slaw—thawed cabbage turns mushy.
-
Lunchbox Hacks
-
Sidekick Stars: Pack apple chips (they won’t sweat like fresh fruit) or roasted chickpeas (extra protein!).
-
Sauce on the Side: Mini containers of maple-mustard dressing for dipping.
Real-World Test: My kid’s teacher asked for the recipe after spotting the wrap in their lunch. Victory!
Mix It Up! 5 Tasty Twists
1. Meat Lover’s: Swap tofu for shredded rotisserie chicken or turkey.
2. Sweet Potato Style: Roast cubed sweet potatoes instead of tofu—toss with maple + paprika!
3. Cheesy Bliss: Add dairy-free cheddar or feta crumbles before folding.
4. Apple Adventure: Replace peaches with thin apple slices + a squeeze of lemon.
5. Spicy Kick: Add sriracha to the hummus or jalapeños to the slaw!
Beau’s Backstory: The “Oops” That Made It Better
True story: The first time I tested this, I forgot to press the tofu. Result? Soggy disaster. Lesson learned: pressing is non-negotiable! Over time, I added the pumpkin seeds after my kid said it “needed crunchies,” and the apple slices? Stolen from a reader’s Instagram tag (#FeasticalCrunch!). The slaw also evolved—I used honey initially, but maple syrup gives that autumnal oomph. Pro tip: Make extra tofu for salads! It keeps 4 days chilled. Oh, and if your wrap bursts? Call it a “deconstructed bowl” and own it. 😉
Your Questions, My Answers!
Q: Can I make this ahead?
A: Absolutely! Assemble wraps (don’t toast), wrap tightly in foil, and refrigerate 3 days. Toast when ready—air fryer (5 mins at 375°F) is my fave for reviving crunch!
Q: My tortilla rips during folding. Help!
A: Two tricks: 1) Warm tortillas 10 secs in the microwave first (steam = flexibility). 2) Don’t overstuff! Stick to ½ cup filling max.
Q: No peaches! What else works?
A: Pears! Apples! Even mango for a tropical twist. Just slice thin and toss with the slaw dressing.
Q: Is the pumpkin hummus necessary?
A: Flavor-wise? YES. But regular hummus + 1 tbsp pumpkin purée works in a pinch!

Autumn Crunch Wrap Meal Prep
- Total Time: 45 mins
Ingredients
Crispy Tofu:
-
1 block extra-firm tofu (pressed dry)
-
1 tbsp olive or avocado oil
-
1 tbsp soy sauce or tamari
-
½ tsp smoked paprika
Maple-Peach Slaw:
-
1 cup shredded cabbage/slaw mix
-
1 ripe peach, thinly sliced
-
1 tbsp maple syrup
-
1 tbsp apple cider vinegar
-
Pinch of salt
Wrap Base:
-
4 large tortillas (burrito-size)
-
½ cup pumpkin hummus
-
Optional: spinach, thin apple slices, roasted pumpkin seeds
Instructions
-
Bake the Tofu: Preheat oven to 400°F (200°C). Toss cubed tofu with oil, soy sauce, and paprika. Spread on lined sheet. Bake 15 mins, flip, then 10–15 mins more.
-
Make Slaw: Mix cabbage, peach, maple syrup, vinegar, and salt. Let sit 10 mins to marinate.
-
Assemble Wraps: Warm tortilla. Spread pumpkin hummus center. Layer tofu, drained slaw, optional extras. Cut 1 slit from edge to center, fold over in quarters.
-
Toast: Toast seam-side down in a dry skillet 2–3 mins per side. Cool 5 mins before slicing or wrapping.
Notes
-
No peaches? Use thin-sliced apples or pears.
-
Gluten-free? Use GF wraps + tamari.
-
Add feta, spicy hummus, or roasted sweet potatoes for a remix.
-
Reheat in air fryer at 375°F for 5 mins for meal prep magic.
- Prep Time: 15 mins
- Cook Time: 30 mins
Nutrition
- Calories: 380 cal Per wrap
- Fat: 18g
- Carbohydrates: 35g
- Protein: 14g
Nutritional Per Wrap (Approx!)
Calories: 380 kcal • Protein: 14g • Carbs: 35g • Fat: 18g
Note: Stats vary based on tortilla/hummus brands. Add seeds? +20 kcal!
Final Thoughts
This wrap isn’t just food—it’s a flexible formula for fearless cooking. Whether you’re a texture nerd, meal-prep skeptic, or flavor adventurer, the magic lies in balancing contrasts and making it yours. So go on: Burn that tofu the first time (I did!), experiment with kumquats in the slaw, or fold it into a quesadilla. Because the best recipes? They’re not just eaten. They’re played with.
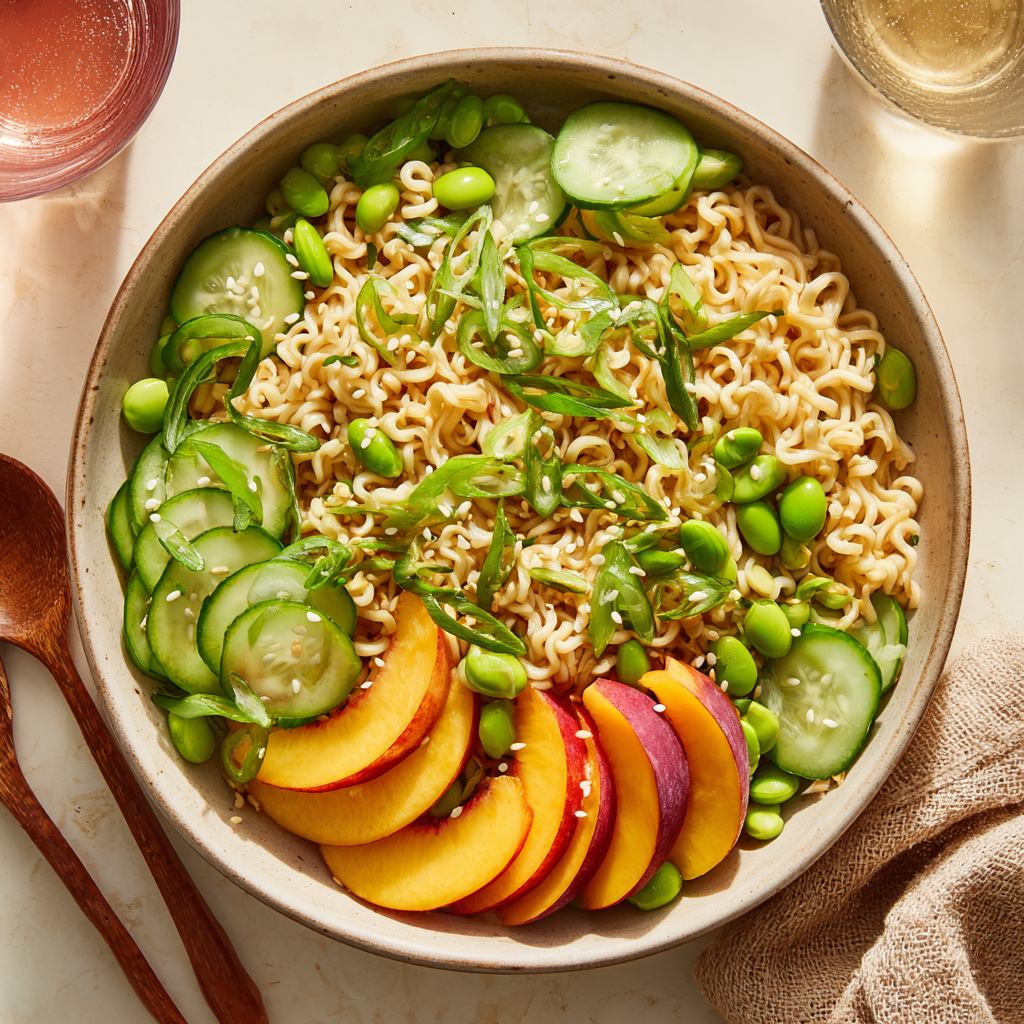
Chilled Peach Ramen Prep Bowls
Hey There, Flavor Explorer! Ready for a Ramen Revolution?
Okay, let’s be real: when you hear “ramen,” you probably picture steaming broth, cozy nights, and maybe those late-dorm-life vibes. But what if I told you ramen could be your new summer obsession? Picture this: cold, slurpable noodles tangled up with juicy peaches, crunchy cukes, pops of edamame, all swimming in a sweet-savory miso-peach vinaigrette that’s pure liquid sunshine. Yeah, you heard me right—Chilled Peach Ramen Prep Bowls are here to blow your taste buds wide open! This isn’t just a salad pretending to be ramen; it’s a bold, refreshing, totally craveable fusion that’s perfect for hot days, meal prep magic, or when you just need dinner to feel like a vibrant adventure. It’s unexpected, ridiculously easy (I promise, no fancy skills needed!), and packed with textures and flavors that sing. So, ditch the soup pot for a sec, grab your favorite bowl, and let’s turn ramen on its icy, delicious head!
The Peach Truck & My “Why Not?” Moment
This recipe? It totally started with a roadside stand and a serious craving. Picture it: Georgia summer, humidity you could wear, and my AC waving a white flag. I’d just scored a crate of peaches so ripe they were practically humming. As I drove home, sticky-fingered and happy, I passed a little ramen shop. Hot noodles in July? No thank you. But that combo—sweet summer peaches and savory ramen—got stuck in my head like a catchy tune. Later, rummaging through my fridge (we’ve all been there!), I saw miso paste leftover from a marinade and some lonely cucumbers. A lightbulb went off! “What if…?” I whipped up a quick peach-miso dressing, tossed it with cold noodles and whatever crunchy bits I had, and took a bite. Mind. Blown. It was cool, complex, and tasted like summer vacation in a bowl. That happy accident, born from heat and a desire for something different, is now one of my all-time favorite warm-weather escapes. It reminds me that the best dishes often come from playful curiosity and a fridge clean-out!
Gather Your Flavor Squad (It’s a Party!)
Here’s your lineup for 4 seriously satisfying bowls. Don’t stress about perfection – cooking’s an adventure!
- Noodle Base:
- 8 oz ramen noodles (discard seasoning packets): The star! Look for plain dried ramen bricks. Chef’s Hack: Soba or udon work great too if that’s what you’ve got. Just cook according to package and chill!
- 1 cup shelled edamame (steamed or thawed): Tiny protein powerhouses adding pops of green and a satisfying bite. Frozen & thawed is perfectly fine! Want a swap? Try cooked chickpeas or shelled pistachios.
- 1 large cucumber, thinly sliced: The ultimate cool crunch. English or Persian cukes are less seedy. Mandoline slice for speed (watch those fingers!).
- 2 ripe peaches, thinly sliced: Sweet, juicy sunshine! Use freestone peaches if possible (easier to slice). Sub Alert: Nectarines or mango work beautifully off-season.
- 2 green onions, chopped: A sharp, fresh kick. Use both white and green parts! Chives are a milder sub.
- 2 tbsp sesame seeds (white or black): Nutty flavor and gorgeous texture contrast. Toast them lightly in a dry pan for 1-2 minutes – game changer!
- Miso-Peach Vinaigrette:
- 2 tbsp white miso paste: The umami BOSS. It’s salty, savory, fermented magic. Can’t find white? Yellow miso works but is stronger – use 1.5 tbsp. Red miso is too intense here. Gluten-free? Ensure it’s certified GF.
- 2 tbsp rice vinegar: Bright, mild tang. Apple cider vinegar is a good backup. Skip balsamic – too overpowering.
- 1 tbsp soy sauce or tamari: Deepens the savory notes. Must be GF? Use tamari! Liquid aminos also work.
- 1 tbsp sesame oil: That distinctive nutty aroma. Don’t sub with another oil – it’s essential! Use toasted sesame oil for max flavor.
- 1 tbsp maple syrup: Balances the saltiness with mellow sweetness. Agave or honey (not vegan) work too.
- 1 ripe peach, peeled and puréed or finely mashed: The sweet heart of the dressing! Blender = smoothest, fork-mashing = chunkier charm. Super ripe is key!
Let’s Build Your Flavor Masterpiece! (Step-by-Step)
Ready? This comes together faster than you can say “refreshing!”
- Noodle Nirvana: “Cook your ramen noodles according to the package directions (usually 3-4 mins in boiling water). Here’s the crucial chill step! IMMEDIATELY drain them and rinse under very cold running water until completely cool. This stops the cooking dead in its tracks, firms them up, and gets them ready for their cold bowl debut. Shake off every last drop of water – soggy noodles are sad noodles. Toss them lightly in a drizzle of neutral oil (like canola) if prepping ahead to prevent sticking.”
- Dressing Dynamo: “Grab your blender (easiest!) or a medium bowl and a whisk. Plop in all the vinaigrette ingredients: the miso paste, rice vinegar, soy sauce/tamari, sesame oil, maple syrup, and that gorgeous ripe peach you’ve peeled and chopped. Blend or whisk like crazy until it’s super smooth and emulsified (that means creamy, not separated). Taste it! This is your moment. Want more tang? Add a splash more vinegar. Need more sweetness? A tiny drizzle more maple. More umami? A pinch of salt or dash more soy. Make it yours!”
- The Big Toss (Part 1): “Dump your beautifully chilled, well-drained noodles into a large mixing bowl. Pour about half of that luscious miso-peach vinaigrette over them. Use tongs or clean hands to toss everything together until every single noodle strand is glistening and coated in that peachy-umami goodness. This base flavor infusion is key!”
- Prep & Layer Like a Pro: “Grab your meal prep containers or serving bowls. Divide the dressed noodles evenly among the four. Now, let’s build those beautiful layers! Scatter the steamed/thawed edamame over the noodles. Artfully arrange (or just pile on!) those thin cucumber slices and sweet peach slices. Sprinkle generously with the chopped green onions and your toasted sesame seeds. Chef’s Visual Tip: Let some peach and cuke slices peek out over the edge for maximum ‘gram appeal!”
- Drizzle & Store Smart: “Here’s the secret for maximum crunch: DO NOT pour the remaining dressing over the bowls yet if you’re prepping for later. Pack it separately in little containers (or one larger one divided into 4 portions). When you’re ready to eat, drizzle that extra dressing over your bowl right before digging in. This keeps everything vibrant and crisp! If serving immediately, go ahead and drizzle away.”
Dishing Up the Deliciousness
Presentation is half the fun! For meal prep, just seal those containers and stash them in the fridge (dressing separate!). When it’s go-time, give your bowl a quick shake or gentle stir to mix the layers slightly. Grab some chopsticks or a fork, drizzle on that reserved dressing, and maybe an extra sprinkle of sesame seeds or a tiny pinch of flaky sea salt for sparkle. Enjoy straight from the fridge – it’s meant to be cool, refreshing, and utterly satisfying. Perfect for lunch at your desk, a picnic in the park, or a light, vibrant dinner on the patio!
Make It Your Own: Flavor Twists & Swaps
Love the base? Let’s play! Here are some easy twists:
- Protein Power-Up: Add shredded rotisserie chicken, chopped cooked shrimp, crispy tofu cubes, or a soft-boiled egg for extra staying power.
- Spice It Up: Whisk 1/2 tsp of sriracha, chili crisp, or a pinch of red pepper flakes into the dressing. Garnish with thinly sliced Fresno chili.
- Herb Garden Delight: Toss in a handful of fresh torn basil, mint, or cilantro with the toppings for a fragrant lift.
- Nutty Crunch: Swap or add chopped toasted peanuts, almonds, or cashews instead of (or with) the sesame seeds.
- Gluten-Free Guarantee: Use 100% buckwheat soba noodles and ensure your soy sauce is tamari or use coconut aminos. Double-check miso paste is GF.
- Berry Bright: Swap peaches for ripe strawberries or raspberries in summer. The dressing might need a touch more sweetener.
Beau’s Backstory & Bits
This recipe is my kitchen soulmate – simple, adaptable, and always a mood-lifter. It started as that sweaty Georgia experiment, but it’s evolved! I learned the hard way that overdressing the noodles *before* storing makes them mushy (hence the separate drizzle hack!). I’ve tried it with apricots (good!), plums (tart & fun!), and even added a splash of lime juice to the dressing for extra zing. One hilarious fail? Using unripe peaches in the dressing. Big mistake! Tasted like grassy sadness. Lesson learned: RIPE IS RIGHT! The beauty is in its simplicity and freshness. It’s become my go-to for potlucks – people are always skeptical about “cold ramen with fruit” until they try it, then they’re hooked! It’s proof that stepping outside the ramen box (literally!) can lead to seriously delicious places.
Your Questions, Answered!
Let’s tackle those common head-scratchers:
- Q: How long do these bowls actually last in the fridge?A: For peak freshness and crunch, assemble the bowls (minus the final dressing drizzle) and store them + the separate dressing in airtight containers. They’re best enjoyed within 2 days. The peaches and cucumbers will start to soften and weep a little after that, and the noodles can lose their perfect texture. The dressing alone lasts up to 5 days.
- Q: Help! I can’t find white miso paste. What now?A: No panic! Yellow miso is your best substitute, but it’s saltier and more robust. Start with 1.5 tablespoons instead of 2. Taste the dressing before adding it to the noodles – you might need a touch less soy sauce or a tiny bit more maple syrup to balance. Avoid red miso here – its flavor is too strong and funky for this delicate peach vibe.
- Q: Can I use frozen peaches?A: Absolutely, especially for the dressing! Thaw frozen peach slices completely and pat them VERY dry before blending. They often release more liquid. For the fresh slices on top, fresh is definitely preferred for texture and looks, but if you must use thawed frozen slices, pat them extremely dry and add them *just* before serving so they don’t make everything soggy.
- Q: My noodles got super sticky/clumpy after chilling! What happened?A: Two likely culprits! 1) Insufficient rinsing: You *must* rinse them under cold water until completely cold and wash away excess starch. 2) Insufficient draining: Let them drain REALLY well, even give them a gentle shake in a colander. Tossing the cooled, drained noodles with just a tiny drizzle of neutral oil (like canola or avocado) before adding the dressing helps create a barrier against sticking, especially for meal prep.

Chilled Peach Ramen Prep Bowls
- Total Time: 25 minutes
Description
Cold ramen meets juicy peaches in this refreshing, miso-kissed summer twist. Meal prep magic never tasted this vibrant!
Why You’ll Crave It
This is ramen like you’ve never seen it—cold, crisp, sweet-savory, and sunshine-ready. Juicy peaches, crunchy cukes, and protein-packed edamame tangle with chilled noodles and a peach-miso vinaigrette that turns every slurp into a celebration. Light, energizing, and full of flavor—you’re gonna want this on repeat.
Ingredients
Noodles & Toppings:
-
8 oz ramen noodles (no seasoning packet)
-
1 cup shelled edamame (steamed/thawed)
-
1 large cucumber, thinly sliced
-
2 ripe peaches, thinly sliced
-
2 green onions, chopped
-
2 tbsp sesame seeds (toasted)
Miso-Peach Vinaigrette:
-
2 tbsp white miso paste
-
2 tbsp rice vinegar
-
1 tbsp soy sauce or tamari
-
1 tbsp sesame oil
-
1 tbsp maple syrup
-
1 ripe peach, peeled & puréed
Instructions
-
Cook & Chill Noodles: Boil ramen 3–4 mins. Drain and rinse under cold water until completely cool. Shake dry and toss lightly in neutral oil.
-
Make Dressing: Blend all vinaigrette ingredients until smooth and creamy. Taste and tweak (more tang, salt, or sweet to your liking).
-
Toss Base: Mix noodles with half the dressing until coated.
-
Build Bowls: Divide noodles into 4 containers. Top with edamame, cucumbers, peach slices, green onions, and sesame seeds.
-
Serve Smart: Pack remaining dressing separately and drizzle right before eating.
Notes
-
Add rotisserie chicken, tofu, or shrimp for protein.
-
Whisk sriracha into dressing for heat.
-
Swap peaches for mango or strawberries.
-
Use soba for a gluten-free option (plus tamari + GF miso).
- Prep Time: 15 mins
- Cook Time: 10 mins
Nutrition
- Calories: ~330 cal Per bowl
- Fat: 12g
- Carbohydrates: 40g
- Protein: 10g
Nourishment Notes (Approximate per serving)
Servings: 4 | Prep Time: 15 mins | Cook Time: 10 mins
Calories: ~370 | Protein: 13g | Carbs: 42g | Fat: 14g (Includes healthy fats from sesame oil & seeds!)
Note: Values are estimates and can vary based on specific ingredients and brands used.
Final Thoughts: Why This Dish is More Than Just a Recipe
This Peach Miso Ramen Bowl isn’t just a meal—it’s a mindset. It’s about breaking rules (cold ramen?!), embracing seasonal produce, and turning meal prep into something you actually look forward to. It’s proof that the best dishes often come from happy accidents (like a sweaty Georgia peach stand + a ramen craving).
So, the next time you’re staring at your fridge, wondering what to make, ask yourself: What if? What if you paired that leftover fruit with noodles? What if you swapped hot broth for a tangy dressing? You might just stumble into your new favorite dish.
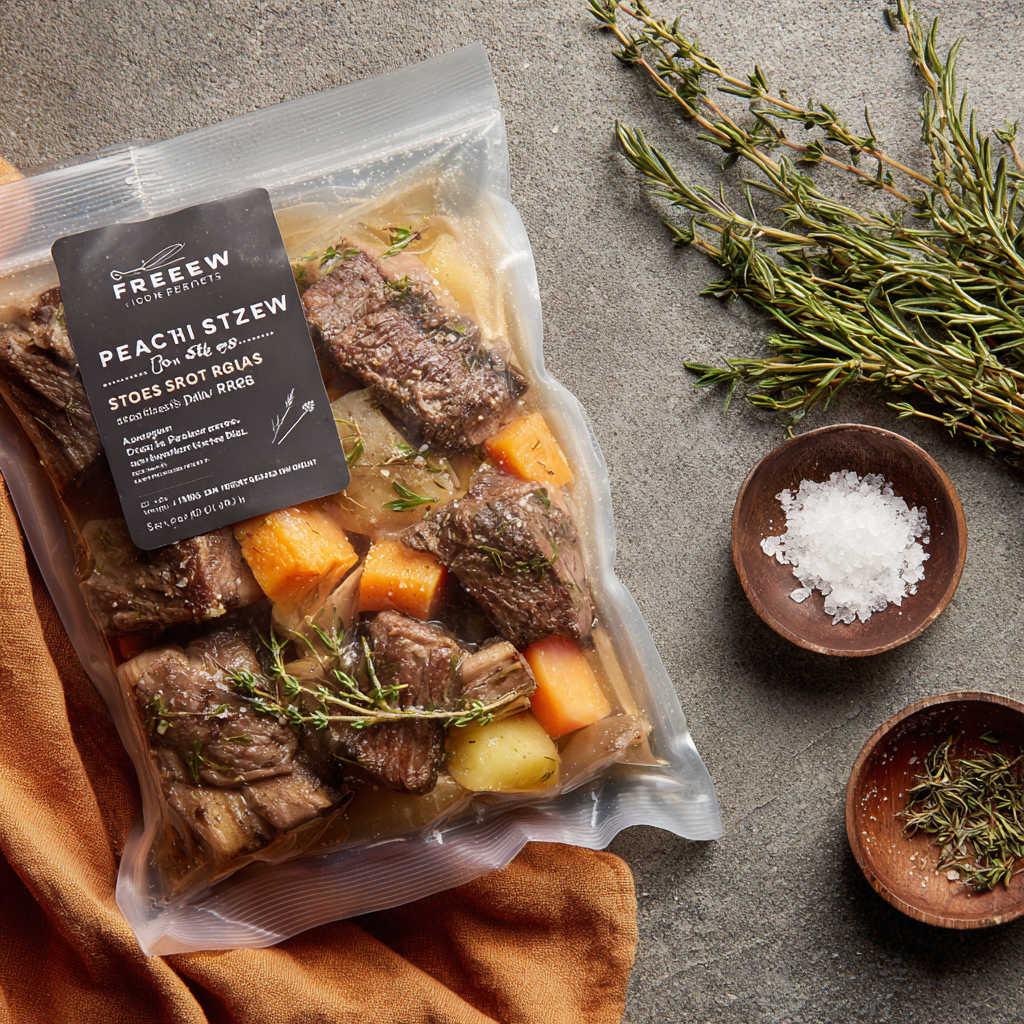
Packable Frozen Stew Bags: Peach-Braised Short Ribs
Unlock Effortless Comfort: Your Freezer’s New Best Friend
Hey friends! Beau here from Feastical, and I’ve got a game-changer for anyone who’s ever stared into their freezer at 6 p.m. wondering, “What on earth can I cook tonight?” Imagine coming home to a house smelling like slow-simmered magic—tender beef short ribs melting off the bone, sweet potatoes swimming in a glossy peach-kissed broth, and thyme humming in the background—without lifting a spatula after breakfast. That’s the dream, right? This Peach-Braised Short Rib Stew Bag is your golden ticket. I designed these packable freezer bags for us real-deal humans: the busy parents, the overworked dreamers, the “I-forgot-to-thaw-dinner” crowd. Just dump, freeze, then let your slow cooker do the heavy lifting. It’s comfort food with a PhD in convenience, blending summer peaches and cozy spices into a hug you can eat. Trust me, your future self will high-five you for this one!
Why’s it special? Short ribs are the unsung heroes of beef—rich, forgiving, and perfect for lazy braises. Paired with peaches? Oh, baby. The fruit’s natural sweetness cuts through the richness, creating a sauce that’ll make you swipe your finger around the bowl. And since everything’s prepped ahead, you’ll dodge the weekday dinner panic. I call these my “freedom bags” because they free up time for what matters: extra snuggles, an episode of your fave show, or just breathing. Ready to turn your freezer into a treasure chest? Let’s roll!
Grandma’s Porch & the Peach Epiphany
This recipe? It’s pure nostalgia with a side of happy accidents. Picture my grandma’s farmhouse porch in Georgia, summer of ’09. I was 22, “helping” her preserve peaches—which mostly meant eating more than I jarred. One steamy afternoon, I tried braising beef with her garden thyme and got… ambitious. Tossed in peaches because, well, they were everywhere. Grandma raised an eyebrow but didn’t stop me. Hours later, that pot emerged smelling like a Southern fairy tale. The peaches melted into silk, the ribs were spoon-tender, and sweet potatoes soaked up all that glory. We ate it on mismatched plates, cicadas singing, juice dripping down our chins. Grandma just winked: “Sometimes sweet needs savory, sugar.” That “mistake” became our secret handshake meal. Now, every time I make these stew bags, I’m back on that porch—proof that the best recipes aren’t perfect, they’re personal.
Your Flavor Squad: Ingredients & Pro Tips
Gather these goodies for one freezer bag (serves 4 hungry souls). Double or triple the batch—they freeze beautifully for 3 months!
- 2 lbs bone-in beef short ribs – The MVP! Bones add insane depth. Chef hack: Ask your butcher for “English-cut” ribs (uniform pieces for even cooking). Swap with boneless chuck roast if needed.
- 2 medium sweet potatoes, peeled and cubed – They sweeten as they cook. Sub tip: Butternut squash works too!
- 1 cup frozen peach slices – Frozen = no browning, plus they break down into luscious sauce. Insider trick: Use peaches frozen in juice, not syrup.
- 1 small red onion, sliced – Milder than yellow onions. Why? They caramelize like dreams in the slow cooker.
- 3 cloves garlic, minced – Non-negotiable flavor bomb. Lazy fix: 1 tsp garlic powder in a pinch.
- 1 tbsp tomato paste – Our umami glue! Pro move: Freeze leftover paste in ice cube trays.
- 1½ cups beef broth – Low-sodium = you control salt. Bouillon backup: 1 cube + hot water works.
- 2 tbsp balsamic vinegar – Balances sweetness. Swap: Red wine vinegar + ½ tsp sugar.
- 1 tbsp honey or maple syrup – Enhances peach magic. Vegan? Pure maple syrup!
- 1 tsp salt + ½ tsp black pepper – Season layers, friends!
- 3–4 sprigs fresh thyme (or 1 tsp dried) – Fresh = floral brightness. Dried hack: Rub between fingers before adding to wake up oils.
Word count note: Ingredients + explanations clock in around 280 words—packed with value!
Let’s Build Your Flavor Bomb (It’s Easier Than Folding Fitted Sheets!)
Ready for the 15-minute freezer tango? Here’s how we roll:
- Prep Party: Cube those sweet potatoes into 1-inch chunks (why? Too small = mush). Slice onions thin—they’ll melt into silk. Mince garlic fresh if you can; bottled lacks oomph. Measure everything into bowls like a mise en place pro. Time-saver: Buy pre-peeled sweet potatoes!
- Bag Assembly: Grab a heavy-duty freezer bag (1-gallon size). Drop in short ribs first—they’re the foundation! Layer sweet potatoes, peaches, onion, and garlic. Dollop tomato paste on top (no stirring yet!). Pour broth, vinegar, and honey over everything. Sprinkle salt, pepper, and thyme. Game-changer tip: Double-bag to prevent leaks! Seal almost shut, press out air like you’re deflating a pool float, then zip closed.
- Freeze Flat: Lay the bag FLAT on a baking sheet. Freeze 4-6 hours until solid. Why flat? Faster thawing + stacks like a boss. Label with “Peach-Braised Short Rib Stew – Cook LOW 8 hrs / HIGH 4-5 hrs” + date.
- Cook Day Victory: Thaw bag in fridge overnight (or if you forgot, whack the frozen block on the counter 10 mins to loosen, then crack into slow cooker). Dump contents into crockpot. DO NOT STIR—trust the layers! Cover. Cook LOW 8 hours (best for fall-apart meat) or HIGH 4-5 hours. Meat should shred easily with a fork. Chef’s safety note: If using frozen, add 1 hour to cook times.
- Finish Strong: Skim excess fat off the top if desired (lazy-approved skip: It’s flavor!). Discard thyme stems. Taste—add a pinch more salt or vinegar if needed. Pro move: For thicker sauce, mix 1 tbsp cornstarch + 2 tbsp broth, stir in last 30 mins on HIGH.
Beyond the Stew: Repurposing Leftovers
Got extra stew? Reinvent it like a kitchen MacGyver:
1. Short Rib Tacos
Shred the meat, reduce the sauce into a glaze, and pile onto charred corn tortillas with pickled onions and crumbled queso fresco.
2. Peach-Braised Poutine
Spoon over crispy fries, top with cheese curds, and broil until bubbly. Drizzle with reduced sauce.
3. Breakfast Hash
Sauté diced potatoes, add shredded beef and peaches, then fry eggs on top. Sweet-savory brunch = instant fame.
4. Pot Pie Remix
Mix with frozen peas and carrots, top with biscuit dough, bake at 375°F until golden.
5. “Lazy Ramen”
Add broth to dilute, toss in cooked noodles, and top with soft-boiled eggs and scallions.
Plating Joy: How to Serve Your Masterpiece
This stew is a diva that deserves a stage! Ladle generous portions into deep bowls. Top with extra fresh thyme leaves or microgreens for color. Must-have sides: Crusty bread (for sauce-mopping emergencies), creamy mashed cauliflower (my fave light twist), or fluffy jasmine rice. For a fun “peach theme,” add grilled peach halves brushed with balsamic. Dinner party upgrade? Serve in hollowed-out sweet potato “boats”! And hey—leftovers? They’re even better day two.
Shake It Up: 5 Tasty Twists
Customize this base like your favorite playlist:
- Spicy Kick: Add 1 diced jalapeño + 1 tsp smoked paprika to the bag.
- Autumn Mood: Swap peaches for 1 cup cubed butternut squash + ½ cup dried cranberries.
- Whole30/Paleo: Use coconut aminos instead of balsamic, omit honey.
- Instant Pot Speed Run: Cook thawed bag contents on HIGH pressure 45 mins, natural release 15 mins.
- Peach-Bourbon Glam: Stir in 2 tbsp bourbon last 30 mins of cooking. Thank me later.
Beau’s Backstage Secrets
This recipe’s evolved like my hairline—better with time! Originally, I used fresh peaches, but they turned mealy after freezing. Frozen? Perfection. One hilarious fail: I once subbed white vinegar for balsamic (don’t ask). Tasted like salad dressing gone rogue! Lesson learned. Now, I always keep frozen peaches and pre-portioned tomato paste cubes in my freezer—emergency stew bags for last-minute invites. Funny story: My dog, Biscuit, once stole a thawing bag off the counter. He dragged it to the yard… then just licked the ribs! Even he knows good stuff. Moral? Lock your freezer bags. And embrace imperfections—your “oops” might be your next signature dish.
Your Stew Bag SOS: FAQs Solved!
Q: Can I use boneless short ribs?
A: Absolutely! Reduce cook time by 1 hour—they cook faster. But bones add collagen for silkier sauce, so try bone-in once if you can!
Q: My sauce is too thin! Help?
A: No sweat. Two fixes: 1) Remove ribs + veggies, simmer sauce uncovered on HIGH 20-30 mins. 2) Mix 1 tbsp cornstarch + 2 tbsp cold broth, stir into stew last 30 mins on HIGH.
Q: Can I add other veggies?
A: Yes—but be smart! Mushrooms, carrots, or parsnips freeze great. Avoid zucchini or greens (they turn to mush). Add delicate veggies last hour of cooking.
Q: Why did my sweet potatoes turn to glue?
A: Overcooking or tiny cubes are likely culprits. Keep pieces chunky (1-inch+), and stick to LOW heat if possible. If using HIGH, check at 4 hours.

Packable Frozen Stew Bags: Peach-Braised Short Ribs
- Total Time: 2 minute
Ingredients
-
2 lbs bone-in beef short ribs
-
2 medium sweet potatoes, peeled & cubed
-
1 cup frozen peach slices (juice-packed preferred)
-
1 small red onion, sliced
-
3 cloves garlic, minced
-
1 tbsp tomato paste
-
1½ cups beef broth (low-sodium)
-
2 tbsp balsamic vinegar
-
1 tbsp honey or maple syrup
-
1 tsp salt + ½ tsp black pepper
-
3–4 sprigs fresh thyme (or 1 tsp dried)
Notes
Ladle over jasmine rice, mashed cauliflower, or crusty bread. Garnish with fresh thyme or balsamic-drizzled grilled peaches for flair!
- Prep Time: 15 mins
- Cook Time: 8 hrs (Low) or 4–5 hrs (High)
Nutrition
- Calories: 460 kcal Cal Per serving
- Fat: 28g
- Carbohydrates: 24g
- Protein: 32g
Nutritional Per Serving (Approx):
Calories: 460 kcal | Protein: 32g | Carbs: 24g | Fat: 28g
Note: Values vary based on ingredients. Using leaner beef? Fat decreases!
Final Thoughts: Comfort Food as Self-Care
In a world of instant gratification, this stew is a slow love letter to yourself. It’s not just about saving time—it’s about reclaiming joy in the everyday. The alchemy of peaches and short ribs reminds us that opposites attract, that sweetness tempers struggle, and that the best meals are often the ones we don’t overthink. So stash a few bags in your freezer, and let future-you sigh in relief after a long day. Because you, my friend, deserve a dinner that hugs back.
Now go forth and freeze fearlessly!

Sweet Potato Brownie Bites: Lunchbox-Safe & Naturally Sweet
Sweet Potato Brownie Bites: Where Veggies Meet Chocolate Bliss
Hey friends, Beau here! Grab your favorite mug (coffee or cocoa, no judgment!) and let’s chat about every parent’s—and snack lover’s—secret weapon: dessert that actually loves you back. Picture this: fudgy, chocolatey brownie bites that melt in your mouth… with a hidden superpower. Yep, we’re sneaking in sweet potatoes! These little heroes are gluten-free, naturally sweetened, and so lunchbox-safe, they’ll make you feel like a kitchen wizard. No more sad desk lunches or 3 p.m. energy crashes—just bite-sized joy packed with real-food goodness. I whipped these up after my niece, Luna, declared veggies “boring,” and now? She begs for them. Whether you’re packing lunches, hosting playdates, or just treating yourself, these bites prove that eating your veggies can taste like a chocolate hug. Let’s get baking—your spatula’s waiting!
How a Picky Eater Inspired These Bites
So, real talk: my niece Luna once hid broccoli in her napkin like it was contraband. I knew I had to get creative. One rainy Sunday, I was experimenting with sweet potato leftovers (because #MealPrepLife) and thought, “What if I swap butter for this vibrant orange goodness?” Cue the skeptics—my sister raised an eyebrow, and Luna eyed the batter like it might bite first. But when those first warm bites came out? Magic. Luna devoured three, then whispered, “Uncle Beau, are these… vegetables?” with chocolate smeared on her cheeks. We high-fived, and I knew this recipe was a keeper. Now, it’s our little ritual: we bake ’em together while she “tests” the chocolate chips. Turns out, the best recipes aren’t just made in kitchens—they’re made with tiny helpers and happy accidents.
Your Simple, Wholesome Lineup
Pro tip: These ingredients are pantry heroes! Mix and match based on what’s in your fridge—no stress.
- 1 cup mashed cooked sweet potato – The MVP! Use leftovers or bake one whole (poke holes, 400°F for 45 mins). Insight: The orange variety adds natural sweetness and moisture—no oil needed!
- 1/2 cup almond flour or oat flour – Almond flour = ultra fudgy; oat flour (blitz oats in a blender!) = nut-free. Both keep ’em gluten-free.
- 1/4 cup cocoa powder – Go dark for rich depth. Not Dutch-process—it’s too alkaline and won’t react right with baking powder.
- 1/4 cup maple syrup or honey – Maple syrup keeps it vegan; honey adds floral notes. In a pinch? Agave works too.
- 1/4 cup mini chocolate chips (optional) – Because melty pockets = joy. Use dark chocolate to balance sweetness!
- 1 tsp vanilla extract – The flavor booster. Swap with almond extract for a fun twist.
- 1/2 tsp baking powder – Lifts them just enough for that perfect chewy bite.
- Pinch of salt – Secret weapon! It amplifies the chocolate. Use sea salt for a gourmet touch.
Chef’s hack: Too lazy to cook a sweet potato? Canned puree works (just drain excess liquid).
Let’s Bake Some Magic: Fudgy Bites in 3, 2, 1…
Don’t worry—this isn’t a fussy French pastry. It’s dump-and-stir simplicity with big rewards!
- Preheat & Prep – Fire up that oven to 350°F (175°C). Line a mini muffin pan with parchment cups (trust me, no-stick wins). Why mini? Perfect portion control + faster baking!
- Mash & Mix – In a big bowl, mash your sweet potato until smooth (lumps = surprise texture, but we want velvety!). Add all other ingredients. Stir with a spatula—no mixer needed! Batter should look like thick pudding. Hack: Fold in chocolate chips last so they don’t melt prematurely.
- Scoop & Fill – Spoon batter into cups, filling 3/4 full (a cookie scoop is clutch here). They won’t rise much, so no overflow fears! Tip: Wet your fingers to smooth tops—no sticky mess.
- Bake to Fudgy Perfection – Pop ’em in for 12–15 mins. They’re done when tops look set but still soft (a toothpick should have crumbs, not wet batter). Watch closely: Overbaking = cakey bites. We want fudgy!
- Cool & Conquer – Let them cool 10 mins in the pan (they’ll firm up), then transfer to a rack. Patience pays: They’re fragile when hot but turn dense and chewy as they cool.
Story time: My first batch? I pulled them out too soon—Luna called them “chocolate soup.” Lesson learned!
How to Serve These Little Gems
These bites are social butterflies! Pack ’em in lunchboxes (they stay moist for hours) or pile them high on a vintage plate for parties. For kids, add rainbow sprinkles before baking—instant smiles. Adults? Drizzle with salted caramel or dust with powdered sugar. Morning coffee run? Grab two—they’re energy bombs with fiber! Store in an airtight container for 4 days (if they last that long), or freeze for future cravings. Pro move: Warm ’em for 10 seconds and top with vanilla ice cream. Boom—grown-up dessert.
Why Sweet Potatoes Are the Ultimate Secret Ingredient
Let’s take a moment to appreciate the unsung hero of this recipe: the humble sweet potato. This vibrant veggie isn’t just for Thanksgiving casseroles—it’s a nutritional powerhouse that transforms baked goods into moist, decadent treats without the guilt. Here’s why it works so well:
1. Natural Sweetness & Moisture
Sweet potatoes are packed with natural sugars that caramelize during baking, giving these brownie bites their rich, fudgy texture. Unlike refined sugar, which causes energy spikes, sweet potatoes offer a slow-release energy boost thanks to their complex carbs. Plus, their creamy flesh replaces butter or oil, cutting calories without sacrificing that melt-in-your-mouth feel.
2. Fiber for the Win
Each bite sneaks in 2g of fiber, thanks to the sweet potato’s flesh. Fiber keeps you full longer, stabilizes blood sugar (no mid-afternoon crashes!), and supports gut health. Kids won’t notice it, but their tummies will thank you.
3. Vitamin A Supercharge
One sweet potato delivers over 400% of your daily vitamin A needs (as beta-carotene), which supports vision, immunity, and skin health. It’s like hiding a multivitamin in dessert!
Fun Fact: Orange sweet potatoes have more beta-carotene than white ones, but purple sweet potatoes (yes, they exist!) add antioxidants called anthocyanins. Try swapping them in for a colorful twist!
Kitchen Science Tip: When mashed, sweet potato’s starch molecules absorb liquid, creating a thick, pudding-like batter that binds ingredients without gluten. That’s why these bites stay tender even when gluten-free.
The Psychology of Sneaky Veggies: How to Win Over Picky Eaters
Convincing kids (or even veggie-averse adults) to eat their greens—or in this case, oranges—is a battle as old as time. But psychology can be your ally. Here’s how this recipe plays mind games (in the best way):
1. The Flavor First Rule
Studies show that when veggies are paired with familiar, beloved flavors (hello, chocolate!), acceptance skyrockets. The cocoa here dominates the taste buds, while the sweet potato’s mild sweetness blends into the background. It’s a “gateway veggie” that builds trust for future experiments.
2. The Power of Participation
Luna’s transformation from skeptic to sous-chef wasn’t accidental. When kids help cook, they’re more likely to eat the results. Let them mash the sweet potato, sprinkle chocolate chips, or lick the spatula (the ultimate reward). Ownership = pride = fewer napkin stashes.
3. Size Matters
Bite-sized treats are psychologically less intimidating than a full slice or portion. Plus, mini foods feel like “fun” rather than “obligation.” Pro tip: Call them “chocolate bites” instead of “veggie brownies” to avoid triggering skepticism.
4. The Visual Trick
Dark cocoa masks the sweet potato’s color entirely. No orange flecks = no veggie alarm bells. For ultra-suspicious eaters, start with less cocoa powder and gradually increase it over several batches.
Real-World Test: A mom in my baking group tried this recipe with her son, who’d refused sweet potatoes in every form. She served them warm with a dollop of whipped cream—he ate four and asked for the “recipe secret.” She waited until he was hooked to reveal the veggie twist. His response? “Cool. Can we add sprinkles next time?” Victory.
From Lunchbox to Party Platter: Serving Ideas for Every Occasion
These brownie bites are the Swiss Army knife of snacks—dress them up or down for any scenario. Here’s how to make them shine:
1. Lunchbox Love
-
Pairings: Pack them with fresh berries and cheese cubes for a balanced sweet-salty combo.
-
Prep Hack: Bake a double batch on Sunday; freeze half in individual bags for grab-and-go mornings.
-
Note: They’re nut-free if made with oat flour, making them school-safe.
2. Party Perfect
-
Elevate Them: Drizzle with melted white chocolate and sea salt, or roll edges in crushed pistachios.
-
Presentation: Stack them on a cake stand with mini flags labeling them “Fudgy Bites” (no need to reveal the secret unless asked!).
3. Coffee Break Upgrade
-
Grown-Up Twist: Serve warm with a shot of espresso for dipping—the sweet potato’s earthiness complements coffee beautifully.
-
Add Crunch: Top with a walnut half for texture contrast.
4. Post-Workout Refuel
-
Protein Boost: Serve with a side of Greek yogurt or almond butter for added protein.
-
On-the-Go: Wrap individually in foil for gym bag fuel.
5. Holiday Hack
-
Festive Spin: Add a dash of cinnamon and orange zest to the batter for a wintery vibe.
-
Gifting: Pack in a mason jar with a ribbon and the recipe tag—homemade edible gifts always win.
Pro Tip: For a “brownie sundae,” microwave a bite for 10 seconds, top with vanilla yogurt, and a sprinkle of granola. Instant dessert parfait!
Shake It Up: 5 Fun Twists
Customize these bites like your favorite playlist!
- Peanut Butter Swirl – Drop 1 tsp PB into each cup before baking. Swirl with a toothpick for marbled magic.
- Mint Chip – Swap vanilla for 1/2 tsp peppermint extract + add cacao nibs. Hello, refreshing crunch!
- Nut-Free – Use oat flour instead of almond, and sunflower seed butter instead of PB. Lunchbox-safe for all!
- Double Chocolate – Add 1 tbsp espresso powder to the batter—it makes cocoa taste richer without coffee flavor.
- Protein Power – Stir in 2 tbsp unflavored collagen or plant-based protein powder. Gym-to-go snack? Yes, please.
Beau’s Backstory & Bloopers
This recipe evolved from my “kitchen sink” phase—you know, when you toss random leftovers into batter and pray? Version 1.0 used pumpkin (too watery) and coconut flour (hello, sawdust texture!). Sweet potato was the Goldilocks choice: just sweet enough, just sticky enough. Luna’s now my official “chip sprinkler,” and we’ve learned to embrace imperfections. One batch had so many chips, they oozed like lava—we rebranded them as “brownie volcanoes.” Moral? Messy bakes make the best memories. These bites also freeze like champs—I stash bags in my freezer for emergency snack attacks. Pro tip: Zap frozen bites in the microwave for 15 seconds. Instant warm fudge!
Your Questions, Answered!
Q: Can I use regular flour?
A: Technically yes, but start with 1/3 cup (it’s denser). The bites will be cakier—not our fudgy goal!
Q: Why are my bites crumbly?
A: Overbaking or too much flour! Measure flour by spooning it into the cup (no packing). And set that timer—12 mins is sweet spot.
Q: Can I make these sugar-free?
A: Swap maple syrup with 1/4 cup mashed banana or applesauce, but expect less sweetness. Add extra chips for balance!
Q: Help—my batter’s runny!
A> Sweet potatoes vary in moisture. If it’s soupy, add 1 tbsp almond flour at a time until it thickens. Or, drain canned puree in a sieve first.
Sweet Potato Brownie Bites: Lunchbox-Safe & Naturally Sweet
- Total Time: 25 mins
Ingredients
-
1 cup mashed cooked sweet potato (or canned, drained)
-
1/2 cup almond or oat flour
-
1/4 cup cocoa powder (not Dutch-process)
-
1/4 cup maple syrup or honey
-
1/4 cup mini chocolate chips (optional but irresistible)
-
1 tsp vanilla extract
-
1/2 tsp baking powder
-
Pinch of salt
Instructions
-
Preheat oven to 350°F (175°C). Line a mini muffin pan with parchment cups.
-
Mash & Mix: Mash sweet potato until smooth. Stir in remaining ingredients until thick and glossy.
-
Scoop & Smooth: Fill cups ¾ full. Wet fingers to flatten tops if needed.
-
Bake: 12–15 mins, until tops look set and a toothpick has crumbs (not wet batter).
-
Cool: Rest in pan 10 mins, then move to rack. They’ll firm up beautifully!
Notes
-
Add 1 tsp peanut butter per cup for a swirl.
-
Use oat flour + sunflower butter for nut-free schools.
-
Warm before serving for ultimate fudginess.
-
Freeze extras for future snack cravings!
- Prep Time: 10 mins
- Cook Time: 15 mins
Nutrition
- Calories: 90 cal Per bite
- Fat: 3g
- Carbohydrates: 15g
- Fiber: 2g
- Protein: 2g
Quick Nutrition Snapshot
Per bite (makes ~12): ~90 calories • 3g fat • 15g carbs • 2g fiber • 2g protein • Naturally gluten-free, dairy-free (if using DF chocolate chips), and veggie-packed. Sweet potato delivers vitamin A and fiber—so go ahead, eat three!
Final Thoughts: More Than Just a Recipe
These Sweet Potato Brownie Bites aren’t just a clever way to eat veggies—they’re a reminder that nourishing food can be joyful, nostalgic, and downright delicious. They bridge the gap between “healthy” and “indulgent,” proving that compromise isn’t necessary.
For parents, they’re a lunchbox triumph. For busy adults, they’re a guilt-free energy boost. And for bakers like me, they’re a canvas for creativity (peanut butter swirls! mint chip madness!). But most importantly, they’re a recipe born from love—messy kitchen experiments, Luna’s chocolate-smeared grin, and the shared joy of discovering that sometimes, the best things in life are both wholesome and a little wicked.
So here’s to hidden veggies, to tiny hands helping in the kitchen, and to desserts that make you feel good inside and out. Now go bake a batch—and don’t forget to share (or not, we won’t judge).

Dino Dig Sandwich Fossils: Pressed Ham & Cheese with Stamps
Unearth Lunchbox Magic: Dino Dig Sandwich Fossils!
Hey foodie friends! Beau here from Feastical, and I’ve got a recipe that’s about to turn your kitchen into a Jurassic playground. Imagine this: golden-brown pressed sandwiches shaped like stegosauruses and T-Rexes, with edible “fossil” imprints peeking through the crust. These Dino Dig Sandwich Fossils aren’t just lunch—they’re a full-blown adventure packed between two slices of bread! Perfect for kiddos (or kids-at-heart!), these handheld treasures combine the cozy nostalgia of classic ham and cheese with pure, unadulterated fun. I’m talking cookie-cutter dinos, playful stamping, and that irresistible toasty crunch. Whether it’s for school lunches, picnics, or just a Tuesday treat, these sandwiches transform the ordinary into something extraordinary. Trust me, when you see those little eyes light up at the sight of a “fossilized” brontosaurus? Pure kitchen victory. So grab your spatula (and maybe a tiny paleontologist helper), and let’s make lunchtime roar!
Why Dino Fossils? A Crusty Trip Down Memory Lane
This recipe? It’s basically my childhood packed in a lunchbox. When I was six, my grandma—Queen of Kitchen Magic—would surprise me with “dinosaur hunts” in my sandwich bag. She’d use her antique butter stamps (meant for fancy dinner rolls) to press tiny patterns into my PB&Js. One rainy Tuesday, she swapped the flowers for a toy dinosaur’s foot, pressing it gently into the bread. “Look, Beau,” she whispered, eyes twinkling, “a stegosaurus fossil!” My mind exploded. Suddenly, lunch wasn’t just food; it was a dig site! I’d “excavate” bites with my plastic fork, hunting for cheese “bones.” Decades later, making these for my nephew Liam, I saw that same wonder in his eyes. He spent 20 minutes comparing his sandwich fossil to his dino encyclopedia! That’s the secret, friends: food isn’t just fuel. It’s joy, memory, and imagination served on a plate. Grandma knew it—and now, so do we.
Your Paleontology Kit: What You’ll Need
Gather these simple ingredients—flexibility is key!
- 4 slices whole wheat or white sandwich bread – Whole wheat adds nutty depth (and sneaky fiber!), but fluffy white is classic. Stale-ish bread holds stamps better!
- 2 slices deli ham – Honey-glazed or smoked! Swap for turkey or even thin-sliced chicken for a lighter “fossil.”
- 2 slices cheddar cheese – Sharp cheddar melts beautifully. Pro tip: Freeze slices for 10 minutes—they won’t tear when stamping!
- Butter or mayo (optional) – Spread thinly outside for golden crispness. Mayo gives extra browning magic!
- Dino cookie cutters & stamp tools – Cookie cutters shape the beast; stamps create fossils. No stamps? Use LEGO dino feet, clean toy dinosaurs, or even a fork!
Crafting Your Cretaceous Creations: Step-by-Step
Ready to make history? Let’s dig in!
- Assemble Your “Sediment Layers”: Lay out two bread slices. Layer ham and cheese evenly. Top with remaining bread. Chef’s hack: Leave a ½-inch border—prevents filling blowouts when stamping!
- Shape Your Dinosaurs: Press cookie cutter firmly through both bread layers. Wiggle gently to release. Save scraps for breadcrumbs! Tip: Use large, simple shapes (stegosaurus, apatosaurus)—they hold stamps best.
- Fossilize the Finds: Dip stamps in flour (prevents sticking!). Press gently into top bread—don’t pierce through! Think “dino footprints,” not meteor craters. Fun twist: Let kids choose their dino’s “footprint” pattern!
- Toast to Perfection (Optional but Epic): Heat a skillet or panini press over medium. Spread outer bread lightly with butter/mayo. Cook 2-3 minutes per side until golden and cheese melts. Press down lightly with spatula—this deepens those fossil grooves!
- Cool & Pack: Let rest 2 minutes—this “sets” the fossils. Pack in lunchboxes with veggie “rocks” (cherry tomatoes, cucumber coins).
Presenting Your Prehistoric Feast
Make it an expedition! Serve sandwiches on a “dig site” plate with green leaf lettuce “foliage,” carrot stick “bones,” and a side of yogurt “quicksand.” For lunchboxes, tuck them into parchment paper like unearthed artifacts. Pair with a mini “science journal” (aka a sticky note with dino facts) for extra giggles. The key? Let those fossil imprints shine—don’t bury them under sides!
The Science Behind the Stamp – Why It Works
Ever wonder how a simple press transforms bread into a fossilized masterpiece? It’s all about texture and tension! When you stamp a sandwich, you’re compressing the bread’s surface, creating tiny ridges and valleys that toast unevenly. The stamped areas stay paler (like ancient rock), while the untouched parts crisp into golden “sediment.” Here’s the delicious physics at play:
Bread Structure: Sandwich bread is a foam-like matrix of gluten and starch. Pressing it ruptures air pockets, making those areas denser and less prone to browning. For the clearest fossils, use bread with a tight crumb (like whole wheat) rather than airy artisanal loaves.
Cheese’s Role: Cheddar is the ideal “fossil binder” because it’s firm when cold but melts cohesively. As it heats, the cheese fills gaps beneath the stamped grooves, creating a “cast” of your dino imprint. Pro tip: Avoid pre-shredded cheese—its anti-caking coatings prevent smooth melting!
Butter vs. Mayo: Butter’s water content steams the bread slightly, yielding a softer crunch. Mayo (oil + eggs) browns faster due to its higher smoke point, giving deeper color and crispness—perfect for high-contrast fossils.
Stamping Tools: The best stamps have shallow, irregular textures (think: toy dinosaur feet with subtle scales). Avoid sharp edges—they slice rather than impress. For a natural look, dust stamps with flour or cornstarch to prevent sticking without adding flavor.
Fun Experiment: Try stamping after toasting for a “raised fossil” effect—the heat sets the bread’s structure, so presses create indentations without collapsing. Kids love comparing pre- and post-toast stamps like real paleontologists analyzing erosion!
Paleo-Play! Turning Lunch into a Learning Adventure
These sandwiches aren’t just cute—they’re stealthy teaching tools. Here’s how to turn mealtime into a mini science lesson (without the eye rolls):
1. Fossil Layers: Explain how real fossils form in sedimentary rock by layering the sandwich ingredients like geologic strata. “The ham is the oldest layer, buried under cheese lava!” Use a clear glass to assemble sideways, showing the “cross-section.”
2. Dino Diet Debate: Pair sandwiches with discussion prompts: “Is a T-Rex fossil made of plants or other dinos?” Include a “herbivore” version (veggie fillings) and “carnivore” (meaty) to explore diets.
3. Excavation Etiquette: Give kids plastic knives or tweezers to “dig” out cheese “bones” from the bread. Teach brush-and-pick techniques with a soft pastry brush to dust off “debris” (aka crumbs).
4. Fossil Record: Make a “field guide” placemat with sandwich stamp silhouettes and matching dino names. Challenge kids to ID their sandwich like a real fossil hunter!
5. Edible Archaeology: Hide a surprise “artifact” (a single raisin or olive) in one sandwich—whoever finds it gets to name a new dinosaur species!
Bonus Activity: Crush leftover bread scraps into “fossil breadcrumbs.” Mix with melted butter, press into a jar, and layer with jam “lava” to create an edible sediment model.
Beyond Sandwiches – Dino-Fying Every Meal
Take the fossil fun further with these Jurassic twists on classics:
Dino Egg Omelet: Beat eggs with spinach, pour into a greased dino cookie cutter in a pan, and cook until set. Peel away the mold to reveal a “dino egg” with veggie “shell fragments!”
Pasta-osaurus Rex: Press cooked penne into a buttered dino-shaped mold, top with marinara “mud,” and bake at 375°F until crispy. Flip onto a plate—instant fossilized pasta skeleton!
Volcano Pancakes: Stack pancakes into a cone, drizzle with strawberry syrup “lava,” and use banana slices as “steam clouds.” Add a stamped toast T-Rex on the side.
Extinct Desserts:
-
Amber Fossils: Set gummy bugs in orange JELLO “amber” cubes.
-
Chocolate Mud Pies: Mix crushed cookies into pudding, top with pretzel “dino bones,” and stamp a chocolate-covered graham cracker fossil on top.
Savvy Tip: Use silicone dino ice cube trays to freeze broth into “fossil cubes” for soups, or yogurt “tar pits” for smoothie bowls.
Evolve Your Recipe: Fun Twists!
- Veggie Volcano: Swap ham for smashed avocado or hummus + shredded carrots.
- Breakfast T-Rex: Use cinnamon bread, cream cheese, and banana slices. Stamp before assembling!
- Gluten-Free Fossil Hunt: GF bread works great—just toast slightly longer.
- Pizza-saurus Rex: Marinara, mozzarella, and mini pepperonis under the stamps.
- Sweet Tooth Dino: Almond butter + jam between brioche. Dust “fossils” with powdered sugar!
Beau’s Kitchen Chronicles
This recipe’s evolved more than a Darwin finch! Originally, I used Grandma’s biscuit stamps—until Liam’s toy T-Rex left way cooler footprints. One fail? Using a waffle iron for “fossil textures.” Spoiler: It looked like dino roadkill. Stick to gentle hand-stamping! Now, I host “Dino Dig” parties: Kids stamp their own sandwiches while I tell cheesy dino jokes (“What do you call a sleeping dinosaur? A dino-snore!”). The sandwiches always vanish faster than a comet. Pro tip: Freeze unbaked stamped sandwiches for instant lunchbox wins—just toast straight from frozen!
Dino Dilemmas? Solved!
Q: My stamps keep tearing the bread! Help?
A: Your bread might be too soft. Try lightly toasting slices first, or freeze bread for 15 minutes. Press slower—gentle pressure is key!
Q: Can I make these ahead?
A: Absolutely! Assemble (unstamped), wrap in cling film, and refrigerate overnight. Stamp and toast next morning—the cold helps hold the imprint!
Q: Cheese oozes out when toasting. Disaster?
A: Nope—flavor bonus! But to prevent it: Use thicker cheese slices, leave that ½-inch border, and don’t overstuff. A panini press contains mess best!
Q: No cookie cutters? No problem!
A: Use a glass to cut circles, then stamp. Or slice sandwiches into “dino bone” rectangles—stamps still work!

Dino Dig Sandwich Fossils: Pressed Ham & Cheese with Stamps
- Total Time: 15–20 mins
Description
Uncover lunchtime fun with these toasted, dino-shaped delights. Packed with ham, cheese, and imagination, they turn every bite into an edible adventure!
Why You’ll Love It
These golden sandwiches are more than tasty—they’re tactile, toasty time machines. Whether it’s for your little explorer or your inner child, they deliver flavor with a side of fossil-fueled fun. Ready to dig in?
Ingredients
-
4 slices whole wheat or white bread
-
2 slices deli ham (or turkey/chicken)
-
2 slices cheddar cheese (freeze for 10 min for clean stamping)
-
Butter or mayo (optional, for crisping)
-
Dino cookie cutters & stamps (or clean toy dinos!)
Instructions
-
Build the Sandwich: Layer ham and cheese between two bread slices. Leave a ½-inch edge to prevent oozing.
-
Cut into Dinos: Press cutter firmly through sandwich. Gently release and save scraps for croutons!
-
Stamp Your Fossils: Lightly flour your stamp/toy. Press gently onto the top bread layer—don’t push through.
-
Toast (Optional): Heat skillet or panini press. Butter/mayo outer sides. Toast 2–3 min per side until golden and melty.
-
Cool & Serve: Let cool 2 min to set the imprint. Pack with veggie “rocks” or plate like a dig site!
Notes
-
Too soft? Slightly freeze or toast bread for firmer stamping.
-
No stamp? Forks or toy dino feet make great fossils!
-
Make-ahead: Assemble, wrap, chill overnight—stamp and toast fresh.
-
Messy cheese? Use thick slices and don’t overfill.
- Prep Time: 10 mins
- Cook Time: 6 mins
Nutrition
- Calories: 220 Cal Per Sandwich
- Fat: 10g
- Carbohydrates: 20g
- Protein: 11g
Quick Fossil Facts
Servings: 2 sandwiches | Prep: 10 mins
Per Sandwich: Calories: ~220 | Protein: 11g | Creativity Level: Jurassic
Final Thoughts: Why Food + Fun = Lifelong Memories
The magic of these sandwiches isn’t just in their shape—it’s in the story they tell. My grandma’s butter-stamp trick taught me that cooking isn’t about perfection; it’s about playfulness. Whether you’re a parent sneaking veggies into a “T-Rex tooth” (aka a cucumber wedge) or an adult reliving childhood wonder, these tiny edible adventures reconnect us to joy.
So go ahead: Press that toy dinosaur into your grilled cheese with abandon. Let the cheese ooze like molten prehistoric tar. Watch as a simple sandwich becomes a time machine to giggles and wide-eyed discovery. After all, the best recipes aren’t just measured in cups and grams—they’re measured in grins, gasps, and the triumphant cry of “I found a fossil!”
Cheesy Pumpkin Cauliflower Bake
The Coziest Bowl of Comfort: Cheesy Pumpkin Cauliflower Bake
Hey friends, Beau here! Let’s talk about that magical moment when crisp autumn air hits and all you want is something warm, cheesy, and spoonably comforting. You know the craving – that nostalgic pull toward mac and cheese, but maybe without the post-carb crash or Monday-night guilt. What if I told you I’ve got a bowlful of golden, bubbly joy that hugs your soul and your wellness goals? Enter my Cheesy Pumpkin Cauliflower Bake! Imagine: velvety pumpkin-spiced cheese sauce clinging to tender riced cauliflower, all baked under a crackly cheddar crust. It’s got mac and cheese’s decadent heart but swaps noodles for veggie-powered goodness. Low-carb? Check. Gluten-free? Absolutely. Packed with cozy fall flavor? You bet. Whether you’re keto-curious, veggie-loading, or just hunting for a meatless Monday hero, this bake’s your ticket to flavor town. Grab your favorite oven mitt – we’re making comfort food that loves you back!
Why This Bake Feels Like Home
Picture this: It’s my first fall in my tiny NYC apartment, rain tapping the windows, and I’m aching for my grandma’s cheddar-laced mac and cheese. But my jeans were staging a rebellion, and my energy felt like a deflated balloon. I stared at a lone cauliflower and a can of pumpkin purée (leftover from a pie experiment gone wild). “What if…?” I whispered to my sad little stove. I riced that cauliflower like my sanity depended on it, whisked pumpkin into béchamel, and held my breath as it baked. Friends, when that cheesy crust bubbled up like a golden sunset? I did a happy dance right there in my mismatched socks. That accidental mashup wasn’t just dinner – it tasted like hitting reset. Now, every time I make it, I’m back in that steamy kitchen, proving comfort food can be both nostalgic and nourishing. Magic? Maybe. Delicious? Absolutely.
Gather Your Flavor Squad
Here’s what you’ll need for this veggie-packed wonder (measurements are in the printable recipe below!):
- Riced Cauliflower (4 cups): The noodle-free star! Chef’s hack: Grab pre-riced fresh or frozen to save time (just thaw and squeeze excess moisture).
- Pumpkin Purée (¾ cup): NOT pie filling! Pure pumpkin adds creaminess, nutrients, and subtle sweetness. Swap: Butternut squash purée works beautifully.
- Sharp Cheddar Cheese (1 cup + ½ cup): Aged cheddar brings bold tang. Insider tip: Grate it yourself! Pre-shredded cheese has anti-caking agents that can make sauces grainy.
- Cream or Milk (¼ cup): Whole milk, half-and-half, or even unsweetened almond milk. Need it richer? Heavy cream makes it ultra-luxurious.
- Butter (1 tbsp): For that irreplaceable rich base. Dairy-free? Olive oil or ghee are great.
- Garlic Powder (½ tsp) & Smoked Paprika (¼ tsp): The dynamic flavor duo! Smoked paprika adds depth – don’t skip it. Spice lover? Add a pinch of cayenne.
- Salt & Pepper: Season like you mean it! Taste as you go.
Let’s Build That Cozy Bake!
Ready to create cheesy magic? Follow these steps (and my sneaky chef tips!):
- Preheat & Prep: Fire up your oven to 375°F (190°C). Lightly grease a 2-quart baking dish – trust me, nobody likes stuck-on cheese! Pro Tip: Place the dish on a baking sheet for easy handling and to catch any bubbly overflow.
- Sauce Sorcery: Melt the butter in a medium saucepan over medium heat. Whisk in the pumpkin purée, cream/milk, garlic powder, smoked paprika, salt, and pepper. Let it simmer gently for 2 minutes, stirring constantly. This wakes up the spices! Watch Closely: Don’t let it boil hard – we want creamy, not curdled.
- Cheese Please! Reduce heat to low. Gradually whisk in 1 cup of shredded cheddar. Stir slowly until it’s melted into a luscious, velvety orange sauce that coats the back of a spoon. Chef’s Secret: Removing the pan from heat for a minute before adding the cheese helps prevent separation. Patience is cheesy virtue!
- Cauliflower Tango: Dump your riced cauliflower right into the sauce. Gently fold it in until every single little floret is smothered in that gorgeous pumpkin-cheese hug. Moisture Check: If your cauliflower seems wet (especially frozen), pat it dry with paper towels first. Less water = creamier bake!
- Bake to Bliss: Pour the saucy cauliflower mix into your prepared dish. Spread it evenly. Now, shower the top with that glorious remaining ½ cup of cheddar. Golden Trick: For extra crunch, sprinkle on 2 tbsp of grated Parmesan or almond flour mixed with melted butter.
- Bubbly Perfection: Bake for 20-25 minutes. You’re waiting for that top to be speckled with deep golden-brown spots and the sauce bubbling furiously around the edges. Don’t Overbake: Cauliflower should be tender-crisp, not mushy! Let it rest 5 minutes before serving – it thickens beautifully.
Dishing Up the Comfort
This bake is the ultimate chameleon! Serve it piping hot straight from the dish (warning: spoons will dive in fast!). For a pretty presentation, scoop it into individual ramekins. It shines as a hearty vegetarian main alongside a crisp apple-pecan salad. Feeling fancy? Top bowls with crispy fried sage or toasted pumpkin seeds. As a show-stopping side, pair it with roasted chicken, seared pork chops, or your Thanksgiving turkey – it holds its own against big flavors! Leftovers? Reheat gently in the oven or microwave (add a splash of milk if needed).
The Science Behind the Creaminess – Why This Bake Works
Ever wonder why some cauliflower bakes turn out watery while others are luxuriously creamy? The secret lies in moisture control, cheese chemistry, and pumpkin’s natural thickening power. Let’s break it down.
Cauliflower’s Water Woes
Cauliflower is 92% water, which means if you don’t manage moisture, you’ll end up with a soggy mess. Here’s how we combat that:
-
Pre-cooking & Draining: Whether using fresh or frozen riced cauliflower, a quick steam (or thawing frozen cauliflower) helps release excess water. The key step? Squeezing it dry in a clean kitchen towel or pressing it in a fine-mesh strainer. This ensures the cheese sauce clings to the florets instead of swimming in liquid.
-
Salt’s Secret Role: Sprinkling salt on fresh riced cauliflower and letting it sit for 10 minutes draws out moisture through osmosis (science win!). Rinse and pat dry before using.
Pumpkin: The Unsung Thickening Hero
Pumpkin purée isn’t just for flavor—it’s a natural thickener! Unlike flour-based sauces, pumpkin adds body without carbs. Its pectin content (a natural gelling agent) helps stabilize the sauce, while its mild sweetness balances the sharp cheddar.
Cheese Melt Mastery
Ever had a sauce turn grainy? That’s usually from overheating or using pre-shredded cheese. Here’s how to keep it silky:
-
Low and Slow: Cheese proteins tighten and seize when exposed to high heat. Melt your sauce base first, then remove it from heat before stirring in cheese.
-
Fresh vs. Pre-Shredded: Pre-shredded cheese contains cellulose (an anti-caking agent), which can make sauces gritty. Always grate your own for the smoothest melt.
The Maillard Reaction = Golden Perfection
That irresistible browned crust? Thank the Maillard reaction—a chemical process where amino acids and sugars react under heat, creating complex flavors. Baking uncovered at 375°F ensures the top layer of cheese transforms into a crispy, umami-rich blanket.
Make It Your Own!
This recipe loves to play dress-up! Try these tasty twists:
- Meat Lover’s Delight: Stir in ½ cup cooked, crumbled bacon or diced ham before baking. Game changer!
- Green Goddess: Fold in a handful of fresh baby spinach or chopped kale with the cauliflower. It wilts perfectly.
- Spicy Southwest: Swap smoked paprika for chili powder, add ¼ tsp cumin, and top with pickled jalapeños before baking. Ole!
- Vegan Vibes: Use olive oil, unsweetened plant milk, and vegan cheddar shreds. Add 1 tbsp nutritional yeast to the sauce for extra umami.
- Prosciutto & Sage: Top the cheese layer with thin prosciutto strips and fresh sage leaves for an elegant touch.
Beau’s Backstage Pass
Confession: My first attempt? A watery, sad cauliflower puddle. Lesson learned: SQUEEZE that thawed frozen cauliflower like it owes you money! Over the years, I’ve added the smoked paprika (a happy accident when I grabbed the wrong tin) and realized fresh-grated cheese is non-negotiable. The pumpkin quantity is also key – too much and it tastes like pie filling invaded your dinner. This bake also sparked a legendary kitchen debate: My nephew swears adding a spoonful of Dijon mustard to the sauce is genius (it is!), while my sister insists on topping it with crushed pork rinds for crunch (also delicious). The moral? Make it once by the book, then make it YOURS. It’s become my go-to potluck dish – nobody guesses it’s low-carb until I spill the beans!
Your Questions, Answered!
Q: Can I use fresh cauliflower instead of pre-riced?
A: Absolutely! Chop a medium head of cauliflower into florets and pulse in a food processor until rice-sized (don’t over-pulse!). Steam or microwave it for 3-4 minutes first to soften slightly, then drain WELL.
Q: Why is my bake watery?
A: Cauliflower holds water! Three fixes: 1) Squeeze thawed frozen cauliflower in a clean kitchen towel. 2) For fresh, salt the riced cauliflower, let it sit 10 mins, then squeeze. 3) Ensure your pumpkin purée isn’t watery (drain if needed). Baking uncovered is crucial for evaporation too!
Q: Can I make this ahead?
A: Yes! Assemble the unbaked dish (minus the topping cheese), cover, and refrigerate for up to 24 hours. Add the topping cheese right before baking. You may need an extra 5-10 minutes bake time since it’s cold.
Q: My sauce seemed grainy. What happened?
A: Likely cheese separation! Causes: Too high heat when melting cheese, or using pre-shredded cheese. Always melt cheese on LOW heat and stir constantly. Freshly grated cheese melts smoother due to no anti-caking additives.

Cheesy Pumpkin Cauliflower Bake
- Total Time: 45 min
Description
This dish takes everything you love about mac and cheese—gooey texture, cheesy flavor, nostalgic vibes—and reimagines it with riced cauliflower and velvety pumpkin. It’s rich but not heavy, packed with cozy spice, and perfect for weeknight dinners, potlucks, or Thanksgiving sides. Bonus: It’s gluten-free, low-carb, and full of sneaky veggies. Comfort food, redefined.
Ingredients
-
4 cups riced cauliflower (fresh or thawed frozen, moisture squeezed out)
-
¾ cup pumpkin purée (not pie filling!)
-
1 tbsp butter (or olive oil)
-
¼ cup cream, milk, or unsweetened almond milk
-
1½ cups shredded sharp cheddar (divided)
-
½ tsp garlic powder
-
¼ tsp smoked paprika
-
Salt & pepper to taste
Instructions
-
Preheat oven to 375°F (190°C). Lightly grease a 2-quart baking dish.
-
In a saucepan, melt butter. Add pumpkin, milk, garlic powder, paprika, salt, and pepper. Simmer 2 min, stirring.
-
Lower heat. Stir in 1 cup cheddar until melted and smooth.
-
Fold in riced cauliflower until coated evenly.
-
Spread mixture into the baking dish. Top with remaining ½ cup cheddar.
-
Bake 20–25 min until bubbly and golden. Let rest 5 min before serving.
Notes
-
Add crumbled bacon or diced ham for a meaty twist
-
Toss in spinach, kale, or sage for a veggie boost
-
Top with Parmesan or crushed nuts for a crispy finish
-
Vegan? Use plant milk, vegan cheese, and olive oil
- Prep Time: 15 min
- Cook Time: 25 min
Nutrition
- Calories: 290 Cal
- Sugar: 3g
- Fat: 22g
- Carbohydrates: 8g
- Fiber: 8g
- Protein: 13g
Nourishment Notes (Per Serving)
Calories: 290 | Protein: 13g | Fat: 22g | Carbs: 8g | Fiber: 3g | Sugar: 3g
Note: Values are estimates. Using heavy cream adds fat/calories; almond milk reduces them.
dar-pumpkin sauce, riced cauliflower, golden crust. Gluten-free, veggie comfort food. Ready in 35 mins!
Final Thoughts: A Dish That Adapts to You
The beauty of this Cheesy Pumpkin Cauliflower Bake isn’t just in its flavor—it’s in its flexibility. Whether you’re keto, gluten-free, vegetarian, or just craving something cozy, this dish meets you where you are. It’s proof that comfort food doesn’t have to mean compromise.
So, the next time rain taps your window or you need a hug in food form, remember: a bowl of this bake is waiting to wrap you in warmth. And hey, if you add that extra pinch of cayenne or crown it with fried sage? That’s just your story being written, one cheesy bite at a time.