
Blueberry Cheesecake Swirl Cookies
Your New Favorite Cookie Just Walked Into the Kitchen
Hey friends, Beau here! Let’s be real for a second. Is there anything better than the smell of cookies baking in the oven? It’s like a warm, buttery hug for your entire house. And while I’m a sucker for a classic chocolate chip, sometimes you just need a cookie that feels a little… extra. A cookie that looks like it flew straight out of a fancy bakery window but is secretly simple enough to whip up on a lazy Sunday afternoon.
That’s exactly why I’m so crazy about these Blueberry Cheesecake Swirl Cookies. Imagine this: a soft, buttery, chewy sugar cookie base. Now, picture a sweet-tart, creamy ribbon of blueberry cheesecake swirled right through the center. They bake up with golden, slightly crisp edges and these gorgeous, jammy pockets of flavor that will absolutely make your day. They’re the perfect marriage of two incredible desserts, all wrapped up in one handheld, totally irresistible treat.
Whether you’re prepping for a potluck, looking for a show-stopping gift for a neighbor, or just treating yourself after a long week (you deserve it!), these cookies are the answer. So, tie on your favorite apron, grab your mixing bowl, and let’s make some magic happen. I promise, this is one recipe you’ll come back to again and again.
A Sweet Slice of Nostalgia
This recipe always takes me right back to my grandma’s kitchen table. Every summer, we’d spend a day blueberry picking until our fingers were stained purple and our buckets were overflowing. The reward for our work was always her legendary blueberry cheesecake. It was a whole production—the careful water bath, the agonizing wait for it to chill—but that first creamy, fruity bite was pure bliss.
I wanted to capture that exact feeling in a cookie—something you could enjoy without the wait or the fuss. One day, I was messing around with my go-to cookie dough and a leftover tub of cream cheese from breakfast. I swirled in some of the blueberry jam I’d made from the previous summer’s haul, and voilà! A happy accident was born. They’re my little tribute to those sunny days and my grandma’s legendary desserts, but in a form that’s ready to enjoy in under 30 minutes. Now, every time I bake a batch, it feels like a sweet little visit to the past.
Gathering Your Cookie Crew: The Ingredients
Here’s the dream team of ingredients that’ll come together to create these heavenly cookies. Using quality stuff here makes a real difference!
Dry Ingredients
- 2½ cups all-purpose flour: The foundation of our cookie! It gives structure. For a slightly more tender cookie, you can swap in ½ cup of cake flour, but all-purpose works perfectly.
- 1 tsp baking soda: Our leavening agent. It helps the cookies puff up and get that perfect chewy-yet-soft texture. Make sure it’s fresh for the best rise!
- ½ tsp baking powder: A little extra lift never hurt anybody. This combo with baking soda is my secret for the ideal cookie crumb.
- ¼ tsp salt: Don’t you dare skip this! Salt is the flavor enhancer that makes all the sweet, buttery notes pop. It’s the unsung hero of baking.
Wet Ingredients
- 1 cup (2 sticks) unsalted butter, softened: The key to richness and that irresistible chewy texture. I insist on unsalted so we can control the salt level. Pro Chef Tip: “Softened” means cool to the touch but your finger can leave a gentle indent. Not melted and not cold! This is crucial for creaming.
- ¾ cup granulated sugar: Adds sweetness and helps create those delightfully crisp edges.
- ¾ cup packed brown sugar: My favorite for cookies! The molasses in brown sugar adds a deep, caramel-like flavor and ensures a wonderfully soft, moist center.
- 1 large egg: Binds everything together. Make sure it’s at room temperature to blend smoothly into the creamed butter and sugar.
- 1 tsp vanilla extract: Pure vanilla extract is always my go-to for the best flavor. It’s the warm, cozy background note that makes everything taste like home.
The Show-Stopping Filling
- ½ cup cream cheese, softened: Full-fat is the way to go for the truest cheesecake flavor and creamiest texture. Again, softening is key here so it blends smoothly without lumps.
- ¼ cup blueberry jam or preserves: I prefer preserves for the little bursts of real fruit, but a smooth jam works great too! Feel free to use homemade or a high-quality store-bought brand. This is where the big blueberry flavor comes from.
Let’s Get Baking: The Step-by-Step Guide
Alright, team, let’s do this! Follow these steps and you’ll be a cookie-swirling pro in no time.
Step 1: Preheat your oven to 350°F (175°C). Line your baking sheets with parchment paper. This isn’t just to prevent sticking; it also helps the bottoms of the cookies bake evenly without getting too dark. Trust me, it’s a game-changer.
Step 2: In a medium bowl, whisk together your dry ingredients—the flour, baking soda, baking powder, and salt. Whisking is better than sifting here because we’re not only combining them but also aerating the flour a little, which leads to a lighter cookie. Set this bowl aside.
Step 3: In a large bowl, cream together the softened butter, granulated sugar, and brown sugar. Now, “cream” means beat it until it’s light, pale, and fluffy. This should take a good 2-3 minutes with a hand mixer or stand mixer. This step is non-negotiable! It incorporates air into the dough, which is what gives your cookies that perfect texture. Don’t rush it!
Step 4: Beat in the egg and vanilla extract until they are fully incorporated. Scrape down the sides of the bowl to make sure everything is getting mixed in evenly.
Step 5: Gradually add your dry ingredients to the wet ingredients. Mix on low speed just until the flour disappears. Chef Hack: The second you don’t see any more dry flour, STOP MIXING. Overmixing at this stage is the number one cause of tough, dense cookies. We want tender!
Step 6: In a small bowl, mix the softened cream cheese and blueberry jam together until it’s smooth and beautifully swirled. You can do this with a spoon or a small whisk.
Step 7: Now for the fun part! Scoop the cookie dough into balls, about 2 tablespoons each (I use a medium cookie scoop for perfect uniformity). Use your thumb or the back of a small spoon to press a deep indent into the center of each dough ball. Spoon about a teaspoon of the blueberry cheesecake filling into that well.
Step 8: Gently fold the dough around the filling to seal it in, then place it seam-side down on your prepared baking sheet. You can just leave it like this for a more hidden center, or for that gorgeous marbled effect, use a toothpick to lightly swirl the filling into the top of the cookie dough. Don’t over-swirl, or the filling will bleed too much!
Step 9: Bake for 10-12 minutes. The cookies are done when the edges are a beautiful golden brown, but the centers still look slightly soft and underdone. They will continue to cook on the hot baking sheet out of the oven. Let them cool on the pan for at least 5 minutes—this is when they firm up and achieve chewy perfection. Then, transfer them to a wire rack to cool completely.
How to Serve These Beauties
Honestly, these cookies are stars all on their own, still slightly warm from the oven with a cold glass of milk. But if you want to take them to legendary status, here are a few ideas:
For a truly decadent dessert, crumble one over a scoop of vanilla bean ice cream. The contrast of warm cookie and cold ice cream is everything. They also look incredible on a dessert platter for a party. Stack them high on a cute cake stand so everyone can grab one. For a breakfast treat (hey, I won’t tell!), pair one with your morning coffee or tea—the blueberry cheesecake swirl makes it feel totally justified.
If you’re gifting them, let them cool completely first. Layer them in a cardboard gift box or a cute tin with sheets of parchment paper between the layers. They travel beautifully and are guaranteed to make someone’s day.
Mix It Up! Recipe Variations
The beauty of this recipe is its versatility. Once you master the basic swirl, a whole world of cookies opens up!
- Raspberry Lemonade: Swap the blueberry jam for raspberry and add a teaspoon of lemon zest to the cream cheese filling. Bright, tangy, and incredible.
- Strawberry Swirl: Use strawberry preserves for a classic cheesecake vibe. A drizzle of white chocolate on top after baking takes it over the top.
- Chocolate Hazelnut: Replace the jam with chocolate-hazelnut spread (like Nutella) mixed into the cream cheese. You’ve just created a cookie version of a fancy tart.
- Gluten-Free Friendly: Use a 1:1 gluten-free all-purpose flour blend. I’ve had great success with brands like Bob’s Red Mill or Cup4Cup.
- Double Berry Bliss: Fold ¼ cup of fresh or frozen blueberries into the cookie dough itself for an extra burst of berry in every single bite.
Beau’s Chef Notes
This recipe has seen a few iterations over the years. My first attempt? Let’s just say the filling completely melted out and created a blueberry lava flow all over my baking sheet. Delicious, but not exactly pretty. The key is making sure your cookie dough is thick enough to act as a barrier and not over-swirling. Chilling the filled dough balls for 15-20 minutes before baking can also help if your kitchen is particularly warm.
I also learned the hard way that using cold cream cheese leads to lumpy filling that’s impossible to swirl smoothly. Softening your ingredients is the simplest hack for a flawless result. Now, these cookies are my go-to for last-minute bake sales and picnics. They’re always the first to disappear!
FAQs & Troubleshooting
Q: My filling leaked everywhere! What did I do wrong?
A: This usually happens for one of two reasons: 1) The indent wasn’t deep enough, or the filling wasn’t sealed inside the dough properly. Make sure you’re really wrapping the dough around it. 2) The cookies were over-swirled, causing the filling to mix too much with the dough and thin out. A light hand with the toothpick is best!
Q: Can I make the dough ahead of time?
A: Absolutely! You can scoop and fill the dough balls, then store them in an airtight container in the fridge for up to 2 days. You may need to add a minute or two to the baking time since you’ll be putting them in the oven cold.
Q: My cookies spread too much and got flat.
A: This is almost always a butter problem. Was your butter too soft or melted? Make sure it’s just softened. Also, double-check that your baking soda and powder are fresh, as they provide the necessary lift. Chilling the dough for a bit can also prevent excess spreading.
Q: Can I freeze these cookies?
A> Yes, they freeze beautifully! Once baked and cooled completely, freeze them in a single layer on a baking sheet before transferring to a freezer bag. They’ll keep for up to 3 months. Thaw at room temperature… or my personal favorite, pop one frozen right into the microwave for 10 seconds for a gooey, almost-fresh-from-the-oven treat.

Blueberry Cheesecake Swirl Cookies
Description
A bakery-style treat made simple at home. These cookies bring together the best of both worlds: a buttery sugar cookie base and a creamy, tangy blueberry cheesecake swirl. Perfect for potlucks, gifting, or a well-deserved sweet break, they’re guaranteed to impress. Tie on that apron—it’s time for cookie magic!
Ingredients
Dry
-
2½ cups all-purpose flour
-
1 tsp baking soda
-
½ tsp baking powder
-
¼ tsp salt
Wet
-
1 cup (2 sticks) unsalted butter, softened
-
¾ cup granulated sugar
-
¾ cup brown sugar, packed
-
1 large egg (room temp)
-
1 tsp vanilla extract
Filling
-
½ cup cream cheese, softened
-
¼ cup blueberry jam or preserves
Instructions
-
Preheat oven to 350°F (175°C). Line baking sheets with parchment.
-
Whisk together flour, baking soda, baking powder, and salt. Set aside.
-
In a large bowl, cream butter, granulated sugar, and brown sugar until light and fluffy (2–3 mins).
-
Beat in egg and vanilla, scraping down sides.
-
Add dry mixture gradually, mixing until just combined. Don’t overmix.
-
In a small bowl, stir cream cheese and blueberry jam until smooth and swirled.
-
Scoop cookie dough (about 2 tbsp each). Press a deep indent in each and spoon in ~1 tsp filling. Fold dough over to seal or lightly swirl on top with a toothpick.
-
Place seam-side down on baking sheet.
-
Bake 10–12 mins, until edges are golden but centers look slightly soft. Cool 5 mins on sheet, then transfer to a rack.
Notes
-
Pair warm cookies with cold milk or coffee.
-
Crumble over vanilla ice cream for an instant dessert upgrade.
-
Gift in a cookie tin lined with parchment.
Nutritional Information (Approximate, Per Cookie)
Alright, let’s talk real numbers. Remember, this is a treat, and it’s all about balance! Each cookie is roughly:
- Calories: 210
- Fat: 11g
- Carbohydrates: 26g
- Sugar: 14g
- Protein: 2g
- Sodium: 95mg
This info is an estimate based on the specific ingredients I used. If you use low-fat cream cheese or a sugar-free jam, these numbers will change. But sometimes, your soul needs a delicious, homemade cookie, and that’s a kind of nourishment too!
Final Thoughts
Well, friends, there you have it—my all-time favorite cookie recipe that’s sure to become a new classic in your home. It’s more than just a list of ingredients and steps; it’s a chance to create a little moment of joy, to share something made with love, and to fill your kitchen with the most incredible aroma.
I hope you have as much fun making these Blueberry Cheesecake Swirl Cookies as I do. Don’t be afraid to make them your own! Tag me @Feastical on Instagram if you give them a try—I always love seeing your creations. Now, go preheat that oven and get ready for some serious compliments. Happy baking!

Easy No-Bake Pumpkin Cheesecake Balls
Your New Favorite Fall Treat: No-Bake Pumpkin Cheesecake Balls
Hey friends, Beau here! Can you feel it? That crisp, cool air, the leaves starting to turn, and that undeniable urge to cozy up with all things pumpkin. It’s officially that magical time of year, and my kitchen is smelling like a dream. But I get it—between holiday prep, gatherings, and just the general busyness of life, turning on the oven for a complicated dessert isn’t always on the menu. That’s exactly why I’m so excited to share this recipe with you today.
Imagine this: all the creamy, spiced, soul-warming flavor of your favorite pumpkin cheesecake, rolled into a perfect, pop-able bite. No water baths, no cracked tops, no fuss. Just a simple mix, roll, and dip situation that results in the most incredible little treats. These No-Bake Pumpkin Cheesecake Balls are here to be the star of your holiday cookie tray, the perfect homemade gift for neighbors, or just a secret little sweet treat tucked away in your fridge for when a cozy craving hits. They’re creamy, they’ve got a fantastic crunch from the crust, and that smooth white chocolate coating? Pure magic. So, grab your favorite mixing bowl and let’s make some no-bake memories together!
A Spoonful of Nostalgia: Where This Recipe Came From
This recipe takes me right back to my grandma’s kitchen table. She was the queen of “keeping it simple,” especially during the hectic holidays. Every year, without fail, she’d make her famous no-bake cheesecake. It was a glorious, jiggly masterpiece that we’d all dive into after Thanksgiving dinner. One year, I decided I wanted to take that same no-bake magic but make it portable—something we could share easily at our big family potluck.
After a little trial and (mostly delicious) error, I landed on the idea of rolling the filling into balls. The first batch was a bit soft, but adding the graham cracker and gingersnap crumbs was the game-changer. It gave them that classic “crust” texture and made them sturdy enough to dip. The moment I brought out that first platter, drizzled with a little extra chocolate, my grandma gave me that slow, knowing nod of approval. That’s the beauty of food, isn’t it? It’s not just about filling our bellies; it’s about taking those beloved traditions and adding our own chapter to the story. Now, every time I make these, it feels like she’s right there in the kitchen with me.
Gathering Your Pumpkin Cheesecake Ball Squad
Here’s the dream team of ingredients that’s going to come together to create something spectacular. The best part? You probably have a lot of this hanging out in your pantry already!
- 8 oz Cream Cheese, softened: This is the creamy, tangy heart of our cheesecake ball. Full-fat is best for flavor and structure, but reduced-fat will work in a pinch. The key word here is SOFTENED. Take it out of the fridge at least an hour before you start. This ensures a smooth, lump-free mixture.
- ⅓ cup Powdered Sugar: Sweetens everything up without the grittiness of granulated sugar. It also helps thicken the mixture slightly.
- ⅔ cup Pumpkin Purée: The star of the show! Make sure you’re using 100% pure pumpkin purée, NOT pumpkin pie filling, which is pre-sweetened and spiced.
- 1 tsp Pumpkin Pie Spice: That warm, cozy flavor we all crave. Feel free to adjust to your taste—add a pinch more if you’re a spice lover!
- 1½ cups Graham Cracker Crumbs: This gives us that classic cheesecake crust flavor and crucial texture. You can buy pre-crumbled or crush whole sheets in a zip-top bag with a rolling pin.
- 1½ cups Gingersnap Crumbs: My secret weapon! The ginger adds a wonderful, warm kick that pairs perfectly with the pumpkin. If you can’t find gingersnaps, you can use all graham cracker crumbs, but the gingersnap really takes it to the next level.
- 12 oz White Almond Bark (for coating): This is my coating of choice because it melts smoothly, sets firmly, and has a sweet, vanilla flavor that doesn’t overpower the pumpkin. You can also use white chocolate chips, but add a teaspoon of coconut oil to help them melt smoothly.
- Optional: 1 cup Orange Candy Melts (for drizzle): Purely for festive flair! A little drizzle makes these look professionally done and extra fun for Halloween or Thanksgiving.
Let’s Get Rolling: Your Step-by-Step Guide
Okay, team! Let’s do this. It’s an easy process, but a few chef-ly tips will make it absolutely foolproof.
Step 1: The Creamy Base
In a large mixing bowl, beat your softened cream cheese with an electric hand mixer (or a stand mixer with the paddle attachment) on medium speed until it’s completely smooth and creamy. This should only take about 30 seconds. Now, add in the powdered sugar, pumpkin purée, and pumpkin pie spice. Beat it all together until it’s beautifully combined and there are no streaks of cream cheese left. Pro Chef Hack: Scrape down the sides of the bowl with a spatula halfway through to ensure everything is evenly mixed.
Step 2: The Crunchy Add-In
Switch to a sturdy spatula or a wooden spoon. Dump in the graham cracker and gingersnap crumbs. Gently fold them into the wet mixture until a soft, somewhat sticky dough forms. It will look and feel like a thick, delicious paste—that’s exactly what you want!
Step 3: The Chill Session
This step is non-negotiable, my friends! Cover the bowl with plastic wrap and pop it into the refrigerator for at least 20-30 minutes. This firms up the fat in the cream cheese, making the dough MUCH easier to handle and roll. Trying to roll it right away is a sticky mess—trust me, I’ve learned the hard way so you don’t have to!
Step 4: Roll Call!
Line a baking sheet with parchment paper or a silicone baking mat. Using a small cookie scoop (about 1 tablespoon size) or a spoon, portion out the dough. Then, with clean, dry hands, roll each portion into a smooth, tight 1-inch ball. Place each ball on the prepared tray. Once they’re all rolled, slide the entire tray into the freezer for 15-20 minutes. This quick freeze is the second key to perfect dipping. A frozen ball means a firm center that won’t fall apart in the warm coating.
Step 5: The Coating Magic
Break the almond bark into chunks and place it in a microwave-safe bowl. Microwave in 30-second bursts, stirring vigorously between each burst, until it’s completely melted and smooth. Do not over-microwave! Now, remove a few balls from the freezer at a time (keeping the rest cold). Using a fork or a dipping tool, submerge a ball in the melted coating. Lift it out, tap the fork gently on the side of the bowl to let the excess drip off, and then place it back on the parchment-lined tray.
Step 6: The Finishing Touch (Optional)
If you’re using the orange candy melts, melt them the same way you did the almond bark. Transfer the melted candy to a small zip-top bag, snip a TINY corner off, and drizzle away over the set balls. Get creative with it!
Step 7: The Final Set
Let the coating set completely at room temperature, or for a faster set, pop them back in the fridge for 10 minutes. Then, it’s time to dig in!
How to Serve These Little Bites of Joy
Presentation is part of the fun! Here’s how to make these cuties shine:
For a casual family treat, simply pile them high on a cute plate or in a rustic wooden bowl. For a holiday party or cookie exchange, give them the star treatment. Arrange them on a elegant platter in a single layer, maybe with a few autumn leaves or cinnamon sticks for decoration. They look incredible nestled in mini paper candy cups—it makes them easy to grab and keeps the coating from sticking to the plate.
These also make the most heartfelt homemade gift. Package them in a clear cellophane bag tied with a pretty ribbon, or stack them in a festive holiday tin. I promise, anyone receiving these as a gift will be absolutely thrilled. They’re the perfect sweet bite with a cup of coffee after dinner, or a fun addition to a dessert charcuterie board!
Mix It Up! Delicious Recipe Variations
Once you’ve mastered the base recipe, the flavor world is your oyster! Here are a few of my favorite twists:
- The Chocolate Lover: Use chocolate graham cracker crumbs instead of regular, and dip the balls in melted dark or milk chocolate instead of white almond bark.
- The Nutty One: Roll the coated balls in finely chopped pecans or walnuts before the coating sets for a fantastic crunchy exterior.
- The Bourbon-Spiced: Add 1-2 tablespoons of bourbon or whiskey to the cream cheese mixture for a sophisticated adult twist. So good!
- Gluten-Free Friendly: Simply use certified gluten-free graham crackers and gingersnaps. The recipe works exactly the same!
- The Extra-Cozy: Add a tiny pinch of black pepper or cayenne pepper to the mix along with the pumpkin spice for a surprising and delicious warm kick.
Beau’s Chef Notes & Kitchen Stories
This recipe is a living thing in my kitchen—it’s evolved over the years! The first time I made them, I was so impatient I didn’t chill the mixture at all. Let’s just say I ended up with pumpkin cheesecake *soup* balls. It was a delicious mess, but a mess nonetheless. I’ve learned that patience with the chilling steps is the true secret ingredient.
Another fun story: I once brought these to a friendsgiving and a guy there, who claimed to “hate pumpkin,” ate about six of them before someone told him what they were. He just looked at me, shrugged, and went back for more. That’s the power of a good no-bake bite! Don’t be afraid to play around and make it your own. That’s what cooking is all about.
Your Questions, Answered!
Q: My mixture is too soft to roll, even after chilling! What did I do wrong?
A: This usually means the cream cheese wasn’t soft enough to incorporate fully, or you might have accidentally used pumpkin pie filling (which is wetter). Don’t panic! Just add more graham cracker crumbs, a tablespoon at a time, until the mixture is rollable.
Q: The coating is clumpy and thick. How can I fix it?
A: This means the almond bark might have been overheated. You can try stirring in a teaspoon of solid shortening (like Crisco) to help smooth it out. Next time, melt it more slowly using shorter bursts in the microwave.
Q: Can I make these ahead of time?
A: Absolutely! They are the perfect make-ahead dessert. Store them in a single layer in an airtight container in the fridge for up to 5 days, or you can freeze them for up to 2 months. Just thaw in the fridge before serving.
Q: Why do I have to freeze the balls before dipping?
A: Freezing them solidifies the fat, ensuring the ball doesn’t fall apart when you dip it into the warm coating. It also helps the coating set much faster and creates a satisfying snap when you bite into it.

Easy No-Bake Pumpkin Cheesecake Balls
Description
Fall flavors, no oven required. These little bites pack all the creamy, spiced goodness of pumpkin cheesecake into a poppable, shareable treat. Perfect for holiday trays, gifts, or a secret stash in your fridge, they’re easy to make and absolutely irresistible. Think cozy pumpkin spice, crunchy cookie crumbs, and a sweet chocolate shell—all in one bite-sized package.
Ingredients
-
8 oz cream cheese, softened
-
⅓ cup powdered sugar
-
⅔ cup pumpkin purée (100% pure, not pie filling)
-
1 tsp pumpkin pie spice
-
1½ cups graham cracker crumbs
-
1½ cups gingersnap crumbs
-
12 oz white almond bark (or white chocolate + 1 tsp coconut oil)
-
Optional: orange candy melts, for drizzle
Instructions
-
Beat cream cheese until smooth. Add powdered sugar, pumpkin, and pumpkin pie spice; mix well.
-
Fold in graham cracker and gingersnap crumbs until a thick dough forms.
-
Chill mixture 30 min, then roll into 1-inch balls. Freeze 15–20 min.
-
Melt almond bark in 30-sec bursts until smooth. Dip balls, let excess drip off, and place on parchment paper.
-
(Optional) Drizzle with melted orange candy melts for a festive finish.
-
Chill until coating sets. Enjoy!
Notes
-
Chill twice: once before rolling, once before dipping—this keeps them firm.
-
Too soft? Add extra crumbs, 1 tbsp at a time.
-
Swap coatings: dark or milk chocolate for a richer twist.
-
Perfect make-ahead: fridge 5 days or freeze up to 2 months.
Nutritional Information (Approximate)
Okay, let’s be real—these are a dessert, a treat, a moment of joy! But I know many of us like to have a general idea of what we’re enjoying. Here’s the approximate nutritional info per ball (based on a yield of 24 balls). Remember, these are estimates and can vary based on specific brands and ingredients used.
Per Serving: Calories: 130 | Fat: 7g | Saturated Fat: 4g | Carbohydrates: 15g | Fiber: 0g | Sugar: 11g | Protein: 2g | Sodium: 95mg
While they’re not a health food, they are a portion-controlled delight. Enjoying one or two is a perfect way to satisfy that sweet tooth without overdoing it!
Final Thoughts from My Kitchen to Yours
Well, friends, we’ve done it! We’ve created a ridiculously easy, incredibly delicious, and absolutely impressive fall treat without ever turning on the oven. I hope these No-Bake Pumpkin Cheesecake Balls bring as much joy to your kitchen and your people as they have to mine.
The real recipe here is more than the ingredients—it’s about taking a few moments to create something delightful to share. It’s about the laughter that happens while you’re rolling the balls, the satisfaction of that perfect drizzle, and the happy faces of everyone who gets to try one. So don’t stress about making them perfect. Just have fun with it! I’d love to see your creations. Tag me @Feastical on social media so I can cheer you on.
Now, go forth and make something Feastical! Until next time, happy cooking.

Split Pea Soup with Smoked Turkey (Hearty & Gluten-Free)
Your New Favorite Bowl of Cozy: Split Pea Soup with Smoked Turkey
Hey friends, Beau here from Feastical! Let’s talk about the ultimate culinary hug. You know the one. It’s that meal you crave when the wind is howling, the day has been a marathon, and your soul needs something deeply, profoundly comforting. For me, that’s a steaming, hearty bowl of split pea soup. But not just any split pea soup. We’re taking this classic to new, smoky, incredibly flavorful heights with a secret weapon: smoked turkey.
This isn’t a fussy, chef-y recipe. This is a one-pot wonder that practically makes itself while filling your kitchen with the most incredible aroma. It’s the kind of meal that gathers people around the table, sparks conversation, and leaves everyone feeling completely satisfied. The split peas break down into a luxuriously creamy, thick broth without a drop of cream, and the smoked turkey infuses every single spoonful with a rich, savory depth that is just… *chef’s kiss*.
Plus, it’s naturally gluten-free and packed with protein and fiber, so it’s as wholesome as it is delicious. Whether you’re a seasoned soup slinger or a kitchen newbie, this recipe is your ticket to comfort food glory. So, grab your favorite big pot, and let’s make a memory together.
A Pot of Soup and a Side of Nostalgia
This recipe always takes me right back to my Grandma Dot’s kitchen. She was a no-nonsense woman who believed strongly in two things: a well-stocked pantry and the healing power of a good soup. Every fall, without fail, a giant pot of split pea soup would appear on her stovetop, simmering for hours. Her version used a humble ham hock, and it was glorious.
But a few years ago, after a particularly successful Thanksgiving that left me with a colossal smoked turkey carcass, I had a lightbulb moment. I threw the whole thing into a pot with some split peas and water, thinking I was just making stock. What emerged was a revelation. The smoke from the turkey paired with the earthy peas created a flavor so complex and satisfying, it instantly dethroned my memory of the original. It became my new tradition—a little nod to Grandma Dot, but with a Feastical twist. It’s my go-to for using up holiday leftovers or for just conjuring that feeling of home, no special occasion needed.
Gathering Your Soup Squad: The Ingredients
One of the best things about this soup is its simplicity. You likely have most of this in your pantry right now! Here’s what you’ll need and why each ingredient is a key player:
- 2 tbsp olive oil: Our cooking fat to sauté our veggie base. Avocado oil or butter work great here too!
- 1 onion, chopped: The sweet, aromatic foundation of so many great dishes. Don’t rush cooking it!
- 2 carrots, diced: Adds a subtle sweetness and a beautiful pop of color.
- 2 celery stalks, diced: The classic third member of the “holy trinity” (mirepoix), providing an earthy, savory note.
- 2 garlic cloves, minced: Because what’s a savory dish without garlic? It adds a crucial layer of flavor.
- 1 lb dried green split peas, rinsed: The star of the show! Chef’s Insight: Always, always rinse them in a colander. You’d be surprised at the little bits of dust or tiny stones you might find. They are naturally creamy and thicken the soup all on their own.
- 6 cups low-sodium chicken broth or water: I prefer low-sodium broth so I can control the salt level myself. Using all water is totally fine—the turkey and veggies will create a fantastic broth!
- 2 cups smoked turkey, shredded: Our flavor MVP! You can use meat from a leftover smoked turkey breast or leg, or even find it pre-shredded at some grocery stores. Substitution Tip: A ham hock, diced ham, or even a couple of smoked turkey legs (which you can shred after cooking) are perfect substitutes.
- 1 tsp dried thyme: Herby, slightly floral, and a classic pairing with peas and poultry.
- 1 bay leaf: It adds a subtle, almost tea-like background note. Just remember to fish it out before serving!
- Salt & pepper, to taste: Seasoning is everything. We add this at the end so the salt doesn’t prevent the peas from softening.
- 1–2 tsp apple cider vinegar (to finish): This is non-negotiable, friends! It seems like a tiny amount, but it brightens the entire pot, cutting through the richness and making all the flavors pop. Think of it as the secret ingredient that makes people ask, “Wow, what is in this?”
Let’s Get Cooking: Building the Perfect Pot of Soup
Ready to work some magic? This process is simple, relaxing, and oh-so-rewarding. Follow these steps for a foolproof pot of perfection.
- The Sizzling Start: In a large Dutch oven or heavy-bottomed pot, heat your olive oil over medium heat. Add the chopped onion, carrots, and celery (your mirepoix!). Sauté for 6-8 minutes, stirring occasionally, until the onions are translucent and the veggies have started to soften. Chef’s Hack: Don’t crank the heat to high here. We’re not looking to brown them, just to sweat them and release their sweet, sweet flavors.
- Garlic Time! Add the minced garlic, dried thyme, and that trusty bay leaf. Cook for just 1 minute more until fragrant. Ah, smell that? That’s the sound of your kitchen winning.
- The Big Pour: Now, stir in your rinsed split peas, the broth (or water), and the shredded smoked turkey. Give it a good stir to combine everything.
- Simmer to Success: Bring the pot to a lively boil. Once it’s bubbling away, immediately reduce the heat to low, partially cover the pot with a lid (leave a small crack for steam to escape), and let it simmer gently for 45 to 60 minutes. Chef’s Tip: Stir it occasionally, especially towards the end, to prevent the peas from sticking to the bottom of the pot. You’ll know it’s done when the peas have completely broken down and the soup has thickened to a lovely, creamy consistency.
- The Finishing Touches: Carefully remove the bay leaf (it’s done its job!). Now, taste your masterpiece. Season with salt and freshly ground black pepper. Remember, the smoked turkey can be salty, so taste first! Finally, stir in that magical 1-2 teaspoons of apple cider vinegar. Taste again and be amazed at the transformation.
Bowl + Spoon = Happiness: How to Serve It Up
This soup is a complete meal in a bowl, but a few simple accompaniments can turn it into a feast. I love serving it piping hot in big, deep bowls.
For a little textural contrast, set out a few topping options for everyone to choose from: a dollop of plain Greek yogurt or sour cream, a sprinkle of fresh chopped chives or parsley, extra black pepper, or even some crunchy croutons (if you’re not strictly gluten-free).
On the side, you can’t go wrong with a thick, crusty slice of gluten-free bread for dipping, or a simple, crisp green salad with a tangy vinaigrette to balance the soup’s richness. It’s the perfect easy, satisfying weeknight dinner that feels anything but ordinary.
Make It Your Own: Delicious Recipe Variations
The beauty of this soup is its flexibility. Play around with these twists to keep it exciting!
- The “Clean Out the Fridge” Version: Toss in a handful of spinach or kale during the last 5 minutes of cooking. Got a potato? Dice it up and add it with the split peas for extra heartiness.
- Spice It Up: Add a pinch of red pepper flakes with the thyme for a gentle kick, or a dash of smoked paprika to double down on the smoky flavor.
- Herb Garden Refresh: Swap the dried thyme for a tablespoon of fresh chopped rosemary or tarragon for a different herbal profile.
- Vegan/Veggie Powerhouse: Easy! Omit the turkey and use water or veggie broth. To replace the smoky depth, add a teaspoon of liquid smoke or smoked paprika. You could also add a cup of diced potatoes for body.
- Instant Pot Speed Run: Use the sauté function for Step 1. Add all remaining ingredients (except the vinegar, salt, and pepper). Pressure cook on high for 15 minutes, then let the pressure release naturally for 10 minutes before doing a quick release. Finish with vinegar, salt, and pepper.
Beau’s Chef’s Notes & Kitchen Stories
This recipe has evolved so much from my first attempt! The first time I made it, I made the classic mistake of salting the broth at the beginning. The peas never quite softened, and I ended up with a slightly grainy, undercooked soup. Lesson learned: salt at the end, always!
Another funny story: I once convinced my nephew that the green color came from pureed leprechauns. He believed it for years and would demand “Leprechaun Soup” every time he visited. Whatever gets the kids to eat their veggies, right?
This soup is also a fantastic freezer meal. I almost always double the batch and freeze half for those nights when I just can’t even think about cooking. It thaws and reheats like an absolute dream.
Your Soup Questions, Answered!
Q: My soup is too thick! How can I thin it out?
A: No problem at all! Simply stir in a little more broth or water, a splash at a time, until it reaches your preferred consistency. It will thicken as it sits, so you may need to do this when reheating leftovers, too.
Q: Can I make this in a slow cooker?
A: Absolutely! Sauté your veggies on the stovetop first for the best flavor, then transfer everything to your slow cooker. Cook on LOW for 6-8 hours or on HIGH for 3-4 hours.
Q: I forgot to add the apple cider vinegar. Is it ruined?
A: Not ruined at all! It will still be tasty, but it might taste a little flat or one-dimensional. Just stir it in at the end when you’re reheating your bowl. You’ll notice the difference immediately.
Q: Where do I find smoked turkey?
A: Great question! Many grocery stores sell pre-cooked smoked turkey breasts or legs near the lunch meat or in the meat section. After holidays like Thanksgiving, it’s also easy to find. You can also use leftover turkey and add a ½ teaspoon of liquid smoke to the broth to mimic the flavor.

Split Pea Soup with Smoked Turkey (Hearty & Gluten-Free)
Description
If comfort had a flavor, this would be it. Creamy split peas melt into a silky, hearty broth while smoked turkey adds a savory depth that makes every spoonful feel like a hug. It’s cozy, nutrient-rich, and perfect for chilly nights or using up holiday leftovers. The best part? It’s simple, one-pot cooking that rewards you with big flavor and zero fuss.
Ingredients
-
2 tbsp olive oil
-
1 onion, chopped
-
2 carrots, diced
-
2 celery stalks, diced
-
2 garlic cloves, minced
-
1 lb dried green split peas, rinsed
-
6 cups low-sodium chicken broth or water
-
2 cups smoked turkey, shredded
-
1 tsp dried thyme
-
1 bay leaf
-
Salt & pepper, to taste
-
1–2 tsp apple cider vinegar (to finish)
Instructions
-
Heat olive oil in a large pot over medium heat. Sauté onion, carrots, and celery until softened (6–8 min).
-
Add garlic, thyme, and bay leaf; cook 1 min until fragrant.
-
Stir in split peas, broth, and smoked turkey. Bring to a boil.
-
Reduce heat, partially cover, and simmer 45–60 min, stirring occasionally, until peas break down and soup thickens.
-
Remove bay leaf, season with salt and pepper, then stir in apple cider vinegar before serving.
Notes
-
Rinse split peas well—sometimes tiny stones sneak in.
-
For a smoky kick, add smoked paprika.
-
If soup is too thick, stir in extra broth or water.
-
Freezes beautifully—double the batch for future comfort.
Nutritional Information (Per Serving)
This soup isn’t just good for the soul; it’s packed with nutritional goodness! Here’s a rough breakdown per serving (based on 6 servings):
- Calories: ~290
- Carbohydrates: 35g
- Fat: 8g
- Protein: 20g
- Fiber: 12g (That’s nearly half the recommended daily intake!)
This makes it a fantastic, balanced meal. The protein and fiber keep you full and satisfied, while the ingredients provide a great source of vitamins A and C (from the carrots), iron, and potassium. It’s proof that comfort food can be incredibly nourishing.
Final Thoughts from My Kitchen to Yours
Well, there you have it, my friends. My heartwarming, soul-soothing, incredibly delicious recipe for Smoked Turkey Split Pea Soup. It’s more than just a list of ingredients and steps; it’s a reminder that the best meals are often the simplest ones, made with a little patience and a whole lot of love.
I hope this recipe finds its way into your regular rotation and becomes a new tradition in your home, just like it is in mine. If you make it (and I really hope you do!), tag me on social @feastical so I can see your beautiful bowls! Nothing makes me happier than seeing you guys create and enjoy these recipes.
Now, go forth and get your soup on! Until next time, keep your spoons ready and your hearts full.
– Beau
Ham & White Bean Soup with Kale (Hearty & Gluten-Free)
Your New Favorite Bowl of Comfort: Ham & White Bean Soup with Kale
Hey friends, Beau here from Feastical! Can we talk about soup for a second? Not just any soup, but the kind of soup that feels like a warm, hearty hug from the inside out. The kind that simmers on your stove, filling the whole house with an aroma that somehow smells like comfort, home, and pure happiness. If you’re nodding along, then you and I are on the same delicious wavelength, and I am so excited to share this recipe with you today.
This isn’t just a recipe; it’s my go-to solution for chilly evenings, for using up that leftover holiday ham, and for packing a serious nutritional punch without sacrificing an ounce of flavor. We’re talking tender, creamy white beans, smoky bites of ham, and vibrant kale that holds its own in a rich, savory broth. A hint of rosemary and a sneaky spoonful of Dijon mustard create a depth of flavor that will have everyone asking for seconds. The best part? It’s naturally gluten-free, incredibly easy to make, and on the table in under an hour. So, grab your favorite soup pot, and let’s make something beautiful together.
The Story Behind the Soup: More Than Just Leftovers
This soup has roots, my friends. It all started the day after a seriously epic Friendsgiving a few years back. My fridge was a landscape of leftovers, dominated by a giant, beautifully glazed ham bone with plenty of meat still hanging on. Now, my grandma Collier, a woman who never let a single scrap of food go to waste, would have looked at that bone and seen pure potential. She believed a ham bone wasn’t the end of a meal; it was the glorious beginning of the next one.
Channeling her spirit, I threw that bone into a big pot with some water, letting it simmer away while I rummaged through the veggie drawer. An onion here, a couple of lonely carrots there, a can of beans from the pantry… before I knew it, I had created this soul-warming concoction. That first spoonful was a revelation—it tasted like resourcefulness, like comfort, and like a delicious secret handshake between cooks who know the magic of a good leftover. Now, I almost look forward to the ham more for the soup that follows. It’s a tradition that keeps my grandma’s savvy kitchen spirit alive in my own cooking, and I’m just thrilled to pass it on to you.
Gathering Your A-Team: The Ingredients
Simple, wholesome ingredients are the heart of this recipe. Here’s what you’ll need and why each one is a star player:
- 2 tbsp olive oil: Our cooking fat of choice! It adds a lovely fruitiness and helps sauté our veggies to perfection. Avocado oil works great too if that’s what you have.
- 1 small onion, diced: The sweet, aromatic foundation of so many great soups. No onion? A leek or a couple of shallots are fantastic stand-ins.
- 2 carrots, chopped: They bring a subtle sweetness and a gorgeous pop of color. Don’t stress about perfect chops—rustic chunks are part of this soup’s charm!
- 2 celery stalks, chopped: The third member of the classic “mirepoix” trio, adding essential earthy flavor and texture.
- 2 garlic cloves, minced: Because what’s a savory soup without garlic? Pro tip: smash the cloves with the flat of your knife first—the skins will slip right off!
- 1 tsp chopped fresh rosemary (or 1/2 tsp dried): This herb is a powerhouse friend to ham and beans. It’s woodsy and fragrant. If you’re using dried, rub it between your fingers as you add it to wake up the oils.
- 4 cups cooked ham, diced: The king of flavor! This is where you use up that leftover holiday ham. No leftovers? Most grocery stores sell pre-diced ham steak near the bacon, which works beautifully.
- 2 cans (15 oz each) white beans, drained and rinsed: I use canned for speed and convenience. Great Northern or Cannellini beans are perfect—they’re creamy and hold their shape. Rinsing them gets rid of any excess sodium and that starchy can liquid.
- 6 cups low-sodium chicken or vegetable broth: Using low-sodium is key here, as the ham will already add saltiness. You’re the boss of your broth, so you can control the seasoning at the end!
- 2 cups chopped kale, stems removed: A superfood that wilts down into tender, yummy goodness. I prefer curly kale for soup, but Lacinato (or dinosaur) kale works too. Chef’s Hack: Give the leaves a good massage after chopping to make them even more tender.
- 1 tbsp Dijon mustard: This is my secret weapon! It doesn’t make the soup taste like mustard; instead, it adds a incredible depth and tang that brightens the entire pot. Trust me on this one.
- Salt & pepper, to taste: Always season at the end, after the ham has had time to share its salty goodness with the broth.
Let’s Get Cooking: Building Your Soup, Step-by-Step
Okay, team! Let’s fire up the stove. This process is all about building layers of flavor. Follow these steps, and you’ll have a pot of gold (or, you know, soup) in no time.
Step 1: The Aromatic Base. In a large Dutch oven or heavy-bottomed pot, heat your olive oil over medium heat. Once it shimmers, add your onion, carrots, and celery. We’re not looking to brown them, just to sweat them out until they’re softened and the onion is translucent, about 5-7 minutes. This sweet, savory foundation is what makes the broth so incredible.
Step 2: Wake Up the Flavors. Add the minced garlic and rosemary to the pot. Now, lean in and take a big whiff—this is where the magic starts! Cook for just about 60 seconds, until incredibly fragrant. Be careful not to burn the garlic, or it’ll turn bitter. We’re just toasting its potential.
Step 3: The Main Event. Time for the ham and beans! Stir them into the veggie mixture, letting the ham get friendly with the heat and release some of its smoky flavor. This quick sear on the ham adds another fantastic layer of taste.
Step 4: Simmer to Perfection. Carefully pour in your broth and give everything a good stir. Crank the heat up to bring it to a lively simmer, then reduce the heat to maintain it. Let it bubble away, uncovered, for 20-25 minutes. This allows the flavors to meld, the broth to reduce slightly, and the carrots to become perfectly tender. Stir it occasionally and just enjoy the smell.
Step 5: The Grand Finale. Stir in your chopped kale and that secret weapon—the Dijon mustard. Let it simmer for another 5-7 minutes, just until the kale has wilted and turned a vibrant green. You want it tender but not mushy.
Step 6: Taste and Season. This is the most important step! Turn off the heat. Grab a spoon and taste your creation. Now, and only now, season with salt and black pepper to your liking. Remember, the ham is salty, so you might not need much! Give it one final stir, and you are DONE.
How to Serve It Up: Bowl & Beyond
Ladle this beautiful, steaming soup into deep, wide bowls. This is where you can make it your own! I love to finish each bowl with a generous crack of black pepper and maybe a drizzle of good olive oil. If you’re feeling fancy, a sprinkle of grated Parmesan or Pecorino Romano cheese adds a salty, umami kick that is just divine.
While this soup is a complete meal in a bowl, it’s also fantastic with a thick, crusty slice of gluten-free bread for dipping and sopping up every last drop. For a lighter option, a simple side salad with a bright vinaigrette helps cut through the richness perfectly. Don’t forget a big glass of iced tea or a crisp white wine like Sauvignon Blanc!
Make It Your Own: Delicious Twists & Swaps
This recipe is incredibly forgiving and easy to adapt. Here are a few of my favorite ways to switch it up:
- Smoky & Spicy: Add a pinch of red pepper flakes with the garlic, or stir in a teaspoon of smoked paprika for an extra layer of smokiness.
- The “Everything but the…” Version: Clean out your fridge! A handful of frozen corn, some diced potatoes, or even a cup of chopped green beans would be right at home in this pot.
- Turkey Twist: Have leftover turkey instead of ham? It works beautifully! The flavor will be a bit milder, so you might want to add a touch more rosemary or a splash of lemon juice at the end to brighten it up.
- Vegetarian/Vegan Delight: Simply omit the ham and use vegetable broth. To replicate that smoky depth, sauté 8 oz of sliced cremini mushrooms until brown and use a teaspoon of liquid smoke (use sparingly!) or smoked paprika.
- Creamy Dreamy: For a richer, creamier texture, stir in 1/2 cup of heavy cream or full-fat coconut milk during the last few minutes of cooking.
Beau’s Chef Notes & Kitchen Stories
This recipe has evolved so much from that first post-Friendsgiving experiment. The single biggest game-changer was adding the Dijon mustard. I was once making a vinaigrette next to the soup pot and a little splash of Dijon went rogue, landing right in the soup. Rather than panic, I tasted it. It was a revelation! It cut through the richness and made every other flavor pop. Now, it’s a non-negotiable ingredient.
Another lesson learned: always wait to salt! I once made this for a friend and salted at the beginning without thinking. The ham released its salt, and the broth reduced… let’s just say we drank a lot of water that night. Season at the end, folks. Your taste buds will thank you.
Your Questions, Answered: FAQs & Troubleshooting
Q: Can I use a ham bone instead of diced ham?
A: Absolutely! This is the classic way. Use a meaty ham bone and add it in with the broth. Let the soup simmer for at least an hour to extract all that glorious flavor from the bone. Then, remove the bone, shred the meat, and return it to the pot before adding the kale.
Q: My soup is too thin! How can I thicken it?
A: No problem! Take about 1 cup of the soup (mostly beans and a little broth) and blend it until smooth in a blender or with an immersion blender. Stir this puree back into the pot—it will thicken the broth beautifully without any flour.
Q: Can I make this in a slow cooker or Instant Pot?
A: You bet. For the Slow Cooker: Sauté the veggies first (this step is worth it for flavor!), then add everything except the kale and Dijon to the pot. Cook on LOW for 6-8 hours or HIGH for 3-4. Stir in kale and Dijon 30 minutes before serving. For the Instant Pot: Use the Sauté function for the veggies. Add everything except kale and Dijon. Cook on HIGH pressure for 10 minutes, then do a quick release. Stir in kale and Dijon and let it wilt using the residual heat.
Q: How long will leftovers last?
A: Stored in an airtight container in the fridge, this soup is even better the next day! It will keep for 3-4 days. You can also freeze it for up to 3 months. The beans may soften a bit upon thawing, but it will still taste amazing.

Ham & White Bean Soup with Kale (Hearty & Gluten-Free)
- Total Time: 45 min
Description
There’s nothing quite like a steaming bowl of soup that feels like a hug in every bite. This hearty dish brings together smoky ham, creamy white beans, and nutrient-packed kale in a rich, savory broth that’s comforting yet wholesome. With just a few simple steps, you’ll have a pot of cozy goodness ready in under an hour. Perfect for chilly nights, holiday leftovers, or anytime you crave comfort in a bowl.
Ingredients
-
2 tbsp olive oil
-
1 small onion, diced
-
2 carrots, chopped
-
2 celery stalks, chopped
-
2 garlic cloves, minced
-
1 tsp fresh rosemary (or ½ tsp dried)
-
4 cups cooked ham, diced
-
2 cans (15 oz) white beans, rinsed
-
6 cups low-sodium chicken or vegetable broth
-
2 cups kale, chopped, stems removed
-
1 tbsp Dijon mustard
-
Salt & black pepper, to taste
Instructions
-
Heat olive oil in a large pot. Sauté onion, carrots, and celery until softened (5–7 min).
-
Stir in garlic and rosemary; cook until fragrant (1 min).
-
Add ham and beans, stirring to coat.
-
Pour in broth, bring to a simmer, and cook uncovered 20–25 min.
-
Stir in kale and Dijon; simmer 5–7 min until kale is tender.
-
Taste, season with salt and pepper, and serve hot.
Notes
-
Massage kale leaves before adding—they’ll soften beautifully.
-
For extra creaminess, blend 1 cup of beans with broth and stir back in.
-
Vegetarian? Swap ham for mushrooms + smoked paprika.
- Prep Time: 15 min
- Cook Time: 30 min
Nutritional Info (Because Knowledge is Power!)
This soup isn’t just good for the soul; it’s packed with nutrients! Here’s a rough breakdown per serving (based on 6 servings):
Calories: ~320 | Protein: 22g | Carbohydrates: 25g | Fiber: 6g | Fat: 14g
This is a well-balanced meal! The ham and beans provide a powerhouse of protein to keep you full and satisfied. The fiber from the beans and kale is fantastic for digestion and heart health. Kale is a superstar, loaded with Vitamins A, K, and C, along with antioxidants. Using low-sodium broth and waiting to salt helps keep the sodium content in check. It’s a hearty, gluten-free meal that truly nourishes you from the inside out.
Final Thoughts from My Kitchen to Yours
Well, there you have it, my friends. My absolute favorite way to turn simple ingredients into a pot of pure comfort. This Ham & White Bean Soup with Kale is more than just a recipe; it’s a reminder that the best meals often come from a place of resourcefulness and love. They don’t have to be complicated to be incredible.
I hope this recipe finds its way into your regular rotation and becomes a story you tell in your own kitchen. Maybe it’ll be the soup you make after your next big holiday feast, or the quick fix for a busy weeknight. However you enjoy it, I’d love to hear about it! Tag me @feastical on social media so I can see your beautiful creations.
Now go forth, get cooking, and remember—food is meant to be shared. Until next time, keep your spoons handy and your hearts full.
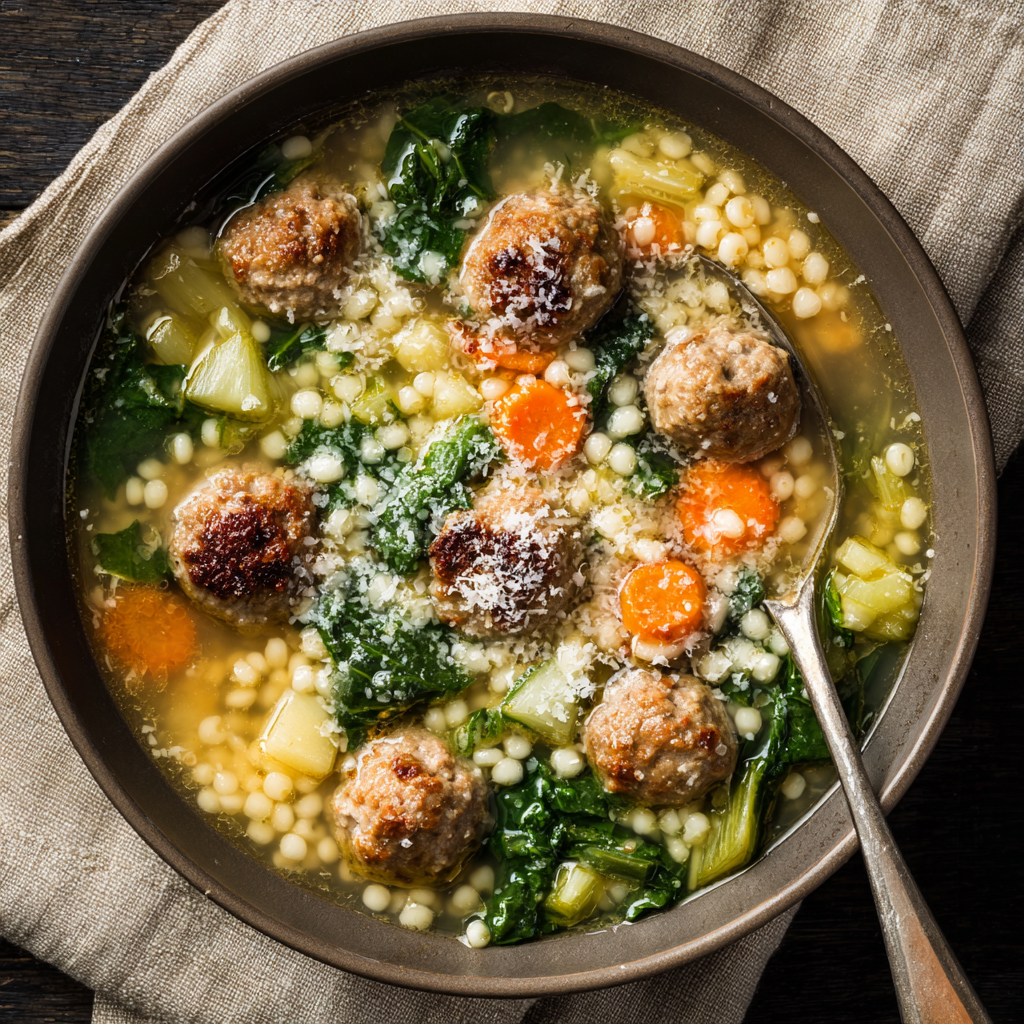
Italian Wedding Soup (Hearty & Traditional)
Your New Favorite Bowl of Sunshine: Italian Wedding Soup
Hey friends, Beau here from Feastical! Let’s talk about that magical moment when you need a meal that feels like a warm, comforting hug from the inside out. You know the feeling—maybe there’s a slight chill in the air, or you’ve had one of those days that calls for a serious dose of cozy. That’s exactly when I find myself drifting toward my big, well-loved stockpot to whip up a batch of what I consider liquid sunshine: Hearty & Traditional Italian Wedding Soup.
Now, don’t let the name fool you. This soup isn’t just for nuptials! The “wedding” (or minestra maritata in Italian) actually refers to the beautiful marriage of flavors between the savory meatballs, the delicate greens, and the rich, parmesan-kissed broth. It’s a harmony in a bowl. This recipe is my absolute go-to because it’s surprisingly simple, endlessly satisfying, and packed with so much love and flavor. It’s light enough that you don’t feel weighed down, yet hearty enough to be a complete meal. So, tie on your favorite apron, and let’s create some magic together. I promise, your kitchen is about to smell incredible.
A Soup for the Soul (And My Nonna’s Table)
This soup always takes me right back to my friend Gina’s chaotic, loud, and incredibly warm family kitchen. I was maybe 19, and her Italian grandmother, Nonna Maria, was presiding over a giant pot of this simmering soup like it was her throne. I remember watching, completely mesmerized, as she effortlessly rolled dozens of tiny meatballs between her palms, all while arguing passionately in a mix of Italian and English about a soccer game on TV.
She handed me a spoon to taste the broth. It was life-changing. Deep, savory, with a hidden richness I couldn’t place. When I asked her secret, she just winked, pointed to a faded piece of Parmesan rind bubbling away in the pot, and said, “That’s the ghost, ragazzo mio. It gives its life for the flavor.” That moment stuck with me. It wasn’t just about the ingredients; it was about the soul. It was about feeding the people you love with something made entirely from the heart. That’s the spirit I try to bring to this recipe every single time.
Gathering Your Flavor All-Stars
Here’s the beautiful part: the ingredient list is humble and simple. It’s all about quality and a couple of chef secrets. Let’s break it down.
For the Meatballs:
- 1/2 lb ground beef: I like an 80/20 blend here. The little bit of fat keeps the meatballs juicy and flavorful. For a leaner option, ground chicken works too.
- 1/2 lb ground pork: This is the classic choice for incredible flavor. Chef’s Insight: If you want to lighten it up, ground turkey is a fantastic and delicious swap!
- 1/3 cup breadcrumbs: They act as a binder. Panko works great, or use gluten-free breadcrumbs if needed.
- 1/4 cup grated Parmesan: Please, for the love of all that is good, grate it fresh off the block! The pre-shredded stuff just doesn’t melt the same way.
- 1 egg: Our binding agent that holds this little flavor party together.
- 1 garlic clove, minced: Fresh is best! It gives a little punch that powdered garlic just can’t match.
- Salt & pepper to taste: Don’t be shy. Seasoning is key!
For the Soup:
- 1 tbsp olive oil: For sautéing our aromatic veggie base.
- 1 small onion, finely chopped: The sweet, foundational flavor.
- 2 carrots, diced: Adds a touch of natural sweetness and beautiful color.
- 2 celery stalks, diced: The third member of the “holy trinity,” adding essential earthy notes.
- 8 cups chicken broth: Use the best quality you can find! It makes a huge difference. Low-sodium is best so you can control the salt level.
- 1 Parmesan rind: This is the SECRET WEAPON! It infuses the broth with an unbelievable, deep, umami richness. Don’t throw your rinds away—freeze them for moments like this!
- 3/4 cup acini di pepe or other tiny pasta: The classic little “peppercorn” pasta. Orzo, pastina, or even ditalini work perfectly.
- 1 head escarole, chopped: The traditional green. It has a slight bitterness that balances the soup beautifully. Sub Tip: No escarole? Spinach, kale, or chopped endive are all great!
- Salt & pepper, to taste: Always taste and season at the end!
- Extra grated Parmesan (for serving): Because is there ever really enough cheese? I think not.
Let’s Get Cooking: Building the Perfect Bowl
Okay, team! Let’s do this. It’s all about building layers of flavor. Read through once, then just go for it—cooking is about feeling, not perfection!
- Make the Meatball Mix: In a medium bowl, combine the ground beef, ground pork, breadcrumbs, grated Parmesan, egg, minced garlic, and a good pinch of salt and pepper. Now, here’s my chef hack: Use your hands! Get in there and mix it until just combined. Don’t overwork it, or your meatballs can get a little tough.
- Form the Mini Meatballs: Pinch off small pieces of the mixture and roll them into tiny, bite-sized balls—about 1 inch in diameter. Pro tip: lightly wet your hands with water to prevent the mixture from sticking. You should get about 30-40 little guys. Set them on a plate or baking sheet.
- Sauté the Aromatics: In a large Dutch oven or heavy-bottomed pot, heat the olive oil over medium heat. Add the chopped onion, carrots, and celery (this trio is called a soffritto!). Sauté for about 5-7 minutes, until they become fragrant and the onion turns translucent. You’re building your flavor base right here!
- Simmer the Broth: Pour in the 8 cups of chicken broth and add that glorious Parmesan rind. Bring it all to a gentle simmer. This is where the magic starts. Let that rind bubble away and work its umami magic for a few minutes before the next step.
- Cook the Meatballs: Gently drop the meatballs into the simmering broth one by one. Don’t stir right away! Let them cook for about 10 minutes. They’ll float to the top when they’re mostly done. This poaching method keeps them incredibly tender.
- Add the Pasta: Stir in your tiny pasta and let it simmer for another 8-10 minutes, or until the pasta is perfectly al dente. Give it an occasional stir to prevent anything from sticking to the bottom.
- Wilt the Greens: Finally, stir in your chopped escarole. It will look like a lot at first, but it wilts down dramatically. Cook for just 2-3 more minutes until the greens are bright green and tender. Chef’s Note: If you’re using spinach, it will wilt in under a minute, so add it literally at the last second!
- Season and Serve: Taste the soup! This is the most important step. Does it need more salt? Pepper? Adjust accordingly. Fish out the Parmesan rind (its job is done, and you can discard it). Ladle the soup into bowls and finish with a generous shower of freshly grated Parmesan cheese.
How to Serve This Masterpiece
Presentation is part of the fun! Ladle this beautiful soup into deep, wide bowls so you get a little bit of everything in each spoonful—broth, pasta, veggie, and meatball. The grand finale is a hefty sprinkle of that extra Parmesan cheese. For the full Feastical experience, serve it with a thick, crusty slice of garlic bread or some warm, buttery breadsticks for dipping. A simple, bright arugula salad on the side helps cut through the richness perfectly. And don’t forget a lemon wedge on the side—a tiny squeeze right at the end can really make the flavors pop in a way you wouldn’t believe!
Make It Your Own: Delicious Twists & Swaps
The best recipes are templates for creativity. Here are a few ways to riff on this classic:
- Lemon-Herb Brightness: Add the zest of one lemon to the meatball mixture and a big handful of fresh chopped parsley or dill at the very end with the greens.
- Keep It Lean: Use all ground turkey or chicken for the meatballs and swap the pasta for a whole wheat or gluten-free variety. It’s just as comforting!
- Greens Galore: Not an escarole fan? Use kale (just add it a minute or two earlier to soften) or Swiss chard. Spinach is always a quick and easy winner.
- “Knot” Your Average Meatball: For an incredible texture, use ground sausage (mild or hot Italian) instead of plain pork. It’s already seasoned with those amazing fennel and herbs.
- White Bean Bliss: Want to make it even heartier? Stir a can of drained and rinsed cannellini beans in with the pasta. You’ll thank me later.
Beau’s Chef Notes & Kitchen Stories
This recipe has evolved so much in my kitchen over the years. I once, in a frantic pre-dinner party rush, tried to roll all the meatballs at once and ended up with one giant, soup-sized meatball. We still laugh about the “Italian Wedding Meatloaf Soup” incident. Lesson learned: take your time and enjoy the process!
The single best piece of advice I can give you is to SAVE YOUR PARMESAN RINDS. Keep a zip-top bag in your freezer and just toss them in whenever you finish a block of cheese. They are absolute gold for adding depth to any soup, stew, or sauce. This little habit will change your cooking forever.
Your Questions, Answered!
Q: Can I make this soup ahead of time?
A: Absolutely! You can make the entire soup, but I recommend keeping the pasta separate if you can. Pasta continues to absorb liquid and can get mushy. If you’ve already mixed it in, just know you might need to add a splash of extra broth when you reheat it. The flavor will still be amazing.
Q: My meatballs are falling apart in the soup! What did I do wrong?
A: No worries! This usually means the mixture needed a better binder. Next time, make sure your breadcrumbs are nice and fine, and that you’ve included the egg. Chilling the formed meatballs for 15-20 minutes before adding them to the soup can also help them firm up and hold their shape.
Q: I can’t find acini di pepe. What’s the best substitute?
A: Any small pasta will work wonderfully! Orzo, pastina, stelline (little stars), ditalini, or even broken-up pieces of angel hair pasta are all perfect in this soup.
Q: Is it really necessary to use both meats for the meatballs?
A> While the blend of beef and pork is traditional and gives the best flavor, you can absolutely use just one. All beef, all pork, all turkey—it will still be delicious. The soup police will not come knocking, I promise!
Italian Wedding Soup (Hearty & Traditional)
Description
Hearty & Traditional Italian Wedding Soup
A cozy, flavorful soup with tender meatballs, delicate greens, and a Parmesan-kissed broth. Serves 6.
Ingredients
Meatballs:
-
½ lb ground beef (80/20)
-
½ lb ground pork (or turkey/chicken for leaner option)
-
⅓ cup breadcrumbs (or gluten-free)
-
¼ cup freshly grated Parmesan
-
1 egg
-
1 garlic clove, minced
-
Salt & pepper, to taste
Soup:
-
1 tbsp olive oil
-
1 small onion, finely chopped
-
2 carrots, diced
-
2 celery stalks, diced
-
8 cups chicken broth (low-sodium recommended)
-
1 Parmesan rind
-
¾ cup acini di pepe (or orzo, pastina, ditalini)
-
1 head escarole, chopped (or spinach/kale/Swiss chard)
-
Salt & pepper, to taste
-
Extra grated Parmesan, for serving
Instructions
-
Make Meatballs: Combine all meatball ingredients in a bowl. Mix lightly with hands, form 1-inch balls (30–40). Chill 15–20 min for firmer texture.
-
Sauté Aromatics: Heat olive oil in a large pot over medium heat. Add onion, carrots, and celery. Cook 5–7 min until softened.
-
Simmer Broth: Add chicken broth and Parmesan rind. Bring to gentle simmer.
-
Cook Meatballs: Gently drop meatballs into simmering broth. Cook 10 min, do not stir immediately.
-
Add Pasta: Stir in tiny pasta; simmer 8–10 min until al dente.
-
Wilt Greens: Add escarole; cook 2–3 min until tender (spinach wilts in <1 min).
-
Season & Serve: Taste, adjust salt/pepper. Remove Parmesan rind. Ladle into bowls, top with extra Parmesan. Optional: serve with crusty bread or breadsticks.
Notes
-
Lemon-Herb Brightness: Add zest of 1 lemon to meatballs and fresh parsley or dill at the end.
-
Keep It Lean: Use all turkey/chicken and swap pasta for gluten-free or whole wheat.
-
Greens Galore: Kale or Swiss chard works; adjust cooking time.
-
Sausage Swap: Use mild or hot Italian sausage for extra flavor.
-
Extra Hearty: Stir in a can of rinsed cannellini beans with the pasta.
Nutrition
- Calories: 370 Calo
- Fat: 22g
- Fiber: : 3g
- Protein: 22g
Nutritional Information (Because We Care!)
Here’s a rough breakdown per serving (based on 6 servings). Remember, this is just an estimate and can vary based on your specific ingredients and substitutions!
Calories: ~370
Carbohydrates: 20g
Fat: 22g
Protein: 22g
Fiber: 3g
This soup is a wonderfully balanced meal! You’re getting a great dose of protein from the meatballs and broth, complex carbs from the pasta and veggies, and vitamins from the leafy greens. Using leaner meat or loading up on extra veggies are easy ways to tailor it to your nutritional goals.
Final Thoughts from My Kitchen to Yours
Well, there you have it, my friends. My heart-on-a-sleeve, tried-and-true recipe for the most comforting Italian Wedding Soup. It’s more than just a recipe; it’s a reminder that the best food is often the simplest, made with intention and shared with joy. I hope this soup finds its way to your table on a busy weeknight, a lazy Sunday, or whenever you need a little edible comfort.
If you make it (and I really hope you do!), tag me @feastical on social media so I can see your beautiful creations! Nothing makes me happier than seeing you guys in the kitchen. Now go forth, cook with confidence, and enjoy every last slurp.
With a full belly and a happy heart,
Beau

Turkey & Wild Rice Soup (Hearty & Gluten-Free)
Your New Favorite Bowl of Cozy: Turkey & Wild Rice Soup
Hey friends, Beau here from Feastical! Can we talk about that beautiful, slightly chaotic, and utterly delicious time after a big holiday feast? You know the scene: the table is cleared, the laughter has settled into a warm hum, and sitting proudly in the fridge is… The Turkey. We’ve all been there, staring at that magnificent bird and thinking, “Okay, glorious beast, round two begins now.” Sandwiches are a classic move, sure, but if you really want to win the post-holiday game, you transform those leftovers into something magical, comforting, and downright soul-warming.
That’s where this superstar recipe comes in. This isn’t just any soup; this is a Hearty & Gluten-Free Turkey & Wild Rice Soup that tastes like a warm hug in a bowl. We’re talking tender shreds of turkey and a rich, savory broth packed with earthy mushrooms and fragrant thyme. It’s the kind of meal that fills your kitchen with the most incredible aroma, promising comfort with every single spoonful. It’s nourishing without being pretentious, elegant in its simplicity, and it just so happens to be naturally gluten-free. Whether you’re using up holiday leftovers or just craving a cozy weeknight dinner, this soup is your answer. So, grab your favorite pot and let’s make something beautiful together.
The Soup That Started With a “Happy Accident”
This recipe has a special place in my heart because it was born from what I lovingly call a “happy accident.” A few years back, I hosted my first big Friendsgiving. I was so focused on nailing the perfectly brined, herb-roasted turkey (mission accomplished!) that I completely underestimated how many sides we’d need. We ended up with a mountain of leftover turkey and a serious case of the next-day lazies. No one wanted to cook, but we were all craving something satisfying.
I started pulling things out of the pantry and fridge: some wild rice blend from a pilaf I never got around to making, a handful of mushrooms starting to look a little lonely, and the last of the celery. I threw it all in a pot with the glorious turkey carcass I’d simmered into broth overnight. The result was this incredibly rich, hearty soup that had everyone hovering around the stove, bowls in hand. It was unplanned, imperfect, and absolutely perfect. It reminded me that the best meals aren’t always the ones you plan for days; sometimes, they’re the ones you create from a little bit of love and whatever you have on hand. That’s the spirit of Feastical, and it’s the spirit of this soup.
Gathering Your Soup Squad: The Ingredients
This recipe is wonderfully flexible, but each ingredient plays a key role in building that deep, comforting flavor. Here’s your shopping list and my chef-y insights on each one.
- 2 tbsp olive oil or butter: This is our cooking fat to build the foundation of flavor. I love the fruity depth of a good olive oil, but butter adds a classic, rich comfort. For a dairy-free version, stick with oil!
- 1 small onion, diced: The humble onion is our aromatic base, providing a sweet, savory backbone. No onion? A large shallot or even a leek (white and light green parts only, well-cleaned!) works beautifully.
- 2 garlic cloves, minced: Non-negotiable for me! Garlic adds that punch of aroma and flavor. Pro tip: press your garlic instead of mincing for an even more potent and integrated flavor.
- 2 cups mushrooms, sliced: These are our flavor bombs! They add a deep, earthy, umami richness. Cremini or baby bellas are my go-to, but use whatever you have. Even simple white buttons will work in a pinch.
- 1 cup uncooked wild rice blend (GF certified): The heart of the soup! A blend with wild rice, brown rice, and perhaps some other grains gives fantastic texture. Crucially, always check the package to ensure it’s certified gluten-free if that’s a concern, as some blends can be processed in facilities with wheat.
- 6 cups turkey or chicken broth (GF): The soul of the operation. Homemade broth from your turkey carcass is next-level amazing, but a good quality store-bought broth works wonderfully. Just double-check that label for gluten-free certification!
- 2 cups cooked turkey, shredded or diced: The star of the show! This is why we’re here. Use white meat, dark meat, or a mix. Rotisserie chicken is a fantastic year-round substitute.
- 1 tsp dried thyme (or 1 tbsp fresh): This herb is a match made in heaven with poultry and mushrooms. Dried is perfectly fine, but if you have fresh thyme, you’ll get a brighter, more vibrant note.
- Salt & pepper, to taste: Season as you go! Your broth will have salt, so taste before you add more at the end.
- 1/2 cup heavy cream or full-fat coconut milk (for dairy-free option): This is our finishing touch, adding a touch of luxurious creaminess and rounding out all the flavors. For dairy-free, full-fat coconut milk is a stellar substitute that won’t taste coconutty.
Let’s Get Cooking: Building Your Masterpiece
Now for the fun part! Making soup is a therapeutic process of building layers of flavor. Follow these steps, and you’ll have a pot of gold in under an hour.
Step 1: The Aromatic Base
In a large Dutch oven or heavy-bottomed pot, heat your olive oil or butter over medium heat. Once it shimmers (or the butter melts), add your diced onion. Sauté for about 4-5 minutes, until it becomes translucent and fragrant. Now, add the minced garlic and cook for just another 60 seconds—until you can smell that gorgeous garlicky perfume. Don’t let it brown! Chef’s Hack: Sautéing the onion until soft but not brown helps release its natural sugars, creating a sweet foundation that balances the savory elements.
Step 2: Unleashing the Umami
Add your sliced mushrooms and thyme to the pot. Here’s a key tip: don’t stir them immediately! Let them sit for a minute to get a little color on one side, then give them a good stir. Cook, stirring occasionally, until the mushrooms have released their moisture, shrunk in size, and taken on a beautiful golden-brown color, about 6-8 minutes. Chef’s Hack: This step is crucial for developing deep flavor. We’re not just softening the mushrooms; we’re browning them to create fond (those tasty browned bits) on the bottom of the pot.
Step 3: The Hearty Foundation
Stir in your uncooked wild rice blend, making sure to coat it in the oil and vegetable mixture. This toasts the grains just slightly, enhancing their nutty flavor. Now, pour in your gluten-free broth, scraping the bottom of the pot with your spoon to release all that delicious fond. This is where all the flavor lives! Bring the whole thing to a rolling boil. Chef’s Hack: Deglazing the pot by scraping up the browned bits is a simple step that adds a ton of complex flavor to your soup base.
Step 4: The Simmering Patience
Once boiling, reduce the heat to low, cover the pot with a lid, and let it simmer gently for 40-45 minutes. You’ll know it’s ready when the wild rice grains have split open and are tender to the bite. The broth will also have thickened slightly from the rice starch. Chef’s Hack: Resist the urge to lift the lid too often! Keeping it covered traps the heat and moisture, ensuring the rice cooks evenly and the broth doesn’t reduce too much.
Step 5: The Grand Finale
Once the rice is tender, stir in your cooked, shredded turkey. Let it heat through for about 5-10 minutes—this is just to warm the turkey and let it soak up some of that lovely broth. Finally, turn off the heat and stir in the heavy cream or coconut milk. This is your last step! Adding the cream off the heat prevents it from curdling. Give it a taste and season with salt and freshly ground black pepper until it’s just right for you.
Let’s Dish It Up: Serving Suggestions
This soup is a complete meal in a bowl, but a little presentation goes a long way! Ladle those steaming, hearty spoonfuls into deep, wide bowls. The contrast of the dark wild rice, creamy broth, and tender turkey is just beautiful. Now, let’s gild the lily a little, shall we?
I love to finish each bowl with a fresh garnish. A sprinkle of chopped fresh parsley or chives adds a pop of color and a bright, fresh flavor that cuts through the richness. If you’re feeling indulgent, a little extra crack of black pepper or a drizzle of a good quality olive oil on top is divine. For my friends who aren’t avoiding gluten, a warm, crusty slice of sourdough bread for dipping is non-negotiable. For a gluten-free option, my favorite pairing is a simple side salad with a tangy vinaigrette or even some gluten-free crackers or cornbread on the side. It’s all about that cozy, satisfying experience.
Make It Your Own: Delicious Recipe Variations
The beauty of this soup is its adaptability. Don’t be afraid to play around and make it work for you! Here are a few of my favorite twists:
- The “Kitchen Sink” Veggie Boost: Feel free to add other vegetables when you sauté the onions. Diced carrots and celery (a classic mirepoix) are a natural fit. Add them with the onions to give them time to soften. A handful of spinach or kale stirred in at the very end until wilted is also fantastic.
- Cozy Chicken & Wild Rice: No turkey? No problem! This is arguably just as popular in my house year-round. Simply substitute cooked, shredded rotisserie chicken for the turkey. It’s the ultimate easy weeknight dinner lifesaver.
- Creamy Dairy-Free Dream: As noted, full-fat coconut milk is a perfect one-to-one substitute for the heavy cream. It provides the same luxurious creaminess without a overpowering coconut flavor. For a richer broth without cream, you can also blend a cup of the cooked soup and stir it back into the pot to naturally thicken it.
- Herb Garden Refresh: While thyme is classic, other herbs work wonderfully. Try a teaspoon of dried tarragon or rosemary (use a light hand with rosemary, as it’s powerful!) for a different flavor profile. A bay leaf added during the simmering step and removed before serving adds a subtle, warm depth.
- Instant Pot Shortcut: Short on time? Use the sauté function for Steps 1-3. Add everything except the turkey and cream, seal the lid, and cook on high pressure for 25 minutes. Let the pressure release naturally for 10 minutes, then quick release. Stir in the turkey and cream, and you’re done!
Beau’s Chef Notes: A Few Parting Thoughts
This recipe has evolved from that first happy accident into a true Feastical staple. I’ve made it for sick friends, for frosty winter potlucks, and as my go-day-after-Thanksgiving lunch. One time, I accidentally used a triple amount of black pepper (note to self: the cap was not on tight), and we ended up calling it “Cracked Pepper Potion” – it was actually still delicious, just very, very spicy!
The biggest lesson this soup has taught me is to not be afraid of improvisation. Cooking isn’t about rigid rules; it’s about intuition and taste. Your broth might be saltier than mine, your turkey might be more plentiful—taste as you go and make it yours. The goal is a bowl that makes you and your people feel good. That’s always the goal.
FAQs & Soup Salvation
Q: My soup got really thick after sitting in the fridge. What happened?
A: Don’t worry! This is completely normal. The rice continues to absorb liquid as it sits. Just thin it out with a little extra broth or water when you reheat it on the stove, and it will be good as new.
Q: Can I freeze this soup?
A: You can, but with a caveat. Soups with dairy can sometimes separate or become grainy when frozen and thawed. For best results, freeze the soup before adding the cream. When you’re ready to eat, thaw it, reheat it, and then stir in the cream at the end.
Q: My wild rice is still crunchy after 45 minutes. Help!
A: Different wild rice blends can have varying cook times depending on the specific grains included. If it’s still too firm for your liking, just add a splash more broth and continue simmering, checking every 5-10 minutes until it reaches your desired tenderness.
Q: Is there a way to make this soup in a slow cooker?
A: Absolutely! Sauté the onions, garlic, and mushrooms on the stove first (this step is key for flavor). Then transfer them to your slow cooker and add the rice, broth, and thyme. Cook on LOW for 6-7 hours or on HIGH for 3-4 hours. Stir in the turkey and cream during the last 30 minutes of cooking.
Turkey & Wild Rice Soup (Hearty & Gluten-Free)
Description
Hearty & Gluten-Free Turkey & Wild Rice Soup
Comforting, creamy, and naturally gluten-free. Serves 6.
Ingredients
Soup Base:
-
2 tbsp olive oil or butter
-
1 small onion, diced
-
2 garlic cloves, minced
-
2 cups mushrooms, sliced
-
1 cup uncooked wild rice blend (GF certified)
-
6 cups turkey or chicken broth (GF)
-
2 cups cooked turkey, shredded or diced
-
1 tsp dried thyme (or 1 tbsp fresh)
-
Salt & pepper, to taste
-
½ cup heavy cream or full-fat coconut milk (optional, for creaminess)
Optional Add-Ins & Garnishes:
-
Diced carrots, celery, spinach, or kale
-
Fresh parsley or chives for topping
-
Olive oil drizzle or extra black pepper
Instructions
-
Sauté Aromatics: In a large pot, heat olive oil/butter over medium heat. Add onion, cook 4–5 min until soft. Add garlic, cook 1 min.
-
Cook Mushrooms: Add mushrooms and thyme. Let sit 1 min, then stir occasionally until golden and moisture released (~6–8 min).
-
Add Rice & Broth: Stir in wild rice to toast slightly. Pour in broth, scraping pot bottom to release flavorful bits. Bring to a boil.
-
Simmer: Reduce heat, cover, and simmer 40–45 min until rice is tender.
-
Add Turkey & Cream: Stir in cooked turkey; heat 5–10 min. Remove from heat, stir in cream or coconut milk. Season to taste.
-
Serve: Ladle into bowls. Garnish with parsley, chives, or a drizzle of olive oil. Optional: gluten-free bread or crackers on the side.
Notes
-
Veggie Boost: Add diced carrots, celery, or leafy greens.
-
Chicken Substitute: Rotisserie chicken works year-round.
-
Dairy-Free Creaminess: Use full-fat coconut milk or blend some soup to thicken naturally.
-
Herb Swaps: Tarragon, rosemary, or a bay leaf for different flavors.
-
Slow Cooker: Sauté aromatics first, then add rice, broth, and thyme; cook LOW 6–7 hrs or HIGH 3–4 hrs. Stir in turkey and cream last.
-
Instant Pot Shortcut: Sauté onions/mushrooms, add rice & broth, cook high pressure 25 min, natural release 10 min, then stir in turkey & cream.
Nutrition
- Calories: 330 Cal
- Carbohydrates: 25g
- Fiber: 3g
- Protein: 20g
Nourishment By The Bowl (Approximate)
While I’m all about flavor first, it’s nice to know what’s fueling that comfort! This nutritional information is per serving (assuming 6 servings) and is an estimate calculated using olive oil and heavy cream. Remember, values can vary based on your specific ingredients and portion sizes.
Calories: ~330 | Protein: 20g | Carbohydrates: 25g | Fiber: 3g | Fat: 17g
This soup is a fantastic source of lean protein from the turkey, keeping you full and satisfied. The wild rice provides complex carbohydrates and fiber for sustained energy, and the healthy fats from the olive oil and cream aid in nutrient absorption and add that satisfying mouthfeel. It’s a wonderfully balanced meal that truly nourishes from the inside out.
Final Thoughts: Share the Comfort
Well, friends, there you have it—my all-time favorite way to turn leftovers into a legendary meal. This Turkey & Wild Rice Soup is more than just a recipe; it’s a feeling. It’s the feeling of resourcefulness, of creating something incredible from simple ingredients, and of sharing a steaming, hearty bowl of comfort with people you love.
I truly hope this recipe becomes a trusted favorite in your kitchen, too. It’s earned its spot in my regular rotation, and I have a feeling it will in yours. If you make it (and I really hope you do!), tag me on social @feastical so I can see your beautiful creations. Nothing makes me happier than seeing you guys in the kitchen, creating your own stories and your own versions of comfort.
Until next time, keep your spoons ready and your hearts full. Happy cooking!

Chicken Pot Pie Soup with Buttered Biscuit Croutons
Your New Favorite Comfort Food Bowl is Here!
Hey friends, Beau here from Feastical! Ever have one of those days where you’re craving the cozy, heartwarming hug of a classic chicken pot pie, but the thought of making a from-scratch crust feels, well… like a bit too much of a project? I feel you. Some days call for flaky pastry, and other days call for a big spoon and a deep, satisfying bowl of something delicious. That’s exactly why I created this recipe for Chicken Pot Pie Soup with Buttered Biscuit Croutons.
This soup is the ultimate weeknight hero. It captures every single bit of that nostalgic, creamy, savory pot pie magic we all love—the tender chunks of chicken, the sweet peas and carrots, the luxurious, velvety broth—but gets it into your bowl in about 40 minutes flat. And the best part? Instead of a bottom crust that can get soggy, we top it with these incredible, golden, buttery biscuit croutons that are so good, you might just start putting them on everything. They give you that perfect, satisfying crunch in every single bite.
This isn’t just a soup; it’s an experience. It’s the kind of meal that gathers everyone around the kitchen table, sparks conversation, and leaves everyone feeling completely content. It’s uncomplicated, soulful cooking at its finest. So, grab your favorite pot and let’s make a memory together. This is one recipe you’ll come back to again and again.
A Pot Pie Revelation on a Rainy Tuesday
This recipe was born out of a serious comfort food craving on a particularly dreary Tuesday evening. I was rifling through the freezer, hoping a fully-formed pot pie would magically appear, when I found some leftover roasted chicken and a bag of frozen peas and carrots. The classic components were all there, just waiting for a new interpretation.
I started building a creamy soup base, and the aroma of sautéed onion and garlic began to work its magic, instantly making the kitchen feel warmer. As I stirred in the broth and milk, I had a flash of genius (if I do say so myself!). I remembered a can of biscuit dough tucked away in the fridge. Instead of baking whole biscuits on the side, I thought, why not make them the star of the show? I chopped them into bite-sized pieces, tossed them in melted butter, and popped them in the oven. The result was nothing short of a revelation. Those little golden nuggets of buttery goodness, floating on top of that rich, creamy soup, delivered the exact same comfort and flavor as a traditional pot pie, but with half the effort and twice the fun. It was a happy accident that’s now a permanent part of my comfort food rotation.
Gathering Your Cozy Ingredients
Here’s everything you’ll need to create this bowl of comfort. Don’t stress about being exact—cooking is about feeling, and these ingredients are wonderfully flexible!
- 2 tbsp Butter: The foundation of our flavor. It’s for sautéing and building our roux. Unsalted is best so we can control the salt level, but salted works in a pinch—just taste before adding more salt later.
- 1 small Onion, diced: This sweet, aromatic base builds a deep flavor foundation. No onion? A shallot or even a leek would be lovely here.
- 2 Garlic cloves, minced: Because is there any savory dish that isn’t made better by garlic? I think not.
- 2 cups cooked, shredded Chicken: The ultimate time-saver! Use a rotisserie chicken, leftover baked chicken, or even poach two breasts in the broth for 15 minutes before you start. Shred it, and you’re golden.
- 2 cups Chicken Broth: Use a good-quality broth for the best flavor. This is the soul of your soup!
- 2 cups Whole Milk or Half-and-Half: This creates our creamy, luxurious base. Whole milk gives a lighter creaminess, while half-and-half is extra rich. For a dairy-free version, full-fat canned coconut milk is a fantastic substitute.
- 1/2 cup Heavy Cream (optional): I call this the “luxury lift.” It’s not strictly necessary, but oh boy, does it make the soup incredibly silky and decadent.
- 1 1/2 cups frozen Peas and Carrots: The classic pot pie veggie duo! Using frozen is a huge time-saver, and they’re frozen at peak freshness. No need to thaw!
- 1/4 cup All-Purpose Flour: This is our thickening agent. It combines with the butter to make a roux, which gives the soup its perfect body. For a gluten-free soup, a 1:1 gluten-free flour blend works beautifully.
- Salt & Pepper, to taste: The essential seasonings. I always say season gradually and taste as you go!
- 1/2 tsp Thyme (optional): A little sprinkle of dried thyme adds a subtle, earthy note that whispers “classic pot pie.” Feel free to use poultry seasoning or a bit of sage instead.
For the Buttered Biscuit Croutons:
- 1 can refrigerated Biscuit Dough: The secret weapon! Any brand will do. These bake up into incredibly soft, fluffy, and buttery croutons.
- 2 tbsp melted Butter: For tossing the biscuit pieces. This ensures they get golden brown and deliciously crisp on the outside.
- Pinch of Garlic Powder or herbs (optional): A little extra flavor boost for the croutons. I sometimes add a pinch of dried parsley or rosemary.
Let’s Make Some Magic: Step-by-Step
Alright, team! Let’s fire up the stove and get this cozy masterpiece going. It comes together faster than you think.
- The Aromatic Base: Grab your largest, heaviest-bottomed pot or Dutch oven and place it over medium heat. Add your 2 tablespoons of butter and let it melt until it’s just starting to foam. Toss in your diced onion and sauté for about 4-5 minutes, until it becomes soft and translucent. You’re not looking for color here, just sweetness. Now, add the minced garlic and cook for just one more minute until it’s incredibly fragrant. Chef’s Hack: Don’t let the garlic brown! Burnt garlic tastes bitter, and we want sweet, aromatic goodness.
- Build the Roux: Sprinkle the 1/4 cup of flour over the onion and garlic. Now, stir continuously for a full 1-2 minutes. You’re cooking out the raw flour taste and creating what’s called a “roux.” It will look like a thick paste. This is the key to a non-watery, beautifully thickened soup!
- Whisk in the Goodness: Here’s the only slightly tricky part, but you’ve got this! Slowly, and I mean slowly, start pouring in your chicken broth while whisking CONSTANTLY. This prevents lumps from forming. Once all the broth is incorporated and smooth, repeat the process with the milk (and cream, if using). Keep whisking until everything is smooth and unified.
- Simmer to Thicken: Bring the pot to a gentle simmer (not a rolling boil). Let it cook for 5-8 minutes, stirring occasionally. You’ll feel the whisk start to move through the soup with a little more resistance, and it will visibly thicken to a creamy, gravy-like consistency. Beautiful!
- Add the Stars of the Show: Now, stir in your frozen peas and carrots, shredded chicken, and that optional 1/2 teaspoon of thyme. Bring it back to a simmer and let it cook for another 10-15 minutes. This allows the veggies to heat through and the flavors to meld together into one happy family.
- The Final Seasoning: This is the most important step! Taste your soup. Now season with salt and pepper. How much? Until it tastes just right to you. Remember, the broth and chicken might have salt already, so start with a little and add more as needed.
- Make the Croutons: While the soup is doing its final simmer, preheat your oven to 400°F (200°C). Open your can of biscuit dough and cut each biscuit into 1-inch chunks. Place them in a bowl, drizzle with the 2 tablespoons of melted butter and a pinch of garlic powder (if using), and toss to coat evenly. Spread them out on a baking sheet. Bake for 10-12 minutes, flipping once halfway through, until they are puffed up and golden brown. They will smell amazing.
- Serve Immediately: Ladle that gorgeous, steaming soup into bowls and top with a generous handful of the warm, buttery biscuit croutons. The contrast of the hot, creamy soup with the crispy, fluffy croutons is pure heaven.
How to Serve This Cozy Masterpiece
Presentation is part of the fun! I love serving this soup in wide, shallow bowls—it gives the croutons plenty of room to shine without sinking immediately. For a real “wow” factor, bring the whole pot to the table and let everyone serve themselves family-style. It just feels more communal and celebratory that way.
While this soup is a full meal in a bowl, a simple, crisp side salad with a bright vinaigrette is the perfect partner to cut through the richness. A glass of chilled Chardonnay or a crisp hard cider would also be a fantastic pairing for the grown-ups at the table. And don’t forget the big, comfy napkins—this is cozy food, and a little splatter is just a sign of a good time!
Make It Your Own: Delicious Variations
One of the best things about this recipe is how adaptable it is. Play with it and make it suit your taste!
- The Veggie Lover: Clean out the fridge! Diced celery sautéed with the onion is classic. Mushrooms, corn, green beans, or even chopped broccoli would be fantastic additions. Just adjust cooking times for firmer veggies.
- Thanksgiving Leftovers Twist: Swap the chicken for leftover shredded turkey and add a teaspoon of sage. It’s like Thanksgiving in a bowl, all year round!
- Gluten-Free & Dairy-Free Friendly: It’s easy! Use a gluten-free 1:1 flour blend for the roux. For the soup liquid, use a rich, unsweetened almond milk or oat milk and skip the cream. For the croutons, use a tube of gluten-free biscuit dough or even cubes of gluten-free bread tossed in olive oil.
- Extra Herby & Bright: Stir in a tablespoon of fresh chopped parsley or dill right at the end of cooking for a burst of fresh flavor. A small squeeze of lemon juice can also brighten up all the rich, creamy notes.
- Pot Pie Dumplings: Feeling fancy? Instead of baking the biscuit pieces, drop the raw, quartered biscuit dough directly onto the simmering soup. Cover the pot and let them steam/poach for 10-12 minutes. You’ll get fluffy dumplings right in your soup!
Beau’s Chef Notes & Kitchen Stories
This recipe has evolved so much since that first rainy Tuesday. I’ve made it for friends after a long move, for family during the holidays, and honestly, for myself on more than a few “need a hug” nights. The biggest lesson? Don’t fear the roux. I used to rush it or turn the heat up too high, which led to a floury taste or, worse, burning. Low and slow is the way to go—let that butter and flour mixture cook for the full two minutes. It makes all the difference in the world.
Another funny kitchen story: I once accidentally used a can of cinnamon roll dough instead of biscuits for the croutons. It was… an interesting sweet-and-savory experiment that my kids actually loved! I don’t necessarily recommend it, but it goes to show that even kitchen mishaps can lead to happy accidents.
Your Questions, Answered
Q: My soup turned out too thin. How can I thicken it?
A: No worries! Make a “slurry.” Mix one tablespoon of cornstarch with two tablespoons of cold water or broth until smooth. Whisk this into your simmering soup and let it cook for 2-3 minutes. It will thicken right up.
Q: Can I make this soup ahead of time?
A: Absolutely! The soup itself (without croutons) stores and reheats beautifully. Let it cool completely and store it in an airtight container in the fridge for up to 3 days. The soup will thicken as it sits, so you may need to add a splash of broth or milk when reheating. Make the croutons fresh right before serving for the best texture.
Q: Can I freeze this chicken pot pie soup?
A: I don’t recommend freezing the soup with the dairy in it, as it can separate and become grainy when thawed. For a freezable version, prepare the soup base with the roux and broth only, and freeze that. When ready to eat, thaw, reheat, and then add the milk/cream and veggies to finish.
Q: My croutons got soggy really fast. Any tips?
A> For maximum crunch, I’m a big fan of serving the croutons on the side in a separate bowl and letting people add their own right before they eat. This keeps them perfectly crisp until the very last spoonful!

Chicken Pot Pie Soup with Buttered Biscuit Croutons
Description
Chicken Pot Pie Soup with Buttered Biscuit Croutons
Creamy, comforting, and cozy—like a pot pie in a bowl. Serves 6.
Ingredients
Soup:
-
2 tbsp butter
-
1 small onion, diced
-
2 garlic cloves, minced
-
2 cups cooked, shredded chicken (rotisserie or leftover)
-
2 cups chicken broth
-
2 cups whole milk or half-and-half
-
½ cup heavy cream (optional)
-
1½ cups frozen peas and carrots
-
¼ cup all-purpose flour (or gluten-free 1:1 flour)
-
½ tsp thyme (optional)
-
Salt & pepper, to taste
Buttered Biscuit Croutons:
-
1 can refrigerated biscuit dough
-
2 tbsp melted butter
-
Pinch of garlic powder or herbs (optional)
Instructions
-
Sauté Aromatics: In a large pot, melt butter over medium heat. Add onion and cook 4–5 min until soft. Add garlic and cook 1 min.
-
Make Roux: Sprinkle flour over onion/garlic, stirring 1–2 min until smooth.
-
Add Liquids: Slowly whisk in chicken broth, then milk (and cream, if using) until smooth.
-
Simmer: Cook 5–8 min, stirring occasionally, until soup thickens.
-
Add Chicken & Veggies: Stir in shredded chicken, peas, carrots, and thyme. Simmer 10–15 min until heated through.
-
Season: Taste and adjust salt and pepper.
-
Make Croutons: Preheat oven to 400°F (200°C). Cut biscuits into 1-inch chunks, toss with melted butter and optional seasonings. Bake 10–12 min until golden, flipping halfway.
-
Serve: Ladle soup into bowls and top with croutons. Serve immediately.
Notes
-
Make Ahead: Soup stores 3 days in fridge; add croutons fresh before serving.
-
Veggie Boost: Add celery, mushrooms, corn, green beans, or broccoli.
-
Thanksgiving Twist: Swap chicken for turkey and add 1 tsp sage.
-
Dumpling Option: Drop quartered raw biscuits directly into simmering soup, cover, cook 10–12 min.
-
Gluten/Dairy-Free: Use gluten-free flour, almond or oat milk, and gluten-free biscuit dough.
Nutritional Information*
*This is an estimate for informational purposes and may vary based on specific ingredients and portion sizes used.
Per Serving (based on 6 servings):
Calories: ~460 | Total Fat: 28g | Saturated Fat: 14g | Cholesterol: 95mg | Sodium: 780mg | Total Carbohydrates: 35g | Dietary Fiber: 3g | Sugar: 8g | Protein: 22g
This soup is a great source of protein and Vitamin A (thanks to those carrots!). Using low-sodium broth is a great way to control the salt content, and opting for whole milk instead of half-and-half can lighten it up slightly without sacrificing creaminess.
Final Thoughts: Your New Comfort Food Tradition
So there you have it, friends—your shortcut to one of the coziest, most satisfying meals you’ll ever make. This Chicken Pot Pie Soup is more than just a recipe; it’s a promise of comfort, a solution for busy nights, and a guaranteed way to bring everyone to the table with a smile.
It proves that you don’t need to spend hours in the kitchen to create something truly special and heartwarming. With a few simple ingredients and one brilliant shortcut (those buttered biscuit croutons, I’m telling you!), you can capture all the nostalgic flavor of a classic dish in a fun, modern, and utterly delicious way.
I truly hope this soup becomes a cherished go-to in your home, just like it is in mine. It’s a reminder that the best meals are often the simplest ones, made with a little bit of love and a willingness to try a happy accident.
Crockpot Garlic Parmesan Chicken Pasta
Your New Favorite Comfort Food Is Just a Crockpot Away
Hey there, friends! Beau here from Feastical, coming at you from my kitchen, which currently smells like an Italian grandmother’s dream. We’re talking about the kind of aroma that pulls everyone into the room, asking, “Is it ready yet?” with hopeful eyes and empty plates. If you’re craving a meal that’s creamy, savory, and so ridiculously easy it feels like a cheat code, you have absolutely come to the right place.
Today, we’re whipping up my legendary Crockpot Garlic Parmesan Chicken Pasta. This isn’t just any pasta dish; it’s a hug in a bowl. It’s the answer to a long day, the hero of busy weeknights, and the star of every potluck. We’re taking juicy chicken, bathing it in that iconic Buffalo Wild Wings Parmesan Garlic Sauce, and letting our trusty slow cooker work its magic. The result? Tender, shreddable chicken swimming in a luxuriously creamy, cheesy, garlicky sauce that clings perfectly to every noodle. It’s comfort food that feels indulgent but is honestly a breeze to make. So, grab your crockpot, and let’s make dinner the easiest—and most delicious—part of your day.
The Night This Recipe Saved My Sanity
I have to tell you about the origin story of this dish. It was one of those chaotic weeknights a few years back. My nephew was over, my dog was chasing his tail around the kitchen island, and I had about 20 minutes of mental energy left for dinner. I stared into my pantry, willing inspiration to strike. I saw a bottle of that Parmesan Garlic sauce I’d picked up on a whim, some pasta, and a package of chicken breasts in the fridge. It was a culinary Hail Mary.
I threw it all in the crockpot hours earlier, completely crossing my fingers. When I finally lifted the lid that evening, the stress of the day just melted away. The smell was incredible. We sat down to eat, and the first bite was pure silence—the good kind, followed by a unanimous “Wow.” It was an instant hit. Now, it’s my go-to for effortless entertaining and a guaranteed happy-dance-at-the-dinner-table moment. It reminds me that the best meals don’t have to be complicated; they just have to be made with a little bit of love (and a great sauce!).
Gathering Your Flavor All-Stars
Here’s everything you’ll need to create this masterpiece. The beauty of this recipe is in its simplicity, but each ingredient plays a crucial role!
- 1 (12 oz) bottle Buffalo Wild Wings Parmesan Garlic Sauce: This is the flavor powerhouse! It gives the dish its signature zesty, garlicky, and savory base. If you can’t find it, a good substitute is 1 cup of a good alfredo sauce mixed with 2 minced garlic cloves and ¼ cup grated Parmesan. But trust me, the original sauce is worth seeking out!
- 2 lbs boneless, skinless chicken breasts: The lean protein canvas for our dish. They’ll become incredibly tender and shred perfectly after slow cooking. You can also use chicken thighs for an even richer, more forgiving result.
- 1 cup milk: Whole milk is ideal for creaminess, but 2% works just fine. This helps to loosen up the sauce and create the perfect consistency. For a richer taste, swap it for half-and-half!
- 8 oz cream cheese, cut into blocks: Chef’s insight: Cutting it into blocks helps it melt evenly into the sauce without clumping. This is our secret weapon for that luxuriously creamy, velvety texture that makes this dish so irresistible.
- 1 cup shredded Parmesan cheese: I use a good quality pre-shredded Parm for convenience, but freshly grated Parmesan from a block will melt even smoother and add a sharper flavor. It’s all about that extra cheesy goodness.
- 12 oz pasta: I love using short pasta with nooks and crannies like rotini, penne, or cavatappi. They trap the creamy sauce in every bite! Gluten-free pasta works beautifully here too—just cook it al dente.
Let’s Build Some Deliciousness, Step-by-Step
Okay, team! Let’s get cooking. Follow these steps, and you’ll have a perfect dinner with minimal effort.
Step 1: Place your chicken breasts in the bottom of your crockpot. There’s no need to grease it first. Just lay them in a single layer if you can. This is your foundation!
Step 2: Pour the entire bottle of Parmesan Garlic Sauce directly over the chicken. Go ahead, drown those beauties in flavor. Don’t be shy!
Step 3: Here’s a pro kitchen hack I love: Take that now-empty sauce bottle, add the 1 cup of milk, screw the lid back on, and give it a really good shake. This gets every last bit of that delicious sauce out of the bottle and into your dinner, plus it starts mixing the milk in. Pour this milky-saucy goodness into the crockpot.
Step 4: Add your blocks of cream cheese and the 1 cup of shredded Parmesan. Just plop them right on top. No need to stir vigorously yet—a gentle stir to coat everything is perfect. We want the cream cheese to melt slowly and evenly.
Step 5: Cover and cook! You’ve got options here. On LOW for 3-4 hours or on HIGH for 2-3 hours. The chicken is done when it reaches an internal temperature of 165°F and shreds easily with a fork. I prefer low and slow for the most tender meat!
Step 6: Once the chicken is cooked, grab two forks and shred the chicken right in the crockpot. This is the fun part! Then, give everything a really good stir. You’ll see the cream cheese and Parmesan have melted into the most gorgeous, creamy sauce. Taste it and do a little happy dance.
Step 7: While the chicken is cooking, this is your window to cook your pasta according to the package directions to al dente. Chef’s tip: Don’t overcook it! It will continue to soak up sauce later. Drain it well but you don’t need to rinse it.
Step 8: Add the drained, cooked pasta directly into the crockpot with your creamy chicken mixture. Stir it all together until every single noodle is coated in that glorious sauce. Let it sit for 5-10 minutes on the WARM setting to let the flavors get to know each other. Serve it up hot!
How to Serve This Creamy Dream
Presentation is part of the fun! I love serving this family-style right out of the crockpot (less dishes!), but plating it up nicely makes it feel extra special.
Grab a big, wide bowl and use tongs to give a generous swirl of pasta. Make sure you get plenty of that shredded chicken in there. The final touch? A little extra shower of freshly grated Parmesan cheese and a good crack of black pepper over the top. For a pop of color and freshness, a light sprinkle of chopped fresh parsley or basil is incredible.
This is a rich dish, so I love serving it with something bright and crisp on the side. A simple arugula salad with a lemon vinaigrette, some steamed green beans, or garlic bread for dipping into any leftover sauce is non-negotiable in my house. Don’t forget a big glass of iced tea or a crisp white wine!
Make It Your Own: Delicious Twists & Swaps
The best recipes are a starting point for your own creativity. Here are a few ways to mix it up!
- Veggie Lover’s Delight: Stir in 2 cups of fresh spinach or chopped kale during the last 30 minutes of cooking. You could also add a cup of frozen peas right when you add the pasta. For heartier veggies like broccoli or mushrooms, sauté them first and stir them in with the pasta.
- Spicy Kick: If you like a little heat, add ½ teaspoon of red pepper flakes with the sauce, or stir in a few tablespoons of your favorite hot sauce (like Frank’s RedHot) when you shred the chicken.
- Protein Swap: Not a chicken person? This works amazingly well with turkey tenderloin or even meatballs! For a vegetarian version, use two cans of drained cannellini beans and vegetable broth instead of milk.
- Lighter Version: Use reduced-fat cream cheese, low-fat milk, and a reduced-fat Parmesan cheese blend. You can also use a whole wheat or chickpea pasta for extra fiber.
- Ultra Creamy: Feeling decadent? Swap the milk for heavy cream and stir in an extra ½ cup of Parmesan at the end. Thank me later.
Beau’s Chef Notes & Kitchen Stories
This recipe has evolved a bit since that first chaotic night. I’ve learned that a quick sear on the chicken breasts in a hot skillet before adding them to the crockpot adds a wonderful depth of flavor, but it’s absolutely not necessary for a quick meal. That’s the “from-scratch” chef in me talking to the “I’m-tired-let’s-eat” human in me!
One time, I was filming a reel for Feastical and I was so busy talking to the camera I accidentally added the uncooked pasta straight into the crockpot with the raw chicken. Don’t do that! It turned into a starchy, mushy mess. We had to order pizza and laugh it off. Always, always cook your pasta separately. Live and learn, right?
Your Questions, Answered!
Q: My sauce seems a little thin. How can I thicken it up?
A: No worries! This can happen. The easiest fix is to make a quick slurry. Mix 1 tablespoon of cornstarch with 2 tablespoons of cold water until smooth. Stir this into the crockpot after you’ve shredded the chicken, turn the heat to high, and let it cook uncovered for 10-15 minutes, stirring occasionally. It will tighten right up.
Q: Can I use frozen chicken?
A: You can, but I don’t recommend it. Frozen chicken will release a lot of water as it cooks, making your sauce much thinner. It also increases the time it spends in the “danger zone” temperature range. For best results, use thawed chicken.
Q: The sauce is too thick! How do I thin it out?
A: Easy fix! Just stir in a splash of warm milk or a little chicken broth until it reaches your desired consistency. The pasta will also absorb some sauce as it sits, so you may need to do this when reheating leftovers, too.
Q: Can I make this ahead of time?
A: You can prepare the creamy chicken mixture ahead of time and store it in the fridge for up to 2 days. When you’re ready, reheat it in the crockpot on low and cook your pasta fresh. I don’t recommend cooking the pasta ahead of time and storing it together, as it will become very soft and absorb all the sauce.

Crockpot Garlic Parmesan Chicken Pasta
Description
Crockpot Garlic Parmesan Chicken Pasta
Creamy, cheesy, garlicky comfort food that cooks itself in the slow cooker. Serves 6.
Ingredients
-
Chicken & Sauce:
-
2 lbs boneless, skinless chicken breasts
-
1 (12 oz) bottle Buffalo Wild Wings Parmesan Garlic Sauce (or 1 cup Alfredo + 2 garlic cloves + ¼ cup Parmesan)
-
1 cup milk (whole preferred)
-
8 oz cream cheese, cut into blocks
-
1 cup shredded Parmesan
-
-
Pasta:
-
12 oz short pasta (rotini, penne, cavatappi), cooked al dente
-
-
Optional Garnish & Sides:
-
Extra Parmesan, black pepper, chopped parsley/basil
-
Arugula salad, steamed veggies, garlic bread
-
Instructions
-
Layer the Chicken: Place chicken breasts in the crockpot. Pour the entire bottle of Parmesan Garlic Sauce over them.
-
Add Milk: Add 1 cup milk (shake milk in empty sauce bottle for extra flavor) to the crockpot.
-
Add Cheese: Top with cream cheese blocks and shredded Parmesan. Stir gently.
-
Cook: Cover and cook LOW 3–4 hrs or HIGH 2–3 hrs, until chicken reaches 165°F and shreds easily.
-
Shred Chicken: Use two forks to shred chicken in the crockpot. Stir well to melt cream cheese and Parmesan into a creamy sauce.
-
Cook Pasta: While chicken cooks, boil pasta to al dente, then drain.
-
Combine: Stir pasta into the crockpot. Let sit on WARM for 5–10 minutes to blend flavors.
-
Serve: Garnish with extra Parmesan, pepper, and parsley/basil.
Notes
-
Thickening Sauce: Mix 1 tbsp cornstarch + 2 tbsp cold water; stir in and cook 10–15 min on high.
-
Thinning Sauce: Stir in milk or chicken broth as needed.
-
Frozen Chicken: Not recommended; can water down sauce.
-
Make Ahead: Store creamy chicken mixture (no pasta) up to 2 days. Cook pasta fresh when serving.
Nutrition
- Calories: 530
- Carbohydrates: 32g
- Protein: 35g
Nutritional Information*
Okay, friends, let’s talk nutrition. This is a hearty, comforting dish, so it’s on the richer side. Here’s a rough breakdown per serving (assuming this recipe serves 6).
Calories: ~530
Protein: 35g (Great for muscle repair and keeping you full!)
Carbohydrates: 32g (The pasta gives you energy for your day.)
Fat: 32g (This is where the creamy, indulgent flavor comes from.)
Sodium: This will be on the higher side due to the Parmesan Garlic sauce and cheeses. If you are monitoring sodium intake, you can look for a lower-sodium sauce, use low-sodium cheese, and not add any extra salt.
*Please note: This is an estimate based on the ingredients used. For precise nutritional information, consider using an online calculator with the exact brands and quantities you use.
Final Thoughts from My Kitchen to Yours
Well, that’s it, folks! My ultimate Crockpot Garlic Parmesan Chicken Pasta. This recipe is more than just a list of ingredients; it’s a promise of a stress-free, incredibly satisfying meal that’s going to have everyone asking for seconds. It’s the kind of food that builds memories around the dinner table.
I hope you love making it (and eating it!) as much as I do. Remember, cooking is an adventure—don’t be afraid to put your own spin on it. If you do make it, I’d be absolutely thrilled if you tagged me @feastical on social media so I can see your beautiful creations! Now, go forth and conquer dinner. You’ve got this.

Pumpkin Donuts with Cinnamon Sugar
Your New Favorite Fall Ritual: Pumpkin Donuts That Taste Like a Hug
Hey there, friends! Beau here from Feastical, and I have to ask: is there anything better than the smell of something sweet and spiced frying up in the kitchen on a crisp autumn morning? It’s the kind of aroma that pulls everyone out of bed, no alarm clock needed. If you’ve been chasing that perfect, cozy fall baking project, the one that feels both impressively homemade and soul-warmingly simple, you’ve just found it. Today, we’re making the undisputed champions of the season: Pumpkin Donuts with Cinnamon Sugar & an optional, but highly recommended, Spiced Cream Filling.
Now, I know what some of you might be thinking: “Beau, donuts? That sounds… involved.” But trust me on this one. We’re keeping it friendly in here. These aren’t just any donuts; they’re fluffy, cakey, golden-brown pillows of pure pumpkin joy, rolled in a crackly cinnamon-sugar jacket. And that spiced cream filling? It’s like the best part of a pumpkin pie decided to get all dressed up and move into a donut. It’s rich, it’s light, and it takes this treat to a whole new level of “wow.”
I’ve made this a double batch because, well, generosity is my love language and these disappear faster than the last leaf on an oak tree. So, grab your favorite mixing bowl, put on that apron (the one with the questionable stains that tell the best kitchen stories), and let’s make some memories. This is more than a recipe; it’s an experience. Let’s dig in!
The Dough-Not-Forget Memory
This recipe always takes me right back to my grandma’s kitchen. She wasn’t a fancy pastry chef; she was a “a little of this, a pinch of that” kind of cook, the kind who measured love with a heaping cup. Every fall, without fail, the first truly chilly weekend would trigger her donut-making instinct. The whole house would fill with the warm scent of yeast, pumpkin, and frying oil—a scent I’d later learn is the official perfume of happiness.
My job, as the eager (and shortest) sous-chef, was to man the cinnamon sugar station. I’d stand there with a brown paper bag, and as soon as a batch of golden donuts came out of the oil and drained for just a second, she’d toss them my way. I’d give that bag a series of enthusiastic, slightly chaotic shakes, coating them in that magical, spiced sugar. The rule was always “one for the plate, one for the chef,” and I took my quality control duties very seriously. That simple, joyful ritual of shaking that bag is where this recipe was born. It’s a taste of nostalgia, and I’m so excited to share that feeling with you.
Gathering Your Pumpkin Donut Dream Team
Here’s everything you’ll need for this double batch of autumnal bliss. Don’t be intimidated by the list—a lot of it is pantry staples! I’ve included my chef-y notes and swaps to make this recipe work for you.
For the Pumpkin Donuts (Makes ~24 Donuts)
- 1 cup warm milk (95–105°F): This wakes up the yeast. Think warm bath temperature, not hot. Too hot and it’ll kill the yeast! Chef’s Tip: No dairy? Unsweetened almond or oat milk work perfectly here.
- 3 tsp active dry yeast: The life of the party! This is what gives our donuts their incredible airy, fluffy texture.
- 6 1/2 cups all-purpose flour: The foundation. I like to fluff my flour with a spoon before measuring to avoid dense donuts.
- 2/3 cup granulated sugar: Just the right amount of sweetness to complement the pumpkin spice.
- 1 tsp salt: Crucial for balancing all the flavors. Don’t skip it!
- 1 tsp pumpkin spice: The flavor MVP. If you’re out, make your own with a blend of cinnamon, ginger, nutmeg, and allspice.
- 1 1/3 cups pumpkin puree (not pie mix): This is key! Make sure you grab pure pumpkin puree, not the pre-sweetened pie filling. The cans look very similar, so double-check that label!
- 2 large eggs: They bind everything together and add richness.
- 6 tbsp unsalted butter, softened: For that melt-in-your-mouth tenderness. Chef’s Insight: Let it sit out for an hour before you start. Soft butter incorporates way easier into the dough.
- Optional twist: 1 tsp vanilla extract or 1/4 tsp ground nutmeg: I almost always add the vanilla for a deeper, warmer flavor profile. The extra nutmeg is for my spice lovers!
For the Cinnamon Sugar Coating
- 1 cup granulated sugar: We’re creating that classic, crackly shell.
- 1 1/2 tsp ground cinnamon: The perfect partner for sugar. Adjust to your taste!
- Optional: 1/4 tsp allspice: This is my little secret for an extra layer of warm, complex spice. Highly recommend!
For the Spiced Pumpkin Cream Filling (Optional but Amazing!)
- 8 oz cream cheese, softened: The base of our filling. Full-fat gives the best texture and flavor.
- 1/2 cup pumpkin puree: Doubling down on that pumpkin goodness.
- 1 tsp pumpkin spice: To keep the spice theme going strong.
- 2 tsp vanilla extract (optional): I add this for a flavor boost, but it’s still great without.
- 2 cups powdered sugar: Sweetens and helps thicken the filling.
- 2 cups cold heavy cream: This is what we whip to fold in, creating that light, fluffy, pipeable cloud of cream.
Let’s Make Some Magic: Step-by-Step Donut Domination
Okay, team! Let’s walk through this together. Read through all the steps once before you start—it’s like scouting the trail before a hike. You’ve got this!
- Wake Up the Yeast: In a small bowl or measuring cup, stir your yeast into the warm milk. Let it sit for 5-10 minutes. You’re waiting for it to get foamy and creamy on top—this is called “proofing” and it’s your sign that the yeast is alive and ready to make your dough rise. If nothing happens, your yeast might be old or your milk was too hot. Start over!
- Combine the Dry Crew: In the bowl of your stand mixer fitted with a dough hook (you can do this by hand, it’ll just be a workout!), whisk together the flour, sugar, salt, and pumpkin spice. This ensures everything is evenly distributed so you don’t get a pocket of salt in one bite!
- Bring It All Together: Pour the foamy yeast mixture, pumpkin puree, eggs, and softened butter into the dry ingredients. Chef’s Hack: If you forgot to soften your butter, just cut it into small pieces—it’ll incorporate as you mix.
- Knead to Perfection: Turn your mixer on low to combine, then increase to medium speed. Let it knead for 8-10 minutes. The dough will be slightly sticky but should pull away from the sides of the bowl. If it’s super sticky, add a tablespoon of flour at a time until it manages. You’re looking for a smooth, elastic dough ball.
- The First Rise: Grease a large bowl with a little oil or butter. Place your beautiful dough ball in the bowl, turning it once to coat it. Cover the bowl with plastic wrap or a clean kitchen towel and place it in a warm, draft-free spot. Let it rise until doubled in size, about 1 hour. (I like to turn my oven on to its lowest setting for 1 minute, turn it OFF, and then place the bowl in the warm oven.)
- Shape Your Donuts: Once risen, punch the dough down to release the air. Turn it out onto a lightly floured surface. Roll it out to about a 1/2-inch thickness. Use a donut cutter or a 3-inch round cutter (a drinking glass works in a pinch!) for the outer shape and a 1-inch cutter for the holes. Re-roll the scraps to cut more. Place the donuts and holes on parchment-lined baking sheets.
- The Second Rise: Cover the shaped donuts loosely with plastic wrap or a towel and let them rise again for 30-45 minutes. They won’t quite double, but they should look puffy.
- Fry Time! While they rise, heat 2-3 inches of a neutral oil (like vegetable or canola) in a heavy-bottomed pot or Dutch oven to 350°F (175°C). Use a thermometer! This is non-negotiable for perfect donuts. Too cold and they’ll be greasy; too hot and they’ll burn outside before cooking inside. Fry in batches of 2-3 donuts at a time for about 1-2 minutes per side, until deep golden brown. Use a slotted spoon or spider strainer to flip and remove them. Drain on a wire rack set over a baking sheet or on paper towels for a minute.
- Cinnamon Sugar Coat: While the donuts are still very warm (but cool enough to handle), toss them in the cinnamon sugar mixture. I do this in a bowl, but my grandma’s brown paper bag method is still my favorite for maximum, even coverage. The warmth helps the sugar stick beautifully.
- Make the Filling (If using): In a large bowl, beat the softened cream cheese, 1/2 cup pumpkin puree, pumpkin spice, and vanilla until smooth and combined. Gradually beat in the powdered sugar. In a separate, chilled bowl, whip the cold heavy cream to stiff peaks. Gently fold the whipped cream into the pumpkin-cheese mixture until no white streaks remain. Be gentle to keep it airy! Transfer to a piping bag fitted with a round tip (like a Bismarck tip).
- Fill ‘Em Up: Once the donuts are completely cool, use a skewer or small knife to poke a hole in the side. Insert the piping tip and squeeze gently, filling until you feel the donut weight slightly in your hand. A little bit of cream might peek out—that’s a good thing!
How to Serve These Pumpkin Masterpieces
Presentation is part of the fun! For a classic, homey feel, pile these donuts high on a rustic wooden board or a simple cake stand. They look incredible all jumbled together, with their crackly cinnamon-sugar coats. Don’t forget the donut holes! Serve them in a small bowl nearby—they’re the cook’s treat, but it’s nice to share.
These are best served the day they’re made, ideally within a few hours of frying when they’re at their peak of fluffy perfection. They pair perfectly with a hot cup of coffee, a cold glass of milk, or a steamy chai latte. For a next-level autumn brunch, serve them alongside a savory frittata and some crispy bacon to balance all that sweet, spiced goodness. Honestly, there’s no wrong way to serve a fresh, homemade donut.
Mix It Up! Delicious Variations on a Theme
Once you’ve mastered the classic, feel free to get creative! Here are a few of my favorite twists:
- Chocolate Drizzle: Skip the filling and drizzle melted chocolate or a simple powdered sugar glaze over the cinnamon-sugar coated donuts.
- Apple Cider Glaze: Reduce 1 cup of apple cider down to about 1/4 cup. Mix it with 2 cups of powdered sugar and a pinch of cinnamon to create a thin glaze. Dip the warm donuts in this instead of the cinnamon sugar.
- Maple Bourbon Cream: For the filling, replace the vanilla with 1-2 tablespoons of real maple syrup and a splash of bourbon (optional) for a sophisticated grown-up twist.
- Baked Option: Want to avoid frying? You can try baking these! Preheat oven to 350°F (175°C). Bake on a greased or parchment-lined sheet for 8-10 minutes, until springy to the touch. They’ll be more like donut-shaped rolls, but still delicious! Coat in butter then cinnamon sugar while warm.
- Vegan Swap: Use plant-based milk, a flax egg (1 tbsp ground flax + 3 tbsp water per egg), and vegan butter. For the filling, use vegan cream cheese and chilled coconut cream (the solid part from a can of full-fat coconut milk) instead of heavy cream.
Beau’s Kitchen Confidential
This recipe has evolved so much since those first shaky-bag sessions with my grandma. I’ve learned that the temperature of your ingredients truly matters—cold eggs can re-solidify your softened butter, and too-hot milk will leave you with a flat dough. Patience during the rises is your greatest tool. I once tried to rush the second rise because friends were coming over, and I ended up with delicious, but decidedly dense, pumpkin pucks. They were still eaten, but the lesson was learned!
Also, a funny story: the first time I made the cream filling, I got a little overzealous with the piping bag. I filled one donut so much that it literally burst open when someone took a bite, sending a plume of spiced cream across the room. We still laugh about it. So, pro-tip: fill with confidence, but also with a little restraint!
Donut Dilemmas? We’ve Got Answers.
Q: My dough didn’t rise. What happened?
A: The most common culprits are old yeast (always check the expiration date!) or liquid that was too hot and killed the yeast. Your liquid should be warm to the touch, not scalding. Also, make sure your rising spot is warm and draft-free.
Q: My donuts are raw inside but dark outside.
A: This means your oil was too hot! It cooked the outside before the heat could travel to the center. Let the oil come back down to 350°F between batches and keep a close eye on that thermometer. The temperature will drop when you add cold dough, so adjust your burner as needed.
Q: Can I make the dough ahead of time?
A: Absolutely! After the first rise, punch the dough down, wrap it tightly in plastic wrap, and refrigerate it overnight. The next morning, let it sit on the counter for 30 minutes to take the chill off, then roll, cut, and proceed with the second rise. This actually develops even more flavor!
Q: My cream filling is runny. How can I fix it?
A: This usually happens if your heavy cream wasn’t cold enough or if you overmixed when folding. To fix it, pop the entire bowl into the freezer for 15-20 minutes, then re-whip it. It should firm up nicely.

Pumpkin Donuts with Cinnamon Sugar
Description
Pumpkin Donuts That Taste Like a Hug
Fluffy, cakey, golden-brown donuts rolled in cinnamon sugar, with an optional spiced cream filling. Perfect for fall mornings, brunches, or any cozy moment. Makes ~24 donuts (double batch).
Ingredients
For the Donuts
-
1 cup warm milk (95–105°F / 35–40°C)
-
3 tsp active dry yeast
-
6 ½ cups all-purpose flour
-
2/3 cup granulated sugar
-
1 tsp salt
-
1 tsp pumpkin spice
-
1 1/3 cups pumpkin puree (not pie filling)
-
2 large eggs
-
6 tbsp unsalted butter, softened
-
Optional: 1 tsp vanilla extract or ¼ tsp ground nutmeg
Cinnamon Sugar Coating
-
1 cup granulated sugar
-
1 ½ tsp ground cinnamon
-
Optional: ¼ tsp allspice
Spiced Pumpkin Cream Filling (Optional)
-
8 oz cream cheese, softened
-
½ cup pumpkin puree
-
1 tsp pumpkin spice
-
2 tsp vanilla extract (optional)
-
2 cups powdered sugar
-
2 cups cold heavy cream
Instructions
1. Proof the Yeast
-
Stir yeast into warm milk. Let sit 5–10 minutes until foamy.
2. Mix Dry Ingredients
-
In a large bowl or stand mixer, whisk flour, sugar, salt, and pumpkin spice.
3. Combine Wet Ingredients
-
Add foamy yeast, pumpkin puree, eggs, and softened butter to dry ingredients. Mix until a sticky dough forms.
4. Knead
-
Knead 8–10 minutes until smooth and elastic. Add flour 1 tbsp at a time if too sticky.
5. First Rise
-
Grease a bowl, place dough inside, cover, and let rise in a warm, draft-free spot until doubled (~1 hour).
6. Shape Donuts
-
Punch down dough. Roll to ½-inch thickness. Cut donuts (3-inch cutter) and holes (1-inch cutter). Place on parchment-lined baking sheets.
7. Second Rise
-
Cover loosely and let rise 30–45 minutes until puffy.
8. Fry Donuts
-
Heat 2–3 inches of neutral oil to 350°F (175°C). Fry donuts 1–2 minutes per side until golden brown. Drain on a wire rack or paper towels.
9. Cinnamon Sugar Coat
-
While warm, toss donuts in cinnamon sugar mixture for an even, crackly coating.
10. Make Filling (Optional)
-
Beat cream cheese, pumpkin puree, pumpkin spice, and vanilla until smooth.
-
Gradually add powdered sugar.
-
Whip cold heavy cream to stiff peaks. Fold gently into pumpkin mixture.
11. Fill Donuts (Optional)
-
Poke a hole in cooled donuts and pipe in filling until slightly firm to the touch.
Notes
-
Chocolate Drizzle: Skip filling, drizzle melted chocolate or glaze on top.
-
Apple Cider Glaze: Reduce 1 cup cider to ¼ cup, mix with 2 cups powdered sugar + pinch cinnamon. Dip donuts warm.
-
Maple Bourbon Cream: Add 1–2 tbsp maple syrup + splash bourbon to filling.
-
Baked Version: Bake at 350°F (175°C) for 8–10 mins; coat in butter + cinnamon sugar while warm.
-
Vegan Option: Use plant milk, flax eggs (1 tbsp + 3 tbsp water per egg), vegan butter; replace cream with whipped coconut cream.
Final Thoughts: More Than Just a Donut
So there you have it, friends—your new favorite fall ritual, from my kitchen to yours. These pumpkin donuts are more than just a treat; they’re an invitation to slow down, to create, and to fill your home with the kind of warmth that lingers long after the last bite is gone.
Whether you’re shaking that bag of cinnamon sugar with the chaotic joy of my inner child, meticulously piping that creamy filling, or simply enjoying the quiet satisfaction of a frying donut turning a perfect golden brown, you’re participating in something special. You’re not just baking; you’re weaving a memory, a scent, a taste that will forever smell like autumn.
This recipe is a love letter to the season, to nostalgia, and to the simple, profound joy of sharing something made by hand. So go ahead, dust the flour off your apron, pour yourself a cup of coffee, and take that first glorious bite. You’ve earned it.

Pumpkin Protein Muffins
Your New Favorite Grab-and-Go Powerhouse: Pumpkin Protein Muffins
Hey friends, Beau here! Can we talk about that daily struggle for a second? You know the one. It’s 7:15 AM, you’re trying to get out the door, and your stomach is already rumbling with a serious question: “What’s for a snack that won’t leave me crashing by 10 AM?” Or maybe you’re hustling back from the gym, feeling that post-workout hunger hit, and the siren call of the donut shop is just a little too loud. I’ve been there more times than I’d like to admit. That’s exactly why I created these unbelievably delicious, soft, and secretly wholesome Pumpkin Protein Muffins.
Now, I know what you might be thinking. “Protein muffin? Beau, that sounds… dry. And boring.” I get it! I’ve had my fair share of hockey pucks disguised as health food. But trust me on this one. These muffins are the glorious opposite. They’re moist, perfectly spiced with that warm, cozy pumpkin flavor we all crave, and naturally sweetened just enough to feel like a treat. They’re the smart snack that actually satisfies, packing a solid 8-10 grams of protein to keep you fueled and focused. Whether you need a breakfast on the run, a lunchbox hero for the kids, or a post-workout bite that tastes like a reward, these muffins are about to become your new meal prep best friend. So, preheat that oven, friends. We’re baking up a batch of feel-good fuel!
A Batch of Memories: Why These Muffins Mean So Much
This recipe takes me right back to my early days in a tiny apartment kitchen, where my roommates and I were constantly trying to balance our budgets with our big appetites. One fall, a friend of ours was training for a marathon, and she was always on the hunt for snacks that could keep up with her insane schedule. We’d joke that her diet was 50% peanut butter and 50% determination. One rainy Sunday, we decided to create the ultimate “power muffin” for her. We started with a classic pumpkin bread base and began experimenting—swapping in oat flour, adding scoops of protein powder, and sweetening it only with the maple syrup we’d brought back from a trip to Vermont.
The first few batches were… educational. Let’s just say we learned the hard way that too much protein powder creates a fascinatingly dense texture! But finally, we nailed it. The moment we pulled that perfect batch out of the oven, the whole apartment smelled like a cozy fall hug. Our marathon friend adored them, and they became a weekly staple for all of us. For me, these muffins will always symbolize that spirit of community—of cooking for the people you care about, of nourishing their goals, and of sharing something truly delicious that also makes you feel amazing. It’s that same spirit I want to bring to your kitchen today.
Gathering Your Kitchen Crew: The Ingredients
Here’s the all-star lineup that makes these muffins so magical. Don’t stress if you need to make a swap or two—I’ve got your back with plenty of tips!
- 1 cup (96g) oat flour – This is our whole-grain base, giving the muffins a tender, slightly chewy crumb and a lovely nutty flavor. Chef’s Hack: No oat flour? No problem! Just toss old-fashioned or quick oats into a blender and pulse until they form a fine powder. It’s literally that easy.
- 1/2 cup (40g) vanilla protein powder – The protein powerhouse! Vanilla blends perfectly with the pumpkin spice. For the best texture, I recommend a whey-casein blend or a plant-based pea protein blend. Heads up: Using 100% whey protein isolate can sometimes make things gummier, so a blend is your best bet.
- 1/2 tsp baking soda & 1/2 tsp baking powder – Our dynamic leavening duo! They work together to give our muffins a perfect rise and that beautiful domed top.
- 1/2 tsp salt – Crucial for balancing all the sweet and spicy flavors. Don’t you dare skip it!
- 1 1/2 tsp pumpkin pie spice – The heart and soul of the flavor! If you’re out, make your own by whisking together 1 tsp cinnamon, 1/4 tsp ginger, 1/4 tsp nutmeg, and a pinch of cloves or allspice.
- 1 cup (244g) pumpkin puree – NOT pumpkin pie filling! This is the secret to incredible moisture and that iconic flavor. It also adds a dose of vitamin A.
- 2 large eggs – Our binding agents, helping to hold everything together and add structure.
- 1/3 cup (80ml) maple syrup or honey – Our natural sweeteners. I love the extra layer of flavor maple syrup adds, but honey works beautifully too.
- 1/4 cup (60ml) milk (any kind) – This just helps bring the batter to the perfect pourable consistency. Dairy, almond, oat—use whatever you have.
- 2 tbsp (30ml) melted coconut oil or olive oil – Adds fat for tenderness and moisture. I love the subtle flavor of coconut oil here, but a light olive oil works great if that’s all you have.
- 1 tsp vanilla extract – The flavor enhancer that makes everything taste more like itself.
- Optional: 1/4 cup chopped nuts or dark chocolate chips – Because everything’s better with a little crunch or melty chocolate! Walnuts, pecans, or pepitas are all fantastic choices.
Let’s Get Baking: The Step-by-Step Lowdown
Alright, team! Let’s turn these ingredients into muffin magic. This process is simple, but I’ve packed it with my favorite chef hacks to ensure your success.
Step 1: Preheat & Prep
Preheat your oven to 350°F (175°C). This is non-negotiable for even baking! Now, grab your 12-cup muffin tin. You can grease each cup with a little butter or oil, but for ultimate ease, I’m a huge fan of using parchment paper liners. They peel away perfectly without sticking, and they just look so darn professional.
Step 2: The Dry Team Assemble!
In a medium-sized bowl, grab your whisk. We’re going to add our oat flour, vanilla protein powder, baking soda, baking powder, salt, and pumpkin pie spice. Now, whisk it all together like you mean it! You’re not just mixing; you’re aerating the flour and making sure those leaveners are evenly distributed. This is your secret for a uniform, non-cratered muffin top. No one wants a baking soda pocket!
Step 3: The Wet Team Party
In a larger bowl, it’s time for the wet ingredients. Add your pumpkin puree, eggs, maple syrup (or honey), milk, melted coconut oil, and vanilla extract. A quick note on the oil: make sure it’s melted but not piping hot, or it might start to cook the eggs when you mix it in. Whisk this all together until it’s completely smooth and beautifully orange. It should look like a creamy, spiced pumpkin latte.
Step 4: The Grand Union
Here’s the most important step: pour the dry ingredients into the wet ingredients. Why wet into dry? It’s just easier to mix without overworking the batter. Now, put that whisk away and grab a spatula or a wooden spoon. Gently fold the dry mix into the wet mix. Stop when you just see the last traces of flour disappear. A few lumps are totally fine—I promise! Overmixing is the enemy of a tender muffin because it develops the gluten in the oat flour and leads to toughness. If you’re adding any mix-ins like chocolate chips or nuts, fold them in now.
Step 5: Portion & Bake
Using a spoon or a cookie scoop, divide the batter evenly among your 12 prepared muffin cups. I like to fill them almost to the top for a nice, big bakery-style muffin. Slide that tin into your preheated oven and set your timer for 18 minutes. The magic number is usually between 18-22 minutes. You’ll know they’re done when the tops are firm to the touch and a toothpick inserted into the center of a muffin comes out with just a moist crumb or clean. No wet batter!
Step 6: The Cool Down
Let the muffins cool in the pan for about 5 minutes. This allows them to set up so they don’t fall apart when you take them out. Then, carefully transfer them to a wire rack to cool completely. I know it’s torture, but try to let them cool for at least 15 minutes before diving in. This rest time allows the flavors to meld and the texture to perfect itself.
How to Serve These Beauties
Okay, they’re out of the oven and your kitchen smells incredible. Now what? These muffins are delicious completely naked, but let’s talk about dressing them up!
For the ultimate breakfast or snack, I love them just as they are, maybe warmed up for 15 seconds in the microwave so they’re soft and fragrant. Paired with a cup of coffee or a cold glass of milk, it’s pure bliss.
If you’re feeling a little fancy, turn them into a healthy dessert. Slice one in half, warm it up, and add a smear of almond butter or a dollop of Greek yogurt on top. A drizzle of extra maple syrup and a sprinkle of cinnamon never hurt anybody either!
For a post-workout refuel, pair a muffin with a piece of fruit. The carbs from the muffin and fruit will help replenish your energy stores, and the protein will aid muscle recovery. It’s the perfect one-two punch.
Make It Your Own: Delicious Variations
The beauty of this recipe is its flexibility. Here are a few of my favorite ways to switch it up:
- Chocolate Lover’s Delight: Swap out the pumpkin pie spice for 1/4 cup of cocoa powder and fold in 1/2 cup of dark chocolate chips. You get a rich, chocolatey muffin that still has all the protein benefits.
- Nutty Crunch: Fold in 1/4 cup of chopped pecans or walnuts into the batter. Right before baking, sprinkle the tops with a few extra nuts and a little coarse sugar for a delightful crunch.
- Vegan Version: Use a plant-based vanilla protein powder. Replace the eggs with two “flax eggs” (2 tbsp ground flaxseed mixed with 5 tbsp water, let sit for 5 mins). Use maple syrup instead of honey and any plant-based milk. The texture might be slightly denser but still delicious!
- Spice It Up: Add a pinch of black pepper or a tiny dash of cayenne pepper to the dry ingredients alongside the pumpkin spice. It creates a wonderful, warm depth of flavor that really makes the sweetness pop.
- Lower Sugar Option: You can reduce the maple syrup to 1/4 cup if you prefer a less sweet muffin. The pumpkin puree adds natural sweetness, so it still tastes great!
Beau’s Chef Notes & Kitchen Stories
This recipe has seen it all in my kitchen! I once, in a pre-coffee haze, accidentally used chili powder instead of pumpkin pie spice. Let me tell you, that was a… spicy surprise no one was expecting for breakfast. We salvaged them by turning them into a weirdly good companion to a bowl of chili later that night! So, always double-check your spice jars.
I’ve also learned that the brand of protein powder can make a slight difference in how much liquid it absorbs. If your batter seems unusually thick, don’t panic. Just add another tablespoon or two of milk until it reaches a standard, slightly thick muffin batter consistency. Trust your instincts—you’ve got this!
Your Questions, Answered (FAQs)
Q: My muffins turned out a bit dry. What happened?
A: The most common culprits are overmixing the batter or overbaking. Remember, fold just until combined! Also, all ovens run a little different. Start checking at 18 minutes—if the toothpick comes out clean, they’re done. An extra minute can make a difference.
Q: Can I make these gluten-free?
A> Absolutely! Just ensure your oat flour is certified gluten-free (oats are naturally gluten-free but are often processed in facilities with wheat). That’s all you need to do—this recipe is naturally gluten-free otherwise.
Q: How should I store these muffins, and can I freeze them?
A: For best freshness, keep them in an airtight container at room temperature for 2-3 days. For longer storage, they freeze like a dream! Let them cool completely, then pop them in a freezer bag. They’ll keep for up to 3 months. Thaw at room temperature or warm up straight from the freezer in the microwave for 30-45 seconds.
Q: Can I use a different type of protein powder?
A> You can, but be aware that results may vary. Chocolate protein powder is a great swap for a chocolate version. Collagen peptides can work, but they won’t provide the same structure, so your muffins might be denser and not rise as much. I always recommend a protein powder blend for baking for the best texture.

Pumpkin Protein Muffins
Description
Hey friends, Beau here! Life moves fast, and sometimes you need a snack that actually keeps you fueled. These Pumpkin Protein Muffins are soft, perfectly spiced, naturally sweet, and pack 8–10 grams of protein each—making them ideal for breakfast on the run, post-workout fuel, or a healthy treat anytime.
Ingredients
Muffins:
-
1 cup (96g) oat flour
-
½ cup (40g) vanilla protein powder
-
½ tsp baking soda
-
½ tsp baking powder
-
½ tsp salt
-
1 ½ tsp pumpkin pie spice (or 1 tsp cinnamon + ¼ tsp ginger + ¼ tsp nutmeg + pinch of cloves/allspice)
-
1 cup (244g) pumpkin puree (not pie filling)
-
2 large eggs
-
⅓ cup (80ml) maple syrup or honey
-
¼ cup (60ml) milk (any kind)
-
2 tbsp (30ml) melted coconut or olive oil
-
1 tsp vanilla extract
-
Optional: ¼ cup chopped nuts or dark chocolate chips
Instructions
-
Preheat & Prep: Preheat oven to 350°F (175°C). Line a 12-cup muffin tin with paper liners or lightly grease.
-
Mix Dry Ingredients: In a medium bowl, whisk together oat flour, protein powder, baking soda, baking powder, salt, and pumpkin pie spice.
-
Combine Wet Ingredients: In a large bowl, whisk pumpkin puree, eggs, maple syrup, milk, melted oil, and vanilla until smooth.
-
Fold Together: Pour dry ingredients into wet ingredients and gently fold with a spatula until just combined. Fold in any mix-ins. Avoid overmixing.
-
Fill & Bake: Divide batter among muffin cups, almost to the top. Bake 18–22 minutes until tops are firm and a toothpick comes out clean or with a moist crumb.
-
Cool: Let muffins cool in the pan 5 minutes, then transfer to a wire rack for at least 15 minutes before serving.
Notes
-
Moisture Check: If batter seems thick, add 1–2 tbsp milk.
-
Chocolate Version: Add ¼ cup cocoa powder and ½ cup dark chocolate chips.
-
Nutty Crunch: Fold in ¼ cup chopped nuts and sprinkle some on top.
-
Vegan Option: Use flax eggs (2 tbsp flaxseed + 5 tbsp water) and plant-based protein powder.
-
Lower Sugar: Reduce maple syrup to ¼ cup; pumpkin puree adds natural sweetness.
Nutrition
- Calories: 150–180 Cal
- Sugar: 8g
- Fat: 6g
- Carbohydrates: 15g
- Fiber: 2g
- Protein: 8–10g
Breaking It Down: Nutritional Info*
Knowing what’s in your food is part of feeling good about what you eat! Here’s a general breakdown per muffin (without optional add-ins).
Calories: ~150-180 | Fat: 6g | Carbohydrates: 15g | Fiber: 2g | Sugar: 8g | Protein: 8-10g
These macros make it a balanced snack that provides sustained energy. The protein and fat help keep you full, while the carbs from the oat flour and maple syrup give you a quick energy boost without a major sugar crash. It’s a win-win!
*Please note: This is an estimate based on the specific ingredients I used. Your exact nutritional information may vary depending on the brands you choose. Use an online calculator for precise info based on your ingredients.
Final Thoughts from My Kitchen to Yours
Well, friends, there you have it—my go-to recipe for feeling fueled and fabulous. These Pumpkin Protein Muffins are more than just a recipe; they’re a tool for your busy life. They’re proof that taking a few minutes to prep something wholesome can set you up for a successful, energized day.
I hope you love baking them as much as I do. I hope your kitchen fills with that incredible spiced aroma and that you feel that little spark of pride when you pull your perfect batch out of the oven. Most importantly, I hope you share them. Pack one for your partner’s lunch, leave a few on the counter for your roommates, or bring a plate to your next book club. Good food is meant to be shared, and food that makes you feel good is the best kind of all.
Happy baking, everyone! If you make them, I’d love to hear how it goes. Tag me on social