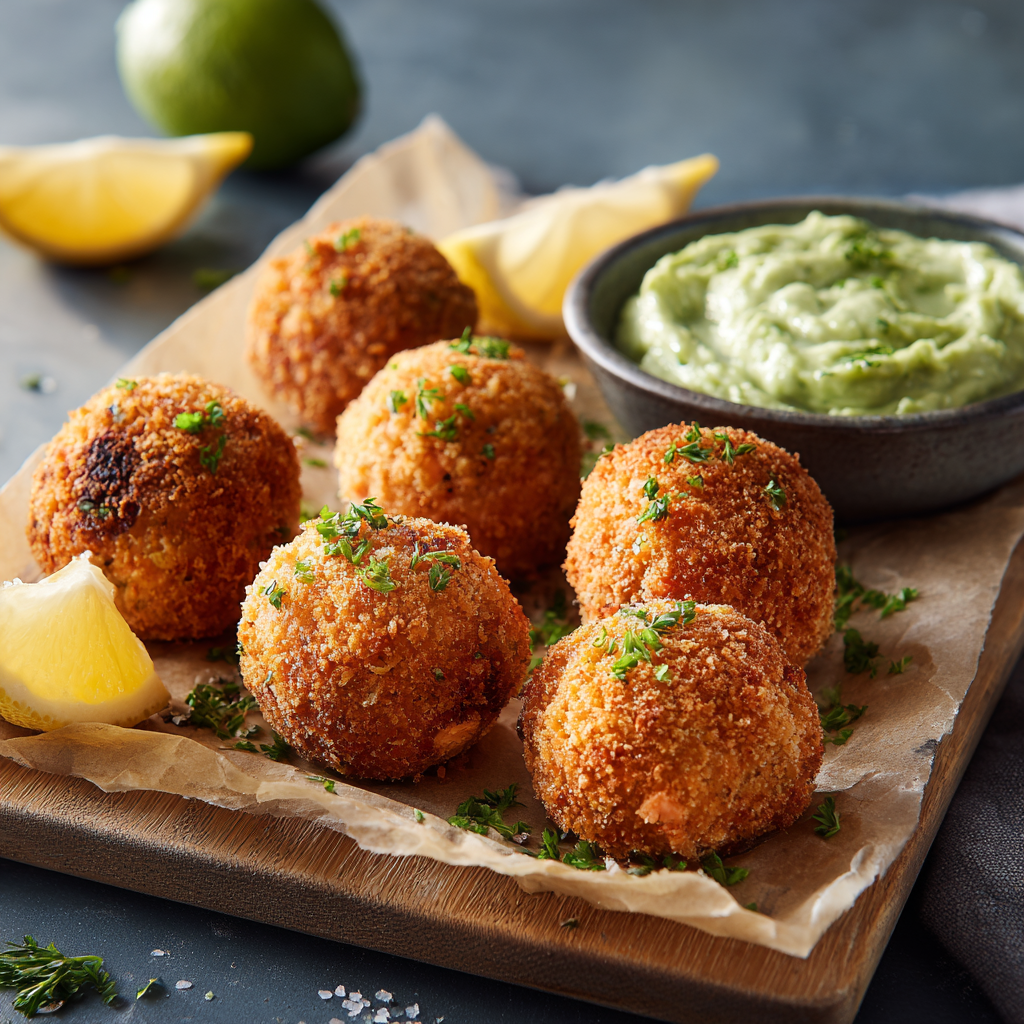
Salmon Balls with Creamy Avocado Sauce
Your New Favorite Bite: Crispy Salmon Balls with Dreamy Avocado Sauce
Hey friends, Beau here! Let’s get straight to it: if you’re looking for a recipe that’s going to make you feel like a kitchen superstar without any of the usual stress, you’ve just hit the jackpot. We’re talking about my Crispy Salmon Balls with a Creamy Avocado Sauce. Just saying the name makes me smile. This isn’t just another recipe; it’s your new secret weapon for a quick, healthy, and downright delicious meal that works for a fancy-ish dinner party or a casual Tuesday night.
Imagine this: tender, flaky salmon, all jazzed up with fresh herbs and a zing of lemon, formed into perfect little golden-brown orbs. They’re crispy on the outside, incredibly moist on the inside, and they pack a serious protein punch. And then, we take things to a whole new level of yum with a sauce so smooth and dreamy, you’ll want to put it on everything. We’re blending ripe, buttery avocado with tangy Greek yogurt and a hint of garlic for a cool, creamy dip that cuts through the richness of the salmon in the most perfect way.
This dish is the epitome of what we stand for here at Feastical: food that feels good, tastes even better, and brings a little joy to your table. It’s approachable enough for a beginner but impressive enough for any seasoned cook. So, tie on your apron, find that trusty spatula, and let’s make some kitchen magic happen together.
A Recipe Born from a Happy Accident
I have to confess, this recipe wasn’t born from some grand, pre-meditated plan. It came from one of those “what on earth am I going to do with this?” moments we all have. I had a beautiful piece of leftover grilled salmon from a backyard BBQ the night before. It was too good to waste, but just sitting there in the fridge, looking a little lonely.
My grandma’s voice popped into my head, as it often does. She was the queen of “waste not, want not,” and her salmon croquettes were the stuff of legend. They were simple, pan-fried, and always served with a big dollop of tartar sauce. I wanted to capture that same cozy, nostalgic feeling but give it a fresh, modern spin. I decided to bake them for a lighter, crispier bite and, in a moment of pure inspiration (and because I was out of mayo), I whipped up an avocado-yogurt sauce. The second I dipped that first warm salmon ball into that cool, creamy green goodness, I knew I had stumbled onto something special. It was a happy accident that instantly felt like a classic.
Gathering Your Flavor All-Stars
One of the best things about this recipe is its simplicity. We’re using straightforward ingredients that pack a massive flavor punch. Here’s your shopping list, complete with a few chef-y insights to make you feel like a pro.
For the Salmon Balls:
- 1 lb fresh, skinless salmon fillets (cooked and flaked): This is our star player! I love using leftover grilled or baked salmon for an incredible depth of flavor, but poaching a fresh fillet for 10-12 minutes works beautifully too. Chef’s Tip: Canned salmon is a fantastic, budget-friendly shortcut here. Just make sure to drain it well!
- 1 cup plain breadcrumbs: These are our binding agent and crunch-creator. I prefer Panko for an extra-crispy texture. Chef’s Tip: For a gluten-free version, gluten-free breadcrumbs or even crushed gluten-free crackers work like a charm.
- 1 large egg: This is the glue that holds our delicious little balls together. It ensures they don’t fall apart in the oven.
- 2 tablespoons fresh dill or parsley, chopped: Herbs bring a burst of freshness that cuts through the richness of the salmon. Dill is a classic pairing with fish, but parsley is a wonderful, vibrant alternative. Chef’s Tip: If you’re in a pinch, 2 teaspoons of dried dill will work, but fresh really makes a difference.
- 2 tablespoons lemon juice: A little acidity is key! It brightens up the entire dish and makes all the flavors pop.
- Salt and pepper to taste: Don’t be shy here! Seasoning is what transforms good food into great food. I start with ½ tsp of salt and a few good cracks of black pepper.
For the Creamy Avocado Sauce:
- 1 ripe avocado: Look for an avocado that yields gently to a squeeze. This is the base of our lush, creamy sauce.
- ½ cup plain Greek yogurt: This adds a wonderful tang and creaminess while boosting the protein. Chef’s Tip: For a dairy-free sauce, swap in unsweetened coconut or almond-based yogurt.
- ½ teaspoon garlic powder: We’re using powder here for a smooth, mellow garlic flavor without the sharp bite of raw garlic. It blends seamlessly into the sauce.
- 1 tablespoon lemon juice: This keeps the avocado a vibrant green and adds a necessary zing to balance the sauce’s richness.
- Salt and pepper to taste: A pinch of each to tie all the sauce flavors together beautifully.
Let’s Get Cooking: Crafting Your Culinary Masterpiece
Ready to see how these beauties come together? It’s an incredibly satisfying process. Follow these steps, and you’ll have a plate of golden perfection in no time.
- Preheat and Prep. First things first, get that oven roaring. Preheat it to 375°F (190°C). This is a crucial step for that instant crispiness we’re after. While it’s heating up, line a baking tray with parchment paper. Not only does this prevent sticking, but it also makes cleanup an absolute dream. I’m all about those little kitchen wins!
- Combine the Goodness. In a large mixing bowl, add your flaked salmon, breadcrumbs, egg, fresh herbs, lemon juice, salt, and pepper. Now, roll up your sleeves and get in there with your hands! Gently mix everything until it’s just combined. Chef’s Hack: The key word here is gently. You don’t want to overwork the mixture and make the salmon pasty. A light touch makes for a more tender salmon ball.
- Form the Balls. Now for the fun part! Scoop up about a tablespoon of the mixture and roll it between your palms to form a 1-inch ball. I like to use a small cookie scoop for this to keep them all uniform, which means they’ll cook evenly. Place each one on your prepared baking tray, giving them a little space to breathe. If you find the mixture is a bit sticky, a quick rinse of your hands under cold water makes rolling much easier.
- Bake to Golden Perfection. Slide that tray into your preheated oven and let the magic happen. Bake for 20-25 minutes. Here’s the secret for all-around crispiness: about halfway through, at the 10-minute mark, give the tray a quick turn and flip each salmon ball over. You’ll know they’re done when they’re firm to the touch and have a gorgeous, golden-brown color.
- Whip Up the Sauce. While the salmon balls are getting their tan on, let’s make that legendary sauce. It could not be easier. Simply scoop the flesh of your ripe avocado into a blender or food processor. Add the Greek yogurt, garlic powder, lemon juice, salt, and pepper. Blend it all up until it’s silky smooth and irresistibly creamy. If you don’t have a blender, you can mash the avocado with a fork and whisk everything together vigorously in a bowl—it’ll be just as delicious, with a slightly more rustic texture.
- Serve and Savor! Take those gorgeous, crispy salmon balls out of the oven and let them rest for just a minute. Then, transfer them to a platter with a bowl of that vibrant green avocado sauce right in the middle. Dig in immediately while they’re still warm and the contrast with the cool sauce is at its peak.
How to Serve These Flavor Bombs
Presentation is part of the fun! You’ve worked hard, so let’s make it look as good as it tastes.
For a stunning appetizer, pile the warm salmon balls high on a beautiful wooden board or a white platter to make the colors pop. Place the bowl of avocado sauce in the center and scatter some extra fresh dill or a few lemon wedges around for a restaurant-worthy look. Don’t forget a handful of toothpicks for easy grabbing!
To turn this into a satisfying main course, I love serving them over a bed of fluffy quinoa, a simple arugula salad, or with a side of roasted asparagus. The salmon balls and the sauce essentially become the most incredible dressing. Drizzle that extra sauce over everything on the plate—trust me, you won’t want to waste a single drop.
Make It Your Own: Delicious Twists & Swaps
This recipe is like a blank canvas for your culinary creativity. Feel free to play around and make it suit your mood or dietary needs!
- Spicy Sriracha Kick: Add 1-2 tablespoons of Sriracha or your favorite hot sauce to the salmon mixture. For an extra punch, swirl a little into the avocado sauce as well.
- Lemon-Herb Zest: Boost the freshness by adding the zest of one lemon to the salmon mix, along with a tablespoon of chopped fresh chives.
- Mediterranean Vibe: Stir in ¼ cup of crumbled feta cheese and 2 tablespoons of chopped Kalamata olives into the salmon mixture. The salty, briny flavor is incredible.
- Paleo/Whole30 Friendly: Swap the breadcrumbs for ⅓ cup of almond flour and use a “flax egg” (1 tbsp ground flaxseed mixed with 3 tbsp water, let sit for 5 mins) to bind. Ensure your hot sauce and yogurt are compliant for the sauce.
A Few More Thoughts from My Kitchen to Yours
This recipe has become a real workhorse in my own home kitchen. I’ve made it for picky toddlers (just shape them into fun “fish sticks”), for last-minute guests, and for healthy meal prep. I often double the batch and freeze the uncooked salmon balls on a tray before transferring them to a freezer bag. Then, I can bake them straight from frozen, adding just a few extra minutes to the cooking time. It’s a lifesaver!
The biggest evolution has been the sauce. I started with just avocado and lemon, but adding the Greek yogurt was a game-changer. It made the sauce creamier, tangier, and more stable. It’s a testament to the fact that the best recipes are living things—don’t be afraid to tweak them until they’re perfect for you.
Your Questions, Answered!
I’ve gotten a lot of great questions about this recipe over time. Here are the ones that pop up most often.
Q: My salmon balls are falling apart! What did I do wrong?
A: Don’t worry, this is a common fix! The most likely culprit is not enough binding agent. Make sure you’re using a large egg. If your mixture still seems too wet, add another tablespoon or two of breadcrumbs until it holds together nicely when you squeeze it in your hand. Chilling the mixture in the fridge for 15-20 minutes before rolling can also work wonders.
Q: Can I pan-fry these instead of baking them?
A> Absolutely! Baking is my go-to for ease and health, but pan-frying gives you an incredible, extra-crispy exterior. Just heat a few tablespoons of olive or avocado oil in a skillet over medium heat and cook the salmon balls, turning occasionally, until they’re golden brown on all sides, about 8-10 minutes total.
Q: My avocado sauce turned brown overnight. Is it still safe to eat?
A> It’s perfectly safe! Avocados oxidize when exposed to air, which causes that browning. The lemon juice helps slow it down. To store leftovers, press a piece of plastic wrap directly onto the surface of the sauce to limit air exposure. It will keep for about a day in the fridge. For the best color and flavor, I always recommend making the sauce fresh.

Salmon Balls with Creamy Avocado Sauce
Description
A quick, healthy, and delicious appetizer or main dish featuring golden-baked salmon balls served with a silky avocado-yogurt dip. Perfect for dinner parties, family meals, or meal prep.
Ingredients
For the Salmon Balls:
-
1 lb fresh, skinless salmon fillets (cooked and flaked)
-
1 cup plain breadcrumbs (Panko recommended)
-
1 large egg
-
2 tbsp fresh dill or parsley, chopped
-
2 tbsp lemon juice
-
½ tsp salt (or to taste)
-
Freshly ground black pepper (to taste)
For the Creamy Avocado Sauce:
-
1 ripe avocado
-
½ cup plain Greek yogurt (dairy-free alternative: coconut or almond yogurt)
-
½ tsp garlic powder
-
1 tbsp lemon juice
-
Salt and pepper to taste
Instructions
1. Preheat & Prep
-
Preheat oven to 375°F (190°C).
-
Line a baking tray with parchment paper for easy cleanup.
2. Combine Salmon Mixture
-
In a large bowl, mix flaked salmon, breadcrumbs, egg, herbs, lemon juice, salt, and pepper.
-
Gently fold until just combined—avoid overmixing to keep salmon balls tender.
3. Form the Balls
-
Scoop ~1 tablespoon of mixture and roll into 1-inch balls.
-
Place on prepared tray with space between each.
-
Tip: Rinse hands with cold water if the mixture is sticky.
4. Bake
-
Bake for 20–25 minutes, flipping halfway through at 10 minutes.
-
Balls are done when golden brown and firm to the touch.
5. Make the Avocado Sauce
-
Blend avocado, Greek yogurt, garlic powder, lemon juice, salt, and pepper until smooth.
-
Alternative: Mash avocado with a fork and whisk in remaining ingredients for a rustic texture.
6. Serve
-
Arrange salmon balls on a platter with avocado sauce in a small bowl in the center.
-
Optional: Garnish with extra fresh dill or lemon wedges.
Serving Suggestions
-
Appetizer: Pile balls on a board or platter with toothpicks.
-
Main Course: Serve over quinoa, arugula salad, or roasted veggies. Drizzle extra sauce over the plate.
Variations & Twists
-
Spicy Sriracha: Add 1–2 tbsp Sriracha to the salmon mix and/or avocado sauce.
-
Lemon-Herb Zest: Add zest of 1 lemon and 1 tbsp chopped chives to the salmon mixture.
-
Mediterranean Style: Mix in ¼ cup crumbled feta and 2 tbsp chopped Kalamata olives.
-
Paleo/Whole30 Friendly: Replace breadcrumbs with ⅓ cup almond flour and the egg with a flax egg.
Notes
-
If salmon balls fall apart: add more breadcrumbs or chill mixture 15–20 min before rolling.
-
Pan-frying option: cook in 2–3 tbsp oil over medium heat, turning until golden (~8–10 min).
-
To prevent avocado browning: press plastic wrap directly onto surface; best made fresh.
-
Make ahead: Freeze uncooked balls on a tray, then store in freezer bags. Bake from frozen, adding a few extra minutes.
Nourishing Your Body & Soul
One of the things I love most about this dish is that it’s a true powerhouse of nutrition, proving that healthy eating doesn’t have to be boring. Salmon is loaded with high-quality protein and those famous Omega-3 fatty acids, which are fantastic for heart and brain health. The avocado brings a dose of healthy monounsaturated fats and fiber, while the Greek yogurt adds a bonus hit of protein and probiotics. Using the baking method instead of frying keeps the fat content in check while still delivering that crave-worthy crispy texture. It’s a meal that will leave you feeling satisfied, energized, and happy.
Yield: Approx. 12 servings (about 24-26 balls)
Prep Time: 15 minutes
Cook Time: 25 minutes
Total Time: 40 minutes
Per Serving (approximate, 2 balls with sauce):
Calories: 120 | Protein: 10g | Carbohydrates: 6g | Fat: 7g
You Did It!
And there you have it! You’ve just created a dish that’s bursting with flavor, packed with goodness, and sure to become a regular in your recipe rotation. I hope these crispy salmon balls and that dreamy avocado sauce bring as much joy to your table as they have to mine.
Remember, cooking is all about sharing, experimenting, and enjoying the process. Did you put your own spin on it? I’d love to hear about it! Tag me on social @Feastical or drop a comment on the blog. Now, go on and enjoy every last bite. You’ve earned it!
With a full heart and an even fuller plate,

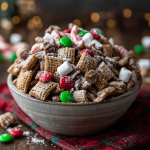
Festive Christmas Puppy Chow (Reindeer Chow) : Easy No-Bake Holiday Treat
Festive Christmas Puppy Chow (Reindeer Chow) – Your New Holiday Obsession!
Hey friends, Beau here! Can you smell it? That magical mix of melting chocolate, a hint of peppermint, and pure, unadulterated holiday joy wafting from the kitchen? That, my friends, is the sound of Christmas Puppy Chow coming to life. Now, if you’ve never experienced the wonder of this no-bake treat, you are in for a serious delight. And if you’re a seasoned pro, get ready to fall in love all over again with our festive twist we like to call Reindeer Chow!
We’re taking the classic muddy buddy mix and giving it a full-blown, tinsel-and-all holiday makeover. Imagine this: crunchy Chex cereal coated in a velvety blanket of chocolate and peanut butter, then tossed in a blizzard of powdered sugar. But we don’t stop there. Oh no. We’re loading it up with cheerful red and green M&M’s, fluffy mini marshmallows, a confetti of festive sprinkles, and a cool, minty kick from crushed peppermint. The result is a sweet, crunchy, and ridiculously addictive snack that’s perfect for holiday parties, stuffing into gift bags for neighbors, or just munching on during a cozy Christmas movie marathon.
The best part? You don’t need to be a pastry chef to pull this off. This is a zero-bake, one-bowl (okay, maybe two bowls) wonder that comes together in about 15 minutes flat. It’s the ultimate kitchen project that’s just as fun to make as it is to eat. So, grab your biggest mixing bowl, rally the family, and let’s create some delicious, memory-filled magic together.
The Year the “Puppy Chow” Saved Christmas Eve
This recipe always takes me right back to my first Christmas hosting my entire, wonderfully chaotic family. I had the turkey timed, the potatoes mashed, and the pies perfectly golden. I was feeling like a real culinary champion. Then, my then six-year-old nephew, Leo, looked up at me with big, hopeful eyes and asked, “Uncle Beau, where are the *fun* snacks?”
My heart sank. In all my “fancy chef” planning, I’d completely forgotten the kid-friendly, hands-on food! Panic set in for a solid minute until I remembered a bag of Chex cereal tucked away in the pantry. With Leo as my head taste-tester, we whipped up a batch of what he called “people chow.” We melted chocolate, shook the bag of powdered sugar until a sweet cloud filled the kitchen, and tossed in every festive sprinkle and candy we could find. That giant bowl of Reindeer Chow was the undisputed star of the night. It brought everyone together, laughing and grabbing handfuls, and it taught me a beautiful lesson: the best holiday food isn’t always the most complicated. It’s the food made with joy and shared with love.
Gather Your Ingredients: Let’s Build Some Flavor!
Here’s everything you need to create this holiday masterpiece. I’ve included a few of my favorite chef-y insights and substitutions to make this recipe your own.
- 18 cups Chex cereal (rice, corn, or a mix): This is our crunchy foundation. I love a mix of rice and corn for the best texture. Chef’s Insight: The nooks and crannies in the cereal are perfect for catching all that chocolatey goodness. If you’re gluten-free, just make sure to use the certified GF Corn or Rice Chex!
- 2 cups semi-sweet chocolate chips: Provides a deep, rich chocolate base that isn’t overly sweet. Substitution Tip: Feel free to use milk chocolate for a sweeter vibe, or dark chocolate chips for a more sophisticated, less sweet flavor. Even white chocolate chips work for a fun “snowy” variation!
- 1 cup smooth peanut butter: This is our binding agent, adding creaminess and that classic, beloved flavor. Substitution Tip: No peanut allergies or preferences? Any nut or seed butter works wonderfully—try almond butter, SunButter, or even cashew butter.
- ½ cup unsalted butter: Adds richness and helps create a smooth, pourable coating. Using unsalted lets you control the salt level. Chef’s Insight: Don’t skip the butter! It’s the secret to a coating that hardens into a perfect, non-greasy shell.
- 2 tsp pure vanilla extract: The flavor enhancer! It rounds out the chocolate and peanut butter, adding a warm, aromatic depth.
- 4 cups powdered sugar: This creates the iconic “puppy chow” look and a sweet, melt-in-your-mouth coating. Chef’s Hack: Sift your powdered sugar if it’s lumpy to avoid any sugary clumps in your final mix.
- 2 cups festive sprinkles (holiday jimmies or quins): This is where the Christmas magic really shines! They add color and a fun, crunchy texture.
- 1 cup red & green M&M’s: For those classic, chocolatey, colorful pops. Chef’s Insight: We add these *after* the mix has cooled so they don’t melt and lose their vibrant color.
- 1 cup mini marshmallows: These little pillows provide a soft, chewy contrast to all the crunch. They’re like tiny, sweet surprises!
- ½ cup crushed peppermint candies or peppermint chips (optional): This is our “grown-up” twist. The cool peppermint cuts through the sweetness and screams “holidays.” Substitution Tip: If you’re not a mint fan, leave it out or swap in crushed pretzels for a sweet-and-salty situation.
Let’s Get Mixing: Your Foolproof Guide to Perfect Reindeer Chow
Ready? This is the fun part. Put on some Christmas tunes, and let’s do this!
- Prep Your Station. Before you even turn on the microwave, get your giant mixing bowl ready with all 18 cups of Chex cereal. I’m talking the biggest bowl you own. Trust me, you’ll need the space. Also, lay out a couple of baking sheets lined with parchment paper or wax paper. This is where our chow will cool and set. Chef’s Hack: If you don’t have a bowl big enough, use a clean, large paper grocery bag or two extra-large zip-top bags. It makes for a super fun shaking step later!
- Create the Chocolate Coating. In a large, microwave-safe bowl, combine the chocolate chips, peanut butter, and butter. Now, the key to perfectly smooth chocolate is patience. Microwave on high for 30 seconds, then take it out and stir. Repeat this process—30 seconds, stir, 30 seconds, stir—until the mixture is completely smooth and glossy. This usually takes about 90 seconds to 2 minutes total. Rushing this with high heat will scorch your chocolate, and we don’t want that! Once it’s smooth, stir in the 2 teaspoons of vanilla extract. Your kitchen should already smell incredible.
- Coat the Cereal. Pour the warm, velvety chocolate mixture over the waiting Chex cereal. Now, using a large spatula, gently fold and toss the cereal until every single piece is lovingly coated. Be gentle! We want to maintain the integrity of our crunchy cereal, not turn it into crumbs. Chef’s Hack: If you’re using the bag method, pour the chocolate into the bag, seal it tight (very tight!), and have a mini dance party while you gently shake and massage the bag to coat everything evenly.
- The Powdered Sugar Blizzard. Now for the signature snowy look! Sprinkle the 4 cups of powdered sugar over the chocolate-coated cereal. If you’re in a bowl, toss and fold again until the powdered sugar envelops every piece. If you’re in a bag, add the powdered sugar to the bag, seal it, and shake, shake, shake! It’s like a winter snow globe, but you can eat the contents.
- Cool and Set. Dump the coated cereal onto your prepared baking sheets and spread it into an even layer. This allows it to cool completely and for the chocolate shell to harden. Let it sit at room temperature for at least 30 minutes. You can pop it in the fridge to speed this up if you’re impatient, but room temp is perfect.
- Add the Festive Finishing Touches. Once the mix is completely cool to the touch, transfer it back to your giant clean bowl. Now, shower it with the festive sprinkles, M&M’s, mini marshmallows, and crushed peppermint. Gently fold everything together to distribute all that holiday cheer evenly.
- Store and Serve! Transfer your finished Christmas Puppy Chow to airtight containers or festive cellophane bags for gifting. It will stay fresh and crunchy at room temperature for up to a week… if it lasts that long!
How to Serve Your Holiday Masterpiece
This stuff is so versatile, it’s happy just about anywhere! Here are a few of my favorite ways to serve it up:
The Casual Snack Bowl: Pile it high in a big, beautiful festive bowl right in the center of your holiday spread. Stick a serving scoop in it and watch it disappear.
The Ultimate Foodie Gift: This is my go-to neighbor and teacher gift. Layer it in a clear mason jar, tie a ribbon around it, and attach a cute tag that says “Reindeer Chow.” For an extra touch, include the recipe so they can make their own!
Dessert Charcuterie Board: Create a stunning holiday dessert board! Pile the Reindeer Chow in one section and surround it with cookies, fruit, cheeses, and nuts. It adds amazing texture and color.
The Movie Night Essential: Serve it in individual bowls or mugs for a cozy night watching your favorite Christmas films. It pairs perfectly with a mug of hot cocoa (and maybe a sneaky splash of peppermint schnapps for the adults).
Mix It Up! 5 Fun Variations on Reindeer Chow
Once you master the base recipe, the sky’s the limit! Here are a few delicious twists to keep things interesting.
- White Christmas Chow: Swap the semi-sweet chocolate for white chocolate chips. Use holiday-colored M&M’s and maybe even some dried cranberries for a red-and-white theme. It’s visually stunning and deliciously sweet.
- Sweet & Salty Elf Mix: Add 2 cups of mini pretzel twists and 1 cup of roasted, salted peanuts in with the Chex cereal at the very beginning. The combination of sweet, salty, and crunchy is absolutely irresistible.
- Gingerbread Spice Chow: Stir 1 teaspoon of ground ginger, ½ teaspoon of cinnamon, and a pinch of nutmeg and cloves into the powdered sugar before tossing. It tastes just like a gingerbread cookie!
- Tropical Escape Chow (For a Warm-Weather Holiday): Use white chocolate, substitute the peanut butter with coconut cream, and mix in chopped macadamia nuts and dried pineapple bits instead of the peppermint and M&M’s.
- Triple Chocolate Monster: For the ultimate chocoholic, use chocolate Chex cereal, melt down a combination of milk and dark chocolate chips, and toss in some chocolate chips along with the M&M’s. You can’t go wrong!
Beau’s Chef’s Notes & Kitchen Confessions
This recipe has evolved so much since that first frantic Christmas Eve. I’ve learned that the best batches are the ones made with a little bit of mess and a whole lot of laughter. Don’t stress about perfection. So what if a little powdered sugar gets on the floor? That’s just more holiday spirit!
One of my favorite kitchen fails turned into a win: I once accidentally used crunchy peanut butter because it was all I had. The tiny peanut bits added such a fantastic texture that it’s now my preferred way to make it! The recipe is a guideline, not a rigid rulebook. Make it your own. That’s what cooking is all about.
Your Reindeer Chow Questions, Answered!
Over the years, I’ve gotten a few repeat questions about this recipe. Here are the answers to help you succeed!
Q: My Puppy Chow turned out soggy. What happened?
A: The most common culprit is adding the extras (like M&M’s and marshmallows) before the chocolate mixture has fully cooled and set. If they’re added while the coating is still warm, the candies can melt and the marshmallows can deflate, releasing moisture. Always let it cool completely first! Also, make sure you’re storing it in an absolutely airtight container.
Q: Can I make this ahead of time?
A: Absolutely! In fact, it’s a fantastic make-ahead treat. It stays perfectly fresh and crunchy in an airtight container at room temperature for 5-7 days. You can even make the base mix (without the add-ins) and freeze it for up to a month! Thaw it at room temperature, then stir in your festive candies.
Q: I need a nut-free version. What can I use instead of peanut butter?
A> No problem! SunButter (made from sunflower seeds) is my top recommendation. It has a similar texture and a subtly nutty flavor that works beautifully. You could also use soy nut butter or even Wowbutter.
Q: Can I melt the chocolate on the stovetop instead of the microwave?
A> Of course! I actually prefer this method for maximum control. Use a double boiler, or simply place a heatproof bowl over a pot of gently simmering water (make sure the bottom of the bowl doesn’t touch the water). Stir the chocolate, peanut butter, and butter until melted and smooth. This method is virtually foolproof and prevents scorching.
Festive Christmas Puppy Chow (Reindeer Chow) : Easy No-Bake Holiday Treat
Description
A sweet, crunchy, no-bake holiday treat that’s perfect for parties, gifts, or cozy movie nights. Chex cereal gets coated in chocolate and peanut butter, dusted with powdered sugar, and finished with festive candies.
Ingredients
Base
-
18 cups Chex cereal (rice, corn, or a mix)
-
2 cups semi-sweet chocolate chips
-
1 cup smooth peanut butter (or nut/seed butter of choice)
-
½ cup unsalted butter
-
2 tsp vanilla extract
-
4 cups powdered sugar
Festive Add-Ins
-
2 cups holiday sprinkles
-
1 cup red & green M&M’s
-
1 cup mini marshmallows
-
½ cup crushed peppermint candies or chips (optional)
Instructions
1. Prep
-
Place Chex cereal in a large mixing bowl.
-
Line two baking sheets with parchment or wax paper.
2. Melt Chocolate Mixture
-
In a microwave-safe bowl, combine chocolate chips, peanut butter, and butter.
-
Microwave in 30-second intervals, stirring each time, until smooth (about 1.5–2 minutes).
-
Stir in vanilla extract.
3. Coat Cereal
-
Pour chocolate mixture over Chex cereal.
-
Gently fold or toss until all pieces are coated.
-
Tip: If using a large zip-top bag, pour the mixture inside, seal tightly, and shake gently to coat evenly.
4. Add Powdered Sugar
-
Sprinkle powdered sugar over coated cereal.
-
Toss or shake until every piece is fully covered.
5. Cool and Set
-
Spread coated cereal in a single layer on prepared baking sheets.
-
Let cool at room temperature for at least 30 minutes to harden the chocolate.
6. Add Festive Toppings
-
Once cooled, transfer back to a clean bowl.
-
Fold in sprinkles, M&M’s, marshmallows, and crushed peppermint.
7. Store & Serve
-
Store in an airtight container or festive bags at room temperature for 5–7 days.
-
Serve in bowls, mason jars, or on a holiday dessert board.
Notes
-
Let chocolate-coated cereal cool completely before adding M&M’s or marshmallows to prevent melting.
-
Nut-free? Use SunButter, soy nut butter, or Wowbutter.
-
Prefer stovetop melting? Use a double boiler for smooth, even chocolate.
-
For a festive gift, layer in a mason jar, tie with ribbon, and attach a tag.
Nutrition
- Calories: 260 Cal Per Serving
- Sugar: 22g
- Fat: 12g
- Carbohydrates: 35g
- Protein: 3g
Let’s Talk Nutrition (The Fun Stuff!)
Look, we’re all friends here. This is a holiday treat, through and through. It’s meant to be enjoyed in joyful handfuls during the most wonderful time of the year. It’s not a salad, and that’s perfectly okay!
That said, I believe in transparency. The nutritional info below is an approximate estimate per serving (about ¾ cup), and it can vary based on the specific brands you use. The beauty of this recipe is that you can tweak it to your preferences. Using dark chocolate can add antioxidants, and the peanut butter provides a bit of protein. But mostly, it provides happiness, and that’s a nutrient we could all use more of during the holidays.
Approximate Per Serving: Calories: 260 | Fat: 12g | Carbs: 35g | Sugar: 22g | Protein: 3g
Final Thoughts from My Kitchen to Yours
Well, there you have it! My ultimate guide to the most festive, fun, and downright delicious Christmas Puppy Chow on the planet. This recipe is more than just a list of ingredients; it’s a ticket to creating sweet memories in your kitchen. It’s about the laughter that comes from shaking a bag of powdered sugar, the joy on your kids’ faces when they sneak a warm piece, and the warmth of sharing something you made with love.
So, from my Feastical family to yours, I hope
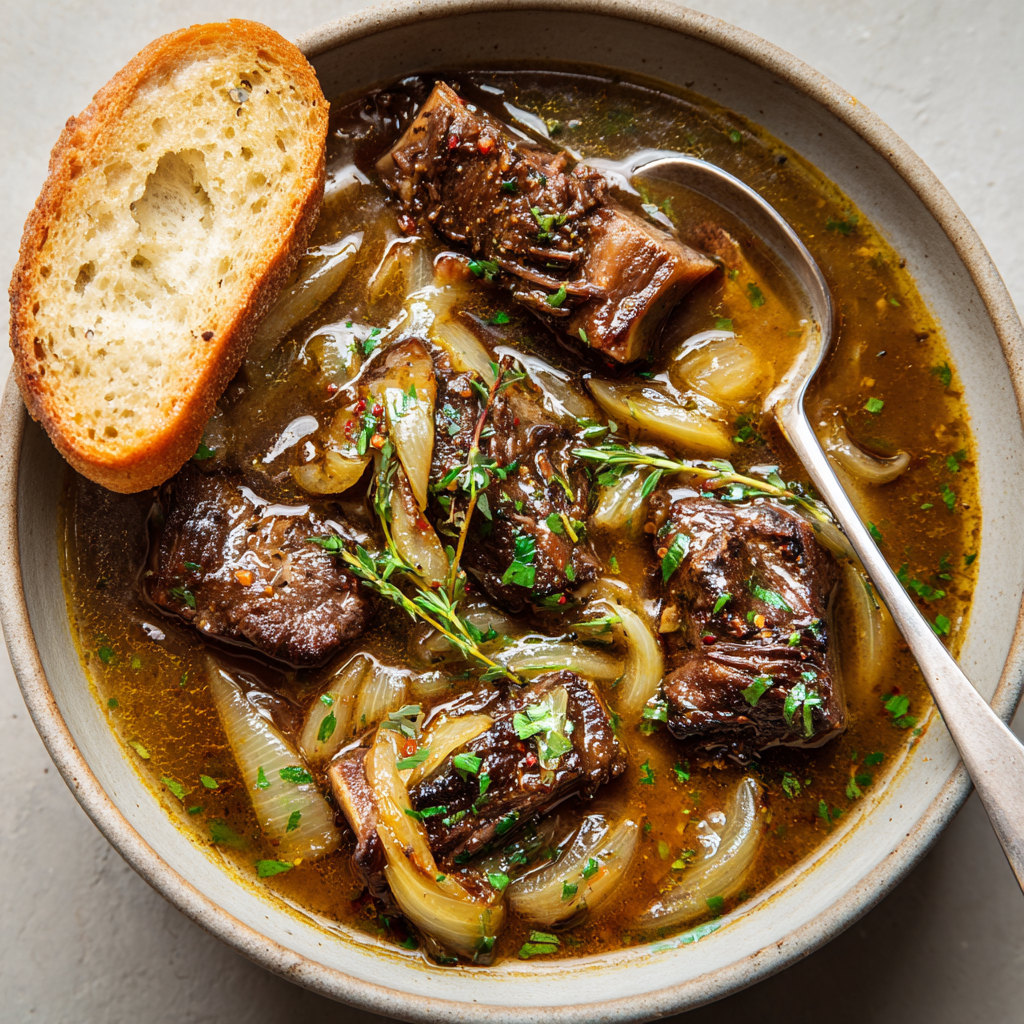
Rich French Onion Short Rib Soup : Hearty, Herby, and Packed with Bold Flavor
Rich French Onion Short Rib Soup: Your New Favorite Comfort Food
Hey friends, Beau here from Feastical! Let’s be real for a second. Sometimes, a regular bowl of soup just doesn’t cut it. You know those days when the wind is howling, your schedule has been a marathon, and your soul is begging for something that feels like a warm, hearty, and deeply satisfying hug from the inside out? Yeah, me too. And that’s exactly why I created this masterpiece.
We’re taking the cozy, familiar vibes of a classic French onion soup and turning the volume all the way up to eleven. How? By slow-simmering rich, bone-in beef short ribs right in the pot until they’re so tender, they practically fall apart if you look at them too hard. This isn’t just a soup; it’s a culinary event in a bowl. We’re building layers of flavor with slowly caramelized onions, aromatic herbs, and a few of my secret umami-boosting ingredients that make this dish truly unforgettable.
So, if you’re ready to fill your kitchen with the most incredible aromas and treat yourself (and your lucky crew) to a meal that’s both impressively gourmet and wonderfully simple to make, you’re in the right place. Grab your favorite Dutch oven, and let’s make some magic happen.
The Story Behind the Soup: A Happy Kitchen Accident
This recipe was born from one of my favorite kinds of kitchen moments: a happy accident. A few winters back, I was planning to make my classic French onion soup for a big family gathering. I had my onions slowly caramelizing, filling the house with that sweet, heavenly scent. At the same time, I had a giant tray of beef short ribs I’d just seared for a different project, resting on the counter.
My nephew, who was about six at the time, came running through the kitchen and, in a whirlwind of little-kid energy, bumped my arm just as I was moving the ribs. Before I knew it, two of those beautiful, meaty ribs slid right off the tray and landed with a gentle plop into my pot of onions and broth. I was about to fish them out, but I stopped. The smell was incredible. The rich beef fat from the ribs was already mingling with the sweet onions, creating a broth that smelled better than anything I’d ever made.
I decided to throw caution to the wind. I added the rest of the ribs to the pot, let it all simmer for hours, and the result was pure magic. That “mistake” is now one of the most-requested dishes in my repertoire. It just goes to show you that sometimes, the best recipes come from a little bit of chaos and a whole lot of curiosity.
Gathering Your Flavor Powerhouses
Here’s your shopping list for this flavor adventure. Don’t be intimidated by the number of ingredients—each one plays a specific role in building the deep, complex flavor profile that makes this soup so special. I’ve also included my go-to substitutions so you can make it work with what you have.
- 12 tbsp Salted Butter: This is our caramelizing workhorse. Salted butter adds a rich, savory base and helps draw the moisture out of the onions. Chef’s Insight: Don’t sub for oil here; the butter is non-negotiable for that classic, luxurious French onion flavor.
- 8 Medium Yellow Onions & 4 Shallots, thinly sliced: The stars of the show! Yellow onions bring a robust sweetness, while shallots add a more delicate, nuanced flavor. Sub Tip: You can use all yellow onions if needed, but the shallots are worth it!
- 8 Cloves Garlic, chopped: Because what’s a cozy soup without plenty of garlic? It adds a pungent, aromatic backbone.
- 4 tbsp Fresh Thyme & 4 tbsp Chopped Fresh Sage: This herby duo is a match made in heaven. Thyme is earthy and classic, while sage brings a slightly peppery, warm flavor. Sub Tip: If using dried, use 1 tbsp of each, as dried herbs are more potent.
- Red Chili Flakes & Fresh Ground Black Pepper: A little heat and bite to balance all the richness. Start with ½ tsp of chili flakes and adjust to your taste.
- 12-14 cups Low Sodium Chicken Broth: Using low-sodium gives you control over the salt level, especially since we’re adding tamari. Sub Tip: Beef broth works great too for an even beefier flavor.
- 1 cup Tamari or Low-Sodium Soy Sauce: This is our secret umami weapon! It adds a deep, savory saltiness that elevates the broth beyond the ordinary.
- 8 lbs Bone-In Beef Short Ribs: The bone is key here—it releases gelatin as it cooks, giving the soup an incredible, velvety body. Chef’s Insight: Look for ribs with good marbling for the most tender result.
- 4 Bay Leaves & 2 Star Anise (optional): Bay leaves add a subtle, floral depth. Star anise introduces a whisper of licorice-like sweetness that makes the broth truly complex.
- 4 cups Baby Carrots: They add a touch of natural sweetness and a lovely pop of color.
Flavor Twists (Don’t Skip These!)
- 2 tsp Worcestershire Sauce: Amplifies the savory, umami notes.
- 1 tbsp Balsamic Vinegar: A splash of acidity to brighten everything up and cut through the richness.
- ½ tsp Smoked Paprika: Imparts a subtle, smoky undertone that’s just divine.
- 1 cup Dry Red Wine (Optional): For ultimate richness. A Cabernet Sauvignon or Merlot works perfectly.
Let’s Get Cooking: Building Your Masterpiece
Okay, team. This is where the fun begins. We’re not just throwing everything in a pot; we’re building flavors layer by layer. Put on some good music, pour yourself a little of that red wine (for the cook, of course), and let’s get started.
- Caramelize Those Onions (The Heart of the Soup): In your largest, heaviest Dutch oven or stockpot, melt the butter over medium-low heat. Add all your sliced onions and shallots with a generous pinch of salt. Now, here’s the most important part: be patient. This isn’t a 5-minute job. Stir them often and let them cook low and slow for 30-40 minutes. You’re looking for a deep, golden-brown color and a wonderfully sweet aroma. Chef’s Hack: Don’t crank the heat to speed this up! You’ll burn them. Low and slow is the only way to achieve that perfect, jammy caramelization.
- Bloom the Aromatics: Once your onions are beautifully golden, stir in the chopped garlic, fresh thyme, sage, chili flakes, and a good amount of black pepper. Cook for just 2-3 minutes, until the garlic is fragrant. You’re waking up all those essential oils and toasting the spices—this step makes a world of difference.
- The Optional (But Highly Recommended) Wine Deglaze: If you’re using the red wine, now’s the time! Pour it into the pot. It will sizzle and steam gloriously. Use your wooden spoon to scrape up all those tasty browned bits from the bottom of the pot. Let the wine bubble and reduce by about half. This cooks off the alcohol and leaves behind a concentrated, fruity richness.
- Build the Broth: Now, pour in the chicken broth, tamari (or soy sauce), Worcestershire, balsamic vinegar, and smoked paprika. Add the bay leaves, star anise (if using), and the baby carrots. Give it all a good stir and bring it up to a gentle simmer.
- Nestle in the Star Ingredient: Carefully place your beef short ribs into the simmering broth, making sure they’re mostly submerged. Put the lid on your pot, reduce the heat to low, and let it all bubble away peacefully for 3 to 4 hours. Chef’s Hack: You’ll know it’s ready when you can easily pull a piece of meat away from the bone with a fork. The long, slow cook time is what transforms the tough connective tissue into melt-in-your-mouth goodness.
- Shred and Return: Using tongs, carefully remove the short ribs from the pot. They will be incredibly tender, so be gentle! Let them cool just until you can handle them, then shred the meat, discarding the bones and any large chunks of fat. Return all that glorious, tender beef back to the soup.
- The Final Simmer: Let the soup simmer for another 10 minutes with the shredded meat back in the pot. This allows the meat to soak up all the flavors of the broth. Now is the time to taste it! Adjust the seasoning—add more black pepper, a pinch of salt, or another dash of balsamic if you think it needs it.
How to Serve This Hearty Masterpiece
Presentation is part of the fun! You’ve put in the work, now let’s make it look as good as it tastes. I love serving this soup in deep, wide bowls—the kind you can really cradle in your hands. The classic move is to ladle a generous amount of soup into each bowl, making sure everyone gets plenty of beef, carrots, and those silky onions.
Then, top it with a thick, crusty slice of toasted sourdough or a baguette. For the ultimate indulgence, you can even toast your bread, rub it with a garlic clove, and sprinkle it with Gruyère or Swiss cheese before popping it under the broiler until bubbly and golden. Placing that cheesy toast right on top of the steaming soup is pure heaven. It soaks up the incredible broth and adds a wonderful textural contrast. Don’t forget a sprinkle of fresh thyme leaves on top for a pop of color and freshness!
Make It Your Own: Delicious Recipe Twists
One of the best things about this recipe is how adaptable it is. Feel free to play around and make it suit your taste or dietary needs!
- The “Stew” Variation: Want it even heartier? After shredding the beef, stir in a cup of frozen peas and a cup of pearl barley about 30 minutes before the end of cooking. It turns into a fantastic, complete meal-in-a-bowl.
- Slow Cooker Simplicity: You can absolutely make this hands-off! Caramelize the onions and shallots in a skillet, then transfer everything to your slow cooker. Cook on LOW for 7-8 hours or on HIGH for 4-5 hours.
- Bone Broth Boost: For an extra nutrient-packed punch, swap the chicken broth for beef bone broth. The collagen and richness will take the soup to a whole new level of comfort.
- Mushroom Lover’s Dream: For a deeper, earthier flavor, add a pound of sliced cremini mushrooms when you add the carrots. They’ll soak up all the herby, beefy goodness.
- Wine-Free Version: No wine? No problem! You can deglaze the pot with an additional ½ cup of broth instead. The soup will still be absolutely delicious.
Beau’s Kitchen Notes & Stories
This recipe has evolved so much since that first accidental drop of a short rib! I’ve found that the soy sauce (or tamari) was the real game-changer—it adds a depth that Worcestershire sauce alone can’t achieve. I also started adding the star anise after being inspired by a Vietnamese pho recipe, and I love the subtle, aromatic complexity it brings.
A funny kitchen story? The first time I made the final version of this for my family, my dad, who is a man of few words, took one bite, put his spoon down, looked me dead in the eye, and said, “Son, you can’t ever *not* make this again.” I think that’s the highest compliment a home cook can get. It’s a recipe that creates its own memories around the table, and that’s what Feastical is all about.
Your Questions, Answered!
I’ve gotten a few questions about this recipe over the years, so I figured I’d answer the most common ones right here.
Q: My soup broth is a bit thin. How can I thicken it?
A: No worries! The easiest way is to make a quick slurry. Mix 2 tablespoons of cornstarch or all-purpose flour with ¼ cup of cold broth or water until smooth. Stir this into your simmering soup and let it cook for another 5-10 minutes until it thickens up beautifully.
Q: Can I make this ahead of time?
A: Absolutely! In fact, I think soups like this taste even better the next day after the flavors have had more time to mingle. Let it cool completely and store it in an airtight container in the fridge for up to 4 days. Reheat gently on the stovetop.
Q: Can I use boneless short ribs?
A> You can, but the bone-in ribs will give you a richer, more gelatinous broth. If you use boneless, the cook time might be slightly less, so start checking for tenderness around the 2.5-hour mark.
Q: It tastes a little flat. What did I miss?
A> This usually means it needs a hit of acidity or salt. Try adding another splash of balsamic vinegar or a pinch more salt. Sometimes, a final squeeze of fresh lemon juice right at the end can also brighten all the flavors perfectly.

Rich French Onion Short Rib Soup : Hearty, Herby, and Packed with Bold Flavor
Description
A luxurious, hearty soup that combines the sweet, caramelized flavors of French onion soup with tender, melt-in-your-mouth short ribs. Perfect for cozy nights and impressing guests!
Ingredients
Soup Base
-
12 tbsp salted butter
-
8 medium yellow onions, thinly sliced
-
4 shallots, thinly sliced
-
8 cloves garlic, chopped
-
4 tbsp fresh thyme, chopped
-
4 tbsp fresh sage, chopped
-
½ tsp red chili flakes (adjust to taste)
-
Freshly ground black pepper, to taste
-
12–14 cups low-sodium chicken or beef broth
-
1 cup tamari or low-sodium soy sauce
-
2 tsp Worcestershire sauce
-
1 tbsp balsamic vinegar
-
½ tsp smoked paprika
-
1 cup dry red wine (optional)
-
4 bay leaves
-
2 star anise (optional)
-
4 cups baby carrots
Short Ribs
-
8 lbs bone-in beef short ribs
Serving
-
Crusty sourdough or baguette slices
-
Gruyère or Swiss cheese, grated
-
Fresh thyme, for garnish
Instructions
1. Caramelize Onions
-
Melt butter in a large Dutch oven over medium-low heat.
-
Add onions, shallots, and a pinch of salt. Cook low and slow, stirring often, 30–40 minutes until deep golden brown.
2. Bloom Aromatics
-
Stir in garlic, thyme, sage, chili flakes, and black pepper. Cook 2–3 minutes until fragrant.
3. Deglaze (Optional)
-
Pour in red wine, scraping browned bits from the bottom. Reduce by half.
4. Build the Broth
-
Add broth, tamari, Worcestershire sauce, balsamic vinegar, smoked paprika, bay leaves, star anise, and carrots. Stir and bring to a gentle simmer.
5. Add Short Ribs
-
Nestle ribs into the broth. Cover, reduce heat to low, and simmer 3–4 hours until meat is tender and falling off the bone.
6. Shred Ribs
-
Carefully remove ribs. Shred meat, discarding bones and large fat chunks. Return meat to soup. Simmer 10 more minutes.
7. Serve
-
Ladle soup into deep bowls.
-
Top with toasted bread slices and melted cheese under the broiler.
-
Garnish with fresh thyme.
Notes
-
Thicker Broth: Mix 2 tbsp cornstarch or flour with ¼ cup cold broth. Stir in and simmer 5–10 min.
-
Make Ahead: Soup tastes even better the next day. Store in airtight container up to 4 days.
-
Boneless Short Ribs: Slightly shorter cook time; bones give richer broth.
-
Extra Veggies: Add mushrooms, pearl barley, or peas 30 min before finishing.
-
Wine-Free: Substitute with extra broth for deglazing.
Nutrition
- Calories: 490 kcal per serving
- Fat: 28g
- Carbohydrates: 18g
- Protein: 36g
Nutritional Information (Approximate)
Okay, let’s talk fuel. This is a hearty, protein-packed soup designed to satisfy. Remember, these numbers are per serving (and this recipe makes a lot!) and are just an estimate. Using low-sodium broth and tamari helps control the salt content.
Per Serving (based on 12 servings):
Calories: 490 | Protein: 36g | Fat: 28g | Carbohydrates: 18g | Fiber: 2g
This soup is an excellent source of high-quality protein from the beef, which is great for muscle repair and keeping you full and satisfied. The onions and carrots provide dietary fiber, vitamins, and antioxidants. The fat content comes from the butter and the marbling in the short ribs, which is what gives the soup its incredible richness and mouthfeel. It’s a balanced, wholesome meal that’s as nourishing as it is delicious.
Final Thoughts from My Kitchen to Yours
Well, there you have it, my friends—my all-time favorite Rich French Onion Short Rib Soup. This recipe is a labor of love, but I promise you, every minute is worth it. It’s the kind of dish that turns a regular Tuesday into a celebration and makes a dinner party unforgettable.
I hope you feel empowered to give this a try. Don’t be afraid to make it your own. That’s the true joy of cooking. If you do make it, I’d be absolutely thrilled to see your creation! Tag me on social @Feastical or @BeauCollier with the hashtag #FeasticalFeast so I can see the warm, delicious hugs you’re serving up in your kitchen.
Until next time, keep your spoons handy and your hearts
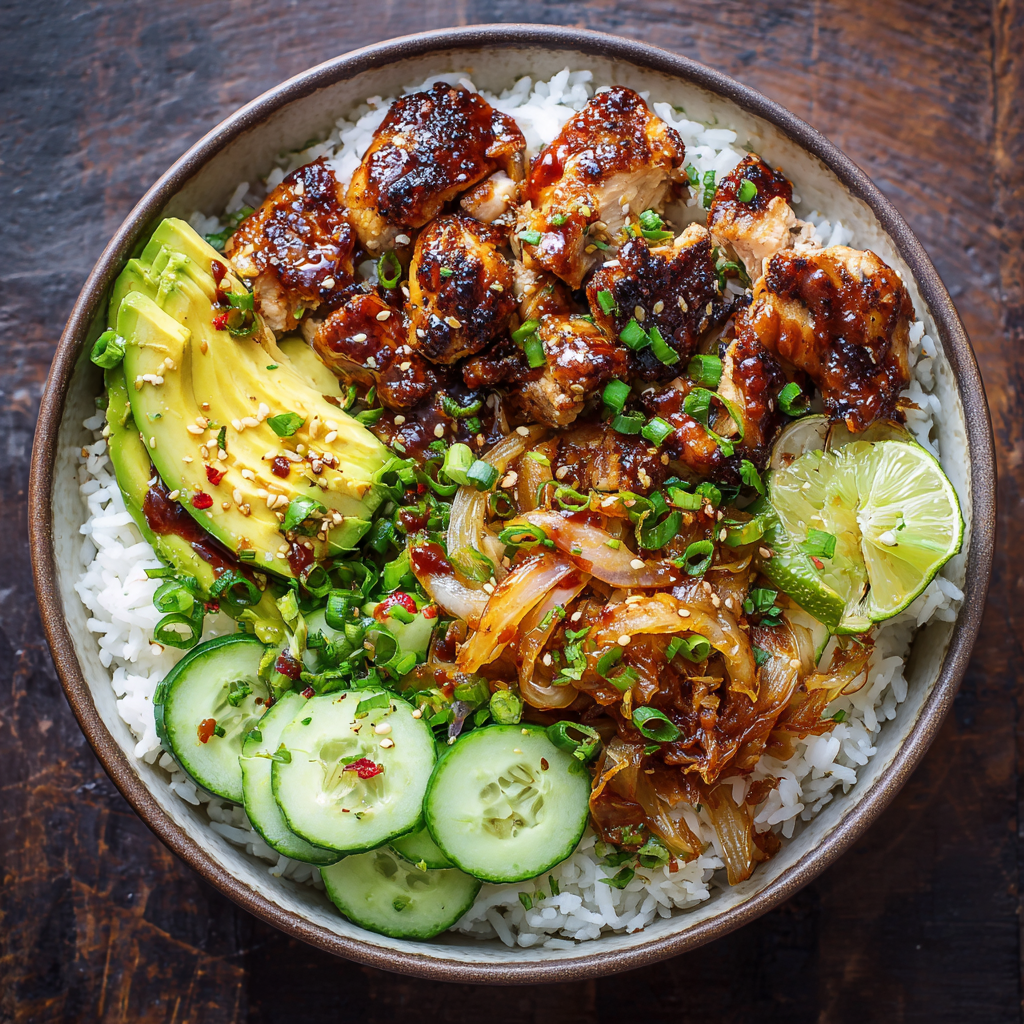
Sticky Chili-Garlic Chicken Bowls with Yum Yum Sauce : Bold, Spicy & Better Than Takeout
Sticky Chili-Garlic Chicken Bowls: Your New Takeout Obsession
Hey friends, Beau here from Feastical! Let’s be real for a second. We’ve all been there. It’s been a long day, your stomach is growling, and the siren song of the takeout app is getting louder by the minute. The promise of something saucy, spicy, and delivered right to your door is a powerful one. But what if I told you that you could create a meal at home that’s even better than takeout? A meal that’s bursting with bold, sticky, chili-garlic flavor, packed with fresh, crunchy toppings, and drizzled with a sauce so good we literally named it “Yum Yum”?
That’s exactly what these Sticky Chili-Garlic Chicken Bowls are all about. This isn’t just a recipe; it’s a full-sensory experience. Imagine tender, juicy chicken coated in a glaze that’s the perfect balance of sweet, spicy, and savory. We’re talking about a sauce that caramelizes into sticky, gorgeous perfection on the grill or in your pan. Then, we balance all that fiery goodness with fluffy jasmine rice, cool slices of avocado and cucumber, and the tangy punch of kimchi. And the pièce de résistance? A generous, creamy, utterly addictive drizzle of our homemade Yum Yum sauce that ties the whole party together in your bowl.
This recipe is designed for real life. It’s for weeknight wins, for feeding a crowd without stress, and for those moments when you want a meal that feels like a celebration. So, let’s put those takeout menus aside for one night and create some magic together. I promise, your kitchen is about to smell incredible, and your taste buds are in for the ride of their lives.
The Night We Invented “Yum Yum” Sauce
This recipe has a special place in my heart because it was born out of a happy kitchen accident. A few years back, a bunch of my friends showed up unannounced, ravenous after a long hike. My fridge was… let’s call it “creatively stocked.” I had some chicken thighs, a motley crew of condiments, and a whole lot of determination to avoid ordering ten different pizzas.
I whipped up a quick marinade with what I had—soy sauce, a squirt of honey, a heaping spoonful of chili paste, and a whole lot of garlic. While the chicken was sizzling away, I stared into the abyss of my condiment shelf: mayo, ketchup, Worcestershire. In a moment of “what’s the worst that could happen?” I mixed them all together. My friend Sam took one bite of the chicken dipped in this mystery pink sauce, her eyes went wide, and all she could say was, “Yum. YUM.” The name stuck instantly. That chaotic, thrown-together meal turned into one of the most-requested recipes in my arsenal, and I’m so excited to finally share the polished, perfected version with you.
Gathering Your Flavor Arsenal
Here’s everything you’ll need to create these epic bowls. Don’t be intimidated by the list—a lot of this is pantry staples, and I’ve included plenty of swaps and chef insights to make it your own.
For the Sticky Chili-Garlic Chicken:
- 3 lbs boneless, skinless chicken (breasts or thighs): I’m a thigh guy myself—they’re more forgiving and stay juicier, but breasts work beautifully if that’s your preference. Just keep an eye on them so they don’t dry out!
- 2 tbsp + ⅔ cup tamari or soy sauce: We use a little to marinate the chicken briefly before adding the rest to the sauce. Tamari is a great gluten-free option with a slightly richer, smoother flavor.
- 4 tbsp orange juice (fresh if possible!): The bright, subtle acidity from the OJ cuts through the richness and helps create that incredible sticky glaze. No fresh oranges? The bottled stuff works in a pinch.
- ½ cup honey: This is our sweet backbone. For a deeper flavor, try maple syrup. For a vegan version, agave nectar works perfectly.
- 4–5 tbsp chili paste (like Sambal Oelek or Gochujang): This is your heat control! Start with 4 tbsp for a medium kick, and go up from there if you’re feeling brave. Gochujang will add a lovely, fermented depth.
- 2 tbsp fresh ginger, chopped & 4 cloves garlic, chopped: Non-negotiable flavor bombs! Please, please use fresh. The jarred stuff just doesn’t bring the same vibrant punch.
- 4 tbsp olive oil: Helps the marinade cling to the chicken and prevents sticking during cooking.
- Black pepper, to taste: Freshly cracked is always best.
- Optional Twists: A tbsp of rice vinegar or lime juice adds a fantastic zing right at the end. A tsp of toasted sesame oil stirred into the marinade gives an incredible nutty, deep flavor.
For the Famous Yum Yum Sauce:
- ⅔ cup olive oil mayo: The creamy base. I like the flavor of olive oil mayo, but any good-quality mayo will do.
- 4 tbsp ketchup: Don’t knock it ’til you’ve tried it! It adds sweetness, tang, and that iconic pink color.
- 2 tbsp Worcestershire sauce: The secret umami weapon. It adds a complex, savory depth that makes the sauce truly irresistible.
- 2 tsp seasoned salt: I use Lawry’s. It’s the perfect blend of salt and spices that makes this sauce so moreish.
- ½ tsp cayenne pepper: A little warmth to balance the creaminess. Adjust to your taste!
- Optional Twist: A tsp of lemon juice or a dash of sriracha can brighten things up or add an extra kick.
For Serving & Building Your Bowl:
- 6–7 cups cooked jasmine or basmati rice: Their fragrant, fluffy texture is the perfect bed for our bold chicken.
- 1–2 cucumbers, thinly sliced & 2 avocados, sliced: Our cool, fresh elements that provide a lovely contrast to the spicy chicken.
- 1 cup kimchi: The tangy, fermented crunch is a game-changer. If you’re new to kimchi, start with a small amount!
- Handful of fried wontons or crispy shallots: The textural MVP! That final crunch makes every bite exciting.
- Optional extras: Pickled red onions or shredded carrots add a gorgeous pop of color and another layer of flavor and crunch.
Let’s Get Cooking: Building Your Flavor Masterpiece
Okay, team! Aprons on, music playing, let’s transform these ingredients into a meal you’ll be dreaming about. We’re going to work in a logical flow so everything comes together hot and delicious at the same time.
- Marinate the Chicken (The Flavor Foundation): In a medium bowl, grab your 2 tbsp of soy sauce and toss your chicken in it. Let it sit for just 10-15 minutes while you make the main marinade. This little pre-seasoning step helps the chicken absorb flavor deeply. Now, in a separate, larger bowl, whisk together the remaining ⅔ cup soy sauce, orange juice, honey, chili paste, ginger, garlic, olive oil, and a good crack of black pepper. This is your magic potion! Chef’s Hack: Always reserve about ¼ cup of this marinade in a small bowl before you add the chicken. This is your clean, safe basting glaze for later—no cross-contamination!
- Get Your Grill or Pan Screaming Hot: Whether you’re grilling outdoors or using a grill pan or cast-iron skillet on the stove, get it nice and hot over medium-high heat. You want to hear a confident sizzle when that chicken hits the surface. If you’re baking, preheat your oven to 400°F (200°C).
- Cook to Caramelized Perfection:
- Grill/Pan Method: Shake off excess marinade and lay the chicken down. Don’t touch it! Let it sear for 5-7 minutes per side until you get those beautiful grill marks and the chicken releases easily. In the last 2-3 minutes of cooking, brush the reserved, clean marinade onto the cooked side. Flip, brush the other side, and let it caramelize into a sticky, glossy glaze. Cook until the internal temperature hits 165°F (74°C).
- Bake Method: Place the marinated chicken on a parchment-lined baking sheet. Bake for 20-25 minutes, brushing with the reserved glaze in the last 5-10 minutes to get that sticky finish.
- Rest is Best: Once cooked, transfer the chicken to a cutting board and let it rest for 5-10 minutes. This is non-negotiable for juicy chicken! It allows the juices to redistribute throughout the meat. If you cut into it right away, all those beautiful juices will run out onto your cutting board. While it rests, you can slice your avocado and cucumber.
- Whip Up the Yum Yum Sauce: This couldn’t be easier. In a small bowl, combine the mayo, ketchup, Worcestershire sauce, seasoned salt, and cayenne. Whisk until it’s smooth, creamy, and uniformly pink. Give it a taste and adjust the seasoning if needed. Pop it in the fridge until you’re ready to assemble.
- Slice and Dice: After the chicken has rested, slice it against the grain into bite-sized strips or chunks. Slicing against the grain ensures every piece is tender and easy to eat.
Bowl Assembly: The Grand Finale
This is where the art happens! Building the bowl is part of the fun and makes the meal feel extra special. Here’s my favorite way to layer it up for maximum visual and flavorful impact.
Start with a generous fluffy base of warm jasmine rice. Then, artfully arrange your sliced sticky chili-garlic chicken over one section of the rice. Next, create little “flavor stations” around the bowl: a neat pile of cool cucumber slices, a fan of creamy avocado, a vibrant mound of tangy kimchi. Scatter a handful of those crispy fried wontons or shallots over everything for that essential crunch factor.
Now, the moment we’ve all been waiting for. Take that bowl of Yum Yum sauce and drizzle it liberally over the entire creation. Don’t be shy! You can even serve extra on the side for dippin’. The final result is a beautiful, colorful, textural masterpiece that’s as Instagram-worthy as it is delicious. Grab a big fork, dig down to get a bit of everything in one bite, and prepare for your mind to be blown.
Make It Your Own: Delicious Twists & Swaps
The beauty of a bowl recipe is its flexibility. Here are a few ways to mix it up and keep things exciting!
- Go Veggie! Swap the chicken for extra-firm tofu (pressed and cubed) or thick slices of halloumi cheese. The marinade and cooking method work beautifully for both.
- Turn Up the Heat (or Turn It Down): For a five-alarm fire, add a teaspoon of Sriracha or a chopped fresh Thai chili to the marinade. For a milder, family-friendly version, reduce the chili paste to 2 tablespoons and use a mild ketchup-based Yum Yum sauce without the cayenne.
- Korean BBQ Vibe: Replace the chili paste with Gochujang and the honey with brown sugar for a deeper, fermented, sweet-and-spicy flavor that’s classic Korean BBQ.
- Different Grain, Different Gain: Not feeling rice? Serve this over quinoa, cauliflower rice for a low-carb option, or even a bed of crunchy shredded romaine lettuce for a deconstructed salad bowl.
- Pineapple Punch: Add ½ cup of crushed pineapple (juice and all) to the marinade. It adds a wonderful tropical sweetness and helps tenderize the chicken.
Beau’s Brain Dump & Kitchen Stories
This recipe has evolved so much from that first chaotic night. I’ve learned that marinating the chicken for at least 4 hours (or even overnight) makes the flavor penetrate down to its very soul. I also started adding that splash of rice vinegar at the end for brightness, and it was a total game-changer. One funny fail: I once tried to blend the Yum Yum sauce in a blender to make it extra smooth. Let’s just say it turned into a pink, mayo-based soup. A whisk and a little elbow grease are all you need! The moral of the story? Don’t overcomplicate the good stuff.
Your Questions, Answered!
Q: My sauce isn’t getting “sticky.” What am I doing wrong?
A: The stickiness comes from the sugar in the honey caramelizing. Make sure your heat is high enough when you apply the reserved glaze at the end. If you’re baking, you can even pop the chicken under the broiler for the last 1-2 minutes to really bubble and caramelize that glaze. Just watch it like a hawk!
Q: Can I make this ahead of time?
A> Absolutely! You can marinate the chicken for up to 24 hours. The Yum Yum sauce actually gets better after sitting in the fridge for a few hours, as the flavors meld. You can also cook the chicken, let it cool, slice it, and store it in an airtight container for up to 3 days. Reheat gently in the microwave or a skillet.
Q: My chicken is cooking too fast on the outside but is raw inside!
A> This usually means your heat is too high. You want a good sear, but if the outside is burning before the inside cooks, lower the heat to medium and cook for a longer time. If grilling, you can move the chicken to a cooler part of the grill to finish cooking through after you get a good sear. Using a meat thermometer is the best way to avoid guesswork!
Q: Is there a substitute for Worcestershire sauce in the Yum Yum sauce?
A> For a vegetarian version, you can use coconut aminos or a extra teaspoon of soy sauce, though the flavor will be slightly different. In a real pinch, a tiny bit of balsamic vinegar mixed with a dash of soy sauce can mimic the tangy-savory notes.

Sticky Chili-Garlic Chicken Bowls with Yum Yum Sauce : Bold, Spicy & Better Than Takeout
Description
These bowls are sweet, spicy, savory, and utterly addictive. Juicy chicken, sticky chili-garlic glaze, creamy Yum Yum sauce, fresh veggies, and crispy toppings—better than takeout, guaranteed.
Ingredients
Sticky Chili-Garlic Chicken
-
3 lbs boneless chicken (thighs or breasts)
-
2 tbsp soy sauce (for pre-marinating)
-
⅔ cup soy sauce (for main marinade)
-
4 tbsp orange juice
-
½ cup honey (or maple syrup for vegan)
-
4–5 tbsp chili paste (Sambal Oelek or Gochujang)
-
2 tbsp fresh ginger, chopped
-
4 cloves garlic, chopped
-
4 tbsp olive oil
-
Black pepper, to taste
-
Optional: 1 tbsp rice vinegar or lime juice, 1 tsp toasted sesame oil
Yum Yum Sauce
-
⅔ cup mayonnaise (olive oil or vegan)
-
4 tbsp ketchup
-
2 tbsp Worcestershire sauce (or vegetarian alternative)
-
2 tsp seasoned salt
-
½ tsp cayenne pepper
-
Optional: 1 tsp lemon juice or sriracha
Bowls & Toppings
-
6–7 cups cooked jasmine or basmati rice
-
1–2 cucumbers, thinly sliced
-
2 avocados, sliced
-
1 cup kimchi
-
Handful fried wontons or crispy shallots
-
Optional: pickled red onions, shredded carrots
Instructions
1. Pre-Marinade Chicken
-
Toss chicken with 2 tbsp soy sauce for 10–15 min.
2. Make Main Marinade
-
Whisk together remaining soy sauce, orange juice, honey, chili paste, ginger, garlic, olive oil, black pepper.
-
Reserve ¼ cup for basting.
3. Cook Chicken
Grill/Pan:
-
Preheat pan or grill to medium-high. Sear chicken 5–7 min per side.
-
In last 2–3 min, brush reserved marinade, flip, brush other side. Cook until 165°F (74°C).
Bake:
-
Preheat oven to 400°F (200°C). Bake 20–25 min, brushing reserved marinade during last 5–10 min.
4. Rest & Slice
-
Let chicken rest 5–10 min, then slice against the grain.
5. Make Yum Yum Sauce
-
Whisk mayo, ketchup, Worcestershire, seasoned salt, cayenne until smooth. Chill until serving.
6. Assemble Bowls
-
Layer rice, chicken, cucumber, avocado, kimchi, and crispy toppings.
-
Drizzle generously with Yum Yum sauce. Serve extra on the side.
Notes
-
Marinate Longer: 4 hours or overnight for deeper flavor.
-
Vegetarian/Vegan: Swap chicken for pressed tofu or halloumi.
-
Heat Control: Add extra chili paste or sriracha to taste.
-
Grain Swap: Quinoa, cauliflower rice, or shredded lettuce.
-
Tropical Twist: Add ½ cup crushed pineapple to the marinade.
Final Thoughts: Your New Kitchen Staple Awaits
So, there you have it. What started as a desperate attempt to feed my hungry friends has become one of my all-time favorite recipes, and I have a feeling it’s about to become one of yours, too.
These Sticky Chili-Garlic Chicken Bowls are more than just a meal; they’re a testament to the magic that can happen in your own kitchen. They prove that you don’t need a delivery driver to get a dinner that’s bursting with excitement, texture, and flavor. This is the kind of recipe that builds confidence—the one you’ll pull out when you want to impress, when you need a reliable weeknight hero, or when you simply want to treat yourself to something truly special.
It’s a complete experience. From the sizzle of the chicken in the pan and the incredible aroma of garlic and chili filling your kitchen, to the joyful, messy art of building your own perfect bowl. That final drizzle of Yum Yum sauce isn’t just a garnish; it’s a victory lap.
So, the next time that takeout craving hits, I hope you remember this recipe. Remember that you have the power to create something not just as good, but better—fresher, more vibrant, and made exactly to your taste.

Ultimate Vegan Chocolate Chip Cookies : Soft, Chewy & Crowd-Approved
Ultimate Vegan Chocolate Chip Cookies: Your New Go-To Comfort Cookie
Hey friends, Beau here from Feastical! Let’s talk about one of life’s simple, soul-deep pleasures: a perfect chocolate chip cookie. You know the one. It’s the cookie that makes you close your eyes after the first bite. The one with a slightly crisp edge that gives way to a soft, almost gooey center, packed with pockets of melted chocolate. It’s a warm hug in dessert form.
Now, I know what some of you might be thinking: “But Beau, can a *vegan* cookie really deliver that level of pure, unadulterated joy?” My answer, delivered with a big, flour-dusted grin, is a resounding YES. In fact, this recipe might just become your new gold standard.
We’re not just making a cookie that’s “good for being vegan.” We’re crafting a masterpiece that stands tall and proud in any cookie lineup. We’re using a few simple, plant-based ingredients and some clever kitchen magic to create cookies that are soft, chewy, and wildly addictive. I’ve added a couple of my secret flavor boosters—a whisper of espresso and a drizzle of maple syrup—to take these from great to absolutely legendary. So, preheat your ovens and grab your favorite mixing bowl. We’re about to make your kitchen smell like a bakery dream.
The Cookie That Started It All
My love affair with chocolate chip cookies started not in a fancy kitchen, but on a worn linoleum floor in my Grandma Jean’s house. I was maybe six years old, and my job was the “chocolate chip depositor,” which basically meant I got to sneak as many chocolate morsels as I ate. Her recipe was classic—butter, eggs, the whole shebang. The smell of those cookies baking is a core memory for me.
When I started Feastical and began exploring all corners of the food world, I knew I had to create a vegan version that captured that same feeling of warmth and nostalgia. The first batch was… a learning experience. Let’s just say they had the structural integrity of a hockey puck. But after countless tests, tweaks, and happy (and not-so-happy) taste-testers, we landed on this formula. It’s a recipe that honors those childhood memories while being completely inclusive and delicious for everyone at the table. That’s the power of food—it connects us, no matter our dietary choices.
Gathering Your Cookie Crew: The Ingredients
Great cookies start with great ingredients. Here’s the lineup for our vegan all-stars. Don’t worry, we’re keeping it simple and I’ll explain the “why” behind each one.
- 1 cup vegan margarine, softened (or solid coconut oil): This is our fat, and it’s crucial for that rich flavor and tender texture. I prefer a good vegan margarine (like Miyoko’s Kitchen or Melt) for the most classic buttery taste. If you use coconut oil, make sure it’s solid, not melted, for the right consistency.
- 2 cups packed brown sugar: Brown sugar is the secret to a chewy, moist cookie. The molasses in it brings that deep, caramel-like flavor and helps keep the centers soft. Pack it firmly into your measuring cup!
- ½ cup non-dairy milk (like almond, soy, or oat): This replaces the eggs, adding moisture and helping to bind our dough together. Unsweetened almond milk is my go-to, but oat milk adds a lovely creaminess.
- 2 tsp vanilla extract: The flavor backbone. Don’t skimp! Use the real stuff if you can.
- 1 tbsp maple syrup (flavor boost): My little chef’s hack! This isn’t for sweetness, but for depth. It enhances the caramel notes of the brown sugar and gives the cookies a beautiful golden color.
- 3 cups all-purpose flour: The structure of our cookie. I use unbleached all-purpose for a consistent, tender crumb.
- 2 tsp baking soda & 2 tsp baking powder: Our dynamic leavening duo! The baking powder gives an initial lift, while the baking soda helps the cookies spread and brown perfectly.
- ½ tsp salt: Balances the sweetness and makes all the flavors pop. Trust me on this.
- ½ tsp instant espresso powder (optional – enhances chocolate flavor): This is the ultimate secret weapon! It won’t make your cookies taste like coffee. Instead, it amplifies the richness of the chocolate, making it taste more… chocolaty. It’s a game-changer.
- 1 to 1¼ cups dairy-free chocolate chips or chunks: The star of the show! I’m a fan of using a mix of chips and chopped-up chocolate bars for those lovely, uneven melty pockets. Guittard, Enjoy Life, and Trader Joe’s have great options.
- Flaky sea salt, for topping (optional but recommended): A sprinkle of flaky salt right when they come out of the oven creates a magical sweet-and-salty contrast that will have people begging for the recipe.
Let’s Get Baking: The Step-by-Step Magic
Ready to create some magic? Follow these steps, and you’ll be a vegan cookie pro in no time. I’ve sprinkled in my best chef hacks to ensure your success.
Step 1: Preheat & Prep
Preheat your oven to 350°F (175°C). Line two baking sheets with parchment paper. Chef’s Hack: Parchment paper is non-negotiable for even baking and easy cleanup. Don’t grease the pan, as it can cause the cookies to spread too much.
Step 2: The Creamy Foundation
In a large bowl, cream together the softened vegan margarine and packed brown sugar until the mixture is smooth, light, and fluffy. This should take about 2-3 minutes with a hand mixer or stand mixer. Chef’s Insight: Creaming is not just mixing! This step incorporates air into the dough, which is part of what gives the cookie its lovely texture. Don’t rush it.
Step 3: The Wet Team Assembles
Add the non-dairy milk, vanilla extract, and that flavor-boosting maple syrup to the butter-sugar mixture. Mix well until everything is perfectly combined. It might look a little separated or grainy at first, but just keep mixing—it will come together.
Step 4: Whisk the Dry Crew
In a separate, medium-sized bowl, whisk together the flour, baking soda, baking powder, salt, and that magical instant espresso powder. Chef’s Hack: Whisking the dry ingredients separately ensures the leavening agents and salt are evenly distributed throughout the flour, preventing any bitter pockets in your finished cookies.
Step 5: The Grand Union
Now, slowly add the dry ingredients to the wet ingredients, mixing on low speed until *just* combined. You’ll see a beautiful dough starting to form. Do not overmix! Overworking the dough develops gluten and can lead to tough cookies. A few streaks of flour are okay.
Step 6: The Main Event
Using a spatula or wooden spoon, gently fold in the dairy-free chocolate chips. This is where you get a sneak peek of the goodness to come. Feel free to add a few extra chips on top of the dough balls later for a bakery-style look.
Step 7: Scoop & Salt
Scoop the dough into balls, about 1.5 tablespoons each. I love using a cookie scoop for uniform size, but a tablespoon measure works great too. Place the dough balls on your prepared baking sheets, leaving about 2 inches between them—they need room to spread and become glorious. If you’re using it, now is the time for a light sprinkle of flaky sea salt on top of each raw dough ball.
Step 8: Bake to Perfection
Bake for 10–12 minutes. The cookies are done when the edges are set and look lightly golden, but the centers still appear soft, puffy, and slightly underdone. Chef’s Golden Rule: They will continue to cook on the hot baking sheet after you pull them out. This is the secret to that soft, chewy center!
Step 9: The Patience Test
Let the cookies cool on the hot baking sheet for a full 5 minutes. This allows them to set up enough to handle. Then, transfer them to a wire rack to cool completely… or, you know, grab a glass of oat milk and dive in while they’re still warm and the chocolate is gloriously gooey. I won’t judge.
How to Serve These Vegan Wonders
Sure, you can just pile these cookies on a plate and call it a day (a very good day, I might add). But if you want to elevate the experience, here are a few of my favorite ways to serve them up.
For the ultimate comfort dessert, place a warm cookie in a bowl and top it with a scoop of your favorite vegan vanilla ice cream. Drizzle with a little vegan caramel or chocolate sauce, and you have an epic cookie sundae that’s guaranteed to impress.
If you’re serving them at a party or as a gift, stack them high on a cute wooden board or a vintage cake stand. The variation in color and those peek-a-boo chocolate chips make them look as good as they taste. They pair beautifully with a cold glass of oat milk, a hot coffee, or even a mug of chai tea. However you choose to serve them, just make sure you’re sharing them with good company.
Make It Your Own: Fun Recipe Variations
This recipe is a fantastic base for your own culinary creativity. Feel like mixing it up? Here are a few of my favorite twists:
- The Nutty Professor: Fold in ¾ cup of chopped walnuts, pecans, or toasted almonds along with the chocolate chips for a wonderful crunch.
- Kitchen Sink Cookie: Go all out! Add ½ cup of vegan white chocolate chips and ½ cup of dried cranberries or cherries for a sweet and tart flavor explosion.
- Salty Sweet Supreme: Use ¾ cup chocolate chips and fold in ½ cup of crushed vegan pretzel pieces. The salty pretzel bits baked inside are an incredible surprise.
- Gluten-Free Goodness: You can easily make these gluten-free! Simply swap the all-purpose flour for a 1:1 gluten-free baking blend. My tests show that Bob’s Red Mill or King Arthur blends work perfectly.
- Double Chocolate Madness: Replace ½ cup of the flour with ½ cup of unsweetened cocoa powder for the ultimate chocolate lover’s cookie.
Beau’s Chef’s Notes & Kitchen Stories
This recipe has been a labor of love, and it’s evolved so much since that first hockey-puck batch. The maple syrup and espresso powder were total “aha!” moments that happened after I accidentally spilled a little syrup into a batch I was making while half-asleep. Best mistake ever!
One of my favorite kitchen stories involves my nephew, who is fiercely dairy-free. He tried these cookies and, with a mouth full of crumbs, declared them “better than the real thing.” That’s the moment I knew we had a winner. Food is about connection, and seeing his face light up is why I do this. Don’t be afraid to make this recipe your own. Baking is part science, part heart, and these cookies have plenty of both.
Your Cookie Questions, Answered!
Q: My cookies spread too much and became flat. What happened?
A: This is usually a temperature issue! Your vegan margarine might have been too soft or melted. Make sure it’s softened to a cool, spreadable consistency, not warm and oily. Also, double-check that your baking soda and powder are fresh.
Q: Can I make the cookie dough ahead of time?
A: Absolutely! In fact, I highly recommend it. Chilling the dough for at least 30 minutes (or up to 48 hours) firms up the fat, which results in a thicker, chewier cookie with more complex flavor. Just let it sit at room temp for 10-15 minutes before scooping.
Q: My cookies are too cakey. How can I fix that?
A: A cakey texture often comes from overmixing the dough once the flour is added, or using too much flour. When you measure your flour, fluff it up in the bag, then spoon it into your measuring cup and level it off with a knife. Don’t pack it down!
Q: Are these cookies freezer-friendly?
A: 100%! You can freeze the baked cookies for up to 3 months. Or, for fresh-baked cookies anytime, scoop the dough balls onto a tray, freeze them solid, then transfer to a freezer bag. You can bake them straight from the freezer, just add 1-2 minutes to the baking time.

Ultimate Vegan Chocolate Chip Cookies : Soft, Chewy & Crowd-Approved
Description
Ultimate Vegan Chocolate Chip Cookies
Hey friends! These vegan cookies are soft, chewy, slightly crisp on the edges, and packed with gooey pockets of chocolate. Perfect for any occasion, these cookies will quickly become your go-to comfort treat.
Ingredients
-
1 cup vegan margarine, softened (or solid coconut oil)
-
2 cups packed brown sugar
-
½ cup non-dairy milk (almond, soy, or oat)
-
2 tsp vanilla extract
-
1 tbsp maple syrup (optional, for flavor depth)
-
3 cups all-purpose flour
-
2 tsp baking soda
-
2 tsp baking powder
-
½ tsp salt
-
½ tsp instant espresso powder (optional, enhances chocolate flavor)
-
1–1¼ cups dairy-free chocolate chips or chopped chocolate
-
Flaky sea salt for topping (optional)
Instructions
1. Preheat & Prep
-
Preheat oven to 350°F (175°C).
-
Line two baking sheets with parchment paper.
2. Cream Butter & Sugar
-
In a large bowl, cream together the softened vegan margarine and brown sugar until light and fluffy (2–3 minutes).
3. Add Wet Ingredients
-
Mix in non-dairy milk, vanilla extract, and maple syrup until smooth.
4. Mix Dry Ingredients
-
In a separate bowl, whisk together flour, baking soda, baking powder, salt, and espresso powder.
5. Combine Wet & Dry
-
Slowly add dry ingredients to the wet mixture on low speed until just combined. Avoid overmixing.
6. Fold in Chocolate
-
Gently fold in chocolate chips or chunks. Optionally, sprinkle extra chips on top of the dough balls.
7. Scoop & Top
-
Scoop 1.5-tablespoon dough balls onto prepared sheets, spacing ~2 inches apart.
-
Optionally, sprinkle flaky sea salt on top.
8. Bake
-
Bake 10–12 minutes until edges are lightly golden but centers are still soft.
-
Allow to cool on the baking sheet for 5 minutes before transferring to a wire rack.
Notes
-
Chill Dough: Refrigerate for 30 minutes–48 hours for chewier cookies.
-
Nutty Addition: Fold in ¾ cup chopped walnuts or pecans.
-
Double Chocolate: Replace ½ cup flour with ½ cup cocoa powder.
-
Gluten-Free: Use a 1:1 gluten-free flour blend.
-
“Kitchen Sink” Cookie: Add ½ cup vegan white chocolate chips and ½ cup dried cranberries or cherries.
Nutrition
- Calories: 165Cal Per cookie
- Sugar: 14 g
- Fat: 7 g
- Carbohydrates: 24 g
- Fiber: 1 g
Nutritional Information (Because We’re Curious!)
Okay, let’s be real—we eat chocolate chip cookies for the soul, not for the stats. But I know many of you like to keep track, so here’s a general breakdown. Remember, this is an estimate and can vary based on the specific brands of ingredients you use.
Per Cookie (approximate, based on yield of 32 cookies):
- Calories: 165
- Fat: 7g
- Carbohydrates: 24g
- Sugar: 14g
- Fiber: 1g
These cookies are a treat, and a wonderful one at that! They’re naturally free of cholesterol and are a plant-based delight. Enjoy them mindfully and savor every single bite.
Final Thoughts from My Kitchen to Yours
Well, there you have it, friends—my heart and soul baked into a single, perfect vegan chocolate chip cookie. This recipe is proof that you don’t need animal products to create something that feels indulgent, comforting, and downright delicious.
I hope these cookies become a staple in your home, filling your kitchen with that incredible baking aroma and your table with happy people. Remember, the best ingredient you can add to any recipe is a dash of joy and a pinch of love. Now, I’d love to hear from you! Did you add your own twist? Did your family go crazy for them? Tag me on social @Feastical or drop a comment below. Happy baking!
With a full heart and an even fuller cookie jar,
Beau

Insanely Good Vegan Chocolate Mousse Cake : Rich, Creamy & No Bake!
Pure Chocolate Bliss—100% Vegan & Shockingly Simple
Hey, friends! Beau here, welcoming you back to my kitchen. Today, we’re diving fork-first into one of those recipes that feels like a little bit of magic. We’re talking about a Vegan Chocolate Mousse Cake that is so decadent, so silkily rich, and so unbelievably creamy, it’ll make you do a double-take. I’m not kidding. The best part? We’re not turning on the oven. Not even for a second.
I know what you might be thinking. “Beau, a no-bake, vegan chocolate cake? Is it going to taste like… well, compromise?” Let me stop you right there. This cake is the opposite of compromise. It’s a triumph. It’s a celebration of deep, dark chocolate flavor that gets its incredible texture from a secret, plant-based powerhouse you might be throwing away. We’re creating a cloud-like, intense chocolate mousse layer and crowning it with a luscious, glossy ganache that would make any pastry chef proud.
This is the dessert you make when you want to impress absolutely everyone at the table—the vegan skeptics, the dessert connoisseurs, your gluten-free friend, and most importantly, yourself. It’s perfect for a fancy holiday centerpiece, a show-stopping dinner party finale, or just a Tuesday night when your soul needs a chocolate hug. So, grab your favorite mixing bowl and let’s create some pure, unadulterated chocolate joy together.
The Magic of Aquafaba: A Kitchen Accident Turned Triumph
I have to come clean. The first time I whipped up a can of chickpea brine—aquafaba—I fully expected a kitchen disaster. I was experimenting with vegan desserts for a friend’s birthday, determined to create something that didn’t feel “less than.” I remember staring into that bowl of cloudy liquid, my electric mixer whirring, thinking, “This is never going to work.” But then, a few minutes in, magic started to happen. The liquid began to foam, then froth, and then—I kid you not—it transformed into these beautiful, glossy, snow-white peaks that held their shape perfectly.
My mind was utterly blown. I carefully folded in the melted chocolate, holding my breath, terrified the whole thing would collapse into a puddle. But it didn’t. It stayed light and airy. After a few hours in the fridge, I took my first bite. The texture was a revelation—ethereally light yet profoundly rich. It was a “holy moly” moment that changed my entire perspective on plant-based baking. It taught me that the coolest kitchen discoveries often come from a place of playful experimentation and a willingness to be surprised. This cake is that happy accident, perfected and shared with all of you.
Gathering Your Chocolate Dream Team
One of the best things about this recipe is its beautiful simplicity. You only need a handful of ingredients to create pure magic. Here’s your shopping list, complete with my chef-ly insights to set you up for success.
For the Chocolate Mousse Layer:
- 2 cups vegan dark chocolate chips or chopped chocolate: This is the star of the show, so use a brand you genuinely love to eat. The quality of your chocolate directly impacts the flavor. Look for a 70% dark chocolate for a perfect balance of bitter and sweet. A quick tip: Make sure your chocolate chips are explicitly vegan, as some contain milk fat.
- 1 ¾ cups aquafaba (the liquid from a can of chickpeas), room temp: Our magical, mousse-making hero! Don’t toss that brine! I find that reduced-sodium chickpea brine works best. Make sure it’s at room temperature for maximum volume when whipping. Pro tip: A standard 15-oz can usually yields just about this amount.
- ¼ tsp cream of tartar: This isn’t just an optional add-in; it’s our stability superstar. It helps the aquafaba whip up stiffer and hold its shape much longer, ensuring our mousse doesn’t deflate. If you’re in a pinch, a few drops of lemon juice can work, but cream of tartar is my #1 choice.
- Pinch of salt: This is my secret weapon for making any dessert, especially chocolate, taste more like itself. It enhances and deepens the chocolate flavor, cutting through the sweetness perfectly.
For the Ganache Topping:
- 1 cup vegan dark chocolate: You can use chips or chopped bars again here. Using the same chocolate as the base ensures a harmonious flavor profile.
- ½ cup full-fat canned coconut milk: The “full-fat” part is non-negotiable! You need that rich, creamy fat to create a silky-smooth, pourable ganache. Shake the can well before opening. The thick cream at the top is pure gold for this.
Optional Toppings for Pizzazz:
- Fresh berries (raspberries are a classic!)
- Vegan whipped cream
- Shaved chocolate or crunchy cacao nibs
- A delicate sprinkle of sea salt flakes
Crafting Your No-Bake Masterpiece: A Step-by-Step Guide
Ready to work some kitchen wizardry? Follow these steps, and you’ll have a stunning dessert that looks and tastes like it came from a professional patisserie. The key here is patience and a gentle hand.
- Melt the Chocolate (Like a Pro): Place your 2 cups of chocolate for the mousse layer into a heatproof bowl. You can melt this using a double boiler (a bowl set over a pot of gently simmering water, making sure the bottom of the bowl doesn’t touch the water) or in the microwave in 20-second bursts, stirring well after each burst. Either way, our goal is smooth, melted chocolate. Chef’s Hack: Once melted, let it cool down until it’s just barely warm to the touch. If it’s too hot, it will deflate our precious aquafaba foam. This is a crucial step!
- Whip the Aquafaba (The Magic Moment): Pour your room-temperature aquafaba into a large, impeccably clean mixing bowl. Glass or metal is best. Add the cream of tartar and that tiny pinch of salt. Now, using an electric hand mixer or a stand mixer with the whisk attachment, start whipping on medium-high speed. I won’t lie—this takes a little time, about 8-10 minutes. You’ll go from a cloudy liquid to froth, to soft peaks, and finally to beautiful, stiff, glossy peaks. You’ll know you’re there when you can turn the bowl upside down over your head (a classic chef test!) and nothing moves. Chef’s Hack: A clean bowl is essential. Any trace of grease can prevent the aquafaba from whipping properly.
- The Grand Fold (Gentleness is Key): This is the most important part of the process. We need to incorporate the chocolate into the aquafaba without knocking out all the air we just worked so hard to create. Add about one-third of the cooled, melted chocolate to the whipped aquafaba. Using a large spatula, gently fold it in by cutting down through the middle of the bowl, sliding the spatula along the bottom, and folding the mixture over on top of itself. Rotate the bowl and repeat. It will look streaky at first—that’s okay! Add the next third, and fold, then the final third, folding just until no white streaks remain. Chef’s Hack: A figure-eight motion works wonders here. Be patient and resist the urge to stir!
- Set the Mousse: Lightly grease a 7 or 8-inch springform pan and line the bottom with a circle of parchment paper for easy removal. Gently pour your beautiful mousse mixture into the pan and smooth the top with your spatula. Give the pan a little tap on the counter to release any large air bubbles. Now, pop it into the fridge to chill and set for at least 3-4 hours, or until it’s firm to the touch. Overnight is even better!
- Create the Ganache Topping: When your mousse layer is almost set, it’s ganache time! Place your 1 cup of chocolate for the ganache in a clean bowl. In a small saucepan, heat the ½ cup of full-fat coconut milk until it’s just steaming—you should see small bubbles around the edges, but don’t let it boil. Pour the hot coconut milk over the chocolate, and let it sit, untouched, for one full minute. This allows the chocolate to gently melt. After a minute, start stirring slowly from the center outward until you have a perfectly smooth, shiny, and luxurious ganache. Let it cool for about 5-10 minutes so it’s still pourable but won’t melt the mousse layer.
- The Grand Finale: Top & Final Chill: Slowly and evenly pour the slightly cooled ganache over the top of your set mousse layer. You can tilt the pan to help it spread into a perfect, glossy coat. Return the whole cake to the fridge for at least another hour, or until the ganache is beautifully set.
- Serve and Impress: To serve, carefully run a thin, warm knife around the edge of the springform pan before releasing the clamp. Lift the ring away, slide the cake (on its parchment paper base) onto a serving plate, and get ready for the “oohs” and “aahs.” Use a hot, clean knife to slice clean pieces, wiping the blade between cuts for picture-perfect slices.
Plating Your Perfect Slice of Heaven
This cake is a stunner all on its own, but a few simple garnishes can take it from “wow” to “WOWZA!” Here’s how I love to serve it:
For a touch of elegance, place a slice on a simple white plate. Add a small dollop of vegan whipped cream on the side and a few fresh, vibrant raspberries. The tartness of the berries cuts through the richness of the chocolate beautifully. For a bit of texture and a pro-baker touch, sprinkle a few cacao nibs over the top or add some delicate shavings of vegan chocolate. My absolute favorite finish? A tiny, flaky sprinkle of sea salt right on top of the ganache. It amplifies the chocolate flavor in the most incredible way and makes the whole experience feel gourmet.
This cake is rich, so slices can be on the smaller side. It pairs wonderfully with a cup of strong black coffee, a glass of oat milk latte, or even a nice dessert wine if that’s your thing. Remember, you’re not just serving dessert; you’re serving a conversation piece!
Make It Your Own: Delicious Twists & Swaps
The beauty of this recipe is its versatility. Once you’ve mastered the classic, feel free to get creative and play with flavors!
- Orange Zest Dream: Add the zest of one large orange to the melted chocolate for the mousse layer. The bright, citrusy notes of orange and dark chocolate are a match made in heaven.
- Mint Chocolate Chip: Fold ½ cup of finely chopped vegan dark chocolate (or mini chocolate chips) into the mousse at the very end, and add ¼ teaspoon of peppermint extract to the melted chocolate. It’s like a grown-up, sophisticated version of your favorite ice cream.
- Mocha Kick: Dissolve 1-2 teaspoons of instant espresso powder into the hot coconut milk for the ganache. This will create a stunning mocha-flavored topping that coffee lovers will adore.
- Nutty Crunch Base: Feeling like a crust? Combine 1 ½ cups of vegan biscuit or cookie crumbs (like Oreos or graham crackers) with ⅓ cup of melted vegan butter. Press firmly into the bottom of your springform pan before adding the mousse layer for a delightful textural contrast.
- Berry Swirl: Before chilling the mousse layer, gently dollop 3-4 tablespoons of seedless raspberry jam on top and use a knife or skewer to swirl it beautifully into the mousse.
Beau’s Back-Pocket Tips & Stories
This recipe has become a staple in my home, and it’s evolved a bit over the years. The first time I made it, I was so impatient that I tried to add the chocolate when it was still warm, and let’s just say… I ended up with chocolate soup. A delicious soup, but a soup nonetheless. So, my number one piece of advice is to let that chocolate cool!
I’ve also found that this cake actually gets even better after a full 24 hours in the fridge. The flavors meld and the texture becomes even more uniform and velvety. So, if you have the time, make it a day ahead for a truly stress-free, impressive dessert. It’s a little gift from present-you to future-you.
Your Questions, Answered!
I’ve gotten a lot of questions about this cake over the years, so I’ve compiled the most common ones to help you out.
Q: My aquafaba won’t whip up! What did I do wrong?
A: The most common culprits are a greasy bowl or beaters, or the aquafaba being too cold. Make sure everything is squeaky clean and that your aquafaba is at room temperature. Also, be patient—it can sometimes take a full 10-12 minutes to reach stiff peaks. Don’t give up!
Q: Can I make this without a springform pan?
A: You can! A deep-dish pie plate will work, though it will be trickier to get clean slices out. You can also use a standard 8×8 or 9×9 square baking dish and just scoop it out like a mousse trifle—it will taste just as amazing!
Q: How long will this cake keep in the fridge?
A: It holds up beautifully! Covered tightly, it will stay perfect for 4-5 days. I do not recommend freezing it, as the texture of the mousse can become a bit grainy upon thawing.
Q: I can’t find cream of tartar. Is there a substitute?
A> Yes, you can use an equal amount of lemon juice or white vinegar. While it works, the cream of tartar does provide the most stable and voluminous results, so it’s worth tracking down if you can.

Insanely Good Vegan Chocolate Mousse Cake : Rich, Creamy & No Bake!
Description
Hey friends! This Vegan Chocolate Mousse Cake is rich, silky, and completely no-bake. Using aquafaba (the liquid from canned chickpeas), we create a light, airy mousse layered with a glossy, decadent ganache. Perfect for impressing anyone—vegan or not—without turning on the oven.
Ingredients
Chocolate Mousse Layer
-
2 cups vegan dark chocolate chips or chopped chocolate (70% recommended)
-
1 ¾ cups aquafaba (chickpea liquid), room temperature
-
¼ tsp cream of tartar (or lemon juice as a substitute)
-
Pinch of salt
Ganache Topping
-
1 cup vegan dark chocolate
-
½ cup full-fat canned coconut milk
Optional Garnishes
-
Fresh berries (raspberries, strawberries)
-
Vegan whipped cream
-
Shaved chocolate or cacao nibs
-
Flaky sea salt
Instructions
-
Melt the Chocolate: In a double boiler or microwave, melt the chocolate for the mousse. Let it cool slightly—just warm to the touch.
-
Whip the Aquafaba: In a clean bowl, combine aquafaba, cream of tartar, and salt. Whip with a hand or stand mixer on medium-high speed for 8–10 minutes until stiff, glossy peaks form.
-
Fold in Chocolate: Gently fold the melted chocolate into the whipped aquafaba in three additions. Use a spatula and a figure-eight motion, folding until smooth but keeping the mousse airy.
-
Set the Mousse: Lightly grease a 7–8 inch springform pan and line the bottom with parchment paper. Pour in the mousse, smooth the top, and tap gently to remove air bubbles. Chill 3–4 hours or overnight until firm.
-
Prepare the Ganache: Heat coconut milk in a small saucepan until steaming. Pour over chocolate for the ganache, let sit 1 minute, then stir until smooth. Cool slightly before pouring over the mousse. Chill at least 1 hour until set.
-
Serve: Run a warm knife around the pan before releasing. Slice with a hot, clean knife for perfect pieces. Garnish with berries, whipped cream, or chocolate shavings.
Notes
-
Orange Chocolate: Fold in orange zest to the mousse.
-
Mint Chocolate: Add peppermint extract and mini chocolate chips.
-
Mocha Ganache: Dissolve instant espresso in the coconut milk for a coffee kick.
-
Nutty Base: Press vegan cookie crumbs with melted vegan butter into the pan before mousse.
-
Berry Swirl: Swirl in raspberry jam before chilling the mousse.
Nutrition
- Calories: 290 Cal Per Serving
- Fat: 20 g
- Protein: 3 g
A Quick Nutritional Glance
While we’re all here for the incredible taste, it’s nice to know what’s in our food! This cake is naturally gluten-free and packed with the rich, satisfying flavors of dark chocolate and coconut. Dark chocolate is a known source of antioxidants, and using aquafaba is a fantastic way to reduce food waste. A typical slice (based on 10 servings) contains roughly:
- Calories: ~290 kcal
- Fat: 20g
- Carbohydrates: 25g
- Protein: 3g
Remember, these are estimates and can vary based on the specific brands of ingredients you use. This is a rich, indulgent treat, and a little slice goes a long way in satisfying your sweet tooth!
Final Thoughts from My Kitchen to Yours
Well, there you have it, my friends. My go-to recipe for a dessert that never fails to delight and amaze. This Vegan Chocolate Mousse Cake is proof that you don’t need complicated techniques or a pantry full of obscure ingredients to create something truly spectacular. All you need is a little bit of kitchen magic (and a can of chickpeas!).
I hope this recipe brings as much joy to your table as it has to mine. It’s more than just a dessert; it’s a reminder that the best food is often the simplest, made with a dash of love
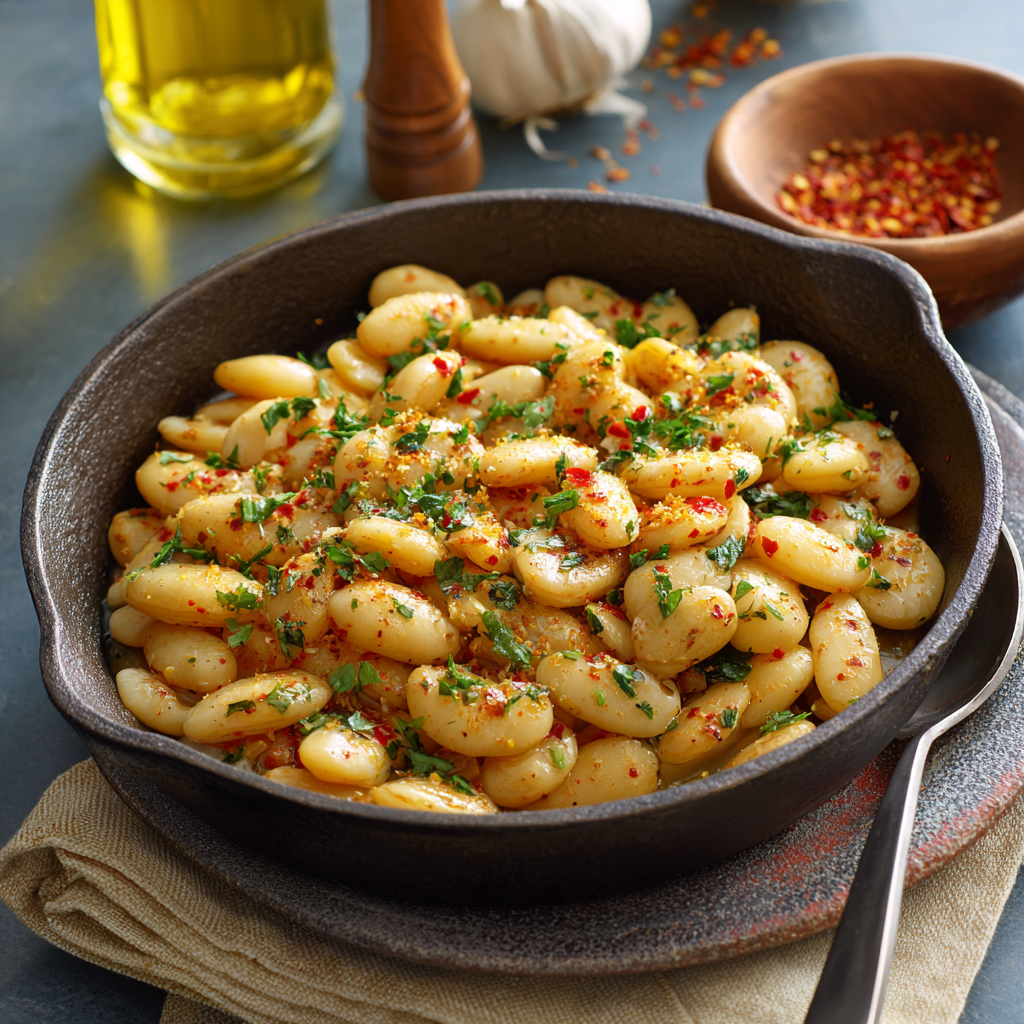
Zesty Butter Beans : Creamy, Bold & Easy Side Dish
Zesty Butter Beans: Your New Go-To Side Dish That Steals the Show
Hey friends, Beau here from Feastical! Let’s be real for a second. Sometimes, the humble side dish gets a bad rap. It’s the quiet friend at the dinner party, the one that sits politely next to the flashy main course. But what if I told you that the most memorable, soul-satisfying part of your meal could be that very dish? What if a simple can of beans could transform into something so creamy, so boldly flavored, and so downright addictive that your guests start asking for the recipe before they even touch their steak or chicken?
Well, pull up a chair, because I’m about to let you in on one of my all-time favorite kitchen secrets: Zesty Butter Beans. This isn’t your grandmother’s bland, mushy bean situation. Oh no. This is a bright, modern, and vibrantly flavorful take that celebrates the simple butter bean (or lima bean, if that’s what you’ve got in the pantry) for the creamy, dreamy superstar it is.
We’re talking about a dish that comes together in about 15 minutes flat, uses mostly pantry staples, and delivers a flavor punch that will have you doing a little happy dance right there by the stove. With a base of aromatic garlic and onion, a warm hug from smoked paprika, and a zippy, fresh finish from lemon juice, these beans are the culinary equivalent of your favorite feel-good playlist. They’re comforting, they’re exciting, and they make everything better. So, let’s ditch the boring sides and whip up a batch of pure, unapologetic joy.
The Butter Bean Epiphany: A Tale of Two Chefs
I have to share a quick story about where my love for this particular dish really took root. Picture a tiny, sun-drenched kitchen in a little coastal town. I was visiting a friend, a brilliant cook who believes, like I do, that the best food comes from the heart and doesn’t need to be complicated. One evening, as the sun was setting and we were debating what to make with the fresh fish we’d just grilled, she disappeared into the pantry and emerged with a can of butter beans.
I’ll admit, I was skeptical. Butter beans? Really? But then I watched her work her magic. She didn’t just heat them up. She sautéed onions until they were sweet, let the garlic sizzle just enough to perfume the entire house, and then added this gorgeous, brick-red smoked paprika that filled the air with a smoky, almost bacon-like aroma. When she tossed in the beans and finished it all with a generous squeeze of lemon, the whole dish came alive. That first bite was a revelation—creamy, smoky, bright, and utterly perfect. It was a powerful reminder that the simplest ingredients, treated with a little love and creativity, can create the most unforgettable moments. This recipe is my homage to that perfect, lazy evening by the sea.
Gathering Your Flavor All-Stars
One of the best things about this recipe is its flexibility. This is your foundation, your launchpad for deliciousness. Don’t stress if you’re missing an item or two; I’ve got your back with substitutions.
- 1 can (13–15 oz) Butter Beans, drained and rinsed: The star of the show! Butter beans are naturally creamy and mild, making them the perfect canvas for our zesty flavors. Chef’s Insight: Don’t skip the rinsing step! It washes away that slightly starchy canning liquid and lets the beans really soak up our tasty sauce.
- 1 tbsp Olive Oil: Our cooking fat of choice. It adds a fruity, rich base note. Substitution Tip: Avocado oil or a good-quality vegetable oil will work just fine here.
- 1 small Red or Yellow Onion, finely chopped: Yellow onion will give you a classic, sweet savoriness, while a red onion will add a slightly sharper, more vibrant bite. You can’t go wrong!
- 2–3 Garlic Cloves, minced: The aromatic heartthrob of the dish. Fresh is best here, friends! That pre-minced stuff in a jar just doesn’t have the same punch.
- ½ tsp Smoked Paprika: This is the secret weapon. It doesn’t just add color; it brings a deep, smoky, complex flavor that makes the dish taste like it simmered for hours. Chef’s Insight: If you only have sweet paprika, it’ll work, but you’ll lose that signature smokiness.
- ½ tsp Ground Turmeric (optional): I add this for its gorgeous golden color and a subtle, earthy warmth. It’s totally optional, but it makes the beans look sun-kissed and gorgeous.
- ½ tsp Dried Oregano: A little Mediterranean herbaceousness that ties everything together. Substitution Tip: A teaspoon of fresh thyme leaves would be a lovely swap.
- ½ tsp Black Pepper: Freshly cracked is always ideal for the best flavor.
- ¼ tsp Red Pepper Flakes: This is where we bring the “zesty”! It adds a gentle, building heat. Adjust to your spice tolerance—a pinch for a whisper, ½ tsp for a real kick.
- 2 tbsp Lemon Juice (fresh recommended): The bright, zippy finale that lifts the entire dish. Please, please use a fresh lemon if you can. The bottled stuff just tastes flat in comparison.
- Salt, to taste: We add this at the end because the beans can vary in saltiness. Season, taste, and adjust—you’re the boss of your beans!
- Optional Garnish: A shower of fresh, chopped parsley or cilantro adds color and freshness. A final sprinkle of red pepper flakes looks beautiful, too!
Let’s Get Cooking: Your Foolproof Guide to Zesty Perfection
Ready to make some magic? Grab your favorite skillet (I’m partial to my well-seasoned cast iron), and let’s fire it up. This process is as simple as it is satisfying.
- Wake Up the Aromatics: Place your skillet over medium heat and add the olive oil. Once the oil shimmers (you’ll see little waves in it), add the chopped onion. Now, here’s your first chef hack: don’t rush this. Sauté the onion for a good 3-4 minutes, stirring occasionally, until it becomes soft and translucent. We’re building a flavor foundation, and sweet, softened onions are key. You should smell their sweet aroma filling your kitchen.
- Bloom the Spices: Push the onions to the side a bit and add the minced garlic, smoked paprika, turmeric, oregano, black pepper, and red pepper flakes. This is the moment! Cook this fragrant paste for just 30 seconds to 1 minute, stirring constantly. Why? This process, called “blooming,” heats the spices in oil and unlocks their full, deep, complex flavors. Your kitchen will smell absolutely incredible. Be careful not to burn the garlic—we’re toasting, not torching!
- Welcome the Beans: Now, add the drained and rinsed butter beans to the skillet. Gently stir and toss them for a minute or two until every single bean is beautifully coated in that vibrant, aromatic spice mixture. You’ll see them turn a lovely golden-orange color. They’re already happy to be here.
- The Zesty Finish: Pour in the fresh lemon juice. It will sizzle and steam gloriously, deglazing the pan and pulling up any of those tasty browned bits from the bottom. Reduce the heat to low and let everything simmer together for about 5 minutes. This gentle simmering allows the beans to heat through and the flavors to meld into one harmonious, zesty symphony. Stir it occasionally with love.
- Taste and Triumph: This is the most important step. Turn off the heat. Grab a spoon and taste your creation. Does it need a pinch more salt? A squeeze more lemon? This is your dish—adjust it until it sings to your soul. Once it’s perfect, stir in your fresh herb garnish if you’re using one.
How to Serve Your Zesty Butter Beans
Okay, the beans are done and they’re begging to be eaten. How do we make this moment a feast for the eyes as well as the stomach?
For a simple, rustic presentation, I love serving them family-style right in the warm skillet I cooked them in. It just feels cozy and inviting. Spoon them into a beautiful, shallow bowl to show off their creamy texture and vibrant color.
Now, what to serve them with? The possibilities are endless!
- The Perfect Sidekick: They are phenomenal alongside simply grilled chicken, flaky white fish, or a juicy pork chop. The zestiness cuts through the richness of the meat beautifully.
- Bowl Food Bliss: Create a epic grain bowl! Start with a base of fluffy quinoa, brown rice, or couscous. Top with these zesty beans, some roasted vegetables (like broccoli or sweet potato), a dollop of yogurt or hummus, and an extra drizzle of olive oil.
- Bread’s Best Friend: Grab the crustiest, chewiest piece of bread you can find—a baguette, sourdough, or even focaccia. This dish is basically a sophisticated, scoopable dip. You’ll want to wipe that skillet clean, trust me.
- Brunch Upgrade: Serve them alongside fried or poached eggs for a protein-packed, flavor-forward brunch that will wow your guests.
Make It Your Own: Delicious Recipe Variations
Once you’ve mastered the base recipe, the fun really begins. Think of this as your culinary playground. Here are a few of my favorite twists to keep things exciting:
- Creamy Coconut Dream: For a luscious, dairy-free creamy version, stir in ¼ cup of full-fat coconut milk or cashew cream along with the lemon juice. Let it simmer until the sauce thickens slightly. It’s rich, tropical, and utterly divine.
- Garden Veggie Boost: Add some color and crunch! When you’re sautéing the onion, throw in a diced bell pepper (any color!) or a handful of cherry tomatoes, halved. They’ll soften and release their sweet juices into the sauce.
- Tangy Cheese Please: Right before serving, crumble over some tangy feta cheese or soft goat cheese. The salty, creamy cheese against the zesty, smoky beans is a match made in heaven.
- Greens & Beans: Want to sneak in some greens? In the last minute of cooking, stir in a couple of large handfuls of fresh baby spinach or chopped kale until it just wilts.
- Herbaceous Blast: Swap the dried oregano for a full tablespoon of a fresh, soft herb like chopped dill, tarragon, or basil. Stir it in at the very end to keep its flavor bright and potent.
Beau’s Chef Notes & Kitchen Confessions
This recipe has been a living, evolving thing in my kitchen. I’ve made it for last-minute potlucks, cozy date nights, and even as a quick lunch just for me. One time, I was filming a video for the site and got so excited talking about the smoked paprika that I accidentally used a full tablespoon of red pepper flakes instead of a quarter teaspoon. Let’s just say it was a *very* zesty butter bean experience that required an entire loaf of bread and a gallon of milk to recover from! A friendly reminder to always double-check your spice jars.
The beauty of this dish is its resilience. It’s hard to mess up. It’s forgiving, flexible, and always, always delicious. Don’t be afraid to play with it and make it your own. That’s what cooking is all about.
Your Zesty Butter Bean Questions, Answered!
I get a lot of questions about this recipe, so I’ve compiled the most common ones right here to help you out.
Q: Can I use dried butter beans instead of canned?
A: Absolutely! You’ll need about 1.5 cups of cooked butter beans. Just be sure to soak and cook them according to the package directions until they are tender before adding them to the recipe. Using canned is all about convenience and speed, but from-scratch beans have a wonderful texture and flavor.
Q: My sauce seems a bit dry. What can I do?
A: No worries! This is an easy fix. Simply add a tablespoon or two of water, vegetable broth, or even a splash more olive oil or lemon juice to the skillet when you’re simmering the beans. This will loosen everything up and create a saucier consistency.
Q: How long do the leftovers last, and how should I reheat them?
A: Stored in an airtight container in the fridge, these beans will stay delicious for 3-4 days. To reheat, I recommend gently warming them in a skillet over low heat with a tiny splash of water to keep them from drying out. The microwave works in a pinch, but the stovetop does a better job of reviving their texture.
Q: I’m not a fan of spicy food. Can I leave out the red pepper flakes?
A: Of course! The recipe is completely customizable. Simply omit the red pepper flakes. The dish will still be packed with flavor from the smoked paprika, garlic, and lemon. You’ll get all the zest without the zip.

Zesty Butter Beans : Creamy, Bold & Easy Side Dish
Description
Hey friends! Let’s be real—sometimes a humble side dish steals the show. Enter Zesty Butter Beans: creamy, smoky, lemony, and ready in just 15 minutes. This is the perfect quick side that will make your main course look even better.
Ingredients
-
1 can (13–15 oz) butter beans, drained and rinsed
-
1 tbsp olive oil (or avocado/vegetable oil)
-
1 small red or yellow onion, finely chopped
-
2–3 garlic cloves, minced
-
½ tsp smoked paprika
-
½ tsp ground turmeric (optional, for color)
-
½ tsp dried oregano (or 1 tsp fresh thyme)
-
½ tsp black pepper, freshly cracked
-
¼ tsp red pepper flakes (optional, adjust to taste)
-
2 tbsp fresh lemon juice
-
Salt, to taste
-
Optional garnish: chopped fresh parsley or cilantro
Instructions
Instructions
-
Sauté the Aromatics: Heat olive oil in a skillet over medium heat. Add onion and sauté 3–4 minutes until soft and translucent.
-
Bloom the Spices: Add garlic, smoked paprika, turmeric, oregano, black pepper, and red pepper flakes. Stir constantly for 30 seconds to 1 minute until fragrant.
-
Add the Beans: Stir in the butter beans until coated with the spice mixture and slightly golden.
-
Finish with Lemon: Pour in lemon juice, reduce heat to low, and simmer 5 minutes, stirring occasionally. Adjust salt and lemon to taste.
-
Garnish & Serve: Sprinkle with fresh herbs and extra red pepper flakes if desired. Serve warm.
Notes
-
Creamy Twist: Stir in ¼ cup coconut milk or cashew cream for a rich, dairy-free version.
-
Veggie Boost: Add diced bell peppers, cherry tomatoes, or spinach while sautéing onions.
-
Cheesy Touch: Crumble feta or goat cheese on top before serving.
-
Grain Bowl: Serve over quinoa, brown rice, or couscous with roasted veggies for a complete meal.
Nutrition
- Calories: 83 kcal per serving
- Sugar: 1 g
- Fat: 7 g
- Carbohydrates: 5g
Nutritional Lowdown (The Good Stuff!)
Now, let’s talk about why this dish is not just a treat for your taste buds, but a little high-five for your body, too. This is a rough estimate per serving, but it gives you a great idea of the nutritional powerhouse you’re enjoying.
Butter beans are a fantastic source of plant-based protein and dietary fiber, which helps keep you feeling full and satisfied. They’re also rich in important minerals like iron, magnesium, and potassium. The olive oil provides healthy monounsaturated fats, which are great for heart health, and the spices like turmeric and paprika are loaded with antioxidants.
Estimated per serving:
Calories: ~83 kcal | Fat: 7g | Saturated Fat: 1g | Carbohydrates: 5g | Fiber: 1g | Protein: 1g | Sodium: 148mg
Remember, these numbers can vary based on the specific brands you use and any additions or substitutions you make. But overall, this is a dish you can feel genuinely good about eating.
Final Thoughts from My Kitchen to Yours
And there you have it, my friends—my not-so-secret, secret weapon for turning an ordinary meal into something extraordinary. These Zesty Butter Beans are more than just a recipe; they’re a reminder that incredible food doesn’t have to be complicated or time-consuming. It’s about using a handful of good ingredients with confidence and a dash of joy.
I hope this recipe finds its way into your regular rotation and becomes a trusted friend in your kitchen, just like it is in mine. I’d love to hear how it turns out for you! Did you add the feta? Try the coconut milk? Tag me on social @Feastical or shoot me an email and tell me all about your culinary creation.
Now, go forth, cook with heart, and never
Seedy Sourdough Crackers : Crunchy, Nutty, and Naturally Fermented
Forget Store-Bought: Your New Favorite Seedy Sourdough Crackers Are Here!
Hey friends, Beau here! Let’s talk about one of life’s simple, crunchy pleasures: the perfect cracker. You know the one. It’s sturdy enough to scoop up a hefty glob of hummus but delicate enough to let a sharp cheddar shine. It has a satisfying snap, a nutty aroma, and a flavor that keeps you reaching for just one more. For too long, we’ve settled for the stuff in plastic sleeves from the grocery aisle. But what if I told you that the most incredible, flavorful, and downright satisfying crackers are hiding in your kitchen right now, just waiting to be baked?
That’s right, I’m talking about turning that jar of sourdough discard sitting on your counter into a golden, seedy, tangy masterpiece. These Seedy Sourdough Crackers are a game-changer. They’re crispy, packed with texture, and have that subtle fermented tang that makes sourdough so irresistible. This isn’t just a recipe; it’s a brilliant way to reduce food waste and create something truly special from what you might have otherwise tossed. Whether you’re a sourdough pro or just starting your fermentation journey, this is your invitation to roll up your sleeves, dust your counter with a little flour, and experience the magic of homemade. So, let’s preheat that oven and transform that sleepy starter into your new snack-time superstar!
The Happy Accident That Started It All
I’ll never forget the first time I made these. It was a lazy Sunday morning, and my sourdough starter, “Bubbles,” was looking a little… dejected. I’d missed a feeding, and a solid cup of discard was staring back at me, begging for a purpose. I hate waste more than I hate a soggy bottom on a pie, so the mission was clear: create something delicious, and create it now. I started throwing things into a bowl—some whole wheat flour, a chunk of soft butter, a generous pinch of salt. It felt less like baking and more like kitchen therapy. I rolled the dough out thin, scattered every seed and grain I could find in my pantry over the top, and sent it into the oven with a hopeful heart.
The smell that filled my kitchen was pure magic—toasty, nutty, and warm. But the real moment of truth was the sound. That first CRACK as I broke a piece off the sheet was so crisp and clean, it was downright musical. I slathered a warm piece with goat cheese, and my taste buds did a happy dance. It was a flavor and texture experience no store-bought box could ever deliver. That happy accident, born from a desire to not waste a single bubble, is now a Feastical staple. It’s a reminder that sometimes, the best recipes aren’t meticulously planned—they’re discovered with a little intuition and a lot of love for good food.
Gathering Your Cracker Crew: The Ingredients
This is where the fun begins! We’re making a double batch because, trust me, you’ll want plenty to share (or not to share, no judgment here). Here’s your shopping and scooping list.
- 2 cups (8 oz) Whole Wheat Flour: This is our base, giving the crackers a rustic, nutty depth that all-purpose flour just can’t match. Chef’s Insight: If you only have all-purpose, that’s okay! The crackers will be a bit lighter and less whole-grainy, but still delicious.
- 1 1/2 teaspoons Salt: Don’t be shy! Salt is crucial for balancing the tang of the sourdough and making the flavors pop. I use fine sea salt.
- 1/2 teaspoon Baking Soda & 1/2 teaspoon Baking Powder: Our dynamic leavening duo! They work together to give the crackers a little lift and that perfect, delicate crispness.
- 1 1/2 teaspoons Sugar: Just a touch to round out the flavors. It doesn’t make the crackers sweet, I promise. It just balances the tang.
- 2 cups (18 oz) Unfed Sourdough Starter (Discard): The star of the show! This can be straight from the fridge, thick or a little thin—it’s all good. This recipe is very forgiving. Using discard gives you all the fermented flavor without the wait.
- 8 tablespoons (4 oz) Unsalted Butter, room temperature: Soft, creamy butter is the key to a flaky, tender, and rich cracker. Pro Tip: If you forgot to take your butter out, you can grate cold butter right into the flour mixture for a similar effect.
- 4–6 tablespoons Mixed Grains and Seeds: This is your chance to get creative! I love a mix of poppy seeds, sesame seeds, chopped sunflower seeds, ground oats, flaxseed, and chia. The more variety, the more texture and nutrition!
Optional Twists (Go Wild!)
- 1 tsp dried rosemary or thyme: For a fragrant, herby vibe that’s perfect with cheese.
- 1/2 tsp garlic powder or smoked paprika: A quick way to add a savory, smoky kick.
- 1/4 cup finely grated Parmesan cheese: Mix it right into the dough for a serious umami depth.
Let’s Get Rolling: Your Step-by-Step Guide to Crackers
Ready to make some magic? Follow these steps, and you’ll be a cracker-making pro in no time. I’ve sprinkled in my favorite chef hacks to make the process even smoother.
- Preheat and Prep. Fire up your oven to 350°F (175°C). This is our target temperature for golden, even baking. Line two large baking sheets with parchment paper. Chef’s Hack: No parchment? A light spray of oil will work, but parchment makes cleanup a dream and ensures nothing sticks.
- The Dry Team Assembles. In a large bowl, whisk together your whole wheat flour, salt, baking soda, baking powder, and sugar. Give it a good whisk for about 30 seconds. We’re not just mixing; we’re aerating the flour and making sure our leaveners are evenly distributed. This is the secret to a consistent texture in every single cracker.
- Bring in the Wet Team. Now, plop in your sourdough starter and that lovely softened butter. I like to use a sturdy spatula or even my hands at this point. Mix until a shaggy, stiff dough forms. It might seem dry at first, but keep working it. The dough should come together and hold its shape without being sticky. Chef’s Note: If it’s genuinely too dry and crumbly, add a teaspoon of water. If it’s sticky, add a tablespoon of flour. You’re in control!
- Divide and Conquer. Turn the dough out onto a lightly floured surface and divide it into two equal portions. This makes it much easier to roll out thinly. Working with one portion at a time, place it between two sheets of parchment paper. This is the ultimate hack for no-stick, no-fuss rolling!
- Roll It Real Thin. Grab your rolling pin and roll the dough out to about 1/16 of an inch thickness. That’s seriously thin—you should almost be able to see the parchment paper through it. This is non-negotiable for the ultimate crisp factor. Thin dough = crispy crackers. Thick dough = hard tack. We want crispy!
- The Seed Shower. Peel off the top layer of parchment. Now, generously sprinkle your seed mix (and any optional herbs or spices) all over the surface. Place the parchment back on top and give it one more gentle roll with the pin. This presses the seeds in so they don’t fall off after baking.
- Score and Shape. Using a pizza cutter, a sharp knife, or even a bench scraper, score the dough into whatever shape you like—squares, rectangles, or even triangles! You don’t need to cut all the way through; just scoring the surface makes it easy to snap apart after baking. This gives you that rustic, artisanal look.
- Bake to Perfection. Carefully slide the parchment paper with the scored dough directly onto your prepared baking sheet. Bake for 20-25 minutes. Key Tip: Rotate the pans halfway through baking to ensure they get evenly golden and crisp. You’re looking for a light brown color across the top. They will crisp up more as they cool!
- The Cool Down. This is the hardest part: patience! Let the giant cracker sheets cool completely on the baking sheet. Once cool, break them apart along the score lines into perfect, individual crackers.
How to Serve These Seedy Sensations
Okay, you’ve got a big beautiful bowl of homemade crackers. Now what? The possibilities are endless, but here are a few of my favorite ways to serve them up.
The Ultimate Grazing Board: This is their natural habitat. Arrange these crackers alongside a sharp aged cheddar, a creamy brie, some spicy salami, a pile of grapes, and a dollop of grainy mustard. Watch them disappear first.
Soup’s Best Friend: Crumbled over a creamy tomato soup or a hearty lentil stew, these crackers add the perfect crunchy texture. They’re a million times better than any store-bought crouton.
The Dip Vehicle: Their sturdy nature makes them ideal for scooping. Think thick hummus, tangy tzatziki, a vibrant beet dip, or a simple whipped feta. They can handle it all without snapping mid-scoop!
Straight from the Jar: Let’s be real, the best way to eat them is by the handful, standing over the kitchen counter, appreciating your own handiwork. You’ve earned it.
Make It Your Own: 5 Tasty Twists
Once you’ve mastered the basic recipe, the flavor world is your oyster! Here are a few of my favorite variations to keep things exciting.
- Everything Bagel Bliss: Swap the seed mix for a generous coating of everything bagel seasoning. It’s a flavor explosion you already know and love.
- Spicy Sriracha & Cheddar: Mix 2 tablespoons of sriracha and 1/4 cup of finely grated sharp cheddar right into the dough. You get a gorgeous orange hue and a spicy, cheesy kick.
- Rosemary & Sea Salt: A classic for a reason. Add 1 teaspoon of finely chopped fresh rosemary to the dough and finish with a flaky sea salt sprinkle before baking. So simple, so elegant.
- Vegan-Friendly Version: This is an easy swap! Use solid coconut oil or a good vegan butter in place of the dairy butter. The result is just as flaky and delicious.
- Gluten-Free Adventure: Replace the whole wheat flour with a 1:1 gluten-free all-purpose flour blend. The texture will be slightly different, but you’ll still get a wonderfully crispy, tangy cracker.
Beau’s Kitchen Chronicles: A Few Parting Thoughts
This recipe has evolved so much since that first lazy Sunday. I’ve learned that a slightly wetter starter makes for a dough that’s easier to roll paper-thin. I’ve accidentally baked them for 30 minutes and ended up with crackers that could probably stop a bullet (lesson learned: set a timer!). And I’ve found that the dough freezes beautifully. Just roll it out between parchment, stack the sheets, and freeze flat. You can bake from frozen, just add a few extra minutes to the bake time. It’s a lifesaver for unexpected guests. The best part? I get emails from you all, the Feastical family, with your own wild and wonderful variations. That’s what cooking is all about—sharing, adapting, and finding joy in every crunchy bite.
Cracker Questions? I’ve Got Answers!
Over the years, I’ve heard all your brilliant questions. Here are the most common ones to help you on your cracker journey.
Q: My crackers are chewy, not crisp! What happened?
A: The number one culprit is thickness! If you don’t roll the dough thin enough, the center can stay soft. The second culprit is under-baking. They should be lightly golden all over. If they’re still a bit soft after cooling, just pop them back in the oven for another 5 minutes. Also, make sure you let them cool completely on the sheet—they continue to crisp up as they cool.
Q: Can I use active, bubbly starter instead of discard?
A: You absolutely can! The result will be a slightly airier, lighter cracker because the active yeast is, well, active. The flavor might be a little less tangy since the discard has more acetic acid. Both ways are delicious, so use what you have!
Q: How should I store these, and how long do they last?
A> To keep them super crisp, store them in an airtight container at room temperature. They’ll be at their prime for about a week. If your kitchen is humid, you can add a small food-safe silica gel packet to the container (the kind you find in store-bought seaweed snacks or beef jerky) to absorb any moisture.
Q: My dough is too sticky/wet to handle. Help!
A> No worries, this is an easy fix! Different starters have different hydration levels. Just add a tablespoon of whole wheat flour at a time until the dough comes together and is no longer sticky. It should be smooth and pliable.
The Good Stuff: A Peek at the Nutrition
Now, I’m not a nutritionist, but I am a guy who loves to know what’s going into my body. One of the best things about making food from scratch is that you control the ingredients. These crackers are a fantastic source of fiber and healthy fats from the whole wheat flour and seed mix. The fermentation process in the sourdough starter can also help pre-digest some of the grains, making nutrients more bioavailable and often easier on the stomach. Compared to many store-bought crackers, you’ll find these have less processed junk and more real, whole-food goodness. It’s a snack you can feel genuinely good about.
Approximate Nutritional Info per serving (about 8 crackers): Calories: 150, Fat: 7g, Carbohydrates: 18g, Fiber: 2g, Protein: 3g, Sodium: 180mg.
Print
Seedy Sourdough Crackers : Crunchy, Nutty, and Naturally Fermented
Description
Hey friends, Beau here! Say goodbye to store-bought crackers and hello to crispy, tangy, seedy perfection. Made from your sourdough discard, these crackers are crunchy, flavorful, and full of texture—perfect for cheese boards, dips, soups, or just snacking straight from the jar. Plus, they reduce food waste while turning your starter into a true superstar!
Ingredients
Dry Ingredients:
-
2 cups (8 oz) whole wheat flour (or all-purpose for a lighter version)
-
1 1/2 tsp salt
-
1/2 tsp baking soda
-
1/2 tsp baking powder
-
1 1/2 tsp sugar
Wet Ingredients:
-
2 cups (18 oz) unfed sourdough starter (discard)
-
8 tbsp (4 oz) unsalted butter, room temperature
Seeds & Mix-ins (4–6 tbsp total):
-
Poppy seeds, sesame seeds, sunflower seeds, flaxseed, chia, oats—get creative!
Optional Flavor Twists:
-
1 tsp dried rosemary or thyme
-
1/2 tsp garlic powder or smoked paprika
-
1/4 cup finely grated Parmesan cheese
Instructions
1. Preheat & Prep:
-
Preheat oven to 350°F (175°C).
-
Line two large baking sheets with parchment paper.
2. Mix Dry Ingredients:
-
Whisk together flour, salt, baking soda, baking powder, and sugar.
3. Combine with Wet Ingredients:
-
Add sourdough starter and butter to the dry mix. Use a spatula or your hands to form a shaggy dough. Adjust with 1 tsp water if too dry or 1 tbsp flour if too sticky.
4. Divide & Roll:
-
Split dough in half. Roll each portion between two sheets of parchment paper to 1/16-inch thickness (very thin for ultimate crisp).
5. Add Seeds & Score:
-
Remove top parchment. Sprinkle seeds/herbs over dough and gently roll again to press them in.
-
Score dough into squares, rectangles, or triangles using a pizza cutter or knife (don’t cut all the way through).
6. Bake:
-
Transfer sheets to baking pans. Bake 20–25 minutes until light golden. Rotate halfway for even baking.
-
Cool completely on the sheet to allow crackers to crisp fully, then break along score lines.
Notes
-
-
Crackers are chewy: Dough too thick or under-baked. Roll thinner and bake until lightly golden.
-
Using active starter: Can swap discard with bubbly starter; crackers will be airier and slightly less tangy.
-
Sticky dough: Add 1 tbsp flour at a time until manageable.
-
Storage: Airtight container at room temperature; best within a week. Add a silica gel packet in humid climates.
-
Nutrition
- Calories: 150Cal per 8 crackers
- Fat: 7 g
- Carbohydrates: 18 g
- Fiber: 2 g
- Protein: 3g
Your New Go-To Snack Awaits
And there you have it, my friends! From a jar of lonely sourdough discard to a towering pile of the most incredible, seedy, tangy, and satisfying crackers you’ve ever crunched. This recipe is a testament to the idea that the best foods don’t have to be complicated. They just have to be made with a little bit of heart and a whole lot of delicious intention.
I hope this recipe becomes a trusted favorite in your home, just like it is in mine. It’s a reminder that magic happens when we get our hands a little dusty with flour and our kitchens smelling like toasted seeds. So, what are you waiting for? Your sourdough starter is calling. Go make some crackers!
Final Thoughts: Your Homemade Cracker Revolution Starts Now
So, there you have it. What began as a simple mission to rescue a cup of sourdough discard has unfolded into your new secret weapon for snacking. You’re no longer just a baker; you’re an alchemist, transforming humble ingredients into golden, seedy works of art.
Forget settling for the bland, the overly salted, or the mysteriously preserved. You now hold the key to a cracker that is unabashedly yours—crisp, flavorful, and born from your own kitchen. Each satisfying SNAP is a testament to your effort, and every seed-speckled surface is a badge of honor.
This is more than a recipe; it’s an invitation to a more flavorful, less wasteful way of life. It’s about the quiet satisfaction of creating something beautiful from what you already have. It’s about the joy of sharing a homemade gift that says, “I made this just for you.”
So preheat that oven, liberate that jar of starter, and get ready for the incredible aroma of toasty seeds and warm sourdough to fill your home. Your journey to cracker perfection is just a bake away.
Now go on, get cracking!
Happy Baking,
Beau
Peanut Butter Snacking Cake : Soft, Buttery & Easy to Make
A Cozy Peanut Butter Snacking Cake for Anytime Cravings
Hey there, friend! Beau here, welcoming you back to my kitchen. You know that feeling around 3 PM? When your energy dips, your focus wanes, and a little voice in your head starts whispering sweet nothings about something… satisfying? Not a full-blown, fancy dessert, but a simple, soulful treat that feels like a warm hug. That, my friends, is the sacred territory of the snacking cake.
And today, we’re making the undisputed champion of that category: a Peanut Butter Snacking Cake. This isn’t a fussy, multi-layer masterpiece. Oh no. This is a soft, buttery, incredibly moist cake that lives on your counter, patiently waiting for you to slice off a humble square with your morning coffee, pack into a lunchbox, or enjoy as a just-because reward after a long day.
I’ve doubled the batch because, trust me, you’ll want extra. It’s the kind of easy, one-bowl wonder that brings people together. The rich peanut butter flavor is pure nostalgia, and the crumb is so tender it practically melts in your mouth. So, let’s ditch the complicated recipes and dig into something real, simple, and deeply delicious. Grab your favorite mixing bowl, and let’s get baking!
The Snacking Cake That Started It All
This cake takes me right back to my grandma’s linoleum-floored kitchen. She wasn’t a pastry chef; she was a “get-it-done” cook who believed in the power of a good, simple treat. Her version of this cake was always tucked under a glass dome on the counter, a permanent fixture next to the fruit bowl.
I remember sneaking slivers as a kid, the tines of my fork making quiet scrapes against the plate. It was our secret, mine and the cake’s. She never iced it, believing the peanut butter’s richness was glory enough. And you know what? She was right. That humble cake taught me a foundational Feastical philosophy: food doesn’t need to be fancy to be fantastic. It just needs to be made with love and be ready when you need it most. This recipe is my homage to her—a little more refined, but with the same beautiful, comforting soul.
Gathering Your Ingredients (Let’s Chat About Them!)
This is where the magic starts. We’re using simple pantry staples, but each one plays a star role. Let’s break it down so you understand the “why” behind the “what.”
- 1/2 cup (4 oz) unsalted butter, melted: This gives our cake a rich, buttery backbone and that wonderfully soft crumb. Chef’s Insight: Melting the butter means we don’t need a mixer! We’re whisking by hand today, friends. If you only have salted butter, just reduce the added salt in the dry ingredients by 1/4 teaspoon.
- 1/2 cup (128 g) creamy peanut butter: The star of the show! I use a standard, no-stir creamy peanut butter for consistent results. The natural, oily kind can sometimes separate and alter the texture.
- Scant 1/2 cup (80 g) granulated sugar & Scant 1/2 cup (80 g) brown sugar, packed: We’re using a blend! The white sugar provides sweetness and tenderness, while the brown sugar brings moisture and a subtle molasses warmth that pairs perfectly with peanut butter. A “scant” cup means you fill the measuring cup just *slightly* less than full.
- 2 large eggs: Our binding agents and structure-builders. Make sure they’re at room temperature to blend seamlessly into the batter.
- 1 teaspoon vanilla extract: The flavor enhancer. It rounds out all the other ingredients and makes the whole cake taste… more.
- 2 cups + 4 tablespoons (560 g) all-purpose flour: I give the weight in grams for precision, but spooning and leveling your flour (don’t scoop!) works perfectly. This is our foundation.
- 2 teaspoons baking powder & 1 teaspoon baking soda: Our dynamic leavening duo! They work together to give this cake its perfect, gentle rise. Check the dates on your containers—old leaveners are the number one cause of flat cakes.
- 3/4 teaspoon salt: Crucial for balancing the sweetness and making the peanut butter flavor pop. Don’t you dare skip it!
- 1 cup milk: The hydrator. Whole milk will give you the richest result, but any milk you have on hand will work beautifully.
Let’s Bake This Thing: Simple Steps to Cake Heaven
Ready? This is where we turn those simple ingredients into something magical. It’s a straightforward process, but I’ll walk you through every step with my favorite chef hacks to ensure perfection.
- Preheat and Prep. Fire up your oven to 350°F (175°C). Now, take an 8×12-inch baking dish (or a 9×13 for a slightly thinner cake) and grease it well. My pro-move? I then line it with a sling of parchment paper, leaving an overhang on the two long sides. This little trick lets you lift the entire cake out for effortless cooling and slicing. No more wrestling with a hot pan!
- The Wet Team Assembles. In a large bowl, whisk together your melted butter and peanut butter. You’ll get a smooth, gloriously fragrant paste. Chef’s Tip: If your peanut butter is cold from the fridge, warm the measured amount for 10-15 seconds in the microwave to make it easier to blend.
- Sweeten the Deal. Add both sugars to the peanut butter mixture and whisk vigorously for a good minute. You want it to be well-combined. Now, crack in the eggs and pour in the vanilla. Whisk again until the batter is smooth and slightly paler in color.
- The Dry Team Unites. In a separate, medium-sized bowl, whisk together your flour, baking powder, baking soda, and salt. This isn’t just mixing; you’re aerating the flour and ensuring the leaveners are evenly distributed, which is key for an even rise. No one wants a baking soda pocket in their slice!
- The Grand Union. Here’s the secret to a tender cake: don’t overmix! Add about one-third of your dry ingredients to the wet and gently fold them in with a spatula until just combined. Follow that with half of the milk. Repeat with another third of the dry, the rest of the milk, and finally the last of the dry ingredients. Mix until you no longer see streaks of flour. A few small lumps are totally fine—they’re better than a tough, overworked cake.
- Get Creative (Optional, but Fun!). This is your moment! If you’re adding chocolate chips, mashed banana, or any other twists, fold them in gently now.
- Into the Oven! Pour the batter into your prepared pan and use a spatula to spread it into an even layer. For a little extra flair, you can sprinkle some crushed peanuts or a few extra chocolate chips on top. Bake for 25-30 minutes. The cake is done when the top is golden and springs back when lightly touched, and a toothpick inserted into the center comes out clean or with a few moist crumbs.
- The Patience Test. This is the hardest part. Let the cake cool in the pan on a wire rack for at least 30 minutes before you attempt to slice it. A warm cake is delicate, and waiting ensures you get clean, beautiful slices instead of a crumbly mess. You can do it!
How to Serve Your Masterpiece
This cake is a chameleon. It’s glorious all on its own, but here are a few of my favorite ways to serve it up:
- The Purist’s Plate: A simple square, maybe still a little warm from the pan, with a tall glass of cold milk. This is the classic, and it never fails.
- The Afternoon Upgrade: Warm a slice for 15 seconds in the microwave and top it with a thin schmear of extra peanut butter that gets all melty and glorious. It’s next-level.
- The Dessert Dream: Take it up a notch! Serve a slice with a scoop of high-quality vanilla bean ice cream and a drizzle of chocolate sauce. Suddenly, your humble snacking cake is a restaurant-worthy dessert.
- The Lunchbox Hero: Cool the cake completely, slice it into squares, and pack them in airtight containers. It’s the perfect lunch treat or after-school surprise for the family.
Make It Your Own: Delicious Recipe Variations
One of the best things about this recipe is its flexibility. Feel free to play with it! Here are a few twists I absolutely love:
- Chocolate Chip Bliss: Fold in 1/2 cup of mini chocolate chips or chopped dark chocolate. The melty pockets of chocolate against the peanut butter cake are a match made in heaven.
- Banana-Peanut Butter Combo: Mash one very ripe banana and fold it in with the wet ingredients. It adds incredible moisture, natural sweetness, and a flavor combo that’s pure comfort.
- A Touch of Warmth: Add 1/2 teaspoon of cinnamon to the dry ingredients. It gives the cake a subtle, cozy depth that’s just wonderful.
- For the Crunch Lovers: Sprinkle the top of the batter with 1/4 cup of crushed, roasted peanuts before baking for a delightful textural contrast.
- Gluten-Free Swap: You can easily use a 1:1 gluten-free all-purpose flour blend in place of the regular flour. The texture will be just as lovely!
Beau’s Chef’s Notes & Kitchen Confessions
This recipe has been a staple in my kitchen for years, and it’s evolved in tiny ways. I initially used all white sugar, but adding brown sugar was a game-changer for moisture. I’ve also learned that this cake is a fantastic “clean out the pantry” project. A handful of leftover Reese’s Pieces? Toss ’em in! Some lonely oats? Sprinkle them on top!
One time, I was filming a video for the site and, in my excitement, I completely forgot the baking soda. The cake baked up… dense. Really dense. We lovingly called it the “Peanut Butter Brick.” It still tasted good, but it was a hilarious reminder that those leavening agents are non-negotiable! So double-check your bowls, friends. We learn by doing, and sometimes by laughing at our delicious mistakes.
Your Questions, Answered!
Over the years, I’ve gotten a few repeat questions about this cake. Here’s the scoop to help you troubleshoot:
Q: My cake is dry. What happened?
A: The most common culprit is overbaking. Ovens can vary, so start checking at the 22-minute mark. Also, be sure you’re using a “scant” cup measurement for the sugars—too much sugar can actually dry out a bake. And finally, don’t overmix the batter once the flour is added!
Q: Can I use natural peanut butter?
A> You can, but it can be tricky. The natural oils tend to separate, which can lead to a greasy or dense cake. If it’s all you have, make sure you stir it incredibly well before measuring, and be prepared for a slightly different texture. For guaranteed results, standard creamy peanut butter is your best bet.
Q: Can I make this into cupcakes?
A> Absolutely! This batter will make about 18 standard cupcakes. Line your muffin tin, fill the cups 2/3 full, and bake at the same temperature for 18-22 minutes, or until a toothpick comes out clean.
Q: How should I store this cake?
A> Once completely cool, store it in an airtight container at room temperature for up to 3 days. It also freezes beautifully! Wrap individual slices in plastic wrap and then place them in a freezer bag for up to 3 months. Thaw at room temperature or warm gently in the microwave.

Peanut Butter Snacking Cake : Soft, Buttery & Easy to Make
Description
Hey friends, Beau here! This is your 3 PM savior: a soft, tender, and buttery cake with rich peanut butter flavor that feels like a warm hug. Perfect for coffee breaks, lunchboxes, or just a small “me-time” treat. No layers, no fuss—just straight-up comfort in cake form.
Ingredients
Wet Ingredients:
-
1/2 cup (4 oz) unsalted butter, melted
-
1/2 cup (128 g) creamy peanut butter
-
Scant 1/2 cup (80 g) granulated sugar
-
Scant 1/2 cup (80 g) packed brown sugar
-
2 large eggs, room temperature
-
1 tsp vanilla extract
-
1 cup milk (whole milk preferred)
Dry Ingredients:
-
2 cups + 4 tbsp (560 g) all-purpose flour
-
2 tsp baking powder
-
1 tsp baking soda
-
3/4 tsp salt
Optional Toppings / Mix-ins:
-
Chocolate chips (1/2 cup)
-
Crushed roasted peanuts (1/4 cup)
-
Mashed banana (1 very ripe)
Instructions
1. Preheat & Prep:
-
Preheat oven to 350°F (175°C).
-
Grease your pan and line with parchment paper, leaving overhang on long sides for easy cake removal.
2. Mix Wet Ingredients:
-
Whisk together melted butter and peanut butter until smooth.
-
Add sugars, eggs, and vanilla. Whisk until slightly pale and fully combined.
3. Mix Dry Ingredients:
-
Whisk together flour, baking powder, baking soda, and salt.
4. Combine:
-
Gently fold in one-third of the dry ingredients, then half the milk. Repeat until all ingredients are incorporated. A few small lumps are fine—don’t overmix!
-
Optional: Fold in chocolate chips, banana, or other mix-ins now.
5. Bake:
-
Pour batter into prepared pan and smooth the top. Sprinkle toppings if desired.
-
Bake 25–30 minutes, or until a toothpick inserted in the center comes out clean or with a few moist crumbs.
6. Cool:
-
Let cool at least 30 minutes before slicing. For neat slices, lift the cake from the pan using the parchment overhang.
Notes
-
Chocolate Chip Bliss: Fold in 1/2 cup chocolate chips.
-
Banana-Peanut Butter Combo: Add 1 mashed ripe banana to wet ingredients.
-
Warm Spice: 1/2 tsp cinnamon in dry mix adds cozy depth.
-
Crunch Lovers: Top with 1/4 cup crushed roasted peanuts.
-
Gluten-Free Swap: Use 1:1 gluten-free flour blend.
-
Cupcakes: This batter makes ~18 standard cupcakes; bake 18–22 minutes at 350°F.
Nutrition
- Calories: 215 Cal per Slice
- Sugar: 12 g
- Fat: 10 g
- Carbohydrates: 7g
- Protein: 4 g
Nutritional Information (For Your Info!)
Hey, I believe in balance! Enjoying a homemade treat is part of a happy life. Here’s a rough nutritional breakdown per slice (based on 16 slices without any add-ins), so you can enjoy it mindfully.
- Calories: 215
- Fat: 10g
- Carbohydrates: 27g
- Sugar: 12g
- Protein: 4g
- Sodium: 190mg
Remember, these are estimates and can vary based on your specific ingredients. Adding chocolate chips or other mix-ins will change these values. The beauty of baking it yourself is you control what goes in!
Final Thoughts from My Kitchen to Yours
And there you have it! Your new go-to recipe for when life calls for a simple, soul-satisfying treat. This Peanut Butter Snacking Cake is more than just a list of ingredients; it’s a reminder that the best foods are often the simplest ones. They’re the ones that don’t require a special occasion, the ones that are there for you on a quiet Tuesday afternoon.
I hope this recipe finds a permanent spot in your rotation, just like it has in mine. It’s a little piece of Feastical I’m so happy to share with you. Now, I’d love to hear from you! Did you add a twist? Did it become an instant family favorite? Tag me on social @feastical or drop a comment on the blog—I love seeing your creations.
Until next time, happy baking, and remember: keep it simple, keep it soulful, and always save room for a snack.
– Beau

Tahini Butter Cookies : Nutty, Buttery & Spiced with a Middle Eastern Twist
Melt-in-Your-Mouth Tahini Butter Cookies: Your New Favorite Treat
Hey friends, Beau here! Welcome back to the Feastical kitchen. Is there anything in the world quite like the smell of warm cookies wafting through your home? That sweet, buttery aroma just seems to hug every corner of the house, promising a little moment of pure, uncomplicated joy. We all have our go-to classics, the chocolate chip veterans and the oatmeal raisin loyalists, but today? Today, I’m so excited to introduce you to a cookie that might just become your new best friend.
Imagine the crumbly, tender perfection of the best shortbread cookie you’ve ever had. Now, give it a sophisticated, nutty makeover with the rich, earthy flavor of tahini. Add a cozy blanket of cinnamon sugar, and you’ve got these incredible Tahini Butter Cookies. They’re buttery, they’re a little savory, they’re perfectly sweet, and they have this magical melt-in-your-mouth quality that makes it genuinely impossible to eat just one.
I know tahini might sound like a “cheffy” ingredient, but trust me on this one. It’s the secret weapon that takes these cookies from simple to sublime. This recipe is a double batch, because I’m a firm believer that joy is meant to be shared. We’re making enough to fill a cookie tin, perfect for gifting, potlucks, or just treating yourself all week long. So, preheat your ovens and grab your favorite mixing bowl—we’re about to create some magic.
The Cookie That Started It All: A Sweet Memory
This recipe takes me right back to my first food festival. I was just starting Feastical, wide-eyed and trying to absorb every flavor I could. I wandered past a stall where a lovely woman was handing out these unassuming, pale golden cookies. I took one bite, and my entire concept of a cookie just… expanded. It was nutty, buttery, and unlike anything I’d ever tasted. I must have looked stunned because she just laughed and said, “Tahini! It’s all in the tahini.”
I spent the rest of the day thinking about that cookie. I went back twice, “just to make sure I liked it,” (chef’s honor, that’s my story and I’m sticking to it). I finally asked her for the secret, and in the generous way that so many food lovers have, she scribbled down the basic ingredients on a napkin. That napkin lived on my fridge for years. This recipe is my evolved, Feastical-ified version of that napkin inspiration. It’s a reminder that the best food discoveries often come from a simple moment of connection and a willingness to try something new.
Gathering Your Cookie Crew: The Ingredients
This is where the fun begins! Let’s break down this dream team of ingredients. I’ve included some of my favorite chef insights and substitution hacks so you can make these cookies your own.
- 2 cups (280 g) All-Purpose Flour, sifted: The backbone of our cookie! Sifting is a non-negotiable first step here—it aerates the flour, which prevents over-mixing and gives us that delightfully tender, crumbly texture we’re after.
- 1 teaspoon Baking Powder: Our little leavening agent. It gives the cookies just the slightest bit of lift, so they’re not hockey pucks but beautiful, delicate discs.
- 1 teaspoon Ground Cinnamon: The warm, cozy soul of the spice blend. It pairs so naturally with the nutty tahini, creating a flavor that feels both familiar and excitingly new.
- 1/4 teaspoon Salt: Don’t you dare skip the salt! It’s the flavor enhancer that makes all the other ingredients pop and balances the sweetness perfectly.
- 2/3 cup (150 g) Unsalted Butter, room temperature: This is key. Your butter needs to be so soft that you can leave a deep fingerprint in it, but not melted. This allows it to cream beautifully with the sugar, creating tiny air pockets that are the foundation of a perfect texture.
- 2/3 cup + 2 tablespoons (160 g) Granulated Sugar: We use this for the dough itself. It creamed with the butter, it provides sweetness and contributes to the lovely spread and golden edges.
- 2/3 cup + 2 tablespoons (200 g) Tahini: The star of the show! Use a well-stirred, good-quality tahini here. I prefer one with a runny consistency and a light golden color. Give the jar a really good stir until the oil and paste are completely unified.
- 6 tablespoons Powdered Sugar + 2 teaspoons Ground Cinnamon (for rolling): This dynamic duo creates that classic crackly, sugary crust. The powdered sugar melts and creates a delicate shell, while the cinnamon adds another layer of warmth.
- Whole Almonds (for garnish): A classic, elegant touch. They add a little crunch and a beautiful visual element.
Let’s Get Baking: The Step-by-Step Magic
Alright, team, let’s roll up our sleeves and make some cookie magic. Follow these steps, and you’ll be a tahini cookie pro in no time. I’ve sprinkled in my favorite kitchen hacks to set you up for success!
- Combine the Dry Team. In a medium bowl, grab your whisk and vigorously whisk together the sifted flour, baking powder, cinnamon, and salt. Doing this first ensures every single ingredient is evenly distributed, so every bite is perfectly balanced. Chef’s Hack: Whisking is a fantastic way to “sift” your dry ingredients without pulling out another gadget. Just give it a good 30-second whisk right in the bowl!
- Cream the Butter & Sugar. In a separate, larger bowl, use an electric mixer (or some serious elbow grease with a wooden spoon) to beat the room-temperature butter and granulated sugar together. We’re not just mixing; we’re creaming. Beat it on medium-high speed for a good 2-3 minutes until it becomes pale, fluffy, and almost white. This step is CRUCIAL for that melt-in-your-mouth texture. Chef’s Hack: If you press the mixture between your fingers, you shouldn’t feel any grittiness from the sugar. That’s when you know it’s ready!
- Welcome the Tahini. Scrape down the sides of the bowl with a spatula (a step I forget about 50% of the time, so no judgment!). Now, add in all that glorious tahini. Mix on medium speed until it’s completely smooth, creamy, and incorporated. The dough will take on a beautiful light beige color and smell incredibly nutty.
- Bring It All Together. Reduce your mixer speed to low. Gradually add the dry ingredients to the wet ingredients. Mix just until the flour disappears and a soft, pliable dough forms. Do not overmix! Overmixed dough = tough cookies. Chef’s Hack: When in doubt, stop the mixer and finish incorporating the last bit of flour by hand with a spatula. You have more control this way.
- The Chill Session. This is the patience-testing part, but it’s so worth it. Cover the bowl with plastic wrap and chill the dough for at least 30 minutes. This firms up the butter, making the dough easy to roll, and prevents the cookies from spreading too much in the oven. Chef’s Hack: If you’re in a hurry, you can spread the dough into a disc on a plate and pop it in the freezer for 15 minutes. It works like a charm!
- Preheat & Prep. While the dough chills, preheat your oven to 350°F (175°C) and line your baking sheets with parchment paper. Trust me, parchment paper is a kitchen miracle for easy cleanup and no-stick baking.
- Roll, Coat, & Press. Take the dough out of the fridge. Using your hands, roll portions of dough into smooth, 1-inch balls. Roll each ball generously in the cinnamon-powdered sugar mixture. Place them on your prepared baking sheet, about 2 inches apart. Now, gently press a single whole almond into the center of each cookie.
- Bake to Perfection. Bake for 10-12 minutes. You’re looking for the edges to be just barely turning a light golden brown. The centers will still look a little soft – that’s perfect! They will firm up as they cool. Chef’s Hack: For ultimate even baking, rotate your baking sheet halfway through the bake time.
- The Cool Down. Let the cookies cool on the baking sheet for 5 minutes before transferring them to a wire rack to cool completely. This allows them to set up properly so they don’t fall apart. I know it’s hard to wait, but it makes all the difference!
Sharing the Love: How to Serve These Beauties
Now for the best part: eating! These cookies are incredibly versatile. Pile them high on a rustic wooden board for a casual get-together. For a more elegant touch, arrange them on a beautiful ceramic platter. They are an absolute dream with a cup of strong black coffee, cutting through the bitterness beautifully. Or, my personal favorite, dunk one into a steaming mug of chai tea—the spices in the chai and the cinnamon in the cookie are a match made in heaven.
They also make the most thoughtful homemade gift. Find a cute tin or a glass jar, layer the cookies with a piece of parchment paper, and tie a ribbon around it. You’re not just giving cookies; you’re giving a little jar of comfort and joy. It’s a gift that says, “I thought you deserved something wonderful today.”
Make It Your Own: Delicious Recipe Variations
Once you’ve mastered the classic, feel free to get creative! This dough is a fantastic canvas for your flavor experiments. Here are a few of my favorite twists:
- Citrus Sunshine: Add the finely grated zest of one large orange (about 1 teaspoon) to the butter-sugar mixture during the creaming step. The bright, floral notes of orange cut through the richness beautifully.
- Warm Spice Journey: Add 1/2 teaspoon of ground cardamom to the dry ingredients. This is a classic Middle Eastern pairing with tahini and adds an incredible, aromatic depth that will have people asking, “What is that amazing flavor?”
- Nutty Swap: Not an almond fan? No problem! Swap them out for a single, beautiful pistachio pressed into the center for a pop of color and a slightly sweeter flavor. You could also just skip the nut and press the cookies down with the back of a fork for a classic criss-cross pattern.
- Sesame Crunch: For the ultimate sesame experience, after rolling the dough balls in cinnamon sugar, give them a gentle roll in a bowl of white sesame seeds before placing them on the baking sheet.
- Chocolate Dip: For a decadent treat, melt some dark chocolate and dip half of each cooled cookie in it. Let them set on a parchment-lined tray. Because let’s be real, chocolate makes everything better.
Beau’s Kitchen Notes & Stories
This recipe has been a fun journey of tweaks and tastes. The first time I made them, I was so impatient I skipped the chilling step. Let’s just say I ended up with one giant, flat, “cookie puddle” instead of individual cookies. It still tasted amazing, but it was a hilarious kitchen fail! That’s how I learned to respect the chill.
Over time, I’ve found that using a tahini that’s on the runnier side, rather than a super thick one, gives the cookies a better texture. I also started making a double batch as the standard because my friends and family would stage a protest if I showed up with anything less. Food, at its heart, is about connection, and these cookies have connected me to so many wonderful people.
Your Questions, Answered!
I’ve gotten a lot of questions about this recipe over the years. Here are the most common ones to help you out!
- My dough is too crumbly and won’t roll into balls. What happened? This usually means your dough was a bit over-floured or your tahini was very thick. Don’t panic! Just add a teaspoon of cold water or milk at a time, mixing with your hands, until the dough just comes together. It should feel like Play-Doh.
- Can I make these cookies ahead of time? Absolutely! You can prepare the dough, wrap it tightly, and keep it in the fridge for up to 3 days. You can also freeze the rolled, un-baked dough balls on a tray, then transfer them to a freezer bag. Bake straight from frozen, adding 1-2 minutes to the baking time.
- My cookies spread too much and are flat. Why? The usual suspects are: 1) Your butter was too soft or melted, 2) You didn’t chill the dough long enough, or 3) Your baking powder might be old. Check the expiration date on your leavener!
- What does tahini taste like in a cookie? If you’re imagining a strong, bitter flavor, think again! When baked with sugar and butter, tahini becomes mellow, nutty, and rich, almost like a more complex and less sweet peanut butter. It’s truly delightful.

Tahini Butter Cookies : Nutty, Buttery & Spiced with a Middle Eastern Twist
Description
Hey friends, Beau here! Imagine the tender crumb of the best shortbread cookie, elevated with rich, nutty tahini and finished with a cozy cinnamon-sugar blanket. These cookies are buttery, slightly savory, perfectly sweet, and genuinely impossible to eat just one.
Ingredients
For the Cookie Dough:
-
2 cups (280 g) all-purpose flour, sifted
-
1 tsp baking powder
-
1 tsp ground cinnamon
-
1/4 tsp salt
-
2/3 cup (150 g) unsalted butter, room temperature
-
2/3 cup + 2 tbsp (160 g) granulated sugar
-
2/3 cup + 2 tbsp (200 g) tahini, well-stirred
For Rolling:
-
6 tbsp powdered sugar
-
2 tsp ground cinnamon
Optional Garnish:
-
Whole almonds, pistachios, or a fork-pressed pattern
Instructions
1. Combine Dry Ingredients:
-
Whisk together flour, baking powder, cinnamon, and salt in a medium bowl.
2. Cream Butter & Sugar:
-
Beat butter and granulated sugar in a large bowl on medium-high speed for 2–3 minutes until pale and fluffy.
3. Add Tahini:
-
Mix in tahini until smooth and fully incorporated. The dough will turn a light beige and smell wonderfully nutty.
4. Combine Wet & Dry:
-
Reduce mixer speed to low. Gradually add dry ingredients, mixing just until combined. Stop before overmixing; finish by hand if needed.
5. Chill the Dough:
-
Cover with plastic wrap and chill at least 30 minutes (or 15 minutes in the freezer if short on time).
6. Preheat & Prep:
-
Preheat oven to 350°F (175°C). Line baking sheets with parchment paper.
7. Roll, Coat, & Press:
-
Roll dough into 1-inch balls. Roll each in the cinnamon-powdered sugar mixture. Place 2 inches apart on baking sheets and press an almond (or other garnish) into the center.
8. Bake:
-
Bake 10–12 minutes until edges just turn golden. Centers may appear soft but will firm as they cool. Rotate sheets halfway for even baking.
9. Cool:
-
Let cookies rest 5 minutes on the baking sheet, then transfer to a wire rack to cool completely.
Notes
-
Citrus Sunshine: Add 1 tsp finely grated orange zest to butter-sugar mixture
-
Warm Spice: Add 1/2 tsp ground cardamom to dry ingredients
-
Nut Swap: Use pistachios instead of almonds
-
Sesame Crunch: Roll in white sesame seeds before baking
-
Chocolate Dip: Dip cooled cookies halfway in melted dark chocolate
Nutrition
- Calories: 105 Cal per Cookie
- Sugar: 5 g
- Sodium: 40 mg
- Carbohydrates: 11 g
- Protein: : 1.5 g
Nutritional Information (For the Curious!)
While we’re all about feel-good comfort food here at Feastical, I know some of you like to keep track! Here’s a rough nutritional breakdown per cookie (assuming the batch yields 40 cookies). Remember, this is an estimate, and actual values can vary based on your specific ingredients.
- Calories: 105 kcal
- Fat: 6g
- Carbohydrates: 11g
- Sugar: 5g
- Protein: 1.5g
- Sodium: 40mg
These cookies get their healthy fats from the tahini and butter, providing a more satisfying treat than a standard sugar cookie. Enjoy them as part of a balanced diet—and by balanced, I mean balanced with a big smile on your face!
Final Thoughts from My Kitchen to Yours
Well, there you have it, my friends—my heart and soul in a cookie recipe. These Tahini Butter Cookies are more than just a dessert; they’re a little edible adventure, a conversation starter, and a warm hug in cookie form. I love how they bridge the gap between classic American comfort and intriguing global flavor.
I hope you’ll give them a try and fall in love with them as much as I have. When you do, I’d be absolutely thrilled if you tagged me @Feastical on social media or left a comment below telling me how they turned out! Sharing your kitchen victories is my favorite part of this whole journey.
Now, go forth and bake something beautiful. Until next time, keep your kitchen messy and your heart full.
– Beau
***