
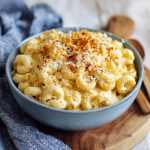
High-Protein Cottage Cheese Mac & Cheese : Light, Creamy & Comforting
Who Says Comfort Food Can’t Love You Back?
Hey friends, Beau here! Let’s talk about one of life’s greatest simple pleasures: a big, steamy bowl of mac and cheese. That golden, creamy, cheesy goodness that feels like a warm hug from the inside out. We all have those days where nothing but a classic comfort food will do. But what if I told you that you could get that same soul-satisfying experience, that same cheesy grin, in a dish that’s actually packed with protein and feels light and energizing?
I see you raising an eyebrow! Trust me, I was a skeptic too. For the longest time, I believed that a truly great mac and cheese required a mountain of butter, a river of heavy cream, and a whole block of cheese. It was a “sometimes” food, reserved for holidays and serious comfort emergencies. But then, I started playing around in the kitchen, determined to create a version I could enjoy any night of the week without the dreaded food coma. And friends, after more taste tests than I can count (a tough job, but someone’s gotta do it), I landed on this masterpiece: my High-Protein Cottage Cheese Mac & Cheese.
This isn’t a “diet” food pretending to be something it’s not. This is a legitimately delicious, creamy, and deeply satisfying macaroni and cheese that just happens to be a nutritional powerhouse. By swapping the traditional heavy roux for a magically smooth, protein-packed cottage cheese sauce and using a high-protein pasta, we’re turning a classic side dish into a main event that fuels your body and delights your taste buds. So, grab your favorite pot, and let’s make some feel-good magic happen!
The Mac & Cheese That Changed My Mind
My relationship with cottage cheese used to be… complicated. For years, it lived in a lonely tub in the back of my fridge, a well-intentioned purchase that usually ended up forgotten. I saw it as a bland, diet-food staple, something you ate because you had to, not because you wanted to. That all changed one rainy Tuesday. I was craving mac and cheese something fierce, but I was also fresh off a good workout and didn’t want to undo all that effort.
Staring into the fridge, my eyes landed on that tub of cottage cheese, and a wild idea popped into my head. “What if…?” I thought. I grabbed it, tossed it into my blender with some sharp cheddar and my favorite spices, and gave it a whir. The result was this unbelievably smooth, tangy, and creamy sauce that had absolutely no business being so good. I poured it over some chickpea pasta, gave it a stir, and took a tentative bite. The flavor was all the rich, cheesy comfort I was craving, but the texture was even creamier than my old flour-based sauce. It was a total lightbulb moment. That lonely tub of cottage cheese had just become my new favorite kitchen hero, and it completely reshaped how I think about healthy, satisfying cooking.
Gathering Your Feel-Good Ingredients
This recipe is all about smart, simple swaps that add up to big flavor and nutrition. Here’s what you’ll need to create this creamy dream.
For the Pasta:
- 8 oz High-Protein Elbow Pasta: Look for pasta made from chickpeas, lentils, or yellow peas. Not only do they pack a serious protein punch (often double that of regular pasta!), but they also add a wonderful, nutty flavor and extra fiber to keep you full and satisfied. Chef’s Insight: Don’t overcook this pasta! It can go from al dente to mushy quickly, so keep a close eye on it.
- Salt for Boiling Water: Don’t be shy! Salting your pasta water is your one chance to season the pasta from the inside out. Make it taste like the sea.
For That Magical Cheese Sauce:
- 1 cup Low-Fat Cottage Cheese: This is our secret weapon! It creates an incredibly creamy, high-protein base for the sauce without any heavy cream. Substitution Tip: If you’re dairy-free, a firm, silken tofu can work in a pinch, though the flavor will be milder.
- ½ cup Unsweetened Almond Milk or Skim Milk: This helps achieve the perfect saucelike consistency. I like almond milk for its neutral flavor. Chef’s Insight: Make sure your milk is unsweetened! Vanilla mac and cheese is not the vibe we’re going for.
- ½ cup Reduced-Fat Shredded Cheddar Cheese: This brings the classic, sharp, cheesy flavor we all know and love. Substitution Tip: Feel free to use full-fat cheddar for an extra-indulgent version, or swap in Pepper Jack for a little kick!
- 2 tbsp Grated Parmesan Cheese: A little Parmesan adds a salty, savory, umami depth that makes the sauce taste more complex.
- 1 tbsp Nutritional Yeast (optional): Don’t let the name scare you! This gives a fantastic, cheesy, slightly nutty flavor and is packed with B-vitamins. It’s a great hack for deepening the cheesy flavor without more cheese. Substitution Tip: You can simply leave it out if you don’t have any.
- ½ tsp Garlic Powder & ½ tsp Onion Powder: These pantry superstars build a foundation of savory flavor that makes the sauce taste rich and well-rounded.
- ¼ tsp Paprika: I add this for a subtle warmth and a beautiful golden-orange color. A smoked paprika would be fantastic here, too!
- Salt and Black Pepper to Taste: The finishing touch! Always taste your sauce at the end and season it until it sings.
Let’s Get Cooking: Your Foolproof Guide to Creamy Perfection
Ready to see the magic happen? This comes together in about 20 minutes, making it the perfect hero for a busy weeknight. Follow these steps, and you’ll be in mac and cheese heaven in no time.
- Cook the Pasta to Al Dente Glory. Bring a large pot of well-salted water to a rolling boil. Add your high-protein elbows and cook according to the package directions, but aim for al dente—meaning it still has a slight bite to it. Chef’s Hack: Before you drain the pasta, reserve about a ½ cup of the starchy pasta water. This liquid gold is a secret weapon for thinning out your sauce later if it gets too thick. Drain the pasta and set it aside.
- Blend That Dreamy Sauce. While the pasta is cooking, it’s sauce time! Add the cottage cheese, milk, cheddar, Parmesan, nutritional yeast (if using), garlic powder, onion powder, and paprika to a high-speed blender. Blend on high for 45-60 seconds, or until the sauce is completely smooth and silky. Chef’s Commentary: This step is non-negotiable for that luxuriously smooth texture. No one wants chunky cottage cheese in their sauce, so let that blender run until you can’t see a single curd!
- Wake Up the Sauce in the Pan. Pour the smooth sauce into a medium saucepan and place it over medium heat. Now, here’s the key: stir it constantly! Use a whisk or a silicone spatula and keep it moving for 3-4 minutes. You’ll see it slowly start to thicken and become hot and bubbly. This gentle heating melts the shredded cheese fully and cooks the sauce, taking away any raw flour or starchy taste (not that we used any, but you get the idea!). Chef’s Tip: Don’t walk away and let it boil vigorously! A gentle heat and constant stirring guarantee a smooth, non-grainy sauce.
- The Grand Union: Pasta Meets Sauce. Now for the best part! Add your drained, cooked pasta directly into the saucepan with the warm, thickened cheese sauce. Stir everything together gently but thoroughly, making sure every single nook and cranny of those elbows is coated in cheesy goodness. Chef’s Hack: If the sauce seems a little too thick for your liking, now is the time to use that reserved pasta water! Add a tablespoon at a time, stirring, until it reaches your perfect saucy consistency.
- Taste and Tweak. This is the most important step in any recipe. Grab a spoon and taste your creation! Does it need a pinch more salt? A crack of black pepper? Maybe another dash of paprika? Adjust the seasoning until it’s absolutely perfect for your palate.
Plating Up Your Protein-Packed Masterpiece
You’ve done the hard work, now let’s make it look as good as it tastes! I’m a firm believer that we eat with our eyes first. For a simple, cozy dinner, just ladle a generous portion into a deep, warm bowl. The steam rising with that cheesy aroma is part of the experience!
But let’s kick it up a notch. To make it feel extra special, here are a few of my favorite ways to serve it:
- The Classic Combo: Serve it alongside a simple, crisp green salad with a bright lemon vinaigrette. The freshness of the salad cuts through the richness of the mac and cheese beautifully.
- Top It Off: A sprinkle of fresh chopped chives or parsley adds a pop of color and fresh flavor. A little extra black pepper and a final dusting of Parmesan cheese never hurt anybody, either.
- Add a Crunch: For a nod to the baked version, toast some whole-wheat panko breadcrumbs in a tiny bit of olive oil with a pinch of garlic powder until golden brown, and sprinkle it over the top for a fantastic textural contrast.
- Make it a Meal: This mac and cheese is fantastic with a simple roasted protein. Serve it with some lemon-herb chicken breast or some flaky baked salmon for a complete, well-rounded dinner that will impress everyone at the table.
Make It Your Own: Delicious Twists & Swaps
The beauty of this recipe is its versatility. Once you’ve mastered the base, the canvas is yours to paint! Here are a few of my favorite ways to mix it up.
- Buffalo Chicken Mac: Stir in ½ cup of shredded rotisserie chicken and 2-3 tablespoons of your favorite buffalo sauce along with the pasta. Top with crumbled blue cheese and extra green onions for the ultimate game-day feast.
- Taco Mac & Cheese: Add 1 teaspoon of chili powder and ½ teaspoon of cumin to the sauce in the blender. After combining the pasta and sauce, stir in some browned lean ground turkey or beef, black beans, and corn. Serve with a dollop of Greek yogurt and diced avocado.
- Garden Veggie Delight: Sauté some chopped broccoli florets, sun-dried tomatoes, and spinach, then fold them into the mac and cheese at the end. It’s an easy way to pack in even more nutrients and color.
- Dairy-Free Dream: It’s easy to make this vegan! Use a dairy-free cottage cheese alternative (like Tofutti brand) or silken tofu, your favorite vegan cheddar shreds, and nutritional yeast. The method stays exactly the same!
- Italian Herb Infusion: Add a teaspoon of Italian seasoning and a pinch of red pepper flakes to the sauce in the blender. Swap the cheddar for a Italian blend cheese and stir in some chopped fresh basil at the end for a Mediterranean flair.
A Few More Thoughts From My Kitchen to Yours
This recipe has become a weekly staple in my house, and it’s evolved in fun ways. My partner, who claimed to “hate” cottage cheese, had no idea it was in the sauce until I told him after his second helping! That’s the magic—it completely disappears, leaving only its creamy, protein-rich goodness behind.
One funny kitchen fail I had early on was trying to skip the blender and just whisk the cottage cheese into the milk in the pan. Let me save you the trouble: it does not work. You’ll be left with a chunky, curdled-looking sauce that, while still tasty, is not the smooth, luxurious experience we’re aiming for. Trust the blender!
Don’t be afraid to play with different cheeses, too. A little Gruyère or smoked Gouda in place of some of the cheddar can take this to a whole new level of fancy. Cooking is all about making a recipe your own, so have fun with it!
Your Questions, Answered!
I’ve gotten a lot of great questions about this recipe over time. Here are the ones that pop up most often.
- Q: Can I really not taste the cottage cheese?
A: I promise, you really can’t! When blended until completely smooth and combined with the sharp cheddar and savory spices, the cottage cheese loses its distinct “curdy” identity and simply becomes the most incredible, creamy base. It adds a slight tang that actually enhances the cheesy flavor. - Q: My sauce is a bit too thin/too thick. How can I fix it?
A: No worries, both are easy fixes! If it’s too thin, let it simmer for another minute or two over the heat, stirring constantly—it will continue to thicken. If it’s too thick, that’s what your reserved pasta water is for! Add a tablespoon at a time, stirring, until it loosens up to your perfect consistency. - Q: Can I make this ahead of time?
A: You can! The sauce can be blended and stored in an airtight container in the fridge for up to 2 days before you heat it up and combine it with freshly cooked pasta. I don’t recommend storing the fully assembled dish for long, as the pasta can absorb the sauce and become a bit soft. - Q: Is the nutritional yeast necessary?
A: It’s optional, but highly recommended! It adds a deep, savory, “cheesy” flavor that makes the dish taste even more indulgent. If you don’t have it, the recipe will still be delicious, but it’s a fantastic ingredient to have in your pantry for healthy cooking.
High-Protein Cottage Cheese Mac & Cheese : Light, Creamy & Comforting
Description
Indulge in creamy, cheesy, soul-satisfying mac and cheese that’s actually packed with protein! By blending cottage cheese with sharp cheddar and using high-protein pasta, this dish transforms a classic comfort food into a light, energizing, and deeply satisfying meal.
Ingredients
For the Pasta:
-
8 oz high-protein elbow pasta (chickpea, lentil, or yellow pea pasta)
-
Salt, for boiling water
For the Sauce:
-
1 cup low-fat cottage cheese (or silken tofu for vegan)
-
½ cup unsweetened almond milk or skim milk
-
½ cup reduced-fat shredded cheddar cheese (or full-fat/alternative cheese)
-
2 tbsp grated Parmesan cheese
-
1 tbsp nutritional yeast (optional)
-
½ tsp garlic powder
-
½ tsp onion powder
-
¼ tsp paprika (smoked or regular)
-
Salt and black pepper to taste
Optional Toppings/Enhancements:
-
Chopped chives or parsley
-
Toasted breadcrumbs
-
Extra Parmesan
-
Mix-ins: shredded chicken, veggies, buffalo sauce, spices, etc.
Instructions
-
Cook the pasta: Boil salted water and cook pasta al dente. Reserve ½ cup pasta water, then drain.
-
Blend the sauce: In a high-speed blender, combine cottage cheese, milk, cheddar, Parmesan, nutritional yeast, garlic powder, onion powder, and paprika. Blend until smooth (45–60 seconds).
-
Heat the sauce: Pour blended sauce into a medium saucepan over medium heat. Stir constantly for 3–4 minutes until warm, thickened, and bubbly.
-
Combine pasta and sauce: Add drained pasta to the sauce. Stir until fully coated. If sauce is too thick, add reserved pasta water 1 tbsp at a time until desired consistency.
-
Taste and adjust: Season with salt, pepper, or extra spices to preference.
-
Serve and garnish: Ladle into bowls and optionally top with parsley, chives, extra Parmesan, or toasted breadcrumbs.
Notes
-
Buffalo Chicken Mac: Stir in ½ cup shredded chicken and 2–3 tbsp buffalo sauce. Top with crumbled blue cheese.
-
Taco Mac & Cheese: Add chili powder, cumin, black beans, corn, and cooked ground turkey or beef. Top with Greek yogurt and diced avocado.
-
Garden Veggie Delight: Fold in sautéed broccoli, spinach, and sun-dried tomatoes.
-
Dairy-Free Version: Use vegan cottage cheese or silken tofu and vegan cheddar shreds.
-
Italian Herb Infusion: Add Italian seasoning and red pepper flakes. Swap cheddar for Italian blend cheese and stir in fresh basil.
Nutrition
- Calories: 320 Cal Per Serving
- Fat: 11 g
- Carbohydrates: 30 g
- Fiber: 6 g
- Protein: 24 g
The Good Stuff: What’s Fueling Your Body
Now, let’s talk about why this dish makes you feel so good! This isn’t just empty calories; it’s real, satisfying fuel. The estimated nutritional info (for 1 of 3 servings) is a game-changer compared to traditional mac and cheese.
Per Serving (est.): Calories: ~320 | Protein: 24g | Carbs: 30g | Fat: 11g | Fiber: 6g
Let’s break that down. The 24 grams of protein primarily comes from two powerhouses: the high-protein pasta (from chickpeas, lentils, or peas) and the cottage cheese. Protein is essential for building and repairing muscles, keeping you full for hours, and stabilizing your energy levels. The 6 grams of fiber from the pasta aids in digestion and also contributes to that feeling of fullness. By using reduced-fat cheeses and ditching the heavy butter-and-flour roux, we keep the fat content reasonable while maximizing flavor. This is comfort food that truly comforts you from the inside out, making it perfect for a post-workout meal, a satisfying lunch, or a dinner that won’t weigh you down.
Final Thoughts: Comfort, Redefined
So, there you have it. A big, steamy bowl of mac and cheese that doesn’t just love your soul for a fleeting moment, but truly loves your body back. It’s proof that the most satisfying meals aren’t about deprivation or settling for less. They’re about being a little smarter in the kitchen, using ingredients that work for you, and never, ever compromising on flavor.
This High-Protein Cottage Cheese Mac & Cheese is more than just a recipe—it’s a new way to think about the food that fuels you. It’s a reminder that “healthy” doesn’t have to mean complicated, bland, or boring. It can be creamy, cheesy, deeply comforting, and joyfully simple.
The next time that mac and cheese craving hits, you don’t have to choose between indulgence and feeling good. You can have both. You deserve both.
Now, I’d love to hear from you! Did this recipe change your mind about cottage cheese? What are your favorite add-ins? Share your creations and tag me—seeing your kitchen wins is my favorite thing.

No-Bake Gingerbread Oat Bars : Cozy, Crunchy & Naturally Sweet
No-Bake Gingerbread Oat Bars: Your New Favorite Cozy Snack
Hey friends, Beau here! Can we talk about that magical, elusive feeling for a second? You know the one. It’s that moment you bite into something and it just gets you. It’s cozy, it’s comforting, and it tastes like a warm hug on a crisp afternoon. For me, that feeling has always been wrapped up in the warm, spiced, deeply soulful flavors of gingerbread. The only problem? Sometimes, turning on the oven feels like a monumental task. Between preheating, baking, and cleaning up, the cozy vibe can get lost in the shuffle.
Well, I’m here to tell you that we can have our gingerbread and eat it too, with zero baking required. These No-Bake Gingerbread Oat Bars are my latest kitchen obsession, and I have a feeling they’re about to become yours. Imagine all the nostalgic charm of a gingerbread cookie, but in a chewy, crunchy, perfectly sweet bar that comes together in one bowl and sets up in your fridge. They’re packed with wholesome oats, a double hit of cozy spice, and pockets of melty chocolate that send the whole experience over the top. This is feel-good food at its finest—simple, soulful, and seriously satisfying. So, let’s ditch the hot kitchen and get straight to the good part.
A Spoonful of Molasses & a Dash of Memory
This recipe takes me right back to my grandma’s kitchen, but not in the way you might think. She was the queen of gingerbread men, but her kitchen during the holiday baking marathon was a strict “no-kids-underfoot” zone. My gateway to those flavors was actually a jar of molasses she kept in the pantry. I’d sneak a spoonful when no one was looking—that deep, bittersweet, almost smoky flavor was like nothing else. It felt so grown-up and complex. These bars capture that exact same spirit. They’re not overly sweet; they’re sophisticated in their simplicity, with the rich molasses taking center stage, supported by cinnamon and vanilla. It’s that same thrilling, cozy flavor I discovered as a kid, now all grown up and packed into a no-fuss bar perfect for our busy, beautiful lives. Every bite is a little delicious time machine.
Gathering Your Bar-Making Superstars
One of the best things about this recipe is its flexibility. I’m a big believer in using what you’ve got, so don’t stress if you need to make a swap or two. Here’s the lowdown on what goes into these beauties and why:
- 1 ½ cups (360 g) Cashew Butter: This is our superstar binder! Cashew butter has a mild, buttery sweetness that lets the other flavors shine. Chef’s Insight: No cashew butter? No problem! Almond butter, peanut butter, or even sunflower seed butter will work beautifully. Just know that a stronger-flavored nut butter will add its own distinct voice to the choir.
- ½ cup (6 oz) Honey: Our natural sweetener that also helps everything stick together. It adds a lovely floral note that pairs perfectly with the spices.
- ¼ cup (80 g) Molasses: This is the heart and soul of the gingerbread flavor! That deep, robust, almost bitter sweetness is non-negotiable for that classic taste. Pro Tip: I use a light, unsulphured molasses for the best flavor. Blackstrap can be too intense and bitter for this recipe.
- ½ teaspoon Salt: Never, ever skip the salt! It’s the flavor enhancer that makes all the other ingredients pop and prevents the bars from tasting flat.
- 2 teaspoons Ground Cinnamon: The warm, familiar spice that makes everything feel like home.
- 2 teaspoons Vanilla Extract: The flavor bridge that ties all our sweet and spicy elements together in perfect harmony.
- 6 cups (480 g) Old-Fashioned Rolled Oats: The sturdy, chewy foundation of our bars. They give us substance, fiber, and that wonderful wholesome texture.
- 2 cups (30 g) Puffed Kamut: My secret weapon for a delightful, airy crunch! Substitution Tip: Can’t find puffed kamut? Puffed rice or even puffed millet are fantastic and easy-to-find alternatives.
- 2 cups Chocolate Chips: Because chocolate makes everything better! I’m partial to dark chocolate for a bittersweet contrast, but semi-sweet or milk chocolate are all welcome here.
- Sea Salt for topping (optional): A light sprinkle of flaky sea salt right before chilling creates an incredible sweet-and-salty situation that will have everyone asking for your secret.
Let’s Make Some Magic: The No-Bake Process
Ready to see how this all comes together? It’s so simple, you might just have it memorized after one try. Let’s get mixing!
- Create the Gooey Glue. Grab a large saucepan—and I mean large, we’re making a double batch for a reason!—and place it over medium-low heat. Add your cashew butter, honey, molasses, salt, cinnamon, and vanilla extract. Now, the key here is gentle heat. We’re just warming everything through until it’s melted, smooth, and beautifully fragrant. You’ll want to stir it constantly with a spatula. This should only take 3-4 minutes. Chef’s Hack: If your nut butter is super thick, you can gently warm it in the microwave for 20-30 seconds first to make it easier to stir into the mixture.
- Combine the Dry Crew. Once your wet mixture is silky smooth, take the saucepan off the heat. This is a crucial step! If you add the oats to a hot pan, the chocolate chips you add later will instantly melt. Now, dump in all your rolled oats and puffed kamut. Use that spatula to fold and stir until every single oat and puff is gleaming and thoroughly coated in that spiced, sweet glue. It’s a serious arm workout, but so worth it!
- Let It Cool (Be Patient!). Here’s a little tip that makes a big difference: let the oat mixture sit and cool down for about 10-15 minutes. Stir it once or twice to help it along. Why? This prevents the chocolate chips from completely melting when we fold them in. We want lovely little pockets of chocolate, not a uniformly chocolate-colored bar.
- The Grand Chocolate Fold-In. Once the mixture is warm but not hot to the touch, it’s time! Pour in almost all of your chocolate chips (save a small handful for topping) and gently fold them in until they’re evenly distributed.
- Press It, Don’t Just Dump It. Line a 9×13-inch baking pan with parchment paper, leaving some overhang on the sides. This is your golden ticket to easy bar removal later! Transfer the mixture into the pan. Now, for the texture secret: press it down firmly and evenly. I like to use the bottom of a flat measuring cup or a glass, sometimes with a small piece of parchment on top to prevent sticking. Really compacting the mixture is what gives you bars that hold their shape and don’t crumble when you bite into them.
- The Final Flourish & The Big Chill. Sprinkle those reserved chocolate chips over the top and add a flurry of flaky sea salt if you’re feeling fancy. Now, the hardest part: patience. Slide the pan into the refrigerator and let it chill for at least 1-2 hours, or until the bars are completely firm. This allows the fats in the nut butter to re-solidify, setting our creation into perfect, sliceable bars.
- Slice and Savor! Once set, use the parchment paper to lift the entire slab of bars out of the pan. Place it on a cutting board and slice it into your desired size. I usually go for 24 generous rectangles.
How to Serve Up These Cozy Bars
Honestly, one of my favorite ways to enjoy these bars is straight from the fridge, standing in front of the open fridge door. No judgment here! But if you want to get a little fancy, here are a few of my go-to serving ideas:
- The Classic: Just the bar, all on its own, with a hot cup of coffee or a cold glass of milk. Perfection.
- The A La Mode Affair: For a decadent dessert, warm a bar slightly in the microwave for 10-15 seconds and top it with a scoop of vanilla bean ice cream. The contrast of warm, chewy bar and cold, creamy ice cream is next-level.
- The Gift of Good Taste: These bars make incredible edible gifts! Stack them in a cute cellophane bag tied with a ribbon, or arrange them in a festive tin. It’s a homemade gift from the heart that everyone actually wants.
- The Meal Prep Hero: Store them in an airtight container in the fridge and grab one for a quick breakfast on-the-go or an afternoon pick-me-up. They’re packed with lasting energy!
Make It Your Own: Delicious Twists & Swaps
This recipe is like a blank canvas for your culinary creativity. Feel free to play around and make it your own! Here are a few of my favorite variations:
- Spice Lover’s Dream: Add 1 teaspoon of ground ginger and a pinch of nutmeg or allspice along with the cinnamon for a more complex, classic gingerbread spice profile.
- Citrus Zing: Fold in 1 tablespoon of fresh orange zest with the chocolate chips. The bright, sunny citrus cuts through the richness beautifully.
- Crunchy Nut Delight: Add ½ cup of chopped walnuts or pecans for an extra layer of texture and a toasty, nutty flavor.
- Mocha Magic: Stir 1 teaspoon of instant espresso powder into the wet mixture. It won’t taste like coffee, but it will deepen the chocolate flavor and add a wonderful warmth.
- Fruity Fun: Swap out half of the chocolate chips for dried cranberries or chopped apricots for a chewy, tart contrast.
Beau’s Kitchen Chronicles
This recipe has truly evolved in my kitchen. The first time I made it, I was so impatient that I sliced into it after only 30 minutes of chilling. Let’s just say I ended up with more of a “gingerbread oat crumble” than bars—still delicious, but not exactly what I was going for! I’ve learned that the firm press and the full chill time are non-negotiable for the perfect texture. I’ve also made these with every nut butter under the sun, and while cashew is my favorite, a chunky peanut butter version with chopped peanuts mixed in is a close second. Don’t be afraid to experiment; some of the best recipes are born from a happy kitchen accident!
Your Questions, Answered!
I’ve gotten a few questions about this recipe over time, so I thought I’d answer the most common ones right here.
- My mixture is too dry and crumbly. What happened? This usually means your nut butter was particularly thick or you measured your oats a little heavy. No worries! Just add another tablespoon or two of honey or maple syrup and mix it in. It should come together nicely.
- Can I make these vegan? Absolutely! Simply swap the honey for maple syrup and use dairy-free chocolate chips. It works like a charm.
- How long do these bars last? Stored in an airtight container in the fridge, they’ll stay fresh and firm for up to 2 weeks. You can also freeze them for up to 3 months! Just layer them between parchment paper in a freezer-safe container.
- My bars are too soft, even after chilling. This can happen if the mixture wasn’t pressed firmly enough into the pan. Next time, really put some muscle into it! Also, ensure you’re using the correct amount of nut butter and sweetener—they are the binding agents.
A Note on Nourishment
While I’m not a nutritionist, I love creating food that makes you feel good from the inside out. These bars are a fantastic source of sustained energy, thanks to the complex carbs and fiber from the oats. The healthy fats and protein from the nut butter help keep you full and satisfied. Using natural sweeteners like honey and molasses means we’re avoiding refined sugars, and molasses even brings a small boost of iron and calcium to the party. Remember, this is a treat, but it’s one made with real, wholesome ingredients that love you back.
Print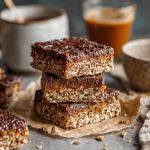
No-Bake Gingerbread Oat Bars : Cozy, Crunchy & Naturally Sweet
Description
These cozy, chewy, no-bake bars capture all the warm, spiced magic of gingerbread without ever turning on the oven. Packed with oats, a hint of molasses, and melty chocolate chips, they’re a quick, wholesome snack perfect for breakfast, dessert, or a midday pick-me-up.
Ingredients
-
1½ cups (360 g) cashew butter (or almond/peanut/sunflower butter)
-
½ cup (6 oz) honey (or maple syrup for vegan)
-
¼ cup (80 g) light molasses
-
½ tsp salt
-
2 tsp ground cinnamon
-
2 tsp vanilla extract
-
6 cups (480 g) old-fashioned rolled oats
-
2 cups puffed kamut (or puffed rice/millet)
-
2 cups chocolate chips (dairy-free if vegan)
-
Flaky sea salt, optional, for topping
Instructions
-
Make the wet mixture: In a large saucepan over medium-low heat, combine cashew butter, honey, molasses, salt, cinnamon, and vanilla. Stir until smooth and fragrant (3–4 minutes).
-
Add the oats and puffed grains: Remove from heat. Fold in rolled oats and puffed kamut until fully coated. Let cool 10–15 minutes.
-
Add chocolate: Fold in almost all chocolate chips, reserving a few for topping.
-
Press into pan: Line a 9×13-inch pan with parchment paper. Transfer mixture and press firmly into an even layer. Sprinkle reserved chocolate chips and optional flaky sea salt on top.
-
Chill: Refrigerate 1–2 hours until firm.
-
Slice and serve: Lift from pan using parchment overhang. Slice into bars (24 rectangles recommended).
Notes
-
Spice it up: Add 1 tsp ground ginger and a pinch of nutmeg/allspice.
-
Citrus zing: Fold in 1 tbsp orange zest with chocolate chips.
-
Extra crunch: Add ½ cup chopped nuts.
-
Mocha magic: Stir in 1 tsp instant espresso powder.
-
Fruity twist: Swap half of the chocolate chips for dried cranberries or apricots.
-
Vegan: Use maple syrup and dairy-free chocolate chips.
Nutrition
- Calories: 180 Cal Per Serving
- Sugar: 12 g
- Fat: 9 g
- Carbohydrates: 22 g
- Protein: 5 g
Your New Go-To Cozy Treat
And there you have it, friends! My ultimate no-bake, feel-good, gingerbread-spiced oat bars. This recipe is a celebration of simplicity, flavor, and that wonderful feeling of creating something delicious with your own two hands. It’s proof that you don’t need fancy equipment or a whole day to make a treat that feels special. I hope these bars find a spot in your recipe box, become a lunchbox staple, or become your new favorite thing to share with neighbors and friends. Food is about connection, and I’m so glad we got to connect over this recipe today. Now, go forth and make something Feastical!
With a full heart and a happy stomach,
Final Thoughts
These No-Bake Gingerbread Oat Bars are more than just a snack; they’re a little passport to coziness, anytime you need it. Simple to make, endlessly adaptable, and deeply satisfying, they’re proof that the most comforting treats often come from the simplest processes. I hope this recipe becomes a cherished, easy-going staple in your kitchen, bringing a moment of warm, spiced joy to your beautifully busy days. Now, go make something Feastical!

“Can’t Fail” Divinity
Your New Favorite Holiday Tradition: “Can’t Fail” Divinity
Hey friends, Beau here! Can we talk about a little piece of edible magic for a minute? I’m talking about that old-school, cloud-like, melt-in-your-mouth confection that your grandma probably made: Divinity. I see you – maybe you’ve been a little intimidated by it. You’ve heard the whispers about humidity being the enemy and candy thermometers being a must. But what if I told you there’s a version that’s… well, “can’t fail”?
This isn’t just any candy recipe. This is the one you pull out when you want to impress the in-laws, become the hero of the cookie swap, or just treat yourself to a sweet, nostalgic bite of pure joy. It’s soft, it’s fluffy, it has that perfect little nutty crunch, and it’s so much easier than the old-fashioned kind. We’re using a brilliant little shortcut that guarantees a perfect, pillowy texture every single time. So, if you’ve ever stared longingly at a plate of divinity but were too scared to try making it, your moment has arrived. Grab your mixing bowl and that jar of marshmallow creme hiding in your pantry – we’re about to make some sweet, sweet memories.
The Sweet Taste of Memory
For me, divinity will always taste like my Great-Aunt Shirley’s kitchen in December. The air would be thick with the scent of pine and roasting turkey, but the real action was always at her Formica-topped kitchen table. She’d have what looked like a tiny edible snowstorm happening, with little white clouds of candy dotted across sheets of waxed paper. My job, as the official “official taster,” was critical. I had to ensure every batch was up to snuff. She’d hand me a piece, her hands dusted with a fine powder of sugar, and watch my face. The moment that sweet, vanilla-kissed fluff dissolved on my tongue, I’d give her a vigorous thumbs-up. It was our little ritual. She’s been gone for years now, but every time I whip up a batch of this “Can’t Fail” Divinity, I’m eight years old again in her warm, bustling kitchen, feeling utterly loved and deeply important. That’s the power of a great recipe – it’s a time machine for your heart.
Gathering Your Cloud-Making Ingredients
One of the best things about this recipe is its beautiful simplicity. You only need a handful of ingredients to create something truly spectacular. Here’s the lineup:
- 1½ cups granulated sugar: This is the foundation of our candy. The sugar cooks down to create the structure and the classic, clean sweetness that divinity is known for. Don’t be tempted to reduce it – the chemistry needs it!
- Dash of salt: Never, ever skip the salt in a sweet recipe! A tiny dash is our secret weapon. It doesn’t make the candy taste salty; it just makes the vanilla and sugar flavors pop and become more complex, cutting through the pure sweetness.
- ⅓ cup water: Simple H2O is our cooking liquid. It helps the sugar dissolve evenly so we don’t end up with a grainy texture. It’s the launchpad for our sugar syrup.
- 1 (7 oz) jar Marshmallow Creme (like Hip-O-Lite or Jet-Puffed): Here she is – the star of the show and our “can’t fail” guarantee! This magical fluff gives us a head start on that airy, stable texture, making the whole process much more forgiving than the traditional egg-white method.
- ½ cup chopped nuts: I’m a classicist and love pecans here, but walnuts are fantastic too. They provide a wonderful textural contrast and a toasty, rich flavor that balances the sweetness. Chef’s Tip: Toast your nuts lightly in a dry pan before chopping! It unlocks their oils and makes them infinitely more flavorful.
- 1 tsp vanilla extract: The soul of the dish. Use the good, pure stuff if you can. That warm, aromatic vanilla is what makes divinity taste like a hug from the inside.
Let’s Make Some Magic: Step-by-Step
Okay, team, let’s get cooking! Read through all the steps once before you start. Candy-making is a bit of a dance, but I’ll be your partner, guiding you through every move.
- Prep Your Station: Before you even think about turning on the stove, lay out sheets of wax paper or parchment paper on your countertops. This is a non-negotiable first step! Once that hot sugar syrup is ready, you need to be able to work quickly. Having your landing pad ready is key. Also, get out your stand mixer or electric hand mixer and have it ready to go.
- Create the Sugar Syrup: In a medium-sized, heavy-bottomed saucepan, combine the sugar, salt, and water. Stir it over medium heat just until the sugar dissolves. Once it’s clear and bubbling, stop stirring! This is important. If you stir after this point, you can cause the sugar to crystallize. Attach your candy thermometer to the side of the pan, making sure the tip isn’t touching the bottom. Let it boil away until it reaches the hard-ball stage, which is 250°F (125°C). This usually takes about 10-15 minutes. No candy thermometer? No panic! You can do the “cold water test”: drop a tiny bit of the syrup into a cup of cold water. If it forms a hard, firm ball that you can squish between your fingers, you’re good to go!
- The Marshmallow Base: While the syrup is boiling, scoop the entire jar of marshmallow creme into the bowl of your stand mixer. If you’re using a hand mixer, use a large, heatproof bowl. Pro tip: Lightly greasing your spoon or spatula with a little butter or cooking spray will make getting every last bit of that sticky fluff out of the jar a breeze!
- The Big Pour & Mix: Once your syrup hits 250°F, immediately remove it from the heat. Now, with your mixer on low speed, slowly and carefully pour the hot syrup in a thin stream directly into the marshmallow creme. Be careful, it’s crazy hot! Once all the syrup is in, crank the mixer up to medium-high speed and let it work its magic. We’re going to beat it for about 5-7 minutes, or until the mixture becomes thick, glossy, and slightly stiff. You’ll know it’s ready when the beaters start leaving defined trails in the candy and it holds its shape. It should look like a beautiful, glossy, white cloud.
- Fold in the Goodies: Stop the mixer! Now, using a sturdy spatula, gently fold in the vanilla extract and your toasted, chopped nuts. “Folding” means you’re cutting down through the middle of the batter, sliding the spatula across the bottom, and turning the mixture over itself. This keeps all that beautiful air we just whipped into it. Be gentle but thorough.
- Time to Spoon & Set: Working relatively quickly (the mixture will start to set), drop teaspoonfuls of the divinity onto your prepared wax paper. For dainty, bite-sized pieces, I like using a ½ teaspoon. If you want those classic, generous puffs, go for a full teaspoon or even a tablespoon. If the mixture gets too stiff to scoop easily, you can add a few drops of hot water and stir gently to loosen it up. Then, the hardest part: walk away. Let the divinity cool and set completely. This usually takes 30-45 minutes. You’ll know they’re ready when they’re firm to the touch and easily peel off the paper.
How to Serve Your Heavenly Creation
You’ve done it! You’ve created little edible clouds of joy. Now, how do you present them? I’m a firm believer that food tastes better when it looks beautiful. For a classic, homespun look, pile them high on a vintage cake stand or a simple white platter. They look stunning all on their own. During the holidays, I love arranging them in a festive tin between layers of wax paper – they make the most thoughtful, heartfelt gifts. For a party, consider placing a single piece in colorful mini cupcake liners; it makes them easy to grab and adds a lovely pop of color. However you choose to serve them, pair them with a hot cup of black coffee or a tall glass of cold milk. The contrast is absolutely perfect.
Make It Your Own: Delicious Divinity Twists
The classic version is perfection, but who says we can’t play with our food? Here are a few of my favorite ways to mix things up:
- Chocolate Swirl: After folding in the nuts, drizzle in 2-3 tablespoons of melted and slightly cooled dark or semi-sweet chocolate. Fold just a few times to create a beautiful marbled effect. Don’t overmix, or you’ll lose the swirl!
- Fruity Pebbles: Feeling fun? Replace the nuts with ½ cup of crushed, fruity cereal. It adds a burst of color and a fantastic fruity flavor that kids (and kids-at-heart) adore.
- Peppermint Patty: For a festive winter twist, swap the vanilla for ½ teaspoon of peppermint extract and fold in ¼ cup of crushed candy canes or peppermint baking bits. It’s incredibly refreshing.
- Nut-Free & Fancy: No nuts? No problem! Simply leave them out and add ½ cup of chopped dried cranberries or cherries for a sweet-tart kick. Toasted coconut flakes are another incredible option.
- Espresso Kick: For the adults, add 1-2 teaspoons of instant espresso powder to the sugar syrup along with the water. It creates a mocha-flavored divinity that is absolutely to die for.
A Few Chef’s Secrets from My Kitchen to Yours
Over the years, this recipe has become my go-to, but it wasn’t always perfect. I remember one particularly… ambitious batch where I decided to triple the recipe. Let’s just say my stand mixer was not happy, and I ended up with divinity slowly creeping over the edge of the bowl like a sweet, sticky glacier. Lesson learned: don’t crowd your mixer! Stick to a single or double batch for best results. Another thing I’ve learned is that while this recipe is forgiving, it still has a sweet tooth’s sense of drama. It truly works best on a dry day. If it’s humid or rainy, the candy can absorb moisture from the air and stay a bit sticky. If that happens, just store them in a single layer with plenty of space in an airtight container – they’ll still taste incredible!
Your Divinity Questions, Answered!
I’ve gotten a lot of questions about this recipe over on Feastical. Here are the most common ones to help you out:
- Q: My divinity never got stiff and is still runny. What happened?
A: The most likely culprit is that your sugar syrup didn’t get hot enough. Make sure it hits a firm 250°F. Another possibility is under-mixing. You really need to beat it until those trails hold their shape. If it’s too late to fix, no worries! You can use it as a delicious ice cream topping. - Q: Can I make this without corn syrup?
A> This specific “can’t fail” version relies on the stabilizers in the marshmallow creme, which typically contains corn syrup. For a corn-syrup-free divinity, you’d need to use the traditional egg-white method, which is a bit more finicky. - Q: How should I store divinity, and how long does it last?
A: Store them in a single layer (or between layers of wax paper) in an airtight container at room temperature. They’ll keep their perfect texture for about 1-2 weeks. Do not refrigerate, as the fridge will introduce moisture and make them sticky. - Q: My candy is grainy. Why?
A: Graininess usually means the sugar crystallized. This can happen if you stirred the syrup after it started boiling, or if a sugar crystal got stuck to the side of the pan. To prevent this, you can brush down the sides of the pan with a wet pastry brush right as the syrup starts to boil.
A Little Note on Nutrition
Let’s be real, friends – divinity is a treat, a confection, a pure delight. It’s not a health food, and that’s perfectly okay! Life is all about balance. A single piece of this heavenly candy comes in at around 40 calories, with minimal fat and less than a gram of protein. It’s primarily sugar. So, the goal here isn’t to fuel your body for a marathon; it’s to fuel your soul with a bite of nostalgia and joy. Enjoy it mindfully, savor each fluffy bite, and share the rest with people you love. That’s what good food is all about.
Print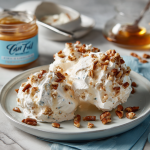
“Can’t Fail” Divinity
Description
Divinity is a classic, fluffy, melt-in-your-mouth candy that has been delighting generations. This simplified “can’t fail” version uses marshmallow creme to guarantee soft, pillowy divinity every time—perfect for the holidays, gift-giving, or a nostalgic treat!
Ingredients
-
1½ cups granulated sugar
-
Dash of salt
-
⅓ cup water
-
1 (7 oz) jar marshmallow creme
-
½ cup chopped nuts (pecans or walnuts), lightly toasted
-
1 tsp vanilla extract
Instructions
-
Prep your station: Line a counter or baking sheet with wax paper. Have your mixer ready.
-
Make the sugar syrup: In a medium saucepan, combine sugar, salt, and water. Heat over medium until sugar dissolves. Do not stir once boiling. Cook until 250°F (hard-ball stage). (Or test by dropping syrup in cold water—if it forms a firm ball, it’s ready.)
-
Prepare marshmallow base: Scoop marshmallow creme into a large mixing bowl.
-
Combine syrup and marshmallow: With mixer on low, slowly pour hot syrup into the marshmallow creme. Increase speed to medium-high and beat 5–7 minutes until thick, glossy, and slightly stiff.
-
Fold in flavor: Gently fold in vanilla extract and toasted nuts.
-
Spoon and set: Drop teaspoonfuls onto prepared wax paper. Let set 30–45 minutes until firm.
Notes
-
Prevent stickiness: Best made on dry days; store in an airtight container at room temp.
-
Chocolate swirl: Fold in 2–3 tbsp melted chocolate for a marbled effect.
-
Peppermint: Use ½ tsp peppermint extract + ¼ cup crushed candy canes.
-
Nut-free: Replace nuts with dried cranberries or toasted coconut.
-
Espresso kick: Add 1–2 tsp instant espresso powder to syrup for a mocha flavor.
Nutrition
- Calories: 40 Cal per1 tsp piece
- Fat: 1 g
- Carbohydrates: 9 g
You’re a Candy-Making Pro!
And there you have it! You’ve just mastered a classic candy that’s sure to earn you rave reviews and requests for the recipe. I’m so proud of you for taking the leap. This “Can’t Fail” Divinity is more than just a recipe; it’s a connection to the past, a reason to gather in the kitchen, and a simple, sweet way to show someone you care. I’d love to hear how your batch turns out! Tag me on social @Feastical or shoot me an email with your pictures and stories. Now, go forth and spread the sweetness!
Final Thoughts: More Than Just a Candy
So, there you have it. What once seemed like a daunting, old-fashioned art is now a simple, joyful ritual waiting to happen in your own kitchen. This “Can’t Fail” Divinity isn’t just about creating a perfect confection—though you absolutely will. It’s about reclaiming a piece of culinary heritage and making it your own. It’s about the quiet satisfaction of watching sugar and air transform into something magical, and the shared smiles that follow the first, melting bite.
Remember, the true secret ingredient isn’t the marshmallow creme or the vanilla; it’s the confidence to try. This recipe is your invitation to create those warm, fuzzy kitchen memories for yourself and for others. Whether you’re carrying on a family tradition or starting a brand new one, each fluffy white puff is a little testament to the fact that the sweetest things in life are often the simplest to make.
Now, go dust that counter with powdered sugar, and get ready to make a little edible magic. Your new favorite holiday tradition is waiting.

Low-Carb Keto Cheddar Biscuits : Red Lobster Style!
Forget the Carbs, Not the Flavor: My Keto Cheddar Biscuits Are a Game-Changer
Hey friends, Beau here. Can we have a real, kitchen-to-kitchen chat for a second? I think we can all agree that some cravings hit differently. They’re not just a passing thought; they’re a deep, soul-level need. For me, and I’m guessing for a lot of you, one of those cravings has always been for those warm, fluffy, insanely addictive Cheddar Bay Biscuits from Red Lobster. You know the ones. That perfect storm of sharp cheddar, garlicky butter, and a texture that’s somehow both tender and slightly crumbly, melting in your mouth before you’ve even had a chance to swallow.
But here’s the rub: when you’re living a low-carb or keto lifestyle, that kind of comfort food often feels like a distant memory. A delicious, cheesy memory you can only visit in your dreams. For years, I watched friends and family dive into bread baskets with a quiet sigh, settling for an extra piece of chicken while dreaming of biscuits. I knew there had to be a better way. I made it my mission in the Feastical test kitchen to crack the code.
After more batches than I care to admit (my recipe testers were *very* happy that month), I did it. I’m talking about a biscuit that doesn’t taste like a “substitute.” It tastes like the real, glorious deal. These Low-Carb Keto Cheddar Biscuits are buttery, cheesy, and perfectly soft, with that signature garlic punch you love. They come together in one bowl and are ready in under 30 minutes, making them the perfect, feel-good side for a cozy soup, a crisp salad, or your favorite keto-friendly steak. So, let’s grab our almond flour and get ready to bring that iconic flavor back to your table, no guilt attached.
The Biscuit That Started It All: A Salty, Buttery Memory
My obsession with these biscuits goes way back. Picture a younger Beau, maybe eight years old, sitting in a Red Lobster booth with my grandparents. The place felt massive, like a ship, with all those nautical ropes and nets on the walls. But my entire world narrowed down to one thing: that little red plastic basket, lined with a checkered paper, being placed in the center of our table.
A cloud of steam would rise, carrying the most intoxicating aroma of garlic and warm cheese. My grandma would always say, “Now, Beau, save room for your shrimp!” but it was a losing battle. I’d grab one, burning my fingers just a little, and that first bite was pure magic. It was more than a biscuit; it was the start of a family dinner, a signal that we were all together and something good was about to happen. That memory is baked right into the soul of this recipe. It’s not just about recreating a flavor; it’s about recapturing that feeling of simple, shared joy, no matter what your dietary journey looks like.
Gathering Your Kitchen Crew: The Ingredients
The beauty of this recipe is in its simplicity. We’re using a handful of powerhouse ingredients to create something truly spectacular. Here’s your shopping list and my little chef insights for each one.
- 1 ½ cups Almond Flour: This is our flour hero! Almond flour gives these biscuits a wonderfully tender crumb and a nutty, rich flavor that plays so well with the cheddar. Chef’s Tip: Make sure you’re using blanched almond flour, not almond meal, for the best texture. It’s finer and gives you that smooth, bakery-style finish.
- 1 ½ cups Shredded Cheddar Cheese: The star of the show! I use a sharp or extra-sharp cheddar because it packs the biggest flavor punch. Substitution Tip: Feel free to mix in some Pepper Jack for a little kick, or even a smoked Gouda for a deeper, more complex flavor profile.
- 2 large Eggs: Our trusty binder. Eggs bring everything together and provide the structure and lift that makes these biscuits puff up beautifully.
- 3 tbsp Butter, melted: For that essential richness and moisture. Butter makes everything better, and it’s a key part of that “warm hug” feeling. I use unsalted so I can control the salt level myself.
- 1 tsp Baking Powder: This is our leavening agent—the little magic maker that gives the biscuits their airy, light texture. Chef’s Tip: Always check the expiration date on your baking powder! If it’s old, your biscuits won’t rise as well.
- 1 tsp Garlic Powder & ½ tsp Onion Powder: The dynamic duo of flavor! This combination creates that iconic savory taste we all know and love. Don’t be shy here; this is where the personality comes from.
- A Generous Pinch of Salt: This is crucial for balancing the flavors and making the cheese and garlic really pop. If you’re using salted butter, you might just need a small pinch.
Let’s Get Baking: Your Foolproof Steps to Biscuit Bliss
Ready to make some magic? This process is so straightforward, you’ll have it memorized after the first batch. I’ll walk you through each step with my favorite kitchen hacks to ensure perfection.
- Preheat and Prep. Fire up your oven to 350°F (175°C). This is always the first step—giving your oven time to get perfectly hot ensures an even bake from the second your biscuits hit the rack. While it’s warming, line a baking sheet with parchment paper. Chef’s Hack: A light spritz of cooking spray on the parchment paper guarantees a flawless release, even if a little cheese decides to escape and get crispy.
- The One-Bowl Wonder. In a medium-sized mixing bowl, combine the almond flour, shredded cheddar, baking powder, garlic powder, onion powder, and salt. Give it a good whisk with a fork. Why? We’re evenly distributing the baking powder and seasonings so every single bite is perfectly flavored and risen.
- Bring in the Wet Team. In a separate small bowl or measuring cup, whisk your two eggs and pour in the melted butter. Whisk them together until they’re one happy, cohesive liquid. Now, pour this wet mixture into your dry ingredients. Chef’s Hack: Letting your melted butter cool for a minute before adding it to the eggs prevents them from accidentally scrambling!
- Mix with Heart (But Not Too Much!). This is the most important step. Use a sturdy spatula or your hands (my personal favorite method) to mix everything together. You’re looking for a soft, slightly sticky dough that holds together when you squeeze it. The key here is to mix just until combined. Overmixing can lead to dense biscuits, and we want them light and fluffy!
- Portion with Pride. Now, using a spoon, a cookie scoop, or your hands, scoop out 12 equal portions of dough. I like to gently roll them into rough balls and place them on your prepared baking sheet. They don’t have to be perfect spheres—a rustic, craggy top is what gives them character and extra nooks for our optional topping!
- The Icing on the Cake (Or, Topping on the Biscuit). Before they go in the oven, I highly recommend sprinkling a little extra shredded cheddar cheese on top of each biscuit. This creates that gorgeous, cheesy, golden-brown crust that is just irresistible.
- Bake to Golden Perfection. Slide your tray into the preheated oven and bake for 12-16 minutes. Ovens can vary, so start checking at the 12-minute mark. You’re looking for beautifully golden tops and a firmness to the touch. A toothpick inserted into the center should come out clean.
- The Hardest Part: Let Them Rest! I know, the aroma is torture. But trust me on this one. Let the biscuits cool on the baking sheet for at least 10-15 minutes before you dive in. This allows them to set properly, making them easier to handle and giving the flavors a chance to settle into their final, perfect form.
Setting the Scene: How to Serve These Beauties
Okay, the biscuits are out of the oven, your kitchen smells like a five-star bakery, and your willpower has held strong through the cooling period. Now what? The beauty of these biscuits is their versatility.
For the ultimate experience, serve them warm, all on their own. They are a superstar appetizer or snack that needs no accompaniment. But if you want to build a meal around them, they are the perfect sidekick to a big, creamy bowl of keto broccoli cheddar soup or a hearty chili. Crumble one over a fresh green salad for the best “croutons” you’ve ever had, or serve them alongside a perfectly grilled steak or roasted chicken. They soak up pan sauces and gravies like a dream, all while keeping your carb count firmly in check.
Make It Your Own: Delicious Recipe Twists
Once you’ve mastered the classic, have some fun with it! This dough is a fantastic base for all sorts of flavor adventures. Here are a few of my favorite variations:
- Everything Bagel Style: Before baking, brush the tops with a little extra melted butter and sprinkle generously with everything bagel seasoning. Savory, salty, and absolutely addictive.
- Jalapeño Popper: Fold in ¼ cup of finely diced jalapeños (fresh or pickled, depending on your heat preference) and 2 tablespoons of crispy, crumbled bacon into the dough. It’s all the flavor of your favorite appetizer in biscuit form.
- Herb Garden Delight: Add two tablespoons of freshly chopped herbs like chives, parsley, and dill to the dry ingredients. It brightens up the whole biscuit and makes it feel incredibly fresh.
- Dairy-Free Swap: You can still enjoy these! Use a firm, shreddable dairy-free cheese and replace the butter with melted coconut oil or a plant-based butter alternative. The texture might be slightly different, but the flavor will still be fantastic.
Beau’s Kitchen Chronicles: A Few Parting Thoughts
This recipe has become a staple in my own home, and it’s evolved in funny ways. The first time I made them, I was so excited I burned my mouth on molten cheese—a mistake I hope you’ll avoid! I’ve also learned that the dough can be a little sticky, and that’s perfectly okay. Don’t be tempted to add more almond flour; just wet your hands slightly when shaping the balls, and you’ll be golden. The best part? Seeing the look on a friend’s face when they try one and I tell them, “Yep, they’re keto.” That moment of disbelief followed by pure joy is exactly why I do what I do.
Your Questions, Answered: Biscuit Troubleshooting
Let’s tackle some common questions head-on so you can bake with confidence!
Q: My biscuits are a bit greasy. What happened?
A: This usually means your cheese released more oil than expected. Different brands of cheese have varying moisture and oil content. Next time, try using a brand that’s a bit drier, or simply pat your shredded cheese with a paper towel before using it. Also, ensure you’re measuring your almond flour correctly—don’t pack it into the cup.
Q: Why are my biscuits flat and not rising?
A: The most common culprit is expired baking powder. It loses its potency over time! Give it a test by stirring a half teaspoon into a cup of hot water. If it doesn’t bubble vigorously, it’s time for a new can. Also, make sure you’re not overmixing the dough.
Q: Can I make these ahead of time?
A: Absolutely! You can mix the dough, portion it onto a baking sheet, and freeze the unbaked biscuits solid. Once frozen, transfer them to a zip-top bag. When a biscuit craving strikes, just bake them straight from the freezer, adding a few extra minutes to the baking time.
Q: Are they still good the next day?
A: They are best served day-of, but they reheat like a dream! Just pop them in a 350°F oven for 5-7 minutes or in the toaster oven for a few minutes until warm. This brings back their tender texture and makes them taste fresh-baked.
The Healthy Indulgence: A Quick Nutritional Look
I’m a chef, not a dietitian, but I believe in being transparent about what we’re eating! The main goal of this recipe is to be a delicious, low-carb alternative to a traditional high-carb food. By swapping out all-purpose flour for almond flour, we drastically reduce the net carbohydrates. Each biscuit comes in at around 2-3 grams of net carbs, making it a fantastic option for those following a keto or low-carb lifestyle. They are also naturally gluten-free and packed with more protein and healthy fats than a standard biscuit, thanks to the almond flour, eggs, and cheese. Remember, this is a treat—a wonderfully satisfying one that helps you stay on track without feeling deprived.
Print
Low-Carb Keto Cheddar Biscuits : Red Lobster Style!
Description
Keto Cheddar Biscuits – Low-Carb, Big Flavor
Indulgent, cheesy, garlicky biscuits—just like Red Lobster, but low-carb and keto-friendly. Ready in under 30 minutes, one bowl, no guilt.
Ingredients
-
1 ½ cups blanched almond flour
-
1 ½ cups shredded sharp cheddar cheese (or mix with Pepper Jack or smoked Gouda)
-
2 large eggs
-
3 tbsp unsalted butter, melted
-
1 tsp baking powder
-
1 tsp garlic powder
-
½ tsp onion powder
-
Pinch of salt
-
Optional: extra shredded cheese for topping
Instructions
1. Preheat & Prep
-
Preheat oven to 350°F (175°C).
-
Line a baking sheet with parchment paper; lightly spray with cooking oil.
2. Mix Dry Ingredients
-
In a medium bowl, whisk together almond flour, cheddar, baking powder, garlic powder, onion powder, and salt.
3. Combine Wet Ingredients
-
In a small bowl, whisk eggs and melted butter together.
-
Pour into dry ingredients and mix just until combined. Dough should be soft and slightly sticky.
4. Shape Biscuits
-
Scoop 12 equal portions (spoon, cookie scoop, or hands).
-
Roll into rough balls and place on baking sheet.
-
Optional: sprinkle extra cheese on top.
5. Bake
-
Bake for 12–16 minutes, until golden brown and firm to touch.
-
Let cool 10–15 minutes before serving.
Notes
-
Greasy biscuits: Cheese moisture varies; pat shredded cheese with paper towel if needed.
-
Flat biscuits: Check baking powder freshness; don’t overmix dough.
-
Make ahead: Freeze unbaked biscuits; bake straight from freezer, adding a few minutes.
-
Reheat: Oven 350°F, 5–7 minutes, or toaster oven until warm.
Dig In, You’ve Earned It!
And there you have it, my friends. The biscuit of your dreams, reimagined for the life you’re living now. This recipe is proof that you don’t have to give up the foods you love; you just have to get a little creative in the kitchen. I hope these keto cheddar biscuits bring as much warmth and happiness to your table as they have to mine.
I’d love to hear how your batch turns out! Tag me on social @Feastical or shoot me an email with your photos and stories. Did you try the jalapeño version? Invent a new twist of your own? Tell me all about it. Now, go forth and bake something Feastical!
Final Thoughts: Welcome Back to the Bread Basket
So, there you have it. The craving that once felt like a distant memory is now a warm, cheesy, garlicky reality, ready in under 30 minutes right from your own oven.
These Keto Cheddar Biscuits are more than just a successful recipe; they’re a victory. A victory over feeling left out, over settling for less, and over the idea that “healthy” means “bland.” They are living proof that with a little ingenuity, you can have it all—the comforting aroma, the tender crumb, the burst of sharp cheddar, and that unforgettable garlic butter essence, all while honoring your health goals.
This recipe is a love letter to comfort food, carefully reimagined. It’s a reminder that the foods that make us feel good, the ones tied to our happiest memories, don’t have to be off the table. They just need a new invitation. Consider this yours.
So, the next time that craving hits—and it will—you know exactly what to do. No sighing, no settling. Just preheat your oven, grab that almond flour, and get ready to pull a basket of pure, unapologetic joy from the oven. You’ve earned this.
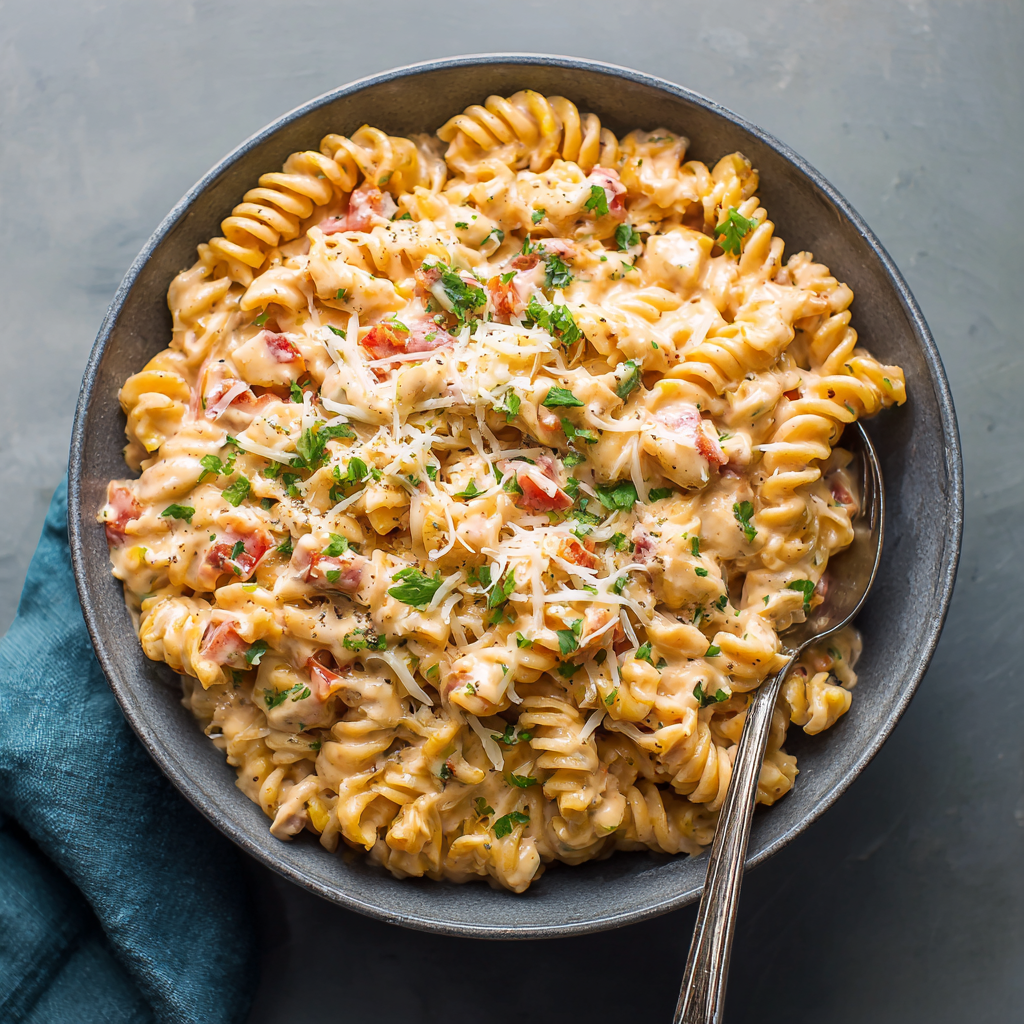
Creamy Queso Rotel Pasta : A Budget-Friendly Family Favorite
Creamy Queso Rotel Pasta: Your New Go-To Weeknight Wonder
Hey there, friend! Beau here, welcoming you back to my kitchen at Feastical. Let’s be real for a second. Some nights, you just don’t have the time or energy to wage war with a complicated recipe. You want something delicious, something that feels like a warm, cheesy hug, but you need it on the table faster than you can say “What’s for dinner?”
Well, pull up a chair and get ready to meet your new best friend: my Creamy Queso Rotel Pasta. This isn’t just a recipe; it’s a lifesaver. It’s the culinary equivalent of your favorite cozy sweater—familiar, comforting, and always a perfect fit. We’re talking about a one-pot wonder (okay, maybe two pots, but who’s counting?) that’s bursting with zesty, creamy, cheesy flavor and comes together in the time it takes to boil a pot of water.
What I absolutely adore about this dish is its magical ability to be both incredibly simple and wildly satisfying. It’s the kind of meal that has everyone asking for seconds, yet it’s so easy on your wallet you’ll feel like you’ve outsmarted the grocery bill. We’re feeding a family of five for around eight bucks! So, if you’re ready for a no-fuss, big-flavor dinner that delivers maximum comfort with minimal effort, grab your favorite pot and let’s get cooking.
The Happy Accident That Started It All
This recipe has a special place in my heart because it was born from a classic “empty pantry, creative desperation” situation. Picture this: It was a rainy Tuesday during my college years. My roommates and I had exactly $12 to our names and a serious case of the hangries. The cupboards were looking bleak—a half-box of pasta, a lonely jar of queso from a forgotten game night, and a can of Rotel that had been rolling around for weeks.
We looked at each other, shrugged, and decided to go for it. We boiled the pasta, dumped everything in, and crossed our fingers. What emerged from that pot was nothing short of a miracle. It was creamy, it was spicy, it was cheesy, and it was pure, unadulterated comfort. We ate it straight from the pot, laughing about how we’d somehow created a masterpiece from scraps. That’s the beauty of cooking, isn’t it? Sometimes the best recipes aren’t planned; they’re discovered in a moment of need, and they become a part of your story forever.
Gathering Your Flavor All-Stars
One of the best parts of this recipe is the short, sweet ingredient list. You probably have most of this hanging out in your pantry right now! Here’s what you’ll need to create this cheesy masterpiece.
- 1 box (16 oz) Rotini Pasta: I love rotini for this because all those little spirals are like flavor highways, trapping every bit of that creamy queso sauce. But honestly, any short pasta you have works—penne, fusilli, or even shells are all fantastic.
- 1/2 jar (about 8 oz) Queso Dip: This is our secret weapon! I’m a big fan of a smooth Monterey Jack queso for its mild, creamy base, but feel free to use a spicy jalapeño queso if you want to turn up the heat. No need to be fancy here; your grocery store’s brand works perfectly.
- 1 can (10 oz) Rotel Diced Tomatoes & Green Chilies, UNDRAINED: Do not, I repeat, DO NOT drain this can! The liquid is packed with flavor and is crucial for creating our sauce. Rotel gives us that perfect zesty kick and a little bit of texture. It’s the dynamic duo with the queso.
- 1 to 1 1/2 cups Shredded Mexican-Style Cheese Blend: Because more cheese is always the answer. We’re using this for a glorious, melty finish. I like the blend for its combination of cheddar, Monterey Jack, and other goodies, but a straight sharp cheddar is also a winner.
- Kosher Salt: For seasoning your pasta water. Trust me, salting your pasta water is the single most important step for building flavor from the inside out. It should taste like the sea!
- Optional Garnishes: A sprinkle of fresh chopped cilantro, a squeeze of lime juice, or a dollop of sour cream can really take this dish to the next level and add a fresh, bright contrast.
Let’s Make Some Magic: Your Step-by-Step Guide
Ready to see how this all comes together? It’s so simple, you’ll have it memorized after the first time. I’ll walk you through each step with a few of my favorite chef hacks to ensure perfection every single time.
- Boil Like a Pro: Fill a large pot with water, add a hearty tablespoon of kosher salt, and bring it to a rolling boil. Chef’s Tip: Don’t add oil to the water! It will prevent the sauce from clinging to the pasta later. The salt is all you need. Add your rotini and cook according to the package directions for al dente. We want a little bite to it so it doesn’t get mushy when we mix in the sauce.
- Reserve the Liquid Gold: Before you drain the pasta, grab a mug and scoop out about a 1/2 cup of the starchy pasta water. This stuff is pure culinary gold! If our sauce feels a little thick later, a splash of this starchy water will loosen it up beautifully and help the sauce emulsify and cling to every noodle.
- The Big Drain & Return: Now, drain the pasta in a colander and immediately return it to the warm pot you cooked it in. We’re going to build our sauce right in this same pot—fewer dishes is always a win in my book!
- The Flavor Party: Turn the heat down to low. Now, pour in that glorious, un-drained can of Rotel. Follow it up with half the jar of queso dip and about one cup of the shredded Mexican cheese. Chef’s Hack: Save a little cheese for sprinkling on top at the end for that perfect, cheesy finish.
- Mix with Love: Now, stir everything together gently but thoroughly. You’ll see the residual heat from the pasta and the pot melt the queso and cheese into a creamy, dreamy sauce that coats every single spiral. If the sauce seems a bit too thick for your liking, this is where you add that reserved pasta water, a tablespoon at a time, until it reaches your desired consistency.
- The Final Melt: Once everything is combined and creamy, sprinkle the remaining shredded cheese over the top. Put a lid on the pot for just a minute off the heat to let that cheese melt into a gooey, irresistible blanket. Give it one final stir to incorporate that last layer of cheesy goodness.
How to Serve It Up in Style
This pasta is a superstar all on its own, but a little presentation goes a long way! I love serving it family-style, right out of the warm pot in the middle of the table. It just feels homey and inviting.
For a complete meal that balances the richness, I always pair it with something fresh and crisp. A simple side salad with a tangy vinaigrette is my go-to. The acidity from the dressing cuts through the creaminess of the pasta perfectly. If you’re feeling the Tex-Mex vibe, some warm, crispy tortilla chips for scooping are an absolute must. And don’t forget those optional garnishes! A bright sprinkle of fresh cilantro and a cool dollop of sour cream or Greek yogurt not only looks beautiful but adds fantastic layers of flavor.
Make It Your Own: Delicious Twists & Swaps
The beauty of this recipe is its flexibility. It’s a fantastic canvas for your own culinary creativity! Here are a few of my favorite ways to mix it up.
- The Protein Power-Up: Stir in a pound of cooked, seasoned ground beef or turkey, some shredded rotisserie chicken, or a can of rinsed black beans for a heartier, more protein-packed meal.
- Veggie Lover’s Delight: Sauté some diced onions and bell peppers and mix them in with the Rotel. You can also add a cup of frozen corn (no need to thaw) for a pop of sweetness and color.
- Spice It Up (or Down): For a milder version, use a “Mild” Rotel and a plain queso. If you’re a heat-seeker like me, grab the “Hot” Rotel, use a spicy queso, and add a diced jalapeño or a few shakes of your favorite hot sauce.
- Smoky Sensation: Add a teaspoon of smoked paprika or chipotle powder to the sauce for a deep, smoky flavor that’s absolutely incredible.
- Gluten-Free & Lightened-Up: Easily make this gluten-free by using your favorite GF pasta. To lighten it up, use a light or reduced-fat queso and cheese blend—it will still be wonderfully creamy and satisfying.
Beau’s Kitchen Notes & Stories
This recipe has evolved so much from that desperate college night. I’ve made it for potlucks where it was the first dish to disappear, and I’ve whipped it up on busy weeknights for my family more times than I can count. My biggest piece of advice? Don’t stress about measuring the cheese perfectly. This is a “feel” recipe. Want it cheesier? Add more cheese! Want it saucier? Add a bit more queso or that pasta water. It’s forgiving and wants you to succeed. The funniest thing that ever happened was when my dog, Biscuit, somehow managed to snag a noodle from a bowl left on the coffee table. He’s been my biggest fan ever since!
Your Questions, Answered!
I’ve gotten a lot of great questions about this recipe over the years. Here are the most common ones to help you out.
- Q: Can I make this ahead of time?
A: Absolutely! You can assemble it completely, let it cool, and store it in an airtight container in the fridge for up to 3 days. When you’re ready, reheat it in the microwave or in a pot on the stove over low heat, adding a splash of milk or water to loosen the sauce back up. - Q: My sauce turned out a little grainy. What happened?
A: This can happen if the heat is too high when you’re melting the cheese. Cheese prefers a gentle, low heat to melt smoothly. Always make sure you’ve turned the burner off or to its lowest setting before stirring in the queso and shredded cheese. The residual heat is all you need! - Q: Can I use a different kind of pasta?
A: Of course! This recipe is very pasta-shape-agnostic. Elbow macaroni, penne, cavatappi, or farfalle (bow-ties) all work wonderfully. Just stick to a short pasta for the best sauce-to-noodle ratio. - Q: Is there a substitute for the jarred queso?
A: In a pinch, you can make a simple cheese sauce by melting 2 tablespoons of butter, whisking in 2 tablespoons of flour to make a roux, then slowly whisking in 1 1/2 cups of milk until thickened. Off the heat, stir in 1 1/2 cups of shredded cheese until melted. Then proceed with the Rotel!

Creamy Queso Rotel Pasta : A Budget-Friendly Family Favorite
Description
Creamy Queso Rotel Pasta
A quick, cheesy, zesty weeknight dinner that’s comfort food at its finest—ready in under 30 minutes and budget-friendly!
Ingredients
-
1 box (16 oz) rotini pasta (or any short pasta: penne, fusilli, shells)
-
1/2 jar (8 oz) queso dip (mild or spicy)
-
1 can (10 oz) Rotel diced tomatoes & green chilies, undrained
-
1–1 1/2 cups shredded Mexican-style cheese blend
-
Kosher salt (for pasta water)
-
Optional garnishes: fresh cilantro, lime juice, sour cream
Instructions
1. Cook Pasta
-
Fill a large pot with water, add a heaping tablespoon of kosher salt, and bring to a rolling boil.
-
Cook pasta according to package directions for al dente.
-
Reserve 1/2 cup of pasta water before draining. Drain pasta and return it to the pot.
2. Build the Sauce
-
Reduce heat to low. Add Rotel (undrained), half the jar of queso dip, and 1 cup shredded cheese.
-
Stir gently until the cheese melts and forms a creamy sauce.
-
If sauce is too thick, add reserved pasta water 1 tbsp at a time until desired consistency.
3. Finish & Serve
-
Sprinkle remaining cheese on top, cover for 1 minute off heat to melt.
-
Stir gently to incorporate.
-
Serve immediately with optional garnishes: cilantro, lime juice, sour cream.
Notes
-
Grainy sauce: Ensure heat is low; cheese melts best on gentle residual heat.
-
Different pasta: Any short pasta works; sauces cling best to spirals or tubes.
-
Make-ahead: Refrigerate up to 3 days, reheat gently with a splash of milk or water.
-
Queso substitute: Make a simple cheese sauce with butter, flour, milk, and shredded cheese if needed.
Nutrition
- Calories: 400 Cal Per Serving
- Fat: 18g
- Carbohydrates: 42g
- Protein: 13g
Let’s Talk Nutrition & Budget
While this is definitely a comfort food dish, it’s helpful to know what you’re enjoying! The estimated nutritional information per serving (about 1/5th of the recipe) is roughly:
- Calories: ~400
- Fat: ~18g
- Carbohydrates: ~42g
- Protein: ~13g
Remember, these are estimates and can vary based on the specific brands you use. The real star here is the cost! This entire meal comes in at around $8, making it just about $1.60 per serving. In a world of rising grocery prices, it’s a genuine victory to find a meal that’s this delicious, easy, and incredibly kind to your wallet. It’s proof that eating well doesn’t have to mean spending a lot.
Final Thoughts from My Kitchen to Yours
And there you have it! My beloved Creamy Queso Rotel Pasta in all its simple, glorious detail. This recipe is more than just a list of ingredients and steps; it’s a reminder that the best meals are often the easiest ones, made with a spirit of joy and a dash of creativity.
I hope this recipe finds its way into your regular rotation and becomes a reliable friend on those busy nights, just like it has for me. Cooking should be fun, freeing, and fulfilling. So don’t be afraid to make it your own. Add your favorite protein, play with the spice level, and most importantly, share it with people you love.
If you make it, I’d be absolutely thrilled to see your creation! Tag me @Feastical on social media so I can cheer you on. Now, go forth and conquer that kitchen! Until next time, happy cooking.
Brown Sugar and Dijon Baked Corned Beef Brisket (Tender & Juicy)
Brown Sugar and Dijon Baked Corned Beef Brisket: Your New Favorite Comfort Food
Hey friends, Beau here from Feastical! Let’s talk about a cut of meat that sometimes feels a little intimidating but is secretly one of the easiest, most forgiving, and downright delicious things you can make in your oven: corned beef brisket.
Now, I know what you might be thinking. “Beau, that’s a St. Paddy’s Day thing, right? Don’t I have to boil it for hours?” Well, I’m here to let you in on a little kitchen secret that will change your corned beef game forever. We’re skipping the boil and heading straight for the oven. Why? Because baking your brisket, all wrapped up in a cozy foil packet, is the ultimate ticket to meat that’s so tender, you could cut it with a spoon.
And to take it from simply “tender” to “absolutely-can’t-wait-for-leftovers” incredible, we’re giving it a simple, two-ingredient glaze that does all the heavy lifting. We’re talking about the dynamic duo of deep, molasses-kissed brown sugar and tangy, complex Dijon mustard. This combo creates a crust that’s sticky, slightly sweet, savory, and packs a flavor punch that seeps right into the beef. It’s a no-fuss, set-it-and-forget-it kind of recipe that delivers a meal worthy of a Sunday supper centerpiece or a killer weeknight dinner that makes you feel like a kitchen superstar. So, preheat that oven, grab your favorite baking sheet, and let’s make some magic happen.
A Messy Apron and a Lesson in Patience
This recipe always takes me back to my grandma’s kitchen. She was the queen of “low and slow” cooking long before it was a trendy food network term. I remember one chilly Sunday, I was about ten years old, buzzing around her like a gnat, desperate for whatever was making the house smell so incredible to be ready now. She had this massive piece of corned beef brisket, and she let me help her mix the glaze. I, of course, got brown sugar all over the floor and Dijon mustard on my shirt. But she just laughed, handed me a clean apron, and said, “Beau, the best things in life—and in the kitchen—take time. You can’t rush a good brisket.”
When she finally pulled that steaming, fragrant packet from the oven and unwrapped it, the sight of that glistening, dark-crusted beef is seared into my memory. That first bite was a revelation—savory, sweet, and so incredibly tender it practically melted on my tongue. It taught me that a little patience yields the most delicious rewards. This recipe is my homage to her, and to the simple, soul-satisfying power of a well-cooked piece of meat.
Gather Your Goods: The Simple Lineup
Here’s the beautiful part: you only need a few key players to create this masterpiece. The brisket itself comes pre-seasoned, so the hard work is already done for you!
- 1 (3-4 pound) Corned Beef Brisket: This is the star of our show! Look for one in the refrigerated meat section of your grocery store, usually around St. Patrick’s Day, but many stores carry it year-round. It typically comes with a little spice packet—we’ll be using that! Chef’s Insight: Don’t worry about rinsing the brisket; that salty brine is part of the flavor. Just pat it dry with paper towels so our glaze can stick.
- 1/3 Cup Brown Sugar: Light or dark works beautifully. Dark brown sugar has a deeper molasses flavor that pairs wonderfully with the savory beef, creating an almost barbecue-like crust. Substitution Tip: If you’re out of brown sugar, you can use coconut sugar for a less refined option, or even pure maple syrup, though the glaze will be a bit runnier.
- 3 Tablespoons Dijon Mustard: This isn’t your average yellow mustard! Dijon has a complex, sharp, and slightly white wine-like tang that cuts through the richness of the beef and sugar. Chef’s Insight: The mustard acts as a glue for the sugar and adds a fantastic savory depth. If you only have whole-grain Dijon, that will add a lovely texture and even more flavor.
- The Spice Packet: That little packet of goodness tucked in with your brisket! It’s usually a mix of peppercorns, coriander, mustard seeds, and bay leaves. We’ll sprinkle this right onto the meat before the glaze for an extra layer of flavor.
Let’s Get Cooking: Your Foolproof Roadmap to Perfection
Ready to make the most tender brisket of your life? Follow these steps, and you really can’t go wrong. I’ve included all my little chef hacks to ensure your success.
- Preheat and Prep. Fire up your oven to a steady 350°F (175°C). While it’s warming, grab a large baking sheet and a long piece of heavy-duty aluminum foil—you want it to be long enough to fully envelop the brisket. Chef’s Hack: Laying the brisket on the foil on the baking sheet now saves you from a messy transfer later!
- Meet Your Brisket. Take your corned beef out of its package and place it flat-side down on the foil. Pat it completely dry with a few paper towels. This is a CRUCIAL step! A dry surface means our glaze will cling on for dear life, creating that incredible crust. If there’s a thick, solid layer of fat on one side, you can trim a little off, but leave a good amount—it’s our built-in basting system that keeps everything juicy.
- Sprinkle the Spices. Open up that little spice packet and sprinkle the contents evenly over the top and sides of the brisket. Gently press the spices into the meat so they adhere.
- Create the Magic Paste. In a small bowl, combine the brown sugar and Dijon mustard. Stir it together until it forms a thick, spreadable paste. It might seem a little stiff at first, but that’s perfect. Chef’s Hack: If your brown sugar is a little hard, pop it in the microwave for 15 seconds with a damp paper towel over it to soften it up.
- Get Hands-On with the Glaze. Using a spoon or your hands (my preferred method—cooking is tactile!), slather that brown sugar and Dijon paste all over the top and sides of the brisket. Cover every nook and cranny you can. Don’t be shy! This is what’s going to create that beautiful, caramelized, flavor-packed bark.
- The Cozy Foil Blanket. Carefully bring the long sides of the foil up over the brisket and fold them down together in a series of tight folds, creating a sealed tent. Then, fold the short ends up and in, creating a completely sealed packet. Chef’s Insight: This sealed environment is the key to tenderness. It traps the steam and the brisket’s own juices, essentially braising it in its own glorious liquid. No dry brisket here!
- Bake to Melt-in-Your-Mouth Tenderness. Slide the baking sheet with the foil packet into your preheated oven. Now for the hardest part: the wait. For a 3-pound brisket, bake for about 2 hours and 30 minutes. If yours is closer to 4 pounds, aim for 3 hours. You’ll know it’s done when your whole house smells amazing and a fork inserted into the meat meets almost no resistance.
- The All-Important Rest. Once the timer dings, carefully remove the baking sheet from the oven. DO NOT OPEN THE FOIL. I know, the temptation is real! But let that brisket rest, still wrapped, for a solid 15-20 minutes. This allows the frantic, hot meat juices to relax and redistribute back throughout the brisket. If you skip this step, all those lovely juices will just run out onto the cutting board, leaving you with drier meat.
- Slice and Serve. Now you can unwrap your masterpiece! Be careful of the steam. Transfer the brisket to a cutting board. Here’s your final pro-tip: always slice against the grain. Look for the lines running through the meat (the “grain”) and cut perpendicular to them. This shortens the muscle fibers, making each bite incredibly tender instead of chewy.
Plating Up Your Masterpiece
Now that you have this gorgeous, glistening brisket, how do you serve it? The possibilities are endless!
For a classic, hearty plate, I love serving thick slices of the brisket alongside buttery, garlicky mashed potatoes and some simple steamed green beans or roasted carrots. The potatoes are the perfect vehicle for soaking up any of those incredible juices left in the foil packet—don’t you dare throw those away! Drizzle that liquid gold right over the top of the sliced beef and potatoes.
Feeling like a traditionalist? You can’t go wrong with the classic Boiled Dinner. About 45 minutes before your brisket is done, you can unwrap it (carefully!), toss in some chopped potatoes, carrots, and wedges of cabbage around it, re-seal the foil, and let everything roast together until the vegetables are tender.
And let’s not forget the king of all leftovers: the Reuben sandwich. Pile thin slices of this brisket on rye bread with Swiss cheese, sauerkraut, and Thousand Island dressing, then grill it up in a buttered pan until golden and crispy. It’s a life-changing experience, I promise you.
Mix It Up! Fun Flavor Twists
Once you’ve mastered the basic formula, have some fun with it! This recipe is a fantastic canvas for your own creativity.
- The Irish Whiskey Glaze: Add a tablespoon of Irish whiskey to the brown sugar and Dijon mix for a wonderfully deep, adult flavor. The alcohol cooks off, leaving just a beautiful, smoky warmth.
- Orange & Clove Zest: Stir the zest of one whole orange and a quarter teaspoon of ground cloves into your glaze. This gives the brisket a wonderfully bright, aromatic, almost holiday-like flavor profile.
- Spicy Maple Kick: Swap the brown sugar for pure maple syrup and add a teaspoon of smoked paprika and a pinch of cayenne pepper. You’ll get a sweet, smoky, and slightly spicy crust that’s absolutely addictive.
- Honey & Whole Grain Mustard: Use honey instead of brown sugar and whole-grain mustard instead of Dijon. You’ll get a lighter, fruitier sweetness and a fantastic pop of texture from the mustard seeds.
- Low-Carb/Keto Version: Simply replace the brown sugar with a brown sugar substitute like Swerve or Lakanto’s Golden Monkfruit Sweetener. The Dijon mustard is already low in carbs, so you’re good to go!
Beau’s Kitchen Chronicles
This recipe has been a staple in my kitchen for years, and it’s evolved in the funniest ways. There was the infamous “Great Brisket Incident of 2018” where I used parchment paper instead of foil (don’t do it—it leaks!) and ended up with a smoky kitchen and a very sad, dried-out brisket. Lesson learned the hard way! I’ve also found that the quality of the corned beef makes a difference. I tend to splurge on a flat-cut brisket from a good butcher when I can—it’s a bit leaner and slices up beautifully for sandwiches. But honestly, even the budget-friendly grocery store versions turn out phenomenal with this method. It’s a truly foolproof recipe.
Your Questions, Answered!
Q: My glaze seemed to melt off and mix with the juices. Did I do something wrong?
A: Not at all! This is totally normal. While some of the glaze will caramelize onto the top of the brisket, a good portion of it will melt into the cooking liquid. This is a *good* thing! It creates an incredibly flavorful au jus that you can spoon over the sliced meat. You’re still getting all the flavor, I promise.
Q: Can I cook this in a slow cooker instead?
A: You bet! This method translates beautifully to a crockpot. Prepare the brisket with the spice packet and glaze just as directed. Place it in the slow cooker (you might need to cut it in half to fit), and add about 1/2 cup of water or beef broth to the bottom. Cook on LOW for 8-9 hours or on HIGH for 5-6 hours. The result will be just as tender!
Q: Why is my corned beef still tough?
A: Tough meat almost always means it needs more time. The beauty of this method is that it’s very forgiving. If your brisket isn’t fork-tender after the initial cook time, just re-seal the foil and pop it back in the oven for another 20-30 minutes. Brisket is a tough cut that becomes tender through long, slow, moist cooking.
Q: How should I store leftovers?
A: Let the brisket cool completely, then store it in an airtight container in the refrigerator for up to 4 days. It makes the most incredible leftovers! You can also freeze it for up to 3 months. Slice it before freezing for easy sandwich-making later.

Brown Sugar and Dijon Baked Corned Beef Brisket (Tender & Juicy)
Description
Brown Sugar and Dijon Baked Corned Beef Brisket
Tender, flavorful corned beef with a sticky-sweet Dijon glaze—perfect for Sunday suppers, sandwiches, or a cozy dinner.
Ingredients
-
1 (3–4 lb) corned beef brisket (flat cut, with spice packet)
-
1/3 cup brown sugar (light or dark)
-
3 tbsp Dijon mustard
-
Spice packet included with brisket
Instructions
1. Prep the Oven & Brisket
-
Preheat oven to 350°F (175°C).
-
Line a large baking sheet with heavy-duty aluminum foil long enough to fully wrap the brisket.
-
Place the brisket flat-side down on the foil. Pat dry thoroughly with paper towels.
2. Season & Glaze
-
Sprinkle the spice packet evenly over the brisket, pressing lightly.
-
In a small bowl, mix brown sugar + Dijon mustard into a thick paste.
-
Spread the paste evenly over the top and sides of the brisket.
3. Wrap & Bake
-
Fold the long sides of the foil up and seal, then fold the short ends to create a fully sealed packet.
-
Place the foil-wrapped brisket on the baking sheet and bake:
-
3 lbs: ~2 hr 30 min
-
4 lbs: ~3 hr
-
-
Rest wrapped 15–20 minutes before slicing.
4. Slice & Serve
-
Slice against the grain for tender pieces.
-
Serve with mashed potatoes, roasted veggies, or in a Reuben sandwich.
Notes
-
Glaze melting: Some glaze mixes with cooking juices—this makes an incredible au jus.
-
Slow cooker option: Place glazed brisket + ½ cup water/broth in slow cooker. Cook LOW 8–9 hr or HIGH 5–6 hr.
-
Tough brisket: Simply wrap and bake 20–30 min longer until fork-tender.
-
Storing leftovers: Refrigerate in airtight container up to 4 days, or freeze up to 3 months (slice before freezing).
Nutrition
- Calories: 420Cal Per Serving
- Sugar: 8g
- Fat: 28g
- Carbohydrates: 10g
- Protein: 28g
Nutritional Information (A Quick Note!)
Hey, I’m all about feel-good food, and that includes being mindful of what we’re eating. This baked corned beef brisket is a rich, satisfying source of protein. A 4-ounce serving provides a great protein boost to keep you full and energized. It’s important to note that corned beef is cured, so it is higher in sodium than a regular beef brisket. The brown sugar adds carbohydrates and natural sugars, creating that delicious crust we all love.
As with any good thing, balance is key! I love serving this with lots of healthy, simple vegetables to create a well-rounded meal. If you’re watching your sodium intake, you can look for a lower-sodium corned beef option at the store, and remember that you don’t need to add any extra salt to this recipe. The estimated values per serving (about 4oz of meat) are: Calories: ~420 | Protein: ~28g | Fat: ~28g | Carbs: ~10g | Sugar: ~8g.
Final Thoughts from My Kitchen to Yours
Friends, this Brown Sugar and Dijon Baked Corned Beef Brisket is more than just a recipe—it’s a reminder that the most satisfying meals often come from the simplest techniques. It’s about taking a humble cut of meat and treating it with a little patience and a lot of love, transforming it into something truly spectacular. It’s the kind of dish that gathers people around the table, that fills your home with an irresistible aroma, and that leaves everyone asking for seconds.
I hope this recipe becomes a trusted favorite in your home, just like it is in mine. It’s proof that you don’t need fancy skills or a million ingredients to create a meal that tastes like a warm hug. So go on, give it a try. And when you do, I’d love to hear

Southern Caramel Cream Cheese Pound Cake with Rich Caramel Glaze
Southern Caramel Cream Cheese Pound Cake: A Slice of Sweet, Buttery Heaven
Welcome to Your New Favorite Cake
Hey friends, Beau here! Let’s get straight to the good stuff. If you’ve been hunting for a dessert that doesn’t just satisfy a sweet tooth but practically gives it a warm, buttery hug, you’ve landed in the right spot. Today, we’re diving headfirst into my all-time, never-fail, always-gets-raves Southern Caramel Cream Cheese Pound Cake.
This isn’t just a cake; it’s an experience. Imagine the dense, velvety crumb of a classic pound cake, but amplified with the tangy richness of cream cheese. Now, picture that same masterpiece drowned in a luxuriously rich, homemade caramel glaze that seeps into every single pore. This cake is the star of family reunions, the hero of potlucks, and the secret weapon you pull out when you really, really want to impress someone. It’s the definition of a feel-good food, and I’m so excited to guide you through it. So, tie on your favorite apron, and let’s create some magic together.
The Cake That Started It All
This recipe takes me right back to my grandma’s linoleum-floored kitchen. The air was always thick with the scent of something baking, but her caramel pound cake was the holy grail. She’d never use a mixer—just a big, yellow bowl and a wooden spoon, her arms moving with a rhythm that seemed as ancient as the hills. I’d sit at the table, legs swinging, watching her like it was the greatest show on earth.
One summer, she finally let me “help” by pouring in the vanilla. I was so nervous I nearly dropped the bottle, but her hand steadied mine. She said, “Beau, the secret isn’t in the recipe. It’s in the love you stir into it.” That moment, the smell of caramelizing sugar and the feel of her flour-dusted hand on my shoulder, is baked into my memory forever. My version adds the cream cheese for an extra layer of indulgence, but the soul? That’s all Grandma. Every time I bake this, it feels like she’s right there with me, and I hope it brings a little of that same warmth to your kitchen, too.
Gathering Your Golden Ingredients
Great cakes start with great ingredients, and this one is no exception. Let’s break down what you’ll need and why each one is a superstar. Having everything at room temperature is non-negotiable here—it’s the chef’s secret to a perfectly smooth, non-curdled batter that bakes up like a dream.
For the Pound Cake:
- 3 cups Cake Flour: This lower-protein flour gives us that tender, fine crumb we crave in a pound cake. Chef’s Tip: If you’re in a pinch, you can make a DIY version by measuring 3 cups of all-purpose flour, removing 6 tablespoons of it, and replacing that with 6 tablespoons of cornstarch. Whisk it well!
- 3 cups Granulated Sugar: It sweetens, sure, but it also helps create that beautiful, delicate crust.
- 3 sticks (1.5 cups) Unsalted Butter, softened: The foundation of flavor and that signature dense, moist texture. I use unsalted to control the salt level.
- 1 (8 oz) package Cream Cheese, softened: The magic ingredient! It introduces a subtle tang and incredible moisture, preventing the cake from being dry.
- 6 large Eggs, room temperature: They provide structure and richness. Room temperature eggs blend into the batter much more smoothly.
- 1 tablespoon Vanilla Extract: Use the good stuff! It adds a beautiful, warm aroma. Fun Swap: Try using 2 teaspoons of vanilla and 1 teaspoon of almond extract for a nuanced flavor.
For the Rich Caramel Glaze:
- 2 sticks (1 cup) Salted Butter: Using salted butter here balances the intense sweetness of the glaze and adds a wonderful buttery depth.
- 2 cups Granulated Sugar: This is what we’ll caramelize to create the deep, complex flavor of the glaze.
- 2 (12 oz) cans Evaporated Milk: Not to be confused with sweetened condensed milk! This gives the glaze its creamy, pourable consistency without making it overly sweet.
- 1 teaspoon Vanilla Extract: We stir this in at the very end to preserve its flavor.
Let’s Bake: The Step-by-Step Symphony
Okay, team. We’re all set. Follow these steps, and you’ll have a masterpiece. Remember, baking is a labor of love, so don’t rush it!
- Prep Like a Pro: First things first, preheat your oven to a steady 325°F (165°C). Grab your trusty 10-inch Bundt pan and give it a really good coating of butter or non-stick spray. Now, dust it with a little flour, tapping out the excess. This dynamic duo ensures your beautiful cake will release cleanly. Chef’s Hack: After flouring, pop the pan in the fridge for 10 minutes. The cold butter hardens and creates an even more non-stick surface!
- The Creaming Foundation: In the bowl of your stand mixer fitted with the paddle attachment (or a large bowl with a hand mixer), combine the softened butter, cream cheese, and sugar. Beat this on medium-high speed for a full 5-7 minutes. I’m not kidding—set a timer! You want it to be incredibly pale, fluffy, and almost white. This step incorporates air, which is crucial for the cake’s texture.
- Egg-cellent Incorporation: With the mixer on low, add your room-temperature eggs one at a time. Let each egg fully incorporate into the batter before adding the next. This patience prevents the batter from breaking and ensures a smooth, emulsified mixture. Scrape down the bowl halfway through.
- Bringing It All Together: Gradually add the cake flour to the wet ingredients, mixing on low speed just until the flour disappears. Do not overmix! Overworking the flour develops gluten, which can make the cake tough. Finally, stir in that glorious vanilla extract by hand.
- Bake to Perfection: Spoon the thick, luscious batter into your prepared Bundt pan and smooth the top. Place it in the center of your preheated oven and bake for 1 hour and 15 minutes. Start checking for doneness at the 1-hour mark. The cake is ready when a long toothpick or skewer inserted into the center comes out clean, and the top is a deep golden brown.
- The All-Important Cool Down: Once baked, let the cake cool in the pan on a wire rack for 20 minutes. This allows the structure to set. Then, carefully invert the pan onto the rack and lift it off. Let the cake cool completely before you even *think* about adding the glaze. A warm cake will absorb the glaze too quickly and can become soggy.
- Conquer the Caramel Glaze: While the cake cools, make your glaze. Use a heavy-bottomed, deep saucepan (this is key to preventing boil-overs). Melt the salted butter over medium heat. Add the sugar and evaporated milk, and stir constantly until the sugar dissolves. Now, the test of patience: continue cooking and stirring frequently for about 45 minutes. You’ll see it slowly thicken and turn a beautiful caramel color. It’s ready when it coats the back of a spoon. Remove it from the heat and stir in the vanilla. Let it cool slightly; it will thicken more as it sits.
- The Grand Finale: Place your completely cooled cake on a serving plate. Pour the warm (not piping hot) caramel glaze generously over the top, letting it cascade down the sides in delicious rivulets. Let it set for about 30 minutes before slicing.
How to Serve This Masterpiece
Presentation is part of the joy! I love serving this cake on a beautiful cake stand to really show it off. A simple, thin slice is incredibly rich, so you don’t need a huge piece. For an extra touch of decadence, warm the slice slightly in the microwave for 10 seconds and serve it with a small scoop of high-quality vanilla bean ice cream. The contrast of warm cake, cool ice cream, and gooey caramel is next-level. A cup of strong black coffee or a cold glass of milk is the perfect companion to cut through the sweetness.
Make It Your Own: Fun Recipe Twists
Once you’ve mastered the classic, feel free to get creative! Here are a few of my favorite variations:
- Bourbon-Spiked Caramel: Add 2 tablespoons of good bourbon to the caramel glaze along with the vanilla for a wonderfully grown-up, complex flavor.
- Apple-Cinnamon Delight: Fold 1 cup of finely chopped, toasted pecans and 1 teaspoon of ground cinnamon into the cake batter before baking. The nutty crunch and warm spice are a match made in heaven with the caramel.
- Sea Salt Sensation: Finish the glazed cake with a light sprinkling of flaky sea salt. The salty-sweet combo is absolutely irresistible.
- Chocolate Caramel Swirl: Pour half the batter into the pan. Drizzle with 1/2 cup of chocolate fudge sauce, then top with the remaining batter and swirl with a knife. You get a marbled effect that chocolate lovers will adore.
- Dairy-Free Version: Use plant-based butter and cream cheese, and replace the evaporated milk with canned full-fat coconut milk. The result is surprisingly rich and delicious!
Beau’s Chef’s Notes & Kitchen Stories
This recipe has been a living, evolving thing in my kitchen. The first time I made it by myself, I was so proud I took a picture and sent it to my mom. I also forgot the vanilla in the cake. It was still good, but it taught me to always line up my ingredients beforehand (we chefs call this mise en place). Another time, I got a phone call while making the caramel and let it boil over. Let me tell you, cleaning solidified caramel off a glass stovetop is a rite of passage I don’t wish on anyone! So, learn from my mistakes: stay focused during the caramel stage. The beauty of this cake is its resilience. Even with little hiccups, it almost always turns out delicious.
Your Questions, Answered!
I’ve gotten a lot of questions about this cake over the years. Here are the most common ones to help you succeed.
Q: My cake is browning too fast on top but isn’t cooked in the middle. Help!
A: This is a classic oven issue! Ovens can have hot spots. If you see the top browning too quickly, tent it loosely with a piece of aluminum foil for the remainder of the baking time. This will shield it from direct heat and allow the center to cook through without burning the top.
Q: Why is my caramel glaze grainy?
A: Graininess usually means the sugar crystallized. To prevent this, make sure you stir constantly until the sugar is fully dissolved at the beginning. Avoid scraping the sides of the pot with your spoon once you start cooking, as sugar crystals can form there and trigger a chain reaction.
Q: Can I make this cake ahead of time?
A: Absolutely! This cake actually gets better and more moist the next day. Bake and cool the cake completely, wrap it tightly in plastic wrap (without glaze), and store it at room temperature. Make the glaze the day you plan to serve it for the best texture and shine.
Q: My cake stuck to the pan! What now?
A: Don’t panic! First, let it cool a bit longer. Then, take a thin, flexible butter knife and gently work it between the cake and the pan all the way around. You can also try placing the bottom of the pan on a warm, damp towel for a minute to slightly loosen the butter. If a few pieces break off, just place them back and cover the evidence with a generous pour of caramel glaze. No one will ever know.
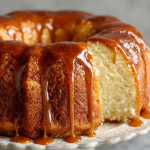
Southern Caramel Cream Cheese Pound Cake with Rich Caramel Glaze
Description
Southern Caramel Cream Cheese Pound Cake
A dense, velvety pound cake with cream cheese and a luscious homemade caramel glaze—pure Southern comfort in every bite.
Ingredients
For the Cake:
-
3 cups cake flour
-
3 cups granulated sugar
-
3 sticks (1½ cups) unsalted butter, softened
-
1 (8 oz) package cream cheese, softened
-
6 large eggs, room temperature
-
1 tbsp vanilla extract
For the Caramel Glaze:
-
2 sticks (1 cup) salted butter
-
2 cups granulated sugar
-
2 (12 oz) cans evaporated milk
-
1 tsp vanilla extract
Instructions
1. Prep
-
Preheat oven to 325°F (165°C).
-
Grease and flour a 10-inch Bundt pan. For extra release, refrigerate the pan 10 minutes after flouring.
2. Make the Cake
-
In a large bowl, cream butter, cream cheese, and sugar on medium-high for 5–7 minutes until pale and fluffy.
-
Add eggs, one at a time, mixing fully after each. Scrape down the bowl halfway through.
-
Gradually mix in cake flour on low speed until just combined. Stir in vanilla by hand.
-
Pour batter into prepared pan, smooth top, and bake 1 hour 15 minutes. Check at 1 hour; cake is done when a toothpick comes out clean.
-
Cool in pan 20 minutes, then invert onto a wire rack to cool completely.
3. Make the Caramel Glaze
-
In a heavy-bottomed saucepan, melt butter over medium heat.
-
Add sugar and evaporated milk, stirring constantly until sugar dissolves.
-
Continue cooking and stirring frequently ~45 minutes until thick and golden.
-
Remove from heat, stir in vanilla, and let cool slightly.
4. Glaze & Serve
-
Pour warm (not hot) caramel over completely cooled cake.
-
Let set 30 minutes before slicing.
-
Serve with ice cream, whipped cream, or a dusting of flaky sea salt if desired.
Notes
-
Prevent grainy glaze: Stir constantly until sugar dissolves; avoid scraping pot sides.
-
Avoid sinking: Don’t overmix flour; don’t open oven early.
-
Fast-browning tops: Tent with foil if necessary.
Nutrition
- Calories: 550–600 Cal Per Serving
- Sugar: 45g
- Fat: 30g
- Carbohydrates: 65g
A Little Note on Nutrition
Let’s be real, friends—this is a celebration cake, a treat to be savored and enjoyed with people you love. It’s not an everyday health food, and that’s perfectly okay! Food is about joy and connection, too. A standard slice (about 1/12th of the cake) will have roughly 550-600 calories, 30g of fat, 65g of carbohydrates, and 45g of sugar. It’s rich, so a little goes a long way. Enjoy it mindfully, and savor every single delicious, buttery, caramel-drenched bite without an ounce of guilt.
Final Thoughts from My Kitchen to Yours
Well, there you have it—my heart and soul in cake form. This Southern Caramel Cream Cheese Pound Cake is more than a recipe; it’s a tradition, a comfort, and a guaranteed smile-maker. I hope you feel empowered to bake it, share it, and make it a part of your own family’s story.
Remember, the best ingredient you can add is your own love. So don’t stress over a little spilled flour or a slightly lopsided cake. It’s all part of the beautiful, messy, and utterly delicious journey of cooking. Now, I’d love to hear from you! Did you add your own twist? Did your family go crazy for it? Share your stories and photos with me over on Instagram by tagging @Feastical. Happy baking!
With a full heart and an even fuller plate,
Beau

Easy Vanilla Pound Cake Recipe
Your New Favorite Slice of Sunshine: Easy Vanilla Pound Cake
Hey there, friend! Beau here, welcoming you back to my kitchen. Is there anything in the world that smells more like home than a vanilla pound cake baking in the oven? That sweet, buttery aroma just seems to hug every corner of the house, promising something truly special is on the way.
Today, I’m sharing what I honestly believe is the most perfect, foolproof, and downright delicious Vanilla Pound Cake recipe you’ll ever make. This isn’t just a dessert; it’s a blank canvas for your cravings, a reliable friend for last-minute potlucks, and the ultimate tea-time companion. We’re talking about a cake with a crackly, golden-brown crust that gives way to a melt-in-your-mouth, velvety crumb. It’s rich without being heavy, sweet without being cloying, and so incredibly moist you might just do a little happy dance after your first bite.
I know the word “from-scratch” can sometimes feel intimidating, but I promise you, this recipe is your new best friend. We’re keeping it simple, soulful, and satisfying—just like we do around here. So, tie on your favorite apron, find that trusty spatula, and let’s bake a cake that tastes like a warm, sunny afternoon.
A Slice of Memory: My Grandma Elsie’s Cake Stand
This recipe always takes me right back to my Grandma Elsie’s linoleum-floored kitchen. She didn’t have fancy gadgets or a designer kitchen, but she had a cake stand that was practically a family heirloom. It was a simple glass pedestal, but when that stand came out of the cupboard, you knew something good was happening.
She’d make this exact pound cake every Sunday. No fancy frosting, no elaborate decorations—just pure, unadulterated cake perfection. The ritual was everything. She’d let me cream the butter and sugar with her old wooden spoon, my small hands struggling to mix it until it was “pale and happy,” as she’d say. The sound of the mixer (a vintage model that weighed a ton) and the smell of vanilla and butter are my ultimate comfort sounds and smells. That cake wasn’t just about the ingredients; it was about the love and the tradition baked right in. Every time I pull out my own cake stand, I feel that connection, and I’m so excited to help you start your own delicious traditions.
Gathering Your Ingredients: The Dream Team
Part of the magic of this cake is its beautiful simplicity. You probably have most of these ingredients in your pantry right now! Here’s the lineup, with a few of my chef-y insights to help you understand the “why” behind the “what.”
- 1 cup (2 sticks) unsalted butter, softened: This is the heart and soul of our pound cake, providing that incredible richness and tender crumb. Using unsalted lets us control the salt level. Chef’s Tip: “Softened” is key! It should press easily with a finger but not be melted or greasy. Leave it on the counter for about an hour. In a pinch, you can cut it into tablespoons and microwave for 5-second bursts, but be careful!
- 1 ½ cups granulated sugar: Sweetness and structure! When creamed with the butter, it creates tiny air pockets that help the cake rise. For a deeper flavor, you can swap half for light brown sugar.
- 4 large eggs, at room temperature: Our binding agents and another source of lift and richness. Room-temperature eggs blend into the batter much more smoothly than cold ones, preventing a curdled look. Just place them in a bowl of warm water for 5-10 minutes before using.
- 2 teaspoons pure vanilla extract: The star of the flavor show! Don’t be shy here, and please use the real stuff. The artificial kind just can’t compete. For a next-level experience, try using vanilla bean paste—you’ll see those beautiful little specks throughout the cake.
- 2 cups all-purpose flour: The foundation of our cake. I always recommend spooning the flour into your measuring cup and leveling it off with a knife to avoid packing in too much, which can lead to a dense cake.
- ½ teaspoon baking powder: Our little rising helper, ensuring we get a nice, light texture.
- ½ teaspoon salt: A crucial flavor enhancer! It balances the sweetness and makes the vanilla flavor pop. Never skip the salt in baking.
- ½ cup whole milk, at room temperature: This adds moisture and helps bring the batter together. The fat in whole milk gives us a superior texture, but 2% will work in a pinch. Like the eggs, room temp is best for even mixing.
Let’s Get Baking: The Step-by-Step Magic
Ready to create some magic? Follow these steps, and you’ll be a pound cake pro in no time. I’ve sprinkled in my favorite kitchen hacks to make sure you succeed on the first try!
- Prep Your Pan and Oven: Start by preheating your oven to 350°F (175°C). This is non-negotiable for an even bake! Now, take your 9×5-inch loaf pan and give it a good coating of butter or non-stick spray. Add a tablespoon of flour and shake it around until the entire interior is coated, then tap out the excess. This “grease and flour” method is your best insurance policy against a stuck cake. Little Chef Hack: For extra-easy removal, you can line the bottom with a sling of parchment paper after greasing.
- Creaming is Key: In a large bowl, use an electric mixer (hand or stand) to beat the softened butter and sugar together. Now, don’t rush this! We’re not just mixing; we’re “creaming.” Beat on medium-high speed for a full 3-5 minutes until the mixture is light, pale yellow, and fluffy. This process incorporates air, which is essential for the cake’s texture. If you drag a spatula through it, it should look noticeably lighter.
- Incorporate the Eggs & Vanilla: With the mixer on medium speed, add your room-temperature eggs one at a time, beating well after each addition. Let each egg fully incorporate before adding the next. This patience prevents the batter from breaking and ensures a smooth, emulsified mixture. Once all the eggs are in, beat in the glorious vanilla extract until just combined.
- Whisk the Dry Goods: In a separate, medium-sized bowl, whisk together the flour, baking powder, and salt. This simple step ensures the leavening and salt are evenly distributed throughout the flour, so you get a uniform rise and flavor in every single bite.
- The Grand Finale: Combining Wet & Dry: Reduce your mixer speed to low. We’re going to add the dry ingredients and the milk alternately, starting and ending with the flour mixture. So, add about one-third of the flour, mix until *just* combined, then half the milk, another third of the flour, the rest of the milk, and finally the last of the flour. Mixing until *just* combined after each addition is crucial. Overmixing at this stage can develop the gluten in the flour and make your cake tough. A few streaks of flour are okay—they’ll get worked in at the end.
- Into the Pan & Smooth the Top: Pour the beautiful, thick batter into your prepared loaf pan. Use a spatula to spread it evenly and smooth the top. For that classic pound cake crack down the middle, you can run a spatula down the center, creating a slight indentation.
- Bake to Golden Perfection: Place the pan in the center of your preheated oven and bake for 55-65 minutes. Chef’s Truth: Ovens lie! Start checking at the 55-minute mark. The cake is done when it’s golden brown on top and a toothpick or skewer inserted into the very center comes out clean or with a few moist crumbs attached. If it has wet batter, it needs more time.
- The All-Important Cool Down: Once baked, remove the cake from the oven and let it cool in the pan on a wire rack for 10 minutes. This allows the structure to set slightly. Then, run a thin knife around the edges to loosen it, and carefully invert it onto the rack to cool completely. I know it’s tempting, but cutting into a warm pound cake can cause it to crumble. Letting it cool completely gives you the perfect, clean slice.
How to Serve Your Masterpiece
Now for the best part: eating it! This cake is a superstar all on its own, but here are a few of my favorite ways to dress it up.
Classic & Simple: A thick, room-temperature slice with a hot cup of coffee or tea is absolute perfection. It’s the ultimate afternoon pick-me-up.
Berry Bliss: Macerate some fresh strawberries or raspberries with a sprinkle of sugar and a dash of lemon juice. Spoon them and their glorious juices over a slice for a fresh, vibrant twist.
Indulgent & Creamy: A scoop of high-quality vanilla bean ice cream melting over a slightly warmed slice is a dessert dream come true. Drizzle with a little caramel or chocolate sauce for extra pizazz.
Whipped Cream Wonder: A dollop of freshly whipped cream and a dusting of powdered sugar is an effortlessly elegant way to serve this cake for guests.
Make It Your Own: Delicious Recipe Variations
Once you’ve mastered the classic, the world is your oyster! Here are a few fun twists to keep things exciting.
- Lemon Blueberry Burst: Add the zest of one lemon to the butter-sugar mixture and gently fold 1 cup of fresh or frozen (don’t thaw) blueberries into the finished batter. The bright lemon and juicy berries are a match made in heaven.
- Almond Joy: Substitute 1 teaspoon of the vanilla extract with pure almond extract. Fold in ½ cup of toasted sliced almonds and ½ cup of shredded coconut for a nutty, tropical flavor.
- Chocolate Chip Swirl: Toss ¾ cup of chocolate chips with a tablespoon of the flour mixture (this prevents them from sinking). Gently fold them into the batter at the very end.
- Brown Sugar Bourbon: Replace ½ cup of the granulated sugar with dark brown sugar and add a tablespoon of bourbon along with the vanilla. This creates a deeper, almost caramel-like flavor that’s incredible in the fall.
- Gluten-Free Friendly: You can usually substitute the all-purpose flour with a 1:1 gluten-free baking blend with great success. Just be sure the blend contains xanthan gum.
Beau’s Chef’s Notes & Kitchen Stories
This recipe has been my go-to for years, and it’s evolved with me. I once, in a frantic pre-party baking session, accidentally used salted butter and forgot the added salt. The cake was still delicious, but it taught me the importance of that salt balance! Another time, I was so impatient I didn’t let my butter soften enough, and I ended up with a denser, shorter cake. It was a tasty lesson in patience. The beauty of baking is that even the “mistakes” are usually still pretty wonderful. Don’t stress, just enjoy the process. The love you put in is the most important ingredient.
Your Pound Cake Questions, Answered!
Q: Why did my cake sink in the middle?
A: This is usually due to underbaking or opening the oven door too early. The cake’s structure hasn’t set yet, and the sudden temperature drop causes it to collapse. Use that toothpick test and try to resist peeking for at least the first 45 minutes!
Q: My cake is dense and heavy. What went wrong?
A: A few things can cause this: overmixing the batter after adding the flour (which develops gluten), not creaming the butter and sugar long enough, or using cold ingredients that don’t emulsify properly. Remember, “light and fluffy” in the creaming stage is your mantra!
Q: Can I make this in a Bundt pan?
A: Absolutely! This recipe fits perfectly in a standard 10-cup Bundt pan. Grease and flour the pan *very* thoroughly, especially all those nooks and crannies. The baking time might be slightly less, so start checking around the 45-minute mark.
Q: How should I store leftover pound cake?
A: Once completely cool, wrap it tightly in plastic wrap or store it in an airtight container at room temperature for up to 3 days. For longer storage, it freezes beautifully for up to 3 months. Just wrap it well in plastic and then foil.
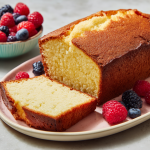
Easy Vanilla Pound Cake Recipe
Description
Easy Vanilla Pound Cake
A classic, buttery pound cake with a crackly golden crust and melt-in-your-mouth crumb—perfect for tea, dessert, or anytime you need a little slice of sunshine.
Ingredients
-
1 cup (2 sticks) unsalted butter, softened
-
1 ½ cups granulated sugar
-
4 large eggs, room temperature
-
2 tsp pure vanilla extract
-
2 cups all-purpose flour
-
½ tsp baking powder
-
½ tsp salt
-
½ cup whole milk, room temperature
Optional Add-ins & Toppings:
-
Fresh berries, whipped cream, chocolate chips, lemon zest, toasted nuts, or powdered sugar
Instructions
1. Prep Pan & Oven
-
Preheat oven to 350°F (175°C).
-
Grease and flour a 9×5-inch loaf pan; line bottom with parchment paper for easy removal.
2. Cream Butter & Sugar
-
In a large bowl, beat butter and sugar on medium-high speed for 3–5 minutes until pale, fluffy, and light.
3. Add Eggs & Vanilla
-
Beat in eggs, one at a time, mixing fully after each.
-
Stir in vanilla extract.
4. Combine Dry Ingredients
-
Whisk together flour, baking powder, and salt in a separate bowl.
5. Mix Wet & Dry
-
Reduce mixer to low. Alternately add dry ingredients and milk to the butter mixture, starting and ending with flour.
-
Mix just until combined—avoid overmixing.
6. Bake
-
Pour batter into pan, smooth top, and optionally create a shallow center indentation.
-
Bake 55–65 minutes, checking at 55 minutes. Done when a toothpick comes out clean or with a few moist crumbs.
7. Cool
-
Let cake cool in pan for 10 minutes.
-
Run a knife around edges, invert onto a wire rack, and cool completely before slicing.
Serving Suggestions
-
Classic: Slice and enjoy with coffee or tea.
-
Berry Bliss: Top with macerated strawberries or raspberries.
-
Indulgent: Serve slightly warmed with vanilla ice cream and a drizzle of caramel or chocolate sauce.
-
Elegant: Add whipped cream and dust with powdered sugar.
Notes
-
Lemon Blueberry: Fold in lemon zest and fresh/frozen blueberries.
-
Almond Joy: Swap 1 tsp vanilla for almond extract; fold in toasted almonds & shredded coconut.
-
Chocolate Chip Swirl: Toss chocolate chips with a little flour and fold into batter.
-
Brown Sugar Bourbon: Replace ½ cup sugar with dark brown sugar + 1 tbsp bourbon.
-
Gluten-Free: Substitute flour with a 1:1 gluten-free blend (with xanthan gum).
Nutritional Information*
Hey, we’re all about balance here! It’s totally okay to indulge in a slice of something wonderful. Here’s the approximate nutritional breakdown per slice (based on 10 slices), so you can enjoy every bite mindfully.
- Calories: 340
- Total Fat: 17g
- Saturated Fat: 10g
- Cholesterol: 95mg
- Sodium: 150mg
- Total Carbohydrates: 40g
- Dietary Fiber: 0.5g
- Sugars: 25g
- Protein: 5g
*Please note: These values are estimates generated using a third-party calculator and will vary based on the specific brands of ingredients you use.
Final Thoughts from My Kitchen to Yours
And there you have it, my friends—the humble, glorious vanilla pound cake in all its buttery, vanilla-kissed glory. This recipe is more than just a list of ingredients; it’s a trusty companion for your baking journey. It’s the cake you can whip up for a birthday, a bad day, or just a beautiful Tuesday.
I hope this recipe brings as much joy to your kitchen as it has to mine. Remember, the best dishes are the ones made with a little bit of love and a whole lot of flavor. If you make it, I’d be absolutely thrilled if you tagged me @FeasticalBeau on social media so I can see your beautiful creation!
Now go forth and bake something Feastical!
With a full heart and an even fuller plate,

2-Ingredient Peanut Butter Fudge
Your New Go-To Dessert: 2-Ingredient Peanut Butter Fudge
Hey friends, Beau here from Feastical! Let’s be real for a second. We all have those moments. It’s 4 PM, the day is getting long, and a serious sugar craving hits you like a ton of bricks. Or maybe you just remembered you promised to bring a treat to your kid’s class party… tomorrow. Or perhaps a friend is stopping by, and you want to offer something sweet and homemade without spending the next two hours in the kitchen.
Whatever the scenario, I’ve got your back. Today, we’re making what might just be the easiest, most mind-blowingly simple dessert in my entire recipe arsenal: 2-Ingredient Peanut Butter Fudge. Yes, you read that right. Just two ingredients stand between you and a pan of creamy, rich, melt-in-your-mouth fudge that tastes like a little square of pure joy.
This isn’t just a recipe; it’s a kitchen miracle. It requires zero baking, almost no cleanup, and comes together in less than five minutes of active work. If you can stir two things together in a bowl, you can make this fudge. So, let’s banish the idea that making candy is hard or intimidating. Grab your favorite jar of peanut butter and let’s create some sweet, simple magic together.
The Happy Accident That Started It All
I’ll never forget the first time I stumbled upon this recipe. It was a blisteringly hot summer day, years ago, and my air conditioner had decided to take an unscheduled vacation. The last thing I wanted to do was turn on the oven, but my niece and nephew were visiting, and their little faces were begging for something sweet.
We were rummaging through the pantry, and all we had was a jar of peanut butter and a lonely container of vanilla frosting left over from a birthday months prior. In a moment of “what’s the worst that could happen?” inspiration, we melted the frosting, stirred in the peanut butter, and poured it into a pan. We crossed our fingers and waited.
What emerged from the fridge 20 minutes later was nothing short of legendary. It was smooth, it was sweet, it was undeniably fudge. The kids were ecstatic, and I was a believer. It became our little secret, our “magic trick” dessert. It’s a reminder that sometimes the most beloved recipes aren’t the complicated, fussy ones, but the simple, happy accidents that bring everyone together.
Gathering Your Two Magical Ingredients
This is the part where you’ll truly appreciate the beauty of this recipe. Here’s your shopping list—I promise it won’t break the bank or require a trip to a specialty store.
- 1 (16-ounce) jar of Creamy Peanut Butter: This is the star of the show, so choose wisely! I recommend using a standard, shelf-stable brand like Jif or Skippy. Their texture is perfect for this, and they’re already sweetened, which helps the fudge set up beautifully. Chef’s Insight: Avoid the “natural” kind that separates, as the extra oil can prevent the fudge from firming up properly. If it’s all you have, give it a really, really good stir first!
- 1 (16-ounce) can of Vanilla Frosting: The unsung hero that makes the magic happen. Any common brand like Betty Crocker or Pillsbury works perfectly. The frosting acts as the sweetener and the base that melts down to create that classic fudge texture. Substitution Tip: While vanilla is classic, feel free to experiment! Chocolate frosting makes for an incredible chocolate-peanut butter cup-style fudge. Just make sure it’s the same size can.
Let’s Make Some Magic: Your Foolproof Fudge Steps
Okay, team. Get ready to be amazed. This process is so fast, you might blink and miss it. I recommend having everything ready to go before you start.
- Prep Your Pan: First things first, grab an 8×8 or 9×9-inch baking pan. Lining it with parchment paper is my number one chef hack here. Just let a little extra paper hang over the sides. This creates “slings” that make it incredibly easy to lift the entire block of fudge out for clean, stress-free slicing later. No more wrestling with a stuck-on mess!
- The Great Emptying: Scoop the entire jar of creamy peanut butter into a large, microwave-safe mixing bowl. Using a bigger bowl than you think you need is another pro-tip—it gives you plenty of room to stir without making a mess on your countertops.
- Melt the Frosting: Now, take your can of vanilla frosting. This is crucial: remove the foil seal and the lid completely. Place the open can (you can pop the frosting out into a separate microwave-safe bowl if you prefer) into the microwave. Heat it on high for about 60 seconds. Keep an eye on it! You’re looking for it to be completely melted and pourable, almost like a thick glaze. Chef’s Note: If it’s not quite there, heat in 15-second bursts until it is. We don’t want it boiling, just melted.
- The Grand Stir-In: Carefully pour the hot, melted frosting directly over the peanut butter in the bowl. The heat from the frosting will slightly warm the peanut butter, making everything blend together like a dream. Now, take a sturdy spatula and stir, stir, stir! Keep going until the two ingredients are completely unified into one smooth, luscious, homogenous mixture. You shouldn’t see any streaks of frosting or lumps of peanut butter.
- Spread and Smooth: Working relatively quickly, pour your beautiful fudge mixture into your prepared pan. Use your spatula to spread it into an even layer. For that picture-perfect top, I like to dip the spatula in a little warm water and smooth it over the surface—this gives it a gorgeous, glossy finish.
- The Patience Part: Now, the hardest part: waiting. You can let the fudge set up at room temperature for about an hour, or for a faster set, pop it into the refrigerator for 15-30 minutes. It’s ready when it’s firm to the touch.
- Slice and Serve: Once set, use the parchment paper slings to lift the fudge block out of the pan and onto a cutting board. Using a sharp knife, slice it into small squares. I find that a 6×6 grid gives you 36 perfect, bite-sized pieces. Wiping the knife clean between cuts helps get those super clean edges.
How to Serve Your Fudge Masterpiece
You’ve done it! You’ve created a tray of pure happiness. Now, let’s talk about presentation. While eating it straight from the pan with your fingers is a totally valid (and time-honored) option, here are a few fun ways to make it extra special.
For a simple, classic look, arrange the little fudge squares on a beautiful plate or a rustic wooden board. If you’re gifting it, stack a few pieces in a clear cellophane bag, tie it with a cute ribbon, and you’ve got a heartfelt, homemade present that looks like it came from a fancy candy shop.
Feeling fancy? Give your fudge a little chef’s kiss right before serving. A tiny sprinkle of flaky sea salt on top of each square balances the sweetness perfectly. You could also press a single, whole roasted peanut into the center of each piece while the fudge is still soft for a decorative and delicious touch.
Mix It Up! Fun Flavor Twists
The beauty of this base recipe is that it’s a fantastic canvas for your creativity. Once you’ve mastered the classic, try one of these delicious variations!
- The Chocolate Lover: Swap the vanilla frosting for chocolate frosting! It’s like a Reese’s Peanut Butter Cup in fudge form. You can also stir in 1/2 cup of mini chocolate chips after you’ve combined the main ingredients.
- The Nutty Professor: Use crunchy peanut butter instead of creamy for a delightful texture. Or, stir in 1/3 cup of chopped peanuts, pecans, or walnuts for an extra crunch.
- The Sweet & Salty: This is my personal favorite. After spreading the fudge in the pan, generously sprinkle the top with coarse sea salt or even crushed pretzel pieces. The contrast is absolutely addictive.
- The Cookie Monster: Gently fold in 1/2 cup of crushed Oreo cookies or Nutter Butter biscuits for a fun, chunky fudge experience.
- Dairy-Free/Vegan Delight: This recipe is naturally dairy-free if you use a vegan-friendly frosting (many common brands are accidentally vegan—just check the label!) and a standard peanut butter. It’s an awesome inclusive treat!
Beau’s Kitchen Confidential
Over the years, this fudge has been my trusty sidekick for more potlucks, movie nights, and “I-need-a-dessert-STAT” emergencies than I can count. It’s evolved from that first hot-day experiment into a true Feastical staple. One of my favorite memories is bringing it to a neighborhood block party and watching people’s jaws drop when I told them it only had two ingredients. They didn’t believe me until I made a fresh batch right there on someone’s counter in under five minutes! It’s a recipe that builds confidence in the kitchen, and that’s what I love most about it.
Your Fudge Questions, Answered!
I’ve made this fudge a thousand times, and I’ve heard all your questions. Here are the answers to the most common ones.
- My fudge is too soft. What did I do wrong? This usually happens for one of two reasons. First, you might have used a “natural” peanut butter with lots of added oil. Second, it might just need more chilling time! Pop it back in the fridge for another 30-60 minutes. If it’s still soft, it will still taste delicious—just eat it with a spoon!
- Can I use a different nut butter? Absolutely! Almond butter or cashew butter work wonderfully. Just make sure they are the creamy, non-natural separation kind for the best results. The flavor will be different, but just as tasty.
- How should I store this fudge? Because of the frosting, this fudge is best stored in an airtight container in the refrigerator. It will stay perfectly fresh and firm for up to two weeks (if it lasts that long!). You can also freeze it for up to three months.
- Can I melt the frosting on the stovetop? You sure can! If you don’t have a microwave, simply empty the frosting into a small saucepan and melt it over low heat, stirring constantly, until it’s smooth and pourable.
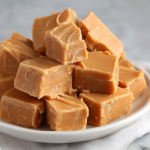
2-Ingredient Peanut Butter Fudge
Description
2-Ingredient Peanut Butter Fudge
The quickest, creamiest fudge you’ll ever make—just peanut butter + frosting, zero baking, minimal cleanup, and ready in under 5 minutes of active prep.
Ingredients
-
1 (16 oz) jar creamy peanut butter – smooth and sweetened (avoid natural/separated varieties if possible)
-
1 (16 oz) can vanilla frosting – any common brand like Betty Crocker or Pillsbury
Optional Toppings:
-
Flaky sea salt
-
Whole roasted peanuts
-
Chocolate chips, crushed cookies, or pretzels
Instructions
1. Prep Your Pan
-
Line an 8×8 or 9×9-inch baking pan with parchment paper, leaving extra overhang for easy lifting later.
2. Melt the Frosting
-
Scoop frosting into a microwave-safe bowl.
-
Microwave on high for 60 seconds. Stir, then heat in 15-second bursts until pourable but not boiling.
3. Combine with Peanut Butter
-
Place peanut butter in a large mixing bowl.
-
Pour melted frosting over the peanut butter.
-
Stir vigorously until fully smooth and homogenous.
4. Spread in Pan
-
Pour mixture into prepared pan.
-
Smooth evenly with a spatula (dip spatula in warm water for a glossy finish).
5. Chill
-
Let fudge set at room temperature ~1 hour or refrigerate 15–30 minutes until firm.
6. Slice & Serve
-
Lift fudge using parchment paper overhang.
-
Slice into small squares (~6×6 grid).
-
Optional: sprinkle toppings or press in whole peanuts.
Notes
-
Use a dry bowl and utensils to prevent sticking or seizing.
-
Natural peanut butter may need extra chilling to firm up.
-
Store in an airtight container in the fridge for up to 2 weeks, or freeze up to 3 months.
Nutrition
- Calories: 140 Cal Per Serving
- Sugar: 13g
- Fat: 8g
- Carbohydrates: 15g
- Protein: 3g
Nutritional Information (Approximate)
Let’s keep it real—this is a treat, through and through. It’s all about indulgence and joy. Here’s a general nutritional breakdown per small square (based on a yield of 36 pieces), but please remember this can vary based on the specific brands you use.
- Calories: 140
- Fat: 8g
- Carbohydrates: 15g
- Sugar: 13g
- Protein: 3g
This fudge is a wonderful, portion-controlled way to satisfy a sweet craving. Just one little square is incredibly rich and satisfying!
Final Thoughts from My Kitchen to Yours
And there you have it, friends. The secret to impossibly easy, delightfully delicious peanut butter fudge is out of the bag. This recipe proves that you don’t need a culinary degree or a pantry full of obscure ingredients to make something truly special. All you need is a little know-how, a sense of adventure, and a deep, abiding love for peanut butter.
I hope this recipe becomes a trusted friend in your kitchen, just like it is in mine. It’s a reminder that cooking and baking should be fun, accessible, and always, always about sharing the love. So, what are you waiting for? Go whip up a batch, and don’t forget to tag me @Feastical on social media so I can see your beautiful creations! Happy cooking!
With a full heart and an even fuller plate,

Butter Cracker Peppermint Bark
Butter Cracker Peppermint Bark: Your New Holiday Obsession
Hey friends, Beau here! Can you smell it? That crisp, chilly air mixed with the sweet scent of sugar cookies and… is that a hint of peppermint? It’s officially that magical time of year, and my kitchen is buzzing with all the cozy, festive recipes that make the season so special. Today, I’m bursting with excitement to share one of my all-time favorite holiday hacks: Butter Cracker Peppermint Bark.
Now, I know what you might be thinking. “Beau, bark is just chocolate and candy. What’s the big deal?” Oh, my friend. Let me stop you right there. This isn’t just any bark. This is the ultimate sweet-and-salty symphony that will completely change your holiday dessert game. We’re taking humble, buttery crackers and transforming them into an impossibly delicious, crunchy base for a layer of creamy white chocolate and a festive avalanche of crushed peppermint.
The best part? This isn’t some fussy, day-long kitchen project. This is a “wow-factor” treat you can whip up in less than 30 minutes with zero baking required. It’s perfect for last-minute gifts, potlucks where you want to be the hero, or just for treating yourself during a cozy night watching holiday movies. So, grab your favorite apron and let’s make some magic happen. This Butter Cracker Peppermint Bark is about to become your most-requested holiday recipe.
The Accidental Discovery That Started It All
This recipe has a fun little origin story. A few years back, I was hosting a massive “Friendsgiving” potluck, and I was in charge of desserts. I’d planned an elaborate lineup, but at the last minute, I realized I had a whole crew of friends with various dietary preferences and a serious collective sweet tooth. I was scrambling, looking for something that could please everyone without requiring a trip to the store.
I opened my pantry and saw a sleeve of Ritz crackers, a bag of white chocolate chips from a previous baking spree, and a giant bag of candy canes left over from the previous Christmas. A lightbulb went off. I remembered seeing a version of a “cracker toffee” online and thought, “What if I gave it a major holiday upgrade?” I threw it all together, crossed my fingers, and set it out on the table.
Friends, it was the first platter to be completely demolished. People were raving about the “unbelievable texture” and the “genius salty-sweet combo.” They couldn’t believe it was made with crackers! That happy accident, born from pantry desperation, is now a Feastical holiday staple. It just goes to show that the best recipes often come from a little bit of chaos and a whole lot of heart.
Gathering Your Bark-Making Squad
One of the things I love most about this recipe is its beautiful simplicity. You only need a handful of ingredients to create something truly spectacular. Here’s your shopping list, complete with my chef-y notes to help you nail it.
- 110 butter crackers (such as Ritz): This is the foundation of our masterpiece! The subtle saltiness and incredible buttery flavor of Ritz crackers are the secret weapons here, cutting through the sweetness of the chocolate and creating a flavor that’s complex and utterly addictive. Chef’s Insight: Don’t sub with a bland cracker; that buttery taste is non-negotiable for the magic!
- 48 ounces white chocolate melting wafers or vanilla-flavored candy coating: This is our glorious glue. I highly recommend using high-quality melting wafers over regular white chocolate chips. Wafers are specifically designed to melt smoothly and set firmly, giving you that perfect “snap” when you break the bark. Substitution Tip: If you must use chips, add an extra teaspoon of oil to help them melt more evenly.
- ½ teaspoon peppermint extract (optional): This is your flavor booster! The candies on top give crunch and bursts of mint, but this extract infuses the entire white chocolate layer with a cool, refreshing peppermint essence. Chef’s Insight: A little goes a long way! Too much can taste medicinal, so measure carefully.
- 2 teaspoons vegetable or coconut oil: This is our little kitchen hack for achieving super-smooth, dippable chocolate. The oil helps thin the melted wafers just enough to make spreading over the crackers a total breeze.
- 50 soft peppermint candies, crushed: This is where the festive crunch and vibrant color come from! You can use candy canes, Starlight mints, or any soft peppermint candy. Chef’s Hack: Place them in a zip-top bag and use a rolling pin to crush them. It’s a fantastic way to work out any pre-holiday stress!
- Red and green sprinkles: Let’s get festive! Sprinkles add a pop of color and a fun, celebratory feel. Use jimmies, nonpareils, or even holiday-shaped quins.
- Optional: 4 ounces dark chocolate, melted for drizzling: I am a huge fan of this optional step. A zigzag of dark chocolate not only looks gorgeous and professional, but it adds another layer of deep, rich flavor that complements the white chocolate and peppermint beautifully.
Let’s Build Some Bark: Your Step-by-Step Guide
Ready to create? This process is fast, fun, and almost foolproof. I’ll walk you through each step with all my favorite tips and tricks to ensure your bark is absolutely perfect.
- Line a large baking sheet with parchment paper. Arrange crackers in a single, tight layer.This is our prep stage, and it’s crucial for a stress-free finish. Don’t skip the parchment paper! It guarantees your bark will lift off the pan easily without any sticking. When arranging your crackers, get them as close together as possible. We’re creating one solid base, so they should be touching on all sides. A little overlap is totally fine—we’re going for rustic and delicious, not necessarily perfect!
- In a microwave-safe bowl, melt white chocolate with oil in 30-second intervals, stirring until smooth. Add peppermint extract if using.Here’s where patience is your best friend. Do not try to melt the wafers in one long blast. The low-and-slow method is key. Microwave for 30 seconds, stir well, then another 30 seconds, and stir again. It might seem like it’s not melting at first, but keep stirring—the residual heat will do the work. Once it’s almost completely smooth, you can do a final 15-second blast if needed. Stir in the peppermint extract right at the end. Chef’s Hack: If your chocolate seems too thick, add another ½ teaspoon of oil until it’s a pourable, spreadable consistency.
- Pour the melted chocolate over the crackers and spread evenly with a spatula.Okay, work quickly but confidently here! Pour the melted chocolate right into the center of your cracker base. Using an offset spatula or the back of a spoon, gently spread the chocolate out to the edges, making sure every single cracker gets a generous coating. Don’t worry if it’s not perfectly smooth—the toppings will hide any imperfections, and it’s meant to look homemade and joyful!
- Immediately sprinkle crushed peppermint candies and holiday sprinkles over the top.Immediately is the key word here! You want to add your toppings while the chocolate is still wet and sticky so they adhere perfectly. Don’t be shy! Grab handfuls of the crushed peppermint and sprinkles and shower that bark with festive goodness. Cover every inch for maximum crunch and color.
- Optional: Drizzle with melted dark chocolate and add extra toppings for texture and flair.Feeling fancy? This is your moment. Melt your dark chocolate with a tiny bit of oil (same method as before), then transfer it to a zip-top bag. Snip a very tiny corner off the bag and wave it back and forth over your bark to create beautiful, professional-looking drizzles. You can also add a sprinkle of flaky sea salt or crushed pretzels at this stage for an extra salty kick.
- Let cool completely at room temperature or refrigerate until set. Break into pieces and enjoy.The hardest part: waiting! You can let the bark set up at room temperature if your kitchen is cool, but I usually pop it in the refrigerator to speed things up. It should be firm to the touch and make a satisfying “crack” when you break it. Once set, use your hands to break it into rustic, uneven pieces. I love the organic, fun look of hand-broken bark!
How to Serve Your Festive Masterpiece
You’ve made this gorgeous bark, now how do you show it off? This treat is incredibly versatile. For a casual family treat, I just pile the pieces high on a beautiful wooden board or in a big festive bowl right in the middle of the kitchen counter—it never lasts long!
If you’re gifting it, you can get really creative. Stack pieces in clear cellophane bags tied with a pretty ribbon for a simple, sweet present for neighbors, teachers, or your mail carrier. For a real showstopper gift, layer the pieces in a decorative tin between sheets of parchment paper. It travels well and looks incredibly thoughtful.
And let’s not forget the party platter! Arrange this bark alongside other holiday cookies, some cheese and fruit, and maybe a few of my No-Fuss Chocolate Dipped Shortbread cookies. The variety of textures and flavors will make your dessert spread the talk of the town.
Mix It Up! Fun Flavor Twists
Once you’ve mastered the classic, the fun really begins. This recipe is a fantastic canvas for your creativity. Here are a few of my favorite ways to mix it up:
- The Salty Sweet Supreme: Swap out half of the peppermint candies for crushed, salty pretzel pieces. The combo of peppermint, white chocolate, and pretzel is a next-level flavor explosion.
- Chocolate Lover’s Dream: Use a base of chocolate crackers (like Famous Chocolate Wafers) instead of Ritz. Top with semi-sweet or milk chocolate and then the peppermint. It’s a deep, rich chocolate experience.
- Nutty Noel: Add a half-cup of finely chopped toasted almonds or pecans to your sprinkle mix. The nuttiness adds a wonderful warmth and complexity that feels very grown-up and elegant.
- Fruity Festive: Not a huge peppermint fan? No problem! Use crushed freeze-dried strawberries or raspberries instead of the peppermint for a beautiful pink hue and a tangy, fruity flavor.
- Dairy-Free Delight: You can easily make this vegan! Use a high-quality dairy-free white chocolate and ensure your crackers are vegan-friendly (check the label). The method remains exactly the same.
Beau’s Kitchen Confidential
This recipe has evolved so much since that first Friendsgiving panic-attack batch. I’ve learned that a heavier hand with the peppermint crushing (I like some bigger chunks for texture) is a good thing. I’ve also started using a pizza cutter to score the bark lightly before it fully sets if I want neater, more uniform pieces for gift boxes—a little pro-tip for you!
One of my favorite kitchen memories involving this bark was the year my nephew, who was about four at the time, “helped” me by taste-testing every single sprinkle. His face was covered in red and green, and he declared it “the best sparkle candy ever.” That’s the spirit of this recipe—it’s about fun, family, and a little bit of mess. Don’t stress over perfection. Embrace the delicious chaos!
Your Bark Questions, Answered!
Over the years, I’ve gotten a lot of questions about this recipe. Here are the answers to the most common ones to ensure your success.
Q: My chocolate seized up and got clumpy! What did I do wrong?
A: Ah, the dreaded seize! This usually happens if a tiny bit of steam or water gets into your melting chocolate. Always make sure your bowl and utensils are completely dry. If it happens, don’t panic! Try stirring in a bit more vegetable oil, one teaspoon at a time, until it smooths out again.
Q: Can I use chocolate chips instead of melting wafers?
A: You can, but it’s trickier. Chocolate chips have stabilizers to help them hold their shape, so they don’t melt as smoothly. If you use them, be sure to add the full 2 teaspoons of oil (or even a touch more) and stir like crazy to get it smooth. Melting wafers are still my #1 recommendation for foolproof results.
Q: How far in advance can I make this?
A> This bark is a fantastic make-ahead treat! Stored in an airtight container at cool room temperature (or in the fridge if your house is warm), it will stay fresh and delicious for up to 2 weeks. The crackers may soften slightly over time, but it will still taste amazing.
Q: My bark is sticky and won’t break. Help!
A> This means it hasn’t set completely. Pop it back in the refrigerator for another 30-60 minutes. If you used a chocolate that doesn’t set firmly (like some chocolate chips), it might remain a bit softer. It will still be delicious, just a bit messier to eat!

Butter Cracker Peppermint Bark
Description
A quick, no-bake holiday treat featuring buttery crackers, creamy white chocolate, and festive peppermint crunch. Perfect for gifting, party platters, or just indulging during cozy winter nights.
Ingredients
-
110 butter crackers (e.g., Ritz) – buttery, salty, perfect for crunch
-
48 oz white chocolate melting wafers or vanilla candy coating
-
½ tsp peppermint extract (optional, for extra minty flavor)
-
2 tsp vegetable or coconut oil (helps smooth chocolate for spreading)
-
50 soft peppermint candies, crushed (candy canes or Starlight mints)
-
Red and green sprinkles (for festive flair)
-
Optional: 4 oz dark chocolate, melted, for drizzling
Instructions
1. Prep
-
Line a large baking sheet with parchment paper.
-
Arrange crackers in a single, tight layer (touching is fine; slight overlap okay).
2. Melt Chocolate
-
In a microwave-safe bowl, melt white chocolate with oil in 30-second intervals, stirring in between until smooth.
-
Stir in peppermint extract, if using.
3. Spread Chocolate
-
Pour melted chocolate evenly over crackers.
-
Use a spatula to spread to edges, ensuring all crackers are coated.
4. Add Toppings
-
Immediately sprinkle crushed peppermint candies and holiday sprinkles over the chocolate.
-
Optional: Drizzle melted dark chocolate over the top and add extra toppings (like flaky sea salt or crushed pretzels).
5. Set
-
Let bark cool completely at room temperature or refrigerate until firm.
-
Once set, break into rustic, uneven pieces.
Notes
-
Use a dry, clean bowl and utensils to prevent chocolate from seizing.
-
For chocolate chips, add extra oil for smooth melting.
-
Store in an airtight container at cool room temperature or fridge for up to 2 weeks.
Nutrition
- Calories: 80–100 Cal Per Serving
- Sugar: ~8–10g
- Fat: 5–7g
- Carbohydrates: 10–12g
Nutritional Info (For Your Peace of Mind)
Now, let’s be real—this is a celebratory treat, and it’s all about indulgence! But I believe in transparency, so here’s a general breakdown. Remember, these are estimates and can vary based on the specific brands you use and the size of your bark pieces.
Yield: About 100 bite-sized pieces
Prep Time: 15 minutes
Cook Time: 10 minutes (melting time)
Total Time: 25 minutes, plus setting time
Per Piece (approximate):
Calories: 90 | Fat: 5g | Carbs: 9g | Sugar: 7g
The beauty of making it yourself is that you control the portions and ingredients. You can use a sugar-free chocolate alternative if you prefer, or simply enjoy a piece or two to satisfy your sweet tooth as part of a balanced diet. Life’s too short not to enjoy a little festive sparkle!
Final Thoughts from My Kitchen to Yours
Well, there you have it, friends—my complete guide to the most addictive, easy, and festive Butter Cracker Peppermint Bark on the planet. This recipe is a perfect example of what Feastical is all about: taking simple, feel-good ingredients and turning them into something magical that brings people together.
I hope this recipe fills your kitchen with laughter, your home with the wonderful smell of peppermint, and your holiday season with a whole lot of delicious joy. If you make it (and I really hope you do!), I’d love to see your creation. Tag me on social @Feastical or @BeauCollier so I can share in the fun.</p