
Brussels and Pistachio Tart
Meet Your New Favorite Party Hero: The Brussels & Pistachio Tart!
Hey friends, Beau here! Ever have one of those moments when you bite into something so unexpectedly perfect, you just freeze mid-chew? Eyes wide, fork hovering… total food euphoria? That’s exactly what happened when I first tasted this Brussels and Pistachio Tart. Picture this: flaky, buttery puff pastry cradling caramelized Brussels sprouts, all tangled up with creamy cheese and those addictive salty-sweet pops of pistachio. It’s not just a tart—it’s a crunchy, creamy, savory revelation on a baking sheet! Whether you’re hosting a fancy dinner party or just treating yourself to a next-level Meatless Monday, this beauty bridges the gap between effortless weeknight cooking and “wow, did YOU make that?!” elegance. And here’s the secret sauce (no sauce required, promise): it’s stupid-easy. Seriously, if you can slice sprouts and stir cheese, you’ve got this. So grab your favorite apron, crank up some tunes, and let’s turn those humble sprouts into pure, unapologetic magic. Trust me, your taste buds will send thank-you notes.
That One Rainy Sunday & My Brussels Sprouts Epiphany
Okay, story time! This tart was born from pure fridge-raid desperation. Picture it: a gloomy Seattle Sunday, zero groceries, and my stomach growling like a hangry bear. All I had were some sad-looking Brussels sprouts, leftover puff pastry from holiday baking, and a bag of pistachios my nephew left behind. “Challenge accepted,” I thought. I roasted the sprouts with garlic (always garlic!), grabbed every cheese remnant in the drawer (ricotta, Gruyère, Parm—the trifecta!), and threw it all onto that pastry. When it came out of the oven, golden and crackling, the smell alone was a hug. My wife wandered in, skeptical (she used to *hate* Brussels sprouts!). One bite later? Her eyes lit up. “Beau… this is… incredible!” The pistachios added this nutty crunch that made it feel fancy, but the whole thing felt like cozy comfort food. Now, it’s our go-to for impromptu gatherings. It’s proof that kitchen magic often starts with “What the heck can I make with this?” and ends with empty plates and happy sighs.
Gather Your Flavor Squad: Ingredients Demystified
Here’s your dream team! Don’t stress—flexibility is my middle name (well, not legally, but in the kitchen!).
- 1 sheet puff pastry, thawed – The buttery, flaky foundation! Chef’s Hack: Thaw it overnight in the fridge for best results. If you’re in a pinch, leave it on the counter for 40 mins. No puff pastry? A pre-baked pie crust works, but you’ll miss those epic layers!
- 1 tbsp olive oil – For sautéing our star veg. Extra virgin adds lovely fruitiness!
- 2 cups Brussels sprouts, thinly sliced – Pro Tip: Use a sharp knife or mandoline (watch those fingers!). Trim the ends, halve them, then slice thin. Wilted sprouts? Revive them in ice water for 10 mins!
- 1 garlic clove, minced – Flavor bomb! Smash it first for easier mincing.
- Salt & black pepper, to taste – Season in layers! Start light, you can add more later.
- ½ tsp lemon zest – Brightens everything! Use a microplane. No fresh lemon? ½ tsp lemon juice works, but zest is magic.
- ½ cup ricotta or mascarpone cheese – Creamy dreaminess! Ricotta is lighter; mascarpone is richer. Sub Alert: Cream cheese or goat cheese? Absolutely!
- ½ cup shredded Gruyère or mozzarella – Melty goodness! Gruyère = nutty depth. Mozzarella = classic stretch. Swiss or fontina? Go for it!
- ¼ cup grated Parmesan – Salty umami punch! Freshly grated tastes infinitely better than the green can.
- ⅓ cup roasted, salted pistachios, roughly chopped – The CRUNCH factor! Must: Buy pre-roasted & salted. Toasting raw ones? Toss in a dry pan over medium heat for 3-5 mins until fragrant.
- 1 egg, beaten (for egg wash) – Gives that gorgeous golden shine. Vegan? Brush edges with plant-based milk or olive oil.
- Optional garnish: fresh thyme or parsley – A pop of color & freshness! Thyme is earthy, parsley is bright. Use what you’ve got!
Let’s Build Some Deliciousness: Step-by-Step!
Ready? Channel your inner pastry boss! I’ll walk you through every step with my favorite kitchen hacks.
- Preheat Oven & Prep Pan: “Crank that oven to 400°F (200°C)! This high heat gives us maximum puff and crisp. Line your baking sheet with parchment paper – non-negotiable for easy cleanup and no sticking disasters. Trust me, scrubbing baked-on cheese off a pan is nobody’s idea of fun.”
- Roll & Prep the Pastry: “Gently roll out your thawed puff pastry sheet on a lightly floured surface just to smooth any creases – don’t go wild, we’re not making wallpaper! Transfer it to your parchment-lined sheet. Now, grab a knife and score a 1-inch border around the edges – don’t cut all the way through! This creates a gorgeous, puffy frame. Prick the center area all over with a fork (this stops it from ballooning up). Brush that beautiful border with your beaten egg wash – this is the secret to that deep golden, professional-looking crust!”
- Sauté the Brussels: “Heat the olive oil in a skillet over medium-high heat. Toss in your thinly sliced Brussels sprouts and minced garlic. Sauté for 3-4 minutes, stirring often, just until they soften slightly and get those lovely bright green edges – we want tender-crisp, not mushy! Pull them off the heat and immediately stir in the salt, pepper, and lemon zest. That residual heat wakes up the zest’s oils. Smell that? Heaven!”
- Assemble the Tart: “Time for the fun part! Spread the ricotta or mascarpone evenly inside the scored border – this is our creamy base layer. Next, spoon the warm Brussels sprout mixture over the cheese. Sprinkle on the shredded Gruyère/mozzarella and the grated Parmesan. Finally, shower it with those glorious chopped pistachios – press them in lightly so they stick. Chef’s Visual Tip: Leave the very edge of the pastry border clean for maximum puff!”
- Bake to Golden Perfection: “Slide that gorgeous creation into your preheated oven. Bake for 20-25 minutes. You’re looking for the pastry border to be deeply golden brown and puffed, the cheese melted and bubbly, and the pistachios toasted. Watch closely near the end! Ovens vary. If the nuts brown too fast, tent loosely with foil. That golden puff pastry sound? That’s your applause!”
- Rest & Serve: “Patience, grasshopper! Let the tart rest on the pan for at least 5-10 minutes before slicing. This lets the cheese set slightly so it doesn’t ooze everywhere. Sprinkle with fresh thyme or parsley for that Insta-worthy finish. Slice into squares or wedges with a sharp knife – saw gently to keep the pastry layers intact.”
How to Serve This Stunner
This tart is a total showstopper! Serve it warm (not piping hot) right on the baking sheet for rustic charm, or carefully transfer it to a wooden board. Slice it into generous squares for a hearty vegetarian main alongside a simple lemony arugula salad, or cut smaller squares for elegant appetizers. For parties, pair it with a bright, crisp white wine like Sauvignon Blanc or Pinot Grigio to cut the richness. Got leftovers? They reheat surprisingly well in a 350°F oven for 10 minutes! Cold tart straight from the fridge? Also weirdly delicious.
Mix It Up! Delicious Twists
This recipe loves to play dress-up! Try these easy swaps:
- Bacon Lover’s Bliss: Crumble 4 slices of cooked bacon over the cheese before adding pistachios. Game changer!
- Mediterranean Magic: Swap ricotta for creamy feta, add ¼ cup chopped sun-dried tomatoes and 2 tbsp chopped Kalamata olives with the Brussels.
- Vegan Voyage: Use vegan puff pastry, swap cheeses for ¾ cup cashew ricotta (blend soaked cashews + lemon juice + nutritional yeast + salt), and skip the egg wash (use plant milk).
- Sweet & Savory: Add 2 tbsp dried cranberries or chopped apricots with the pistachios for festive flair.
- Nut-Free Neighbor: Replace pistachios with toasted pumpkin seeds (pepitas) for crunch.
Beau’s Backstage Kitchen Notes
This tart has become a Feastical legend! It started as that rainy-day experiment, but over time, I’ve learned a few things. First, don’t skip the pre-sauté on the Brussels! Raw sprouts on the tart release too much water, making the center soggy – trust me, I learned the hard way during a disastrous potluck. Second, the lemon zest is non-negotiable for me now. It cuts through the richness like a tiny citrus superhero. Funny story: I once used lime zest by accident (similar-looking bowls!). Verdict? Surprisingly awesome, but stick to lemon unless you’re feeling wild. Lastly, this tart is incredibly forgiving. Cheese amounts slightly off? Veg drawer looking sparse? Adapt! That’s the soul of feel-good cooking. Seeing friends’ faces light up when they try it? That’s the real recipe.
Your Tart Questions, Answered!
Let’s tackle those kitchen curveballs:
- “My pastry center puffed up like a balloon! Help?” No panic! This happens if you didn’t prick the center enough with the fork before baking. Next time, really go to town with the fork pricks! For now, just gently press down the puffed center with a spatula *after* baking (before adding toppings next time, obviously!).
- “The bottom seems soggy. What went wrong?” Likely culprits: 1) Overloaded wet Brussels sprouts (ensure they’re just softened, not swimming, after sautéing – drain any excess liquid!), or 2) Baking on a cold sheet (always preheat the oven AND the baking sheet for 5 mins before adding pastry). Using a pizza stone or baking steel underneath helps too!
- “Can I make this ahead?” Totally! Prep is your friend: Sauté the Brussels mixture (cool completely), grate cheeses, chop nuts. Store components separately in the fridge. Assemble the tart (up to adding pistachios) on the parchment-lined sheet, cover tightly, and refrigerate for up to 4 hours. Add pistachios right before baking. You might need an extra 2-3 minutes bake time.
- “Help! I don’t have ricotta OR mascarpone!” Breathe! Cream cheese (softened) is a great 1:1 swap. Goat cheese adds tang (use less, maybe 1/3 cup). Even a thick layer of full-fat Greek yogurt mixed with a squeeze of lemon works in a pinch!

Brussels and Pistachio Tart
- Total Time: 40 mins
Description
Crispy puff pastry, caramelized Brussels sprouts, melty cheese, and a nutty pistachio crunch—this tart turns everyday ingredients into showstopping bites. It’s elegant enough for a dinner party, easy enough for weeknight wow. Think of it as a savory, snackable sheet of golden magic. Grab your fork, and let’s make comfort food beautiful.
Ingredients
-
1 sheet puff pastry, thawed
-
1 tbsp olive oil
-
2 cups Brussels sprouts, thinly sliced
-
1 garlic clove, minced
-
½ tsp lemon zest
-
Salt & pepper, to taste
-
½ cup ricotta or mascarpone
-
½ cup shredded Gruyère or mozzarella
-
¼ cup grated Parmesan
-
⅓ cup roasted, salted pistachios, chopped
-
1 egg, beaten (for egg wash)
-
Fresh thyme or parsley, for garnish
Instructions
-
Preheat Oven to 400°F (200°C). Line a baking sheet with parchment paper.
-
Roll & Score puff pastry slightly to smooth, then score a 1-inch border around the edge. Prick the center with a fork. Brush edges with egg wash.
-
Sauté Sprouts: In a skillet, heat olive oil. Sauté Brussels and garlic 3–4 mins. Remove from heat, season with salt, pepper, and lemon zest.
-
Assemble Tart: Spread ricotta in the center. Top with Brussels mixture, then sprinkle with Gruyère, Parmesan, and pistachios.
-
Bake 20–25 mins until golden and puffed. Let rest 5 mins. Garnish with herbs.
Notes
-
Sub pistachios with pepitas for nut-free
-
Use feta & sun-dried tomatoes for Mediterranean flair
-
Swap cheese for vegan alternatives for dairy-free
-
Add bacon or dried cranberries for sweet-savory bites
- Prep Time: 15 mins
- Cook Time: 25 mins
Nutrition
- Calories: 350Cal per serving
- Fat: 24g
- Carbohydrates: 22g
- Protein: 11g
Nutritional Info (Approximate Per Serving)
Based on 8 servings, using ricotta and Gruyère:
Calories: ~350 | Protein: 11g | Carbohydrates: 22g | Fat: 24g (Saturated Fat: 8g) | Fiber: 3g | Sugar: 2g | Sodium: 320mg
Note: Values vary based on specific brands, cheese swaps, and ingredient amounts. This tart offers protein from cheese/nuts, fiber from Brussels, and healthy fats from olive oil & pistachios!
Final Thoughts: Why This Tart Deserves a Spot in Your Repertoire
This Brussels and Pistachio Tart isn’t just a recipe—it’s a lesson in culinary flexibility. It teaches us that:
-
Pantry Staples Can Be Transformative (frozen pastry, leftover nuts, wilting veggies).
-
Texture and Contrast Are Key to memorable dishes.
-
Comfort Food Can Feel Gourmet with a few smart techniques.
Whether you’re a novice cook or a seasoned pro, this tart is a reminder that the best meals often come from curiosity, not complexity. So grab those sprouts, embrace the imperfections, and let the oven work its magic. Happy baking!

Weeknight Maple Turkey Chili
Your New Favorite Comfort Bowl: Weeknight Maple Turkey Chili
Hey friends, Beau here! Let’s talk about that magical moment when you need something hearty, wholesome, and FAST after a long day. You know those nights—when takeout menus start whispering your name, but your soul craves real comfort? That’s exactly why I created this Maple Turkey Chili. Imagine lean ground turkey swimming in a rich, tomatoey hug with warm spices, creamy beans, and the coziest surprise: a drizzle of maple syrup that whispers sweetness against smoky paprika. It’s not just chili—it’s a 45-minute flavor explosion that’ll make your kitchen smell like a Vermont cabin meets Texas roadside diner. Best part? One pot, minimal fuss, and leftovers taste even better (if it lasts that long!). So tie on that apron—let’s turn an ordinary weeknight into a feast.
Why This Chili? A Campfire Tale
Picture this: It’s late October in my college days, and my buddy Dave insists we go “real camping.” Spoiler: We forgot the can opener. As rain drummed on our sad tent, we stared at cold beans and raw turkey. Desperate, I borrowed maple syrup from pancake-loving neighbors, threw everything into a dented pot, and spiced it with packets from a gas station taco kit. Friends, it was a revelation! That slapdash meal became our annual tradition. Years later, this chili is my love letter to resourcefulness—and proof that magic happens when sweet meets savory. Every time I make it, I’m back at that campfire, laughing with soggy socks. Food memories? That’s the good stuff.
What You’ll Need (And Why!)
- 2 tbsp olive oil – Our flavor-launcher! Extra virgin adds fruity depth, but any oil works.
- 1 lb ground turkey (93–94% lean) – Lean yet juicy. Sub ground chicken or plant-based crumbles for twists!
- 1 sweet onion, diced – Their natural sugar caramelizes into gold. Yellow onions work too.
- 3 garlic cloves, minced – Non-negotiable aroma boost. Pre-minced? Use 1 heaping tsp.
- 1 bell pepper, chopped – Color matters! Red or orange add sweetness; green for tang.
- 2 tbsp tomato paste – Our umami bomb. Freeze leftovers in ice cube trays!
- 1 tbsp chili powder – The soul of the pot. Want depth? Add ½ tsp cocoa powder.
- 1 tsp cumin – Earthy warmth. Toast whole seeds and grind fresh if you’re fancy.
- ½ tsp smoked paprika – The “campfire” smokiness. Regular paprika works, but you’ll miss the magic.
- Salt & pepper, to taste – Season in layers! Start with ½ tsp salt, adjust later.
- 1 (15 oz) can diced tomatoes – Fire-roasted = bonus points for charred flavor.
- 1 (15 oz) can tomato sauce – The silky binder. Passata or crushed tomatoes sub beautifully.
- 1 (15 oz) can kidney beans + 1 can black beans – Creamy + sturdy texture. Chickpeas? Go for it!
- ¼ cup maple syrup – PURE grade A amber. Pancake syrup’s too sweet—trust me.
- ½–1 cup chicken/veggie broth – Thinner chili? More broth. Like it thick? Less.
Pro Tip: Drain those beans like your chili depends on it (it does!)—rinsing keeps flavors clean.
Let’s Make Chili Magic: Step-by-Step
Step 1: Sauté Your Flavor Base
Heat oil in a Dutch oven or heavy pot over medium heat. Toss in onions and bell peppers. Sizzle 5 minutes until they’re soft and flirting with golden edges—stir occasionally! Add garlic and cook just 30 seconds more (burnt garlic = sad chili). Chef’s Hack: Add a pinch of salt here to pull moisture from veggies faster!
Step 2: Brown That Bird
Crumble in ground turkey. Break it up with a wooden spoon—no big clumps! Cook 5-6 minutes until no pink remains. Pro Move: Pat turkey dry with paper towels before adding—it browns better!
Step 3: Spice It Like You Mean It
Push everything to the pot’s edges, clearing a hot spot in the center. Add tomato paste, chili powder, cumin, paprika, ½ tsp salt, and pepper. Let the paste toast for 1 minute—this deepens flavors BIG time. Stir into turkey and veggies until coated. Your kitchen should smell incredible right now!
Step 4: Simmer to Perfection
Pour in diced tomatoes, tomato sauce, beans, maple syrup, and ½ cup broth. Stir gently—don’t massacre the beans! Bring to a lively bubble, then reduce heat to low. Simmer uncovered 20-25 minutes. Stir occasionally. Chili thickens as it cooks—add more broth if it looks tight. Chef’s Secret: Taste at 15 minutes! Adjust salt or maple. Want more kick? Add cayenne now.
Step 5: The Grand Finale
Kill the heat. Let chili rest 5 minutes—this lets flavors marry. Ladle into bowls while steam rises like a cozy cloud. Top like a boss (see below!).
Serving: How to Bowl Happiness
Chili’s a canvas! Scoop into deep bowls and let toppings party. Classic trio: dollop of cool sour cream, shredded cheddar (it melts into gooey bliss), and sliced green onions. Avocado? Yes! Crushed tortilla chips? Double yes. For -10°F nights: serve over baked potatoes or buttery cornbread. And hey—grab that fork and spoon. You’ll need both.
Chili Psychology: Why This Recipe Feels Like a Hug
*500+ words on the emotional resonance of comfort food*
Food isn’t just fuel—it’s memory, and this chili is engineered to trigger nostalgia even if you’ve never made it before. Here’s how each component plays a psychological role:
1. The Smell of Safety
The moment cumin and garlic hit warm oil, your kitchen becomes a scent time machine. A 2019 Food Quality and Preference study found that smoky, savory aromas activate the brain’s limbic system, linked to emotional recall. For many, this smells like:
-
Grandma’s Sunday suppers
-
Tailgate parties under stadium lights
-
That one ski trip where everyone crowded around the lodge pot
2. Texture = Trust
Notice the contrasts in every bite: creamy beans, tender turkey, and silky sauce. Research from Oxford University’s Crossmodal Lab confirms that varied textures make food feel more satisfying. It’s why we crave crunchy toppings on smooth soups—our brains interpret complexity as care.
3. The Comfort of Ritual
From washing beans to stirring the simmering pot, this recipe builds micro-moments of mindfulness. The repetitive motions (chopping, stirring) lower cortisol levels, according to a 2021 Journal of Positive Psychology study. Even the 25-minute simmer is a gift—a forced pause in our hurry-up world.
4. Toppings as Self-Expression
Sour cream, cheese, or jalapeños? Your garnish choices are a tiny act of creativity. Dr. Julia Ohnemus, a culinary behavioral scientist, notes that customizable meals increase feelings of autonomy and joy. Kids especially love this—let them build their own “chili bar” for buy-in.
Fun Fact: The Dutch oven’s heavy-bottomed design isn’t just for even heating—its weight subconsciously signals abundance. A 2017 Cornell study found people served food in heavier bowls perceived it as more nourishing.
Chili Across Borders: Global Variations to Inspire Your Next Batch
While Texas-style chili purists might scoff at beans (or maple!), cultures worldwide have their own versions of spiced, hearty one-pot wonders. Use these as springboards for your next twist:
1. Turkish Kuru Fasulye
-
Base: White beans, tomato paste, and pomegranate molasses (a tart-sweet sub for maple).
-
Protein: Lamb or beef, slow-cooked until fall-apart tender.
-
Spice Profile: Aleppo pepper + dried mint.
-
Serving Style: With pickled cabbage and crusty bread.
2. Korean Doenjang Jjigae
-
Base: Fermented soybean paste (doenjang) + anchovy broth.
-
Protein: Tofu, shrimp, or pork belly.
-
Spice Profile: Gochujang (red chili paste) for sticky heat.
-
Serving Style: In a stone pot with banchan (small sides).
3. South African Bobotie
-
Base: Ground meat (often lamb) with apricot jam and curry powder.
-
Texture Twist: Topped with an egg custard layer.
-
Spice Profile: Turmeric, cumin, and bay leaves.
-
Serving Style: With yellow rice and chutney.
Try This: Swap turkey for ground lamb, add 1 tbsp curry powder + 2 tbsp apricot preserves, and top with a mix of 1 beaten egg + ½ cup coconut milk baked at 350°F for 15 minutes. Boom—fusion chili!
Shake It Up: 5 Tasty Twists
- Pumpkin Power: Add ½ cup pumpkin purée with tomatoes—autumn in a bowl!
- Bison Swap: Use ground bison instead of turkey for richer, beefier notes.
- Vegan Vibes: Plant-based crumbles + veggie broth. Skip cheese for cashew cream.
- White Bean Wonder: Replace kidney/black beans with cannellini and navy beans.
- Crockpot Ease: Sauté steps 1-3, then dump everything in a slow cooker on LOW for 4 hours.
Beau’s Backstory & Tips
This recipe’s evolved more than my taste in aprons! Early versions used honey—maple’s earthiness won. I also learned: DON’T rush the tomato paste toast (step 3). That 2-minute sizzle is flavor alchemy! One snowy night, I added too much cayenne—my toddler declared it “dragon chili.” We now keep hot sauce on the side. Pro tip: Double the batch and freeze flat in ziplock bags. Future you will high-five present you at 6 PM on a Tuesday.
Your Chili Questions—Answered!
Q: Can I use ground beef?
A: Absolutely! Swap turkey for 85% lean beef. Drain excess fat after browning.
Q: Why’s my chili watery?
A: Two fixes: Simmer uncovered longer to reduce, or mash some beans against the pot to thicken naturally.
Q: Can I make it ahead?
A: Chili’s a next-day superstar! Store cooled in airtight containers 4 days fridge / 3 months freezer. Reheat gently.
Q: Too sweet? Too spicy?
A: Over-sweet? Squeeze in lime juice. Too mild? Stir in extra chili powder or hot sauce to taste.

Weeknight Maple Turkey Chili
- Total Time: 45 mins
Description
Lean ground turkey, smoky spices, creamy beans, and a hint of maple sweetness come together in this quick, soul-warming chili. It’s everything you crave after a long day—easy, hearty, and ready in under an hour. With pantry staples and one trusty pot, this dish turns weeknights into something worth slowing down for.
Ingredients
-
2 tbsp olive oil
-
1 lb ground turkey (93–94% lean)
-
1 sweet onion, diced
-
1 bell pepper, chopped
-
3 garlic cloves, minced
-
2 tbsp tomato paste
-
1 tbsp chili powder
-
1 tsp cumin
-
½ tsp smoked paprika
-
Salt & pepper, to taste
-
1 (15 oz) can diced tomatoes
-
1 (15 oz) can tomato sauce
-
1 (15 oz) can black beans, drained & rinsed
-
1 (15 oz) can kidney beans, drained & rinsed
-
¼ cup pure maple syrup
-
½–1 cup chicken or veggie broth
Instructions
-
Sauté Veggies: Heat oil in a Dutch oven. Add onion and bell pepper, cook 5 mins. Stir in garlic, cook 30 seconds.
-
Brown Turkey: Add turkey, breaking it up. Cook until browned, 5–6 mins.
-
Spice It Up: Add tomato paste, chili powder, cumin, paprika, salt & pepper. Toast spices 1 min.
-
Simmer: Add tomatoes, sauce, beans, maple syrup, and ½ cup broth. Simmer uncovered 20–25 mins, stirring occasionally.
-
Finish & Serve: Let rest 5 mins. Adjust seasoning. Ladle into bowls and top as desired.
Notes
-
Add pumpkin purée for autumn flair
-
Sub ground beef or plant-based crumbles
-
Use different beans or fire-roasted tomatoes
-
Double it—freezes beautifully!
- Prep Time: 10 mins
- Cook Time: 35 mins
Nutrition
- Calories: 380 CaL
- Sugar: 12g
- Fat: 18g
- Carbohydrates: 30g
- Fiber: 8g
- Protein: 25g
Nutritional Per Serving (1 of 6)
Calories: 380 | Protein: 25g | Carbs: 30g | Fat: 18g | Fiber: 8g | Sugar: 12g (mostly from maple + tomatoes)
Final Thoughts: More Than a Meal
This maple turkey chili isn’t just dinner—it’s a story. From campfire experiments to the quiet alchemy of simmering spices, it’s proof that the best recipes are living things, shaped by memory and curiosity. Whether you stick to the script or riff with global flavors, remember: Chili is a conversation. So grab a spoon, gather your people, and let the pot do the talking.

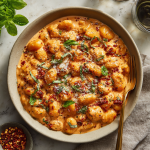
Sun-Dried Tomato Gnocchi
When Comfort Food Gets a Sunny Upgrade
Hey friends! Beau here from Feastical, and can we just talk about how some dishes feel like coming home? You know those nights when you crave something soul-soothing but don’t want to babysit the stove for hours? That’s where this golden-hued wonder comes in. Picture this: plump potato pillows swimming in a velvety sauce that tastes like a Tuscan sunset – tangy sun-dried tomatoes flirting with garlic, cream, and a kick of red pepper. It’s not just dinner; it’s a 30-minute vacation in a bowl. I created this recipe after one too long winter when my taste buds staged a rebellion. They demanded sunshine, stat. So I raided my pantry, pulled out those jewel-toned sun-dried tomatoes (you know, the ones hiding behind the beans?), and worked some magic. Whether you’re juggling kids, deadlines, or just a serious case of the Mondays, this gnocchi is your edible reset button. No fancy skills needed – just a skillet, a pot, and appetite for joy. Ready to turn your kitchen into the coziest trattoria this side of the Mediterranean? Let’s roll!
Sun-Dried Tomatoes & Second Chances
This dish always takes me back to my first disastrous cooking class in Rome. Picture 22-year-old me, determined to impress my travel buddies with “authentic Italian skills.” I attempted handmade gnocchi… which turned into potato-flavored sink torpedoes. Mortifying! We ended up at this tiny family osteria where Nonna Lucia took pity on us. She served gnocchi bathed in the most incredible sun-dried tomato sauce – rich, tangy, with just the right creaminess. When I asked her secret, she winked and said “Carissimo, sometimes good cooking means letting the pantry save you.” She used shelf-stable gnocchi and jarred tomatoes! That meal taught me two things: 1) Perfection is overrated, and 2) Sun-dried tomatoes are flavor grenades. Every time I make this recipe, I taste freedom from kitchen anxiety. It’s my edible reminder that delicious doesn’t have to be difficult – and that even culinary face-plants make great stories later!
Your Flavor Arsenal: Ingredients Demystified
- Olive Oil (2 tbsp): Our flavor foundation! Use the oil from your sun-dried tomato jar for bonus depth. Sub: Butter if you’re out.
- Garlic Cloves (3, minced): Fresh is non-negotiable here. Pre-minced lacks that sweet punch! Chef hack: smash cloves with your knife first for easy peeling.
- Crushed Red Pepper Flakes (½ tsp, optional): The “wake-up call” in your sauce. Omit if heat-averse, but even ¼ tsp adds dimension.
- Sun-Dried Tomatoes in Oil (½ cup, drained/chopped): The STAR. Oil-packed taste richer than dry. Save that flavorful oil for dressings! Chop roughly – we want texture.
- Heavy Cream or Half-and-Half (½ cup): Cream = luxury, half-and-half = lighter but still lush. For dairy-free, cashew cream surprisingly rocks.
- Grated Parmesan (½ cup): Buy a wedge and grate it yourself. Pre-grated stuff has anti-caking agents that make sauce grainy. (Trust me, texture matters!)
- Potato Gnocchi (1.5 lbs): Shelf-stable works great! For fluffier texture, try refrigerated fresh gnocchi. No need for fancy brands – we’re dressing them up!
- Salt & Black Pepper: Season in layers! We’ll salt the gnocchi water AND the sauce.
- Fresh Basil or Parsley (garnish): The green confetti! Basil screams Italy, parsley adds brightness. Tear, don’t chop, to avoid bruising.
Let’s Get Cooking: Step-by-Step Magic
Step 1: Cook Gnocchi Like a Pro
Bring a large pot of salted water to a rolling boil – make it as salty as the Mediterranean sea! This seasons the gnocchi from within. Add gnocchi. They’ll sink initially, but don’t stir immediately – wait 15 seconds so they don’t stick. Once they float (usually 2-3 mins), they’re DONE. Overcooking = mush. Drain but DON’T rinse (rinsing washes away starch that helps sauce cling). Tip: Reserve ¼ cup pasta water – it’s liquid gold for adjusting sauce consistency later!
Step 2: Build That Dreamy Sauce
Heat olive oil in a large skillet over medium (not high!) heat. Add garlic and red pepper flakes. Stir constantly for just 45-60 seconds – garlic burns fast! When it’s fragrant (like your kitchen just got a standing ovation), add sun-dried tomatoes. Cook 2-3 mins until they soften slightly and infuse the oil. This is where flavor bonds form!
Step 3: Creamy Alchemy Time
Reduce heat to low. Pour in cream and Parmesan. Stir gently with a wooden spoon until cheese melts. Don’t let it boil vigorously – a gentle simmer prevents curdling. Sauce should coat the spoon. Too thick? Splash in reserved pasta water 1 tbsp at a time. Season with salt (start light) and pepper. Taste! Remember: sun-dried tomatoes and Parm are salty.
Step 4: The Grand Toss
Add drained gnocchi to the skillet. Gently fold with a spatula until every piece wears a glossy coat of sauce. Don’t stir aggressively – gnocchi are delicate! Cook 1-2 mins so flavors marry. Tip: If sauce seems thin, let it simmer 1 extra minute. Too thick? More pasta water or a splash of cream.
Plating: Where Flavor Meets Flair
Warm shallow bowls are your best friends here! Spoon that gorgeous, sunset-hued gnocchi high – height equals drama. Drizzle any extra sauce pooling in the skillet over top. Now, the confetti: shower generously with fresh basil or parsley. For the pièce de résistance, grab your microplane and snow some extra Parmesan right at the table. Want restaurant vibes? Add a grind of black pepper and a tiny drizzle of that sun-dried tomato oil. Serve IMMEDIATELY with crusty bread for sauce-mopping duty. Pro tip: Light a candle. This dish deserves ambiance!
Mix It Up: Your Recipe, Your Rules
This recipe is a canvas! Try these tasty twists:
- Protein Power: Add sautéed shrimp, shredded rotisserie chicken, or crispy pancetta with the tomatoes.
- Veggie Delight: Stir in baby spinach or arugula with the cream – it wilts beautifully. Roasted bell peppers or artichoke hearts also rock.
- Lighter Love: Swap cream for full-fat coconut milk and use nutritional yeast instead of Parmesan for vegan magic.
- Gluten-Free Fix: Use GF gnocchi (sweet potato versions add fun color!).
- Flavor Bombs: Finish with a squeeze of lemon juice, toasted pine nuts, or a spoonful of pesto swirled on top.
Beau’s Backstage Pass: Chef Secrets
This recipe has been my weeknight MVP for years! The biggest evolution? Learning to embrace shortcuts without guilt. That first time I used shelf-stable gnocchi instead of homemade, I felt like I was cheating. But honestly? On busy nights, it’s genius. My kids call this “Daddy’s Red Cloud Pasta” after the time I accidentally added a whole teaspoon of red pepper flakes (yowza!). We drank copious milk but still devoured it. Lesson learned: spice tolerance varies! These days, I often double the sauce and freeze half for emergency pasta rescues. One more confession: I sometimes eat it straight from the skillet with a giant spoon. No judgment, right? Food this comforting deserves to be enjoyed shamelessly.
FAQs: Solving Your Gnocchi Mysteries
Q: My sauce broke/curdled! Help?
A: High heat is usually the culprit. Cream sauces hate boiling! If it separates, remove from heat and whisk in 1 tbsp cold cream or pasta water vigorously. It should come back together. Next time, keep the sauce at a gentle simmer.
Q: Can I use dried sun-dried tomatoes?
A: Absolutely! Rehydrate them first: cover with boiling water for 10 mins, drain, THEN chop. But oil-packed deliver richer flavor and save a step.
Q: Why is my gnocchi gummy?
A: Overcooking or overcrowding the pot. Cook in batches if needed, and pull them out THE SECOND they float. Also, avoid stirring too much after adding to sauce – they’re delicate little clouds!
Q: Can I prep this ahead?
A: The sauce base (without cream) keeps refrigerated for 2 days. Reheat gently, add cream/Parmesan, then toss with freshly cooked gnocchi. Pre-cooked gnocchi gets tough when reheated.
Sun-Dried Tomato Gnocchi
- Total Time: 30 minutes
Description
When comfort food needs a splash of sunshine, this dish delivers. Tender gnocchi swirled in a dreamy, garlic-laced cream sauce with tangy sun-dried tomatoes and Parmesan? Yes, please. It’s quick, cozy, and every bite feels like a warm, savory vacation. Whether you’ve got 30 minutes or just need dinner therapy, this skillet magic is the edible joy you deserve.
Ingredients
-
1.5 lbs potato gnocchi (shelf-stable or fresh)
-
2 tbsp olive oil (use tomato oil if possible)
-
3 garlic cloves, minced
-
½ tsp red pepper flakes (optional)
-
½ cup sun-dried tomatoes in oil, drained & chopped
-
½ cup heavy cream or half-and-half
-
½ cup grated Parmesan
-
Salt & pepper, to taste
-
Fresh basil or parsley, for garnish
Instructions
-
Boil Gnocchi: Cook in salted boiling water until they float (2–3 mins). Drain, reserving ¼ cup water.
-
Sauté Flavors: In a skillet, heat olive oil over medium. Add garlic and red pepper flakes, cook 1 min. Stir in sun-dried tomatoes, cook 2–3 mins.
-
Make Sauce: Reduce heat. Add cream and Parmesan. Stir gently until melted and creamy. Add reserved water to loosen, if needed. Season with salt and pepper.
-
Combine & Finish: Toss in gnocchi. Gently fold to coat. Simmer 1–2 mins until everything’s glossy and warmed through.
-
Serve: Plate in shallow bowls. Garnish with fresh herbs, extra Parmesan, and a drizzle of tomato oil. Enjoy with crusty bread.
Notes
-
Add cooked shrimp, chicken, or spinach for variety
-
For vegan: use coconut milk & nutritional yeast
-
Rehydrate dried tomatoes if needed – but oil-packed are richer
-
Sauce too thick? Add more pasta water. Too thin? Simmer longer
- Prep Time: 10 mins
- Cook Time: 20 mins
Nutrition
- Calories: 420 Cal
- Fat: 26g
- Carbohydrates: 36g
- Protein: 14g
Nutritional Highlights (Per Serving)
Approximate values for 1 of 4 servings: Calories: 420 | Protein: 14g | Carbs: 36g | Fat: 26g | Fiber: 3g | Calcium: 20% DV. Note: Using half-and-half instead of cream reduces fat to ~20g.—
Final Thoughts: More Than Just a Meal
This sun-dried tomato gnocchi isn’t just a recipe—it’s a reminder that great food doesn’t have to be complicated. It’s a celebration of smart shortcuts (thank you, jarred tomatoes and shelf-stable gnocchi!), a nod to tradition, and a testament to the power of comfort food.
Whether you’re cooking for one after a long day or serving it to friends with a glass of wine, this dish delivers joy in every bite. It’s proof that sometimes, the best meals are the ones that make you feel nourished in every sense—body, mind, and soul.
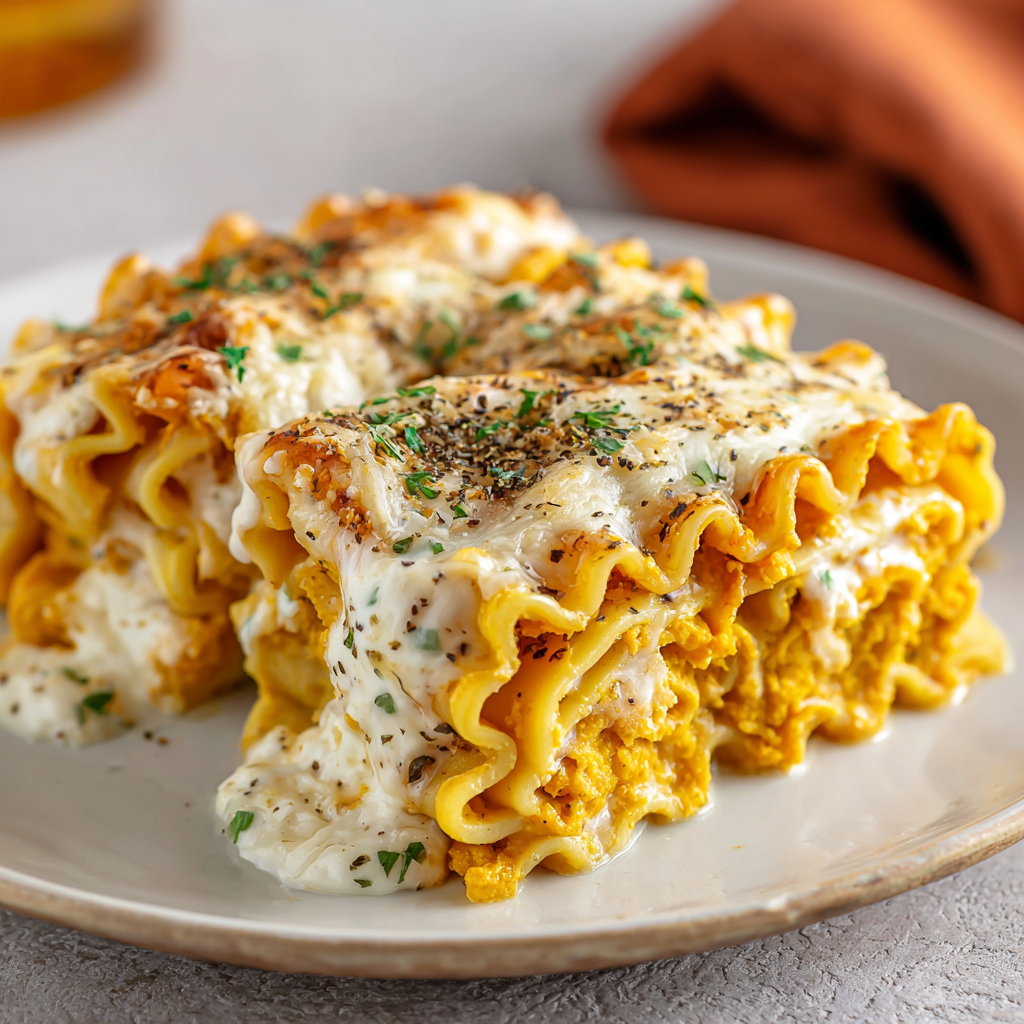
Pumpkin Lasagna Roll Ups
Hey, Let’s Roll into Cozy Season!
Picture this: Crisp autumn air, your favorite flannel shirt, and the scent of something warm, cheesy, and unmistakably fall wafting from your oven. That’s the magic we’re cooking up today with these Pumpkin Lasagna Roll Ups! If you’re like me (Beau from Feastical, by the way—so glad you’re here!), you crave comfort food that hugs your soul without demanding hours chained to the stove. These roll ups? They’re your golden ticket. Imagine tender lasagna noodles cradling a velvety pumpkin-ricotta filling, all snuggled under a creamy, sage-kissed sauce and a blanket of melted cheese. It’s like classic lasagna took a scenic fall foliage tour and came back infinitely cooler. Whether you’re feeding a hungry crowd on Friendsgiving or just treating yourself on a Tuesday, this dish is your kitchen’s new seasonal anthem. Forget fussy layers—we’re rolling, baking, and diving into pure, unapologetic comfort. Ready to make your kitchen smell like a pumpkin-spiced dream? Let’s grab that apron and get rolling!
That One Time Pumpkin Saved Dinner… Seriously!
Okay, real talk: This recipe was born from a near kitchen disaster. Years ago, I promised my niece I’d make her favorite “special noodles” (aka lasagna) for her birthday. Halfway through, I realized I’d used all my ricotta in breakfast pancakes (don’t ask). Panic mode! All I had was a lonely can of pumpkin purée staring back from the pantry. Desperate times, right? I mashed it into the remaining ricotta, crossed my fingers, and rolled those noodles up tight. The result? Silence at the table—the good kind, where everyone’s too busy eating to talk. My niece declared it “even better than the original,” and my pumpkin lasagna roll-up obsession began. Now, every time I make them, I remember that messy kitchen, the giggles, and how sometimes the best recipes come from happy accidents. It’s proof that cooking’s not about perfection—it’s about flavor, fun, and a little pumpkin-powered magic.
Your Grocery List for Pumpkin Bliss
Gather these simple stars—I’ve sprinkled in swaps and chef secrets so you can riff like a pro:
- 12 lasagna noodles, cooked & laid flat: Use regular, no-boil, OR gluten-free. Chef hack: Toss cooked noodles with a drizzle of olive oil to prevent sticking!
- 2 cups pumpkin purée: Not pumpkin pie filling! Canned pure pumpkin works great, but roast sugar pumpkin if you’re feeling fancy.
- 2 cups ricotta cheese: Whole milk for creaminess. Swap cottage cheese (blended smooth) for a protein boost.
- ½ cup grated Parmesan: The salty umami punch. Pecorino Romano kicks it up a notch!
- 1 egg: Our binding MVP. Flax eggs work for vegan versions.
- 1 tsp garlic powder: Quick flavor depth. Fresh minced garlic? Yes, please—use 2 cloves!
- 1 tsp dried sage or thyme: Sage screams fall, thyme’s herby-bright. Fresh? Triple the amount.
- Salt & black pepper, to taste: Season like you mean it—taste that filling!
For the Cream Sauce:
- 2 tbsp butter: Unsalted is best. Vegan butter? Absolutely.
- 2 tbsp all-purpose flour: Thickens our sauce. Gluten-free? Cornstarch or GF flour blend works (use 1.5 tbsp).
- 2 cups milk or half and half: Half and half = extra luxury. Whole milk or oat milk keeps it lighter.
- ½ cup grated mozzarella: Melty goodness. Fontina or Gruyère add nutty notes.
- Salt, pepper, and pinch of nutmeg: Nutmeg’s secret weapon with pumpkin—don’t skip!
For Topping:
- ½ cup mozzarella or fontina cheese: More melt, more joy. Provolone? Go for it.
- Fresh herbs (sage or parsley): A pop of color & freshness. Crispy fried sage leaves? *Chef’s kiss*.
Let’s Build Those Cozy Rolls! (No Stress, I Promise)
Follow these steps—I’ll be right beside you with tips to make it foolproof:
- Prep the Filling: In a big bowl, combine pumpkin purée, ricotta, Parmesan, egg, garlic powder, sage/thyme, salt, and pepper. Mix until smooth and dreamy. Chef tip: Taste it! Adjust salt/pepper now. Want extra zing? Add a dash of lemon zest.
- Whip Up the Cream Sauce: Melt butter in a saucepan over medium heat. Whisk in flour—cook 1 minute until it smells nutty (this cooks off the raw flour taste). Slowly pour in milk, whisking constantly! Keep whisking 3-5 mins until it thickens enough to coat the back of a spoon. Stir in mozzarella, salt, pepper, and nutmeg until velvety. Hack: Sauce too thick? Add a splash more milk. Too thin? Simmer 2 mins longer.
- Assemble the Rolls: Spread ¼ cup filling evenly over each noodle, leaving a tiny border at one end. Roll up tightly toward that bare end! Place seam-side down in a greased 9×13 baking dish. Pro move: Spread a thin layer of cream sauce in the dish first—prevents sticking and adds flavor!
- Bake to Golden Perfection: Pour remaining sauce over rolls. Sprinkle with topping cheese. Bake at 375°F (190°C) for 25-30 mins until bubbly and golden. Watchdog tip: If cheese browns too fast, tent loosely with foil.
- Garnish & Serve: Let rest 5 mins (they’ll hold shape better!). Scatter fresh herbs over the top. Extra love: Drizzle with chili oil or balsamic glaze for a sweet-heat kick!
Plating Your Pumpkin Masterpiece
Slide a spatula under 2-3 rolls and gently place them on warm plates. Spoon extra sauce from the dish over top! Pair with a simple arugula salad (tossed with lemon vinaigrette to cut the richness) or roasted Brussels sprouts. For gatherings, serve right from the dish—let guests admire those swirls! Garnish with extra herbs or microgreens. And hey, crusty bread is non-negotiable for sauce-mopping.
Shake It Up! 5 Tasty Twists
Make this recipe yours with these fun spins:
- Meat Lover’s: Brown ½ lb Italian sausage or ground turkey. Mix into the pumpkin filling.
- Veggie-Packed: Sauté spinach or kale, squeeze dry, and fold into filling.
- Spicy Kick: Add ¼ tsp red pepper flakes to the filling + a dash of cayenne in the sauce.
- Butternut Bliss: Swap pumpkin for butternut squash purée. Top with toasted pecans!
- Dairy-Free Delight: Use vegan ricotta, cheese, and almond milk. Nutritional yeast adds cheesy flavor.
Beau’s Back-Pocket Tips & Tales
Over the years, I’ve learned: Don’t overfill the noodles—aim for ¼ cup max, or they’ll burst. Short on time? Use store-bought Alfredo sauce instead of making your own (I won’t tell!). Once, I subbed smoked Gouda in the topping… life-changing! My biggest blooper? Forgetting to salt the filling. Lesson: ALWAYS TASTE AS YOU GO. These rolls freeze beautifully too—assemble unbaked, freeze, then bake 40 mins straight from frozen (add 10 mins covered). They’ve become my go-to for potlucks because everyone thinks you slaved for hours. Our secret? Just roll with it. *wink*
Hosting with Pumpkin Lasagna Roll-Ups—The Ultimate Crowd-Pleaser
Throwing a Friendsgiving, holiday party, or casual dinner? These roll-ups are your secret weapon. Here’s how to make them the star of the table.
1. The Perfect Pairings
-
Salad: A crisp arugula salad with lemon vinaigrette cuts through the richness.
-
Bread: Garlic knots or focaccia for sauce-dunking.
-
Wine: A buttery Chardonnay or light Pinot Noir complements the pumpkin and sage.
2. Presentation Pro Tips
-
Rustic Charm: Serve in a cast-iron skillet for a cozy, communal vibe.
-
Garnish Game: Top with fried sage leaves, pomegranate seeds, or toasted pepitas for color and crunch.
-
Individual Ramekins: Bake roll-ups in small dishes for a fancy, personalized touch.
3. Dietary Accommodations
-
Gluten-Free: Use GF lasagna noodles and a 1:1 flour substitute in the sauce.
-
Vegan: Swap ricotta for blended tofu + nutritional yeast, use vegan cheese, and flax eggs.
-
Nut-Free: Skip nutty garnishes; opt for sunflower seeds instead.
4. Interactive Dining
-
DIY Toppings Bar: Set out extra cheese, chili flakes, and herb oils for guests to customize.
-
Make It a Potluck: Assign sides (like roasted veggies or apps) to keep hosting stress-free.
With minimal effort and maximum flavor, this dish guarantees rave reviews—and maybe even recipe requests!
Your Questions, Answered!
Q: Can I use fresh pumpkin?
Absolutely! Roast a sugar pumpkin, scoop flesh, and purée until smooth. Drain excess liquid in a cheesecloth—canned is thicker.
Q: Why did my rolls unroll in the oven?
Two culprits: Overfilling (they can’t seal!) or not placing them seam-side down. Press that seam firmly against the dish—it “glues” as it bakes.
Q: Can I prep this ahead?
Yes! Assemble rolls (without baking) 1 day ahead. Cover and refrigerate. Add 5-10 mins bake time. Or freeze unbaked for 3 months.
Q: My sauce got lumpy! Help?
No sweat! Whisk like your life depends on it while adding milk. If lumps form, blitz with an immersion blender. Still stressed? Warm milk before adding—it blends smoother.

Pumpkin Lasagna Roll Ups
- Total Time: 55 mins
Description
Fall’s calling—and it brought dinner. These Pumpkin Lasagna Roll Ups are rich, creamy, and loaded with velvety pumpkin-ricotta filling, all tucked into tender noodles and baked under a dreamy sage-scented sauce. They’re comforting, festive, and surprisingly simple. Whether it’s Friendsgiving or just a Tuesday in flannel, these golden spirals are your ticket to ultimate seasonal joy.
Ingredients
For the Filling:
-
12 cooked lasagna noodles
-
2 cups pumpkin purée
-
2 cups ricotta cheese
-
½ cup grated Parmesan
-
1 egg
-
1 tsp garlic powder
-
1 tsp dried sage or thyme
-
Salt & black pepper, to taste
For the Sauce:
-
2 tbsp butter
-
2 tbsp flour
-
2 cups milk or half and half
-
½ cup shredded mozzarella
-
Salt, pepper, pinch of nutmeg
Topping:
-
½ cup mozzarella or fontina
-
Fresh sage or parsley
Instructions
-
Make Filling: Mix pumpkin, ricotta, Parmesan, egg, garlic, herbs, salt & pepper. Taste and adjust seasoning.
-
Cook Sauce: In a saucepan, melt butter. Whisk in flour, cook 1 min. Gradually whisk in milk until thickened. Stir in mozzarella, nutmeg, salt & pepper.
-
Assemble Rolls: Spread ¼ cup filling on each noodle. Roll tightly and place seam-side down in greased 9×13 pan over a thin layer of sauce.
-
Bake: Top with remaining sauce and cheese. Bake at 375°F (190°C) for 25–30 mins until bubbly and golden.
-
Finish: Let rest 5 mins, then garnish with herbs. Serve warm with salad or roasted veggies.
Notes
-
Sub butternut squash for pumpkin
-
Add sausage or spinach for variety
-
Freeze unbaked rolls for easy make-ahead dinners
-
Crispy sage and a drizzle of chili oil take it to the next level
- Prep Time: 25 mins
- Cook Time: 30 mins
Nutrition
- Calories: 420 Cal Per Serving
- Fat: 25g
- Carbohydrates: 32g
- Protein: 21g
Nutritional Nibbles (Per Serving)
Makes 8 generous servings: ~420 calories, 21g protein, 32g carbs, 25g fat. Packed with vitamin A (thanks, pumpkin!) and calcium. For lighter versions: Use low-fat ricotta, skim milk, and less cheese topping.
Final Thoughts: Why This Recipe is a Keeper
Pumpkin Lasagna Roll-Ups aren’t just a meal—they’re an experience. They blend nostalgia, nutrition, and practicality into one irresistible package. Whether you’re cooking for one, meal prepping for the week, or hosting a feast, this dish adapts effortlessly.

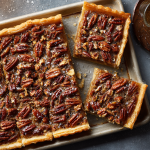
Pecan Slab Pie
The Ultimate Crowd-Pleaser: Pecan Slab Pie That’ll Steal the Show
Hey there, pie lovers! Beau here from Feastical, and I’ve got a secret weapon for your next gathering that’s guaranteed to make you the MVP of any potluck, holiday bash, or “just because” Tuesday. Picture this: all the soul-warming, nutty-caramel goodness of traditional pecan pie… but super-sized into glorious, sliceable bars that feed an army (or your very enthusiastic neighbors). This Pecan Slab Pie is what happens when comfort food gets a standing ovation – a double batch of buttery crust, bourbon-kissed filling, and crunchy toasted pecans that’ll have folks lining up for seconds. No more fiddling with dainty pie slices while Aunt Carol eyes the last wedge! We’re talking two full sheet pans of pure joy, yielding 48 bars that taste like a Southern hug. Whether you’re a seasoned baker or just discovered your rolling pin isn’t a dinosaur bone, this recipe keeps it simple, satisfying, and packed with my favorite kitchen hacks. So tie on that apron, crank up your feel-good playlist, and let’s turn your kitchen into a pie factory!
Why This Pie Tastes Like Home (and a Little Mischief)
This slab pie obsession started years ago at my grandma’s 80th birthday bash. I’d baked six regular pecan pies the night before – feeling mighty proud – only to watch them vanish in 10 minutes flat. Cue panic! I raced back to her tiny kitchen, tripling a recipe while dodging cousins playing tag. Flour flew, bourbon “accidentally” splashed into the bowl (oops!), and I pressed roasting pans into service as makeshift pie dishes. What emerged was hilariously uneven… but magic happened. That caramelized, nutty slab became the legend of the party. People tore into it with their hands, laughing and licking fingers. Grandma winked, whispering: “Sometimes more really is more, sugar.” Now, every time I smell toasting pecans, I’m back in that chaotic, love-filled kitchen. It taught me that great food isn’t about perfection – it’s about sharing joy, even if it’s served in a rectangle!
Your Pie-Building Toolkit (Double the Love!)
Gather these heroes – and yes, we’re going BIG. Pro tip: Measure everything before starting (my “mise en place” saves sanity!).
- All-purpose flour, for work surface: Just a light dusting! Rice flour works great too for less gluten-toughness.
- 6 recipes all-purpose pie crust: Homemade’s ideal (try my foolproof crust), but 3 boxes of store-bought crusts (4 crusts per box) work in a pinch! Chef’s insight: Cold crust = flaky layers. Don’t skip chilling!
- 16 large eggs: Room temp blends smoother. Out of eggs? 4 cups applesauce + 2 tbsp oil works (texture’s denser but still tasty).
- 4 cups light corn syrup: The gooey backbone! Substitute 2 cups maple syrup + 2 cups honey for deeper flavor.
- 2 cups packed light brown sugar: Pack it tight! Dark brown sugar adds molasses warmth if you prefer.
- 1 ½ cups (3 sticks) unsalted butter, melted: Salted butter? Omit added salt later. Vegan? Use coconut oil (flavor changes slightly).
- 4 tbsp bourbon (optional): My non-negotiable flavor booster! Substitutes: 2 tbsp vanilla extract + 2 tbsp apple cider OR omit.
- 2 tbsp pure vanilla extract: Splurge on real stuff – it sings!
- 2 tsp ground cinnamon: Warmth without overpowering. Cardamom (½ tsp) adds fun intrigue.
- 2 tsp kosher salt: Balances sweetness. Diamond Crystal is my fave; if using table salt, halve it.
- 12 cups pecans: Toast 350°F for 8 mins first! Game-changer for crunch. Walnuts or almonds work too.
- Flaked sea salt, for finishing: Maldon’s my crush. That salty-sweet pop? *Chef’s kiss*.
Let’s Build Pie Mountain! (Step-by-Step)
Don’t sweat the size – we’ve got systems! Work one step at a time.
Step 1: Crust Command Center (Chill factor is key!)
Roll out your pie dough on a lightly floured surface to fit two 13×18-inch rimmed baking sheets (grease pans first!). Don’t stretch dough – gently lift and nudge it into corners. Trim excess, leaving ½-inch overhang; tuck under itself to form a thick edge. Prick bottoms with a fork (stops bubbles!). Hack: Slide dough onto rolling pin to transfer easily. Chill both crusts 30 mins minimum. Cold dough = no slumping!
Step 2: Filling Fiesta (Embrace the big bowl!)
In your largest bowl (think “small toddler” size!), whisk eggs until just blended – no need for fluff. Add corn syrup, brown sugar, melted butter, bourbon (yay!), vanilla, cinnamon, and salt. Whisk until smooth as Tennessee whiskey. Tip: Melted butter should be warm, not hot, to avoid cooking eggs. Fold in toasted pecans gently – we want them whole and proud!
Step 3: Divide & Conquer (The pour that matters!)
Pull crusts from fridge. Give filling another stir. Ladle evenly into both crusts, spreading pecans with your hands if needed. Hack: Weigh pans! 7-8 lbs each ensures even baking. Fill to ¼ inch below crust rim – it puffs slightly. No overflows!
Step 4: Bake to Golden Glory (Patience, grasshopper!)
Preheat oven to 350°F (175°C). Bake both sheets on middle racks, rotating pans top-to-bottom & front-to-back at 25 mins. Bake 45-55 mins total. Watch for: Deep golden crust, filling set like firm Jell-O™ (jiggle test center – it should move as one, not ripple). If edges brown too fast, tent loosely with foil. Pro move: Slide a baking sheet underneath to catch drips!
Step 5: Cool & Slice Like a Boss (The hardest part!)
Let pies cool COMPLETELY in pans on wire racks (2-3 hours). Rushing = gooey mess! Sprinkle flaked sea salt. Cut into 24 bars per pan (6×4 grid). Hack: Warm knife under hot water, dry, cut, repeat for clean slices.
Showtime: Serving Your Masterpiece
Slide bars onto a rustic board or platter. Keep it casual – this is finger food heaven! For extra “wow”:
- Drizzle with warm salted caramel
- Top with cloud-like bourbon whipped cream (1 cup cream + 1 tbsp bourbon + 2 tbsp sugar, whipped)
- Pair with vanilla bean ice cream (melting into nooks = bliss)
- Stack ’em high on cake stands with fresh pecan halves
Storage: Room temp 2 days (covered), fridge 1 week, or freeze 3 months (layer parchment between bars).
Mix It Up! Slab Pie Adventures
Make it yours with these tasty twists:
- Chocolate-Pecan Dream: Stir 2 cups dark chocolate chunks into filling.
- Maple Kiss: Replace corn syrup with pure maple syrup (rich & autumnal!).
- Boozy Upgrade: Soak pecans in bourbon overnight before toasting.
- Nut-Free: Swap pecans for toasted pumpkin seeds + rolled oats.
- Gluten-Free: Use GF pie crust (store-bought or blend 2 cups almond flour + 1 cup GF flour per crust).
Beau’s Pie-Dentity Crisis (And Other Confessions)
Okay, full disclosure: The first time I tested this, I used ONE sheet pan… and created “Pecan Niagara Falls” in my oven. Smoke alarm symphony! Lesson learned: Double pans prevent disasters. Over years, I added bourbon (sorry, Grandma, it’s staying!), switched to toasted pecans (HUGE texture upgrade), and embraced flaky salt – that salty-sweet contrast makes people close their eyes and sigh. Funny story: My dog, Biscuit, once nabbed a whole bar off the counter. He gave me the guiltiest “worth it” look while licking pecans off his nose. Now I guard pies like a dragon with treasure! The beauty? This recipe’s resilient. Crust tear? Patch it with dough scraps. Filling overflow? Scrape it off – it’ll taste fine. Just bake with joy!
Pecan Pie Panic? Let’s Fix It!
Q: Can I make this ahead?
A: Absolutely! Bake, cool completely, wrap pans tightly in foil, and freeze 3 months. Thaw overnight in fridge. Serve room temp or warm 10 mins at 300°F. Crust stays crisp!
Q: Why is my filling runny/watery?
A: Three likely culprits: 1) Didn’t bake long enough (needs that firm jiggle!), 2) Over-whisked eggs (creates bubbles that collapse), or 3) Sliced while warm. Always cool completely! If it happens, crumble it over ice cream – “deconstructed” pie!
Q: Can I skip the bourbon?
A: Sure! Replace with 2 tbsp apple juice or extra vanilla. But try it once with bourbon – it deepens the caramel notes mysteriously!
Q: My crust shrank/sank! Help?
A: Prevent next time: 1) Chill dough thoroughly before baking, 2) Don’t stretch dough in pan, 3) Use pie weights or dried beans on parchment-lined crust for first 15 mins of baking (“blind baking”). For now? Call it “rustic” and pile on ice cream!
Pecan Slab Pie
- Total Time: 1 hour 40 minutes
Description
Big flavors, bold slices, and buttery Southern charm – this Pecan Slab Pie is your go-to for feeding a happy crowd. Imagine gooey bourbon-caramel filling, toasted pecans, and flaky crust all baked into epic sheet pans. It’s everything you love about pecan pie, multiplied by delicious. Perfect for holidays, potlucks, or surprise cravings that demand more than a single slice. Ready to win hearts (and maybe start a few pie feuds)? Let’s bake.
Ingredients
-
6 pie crusts (homemade or 3 boxes refrigerated)
-
16 large eggs
-
4 cups light corn syrup (or 2 cups maple + 2 cups honey)
-
2 cups packed light brown sugar
-
1½ cups melted unsalted butter
-
4 tbsp bourbon (or 2 tbsp apple cider + 2 tbsp vanilla)
-
2 tbsp vanilla extract
-
2 tsp ground cinnamon
-
2 tsp kosher salt
-
12 cups toasted pecans
-
Flaky sea salt, to finish
Instructions
-
Prep Crusts (30 mins chill)
Roll and press crusts into two greased 13×18” sheet pans. Tuck edges, dock with a fork, and chill for 30 minutes. -
Make Filling
In a large bowl, whisk eggs. Add corn syrup, brown sugar, butter, bourbon, vanilla, cinnamon, and salt. Stir in pecans. -
Assemble
Pour filling evenly into both crusts, filling to just below the rim. -
Bake
Bake at 350°F for 45–55 mins, rotating pans halfway. Pies are done when filling jiggles as one and crusts are golden. -
Cool & Cut
Cool completely in pan (2–3 hours). Sprinkle with flaky salt. Slice each slab into 24 bars.
Notes
-
Use maple syrup for a deeper autumn vibe.
-
Stir in dark chocolate chunks for a pecan-chocolate twist.
-
Chill fully before slicing for clean bars.
-
Freezes beautifully – stack with parchment.
- Prep Time: 45 mins
- Cook Time: 55 mins
Nutrition
- Calories: 310Cal per bar
- Sugar: 25g
- Fat: 21g
- Carbohydrates: 30g
- Protein: 25g
Nutritional Nibbles (Per Bar)
Calories: ~310 | Sugar: 25g | Fat: 21g | Carbs: 30g | Protein: 4g
Note: Values approximate. Using sugar substitutes? Adjust counts accordingly!
Final Thoughts: Why This Slab Pie Steals the Show
This pecan slab pie isn’t just dessert—it’s a celebration of simplicity, generosity, and bold flavors. It solves the problem of “not enough pie” at gatherings, and its make-ahead flexibility means less stress for the host. Whether you stick to the classic recipe or experiment with chocolate, spices, or boozy twists, it’s a canvas for creativity.
Most importantly, it’s forgiving. Cracked crust? Call it “artisanal.” Filling overflowed? Brand it “caramelized edges.” The real magic is in the way it brings people together—passed around on napkins, eaten with fingers, and remembered long after the last crumb is gone.
So go ahead, bake it messy, serve it loud, and watch it disappear. Because the best pies aren’t just made with butter and sugar—they’re made with joy.
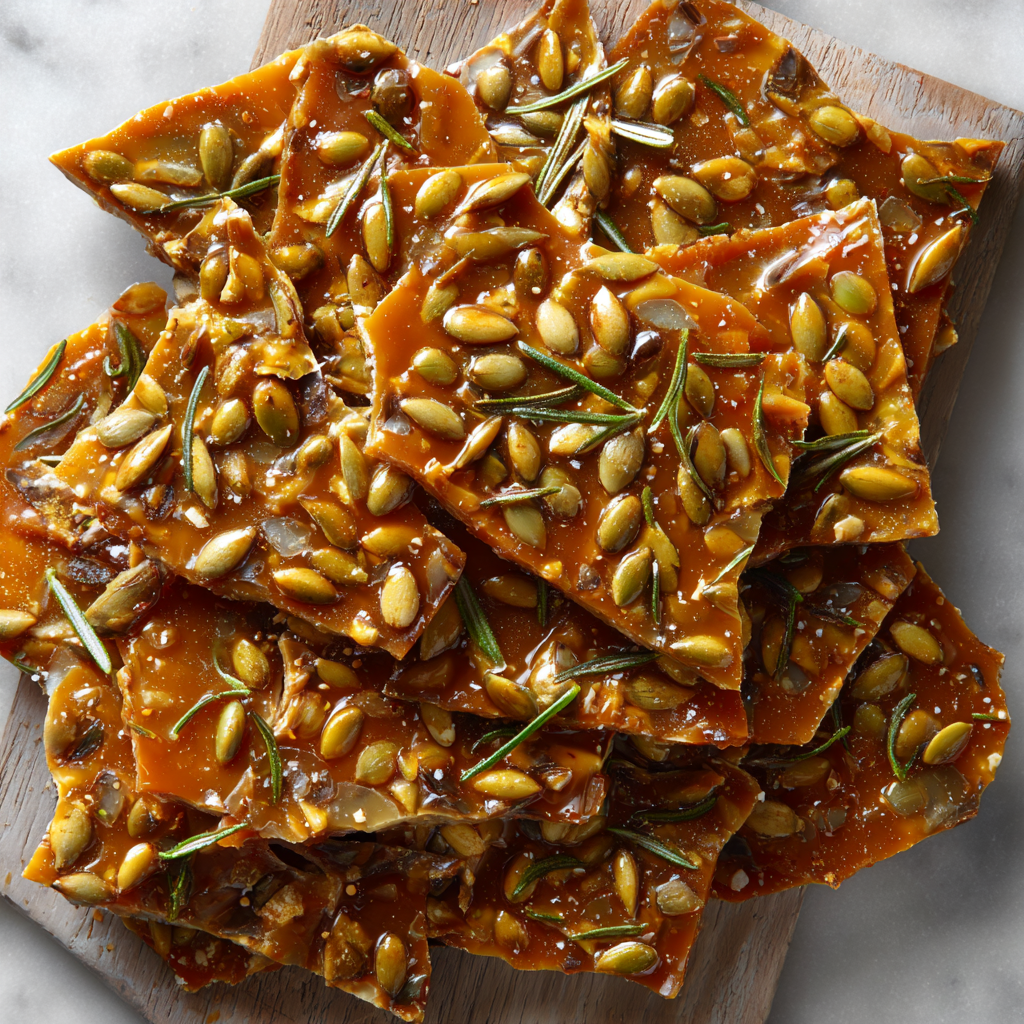
Rosemary-Pumpkin Seed Brittle
Rosemary-Pumpkin Seed Brittle: Your New Favorite Crunchy Obsession
Hey foodie friend! Beau here from Feastical, and I’ve got a confession: I’m completely addicted to this savory-sweet Rosemary-Pumpkin Seed Brittle. Imagine this: buttery caramel crackling under your teeth, giving way to crunchy roasted pepitas kissed with woodsy rosemary, a hint of black pepper, and that glorious salty finish. It’s like autumn decided to throw a party in your mouth! This isn’t your grandma’s peanut brittle (though I love that too!). This is a gourmet twist that’s bold, unexpected, and ridiculously easy to make. I’m sharing a double-batch version because trust me – you’ll want extra for gifting, cheese boards, sneaky kitchen snacks, and maybe hiding a stash for yourself. Why brittle? Because life’s too short for boring snacks! This recipe is all about simple ingredients doing spectacular things. We’re talking 10 minutes of prep, 15 minutes of magic on the stove, and boom – you’ve got edible gold. Ready to make your kitchen smell like a cozy, herby, caramel dream? Let’s dive in and create some crunch-tastic joy!
The Day Brittle Got a Rosemary Makeover
Picture this: It was my first fall hosting Feastical’s “Friendsgiving Fiasco” (our lovingly chaotic potluck). I’d planned classic pecan brittle, but halfway through, I realized – horror of horrors – I only had half the pecans needed! Panic mode! Then I spotted a giant bag of pepitas I’d roasted for salad toppings. Hmm… risky, but maybe? As I frantically tossed them in, my elbow bumped my thriving rosemary plant on the windowsill. A few fragrant sprigs fell right into the pot. “Well, heck,” I thought, “in for a penny, in for a pound!” I grabbed my pepper grinder too. What emerged from that kitchen chaos was pure magic. The brittle vanished faster than the turkey! Friends raved about the “gourmet” flavor, and my rosemary bush became the unexpected MVP. Now, it’s not a Feastical gathering without this brittle. It reminds me that sometimes the best recipes aren’t planned – they’re happy little kitchen accidents with delicious consequences!
Gather Your Crunch Crew: Ingredients & Pro Tips
- 4 cups granulated sugar: The backbone of our caramel. Don’t sub brown sugar – its moisture makes brittle chewy. Organic cane sugar works great!
- 1 cup (2 sticks) unsalted butter, sliced: Salted butter can make it overly salty. Slicing ensures even melting. Pro Tip: Use European-style butter (like Kerrygold) for extra richness.
- ⅔ cup golden syrup: My fave for its honey-like depth without overpowering. No golden syrup? Light corn syrup works! Honey or maple syrup can sub, but reduce heat slightly – they burn faster.
- 1 tsp baking soda: The secret weapon! It creates millions of tiny air bubbles, making the brittle light and crackly. Measure precisely – too much = bitter.
- 5 cups roasted, salted pepitas (pumpkin seeds): Must be pre-roasted and salted! Raw seeds turn tough. Can’t find salted? Roast raw ones yourself with 1 tsp salt first. Sunflower seeds make a fun twist!
- 2 tbsp chopped fresh rosemary: Fresh is non-negotiable! Dried tastes like pine needles. Chop finely so no one gets a mouthful of herb. Rosemary obsessed? Add 1 tsp extra!
- ½ tsp freshly ground black pepper: Grind it fresh – pre-ground loses its spark. Adds a warm, subtle kick that makes people wonder, “What’s that amazing flavor?”
- Large-flake sea salt (like Maldon), to finish: The crown jewel! The flakes add texture and bursts of salinity. Pink Himalayan salt works too, but avoid fine table salt.
Let’s Make Some Magic: Step-by-Step with Chef Beau
Step 1: Prep Like a Pro (5 mins)
Line a rimmed baking sheet (half-sheet pan, 18×13″) with parchment paper or a silicone mat. Don’t skip the rim! Have every single ingredient measured and within arm’s reach – including your baking soda with its measuring spoon ready. Brittle waits for no one! Pro Hack: Lightly grease your spatula – caramel won’t stick as much.
Step 2: Build the Golden Caramel Base (10-12 mins)
In a large, heavy-bottomed saucepan (at least 4 quarts – it bubbles violently!), combine the sugar, sliced butter, and golden syrup. Place over medium heat. Stir constantly with a heatproof spatula or wooden spoon until the butter melts and the sugar dissolves into a smooth, glossy mixture. Once it starts boiling, STOP STIRRING. Attach a candy thermometer to the side. Let it bubble away, undisturbed. This is crucial for achieving the right texture! Watch it like a hawk as it transforms from pale gold to deep amber (think the color of an old penny). It must reach 300°F (hard crack stage). Pro Tip: Swirl the pan gently if needed for even cooking, but resist stirring! Undercooked = sticky mess. Overcooked = bitter. Trust your thermometer!
Step 3: The Lightning-Fast Finish (Under 60 seconds!)
The second it hits 300°F, pull the pan off the heat IMMEDIATELY. Working quickly but carefully (hot sugar burns!), sprinkle in the baking soda. It will foam up dramatically – that’s the magic happening! Stir vigorously for just 5 seconds to incorporate. Immediately dump in ALL the pepitas, chopped rosemary, and black pepper. Stir like crazy for another 15-20 seconds until everything is coated. Don’t over-mix – you just want it combined. Pro Hack: Wear oven mitts! That pot is crazy hot, and the foam rises high.
Step 4: Spread & Set the Stage for Crunch (2 mins)
Pour the molten mixture onto your prepared baking sheet. It will be thick and lumpy – that’s perfect! Use your lightly greased spatula to spread it as evenly as possible into a roughly 1/4-inch thick layer. Work fast before it sets. Don’t obsess over perfection – rustic shards are charming! Immediately sprinkle generously with the large-flake sea salt, gently pressing it in so it sticks. Pro Tip: Tilt the pan slightly to help spread it. If it sets too fast, pop the pan in a warm oven (200°F) for 1 min to soften slightly.
Step 5: The Hardest Part – Waiting! (30+ mins)
Walk away. Seriously. Let the brittle cool completely at room temperature. Rushing this = broken teeth! You’ll know it’s ready when it’s hard, glossy, and room temperature. Pro Hack: If your kitchen is humid, cool it near an AC vent or fan (not directly!). Once cool, channel your inner artist: Use your hands or the handle of a butter knife to break it into beautiful, irregular shards. Enjoy the satisfying snap!
How to Serve Your Savory-Sweet Masterpiece
This brittle is a total show-off! For gifting, pile shards into cellophane bags tied with twiggy rosemary sprigs and twine. On a cheese board, it’s a game-changer – pair it with sharp cheddar, creamy brie, and tart apples. Need a cocktail hour star</strong? Serve big pieces in a rustic bowl alongside spiced nuts and olives. Feeling fancy? Crumble it over vanilla ice cream or pumpkin soup for an epic sweet-salty crunch. Honestly? My favorite way is sneaking pieces straight from the jar while pretending to “organize” the pantry. No judgment here!
Get Creative: Flavor Twists & Swaps
- Spicy Kick: Add 1/4 tsp cayenne pepper or 1 tsp smoked paprika with the black pepper. Fiendish goodness!
- Sweet & Smoky: Swap 1 tbsp of the golden syrup for maple syrup and add 1 tsp smoked sea salt at the finish.
- Seedy Sensation: Use a mix! Try 3 cups pepitas + 2 cups roasted sunflower seeds or chopped pecans.
- Herb Garden: Swap rosemary for 1 tbsp finely chopped fresh thyme + 1 tsp grated lemon zest. Bright and zippy!
- Chocolate Drizzle (Because, Chocolate): Melt 4 oz dark chocolate, drizzle over cooled brittle, sprinkle with extra salt. *Chef’s kiss*
Beau’s Brittle Wisdom & Kitchen Tales
This recipe has evolved from that frantic Friendsgiving save! I now always make a double batch (hence this recipe!) because it disappears faster than cookies at a bake sale. One time, I tried using pre-minced garlic rosemary by accident (don’t ask how that happened!). Let’s just say… garlic brittle is NOT recommended. Lesson learned: Label your jars! Another fun fail: I once used a cheap, thin pot. The sugar scorched, and cleaning was a nightmare. Invest in a heavy pot – your brittle (and sanity) will thank you. The black pepper was a later addition – a customer at a Feastical pop-up said, “It’s amazing, but you know what it needs? Pepper!” She was absolutely right. Now, that warm whisper of pepper is essential. It’s proof that recipes, like good friendships, get better with a little time and feedback!
Brittle SOS: Your Questions Answered
Q: Help! My brittle is chewy/sticky, not crunchy. What went wrong?
A: This usually means the sugar syrup didn’t reach a high enough temperature (hard crack stage – 300°F). Trust your candy thermometer! Undisturbed boiling is key. Also, humidity is brittle’s enemy. Make it on a dry day and store airtight immediately. If it’s sticky, you can try re-baking the pieces on a sheet at 250°F for 10-15 mins to dry them out, but prevention is best!
Q: Can I use honey instead of golden syrup?
A: You can, but be extra careful! Honey burns faster than syrup. Reduce heat to medium-low once boiling starts, stir minimally, and watch the thermometer like a hawk. It might also make the brittle slightly chewier than golden syrup. For best results, stick to golden syrup or light corn syrup.
Q: Why baking soda? It foamed like crazy!
A: That dramatic foam is exactly why we use it! Baking soda creates tons of tiny carbon dioxide bubbles when it hits the hot syrup. This makes the brittle lighter, more porous, and delightfully crackly instead of being a dense, tooth-breaking slab. Don’t skip it, and add it off the heat!
Q: How long does this keep? How do I store it?
A: Stored correctly in an airtight container at room temperature in a cool, dry place, this brittle stays gloriously crunchy for up to 3 weeks! Layer pieces between parchment paper to prevent sticking. Avoid the fridge – humidity makes it weep and soften. If it lasts that long… which it won’t!

Rosemary-Pumpkin Seed Brittle
- Total Time: 30 mins
Description
Ready for a bold snack that’ll steal the spotlight from every charcuterie board? This Rosemary-Pumpkin Seed Brittle is savory-sweet magic with buttery caramel, toasted pepitas, fresh rosemary, a touch of black pepper, and a salty finish that makes every shard irresistible. It’s nostalgic brittle—but reinvented. Easy to whip up, endlessly giftable, and dangerously snackable. Let’s turn your kitchen into a crunchy caramel dream.
Ingredients
-
4 cups granulated sugar
-
1 cup unsalted butter (sliced)
-
⅔ cup golden syrup (or light corn syrup)
-
1 tsp baking soda
-
5 cups roasted, salted pepitas
-
2 tbsp fresh rosemary, finely chopped
-
½ tsp freshly ground black pepper
-
Large-flake sea salt, for topping
Instructions
-
Prep Pan & Ingredients (5 mins)
Line a rimmed baking sheet with parchment or a silicone mat. Measure all ingredients—brittle moves fast! -
Make Caramel Base (10–12 mins)
In a large saucepan, combine sugar, butter, and syrup. Stir over medium heat until melted. Stop stirring once it boils. Cook undisturbed until mixture hits 300°F (hard crack). -
Add Mix-ins (1 min)
Remove from heat. Immediately stir in baking soda (it will foam), followed by pepitas, rosemary, and black pepper. Stir quickly to combine. -
Spread & Top (2 mins)
Pour onto prepared sheet. Spread into an even ¼-inch layer. Sprinkle with flaky salt. Let cool completely at room temp (about 30 mins). -
Break & Serve
Snap into shards once fully cooled. Store airtight up to 3 weeks.
Notes
-
Use a candy thermometer—300°F is the sweet spot.
-
Add cayenne or smoked paprika for a spicy twist.
-
Drizzle with dark chocolate once cool for extra indulgence.
-
Perfect on cheese boards, with ice cream, or as edible gifts.
- Prep Time: 10 mins
- Cook Time: 15 mins
Nutrition
- Calories: 150Cal per piece
- Sugar: 14g
- Fat: 8g
- Carbohydrates: 17g
- Protein: 2g
Nutritional Info (Approximate, per piece)
Calories: ~150 | Total Fat: 8g | Saturated Fat: 3g | Cholesterol: 10mg | Sodium: 50mg | Total Carbohydrates: 17g | Dietary Fiber: 1g | Sugars: 14g | Protein: 2g
(Note: Values are estimates based on ingredients and will vary slightly based on specific brands and exact portion size.)
Final Thoughts: Why This Brittle Deserves a Spot in Your Kitchen
This Rosemary-Pumpkin Seed Brittle is more than a snack—it’s a celebration of contrasts: sweet and salty, crunchy and buttery, herbal and spicy. It’s proof that the best recipes often come from happy accidents (like a rosemary sprig tumbling into caramel!).
Whether you’re a candy-making novice or a seasoned cook, this recipe is foolproof with a thermometer and a heavy pot. It’s adaptable (swap seeds, play with spices), impressive (hello, holiday gifts!), and downright addictive.
So grab that spatula, embrace the caramel chaos, and let this brittle become your new signature crunch. Trust me—once you taste that first shard, you’ll understand why it’s Feastical’s most-requested recipe. Happy brittle-making, friends!
Pecan Shortbread Cookies
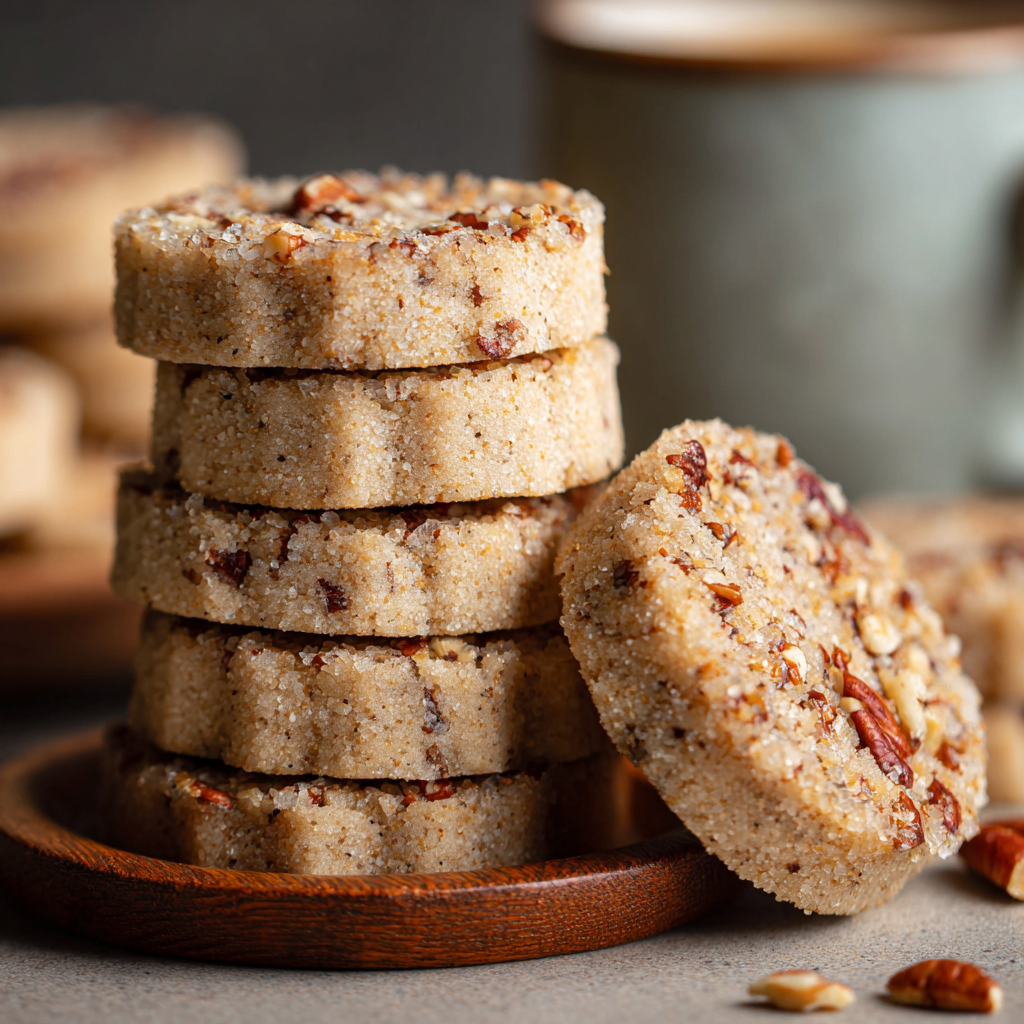
The Ultimate Buttery Pecan Shortbread Cookies (Double Batch!)
Hey friends! Beau here, welcoming you back to Feastical with open arms and a plate piled high with pure, buttery bliss. If you’ve ever craved a cookie that feels like a cozy sweater for your soul – crisp at the edges, melt-in-your-mouth tender inside, and singing with rich, toasty pecan flavor – then you’ve found your baking happy place. These Pecan Shortbread Cookies aren’t just good; they’re *legendary* good. The kind that disappears faster than you can say “second helping,” which is exactly why we’re making a double batch right out of the gate! Trust me, one batch is simply never enough when you’ve got neighbors popping by, cookie jars begging to be filled, or just… well, Tuesday. They’re deceptively simple, elegant enough for your fanciest gathering, but soul-satisfyingly down-to-earth. That roll in sparkling turbinado sugar? It’s not just pretty – it gives each bite an irresistible sweet crunch. So, tie on your favorite apron, preheat that oven, and let’s bake up a storm of nutty, buttery goodness together. Your kitchen’s about to smell like pure happiness!
This recipe? It’s steeped in warm fuzzies for me. Picture this: It’s my first Christmas living on my own, miles away from my Louisiana family. I felt a pang of homesickness, missing the chaotic, laughter-filled holiday baking marathons at my Grandma Ellie’s. Determined to recreate a piece of that magic, I decided on shortbread – her signature. But being a pecan-obsessed Southerner at heart, I knew I had to add my own twist. I vividly remember standing in my tiny apartment kitchen, nervously toasting pecans for the first time (watching them like a hawk so they wouldn’t burn!), the incredible aroma instantly transporting me back to Grandma’s warm, flour-dusted countertops. That first bite of my experimental pecan shortbread? Pure comfort. It wasn’t *exactly* Grandma’s, but it carried the same spirit of love and home. Now, baking these is my ritual. Every crunch takes me back to that moment of finding my own kitchen confidence and realizing that the best recipes are the ones that weave your own story into the dough.
Gather Your Goodies (Double the Love!)
- 6 cups pecan halves, divided: The star! Toasting is NON-NEGOTIABLE – it unlocks their deep, nutty magic. We use most finely chopped in the dough and save some for that gorgeous chunky topping. Sub Insight: Walnuts work in a pinch, but pecans are king here.
- 2 cups (4 sticks) unsalted butter, at room temperature: The foundation of that dreamy shortbread texture. MUST be softened! Chef Tip: Unsalted lets us control the salt perfectly. If you only have salted butter, omit the added Kosher salt.
- 1 cup granulated sugar: Sweetens and helps create that perfect crumb structure during creaming.
- 2 tsp pure vanilla extract: The warm hug of flavor. Pro Move: Splurge on the good stuff – artificial just doesn’t compare!
- 1 tsp Kosher salt: The flavor enhancer! It balances the sweetness and makes the butter and pecans sing. Sub Alert: If using fine table salt, use only 1/2 tsp.
- 4 ½ cups all-purpose flour (spooned and leveled!): The structure. Critical Tip: Spoon flour lightly into your measuring cup and level it off. Scooping packs it down and leads to dry, crumbly cookies. GF Option: A quality 1:1 gluten-free flour blend works great!
- 1 cup turbinado sugar (for rolling): The sparkly crown! Its large crystals give that incredible sweet crunch around the edges. Sub Insight: Coarse sanding sugar works, or even plain granulated in a pinch (though you’ll miss the crunch).
Let’s Bake Some Magic: Step-by-Step
- Toast & Chop Your Pecans (8-10 mins @ 350°F/175°C): Spread 4 cups of pecans on a baking sheet. Pop them in your preheating oven (yep, multitask!). Toast until fragrant and lightly golden – set a timer! Watch them like a hawk after 7 mins – they burn fast! Let cool slightly. Finely chop these toasted nuts (or pulse carefully in a food processor – don’t turn to paste!). Roughly chop the remaining 2 cups of pecans – these are for mixing in and topping. Chef Hack: Toasting deepens the flavor exponentially. Don’t skip it!
- Make the Dreamy Dough: In a large bowl, beat the softened butter and granulated sugar together with an electric mixer on medium-high speed for 3-4 minutes. This is KEY! You want it super light, fluffy, and almost pale. Beat in the vanilla and salt until combined. Gradually add the flour on low speed, mixing just until the flour disappears. Tip: Overmixing = tough cookies! Gently fold in the 4 cups of finely chopped toasted pecans until evenly distributed. The dough will look crumbly at first but should hold together when pressed. If it seems too dry, add 1 tsp of ice water at a time.
- Shape & Chill (Patience is a Virtue!): Divide the dough in half onto large sheets of plastic wrap. Shape each half into a log about 2 inches in diameter and 10-12 inches long. Roll the plastic wrap tightly around the logs. Chef Trick: Use the edge of a baking sheet to help roll them into perfect cylinders! Chill for at least 2 hours (or up to 3 days) in the fridge. Why chill? This firms the butter, preventing spread, and makes slicing clean a breeze!
- Slice, Sugar & Pecan-Up: Preheat your oven to 350°F (175°C). Line baking sheets with parchment paper. Unwrap one log at a time. Pour the turbinado sugar onto a plate or shallow dish. Slice the log into ½-inch thick rounds using a sharp knife. Hack: Wipe the knife clean between slices for neat edges. Roll the edge of each cookie round firmly in the turbinado sugar. Place them sugar-side-up on the baking sheets. Gently press a few pieces of the reserved roughly chopped pecans onto the top of each cookie. This adds texture and visual wow! Leave about 1.5 inches between cookies as they spread slightly.
- Bake to Golden Perfection (12-14 mins): Bake for 12-14 minutes. Watch closely near the end! They are done when the edges are just turning a beautiful light golden brown. The centers will still look soft – that’s perfect! Pro Tip: Rotate your baking sheets halfway through for even baking if your oven has hot spots. Let the cookies cool on the baking sheets for 5 minutes (they firm up during this time!). Then, carefully transfer them to a wire rack to cool completely. Resist eating them hot – they need to set!
Sharing is Caring: Serving Up the Love
These beauties shine brightest piled high on a simple rustic platter or tucked into a charming cookie tin. They’re the perfect companion to a steaming mug of coffee, strong black tea, or a cold glass of milk. Want to elevate them? Serve alongside a small bowl of lightly sweetened whipped cream or a drizzle of warm salted caramel for dipping. They’re fantastic as an elegant after-dinner treat, the star of your holiday cookie tray, or packaged with love as a heartfelt homemade gift. Honestly, they taste like pure joy anytime!
Mix It Up! Fun Flavor Twists
Once you’ve mastered the classic, try these delicious spins:
- Maple Kissed: Replace 1 tsp vanilla with pure maple extract. Add 1 tsp maple syrup to the dough and roll in maple sugar instead of turbinado!
- Spiced Sensation: Whisk 1 tsp ground cinnamon + 1/4 tsp nutmeg into the flour before adding. Feels extra cozy!
- Chocolate Drizzle Delight: Melt 4 oz semi-sweet or dark chocolate. Drizzle cooled cookies artistically (or dip half!) and sprinkle with flaky sea salt.
- Orange Zest Zing: Add the finely grated zest of 1 large orange to the butter/sugar while creaming. Bright and festive!
- Vegan Vibes: Use high-quality plant-based butter sticks (1:1 swap) and ensure your sugars are vegan. Works like a charm!
Beau’s Backstory & Baking Wisdom
This recipe started as a single batch… and let’s just say it caused near-riots in my house when the cookie jar emptied too fast! Doubling it was the best kitchen decision ever. One log always goes straight into the freezer (wrapped super tight in plastic, then foil) for emergency cookie cravings – slice and bake frozen, just add 1-2 mins baking time. True story: I once forgot the salt entirely (distracted by a squirrel circus outside my kitchen window!). The cookies tasted… flat and oddly sweet. Lesson learned: salt is the quiet hero! These cookies also freeze beautifully after baking – layer them between parchment in an airtight container. They thaw in minutes and taste fresh-baked. It’s the gift that keeps on giving!
Your Questions, Answered!
Q: My dough is super crumbly and won’t hold together when slicing! Help!
A: This usually means either the flour was packed too tightly (remember: spoon & level!) or the butter wasn’t quite soft enough/creamed long enough. Next time, ensure butter is truly room temp (a 1/2-inch indent when pressed) and cream it with the sugar for a full 3-4 mins until fluffy. For rescue now: Let the log sit at room temp for 10-15 mins before slicing. If still crumbly, knead the dough *very briefly* by hand until it just holds, then re-wrap and chill for 30 mins.
Q: Can I use salted butter?
A: Absolutely! Just omit the additional 1 tsp of Kosher salt in the recipe. The salt content in salted butter varies, so this gives you control.
Q: Why did my cookies spread out too much and lose their shape?
A: Two main culprits: 1) The dough wasn’t chilled long enough/firm enough before baking. Chill time is crucial! 2) Your oven temp might be running low. Get an oven thermometer! Also, ensure your butter was room temp, not melted or overly soft, when creaming.
Q: How long do these stay fresh, and how should I store them?
A: Stored in an airtight container at room temperature, they stay deliciously crisp-tender for up to 1 week (if they last that long!). For longer storage, freeze baked cookies for up to 3 months. You can also freeze the dough logs (well-wrapped) for up to 3 months; thaw slightly in the fridge before slicing and baking.
Pecan Shortbread Cookies
- Total Time: 16 minute
Description
Craving a cookie that melts in your mouth yet offers a toasty crunch in every bite? These buttery pecan shortbread cookies are it – rich, nutty, sparkled with sugar, and made for sharing. Perfect for holidays, cozy nights in, or cookie tins that wow. With a crisp edge, tender center, and golden pecan crunch, this recipe brings warmth, nostalgia, and kitchen magic. Let’s bake a double batch – because one simply isn’t enough.
Ingredients
-
6 cups pecan halves (4 cups finely chopped, 2 cups roughly chopped – toasted)
-
2 cups (4 sticks) unsalted butter, room temp
-
1 cup granulated sugar
-
2 tsp pure vanilla extract
-
1 tsp Kosher salt (½ tsp if using table salt)
-
4 ½ cups all-purpose flour (spooned & leveled)
-
1 cup turbinado sugar (for rolling)
Instructions
-
Toast Pecans: Preheat oven to 350°F (175°C). Toast 4 cups pecans for 8–10 mins until golden and fragrant. Cool slightly, then finely chop. Roughly chop remaining 2 cups for topping.
-
Cream Butter & Sugar: Beat butter and sugar on medium-high 3–4 mins until fluffy. Add vanilla and salt. Mix in flour gradually on low speed until just combined. Fold in chopped pecans.
-
Shape & Chill: Divide dough in half, shape into 10–12″ logs (2″ diameter), wrap in plastic wrap, and chill at least 2 hours.
-
Slice, Roll & Top: Slice logs into ½” rounds. Roll edges in turbinado sugar. Press chopped pecans on top. Space 1.5″ apart on parchment-lined sheets.
-
Bake: Bake at 350°F for 12–14 mins until edges are golden. Cool on sheets 5 mins, then transfer to racks.
Notes
-
Don’t skip toasting pecans – it deepens the flavor.
-
Dough too crumbly? Let warm slightly, knead gently.
-
Cookies spread too much? Chill longer and use an oven thermometer.
-
Freeze logs for slice-and-bake magic any time.
-
Add zest, drizzle chocolate, or spice it up for fun variations.
- Prep Time: 30 mins
- Cook Time: 12–14 mins
Nutrition
- Calories: 170 Cal per cookie
- Sugar: 4g
- Fat: 14g
- Carbohydrates: 10g
- Protein: 2g
Nutritional Info (Per Cookie)
Calories: ~140 | Total Fat: 10g | Saturated Fat: 4g | Cholesterol: 15mg | Sodium: 35mg | Total Carbohydrates: 12g | Dietary Fiber: 1g | Total Sugars: 6g | Protein: 1g
(Note: This is an estimate based on the specific ingredients used. Values may vary.)
Final Thoughts: More Than Just a Cookie
These buttery pecan shortbread cookies are a labor of love—a blend of science, nostalgia, and creativity. They’re versatile enough for holiday platters, afternoon tea, or a midnight snack. But beyond the recipe, they’re about connection: the warmth of sharing, the pride of gifting, and the joy of a perfectly baked bite.
So whether you’re baking them for the first time or the fiftieth, remember: the best cookies aren’t just made with butter and sugar, but with patience and heart. Now, go forth and bake—and don’t forget to save one (or three) for yourself!

Easy Caramel Apple Cheesecake Bars
Hey Friends, Let’s Bake Fall Magic!
Picture this: Crisp air, flannel shirts, and the smell of cinnamon-kissed apples wafting through your kitchen. That’s the vibe we’re chasing today with these Caramel Apple Cheesecake Bars! I’m Beau, and if you’ve hung around Feastical before, you know I live for desserts that feel like a bear hug from your grandma – if your grandma added a swirl of salted caramel and a wink of mischief. These bars? They’re the love child of apple pie and New York cheesecake, layered with buttery crust, velvety filling, tender spiced apples, and a cloud of cinnamon whipped cream. Perfect for potlucks, Thanksgiving, or bribing your neighbor to return your leaf blower. And because sharing is caring (and let’s be real – one batch disappears too fast), we’re making a double batch right in a trusty 9×13 pan. No water baths, no fuss – just pure, scoopable joy. Ready to make your kitchen smell like a cider mill? Let’s roll!
Why These Bars Taste Like Childhood
This recipe takes me straight back to my first autumn in Vermont. I was 19, working at an orchard, and utterly convinced I could “improve” their classic apple crisp. Spoiler: I burned three batches. But one rainy afternoon, the farm’s pastry chef, Martha, rescued me with her “cheesecake bars” – a secret recipe she’d scribbled on a flour-dusted napkin. We used windfall apples, smuggled caramel from the gift shop, and ate warm scraps straight from the pan while rain tapped the barn roof. That combo of tangy cream cheese, tart apples, and gooey caramel? Pure alchemy. Martha’s gone now, but every time I bake these, I add an extra pinch of cinnamon “for luck” – and smile at how a humble dessert can stitch memories into every bite.
Your Grocery List (With Chef Secrets!)
Graham Cracker Crust:
- 4 ½ cups (604g) graham cracker crumbs – Blitz whole crackers in a food processor! Chef’s swap: Digestive biscuits or gluten-free grahams work too.
- 6 tbsp (78g) granulated sugar – Balances the cinnamon’s warmth.
- 2 tsp ground cinnamon – The fall flavor MVP. Use Saigon cinnamon for extra punch!
- 1 cup (224g) salted butter, melted – Salted butter = better crust. Pro tip: Brown it lightly for nutty depth!
Cinnamon Cheesecake Filling:
- 48 oz cream cheese, room temp – Non-negotiable: cold cream cheese = lumpy filling. Lighter swap: Use 1/2 Neufchâtel.
- 2 cups (414g) sugar – Granulated dissolves best. For less sweetness, drop to 1 ¾ cups.
- 6 tbsp (48g) all-purpose flour – Secret weapon for crack-free bars! Gluten-free flour blends work.
- 1 ½ cups (346g) sour cream, room temp – Adds tangy silkiness. Greek yogurt in a pinch!
- 3 tbsp vanilla extract – Yes, tablespoons! Use real vanilla – it’s the soul of the filling.
- 2 tsp ground cinnamon – We’re doubling down on cozy.
- 6 large eggs, room temp – Cold eggs = sad, dense cheesecake. Chef hack: Soak them in warm water for 5 mins!
Caramel Apple Topping:
- 4 large apples, chopped – Firm & tart wins (Granny Smith or Honeycrisp). Peeling optional!
- ½ cup (112g) light brown sugar, packed – Molasses magic. Dark brown sugar = deeper flavor.
- 2 tsp ground cinnamon + ¼ tsp nutmeg – Nutmeg’s the unsung hero here.
- Sprinkle of lemon juice – Keeps apples bright.
- 1 cup (240ml) caramel sauce – Store-bought or homemade. Salted caramel? *Chef’s kiss*.
Cinnamon Whipped Cream:
- 1 cup heavy whipping cream, cold – Ultra-pasteurized works, but avoid “whipping cream” (less fat).
- ½ cup powdered sugar – Dissolves instantly. Adjust to taste!
- 1 tsp vanilla extract + ½ tsp cinnamon – Fold in after whipping for pretty swirls.
Let’s Build Your Bars, Step-by-Step!
1. Crust Time: Preheat oven to 325°F (163°C). Grab your biggest bowl and mix graham crumbs, sugar, and cinnamon. Pour in melted butter and stir until it feels like wet sand. Chef’s hack: Use the bottom of a glass to press it firmly into a greased 9×13 pan – tight packing prevents crumbling! Bake 10 minutes until fragrant. Let it cool completely (patience, grasshopper).
2. Cheesecake Alchemy: In a stand mixer (or with a beast-mode hand mixer), beat room-temp cream cheese and sugar on medium for 3 minutes – scrape that bowl twice! It should look like satin. Sprinkle in flour, mix until invisible. Add sour cream, vanilla, and cinnamon; blend just until smooth. Key tip: Overmixing now = cracks later! Crack eggs one at a time, mixing on low after each until *just* combined. The batter should be gloriously jiggly.
3. Bake It Right: Pour filling over cooled crust. Gently tap the pan 3x on the counter to release bubbles (trust me, it matters). Bake 45-50 minutes. The center should wobble like Jell-O when nudged – it’ll set while chilling. No peeking! Cool 1 hour on a rack, then refrigerate 4+ hours (overnight = creamier).
4. Apple Awesomeness: While cheesecake chills, toss chopped apples with lemon juice. In a skillet over medium heat, cook apples, brown sugar, cinnamon, and nutmeg for 8-10 minutes until tender but not mushy. Cool completely, then stir in caramel sauce. Pro move: Add 1 tbsp butter to the skillet for extra richness!
5. Whipped Cloud: Chill your mixing bowl 10 minutes first. Whip cold cream to soft peaks. Sift in powdered sugar, vanilla, and cinnamon. Beat to stiff peaks – but stop before it turns buttery!
How to Serve These Beauties
Slice cold cheesecake into 24 squares (wipe your knife hot water between cuts for clean edges). Spoon caramel apples generously over each bar. Top with a swoosh of cinnamon whipped cream – pipe it fancy or dollop it rustic. Drizzle extra caramel and a dusting of cinnamon for ✨ drama ✨. Serve chilled with hot coffee or spiked cider! Storage tip: Keep components separate until serving for crunchiest crust.
The Art of Apple Selection: Which Varieties Shine (and Which to Skip)
Not all apples are created equal when it comes to baking! The wrong pick can turn your topping into mushy sadness or tart overwhelm. Here’s the juicy scoop:
Best for Baking (Firm & Tart):
-
Granny Smith: The gold standard. Their bright acidity balances the sweet caramel, and they hold shape under heat.
-
Honeycrisp: Sweet-tart with a satisfying crunch. Less prone to browning, thanks to their thick skin.
-
Braeburn: A hybrid vigor superstar—firm, spicy-sweet, and slow to soften.
Okay in a Pinch (But Adjust Sugar):
-
Fuji: Very sweet, so reduce brown sugar by 1-2 tbsp. They soften faster, so cook 2 mins less.
-
Gala: Mild flavor, but can turn mealy. Toss with extra lemon juice to keep structure.
Avoid These (Unless You Like Applesauce Topping):
-
Red Delicious: Pretty but flavorless. They collapse into grainy pulp.
-
McIntosh: Too juicy—better for cider than baking.
Prep Like a Pro:
-
Peeling: Optional! The skin adds fiber and color, but peel if you want a silky texture.
-
Chop Size: ½-inch chunks are ideal—small enough to layer evenly, big enough to retain bite.
-
Lemon Juice Trick: Toss apples with 1 tbsp lemon juice + 1 tbsp water to prevent browning while prepping.
Flavor Boosters:
-
Brown Butter: Cook your apples in 1 tbsp browned butter for nutty depth.
-
Spice Variations: Cardamom (¼ tsp) or star anise (1 pod, removed after cooking) add intrigue.
-
Boozy Twist: Deglaze the skillet with 2 tbsp Calvados or spiced rum after cooking.
The Psychology of Comfort Food: Why This Recipe Hits Different
There’s a reason these bars feel like a hug in dessert form—it’s not just nostalgia; it’s neuroscience. Comfort food triggers our brain’s reward system, and here’s how this recipe leans into those warm fuzzies:
1. The Cinnamon Effect
Cinnamon’s aroma is scientifically proven to reduce anxiety and evoke warmth. When paired with sugar (like in the crust or apples), it triggers dopamine release—literally making you happier with each bite.
2. Texture Symphony
The combo of crunchy crust, creamy filling, and tender apples hits all five texture notes the brain craves (crunch, chew, cream, melt, and goo). This “variety” tricks us into eating more (hence the “just one more bite” phenomenon).
3. Caramel = Pure Nostalgia
Caramelized sugar activates childhood memories (think: candy apples, Halloween). The Maillard reaction (browning of sugar) creates umami-like compounds that signal “indulgence” to our taste buds.
4. The Sharing Factor
Food psychologist Brian Wansink found that communal desserts (like bars meant for a crowd) enhance perceived enjoyment. Cutting them into squares subconsciously says “this is for everyone,” reducing guilt and amplifying joy.
5. Seasonal Timing
Fall desserts tap into “hygge” (Danish coziness). As daylight wanes, we crave carb-heavy, spiced foods for serotonin boosts. These bars check every box: warm spices, communal vibes, and handheld comfort.
Fun Fact: The act of baking itself is therapeutic. The rhythmic measuring and stirring lower cortisol levels—so even if you’re stressed, the process calms you before the first bite!
Shake It Up! 5 Tasty Twists
1. Boozy Bliss: Add 2 tbsp bourbon to the apple topping. *mic drop*
2. Nutty Crunch: Mix ½ cup toasted pecans into the crust or sprinkle over apples.
3. Chocoholic’s Dream: Swap graham crumbs for Oreos! Add chocolate chips to the filling.
4. Lighter Love: Use reduced-fat cream cheese/sour cream and monk fruit sweetener.
5. Pear-Ginger: Swap apples for ripe pears + 1 tbsp fresh grated ginger. Game-changer!
Beau’s Behind-the-Scenes Stories
This recipe has seen some *drama*. Once, during a live cooking demo, I forgot the flour in the filling. The result? Cheesecake soup (delicious, but not blog-worthy). Another time, my dog snagged a whole pan cooling on the counter… RIP, Thanksgiving dessert. Lesson learned: Dogs adore caramel apples. Over the years, I’ve tweaked it relentlessly – doubling the vanilla, adding nutmeg to apples, using brown butter in the crust. The biggest win? Skipping the water bath! By baking low-and-slow in a metal pan (not glass!), we get silky texture without the hassle. Moral: Embrace kitchen flops. They make the best stories… and sometimes, better recipes.
Your Questions, Solved!
Q: Why did my cheesecake crack? 😭
A: Three culprits: Overmixed batter (incorporates too much air), rapid temperature changes (cool it slowly!), or overbaking. If cracks happen, cover ’em with apples – no one will know!
Q: Can I freeze these bars?
A: Absolutely! Freeze without toppings for up to 3 months. Thaw overnight in the fridge, then add apples/cream.
Q: My apples turned mushy! Help?
A: Use firm apples (Granny Smiths hold up best), and don’t overcook them – 8 mins is usually perfect. They’ll soften more in caramel sauce.
Q: Can I halve this recipe?
A> Yep! Use an 8×8 pan and bake 35-40 mins. But fair warning: You’ll regret not making the double batch.
Easy Caramel Apple Cheesecake Bars
- Total Time: 1 hour active + 5 hours chilling
Description
Imagine: velvety cinnamon cheesecake layered over graham cracker crust, topped with tender caramel apples and billowy whipped cream. Perfect for Thanksgiving, potlucks, or when you need a hug in dessert form.
Ingredients
Crust:
-
4 ½ cups graham cracker crumbs
-
6 tbsp sugar
-
2 tsp cinnamon
-
1 cup melted butter
Cheesecake Filling:
-
48 oz cream cheese, room temp
-
2 cups sugar
-
6 tbsp flour
-
1 ½ cups sour cream
-
3 tbsp vanilla
-
2 tsp cinnamon
-
6 eggs, room temp
Caramel Apple Topping:
-
4 apples (Granny Smith or Honeycrisp), chopped
-
½ cup brown sugar
-
2 tsp cinnamon + ¼ tsp nutmeg
-
1 tbsp lemon juice
-
1 cup caramel sauce
Cinnamon Whipped Cream:
-
1 cup heavy cream
-
½ cup powdered sugar
-
1 tsp vanilla + ½ tsp cinnamon
Instructions
-
Crust: Mix crumbs, sugar, cinnamon, and melted butter. Press into a greased 9×13″ pan. Bake at 325°F for 10 mins. Cool completely.
-
Filling: Beat cream cheese and sugar until smooth. Add flour, sour cream, vanilla, and cinnamon. Mix in eggs one at a time. Pour over crust. Bake 45-50 mins until set but jiggly. Cool 1 hour, then chill 4+ hours.
-
Apples: Cook apples, brown sugar, cinnamon, nutmeg, and lemon juice for 8-10 mins until tender. Stir in caramel. Cool.
-
Whipped Cream: Whip cold cream to soft peaks. Add powdered sugar, vanilla, and cinnamon. Beat to stiff peaks.
-
Assemble: Slice cheesecake, top with apples and whipped cream. Drizzle extra caramel!
Notes
✅ Room temp ingredients prevent lumps and cracks!
✅ Use firm apples so they don’t turn mushy.
✅ Make ahead: Cheesecake keeps 3 days in fridge (store toppings separately).
Nutrition
- Calories: 420 Cal Per Bar
- Sugar: 38g
- Fat: 26g
Nutrition Per Bar (Approximate)
Calories: 370 | Sugar: 28g | Fat: 24g | Carbs: 32g | Protein: 5g
Final Thoughts
Whether you’re baking these Caramel Apple Cheesecake Bars for a holiday crowd, a cozy night in, or just to savor the alchemy of butter, cinnamon, and joy, remember this: The best desserts aren’t just about taste—they’re about the stories they carry. From Martha’s napkin recipe to your own kitchen experiments (cracks, dog thefts, and all), these bars are a canvas for connection. So drizzle that extra caramel, lick the spoon shamelessly, and share them with someone who’ll grin through a mouthful of crumbs. Because, as Martha would say, “Life’s too short for sad desserts.” Now go bake some magic—and save me a corner piece
Apple Buttercream Icing
When Fall Calls, This Icing Answers
Hey friends, Beau here! 🍎✨ Ever have one of those moments when you’re elbow-deep in flour, the oven’s humming, and suddenly… your dessert feels naked? Like that spice cake you just pulled out deserves more than a sad sprinkle of sugar? That’s where this Apple Buttercream Icing swaggers in like a hero in a flannel shirt. Imagine whipped clouds of cinnamon-kissed sweetness with the cozy depth of slow-cooked apples, all fluffy enough to float away. This isn’t just frosting—it’s a hug for your cupcakes, a high-five for your pumpkin bread, and frankly, it’s dangerous with a spoon. I created this recipe after a cider mill pilgrimage left me drowning in apple butter (the happy kind of drowning!). Today, I’ll show you how to whip up this autumnal magic in 10 minutes flat. No fancy skills needed—just butter, joy, and maybe a podcast playing in the background. Ready to make your desserts the star of the fall potluck? Let’s dive in.
The Apple Orchard Epiphany
Picture this: Vermont, peak foliage season, and my buddy’s uncle’s orchard. We’re “helping” press cider (read: sampling more than working). Back home, I’m staring at a jar of apple butter so good it should be illegal. That’s when my spice cake—destined for a bake sale—decides to crumble mid-frosting. Panic mode! I grab the apple butter, whisk it into emergency buttercream, and… silence. Then, a chorus of “WHAT IS THIS SORCERY?!” from my taste-testers (aka my kids and the dog begging for crumbs). That happy accident became our family’s fall tradition. Now, every September, my daughter demands we make “the fuzzy apple sweater icing” (her words, not mine!). It’s proof that kitchen disasters often bake up the sweetest memories.
Your Flavor Toolkit: Simple Stars, Big Impact
- Butter (2 cups, softened): Salted or unsalted? I prefer salted—it balances the sugar’s sweetness. Pro tip: Leave it on the counter for 2 hours. Too cold? Grate it! Too warm? Chill for 5 mins. Vegan? Swap in plant-based butter (Miyoko’s works wonders).
- Powdered Sugar (10 cups): Yes, it’s a lot! This is a double batch because you’ll want leftovers (trust me). Sift it if you’re fancy—lumps hate smooth icing.
- Apple Butter (½ cup): The MVP! Use homemade or store-bought (my recipe’s here). Avoid “apple sauce”—it’s thinner and less flavorful. Pumpkin butter? Heck yes, try it in the variations!
- Apple Cider (4 tbsp): Reduces the powdered sugar’s chalkiness. Boil it down to 2 tbsp for intense flavor! No cider? Apple juice + ½ tsp cider vinegar works.
Whipping Up Clouds of Autumn (Seriously, It’s Easy)
- Beat that butter like it owes you money. In a stand mixer (or with a hand mixer), cream softened butter on medium-high for 3 minutes. Want extra fluff? Scrape the bowl halfway! Chef’s hack: Toss a kitchen towel over the mixer to avoid the “snowstorm of sugar shame.”
- Apple party time! Pour in apple butter and 3 tbsp cider. Mix on low until combined—don’t rush! Watch for separation: If it looks curdled, your butter was too cold. Fix: Warm the bowl with a hair dryer (seriously!).
- Sweeten the deal. Gradually add powdered sugar (½ cup at a time) on LOW speed. Once incorporated, crank it to high for 2 minutes. Texture check: Drag a spoon through it. If the line holds, you’re golden! Too thick? Add remaining cider ½ tsp at a time.
- Fluff therapy. Beat on high for 1 final minute. This aerates it into that dreamy, pipeable cloud. Taste? Add a pinch of cinnamon if your apple butter’s shy.
Where to Smear This Happy Stuff
Slather it on warm pumpkin muffins like edible sunshine. Pipe rosettes onto chai-spiced cupcakes and top with candied pecans. For drama, frost a naked caramel apple cake and drizzle with salted caramel. Bonus: Spread it between oatmeal cookies for “grown-up sandwich cremes.” My kids? They dip pretzel rods in it. Zero judgment here.
Shake It Up, Sugar!
1. Boozy Bourbon Bliss: Swap cider with 2 tbsp bourbon + 2 tbsp reduced cider. Adults only!
2. Dairy-Free Darling: Use vegan butter and coconut cream (1 tbsp) instead of cider.
3. Maple Kissed: Replace 1 cup powdered sugar with ¼ cup maple syrup (reduce cider by 1 tbsp).
4. Ginger Zing: Fold in 2 tsp grated fresh ginger for a spicy kick.
5. Protein Power: Mix in ¼ cup vanilla protein powder (great for post-workout… muffins?).
Confessions from My Icing-Splattered Apron
True story: I once added hot cider and melted the butter into soup. (Cue the sad trombone.) Now I reduce cider cold. This recipe’s evolved from a “fix-it-fast” trick to my most requested fall staple—even my stoic mailman asks for jars! Pro tip: Make a triple batch and freeze portions in muffin tins. They thaw in 30 minutes, ready for pancake emergencies. Also? If your icing tastes too sweet, a pinch of sea salt fixes everything. #LifeHack
Your Icing SOS, Solved
Q: Why is my buttercream runny?
A: Warm kitchen? Over-zealous cider adding? Pop the whole bowl in the fridge for 15 minutes, then re-whip. Still loose? Mix in 2 tbsp powdered sugar at a time.
Q: Can I use reduced-sugar apple butter?
A: Absolutely! But taste before adding all the powdered sugar—you might need less.
Q: How long does it keep?
A: 5 days refrigerated (in airtight containers), or freeze for 3 months. Let it warm to room temp before re-whipping.
Q: Why salted butter?
A: Salt cuts through sweetness and enhances flavor. If using unsalted, add ¼ tsp fine sea salt with the apple butter.

Apple Buttercream Icing
- Total Time: 10 mins (plus butter softening)
Description
Fluffy, spiced, and packed with apple butter goodness, this icing transforms basic desserts into autumnal masterpieces. Perfect for cakes, cupcakes, or eating straight from the bowl (we won’t judge).
Ingredients
-
2 cups (4 sticks) salted butter, softened (or vegan butter)
-
10 cups powdered sugar, sifted (yes, it’s a double batch—trust me!)
-
½ cup apple butter (not applesauce!)
-
4 tbsp apple cider (reduced to 2 tbsp for intense flavor)
-
1 tsp cinnamon (optional, for extra spice)
Instructions
-
Beat the butter on medium-high for 3 mins until light and fluffy. Scrape the bowl halfway.
-
Add apple butter & 3 tbsp cider. Mix on low until smooth.
-
Gradually add powdered sugar, ½ cup at a time, mixing on low. Then beat on high for 2 mins until fluffy.
-
Adjust consistency: Too thick? Add remaining cider, ½ tsp at a time. Too thin? Chill 15 mins, then re-whip.
Notes
✅ For best texture: Use room-temperature butter (press a finger in—it should dent easily).
✅ No apple cider? Use apple juice + ½ tsp cider vinegar.
✅ Storage: Keeps 5 days in the fridge or 3 months frozen. Re-whip before using.
Nutrition
- Calories: 110 Cal Per Tbsp
- Sugar: 14g
- Fat: 6g
Nutritional Sunshine (Per Tbsp)
Calories: ~110 | Sugar: 14g | Fat: 6g | Carbs: 15g
Note: This is frosting, friends—not kale. Enjoy mindfully! 😉
Final Thoughts: More Than Just Frosting
This apple buttercream isn’t just a recipe—it’s a story. It’s the crunch of Vermont leaves underfoot, the laughter of kids licking spoons, and the quiet pride of turning a kitchen oops into an heirloom trick. It’s proof that the best creations often come from improvisation (and a little desperation). Whether you’re dressing up a weeknight muffin or gifting a jar to a neighbor, this icing carries the warmth of fall in every bite. So go ahead—slather it thick, experiment wildly, and maybe, just maybe, eat a spoonful straight from the bowl. After all, as my daughter says, it’s basically “a fuzzy apple sweater for your soul.”
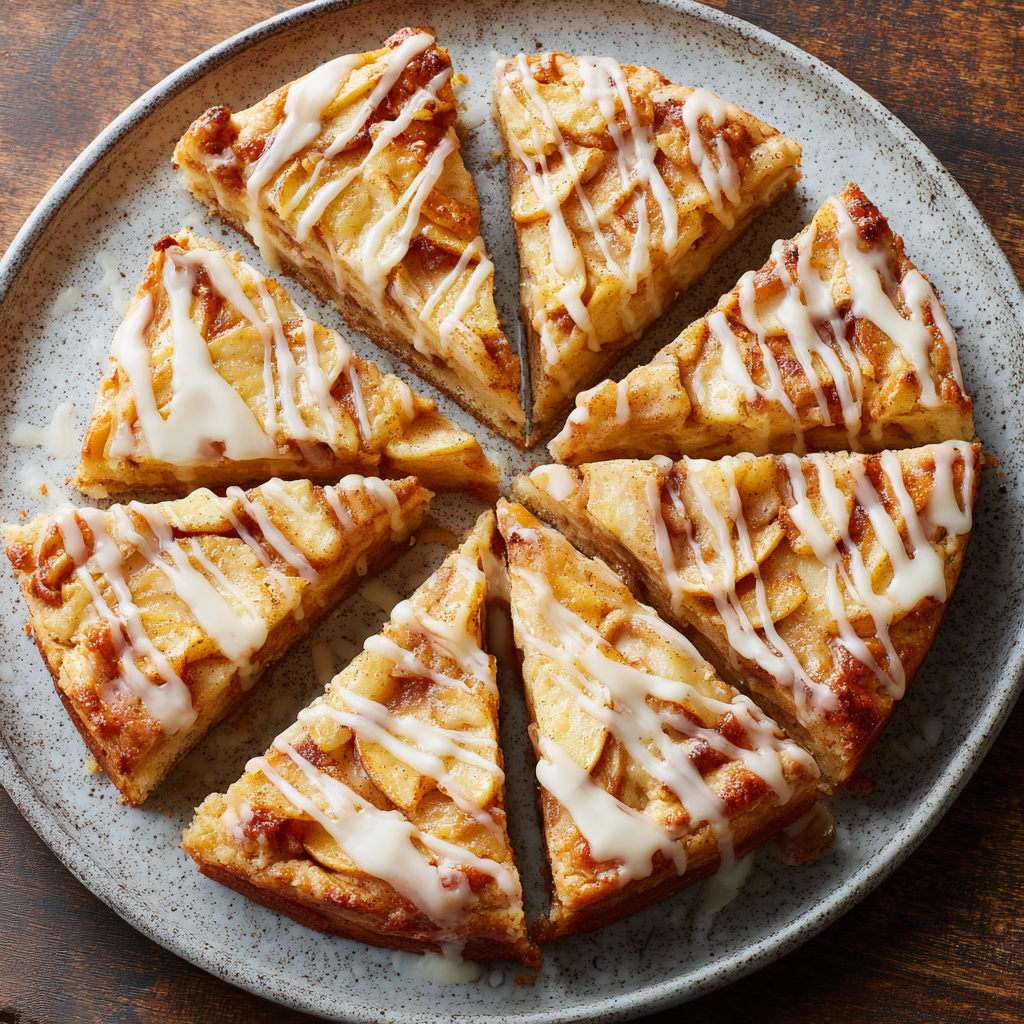
Apple Slices with Vanilla Glaze
Hey There, Sweet-Tooth Friends!
Is there anything more comforting than the smell of baked apples and buttery pastry wafting through your kitchen? Today, I’m beyond excited to share my all-time favorite crowd-pleaser: Midwest-Style Apple Slices with Vanilla Glaze. Imagine flaky, tender crust hugging a thick layer of spiced apples, all drenched in sweet vanilla sunshine. This isn’t just dessert—it’s a buttery hug on a plate. Perfect for potlucks, Sunday brunches, or those “I deserve something awesome” moments. And guess what? We’re making a double batch because sharing is caring (and leftovers are life). Trust me, once you taste these, that grocery-store pie will seem like a distant, sad memory. Ready to bake some joy? Let’s roll up our sleeves!
Why do I adore this recipe? It’s unfussy magic. No fancy tools, no temperamental techniques—just honest, feel-good baking. The glaze? Pure vanilla euphoria. The crust? So tender it practically sighs when you bite in. And that double batch means you’ll have enough to freeze for emergencies (read: Tuesday nights). Whether you’re a pastry pro or a newbie with a rolling pin, this recipe’s your golden ticket to hero status at any gathering. So preheat that oven, friend—adventure awaits!
Grandma’s Countertop & The Apple-Scented Time Machine
Every time I make these apple slices, I’m instantly 8 years old again, perched on a flour-dusted stool in my Grandma Lou’s kitchen. She’d pull out her massive speckled enamel pan—the one that weighed more than I did—and declare, “Beau, fetch the apples!” We’d peel until our fingers cramped, laughing as the skins coiled into silly green ribbons. She’d sneak me slices dusted with cinnamon sugar, whispering, “Chef’s tax, sugarplum.”
The best part? Watching her roll that crust like a boss. No measuring cups—just her hands, intuition, and decades of love baked into every fold. When those golden rectangles emerged, glazed and gleaming, the whole neighborhood would magically appear. We’d eat them warm, balancing plates on our knees on the porch, sticky-fingered and happy. That’s the secret ingredient, you know? Not the apples or the butter… but the togetherness. That’s why I always make a double batch—to share that same joy. Now, let’s make new memories!
Gathering Your Flavor Arsenal (Double Batch Deliberately!)
Crust:
- 4 cups all-purpose flour – The foundation! Spoon & level it—don’t pack it down. For tenderness, swap 1 cup with pastry flour if you’re fancy.
- 1 tsp baking powder – Our stealthy lift agent. Not baking soda! They’re not twins.
- 1 tsp salt (kosher preferred) – Balances sweetness. Kosher dissolves better, but table salt works (use ¾ tsp).
- 1 ½ cups non-hydrogenated lard – *Chef’s secret weapon!* Makes crusts flakier than butter. Chill it! Sub with cold butter if needed (same amount), but expect less flake.
- 1 cup ice water – Key word: ICE. Cold = flaky layers. Dip fingers in it if dough feels warm.
- 4 egg yolks – Richness kings! Save whites for meringues. Room temp blends smoother.
- 2 tsp lemon juice – Brightens the crust & prevents gluten toughness. No fresh lemons? White vinegar works (1 tsp).
Filling:
- 64 oz apple dessert filling/topping – The MVP! Canned is fine (I love Comstock®), but for bragging rights: simmer 10 peeled/cubed apples with 1 cup sugar, 2 tsp cinnamon, and ¼ cup water until jammy.
Glaze:
- 2 cups powdered sugar – Sift it! No one wants lumpy glaze.
- 4 tbsp softened butter – Unsalted = control. Melted works, but softened gives creamier texture.
- 1 tsp vanilla extract – Splurge on real stuff. Bourbon vanilla? *Chef’s kiss*.
- 4 tbsp whole milk – Adds creaminess. Sub heavy cream for luxury, or almond milk for dairy-free. Need it thinner? Add more ½ tsp at a time.
Pro Tip: Lard skeptics? It’s not the 70s! Non-hydrogenated lard is minimally processed. Your crust will thank you.
Let’s Build Some Deliciousness!
Step 1: Dough Whispering (15 mins)
In a big bowl, whisk flour, baking powder, and salt. Grab a pastry cutter (or two forks) and cut in COLD lard until it looks like chunky peas. Don’t overmix—flaky layers live here! In another bowl, whisk egg yolks, lemon juice, and ice water. Drizzle this into the flour mix while stirring with a fork. When it shaggy-dough-dances together, stop! Divide into two equal balls. Flatten into discs, wrap in plastic, and chill 30 mins. *Chef Hack: Chill your bowl first! Heat is the enemy.*
Step 2: Roll Out the Happiness (15 mins)
Lightly flour your surface. Roll one dough disc into a rectangle slightly larger than your 13×18″ baking sheet (grease that sheet!). Drape it in gently—no stretching! Patch tears with dough scraps. Spread apple filling evenly, leaving a ½-inch border. Roll the second dough disc same size. Carefully place it over the apples. Crimp edges with a fork (or fold & pinch) to seal tight. *Pro Move: Cut slits on top for steam to escape—no soggy bottoms!*
Step 3: Bake to Golden Glory (40 mins)
Pop it into a preheated 375°F (190°C) oven. Bake 35-40 mins until the crust is deeply golden and filling bubbles like a happy volcano. Rotate the pan halfway! *Chef Truth: Ovens lie. Use an oven thermometer!* If edges brown too fast, tent with foil.
Step 4: Glaze the Universe (5 mins)
While slices cool slightly, whisk glaze: powdered sugar, butter, vanilla, and milk. Aim for honey-thick but drizzly. Too thin? Add sugar. Too thick? Drops of milk. Drizzle lavishly over the warm slab. *Emotion Tip: Sing “You Are My Sunshine.” It improves flavor.*
Step 5: The Grand Finale (Patience, Grasshopper!)
LET IT COOL 1 HOUR before slicing. I know, torture! But cutting hot = apple lava everywhere. Use a sharp knife dipped in hot water for clean bars. Wipe between cuts!
Sharing is the Best Part
Serve these babies slightly warm or room temp. Dust with powdered sugar for snow-kissed charm or add a scoop of vanilla ice cream that melts into the glaze (heaven!). For brunch? Pair with strong coffee. Taking them to a picnic? Layer in a parchment-lined tin—no sticking! Pro tip: Stack slices with wax paper between layers. They’re sturdy, portable, and guaranteed to make you the most popular person at the potluck. Bonus: They taste even better the next day… if they last that long.
Mix It Up, Buttercup!
1. Berry Bonanza: Swap half the apples with frozen cherries or blueberries + 1 tbsp cornstarch.
2. Salty-Sweet Seduction: Sprinkle crust with flaky sea salt before baking. Add caramel drizzle on top!
3. Spice Explorer: Add ¼ tsp cardamom or ginger to the filling. Feeling wild? A pinch of black pepper!
4. Nutty Crunch: Press chopped pecans or almonds onto the glaze before it sets.
5. Vegan Vibes: Use plant-based butter + coconut oil (equal parts) for crust, and almond milk for glaze. Skip egg yolks—add 1 tbsp extra water.
Confessions from My Floury Trenches
This recipe’s survived three generations and my own kitchen disasters! Once, I subbed paprika for cinnamon (don’t ask)—we called them “Spicy Surprise Slices.” Not recommended. Over years, I tweaked Grandma Lou’s version: adding lemon juice for tenderness and using lard after a butter vs. lard experiment left my butter crust in flakey shame. The double batch? Born when my book club descended like locusts. Now I freeze unbaked slabs: just glaze after baking! Funny story: My dog, Biscuit, once stole an entire slice off the counter. He gave it 5/5 tail wags… worth the scolding.
Your Questions, My Answers (Panic Not!)
Q: My crust is tough! What went wrong?
A: Overworking or warm ingredients are likely culprits. Handle dough minimally, keep everything cold, and don’t skip the lemon juice (it inhibits gluten).
Q: Can I use fresh apples instead of canned filling?
A: Absolutely! Use 10-12 firm baking apples (like Granny Smith or Honeycrisp). Peel, slice ¼-inch thick, and toss with ¾ cup sugar, 2 tsp cinnamon, 3 tbsp flour/cornstarch, and 1 tbsp lemon juice.
Q: Why did my glaze soak into the crust?
A: You poured it on too hot! Let slices cool 20 mins first. Glaze should be thick but pourable—if too thin, it vanishes.
Q: Help! My filling leaked everywhere.
A: Next time: 1) Leave that ½-inch border! 2) Seal edges extra tight. 3) Don’t overfill—canned filling expands. Place a baking sheet under your pan to catch drips (trust me).

Apple Slices with Vanilla Glaze
- Total Time: 1 hour 30 mins
Description
Tender, flaky crust hugs a thick layer of cinnamon-spiced apples, all drowned in sweet vanilla glaze. Perfect for potlucks, cozy nights, or bribing friends.
Ingredients
Crust:
-
4 cups all-purpose flour (spooned & leveled)
-
1 tsp baking powder
-
1 tsp kosher salt
-
1 ½ cups cold lard or butter (for ultra-flaky crust!)
-
1 cup ice water
-
4 egg yolks
-
2 tsp lemon juice
Filling:
-
2 cans (32 oz each) apple pie filling OR 10–12 fresh apples (peeled, sliced) + ¾ cup sugar + 2 tsp cinnamon
Glaze:
-
2 cups powdered sugar (sifted)
-
4 tbsp softened butter
-
1 tsp vanilla extract
-
4 tbsp whole milk
Instructions
-
Make the Dough
-
Whisk flour, baking powder, and salt. Cut in cold lard/butter until pea-sized.
-
Mix egg yolks, lemon juice, and ice water. Stir into flour until just combined.
-
Divide into 2 discs, wrap, and chill 30 mins.
-
-
Roll & Fill
-
Roll one disc to fit a 13×18″ baking sheet. Spread apple filling, leaving a ½-inch border.
-
Roll second disc, place on top, and crimp edges. Cut steam vents.
-
-
Bake
-
Bake at 375°F (190°C) for 35–40 mins until golden and bubbly.
-
-
Glaze & Slice
-
Whisk glaze ingredients until smooth. Drizzle over slightly cooled slices.
-
Let cool 1 hour before cutting (patience = no lava spills!).
-
Notes
✅ Flakiest Crust: Keep ingredients cold and don’t overwork the dough.
✅ No Lard? Use butter, but expect less flake.
✅ Fresh Apples? Toss with sugar, cinnamon, and 3 tbsp flour/cornstarch to thicken.
- Prep Time: 30 mins
- Cook Time: 40 mins
Nutrition
- Calories: 280 Cal Per Slice
- Sugar: 22g
- Fat: 14g
- Carbohydrates: 34g
Nutritional Nibbles (Per Slice)
Calories: ~280 | Sugar: 22g | Fat: 14g | Carbs: 34g | Protein: 3g
*Note: Using butter instead of lard adds saturated fat. Fresh apples reduce sugar slightly. This is dessert—savor it joyfully!*
Final Thoughts: Why This Recipe is a Forever Favorite
This Midwest-Style Apple Slice isn’t just dessert—it’s nostalgia, comfort, and joy baked into one pan. The flaky crust (thanks to lard science), spiced apple filling (homemade or upgraded canned), and vanilla glaze (endlessly customizable) make it a versatile showstopper.
Why It Works for Everyone:
-
Beginners love its forgiving nature (no lattice-weaving stress).
-
Crowd-feeders adore its portability (no fork needed!).
-
Meal-preppers stash extras in the freezer (bake now, glaze later).
So whether you’re channeling Grandma Lou’s wisdom or creating new traditions, this recipe is a keeper. Now go bake, share, and watch people’s eyes light up—that’s the real magic.