
Low Carb Pizza Rolls
Who Says Low Carb Means Giving Up Pizza Night Magic?
Hey friends! Beau here from Feastical, and let’s get real for a sec: when you’re living that low-carb life, sometimes you just crave something indulgent. Something melty, savory, and joyfully messy. Enter these Low Carb Pizza Rolls – your golden ticket to flavor town without the carb coma! Imagine pepperoni-studded swirls of cheesy goodness, crispy-edged dough, and that iconic pizza sauce tang… all clocking in at just 2–4g net carbs per roll. Mind blown yet?
I know what you’re thinking: “Beau, low-carb dough? Sounds sus.” Trust me, I’ve been there. But after years of kitchen experiments (and a few hilarious fails), I cracked the code. These rolls are stupid-easy, freezer-friendly, and vanish faster than my willpower near a cookie jar. Perfect for game day, kiddo snacks, or when you need a 30-minute “I deserve this” moment. So dust off that rolling pin – we’re making magic happen!
Pizza Rolls & My Midlife Kitchen Meltdown
Flashback to 2020: my doctor suggested cutting carbs. Cue internal screaming. My Friday pizza ritual felt doomed… until my niece handed me a “get well” crayon drawing of a pizza roll. Lightbulb moment! I spent weeks testing doughs – almond flour? Too crumbly. Cauliflower? A soggy tragedy. Then I remembered my grandma’s cheese-based “dough” trick for pierogi. BINGO.
The first batch? Let’s just say they looked like deflated stress balls. But when my wife took one bite and yelled, “HOLY PEPPERONI!” while our dog did a happy dance for crumbs? I knew we’d struck gold. Now, these rolls are our family’s victory lap – proof that eating smart doesn’t mean sacrificing soul. Every bite tastes like nostalgia… minus the gluten guilt!
What You’ll Need (Plus My Sneaky Chef Hacks!)
- 1 batch low-carb pizza dough – Use your favorite recipe (like fathead dough)! Chef’s tip: Pick one with mozzarella & cream cheese for stretchiness. Pre-made? Totally cool – we’re judging-free here!
- ¾ cup shredded provolone – Melts like a dream! Swap: Mozzarella for mildness, sharp cheddar for tang, or dairy-free shreds. Pro move: Freeze cheese 10 mins before shredding – no clumps!
- 1 cup low-carb pizza sauce – Read labels! Avoid added sugar. DIY hack: Simmer canned tomato sauce + oregano + garlic powder for 5 mins.
- Your favorite toppings! – Pepperoni (classic!), olives, mushrooms, bell peppers. Low-carb pro tip: Pre-cook watery veggies (like mushrooms) to avoid soggy rolls!
Let’s Roll! (Pun Very Intended)
Step 1: Preheat oven to 375°F (190°C). Line a baking sheet with parchment paper – trust me, cleanup is evil without it! Chef’s hack: Lightly spray paper with oil for EXTRA crispiness.
Step 2: Roll dough between two parchment sheets into a ¼-inch thick rectangle. Sticky? Chill dough 15 mins first! No rolling pin? Use a wine bottle – I’ve done it mid-pinot-grigio!
Step 3: Spread sauce evenly, leaving a ½-inch border. Why the border? Sealing power! Saucy edges = leaky rolls. Use the back of a spoon for thin, even coverage.
Step 4: Sprinkle cheese first (creates a “glue” layer), then toppings. Don’t overload! 1 cup max toppings total. Less is more for tight rolling.
Step 5: Roll tightly from the LONG side, like a cinnamon roll. Use the bottom parchment to lift & tuck. Seal the edge with water or egg wash.
Step 6: Slice into 1-inch pieces with a serrated knife. Pro tip: Dental floss cuts cleanly without squishing! Just slide it under the roll, cross ends, and pull.
Step 7: Place rolls cut-side down on the sheet. Bake 18–22 mins until GOLDEN brown. Undercooked = doughy sadness. Listen for that cheesy sizzle!
Step 8: Cool 5 mins – molten cheese burns are tragic. Reheat leftovers in an air fryer (3 mins at 370°F) for revived crunch!
Serving: Dip It, Dunk It, Devour It!
Slide these badgers onto a rustic wooden board – the gooey cheese peeking out is *chef’s kiss*. Serve with extra warmed pizza sauce for dipping (ranch works too, no shame!). For a meal, pair with a zesty kale salad or garlicky green beans. Party trick? Skewer rolls with cute toothpicks and watch them disappear faster than my dad’s “secret” cookie stash!
Shake It Up! 5 Tasty Twists
- Buffalo Chicken: Swap sauce for buffalo + shredded rotisserie chicken + blue cheese crumbles.
- Vegan Wonder: Use dairy-free cheese + plant-based “pepperoni” + lentil-based dough.
- Breakfast Rolls: Scrambled eggs + cooked sausage + cheddar. Dip in salsa!
- Mediterranean: Pesto sauce + feta + spinach + sun-dried tomatoes.
- Supreme Style: Pepperoni + mushrooms + olives + onions (measure carbs!).
Beau’s Behind-the-Scenes Notes
This recipe evolved from my “Great Dough Disaster of 2019” where I used too much almond flour… and created savory sandcastles. Lesson learned: moisture balance is KEY! Now, I add an extra egg yolk if dough feels brittle. Funny story: My dog, Biscuit, once stole a whole roll off the counter, gave me side-eye, and trotted away like a furry bandit. Joke’s on him – doggo tummy + garlic = regrets. These days, I double-batch for freezer stash – just bake frozen rolls +5 mins. They’re my edible love letter to comfort food rebels!
FAQs: Your Crispy Questions, Answered!
Q: Why did my rolls unravel?
A: Likely overfilled or loose rolling! Tuck the first turn tightly. Seal the edge with water, and chill the log 10 mins before slicing.
Q: Can I freeze these?
A: YES! Freeze unbaked rolls on a tray, then bag them. Bake from frozen +5–7 mins. Baked rolls freeze well too – reheat in air fryer.
Q: Store-bought dough okay?
A: Absolutely! Look for “cauliflower pizza crust” dough (check carbs!). Trader Joe’s has a great one. Or grab my easy fathead dough recipe here.
Q: Too greasy?
A: Blot pepperoni with paper towels first, or opt for turkey pepperoni. Also, avoid excess cheese – ¾ cup is plenty!

Low Carb Pizza Rolls
- Total Time: 30 mins
Description
Hey pizza lover! Beau here — these melty, crispy-edged pizza rolls bring you all the classic pie joy without the carb crash. They’re cheesy, saucy, pepperoni-packed, and ready in 30 minutes. Whether it’s game day or just a “treat yo’self” Tuesday, these rolls deliver nostalgia and satisfaction — minus the crust coma.
Ingredients
Hey pizza lover! Beau here — these melty, crispy-edged pizza rolls bring you all the classic pie joy without the carb crash. They’re cheesy, saucy, pepperoni-packed, and ready in 30 minutes. Whether it’s game day or just a “treat yo’self” Tuesday, these rolls deliver nostalgia and satisfaction — minus the crust coma.
Instructions
1️⃣ Prep: Preheat oven to 375°F (190°C). Line baking sheet with parchment; lightly oil it.
2️⃣ Roll Dough: Roll dough between parchment into a ¼-inch thick rectangle. Chill 10 mins if sticky.
3️⃣ Sauce & Toppings: Spread sauce (leave ½-inch border). Sprinkle cheese, then toppings — don’t overload!
4️⃣ Roll It: Roll tightly from long side like a cinnamon roll, sealing edge with water.
5️⃣ Slice: Cut 1-inch pieces (dental floss works!). Place cut-side down on sheet.
6️⃣ Bake: 18–22 mins until golden brown & cheesy. Cool 5 mins before devouring.
Notes
Chill the Dough: If your dough’s sticky, chill it 10–15 mins — makes rolling so much easier.
Use Parchment: Always roll AND bake on parchment paper. Zero sticking, zero swearing at the baking sheet later.
Don’t Overfill: Less is more — ¾ cup cheese and ~½ cup toppings total keeps rolls tight and neat.
Seal it Tight: Roll firmly and seal the edge with a dab of water or egg wash to stop unravelling.
Slice Smart: Dental floss cuts clean rolls without smashing them. Slide under, cross, pull — perfect every time!
Nutrition
- Calories: 130–160 cal per roll
- Fat: 10g
- Carbohydrates: 2–4g
- Protein: 8g
Nutritional Perks (Per Roll!)
Approx: 130–160 calories | 10g fat | 2–4g net carbs | 8g protein
*Varies based on dough/toppings. Calculated with fathead dough, 1 tbsp sauce, 1 tsp cheese, 2 pepperoni slices per roll.
Prep Time: 10 mins
Cook Time: 20 mins
Total Time: 30 mins
Servings: 10–12 rolls
Final Thought: It’s About Joy, Not Deprivation
Food should be fun—not a stressor. These pizza rolls prove that low-carb doesn’t mean low-flavor. Whether you’re keto, gluten-free, or just carb-conscious, you deserve food that excites you. So roll up your sleeves (and your dough), and reclaim pizza night.
–
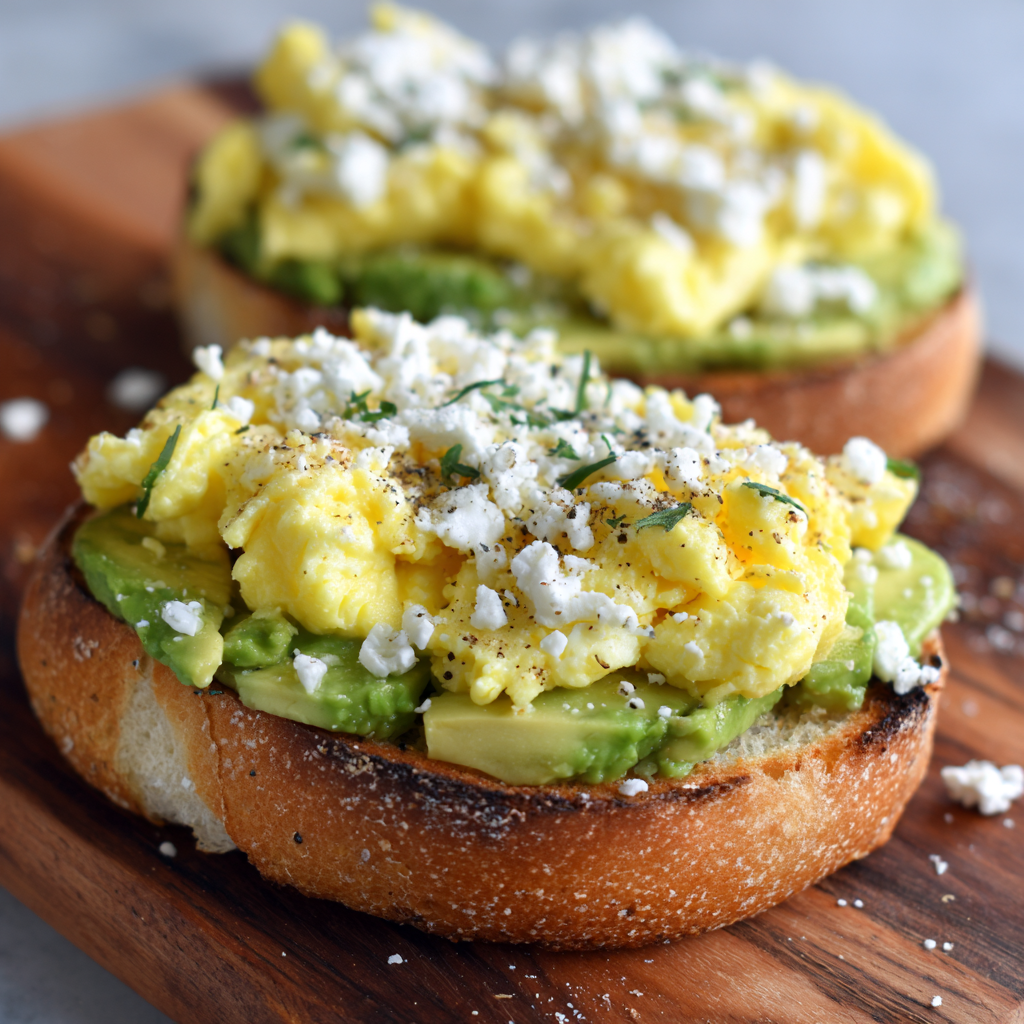
Avocado & Egg English Muffin Toast
Rise, Shine, and Devour: Your New Breakfast Obsession Awaits!
Hey friends, Beau here! ☀️ Ever have one of those mornings where your alarm feels like a personal insult, your brain’s still foggy, and the thought of cooking a complicated breakfast makes you want to crawl back under the covers? Yeah, me too. That’s exactly why I’m practically *bursting* to share this Avocado & Egg English Muffin Toast with you today. This isn’t just breakfast; it’s your edible permission slip to hit snooze (metaphorically speaking!) and still walk out the door feeling like you conquered the world. Think about it: creamy, dreamy avocado smashed onto a perfectly crisp, nooks-and-crannies English muffin, topped with soft, buttery clouds of scrambled eggs, and finished with a salty, tangy shower of feta. It’s the ultimate feel-good fuel – satisfyingly indulgent *and* sneakily nourishing. It hits that sweet spot where comfort food hugs your soul and clean(ish) eating gives you a high-five. Best part? We’re talking 10 minutes, tops. One bite of this golden, layered goodness, and I promise, your mornings just got a whole lot brighter. So, ditch the sad cereal box and let’s turn your kitchen into the happiest breakfast spot in town!
My Midnight Snack Savior & the Birth of a Breakfast Legend
Okay, confession time. This glorious stack of joy actually started life as a desperate midnight fridge raid! Picture this: It was finals week in my sophomore year of culinary school. I’d been hunched over textbooks for hours, fueled only by cold pizza and sheer panic. My stomach was staging a full-blown mutiny. I stumbled into the dim kitchen, bleary-eyed, and scanned the sad contents of my fridge. Half an avocado looking lonely? Check. Two eggs whispering promises of protein? Check. A sad little nub of feta cheese? Bonus! And lurking in the bread box – one slightly stale English muffin. Desperation is the mother of invention, right? I toasted that muffin like my GPA depended on it, smashed the avocado with reckless abandon (who needs a fork? A sturdy spoon works!), scrambled those eggs in a frenzy, and threw it all together. That first messy, glorious bite under the harsh fluorescent light? Pure magic. It was creamy, comforting, savory, and exactly what my frazzled brain and grumbling belly needed. It became my go-to study fuel, my post-shift lifeline when I started working crazy kitchen hours, and eventually, the breakfast I’d make for Sarah (my now-wife) on lazy Sunday mornings, proving that sometimes the best recipes aren’t planned – they’re born from hungry, happy accidents.
Gather Your Goodness: Simple Ingredients, Big Flavor
Here’s the beautiful thing about this recipe: it’s all about celebrating simple, quality ingredients. No fancy schmancy stuff needed! Just grab these basics:
- 1 whole grain or sprouted English muffin, halved and toasted: This is our sturdy, wholesome base! I love the nutty flavor and extra fiber from whole grain or sprouted versions – they hold up beautifully to the toppings without getting soggy. Chef Tip: No English muffin? A thick slice of hearty sourdough or even a sturdy bagel half works wonders in a pinch!
- ½ ripe avocado, mashed: The heart of our creamy layer! Look for an avocado that yields slightly to gentle pressure near the stem – that’s peak ripeness. Chef Insight: A squeeze of lemon or lime juice mixed in not only adds a bright zing but also helps keep that gorgeous green color vibrant!
- 2 large eggs: Our protein-packed cloud makers! Substitution Savvy: For a vegan twist, swap in a generous scoop of silken tofu scramble seasoned with turmeric and nutritional yeast. It’s surprisingly delicious!
- 1 tbsp butter or olive oil (for scrambling): This is our cooking fat for luxuriously rich, non-stick eggs. Chef Preference: I adore the flavor butter brings, but a good olive oil is fantastic for a lighter, fruitier vibe. Use what makes you happy!
- 2 tbsp crumbled feta cheese: The salty, tangy crown jewel! Substitution Tip: Don’t have feta? Goat cheese offers a similar tang, sharp cheddar brings boldness, or even a dollop of ricotta adds creamy mildness. Pick your cheese adventure!
- Salt and black pepper to taste: The essential flavor enhancers! Chef Hack: Use flaky sea salt (like Maldon) for the avocado mash – its texture and clean saltiness are *chef’s kiss*. Freshly cracked black pepper on the eggs at the end is non-negotiable for me!
Let’s Build Breakfast Bliss: Step-by-Step Perfection
Ready to create morning magic? Follow these steps – I’ve packed them with all my favorite tricks to ensure your toast is utterly flawless.
- Toast the English muffin halves until golden and delightfully crisp. Pop those halves into your toaster, toaster oven, or even under the broiler for a minute. Chef Secret Weapon: Want next-level flavor and crunch? Lightly butter the cut sides *before* toasting! It creates an incredible golden, slightly caramelized surface that’s pure heaven. Listen for that satisfying crunch – that’s your signal it’s ready!
- Mash the avocado in a small bowl with a pinch of salt and pepper. Scoop that beautiful green flesh into a bowl. Grab a fork (or that trusty spoon!) and mash away. Chef Texture Tip: I like mine a little chunky for texture, but go as smooth or rustic as you like! That pinch of salt now wakes up the avocado’s flavor. Remember that squeeze of lemon/lime juice? Add it here if using!
- Spread the mashed avocado evenly onto each warm, toasted muffin half. Divide that creamy green goodness right away while the muffin is still warm. The warmth helps the avocado cling on and just starts to soften it perfectly. Chef Hack: Spread it right to the edges – maximum coverage equals maximum deliciousness in every bite!
- Whisk the eggs in a bowl until well combined and slightly frothy. Crack those eggs into a separate bowl. Whisk vigorously! You’re not just mixing; you’re incorporating air, which leads to fluffier eggs. See those little bubbles? That’s the good stuff. A tiny splash of milk or water (about 1 tsp) whisked in can make them even more tender.
- Cook the eggs in a non-stick pan over LOW heat with the butter or oil. Melt your butter (or warm the oil) in the pan over LOW heat. Patience is key! Pour in the whisked eggs. Chef Golden Rule: LOW AND SLOW wins the scramble race. High heat makes eggs tough and rubbery. Let them sit undisturbed for about 10-15 seconds until they just *start* to set around the edges.
- Gently stir the eggs with a spatula, pushing the cooked parts towards the center. Use a silicone spatula for gentle maneuvering. Push the set edges toward the middle, letting the uncooked egg flow to the hot pan. Keep this gentle pushing/folding motion going. Chef Insight: Stirring constantly makes tiny curds; less stirring makes larger, fluffier curds. I aim for medium curds – creamy but defined. Take the pan off the heat JUST before they look fully set (they’ll keep cooking!). We want them soft, creamy, and moist.
- Immediately top each avocado-covered muffin half with the warm, creamy scrambled eggs. Divide the eggs while they’re piping hot! Their heat slightly warms the avocado layer beneath, creating a cohesive, comforting bite.
- Generously sprinkle the crumbled feta cheese over the eggs. Let that salty, tangy feta rain down! The warmth of the eggs will soften it just slightly, making it even more delightful.
- Finish with a final flourish of freshly cracked black pepper. Grind that pepper right over the top – the aroma is incredible, and the flavor pop is essential. Admire your creation for a nanosecond… then devour!
Plating Up Pure Morning Joy
This beauty is basically ready to rock straight off the cutting board, but let’s make it Instagram-worthy (or just extra special for yourself!). Slide those loaded muffin halves onto a bright plate – the contrast makes the green avocado pop. Feeling fancy? Add a tiny sprinkle of everything bagel seasoning or red pepper flakes over the feta for color and a flavor kick. A small handful of fresh microgreens or baby arugula tossed lightly in lemon juice adds a lovely fresh bite and looks gorgeous. For a heartier brunch, serve alongside some juicy cherry tomatoes or crispy roasted potatoes. Most importantly? Grab it with both hands, take a big bite, and let that creamy, savory, satisfying goodness fuel your day! Enjoy immediately – this is peak deliciousness when fresh.
Shake It Up! Delicious Twists on the Classic
Once you’ve mastered the classic, the flavor playground is wide open! Here are a few of my favorite riffs:
- The “Everything But The…” Blast: Stir 1/2 tsp of everything bagel seasoning into the mashed avocado. Top the finished toast with extra everything spice and maybe some thinly sliced red onion. So much savory crunch!
- Spicy Southwest Fiesta: Mix a pinch of cumin and chili powder into the eggs while scrambling. Swap feta for crumbled cotija cheese. Top with a spoonful of fresh salsa or pickled jalapeños after the feta. Olé!
- Smoky Bacon Lover’s Dream: Cook 1-2 slices of crispy bacon first. Crumble it over the eggs along with the feta. Bonus points for using a tiny bit of the bacon fat to cook the eggs!
- Mediterranean Sunshine: Replace the feta with crumbled goat cheese. Top the assembled toast with a few halved Kalamata olives and a sprinkle of fresh chopped dill or oregano. Bright and herby!
- Vegan Powerhouse: Skip the eggs and feta. Mash the avocado with lemon, salt, pepper, and nutritional yeast (for cheesy flavor). Top with seasoned, pan-fried crumbled firm tofu or tempeh “scramble”. Still incredibly satisfying!
Beau’s Backstory Bites: More Than Just Toast
This recipe feels like an old friend now. That frantic midnight creation? It stuck. Hard. But like any good friendship, it’s evolved! Back then, it was purely about speed and survival. Now, it’s a canvas for whatever’s fresh and inspiring. I remember one hilarious Saturday morning trying to impress Sarah early in our dating days. I went full chef mode – truffle salt on the eggs, fancy microgreens, the works. Totally over-engineered it! The kicker? I got so distracted plating, I burnt the English muffins to little charcoal hockey pucks. We ended up scraping the toppings onto slightly singed toast and laughing until our sides hurt. Lesson learned: Keep it simple, keep it real, and sometimes burnt toast makes the best memory. The core – that perfect trio of crispy base, creamy avocado, and soft eggs – remains sacred. But that sprinkle of feta? That was a later revelation, a happy accident adding that essential salty tang that tied everything together. Don’t be afraid to make it your own!
Your Questions, Answered: Breakfast SOS!
Let’s tackle those common kitchen conundrums so your toast is always triumphant:
- Q: Help! My avocado is rock-hard/unripe, but I NEED this toast now! Any tricks?
A: We’ve all been there! Speed up ripening by placing the avocado in a paper bag with a banana or apple (they release ethylene gas). If you’re truly desperate, you can *gently* microwave the unpeeled, uncut avocado for 15-20 second bursts until it just yields slightly, but be careful – it can cook unevenly and get weird. For a quick fix, smash some defrosted frozen peas with a little lemon, salt, and olive oil – it’s surprisingly fresh and green! Not quite avocado, but a decent stand-in. - Q: My eggs always turn out dry or rubbery. What am I doing wrong?
A: The culprit is almost always heat! Eggs are delicate. Commit to LOW heat. If your stove runs hot, use the smallest burner. Melt the butter until foamy but not brown, pour in the eggs, and let them start setting SLOWLY. Stir gently and infrequently – constant stirring breaks them into tiny, dry curds. Take them off the heat when they still look slightly wet/glossy – carryover cooking will finish them perfectly. Remember, low and slow = creamy dreamy! - Q: Can I prep any part of this ahead of time for a super-fast morning?
A: You can definitely toast the English muffin halves ahead (store airtight at room temp) and crumble the feta. However, avocado browns quickly and scrambled eggs are best fresh. If you *must* prep the avocado mash, press plastic wrap directly onto the surface to limit air exposure and store in the fridge for a few hours max (it’ll still darken a bit). I strongly recommend assembling fresh for the best texture and flavor – it’s so quick anyway! Pre-cooked eggs reheat poorly, becoming rubber - Print

Avocado & Egg English Muffin Toast
- Total Time: 10 minutes
Description
Hey friends — Beau here! Meet your new morning obsession: crunchy, golden English muffin, creamy smashed avo, fluffy eggs, tangy feta. This chef’s kiss stack fuels busy days and lazy Sundays alike. Ready in 10 mins, no stress, maximum comfort.
Ingredients
• 1 whole grain or sprouted English muffin, halved & toasted
• ½ ripe avocado, mashed
• 2 large eggs
• 1 tbsp butter or olive oil (for scrambling)
• 2 tbsp crumbled feta cheese
• Salt & black pepper to taste
• Optional: squeeze of lemon or lime
Instructions
1️⃣ Toast: Halve & toast your English muffin until golden. Pro tip: Butter before toasting for extra crunch!
2️⃣ Mash: In a bowl, mash avocado with salt, pepper & a squeeze of lemon/lime (optional).
3️⃣ Scramble: Whisk eggs till frothy. Melt butter/oil in a non-stick pan on LOW. Pour eggs in. Let set slightly, then gently push edges toward center for soft curds. Take off heat just before fully set — they’ll finish cooking off-heat!
4️⃣ Assemble: Spread warm muffin halves with avocado. Top with fluffy eggs. Sprinkle crumbled feta generously. Finish with cracked black pepper.Notes
Like it spicy? Add chili flakes or everything bagel seasoning over the feta.
- Prep Time: 10 mins
Nutrition
- Calories: 380 kcal (1 serving, approx.)
- Fat: 24g
- Carbohydrates: 25g
- Protein: 16g
-
Final Thoughts: More Than Just a Breakfast
This Avocado & Egg English Muffin Toast isn’t just a meal—it’s a mindset. It’s proof that:
-
The best recipes are born from necessity (hello, midnight snack epiphany!).
-
Simple ingredients can be extraordinary with the right techniques.
-
Breakfast can be both indulgent and nourishing.
Whether you stick to the classic or riff with spices, cheeses, and toppings, this toast is a blank canvas for creativity. So tomorrow morning, when that alarm goes off, remember: 10 minutes is all it takes to turn a groggy start into a glorious one. Now go forth and devour!
-
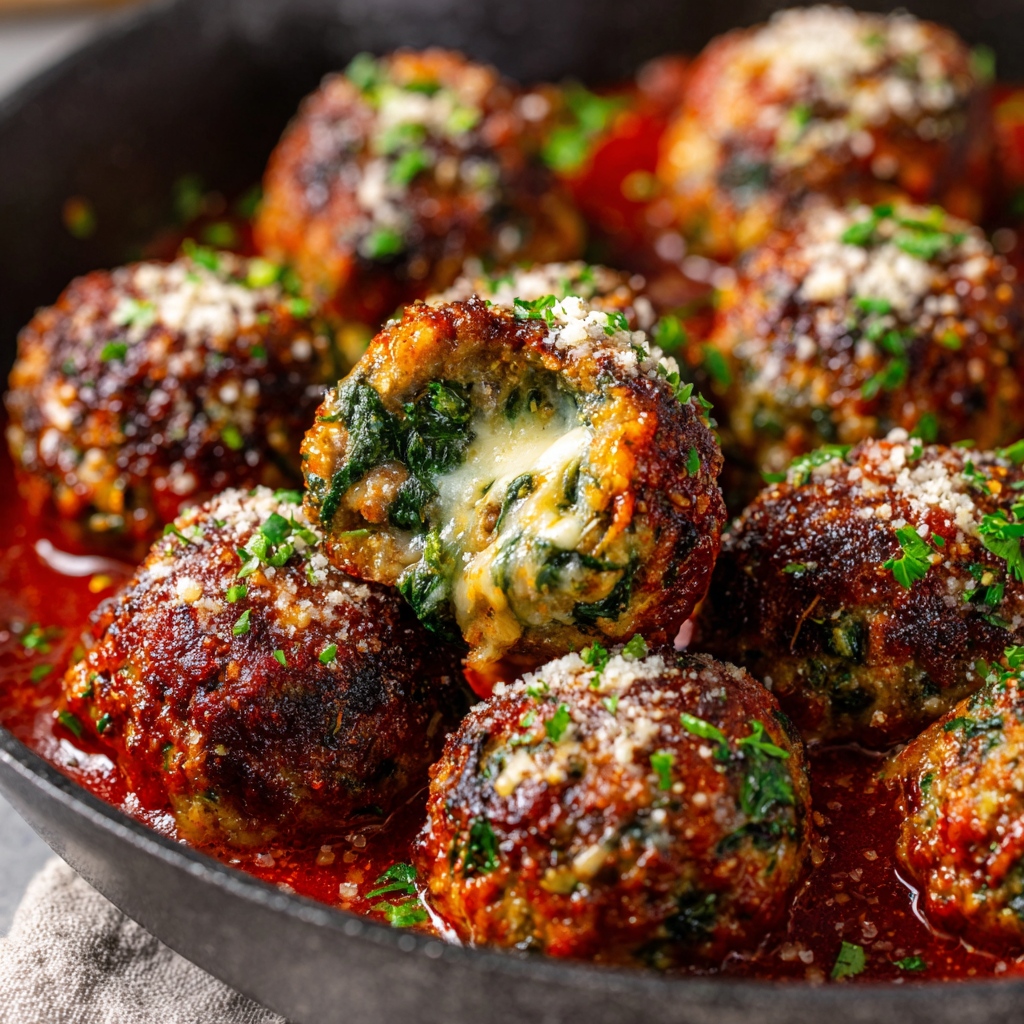
Spinach Garlic Meatballs Stuffed with Mozzarella
Spinach Garlic Meatballs Stuffed with Mozzarella: Your New Comfort Food Obsession
Hey foodie friends! Beau here from Feastical, back with a recipe that’s about to become your weeknight hero and party showstopper. Imagine this: tender, garlicky meatballs packed with vibrant spinach, hiding a molten core of gooey mozzarella that oozes out with every single bite. Yeah, we’re taking meatballs from humble to heck yes! These aren’t just any meatballs—they’re juicy little flavor bombs wrapped in a cozy, cheesy hug. Perfect for swirling into spaghetti, piling onto crusty bread, or even sneaking straight from the baking dish (no judgment here!).
Whether you’re cooking for a crowd, meal-prepping like a boss, or just treating yourself to something special, this recipe keeps it simple without skimping on that gourmet “wow” factor. I promise, once you see that cheesy center pull, you’ll be hooked. So tie on your favorite apron, crank up some tunes, and let’s turn your kitchen into the heartiest, happiest place on earth. Trust me—your spatula’s ready for this adventure!
The Night These Meatballs Saved Dinner (and My Ego!)
Picture this: It’s a rainy Tuesday, and my best mates were coming over for a last-minute dinner. I’d planned this fancy pork loin… only to realize it was still frozen solid. Cue panic! I raided the fridge like a man possessed—ground beef, spinach, half a mozzarella block. Desperation birthed inspiration. I started throwing things together, stuffing cheese into meatballs like my reputation depended on it (spoiler: it kinda did!).
Twenty minutes later? Silence. The good kind. Just forks scraping plates and mumbled “ohmygosh, BEAU.” My mate Liam actually hugged the baking dish. That chaotic little experiment became Feastical’s most-requested recipe. It taught me that the best meals aren’t about perfection—they’re about joy, a little mess, and molten cheese saving the day. Now, every time I make these, I grin remembering Liam’s cheese-stretched smile. Magic!
Gather Your Flavor Squad
Here’s what you’ll need for these cheesy wonders (measurements in the recipe card below!). Pro tip: Mise en place is your friend—chop/prep everything first!
- 1 lb ground beef (80/20 blend) – The MVP! 80/20 keeps ’em juicy. Swap with ground turkey or a 50/50 beef/pork mix for extra richness.
- 2 cups fresh spinach – Packed with color and nutrients! Wilt it down—it shrinks a ton. Use frozen? Thaw and SQUEEZE out ALL the water (seriously, get aggressive!).
- 2 cloves garlic, minced – Fresh is non-negotiable! It infuses the spinach with that aromatic punch.
- 1 tsp onion powder – Our flavor shortcut hero. No tears, all taste!
- ½ tsp salt + ½ tsp pepper – Season like you mean it. Taste your mix before forming balls!
- 1 tsp Italian seasoning – That herby hug in every bite. DIY blend? Oregano, basil, thyme, rosemary.
- 1 large egg – The binder that holds our juicy dreams together.
- ½ cup breadcrumbs – Optional but golden for structure. Panko works! Gluten-free? Use almond flour or crushed GF crackers.
- 4 oz mozzarella cheese, cubed – Low-moisture works best (less leak risk!). Cut ½-inch cubes—melty treasure!
- 1 cup shredded mozzarella (topping) – Because more cheese is always the answer.
- Chopped parsley – Fresh pop of color & flavor. Don’t skip the garnish!
Let’s Build Some Cheesy Magic!
Ready to roll? Literally! Follow these steps for guaranteed ooze-worthy success:
- Preheat & Prep: Fire up that oven to 375°F (190°C). Lightly grease a baking dish—trust me, cleanup’s easier! Chef Hack: Line the dish with parchment paper for zero sticking.
- Sizzle Your Greens: Heat a drizzle of olive oil in a skillet over medium. Add minced garlic—sauté 30 seconds until fragrant (don’t brown it!). Toss in spinach and stir until wilted (1-2 mins). Transfer to a plate, spread it out, and let it cool completely. Critical Tip: Hot spinach = steamed meatballs. Patience = juicy perfection!
- Meat Mix Mastery: In a large bowl, combine ground beef, cooled spinach-garlic mix, egg, onion powder, salt, pepper, Italian seasoning, and breadcrumbs (if using). Now, channel your inner artist—mix gently with your hands JUST until combined. Overmixing = tough meatballs. Be kind!
- The Cheese Core: Grab a small handful of meat mix (golf-ball size works). Flatten it in your palm, place a mozzarella cube in the center, and carefully wrap the meat around it, sealing tightly. Roll gently between palms to smooth. Pro Move: Wet your hands slightly—prevents sticking! Repeat with remaining mix.
- Bake & Bubble: Arrange meatballs in your prepped dish, leaving a little space between. Generously sprinkle shredded mozzarella over the top. Bake 20-25 minutes until golden, cooked through (internal temp 165°F), and cheese is gloriously bubbly. Watch for the Cheese Signal: When the tops are golden and cheese pools slightly around the base, they’re done!
- Garnish & Devour: Sprinkle with fresh parsley immediately out of the oven. Let rest 5 minutes (torturous but vital—lets juices settle!).
How to Serve These Beauties
These meatballs are social butterflies! For a classic vibe, nestle them atop a mountain of spaghetti and marinara. Feeling fancy? Skewer them as appetizers with basil leaves. Weeknight warrior? Serve 3-4 over creamy polenta or zoodles with a crisp side salad. Or hey, grab crusty bread, split a meatball open to reveal the molten core, and dunk away! Don’t forget extra napkins—cheese pulls demand them.
Shake It Up! Tasty Twists
Customize your cheesy spheres:
- Spicy Arrabbiata Twist: Add ½ tsp red pepper flakes to the meat mix & serve with spicy marinara.
- Mediterranean Sunshine: Swap mozzarella for feta cubes, add 2 tbsp chopped sun-dried tomatoes & oregano to the meat.
- Gluten-Free & Lean: Use almond flour instead of breadcrumbs & ground turkey/chicken.
- Pesto Party: Mix 2 tbsp basil pesto into the meat & top with grated parmesan instead of shredded mozz.
- Mega Meatball Sub: Nestle 3-4 meatballs into a toasted hoagie roll, top with marinara & provolone, broil until melty!
Beau’s Backstage Tips
This recipe’s evolved since that fateful freezer-fail night! Early versions had cheese explosions (RIP my oven tray!). Key lesson? Chill your stuffed meatballs for 15 mins before baking—firms them up so cheese stays put. Also, using low-moisture mozzarella cubes (not fresh!) is a game-changer. Funny story: My dog, Biscuit, once stole a whole meatball off the counter… and looked utterly betrayed when the hot cheese hit his tongue! Now he gets his own (un-stuffed) version. Final tip: Double the batch! Freeze unbaked meatballs on a tray, then bag ’em. Bake frozen (add 5-8 mins)—emergency comfort food solved!
Your Questions, Answered!
Q: Help! My cheese leaked everywhere. What did I do wrong?
A) Meat mix too wet? Squeeze that spinach dryer! B) Seal not tight? Cup meat in palm, press cheese deep, pinch firmly. C) Overcrowded dish? Give ’em space! D) Cheese too moist? Use low-moisture blocks, not fresh. A little leakage is tasty—own it!
Q: Can I use frozen spinach? How?
Absolutely! Thaw 1 cup frozen spinach. Then—crucial—squeeze it in a clean towel until bone-dry. Sauté with garlic as directed. Wet spinach = sad, mushy meatballs.
Q: Can I prep these ahead?
Yes! Assemble meatballs (without baking), cover tightly, and refrigerate 24 hours. Bake straight from fridge (add 3-5 mins). Or freeze unbaked for 3 months—bake from frozen (+8-10 mins).
Q: No breadcrumbs? Are they falling apart?
They’ll be softer but still work! For binder alternatives, try 2 tbsp grated parmesan, ¼ cup quick oats, or 2 tbsp almond flour. Chilling before baking also helps firm them up.

Spinach Garlic Meatballs Stuffed with Mozzarella
- Total Time: 40 mins
Description
Hey foodie crew — Beau here! Meet your new obsession: juicy meatballs packed with garlicky spinach and hiding a molten mozzarella core that melts hearts at first bite. These flavor bombs level up spaghetti, sliders, or stand alone on a cheesy pedestal.
Ingredients
• 1 lb ground beef (80/20)
• 2 cups fresh spinach, wilted (or 1 cup frozen, squeezed dry)
• 2 cloves garlic, minced
• 1 tsp onion powder
• 1 tsp Italian seasoning
• ½ tsp salt + ½ tsp pepper
• 1 egg
• ½ cup breadcrumbs (panko or GF swap OK)
• 4 oz mozzarella, cut in ½-inch cubes
• 1 cup shredded mozzarella (for topping)
• Fresh chopped parsley, for garnish
Instructions
1️⃣ Preheat & Prep: Oven to 375°F (190°C). Grease or line a baking dish.
2️⃣ Wilt & Cool: Sauté garlic 30 sec in oil, add spinach, wilt 1-2 mins. Cool completely!
3️⃣ Mix: In a big bowl, combine beef, cooled spinach, seasonings, egg, breadcrumbs. Mix gently — don’t overwork!
4️⃣ Stuff: Take a golf-ball scoop, flatten, place mozzarella cube inside, wrap & seal tight. Roll smooth.
5️⃣ Bake: Arrange meatballs in dish. Top with shredded mozz. Bake 20–25 mins until cooked (165°F) and cheese is bubbly.
6️⃣ Garnish: Rest 5 mins, sprinkle parsley, serve molten!
Notes
For zero leaks, chill formed meatballs 10–15 mins before baking.
Nutrition
- Calories: 200 cal 1 meatball
- Fat: 14g
- Carbohydrates: 2g
- Protein: 16g
Nutritional Info (Per Meatball, approx.)
Calories: 180-220 | Fat: 14g | Carbs: 2g | Protein: 16g
*Estimates vary based on meat fat %, cheese used, and meatball size. Using lean meat or turkey reduces fat content.
Spinach Garlic Meatballs Stuffed with Mozzarella
Prep Time: 15 mins | Cook Time: 25 mins | Total Time: 40 mins | Servings: 6-8 meatballs
Final Thoughts: Why This Recipe Works
These spinach garlic meatballs are more than a meal—they’re a experience. The contrast of savory beef, earthy spinach, and molten cheese hits every comfort food craving. They’re versatile (appetizer, pasta topper, sandwich filler) and forgiving (swap ingredients, bake or air-fry).
Most importantly, they remind us that cooking should be fun. Whether it’s a last-minute save (like my freezer fiasco) or a planned feast, the best dishes come from a mix of creativity and joy. So grab that cheese, get your hands messy, and let every oozy bite bring a little happiness to your table.

Hibachi Zucchini
Hibachi Zucchini: Your Kitchen’s Front-Row Seat to Japanese Steakhouse Magic
Hey friends, it’s Beau! Tell me this sounds familiar: You’re sitting at that sizzling hibachi grill, mesmerized as the chef sends onion volcanoes erupting and shrimp tails flipping through the air. The smells! That savory-garlicky perfume curling around the room… and then comes the zucchini. Gloriously charred, buttery-tender yet crisp, glistening with soy-kissed goodness. You sneak that first bite and think, “I wish I could eat this every Tuesday.” Well, my fellow flavor-chaser, consider this your golden ticket.
Today, we’re unlocking the secrets to Hibachi-Style Zucchini that tastes like it jumped straight off the teppanyaki grill and onto your plate. No fancy equipment or circus-worthy knife skills needed—just 20 minutes, one trusty skillet, and that joyful hunger for restaurant-worthy eats made in your own kitchen. This isn’t just a side dish; it’s the unsung hero of the hibachi spread. Crisp-edged, garlicky, with whispers of ginger and that irresistible umami depth, it’s the veggie that even veggie-skeptics inhale. Whether you’re pairing it with grilled teriyaki chicken, fluffy fried rice, or savoring it straight from the pan (no judgment here!), this recipe is your weeknight win. So grab your favorite spatula—let’s turn up the heat and make some magic!
The Night Zucchini Stole the Show (And My Heart)
Picture it: My 10th birthday dinner at “Hibachi Heaven.” I was laser-focused on the flying shrimp, convinced nothing could top it. But then, Chef Marco started dancing zucchini batons across the grill. They hissed and charred, and when he slid that mountain onto my plate, I took one skeptical bite… and my world tilted. That crispy-but-velvety texture! That buttery-garlic punch! I abandoned my shrimp like yesterday’s news. My dad still teases me about “the great zucchini betrayal.” Years later, when I first recreated this at home for my now-wife? Her eyes lit up like I’d proposed again. That’s the power of this dish—it’s not just food, it’s delicious nostalgia. Every time I smell ginger hitting hot butter, I’m back at that grill, wide-eyed and wondering how humble zucchini could taste so extraordinary. Now? I get to gift you that same magic.
Your Flavor Toolkit: Simple Ingredients, Big Impact
- 2 large zucchini (green or yellow, unpeeled) – The star! Unpeeled = texture + color. Chef’s hack: Pick firm, glossy ones. Yellow zucchini adds sunshine!
- 1 tbsp oil – Avocado or grapeseed for high-heat searing. Olive oil works but smokes faster.
- 2 tbsp butter – The “secret” hibachi richness. Vegan? Swap with Miyoko’s plant butter or coconut oil.
- 1 tsp minced ginger + 1 tsp minced garlic – The aromatic soulmates. Jarred works, but fresh sings! In a pinch? ½ tsp powdered ginger/garlic.
- 1 cup sliced onions – Sweet or yellow. They caramelize into jammy ribbons of joy.
- 2 tsp soy sauce – Gluten-free? Tamari is your BFF. Coconut aminos work too (use 1 tbsp—it’s milder).
- ¼ tsp salt + ¼ tsp black pepper – Enhances without overpowering. Freshly cracked pepper = chef’s kiss.
- Chopped scallion greens + toasted sesame seeds – The confetti! Toasting seeds? Toss in a dry pan until golden—flavor x10.
Why this combo rocks: Butter + soy creates that addictive “restaurant glaze,” while high-heat cooking locks in crunch. Skipping the peel? You’ll miss the char and nutrients! And trust me—toasted sesame isn’t optional. It’s the nutty encore your zucchini deserves.
Let’s Get Sizzling: Your Foolproof Roadmap to Zucchini Bliss
Step 1: Rinse those zucchinis under cool water and pat them bone-dry with paper towels. (Wet zucchini = steamed mush. We want sear!) Trim the ends, then slice into 2-inch batons—about the thickness of your pinky finger. Too thin? They’ll vanish. Too thick? They won’t char inside. Pro move: Angle your knife slightly for longer, restaurant-style pieces.
Step 2: Heat a large wok or heavy skillet over medium-high heat until it’s seriously hot. Add oil and butter. When butter melts and starts foaming? That’s your cue! No wok? A cast-iron skillet is perfect for char.
Step 3: Throw in ginger and garlic. Stir like your life depends on it for 4-5 seconds—just until fragrant! Burnt garlic = bitter heartbreak. Hack: Push aromatics to the cooler edge after toasting to avoid scorching.
Step 4: Toss in zucchini and onions. Spread them in a single layer—don’t overcrowd! Let them sear untouched for 1 minute. Hear that sizzle? That’s flavor forming. Stir once, then…
Step 5: Drizzle soy sauce, salt, and pepper over everything. Toss to coat—the pan will hiss and steam! Timing tip: Add soy now so it reduces into a glaze, not at the end.
Step 6: Cook uncovered for 6-8 minutes, stirring every 60-90 seconds. You want caramelized spots and evaporated liquid. The golden rule? Stop when zucchini is fork-tender but still snaps—about 80% cooked. Residual heat finishes it! Overcooking = sad, floppy spears.
Step 7: Kill the heat. Immediately garnish with scallions and sesame seeds. Serve piping hot—this dish waits for no one!
Critical secret: High heat + minimal stirring = maximum char. Think “toss, not mush.” If your pan looks dry? Add 1 tsp butter, not water. Water is the enemy of crisp!
Plating Like a Pro: Where Zucchini Shines Brightest
Slide those glossy batons onto a warmed plate (cold plates zap heat!). Pile ’em high—rustic charm beats fussy arrangements. Sprinkle extra scallions and sesame seeds for color pop. Pair it with grilled teriyaki salmon, yaki soba noodles, or hibachi fried rice for the full steakhouse experience. Feeling fancy? Serve in a scallion-lined bamboo boat. Solo act? Top with a fried egg or crispy tofu. And oh—cold beer or green tea? Non-negotiable sides!
Mix It Up! 5 Flavor Twists That Slay
- Spicy Dragon Style: Toss in 1 tsp chili crunch or sriracha with the soy sauce. Finish with lime zest.
- Umami Bomb: Add ¼ cup sliced shiitakes with the onions. Finish with a drizzle of truffle oil.
- Protein Powerhouse: Stir-fry diced chicken or shrimp first, remove, then cook zucchini. Combine at the end!
- Bright & Herbaceous Swap butter for lemon-infused olive oil. Toss in fresh basil or cilantro at the end.
- Keto-Friendly: Use coconut aminos, add extra butter, and throw in halved cherry tomatoes last minute.
Beau’s Backstage Tips & Zucchini Confessions
This recipe? It’s survived 12 years of Feastical tweaks. Version 1.0 involved way too much soy sauce (RIP, salt-sensitive friends). My biggest “aha!”? Undercook slightly—zucchini keeps cooking off-heat. Also? I once subbed margarine for butter during a pantry emergency… never again. Real butter or bust! Funny story: My dog, Biscuit, once snatched a whole raw zucchini off the counter. Now he gets a cooked piece as his “hibachi tax.” Final thought: This dish is forgiving. Burned the garlic? Scoop it out and restart. Added too much soy? Balance with a squeeze of honey. Cooking’s a dance, not a drill—have fun with it!
Your Hibachi Zucchini Questions—Solved!
Q: Why is my zucchini soggy?!
A: Three culprits: 1) Didn’t pat it dry, 2) Overcrowded the pan (steam city!), 3) Stirred non-stop. Solution: Work in batches if needed, and let it sear!
Q: Can I make this ahead?
A: It’s best fresh, but! Cook 90% through, cool, then refrigerate. Reheat in a screaming-hot pan for 1 minute to revive the char.
Q: No wok—will a non-stick skillet work?
A: Yes! Just get it HOT before adding oil. Note: You won’t get quite as much char, but flavor still wins.
Q: Can I use other squash?
A: Yellow squash? Absolutely. Mushy veg like eggplant? No—it’ll turn to soup. Try asparagus or broccoli instead (adjust cook time!).
Hibachi Zucchini
- Total Time: 20 min
Description
Hey flavor chaser — Beau here! Ready to bring that sizzling Japanese steakhouse vibe straight to your kitchen? This Hibachi Zucchini is buttery, garlicky, lightly charred, and ridiculously easy. No fancy tools, no chef showmanship — just your skillet, 20 minutes, and a sprinkle of sesame magic. Trust me, you’ll never look at humble zucchini the same again!
Ingredients
• 2 medium zucchini (green or yellow) — cut into 2-inch batons
• 1 tbsp avocado or grapeseed oil
• 2 tbsp butter (or vegan butter)
• 1 cup sliced onions (sweet or yellow)
• 1 tsp minced garlic
• 1 tsp minced fresh ginger
• 2 tsp soy sauce (or tamari)
• ¼ tsp salt + ¼ tsp black pepper
• Scallion greens + toasted sesame seeds for garnish
Instructions
1️⃣ Prep: Rinse, dry, and slice zucchini into sturdy batons. Pat dry — moisture is the enemy of char!
2️⃣ Heat It Up: Warm a large skillet or wok over medium-high heat. Add oil + butter. When foaming, add ginger & garlic — stir 5 seconds, no more!
3️⃣ Veggie Toss: Add zucchini & onions. Spread in a single layer. Sear 1 minute without stirring. Hear that sizzle? That’s your steakhouse moment.
4️⃣ Glaze: Drizzle soy sauce, sprinkle salt & pepper. Toss to coat. Stir-fry 6–8 mins, stirring every 1–2 mins, until charred but still crisp.
5️⃣ Finish: Kill heat. Sprinkle scallions & toasted sesame seeds. Serve hot and bask in your hibachi glory.
Notes
Want extra flair? Stir in chili crisp, mushrooms, or top with a fried egg!
- Prep Time: 10 min
- Cook Time: 10 min
Nutrition
- Calories: 100 Cal Per Serving
- Fat: 8g
- Carbohydrates: 5g
- Protein: 2g
Nutritional Nibbles (Per Serving)
Calories: 90-110 • Fat: 8g • Carbs: 5g • Protein: 2g
Note: Stats use oil + butter. Vegan? Sub coconut oil—calories similar!
Save This Recipe For Later!
Final Thoughts: More Than a Side Dish
Hibachi zucchini isn’t just food—it’s a gateway to confidence in the kitchen. It teaches you to control heat, balance flavors, and embrace imperfection (because even slightly burnt bits taste good). Whether you’re recreating childhood memories or impressing a date, this dish delivers joy in every bite. So turn up that heat, trust the process, and let the zucchini work its magic. And hey—if my dog Biscuit approves, you know it’s legit. Happy cooking!