
Sugar Free Yogurt Cake
Sugar-Free Yogurt Cake: A Slice of Happiness
Introduction
Hey there, fellow food lovers! Today, I’m super excited to share with you one of my absolute favorite desserts: the Sugar-Free Yogurt Cake! Now, I know what you might be thinking: “How can a cake be both delicious and sugar-free?” Well, let me tell you—this cake is not only a guilt-free indulgence, but it’s also moist, light, and utterly scrumptious. Whether you’re hosting a cozy weekend brunch, looking for the perfect dessert to share with friends, or simply treating yourself on a weekday, this cake fits the bill perfectly.
You see, desserts don’t always have to be loaded with sugar to be satisfying. I believe that food is about finding balance, joy, and love in every bite, and this yogurt cake embodies that philosophy beautifully. Made with simple, wholesome ingredients, it’s a delightful way to enjoy a sweet treat without the sugar crash that typically follows. Plus, it’s incredibly versatile, so you can dress it up or down as your taste buds desire!
Picture this: a warm slice of cake fresh out of the oven, served with a dollop of whipped cream or fresh berries. Yum! So, grab your apron and let’s dive into this scrumptious recipe that’s sure to become a staple in your kitchen!
Personal Story
This yogurt cake holds a special place in my heart. I remember the first time I decided to make it when my sister was visiting from out of town. She had been raving about healthy desserts, and I wanted to surprise her with something delightful that wouldn’t make her cringe at the thought of “healthy.” Buzzing with excitement, I rummaged through my pantry and found a few simple ingredients: Greek yogurt, eggs, and monkfruit sweetener.
As I mixed everything in my cozy little kitchen, the familiar scent of vanilla wafted through the air, and I could feel my excitement bubble over. When I pulled the cake out of the oven, it puffed up beautifully, golden and inviting. We eagerly waited for it to cool, and when it was finally ready to slice, we couldn’t resist diving in! The first bite was pure bliss. The cake was not only delightfully moist but also incredibly satisfying. My sister’s eyes lit up, and we couldn’t stop talking about how amazing it was to enjoy such a delicious dessert without the remorse of excess sugar. That day solidified my love for this yogurt cake and for the joy that homemade desserts can bring.
Ingredients
Before we get started, let’s gather all the goodies you’ll need for our Sugar-Free Yogurt Cake:
-
4 Large Eggs (separated)
Eggs provide structure and moisture, giving the cake its fluffy texture. If you’re vegan or looking for an egg substitute, you can use flax eggs (1 tablespoon of flaxseed meal mixed with 2.5 tablespoons of water per egg). -
1.5 Cups Non-Fat Greek Yogurt (350 g/12.5 oz)
Greek yogurt lends creaminess and a slight tang to the cake, which balances the sweetness beautifully. Want to add more flavor? Try using vanilla or lemon-flavored yogurt! -
⅓ Cup Monkfruit Sweetener (70 g/2.5 oz)
This natural sweetener offers a low-calorie alternative to sugar. It’s great for sugar-free baking! If you don’t have monkfruit sweetener, you could use stevia or erythritol, but make sure to adjust the quantities according to the sweetness level. -
⅓ Cup Cornstarch (40 g/1.4 oz)
Cornstarch is key for a light, fluffy texture. You can easily substitute it with arrowroot powder or even almond flour for a different flavor profile. Just be aware this might slightly adjust the texture! -
1 tsp Vanilla Extract (optional)
Vanilla extract enhances the flavors in the cake, making it taste heavenly! If you want to get a little creative, you can swap this out for almond extract or a splash of citrus juice for bright notes.
In total, these simple yet wholesome ingredients come together to create a cake that you’ll love letting melt in your mouth!
Step-by-Step Instructions
Now that we have everything ready, let’s get baking! Follow these steps, and we’ll whip up a delicious Sugar-Free Yogurt Cake.
-
Preheat Your Oven:
Start by preheating your oven to 350°F (175°C). This step ensures your cake bakes evenly and nicely. -
Prepare Your Baking Pan:
Grease a 9-inch round cake pan with a little olive oil or non-stick spray, and then line the bottom with parchment paper. This makes sure your cake comes out without a hitch! -
Separate the Eggs:
In two separate bowls, crack your eggs and separate the whites from the yolks. When beating the egg whites, you want them to whip up into soft peaks—this will help your cake rise beautifully! -
Mix the Egg Yolks and Yogurt:
In a large mixing bowl, combine the egg yolks with Greek yogurt and the monkfruit sweetener. Mix until well combined—no lumps here! This mixture will be creamy and luscious. -
Add Cornstarch and Vanilla:
Gradually add the cornstarch and vanilla extract to the yolk and yogurt mixture. Stir until fully combined. Your batter should start to come together beautifully at this stage. -
Whip the Egg Whites:
Grab a clean bowl and your electric mixer, and start whipping the egg whites until they form soft peaks. This is where the magic happens—whipped egg whites will give your cake that airy, fluffy texture! -
Fold in the Egg Whites:
Gently fold the whipped egg whites into the yogurt mixture. Do this slowly and lovingly, as you want to keep as much air in the batter as possible. You’ll see the color lighten; that’s a great sign! -
Pour the Batter into the Pan:
Transfer the batter to your prepared cake pan, spreading it evenly to level out the top. Don’t worry about perfection; it’ll all even out in the oven! -
Bake to Perfection:
Place the cake in the preheated oven and let it bake for about 30-35 minutes. You’ll know it’s done when the top is golden, and a toothpick inserted into the center comes out clean. -
Cool and Unmold:
Once baked, take it out of the oven and allow it to cool in the pan for about 15 minutes. Then, gently remove it from the pan, peel off the parchment paper, and let it cool completely on a wire rack. -
Time to Serve and Enjoy!:
Once cooled, slice it up and serve it your favorite way, whether that’s plain, with some whipped cream, or topped with fresh fruit. Let your guests marvel at your baking prowess!
Serving Suggestions
Now that your Sugar-Free Yogurt Cake is out of the oven and looking fabulous, let’s talk about how to serve it up! Here are a few of my favorite ways:
-
Classic Slice: Just serve it as is. This cake is naturally delicious and doesn’t need much dressing up. Serve slices at room temperature with a sprinkle of powdered monkfruit sweetener if you’d like, for a little extra flair!
-
Whipped Cream: Top slices with a dollop of whipped cream (or whipped coconut cream for a dairy-free option). A little cinnamon sprinkled on top adds warmth and a lovely aroma.
-
Fruit Toppings: Fresh berries such as strawberries, blueberries, or raspberries add a burst of color and flavor. Drizzle a bit of honey or a sugar-free syrup over the fruits for an extra touch.
-
Yogurt Parfait: Turn your cake into a delightful parfait! Crumble leftover cake into a glass, layer with Greek yogurt, and top with fresh fruits or a berry compote for an impressive dessert.
Recipe Variations
Feeling a little adventurous? Here are some easy twists or variations you can try with this Sugar-Free Yogurt Cake:
-
Chocolate Yogurt Cake: Add 1/3 cup of unsweetened cocoa powder to the dry ingredients for a rich chocolate flavor. Replace the vanilla extract with an espresso shot for a mocha twist!
-
Citrus Infusion: Add zest from one lemon or orange, along with a tablespoon of juice, to give your cake a bright, fresh flavor that’s especially lovely in spring or summer.
-
Nutty Crunch: Fold in a handful of chopped nuts or seeds (like almonds or walnuts) for added texture and nutritional benefits. They will add a wonderful crunch and flavor!
-
Spiced Sensation: For a warming twist, try adding a pinch of nutmeg or cinnamon to the batter. Alternatively, some ginger will give it a cozy kick!
-
Gluten-Free Option: Substitute cornstarch with a gluten-free all-purpose flour blend. Your cake will be equally marvelous for your gluten-sensitive friends!
Chef’s Notes
Over the years, this recipe has evolved to suit my taste and needs. I initially stumbled upon a similar yogurt cake recipe but quickly personalized it to make it sugar-free and lighter. It’s fun to experiment with flavors and textures, always keeping in mind the essence of comfort and joy in the kitchen. And I must share: every time I serve this cake, it prompts stories and happy memories, whether it’s from sharing slices with friends or enjoying it solo on a cozy evening.
Once, I even made it for a potluck and came back with an empty dish—that’s a sure sign of success! Remember, cooking is a journey, and this cake has been a part of mine, transforming from an experiment into a beloved staple.
FAQs and Troubleshooting
1. Why did my cake turn out dense?
If your cake came out denser than expected, it may be due to overmixing the batter after adding the egg whites. Be gentle when folding them in to keep that nice airy texture!
2. Can I use regular yogurt instead of Greek yogurt?
Absolutely! Just be aware that the texture and flavor profile might change a bit. Regular yogurt will make the cake a little less thick and creamy, but it can still be delicious!
3. How long can I store the cake?
You can store the cake in an airtight container at room temperature for up to 3 days, or refrigerate it for about a week. If you want to keep it longer, slice and freeze—thaw it out whenever you’re craving a sweet treat!
4. What if I don’t have monkfruit sweetener?
No worries! Feel free to substitute with another sugar-free sweetener, like stevia or erythritol, adjusting the amount according to sweetness levels. Just ensure it’s a one-to-one substitution if possible for best results.
Nutritional Info
Let’s break down the nutrition in a single slice of this fantastic Sugar-Free Yogurt Cake (assuming the recipe yields 12 slices):
- Calories: Approximately 80
- Protein: 6g
- Carbohydrates: 10g
- Fat: 3g
- Fiber: 1g
- Sugar: 1g (depending on your sweetener)
With a healthy protein boost from the Greek yogurt and low sugars, this cake is a great option for those looking to satisfy their sweet tooth without the guilt!
Final Thoughts
There you have it—a delicious and simple recipe for Sugar-Free Yogurt Cake that will surely put a smile on your face! Remember, the best meals are the ones shared with friends and family, bringing together laughter, memories, and, of course, fantastic food. So whether you’re making this cake for a gathering or just to treat yourself, know that you’re creating something wonderful!
As you embark on your baking journey, make sure to enjoy every moment of the process. Cooking is as much about the experience as it is about the food itself. Don’t forget to share your creation with loved ones or put your unique twist on the recipe—this is just the beginning!
Thanks for joining me in the kitchen today, and happy cooking! Until next time, keep those spatulas twirling and those taste buds tingling!
Print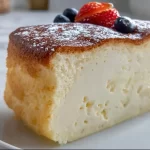
Sugar-Free Yogurt Cake
- Total Time: 45 minutes
- Yield: 12 servings 1x
- Diet: Sugar-Free
Description
A delicious and moist yogurt cake that’s sugar-free, perfect for any occasion!
Ingredients
- 4 Large Eggs (separated)
- 1.5 Cups Non-Fat Greek Yogurt (350 g/12.5 oz)
- ⅓ Cup Monkfruit Sweetener (70 g/2.5 oz)
- ⅓ Cup Cornstarch (40 g/1.4 oz)
- 1 tsp Vanilla Extract (optional)
Instructions
- Preheat your oven to 350°F (175°C).
- Prepare a 9-inch round cake pan with olive oil and parchment paper.
- Separate the eggs into whites and yolks in two bowls.
- Mix egg yolks with Greek yogurt and monkfruit sweetener until creamy.
- Add cornstarch and vanilla to the mixture and stir until combined.
- Whip egg whites in a clean bowl until soft peaks form.
- Fold the whipped egg whites into the yogurt mixture gently.
- Pour the batter into the prepared cake pan, leveling the top.
- Bake for about 30-35 minutes until golden and a toothpick comes out clean.
- Cool for 15 minutes in the pan before transferring to a wire rack to cool completely.
- Serve plain, with whipped cream, or topped with fresh fruit.
Notes
This cake can be stored in an airtight container at room temperature for up to 3 days, or refrigerated for about a week. It can also be sliced and frozen for future cravings.
- Prep Time: 10 minutes
- Cook Time: 35 minutes
- Category: Dessert
- Method: Baking
- Cuisine: American
Nutrition
- Serving Size: 1 slice
- Calories: 80
- Sugar: 1g
- Sodium: 50mg
- Fat: 3g
- Saturated Fat: 1g
- Unsaturated Fat: 2g
- Trans Fat: 0g
- Carbohydrates: 10g
- Fiber: 1g
- Protein: 6g
- Cholesterol: 120mg
Keywords: sugar-free, yogurt cake, healthy dessert, light cake, guilt-free dessert

No-Bake Sugar-Free Lemon Pie Recipe
No-Bake Sugar-Free Lemon Pie Recipe
Hey there, food lovers! 🥧 If you’re anything like me, you have a special spot in your heart (and stomach) for desserts that feel like a joyful celebration in every bite. Today, we’re whipping up something fantastic that doesn’t require turning on the oven—yep, you heard me right! This No-Bake Sugar-Free Lemon Pie is the perfect treat for those warm sunny days when you crave something refreshing yet indulgent.
This pie is not just easy to make, but it’s also a guilt-free delight that satisfies your sweet tooth without any of the usual sugar-induced guilt. If you want to impress your friends at the next picnic or simply conjure up some sweet memories while enjoying a slice on your couch, this pie is calling your name. I mean, who doesn’t love a good lemon dessert? With its bright zest and creamy filling, it’s like sunshine on a plate!
In my kitchen, this pie has become a staple after learning a few tricks along the way. As someone who loves sharing kitchen magic, I’m thrilled to spill all my secrets to you in this guide. Grab your apron, and let’s dive into creating this zesty beauty!
Personal Story
Ah, lemons. Just saying the word brings back fragrant memories from my childhood. I remember standing on a stool in my grandmother’s cozy kitchen, helping her whip up lemon meringue pies from scratch. The air was filled with the tangy scent of fresh lemons and the sweet softness of meringue. It was our bonding time, filled with laughter and flour fights—my grandfather’s playful shenanigans always made the kitchen feel extra warm.
The meringue was a bit finicky, though, which made me long for a dessert that was both easy and delicious. Fast forward to my culinary adventures today, and I’ve found that no-bake treats are my jam! This No-Bake Sugar-Free Lemon Pie sums up those cheerful memories, wrapped up in a creamy, dreamy filling that reminds me of those blissful days in my grandma’s kitchen. Let me share this recipe that keeps those joyous flavors alive, minus the fuss of the oven!
Ingredients
To bring this delightful creation to life, gather the following ingredients:
-
1 1/2 cups almond flour
This nutty flour serves as a great base for the crust. It’s gluten-free and offers a light, pleasant texture. If you’re not a fan of almond flour, feel free to swap in your favorite nut flour or even gluten-free oat flour! -
1/4 cup melted butter
Butter adds richness to the crust, creating a buttery flavor that complements the pie. If you prefer a dairy-free version, coconut oil works beautifully too! -
2 tbsp powdered sugar substitute (like erythritol)
This is a sweetener that gives just the right touch of sweetness without the sugar rush. You can also use stevia powdered for a similar effect, just bear in mind that the sweetness levels may vary! -
1 package (8 oz) cream cheese (softened)
Cream cheese provides the rich and creamy texture we crave in a lemon pie. For a lighter option, consider using Greek yogurt, but keep in mind it may alter the flavor slightly! -
1/2 cup powdered sugar substitute
Another layer of sweetness for the filling! If you’re looking for a fun twist, try flavored sugar substitutes like vanilla or coconut! -
1/4 cup fresh lemon juice
Nothing beats fresh lemon juice for that bright, zesty flavor! Feel free to use bottled lemon juice in a pinch, but fresh is always best! -
1 tbsp lemon zest
The zest adds a punch of citrusiness; it amplifies the flavor and gives that aromatic quality. If you’re in a pinch, don’t worry, you can skip the zest, but I highly recommend it! -
1 tsp vanilla extract
A splash of vanilla rounds out the flavors and brings everything together. If you’re looking to experiment, almond extract provides a lovely twist too! -
1 container (8 oz) sugar-free whipped topping (like Cool Whip or homemade)
This heavenly addition provides that airy lightness we love. You can also make your own by whipping heavy cream with a sweetener of your choice!
Step-by-Step Instructions
Ready to dive in? Let’s get to work on this pie!
Step 1: Prepare the Crust
-
In a mixing bowl, combine 1 1/2 cups almond flour and 1/4 cup melted butter along with 2 tbsp powdered sugar substitute. Mix them together until the texture resembles wet sand.
- Chef’s tip: Ensure your butter is not too hot; otherwise, it could make the crust oily.
-
Press the mixture firmly into the bottom and up the sides of an 8-inch pie dish.
- Hack: Use a glass or measuring cup to compact the crust evenly and create a smooth surface.
-
Chill the crust in the fridge for at least 15 minutes to help it set.
- Chef’s tip: A chilled crust will slice beautifully later—patience is key!
Step 2: Create the Creamy Filling
-
In a separate large mixing bowl, beat together 1 package of softened cream cheese and 1/2 cup powdered sugar substitute using a hand mixer or a stand mixer until smooth and creamy.
- Pro tip: Make sure the cream cheese is softened for the best texture. You can microwave it for about 10 seconds if you forgot to take it out early!
-
Add in the 1/4 cup fresh lemon juice, 1 tbsp lemon zest, and 1 tsp vanilla extract. Continue beating until it’s fully combined.
- Little hack: For extra lemony goodness, add a dash of lemon extract if you have it on hand!
-
Gently fold in 1 container of sugar-free whipped topping until fully mixed.
- Tip: Use a spatula to fold; this method keeps the mixture airy and luscious—no deflating allowed!
Step 3: Assemble the Pie
-
Take your chilled crust out of the fridge and spoon the creamy filling into it, spreading it evenly with a spatula.
- Chef’s insight: If you want a beautiful swirl, use the back of a spoon to create a design!
-
Cover the pie with plastic wrap and refrigerate for at least 4 hours, but overnight is even better. This allows the flavors to meld beautifully.
- Tip: If you’re in a hurry, just aim for a minimum of 2 hours—good things come to those who wait, but we’ve all been there, right?
Serving Suggestions
When the time finally comes to enjoy your delightful No-Bake Sugar-Free Lemon Pie, there are a few ways to elevate the presentation! Consider these serving suggestions:
-
Slice It Up: When you’re ready to serve, use a sharp knife dipped in hot water for clean cuts. This produces that perfect slice to show off the filling’s gorgeous color!
-
Garnish: Top each slice with a bit of fresh whipped cream and lemon zest for a pop of color and flavor. Fresh berries, such as blueberries or raspberries, add a nice touch of sweetness and a bit of tartness that really plays well with the lemon!
-
Serving Bowl: If you want to get creative, try using small mason jars for individual servings. Not only do they look adorable, but everyone loves grabbing their own pie in a jar!
Recipe Variations
Feeling adventurous? Here are some fun twists you can try out with your No-Bake Lemon Pie:
-
Berry Bliss: Fold in fresh strawberries or blueberries into the filling for a fruity explosion.
-
Coconut Cream: Add shredded unsweetened coconut to the filling for a tropical vibe. You can even substitute coconut cream for some of the cream cheese for added richness!
-
Chocolate Drizzle: For a decadent touch, melt some sugar-free chocolate chips and drizzle on top before serving.
-
Ginger Snap Crust: Swap out the almond flour for crumbled sugar-free ginger snaps for a spicy, crunchy crust.
-
Matcha Layer: For a unique twist, create a matcha layer by mixing one teaspoon of matcha powder into a portion of the filling before pouring it into the crust.
Chef’s Notes
Throughout my journey as a home chef, this No-Bake Sugar-Free Lemon Pie has evolved from a simple dessert to a cherished family recipe. The joy it brings at gatherings reminds me that cooking doesn’t have to be tedious. I recall one quirky mishap where I accidentally mistook salt for sugar—I don’t recommend that! The look on everyone’s face when they took a bite was priceless! Now, I keep my sweetener close at hand and always double-check.
Cooking is about experimenting and having fun, and it’s okay to laugh at your mistakes! So, my fellow foodies, if you stray off the beaten path while making this pie, don’t sweat it—just embrace the process!
FAQs and Troubleshooting
Q1: Can I use a different sweetener?
Absolutely! You can experiment with your favorite sweeteners, but keep in mind that some alternatives may have varying levels of sweetness, so adjust to your taste!
Q2: Why is my filling a bit runny?
If your filling is runny, it could be due to overmixing. When folding in the whipped topping, remember to do it gently to preserve the airy texture.
Q3: How long will this pie last?
In the refrigerator, your No-Bake Sugar-Free Lemon Pie will last about 3–5 days. But I doubt it’ll last that long—it’s just too good!
Q4: Can I freeze the pie?
Yes, you can! Just be sure to wrap it tightly in plastic wrap and foil. When you’re ready to enjoy it, thaw it in the fridge overnight!
Nutritional Info
This No-Bake Sugar-Free Lemon Pie recipe is not only delicious but also has some impressive nutritional benefits:
- Low in carbs: Perfect for those following a low-carb or keto lifestyle.
- Packed with healthy fats: The almond flour and cream cheese provide healthy fats that can help keep you satisfied.
- Sugar-free: Enjoy it without the traditional guilt of added sugars; it’s a delightful indulgence that won’t spike your blood sugar levels.
Per serving (approximate):
- Calories: 160
- Total carbs: 4g
- Fiber: 2g
- Sugar: 1g (from natural ingredients)
- Fat: 14g
- Protein: 3g
Final Thoughts
There you have it—your guide to making a luscious No-Bake Sugar-Free Lemon Pie! I hope you’re just as excited as I am to whip this up in the kitchen. This pie serves as an invitation to share laughter, love, and deliciousness with those around you, all while keeping it healthy and enjoyable.
So, next time you’re in the mood for something sweet that brings a burst of sunshine into your day, reach for this lemon pie recipe. Remember, it’s all about the experience of cooking, enjoying, and, most importantly, sharing with the people you love. Cheers to more delicious memories—and my friends, happy baking, or rather, “no-baking!” 🍋✨
Print
No-Bake Sugar-Free Lemon Pie
- Total Time: 255 minutes
- Yield: 8 servings 1x
- Diet: Sugar-Free
Description
A refreshing and indulgent no-bake lemon pie that is sugar-free and perfect for warm days.
Ingredients
- 1 1/2 cups almond flour
- 1/4 cup melted butter
- 2 tbsp powdered sugar substitute (like erythritol)
- 1 package (8 oz) cream cheese (softened)
- 1/2 cup powdered sugar substitute
- 1/4 cup fresh lemon juice
- 1 tbsp lemon zest
- 1 tsp vanilla extract
- 1 container (8 oz) sugar-free whipped topping (like Cool Whip or homemade)
Instructions
- Prepare the crust by mixing almond flour, melted butter, and powdered sugar substitute until resembling wet sand. Press into an 8-inch pie dish and chill for 15 minutes.
- Create the creamy filling by beating softened cream cheese and powdered sugar substitute until smooth. Add lemon juice, lemon zest, and vanilla; mix well. Fold in whipped topping gently.
- Assemble the pie by adding the filling to the crust. Cover with plastic wrap and refrigerate for at least 4 hours before serving.
Notes
For clean cuts, dip a knife in hot water while slicing. Garnish with fresh whipped cream, lemon zest, and berries for added flavor.
- Prep Time: 15 minutes
- Cook Time: 240 minutes
- Category: Dessert
- Method: No-Bake
- Cuisine: American
Nutrition
- Serving Size: 1 slice
- Calories: 160
- Sugar: 1g
- Sodium: 300mg
- Fat: 14g
- Saturated Fat: 7g
- Unsaturated Fat: 6g
- Trans Fat: 0g
- Carbohydrates: 4g
- Fiber: 2g
- Protein: 3g
- Cholesterol: 30mg
Keywords: no-bake dessert, sugar-free, lemon pie, refreshing dessert, healthy dessert