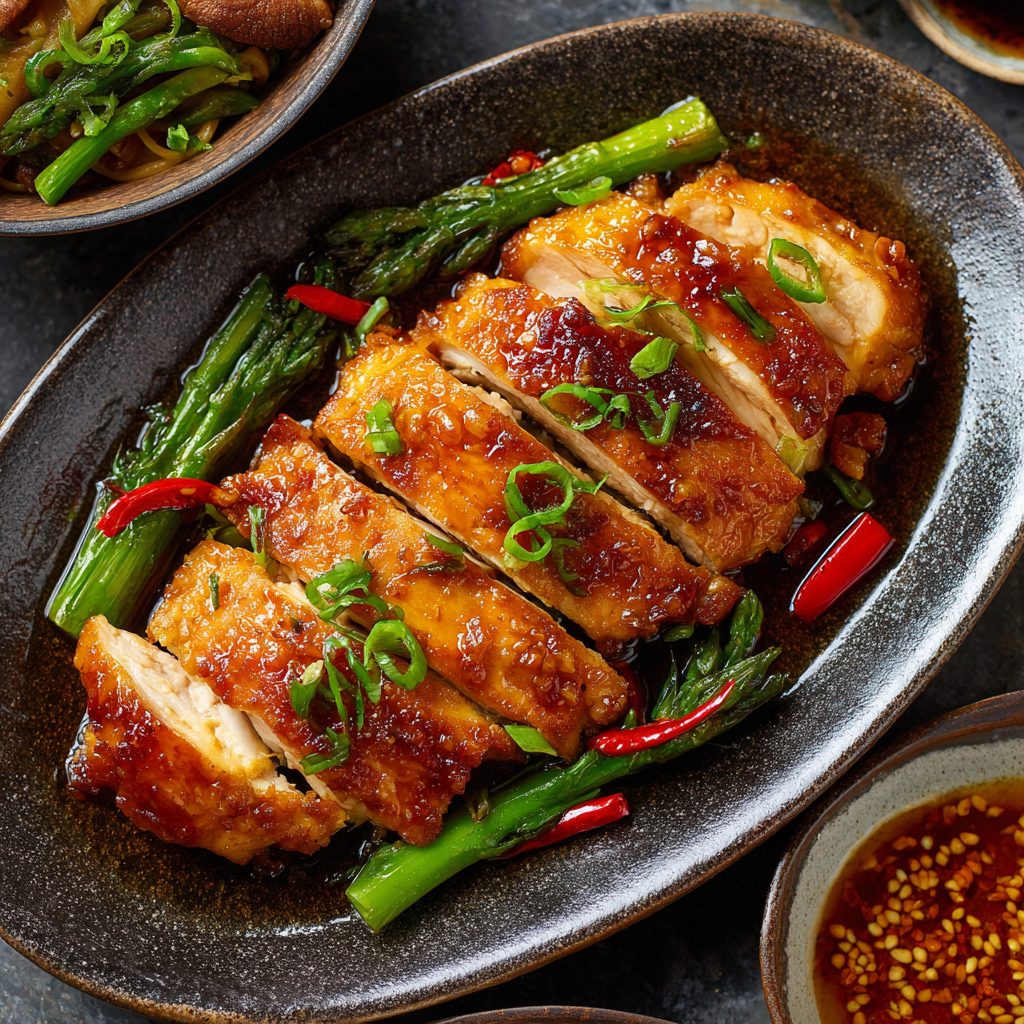
Velveted Chicken Breast: The Chinese Secret to Unbelievably Tender Chicken
Say Goodbye to Dry, Chewy Chicken Forever
Hey friends, Beau here from Feastical! Let me ask you a question that might hit a little too close to home: have you ever stared at a plate of dry, sad, chewy chicken breast and wondered, “Why bother?” I know I have. You follow the recipe, you watch the timer, you do everything “right,” and yet… there it is. Chicken that tastes more like regret than dinner.
Well, my fellow foodie, I’m about to change your chicken game forever. Today, we’re pulling back the curtain on a brilliant Chinese restaurant technique called velveting. This isn’t a fancy sauce or a complicated spice rub. It’s a simple, almost magical prep method that transforms lean, bland chicken breast into something so silky, tender, and juicy, you’ll swear it snuck out of a five-star takeout box.
Velveting is my not-so-secret weapon for weeknight stir-fries, healthy lunch bowls, and anything else that deserves a protein upgrade. It’s the reason the chicken in your favorite Chinese dish melts in your mouth while yours sometimes feels like a workout for your jaw. The best part? It takes just a few pantry staples and about 30 minutes of mostly hands-off time. No special equipment, no culinary degree required. Just you, a few simple steps, and the promise of perfect chicken every single time. Ready to turn that kitchen frustration into pure, delicious triumph? Let’s get velveting!
The “Aha!” Moment in a Tiny Apartment Kitchen
My love affair with velveting started not in a fancy cooking class, but in my first post-college apartment kitchen. You know the one—the size of a postage stamp, with exactly one functional burner and a dream. I was determined to recreate the glorious Kung Pao Chicken from this little spot near campus, but no matter how perfect my sauce was, my chicken turned out tough and stringy. It was a culinary heartbreak!
Frustrated, I called my Aunt Marie, who spent years living in Hong Kong. She listened patiently to my plight and then laughed that warm, knowing laugh of someone who holds a secret. “Beau, honey,” she said, “you’re missing the velvet.” She walked me through the process over the phone, and I remember the sheer disbelief as I rinsed the baking soda off the chicken. “This feels weird,” I thought. But then, after the quick blanch in simmering water? Magic. I took a bite of a piece right out of the colander. It was tender. It was juicy. It was *silky*. I literally did a little dance in that tiny kitchen. That moment of discovery—that a simple trick could solve a universal cooking woe—is exactly why I started Feastical. To pass on those game-changing “aha!” moments that make cooking joyful, not frustrating.
Your Velveting Toolkit: Simple Ingredients, Spectacular Results
Here’s everything you need. Don’t let the short list fool you—each ingredient plays a starring role in creating that signature texture.
- 2 boneless, skinless chicken breasts (about 1 lb total): The canvas for our masterpiece. I prefer breasts for their lean, uniform shape, but you can absolutely use thighs if you want an even richer, more forgiving result. Chef’s Insight: Slice them thinly and against the grain *before* tenderizing. This shortens the muscle fibers, guaranteeing tenderness in every bite.
- 1 ½ tsp baking soda: This is the tenderizing powerhouse! A brief bath in baking soda (a mild alkali) changes the chicken’s protein structure, helping it retain incredible amounts of moisture during cooking. Key Tip: Don’t skip the rinse! Leaving it on will give you weird, soapy-tasting chicken, and nobody wants that.
- 1 tbsp cornstarch: Our coating agent. It creates a delicate, protective sheath around each piece of chicken during the velveting process, sealing in juices and giving that characteristic “silky” mouthfeel.
- 1 tbsp soy sauce: For depth of flavor and a bit of salt. Use light soy sauce if you have it for a more authentic touch, but your regular bottle works perfectly. For a gluten-free swap, tamari is your best friend.
- 1 tbsp Shaoxing wine: This Chinese cooking wine adds a subtle, complex sweetness that’s irreplaceable. Substitution: Dry sherry is the closest match. In a real pinch, you can use a splash of chicken broth with a tiny pinch of sugar, but try to find the wine—it makes a difference.
- 1 egg white (optional but glorious): The “extra credit” ingredient for maximum luxury. It adds an additional layer of protein that coats the chicken, resulting in an even silkier, more velvety texture. Highly recommended for special dishes!
- 1 tbsp neutral oil (like vegetable or canola), plus more for the water: A little oil in the marinade helps prevent sticking. We’ll also add a glug to the blanching water to keep the chicken pieces from clinging to each other.
- Water (for the blanching method): Just plain water! We’re going to gently poach the chicken to set the velvet coating.
Step-by-Step: Creating Silkiness, One Easy Step at a Time
Follow these steps, embrace the process, and get ready for the most tender chicken of your life.
Step 1: The Pre-Slice & Tenderizing Bath (15 mins)
First, place your chicken breast flat on the cutting board. Find the direction of the grain (those little white lines running along the breast) and slice *across* them, on a slight diagonal, into ¼-inch thick pieces. This is non-negotiable for tenderness! Toss all those slices into a bowl and sprinkle with the baking soda. Use your hands to massage it in evenly, ensuring every piece gets a light coating. Now, walk away for 15 minutes. Set a timer! This is when the science happens. When the time’s up, rinse the chicken thoroughly under cold water in a colander to wash away all the baking soda. Pat the slices completely dry with paper towels. This step is crucial for the marinade to stick properly.
Step 2: The Flavorful Marinade (20 mins – 1 hour)
In a clean bowl, whisk together the cornstarch, soy sauce, Shaoxing wine, and egg white (if using) until it’s a smooth, thin slurry. Add the rinsed and dried chicken slices and that tablespoon of oil. Toss, toss, toss until every single piece is beautifully coated. The oil might make it seem slippery, but that’s good—it’s creating a barrier. Let this marinate at room temp for 20 minutes, or cover and pop it in the fridge for up to an hour. Don’t go longer, or the texture can get a bit *too* soft.
Step 3: The Velveting Moment – Choose Your Method!
Blanching Method (My Go-To for Stir-Fries): Fill a medium pot about halfway with water. Bring it to a lively simmer (not a rolling boil—bubbles should be gentle). Add a generous tablespoon of neutral oil to the water. This is my little hack to keep the pieces separate. Gently drop in the chicken pieces one by one, stirring immediately so they don’t clump. They’ll cook FAST—in just 60-90 seconds, they’ll turn opaque and float to the top. The moment they’re all white, scoop them out with a slotted spoon or strainer. They will not be fully cooked inside, and that’s perfect! They’ll finish cooking in your stir-fry sauce later. Drain them well. You now have velveted chicken!
Stir-Fry Method (Quick & Direct): Heat a wok or large skillet over high heat until it’s very hot. Add 2-3 tablespoons of oil and swirl it around. Add the marinated chicken in a single layer (you may need to do two batches). Let it sear for just 30 seconds WITHOUT MOVING, then quickly stir-fry for another 1-2 minutes, just until the outside turns completely white. No browning! Immediately remove from the pan. This method is faster but requires more attention.
Step 4: Finish & Feast!
Your chicken is now velveted, tender, and ready for its final act. Add it to your sizzling stir-fry during the last 1-2 minutes of cooking just to heat through and coat in sauce. Toss it into a soup right before serving. Pile it on top of a salad or rice bowl. It’s your culinary playground now!
How to Serve Your Masterpiece: Beyond the Stir-Fry
Okay, you’ve got this bowl of incredibly tender chicken. Now what? The world is your oyster sauce!
My absolute favorite is, of course, a quick vegetable stir-fry. Sauté bell peppers, broccoli, and snap peas in a screaming hot wok, add a simple sauce of soy, garlic, ginger, and a touch of honey, then toss in the velveted chicken at the very end. Serve over steamed jasmine rice for a 15-minute miracle meal.
But don’t stop there! Chop it up and add it to fried rice for protein that stays juicy. Layer it into Asian-inspired noodle bowls with a rich broth, ramen noodles, and a soft-boiled egg. Let it star in a crispy lettuce wrap situation with hoisin sauce and crunchy water chestnuts. Or, keep it simple and elegant: arrange the warm, velveted slices over a bed of vibrant greens for a salad that will blow your mind. It turns an ordinary lunch into something truly special.
Get Creative: 5 Tasty Twists on Velveted Chicken
Once you master the basic velvet, the fun really begins. Here are a few ways to mix it up:
- Lemon-Herb Velvet: Swap the soy sauce for 2 tsp of fresh lemon juice and add 1 tsp of finely chopped rosemary or thyme to the marinade. Perfect for Mediterranean-style dishes or topping a Caesar salad.
- Spicy Szechuan Velvet: Add 1 tsp of Szechuan peppercorn powder and ½ tsp of chili crisp or crushed red pepper flakes to the marinade. Incredible for adding a numbing, fiery kick.
- Gluten-Free & Paleo Velvet: Easy! Use tamari instead of soy sauce, arrowroot powder instead of cornstarch, and omit the Shaoxing wine (or use a splash of apple cider vinegar). The technique works flawlessly.
- Velveted Shrimp or Beef: Yes, it works on other proteins! For shrimp, use ½ tsp baking soda and reduce the velveting time to 45 seconds. For thinly sliced beef (like flank steak), follow the chicken method exactly. A game-changer for Mongolian beef.
- Coconut Curry Velvet: Replace the Shaoxing wine with coconut milk and add 1 tsp of curry powder to the marinade. Velvet as usual, then use it in a Thai yellow curry. The texture is unreal.
Beau’s Kitchen Notes & Stories
This recipe has been a living, evolving part of my kitchen for years. I once, in a frantic “I-have-nothing-in-the-fridge” moment, tried velveting chicken with just baking soda, cornstarch, and water (no soy or wine). You know what? It still worked like a charm for texture! I tossed it in bottled teriyaki sauce later, and my kids couldn’t tell the difference. That’s the beauty of the technique—it’s flexible.
The biggest evolution for me was embracing the egg white. I avoided it for a long time, thinking it was an extra, fussy step. Then I tried it side-by-side with a batch without. Friends, the egg white version is like sliding into satin sheets. It’s next-level. So if you’re making this for a date night or just to treat yourself, crack that egg. You deserve the luxury.
Velveting Chicken FAQs: Solving Your Kitchen Mysteries
Q: My chicken came out a bit mushy. What went wrong?
A: This almost always means it marinated for too long, especially in the baking soda phase. Stick to the 15-minute timer for the baking soda bath like it’s a sacred rule. For the final marinade, 1 hour in the fridge is the max I’d recommend. The proteins break down quickly!
Q: Can I velvet a whole batch and freeze it for later?
A: You can, but with a caveat. After velveting (blanching method), drain and cool the chicken completely. Flash-freeze the pieces on a parchment-lined baking sheet, then transfer to a freezer bag. They’ll keep for 1-2 months. The texture will be slightly less perfect than fresh, but still miles better than un-velveted frozen chicken. Thaw in the fridge before using.
Q: Do I *have* to use baking soda? It seems weird.
A: The baking soda is the core of the “velveting” technique as it’s known in Chinese cooking. However, if you’re truly opposed, you can achieve a *good* (but not *great*) tender result with just the cornstarch, egg white, and oil marinade for 30 minutes. The texture will be smoother but not as profoundly transformed.
Q: I stir-fried it, but it stuck to my pan and browned. Help!
A: This means your pan wasn’t hot enough or was overcrowded. Make sure your wok or skillet is smoking hot before adding the oil, then immediately add the chicken in a single layer with space between pieces. Work in batches if you need to. We’re seizing the coating, not caramelizing the meat.

Velveted Chicken Breast : Chinese Technique for Ultra-Tender, Juicy Perfection
Description
Say goodbye to dry, chewy chicken forever! This classic Chinese technique, called velveting, transforms lean chicken breast into juicy, melt-in-your-mouth perfection. It’s simple, fast, and works for stir-fries, soups, salads, or rice bowls. Perfect for weeknight dinners or impressing friends without stress.
Ingredients
-
2 boneless, skinless chicken breasts (about 1 lb / 450 g)
-
1 ½ tsp baking soda
-
1 tbsp cornstarch
-
1 tbsp soy sauce (or tamari for gluten-free)
-
1 tbsp Shaoxing wine (or dry sherry / splash of chicken broth + pinch of sugar)
-
1 egg white (optional, for extra silkiness)
-
1 tbsp neutral oil (vegetable or canola), plus 1 tbsp for blanching water
-
Water (for poaching)
Instructions
1. Prep & Tenderize (15 min)
-
Slice chicken across the grain into ¼-inch thick pieces.
-
Toss with baking soda, coating evenly.
-
Let sit 15 minutes.
-
Rinse thoroughly under cold water, then pat dry.
Tip: Cutting against the grain ensures maximum tenderness.
2. Marinate (20 min – 1 hr)
-
In a clean bowl, whisk together cornstarch, soy sauce, Shaoxing wine, and egg white (if using).
-
Add chicken and 1 tbsp oil; toss until coated.
-
Marinate at room temperature for 20 minutes, or up to 1 hour in the fridge.
Tip: Don’t marinate too long—chicken can become too soft.
3. Velvet the Chicken
Option A: Blanching (recommended for stir-fries)
-
Bring a pot of water to a gentle simmer, add 1 tbsp oil.
-
Add chicken pieces in a single layer, stirring immediately to prevent sticking.
-
Cook 60–90 seconds until opaque and floating.
-
Drain; chicken will finish cooking in the stir-fry or final dish.
Option B: Stir-Fry (quick method)
-
Heat wok or skillet on high until very hot.
-
Add 2–3 tbsp oil.
-
Sear chicken in a single layer for 30 seconds without moving.
-
Stir-fry 1–2 more minutes until opaque. Remove immediately.
Tip: High heat and single layers prevent sticking and browning.
4. Serve
-
Add to stir-fries at the last 1–2 minutes to heat through.
-
Use in soups, noodle bowls, salads, or lettuce wraps.
-
Try creative twists like Lemon-Herb, Spicy Szechuan, or Coconut Curry Velvet (see notes below).
Notes
-
Egg White Magic: Optional, but creates the silkiest texture.
-
Freeze Ahead: Blanch, cool, flash-freeze, and store up to 2 months. Thaw before using.
-
Other Proteins: Works on shrimp and thinly sliced beef; adjust cooking times.
-
Flavor Boost: Don’t skip Shaoxing wine—it adds authentic depth.
Nutritional Information (A Pleasant Surprise!)
Here’s the fantastic thing about velveting: it makes lean chicken breast incredibly satisfying without adding a ton of extra calories or fat. The method is all about maximizing moisture and mouthfeel, not about drowning things in butter or oil.
Per Serving (approx. ¼ of the recipe):
Calories: ~180 kcal | Protein: 27g | Fat: 6g | Carbohydrates: 4g | Sodium: ~500mg (will vary based on soy sauce used).
Because the chicken stays so juicy and flavorful, you’ll find you’re perfectly happy with a reasonable portion. It’s a brilliant technique for healthy eating that doesn’t feel like a sacrifice. Pair it with a mountain of stir-fried vegetables and brown rice for a balanced, nutrient-packed meal that truly delights your taste buds.
Final Thoughts: Your Journey to Unbeatable Tenderness Begins Now
And there you have it—the simple, transformative secret that bridges the gap between home-cooked struggle and restaurant-quality triumph. Velveting isn’t just a recipe; it’s a fundamental shift in how you approach lean protein. It’s the realization that the most profound changes often come from the simplest techniques, not the longest ingredient lists.
Remember that feeling of cutting into a dry, chewy chicken breast? That’s a thing of the past. From this moment forward, you hold the key to consistently tender, succulent, and silky chicken. You’re not just following steps; you’re applying a piece of culinary wisdom passed down through generations—a humble, genius act of kitchen science that turns an everyday ingredient into something extraordinary.
So take this technique and make it your own. Start with that classic stir-fry you’ve always wanted to perfect, then get creative. Try those twists. Share it with a friend who’s given up on chicken breast. Experience that “aha!” moment for yourself, and then pass it on.
Because great cooking shouldn’t be a series of mysteries or disappointments. It should be a source of joy, connection, and pure, delicious satisfaction. You’ve got this. Now, go forth and velvet.
Tenderly yours,
Beau from Feastical