
Say Hello to Your New Favorite Way to Use Sourdough Discard
Hey there, friend! Beau here, welcoming you back to my kitchen at Feastical. If you’re anything like me, you’ve stared down that jar of sourdough discard on your counter with a mix of guilt and determination. Tossing it feels like a crime, but committing to another 12-hour baking project? Not always in the cards. That’s exactly why I need to tell you about this recipe. This isn’t just focaccia; this is your ticket to stress-free, glorious, fluffy bread that turns that “waste” into a masterpiece in about two hours, hands-off time included.
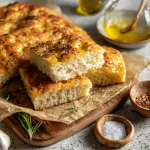
Let’s be real: the words “quick” and “sourdough” don’t often go together. But this Quick Sourdough Discard Focaccia is the beautiful exception. We’re using a little instant yeast as a trusty co-pilot to guarantee that iconic rise and airy crumb, while the discard brings that irreplaceable, subtle tang and depth of flavor that makes your soul (and your stomach) sing. The result? A golden, olive oil-crisped canvas that’s begging for your favorite toppings. It’s perfect for tearing apart with friends, sopping up soup, or building the ultimate sandwich. This recipe is my kitchen hug to you—simple, soulful, and incredibly satisfying. So, grab that discard jar, and let’s transform it into something feastical together.
Grandma’s Counter & The Magic of Simple Dough
This recipe always takes me back to my Grandma Ellie’s kitchen. She wasn’t a “sourdough person,” but she was a wizard with simple yeast doughs. Her counter was perpetually dusted with flour, and her hands moved with a calm, knowing rhythm. I remember one rainy afternoon, she plopped a bowl of sticky dough in front of me, coated my tiny fingers in oil, and said, “Now, Beau, you gotta poke it like you’re playing the piano for grumpy ghosts.” We dimpled that focaccia (though she just called it “herb bread”) together, scattering dried rosemary from her garden like confetti.
The smell that filled her kitchen as it baked—garlic, rosemary, and that unmistakable scent of baking bread—was pure magic. It was my first lesson that food isn’t about perfection; it’s about the feel of the dough, the smell in the air, and the joy of sharing something warm from the oven. This recipe is my homage to that feeling. It’s that simple, joyful magic, now with the wonderful complexity of sourdough discard added to the mix. Every time I make it, I think of her, and I hope it becomes a little moment of delicious memory-making in your kitchen, too.
Gathering Your Cast of Characters
Here’s the beautiful part: you likely have almost everything you need already. This is pantry-raiding at its finest!
- 1 cup (about 250g) sourdough discard, unfed – This is your flavor hero! Straight from the fridge is perfect. It can be thick or thin, recent or a few days old—this recipe is forgiving. Chef’s Insight: The acidity in the discard tenderizes the gluten, giving us that lovely, tender chew.
- 1 ½ cups (about 190g) all-purpose flour – The workhorse. I use plain, unbleached all-purpose for a reliable, fluffy crumb. Sub Tip: For a bit more rustic texture, swap in up to ½ cup of bread flour. Need it gluten-free? A 1:1 gluten-free AP blend works beautifully here.
- ¾ cup (about 180ml) warm water – The catalyst. Aim for “baby bathwater” warm, around 105°F (40°C). Too hot and it’ll upset the yeast; too cold and it’ll slow everything down.
- 1 tsp instant yeast – Our reliable co-pilot! This ensures a great rise without a long ferment. Chef’s Hack: If you only have active dry yeast, use the same amount but let it foam in the warm water for 5 minutes before adding the discard.
- 1 tsp fine sea salt – The flavor enhancer. Never skip it! It balances the tang and strengthens the gluten structure.
- 2 tbsp olive oil, plus a generous amount for the pan and drizzling – This is non-negotiable for authentic focaccia. It creates the irresistible crisp-bottomed crust and rich flavor. Use the good stuff for drizzling!
- Optional Toppings: This is your playground! Flaky sea salt, fresh rosemary sprigs, sliced garlic, halved cherry tomatoes, thinly sliced onion, or a sprinkle of everything bagel seasoning. Go wild!
Let’s Make Some Magic: Step-by-Step
Ready? We’re going to mix, rest, shape, and bake. It’s a peaceful process, I promise.
- The Mix-Up: In a large bowl, combine your sourdough discard, warm water, and instant yeast. Give it a good whisk until it looks like a slightly lumpy smoothie. Chef’s Commentary: Don’t overthink this step. We’re just waking up the yeast and welcoming the discard to the party.
- Bringing it Together: Add the all-purpose flour and salt to the bowl. Using a sturdy spatula or your hands, mix until there are no dry patches of flour left. The dough will be very sticky and shaggy—that’s exactly what we want! Pro Tip: Resist the urge to add more flour. This high hydration is the secret to those beautiful, airy bubbles later.
- First Rest (The Autolyse): Cover the bowl with a damp kitchen towel or plastic wrap and let it sit for 1 hour at room temperature. This is where the magic starts. The flour fully hydrates, and the gluten begins to develop on its own. You might see some bubbles already! Kitchen Hack: No warm spot? No problem. Just let it rest a little longer, maybe 1 hour 15 minutes.
- Prepare the Pan: While the dough rests, grab a standard 9×13 inch baking dish (or a similar-sized rimmed sheet pan). Pour in a generous 2-3 tablespoons of olive oil. Use your fingers or a pastry brush to coat the bottom and sides completely. This will give us that golden, fried-bottom crust.
- Shape & Second Rest: After the first rest, your dough will be puffy and bubbly. Pour/scrape it directly into the oiled pan. Now, with oiled fingers, gently stretch and nudge the dough towards the corners. Don’t fight it! It might not reach all the way immediately. That’s fine. Cover the pan and let it rest for another 30 minutes. It will relax and spread out more.
- Preheat & Dimple: Place a rack in the middle of your oven and preheat to 425°F (220°C). This is the fun part! Uncover the dough. Pour another tablespoon or two of olive oil right over the top. Now, oil your fingers again and press straight down to create deep dimples all over the surface, nearly to the bottom of the pan. You’re literally “playing the piano for grumpy ghosts.” This creates the classic focaccia look and traps pools of delicious oil.
- Top & Bake: Scatter your chosen toppings and a generous pinch of flaky salt over the dimpled dough. Slide the pan into the hot oven and bake for 20-25 minutes. It’s done when the top is a deep, golden brown and the edges are pulling away from the sides of the pan.
- The Grand Finale: Transfer the pan to a wire rack. For the ultimate crust, carefully run a spatula around the edges and under the focaccia to loosen it, then slide it directly onto the rack to cool slightly. This prevents the bottom from steaming and getting soggy. Let it cool for at least 15 minutes before you tear into it!
How to Serve Your Masterpiece
This focaccia is a star in so many ways! For the full experience, serve it warm, straight from the cooling rack. Place it on a big wooden board and let everyone tear off their own piece—it’s communal and fun. Pair it with a small bowl of your best olive oil and balsamic vinegar for dipping. It’s also the perfect sidekick to a big, hearty salad or a bowl of soup (imagine dunking it into tomato soup… heavenly).
Don’t forget its sandwich potential! The next day, slice it horizontally and build an epic Italian sub with cured meats, cheeses, and giardiniera. Or, cube up any leftovers, toss them with a bit more oil and herbs, and toast them into the most incredible croutons you’ve ever had.
Make It Your Own: Fun Flavor Twists
The basic recipe is a perfect canvas. Here are a few of my favorite ways to play:
- Everything Bagel Focaccia: Before baking, brush with a mix of olive oil and a teaspoon of everything bagel seasoning. After baking, sprinkle with more seasoning and sesame seeds.
- Sun-Dried Tomato & Parmesan: Fold ¼ cup chopped oil-packed sun-dried tomatoes into the dough during the final mix. Dimple, then top with grated Parmesan before baking.
- Vegan “Honey” & Herb: For a vegan sweet-savory twist, drizzle the dimpled dough with a mix of olive oil and a tablespoon of maple syrup or agave. Top with fresh thyme and flaky salt.
- Caramelized Onion & Goat Cheese: Spread a layer of quick-caramelized onions over the dimpled dough. Dot with small pieces of goat cheese and a sprinkle of fresh rosemary.
- Gluten-Free & Seeded: Use a certified gluten-free 1:1 flour blend. Mix 2 tablespoons of seeds (pumpkin, sunflower, sesame) into the dough for extra structure and crunch.
A Few More Thoughts From My Kitchen
This recipe has evolved from a “kitchen rescue” mission into a weekly staple. I’ve made it in vacation rentals with questionable oven temperatures and still had a triumph. One time, I was so eager I forgot the second rest and just dimpled and baked it immediately. You know what? It was still delicious, just a tad denser. This dough is wonderfully forgiving.
My biggest tip? Don’t skimp on the olive oil in the pan. That sizzle as the dough hits the oil is the sound of your future crispy crust. And if you have fresh herbs, they’re always better added halfway through baking or right after to prevent burning. Most of all, have fun with it! Baking should feel like a delicious experiment, not a chemistry exam.
Your Questions, Answered
Q: My dough didn’t get very bubbly or rise much during the rests. What happened?
A: This usually points to old yeast or cold conditions. First, check your yeast’s expiration date. Next time, try letting the dough rest in a slightly warmer spot (like inside an oven with just the light on). The yeast in the discard isn’t active, so we rely on the instant yeast—giving it a warm, cozy environment is key!
Q: The focaccia turned out dense. How can I make it lighter next time?
A: Density often comes from over-handling or using too much flour. Remember, it’s a sticky dough—that’s good! Also, ensure your water was warm enough to activate the yeast and that you gave it the full resting time. The dimpling step is also crucial; those pockets allow for expansion and airiness.
Q: Can I make this dough ahead of time?
A> Absolutely! After the first 1-hour rest, you can cover the bowl tightly and stash it in the fridge for up to 24 hours. When you’re ready, let it sit at room temp for 30 minutes, then proceed with shaping, the second rest, and baking. The flavor deepens wonderfully!
Q: My toppings burned before the bread was done. Help!
A> Delicate toppings like fresh herbs, garlic, and cherry tomatoes can burn. For garlic and herbs, add them halfway through baking. For tomatoes, press them cut-side up into the dimples—they’ll roast perfectly without charring.
Quick Sourdough Discard Focaccia : Easy, Homemade & Perfectly Fluffy
Description
This quick sourdough discard focaccia is the easiest way to turn leftover starter into bakery-style bread—no long ferment, no fuss. A small amount of instant yeast guarantees a beautiful rise, while the discard adds that subtle sourdough tang we love. In about 2 hours total, you’ll have a pillowy, olive-oil-crisp focaccia perfect for dipping, sharing, or sandwich-making.
Ingredients
-
1 cup sourdough discard (unfed)
-
1½ cups all-purpose flour
-
¾ cup warm water (about 105°F / 40°C)
-
1 teaspoon instant yeast
-
1 teaspoon fine sea salt
-
2 tablespoons olive oil (plus more for pan and top)
-
Optional toppings: flaky salt, rosemary, sliced garlic, cherry tomatoes, onions
Instructions
-
Mix:
In a large bowl, whisk together discard, warm water, and yeast. Add flour and salt; mix until no dry spots remain. Dough will be sticky. -
First Rest:
Cover and rest at room temperature for 1 hour. -
Prepare Pan:
Generously oil a 9×13-inch baking pan (2–3 tablespoons olive oil). -
Shape & Second Rest:
Scrape dough into the pan. With oiled fingers, gently stretch toward corners. Cover and rest 30 minutes. -
Dimple & Top:
Preheat oven to 425°F (220°C). Drizzle dough with olive oil, dimple deeply with fingers, and add toppings. -
Bake:
Bake 20–25 minutes until deeply golden and crisp at the edges. -
Cool Slightly:
Remove from pan and cool on a rack for 10–15 minutes before slicing or tearing.
Notes
-
Sticky is good: High hydration = airy crumb. Don’t add extra flour.
-
Oil generously: This creates the signature crisp bottom and rich flavor.
-
Prevent burned toppings: Add delicate herbs or garlic halfway through baking.
-
Make ahead: After the first rest, refrigerate dough up to 24 hours for deeper flavor.
Nutritional Information*
Here’s a general breakdown per slice (assuming 8 slices from one 9×13 pan, without extra toppings). Remember, this is homemade goodness without any weird preservatives!
Calories: ~180 | Fat: 6g | Saturated Fat: 1g | Carbohydrates: 26g | Fiber: 1g | Sugars: 0g | Protein: 4g | Sodium: 290mg
*This is an estimate provided by an online nutrition calculator. Values can vary based on specific ingredients used and portion size. The olive oil is a source of heart-healthy monounsaturated fats.
Go Forth and Bake!
And there you have it, my friend—the simplest, most rewarding way to turn that jar of sourdough discard into a showstopping loaf of comfort. This Quick Sourdough Discard Focaccia is more than a recipe; it’s a reminder that the best food often comes from humble beginnings and a little bit of joyful poking.
I hope this bread brings as much warmth and delight to your table as it has to mine. Remember, the Feastical kitchen is always open. If you make it (and I truly hope you do!), tag me or send me a note. I love seeing your creations. Now, go preheat that oven and get ready for your kitchen to smell incredible. Happy baking!
With a full heart and an empty discard jar,
Beau