Honey Garlic Chicken Breasts: Your New 25-Minute Weeknight Hero
Hey friends, Beau here! Let me paint you a picture: It’s been a day. You’re rummaging through the fridge, the clock is ticking, and everyone’s starting to get that “what’s for dinner?” look in their eyes. You could call for takeout… or you could whip up something that’s faster, fresher, and will make your kitchen smell like a cozy bistro.
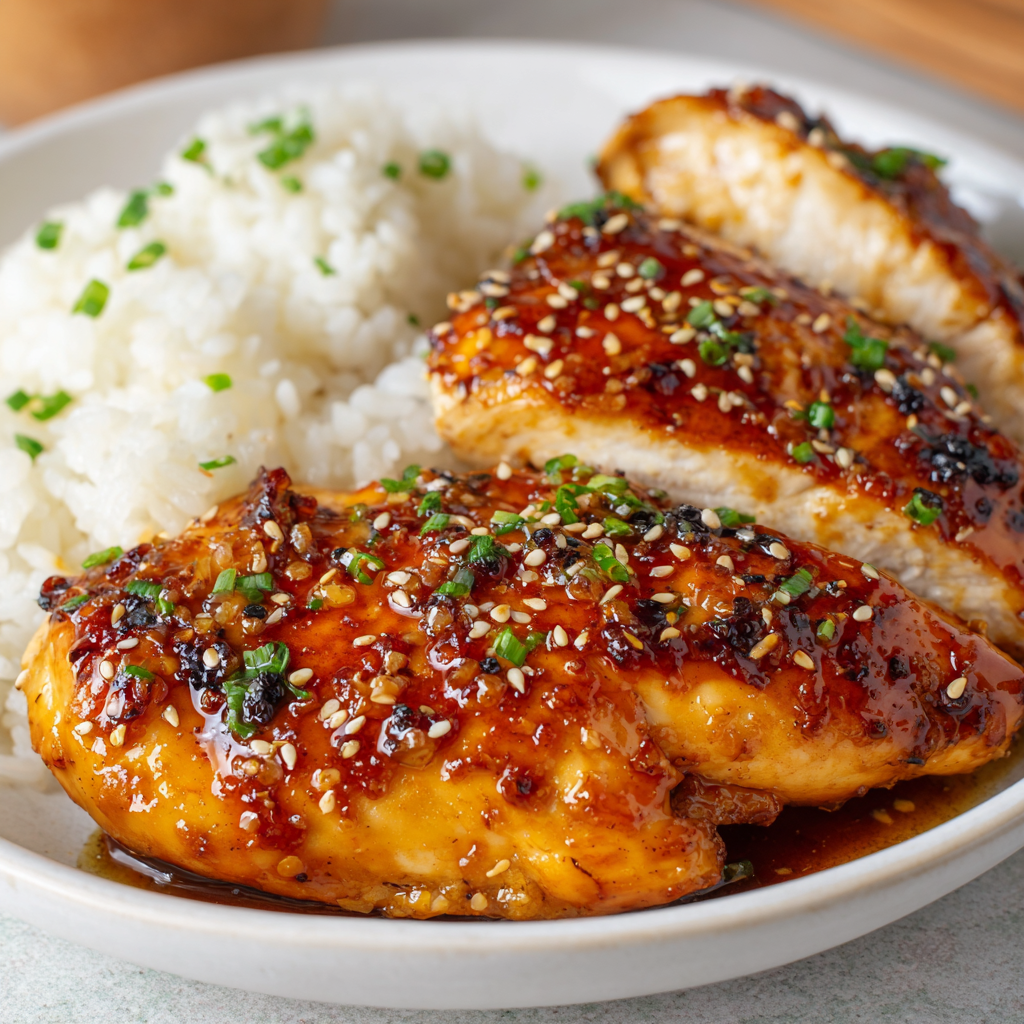
That’s where this magic comes in. These Honey Garlic Chicken Breasts are my absolute go-to when I need a dinner win that feels special but demands zero special effort. We’re talking juicy, golden-seared chicken, slicked with a glaze that’s the perfect harmony of sweet, savory, and garlicky goodness. It clings to every bite in the most satisfying, sticky way.
The best part? It all happens in one skillet in about 25 minutes, start to finish. No fussy techniques, no laundry list of ingredients—just real, feel-good food that brings everyone to the table with a smile. This isn’t just a recipe; it’s your secret weapon for turning an ordinary Wednesday into a mini celebration. So, grab your favorite skillet and let’s create some deliciousness together!
The Night This Recipe Saved My Sanity (And My Dignity)
This recipe has roots in a little kitchen panic I like to call “The Great Impromptu Dinner Party Debacle.” A few years back, my partner casually mentioned they’d invited a couple of friends over… in about an hour. My fridge was sporting the “pre-grocery shop” vibe—a little lonely, a lot random.
I had chicken breasts, the eternal half-head of garlic, and the bear-shaped honey bottle. Desperation, they say, is the mother of invention (or in my case, a really tasty glaze). I threw them together with some soy sauce for depth and a splash of vinegar for zing, not knowing if I was creating dinner or a culinary crime.
Friends, the sizzle, the smell, the way that sauce reduced into a glossy, gorgeous coat… it was a revelation. Our guests raved, asking what fancy technique I’d used. I just smiled, swirling the pan. “Oh, a little something I whipped up,” I said, pretending I hadn’t been in a cold sweat 30 minutes prior. That night, this dish earned its permanent spot in my “Too Good & Too Easy” hall of fame. It’s proof that the most beloved meals often come from simple ingredients and a dash of kitchen confidence.
Gathering Your Flavor Arsenal
Here’s everything you’ll need to work this 25-minute magic. I’ve added my little chef insights and swaps so you can make this recipe work with what you’ve got!
- 2 boneless, skinless chicken breasts: The star of our show! Pro-Tip: We’re going to slice these horizontally into thinner cutlets. This ensures quick, even cooking and maximizes that glorious surface area for searing and saucing. If you’re in a rush, ask your butcher to do it, or buy thin-cut breasts.
- Salt and pepper, to taste: The fundamental wake-up call for any protein. Don’t be shy here—seasoning the chicken well is step one to big flavor.
- 2 tablespoons olive oil: Our trusty searing medium. Avocado oil works great too for its high smoke point. The goal is a beautiful golden crust.
- 3 cloves garlic, minced: The “garlic” in honey garlic! Fresh is best here for that pungent, aromatic kick. In a true pinch, ¾ teaspoon of good-quality garlic powder can stand in.
- 1/4 cup honey: Nature’s golden syrup brings the sweet, sticky glue that makes this sauce so irresistible. For a deeper flavor, try using buckwheat honey. Maple syrup is a fantastic 1:1 substitute if you need a vegan option.
- 2 tablespoons soy sauce: Our savory, salty, umami backbone. For a gluten-free version, tamari or coconut aminos are perfect swaps. If using coconut aminos, note it’s sweeter, so you might reduce the honey by a teaspoon.
- 1 tablespoon apple cider vinegar or lemon juice: This is the secret weapon! That touch of acidity balances the sweetness and saltiness perfectly, creating a complex, well-rounded glaze. White wine vinegar or rice vinegar also work beautifully.
- Optional: chopped green onions or sesame seeds for garnish: Not just for looks! A sprinkle of green onions adds a fresh, sharp finish, and sesame seeds give a delightful little crunch and nutty flavor. Highly recommended for the full experience.
Let’s Get Cooking: Your Foolproof Roadmap to Golden, Sticky Bliss
Ready? Tie on that apron, and let’s dance. We’re going to move with purpose, but there’s no stress here—just delicious steps forward.
- Prep & Season the Chicken: First, pat those chicken breasts completely dry with a paper towel. This is a non-negotiable step for a proper sear—water is the enemy of browning! Lay them flat on your cutting board. Using your hand to steady the top, carefully slice each breast horizontally through the middle to create two thinner cutlets. Generously season both sides with salt and pepper. Chef’s Hack: Doing this while your pan heats up saves time and lets the seasoning start to work its way in.
- Sear to Golden Perfection: Heat the olive oil in a large skillet (stainless steel or non-stick are perfect) over medium-high heat. Once the oil shimmers, add the chicken cutlets. You should hear a happy sizzle! Don’t crowd the pan—if you need to, cook in two batches. Let them cook, untouched, for 4-5 minutes on the first side until you see a beautiful golden-brown crust peeking up the edges. Flip and cook for another 4-5 minutes on the other side, or until cooked through (internal temperature of 165°F). Transfer the chicken to a clean plate. Little Story: Resist the urge to poke and prod! Letting them sear undisturbed is how you build flavor and keep them juicy.
- Create the Magic Glaze: Reduce the heat to medium-low. In that same glorious, flavorful pan (all those brown bits are liquid gold!), add the minced garlic. Sauté for just about 30 seconds until fragrant—you’ll smell it! Don’t let it burn. Quickly pour in the honey, soy sauce, and vinegar. Give it all a good whisk, scraping up any browned bits from the bottom of the pan. Let it simmer gently for 2-3 minutes. You’ll see it start to bubble and thicken slightly into a glossy sauce. Pro-Tip: This is your taste-and-adjust moment. Want more tang? Add a splash more vinegar. More salt? A dash of soy sauce.
- The Grand Glaze & Finish: Now for the grand finale! Return the chicken (and any accumulated juices) to the skillet, nestling it right into that bubbling glaze. Spoon the sauce over the top of each piece repeatedly for a minute or two, letting the chicken warm through and really soak up the flavor. The sauce will continue to thicken and cling to the chicken in the most dreamy way. Chef’s Hack: For extra gloss and a restaurant-style finish, add a tablespoon of cold butter to the sauce as you glaze the chicken and swirl it in until melted. Pure luxury!
Plating Up Your Masterpiece
You did it! Now, let’s make it a meal. I love serving this chicken straight from the skillet—it feels rustic and inviting.
Slide a cutlet onto each plate and don’t be stingy with that extra sauce! Drizzle every last drop over the top. A final flourish of finely sliced green onions or a sprinkle of white and black sesame seeds adds color, texture, and that “chef’s touch.”
For the sides, you can’t go wrong. My top picks are:
- Fluffy white or brown rice: The ultimate sauce-soaking vehicle.
- Quick-steamed broccoli or snap peas: The fresh, crisp contrast is perfect.
- A simple cucumber salad: Bright and acidic to cut through the richness.
- Garlic mashed potatoes: For the ultimate comfort food plate.
However you serve it, the goal is to gather, share, and enjoy the simple pleasure of a meal made with your own two hands.
Make It Your Own: Delicious Twists on the Classic
Once you’ve mastered the base, have fun playing with flavors! Here are a few of my favorite spins:
- Spicy Korean-Inspired: Add 1-2 teaspoons of gochujang (Korean chili paste) to the glaze mixture. Finish with a garnish of toasted sesame oil and those green onions.
- Ginger & Citrus Boost: Add 1 tablespoon of freshly grated ginger with the garlic. Swap the vinegar for fresh orange or lime juice for a brighter, zingier profile.
- Crispy Baked Version: For less hands-on time, skip the stovetop sear. Dredge seasoned chicken in a little cornstarch, place on a parchment-lined baking sheet, and bake at 400°F for 15 minutes. Whisk the sauce ingredients in a saucepan, simmer to thicken, then toss with the baked chicken.
- Pineapple Sweet & Sour Twist: Stir in ½ cup of small pineapple chunks (fresh or canned) into the glaze as it simmers. The fruit caramelizes slightly and adds a tropical sweetness.
- For the Slow Cooker Fans: Place chicken breasts in the slow cooker. Whisk sauce ingredients and pour over top. Cook on LOW for 3-4 hours. Thicken the sauce at the end with a cornstarch slurry for that sticky finish.
Beau’s Kitchen Notebook
This recipe is a living, breathing thing in my kitchen. Over the years, I’ve learned that the chicken cutlet trick is the real game-changer—it turns the often-tricky thick breast into a quick-cooking, tender delight. I’ve also been known to double, even triple, the sauce recipe because, let’s be real, it’s that good. My friends now jokingly demand “extra sauce on the side” when they come over.
The beauty of this dish is its resilience. Forgotten and left to simmer a minute too long? A splash of water or chicken broth brings it right back. Don’t have fresh garlic? Powder works in a pinch. It’s a forgiving recipe that wants you to succeed. Every time I make it, I think back to that first frantic dinner party and smile. From a scramble to a staple—that’s the power of a great, simple recipe.
Your Questions, Answered
Q: My sauce isn’t thickening up. What did I do wrong?
A: No worries! This usually means it just needs a little more simmer time. Let it bubble over medium-low heat for another 2-3 minutes, stirring often. If it’s still too thin, mix 1 teaspoon of cornstarch with 1 tablespoon of cold water and whisk it into the simmering sauce. It should thicken up almost instantly.
Q: How do I know when the chicken is cooked through without cutting into it?
A: The best tool is an instant-read meat thermometer! Insert it into the thickest part of the cutlet—you’re aiming for 165°F. If you don’t have one, make a small cut in the thickest piece; the juices should run clear, not pink.
Q: Can I use chicken thighs instead?
A: Absolutely! Bone-in, skin-on thighs are fantastic. You’ll need to cook them a bit longer (about 6-7 minutes per side) to render the fat and crisp the skin. The rich, dark meat pairs wonderfully with the sweet glaze.
Q: How should I store and reheat leftovers?
A: Store chicken and sauce together in an airtight container in the fridge for up to 3 days. Reheat gently in a covered skillet with a tiny splash of water over low heat, or in the microwave at 50% power to prevent the sauce from separating.

Honey Garlic Chicken Breasts : Sweet, Savory & Ready in 25 Minutes
Description
Some nights call for a dinner that’s quick, comforting, and guaranteed to please everyone at the table. These Honey Garlic Chicken Breasts are exactly that. Juicy pan-seared chicken is coated in a sticky-sweet, savory garlic sauce that tastes like it took way more effort than it actually did.
Ingredients
-
2 boneless, skinless chicken breasts
-
Salt and black pepper, to taste
-
2 tablespoons olive oil
-
3 cloves garlic, minced
-
¼ cup honey
-
2 tablespoons soy sauce (or tamari for gluten-free)
-
1 tablespoon apple cider vinegar or lemon juice
Optional garnish:
-
Chopped green onions
-
Sesame seeds
Instructions
-
Prepare the Chicken
Pat the chicken breasts dry. Slice each one horizontally to create thinner cutlets. Season both sides generously with salt and pepper. -
Sear the Chicken
Heat olive oil in a large skillet over medium-high heat. Add the chicken and cook for 4–5 minutes per side, until golden brown and cooked through (internal temperature of 165°F / 74°C). Remove chicken from the pan and set aside. -
Make the Sauce
Lower the heat to medium. Add the minced garlic to the same pan and sauté for about 30 seconds, just until fragrant.
Stir in honey, soy sauce, and vinegar. Simmer for 2–3 minutes until the sauce thickens slightly. -
Glaze the Chicken
Return the chicken to the skillet. Spoon the sauce over the chicken and let it simmer for 1–2 minutes until glossy and well coated. -
Serve
Garnish with green onions or sesame seeds if desired. Serve hot with your favorite sides.
Notes
-
Slice the chicken thin: Thin cutlets cook faster and stay juicier.
-
Don’t rush the sear: Let the chicken brown properly before flipping for best flavor.
-
Sauce too thin? Let it simmer longer, or add 1 teaspoon cornstarch mixed with 1 tablespoon water.
-
Extra flavor: Add a small knob of butter at the end for a richer, restaurant-style sauce.
-
Make it spicy: Add chili flakes or a teaspoon of hot sauce to the glaze
A Quick Note on Nutrition
Hey, I’m all about balance—indulgent comfort food and nourishing our bodies can absolutely go hand-in-hand! This dish is a fantastic source of lean protein, which helps keep you full and satisfied. The sauce, while flavorful, is made with simple, whole-food ingredients.
As a general guide, one serving (about one cutlet with sauce) comes in around: 310 calories, 30g of protein, 15g of carbohydrates, and 14g of fat. Remember, these numbers can vary based on the exact size of your chicken breast and specific brands of ingredients you use. To lighten it up, you can reduce the honey slightly or use a sugar-free substitute, and serve it over a big bed of veggies or cauliflower rice. But in my book, enjoying the real-deal version as part of a joyful meal is always worth it.
Final Thoughts From My Kitchen to Yours
So there you have it, friend—my heart-on-a-plate, 25-minute wonder. This Honey Garlic Chicken is more than just dinner; it’s a reminder that incredible flavor doesn’t require complexity. It’s about trusting simple ingredients, enjoying the process, and sharing the delicious results.
I hope this recipe finds its way into your regular rotation, becoming your own back-pocket solution for busy nights and unexpected guests. Give it a try, tweak it to your taste, and most importantly, have fun with it! That’s what Feastical is all about.
If you make it, I’d love to hear how it turned out! Tag me on social or leave a comment over on the blog. Now, go forth and conquer that skillet. You’ve got this.
With a full heart and a sticky spoon,
Beau