Your Favorite Childhood Treat, All Grown Up (And Way More Delicious!)
Hey there, friend! Beau here. Let’s talk about one of life’s simple, magical pleasures: that perfect bite of a soft, chewy oatmeal cookie hugging a cloud of sweet vanilla cream. You know the one I mean. It came wrapped in cellophane, lived at the bottom of lunchboxes, and tasted like pure, unadulterated joy. For years, I thought that specific brand of happiness could only come from a store-bought box. Then, one rainy afternoon in my tiny apartment kitchen, I decided to try making them from scratch. Let me tell you, friends—the homemade version isn’t just a copy. It’s a revelation.
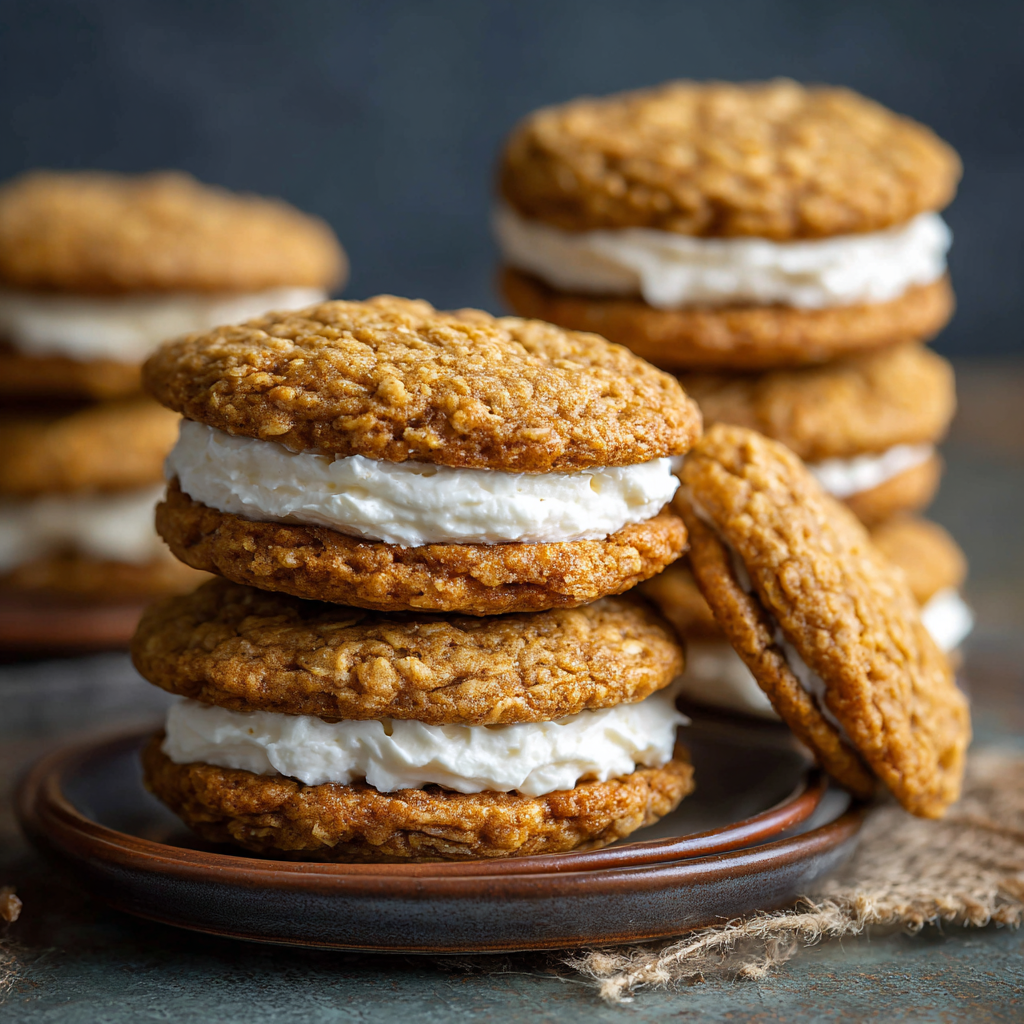
These Homemade Oatmeal Cream Pies are everything you loved about the original, but dialed up to eleven. The cookies are softer, with a deeper, more complex flavor thanks to a hint of molasses and cinnamon. The cream filling is silky, rich, and lacks that vaguely “mysterious” aftertaste. They taste like love, not a laboratory. And the best part? Making them is a total blast. It’s a forgiving, fun recipe that fills your kitchen with the most incredible smell. So, tie on your apron, find that spatula (check the dishwasher!), and let’s bake some happiness together.
The Lunchbox Swap That Started It All
My obsession with these treats goes way back to third grade. I was the kid with the “weird” homemade snacks—whole wheat date bars, zucchini muffins, you name it. My mom meant well (love you, Mom!), but all I wanted was what my friend Mike had: those perfectly uniform, cream-filled oatmeal cakes. One fateful Tuesday, we negotiated The Great Trade: my exceptionally wholesome apple-oat bran puck for his glorious, plasticky-wrapped pie. That first bite was a symphony of sugary, processed bliss. It was also, I later realized, the moment I became a food detective. Even at eight, I was trying to figure out what made things taste the way they did. Years later, recreating that memory from scratch—but better—felt like closing a delicious, sweet loop. Now, I get to share that upgraded nostalgia with you. No trades required.
Gathering Your Delicious Crew: Ingredients & Insights
Here’s the lineup for these legendary cookies and their fluffy filling. Don’t just grab and go—read my little chef notes! Knowing your ingredients is the first step to becoming a kitchen rockstar.
For the Soft & Chewy Oatmeal Cookies:
- 1 cup (2 sticks) unsalted butter, softened: This is non-negotiable for that tender crumb. “Softened” means it should give easily when pressed but not be oily or melted. Pro tip: if you forgot to take it out, cut it into chunks and let it sit for 15-20 minutes.
- 3/4 cup packed brown sugar & 1/2 cup granulated sugar: The brown sugar brings molasses notes and moisture for chewiness, while the white sugar helps with spread and crisp edges. Pack that brown sugar tight!
- 2 large eggs: They bind everything together and add richness. Make sure they’re at room temperature to blend seamlessly with the butter.
- 1 tablespoon molasses: THIS is the secret flavor agent! It gives that unmistakable, deep, almost-spicy note that makes you say “Yep, that’s the taste.” Don’t skip it! Blackstrap is too strong; light or golden molasses is perfect.
- 1 teaspoon pure vanilla extract: The flavor foundation. The better the vanilla, the better the cookie. It’s worth the splurge.
- 1 1/2 cups all-purpose flour: The structure-builder. For a slightly more tender cookie, you can swap 1/2 cup with cake flour.
- 1/2 teaspoon baking soda: Our leavening agent. It helps the cookies puff up and then settle into that perfect chew.
- 1/2 teaspoon salt: The flavor enhancer. It makes the sweet pop and balances everything. I use fine sea salt.
- 1 teaspoon ground cinnamon: Warmth and coziness in a powder. It whispers “hello” in every bite.
- 1 1/2 cups quick-cooking oats: They give the classic texture without being too bulky. If you only have old-fashioned rolled oats, give them a few pulses in the food processor. Do not use steel-cut.
For the Fluffy Vanilla Cream Filling:
- 1/2 cup (1 stick) unsalted butter, softened: Yes, more butter. This is the base of our filling, and it needs to be very soft for ultimate fluffiness.
- 1 1/2 cups powdered sugar (confectioners’ sugar): Sift it! I know it’s an extra step, but it prevents a gritty filling. Trust me on this.
- 1 teaspoon pure vanilla extract: Doubling down on that good vanilla flavor.
- 1-2 tablespoons milk or heavy cream: This is your consistency adjuster. Start with one, add more as needed. Heavy cream makes it extra rich.
- Tiny pinch of salt: Just a smidge to cut the sweetness and make the vanilla sing.
Let’s Get Baking: The Step-by-Step Fun
Okay, team! Let’s turn these ingredients into magic. Follow along, and don’t worry—it’s easier than you think.
- Preheat & Prep: Fire up your oven to 350°F (175°C). Line your baking sheets with parchment paper. This isn’t just for easy clean-up; it prevents the bottoms from over-browning and is a lifesaver. No parchment? A silicone baking mat works great too.
- Cream the Butter & Sugars: In a large bowl, use an electric mixer (hand or stand) to beat the softened butter, brown sugar, and granulated sugar together on medium-high speed. We’re going for light, fluffy, and almost pale in color. This should take a good 2-3 minutes. This step incorporates air, which is key for texture! Chef’s Hack: Scrape down the bowl halfway through to make sure everything is getting friendly.
- Add the Wet Team: Beat in the eggs, one at a time, making sure each is fully incorporated before adding the next. Then, add the molasses and vanilla. Mix until the batter looks smooth and cohesive. It might look a little curdled at first—that’s the molasses doing its thing. Keep mixing; it’ll come together.
- Whisk the Dry Crew: In a separate bowl, whisk together the flour, baking soda, salt, and cinnamon. This ensures the leavening and salt are evenly distributed so every cookie bakes the same. Give it a good whisk for about 30 seconds.
- Combine with Care: With your mixer on low speed, gradually add the dry ingredients to the wet ingredients. Mix just until no dry flour remains. Overmixing at this stage can lead to tough cookies. We want tender!
- Fold in the Oats: Using a sturdy spatula, fold in the quick oats by hand. This gives you control and ensures you don’t overwork the dough. The dough will be thick and spoonable—perfect!
- Scoop & Space: Use a tablespoon cookie scoop or a regular spoon to drop rounded tablespoons of dough onto your prepared sheets. Leave about 2 inches between them—they will spread! For perfectly uniform cookies, I weigh my dough balls to about 1.5 ounces each, but eyeballing is totally fine.
- Bake to Perfection: Bake for 9-11 minutes. You want the edges to be just set and lightly golden, but the centers should still look soft and slightly puffed. They will finish setting as they cool. Key Tip: Do not overbake! Taking them out when they look slightly underdone is the secret to a supremely soft, chewy cookie.
- The Cool Down: Let the cookies cool on the baking sheet for 5 minutes. This allows them to firm up enough to move. Then, transfer them to a wire rack to cool completely. They must be completely cool before you add the filling, or it will melt into a sad puddle.
- Make the Fluffy Cloud (The Filling!): While the cookies cool, make the filling. In a clean bowl, beat the very soft butter on medium speed until it’s smooth and creamy. Gradually add the sifted powdered sugar on low speed (unless you want a sugar blizzard in your kitchen). Once incorporated, add the vanilla, a pinch of salt, and 1 tablespoon of milk/cream. Whip on medium-high for 2-3 minutes until it’s very light, fluffy, and white. If it seems too thick, add the remaining liquid a teaspoon at a time. It should be spreadable but hold its shape.
- Sandwich Time! Flip half of your cooled cookies upside down. Spread or pipe a generous dollop (about 1.5 tablespoons) of filling onto the flat bottom of each. Gently press a second cookie on top, flat side down, to form a sandwich. Give it a slight squeeze so the filling peeks out the edges just a little. Perfection!
How to Serve Your Masterpiece
Presentation is part of the fun! These pies are stunningly casual. Pile them high on a rustic wooden board or a vintage cake stand for a real “bakery counter” feel. For a lunchbox throwback, wrap them individually in parchment paper and tie them with baker’s twine. They pair perfectly with a tall glass of cold milk (the classic move), a cup of strong black coffee to cut the sweetness, or even a mug of hot apple cider. They’re the ultimate shareable treat, but I won’t judge if you sneak one (or two) for yourself with your morning coffee. Your secret is safe with me.
Make It Your Own: Delicious Twists & Swaps
Once you’ve mastered the classic, the kitchen playground opens up! Here are a few of my favorite riffs:
- Salty Sweet Sensation: Add 1/2 cup of crushed potato chips (yes, really!) to the cookie dough along with the oats. The salt and savory crunch is mind-blowing.
- Chocolate Dream: Replace the vanilla filling with a chocolate buttercream: add 1/4 cup of sifted cocoa powder to the filling ingredients and an extra splash of milk.
- Peanut Butter Paradise: Add 1/2 cup of creamy peanut butter to the cookie dough (reduce butter to 3/4 cup). For the filling, mix 1/4 cup peanut butter into the vanilla cream.
- “Everything Nice” Spice: Boost the cozy factor by adding an extra 1/2 tsp cinnamon, 1/4 tsp nutmeg, and 1/4 tsp ginger to the dry ingredients.
- Gluten-Free Friendly: Use a 1:1 gluten-free all-purpose flour blend (like Bob’s Red Mill) and certified GF oats. The texture is fantastic!
Beau’s Kitchen Chronicles: A Few Parting Thoughts
This recipe has been my edible science project for years. I’ve learned that the molasses is truly the soul of the cookie flavor, and that letting the butter get truly soft for the filling is the difference between “good” and “cloud-like.” One time, I accidentally used baking powder instead of soda. The cookies puffed up like little mushroom caps and were cakey, not chewy—a happy accident that taught me to always label my jars! These pies also get even better after a few hours, once the filling has softened the cookies slightly from the inside out. If you can wait, it’s worth it. But let’s be real… who can wait?
Your Questions, Answered
Q: My cookies spread too much and got flat. What happened?
A: This usually means your butter was too warm or melted. Next time, ensure it’s just softened. Also, check that your baking soda is fresh and that you didn’t accidentally use baking powder.
Q: Can I make the dough ahead of time?
A: Absolutely! Scoop the dough balls onto a sheet, freeze them solid, then transfer to a freezer bag. Bake straight from frozen, adding 1-2 minutes to the bake time. Fresh cookies on demand!
Q: My filling is runny/gritty. Help!
A: Runny means your butter might have been too soft or warm. Pop the whole bowl in the fridge for 10 minutes, then re-whip. Gritty means the powdered sugar wasn’t sifted. You can try to beat it for longer, but sifting next time is the sure fix.
Q: How do I store these, and how long do they last?
A: Keep them in an airtight container at room temperature for up to 3 days. For longer storage (up to a week), refrigerate them. Let them come to room temp before eating for the best texture. They also freeze beautifully for up to 3 months.

Homemade Oatmeal Cream Pies : Soft, Chewy & Better Than Store-Bought
Description
XXK
Nutritional Info*
*Because knowledge is power, even with dessert! This is an approximate breakdown per finished cream pie (based on 12 pies).
- Calories: ~320
- Protein: 3g
- Total Fat: 15g
- Saturated Fat: 9g
- Carbohydrates: 45g
- Dietary Fiber: 1g
- Sugars: 25g
Remember, these are homemade with real ingredients—no preservatives, artificial flavors, or high-fructose corn syrup. Enjoying a treat you made yourself, with love, is always a win in my book. Balance is key, friends!
Final Thoughts from My Kitchen to Yours
And there you have it—the roadmap to your new favorite homemade treat. This recipe is more than just a list of steps; it’s an invitation to play, to create, and to reconnect with a simple joy. Whether you’re baking these for giggling kids, for a nostalgic book club, or just for a quiet moment with your favorite mug, I hope they bring a little extra sweetness to your day. Food is my love language, and sharing this recipe feels like passing along a big, warm, delicious hug. Thanks for letting me be part of your kitchen adventure. Now, go forth and bake! And be sure to tag @Feastical if you share your creations—I love seeing your masterpieces.
With a full heart and a happy spoon,
Beau
Loved this recipe? Save it for later!