
Hey There, Birthday Party Planners!
Welcome back to Feastical, your go-to spot for food that feels like a celebration. Today, we’re diving into one of the sweetest kitchen projects you’ll ever tackle: your little one’s very first birthday cake. Now, I know this can feel a bit daunting. You want it to be special, adorable, and—most importantly—perfectly safe and gentle for that tiny, curious palate. No sugar rush, no mystery ingredients, just pure, wholesome, smash-worthy goodness.
I’m Beau, and around here, we believe that marking life’s big moments starts in the kitchen. This isn’t just about baking a cake; it’s about creating the centerpiece for a memory you’ll cherish forever. Those photos of frosting-smeared giggles? Priceless. That’s why I’ve crafted this Easy First Birthday Cake Recipe to be incredibly simple, naturally sweetened, and so delicious the whole family will sneak a slice. We’re using ingredients you can feel great about, and I’ll walk you through every step with my favorite chef hacks. So, tie on your apron, grab your cutest mixing bowl, and let’s make a cake that’s as full of love as your home is right now.
Why This Cake? A Little Kitchen Nostalgia
This recipe takes me right back to my niece’s first birthday. My sister, who is a wizard with a spreadsheet but gets nervous around a whisk, was determined to make the cake herself. She called me in a panic: “Beau, it has to be perfect, but I don’t want her eating a bowl of frosting and food coloring!” We spent a sunny afternoon in her kitchen, mashing bananas and laughing as we taste-tested the batter (the perks of a no-raw-egg recipe!).
The look on my niece’s face when that little cake was placed in front of her—eyes wide, hands cautiously poking the soft crumb—was pure magic. She went from curious to jubilant in about three seconds flat. It wasn’t a picture-perfect bakery cake; it was lopsided, with yogurt frosting swooped on by a proud, amateur-mom-chef. And it was absolutely perfect. That day cemented my belief that the best first birthday cake isn’t about elaborate decoration; it’s about love, safety, and the start of a beautiful, messy, delicious relationship with food. That’s the spirit I’ve baked right into this recipe for you.
Gathering Your Simple, Wholesome Ingredients
Here’s the beautiful part: you probably have most of this in your kitchen already. We’re building flavor and texture with whole foods. Let’s break it down:
- 1 cup mashed ripe bananas (about 2 bananas) – This is our natural sweetener superstar! The spottier the banana, the sweeter and more flavorful your cake. Chef’s Insight: Mash them until completely smooth with no chunks for an even crumb.
- 1/4 cup unsweetened applesauce – Adds moisture and a hint of tartness to balance the banana’s sweetness. It also helps keep the cake beautifully tender. Substitution Tip: You can use an equal amount of pureed pears or even pumpkin puree for a fun twist.
- 1/4 cup whole milk or plant-based milk – Whole milk adds richness, but oat, almond, or coconut milk work flawlessly for dairy-free needs. The goal is just a bit of liquid for the perfect batter consistency.
- 1/4 cup melted coconut oil or unsalted butter – I love the very subtle tropical note coconut oil adds, but melted butter gives a classic, comforting flavor. Use what you love! Pro Hack: Make sure it’s cooled slightly before mixing so it doesn’t “cook” the other ingredients.
- 1 teaspoon vanilla extract – The essence of celebration! Pure vanilla adds a warm, aromatic depth that makes the cake taste “special.”
- 1 large egg – Our binder and leavening helper. It gives the cake structure so it’s soft but not gummy. For an egg-free version, see the variations section below!
- 1 cup all-purpose or whole wheat flour – All-purpose gives a lighter, classic crumb. Whole wheat pastry flour adds a nutty wholesomeness and extra fiber. If using standard whole wheat, swap half with all-purpose to keep it light.
- 1 teaspoon baking powder & 1/2 teaspoon baking soda – Our dynamic rising duo! They work together to give this dense fruit-based batter the perfect, gentle lift. Check the dates on yours—fresh leaveners are key.
- 1/2 teaspoon cinnamon – The secret warmth! Just a half-teaspoon complements the banana beautifully without being overpowering for little taste buds.
For the Frosting:
- 1 cup full-fat plain Greek yogurt or whipped cream cheese – Greek yogurt is my go-to: tangy, protein-rich, and spreadable straight from the fridge. Full-fat is crucial for creaminess. Cream cheese frosting is a bit richer and holds swirls better for decorating.
- 1 teaspoon vanilla extract – A must to flavor the frosting.
- Optional: a drizzle of maple syrup – If you’re serving toddlers over 1 and want a hint more sweetness for the frosting, a teaspoon of pure maple syrup does the trick beautifully. For baby’s slice, you can skip it!
Let’s Bake! Your Step-by-Step Guide to Smash Cake Success
Ready? Let’s turn these simple ingredients into a birthday masterpiece. I’ll be with you at every step, sharing my best tips.
- Preheat & Prep: Fire up your oven to 350°F (175°C). This is the golden temperature for even, gentle baking. Now, grab your pans. I adore using two 6-inch round pans for a perfect little layered cake, or even a single 6-inch for a charming, one-layer “smash” cake. Grease the pans lightly with a bit of your chosen oil or butter, then line the bottom with a circle of parchment paper. This guarantees a clean release every single time—no cake casualties on the big day!
- The Wet Team Mix-Up: In a large bowl, combine your beautifully mashed bananas, applesauce, milk, slightly cooled melted oil/butter, vanilla, and the egg. Whisk it all together until it’s smooth and homogenous. You’ll see the mixture emulsify and become creamy. This is your flavor base, and it already smells amazing.
- The Dry Team Whisk: In a separate bowl, whisk together your flour, baking powder, baking soda, and cinnamon. Why whisk? It aerates the flour and ensures our leavening agents are evenly distributed, so you don’t get any bitter baking soda pockets. Little Chef Hack: If you’re worried about dense spots, you can sift these together. I often just give it a good 30-second whisk.
- The Gentle Merge: This is the most important step! Add the dry ingredients to the wet ingredients. Now, put your inner mixer on low. Use a spatula and fold gently, just until the last streak of flour disappears. A few tiny lumps are okay! Overmixing develops gluten in the flour, which can make the cake tough. We want tender, soft, and melt-in-your-mouth.
- Pan & Bake: Divide the batter evenly between your prepared pans. Tap them gently on the counter to release any air bubbles. Slide them into the center of your preheated oven. Bake for 20-25 minutes. The cake is done when the top springs back lightly to the touch, the edges are just pulling away from the pan, and a toothpick inserted into the center comes out clean or with a couple of moist crumbs (not wet batter).
- The Patience Test (Cooling!): Let the cakes cool in their pans on a wire rack for about 10 minutes. Then, run a knife around the edge, invert them, peel off the parchment paper, and let them cool completely on the rack. I know it’s tempting, but do not frost a warm cake! The frosting will melt into a puddle. Use this time to whip up your frosting!
- Frosting Magic: Simply stir the Greek yogurt (or softened cream cheese) with the vanilla (and optional maple syrup) until smooth. Pop it in the fridge to firm up slightly while the cakes cool. This makes it much easier to spread.
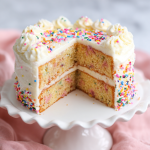
- Decorate & Celebrate! Once the cakes are completely cool, place one layer on your cake stand or plate. Add a dollop of frosting, spread it, top with the second layer (if using), and frost the top and sides. Get creative! Use the back of a spoon to make soft swirls. Decorate with a rainbow of fresh berries, banana slices, or a sprinkle of freeze-dried fruit powder for a natural “sprinkle” effect.
How to Serve Your First Birthday Masterpiece
Presentation is part of the fun! For the guest of honor, place the whole smash cake or a large slice right on their high chair tray. Strip them down to a diaper or put on a dedicated “smash outfit”—things are about to get gloriously messy. Have your camera ready and just let them explore. Poking, squishing, tasting… it’s all part of the experience!
For party guests and family, slice the rest of the cake like you normally would. It’s perfectly sweet and delicious for all ages. I love serving it with a side of fresh berries and maybe an extra dollop of that Greek yogurt frosting. It’s a humble, wholesome cake that speaks volumes of love. Remember, the messier the hands, the bigger the smiles in those photos!
Make It Your Own: Delicious Twists & Swaps
This recipe is wonderfully adaptable. Here are a few of my favorite spins:
- Blueberry Bliss: Fold 1/2 cup of fresh or frozen (and thawed) blueberries into the batter at the very end. They create little bursts of flavor and a gorgeous color.
- Peanut Butter Protein Punch (For non-allergic babies): Replace the coconut oil with 1/4 cup of smooth, unsweetened peanut butter (warmed to make it runny). It adds incredible flavor and staying power.
- Sweet Potato Spice: Substitute the mashed banana with an equal amount of pureed, cooked sweet potato or butternut squash. Increase the cinnamon to 1 tsp and add a pinch of nutmeg. A wonderful fall-inspired option!
- Egg-Free & Dairy-Free Delight: For the egg, use a “flax egg” (1 Tbsp ground flaxseed mixed with 2.5 Tbsp water, let sit 5 mins). Use plant-based milk and coconut oil. For frosting, a thick, plain coconut yogurt can work, or simply use a dairy-free cream cheese alternative.
- Mini Muffin Mania: Turn this into perfect, grab-and-go baby muffins! Pour the batter into a greased mini muffin tin and bake for 12-15 minutes. Great for little hands and party favors!
Beau’s Kitchen Notes & Stories
This cake has evolved in my kitchen more times than I can count. The first version was literally just banana, apple, and oat flour—it was tasty but dense! Through testing (and many happy baby taste-testers in my friend circle), I found the balance of leavening agents and the egg to give it that celebratory cake texture. One time, I accidentally used baking soda instead of powder for the full amount… let’s just say we got a volcanic, bitter cake that only the dog was interested in. A good reminder to always double-check your cans!
The beauty of this recipe is its flexibility. It’s a template for love. Don’t stress if it’s not perfectly level or if the frosting is a bit rustic. That’s the charm. The memory is in the making and the sharing, not in the precision. Just have fun with it!
Your Questions, Answered
Q: Can I make this cake ahead of time?
A: Absolutely! Bake the cake layers up to two days in advance. Let them cool completely, wrap tightly in plastic wrap, and store at room temperature. Frost the day of the party. You can also frost the whole cake and store it, covered, in the fridge for up to a day.
Q: My cake is dense/gummy. What happened?
A: This usually points to two things: 1) Overmixing the batter after adding the flour, or 2) The bananas weren’t ripe enough. Super ripe, spotty bananas are sweeter and incorporate better. Also, ensure your baking powder/soda are fresh!
Q: What can I use instead of Greek yogurt for frosting?
A> Whipped full-fat cream cheese is a fantastic, stable alternative. For a dairy-free option, try whipping a thick coconut cream (chill a can of full-fat coconut milk and scoop out the solid cream) with a little vanilla.
Q: Is this cake safe for babies under 1?
A> While it’s made with baby-friendly ingredients, it’s always best to consult your pediatrician and introduce individual ingredients first. The cake contains common allergens like egg, dairy (if used), and wheat. For baby’s first taste, a plain, unfrosted piece is a great start.
Easy First Birthday Cake Recipe : Baby-Friendly and Delicious
Description
Welcome to Feastical, your go-to spot for food that feels like a celebration. Today, we’re tackling a truly special kitchen project: your little one’s very first birthday cake. This cake is naturally sweetened, soft, safe for tiny taste buds, and perfect for that iconic “smash cake” moment. Think minimal sugar, wholesome ingredients, and maximum cuteness.
Ingredients
For the Cake:
-
1 cup mashed ripe bananas (about 2 bananas)
-
1/4 cup unsweetened applesauce
-
1/4 cup whole milk or plant-based milk
-
1/4 cup melted coconut oil or unsalted butter
-
1 tsp vanilla extract
-
1 large egg (or 1 flax egg for egg-free version: 1 Tbsp ground flax + 2.5 Tbsp water, sit 5 mins)
-
1 cup all-purpose or whole wheat flour
-
1 tsp baking powder
-
1/2 tsp baking soda
-
1/2 tsp cinnamon
For the Frosting:
-
1 cup full-fat plain Greek yogurt or whipped cream cheese
-
1 tsp vanilla extract
-
Optional: 1 tsp maple syrup (for extra sweetness for older toddlers)
Instructions
1. Preheat & Prep
-
Oven: 350°F (175°C).
-
Grease two 6-inch round pans or a single 6-inch pan. Line with parchment for easy removal.
2. Mix the Wet Ingredients
-
In a large bowl, combine mashed bananas, applesauce, milk, melted coconut oil/butter, vanilla, and egg. Whisk until smooth.
3. Mix the Dry Ingredients
-
In a separate bowl, whisk together flour, baking powder, baking soda, and cinnamon.
4. Combine Wet & Dry
-
Fold dry ingredients into wet ingredients gently until just combined. A few lumps are okay! Overmixing = dense cake.
5. Bake
-
Divide batter between pans. Tap gently to release air bubbles.
-
Bake 20–25 minutes. Done when tops spring back lightly, edges pull slightly from pan, and a toothpick comes out with a few moist crumbs.
6. Cool
-
Cool cakes in pans 10 minutes. Run a knife around edges, invert, remove parchment, and cool completely on a wire rack.
7. Make Frosting
-
Stir Greek yogurt or softened cream cheese with vanilla (and optional maple syrup). Chill slightly to firm up.
8. Decorate & Celebrate
-
Frost cooled cake layers. Spread frosting between layers and over top and sides.
-
Decorate with fresh fruit, banana slices, or a sprinkle of freeze-dried fruit powder.
-
Smash cake: Place for baby to explore, squish, and taste—messy, fun, and memorable!
Notes
-
Blueberry Bliss: Fold in 1/2 cup fresh or thawed blueberries.
-
Peanut Butter Protein Punch: Swap coconut oil for 1/4 cup smooth peanut butter (for non-allergic kids).
-
Sweet Potato Spice: Use 1 cup pureed cooked sweet potato instead of banana; add 1 tsp cinnamon + pinch nutmeg.
-
Egg-Free & Dairy-Free: Use flax egg, plant milk, coconut oil, and coconut yogurt or dairy-free cream cheese.
-
Mini Muffins: Pour batter into a mini muffin tin; bake 12–15 mins—perfect for little hands!
A Quick Look at the Good Stuff (Nutritional Info)
This information is per slice (based on 8 servings from a 6-inch layer cake frosted with Greek yogurt). Please note, this is an estimate.
- Calories: 140
- Fat: 6g
- Saturated Fat: 4g
- Carbohydrates: 18g
- Fiber: 1g
- Sugar: 6g (all naturally occurring from banana & applesauce)
- Protein: 3g
- Sodium: 100mg
Prep Time: 15 minutes | Cook Time: 25 minutes | Total Time: 40 minutes + cooling | Servings: 8 small slices or 1 perfect smash cake
Final Thoughts From My Kitchen to Yours
And there you have it—your roadmap to a joyful, delicious, and truly memorable first birthday cake. This isn’t just a recipe; it’s a little container for one of life’s biggest little moments. As you bake, remember that the love you stir into the batter is the most important ingredient of all.
I’d love to see your creations! If you make this cake, tag me @Feastical on social media so I can celebrate with you. Here’s to sticky fingers, giant smiles, and the start of a beautiful lifetime of sharing food and joy with your little one. Happy baking, and happy birthday to your amazing baby!
With love and a spatula,
Beau Collier