The Crispy-Edge Chicken Breast That Changed My Weeknights (And It’ll Change Yours Too!)
Hey friend, Beau here. Pull up a stool. Let’s talk about a kitchen miracle so simple, so downright satisfying, that it feels like you’ve unlocked a secret level in the game of dinner. I’m talking about the perfectly seared, crispy-edged, impossibly juicy chicken breast.
We’ve all been there. You’re hungry, you’ve got chicken breasts in the fridge, and you have…concerns. Will it be dry? Will it be bland? Will it be that sad, steamed-looking piece of protein that you have to douse in sauce just to get through? I raise my spatula and say NO MORE.
Today, we’re not just cooking chicken. We’re on a mission for contrast. That magical, mouthwatering contrast of a deep, golden, audibly crunchy crust giving way to a tender, moist, and flavorful interior. This isn’t fussy or fancy. It’s foundational. It’s the skill that turns a basic breast into the star of your salad, the hero of your sandwich, the centerpiece of your grain bowl.
The key? We’re going for a hard sear. We’re not gently nudging the chicken to doneness. We’re introducing it to serious, focused heat and having the patience to let magic happen. This method locks in every single drop of juice while building flavor layers you can actually see and hear. So, grab your favorite heavy skillet (you know the one), and let’s transform dinner from a question mark into an exclamation point. Ready? Let’s dig in.
The Sizzle That Started It All
My love affair with the hard-seared chicken breast started not in a fancy kitchen, but in my grandma’s tiny, always-warm kitchen on a busy weeknight. She’d be juggling three things at once, but when it was time for the chicken, the whole world stopped.
I remember the sound most of all. That unmistakable, aggressive SSSSHHHHZZZZTTT the moment the seasoned breast hit the hot cast iron. It wasn’t a timid sound; it was a promise. She’d point a finger at me, a mischievous glint in her eye, and say, “Now, Beau. Don’t you dare poke it. Let it make friends with the pan.” The aroma of toasting spices and caramelizing meat would fill the house, a dinner bell more effective than any ring.
When she finally flipped it, revealing that perfect, mahogany-brown crust, it was like uncovering treasure. She’d let it rest (a step I admittedly whined about as a hungry kid), then slice into it. The steam would puff out, and the juices would pool on the cutting board. That first bite was a revelation: crunch, then utter tenderness. It taught me that the best food isn’t about the most ingredients, but about the respect you give to the ones you have. That lesson, and that sound, is what I hear in my head every single time I heat up my skillet.
Your Flavor Toolkit: Simple Ingredients, Big Impact
Here’s the beautiful part: the ingredient list is short. This is about technique, not a shopping marathon. But each component plays a starring role. Let’s break it down:
- 2 boneless, skinless chicken breasts (about 6-8 oz each): The canvas. Pro-Tip: Look for breasts that are relatively even in thickness. If one end is super thick and the other is thin, it’s harder to cook evenly. We’ll fix that in a sec!
- Kosher salt & freshly ground black pepper: The non-negotiable dynamic duo. Why Kosher? Its flaky crystals season meat more evenly than fine table salt. And please, for the love of crispy edges, grind that pepper fresh. The pre-ground stuff has lost its soul.
- 1-2 tbsp high-heat cooking oil: Our heat conductor. Avocado oil, refined coconut oil, or a good quality olive oil are my go-tos. They have a high smoke point, meaning they won’t burn and get bitter when our pan gets screaming hot. Butter is delicious for flavor, but it burns. We’ll use it as a finisher instead!
- 1 tsp garlic powder OR smoked paprika (optional but highly recommended): The flavor booster. Garlic powder gives a savory, all-purpose kick. Smoked paprika is my secret weapon—it adds a subtle smokiness and a gorgeous red hue to the crust.
- Optional Garnish: Fresh herbs (thyme, rosemary), a pat of cold butter, or a squeeze of fresh lemon juice. These aren’t just pretty; they add a final bright layer of flavor that makes the whole dish sing.
The Step-by-Step Dance to Crispy Perfection
Okay, team. This is where we turn up the heat and build some confidence. Follow these steps, trust the process, and you’ll be a searing superstar.
- Prep the Chicken – The Dryness Secret: First thing’s first: pat those chicken breasts completely dry with paper towels. This is the MOST IMPORTANT STEP for a good sear. Water is the enemy of crispiness; it creates steam. We want direct contact between meat and hot metal. Next, check the thickness. If one side is much thicker, place the breast between two pieces of plastic wrap and gently pound the thick end with a rolling pin or pan until it’s mostly even. This ensures even cooking.
- Season with Gusto: Season both sides generously with salt, pepper, and your chosen spice (garlic powder or paprika). Don’t be shy! This seasoning forms the delicious crust. Do this right before cooking so the salt doesn’t draw out moisture onto the surface.
- Heat the Pan – Get it HOT: Place your heavy-bottomed skillet (cast iron is the undisputed champion here) over medium-high heat and let it sit empty for 2-3 minutes. Add your oil and swirl to coat. Let the oil heat until it shimmers and just starts to whisper a wisp of smoke. That’s your signal. The pan is ready.
- The Hard Sear – Practice Patience: Using tongs, gently lay the chicken breasts in the pan, laying them down away from you to avoid oil splatter. Here comes the hard part: DO NOT TOUCH THEM. Set a timer for 4-5 minutes. Let the magic happen. You’ll see the edges start to turn opaque. This is the crust forming. If you try to move it early, it will tear and stick. Trust the heat.
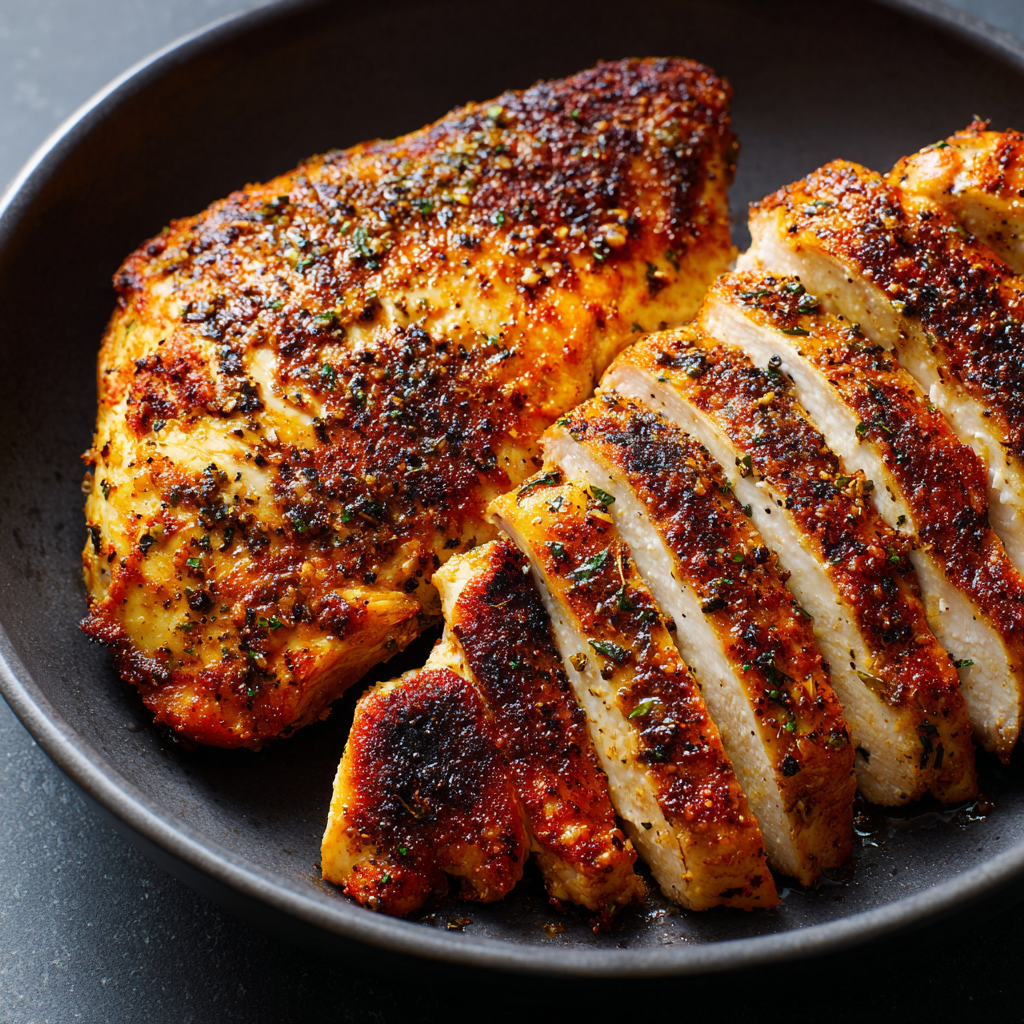
- The Flip & Finish: After 4-5 minutes, the edges should look cooked and the bottom should release easily from the pan. Flip! The cooked side should be a deep, golden brown. Cook on the second side for another 4-6 minutes. If the pan is getting too hot and the crust is darkening too fast, reduce the heat to medium. The chicken is done when it reaches 165°F at the thickest part (a quick-read thermometer is your best friend here!).
- The Crucial Rest: Immediately transfer the chicken to a clean plate or cutting board. DO NOT SLICE IT. Let it rest, loosely tented with foil, for 5-7 minutes. This allows the frantic, hot juices to redistribute throughout the meat. If you cut it now, all those precious juices will run out onto the board, leaving you with dry chicken. The wait is worth it, I promise.
How to Serve Your Masterpiece
You’ve waited. You’ve rested. Now for the fun part! Slice your rested chicken against the grain (look for the lines of muscle fiber and cut perpendicular to them) for the most tender bite.
Now, make it a meal! I love to deglaze that flavorful pan with a splash of chicken broth or white wine, scrape up the crispy bits (the “fond” – chef’s gold!), and let it reduce into a quick pan sauce. Pour that right over the top.
Plate it like a pro: For a simple dinner, place sliced chicken over a pile of creamy mashed potatoes or fluffy rice, drizzle with the pan sauce, and add a simple green veggie like roasted broccoli or a crisp salad. For meal prep, let the whole breast cool, then slice or cube it for salads, grain bowls, or wraps all week. It’s the ultimate versatile protein that actually tastes amazing.
Mix It Up! Flavor Twists & Dietary Swaps
Once you’ve mastered the basic method, the world is your crispy chicken oyster. Here are a few of my favorite riffs:
- Lemon-Herb Butter Bash: In the last minute of cooking, add 2 tbsp of cold butter, a few sprigs of thyme or rosemary, and two lemon slices to the pan. Tilt the pan and spoon the bubbling, fragrant butter over the chicken continuously. Heaven.
- The “Everything Bagel” Chicken: Swap the garlic powder for a hearty sprinkle of everything bagel seasoning before searing. The sesame seeds, garlic, and onion get toasty and incredible.
- Spicy & Sweet Glaze: After removing the chicken to rest, add ¼ cup of hot honey or a mix of honey and sriracha to the pan. Let it bubble for 30 seconds, then brush it liberally over the sliced chicken.
- Parmesan-Crusted: After seasoning, press one side of each breast into finely grated Parmesan cheese. Sear, cheese-side down first, to create an insane, cheesy, lacy crust. Flip and finish cooking.
- For Our Vegan Friends: This method works brilliantly on extra-firm pressed tofu or thick slabs of cauliflower steak. Pat them obsessively dry, follow the same searing rules, and season generously.
Beau’s Kitchen Notes & Stories
This recipe has been my weeknight wingman for years, but it wasn’t always perfect. I’ll admit, my early attempts were… tragic. I’d crowd the pan, poke the chicken incessantly, and slice it straight from the heat. The result was more “shoe leather surprise” than “crispy-edge delight.”
The real game-changer was learning to listen to the pan. That confident sizzle when you add the chicken tells you the heat is right. A weak sputter means it’s not hot enough. The way the chicken releases on its own when the crust is ready—it’s like it gives you a little nod. It’s a conversation between you, the food, and the heat. Now, I teach this method to every beginner cook I know because it builds fundamental skills and delivers a seriously impressive result. It’s the recipe that makes you feel like a real cook.
FAQs: Your Crispy Chicken Questions, Answered
Q: My chicken is sticking to the pan! What did I do wrong?
A: Two likely culprits: 1) The pan wasn’t hot enough before adding the chicken. Wait for that shimmering oil. 2) You tried to move it too soon. Be patient! A proper crust will release naturally. If it’s still stuck, give it another minute.
Q: How do I know it’s done without cutting into it?
A: Please, invest in an instant-read thermometer. It takes the guesswork out and is the single best tool for perfect proteins. 165°F at the thickest part is your target. No thermometer? The chicken should feel firm to the touch (not hard), and the juices should run clear.
Q: Can I use this method with chicken thighs?
A: Absolutely! Bone-in, skin-on thighs are DIVINE with this method. Just cook skin-side down first for 8-10 minutes to render the fat and crisp the skin, then flip and finish. They may take a few minutes longer.
Q: My crust is burning before the inside is cooked. Help!
A: Your heat is too high! After the initial flip, if the crust is getting too dark, simply reduce the heat to medium. You can also finish it in a 375°F oven for 5-8 minutes after searing both sides, which is a great trick for extra-thick breasts.
Crispy-Edge Chicken Breast : Hard Sear for the Perfect Juicy Bite
Description
This method gives you the best of both worlds: a crispy, golden-brown crust and a tender, juicy interior. Simple ingredients, focused heat, and a little patience transform ordinary chicken breasts into a dinner star. Perfect for salads, sandwiches, grain bowls, or just a satisfying weeknight meal.
Ingredients
-
2 boneless, skinless chicken breasts (6–8 oz each, even thickness)
-
Kosher salt & freshly ground black pepper, to taste
-
1–2 tbsp high-heat cooking oil (avocado, refined coconut, or light olive oil)
-
1 tsp garlic powder or smoked paprika (optional, for flavor and color)
-
Optional garnish: fresh herbs (thyme, rosemary), pat of cold butter, or a squeeze of lemon
Instructions
1. Prep the Chicken
-
Pat chicken completely dry with paper towels.
-
Check thickness. If uneven, place between plastic wrap and gently pound to an even thickness.
-
Season both sides generously with salt, pepper, and optional spice.
Tip: Dry chicken ensures a crisp, golden crust.
2. Heat the Pan
-
Place a heavy-bottomed skillet (cast iron is ideal) over medium-high heat for 2–3 minutes.
-
Add oil and swirl to coat. Heat until shimmering with a faint wisp of smoke.
Tip: Hot pan = perfect sear. Don’t rush it!
3. Sear the Chicken
-
Carefully lay the chicken breasts in the pan, away from you.
-
Do not touch for 4–5 minutes. Let the crust form naturally.
-
Flip the chicken and cook the second side for 4–6 minutes, adjusting heat if the crust browns too fast.
Tip: Use an instant-read thermometer; chicken is done at 165°F (74°C).
4. Rest Before Slicing
-
Transfer chicken to a cutting board and rest, loosely tented with foil, for 5–7 minutes.
-
Slice against the grain for maximum tenderness.
Tip: Resting allows juices to redistribute—skip it, and you’ll lose moisture.
Notes
-
Don’t overcrowd the pan; work in batches if necessary.
-
Let the pan tell you when it’s ready—the confident sizzle is your guide.
-
For thicker breasts, finish in a 375°F oven for 5–8 minutes after searing.
-
Chicken thighs work too! Skin-on, bone-in cooks beautifully with the same method (longer cook time).
Nutritional Info (Because Knowledge is Power!)
Let’s keep it real and simple. One serving (about 6 oz of cooked chicken breast prepared as written with 1 tbsp olive oil) provides a powerhouse of lean protein to keep you fueled. Approximate values are: ~280 calories, 35g of protein, 14g of fat (mostly from the healthy oil), and 0g of carbs.
This makes it an incredibly versatile base for any dietary style. Pair it with a complex carb like quinoa or sweet potato and a mountain of veggies for a balanced meal. The protein and healthy fats will keep you satisfied for hours. Remember, these are estimates—actual values can vary based on the exact size of your chicken breast and the amount of oil used.
Your New Weeknight Superpower
And there you have it, friend! The secret is out. A crispy, juicy, flavor-packed chicken breast isn’t a restaurant luxury; it’s a 15-minute reality in your own kitchen. It’s about embracing high heat, practicing a little patience, and treating a simple ingredient with respect.
So the next time you’re staring into the fridge, wondering what’s for dinner, I hope you hear that sizzle in your head. Grab that skillet, heat it with confidence, and give that chicken the hard sear it deserves. You’ve got this. And when you pull it off (which you will), slice into it, see those juices, and take a proud bite—you’ll know you’ve leveled up.
Final Thoughts
So there you have it. What seems like a simple piece of chicken is actually a masterclass in technique, patience, and trust—in your ingredients, your pan, and yourself.
This method is more than a recipe; it’s a shift in mindset. It’s about embracing high heat, respecting the process, and finding joy in the fundamentals. That glorious, crispy-edged chicken breast isn’t just dinner; it’s a victory. It’s the proof that you don’t need complicated tricks or a pantry full of exotic ingredients to make something truly exceptional. You just need to pay attention.
I started this journey in my grandma’s kitchen, captivated by a sound and a lesson. Now, I pass it to you. Let that assertive sizzle be your starting bell. Let the sight of that golden crust be your reward. Let the juicy, tender slice be your proof that the best weeknight wins are often the simplest ones.
Take this method, make it yours, and then go build a hundred different meals around it. That’s the real magic—once you’ve got this foundation down, you’re unstoppable.