
The Ultimate Easy Vegan Banana Bread: Your Kitchen’s New Best Friend
Hey friends, Beau here! Let’s talk about a universal truth: a kitchen without the smell of baking banana bread is just a room with a bunch of appliances. It’s the ultimate comfort food alchemy, turning those sad, speckled bananas on your counter into a glorious, fragrant loaf that promises a slice of coziness with every bite. But what if you’re baking for a plant-based pantry, or just want to whip something up without running to the store for eggs? I’ve got you, and it’s about to become your new go-to.
This isn’t a “compromise” vegan recipe. Nope. This is the moist, fluffy, crackly-topped, banana-packed dream you remember, just made with simple, wholesome ingredients you likely already have. I’m talking one-bowl-simple, no-fuss, “I-can-make-this-before-my-coffee-gets-cold” easy. Whether you’re a seasoned vegan baker, have an egg allergy, or are just curious, this recipe is a warm hug from the oven. It’s naturally sweet, incredibly forgiving, and so delicious that it’ll have everyone asking, “Wait, this is VEGAN?” Let’s grab those ripe bananas and make your kitchen smell like pure happiness.
Why This Recipe Has My Heart (And My Grandmother’s Apron)
This recipe always takes me back to my grandma’s linoleum-floored kitchen. She wasn’t vegan, but she was a genius at “using up.” Wasting food was a cardinal sin. Those blackening bananas on her windowsill weren’t trash; they were destiny. She’d mash them with a fork in her big yellow bowl, humming some old tune, and like magic, an hour later there’d be a perfect, humble loaf cooling on a rack. It wasn’t fancy, but it was love.
When I started Feastical, I wanted to capture that spirit—the “make something wonderful from what you have” mentality. This vegan banana bread is my tribute to that. It’s about resourcefulness creating joy. I’ve tweaked and tested it a hundred times to get that same tender crumb and soul-warming flavor without dairy or eggs, and every time I pull it out of the oven, I swear I can smell her kitchen. It’s more than a snack; it’s a delicious little heirloom.
Gathering Your Flavor Squad: Simple Ingredients, Big Impact
Here’s the beautiful part: you probably have most of this in your pantry right now. Let’s break down the team players and why they work so well together.
- 3 Very Ripe Bananas, Mashed: This is the STAR. The blacker, the better. Those brown spots mean maximum sweetness and intense banana flavor. They also add natural moisture, which is key in vegan baking. No super-ripe bananas? Bake less-ripe ones at 300°F for 15-20 minutes until the skins blacken!
- 1/3 Cup Melted Coconut Oil or Neutral Oil: Coconut oil adds a hint of richness, but if you’re not a fan, avocado oil or light olive oil works great. This is our fat, replacing butter, for that tender mouthfeel.
- 1/2 Cup Brown Sugar or Pure Maple Syrup: Brown sugar gives a deeper, caramel-like sweetness and helps create a moist crumb. Maple syrup (the real stuff!) offers a lovely flavor and keeps things refined-sugar-free. Both are winners.
- 1/4 Cup Plant-Based Milk (Almond, Oat, Soy): Our liquid component to bring the batter together. Oat milk is my favorite here—it’s creamy and neutral. This also reacts with the baking soda for lift.
- 1 tsp Pure Vanilla Extract: The flavor enhancer. It rounds out the sweetness and makes everything taste more… baked. Don’t skip it!
- 1 1/2 Cups All-Purpose Flour or Whole Wheat Pastry Flour: The foundation. All-purpose gives a classic, light texture. For a nuttier, heartier loaf, swap in half whole wheat flour. If using all whole wheat, add an extra tbsp of plant milk.
- 1 tsp Baking Soda (NOT baking powder!): Our leavening hero. The acidity from the ripe bananas activates it, giving us that beautiful rise. Make sure it’s fresh!
- 1/2 tsp Salt: Crucial! It balances the sweetness and makes all the other flavors pop.
- 1/2 tsp Cinnamon (Optional but Highly Recommended): My chef’s insight? It’s not optional for me. It adds a warm, cozy depth that pairs perfectly with banana.
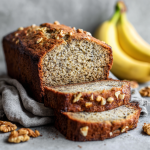
- 1/2 Cup Mix-Ins (Walnuts, Chocolate Chips, etc.): The fun part! Toasted walnuts are classic. Vegan chocolate chips turn it into dessert. Or go wild with dried cranberries or shredded coconut.
Let’s Bake! Your Foolproof, Step-by-Step Guide
See? I told you it was easy. Follow these steps, and you’re golden.
- Preheat & Prep: Fire up your oven to 350°F (175°C). Grease a standard 9×5-inch loaf pan well, or line it with parchment paper with overhanging edges for the ultimate easy lift-out. This is your “no-stick” insurance policy.
- Mash & Mix the Wet Team: In a large mixing bowl, take out any lingering stress on those ripe bananas. Mash them with a fork or potato masher until mostly smooth, with a few small lumps for texture. Pour in the melted (and slightly cooled) oil, your sweetener of choice, plant milk, and vanilla. Give it a vigorous stir with a wooden spoon until it’s one happy, homogenous, fragrant liquid. Chef Hack: If your coconut oil re-solidifies when it hits the cool bananas, just pop the whole bowl in the microwave for 15 seconds and stir.
- Add the Dry Crew: Right into the same bowl (hello, one-bowl wonder!), sprinkle the flour, baking soda, salt, and cinnamon directly over the wet mixture. This prevents the baking soda from clumping. Now, here’s the secret to a tender, not tough, loaf: mix until JUST combined. A few streaks of flour are okay! Overmixing develops gluten and leads to a gummy bread. We want fluffy.
- Fold in the Fun: Gently fold in your chosen mix-ins until they’re evenly distributed. This is the final stir—be gentle!
- Bake to Perfection: Pour the batter into your prepared loaf pan and smooth the top with your spoon. For a professional touch, run a wet finger down the center of the batter—this encourages an even split in the classic banana bread “crack.” Slide it into the center of your preheated oven and set a timer for 50 minutes. Chef’s Note: DO NOT open the oven door before 45 minutes! The rush of cold air can cause the center to fall.
- The Toothpick Test & The Cool Down: At 50 minutes, insert a toothpick or thin knife into the very center of the loaf. It should come out with a few moist crumbs, but not wet batter. If needed, bake in 5-minute increments. Once done, let the loaf cool in the pan on a wire rack for a full 10 minutes. This lets it set. Then, run a knife around the edges and carefully lift it out (using the parchment sling if you used it) to cool completely on the rack. I know it’s hard, but letting it cool ensures it slices cleanly!
How to Serve This Slice of Sunshine
This bread is a versatile superstar. For a simple, perfect breakfast or snack, a thick slice all on its own is heavenly. Want to level it up? Here are my favorite ways to serve it:
- Breakfast of Champions: Lightly toast a slice and slather it with vegan butter, almond butter, or a drizzle of tahini and a drizzle of maple syrup. Pair with a hot coffee for the ultimate morning ritual.
- Dessert Mode, Activated: Serve a warm slice à la mode with a scoop of vegan vanilla ice cream or a dollop of coconut whipped cream. Sprinkle with a pinch of flaky sea salt for a gourmet touch.
- The Afternoon Pick-Me-Up: Plate a slice on a cute plate with a handful of fresh berries and a dusting of powdered sugar. It instantly feels like a café treat.
- For Sharing (or Not!): This loaf makes a fantastic, heartfelt gift. Let it cool completely, wrap it in parchment, tie it with baker’s twine, and deliver some homemade joy.
Make It Your Own: 5 Delicious Twists
Once you’ve mastered the base, the canvas is yours to paint! Here are some of my favorite riffs on this classic.
- Chocolate Swirl Everything: Fold in 1/2 cup of vegan chocolate chips. Take it further by melting 1/4 cup more chips with a tsp of coconut oil and swirling it into the batter before baking for a marbled effect.
- Gluten-Free Friend: Swap the all-purpose flour for a 1:1 gluten-free baking blend (like Bob’s Red Mill). The result is just as moist and delicious.
- Protein-Packed Power Bread: Replace 1/4 cup of the flour with your favorite vanilla or unflavored plant-based protein powder. Add an extra splash of plant milk if the batter seems too thick.
- Tropical Vacation Loaf: Fold in 1/3 cup shredded coconut and 1/4 cup chopped dried pineapple or mango. A teaspoon of lime zest in the batter brightens it up beautifully.
- PB&J Remix: Swirl 1/3 cup of your favorite berry jam or peanut butter (or both!) into the batter before baking for a delightful surprise in every slice.
Beau’s Kitchen Confidential Notes
This recipe has lived in my back pocket for years, and it’s evolved from a simple experiment to my most-requested treat. A funny story: I once accidentally used baking POWDER instead of soda. The loaf rose like a majestic volcano in the oven, then collapsed into a sad, dense pancake the moment it cooled. Lesson learned—check your labels! I’ve also learned that the bananas truly are the boss. The riper they are, the less added sugar you can get away with. I’ve even made it with just a tablespoon of maple syrup when my bananas were practically liquid sugar themselves. Trust the process, and don’t be afraid to make it your own. That’s what home cooking is all about.
Your Questions, Answered
Q: My bread is gummy/wet in the middle. What happened?
A: The two most common culprits are underbaking or overmixing. Next time, ensure your toothpick test comes out clean and remember to mix the batter only until the flour disappears. Also, make sure your baking soda is fresh!
Q: Can I make this into muffins?
A: Absolutely! This batter makes about 10-12 standard muffins. Fill liners 2/3 full and bake at the same temperature (350°F) for 20-25 minutes. Perfect for on-the-go!
Q: How do I store it, and can I freeze it?
A: Keep it wrapped tightly at room temp for 2-3 days, or in the fridge for up to a week. It freezes beautifully! Wrap the whole loaf or individual slices tightly in plastic wrap and then foil. Freeze for up to 3 months. Thaw at room temp or pop a frozen slice right in the toaster.
Q: My bread didn’t rise much. Why?
A: Check the expiration date on your baking soda. If it’s old, it loses its power. Also, ensure your oven is fully preheated before the pan goes in.
Easy Vegan Banana Bread : Moist, Fluffy & Naturally Sweet
Description
Hey friends, Beau here! This vegan banana bread is not a compromise—it’s a one-bowl, no-fuss, plant-based dream. It’s naturally sweet, forgiving, and so delicious that everyone will wonder, “Wait… this is vegan?” Perfect for breakfast, snack time, or a comforting slice any time of day.
Ingredients
Wet Ingredients
-
3 very ripe bananas, mashed
-
⅓ cup melted coconut oil (or neutral oil like avocado)
-
½ cup brown sugar or pure maple syrup
-
¼ cup plant-based milk (almond, oat, soy)
-
1 tsp pure vanilla extract
Dry Ingredients
-
1½ cups all-purpose flour (or half whole wheat pastry flour for a nuttier loaf)
-
1 tsp baking soda
-
½ tsp salt
-
½ tsp cinnamon (optional but highly recommended)
Optional Mix-Ins (½ cup)
-
Walnuts, vegan chocolate chips, dried cranberries, shredded coconut, etc.
Instructions
1. Preheat & Prep
-
Oven: 350°F (175°C)
-
Grease a 9×5-inch loaf pan, or line with parchment paper for easy lift-out.
2. Mash & Mix Wet Ingredients
-
Mash bananas in a large bowl, leaving a few lumps.
-
Stir in melted oil, sweetener, plant milk, and vanilla until smooth.
3. Add Dry Ingredients
-
Sprinkle flour, baking soda, salt, and cinnamon over wet mixture.
-
Gently stir until just combined (a few streaks of flour are okay—overmixing = dense loaf).
4. Fold in Mix-Ins
-
Add your choice of walnuts, chocolate chips, or other fun mix-ins.
5. Bake
-
Pour batter into prepared pan and smooth top.
-
Optional: run a wet finger down the center for a classic “banana bread crack.”
-
Bake 50 minutes, do not open oven before 45 minutes.
-
Toothpick test: Insert into center—should come out with a few moist crumbs, not wet batter. Bake in 5-min increments if needed.
6. Cool
-
Cool in pan 10 minutes.
-
Run a knife around edges and lift out using parchment sling (if used) to cool completely on a wire rack.
Serving Suggestions
-
Breakfast: Toast slice with vegan butter or nut butter + maple syrup.
-
Dessert: Warm slice with vegan ice cream or coconut whipped cream.
-
Snack: Pair with berries and a dusting of powdered sugar.
-
Gift: Wrap cooled loaf in parchment and tie with baker’s twine.
Notes
-
Chocolate Swirl: Fold in ½ cup vegan chocolate chips; swirl in ¼ cup melted chips + tsp coconut oil for marble effect.
-
Gluten-Free: Use 1:1 GF flour blend.
-
Protein Bread: Replace ¼ cup flour with plant-based protein powder. Add extra milk if needed.
-
Tropical Loaf: ⅓ cup shredded coconut + ¼ cup dried pineapple or mango + 1 tsp lime zest.
-
PB&J Remix: Swirl in ⅓ cup jam or peanut butter before baking.
Nutritional Breakdown (A General Guide)
Please note: The following is an approximate estimate per slice (based on 10 slices) using all-purpose flour, coconut oil, maple syrup, and no add-ins. Values will vary with substitutions.
- Calories: ~180
- Total Fat: 7g
- Saturated Fat: 6g (from coconut oil)
- Carbohydrates: 28g
- Fiber: 2g
- Sugars: 10g (primarily natural from banana & maple syrup)
- Protein: 2g
This bread is a source of quick energy, potassium from the bananas, and, when made with whole wheat flour or add-ins like nuts, provides more fiber and healthy fats. It’s a satisfying treat that fits beautifully into a balanced diet.
One Last Slice of Wisdom
And there you have it, friends—the banana bread that proves plant-based baking can be utterly simple and spectacularly delicious. This recipe is more than just a list of instructions; it’s an invitation to slow down, to create something with your hands, and to fill your home with the kind of smell that makes people feel welcome. It’s forgiving, flexible, and founded on the beautiful principle of not letting good food go to waste. So the next time you see those bananas turning spotty, don’t sigh—smile. You’re just one bowl away from something wonderful. Now, go preheat that oven. I can’t wait for you to taste it.
Happy baking,
Beau