
The Bagel Breakthrough You Didn’t Know You Needed: 3-Ingredient, Gluten-Free & Packed with Protein
Hey there, friend! Beau here, welcoming you back to my kitchen corner at Feastical. Let’s have a real talk for a second. How many times have you stared into the abyss of your pantry or the grocery store’s “health food” aisle, desperately seeking a snack that’s actually satisfying? Something that’s gluten-free, high in protein, and tastes like a treat, not a punishment. I’ve been there too, my friend. The cardboard-like textures, the ingredient lists longer than a novel, the sneaky sugars hiding in “protein” bars… it’s enough to make you want to throw in the tea towel.
But what if I told you the ultimate solution was already in your fridge and pantry, waiting to be transformed? What if you could whip up a batch of genuinely delicious, chewy-on-the-inside, crisp-on-the-outside bagels with just three simple ingredients and about 35 minutes of your time? No yeast, no complicated rising, no mysterious additives. Just pure, feel-good fuel.
These Gluten-Free Protein Bagels are my absolute go-to for busy mornings, essential post-workout refueling, or that 3 PM slump when you need something substantial. They’re fluffy, they’re satisfying, and they hold everything from a schmear of cream cheese to a stack of turkey and avocado like champions. This isn’t just a recipe; it’s a kitchen revolution in bagel form. So, preheat that oven, grab your favorite mixing bowl, and let’s bake some magic that will change your snack game forever.
My “A-Ha!” Moment: From Kitchen Flop to Flourless Fortune
This recipe’s origin story is a classic case of happy accident meets stubborn hunger. A few years back, I was deep in recipe testing for a completely different project—a gluten-free flatbread, if memory serves. I was out of my usual flour blends and started playing with a simple combo of Greek yogurt and a single gluten-free flour. My goal was something pliable and quick. What I pulled out of the oven, however, was dense, oddly moist, and decidedly not flatbread.
Frustrated, I almost tossed the whole experiment. But as I poked at the warm, golden disc, a wild thought hit me: the shape, the slight chew… it reminded me of a bagel’s top half. I sliced it in half, threw it in the toaster, and slathered it with a generous swipe of almond butter. One bite later, my kitchen was filled with the kind of victory whoop usually reserved for game-winning touchdowns. The texture was spot-on! It was that perfect marriage of soft interior and toaster-ready exterior I’d been missing in store-bought GF options. That “flop” became the foundation for every batch I’ve made since. It taught me that sometimes the best recipes aren’t meticulously planned; they’re discovered when you’re willing to play with your food.
Gathering Your Kitchen Allies: The Simple Trio
Here’s the beautiful part. You likely have these staples on hand right now. Let’s break down why each one is a superstar and how you can swap things if needed.
-
- 1 Cup Gluten-Free Flour Blend
This is your foundation. I use a reliable store-bought blend that contains xanthan gum (this is key for structure and chew!). My go-to is a simple rice flour/potato starch/tapioca blend. Chef’s Insight: Avoid using straight coconut or almond flour here—they behave very differently and will leave you with a crumbly mess. If your blend doesn’t have xanthan gum, add ½ teaspoon. - 1 Cup Plain Greek Yogurt
The magic binder and protein powerhouse! The tanginess gives these bagels their distinctive “bagel-shop” flavor, while the proteins create a fantastic texture. Substitution Tip: For a dairy-free version, use a thick, plain plant-based yogurt (like coconut or almond milk yogurt). Just make sure it’s very thick, not runny. Full-fat yogurt yields a slightly richer, softer bagel, while non-fat gives a chewier, protein-packed result. Both work beautifully!
- 1 Cup Gluten-Free Flour Blend
1.5 Teaspoons Baking Powder
Our leavening hero. This is what gives our dough its lift and creates those lovely air pockets inside. Chef’s Must-Do: Make sure your baking powder is fresh! If it’s been in the back of your cupboard for a year, it won’t do its job. Test it by stirring a little into hot water—if it doesn’t fizz vigorously, it’s time for a new tin.
- Optional: Everything Bagel Seasoning or Toppings of Choice
This is where personality shines! I’m an everything-bagel-seasoning devotee, but don’t stop there. Think sesame seeds, poppy seeds, dried garlic flakes, coarse salt, or even a cinnamon-sugar sprinkle for a sweet version.
Let’s Get Baking: Your Foolproof Roadmap to Bagel Bliss
Ready? This is where the fun happens. I’ll walk you through every step, sharing all the little hacks I’ve learned over countless batches.
- Preheat & Prep: Fire up your oven to 375°F (190°C). Line a baking sheet with parchment paper or a silicone mat. This little step prevents sticking and makes cleanup a dream. No liner? A light spray of oil will work in a pinch.
- The Great Mix-Off: In a medium mixing bowl, combine your gluten-free flour and baking powder. Give them a quick whisk to distribute the baking powder evenly. Now, add the entire cup of Greek yogurt. Chef’s Hack: I like to use a sturdy spatula or even my (clean!) hands for this part. It will seem dry at first, but keep mixing. It’ll come together into a soft, slightly sticky dough. If it feels too sticky to handle, add a dusting (just a teaspoon or so) more flour.
- Divide & Conquer: Lightly dust your hands and a clean work surface with a bit of gluten-free flour. Plop your dough ball onto the surface and divide it into four equal parts. I just press it into a rough square and cut it like a pizza. Pro Tip: Using a kitchen scale here is the secret to perfectly uniform bagels. Aim for about 4 ounces (113g) per piece.
- Shape Those Beauties: Now, take each piece of dough and roll it into a smooth ball. Press your finger directly through the center of the ball to make a hole. Then, gently widen the hole by rotating your finger or twirling the dough around your fingers until the hole is about 1.5 inches across. Don’t be shy—the hole will shrink a bit as it bakes! Place each shaped bagel on your prepared baking sheet.
- Top It Off (Optional but Recommended): If you’re using toppings, now’s the time! For seeds or seasoning, a quick brush with an egg wash (1 egg beaten with 1 tbsp water) will help them stick. For a simpler approach, just lightly spray the top of each bagel with water or olive oil and press the seasoning on. It works like a charm!
- Bake to Golden Perfection: Slide your tray into the preheated oven and bake for 25-30 minutes. You’re looking for a beautifully golden-brown top and a firm exterior. Kitchen Story Time: My oven has a hot spot, so at the 20-minute mark, I always rotate the tray. It’s a small move that ensures even browning on all four bagels.
- The Patience Payoff: Once they’re gorgeously golden, take them out and let them cool on the baking sheet for at least 10-15 minutes. I know it’s tempting to dive right in, but this resting time lets the structure set. They’ll be warm, but not doughy. Then, transfer to a wire rack to cool completely if you’re storing them.
How to Serve Your Masterpiece: Let’s Get Creative!
The beauty of a great bagel is its versatility. Here’s how I love to enjoy mine:
The Classic: Slice, toast until just crisp, and slather with cream cheese (regular or dairy-free). A sprinkle of everything seasoning on top of the cream cheese? *Chef’s kiss*.
The Power Breakfast: Top a toasted half with mashed avocado, a sprinkle of chili flakes, a squeeze of lime, and a perfectly fried or poached egg. This is my ultimate Saturday morning fuel.
The Sweet Treat: Try a toasted bagel with a thick layer of almond or peanut butter, sliced bananas, and a drizzle of honey. It’s a protein-packed dessert-for-breakfast situation.
Straight-Up Snackin’: Honestly, they’re fantastic just warm from the oven, plain. The subtle tang and chewy texture are satisfying all on their own.
Make It Your Own: 5 Flavorful Twists
Once you’ve mastered the basic blueprint, the flavor world is your oyster! Here are a few of my favorite riffs:
- Everything-but-the-Kitchen-Sink Bagel: The classic. Fold 2 tablespoons of everything bagel seasoning right into the dough before shaping, then top with more after the egg wash.
- Cinnamon Raisin Delight: Mix 1 teaspoon of cinnamon into the dry ingredients. After mixing the dough, gently knead in ¼ cup of raisins (soak them in warm water for 10 minutes first to plump up!). Sprinkle the tops with cinnamon sugar before baking.
- Cheesy Herb: Fold ½ cup of shredded sharp cheddar and 1 tablespoon of dried Italian herbs into the dough. The cheese gets melty and creates incredible flavor pockets.
- 100% Whole Grain: Substitute the GF flour blend with a whole-grain gluten-free blend or oat flour (certified GF). The texture will be heartier and nuttier—perfect for a savory sandwich.
- Mini Bagel Bites: Divide the dough into 8 pieces instead of 4. Shape into mini bagels and reduce baking time to 18-22 minutes. Perfect for parties or kid-friendly snacks!
Beau’s Bagel Chronicles: A Few Parting Thoughts
This recipe has become such a staple in my home that I barely think about it—I just make it. It’s evolved from that first accidental flatbread into my most-requested “healthy hack” by friends. I’ve made them on camping trips (mixed in a zip-top bag, baked in a portable oven!), brought them to potlucks, and even shipped them to my sister during her college finals. They freeze like a dream, which means a quick, healthy breakfast is always within reach. The biggest lesson? Don’t fear the sticky dough. Embrace it! A little extra flour on your hands is all you need. This recipe is forgiving, fast, and fundamentally delicious. That’s the Feastical spirit.
Your Questions, Answered: No-Bagel-Fiasco Zone
Q: My dough is super sticky and impossible to shape! What did I do wrong?
A: Don’t panic! This usually means your yogurt was a bit wetter than usual or your flour blend is extra thirsty. The fix is easy: sprinkle your dough, hands, and work surface with a little more gluten-free flour (a tablespoon at a time) until it’s just manageable. It should still be soft, but not glue-like.
Q: Why are my bagels so dense and not fluffy inside?
A: The two most common culprits are over-mixing or old baking powder. Once the dough comes together, stop mixing! Overworking it develops the starches and leads to density. And always check that baking powder for fizz—it’s the lifeline of this recipe.
Q: Can I make these ahead of time? How do I store them?
A: Absolutely! They store beautifully. Let them cool completely, then pop them in an airtight container or bag. They’ll last 3-4 days on the counter. For longer storage, freeze them for up to 3 months. I slice mine before freezing so I can toss a half straight into the toaster.
Q: Are these really high in protein?
A> They are! Between the Greek yogurt and the protein in many gluten-free flour blends, each bagel packs a satisfying 8-12 grams of protein (depending on your specific brands), making them a fantastic, balanced snack or meal component.
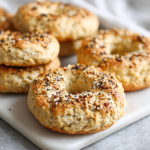
Gluten-Free Protein Bagels : 3 Ingredient High-Protein Snack
Description
Say goodbye to dry, store-bought gluten-free bagels! These 3-ingredient protein bagels are soft on the inside, slightly crisp on the outside, and packed with protein to fuel your morning, workout, or afternoon snack. No yeast, no complicated rising, and no long ingredient lists—just simple, wholesome ingredients that come together in about 35 minutes.
Ingredients
-
1 cup gluten-free flour blend (with xanthan gum; add ½ tsp if your blend doesn’t contain it)
-
1 cup plain Greek yogurt (or thick plant-based yogurt for dairy-free)
-
1½ tsp baking powder
-
Optional toppings: everything bagel seasoning, sesame seeds, poppy seeds, coarse salt, or cinnamon-sugar
Instructions
-
Preheat & Prep: Preheat oven to 375°F (190°C). Line a baking sheet with parchment paper or a silicone mat.
-
Mix the Dough: In a medium bowl, whisk together gluten-free flour and baking powder. Add the Greek yogurt and mix with a spatula or clean hands until a soft, slightly sticky dough forms. If too sticky, sprinkle a little extra flour until manageable.
-
Divide & Shape: Dust your hands and work surface lightly with flour. Divide dough into 4 equal pieces. Roll each piece into a smooth ball, then press your finger through the center to make a hole. Widen the hole to about 1.5 inches across. Place on the prepared baking sheet.
-
Add Toppings (Optional): Brush tops with water or olive oil (or an egg wash for extra stickiness) and sprinkle toppings of choice.
-
Bake: Bake 25–30 minutes until golden brown and firm to the touch. Rotate tray halfway for even browning if needed.
-
Cool: Let bagels cool on the sheet for 10–15 minutes, then transfer to a wire rack. They’re ready to enjoy warm or stored for later.
Notes
-
Sticky dough? Dust hands and work surface with a little extra flour.
-
Dense bagels? Avoid over-mixing and always check that baking powder is fresh.
-
Storage: Cool completely, store in an airtight container 3–4 days, or freeze up to 3 months. Slice before freezing for easy toasting.
-
Protein boost: Greek yogurt + protein in GF flour gives 8–12g protein per bagel.
The Nourishing Numbers (Approximate!)
Here’s a general nutritional breakdown per bagel (based on using non-fat Greek yogurt and a standard GF flour blend, without toppings). Remember, exact numbers will vary with your specific ingredients.
- Calories: ~120-140
- Protein: 10-12g
- Carbohydrates: 20-22g
- Fiber: 2-3g
- Fat: 1-2g (higher if using full-fat yogurt)
This snack is a fantastic source of sustained energy, thanks to the balanced mix of protein and complex carbs. It’s gluten-free, can easily be made dairy-free, and fills you up without weighing you down.
Final Thoughts
And there you have it, my friend—the secret to never settling for a sad, store-bought gluten-free snack again. These bagels are proof that eating well doesn’t require a dozen ingredients or hours of effort. It’s about smart, simple combos that deliver on flavor and function.
I hope this recipe finds its way into your regular rotation and brings as much joy and convenience to your kitchen as it has to mine. When you make them, I’d love to see your creations! Tag me @feastical on social media and show me your topped-and-toasted masterpieces.
Now, go forth and bake! And remember, in this kitchen and in life, keep it simple, soulful, and always satisfying.
With a full heart and a full plate,
Beau