
Easy 4-Ingredient Sourdough Discard Tortillas – Soft, Tangy & Homemade
Who Knew Your Discard Could Taste This Good?
Hey friends, Beau here. Let me paint you a picture: It’s taco night. The fillings are sizzling, the salsa is fresh, but you’re reaching for that same old pack of store-bought tortillas from the back of the fridge. Sound familiar? What if I told you that the secret to the most soul-satisfying, flavorful, and soft tortillas you’ll ever taste is already sitting in your kitchen, probably bubbling away quietly in a jar? I’m talking about your sourdough discard.
These aren’t just any tortillas. These are your new kitchen superstars. With just four humble ingredients and about 40 minutes, you can transform that tangy, fermented discard into golden, bubbly, incredibly pliable wraps that will make every meal feel like a celebration. The best part? You’re not just making food; you’re honoring that sourdough starter you’ve been lovingly tending to. You’re turning potential waste into wonderful, wholesome nourishment. That’s the Feastical way—finding joy and flavor in the simple, smart choices.
So, if you’ve ever looked at your discard and thought, “There has to be more than just pancakes,” you’re absolutely right. Grab your jar, and let’s turn that tangy treasure into the star of your next meal. Trust me, once you go homemade, you’ll never look at a plastic-wrapped tortilla the same way again.
The Tortilla That Took Me Home
This recipe brings me right back to my grandma’s kitchen in Arizona. She wasn’t a sourdough baker, but she was a tortilla wizard. Her hands moved with a rhythm that was pure magic—pat, roll, a quick sizzle on the comal, and then that incredible puff. The smell of flour and heat filling the air is one of my core food memories. She’d always let me have the first one, slathered in butter and rolled up like a warm, edible cigar.
When I started my sourdough journey years later, I had that “aha!” moment. That slight tang in my starter? It reminded me of the fresh, fermented flavor in really good, traditional corn tortillas. My brain started whirring: could I merge my new sourdough obsession with my oldest food memory? After a few (dozen) delicious experiments, these sourdough discard tortillas were born. They’re my little kitchen homage—my sourdough spin on Nana’s classic. They have that same soft, pliable soul, but with a subtle, grown-up tang that makes them unforgettable. Every time I see them puff up in the skillet, I see her hands, and I feel that same rush of “I made this!” that she must have felt.
Your Fantastic Four: The Ingredients
See? I told you it was simple. Just four everyday ingredients team up to create something extraordinary. Here’s the breakdown, with a little chef’s insight on each one.
- 1 cup sourdough discard (unfed): This is your flavor MVP. The star of the show! Use discard that’s ripe, bubbly, and tangy—anywhere from freshly unfed to a week old (if it’s been stored in the fridge). Its acidity helps tenderize the dough, giving you that beautifully soft texture. Chef’s Tip: The thickness of your discard will affect hydration. If it’s super thick, like peanut butter, you might need a tiny splash of water. If it’s very runny, you might need a tablespoon or two more flour. We’re going for a smooth, slightly tacky dough.
- 1 ½ cups all-purpose flour (plus more for dusting): Our reliable structure-builder. All-purpose flour gives us the perfect balance of tenderness and strength for rolling. Chef’s Swap: Feel free to substitute half with whole wheat flour for a nuttier, heartier tortilla. For a fully whole wheat version, add an extra tablespoon of water or oil, as whole wheat flour soaks up more liquid.
- ¼ cup olive oil or melted butter: The secret to softness and richness! The fat coats the flour proteins, ensuring your tortillas stay pliable and don’t turn into cracker-like discs. Chef’s Insight: I love olive oil for its fruity notes, but melted butter (or even bacon fat!) adds a gorgeous, homey richness. Use what you love.
- ½ tsp salt: Never, ever skip the salt! It’s not just for flavor—it tightens the gluten structure just enough and makes all the other ingredients sing. If your discard is very old and acidic, the salt also helps balance that sharp tang beautifully.
Let’s Get Rolling: Your Foolproof Steps
Ready? Tie on your apron, clear a little counter space, and let’s make some magic. This process is meditative, simple, and so darn satisfying.
- The Mix & Knead: In a large bowl, combine the discard, flour, oil, and salt. Stir with a sturdy spoon or just dive in with your hands until a shaggy dough forms. Dump it onto a lightly floured surface. Now, knead it for just 3-4 minutes. You’re not trying to win a strength contest here—just fold, push, turn, repeat until the dough feels smooth, elastic, and only slightly tacky. Chef’s Hack: If the dough feels too dry and crumbly, wet your hands a little and keep kneading. The extra moisture from your hands is often all it needs to come together perfectly.
- The Rest & Relax: Divide the dough into 8 equal-ish balls. I like to roll it into a log and slice it like sushi for accuracy. Place the balls on a plate, cover them with a damp kitchen towel or a piece of plastic wrap, and let them rest for 20 minutes. This is NON-NEGOTIABLE. This rest period allows the gluten to relax, making the dough infinitely easier to roll out without it springing back like a rubber band.
- Roll It Out: On a lightly floured surface, take one ball and flatten it slightly with your hand. Using a rolling pin, roll from the center outwards, turning the dough a quarter turn after each roll. Aim for a thin circle, about 6-8 inches wide. Don’t stress about perfect circles! Rustic, hand-shaped tortillas have character. Chef’s Pro-Tip: If you’re struggling to get them thin enough, let the rolled-out tortilla sit for a minute. The gluten will relax further, and you can often give it another pass with the pin to get it paper-thin.
- Skillet Magic: Heat a dry, heavy skillet (cast iron is king!) or griddle over medium-high heat. No oil needed! Test the heat by flicking a tiny bit of water onto the surface—it should skitter and evaporate quickly. Lay a tortilla in the hot pan. Cook for 30-60 seconds. You’ll see bubbles form and the top look dry with some darker spots. Flip! Cook the second side for another 30-60 seconds until you get those beautiful golden-brown freckles. Watch for the Puff: If you’re lucky and your skillet is at the perfect temp, the tortilla might puff up like a balloon! This is a good sign of a well-rolled, well-cooked tortilla.
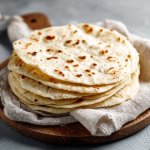
- Keep ‘Em Cozy: As each tortilla finishes, toss it into a clean kitchen towel folded over in a basket or bowl, or a tortilla warmer. Wrapping them up traps the steam and keeps them soft, flexible, and warm until you’re ready to serve.
How to Serve These Tangy Treasures
Okay, you’ve got a stack of warm, fragrant tortillas. Now the real fun begins! Their subtle tang pairs beautifully with so many flavors.
The Classic Taco Night: This is their destiny. Load them up with seasoned ground beef or turkey, black beans, crisp lettuce, pico de gallo, and a creamy avocado lime sauce. The tangy tortilla cuts through rich fillings perfectly.
Breakfast Wrap of Champions: Scramble some eggs with cheese and chorizo, wrap it up, and thank me later. The tanginess is brilliant with breakfast flavors.
Simple & Sublime: Sometimes, the best way is the simplest. Slather a warm tortilla with good butter, a drizzle of honey, and a sprinkle of cinnamon. Roll it up and enjoy with your morning coffee.
Hearty Veggie Burrito: Roast a medley of sweet potatoes, bell peppers, and onions. Add some rice, black beans, and a zesty cilantro crema. The sturdy, soft tortilla holds up to all those textures without falling apart.
Make It Your Own: Fun Variations
Once you’ve mastered the base, the world is your tortilla! Here are a few of my favorite spins.
- Herb & Garlic Infused: Add 1 teaspoon of dried oregano or Italian seasoning and ½ teaspoon of garlic powder to the dry ingredients. Fantastic for Mediterranean-style wraps with chicken and tzatziki.
- Spicy Jalapeño & Cheddar: Finely mince one jalapeño (seeds removed for less heat) and add it with ¼ cup of finely shredded sharp cheddar to the dough. Insanely good for quesadillas.
- 100% Whole Wheat: Swap the all-purpose flour for whole wheat flour and add an extra tablespoon of oil or water. You get a heartier, nuttier tortilla packed with fiber.
- Gluten-Free Friendly: Replace the all-purpose flour with a 1:1 gluten-free baking blend. The texture will be a bit more delicate, but they’re still utterly delicious and a great way to use discard for GF friends.
- Everything Bagel Twist: After rolling out the tortilla, sprinkle one side generously with everything bagel seasoning before cooking. Cook seasoning-side down first. Unbelievably good for breakfast sandwiches!
Beau’s Kitchen Notes
This recipe has become a weekly staple in my house. It’s evolved from a “can I do this?” experiment to a trusted friend. I’ve learned a few things along the way: First, the state of your discard is your co-pilot. A young, mild discard makes a milder tortilla; an old, hoochy discard gives you that serious tang that I personally adore with spicy fillings. Second, I stopped chasing the perfect circle. My lopsided, map-of-the-world-shaped tortillas taste just as incredible and remind me that homemade is about heart, not perfection. Finally, I once tried to rush the rest time. Big mistake. The dough fought me every roll. Now, I use that 20 minutes to clean up and prep my fillings. Lesson learned: let the dough (and yourself) breathe.
Your Questions, Answered
Q: My tortillas turned out tough. What happened?
A: The most common culprits are over-kneading or not letting the dough rest. We’re not making bread here—a brief, gentle knead is plenty. And that 20-minute rest is crucial for relaxing the gluten so the tortillas stay soft.
Q: Can I make these ahead of time?
A: Absolutely! Cook them completely, let them cool, then store in a sealed zip-top bag in the fridge for up to 5 days or freeze for 3 months. Reheat in a dry skillet for 20 seconds per side to bring back their soft, pliable magic.
Q: My dough is too sticky to handle!
A> No panic. Just add flour a tablespoon at a time while kneading until it becomes manageable. Remember, a slightly tacky dough is good, but if it’s sticking to everything, a bit more flour is your friend.
Q: Why didn’t my tortillas puff up?
A> Puffing is a happy bonus, not a requirement for deliciousness! It usually means the skillet was at the perfect hot temperature and the tortilla was rolled evenly. If they didn’t puff, they’ll still taste amazing. Check your heat and make sure you’re rolling them thinly and evenly.
Easy 4-Ingredient Sourdough Discard Tortillas : Soft, Tangy & Homemade
Description
These easy sourdough discard tortillas are a smart, delicious way to use up leftover starter. With just four basic ingredients and no yeast required, you’ll get soft, flexible tortillas with a gentle tang—perfect for tacos, wraps, and quesadillas. They cook quickly in a skillet and taste far better than store-bought.
Ingredients
-
1 cup sourdough discard (unfed)
-
1½ cups all-purpose flour (plus extra for dusting)
-
¼ cup olive oil or melted butter
-
½ teaspoon salt
Instructions
-
Make the Dough:
In a bowl, mix sourdough discard, flour, oil, and salt until a dough forms. -
Knead Briefly:
Turn onto a lightly floured surface and knead for 3–4 minutes until smooth and slightly tacky. -
Rest:
Divide into 8 balls. Cover and rest for 20 minutes to relax the dough. -
Roll:
Roll each ball into a thin 6–8 inch circle on a floured surface. -
Cook:
Heat a dry skillet over medium-high heat. Cook each tortilla 30–60 seconds per side until bubbles form and brown spots appear. -
Keep Warm:
Stack cooked tortillas in a clean towel to keep them soft.
Notes
-
Don’t skip the rest: Resting makes rolling easier and tortillas softer.
-
Adjust flour as needed: Discard thickness varies—add a little flour if sticky, or a splash of water if dry.
-
For extra softness: Keep tortillas covered while warm to trap steam.
-
Storage: Refrigerate up to 5 days or freeze up to 3 months. Reheat in a dry skillet.
Nutritional Nibbles
Let’s talk about what’s fueling you. These homemade tortillas are a cleaner, simpler choice compared to many store-bought versions, which can contain preservatives and added conditioners. Each tortilla (assuming the recipe makes 8) provides a good source of energy from complex carbs, with a bit of protein and fiber from the flour and sourdough fermentation. The olive oil adds heart-healthy monounsaturated fats. Using sourdough discard may also offer the benefits of prebiotics, which are great for gut health. Remember, this is about turning “waste” into wholesome, satisfying food you can feel great about serving your family. As always, specific values can vary based on your exact ingredients, but you’re in control of every single one that goes in.
Your New Kitchen Ritual
And there you have it, friends—the simplest way to fall in love with your sourdough discard all over again. This recipe is more than just a way to make tortillas; it’s a 40-minute lesson in slowing down, creating with your hands, and turning something simple into something special. That stack of warm, homemade tortillas on your table is a quiet victory. It’s a testament to the fact that the best food doesn’t need a mile-long ingredient list, just a little bit of heart and a jar of tangy starter.
So, the next time you’re about to feed your starter, save that discard with purpose. Know that it’s destined for greatness. I can’t wait for you to experience that first bite—the soft texture, the slight tang, the pure satisfaction of knowing, “I made this.” Share them, fill them, enjoy them. And don’t forget to tag @Feastical so I can see your beautiful creations! Now, go on. Your taco night just got a major upgrade.
Final Thoughts: More Than Just a Tortilla
If you’ve made it this far, you’re not just holding a recipe—you’re holding an invitation. An invitation to slow down, to create with intention, and to taste the quiet magic that happens when simple ingredients meet a little bit of care.
These tortillas are a beautiful lesson in kitchen alchemy. They remind us that what we might overlook as “discard” is actually a powerhouse of flavor and possibility. In a world of complicated recipes and lengthy ingredient lists, this humble four-ingredient ritual brings us back to the heart of cooking: transformation. You’re not just preventing waste; you’re crafting a conduit for connection—to your food, to your heritage, and to the people you’ll share these with.
I hope this recipe becomes more than just a way to use up starter for you. I hope it becomes a moment in your week where you feel the dough under your palms, smell that warm flour-toast scent in the air, and feel that deep, simple pride of making something real. Perfection isn’t the goal here; joy is. Whether your tortillas are picture-perfect circles or charmingly rustic, they are yours. They carry the unique fingerprint of your starter and your hands.
So here’s to the tangy, the soft, the homemade, and the heartfelt. Here’s to turning everyday rituals into small celebrations. May your skillet always be hot, your dough always relaxed, and your tacos always delicious.