Roasted Garlic Bucatini Alfredo with Smoked Mozzarella Chicken Parm
The Dinner That Gets a Standing Ovation: Roasted Garlic Bucatini Alfredo with Smoked Mozzarella Chicken Parm
Hey friends, Beau here from Feastical! Let me paint you a picture. It’s that kind of evening where you’re craving something unapologetically delicious. You want the crispy, saucy, cheesy joy of a perfect chicken parm, but you’re also dreaming of a luxuriously creamy, garlicky pasta that wraps around your fork like a warm blanket. You stare into the fridge, then the pantry, and think… why choose?
Well, my fellow foodie, today is the day we stop choosing and start feasting. This isn’t just a recipe; it’s a culinary high-five. We’re taking two all-star comfort food classics—Chicken Parmesan and Fettuccine Alfredo—and smashing them together into one epic, show-stopping plate. We’re adding depth with smoky mozzarella and sweet, mellow roasted garlic, and we’re serving it all on a bed of bucatini, my favorite pasta for holding onto every last drop of that incredible sauce.
This dish might look like it belongs on a white-tablecloth menu, but I promise you, it’s totally achievable in your own kitchen. We’ll walk through it together, step-by-step, with all my favorite chef hacks to make it foolproof. So, tie on your apron, put on some good tunes, and let’s create a dinner memory that’s going to have everyone at your table asking for seconds (and the recipe).
Why This Dish Feels Like Home
This recipe is basically my childhood food memories having a party on a plate. Growing up, “fancy” dinner meant my dad making his “world-famous” (in our house, anyway) chicken parm. The smell of tomato sauce simmering and cheese bubbling under the broiler was the ultimate signal that a good night was ahead. Meanwhile, my mom’s special occasion dish was her Alfredo—rich, garlicky, and always served with garlic bread for dipping.
Years later, working in restaurants, I fell in love with the technique of roasting garlic. Transforming a sharp, pungent bulb into a sweet, spreadable paste felt like kitchen magic. One slow Sunday, I was experimenting, craving both of those foundational comforts, and I thought… what if? What if I swirl that roasted garlic magic into a creamy Alfredo and pile it under that crispy, cheesy chicken? The first time I took a bite of the finished mashup, it was a full-on flavor flashback, but better. It was all the cozy, happy feels, upgraded. That’s the spirit I want to bring to your table.
Gathering Your Flavor All-Stars
Great food starts with great ingredients. Here’s everything you’ll need. Don’t stress if you need to swap something—I’ve got your back with tips!
For the Smoked Mozzarella Chicken Parm:
- 2 boneless, skinless chicken breasts: We’ll pound them thin for even cooking and maximum crispiness. Chef’s Tip: If they’re huge, slice them horizontally into cutlets first!
- Salt, pepper, garlic powder: The holy trinity of seasoning. Don’t be shy—season every layer.
- 1 cup all-purpose flour: This is the first coat in our “breading armor.” It helps the egg stick and creates a perfect crispy base.
- 2 large eggs, beaten: Our glue! A quick splash of water or milk in the beaten eggs can make them easier to work with.
- 1 ½ cups panko breadcrumbs: The secret to ultra-crunchy chicken parm! Panko is lighter and airier than regular breadcrumbs. Substitution: Italian-seasoned breadcrumbs work in a pinch for extra flavor.
- ½ cup good marinara sauce: Use your favorite jarred brand or your own homemade. We just need a flavorful spoonful on each cutlet.
- 4 slices smoked mozzarella: This is the game-changer! The smokiness adds a whole new dimension. Substitution: Regular fresh mozzarella (the kind in water) works beautifully too—it’ll be extra gooey.
- Olive oil for frying: A good glug in the pan. You want enough to shallow fry, about ¼ inch deep.
For the Roasted Garlic Bucatini Alfredo:
- 8 oz bucatini pasta: Those long, hollow tubes are perfect for capturing sauce. Substitution: Fettuccine, tagliatelle, or even linguine are all fantastic.
- 2 tbsp unsalted butter: The rich foundation of our sauce.
- 1 whole head of roasted garlic: Don’t skip this! Roasting tames the garlic’s bite and brings out incredible sweetness. Chef’s Hack: Roast 2-3 heads at once while you’re at it—the leftovers are amazing on bread, in mashed potatoes, everywhere!
- ¾ cup heavy cream or half-and-half: Heavy cream = ultimate luxury. Half-and-half = a touch lighter but still delicious. For a truly decadent sauce, go with the cream.
- ½ cup freshly grated Parmesan cheese: Please, for the love of all that is cheesy, grate it yourself! The pre-grated stuff has anti-caking agents that can make your sauce grainy.
- Salt and freshly cracked black pepper: To taste. Fresh pepper in an Alfredo sauce is non-negotiable for me.
- Chopped fresh parsley for garnish: A pop of color and freshness to cut through the richness.
Let’s Get Cooking: Your Step-by-Step Roadmap to Delicious
We’ll tackle this in a logical flow. I recommend reading through once, then diving in. You’ve got this!
Step 1: The Garlic Magic (Do This First!)
Preheat your oven to 400°F (200°C). Take your whole head of garlic, slice about ¼ inch off the top to expose the cloves. Drizzle with a little olive oil, wrap it tightly in foil, and roast for 35-40 minutes until the cloves are deeply golden, soft, and smell incredible. Let it cool slightly so you can handle it. Chef’s Hack: You can do this up to 3 days ahead! Just store the cooled, whole roasted head in the fridge.
Step 2: Prep the Chicken for Stardom
While the garlic roasts, place your chicken breasts between two sheets of plastic wrap or in a large zip-top bag. Using a rolling pin, meat mallet, or even a heavy skillet, gently pound them to an even ½-inch thickness. This ensures quick, even cooking. Season both sides generously with salt, pepper, and garlic powder. Set up your breading station: one shallow dish with flour, one with the beaten eggs, and one with the panko breadcrumbs.
Step 3: Cook the Pasta Like a Pro
Bring a large pot of well-salted water to a boil (it should taste like the sea!). Cook the bucatini according to package directions until al dente—it should still have a slight bite. Right before draining, scoop out about ¼ cup of the starchy pasta water and set it aside. This liquid gold will help our sauce cling to the pasta beautifully. Drain the pasta but do not rinse it.
Step 4: Create the Creamy Roasted Garlic Alfredo
In a large skillet or saucepan, melt the butter over medium heat. Carefully squeeze the entire head of roasted garlic into the pan—the soft cloves should just pop right out! Mash them into the butter with a fork until you have a fragrant paste. Pour in the heavy cream, stir to combine, and let it simmer gently for 2-3 minutes to thicken slightly. Reduce the heat to low and gradually whisk in the grated Parmesan until it’s melted and the sauce is smooth. If the sauce feels too thick, add a splash of that reserved pasta water. Season with salt and a hearty amount of black pepper. Toss the drained bucatini directly into the sauce, stirring until every strand is gloriously coated. Keep it on very low heat while you finish the chicken.
Step 5: Crispy Chicken Parm Perfection
Heat about ¼ inch of olive oil in a large skillet over medium-high heat. Take your seasoned chicken: dredge it first in flour (shake off excess), then dip in egg (let excess drip off), then press firmly into the panko, coating both sides. Test the oil by flicking in a panko crumb—it should sizzle immediately. Gently add the breaded chicken and cook for 4-5 minutes per side, until the crust is golden brown and the chicken is cooked through (165°F internal temp). Transfer to a paper-towel-lined plate for a minute.
Step 6: The Grand Finale: Cheese & Broil
Switch your oven to broil (high, if you have the option). Place the crispy chicken cutlets on a baking sheet. Spoon a couple tablespoons of marinara over each piece, then top with two slices of the smoked mozzarella. Broil for 2-3 minutes, WATCHING CLOSELY, until the cheese is melted, bubbly, and spotted with golden brown. It happens fast!
Plating Your Masterpiece
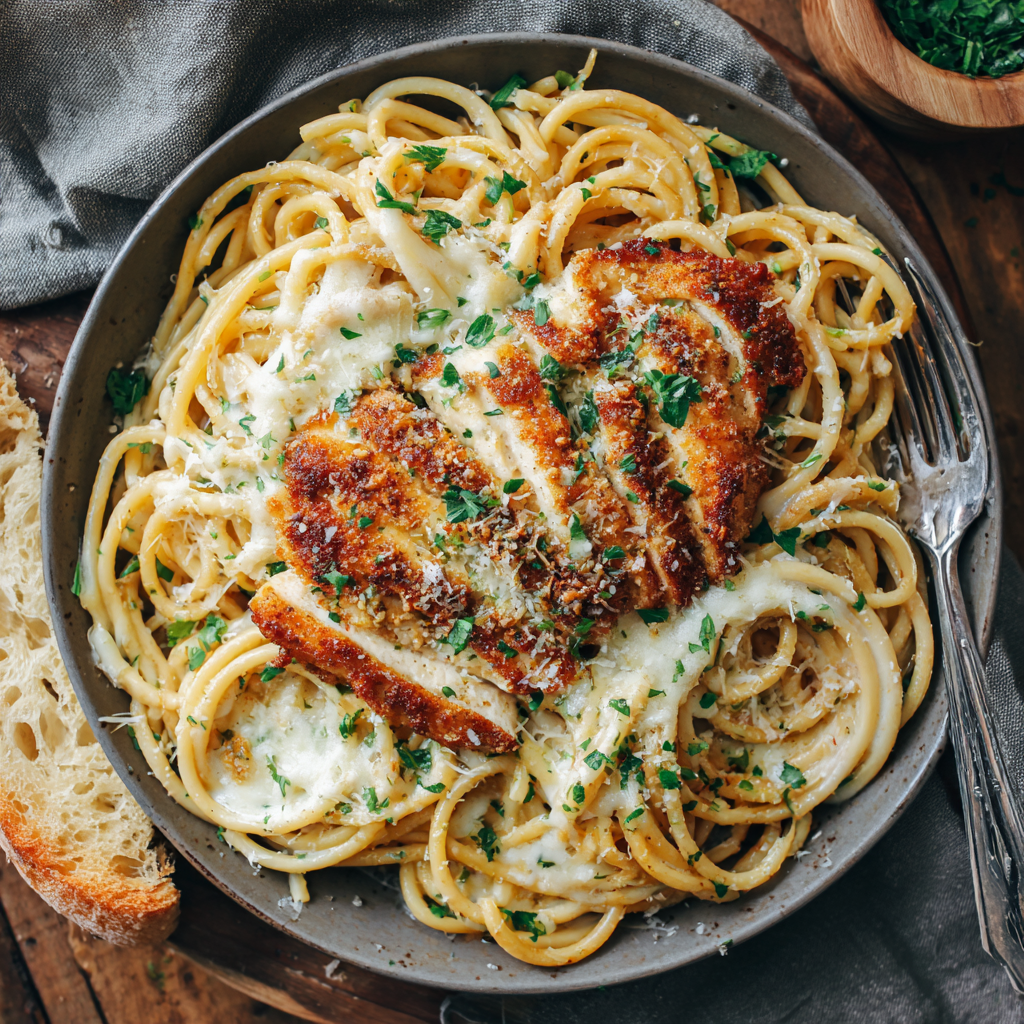
This is the fun part! Grab your biggest, most comforting bowls or plates. Pile a generous swirl of the roasted garlic bucatini Alfredo right in the center. Carefully place a smoked mozzarella chicken parm cutlet on top, letting it lean against the pasta mountain. Finish with a sprinkle of fresh parsley and an extra dusting of grated Parmesan. I love to serve this with a simple, crisp green salad and maybe a slice of crusty bread for mopping up any leftover sauce on the plate. It’s a complete, satisfying, and downright impressive meal.
Make It Your Own: Delicious Twists & Swaps
Love the idea but want to mix it up? Here are some of my favorite variations:
- ‘Nduja & Herb: Stir a tablespoon of spicy ‘nduja (a spreadable Calabrian sausage) into the Alfredo sauce for a fiery, meaty kick. Garnish with fresh basil instead of parsley.
- Vegetarian Delight: Skip the chicken! Roast thick slices of cauliflower or zucchini, bread and fry them just like the chicken, or use large portobello mushroom caps. The creamy pasta is hearty enough to carry the dish.
- Lemon & Pea Brightness: Add the zest of one lemon and a cup of frozen peas (thawed) to the Alfredo sauce along with the pasta for a brighter, springtime version.
- Gluten-Free Friendly: Use your favorite GF pasta and GF panko breadcrumbs for the chicken. The method stays exactly the same!
- Prosciutto & Sage: Before adding the chicken to the pan, fry a few slices of prosciutto until crisp. Crumble over the finished dish. Add a few fried sage leaves for an incredible gourmet touch.
Beau’s Kitchen Notebook
This recipe has become my go-to for “wow factor” dinners, and it’s evolved a bit since that first Sunday experiment. I used to use regular shredded mozzarella, but the first time I tried the smoked version, it was a revelation—it adds a campfire-cozy note that plays so well with the sweet roasted garlic. Another lesson learned the hard way: don’t overcrowd the pan when frying the chicken! Give them space, or you’ll steam them instead of crisping them. And honestly, the roasted garlic step is where the soul of the pasta sauce is. Once, in a rush, I tried using raw minced garlic… let’s just say it was a completely different (and much harsher) beast. Low and slow for the win!
Your Questions, Answered
Q: Can I make any part of this ahead of time?
A: Absolutely! You can roast the garlic, bread the chicken (store it covered in the fridge for up to 4 hours), and even make the Alfredo sauce base (hold the pasta water). Reheat the sauce gently, adding a splash of cream or pasta water to loosen it.
Q: My sauce broke/got grainy! What happened?
A: This usually happens if the heat is too high when adding the cheese. Always add Parmesan off the heat or on very low heat. If it does separate, a splash of hot pasta water or cream and a vigorous whisk can often bring it back together.
Q: Can I bake the chicken instead of frying?
A: For sure! Place the breaded chicken on a wire rack set over a baking sheet, spray lightly with oil, and bake at 400°F for 15-20 minutes, flipping halfway, until cooked and crispy. Top with sauce and cheese and broil as directed.
Q: What’s the best substitute for bucatini?
A Any long, sturdy pasta is great. Fettuccine is the classic Alfredo vehicle, but I also love thick spaghetti or even rigatoni for catching all that sauce in its tubes.
Roasted Garlic Bucatini Alfredo with Smoked Mozzarella Chicken Parm
Description
When you can’t decide between rich, creamy Alfredo and crispy, cheesy chicken parmesan—don’t. This show-stopping dinner layers golden smoked mozzarella chicken parm over luxuriously creamy roasted garlic Alfredo tossed with bucatini. It’s bold, comforting, and restaurant-worthy, yet completely achievable at home. A true standing-ovation kind of meal.
Ingredients
Smoked Mozzarella Chicken Parmesan
-
2 boneless, skinless chicken breasts
-
Salt, black pepper, and garlic powder
-
1 cup all-purpose flour
-
2 large eggs, beaten
-
1½ cups panko breadcrumbs
-
Olive oil, for frying
-
½ cup marinara sauce
-
4 slices smoked mozzarella cheese
Roasted Garlic Bucatini Alfredo
-
8 oz bucatini pasta
-
2 tablespoons unsalted butter
-
1 whole head garlic, roasted
-
¾ cup heavy cream (or half-and-half)
-
½ cup freshly grated Parmesan cheese
-
Salt and freshly cracked black pepper
-
¼ cup reserved pasta water
- Chopped fresh parsley, for garnish
Instructions
1. Roast the Garlic
Preheat oven to 400°F (200°C). Slice the top off the garlic head to expose cloves. Drizzle with olive oil, wrap in foil, and roast 35–40 minutes until soft and golden. Cool slightly.
2. Prep the Chicken
Pound chicken to an even ½-inch thickness. Season generously with salt, pepper, and garlic powder.
Set up breading stations: flour → beaten eggs → panko.
3. Cook the Pasta
Boil bucatini in well-salted water until al dente. Reserve ¼ cup pasta water, then drain.
4. Make the Roasted Garlic Alfredo
Melt butter over medium heat. Squeeze roasted garlic into the pan and mash into a paste.
Add cream and simmer gently 2–3 minutes.
Lower heat and whisk in Parmesan until smooth. Season with salt and pepper.
Add pasta and a splash of reserved pasta water until glossy and coated. Keep warm on low.
5. Fry the Chicken
Heat about ¼ inch olive oil in a skillet over medium-high heat.
Dredge chicken in flour, egg, then panko.
Fry 4–5 minutes per side until golden and cooked through (165°F). Drain briefly on paper towels.
6. Sauce, Cheese & Broil
Preheat broiler. Place chicken on a baking sheet. Spoon marinara over each piece and top with smoked mozzarella.
Broil 2–3 minutes, watching closely, until cheese is melted and bubbly.
Notes
-
Smoked mozzarella adds incredible depth—worth seeking out
-
Grate Parmesan fresh to prevent grainy sauce
-
Add pasta water gradually for perfect sauce texture
-
Don’t overcrowd the pan when frying chicken
Nutritional Information (Per Serving)
Disclaimer: This is an estimate based on the specific ingredients listed and standard nutrition databases. Values can vary based on brands, exact measurements, and substitutions (like using half-and-half vs. heavy cream).
- Calories: ~700-750
- Protein: 45g
- Carbohydrates: 50g
- Fat: 35g
- Saturated Fat: 18g
- Fiber: 2g
- Sugar: 4g
This is a rich, indulgent dish designed for a special meal. Pairing it with a large side salad is a great way to add volume, fiber, and nutrients to your plate!
Final Thoughts from My Kitchen to Yours
Friends, this Roasted Garlic Bucatini Alfredo with Smoked Mozzarella Chicken Parm is more than just a recipe. It’s a celebration of bold flavors, comforting textures, and the pure joy of creating something spectacular in your own kitchen. It’s the dish you make when you want to treat your loved ones (or just treat yourself!) to something truly special.
Remember, cooking is an adventure. If your cheese gets a little too

Deconstructed Cheesy Baked Ziti Bowls : Vegan & High Protein Comfort
Deconstructed Cheesy Baked Ziti Bowls – Your New Vegan Comfort Food Obsession
Hey, friend! Beau here, welcoming you back to the Feastical kitchen. Let’s talk about those nights. You know the ones. You’re scrolling through your feed, you see a picture of someone’s bubbling, cheesy, glorious baked pasta, and a wave of pure comfort food craving hits you like a freight train. But maybe you’re trying to eat more plants, or you’re short on time, or you just don’t feel like heating up the whole oven for one dish. I hear you. Loud and clear.
That’s exactly why I created these Deconstructed Cheesy Baked Ziti Bowls. We’re taking every single thing we love about that classic, nostalgic bake—the tender pasta, the rich tomato sauce, the creamy, dreamy cheese factor—and we’re turning it into a quick, high-protein, 100% vegan bowl of glory that comes together faster than you can preheat your oven. No layering, no baking, no waiting. Just all the flavor, all the coziness, and a satisfying protein punch that’ll keep you full and happy.
This isn’t about sacrificing flavor; it’s about reimagining comfort. It’s about getting that warm-hug feeling from your food without the hassle. So, grab your favorite bowl and your trusty fork. We’re about to make magic happen.
The Night That Inspired a Bowl (And a Few Laughs)
This recipe was born on a rainy Tuesday that felt like a Monday. My friends had spontaneously popped over, movies were queued up, and the unanimous vote was for “something cheesy and carby.” The problem? My oven had decided to throw a tantrum and refuse to heat past 250 degrees. A classic baked ziti was off the table, and a minor kitchen mutiny was brewing.
I stared into my pantry, then my fridge. Pasta? Check. Sauce? Check. I had some tofu ricotta from testing another recipe, a tub of vegan cream cheese, and a bag of spinach looking hopeful. In a moment of “let’s-see-what-happens” inspiration, I just started tossing it all into my biggest skillet. I figured we’d have a decent, if slightly chaotic, pasta toss. What emerged from that pan ten minutes later was a revelation—a creamy, cheesy, incredibly hearty dish that had everyone scraping the skillet clean. My friend Sam, mouth full, declared it “better than the baked kind.” High praise! We dubbed it the “Deconstructed Disaster-Saver Ziti,” and it’s been in my weekly rotation ever since.
Gathering Your Flavor Arsenal
Here’s the beautiful part: this recipe is incredibly forgiving and flexible. Think of this list as your roadmap, not a rigid rulebook. I’ll give you the perfect starting point and all the detours you might want to take.
- 1½ cups cooked ziti or penne pasta: The sturdy vessel for all our saucy goodness. I love the way ziti or penne catch the creamy sauce in their tubes. Chef’s Insight: Cook your pasta in well-salted water until just al dente—it’ll soften a touch more when we warm everything together.
- 1 cup frozen spinach, thawed and squeezed dry: Our veggie boost! Squeezing out the excess water is non-negotiable—we want flavor, not a watery sauce. No spinach? Try chopped kale or even thawed, chopped broccoli florets.
- ½ cup vegan ricotta or tofu ricotta: The creamy, protein-packed heart of the dish. Store-bought is great, but if you’re feeling fancy, my easy tofu ricotta (blend firm tofu with lemon juice, garlic, salt, and nutritional yeast) is a game-changer.
- ¼ cup vegan cream cheese or plain dairy-free yogurt: This is our secret weapon for next-level creaminess and tang. Cream cheese gives a richer feel, while yogurt lightens it up a bit. Both are fantastic.
- ½ cup marinara or tomato sauce: Use your favorite jarred sauce for ease, or your own homemade stash. This brings that familiar, cozy tomato base.
- 2 tbsp nutritional yeast: Don’t skip this! It’s not just for hippies—it adds a deep, savory, “cheesy” umami flavor that makes this dish truly sing. It’s a flavor powerhouse.
- ½ tsp garlic powder: We’re using powder here for its consistent, mellow flavor that melds seamlessly into the sauce. Of course, a minced fresh garlic clove sautéed for 30 seconds before adding everything else is also a stellar move.
- Salt & pepper to taste: Your best friends. Season in layers—a pinch in the ricotta mix, then again at the end. Taste as you go!
- Optional: vegan mozzarella shreds for topping: Because sometimes, you just need that melty, stringy cheese pull on top. It’s the celebratory finish.
Let’s Build Some Deliciousness: Your Step-by-Step Guide
Ready? This is where the fun begins. We’re going to create creamy, cheesy harmony in about 10 minutes flat.
- The Creamy Foundation: In a medium mixing bowl, plop in your squeezed-dry spinach, vegan ricotta, vegan cream cheese (or yogurt), nutritional yeast, garlic powder, a good pinch of salt, and a few cracks of black pepper. Now, get in there with a fork or spatula and mix it until it’s a beautifully uniform, green-flecked, creamy dream. Chef’s Hack: If your ricotta is cold and firm, letting this mixture sit for 5 minutes before adding the pasta helps the flavors get to know each other.
- Bringing It All Together: Add your cooked pasta and the marinara sauce to the bowl. Here’s my favorite part: gently fold and stir until every single piece of pasta is lovingly coated in that creamy, cheesy, tomato-y goodness. Don’t be aggressive—we’re coaxing flavors together, not beating them up.
- The Warm Hug: You have two brilliant options here. For the Skillet Method (my preference for maximum flavor): transfer the whole mixture to a non-stick skillet over medium-low heat. Stir gently for 3-5 minutes until everything is heated through and bubbling slightly. For the Speed Demon Method: simply microwave your bowl in 60-second bursts, stirring in between, until perfectly hot.
- The Grand Finale (Optional but Recommended): If you’re using that vegan mozzarella, now’s the time! Sprinkle a generous handful over the top of your warm pasta, either in the skillet or in your serving bowls. Pop it under a broiler for 1-2 minutes (watch it like a hawk!) or microwave for another 45-60 seconds until the cheese is melty and glorious.
How to Serve Up This Bowl of Cozy
Presentation is part of the fun, even on a casual weeknight! I like to ladle big, generous scoops into deep, wide bowls—the kind you can cradle in your hands. The contrast of the creamy red pasta, flecked with green, and that white, melty mozzarella top is just *chef’s kiss*.
For a little restaurant-style flair, finish it with a tiny drizzle of good olive oil, a fresh crack of black pepper, and maybe a sprinkle of chopped fresh basil or parsley if you have it. A side of garlic bread for dipping is basically a legal requirement, and a simple, crisp green salad with a lemony vinaigrette cuts through the richness perfectly. This is also a stellar meal prep candidate—portion it into containers, and you’ve got instant lunches that reheat like a dream.
Make It Your Own: 5 Tasty Twists
The beauty of a “deconstructed” dish is how easy it is to customize. Here are a few of my favorite spins:
- The “Meaty” Marvel: Crumble in a plant-based Italian sausage or ground “beef” alternative when you’re warming the mixture in the skillet. Let it brown a bit first for extra flavor.
- Sun-Dried Tomato & Artichoke Heart Fancy-Pants Version: Swap the marinara for a creamy roasted garlic sauce, and stir in ¼ cup chopped sun-dried tomatoes and a handful of chopped artichoke hearts. Pure Mediterranean bliss.
- Pumpkin Cream “Fall-tastic” Bowl: Replace the marinara with ½ cup of canned pumpkin puree and use vegetable broth to thin it to a sauce consistency. Add a pinch of nutmeg and sage. Trust me on this one.
- Gluten-Free & Protein-Packed: Use your favorite gluten-free pasta (chickpea or lentil pasta adds even more protein!) and ensure your other ingredients are GF. It works perfectly.
- Spicy Arrabbiata Kick: Use a spicy arrabbiata sauce and add a pinch of red pepper flakes to the ricotta mix. Top with a dollop of vegan pesto for a flavor explosion.
A Few Notes From My Kitchen to Yours
This recipe has become my go-to for so much more than broken-oven emergencies. It’s my “I need comfort now” dish, my “impress a vegan friend” dish, and my “what can I make with these random leftovers?” dish. Over time, I’ve learned that the type of vegan cream cheese you use makes a difference—some are tangier, some are richer. Pick your favorite brand, and it’ll shine through.
The biggest evolution? I almost always double it now. Because the leftovers (if there are any!) are arguably even better the next day after the flavors have had a full night to mingle and deepen in the fridge. It’s a forgiving, friendly recipe that wants you to succeed. So relax, have fun, and make it yours.
Your Questions, Answered
Q: My sauce turned out a bit watery. What happened?
A: The usual suspect is the spinach! Make sure you really, truly squeeze all the liquid out of it after thawing. Using a clean kitchen towel is the best method. Also, if you’re using a very watery marinara sauce, try simmering it for a few minutes in the skillet first to thicken it up before adding the pasta mix.
Q: Can I make this nut-free?
A: Absolutely! Just check your vegan cheese labels carefully, as some are made with nuts (like cashews). Opt for brands that use a soy, coconut, or oat base. Your homemade tofu ricotta is naturally nut-free.
Q: I don’t have nutritional yeast. Can I omit it?
A: You can, but you’ll lose a lot of the savory, cheesy depth. If you must, add an extra tablespoon of vegan cream cheese and a squeeze of lemon juice to try to compensate for the tang and richness.
Q: How long do leftovers keep?
A: Stored in an airtight container in the fridge, they’re perfect for 3-4 days. Reheat gently in the microwave or in a skillet with a tiny splash of water or plant milk to loosen it up.
Deconstructed Cheesy Baked Ziti Bowls : Vegan & High Protein Comfort
Description
All the cozy, cheesy comfort of baked ziti—without the oven, layering, or waiting. These Deconstructed Cheesy Baked Ziti Bowls deliver tender pasta, rich tomato sauce, and creamy vegan “cheese” in one fast, satisfying bowl. They’re 100% plant-based, packed with protein, and ready in about 15 minutes—perfect for busy nights when you want comfort now.
Ingredients
-
1½ cups cooked ziti or penne pasta
-
1 cup frozen spinach, thawed and squeezed completely dry
-
½ cup vegan ricotta or tofu ricotta
-
¼ cup vegan cream cheese or plain dairy-free yogurt
-
½ cup marinara or tomato sauce
-
2 tablespoons nutritional yeast
-
½ teaspoon garlic powder
-
Salt and black pepper, to taste
Optional Topping
- Vegan mozzarella shreds
Instructions
-
Make the Creamy Base
In a medium bowl, combine spinach, vegan ricotta, vegan cream cheese (or yogurt), nutritional yeast, garlic powder, salt, and pepper. Mix until smooth and evenly combined. -
Add Pasta & Sauce
Fold in the cooked pasta and marinara sauce, stirring gently until every piece is coated. -
Heat
-
Skillet method: Transfer to a non-stick skillet over medium-low heat and warm for 3–5 minutes, stirring gently.
-
Microwave method: Heat in 60-second intervals, stirring between each, until hot.
-
-
Optional Cheesy Finish
Sprinkle vegan mozzarella on top and heat until melted (under the broiler for 1–2 minutes or microwave for 45–60 seconds). - Serve
Spoon into bowls and enjoy warm.
Notes
-
Squeeze spinach extremely well to avoid watery sauce
-
Nutritional yeast is essential for cheesy depth—don’t skip it
-
Use al dente pasta so it doesn’t turn mushy when reheated
-
Add a splash of plant milk when reheating leftovers for creaminess
Nutritional Info (A Per-Serving Breakdown)
Approximate values per serving (recipe makes 2 generous bowls or 3 smaller portions), calculated using a generic vegan ricotta and cream cheese:
- Calories: 370
- Protein: 20g – That’s the power of tofu ricotta and nutritional yeast working together!
- Carbohydrates: 38g
- Fat: 14g
- Fiber: 6g – Thanks, spinach and whole-food ingredients!
This bowl is a fantastic balance—it delivers the comfort food experience while also providing a solid amount of plant-based protein and fiber to keep you satisfied. It’s proof that “indulgent” and “nourishing” can absolutely be on the same plate.
Final Thoughts Before You Dig In
And there you have it! A recipe that proves you don’t need dairy or hours in the kitchen to experience the profound joy of a cheesy, comforting pasta dish. This deconstructed ziti bowl is all about simplicity, big flavor, and that feeling of satisfaction you get from creating something delicious for yourself (and maybe your lucky dinner companions).
I hope this recipe finds its way into your regular rotation, becoming your own version of a quick, reliable, hug-in-a-bowl. If you make it, I’d love to hear how it turned out! Tag me over on Instagram or Facebook with #Feastical so I can see your beautiful creations.
Now, go forth and cook with confidence! Remember, the best kitchen is a happy, relaxed one. Until next time, keep your forks ready and your appetite adventurous.
With love and a full bowl,
Beau
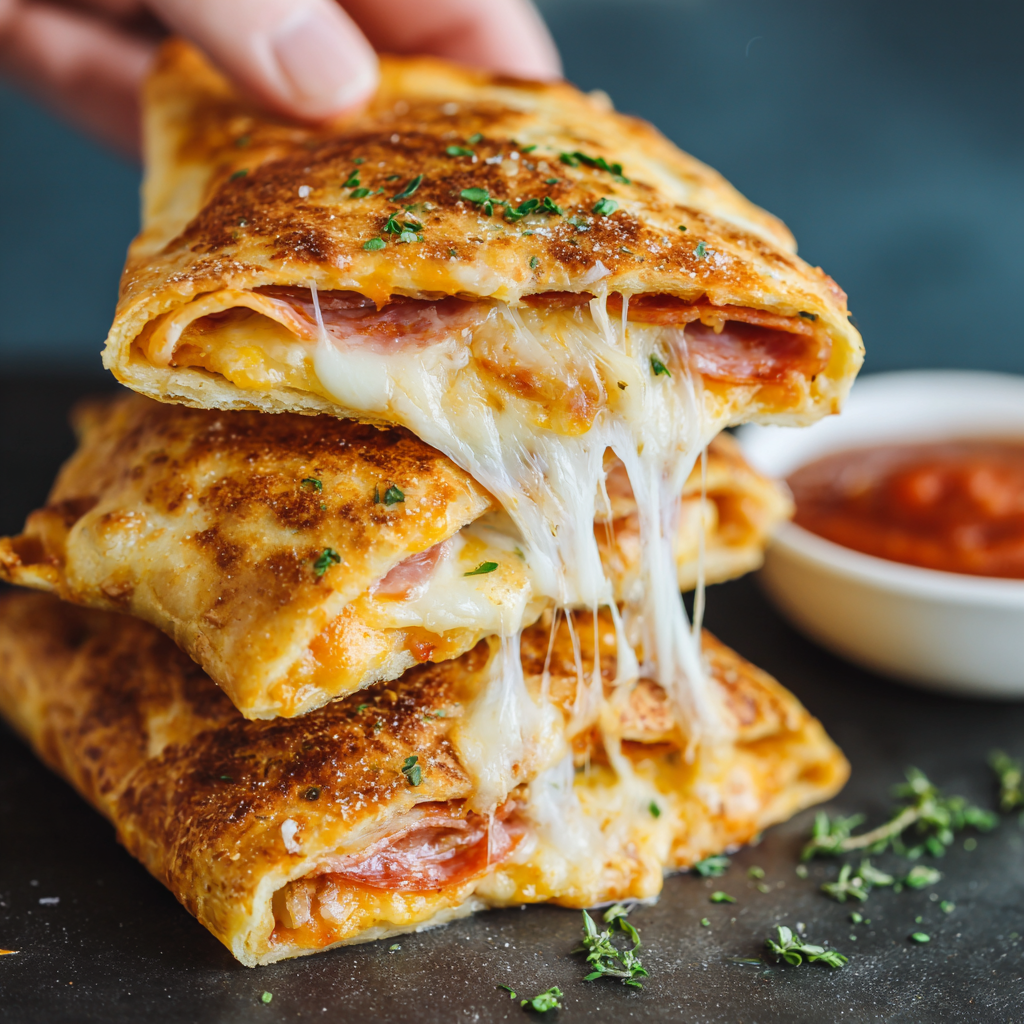
High Protein Pizza Pockets (Cheesy, Savory & Meal Prep Friendly)
The Quest for the Perfect Handheld, High-Protein Pizza Pocket: Let’s Get Cheesy!
Hey there, friend! Beau here, welcoming you back to my kitchen counter at Feastical. Ever have one of those days where the craving for gooey, savory pizza hits hard, but the thought of a whole pie (and the subsequent food coma) feels like a bit much? Or maybe you’re rushing between meetings, carpool lines, and workouts, and you need a satisfying, protein-packed bite that actually tastes like a treat? I hear you. I’ve been there, staring into the fridge, wishing for something that felt indulgent but didn’t derail my day.
That’s exactly why I became obsessed with creating the ultimate High-Protein Pizza Pocket. We’re talking about everything you love—the tangy sauce, the stretchy cheese, the savory pepperoni—wrapped up in a golden, handheld crust that’s secretly working for you. These aren’t just another sad, frozen “health” food. They’re a celebration of flavor and smart cooking, born from my belief that feel-good food should make you feel awesome, not sluggish.
Best part? This recipe is a kitchen hack dream. With just a few staple ingredients (hello, Greek yogurt and self-rising flour!), you’re about 30 minutes away from a meal prep hero that freezes like a champ. So, tie on your apron, grab your favorite rolling pin (or a wine bottle—no judgment here!), and let’s turn that pizza craving into a powerhouse of delicious, macro-friendly joy.
My Pizza Pocket Epiphany: A Tale of Two Slices
My love affair with handheld pizza started, like many great food stories, in a slightly chaotic and deeply nostalgic setting. Picture a rainy Saturday in my Nana’s warm, always-smelling-like-something-awesome kitchen. My cousins and I were underfoot, and to keep us busy, she’d give us little balls of her bread dough, a bowl of leftover spaghetti sauce, and a handful of shredded cheese. Our mission: create our own “pizza packets.” They were messy, they were oddly shaped, and they were absolute perfection.
Fast forward to my early days of trying to eat better and fuel my body for long days in a busy restaurant kitchen. I missed that simple, contained joy. The frozen stuff at the store was either a cardboard disappointment or a calorie bomb. I wanted Nana’s spirit in a package that fit my grown-up life. The “aha!” moment came when I was making two-ingredient dough for bagels. I looked at that simple, pliable dough and thought, “This could be a pizza pocket vessel.” A few (dozen) tests later—involving everything from too-thick crusts to catastrophic cheese leaks—and we landed on this beauty. It’s the happy marriage of my childhood kitchen chaos and my chef’s drive for a better bite. Every time I make them, I swear I can hear Nana saying, “See? I told you good food is simple.”
Gathering Your Pizza Pocket Toolkit: Ingredients with Intent
Magic happens with simple, quality ingredients. Here’s exactly what you’ll need and why each one matters. I’ve also included my favorite swap-outs so you can make this recipe your own.
- 1 cup plain non-fat Greek yogurt: This is our superstar. It adds incredible moisture, tang, and a massive protein boost to the dough. Chef’s Insight: Make sure it’s Greek yogurt, not regular. The thickness is key for the dough texture. For a dairy-free version, a thick, plain vegan yogurt can work, but the dough may be stickier.
- 1 cup self-rising flour: The convenience champion! It already has baking powder and salt mixed in, giving our pockets a perfect, slightly fluffy rise. Substitution Tip: No self-rising flour? Combine 1 cup all-purpose flour with 1½ teaspoons of baking powder and a tiny pinch of salt. Easy fix!
- ½ cup low-fat mozzarella cheese, shredded: Melty, stretchy, classic pizza joy. Using part-skim keeps the protein high and fat in check. Chef’s Insight: Pre-shredded bagged cheese works in a pinch, but blocks you shred yourself melt so much better and don’t have anti-caking agents.
- ¼ cup turkey pepperoni or cooked lean ground turkey: The savory punch! Turkey pepperoni is my go-to for that classic flavor with less grease. Substitution Tip: This is your playground! Diced chicken sausage, ham, crumbled tofu, or even a handful of rinsed canned black beans for a veggie boost are all fantastic.
- ¼ cup pizza sauce (no sugar added): Flavor central! A no-sugar-added or lower-sugar sauce keeps things clean. Chef’s Insight: A little goes a long way here—overfilling with sauce is the main cause of leaks! I use about 1 tablespoon per pocket.
- Italian seasoning & garlic powder (optional): These are your flavor amplifiers. A sprinkle in the filling or on the crust takes it to the next level.
- 1 egg (for egg wash): The golden glow secret! Whisking an egg with a splash of water and brushing it on before baking gives our pockets that gorgeous, professional-looking golden brown shine.
Let’s Build Some Pockets! Your Foolproof, Step-by-Step Guide
Ready to roll? Let’s transform these simple ingredients into your new favorite meal prep staple. Follow along, and don’t worry—I’ve packed each step with my hard-earned kitchen hacks to ensure success.
- Preheat & Prep: Fire up your oven to 375°F (190°C) and line a baking sheet with parchment paper. Chef’s Hack: Parchment is non-negotiable here. It prevents sticking and makes cleanup a literal snap. No parchment? A light spray of oil will do.
- Make the Magic Dough: In a medium bowl, mix the Greek yogurt and self-rising flour with a fork until it starts to come together. Then, use your hands to knead it right in the bowl for about 30-45 seconds until it forms a slightly sticky, cohesive ball. Chef’s Commentary: It might seem too shaggy at first, but trust the process! If it’s extremely sticky, dust your hands with a tiny bit of flour. Don’t over-knead—we want tender pockets, not tough ones.
- Divide & Conquer: Lightly flour your clean countertop. Place the dough ball on it and divide it into four equal pieces. Think of them as hearty, palm-sized portions. Roll each piece into a smooth ball. Chef’s Hack: Use a kitchen scale for absolute precision, or just eyeball it—they’re homemade, they’re meant to have character!
- Roll It Out: Using a rolling pin (or that wine bottle!), roll each ball into a circle or oval about ⅛-inch thick. Chef’s Tip: If the dough springs back, let it rest for 5 minutes. The gluten just needs to relax. Aim for roughly 6-7 inches across.
- The Fill & Fold: This is the fun part! On one half of each dough circle, spread about 1 tablespoon of pizza sauce, leaving a ½-inch border. Top with a sprinkle of cheese, then your meat (or veggie filling). DO NOT OVERFILL! This is the cardinal rule of pocket-making. Fold the bare half of the dough over the filling to create a half-moon shape. Chef’s Crucial Hack: Use a fork to firmly press and crimp the edges shut. Press, press, press! This seals in the cheesy goodness.
- Gild the Lily (Egg Wash Time): Transfer your sealed pockets to the prepared baking sheet. Whisk the egg with a teaspoon of water, and gently brush it over the top of each pocket. This gives them that gorgeous color and shine. Sprinkle with a little Italian seasoning or garlic powder if you like.
- Bake to Golden Perfection: Slide the baking sheet into your preheated oven. Bake for 18 to 22 minutes. You’re looking for a beautifully golden brown crust. Chef’s Insight: Ovens vary, so start checking at 18 minutes. If you see any cheese trying to escape, just gently nudge it back with a spatula—no big deal!
- The Tortuous Wait (Cooling): I know, it’s hard. But let them cool on the sheet for at least 5-10 minutes. The filling is like molten lava right out of the oven! Cooling helps them set and makes them easier to handle.
How to Serve Up These Savory Handheld Gems
You did it! Now, let’s talk about enjoying the fruits of your labor. Straight out of the oven, these pizza pockets are a glorious, self-contained meal. I love placing one on a simple plate with a big, crunchy side salad tossed in a light vinaigrette. The fresh, cool salad is the perfect contrast to the warm, cheesy pocket.
For a game-day snack or casual appetizer, slice them into dippable strips! Serve with a side of warm marinara, ranch, or even a zesty Greek yogurt dip mixed with herbs. For the ultimate post-workout refuel, pair a pocket with a piece of fruit or some veggie sticks for a perfectly balanced, satisfying meal. And don’t forget the lunchbox! They pack beautifully and taste fantastic at room temperature or reheated.
Make It Your Own: 5 Flavorful Twists on the Classic
The basic recipe is just the launching pad. Here are a few of my favorite ways to mix things up:
- Veggie Lover’s Delight: Skip the meat and load up with sautéed mushrooms, spinach, diced bell peppers, and onions. A few black olives or banana peppers add a great tang.
- BBQ Chicken Twist: Swap the pizza sauce for your favorite sugar-free BBQ sauce. Use shredded cooked chicken and a blend of mozzarella and sharp cheddar cheese. A sprinkle of red onion inside is *chef’s kiss*.
- Breakfast Pocket: Morning pizza, anyone? Fill with scrambled eggs, diced turkey sausage or ham, and a sprinkle of cheddar. A dash of hot sauce before sealing is amazing.
- “White Pizza” Herb & Ricotta: Mix a few tablespoons of part-skim ricotta with minced garlic, chopped fresh basil, and a pinch of salt. Use this as your base instead of red sauce, and top with mozzarella.
- Spicy Supreme: Kick up the heat! Use spicy turkey sausage, add a few sliced jalapeños to the filling, and mix a little red pepper flake into your egg wash sprinkle.
Beau’s Kitchen Notes: Tales from the Trenches
This recipe has seen some… experimental phases in my kitchen. There was the “More Cheese Is Always Better” incident of 2022, which resulted in a delicious but structurally unsound cheese lake on my baking sheet. Lesson learned: restraint is key! I’ve also tried every folding technique known to man—crimping with a fork remains the undefeated champion for home cooks.
Over time, I’ve found that letting the filled pockets sit on the sheet for 5 minutes before brushing with egg wash helps the seals really set, preventing last-minute leaks. Also, these freeze even better than I’d hoped. They’ve saved me on countless busy weeknights, making me feel like I’ve got a secret stash of gourmet hot pockets (but way, way better). The recipe has evolved, but its soul—simple, satisfying, shareable food—remains the same.
Your Questions, Answered: Pizza Pocket Troubleshooting
Q: My dough is super sticky and hard to handle. What did I do wrong?
A: This usually means your yogurt was a bit wetter than usual, or you may have accidentally packed your flour when measuring. No worries! Just add an extra tablespoon or two of flour, a little at a time, until the dough is workable. Also, make sure to flour your hands and surface well.
Q: Help! My pizza pocket burst open in the oven and cheese leaked everywhere.
A> Welcome to the club—it’s a rite of passage! This is almost always due to overfilling or not sealing the edges well enough. Next time, use less filling (remember: 1 Tbsp sauce max!) and really press hard with that fork to crimp. A tiny leak is no big deal, but a blowout means ease up on the fillings.
Q: Can I make these ahead and freeze them?
A> Absolutely! This is one of their best features. Let the baked pockets cool completely, then place them in a single layer on a baking sheet to freeze solid (about 2 hours). Once frozen, transfer them to a freezer bag or container. They’ll keep for up to 3 months. Reheat from frozen in the air fryer (5-7 mins at 375°F) or oven (15-20 mins at 375°F) until hot and crispy.
Q: Is there a way to make these gluten-free?
A> You bet. Use a 1:1 gluten-free self-rising flour blend (like Bob’s Red Mill) or make your own by adding baking powder and salt to a GF all-purpose blend. The texture will be slightly different but still delicious.

High Protein Pizza Pockets (Cheesy, Savory & Meal Prep Friendly)
Description
These High-Protein Pizza Pockets deliver everything you love about pizza—melty cheese, savory fillings, and tangy sauce—wrapped in a golden, handheld crust that’s secretly fueling your day. Made with Greek yogurt dough and lean protein, they’re ready in about 30 minutes and freeze beautifully for busy weeks. Comfort food that works with you, not against you.
Ingredients
Dough
-
1 cup plain non-fat Greek yogurt
-
1 cup self-rising flour
(or 1 cup all-purpose flour + 1½ tsp baking powder + pinch of salt)
Filling
-
¼ cup pizza sauce (no sugar added)
-
½ cup shredded low-fat mozzarella cheese
-
¼ cup turkey pepperoni or cooked lean ground turkey
Optional Flavor Boosters
-
½ tsp Italian seasoning
-
¼ tsp garlic powder
For Finishing
- 1 egg, whisked with 1 tsp water (egg wash)
Instructions
-
Preheat Oven
Preheat to 375°F (190°C). Line a baking sheet with parchment paper. -
Make the Dough
In a bowl, mix Greek yogurt and self-rising flour until a shaggy dough forms. Knead lightly in the bowl for 30–45 seconds until smooth.
If sticky, dust hands with a little flour. -
Divide & Roll
Transfer dough to a lightly floured surface. Divide into 4 equal pieces. Roll each into a 6–7 inch circle, about ⅛-inch thick. -
Fill
On one half of each circle, spread 1 tablespoon pizza sauce, leaving a ½-inch border. Top with cheese and protein.
Do not overfill. -
Fold & Seal
Fold dough over filling to form a half-moon. Crimp edges firmly with a fork to seal. -
Egg Wash
Place pockets on baking sheet. Brush tops with egg wash. Sprinkle with Italian seasoning or garlic powder if desired. -
Bake
Bake for 18–22 minutes, until golden brown and puffed. - Cool Slightly
Let cool 5–10 minutes before eating—the filling will be hot.
Notes
-
Greek yogurt must be thick—regular yogurt will make the dough too wet
-
Less sauce = fewer leaks (1 Tbsp max per pocket)
-
Fork-crimping beats every fancy folding method
- Let sealed pockets rest 5 minutes before baking to help prevent blowouts
Nutritional Breakdown (Because Knowledge is Power!)
Here’s a general estimate per pizza pocket (using turkey pepperoni and the exact ingredients listed). Remember, exact numbers can vary based on your specific brand choices.
- Calories: ~220
- Protein: 18-20g (Now that’s a satisfying snack!)
- Carbohydrates: 18g
- Fat: 7g
- Fiber: 1g
These macros make this recipe a fantastic option for those looking to support an active lifestyle, manage hunger with high-protein meals, or simply enjoy a more balanced version of a comfort food classic. By using lean proteins and smart swaps, we’ve packed flavor and nutrition into every bite.
The Last Bite: More Than Just a Recipe
And there you have it, my friend—your ticket to hassle-free, high-protein pizza joy. This recipe is more than just a list of steps; it’s an invitation to play in the kitchen, to make something that nourishes your body and delights your tastebuds. It’s about taking that warm, fuzzy memory of pizza and giving it a clever, modern twist that fits right into your real, busy, awesome life.
I hope these pizza pockets become a regular in your rotation, a lunchbox hero, and your secret weapon against boring meals. Give one of the variations a whirl, share them with someone you love, and most importantly, enjoy the process. Food is meant to be fun, remember?
If you make them (and I really hope you do!), tag me @feastical so I can see your beautiful creations. Now, go forth and get cheesy! Until next time, keep your spatula close and your appetite closer.

Cowboy Butter Chicken Bites : Bold, Buttery, and Full of Flavor
Hey There, Hungry Friend! Let’s Talk About a Flavor Explosion
Picture this: It’s been a long day. You’re craving something that feels like a celebration but cooks up in about the same time it takes to scroll through your socials. You want juicy, succulent protein, but you also want a sauce so good you’d consider drinking it with a spoon (no judgment here). You need something bold, a little bit sassy, and utterly, completely satisfying.
Well, pull up a chair, because I’m about to introduce you to your new kitchen best friend: Cowboy Butter Chicken Bites. This isn’t just another chicken recipe. This is a one-skillet wonder where tender, golden-brown chicken meets a melted sauce of garlicky, herby, slightly spicy butter that clings to every single nook and cranny. It’s the kind of dish that makes you close your eyes and hum after the first bite. The “cowboy butter” is the star—a versatile, magic elixir of smoked paprika, Dijon, lemon, and herbs that transforms simple chicken into a crave-worthy masterpiece. Whether you’re wrangling a hungry family on a Tuesday night, impressing friends on game day, or just treating yourself to a protein-packed snack that actually excites your taste buds, this recipe is your ticket to Flavortown. It’s quick, it’s unpretentious, and it delivers a warm, buttery hug with a kick. So, tie on your apron (or don’t, I’m not the boss of you), and let’s get cooking!
The Night the “Cowboy Butter” Was Born
This recipe has roots in a slightly chaotic, utterly delicious memory. A few summers back, a bunch of us were gathered at a friend’s rustic cabin—the kind with a questionable grill and more mosquitoes than plates. We had a mountain of chicken thighs, some basic spices, and a whole lot of butter that was softening fast in the summer heat. The plan was simple: grill, eat, repeat.
But then the clouds rolled in. A classic summer downpour sent us scrambling indoors, abandoning the grill for a single, trusty cast-iron skillet on the stovetop. In that cramped, steamy kitchen, with laughter and rain pounding the roof, the “throw-it-together” spirit took over. I melted that butter and started raiding the cooler and spice rack: a squeeze of lemon from a leftover wedge, the last of the Dijon from a nearly empty jar, garlic we were going to use for garlic bread, and a hearty shake of smoked paprika that just felt right. I poured this glorious, haphazard butter over the sizzling chicken in the skillet. The smell was insane—savory, smoky, bright. We tore into it straight from the pan with forks, and the room went quiet except for the sounds of pure enjoyment. Someone, with a mouth full, mumbled, “This is some good cowboy butter,” and the name just stuck. It was a lesson that the best meals aren’t about perfection; they’re about flavor, fun, and feeding the people you love.
Gathering Your Posse: What You’ll Need
Here’s the beautiful part: the ingredient list is short, sweet, and packed with flavor powerhouses. I’ll walk you through each one so you know exactly why it’s there and what you can swap if needed.
- 1 lb boneless, skinless chicken breast or thighs: The canvas for our masterpiece! Thighs are my personal favorite—they stay juicier and have more flavor, but breasts work perfectly for a leaner option. Just don’t overcook them!
- Salt & pepper to taste: The essential foundation. Season your chicken well. This isn’t a suggestion; it’s the law of good cooking.
- 1 tbsp olive oil (for cooking): Our trusty steed for getting that beautiful, golden sear. Avocado oil works great here too for its high smoke point.
For the Legendary Cowboy Butter:
- ¼ cup butter, melted: The rich, creamy heart of the sauce. Use unsalted so you control the salt level. For a dairy-free twist, a high-quality plant-based butter works surprisingly well.
- 2 cloves garlic, minced: The aromatic powerhouse. Fresh is best! If you’re in a real pinch, ½ teaspoon of garlic powder can sub in.
- 1 tbsp Dijon mustard: This is the secret agent. It adds depth, tang, and helps emulsify the butter into a silky sauce. Yellow mustard will work in a crisis, but Dijon is worth it.
- 1 tbsp lemon juice: The bright spark that cuts through the richness and makes all the flavors pop. Freshly squeezed is ideal.
- 1 tsp smoked paprika: This is what gives it the “cowboy” vibe—that warm, campfire smokiness. Regular paprika will work but you’ll miss that signature depth.
- ½ tsp crushed red pepper flakes (optional): The gentle kick! Adjust to your heat preference. Leave it out for a mild version, or add more if you’re feeling fiery.
- 1 tbsp chopped parsley: Fresh, grassy color and flavor. Chives or even a little cilantro would be fun swaps.
- ½ tsp thyme or rosemary: Earthy, woody notes. Dried herbs work fine here—just use half the amount (so ¼ tsp).
- Pinch of salt and pepper: To tie it all together. Always taste your sauce!
Saddling Up & Cooking: Your Step-by-Step Trail Guide
Ready to ride? Follow these steps for foolproof, flavor-packed bites. I’m right here with you with all my favorite chef hacks.
- Prep Your Chicken: Pat your chicken pieces completely dry with paper towels. This is CRUCIAL for getting a gorgeous sear instead of a steam. Cut them into evenly sized, bite-sized pieces—about 1 to 1.5 inches. Uneven pieces mean uneven cooking, and we want perfection. Season them generously on all sides with salt and pepper. Let them sit for 5 minutes while your pan heats up; it helps the seasoning stick.
- Heat the Pan: Place a large skillet (cast iron is king for this!) over medium-high heat. Add the olive oil and let it get nice and hot. You should see it shimmering. A hot pan is your best friend for locking in juices.
- Cook the Chicken: Carefully add the chicken in a single layer. Don’t crowd the pan! If you pile them in, they’ll steam. Work in batches if needed. Let them cook, undisturbed, for 3-4 minutes to get that beautiful golden-brown crust. Then, flip and cook another 3-4 minutes, until cooked through. The internal temp should reach 165°F. Pro-Tip: Resist the urge to constantly stir! Let the pan do its magic.
- Whip Up the Cowboy Butter: While the chicken cooks, make your magic sauce. In a medium bowl, combine the melted butter, minced garlic, Dijon, lemon juice, smoked paprika, red pepper flakes, herbs, salt, and pepper. Whisk it until it’s a smooth, glorious, orange-hued sauce. Give it a taste and adjust anything you like—more lemon? More heat? You’re the boss.
- The Grand Finale: Once the chicken is cooked through and beautifully browned, reduce the heat to low. Pour that incredible cowboy butter sauce all over the chicken bites. Gently toss and stir for about 60-90 seconds, letting the butter soak into every crevice and warm the garlic gently. You’ll see the sauce thicken slightly and cling to the chicken. That’s the money shot right there.
How to Serve These Buttery Bites in Style
Now for the fun part: getting these from the pan to your plate (or, let’s be real, straight into your mouth).
For a hearty, satisfying dinner, I love serving these over a pile of creamy mashed potatoes or fluffy white rice. The butter sauce mingles with the carbs in the most divine way. A side of simple roasted broccoli, green beans, or a crisp garden salad cuts through the richness perfectly.
As a knock-out appetizer or game day snack, stick a toothpick in each bite and let people go to town. Serve them in a bowl with all that extra sauce drizzled on top, alongside some crusty bread for dipping. You’ll be a legend.
Don’t forget the garnish! A final sprinkle of fresh chopped parsley or a little extra red pepper flake not only looks professional but adds a fresh flavor punch. Squeeze an extra lemon wedge over the top right before serving for that final zing.
Switch Up the Roundup: Fun Recipe Twists
One of the best things about this recipe is how adaptable it is. Feel like playing? Here are some of my favorite ways to change the trail.
- Honey Sriracha Cowboy: Add 1 tablespoon of honey and 1-2 teaspoons of sriracha to the butter sauce. It creates an addictive sweet, spicy, and buttery glaze that’s absolutely irresistible.
- Lemon Herb & Caper: Add the zest of the lemon along with the juice and stir in 2 tablespoons of briny capers at the very end. It’s bright, tangy, and feels super gourmet with minimal effort.
- Creamy Parmesan Dream: Stir ¼ cup of freshly grated Parmesan cheese into the warm cowboy butter sauce until melted. It becomes a rich, cheesy, decadent coating that is pure comfort.
- Swap the Protein: This sauce is a champion! Try it on seared shrimp (cook for just 2-3 minutes per side), on steak bites, or even drizzled over roasted cauliflower or chickpeas for a fantastic vegetarian option.
- Fresh Herb Fiesta: Swap the parsley and thyme for fresh cilantro and a pinch of ground cumin for a Tex-Mex vibe. Incredible!
Beau’s Kitchen Counter Confessions
This recipe has become a staple in my house, and it’s evolved in the funniest ways. My partner now calls it “The Pan Licker” because the sauce is just that good. I’ve made it so often that I can whip up the cowboy butter by muscle memory while simultaneously chatting and, let’s be honest, probably spilling something.
The biggest lesson? Don’t skip the sear. That brown, crispy exterior on the chicken is flavor gold. It’s worth the patience. Also, I’ve learned to always make a little extra sauce—it’s too good not to. Sometimes I’ll double the butter mixture and save half to toss with pasta or steamed veggies the next day. Waste not, want not!
This dish is a reminder that cooking doesn’t have to be complicated to be extraordinary. It’s about bold flavors, simple techniques, and the joy of sharing something delicious. Now, go make some memories (and maybe a little mess) with it!
Your Questions, Answered!
Q: Can I make this ahead of time?
A: You can prep the chicken and mix the dry spices for the sauce ahead. But for the best texture and flavor, cook the chicken and make the fresh sauce right before serving. The butter sauce can separate if made too far in advance.
Q: My sauce seems thin/watery. What happened?
A: This usually means the pan was too hot when you added the butter, or there was too much liquid from the chicken. Make sure your chicken is patted very dry before cooking. Also, after adding the sauce, just toss it over low heat for a minute—it will thicken as it coats the chicken.
Q: Can I bake these instead of pan-frying?
A: Absolutely! Toss the seasoned chicken bites with a little oil and bake on a sheet pan at 400°F for 15-20 minutes, until cooked. While they bake, make the cowboy butter. Toss the hot baked chicken directly in the butter sauce bowl. Easy cleanup!
Q: How do I store and reheat leftovers?
A: Store in an airtight container in the fridge for up to 3 days. Reheat gently in a skillet over low heat to try and preserve that saucy goodness. The microwave works but can make the chicken a bit rubbery.
Cowboy Butter Chicken Bites : Bold, Buttery, and Full of Flavor
Description
Cowboy Butter Chicken Bites are quick, bold, and irresistibly buttery. Juicy chicken pieces are seared until golden, then tossed in a rich cowboy butter sauce made with garlic, Dijon mustard, lemon, herbs, and a touch of heat. Everything comes together in one skillet in under 20 minutes, making this an easy weeknight dinner or a crowd-pleasing appetizer.
Ingredients
Chicken
-
1 lb boneless, skinless chicken breast or thighs, cut into bite-sized pieces
-
Salt and black pepper, to taste
-
1 tablespoon olive oil
Cowboy Butter Sauce
-
¼ cup unsalted butter, melted
-
2 cloves garlic, minced
-
1 tablespoon Dijon mustard
-
1 tablespoon fresh lemon juice
-
1 teaspoon smoked paprika
-
½ teaspoon crushed red pepper flakes (optional)
-
½ teaspoon dried thyme or rosemary
-
1 tablespoon fresh parsley, chopped
- Pinch of salt and pepper
Instructions
-
Season the Chicken
Pat chicken dry and season generously with salt and pepper. -
Sear
Heat olive oil in a large skillet over medium-high heat. Add chicken in a single layer and cook for 3–4 minutes per side until golden brown and cooked through. Remove from heat and reduce heat to low. -
Make the Sauce
In a small bowl, whisk together melted butter, garlic, Dijon mustard, lemon juice, smoked paprika, red pepper flakes, herbs, salt, and pepper. -
Combine
Pour the cowboy butter sauce over the chicken and toss gently for 1–2 minutes until fully coated and glossy. - Serve
Garnish with extra parsley and a squeeze of lemon if desired. Serve hot.
Notes
-
Pat the chicken dry to achieve a better sear.
-
Use thighs for extra juiciness, breasts for a leaner option.
-
Keep heat low when adding butter to prevent separation.
- Double the sauce if serving with rice, potatoes, or bread.
Breaking Down the Bite (Approximate)
While we’re all about flavor first, it’s nice to know what’s fueling the fun! This nutritional info is an estimate per serving (about 1/3 of the recipe), using chicken breast.
- Calories: 340
- Protein: 30g (Fantastic for keeping you full and satisfied!)
- Carbs: 2g
- Fat: 22g (The good, flavorful kind from butter and olive oil)
- Fiber: 0g
Remember: These numbers can vary based on the exact ingredients you use (like thigh vs. breast, exact butter amount). If you’re watching sodium, use low-sodium Dijon and be mindful with the added salt. The high protein and low carb count make this a great option for many eating styles, especially when paired with a veggie side!
Final Crispy Thoughts
And there you have it, friend—the full story of the Cowboy Butter Chicken Bites that took a rainy night and turned it into a recipe I know you’ll love. This dish is proof that you don’t need a dozen fancy ingredients or hours of time to create something truly memorable. You just need a little butter, a lot of flavor, and the spirit to have fun with it.
I hope this recipe finds its way into your regular rotation, becomes your secret weapon for last-minute guests, and maybe even starts a new tradition in your own kitchen. Food is about connection, joy, and yes, sometimes a little bit of butter-induced bliss.
If you make it (and I really hope you do), I’d love to hear about it! Tag me over on Feastical.com or on social media. Now, go forth and cook something feastical!
With a full heart and an even fuller plate,
Beau

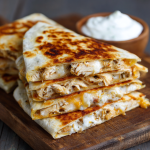
Chicken Ranch Quesadillas : Crispy, Creamy, and Protein-Packed
Chicken Ranch Quesadillas: Your New Go-To for Crispy, Creamy Comfort
Hey friends, Beau here from Feastical! Let’s talk about that beautiful, universal craving for something that’s crunchy on the outside, gooey on the inside, and ready in under 15 minutes. You know the feeling. It’s been a day—maybe a great one, maybe a “where-did-I-put-my-keys-again” kind of one—and your stomach is singing the song of its people: a melody that sounds suspiciously like the sizzle of something delicious hitting a hot pan.
That’s where this beautiful, beautiful creation comes in. These aren’t just any quesadillas. These are Chicken Ranch Quesadillas – a protein-packed, flavor-loaded hug in crispy tortilla form. We’re talking tender shredded chicken swirled in a tangy, creamy ranch-spiked cheese sauce, all sealed inside a tortilla and grilled to golden-brown perfection. It’s the dinner hero you deserve, and the best part? It’s so simple you can make it with your eyes half-closed (though I recommend keeping them open for the flipping part). So, grab your favorite pan and let’s turn a few simple ingredients into pure, unadulterated comfort.
The Quesadilla That Saved Game Night
This recipe reminds me of my legendary, slightly chaotic “Friendsgiving Football” nights. Picture this: my tiny apartment kitchen, a game on the TV, friends everywhere, and a critical shortage of substantial snacks. The chips and dip were long gone, and the pizza delivery was stuck in traffic. Panic? For a second. Then, I saw the leftover rotisserie chicken from two days prior, a lonely tortilla, and some cheese. A little Greek yogurt stood in for sour cream, and a sprinkle of ranch seasoning I use for my famous “lazy person’s dip” became the secret weapon.
I whipped up a single, monster quesadilla, sliced it into wedges, and placed it in the middle of the coffee table. It was gone in 60 seconds flat. The silence was broken only by chewing and a unanimous, “Dude, what WAS that? You HAVE to make more.” It was the culinary equivalent of a game-winning touchdown. That night, this quesadilla went from a fridge-forage scramble to a permanent fixture in my recipe hall of fame. It proved that the best meals aren’t always planned—they’re crafted with a little ingenuity and a lot of love for feeding your people.
Gathering Your Quesadilla Dream Team
Here’s the beautiful lineup. This recipe is for one glorious, personal-sized feast, but it scales up effortlessly for a crowd. Every player has a role!
- 1 low-carb tortilla (like Mission Carb Balance): This is our vessel! I love these for their high fiber and sturdy texture that gets super crispy without tearing. Chef’s Insight: Any burrito-sized tortilla works—flour, whole wheat, or a gluten-free alternative. The key is pliability.
- ½ cup shredded cooked chicken: The star protein! Rotisserie chicken is your best friend here for ultimate ease and flavor. Substitution Tip: Leftover grilled chicken, turkey, or even canned, drained chickpeas for a veggie twist are all fantastic.
- 1 tbsp plain Greek yogurt: Our creamy, tangy secret weapon! It adds moisture and a protein boost without the heaviness of mayo or sour cream. Chef’s Insight: Full-fat, 2%, or even non-fat all work. Sour cream is a perfect 1:1 substitute if that’s what you have.
- 1 Laughing Cow cheese wedge (Light or Original): The magic binder! This little guy melts into a silky, creamy sauce that holds everything together. Substitution Tip: 1 tablespoon of cream cheese, softened, will do the trick in a pinch.
- ¼ cup shredded mozzarella cheese: The gooey, stretchy glory! Mozzarella has a mild flavor and phenomenal melt. Chef’s Insight: A Mexican blend, Monterey Jack, or even a sharp cheddar would be delicious here for a different flavor profile.
- ½ tsp ranch seasoning: The flavor bomb! This dry seasoning pack is pure concentrated herby, tangy goodness. Substitution Tip: No packet? Mix a pinch of dried dill, garlic powder, onion powder, parsley, and a tiny bit of salt.
- 1 tsp butter (for pan crisping): The key to the perfect golden, crispy exterior. Butter gives that irresistible flavor and color. Chef’s Insight: Avocado oil, ghee, or a light olive oil spray will also work for crisping.
Let’s Build Some Crispy Magic: Step-by-Step
Follow these steps, and you’re minutes away from quesadilla bliss. I’m talking you through it like you’re right here in my kitchen with me!
- Create the Creamy Filling. In a small bowl, add your shredded chicken, Greek yogurt, Laughing Cow cheese wedge, shredded mozzarella, and ranch seasoning. Now, get in there with a fork and mix, mix, mix! You want everything to be evenly coated and form a cohesive, creamy mixture. Chef’s Hack: If your chicken is a bit dry, this creamy mixture is the perfect remedy. The Greek yogurt and Laughing Cow will bring it right back to life.
- Load and Fold the Tortilla. Lay your tortilla flat on a cutting board. Spoon the entire creamy chicken mixture onto one half of the tortilla, leaving a small border around the edge. Gently fold the empty half over the filling, creating a perfect half-moon. Press down lightly. Pro Tip: Don’t overfill! A moderate, even layer ensures everything heats through and the tortilla seals without bursting.
- Heat the Pan. Place a non-stick or well-seasoned cast-iron skillet over medium heat. Let it get properly warm for a minute—this is crucial for an even cook. Add the teaspoon of butter and swirl it around until it melts and just starts to foam. Chef’s Hack: The sizzle test? A tiny droplet of water should skitter and evaporate immediately when the pan is ready.
- Cook to Golden Perfection. Carefully place your folded quesadilla in the center of the buttery pan. Cook for 2-3 minutes on the first side, until it’s a deep, gorgeous golden brown with some darker toasted spots. Peek underneath with a spatula to check! Then, the flip: confidently slide your spatula underneath, lift, and flip it over in one smooth motion. Cook the second side for another 2-3 minutes until equally golden and the cheese inside is audibly bubbling and melty. Pro Tip: If you’re nervous about the flip, you can use a second spatula to help guide it, or simply practice your wrist flick! A little cheese might ooze out—that’s a sign of a good, cheesy quesadilla.
- Rest and Slice. Transfer your masterpiece to a cutting board. This is IMPORTANT: let it rest for just 60 seconds. This allows the molten cheese filling to set slightly, so when you cut it, it doesn’t all rush out. Then, use a sharp knife or pizza cutter to slice it into 2 or 3 wedges. Chef’s Final Touch: Listen for that satisfying, crispy crunch as you cut. That’s the sound of success.
How to Serve Your Masterpiece
Presentation is part of the fun! Slide those gorgeous, cheesy wedges onto a plate. I love serving them with little bowls of extras for dipping and topping. A side of cool, chunky salsa or pico de gallo cuts through the richness perfectly. A drizzle of hot sauce or a scoop of guacamole adds another layer of flavor. For a true “ranch experience,” mix a little extra Greek yogurt with a dash of ranch seasoning for a quick dipping sauce. And don’t forget a simple side—a handful of crunchy lettuce, some pickled jalapeños, or even just some carrot sticks make this a complete, satisfying meal.
Make It Your Own: Delicious Twists
The basic blueprint is perfect, but the canvas is yours to paint! Here are a few of my favorite riffs:
- Buffalo Blue Cheese: Swap the ranch seasoning for 1-2 teaspoons of buffalo sauce. Use crumbled blue cheese instead of mozzarella for a bold, tangy kick.
- Southwest Fiesta: Add 2 tablespoons of drained black beans, a tablespoon of frozen corn (thawed), and a tablespoon of diced green chiles to the filling mixture. A sprinkle of chili powder is great here too.
- Spinach & Artichoke: Stir in a handful of finely chopped fresh spinach and a tablespoon of finely chopped marinated artichoke hearts. It’s like your favorite dip in quesadilla form!
- Everything Bagel: Replace the ranch seasoning with everything bagel seasoning. Use a whipped cream cheese instead of Laughing Cow. So good for a brunch-inspired twist.
- Fully Loaded: After flipping, open the quesadilla slightly and add a layer of fresh ingredients like diced tomatoes, sliced avocado, or crisp bacon bits before the final cook. This adds fresh texture!
Beau’s Kitchen Notes & Stories
This recipe has evolved from that desperate game-night save into my most-requested “quick fix” meal. I’ve made it for post-hike hunger, for solo date nights with a great movie, and for my niece who declared it “way better than a plain cheese one.” The biggest lesson? The Laughing Cow wedge is non-negotiable for me now—it creates a sauce, not just melted cheese clumps. One time, I tried to be fancy and use only shredded cheese. It was fine, but it wasn’t the same creamy, cohesive experience. Sometimes, the “hack” ingredient is the true hero. Also, a well-heated pan is the difference between a soggy tortilla and the crispy, buttery shell of your dreams. Patience, young padawan!
Your Quesadilla Questions, Answered
- Q: My quesadilla is burning on the outside before the cheese melts inside. Help!
A: Your heat is too high! Dial it back to medium or even medium-low. A perfectly crispy quesadilla is a product of steady, even heat that has time to melt the interior while browning the exterior. - Q: Can I make these ahead of time?
A: You can prep the filling ahead! Mix it up and store it in an airtight container in the fridge for up to 2 days. Assemble and cook when you’re ready. I don’t recommend cooking them fully ahead, as they lose their fantastic crispiness upon reheating. - Q: My filling keeps falling out when I flip! What am I doing wrong?
A: Two likely culprits: 1) Overfilling. Use a moderate amount. 2) Not letting the first side cook long enough. That first side needs to be fully sealed and crispy before you attempt the flip. A good spatula that can slide completely under the quesadilla is key! - Q: Can I bake these instead of pan-frying?
A> Absolutely! For a batch, preheat your oven to 400°F (200°C). Place assembled quesadillas on a baking sheet, lightly spray or brush with oil, and bake for 8-10 minutes per side, flipping once, until golden and crispy.
Chicken Ranch Quesadillas : Crispy, Creamy, and Protein-Packed
Description
These Chicken Ranch Quesadillas are the ultimate quick comfort food—crispy on the outside, creamy and cheesy on the inside, and ready in minutes. Tender shredded chicken is mixed with ranch seasoning, melty cheese, and a creamy base, then grilled inside a tortilla until golden and irresistible. Perfect for busy nights, game-day snacks, or anytime cravings hit.
Ingredients
-
1 large flour or low-carb tortilla
-
½ cup cooked shredded chicken
-
1 tablespoon plain Greek yogurt or sour cream
-
1 Laughing Cow cheese wedge (or 1 tablespoon cream cheese)
-
¼ cup shredded mozzarella cheese
-
½ teaspoon ranch seasoning
- 1 teaspoon butter (for cooking)
Instructions
-
Mix the Filling
In a small bowl, combine shredded chicken, Greek yogurt, Laughing Cow cheese, mozzarella, and ranch seasoning. Mix until creamy and well combined. -
Assemble
Spread the chicken mixture evenly over one half of the tortilla. Fold the tortilla over to form a half-moon. -
Cook
Heat a skillet over medium heat and melt the butter. Place the quesadilla in the pan and cook for 2–3 minutes per side, until golden brown and crispy, and the cheese is fully melted. -
Slice & Serve
Remove from the pan, let rest for 1 minute, then slice into wedges and enjoy warm.
Notes
-
Keep heat at medium to prevent burning before the cheese melts.
-
Don’t overfill—an even layer cooks and flips best.
-
Let it rest briefly before cutting to keep the filling inside.
-
Monterey Jack or cheddar work well if mozzarella isn’t available.
-
Add-ins like cooked bacon, green onions, or jalapeños boost flavor fast.
Nutritional Highlights (Per Quesadilla)
Let’s be real—we eat this because it’s delicious. But it’s a nice bonus that it’s also a seriously balanced meal! These approximations are based on the specific ingredients listed and show why this recipe feels so satisfying: ~360 Calories, 35g Protein, 12g Net Carbs, 18g Fat, 7g Fiber. The high protein from the chicken and Greek yogurt keeps you full for hours. The low-carb, high-fiber tortilla helps manage blood sugar spikes, and the healthy fats from the cheese and butter aid in nutrient absorption. It’s a macro-friendly home run that proves comfort food and feeling good can absolutely go hand-in-hand.
Final Crispy Thoughts
So there you have it, friends—my not-so-secret, always-reliable recipe for pure, crispy, creamy joy. This Chicken Ranch Quesadilla is more than just food; it’s a reminder that the best meals are often the simplest ones, made with a little creativity and a lot of heart. It’s about turning leftovers into a celebration and finding comfort in the sizzle of a hot pan. I hope this recipe becomes a trusted friend in your kitchen, just like it is in mine. Now, go forth and get crispy! And don’t forget to tag @Feastical when you make yours—I love seeing your kitchen creations.
Until next time, keep it simple, soulful, and satisfying.
— Beau

Grilled Chicken Quinoa Bowl with Goat Cheese & Basil
Welcome to Your New Favorite Bowl (Seriously!)
Hey friends, Beau here from Feastical! Pull up a stool and let’s talk about something I believe in with my whole heart: food that makes you feel amazing doesn’t have to be complicated. I’m talking about the kind of meal that’s a joy to make, a feast for your eyes, and an absolute party in your mouth. That’s exactly what we’re whipping up today: my Grilled Chicken Quinoa Bowl with Goat Cheese & Basil.
Picture this: perfectly juicy, smoky grilled chicken nestled on a fluffy bed of protein-packed quinoa. It’s surrounded by sweet, char-kissed peppers and corn, fresh, juicy tomatoes, and then… the magic happens. A shower of creamy, tangy goat cheese crumbles and a generous handful of fragrant, fresh basil. A glug of good olive oil and a bright squeeze of lime tie this whole beautiful mess together. This isn’t just a “healthy bowl.” This is a flavor explosion, a textural symphony, and my go-to answer for “What should I make that’s delicious, satisfying, and maybe even makes me feel a little virtuous?”
Whether you’re a meal-prep master looking for your next superstar or someone who just wants a darn good dinner on the table without the fuss, this recipe is your new best friend. It’s flexible, it’s forgiving, and it’s packed with real, whole ingredients that love each other’s company. So, fire up that grill (or your trusty grill pan), and let’s create something spectacular together.
The Backyard BBQ That Started It All
This bowl honestly feels like a happy accident—one of those “clean out the fridge” moments that turned into a regular request. It was a classic late-summer Sunday. My friends were over, the grill was still hot from burgers, and we had a random assortment of leftovers staring us down: a lone chicken breast, half a bag of peppers, some ears of corn, and a container of cooked quinoa from who-knows-when.
Instead of letting it all languish, I started chopping and tossing. The goat cheese was a last-minute “why not?” from the cheese drawer, and the basil was practically waving at me from the patio plant. When I squeezed that lime over the top and gave it a toss, something magical happened. We stood around the picnic table, forks diving in straight from the big mixing bowl, and there was that beautiful silence that only really great food can bring. “What is this?” someone asked, mouth full. I just grinned. It was the taste of summer, of simplicity, and of not letting good food go to waste. That’s the spirit I bring to this recipe every single time.
Gathering Your Flavor Crew
Here’s the dream team. The beauty of this list is its flexibility—use what you have, love what you use!
- 1 cup cooked quinoa: Your hearty, nutty base. I love tri-color quinoa for visual pop, but any color works. Chef’s Insight: Rinse your quinoa in a fine-mesh sieve before cooking to remove its natural bitter coating (saponin). It makes a world of difference!
- 1 grilled chicken breast, chopped: The savory star. For maximum flavor, marinate it for even 30 minutes in olive oil, lemon, garlic, and herbs. Substitution Tip: Leftover rotisserie chicken is a fantastic shortcut! Shredded grilled shrimp or chickpeas (for a vegan twist) are also stellar.
- ½ cup grilled bell peppers, diced: Sweetness and smokiness. I use a mix of red, yellow, and orange for a rainbow effect. Chef’s Hack: Don’t have a grill? A blistering hot cast-iron skillet or even the broiler works wonders.
- ½ cup grilled corn (fresh or frozen): Pure summer sweetness. If using fresh, grill the cobs whole, then slice off the kernels. Substitution Tip: Frozen fire-roasted corn from the store is a genius pantry staple for this.
- 1 medium tomato, chopped: Fresh, juicy acidity. Use ripe Roma, cherry tomatoes halved, or heirlooms if you’re feeling fancy.
- Handful of fresh basil, chopped: The aromatic hero. Tear it with your hands at the last second for the most incredible fragrance. Pro Tip: Don’t sub dried basil here—it’s not the same. In a pinch, fresh cilantro or parsley would work.
- 2 tbsp goat cheese crumbles: The creamy, tangy counterpoint. It melts just slightly into the warm ingredients. Substitution Tip: Feta cheese is a bolder, saltier swap. For dairy-free, a dollop of avocado or a sprinkle of nutritional yeast can offer creaminess.
- 1 tbsp good olive oil: The silky binder. Use the best extra-virgin olive oil you have for dipping bread—it’s a flavor ingredient, not just a lubricant!
- Juice of ½ a lime: The bright, fresh finish. Lemon works too, but lime has that special zing that sings with the basil and corn.
- Salt to taste: The flavor enhancer. I use kosher salt or sea salt. Remember, goat cheese is salty, so taste before you add a lot!
Let’s Build Some Deliciousness: Step-by-Step
Okay, team! Let’s walk through this together. I’m giving you all my little hacks to make this foolproof and flavorful.
Step 1: The Quinoa Foundation. If you’re starting from scratch, cook your quinoa first so it has time to cool slightly. Use a 1:2 ratio of quinoa to water or broth. Bring it to a boil, reduce to a simmer, cover, and let it cook for about 15 minutes until the little “tails” (the germ) sprout and the liquid is absorbed. Fluff it with a fork and spread it on a plate or baking sheet to cool quickly. Why? This stops it from overcooking and getting mushy. A fluffy, separate grain is what we want!
Step 2: Grill with Gusto. Fire up your grill or a grill pan over medium-high heat. Season your chicken breast generously with salt, pepper, and a drizzle of oil. For the veggies, toss your pepper slices and corn cobs (or frozen kernels in a grill basket) with a tiny bit of oil. Grill the chicken for 6-7 minutes per side until cooked through (165°F internal temp). Grill the peppers and corn until they have nice char marks and are tender-crisp. Chef’s Hack: Let the chicken rest for 5 minutes after grilling before chopping. This keeps all those precious juices inside the meat, not on your cutting board.
Step 3: The Chop & Prep. Dice your rested chicken into bite-sized chunks. Dice the grilled peppers. If you grilled corn on the cob, stand it upright in a bowl and use a sharp knife to slice down the sides—the bowl catches all the kernels! Chop your tomato and basil. Crumble your goat cheese. Having everything prepped and ready (this is your *mise en place*) makes assembling the bowls a joyful, 60-second affair.
Step 4: The Big, Beautiful Toss. In a large mixing bowl (bigger than you think you need), combine the fluffy quinoa, chopped chicken, grilled peppers, corn, and tomatoes. Now, add about ¾ of your goat cheese crumbles and most of your chopped basil. Drizzle with the olive oil and squeeze the fresh lime juice over everything. Pro Tip: Toss gently with a large spoon and fork, lifting from the bottom. You want to combine everything without smashing the quinoa or tomatoes.
Step 5: Season & Serve. Give the bowl a taste. Need more tang? Add another squeeze of lime. Need it to pop? Add a pinch more salt. This is your moment to make it perfect for YOU. Once it’s seasoned to your liking, divide it into bowls and top with the remaining goat cheese and basil for a gorgeous, fresh finish.
How to Serve This Stunner
This bowl is a complete meal all on its own, but a little presentation goes a long way! I love serving it in wide, shallow bowls so all the gorgeous colors can shine. For a warm meal, serve it right after tossing while the quinoa and chicken are still slightly warm from the grill—the goat cheese will get ever-so-slightly melty and incredible.
For a fantastic chilled option (perfect for meal prep!), let the entire mixture cool to room temperature before covering and refrigerating. The flavors marry and intensify beautifully overnight. If you’re taking it on the go, pack a lime wedge separately to squeeze over right before eating for that fresh kick.
Want to make it more of a feast? Serve it with a side of warm, crusty bread for dipping into any herby oil that pools at the bottom of the bowl, or with a simple arugula salad dressed with lemon. A crisp, cold glass of Sauvignon Blanc or sparkling water with extra lime is the perfect beverage partner.
Make It Your Own: 5 Flavor Twists
The formula here is your playground. Here are some of my favorite riffs:
- Mediterranean Meets Mexico: Swap the basil for cilantro, the lime for lemon, add a pinch of cumin to the chicken, and use cotija cheese instead of goat cheese. Add a spoonful of salsa verde on top!
- Greek Goddess Bowl: Use oregano-marinated chicken, swap the goat cheese for a big handful of briny feta, add some sliced Kalamata olives and diced cucumber, and use lemon juice instead of lime. Drizzle with tzatziki.
- Everything Bagel-Inspired: Toss the cooked quinoa with a teaspoon of “everything bagel” seasoning. Use cream cheese thinned with a little milk as a drizzle instead of plain olive oil. Top with extra everything seasoning and fresh dill.
- Vegan Power Bowl: Replace the chicken with 1 can of drained, roasted chickpeas (crisp them up in the oven or skillet!). Skip the goat cheese or use a vegan feta. The olive oil and lime dressing is already plant-based perfection.
- Pesto Lover’s Dream: Skip the fresh basil and olive oil/lime dressing. Instead, toss the entire bowl with 2-3 tablespoons of your favorite basil pesto (or sun-dried tomato pesto!) for an ultra-creamy, herby version.
Beau’s Kitchen Notes & Stories
This recipe has evolved more than my taste in kitchen aprons. That first haphazard toss was heavy on the corn and light on the quinoa. I’ve learned that the order of tossing matters—add the dressing components last so the quinoa soaks it up. I also went through a phase of adding avocado to everything (delicious, but it doesn’t hold up for meal prep).
One funny fail: I once tried to “save time” by mixing everything, including the cold quinoa, in the container I was going to store it in. It was so packed I couldn’t toss it properly, and I ended up with a clumpy, uneven mess. Lesson learned: always use a giant bowl for mixing! Now, it’s a ritual I love—that final toss in my biggest ceramic bowl feels like I’m literally mixing up happiness. Don’t skip the joy of the process.
Your Questions, Answered
Q: My quinoa turned out mushy/wet. What did I do wrong?
A: The most common culprit is either not rinsing it first (which can leave a starchy residue) or using too much water. Stick to the 1:2 ratio, and make sure to fluff it and spread it to cool after cooking. If it’s still a bit wet, you can spread it on a baking sheet and pop it in the oven at a very low temp (200°F) for 10 minutes to dry it out.
Q: Can I make this entirely ahead of time for meal prep?
A: Absolutely! It’s a meal-prep superstar. Prep and mix all components, but hold back on adding the fresh basil and the final lime squeeze. Store in airtight containers for up to 4 days. Add the fresh basil and an extra squeeze of lime just before eating to wake all the flavors right up.
Q: My chicken always comes out dry. Any secrets?
A> Two words: brine and rest. Even a 30-minute soak in a simple brine (1/4 cup salt dissolved in 4 cups water) makes chicken incredibly juicy. And never, ever skip letting it rest off the heat for 5 minutes before cutting. It’s non-negotiable for juicy meat!
Q: Is there a way to make this without a grill?
A> Of course! A grill pan on your stovetop is great. You can also roast your chicken and veggies in a 425°F oven on a sheet pan until cooked through and slightly caramelized. The broiler is also your friend for getting those delicious charred edges.
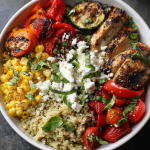
Grilled Chicken Quinoa Bowl with Goat Cheese & Basil
Description
This Grilled Chicken Quinoa Bowl is fresh, filling, and full of flavor. Juicy grilled chicken, fluffy quinoa, sweet charred veggies, and creamy goat cheese come together with fresh basil and a squeeze of lime for a bowl that’s both nourishing and crave-worthy. It’s easy enough for weeknights, impressive enough for guests, and perfect for meal prep.
Ingredients
-
1 cup cooked quinoa
-
1 grilled chicken breast, chopped
-
½ cup grilled bell peppers, diced
-
½ cup grilled corn (fresh or frozen)
-
1 medium tomato, chopped
-
Handful of fresh basil, chopped
-
2 tablespoons goat cheese crumbles
-
1 tablespoon extra-virgin olive oil
-
Juice of ½ lime
- Salt, to taste
Instructions
-
Prepare the Base
Place cooked quinoa in a large bowl and fluff with a fork. -
Add the Toppings
Add chopped grilled chicken, bell peppers, corn, and tomato to the quinoa. -
Dress the Bowl
Drizzle with olive oil and squeeze fresh lime juice over the bowl. -
Finish & Toss
Add most of the goat cheese and basil. Gently toss to combine. -
Serve
Taste and season with salt as needed. Top with remaining goat cheese and basil before serving.
Notes
-
Rinse quinoa before cooking to avoid bitterness.
-
Let grilled chicken rest 5 minutes before chopping to keep it juicy.
-
Use warm quinoa for a cozy bowl or chill everything for meal prep.
-
Swap goat cheese with feta or avocado if preferred.
- Fire-roasted frozen corn works great when fresh isn’t available.
Nutritional Breakdown (A Friendly Look)
Let’s talk about what’s fueling you in this bowl! Please remember, I’m a chef, not a dietitian, so these are estimates based on the core ingredients. This information is for general guidance and celebrating the good stuff in our food.
This recipe, as written for two servings, is a beautifully balanced meal. The grilled chicken provides a lean, high-quality protein source to keep you satisfied and support muscle repair. The quinoa is a fantastic complex carbohydrate and a complete plant-based protein, offering steady energy and fiber. The colorful veggies deliver a spectrum of vitamins, antioxidants, and more fiber. The healthy fats from the olive oil and goat cheese help your body absorb all those fat-soluble vitamins and add that crucial satiety factor. It’s a meal designed to make you feel nourished, energized, and deeply satisfied—not deprived. Food is joy, first and foremost.
Your Kitchen Awaits
And there you have it, friends—more than just a recipe, but a blueprint for a fresh, flavorful, and deeply satisfying meal that’s as fun to make as it is to eat. This Grilled Chicken Quinoa Bowl is a testament to my whole Feastical philosophy: great food is about connection, creativity, and treating yourself with kindness (and deliciousness).
I hope you make it, love it, and make it your own. Tag me @Feastical if you do—nothing makes me happier than seeing your creations. Now, go grab that spatula (I know it’s in there somewhere), and let’s get cooking. Your bowl of bright, beautiful goodness is waiting.
Final Thoughts
This isn’t just a recipe—it’s an invitation. An invitation to play in the kitchen, to trust your taste buds, to turn a handful of simple ingredients into something that feels like a celebration. I didn’t set out to create the “perfect bowl,” just a real one: filling, fresh, and full of life. And that’s exactly what this is.
If there’s one thing I hope you take from this, it’s permission to make it your own. Swap the herbs, change the cheese, use what you’ve got. The magic isn’t in following steps perfectly—it’s in that final toss, the squeeze of lime, the sprinkle of cheese and basil over the top. It’s in the quiet “mmm” around the table, the lunch that makes your coworkers jealous, the meal that feels like a reset.
Cooking, for me, has always been about more than food. It’s a small act of care—for yourself, for the people you share it with. This bowl is a little reminder that feeling good starts with what’s on your plate, and it doesn’t have to be complicated to be extraordinary.
So here’s to simple ingredients, big flavors, and the joy of a meal well made. I’m so glad we got to cook this together.
Spicy Shrimp Crispy Rice Cups : Crunchy, Creamy, and Packed with Heat
Spicy Shrimp Crispy Rice Cups – Your New Favorite Party Trick!
Hey there, friend! Beau here, from Feastical. Pull up a chair and let’s talk about that magical moment when crunchy meets creamy, and spicy does a little happy dance with cool and fresh. You know the one I mean—it’s the bite that makes everyone at the table go completely quiet for a second, followed by a chorus of “Oh my gosh, what IS this?” That’s the exact reaction I’m going for with these Spicy Shrimp Crispy Rice Cups, and I’m so excited to walk you through every step.
These little cups are more than just an appetizer; they’re a full-on sensory experience. Imagine: a golden, crispy shell of rice that shatters with the gentlest pressure, giving way to a soft, warm center. Then, piled high on top, you get the main event: tender, buttery shrimp tossed in a luscious, spicy-sweet sriracha mayo. A tiny cube of cool avocado and a sprinkle of nutty sesame seeds finish it all off. It’s a party in your mouth where every texture and flavor is invited.
The best part? They look like you spent all day in a fancy kitchen, but the process is actually straightforward and, dare I say, a whole lot of fun. Whether you’re prepping for game day, needing a show-stopping starter for dinner guests, or just treating yourself to a seriously awesome snack, this recipe is your new best friend. So, tie on your apron, my friend. We’re about to make some kitchen magic that’s guaranteed to get you rave reviews. Let’s dig in!
The First Bite: A Kitchen “Aha!” Moment
Let me take you back to a seriously cramped but incredibly lively kitchen in a tiny apartment I shared with three roommates after culinary school. We were broke, creative, and constantly trying to one-up each other’s “fridge forage” dinners. One night, the mission was: leftover sushi rice, a handful of frozen shrimp, and whatever condiments we had.
I was obsessed with getting rice crispy in a pan, but forming little individual portions was a mess. Someone (probably after a sip of wine) suggested using our old, slightly warped muffin tin. We packed the rice in, crossed our fingers, and baked it. What emerged were these adorable, edible little cups! We scrambled the shrimp with our last bit of butter and mayo, spiked it with hot sauce, and spooned it in. That first bite… it was silent. Then came the simultaneous “WHOA.” It was one of those beautiful, unplanned kitchen victories where necessity and a little chaos birth something truly delicious. Every time I make these now, I’m right back in that noisy, happy kitchen, reminded that the best food often comes from playful experimentation.
Gathering Your Flavor Arsenal: The Ingredients
Here’s everything you’ll need to build these flavor bombs. I’ve added my little chef notes next to each one—because knowing your ingredients is the first step to owning a recipe!
- 250g Sushi Rice: This is non-negotiable for the perfect sticky, chewy base. Its high starch content is what gives us that lovely crisp exterior and soft interior. Chef’s Insight: Don’t rinse it too vigorously! We want that starch.
- 10–12 Jumbo Shrimp, diced: Big, sweet, and meaty. Dicing them ensures every rice cup gets plenty of shrimp. Sub Tip: No shrimp? Diced cooked chicken or even lump crab meat would be fantastic here.
- 2 tbsp Mayonnaise: Our creamy, rich binder. It creates the luxurious sauce for the shrimp. Chef’s Insight: Use a good-quality mayo; it’s the base of your sauce!
- 1 tbsp Sriracha Sauce: The “spicy” in our spicy shrimp! It brings garlicky, tangy heat. Sub Tip: Gochujang or a chili-garlic sauce would add a different, delicious kind of heat.
- 1 tbsp Unsalted Butter: For cooking the shrimp. Butter adds a depth of flavor and richness that oil just can’t match. Chef’s Insight: This is where a lot of the “wow” flavor comes from. Don’t skip it!
- 1 tsp Garlic Powder: It coats the shrimp evenly and gives a quick, punchy garlic flavor without risking burnt garlic bits.
- 1 tsp Olive Oil (plus spray for baking): A touch for cooking, and spray to help the rice cups crisp up beautifully in the oven.
- Salt, to taste: The flavor enhancer. Season your shrimp well!
- ¼ Avocado, cubed: Our cool, creamy, fresh counterpoint to the heat. It’s essential for balance. Chef’s Insight: Add it right before serving to keep it bright green and fresh.
- Black Sesame Seeds, for garnish: For a gorgeous visual pop and a tiny, nutty crunch. Sub Tip: White sesame seeds or even chopped green onion tops work too!
Let’s Build Some Crispy Magic: Step-by-Step
Ready to create? Follow these steps, and don’t skip my little hacks in the commentary—they’re the secret sauce to success!
- Cook the Rice to Perfection:In a medium saucepan, combine your sushi rice with the water (use the package ratio, usually about 1:1.25 rice to water). Bring it to a lively boil, then immediately reduce the heat to the lowest setting, cover tightly, and let it simmer for 15-20 minutes. Chef’s Hack: No peeking! Let the steam do its work. When done, the water should be fully absorbed, and the rice will be tender and sticky. Fluff it with a fork and let it cool just enough to handle.
- Form the Cups (The Fun Part!):Lightly grease a standard muffin tin. Take a generous spoonful of warm rice and press it firmly into a cup. Use the back of a small spoon or your fingers (dampen them with water to prevent sticking!) to press the rice up the sides, creating a sturdy cup shape. Pro Tip: Really pack it in! The tighter it is, the better it holds together. Once all cups are formed, slide the entire tin into the freezer for a solid 30 minutes. This step is KEY—it firms up the rice so it crisps instead of crumbles.
- Crisp ‘Em Up!Preheat your oven to 400°F (200°C). Take the tin from the freezer and lightly but evenly spray each rice cup with olive oil spray. This promotes all-over browning and crispiness. Bake for 20-25 minutes, or until the edges and tops are deeply golden and crisp. Chef’s Watch-Out: Ovens vary! Start checking at 18 minutes. You want that gorgeous golden-brown color.
- Cook the Shrimp:While the rice bakes, let’s make the filling. In a skillet over medium heat, melt your butter until it’s just foaming. Add the diced shrimp, garlic powder, and a good pinch of salt. Cook, stirring often, for 4-5 minutes until the shrimp are opaque, pink, and cooked through. Transfer them to a bowl and let them cool for a few minutes. Why cool? Adding hot shrimp to the mayo will make the sauce runny.
- Whip Up the Dreamy Filling:In the bowl with the slightly cooled shrimp, add the mayonnaise and sriracha. Gently fold everything together until every piece of shrimp is luxuriously coated in that creamy, spicy, orange-hued sauce. Taste it! Want more heat? Add another dash of sriracha. This is your moment to adjust.
- The Grand Assembly:Carefully remove the crispy rice cups from the muffin tin—a small offset spatula or butter knife helps. Place them on your serving platter. Spoon a generous heap of the spicy shrimp mixture into each cup. Top with a cube or two of avocado and a graceful sprinkle of black sesame seeds. Serve immediately and watch the magic happen!
How to Serve These Show-Stoppers
Presentation is part of the fun! I love using a simple, dark-colored slate board or a bright white platter to make the colors of the shrimp, avocado, and sesame seeds really pop. Arrange the cups in a circle or a little cluster. Because they’re best eaten right away, I like to bring the whole platter straight to the table and let everyone dig in. The sound of that first crispy crunch is part of the experience!
What to serve with them? They’re rich and flavorful, so a simple, crisp side salad with a ginger-soy dressing is perfect for cutting through the richness. If you’re going all out with an Asian-inspired feast, pair them with some vegetable spring rolls or a miso-glazed eggplant. For drinks, a cold, crisp lager, a dry Riesling, or even a glass of chilled sake are all phenomenal companions.
Make It Your Own: Fun Variations to Try
Once you’ve mastered the classic, the kitchen playground is open! Here are a few of my favorite twists:
- The “Dragon” Style: Drizzle the assembled cups with a zigzag of spicy mayo (just mix more sriracha with mayo) and a drizzle of eel sauce for a sweet-and-spicy finish.
- Vegetarian Powerhouse: Swap the shrimp for a mix of finely diced mushrooms (shiitake are amazing!) and crisp edamame. Sauté them in the butter with a splash of soy sauce for a deep, umami-packed filling.
- Spicy Tuna Twist: Classic for a reason! Use high-quality canned or fresh sashimi-grade tuna, diced, and mix it with the sriracha mayo. It’s a quicker, no-cook filling that’s incredibly delicious.
- Breakfast Edition: Fill the crispy rice cups with softly scrambled eggs and a dot of salsa, or a slice of crispy bacon and a sprinkle of cheddar. Yes, it works!
- Korean BBQ Flare: Use thinly sliced bulgogi-style beef (leftovers are perfect!) as the filling, and top with a tiny bit of kimchi and a dot of gochujang.
Beau’s Kitchen Notes & Stories
This recipe has evolved from that messy apartment experiment into my most-requested party app. The biggest lesson learned? Freeze the rice cups. I once tried to skip it to save time, and let’s just say we had “deconstructed spicy shrimp crispy rice salad” instead. It was still tasty, but not the showpiece I wanted!
Over the years, I’ve found that letting people assemble their own can be a great interactive option for casual gatherings. Set out a platter of crispy cups, a bowl of the shrimp filling, and little dishes of toppings like diced cucumber, pickled ginger, and extra sesame seeds. It’s a guaranteed conversation starter and lets everyone customize their perfect bite.
Your Questions, Answered (Before You Even Ask!)
-
- Q: Can I make any part of this ahead of time?A: Absolutely! You can cook the rice and form the cups a day ahead. Keep them covered in the fridge (not freezer) until you’re ready to bake and crisp them. The shrimp filling can also be made a few hours ahead and stored in the fridge.
- Q: My rice cups are sticking to the pan! Help!A: A well-greased muffin tin is crucial. I use baking spray with flour in it for the best release. Let the baked cups cool in the tin for 2-3 minutes after baking—they’ll contract slightly and be easier to remove with a small tool.
Q: What if I don’t have a muffin tin?
A: No problem! Form the rice into small, thick patties on a parchment-lined baking sheet. They’ll be more like crispy rice cakes, but just as delicious. Press a little divot in the center after baking to hold the filling.
- Q: Can I air fry the rice cups?A: YES, and they get incredibly crisp! Spray the frozen rice cups with oil and air fry at 400°F for about 10-12 minutes, checking for color. You may need to work in batches.

Spicy Shrimp Crispy Rice Cups : Crunchy, Creamy, and Packed with Heat
Description
These Spicy Shrimp Crispy Rice Cups are crunchy, creamy, and packed with bold flavor. Crispy baked sushi rice forms a golden cup that’s filled with tender shrimp tossed in spicy sriracha mayo, then finished with fresh avocado and sesame seeds. They look fancy, taste incredible, and are surprisingly easy to make—perfect for parties, game day, or an impressive appetizer at home.
Ingredients
For the Crispy Rice Cups
-
1½ cups cooked sushi rice
-
Olive oil spray or 1 teaspoon olive oil
For the Spicy Shrimp
-
10–12 jumbo shrimp, peeled, deveined, and diced
-
1 tablespoon unsalted butter
-
1 teaspoon garlic powder
-
Salt, to taste
For the Sauce & Topping
-
2 tablespoons mayonnaise
-
1 tablespoon sriracha (adjust to taste)
-
¼ avocado, diced
- Black or white sesame seeds, for garnish
Instructions
-
Prepare the Rice Cups
Preheat oven to 400°F (200°C). Lightly grease a muffin tin. Press warm sushi rice firmly into each cup, shaping it up the sides to form a bowl. Freeze for 30 minutes to help them hold their shape. -
Bake Until Crispy
Remove the muffin tin from the freezer and lightly spray the rice with olive oil. Bake for 20–25 minutes, or until the rice cups are golden and crispy around the edges. -
Cook the Shrimp
In a skillet over medium heat, melt the butter. Add shrimp, garlic powder, and salt. Cook for 4–5 minutes, stirring, until shrimp are pink and cooked through. Remove from heat and let cool slightly. -
Make the Spicy Sauce
In a bowl, mix mayonnaise and sriracha. Fold in the cooked shrimp until well coated. - Assemble
Carefully remove rice cups from the tin. Fill each with spicy shrimp, top with diced avocado, and sprinkle with sesame seeds. Serve immediately.
Notes
-
Pack the rice tightly so the cups don’t fall apart.
-
Don’t skip freezing—this helps the rice crisp instead of crumble.
-
Adjust spice by adding more or less sriracha.
-
Add avocado just before serving to keep it fresh and green.
- Try an air fryer: cook at 400°F for 10–12 minutes for extra crunch.
Nutritional Info (For the Curious Foodie!)
Here’s a rough breakdown per serving (based on 6 cups). Remember, I’m a chef, not a dietitian, but I believe in mindful eating!
- Calories: ~350
- Protein: 15g (Thanks, shrimp!)
- Fat: 20g (The good, flavorful kind from mayo, butter, and avocado)
- Carbohydrates: 28g (Primarily from the energy-giving rice)
Note: These are estimates. Actual values can vary based on specific ingredient brands and portion sizes. The beauty of this recipe is its balance—you’ve got protein, healthy fats, and carbs all in one satisfying, flavorful bite. It’s a treat that feels indulgent but is made with real, simple ingredients.
Final Thoughts: Go Forth and Crisp!
And there you have it, my friend—the full story behind my beloved Spicy Shrimp Crispy Rice Cups. This recipe is a testament to everything I love about cooking: it’s creative, a little bit playful, deeply satisfying, and meant to be shared. That perfect crunch, the burst of spicy creaminess, the cool finish… it’s a combination that never gets old.
Don’t be intimidated by the steps. Embrace the process, especially that freezer time (perfect for doing a little dance or pouring yourself a drink). When you pull that golden, crispy
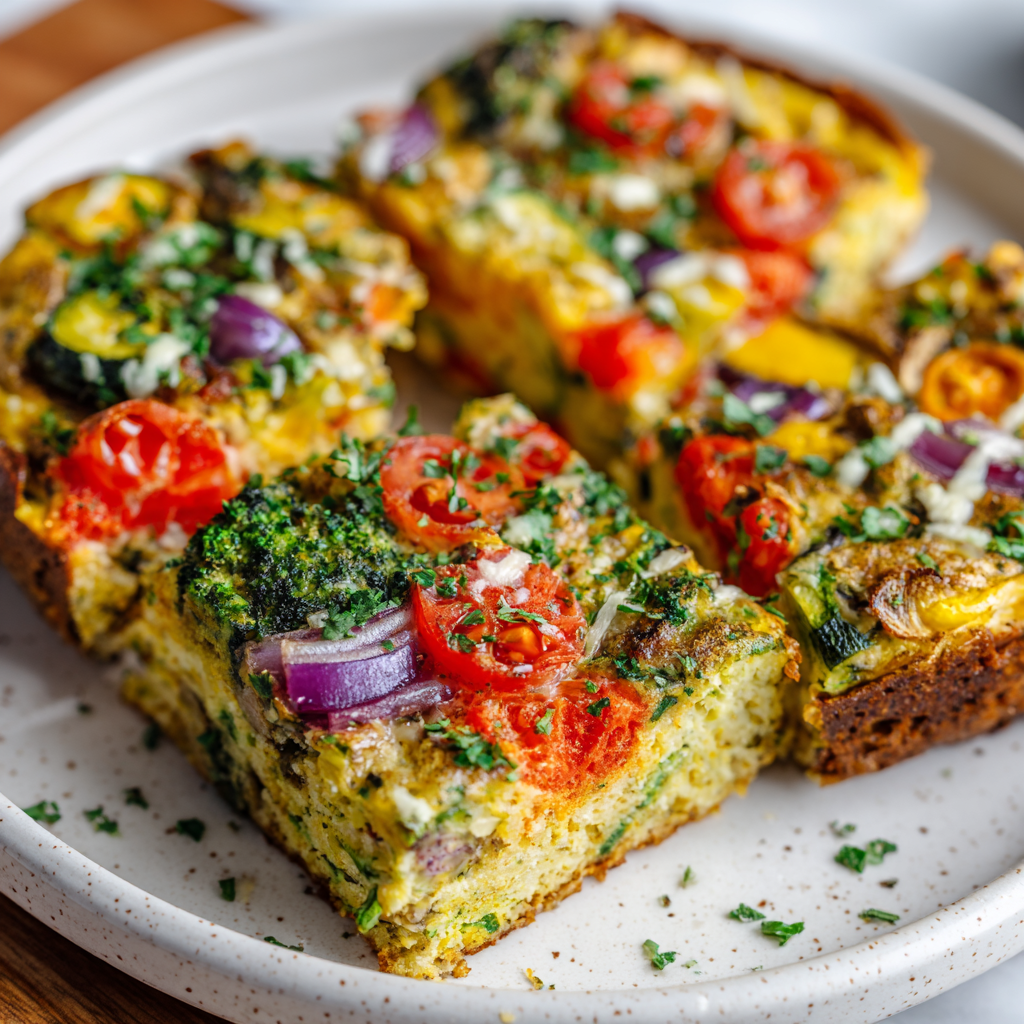
Veggie Frittata Slices : Meal-Prep Friendly, Protein-Packed & Veggie-Loaded
The Great Breakfast Rescue: Your New Favorite Veggie Frittata Slices
Hey friends, Beau here from Feastical! Let’s talk about that all-too-familiar morning scramble. And no, I don’t mean the egg kind (yet). I’m talking about that frantic dance between the snooze button and getting out the door, where a “good breakfast” often loses out to a granola bar wrapper and a sigh. Sound familiar? For years, it was my normal. I’d be creating elaborate dinners but starting my day with, well, let’s call it “nutritional optimism” that never quite panned out.
That is, until I fell head over heels for the humble, glorious, infinitely adaptable Veggie Frittata Slice. This isn’t just a recipe; it’s a strategy. A delicious, protein-packed, veggie-loaded strategy for winning your mornings. Imagine opening your fridge to find neat little squares of golden, fluffy egg packed with colorful peppers, vibrant spinach, and sweet bursts of tomato. They’re ready to be grabbed, eaten warm or cold, and they actually keep you full until lunch. No more 10:30 a.m. stomach grumbles that could frighten the office cat.
Today, I’m sharing my absolute favorite blueprint. This recipe is a feel-good hug in food form—simple, soulful, and deeply satisfying. It’s for the meal-prepper, the busy parent, the I’m-just-figuring-this-out new cook, and anyone who believes food should make your life easier, not harder. So, preheat that oven and let’s make your fridge a beacon of breakfast hope!
My Frittata “Aha!” Moment: More Than Just Eggs
My love affair with the frittata slice started in a tiny, sun-drenched apartment kitchen with my best friend, Leo. We were in our early 20s, perpetually broke, and our idea of “gourmet” was adding an extra slice of cheese to our instant noodles. One Sunday, faced with a fridge containing exactly: half an onion, a wilting bell pepper, three eggs, and eternal hope, we decided to get creative.
We chopped, we whisked, we poured everything into our one trusty pan and prayed. What emerged was a humble, puffed-up egg pie. We sliced it like pizza, ate it straight from the pan, and had one of those perfect, lazy afternoons filled with laughter and terrible movies. It wasn’t fancy, but it felt like a triumph. We’d made something real from almost nothing. That feeling—of resourcefulness, simplicity, and sharing good food with good people—is the soul of Feastical. Every time I bake a batch of these slices, I’m reminded that the best meals aren’t about perfection; they’re about connection, ingenuity, and giving yourself a tasty little win.
Gathering Your Veggie Frittata Crew
Here’s the beautiful part: this recipe is a brilliant canvas. Think of this list as your core team—feel free to swap players based on what’s in your fridge’s “need-to-use” section!
- 6 large eggs: The MVP, the protein powerhouse, the glue that holds our dream team together. For a richer flavor, I sometimes use one or two duck eggs if I have them!
- 1/4 cup milk (dairy or non-dairy): The secret to a tender, fluffy texture, not a rubbery one. Whole milk adds richness, but unsweetened almond or oat milk works perfectly for a dairy-free lift.
- 1 cup spinach, chopped: A pop of color and nutrients. Don’t be shy about using frozen, thawed, and squeezed-dry spinach! It’s a kitchen hack that saves time and money.
- 1/2 cup bell peppers, diced: I love the confetti-like color of a red, yellow, or orange pepper. Green peppers work too, but they have a slightly more bitter, grassy note.
- 1/2 cup cherry tomatoes, halved: These little gems burst with sweet acidity. Pro-tip: Toss them in a pinch of salt and let them sit for 5 minutes before adding to the mix. It draws out excess water, preventing a soggy frittata.
- 1/4 cup red onion, finely diced: They add a mild, sweet sharpness. If raw onion isn’t your thing, give them a quick 2-minute sauté in the baking dish before adding the eggs to mellow their bite.
- 1/4 cup shredded cheese (optional): The celebratory sprinkle! A sharp cheddar, creamy goat cheese, or salty feta are all stellar choices. Leaving it out makes a delicious dairy-free version.
- Salt and pepper to taste: The essential flavor enhancers. I season my egg mixture well, and often finish with a final crack of pepper after baking.
- Olive oil spray for greasing: Our trusty tool to ensure a clean release. A pastry brush with a little olive oil or melted butter works just as magically.
Let’s Build Some Breakfast Magic: Step-by-Step
Ready? Put on some tunes, grab your favorite bowl, and let’s do this. It’s simpler than you think.
- Preheat & Prep: Fire up your oven to 375°F (190°C). This is our “set it and forget it” heat that cooks everything evenly. While it warms, grab your 8×8 baking dish (or a similar size oven-safe pan) and give it a light but thorough coat of olive oil spray. Getting into the corners is key!
- The Whisking Ritual: In a large bowl, crack in your 6 eggs. I like to crack them on a flat surface, not the bowl edge, to avoid shell shards. Add the milk, a good pinch of salt (about 1/2 tsp), and several grinds of black pepper. Now, whisk with enthusiasm! You’re not just mixing; you’re incorporating air, which leads to a lighter texture. Whisk until the mixture is completely uniform and slightly frothy on top.
- The Veggie Mingle: Time for the party. Add your chopped spinach, diced peppers, prepared cherry tomatoes, and red onion to the egg bowl. If you’re using cheese, fold in about three-quarters of it now, saving a little for the top. Gently stir everything until the veggies are evenly distributed and smiling back at you from their egg bath.
- Bake to Golden Perfection: Pour the entire mixture into your greased dish. If you saved some cheese, sprinkle it artfully over the top now. Carefully place the dish in the center of your preheated oven. Set your timer for 25 minutes, but don’t wander too far. The magic number is usually between 25-30 minutes. You’ll know it’s done when the edges are beautifully golden and pulling away from the sides, and the center is firmly set with just the faintest jiggle (not a wobbly wave).
- The Patient Slice: This might be the hardest step! Remove the frittata from the oven and let it cool in the dish for at least 10-15 minutes. This allows it to set fully, making it infinitely easier to slice cleanly. Then, run a knife around the edges, and slice into squares or rectangles—whatever makes your meal-prep heart sing.
How to Serve Your Frittata Masterpiece
The beauty of these slices is in their versatility. Here’s how I love to enjoy them:
For the Classic Grab-and-Go: Let a slice cool completely, then wrap it individually in parchment paper and foil, or stash it in a small reusable container. It’s your instant breakfast or lunch, straight from the fridge. I’ve been known to eat one while walking my dog, Beau (yes, we share a name!).
For a Cozy Plate: Warm a slice gently in the microwave or toaster oven. Plate it alongside a handful of peppery arugula dressed with a quick lemon vinaigrette and a slice of buttery avocado. Suddenly, you’re at a cute brunch cafe, but in your pajamas.
For Party Mode: Cut the entire batch into smaller, bite-sized squares. Spear them with festive toothpicks and watch them disappear from a platter at your next gathering. They’re a guaranteed crowd-pleaser!
Make It Your Own: Delicious Twists & Swaps
Once you’ve mastered the basic blueprint, the world (or at least your crisper drawer) is your oyster! Try these fun variations:
- The “Clean Out the Fridge” Special: Swap in 1/2 cup of any diced cooked veggies—asparagus, broccoli, zucchini, or mushrooms are all fantastic. Leftover roasted potatoes? Dice them and add them in for a heartier slice.
- Mediterranean Sunshine: Use crumbled feta cheese, add a handful of chopped Kalamata olives, and swap the spinach for fresh oregano. A drizzle of pesto on top after baking is *chef’s kiss*.
- Southwest Fiesta: Add a diced jalapeño (seeds removed for less heat), use pepper jack cheese, and mix in 1/4 cup of black beans (rinsed and drained). Serve with a dollop of salsa or creamy avocado.
- Dairy-Free & Delicious: Simply omit the cheese or use a vegan shred. The frittata is still packed with flavor and protein from the eggs and veggies.
- Meat Lover’s Boost: Brown 1/4 lb of Italian sausage or diced ham before adding your veggies to the pan. Make sure to drain any excess grease before combining with the eggs.
Beau’s Kitchen Notes & Stories
Over the years, this recipe has become my kitchen security blanket. I’ve made it for nervous new roommates, for friends after a tough day, and for myself on countless “I need something good” Mondays. One time, I accidentally used cumin instead of black pepper (similar-looking shakers, very different results!). It was… interesting. Let’s just say it was a “Southwest” variation I didn’t plan for! The lesson? Always label your spice jars, folks.
The biggest evolution has been in the slicing. I used to dig in right away, resulting in a delicious but messy scramble-pile. Learning to let it cool completely was a game-changer for neat slices and proper meal prep. Trust the process—and the cooling time!
Your Frittata Questions, Answered
Q: Can I make this in a muffin tin instead?
A: Absolutely! Welcome to the wonderful world of Frittata Muffins! Grease a 12-cup muffin tin well, divide the mixture evenly, and bake for 18-22 minutes. They’re the ultimate portion-controlled grab-and-go option.
Q: My frittata turned out watery. What happened?
A: This is almost always due to veggies releasing moisture. The two best fixes are: 1) Sauté watery veggies like mushrooms, zucchini, or onions for a few minutes to cook off excess liquid before adding them to the egg mix. 2) Follow the tomato tip above—salting and draining them works wonders!
Q: How long do these really last in the fridge?
A: In an airtight container, they are perfect for up to 4 days. For longer storage, they freeze beautifully for up to 2 months. Let them thaw overnight in the fridge and reheat gently.
Q: Can I double this recipe?
A: Please do! Simply double all ingredients and bake it in a 9×13 inch dish. You may need to add 5-10 minutes to the baking time. You’ll have breakfast for the whole week or a fantastic dish to feed a crowd.

Veggie Frittata Slices : Meal-Prep Friendly, Protein-Packed & Veggie-Loaded
Description
Veggie Frittata Slices
The Ultimate Make-Ahead Breakfast Rescue
Prep Time: 10 minutes
Cook Time: 25–30 minutes
Total Time: ~40 minutes
Servings: 6 slices
Ingredients
-
6 large eggs
-
¼ cup milk (dairy or unsweetened non-dairy)
-
1 cup spinach, chopped (fresh or frozen, squeezed dry)
-
½ cup bell peppers, diced
-
½ cup cherry tomatoes, halved
-
¼ cup red onion, finely diced
-
¼ cup shredded cheese (cheddar, feta, or goat cheese – optional)
-
Salt & black pepper, to taste
-
Olive oil spray or oil for greasing
Instructions
-
Preheat oven to 375°F (190°C). Grease an 8×8-inch baking dish well.
-
Whisk eggs in a large bowl with milk, salt, and pepper until smooth and slightly frothy.
-
Fold in veggies (spinach, peppers, tomatoes, onion) and most of the cheese, if using.
-
Pour mixture into the prepared baking dish. Sprinkle remaining cheese on top.
-
Bake for 25–30 minutes, until edges are golden and center is just set.
-
Cool 10–15 minutes, then slice into squares.
Notes
-
Refrigerate in an airtight container for up to 4 days
-
Freeze up to 2 months (wrap individually)
-
Reheat gently in microwave or toaster oven
Nutritional Info (A Quick Note!)
While I’m all about flavor first, I know many of you like to keep track. Here’s the approximate breakdown per slice (based on 6 slices, using whole milk and cheddar cheese):
- Calories: 140
- Protein: 10g (Hello, staying power!)
- Carbohydrates: 4g
- Fat: 9g
- Fiber: 1g
Remember, these numbers can vary based on your specific ingredients (like the type of milk or cheese, or adding meat). The key takeaway? You’re getting a fantastic balance of high-quality protein and vegetables to fuel your day. It’s real food that makes you feel really good.
Final Thoughts
And there you have it, friends—my not-so-secret weapon for delicious, stress-free mornings. These Veggie Frittata Slices are more than just a recipe; they’re a promise to yourself that a good, nourishing start to the day is possible, and honestly, pretty easy.
I hope this recipe finds its way into your regular rotation and becomes as beloved in your home as it is in mine. Give one of the fun variations a try, and make it your own. And when you do, I’d love to hear about it! Tag me @feastical or shoot me a message—seeing your kitchen creations is my favorite part of this whole adventure.
Now, go forth and conquer your day, one delicious, protein-packed slice at a time. Happy cooking!
Warmly,
Beau
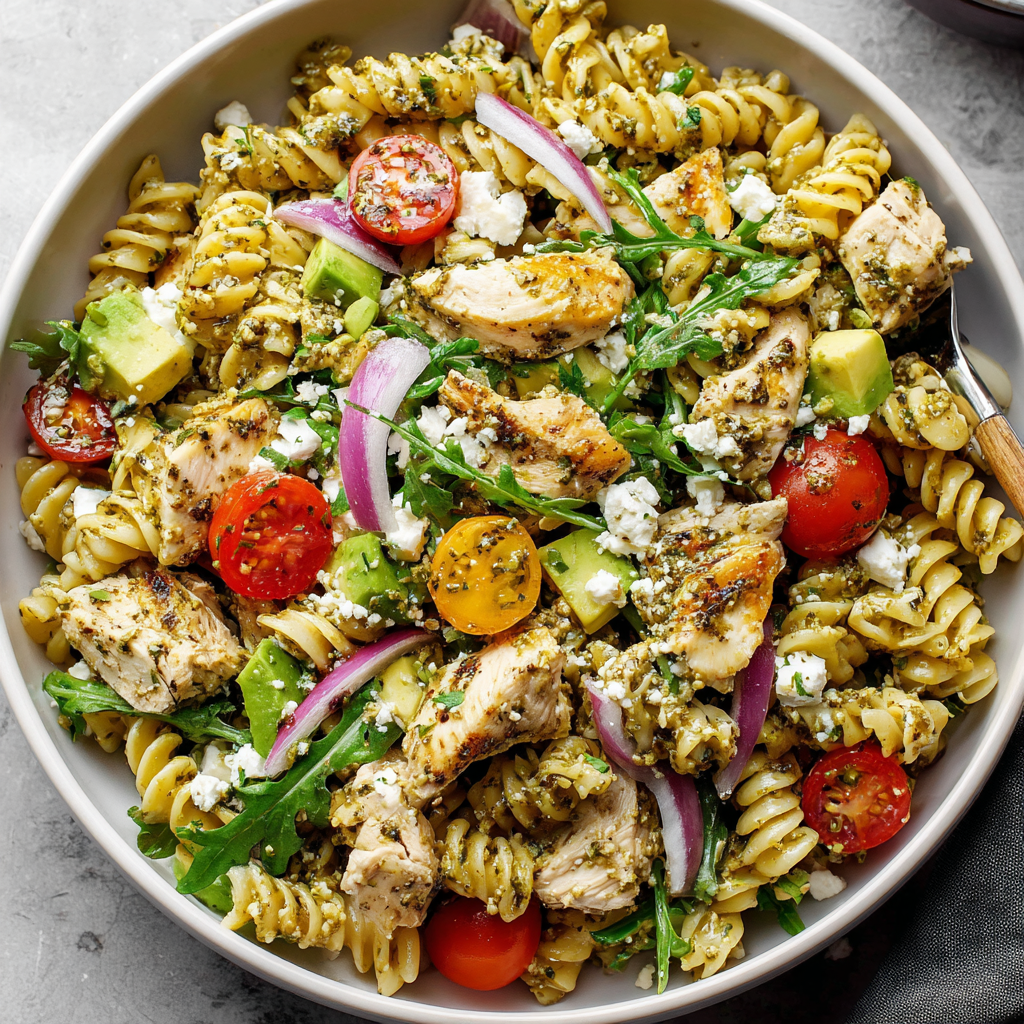
Pesto Chicken Pasta Salad : Fresh, Creamy & Protein-Packed
Pesto Chicken Pasta Salad: Your New Favorite “No-Fuss, All-Flavor” Meal
Hey friends, Beau here from Feastical! Let me paint you a picture: it’s one of those days where your to-do list is a mile long, the sun is shining, and the last thing you want is to be stuck over a hot stove. But you also want something genuinely delicious—something that tastes like you put in way more effort than you actually did. Sound familiar? That, my friends, is the exact moment you need this Pesto Chicken Pasta Salad in your life.
This isn’t your average, mayo-heavy, sad deli-counter pasta salad. Oh no. This is a vibrant, protein-packed, flavor-explosion of a dish. We’re talking tender pasta, juicy chicken, creamy pops of avocado and feta, and the freshest veggies, all brought together by a bold, herby green pesto that coats every single bite. It’s creamy without being gloppy, fresh without being boring, and satisfying in that way only a perfectly balanced meal can be.
Whether you’re meal-prepping lunches for the week, need a stellar side for your next backyard BBQ, or just want a dinner that comes together in the time it takes to boil water, this recipe has got your back. It’s forgiving, flexible, and seriously tasty. So, grab your favorite big bowl and your sunniest disposition—we’re about to make magic happen.
The Picnic That Started It All
This recipe has its roots in a hilariously ambitious picnic I planned a few summers back. I had this vision of a sprawling, Instagram-perfect feast in the park. I spent hours on complicated tartlets and fragile desserts. Of course, by the time we hauled everything to the perfect spot, the fancy stuff was a mess. The one thing that survived the journey, looked gorgeous, and had everyone raiding the container? A simple version of this pasta salad I’d thrown together with leftovers.
As we sat there, laughing about my culinary ambitions, devouring this simple, cold pasta, it hit me: the best food isn’t about the most complicated techniques. It’s about the joy of sharing something truly tasty, something that makes life easier and bellies happier. That picnic became a core memory for me—a reminder to keep it simple, soulful, and satisfying. Every time I make this salad, I think of that sunny afternoon, good friends, and the humble dish that saved the day.
Gathering Your Flavor Crew
Here’s what you’ll need to bring this sunny salad to life. Remember, cooking is a vibe, not a rigid science—feel free to swap based on what’s in your fridge!
- 1½ cups cooked pasta (rotini is my go-to): Those little spirals are champions at catching every bit of pesto and clinging to little cheese crumbles. Chef’s Tip: Cook it in well-salted water—it should taste like the sea! This is your only chance to season the pasta itself.
- 1 cup cooked chicken breast, cubed or shredded: The protein powerhouse. I often use a store-bought rotisserie chicken to make this ultra-fast, or I’ll quickly pan-sear a seasoned breast. Leftover grilled chicken from last night’s dinner? Perfect.
- 1 cup arugula: This isn’t just filler! Arugula adds a wonderful, peppery bite that cuts through the richness. If you’re not an arugula fan, baby spinach works beautifully.
- ½ cup cherry tomatoes, halved: They bring juicy, sweet bursts of flavor. I love using a mix of colors if I can find them—it just looks so happy!
- ¼ cup red onion, finely chopped: A little zingy crunch is essential. If raw onion is too strong for you, soak the chopped pieces in ice water for 10 minutes. It tames the bite perfectly.
- ½ avocado, diced: Hello, creamy goodness! It adds healthy fats and a luxurious texture. Add it right before serving to keep it from browning.
- ¼ cup feta cheese, crumbled: The salty, tangy pop that makes everything better. If you’re dairy-free, a good vegan feta or even some nutritional yeast can add a similar savory note.
- 2–3 tbsp green pesto (basil pesto preferred): The star of the show! A good-quality store-bought pesto is totally fine, but if you’re feeling fancy, my homemade pesto recipe is a game-changer.
- Salt & black pepper to taste: Your trusty sidekicks. Always taste before you add, especially since the pesto and feta are already salty.
Let’s Build Some Deliciousness: Step-by-Step
Follow these steps, and you’ll be in pasta salad paradise in no time. I’ve sprinkled in my favorite kitchen hacks to guarantee success.
- Cook & Cool Your Pasta: Get that pasta cooking in your salted boiling water. Cook it just to al dente—it should still have a slight bite. Why? It won’t turn to mush when you toss it. Once it’s done, drain it and give it a quick rinse under cool water. This stops the cooking process and cools it down fast, which is key for a cold salad. Let it drain well so your salad isn’t watery.
- Prep Your Players: While the pasta cooks, this is your time to shine. Cube your chicken, halve those tomatoes, finely chop the red onion, dice the avocado, and crumble the feta. Having everything prepped and ready to go (we chefs call this mise en place) makes assembling the salad a joyful, 2-minute affair.
- The Big Toss: In a large, spacious bowl (bigger than you think you need!), add your cooled pasta. Layer in the chicken, arugula, tomatoes, red onion, and feta. Hold off on the avocado for just a sec. Drizzle 2 tablespoons of pesto over the top.
- Fold with Love: Here’s my pro-tip: use a large silicone spatula or two big spoons to gently fold and lift the ingredients together. You want to coat everything evenly without smashing the delicate components. This isn’t a kneading bread situation—it’s a gentle hug.
- Taste & Adjust: This is the most important step! Taste a forkful. Need more pesto? Add the extra tablespoon. Need more zip? A squeeze of fresh lemon juice is magical. Season with salt and pepper until it sings.
- The Final Touch: Now, gently fold in your diced avocado. This way, it gets lightly coated but stays in beautiful, distinct pieces. Give it one final, gentle mix.
How to Serve This Star
You’ve made it! Now, let’s talk presentation and pairing because we eat with our eyes first.
For a simple lunch, I pile it high into a wide, shallow bowl. For meal prep, I divide it evenly between airtight containers—it keeps beautifully for 3-4 days. If I’m taking it to a potluck or serving it at a gathering, I’ll transfer it to a beautiful, colorful serving platter and garnish with a few extra whole basil leaves, a extra sprinkle of feta, and a crack of black pepper on top. It looks incredible.
This salad is a full meal on its own, but if you want to build a spread, it pairs wonderfully with a crisp, cold white wine or sparkling water with lemon. For a heartier dinner, serve it alongside some grilled garlic bread or a simple white bean soup. It’s versatile like that!
Make It Your Own: Fun Recipe Twists
The beauty of this salad is its adaptability. Play with these variations based on your mood or what’s in the pantry!
- Mediterranean Twist: Swap the chicken for chickpeas (great for vegetarians!), use kalamata olives instead of avocado, and add some chopped cucumber. Swap the feta for creamy goat cheese.
- Sun-Dried Tomato & Artichoke: Replace the cherry tomatoes with chopped sun-dried tomatoes (packed in oil) and add a handful of chopped marinated artichoke hearts. Use a kale and spinach mix instead of arugula.
- “Everything Bagel” Vibe: Use everything bagel seasoned cream cheese thinned with a little milk or lemon juice as part of your dressing mix along with the pesto. Top the finished salad with everything bagel seasoning for a serious flavor crunch.
- Lower-Carb Option: Ditch the traditional pasta and use chickpea pasta, lentil pasta, or even roasted cauliflower florets as the base. The pesto coats them just as deliciously.
- Nut-Free/Paleo: Make sure your pesto is nut-free (many use sunflower seeds) or use a simple basil-oil puree. Omit the pasta and use zucchini noodles (“zoodles”) or shredded cabbage as the base.
A Few Notes From My Kitchen to Yours
Over the years, this recipe has become a true workhorse in my home. I’ve made it for fancy ladies’ luncheons and hastily scooped it into a bowl for a 10-minute dinner between meetings. It never fails. One of my favorite kitchen “hacks” is to double the recipe on a Sunday. We eat some for dinner that night, and the rest becomes my grab-and-go lunch for the next few days. The flavors actually get better as they mingle in the fridge!
A funny story: I once accidentally used spicy harissa paste instead of pesto (similar jar, very different color in my defense!). It was… fiery. And you know what? We loved it! It became a whole new recipe. So don’t be afraid of a happy accident in your kitchen—it might just be your next favorite thing.
Your Questions, Answered
Can I make this ahead of time?
Absolutely! It’s a fantastic make-ahead meal. Prep everything, toss it together (wait to add the avocado until you’re ready to serve), and store it in an airtight container in the fridge for 3-4 days. The arugula will wilt slightly, but it will still taste amazing.
My salad seems dry. What did I do wrong?
No worries—this is an easy fix! It usually means the pasta soaked up the pesto. Simply drizzle in a little extra-virgin olive oil or a splash of lemon juice and give it another gentle toss. It’ll come right back to life.
What’s the best way to cook the chicken for this?
For maximum flavor and juiciness, I love pan-searing a boneless, skinless breast. I pat it dry, season it generously with salt, pepper, and garlic powder, then cook it in a hot skillet with a bit of oil for 5-7 minutes per side until cooked through. Let it rest for 5 minutes before cubing. But again, rotisserie chicken is the ultimate shortcut!
Can I use a different type of pasta?
Of course! Farfalle (bowties), penne, orecchiette, or even small shells all work wonderfully. Just aim for a shape with some nooks and crannies to hold onto the dressing.
Print
Pesto Chicken Pasta Salad : Fresh, Creamy & Protein-Packed
Description
Pesto Chicken Pasta Salad
No-Fuss, All-Flavor, Meal-Prep Friendly
Prep Time: 15 minutes
Cook Time: 10 minutes
Total Time: 25 minutes
Servings: 2–3 as a main, 4 as a side
Ingredients
-
1½ cups cooked pasta (rotini, penne, or farfalle)
-
1 cup cooked chicken breast, cubed or shredded
-
1 cup arugula (or baby spinach)
-
½ cup cherry tomatoes, halved
-
¼ cup red onion, finely chopped
-
½ avocado, diced (add just before serving)
-
¼ cup feta cheese, crumbled
-
2–3 tablespoons basil pesto
-
Salt & black pepper, to taste
Optional Boosters
-
Fresh lemon juice (for brightness)
-
Extra-virgin olive oil (if pasta absorbs sauce)
-
Fresh basil for garnish
Instructions
-
Cook the pasta in well-salted water until al dente. Drain and rinse briefly with cool water. Let drain well.
-
Prep ingredients while pasta cooks: chop chicken, tomatoes, onion, avocado, and crumble feta.
-
Assemble pasta, chicken, arugula, tomatoes, onion, and feta in a large bowl.
-
Dress with 2 tablespoons pesto and gently fold to coat evenly.
-
Taste & adjust — add more pesto, salt, pepper, or a squeeze of lemon if needed.
-
Finish by gently folding in avocado just before serving.
Notes
-
Serve chilled or at cool room temperature
-
Stores well in the fridge for 3–4 days (add avocado fresh)
-
Great for meal prep, picnics, BBQs, or quick dinners
Nutritional Information (A Friendly Breakdown)
Please note: The following is an approximate estimate for one serving (about 1/3 of the total recipe) based on the ingredients listed. Values can vary depending on specific brands and ingredient quantities used.
- Calories: ~420
- Protein: ~30g (A fantastic, muscle-fueling amount!)
- Carbohydrates: ~30g (Mainly from the wholesome pasta and veggies)
- Fat: ~22g (The good kind from avocado, olive oil in the pesto, and cheese)
- Fiber: ~5g (Thanks to the veggies, avocado, and whole-grain pasta if you use it!)
This salad is a beautifully balanced plate—it provides long-lasting energy from the carbs, satiety and body-supporting protein from the chicken, and healthy fats that keep you full and help absorb all those good vitamins from the greens. It’s a meal that truly nourishes.
Final Thoughts Before You Dig In
And there you have it, my friends—my go-to recipe for when life is busy but my taste buds still demand something spectacular. This Pesto Chicken Pasta Salad is more than just a recipe; it’s a reminder that incredible food doesn’t have to be complicated. It’s about fresh ingredients, bold flavors, and the simple joy of creating something delicious for yourself and the people you love.
I hope this recipe finds its way into your regular rotation and becomes a trusted friend in your kitchen, just like it is in mine. When you make it, I’d love to hear how it turns out! Tag me @Feastical on social media so I can see your beautiful creations.
Now, go forth and toss with confidence! Until next time, keep your kitchen messy and your heart full.
– Beau

Zesty Fish Taco Sauce : Creamy, Tangy & Perfectly Spiced
Welcome to Flavor Town: Your Fish Tacos Are About to Level Up!
Hey friends, Beau here from Feastical! Grab a stool and pull up to the kitchen island. Have you ever taken a bite of a fish taco and thought, “This is good… but it could be legendary?” You’re not alone. I’ve been there, staring at a perfectly grilled piece of fish, wondering what magic ingredient was missing. That magic, my friends, isn’t just one ingredient—it’s a symphony of them, all whirled together into what I now call my Zesty Fish Taco Sauce.
This isn’t just another white sauce. This is the secret handshake of the taco world. It’s creamy without being heavy, tangy without puckering your lips, and spiced with just the right amount of warmth to make your taste buds do a little happy dance. The best part? You can whip it up in about five minutes flat with ingredients that are probably lounging in your fridge and pantry right now, wondering when they’ll get their moment to shine.
Whether you’re a grill master, an air-fryer aficionado, or a sheet-pan supper champion, this sauce is the unifying force that ties your crispy fish, crunchy slaw, and soft tortilla into one unforgettable experience. It’s the difference between a Tuesday night dinner and a mini-vacation for your mouth. So, let’s ditch the store-bought bottles and make something fresh, vibrant, and bursting with real flavor. Your fish tacos are waiting for their crowning glory!
The Beach Day That Changed My Taco Game Forever
This sauce recipe was born from a happy accident, as the best kitchen stories often are. Picture this: a sun-bleached beach day with my family, a cooler full of slightly-sandy fish tacos I’d prepped at home, and one crucial container left on the kitchen counter. Yep, the sauce. My “special sauce.” I was devastated for about two minutes until I decided to MacGyver something with what we had. A squeeze of lime from the fish marinade, a few packets of mayo and sour cream from a nearby takeout spot, a dash of hot sauce from my brother’s backpack (don’t ask), and a pinch of the smoky paprika I’d brought for the grill.
I mixed it all together in a paper cup with a plastic fork, fully expecting a culinary disaster. But when we drizzled it over our slightly-warm, very sandy tacos, something miraculous happened. Everyone went quiet. Then came the chorus of, “Whoa, what *is* this?” It was brighter, zestier, and more *alive* than my original recipe. That messy, improvised beach-side sauce taught me a beautiful lesson: sometimes, the best flavors come from a place of fun, necessity, and a little bit of chaos. Now, every time I make this version, I’m right back on that beach, laughing with my family and tasting that first perfect, tangy bite.
Gathering Your Flavor All-Stars
Let’s meet the dream team! Here’s everything you need to build this creamy, zesty masterpiece. Remember, great ingredients make a great sauce, but I’ve got your back with swaps if you need them.
- ½ cup sour cream: This is our creamy, tangy base. It brings a delightful coolness that balances the heat. Chef’s Insight: For a lighter version, plain Greek yogurt works beautifully and adds a protein boost. If you want it extra rich, use full-fat sour cream.
- ¼ cup mayo: The other half of our creamy dream team! Mayo adds body and a subtle richness that makes the sauce luxuriously smooth. Chef’s Insight: I’m a fan of avocado oil or olive oil-based mayo for a cleaner flavor, but your favorite brand works perfectly.
- 1 tbsp lime juice (freshly squeezed): Non-negotiable! Fresh lime juice is the “zesty” in our zesty sauce. That bright, citrusy punch cuts through the creaminess. Pro Tip: Roll your lime on the counter firmly before cutting to get the most juice out of it.
- 1 tsp hot sauce (like Cholula or Sriracha): This is where you customize your spice level. Cholula gives a vinegary, garlicky heat, while Sriracha is a bit sweeter and thicker. Chef’s Insight: Start with a teaspoon and add more after tasting. You can always add heat, but you can’t take it away!
- ½ tsp garlic powder: We’re using powder here for a consistent, mellow garlic flavor that won’t overpower. Substitution Tip: In a pinch, a tiny bit of very finely minced fresh garlic works, but let the sauce sit for 15 minutes so the raw edge mellows.
- ½ tsp smoked paprika: The secret weapon! This isn’t regular paprika. Smoked paprika adds a deep, smoky sweetness that gives the sauce incredible complexity and a gorgeous orangey-red hue.
- ¼ tsp cumin: Just a whisper! Cumin adds an earthy, warm undertone that whispers “taco” without shouting it. A little goes a long way.
- Salt to taste: The flavor enhancer. Always add a pinch, stir, taste, and decide if it needs more. It makes all the other flavors pop.
- Optional: 1 tsp honey: If you like a hint of sweetness to round out the tang and heat, this is your friend. A must-try if you’re using a very vinegary hot sauce.
- Optional: Finely chopped cilantro or jalapeño: For the adventurers! Cilantro adds a fresh, herbal note, and a bit of finely minced jalapeño (seeds removed for less heat) gives a fantastic fresh chili crunch.
Let’s Make Some Magic: Step-by-Step
Ready? This is the easiest part. We’re not cooking, we’re creating. Get out a medium-sized mixing bowl and a whisk or a trusty fork.
- The Creamy Foundation: Scoop your sour cream and mayo into the bowl. Squeeze in that glorious fresh lime juice. Now, take your whisk and start blending. Chef’s Hack: Go for a figure-eight motion. It incorporates everything more evenly than just stirring in circles. You’re looking for a smooth, uniform, pale mixture. See? We’re already halfway there!
- The Flavor Bomb Drop: Here’s where the personality comes in. Sprinkle in the garlic powder, smoked paprika, and cumin. Add your chosen hot sauce and that initial pinch of salt. Pro Tip: If your spices have been sitting in the pantry for a while, give the jars a little shake or stir before measuring. It wakes up the oils and flavor!
- The Grand Unification: Whisk, whisk, whisk! Get in there and make sure every single spice granule and droplet of hot sauce is fully embraced by the creamy base. No one wants a surprise pocket of plain sour cream. The color should transform into a beautiful, creamy coral shade from the paprika and hot sauce.
- The Taste Test (The Most Important Step): Dip a clean spoon or the tip of your finger in and have a taste. Be your own chef! Ask yourself: Is it tangy enough? Maybe a tiny extra squeeze of lime. Need more heat? Add another ¼ tsp of hot sauce. Missing something? This is where you might add that optional honey for balance or another tiny pinch of salt. Your kitchen, your rules.
- The Patience Phase (Worth It!): If you can possibly wait, cover the bowl with plastic wrap or pop the sauce into a sealed container and refrigerate it for at least 15-30 minutes. Why? This chilling time allows the flavors to get to know each other, mingle, and deepen. The sharp edges soften, and the sauce becomes a harmonious, cohesive superstar. If you’re in a taco emergency, it’s still delicious right away—I promise.
How to Serve Your Sauce Like a Pro
Okay, sauce is ready. Let’s talk presentation! You’ve crafted this beautiful condiment, so let it shine.
The classic move is to drizzle it generously over your assembled fish tacos. I love using a squeeze bottle for restaurant-style zig-zags, or just a spoon works perfectly. But don’t stop there! This sauce is a multi-talented MVP. Serve it in a small bowl on the side for dipping. It’s incredible with sweet potato fries, crispy roasted cauliflower, or even as a veggie dip for bell peppers and cucumber slices.
Think beyond the taco, too. It makes a killer dressing for a taco salad (just thin it out with a touch more lime juice or water). Slather it on a fish sandwich or use it as a burger sauce for a Southwestern twist. When you make a sauce this good, it deserves to be the star of the whole meal spread.
Make It Your Own: Delicious Twists & Swaps
One of my favorite things about this recipe is its flexibility. Play with it! Here are a few of my favorite variations.
- The “Everything But the Elote” Sauce: Fold in 2 tablespoons of finely crumbled cotija cheese and ¼ teaspoon of chili powder. It turns into a creamy, cheesy sauce that’s insane on shrimp tacos or grilled corn.
- Herb Garden Delight: Stir in 2 tablespoons of finely chopped fresh herbs. I love a combo of cilantro, dill, and chives. It’s fresh, green, and perfect for a springtime fish fry.
- Spicy Avocado Crema: Add half a ripe avocado to the blender with all the other ingredients and blend until ultra-smooth and dreamy green. It’s richer, thicker, and packed with good fats.
- Dairy-Free & Lighter: Swap the sour cream for unsweetened, plain coconut yogurt or a dairy-free sour cream alternative. Use a vegan mayo. The flavor profile is slightly different but still absolutely delicious and inclusive for all your guests.
- Sweet Chipotle Twist: Replace the hot sauce and smoked paprika with 1-2 teaspoons of minced chipotle peppers in adobo sauce (start with 1 tsp, it’s potent!). Add that teaspoon of honey. This gives a deep, smoky, sweet, and spicy vibe that’s completely addictive.
Beau’s Kitchen Notes & Stories
This sauce has been my faithful kitchen companion for years now, and it’s evolved with me. The original beach version didn’t have smoked paprika—I added that later after a friend brought some back from Spain. It was a game-changer! I also used to insist on only Cholula, but one day I ran out and used Sriracha. My daughter actually preferred it, so now I list both. Recipes are living things, meant to be adapted.
A funny story: I once accidentally used cinnamon instead of cumin (those identical spice jars will get you every time!). We dubbed it “Desert Taco Sauce” and it was… interesting. Not my finest moment, but we laughed through the whole weird meal. It’s a good reminder to always, always smell your spices before adding!
Your Questions, Answered
Q: How long does this fish taco sauce last in the fridge?
A: Stored in an airtight container, it will stay fresh and delicious for up to 5-7 days. The flavors continue to meld and get even better on day two!
Q: My sauce turned out too thin/runny. What happened?
A> No worries! This usually happens if the sour cream was a bit watery. Easy fix: whisk in an extra tablespoon of mayo or let it sit, covered, in the fridge for an hour. The chilling time often thickens it up perfectly. For instant thickening, a tiny sprinkle of powdered garlic or onion can help.
Q: Can I make this sauce ahead of time for a party?
A: Absolutely, and I encourage it! Making it a day ahead is brilliant. The flavors have a full 24 hours to become best friends, resulting in an even more incredible sauce. Just give it a good stir before serving.
Q: Is this sauce spicy? My kids don’t like heat.
A: The base recipe as written has just a gentle warmth. For a completely mild version, you can omit the hot sauce entirely. The smoked paprika provides flavor, not heat. You can also use a very mild hot sauce like Tapatío or just add an extra pinch of paprika for color.
Zesty Fish Taco Sauce : Creamy, Tangy & Perfectly Spiced
Description
Zesty Fish Taco Sauce (5-Minute Creamy Taco Magic)
Prep Time: 5 minutes
Chill Time (optional): 15–30 minutes
Yield: About ¾ cup (6–8 servings)
Ingredients
-
½ cup sour cream
-
¼ cup mayonnaise
-
1 tablespoon fresh lime juice
-
1 teaspoon hot sauce (Cholula, Sriracha, or mild for kids)
-
½ teaspoon garlic powder
-
½ teaspoon smoked paprika
-
¼ teaspoon ground cumin
-
Salt, to taste
Optional Add-Ins
-
1 teaspoon honey (balances tang & heat)
-
1–2 tablespoons chopped cilantro
-
Finely minced jalapeño (seeds removed)
Instructions
-
In a medium bowl, whisk together sour cream, mayo, and lime juice until smooth.
-
Add hot sauce, garlic powder, smoked paprika, cumin, and a pinch of salt.
-
Whisk until fully combined and creamy.
-
Taste and adjust seasoning—add more lime, salt, heat, or honey as desired.
-
Chill for 15–30 minutes for best flavor, or use immediately.
Notes
-
Drizzle over fish, shrimp, or chicken tacos
-
Use as a dipping sauce for fries or roasted veggies
-
Thin with lime juice for taco salad dressing
-
Spread on burgers or fish sandwiches
Nutritional Info (For the Curious Foodie!)
While we’re all about flavor first at Feastical, I know some folks like to keep track. Here’s a general breakdown per tablespoon (remember, a little goes a long way!):
- Calories: ~45
- Fat: 4.5g (The majority comes from the mayo and sour cream, using the good fats to carry all our delicious flavors.)
- Carbohydrates: 1g
- Protein: 0.5g
Prep Time: 5 minutes | Chill Time (optional but recommended): 15-30 minutes | Total Time: 5-20 minutes
Perfect For: Fish tacos, shrimp tacos, chicken tacos, dipping sauces, salad dressings, burger spreads!
Final Thought
And there you have it, friends—the not-so-secret sauce to your best fish tacos ever. It’s more than just a recipe; it’s a five-minute project that builds confidence and brings a ton of joy to the table. I love knowing that this little sauce is making its way into your kitchen, maybe becoming part of your own family’s stories and beach trips.
So the next time you’re staring at that beautiful piece of fish, wondering what it needs, remember: the power is in your hands (and your whisk). Don’t be afraid to taste, adjust, and make it yours. That’s what real, feel-good cooking is all about.
If you make it, I’d love to hear how it turned out! Tag me @Feastical or drop a comment on the blog. Now, go forth and sauce with abandon. Your taste buds will thank you.
Until next time, keep it simple, soulful, and satisfying,
Beau